SerialNo.:
Dear Customer,
Thank you for purchashlg this Toshiba T_LThis manual wifl
help you use the many exciting features of your new TV.
Before operating the TV, please read this manual
completely, and keep it nearby for future reference.
Safety Precautions
WARNUNG
TO REDUCE THE RmSKOF FmBEOR ELECTRmCSHOCK,
DO NOT EXPOSE THinSAPPMANCE TO BAroNOR
MOmSTUBE.
The lightning symbol in the triangle tens you that the
voltage inside this product may be strong enough to
cause an e_ectdc shock, DO NOTTRY TO SERWCE
THIS PRODUCT YOURSELF,
The e×clamation mark in the triangte tens you that
important operating and maintenance instructions
follow this symbol
NOTETOCATVUNSTALLERSUNTHEUSA
This is a reminder to call the CATV system instdbr's
attention to Article 820-40 of the NEC,which provides
guidelines for proper grounding and, in particular, specifies
that the cable ground shall be connected to the grounding
system of the building, as close to the point of cable entry
as practical. For additional antenna grounding information,
see items 25 and 26 on page 4.
NOTUCEOF POSSIBLETV STAND INSTABUUTY
{:)ANGER:RISK OF SERMONS PERSONAL
raNJURY OR DEATH! UsethisTV with
the TOSHIBATV stand recommended in the
"Specifications" section only'.Use with other stands may
result in instability, causing possible injury or death.
NOTUCEOFPOSSUBLEADVERSEEFFECTS
ONTV PUCTURETUBE
If a fixed 01on-moving] pattern remains on the TV
screen for long periods of time, the image can become
permanently engrained in the picture tube. This type of
damage is NOT COVERED BY YOUR WABBANTYo
See item 33 on page 4.
2 0303
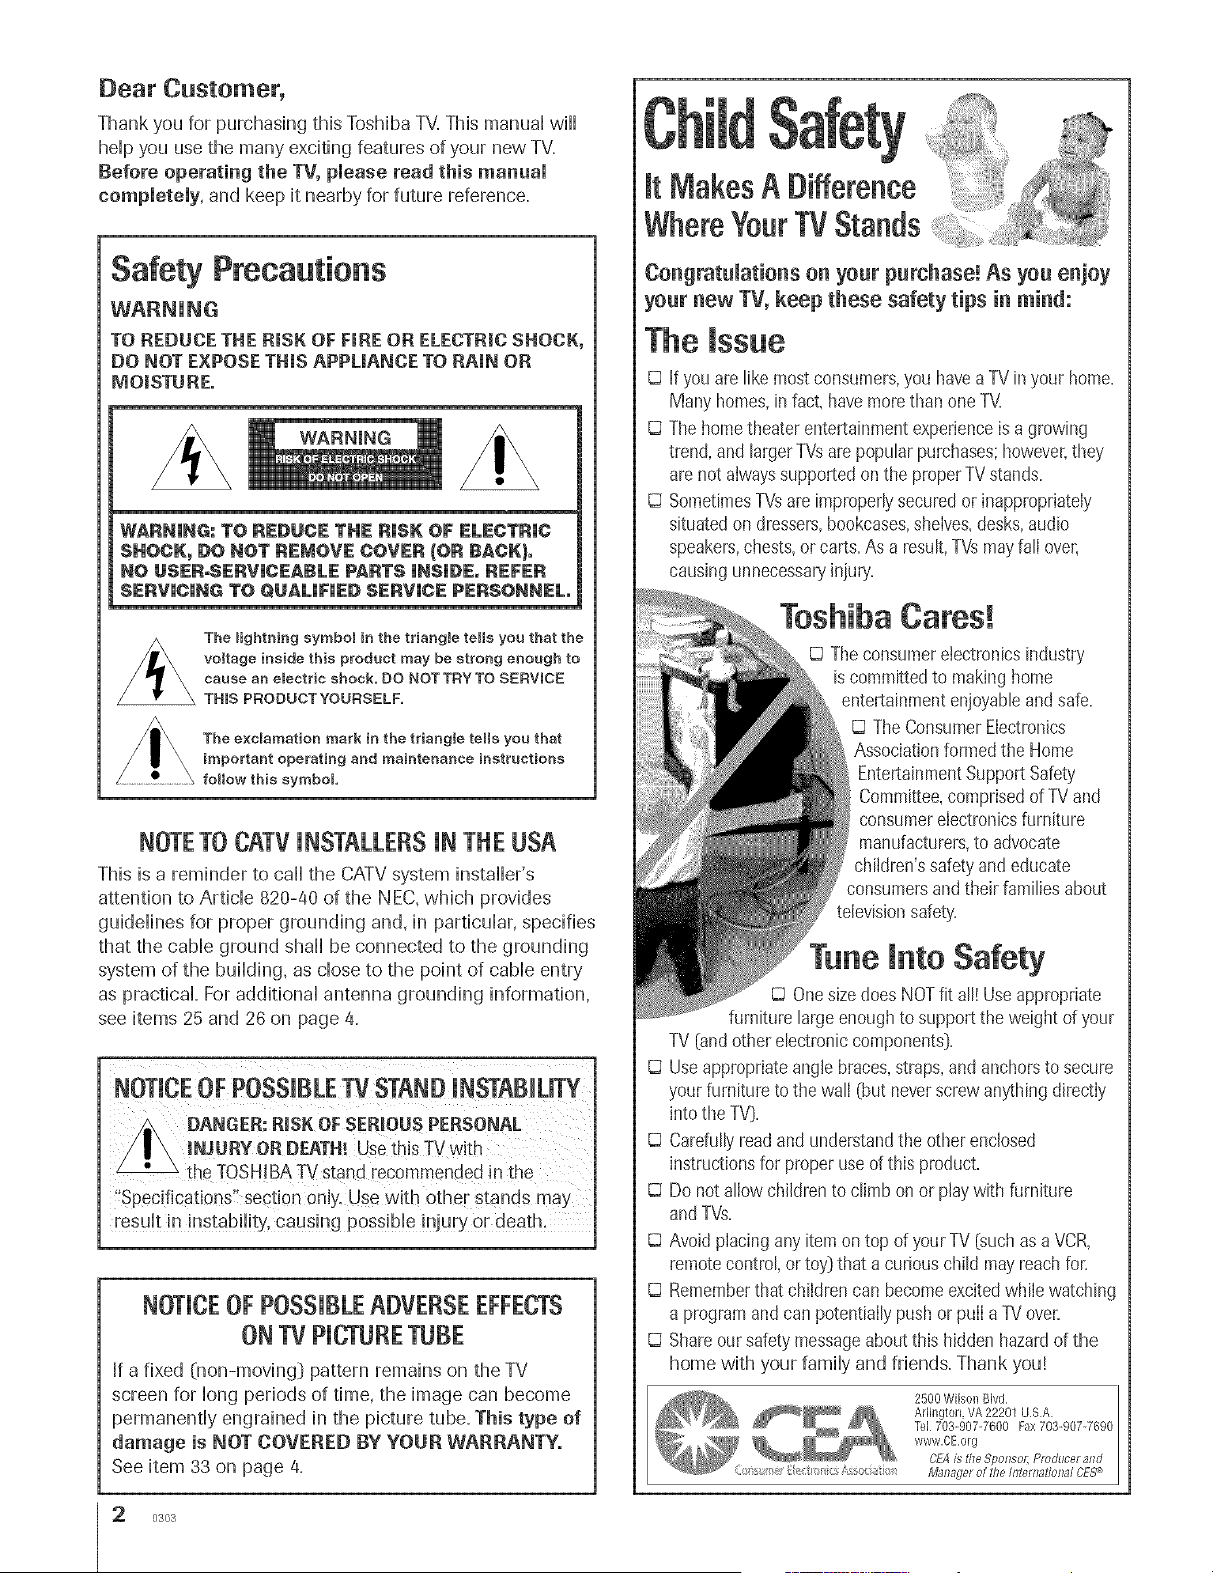
It MakesADifference
WhereYourTVStands
Congratnmations on yonr purchase! As yon enjoy
yonr new TV, keep these safety tips in mind:
The mssue
D If you arelike mostconsumers,you havea TVin your home.
Many homes,infact, havemorethan one TVI
D ThehometheaterentertNnmentexperienceis agrowing
trend,andlargerTVsarepopularpurchases;howwer,they
are not aiwayssupportedonthe properTVstands.
D SometimesTVsareimproperlysecuredor inappropriately
situatedon dressers,bookcases,sheives,desks,audio
speakers,chests,or carts.As a result,TVsmayfali over,
causingunnecessaD'iniury.
Toshiba Cares!
Theconsumerelectronicsindustry
iscommittedto makinghome
entertainmentenjoyabbandsafe.
TheConsumerEbctronics
Associationformed the Home
EntertainmentSupportSafety
Committee,comprisedof TV and
consumerebctronicsfurniture
manufacturers,to advocate
children'ssafety and educate
consumersand their familiesabout
televisionsafety.
mntoSafety
OnesizedoesNOTfit all! Use appropriate
furniturelargeenoughto supportthe weight of your
TV {andotherebctronic components}.
D Useappropriateangb braces,straps,and anchorsto secure
your furnitureto the waft {but neverscrewanything directiy
into the TV}.
D Carefullyreadandunderstandthe otherenclosed
instructionsfor properuseof this product.
D Do not alIowchildrento climb on or playwith furniture
andTVs.
D Avoidplacing anyitemon top of yourTV {suchas a VCR,
remotecontrol,or toy'}that a curiouschild mayreachfor.
D Rememberthatchildren can becomeexcitedwhile watching
a programand can potentiallypushor pulI a 1!/over.
D Shareoursafetymessageaboutthis hiddenhazardof the
home with your family and friends. Thank you!
2500Wilson Bird
Arlington,VA 22201 USA
tel 703-907-7600 Fax703@07-7690
www.OEorg
CEA£ the Sponsol; PmdHcerand
mmportant Safety mnstructions
1) Read these instructions.
2) Keep these instructions.
3) Heed all warnings.
4) Follow all instructions.
5) Do not use this apparatus near
water,
6) Clean only with a dry cloth.
7) Do not block any ventilation _-_ _
openings. Install in accordance with
the manufacturer's instructions=
8) Do not install near any beat _--__' .......
sources such as radiators, 1_}}
registers, stoves, or other
heat
apparatus 0ncluding amplifiers)
that produce heat=
9) Do not defeat the safety purpose of the polarized or
grounding type plug. A polarized plug has two blades
with one wider than the other. A grounding type plug has
two blades and a third grounding
prong. The wide blade or the third Wideplug
prong are provided for your safety'=
If the provided plug does not fit into
your outlet, consult an electrician
for replacement of the obsolete outlet.
10) Protect the power cord from being
walked on or pinched, particularly at
pIugs, convenience receptacles, and
the point where it exits the apparatus.
11) Only use attachments/accessories specified by the
mauufacturer.
12) Use only with the cart, stand, tripod,
bracket, or table specified by the
manufacturer, or sold with the
apparatus. When a cart is used, use
caution when moving the cart/apparatus
combination to avoid injury from tip-oven
13) Unpmug this apparatus during _
unused for long periods
of time.
14) Refer aH servicing to quamified service personnel.
Servicing is required when the apparatus has been -,,_.-_
damaged in any way, such as power supply _ _/_
cord or plug is damaged, liquid has t_'-_x_i-,_
been spilled or objects have fallen into II _O,, II /}_/
the apparatus, the apparatus has been _
exposed to rain or moisture, does not _lr_u_.Ey_
operate normally, or has been dropped. _j
15) CAUTBON: To reduce the risk of electric shock, do not
use the polarized plug with an extension cord, receptacle,
or other outlet unless the biades can be inserted
completely to prevent blade exposure=
installation, Care, arid Service
Foilow these recommendations and precautions and heed all
warnings when instaIIing your TV:
16) Never modify this equipment. Changes or modifications
may void: a) the warranty', and b) the user's authority to
operate this equipment under the rules of the Federal
Commtlnications Commission.
17) DANGER: RISK OF SERIOUS PERSONAL
iNJURY, DEATH, OR EQUIPMENT
DAMAGE. _Never pIace the TV on
an unstable cart, stand, or table. The TV
may fail, causing serious personal injury,
death, or sedous damage to the TV.
Neverp,aceorstorethe V,nd,rect
sunlight; hot, humid areas; areas i"",,,,,'_:_
subject to excessive (lust or vibration; l_ ._i_i,_
or Iocations with temperatures at or -_<
below 41°F (5°0).
19) Always place the TV on the floor
or a sturdy, IeveI, stabIe surface that
can support the weight of the unit=
..........j[j
20) Never place items such as vases, '
aquariums, or candles on top of the TV
21) Never block or cover the slots or
openings in the TV cabinet back,
bottom, and sides= Never place
the TV:
• on a bed, sofa, rug, or similar
surface;
o too close to drapes, curtains,
or walls: or
• in a confined space such as a
bookcase, built-in cabinet, or any
other place with poor ventilation=
The slots and openings are provided
to protect the TV from overheating
and to help maintain reliable
operation of the TV=
l iiiii _ ii
22) Never allow anything to rest on or rolI over the power
cord, and never place the TV where the power cord is
s_lbject to wear or abuse.
23) Never overload wall outlets and
extension cords.
j_j}
0303 3

24] Always operate this equipment from
a 120 VAC, 60 Hz power source only.
25] Always make sure the antenna system is properly
grounded to provide adequate protection against voltage
surges and built-up static charges (see Section 810 of the
National Electric Code].
f Antelma bad-in wire
Ground clamp
Antenna discharge unit
NECSection 810-20)
Electric service equipment
_roul_dh_gconductors
NECSection 810-21)
groundir_g
ebctrode system (NECA_t 250 Part H)
26] DANGER: RiSK OF SERIOUS PERSONAL
iNJURY OR DEATH,|
Use extreme care to make sure you are never in
a position where your body (or any item you are in contact
with, such as a ladder or screwdriveO can accidentaily
touch overhead power lines. Never locate the antenna
near overhead power lines or other electrica[ circuits.
. Never attempt to instafl any of the following during
lightning activity:
a) an antenna system; or b) cables, wires, or any home
theater component connected to an antenna or phone
system.
m
Care
For better performance and safer operation of your TOSHIBA
TV, follow these recommendations and precautions:
27) Always sit approximately 10-25 feet away from the TV and
as directly in front of it as possible. The picture can appear
dull if you sit too far to the left or right of the TV, or if
sunlight or room lights reflect on the screen. Turn the TV
off to check for reflections on the screen, and then remove
the source of reflections whib viewing the TV=
28} Always unplug the TV before
cleaning. Never use liquid or
aeroso[ cleaners.
29)
WARNING: RISK OF ELECTRIC SHOCK,_
Never spilI liquids or push objects of any kind
into the TV cabinet slots,
30} [_;is item applies te pr_;ectien TVs only] if the air
temperature rises suddenly (for example, when the TV is
first delivered], condensation may form on the lenses, This
can make the picture appear distorted or the color appear
faded• If this happens, turn off the TV for 6 to 7 hours to
allow the condensation to evaporate.
31) For added protection of your TV from lightning and power
surges, always unplug the power cord and disconnect the
antenna from the TV if you leave the TV unattended or
unused for long periods of time.
32] During normal use, the TV may make < _
occasional snapping or popping . _ (-_-',
sou.ds,Th sisnormalespee aIIy J
when the unit is being turned on or \l t[ (:-_-,)l k f5_'
off. If these sounds become frequentS./_3'j _/_1
or continuous, unplug the power cord b, _
and contact a Toshiba Authorized Service Center. .......
33] Possible Adverse Effects on TV Picture Tube: if a fixed
(non-moving) pattern remains on the TV screen for long
periods of time, the image can become permanentJy
engrained in the picture tube and cause subtle but
permanent ghost images• This type of damage is NOT
COVERED BY YOUR WARRANTY. Never leave your TV
on for long periods of time while it is dispBying the
following formats or images:
. Fixed images, such as PiP/POP windows, stock tickers,
video game patterns, TV station Iogos, and websites.
. Special Formats that do not use the entire screen. For
example, viewing letterbox style (16:9] media on a
normal (4:3) display (gray bars at top and bottom of
screen]; or viewing normal style (4:3) media on a
widescreen (16:9) display (gray bars on left and right
sides of screen].
Service
3@ /_ WARNING: RISROF ELECTRIC _z_
/ I \ SHOCK, Never attempt to servicetI_e _
yourself.Ope. ngand
removingthecoversmayexpose!l ft# !1t::'--,U
you to dangerous voltage or other _
hazards. Refer all servicing to a __nJnED_
Toshiba Authorized Service Center.
35) If you have the TV serviced:
. Ask the service technician to use only replacement parts
specified by the manufacturer. ____\
* Upon completion of service, ask - __ _
the service technician to perform
routine safety checks to determine __.__.._C_Z/_. ]_
that the TV is in safe operating
condition.
36) When the TV reaches the end of its useful life, ask a
qualified service technician to properly dispose of the TV.
Improper disposal may result in a picture tube implosion
and possible personal injury.
0303
important Safety Precautions for Spilt Cabinet Feature
(Model 57H84 only)
Toshiba TV modeH57H84 has a spHitcabinet feature that
dhows disassembHyof the cabinet into two sections during
instaHHation.
For detaiHs,pHeaserefer to the insert tithed "DisassembHyi
ReassembHyinstructions for SpHitCabinet Feature" that
accompanied this owner's manuaHin the accessory pack.
if you do not have the insert, you can downHoada copy of
it from our Web site (www.tosMba.comitacp in the U.S.A.
or www.tosMba.ca in Canada}. if you do not have access
to the Internet, caHH1-800-631-3811 in the U.S.A. or 1-800-
268-3404 in Canada.
WARNING: if you split the cabinet for any
purpose, N EVER energize the bottom section
unti_ it is completely and proper_y instaHedo
Energizing the disassembled bottom section and
subjecting it to intentiona_ misase (for e×ample, exposing it to
a foreign object) creates the potential for an e_ectdcal shock
hazard that could result in death or serious injury.
CAUTION: If you use the spHitcabinet feature, ALWAYS
handHeand treat the top section of the TV cabinet, which
contains a gHassmirror, with great care. If subjected to
excessive mechanicaHabuse (for exampHe,if bumped or
dropped}, the mirror may break, creating exposed gHass
fragments with sharp edges. Contact with these gHass
fragments may resuHtin injury.
Installation, Care, and Service
CAUTION: The spHitcabinet feature [modeH57H84 onH}j}
aHHowsdisassembHyof the cabinet into two sections during
instaHHation.If you use the spHitcabinet feature, foHHow
these precautions whiHethe two sections of the TV cabinet
are disassembHed:
1}
2}
3}
4}
5}
6}
Always handle and treat the top section of the TV cabinet
[;with the viewing screen}, which contains a glass mirror,
with great care. If subjected to excessive mechanical
abuse (for example, if bumped or dropped}, the mirror
may break, creating exposed glass fragments with sharp
edges. Contact with these glass fragments may result in
injury.
Never temporarily locate the disassembled bottom section
in an area where it may be exposed to foreign objects or
abuse Cfor example, areas where children may be playing,
where items may fail on top of the unit, or where liquids
may spill into the uniO. Failure to follow this instruction
may result in damage to the optic components of the TV.
SUCH DAMAGE iS NOT COVERED UNDER THE
TOSHIBA LIMITED WARRANTY.
Always keep the top and bottom sections of the TV
cabinet in an upright position while disassembled. Failure
to follow this instruction may result in damage to the TV,
including but not limited to the optic components, cabinet,
bezel, and glass mirror. SUCH DAMAGE IS NOT
COVERED UNDER THE TOSHIBA LIMITED WARRANTY.
Never energize the bottom section of the TV cabinet
while disassembled° Failure to follow this instruction
could result in death or serious injury.
Never place anything on top of the disassembled bottom
section of the TV cabinet. Failure to follow this instruction
may result in damage to the optic components. SUCH
DAMAGE IS NOT COVERED UNDER THE TOSHIBA
LI MITE D WAR RANTY.
Never store or transport the unit while it is disassembled.
Failure to follow this instruction may result in damage to
the TV, including but not limited to the optic components,
cabinet, bezel, and glass mirror. SUCH DAMAGE IS NOT
COVERED UNDER THE TOSHIBA LiMiTED WARRANTY.
Impo_ant Safety information ............................. 2-5
introduction ................................................................ 7
_Hcome to 3\)shiba ......................................................... 7
Exploring !:our _ew TV ................................................... 7
Connecting your TV .................................................. 8
Cormecting a VCR .......................................................... 9
Comlecting a cable coIiverter box .................................... 9
Comlectirrg a cable coIiverter box arid VCR ................... 10
CoImectirrg a DVD player or satellite receiver arrd
aVCR ............................................................................ 11
Cormecti_g a DVD player with ColorStream °°
(componerrt video) and a VCR ...................................... 12
CormectiIig a DTV receiver/set-top box with
ColorStream _' (compoIierrt video) arrd a VZ2R................ 13
CormectiIig p_voVCRs ................................................... 14
Cormectirrg a camcorder ................................................ 14
Cormecting a HDMI device to tbe HDMI D_put .......... 15
Cormecting a DVI device to HDMI input ..................... 16
Cormectirrg aIi audio system .......................................... 16
Using the remote control ...................................... 17
;r}reparD_gthe remote co_m:o]f'or use .............................. 17
Installing the remote control batteries ............................ 17
ProgrammD_g the remote control to opelate a cable
converter box, satellite receiver, VCR, DVD player,
o17HTIB (home theater in a box) ................................... 18
Remote control codes .................................................... 18
Remote control codes (coIlt.) ......................................... 19
Using the remote coIm:o] to operate a cable converter
box, satellite receiver, VCR, DVD player, or HTIB
(home theater irr a box) .................................................. 2{)
Learning about the rer'_]oteco_xrol ....................................
Setting up your IV .................................................. 22
Leami_lg about the memt system ................................... 22
Cha_giIig tire orr-scree_ display ]arrguage ....................... 23
SeIectDlg tbe a_ltemra D_put............................................ 23
Adding ci_aimels to the TV's memory ............................ 24
ProgrammDlg cbaImels automatically ...................... 24
Addhrg a_d erasing cbamrels manually .................... 25
Cha_girrg charmels ........................................................ 25
Adjusting the color coIlvergerrce ..................................... 26
A_FomaticalIy adjttsting tile color corrverge_ce
usiIlg '[ouchFocus rM ............................................... 26
Mamtally adjustD_g the color coIivergerrce ............... 26
Using the TV's features .......................................... 28
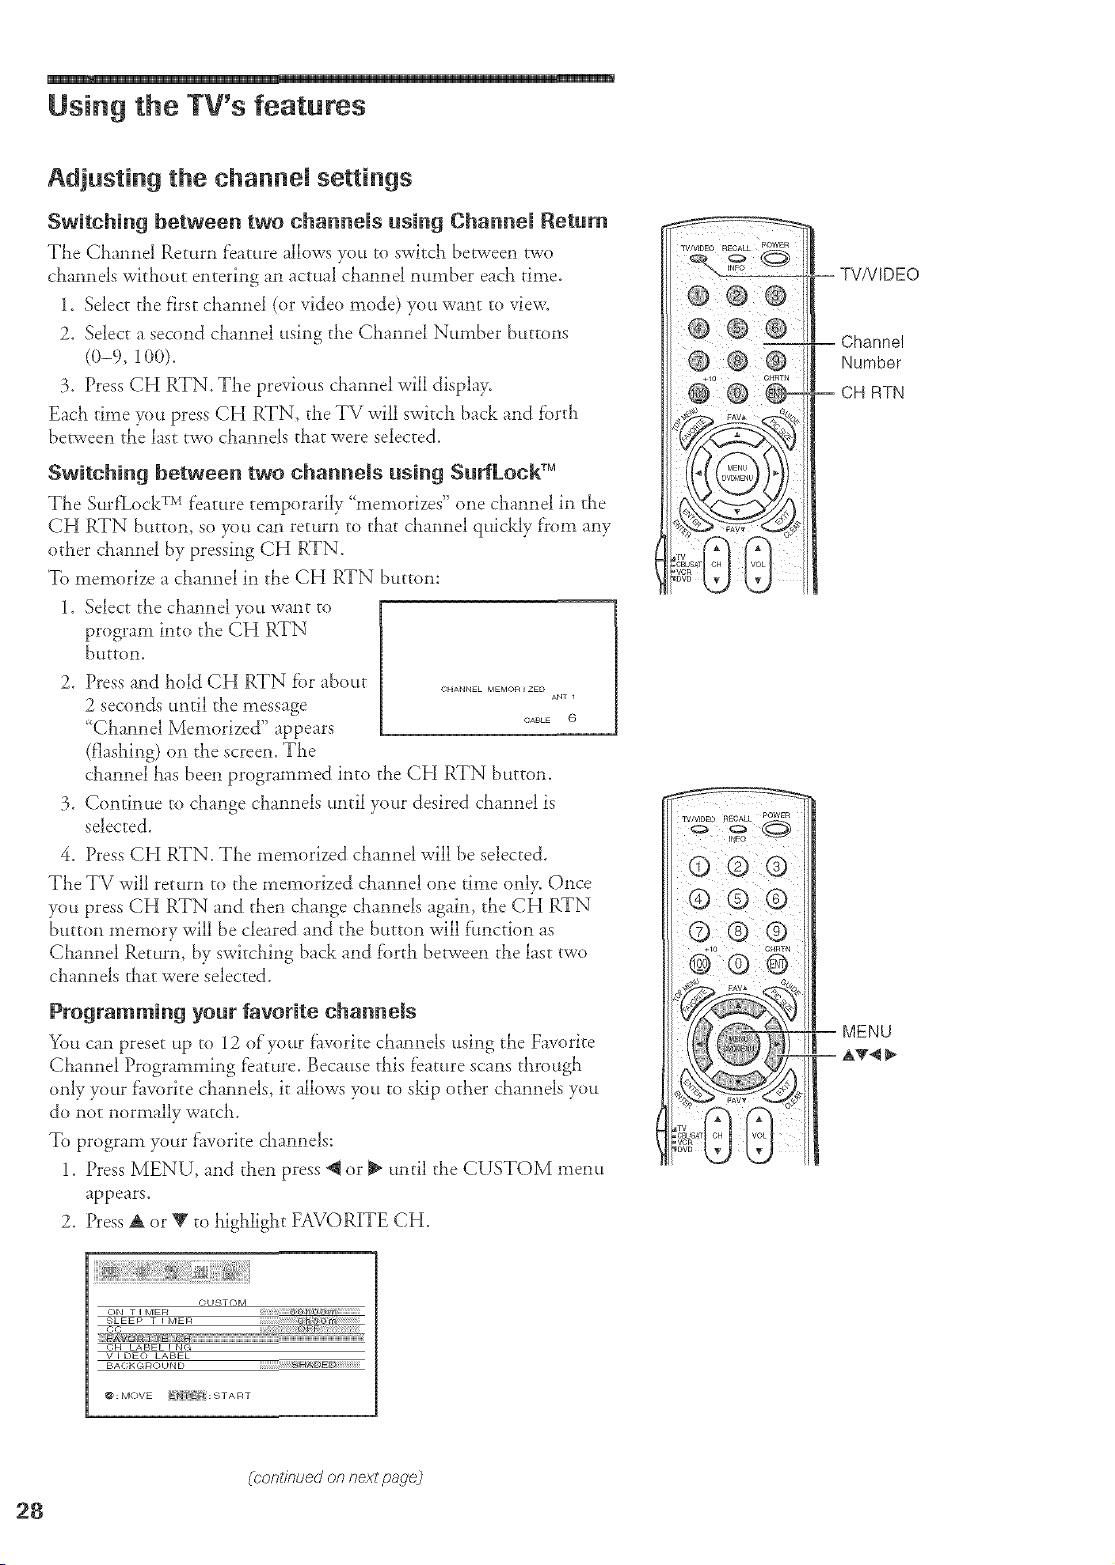
Adjusting the chamrel settirrgs ........................................ 28
Switcbing between two chamrels usD_gQha*mel
Return .................................................................... 28
Switchirrg between two chamrels usDlg
Surf'LockTM ............................................................. 28
Programming your f:avorite chamlds ....................... 28
LabelD_gcbamrels ................................................... }0
Viewing tire wide-screen picture f)._rmats
(480i and 48% signals oIi]y) ....................................... 11
SelectD_gthe picture size ......................................... 31
ScrolEng tbe Theater Wide picture
(Theater Wide 2 a_d 3 oIi]y) .................................. :53
Usirrg the auto aspect fbature (480i sigImls orrly) ..... 14
Using the POP double-wiIidow fbature .......................... }5
Switching the main and POP pictures ..................... }6
Switcbh_g the speaker somid of'maD_ a_d
POP pictures .......................................................... }6
POP double-window aspect ratio ............................ }7
UsD_gthe programmed cham_el search fimctio_ ............. }7
UsD_gthe fhvorite chained search ftmctiorr .............. :58
About the auto f:avoritef_ature ................................ :58
Using the LOCKS metal ............................................... :59
EnteriIig the PIN code ............................................ :59
If'you ca*mot remember your P]N code .................. :59
UsD_gthe V-CHIP menu ............................................... :59
ENABLE BLOCKING .......................................... 40
TV RATING (hrdepe_de_t ratirrg system f'or
broadcasters) ........................................................... 40
MPAA RATING (I_depe_derrt rating system for
movies) ................................................................... 41
BLOCKING OPTION .......................................... 41
U_]lockirrgplog_ams temporarily ............................ 42
Locking cbamreJs ........................................................... 42
Locking video irrputs ..................................................... 44
Cba_girrg tire PIN code ................................................. 44
AdjustDlg tire picture ..................................................... 45
SelectD_gtbe picture mode ...................................... 45
Adjusting the picture quality ................................... 45
Saving new preference ............................................. 46
SelectD_gthe color temperature ............................... 46
SeJectDlgtbe ScaIi Velodty Modulation (SVM) ...... 47
Using the CableClear TM DNR fbature .................... 47
Resetting picture adiustments ................................. 48
Selecting the display format
(for 48% sigrral truly) ............................................. 48
SelectD_gthe ciIiema mode ...................................... 48
SeJectDlg the video input source ..................................... 49
LabelD_gtire video Diput sources .................................... 49
UsD'Igthe closed captio_ f'cature ..................................... 50
Setting tile ON-timer .................................................... 51
Setting tile sleep tDner .................................................... 51
SettDlg tile clock ............................................................ 52
Adjusting tire sourrd ....................................................... 53
Muting tire somid ................................................... 53
SeIectDlg stereo/SAP broadcasts .............................. 53
Using tbe WOW _'v surround sound feature ........... 54
AdjustD_gthe sourrd quality .................................... 54
Resetting your audk} adjustme_ts ........................... 55
Using the StableSomrd °' Dature .............................. 55
Turrri*_gof'f"the built-D_speakers ............................. 56
SelectD_gtbe Audio OUT sound ............................. 56
SelectDlg tire bad£grotmd of'tire memt display ............... 57
Displayirrg on-screeIi inf'ormatio_ .................................. 57
Understa_diIlg the auto power of'f'fbature ...................... 57
Understa_diIig the last mode memory Dature ................ 57
Appendix ................................................................... 58
Specificatio_s ................................................................. 58
"DoubleshootiIig ............................................................. 59
Limited U_ited States k)_lrrantv ..................................... 60
LD_tited Canada \_m:arrtv .............................................. 61
index .......................................................................... B2
6
m
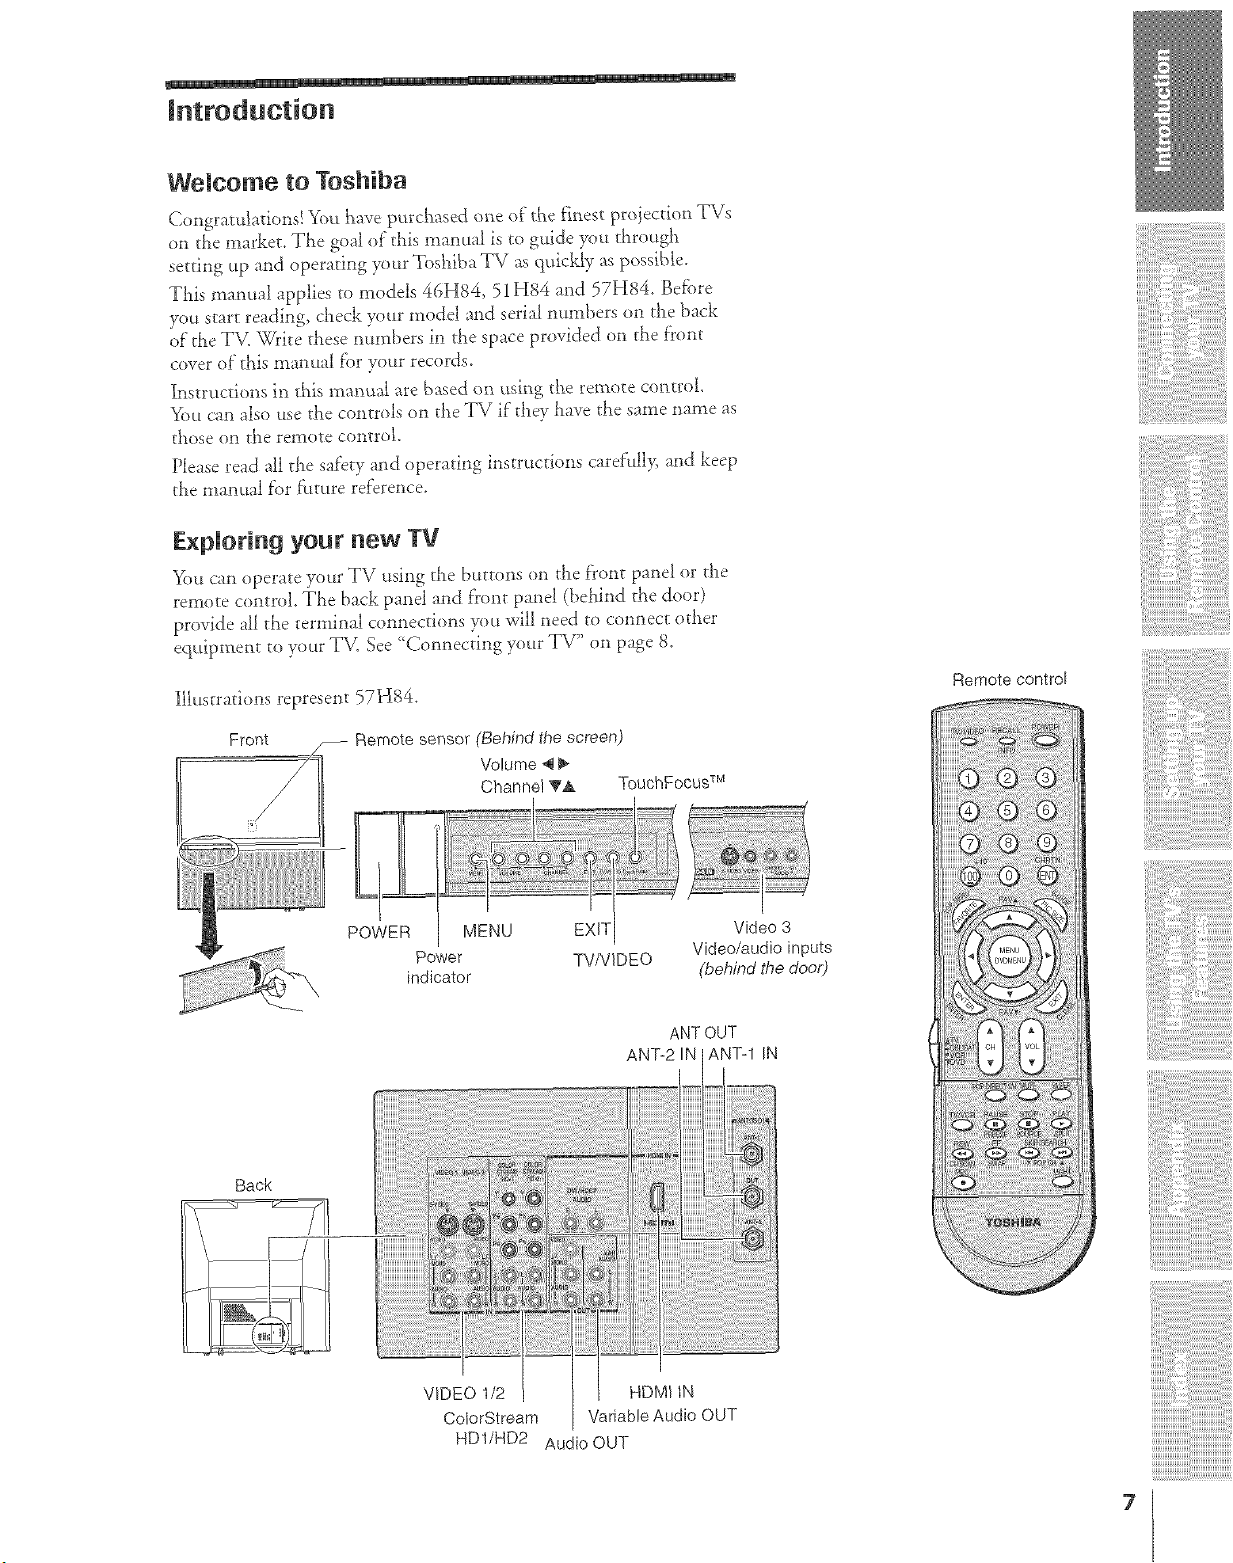
Welcome to Toshiba
Congratulation!! You have purchased one of"the finest proiection TVs
on the market. Tire goal of"tills manual is to guide you througl:
setting up and operating your Tos}:iba TV as quickly as possible.
This manual applies to models 46H84, 51 H84 and 57H84. Bef_re
you start reading, check yx_urmode_ and serial rmmbers o:1 die back
of"the TV. Write these numbers in the space provided on d:e f'ront
cover oF :_:ismanualfbr yourrecords.
In>ructions in :his manual are based on using the remote control
You cat: also t.tsethe controls on the TV if they have the same name as
those on t_:eremote control.
Please read all the safety and operating instructions careflfll> and keep
the manual f'or f'uture ref'erence.
F_xplorin 9 your new TV
You cat: operate your TV using the buttons on the f)'ont panel or the
remote control. The back panel and front panel (behind the door)
provide all the :ermi::al connections you will need to connect other
equipment to your TM See 'Connecting your TV" on page 8.
Illustrations represent 57H84.
Front -- Remote sensor (Behind the screen)
Volume _ _,
Channel !va, TouchFocus s_
POWER MENU EXI-I
Power TVNIDEO
indicator
Video 3
Video/audio inputs
(behindthe door)
Back
ANTOUT
ANTo2iN AN%l iN
(i
HDMI iN
Variable Audio OUT
HD1/HD2 Audio OUT
Remote control

Connecting your TV
Note: Cab/esaf_ not supp/iedv,aitil your 71/
@ Coaxial cable is the cable that comes in from ff}ur antenna, cable TV
service, or cable converter box. Coaxial cable uses "F" connectors
• Standard AJV (audio/vldeo) cables usually come in sets of three, and
are typically co_or-coded according to use: ye_iow f;_r video, red fi)r
stere() right audio, and white for stereo lef'_ (or mann) audio.
On your TV's back pand, t}_estandard A!V inputs are cok)r<oded in
the same manner as the cables.
• S-Video cable is f'or use with video equipme(_t that has an S-Vide0 i(_put
e Compoueut video cables come in sets of three, and are f_r use with
video equipment that has component vide() inputs. (Cok)rStream _°is
Toshiba's brand of coolponent vide().)
e HDMI is fi)r use wkb vide() equipment that })as a HDMI type A
connector (see page 15).
NOTE REGARDING PICTURE QUALITY
When connecting vide() equipment to your 7bshiba TV:
• For GOOD picture quality: Use a standard ye_k)w vide<) cabie.
e For BETTER picture quality: [f'?<mr equipment has an S-video
input, use an S-video cable instead era standard ydk_w video cable.
(You still must connect the standard red and white audio cables f'or f'u_l
system connectkm, but do _lot connect the s[a(_dard ydk_w video cable
at the same time, or the picture perf_rmance wilt be unacceptable.)
e For BEST picture quality: If'your equipment has component video (or
HDMI) ilxputs, use either compolxer*t video cables (or a HDMI cable)
instead of a stand ard video or S-video cable. (You still must cam,err the
standard ted and white audio cables for f'ull system cormection, bar do
not co(inert the standard yellow video cable or at* S-video cable at the
same time)
CAUTION:
Do not p/ug /?_any power colds unt/Tyou have
fin/:xhed connect/hg a// equal)meet
TLis cotmection allows you to watcL TV programs or basic cable
cha*mels.
From Antenna or Cable
TV
8
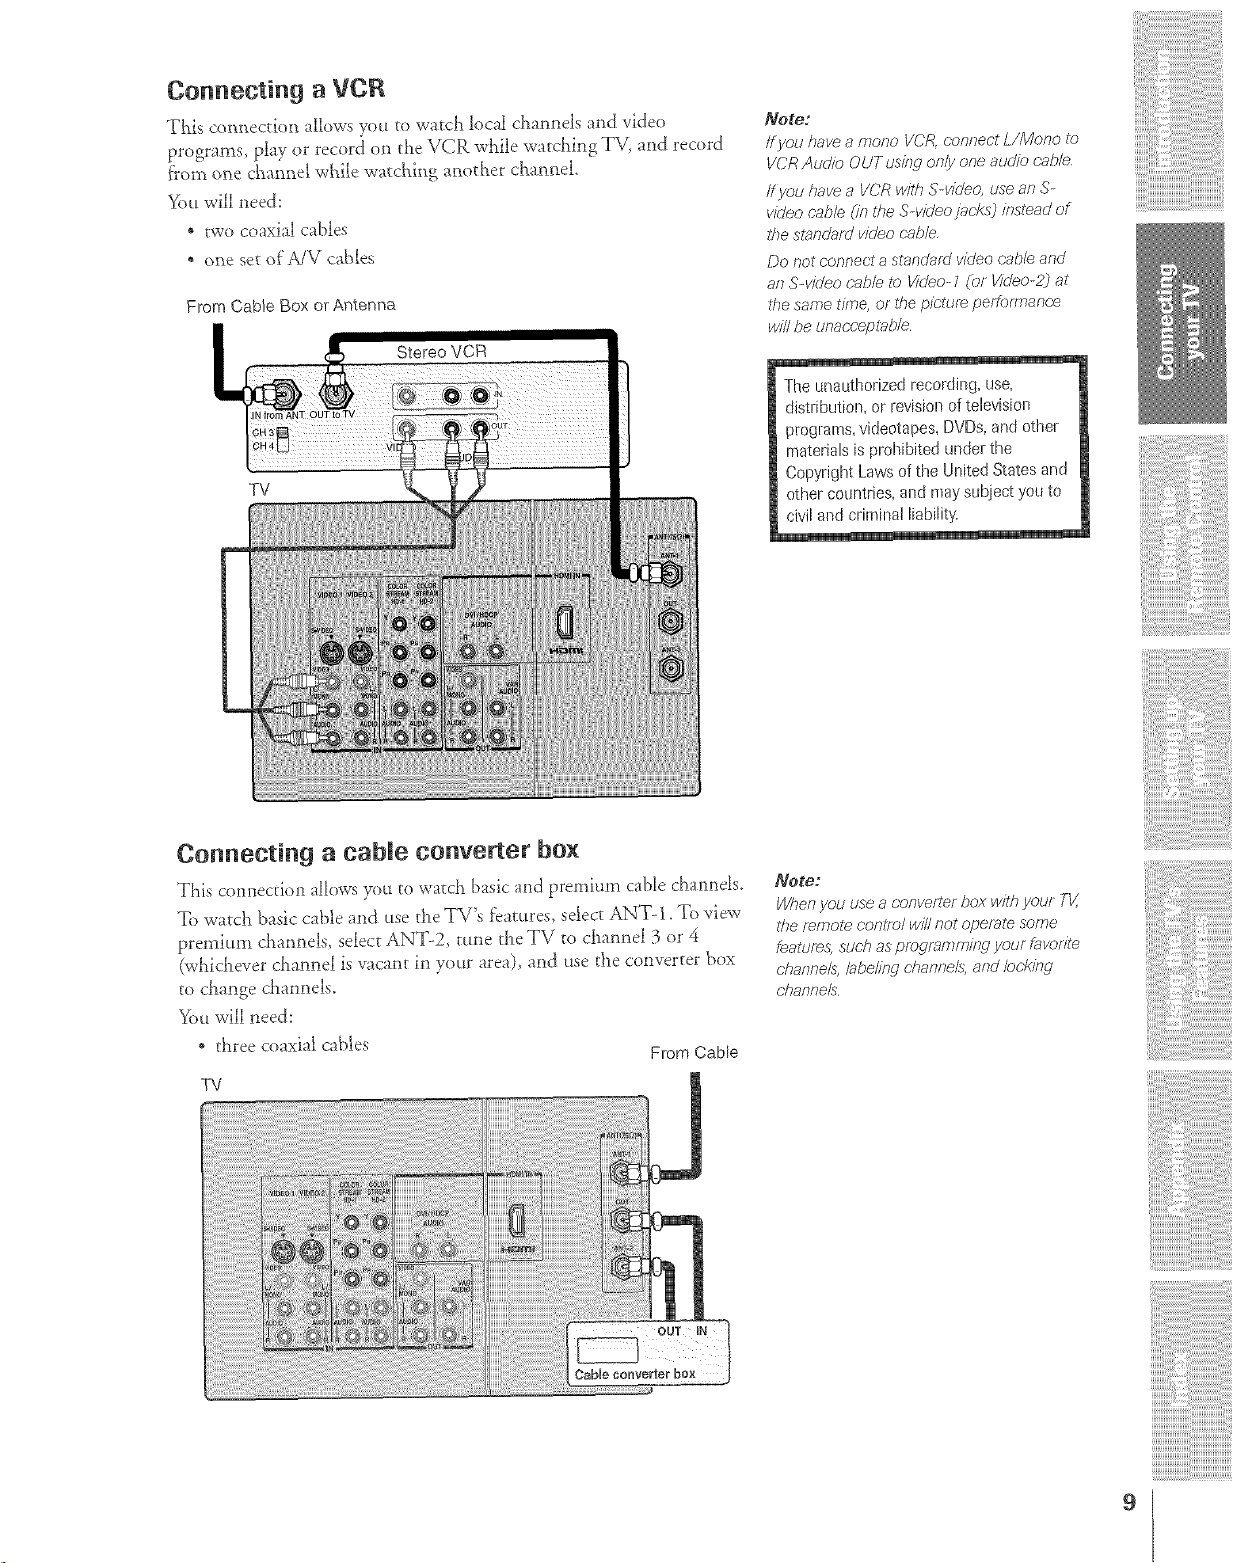
Connecting a VCR
T!_i._; com_ectio_l allows you ro watch local channels and video
programs, play or record on the VCP, while watching TV, and record
f'rom one channel while watching another cMnneL
You will need:
" two coaxial cables
, one set of MV cables
From Cab}e Box or Ante_-rna
TV
Note."
/f you have a mono VCR, (;onnect L/Mono to
VCR Audio OUT usi/W on/y one audio cab/e
/f you have a VCR with S-vkieo, use an S-
video cab/e (//7 tile S vk/eo jacksj instead of
lf}e standaid vi(Jeo cab/e,
Do not c,or_r_ecta standard video cable and
an S-video oab/e to Video-I (or Video-2_ at
2)e same time, or the picture pef;fofmance
win be ufTacceptable
The unauthorized recording, use,
distribution, or levision of television
programs, videotapes, DVDs, and other
materials is prohibited under the
Copyright Laws of the United States and
other countries, and may subject you to
civil and criminal liability.
Connecting a cable converter box
This connecdoti allows ._)u to waEch basic and premium cable channels.
7b watch basic cable and use the TV's features, select ANT-1. To view
premium channels, select"ANT-2, tune the TV to channel 3 or 4
(whichever channel is vacant in your area), and use the cotwerter box
to change channels.
You will need:
. three coaxial cables From Cable
TV
Note:
Pill:Tenyou use a oonvefter box with youF TV,
ff}e Femol_ conlf_)/ wi// not operate some
_gatu/es, sdoh as piDuFamml}7",gyour fSW)lite
channels,/abeling (-banne/s, arid Iockitw
c;ilartt_e/s
9
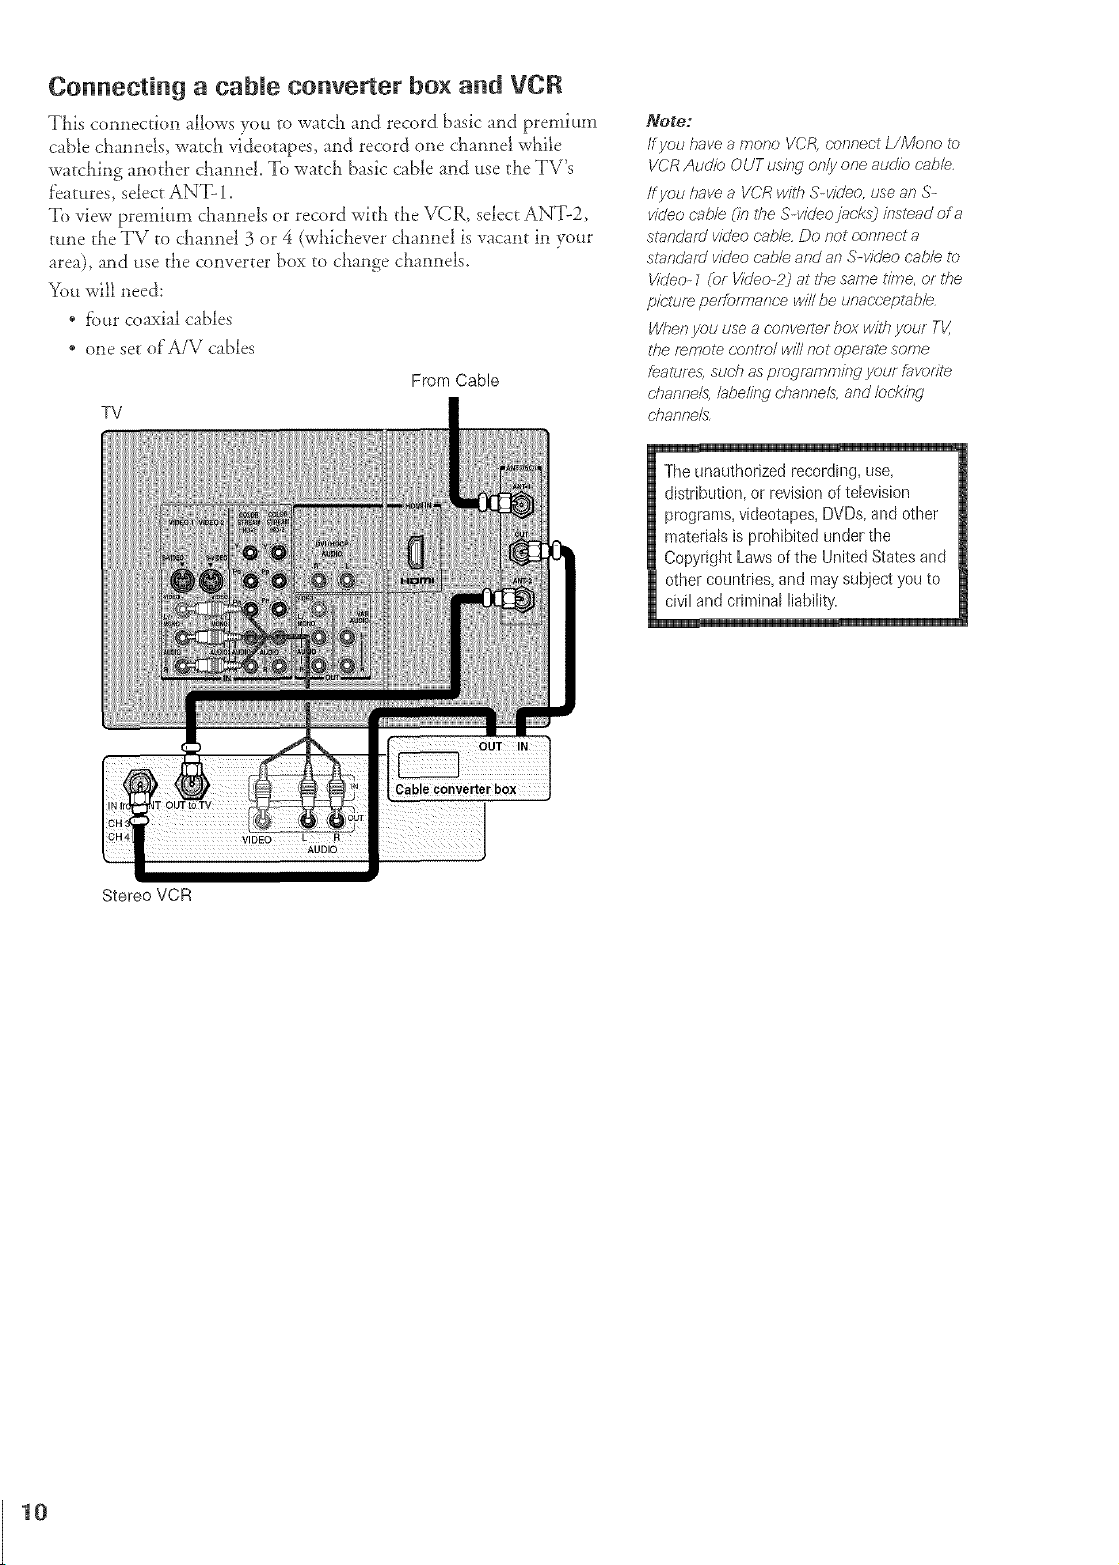
Connecting a cabme converter box and VCR
TLis connection allows you to watct_ and record basic and premium
cable cha,mds, watch videotapes, and record one channel while
watching ai_other cl_a*mel.To watch basic cable and use the TV's
f'eatures, select ANT- 1.
To view premium channels or record with the VCR_ select ANT-2,
tune the TV to channel 3 or 4 (whichever d_anne! is vacant in your
area), and use the converter box to change channels.
You will need:
, four coaxial cables
* one set of A/V cables
From Cable
TV
Stereo VCR
Note;
If you have a morro gcf4, r;onnecf L/Mono to
VCR Audio OUT uskw or_/yone audio cab/e..
ff you have a VCR with S-video, use an S-
w_leo c'abb (in RTeS-v/b'eo jacks) kTstead of a
standard vk/eo cab/e. Do not conrTect a
standard video cab/e and ar_ S-video cab/e to
Vkleo- Z (_)r Video-2) at the same time, or the
pie.turn pe/formar_ce v,//llbe unac-ceptab/e
Whet} you use a converter box with your TV,
the f_mote c,orTtTo/wi// riot operal_ some
fealure& such as progmmmkw your favofTte
d?arTfTe/& /abeli/w <'harvTe/s,arTd/ockied
UTanr_e_
The unauthorized recording, use,
distribution, or revision of television
programs, videotapes, DVDs, and other
materials is prohibited under the
Copyright Laws of the United States and
other countries, and maysubject you to
civil and criminal liability.
10
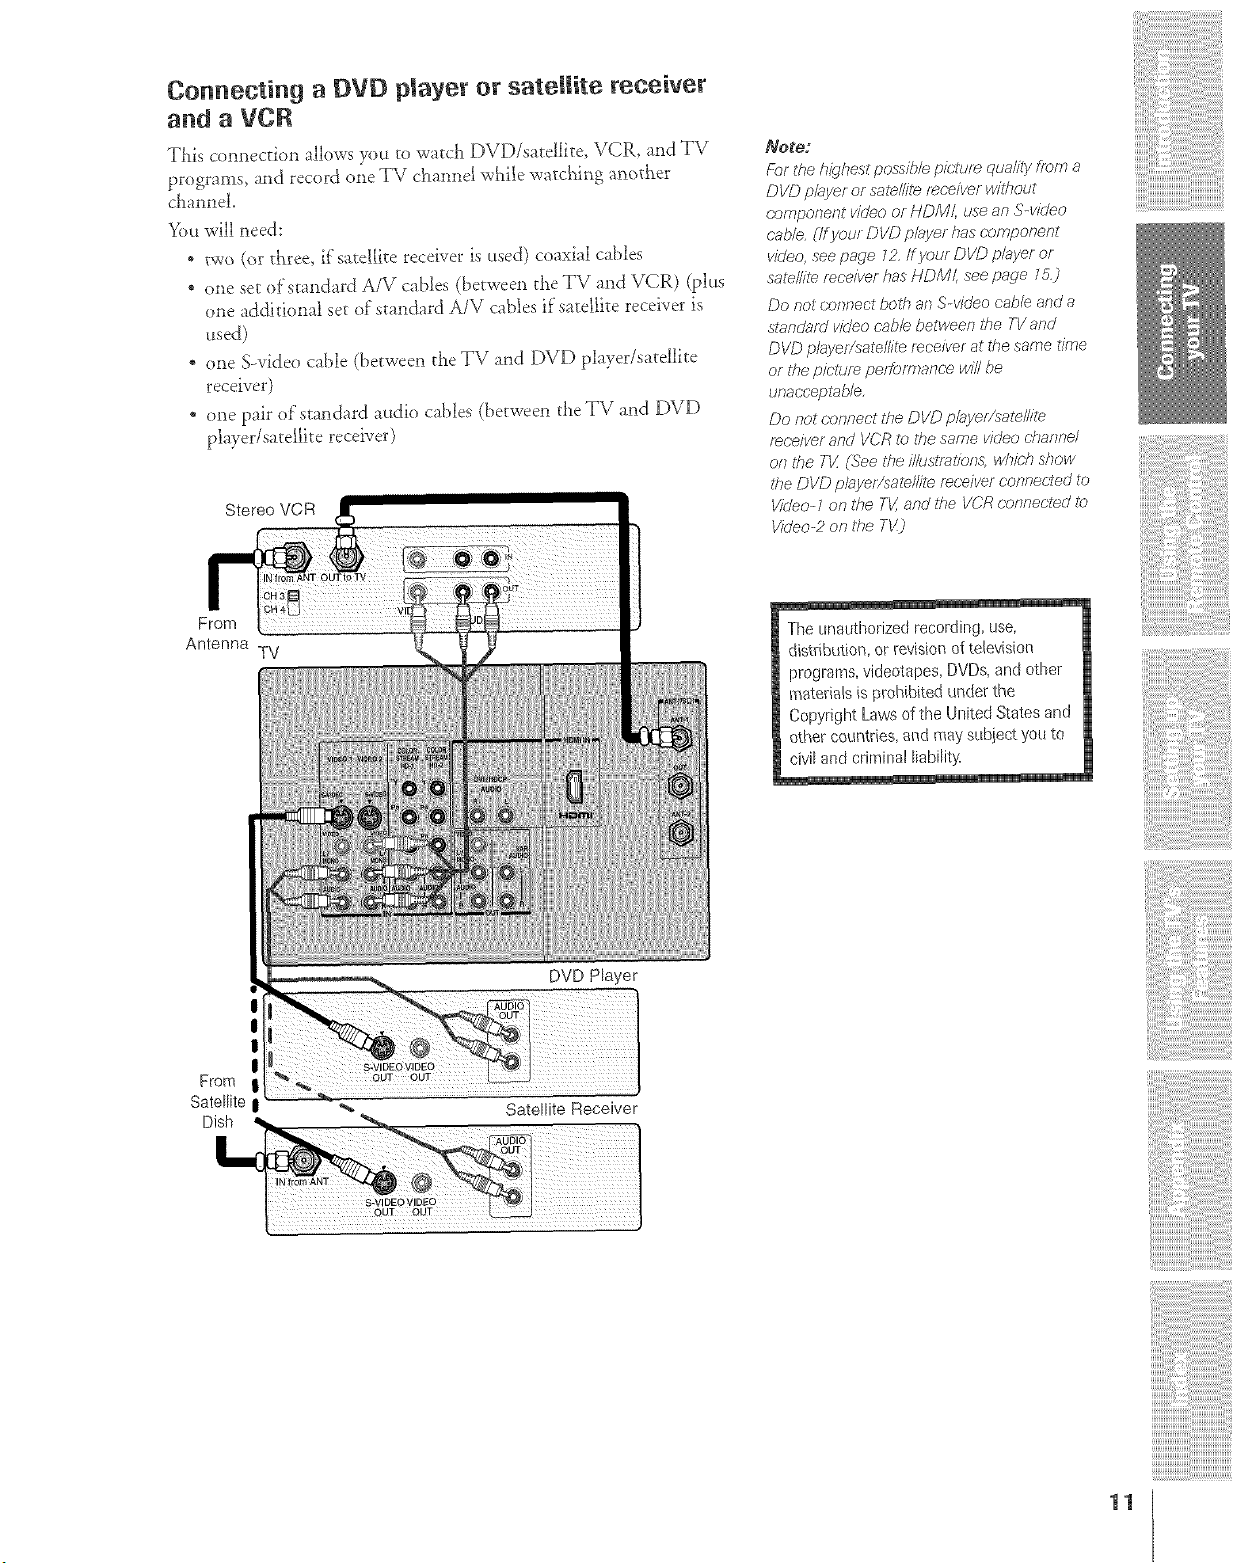
Connecting a DVD player or satellite receiver
and a VCR
This connection allows yot* to watcll DVD/satellite, VCR, and TV
programs, a*ld record one TV channd while watc!_ing anov{ser
channel
You will need:
" two (or t{_ree, if satellite receiver is used) coaxial cables
. one set ofs_asxdard A/V cables (betweesl the TV asxd VCR) (plus
one additional set of standard A/V cables if sard£te receiver is
_sed)
one S-video cable (between the TV and D\fD player/satellite
receiver)
. one pair of stmxdard audio cables (betweeix the TV and DVD
player/satellite receiver}
Stereo VCR
Note:
F:r)rthe highest possib/e picture qualilyfrom a
DVD p/ayer or sate/tire i_r'e/ver without
component video or HDM/, use an S-video
cab/e, r/f your DVD pbyer has component
video, see page Z2, If your DVD p/ayer or
satel/ite receiver has HDMI, see page 1K)
Do not connect both an S-v/dee cable and a
st_'_,,?d_ft_/vi(Jeo c'a/s!etJetweerz t/_e TV a,?d
DI/D pl_yer;/satelllte receiver at the same time
ef tl_e p/c;!tJre pe/fo/?r_ar?c'ewit//)e
unaeceplable,
Do not connect the DVD p/ayef/satel/if_
receiver and VCR t_) the same ddeo c-hannel
on the TK (See t#e il/ustralians, w/TM7 StTOW
#_e DVD pl_-_yel/sate//ite receiver conneded go
Vir/eo-1 on the TV, and ff_e V(?R r'onnecled to
VMeo-2 on the TV_
From
Antenna
TV
The unauthorized recording, use,
distribution, or revisiot_d television
programs, videotapes, DVDs,and other
materials is prohibited under the
Copyright Laws of the United States and
other countries, arid may subDct you to
civil and criminal liability.
I
I
!
From
Satellite
DVD Player
Satellite Receiver
i!{!i!i!/ii!ii!ii!i{i
!ii!ii!ii!{!i!i!i!i!i!
it;_
11
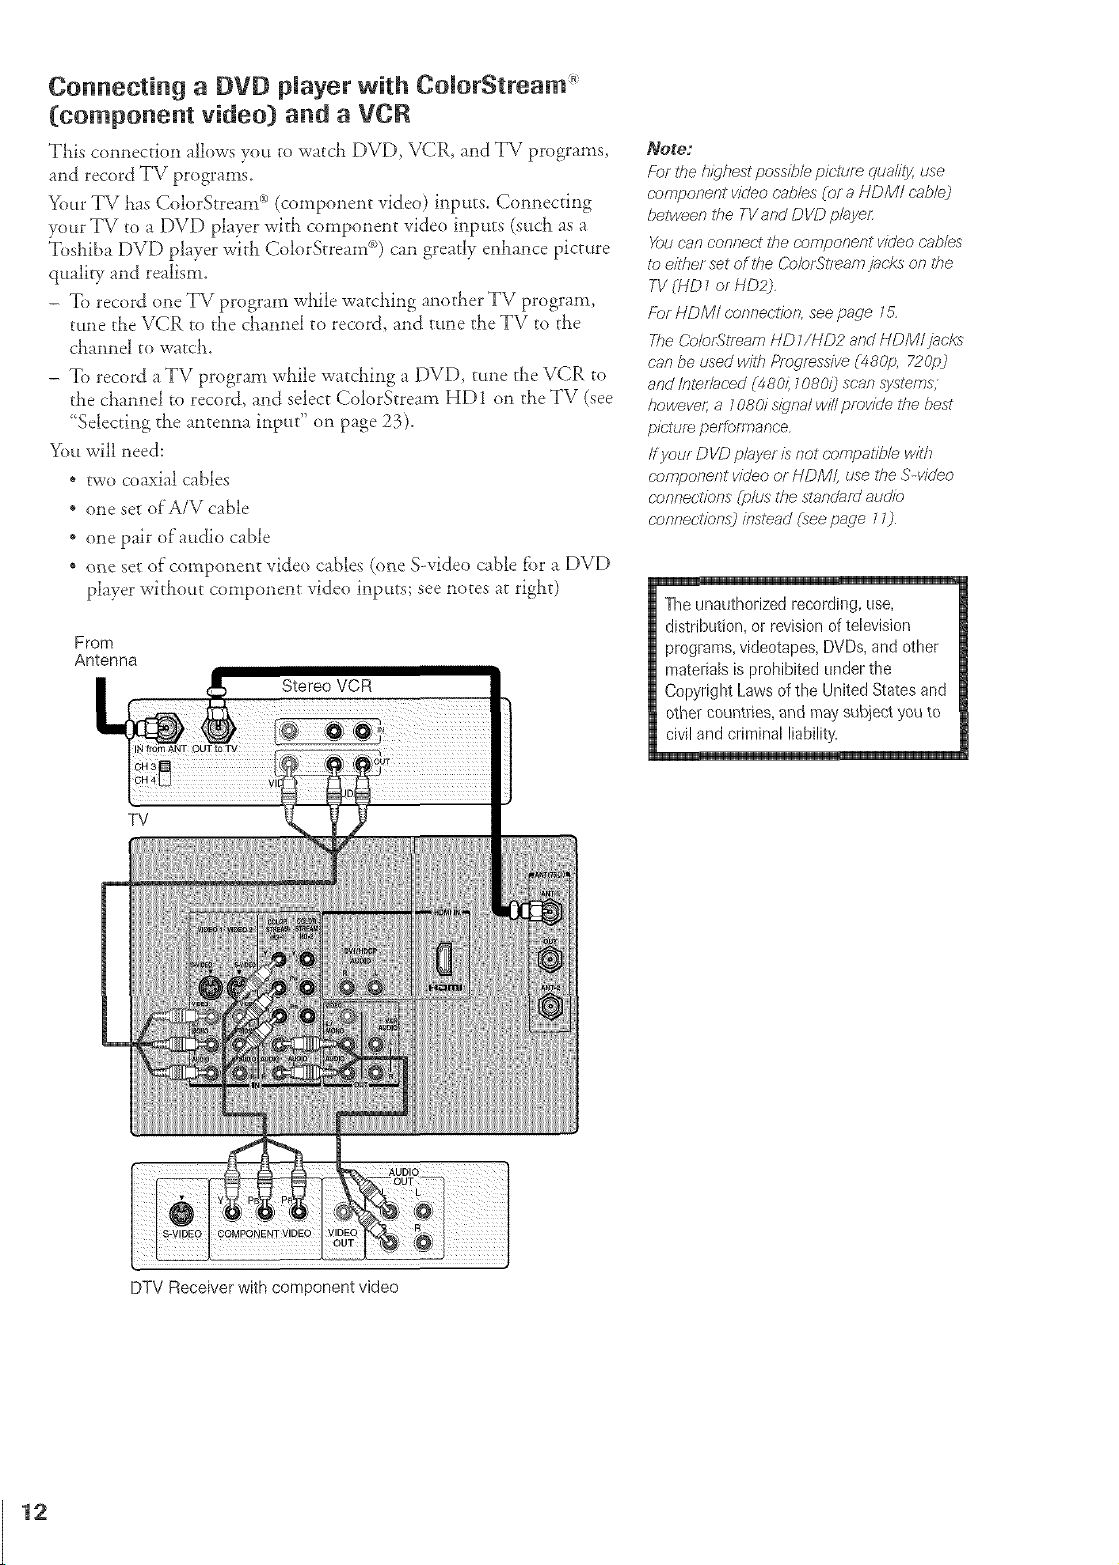
Connecting a DVD player with ComorStream _
(component video) and a VCR
TLis connection allows you ro watc5 [)V[), \ICR, and TV program.%
and record TV programs.
Your TV Las ColorStream _ (component video) inputs. Connecting
your TV to a [)VD player with component video inputs (such as a
:l_oshibaDVD player with ColorStream _) can greatly enhance picture
quality and realism.
- To record one TV program wt_ile watching another TV program,
tune the VCR to tl_e cLannel to record, and tune the TV to {he
cLannel _owatch.
- To record a TV program while watcl_ing a DVD, tune the VCR to
the channel to recor& and select ColorStream HD 1 on the TV (see
.......Selecting the antetma tnpttt on _Tme__ 23).
You will need:
" two coaxial cables
* one set of A/V cable
" one pair of audio cable
" o_e set of'component video cables (one S-video cable fbr a DVD
player without component video inputs; see notes at rigllt)
From
Antenna
Note:
Fbrthe hiLqhestpossib/epir;'t_Jr_quality,use
c.omponent videoc:ables(or a HDMI cable)
beDweenthe TVandDVDp/ayeL
Youc;anconnectthe component virleocab/es
t_)eitbersetof theCo/orSiream jacks or7 the
TV(HD7 or HD2j,
ForHDM/ c.onneclfon,see page 15,
TheCok)rStrP,amHD 1/HD2andHDMI jacks
canbe usedwithProgrRsdve (485p, 720pj
andIntei/ac;ed(4801: 1080i_scan systems,
howevel; a 108ds/D,na/ wi// provide thebest
picture performance.
If your D VD p/ayer is notcompatible W/7/7
r-omponent videoor HDM/, usetheS-video
c;onnections (p/us the standardaudio
c;onnectfonsj k)stead (see page 17_
The unauthorized recording, use,
distribution, or revision of television
programs, videotapes, DVDs,and other
materials is prohibited under the
Copyright Laws of the United States and
other coumfies, and maysubjeet you to
civil and criminal liability.
TV
DTV Receiver with component video
12
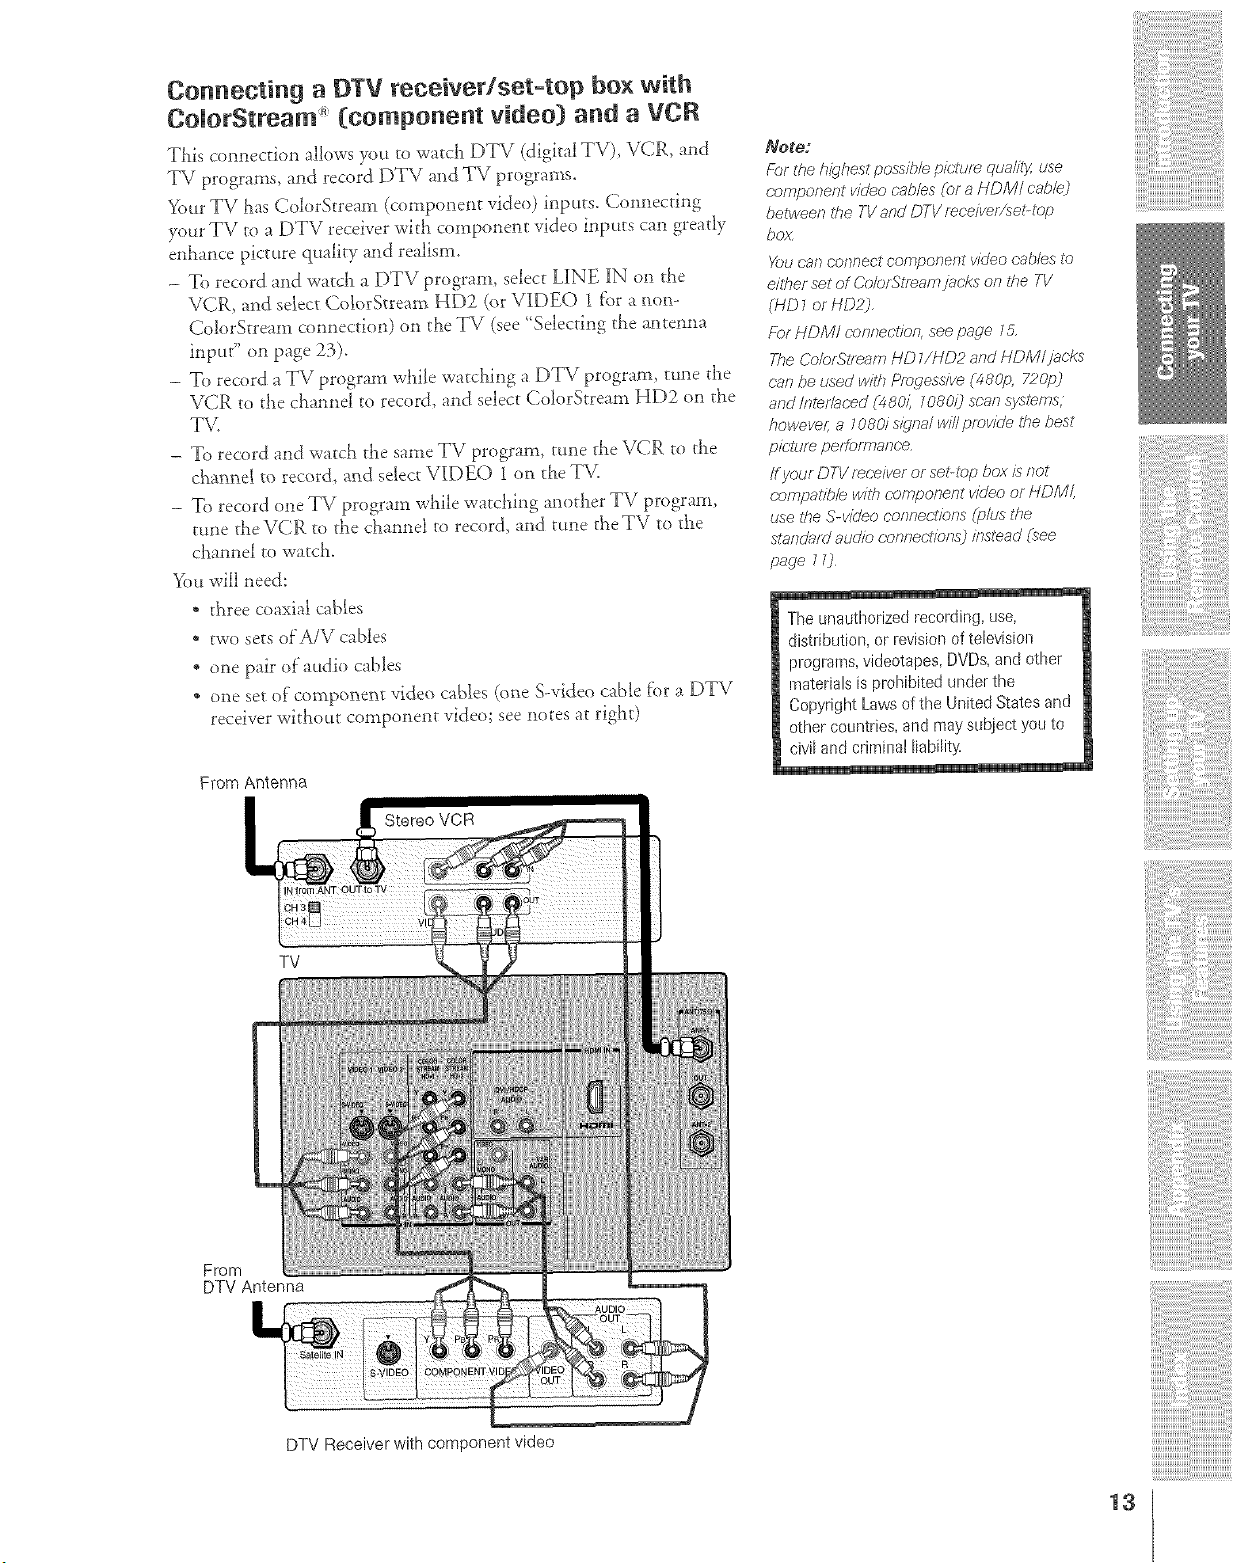
Connecting a DTV receiver/set-top box with
ColorStream (component video) and a VCR
This comlection allows you to watch DTV (digital TV), VCR, and
TV programs, and record DTV and TV programs.
Your TV has ColorStream (compone*lt video) irlputs. Connecting
your TV to a DTV receiver with component video inputs can greatly
enhance picture quality and realism.
- To record and watct_ a DTV program, select HNE _N on the
\/CR_ and selec_ ColorStream HD2 (<_rVIDEO 1 f'or a non-
ColorStream connection) on the TV (see 'Selecting the antenna
input" on page 23).
- To record a TV program while watching a DTV program, tune the
VCR to the channel to record, and select ColorStream HD2 on the
TV.
- To record and watch the same TV program, tune the VCR to the
cl_,annd _orecord, and sdect VIDEO 1 on the TV.
- To record one TV program while watching another TV program,
ttme theVCR to the cham_el to record, and tune theTV to the
cJlannel to watch.
You will need:
* three coaxial cables
* two sets oFA/V cables
* one pair of audio cables
* one sevof"component video cables (one S-video cable f'or a DTV
receiver without componerlt video; see notes at right)
From Antenna
Note:
For the highest possib/e, picture quality, use
e_mponent video cables (or a HDM/ cable)
between the TV and DTV mceiver/sebtop
bc_
You can connect corr}ponent video cables t__,
m_her _t d _77_mnjac,ks on tt_e 2-1/
(HD _ or HD2j.
!:br HDMI _:'.or_neg,tJon,see page 7,_
The CbloWtream HD 1/HD2 and HDM/jocks
e;_/_/jg?iased with Pfoqeas/ve (480/9, 72_)
and #Tten'aced (48&i 1080/) sosn syslems,
howeveg a 708d s/gna/ w/I/ provide the best
picture peffom_ance.
ff your DTV receiver or sel_top box is not
compatibb wilf_ component v/(Jeo oF HDM/,
use the S-video eonnedfons (p/us the
stan¢Jafd aud/o c'onnec'tlbns_ /?Tsg_ad(see
page 17)
Theunauthorizedrecording,use,
distribution, or revisionof television
programs,videotapes, DVDs, andother
materialsis prohibitedunderthe
Copyright Lawsof theUnitedStatesand
other countries, and mays_b]ect youto
civilandcriminalliability,
TV
From
DTV Antenna
DTV Receiver with component video
13
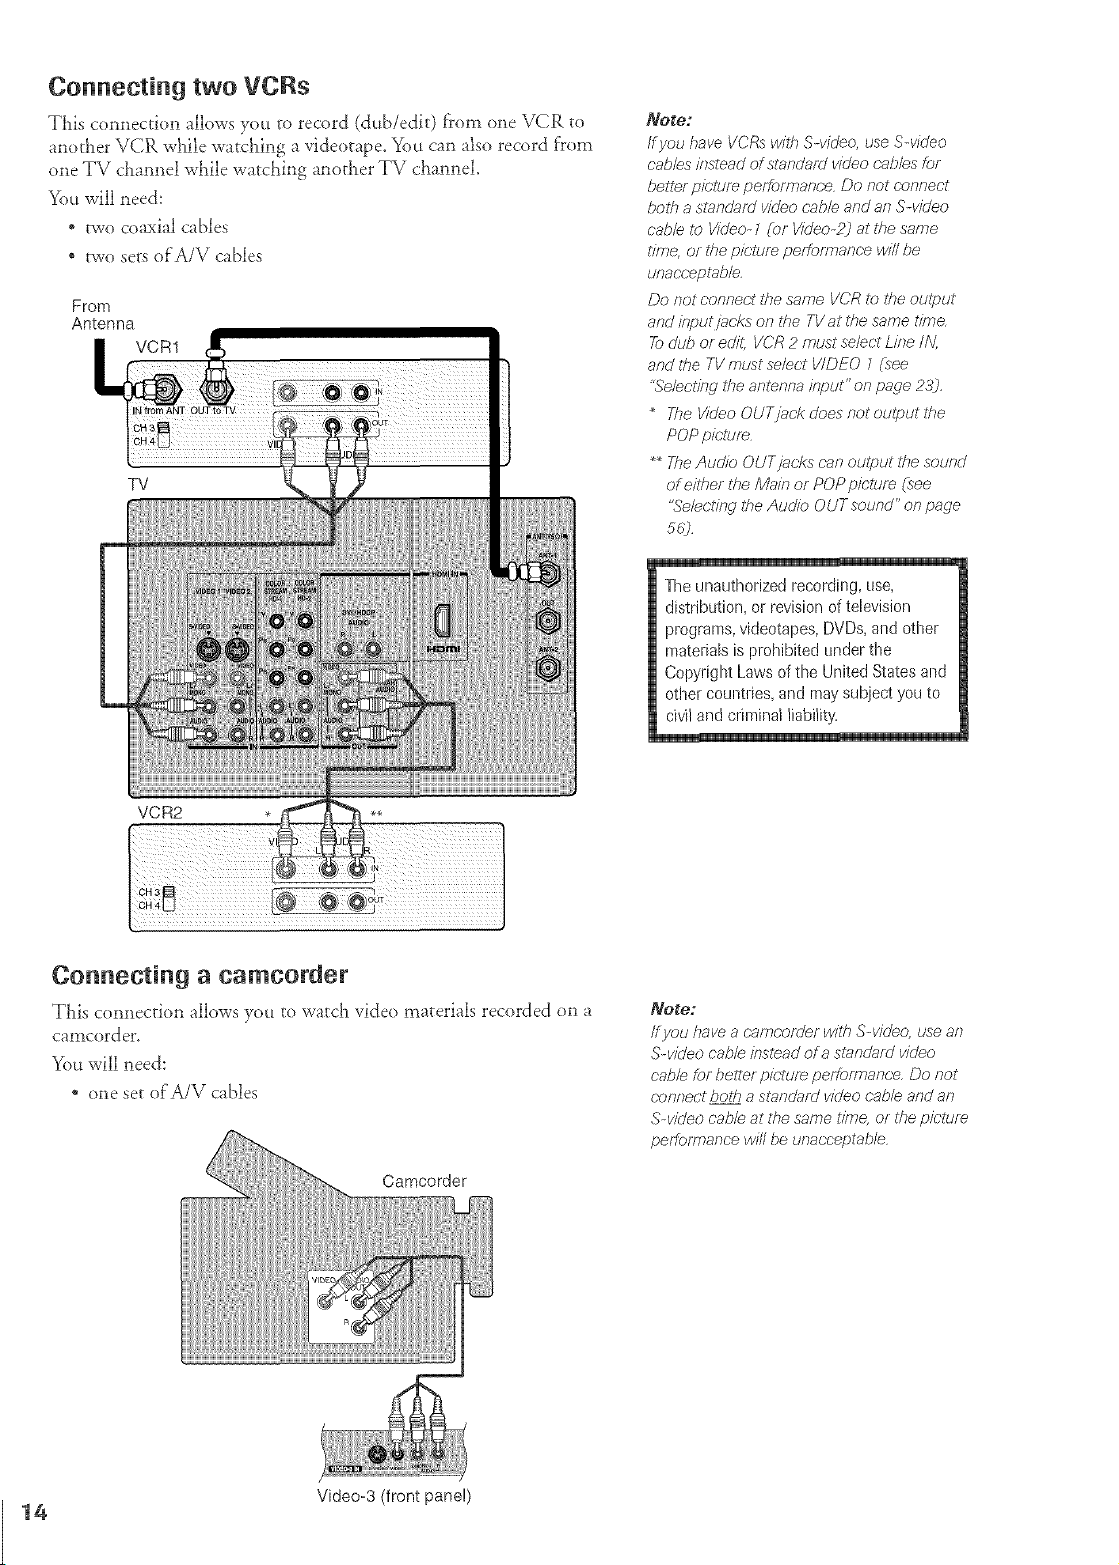
Connecting two VCRs
This co,mection allows you m record (dub/edir) fFom one VCR to
another VCR while watching a videotape. You can also record from
one TV channel while watching another TV channel.
You will need:
* two coaxial cables
* two sets of'A/V cables
From
Antenna
VCR1
TV
Note;
/f you have VCfRsvvHf_Swide< use S-video
cables #_stead of standard video cab/es for
better picture perforTnanc.e Do not r'annect
both a standard video (;able and an S-video
cable, to Video- ] ((_r Video-#j at the same
time, or ibe picttum perT<ormanc'ewill be
tdnacwceptab/e.
Do Rot ootTr7ec'tthe same VCR to tbe output
and input jacks on the TV at the same tittle
#_ dub or edit, VCR 2 must select Li/Te IN,
and tbe TV must select V/DEO 7 (see
"Se/ect21g the arTt_nna itg)ut" on page 23).
The Video OUT jack does not output the
POP picture
_ The Audio OUT jacks can output the sotdnd
of either tile Main or POP pic;tum (see
"Selecting the Audio OUT sound" on page
56j
The unauthorized recording, use,
distribution, or revision of television
programs, videotapes, DVDs, and other
materials is prohibited under the
Copyright Laws of the United States and
other countries, and may subject you to
civiland criminal liability.
VCR2
Connecting a camcorder
TLis comlection allows you to watch video materials recorded on a
camcord er.
You will need:
* one set of'A/V cables
/f yau have a cameorder with S-video, use an
S-w?Jeo cable #Tstmadof a siandard video
cabb for better picture performance. Do not
connect both a standard wdeo cable and an
S-w?Jeo cable at the same tl?rTe,or the piciure
performance w#l be unacceptable
Video-3 (front panel)
14
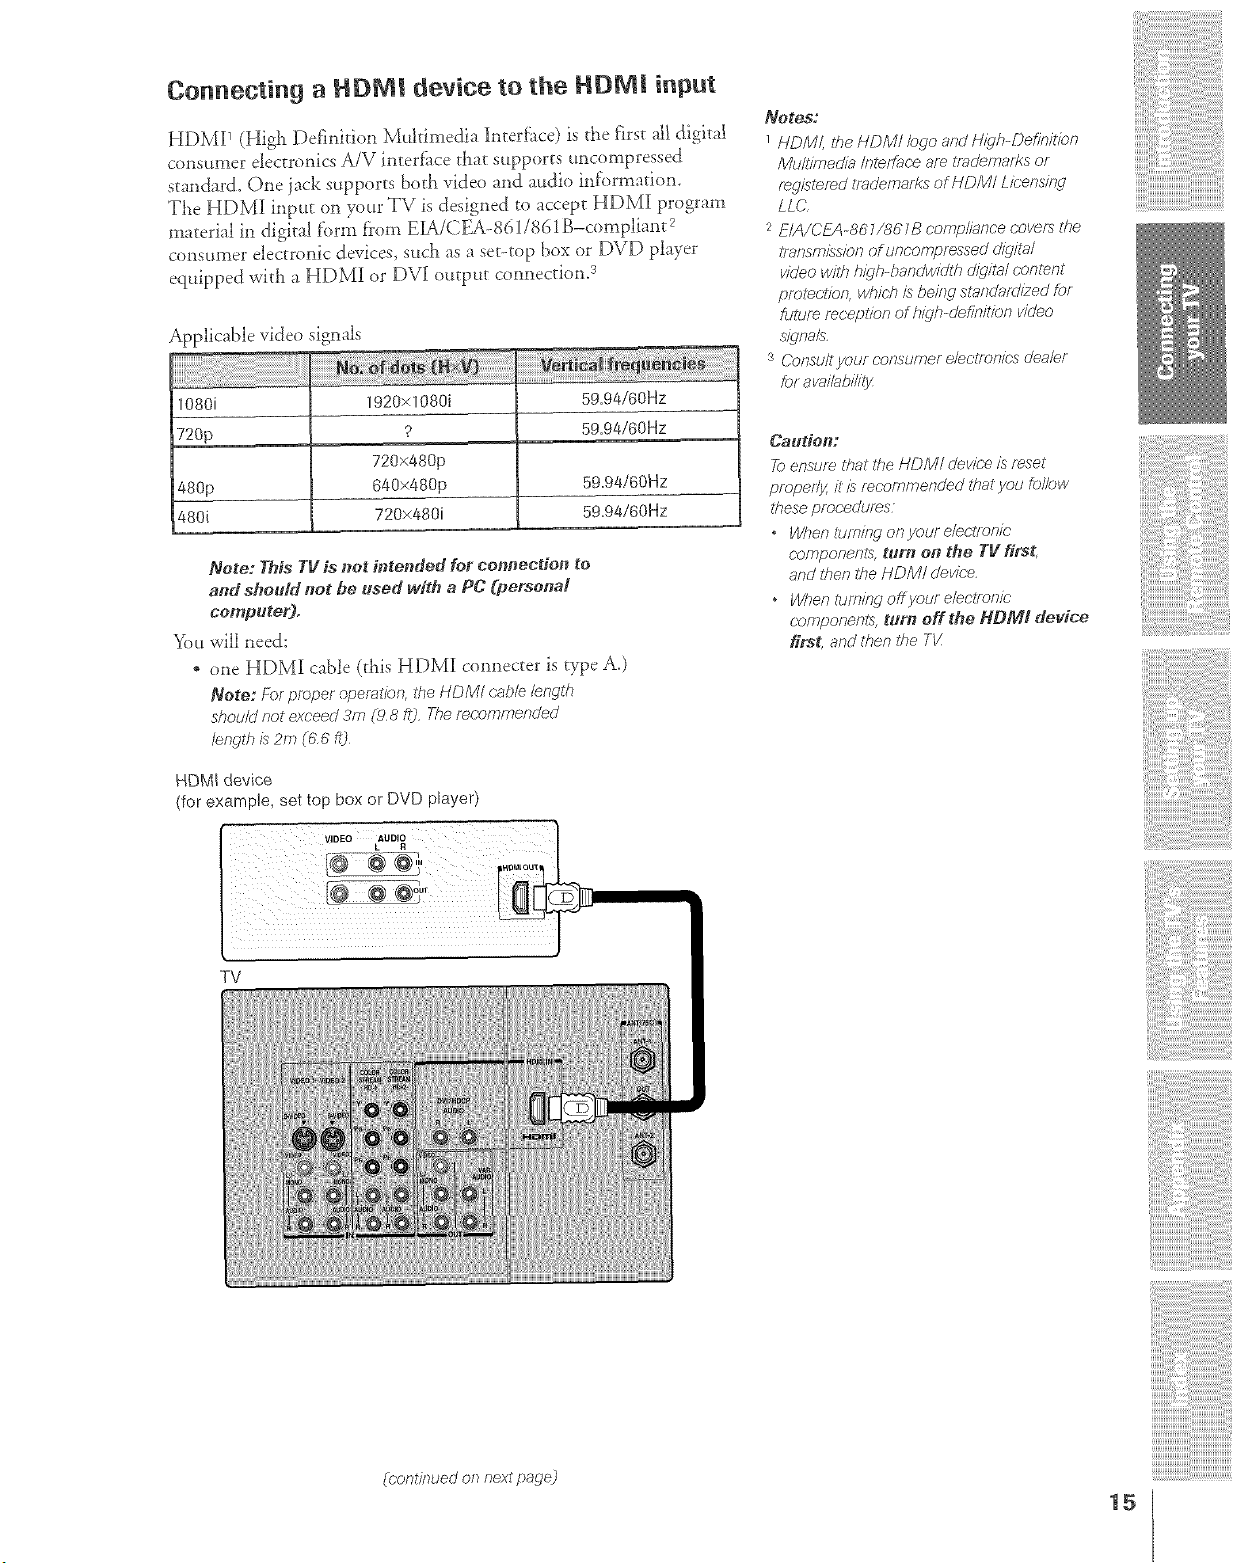
Connecting a HDM! device to the HDM! input
HDM][ 1 (High Definition Multimedia ]nterf'ace) is the first all digital
consm_ler eJectronJcs A/V inter_]_ce that supports tmcompsessed
standard. One iack supports bod_ video and attdio information.
The HDMI inp_t on <w_r TV is designed to accept HDMI program
material in digital f'orm from EIA/CF_5-861/861 B-compliant 2
consumer electronic devices, such as a set-top box or DVD player
equipped with a HDMI or DVI output connection7 *
Applicable video signals
1080i 1920x1080i 59.94/60Hz
720p ? 59.94/60Hz
720x480p
480p 640x480p 59.94/66Hz
480i 720x480i 59.94/60Hz
Note: This TV is #_ot interMed for cot}nection to
and should net he used with a PC (persona!
computer).
You will need:
* one HDM]{ cable (this HDMI connecter is type A0
Note: For proper apee_tion, _f_eHDM/ cable /e,ngtt_
shoulU not exceed 3"m (g 8 It}. The f_c_)eff77efTt/e(/
bndth is 2m C6"6f15
HDMI device
(for example, set top box or DVD player)
Notes."
HDM/, the HDM/ /ego and Nigh-DefinilTbn
/gfu/t/meci/?_/n_effac'e are Tfademaff<s of
regisiered tTs,demar?s of HDMI Licer_sirW
LLC
2 E/A/CEA-861/u, gTB comp//ance covefa the
ITaRSmiss/oR of uncomlpfwssed ¢li5//ta/
video wilh h/_qh-bandw'idth diditgd content
pmlec,9on, which is befw stanc/afU/7ed for
future receplion of high-clefinitien video
s{qna/s.
s CorTsullyour c'onsumer elect/or_/c's clee/er
br s vailablTir/
Caution:
Teensure that the HD/V// c/evk;e is reset
proper!y, it is recammer?ded *tlat you fel/aw
ff_ese pmc;edures
" H/t_ef_ tT//Y?Jeg on yoglY elec)lToeJ¢._
c.amponents, tutti on the TV first,
arid tt_et_the HDM/ c/evioe
" When tumffW offyeur e/eclmnk;
eo;_pof,,ef,v_ tur_ Off the N,t[?_sJ/,gde,ice
first, and tften the TV
ii
TV
!ii!i!!/iiiiiiiiiiiiiiii
(cont/7}ued on next pad)e)
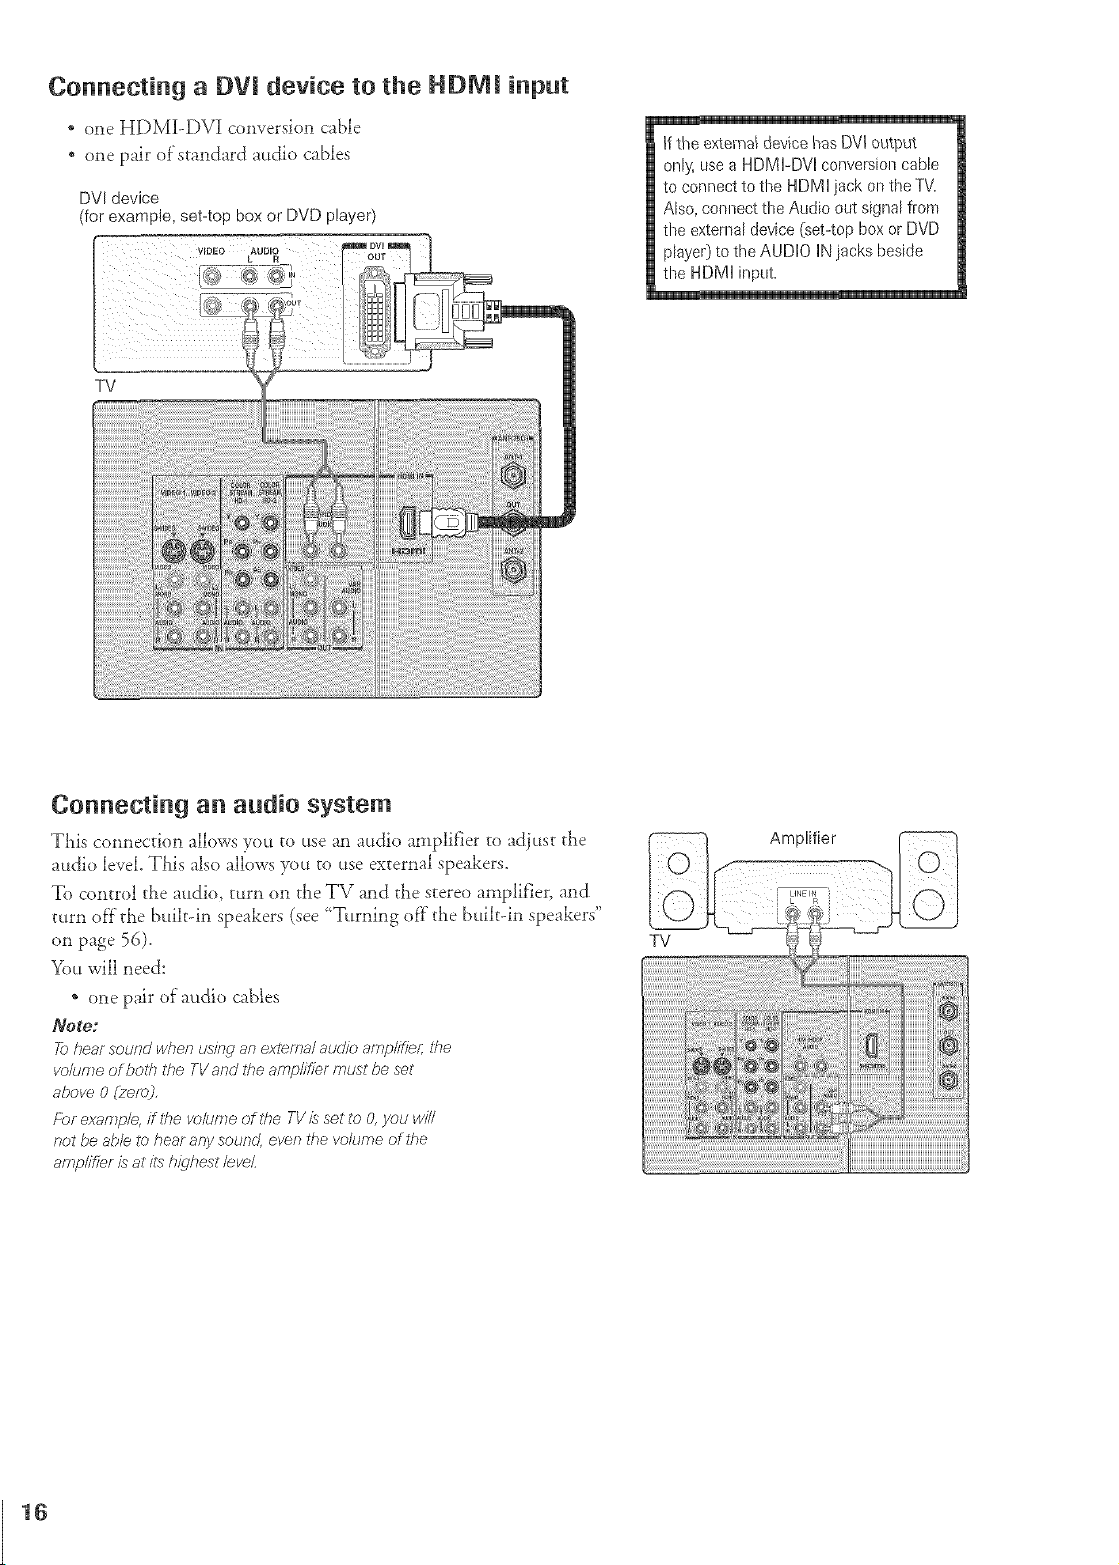
Connecting a DV! device to the HDM! input
* one HDM_-D\q conversion cable
one pair of"standard audio cables
DVIdevice
(for example, set4op box or DVD player)
If the external devicehas DVi output
only, use a HDMbDVHconversiort cable
to connect to the HDMI jack on the TV.
Also, connect the Audio out signal front
the external device (set-top box or DVD
player)to the AUDIO IN jacks beside
the HDMI input.
Connecting an audio system
'This connection allows you to use an audio amplifier to adiust die
audio level. This also allows you to use external speakers.
To control the audio, turn on the TV and die s_ereo amplifier, and
turn off the builtdn speakers (see _T.rning of}"the built-in speakers"
on page 56).
You will need:
* one pair of audio cables
Note:
_ heal sound wben usingan extema/auc/ioamp/ifief; ff_e
vo/umeof botb tbe TVand tbe amp/ifier must be set
above 0 (ze/W.
/:br e.<am/o/e,ff ff_evo/umeof tbe TVis set to O,you will
_?otbe able to hear any sound, ever; the volume of 27e
amplifier is at its h_qbest/eveL
TV
Amplifier
16
Usin 9 the remote control
Preparing the remote ¢ontro_ for use
%_r TV remote control can operate yot_r TV a_d most cable
converter boxes, satellite receivers, VCRs, DVD players, and HTIBs
(home theater in a box), even if"they are different brax_ds.
If you have a Toshiba device:
_)ur T\ 7 remote con{rol is preprogrammed to operate most Toshiba
devices. See page 20.
|f you have a _on-Tosh_ba device or a Toshiba device
that the remote control is not preprogmmmed to
operate:
You can program tt_e TV remote co_*trol so it will operate _}_eot}_er
device. See pages 18-20.
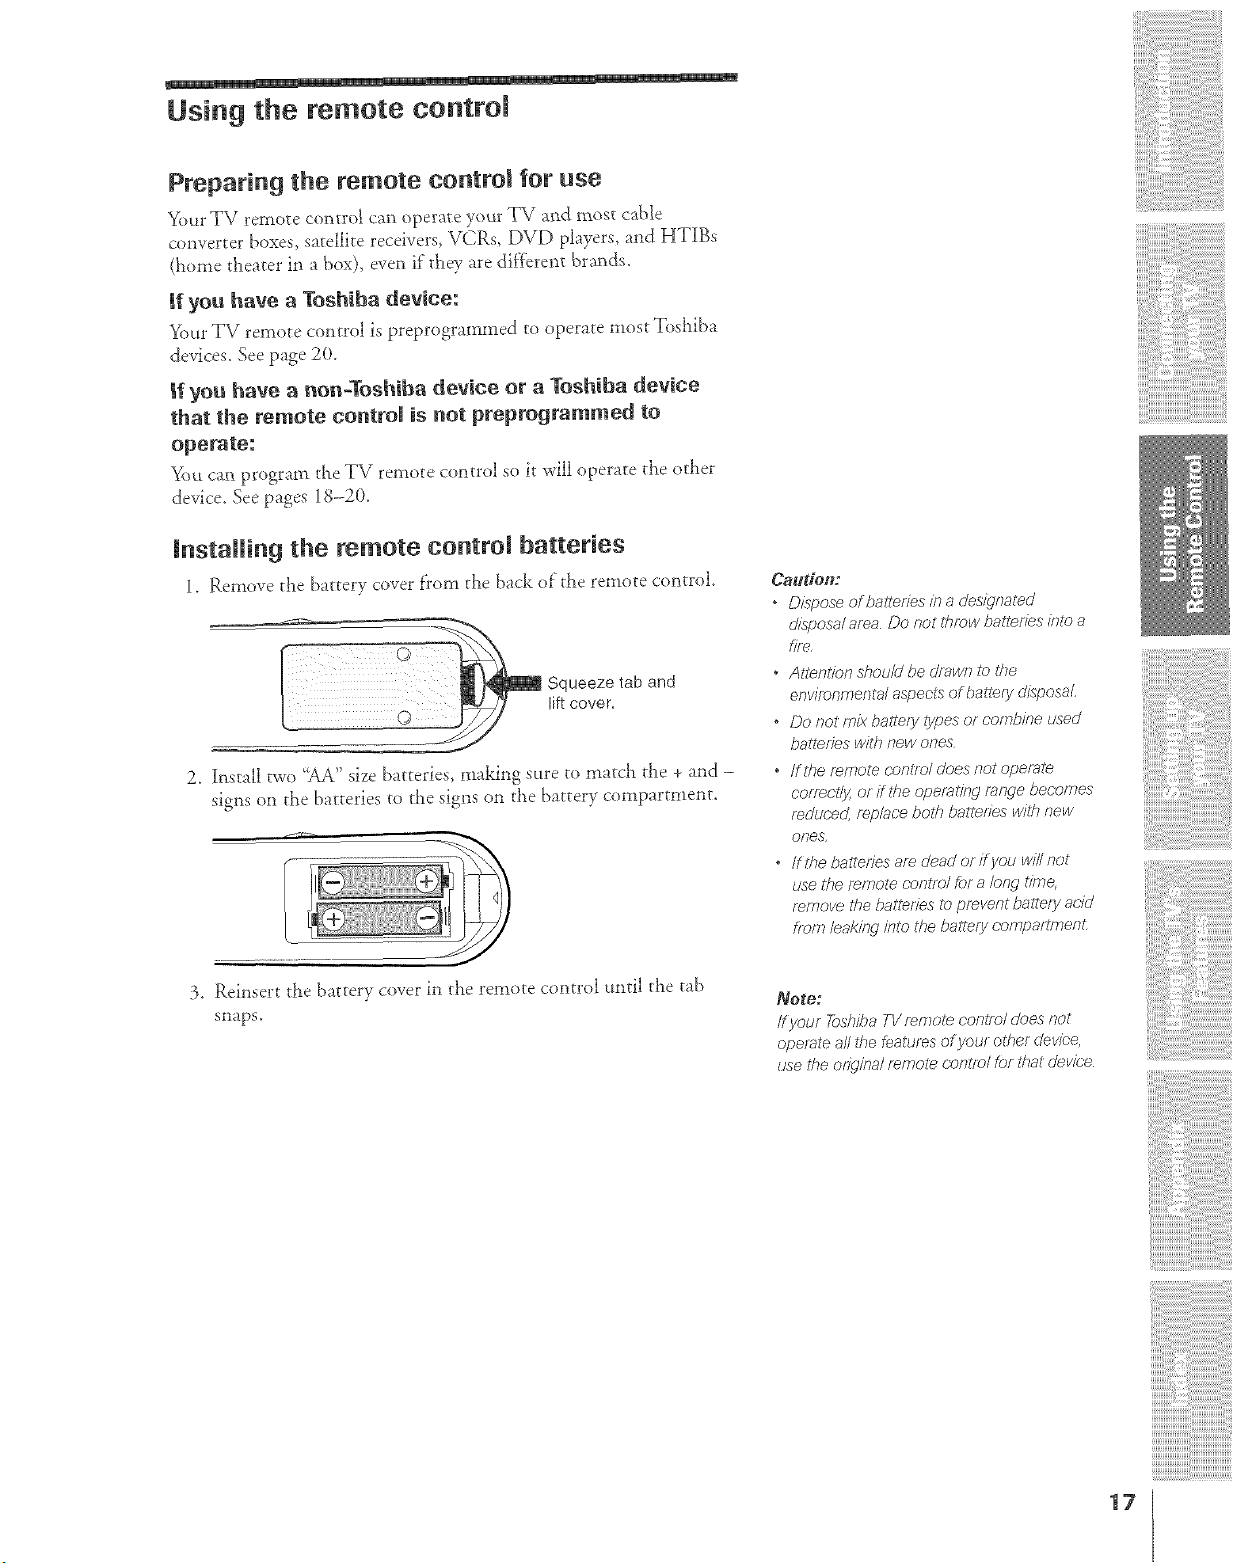
Installing the remote control batteries
1. Remove _}_ebat{'ery cover flx_m t}_eback of"_e re_no_e c(m_rol.
Squeeze tab and
lift cover.
2. Install two "AA"size batteries, making sure to match the + and -
signs on the batteries to tl_e signs on the battery compartment.
3. Rei**sert d_e battery cover i_, c}lere_,ote c(m{rol tmdl {'}lecab
snaps.
Caudoi_:
o DLsposeofballefiesinadesignated
(/isposa/ af_÷a Do not thr_;,wbattefi(÷s #7_ a
fJf_n,
o Allenlion shouM be drawn to ffTe
enw;_r_nmer)tafaspects of battery chsposaL
" Do not mz_<balte/y/yfges ef r.'mr?b//?eused
batteries w#k new ones
. ffthe f_f,_}ote c-c,ngTo/floesnot operate
COfTeCl_" g Of ff ff_e opemlinq range becomes
mcJtJc;'erJ,,fP,D/aC'e belch ball,ties witl_ new
()/;'_S
off _he bailedes are dead of ff you will not
use the/emote c,ontT©/ for a /eRr tW_e,
;:e<r_o_et/_e b;fllelJes to pre.lLent bgJIlefy 8(;'id
_,omleaki/Wint_;thebaltery cc_nTpartmenL
Note:
If your 7_)shiba TV Femo/e con/m/c/oes not
operate dl ghe features of your other clevk_e,
use the odg/na/ mmol_ c;onlm/ for that devk;'e
17
Programming the remote control to operate a
cable converter box, sateRRe receiver, VCR,
DVD player, or HTIB (home theater in a bo×)
Your Toshiba TV remote control is preprogmmmed to operate most
Toshiba devices. To program your T\/" remote control to operate a
non-Tosi_iba device (or a Toshiba device that it is not preprogrammed
to operate), f'ollow the steps below. For derails on using the remote
control to operate the device, see page 2(L
1. In the remote control code table (below and on the next page),
find the code fbr your device. If more titan one code is listed, try
each one separately until you find one that works.
2. Set the Device Swkch to the Fype of device you are programming
the remote control to operate -- CBL!SAT (fbr a cable converter
box or satellite receiver), VCR (f'or a VCR or TV/VCR combo),
or DVD (for a DVD player or HTIB [home theater in a box]).
3. Wi_ile holding down RECALL, press tl_e Channel Number
buttons to enter the 3-digit code f'or your device.
4. To test the code, turn on the device, point ti_e remote control at
it, and press POWER, See notes at right,
* If the correct code was entered, the device will turn of}:
* If the device does not respond, repeat steps 1 - 4 using
anoti_er code.
* If the device does not respond to another code you will need
to use ti_e remote control that came with the device.
5. Remember to set the Device Switch back to TV to c<mtrol the TV.
6. For f'ltture ref'erence, write down the code(s) you used:
DEVICE CODE DEVICE CODE
Remote controm codes
hi some cases you may not be able to operate your device with tl_eTV
remote control. _'_)urother device may use a code that is not
recognized by the TV remote control. If this happens, use the device's
remote control.
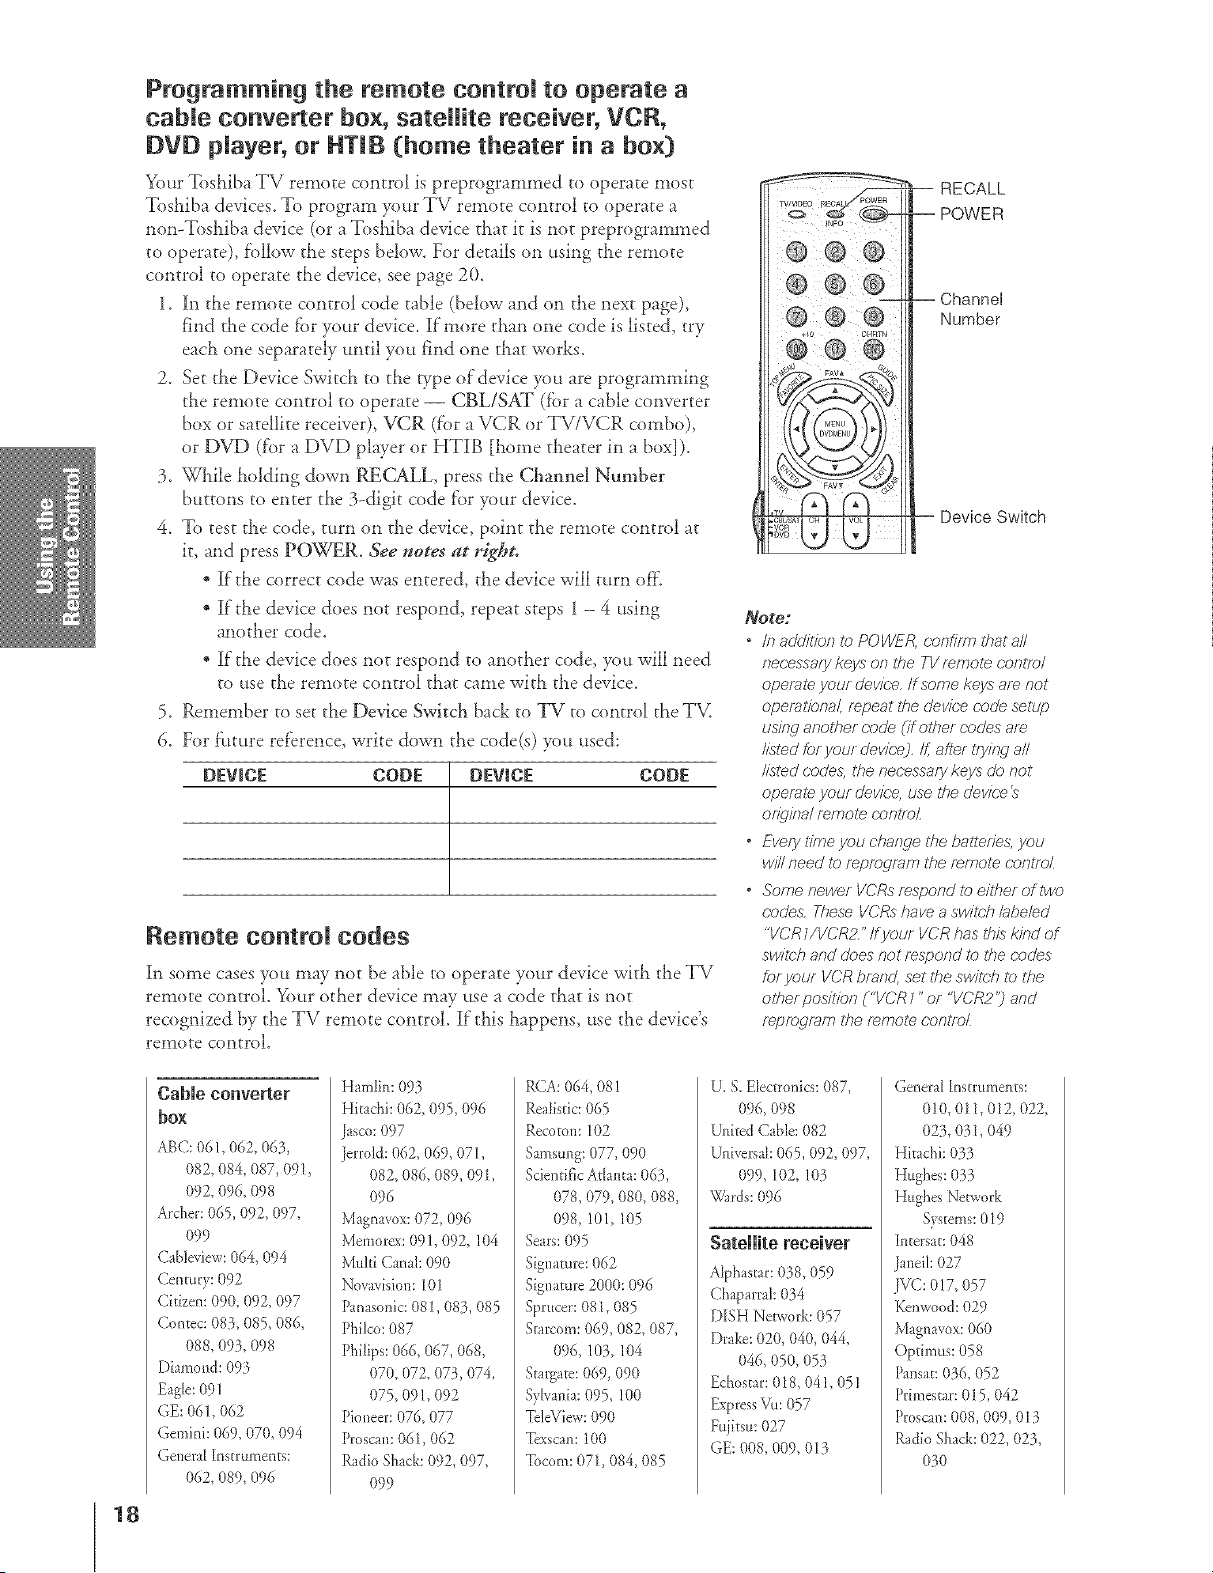
/ +1o CHRTN
RECALL
POWER
-- Channel
Number
Device Switch
_o_go:
" /I7 addilTon to POI/VER, oonfJf771 that all
necessary keys on the TV mmot_ c'ontrol
ope/_,te your devic,,e,If some keys are not
opei_,lfona/, r_peat the device code setup
uskwanother code (if other (-odes are
listedforyourdevice),If,aftertryit W aN
listed c'ode& tf_enecessarykeys donot
opemie your device,usett_edevice
orTgina/ mmole conl_oL
• Every S7rneyoucharwe U_ebaiterTe& you
willneedtor_progmi'T7the r_rnol_(;ontr_)L
• SomenewerVCRsrespond to eiti_erof Dwo
codesTheseVCRshaveaswiS_21labeled
"VCR1/VCR2"If your VCRhasthiskindof
swis>hand doesnot respondto the trades
for your VCR brand, set ti_e switch t2) the
oS#erposiSfon ("VCR 7 "or "VCR2"j and
r_prFJ_f[)n7 the r_rnote c0n_177_
Cable converter
bo×
ABC: 061,062, 063,
082, 084, 087, 091,
092, 096, 098
Archer:065,092, 097,
099
Cab/eview:064, 094
Century: 092
Citizem 090, 092, 097
Contec: 083, 085, 086,
088, 093, 098
Diamond: 093
Eagle:09/
GE: 061,062
Gemini: 069, 070, 094
General {ns_ruments:
062, 089, 096
Hamlin: 093
Hi_chi: 062, 095,096
]asco:097
]errold: 062, 069, 071,
082, 086, 089,091,
096
Magnavo×:072, 096
Memorex:091,092,/04
Mtdti Canal: 090
Novavision:10I
Panasonic:081,083, 085
Phi/co:087
Phitips:066, 067, 068,
070, 072, 073,074,
O75, 091,092
Pio**eer:076, 077
Proscan:061,062
RadioShack:092, 097,
099
R(TA:064, 08!
Realistic:065
Recoton: 102
Samsung:077, 090
Scientifickt{anta: 063,
078,079, 080, 088,
098, 101,105
Sears:095
Signature: 062
Signature 2000:096
Sprucer:081,085
Starcom: 069, 082, 087,
096, 103,/04
Stargate:069, 090
SyNania:095, 100
TdeView: 090
Texscan: 100
Tocom: 071,084, 085
U. S. Electronics:087,
096, 098
United Cable: 082
Universah065,092, 097,
099, 102, 103
k_?{lrds:096
Satellite receiver
Alphascar:018,059
Ch _parra/:034
DISH Nevwork:057
[)rake: 020, 040, 044,
046, 05O,053
Echos_ar:018, 04/, 05/
ExpressVu: 057
Fujitsu:027
GE: 008, 009, 013
Genera[ [nsmtme_*ts:
010, 011,012, 022,
02$, 031,049
Hitachi: 03_
Hughes: 033
Httghes Network
Systems:019
In_ersa_:048
Janei/: 027
.IV(;:017, 057
Kenwood:029
Magnavox:060
Optimus: 058
Pansa_:036, 052
Primes_ar:015,042
Proscan:008,009, 013
RadioShack: 022, 023,
0t0
18
Remote control
SateRRe receiver
(cont.)
RCA: 008,009, 013, 0/6
Realistic:030
Samstmg:059
Sony:014, 055
Star Choice: 057
StarTrak: 925,026, 037,
054
STS:024
%shiba: 000, 001,002,
003, 004, 005,006,
007, 020, 03 !, 056
Uniden: 021,028,030,
032, 035,039, 043,
045,047,058
Zenith: 027
TWVCR Combo
Action:078
GE: 059, 062
Go/dstar: 065
Panasonk: 065
Precision:078
Quasar: 065
Realistic:079
Sony:074
Toshiba:057
Zenith: 065
BVD/VCR Combo
Go Video:
I_)VD;087,VCP.=081
]VC:
DVDd)88,VCP.=082
RCA:
f)gf).-089, VCR=083
Samstmg:
f)Vf)A)90,VCR=084
San}<x
DVf)A)91,VCR=085
Zenkh:
DVD_092,VCR=086
DVD player
A:wa:006, (/15
Apex:016, 0/7
BOSE: 097
Broksonic:0!8
Clarion: 0/9
Classic:020
Daewv_o:021
Denon: 022, 023,024,
025
Emerson: 026, 027
Fisher:028
Funak 027
GE: 001,029,030
Go Video: 087
GPX:031
codes (cont.}
Hkac}*i:005,032, 033,
034, O35
]VC: 003,007,036,
042, 088
Ke**wood:037
Konka: 008,009
Memorex:039
Mint&: 040
NAD: 026
Nakamid'& 041
Norcent: 04B
Ot]kvo: 044
Oritron: 058
Pmlason_c:010, 045,
046, 047,048,049,
O5O
Philips:004, 05 I
Pioneer:052, 053, 054,
055
Proscan:001,056
()_vestar:057, 058
RCA:001,002, 059, 089
Sampo:060
Samsung:061,062, 086,
O9O
Sansui: 073
Sanyn:063, 09t
Sharp: 064, 067
Sherwond:074
Sony: 011, 0!2, 065,
066, 068,069, 070
Sylvania:027
Teat: 071
Technics:072
Tcchwood:075
Toshiba:000, 013, 076,
077, 078
Yamaha:079, 080, 081
Zenkh: 014, 082, 092
_ortable DVD player
kiwa: 09_
kudiovox: 094, 095
Panasonic:024, 096, 099
RCA: 098
VCR
Admirat: 049
Aiko:0/9
Aiwa:018
Akai: OOa*,004, 037,
038, 039, 058,069
Audinvox:010
_ell& Howell:007, 068
Brokswlic:008, 0/7
Ca/ix:0/0
Carver: 026
CCE: 019
Citizen: 009, 010, Ol I,
012, 013_Ol< 015,
0/9, 057, 07_
Co]oWme: 005
Craig: 009, 010, 0!6,
06 I, 065,079
Curtis Marhes:001,005,
009, 012, 014, 040,
048, 053, 056, 057
Dacwno: 0! 1, 0!3,015,
017, 0/8, 0/9,057,
078
l)aytrnw 078
Denon: 063
)imensia: 00!, 048
"2/ectrohome:0/0, 020,
065
Emerson:003, 008,010,
011,017, 018,020,
028, 039, 054, 057,
062, 065, 068,072
Fisher:007,016, 021,
022, 023, 057, 064,
068, 070, 071,079
Fnjk 004, 04/
Fonak 0I 8, (/73
Garrard:018
GE: 001,002, 009, 040,
042, 048, 056
Go Video: 056, (/59,
061,081
Goldstar: 005, 010, 014,
054, 056, 065,067
Gradiento:018, 065
Harman Kardon: 005
Hkachi: 024, 025,035,
0_7, 042, 063,070,
080
BL:076
C Petm<v:005, 006,
007, 008, 009,010,
023, 024, 025,026,
035, 056, 061,063,
065
Jonson:024, 025,037,
050
JVC: 005, 006, 007,
014, 037, 043,050,
062, 063, 068,082
Kenwood:005,006,
007, 012, 014, 0_7,
043, 050, 053,068,
071
Kodak:010
LG: 0/0
Logik:06 /
LXI: 010
k4agllasnnic:06l, 065,
078
034,044,057,061,
072
Maran_:005,006,007,
012.014,026_053_
067
Memorez<007,009,
010, 016, 018, 034,
049,063,065,066,
O68,075, O79
MGA: 020,028,039
MGN: 056
Minnka: 024, 025,035,
O63
Mitsubishi: 02(/, 024,
025,028,039, 043,
065
Mongomery Ward: 049
Motorola: 049
MTC: 009, 046, 061
Mu_dtech:009, 012, 0 /8
NEC: 005,006, 007,
012, 014, 037,943,
053,054, 067, 070
Nikko: 010
Nobtex: 009
Optimus: 010, 049, 065
Optonica: 031
Orion: 054, 057,062,
065,068,072
Panasonic:036, 045,
046, 057, 06/, 072,
079
Pentax: 012, 024, 025,
035,042, 053, 063
Penrex Research:0/ 4
Philco: 026, 027,063
Philips:026, 031,044,
057
Pioneer: 006, 024, 043,
055
Pordand: 012, 013, 015
Proscan:001,002, 048
Proton: 061
Quasar: 045
Radio SMck:010, 031,
065
Radio Shack!Realistic:
007, 009, 010, 0!6,
018,020, 02/, 022
0_1,049
Radix:010
RCA: 001,002, 003,
009, 024, 025, 029,
035,040, 042, 045,
048,055,056, 063,
071, 08_
Realistic:007, 009, 010,
011,016, 018, 020,
021,022, 031,049,
051,056, 060, 065,
075,079
Ricnh:047
Rtmco:034
Samstmg:009, 011,038,
056, 073,084
Sa**suk006, 037, 043,
061
Sanyo:007,009,016,
054,064,068,07/,
075.079,085
Scott:008,011,017,
028.030,057,065,
072
Seats:007,010,016,
02/,022,023,024,
025,035,053,057.
063,064,065,068,
071,075,079
Sharp:013,020,031,
049,051,060,066
Shintom:O04,025,032,
061
Shlger:047, 061
04/, 052, 058,070,
074, 076, 077,080
STS:0_5
Svbania: 018,026, 027,
028, 044, 072
S),mphnnic:0 I8,050,
051,053,073,079
%ndy: 0(}7
Tashikn:010
Tatting:037
%ac: 018, 029, 037
Te&*Jcs:036
%knika: 010, 018, 065
%sh]ba: 000, 0/1, 02t,
023, 024, 028,030,
039, 057,074, 078,
079
Totevision:009, 010,
O65
Unkec: 073
[)nkech: 009
VectorResearch:005,
006.011,012, 053
Video Concepts:005,
006, 011,012, 0}9,
053
_g{_rds:009, 010, 01 I,
016, 018,020, 024,
025, 031,035,049,
051,056, 057, 060,
065, 066, 079
White Westinghouse:
073
XR-1000:018
Yamaha:005, 006, 007,
014, 037, 053
Zenkh: 004, 032, 034,
04/, 047, 069, 086
HTIB
Lasonic:0_;3
Panasonic:084
Venturer:085
19
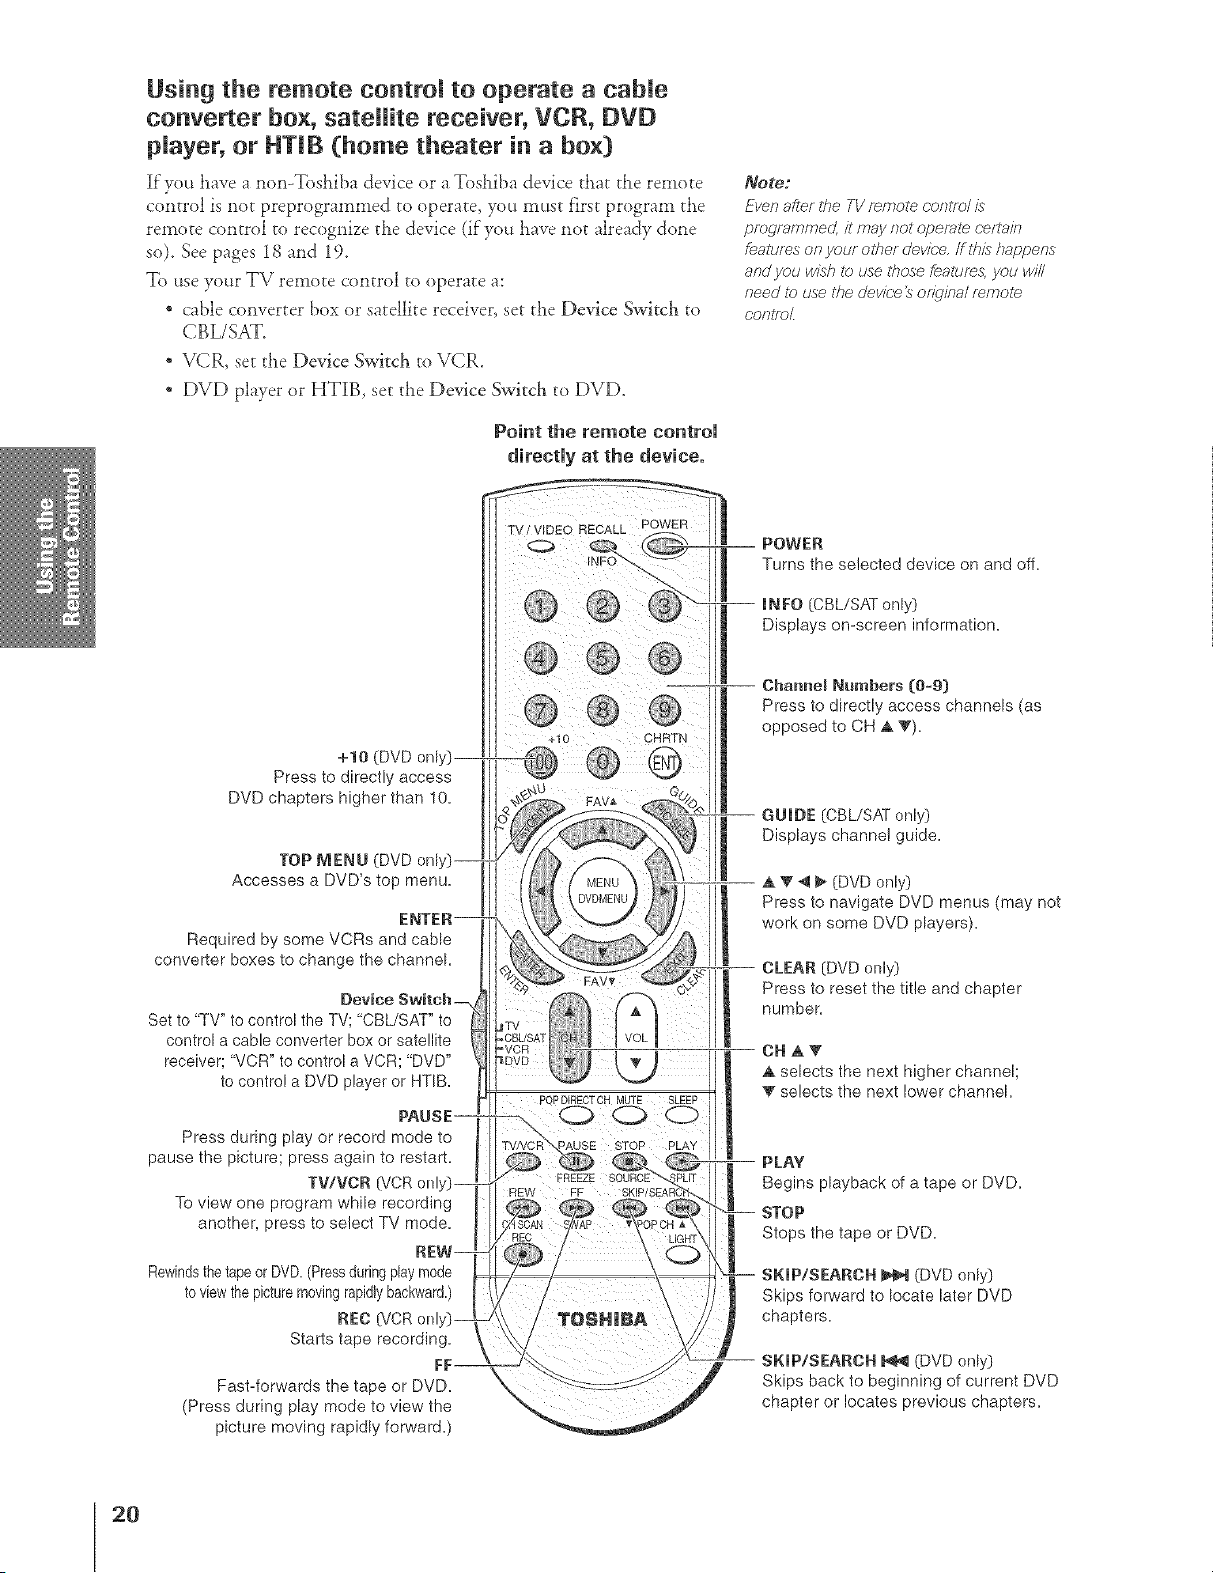
Using the remote controm to operate a cabme
converter box, sateNte receiver, VCR, DVD
player, or HTIB (home theater in a box[}
Ifyuu have a nun-Tusiaiba device or a Tushiba device that the remute
control is not preprogrammed to uperate, you must first program the
remote cuntrul to recognize the device (if you have not already done
so). See pages 18 and 19.
Te use your TV remote control to uperate a:
* cable converter box or satellite receiver, set the Device Switch to
CBL/SAT.
* VCR, set the Device Switch to VCR.
* DVD player or HTIB, set the Device Switch to DVD.
Point the remote control
directly at the device.
Note2
Ever?after the TV r_mote (;onlrel is
programmer!, it may not operate c;eltaff?
fealures on your ot7?er devk;e, ff ibis happens
ar?dyou wish to use U?ose feature& you wi/I
need l_) use tf?e devicr÷ _ oirD,ina/ mmol_
car?ire[
+10 (DVD onlsij--
Press to directly access
DVD chapters higher than 10,
TOP MENU (DVD onl
Accesses a DVD's top menu.
Required by some VCRs and cane
converter boxes to change the channel
Device Switch
Set to '%V" to control the TV; "CBL/SAT" to
control a cable converter box or sate!lite
receiver; "VCR" to control a VCR; "DVD"
to control a DVD player or HTIB,
Press during play or record mode to
pause the picture; press again to restart,
TV/VCR {'\/CR onl
To view one program while recording
another, press to select TV mode,
Rewindsthe tape or DVD. (Pressduring play mode
to view the picture moving rapidlybackwar&)
REC (VCR onl
Starts tape recording,
Fm
Fast4orwards the tape or DVD,
(Press during play mode to view the
picture moving rapidly forward,)
POWER
Turns the selected device on and off,
INFO (CBL/SAT only)
Displays on=screen information.
Charme_ Numbers (0=9}
Press to directly access channels (as
opposed to CH ,A T),
E
l
GUIDE (CBL/SAT only)
Displays channel guide.
,A V _ _ (DVD only)
Press to navigate DVD menus (may not
work on some DVD players).
CLEAR (DVD only)
Press to reset the title and chapter
number.
CN _,_F
A selects the next higher channel;
T selects the next lower channel
PLAY
Begins playback of a tape or DVD,
STOP
Stops the tape or DVD,
SKIP/SEARCH _ (DVD onl_i}
Skips forward to locate later DVD
chapters.
SKIP/SEARCH _ (DVD only}
Skips back to beginning of current DVD
chapter or locates previous chapters.
2O
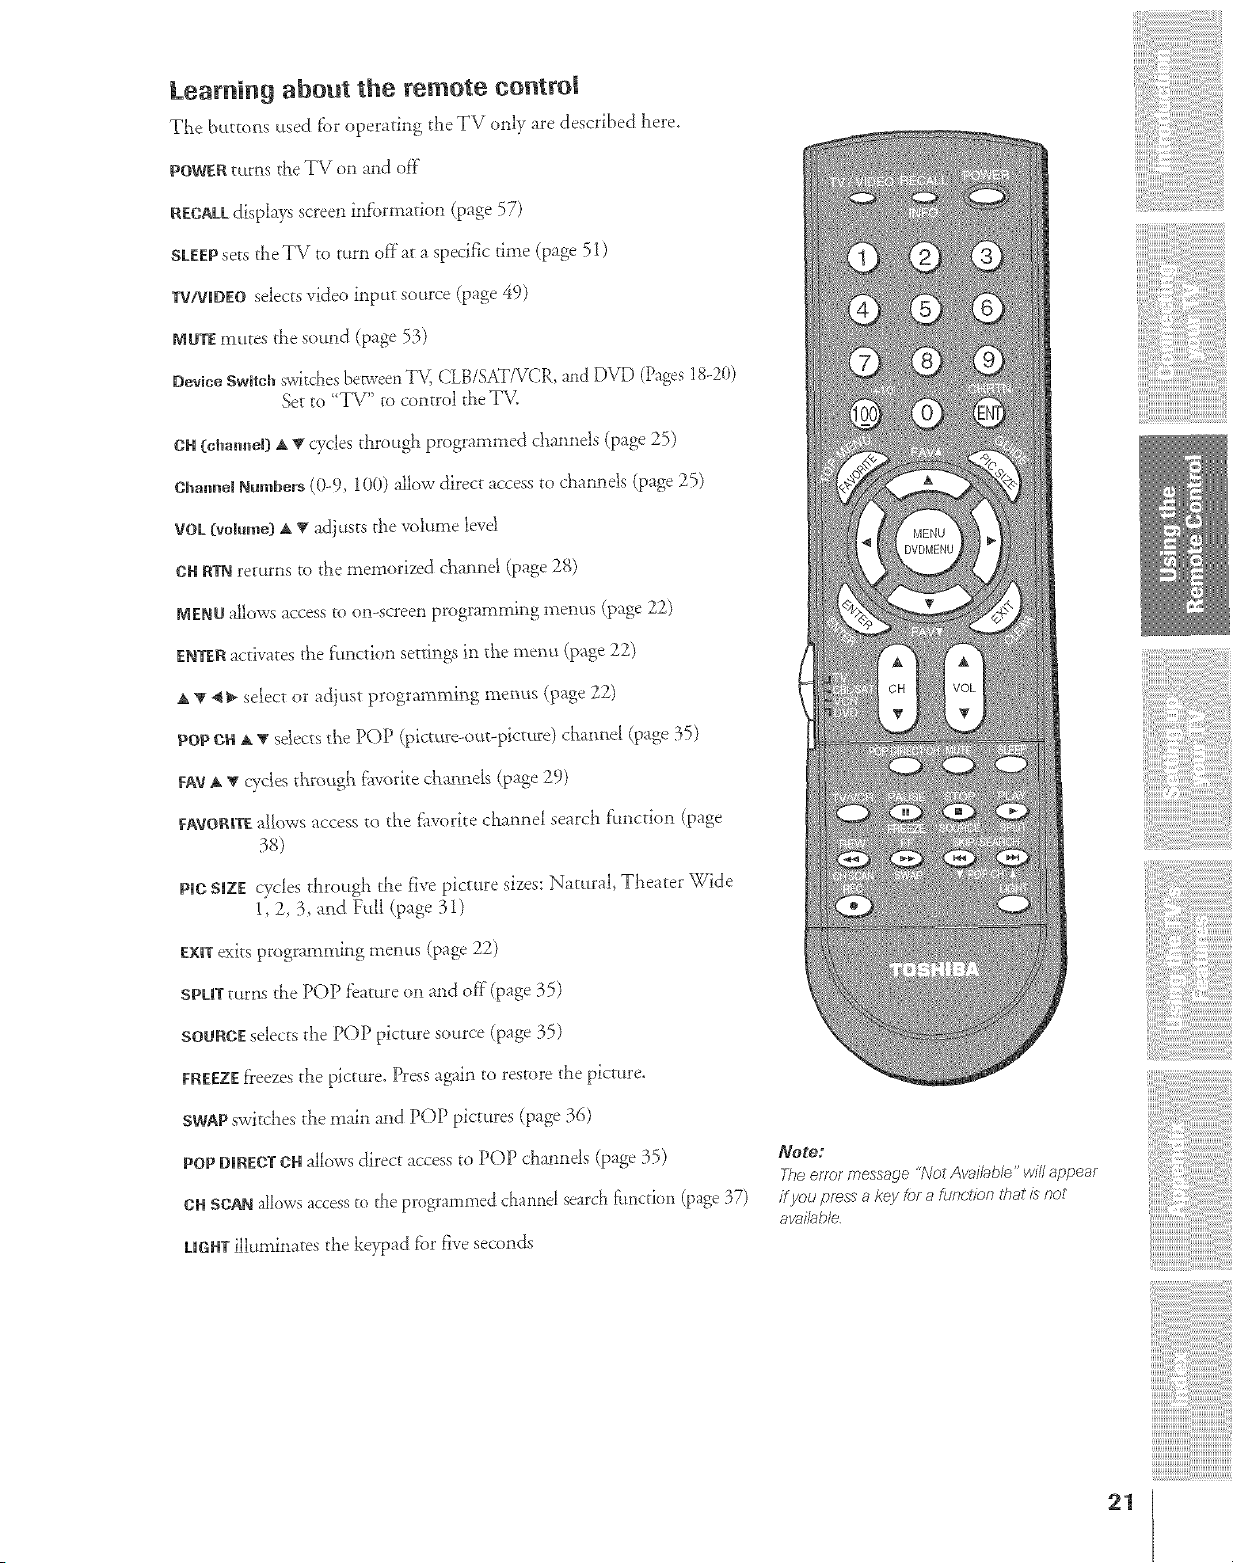
Learning about the remote control
The buttom; _sed fbr operating tile TV only are described here.
POWERtuttis the TV on and off
RECAkLdisplays screen iMbrmation (page 57)
STEEPsets the TV to turn off at a specific time (page 51)
TV/VmDEOselects video input source (page 49)
MUTEmutes the sound (page 53)
DeviceSwitchswk&es bep_vee_T\_ CLB/SMTVCR,a_d DVD (Pages18-2(t)
Set to 'T\/" to control tile T\L
OH(chmmeBA tr cycles through programmed channels (page 25)
OhalmelNumbers (0-9, 100) allow direct access to channels (page 25)
VOL{volume)A T adjusts the volume levd
OHRTNreturns to the memorized channel (page 28)
MENUallows access to on-screen programming rtlenus (page 22)
ENTERactivates the ft,nction settings in the menu (page 22)
A T "_} select or ad}ust programming menus (page 22)
pop OHA _gsdects the POP (pic_ure-out-pict_re) cha_me! (page 35)
FAYJ, V cycles through f:avoritechan_ek (page 29)
_:AVOR_TEa_lows access to the flworite channel search f:_tnction (page
38)
ProdSmZEcycles through the five picture sizes: Natural, Theater Wide
1, 2, 3, and Full (page 31)
E×_Texits programming menus (page 22)
SPL|T tttrils the POP feature on and off (page 35)
SOURCEselects tile POP picture source (page 35)
FREEZEf}eezes the picture. Press a_i_ to restore the picture.
SWAPswitches the main and POP pictures (page 36)
POP DmREDTOHallows direct access to POP channds (page 35)
OHSCANallows accessto the programmed cha*md search time[ion (page 37)
kmGHTilluminates the keypad fbr five seconds
Note:
The error messaqe "Not Available" wfl/ 8ppear
/f you press a key for a ftjr_r't/br7that is not
aw)i/able.
21
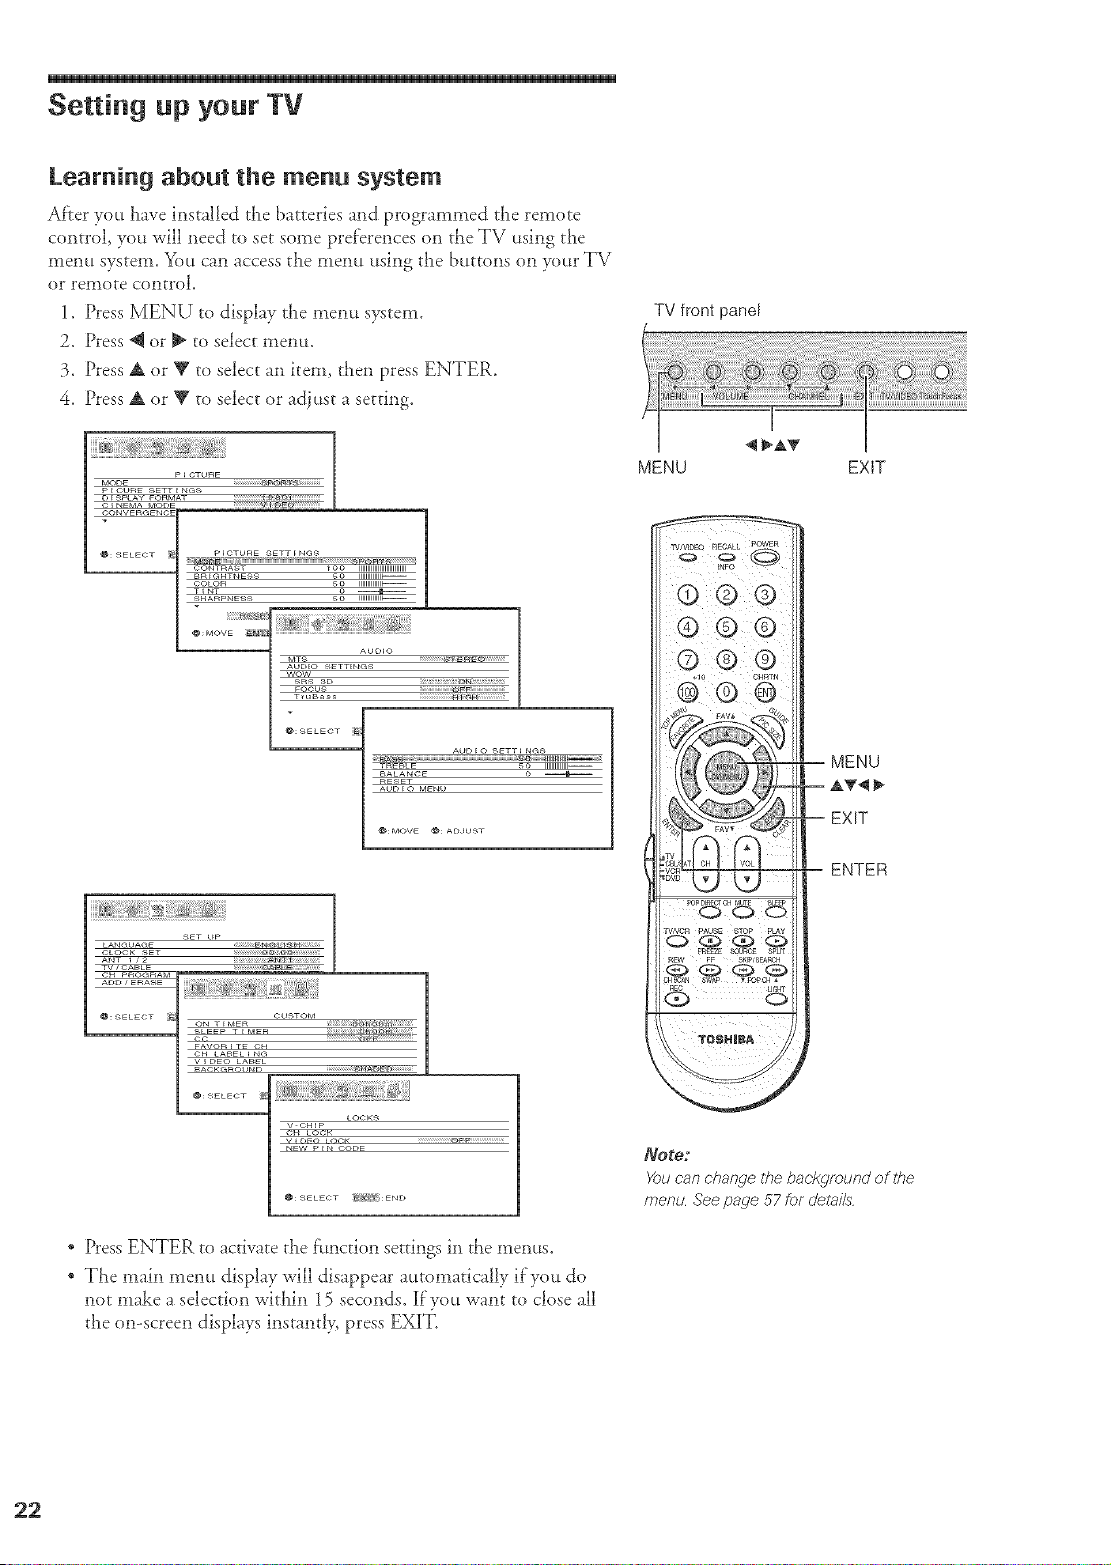
Setting up your TV
Learning about the menu system
After you have installed the batte*ies and programmed the remote
control, you will need to set some preferences on the TV using the
menu system. You can access the mem_ using the buttons on your TV
or remote control.
1. Press MENU to display the memt system.
2. Press @ or _ to select ment.t.
3. Press A or _' to select an item, then press ENTER.
4. Press A or _' to select or adjust a setting.
P _ CTURE
MODE _C_
P E CURE SETT ENGS
TV front panel
MENU EXIT
@: SELECT i_
p ECTUr4E SETT ENGS
CONTr_AST _ OO IIIIIIIIIIIIIIIIIIIIIIIIIIII
Br_ EC_HTNESS _O IIIIIIIIIIIII_----
COLOr_ _ IIIIIIIIIIIII_----
T_NT
SHARPNESS 66 IIIIIIIIIIIIIb-----
r
wow
_R_ 3D
FOC_JS
d e,_ s s
AUD _O S_TT I NG_
_N_N ::::::j ...................................................................................g_Z:::::llllll]ll]_l]_
TREBLE 50 IIIIIIIIIIIIII--
BALANC_ 0 _
_ESET
AUD _O M_NU
LANGOAGE
CLOCK SET
ANT I i 2
TV/CABLE
CH P_OG_AM
ADO _ _RASE
@: SELECT _
SET UP
CUSTOM
F_,VOR I T_ CH
C:H LA_L i NC_
V I _O LABEL
NACg_._)UNB
_; SELECT _
LOOKS
V CH_P
CH LOC_
V r_FO _C_Cg
NEW P _ N CODE
_: _ELECT _iN :END
* Press ENTER to activate the f:,nction settings in t}_emenus.
* The main ment.t display will disappear atttomaticalJy if you do
not make a selection within 15 seconds. ]fyou want to close all
the on-screen displays instantl> press EXIT.
MENU
EXIT
Note:
You can change the background of the
menu See page 07 for c/etai/s
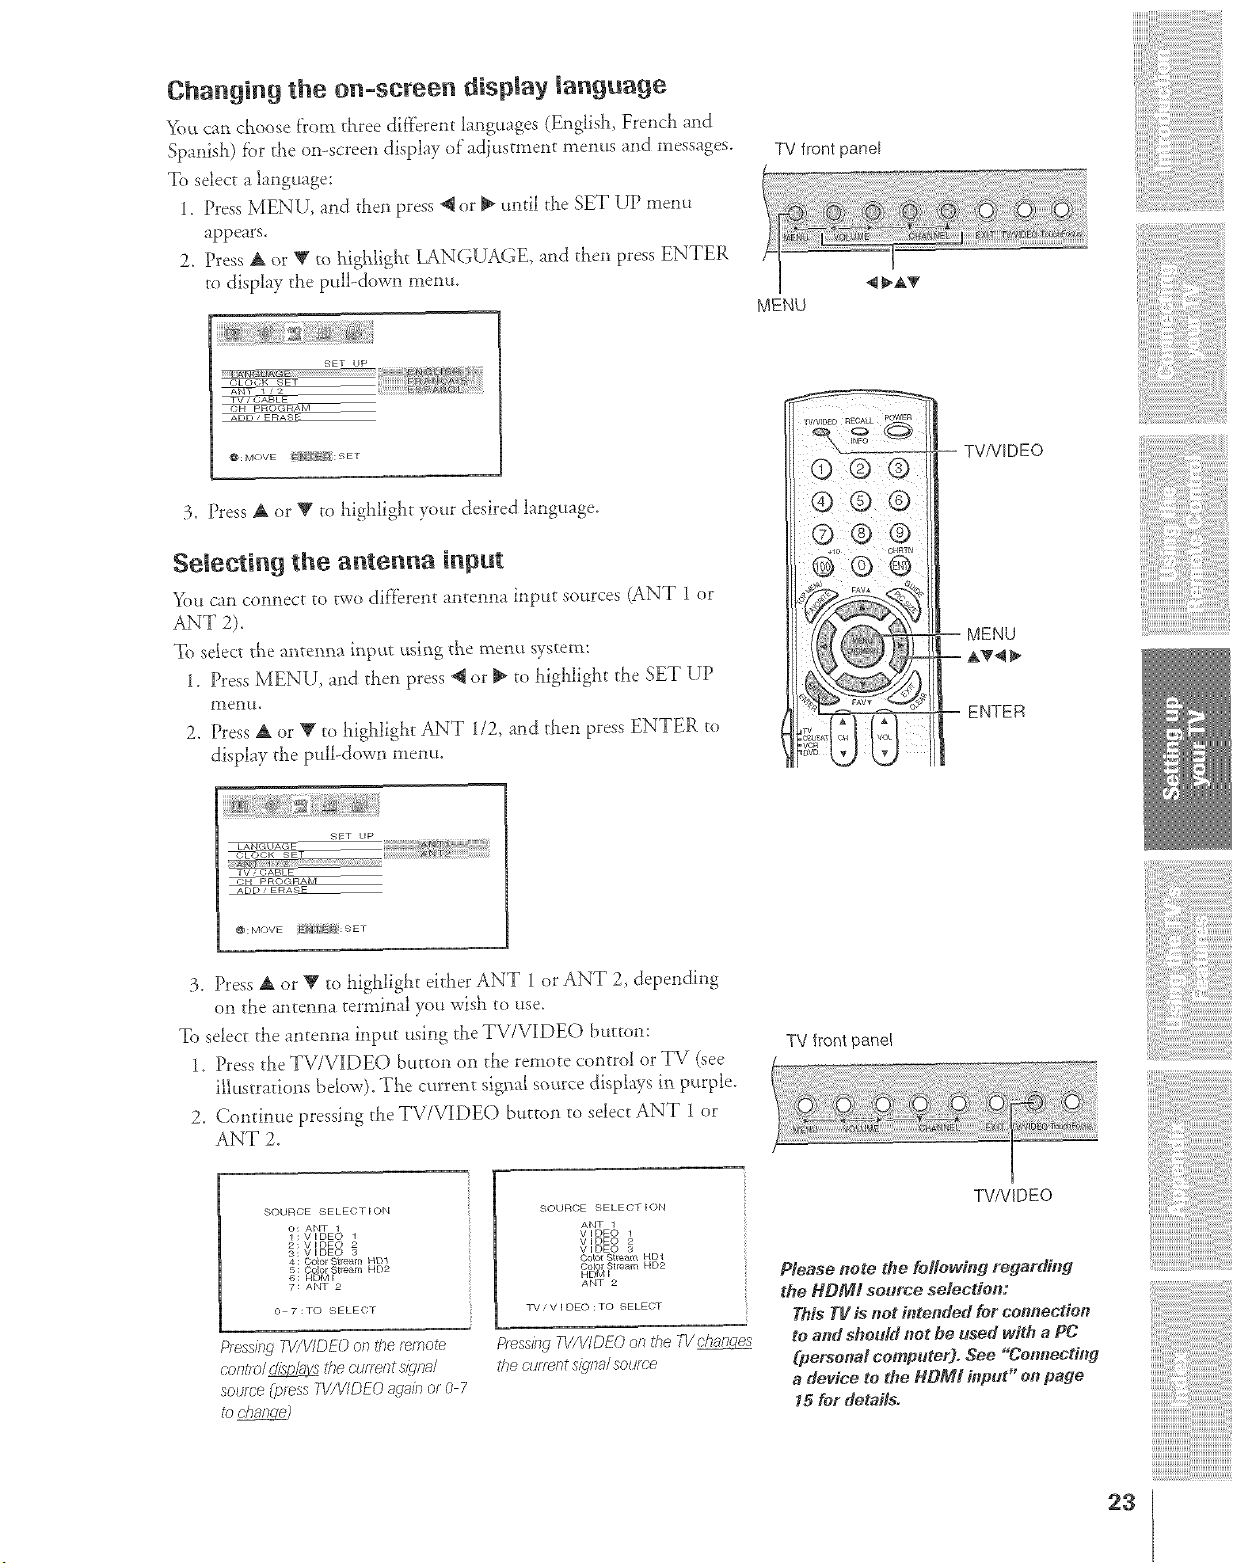
Changing the on-semen display language
You can choose f:rom three different languages (English, French and
Spanish) fi_rthe on-screen display of ad_usmlem menus and messages.
To selec_ a language:
1. Press MENU, and dlen press _ or _ undl d_e SET UP mem_
appears.
2. Press A or _' ro highlight LANGUAGE, and then press ENTER
to display the pull-down menu.
TV front panel
ww,_
MOVE J_f :gET
3. Press A or T to highlight your desired language.
Selecting the antenna input
You can connect to two dif}erent antenna input sources (ANT 1 or
ANT 2).
To select the antenna inpat using the menu system:
1. Press MENU, and then press @ or _ to highlight the SET UP
2. Press A or V to highlight ANT 1/2, and then press ENTER to
display the pulbdow** memo.
© ® ®
-- TV/VIDEO
-- MENU
-- A_
-- ENTER
FIKT up
_LO(dR _ET
_E
3. Press A or _' to highlight either ANT 1 or ANT 2, depending
or_ the anten_a termi_al .w_uwish to use.
To select the antenna input using the TV/VIDEO button:
1. Press the TV/VIDEO button on the remote control or TV (see
illustrations bdow). The cm'rent signal so_ce displays in purple.
2. Continue pressing the TV/VIDEO button to select ANT 1 or
ANT 2.
SOURCE SELECTION
O; ANT 1
1: VIDEO 1
2; V DEC)
4 : COJO_¸ slreari! HD1
5: Co or Stream HD2
6: H_MI
7: ANT 2
0 7:TO SELECT
Pressing T_S/bqDEOon the remote
cont/o/ _ the cu/rent s/gna/
soume Cp_essPv'/V/DE(? _gnin o_ 0 7
to change2
SOURCE SELECTION
ANT 1
V IDE() 1
V IDE() 2
V IDE() 3
CGga_"gl_e_m H_ 1
Color .qt realr_ HD2
HDM I
ANT 2
TVzV I DEO :TO SELEOT
Pr#_ssrhgTV/_YDEOon &e TVch,:moes
thecufl_/_tsiena/source
TV front panel
TVNIDEO
Please _ote the feHet4fi_tg regarding
the HDIVll source selectJe_:
This TV is net i_te_Med for co_ectie_
to arm should/_ot be used with a PC
(personal computer). See "Cot_ecti_lg
a de_ico to the HdMt inptR" oo page
_ for details.
!ii!i!!11111111111111111
23
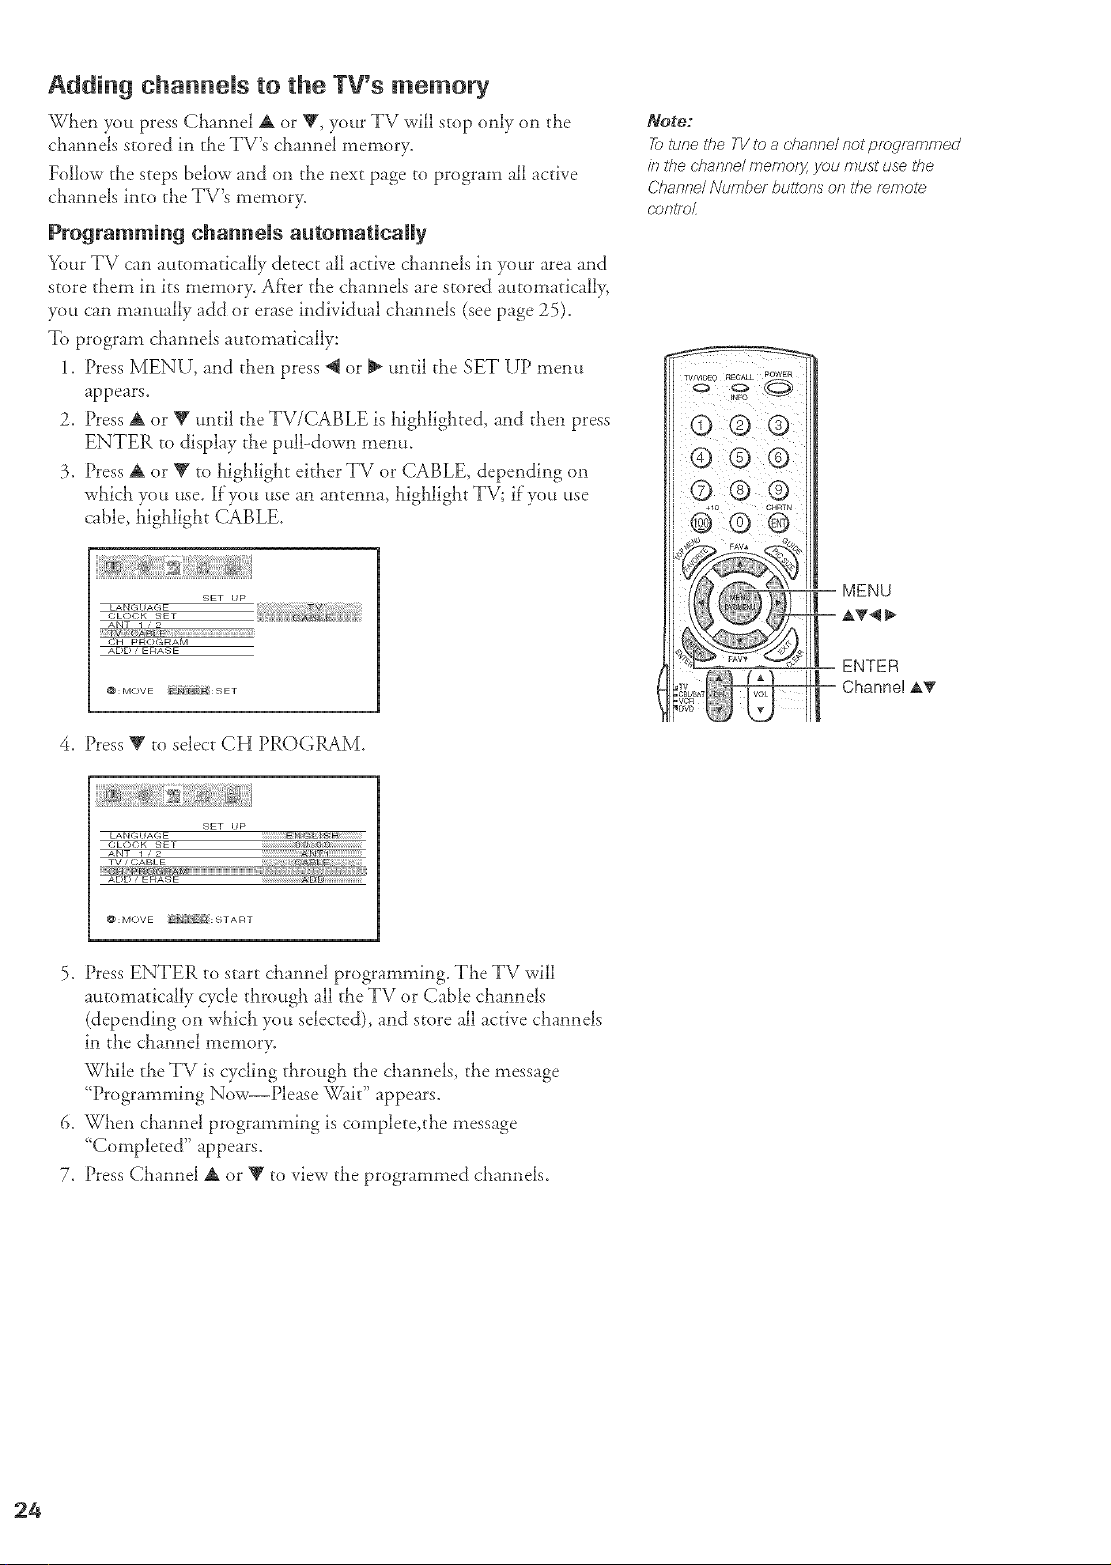
Addin 9 channels to the TV's memory
Wl_en you press Ci_annel A or V, your TV will stop only on the
c!_annels stored in the TV's channel memory.
Follow the steps below and on the next page to program all active
c!_annels into the TV's memor>
Programming channels automatically
Your TV can automatically detect all active channels in your area and
store them in its memor> After the channels are stored automaticall>
you can manually add or erase individual ciaannels (see page 25).
To program channels automatically:
1. Press MENU, and then press @ or _ until the SET UP menu
appears.
2. Press A or Y m_ril the TV/CABLE is highlighted, and then press
ENTER to display the pull-down snenu.
3. Press A or V to highlight either TV or CABLE, depending on
which you use. If you use an antenna, higialight TV; if you use
cable, higiflight (;ABLE.
-_ET UP V
_JH pR_:)GRAM
ADD, ERASE
@ : MOV E _T : 9 E •
Notre:
_ lune the 77/to _, channel nU progl_,mmed
in the channe/ memory, you must use the
Channe/ Numbd buttmTs on the remote
COtTtf_J_
A_
4. Press_to select CHPROGRAM.
SET UP
LA N G I I AG E ENG:gI_$
CLOCK t-;ET U _r_
ANT T • 2 _ _'"'"'"'"'"'"'
TV i (;ABLE _i_ _ _:B_E_ _:__i
i
@:MOVE gliTl_ :START
5. Press ENTER to start claannel programming. The TV will
automatically cycle tiarougia all the TV or Cable channels
(depending on wiaicia you selected), and store all active ciaannels
in the channel memor>
While the TV is cycling througia the channels, the message
"Programming Now--Please _fit" appears.
6. When channel programming is complete,the message
<<Completed" appears.
7. Press Channel _ or _ to view the programmed channels.
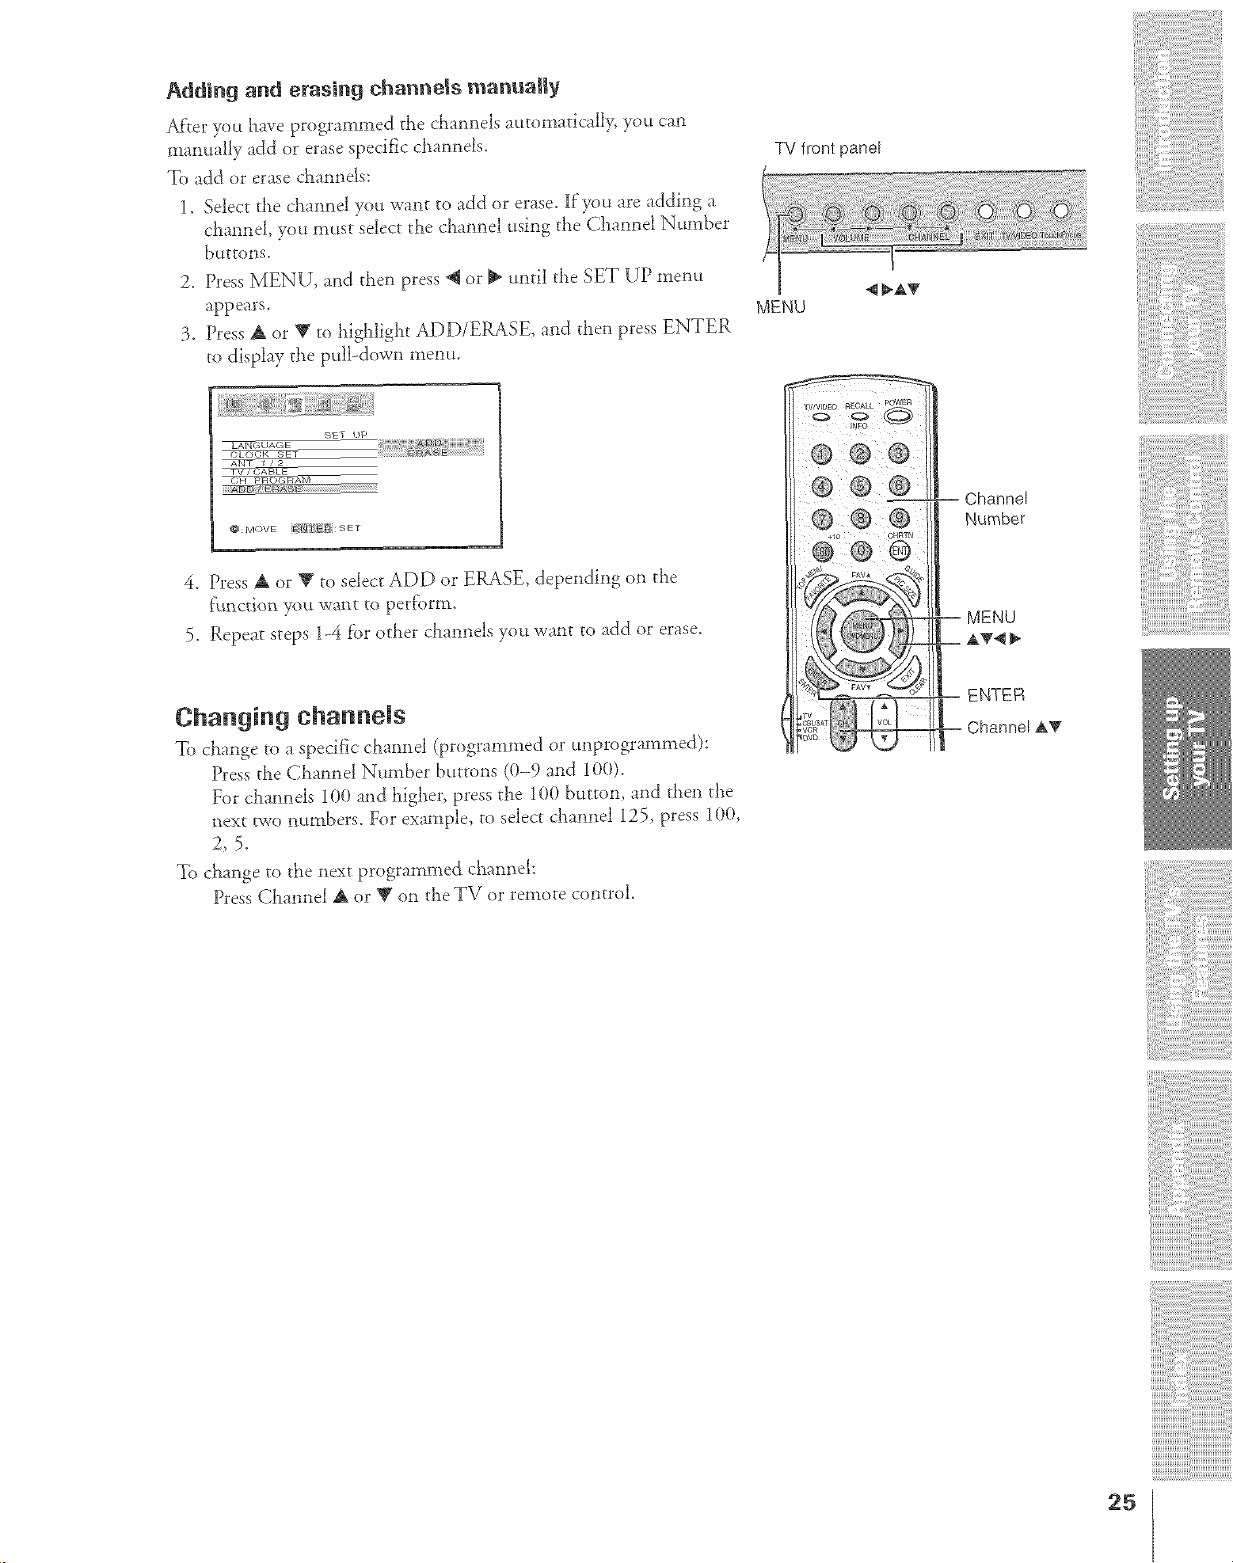
Adding and erasing channels manually
Afrer you have programmed the d_annels a_ttomatically, you can
manually add or erase specific channels.
To add or erase chamlels:
1. Select the chamlel you want to add or erase, lf'you are adding a
cha*mel, you must select tile cham_el using the Cham_el Number
buttons.
2. Press MENU, and then press @ or J_ until the SET U'P menu
appears.
3. Press a_ or V to highlight ADD/ERASE, and then press ENTER
to display the pull-down menu.
TV front panel
5_ET i}p
_,UAGE
TV7_;ABLE
' @:MOVE Js]L" i :SET
4. Press A or V to select ADD or ERASE, depending on tile
6.ruction you want to perf'orm.
5. Repeat steps 1-4 fbr other chamlels you want to add or erase.
Changing ehannems
To clLange to a specific chamlel (programmed or tmprogrammed}:
Press the Chatmel Nnmber bttttons (0-9 and 100).
For cha,mels 100 and higher, pressthe 100 button, and then the
_ext two mtmbers. For example, to select chatmel 125, press 100,
2,5.
To change to the next programmed c!_aimel:
Press Channel A or V on tile TV or remote control.
Channel
Number
MENU
,_'_
ENTER
Channel &T
25
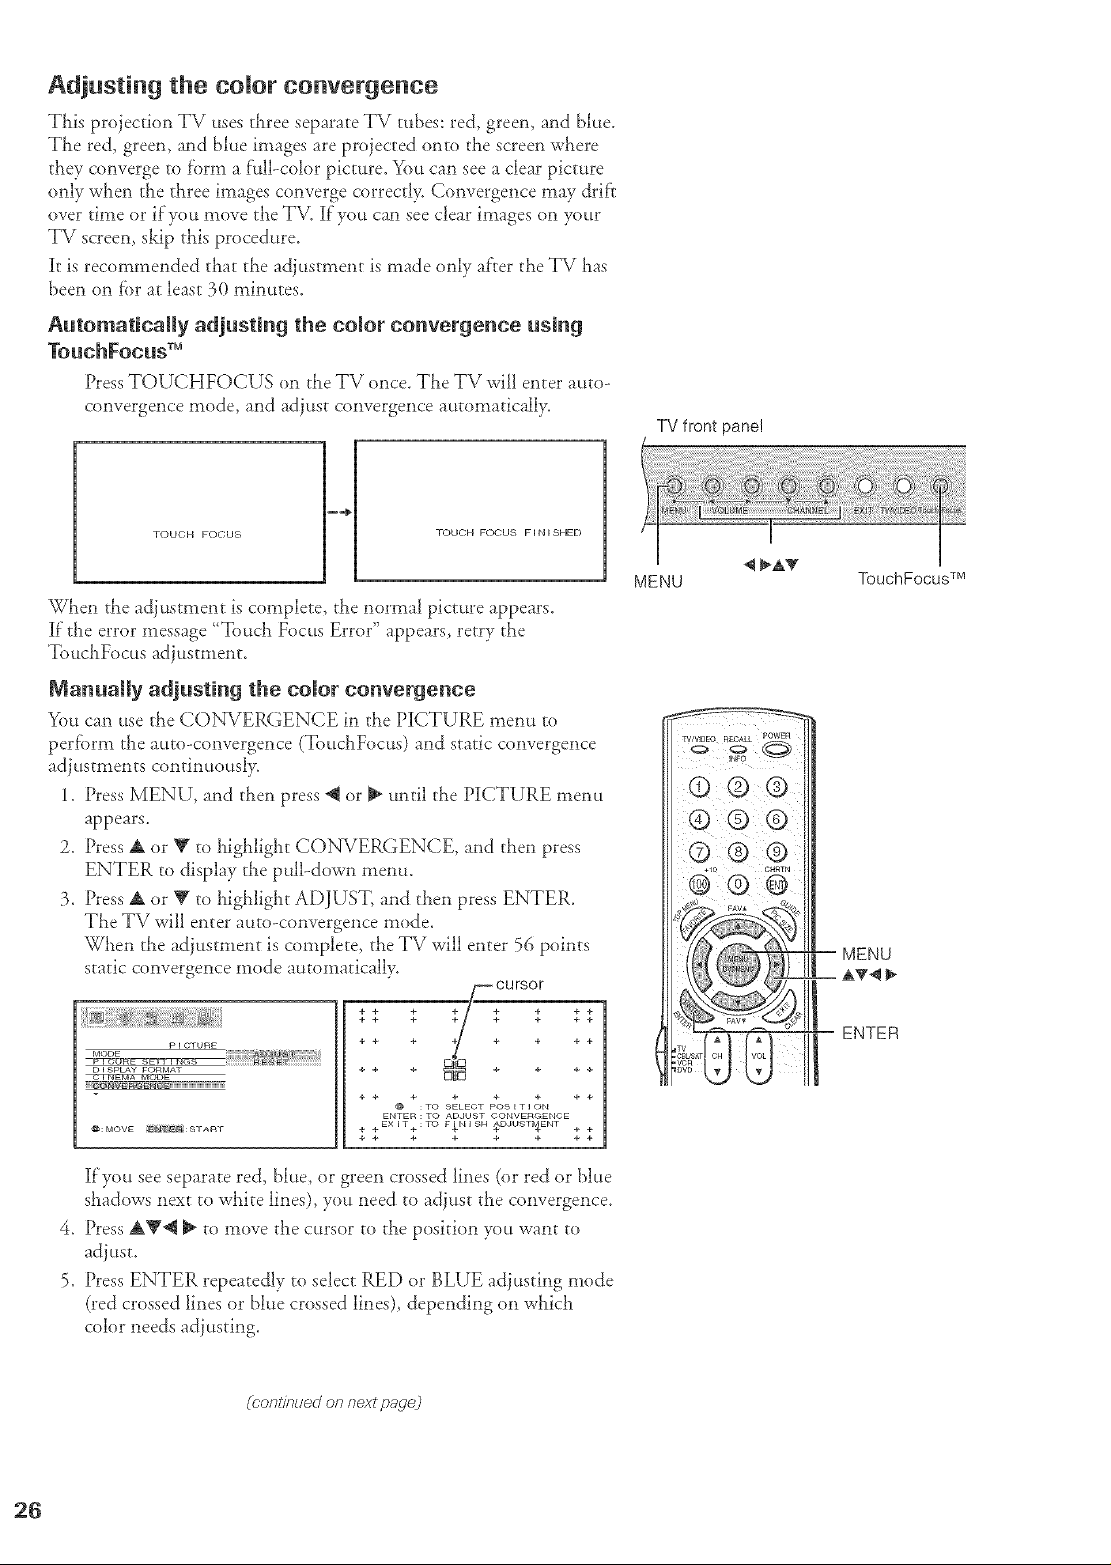
Adjusting the comor convergence
This projection TV uses three separate TV tubes: red, greem and blue.
TLe red, green, and blue images are proiected onto tile screen wt_ere
they converge ro form a full-color picture. You can see a clear picture
only when the three images converge correct!> Convergence may drif't
over time or if you move the T\L if you can see clear images on your
TV screen, skip this procedure.
it is recommended that the adiustment is made only after the TV Las
been on for at least 30 minutes.
Automatically adjusting the color convergence using
TouchFocus TM
Press TOUCEIFOCUS on rhe TV once, 'The TV will enter auto-
convergence mode, and adjust convergence automatically.
TV front panel
4 _aP_
TOUCH FOCUS
TOUCH FOCUS FINISHED
When the adjustment is complete, the normal picture appears.
It"the error message "Touch Focus Error" appears, retry the
TouchFocus adjustment.
Manually adjusting the color convergence
You can use rhe CONVERGENCE in the PICTURE menu to
perform rl_eauto-convergence (ToucllFocus) and static convergence
adiustments continuousl>
1. Press MENU, and then press @ or _ until the PICTURE menu
appears.
2. Press A or Y to highlight CONVERGENCE, and then press
ENTER to display the pull-down menu.
3. Press A or V to highlight ADJUST, and then press ENTER.
TLe TV wiU enter auto-convergence mode.
Wt_en the adjustment is complete, the TV will enter 56 points
static convergence mode automatically.
P i CTURE
MODE
D F8PLAY FORMAT
_: MOVE _E2_IT _i: 8 T A R T
CU rsor
.+++ ; _+ .+ ++ ++;
++ + ÷ + + ++
+÷ + + + ++
++ + + + + ++
t_ :TO SELECT POSITION
ENTER : TO ADJUST CONVERGEN©E
4. acEXIT4.:TO FINISN _D,IUSTI_EhIT 4 4-
+ + + + + ÷ ++
.
5.
if you see separate red, blue, or green crossed lines (or red or blue
shadows next to wLite lines), you need to adjust the convergence.
Press AV@ _ to move the cursor to the position you want to
adjust.
Press ENTER repeatedly to select RED or BLUE adjusting mode
(red crossed lines or blue crossed lines), depending on wLich
color needs adjusting.
MENU
TouchFocus TM
MENU
ENTER
(rontinued on next page,)
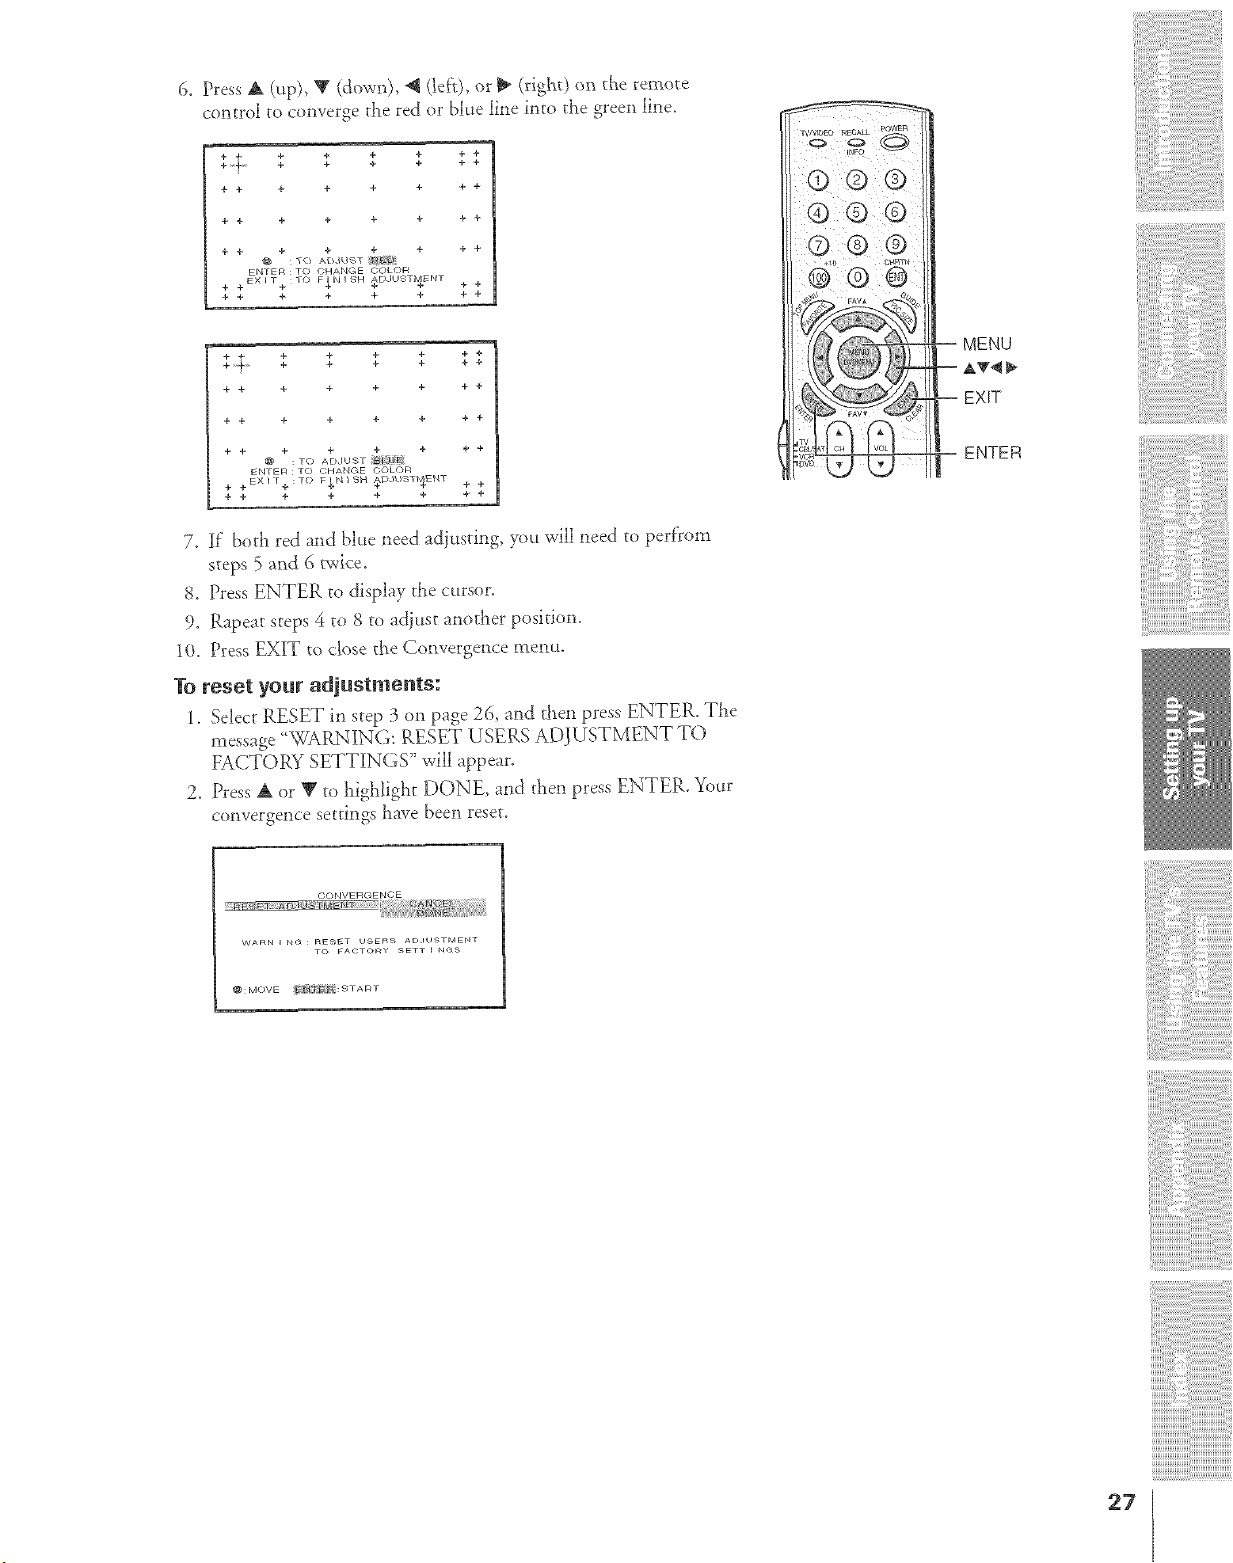
6. Press A (up), V (down), _ (left), or _ (righQ o_ die remote
control to converge d_e red or blue line into the green line.
+ ÷
+'t' ++ $ ++ $ $ $
+ + ÷ + ÷ + + +
+ + ÷ + + + + +
+ + ÷ + + + + +
KNTfflR : TO OHAN( ff COLOR
EXIT :TO FINISH AE;JHSTMKNT
+ + + + + + + +
+ + ÷ + + + + +
+ + + + + + + +
+ + + + + + + +
÷ + ÷ + + @ ÷
@ : TO ADJU-_T
ENTER : TO CHANGE OOLOR
+ + EXI [.b: TO F_IqlSH _D.IIISTI_EBIT + +
÷ ÷ ÷ + + + ÷ ÷
7. If bod_ red and blue _eed adjusting, you will neeJ _o perfFom
steps 5 and 6 twice.
8, Press ENTER to display the cursor,
9, Rapeat steps 4 to 8 to adjust another position,
10, Press EXIT to close t/_e Convergence menu,
1"oreset your adjustments:
1, Select RESET in step 3 on page 26, and then press ENTER, The
message '_WARNING: RESET USERS ADJUSTMENT TO
FACTORY SETTINGS" will appear.
2. Press A or _' to highligi_t DONE_ and then press ENTER. _%_r
convergence secdngs have been reset.
MENU
AT4
EXIT
ENTER
OONVERGENCE
{'
{{{O g/O_ l/
W_RN I N<_ : nE_ET USERS AD,IUSTMENT
TO FACTORY SETT _ _S
@:MOVE f_r {cg:s • An •
27
Using the TWs features
Adjusting the channem settings
Switching between two channels using Channel Return
The Channel Return feature allows you to switch between avo
channels without entering an actual channel number each time.
1. Select the first channel (or video mode) you want to view.
2. Select a second channel using the Channel Number buttons
(0-9, 100).
3. Press CH RTN. The previous dlannel will displa>
Each time F)u press CH RTN, the TV will switch back and fi}rth
between the last two channels that were selected.
Switching between two channels using SurfLock TM
The Sur_Lock TM Dature temporarily "memorizes" one channel in the
CH RTN button, so you can return to that channel quickly f'rom any
other channel by pressing CH RTN.
To memorize a channel in the CH RTN button:
1. Select the channel you want to
program into the CH RTN
bUttOn.
2_
3_
Press and hold CH RTN fi)r about
2 seconds until the message
'Channd Memorized" appears
(flashing) on the screen. The
channel has been programmed into the CH RTN button.
Continue to change channels until your desired channel is
selected.
CHANNEL MEMOR _ ZED
A,NT 1
OaBLE 6
4. Press CH RTN. The memorized channel will be selected.
The TV will return to the memorized channel one time only. Once
you press CH RTN and then ct_ange cllannels again, the CH RTN
button memory will be cleared and the button will flmction as
Channel Return, by switching back and forth between the last two
channels that were selected.
Programming your favorite channels
You can preset up to 12 ofyour fiworite channels using the Favorite
Channel Programming feature. Because this Dature scans through
only your fllvorite channels, it allows you to skip other channels you
do not normally watch.
To program your fhvorite channels:
1. Press MENU, and then press @ or _ until the CUSTOM menu
appears.
2. Press A or V to highlight FAVORITE CH.
Number
RTN
MENU
GUSTOM
ON • ] MER
v I DEO LABEL
ECAGKGROUN D
@: MOVE _i_E FI : STA RT
(Pondnued on rTextfaa.qej
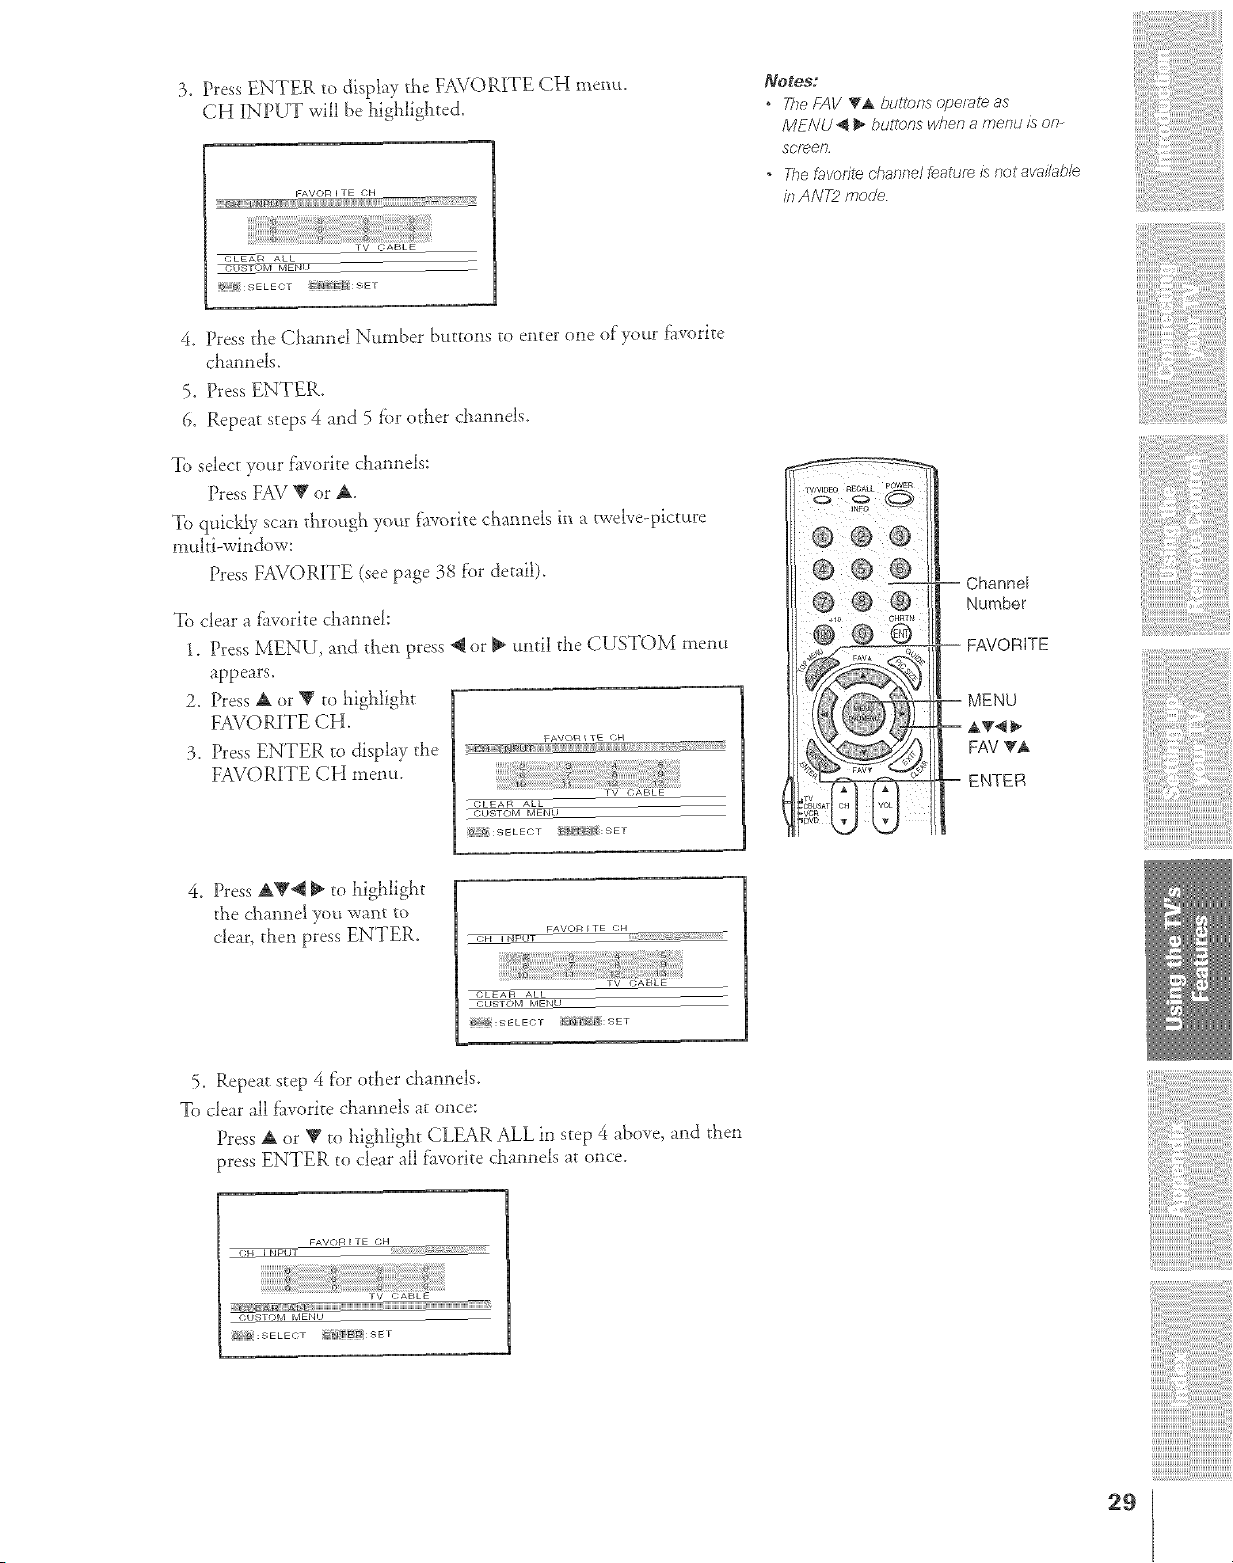
3. Pres._;ENTER to display the FAVORITE CH memo.
CH ]INPUT will be highlighted.
FAVOR I TE CN
CLEAR ALL
_NU
_{ SELECT NiT:SET
_OtOS:
° Tile FAV T& bul?ons operal_ as
MENU _ _ bu_l_/_5 wt_en a me,*_dis o/>
scr_eR
* Tile favorite channel feature is notava_i'ah/e
in ANT2 fflodJe
4. Press the Channel Number buttons to enter one of your fi-_vorite
c_lann els.
5. Press ENTER.
6. Repeat steps 4 and 5 lbr other channels.
To select your f_worite channels:
Press FAV V or A.
To quic}'dy scan t_',roug_'_your favorite c!_annels in a {welve--pictttre
multi-window:
Press FAVORITE (see page 38 for detail).
To clear a f_vorite channel:
1. Pl"essMENU, a_d tllen press _ or _ until the CUSTOM menu
appears.
2. Press A or V to highlight
FAVORITE CH.
3. Press ENTER to display the
FAVORITE CH menu.
VA_/O_4 _ TE GH
(;LEAR ALL
CUSTOM MENU
_ :SELECT _N :SET
®® ®:
-- Channel
Number
FAVORITE
MENU
FAV TA
ENTER
4. Press &V@ _ to highlight
the c_annel yo'_ want to
clear, then press ENTER.
FAVOR I TE CH
_ PNP_T
CLEA f4 ALL
CUSTOM MENU
_ :SELEC)T _NY #:SET
5. Repeat step 4 fi)r ottier cham_els.
To clear all f]worite channels at once:
Press A or V to highlight CLEAR ALL in step 4 above, and then
press ENTER to clear all favorite chamlels at once.
FAVOR I TE CH
I Npl IT _ !i
CUSTOM IvtENU
:-:_ SELECT _1" _:Sd F
29
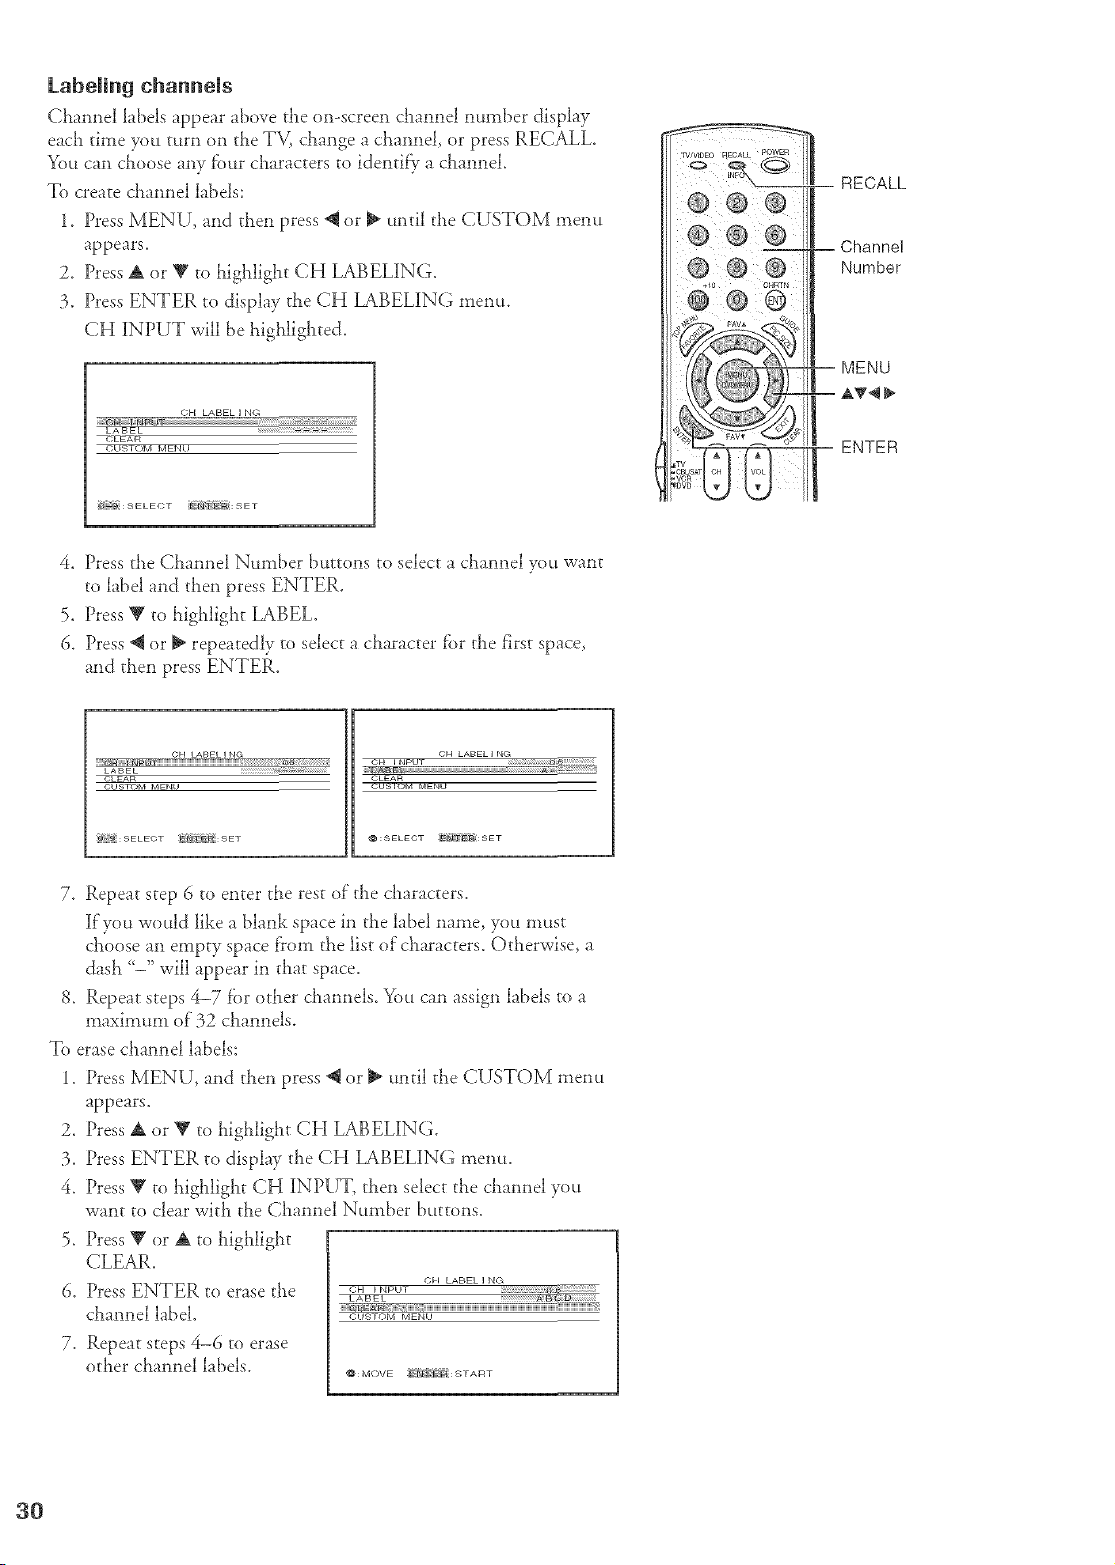
Labeling channels
Channel labels appear above the on-screen &annel number display
each time you tmn on the TV, change a channel, or press RECALL.
You can choose any four characters to identi@ a channel.
To create channel labels:
1. Press MENU, and then press _ or _ until the CUSTOM mesm
appears.
2. Press A or V to highlight CH LABELING.
3. Press ENTER to display the CH LABELING metal
CH INPUT will be highlighted.
CH LABEL I N{-:
C_14
CUSTOM IvIEN U
B _ : S E L E C • S Z •
RECALL
Number
MENU
ENTER
4. Press the Channel Number buttons to select a channel you want
to label and then press ENTER.
5. Press Y to highlight LABEL.
6. Press @ or _ repeatedly to select a character fbr the first space,
and then press ENTER.
CH LABEL I NG CH LABEL I NG
CLEAR CLEAR
CUSTOM MENU GUL_IOM MENU
£_k SELECT _l'_ : S ET @:SELECT 'EN_';_{: SET
7. Repeat step 6 to enter the rest of the &aracters.
If'you would like a blank space in the label name, you must
choose ass empty space from the list of characters. Otherwise, a
dash '-" will appear in daat space.
8. Repeat steps 4-7 fi)r other channels. You can assign labels to a
maximum of"32 channels.
To erase channe! labels:
1. Press MENU, and then press @ or _ until the CUSTOM menu
appears.
2. Press A or V to highlight CH LABELING.
3. Press ENTER to display the CH LABELING menu.
4. Press Y to highlight CH INPUT, then select the channel yott
want to clear with the Channel Number [xtttons.
5. Press V or A to highlight
CLEAR.
6. Press ENTER to erase the
channel label.
7. Repeat steps 4-6 to erase
other channel labels.
CH LABEL I
-T@_L_ _ _i7[_" __
C_ISTOM MENU
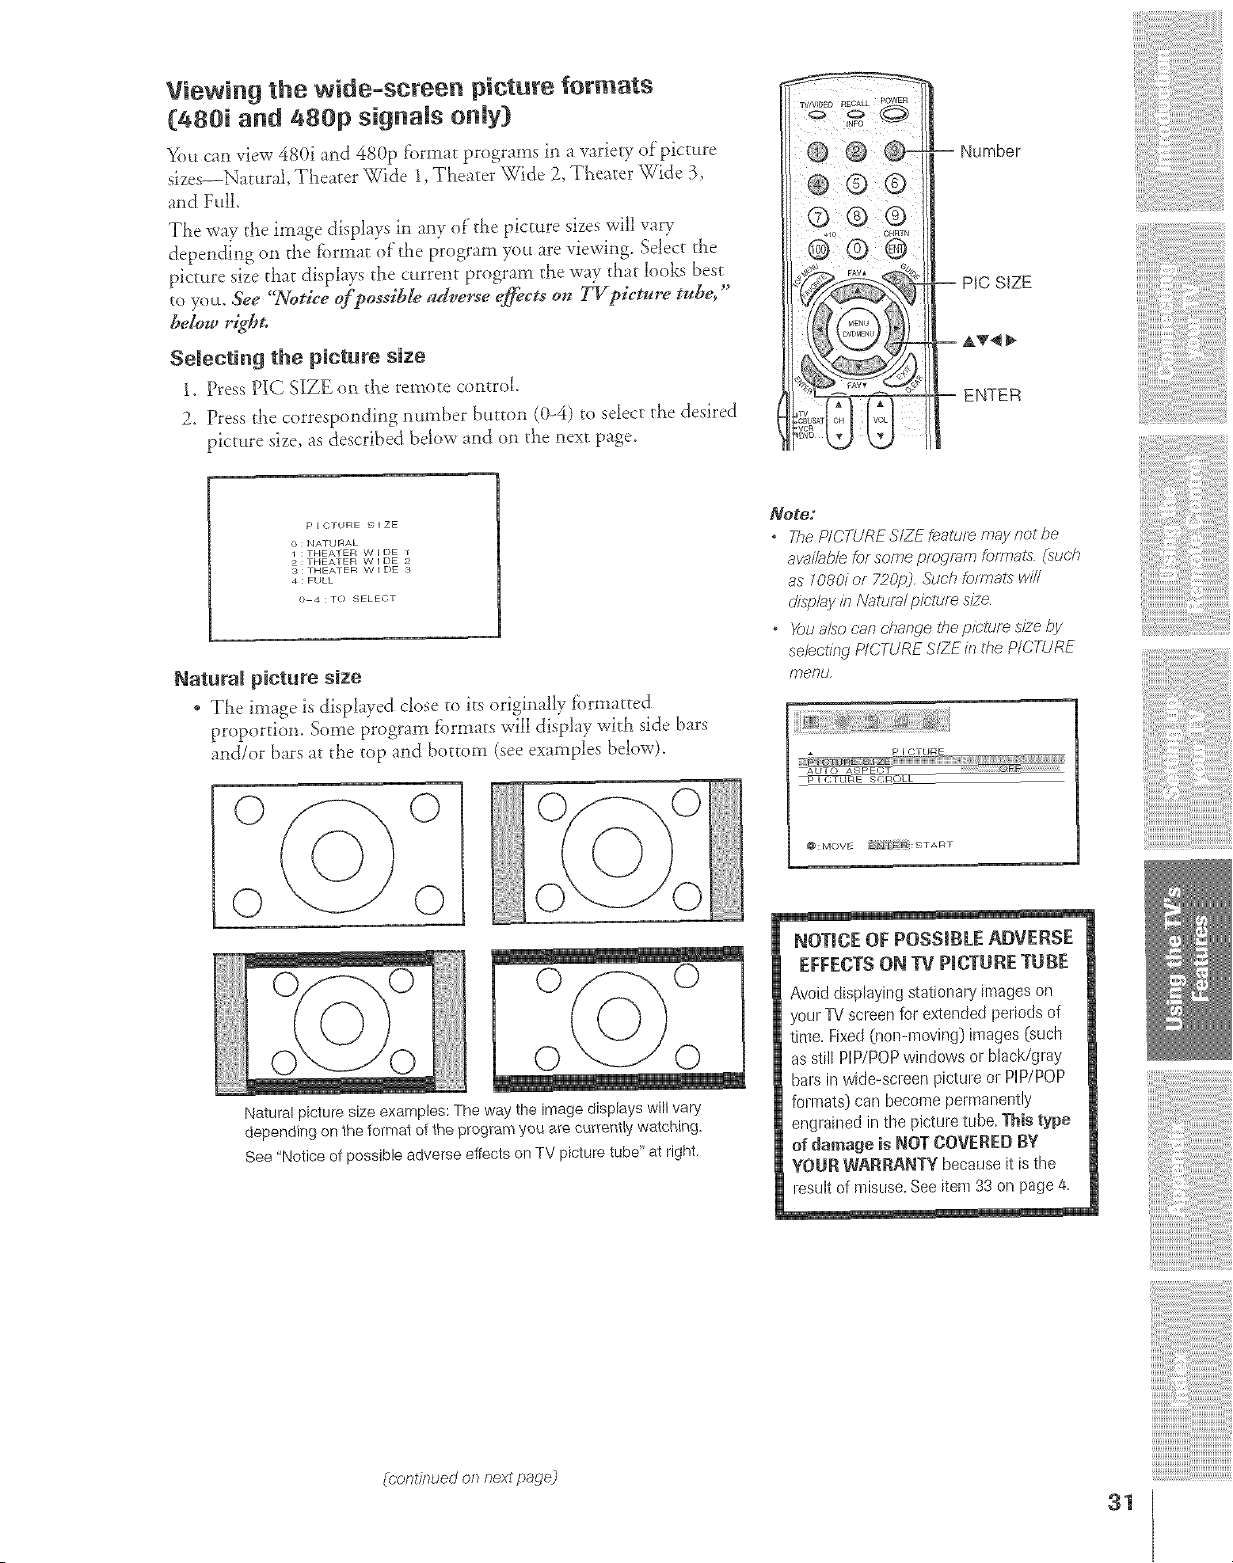
Viewing the wide-screen picture formats
t[480i and 480p s{gna{sonmy)
You can view 4801 and 480p t'ormat programs 1,1a variety of picture
sizes--Nac_ral, TLea_er _,_fide1, TLea_er \'qi& 2, TLea_er Wide 3,
and FcdL
Tl_e way tl_e image displays in any o( tLe picture sizes will vary
depending on the lormat of"the program you are viewing. Selec_ the
pictctre size tllat displays tlle current program tl_e way that looks best
to yot£ See "Notice of possibIe adverse e_ects oft TV picture tube,"
&D,w right.
Semect}ng the picture s}ze
1. Press PIC SIZE on tLe remote control.
2. Press d_e corresponding number bumm (0-4) to select tLe desired
piccc_re size, as described below and on tLe next page.
Nc_mber
PlC S{ZE
ENTER
p I QTIJRE S I ZE
0 : NATUf_AL
1 : THEATER W I DE 1
2 : THEATER W I DE "
S : THEATER W I DE
4 : FULL
0 4 : TO SELEOT
Natural picture size
. TLe image is displayed c!ose to its originally fbrmatted
proportion. Some program lbrmats will display with side bars
and/or bars at the top and bottom (see examples below).
0 0
0 0
Natural picture size examples: The way the image displays will vary
depending on the format of the program you are currer_tly watching.
See 'Notice of possible adverse effects on TV picture tube' at right.
Note:
TkeP/(._TLiRE,SYZk-bJmm fl_ayrio/L_e
av_@b/efor someprogram77formats (su@
c/isfJlayif7Naturalpic-turesite
" _)L/alSOcar7d_mwe U_eplbtur_ s/2e by
se/ecti_g PICTURESIZEif7the PICTURE
I'r_e/?t.!,
p I CTU_E
_OLL
_0: MOVE F_a X:START
NOTICE OF POSSIBEEADVERSE
EFFECTSON TV PICTURETUBE
Avoid displaying stationary images on
yourTVscieenfor extendedperiodsof
time.Fixed0-!co-rooting} images (su@
asstill HP/POPwindowsor black/gray
batsin vvide-scleenpictureor PIP/POP
formats)canbecomepermanently
engrained in thepicture t@e.Thistype
of da_-_ageis NOTCOVERED_g
YOURWkRRANTYbecauseit fsthe
lesuitof misuse.Seeitem33 on page4.
{#orTt/7}ued on next pa,?e)
31
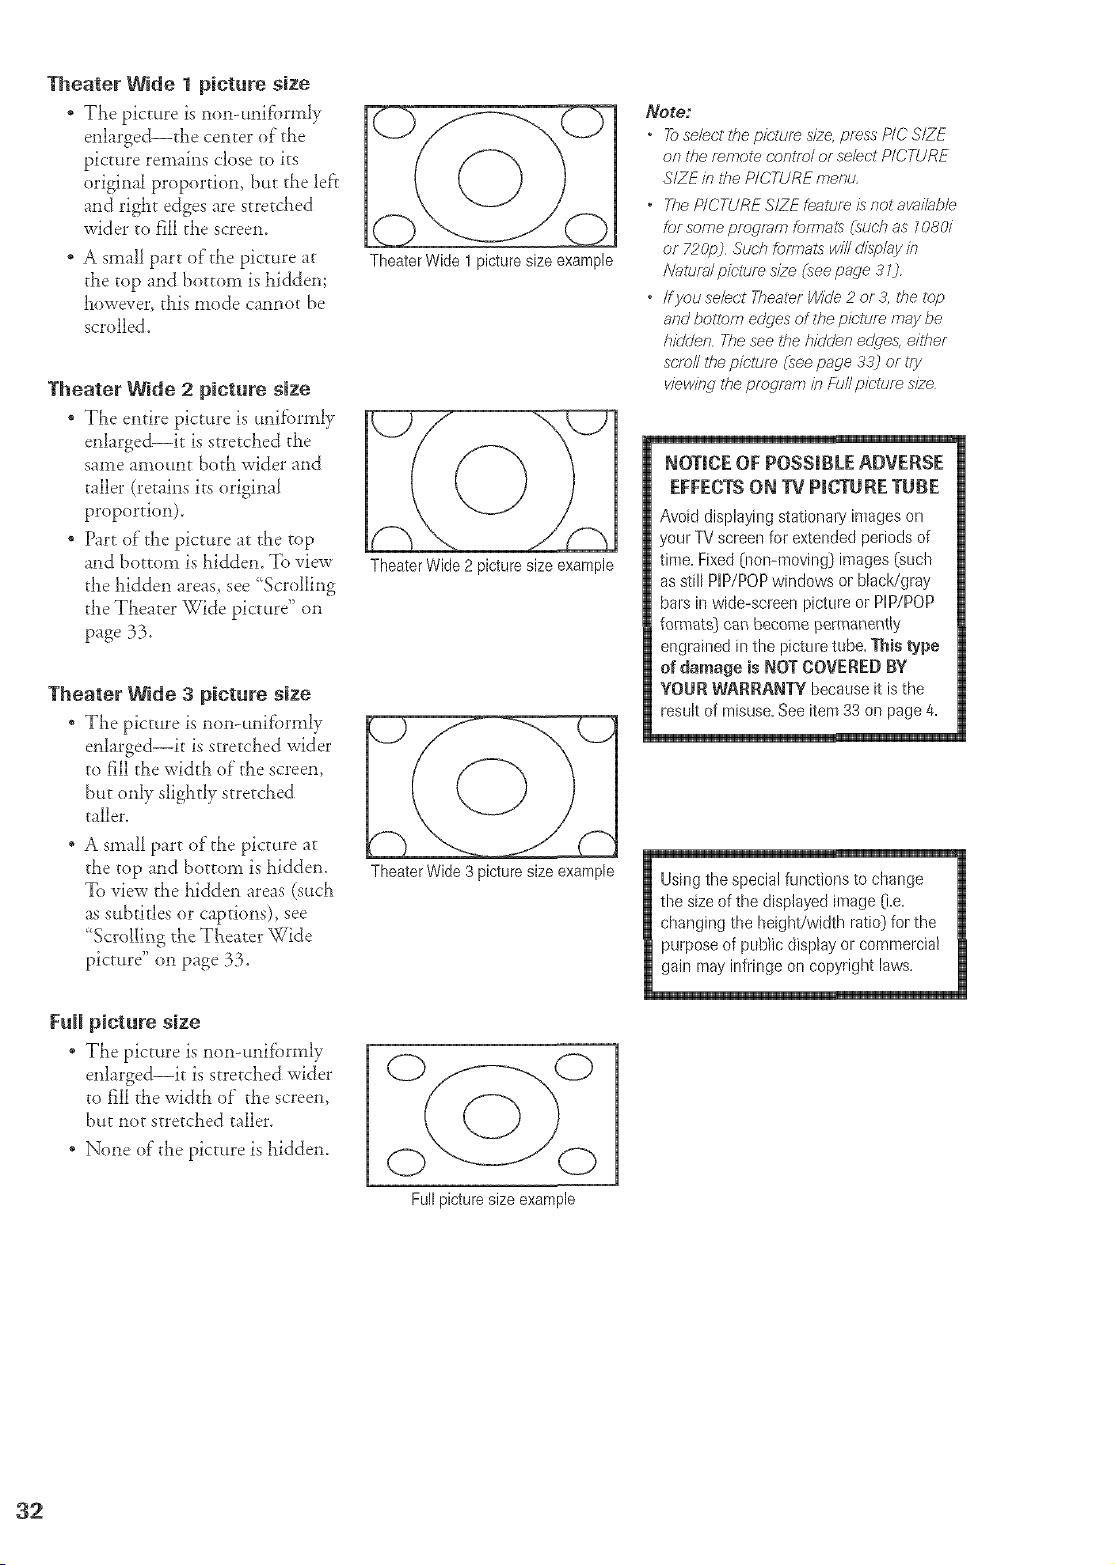
Theater Wide I picture size
* The picture is non-unifbrmlv
enhrged--the center of rhe
picture remains close to its
original proportion, but the left
and right edges are stretched
widei to fill the screen.
A small part of the picture at
the top and bottom iS hidden;
however, this mode cannot be
scrolled.
Theater Wide 2 picture size
, The entire picture is uniformly
enlarged--it is stretched the
same amount both wider and
taller (retains its original
proportion).
* Part of"the picture at the top
and bottom is hidden. To view
the hidden areas, see 'Scrolling
the Theater Wide picture" on
page 33.
Theater Wide 3 picture size
* The picture is non-unifbrmly
enlarged--it is stretched wider
to fill the width of the screen,
but only slightly stretched
taller.
A small part of the picture at
the top and bottom is hidden.
To view the hidden areas (such
as subtitles or captions), see
'Scrolling the Theater Wide
picture" on page 33.
Theater Wide 1 picture size example
Theater Wide 2 picture size example
Theater Wide 3 picture size example
_otoJ
• To se/ec't the p/r;'tTJf_site, press P/C S/ZE
on tT_eremote eoRtfo/ oF se/ect P/CTURE
SIZE k_ff_e P/CTURE menu,
• The P/CTURE S/ZE fea/um is not ava//ab/e
for some program formats (suc'h as 1080/
or 720p_ Su(;h f()fTT?atsVV///displ_y k7
Nature/p/clum s/2e (see page 31},
/f you se/ect Thealsr Wide 2 or A the top
and bottom ed,ges of the picture may be
hidden, The see the hidden edges either
acts//l)qe p/ctuf_ (see page 33) or try
v/ew/rW lhe pr_)gmrr? in [-i;//p/c'/um size
NOTICE OF POSSIBLE ADVERSE
EFFECTS ON TV PICTURE TUBE
Avoid displaying stationaly images on
your TV screen for extended periods of
time, Fixed (non-moving} images (such
as still PIP/POPwindows or bBck/gray
bas in wide-scleen picture or PIP/POP
formats) can become permanently
engrained in the picture tube, This type
of damage is NOT COVERED BY
YOUR WARRANTY becauseit is the
resuk of misuse,See item33 on page 4,
Using the special functions to change
the size of the displayed image O,e,
changing t!_e height/width ratio) for the
purpose of public display or commercial
gain may infringe on copyright laws,
Full picture size
* The picture is non-unifbrmly
enlarged--it is stretched wider
to fill the width of the screen,
but not stretched taller.
, None of the picture is hidden.
Full picture size example
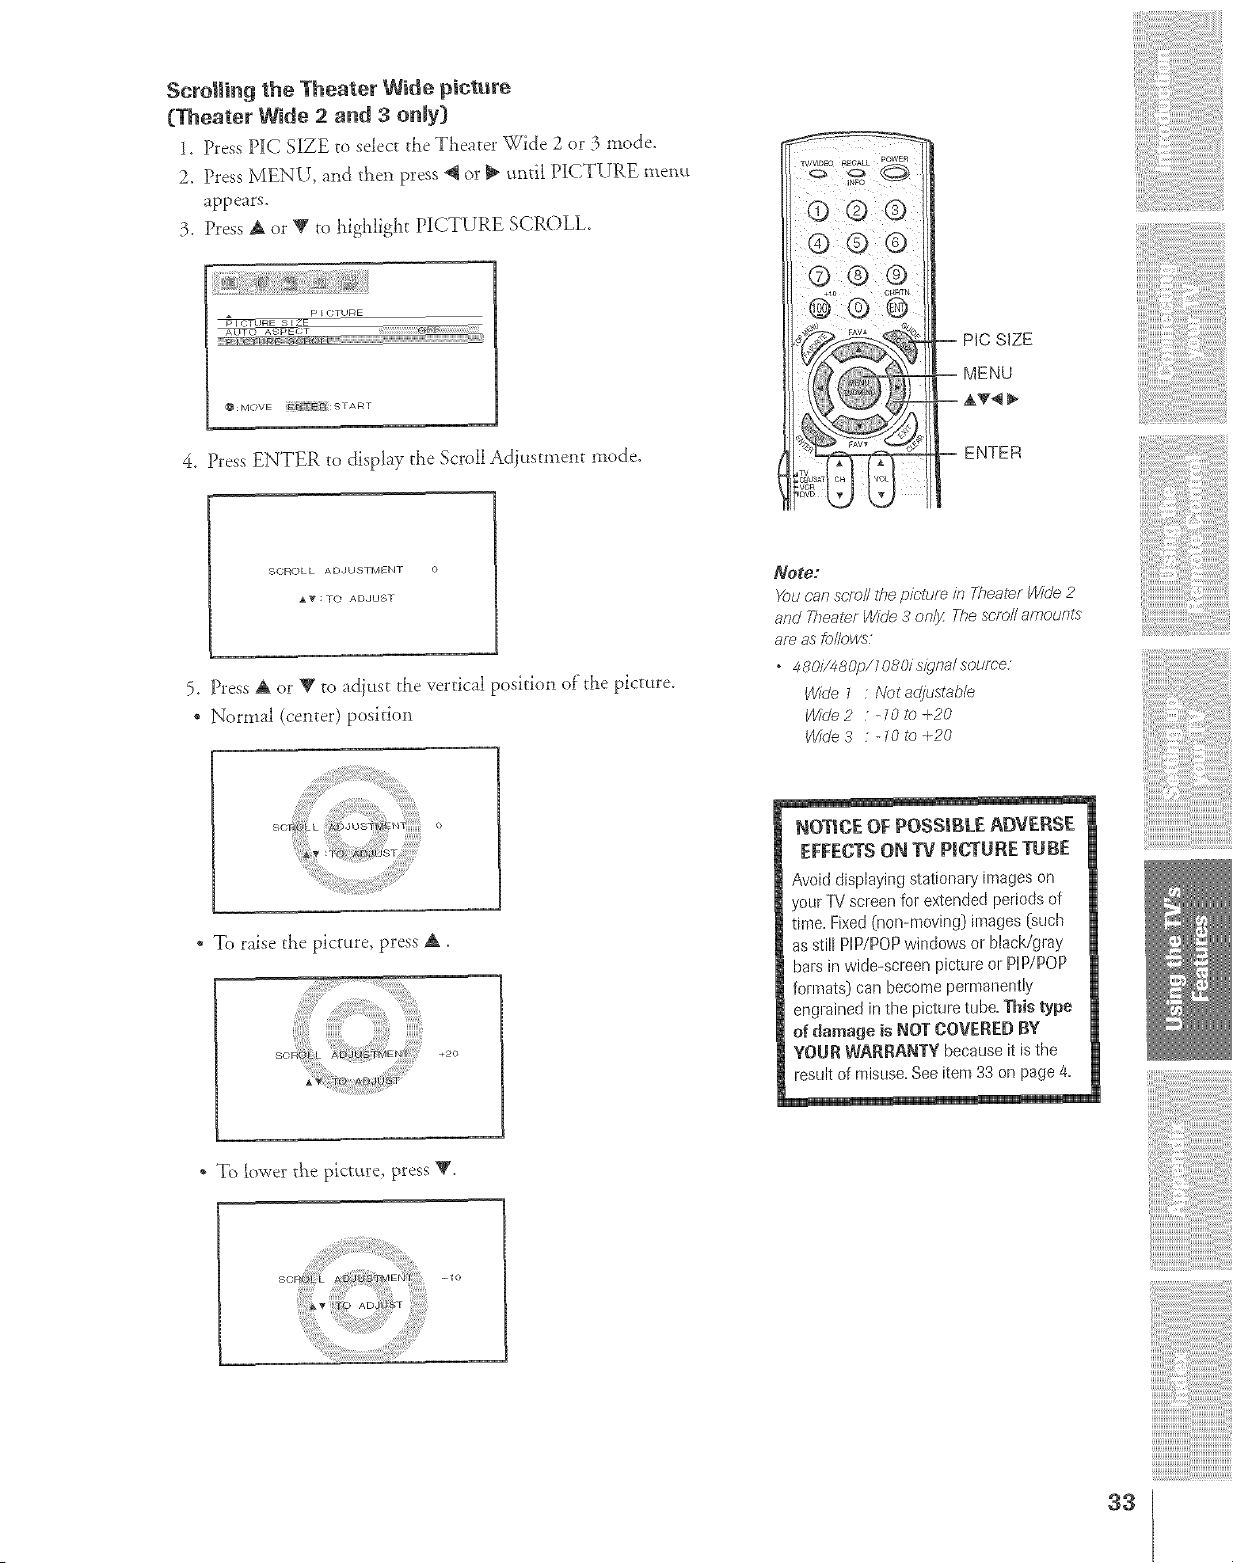
ScrolJing the Theater W_de piclture
(Theater Wide 2 and 3 onJy)
1, Press PIC S_ZE to select the Theater -Wide 2 or 3 mode,
2, Press MENU, and then press _ or !_ until PICTURE menu
appears,
3. Press A or V to highlight P_CTURE SCROLL,
* p F OTURE
_T
AUTO _
4. Press ENTER to display the Scroll Adi_tstment mode.
@ O@
-- PIC SIZE
-- MENU
-- AT_
-- ENTER
SCROLL ADJUSTMENT O
AV:TO ADJUST
5. Press A or V to adiust the vertical position of the picture.
• Normal (center) position
" To raise the picture, press A.
* To lower the picvure, press T.
Not_:
Yau can sr;fo// the picture ia Theater Wide 2
a/_d Thea/e7 l/YJr/e3 o/_// The sr_ell amoLH_ts
am as fel/ows
, 4b,O/F480p/;OPdsidr_a/sou/¢e:
Wide _ : Nat adjustable
Wide 2 " -10 to ÷20
Wide 3 : -_0 te +20
NOTICE OF POSSIBLE ADVEBSE
EFFECTS ON TV PICTURE TUBE
Avoiddisplayingstationaryimages on
yourTVscreenfor extendedperiodsof
time,Fixed(non-moving) images (such
asstill PlP/P0Pwindowsor black/gray
barsin wide-screenpictureorPlP/P0P
formats) can become pemmneetly
engrained in the picture tube,Thistype
d damage is _og COVERED BY
YOUR WARRANTY becauseitisthe
lesult of misuse. See item 33 on page 4.
<> .,,,,,,,
iiiii/iii
33
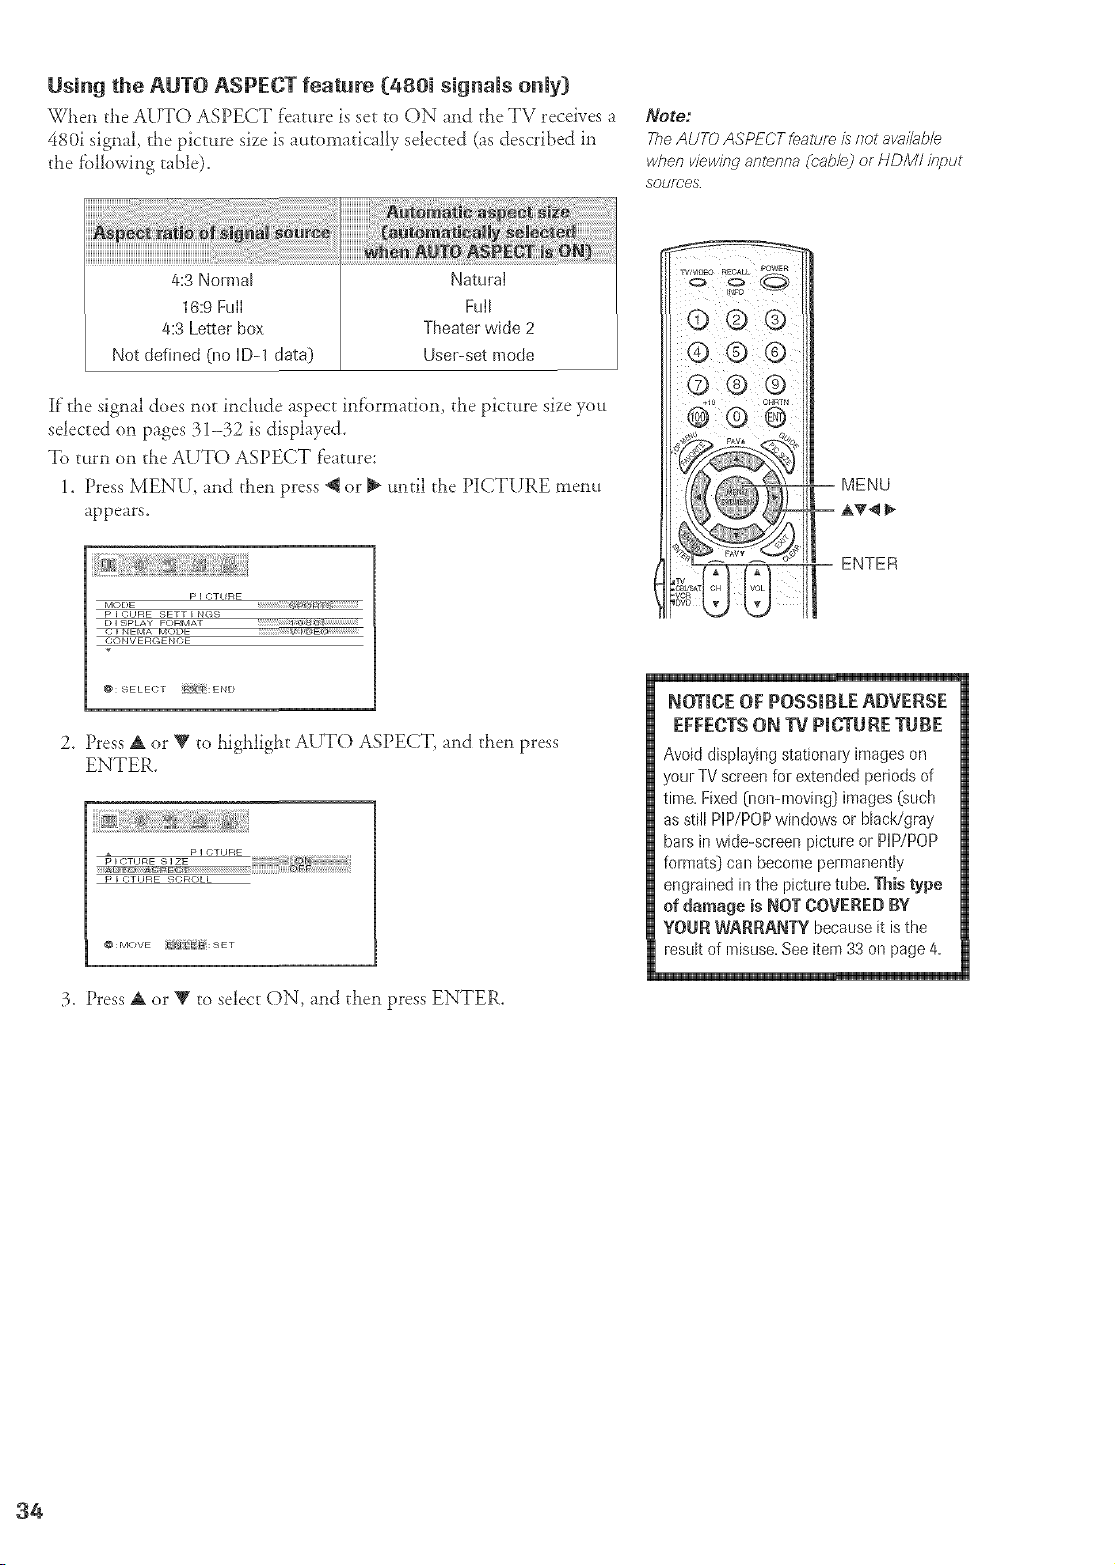
Using the AUTO ASPECT feature (480i signals only)
When the AUTO ASPECT feature is se{-to ON and the TV receives a
480i signal, the picture size is automatically selected (as described in
the fbllowing table).
Note:
The AUTO ASPECT feature is not avaHab/e
when viewing antenna (cable) or HDM/ input
sources
4:3 Nolmal Natural
16:9 FuII FuII
4:3 Letterbox Theater wide 2
Not defined (llo ID-1 data) Usel-set mode
if"the signal does not include aspect inf'ormation, the picture size you
.';elected on pages 31-32 is displayed.
To turn on the AUTO ASPECT feature:
1. Press MENU, and then press @ or _ until the P][CTURE mem_
appears.
p I _-;TI JRE
MODE
P E CHRE SETT F NGS
D I SPLAY FORMAT
C©NVERGENCE
@: SELEGT i_=Xii_i:E N D
2. Press A or V to highlight AUTO ASPECT, and then press
ENTER.
3. Press A or V to select ON, and then press ENTER.
MENU
ENTER
NOTICE OF POSSIBLE ADVERSE
EFFECTS ON TV PICTURE TUBE
Avoiddisplayingstationaryimageson
yourTVscreenfor extendedperiods of
time,Fixed(non-moving) images (such
asstill PiP/POPwindowsor black/gray
barsinwide-screenpietureor PiP/POP
formats) can become permanently
engrained in the picture tube,Thistype
of damage is NOT COVEREDBY
YOUR WARRANTY becauseit isthe
resukof misuse,Seeitem33 on page4,
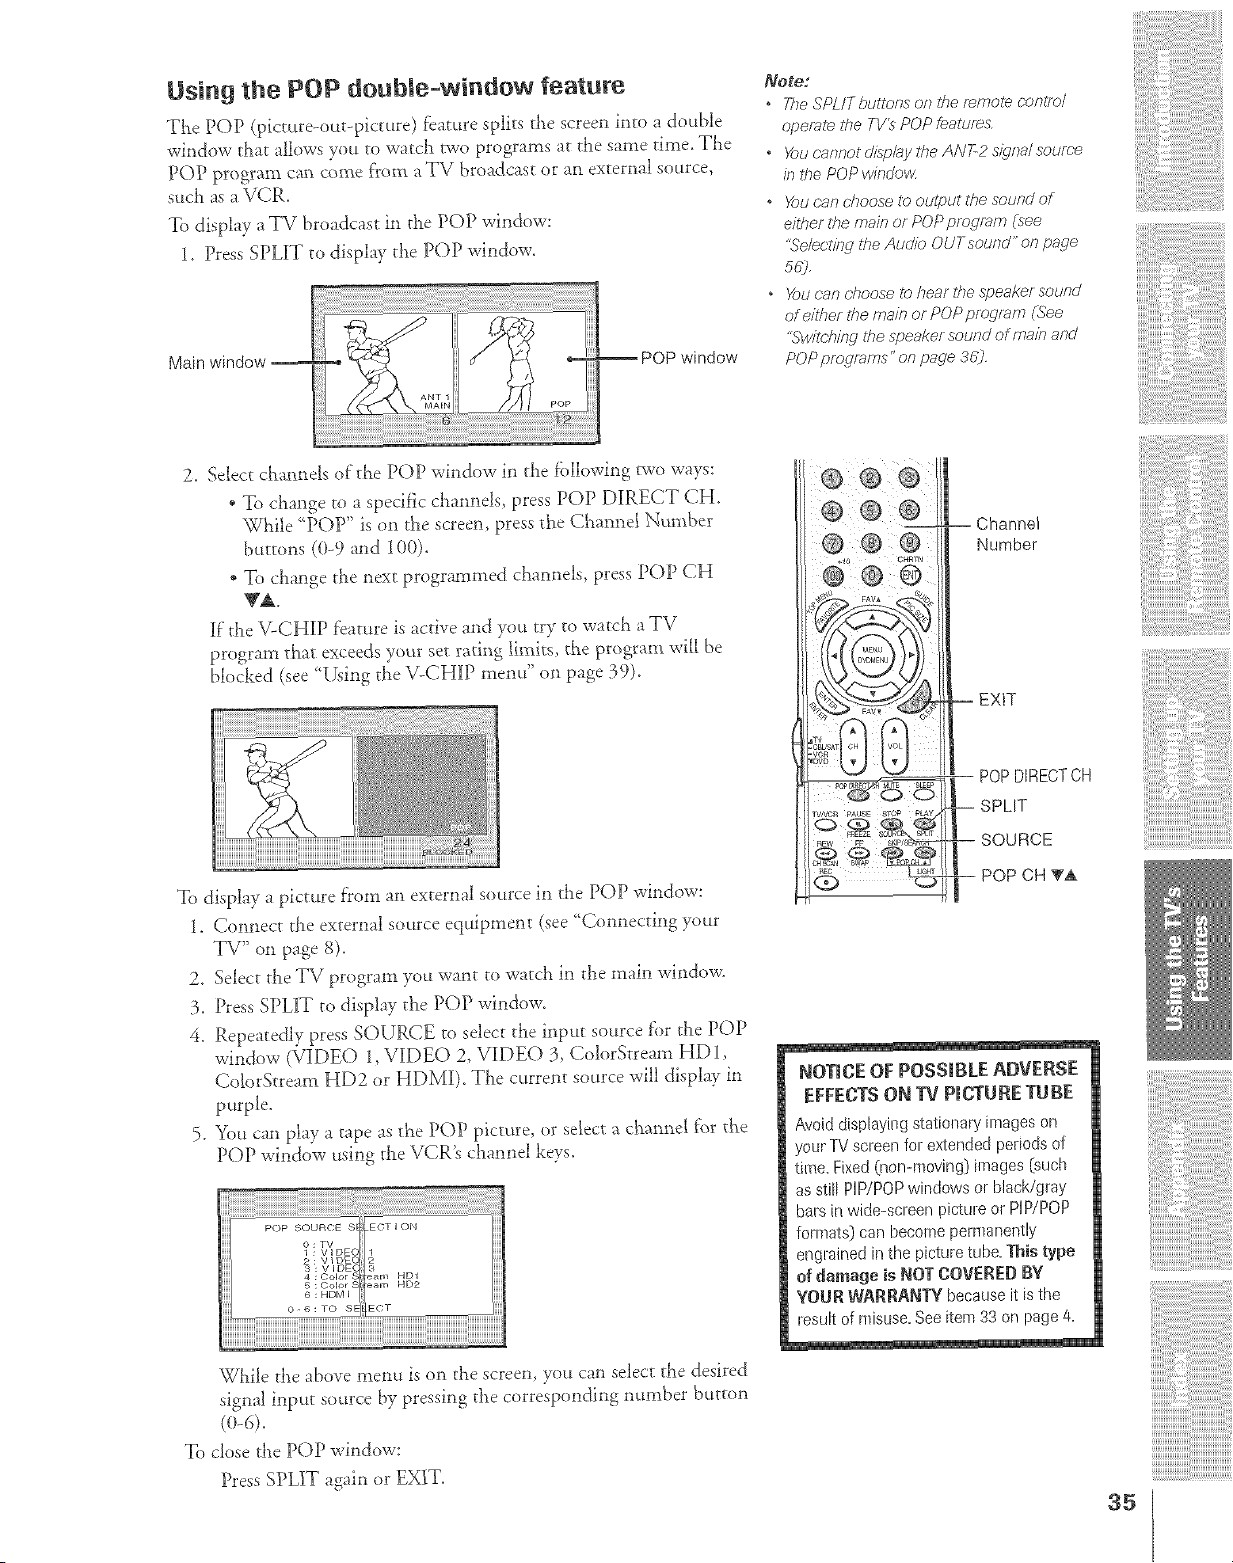
Using the POP double-window feature
The POP (picture-out-picture) feature splits tile screen into a double
window that allows you to watch woo programs at the same time, The
POP prog!'am can come from a TV broadcast or an external sod.roe,
such as a VCR.
To display a TV broadca._t in 41e POP window:
1. Press SPLIT to display the POP window.
Main wbdew
windew
)Vote."
o TheSPL/Tbultonson/he fe,meZeoontm/
op_gf_t#,//,,e TV's POP feat_lf_5:
" Yeuoannotdisp/aytheANT-2si, qealsouf_e
k_the POP wkJcPov<
o Yeucurtd?oosetv>outputthesoundof
eitherthemainor POPprogram{lee
'tck÷/ectf/W_heAudieOUTsoued"or?page
5r/j,
o Yo_J can cheose to hear #re speaker sound
of eiTher tf_e mare or POP program (See
"Svvilching the speaker sound of main and
POP pmgmms" on page 36?
2. Select channels of"the POP window in die following p_o ways:
* To change to a specific channels, press POP DIRECT CH.
While ?OP" is on the screen, press the Channel Number
buttons (0-9 and 100).
* To change the next programmed channels, press POP CH
yi
IF t}_eV-CHIP feature is active and you try to watch a TV
program that exceeds your set rating limits, the program will be
bk)cked (see [kmg the \ -CHIP menu on page 39).
To display a picture from an external source in the POP window:
1. Connect tile external source equipment (see 'Connecting your
TV" on page 8).
2. Select tile TV program you want to watch in the main window.
3. Press SPLIT to display the POP window.
4. Repeatedly press SOURCE to select the input source f'or the POP
window (VIDEO 1, VIDEO 2, VIDEO 3, ColorStream HD1,
ColorStream HD2 or HDMI). The c_rent source will display in
purple.
5. You can play a _ape as the POP picture, or select a channel f_r dxe
POP window using the VCR's channel keys.
POP SOURCE S ECT I ON
O:TV
1 : VIDE(
s: VtOE( _.
4 : Color _ HD1
5 : Color _ HD2
6 : HDM E
O-6:TO S[ [ECT
While tile above menu is on the screen, you can select tile desired
signal input source by pressing the corresponding number button
To dose the POP window:
Press SPLIT again or EXIT.
-- -- Channel
Number
EXIT
POPDIRECTCH
SPLIT
SOURCE
POP CH TA
NOTICE OF POSSIBLE ADVERSE
EFFECTSON TV PICTUREgUBE
Avoid dispbying stationary images on
yourTVscleenfor extendedperiodsof
time.Fixed(nen-moving) images [such
asstif[HP/POPwindowsor black/gray
barsinwide-scJeenpict[ueor PiP/POP
formats) can become permanently
engrainedin thepicturetube.Thistype
of damage is NOTCOVEREDBY
YOURWARRANTYbecauseit isthe
lesult of misuse, See item 33 on page 4.
35
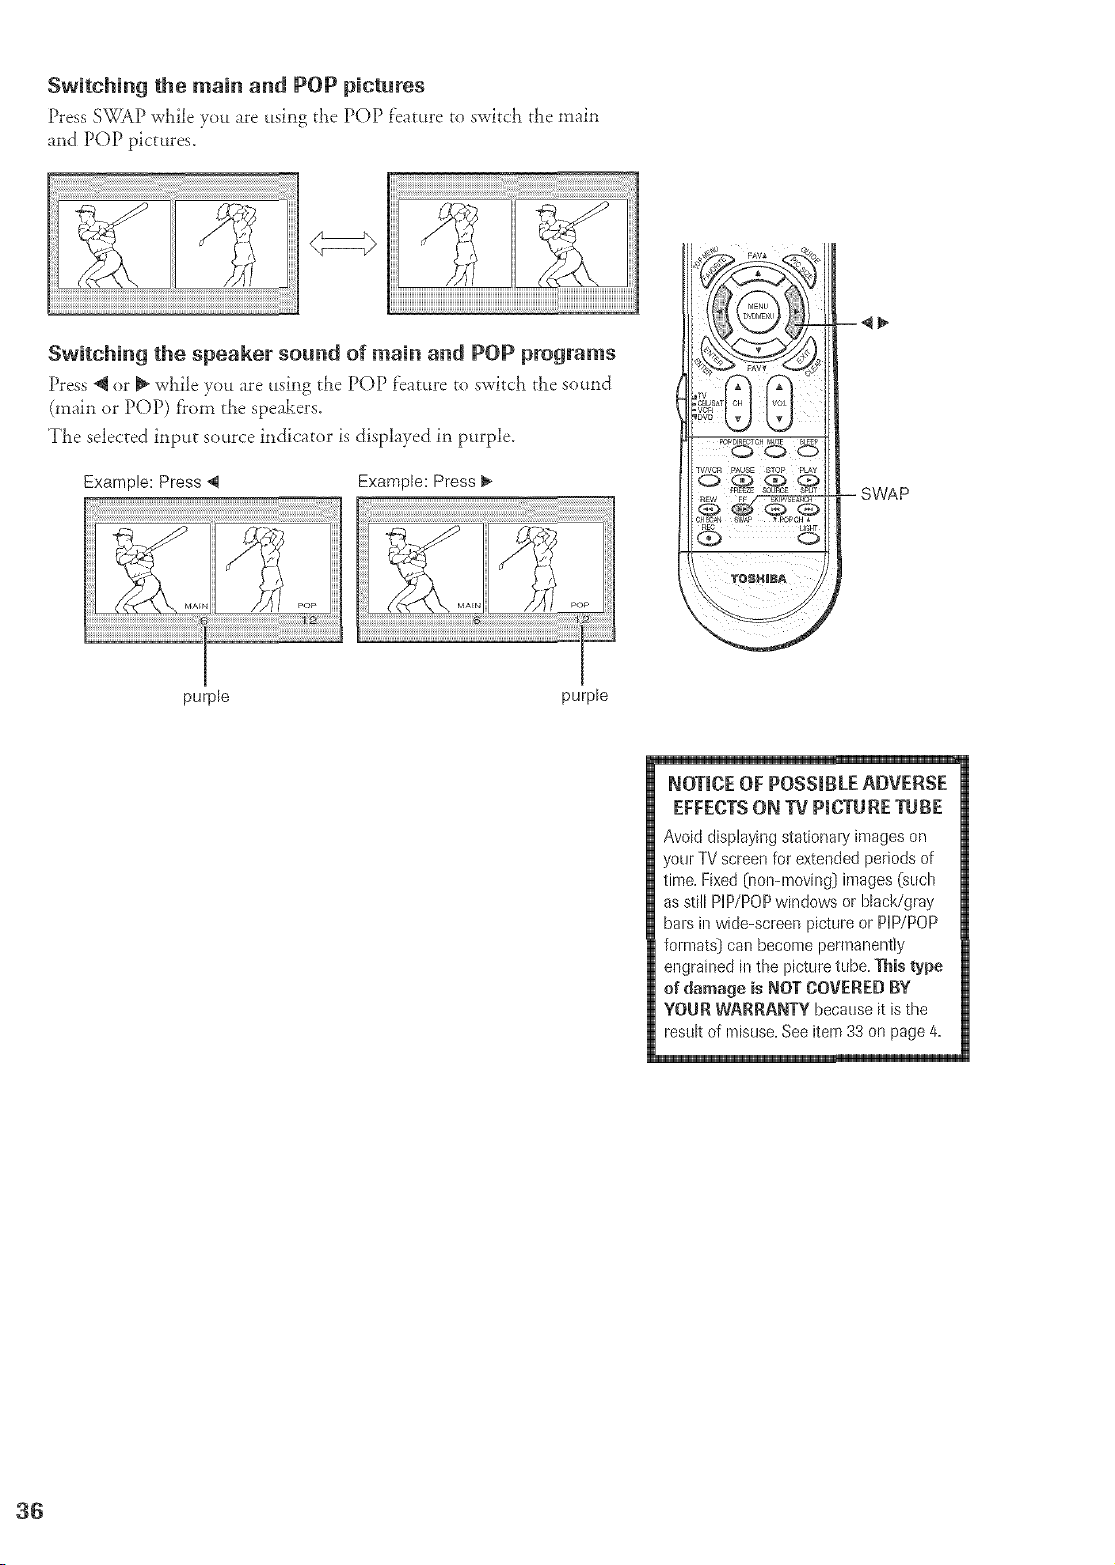
Switching the main and POP pictures
Press SWAP wt_ile you are using the POP feature to switch the main
and POP pictures.
1
Switching the speaker sound of main and POP programs
Press _ or _ while you are using the POP f'eature to switch the so_tnd
(main or POP) f?om the speakers.
TLe selected input source indicator is displayed in purple.
Example: Press 4
Example: Press _.
_AEN
F'Op
PO_DIREOTCHMUTE _Lg_p
CH_ SW_ _ POPCH
-- SWAP
purple
purple
NOTmCEOF POSSmBLEADVERSE
EFFECTSON TV P_CTURETUBE
Avoiddisplayingstationaryimageson
yourTVscreenfor extendedperiodsof
time,Fixed(non-moving] images (such
asstill HP/POPwindowsor black/gray
balsin wide-screenpictureor HP/POP
formats) can become permanently
engrained in the picture tube,Thistype
of damage isNOT COVEREDBY
YOUR WARRANTY becauseitisthe
resuk of misuse, See item 33 on page 4,
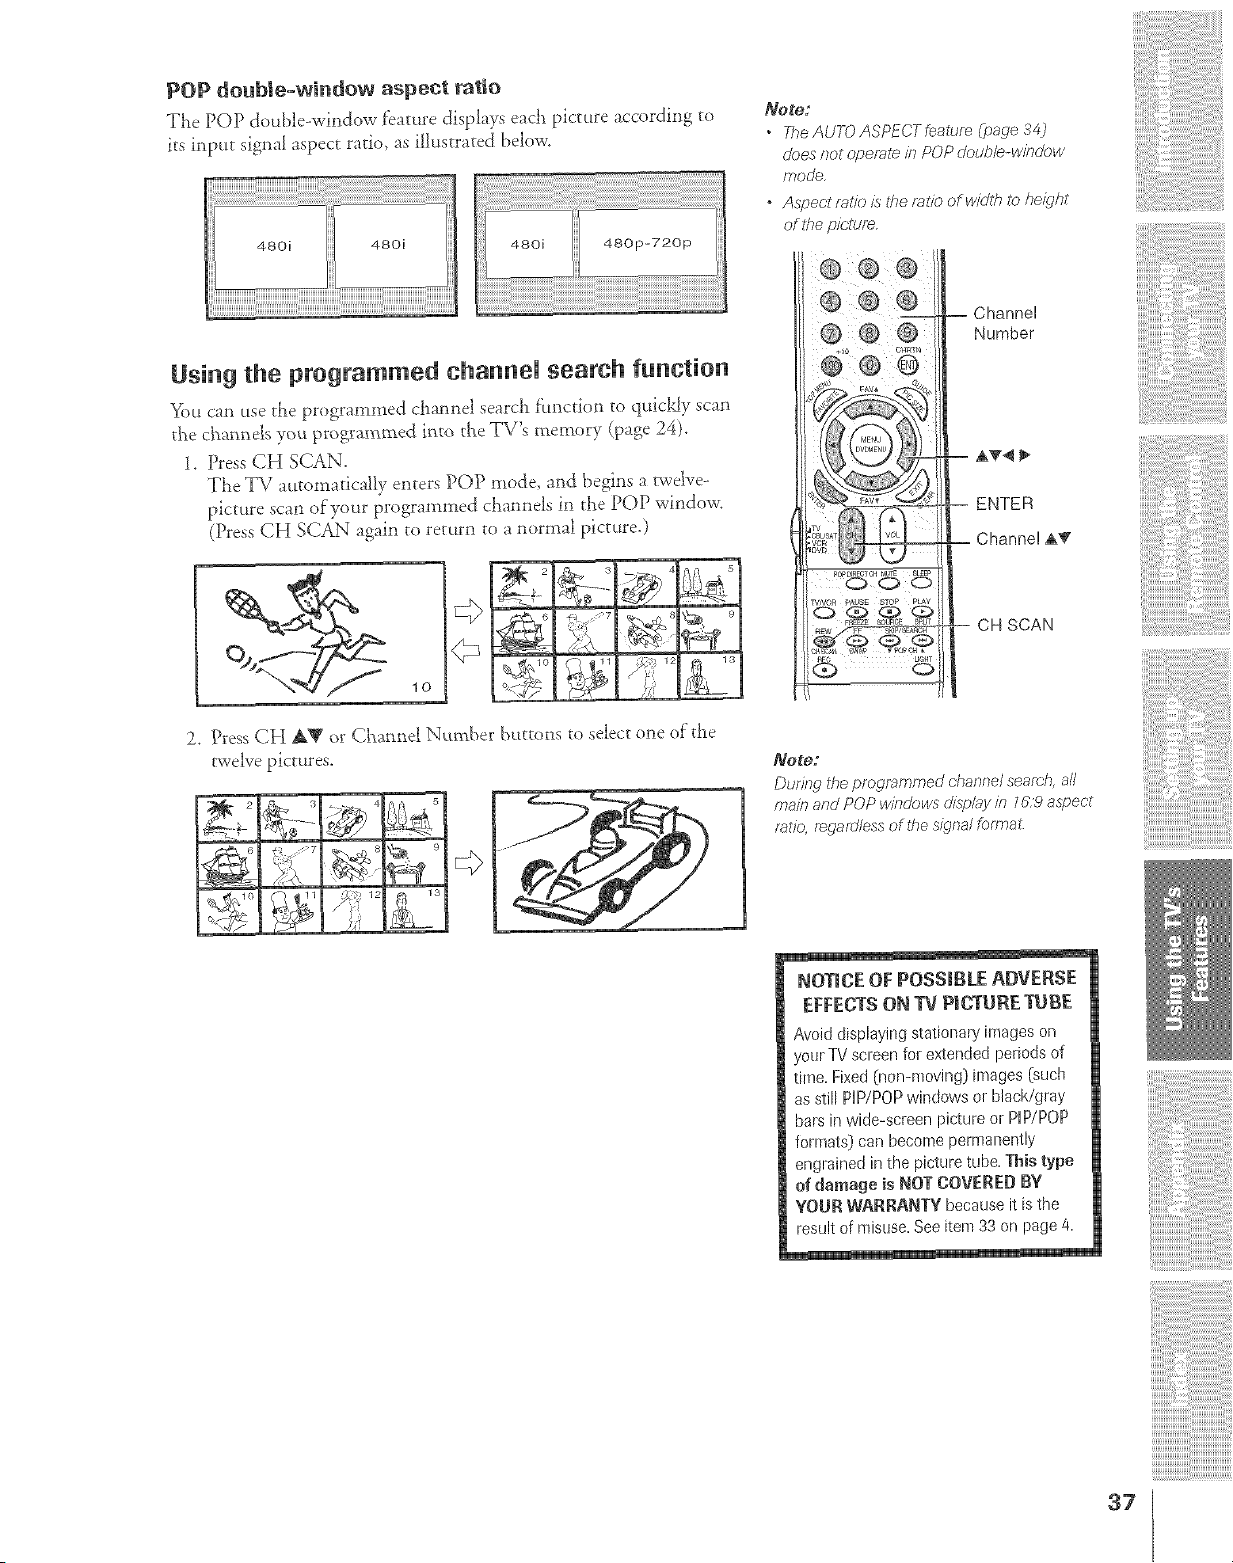
POP douMe-wJndow aspect ratio
The POP double-window f'eatttre displays each picture according to
its input signal aspect ratio, as illustrated below.
4eoi
Using the programmed channel search function
YOU can use tt?e programmed ctaannd searda fimction to quickJy scan
tl',e cl-_annelsyou programmed into tb_eTV's r_temory (page 24).
1. Press CH SCAN.
The TV automatically enters POP mode, and begins a rwdve-
picture scan of your programmed clm*mels in the POP window.
(Press CH SCAN again to return to a normal picture.)
2. Press CH _,W or Chaane[ Nvmxber buttoas to select one of the
twelve pictures.
Note:
The AUTO ASP_-CT feal_re (p_ge ;¢4)
d_)es not opeml_ in POP double-window
mode,
o Aspectmtio is the ratio ofwidlh lo height
of lf_e picture.
@ ® @
_NO_ pAUSE STOP P_Y
-- Channel
Number
-- _,_ _.
-- ENTER
-_ Channel A_r
-- CH SCAN
NO$O:
Durin_ the pregncmmed channel scarab, all
main and POP windows"d;spl_vin l t.t:9a#)ec'/
rat/e, t_gaulless of the signalforma_t
NOTICE OF POSSIBLE ADVERSE
EFFECTS ON 13/P|CgURE TUBE
Avoid displaying stationary images on
your TV scieen for extended periods of
time. Fixed (non-moving) }mages [such
as still NP/POP windows or black/gray
bars in wide-screen picture or PiP/POP
formats) can become permartently
engrained in the picture tube. This type
d damage is NOT COVERED BY
YOUR WARRANTY because it is the
lesult of misuse.Seeitem 33 on page 4.
37
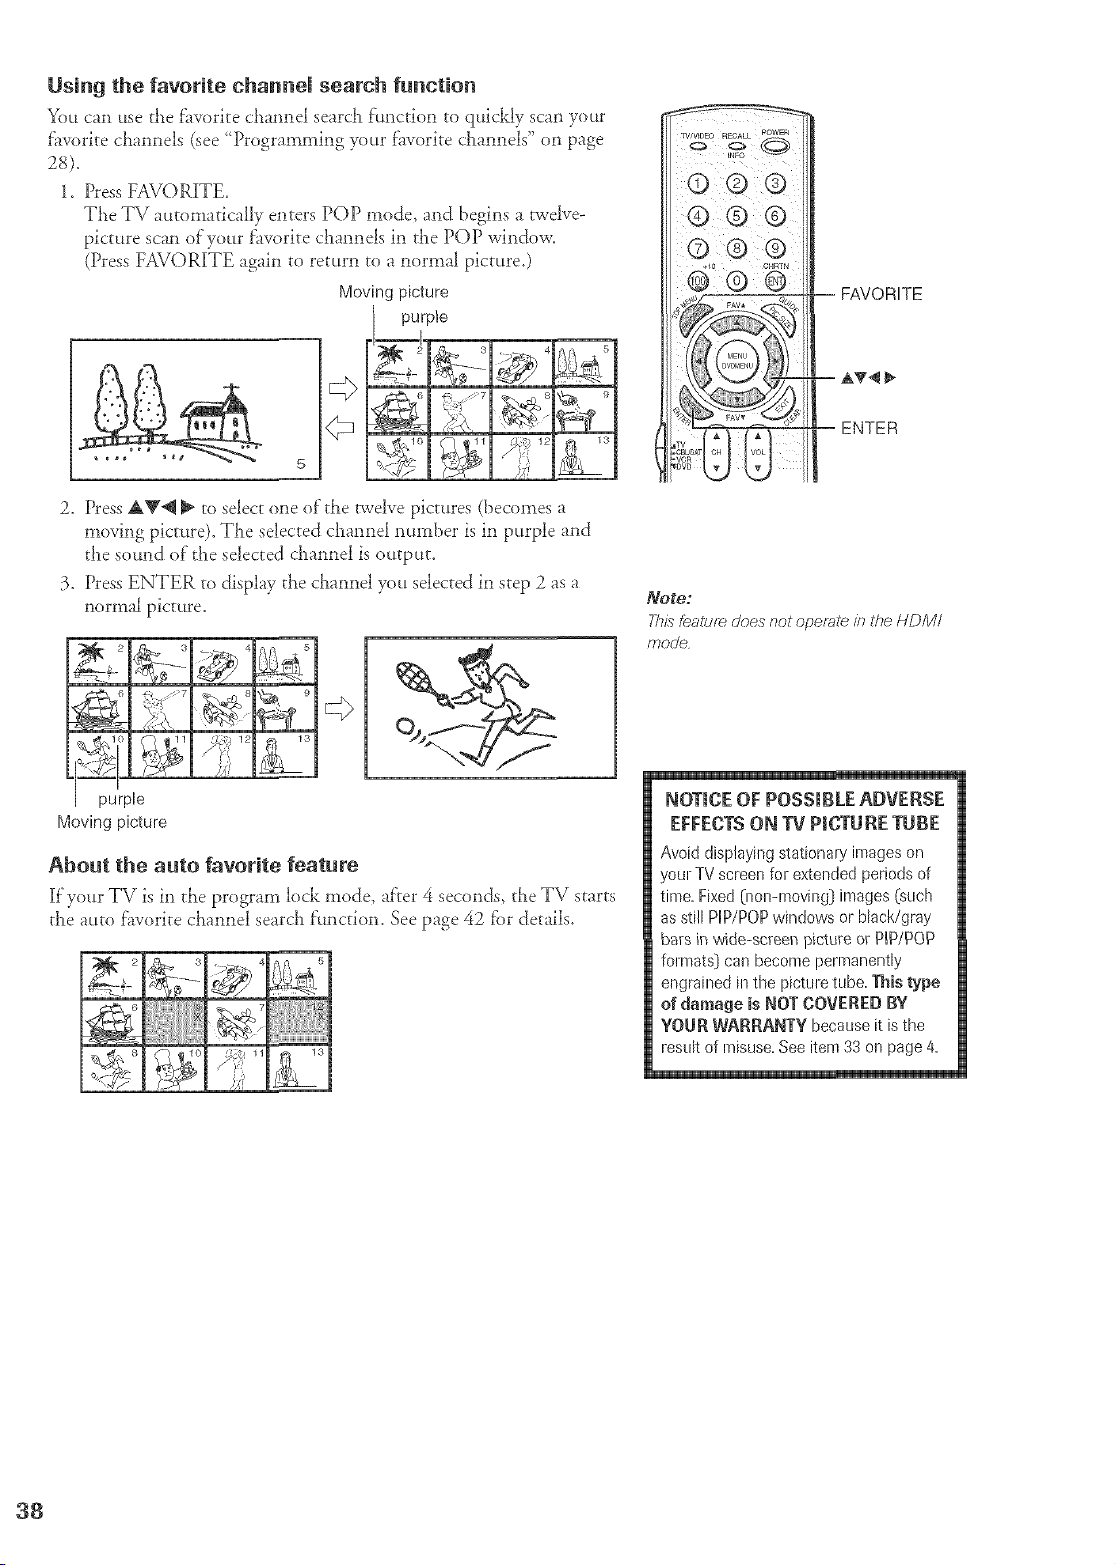
Using the favorite channel search function
You can use tLe f'avorite cLannel search function to quickly scan your
f'avorite cLannels (see ' Programming your f'avorite cLannels" on page
1. Press FAVORITE.
TLe TV automatically enters POP mode, and begins a twelve-
picture scan of your f2_voritecLannels in tLe POP window.
(Press FAVORITE again to return to a normal picture.)
Moving picture
purple
2. Press AV_ _ to select one of tile twelve pictures (becomes a
moving picture), TLe selected cLannel number is in purple and
the sound of"tLe selected cLannel is output,
3. Press ENTER to display the cLannel you selected in step 2 as a
normal picture.
purple
Moving picture
Aboet the aeto favorite featere
[f your TV is in tLe program lock mode, af'rer 4 seconds, tLe TV starts
tile attto f'avorite cLannel searcL f:unction. See page 42 for details.
Q ® ®
ENTER
_Ole,
This Leatu;_ does not ope;ste /n the HDM/
mode
NOTICE OF POSSIBLE ADVERSE
EFFECTS ON TV PIOT[IRETUBE
Avoiddisplayingstationaryimageson
yourTVscreenforextendedperiodsof
time,FixedO_on=moving} images (such
asstill PiP/POPwindowsorblack/gray
barsin wide-screenpicture or P_P/POP
fommts) can become permanently
engrained in the picttn e tube,Thistype
of damage is NOTCOVEREDBY
YOURWARRANTYbecauseit isthe
resultof misuse,Seeitem33onpage4,
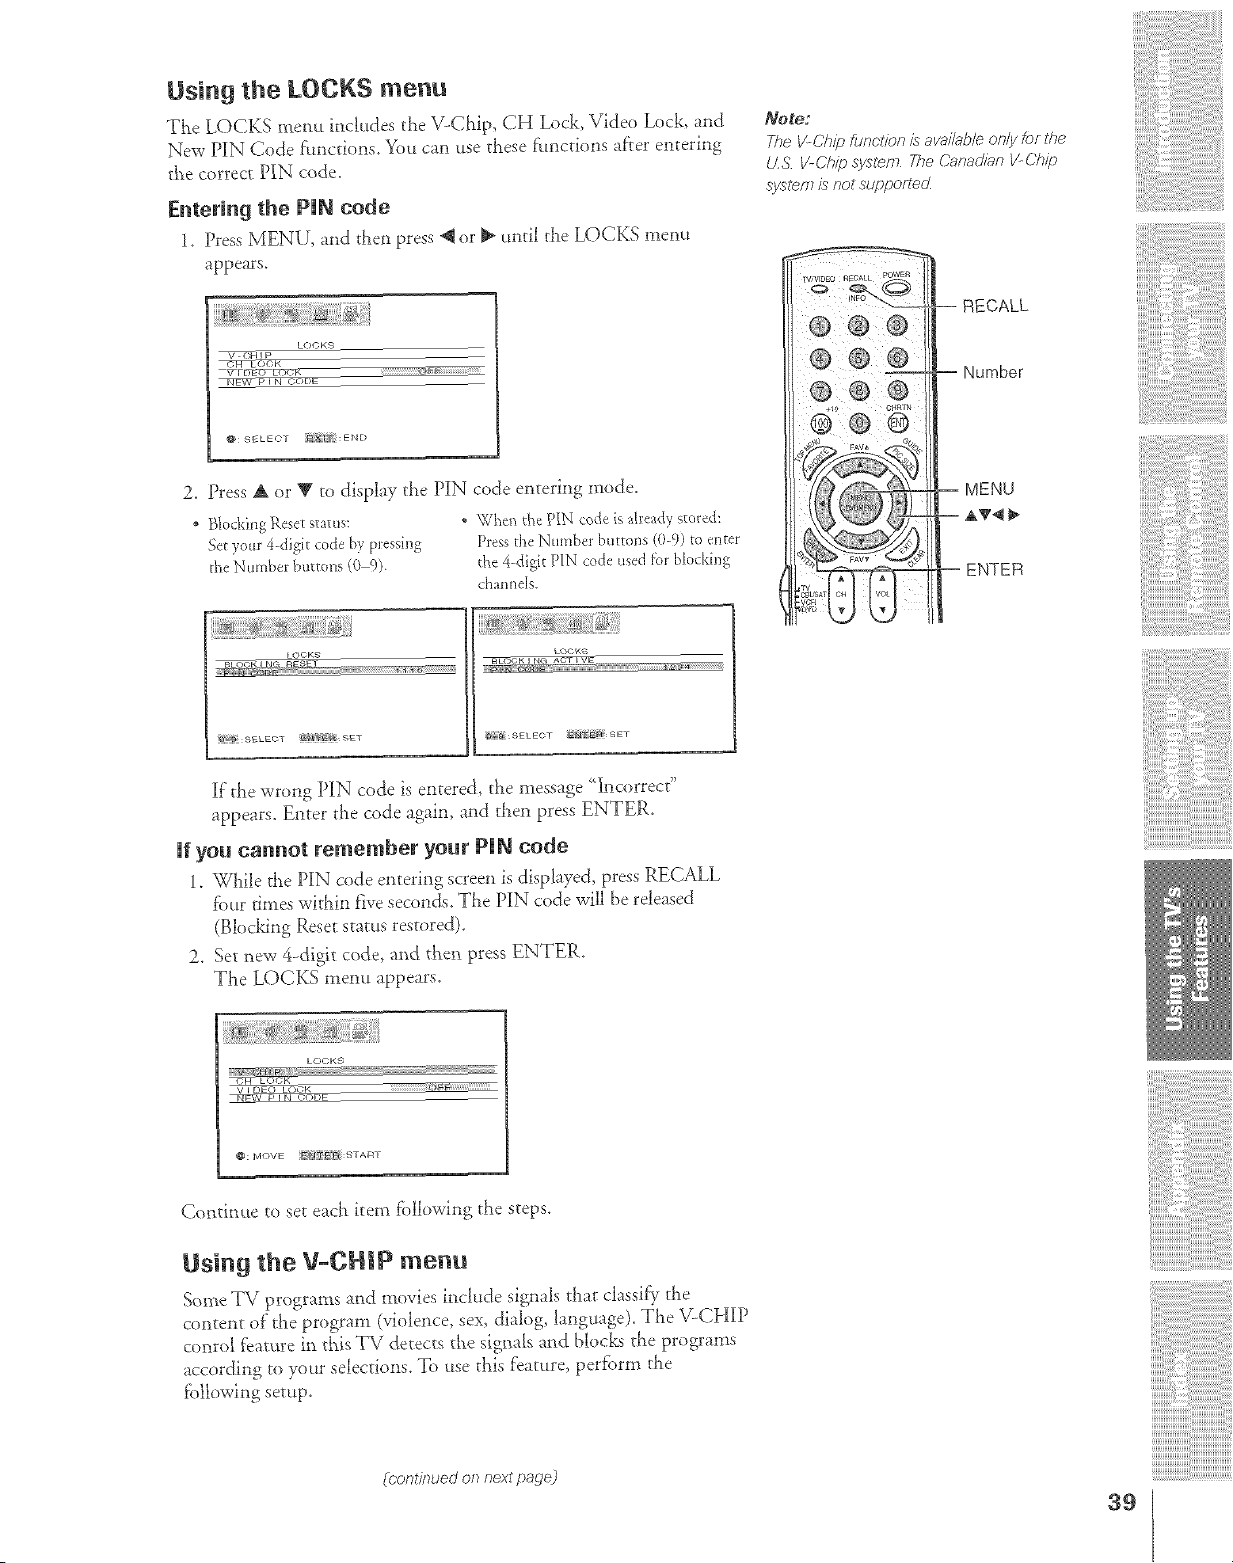
Using the LOCKS menu
The LOCKS menu inckuJes the V-Chip, CH Lock, Video Lock_ and
New PIN Code fimcdons. You can use these f:_mcdons after entering
_he correct PIN code.
Entering the PUN code
1. Press MENU, and then press @ or _ until the LOCKS menu
appears.
LOCKS
V OHI P
'WFET_#_ EC)OiZ
_)DE
_: SELEOT _;_" :END
2. Press A or V to display the PIN code entering mode.
• Blocking Rese_status: * Whe_ the PIN code isalready stored:
Set your 4-digit code by pressing Dess the Number burro*is(0-9) to enter
the Number buttons (0 9). the 4-digit PIN code used f_r blockh%
channels.
Note;
The V-Ch/io &nc.tion is ava&b/e on/;/for the
tZS V-Ch@ system 27e Canadian I/C('hip
sysl_/7?is <lot suppofiecZ
--RECALL
Number
MENU
AT4_
ENTER
LOOKS L(_ KS
BLOOK i NG ACT _ VE
If the wrong PIN code is entered, the message <Incorrect"
appears. Eliter c}lecode agahl, and t/_en press ENTER.
Ufyou cannot remember your PUN code
1. While the PIN code entering screen is displayed, press RECALL
fbur times widli_l f_veseconds. Tile PIN code wi]_ be released
(BlockJng Reset stares restored}.
2. Set new 4-digit code, and dxen press ENTER.
The LOCKS _l:len_tappears.
LOCK9
V E )EO LOCK
_ _)E>E
_: MOVE f- T _:START
Continue to set eac_ kern fbllowing the steps.
Usi#g the V-CH}P me#u
Some TV programs and movies include signals that classify the
content of the program (violence, sex, dialog, language). The V-CHIP
conrol feature in this TV detects the signals and blocks the programs
according to your selections. To _tsethis _ature, peKbrm the
fbllowing setup.
_cont/7?ued on next pa_)e)
39
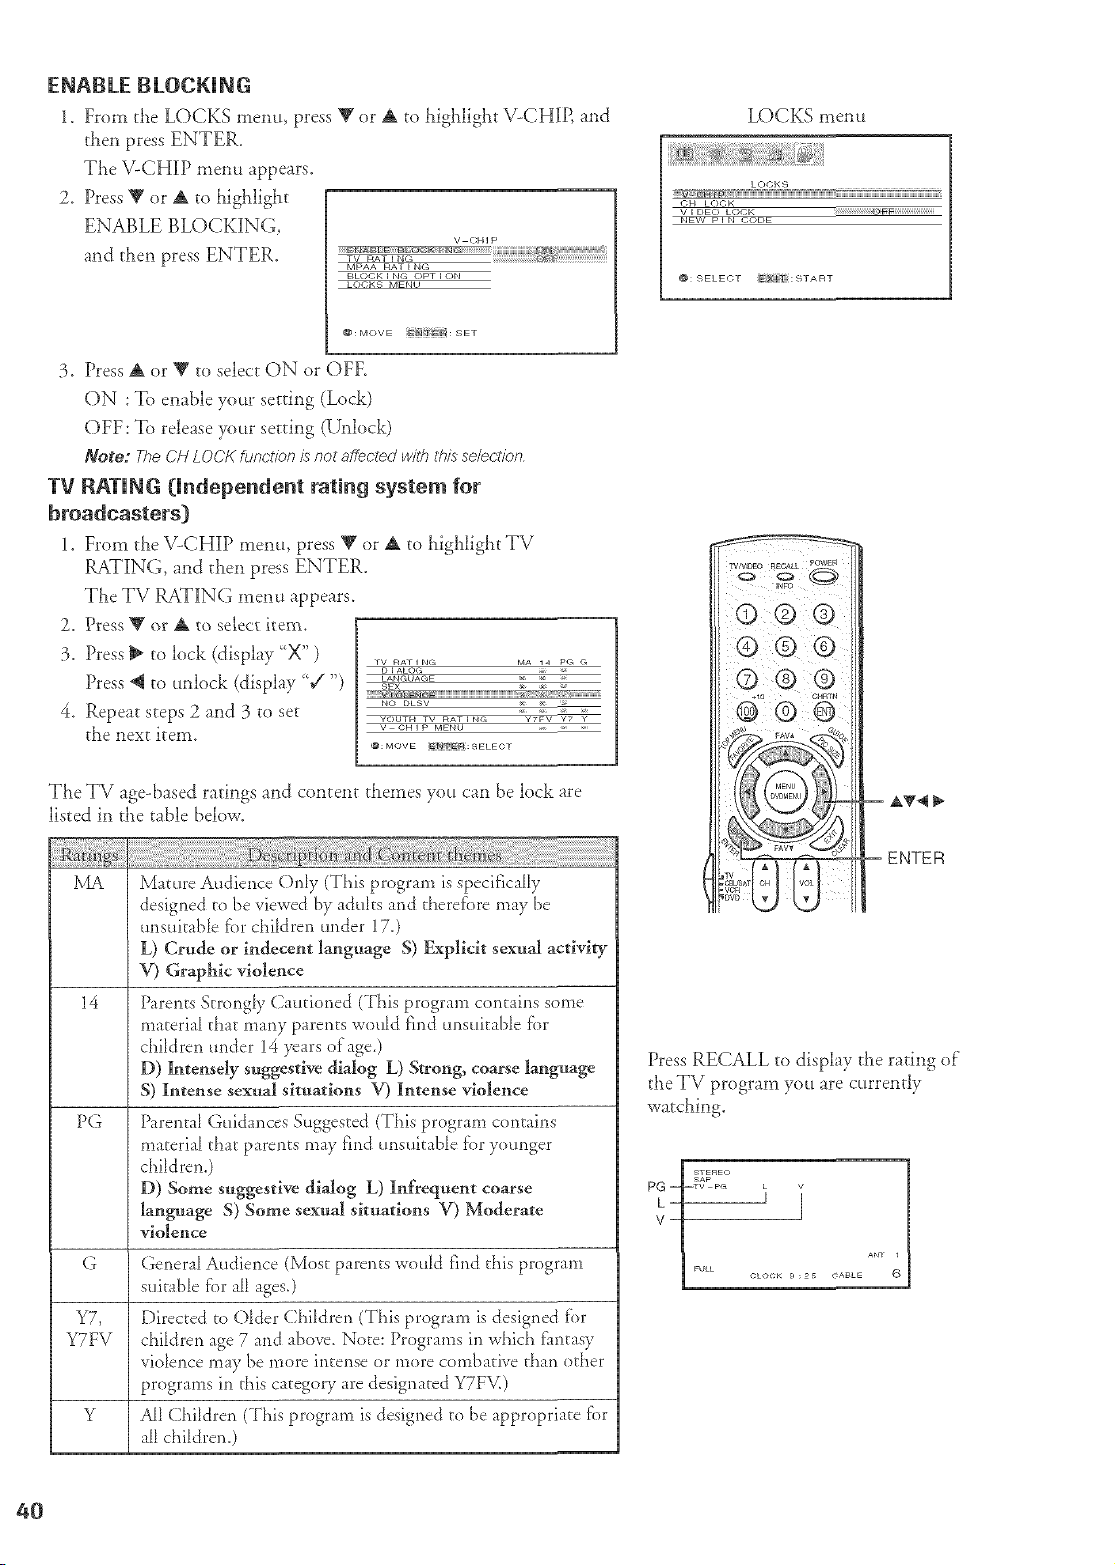
ENABZE BE.OCKuNG
1. From the LOCKS memo, press _ or & to highligllt V-CHIP, and
then press ENTER.
The V-CHIP menu appears.
2. Press V or A to hig!_ligbt
ENABLE BLOCKING,
and then press ENTER.
v CHIP
:::::E N_ B_E _BiL¸Q_ _ I::IN_ _ %iiiiiiiiiiiiiiiiiiiiiii_i_ N _i@i!i!i!i!i!i!i!i!i!i!i!iiiii
MPAA RAT I NG
BLOCK I NG OPT ION
LOCKS MENU
@: MOVE SET
3. Press A or _' to select ON or OFE
ON : To enable your setting (Lock)
OFF:To release your setting (Unlock)
Note: The CH LOCK fuf_(;tion is not affected w/?h #_isse/ec'tion
TV RATING [IBdepeBdeBt ratiBg system for
broadcasters[}
1. From the V-CHIP memt, press Rgor & to highlight TV
RATING, and then press ENTER.
The TV RATING menu appears.
2. Press _ or A to select item,
3. Press _ to lock (display "X")
Press @ to unlock (display %/")
4. Repeat steps 2 and 3 to set
the next item,
TV RATING MA 14 PG G
I ALOG _ T
LANGUAGE x x _
SEX _ _ -
NO DLSV _
YOUTM TV RAT IN<'_ YTFV Y7 Y
V OH I P MENU _
The TV age-based ratings and content themes you can be lock are
listed in the table below,
MA Mature Audience Only (This program is specifically
designed to be viewed by adults and there_i)re may be
unsuitable fbr children under 17.)
L) Crude or iudecent lagtguage S) Explicit sexual activity
V) Gral?hic violence
14 Parents Strongly (;audoned (This program contains some
material dmt many parents wnuld find unsuitable f_)r
children under 14 years of age.)
I)) htteuse_y suggestive didog L) Strong, coarse language
S) Intense sexual situations V) Intense violence
PG
Parental Guidances Suggested (This program contains
materia_ that parents may find unsuitable f_)r younger
children,)
D) Some suggestive dialog L) Iufrequent coarse
language S) Some sexual situations V) Moderate
violence
G General Audience (Most parents wnu[d find this program
suitable fi)r a_l ages.)
Y7, Directed to O_der Children (This program is designed fbr
Y7FV children age 7 and above. Note: Programs in which f:antasy
violence may be more intense or more combative dmn ndaer
programs in this category are designated Y7FM)
Y All Children (This program is designed to be appropriate _i)r
a_l childrem)
LOCKS menu
LOCKS
:::::::::::::::::::::::::::::::::::::::::::::::::::::::::::::::::::::::::::::::::::::........................................................................................
_: 9ELECT i_{: START
Press RECALL to display the rating of
the TV program you are currently
watching.
ANT 1
CLOCK _ ; 2 _ C_ABLE @
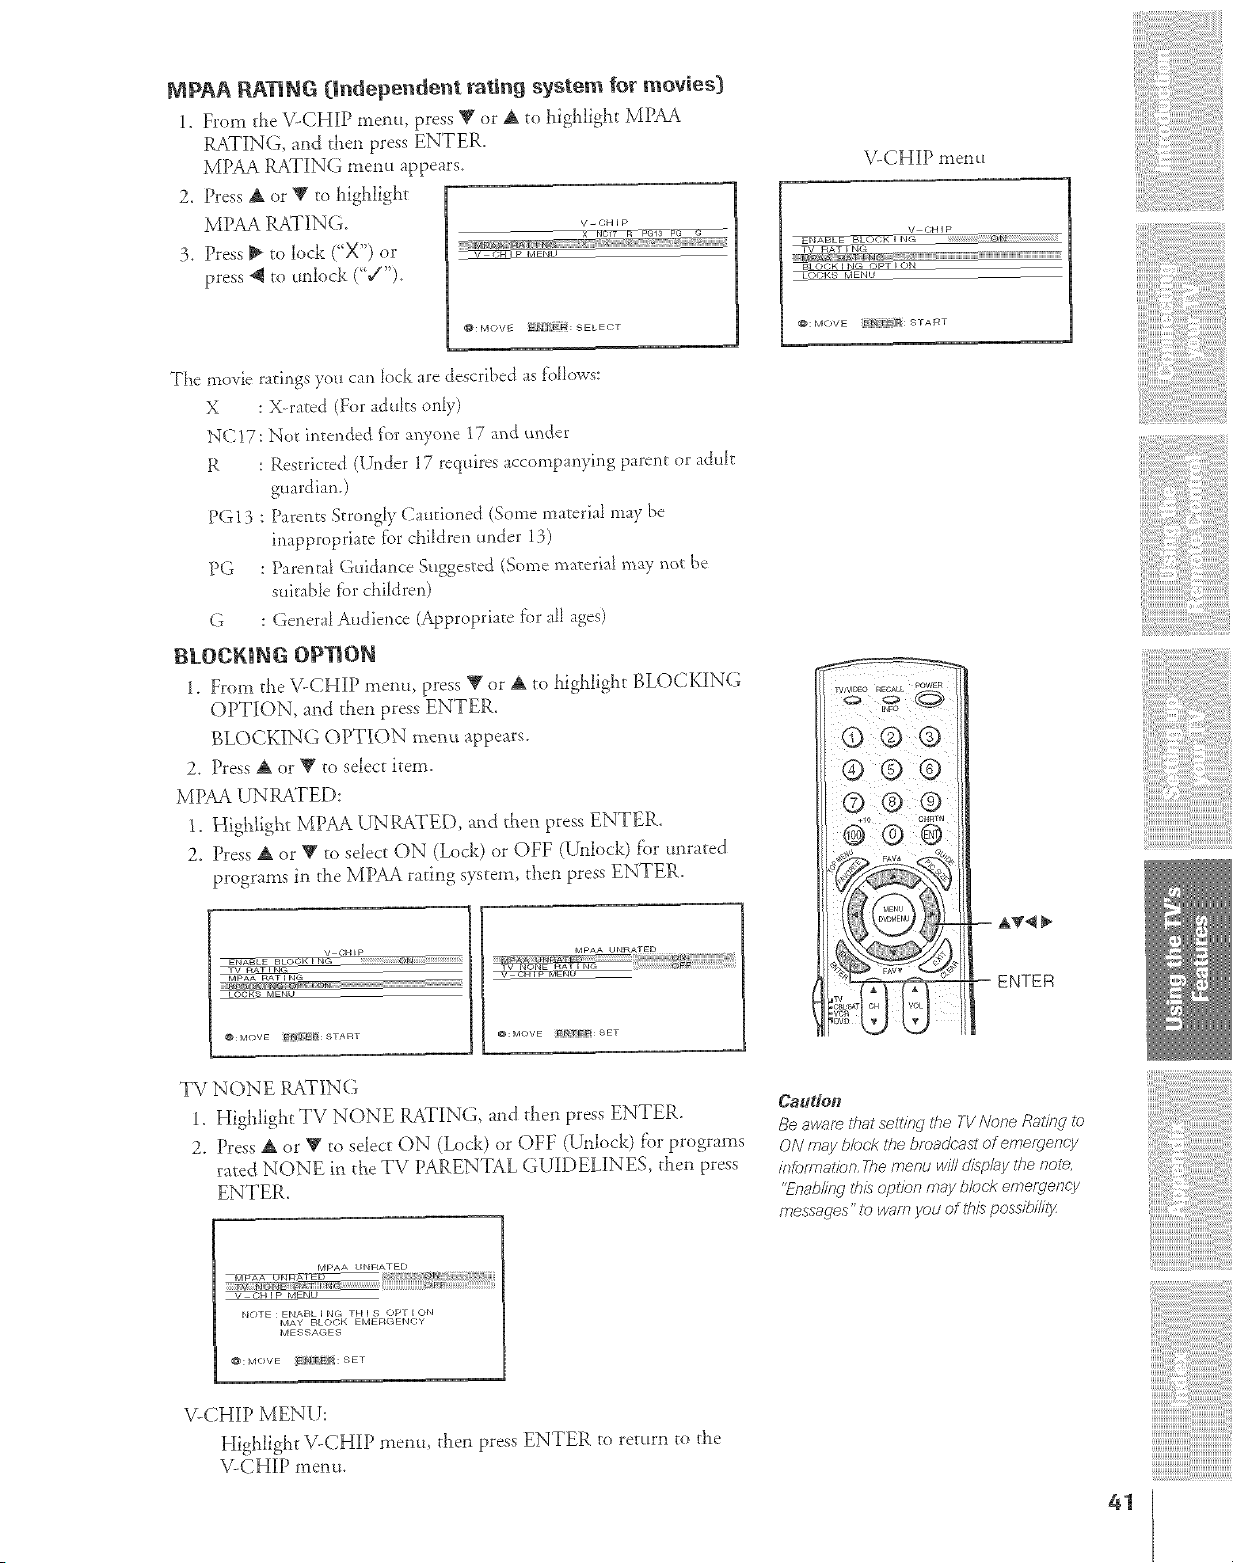
MPAA RATING (independent rating system for movies)
1. From the ILCHIP menu, press V or A to highlight MPAA
RATIN& and then press ENTER,
MPAA RATING mem_ appears.
2. Press A or _1'to highlight
MPAA RATING,
V-CHIP
3. Press !i to lock ("X") or ..............
press 4! to unlock (%/").
_: MOVE PN]T'_i_ : SELECT
The movie ratings you can _ock are described as tbHows:
X : X rated (For aduks only)
NC!7: No_ intended f2_ranyone 17 and under
R : Restricted ({k_der 17 requires accompanying parent or aduIt
guardian.)
PG 13 : Parents Strongly Cautioned (Some material may be
inapproprla_e fbr children under 13)
PG : Parental Guidance Suggested (Some maveria{may noc be
suirabD _brchildren)
G : General Audience (Appropriate f{)rall ages)
BLOCKING OPgiON
1. From the V-CHIP menu, press T or _i to highlight BLOCKING
OPTION, and then press ENTER.
BLOCKING OPTION menu appears.
2. Press At or V to select item.
MPAA UNRATED:
1. Highlight MPAA UNRATED, and then press ENTER.
2. Press At or _t' to select ON (Lock) or OFF (Unlock) lbr unrated
programs in the MPAA raring system, then press ENTER.
V CHIp
__ _0 N
v RAT NC_ ----
MPAA RATING
O(;K-_ ENU
MpAA UNRATED
t_: MOVE _ _: SET
ILCHIP men u
V t'TH I p
ENABLE f4LOCK J NO :::::::::::::::::::::::::::::::
LOOKS IvlEN U
@: MOVE _: START
® ®®
ENTER
ii
TV NONE RATING
1. Higialight TV NONE RATING, and then press ENTER.
2. Press A or T to sdect ON (Lock) or OFF (Unlock) for programs
rated NONE ia the TV PARENTAL GUIDELINES then press
ENTER.
MPAA I JNRATED
_rq P_A UIvrRr_/- >a'o _ N
V {;HI MENL
NOTE : ENAE]L I NG TH I S OPT I ON
MAY BLC)C)K EMERGENCy
MESSAGES
MOVE N_O: SE r
V-CHIP MENU:
Highlight V-CHIP menu, then press ENTER to return to the
V_CHIP menu+
Caution
8e swafs £hat ssJtif_g the 7-11A/oA,eRsii/_ to
ON may b/or,,k the bmadc, ast of emergency
/)?[_ffY?St/O[?T/_P,f_#L'U HI/IIO'/S/2/,5'j/1,1_8£018,
'_n_4@/ingt/tD Optl'O/?ffEYi b/()ok et_Tefgenc:y
me.s,sagas" to u/am yod of this pOSSli)lJlT)f
i{¸!¸i¸7¸!¸i¸7¸!¸i
'77
41
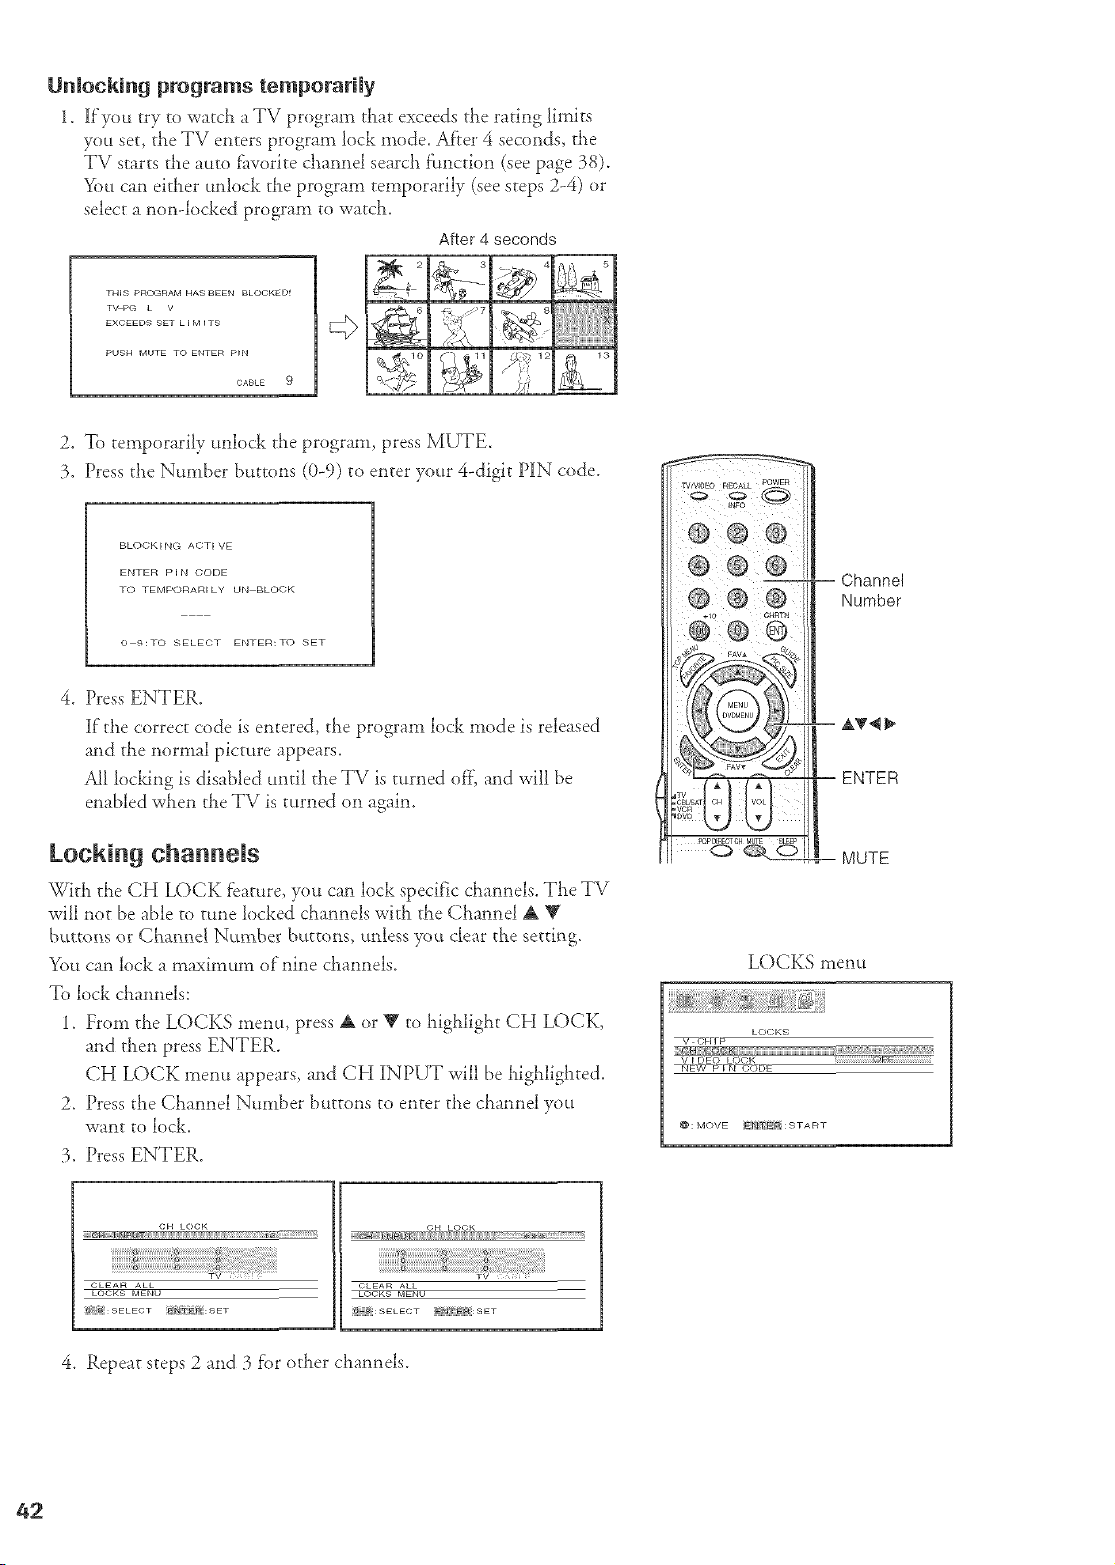
UnMcking programs temporarily
1. If'you try to watch a TV program that exceeds the rating limits
you set, the IV enters program lock mode, Af}ei 4 seconds_ the
TV starts the auto f_worite channel search ftmction (see page 38).
_)u can either unlock the program temporarily (see steps 2-4) or
select a non-locked program to watch.
After 4 seconds
THIS PR<_¢RAM HASBEEN BLOCKED_
T_PG • V
EXCEEDS SET •l M _T9
CABLE 9
<>
2. To temporarily unlock the program, press MUTE.
3. Press the Number buttons (0-9) to enter your 4-digit PIN code.
BLOC;KING ACTIVE
ENTER PIN ()ODE
TO TEMPORARILY UN BLOCK
0 9:TO SELECT ENTER:TO SET
4. Press ENTER.
If"the correct code is entered, the program lock mode is released
and the normal picture appears.
All locking is disabled until the TV is turned of}', and will be
enabled when the TV is turned on again.
LocMng channels
With the CH LOCK feature, you can lock specific channels. The TV
will not be able to tune locked cimnnels with the Cimnnel A IV
buttonsorChamle[Number butrom;,unlessyouclearthe.'_etthlD
You can lock a maximum of"nine channels.
To lock channels:
1. From the LOCKS menu, press A or Y to highlight CH LOCK,
and then press ENTER.
CH LOCK menu appears, and CH INPUT will be higiJighted.
2. Press the Channel Number buttons to enter the channel you
want to lock.
3. Press ENTER.
Channel
Number
ENTER
MUTE
LOCKS menu
LOCK9
_FTp
_T%_cg
_9"_P F_DE-
@: MOVE _ ]_:gTART
CLEAR ALL
LOCKS MENU
OH LOOK
CLEAR AL•
• OCKS MENU
(_ _:SEEECT _ _:SET
4. Repeat steps 2 and 3 f'or other channels.
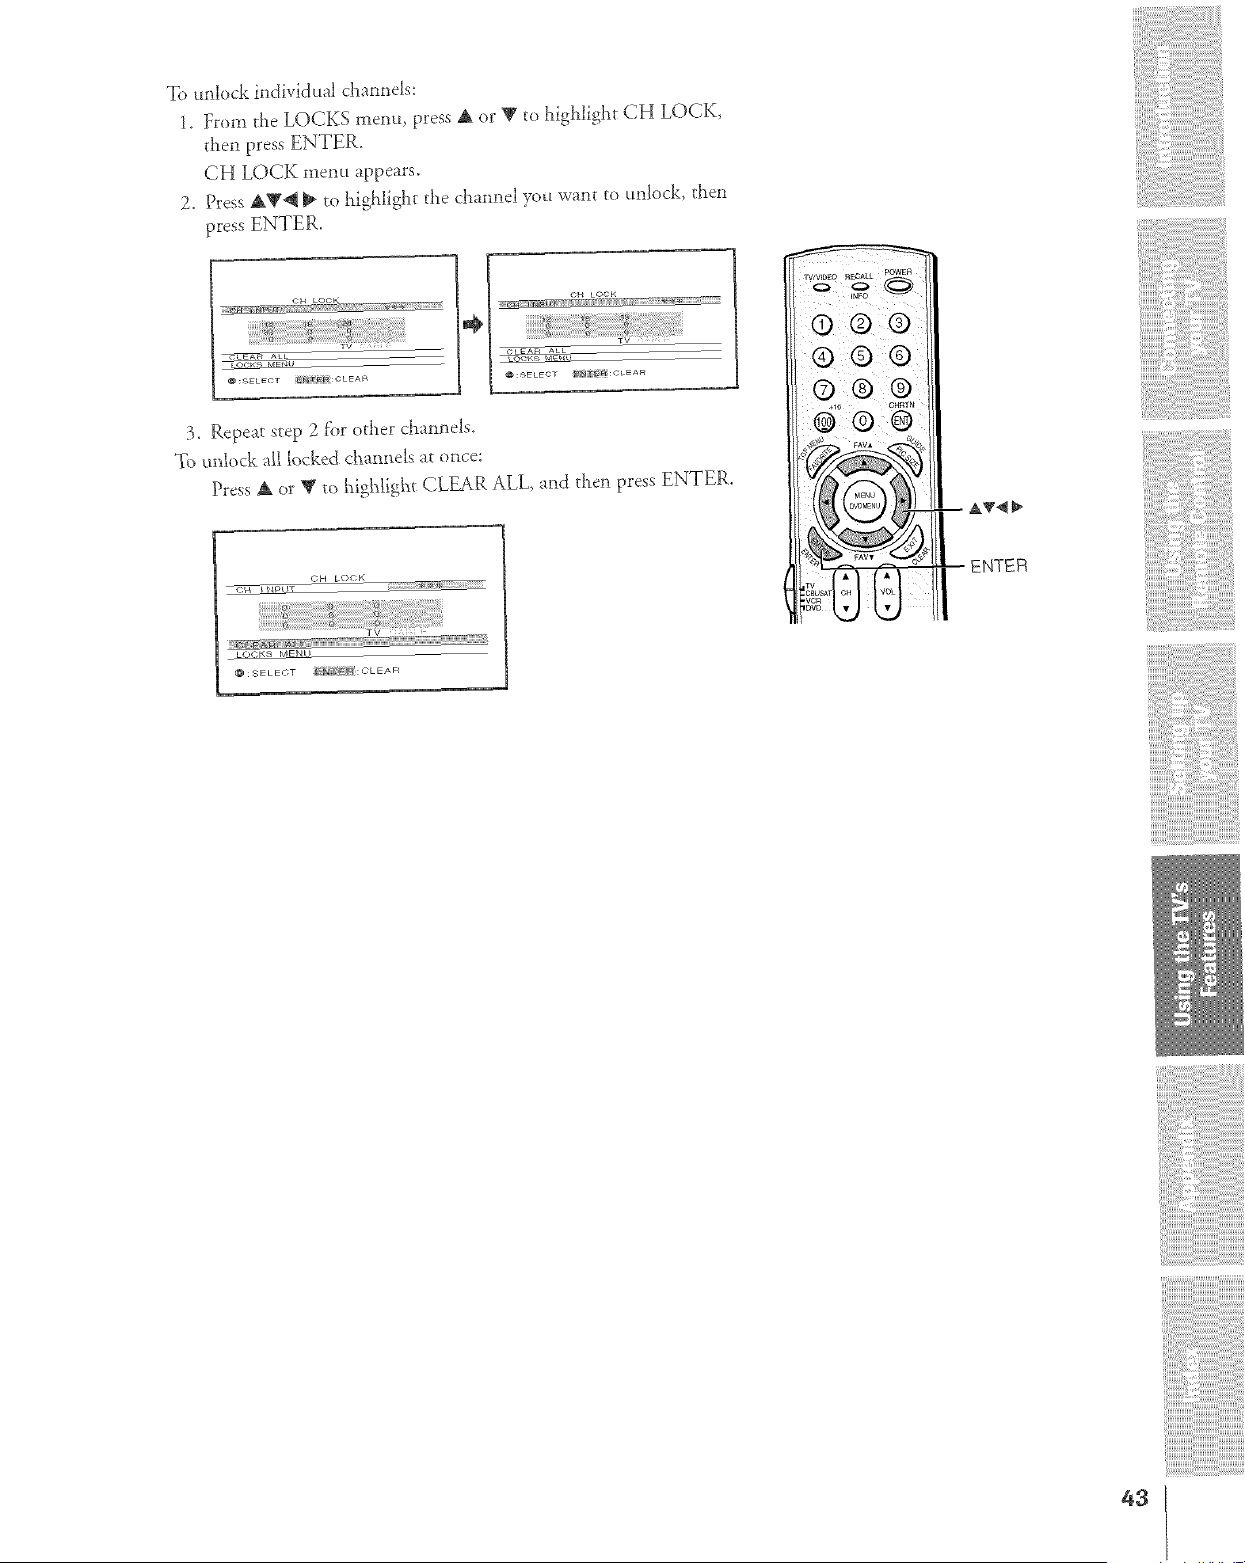
Tounlockindividualchannds:
1. FromtheLOCKS menu, press A or T to highlight CH LOCK,
then press ENTER.
CH LOCK mentt appears.
2. Press AT@ _ to highlight the channel you want to unlock, then
press ENTER.
cH LOOK
Ak_
_U
@=SELECT g*_'F_N:<;L EAR
3. Repeat step "2fbr other channels.
']2_unlock a[[ locked chatme[s at once:
Press A or T to l_igh%ht CLEAR ALL, and tllen press ENTER.
OH LOCK
ENTER
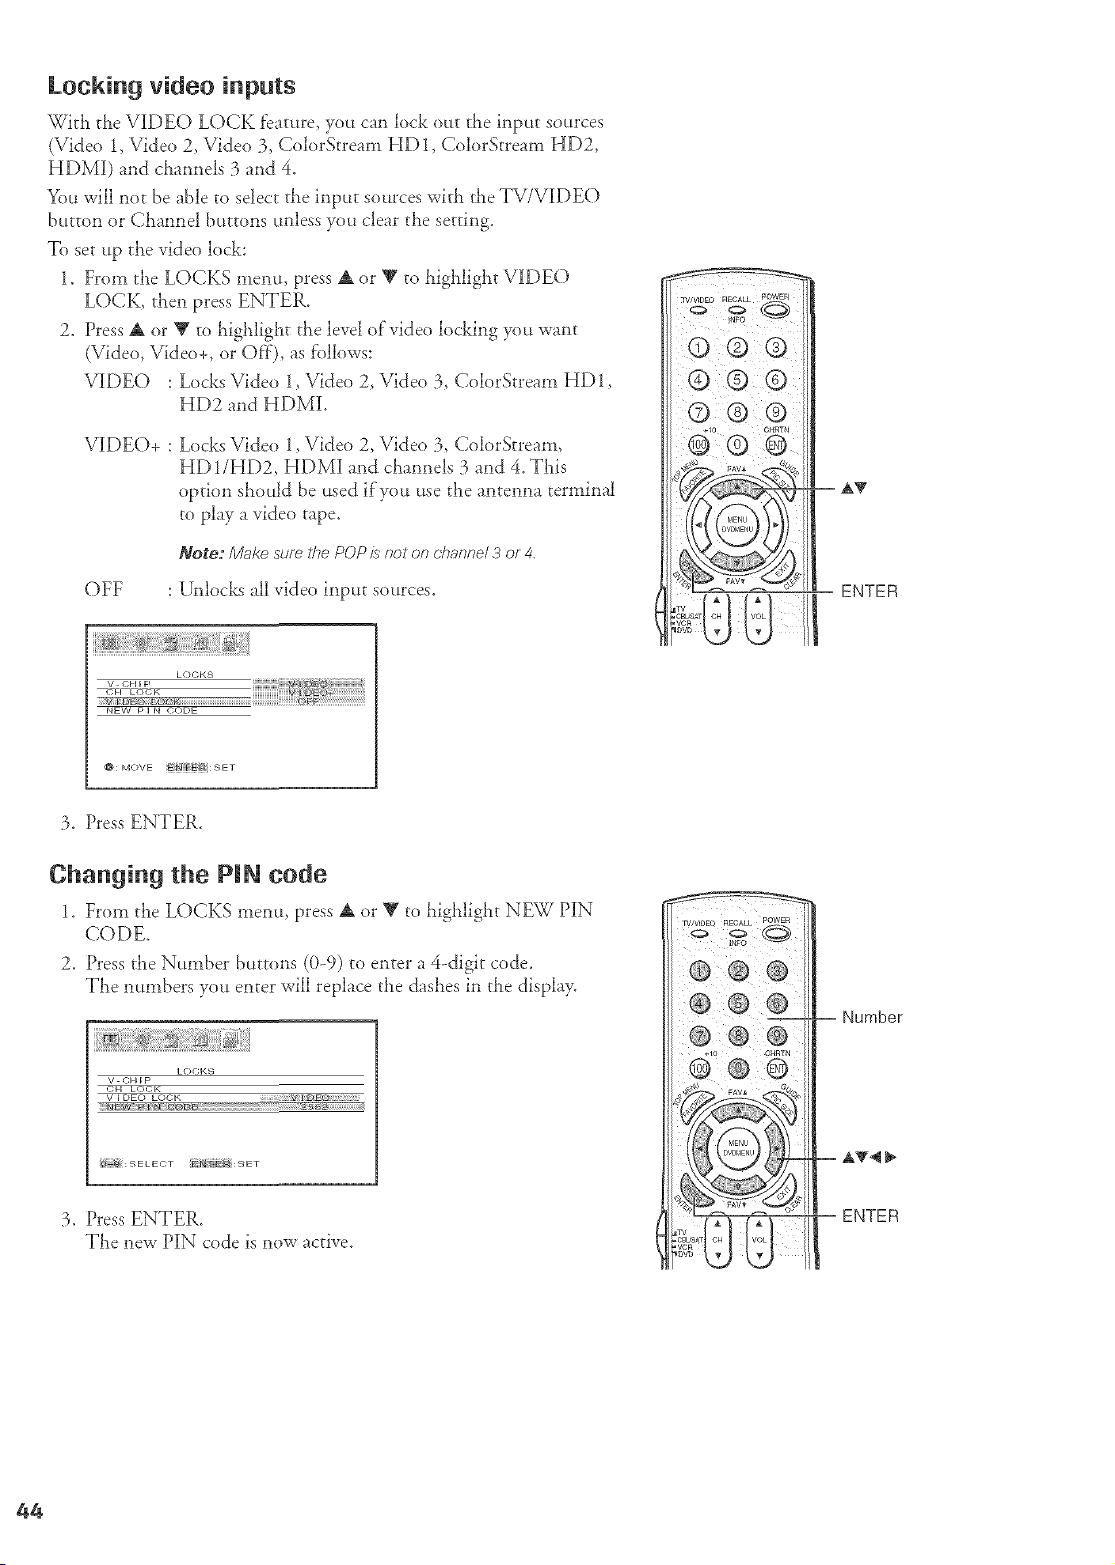
Locking video inputs
With the VIDEO LOCK feature, you can lock out the input sources
(Vide() 1, Video 2, \ride() 3, ColorStream HD 1, ColorStream HD2,
HDMI) and channels 3 and 4.
You will not be able to select the input somces with the TV/VIDEO
button or Cl_annel buttons unless you clear the setting.
To set up the vide() lock:
1. From the LOCKS menu, press A or V to lflghlight VIDEO
LOCK, then press ENTER.
2. Press A or V to highlight the level of'video locking you want
(Video, Video+, or Oft), as f'ollows:
VIDEO : Locks Video 1, Video 2, Video 3, ColorStream HD1,
HD2 and HDMI.
VIDEO+ : Locks Video 1, Video 2, Vide() 3, ColorStream,
HD1/HD2, HDMI and channels 3 and 4. This
option should be used if'you use the antenna terminal
to play a video tape.
OFF
Note: Make sure the POP/s not on channel 3 or 4.
: Unlocks all video input sources.
ENTER
LOCKS
v CHI P
iiiiiiiiiiiiiii
BIEVV P I N CODE
@: MOVE _t-l_[ E'_ : SET
3. Press ENTER.
Changing the PIN code
1. From the LOCKS menu, press A or Y to highlight NEW ][)IN
CODE°
2. Press the Number buttons (0-9) to enter a 4-digit code.
The numbers you enter will replace the dashes in the display.
LOCKS
V CHIP
CH LC)CK
V I DEO LOCK H : i !_DEO
1_ _ q : .q E L E OT NJ [E :: 9 E •
3. Press ENTER.
The new PIN code is now active.
= Number
ENTER
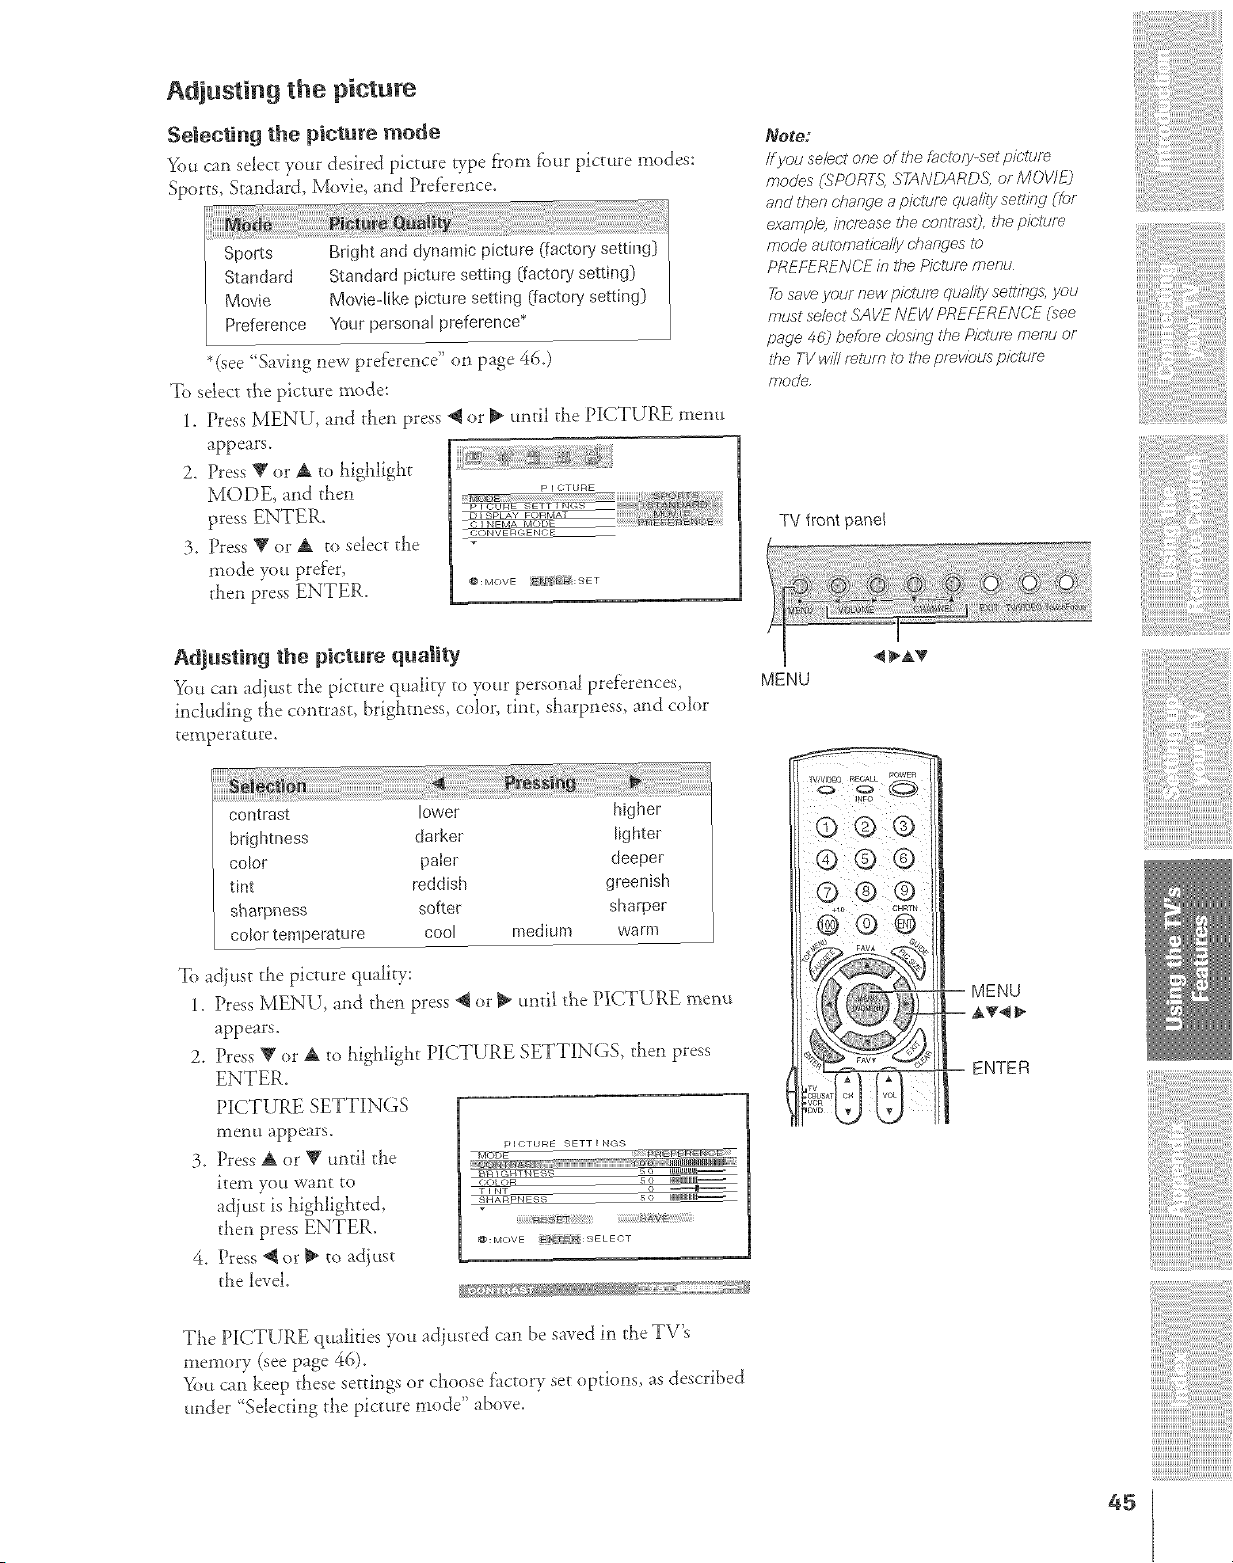
Adjusting the picture
Selecting the picture mode
You can select your desired picture wpe f?om fbur picture modes:
Sports, Standard, Movie, and Preference.
Sports
Standad
Movie
Prefelence
Bright and dynamic picture (fsctol}, setting)
Standard picture setting (factory setting)
Mov[ed[ke picture setting (factory setting)
Your personal preference*
*(see "Saving new preference" on page 46.)
To select the picture mode:
1. Press MENU, and then press _ or _ until the PICTURE menu
appears.
2. Dess T or A to _dgh_ght
MODE, and then
3. Press W or A to select the
mode you prefer,
then press ENTER.
CONVE RGENC;E
Adjusting the picture quaIRy
You can adjust the picture quality to your personaJpreferences,
inch*ding the contrast, brightness, coh)n tint, sharpness, and color
temperature.
Note;
ff you se/ec't one of fire factory-set picture
modes (SPORT,f,1STANDARDS or MOVJ£)
and then charwe a piclum qua/ity se_ir W (/br
exomp/e, i/_c/ease the c_,?t£#s,9, the 19Jolt.!fF_
mode automalica//y changes to
PREFERENCE in the Picture flleou
Tosave youF new pic'tuf_ qua/ity settings, ynu
must sebct SAVE NEW PREkTRENCE (see
page 462 before (-/os/)Tgthe Pic'lure menu or
fire TV win return t_) lhe previous pie.turn
mo¢]e
TV front panel
MENU
cont_ast lower higher
brightness darker lighter
co_or paIer deeper
tint reddish greenish
sharpness softer shatper
colo_ temperature cool medium warm
To adjust the picture quality:
1. Press MENU, and then press @ or _ until the PICTURE menu
appears.
2. Pre.,;sV or A to highlight PICTURE SETTINGS, then press
ENTER.
PICTURE SETTINGS
menu appears.
3. Press A or W until the
item you want to
adjust is highlighted,
then press ENTER.
4. Press "@or _ to adjust
the level.
pICTURE 9ETT I RGS
_Cyb-_E-
_lq S O
SHARPNESS S_:) IIIIIIIIIIIIII--
@:MOVE _TEDi:gELECT
ff+/';_ s_+Y"F">F_ ,,,,;,,,,fbD,.D_,,,,,DDSSS;,,_
Tt_e PICTURE qualities you adjusted can be saved in the TV_
memory (see page 46).
Yo_tcan keep these settings or choose fhctory set options, as described
under ' Sdecting the picture mode" above_
z +10 CHRTN t
MENU
-- ENTER
45
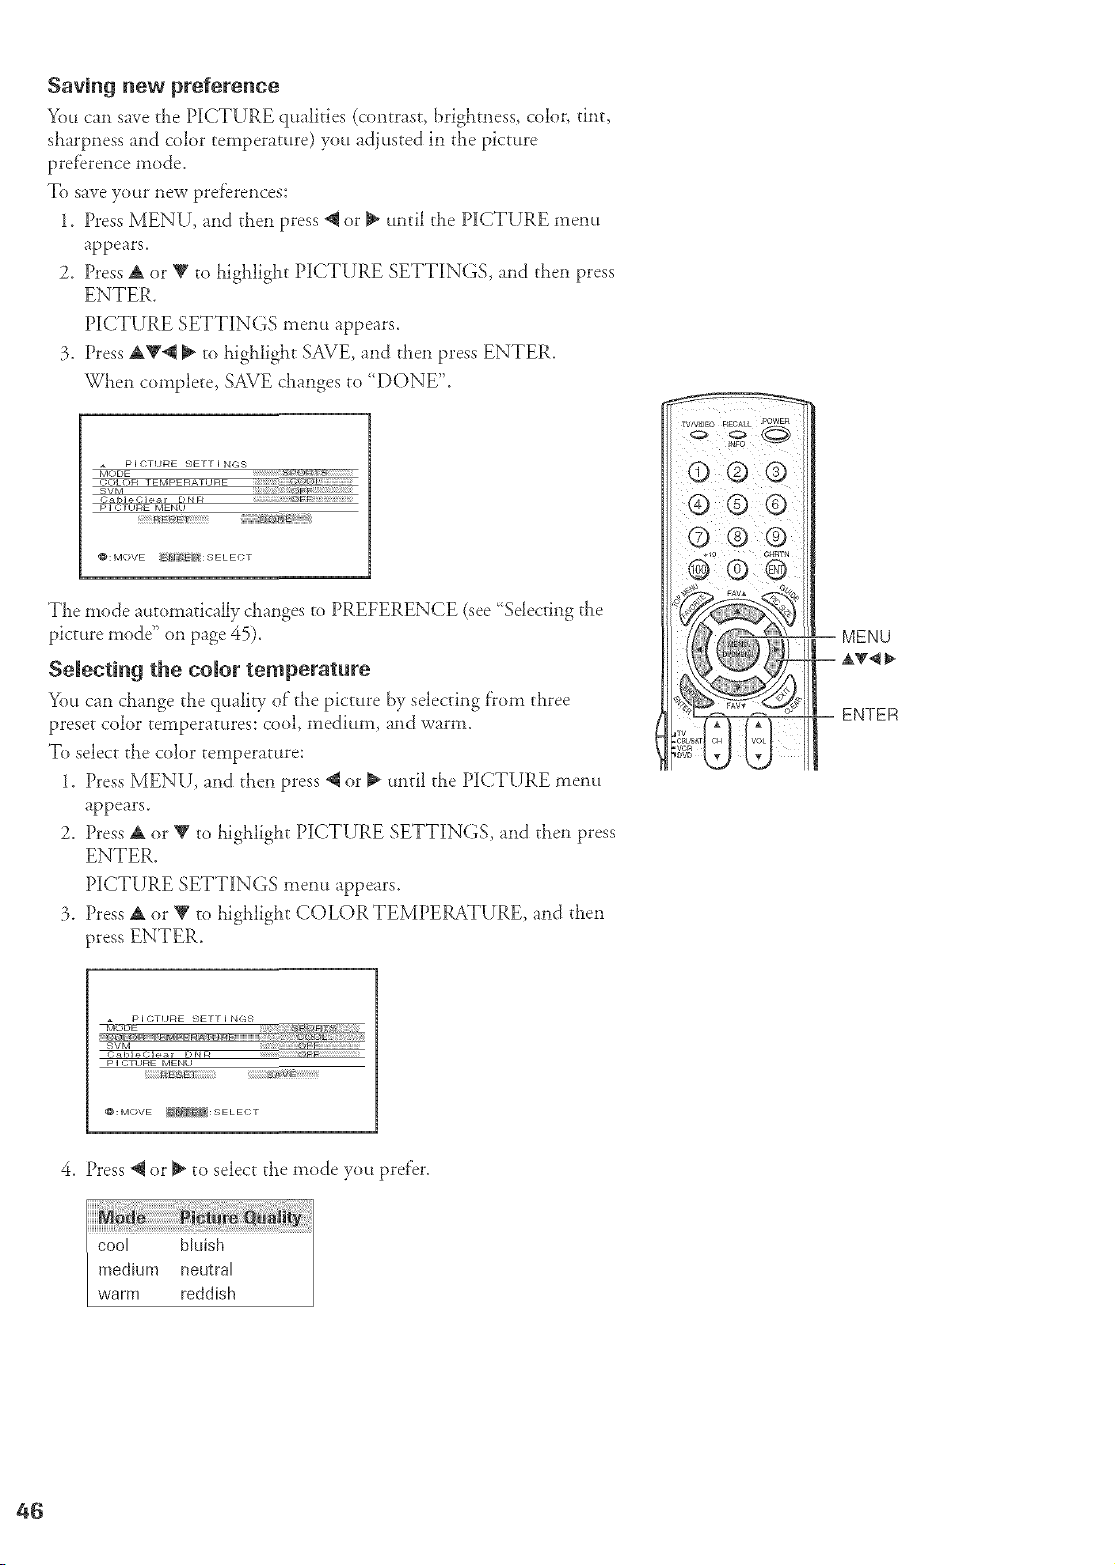
Saving new preference
You can save the PICTURE qualities (contrast, [}rightness, color, tint,
sharpness and color temperat_tre) you adj_tsted in the picture
preference mode.
To save your new preferences:
1. Press MENU, and then press *q or _ until the PICTURE menu
appears.
2. Press A or V to highlight PICTURE SETTINGS, and then press
ENTER.
PICTURE SETTINGS menu appears.
3. Press A_'@ _ to highligtat SAVE, and then press ENTER.
When complete, SAVE changes to '_DONE".
a PICTURE SETTINGS
MODE 2%_Tv_ _
COLOR TEMPERATURE _ _ _ _
C a bl _ C lea r D N R !' @FFi_ _ _ _ ¸¸
P ] {-;T__RE MENU
_: IVlOVE _-[ E'_ : SELECT
The mode automatically &anges m PREFERENCE (see _Sdecting the
picture modg' on page 45).
Selecting the color temperature
You can change the quali V of the picture by selecting f'rom three
preset color temperat_tres: cool, medium, and warm.
To select the color temperature:
1. Press MENU, and then press *_or _ tmti! the PICTURE ment_
appears.
2. Press _ or _ to highlight PICTURE SETTINGS, and then press
ENTER.
PICTURE SETTINGS menu appears.
3. Press _ or _ to highlight COLORTEMPERATURE, and then
press ENTER.
MENU
ENTER
pl CTURE SETTINGS
P ] CT_ _RE MENU
@:MOVE @_: SELECT
4. Press *_or _ to select the mode yott prefer.
medium neutral
warm reddbh
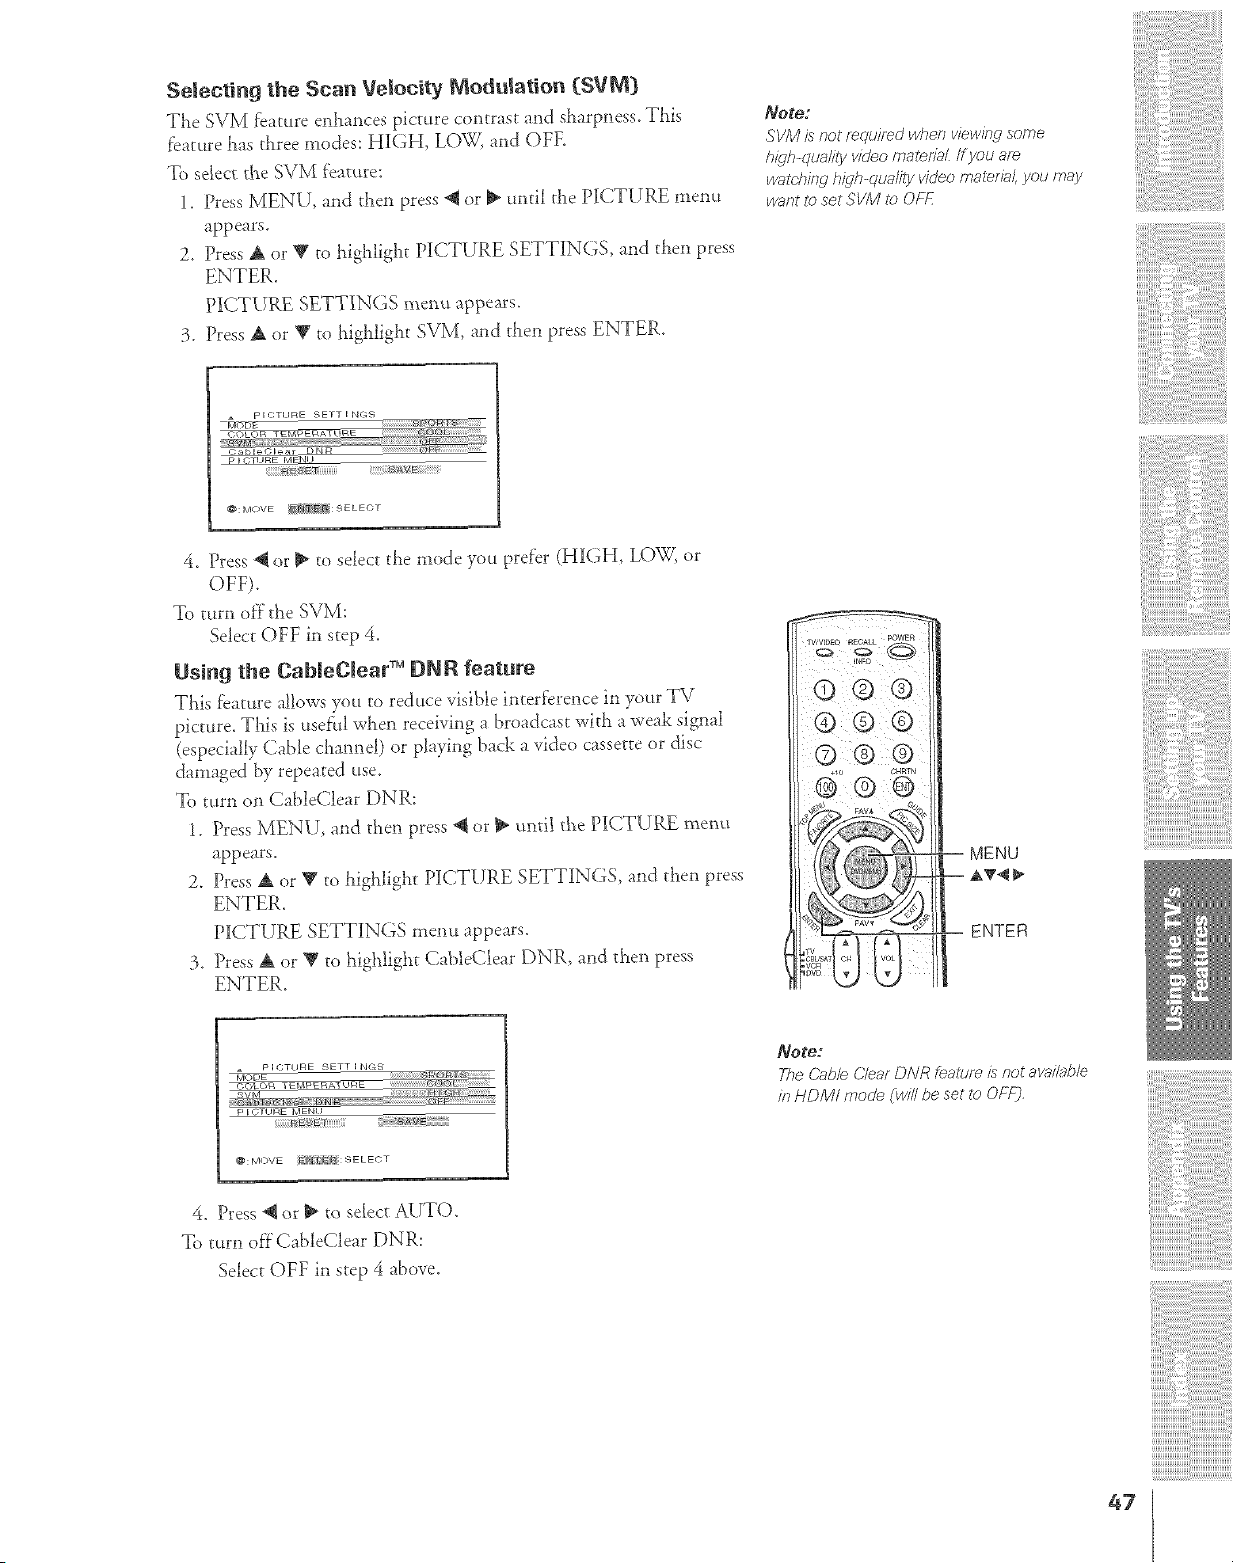
Selecting the Scan Velocity Modulation {SVM_
The SVM _earure enhances picture contrast and sharpness. This
feature has three modes: HIGH, LOW, and OFE
To select the SVM f_eature:
1. Press MENU, and allen press _ or _ until tl_e PICTURE menu
appears.
2. Press A or V to highlight PICTURE SETTINGS, and then press
ENTER.
PICTURE SETTINGS menu appea_s.
3. Press A or V to highlight SVM, and then press ENTER.
Note:
SVM )s not/wquired when viewing some
h_qh quallty vide_omaledaL If you am
watch//w h_qt>qualfly video material, you may
want p set SVIVI to OF£
_I_ETP IOTHRE SETT I NGS)
P I{_F_IRE M NEN_
i F/_ _ iiii/iiiii i AV;_
{}:MOVE _ SELECT
4. Press 4 or _ to select the mode you prder (HIGH, LOW, or
OFF}.
To tum off the SVM:
Sdect OFF in step 4.
Using the Cabiegiear TM ONR feature
This _eature allows you to reduce visible interDrence in your TV
picture. This is _.tse_l wlle'a receiving a broadcast with a weak signal
(especially Cable channel) or playing back a video cassette or disc
damaged by repeated use.
To turn on CableClear DNR:
1. Press MENU, and then press _ or _ unti_ the PICTURE menu
appears.
2. Press a, or Y to lfighlight PICTURE SETTINGS, and then press
ENTER.
PICTURE SETTINGS ment.t appears.
3. Press A or T to highlight CableClear DNR, and then press
ENTER.
jY_
-- MENU
-- AV',q
= ENTER
PICTIIRE SETTING.<,
P I GT_ _RE MEN_
_F/ESET
@ MOVE _[ _{_;: S E L ECT
Note:
The Cable C/ea: DNR feature Js:tot ava/Tab/e
/n HDMI mode (w/fl be set _ OFFj
4. Press @ or _ to sdect AUTO.
To turn offCableClear DNR:
Selec_ OFF in step 4 above.
47
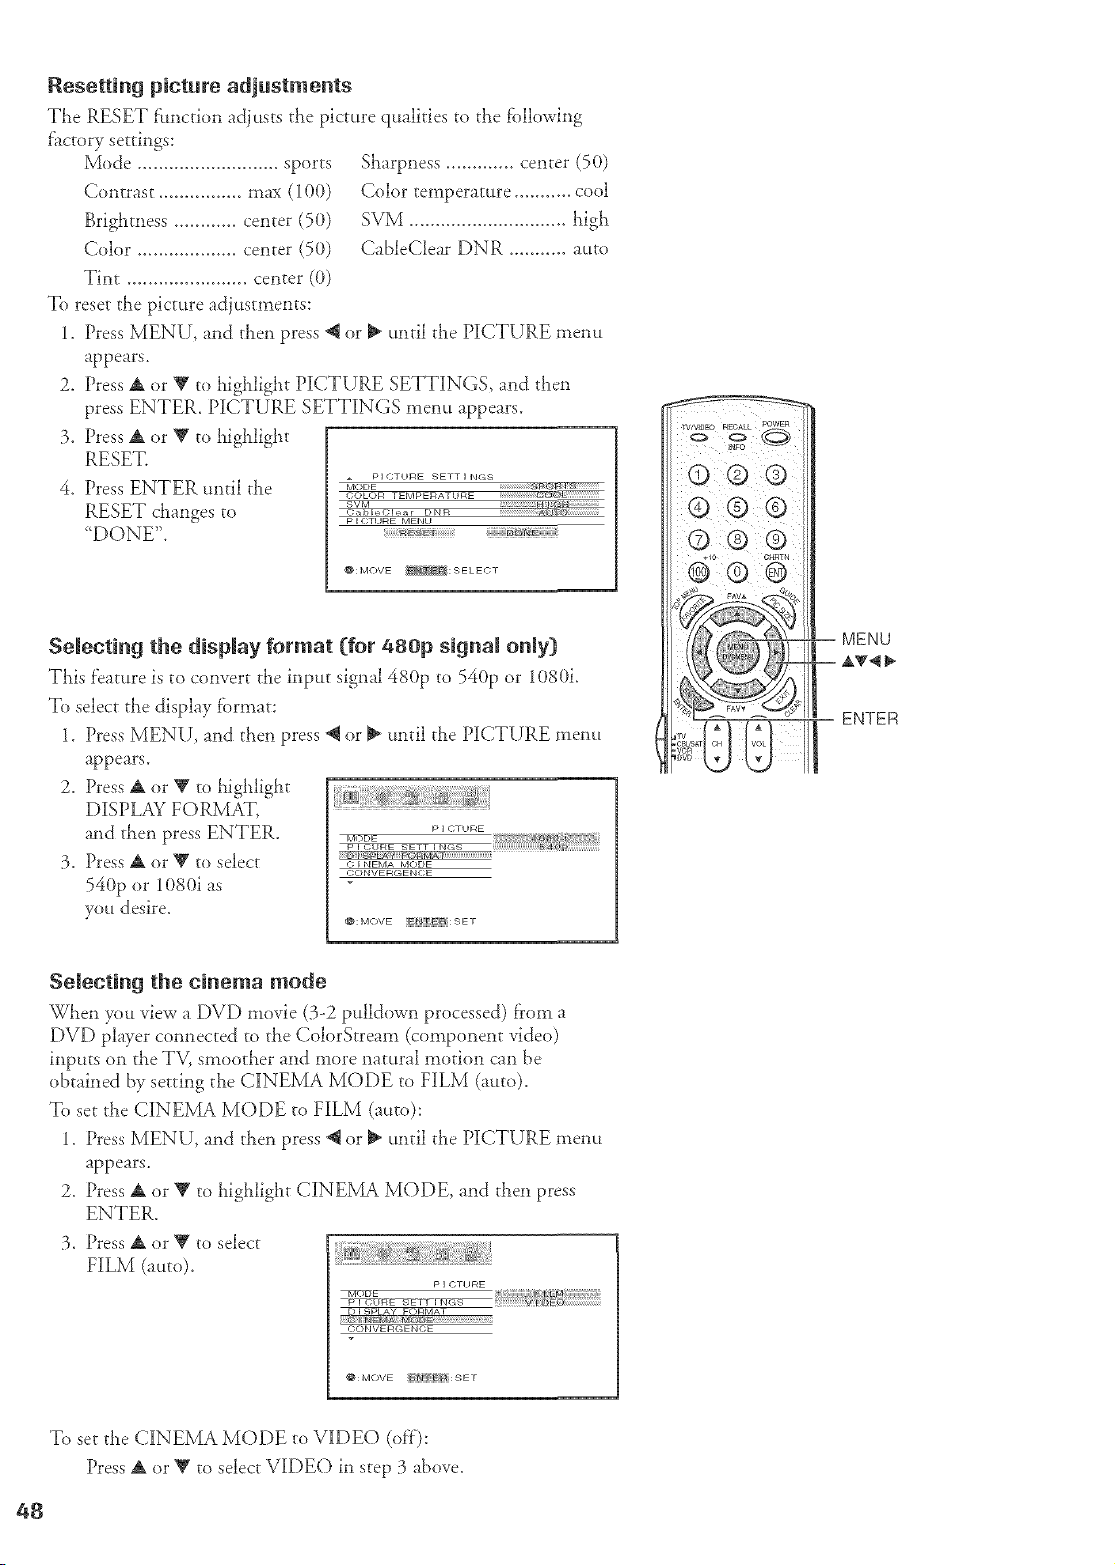
Resettingpicture adjustments
The RESET fimction adjusts the picture qualities to the fbllowhg
f'actory settings:
Mode ........................... sports
Contrast ................ max (100)
Brightness ............ center (50)
Color ................... center (50)
Tint ....................... center (0)
To reset the picture adjustments:
Sharpness ............. center (50)
Color temperature ........... cool
SVM .............................. high
CableClear DNR ........... auto
Press MENU, and then press @ or _ until the PICTURE menu
appears.
Press A or V to highlight PICTURE SETTINGS and then
press ENTER. PICTURE SETTINGS menu appears.
Press A or Y to highlight
RESET.
Press ENTER until the
RESET changes to
'DONE".
PICTURE SETTINGS
MODE 8_FgY_T_
COLOR TEMPERATURE _UE_
P I CT_ IRE MENU
f_: MOVE _: 9ELECT
Selecting the display format [for 480p signal only)
'This feature is to convert the input signal 480p to 540p or 1080i.
To select the display format:
1. Press MENU, and then press @ or _ until the PICTURE t_lenu
appears.
2. Press A or Y to highlight
DISPLAY FORMAT, .....................................................................................................................................
and then press ENTER. P........
p i C_RE SETT FN<*S ))))))))))))))))g-¢0_{{{{{{{{{{{{{
3. Press A or V to select _;_N_A.OD_
CONVERCENOE
540p or 1080i as
you desire.
: IVlOVE _Jt ER : 9 E T
© Q Q
Q@®
+1o
®@
MENU
ENTER
Selecting the cinema mode
Wt_en you view a DVD movie (3-2 pulldown processed) from a
DVD player connected to the ColorSrrean (component video)
inputs on the TV, smoother and more natural motion can be
obtained by setting the CINEMA MODE to FILM (auto).
To set the CINEMA MODE to FILM (auto):
1. Press MENU, and ti_en press @ or _ until ti_e PICTURE _lenu
appears.
2. Press A or Y to highlight CINEMA MODE, and then press
ENTER,
3. Press A or Y to select
FILM (auto).
p I C;Ti _FaE
bTCr_E t@
_177Ff_1_
D I SPLAY FORMAT
CONVERCENCE
@:MOVE _-[ E'_ : 9 E T
To set the CINEMA MODE to VIDEO (off):
Press A or T to select VIDEO h step 3 above.
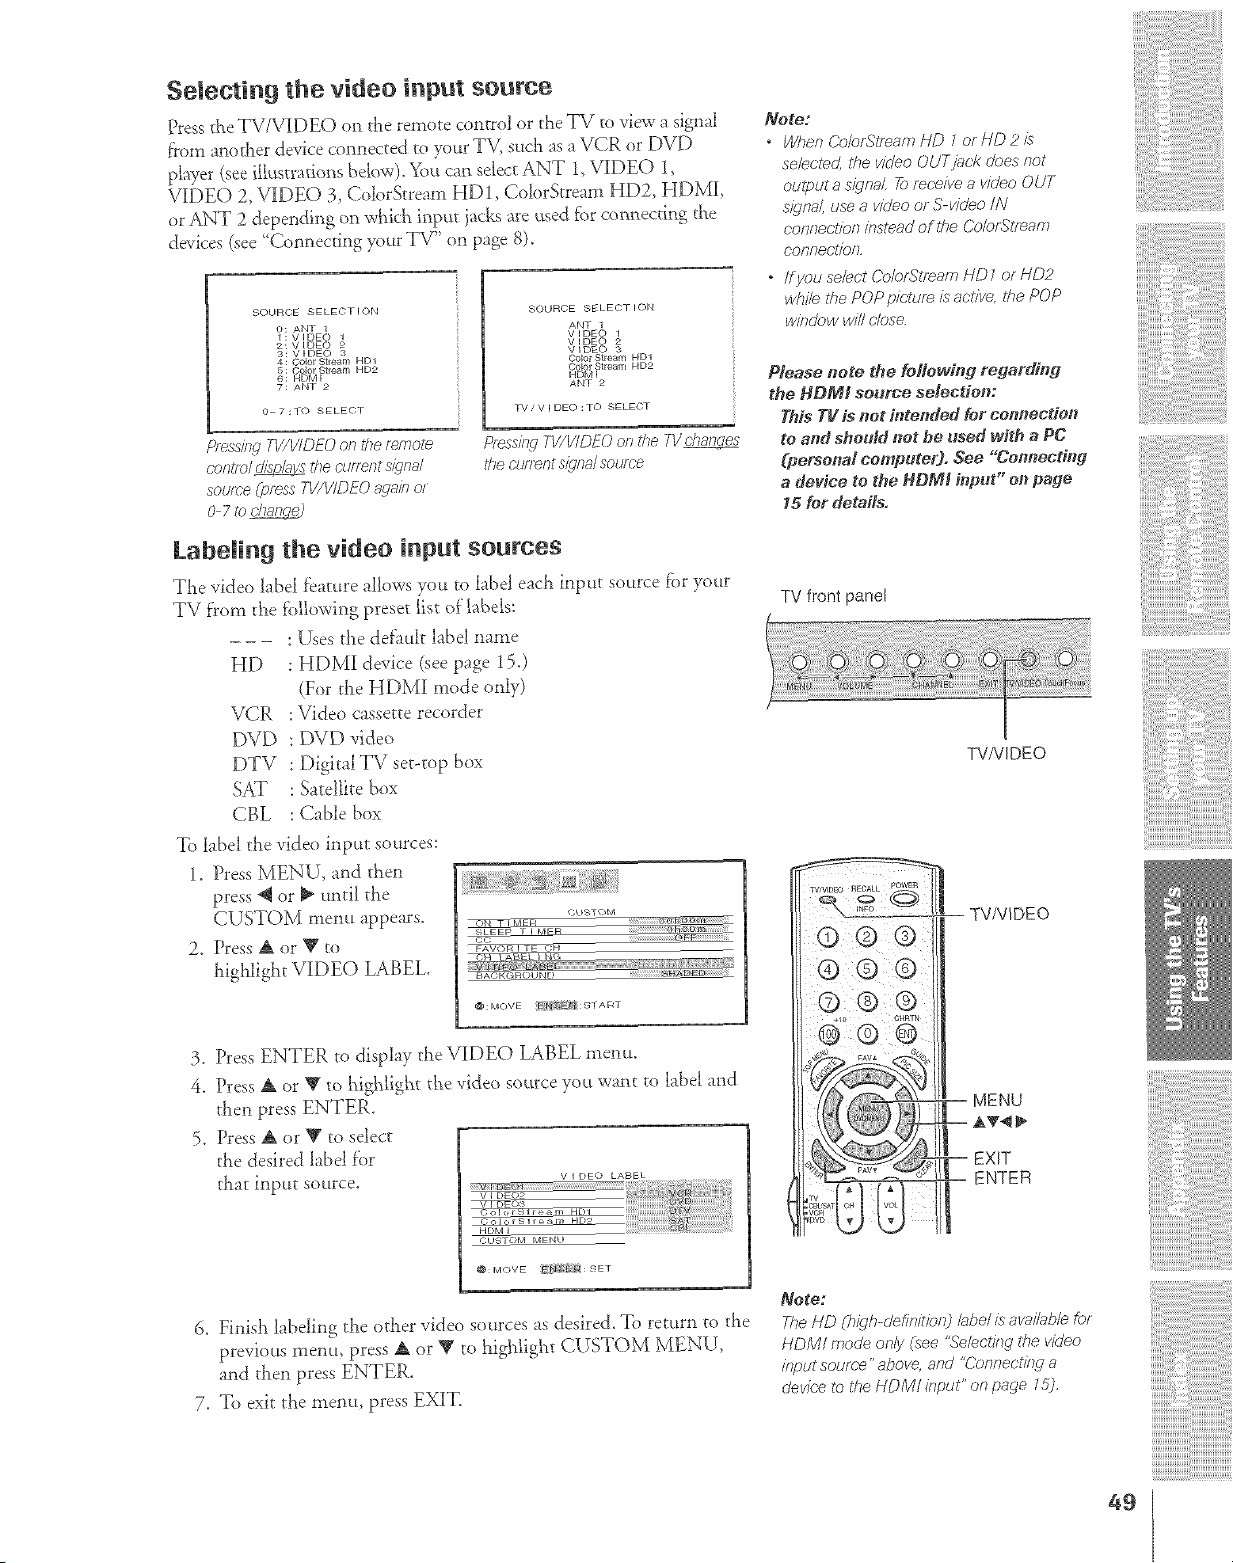
Selecting the video input source
Press d_eTV/VIDEO on the remote control or the TI7 ro vbw a signal
from another device connected to y)ur TV, such as a VCR or DVD
player (see ilk_strarions bdow). _im can select ANT 1, VIDEO l,
VIDEO 2, VIDE(_) 3, ColorStream HD1, ColorStream HD2, HDMI,
or ANT 2 depending on which input }acksare used f_r connecting the
devices (see _Connec@g your TV" on page 8).
SOURCE 8ELE¢)T I ON
O: ANT 1
1: VIDEO 1
2: VIDEO 2
3: VIDEO 3
4: Oolor Stream HD1
5: Go,lot Stream HD2
6 : F_DIv[ I
7: ANT 2
o 7:30 SELECT
SOUROE SELEOT ION
ANT 1
V IDEO 1
V IDE() 2
VIDEO 3
COlOr Stream HD1
Coo .q earr HD2
HDtv[ t
ANT 2
TV!V I DEO :TO SELE¢)T
Pfsss/rlgW/ViDEO on theremote
ceHt/o/_ die CmTentsignal
sou/r-eip_ss TI//VIDEO_,,ge/ho/
O 7 _bdTaH_
Pless/}LqW/ViDEO on the 7V c/.,g,_l_
thecuflent s/gna/source
LabeJing the video input soumes
The video bbe_ f_a_ure allows you ro labd each iWu_ source tbr your
TV from the lbi_owing preset _ist of labels:
- - - :[£es the default label name
HD : HDMI device (see page 15.)
(For the HDM1 mode only)
I/CR :Video c'asseccerecoMer
DVD : DVD video
DTV : DigitalTV set-top box
SAT : Satellite box
CBL : Cable box
To label the video input sources:
1. Press MENU, and then
press _ or _ until the
CUSTOM menu appears. <;'_;_<)_
2. Press A or T to _w,_,_r__H
highlight V£DEO LABEL.
@:MOVE >E_ : S'TA RT
3. Press ENTER to display the VIDEO LABEL menu.
4, Press A or _' to highlight tke video source you want to hd>d and
then press ENTER.
5. Press A or _' to select
the desired label f'or
that input source.
V I DEO LABBL
CUgTOM MENU
@: MOVE _,_F{ : SET
6. Finish labeling the other video sources as desired. To return to the
previous mellt.t, press A or Y to _ighligh_ CUSTOM MENU,
and then press ENTER.
7. To exit the menu, press EXIT.
Note:
" Wt,,en Colo£5"lfoam HD _ or HD 2 £
selected the w?/eo OUTjbck does not
ou@ut a signal 2,_receive a video OUT
s_gnaf, use a video or S-v/deo /IV
confTec;t/on k_st_ad of lDe Colo£qlTeam
connec;tion,
* /fyou select ColortS'tr_am HD / or HDP
while the POP picture is active, the POP
window will (-lose
Please note the feffo_fnff redarfffn ff
_he HDMS se_rce selection:
This TV fs net ft_tended for connection
to and sheuM not be used with a PC
(personal computer). See "Co_nectin d
a device to the HDMI h_put" o_} pa_e
15 for deteils.
TV front panel
TVNIDEO
"I _'/VlD_O _CALL POWER
® ®®
-- TV/VIDEO
MENU
EXIT
ENTER
_oge:
The HD (h_gh-o'efinitio_O bbe/ is avai/abb for
HDMf mode only isee %'e/echng the video
input source" above, and "Connectit W a
devk:e to the HDM/ #_put" on page l &l,
49
!ii!ii!ii!{!i!i!i!i!i!
['['[
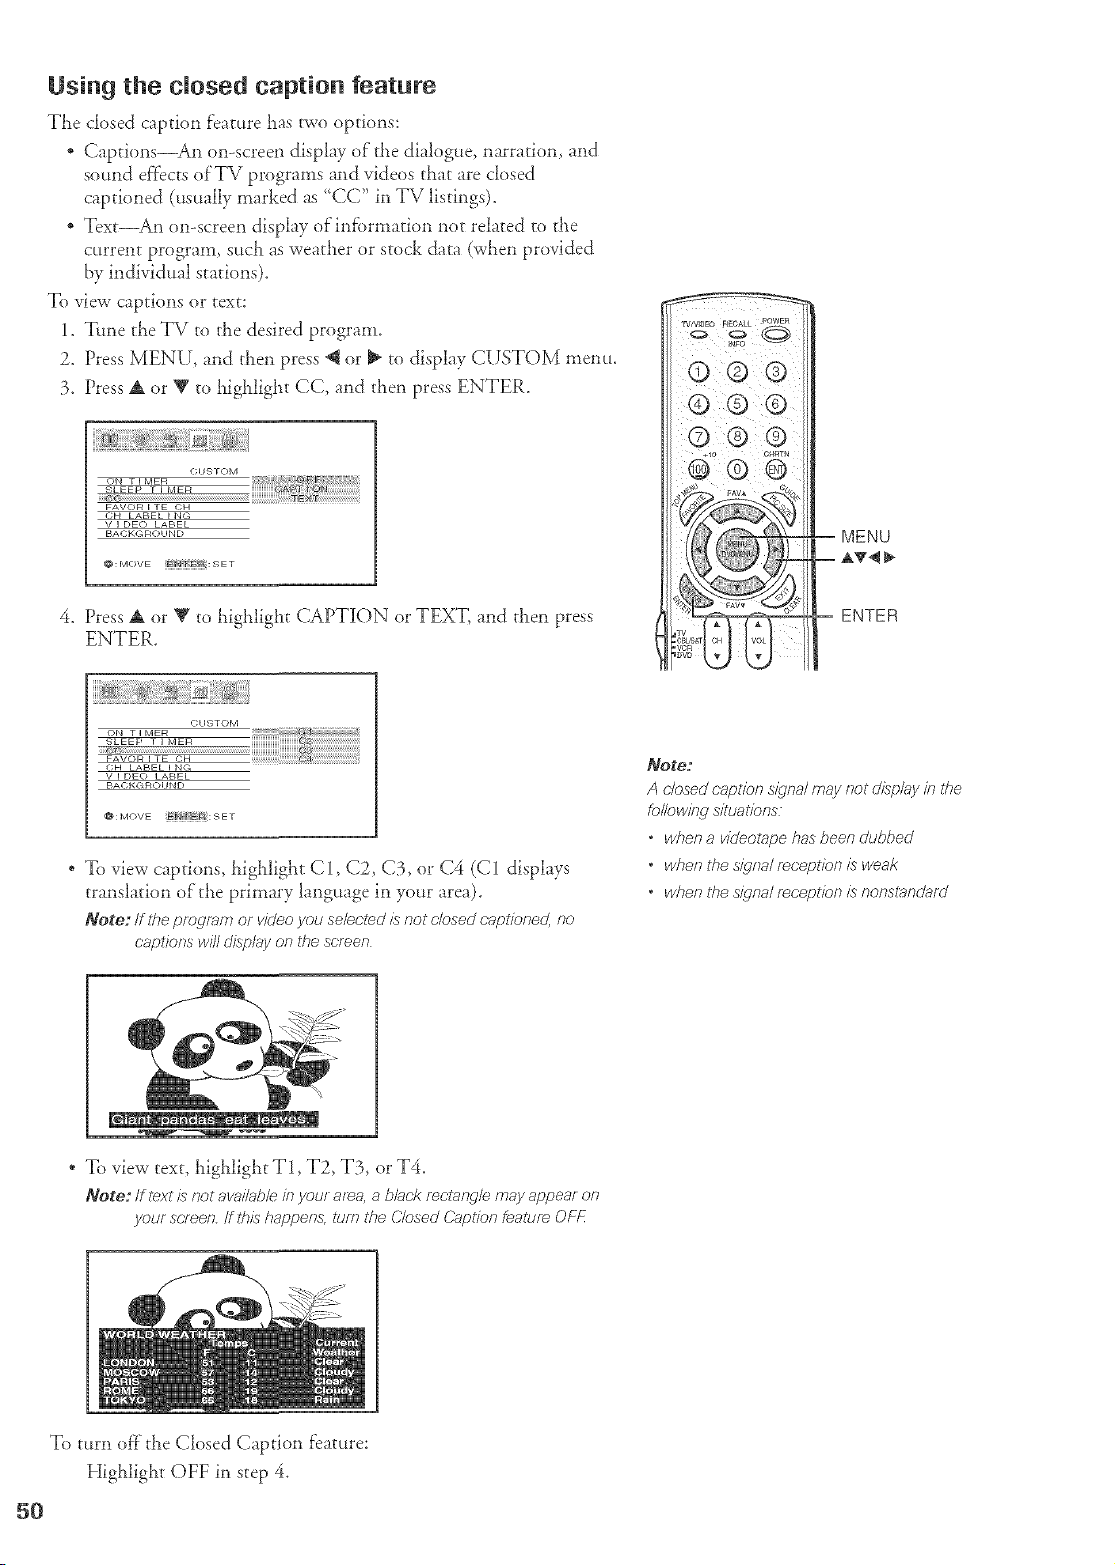
Using the closed caption feature
The closed caption feature has two options:
* Captions_An on-screen display of"the dialogue, narration, and
sound effects of'TV programs and videos that are closed
captioned (usually marked as "CC" in TV listings).
* Text_An on-screen display ofinfbrmation not related to the
current program, such as weather or stock data (when provided
by individual stations).
To view captions or text:
1. "lithe the TV to the desired program.
2. Press MENU, and then press @ or _ to display CUSTOM menu.
3. Press A or Y to highlight CC, and then press ENTER.
(YHSTOM
ON • I MER
SLEEP F I MER ¢3 @
FAVOb_ I TE CH
OH LABEL I N(;
V I DEC) LABEL
BACKL_RO_ IND
@:MOVE _J"J FE_ : S E T
4. Press A or Y to highlight CAPTION or TEXT, and then press
ENTER.
© Q Q
© @ ®
CHSTOM
ON • I MEIR
b;LEEP T I IVlEIR
FAVOR I TE CH
C,H LABEL I N¢;
V I DEO LABEL
BACKGRO_IND
@: IVIOVE E_a E@:SET
" To view captions, highlight C1, C2, C3, or C4 (C1 displays
translation of the primary language in your area).
Note:/f #le pre_ram or vk/eoyou so/actedis no! Hesed oapl/oned,no
captions wilt displayon the screen
Note:
A dosed caT:>/Tbns/_/na/may no_ c//splay in the
fo/lewi/wsituatfo,ns
• whena videotape hasbeendubbed
• whenthes_qna/reception is weak
• whenthes_c/na/fRcept/en/s nonstb_ndJb.tf_J
* To view text, highlight T1, T2, T3, or T4.
Note: If te'<tis not ova/Tableinyour area, _,black rec/ang/emay appear on
yeur semen, ff this happens,turn the C/osed &_,pt/onfeatuf_ OFF
To turn off the Closed Caption feature:
Higialight OFF in step 4.
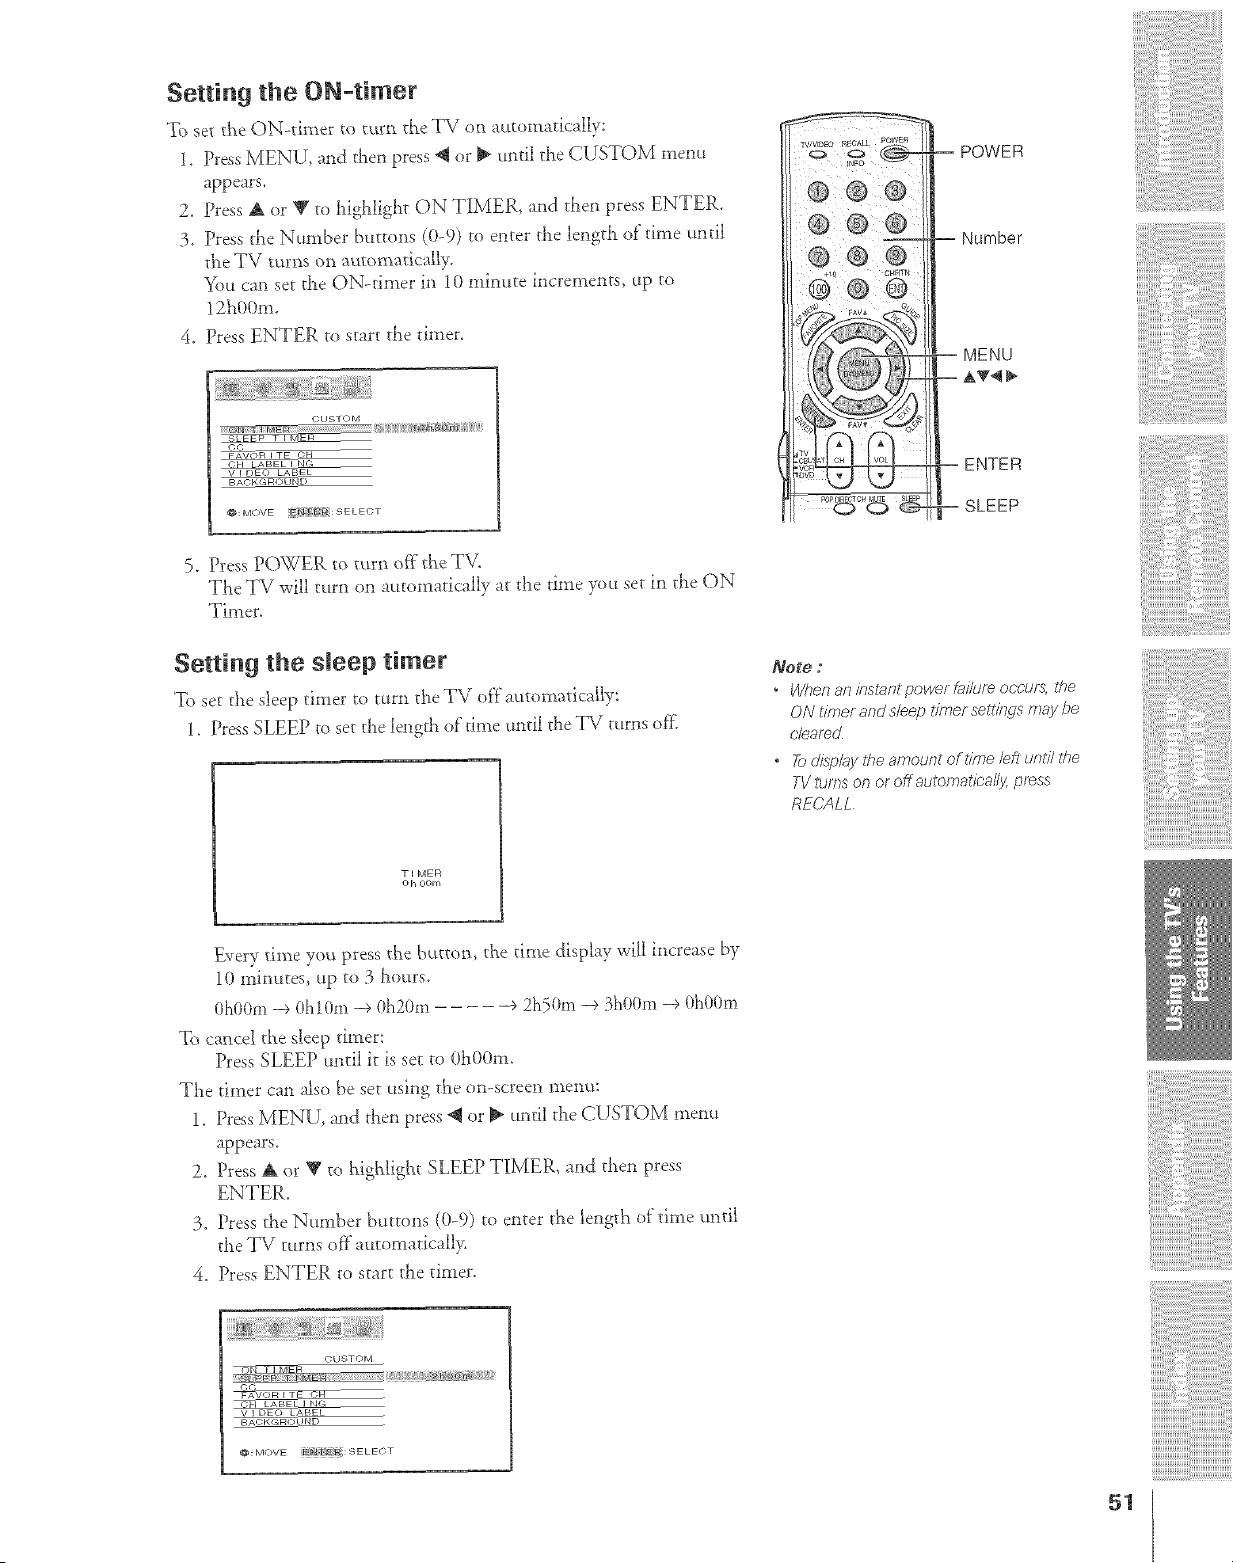
Setting the ON-timer
To set tSe ON<liner to turn the TV on automadcally:
1. Press MENU, and then press _ or _ until the CUSTOM menu
appears.
2. Dess A or T m _figldigllt ON TIMER, arid allen press ENTER.
3. Press the Nmnber buttons (0-9) to enter the length of"time until
the TV turns on automatically.
"_%tcan set the ON-timer in 10 minute increments, up to
12h00m.
4. Dess ENTER to start die thner.
CUSTOM
SLE_ • E k
©c
FAV_ ETE 0
CH _ BEL I _,
v I E)EO LABEL
BACKGROUND
@:MOVE _ {R:SELECT
5. Press POWER to turn off the T\L
The TV will turn on automatically at the time you set M the ON
Timer.
Setting the sleep timer
To set the sleep timer to turn the TV of}" atttomatica[ly:
l. Press SLEEP to set the lengdl of"dine until the TV turns ore
• I MEFI
o h OOrn
-- Number
-- ENTER
-- SLEEP
Note ;
" When an iestaet power fai/ure occurs, the
ON hme/ and s/eep tTb_ersetl_bgs may be
cleared
o _ disp/q!/he amouet of *fme/eft uetil/he
TV turns on or off aulomatioal/y, press
RECALL
ii
Every time you press the button, the time display will increase by
1(}minutes, up to 3 _murs.
OhOOm-e Oh10m _ 0h20m ÷ 2h50m -e 3h00m -e 0h00m
To cancel the sheep diner:
Press SLEEP until it is set to 0h00m.
The timer can also be set using the on-screen menu:
1. Press MENU, and then press @ or _ until the CUSTOM menu
appears.
2. Press A or T to highligb_t SLEEP TIMER, and then press
ENTER.
3. Press the Number buttons (0-9) to enter the length of time until
the TV turns of}"atttomadcall>
4. Press ENTER to start the timer.
CUSTOM
©t-;
c_ L BEL I N(,
v I E)EO LABEL
BAOKGN( )LIND
@: MOVE X_ :SELECT
illii
51
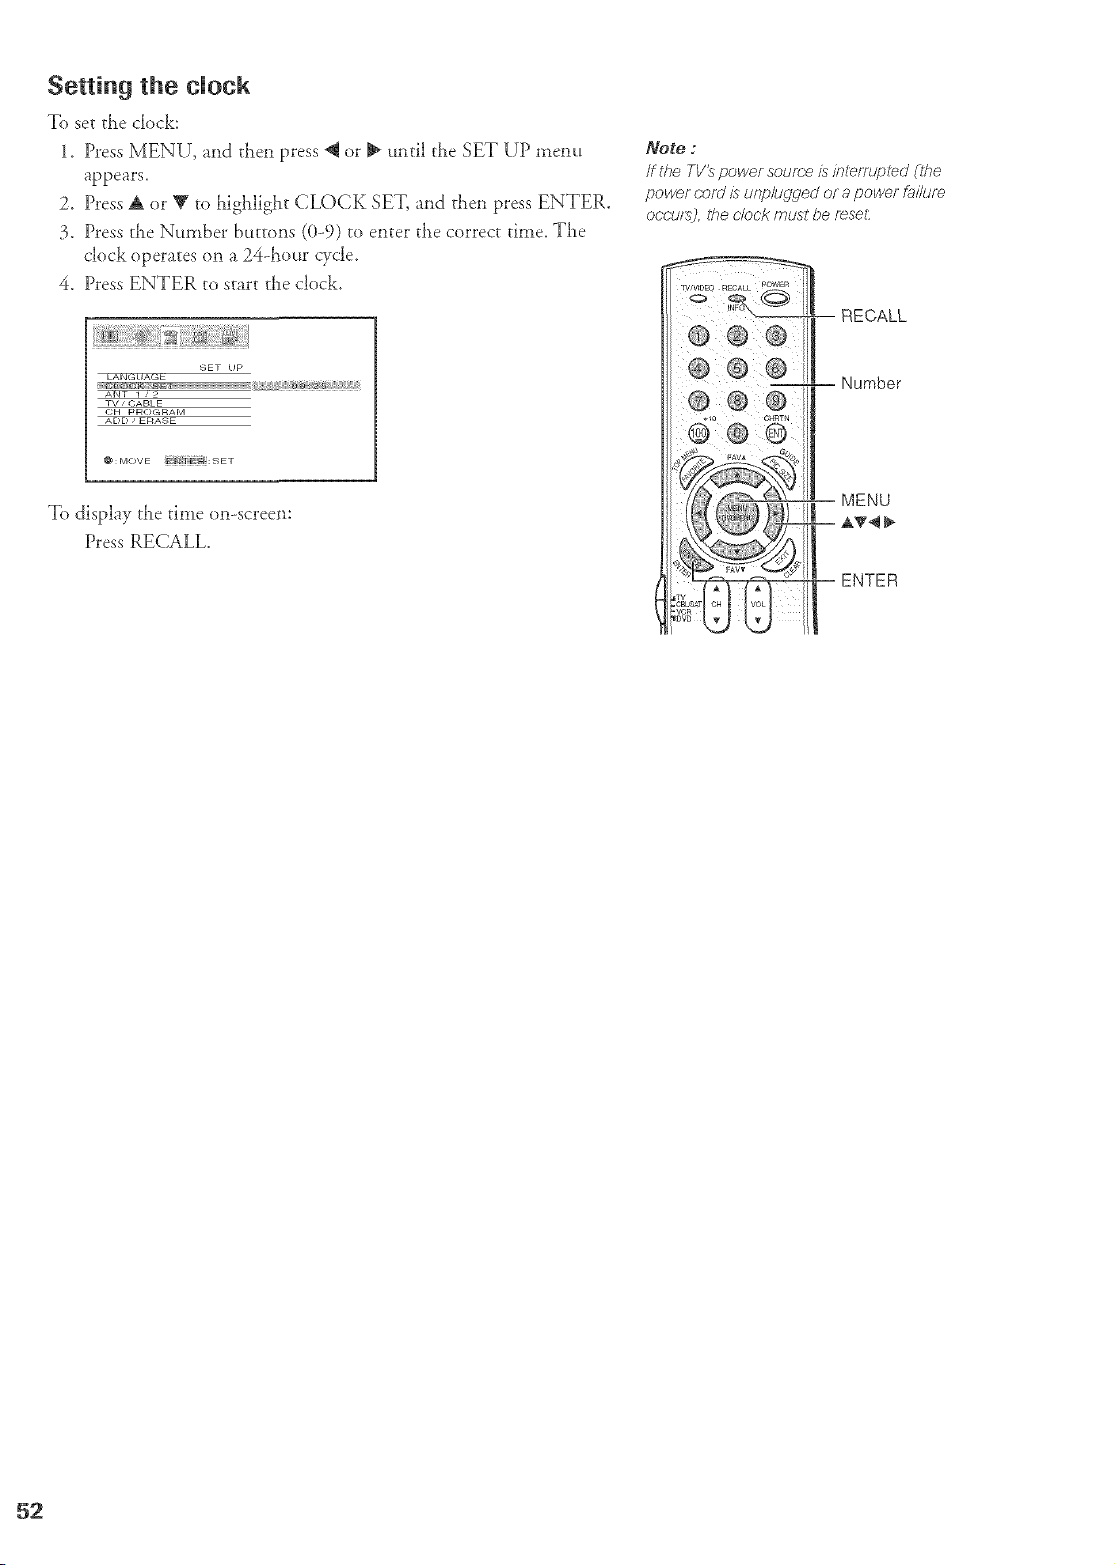
Setting the clock
To set the clock:
1. Press MENU, and then press @ or _ until the SET UP menu
appears.
2. Press A or _' to highlight CLOCK SET, and then press ENTER.
3. Press die Number buttons (0-9) to enter the correct time. The
clock operates on a 24d_our cycle.
4. Press ENTER to start the clock.
_)ET UP
ANT 1 / 2
TV / CABLE
CH pR< >G RAIVl
ADD / ERASE
To display the time on-screen:
Press RECALL.
Note :
/f the TV_ power soume is intemlplec] (the
power c'oo/ is unp/ugged or a power f_ilufe
occurs), the dock must be fsseL
MENU

Adjusting the sound
Muting the sound
Press MUTE to temporarily reduce (1/2 MUTE) or turn off (MUTE)
she sound. Wl:ile the sound is of}_the screen will display _112
MUTE" or '_MUTE" in the lower right corner. Every time you press
the btttton, the mute mode will change in the following order.
[---_Normal --> 1/2 MUTE --> MUTE --]
When you select '_MUTE" mode, the closed caption _eature is
automatically activated. To deactivate this feature, deactivate MUTE.
This feature works only when the closed caption mode is set to OFE
See 'q,Mng the closed caption feature" on page 50 f'or more
information.
Selecting stereo!SAP broadcasts
The multi-channel TV sound (MTS) feature allows you to listen to
higl>fiddiry stereo sound while watching TV. MTS can also transmit
a second audio program (SAP) containing a second language, music,
or other at_dio infbrmatio:: (when provided by individual stations).
When the TV receives a stereo or SAP broadcast, the word STEREO
or SAP appears on-screen every dine d:e TV is turned om tl:e dlarmd
is changed, or the RECALL button is pressed.
The MTS f_ature is :sot available wl_en the TV is in VIDEO mode.
To listen to stereo sound:
1. Press MENU, and then press _ or _ until tl:e AUDIO menu
appears.
2. Press A or Y to highlight MTS, and then press ENTER.
3. Press & or V to higl_light STEREO, and then press ENTER.
© @@
TV front panel
MENU
--RECALL
-- MENU
-- A'T4
= ENTER
-- MUTE
_¢;U,_ S 3D
_rruBa sg
@: _:ove t,_4 B:rt SET
You can leave your TV in STEREO mode because it will
automatically output the type of sound being broadcast (stereo or
monaura b. The word "STEREO" or 'SAP " displays in yellow in
the tnent.t wl:e:: the TV receives the signal.
If the stereo sound is noisy, select MONO to reduce the noise.
To listen toSAP (i_"available):
1. Press MENU, and then press _t or _ until the AUDIO menu
appears.
2. Press A or _g to t_igl:light MTS, and then press ENTER.
3. Press A or V to highlight SAP, and then press ENTER. You will
hear the sr_tio:;s second audio program (if'available) from the
speakers, while viewing the original program's picture (see note at
right),
Note :
A s'e#,r;r_doudiopro;gram(SAPj #,,s,'_be i_,_/d
on/3/on those TV statio_Tsthat erie: it;
For examp/e, a st_£ion m_qht broadcast mdde
as a second audio pfbdmm. /f you have SAP
orl, you will ,_e the eufrer?t p/o dir[2r[? o17 the
screen but hear music;,inslead of the
pf_drJ,'oS"nom?_/audia
Howeve/; ff you haveSAPon,and thestation
bfoadeast/n d a secot?d audio program, the
S_,?tg_5'r?'S f?Of77h2/atJ(iio w/l/L_ OU@tJ£_,
however ocr.'asiona//y there is no sound at a//
in tl,,i;$"/n<st>.u_c'c_./ft;&;s happe/Ts, set the MTS
featt/f_ to STEREO mode
53
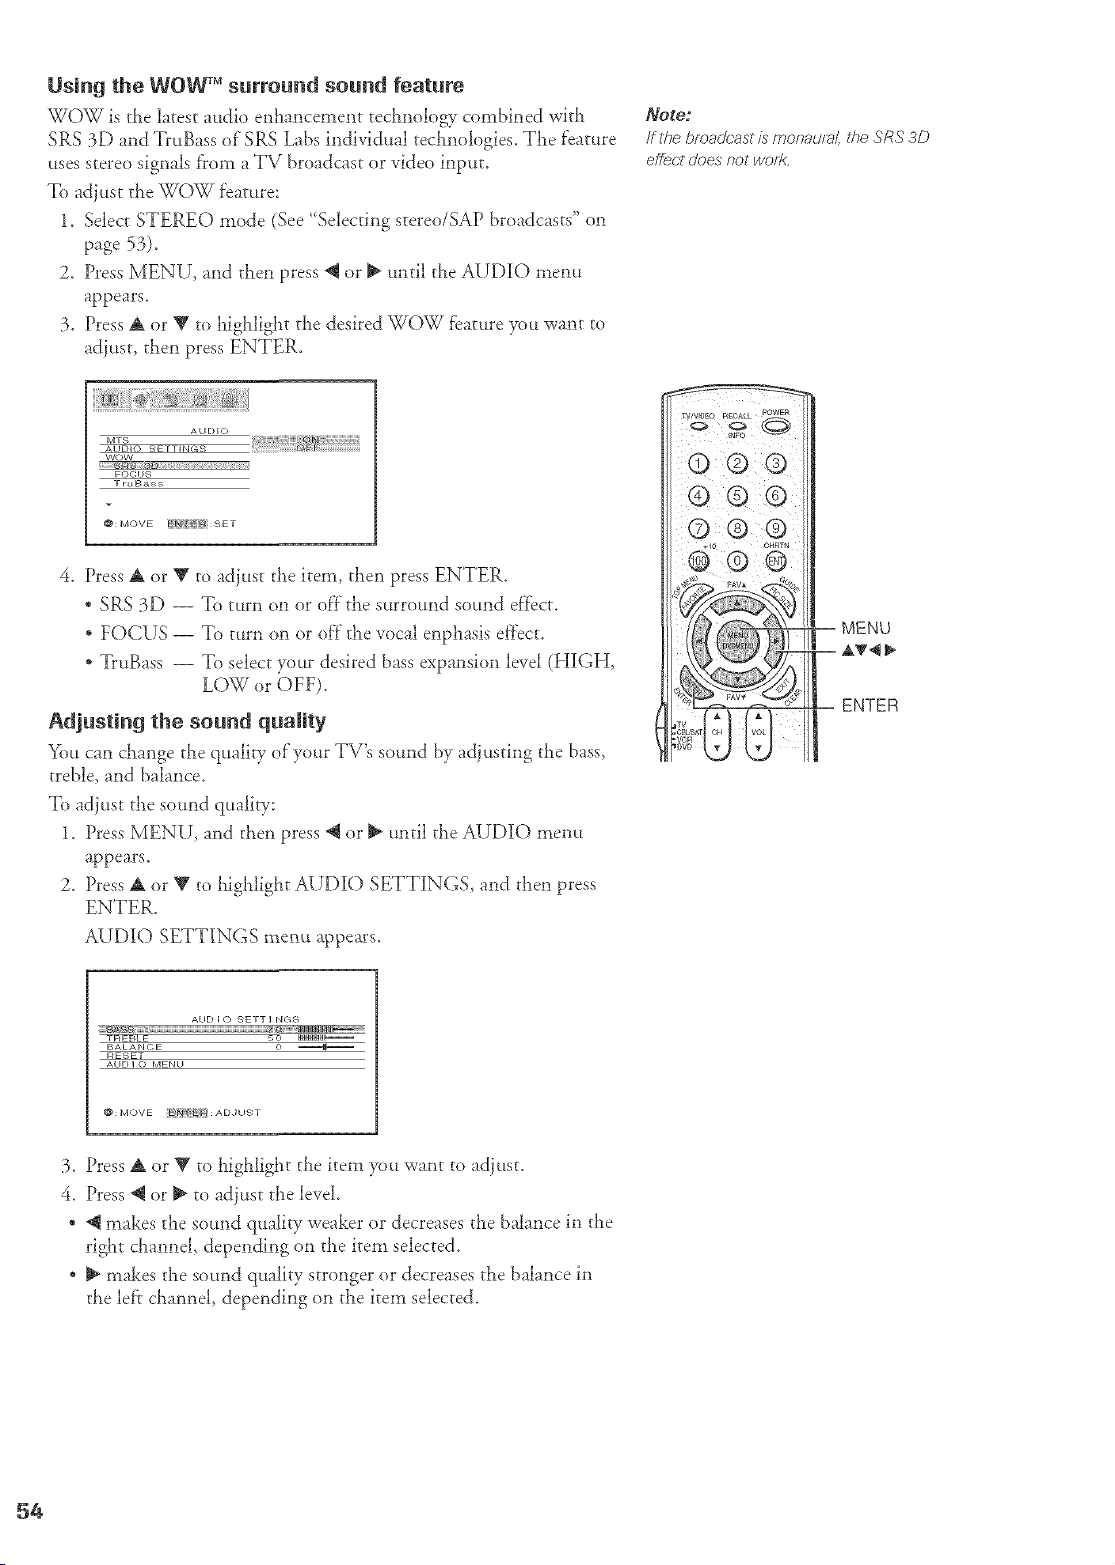
Using the WO_V _ surround sound feature
WOW is the latest audio enhancement technology combined with
SRS 3D and TruBass of SRS Labs individual technologies. The feature
uses stereo signals f_om a TV broadcast or video inpuL
To adiust the WOW feature:
1. Select STEREO mode (See' Selecting stereo/SAP broadcasts" on
page 53).
2. Press MENU, and then press @ or _ until the AUDIO mem_
appears.
3. Press A or T to highlight the desired WOW feature you want to
adiust, then press ENTER.
NOg@f
If the broadcast/s rnonaula/, the SRS 3D
effect does not wofl<,
AU[)EO
AUDIO SETTINGS
WOW
FOCH9
TruBoss
@:MOVE EJ',Y_ _Y4 : S ET
4. Press A or Y to adjust the item, then press ENTER.
* SRS 3D -- To turn on or of'f"the surround sound ef_ecL
* FOCUS -- To turn on or off"the vocal enphasis el_fecL
* TruBass -- To select your desired bass expansion level (HIGH,
LOW or OFF).
Adjusting the sound quality
You can change the q_mlity of'your TV's sound by adjusting the bass,
treble, and balance.
To adiust the sound quality:
1. Press MENU, and then press @ or _ until the AUDIO mem[
appears.
2. Press A or V to highlight AUDIO SETTINGS, and then press
ENTER.
AUDIO SETTINGS me_u appears.
TWWDEO RECALL POWER
AII[)IO SETTI NGS
TREBLE _ (_ IIIIIIIII1_11_
BALANCE 0 _
RESET
AUDI_ MENU
@ : I'/OV E _ f'_'li _ : A D.I U S •
3. Press A or V to highlight the item you want to adjust.
4. Press @ or _ to adjust the level.
* @makes the sound quality weaker or decreases the balance in the
right channel, depending on the item selected.
* _ makes the sound quality stronger or decreases the balance in
the lef'r channel, depending on the item selected.
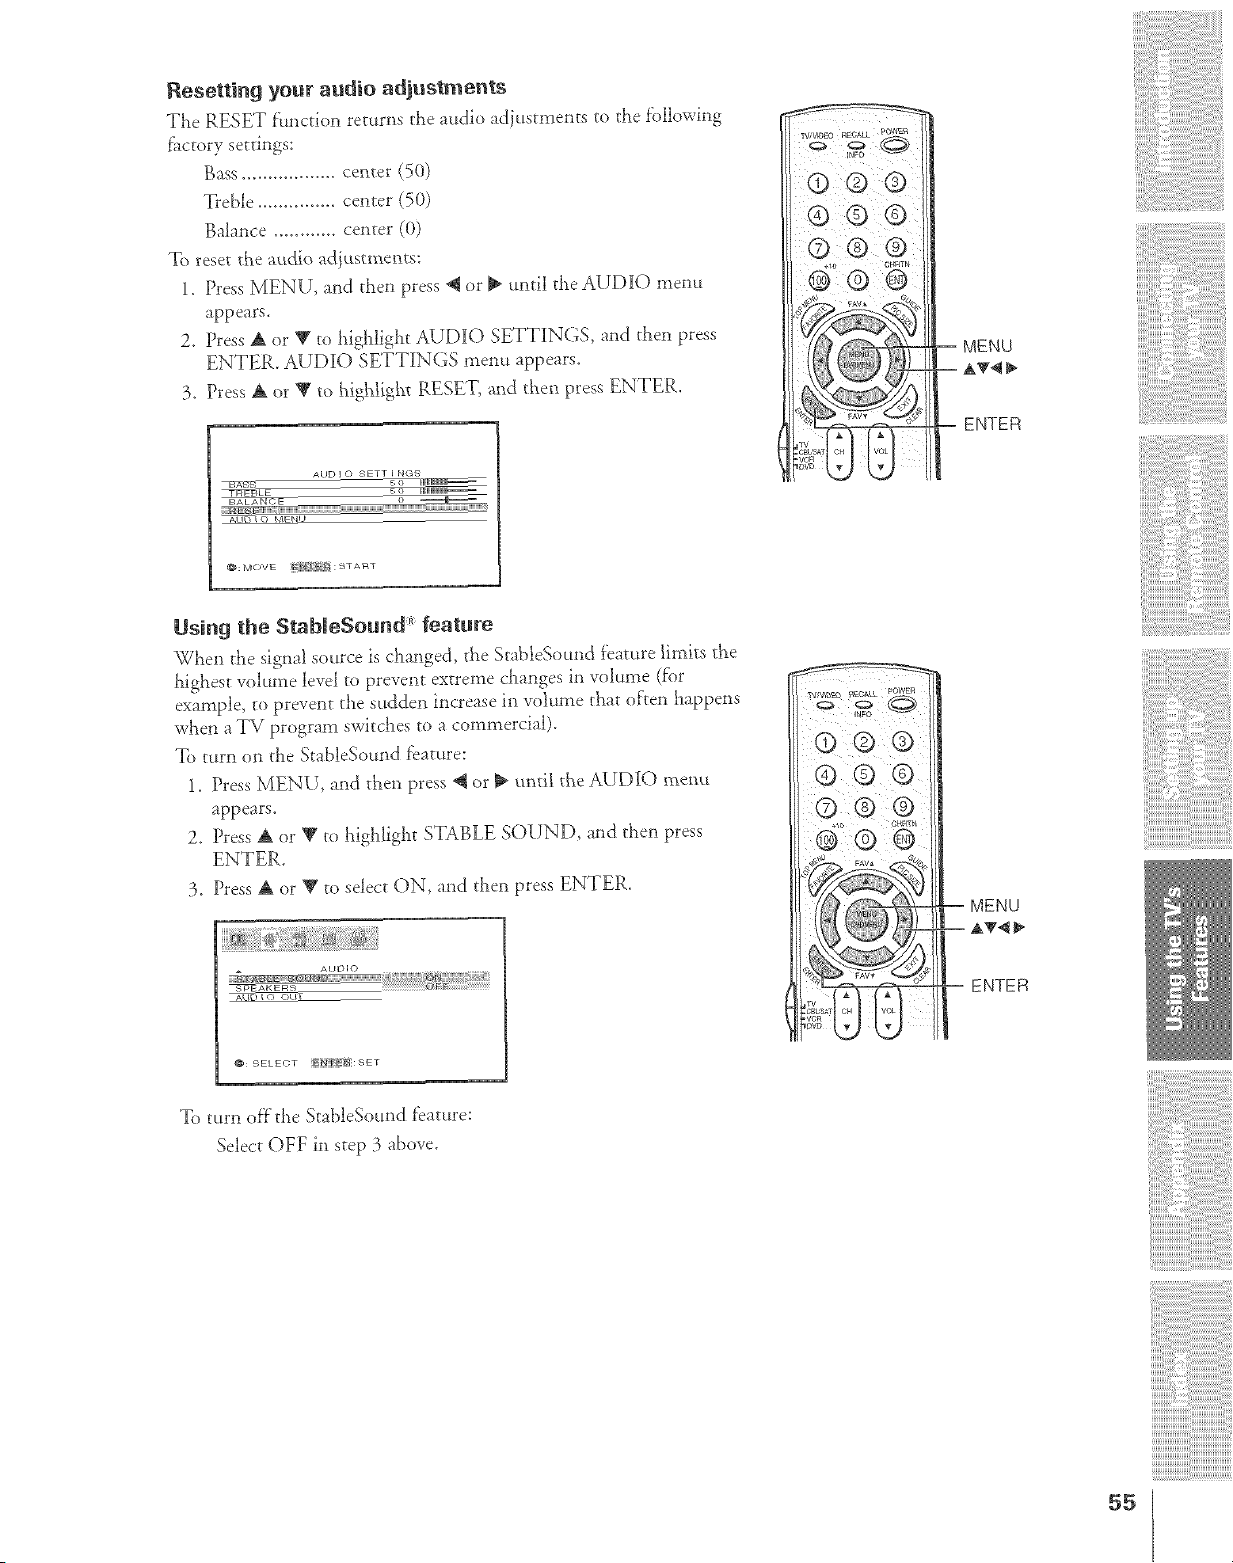
Resettingyour audio adjustments
The RESET function returns the audio ad)ustments to the following
fhctory settings:
Bass.................. center (50)
Treble ............... centd (50)
Balance ............ centd (0)
To reset the audio adjustments:
1. Press MENU, and then press @ or _ until the AUDIO menu
appears.
2. Press A or V to _ighlight AUDIO SETTINGS, and then press
ENTER. AUDIO SETTINGS menu appears.
3. Press A or V to higldight RESET, and then press ENTER.
ADD ] o SETT E NG_
T_,LE _=-=-=
_UU_
@ ®@
MENU
ENTER
Usirtg the StabJeSound _ feature
When the signal source is changed, the SrableSound feature £mits the
llighest volume level to prevent extreme changes in volume (for
example, to prevent the sudden increase in volume that often happens
wl_en a TV program switches to a commercial).
To turn on the StableSound feature:
1, Press MENU, and then press "_ or _ unti! the AUDIO menu
appeais.
2. Press A or V to highlight STABLE SOUND, and then press
ENTER.
3. Press A or Y to select ON, and then press ENTER.
AUO _, CJI_T
@:SELECT _i:SET
JUFO
-- MENU
-- ,A_'4 _"
-- ENTER
To turn oft the StableSound f'eature:
Select OFF in step 3 above.
55
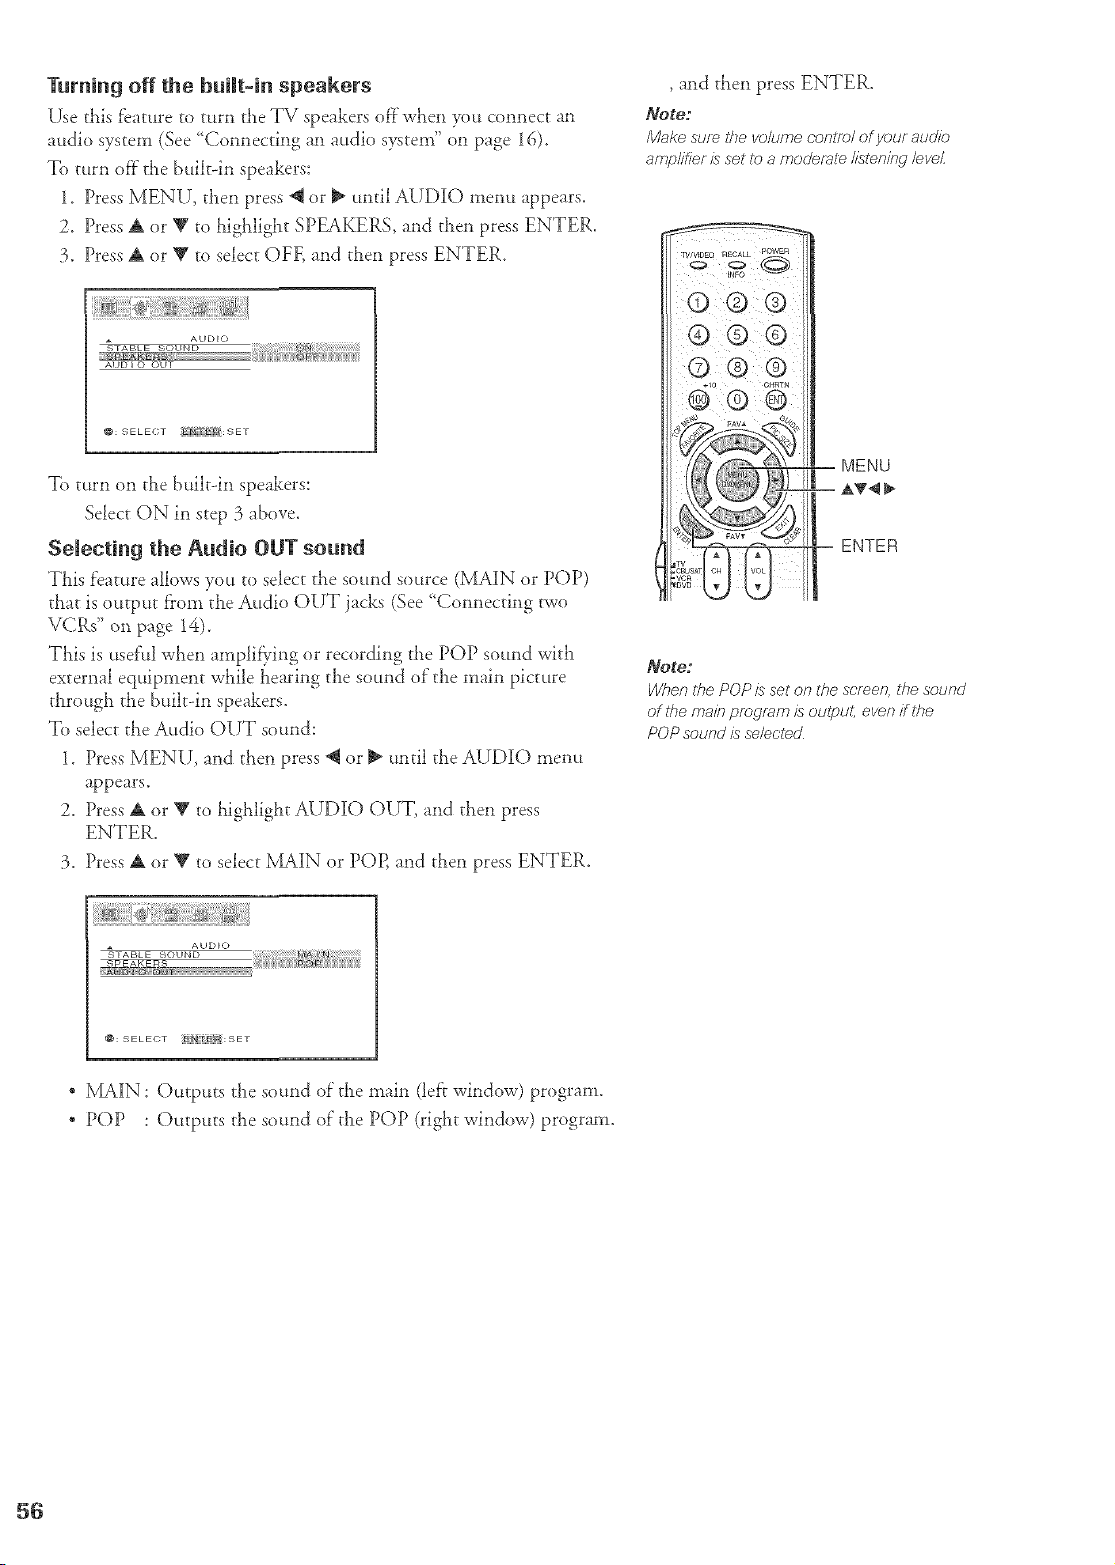
Turning off the buiJt-in speakers
Use thisfeature to turn the TV speakers off'when you connect an
audio system (See '_Connecdng an audio systen? _ on page 16).
To turn of_" the built-in speakers:
1. Press MENU, then press @ or _ until AUDIO menu appears.
2. Press A or Y to iflghlight SPEAKERS, and then press ENTER.
3. Press A or V to select OFE and then press ENTER.
@: SELECT l;a Ei:_: SET
To turn on the builtdn speakers:
Select ON in step 3 above.
SeJeeting the Audio OUT sound
Tiffs feature allows you to select the sound source (MAIN or POP)
that is output f_onl the Audio OUT jacks (See 'Connecting two
VCRs" on page 14).
This is usef'ul wl_en amplif}ing or recording the POP sound with
external equipment while hearing ti_e sound of"the main picture
ti_rough the built-in speakers.
To select the Audio OUT sound:
1, Press MENU, and tl_en press _ or _ until tl_e AUDIO menu
appears.
2. Press A or V to highlight AUDIO OUT, and then press
ENTER.
3. Press A or V to select MAIN or POP, and then press ENTER.
, and then press ENTER.
Note:
M_,kesure the volume conlfb/ of youf audk_
amp//tier/s set to a moderate//stenit_glevel
MENU
ENTER
Note:
W/lef? the POP is set ot_ the screen, the soured
of the main program is output, evm_ if the
POP soured is selec/ed
@: SELECT _{',/1"_ : SET
, l_klN : Outputs the sound of the main (left window) program.
* POP : Outputs the sound of'the POP (right window) program.
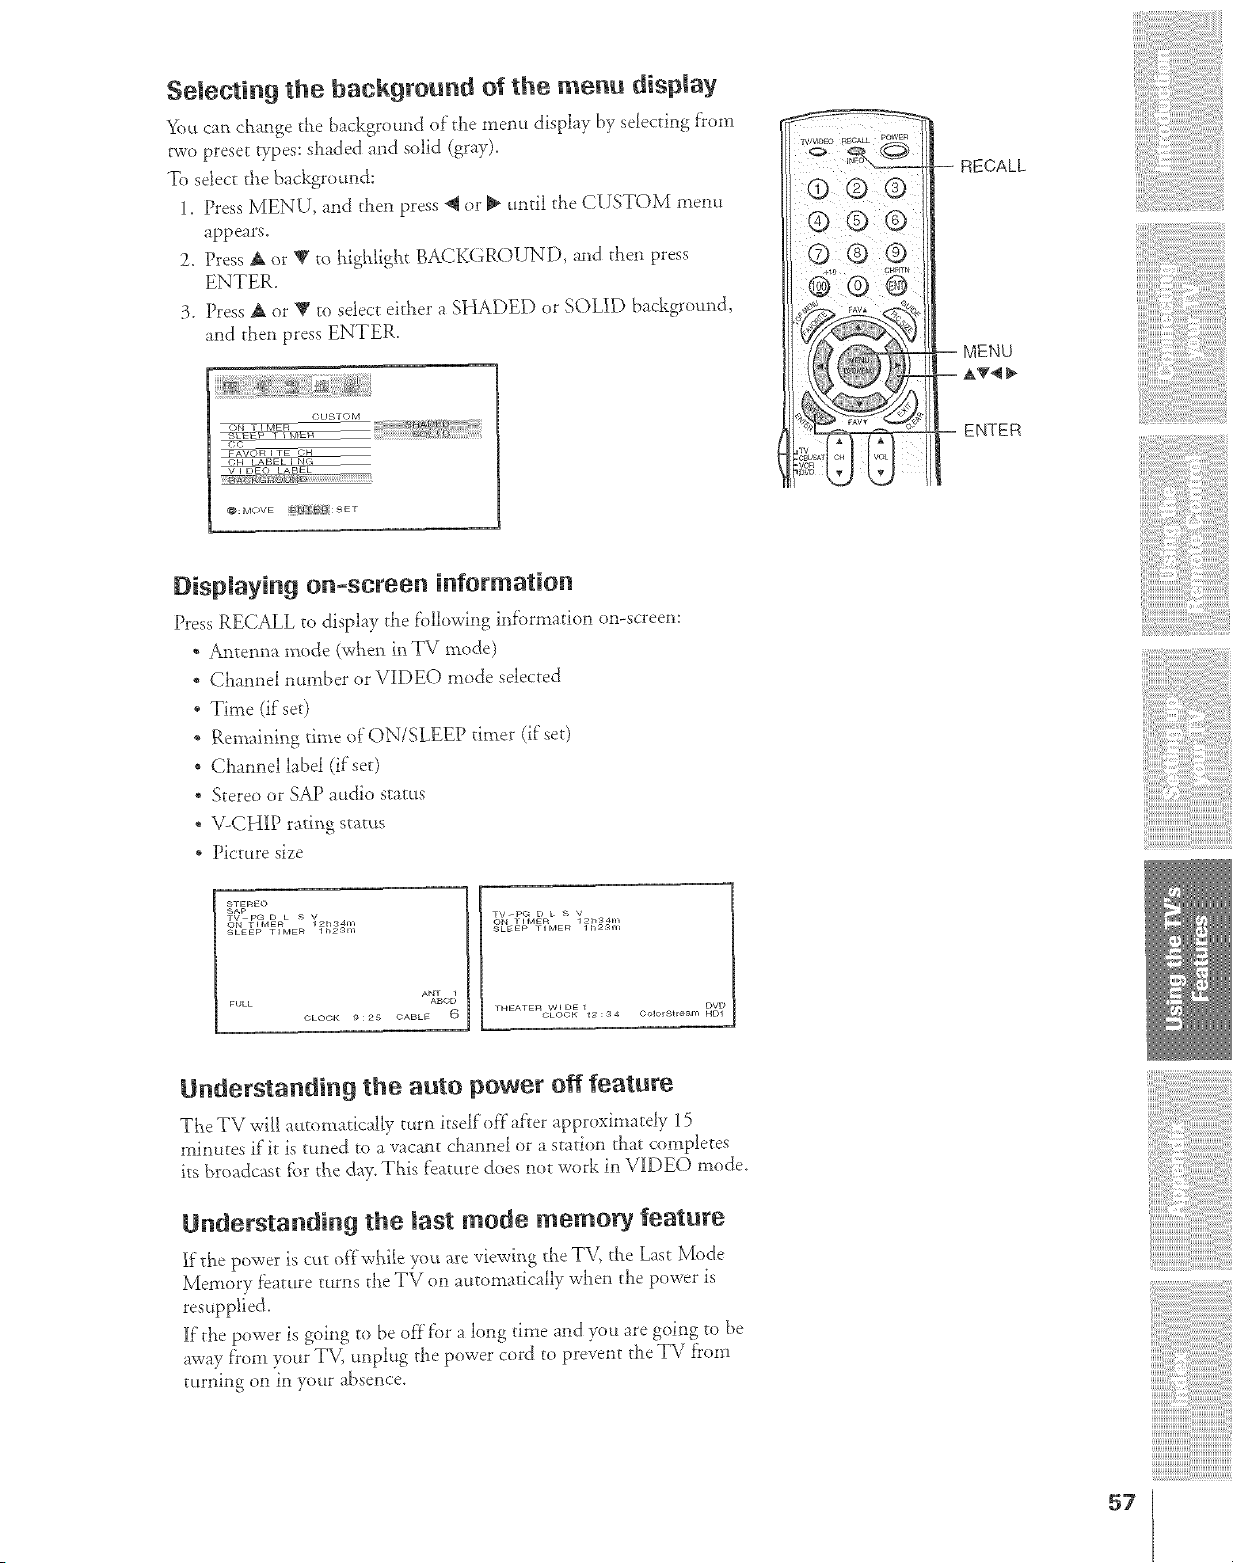
Selecting the background of the menu display
_¢_ucm cllange t_e background of t_e meim display by selecting from
two preset types: shaded and solid (gray).
To select the background:
1. Press MENU, a_]d the11press _ or _ _mtil d_e CUSTOM memt
appears.
2. Press A or RI' to higil[igb£ BACKGROUND, and then press
ENTER.
3. Press A or T to select either a SHADED or SOLID background,
aI*d the*_press ENTER.
GUSTOM
FAV{) ITE ¢_
C;H tAb_L _ _4 •
V I E)EO LABEL
@MOVE _'@ {reSET
_TV
CBUSAT CH VOL
'VGR
DVD
--RECALL
= ENTER
Displaying on-screen information
Press RECALL to display the f'oilowing inf_}rmation on-screem
" Anteima mode (w_e_ in TV mode)
Ctaannel number or V{DEO mode selected
. Time (if set)
* Remai_ing time of ON/SLEEP timer (if set)
Channel label (if set)
* Stere{>or ,gAPat*dio status
* \LCH[P rating status
* Picture size
gTEREO
_AP
TV pG D • _ V
_LEEP TIMER lhPam
ANT 1
FULL AN(;[)
GLO©K 9:25 OABLE 6
TV_PG D g _ 'V
ON TIMER I 2_,r44m
SLEEp TIME_ lh2'_n_
THEATER WIDE1 DVD
OLOOK 12:@4 Oo]olstroam HDI
U_dersta_di_g the a_to power off feature
T[_eTV will acttomatical[y turn itself off after approximately 15
minutes if it is tuned to a vacant c}aam_elor a station t]mt completes
its broadcast _br tee day. T[_is {eature does not work in VIDEO mode.
U_dersta_di_g the last mode memory feature
If the power is cut offwhi|e you are viewing d_e TV, d_e Last Mode
Memory feature turns the TV on automatically wLen the power is
resupp]ied.
if the power is going to be off lbr a long time and you are goi_]g to be
a,_vayfrom your TV, unplug the power cord to prevent the TV from
turning on in your absence.
!ii!i!!/iiiiiiiiiiiiiiii
57
Televiskm System Dimensions
NTSC standard 46H84:
Widtt_
Heigt_t
Channel Coverage Depth
VHF: 2 ttwough 13 51H84: Widtt_
UHF: 14 through 69 Height
Cable TV: Mid band (A-8 through A-l, A through I) Depth
Super band (l through W) 57H84: Width
Hyper band (AA through ZZ, AAA, BBB) Height
Ultra band (65 through 94, 100 through 125) Depth
Power Source Mass
120 V At_;, 60 Hz
Power Consumption
190 \V (average)
Audio Power
20 W + 20 'g'
Speaker Type
46H84: Two 4-3/4 inches (12 cm) round
51H84: Two 65/16 inches (16 cm) roulld
57H84: Two 65/16 inches (16 cm) rotmd
Video/Audio Terminals
S-VIDEO INPUT
Y : 1 V(p-p), 75 ohms, negative sync.
C : 0.286 V(p-p) (burst signal), 75 ohms
VIDEO/AUDIO INPUT
VIDE(): 1V(p-p), 75 ohms, negative sytlc.
AUDIO: 150 mV(rms) (30% modulation equivalent,
22 k ohms or more)
ColorStream _' (component video) INPUT
Y : IV(p-p), 75 ohms
PP,:0.7 V(p-p), 75 ohms
PB: 0.7 V(p-p), 75 ohms
AUDIO: 150 mV(rms), 22 k ohms or more
VIDEO/AUDIO OUTPUT
VIDE(): 1V(p-p), 75 ohms, negative sytlc.
AUDIO: 150 mV(rms) (30% modulation equivalent,
2.2 k ohms or less)
VARIABLE AUDIO OUTPIiT
(}-3(10mV(rms) (3(1%modulation equivalent,
2.2 k ohms or lea,)
HDMI INPUT
HDMI type A
Suggested scan rates: 1080i, 720p, 480p, 480i
xx-x/x inches (xxx ram)
xx-x/x inches (xxx ram)
xx-x/x inches (xxx ram)
47-3/5 inches (1,209 ram)
50-2/5 inches (1,280 ram)
22 inches (570 mm)
52-314 inches (1,340 ram)
55-1/16 D_ches(1,399 ram)
2}-7/8 inches (606 ram)
46H84: xxx Ibs (xxkg)
51H84: xxx Ibs (xx kg)
57H84:230 [bs (105.0 kg)
Supplied Accessories
Remote Control with 2 size "AA" alkaline batteries
Optional TV Stand
46H84:ST466 }
Design and specifications are subiect to change without notice.
Exemptions
TACP/TCL ale not liable fbr:
(1) damage caused by fires, natural disaster (such as thunder,
earthquake, etc.), acts by third person, accidents, owner's
misuse, or use in other improper conditions;
(2) h_ddental damages (such as profit loss or interruption in
business, modification or erasure of record data, and so
t'orth) caused bv use or inability to use of this product;
(}) damage caused by neglect of the D_structions described h_
the owIlelT'Smanual; and
(4) damage caused by misuse or malfimction through
simultaneous use of this product and the connected
equipment.
Troubleshooting
Before calling a service technician, please check the f_dlowh_g table f_r a possible cause of the symptom and
SOI_le SOlHtions_
Symptom
TV will not turn on
So_t_tion
, Make sure the power cord is plugged in, then press POWER.
* The remote control batteries may be dead. Replace the batteries.
No picture, r:to sound
* Check the antenna/cable connections.
No sound, picture OK * The sound may be muted. Press VOLUME.
" The station may have broadcast dif}_culties'_Try another channel.
, Che& that d_e SPEAKERS funcrio,_ in AUDIO menu is set properl>
Poor picture, sound OK
* Check the antenna connections.
, The stadon may have broadcast difficulties. Try another channel.
, Adjust the PICTURE menu.
Poor reception of broadcast chatmels " The stadon may have broadcast difficulties. Try another channel
* Check the antenna connections.
* I[you are using a VCR, make sure the TVYVCR button is set
correctl>
Cannot receive above channel 13
, Make sure die TV/CABLE switda is set to the mode d_ar
corresponds with the signal source type (cable company or outside
an t el_ll_la)_
Black box appears oa the screen " The closed caption feature may be set to one of the Text modes (T i,
T2, T3, or T4). _tri1 closed captioning OFE
Unable to select a certain channel
" The chamd may be locked out wid_ the CH LOCK feature, or
erased with the ADD/ERASE feature.
Multiple images
" The station may have broadcast difficulties. Try another channel.
* Antenna reception may be poor. Use a highly directional outdoor
antel_lna_
Poor color or rio color
* The scadon may have broadcast dif}iculdes'. Try another channel.
* Adiust d_e TINT and/or COLOR in d_e PICTURE menu.
No stereo or SAP sound from a
D_own MTS broadcast
" Make sure the MTS feature is set properly.
The remo_e cotx{roI does not operate
, Check whether the appropriate device mode is selected.
* Remove all obstructions between the remote control and the remote
comrol sensor in die TV2
* The remote c(mtrol batteries" may be dead. Replace d_e baaeries.
Cannot access signal i_put sources
(Video 1, Video2, Video3,
ColorStream HD 1/HD2, HDMI)
and/or Channels 3 and 4.
" Check the VIDEO LOCK feature.
59
Limited United States Warranty'
for 27" FST PURE _ and All Larger Television Models
]bshiba Amelica Consumer Rod(Jets. L.LC. ("TACP') makes the
folbwing ]infited wananties to original consurnels in the United
States, THESE LIMITED WARRANTIES EXTEND TO THE
ORIGINAL CONSUMER PURCHASER OR ANY PERSON
RECEIVING THIS TELEVISION AS A GIFT FROM THE
ORIGINAL CONSUMER PURCHASER AND TO NO OTHER
PURCHASER OR TRANSFEREE,
PRODUCTS PURCHASED IN THE U.S.A. AND USED IN
CANADA ARE NOT COVERED BY THESE WARRANTIES.
PRODUCTS PURCHASED IN CANADA AND USED IN THE
U.S.A. ARE NOT COVERED BY THESE WARRANTIES.
Limited One (1} Year Warranty on Parts an_t Labor*
TACP war]ants this television and its pats against defects in
mateiials ol wolkmanship for a peiiod of one (1) year after the
date of oligina[ retail puichase. DURING THIS PERIOD, TACP
WILL, AT TACP'S OPTION, RERAIR OR REPLACE A
DEFECTIVE RART WITH A NEW OR REFURBISHED PART
WITHOUT CHARGE TO YOU FOR PARTS OR LABOR. TACP
Authorized Sewice Station pelsonne[ will come to your home
when warlanty service is lequired. Depending on the type of
repair requiied, eithel the service wi[[ be perfoHned in your home
or the set will be taken to the TACP Authorized Service Station
fo_ _epair and retu ned to your home at no cost to you.
Limited Two {2} Year Warranty on Picture Tube*
TACP furthe_ wan_nts the picture tube in this television against
detects in mateliab ol wolkmanship for a peliod of two C2] yeas
aftel the date of original retail purchase. DURING THIS PERIOD,
TACP WILL AT TACP'S OPTION, REPAIR OR REPLACE A
DEFECTIVE PICTURE TUBE WITH A NEW OR REFURBISHED
PICTURE TU BE WITHOUT CHARGE TO YOU, EXCEPT THAT. IF
A DEFECTIVE PICTURE TUBE IS REPAIRED OR REPLACED
AFTER ONE (1] YEAR FROIVl THE DATE OFTHE ORIGINAL
RETAIL PURCHASE, YOU PAY LABOR CHARGES INVOLVED
IN THE REPAIR OR REPLACEMENT.
Rental Units
The wa ranty fol lental units begins with the date of first rental or
thhty (3@ days flora the date of shipment to the rental firm,
whichever comes first,
*Co_n_ereial Units
Tebvisions sold and used fol commelcia[ purposes have a ][nfited
ninety (90) day walranty foi all parts, ]abol and pietule tubes,
Owner's Manual and Product Registration Card
Read this owneCs manual tholoughly befole operating this
television. Complete and mail the enclosed product registration
card within ten days aftel you, ol the person who has given you
this product as a gift, purchased this tebvisbn. Returning the
product registration card will enabb TACP to piovide you with
better customer selvice and imploved pioduct suppolt. Failure to
return the product registration card wi]] not affect you rights
undeI this waHanty,
Yonr Responsibility
THE ABOVE WARRANTIES ARE SUBJECT TO
TH EFOLLOWlNG CONDITIONS:
(1) '¢ou must provide you bill of sale ol othel pioof of puichase.
(2} AIr wa rarity selvicing of this television must be made by an
Autholized TACP Sewice Station,
(3} The wananties from ]?,CP are effective only if the television is
purchased and operated in the U,S.A, or RJerto Rico.
(4} Labol selvice chages for set installation, setup, adjustment
of customel controb, and installation or repaii of antenna
systems ae not cove_ed by these wa_ranties, Reception
problems caused by inadequate antenna systems are you
lesponsibi]ity,
(5} Ww_lanties extend only to defects in mateiiab oi
workmanship as Bnited above and do not extend to any
television or pats that have been lost ol disca ded by you or
to damage to television o_ parts caused by misuse accident,
Acts of God (such as lightning or fluctuations in electlic
powe0, improper installation improper maintenance, or use
in violation of [nstluctions furnished by TACP: or to units that
have been modified or had the selial numbe_ removed,
altered, defaced, ol rendered illegible
How to Obtain Warranty Sewiees
If, afte_ following all of the opelating instn_ctions in this manual
and checking the "]]oubleshootir_g" section, you find that service
is needed:
(1} Visit TACP's web site at www.toshiba.eo_/taep ol call
toll free ] 800 63] 38] 1 to find the neaest TACP
Autholized Service Station,
(2} Resent youF bi]] of sale or other ploof of p(n chase to the
Autholized Selvice Station, Authorized TACP Sewice Station
pelsonnel will come to youl home when wa ranty service is
lequh ed. Depending on the type of lepair required, eithel
the service wi[[ be pe_foHned in youl home ol the set will be
taken to the Authorized Service Station for repair and
_etu_ned to your home at no cost to you.
For a_ditionaJ information, visit TACP's web site: 1
www=toshiba=eo_/taep.
1
ALL WARRANTIES IMPLIED BY THE LAW OF ANY STATE
OF THE U.S.A., INCLUDING THE IMPLIED WARRANTIES OF
MERCHANTABILITY AND FITNESS FOR A PARTICULAR
PURPOSE, ARE EXPRESSLY LIMITED TO THE DURATION
OF THE LIMITED WARRANTIES SET FORTH ABOVE. WITH
THE EXCEPTION OF ANY \,_;ARRANTIES IMPLIED BY THE
LAW OF ANY STATE OF THE U.S.A. AS HEREBY LIMITED,
THE FOREGOING WARRANTY IS EXCLUSIVE AND IN LIEU
OF ALL OTHER WARRANTIES, GUARANTEES,
AGREEMENTS, AND SIMILAR OBLIGATIONS OF TACP
WITH RESPECT TO THE REPAIR OR REPLACEMENT OF
ANY PARTS. IN NO EVENT SHALL TACP BE LIABLE FOR
CONSEQUENTIAL OR INCIDENTAL DAMAGES.
No person, agent distlibutol, dealer, ol company is autholized to
change, modify, ol extend the reims of these wananties in any
manne_ whatsoeveh The time within which action must be
commenced to enfqce any obligation of TACP alising undel this
warlanty ol under any law of the United States ol of any state
theleof is hereby limited to 90 days flora the date you discovel
oi should have discoveled, the defect. This limitation does not
apply to implied warranties arising under the law of any state of
the USA,
THIS WARRANTY GIVES YOU SPECIFIC LEGAL RIGHTS,
AND YOU MAY ALSO HAVE OTHER RIGHTS, WHICH MAY
VARY FROM STATE TO STATE IN THE U.S.A. SOME STATES
OF THE U.S.A. DO NOT ALLOW LIMITATIONS ON THE
DURATION OF AN IMPLIED WARRANTY, LIMITATIONS ON
THE TIME WITHIN WHICH AN ACTION MAY BE BROUGHT,
OR THE EXCLUSION OR LIMITATION OF INCIDENTAL OR
CONSEQUENTIAL DAMAGES; THEREFORE, THE ABOVE
LIMITATIONS OR EXCLUSIONS MAY NOT APPLY TO YOU
UNDER SUCH CIRCUMSTANCES.
FSTPURE' isa registeredtlademalkofToshibaAmericaOonsume_Roducts,LLC
0104
TushibaofCanadaLimitedC"TCL']makesthet'ollowinglimited
wanantiestoodginalconsumersin Canada.
THESE LIMITED WARRANTIES EXTEND TO THE ORIGINAL
COBISUMER PURCHASER OR ANY PERSON RECEIVING
THIS TELEVISION AS A GIFT FROM THE ORIGINAL
CONSUMER PURCHASER AND TO NO OTHER
PURCHASER OR TRANSFEREE.
PRODUCTS PURCHASED 1N THE U,S,A, AND USED IN
CANADA ARE NOT COVERED BY THESE WARRANTIES.
PRODUCTS PURCHASED JN CANADA AND USED IN THE
U.S.A. ARE NOT COVERED BY THESE WARRANTIES.
Limited One (1) Year Warraoty ml Parts art4 Labor*
TCL waJraots this television and its paJts against defects i_
materials or _olkmanship tot a pedod of o_e (1} yeal aRel the
date of odgir_a[ retail purchase. DURING THIS PERIOD, TCL
WILL, AT TCL'S OPTION, REPAIR OR REPLACE A DEFECTIVE
PART WITH A NEW OR REFURBISHED PART WIT_OUT
CHARGE TO YOL} FOR PARTS OR LABOR. TCL Authorized
Service Depot personnel will come to your home when warlanty
selvice is required, Depeading on the type of repail lequired,
eithel the service will be perf,ol reed in youl hence ol the set will
be taken to the TCL Authorized Service Depot fi>r i_epairand
returned to you_ home at no cost to you. IN-HOME SERVICE
ONW APPLIES WITHIN 100 KILOMETERS OF AN
AUTHORIZED TCL SERVICE DEPOT,
Limited Twe [,2) Year Warra_tty e_/Picture Tube*
TCL further wau'ants the picture tube in this television against
defects in materials or workmanship fol a period of two (2) yeals
after the date of oliginal retail pulchase. DURING THIS
PERIOD, TOL WILL, AT TOL'S OPTION, REPAIR OR REPLACE
A DEFECTIVE PICTURE TUBE WITH A NEW OR
RFURBISHED PICTURE TUBE WITHOUT CHARGE TO YOU,
EXCEPT THAT, IF A DEFECTIVE PICTURE TUBE iS REPAIRED
OR REPLACED AFTER ONE O) YEAR FROM THE DATE OF
THE ORIGINAL RETAIL PURCHASE, YOU PAY LABOR
CHARGES INVOLVED IN THE REPAIR OR REPLACEMENT.
Rel_taJ Units
The waHanty for rental units begins with the date of filst _ental o_
thilty (30) days flora the date of shipment to the lentaJ film,
whicheve_ comes first.
*Commercial Units
Televisiens sold and used for cornn_erciai purposes have a [iraited
ninety (.gO] day warlaaty fol all pads, labol; and picture tubes.
Owrler_s ManuaJ
Read this owner's manual thoroughly be%re operating this
television.
Your Responsibility
THE ABOVE WARRANTIES ARE SUBJECT TO THE
FOLLOWING CONDITIONS:
(0 'ff;u must pluvide your bill of sale or othe_ p_eof of purehase.
(2} All vvananty servicing of this television must be reade by an
Authorized TCL Selvice Depot
{3) The wananties from TCL are eftecfive only if the televisio;_ is
purchased i_sCanada from an authorized TCL dealel and
epe_ated in Canada,
(4] Label setvice charges re1set installation, setup adiustmer_t
of custolsrer cohtloJs, albd i_]stal)ation oJ Jepair of antenna
systems are not covered by these warranties. _eception
plobJems caused by iY_adequateaisten_a systems ale yOUF
responsibil@.
(5) W_l _anties exi:end only to def_,cts in materials o_
wo_krnanship as limited above and do net extend to any
television ol parts that have bee_ lost o_ discs/deal by you o_
to damage to television or parts caused by misuse, accident,
Acts of God (sdch as lightning o/ fluctuations in electric
poweG imprope_ installation, imp_ope_ maintenance, o_ use
in violalion of instructions furnished by TCL: or to ul_its that
ha're been modified or had the seda( number lemoveG
altered, defaced, or rendered il)eg]ble,
How to O_taio V!/aITal_ty Sei_vices
IL afte_ following all of the operating instuictions in this manual
and checking the "_ oubleshooting" section, you find that sel_vice
is needed:
(0 To find the nearest TCL Autholized Selvice Depot, visit TCJLs
web site : www.teshiba.ea,
(2) Resent your bill of sale el other prod of pulchase _o the
Authorized Service Depot, Authorized TCL Sel vice Depot
pel'sonnel will corse to your home when warlantv selvice is
required. Depending on the type of repail lequired, either
the service will be pelformed in you[ home o/the set will be
taken to the Authorized Belvice Depot f,.)_repail and
returned to your home at no cost to yod, IN-HOME
SERVICE ONLY APPLIES WITHIN _00 KILOMETERS OF
AN AUTHORIZED TCL SERVICE DEPOT.
For additionaJ information,, visit TCL's we_ site:
ALL WARRANTIES IMPLIED BY THE LAW OF ANY
PROVINCE OF CANADA, iNCLUDING THE IMPLIED
WARRANTIES OF MERCHANTABILITY AND FITNESS FOR
A PARTICULAR PURPOSE, ARE EXPRESSLY L[MFFED TO
THE DURATION OF THE LIMITED WARRANTIES SET FORTH
ABOVE. "WITH THE EXCEPTION OF ANY WARRANTIES
IMPLIED BY THE LAW OF ABlY PROVINCE OF CANADA AS
HEREBY LffvIITED, THE FOREGOING WARRANTY IS
EXCLUSIVE AND IN LIEU OF ALL OTHER WARRANTIES,
GUARANTEES, AGREEMENTS, AND SIMILAR
OBLIGATIONS OF TCL WITH RESPECT TO THE REPAIR OR
REPLACEMENT OF ANY PARTS. IN NO EVENT SHALL TCL
BE LIABLE FOR CONSEQUENTIAL OR INCIDENTAL
DAMAGES.
No person, agenL disthbutol_, deale_ or company is autho/ized to
change, modify, or extend the terms of these ?varranties in ai]y
mar_ne_vvhatsoevel. The time within which actior_ must be
commenced to enfolDS any obligation of TCL arising uadel this
warranty or unde_ any Jaw of Canada ol of any p_ovince thereof,
is heleby limited to 90 days flora the date you discove_ ol should
have discovered, the defect, This limitatioi_ does i_ot app(y ta
implied vvaf/anties adsing unde_ the law of any province of
Canada
THIS WARRANTY GIVES YOU SPECIFIC LEGAL RIGHTS,
AND YOU MAY ALSO HAVE OTHER RIGHTS, WHICH MAY
VARY FROM PROVINCE TO PROVINCE iN CANADA. SOME
PROVINCES OF CANADA DO NOT ALLOW LIMITAT(ONS
ON THE DURATION OF AN IMPLIED WARRANTY,
LIMITATIONS ON THE TIME WITHIN WHICH AN ACTION
MAY BE BROUGHT, OR THE EXCLUSION OR LIMITATION
OF INCIDENTAL OR CONSEQUENTIAL DAMAGES;
THEREFORE, THE ABOVE LIMI1ATIONS OR EXCLUSIONS
MAY NOT APPLY TO YOU UNDER SUCH
CIRCUMSTANCES.
FSTPURE@isa registeredtrademarkof ToshibaAmerica0onsume_Roducts,LL,C
0104
iii,'i ii!i!i i i!/iiiiiiiiiii!i!i !! i! i i!!!!ii!i
iiiiiiiii!ilrrr_#
iiiiiiiiiiiiiiii%_
iiiiiiiii!!i_Erlri
. iiiiiiiiiiiii'/i
61
A
A/V cabbs (standard:) .........................................................8
ANT 1/2 ...................................................................................23
Antenna cabbs (coaxia0 ...................................................8
AUDIO OUT sound, sebcdng .......................................56
Audio system connection .................................................16
Auto aspect ...........................................................................34
Auto convergence ...............................................................26
Auto favorite ..................................................................38, 42
Auto power off ......................................................................57
B
BACKGROUND selection ................................................57
Back of the TV ........................................................................7
C
CableClearTM DNR ...............................................................47
Cable converter box connection ...................................10
Camcorder connection ......................................................14
CH AY buttons ....................................................................25
Channel Return ....................................................................28
CH LABELING ......................................................................30
CH LOCK.................................................................................42
CH RTN button .....................................................................28
Channel Number buttons ................................................25
Channel programming
ADD/ERASE .....................................................................25
Automatic programming .............................................24
TV/CAB LE selection ......................................................24
Cinema mode ........................................................................48
Clock, setting ........................................................................52
Closed caption ......................................................................50
Coior temperature ...............................................................46
ColorStream (componen0 cables ...................................8
Convergence adjustment .................................................26
D
Display format ......................................................................48
Double-window ("POP"} feature ...................................35
DTV receiver connection ..................................................13
DVD connection ...........................................................11, 12
FGH
FAVAY buttons ..................................................................29
FAVORITEbutton .................................................................38
Favorite channels, programming ...................................28
Front of the TV ........................................................................7
HDM[ connection ................................................................15
LM
Labeling channels ...............................................................30
Labeling video inputs ........................................................49
Language selection ............................................................23
Last mode memory .............................................................57
Locking channels ................................................................42
Locking video inputs .........................................................44
Locks menu ...........................................................................39
Menu system .........................................................................22
MTS feature ...........................................................................53
MUTE button .........................................................................53
OP
ON-timer .................................................................................51
Picture adjustments
COLOR TEMPERATURE ..............................................46
Picture mode ....................................................................45
Picture quality ..................................................................45
Picture-out-picture (POP}
CH SCAN button ............................................................37
POPCH AT buttons .....................................................35
POP DIRECT CH button ...............................................35
SOURCE button ..............................................................35
SPLIT button .....................................................................35
SWAP button ....................................................................36
Picture scroll ..........................................................................33
Picture size sebction .........................................................31
POP @lso see "Picture-out-picture"} ..........................35
qR
RECALL button ....................................................................57
Remote control
Battery installation .........................................................17
Learning about the buttons ........................................21
Programming ....................................................................18
RESET..............................................................................48, 55
S
SAP sound ..............................................................................53
Satellite receiver connection ...........................................11
Scrolling the Theater Wide picture ...............................33
Set-top box ............................................................................13
Sleep timer .............................................................................51
Sound quality adjustments ..............................................54
SPEAKERS on/off ...............................................................56
Specifications ........................................................................58
SRS 3D surround .................................................................54
StableSound _ ........................................................................55
Stereo sound .........................................................................53
Surf LockTM ...............................................................................28
S-video cables ........................................................................8
T
Theater wide picture ..........................................................32
TouchFocusTM .........................................................................26
Troubleshooting ..................................................................59
TV/V[DEO button .........................................................28, 49
V
V-CHI P
BLOCKING OPTION ......................................................41
ENABLE BLOCKING ....................................................40
MPAA RATING ................................................................41
NEW PIN CODE .............................................................44
TV RATING ........................................................................40
Unlocking programs temporarily ..............................42
VCR connection .....................................................................9
VIDEO LABEL ......................................................................49
VIDEO LOCK .........................................................................44
W
Warranty ..........................................................................60, 61
WOW srround sound feature .........................................54

TOSHIBA AMERnCA CONSUMER PRODUCTS, L.LoC°
HEAD OFFICE: 82 TOTOWA ROAD, WAYNE, NJ 07470, U.S.A.
NATIONAL SERVICE DIVISION:1420-B TOSHIBA DRIVE, LEBANON, TN 37087, U.S.A.
TOSNtBA OF CANADA LTD.
HEAD OFFICE: 191 McNABB STREET, MARKHAM, ONTARIO, L3R 8H2, CANADA-TEL: (905} 470-5400
SERVICE CENTERS:
TORONTO: 191 McNABB STREET, MARKHAM, ONTARIO L3R 8H2, CANADA -TEL: (905) 470- 5400
MONTREAL: 180.50 TRANS CANADA, KIRKLAND, QUEBEC, H9J 4AI, CANADA - TEL: (.514) 390-7766
VANCOUVER: 22171 FRASERWOOD WAY, RICHMOND, B.C., V6W 1J.5, CANADA- TEL: (604) 303-2`500
MANUFACTURED BY
TOSHIBA AMERICA CONSUMER PRODUCTS, LoL.C=
ColorStream and StableSound are registered trademarks of Toshiba America Consumer Products, L.L.C.
CableClear, TouchFocus, and SurfLock are trademarks of Toshiba America Consumer Products, L.L.C.
SRS WOW, SRS and (0) symbol are trademarks of SRS Labs, Inc.
SRS WOW technology is incorporated under license from SRS Labs, Inc.
os., TOSHIBA
(04-05)