For models: GOC1411TH
11 FIN OIL COLUMN HEATER
OPERATING INSTRUCTIONS

1. Use only the voltage specified on the rating
plate of the appliance.
2. Keep all objects at least 1 metre from the
front, sides and rear of the appliance. Do not
place appliance close to radiant heat source.
3. Do not operate in areas where petrol, paint or
other flammable liquids are used or stored.
4. Do not insert or allow foreign objects to enter
any ventilation or exhaust opening, as this
may cause an electric shock, fire or damage
to the appliance.
5. Do not operate this appliance with a
damaged cord, plug or after the appliance
malfunctions or has been dropped or
damaged in any manner. Return to a
qualified electrical person for examination,
electrical service or repair.
6. This appliance is intended for household use
only and not for commercial or industrial use.
7. Use this appliance only as described in this
manual. Any other use is not recommended
by the manufacturer and may cause fire,
electrical shock or injury.
8. The common cause of overheating is
deposits of dust or fluff in the appliance.
Ensure these deposits are removed regularly
by unplugging the appliance and vacuum
cleaning the air vents and grills.
9. Do not use abrasive cleaning products on
this appliance. Clean with a damp cloth (not
wet) rinsed in hot soapy water only. Always
removed plug from the mains supply before
cleaning.
10.Do not connect the appliance to mains
voltage until completely assembled and
adjusted.
11.Switch off and use handles provided when
moving.
12.Do not operate with cord set coiled up as a
heat build up is likely, which could be
sufficient to become a hazard.
13.The use of an extension cord with this
appliance is not recommended.
14. Do not remove plug from power socket until the
appliance has been switched off.
15. Do not remove plug from power socket by
pulling cord – always grip plug.
16. Always unplug appliance when not in use.
17. Do not twist, kink or wrap the cord around the
appliance, as this may cause the insulation to
weaken and split. Always ensure that all cord
has been removed from any cord storage area
and is unrolled before use.
18. This appliance is not intended for use by young
children or infirm persons unless they have been
adequately supervised by a responsible person
to ensure that they can use the appliance safely.
19. Do not use this appliance in the immediate
surrounds of a bath, a shower, or a swimming
pool or other liquids. The appliance must not be
immersed in any liquids.
20. When the appliance has been unpacked, check
if for transport damage and ensure all parts have
been delivered. If parts are missing or the
appliance has been damaged, contact the
Goldair Customer Services Team. (refer to
details on back page)
21. If your appliance does not work, or is not
working properly, contact the place of purchase
or the Goldair Customer Services Team. (refer
to details on back page). Repair work on the
appliance by unqualified persons can cause
serious risk to the user.
22. There are no user serviceable parts installed in
the unit.
23. Do not put your fingers or other articles into or
near the air inlet or outlet. Do not sit on the unit.
24. Do not place the unit in wardrobes or other
enclosed spaces as this may cause fire hazards.
25. This unit is not supposed to be used in or around
locations where foodstuffs, works of art or
delicate articles of science, etc are stored.
26. Indoor use only.
27. Children should be supervised to ensure that
they do not play with the appliance.
WARNINGS AND SAFEGUARDS

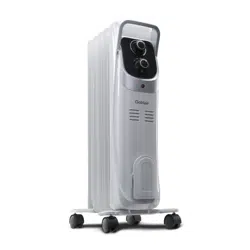
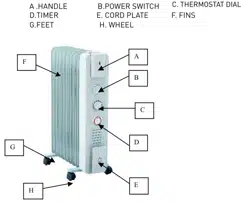
OVERVIEW OF YOUR GOLDAIR FULL SIZE OIL COLUMN HEATER
Your Goldair Oil Column Heater is designed to provide stable background room heating suitable for all
room types and in particular living areas and bedrooms. The heater is equipped with three heat settings
and a thermostat to ensure your specific heating requirements are met. It also includes a 24 hour timer
to enable the heater to come on and off whenever you require it.
Assembly Instructions
Turn the radiator upside-down on a scratch-free and stable surface to prevent damage to the paint finish or
your floor surfacing.
Fit the wheels assemblies onto the radiator by placing the U-shaped bolts between the outermost fins on
each side of the radiator (see Fig.1 - 4).
IMPORTANT: Please fit the wheel bases as per the picture. Other position may affect the stability of the
radiator (see Fig 6 for correct orientation).
Securely fasten the wheels assemblies onto the radiator by screwing the wing nuts onto the bolts (see Fig.
5).
WARNING: Only operate the radiator in normal upright position with wheels assemblies attached to the
bottom as shown in Fig. 6 (wheels on the bottom, controls on the top), any other position could create
a hazardous situation

OPERATING YOUR HEATER
Place the product in an upright position on a flat, steady, stable, heat-resistant surface. Make sure there is
nothing flammable or heat sensitive within 1 meter (40 inches). Operating the product in any other
position could cause a hazard.
Insert the plug into a suitable wall outlet after turning the thermostat knob counter-clockwise to the minimum
position and setting the power switch to “0” for off. The heater is suitable for operation on an A.C.
electricity supply having the same voltage as that show on its rating label.
Heat Setting Operation
Turn the power switch from “0” to either “●” (Minimum heating), “●●” (Medium heating) or “●●●” (Maximum
heating).
Turn the thermostat knob clockwise to maximum position. When the room temperature rises to a
comfortable level, slowly turn thermostat counter-clockwise until the indicator light just goes out.
To adjust the room temperature turn the thermostat clockwise to raise the temperature, or counter-clockwise
to lower it. Thus the heater will attempt to keep the room temperature at the desired level.
To turn off the heater, turn the power switch to “0” position. The power indicator light turns off. Unplug the
product from the electrical outlet when it is left unattended or is not in use.
Timer Setting Operation
24-hour timer. Each segment is 15 minutes
First, set the current time by rotating the Timer Dial clockwise until the arrow points to the correct time.
Next, set the time at which you want the heater to turn ON, by pushing the relevant sections outwards
(towards the outside of the dial).
For all other times, when you want the heater to be off, make sure the corresponding sections are pushed
inwards (towards the centre of the dial).
TURBO/CERAMIC HEATER
• The turbo function is for supplying heat instantly whilst the main heater warms up. For turbo heat,
switch the Turbo ON/OFF using the switch on the front of the turbo cover. Turbo function is also
governed by the thermostat and timer/mode settings.
FULL SIZE OIL COLUMN SPECIFICATION
Model No: GOC1411TH
Power Supply: 230-240V, 50Hz AC only
Power: 2400W
PROOF OF PURCHASE
To receive warranty retain receipt as proof of purchase. (Refer to back of booklet).

SUPPORT AND TECHNICAL ADVICE
North Shore City, Auckland, New Zealand
Monday – Friday 8am-5pm
Phone: 0800 232 633
Website: www.goldair.co.nz
SAFETY DEVICE ~ This appliance has two protection devices:
The first device, automatically disconnects & reconnects the appliance at a preset temperature,
The second safety device disconnects the appliance permanently in case of overheating, by means of a
thermal fuse. (It is non resettable)
IMPORTANT! ~ NEVER COVER THIS HEATER!
Covering the heater will cause activation of the non resettable safety fuse.

Your Goldair product has been inspected and tested and is guaranteed subject to the
following for a period to two years from the date of purchase against defects in
workmanship and materials. During this period, such defects will be rectified by
repair or replacement of the product purchased. Your product contains no user
serviceable components and this warranty becomes invalid if in our opinion the
product has been misused, abused, incorrectly installed, tampered with, connected
to an electrical supply not corresponding with the name plate specification, or
subjected to power surges. The warranty does not include any labour or other
associated expense that may be involved in removal or installation of the product.
Normal wear and tear is expressly excluded.
If your Goldair product fails to operate satisfactorily, please return it to the retailer
from whom it was purchased. To obtain a repair or replacement product under this
warranty, you will need to produce satisfactory evidence of date of purchase. The
completed warranty and purchase receipt must be presented with the product. The
warranty should be filled out at the time of purchase. It is in your interest to make
sure this is done.
If the product is to be replaced (cannot be repaired) then that replacement will be of
the same or similar product or accessory excluding packaging, instruction card etc.
Where a replacement product is supplied, this shall be guaranteed for the balance of
the original warranty period.
Any model that is no longer available will be replaced by a model of a value and with
such features as we consider appropriate in the circumstances. Goldair Ltd is not
responsible for freight forwarding charges, losses or damage in transit.
If service is required after the warranty period has expired, the product should be
returned to a qualified electrical technician. Service outside of the warranty period
will be at your cost.
Consumers GuaranteeAct (1993).
In accordance with the above act consumers are advised that: The manufacturer
does not undertake that repair facilities and parts are necessarily available for this
product.
If any of the provisions of the foregoing are contrary to any relevant legislation, then
that provision shall be deemed to be excluded from the warranty and the rest of the
provisions will continue to apply.
TWO YEAR WARRANTY
IMPORTANT: PLEASE RETAIN THIS WARRANTY CARD
NAME:
ADDRESS:
PURCHASED FROM:
SUBURB:
DATE OF PURCHASE:
NAME OF PRODUCT:
MODEL No: