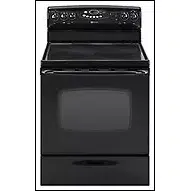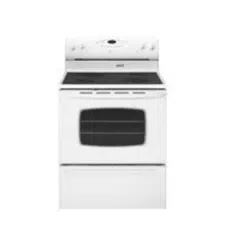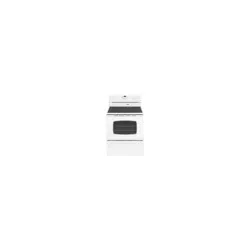
Electric Range - Coil
Ta
Safety .......................................... 1-3
Surface Cooking ...................... 4-5
ControHs
CoiHHements
Oven Cooking ......................... 6-14
Manual Cleon Oven Controls
CHock Baking
Timer BroiUing
Manual Cleon Oven Knob Control
Baking BroiHing
Semf=CmeanOven Controms
CHock Thief
Bakhg Keep Warm
Cook & HoHd BroiHing
DeHay Oven Racks
Care &Cleaning ................... 15-18
Self-CUeanOven
Cleaning Procedures
Maintenance ......................... 19-20
Oven Window
Oven Light
Troubleshooting ................... 21-22
Warranty & Service .................... :23
Guide d'utilisation et
d'entretien ................................... 28
Guia de Use yCuidado ............. 50
Form No. C/10/04 Pat1 No. 8113P465 60 ¢b2004 Maytag Appliances Sales Co. Lithe U.S.A.
installer: Pleaseleave this manual with this appliance
Oensumer: Phase read and keep this manual for future
reference. Keep sabs receipt and. or cancded check as proof
of purchase.
Modal Number
Serial Number
Date of Purchase
f you have questions, carl:
Maytag Customer Assistance
1-800-688-9900 USA
1-800-688-2002 Canada
1-800-688-2080 ( U.S. TrY for hearing or speech impaired}
(Mon.-Fri.. 8 am-8 pm Eastern Time}
InterneL http:iiwww.ma} lag,corn
in our continuing effort to improvethe quaiityand performance
of our cooking products, it may be necessar_ to make changes
to the appliance without revising this guide.
For service information,, see page 23.
To ensere proper and safe operation: Appliance must be
propedy instafled and grounded by a qualified technician.
Do not attempt to adjust, repair, service, or replace any paRR
of your appliance unless it is specificafly recommended in
this guide. All other servicing should be referred to a
qualified servicer.
Always disconnect power to appliance before servicing.
tipping of the appliance from
Warning and Important Safety Instructions appearing in this
guide are not meant to cover all possible conditions and
situations that may occur. Common sense, caution, and care
must be exercised when installing, maintaining, or operating
the appliance.
Always contact the manufacturer about problems or
conditions you do not understand.
Recognize Safety Symboms, Words, Labels
WARNUNG _ Hazards or unsafe practices which COULD
resu!t in severe personal injury or death,
result in minor persona! injury.
Read and follow aU instructions before using this
appmiance to prevent the potential risk of fire, electric
shock, personal injury or damage to the appliance as a
result of improper usage of the appliance. Use appliance
only for its intended purpose as described in this guide.
be secured by a properly installed anti.tip
device.
To check if device is properly instafled, look underneath
range with a flashlight to make sure one of the rear leveling
legs is properly engaged in the bracket slot. The anti-tip
device secures the rear bveling leg to the floor when
properly engaged. You should check this an_me the
range has been moved.
To Prevent Fire or Smoke
Be sure air packing materials are removed from the appli-
ance before operating it.
Keep area around appliance dear and free from combus-
tible materials. Flammable materials should not be stored in
an oven.
Many plastics are vulnerabb to heat. Keep plastics away
from paRRsof the appliance that may become warm or hot.
To prevent grease fires, do not let cooking grease or other
flammabb materials accumulate in or near the appliance.
In Case of Fire
Use dry chemical or foam-type extinguisher or baking soda
to smother fire or flame. Never use water on a grease fire.
1. Turn off appliance to avoid spreading the flame.
2. NEVER pick up or move a flaming pan.
3. Smother oven fire or flame by dosing the oven door.
Child Safety
NEVER store itemsof interest to Children in cabinets above
an app!iance, Children climbing On the appliance o!_on the
appliance door to reach items could be sedousty injured.
NEVER leave children alone or unsupervised near the appli-
ance when it is in use or is still hot. Children should never be
allowed to sit or stand on any part of the appliance as they
could be injured or burned.
Children must be taught that the appliance and utensils in it
can be hot. Let hot utensils cool in a safe place, out of reach of
small children. Children should be taught that an appliance is
not a toy. Children should not be allowed to play with controls
or other parts of the appliance.
About Your Appmiance
NEVER USean appliance as a step to reach cabinets above,
Misuse of appliance door, such as stepping, leaning or
sitting on the dooh may result in possible tipping of the
Cooking Safety
Never heat an unopened food container in the oven. Pressure
build-up may cause container to burst resulting in serious
personal injury or damage to the appliance.
Use dry, sturdy potholders. Damp potholders may cause burns
from steam. Dish towels or other substitutes should never be
used as potholders because they can trail across hot elements
and ignite or get caught on appliance parts.
Wear proper apparel. Loose fitting or long hanging-sleeved
apparel should not be worn while cooking. Clothing may ignite
and cause burns if garment comes in contact with heating
elements.
Always place oven racks in the desired positions while oven is
cool. Slide oven rack outto add or remove food, using dry,
sturdy potholders. Always avoid reaching into the oven to add or
remove food. If a rack must be moved while hot, use a dry
potholder` Do not let potholder contact hot element in oven.
Use racks only in the oven in which they were shipped/pur-
chased.
Use care when opening the oven door, Let hot air or steam
escape before removing or replacing food.
PREPARED FOOD WARNUNG: Follow food manufacturer's
instructions. If a plastic frozen food container and!or its cover
appliance, breakage of door, and serious injuries, distorts, warps, or is otherwise damaged during cooking,
immediately discard the food and its container` The food could
To prevent potential hazard to the user and damage to the
appliance, do not use appliance as a space heater to heat or
warm a room. Also, do not use the oven as a storage area for
food or cooking utensils.
Do not obstruct the flow of air by blocking the oven venL
DO NOT TOUCH HEATING ELEMENTS OR iNTERiOR SUR-
FACESOF OVEN. Heating elements may be hot even though
they are dark in color, interior surfaces of any oven become
hot enough to cause burns. During and after use, do not
touch, or let clothing or other flammable materials contact
heating elements or interior surfaces of oven until they have
had sufficient time to cool Other surfaces of the appliance
may become hot enough to cause burns - among these
surfaces are: oven vent opening, surface near this opening,
oven door and window of oven door,
Do not touch a hot oven light bulb with a damp cloth as the
bulb could break. Should the bulb break, disconnect power to
the appliance before removing bulb to avoid electrical shock
NEVER use aluminum foil to cover an oven rack or oven
bottom. Misuse could result in risk of electric shock, fire, or
damage to the appliance. Use foil only as directed in this
guide.
be contaminated.
Do not allow aluminum foil or meat probe to contact heating
element.
Always turn off aft controls when cooking is completed.
Utensim Safety
Follow the manufacturer's directions when using oven cooking
bags.
This appliance has been tested for safe performance using
conventional cookware. Do not use any devices or accessories
that are not specifically recommended in this guide. Do not use
eyelid covers, stove top grills or add-on oven convection
systems. The use of devices or accessories that are not expressly
recommended in this guide can create serious safety hazards,
result in performance problems, and reduce the life of the
components of the appliance.
If pan is smaller than element, a portion of the element will be
exposed to direct contact and could ignite clothing or pothoider.
Only certain types of glass, glass/ceramic, ceramic, earthenware,
or other glazed utensils are suitable for cooktop or oven service
without breaking due to the sudden change in temperature.
Follow utensil manufacturer's instructions when using glass.
2
Turnpanhandletowardcenterofcooktop,notoutintothe
roomoroveranothersurfaceelement.Thisreducestheriskof
burns,ignitionofflammablematerials,orspillageif panis
accidendybumpedorreachedbysmallchildren.
Besureutensilislargeenoughtoproperlycontainfoodand
avoidboilovers.Pansizeisparticularlyimportantindeepfat
frying.Besurepanwillaccommodatethevolumeoffoodthat
isto beaddedaswellasthebubbleactionoffat.
Neverletapanboildryasthiscoulddamagetheutensiland
theappliance.
caution.Usecaretoavoidsteamburnsifawetspongeorcloth
isusedtowipespillsonahotsurface.Somecleanerscan
producenoxiousfumesif appliedtoahotsurface.
CleanonlypaRRslistedinthisguide.
Se f-C ean Oven (select models)
Do not leave rac_, bro!ling pan, food or'co0king utensils, etc.
in the oven during the self.clean cycle.
NEVER leave surface units unattended especially when using
high heat. An unattended boilover could cause smoking and a
greasy spillover can cause a fire.
This appliance is equipped with different size surface elements.
Select pans with flat bottoms large enough to cover element.
Fitting pan sizeto element will improve cooking efficiency.
Coim Emements
To prevent damage to removable heating elements, do not
immerse, soak or clean in a dishwasher or self-dean oven. A
damaged element could short resulting in a fire or shock
hazard.
Make sure drip bowb are in place as absence of these bowls
during cooking could damage wiring.
ProtectEve Liners: Do not use aluminum foil to line surface
unit drip bowls or oven bottoms, except as suggested in the
manual. Improper installation of these liners may result in a risk
of electric shock or fire.
Deep Fat Fryers
Use extreme caution when moving the grease pan or dispos-
ing of hot grease. Allow grease to cool before attempting to
move pan.
Ventimating Hoods
Clean range hood and filters frequently to prevent grease or
other flammable materials from accumulating on hood or filter
and to avoid grease fires.
When flaming foods under the hood, turn the fan on.
Cmeaning Safety
Clean cooktop with caution. Turn off all controls and wait for
appliance parts to cool before touching or cleaning. Clean with
Do not clean door gasket. The door gasket is essential for a
good seal Care should be taken not to rub, damage, or move
the gasket.
Do not use oven cleaners or oven liners of any kind in or around
any paRRof the self-clean oven.
Before self-cbaning the oven, remove broiler pan, oven racks
and other utensils, and wipe off excessive spillovers to prevent
excessive smoke or flare ups.
It is normal for the cooktop of the range to become hot during a
self-clean cycle. Therefore, touching the cooktop during a clean
cycle should be avoided.
important Safety Notice and
The California Safe Drinking Water and Toxic Enforcement Act
of 1986 (Proposition 65} requires the Governor of California to
publish a list of substances known to the State of California to
cause cancer or reproductive harm, and requires businesses to
warn customers of potential exposures to such substances.
Users of this appliance are hereby warned that when the oven is
engaged in the self-dean cycle, there may be some low-level
exposure to some of the listed substances, including carbon
monoxide. Exposure to these substances can be minimized by
properly venting the oven to the outdoors by opening the
windows and/or door in the room where the appliance is
located during the self-dean cycle.
UMPORTANT NOTICE REGARDUNG PET BURDS: Never keep
pet birds in the kitchen or in rooms where the fumes from the
kitchen could reach. Birds have a very sensitive respiratory
system. Fumes released during an oven self-cbaning cycle may
be harmful or fatal to birds. Fumes released due to overheated
cooking oil, fat, margarine and overheated non-stick cookware
may be equally harmful
Save These instructions for Future Reference
3
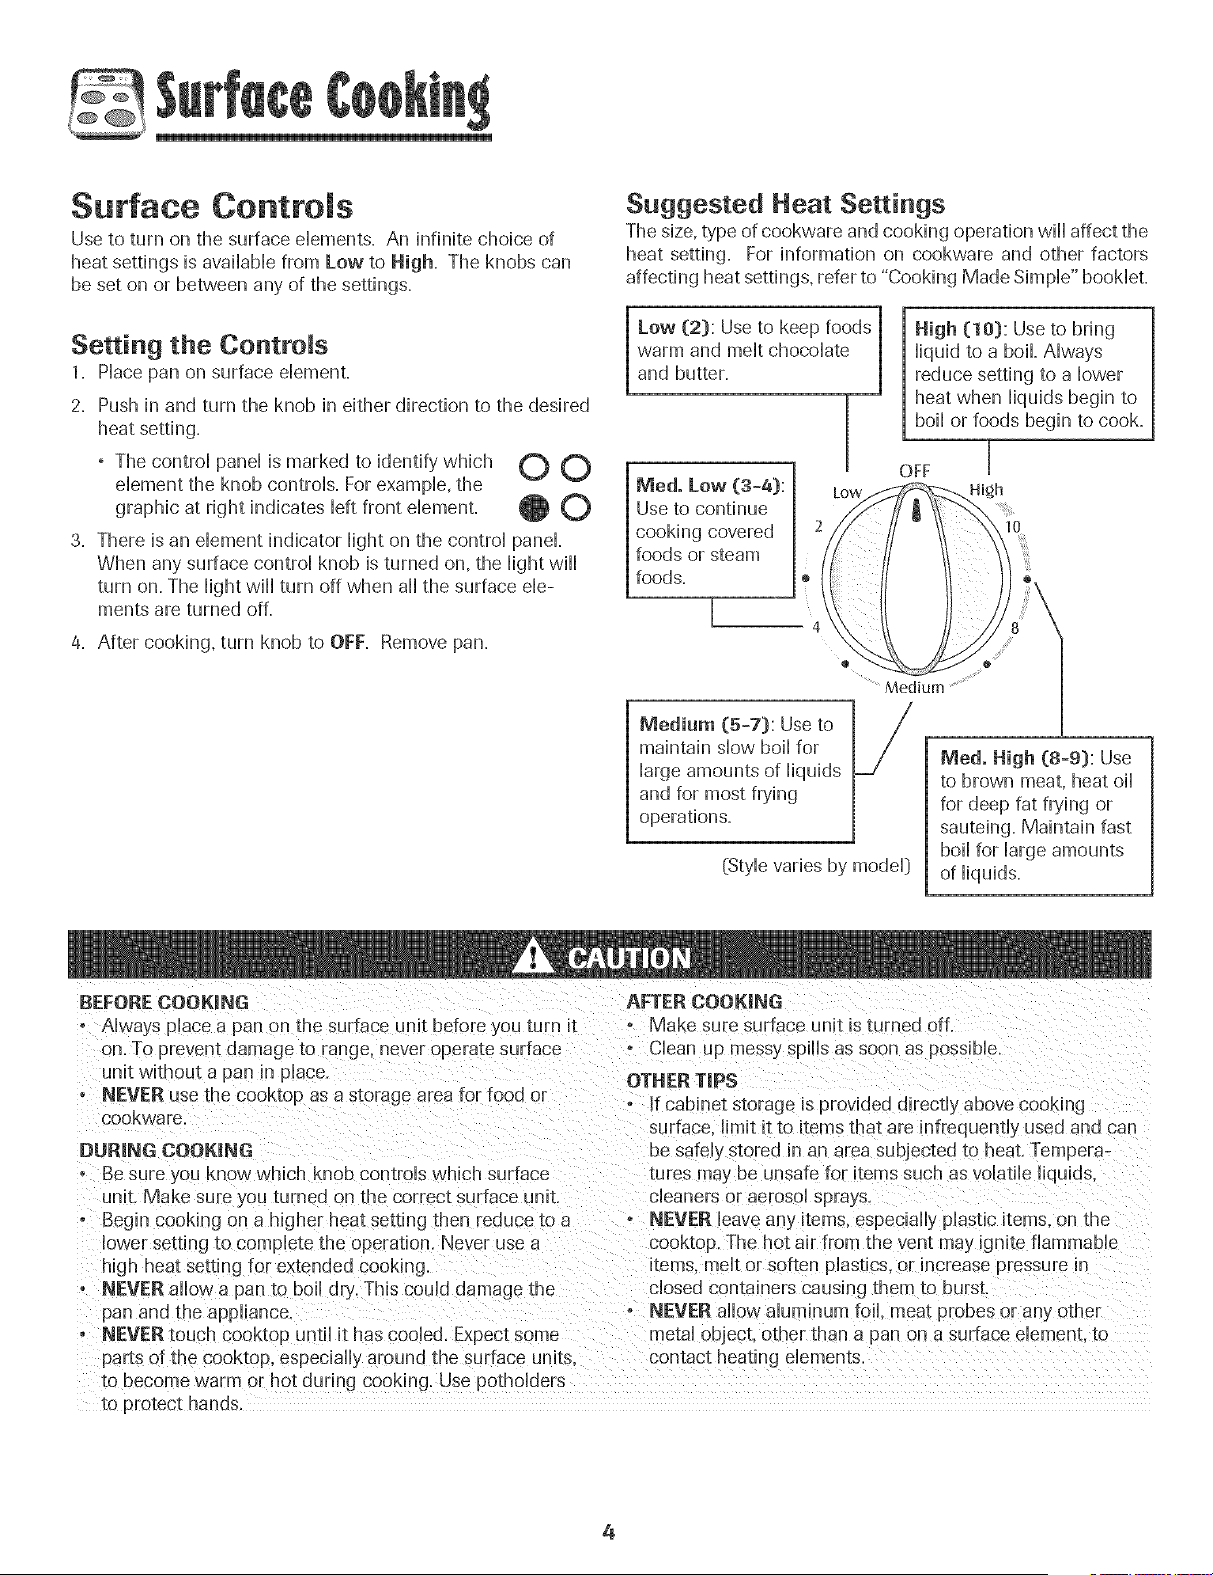
Surface Controls
Use to turn on the surface elements. An hfhite choice of
heat settings is avaiHabHefrom Low to High. The knobs can
be set on or between any of the settings.
Setting the Controls
1. Place pan on surface element.
2. Push in and turn the knob in either direction to the desired
heat setting.
° The control panel is marked to identify'which _ _'_
element the knob controls. For example, the
at right indicates left front dement. @ 0
graphic
3. There is an element indicator light on the control panel
When any surface control knob is turned on, the light wiil
turn on. The light wiil turn off when ail the surface ele-
ments are turned off.
4= After cooking, turn knob to OFF= Remove pan.
Suggested Heat Settings
The size, type of cookware and cooking operation will affect the
heat setting. For information on cookware and other factors
affecting heat settings, refer to "Cooking Made Simple" booklet.
Low (2): Use to keep foods 1
warm and melt chocolate |
and butter. .|
Meal. Low (3°4):
Use to continue
cooking covered
foods or steam
foods.
High (10): Use to bring
liquid to a boil. Always
reduce setting to a lower
heat when liquids begin to
boil or foods begin to cook.
OFF [
Hi_,h
10
@ •
Medium ...............
f_ledium (5=7): Use to
maintain slow boil for
large amounts of liquids
and for most frying
operations.
(Style varies by model]
Medo High (8-9): Use
to brown meat, heat oil
for deep fat frying or
sauteing. Maintain fast
boil for large amounts
of liquids.
BEFORECOOK|NG AFTER COOKING
°Always place a pan on the surface unit before you turn it - Make sure surface unit is turned off.
on. To prevent damage to range, never operate surface • Clean up messy spills as soon as possible.
unit without a pan in place.
o NEVER use the cooktop as a storage area for food or
cookware
DURING COOKING
o Be sure you know which knob controls which surface
unit. Make sure you turned on the correct surface unit.
• Begin cooking on a higher heat setting then reduce to a
lower setting to complete the operation. Never use a
high heat setting for extended cooking.
o NEVER allow a pan to boil dry. This could damage the
pan and the appliance
o NEVER touch cooktop until it has cooled. Expect some
parts of the cooktop, especially around the surface units.
te uecome warm or hot during cooking. Use potholders
OTHER TIPS
If cabine_ storage msprovided directly above cooking
surface limit it to items that are infrequently used and can
be safely stored in an area subjected to qeat.Tempera-
tures ma,_be unsafe fou items such as volatile liquids,
cleaners or aerosol sprays.
• NEVER leave any items, especially plastic items, on the
cooktop. The hot air fron the vent may ignite flammable
kems melt or soften plastics, or increase pressure in
closed containers causing them to burst
NEVER allow aluminum foil. meat probes or any other
metal object, other than a pan on a surface element, to
...............................
to protect hands.
4
@
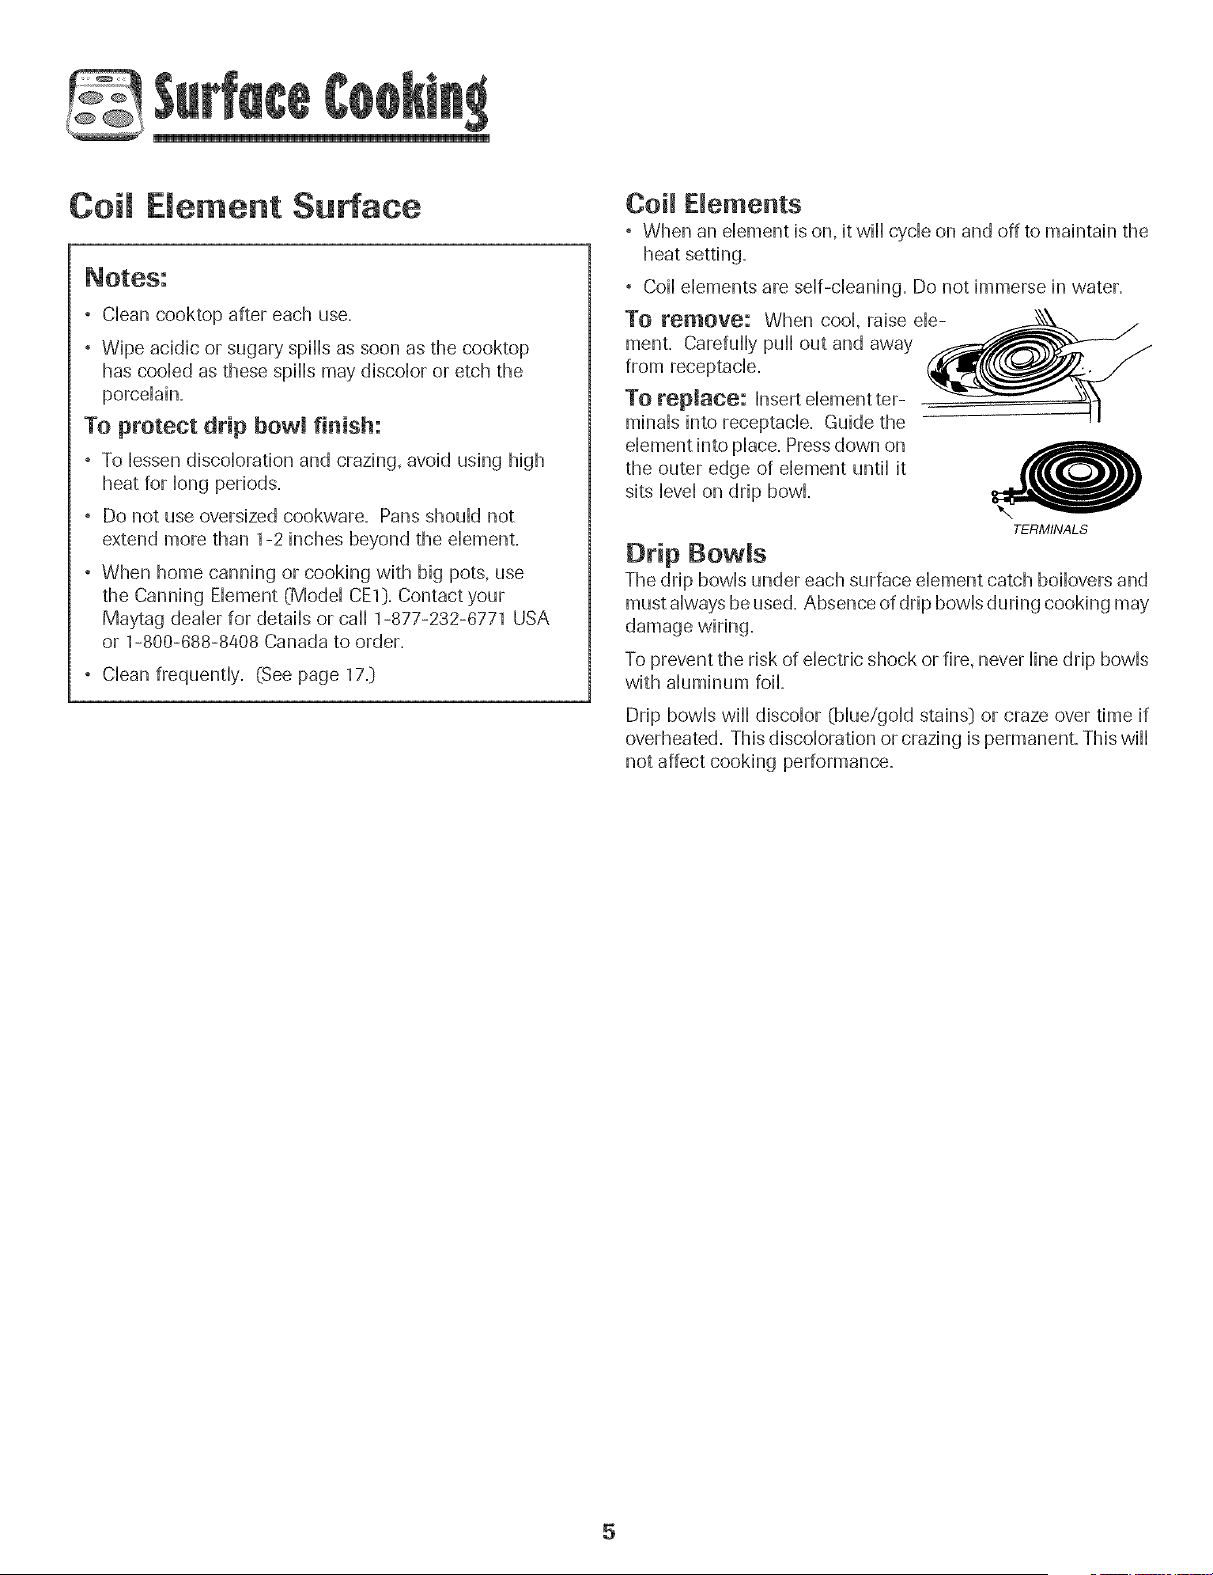
Coi E ement Surface
° Cban cooktop after each use.
° Wipe acidic or sugary spills as soon as the cooktop
has coobd as these spills may discobr or etch the
porcelain.
To protect drip bowl finish:
° To bssen discobradon and crazing, avoid using high
heat for bng periods.
° Do not use oversized cookware. Pans shouM not
extend more than 1-2 inches beyond the dement.
° When home canning or cooking with big pots, use
the Canning Ebment (Modal CE1}. Contact your
Maytag dealer for details or caii 1-877-232-8771 USA
or 1-800-888-8408 Canada to order.
, Clean frequently. (See page 17.}
Coil Dements
, When an element is on, it will cycle on and off to maintain the
heat setting.
° Coil dements are self-cleaning. Do not immerse in water.
To remove: When cool, raise ele-
menL Carefully pull out and away
from receptacle.
To replace: Insert dement ter-
minals into receptacle. Guide the
dement into place. Pressdown on
the outer edge of element until it
sits level on drip bowl
TERMINALS
Drip BowRs
The drip bowls under each surface element catch boilovers and
must always be used. Absence of drip bowls during cooking may
damage wiring.
To prevent the risk of electric shock or fire, never line drip bowls
with aluminum foil
Drip bowls wiii discolor {blue/gold stains} or craze over time if
overheated. This discoloration or crazing is permanent. This wiii
not affect cooking performance.
5

@
Manual Clean Oven Control
(select models]
J
\
\\\
A
More+ \\
...... \
......_iiiiiiiiii!iii/iiiliii/iii!iiiiiiiii_.......... • •
iO _ Less-
Â:_º` { (_A_,L&L) .... /
BCD E F
NOTE: The dispiay will show 12:00 when the appliance is first connected to power OFif power is interrupted. The Bake and Broil
indicators light when function is pressed.
A
B
D
E
F
Bake
Broil
Timer
Clock
CANCEL
More+ or
Less-
Use for baking and roasting.
Use for broiling and top browning.
Sets Timer.
Use to set time-of-day clock.
Cancels all operations except Timer
and Clock.
Enters or changes time, oven
temperature. Sets Hi or LO broil.
Using the Teuchpads
Pressthe desired pad.
Pressthe More+ or Less- pad to enter time or temperature.
, A beep will sound each time a function pad is pressed. There
is no beep for the More+ or Less- pad.
, A double beep will sound if a programming error occurs.
Note: Four seconds after pressing the More+ or Less-
pad, the time or temperature will automatically be entered.
If more than 30 seconds elapse between touching a
function pad and the More+ or Less- pad, the function will
be canceled and the display will return to the previous
display.
Settiog the CJock
1. Pressthe Clock pad.
° The clock time cannot be set if the control is pro-
grammed for a bake, broil or timing operation.
2. Set the correct time of day using the More+ or Less- pads.
If the More+ or Less- pad is not pressed within 30 sec-
onds, the program will cancel. Press the Clock pad and
begin again.
Settiog the Timer
The timer can be set from one minute 001] up to 99 hours
and 59 minutes (99:59]. Time will be displayed in minutes and
not in seconds. THE TIMER DOES NOT CONTROl= THE
OVEN.
1. Pressthe Timer pad.
, 0:00 wiii light and the colon {:] wiii flash in the display.
2. Pressthe More+ or Less- pad until the desired time is
displayed.
, The timer will begin as soon as the time is set.
, The flashing colon indicates that a timing operation is in
progress. (The colon wiii not flash if the time of day or
oven temperature is displayed.]
, Two short beeps signal the end of the operation. "0:00"
wiii appear in the display.
If desired, press the Clock pad and the time of day wiii
briefly reappear in the display during a timing operation.
If desired, press the Bake or Broil pads and the current
temperature setting wiii briefly reappear in the display
during a timing operation.
To cancel the timer operation:
Press and hold the Timer pad for several seconds.
Baking, Roasting and Broiling
For additionaH bakhg, roasthg and broiHhg thnes and tips, see
"Cooking Made Simple" booHet.
Setting the Controls For Baking or Roasting:
1, Press Bake pad,
, 000 will light and the Bake indicator will flash in the display,
, If you press the Bake pad and do not set an oven tempera-
ture within 30 seconds, the program will automatically
cancd and the time of day will reappear in the display,
2, Press the More+ or Less- pad until the desired oven tempera-
ture is displayed,
, The oven temperature can be set from 170° to 550° F,
, 350° wi]] appear in the display when either More+ or Less-
pad is pressed once,
, Press and tap the More+ or Less- pad to change the oven
temperature by 5° increments or press and hold the More+
or Less- pad to change the oven temperature by 10°
increments,
, 100° or the actual oven temperature, whichever is higher,
will appear in the display when the oven turns on.
, The temperature in the display will increase in 5°
increments until preset temperature is reached. A single
beep will sound when the oven is preheated.
, Allow 10 to 15 minutes for the oven to preheat.
, To recall preset temperature during preheat, press the
Bake pad. The temperature will be displayed for three
seconds.
, To change oven temperatare daring cooking, press
the Bake pad, then press the More+ or Less- pad until
the desired temperature is displayed.
,To change oven temperatare during preheat, press
the Bake pad twice, then press the More+ or Less- pad
until the desired temperature is displayed.
3. Place food in the oven. Check food for aloneness at the
minimum cooking time.
4.At the end of cooking, press the Cancel pad to turn the oven
off and remove the food from the oven.
, The oven features an automatic shut-off. If the oven is left
on for 12 hours it will automatically turn off and 000 will
appear in the display. Press the Cancel pad and the time of
day will reappear in the display.
Setting the Controls For Broiling:
For best results, use pan designed for broiling.
1.Place broiler pan on recommended rack position. (See chart
on page 13.)
2. Press the Broil pad.
, "SEt" will light and the Broil indicator light will flash in the
display.
3. Press the More+ pad to select Hi (high) broil or the Less- pad
to set Lo (Jew) broil.
, Select Hi broil for normal broiling.
, Select Lo broil for low temperature broiling to avoid
excessive browning of longer cooking foods like poultry.
, If you do not select Hi or Lo Broil within 30 seconds, the
program will automatically cancel and the time of day
will reappear in the display.
4. Preheat broil element for three minutes. Broil with the oven
door open to the first stop position (about 4 inches).
5. After broiling, press Cancel to turn the oven off and remove
the broiler pan from the oven. The current time of day will
reappear in the display.
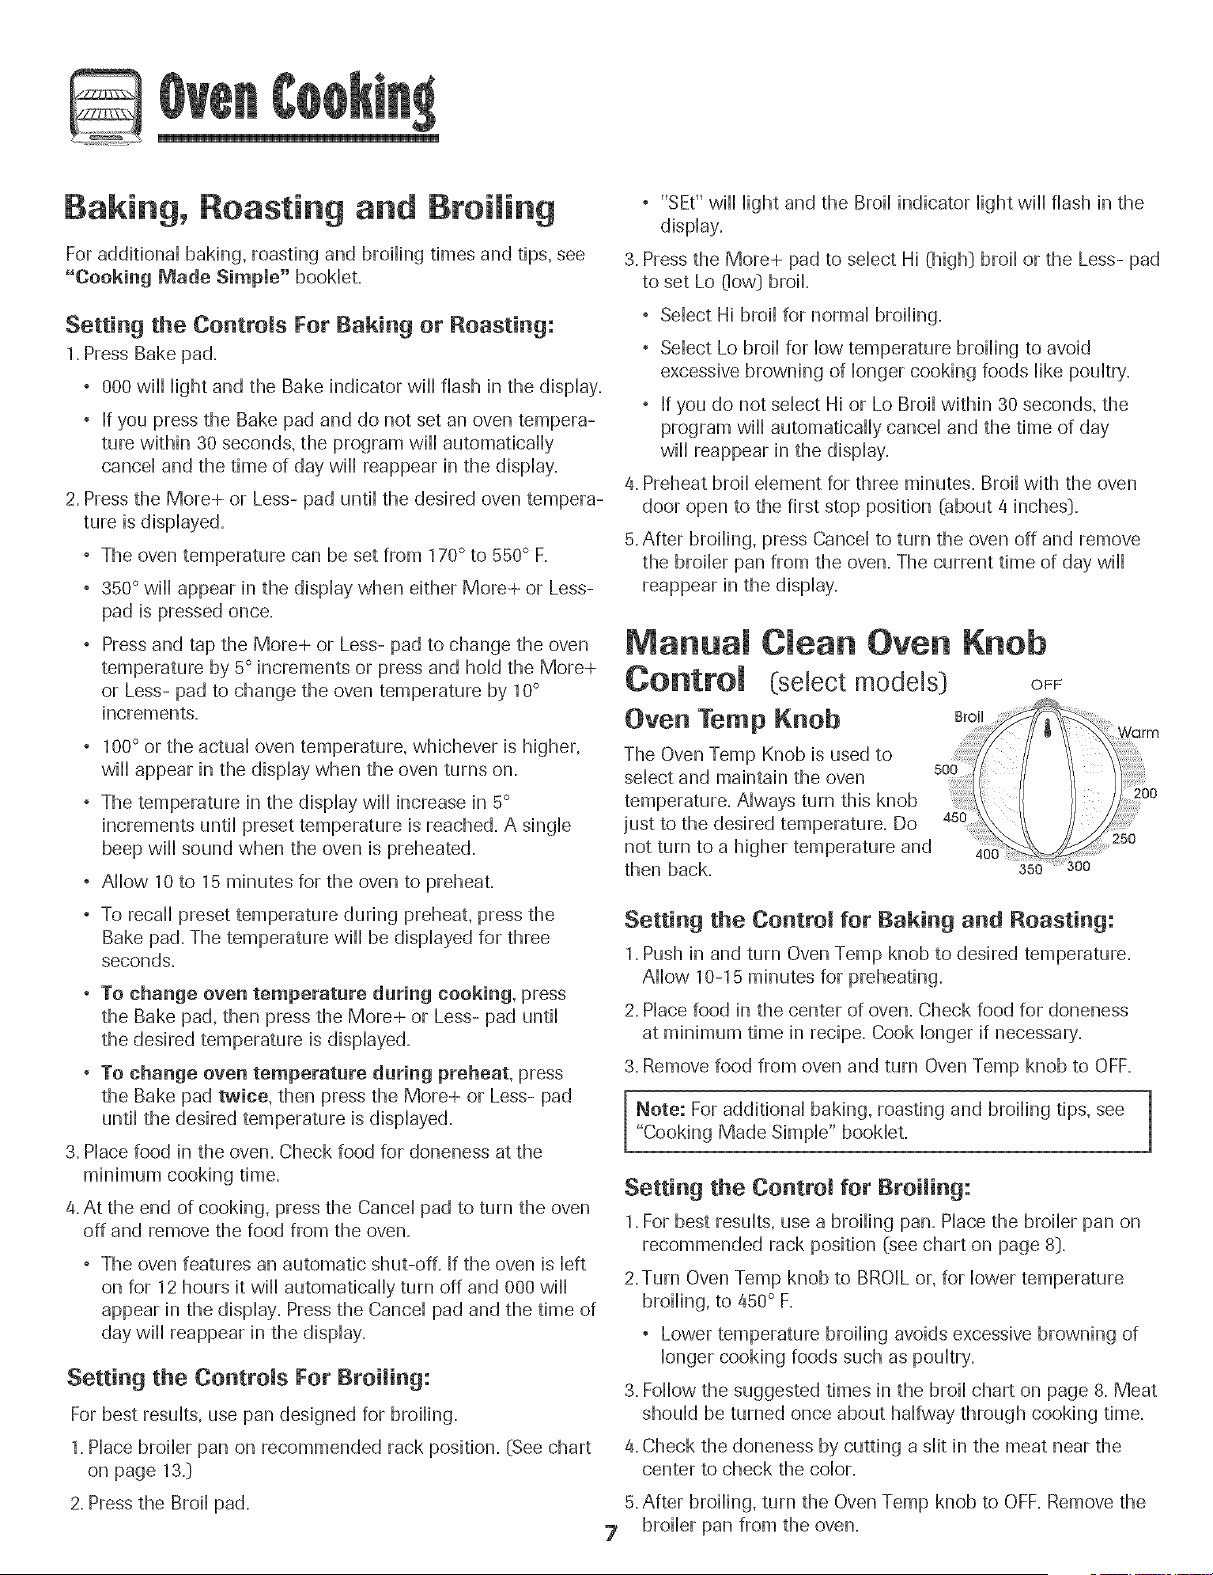
Manual Clean Oven Knob
(select models) OFF
Oven Temp Knob B,o,
The Oven Temp Knob is used to
select and maintain the oven
temperature. Always turn this knob
just to the desired temperature. Do
not turn to a higher temperature and
then back. 350
250
Setting the ControJ for Baking and Roasting:
1.Push in and turn Oven Temp knob to desired temperature.
Allow 10-15 minutes for preheating.
2. Place food in the center of oven. Check food for aloneness
at minimum time in recipe. Cook longer if necessary'.
3. Remove food from oven and turn Oven Temp knob to OFF.
Note: For additional baking, roasting and broiling tips, see
"Cooking Made Simple" booklet.
Setting the Conttom for Broiling:
1.For best results, use a broiling pan. Place the broiler pan on
recommended rack position (see chart on page 8).
2.Turn Oven Temp knob to BROIL or, for lower temperature
broiling, to 450° F.
, Lower temperature broiling avoids excessive browning of
longer cooking foods such as poultry.
3. Follow the suggested times in the broil chart on page 8. Meat
should be turned once about halfway through cooking time.
4. Check the aloneness by cutting a slit in the meat near the
center to check the color.
5. After broiling, turn the Oven Temp knob to OFF.Remove the
broiler pan from the oven.
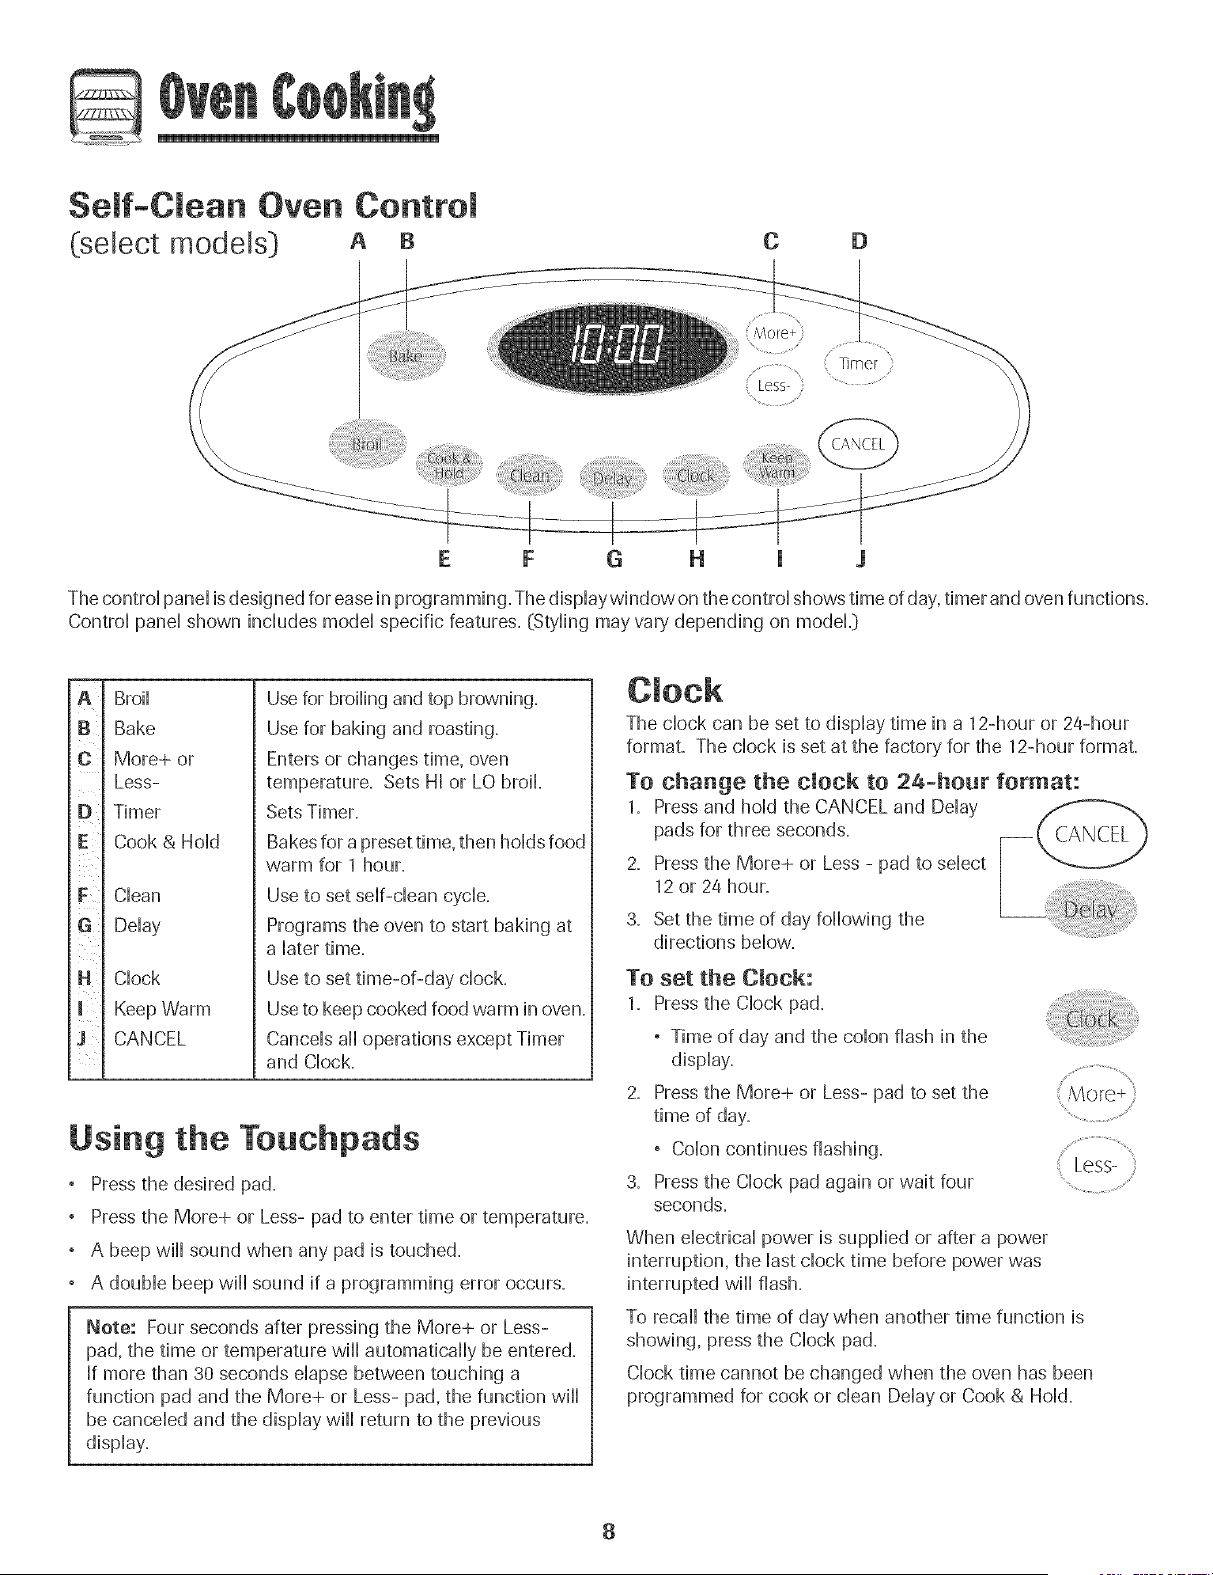
Self-Clean Oven Control
(select models) A B CD
...................... Th]e
Less- ............
GH 1 J
The controi panei is designed for ease in programming. The dispiaywindow on the controi shows time of day, timer and oven functions.
Controi panei shown inciudes modei specific features. (Styiing may vary depending on modeL}
A
B
C
D
F t
G!
H
!!4
J!
Broii
Bake
More+ or
Less-
Timer
Cook &Hoid
Ciean
Deiay
Clock
Keep Warm
CANCEL
Use for broiling and top browning.
Use for baking and roasting.
Enters or changes time, oven
temperature. Sets HI or LO broil
Sets Timer.
Bakes for a preset time, then holds food
warm for 1 hour.
Use to set self-clean cycle.
Programs the oven to start baking at
a later time.
Use to set time-of-day clock.
Use to keep cooked food warm in oven.
Cancels all operations except Timer
and Clock.
Using the Touchpads
Pressthe desired pad.
Pressthe More+ or Less- pad to enter time or temperature.
° A beep wiii sound when any pad is touched.
° A doubie beep wiii sound if a programming error occurs.
Note: Four seconds after pressing the More+ or Less-
pad, the time or temperature will automatically be entered.
If more than 30 seconds elapse between touching a
function pad and the More+ or Less- pad, the function will
be canceled and the display will return to the previous
display.
The clock can be set to display time in a 12-hour or 2a-hour
format. The clock is set at the factory for the 12-hour format.
To change the clock to 24-honr format:
1. Pressand hold the CANCEL and Delay
pads for three seconds.
2. Pressthe More+ or Less - pad to select
12 or 24 hour.
3. Set the time of day following the
directions below.
To set the Clock:
1. Pressthe Clock pad.
° Time of day and the colon flash in the
display.
2. Pressthe More+ or Less- pad to set the
time of day.
° Colon continues flashing.
3. Pressthe Clock pad again or wait four
seconds.
Less-
When electrical power is supplied or after a power
interruption, the last clock time before power was
interrupted wiii flash.
To recall the time of day when another time function is
showing, press the Clock pad.
Clock time cannot be changed when the oven has been
programmed for cook or clean Delay or Cook & Hold.
8
To cancem the Clock display:
If you do not want the thne of day to dispiay:
Press and hoid the CANCEL and CHockpads
for three seconds. The time of day wHi
disappear from the dispiay
When the chock dispiay is cancded, press
the CHockpad to brbfiy dispiay the time
of day.
To restore the Clock display:
Press and hoid the CANCEL and CHockpads for three sec-
onds. The time of day wHi reappear in the dispiay.
The timer can be set from one minute (00:01] up to 99 hours
and 59 minutes @9:59].
The timer can be used independently of any other oven
activity. It can also be set while another oven function is
operating.
The Timer does not control the oven. It only controls a
beeper.
To set the Timer:
1. Press the Timer pad. T_mer ,
° 0:00 iights in the dispiay. ¢
° The cobn flashes in the display. ............................
2. Press the More+ or Less- pad until the \ Less- /
correct time appears in the display. ...................................
° The colon will continue to flash.
3. PressTimer pad again or wait four seconds.
° The colon continues flashing and the time begins
counting down.
° The last minute of the timer countdown wiii be displayed
as seconds.
4. At the end of the set time, one long beep wiii sound.
To caneem the Timer:
1. Press and hold the Timer pad for three seconds.
OR
2. Press the Timer pad and set the time to 00:00.
Locking the Controms
The touchpad controls call be locked for safety',cleaning, or
to prevent unwanted use. They will not function when locked.
If the oven is currently in use, the controls cannot be locked.
The current time of day will remain in the display when the
controls are locked.
To lock:
Press and hold the CANCEL and Cook &
Hold pads for three seconds.
LOCK flashes in the display.
To unlock:
Press and hold the CANCEL and Cook & Hold pads for three
seconds.
LOCK disappears from the display.
Faumt Codes
BAKE or LOCK may flash rapidly ill the display to alert you if
there is all error or a problem. If BAKE or LOCK flash ill the
display, press CANCEL pad. If BAKE or LOCK continue to
flash, disconnect power to the appliance. Wait a few minutes,
and then reconnect power. If the flashing still continues,
disconnect power to the appliance and call an authorized
servicer.
To set Bake:
1. Presstile Bake pad.
° "BAKE" will flash.
° 000 wiii iight in the display. ...........................
2. Select the oven temperature. The oven tempera- :More+}
ture can be set from 170° to 550°. Press or press ...........................
and hold the More+ or Less- pads. Less- :
+ 350° will light when either pad is first pressed.
Press the More+ pad to increase the temperature.
Press the Less- pad to decrease the temperature.
3. Press Bake pad again or wait four seconds.
BAKE wiii stop flashing and light in the display.
9
, 100° or the actual oven temperature wiii display. The
temperature will rise in 5° increments until the preset
temperature is reached.
4. Allow the oven to preheat for 8-15 minutes.
, When the set oven temperature is reached, one long
beep will sound.
, To recall the set temperature during preheat, press the
Bake pad.
5. Place food in center of oven, allowing a minimum of two
inches between utensil and oven walls.
6, Checkcookingprogress,Cookiongerif needed,
7, Whencookingisfinished,pressCANCEL,f?_r_
8, Removefoodfromtheoven,
Baking Notes:
To change oven temperature during cooking, press
the Bake pad, then press the More+ or Less- pad undi
the desired temperature is dispiayed.
To change oven temperature daring preheat, press
the Bake pad twice, then press the More+ or Less- pad
undi the desired temperature is dispiayed.
If you forget to turn off the oven, it wiii automadcaiiy turn
off at the end of 12 hours, If you wish to deactivate this
feature, see page 12,
For addidonai baking and roasting tips, see "Cooking
Made Simple" booklet.
Baking Differences Between Your O_d
and New Oven
It is norma] to notice some baking time differences between a
new oven and an oid one. See"Adjusting the OvenTemperature"
on page 12.
Cook & Hold
Cook & Hold dhows you to bake for a preset amount of time,
foiiowed by a one-hour Keep Warm cyclic.
TO set Cook & Hold:
1. Press the Cook & Hoid pad.
° "BAKE" and "HOLD" flash,
f
° 000 iights in the dispiay.
2. Seiect the oven temperature, The oven tempera-
ture can be set from 170° to 550°. Pressor press .......................
and hoid the More+ or Less- pad. Less-
......................
_ Press the More+ pad to increase the temperature,
° Press the Less- pad to decrease the temperature.
3. Press Cook & Hold again OR wait four seconds.
° "HOLD" flashes.
° 00:00 flashes in the display.
4. Enter the amount of time you want to bake by pressing the
More+ or Less- pad. Bake time can be set from ten
minutes {00:10} to 11 hours, 59 minutes (11:59},
° "BAKE" and "HOLD" light in the display.
, The baking time will light in the display.
° The baking time will start counting down.
When the cooking time has elapsed:
° Four beeps will] sound,
° "BAKE" will] turn off.
° "HOLD" and "WARM" wii] Hight,
° 170°will display.
After one hour in HOLD WARM:
° "End" wiii dispiay.
° The time of day reappears in the dispiay=
To caneem Cook & Hold at any time: _:ANCFI"_
Press the CANCEL pad. Remove food from oven,_._.._ z
[)e ay Bake
as dairy products, pork, poultry, or seafood.
When using Delay, the oven begins to cook later in the day.
Set the amount of time that you want to delay before the oven
turns on and how long you want to cook. The oven begins to
heat at the selected time and cooks for the specified length of
time, then keeps food warm for up to one hour.
Delay time can be set from 10 minutes (00:10} to 11 hours, 59
To set a DeJayed Baking cycle:
1, Pressthe Deiay pad,
."DELAY" flashes,
.00:00 flashes in the dispiay,
2, Pressthe More+ or Less- pad to set the
deiay time,
Whiie "DELAY" is stiii flashing:
3, Pressthe Cook &Hoid pad,
.000 iights in the dispiay,
."BAKE" and "HOLD" flash,
4, Press More+ pad to set the baking temperature,
.00:00 and "HOLD" flash,
."BAKE" stays Hit,
is ¸..........................
More+
10
@
5. Press More+ pad to set the baking time.
, The Delay time, "DELAY", "BAKE" and "HOLD" light in
the display.
When the Delay time has expired:
, "DELAY" wi[[ turn off=
, Baking time is displayed.
, "BAKE" and "HOLD" are displayed.
To set aDelay when Cook & Hold has already
been programmed:
1. Press the Delay pad.
, "DELAY" flashes.
, 00:00 appears
Press the More+ or Less- pad to set the delay
time.
, After four seconds, "DELAY" wi[[
stay [it to remind you that a delayed
cooking cycle has been set.
More÷
When the Delay time has expired and the oven
starts:
, The baking time wi[[ be displayed.
, "DELAY" wi[[ turn off.
° "BAKE" and "HOLD" wi[[ remain [it.
TO cancel: _,_
Press the CANCEL pad.
, A[[ timed and untimed cooking functions wi[[ be
canceled.
° The time of day wi[[ reappear in the display.
_otes:
Do not use delayed baking for items that require a
preheated oven, such as cakes, cookies, and breads.
Do not use delayed baking if oven is already hot.
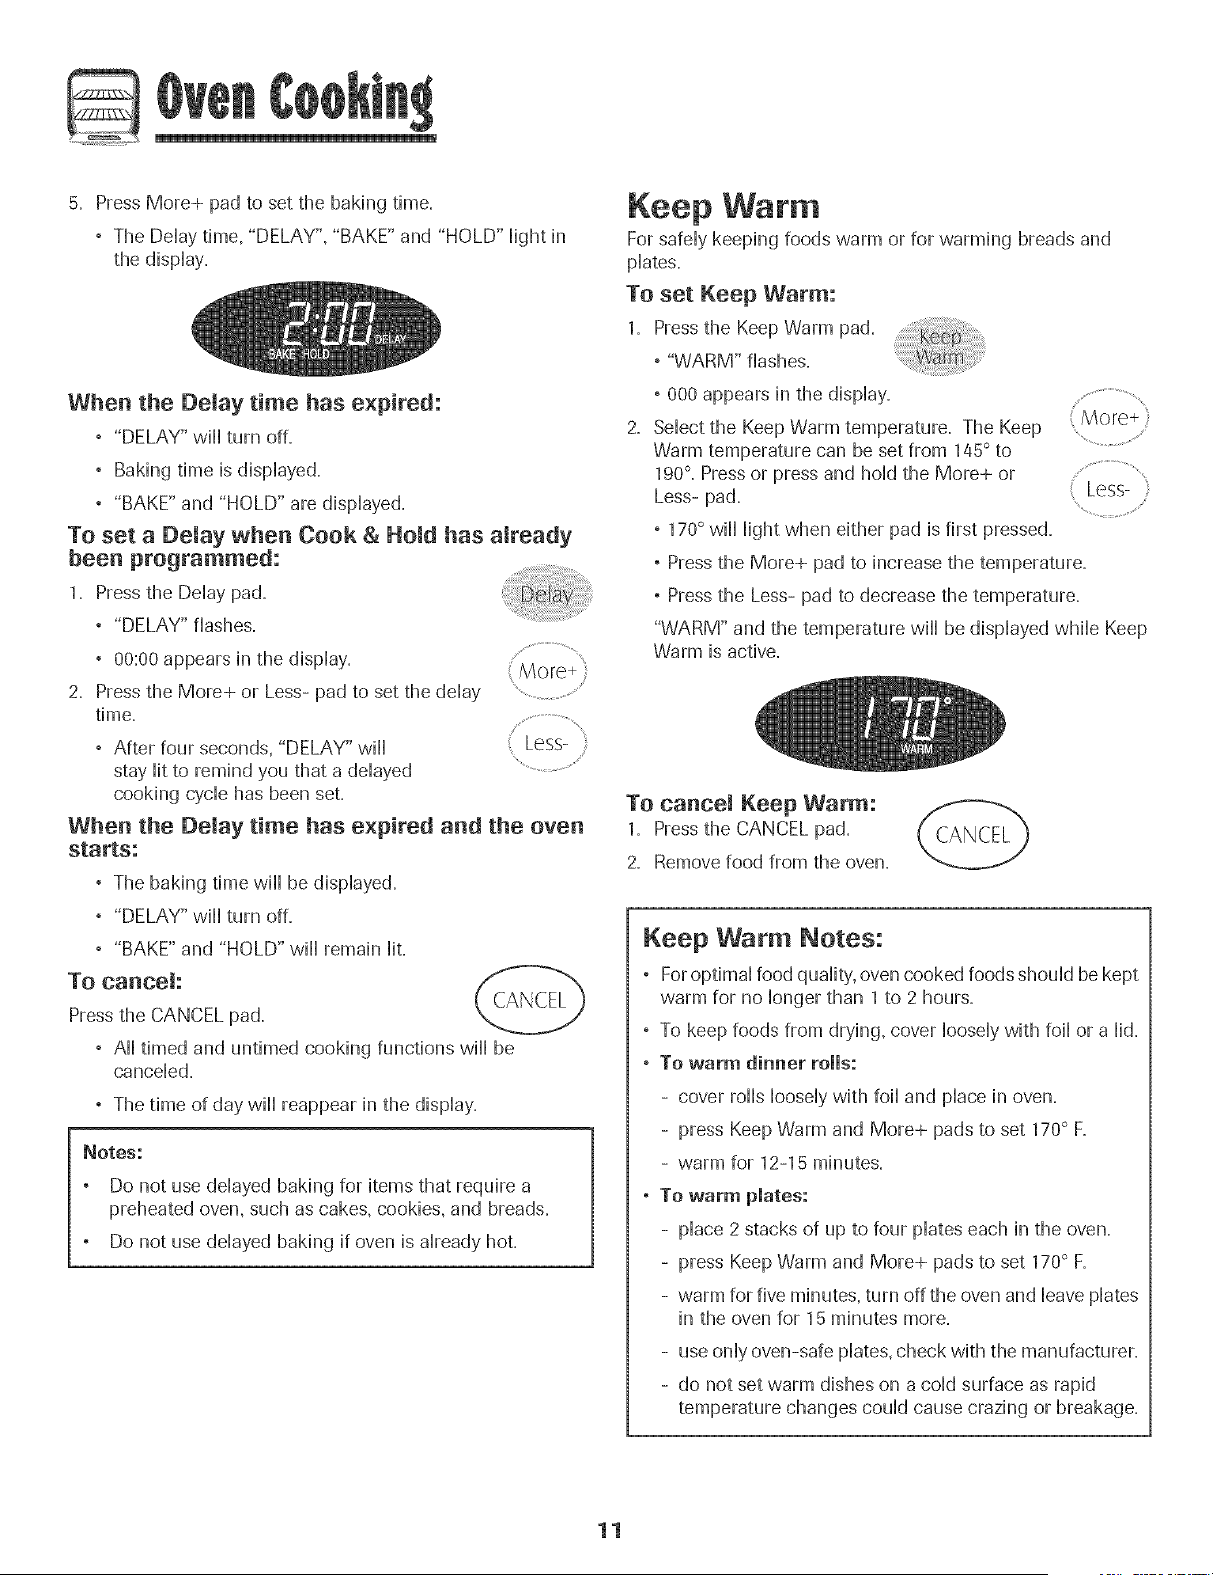
Keep Warm
For safely keeping foods warm or for warming breads and
plates.
To set Keep Warm:
1. Pressthe Keep Warm pad.
° "WARM" flashes.
° 000 appears in the display.
Select the Keep Warm temperature. The Keep More+
Warm temperature can be set from 145° to
190°. Press or press and hold the More+ or
Less- pad. t Less-
° 170°wi[[ light when either pad is first pressed.
° Pressthe More+ pad to increase the temperature.
° Pressthe Less- pad to decrease the temperature.
"WARM" and the temperature wi[[ be displayed while Keep
Warm is active.
To cancel Keep Warm: _...
1. Pressthe CANCEL pad.
2. Remove food from the oven.
Keep Warm Notes:
° For optima[ food quality, oven cooked foods should be kept
warm for no longer than 1 to 2 hours.
° To keep foods from drying, cover loosely with foil or a lid.
.To warm dinner rolls:
- cover roils loosely with foil and place in oven.
- press Keep Warm and More+ pads to set 170° F.
- warm for 12-15 minutes.
,To warm plates:
- place 2 stacks of up to four plates each in the oven.
- press Keep Warm and More+ pads to set 170° F.
- warm for five minutes, turn off the oven and leave plates
in the oven for 15 minutes more.
- use only oven-safe plates, check with the manufacturer.
- do not set warm dishes on a cold surface as rapid
temperature changes could cause crazing or breakage.
11
@
Automatic Shut-Off/Sabbath
Mode
The oven will automatically turn off after 12 hours if you
accidentally Heaveit on= This safety' feature can be turned off=
TO cancel the 12-hour shut-off and run the
oven continuously for 72 hours:
1. Set the oven to bake (see page 9]=
2= Press and hoHdthe CHockpad for five seconds.
° SAb wifl be dispHayedand flash for five seconds.
, SAb wifl then be dispHayedcontinuousHy untiHturned off
or untiHthe 72-hour time limit is reached.
° "BAKE" will also be displayed if a bake cycle is in use
while the oven is in Sabbath Mode.
All other functions EXCEPTBAKE (Timer, Keep Warm,
Clean, etc=_)are locked out during the Sabbath Mode=
To cancel Bake when in Sabbath Mode:
Press CANCEL.
,"BAKE" will turn off in the display.
,No beeps will sound.
To cancel the Sabbath Mode:
1= Press the Clock pad for five seconds.
OR
2= After 72 hours, the Sabbath Mode will end=
,SAb will flash for 5 seconds.
,The time of day will return to the display.
Adjusting the Oven Temperature
Oven temperatures are carefully tested for accuracy at the
factory. It is normal to notice some baking or browning
differences between a new oven and an old one= As ranges
get older, the oven temperature can shift.
You may adjust the oven temperature if you think the oven is
not baking or browning correctly. To decide how much to
change the temperature, set the temperature 25° higher or
lower than your recipe recommends, then bake. The results
of the "test" should give you an idea of how much to adjust
the temperature=
To adjust the oven temperature:
1= Press Bake.
2. Enter 550° by pressing the More+ pad.
3= Pressand hold the Bake pad for several ,M,or(_;+i:
seconds or until 0° appears in the display.
If the oven temperature was previously adjusted, the
change will be displayed. For example, if the oven tem-
perature was reduced by 15° the display will show "-15 °"=
4= Pressthe More+ or Less- pad to adjust the temperature.
Each time a pad is pressed, the temperature changes by
5°=The oven temperature can be increased or decreased
by 5° to 35°=
5= The time of day will automatically reappear in the display.
You do not need to readjust the oven temperature if there
is a power failure or interruption. Broiling and cleaning
temperatures cannot be adjusted.
Sabbath Mode Notes:
, Sabbath Mode can be turned on at any time with or
without the oven on.
° Sabbath Mode cannot be turned on if the touchpads are
locked out or when the door is locked.
, If the oven is baking when Sabbath Mode is set, "BAKE"
will go out at the end of the baking cycle. There will be
no audible beeps.
, When the Sabbath Mode is started, no preheat beep will
sound.
, All prompts, messages and beeps are deactivated when
Sabbath Mode is active.
, Pressing CANCEL will cancel a Bake cycle, however the
control will stay in the Sabbath Mode.
, If power fails, the oven will power up in Sabbath Mode with
72 hours remaining and no cycle active.
12
G
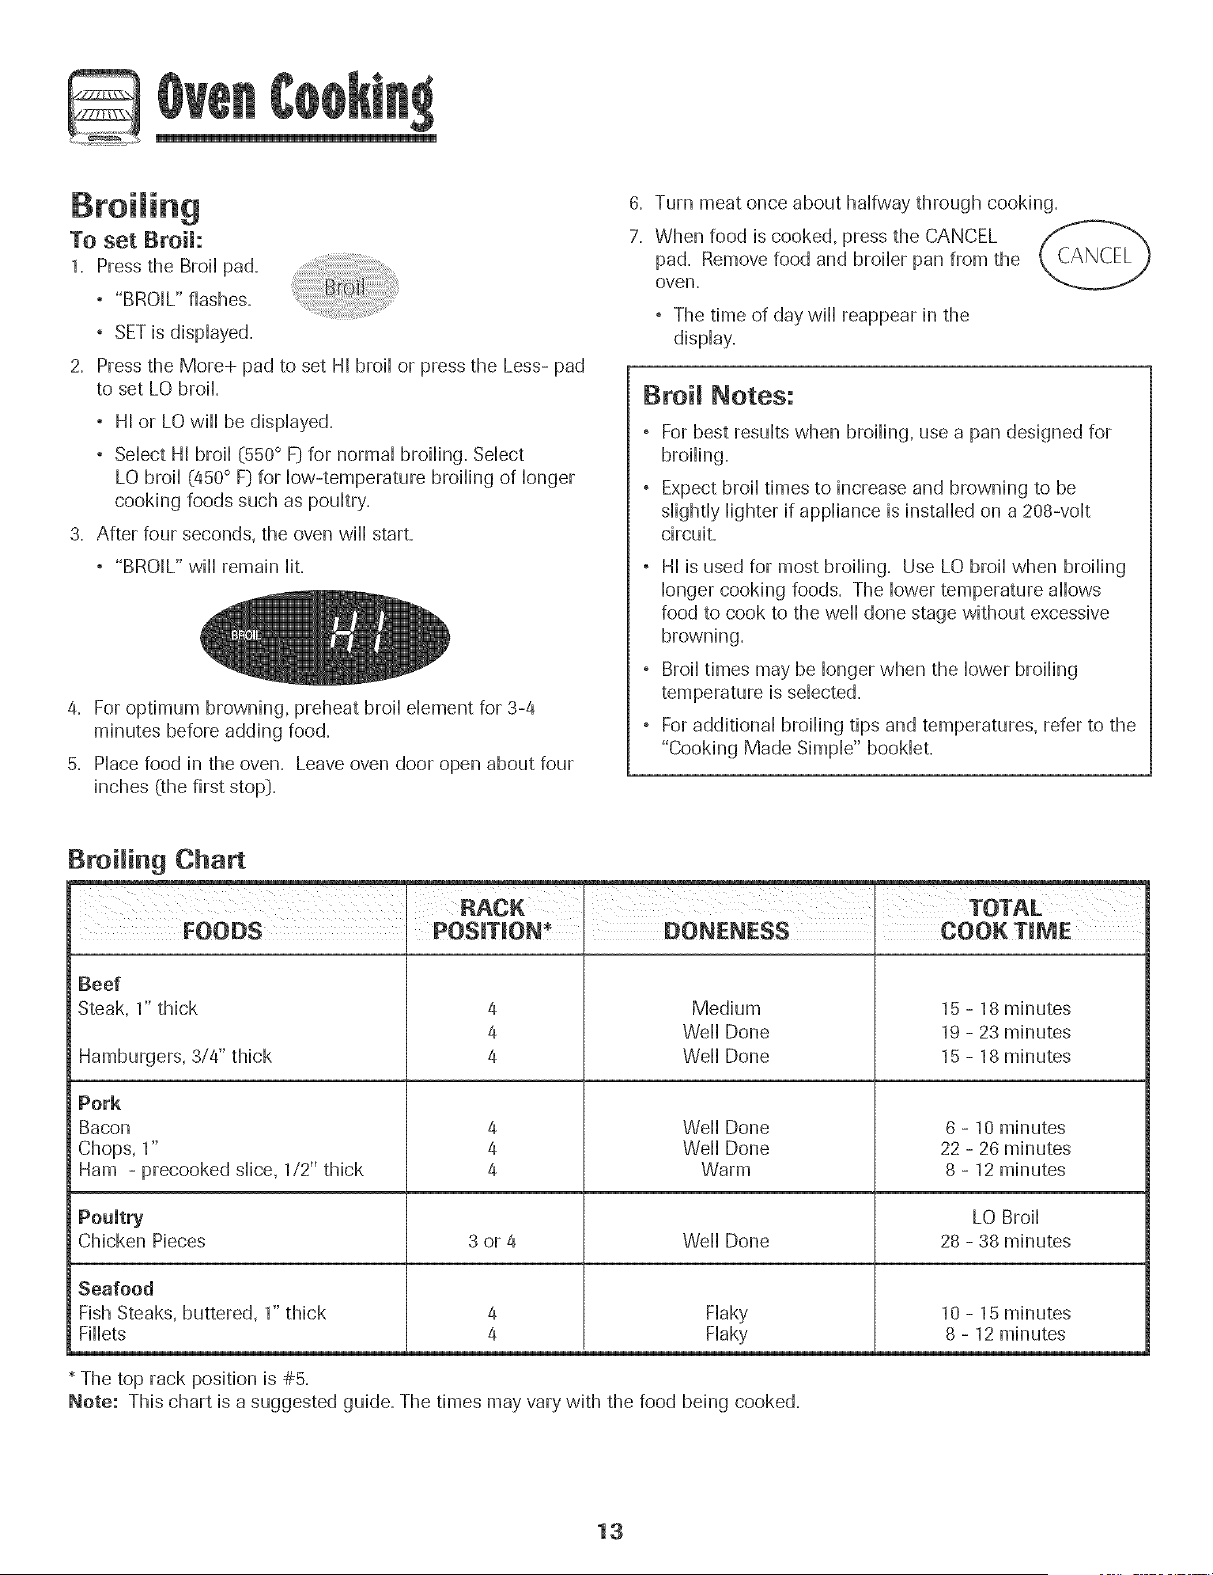
To set Broil:
1. Press the Broi[ pad,
° "BROIL" flashes.
° SET is dbpHayed.
2. Press the More+ pad to set HI broii or press the Less- pad
to set LO broik
, Hi or LO will be dispiayed.
,Sebct HI broii (550° F} for normal broiiing. Sdect
LO broii (450° F} for low-temperature broiling of longer
cooking foods such as poultry.
3. After four seconds, the oven will start.
, "BROIL" will remain lit.
4. For optimum browning, preheat broil dement for 3-4
minutes before adding food.
5. Place food in the oven. Leave oven door open about four
inches (the first stop).
0. Turn meat once about halfway through cooking.
7. When food is cooked, press the CANCEL
pad. Remove food and broiler pan from the
oven.
° The time of day will reappear in the
display.
Broil Notes:
, For best results when broiling, use a pan designed for
broiling.
, Expect broil times to increase and browning to be
slightly lighter if appliance is installed on a 208-volt
circuit.
HI is used for most broiling. Use LO broil when broiling
longer cooking foods. The lower temperature allows
food to cook to the well done stage without excessive
browning.
Broil times may be longer when the lower broilinc
temperature is selected.
For additional broiling tips and temperatures, refer to the
"Cooking Made Simple" bookleL
Broiling Chart
I I
FOODS POS_TmON* COOK TIME
4
4
4
4
4
4
Medium
Weii Done
Weii Done
Beef
Steak, 1" thick
Hamburgers, 3/4" thick
Pork
Bacon
Chops, 1"
Ham - precooked slice, 1/2" thick
Poamtry
Chicken Pieces
Seafood
Fish Steaks, buttered, 1" thick
Fillets
* The top rack position is #5.
Weii Done
Weii Done
Warm
15 - 18 minutes
19 - 23 minutes
15 - 18 minutes
0 - 10 minutes
22 - 26 minutes
8 - 12 minutes
LO Broii
3 or 4 Weii Done 28 - 38 minutes
Flaky
Flaky
10 - 15 minutes
8 - 12 minutes
Note: This chart is a suggested guide. The times may vary with the food being cooked.
13
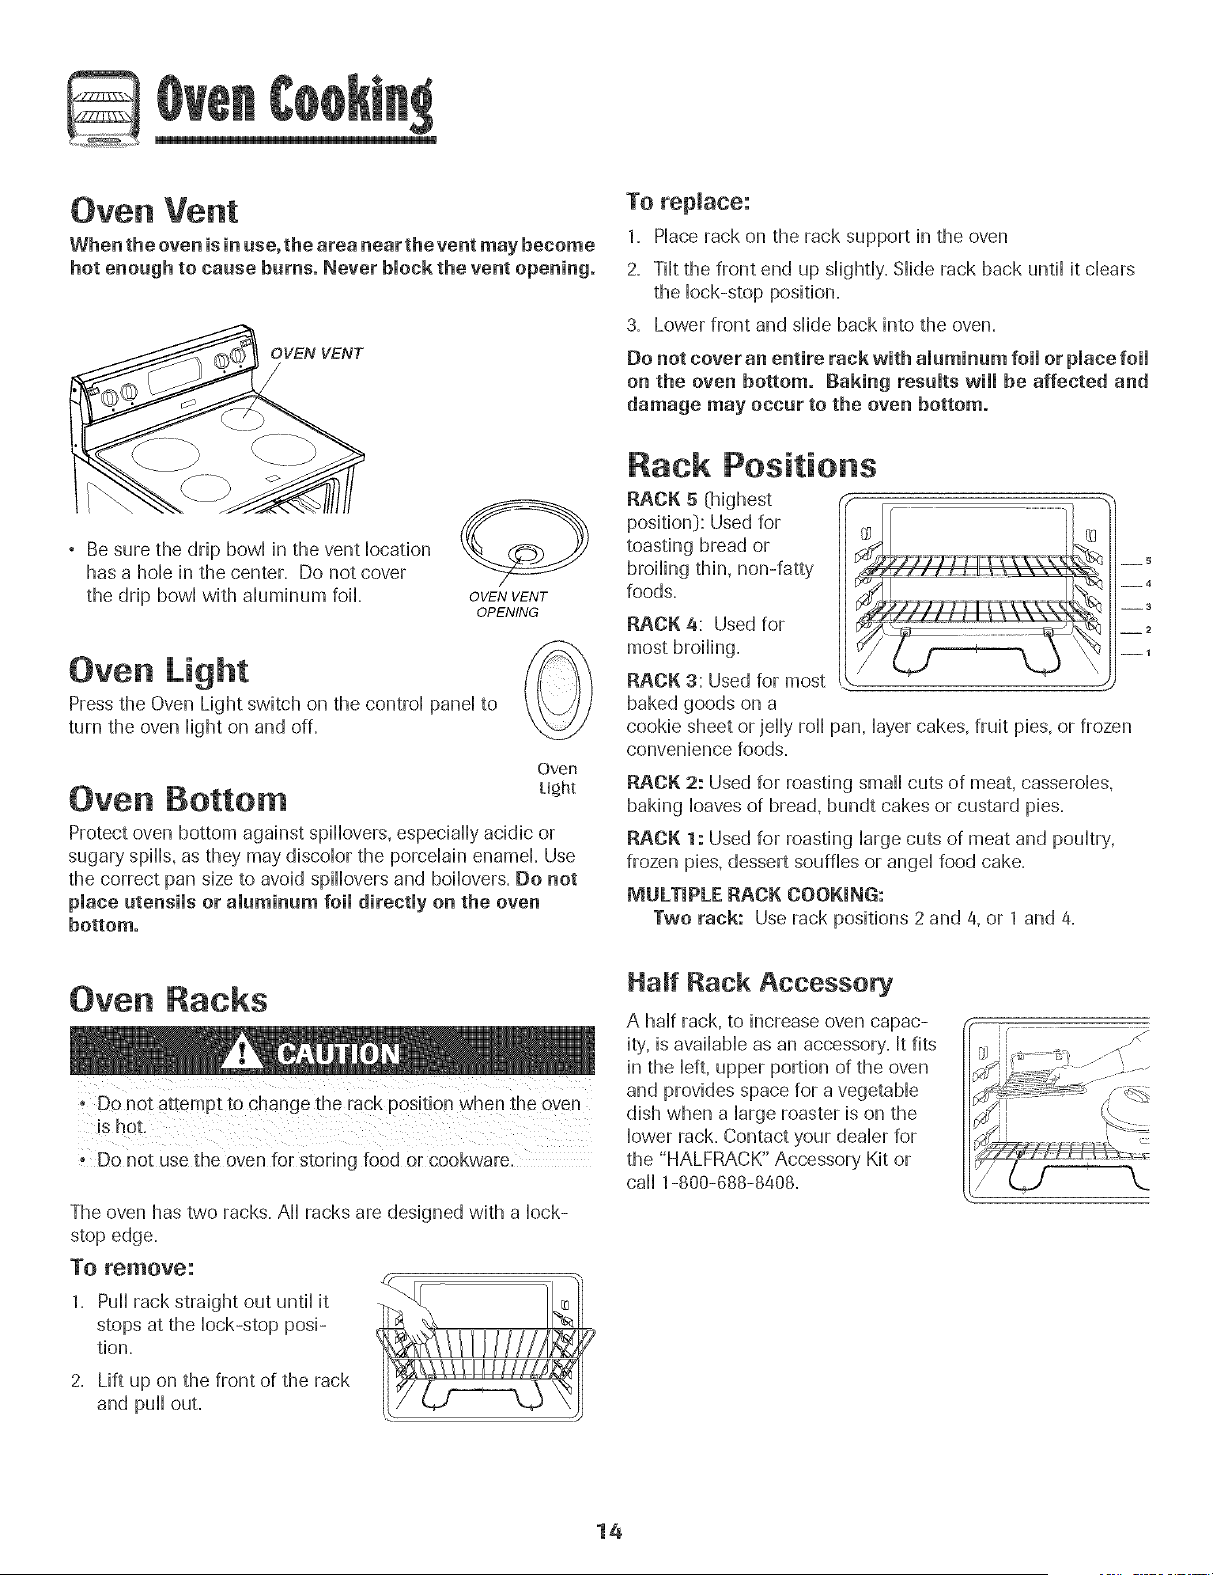
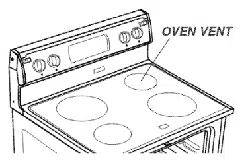
Oven Vent
When the oven is in use, the area near the vent may become
hot enough to cause burns. Never block the vent opening.
OVEN VENT
To replace:
1. Race rack on the rack support hi the oven
2. THtthe front end up slightly. Slide rack back until it dears
the lock-stop position.
3. Lower front and slide back into the oven.
Do not cover an entire rack with aluminum foil or place foil
on the oven bottom. Raking results will be affected and
damage may occur to the oven bottom.
Be sure the drip bow[ in the vent location
has a hole in the center. Do not cover
the drip bow[ with aluminum foiL OVEN VENT
OPENING
Oven Light
Press the Oven Light switch on the control parle[ to
turn the oven light on and off.
Oven
Oven gottom . ht
Protect oven bottom against spi[[overs, especially acidic or
sugary spills, as they may discolor the porcelain enamel Use
the correct pan size to avoid spi[[overs and boi[overs. Do not
place utensils or aluminum foil directly on the oven
bottom.
Rack Positions
RACK 5 _highest
position]: Used for
toasting bread or
broiling thin, non-fatty
foods.
RACK 4: Used for
most broiling.
RACK 3: Used for most
baked goods on a
5
__4
--3
__2
--1
cookie sheet or jelly ro[[ pan, layer cakes, fruit pies, or frozen
convenience foods=
RACK 2: Used for roasting small cuts of meat, casseroles,
baking loaves of bread, bundt cakes or custard pies.
RACK 1: Used for roasting large cuts of meat and poultry,
frozen pies, dessert souffles or angel food cake.
MULTIPLE RACK COOKING:
Two rack: Use rack positions 2 and 4, or 1 and 4.
Oven Racks
" DO not attempt to change the rack pos!ti0n when the oven
is h0t,
, Do nut use the oven for storing food or cookware,
The oven has two racks. A[[ racks are designed with a lock-
stop edge.
To remove:
1. Pu[[ rack straight out until it
stops at the lock-stop posi-
tion.
2, Lift up on the front of the rack
and pu[[ out,
Haft Rack Accessory
A hag rack, to increase oven capac-
ity, is available as an accessory. It fits
in the [eft, upper portion of the oven
and provides space for a vegetable
dish when a large roaster is on the
lower rack. Contact your dealer for
the "HALFRACK" Accessory Kit or
ca[[ 1-800-688-8408.
14
Se f-C ean Oven (seEect modeEs}
Note: For manuai dean oven, see page 18. 1
6. Wipe up sugary and acidic spiiiovers such as sweet
potatoes, tomato, or miHk-based sauces. PorceHainenameH
is acid-resbtant, not acid-proofi The porceiain finish may
discoior if acidic spiiis are not wiped up before a seif-ciean
cycie.
-It is normal for parts of the range to become hot duripg a
self-clean cycle.
•To prevent personal injury and damage to the oven door
do not attempt to open door when "LOCK" is displayed.
o Avoid touching cooktop_ door. window or oven vent area
Do not use commercial oven cleaners on the oven finish
or around any part of the oven. They wiii damage the
finish or parts.
To set Self-Clean:
Note: Oven temperature must be bellow 400° F to program
a dean cycie.
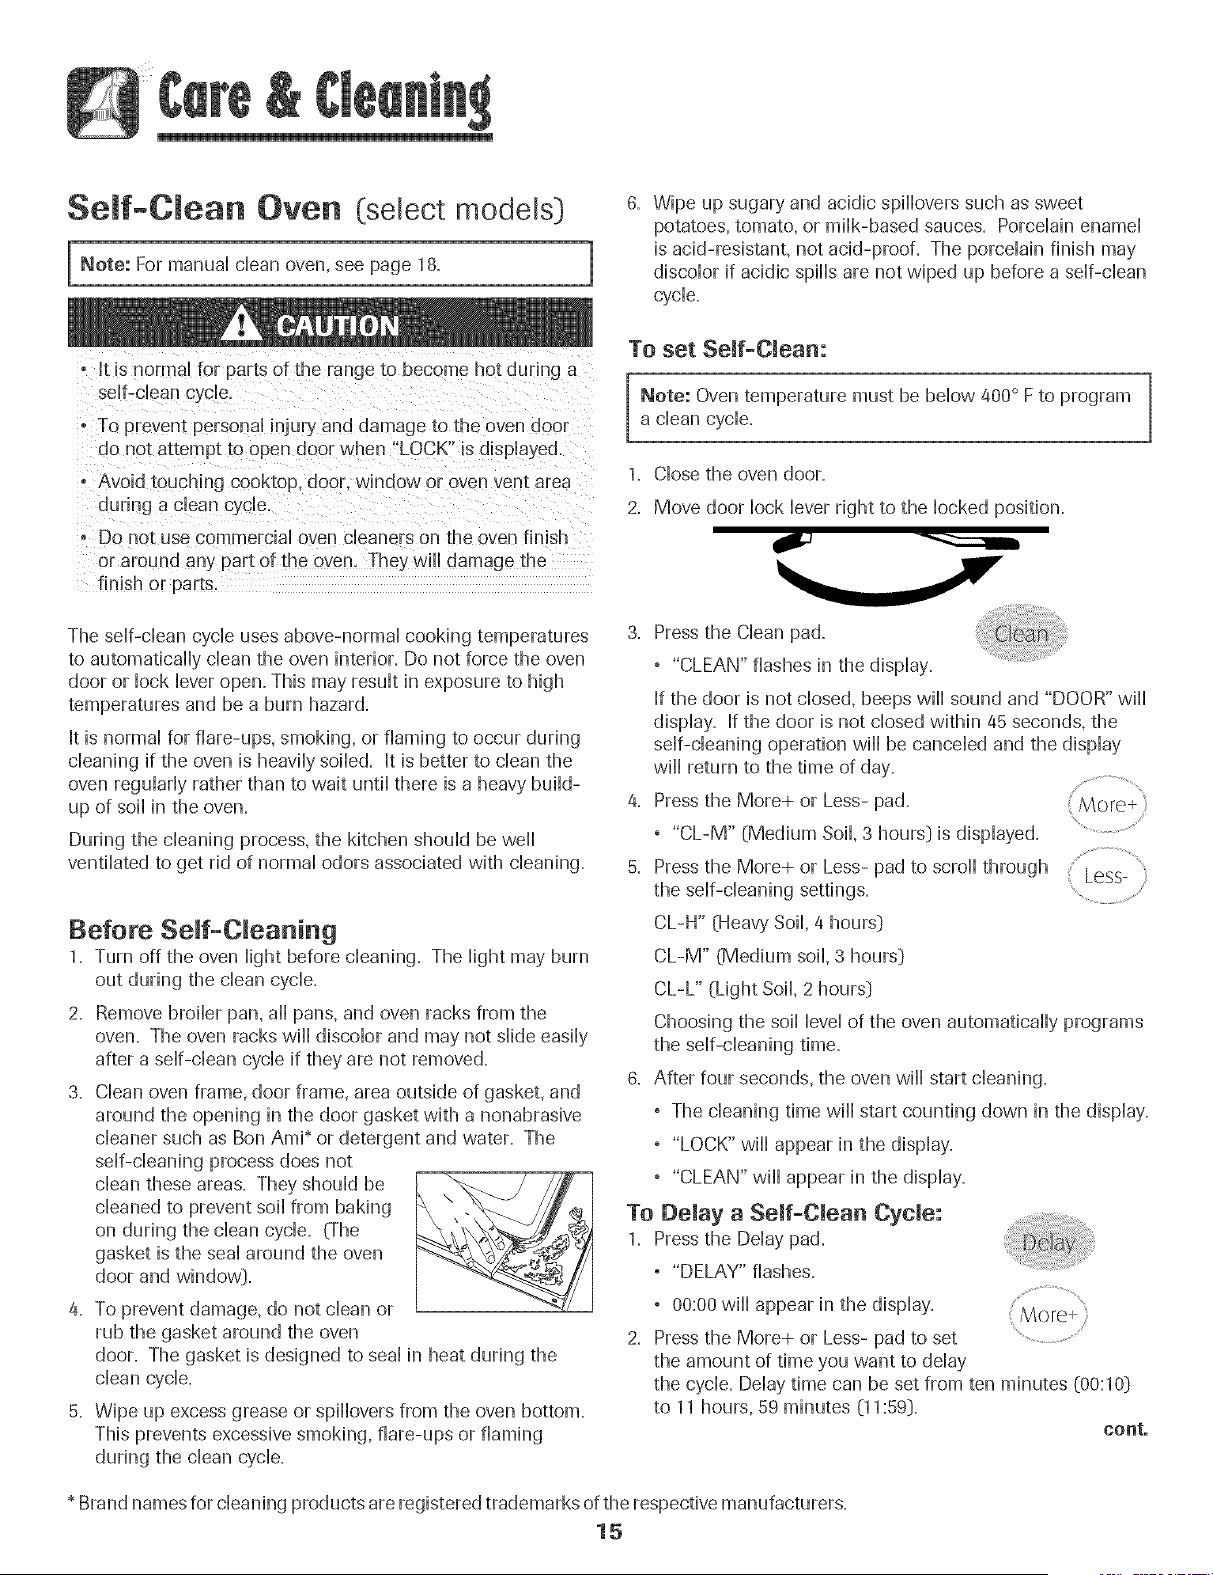
1. CHosethe oven door.
2. Move door Hock]ever right to the Hockedposition.
The self-clean cycle uses above-normal cooking temperatures
to automatically clean the oven interior. Do not force the oven
door or lock lever open. This may result in exposure to high
temperatures and be a burn hazard.
It is normal for flare-ups, smoking, or flaming to occur during
cleaning if the oven is heavily soiled. It is better to clean the
oven regularly rather than to wait until there is a heavy build-
up of soii in the oven.
During the cleaning process, the kitchen should be well
ventilated to get rid of normal odors associated with cleaning.
Before Sdf-C eaning
1. Turn off the oven light before cleaning. The light may burn
2. Remove broiler pan, all pans, and oven racks from the
oven. The oven racks wiii discolor and may not slide easily
after a self-clean cycle if they are not removed.
3. Clean oven frame, door frame, area outside of gasket, and
around the opening in the door gasket with a nonabrasive
cleaner such as Bon Ami* or detergent and water. The
self-cleaning process does not
clean these areas. They should be
cleaned to prevent soil from baking
on during the clean cycle. (The
gasket is the seal around the oven
door and window}.
4. To prevent damage, do not clean or
rub the gasket around the oven
door. The gasket is designed to seal in heat during the
clean cycle.
5. Wipe up excess grease or spillovers from the oven bottom.
This prevents excessive smoking, flare-ups or flaming
during the clean cycle.
3. Press the Clean pad.
, "CLEAN" flashes in the display.
If the door is not closed, beeps wiii sound and "DOOR" wiii
display. If the door is not closed within a5 seconds, the
self-cleaning operation wiii be canceled and the display
will return to the time of day.
a. Press the More+ or Less- pad.
° "CL-M" (Medium Soil, 3 hours} is displayed.
5. Press the More+ or Less- pad to scroii through Less-
the self-cleaning settings.
CL-H" (Heavy,Soil, a hours}
CL-M" (Medium soil, 3 hours}
CL-L" (Light Soil, 2 hours}
Choosing the soil level of the oven automatically programs
the self-cleaning time.
6. After four seconds, the oven wiii start cleaning.
° The cleaning time wiii start counting down in the display.
° "LOCK" wiii appear in the display.
° "CLEAN" wiii appear in the display.
Te Delay a Self-Omean Cycle:
1. Press the Delay pad.
° "DELAY" flashes.
° 00:00 will appear in the display.
2. Press the More+ or Less- pad to set ..................................
the amount of time you want to delay
the cycle. Delay time can be set from ten minutes (00:10}
to 11 hours, 59 minutes (11:59}. eonto
* Brand names for cleaning products are registered trademarks of the respective manufacturers,
15
3. Press the Clean pad.
, "CLEAN" wfl[ flash.
4. Press the More+ or Less- pad.
, "CL-M" (Medium Soft, 3 hours)
is dispHayed.
More*
5. Press the More+ or Less- pad to scroll through the sdf-
cHeaningsettings.
CL-H" (Heavy Soft, 4 hours)
CL-M" (Medium soft, 3 hours)
CL-L" (Light Soft, 2 hours)
Choosing the soft HeveHof the oven automatically programs
the sdf-cHeaning time.
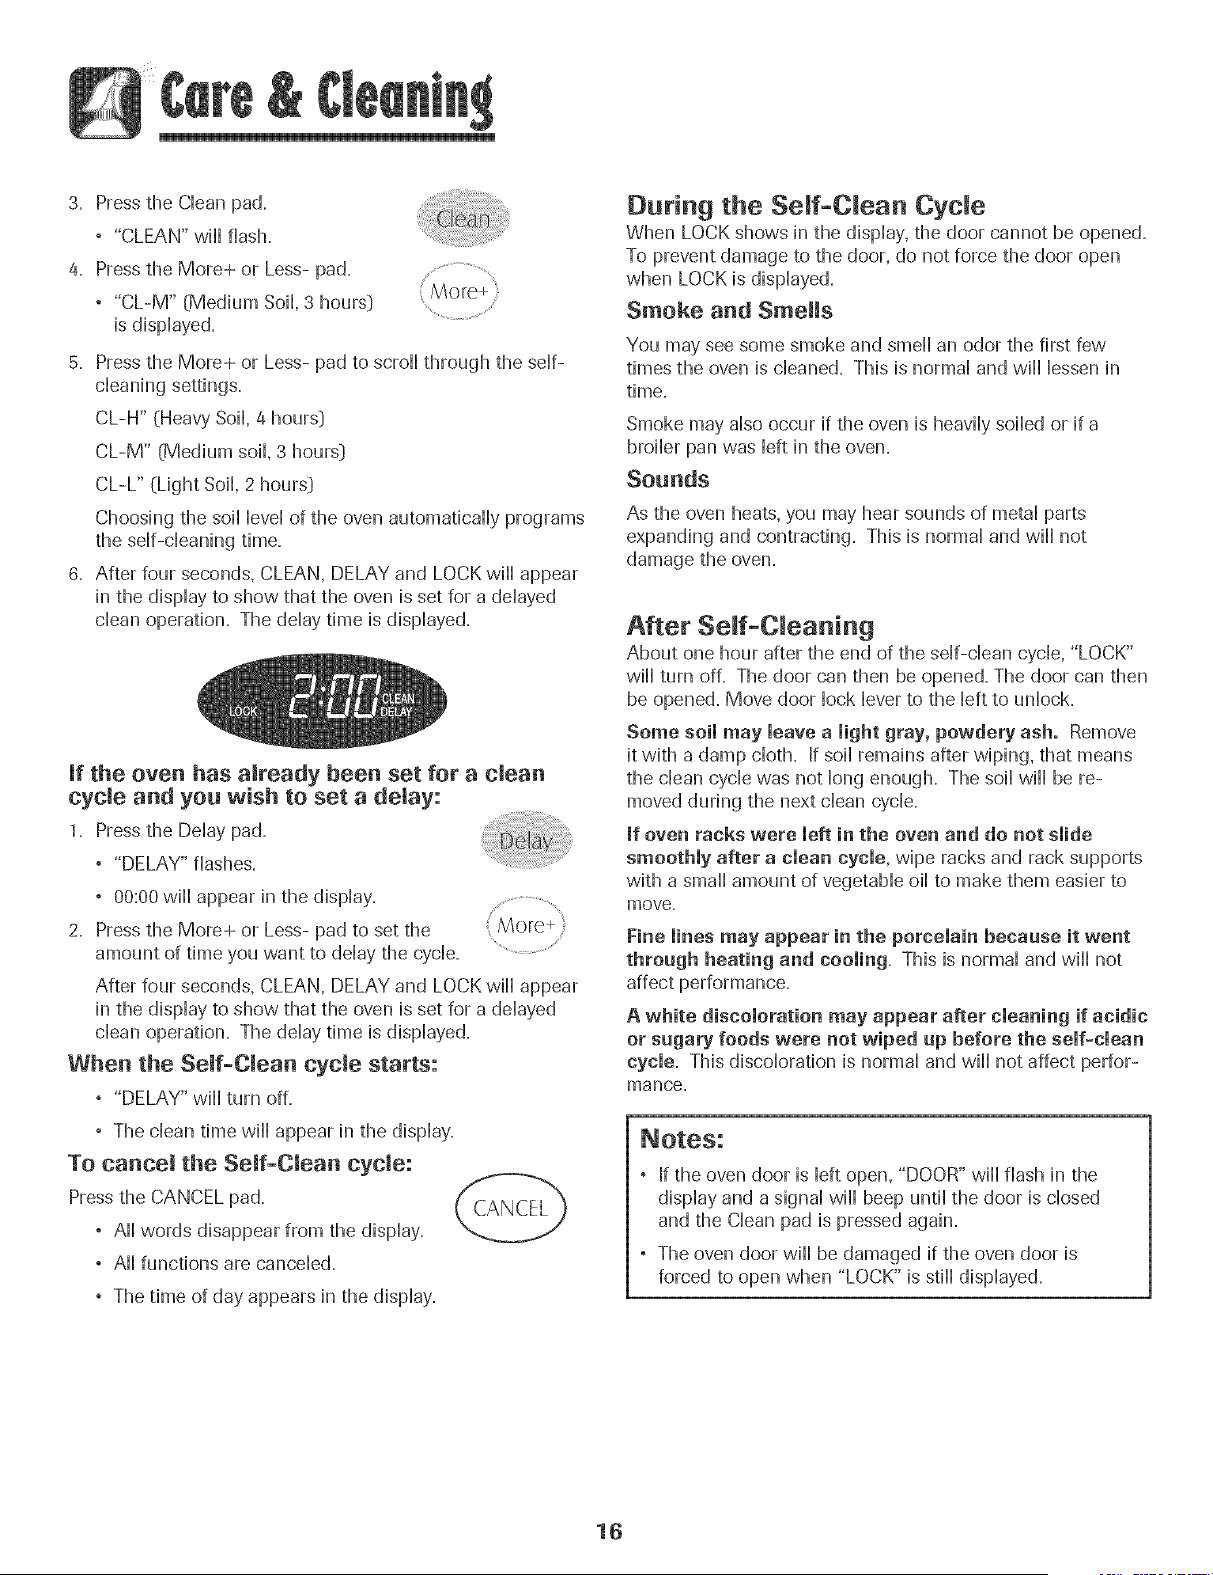
6. After four seconds, CLEAN, DELAY and LOCK wflHappear
in the dispHayto show that the oven is set for a ddayed
dean operation. The dday time is dispHayed.
Jf the oven has already been set for a clean
cycle and you wish to set a delay:
1. Press the DeHaypad.
, "DELAY" flashes.
, 00:00 will appear in the display. ...............................
2. Press the More+ or Less- pad to set the
amount of time you want to delay the cycle. '...............................
After four seconds, CLEAN, DELAY and LOCK will appear
in the display to show that the oven is set for a delayed
clean operation. The delay time is displayed.
Whoa the Seif-Oleaa cycle starLs:
° "DELAY" will turn off,
° The clean time will appear in the display.
To cancel the Serf-Clean cycle:
Press the CANCEL pad.
, All words disappear from the display.
, All functions are canceled.
, The time of day appears in the display.
During the Self-C_ean Cycle
When LOCK shows in the display, the door cannot be opened,
To prevent damage to the door, do not force the door open
when LOCK is displayed,
Smoke and Smells
You may see some smoke and smell an odor the first few
times the oven is cleaned. This is normal and will lessen in
time.
Smoke may also occur if the oven is heavily soiled or if a
broiler pan was left in the oven.
Sounds
As the oven heats, you may hear sounds of metal parts
expanding and contracting. This is normal and will not
damage the oven.
After Self-Cleaning
About one hour after the end of the self-clean cycle, "LOCK"
will turn off. The door can then be opened. The door can then
be opened. Move door lock lever to the left to unlock.
Some soil may leave a light gray, powdery ash. Remove
it with a damp cloth. If soil remains after wiping, that means
the clean cycle was not long enough. The soil will be re-
moved during the next clean cycle.
if oven racks were left in the oven and do not slide
smoothly after a clean cycle, wipe racks and rack supports
with a small amount of vegetable oil to make them easier to
move.
Fine lines may appear in the porcelain becaase it went
throagh heating and cooling, This is normal and will not
affect performance,
A white discoloration may appear after cleaning if acidic
or sugary foods were not wiped up before the self-clean
cycle, This discoloration is normal and will not affect perfor-
mance,
, If the oven door is left open, "DOOR" will flash in the
display and a signal will beep until the door is closed
and the Clean pad is pressed again.
, The oven door will be damaged if the oven door is
forced to open when "LOCK" is still displayed.
16

Cleaning Procedures
,Be sure appliance is Off and all parts are coo! before handling
or cleaning. This is to avoid damage and possible burns.
, To Prevent staining or discol0rati0n, c!ean appliance after each use,
t !1:a part is removed, be sure it is c0rrect!y repUaced.
Brand names are registered trademarks of the
respective manufacturers.
** To order caii 1-877-232-6771 USA or
1-800-688-8408 Canaca.
PROCEDURE
Cooktop -
Porcelain Enamel
Broiler Pan and
insert
Clock and
Control Pad
Area
Control Knobs
Drip Bowls -
Porcelain
(select models}
Drip Bowls =
Chrome
(select models}
Porcelain enamel is glass fused on metal and may crack or chip with misuse. It is acid resistant, not acid
proof. All spillovers, especially acidic or sugar}, spillovers, should bewiped up immediately with a dry cloth.
, When cool, wash with soapy water, rinse and dry.
, Never wipe off a warm or hot surface with a damp cloth. This may cause cracking or chipping.
, Never use oven cleaners, abrasive or caustic cleaning agents on exterior finish of range.
Never cover insert with aluminum foil as this prevents the fat from draining to the pan below.
° Place soapy cloth over insert and pan; let soak to loosen soil=
° Wash in warm soapy water. Use scouring pad to remove stubborn soil
, Broiler pan and insert can be cleaned in dishwasher.
° To activate "Control Lock" for cleaning, see page 9.
° Wipe with a damp cloth and dry. Do not use abrasive cleaning agents as they may scratch the finish.
° Glass cleaners may be used if sprayed on a cloth first. DO NOTspray directly on controlpad and
display area.
° Remove knobs in the OFF position by pulling forward.
, Wash, rinse and dry. Do not use abrasive cleaning agents as they may scratch the finish.
, Turn on each dement to be sure the knobs have been correctly replaced.
Porcelain may discolor or craze if overheated. This is normal and wiii not affect cooking performance.
, When cool, wash after each use, rinse and dr}, to prevent staining or discoloration. May be washed in the
dishwasher.
° To clean heavy soil, soak in hot sudsy water, then use a mild abrasive cleaner such as Soft Scrub* and a
plastic scouring pad.
° For burned on soil, remove from range, place on newspapers and carefully spray with commercial oven
cleaner. {Do not spray surrounding surfaces.} Placein plastic bag and allow to soak several hours. Wearing
rubber gloves, remove from bag, wash, rinse and dr},.
, When cool, wash after each use, rinse and dry to prevent staining or discoloration.
° To clean heavy soil, soak in hot sudsy water, then use a mild abrasive cleaner such as Soft Scrub* and
a plastic scouring pad. Do not use abrasive cleaning agents.
, Avoid using excessive amounts of water which may seep under or behind glass causing staining.
° Wash with soap and water. Rinsewith clear water and dry. Glasscleaner can be used if sprayed on a cloth
first.
° Do not use abrasive materials such as scouring pads,steel wool or powdered cleaners as they wiii scratch
glass.
Oven Window
and Door -Glass
17
PART PROCEDURE
Oven mnterior Self-Clean:
,Follow hstructions on page 15-18 to set a seLf-cLeancycle.
Manual Clean:
° CHeanfrequentHyusing miHdabrasive cleaners and a pHasticpad.
, Do not use metallic scouring pads because they will scratch the surface.
° When using commerciaHoven cleaners follow the manufacturer's instructions.
, Wipe up acidic spills (tomato or milk based foods:) as soon as possible with soap and water. If the spill
is not wiped up, it may discolor the porcelain.
To make cleaning easier, remove the oven door, if desired. (See Maintenance section on
page 19.)
Oven Racks , Clean with soapy water.
, Remove stubborn soil with cleansing powder or soap-filled scouring pad. Rinse and dr},.
, Racks will permanently discolor and may not slide smoothly if left in the oven during a self-clean
operation. If this occurs, wipe the rack edge and rack support with a small amount of vegetable oil to
restore ease of movement, then wipe off excess oil.
Stainless Steel , DO NOT USE ANY CLEANING PRODUCT CONTAINING CHLORINE BLEACH.
(select modds_) ° 00 NOT USE ABRASIVE OR ORANGE CLEANERS.
°ALWAYS WIPE WITH THE GRAIN WHEN CLEANING.
. Daily Cleaning/LigM Soil -- Wipe with one of the following - soapy water, white vinegar/water sohtion,
Formula 409 Glass and Surface Cleaner* or a similar glass cleaner - using a sponge or soft cloth. Rinse
and dry. To polish and help prevent fingerprints, follow with Stainless Steel Magic Spray (Part No.
20000008)**.
° Moderate/Heavy Soil -- Wipe with one of the following -Bon Ami, Smart Cleanser, or Soft Scrub* -
using a damp sponge or soft cloth. Rinse and dry'.Stubborn soils may be removed with a damp multi-
purpose Scotch-Brite* pad; rub evenly with the grain. Rinse and dr},.To restore luster and remove streaks,
follow with Stainless Steel Magic Spray_,
, Discoloration -- Using a damp sponge or soft cloth, wipe with Cameo Stainless Steel Cleaner*. Rinse
immediately and dry,.To remove streaks and restore luster, follow with Stainless Steel Magic Spray_,
Storage Drawer, ° When cool, wash with warm soapy water, rinse and dry'. Never wipe a warm or hot surface with a damp
Door Handle, Side cloth as this may damage the surface and may cause a steam burn.
Panels -Painted ° For stubborn soil, use mildly abrasive cleaning agents such as baking soda paste or Bon Ami.* Do not use
Enamel abrasive, caustic or harsh cleaning agents such as steel wool pads or oven cleaners. These products will
scratch or permanently damage the surface.
NOTE: Use adry towel or cloth to wipe up spills, especially acidic or sugary spills. Surface may
discolor or dull if soil is not immediately removed. This is especially important for white surfaces.
* Brand names for cleaning products are registered trademarks of the respective manufacturers.
** To order direct, call 1-877-232-8771 USA or 1-800-888-8408 Canada.
18
Oven Door
o Do net place excessive weight on or stand on an open
oven door. This could cause the range to tip over. break
Do not attempt to open or close door or operate oven until
door is properly replaced.
Never place fingers between hinge and front oven frame.
Hinge arms are spnng mounted. If accidentally hit. the
hinge will slam shut against oven frame and could injure
To remove:
1. When cool, open the oven door to
the first stop position (opened
about four inches}.
2. Grasp door at each side. Do not
use the door handle to lift door.
3. Lift up evenly until door clears
hinge arms.
Oven Window
To protect the oven door window:
1. Do not use abrasive cleaning agents such as steel wool
scouring pads or powdered cleansers as they may scratch
the glass.
2. Do not hit the glass with pots, pans, furniture, toys, or other
objects.
3. Do not close the oven door until the oven racks are in
place.
Scratching, hitting, jarring or stressing the glass may weaken
its structure causing an increased risk of breakage at a later
date.
i Disconnect p0wei to range before replacing l!ght bu!b.
when replacing bulb,
To repJace:
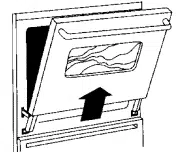
1. Grasp door at each side.
2. Align slots in the door with the hinge arms on the range.
3. Slide the door down onto the hinge arms until the door is
completely seated on the hinges. Push down on the top
corners of the door to completely seat door on hinges.
Door should not appear crooked.
Note: The oven door on a new range may feel "spongy"
when it is closed. This is normal and will decrease with use.
o Do not touch hot bulb with adamp cloth as this may cause
the bulb to break.
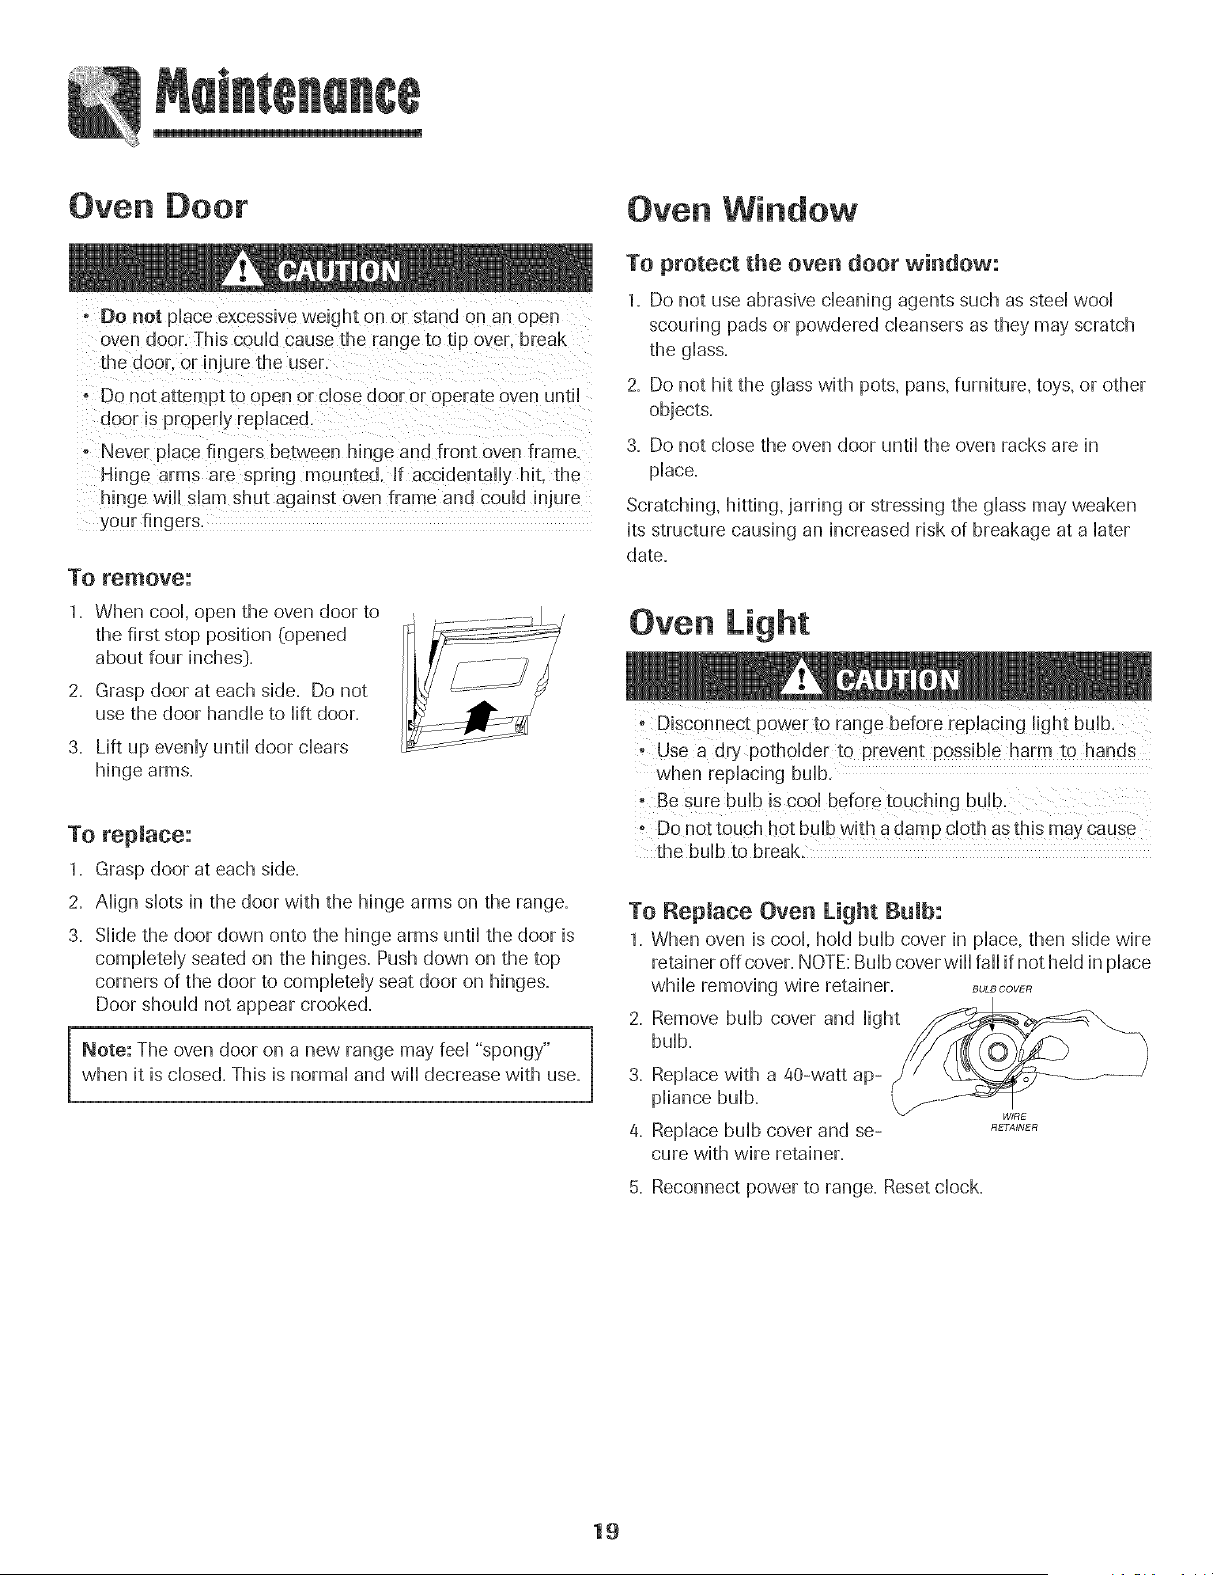
To Replace Oven Light Bulb:
1. When oven is cool, hold bulb cover in place, then slkJe wire
retahler off cover. NOTE:Bulb cover will fall if not hem in place
while removing wire retainer. BULSOOVER
2. Remove bulb cover and light
bulb.
3. Replace with a @-watt ap-
pliance bulb.
4. Replace bulb cover and se-
cure with wire retainer.
RETAINER
5. Reconnect power to range. Reset clock.
19
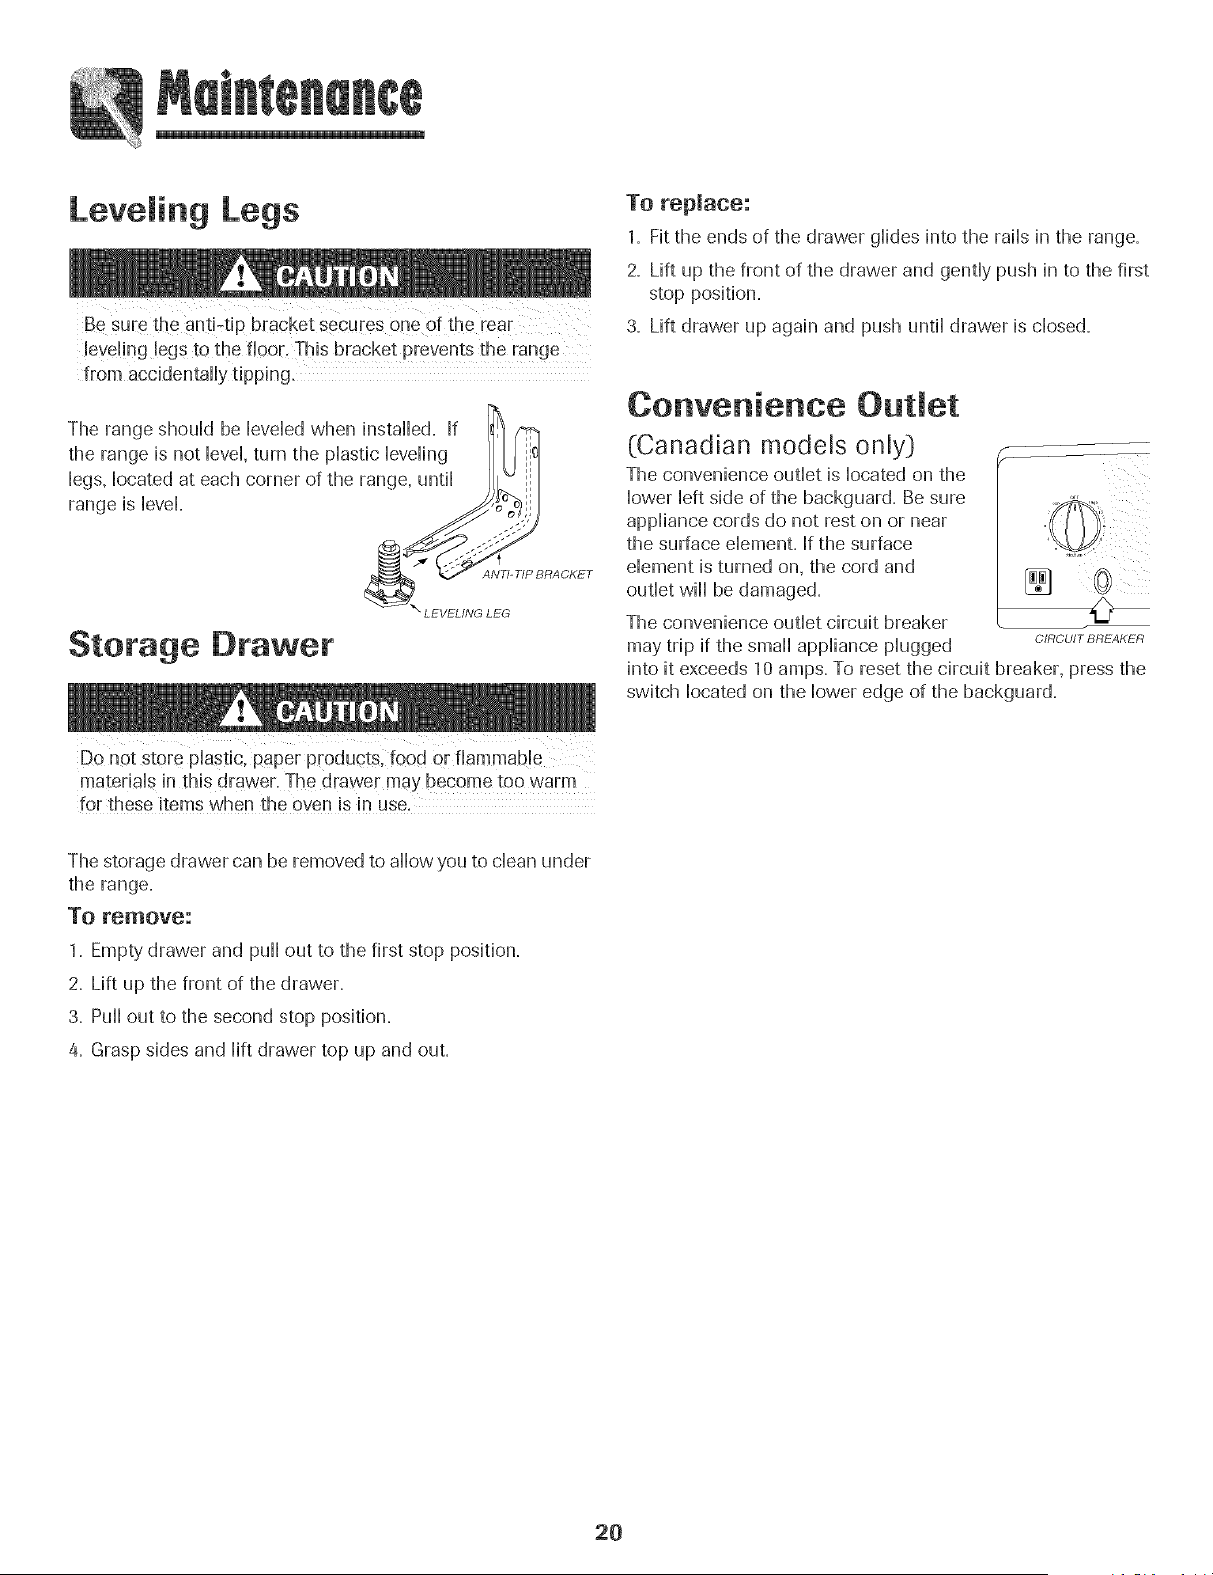
Leve ing Legs
Be suEethe anti-tip bracket secures one of the rear
from accidentafly tipping,
Storage [}rawer
Do not store phstic, paper products, food or flammab!e
materials in this drawer. The drawer may become too warm
for these items when the oven is in use.
To replace:
1. Fit the ends of the drawer glides into the rails in the range.
2. Lift up the front of the drawer and gently push in to the first
stop position.
3. Lift drawer up again and push until drawer is closed.
Convenience Outlet
(Canadian models only} _____
The convenience outlet is located on the
lower left side of the backguard. Be sure
appliance cords do not rest on or near
the surface element. If the surface
dement is turned on, the cord and
outlet will be damaged. _ k_
The convenience outlet circuit breaker 1J
may trip if the small appliance plugged C_-_CU_TBRE,aKE_-_
into it exceeds 10 amps. To reset the circuit breaker, press the
switch located on the lower edge of the backguard.
The storage drawer can be removed to allow you to clean under
the range.
To remove:
1. Empty drawer and puff out to the first stop position.
2. Lift up the front of the drawer.
3. Puffout to the second stop position.
4. Grasp sides and lift drawer top up and out.
2O
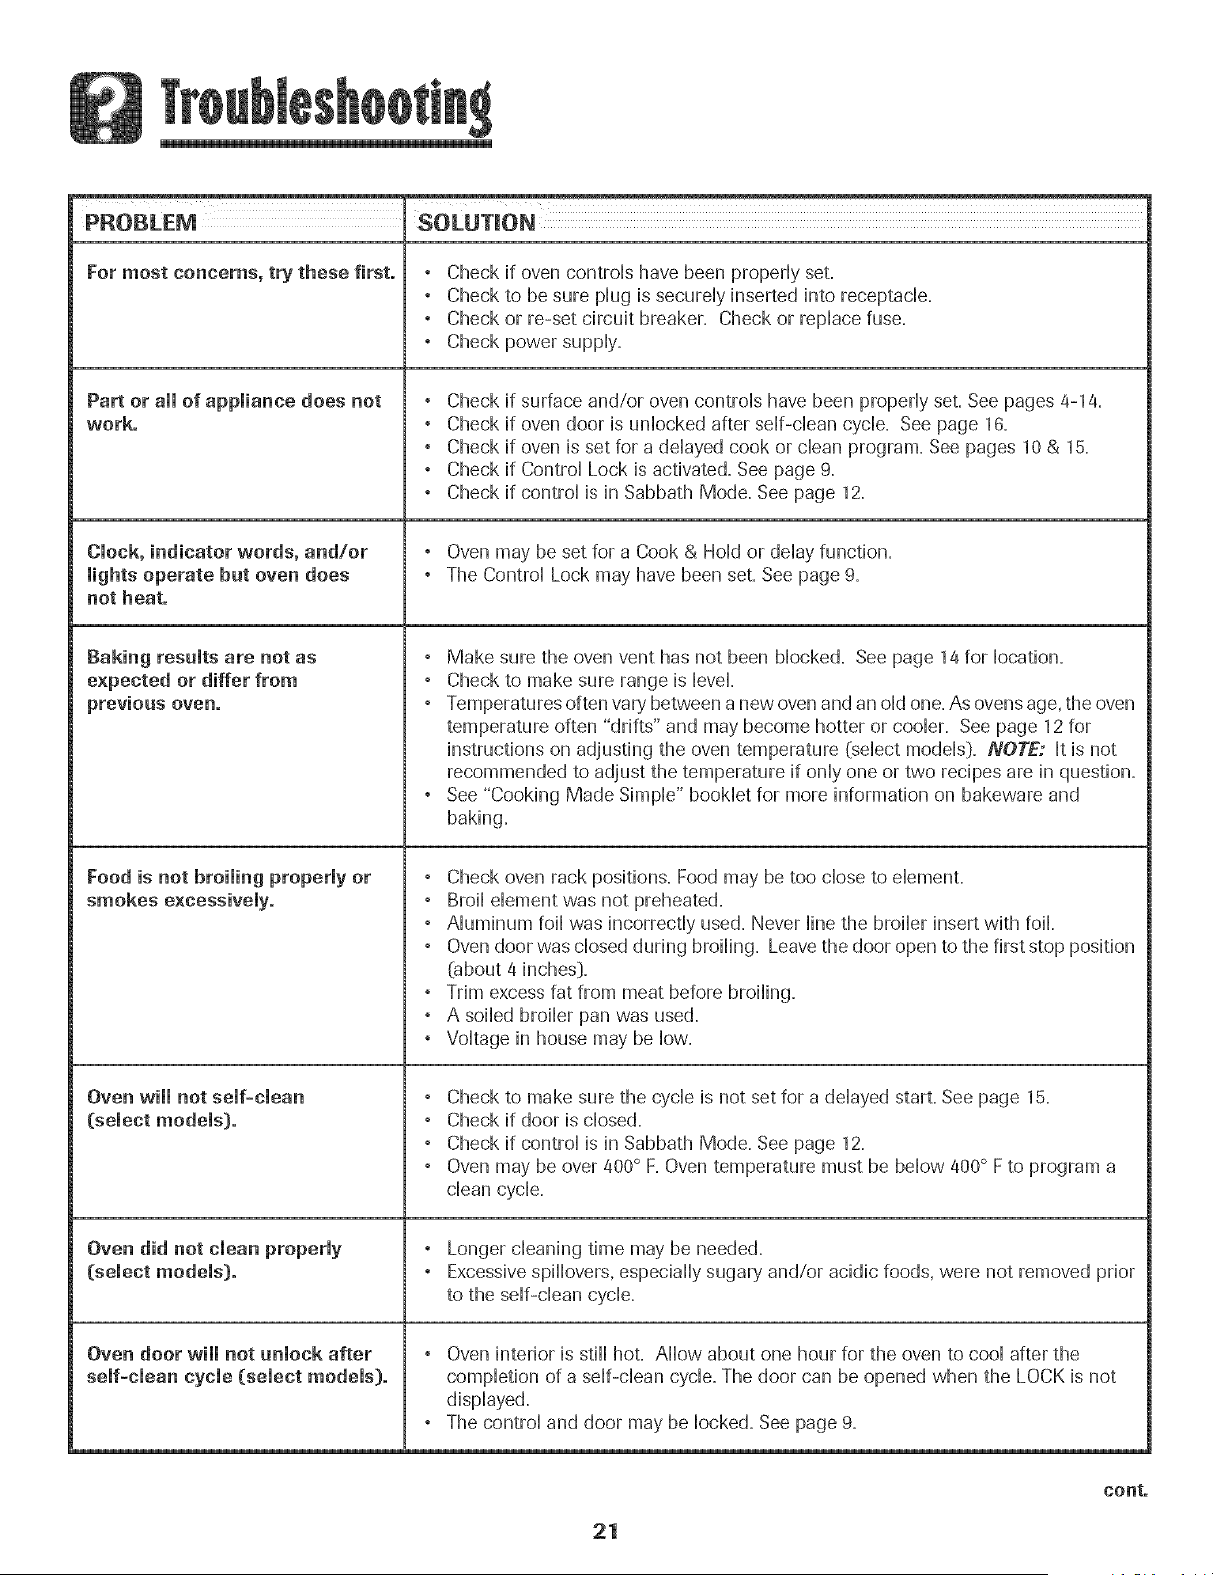
PROBLEM SOLUTION
For most concerns, try these first. , Check if oven controb have been properiy set.
° Check to be sure piug is secumiy inserted into receptacle.
° Check or re-set circuit breaker. Check or repiace fuse.
, Check power suppiy.
Part or atomof appmiance does not
work.
Clock, indicator words, and/or
lights operate but oven does
not heat.
Baking resumts are not as
expected or differ from
previous oven.
Food is not broiming properly or
smokes excessively.
Oven wimmnot semf-cmean
(select models).
Oven did not cmeanproperly
(semect modems).
Oven door will not unlock after
self-clean cycle (select models).
° Check if surface and/or oven controb have been properiy set. See pages 4-14=
° Check if oven door is unbcked after serif-dean cycb. See page 16.
° Check if oven is set for a ddayed cook or clean program. See pages 10 & 15.
° Check if Control Lock is activated=See page 9.
° Check if control is in Sabbath Mode. See page 12.
° Oven may be set for a Cook & Hold or delay function.
° The Control Lock may have been set. See page 9.
° Make sure the oven vent has not been blocked. See page 14 for location.
° Check to make sure range is level=
° Temperatures often var},'between a new oven and an old one. As ovens age, the oven
temperature often "drifts" and may become hotter or cooler= See page 12 for
instructions on adjusting the oven temperature (select models[). NOTE: It is not
recommended to adjust the temperature if only one or two recipes are in question.
° See "Cooking Made Simple" booklet for more information on bakeware and
baking.
° Check oven rack positions. Food may be too close to dement.
, Broil dement was not preheated.
° Aluminum foil was incorrectly used. Never line the broiler insert with foil.
° Oven door was closed during broiling. Leave the door open to the first stop position
@bout 4 inches}.
, Trim excess fat from meat before broiling.
° A soiled broiler pan was used.
, Voltage in house may be low.
, Check to make sure the cycle is not set for a delayed start. See page 15.
° Check if door is closed.
° Check if control is in Sabbath Mode. See page 12.
° Oven may be over 400° F.Oven temperature must be below 400° F to program a
clean cycle.
° Longer cleaning time may be needed.
° Excessivespillovers, especially sugar}, and/or acidic foods, were not removed prior
to the self-clean cycle.
, Oven interior is still hot. Allow about one hour for the oven to cool after the
completion of a self-clean cycle. The door can be opened when the LOCK is not
displayed.
° The control and door may be locked. See page 9.
21
cont.
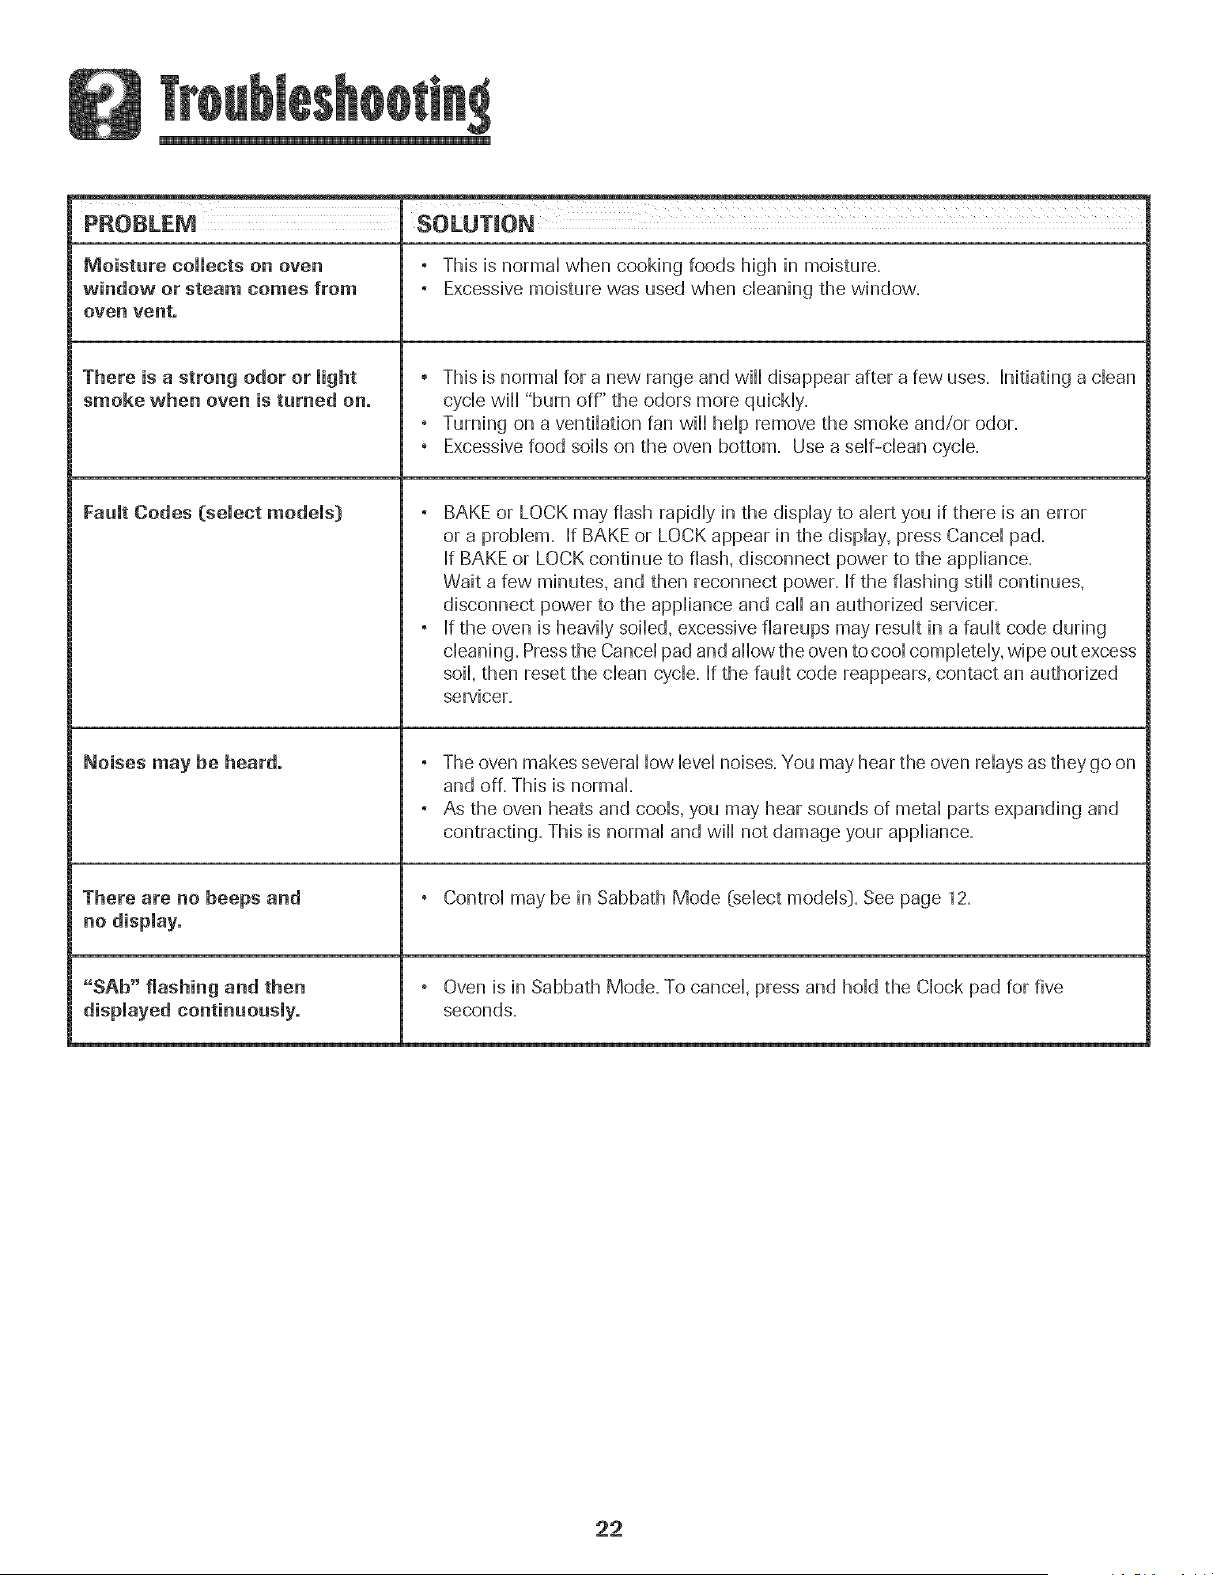
Moisture collects on oven
window or steam comes from
oven vent.
There is astrong odor or light
smoke when oven is turned on.
Fault Codes (select models)
Noises may be heard.
There are no beeps and
no dispiayo
"SAb" flashing and then
displayed continuousiyo
° This is normaHwhen cooking foods high in moisture.
° Excessive moisture was used when cHeaningthe window.
,This is normal for a new range and will disappear after a few uses. Initiating a clean
cycle will "burn off" the odors more quickly.
° Turning on a ventilation fan will help remove the smoke and/or odor.
° Excessive food soils on the oven bottom. Use a self-clean cycle.
° BAKE or LOCK may flash rapidly in the display to alert you if there is an error
or a problem. If BAKE or LOCK appear in the display, press Cancel pad.
If BAKE or LOCK continue to flash, disconnect power to the appliance.
Wait a few minutes, and then reconnect power. If the flashing still continues,
disconnect power to the appliance and call an authorized servicer.
° If the oven is heavily soiled, excessive fiareups may result in a fault code during
cleaning. Pressthe Cancel pad and allow the oven to cool completely, wipe out excess
soil, then reset the clean cycle. If the fault code reappears, contact an authorized
servicer.
° The oven makes several low level noises. You may hear the oven relays as they go on
and off. This is normal.
° As the oven heats and cools, you may hear sounds of metal parts expanding and
contracting. This is normal and will not damage your appliance.
° Control may be in Sabbath Mode (select models:).See page 12.
° Oven is in Sabbath Mode. To cancel, press and hold the Clock pad for five
seconds.
22
Fuji One Year Warranty =
Parts and Labor
For erie (1} year from the original
retail purchase date. any part which
hils in normal home use wHUbe
repaired or repBced free of charge.
Canadian Residents
The above warranties only cover an
appliance installed in Canada that has
been certified or listed by ap propriate
test agencies for compliance to a
National Standard of Canada unless
the appliance was brought into
Canada due to transter of residence
from the Upited States to Canada.
Limited Warranty Outside the
United States and Canada -
Parts Only
For one (1} yea from the date of
original retai purchase, any part which
fails in normal home use will be
repaired or rephced free of charge fo[
the part itself, with the owner paying
aii other costs, including labor, mib-
age, transportation, trip charge and
diagnostic chart ge, if required.
The spedfb warranties expressed
above are the ONLY warranties
prodded by me manutacturef: These
wa#antles give you specific legal tights.
and you may also have other rights
which vary fi'om state to state.
What is Not Covered By These
1. Conditions and damages resulting from any of the following:
a. Improper installation, delivery, or maintenance.
b. Any repair, modification, alteration, or adjustment not authorized by
the manufacturer or an authorized servicer.
c. Misuse, abuse, accidents, or unreasonable use.
d. Incorrect electric current, voltage, or supply.
e. Improper setting of any control
2. Warranties are void if the original serial numbers have been removed, altered,
or cannot be readily determined.
3. Light bulbs.
4. Products purchased for commercial or industrial use.
5. The cost of service or service caii to:
a. Correct installation errors.
b. Instruct the user on the proper use of the product.
c. Transport the appliance to the servicer.
6. Consequential or incidental damages sustained by any person as a result of
any breach of these warranties. Some states do not allow the exclusion or
limitation of consequential or incidental damages, so the above exclusion may
not apply.
If You Need Service
® Call the dealer from whom your appliance was purchased or call Maytag
Services sM,Maytag Customer Assistance at 1-800-688-9900 U.S.A. or
1-800-688-2002 Canada to locate an authorized servicer.
® Be sure to retain proof of purchase to verify warrant}/' status. Refer to
WARRANTY for further information on owner's responsibilities for warranty
service.
o If the dealer or service company cannot resolve the problem, write to Maytag
Services sM,Attn: CAIR _ Center, P.O. Box 2370, Cleveland, TN 37320-2370, or
call 1-800-688=9900 UoSoAoor 1-800-688=2002 Canada.
U.S.customers using TTY for deaf, hearing impaired or speech impaired, caii
1-800-688-2080.
User's guides, service manuals and parts information are available from
Maytag Servicess_a,Maytag Customer Assistance.
When writing or calling about a service problem, please include:
a. Your name, address and telephone number;
b. Model number and serial number;
c. Name and address of your dealer or servicer;
d. A clear description of the problem you are having;
e. Proof of purchase {sales receipt}.
23
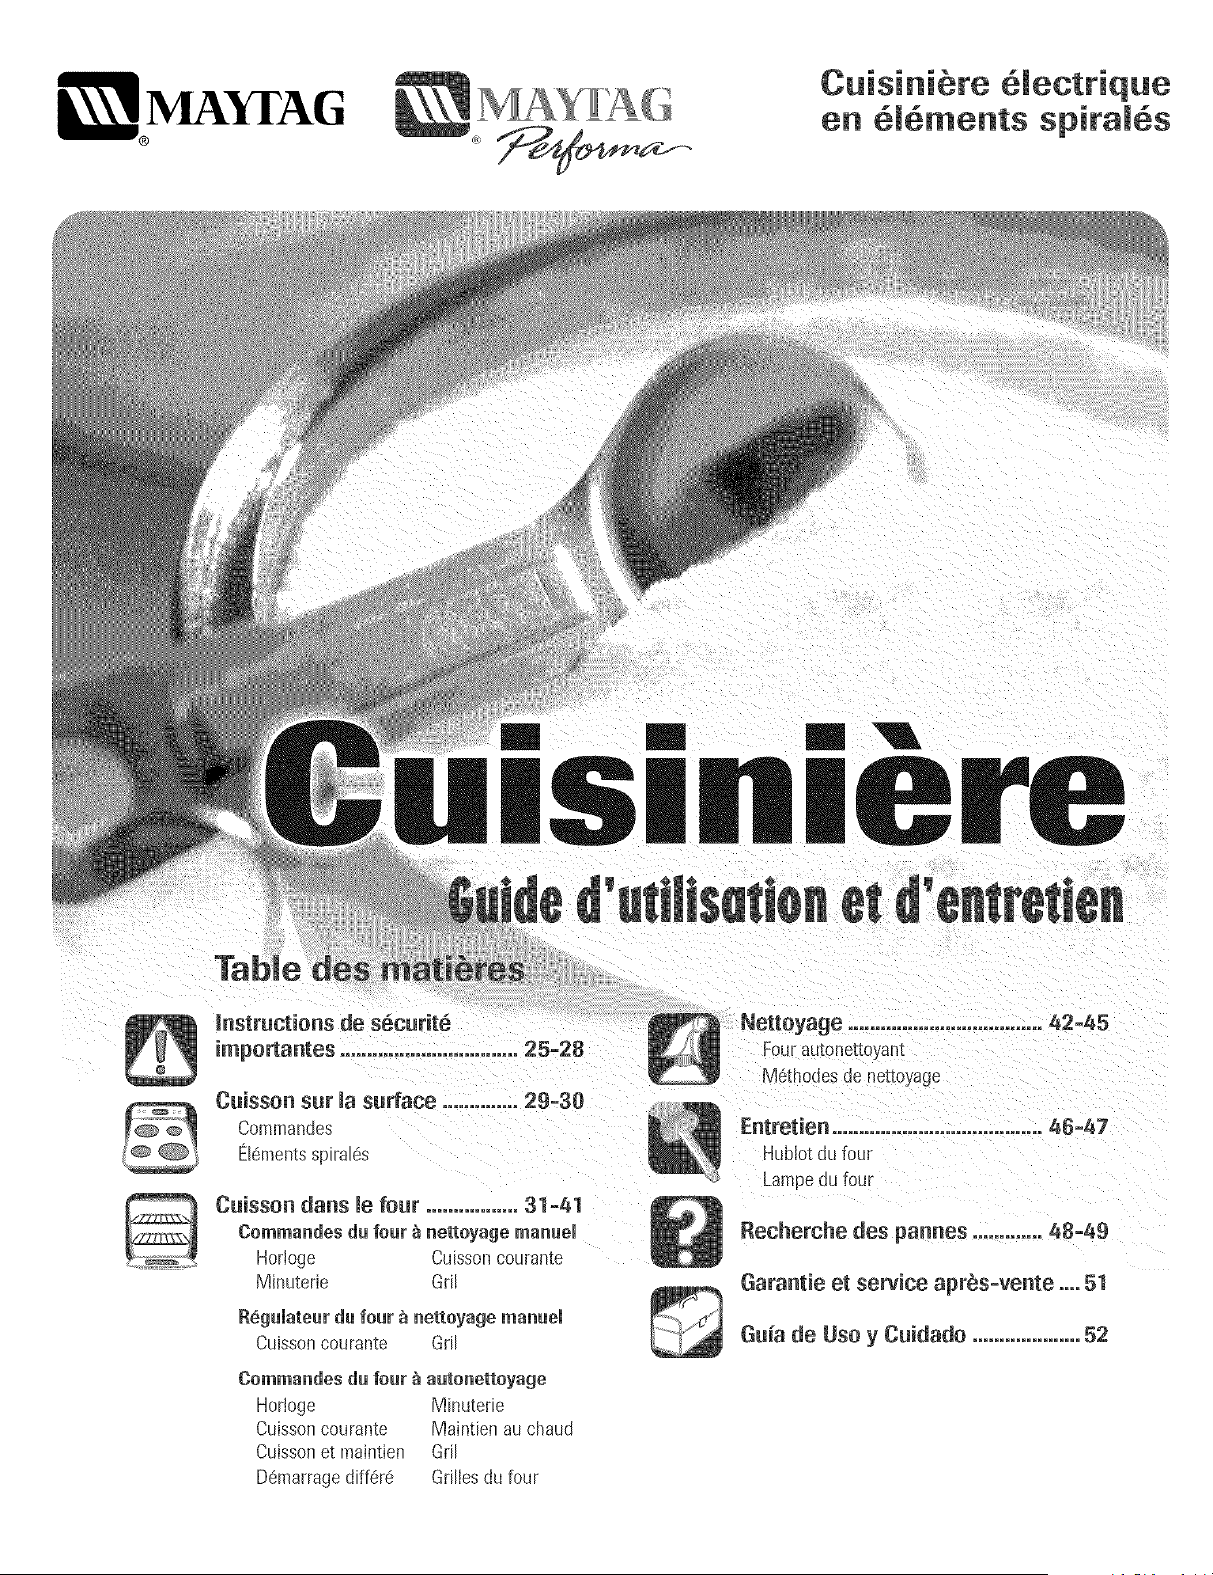
Q YrAG Cuisini_te _mecttique
en _m_ments spital_.s
m m
//|$|//|e
instructions de s6curit6
importantes ................................. 25-28
Cuisson sur masurface .............. 29=30
Commandes
ElementsspiraL6s
Cuisson darts le four ................. 31-41
Cemmandes du fear _ netteyage manuel
Horloge Cuissoncourante
Minuterie Gd!
R_guiateur du four _ nettoyuge manuel
Cuissoncourante Gall
Commundes du four _ uutenettoyuge
Horloge Minutede
Cuissoncourante Maintien au chaud
Cuissonet maintien Gril
D6marragediff6r6 Gdllesdu four
Nettoyage ....................................42-45
Fourautonettoyam
M_thodesde nettoyage
Entretien ....................................... 46-47
Hublotdu four
Lampedu four
Recherche des pannes ............. 48=49
Garantieet serviceapr_s=vente .... 51
Guia de Use y Cuidado ....................52

JnstaUateur :Laissezce guideavecI'apparefi.
Consommateur: Veuillezlire le guideet le conserverpour
consul[ationuJterieure.Conservezlatacture d'achat ou b cheque
enca_ssecommepreuvede I'achat
Num6rode rnodele
Num6rode s6rie
Dated'achat
Sivousavezdes questions,veuifleznous appeter:
Service a la client#Je de Maytag
]-800-688-9900 aux E=-U.
]-800-688-2002 au Canada
(lundi au vendredi.8 h _ 20 h. heurede I'Est)
Internet:http://www.may[ag.com
Dansle cadre de nosprat_quesd'am61iorationcons[an[eae la
qualit6 et de la performancede nos produltsde cuisson oes
modificationsde I'appareilqu_nesent pas mentionn6esdonsce
guLdeon[ pu 6tre introduites.
Repertez_veus _ la page 49 peurplusd'infermatierla
cencemant te sePJiceapres-vente.
Les instructions de securitd importantes et bs paragraphes
<<avertissement >>de ce guide ne sent pas destines a couvrir
toutes bs conditions et situations qui pourraient se presenter.
II faut faire preuve de ben sens, de prudence et de soin lots de
I'instdlation, de I'entretien ou du fonctionnement de I'apparefl.
Toujours prendre contact avec le fabricant dans le cas de
probbmes ou de conditions qui ne seraient pas comprises.
Reconnoitre les 6tiquettes, paragraphes
et symboles sur la s6curit6
POURRAIENTrdsulter en de graves b!essures ou mSme !a
mort.
POURRAtENTresulter en des blessures mineures.
Lire toutes les instructions avant d'utiliser cet appareii;
observer toutes bs instructions pour eliminer bs risques
d'incendie, choc ebctrique, dommages materiels et corporeb
que pourrait susciter une utflisation incorrecte de ['appareiL
Utfliser Fapparefl uniquement pour bs fonctions prevues,
decrites dans ce guide,
Pour one utilisation adequate et en s_eurit_, fl faut que
I'apparefl soit convenabbment installe par un technicien
qudifie, et relic a h terre,
Ne pas regbr, reparer ni remplacer un composant, a moins que
ceh ne soit specifiquement recommande dans ce guide, Toute
autre reparation doit etre effectuee par un technicien qudifie,
Toujours debrancher [apparefl avant d'y faire de [entretien,
, TOIJTE CUI$1NIERE PEUT
BASCULER ETPROVOQUER DES
INSTALLER LA BRIDE
ANTiBA$CULEMENT FOURNIE
risque de bascu!ement de !,appateil _ !,occasien
d'une utilisatien anermale elmd'_n chargement
excessif de la porte do fear, il faat qae la bride
a_tibasc_leme_t seit ce_ve_ableme_t i_stall_e.
Utfliser une lampe torche pour determiner si la bride antibascu-
bment est convenabbment installee sous la cuisiniere, L'un des
pieds arriere de reglage de Faplomb doit etre convenabbment
engage dans la fente de la bride, Lorsque la cuisiniere est con-
venabbment cdee, la bride antibascubment immobflise b pied
arriere centre le sol, Verifier la parfaite immobflisation de la
cuisiniere par la bride apres ehaque dephcement de la
culsmlere,
Po r vitet i ce die des
dommages de
S'assurer que tous[es materiaux de conditionnement sent
retires de [apparefl avant de b mettre en marche,
Garder bs materiaux combustibles bien eloignes de I'apparefl,
Ne pas ranger de materiaux inflammables dans un four,
De nombreux types de plastique sent affectes par la chabur,
Garder bs plastiques eloignes des pieces de I'apparefl pouvant
devenir chaudes,
Pour empecher qu'un feu de graisse ne se declare, eviter toute
accumulation de graisse ou autres matieres inflammables
dans I'apparefl ou au voisinage.
25
En cas d'incendie
Ne jamais utfliser d'eau pour 6teindre de la graisse
enflammee. Utfliser du bicarbonate de soude ou un extincteur
poudre chimique ou a mousse pour etouffer les flammes.
1. Interrompre I'alimentation 61ectrique de Fapparefl pour
minimiser la propagation des flammes.
2. NE JAB/JAmSsaisir ou d@lacer un ustensfle de cuisine
enflamme.
3. Fermer la porte du four pour 6touffer les flammes du four.
S6cutit pour les enfants
parefl des articles auxquds Jesenfants peuvent s'int@essen
pour atte[ndre un objet, pourrait se blesser gravement.
NE JAMAIS laisser des enfants seuls ou sans supervision
Iorsque I'apparefl est en service ou encore chaud, Ne jamais
laisser un enfant s'asseoir ou se tenir sur une partie qudconque
de Fappareil, II pourrait se blesser ou se br01er,
II est important d'enseigner aux enfants que Fapparefl et les
ustensfles places dedans peuvent 6tre chauds, Laisser refroidir
les ustensfles en un lieu s0r, hors d'atteinte des enfants, II est
important d'enseigner aux enfants qu'un apparefl mdnager n'est
pas un jouet, et qu'fls ne doivent toucher aucune commande ou
autre composant de Fapparefl,
Familiarisation avec l'appareil
NE JAMAJS uti!iser un apparei! cemme escabeau pour
atteindre les armoires se trouvant au-dessus, Le mauvais
empl0i de porte d apparei! comme par exemp!e en tant
qu'escabeau, le fait de s'appuyer ou de s'asseoir surJa POrte,
peuvent entra!ner !e renversement de I'appare!!, casser Ja
porte et gravement blesser.
Ne pas utiliser cet appareil pour chauffer ou pour garder
chaude une piece, sinon des dommages a i'appareii pourraient
s'ensuivre et cela pourrait 6tre dangereux pour I'utilisateur.
Aussi, ne pas utiiiser ie four pour ranger des aliments ou des
ustensiles de cuisine.
Ne pas bloquer ou obstruer 1'6ventdu four.
NE JAMAIS TOUCHER LES ELEMENTSCHAUFFANTSNI LES
PAROISINTERIEURESDU FOUR,Les eldments chauffants
peuvent 6tre brQlants meme s'ils ne sont plus rouges. Les
surfaces intdrieures du four peuvent atteindre une temperature
suffisamment dlevee pour infliger des br01ures. Pendant et
apres usage, ne pas toucher les elements chauffants ni les
parois intdrieures du four et 6viter leur contact avec des
vetements ou autres matdriaux inflammables avant qu'fls
n'aient eu le temps de refroidir suffisamment. D'autres surfaces
peuvent egdement atteindre une temperature suffisamment
6levee pour bn31er:le ouverture d'dvent et le surface
avoisinante, ainsi que le porte et le hublot de four.
Ne pas toucher Fampoule du four bn31anteavec un chiffon
humide car elle pourrait se briser. Si tel est le cas, debrancher
Fapparefl avant de retirer Fampoule pour eviter une decharge
electrique.
NE JAI_AIS gamir la sole du four ou une grille du four avec
de la feuflle d'duminium. Ceci pourrait susciter un risque de
decharge electrique ou d'incendie, ou une deterioration de
Fapparefl. Utfliser de la feuflle d'duminium uniquement selon
les instructions de ce guide.
Cuisson et s6cutit6
NE JAMAIS faire chauffer un recipient non ouvert dans le
four, L'accumuiation de pression dans ie recipient pourrait
provoquer son eclatement et de graves dommages matdriels
ou corporeis,
Utiliser des maniques robustes et seches, Des maniques
humides peuvent provoquer ia formation de vapeur brQiante,
Ne jamais utiliser un torchon a vaisselle ou autre article textile
la place de maniques; un tel article pourrait trainer sur un
element et s'enflammer, ou accrocher un ustensile ou un
composant de i'appareii,
Porter un vetement approprid, @iter de porter des vetements
amples ou a Iongues manches pendant I'utilisation de
I'appareil, lls peuvent prendre feu si le vetement entre en
contact avec un el6ment de cuisson brQlant,
Placer toujours les grilles a la position appropriee dans le four
Iorsque le four est froid. Faire coulisser la grille vers Fextdrieur
avant d'ajouter ou enlever un plat; utfliser pour cela une
manique robuste et seche. @iter d'introduire la main darts le
four pour y placer ou retirer un plat. S'fl est necessaire de
deplacer une grille Iorsqu'elle est chaude, utfliser une manique
seche. Ne pas toucher un element chaud avec une manique.
N'utfliser les grilles que darts le four darts lequel elles ont dte
achetees/expediees.
26
Ouvrir toujours la porte du four tres prudemment. Laisser Fair
chaud ou la vapeur s'echapper avant de retirer ou d'introduire
un plat.
AVERTISSEMENT -METS PREPARES : Respecter les
instructions du fabricant. Si le contenant ou le couvercle en
plastique d'un mets surgele se ddorme ou est endommage
durant la cuisson, jeter immediatement le recipient et son
contenu. Les aliments pourraient etre contamines.
Ne pas permettre le contact de papier d'aluminium ou de la
sonde a viande avec les elements chauffants.
Toujours eteindre toutes les commandes une lois la cuisson
terminee.
Ustensiles et s cutit
Appliquer les instructions du fabricant Iors de Femploi d'un
sachet pour cuisson au four.
La securite de fonctionnement de cet appareil a ere testee
I'aide d'ustensiles de cuisine traditionnels. Ne pas utiliser un
ustensile ou accessoire qui n'est pas specifiquement
recommande darts ce guide. Ne pas utiliser de couvre-
element, gril place sur la table de cuisson ou systeme de
convection additionnel. L'utilisation d'un dispositif ou
accessoire qui n'est pas expressement recommande darts ce
guide peut degrader la securite de [appareil ou sa perfor-
mance, ou reduire la Iongevite des composants.
Si un ustensile est plus petit que I'element utilise, une partie
de I'element chauffant est exposee et peut provoquer
I'infiammation d'un vetement ou des maniques.
Seuls certains materiaux en verre, vitroceramique, ceramique,
gres, ou certains ustensiles vitrifies/emailles peuvent etre
utilises sur la table de cuisson ou darts le four sans risque de
bris sous I'effet du choc thermique. Observer les instructions
du fabricant Iors de I'utilisation d'un ustensile en verre.
Orienter la poignee de chaque ustensile vers le centre de la
table de cuisson et non vers I'exterieur ou vers un autre
element; ceci reduira le risque de brOlure, inflammation de
matiere inflammable ou renversement Curtjeune enfant
pourrait saisir et renverser un ustensile dont le manche est
oriente vers I'exterieuO.
Veiller a utiliser un ustensile de taille suffisante pour que le
contenu ne risque pas de deborder. Ceci est particulierement
important pour un ustensile rempli d'huile de friture. Verifier
que la taille de I'ustensile est suffisante pour qu'il puisse
recevoir les produits alimentaires a cuire, et absorber
I'augmentation de volume suscitee par I'ebullition de la
graisse.
Veiller a ne jamais laisser le contenu liquide d'un ustensile
s'evaporer completement; I'ustensile et [appareil pourraient
subir des dommages,
Table de cuisson
NE JAMAIS laisser un element de surface allume sans
surveillance, particulierement avec chauffage eleve. Le
debordement du contenu de I'ustensile pourrait provoquer la
generation de fumee abondante et [inflammation de la
graisse.
Cet appareil comporte des elements chauffants de differentes
tailles. Utiliser toujours un ustensile a fond plat, de taille
suffisante pour qu'il puisse recouvrir completement I'element.
Pour optimiser I'efficacite, choisir un ustensile de meme taille
que I'element.
1
Elements spirales
Pour eviter de deteriorer les elements chauffants amovibles, ne
pas les immerger /tremper /nettoyer darts un hve-vaisselle,
ou darts un four autonettoyant. Un element chauffant
endommage pourrait provoquer un court-circuit suscitant un
incendie ou un choc electrique.
Veiller ace que la cuvette de recuperation soit toujours en
place Iors de I'utilisation de I'element; I'absence de la cuvette
de recuperation Iors d'une cuisson peut faire subir des
dommages au cQbhge.
Garnitures de protection : Ne pas garnir les cuvettes de
recuperation sous les elements ou le fond du four avec de la
feuille d'duminium, saul Iorsque ceci est suggere darts le
guide. La mise en place d'un tel garnissage peut susciter un
risque de choc electrique ou d'incendie.
Exercer une prudence extreme Iors du deplacement du
recipient de graisse ou Iors de I'elimination de graisse chaude.
Laisser la graisse refroidir avant de deplacer [ustensile.
Hottes d'e×traction
Nettoyer frequemment les filtres et la hotte de la cuisiniere
pour empecher la graisse ou d'autres produits inflammables
de s'accumuler sur les filtres ou la hotte en provoquant des
feux de graisse.
Pour fiamber des aliments sous la hotte, mettre le ventilateur
en marche.
27
Nettoyage et securit
Nettoyer prudemment la table de cuisson, Arreter routes les
commandes et attendre le refroidissement de tous les
composants avant de les toucher ou d'entreprendre le
nettoyage, Nettoyer I'appareil avec precaution, Travailler
prudemment pour eviter des brQlures par la vapeur en cas
d'utilisation d'un chiffon ou d'une eponge humide lots de
I'elimination d'un produit renverse sur une surface chaude,
Certains produits de nettoyage peuvent generer des vapeurs
nocives Iorsqu'on les applique sur une surface chaude,
Nettoyer uniquement les pieces mentionnees darts ce guide,
Four autenetteyant
(certains modeles)
16chefrite dans le four lots de I'autonettoyage,
Ne pas nettoyer le joint de porte; le joint joue un r01eessentiel
quanta I'etancheite, Ne pas frotter, endommager ou deplacer
le joint,
Ne pas utiliser de produits de nettoyage pour four ou enduits
de four, darts le four autonettoyant ou sur les zones voisines,
Avant d'executer une operation d'autonettoyage, retirer la
lechefrite, les grilles du four et les autres ustensiles, et eliminer
par essuyage tout exces de residus renverses pour eviter la
formation de fumee ou I'infiammation de ces residus,
II est normal que la surface de cuisson devienne chaude
durant une operation d'autonettoyage; par consequent, eviter
de toucher la surface de cuisson durant I'autonettoyage,
Avertissement et avis
important pour la s6curit6
La Ioi cdifomienne _Safe Drinking Water and Toxic Enforce-
ment Act >>de 1986 Cproposition 65:)stipule la publication par
le gouvemeur de la Californie d'une liste de substances que
I'etat de Californie considere comme cancerigenes ou
dangereuses pour le systeme reproducteur, et impose aux
entreprises commercides Fobligation de signaler aleurs
clients les risques d'exposition a de telles substances,
Nous informons les utilisateurs de cet appareil que lots d'une
operation d'autonettoyage, ils peuvent etre exposes a une
faible concentration de certaines substances figurant darts la
liste mentionnee ci-dessus, dont le monoxyde de carbone,
Pour minimiser [exposition, veiller a ce que la piece o_ se
trouve le four soit convenablement aeree durant une operation
d'autonettoyage par I'ouverture d'une fenetre ou d'une porte,
AViS IMPORTANT -OiSEAU× FAMiLIERS :Les oiseaux ont
un systeme respiratoire tres sensible, Ne pas garder un oiseau
familier darts la cuisine ou darts une piece ou il pourrait etre
expose aux fumees, Les fumees emises durant une operation
d'autonettoyage peuvent etre dangereuses ou mortelles pour
un oiseau, de meme que les fumees emises lots du chauffage
excessif de graisse, huile, margarine, et du chauffage excessif
dans un ustensile a revetement antiadhesif,
Conserver ces instructions pout consultation ult6tieute
28
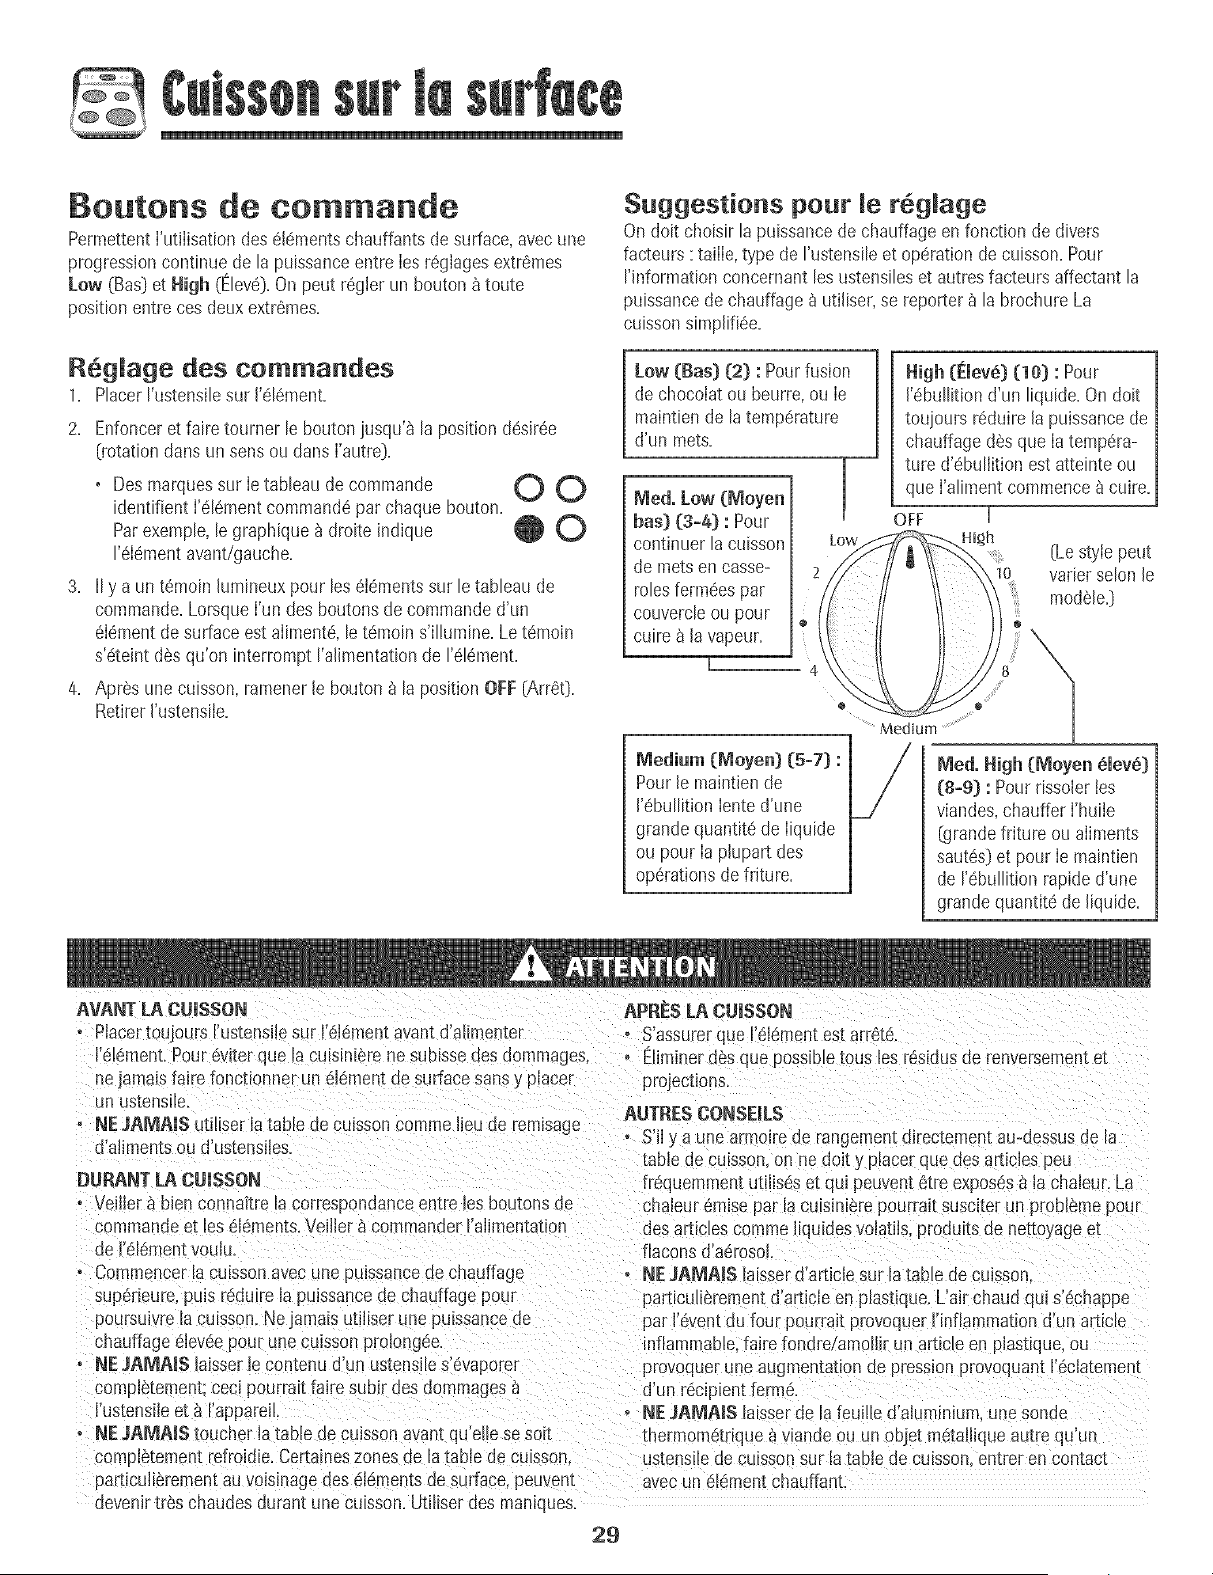
@
Boutons de commande
PermettentI'utJlisationdes 616mentschauffants desurface,avecune
progressioncontinue de la puissanceentre Iesreglagesextremes
Low (Bas]et Nigh (Eleve}+On peut regierun bouton_ toute
positionentre cesdeux extremes+
RegJage des commandes
1+ PlacerI'ustensilesur 1'element+
2. Enfonceret faire tourner le bouton jusqu'_ la positiondesiree
(rotationclansunsensou clansI'autre}.
• Desmarquessur Ietableau de commande
identifient I'elementcommandepar chaque bouton.
Parexemple,le graphique_ droite indique
I'elementavant/gauche.
3. IIy a un temoin hmineux pour leseiementssur le tableau de
commande.LorsqueI'un des boutonsde commanded'un
elementde surfaceestalimente,le temoins'illumine.Letemoin
s'eteint des qu'oninterrompt I'aJimentationde relement.
4. Apres unecuisson,ramenerJebouton _ la positionOFF(Arret}.
RetirerJ'ustensile.
OO
@0
Suggestions pour Je regJage
On doit choisirla puissancede chauffageen fonction de divers
facteurs :tailIe,type de I'ustensileet operation decuisson+Pour
rinformation concemantles ustensileset autresfacteursaffectant la
puissancede chauffagea utiliser,se reporterb la brochureLa
cuissonsimplifiee+
Low (Bas) (2) : Pourfusion
de chocoIatou beurre,ou Ie
maintiende latemperature
d'un mets.
Meal.Low (Moyen
bas) {S-a] : Pour
continuer la cuisson
de mets encasse-
rolesfermeespar
couvercleou pour
cuire _ Javapeun
!
1
1
Medium [Moyen] (5-7} :
Pourle maintiende
['ebullition lente d'une
grande quantit6de [iquide
ou pour [a p[upartdes
operationsdefriture.
APRE$ LACUISSON
Nigh (Emeve}(10] :Pour
['ebullitiond'un liquide.On doit
toujours reduirela puissancede
chauffage desque Ia tempera-
ture d'ebulJitionestatteinte ou
que I'alimentcommencea cuire.
OFF i
High (Lestyle peut
varier selonle
modNe.}
@
@ 1
Meal. Nigh (Moyen 61ev_}
(:8+9] : Pourrissolertes
viandes,chauffer I'huile
[grandefriture ou aliments
sautes}et pourIe maintien
de rebullition rapided'une
grandequantit6de liquide.
AVANTLA CWSSON
o Placertoujours I'ustensi+_sur I'elementavant d'alimenter - Sassurerque I elementes_arr+te.
I'element.Pourev+terque laculmme+enesubissedes dommages, + El+minerdesque possibletousles residusde renversemen_e_
nejammsfaire fonctionner un elementde surfacesansy placer
un ustenslle.
• NEJAMAIS utiliser +atable de cuissoncomme lieude remisage
d'Nimentsou d'ustensiles.
DURANTLA CUISSON
. Vei]]er_ bien connaftrela correspondanceentre les boutonsde
commandeet les elements.Veiile[ _commander!'aHmentat_on
de I'elernen[vouJu.
o Commencerlacusson avecune puissancede chauffage
super_eure,puis reduirela pu+ssancede chauffagepour
poursuivrelacuisson.Nejamaisutiliser unepuissancede
chauffageeleveepour unecuisson prolongee.
. NEJAMAIS iaisserlecontenu d'un ustensiles'evapors+
compl_:ement;cec+pourrait falre subir aes dommages
i'ustensileet _ I'appare+L
o NE,IAMAIS toucher +atable de cuissonavantqu'elle se soil
compi_[emen[refroidie.Certameszonesde la +ablede culsson+
particulierementauvoisJnagedes Ndmentsde surface,peuven[
devenirtres chaudesdurant une cuisson.Utiliser des maniques.
project+ons.
NJTRES CONSEILS
- S'iJ} a unearmoirede rangementdirectementau+dessusde la
table de culsson,on nedolt y placerque des al[icies peu
fi equemmentutllJsdset qu+peuvent_tre exposesb la chaJeur.La
chaieurCruisepar is culsinterepourrait susciterun p+oblemepour
desarticles commeiiquidesvoJatiis,produitsde ne[[oyagee[
flaconsd'aerosol.
+ NE_AP_AISImsserd'art+c+esur latable decu+sson.
particulierementd'art+cleen plastique.L'air chaud qui s'echappe
pal I'eventdu four pourrait provoquer]'inflammationd'un ar[Jcle
inflammable,faJrefondre/amo!l+run articleen plastique,ou
provoquerune augmentationde pressionprovoquantI'eclatement
J'un recipientferme.
- NEJA_AIS laisserde la feu+lied'aJuminium,unesonde
thermometdque8vmndeou un oujet metalliqueautre qu'un
ustenmtedecu_ssonsur fatable de cuisson entrer encontact
avecun _l_mentchauffant.
29
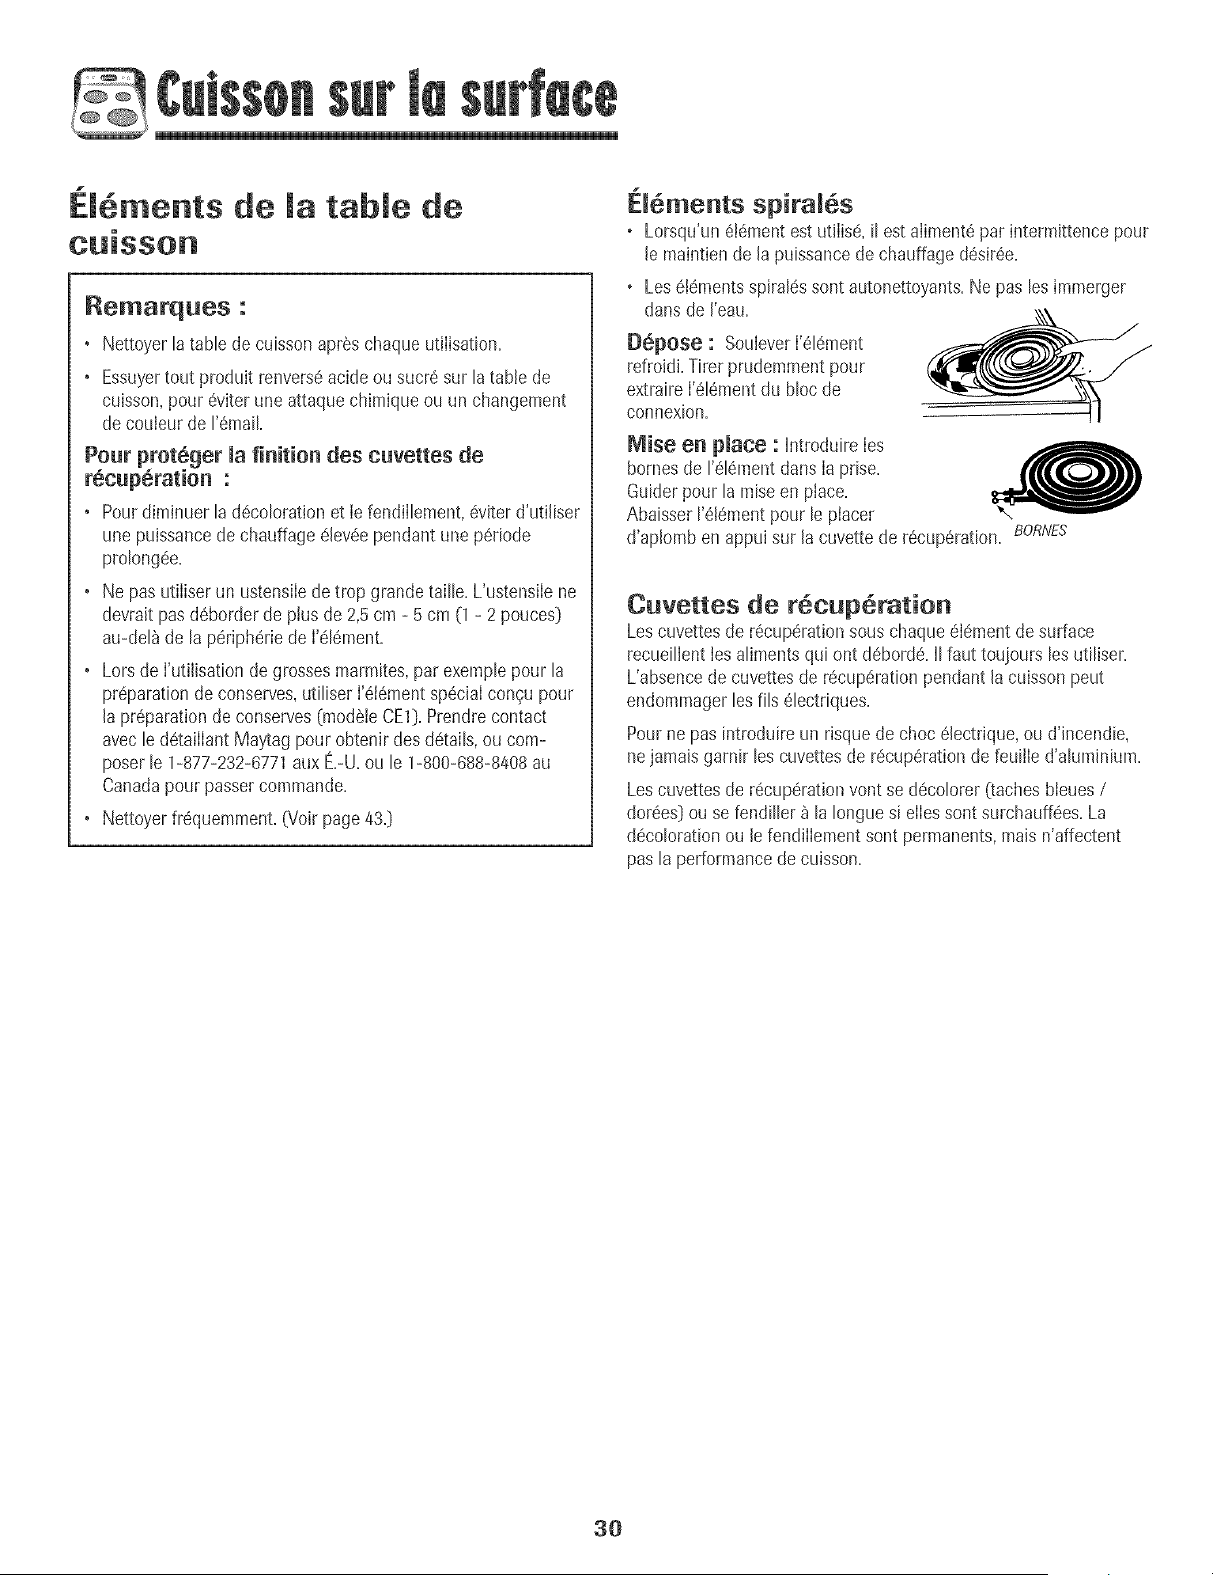
1
El .ments de la table de
Remarques :
• Nettoyerlatable decuissonapr6s chaqueutiIisation.
• Essuyertout produit renvers6acide ou sucr6sur latable de
cuisson,pour 6viterune attaquechimiqueou un changement
de couleurde 1'6mail
Pour prot6ger la finition des cuvettes de
r_cup6ration :
•Pourdiminuer la d6colorationet iefendiIlement,6viterd'utiliser
une puissancede chauffage61ev6ependant une p6riode
prolongee.
• Ne pas utiIiserun ustensiIede trop grandetaille.L'ustensiIene
devraitpas d6borderde plus de 2,5crn - 5 cm (1- 2 pouces}
au-del_de la p6ripheriede I'616ment.
• Lorsde RJtilisationde grossesmarmites,parexemplepour la
preparationde conserves,utiliserI'6i6mentsp6ciaIcongu pour
la pr6parationde conserves(mod6leCE1}.Prendrecontact
avecle d6taiIIantMa_¢agpourobtenir des d6tails,ou com-
poser le 1-877-232-6771aux E.-U.ou le 1-800-688-8408au
Canadapour passercommande.
• Nettoyer%quemment. (Voirpage43.}
EI6ments spiral6s
o Lorsqu'un6!6mentestutiIis6,il est aliment6par intermittencepour
le maintiende la puissancede chauffaged6sir6e.
®
dans de [eau.
[}6pOSe :SouleverI'616ment
refroidi.Tirer prudemmentpour
extraireI'616mentdu blocde
connexion.
Mise en place : IntroduireIes
homesde rel6ment dansIa prise.
Guiderpour la raiseen place.
Abaisser1'61ementpour le placer
Leselementsspiral6ssont autonettoyants.Ne pas lesimmerger
d'ap[omben appuisur [a cuvettede r6cup6rat[on. 80RtVES
Cuvettes de r6cup6ration
Lescuvettesde r6cup6rationsouschaque616mentde surface
recueillenties alimentsqui ont d6borde.IIfaut touiours lesutiliser.
L'absencede cuvettesde recuperationpendant lacuisson peut
endommagerlesills 61ectriques.
Pourne pas introduire un risquede choc 61ectrique,ou d'incendie,
nejamaisgarnir les cuvettesde recup6rationde feuille d'aluminium.
Lescuvettesde r6cup6rationvont se d6colorer(tachesbieues/
dor6es}ou se fendiller _ la Ionguesi eIIessontsurchauff6es.La
decolorationou le fendiIIementsont permanents,maisn'affectent
pas la performancede cuisson.
3O
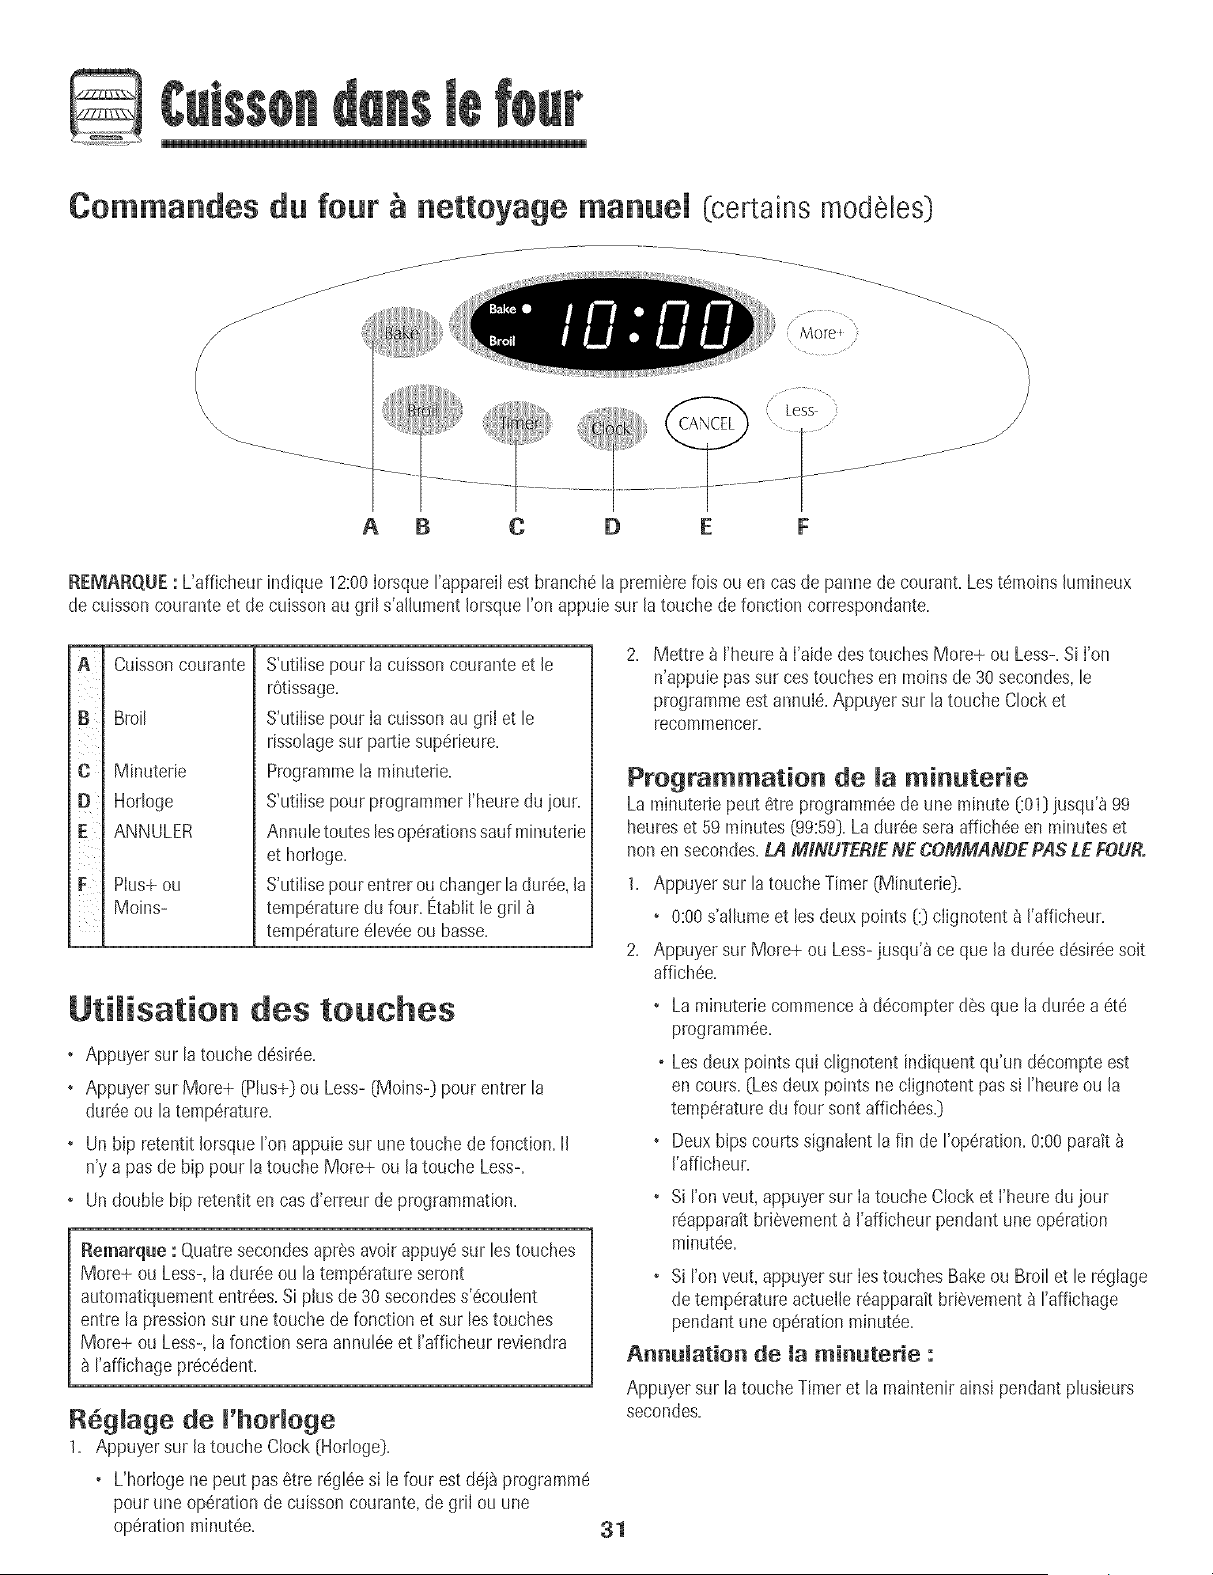
Commandes du four nettoyage manuel (certains modeles]
/MOrC_ \\
\
\
/
/
/
ABC 0
REMARQUE: L'afficheurindique 12:00iorsque Fappareilest branch6B premierefob ou en casde pannede courant,Lest@aoinshmineux
de cuissoncouranteet de cuissonau gril s'alhment IorsqueFonappub sur la touchede fonction correspondante,
B
c
[}
F ¸
Cuissoncourante
Broil
Minuterie
Horloge
ANNULER
Plus+ou
Moins-
S'utiIisepourla cuissoncouranteet le
r6tissage,
S'utiIisepourIa cuissonau gril et le
rissolagesur partiesup6rieure,
Programmelaminuterie,
S'utilisepourprogrammerI'heureduiour,
Annuletoutes lesop6rationssaufminuterie
et horloge,
S'utilisepourentrer ou changerladur@, la
temp6raturedu four,Etablitle gril
temperature#lev#eou basse,
Utilisation des touches
• Appuyer sur la touche@sir@,
• Appuyer sur More+ (Plus+} ou Less-(Moins-] pour entrer la
dur@ ou latemp6rature,
• Un bip retentit IorsqueFonappuiesur unetouche de fonction,II
n'y a pasde hip pour la touche More+ ou la touche Less-,
• Un doublehip retentit encasd'erreur de programmation,
Remarque : QuatresecondesaprSsavoirappuy6sur bs touches
More+ ou Less-,ladur@ ou latemp6ratureseront
automatiquemententr@s,Si plus de30 secondess'6coubnt
entre la pressionstir unetouche defonction et sur lestouches
More+ ou Less-,lafonction seraannul@ et I'afficheurreviendra
I'affJchagepr@6dent,
R6glage de I'hoHoge
1, Appuyer sur la toucheClock (Horloge],
• L'horlogene peut pas 6tre r6gl@ si lefour estd6i_ prograPame
pourune op6rationde cuissoncourante,de gril ou une
op6rationminut6e,
2, Mettre _ I'heure_ I'aidedes touchesMore+ ou Less-,Si I'on
n'appub passur cestouches en moinsde30 secondes,le
programmeest annul& Appuyersur latouche Clocket
recomPaencer,
Programmation de la minuterie
La minuteriepeut 6tre programm@deune minute (:01]iusqu'_99
heureset 59minutes (99:59],Ladur@ seraaffich@ en minuteset
non ensecondes,LA MINUTERtENE COMMANDE PAS £E fOUR.
1, Appuyer sur la toucheTimer(Minuterie],
• 0:00s'allume et lesdeux points (:) ciignotent a I'afficheur,
2, Appuyer sur More+ ou Less-jusqu'&ce que la dur6e d6sir@ soit
affich@,
,Laminuteriecommence_ d@ompterdes que ladur@ a 6t6
programm@,
o Lesdeux pointsqui clignotent indiquentqu'un d@ompteest
en cours, (Lesdeux pointsne c%notent passi I'heureou Ja
temp6raturedu four sontaffich6es,}
• Deuxhips courts signabnt la fin de I'op6ration,0:00parait
J'afficheur,
, SJFonveut, appuyersur Ia toucheClock et I'heule dujour
r6apparaitbrJ@ement_ J'afficheurpendant une operation
minut@,
, Si I'onveut, appuyersur Iestouches Bakeou Broil et le r@glage
de temp6ratureactueJJer6apparaitbri@ement_ I'affJchage
pendantune op6rationminut@,
Annulation de la mi_terie :
Appuyersur latoucheTimeret la maintenirainsJpendant plusburs
secondes,
31
Cuisson courante, rStissage et
cumssonau gril
Pourobtenir des conseitset des dur6esde cuissoncourante,de
rOtissageet de cuissonau gril, se reporter_ la brochureLa cuisson
simptifi6e.
Programmation des commandes £0ur une cuisson
courante ou un rStissage :
1. Appuyer sur Ia touche Bake(CuissoncouranteD.
• 000s'allumeet let6moin lumineuxde cuissoncourante
clignote_ rafficheur.
• Si I'on appuiesur la touche Bake,sansprogrammerune
temp6raturedu four dans les30 secondessuivantes,le
programmeestautomatiquementannul6et I'heureduiour
r6apparait_ I'afficheur.
2. Appuyer sur Ia toucheMore+ [Plus+[ ou Less- (Moins)jusqu'_
ce que latemp6ratured6sir6edu four soit affichee.
• Latemp6raturepeut 8tre programm6ede75 _ 285°C 070
550 °F).
• 350° parait 8 rafficheur Iorsque I'on appuie une fois sur la
touche More+ ou Less-.
• Appuyer _ plusieursreprisessur JatoucheMore+ ou Less-
pourchanger latemp6raturedu four par intervalIesde 3 °C
[5 °F)ou appuyersur latouche More+ ou Less-en maintenant
la pression,pour changerla temperaturedufour par
intervalIesde 6 °C(10°F).
• 100° ou latemp6rature r6etledu four, selon laquefleest la plus
61ev6e,parait _ I'afficheurIorsqueIe four se meten marche.
• Latemperature_ I'afficheuraugmentepar intervallesde 3 °C
(5°F),iusqu'_ ce que latemp6raturepr6programm6esoit
atteinte.Un seul hip retentit Iorsquele four esten coursde
prechauffage.
• Laisserlefour pr6chaufferpendant 10_ 15minutes.
• Pourrappeterla temperaturepr6programm6ependantle
pr6chauffage,appuyersur la touche Bake.Latemperaturesera
affich6ependanttrois secondes.
•Pourchaager matemperatare de fear pendaat macaisson,
appuyersur Bake,puis sur Iatouche More+ ou Less-jusqu'_
ce que latempSratured6sirSesoit affich6e.
•Pourchanger matemperatare de fear marsdu
prenhauffage, appuyerdeax lois sur la touche Bake,puissur
latouche More+ ou Less-jusqu'_ ce que latemperature
dSsirSesoit affichSe.
3. PlacerIa nourdture dans lefour. Verifier I'avancementde la
cuisson_ ladur6e minimalede cuisson.
4. Lorsque[acuisson esttermin_e,appuyersur latouche Cancel
(AnnuIe0 pour eteindrele four, puis retirer la nourriture du four.
• Lefour se caracterisepar un arret automatique.S'iIest laiss6
en marchependant 12heures,il s'arr6teraautomatiquementet
000paraitra _ I'afficheur.Appuyersur la toucheCancelet
I'heurereapparakra_ rafficheur.
Programmation des commandes pour la
c_issoa aa gril :
Pourde meilleursrSsultats,utiliserI'ustensilepr_vu pource genrede
ouisson.
1. PlacerIa I_chefrite_ Ia positionde grille recommandee.{Voirle
tableau de la page39.}
2. Appuyer sur la toucheBroil (Gril}.
o SEts'ailumeet le t6moin hmineux de cuissonau gril clignote
rafficheur.
3. Appuyer sur la toucheMore+ pour choisirun griI _temperature
Hi {Etev6e}ousur Iatouche Less-(Moins}pour choisirun gril
temperatureLo (Basse}.
o Choisirle r6glageHi pourun gril normal.
• Choisirle r6gIageLo pour un gr[l a temperaturebasse,afin
d'6viter un rissolageexcessifdesaliments necessitantdes
dur6esdecuisson plus Iongues,commela volaille.
o Si I'on nechoisit pas le r6giageHi ou Loen moinsde 30
secondes,Ie programmesera automatiquementannul6et
rheure r6apparaitraa I'afficheur.
4. PrSchaufferI'el6mentde gril pendanttrois minutes.Fairecuire au
gril; hisser Ia portedu four ouvertea la premierebutee (environ
10cm [4 po]).
5. Apr6s le griI,appuyersur Cancelpour 8teindre lefour, puis retirer
la 18chefritedu four. L'heure dujour rSapparait_ I'afficheur.
32

@
R gulateur de four nettoyage
(eertains modeles)
R6glage du beuten OFF
Le boutonOvenTemp (Temp6rature
fou0permetdes6bctionneret
maintenirB temp6raturedufour,On
doittoujoursfairetournercebouton
exactementJUSO.U'Alapositionde
Jatemp6rature@sir@. Ne pas faire
toumerb boutonau-del_ de Ia position 358
d6sir6epour le faire toumer ensuiteversle sensinverse.
Reglage du four pour une cuisson courante ou
un rStissage :
1. Enfoncedfairetourner le boutonOvenTemp(Temp6raturefouO,
iusqu'_ la positioncorrespondant_ latemp6ratured6sir@.
LaisserIefour pr@hauffer pendant 10_ 15minutes.
2. Placerlanourriture au centredu four. A I'expiratim]du temps de
cuissonminimumindiqu6 dartsIa recette,6valuerle degr6de
cuisson.PoursuivreIa cuissonsi c'est n@essaire.
3. RetirerIe mets du four et ramenerle bouton OvenTemp
{Temperaturefour} _ la positionOFF(ArrQt}.
Remarque :Ontrouved'autres conseiIsconcernant la cuisson
aufour, le rOtissageou gril dartsla brochure_LaCuisine
Simplifi6e>>.
R6giage du four pour cuissen au gril
(certains modeles} :
1, Pourobtenir les meiIIeursr@uItats,utiiiser un ustensiiecon_u
pour lacuissonau griL Placerla I_chefrite_ la positionre-
command@dartsle grille du four. 07oirle tabbau en page37.}
2. PlacerIe bouton OvenTemp{TemperaturefouO _ Ia position
BROIL[Grid ou _ Ia position (232° C} 450° F pour unecuissonau
gril _ bassetemperature.
• Utiliserla temp6ratureplus bassepour la cuissonau gril pour
alter un brunissageexcessifou pour un mets n@essitantune
Jonguecuisson{parexemplevolaille}.
3. UtiliserIestemps decuissonsugg6r@dansIetableau enpage37.
Retournerlespiecesdeviandeverslemilieu dela p6riodede
ouisson.
4. ContrOlerIe degr6de cuisson:inciser lapiece de viande pros du
centre pouren observerIa coubur.
5. A lafin de lap6riodede cuisson,ramenerlebouton OvenTemp
{TemperaturefouOa la positionOff (Arr6t}.Retirerla I@hefrite
du four.
33
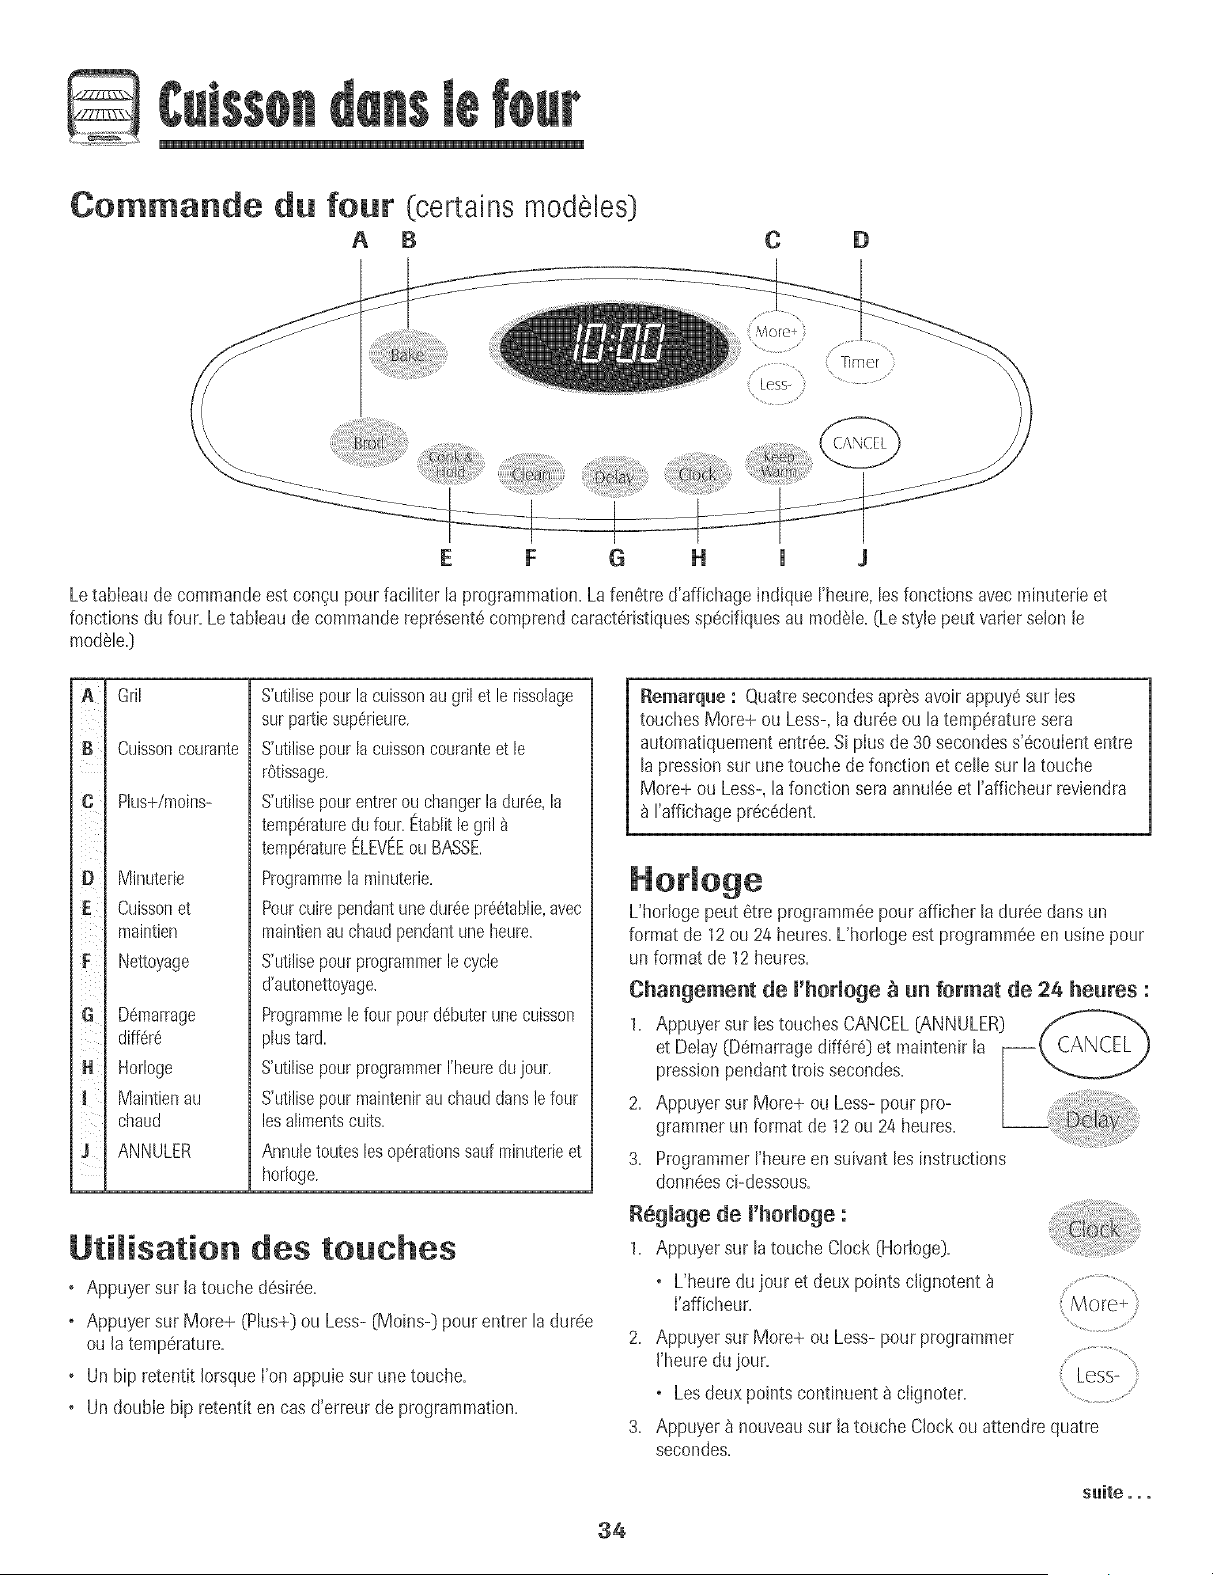
@
Commando du four (certains modeles)
A B C D
Timer
Less+ ..... ......
H l J
LetabIeaude commandeestcon_u pourfaciliter la programmation.Lafen6tre d'affichageindique Fheure,losfonctions avecminuterieet
fonctions du four.Letableau de commandorepr6sent6comprendcaract@istiquessp6cifiquesau modSle+(Lestyle peut varier selonle
mo@le.)
A
B ¸
D
iiii_
G
H ¸
J
Gril
Cuissoncourante
Plus+/moins-
Minuterie
Cuissonet
maJntien
Nettoyage
D6marrage
diff@6
Horloge
Maintienau
chaud
ANNULER
S'utilisepourlacuissonau grilet lerissolage
surpartiesup@ieure.
S'utilisepourlacuissoncouranteet le
rOtissage.
S'utilisepourentrerouchangerladur6e,la
tetr}p@aturedufour.Etablitle gril
tetr}p6ratureELE%EouBASSE.
Programmela minuterie.
Pourcuirependantunedur6epr_6tablie,avec
maintienauchaudpendantuneheure.
S'utiiisepourprogrammerlecycle
d'autonettoyage.
Programmelefour pourd6buterunecuisson
plustard.
S'utilisepourprogrammerI'heuredujour.
S'utilisepourmaintenirauchauddansle four
losalimentscuits.
Annuletouteslosop6rationssaufminuterieet
horloge.
Utilisation des touches
o Appuyersur latouche d(_sir6e+
o Appuyersur More+ (Plus+] ou Less-(Moins-] pour entrer la dur@
ou la temperature+
o Un hip retentit IorsqueI'on appuiesur une touche.
o Un double hip retentit en casd'erreur de programmation+
Remarque: Quatresecondesapres avoirappuy6sur Ies
touches More+ ou Less-,ladur6e ou latemp@aturesera
automatiquemententr6e.Siplus de 30secondess'#coulententre
la pressionsur unetouche de fonction et celle sur la touche
More+ ou Less-,la fonction sera annul6eet I'afficheur reviendra
I'affichagepr6c6dent.
L'hor[ogepout 6tre programm6epour afficher [a dur6edans un
format de 12ou 24 heures+L'holloge est programm6een usinepour
un format de 12heures+
Changement do l'horloge _ un format de 24 heures :
1+ Appuyersur les touchesCANCEL[ANNULER]
et Delay(Demarragediff6r6] et maintenirla --!_ LANLLL .)
pressionpendanttrois secondes.
Appuyersur More+ ou Less-pour pro-
grammerun format de 12ou 24heures.
ProgrammerI'heureen suivantles instructions
donn#esci-dessous.
2,
3.
Reglage de l'horloge :
1+ Appuyersur la touche Clock (Horloge)+
o Uheuredu jour et deux pointsc%notent
I'afficheur+
2. Appuyersur More+ ou Less-pour programmer
n eureduiour ....
+Les deux points continuent _ c%noter+ ................................
Appuyer_ nouveausur latouche Clock ou attendrequatre
secondes.
suite,,,
34
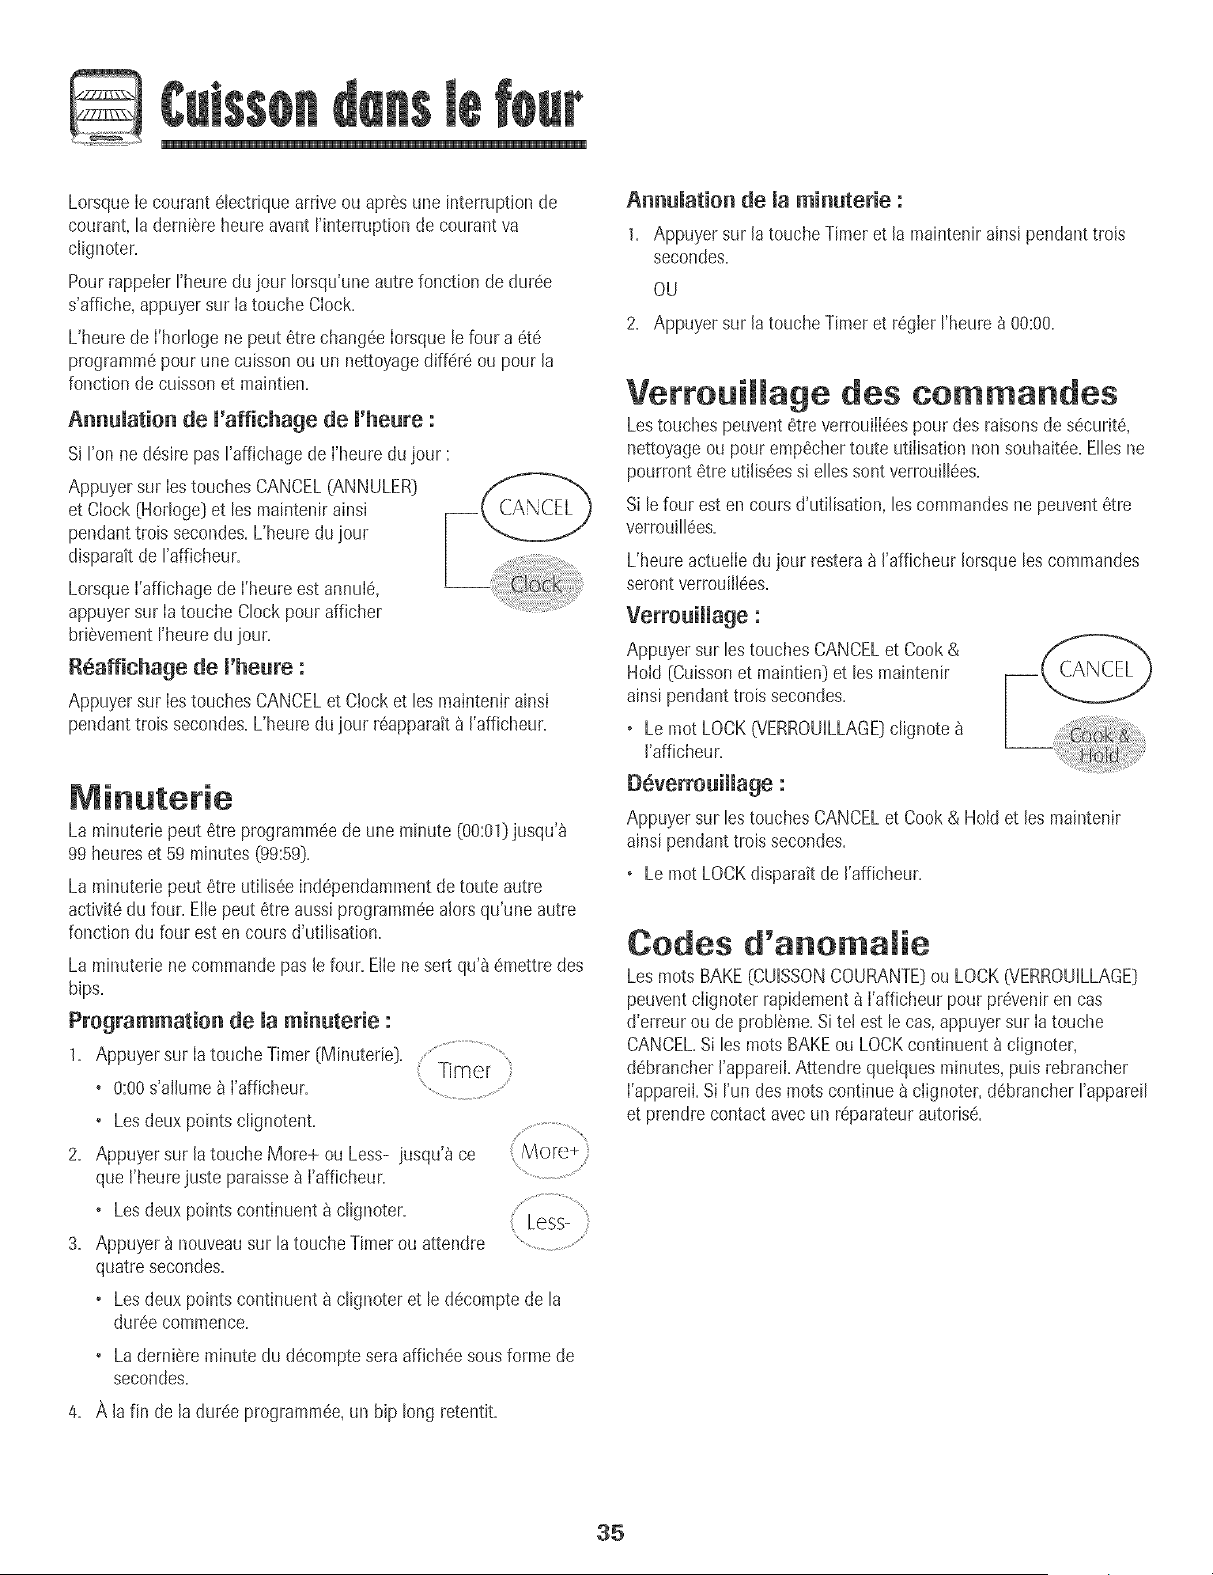
©
LorsqueIe courant6bctrique arriveou apres une interruptionde
courant,!a demiere heureavant!'interruptionde courantva
c!ignoter.
Pourrappebr !'heureduiour brsqu'une autre fonction de dur@
s'affbhe,appuyersur Iatouche CIocL
L'heure de I'hodogene peut etre chang@ Iorsqueb four a ete
programmepour une cuissonou un nettoyagediffere ou pour la
fonction de cuissonet maintien.
Annumation de m'affichage de m'heure:
Si I'onne desire pasI'affmhagede l'heuredu jour :
Appuyersur lestouches CANCEL(ANNULER)
et Ciock (Horlog@et los maintenirainsi
pendanttrois secondes.L'heuredu iour
disparaitde rafficheur.
Lorsquei'affichagede i'heure est annule,
appuyersur ia touche Clockpour affbher
bri@ementrheuredu iour.
Reaffichage de m'heure:
Appuyersur bs touches CANCELet C!ocket los maintenirainsi
pendanttrois secondes.L'heuredu iour rSapparatt_ I'afficheur.
La minuterie peut etre programrn@ de une minute (00:01} jusqu'&
99 heures et 59 minutes (99:59}.
La minuterie pout etre utilis@ in@pendamment de toute autre
activit6 du four= Elle pout etre aussi programm@ alors qu'une autre
fonction du four est en cours d'utilisation.
La minuterb necommandopas !e four.El!enesert qu'& emettredes
bips.
Programmation de maminuterie :
1. Appuyer sur Ia toucheTimer{Minuteri@. ................................................
,: Tim er
0:00s'alhme _ I'afficheur.
• Losdeux pointsc%notent.
2. Appuyer sur la toucheMore+ ou Less- jusqu'_ ce
queI'heurejuste paraisse& I'afficheur. ....................
•Les deux pointscontinuent _ clignoter. Less-
3. Appuyer _ nouveausur latouche Timerou attendre ............................
quatresecondes.
• Losdeux pointscontinuent _ clignoteret le d@omptede la
dureecommence.
• La derniere minute du decompte sera affichee sous forme de
secondes.
4. A la fin de la duree programm@, un hip long retentit.
Annumation de maminuterie :
1. Appuyer sur la toucheTimeret la maintenirainsipendant trois
secondes.
OU
2. Appuyer sur la toucheTimeret reglerI'heure_ 00:00.
Verrouimmage des commar|des
Lestouches peuventetre verrouiII@spour des raisonsde s@urke,
nettoyageou pouremp@hertoute utiIisationnon souhait@.Ellesne
pourront 6tre utilis@s si elles sont verrouill@s.
Si lefour esten cours d'utilisation,les commandesne peuvent6tre
verrouJll@s.
L'heureactuelIedujour resteraa I'afficheur Iorsquelescommandes
serontverrouiil@s.
Verrouimmage:
Appuyersur bs touches CANCELet Cook&
HoId {Cuissonet maintbn} et les maintenir
ainsi pendanttrois secondes.
o Le mot LOCK(VERROUILLAGE}clignote
I'afficheur.
Deverrouillage :
Appuyersur lestouches CANCELet Cook& Ho!det les maintenir
ainsi pendanttrois secondes.
o Le mot LOCKdisparaitde I'afficheur.
Codes d'ano amie
Los rootsBAKE(CUBSONCOURANTE}ou LOCK@'ERROUILLAGE}
peuventcIignoter rapidement_ I'afficheurpour pr@eniren cas
d'erreurou de probleme.Si to! est lecas,appuyersur Iatouche
CANCEL=Si bs rootsBAKEou LOCKcontinuent _ ciignoter,
debrancherI'appareiL£[tendre quelquesminutes,puis rebrancher
I'appareiLSi I'un des rootscontinue_ cIignoter,debrancherI'appareil
et prendrecontactavec un r@arateur autoris_.
35
D
Cuisson courante
Pregrammatien de macuissen ceurante :
1. Appuyer sur la touche Bake(Cuissoncourante}.
• Lemot BAKE(CUISSONCOURANTE)c@note.
° 000clignote _ t'afficheur.
2. %bctionner tatemp6raturedu four.Latemp6rature More+
peut 6tre programm6ede75 _ 290°C070 _ 550°F}. ........................................
Appuyer unefois sur latouche More+ {PIus+}ou
Less-{Moins-}, ou appuyersur la touche More+ ou Less-
Less- et la maintenirainsi. .......................
• 175° (350°) s'ailumeIorsqueron @pub la
premBrefois sur I'unedestouches.
,Appuyer sur la toucheMore+ pour augmenterla temperature.
,Appuyer sur la touche Less- pour diminuer latemp6rature.
3. Appuyer _ nouveausur latouche Bakeou attendrequatre
secondes.
,Lemot BAKEs'arretede clignoteret s'allumea I'afficheur.
• 38° 000°} ou Ia temp6raturer@lb du four sera affich@. La
temp6ratureaugmenterapar intervalb de 3 °C {5°F}jusqu'a
ce que latemp6raturepr@rogramm@soit atteinte.
4. LaisserIefour pr@hauffer pendant8 _ 15minutes.
• LorsqueIatemperatureprogramm@pour Jefour est atteinte,
un hip long retentit.
• Pourrappelerla temp6ratureprogramm@pendant le
pr@hauffage,appuyersur la touche Bake.
5. Placerlanourriture au centredu four, en laissantun minimum de
2 pouces(5 cm} entre rustensib et Jesparoisdu four.
6. V6rifier ravancementde la cuissml_ Ia dur6eminimab de
cuisson.Cuireplus Jongtempsau besoin.
7. LorsqueIacuissonest terrain@,appuyer sur _,_ _r,-"_
latouche CANCEL(ANNULER}.
8. RetirerJanourriture du four.
Diff6rences de cuisson entre Pancien
four et nouveau
II est normalde remarquerquelquesdiff6rencesdartsIadur6ede
cuissonentre un four neuf et un four ancien.VoirAjustementde la
temp6raturedu four _ la page38.
ReFnarques sur _a cuisson courante
all fOUr :
Pour changer matemperature du four pendant macuisson,
appuyersur Bake,puissur Iatouche More+ ou Less-iusqu'_ ce
que latemperatured6sir@ soit affich6e.
Pour changermatemperature du four morsdu
pr_chauffage, appuyerdeu× lois sur Iatouche Bake,puis sur
la toucheMore+ ou Less-iusqu'_ ce que la temp6rature
d@ir@ soitaffich6e.
SiI'onoublie d'arreterIe four, iI s'arr6teraautomatiquement
apr6s 12heures.Si I'on d@ired6sactivercette fonction,voir
page38.
PourdesconseilssuppBmentairessur Ia cuissoncouranteet le
r6tissage,voir la brochureLa cuissonsimplifBe.
Cuisson et aintien
Lafonction Ceok & Hold (Cuissonet maintbn} permet decuire
pendant unedur@ pr6d6termin@,suivie parun cycb de maintien
au chaud d'une heure.
Programmation de mafonction cuissen et maintien :
1. Appuyer sur la toucheCook& Hold [Cuissonet
maintien).
• LesrootsBAKE(CUISSON)et HOLD
(MAINTIEN}clignotent.
• 000s'alIume_ I'afficheur. { ,More+
2. %bctionner Iatemperaturedu four. Latemp6rature .........................................
peut 6tre programm@de 75 _ 290°C070 _ 550°F}. ( Less-
Appuyer unelois sur Iatouche More+ ou Less- ou
appuyersur latouche More+ ou Less- et la maintenirainsi.
• Appuyer sur la toucheMore+ pour augmenterla temperature.
• Appuyer sur la toucheLess- pour diminuer Jatemp6rature.
3. Appuyer 8 nouveausur Jatouche Cook& Hold OU attendre
quatre secondes.
• Lemot HOLDclignote.
• 00:00ciignote_ I'afficheur.
4. EntrerIadur@ pendant laquetleron @sire que la cuissonait
lieuen appuyantsur le toucheMore+ ou Less-. La dur6e
de cuissonpeut 6tre programm@de 10minutes {00:10}
11heures,59minutes (11:59).
• LesrootsBAKEet HOLDs'allument _ I'afficheur.
• Ladur@ de cuissons'alIumea I'afficheur.
• Ladur6ede cuissoncommencele comptea rebours.
36

©
Lorsque la dur6e de cuisson s'est 6coul6e :
+ O,uatre bJpsretentissenL
+ Lemot BAKEs'6teint.
+Les rootsHOLDet WARM (CHAUD}s'a%ment.
• 75° (170°] parait _ rafficheur.
4. Appuyersur More+ pour programmerla temperaturedecuisson.
+ 00:00et le mot HOLDclignotent.
• Le mot BAKEresteallum6.
5. Appuyersur More+ pour programmerla dur@ de cuisson.
+ Ladur6e d'attente,les rootsDELAY,BAKEet HOLDs'allument
I'afficheur.
Apr_s uue heure de MAINTIEN AU CHAUD :
+ Lemot End(Finds'affiche+
+ L'heuredu jour r6apparait_ I'afficheur.
Auuulatiou de la fouctiou cuissou et maiutieu _ tout
momeut :
Appuyersur Iatouche CANCEL(ANNULER}.Retirer (C/\NCEL'_
la nourriture du four.
Cuisson courante diff r e
p@issablescomme les produitslaitiers,+eporc,la volailleou +es
fruits de mar.
AvecIa fonctlon diffSr_e, Ie four se met _cuire plustard dans la
journ6e+Programmerla dur6ed'attented6sir@ avantque Ie four ne
se motto en rnarcheet la dur6ede cuissond6siree+Lefour com-
mence_ chauffer_ I'heures6IectJonneeet cult pour Jadur6e
sp6cifiee,puis gardeIa nourriture au chaud pendantune heure+
La dur6ed'attentepout 6tre programm6ede 10minutes(00:10)
11heures,59 minutes (11:59[+
Programmatiou d'uu cycle de cuissou couraute
diff6r6e :
1+ Appuyer sur la touche Delay (D6marragediff6r6_+
• Lemot DELAY(ATTENTE)clignote+
+ 00:00clignote _ I'afficheur+
2+ Appuyer sur Ia toucheMore+ (Plus+) ou Less- ,..........................
(Moins-] pourprogrammerladuree d'attente+
AIorsque le mot DELAYclignotetoujours : Less- ;
3+ Appuyer sur la toucheCook& Hold (Cuissonet ...............................
maintien).
+ 000s'aliume _ I'afficheur.
• LosrootsBAKE(CUISSONCOURANTE)et HOLD
(MAINTIEN)clignotent.
Lorsque la dur6e d'atteute s'est 8coulee :
+ Lemot DELAYs'6teint+
• Ladur6ede cuissonestaffichee.
• LosrootsBAKEet HOLDsont affiches.
Pour programmer uu temps d'atteute lorsque la
fouctiou cuissou et maiutieu a d6]_ 6t6 programm6e
1. Appuyer sur la toucheDelay(D6marragediff6r6).
• Lemot DELAY(ATTENTE)clignote.
+ 00:00parait _ I'afficheur.
2. Appuyer sur Ia toucheMore+ ou Less- pour
programmerIa dur6ed'attente.
+ Apr6s quatre secondes,Ie mot DELAYreste Less-
,.........................
aIIum6pour rappeterqu'un cycle de cuisson
diff@6ea 6t_ programme.
Lorsque la dur_e d'atteute s'est _coul_e et que le
four se met eu marche :
, More+
• Ladur6ede cuJssonseraaffich_e+
+ Lemot DELAYs'Steint.
o LesrootsBAKEet HOLDrestentallum_s.
P,uuuJatiou :
Appuyersur latouche CANCEL(ANNULER]+
+ Toutesles fonctJonsde cuissonminut_eet
non minut_eserontannu+ees+
• L'heuredu jour r_apparait_ I'afficheur+
Ne pas utiliserla cuissondiff@r6epour des articlesqui
n_cessitentqueIe four soit prSchauffe,commeles g_teaux,
Jespetits biscuitset les pains.
Ne pas utiliserIe cycle decuissonet maintiendiff@Sssile
four estd@j_chaud.
37
Q
Maintien au chaud
Pourmaintenirauchaud (Jarls[e four des alimentscults et chauds
ou pour r6chaufferpains et assiettes.
Programmation du maintien au chaud :
1. Appuyersur [atouche KeepWarm
[Maintien au chaud).
•Le motWARM (CHAUD:)ctignote.
•000parait _ rafficheur.
2. %lectionner tatemp6raturede maintienau chaud.
Celle-cipeut 6tre r6g[6ede 63 _90 °C [145_ ...............................
190°F).Appuyerune fois sur la toucheMore+
[Plus+]ou Less-(Moins-) ou appuyersur la ( Less-
toucheMore+ ou Less- et la maintenirainsi.
• 75° [170°) s'allume IorsqueI'onappuiela premierelois sur
rune destouches.
• Appuyersur Iatouche More+ pour augmenterIatemperature.
,Appuyersur latouche Less- pourdiminuer la temp6rature.
Lemot WARM [CHAUD]et la temp6ratureseront affich6spendant
que lafonction maintienauchaud est active.
Annumation du maintien au chaud :
1.Appuyersur latouche CANCEL[ANNULER). ('CANCEL _)
2. Retirerla nourrituredu four.
Remarques sur Ja fonction maintien
au chaud :
• Pourobtenir des qualit6salimentaireset nutritivesoptimales,
les alimentscuits au four ne doiventpas6tre gardes auchaud
plus de 1_ 2 heures.
° PourempecherIesalimentsde dess6cher,Iesrecouvrirde
papieraluminium,sansserrer,ou d'un couvercle.
• Pour r_chauffer des petits pains :
-recouvrirles petits painsde papier ahminium sansserrer et
les placer aufour.
-appuyersur les touches KeepWarmet More+ pour
programmer75 °C[170 °F).
- r6chaufferpendant 12_ 15minutes.
• Pour r6chauffer des assiettes :
-placer deux piles de quatre assiettes maximum dans le four.
- appuyer sur [es touches Keep Warm et More+ pour
programmer 75 °C [170 °F}.
- r6chauffer pendant cinq minutes, arreter le four et laisser les
assiettes au four pendant encore 15 minutes.
- n'utiliser que des assiettes pouvant aller au four, _ v6rifier
avec le fabricant.
-ne pas poserdes assiettestiedessur unesurface froide,les
changementsrapidesdetemperaturepouvantcasser
I'assietteou la fendiller.
38
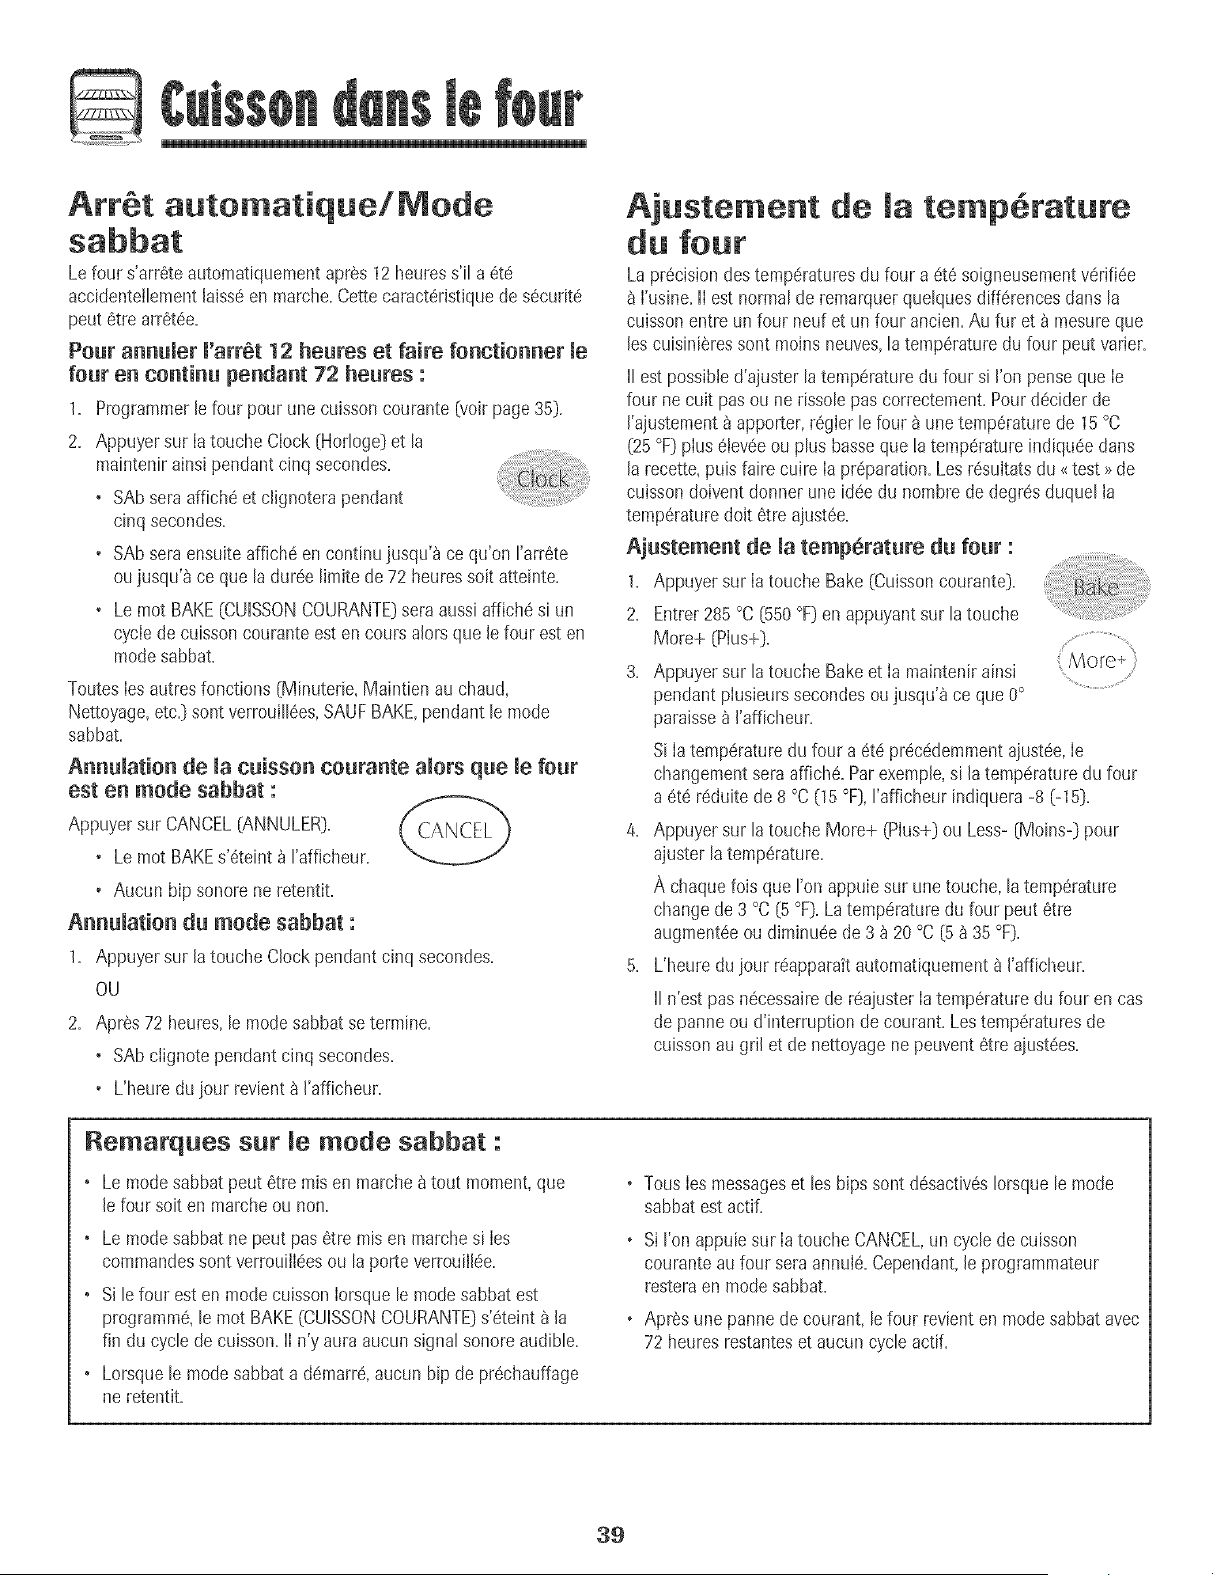
Arr t auto atique/Mode
Lefour s'arr6teautomatiquementapres12heuress'il a 6tO
accidentellementlaisseen marche=Cettecaracteristiquede s6curite
pout etre arret6e=
Pour annuler l'arr_t 12 heures et faire fonctionner me
four en continu pendant 72 heures :
1= Programmerlefour pour une cuissoncourante(voir page35).
2= Appuyer sur la toucheClock (Horloge)et la
maintenirainsipendant cinq secondes=
• SAbsera affiche et clignoterapendant
cinq secondes=
• SAbsera ensuiteaffich_ en continujusqu'b ce qu'on rarr6te
oujusqu'_ ce que la dureelimite de 72heuressoit atteinte=
• Lemot BAKE[CUISSONCOURANTE)sera aussiaffichesi un
cyciede cuissoncouranteesten coursalors que lefour est en
modesabbat.
Toutes Iesautresfonctions (Minuterie,Maintien au chaud,
Nettoyage,etc=)sont verrouill6es,SAUFBAKE,pendant le mode
sabbat=
Annulation de la cuisson courante alors que le four
est en mode sabbat :
Appuyersur CANCEL(ANNULER).
• Lemot BAKEs'6teint_ rafficheur.
, Aucun hip sonorene retentit.
Annulation du mode sabbat :
1. Appuyer sur la toucheClock pendantcinq secondes.
OU
2. Apres 72 heures,le modesabbatsetermine.
• SAbclignote pendantcinq secondes.
• L'heuredu iour revient& I'afficheur.
Ajustement de la temp6rature
du four
La pr6cisiondes temperaturesdu four a _t6 soigneusementverifi6e
I'usine=lI est normalde remarquerquelquesdiff6rencesdans la
cuissonentre un four neuf et un four ancien=Au fur et _ mesureque
loscuisinieressont moinsneuves,la temp6raturedu four peut varlet=
II estpossibled'ajuster latemp6raturedu four si I'onpenseque Ie
four necuit pasou nerissolepas correctement=Pourdecider de
I'ajustement_ apporter,r6gIer le four _ unetemperaturede 15°C
(25 °F)pius 6teveeou plus bassoque la temp6ratureindiqu6edarts
la recette,puis faire cuire Ia preparation=Lesr6suItatsdu <_test >>de
cuissondoiventdonner uneid6edu nomb_ede degr6sduquel la
temp6raturedoit 6tre aiust6e=
Ajustement de la temperature du four :
1. Appuyer sur Ia toucheBake (Cuissoncourante).
2. Entrer285 °C(550°F)en appuyantsur la touche
More+ (Plus+).
3. Appuyer sur la toucheBake et Ia maintenirainsi
pendant plusieurssecondesoujusqu'_ ceque 0°
paraisse_ I'afficheur.
Si Ia temperaturedu four a 6td pr6c6demmentajustee,Ie
changementseraaffich6.Parexemple,si la temperaturedu four
a 6t6 reduitede 8 °C (15°F),I'afficheurindiquera-8 (-15).
4. Appuyer sur la toucheMore+ (Plus+) ou Less- (Moins-) pour
ajuster latempSrature.
A chaquelois que I'onappuiesur unetouche, latempSrature
change de3 °C(5 °F).La tempdlature du four pout etre
augment6eou diminuee de3 _ 20 °C (5_ 35°F).
5. L'heuredu iour r6apparaitautomatiquement8 I'afficheur.
IIn'est pas necessairede reaiusterIatemperaturedu four en cas
de panneou d'interruption de courant. Lestemperaturesde
cuissonau gril et de nettoyagene peuventetre aiust6es.
Remarques sur le mode sabbat :
• Le modesabbatpeut etre mis en marche_ tout moment,que
le four soit en marcheou non.
• Le modesabbatne pout pas 8tin misen marchesi Ies
commandessont verrouill_esou laporte verrouilI6e.
• Sile four esten mode cuissonIorsquele modesabbatest
programm6,le mot BAKE(CUISSONCOURANTE)s'6teint a la
fin du cycle decuisson.IIn'y aura aucunsignal sonoreaudible.
o Lorsquele modesabbata demarre,aucun hip de pr6chauffage
ne retentit.
o Tous Iesmessageset les bips sontdSsactivSsIorsquelemode
sabbatestactiE
, Si I'onappuiesur [atouche CANCEL,un cycle de cuisson
couranteaufour sera annui@=Cependant,Jeprogrammateur
resteraen mode sabbat=
o Apr6s unepannede courant, lefour revienten modesabbatavec
72 heuresrestanteset aucun cycleactif.
39
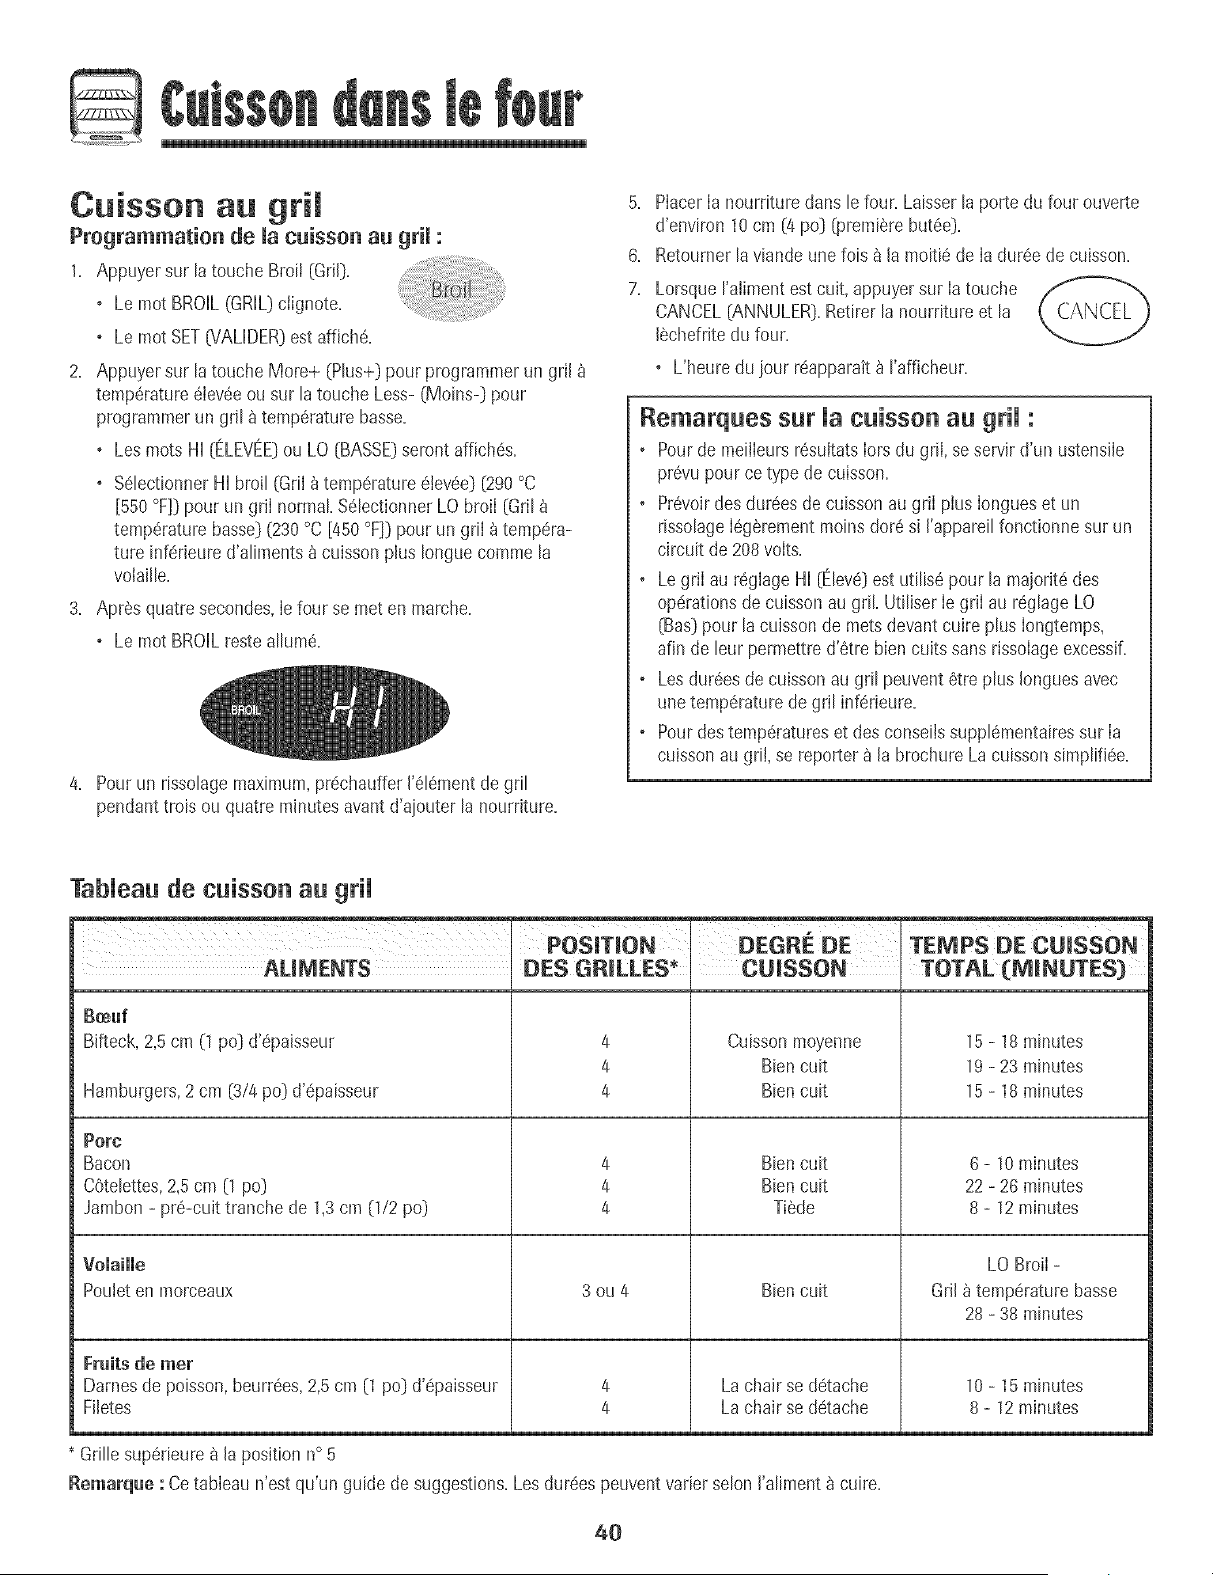
Cuisson au grim
Programmation de la cuisson au gril :
1. Appuyersur [atouche Broil (Gri[).
o Le mot BROIL(GRIL}ciignote.
+ Le motSET6/AUDER)estaffiche.
2. Appuyersur latouche More÷ (Plus÷}pour programmerun gril
temp6rature6iev6eou sur B touche Less-(Moins-] pour
programmerun grH_temp6rature basse.
o Les mots HI (ELEVEE)ou LO (BASSE}serontaffich@.
o %lectionner HIbroil (GriI_temp@ature6by@) (290°C
[550°F]} pour un griI normal S_bctionner LO broil (Gril
temperaturebass@(230°C [450°F]} pour un grii _ tempera-
ture inf_rbure d'aliments_cuisson plus Ionguecomme la
volaille.
3. Apr6s quatresecondes,Ie four se meten mar@e.
o Le mot BROILresteallum6.
4. Pourun risso[agemaximum,pr@hauffer['6[6mentdegri[
pendanttrois ou quatre minutesavantd'ajouter la nourrJture.
5.
6.
7.
PlacerIa nourriture dans lefour. Laisserla porte du four ouverte
d'environ 10cm (4 po] _remi_re but@).
Retournerlaviande unelois _ Jamoiti6de Ia dur6ede cuisson.
LorsqueI'aiimentest cuR,appuyersur Iatouche
CANCEL(ANNULER}.Retirerla nourriture et la
I@hefrJtedu four.
o L'heuredu jour r@pparak_ ['affbheur.
Remarques sur Uacuisson au griU:
o Pourde meilIeursr@ultatsIorsdu griI, seservird'un ustensile
pr@u pour ce typede cuisson.
o Pr@oirdesdur@s decuisson augriI plus Iongueset un
rissolageI6g@ementmoinsdot6 si I'appareilfonctionne sur un
circuit de 208volts.
o LegriI au reglageHI £1ev@estutilis6 pour la majorit6des
op@ationsde cuissonau gril. UtiliserIe griI au r6glageLO
(Bas}pour lacuissonde metsdevantcuire plus Iongtemps,
afin de bur permettred'6tre biencurs sansrissolageexcess+f.
o Lesdur@s de cuissonau gril peuvent6tre plus Ionguesavec
une temp@aturede gril inf@ieure.
o Pourdes temperatureset des conseibsuppl6mentairessur Ia
cuisson augril, se reporter_ la brochure Lacuissonsimplifi@.
TabUeaude cuisson au grH
__ _'_'_,
POS_TION DEGRE DE TEMPS DE CUISSON
AUMENTS DES GR_LLES_
B_uf
Bifteck, 2,5 cm (1 po] d'@aisseur
Hamburgers,2 cm (3/4 po) d'@aisseur
Pore
Bacon
COtelettes,2,5 cm (1 po}
Jambon - pr6-cuit tranche de 1,3 cm 0/2 po]
4
4
4
4
4
4
CUISSON
Cuissonmoyenne
Bbn cuit
Biencuit
Bien cur
Bien cur
Ti6de
TOTAL (MINUTES}
15 - 18 minutes
19 - 23 minutes
15 - 18 minutes
6 - 10 minutes
22 - 26 minutes
8 - 12 minutes
Voiaiiie
Pouleten morceaux
Fruits de mer
Damesde poisson,beurr6es,2,5cm (1 po] d'@aisseur
FJletes
3ou4
4
4
Bien cuit
La chair se detache
La chair se d6tache
LO Broil-
GrJl _ temperature basse
28 - 38 minutes
10 - 15 minutes
8 - 12 minutes
Grillesup6rieurea Japosition n° 5
Remarq_e : Cetableau n'est qu'un guide de suggestions.Les dur@s peuventvarier selon J'aliment_ cuire.
40
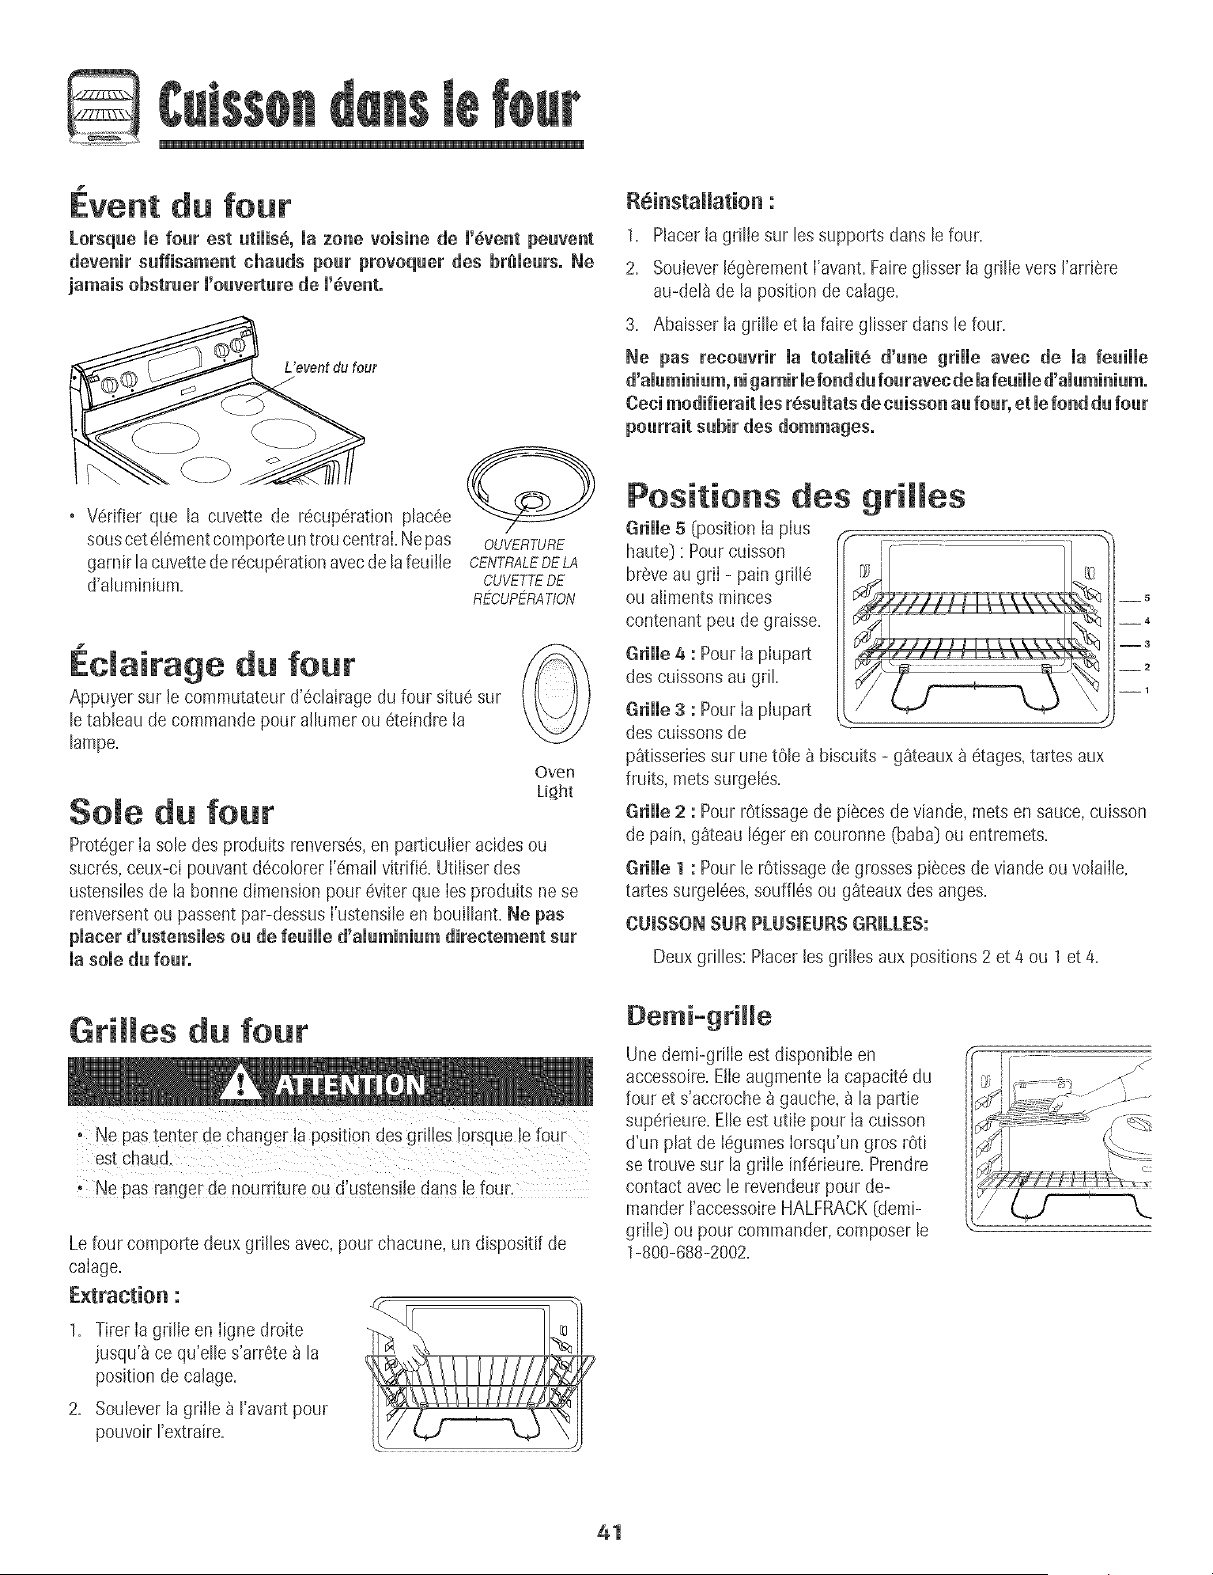
D
1
Event du four
Lorsque mefour est atimis_,mazone voisine de m'_ventpeavent
devenir suffisament chauds pour provoquer des br_leurs, Ne
jamais obstruer m'oaverturede m'@ent.
• V6rifier que la cuvette de r@up6ration plac@
souscot616mentcomporteuntrou central.Nepas OUVERTURE
gamir lacuvettede r@up6rationavecdelafeuille CENTRALEDELA
d'aluminium. CUVETTEDE
Rf-°CUPERATION
Eclairage du four
Appuyersur le commutateurd'@lairagedu four situ6sur
letabbau de commandepour allumerou 6teindre [a
lampe.
Oven
Light
Sole du four
Prot6gerIa sob des produits renvers6s,en particulbr acidesou
sucr6s,ceux-ci pouvantd6colorerI'6mailvitrifi6. Utiliserdes
ustensilesde la bonnedimensionpour @iter que bs produits nese
renversentou passentpar-dessusI'ustensileen bouillant.Ne pas
placer d'astensiles ou de feuiiie d'amuminiamdirectement sur
la somedu four,
R6installation :
1. Placerla grilIe sur les supportsclansle four.
2. Soubver 16g6rementI'avanLFaireglisserla grilIe versI'arri6re
au-deB de la positionde calage.
3. Abaisserlagrilb et la faire glisserdansle four.
Ne pus recouvrir la totamit6d'une grille avec de ia feuiiie
d'aiuminium, nigamir lefonddu fouravec de iafeuiiie d'aiuminium.
Cecimodifierait los rSsumtatsdecaisson aufour, et mefond dufour
pourrait subir des dommages,
Positions des grilles
Grille 5 {positionIa pIus
haute} : Pourcuisson
br@eau griI -pain grill6
ou alimentsminces
contenantpeu degraisse.
Grille 4 : Pour[a piupart
descuissonsau griL
Grille 3 : Pour[a p[upart
descuissonsde
p_tisseries sur une t6Ie a biscuits - g_teaux a 6tages, tartes aux
fruits, lets surgeI6s.
__5
__4
--3
__2
--1
Grille 2 : PourrOtissagede piscesde viande,lets en sauce,cuisson
depain, g_teau 16gerencouronne (baba}ou entremets.
Grille I : Pour le rOtissagede grossespi@es deviande ou volaille,
tartes surgel6es,souf%s ou g_iteauxdes anges.
CUISSONSURP[USIEURS GRILLES:
Deux grilles: Placer [es grilles aux positions 2 et 4 ou 1 et 4.
Grilles du four
° Ne pus rangerde nourritumou d'ustens!!eduns lefour.
Le four comportedeux grilles avec,pourchacune,un dispositifde
calage.
E×traction :
1. Tirer la grille en ligne droite
iusqu'_ ce qu'elles'arr6te _ la
positionde ca[age.
2. Soubver [agriile _ I'avantpour
pouvoirI'extraire.
Demi-grille
Unedemi-griIIe estdisponibieen
accessoire.Elleaugmentela capacit6du
four et s'accroche_gauche,_ la partie
sup@deure.Elleestutile pour Ia cuisson
d'un plat de legumesIorsqu'ungros rOti
se trouvesur la grilb inf6rieure.Prendre
contactavecle revendeurpour de-
manderI'accessoireHALFRACK(demi-
grille}ou pourcommander,composerle
1-800-688-2002.
41
Four autonettoyant
(certains modeles}
Remarque : Pour[a nettoyagemanuaivoir b page44.
o h _stnormal quecertamespiecesde la cubiniere devienuem
tr_s chaudesIorsd'un cyclede ne[[oyage.
o Poureviler de',OUSbiesserat d'endommagerla porte du four
n'essayezpas d'ouvrir ia porte quand<<LOCK
0/ERROUILLAGE}estaffich_,
o Eviterde toucher iasurfacede cubson, ia porte,le huDIoIet [a
zonede 1'6ventdu four Iorsd'un cycled'autone[[oyage,
o Ne pasutiliser de nettoyantpourfour de commercesur iefhfi
du four ou sur {out autre composan_du four. CeB abimeraitie
fini oubs composantsdu four.
5.
G.
Eliminer[esr6sidusde graisseou de produits renvers6ssur la
soleavant le nettoyage.Ceciemp@hela formation deflammes
ou defum6e @rant le nettoyage.
Essuyerlesr@idus sucr6set acides,commeIes patatesdouces,
Ia tomate oubs sauces_ basede lait. Laporcelainevitrifi@
pos@deunecertainer@istanceauxcompose acides,maisqui
n'est pas limit@. Eriepeut se d@olorersi les r@idusacides ou
sucresne sontpas enJev@avantdecommencer['autonettoyage.
Pregrammatien de l'autenetteyage :
[Remarque :La temp6raturedu four dolt 6tre situ@ en dessous
de 205°C{400°F}pour programmerun cycb d'autonettoyage.
].
2.
FermerIa porte du four.
Placerla manettede verrouiilage_ la positiondeverrouillage.
L'autonettoyageutilisedes temp6raturessup6rieures_ ceilesde Ia
cuissonnormaIepour nettoyerautomatiquementI'int6rieurdu four.
Ne forcez pasIa porte du four ni Ie levierde verrouiIIagepourIes
ouvrir.Cecipeut provoquerune exposition_ des temp6ratures
61eves,et donc pr6senterun risquede brQlure.
Si lefour esttr6s sale,il estnormal qu'on observelaformation de
fume ou de flammesdurant Ie nettoyage.Nettoyerlefour
intervalbs r6guliersplutOtqued'attendreune accumulation
importantede r@idus.
Durant Ie processusd'autonettoyage,i! convient de biena6rer la
cuisinepour 61iminerles odeursnormalement6raisesdurant le
nettoyage.
Avant I'autonettoyage
1= Eteindrela lampe du four avant lenettoyage.Celle-cipourrait en
effet griibr.
2. Enbver la I@hefdte,tous Iesplatset tesgrilbs du four. Les griiies
risquentdese @colorer et de ne plus giisseraussibienaprSsun
cycled'autonettoyagesi on ne iesenbve pas.
3. Nettoyerle cadre du four, le cadrede la porte {zone_ l'ext6rieur
duioint} et autour de l'ouverturedartslejoint de laporte,_ l'aide
d'un produit de nettoyagenonabrasifcommeBonAmi* ou d'eau
additionn@de @tergent. Le processus
d'autonettoyagenenettoie pasces
zones.EIIesdoivent6tre nettoy@spour
emp@herla saiet6de s'incruster
pendantie cycle de nettoyage.(Leioint
assure1'6tanch6it6autour de la porte et
du hublot du four.}
[ \
4. Pouremp6chertout dommage,ne pasnettoyer ni frotter b ioint
qui setrouve autour de Ia porte du four. Cejoint estcongu pour
@iter les pertesde chaleur pendant lecycle d'autonettoyage.
*Lesnomsde marquedes produitsde nettoyagesont des marquesd@oseesdes diff6rentsfabrbants.
42
3. Appuyer sur [a toucheCban (Nettoyage}.
• Lemot CLEAN(NETTOYAGE}clignotea ['afficheur.
Si Ia porte n'est pas ferm@,deships retentissentet Ie mot DOOR
{PORTE}parait _ rafficheur.Si la porte n'est pasferm@ dartsles
45 secondes,[operation d'autonettoyageestannuJ6eet
I'afficheurrevbnt _ I'heuredu ]our.
4. Appuyer sur la toucheMore+ (Plus+} ou Less- More+ :,
(Moins-}. ...................................
• CL-M (Nettoyage- sa[et6moyenne,3 heures}
est affich6. Less- ,
5. Appuyer sur la toucheMore+ ou Less- pour voir
ddibr [esdiff6rents r6giagesde I'autonettoyage.
CL-H (Nettoyage- salet#@aisse,4 heures]
CL-M (Nettoyage- salet8moyenne,3 heures}
CL-L (Nettoyage- salet8I#gSre,2 heures]
Lechoixdu niveaudesalet_du four programme
automatiquementla dur#edu cycle d'autonettoyage.
6. Apr@squatre secondes,le four commencelenettoyage.
• Ladur@ de nettoyagecommenceb d@ompte_ I'afficheur.
• Lemot LOCK07ERROUILLAGE]parait _ rafficheur.
o Lemot CLEANparait _ ['afficheur.
D_marrage diff_r_ d'_ cycle d'a_te_etteyage :
1. Appuyer sur la toucheDeIayfiD@_arragediffSr@.
• Lemot DELAY{ATTENTE}clignote.
• 00:00parait _ rafficheur. s_ite oo,
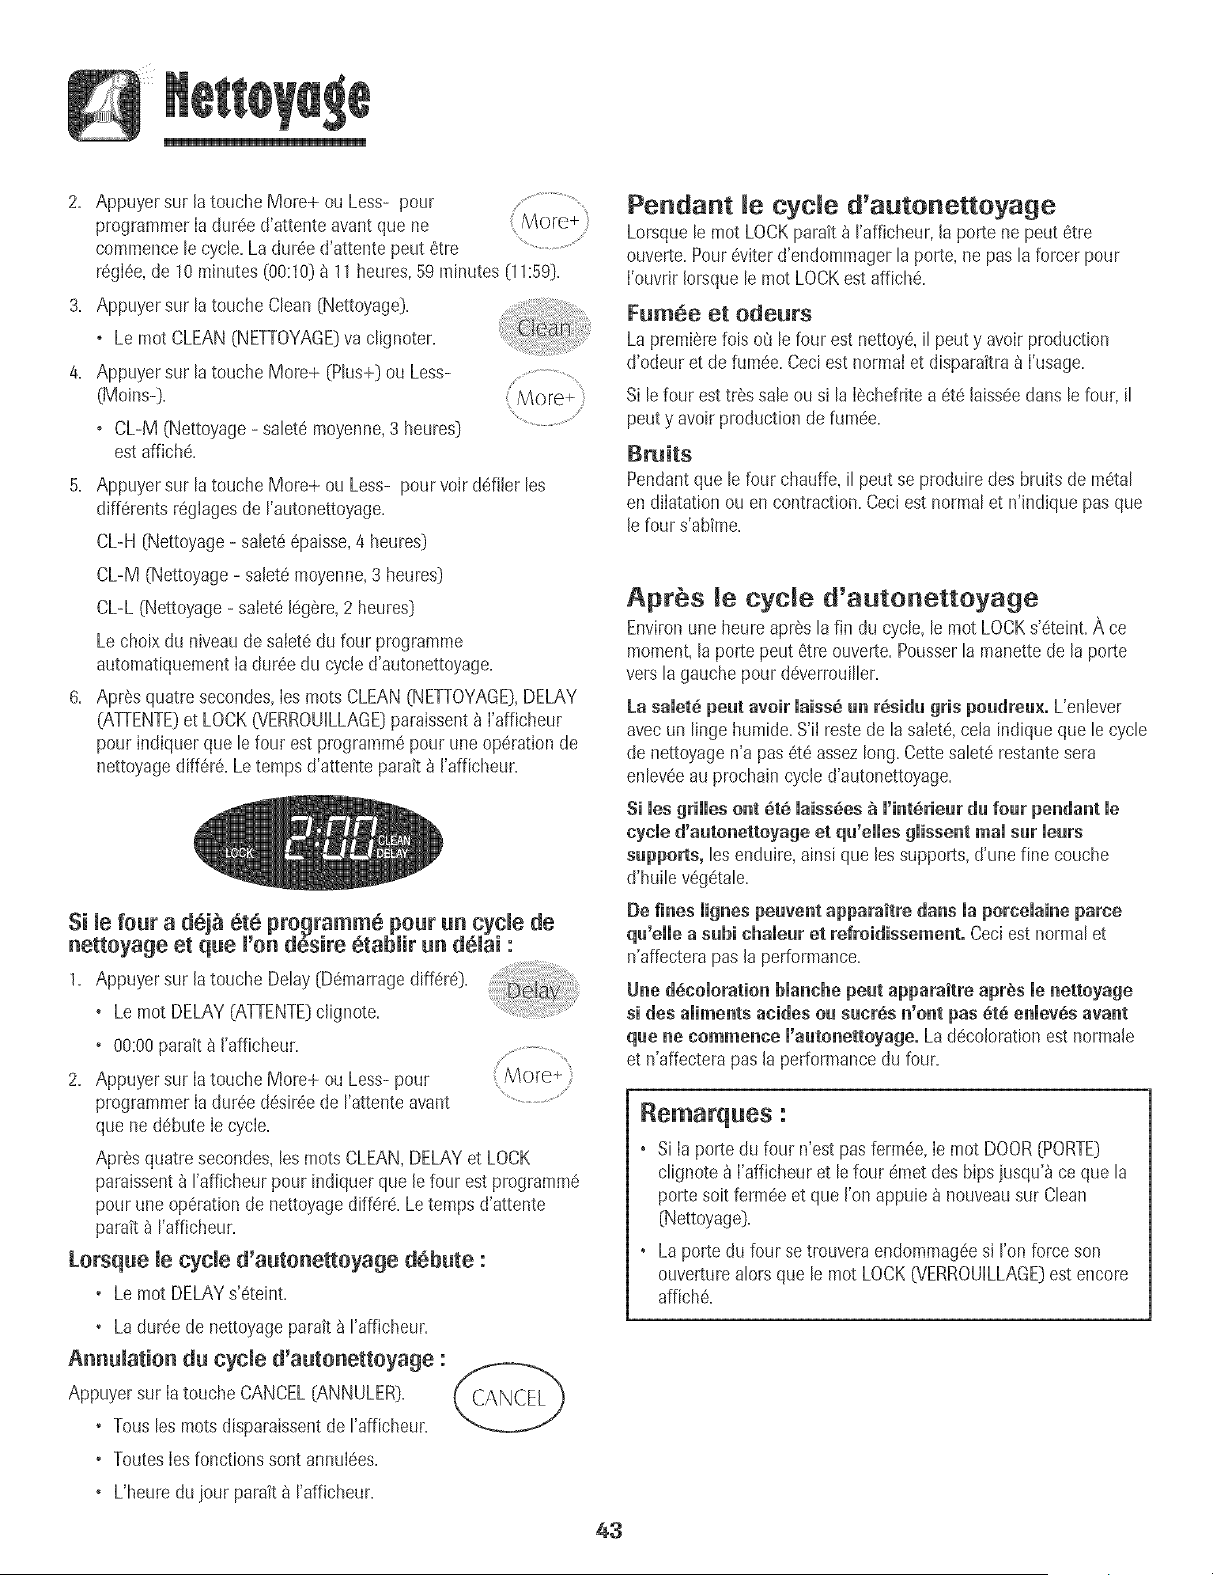
2. AppuyersurlatoucheMore+ouLess-pour
programmerIadur6ed'attenteavantquene
commence[ecycle.Ladur#ed'attentepeut6tre
r6gI6e,de10minutes(00:10}a11heures,59minutes(1!:59}.
AppuyersurtatoucheClean(Nettoyage}.
o LemotCLEAN(NETTOYAGE}vactignoter.
AppuyersurlatoucheMore+(Plus+}ouLess- .......................
(Moins-). More+)
. CL-M[Nettoyage- sa[et6moyenne,3heures)
estaffich@.
5. AppuyersurlatoucheMore+ouLess-pourvoirdallierles
diff6rentsr6glagesdet'autonettoyage.
CL-H(Nettoyage- satet66paisse,4heures)
CL-M(Nettoyage- sa[et6moyenne,3heures}
CL-L(Nettoyage- salete[6g6re,2heures}
Lechoixduniveaudesalet6dufourprogramme
automatiquementiadur6educycled'autonettoyage.
6. Apr6squatresecondes,[esrootsCLEAN(NETTOYAGE},DELAY
(ATTENTE)etLOCKO'ERROUiLLAGE}paraissent_['afficheur
pourindiquerquelefourestprogramm6pouruneop6rationde
nettoyagediff6r6.Letempsd'attenteparait_['afficheur.
Si [e four a d6j_ ete programme pour un cycle de
nettoyage et que ('on desire etab[ir un de[ai :
1+Appuyersur,otoucl+DeCay(D+marrogedOff+re)+
+ Lemot DELAY(ATTENTE)cJignote+
+ 00:00parait _ ['afficheur. ..................
2. Appuyer sur [a toucheMore+ ou Less-pour
programmer[adur6e desireede ['attenteavant .............................
quene debute [e cycle.
Apres quatre secondes,les rootsCLEAN,DELAYet LOCK
paraissent_ I'afficheurpour indiquerque [efour est programme
pourune op6rationde nettoyagediff6r6. Letemps d'attente
parak _ I'afficheur.
iorsque [e cycle d'autenetteyage d_bute :
• Lemot DELAYs'_teint+
• Ladur6ede nettoyageparak b I'afficheur+
Annumation du cycle d'autonettoyage :
Appuyersur [atouche CANCEL(ANNULER)+
• Tousles rootsdisparaissentde I'afficheur+
• Toutes[esfonctionssent annu+6es+
+ L'heuredu jour paraitb I'afficheur+
Pendant [e cycle d'autonettoyage
Lorsquele mot LOCKparait _ I'afficheur,[a porte ne peut 6tre
ouverte+Pour6viterd'endommagerla porte,ne pasla forcer pour
['ouvrir[orsquele motLOCKest affich6+
Fum6e et odeurs
La premierefois o_ lefour est nettoye,il peut y avoir production
d'odeur et de fumee.Ceciest normal et dispara_tra_ ['usage.
Si lefour esttr6s saleou si la [_chefritea 6t6 [aiss6edans le four, il
peut y avoir productionde fum6e.
Bruits
Pendantque lefour chauffe,il peut se produiredes bruitsde instal
en dilatationou en contraction.Ceciestnormal et n'indique pasque
[e four s'abtme.
gprbs [e cycle d'autonettoyage
Environuneheureapres la fin du cycle,le motLOCKs'6teint+Ace
moment,laporte peut 6tre ouverte+Pousserla manettede [a porte
versla gauchepour d_verrouiller+
La salet_ peut avoir laiss_ _ rSsidu gris peudre_×. L'enlever
avecun [[ngehumide.S'i[ restede [asalet_,ce[aindiqueque [e cycle
de nettoyagen'a pas 6t_ assezlong. CettesaIet_restantesera
enIev_eau prochain cycled'autonettoyage.
Si les grilles ont _t_ maissees_m'i_t_rieurd_ fo_r pendant me
cycle d'a_to_etteyage et q_'elles giisse_t real s_r leers
s_pperts, les enduire,ainsi que lessupports,d'une fine couche
d'huilev_getale+
De fi_es iig_es pervert apparaitre da_s ia perceiai_e parce
q_'eiie a s_bi chaie_r et refroidisseme_t. Ceciest normal et
n'affecterapas [a performance.
U_e d_cemoratie_blanche peut apparaitre apr_s me_ettoyage
si des aliments acides eu s_cr_s _'e_t pas _t_ e_mev_savast
q_e _e comme_ce i'a_to_ettoyage. Lad_co[orationestnorma[e
et n'affecterapas [a performancedu four+
Remarq_es :
+ Si la porte du four n'estpas ferrule, le mot DOOR(PORTE)
clignote_ l'afficheur et lefour _metdes hips jusqu'_ ce que la
porte soitfermeeet que ['onappuie_ nouveausur Clean
(Nettoyage).
• Laporte du four se trouveraendommag_esi ron forceson
ouverturealors que le mot LOCK(VERROUILLAGE)est encore
affichS.
43
Methodes de nettoyage
*Avantroute manipulation ou operation de nettoyage, v_rifier que
I'appareil est arr_t_ et que teus les compesants sent freids, afin
d'_viter des dommages ou des br_lures.
,Poureviter laformation de_acrlesou un changementde couLeur,nettoyer
o Aprestout d_montagede composan1:s,veiller a effectuerun remontage
correct.
Les noms de marque sent des maroues
deuosees des differents fabricants,
"" Pour commander directement, comooser
e 1-877-232-677" aux E,-U, eL e
1-800-688-8408 au Canada.
PIECES NET[OYAGE
Dosseret et table
de euisson -
Emaimvitrifi_
L'emailvitrifie estduverre lieau metalparfusion.IIpeut sefissurerous'ecailleren casde mauvaiseutilisation.II est
resistantauxacides,maispastotalementinattaquabiepar lesacides.Touslesproduitsrenverses,enparticulier
acidesou sucres,doivent6treessuyesimmediatementavecun Iingesec.
, Unelois la piecerefroidie,Ia laveravecde [eau savonneuse,rinceret secher.
, Ne jamaisessuyerunesurfacetilde ouchaudeavecun lingehumide.Cecipourraitlafissurerou I'ecailIer.
, Ne jamaisutiliserde nettoyantspourfour,d'agentsde nettoyagecaustiquesou abrasifssur lefini exterieurde la
cuisini_re.
[_ehefrite et sa Ne jamais ceuvdr la gri#e de papier d'aluminium; cela emp_ehe la graisse de cooler dai_sla tbcheMte.
• Recouvriria lechefriteet sa grilled'un lingesavonneux;iaisseragir pourdetacheriesresidus=
, Laveravecdereausavonneusetiede.Utiliserun tampon_ recurerpouretiminerlessouillurestenaces.
, Onpeut placerles deuxcomposantsde la 18chefriteclansun lave-vaisselle.
Zone de la console
de commandeet , Pourutiliserla fonctionVerrouillagedescommandespour Ie nettoyage,voir page34=
, Essuyeravecun linge humide,puis faire secher=Ne pasutiliserun agentde nettoyageabrasifsusceptiblede rayerla
finition=
, Onpeut utiliserunproduit de nettoyageduverre,pulverised'abordsur un chiffon=NE PASprejeter le preduit
directerne1_tsur les touches de cemmande ou sur FafHcheur.
Boutons de , Placerchaquebouton_ Iapositiond'ARRCT,et retirerchaqueboutonen letirant=
cemmande , Laver,rincer et fairesecher=Ne pasutiliserunagent de nettoyageabrasifsusceptibIede rayerIa finition=
, FairefonctionnerbriSvementchaqueelementpourverifierque leboutona ete correctementreinstaiIe=
Cuvettes de
recuperation =
Cuvettesde
chrome
L'emailpeutse decolorerouse fendilJers'i! estsurchauffe.Ceciestnormalet n'affectepas lesperformancesde cuisson.
, Unefois lescuvettesde recuperationrefroidies,les laverapr@schaqueutilisation,iesrinceret Iessecherpoureviter
lestachesou ladeceleration.Lescuvettesde recuperationpeuvent6treIaveesen Iave-vaisselJe.
, PoureJiminerIesgrossessouillures,faire tremperdansde I'eausavonneusechaude,puisutJJiserunproduit de
nettoyagepeu abrasifcommeSoftScrub_et untampon_ recureren plastique.
, EncasdesaleteincrusteedansIescuvettesde recuperation,lesretirerde Ia cuisini@re,lesposersur desfeuilles
de papierjournal et Iespulveriserdoucementde nettoyantcommercialpourfour.[Ne paspulveriserdeproduit
sur lessurfacesavoisinantes.]Mettreles cuvettesde recuperationdansunsacen pJastiqueet laisserle produit
agir plusieursheures.Porterdes gantsen caoutchoucpourretirer lescuvettesde recuperationdu sac,Javerles
cuvettes,Jesrinceret lessecher.
• Apresle refroidissement,laverapreschaqueutilisation,rinceret fairesecherpour@iter la formationde tachesou un
changementde couleur.
• Poureliminerdegrossessouillures,fairetremperdansdereausavonneusechaudepuisutiliserunproduitdenettoyage
peuabrasifcommeSoftScrub*et untampon_ recureren plastique.Ne pasutiliserun produitde nettoyageabrasit
44
NE_OYAGE
_U _OUr en Verre
Int6rieur du four
Grillesdu four
[certainsmoderes)
Tireir de remisage,
poign6e de porte,
panneau× iat6rau× -
• Eviterd'utitisertrop d'eau,qui r[squeraitdes'infiltrersousou derriereteverreet detacher.
• Laverbt'eauet ausavon.Rinceravecde t'eaupropreet secher.Un pmduitde nettoyagedu verrepeut6tre utilise
en levaporisantd'abordsur un linge.
• Ne pasutiliserde produitsabrasifscommetamponsb recurer,lained'acierou produitde nettoyageen poudrequi
r[squeraientde rayerleverre.
• Ex6cuterles instructions pr6sent6esaux pages41-42pour rautonettoyagedu four.
Netteyage manual:
• Nettoyer%quemment avecun tamponde piast[queet un produit de nettoyagemoyennementabrasif.
• Ne pas utiliser untampon _ recurer metallique,qui formeraitdes rayuressur la surface.
• Lorsde remploi d'un produit commerciaIde nettoyagede four,appliquerIesinstructionsdu fabricant.
• Eliminerdesquepossiblelesproduitsacidesrenvers6s(produitsb basedehit oudetomate)aveceauet savon;ces
pmduits peuventfaire changerla couleur de 1'Smaillots d'uncontact prolong6.
Pourfacimitermenettoyage, oil peut enmevermaporte du four° (Voirla section Entretien,page45=)
• Nettoyeravecde I'eausavonneuse.
• Eliminerlessouillurestenacesavecune poudrede nettoyageou untampon _ r6curersavonneux.Rinceret faire
secher.
• Si lesgrilles sentlaiss6esdartsIefour pendant iecycled'autonettoyage,ellessed6colorentet peuventneplus tres
biengiisser.Sicelase produit,enduirele borddesgrilleset lesupportdesgrillesd'une fine couched'huile veg6tale,
puis essuyerI'exc6dent.
•NE PASUTIUSERDE PRODUffS DE NETTOVAGECONTENANTDU JAVELUSANT.
•NE PASUTIUSER DE NETTOYANTS_ORANGE_OU ABRASIFSo
•TOUJOURSESSUYERDANS LE SENSDE LA TEXTUREDE L'AC/ERLOBSDU NETTOYAGE.
• Nettoyage joumumier/sumet6m_g_re- EssuyeravecI'un desproduitssuivants: eausavonneuse,vinaigre blanc/
eau,produit de nettoyagepourverre et surface Formuia409_ou un produit semblablepour verre - avecun linge
soupleet une6ponge.Rinceret secher.PourpoIiret enteverlesmarquesdedoigts,fairesuiwe parunevaporisation
de Magic Spraypour acier inoxydable[piece n° 20000008)*_,
° Saiet_.med6r_e/dpaisse - EssuyeravecI'un desproduitssuivants: BenAmi,SmartCleanserouSoftScrub_-
raide d'un lingesoupleou d'une epongehumide.Rinceret secher.Lestaches rebe!lespeuventetre enleveesavec
untamponmulti-usagesScotch-Brite_humidi% FrotteruniformementdansIesensdu m6tai.Rinceretsdcher.Pour
redonnerdu lustreet retirer Iesrayures,faire suivrepar unevaporisationde Magic Spraypour acier inoxydable_,
• 08coloration - A I'aided'une epongehumidifieeoud'un Iingesoupie,essuyerb I'aidedu nettoyantCameo
pour acier inoxydabIe_,Rincerimm6diatementet sdcher.Pourenlever les marqueset redonnerdu lustre,faire
suiwe parune vaporisationde Magic Spraypour acier inoxydabIe_,
• Unefois les piecesrefroidies,laver_ I'eausavonneusetiede,rinceret secher.Nejamais essuyerune surfacetiede
ou chaudeavecun linge humide,ceci pouvantendommagerlasurface et entrainer unebrOlurepar Iavapeur.
• Pourlestaches rebelles,utiliserdes agentsde nettoyageIegerementabrasifscommela p_te au bicarbonatede
soudeou BenAmi_-Nepas utiliserd'agentsde nettoyageabrasifs,caustiquesou6nergiquescommelesnettoyants
pourfour ou lestamponsen Iained'acier. Cesproduits raieraientou endommageraientde fa_onpermanentela
surface.
REMARQUE:Utilfserun #nge eu un tercflensecpeur essuyer lespreduitsrenvem6s,surtout s'its sent acides
e_ sucres. La s_fface pe_rraft se d_ce_erer ell se ternffsf la salet_ n'_tait pas fmm_dfatement enlev_e. Ced
est paFdcuH_rement impet_ant dans le c,s de surfaces b_ancheso
_Lesnomsde marquesentdes marquesd6poseesdes diff6rentsfabricants.
_ Pourcommanderdirectement,composerle 1-877-232-6771aux E.-U.ou le 1-800-688-8408au Canada.
45
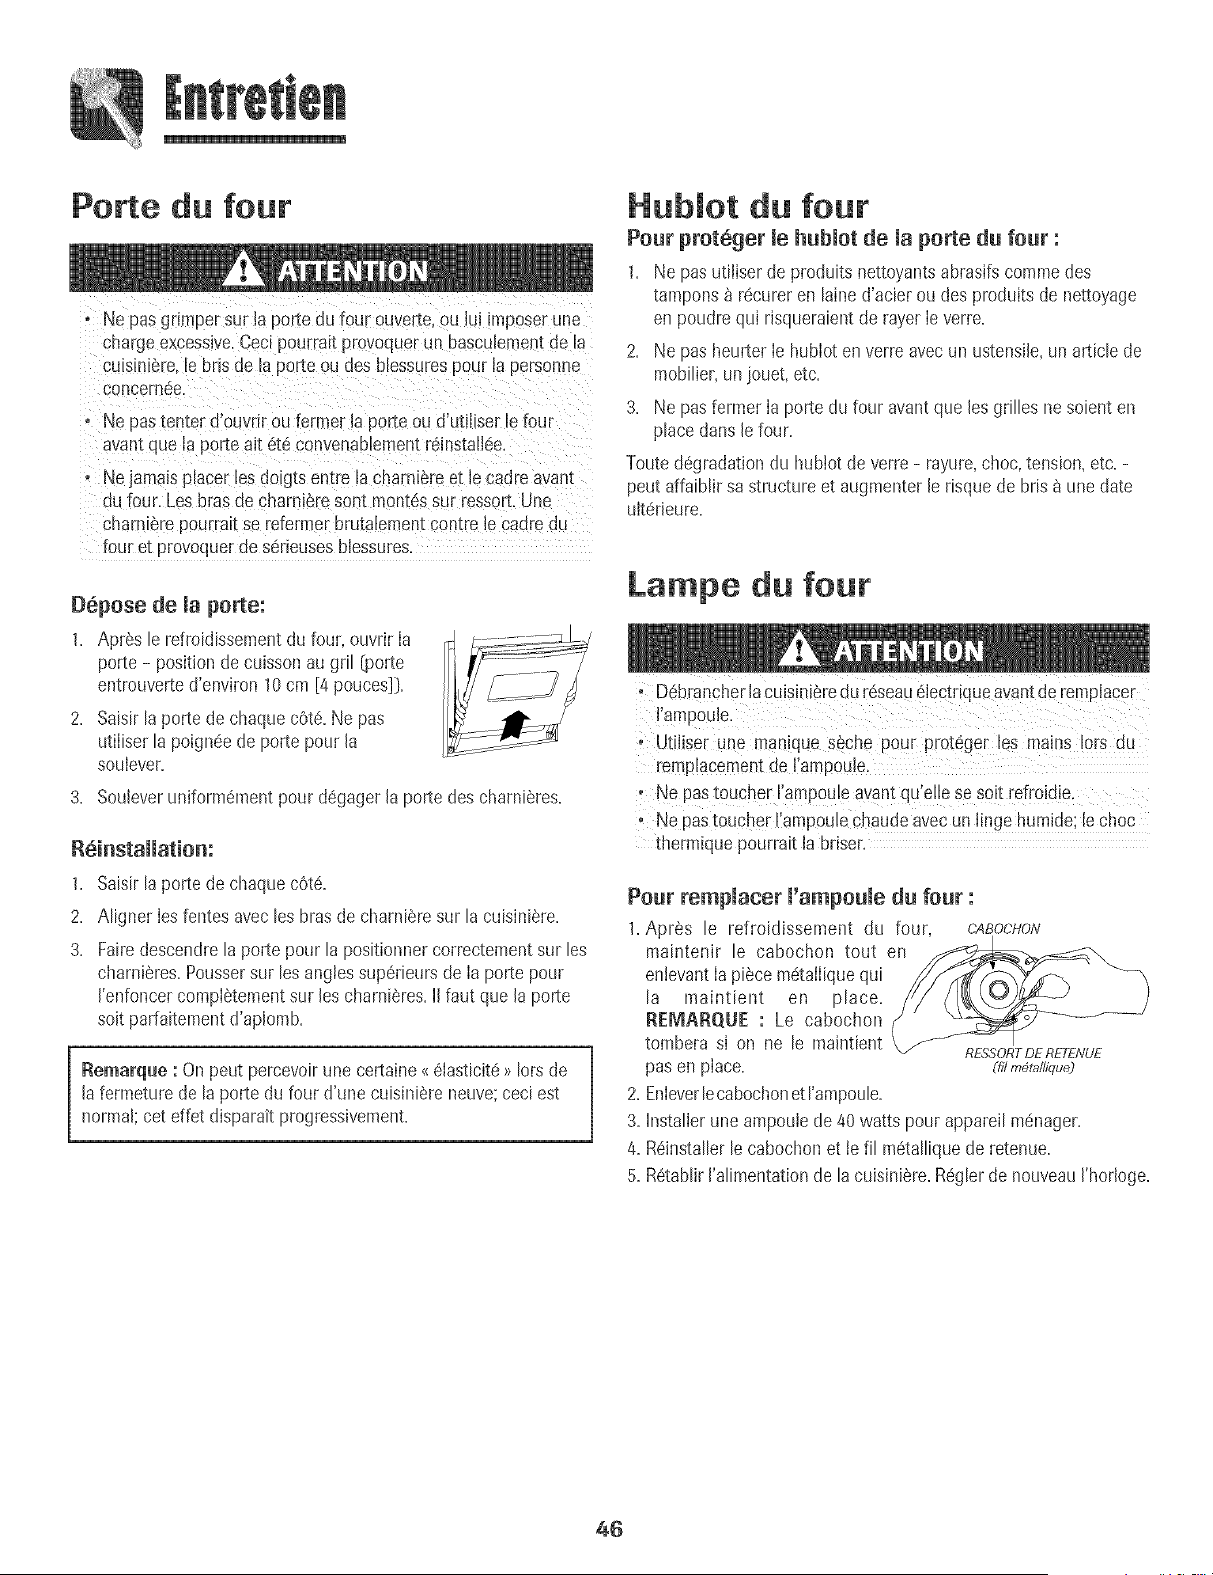
Porte du four
- Ne pasgnmper sur laporte du four ouverte,ou lu_[mpose_une
charge excesswe.Cecipourrait provoquerun basculementde la
culsm_ere._ebris de [a porte ou des blessurespou_la personne
eoncern6e.
,Ne pastenter douvdr ou former la por[e ou d'utll[serle four
avantque la porte alt ete convenabiementrdinstali6e.
• Ne jamaisplacer los doigtsentre la charniSreet ie cadreavam
du four. Los brasde charnleresont mont6ssur ressort Une
charnierepourrait se reformerbrutafemen[con[rele cadre du
four et provoquerde serieusesbiessures
Depose de la porte:
1. Apr6s lerefmidissementdu four, ouvrir Ia
porte - positionde cuissonau gril (porte
entmuverted'environ 10cm [4 pouces]).
2. Saisir laporte dechaque c6t6.Ne pas
utiIiserla poign6ede porte pour la
souieven
3. Souleveruniform6mentpour d6gager[a porte des charni6res.
1. Saisir [aporte dechaque c6t6.
2. Aligner los fentes avec[esbrasde charniSresur [a cuisini@re.
3. Fairedescendrelaporte pour lapositionnercorrectementsur los
charni@res.Poussersur los anglessup6rieursde [a porte pour
['enfoncercompi@tementsur [escharni@res.I[faut que [a porte
soit parfaitementd'aplomb.
[ Remarque : Onpout percevoirune certaine<_6[asticit6>>lots de
[afermeture de la porte du four d'une cuisiniSreneuve;ceciest
normal;cot effet disparaitprogressivement.
Hub[or du four
Pour prot_ger [e hub[or de [a porte du four :
1. Ne pasutiliser de produitsnettoyantsabrasifscommedes
tampons _ r6cureren lained'acier ou desproduitsde nettoyage
en poudrequi risqueraientde rayer[e verre.
2. Ne pas heurterIt hubiot enverre avecun ustensi[e,unarticle de
mobiIier,un jouet,etc.
3. Ne pasfermer [a porte du four avantque los grilles ne soienten
place darts[e four.
Touted6gradationdu hubiot de verre- rayure,choc,tension, etc. -
pout affaiblir sa structureet augmenter[e risque de bris _ unedate
ult6r[eure.
La pe du four
" ,D6brancherlacu sini_redu r6seakj6[ectr[queavantde remplacer
Iampoule.
• Utiliser une manique s_cho pour prot_ger los mains [orsdu
remp[acementde ['ampoule.
, Ne pastoucher 'ampoue avart qu'e e se sot refrod e
, Ne,pastoucher I'ampou[echaudeavecun[incgehumide;[echoc
thermiquepourrait [a bnser.
Pour remplacer l'ampoule du four :
1. Apres le refroidissement du four, CABOCHON
maintenir le cabochon tout en
enlevant [a pi6ce m6taiiique qui
la maintient en place.
R[:MARQU[: :Le cabochon
tombera si on ne [e maintient RESSORT DE RETENUE
pas en place. (_i:_mdtaflique)
2. Enleverlecabochonet I'ampoule.
3. Installeruneampouiede 40watts pour appareilm6nager.
4. R6installerlecabochonet iefil m6talliquede retenue.
5. RStablir['alimentationde la cuisiniere.R6glerde nouveau['hor[oge.
46
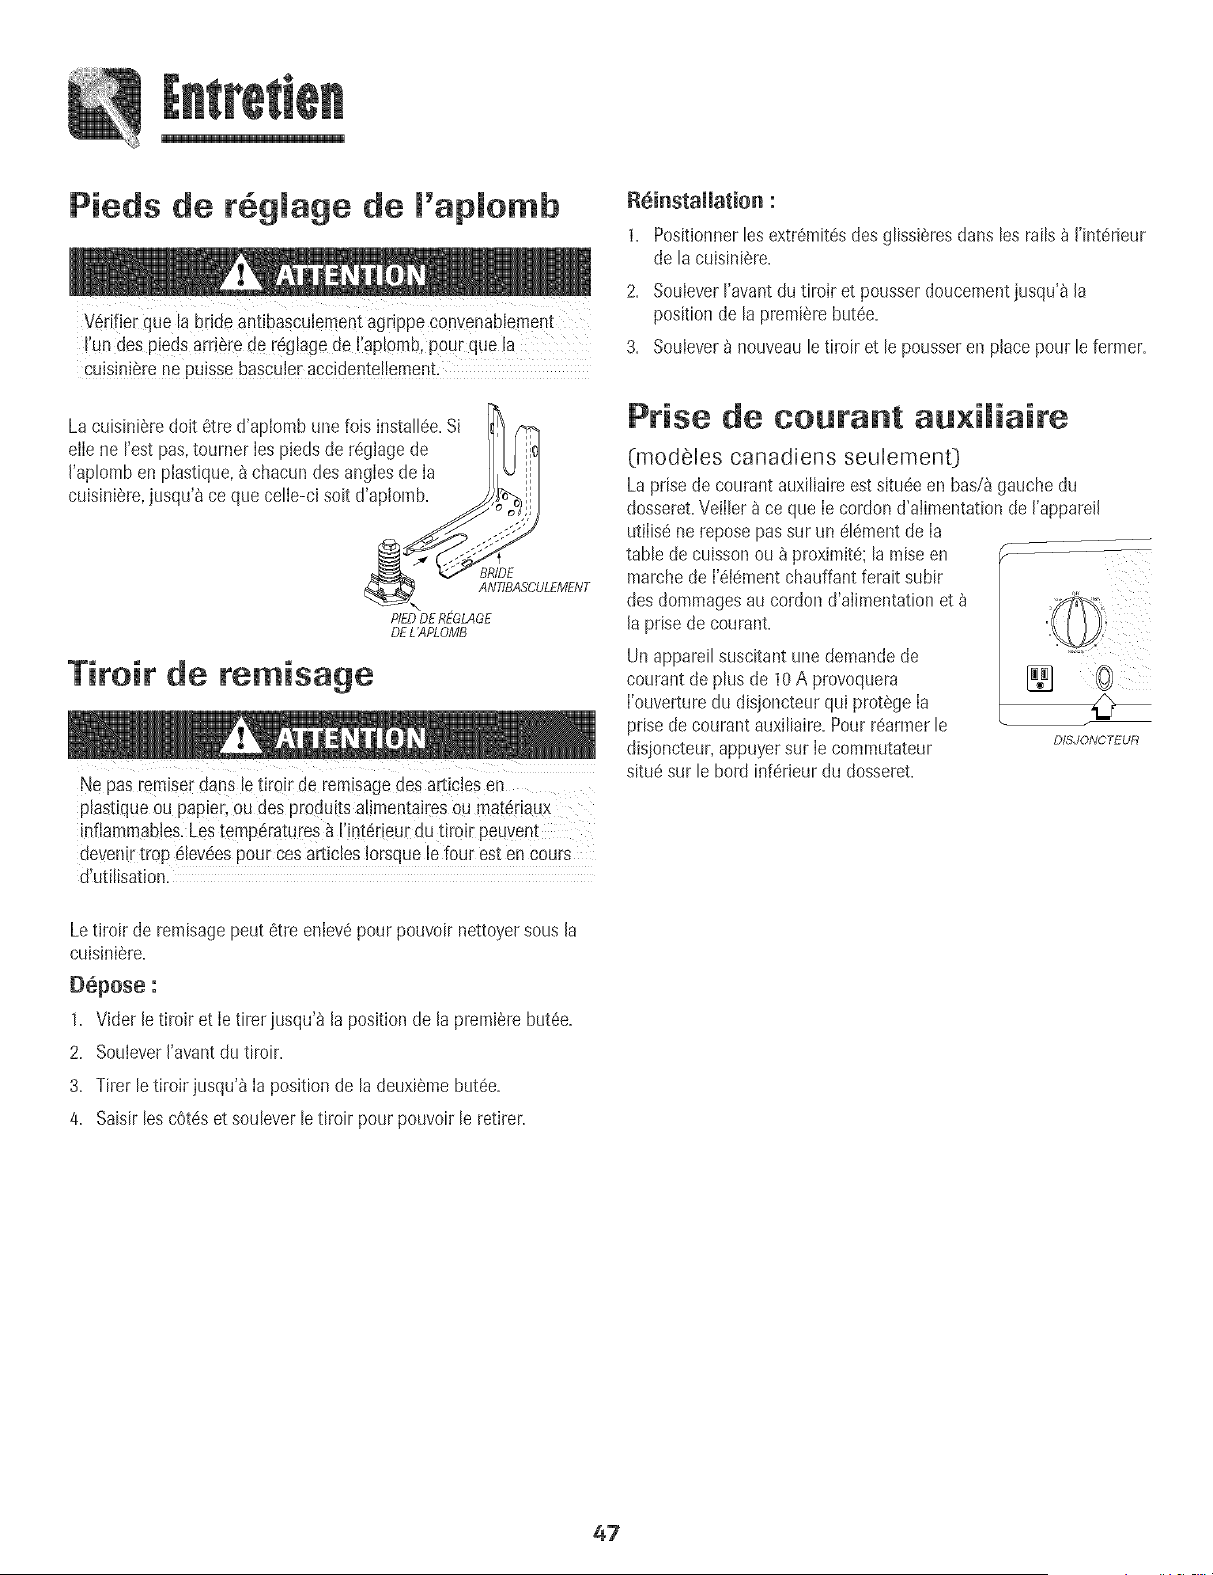
Pieds de r6glage de l'aplo b
Vdri%_que B brideantibascu!ementagrippeconvenabbment
fun des pie@arri6rede r6glagede i'aplomb,pour que la
CU!Sin[SrenePUiSSebascu!eraccidentellement.
La cuisini6redoit 6tre d'aplombune fois install@.Si _ /_
elIe ne rest pas,tourner Iespieds de r6glagede ]
I'aplomben plastique,_ chacundes anglesde Ia I v
cuisini_re,jusqu'_ ce que ceHe-cisoit d'apbm b__.,,,_
7\ . ANTIBASCUL£MENT
PIEDDEREGLAGE
DEL'APLOMB
Tireir de re isage
Ne pas remiserdans letiroir de remisagedes articles en
pBstique ou papier,ou desproduitsalimentairesou mat6riaux
inflammables.Lostemp6ratures_ I'int6deurdu tiroir peuvent
devenirtr0p 61ev6espour cesarticbs Iorsquelefour est encours
d'utilisation.
R6instaHation :
1. Positionnerles extr6mit@des glissi6resdans les rails _ ['int6rieur
de la cuisini_re.
2. Soubver I'avantdu tiroir et pousserdoucementiusqu'_ [a
position de [a prerni@ebut6e.
3. Soubver _ nouveaule tiroir et le pousseren placepour le former.
Prise de eourant auxi[iaire
(modeles canadiens seulement}
La prisede courant auxiIiaireestsitu@ en bas/_gauche du
dosseret.Veilbr ace que Ie cordon d'aiimentationde I'appareil
utilise nereposepas sur un 616mentde Ia
table de cuissonou _ proximit6;[araiseen
marchede ['6[6mentchauffantferait subir
des dommagesau cordond'allmentationet
[a prise de courant.
Un appareilsuscitantune demandede
courantde plus de 10A provoquera
['ouverturedu disjoncteurqui prot6ge [a
prise decourant auxiliaire.Pour r@rmer le
disioncteur,appuyersur [e commutateur
situesur le bord inf6rieurdu dosseret.
DISJONCTEUR
Letiroir de remisagepeut 6tre enlev6pour pouw_irnettoyersous[a
cuisini6re.
D6pose :
1. Viderle tiroir et Ietireriusqu'_ la positionde la premierebut6e.
2. SouieverI'avantdu tiroir.
3. Tirer [etiroir jusqu'a Ia positionde [adeuxi@Tlebut@.
4. Saisir[escot@et sou[ever[etiroir pour pouvoir[e retirer.
47
PROBLEME SOLUTION
Pour mapmupar_desprobm_mes oV6rifier que les commandesdu fo_Jrsontcorrectementr6gI6es.
observSs, essayer d'abord mes oV6rifier si Iefiche est bien inser6eduns la prise,
somutionspossibmes,_ droite, o Inspecter/r6armerIe disjoncteur.Inspecter/remplacerlesfusibles.
o ContrOlerla sourced'alimentation61ectrique.
Non=fonctionnement de m'appareim-
total ou partiem.
L'hormogeou ruesmampesfonctionnent,
ruesroots paraissent_m'afficheur,
mais mefour ne chauffe pus.
R_suitats de cuisson au four
cliff, rents des attentes ou de ceu× qui
sont produits par mefour ant_rieur,
R6sumtutsincerrects morsdema
cuisson au grim,ou _mission
excessive de fum_e.
_mpossibimit_d'autonettoyage du
four (terrains modSies).
Le four nese nettoie pus
correctement (terrains mod_ies:}o
La por_e du four nese dSverrouille
pus aprSs m'autonettoyage
(cem!.ains modules),
oD6terminersi los commandosdes 616mentsde surfaceet/ou du four sont convenablement
r6gl6es.Voir pages29et 40,
o D6terminersi la porte du four s'estdeverrouill6eapres uneoperationd'autonettoyage,
Voir pages42,
o Determinersile four est regle pourune cuissondiff6r6eou un nettoyagediffere.Voir pages
36 et 41,
oV6rifier si ieverroui!lagedes commandosesten marche.Voir page34,
oV6rifier si lacommandoest en modesabbat.Voir page38,
oLescommandessont peut-6treprogramm_espour unefonction de cuissonet maintienou
ded6marragediff6r6.
oLafonction de verrouillagedes commandesestpeut-6tre activ6e.Voir page34.
o Determinersi revent du four est obstru&Voir son emplacementpage40.
oS'assurerque lacuisiniereestd'aplomb.
o Les reglagesdetemp6raturevadentsouvententre un four neuf et lefour qu'il remplace.On
observesouventune d6rivedu rSglagedetemperatured'un four _ mesurequ'il vieillit; il pout
devenirplus chaud ou moinschaud.Voir page38 les instructionsd'ajustementde la
temperaturedu four (certainsmod61es}.REMARQUE: IIn'est pusutile demodifier lereglage
detemperaturesi lavariationn'affecte qu'une ou deux recettes.
o Pourd'autresinformationsausuiet de la cuissonau four,voir labrochure La cuisson
simplifi6e.
o DeterminerIa positiondesgrilles.Les alimentspeuventetre trop prSsde I'el@mentdu griL
o t_l_mentdu griI pus prechauff&
o Utilisationincorrectedefeuille d'alumJnium.Ne ]amaisgarnir lagrille de Jechefriteavecde la
feuille d'aluminium.
o Portedu four ferm6edurant Iacuissonau gril. Laisserla porte du four entrouverted'environ
10cm [4 pouces}- premierebutee.
o EnleverI'exc6sde graissesur Iapi6ce de viandeavantla cuissonau griL
o Utilisationd'une I6chefritesouillee.
o Latensionelectriquede la maisonest peut-etre basse.
o DdterminerqueI'appareiIn'a pas8tOprogramm6pourun autonettoyagediffer&Voir page41,
oV_rifier que la porte estfermSe.
oVSrifiersi Iacommandoest en modesabbat.Voir page38.
o Lefour est peut-Stre_ unetemp6raturesup_rieure_205 °C_400°F).Latemperaturedu four
doit 8tre inferieure_ 205°C [400°F)pour pouvoirprogrammeruncycle d'autonettoyage.
o Un tempsde nettoyageplus long pout 8tre n6cessaire.
o Onn'a puselimin8avantI'operationd'autonettoyagelosaccumulationsexcessivesde residus,
particulierementles rSsidusd'alimentsacidesousucres.
o L'h_tSrieurdu four estencore chaud.Attendre environune heureapres I'achevementde la
pSrioded'autonettoyage.IIest possibled'ouvrirlaporte apr6sladisparitiondu messageLOCK
[VERROUILLAGE)sur I'afficheur.
o Loscommandeset la porte sont peut-etreverrouillSes.Voir page34.
suite
48
PROBLEME SOLUTION
Accumulation d'humidit6 sur me o Ceciest normaldurant Iacuissond'alimentscontenant beaucoupd'eau.
humorou vapeur soltant de l'_venL o Utilisationexcessived'humidit6 Iorsdu nettoyagedu hublot.
®
Emission d'une forte odeur ou de
fum6emorsdemam seenmarcm e
du four°
Codes d'unomalie
Des bruits se font entendreo
Ceciest normalpour une cuisini6reneuve;cet effet disparaitapr_s quelquesutilisations.
L'ex_cutiond'un programmed'autonettoyagepermettrade faire disparakrecette odeur plus
rapidement.
Fairefonctionner leventilateurpour 6vacuerIa fumeeou rodeur.
Presenced'uneaccumulationde residusalimentairessur lefond du four. Ex6cuterune
op6rationd'autonettoyage.
o LesrootsBAKEou LOCKpeuventclignoterrapidement8 I'afficheurpourpr6venird'une erreur
ou d'un probleme.Sile motBAKEou LOCKparait_ I'afficheur,appuyersur Iatouche Cancel
(Annule0. Si Ie mot BAKEou LOCKcontinue _ c@noter, d6brancherI'appareiLAttendre
quelquesminutes,puis rebrancherI'appareiLSile mot continue _ c@noter, d6brancher
I'appareiIet prendrecontact avecun r6parateurautoris6.
o Sile four esttr_ssale,IesfiammSchespeuventproduireun coded'anomalieaucoursducycle
d'autonettoyage.AppuyersurlatoucheCanceletlaisserIefour refroidircompl_tement,essuyer
lasalet6enexcespuisreprogrammerrautonettoyage.Silecoded'anomalier6apparait,prendre
contactavecun r6parateurautoris6.
®
®
Lefour fait plusieursbruitsfaibles.II estpossibled'entendreles relaisdu four qui se mettent
en marcheet s'arr6tent.Ceciest normal.
AIorsquelefour ser6chauffeet serefroidit,il estpossibled'entendredesbruitscorrespondant
ladilatationet 8 lacontractiondes piecesm6talliques.Ceciestnormalet n'endommagepas
I'appareiL
_mn'yu ni hip ni affichageo o Le commandeest peut-6treen modesabbat (certainsmodules).Voir page38.
reste ammum_.
o Lefour est en modesabbat.Pourannulet,appuyersur la toucheClock et maintener-la
enfonc6ependant cinq secondes.
49

50
Garantie complete d'une ann6e -
Pieces e| main-d'_uvre
Durantune periode d'un {[1) an a
compterde la date de I'achatinitial au
d6tafl,tou[e piece qui se rev61erait
ddectueuse dans des conditionsnormales
d'usagemenagersera repareeou
remplaceegratultement.
Residents canadiens
Les ga[antles ci-dessuscouvren[un
appareilinstall6au Canada.seuiements'il
a et6 agreepar lesagencesdetest
habflit6es[verificationde laconformlt6
une normenat_onaLedu Canada),sauf si
['appare[Ia ete introduit auCanada
!'occasiond'un changementde r6sidence
des Etats-Unisvers leCanada
Garantie limit6e hers des Etats-
Unis et du Canada - Pi_ces
seulement
Pendantun [1} an a compter de la dateae
I'achatinitial aud6tail,toute pieca qul se
revdlera_ddectueuse dans des conditions
normalesd'usagemenagersera r6pareeou
rempiaceegratultement(pi6ce seulement};
le propri_,taireaevraassumertousles
autresfrais, y comprisfrais demain°
d'(_uvre,ded6placement,de_rahsport.de
kilorn6trageet de diagnostic.[e cas
echeant.
Les gatanties specifiques forrnulees ci-
dessus sent/es SEULES que /e fa'bricant
accorde. Ces garanties vous conf_re de,_
droits juridiqL 9ssp_cifiques et vou_ oouvez
eqa/ementjouir d'autres drotts, variables
d'un _tat b/'autre, d'une province a une
BUtTe.
Ne sent pas couverts par ces garanties
1. Lesdommagesou derangementsdus _:
a. Miseen service,Iivraisonou entretieneffectues incorrectement.
b.Toutereparation,modification,alt6rationet tout r6glagenonautoris6spar le
fabricantou parun prestatairede serviceapres-venteagre6.
c.Accidents,mauvaiseutilisation ou usageabusifou d6raisonnable.
d.Atimentation6tectrique[tension,intensite)incorrecte.
e. R6glageincorrect d'une commande.
2. Lesgarantiesnepeuvent6tre honor6essi les numSrosde s6ried'origine ont ete
enlev6s,modifiesou nesent pas facilementlisibles.
3. Ampoules.
4. Appareils achetesaux fins d'usagecommercialou industrieL
5. Lesfrais devisite d'un prestatairedeserviceou de serviceaprSs-venteencouruspour
les raisonssuivantes:
a. Correctiond'erreursde raiseen service.
b. Initiation de I'utilisateur_ I'emploi de rappareiL
c.Transportde I'appareiIauxIocauxdu prestatairedeservice.
6. Dommagessecondairesou indirectssubispar toute personnesuite au non-respectde
cesgaranties.Certainsetats ou provincesne permettentpas I'exclusionou Ia limitation
desdommagessecondairesou indirects;par consequentles limitationsou exclusions
ci-dessuspeuventne pass'appliquer_ votrecas.
Si l'intervention d'un r parateur est
• ContacterIe d6taiilantchezqui I'appareila 6t6 achet6,ou contacterMaytag ServicesSM/
service_ la clientelede Maytag au 1-800-688-9900aux E.-U.ou 1-800-688-2002au
Canada,pour obtenir Iescoordonneesd'uneagencede serviceagr86e.
• VeilIer_ conserverIafacture d'achat pourjustlfier de lavalidit_de la garantle.Pour
d'autres informatlonsence qui concerneIesresponsabilitdsdu proprietaire _ 1'Sgard
du servicesousgarantle,voir letexte de Ia GARANTIE.
• Si le detaillantou ragence de serviceapr_s-ventene peut rdsoudrele probleme,dcrire
MaytagServicessM,attention : CAIR" Center,P.O.Box2370,Cleveland,TN37320-
2370ou telephonerau 1_800_688_99ee aa× [._LIooa 1_800_688_2e02 an Canada.
• Lesguides d'utilisation,les manuelsde serviceet les renseignementssur lespisces
sent disponiblesauprSsde Maytag Servicess_,service_ laclientSlede Maytag.
_e_atq_es :
Lors detout contactconcemant un probJ_me,fournir ['informationsuivante :
a. Nora,adresseet num_rode tdlSphonedu client;
b. Numerode modeleet numSrodeserie de I'appareil;
c. Noraet adressedu d6taiIIantou de I'agencede service;
d. Descriptionclaire du probIemeobserve;
e. Preuved'achat [facturede vente[}.
51
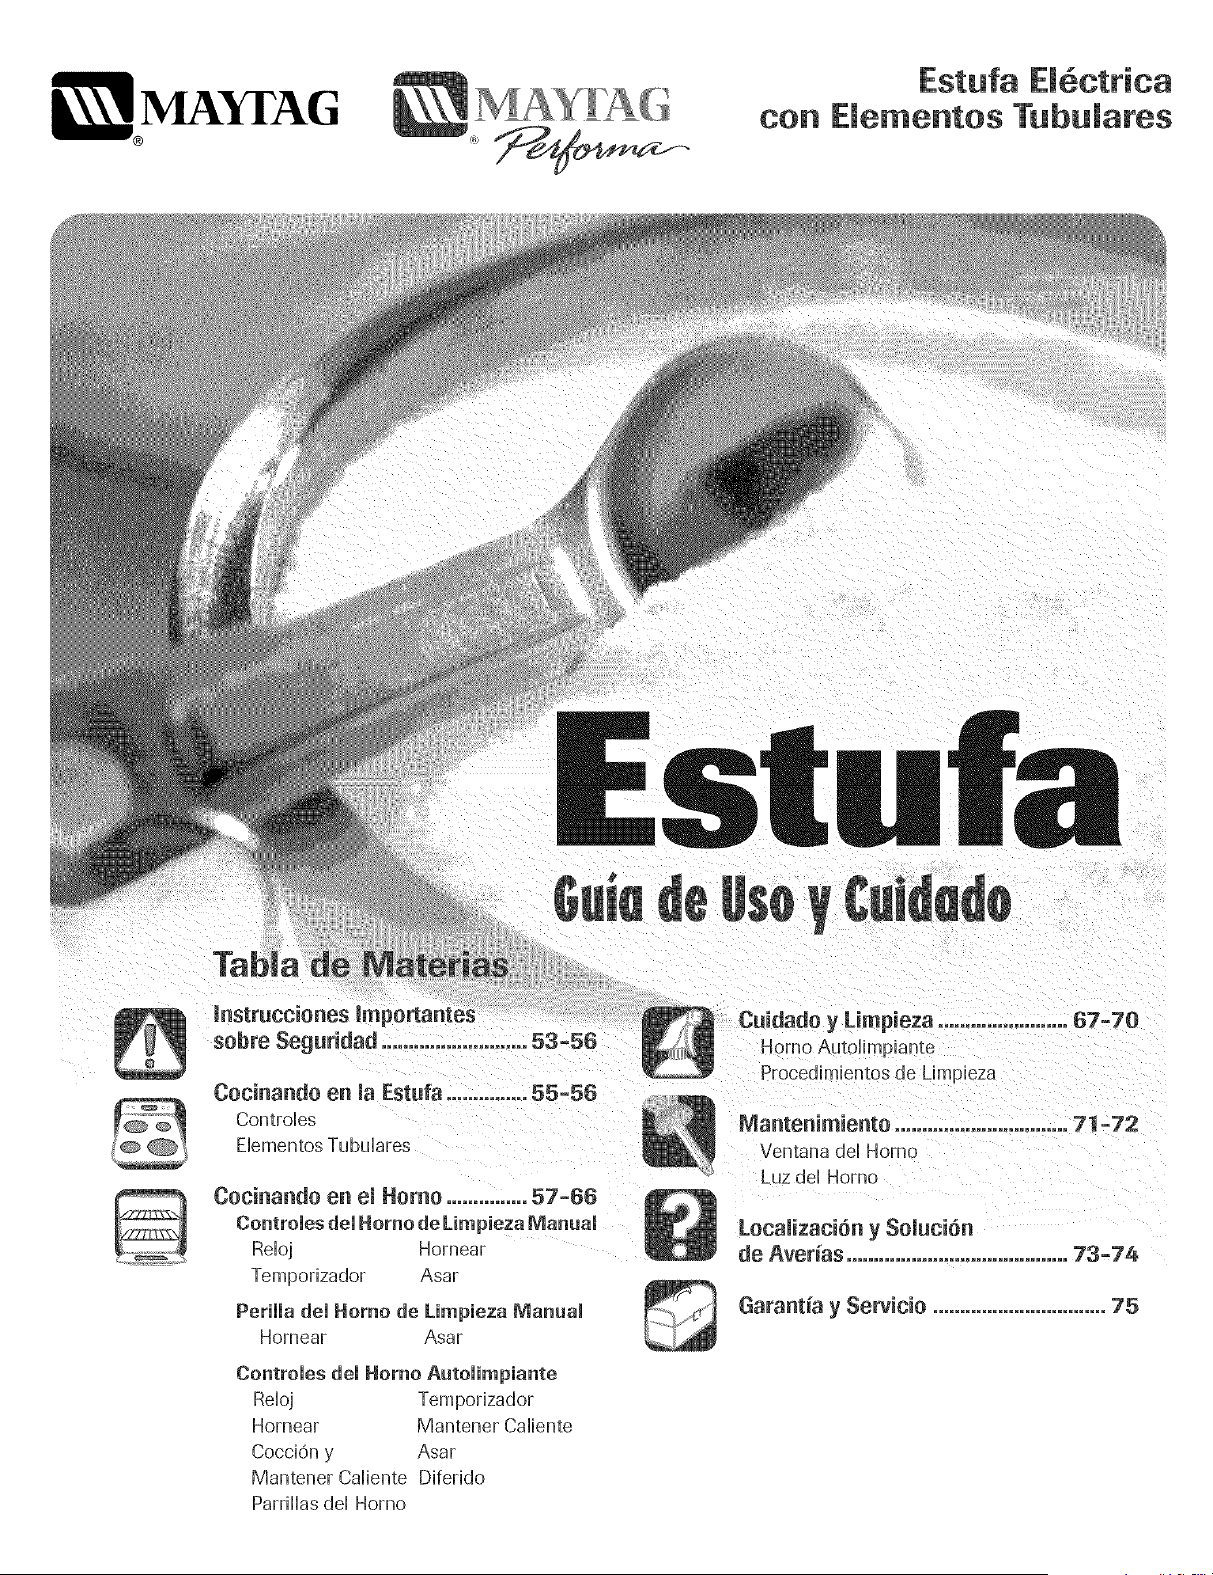
Q MAYrAGQ l:stufa m:[_ctrica
con E[emeetos Tebe[ares
sobre Seguridad ........................... 53=56
Cocinando en la Estufa ............... 55-56
Controles
Ebmentos Tubulares
Cocinando en e[ Homo ............... 57-66
Controies dei Homo de Limpieza Manua[
Reloj Homear
Temporizador Asar
Periiia dei Homo de Limpieza Manual
Homear Asar
Controies dei Homo Automimpiante
Reioj Temporizador
Hornear Mantener Caliente
CocciOn y Asar
Mantener Caliente Diferido
Parrillas del Homo
Cuidado yLimpieza ........................ 67-70
Homo AutoJimpiante
Procedimientos de Limpieza
Mantenimiento ................................ T!-72
Ventana del Homo
Luz de[ Homo
Localizaci6n y $o[uci6n
de Averias .........................................73-74
Garant_a y Servicio ................................75
Instamador:Porfavor dejeestagu[a iun[o con eE
ebctrodomestico.
Oonsumidor: Potfavor leay conserveestaguia parareferencla
futura. Conserveel recibode complay/o el chequecanceBdo
comocomprobantede compra.
N_imerode Mode[o
NOmerode Sene
Fechaae Coml;ra
S[tiene preguntas.[Lamea:
Maytag CustomerAssistance
1-800-688-9900en EE.UU.
]-800-6{-8-2002en Canada1
(LunesaViernes 8:00a.m,a 8:00p.m.Hora de[ Este}
Intemet: http://www.may_ag,com
Enhues[tocont_nuoaf_n de mejorar[a cal[dady rend[miemode
nuestroselectrodom@ticos,puedeque seanecesanomodificar
ele[ectrodomeshcosin actua[izarestagufa.
PaPainfermadSn sebre sendde, vet pbdina 75.
como resultado de su uso inapropiado, Utilice este
electrodomestico solamente para el prop6sito que ha sido
destinado segOn se describe en esta guia,
Para asegurar funcionamiento correcto y seguro: Ei
ebctrodom6stico debe ser instaBdo debidamente y puesto a
tierra por un t@nico cdificado. No intente ajustar, reparar,
prestar servicio o reemplazar ninguna pieza de este producto
a menos que sea espedficamente recomendado en esta guia.
Todas Bs reparaciones deben ser redizadas por un t@nico
calificado,
Siempre desenchufe el electrodom6stico antes de efectuar
aiguna reparaci6n,
" TODAS LAS ESTUFAS SE PUEDEN
Las advertencias e instrucciones importantes sobre seguridad
que aparecen en esta guia no est_in destinadas a cubrir todas
las posibles circunstancias y situaciones que puedan ocurrir,
Se debe ejercer sentido comun, precauci6n y cuidado cuando
instale, realice mantenimiento o haga funcionar el artefacto,
Siempre p6ngase en contacto con el fabricante si surgen
problemas o situaciones que usted no comprenda,
Reconozca Ros simbo}os, advertencias,
etiquetas de seguridad
ADVERTENClA -Pelig[0 o pr_cticas no seguras que
PODRIAN causar bsi6n personal grave o mortal
ATENCl0N, Pel!gr0s 0 pr_cticas no segu[as que PODR!AN
causar lesi6n personal menos gravel
Lea y siga todas las instrucciones antes de usar este
electrodom6stico para evitar ei riesgo potenciai de incendio,
choque ei@trico, iesi6n personal o da_o ai eiectrodom6stico
ADVERTENCIA: Para redacir el desgo de vuelco de!
electredem6stice a causa de use anermal edebide
a peso e×cesive ea la puer_a del homo, es aecesarie
aispositivo antivuelco debidamente instalaaol
Para verificar si el dispositivo est,1debidamente instalado, mire
debajo de ia estufa con una iinterna para asegurarse de que
uno de los tornillos niveladores traseros este debidamente
enganchado en la ranura del soporte, El dispositivo antivuelco
asegura el tornillo nivelador trasero al piso cuando est,1
debidamente enganchado, Esto debe verificarse carla vez
que la estufa sea movida,
Para Evitar un lncendio o
Da o Causado per emHumo
Asegurese de que todos los materiaies de empaque hayan
sido quitados del homo antes de ponerlo en funcionamiento,
No coloque materiales combustibles cerca del
electrodom6stico, No se deben guardar en el homo
materiales infiamables,
Muchos pl_sticos son afectados por el calor, Mantenga los
pl_isticos alejados de las piezas del electrodom6stico que se
pueden entibiar o calentar,
Para evitar incendios de grasa, no permita la acumulaci6n de
grasa de cocinar o de otros materiales inflamables en el homo
o en su cercan[a,
53
En Case de lncendio
Use un extintor con producto quimico seco odel tipo espuma o
bicarbonato para apagar el incendio o las llamas. Nunca use
agua en un incendio de grasa.
1. Apague el homo para evitar que la llama se disperse.
2. NUNCA levante o mueva una sarten en llamas.
3. Apague el fuego o la Ihma del homo cerrando la puerta del
homo.
Segutidad para Ni os
para aucanzar 10sart[cubs pueden les!0narse gravemente.
NUNCA deje a los ni_ios solos o sin supervisi6n cuando ei
homo este en uso o cuando est6 caiiente. Nunca permita que
los niSos se sienten o se paren en ninguna pieza del
eiectrodom6stico pues se pueden iesionar o quemar.
Se ies debe ense_iar a los ni_iosque ei eiectrodomestico y los
utensilios que est_n en el pueden estar calientes. Deje enfriar
los utensilios calientes en un lugar seguro, fuera del alcance
de los ni_ios. Se ies debe ensdiar a los ni_ios que un
eiectrodom6stico no es un juguete y que no deben jugar con
los controles u otras piezas del artefacto.
lnstrucciones Genetales
NUNCA use un electrodom6stico como un peidaHiopara
aicanzar los armanos superiores. El uso incon'ecto de las
puertas del electrodom6stico tales como pisar sobre elias.
apoyarse o sentarse en la puerta puede resuitar en que el
electrodom6stico se vuelque, se rompa la puerta y se
causen lesiones graves.
Para evitar posibles riesgos para el usuario y ddio al
electrodomestico, no use este producto como una estufa para
calentar o entibiar una habitaci6n, Adem_s no use el homo
como un lugar para guardar alimentos o utensilios de cocina,
No obstruya ia circuiaci6n dei aire bioqueando ei respiradero
dei homo,
NO TOQUE LOS ELEMENTOSCALEFACTORESNI LAS
SUPERFICIESINTERIORESDEL HORNO. Los eiementos
calefactores pueden estar calientes aOncuando su color sea
obscuro. Las superficies interiores de cuaiquier homo se
calientan Io suficiente como para causar quemaduras. Du-
rante y despu6s dei uso, no toque ni permita que ias ropas u
otros materiales inflamables entren en contacto con los
eiementos caiefactores o ias superficies interiores dei homo
hasta que no se hayan enfriado. Otras superficies dei
electrodomestico pueden estar Io suficientemente calientes
para causar quemaduras - entre estas superficies est_in la
abertura dei respiradero dei homo y ia superficie cerca de esta
abertura, ia puerta dei homo y ia ventana de ia puerta dei
homo.
No toque un foco caiiente dei homo con un paso huJmedo
pues se puede quebrar. Si ei foco se quiebra, desenchufe ei
eiectrodomestico antes de sacar ei foco para evitar sufrir un
choque ei6ctrico.
NUNCA use papei de aiuminio para cubrir ias parriiias dei
homo ni ei panel inferior dei homo. Ei uso incorrecto puede
resuitar en un riesgo de choque ei6ctrico, incendio o da_ioai
electrodom6stico. Use papel de aluminio solamente como se
indica en esta guia.
Seguridad al Cocinat
Nunca caiiente un contenedor de aiimento cerrado en ei
homo. La acumuiaci6n de presi6n puede reventar ei
contenedor causando una lesi6n personal grave o daSo al
electrodom6stico.
Use tomaollas secos y gruesos. Los tomaollas hOmedos
pueden causar quemaduras por vapor. No se deben usar
toallas de secar los platos ni otros sustitutos en vez de los
tomaoiias porque pueden pasar sobre los eiementos caiientes
y encenderse o pueden quedar atrapados en ias piezas dei
electrodom6stico.
Use vestimentas apropiadas, Las ropas sueitas o ropas con
mangas largas sueltas no se deben usar cuando se est,1
cocinando, La ropa se puede prender fuego y causar
quemaduras si entra en contacto con los elementos
calefactores,
Siempre coioque ias parriiias dei homo en ias posiciones
deseadas cuando ei homo este frio. Desiice ia parriiia dei
homo hacia afuera para agregar o retirar aiimentos usando
tomaoiias secos y gruesos. Siempre evite coiocar o retirar
alimentos del homo sin sacar la parrilla hacia afuera. Si una
parrilla debe ser movida cuando este caliente, use un
tomaollas seco. No deje que el tomaolla entre en contacto
con ei eiemento caiiente dei homo.
54
Uselasparrillassolamenteenelhomoenquefueron
enviadas/compradas.
Tengacuidadocuandoabralapuertadelhomo.Primerodeje
quesdgaelaireovaporcalienteantesdesacarovelveta
colocareldimentoenelhomo.
ADVERTENCiA SOBRE ALiMENTOS PREPARADOS: Siga
las instrucciones del fabricante del dimento, Si un contenedor
de dimento congelado de pl4stico y/o su tapa se deforma,
comba o de otra manera se da_a durante la cocci6n,
inmediatamente descarte el alimento y su contenedor, El
alimento puede estar contaminado,
No permita que el papel de aluminio o la sonda de la came
toque el elemento calefactor,
Siempre apague todos los controles cuando haya terminado
de cocinar,
Nunca deje que un utensilio hierva hasta quedar seco pues
esto puede da_ar el utensilio y la estufa.
Siga las instrucciones del fabricante cuando use bolsas para
cocinar en el homo.
NUNCA deje los elementos superiores sin supervisi6n,
especidmente cuando est6 usando los ajustes de crier altos.
Un derrame que no reciba la debida atenci4n puede causar
humo y un derrame de grasa puede causar un incendio.
Este electrodom6stico tiene diferentes tamales de elementos
superiores. Seleccione utensilios que tengan bases planas Io
suficientemente grandes para cubrir el elemento. La rehci4n
adecuada entre el utensilio y el elemento mejorara la
eficiencia al cocinar.
Segutidad sobre el Use
de UtensiJios
Siga las instrucciones del fabricante cuando use bolsas para
cocinar en el homo.
El rendimiento y funcionamiento seguro de este
electrodom6stico ha side comprobado usando utensilios de
cocina tradiciondes. No use ningun dispositivo o accesorio
que no haya side espedficamente recomendado en esta guia.
No use cubiertas, rejillas superiores de la estufa o sistemas de
convecci6n para homes. El use de dispositivos o accesorios
que no sean expresamente recomendados en esta guia puede
crear peligros graves de seguridad, afectar el rendimiento y
reducir la vida Otil de los componentes de este
electrodom6stico.
Si e[ utensi[io es mas pequeffo que e[ e[emento, una porci6n
del elemento quedar4 expuesta y puede encender la ropa o un
tomaollas,
Solamente ciertos tipos de utensilios de vidrio, vidrio ceramico,
cer4mica, gres u otros utensilios vidriados son convenientes
para cocinar en la superficie o en el homo sin quebrarse
debido al repentino cambio de temperatura. Siga las
instrucciones del fabricante del utensilio cuando use vidrio.
Gire los mangos de los utensi[ios hacia e[ centre de [a
cubierta, no hacia la habitaci6n ni sobre otto elemento
superior. Esto reduce el riesgo de quemaduras, encendido de
materiales infiamables o derrames si el utensilio es tocado
accidentalmente o alcanzado per nifios pequeffos.
EJementos TubuJares
Para evitar dafio a los e[ementos ca[efactores removib[es, no
los sumerja, remoje ni lave en un lavavajillas o en un homo
autolimpiante. Un elemento daffado puede producir un
cortocircuito resultando en un incendio o riesgo de cheque
electrico.
Asegurese de que los platillos protectores esten en su lugar
pues la ausencia de estos durante la cocci4n )uede daffar el
alambrado.
Fortes Protecteres: No use papel de aluminio para forrar los
piatiiios protectores o ia parte inferior dei homo, excepto come
se sugiera en ia guia. La instaiaci6n incorrecta de estos fortes
puede resuitar en un riesgo de cheque ei6ctrico o incendio.
OJJas Freidoras
Use extreme cuidado cuando mueva la ella con aceite o
descarte la grasa caliente. Deje que la grasa se enfrie antes
de intentar mover la ella.
Campanas de VentiJaci6n
Limpie con frecuencia la campana y los fiRros a fin de evitar
que se acumule en ellos grasa u otros materiales infiamables y
para evitar incendios de grasa.
Cuando prepare dimentos fiameados debajo de la campana,
encienda el ventilador.
55
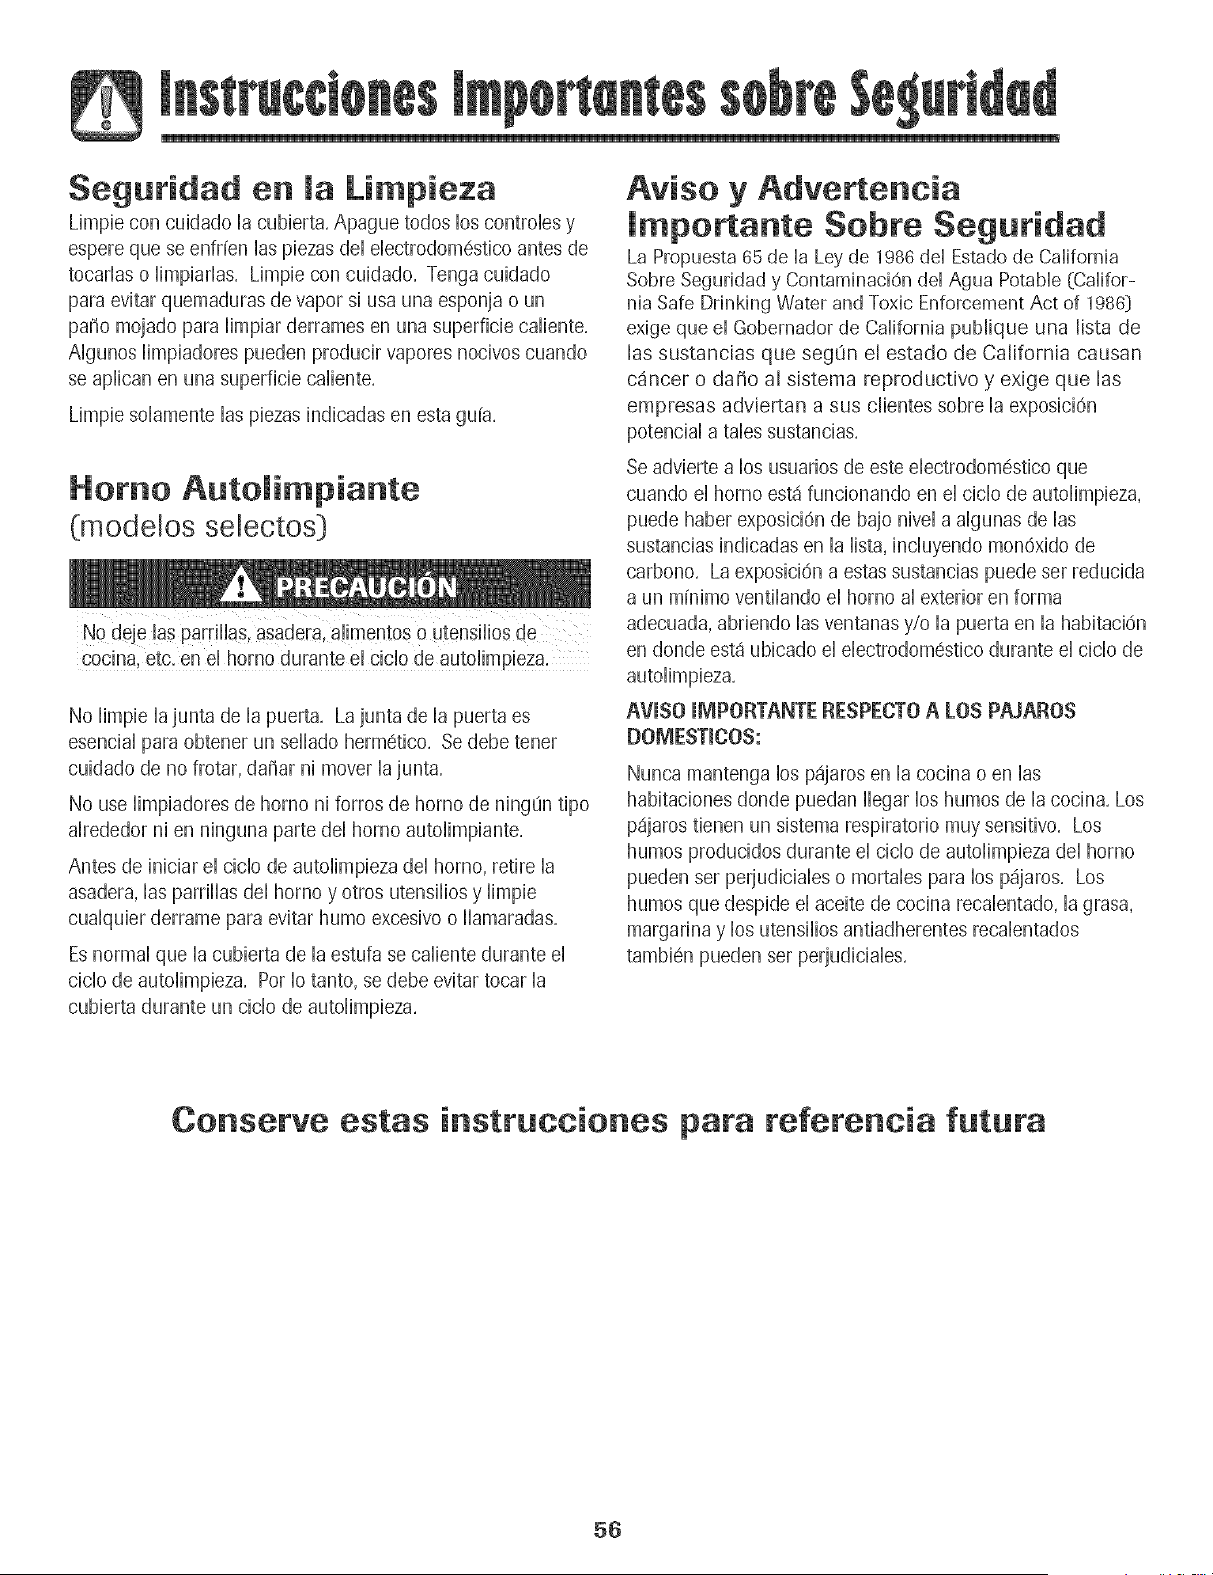
Seguridad en la Li pieza
Limpie con cuidado la cubierta, Apague todos los controles y
espere que se enfrien las piezas del electrodom6stico antes de
tocarlas o limpiarlas, Limpie con cuidado, Tenga cuidado
para evitar quemaduras de vapor si usa una esponja o un
patio mojado para iimpiar derrames en una superficie caiiente,
Aigunos iimpiadores pueden producir vapores nocivos cuando
se aplican en una superficie caliente,
Limpie solamente las piezas indicadas en esta guia,
Homo Automi piante
(modebs selectos}
c0cina, etc:e n e! horno durante e! cid0 de aut0[impieza:
No iimpie ia junta de ia puerta, La junta de ia puerta es
esencial para obtener un sellado hermetico, Se debe tener
cuidado de no frotar, da_iar ni mover la junta,
No use limpiadores de homo ni forros de homo de ningun tipo
alrededor ni en ninguna parte del homo autolimpiante,
Antes de iniciar el ciclo de autolimpieza del homo, retire la
asadera, las parrillas del homo y otros utensilios y limpie
cualquier derrame para evitar humo excesivo o llamaradas,
Es normal que la cubierta de la estufa se caliente durante el
ciclo de autolimpieza, Por Io tanto, se debe evitar tocar la
cubierta durante un cicio de autolimpieza,
Aviso yAdverteneia
lmportante Sobre Seguridad
La Propuesta 65 de la Ley de 1986del Estado de California
Sobre Seguridad y Contaminaci6n del Agua Potable {Califor-
nia Safe Drinking Water and Toxic Enforcement Act of 1986}
exige que ei Gobernador de California publique una lista de
las sustancias que segOn el estado de California causan
cancer o da_o al sistema reproductivo y exige que las
empresas advbrtan a sus dbntes sobre la exposici6n
potencial a tabs sustancias,
Se advierte a los usuarios de este eiectrodom6stico que
cuando el homo est_ funcionando en el ciclo de autolimpieza,
puede haber exposici6n de bajo nivei a aigunas de ias
sustancias indicadas en la lista, incluyendo mon6xido de
carbono, La exposici6n a estas sustancias puede ser reducida
a un minimo ventiiando ei homo ai exterior en forma
adecuada, abriendo las ventanas y/o la puerta en la habitaci6n
en donde esta ubicado ei eiectrodomestico durante ei cicio de
autolimpieza,
AVISO IMPORTANTE RESPECTO A LOS PAJAROS
DOMESTmCOS:
Nunca mantenga los p_jaros en ia cocina o en ias
habitaciones donde puedan llegar los humos de la cocina, Los
p_jaros tienen un sistema respiratorio muy sensitivo, Los
humos producidos durante el cicio de autolimpieza del homo
pueden ser perjudiciaies o mortaies para los p_jaros, Los
humos que despide el aceite de cocina recalentado, la grasa,
margarina y los utensilios antiadherentes recalentados
tambi6n pueden set perjudiciales,
Conserve estas instrucciones para referencia futura
56
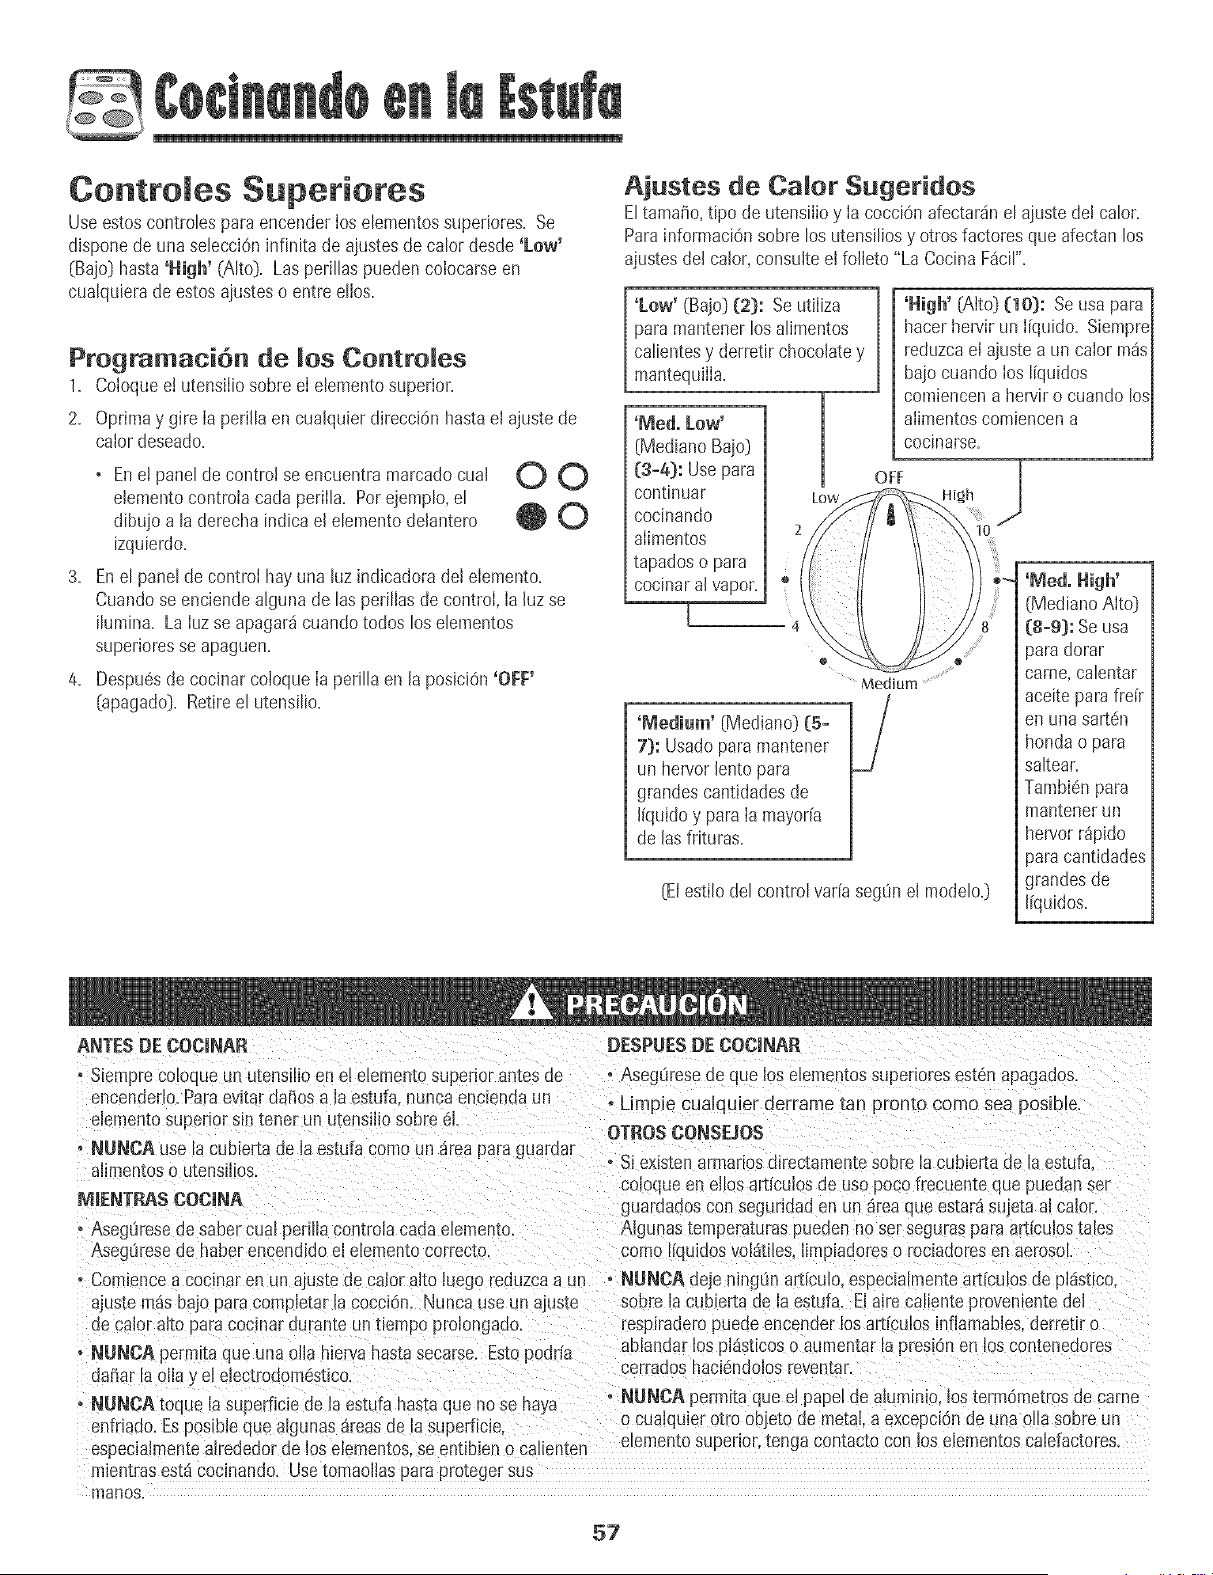
Centroles Superieres
Useestoscontrolesparaencenderlos elementossupedores. Se
dlsponede una selecci6ninfinitade ajustesde calor des@ 'Low'
(Bajo] hasta'Nigh' (Alto}. Las perillaspuedencolocarseen
cualquierade estosajusteso entre ellos.
Programaci6n de los Controles
1. Coloquee! utensiliosobre el elementosuperior.
2. Oprimay gire Ia perillaen cualquier direcci6nhastael ajustede
calordeseado.
3.
4.
• Enet paneldecontro! se encuentramarcadocual O O
elementocontroiacada perilla. Porejemplo,el
dibujoa laderecha indicael elementodelantero _ _J
izquierdo.
Enel paneldecontrol hayuna luz indicadoradel elemento.
Cuandose enciendealgunade las perillasde control, Ia hz se
ilumina. La Iuzse apagar_cuandotodos los elementos
superioresse apaguen.
Despu@de cocinarcoioqueIa perilla en la posiciOn'OFF'
{apagado). Retireel utensilio.
Ajustes de Calor Sugeridos
EltamaSo,%0 de utensilioy Ia cocci@ afectardnel ajuste del calor.
ParainformaciOnsobre los utensiliosy otrosfactoresque afectan Ins
ajustesdel calor,consulte el folleto"La CocinaF_cil'.
'Eow' (Bajo] (2}: Seutiliza
paramantenerInsalimentos
calientesy derretir chocolatey
mantequilIa.
'iVied. Low+
{MedianoBajo]
{:3-4}: Usepara
continuar
cocinando
alimentos
tapadoso para
cocinaralvapor.
[ +
'Nigh' {Alto} (10): Seusapara
hacerhen/it un Ifquido. Siempre
reduzcael ajustea un calor m_s
bajocuando los Ifquidos
comiencena hervir o cuando los
aiimentoscomiencena
cooinarse.
OFF
High
O
Medium ...................
'lViedium' {IVlediano}(5-
7}: Usadoparamantener
un hen/or lento para
grandescantidadesde
Ifquidoy paraIa mayorfa
de las frituras.
{Elestilodel controlvar[aseg0n el modelo.]
(MedianoAlto}
(8°9): Seusa
}ara dorar
carne,calentar
aceiteparafrdr
en una sart_n
hondao para
saltear.
Tambi6npara
mantenerun
hen/or r@ido
)ara cant+dades
grandesde
%uidos.
ANTESDE COCINAR DESPUESDE COCJNAR
• SLemprecoloque un u[ensflloen e! etementosuper+orantesde
encenderlo.Paraev+tardai_losa laestufa,nuncaenciendaun
elemen[osuperior smtener un utensiliosobre 61.
, NUNOA Jse lacublertade laestufa comoun areapara guarda+
aiimentosc utensilios.
M]ENT_S COCINA
+AsegOresedesabercure perltiacontrolacada eJememo,
Aseg8resede haberencendidoel ebmemo correc_o.
+AsegOresede que los elememossuperioresest_napagaJos,
, Limpie cuaiquier derrame tan pronto como sea posibb
OTROSCONSEJOS
o Siexistenarmadosdirectamentesobre lacubierta de la estufa
soloqueenNios articuiosde usopoco frecuenteque puedanser
guardadoscon seguridaden un areaqueestarasujetaa] calor.
Aigunastemperaturaspuedenno set segurasparaart[culos(ales
como tiquidosvol_tibs. ]impiadoreso rocmdoresen aerosot.
• Com+encea cocmaren un ajus[ede calor alto luegoreduzcaa un + NUNCA deje mng6n articulo,especmlmentearticutosde pi4stbo.
ajustemasbNOparacompbtar lacocci6n, Nunca useun ajuste
de calor alto paracocmarouran[e unt_enLpoprolongado,
+ NUNCA permitaqueuna ofla hiervahastasecarse. Estopodria
da+3arlao+la_el electrodom@tico.
+ NUNCA toque lasuperficie de la estufahasmque nose haya
enfnado.Esposibb quealgunas areasde la superficJe
especialmentealrededorde los etemen[os,se entibien o calien[en
mientrasest,1cocinando. Usetomaoilas parapro[eger sus
rnanos.
sobre lacubierta de laestufa. Elairecahenteprovementedel
respiraderopueaeencender losarticulos inflamables,derretir o
abiandarlos piasticoso aumentarla presionen los contenedores
cerraaoshacidndolosrevenmr.
, NNNCA permitaqueel papelde aiuminio,los termOmetrosde came
o cualqu+erotro objeto de metal,a excepciOnde una olla sobreun
e_ememosuper+or,teng_comacto con los ebmentos cabfactores.
57
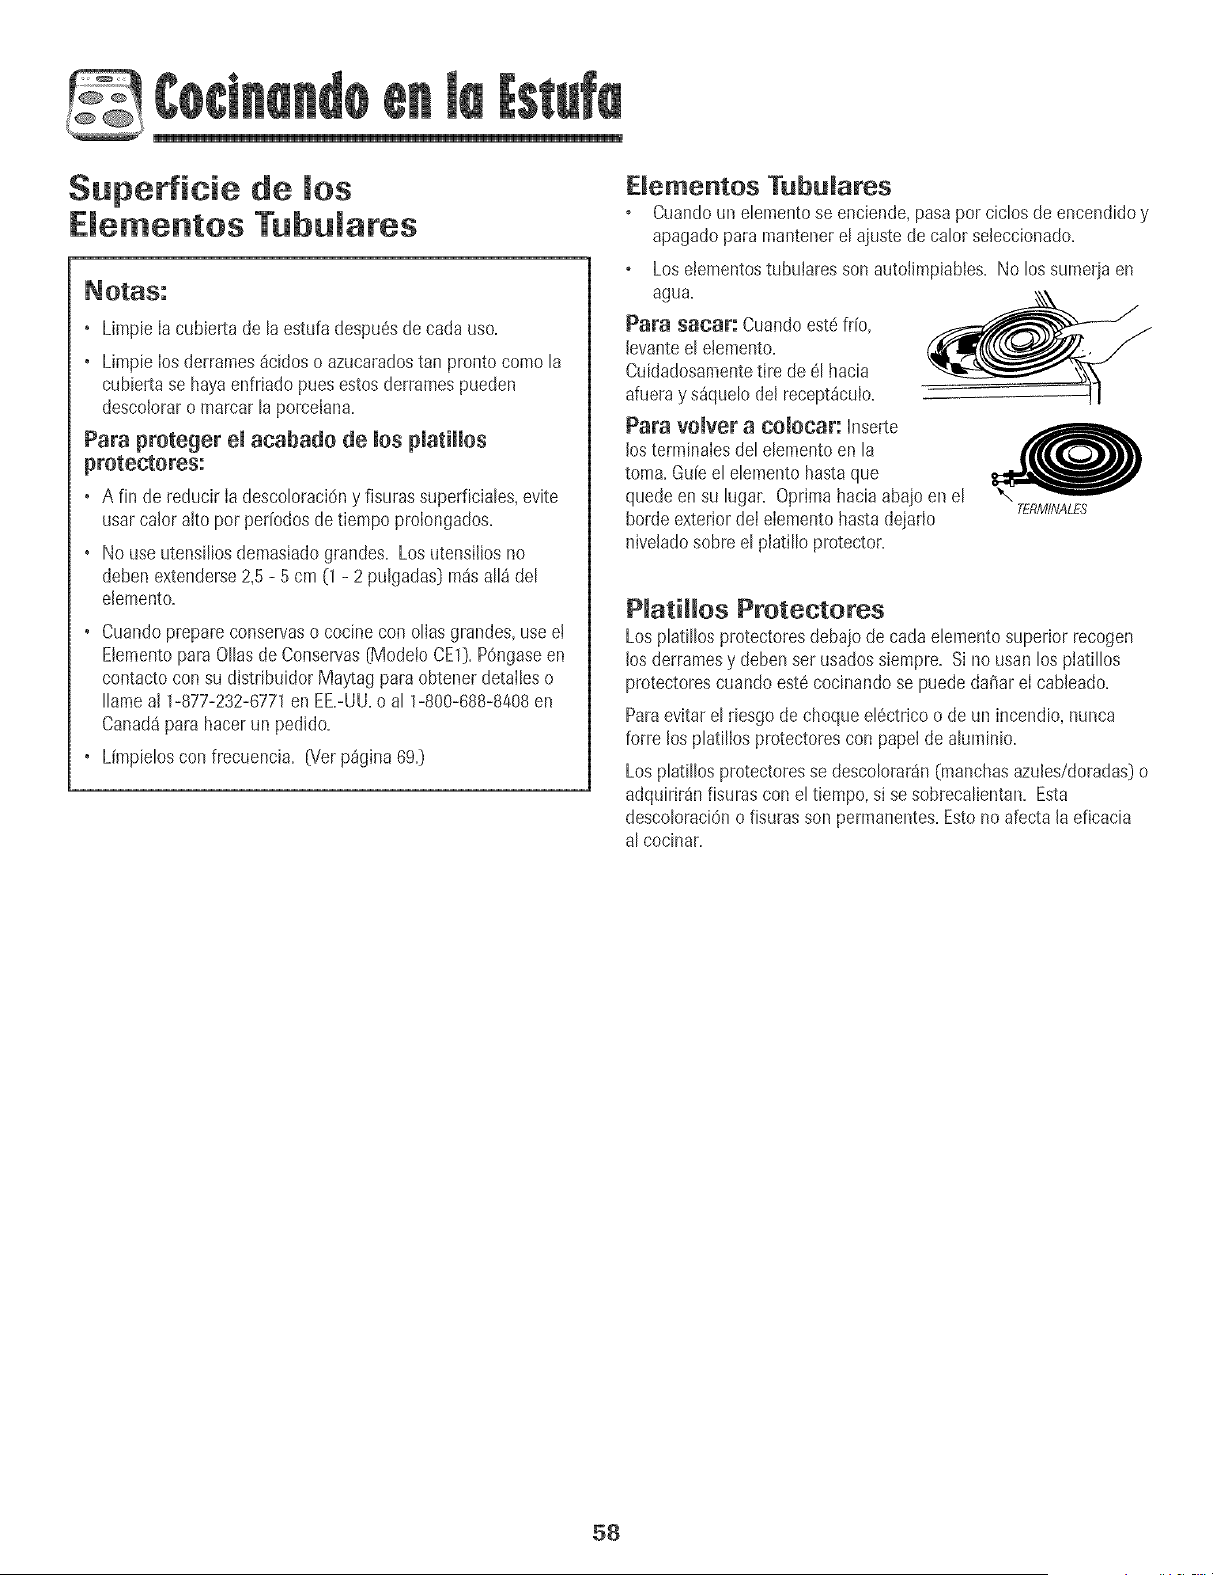
Supetficie de los
E e entos Tubu ares
• Limpie Iacubierta de taestufa despu6sde cadauso.
• Limpie Iosderrames_cidoso azucaradostan pronto como ta
cubiertase hayaenfriado puesestosderramespueden
descoloraro marcarta porcelana=
Para proteger emacabado de ruespmatimmos
protectores:
• A fin de reducir Ia descotoraci6ny fisurassuperficiates,evite
usarcalor alto pot per[odosdetiempo prolongados=
• No use utensiliosdemasiadograndes=Los utensiliosno
debenextenderse2,5 - 5 cm (1 - 2 pulgadas)m_sall_ del
elemento=
• Cuandoprepareconservaso cocinecon ollas grandes,usee!
Elementopara Ollasde Conservas[ModetoCE1)=POngaseen
contactocon su distribuidor Ma_,¢agparaobtenerdetalleso
Ilameal 1-877-232-6771en EE.-UU.o al 1-800-688-8408en
Canad8para hacerun pedido.
• L[mpieJoscon frecuencia. [Ver p_gina69.)
Dementos Tubu_ares
Cuandoun elemet_tose enciende,pasapor ciclos de encendidoy
apagadopara mantenerel ajustede calor seleccionado.
Los elementostubularessonautotimpiables=No los sumeriaen
agua=
Par8 sacar: Cuandoest_frio,
levanteel etemento.
Cuidadosamentetire de 61hacia
afueray s_quelodel recept_culo=
Para vomvera comocar: Inserte
losterminalesdel elementoen la
toma. Gu[eel elementohastaque
quedeen su lugar. Oprimahaciaabajoen el
bordeexteriordel elementohastadejaflo
hive[adosobre el piatillo protector.
TERfVIhVAL£S
PRatiRIos Protectores
Losplatillos protectoresdebajode carla elementosuperior recogen
los derramesy debenser usadossiempre=Sino usan los platillos
pmtectorescuando est6cocinandose puededaSareI cableado=
Paraevitarel riesgode choqueel6ctrico o de un incendio,nunca
forte los platillosprotectorescon papelde aluminio=
Losplatillos protectoresse descolorarSn(manchasazules/doradas)o
adquirir_nfisuras con el tiempo,si se sobrecalientan=Esta
descoloraciOno fisuras son permanentes=Estono afectala eficacia
al cocinar=
58
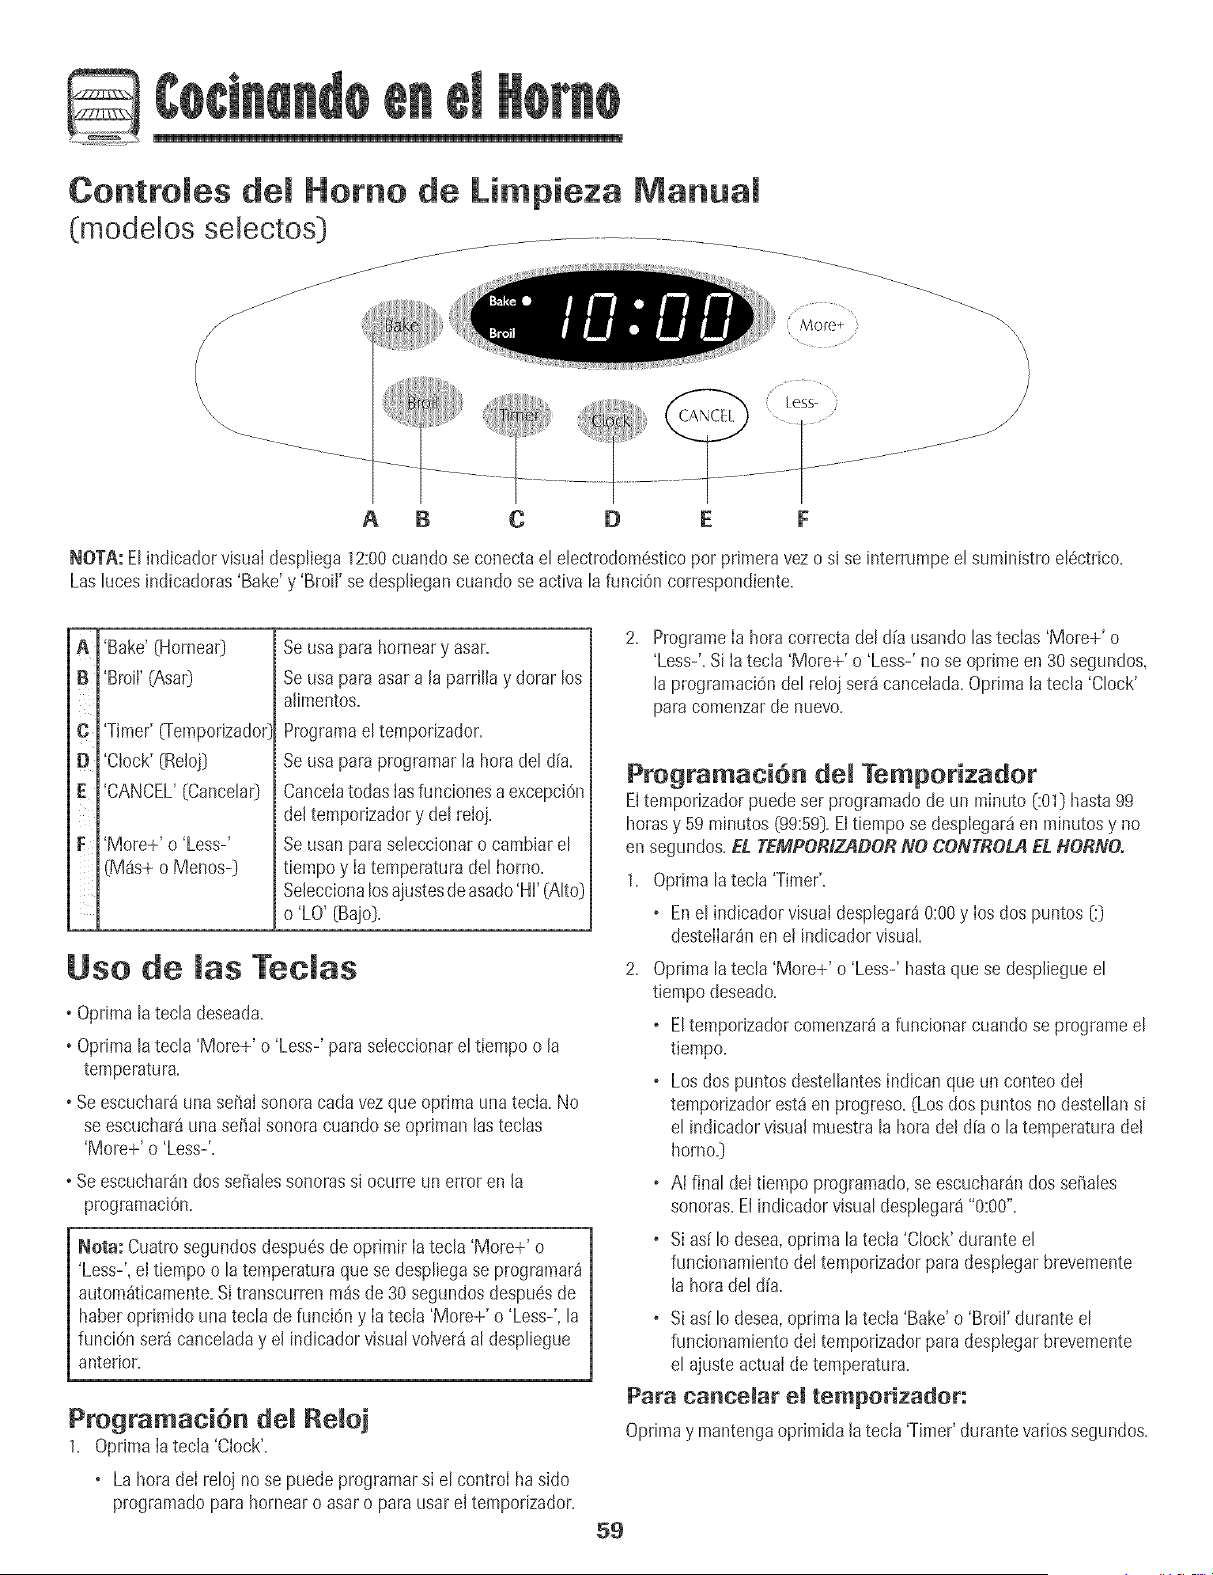
Q
ControJes del Homo de Limpieza MarmuaJ
(modelos selectos )
j_f
\\\
Iess- /
J
A B C D E F
NOTA: Elindicadorvisualdespliega12:00cuando se conectael electrodom6sticopot primeravezo si se interrumpeel suministroel6ctrico.
Laslucesindicadoras'Bake'y 'Broil' se despliegancuandose activa lafunciOncorrespondiente.
A
8
C
D
E
F
'Timer' _Temporizador}
'Clock' (ReJoi}
'CANCEL' [Cancehr}
'More+' o 'Less-'
(M4s+ o Menos-)
Seusa pare horneary asar.
Seusa paraasar a [a parriJJay dorarlos
aJimentos.
Programael temporizador.
Seusa paraprogramar[a horadel dia.
CanceJatodas[asfuncionesa excepciOn
de[ temporizadory del reioj.
Seusan paraseleccionaro cambiarel
tiempoy [a temperaturade[ homo.
SeJeccionalosaiustesdeasado'Hi'(Alto}
o'LO' [Ba}o).
Use de las Tedas
oOptima latecla deseada.
oOptima latecla 'More+' o 'Less-' paraseleccionarel tiempo o Ja
temperatura.
oSeescuchaMuna serialsonoracada vezqueoprima unatecla. No
seescuchar4unaserial sonoracuandose opriman Jasteclas
'More+' o 'Less-'.
oSeescuchar4ndos seraJessonorassi ocurre un error en Ja
programaci6n.
Nora: Cuatrosegundosdespu6sde oprimir [atecla 'More+' o
'Less-',el tiempo o la temperaturaquese despliegase programar_
autom_ticamente.Sitranscurrenm4sde 30segundosdespu6sde
haberoprimido unatecla de funci6ny Ia tecla 'More+' o 'Less-', la
funci6nsera canceladay el indicadorvisualvolver4al despliegue
anterior.
Programaci6n deJ ReJoj
1. Optima IatecJa'Clock'.
o LahoradeI reloj no se puedeprogramarsi el control hasido
programadoparahornearo asaro parausarel temporizador.
2. ProgrameIa horacorrecta del dia usandolasteclas 'More+' o
'Less-'.SiIa tecla 'More+' o 'Less-' no se @rime en 30segundos,
Japrogramaci6ndel reJoiset4cancelada.OptimaJatecJa'Clock'
paracomenzarde nuevo.
Programaci6n deJ Temporizador
Eltemporizadorpuedeset programadode un minuto [:01] hasta99
horasy 59 minutos (99:59].Eltiempose despIegar_en minutosy no
ensegundos.EL TEMPORIZADORNO CONTROLAEL HORNO.
1. Optima latecla 'Timer'.
o Enel indicadorvisual desplegar40:00y Iosdos puntos [:]
desteIIar_nen ei indicadorvisual
2. Optima latecJa'More+' o 'Less-' hastaquese despJiegueel
tiempodeseado.
o EltemporJzadorcomenzar4a funcionarcuando se programeel
tiempo.
o Los dos puntosdestellantesindican queun conteo deI
temporizadorest4en progreso.(Los dos puntosno destellansi
el indicadorvisuaJmuestrala horadel d[a o la temperaturadel
horno.]
o AI final deI tiempoprogramado,seescuchar4ndosserales
sonoras.El indicadorvisualdesplegar4"0:00".
o Si as[Io @sea,optima la tecla'Clock' duranteel
funcionamientodeJtemporizadorpara desplegarbrevemente
Jahoradeldia.
,Si asi Io desea,oprima la tecla'Bake'o 'Broil' durante el
funcionamientodeI temporizadorpara desplegarblevemente
el ajusteactualde temperatura.
Para cancelar el temporizador:
Oprimay mantengaoprJmidaJatecla 'Timer'durantevarJossegundos.
5g
Homeadoo Asado yAsado
ala Parrilia
Paraobtener mayorinformacicinsobre lostiemposy ias sugerencias
de homeado,asadoy asadoa laparrilh, consulteel folleto "La
CocinaF_cil".
Setting the Controls For Baking or Roasting:
1. Optimaiatecla 'Bake'.
•'000'se desplegar_y la hz indicadora'Bake' desteilar_en el
indicadorvisual
• Si oprime latecla 'Bake'y no programalatemperaturaen 30
segundos,e! programase canceiar_autom_ticamentey ia
heradel d{ase desplegar_nuevamenteen el indicadorvisual.
2. Oprimaiatecia 'More+' o 'Less-'hastaque la temperatura
deseadase despliegueen el indicadorvisual.
• LatemperaturadeI bornepuedeser programadade 75° a
285° C 070° a 550° F].
•'175°' [350°] se despiegar_cuando oprima latecla 'More+'
o 'Less-' perprimera vez.
• Oprimalatecla 'More+' o 'Less-' repetidamentepara cambiar
latemperaturaen incrementosde3° C [5° F], u oprimalay
mant6ngaiaoprimida paracambiarla temperaturaen 3.
incrementosde 6° C [10° F].
• Enet indicadorvisualse despiegar_38° 000°] o la
temperaturareal dei homo si es que es superiora 38° C
[100° F]cuando se enciendeeI homo.
• Latemperaturaaumentar_en incrementosde 3° C [5° F] hasta
Ilegara iatemperatura programada.Cuandoel homo se haya
precalentado,se escuchar_una serialsonora.
• Esperea que el homo se precalientedurante 10-15minutes.
• Paravedficaria temperaturaprogramadadurante el
precaientamientodel homo,oprima latecla 'Bake'.La 4.
temperaturase despiegar_durantetres segundos.
•Para camhiar matemperatara demhome durante el
procesode cocci6n,optima ia tecla 'Bake',iuegooptima 5.
'More+' o'Less-' hastaquese desplieguelatemperatura
deseada=
• Para cambiar matemperatura del homo durante 'Preheat',
optima dos vecea latecla 'Bake',luegooprima 'More+' o
'Less-' hastaque se desplieguelatemperaturadeseada.
Coloqueel aiimentoeI en homo.Verifiqueel progresode la
cocci6n cuando hayatranscurridoel tiempo m{nimo
recomendado.
Ai t6rmino de la cocci6n,oprima Ia tecla 'Cancel'pareapagarel
hornoy retireel alimentodel homo.
o El homo cuentacon una funci6n de apagadoautom_tico.Si se
deja encendidodurante 12horas,e] borne se apagar_
autom_ticamentey el indicadorvisualdespiegar_'000'. Optima
la tecla 'Cancel'y la hera de]dia se despiegar_nuevamenteen
el indicadorvisual.
Ajuste de los Controies para Asar a la Parrilla:
Paraobtener mejoresresultados,use un utensiliodise_ado
especiaimenteparaasara laparriila.
1. Coloqueia asaderade asara iaparriiia en la posiciOn
recomendada.[Ver latabla en la pSgina65.]
2. Optimalatecla 'BroiK
o 'SEt'se despiegar_y la hz indicadora'Broil' destellar_enel
indicadorvisual
Oprima[atecla 'More+' para programare[ asadoen e[aiuste'HI'
[alto] o 'Less-' parael ajuste'LO' (bajo].
o Seleccioneel aiuste'HI' (alto] paraasadoa Ia parrilla normal.
o Seleccionee! aiuste'LO' (bajo] paraasadoa Ia parrilIa a bajas
temperaturasparaevitarel doradoexcesivoen alimentosque
requierenmayorestiemposde cocci6ntales comela came de
ave.
o SI noseleccionaun ajustedeAsado ('HI' o 'LO'] en30
segundos,e! programase cancelar_autom_ticamentey Iahera
del d{ase desplegar_nuevamenteen el indicadorvisual.
Precalienteei elementode asara Ia parrilIa durante3 minutes.
DejeIa puerta abierta hastael primer tope,aproximadamente10
cm (4pulgadas].
Cuandoterminede asar a la parrilla,optima latecla 'Cancer para
apagare! borney retire el utensiliodel homo. Lahera deld{a
volver_a desplegarseen el indicadorvisual.
6O
@
Perilla del Home de Li pieza
Pt_anua_ (modelos selectos}
PerHla de _a Temperatura del Homo
La peritB 'OvenTemp'O-emperaturader
Homo] se usa parasebccionar y Broil
mantener,atemperaturade! homo.
Sbmpre gire estaperilB justo 5o_ {/
HASTAta temperaturadeseada.No
girea una temperaturam_sattay
Juegoretroceda.
400 35[
Ajuste del Homo para
Homeado yasado:
OFF
1. Oprimay gire la perilla'OvenTemp'a Ia temperaturadeseada.
Espere10a 15minutosparael precalentambnto.
2. Coloquee! alimentoen el centro del horno.Verifique si el
alimentose cocin6en eI tbmpo minimo indbado parala receta.
Cocinepor rodstiempo si es necesario.
3. Saqueel alimentodel hornoy gire la perilia'OvenTemp'a la
posbiOn"OFF".
Nora: Parasugerenciasadiciona[essobre comohomeadode[
horno,asardoy asadoa la parrflla,consulteel folleto "La Cocina
F_cil".
Ajuste de los Controles para Asado a la
1. Paraobtenerme)oresresukados,use un utensiIiodise_ado
especiaImenteparaasar a Ia parrilla.Coloquela asaderaen Ia
posiciOnde la parrilla recomendado.(VerIa tabla en p%ina 65.}
2. Gire Iaperilla 'OvenTemp'a 'Broil' paraasadoa la parrillaa
temperaturasm_sbajas,a 232° C {450° F}.
• EIasadoa la parriIlaa temperaturasrodsbajasevitaeI dorado
excesivode Iosalimentosquese cocinanpor rosstiempo,
tabs comoIascarriesde ave.
3. SigaIostbmpos sugeridosen Iatabtaparaasara laparriIIaen
p%ina 67 quese incluyea continuaciOn.Lacamedebedarse
vueltaunavezcuandoest_a mitaddeltiempodecocci@s.
4. Verifiqueei t6rmino de cocci@ haciendoun corteen la carne
cercadel centro paraverificar eI coIor.
5. Desp@sdeasar a la pardlla,coIoquela perilia'OvenTemp'en la
posiciOn"Off". Saquela asaderadeI homo.
61
Contro Homo (modeJos seJectos]
A B C D
o
E F G
...............................
HlJ
Elpanelde control haside disefiadoparasu f4cil programaciOn.Elindicadorvisualen et panelde control muestrala heradel dFa,el
temponzadory tasfuncionesdel homo. Etpanelde control mostradoarriba incluye[ascaracterFsticasespedficasdet modelo. (Elestilodel
paneldecontrol varFaseg0n el modelo0
iii_il
C
D
E¸
G
H
J
J
'Broil'[Asara
la Parrilla)
'Bake'(Hornea0
'More+/Less-'
(M_is+/Menos-)
'Timer'_emporizador}
'Cook& Hold'(CocciOn
y MantenerCaliente}
'Clean'(Limpieza)
'Delay'(Diferido)
+Clock'[Reloj)
'KeepWarm'
(MantenerCaliente)
'CANCEL'(CANCELAR)
Seusaparaasara lapmrillay @Farlos
alimentos.
Seusaparahorneary asar.
Programao cambialahera,la
temperaturadelhomo.Programaasara
laparrilla'HI'o'LO'.
Programae! temporizador.
Seusaparahornearduranteuntiempo
seleccionado,luegomantienee!alimento
calienteduranteunahera.
Seusaparaprogramarun ciclode
autolimpieza.
Programael homoparacomenzara
hornearo limpiarsea unaheraposterior.
Seusaparaprograraarlaheradeldia.
Seusaparamantenercalienteenet
homoel alimentococinado.
Cancetatodaslasfuncionesaexcepci6n
dettemporizadory etreloj.
Use de Jas Teclas
• Optimalatecla deseada.
• Oprima'More+' o 'Less-' paraprogramarel tiempo o la
temperatura.
+ Seescuchar4unasd_alsonora cadavezqueoprJmaunatecla.
+ Seescuchar_ndos se5aJessonorassi ocurreun erroren la
programaciOn.
Nota: Cuatrosegundosdespu_sde haberoprimido latecla
'More+' o 'Less-' el tiempoo latemperaturaser_autom4tica-
menteprogramada.Sitranscurren m_sde 30 segundosdespu6s
de haberoprimido unatecla defunciOny antesdeoprimir Ias
teclas 'More+' o 'Less-',la funciOnset4canceladay el indicador
visualw_lver4al despliegueanterior.
'O_OCk' (Reloj)
Elre!oj puedeser ajustadoparadesplegarIa heraya seaen formate
de 12horaso 24 betas.El relojha side programadoen laf_brJca
parael formate de 12horas.
Para cambiar el reJoj a formate de
24 horas:
1. Optimay mantengaoprimidasIasteclas
'CANCEL'y 'Delay' durantetres segundos.
2. Optima'More+' o 'Less-'para programarel
formate de 12horaso 24 horas.
3.
abajo.
Programaci6n de[ Reloj:
1. Optimala tecla 'Clock'.
• La heradel d[a y dos puntosdestellanen el
indicador.
2. Oprima'More+' o 'Less-'paraprogramar[a
hera deld[a.
• Los dos puntoscontint_andesteliando.
3. Oprima[a tecla 'Clock' nuevamenteo esperecuatro
segundos.
Programe[a heradel dia siguiendo las instruccionesindicadas
_i::Less-
cont,
62
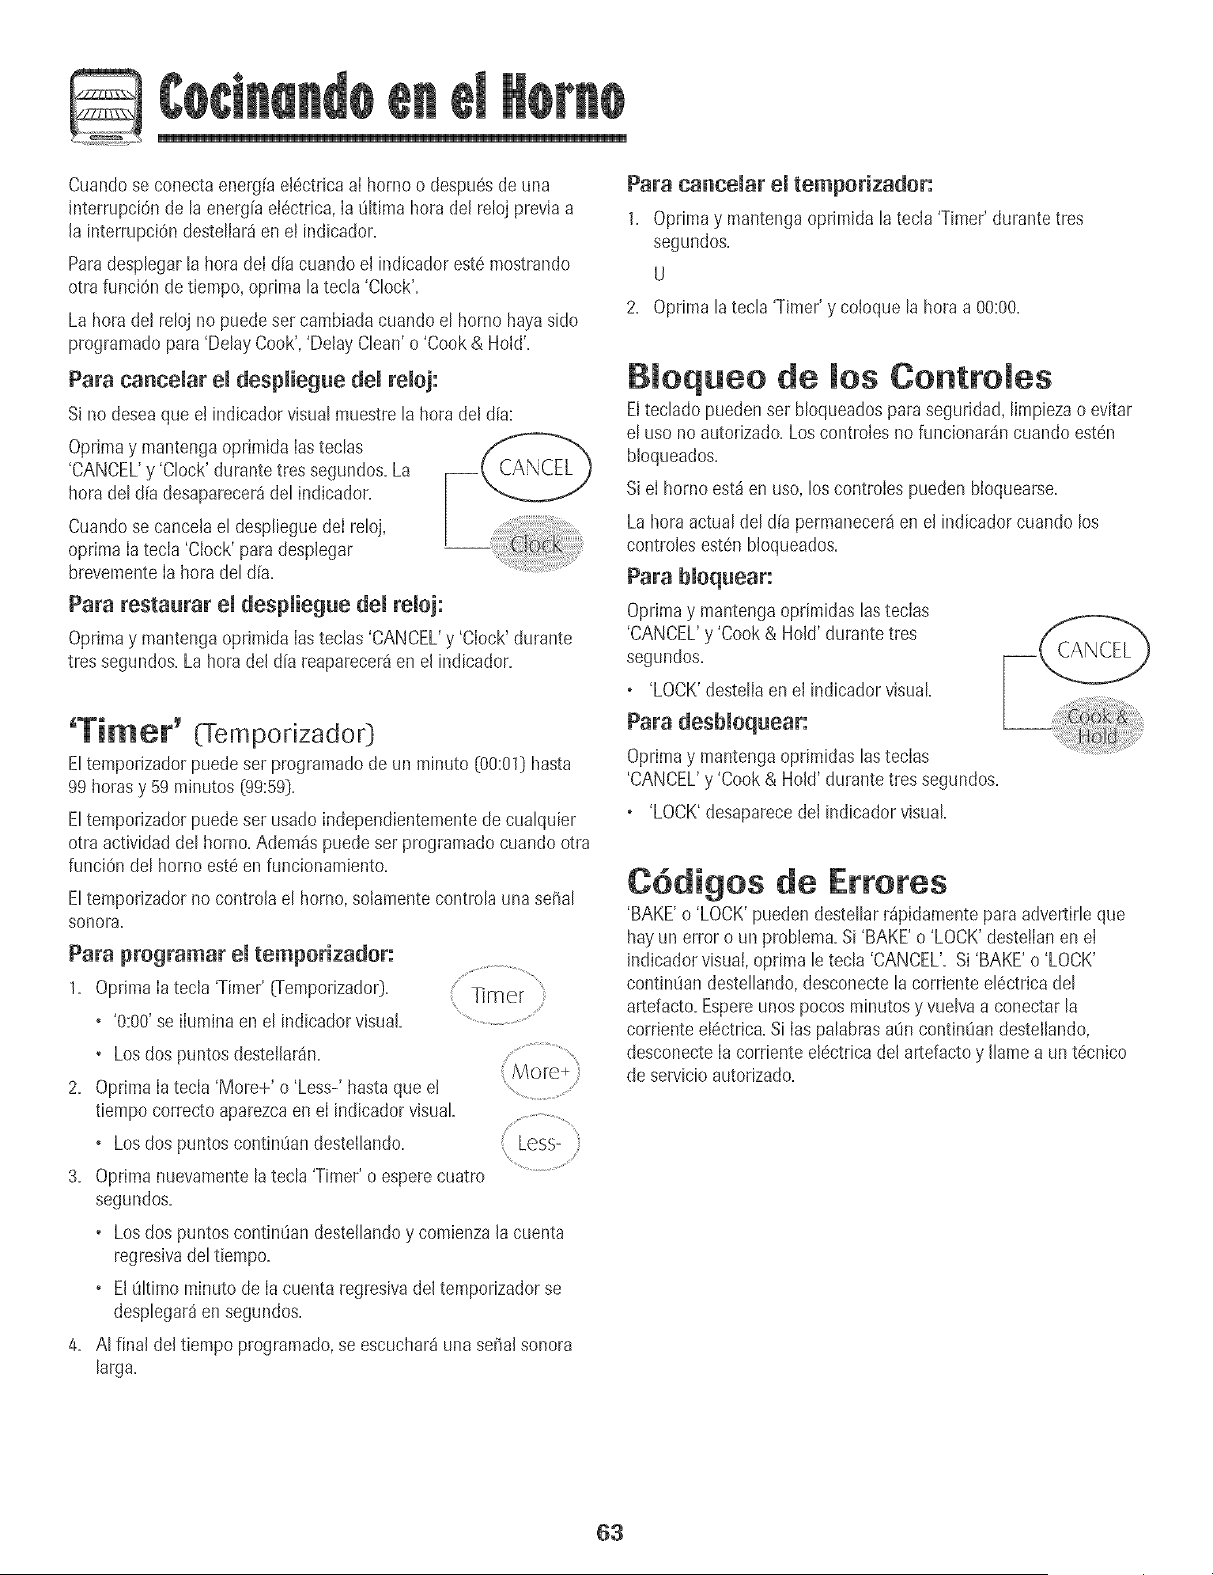
@
Cuandose conectaenergiae!6ctricaal homo o despu6sdeuna
interrupci6nde la energ[aet6ctrica,Ia likima horadel reloj previaa
la interrupciOndestellar_en el indicador.
Paradesplegarla horadeI aliacuando el indicadorest6 mostrando
otra funciOndetiempo, oprima latech 'Clock'.
La horadel reloj no puedeset cambiadacuandoel hornohayasido
programatic para'DelayCook','Delay Clean'o 'Cook& Hold'.
Para cancemar emdespmiegue demremoj:
Si nodeseaque e! indicadorvisualmuestre lahora del alia:
Oprimay mantengaoprimida Iasteclas
'CANCEL'y 'Clock' durantetres segundos.La
horadel dia desaparecer_del indicador.
Cuandose cancelael desplieguedeI reloj,
oprima Iatecla 'C+ock'paradesplegar
blevementeIa horadel dia.
Para restaurar emdespmiegue demremoj:
Oprimay mantengaoprimida Iasteclas 'CANCEL'y 'Clock'durante
tres segundos.Lahoradel d[a reaparecer_en el indicador.
'Timer' (Temporizador)
Eltemponzadorpuedeser pmgramadode un minuto (00:01}hasta
99 horasy 59 minutos (99:59}.
Eltemporizadorpuedeser usado independientementedecualquier
otra actMdad del homo.Adem_spuedeser pmgramadocuando otra
funci6n del homo est6en funcionamiento.
Eltemporizadorno controlael horno,solamentecontrolauna serial
so[_ora,
Para programar emtemporizador:
1. OptimaIatecla 'Timer' (Temporizado0.
+'0:00'se ilumina en el indicadorvisual.
• Losdos puntosdestellarSn.
2. OprimaIatecla 'More+' o 'Less-'hastaque e!
tiempo correctoaparezcaen el indicadorvisual
+ Losdos puntoscontin0andestellando.
3. Optimanuevamentelatecla 'Timer'o esperecuatro
segundos.
T_mer
%•...............................•
+•.................
• Losdos puntoscontintian desteJlandoy comienzaJacuenta
regresivadel tiempo.
+ El8ltimo minutode Ia cuentaregresivadel temporizadorse
desplegar_ensegundos.
4. A! final del tiempo programatic,se escuchar_una serialsonora
larga.
Para cancemar emtemporizador:
1. Optimay mantengaoprimida la tecla'Timer' durantetres
segundos.
U
2. Optima latecla 'Timer'y coloque lahora a 00:00.
B oqueo de Contromes
Eltecladopuedenser bloqueadosparaseguridad,Iimpiezao evitar
el uso no autorizado.Loscontroles no funcionar_ncuando est6n
bloqueados.
Siel hornoest_en uso,los controlespuedenbioquearse.
La horaactualdel aliapermanecer_en el indicador cuando los
controlesest6nbloqueados.
Para bmoquear:
Optimay mantengaoprimidaslasteclas
'CANCEL'y 'Cook & Hold'durante tres
segundos.
'LOCK'desteliaenel indicadorvisual
Para desbmoquear:
Oprimay mantengaoprimidaslasteclas
'CANCEL'y 'Cook & Hold'durante tressegundos.
'LOCK'desaparecedel indicador visual
C6digos de Errotes
'BAKE'o 'LOCK'puedendestellarr4pidamenteparaadvertirleque
hay un error o un problema.Si'BAKE'o 'LOCK'desteJlanen el
JndicadorvisuaJ,optima le tecla 'CANCEL'.Si'BAKE'o 'LOCK'
continOandestellando,desconectelacorrienteel6ctrica del
artefacto.Espereunos pocosminutosy vuelvaa conectarla
corrienteel6ctrica.Si IaspalabrasaOncontinOandestellando,
desconecteIa cornenteel6ctricadel artefactoy Ilamea unt6cnico
de servicioautorizado.
63
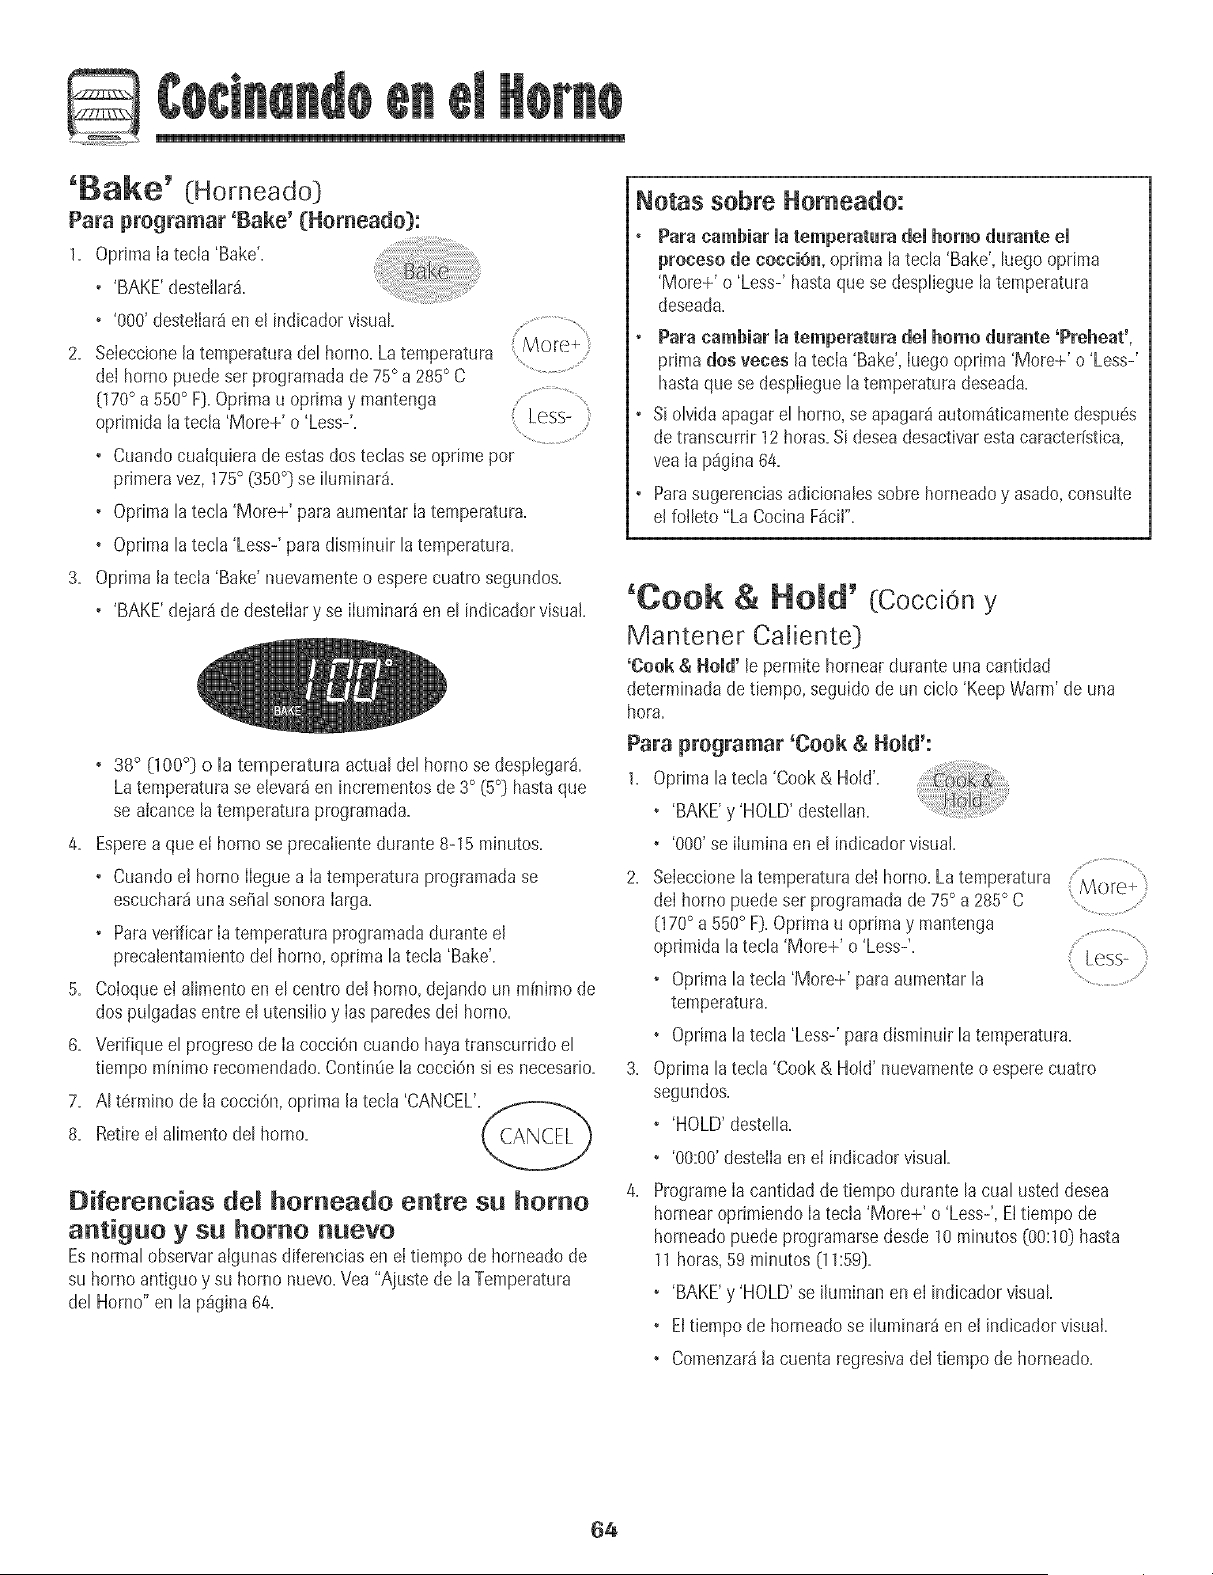
'Bake' (Horneado}
Para programar 'Bake' (Homeado):
1. Oprimalatecia 'Bake'.
•'BAKE'destethr&
+'000'destetlar_en el indicadorvisual. .......................
2. Seleccionelatemperaturadel horno. Latemperatura
del hornopuedeset pragramadade 75° a285° C ........................
070° a 550° F).Oprimau oprimay mantenga
oprJmida[a tecJa'More+' o 'Leas-'. 'Less-
, Cuandocualquierade estasdos teclasse oprime pot
prJmeravez,175° (350°] se ituminar&
+ Optimalatecla 'More+' para aumentarIa temperatura.
+ Optimalatecla 'Less-' paradisminuir latemperatura.
3. OpnmaJatecla 'Bake' nuevamenteo esperecuatrasegundos.
+'BAKE'dejar4de destelIary se iluminar4en el indicadorvisual
° 38° 0 00°} o la temperatura actual del hornose desplegar&
Latemperaturase elevar_en incrementosde3° (5°} hastaque
se alcancelatemperaturapr%ramada.
4. Espereaque et homo se precalientedurante 8-15minutos.
+ Cuandoet hornoIleguea Ia temperaturaprogramadase
escuchar_unasepal sonoraIarga.
+ ParavenficarIa temperaturaprogramadadurante el
precalentamientodel horno,optima latecla 'Bake'.
5. Coloqueel alimentoen el centrodel horno, dejandoun minimade
dospulgadasentre el utensilioy Iasparedesdel horno.
6. Venfique el progresode Ia cocciOncuando hayatranscurridoel
tiempo minimorecomendado.Contimiela cocci6n si es necesario.
7. AI t6rmino de la cocciOn,optimala tecla 'CANCEL'.!f---_
8. Retireel alimentodel horno.
Diferencias del homeade entre su homo
antiguo ysu homo nuevo
Esnormal observaralgunas diferenciasen el tiempode homeado de
su homo antiguoy su homo nuevo.Vea"Ajustede la Temperatura
del Homo" en la p_gina64.
Notas sebre Homeado:
Para camhiar matemperatara demhomo darante em
preeeso de eocci6n, oprima latecla 'Bake',luegooptima
'More+' o 'Less-' hastaquese desplieguelatemperatura
deseada.
Para camhiar matemperatara demhomo darante 'Preheat',
prima des votes latecla 'Bake',Iuegooprima 'More+' o 'Less-'
hastaque se desplieguelatemperaturadeseada.
Si olvidaapagarel horno,se apagar_autom4ticamentedespu6s
de transcurrir 12horas.Si deseadesactivarestacaracter[stica,
yea Ia pSgina64.
Parasugerenciasadicionalessobre horneadoy asado,consulte
el faIleto "La CocinaF_cil".
'Cook & Ho d' (CocciOn y
Mantener Caliente)
'Cook & Hold' le permitehorneardurante unacantidad
determinadadetiempo, seguidode un ciclo 'KeepWarm' de una
hora.
Para programar 'Cook & Hold':
1, Optima latecla 'Cook & Hold'.
• 'BAKE'y'HOLD' destellan.
+ '000'se ilumina en el indicadorvisual.
2. SeleccionelatemperaturadeI horno.La temperatura More,
deI homo puedeser programadade 75° a 285° C
070° a550° F).Optima u oprimay mantenga
oprimida la tecla'More+' o'Less-'.
• Oprimalatecla 'More+' paraaumentarla ................................
temperatura.
+ Oprima[atec[a 'Less-' paradisminuir [atemperatura.
3. Optima [atec[a 'Cook & Hold' nuevamenteo esperecuatro
segundos.
• 'HOLD'deste[[a.
• '00:00'desteilaen el indicadorvisual.
ProgrameIacantidadde tiempo dumnte lacual usteddesea
hornearoprimiendo Iatecla 'More+' o 'Less-', Ettiempode
homeadopuedeprogramarsedesde 10minutos (00:10)hasta
11horas,59 minutos 01:59].
• 'BAKE'y 'HOLD'se ihminan en el indicador visual.
• Eltiempo de horneadose iluminar_ enel indicadorvisual.
+ Comenzar4lacuenta regresivadel tiempode horneado.
64
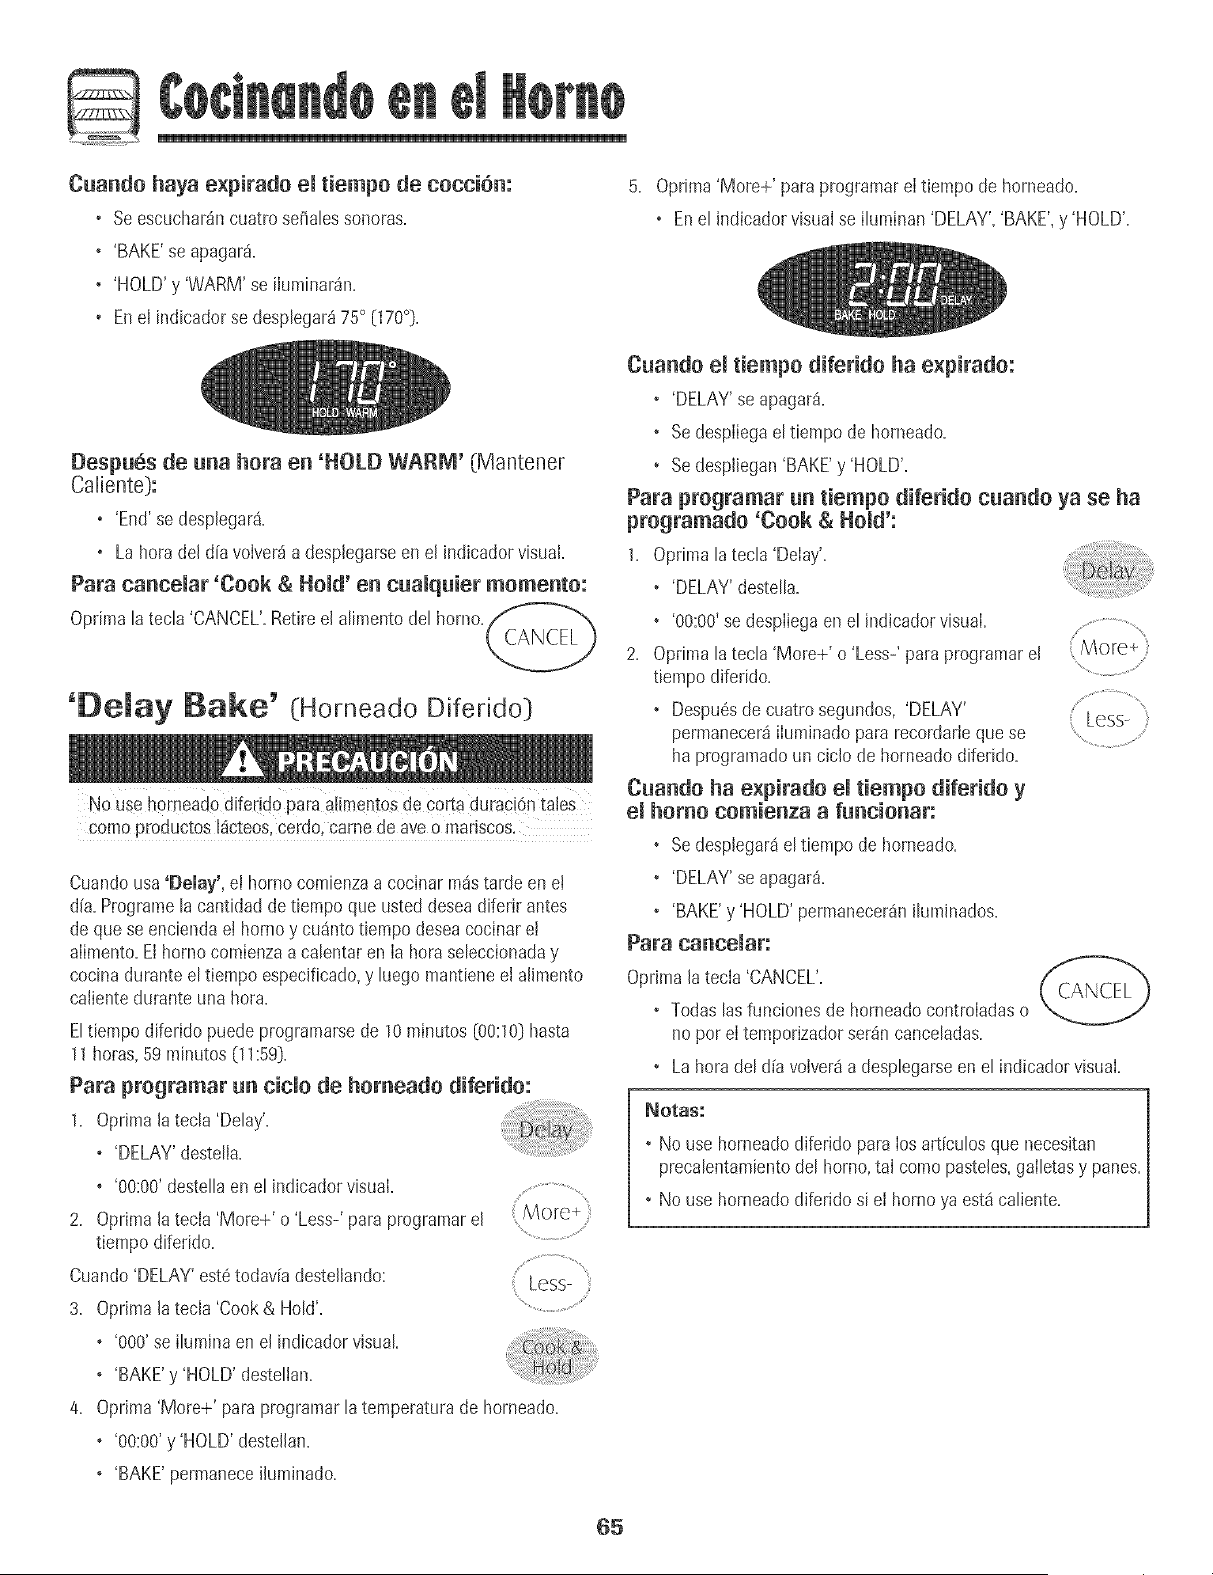
Q
Cuando haya e×pirado emtiempo de cocci6n:
+ Seescuchar_ncuatro sefialessonoras.
+'BAKE'se apagar_.
+'HOLD'y 'WARM'se iluminar_n.
• Enel indicadorse desplegar_75° 070°)+
5. Oprima'More+' paraprogramare[ tiempo de horneado.
o Enel indicadorvisualse iMTlinan'DELAY','BAKE',y 'HOLD'.
Despu6s de una hera en 'HOLD WARM' (Mantener
Caliente):
o'End' se desplegar&
o Laheradel d[a voIver_a desplegarseen el indicadorvisual
Para cancemar 'Cook & Hemal'en cnamqnier memento:
Optimala tecla 'CANCEL'.Retireel alimentodel horno.C_ANCE_
'Delay Bake' (HorneadoDiferido}
No use h0mead0difeddopara a!imentosde co+taduraci6ntales
comeproductos I_cteos,ce[do,came de aveo manscos.
Cuandousa'Delay', el homo comienzaa cocinar m_starde en ei
dia.Programelacantidadde tiempoque usteddeseadiferir antes
deque se enciendael borney cu_ntotiempodeseacocinare!
aIimento.Elhomo comienzaa calentaren Ia heraseleccionaday
cocinaduranteel tiempo especificado,y luegomantieneel alimento
caiientedurante una hera.
Eltiempo diferido puedeprogramarsede 10minutes {00:10]hasta
11horas,59 minutes (11:59}.
Para pregramar nn cicmede hemeado diferide:
1. Oprimala tecla 'Delay'.
o 'DELAY'destelia.
o '00:00'destellaen el indicadorvisual.
2. Oprimala tecla 'More+' o 'Less-' paraprogramarel More+ }
/
tiempodiferido. ........................
Cuando'DELAY'est6todaviadestellando: Less-
i d
3. Oprimala tecla 'Cook& Hold'.
o '000'se ilupahlaenel indicadorvisual
o 'BAKE'y 'HOLD'destelIan.
4. Oprima'More+' paraprograpaarlatemperaturade horneado.
o '00:00'y'HOLD' destellan.
'BAKE'permaneceihminado.
Cnande emtiempe diferide ha e×pirade:
• 'DELAY'se apagar_.
+ Sedespiiegaeltiempo de horneado.
+ Sedespliegan'BAKE'y 'HOLD'.
Para pregramar un tiempe diferide cnande ya se ha
pregramado 'Cook & Hold':
1. Optima latecla 'Delay'.
+ 'DELAY'destella.
+ '00:00'sedespliegaen el indicadorvisual.
2. Opnma latecla 'More+' o'Less-' para programarel More+
tiempo diferido.
+ Despu6sde cuatro segundos, 'DELAY' Less-
permanecer_iluminadopara recordarleque se ........................
haprogramatic un cic[o de horneadodiferido.
Cnande ha expirade emtiempe diferide y
emhomo cemienza a fnncienar:
+ Sedesplegar_el tiempo de homeado.
• 'DELAY'se apagar_.
• 'BAKE'y 'HOLD' permanecer_nilumhlados.
Para cancemar:
Oprimala tecia 'CANCEL'.
• Todaslasfuncionesde homeadocontroIadaso
noper eI temporizadorser_n canceladas.
• Laheradel d[a volver8a desplegarseen el indicadorvisual
Notas: ]
• No use horneadodiferido paralos articu[osque necesitan [
precalentamientodel borne,tal comepasteles,galletasy panes./
R
• No use horneadodiferido si el borneya est_caliente. ]
J
65
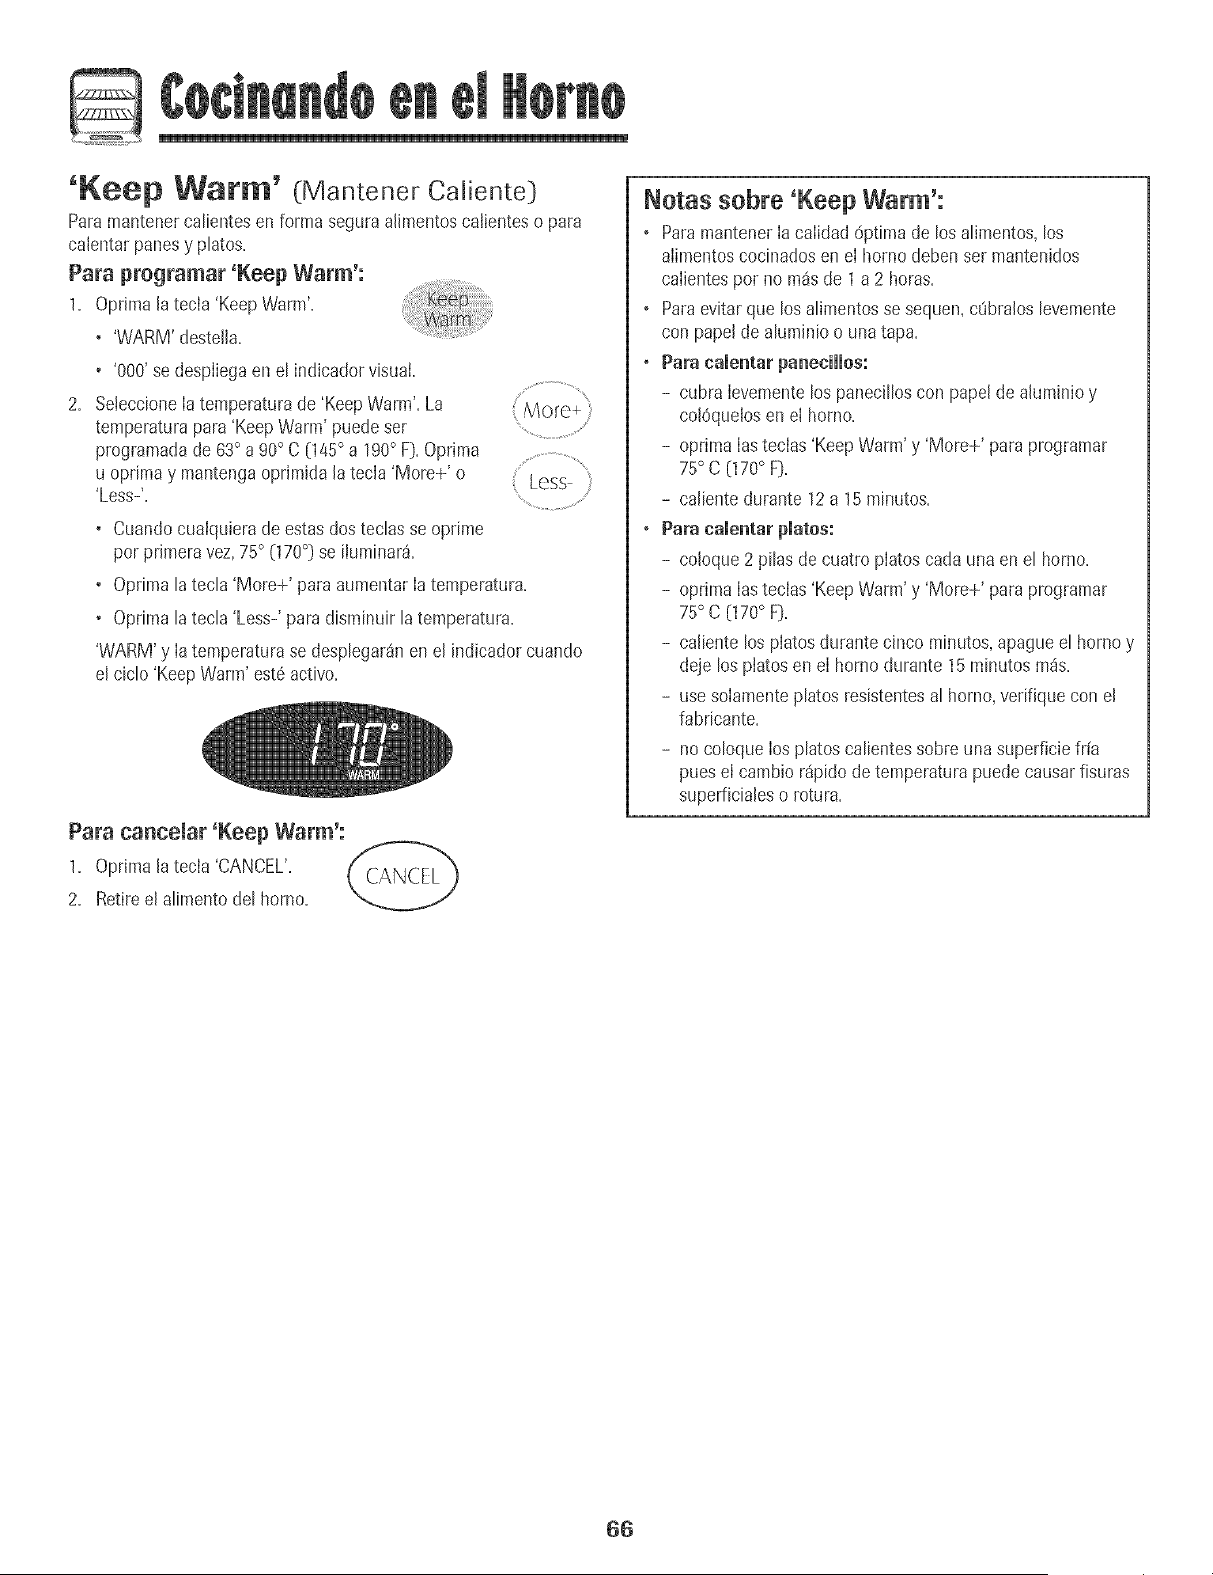
i
Keep Warm' (Mantener Caliente)
Paramantenercatientesen forma seguraalimentoscaJienteso para
calentarpanesy phtos.
Para pregramar 'Keep Warm':
1. OptimaJatecla 'Keep Warm'.
•'WARM'desteila.
•'000'se despliegaenet indicadorvisuai.
2. SeleccioneIatemperaturade 'KeepWarm'.La
temperaturapara 'KeepWarm' puedeset
programadade 63° a 90° C 045 ° a 190° F).Oprima
u optimay mantengaoprJmidala tecla'More+' o
'Less-'.
• Cuandocuaiquierade estasdos teclasse oprime
por prJmeravez,75° (170°] se iJuminar&
• Optimalatecla 'More+' para aumentarla temperatura.
• Optimalatecla 'Less-' paradisminuir latemperatura.
'WARM'y Iatemperaturase desplegar4nen el indicadorcuando
el ciclo'Keep Warm'est6activo.
Para ca_oeJar 'Keep Warm':
1. OptimaJatecla 'CANCEL'.
2. Retireel alimentodel homo.
Notas sobre +Keep Warm':
o ParamantenerIa calidad 6ptimade los alJmentos,los
alimentoscocinadosen el hornodebenser mantenidos
calientespor no m4sde 1a 2 horas.
o Paraevitarque losalimentosse sequen,cQblaJoslevemente
con papelde alumJnioo unatapa.
oPara camentarpaneeiHos:
- cubra Ievementelos panecilloscon papelde ahmJnioy
coBqueios enel homo.
- optima Iasteclas'KeepWarm'y 'More+' para programar
75° C (170° F).
- caJientedurante 12a 15minutos.
+ Para camemarplates:
- coloque 2 pilas decuatro platoscada unaen el homo.
- optima Iastecias'KeepWarm'y 'More+' para pmgramar
75° C (170° F).
- caJientelos platosdurante cinco minutos,@ague el homo y
deje los piatosen el hornodurante 15minutosm4s.
- use solamenteplatos resistentesal horno,verifique con el
fabricante.
- nocoloque los platoscalientessobreuna superficiefr{a
pues el cambior4pidode temperaturapuedecausarfisuras
superficialeso rotura.
66
Q
Ciette Autom tico/Modo Ajuste de la Tempetatuta del
Elhomo se apagar_autom_ticamentedespu6sde 12horassi usted
Iodeja accidentaimenteencendido. Estacaracteffsticadeseguridad
puedeset desactivada.
Para cancemar emcierre autem_tice de 12 betas y
dejar que el home funciene centinuamente durante
72 heras:
1. Programeel homo para hornear(verp%ina 61}.
2. Oprimay mantengaopdmida la tecla 'Clock'
durante cinco segundos.
o'SAb'se desplegar_y destelIar_durantecinco segundos.
o'SAb'se desplegar_continuamentehastaquese desactiveo
hastaque transcurraeI limitede 72 horas.
o'BAKE'tambi_nse desplegaraisJse est_ usandoun ciclo de
horneadocuando el homo est_en Modo Sab_tico.
Todaslasotrasfunciones EXCEPTO'BAKE'('Timer','KeepWarm',
'Clean',etc0 est_nbloqueadasdurante el Modo SabStico.
Para cancemar 'Bake' cuande emIViode Sab_tice est_
activo:
Optima'CANCEL'. CANCEL
o'BAKE'se apagar4en el indicadorvisual
o No se oir4 ningunaserialsonora.
Para cancemar emIVledo Sab_tice:
1. Oprimalatecla 'Clock'durante cinco segundos.
O
2. Despu6sde 72horas,el Modo Sab_ticoterminar_.
o'SAb'destellar8durante 5 segundos.
o Lahora del dia reaparecer_en el indicadorvisual.
La exactitudde las temperaturasdeJhomo es cuidadosamente
probadaen Iaf4brica. Esnormal notar algunadiferenciaentre la
temperaturade horneadoentre un horno nuevoy un hornoantiguo.
ConeJcorrerdel tiempo, Iatemperaturadel horno puedecambiar.
UstedpuedeajustarIa temperaturadel homo si consideraque su
homo noest4 horneandoo dorandoenforma correcta. Paradecidir
cu4ntodebecambiarIa temperatura,programelatemperaturadeI
homo a 15° C (25° F) masalta o m4sbajaque latemperatura
indicadaen sus recetas,luego hornee. Los resultadosde la
"prueba" puedendarleuna ideade cu4ntoajustarJatemperatura.
Ajuste de matemperatura dem home:
1. Oprima 'Bake'.
2. Programe285° (5509 oprimiendolatecla
'More+'.
3. Oprimay mantengaoprimida [a tecia'Bake'
durante vadossegundoso hasta que0° aparezca
en el indicador visuai.
Si Ia temperaturadel homo hasido previamenteajustada,el
cambioaparecer_en et indicadorvisual Poreiemplo,si Ia
temperaturadei horno fue reducidaen 8° C (15° F} el indicador
mostrar_- 8° (-15°}.
Oprima latecla 'More+' o 'Less-' para ajustarlatemperatura.
Cadavezquese oprimeuna tecla, latemperaturacambiaen3° C
(5° F}. LatemperaturadeI horno puedeser aumentadao
disminuidaen 3° a 20° C (5° a 35° F}.
Lahoradel d[a reaparecer_autom_ticamenteenel indicador
visual
No necesitareajustarla temperaturadet hornosi hayuna falla o
interrupci6nde energiae!6ctrica. Lastemperaturasdeasar a la
parrilla y limpiezano puedenset ajustadas.
Notas Sobte eUMode Sab tico:
• ElModo Sab_iticopuedeseractivadoen cualquier momento,
est6o no el homo encendido.
• ElModo Sab_ticonose puedeactivar si lasteclasest_n
bloqueadaso cuando la puerta est_bloqueada.
• Sie! horno est_horneandocuando se programael Modo
Sab_tico,'BAKE'se apagar_al final del ciclode horneado.No
se emitir_nsefialessonoras.
• Cuandocomienzael Modo Sab_tico,nose emitir_ laserial
sonorade precalentamiento.
o Cuandoel Modo SabSticoest8activo,todos los avisos,
mensajesy sefialessonorasest_ndesactivados.
o Siopnme la tecla'CANCEL'se cancelar8un ciclo'Bake',sin
embargoel control permanecer_en Modo Sab_tico.
o Sifalla Iacorrienteelectrica,cuandovuelvaIa energiael horno
se activar_enModo Sab_ticocon 72 horasrestantesy ningOn
ciclo activo.
67
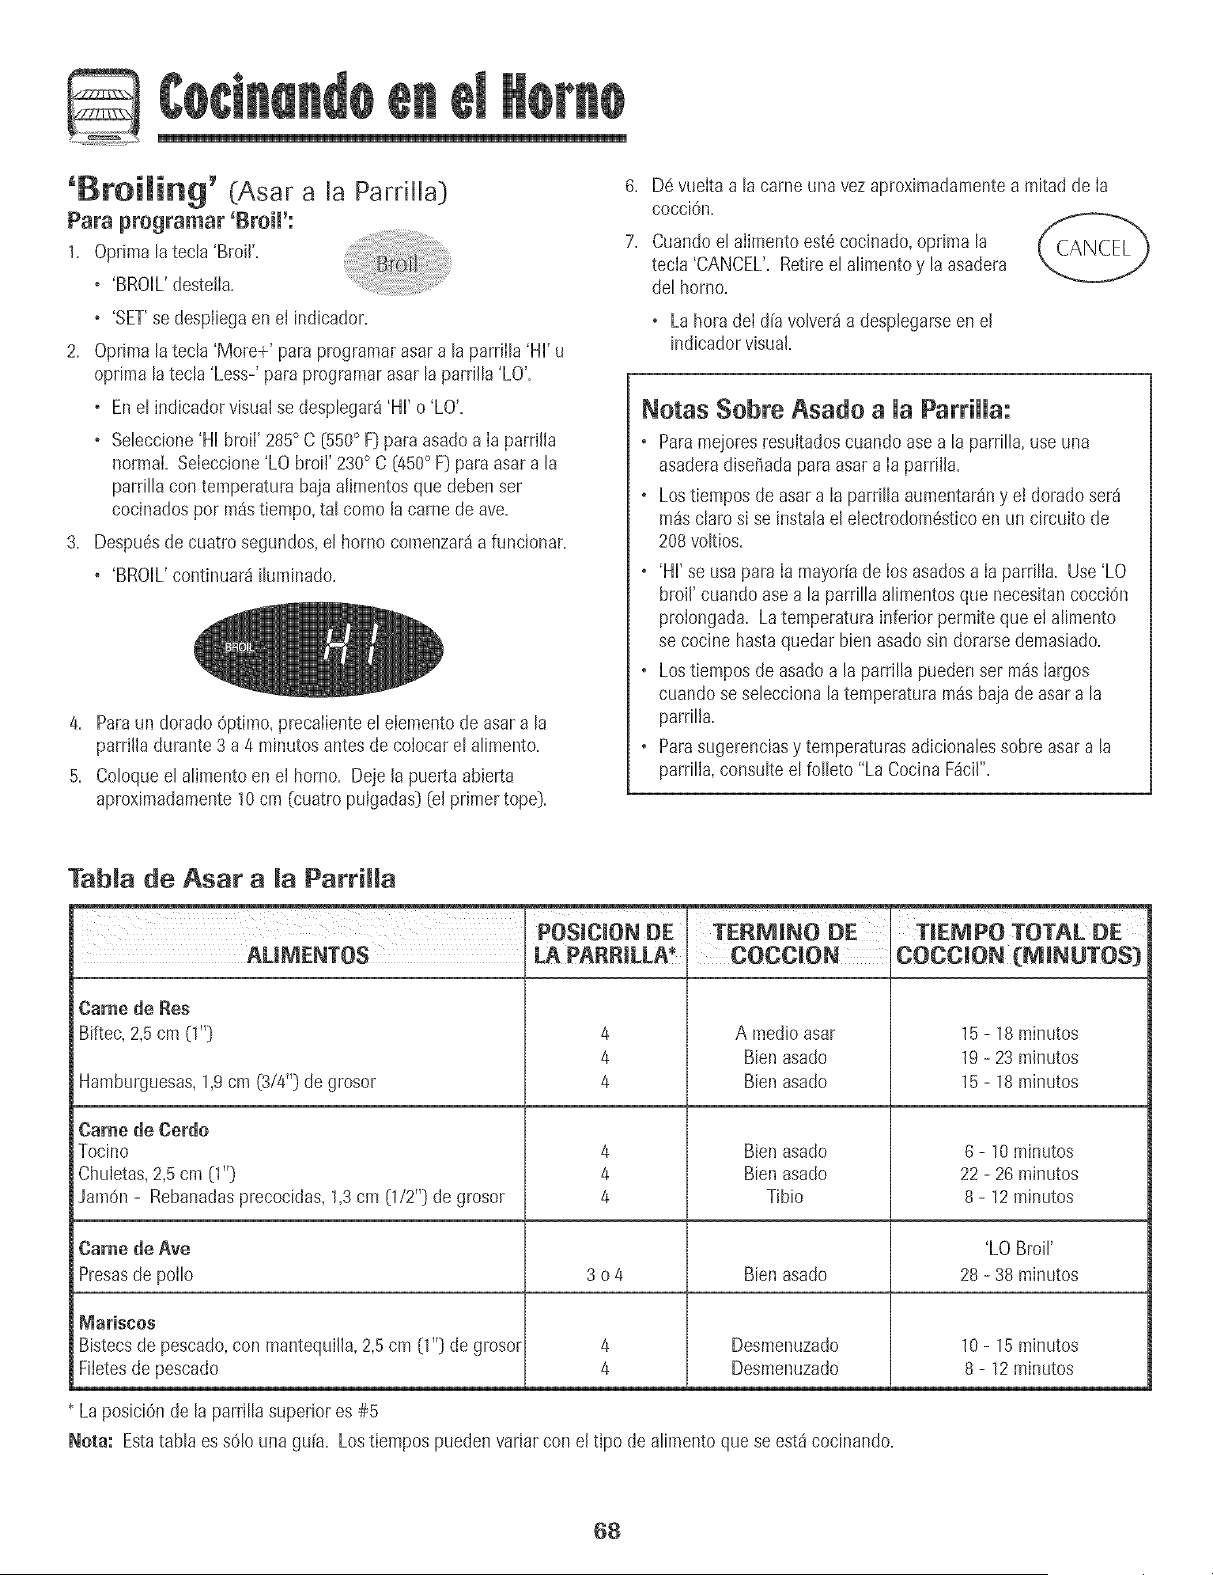
Q
'Broiming' (Asar a [a Pardiia)
Para programar 'Broil':
1. Optima[a tech 'Broil'+
o 'BROHL'destelia.
o 'SET'se despiiegaen el indicador.
2. Oprima[a tech 'More+' paraprogramarasara [aparriih 'HH'u
optima [ateda 'Less-' paraprogramarasar [aparrilh 'LO'.
o Ene[ indicadorvisualse despiegar8'HH'o 'LO'.
o Seleccione'HHbroi[' 285° C (550° F} paraasadoa [a parrilia
normal Seieccione'LO broil' 230°C [450°F}paraasar a [a
parrillacon temperatura bajaalimentosque debenser
cocinadospor m_stiempo,tal como lacame de ave.
3. DespuOsde cuatrosegundos,el homo comenzar8a funcionar.
o 'BROIL'continuar_iIuminado.
4. Paraun dorado0ptimo, precalienteel elementode asar a la
parrilladurante 3 a 4 minutosantesde colocarel alimento.
5. Coloqueel alimentoen el homo. Deje [a puerta abierta
aproximadamente10cm (cuatropulgadas}(el primertope}.
6. D6vueita a la cameuna vezaproximadamentea mitadde [a
cocciOn.
7. Cuandoel aiimentoest6cocinado,oprima la
tecla 'CANCEL'. Retireel aIimentoy laasadera
del homo.
o La horadel dFavolver_adesplegarseenel
indicadorvisual+
Notas Sobre Asado a [a ParriHa:
o Paramejoresresultadoscuando asea la parriIIa,use una
asaderadiseriadaparaasar a [a parrilla.
o Los tiemposde asara [aparriIIaaumentar_ny el doradoser_
m_scIaros[se instalaelelectrodomesticoen un circuito de
208w_Itios.
o 'HH'se usapara [a mayoffade [osasadosa [a parriIla. Use'LO
broil' cuando asea la pardIIaaIimentosque necesitancocciOn
proiongada. Latemperaturainferior permiteque e[ aIimento
se cocine hastaquedarbien asadosin dorarsedemasiado.
o Los tiemposde asadoa la parriIIapuedenser m_s[argos
cuando seseIeccionalatemperatura m_sbajade asar a la
parri[la.
o Parasugerenciasy temperaturasadiciona[essobreasar a [a
parr[Ha,consu[teel fo[[eto"La CocinaF_ci["+
Tab[a de Asar a [a Parr[Ha
POS[CiON DE
ALIMENTOS
Came de Res
Biftec, 2,5 cm (1"}
Hamburguesas,1,9cm (3/4"} degrosor
Came de Cerdo
Tocino
Chuietas,2,5 cm [1"}
JamOn- Rebanadasprecocidas,1,3cm 0/2 ++}de grosor
T[EMPO TOTAL DE
COCC[ON (M[NUTOS)
4
4
4
TERM[NO DE
COCCWON
A medicasar
Bienasado
Bienasado
Bienasado
Bienasado
Tibio
4
4
4
15 - 18 minutos
19 - 23 minutos
15 - 18 minutos
6 - 10 minutos
22 - 26 minutos
8 - 12 minutos
Came de Ave 'LO Broi['
Presasde polio 3 o 4 Bienasado 28- 38 minutos
4
4
_ariscos
Bistecsde pescado,con mantequi[[a,2,5cm [1"} de grosor
FiJetesde pescado
Desmenuzado
Desmenuzado
LaposiciOnde la parrillasuperiores #5
Nora: Estatabla es sOlouna gu[a. Lostiempos puedenvariar con eltipo de alimentoquese est8cocinando.
10- 15minutos
8 - 12minutos
68
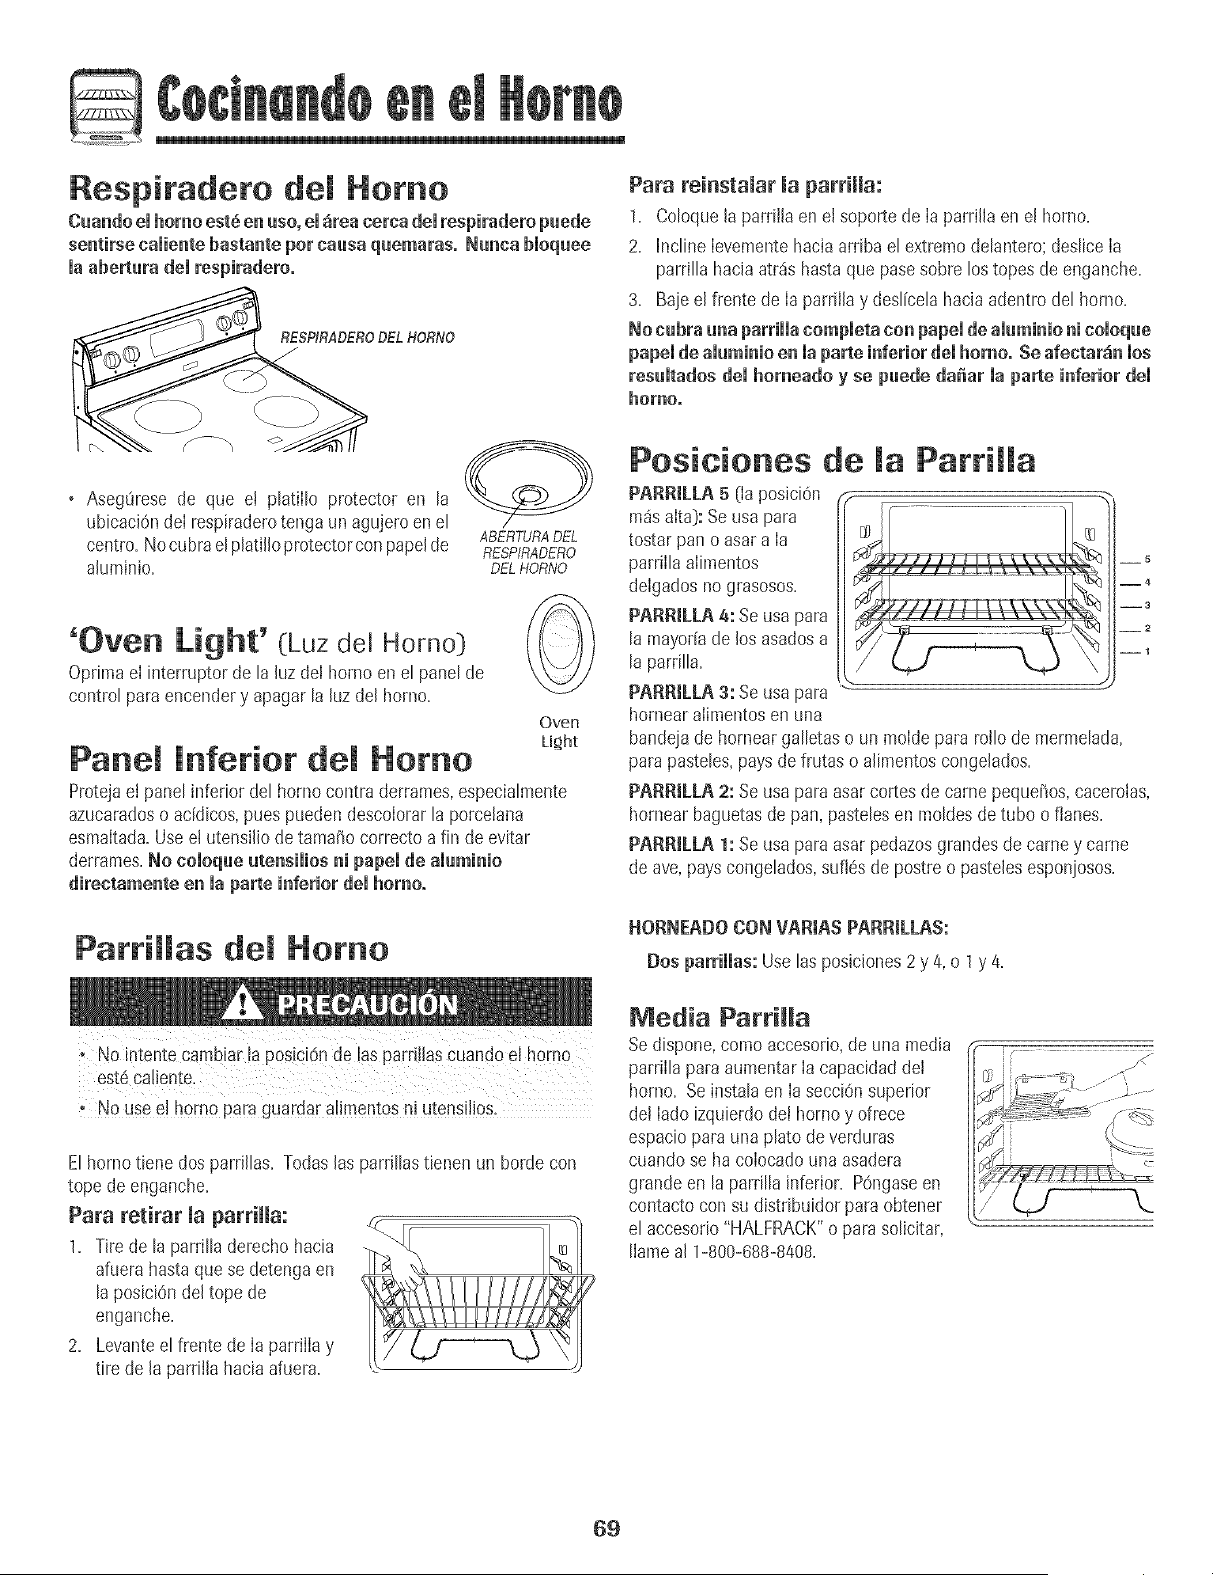
@
Respiradero de[ Homo
Cuandoemhomoest6 en uso, em_reacercademrespiraderopuede
sentirse caiiente bastante pot causa quemaras. Nunca bioquee
maabe_urademrespiradero.
RESPIRADERODEL HORNO
Para reinstaiar ia parriiia:
1= Co[oque[aparrii[a ene[ soportede [a parri[[aen e[ homo=
2= Incline[evementehacia ardbae[ extremode[anteroldes[ice[a
parri[[ahacia atr_shastaque pasesobre los topesde enganche=
3= Baiee[frente de [a parr[Hay des[ice[ahacia adentrode[ homo.
No cebrs uns parrimmacompmetacon papemde smuminioni comoque
papemde smuminioen Is parteinferior demhomo° Se sfectar_n mos
resumtsdosdemhornesdo yse psede dsffsr mspsrte inferior dem
homo.
o Asegt_resede que e! platiilo protector en la
ubicaci6ndelrespiraderotenga unagujeroen el
centro=Nocubraelplatilloprotectorcon papelde ABERTURADEL
RESPIRADERO
aluminio= DELHORNO
'Oven Light' (Luz de[ Horno_)
Optimae[ interruptorde [a [uzde[ hornoen e[ pane[de
control paraencendery apagar[a [uzdel homo.
Panel Inferior de[ Homo
Protejae[ pane[inferior de[ homo contraderrames,especia[mente
azucaradoso acidicos,puespuedendescoiorar[a porcelana
esmaitad&Useel utens[[[odetama_o correctoa fin de evitar
derrames.No coioqse utensiiios ni pspei de aisminio
directsmente en msparte inferior dei homo°
Over
Ug2ht
Parriffas de[ Homo
Posiciones de [a Parri[[a
PARR[LLA5 ([a posiciOn --
m_saita}:Se usapara
tostar pan o asara [a
parrii[a aiimentos -- _
deigadosno grasosos. -- _
--3
PARR[LLA4: Seusa para ___
[a mayoriade los asadosa
[a parri[[a= --_
PARR[LLA3: Seusa para
hornearaiimentosen una
bandeiade hornearga[[etaso un molde para ro[[ode merme[ada,
parapasteIes,paysde frutas o a[imentosconge[ados.
PARRiLLA 2: Seusa paraasarcortes de camepequeffos,caceroias,
hornearbaguetasde pan, pasteIesen moIdesde tubo o flanes.
PARRiLLA 1: Seusa paraasar pedazosgrandesde camey came
de ave,paysconge[ados,sufl6s de postreo pastelesesponiosos.
HORNEADOCONVAR[AS PARR&LAS:
Dos parriiiss:Use[asposiciones2y 4, o 1y 4=
Media ParrH[a
Sedispone,comoaccesorio,de unamedia
parri[[aparaaumentar[a capacidadde[
homo. Seinsta[aen [asecc[Onsuperior
_ No use e[ homo para guardaralimentosn! utens[[!os, de[ [ado [zqu[erdodei homo y ofrece
espaciopara unaplato de verduras
E[homo t[ene dos parri[[as=Todas[asparr[Hast[enen un bordecon
tope de enganche.
Para retirar [a parri[[a:
1. Tire de [a parri[[aderecho hacia
afuerahastaquese detenga en
[a posiciOnde[tope de
enganche.
2. Levantee[frente de la parrillay
tire de [a parrii[a haciaafuera.
cuando se hacolocadouna asadera
grandeen [a pardila inferior. P0ngaseen
contactocon su distdbuidor paraobtener
e[ accesodo"HALFRACK"o parasolicitar, --
[[amea[ 1-800-688-8408.
69
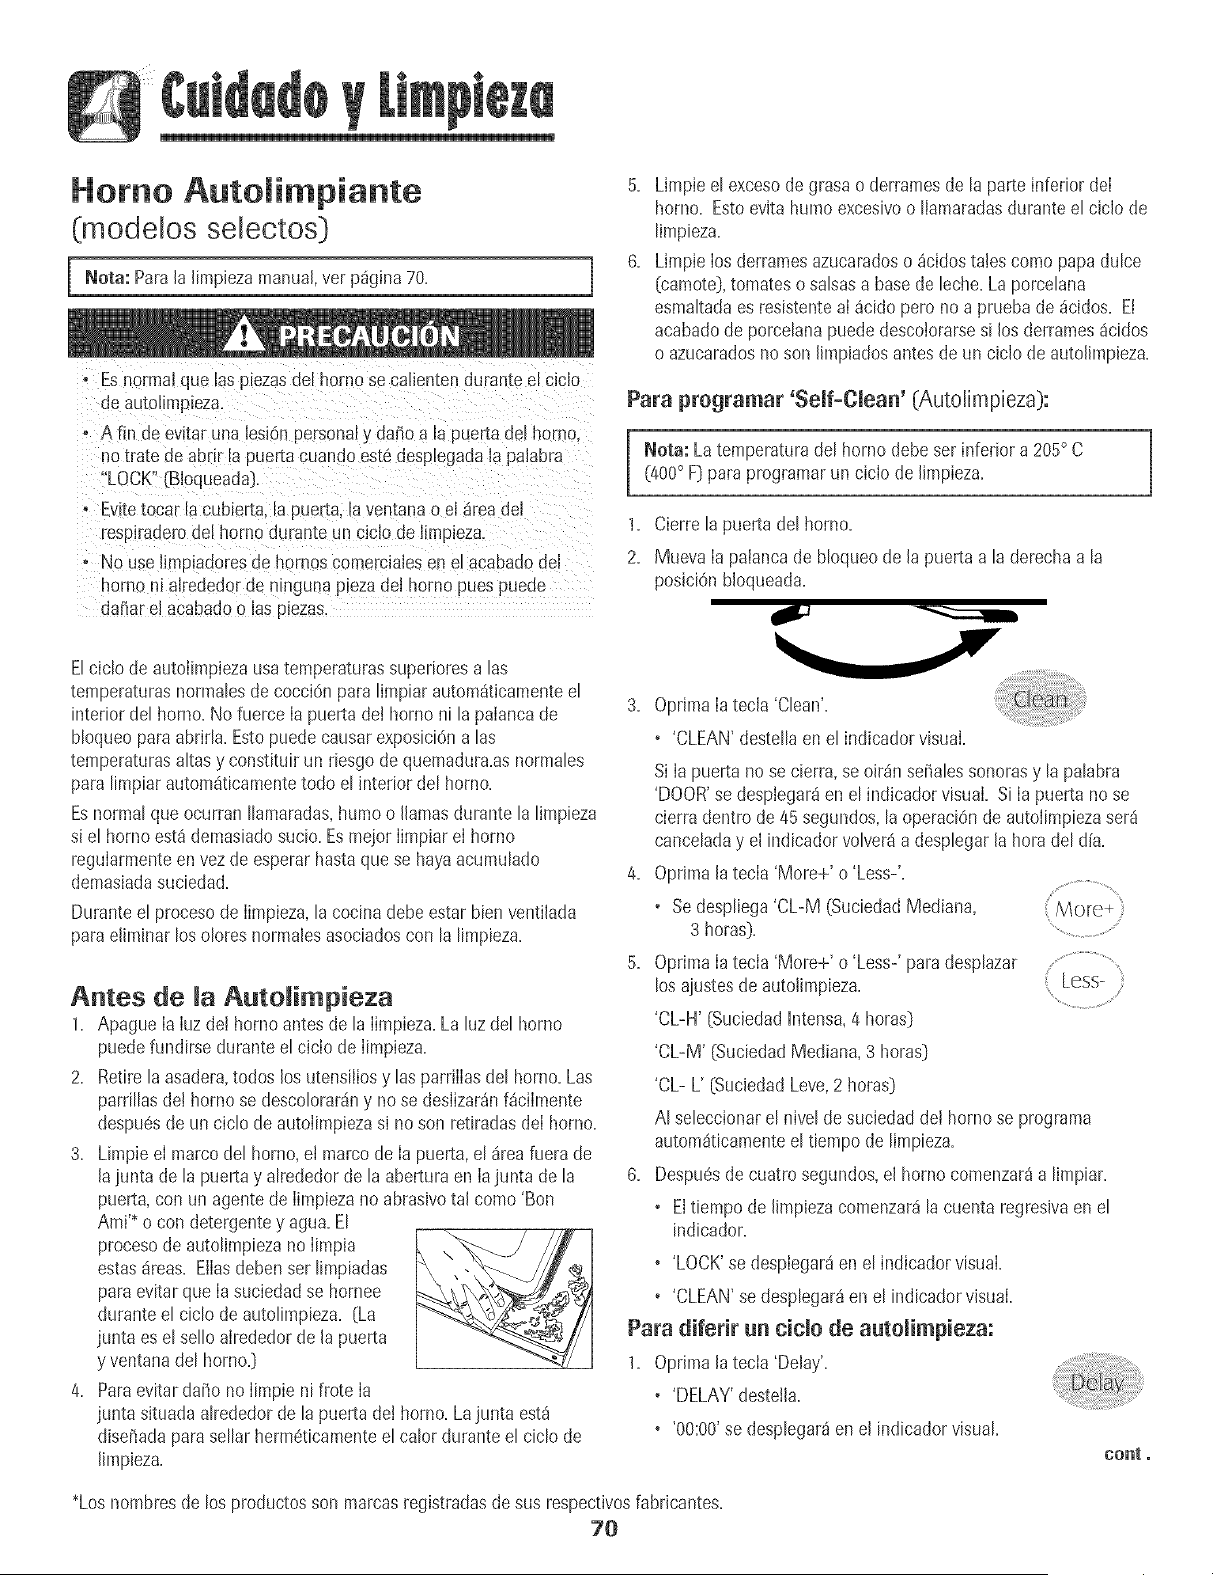
Homo Automimpiante
(modelos selectos}
Neta: Parala limpbza manual,ver p_gina70.
Esnormal que las piezasdel homo se calientendummeel cblo
de aut@mpLeza
Afin de ewtaruna lesi@ personaly dafio a la puertadel homo.
no trate de abrir la puertacuando est6despiegadala palabra
'LOCK" (Bloqueada},
Evitetocar la cubierta,la puerta,laventanao el areadel
resplraderodel homo durante un ciclo deHmpleza.
No use iimpiadoresde hornos comercialesen el acabadodel
homo ni alrededorde ningunapiezadel homo pues puede
daiiar el acabadoo Bs plezas.
Limpie el excesode grasao derramesde la parte inferior deI
homo. Estoevita humoexcesivoo liamaradasdurante el cicb de
limpieza.
Limpie los derramesazucaradoso 4cidostalescomo papadulce
(camote},tomatesosalsasa basede leche.Laporcelana
esmaltadaes resistenteal 4cido pero noa pruebade 4cidos. El
acabadode porcelanapuededescolorarsesi los derrames4cidos
o azucaradosnoson Jimpiadosantesde un cicJode autolimpbza.
Para programar 'Self-Clean' (Autolimpieza):
Nora: Latemperaturadel hornodebe ser inferior a 205° C
(400° F}para programarun ciclo de limpieza.
].
2.
Cierrela puerta del homo.
MuevaIa palancade bloqueode la puerta a laderechaa la
posbiOnbloqueada.
Elcido de autolimpiezausatemperaturassuperioresa Bs
temperaturasnormalesde cocci@ para limpiar autom_tbamenteel
interiordel homo. No fuerce la puertadei horno ni la palancade 3.
bloqueoparaabrirla. Estopuedecausarexposici6na las
temperaturasaltasy constituir un nesgode quemadura.asnormabs
para limpiarautom_ticamentetodo el interior del homo.
Esnormal que ocurran Ilamaradas,humoo llamasdurante la limpieza
si el homo est4demasiadosucio.Esmejor Iimpiarel homo
regularmenteenvezde esperarhastaquese hayaacumulado
demasiadasucbdad. 4.
Duranteel procesode Iimpieza,la cocinadebeestarbien ventilada
para eliminarlos olores normalesasociadoscon la limpieza.
Antes de Auto impieza
1. Apague Ia Iuzde! homo antesde la Iimpieza.La luz del horno
puedefundirse duranteel cicio de Iimpieza.
2. Retirelaasadera,todos los utensiliosy las parriIIasdel homo.Las
parrillasde! homo se descolorar_ny no se desIizar_nf_ciImente
despu@de unciclo de autoIimpiezasi no son retiradasdeI homo.
3. Limpb eI marcodel homo,ei marcode Ia puerta,el areafuera de
laiunta de la puertay alrededorde laaberturaen Iajunta de la
puerta,con un agentede Iimpbza noabrasivotal como'Bon
AmP o con detergentey agua.El
procesode autolimpiezano Iimpia
estasareas. EIIas@ben set limpiadas
paraevitarque Iasuciedadse hornee
durante el ciclo de autolimpbza. [La
junta es el sello alrededorde la puerta
y ventanadel homo.}
4. Paraevitardario noIimpie ni frote Ia
junta situadaalrededorde la puerta de! homo.Lajunta est_
dis@ada parasellar hermeticamenteel calor durante el ciclo de
[impieza.
OprimaIa tecla 'Cban'.
• 'CLEAN'destellaenel indicadorvisual.
SiIa puerta no se cierra,seoir_n se_alessonorasy lapalabra
'DOOR'se desplegar_en el indicadorvisual. Si Ia puerta no se
cierra dentro de45 segundos,la operaciOnde autolimpiezaser_
canceladay el indicador volver_a despbgar la horadel dia.
Optimala tecla 'More+' o 'Less-'.
• Sedespliega'CL-M (Sucbdad Mediana,
3 horas). ...................................
OptimaIa tecla 'More+' o 'Less-' paradesplazar ..................................................
los ajustesde autolh_apieza. Less-
'CL-H' (SuciedadIntensa,4 horas}
'CL-M' (Sucbdad Mediana,3 horas}
'CL- L' (SuciedadLeve,2 horas}
AI sebccionar el nivel de suciedadde[ homo se programa
autom_ticamenteel tiempode limpieza.
Despu@de cuatrosegundos,el homo comenzar_a limpiar.
• Eltiempode [impiezacomenzar_lacuenta regresivaen el
indicador.
• 'LOCK'se desplegar_en el indicadorvisual.
•'CLEAN'se desplegar_en el indicadorvisual.
Para diferir un ciclo de autolimpieza:
1. Oprimala tecla 'Delay',
• 'DELAY'destetla.
• '00:00'se desplegar_en el indicadorvisual
cent,
_Loshombresde los productosson marcasregistradasde sus respectivosfabrbantes.
70
2+ Oprima[atecia 'More+' o 'Less-'para programar[a
cantidadde tiempo queusted deseadiferir el cicto+
Ettiempo diferido puedeser programadode 10
minutos (00:10]a 11horas,59 minutos 01:59]+
3+ Oprima[atec[a 'Clean'+
•'CLEAN'deste[tar&
4+ Opnma[atecia 'More+' o 'Less-'.
+'CL-M' (SuciedadMedian& 3 horas]se
desptiegaen et indicador+
5+ OptimaIatecla 'More+' o 'Less-'pard
desptazartosajustesde autotimpieza+
'CL-H' (SuciedadHntensa,4 horas]
6,
'CL-M' (SuciedadMedian& 3 horas]
'CL-L' (SuciedadLeve,2 horas]
At seleccionarel nivel de suciedadde[ homo se programa
autom_ticamenteel tiempo de limpieza.
Despu6sde cuatrosegundos,'CLEAN','DELAY'y 'LOCK'se
desplegar_nen el indicadorvisualpardind+carque el horno esta
programaticpard un ciclo de limpiezadiferido. Eltiempodfferido
tambiense desp[iegaen el ind+cadorvisual.
Si emhomo ya ha side programado para un cido de
limpieza y usted desea programar un tiempo
diferido:
1. OprJma[atecla 'Delay'.
• 'DELAY'desteHa.
• '00:00'se desplegar_en el indicadorvisual.
2+ Optimalatecla 'More+' o 'Less-'pard programar
la cantidaddetiempo queusted deseadiferir el
ciclo+
/
Despu6sde cuatm segundos,'CLEAN','DELAY'y 'LOCK'se
desplegardnen e! indicadorvisualpardindicar que el horno esta
programaticpard un ciclo de limpiezadifeddo. Eltiempodiferido
tambi_nse desp[iegaen el indicadorvisual.
Cuando comienza el ciclo de autolimpieza:
•'DELAY'se apagar&
• Eltiempo de limpiezase desplegar_en el indicadorvisual.
Pard cancemar el cido de autoiimpieza:
Oprimala tecla 'CANCEL'. CANCEL
° Elindicadorvisualquedaen blanco.
• Todaslasfuncionesson canceladas.
+ Lahora deldid se despliegaen el indlcadorvisual.
Durante e_ Cido de Auto_impieza
Cuandoaparece'LOCK'enel indicador,Ia puerta no se puedeabrir.
Pardevitardaiio a la puerta,nofuerce [a puertapard abdrlacuando
[a palabra'LOCK'est_desplegadaen el indicadorvisual.
Humo y OJores
Ustedpuedevet humoy sentirolor Iasprimerasvecesque el horno
es limpiado+Estoes normal y disminuir_con el tiempo+
Tambi6npuedehaberhumo si el hornoest_demasiadosueio o si se
ha dejadounaasaderaenel homo.
Sonidos
A medidaque el hornose calienta,usted puedeoff sonidosde
piezasmet_licasquese expandeny contraen. Estoes normaly no
dafiar_ el homo.
Despu6s de_ Cic_o de AutoR+mp+eza
Aproximadamenteunahora despu6sdeIfin del ciclo de limpieza,
'LOCK'desaparecer& Lapuerta ahorapuedeset abierta.MuevaIa
palancade bloqueode la puerta a la izquierdaparddesbloquearta.
Amgunasuciedad puede quedar como una mereceniza gris ripe
pomvo.Retffelacon un patio hQmedo.Si Ia suciedadpermanece
despuesde Iimpiarla,significa que e! ciclode Iimpiezano rueIo
suficientementelargo. Lasuciedadser_eliminada duranteel
proximociclo de Iimpieza.
Si masparr+Hasdemhomo fueron dejadas en el homo y no se
desmizansuavemente despu6s de un c+cmode mimpieza,Iimpie
las parrillasy los soportesde lasparr+llascon una pequefiacantidad
de aceKevegetaipard hacerlasdeslizarcon m_sfacilidad+
Pueden aparecer m_neasdemgadasen maporcemanaampasarpot
cicmosde camentamientoy enfriamiento. Estoes normaly no
afectar_el rendimiento.
Una descoloraci6n blanca puede aparecer despuSs del ciclo
de mimpiezasi los amimentos_cidos o azucarados no fueron
limpiados antes del ciclo de autolimpieza. EstadescoloraciOnes
normaly no afectar_el rendimiento+
• Si se dejaabierta la puertadel homo, Ia palabra'DOOR'
destellar_enel indicadorvisualy se escuchar_una serial
sonora hastaque la puertasea cerraday la tecla'Clean' sea
oprimidanuevamente.
• Lapuerta del homo se dafiar_ si se fuerzapardabrirla cuando
la palabra'LOCK'contin0adesplegadaen el indicador.
71

Procedi ientos de Limpieza
fr_as antes de tocarie olimpiarlo. De este medQ se evitar_n da_os y
posibles quemaduras, _ Los hombresde los prod_Jctosson marcas
registradasde susrespectivosfabricantes.
,Parsevitar manchaso dec0!oraci6nlimp!eel hemo despu6Sde cadsuse. _ Parshacer pedidos,Ilameal 1-877-232-6771en
• Sise retira alguna pieza,asegGresedeque sea reinstaladaen forrnacorrecta: EE.UU.o 1-800-688-8408en Canad&
P_EZA PROCED_M_ENTO DE LI_,_P_EZA
Protector Trasere
y Cubier!.a -
Percelana
Fsmaitada
Bandeja de Asar
eInselto
Area dei Reioj y
de masTeeias
de Control
Pmatimmos
Preteeteres,
Percelana
(medelos
selectos)
pmatimmos
Preteeteres,
creme
(medelos
selectos)
Ventana y
Puerla dem
Homo =Vidrio
Laporcelanaesmaltadaesvidriofundidoen metaly puedeagrietalseo picarsesi nose usacorrectamente.Esresistentea
los_cidos,noapruebade_cidos.Todoslosderrames,especialmentelosderramesazucaradosoaddicosdebenset limpiados
inmediatamentecon un patio seco.
° Cuandoseenfr[e,lavecon aguajabonosa,enjuaguey seque.
° Nurlcalimpieunasuperficietibia o calientecon un patio hOmedo.Estopuedecausaragrietamientoo picaduras.
• Nuncauselimpiadoresdehomo,agentesde limpiezaabrasiveso c_usticosenel acabadoexteriorde laestufa.
Nunca cubra el insette cell papel de afumirdeplies este evita que la gFasase eseurm a &bandeja inferior.
• Coloqueunpahoenjabonadosobreel insertoy labandeja;dejeremojarpars soltarlasuciedad=
• Laveen aguajabonosatibia.Useunaesponjadefregarpars quitarlasuciedadpersistente.
• La bandejade asary el insertopuedenset lavadosenel lavavajillas.
° Paraactivar'ControlLock'[BIoqueodeloscontroles}parala limpieza,ver pdgina60.
° Limpieconun pa_ohOmedoy seque.No useagentesdelimpiezaabrasivespuespuedenrayarlasuperficie.
° Sepuedenusarlimpiavidriossi se rocFanenel paiioprimero.NO retie directamenteell elpalleL
° Retirelasperillascuandoest_nenla posiciOn'OFF'tir_ndolashaciaadelante.
° Lave,enjuaguey seque.No useagentesde limpiezaabrasivespuespuedenrayarlasuperficie.
° Enciendacadsquernadorparsasegurarsede quelasperillashayansidecorrectarnentereinstaladas.
Laporcelanapuededescolorarseo adquirirfisurassuperficialessi se sobrecalienta.Estoes normaly no afectardel
rendimientode h cocciOn.
• Ouandoest_nfrfos,lavedespu_sde cadsuse,enjuaguey sequepars evitarmanchasy deco!oraciOn.Puedenlavarseen
e! lavavajillas.
• Parslimpiarsuciedadexcesiva,remojeen aguacalienteconjabOn,luegouse un limpiadorabrasivesuavetal comeSoft
Scrub_y una esponjadefregar de pldstico.
° Parasuciedadquemada,retireel phtillo de laestufa,co!OquelosobreperiOdicosy rode cuidadosamentecon limpiador
de homo comerciaL(No rode lassuperficiesadyacentes.}Ooloqueen unabolsade pl_isticoy deje remojardurante
variashoras.Useguantesde gemspars sacarlode la bolsa,lave,enjuaguey seque.
• Ouandoest_nfrfos,lavedespu6sde cadause,enjuaguey sequepars evitarmanchasy decoloraciOn.
•Para limpiarsuciedadexcesiva,remojeen aguacalienteconjabOn,luegouse un limpiadorabrasivesuavetal comeSoft
Scrub* y una esponjadefregar de pl_stico. No useagentesdelimpiezaabrasives.
• Eviteusa!cantidadesexcesivasde aguapues puedeescurrirsedebajoo detrdsdelvidrio causandomanchas=
• Lavecon aguayjabOn. Enjuaguecon agualimpiay seque. Ellimpiadordevidrio puedeusarsesi se rods en un paiio
primero.
° No usematerialesabrasivestalescomeesponjasderestregar,limpiadoresen polvoo esponjasde lanadeaceropues
puedenrayarel vidrio.
72
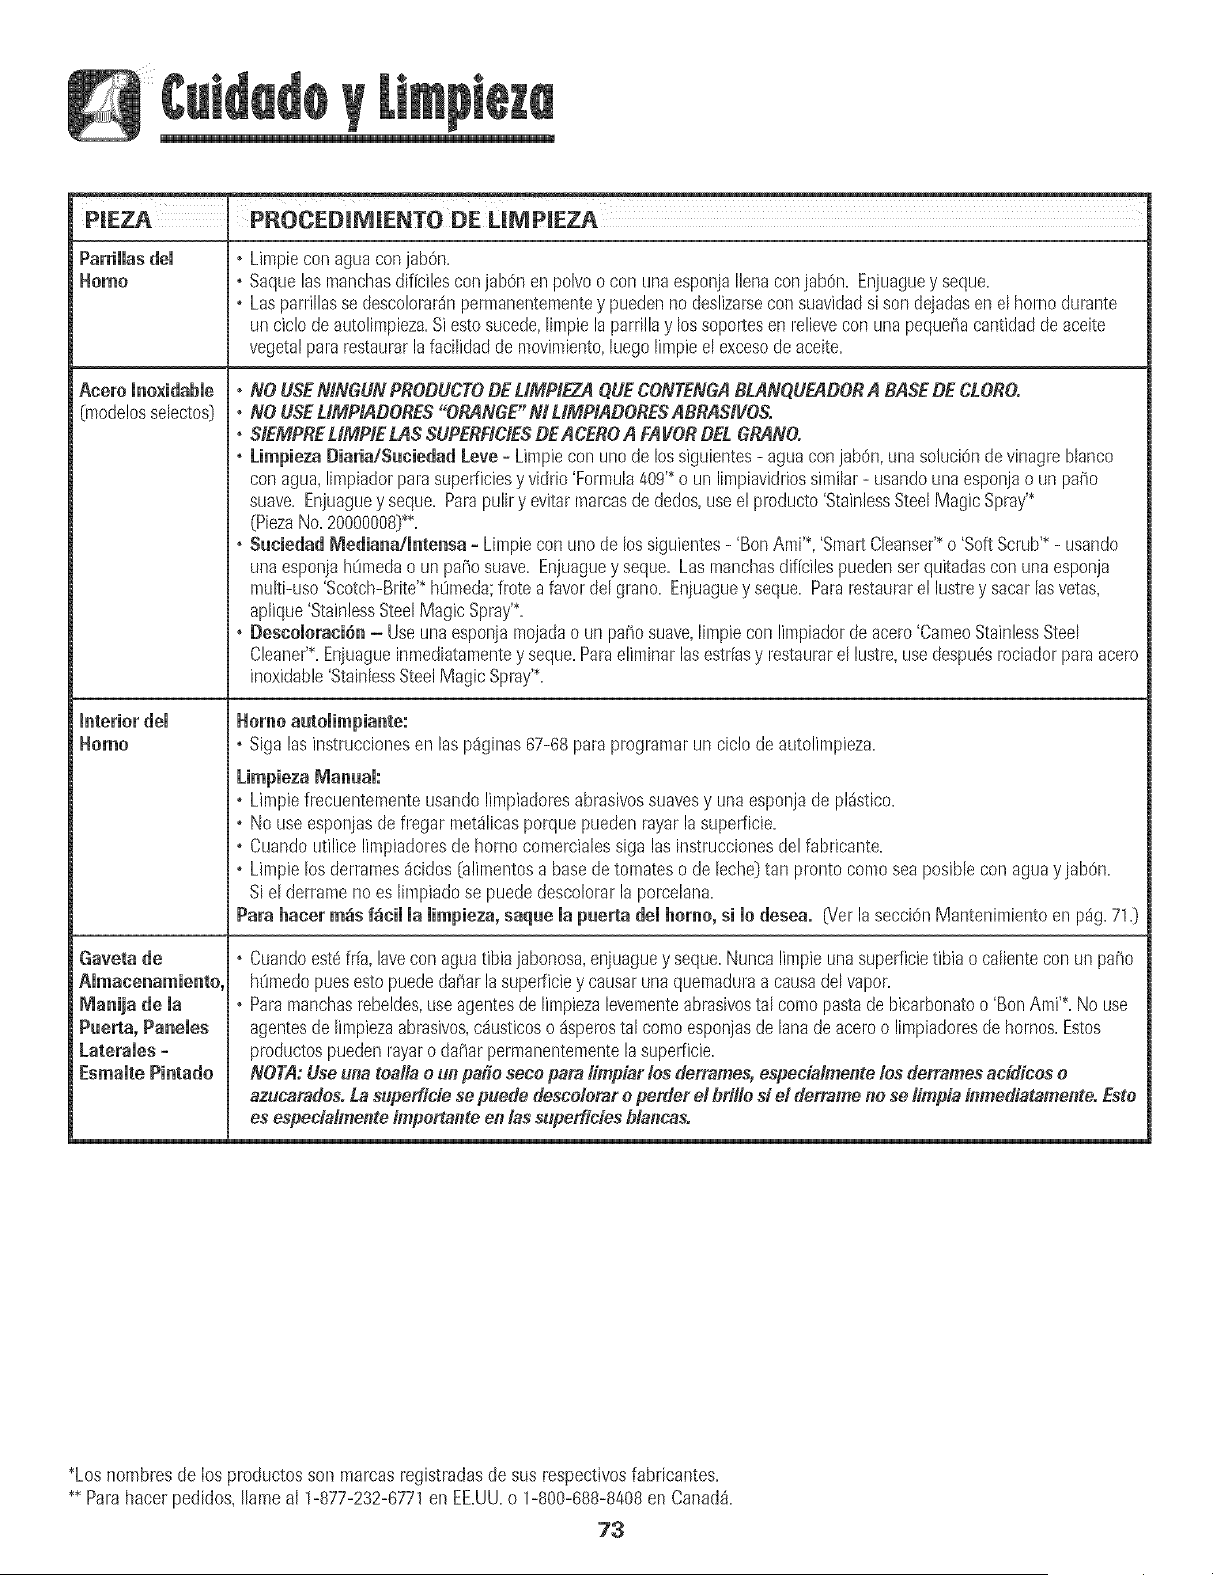
P_EZA PROCED_MIENTO DE UMP_EZA
Parrillasdel , LJmpiecon aguaconjab6n.
Homo , Saquelas manchasdiffcilesconjab6nenpolvoocon unaesponjaliens conjabOn. Enjuaguey seque.
° Lasparrillasse desco!orar_npermanenternentey puedenno deslizarsecon suavidadsi son dejadasenel homodurante
unciclode autolimpieza.Siestosucede,limpielaparrillay lossoportesen relieveconunapequeflacantidaddeaceite
vegetalparsrestaurarlafacilidadde movimiento,luegolimpieelexcesode aceite.
Aeere lno×idable
(mode!osselectos}
Gaveta de
AJmacenamiento,
Manija de la
Puerta, Panemes
LateraJes -
Esmalte Pintado
•NO USENiNGUNPRODUCTODE LIMPIEZAQUECONTENGABLANQUEABOBA BASEDE CLOBO.
,NO USEUMPIADORES"ORANGE"NI LIMPIADOBESABBASIVOS.
•SIEMPRELtMPIE LAS SUPERFICIESDEACEROA FAVORDELGRANO.
• Limpieza Diaria/SuciedadLeve- Limpiecon unode lossiguientes- aguaconjabOn,unasoluciOndevinagrebhnco
conagua,limpiadorparasuperficiesy vidrio'Formula409'*o un limpiavidriossimihr - usandounaesponjaoun patio
suave. Enjuaguey seque.Parspuliry evitarmamasde dedos,useelproducto'StainlessSteelMagicSpray'*
(PiezaNo.20000008}**.
° Sudedad Mediana/lntensa -Limpieconuric delossiguientes- 'BonAnti'*,'SmartCleanser'*o 'SoftScrub'*- usando
unaesponjahOmedaoun patiosuave.Enjuaguey seque.Las manchasdificilespuedenserquitadasconunaesponja
multi-uso'Scotch-Brite'*htimeda;frote afavordel grano. Enjuaguey seque.Parsrestaurarel lustrey sacarlasvetas,
aplique'StainlessSteelMagicSpray'*.
•DescoJoraci6n- Useunaesponjamojadaoun patiosuave,limpiecon limpiadorde acero'CameoStainlessSteel
Cleaner'*.Enjuagueinmediatamentey seque.Parseliminarlasestr[asy restaurarel lustre,usedespu_srociadorpars acero
inoxidable'StainlessSteelMagicSpray'*.
Home autoJimpiante:
• Siga lasinstmccionesen lasp_ginas67-68pars programarun cic!ode autolimpieza.
Limpieza lVlanual:
•Limpiefrecuentementeusandolimpiadoresabrasivossuavesy unaesponjade pl_stico.
° No useesponjasde fregar met_licasporquepuedenrayarlasuperficie.
° Cuandoutilice limpiadoresde homo comercialessiga las instruccionesde]fabricante.
° Limpielos derrames_cidos{alimentosa basedetomateso deleche}tan prontocomoseaposiblecon aguayjabOn.
Si el derrameno es limpiadose puededescolorarlaporcelana.
Pars hater m_s f_cil ia iimpieza, saque ia puerta dei home, si ie deseao 6ier lasecci6nMantenimientoenpdg.71.}
• Cuandoest6frFa,laveconaguatibia jabonosa,enjuaguey seque.Nuncalimpieunasuperficietibia o calientecon unpatio
hOmedopuesestopuededafiarlasuperficiey causarunaquemaduraa causadelvapor.
, Parsmanchasrebeldes,useagentesde Iimpiezalevementeabrasivostal comopastadebicarbonatoo 'BonAmi'*.No use
agentesdeIimpiezaabrasivos,c_usticoso_sperostal comoesponjasde lanadeaceroo limpiadoresdehornos.Estos
productospuedenrayaro daflarpermanentementelasuperficie.
NOTA: Useuna teal/a e un parle sece para fimpiar los derrames, especiatrtlente los derrames addices e
azucaFadesoLa superficie se puede descelerar o perder el bril/o sJel derrame no se /impiait_mediatamelge.Esto
es especialmerge impertallte en Jassuperficies bla_lcas.
*Loshombresde los productosson mamasregistradasde sus respectivosfabricantes.
** Parshacer pedidos,Ilameai 1-877-232-6771en EE.UU.o 1-800-688-8408en Canada.
73
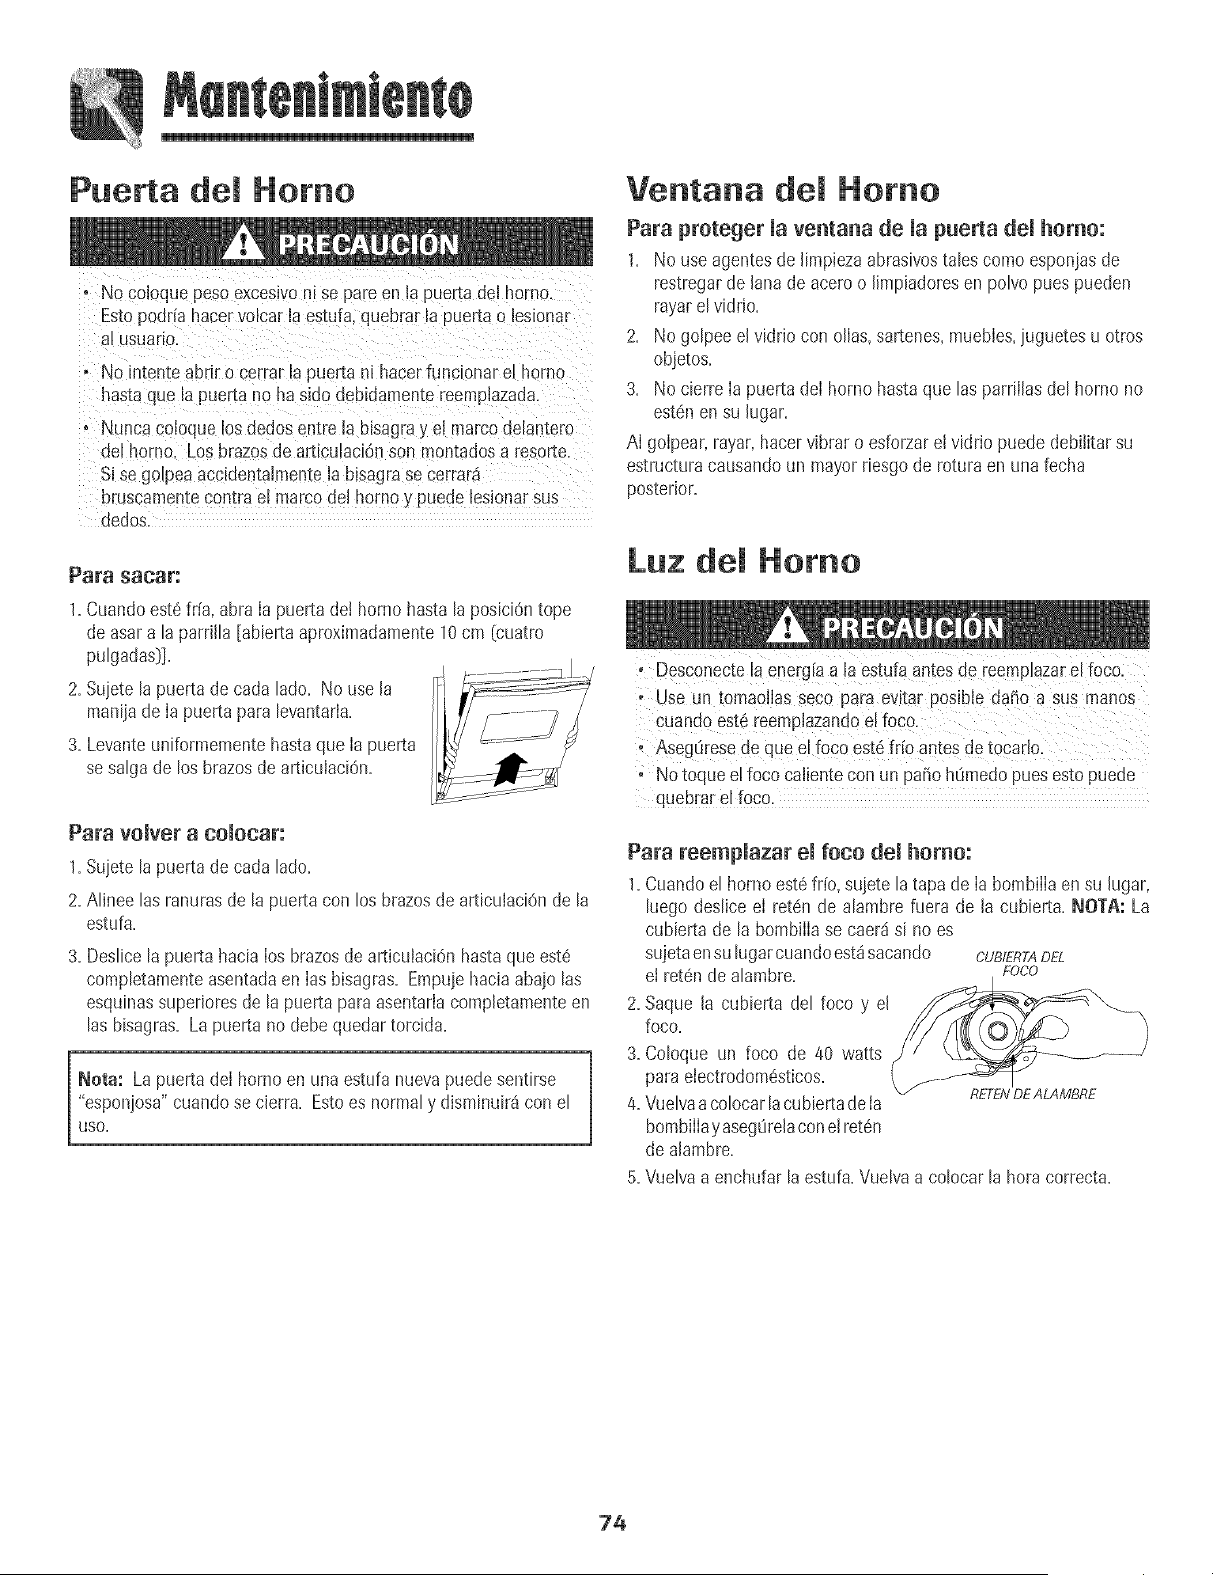
Puerta del Homo
• No co[oque peso exceslvo mse pare en la puerta del homo.
Esto poana hacer volcar Jaestufa, quebrar [a puerta o lesiona_
al usuario.
o No mtenteabrir o cerrar la puerta ni hacerflmcionar el homu
hastaque [a puerta no hasido debidamen[ereerraJazada.
• Nunca co[oquelos dedosentre [a bmagray e[ marcodeIantero
del hornc Los brazosde articulaci6nson montadosa resorts.
SJse golpeaaccLdentaimentela bisagrase cerrarai
bruscamentecontrael marcodel homo y puede lesionarsus
dedos.
Para saosr:
1.Cuandoest6fffa,abra [a puerta de[ hornohastala posiciOntope
de asara la parrJlIa[abiertaaproximadamente10cm (cuatro
puIgadas)].
2. Suietela puerta decada lado. No use la _:z:_ ....
manijade [a puerta para [evantaria. ll_//----///
3. Levanteuniformementehastaque [a puerta
se saigade los brazosde articuiaci6n.
Para voiver a co[ocar:
I.Sujete la puerta de cada lado.
2. AJinee las ranuras de la puerta con los brazos de articulaciOn de la
estufa.
3, Desiicela puerta hacia los brazosde articuiaciOnhastaqueest6
compietamenteasentadaen las bisagras, Empuiehaciaabaiolas
esquinassuperJoresde la puerta paraasentariacompietamenteen
las bisagras, Lapuerta no debequedartorcida,
[ Nora: La puerta del hornoen unaestufa nuevapuedesentirse
"esponiosa"cuandose cierr& Estoes normaly disminuir4con el
USO.
Ventana del Homo
Para proteger [a ventana de [a puerta de[ homo:
1. No useagentesde limpiezaabrasivostalescomoesponiasde
restregarde lanade aceroo limpiadoresen poIvopues pueden
rayarelvidrio.
2. No goIpeeelvidrJocon ollas,sartenes,muebles,iuguetesu otros
objetos.
3. No cierre [a puerta de[ homo hastaque las parrfllasdel horno no
est6nen su hgar.
A[ goipear,rayar,hacervJbraro esforzarel vidrio puede debiJitarsu
estructuracausandoun mayorriesgode rotura en unafecha
posterior.
Luz del Norno
,Desconecte [aenerg[aa [a estufa antesde reemp[azare[foco.
;Use un toma0[[asseCOpara evitar P0sibiedaF/0aSus man0s
Cuando est6reemplazandee[f0c0.
;Asegdresede queel foCoest6fifo aBteSdetecai[ol
; NOtoque e! foco CaiienteConun paffoh@ledo puesestopuede
quebrare!foco,
Para reempiazar e[ foco de[ homo:
1.Cuandoel hornoest8fifo, suietela tapa de [a bombiiiaen su hgar,
luego desiicee[ ret6n de alambre fuera de [a cubiert& NOTA: La
cubierta de la bombiiia se caerd si no es
sujetaensu [ugarcuandoest4sacando CUBIf::°RTADEL
el ret6nde a[ambre, f:oco
2. Saque [a cubierta de[ foco y e[
foco.
3. Co[oque un foco de 40 watts
para eiectrodom6sticos. \
4. Vue[vaaco[ocar[acubiertadeia RETEAIDEALAMBRE
bombiiiayaseg0relaconelret6n
de alambre.
5. Vueivaa enchufarla estufa.Vueivaa colocarla horacorrect&
74
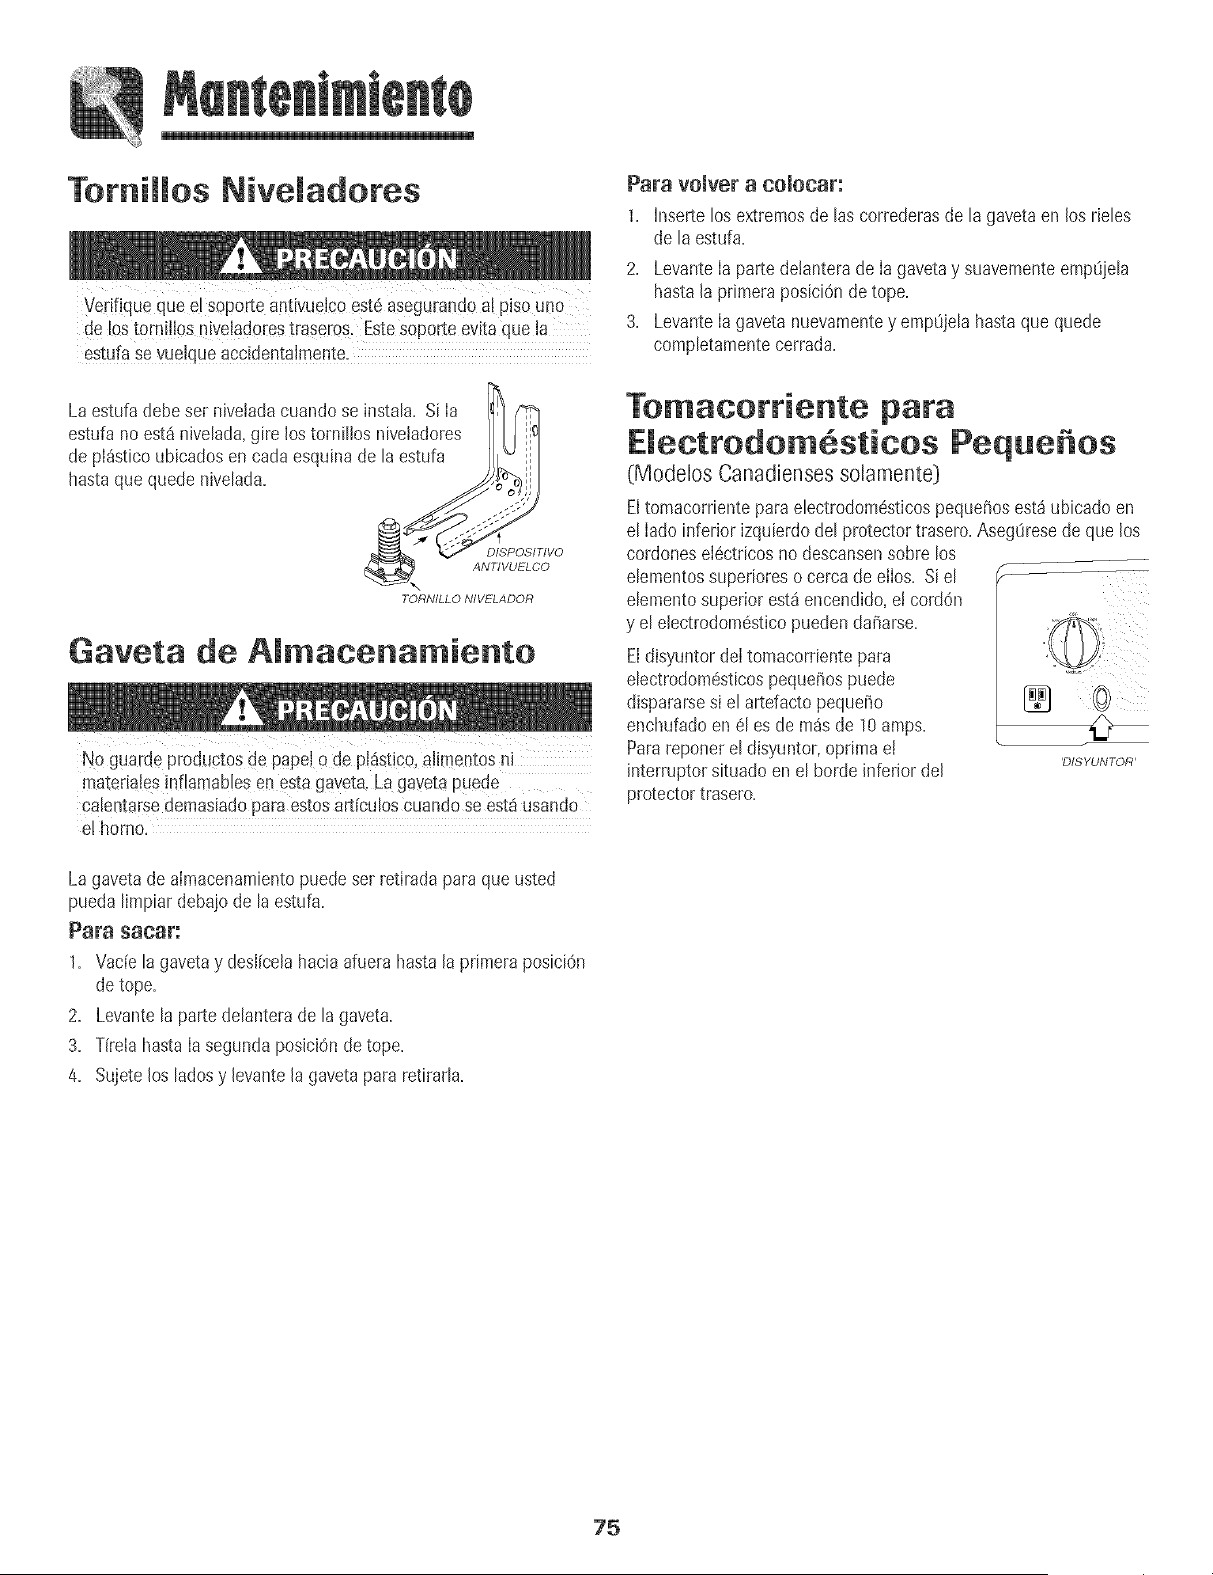
Tomillos Niveladeres
Verif!queque e[soporteantivueJcoest_asegurandoa[ piso uno
delos t0rrfi!!0s[!ivelado_estraseros. Estesoporteev[taque [a
estufa se vueJqueaccidentalmente_
La estufadebeset niveJadacuandose instala=Si Ia II]]F'q
estufa no est4nivelada,gire los torniHosniveJadores I[[I q
de pI_sticoubicadosen cadaesquinade la estufa ][_
hastaquequedenivelada. _,_
,_ . - ;;000%" -
_,_ ANTIVUELCO
TORNILLO NIVELADOR
Gaveta de Almacenamiento
No gaardepmductos de papelo de pJ4stico,alJmen[osn
materialesinfiamablesen _s[aga_eta.Lagave[apuede
cale"ltarsedemasiadoparaestosarticuloscuando se estausando
e! horno.
Para voJver acoJooar:
1= hlsertelos extremosde lascorrederasde la gavetaen JosrJeles
de la estufa=
2= LevanteIa partedetanterade Ia gavetay suavementeempOjela
hastaJaprimera posiciOndetope.
3. LevanteIagavetanuevamentey empOjelahastaque quede
completamentecerrada.
Tomaeorriente para
EJeetrodo stieos Peque os
(Modelos Canadienses solamente])
Eltomacorrienteparaelectrodom@sticospequeiios est4ubicadoen
el Iado inferior izquierdodel protectortrasero.Aseg/iresede que los
cordoneseI6ctricosno descansensobre los
elementossuperioreso cercade elIos. Siel
elementosuperior est4encendido,e! cord6n
y el eJectrodom6sticopuedendaiiarse.
Eldisyuntor deItomacorrientepara
electrodom6sticospequeBospuede
dispararsesi el artefactopequeiio
enchufadoen 61es de m4sde 10amps.
Parareporterel disyuntor,opnma e!
interruptorsituadoen el borde inferiordel
protectortrasero.
F
'DISYUNTOR'
La gavetade almacenamientopuedeset retiradaparaque usted
puedalimpiar debaiode la estufa=
Para sacar:
1= Vade la gavetay desJicelahaciaafuera hastaJaprimeraposicF_n
detope.
2= Levantela partedelanterade la gaveta=
3= Tirela hastaIasegundaposJciOnde tope.
4= Sujete Josladosy JevanteJagavetapara ret[rarla=
75
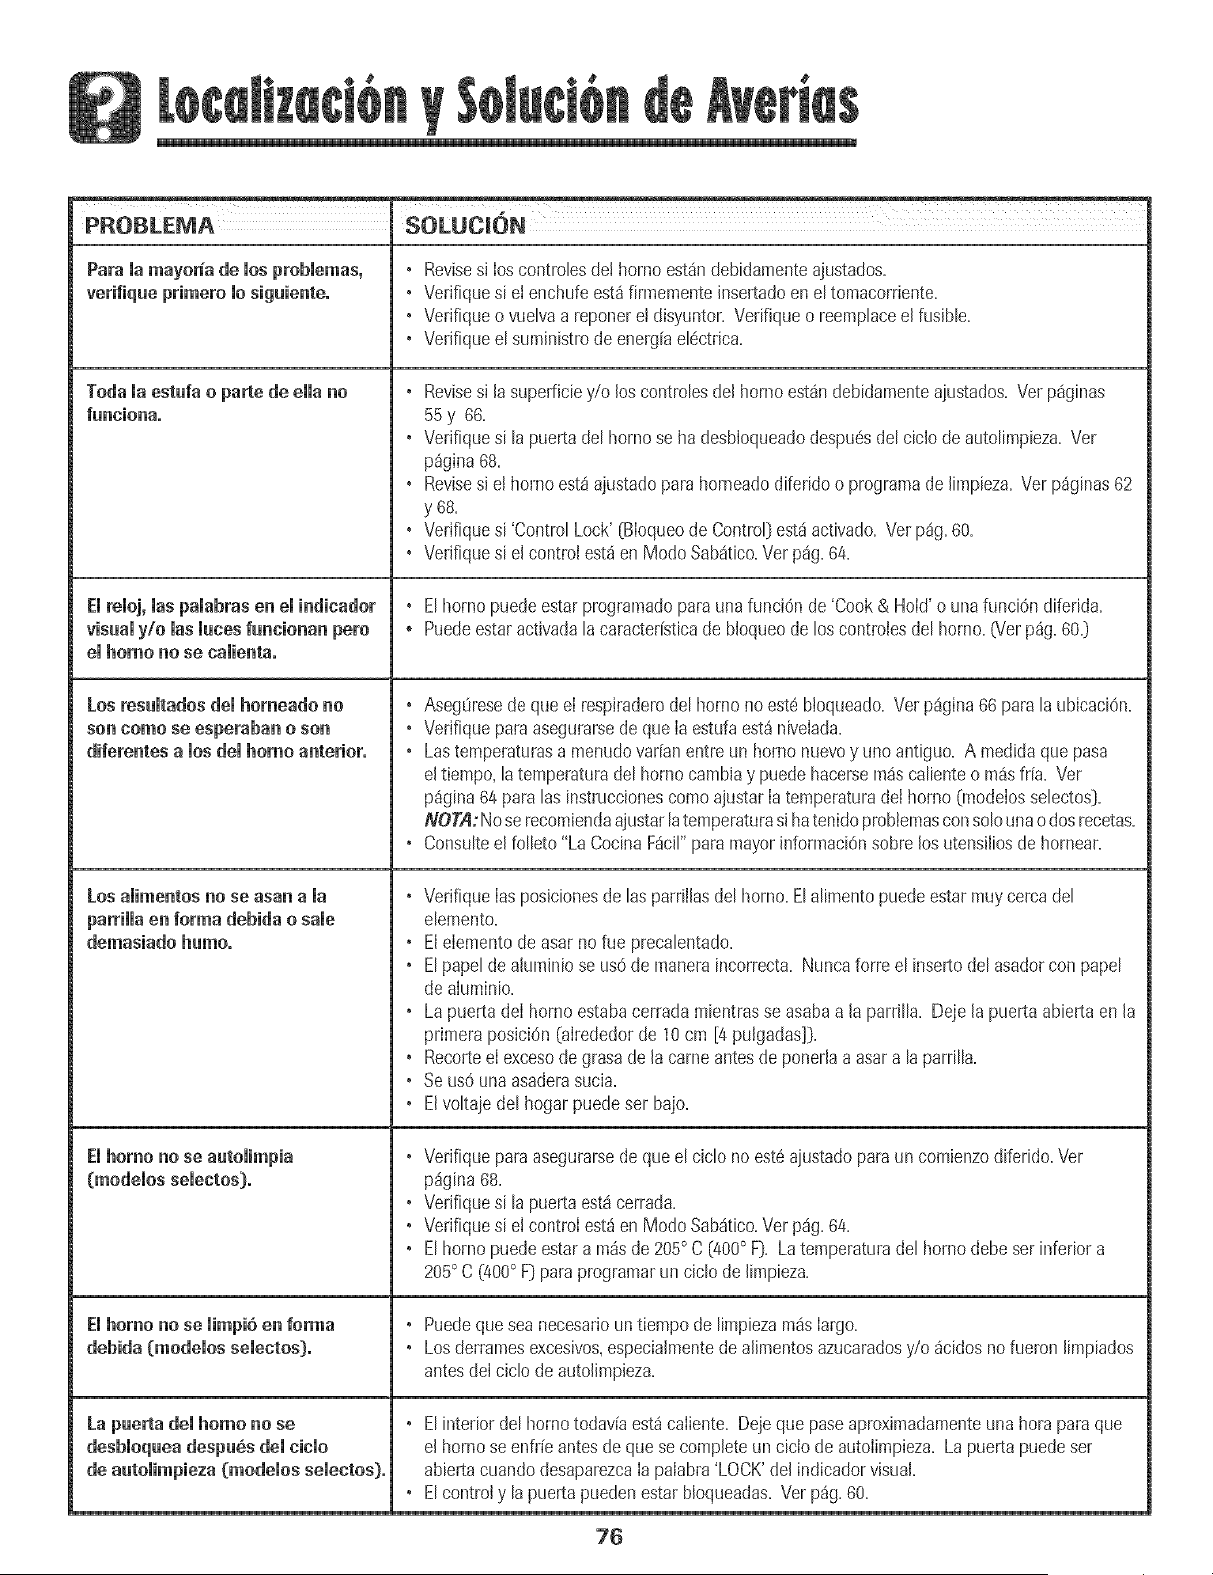
ii ii ii ii ii ii ii ii ii ii ii ii ii ii ii ii ii ii ii
PROBLEMA SOLUC_GN
Para la mayor_ade mosproblemas, • Revisesi Ioscontrolesde! homo est_ndebidamenteajustados,
verifiqaeprimero lo sigaienteo • Verifiquesi et enchufeest_firmementeinsertadoenel tomacorriente,
• Verifiqueo vuelvaa reponerel disyuntor,Verifiqueo reemplaceel fusible,
• Verifiqueel suministrode energiaelectrica,
Todala estafa o par!.ede ella no • Revisesi la superficiey/o los controlesdel homoest_ndebidamenteaiustados,Vet p_ginas
fancionao 55y 66=
• Verifiquesi lapuertadel homo seha desbloqueadodespu6sdelciclode autolimpieza=Ver
p_gina68=
• Revisesi el homo est_ajustadoparahomeadodiferidoo programade limpieza=Verp_ginas62
y 68.
• Verifiquesi 'Control Lock'(Bloqueode Control)est_activado,Vet p_g,60,
• Verifiquesi el controlest_en Mode Sab_tico,Verp_g,64,
F:Ireloj, las palabras en el indicador • Elbornepuedeestarprogramadoparaunafunci6n de'Cook& Hold'o unafunci6ndiferida,
visaaly/o las laces fancionan pete . Puedeestaractivadalacaracter[sticade bloqueodelos controlesdel homo,(Verp_g,60,)
el homo no se calienta,
Los reaaltados del homeado no • AsegOresede q[ie el respiraderodel hornonoesteb]oqueado,Vet p_gina66parala ubicaciOn,
son come se esperaban o son • Verifiqueparaasegurarsede queIa estufaest_nivelada,
diferentes alosdemhomo anterior. • Lastemperaturasa menudovat[an entreun homo nuevoy line antigua. A medidaquepasa
eltiempo,latemperaturadel bornecambiay puedehacersem_scalienteo m_sif[a. Ver
p_gina64 paralas instruccionescomaajustarIatemperaturadeIhomo (modelosselectos),
NOTA:Noserecomiendaajustarlatemperaturasihatenidoprobtemasconsolounaodosrecetas,
• Consulteelfolleto"La CocinaF_cil"paramayorinformaciOnsobre losutensiliosde hornear,
Los aiimentos no se asan a ia • VerifiqueIasposJcionesde lasparriiJasdelhomo.Elalimentopuedeestarmuycercadel
parrimmaen forma debida o sale elemento,
demasiado hamoo • Elelementode asar nofue precalentado,
• Elpapelde ahmhio se us6de maneraincorrecta, Nuncaforre el insertodel asadorcon papel
deaiumin[o,
• Lapuerta deI borneestabacerrada mientrasse asabaa la parrilla, Deje la puertaabierta en la
primeraposiciOn(alrededorde 10cm [4 puJgadas]}.
• Recorteelexcesodegrasade Jacarneantesde ponerlaaasara laparrilla.
• Se us6unaasaderasucia.
• Elvoltajedel hogarpuedeser bale.
Emhomo no se aatomimpia • Verifiqueparaasegurarsede queel ciclono eat6aiustadoparaun comienzodiferido,Ver
(modelos selectos), pdgina68.
• Verifiquesi lapuertaest_cerrada,
• Verifiquesi e! controlest_en Mode Sab_tico,Verp_g,64,
• Elbornepuedeestara m_sde 205° C (400° F), Latemperaturadel bornedebeserinferior a
205° C (400° F) paraprogramarunciclo de limpieza,
El homo no se limpi6 en forma • Puedeque seanecesariountiempode limpiezam4slargo.
debida [modeios seiectos), • Losderrarnesexcesivos,especialmentedeafimentosazucaradosy/o 4cidosnofueron limpiados
antesdelciclo de autofimpieza,
La paerta demborne no se • Elinteriordel homotodav[aest_caliente, Dejeque paseaproximadamenteunaheraparaque
desbloqaea despa_s del ciclo el hornose enfr[eantesdeque secompleteunciclo de autolimpieza,Lapuertapuedeset
de aatomimpieza[modemossemectos)o abiertacuandodesaparezcaIa palabra'LOCK'del indicadorvisual,
• Elcontroly la puertapuedenestarbloqueadas,Verp_g,60,
76
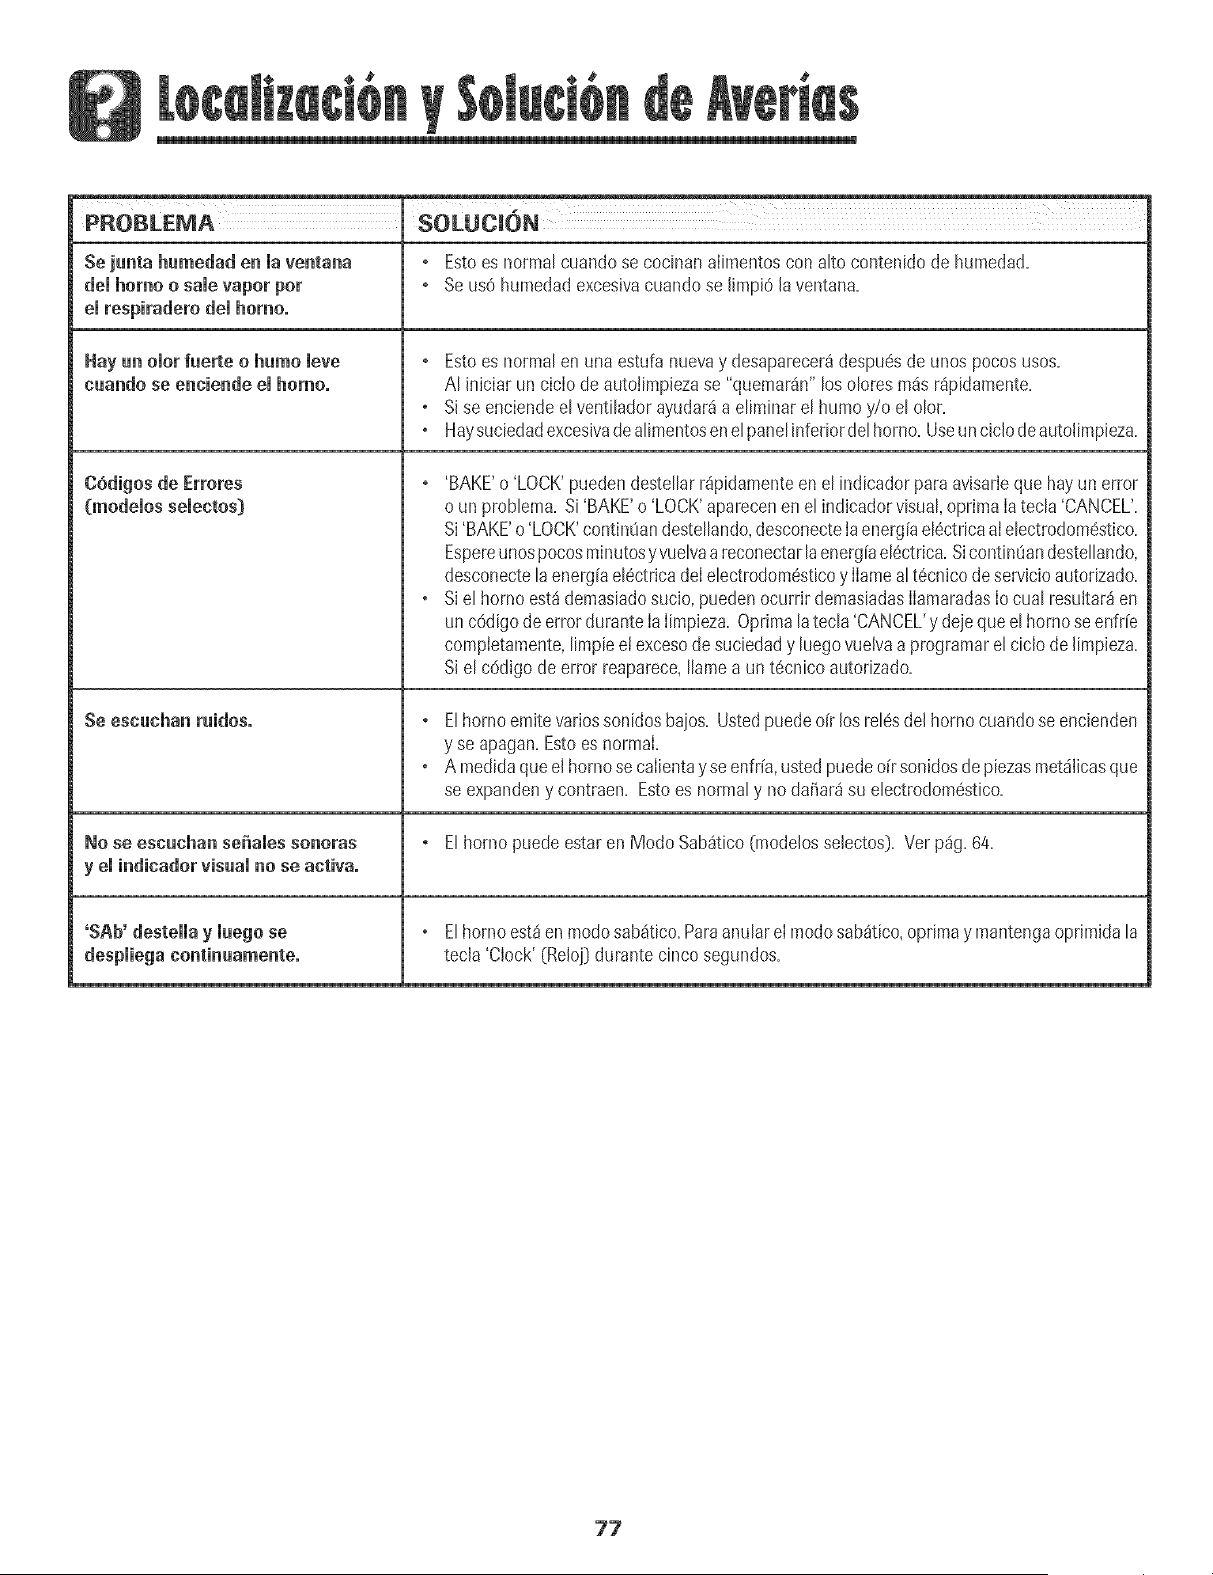
PROSLEMA SOLUC_ON
$e junta humedad en maventana , Estoes normal cuandose cocinanalimentoscon alto contenidode humedad.
demhomo o samevapor per , Seus0 humedadexcesJvacuandose limpi6 laventana.
emrespiraderodemhomo.
Hay un omorfuerte o humo mere ° Estoes normal en una estufanuevay desaparecer_despu6sde unos pocosuses.
euando se enciende emhomo, AI iniciar un ciclo deautolimpiezase "quemar4n"los oloresm4s r4pidamente.
o Sise enciendeel ventihdor ayudar_a eliminar el humo y/o el clot.
o Haysuciedadexcesivadealimentosenelpanelinferiordel homo. UseunciclodeautolimpJeza.
C6digosde Erreres ,
$e esnuchan ruidoso
'BAKE'o 'LOCK'puedendesteJlarr4pidamenteenel indicador para avJsarleque hayun error
o un problema.Si'BAKE'o 'LOCK'aparecenen elindicadorvisual,oprimaIa tecla'CANCEL'.
Si'BAKE'o 'LOCK'contin0andestellando,desconecteJaenerg[ael6ctricaaielectrodom@stico.
Espereunospocosminutesyvuelvaareconectarlaenerg[ael6ctrica.Sicontimiandestellando,
desconectelaenerg[ael6ctricadeIelectrodom@sticoy Ilameal t6cnJcodesewJcioautodzado.
Siel borneest4demasiadosucio,puedenocurrir demasiadasIlamaradasIo cual resuJtar4en
un c6digodeerrordurante IaIimpieza.Oprimalatecla'CANCEL'y dejequeel homose enfr[e
completamente,limpieeJexcesode suciedady luegovuelvaa programarel cicJode JimpJeza.
Siel c6digo de error reaparece,Ilamea un t6cnico autorizado.
° Elhornoemitevariessonidosbaios. Ustedpuedeoir los relesdel hornocuandose encienden
y se apagan.Estoes normal.
o A rnedidaqueel bornese calJentayse enfria,ustedpuedeo[rsonidosdepiezasmet41icasque
se expandeny contraen. Estoes normaly no da_ar4su electrodomestico.
No se eseuchun seiiules soneras ° Elhomo puedeestaren Mode Sab_tico(modelosselectos}. Ver p4g.64.
y el indicadorvisual no se activa,
'$Ab' destemmayluego se
despmiega nontinuamenteo
o Elhomo est4enmodesab4tico.Paraanularel modesab_tico,optimay mantengaoprJmidala
tecla 'Clock'(Rel@ durante cinco segundos.
77

78
Garant[a Compieta de Un A_o -Piezas
yMano de Obra
Duranteun (1} a_o desdelafechaoriginal Je
compraal par menor:se repararao reemp_azara
gratuitamentecualqu[erp_ezaquefaHedurantesu
usa normalen el hogar.
Residentes Canadienses
Lasgarant[a_antedatescubrensolamente
aqueLIoselectrodomesticosinstaladosen Canada
quebansido certificadosoaprobadospar las
agenciasde prueDascorrespondientespara
cumplimientocon la NormaNaciona[de Canad_a
menosqueel electrodom6sticohayasidotra[doa
Canadadesdelos EEUU.debidoa un cambiode
resLdencla.
Garantia Limitada Fuera de rues
Estados Unities yCanad_ = Piezas
Solamente
Duranceun (lJ alia desdela fechadecompra
originalal par menor,cualquierplezaquetalle
duranteusanorma_en el hogarserareemplazaua
o reparadagratultamen[een _oque respec[aa _a
piezay el propietariodeber_pagartodoslos a[ros
cosmosincluyendomariade obra.kiIometraje_
millaje,transporte,costa delviajey costade[
diagn0sttco,si fuesenecesano
Lasgarantfasespecfficasexpresadasan[enormen[e
son/asUNICASgarantfasprovistaspar d
fabricante.EstascJarantLas/eotorcjanderechos
legalesespecfficosy ustedpuede tenetademas
arrasderect_osquevayfande unestadoa otto.
Lo que No Cubten Estas Garantm'as:
1. Situacionesy daSosresultantesde cualquierade Iassiguienteseventualidades:
a. InstalaciOn,entregao mantenimientoinapropiados.
b. CualquierreparaciOn,modificaci0n,alteraciOno ajustenoautorizadopar
el fabricanteo par un centrode servicioautorizado.
c. Mal usa,abuso,accidenteso usa irrazonable.
d. Corrienteel6ctrica,voltajeo suministroincorrecto.
e. ProgramaciOnincorrectade cualquierade Ioscontroles.
2. Lasgarantiasquedan nuIassi Iosn_imerosde serieoriginaleshan side retirados,
alteradoso no sonf_cilmente legibles.
3. Focos.
4. Productoscompradospara usa comercialo industrial.
5. Elcostadel servicioo Jlamadadeserviciopara:
a. Corregirerroresde instalaci6n.
b. Instruir al usuariosabre ei usa correctodeI artefacto.
c. Transportedei artefactoal establecimientode servicio.
6. LosdaBosconsecuenteso incidentalessufddospar cualquier personacoma
resultadode cualquier incumplimientode estasgarantias.Enalgunosestadosno
se permiteIaexclusi6no limitaciOnde los daBosconsecuenteso incidentales,par
Jotanto laexclusionanterior puedeque no se apJiqueensu caso.
Si Necesita Setvicio
o LlameaI distribuidor dondecompr0su electrodom6sticoo Ilamea Maytag
ServicessM,Servicioa los ClientesMa}¢agIlamandoai 1-800-688-9900en EEUU.o
aI 1-800-688-2002en Canad¶ubicar a un t6cnico autorizado.
• Aseg0resede conservarel comprobantede compraparavenficar eIestadode la
garant[a. ConsuIteIasecci6nsabre Ia GARANTIAparamayorinformaciOnsabrelas
responsabilidadesde! propietariopararecibir servicio bajoIa garant[a.
• Siel distribuidoro la compaS[ade serviciono puedenresoIvere! problema,escriba
a Maytag Services_sM,Attn: CAIR_ Center,P.O.Box2370,Cleveland,TN37320-2370
o Ilameal 1_see_688_990e en EE.UU.o al 1_800_688_2002 en Canada1.
• Las gu[asdel usuario,manualesde servicioe informaci6nsabre laspiezaspueden
solicitarsea Maytag ServicessM,Servicioa losClientesMaytag.
CuandoIlameo escribaacercade un problemade servicio,parfavor incluyala
siguienteinformaciOn.
a. Su hombre,direcci6ny n_imerodeteldono;
b.N_merode modeloy nLimerode serie;
c. Nombrey direcci6n desu distribuidoro t6cnico de servicio;
d. Una descripci6nclara del problemaqueest_experimentando;
e. Comprobantede compra0_ecibode compra).
Form No. C/10/04 Part No. 8113P465 60 ®b2004 Maytag Appliances Sales Co. Litho U.S.A.