BRACE CARE
Liners and pads must be cleaned regularly depending upon your
activity level and perspiration. Frame pads and condyle pads are
held in place by hook fasteners and can easily be removed. Straps
are not removable, but can be lengthened for cleaning. Wipe or
HAND WASH with a MILD anti-bacterial soap, rinse well, and then
AIR DRY. Replace and position properly by pressing firmly against
the fasteners.
CLEANING HINGES
The hinges on your brace are pre-lubricated. If sand, dirt or
water gets inside the hinges, they may require cleaning and
lubrication. Remove the condyle pad, clean the hinge thoroughly
and re-lubricate with any common synthetic lubricant (grease)
from a hardware store. Check that the hinge is gliding smoothly
and reassemble.
PARTS, SERVICE & WARRANTY
Straps, liners and other comfort pads may need to be replaced due
to normal wear and tear. If your brace requires replacement parts,
you should contact the professional who assisted you in ordering
and fitting the brace.
Under normal use and conditions, the frames and hinges on your
brace are covered by a one year warranty against defects in
craftsmanship and breaking. Straps, liners and other comfort pads
are backed by a six month warranty.
U.S. Patent No: Patent Pending
PART NUMBERS: 301261-XX; 301262-XX.
-XX
-01 -03 -05 -07 -08 -09
XS
SM
MD
LG
XL
2XL
United Ortho Enterprises
2235 Pennsylvania St. Fort Wayne, IN 46803
www.United-Ortho.com
Phone: 800-227-8748
Fax: 877-688-7975
PN PL0067 REV A 1014
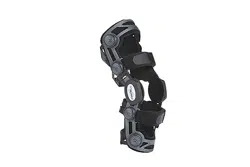
OA NōVel
Medial
Knee Brace
Brace Fitting Instructions
Brace Fitting Instructions
OA No¯ VEL
MEDIAL KNEE BRACE
BRACE CARE
PN PL0067 REV B 0720
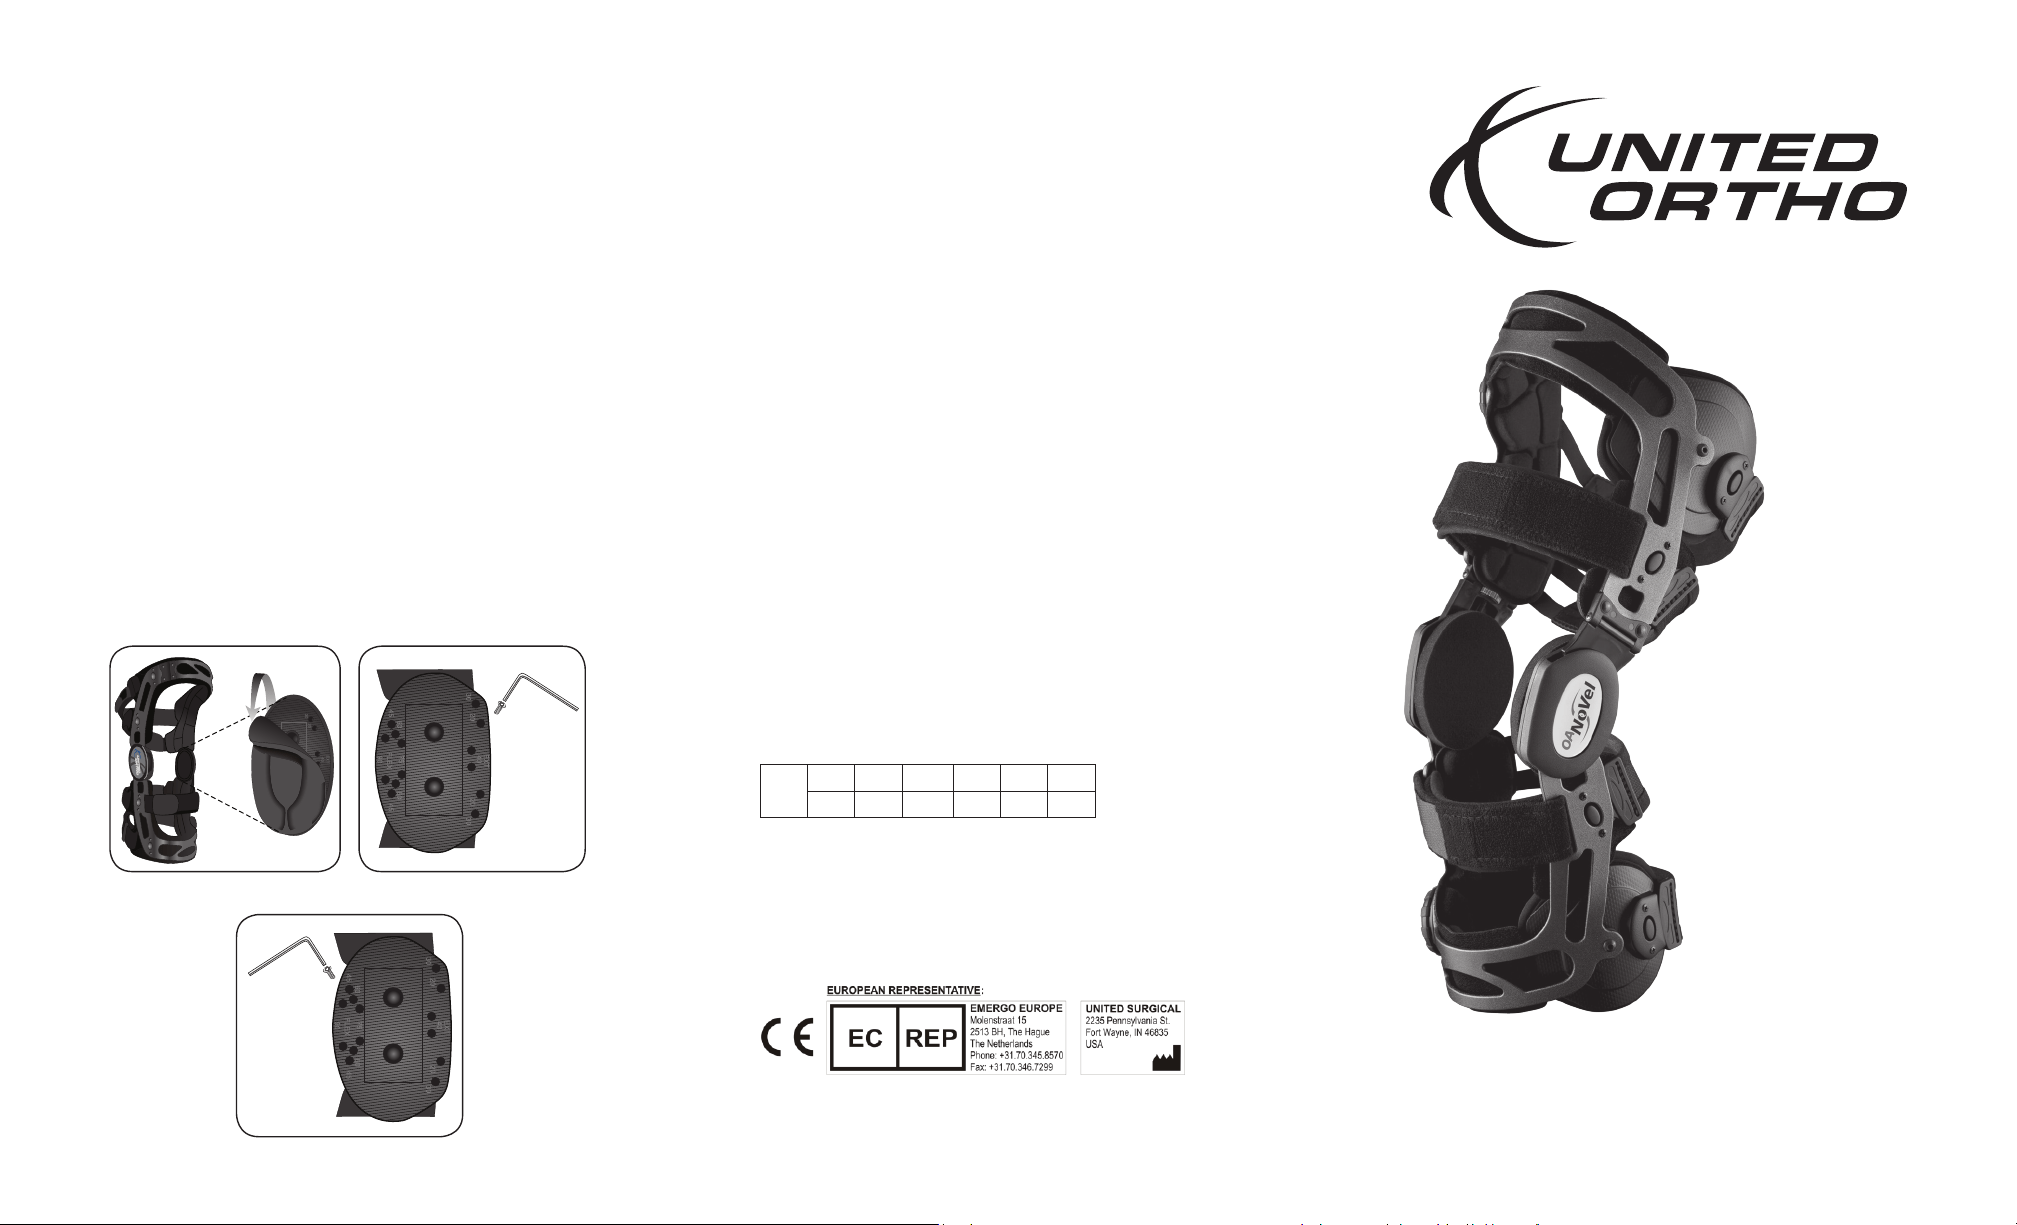
RANGE OF MOTION – HINGE ADJUSTMENT
This brace is shipped without any extension stop installed.
If needed, an extension (EXT) and exion (FLEX) Stop Kit,
along with the tools required to change the stops, is
available to purchase.
EXT: 200, 300, 400
FLEX: 450, 600, 750, 900
ADJUSTING FLEX AND EXT STOPS
1. REMOVE CONDYLE PADS
Remove the condyle pads by detaching them from the
inside of the medial and lateral hinges.
2. INSTALL SCREWS
Determine the proper EXT or FLEX degree stop desired
and insert screw into the corresponding hole, using the
provided Allen wrench.
Important: Insert screws into the same EXT or FLEX
degree holes for both the medial and lateral hinges.
Donotover-ghtenscrews.
Condyle Pad Removal EXT Stop Adjustment
FLEX Stop Adjustment

APPLICATION INSTRUCTIONS
A:
RELEASE THE STRAPS
Release the straps by
depressing the quick release
buckle on the medial side of
the frame. Do this on all four
straps.
The Tibia Strap and Femur
Strap do not have Release
Buttons. Loosen both
straps at initial fitting.
B:
LOOSEN STRAPS
Lengthen the straps by
depressing the center of the
cinching dial and pulling on
the straps. Do this for all 4
straps.
Next, sit at the edge of a chair
with your knee at 30°.
C:
TIBIA STRAP
Unfasten hook/loop on
the Tibia Strap and tighten
so that the center of
hinges line up with the
medial and lateral
condyles of the knee.
The Tibia Strap should
only be adjusted at initial
fitting. Patient should not
readjust unless the hinges
are misaligned with the
knee.
D:
STRAP #1
Pull Strap #1 taut and ensure
that the strap is not twisted.
Engage Strap #1 by wrapping it
around the back of the leg and
inserting the Strap Tab into the
Quick Release Buckle.
Add tension to the strap by
rotating the cinching dial until a
snug fit is achieved (see image in
Step E).
E:
STRAPS #2, #3, #4
Repeat Step D for Straps #2,
#3 and #4.
F:
FEMUR STRAP
Tighten the Femur Strap until
a snug fit is achieved.
The Femur Strap should only
be adjusted at initial fitting.
Patient should not readjust
unless the hinges are
misaligned with the knee.
G:
CHECK ALIGNMENT
Once the brace is properly
fitted, stand up and ensure
that the hinges are aligned
with the center of the
patella.
H:
ADJUSTMENT DIAL
The Adjustment Dial is
designed to offer increased
unloading, if needed. It
ranges from 0 to 5, with 5
delivering the maximum
unloading. To adjust the
dial, sit in a chair with the
knee bent at 30 degrees and
rotate the dial to the
desired setting.
INDICATIONS: Unicompartmental OA (medial), Chondral defect procedures, and
meniscal procedures. This product was designed to complement the variety of
medical treatments common to the above afflictions. The frequency and
duration of use should be determined by your medical professional.
WARNING: CAREFULLY READ FITTING INSTRUCTIONS AND WARNINGS PRIOR TO USE. TO ENSURE PROPER PERFORMANCE OF THE BRACE, FOLLOW ALL INSTRUCTIONS. FAILURE TO PROPERLY POSITION
THE BRACE AND FASTEN EACH STRAP WILL COMPROMISE PERFORMANCE AND COMFORT.
WARNING: IF YOU EXPERIENCE INCREASED PAIN, SWELLING, SKIN IRRITATION, OR ANY ADVERSE REACTIONS WHILE USING THIS PRODUCT, IMMEDIATELY CONSULT YOUR MEDICAL PROFESSIONAL.
WARNING: THIS DEVICE WILL NOT PREVENT OR REDUCE ALL INJURIES. PROPER REHABILITATION AND ACTIVITY MODIFICATION ARE ALSO AN ESSENTIAL PART OF A SAFE TREATMENT PROGRAM.
CONSULT YOUR MEDICAL PROFESSIONAL REGARDING SAFE AND APPROPRIATE ACTIVITY LEVEL WHILE WEARING THIS DEVICE.
CAUTION: CARE AND CLEANING OF THIS PRODUCT IS ESSENTIAL TO ITS CONTINUING STRENGTH AND PERFORMANCE. FOLLOW REMOVAL AND CLEANING PROCESS DESCRIBED IN INSTRUCTIONS.
CAUTION: FOR SINGLE PATIENT USE ONLY.
CAUTION: WHEN WEARING BRACES BILATERALLY, MODIFY ACTIVITY AS NECSESSARY TO KEEP MEDIAL HINGES FROM CONTACTING EACH OTHER.
Femur
Strap
FOLLOW CORRECT STRAP ORDER
All straps are numbered in numerical order,
with the exception of the Tibia and Femur
strap (which are not labeled). It is important
to apply the brace according to the numerical
order to ensure optimal protection and fit.
I:
FINAL CHECK
Stand up with the leg in full
extension and check to ensure
the center of the hinges aligns
with the center of the patella.
Walk around for a few minutes
and allow the brace to settle
into place. Adjust the tension
of the straps and the
Unloading Dial as needed.
IMPORTANT: STRAP ORDER
#3
#4
#2
#1
Tibia
Strap
FITTING TIPS
CONDYLE PAD
The medial and lateral condyle pads
should make full contact with the
knee. In case of a gap or irregular
fitting between the medial or lateral
side, use the extra 5mm or 15mm
condyle pads provided to achieve a
perfect fit for both sides (10mm
condyle pads are installed).
FITTING TIPSIMPORTANT: STRAP ORDERAPPLICATION INSTRUCTIONS
APPLICATION INSTRUCTIONS
INDICATIONS: Unicompartmental OA (medial), Chodral defect procedures, ligament
instabilies and meniscal procedures. This product was designed to complement the
varoety of medical treatments common to the above aicons. The frequency and
duraon of use should be determined by your medical professional.


