
OMELET MAKER
MODEL: EOM205
INSTRUCTION MANUAL & RECIPE GUIDE

OMELET MAKER
IMPORTANT SAFEGUARDS ........................................................................................ 3
PARTS IDENTIFICATION................................................................................................6
BEFORE FIRST USE .......................................................................................................... 7
HOW TO USE YOUR OMELET MAKER ................................................................8
CLEANING & MAINTENANCE TIPS ........................................................................10
RECIPES ................................................................................................................................... 11
WARRANTY & CUSTOMER SERVICE ....................................................................18
2
Questions? We’re here to help! Visit: shopelitegourmet.com for support on this product.

IMPORTANT SAFEGUARDS
3
The Elite Brand takes consumer safety very seriously. Products are designed
and manufactured with our valued consumers’ safety in mind. Additionally,
we ask that you exercise a level of caution when using any electrical
appliance by following all instructions and important safeguards.
When using electrical appliances, basic safety precautions should always
be followed, including the following:
1. READ ALL INSTRUCTIONS
CAREFULLY.
2. Do not touch hot surfaces. Use
handles only.
3. To protect against risk of electric
shock, do not immerse or
partially immerse the cord, plugs,
or the entire unit in water or any
other liquid.
4. Close supervision is necessary
when any appliance is used by or
near children.
5. Unplug from wall outlet when
not in use and before cleaning.
Allow to cool before cleaning or
storing this appliance.
6. Do not operate any appliance
with a damaged cord or plug or
after the appliance malfunctions,
or has been damaged in any
manner. Return the appliance to
the nearest authorized service
facility for examination, repair or
adjustment.
7. The accessible surfaces may
be hot when the appliance is
operating.
8. Appliances are not intended
to be operated by means of
an external timer or separate
remote-control system.
9. The use of accessories
attachments not recommended
by the appliance manufacturer
may cause fire, electrical shock
or injuries.
10. Do not use outdoors. This is for
household only.

11. Do not use while standing in
damp area.
12. Do not let the electrical cord
hang over the edge of the table
or counter, or touch hot surfaces.
13. Do not place on or near a hot gas
or electric burner or in a heated
oven.
14. To disconnect, remove plug from
outlet. Never pull on the cord.
15. This appliance is not intended
for use by persons (including
children) with reduced physical,
sensory or mental capabilities,
or lack of experience and
knowledge, unless they have
been given supervision or
instruction concerning use
of the appliance by a person
responsible for their safety.
16. Children should be supervised to
ensure that they do not play with
the appliance.
17. Do not use appliance for other
than intended use.
18. Do not use abrasive cleaners or
oven cleaners when cleaning this
appliance.
19. Do not attempt to repair the unit
by yourself. Send any revisions,
maintenance, and repair to
authorized service personnel.
4
IMPORTANT SAFEGUARDS (cont.)
SAVE THESE INSTRUCTIONS
THIS PRODUCT IS FOR
HOUSEHOLD USE ONLY

Questions? We’re here to help! Visit: shopelitegourmet.com for support on this product.
SHORT CORD PURPOSE
POLARIZED PLUG
5
NOTE: A short power cord is provided to reduce the risk of personal injury
resulting from becoming entangled in or tripping over a longer cord.
Longer power-supply cords or extension cords may be used if care is
exercised in their use.
If an extension cord is used: (1) the marked electrical rating of the extension
cord should be at least as great as the electrical rating of the product;
(2) the extension cord should be arranged so that it will not drape over the
countertop or tabletop where it can unintentionally be pulled on or tripped
over by children or pets.
If this appliance is equipped with a polarized plug (one blade is wider than
the other), please follow the below instructions:
To reduce the risk of electrical shock, this plug is intended to fit into a
polarized outlet only one way. If you are unable to fit the plug into the
electrical outlet, try reversing the plug. If the plug still does not fit, contact
a qualified electrician. Never use the plug with an extension cord unless
the plug can be fully inserted into the extension cord. Do not alter the plug
of the product or any extension cord being used with this product. Do not
attempt to defeat the safety purpose of the polarized plug.
6
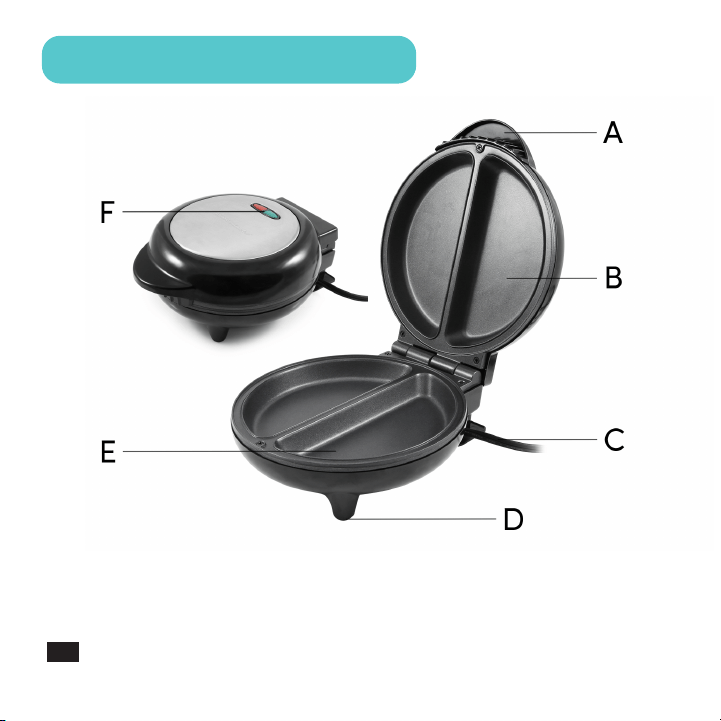
PARTS IDENTIFICATION
A. Cool-Touch Handle
B. Upper Nonstick Plate
C. Power Cord & Wrap
D. Non-skid Feet
E. Bottom Nonstick Plate
F. Power & Ready Indicator Light

BEFORE FIRST USE
1. Unpack the appliance and all parts. Remove all packaging materials,
including any stickers or labels.
2. Read these instructions carefully.
3. Clean the interior surface of the appliance with a damp cloth. Wipe
dry with a soft cloth immediately. Do not use abrasive materials. Wipe
down the exterior with a soft dry cloth.
4. NEVER IMMERSE APPLIANCE OR CORD IN WATER OR ANY OTHER
LIQUID.
5. Position the appliance on a stable, dry, level, heat-resistant surface
near an electrical outlet.
6. Unroll the electrical cord.
7. Operate this appliance on a separate outlet and circuit from other
appliances to avoid overloading the circuit.
7
Questions? We’re here to help! Visit: shopelitegourmet.com for support on this product.

8
1. Prepare the mixture following the recipe instructions. Depending on
the ingredients used in the recipe, the numbers of eggs needed will
change. Normally, 2 large eggs per side are used.
2. Lift the lid to the open position.
3. Coat the non-stick surfaces with a small amount of vegetable oil.
This can be done with a paper towel or with a non-stick cooking oil
spray. Wipe off any excess oil. It is recommended to periodically do
this after use to maintain the quality of the non-stick coating.
4. Check and confirm the voltage of the product is the same as the
outlets. Then, plug electrical cord into the outlet carefully on a
separate outlet from other appliances to prevent the circuit from
being overloaded.
5. Both red and green indicator light will turn on when plugged in.
6. Lower the lid to the closed position to preheat the appliance until
the green indicator light turns off. The appliance is ready to cook as
soon as the green light turns off.
HOW TO USE YOUR OMELET MAKER
Questions? We’re here to help! Visit: shopelitegourmet.com for support on this product.
NOTE: When your omelet maker is heated for the first time, it may
emit slight smoke or odor. This is normal and does not affect the
safety of your appliance. However, it may affect the flavor of the first
omelets prepared in your omelet maker, and it is recommended to
discard these.

9
7. Carefully open the top lid using an oven mitt to avoid burns by
touching the hot surface.
8. Pour the mixture into the non-stick coated omelet shaped cavities,
making sure it does not overflow.
9. Close the lid and let cook for approximately 7 to 10 minutes or until
fully cooked.
10. After the omelets are ready, carefully remove them by using an oven
mitt and a heat resistant wood or plastic spatula. DO NOT use metal
utensils because they can scratch or damage the non-stick surface.
11. If cooking more than one batch in a session, after removing the first
batch, using an oven mitt close the lid to maintain heat.
12. As soon as you are finished cooking, unplug the product and allow it
to cool down.
HOW TO USE YOUR OMELET MAKER
Questions? We’re here to help! Visit: shopelitegourmet.com for support on this product.
NOTE: While the unit is heating up and cooking your omelets, the
Green indicator light will periodically turn on and off to maintain the
right temperature.
CAUTION: The surfaces of the appliance get hot during use. To avoid
accidental burns, scalding or steam being released while cooking,
always open and close the lid by using an oven mitt.
NOTE: DO NOT leave the appliance plugged in without any egg
mixture inside for longer than 2 min.

10
CLEANING & MAINTENANCE
WARNING: Unplug the product and allow the appliance to cool down
before cleaning.
Proper maintenance will ensure years of service from your product. Clean
the product after every use following these steps. This product contains
no user serviceable parts and requires little maintenance.
Questions? We’re here to help! Visit: shopelitegourmet.com for support on this product.
1. Clean the inside and outside surfaces of the appliance with a damp
cloth or a soft sponge.
2. Dry with a soft cloth. Do not use abrasives cleansers, they can
damage the housing of the appliance.
3. To remove food baked on to the cooking surface, pour a small
amount of cooking oil on to the hardened food. After 5 minutes,
carefully wipe with a paper towel or dry cloth.
STORAGE
1. After following the steps of cleaning and maintenance, collect the
power cord and place around the cord wrap.
2. Store the appliance in a dry and clean place.
CAUTION: DO NOT IMMERSE THE APPLIANCE, THE POWER CORD
OR THE PLUG INTO WATER OR ANY LIQUIDS.

11
RECIPES
VEGETABLE OMELET | Makes 1 serving
HAM & CHEESE OMELET | Makes 2 servings
2 large eggs
1/4 cup chopped red pepper
1/4 cup chopped green pepper
1/4 cup chopped mushrooms
salt and pepper to taste
4 eggs
1/2 cup chopped ham
1/2 cup shredded cheese
salt and pepper to taste
1. Mix your ingredients together.
2. Follow the instructions to cook omelets.
3. Serve hot and enjoy!
1. Mix your ingredients together.
2. Follow the instructions to cook omelets.
3. Serve hot and enjoy!

12
BANANA & CHEESE OMELET | Makes 2 servings
4 eggs
4 tbs cottage cheese
2 bananas
1. Whisk together cottage cheese and eggs in
a bowl.
2. Mash the banana and add to the bowl, whisk
together.
3. Follow the steps to cook omelets.
SPANISH OMELET | Makes 2 servings
4 eggs
1 cup baked potatoes sliced
salt and pepper to taste
1/2 onion sliced
1/2 red pepper cut into strips
1/2 cup chopped ham
1. Mix your ingredients together.
2. Follow the instructions to cook
omelets.
3. Serve hot and enjoy!

13
EGG WHITE & MUSHROOM OMELET | Makes 2 servings
SPINACH OMELET | Makes 2 servings
BASIC FRITTATA | Makes 2 servings
4 egg whites
1 tsp salt
1/2 cup chopped mushrooms
4 eggs
2 tbsp parmesan cheese
1 tsp salt
1/2 chopped onion
1/2 cup spinach
1 tbsp butter or olive oil
1/4 cup asparagus, cut into
pieces and sautéed in olive oil
1/4 cup cooked bacon, cut into
pieces
4-6 eggs, lightly beaten
1/4 cup crumbled goat cheese
1. Mix your ingredients together.
2. Follow the instructions to cook omelets.
3. Serve hot and enjoy!
1. Mix your ingredients together.
2. Follow the instructions to cook omelets.
3. Serve hot and enjoy!
1. Preheat the Omelet Maker according
to instructions.
2. Melt butter in omelet maker. Saute
asparagus and bacon until asparagus
is crip-tender and bacon is crisp.
3. Pour egg mixture into omelet maker.
Close lid and cook for 7 minutes.
4. Open and sprinkle with cheese. Close
lid and cook until golden brown.

14
FRESH CORN OMELET | Makes 2 servings
CHEESY CHIVES OMELET | Makes 2 servings
CAPRESE OMELET | Makes 1 serving
4 eggs
2 tbsp cheddar cheese
1/2 cup sweet corn
1/2 cup salsa
4 eggs
2 tbsp minced fresh chives
1/2 cup shredded cheese
2 tbsp water
salt and pepper to taste
2 eggs or 4 egg whites
2-3 tbsp cup basil
3 cherry tomatoes, halved
2 tbsp shredded mozzarella
salt & pepper to taste
1. Mix your ingredients together.
2. Follow the instructions to cook omelets.
3. Serve hot and enjoy!
1. Mix your ingredients together.
2. Follow the instructions to cook omelets.
3. Serve hot and enjoy!
1. Whisk the eggs in a bowl and salt
to taste. Preheat the Omelet Maker
according to instructions.
2. Spray or coat the cooking surface with
some olive oil. Pour eggs onto the
cooking surface.
3. Sprinkle the basil, mozzarella, and
tomatoes over the egg mixture.
4. Cover and cook for 7-10 minutes until
eggs are cooked through.
5. Season with pepper and serve.

15
PIZZA POCKETS | Makes 2 servings
pepperoni and shredded
mozzarella cheese
2 premade biscuit dough
marinara sauce for dipping
1. Slice each premade biscuit dough in
half. Roll your dough out on a floured
surface so that it is 1/2 inch thick. Cut out
four 4" circles.
2. Stretch dough circles so they resemble
the shape of the cooking surfaces in the
omelet maker.
3. Preheat the omelet maker according to
instructions.
4. Top one dough circle with pepperonis
and mozzarella cheese. Top with an-
other dough circle and pinch the edges
closed. Cook pizza pocket in the omelet
maker until golden and crispy.
5. Serve with a side of marinara sauce for
dipping.

16
GREEK OMELET | Makes 2 servings
MEDITERRANEAN BROCCOLI & CHEESE OMELET |
Makes 2 servings
4 eggs
1 tsp salt
2 tbsp feta cheese
1/4 chopped onion
1/3 cup spinach
1/4 cup chopped red pepper
4 eggs
1/2 cup cooked broccoli florets
1/4 cup 2% milk
1/3 cup grated Romano cheese
1/3 cup sliced pitted Greek olives
salt & pepper to taste
1. Mix your ingredients together.
2. Follow the instructions to cook omelets.
3. Serve hot and enjoy!
1. Mix your ingredients together.
2. Follow the instructions to cook
omelets.
3. Sprinkle with shaved cheese &
parsley.
4. Serve hot and enjoy!

17
GOAT CHEESE MUSHROOM OMELET | Makes 2 servings
PEANUT BUTTER & JELLY OMELET | Makes 2 servings
4 eggs
2 tbsp crumble goat cheese
salt and pepper to taste
1/2 ripe avocado, sliced
1/2 cup baby spinach
1/2 cup sliced mushroom
4 eggs
3 tbps water
Confectioner's sugar
1 tbsp butter
1/4 cup sliced ripe banana
2 tbsp strawberry jelly
2 tbsp peanut butter
salt & pepper to taste
1. Mix your ingredients together.
2. Follow the instructions to cook omelets.
3. Serve hot and enjoy!
1. Preheat the omelet maker according to
instructions.
2. Whisk the egg, water, salt & pepper.
3. Melt butter in omelet maker. Add half
of egg mixture into omelet maker.
When the eggs are set, place banana,
jelly and peanut butter on top. Then
add the remaining egg mixture.
4. Close lid and cook for 5-7 minutes.
5. Dust with confectioner's sugar and
serve.

18
LIMITED WARRANTY* ONE (1) YEAR WARRANTY IS ONLY VALID WITH
PROOF OF PURCHASE FROM AN AUTHORIZED DEALER
PLEASE DO NOT RETURN TO STORE OF PURCHASE.
If you have any problems with this unit, contact Customer Service for
support.
1. Your small kitchen appliance is warranted to the original purchaser to be free from
any manufacturing defects under normal use and conditions for one (1) year, cord
excluded. This Warranty applies only to the original purchaser of this product.
2. Retail stores/merchants selling this product do not have the right to alter, modify,
or in any way revise the terms and conditions of the warranty.
3. If you use your appliance for household use and according to instructions, it should
give you years of satisfactory service.
4. At its sole discretion, Maxi-Matic USA will either repair or replace the product found
to be defective during the warranty period.
5. The repaired or replacement product will be in warranty for the remaining balance
of the one-year warranty period and an additional one-month period.
6. Consumer’s remorse is not an acceptable reason to return a product to our Service
Center.
7. This limited warranty covers appliances purchased and used within the 50 U.S.
states plus the District of Columbia and does NOT cover normal wear of parts or:
- Damages caused by unreasonable use, neglect, normal wear and tear,
commercial use, improper assembly or installation of product.
- Damages caused in shipping.
- Damages caused by replacement or resetting of house fuses or circuit breakers.
- Defects other than manufacturing defects.
- Breakage caused by misuse, abuse, accident, alteration, lack of proper care and
maintenance, or incorrect current or voltage.
- Lost or missing parts of the product. Parts will need to be purchased separately.

19
- Damages of parts that are not electrical; i.e. cracked or broken plastic/glass,
scratched/dented inner pots.
- Damage from service or repair by unauthorized personnel.
- Extended warranties purchased via a separate company or reseller.
- Acts of nature such as fire, floods, hurricanes, tornadoes, etc.
8. This warranty does not apply to re-manufactured merchandise.
Maxi-Matic, USA shall not be liable for any incidental or consequential damages caused
by the breach of any express or implied warranty. Apart from the extent prohibited
by applicable law, any implied warranty of merchantability or fitness for a particular
purpose is limited in time to the
duration of the warranty.
*One Year Limited Warranty valid only in the 50 U.S. states plus the District of Columbia,
excluding Puerto Rico and the Virgin Islands.
This warranty is effective only if the product is purchased and operated in the USA;
product usage which is in violation of the written instructions provided with the unit
will void this warranty. For international warranty, please contact the local distributor.
This warranty gives you special legal rights and you may also have other rights to which
you are entitled which may vary by state, province, and/or jurisdiction.
**Any instruction or policy included in this manual may be subject to change at any
time.
MAXI-MATIC, USA
18401 E. Arenth Ave. City of Industry, CA 91748
Visit: shopelitegourmet.com to contact us for support

20
A. Any return of defective merchandise to Maxi-Matic, USA must be
processed accordingly by first contacting customer service to obtainan
RA # (Return Authorization Number). We will not accept any returns of
merchandise without an applicable RA #.
B. IMPORTANT RETURN INSTRUCTIONS. Your Warranty depends on your
following these instructions if you are returning the unit to Maxi-Matic, USA:
1. Carefully pack the item in its original carton or other suitable box with
sufficient cushioning to avoid damage in shipping.
2. Before packing your unit for return, be sure to enclose:
a. Your name, full address with zip code, daytime telephone number,
and RA#,
b. A sales receipt or PROOF OF PURCHASE from an authorized dealer,
c. The model number of the unit and the problem you are having
(Enclose in an envelope and tape directly to the unit before the box
is sealed,) and
d. Any parts or accessories related to the problem.
RETURNS

21
3. Maxi-Matic, USA recommends that you ship the package via UPS
ground service for tracking purposes. We cannot assume responsibility
for lost or damaged products returned to us during incoming shipment.
For your protection, always carefully package the product for shipment
and insure it with the carrier. C.O.D shipments cannot be accepted.
4. All return shipping charges must be prepaid by you.
5. Once your return has been received by our warehouse, Maxi-Matic,
USA will repair or replace the product if it is defective in material or
workmanship, subject to the conditions in paragraph B.
6. Maxi-Matic will pay the shipping charges to ship the repaired or
replacement product back to you.

NOTES

NOTES

Elite Customer Service Center
Mail
Website
Maxi-Matic, USA
18401 E. Arenth Ave
City of Industry, CA
91748-1227
shopelitegourmet.com
Visit our website to contact us for support
Register your product online
Elite is a registered trademark of Maxi-Matic, USA.
Copyright Elite by Maxi-Matic.
Actual product may vary from the images/illustrations in this manual due to
continual product improvement.
Por favor visita shopelitegourmet.com para
descargar un manual de usuario en español.
elitebymaximatic @shopelitegourmet
We take pride in the fact that Elite Gourmet products
are continuously improving. To keep you well informed
of these changes and to reduce paper consumption,
we've included this QR code for you to scan and easily
download the most recent updates to your product to
your mobile device. Just access your camera, point at
the QR code & your mobile device will do the rest.