PROGRAMMING INSTRUCTIONS
SA306
ONE YEAR LIMITED WARRANTY: If this product fails because of a manufacturing
defect within one year after purchase, we will, at our option, either repair or replace
it at no charge. Our warranty does not cover damage caused by accident, abuse or
misuse. We assume no further liability with respect to the sale or use of this product.
THIS WARRANTY IS IN LIEU OF ALL OTHER WARRANTIES, EXPRESSED OR IMPLIED,
INCLUDING THE WARRANTY OF MERCHANTABILITY. We make no warranty with
respect to the fitness of any goods for the users particular application. This warranty
gives you specific legal rights, and you also may have other rights which vary from
state to state.
It is our intent to provide accurate and current specification information. However,
in the interest of product improvement, TORK may alter the specifications or
constructional details without prior notice.
batteries.
4. Install 2 x new CR2032 batteries into the battery compartment, making sure that the + and –
polarities match up with the diagram printed on the unit.
5. When the batteries are in place, return the battery door its original position and tighten the
screws.
6. If you find the timer is not running after installing new batteries, you may need to reset it first.
Using the point of a pencil or paperclip, press the RESET Button located on the front panel. You will
then need to reset the time and date.
NOTE:
When changing batteries, make sure to reset the current time to the correct time in the Eastern time
zone. When you enter your telephone area code, it will then automatically adjust to the proper time
for your location/time zone. If Reset: Zip-Set must have the area code, year and date and Eastern
time entered properly to function.
SETTING CLOCK AND CALENDAR
Clock Setting (this function is usually used when batteries must be replaced). Set only to Eastern
Time- 212 area code.
1. Press and hold the TIME SET Button until the display is flashing.
2. Press and hold the FORWARD/HOURLY ADJUST button to rapidly advance the time forward,
or the REVERSE Button to rapidly change the time backward. Release button when the approximate
correct Eastern time is displayed. PM Indicator is on the upper right corner of the display.
NOTE:
While pressing either FORWARD/HOURLY ADJUST or REVERSE button the minutes will begin
at a moderate pace, and then get faster. This will help you in set the time faster and more accurately.
3. Press the FORWARD/HOURLY ADJUST or REVERSE button repeatedly until the correct
Eastern time is displayed.
4. Press the ON/OFF/ENTER button or wait for approx. 10 seconds to exit time setting mode.
5. Press the DST button to ON to have timer increase the current time by 1 hour for daylight saving
time. The DST Indicator is to the right of the display. Press the DST button again to turn it OFF.
Current time will decrease 1 hour.
CALENDAR SETTING (This function is usually used when batteries must be replaced)
1. Press and hold the CALENDAR/7-5-2 Button until “Y 04” (default) flashes on the display.
2. Press the FORWARD/HOURLY ADJUST or the REVERSE button to adjust to current year then
press ON/OFF/ENTER Button or wait for approx. 10 seconds. The display will show month/date
and flash.
3. Press the FORWARD/HOURLY ADJUST or REVERSE button repeatedly until the correct
month/date is displayed.
4. Press the ON/OFF/ENTER button or wait for approx. 10 seconds to exit calendar setting mode.
NOTE:
While pressing either FORWARD/HOURLY ADJUST or REVERSE button the date will begin at a
moderate pace, and then get faster. This will assist you in setting the time quickly and accurately.
CONTACT RATINGS:
•120VAC, 60 Hz.
•40 AMP Resistive
•40 AMP Inductive
•40 AMP Tungsten
•40 AMP Incandescent
•3 HP Motor
INSTALLATION AND MOUNTING
Mount the timer in the desired location using the three mounting holes
(A,B,C) provided. The best mounting position for the timer is at eye level with
sufficient room for the door cover to swing fully open. The top mounting hole
(A) is a slotted type mounting hole, so measure and secure this to the wall
with the first (A) screw. The head of the screw (or fastener) should be slightly
larger than the narrow portion of the slotted hole. Hang the timer on screw A.
Screw timer into the wall using the remaining two mounting holes (B & C) to
provide a secure permanent mounting for the timer. PLEASE NOTE: Mount
case in a vertical position using mounting holes provided.
EASY WIRING
1. Turn power OFF at circuit breaker or fuse.
2. Strip 5/8 inch of the wire insulation.
3. Unscrew, lift and twist plastic protective cover to access the terminals.
4. Identify your Line and Load wires.
5. Run your wires through the knockouts and cable clamp wire connectors (not provided).
6. Connect and tighten the ground wire to grounding terminal at bottom of case.
7. Insert the wire ends under the proper terminal plates
and tighten the screws firmly.
8. Replace the plastic protective cover.
9. Restore power at fuse box or circuit breaker. Turn power ON.
TIMER OPERATION
MANUAL OVERRIDE
To override the On or Off settings, press the ON/OFF Button. The override setting will not change
the next timed event.
TURN OFF ALL TIMER FUNCTIONS
If you don’t want to use any timer functions, just press the MODE Button until “OFF” is displayed.
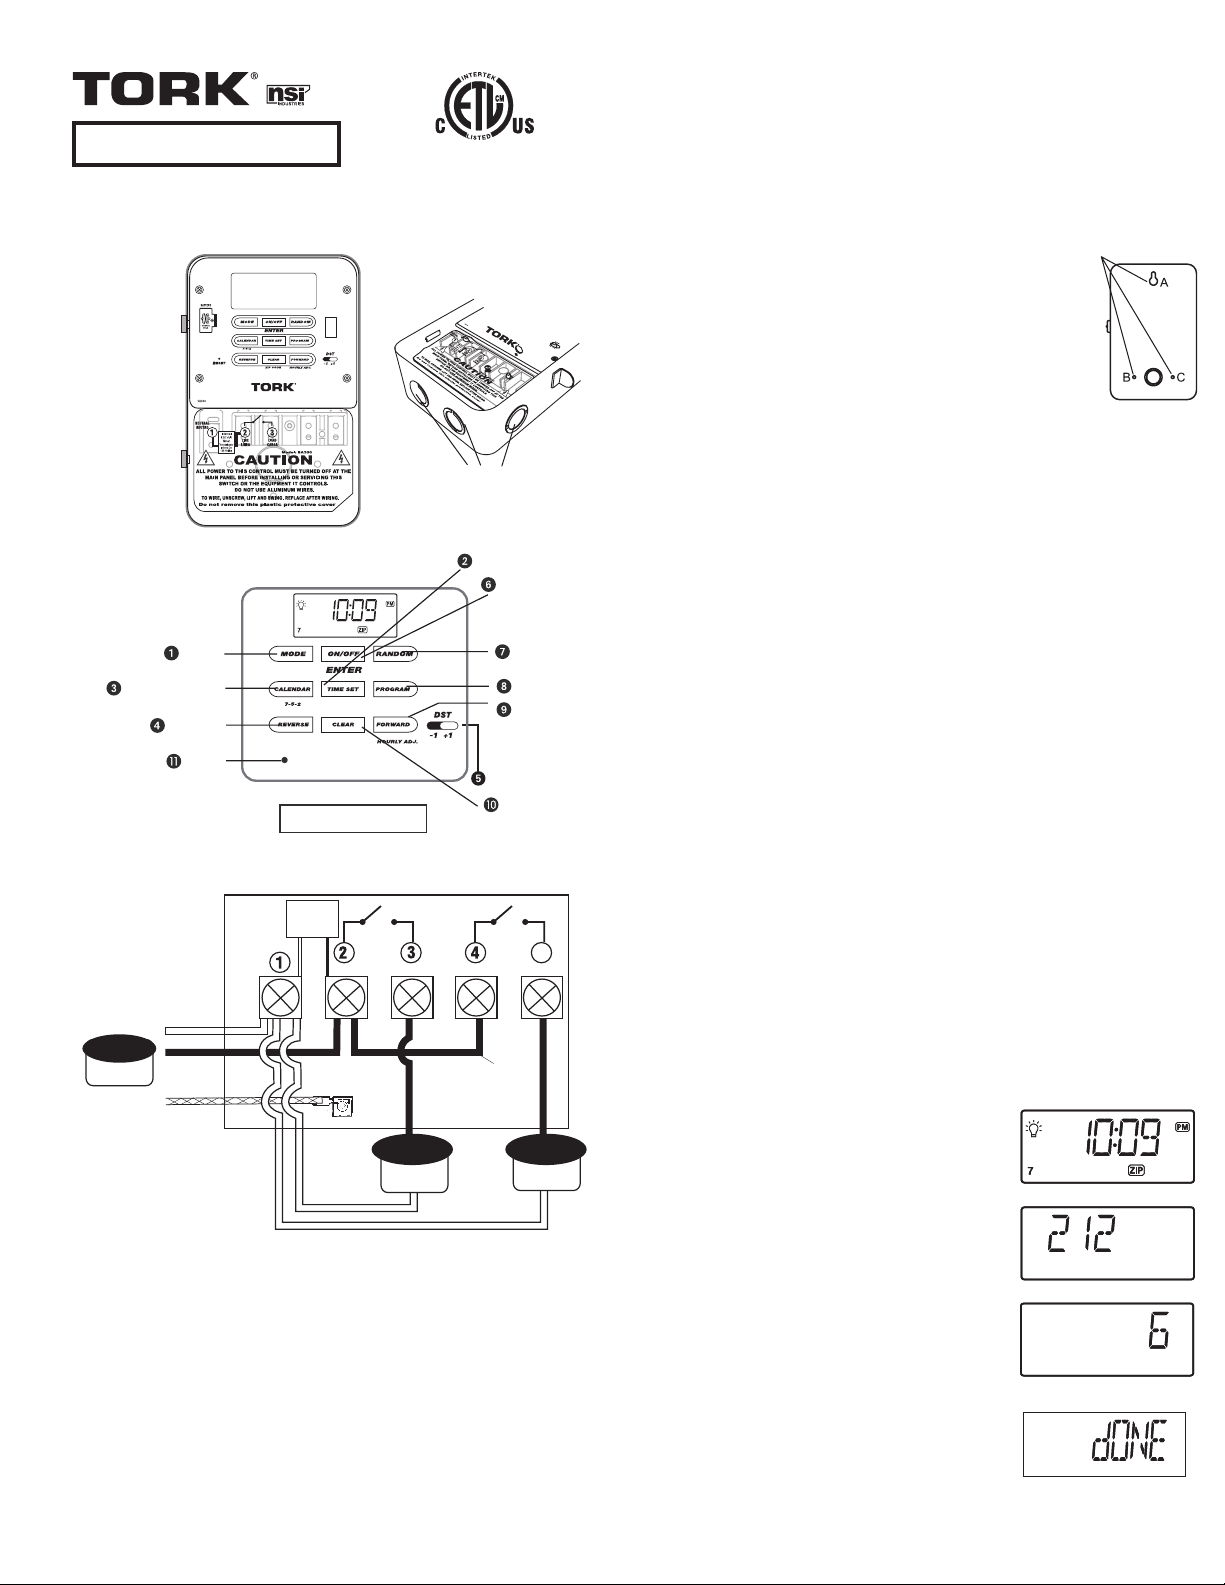
UNDERSTANDING THE ZIP-SET MODE
Zip-Set mode is use to set the TIME and set an outdoor lighting program in one easy step. When
completed, the SA306 will have the proper time and be set to turn ON at Sunset and off after 6
hours. The off time can be adjusted in the mode also.
Zip-Set is pre-set to the 212 area code (New York City) time zone so no adjustment is needed for this
area code. If you live in New York within the 212 area code, simply press the MODE button to “ZIP”
and you are done.
NOTE: Do not touch the time setting! It must always be set to the Default Preset Factory Time (NYC -
(212) local time) for the zip-set program to work.
SET TIME WITH ZIP-SET MODE
The SA 306 internal clock is pre-set at the factory to the (212-
NYC area code) Eastern time zone. (If you live in another area
code other than 212- you need to change the area code).
Simply enter your telephone area code by following these
easy steps to have the time adjust to your location:
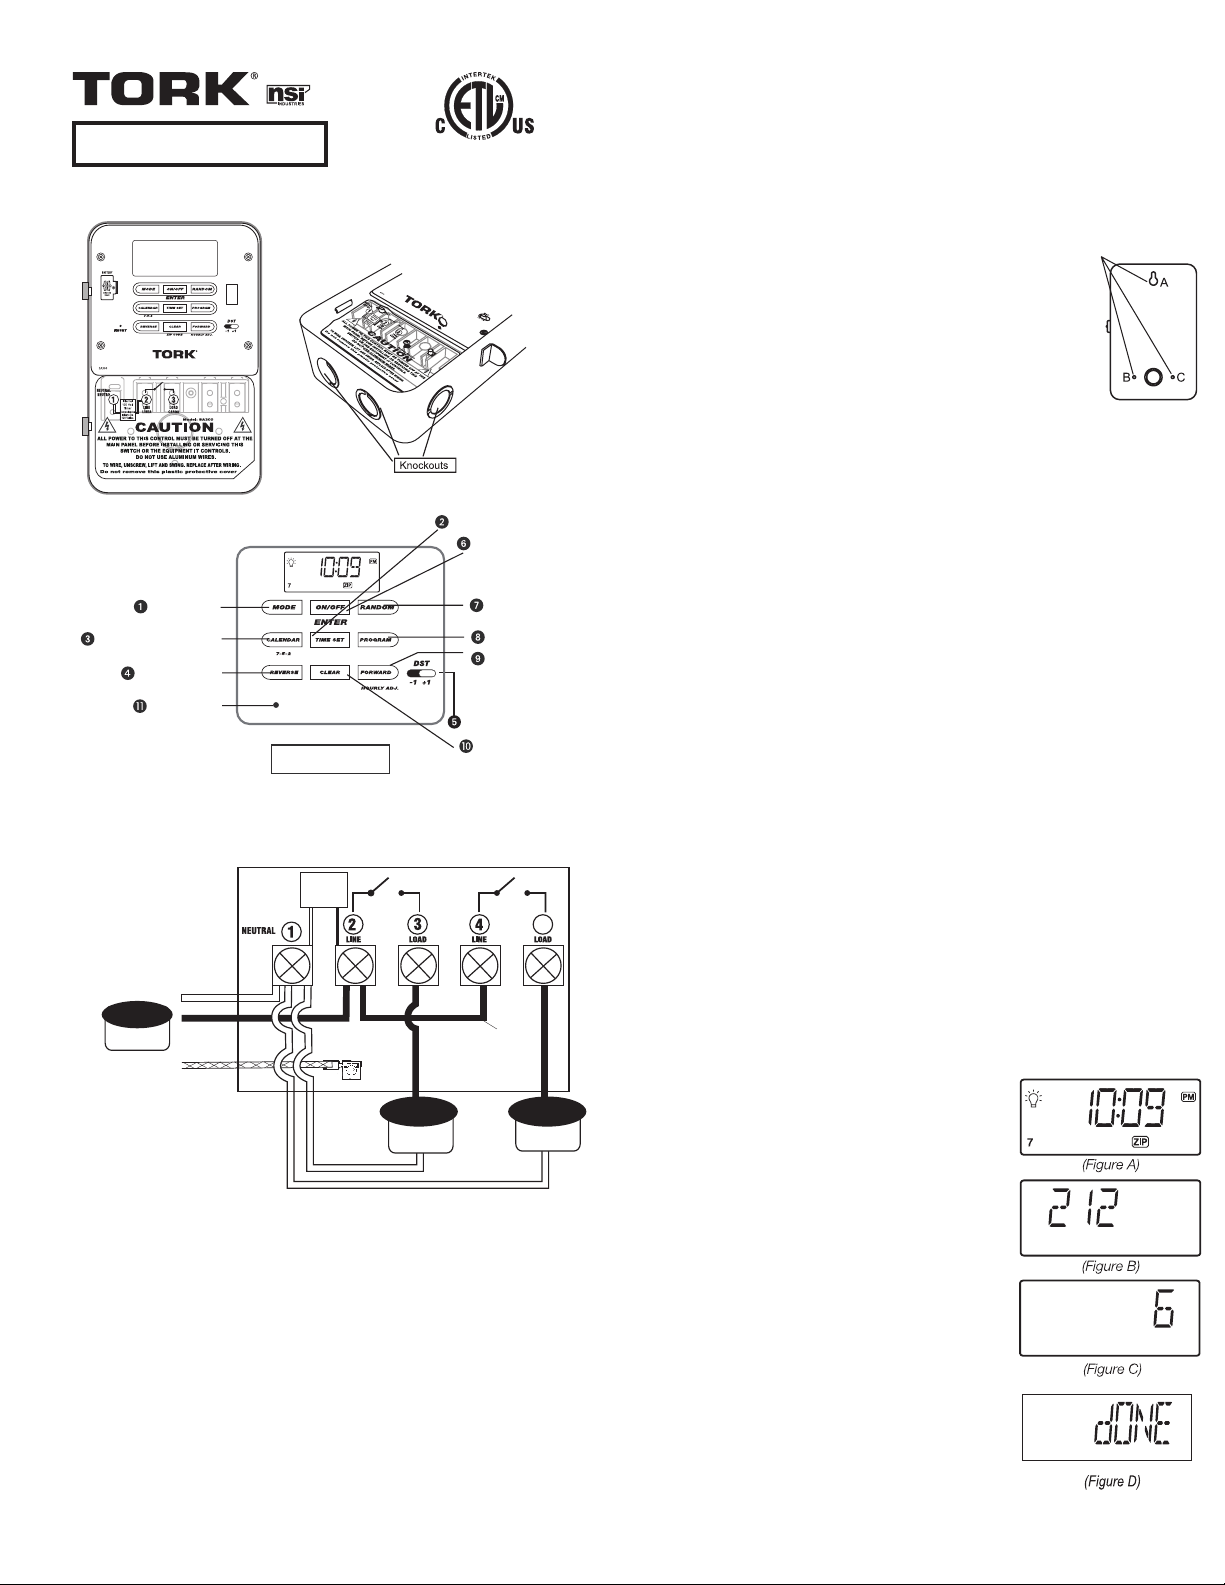
1. (Figure A) Press the MODE button until “ZIP” appears in
the display.
2. (Figure B) Press and hold the ZIP-SET/Clear button until
the display shows the 3-digit area code input mode.
3. The 1st digit of the telephone area code should be flashing.
Press the FORWARD/HOURLY ADJUST or REVERSE
button to adjust it, then press ON/OFF/ENTER button to
enter it and edit the next digit. Press the ZIP SET/Clear
button to go back to edit the previous digit. Continue until the
correct telephone area code is displayed.
4. (Figure C) Once your telephone area code is entered, select
a turn OFF time for the Zip-Set automatic sunset timer (the
default turn OFF time of 6 should flash). You can have the
timer turn off 2, 4, 6, 8, 10, 12, 14, or 16 hours after sunset
- or a fixed time, 12:30am, 1:00am, 1:30am, etc. While the
turn OFF time is flashing, press the FORWARD/HOURLY
ADJUST to cycle to the desired turn OFF setting, then press
BATTERY INSTALLATION
BUTTON DIAGRAM
ZIP-SET
Zip-Set/Clear Button
REVERSE Button
ON/OFF/Enter Button
Time Set Button
Forward/
Hourly Adjust Button
RESET Button
Calendar/7-5-2 Button
RANDOM Button
PROGRAM Button
DST Button
MODE Button
MOUNTING HOLES
Internal 120
Volt
Timer
Neutral
Ground
Jumper wire
(not included)
120 VAC
Input Only
Line
5
120 VAC
Input Only
Load 2Load 1
120 VAC
Input Only
Line (Hot)
Connexion temporaire
(non incluse)
5
Charge 2Charge 1
Alambre de enlance
(no se incluye)
Línea
5
Carga 1 Carga 2
FRENCH
SPANISH
Minuteur
120 V
Interne
Neutre
Ligne
120 V c.a.
entrée
uniquement
120 V c.a.
entrée
uniquement
120 V c.a.
entrée
uniquement
Chargé
Charge
Ligne
Charge
Masse
NEUTRE
120 VCA
SOLO ENTRADA
Temporizador de
120 V
Interno
Neutro
Línea
120 VCA
SOLO ENTRADA
120 VCA
SOLO ENTRADA
Calor
Carga
Línea
Carga
Suelo
NEUTRO
Ligne
Minuteur
120 V
Interne
Temporizador
de120 V
Interno
Internal
120 Volt
Timer
BATTERY INSTALLATION
BUTTON DIAGRAM
ZIP-SET
Zip-Set/Clear Button
REVERSE Button
ON/OFF/Enter Button
Time Set Button
Forward/
Hourly Adjust Button
RESET Button
Calendar/7-5-2 Button
RANDOM Button
PROGRAM Button
DST Button
MODE Button
MOUNTING HOLES
BATTERY INSTALLATION
BUTTON DIAGRAM
ZIP-SET
Zip-Set/Clear Button
REVERSE Button
ON/OFF/Enter Button
Time Set Button
Forward/
Hourly Adjust Button
RESET Button
Calendar/7-5-2 Button
RANDOM Button
PROGRAM Button
DST Button
MODE Button
MOUNTING HOLES
LI-971(A)
ON/OFF/ENTER button to enter it. (Figure D) When DONE appears in the display, press ON/
OFF/ENTER button to confirm or wait 10 seconds.
5. Press MODE button to Zip (display icon) to confirm the timer is set for ZIP-SET Auto ON at Sunset.
NOTE:
1. After entering the Area codes for certain states, a “C” may appear next to the telephone area
code, indicating a central location in the state. Press FORWARD or REVERSE to toggle to W (West)
or E (East) and N (North) or S (South) if needed for proper time setting.
2. There are also area codes that may have different time zones; for example the 208 area code; by
default will flash PST or by pressing FORWARD or REVERSE will toggle to MST)
3. Telephone area codes can change and may not appear in the timer’s table. Should that occur,
please use the closest adjacent area code to set the timer correctly for your location.
4. If a new area code was issued after this unit was manufactured or if you enter an invalid/
nonexistent area code, you will get an error message stating ‘AREA CODE NOT FOUND’. Enter the
closest correct area code for zip set mode to function properly.
5. If the clock/calendar is not correct or time is lost after replacing batteries, zip-Set mode will not
function properly. Please see Setting Clock and Calendar (below).
ACTIVATE THE ZIP-SET SUNSET TIMER
1. Press the MODE button until “ZIP” icon is displayed. The Zip-Set sunset timer is set and active.
2. SA306, once properly set, knows the sunset time of your location. It will automatically turn on at
sunset and turn off after your selected duration time of 2, 4, 6, 8, 10, 12, 14 or 16 hours (see ZIP-
Set Telephone Area Code Setting)- or at a fixed time, 12:30am, 1:00am, 1:30am, etc.
3. Press the RANDOM button once to activate the random feature so the timer ON/OFF time will
fluctuate between +/-10 minutes to +/-120 minutes randomly. To cancel this feature, press the
button again (RANDOM disappears). When your home is left unattended, this is an excellent security
feature to simulate household activity and random should be activated.
USING PROGRAMMABLE ON AND OFF TIME SETTINGS
The SA306 has 2 independent programmable ON/OFF time settings so you can turn outdoor holiday,
landscape and security lighting, etc. on and off at specific times.
1. Press MODE button until the “PROG” and “1” icons are displayed.
2. Press the CALENDAR/7-5-2 button to select the timer frequency. “7” means the timer will
operate all week, “5” for weekdays and “2” for just the weekend.
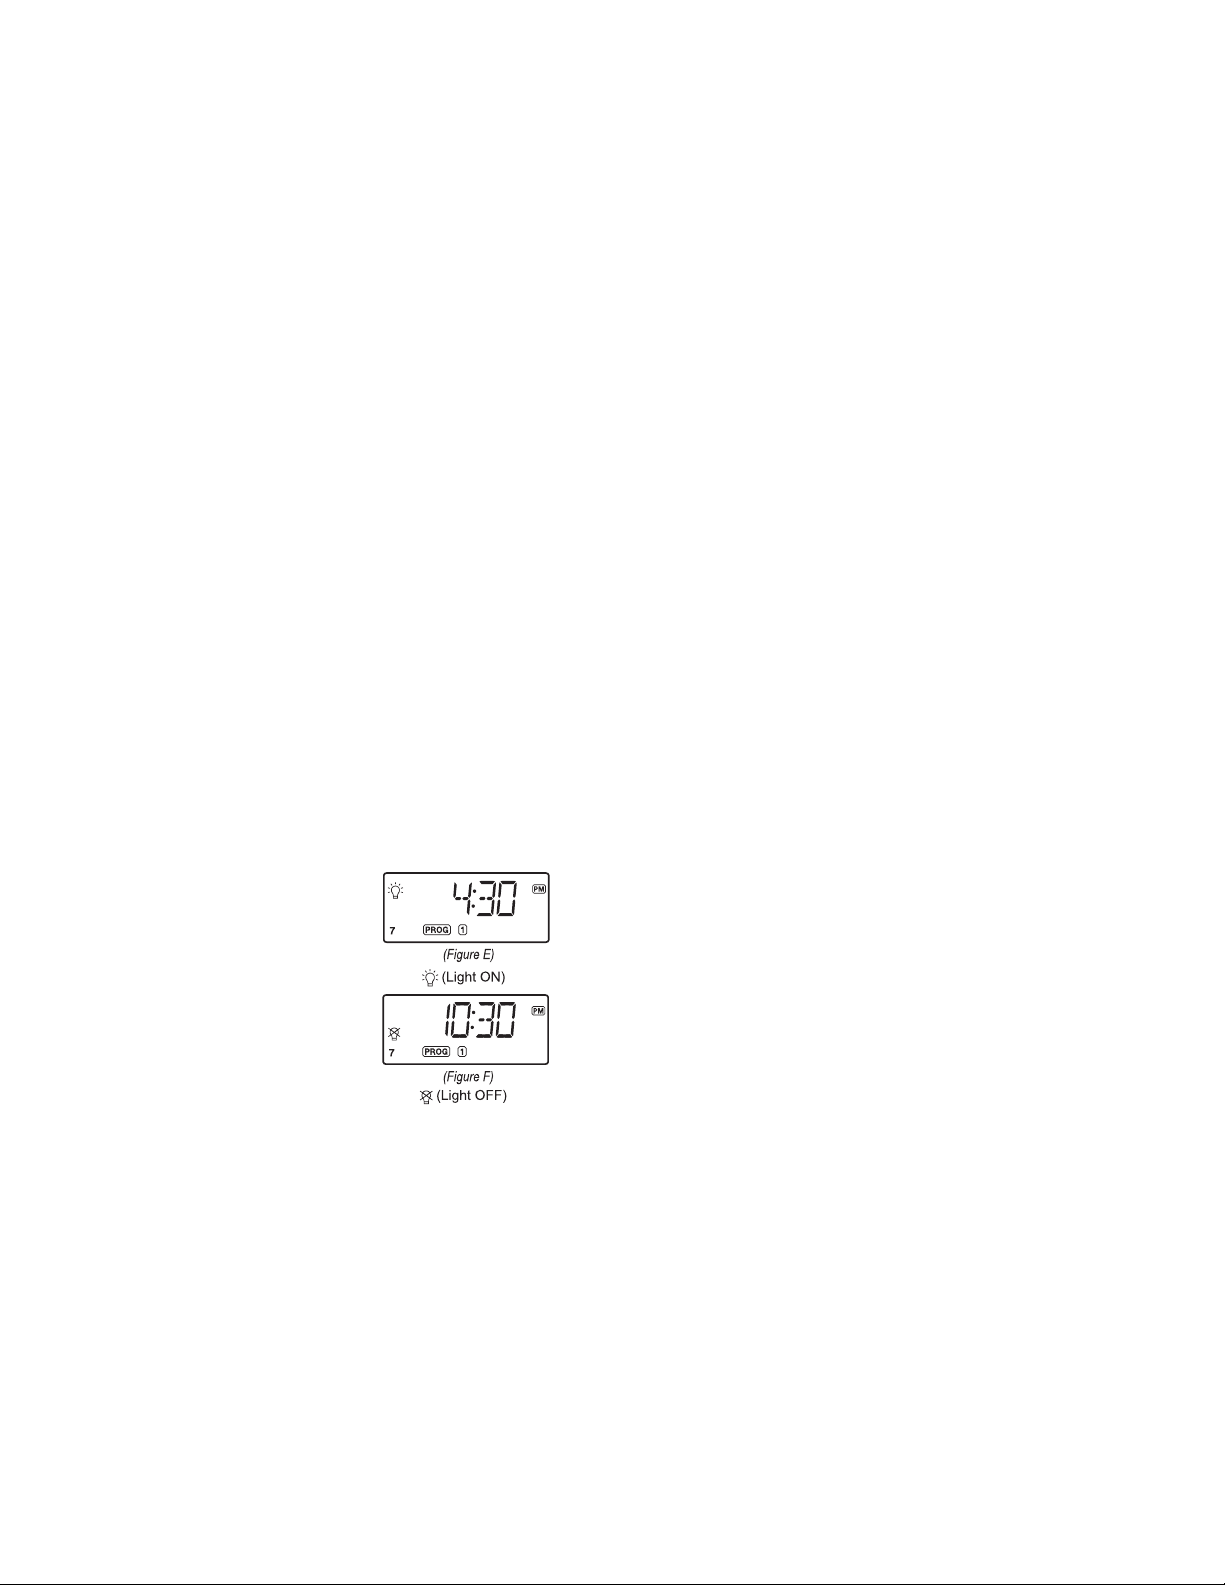
3. (Figure E) Press and hold the PROGRAM button until the display is flashing.
4. The display will change to show the “ON” time for program 1 and flash. The ON icon will appear.
Press the FORWARD/HOURLY ADJUST or REVERSE button to adjust the ON time.
5. (Figure F) Press the ON/OFF/ENTER button or wait for approx. 10 seconds. The display will
show “OFF ” time, and the OFF icon will appear. Press the FORWARD/HOURLY ADJUST or
REVERSE button to adjust OFF time. Press the ON/OFF/
ENTER button once more or wait for approx. 10 seconds to
return to normal mode. Display will change back to show the
clock time.
6. To program 2nd timer, just follow step 1-5 but press MODE
Button until “PROG” and “2” icon is displayed.
NOTE:
Do not program the same on and off time when setting
programs 1, 2, or 12. You can not set the turn on and turn
off to the same time (i.e., Turn on at 5:00 am and turn off
at 5:00 am). Doing so will produce an error message on the
display. To resolve the error message, change the off time
by at least one minute using the FORWARD or REVERSE
button.
ACTIVATING THE PROGRAMMABLE TIMER
1. Press MODE Button until one of the program icons appears. That programmed timer is now
active. (Press the PROGRAM Button to view the existing ON and OFF preset times).
2. There is a simpler way to adjust turn on time by pressing the FORWARD/HOURLY ADJUST
Button. The turn On can be adjusted by +/-90 minutes.
3. If you wish, press the RANDOM Button once to activate the random feature. The timer on/off
time will fluctuate +/-10 to +/-120 minutes randomly. To cancel this feature, just press the button
again.
BATTERY REPLACEMENT
Battery Installation – This unit comes with 2 x CR2032 batteries for time keeping and back-up. You
should replace the batteries every 2 years. To replace the batteries, please follow these steps:
1. Turn power OFF at circuit breaker to remove fuse.
2. Use a small Philips screw driver to remove screw holding the battery compartment.
3. Use a small flat screw driver gently pry the battery door open. Remove the 2 x old CR2032
BATTERY INSTALLATION
BUTTON DIAGRAM
ZIP-SET
Zip-Set/Clear Button
REVERSE Button
ON/OFF/Enter Button
Time Set Button
Forward/
Hourly Adjust Button
RESET Button
Calendar/7-5-2 Button
RANDOM Button
PROGRAM Button
DST Button
MODE Button
MOUNTING HOLES
FRENCH SPANISH
(Figura A)
(Figura B)
(Figura C)
(Figura D)
(Figura E)
(Voyant allumé)
(Figura F)
(Voyant éteint)
(Luz encendida)
(Luz apagada)
FRENCH SPANISH
(Figura A)
(Figura B)
(Figura C)
(Figura D)
(Figura E)
(Voyant allumé)
(Figura F)
(Voyant éteint)
(Luz encendida)
(Luz apagada)
This product has passed
ETL testing. It is certified
and complies with both
U.S. and Canadian
product safety standards.
FOR TECHNICAL SUPPORT: [email protected] 877.230.7874 NSi Industries LLC • USA • www.nsiindustries.com
PROGRAMMING INSTRUCTIONS
SA306
ONE YEAR LIMITED WARRANTY: If this product fails because of a manufacturing
defect within one year after purchase, we will, at our option, either repair or replace
it at no charge. Our warranty does not cover damage caused by accident, abuse or
misuse. We assume no further liability with respect to the sale or use of this product.
THIS WARRANTY IS IN LIEU OF ALL OTHER WARRANTIES, EXPRESSED OR IMPLIED,
INCLUDING THE WARRANTY OF MERCHANTABILITY. We make no warranty with
respect to the fitness of any goods for the users particular application. This warranty
gives you specific legal rights, and you also may have other rights which vary from
state to state.
It is our intent to provide accurate and current specification information. However,
in the interest of product improvement, TORK may alter the specifications or
constructional details without prior notice.
batteries.
4. Install 2 x new CR2032 batteries into the battery compartment, making sure that the + and –
polarities match up with the diagram printed on the unit.
5. When the batteries are in place, return the battery door its original position and tighten the
screws.
6. If you find the timer is not running after installing new batteries, you may need to reset it first.
Using the point of a pencil or paperclip, press the RESET Button located on the front panel. You will
then need to reset the time and date.
NOTE:
When changing batteries, make sure to reset the current time to the correct time in the Eastern time
zone. When you enter your telephone area code, it will then automatically adjust to the proper time
for your location/time zone. If Reset: Zip-Set must have the area code, year and date and Eastern
time entered properly to function.
SETTING CLOCK AND CALENDAR
Clock Setting (this function is usually used when batteries must be replaced). Set only to Eastern
Time- 212 area code.
1. Press and hold the TIME SET Button until the display is flashing.
2. Press and hold the FORWARD/HOURLY ADJUST button to rapidly advance the time forward,
or the REVERSE Button to rapidly change the time backward. Release button when the approximate
correct Eastern time is displayed. PM Indicator is on the upper right corner of the display.
NOTE:
While pressing either FORWARD/HOURLY ADJUST or REVERSE button the minutes will begin
at a moderate pace, and then get faster. This will help you in set the time faster and more accurately.
3. Press the FORWARD/HOURLY ADJUST or REVERSE button repeatedly until the correct
Eastern time is displayed.
4. Press the ON/OFF/ENTER button or wait for approx. 10 seconds to exit time setting mode.
5. Press the DST button to ON to have timer increase the current time by 1 hour for daylight saving
time. The DST Indicator is to the right of the display. Press the DST button again to turn it OFF.
Current time will decrease 1 hour.
CALENDAR SETTING (This function is usually used when batteries must be replaced)
1. Press and hold the CALENDAR/7-5-2 Button until “Y 04” (default) flashes on the display.
2. Press the FORWARD/HOURLY ADJUST or the REVERSE button to adjust to current year then
press ON/OFF/ENTER Button or wait for approx. 10 seconds. The display will show month/date
and flash.
3. Press the FORWARD/HOURLY ADJUST or REVERSE button repeatedly until the correct
month/date is displayed.
4. Press the ON/OFF/ENTER button or wait for approx. 10 seconds to exit calendar setting mode.
NOTE:
While pressing either FORWARD/HOURLY ADJUST or REVERSE button the date will begin at a
moderate pace, and then get faster. This will assist you in setting the time quickly and accurately.
CONTACT RATINGS:
•120VAC, 60 Hz.
•40 AMP Resistive
•40 AMP Inductive
•40 AMP Tungsten
•40 AMP Incandescent
•3 HP Motor
INSTALLATION AND MOUNTING
Mount the timer in the desired location using the three mounting holes
(A,B,C) provided. The best mounting position for the timer is at eye level with
sufficient room for the door cover to swing fully open. The top mounting hole
(A) is a slotted type mounting hole, so measure and secure this to the wall
with the first (A) screw. The head of the screw (or fastener) should be slightly
larger than the narrow portion of the slotted hole. Hang the timer on screw A.
Screw timer into the wall using the remaining two mounting holes (B & C) to
provide a secure permanent mounting for the timer. PLEASE NOTE: Mount
case in a vertical position using mounting holes provided.
EASY WIRING
1. Turn power OFF at circuit breaker or fuse.
2. Strip 5/8 inch of the wire insulation.
3. Unscrew, lift and twist plastic protective cover to access the terminals.
4. Identify your Line and Load wires.
5. Run your wires through the knockouts and cable clamp wire connectors (not provided).
6. Connect and tighten the ground wire to grounding terminal at bottom of case.
7. Insert the wire ends under the proper terminal plates
and tighten the screws firmly.
8. Replace the plastic protective cover.
9. Restore power at fuse box or circuit breaker. Turn power ON.
TIMER OPERATION
MANUAL OVERRIDE
To override the On or Off settings, press the ON/OFF Button. The override setting will not change
the next timed event.
TURN OFF ALL TIMER FUNCTIONS
If you don’t want to use any timer functions, just press the MODE Button until “OFF” is displayed.
UNDERSTANDING THE ZIP-SET MODE
Zip-Set mode is use to set the TIME and set an outdoor lighting program in one easy step. When
completed, the SA306 will have the proper time and be set to turn ON at Sunset and off after 6
hours. The off time can be adjusted in the mode also.
Zip-Set is pre-set to the 212 area code (New York City) time zone so no adjustment is needed for this
area code. If you live in New York within the 212 area code, simply press the MODE button to “ZIP”
and you are done.
NOTE: Do not touch the time setting! It must always be set to the Default Preset Factory Time (NYC -
(212) local time) for the zip-set program to work.
SET TIME WITH ZIP-SET MODE
The SA 306 internal clock is pre-set at the factory to the (212-
NYC area code) Eastern time zone. (If you live in another area
code other than 212- you need to change the area code).
Simply enter your telephone area code by following these
easy steps to have the time adjust to your location:
1. (Figure A) Press the MODE button until “ZIP” appears in
the display.
2. (Figure B) Press and hold the ZIP-SET/Clear button until
the display shows the 3-digit area code input mode.
3. The 1st digit of the telephone area code should be flashing.
Press the FORWARD/HOURLY ADJUST or REVERSE
button to adjust it, then press ON/OFF/ENTER button to
enter it and edit the next digit. Press the ZIP SET/Clear
button to go back to edit the previous digit. Continue until the
correct telephone area code is displayed.
4. (Figure C) Once your telephone area code is entered, select
a turn OFF time for the Zip-Set automatic sunset timer (the
default turn OFF time of 6 should flash). You can have the
timer turn off 2, 4, 6, 8, 10, 12, 14, or 16 hours after sunset
- or a fixed time, 12:30am, 1:00am, 1:30am, etc. While the
turn OFF time is flashing, press the FORWARD/HOURLY
ADJUST to cycle to the desired turn OFF setting, then press
BATTERY INSTALLATION
BUTTON DIAGRAM
ZIP-SET
Zip-Set/Clear Button
REVERSE Button
ON/OFF/Enter Button
Time Set Button
Forward/
Hourly Adjust Button
RESET Button
Calendar/7-5-2 Button
RANDOM Button
PROGRAM Button
DST Button
MODE Button
MOUNTING HOLES
Internal 120
Volt
Timer
Neutral
Ground
Jumper wire
(not included)
120 VAC
Input Only
Line
5
120 VAC
Input Only
Load 2Load 1
120 VAC
Input Only
Line (Hot)
Connexion temporaire
(non incluse)
5
Charge 2Charge 1
Alambre de enlance
(no se incluye)
Línea
5
Carga 1 Carga 2
FRENCH
SPANISH
Minuteur
120 V
Interne
Neutre
Ligne
120 V c.a.
entrée
uniquement
120 V c.a.
entrée
uniquement
120 V c.a.
entrée
uniquement
Chargé
Charge
Ligne
Charge
Masse
NEUTRE
120 VCA
SOLO ENTRADA
Temporizador de
120 V
Interno
Neutro
Línea
120 VCA
SOLO ENTRADA
120 VCA
SOLO ENTRADA
Calor
Carga
Línea
Carga
Suelo
NEUTRO
Ligne
Minuteur
120 V
Interne
Temporizador
de120 V
Interno
Internal
120 Volt
Timer
BATTERY INSTALLATION
BUTTON DIAGRAM
ZIP-SET
Zip-Set/Clear Button
REVERSE Button
ON/OFF/Enter Button
Time Set Button
Forward/
Hourly Adjust Button
RESET Button
Calendar/7-5-2 Button
RANDOM Button
PROGRAM Button
DST Button
MODE Button
MOUNTING HOLES
BATTERY INSTALLATION
BUTTON DIAGRAM
ZIP-SET
Zip-Set/Clear Button
REVERSE Button
ON/OFF/Enter Button
Time Set Button
Forward/
Hourly Adjust Button
RESET Button
Calendar/7-5-2 Button
RANDOM Button
PROGRAM Button
DST Button
MODE Button
MOUNTING HOLES
LI-971(A)
ON/OFF/ENTER button to enter it. (Figure D) When DONE appears in the display, press ON/
OFF/ENTER button to confirm or wait 10 seconds.
5. Press MODE button to Zip (display icon) to confirm the timer is set for ZIP-SET Auto ON at Sunset.
NOTE:
1. After entering the Area codes for certain states, a “C” may appear next to the telephone area
code, indicating a central location in the state. Press FORWARD or REVERSE to toggle to W (West)
or E (East) and N (North) or S (South) if needed for proper time setting.
2. There are also area codes that may have different time zones; for example the 208 area code; by
default will flash PST or by pressing FORWARD or REVERSE will toggle to MST)
3. Telephone area codes can change and may not appear in the timer’s table. Should that occur,
please use the closest adjacent area code to set the timer correctly for your location.
4. If a new area code was issued after this unit was manufactured or if you enter an invalid/
nonexistent area code, you will get an error message stating ‘AREA CODE NOT FOUND’. Enter the
closest correct area code for zip set mode to function properly.
5. If the clock/calendar is not correct or time is lost after replacing batteries, zip-Set mode will not
function properly. Please see Setting Clock and Calendar (below).
ACTIVATE THE ZIP-SET SUNSET TIMER
1. Press the MODE button until “ZIP” icon is displayed. The Zip-Set sunset timer is set and active.
2. SA306, once properly set, knows the sunset time of your location. It will automatically turn on at
sunset and turn off after your selected duration time of 2, 4, 6, 8, 10, 12, 14 or 16 hours (see ZIP-
Set Telephone Area Code Setting)- or at a fixed time, 12:30am, 1:00am, 1:30am, etc.
3. Press the RANDOM button once to activate the random feature so the timer ON/OFF time will
fluctuate between +/-10 minutes to +/-120 minutes randomly. To cancel this feature, press the
button again (RANDOM disappears). When your home is left unattended, this is an excellent security
feature to simulate household activity and random should be activated.
USING PROGRAMMABLE ON AND OFF TIME SETTINGS
The SA306 has 2 independent programmable ON/OFF time settings so you can turn outdoor holiday,
landscape and security lighting, etc. on and off at specific times.
1. Press MODE button until the “PROG” and “1” icons are displayed.
2. Press the CALENDAR/7-5-2 button to select the timer frequency. “7” means the timer will
operate all week, “5” for weekdays and “2” for just the weekend.
3. (Figure E) Press and hold the PROGRAM button until the display is flashing.
4. The display will change to show the “ON” time for program 1 and flash. The ON icon will appear.
Press the FORWARD/HOURLY ADJUST or REVERSE button to adjust the ON time.
5. (Figure F) Press the ON/OFF/ENTER button or wait for approx. 10 seconds. The display will
show “OFF ” time, and the OFF icon will appear. Press the FORWARD/HOURLY ADJUST or
REVERSE button to adjust OFF time. Press the ON/OFF/
ENTER button once more or wait for approx. 10 seconds to
return to normal mode. Display will change back to show the
clock time.
6. To program 2nd timer, just follow step 1-5 but press MODE
Button until “PROG” and “2” icon is displayed.
NOTE:
Do not program the same on and off time when setting
programs 1, 2, or 12. You can not set the turn on and turn
off to the same time (i.e., Turn on at 5:00 am and turn off
at 5:00 am). Doing so will produce an error message on the
display. To resolve the error message, change the off time
by at least one minute using the FORWARD or REVERSE
button.
ACTIVATING THE PROGRAMMABLE TIMER
1. Press MODE Button until one of the program icons appears. That programmed timer is now
active. (Press the PROGRAM Button to view the existing ON and OFF preset times).
2. There is a simpler way to adjust turn on time by pressing the FORWARD/HOURLY ADJUST
Button. The turn On can be adjusted by +/-90 minutes.
3. If you wish, press the RANDOM Button once to activate the random feature. The timer on/off
time will fluctuate +/-10 to +/-120 minutes randomly. To cancel this feature, just press the button
again.
BATTERY REPLACEMENT
Battery Installation – This unit comes with 2 x CR2032 batteries for time keeping and back-up. You
should replace the batteries every 2 years. To replace the batteries, please follow these steps:
1. Turn power OFF at circuit breaker to remove fuse.
2. Use a small Philips screw driver to remove screw holding the battery compartment.
3. Use a small flat screw driver gently pry the battery door open. Remove the 2 x old CR2032
BATTERY INSTALLATION
BUTTON DIAGRAM
ZIP-SET
Zip-Set/Clear Button
REVERSE Button
ON/OFF/Enter Button
Time Set Button
Forward/
Hourly Adjust Button
RESET Button
Calendar/7-5-2 Button
RANDOM Button
PROGRAM Button
DST Button
MODE Button
MOUNTING HOLES
FRENCH SPANISH
(Figura A)
(Figura B)
(Figura C)
(Figura D)
(Figura E)
(Voyant allumé)
(Figura F)
(Voyant éteint)
(Luz encendida)
(Luz apagada)
FRENCH SPANISH
(Figura A)
(Figura B)
(Figura C)
(Figura D)
(Figura E)
(Voyant allumé)
(Figura F)
(Voyant éteint)
(Luz encendida)
(Luz apagada)
This product has passed
ETL testing. It is certified
and complies with both
U.S. and Canadian
product safety standards.
FOR TECHNICAL SUPPORT: [email protected] 877.230.7874 NSi Industries LLC • USA • www.nsiindustries.com
ACTIVATION DU MINUTEUR PROGRAMMABLE
1. Appuyez sur la touche MODE jusqu’à ce que les icônes de programme s’affichent. Ce minuteur programmé
est maintenant actif. (Appuyez sur la touche PROGRAM (PROGRAMME) pour afficher les heures de marche et
d’arrêt prédéfinies.)
2. Il existe une façon plus simple de régler l’heure de marche en appuyant sur la touche FORWARD/HOURLY
ADJUST (AVANCER/RÉGLAGE HORAIRE). L’heure de marche peut être ajustée de +/-90 minutes.
3. Si vous le souhaitez, appuyez une fois sur la touche RANDOM (ALÉATOIRE) pour activer la fonctionnalité
Aléatoire. L’heure de marche ou d’arrêt du minuteur variera entre +/-10 et +/-120 minutes de façon aléatoire.
Pour annuler cette fonctionnalité, appuyez à nouveau sur la touche.
REMPLACEMENT DES PILES
TCette unité est expédiée avec deux piles CR2032 pour le chronométrage et le remplacement. Vous devriez
remplacer les piles tous les 2 ans. Pour les remplacer, veuillez suivre les étapes suivantes :
1. Mettez le disjoncteur hors tension pour retirer le fusible.
2. Utilisez un petit tournevis cruciforme pour retirer la vis du compartiment de piles.
3. Utilisez un petit tournevis plat pour soulever délicatement la porte du compartiment. Retirez les 2 anciennes
piles CR2032.
4. Installez 2 nouvelles piles CR2032 dans le compartiment de piles en vous assurant que les polarités + et –
correspondent au schéma imprimé sur l’unité.
5. Lorsque les piles sont en place, replacez la porte du compartiment de piles à sa position d’origine et serrez les
vis.
6. Si vous constatez que le minuteur ne fonctionne pas après avoir installé les piles, vous devez peut-être d’abord
le réinitialiser. À l’aide de la pointe d’un crayon ou d’un trombone, appuyez sur la touche RESET (RÉINITIALISER)
qui se trouve sur le panneau avant. Vous devrez ensuite réinitialiser l’heure et la date.
REMARQUE :
Lors du remplacement des piles, assurez-vous de réinitialiser l’heure actuelle à l’heure correcte pour l’heure
de l’Est. Lorsque vous entrez votre indicatif régional, l’heure adéquate sera réglée en fonction de votre
emplacement/fuseau horaire. Réinitialisation : Il faut entrer l’indicatif régional, l’année, la date et l’heure de
l’Est dans Zip-Set pour qu’il fonctionne correctement.
RÉGLAGE DE L’HORLOGE ET DU CALENDRIER
Réglage de l’horloge (Cette fonction est habituellement utilisée lorsqu’il faut remplacer les piles). Réglez
uniquement sur l’indicatif régional 212 (heure de l’Est).
1. Appuyez sur la touche TIME SET (RÉGLAGE DE L’HEURE) et maintenez-la enfoncée jusqu’à ce que l’écran
clignote.
2. Appuyez sur la touche FORWARD/HOURLY ADJUST (AVANCE/RÉGLAGE HORAIRE) et maintenez-la
enfoncée pour avancer l’heure rapidement ou sur la touche REVERSE (RECULER) pour reculer l’heure
rapidement. Relâchez la touche lorsque l’heure correcte pour l’heure de l’Est s’affiche. L’indicateur PM se trouve
dans le coin inférieur droit de l’écran.
REMARQUE :
Pendant que vous appuyez sur la touche FORWARD/HOURLY ADJUST (AVANCER/RÉGLAGE HORAIRE) ou
REVERSE (RECULER), les minutes commencent à défiler à une vitesse modérée, puis plus rapidement. Cela vous
aidera à régler l’heure plus rapidement et exactement.
3. Appuyez sur la touche FORWARD/HOURLY ADJUST (AVANCER/RÉGLAGE HORAIRE) ou REVERSE
(RECULER) à plusieurs reprises jusqu’à ce que l’heure de l’Est correcte s’affiche.
4. Appuyez sur la touche ON/OFF/ENTER (MARCHE/ARRÊT/ENTRÉE) ou attendez environ 10 secondes pour
quitter le mode de réglage de l’heure.
5. Appuyez sur la touche DST (HEURE AVANCÉE) jusqu’à ce que « ON » (MARCHE) s’affiche pour avancer l’heure
d’une heure pour l’heure avancée. L’indicateur DST (HEURE AVANCÉE) se trouve dans le coin inférieur droit de
l’écran. Appuyez à nouveau sur la touche DST (HEURE AVANCÉE) pour la désactiver. L’heure actuelle reculera
d’une heure.
CALENDAR SETTING (RÉGLAGE DU CALENDRIER) (Cette fonction est habituellement utilisée lorsqu’il faut
remplacer les piles)
1. Appuyez sur la touche CALENDAR/7-5-2 (CALENDRIER/7-5-2) et maintenez-la enfoncée jusqu’à ce que « Y
04 » (valeur par défaut) clignote sur l’écran.
2. Appuyez sur la touche FORWARD/HOURLY ADJUST (AVANCER/RÉGLAGE HORAIRE) ou REVERSE
(RECULER) pour régler l’année en cours, puis appuyez sur la touche ON/OFF/ENTER (MARCHE/ARRÊT/
ENTRÉE) ou attendez environ 10 secondes. L’écran affichera le mois et la date et clignotera.
3. Appuyez sur la touche FORWARD/HOURLY ADJUST (AVANCER/RÉGLAGE HORAIRE) ou REVERSE
(RECULER) à plusieurs reprises jusqu’à ce que le mois et la date corrects s’affichent.
4. Appuyez sur la touche ON/OFF/ENTER (MARCHE/ARRÊT/ENTRÉE) ou attendez environ 10 secondes pour
quitter le mode de configuration du calendrier.
REMARQUE :
Pendant que vous appuyez sur la touche FORWARD/HOURLY ADJUST (AVANCER/RÉGLAGE HORAIRE) ou
REVERSE (RECULER), la date commence à défiler à une vitesse modérée, puis plus rapidement. Cela vous aidera
à régler l’heure rapidement et avec exactitude.
CONTACT RATINGS:
• 120 V c.a., 60 Hz.
• 40 AMP Resistif
• 40 AMP Inductif
• 40 AMP Tungstène
• 40 AMP Incandescent
• 3 HP Motor
INSTALLATION ET MONTAGE
Montez le minuteur dans l’endroit désiré à l’aide des trois trous de montage (A, B, C)
fournis. La meilleure position de montage pour le minuteur est au niveau des yeux
avec assez d’espace pour que le compartiment puisse s’ouvrir complètement. Le trou
de montage supérieur (A) est un trou de montage oblong; mesurez et fixez-le au mur
à l’aide de la première vis (A). La tête de la vis (ou l’attache) devra être un peu plus
grande que la partie étroite du trou oblong. Accrochez le minuteur sur la vis A. Vissez
le minuteur sur le mur à l’aide des deux trous de montage restants (B et C) afin de
fournir un montage permanent et sécuritaire au minuteur. IMPORTANT : Montez le
boîtier dans une position verticale à l’aide des trous de montage fournis.
CÂBLAGE FACILE
1. Mettez le disjoncteur hors tension.
2. Enlevez 16 mm (5/8 po) de l’isolement des fils.
3. Dévissez, soulevez et faites pivoter le couvercle protecteur en plastique pour accéder aux bornes.
4. Identifiez les fils de ligne et de charge.
5. Installez les fils à travers les pastilles et les connecteurs de fil de serre-câble (non fournis).
6. Raccordez et serrez le fil de terre à la borne de terre en bas du boîtier.
7. Insérez les extrémités des fils sous les plaques de borne appropriées et serrez bien les vis.
8. Replacez le couvercle protecteur en plastique.
9. Rétablissez l’alimentation au niveau du coffret à fusibles ou du disjoncteur. Mettez sous tension.
UTILISATION DE LA MINUTERIE
ANNULATION MANUELLE
Pour annuler les réglages de marche et d’arrêt, appuyez sur la touche ON/OFF (MARCHE/ARRÊT). Le réglage
d’annulation ne changera pas lors du prochain événement temporisé.
DÉSACTIVER TOUTES LES FONCTIONS DU MINUTEUR
Si vous ne souhaitez pas utiliser les fonctions du minuteur, appuyez simplement sur la touche MODE jusqu’à ce
que « OFF » (ARRÊT) s’affiche.
COMPRENDRE LE MODE ZIP-SET
Le mode Zip-Set est utilisé pour régler L’HEURE et un programme d’éclairage extérieur en une seule étape facile.
Lorsque vous aurez terminé, le SA306 sera réglé sur l’heure correcte et pour se mettre en marche au coucher du
soleil et s’éteindre après une période de six heures. L’heure d’arrêt peut être réglée dans ce mode aussi.
Le mode Zip-Set étant prédéfini sur le fuseau horaire de l’indicatif régional 212 (Ville de New York), aucun
réglage n’est nécessaire pour cet indicatif régional. Si vous habitez à New York dans l’indicatif régional 212,
appuyez simplement sur la touche MODE jusqu’à ce que « ZIP » s’affiche et vous avez terminé.
REMARQUE : Ne touchez pas le réglage de l’heure! Il doit toujours être réglé sur l’heure réglée en usine (NYC
– (212) heure locale) pour que l’appareil Zip-Set fonctionne.
RÉGLER L’HEURE EN MODE ZIP-SET
L’horloge interne de l’appareil SA306 est préréglée en usine sur
l’heure de l’Est (indicatif régional 212-NYC). (Si vous habitez dans
une autre région, vous devez modifier l’indicatif régional.) Entrez
simplement votre indicatif régional en suivant ces étapes faciles pour
régler l’heure en fonction de votre région :
1. (Figure A) Appuyez sur la touche MODE jusqu’à ce que « ZIP »
s’affiche à l’écran.
2. (Figure B) Appuyez sur la touche ZIP-SET/Clear (ZIP-SET/
Effacer) et maintenez-la enfoncée jusqu’à ce que l’écran affiche le
mode d’entrée de l’indicatif régional à 3 chiffres.
3. Le premier chiffre de l’indicatif régional devrait clignoter. Appuyez
sur la touche FORWARD/HOURLY ADJUST (AVANCER/RÉGLAGE
HORAIRE) ou REVERSE (RECULER) pour le régler, puis appuyez sur
la touche ON/OFF/ENTER (MARCHE/ARRÊT/ENTRÉE) pour l’entrer
et modifier le chiffre suivant. Appuyez sur la touche ZIP SET/Clear
(ZIP SET/Effacer) pour revenir au chiffre précédent. Continuez jusqu’à
ce que l’indicatif régional adéquat s’affiche.
4. (Figure C) Une fois votre indicatif régional entré, sélectionnez une
heure d’arrêt pour le minuteur de coucher du soleil automatique
Zip-Set (l’heure d’arrêt par défaut de 6 devrait clignoter). Vous
pouvez régler le minuteur pour s’éteindre 2, 4, 6, 8, 10, 12, 14 ou
16 heures après le coucher du soleil, ou à une heure fixe, p. ex., 00
h 30, 01 h 00, 01 h 30, etc. Pendant que l’heure d’arrêt clignote, appuyez sur la touche FORWARD/HOURLY
ADJUST (AVANCER/RÉGLAGE HORAIRE) pour défiler jusqu’au réglage d’arrêt désiré, puis appuyez sur la touche
ON/OFF/ENTER (MARCHE/ARRÊT/ENTRÉE) pour l’entrer. (Figure D) Lorsque « DONE » (TERMINÉ) s’affiche à
l’écran, appuyez sur la touche ON/OFF/ENTER (MARCHE/ARRÊT/ENTRÉE) ou attendez 10 secondes.
5. Appuyez sur la touche MODE jusqu’à ce que « Zip » (icône d’affichage) s’affiche afin de vous assurer que le
minuteur est réglé sur ZIP-SET Auto ON (Mise en marche automatique) au coucher du soleil.
REMARQUE :
1. Après avoir entré les indicatifs régionaux pour certains États, la lettre « C » peut s’afficher à côté de l’indicatif
régional, ce qui indique un endroit central dans l’État. Appuyez sur FORWARD (AVANCER) ou REVERSE
(RECULER) pour basculer entre W (Ouest) ou E (Est) et N (Nord) ou S (Sud), au besoin, pour régler l’heure
adéquate.
2. Il existe également des indicatifs régionaux ayant différents fuseaux horaires; par exemple, l’indicatif régional
208; par défaut, PST (HNP) clignotera ou appuyez sur FORWARD (AVANCER) ou REVERSE (RECULER) pour
passer à MST (HNR).
3. Les indicatifs régionaux peuvent changer et pourraient ne pas apparaître dans le tableau du minuteur. Le
cas échéant, veuillez utiliser l’indicatif régional le plus près pour régler le minuteur correctement pour votre
emplacement.
4. Si un nouvel indicatif régional a été émis après la fabrication de cette unité ou si vous entrez un indicatif
régional non valide ou non existant, vous recevrez le message d’erreur indiquant « AREA CODE NOT FOUND
» (INDICATIF RÉGIONAL INTROUVABLE). Entrez l’indicatif régional le plus proche pour que le mode Zip-Set
fonctionne adéquatement.
5. Si l’horloge/le calendrier n’est pas correct ou si l’heure n’est plus affichée après avoir remplacé les piles, le
mode Zip-Set ne fonctionnera pas adéquatement. Veuillez vous référer à Réglage de l’horloge et du calendrier
(ci-dessous).
ACTIVER LE MINUTEUR COUCHER DU SOLEIL ZIP-SET
1. Appuyez sur la touche MODE jusqu’à ce que l’icône « ZIP » s’affiche à l’écran. Le minuteur coucher du soleil
Zip-Set est réglé et actif.
2. Le SA306, une fois réglé correctement, connaît l’heure du coucher du soleil de votre région. Il se met
automatiquement en marche au coucher du soleil et s’éteint après la durée sélectionnée de 2, 4, 6, 8, 10, 12, 14
ou 16 heures (Voir Réglage de l’indicatif régional ZIP-Set) ou à une heure fixe, 00 h 30, 01 h 00, 01 h 30, etc.
3. Appuyez une fois sur la touche RANDOM (ALÉATOIRE) pour activer la fonctionnalité Aléatoire pour que la
période de MARCHE/ARRÊT varie entre +/-10 minutes et +/-120 minutes de façon aléatoire. Pour annuler cette
fonctionnalité, appuyez à nouveau sur la touche (RANDOM [ALÉATOIRE] n’est plus affiché). Lorsque vous êtes
absent de votre domicile, l’activation de la fonctionnalité Aléatoire est une excellente caractéristique de sécurité
pour simuler les activités ménagères.
UTILISATION DES RÉGLAGES D’HEURE DE MARCHE ET D’ARRÊT PROGRAMMABLES
Le SA306 est équipé de deux réglages d’heure MARCHE/ARRÊT
programmables indépendants pour que vous puissiez allumer/
éteindre l’éclairage festif, paysager, de sécurité, etc.
1. Appuyez sur la touche MODE jusqu’à ce que les icônes « PROG »
et « 1 » s’affichent.
2. Appuyez sur la touche CALENDAR/7-5-2 (CALENDRIER/7-5-2)
pour sélectionner la fréquence du minuteur. « 7 » indique que le
minuteur fonctionnera toute la semaine, « 5 » les jours de la semaine
et « 2 » la fin de semaine uniquement.
3. (Figure E) Appuyez sur la touche PROGRAM (PROGRAMME) et
maintenez-la enfoncée jusqu’à ce que l’écran clignote.
4. L’écran change pour afficher l’heure de marche pour le programme
1 et clignote. L’icône « ON » (MARCHE) s’affiche. Appuyez sur la
touche FORWARD/HOURLY ADJUST (AVANCER/RÉGLAGE
HORAIRE) ou REVERSE (RECULER) pour régler l’heure de mise en
marche.
5. (Figure F) Appuyez sur la touche ON/OFF/ENTER (MARCHE/ARRÊT/ENTRÉE) ou attendez environ 10
secondes. L’écran indiquera l’heure d’arrêt et l’icône « OFF » (ARRÊT) s’affichera. Appuyez sur la touche
FORWARD/HOURLY ADJUST (AVANCER/RÉGLAGE HORAIRE) ou REVERSE (ARRIÈRE) pour régler l’heure
d’arrêt. Appuyez encore une fois sur la touche ON/OFF/ENTER (MARCHE/ARRÊT/ENTRÉE) ou attendez
environ 10 secondes pour revenir au mode normal. L’écran affichera l’heure réelle.
6. Pour programmer un deuxième minuteur, suivez simplement les étapes 1 à 5, mais appuyez sur la touche
MODE jusqu’à ce que « PROG » et l’icône « 2 » s’affichent.
REMARQUE :
Ne programmez pas la même heure de marche et d’arrêt lors de la programmation des programmes 1, 2 ou 12.
Vous ne pouvez pas régler l’heure de marche et l’heure d’arrêt sur la même heure (p. ex., mettre en marche à
5 h 00 et éteindre à 5 h 00). Le cas échéant, un message d’erreur s’affichera à l’écran. Pour résoudre l’erreur,
modifiez l’heure d’arrêt d’au moins une minute à l’aide de la touche FORWARD (AVANCER) ou REVERSE
(RECULER).
SA306
ONE YEAR LIMITED WARRANTY: If this product fails because of a manufacturing
defect within one year after purchase, we will, at our option, either repair or replace
it at no charge. Our warranty does not cover damage caused by accident, abuse or
misuse. We assume no further liability with respect to the sale or use of this product.
THIS WARRANTY IS IN LIEU OF ALL OTHER WARRANTIES, EXPRESSED OR IMPLIED,
INCLUDING THE WARRANTY OF MERCHANTABILITY. We make no warranty with
respect to the fitness of any goods for the users particular application. This warranty
gives you specific legal rights, and you also may have other rights which vary from
state to state.
It is our intent to provide accurate and current specification information. However,
in the interest of product improvement, TORK may alter the specifications or
constructional details without prior notice.
REMPLACEMENT DES PILES
SCHÉMA DES TOUCHES
ZIP-SET
Zip-Set/Clear
REVERSE
ON/OFF/Enter
Time Set
Forward/
Hourly Adjust
RESET
Calendar/7-5-2
RANDOM
PROGRAM
DST
MODE
TROUS DE MONTAGE
PASTILLES
Internal 120
Volt
Timer
Neutral
Ground
Jumper wire
(not included)
120 VAC
Input Only
Line
5
120 VAC
Input Only
Load 2Load 1
120 VAC
Input Only
Line (Hot)
Connexion temporaire
(non incluse)
5
Charge 2Charge 1
Alambre de enlance
(no se incluye)
Línea
5
Carga 1 Carga 2
FRENCH
SPANISH
Minuteur
120 V
Interne
Neutre
Ligne
120 V c.a.
entrée
uniquement
120 V c.a.
entrée
uniquement
120 V c.a.
entrée
uniquement
Chargé
Charge
Ligne
Charge
Masse
NEUTRE
120 VCA
SOLO ENTRADA
Temporizador de
120 V
Interno
Neutro
Línea
120 VCA
SOLO ENTRADA
120 VCA
SOLO ENTRADA
Calor
Carga
Línea
Carga
Suelo
NEUTRO
Ligne
Minuteur
120 V
Interne
Temporizador
de120 V
Interno
Internal
120 Volt
Timer
REMPLACEMENT DES PILES
SCHÉMA DES TOUCHES
ZIP-SET
Zip-Set/Clear
REVERSE
ON/OFF/Enter
Time Set
Forward/
Hourly Adjust
RESET
Calendar/7-5-2
RANDOM
PROGRAM
DST
MODE
TROUS DE MONTAGE
PASTILLES
BATTERY INSTALLATION
BUTTON DIAGRAM
ZIP-SET
Zip-Set/Clear Button
REVERSE Button
ON/OFF/Enter Button
Time Set Button
Forward/
Hourly Adjust Button
RESET Button
Calendar/7-5-2 Button
RANDOM Button
PROGRAM Button
DST Button
MODE Button
MOUNTING HOLES
LI-971(A)
REMPLACEMENT DES PILES
SCHÉMA DES TOUCHES
ZIP-SET
Zip-Set/Clear
REVERSE
ON/OFF/Enter
Time Set
Forward/
Hourly Adjust
RESET
Calendar/7-5-2
RANDOM
PROGRAM
DST
MODE
TROUS DE MONTAGE
PASTILLES
FRENCH SPANISH
(Figura A)
(Figura B)
(Figura C)
(Figura D)
(Figura E)
(Voyant allumé)
(Figura F)
(Voyant éteint)
(Luz encendida)
(Luz apagada)
FRENCH SPANISH
(Figura A)
(Figura B)
(Figura C)
(Figura D)
(Figura E)
(Voyant allumé)
(Figura F)
(Voyant éteint)
(Luz encendida)
(Luz apagada)
Ce produit a réussi les
tests ETL. Il est certifié et
répond aux normes
américaines et canadiennes
de sécurité des produits.
INSTALLATION ET
PROGRAMMATION
PROGRAMACIÓN Y INSTALACIÓN
SA306
ONE YEAR LIMITED WARRANTY: If this product fails because of a manufacturing
defect within one year after purchase, we will, at our option, either repair or replace
it at no charge. Our warranty does not cover damage caused by accident, abuse or
misuse. We assume no further liability with respect to the sale or use of this product.
THIS WARRANTY IS IN LIEU OF ALL OTHER WARRANTIES, EXPRESSED OR IMPLIED,
INCLUDING THE WARRANTY OF MERCHANTABILITY. We make no warranty with
respect to the fitness of any goods for the users particular application. This warranty
gives you specific legal rights, and you also may have other rights which vary from
state to state.
It is our intent to provide accurate and current specification information. However,
in the interest of product improvement, TORK may alter the specifications or
constructional details without prior notice.
NOTA:
No programe el mismo horario de encendido y apagado cuando configure los programas 1, 2 o 12. Usted no
puede configurar el encendido y el apagado a la misma hora (es decir, encender a las 5:00 a. m. y apagar a las
5:00 a. m.). Hacerlo producirá un mensaje de error en la pantalla. Para resolver el mensaje de error, cambie el
horario de apagado, al menos, un minuto utilizando el botón FORWARD (ADELANTAR) o REVERSE (RETROCEDER).
ACTIVACIÓN DEL TEMPORIZADOR PROGRAMABLE
1. Presione el botón MODE (MODO) hasta que aparezca uno de los iconos de los programas. Ese temporizador
programado ahora está activo. (Presione el botón PROGRAM [PROGRAMA] para ver los horarios existentes de
ENCENDIDO y APAGADO preconfigurados).
2. Existe una forma más simple de ajustar el horario de encendido al presionar el botón FORWARD/HOURLY
ADJUST (ADELANTAR/AJUSTAR POR HORA). El encendido puede ajustarse en +/-90 minutos.
3. Si usted lo desea, presione el botón RANDOM (ALEATORIO) una vez para activar la función aleatoria. El
horario de encendido/apagado del temporizador oscilará de +/-10 a +/-120 minutos de forma aleatoria. Para
cancelar esta función, simplemente vuelva a presionar el botón.
CAMBIO DE BATERÍAS
Esta unidad viene con 2 baterías CR2032 para llevar un registro del tiempo y como respaldo. Debe cambiar las
baterías cada 2 años. Para cambiar las baterías, siga estos pasos:
1. APAGUE la corriente en el disyuntor para retirar el fusible.
2. Utilice un destornillador Phillips pequeño para retirar el tornillo que sostiene el compartimiento de las baterías.
3. Utilice un destornillador de cabeza plana pequeño como palanca para abrir suavemente la puerta de las
baterías. Retire las 2 baterías CR2032 viejas.
4. Instale 2 baterías CR2032 nuevas en el compartimiento de baterías, asegurándose de que las polaridades +
y – coincidan con el diagrama impreso en la unidad.
5. Cuando las baterías estén en su lugar, vuelva a colocar la puerta de las baterías en su posición original y ajuste
los tornillos.
6. Si descubre que el temporizador no está funcionando después de instalar baterías nuevas, es posible que
primero deba restablecerlo. Utilizando la punta de un lápiz o un sujetapapeles, presione el botón RESET
(RESTABLECER) que se encuentra en el panel frontal. Luego, deberá restablecer la hora y la fecha.
NOTA:
Al cambiar las baterías, asegúrese de restablecer la hora actual a la hora correcta en el huso horario del Este.
Cuando ingrese su código de área telefónico, se ajustará automáticamente a la hora adecuada para su ubicación/
huso horario. Si se restablece: Zip-Set (configurar código de área) debe tener el código de área, el año y la fecha
y el horario del Este ingresados adecuadamente para funcionar.
CONFIGURACIÓN DEL RELOJ Y EL CALENDARIO
Configuración del reloj (esta función, a menudo, se utiliza cuando deben cambiarse las baterías). Únicamente
está configurado para el código de área del horario del Este 212.
1. Presione y mantenga presionado el botón TIME SET (CONFIGURACIÓN DE LA HORA) hasta que parpadee la
pantalla.
2. Presione y mantenga presionado el botón FORWARD/HOURLY ADJUST (ADELANTAR/AJUSTAR POR
HORA) para adelantar rápidamente la hora o el botón REVERSE (RETROCEDER) para cambiar rápidamente la
hora hacia atrás. Suelte el botón cuando se muestre la hora del Este correcta aproximada. El indicador de PM (p.
m.) está en la esquina superior derecha de la pantalla.
NOTA:
Mientras presiona el botón FORWARD/HOURLY ADJUST (ADELANTAR/AJUSTAR POR HORA) o REVERSE
(RETROCEDER), los dígitos de los minutos comenzarán a parpadear a un ritmo moderado, luego lo harán más
rápido. Esto le ayudará a configurar la hora más rápido y de forma más precisa.
3. Presione el botón FORWARD/HOURLY ADJUST (ADELANTAR/AJUSTAR POR HORA) o REVERSE
(RETROCEDER) repetidamente hasta que se muestre el horario del Este correcto.
4. Presione el botón ON/OFF/ENTER (ENCENDIDO/APAGADO/INGRESAR) o espere aprox. 10 segundos para
salir del modo de configuración de la hora.
5. Presione el botón DST (DE HORARIO DE VERANO [daylight savings time]) hasta ENCENDIDO para hacer que el
temporizador aumente la hora actual en 1 hora para el horario de verano. El indicador DST está a la derecha de
la pantalla. Vuelva a presionar el botón DST (DE HORARIO DE VERANO [daylight savings time]) para APAGARLO.
La hora actual disminuirá 1 hora.
CONFIGURACIÓN DEL CALENDARIO
(Esta función, a menudo, se utiliza cuando deben cambiarse las baterías)
1. Presione y mantenga presionado el botón CALENDAR/7-5-2 (CALENDARIO/7-5-2) hasta que parpadee “Y
04” (por defecto) en la pantalla.
2. Presione el botón FORWARD/HOURLY ADJUST (ADELANTAR/AJUSTAR POR HORA) o el botón REVERSE
(RETROCEDER) para ajustar al año actual; luego presione el botón ON/OFF/ENTER (ENCENDIDO/APAGADO/
INGRESAR) o espere aprox. 10 segundos. La pantalla mostrará mes/fecha y parpadeará.
3. Presione el botón FORWARD/HOURLY ADJUST (ADELANTAR/AJUSTAR POR HORA) o REVERSE
(RETROCEDER) repetidamente hasta que se muestre el mes/la fecha correctos.
4. Presione el botón ON/OFF/ENTER (ENCENDIDO/APAGADO/INGRESAR) o espere aprox. 10 segundos para
salir del modo de configuración del calendario.
NOTA: Mientras presiona el botón FORWARD/HOURLY ADJUST (ADELANTAR/AJUSTAR POR HORA) o
REVERSE (RETROCEDER), la fecha comenzará a parpadear a un ritmo moderado, luego lo hará más rápido. Esto
le ayudará a configurar la hora de forma rápida y precisa.
CONTACT RATINGS:
• 120 VCA, 60 Hz.
• 40 AMP Resistivo
• 40 AMP Inductivo
• 40 AMP Tungsteno
• 40 AMP Incandescente
• 3 HP Motor
INSTALACIÓN Y MONTAJE
Monte el temporizador en la ubicación deseada utilizando los tres orificios de montaje
(A, B, C) que se proporcionan. La mejor posición de montaje para el temporizador es a
la altura de los ojos con lugar suficiente para que la cubierta tipo puerta pueda abrirse
por completo. El orificio de montaje superior (A) es un orificio de montaje de tipo
ranurado; por lo tanto, mídalo y asegúrelo en la pared con el primer tornillo (A). La
cabeza del tornillo (o sujetador) debe ser levemente más grande que la parte angosta
del orificio ranurado. Cuelgue el temporizador en el tornillo A. Atornille el temporizador
en la pared utilizando los dos orificios de montaje restantes (B y C) para proporcionar
un montaje seguro y permanente para el temporizador. TÉNGASE PRESENTE: Monte la carcasa en posición vertical
utilizando los orificios de montaje que se proporcionan.
CABLEADO FÁCIL
1. APAGUE la corriente en el disyuntor o retire el fusible.
2. Pele 5/8 pulgadas de aislamiento del cable.
3. Desatornille, levante y retuerza la cubierta protectora de plástico para tener acceso a los terminales.
4. Identifique los cables de línea y de carga.
5. Pase los cables por las tapas desmontables y sujete con una abrazadera para cables los conectores de cables
(no se proporcionan).
6. Conecte y ajuste el cable de tierra al terminal de tierra que está en la parte inferior de la carcasa.
7. Inserte los extremos del cable debajo de las placas terminales apropiadas y ajuste firmemente los tornillos.
8. Vuelva a colocar la cubierta protectora de plástico.
9. Restablezca la corriente en la caja de fusibles o el disyuntor. ENCIENDA la corriente.
OPERACIÓN DEL TEMPORIZADOR
INTERRUPTOR MANUAL DE ANULACIÓN
Para interrumpir las configuraciones de ENCENDIDO o APAGADO, presione el botón ON/OFF (ENCENDIDO/
APAGADO). La configuración de interrupción no cambiará el próximo evento temporizado.
CÓMO APAGAR TODAS LAS FUNCIONES DEL TEMPORIZADOR
Si usted no desea utilizar ninguna función del temporizador, simplemente presione el botón MODE (MODO)
hasta que se muestre “OFF” (APAGADO).
COMPRENSIÓN DEL MODO ZIP-SET (CONFIGURAR CÓDIGO DE ÁREA)
El modo ZIP-SET (CONFIGURAR CÓDIGO DE ÁREA) se utiliza para configurar la HORA y configurar un programa
de iluminación de exteriores en un solo paso fácil. Cuando se complete, el SA306 tendrá la hora adecuada y
estará configurado para ENCENDERSE al atardecer y APAGARSE después de 6 horas. También puede ajustarse el
horario de apagado en ese modo.
El modo ZIP-SET (CONFIGURAR CÓDIGO DE ÁREA) está preconfigurado para el huso horario del código de área
212 (ciudad de Nueva York), de modo que no es necesario realizar ningún ajuste para este código de área. Si
usted vive en Nueva York dentro del código de área 212, simplemente presione el botón MODE (MODO) hasta
“ZIP” y listo. NOTA: ¡No toque la configuración de la hora! Siempre
debe estar configurado para la Hora preconfigurada de fábrica por
defecto (hora local [212] de la ciudad de Nueva York) para que
funcione el programa ZIP-SET (CONFIGURAR CÓDIGO DE ÁREA).
HORA DEL ESTE (EASTERN TIME, ET) CON EL MODO ZIP-
SET (CONFIGURAR CÓDIGO DE ÁREA)
El reloj interno del SA306 está preconfigurado de fábrica para el huso
horario del Este (código de área 212 de la ciudad de Nueva York).
(Si usted vive en otro código de área que no sea 212, debe cambiar
el código de área). Simplemente ingrese su código de área telefónico
siguiendo estos pasos fáciles para ajustar la hora a su ubicación:
1. (Figura A) Presione el botón MODE (MODO) hasta que aparezca
“ZIP” en la pantalla.
2. (Figura B) Presione y mantenga presionado el botón ZIP-SET/
Clear (CONFIGURAR/Limpiar CÓDIGO DE ÁREA) hasta que la pantalla
muestre el modo de entrada del código de área de 3 dígitos.
3. El 1.er dígito del código de área telefónico debe parpadear.
Presione el botón FORWARD/HOURLY ADJUST (ADELANTAR/
AJUSTAR POR HORA) o REVERSE (RETROCEDER) para ajustarlo;
luego presione el botón ON/OFF/ENTER (ENCENDIDO/APAGADO/
CAMBIO DE BATERÍAS
DIAGRAMA DE BOTONES
ZIP-SET
Zip-Set/Clear
REVERSE
ON/OFF/Enter
Time Set
Forward/
Hourly Adjust
RESET
Calendar/7-5-2
RANDOM
PROGRAM
DST
MODE
ORIFICIOS DE MONTAJE
TAPAS
DESMONTABLES
Internal 120
Volt
Timer
Neutral
Ground
Jumper wire
(not included)
120 VAC
Input Only
Line
5
120 VAC
Input Only
Load 2Load 1
120 VAC
Input Only
Line (Hot)
Connexion temporaire
(non incluse)
5
Charge 2Charge 1
Alambre de enlance
(no se incluye)
Línea
5
Carga 1 Carga 2
FRENCH
SPANISH
Minuteur
120 V
Interne
Neutre
Ligne
120 V c.a.
entrée
uniquement
120 V c.a.
entrée
uniquement
120 V c.a.
entrée
uniquement
Chargé
Charge
Ligne
Charge
Masse
NEUTRE
120 VCA
SOLO ENTRADA
Temporizador de
120 V
Interno
Neutro
Línea
120 VCA
SOLO ENTRADA
120 VCA
SOLO ENTRADA
Calor
Carga
Línea
Carga
Suelo
NEUTRO
Ligne
Minuteur
120 V
Interne
Temporizador
de120 V
Interno
Internal
120 Volt
Timer
CAMBIO DE BATERÍAS
DIAGRAMA DE BOTONES
ZIP-SET
Zip-Set/Clear
REVERSE
ON/OFF/Enter
Time Set
Forward/
Hourly Adjust
RESET
Calendar/7-5-2
RANDOM
PROGRAM
DST
MODE
ORIFICIOS DE MONTAJE
TAPAS
DESMONTABLES
BATTERY INSTALLATION
BUTTON DIAGRAM
ZIP-SET
Zip-Set/Clear Button
REVERSE Button
ON/OFF/Enter Button
Time Set Button
Forward/
Hourly Adjust Button
RESET Button
Calendar/7-5-2 Button
RANDOM Button
PROGRAM Button
DST Button
MODE Button
MOUNTING HOLES
LI-971(A)
INGRESAR) para ingresarlo y editar el siguiente dígito. Presione el botón ZIP-SET/Clear (CONFIGURAR/Limpiar
CÓDIGO DE ÁREA) para volver al dígito anterior para editarlo. Continúe hasta que se muestre el código de área
telefónico correcto.
4. (Figura C) Una vez que haya ingresado su código de área telefónico, seleccione un horario de APAGADO para
el temporizador automático al atardecer ZIP-SET (CONFIGURAR CÓDIGO DE ÁREA) (debe parpadear el horario de
APAGADO de 6 por defecto). Usted puede hacer que el temporizador se apague 2, 4, 6, 8, 10, 12, 14 o 16 horas
después del atardecer o un horario fijo, 12:30 a. m., 1:00 a. m., 1:30 a. m., etc. Mientras parpadea el horario
de APAGADO, presione el botón FORWARD/HOURLY ADJUST (ADELANTAR/AJUSTAR POR HORA) para llegar
a la configuración de APAGADO deseada; luego presione el botón ON/OFF/ENTER (ENCENDIDO/APAGADO/
INGRESAR) para ingresarla. (Figura D) Cuando aparezca DONE (LISTO) en la pantalla, presione el botón ON/
OFF/ENTER (ENCENDIDO/APAGADO/INGRESAR) para confirmar o espere 10 segundos.
5. Presione el botón MODE (MODO) hasta ZIP (icono de la pantalla) para confirmar que el temporizador está
configurado para que se ENCIENDA automáticamente ZIP-SET (CONFIGURAR CÓDIGO DE ÁREA) al atardecer.
NOTA:
1. Después de ingresar los códigos de área para determinados estados, es posible que aparezca una “C” al
lado del código de área telefónico, lo cual indica una ubicación central en el estado. Presione FORWARD
(ADELANTAR) o REVERSE (RETROCEDER) para pasar a W (West [Oeste]) o E (Este) y N (Norte) o S (Sur) de ser
necesario para una configuración adecuada de la hora.
2. También es posible que haya códigos de área que tengan diferentes husos horarios; por ejemplo, el código
de área 208, por defecto, parpadeará la Hora Estándar del Pacífico (Pacific Standard Time, PST) o al presionar
FORWARD (ADELANTAR) o REVERSE (RETROCEDER) pasará a la Hora Estándar de la Montaña (Mountain
Standard Time, MST).
3. Lo códigos de área telefónicos pueden cambiar y es posible que no aparezcan en la tabla del temporizador. Si
eso sucede, utilice el código de área adyacente más cercano para configurar el temporizador correctamente para
su ubicación.
4. Si se emitió un nuevo código de área después de que se fabricara esta unidad o si usted ingresa un código de
área inválido/no existente, obtendrá un mensaje de error que dirá “AREA CODE NOT FOUND” (CÓDIGO DE ÁREA
NO ENCONTRADO). Ingrese el código de área correcto más cercano para que el modo zip set (configurar código
de área) funcione adecuadamente.
5. Si el reloj/calendario no está correcto o si se pierde la hora después de cambiar las baterías, el modo ZIP-SET
(CONFIGURAR CÓDIGO DE ÁREA) no funcionará adecuadamente. Consulte CONFIGURACIÓN DEL RELOJ Y EL
CALENDARIO (a continuación).
ACTIVACIÓN DEL TEMPORIZADOR AL ATARDECER ZIP-SET (CONFIGURAR CÓDIGO DE ÁREA)
1. Presione el botón MODE (MODO) hasta que se muestre el icono “ZIP”. El temporizador al atardecer ZIP-SET
(CONFIGURAR CÓDIGO DE ÁREA) está configurado y activo.
2. El SA306, una vez que está adecuadamente configurado, conoce el horario del atardecer de su ubicación. Se
encenderá automáticamente al atardecer y se apagará después del tiempo de duración que haya seleccionado de
2, 4, 6, 8, 10, 12, 14 o 16 horas (consulte la configuración del código
de área telefónico ZIP-SET [CONFIGURAR CÓDIGO DE ÁREA]) o a un
horario fijo, 12:30 a. m., 1:00 a. m., 1:30 a. m., etc.
3. Presione el botón RANDOM (ALEATORIO) una vez para activar la
función aleatoria, de modo que el horario de ENCENDIDO/APAGADO
del temporizador oscilará entre +/-10 minutos y +/- 120 minutos
de forma aleatoria. Para cancelar esta función, vuelva a presionar el
botón (RANDOM [ALEATORIO] desaparece). Cuando usted deja su casa
sola, esta es una excelente función de seguridad para simular que hay
actividad en el hogar y debería activarse el modo aleatorio.
UTILIZACIÓN DE CONFIGURACIONES DEL HORARIO DE
ENCENDIDO Y APAGADO PROGRAMABLES
TEl SA306 tiene 2 configuraciones de horarios de ENCENDIDO/
APAGADO programables independientes, de modo que usted puede
encender y apagar el alumbrado de exteriores de días festivos, panorámico y de seguridad, etc. en horarios
específicos.
1. Presione el botón MODE (MODO) hasta que se muestren los iconos “PROG” y “1”.
2. Presione el botón CALENDAR/7-5-2 (CALENDARIO/7-5-2) para seleccionar la frecuencia del temporizador.
“7” significa que el temporizador operará toda la semana, “5” para los días de semana y “2” para solo el fin de
semana.
3. (Figura E) Presione y mantenga presionado el botón PROGRAM (PROGRAMA) hasta que parpadee la
pantalla.
4. La pantalla cambiará para mostrar el horario de “ON” (ENCENDIDO) del programa 1 y parpadeará. Aparecerá
el icono ON (ENCENDIDO). Presione el botón FORWARD/HOURLY ADJUST (ADELANTAR/AJUSTAR POR
HORA) o REVERSE (RETROCEDER) para ajustar el horario de ENCENDIDO.
5. (Figura F) Presione el botón ON/OFF/ENTER (ENCENDIDO/APAGADO/INGRESAR) o espere aprox. 10
segundos. La pantalla mostrará el horario de “OFF” (APAGADO) y aparecerá el icono OFF (APAGADO). Presione
el botón FORWARD/HOURLY ADJUST (ADELANTAR/AJUSTAR POR HORA) o REVERSE (RETROCEDER) para
ajustar el horario de APAGADO. Presione el botón ON/OFF/ENTER (ENCENDIDO/APAGADO/INGRESAR) una
vez más o espere aprox. 10 segundos para volver al modo normal. La pantalla volverá a cambiar para mostrar
la hora del reloj.
6. Para programar un 2.° temporizador, simplemente siga los pasos 1 a 5, pero presione el botón MODE
(MODO) hasta que se muestren los iconos “PROG” (PROGRAMA) y “2”.
BATTERY INSTALLATION
BUTTON DIAGRAM
ZIP-SET
Zip-Set/Clear Button
REVERSE Button
ON/OFF/Enter Button
Time Set Button
Forward/
Hourly Adjust Button
RESET Button
Calendar/7-5-2 Button
RANDOM Button
PROGRAM Button
DST Button
MODE Button
MOUNTING HOLES
FRENCH SPANISH
(Figura A)
(Figura B)
(Figura C)
(Figura D)
(Figura E)
(Voyant allumé)
(Figura F)
(Voyant éteint)
(Luz encendida)
(Luz apagada)
FRENCH SPANISH
(Figura A)
(Figura B)
(Figura C)
(Figura D)
(Figura E)
(Voyant allumé)
(Figura F)
(Voyant éteint)
(Luz encendida)
(Luz apagada)
Este producto ha pasado
pruebas de extracción,
transformación y carga (Extract,
Transform, Load, ETL). Se
encuentra certificado y cumple
con los estándares de seguridad
de producto de EE. UU. y Canadá.
PARA COMUNICARSE CON EL SERVICIO TÉCNICO: [email protected] 877.230.7874 NSi Industries LLC • USA • www.nsiindustries.com