

UserManual
M5MusicPlayer
Thank you for purchasing our JOLIKE Music Player.
Please read the manual carefully before using the device.
If you have any question, please contact our customer
Service:[email protected]

Contents
English
Deutsch
Français
Español
Italiano
⽇本語
0 1 ~ 1 4
15~29
30~44
45~60
61~74
75~87
--------------------------
--------------------------
--------------------------
--------------------------
--------------------------
--------------------------
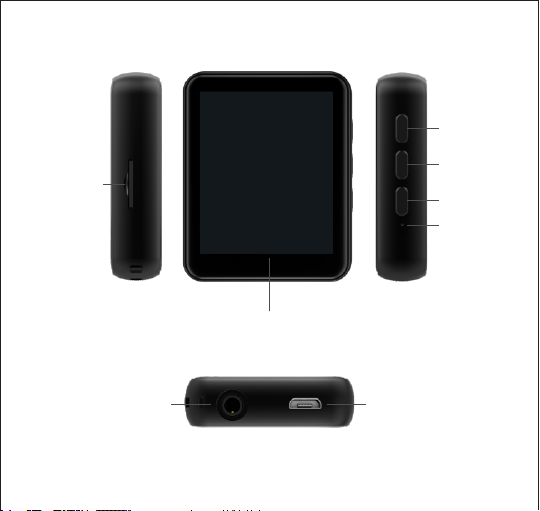
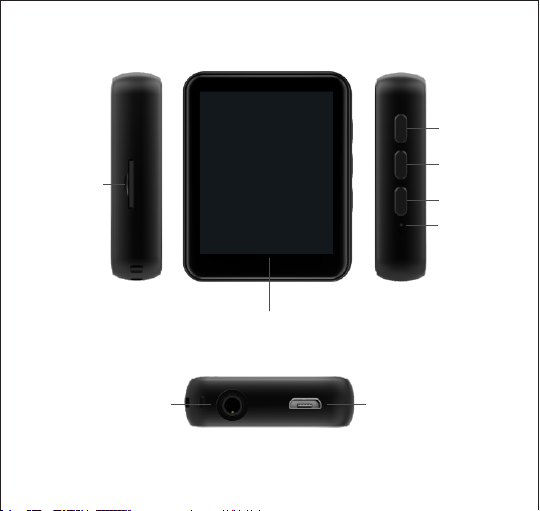
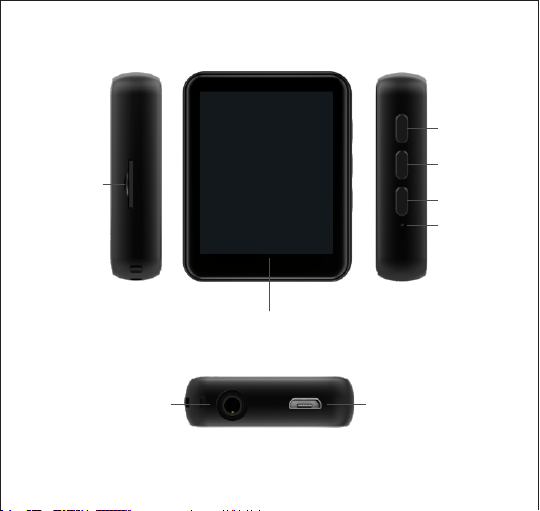
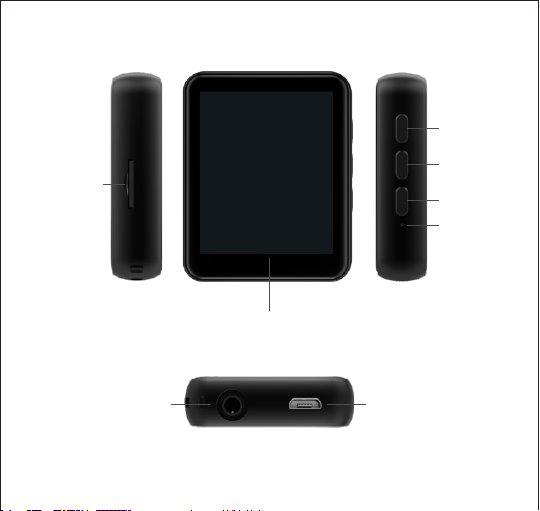
Headphone jack
USB Port
1.8 inch Touch screen
TF Card Slot
Volume +
Volume -
Power ON/OFF
01
Reset

02
1.Power ON/OFF
Hold the Power button for 3s to turn ON/OFF the device. In the state of power ON, short
press the “Power ON/OFF” Button to turn off the screen light
Basic operation
2.Charge the Player
Plug the attached USB cable into the USB port of a computer to charge the player.
When you start charging, it will show two options: “Charge & Transfer” and “Charge &
Play”. An indicate on the top right will show the charging statue.
Noted:Use only the 5V/500mA charger for charging or it may lead to product failure.
3.Date Transfer
Plug it into your computer and copy over media files with the attached USB cable as if
it was a flash driver or use music management software such as Windows Media
Player to transfer the files.(Not supported for iTune)
Note: if your computer cannot detect the MP3 Player, try to update your USB driver or
use another cable. If it still can’t work for you. Ask JOLIKE Customer Service for
additional help. (See Cover)
4.Return
While on playing interface, press the button to exit.
5.Volume Adjustment
Use the Volume Control button on the right to adjust the volume.
Note: There’s a built-in speaker in the MP3 Player, the speaker will turn on automatically
when no earphones are plugged in.
03
6.Headphones and Speaker
JOLIKE MP3 Player only support Headphones with impedance16Ωor32Ω. Built-in
Speaker could be turn OFF, see “Settings”.
Operation of main functions
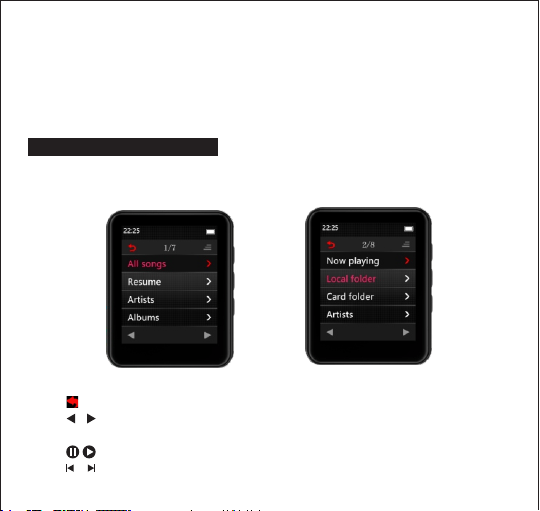
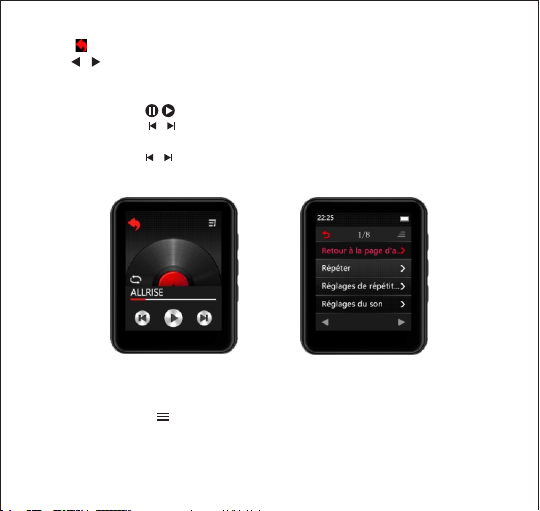
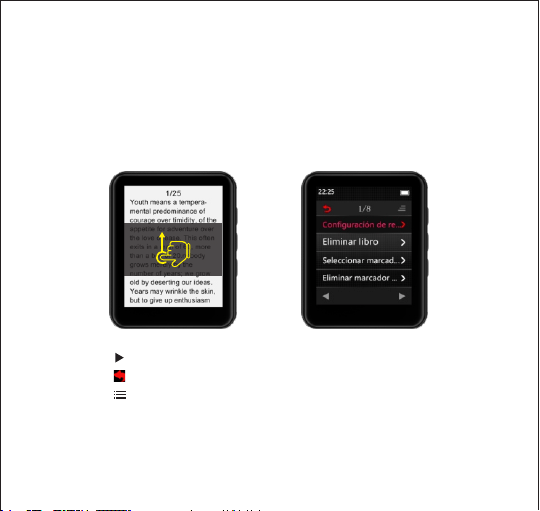
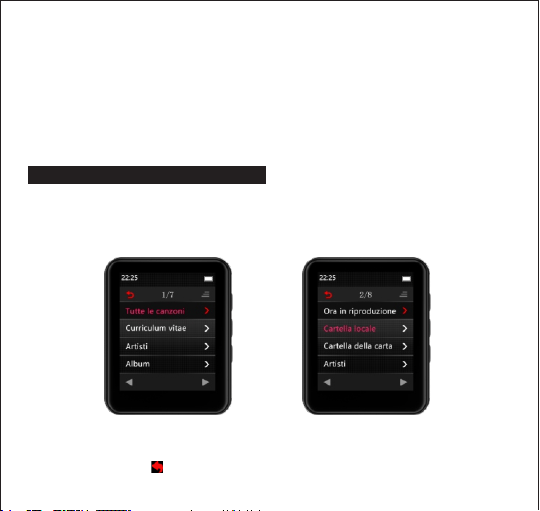
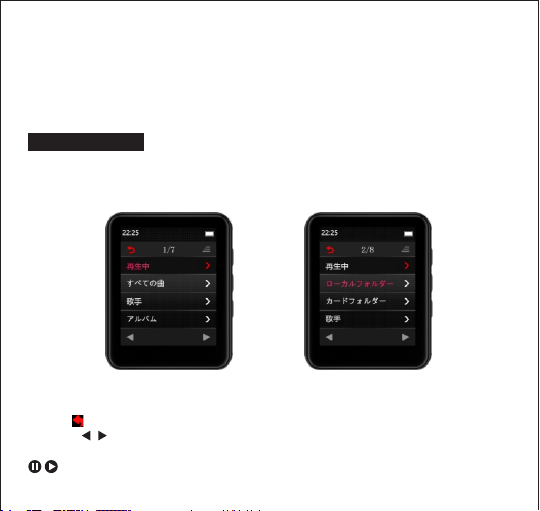
1.Music
Touch the “Music” on main interface to access to its function. A related list will show as
follows:
(Without TF card insert)
(With TF card insert)
Touch back to to exit.
Touch to select each option from menu list
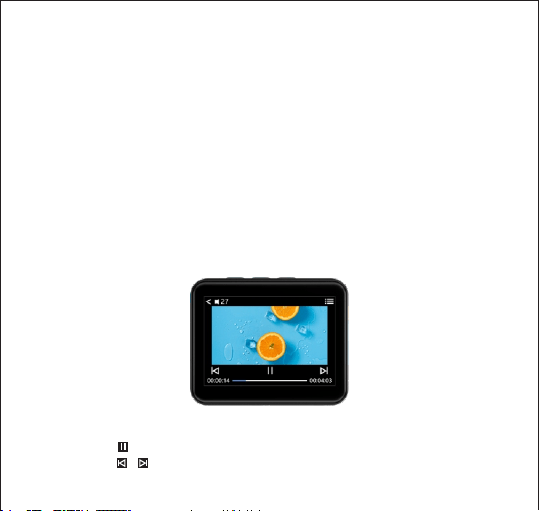
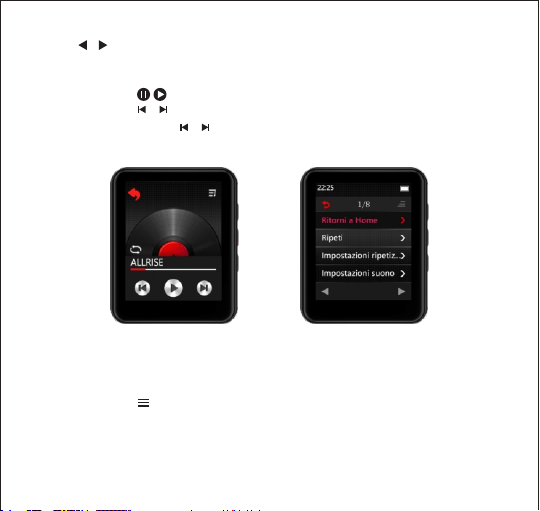
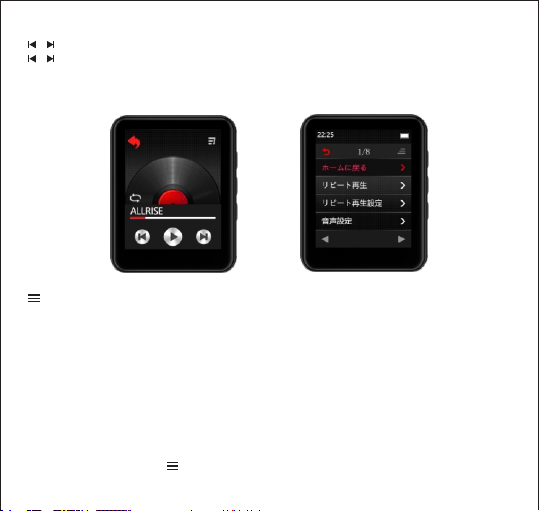
Touch “now playing” to enter the playing interface of the song being played as follows
Touch button to play / Pause
Touch / button to start to play the last song/Next song
7.Reset
Poke the reset hole with a thin needle to restore the device to factory settings.
04
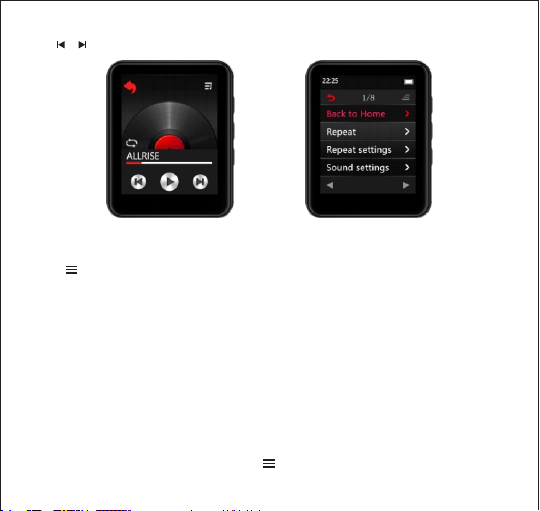
Touch Play mode icon (Sequential Play / Repeat One / Repeat all /Shuffle + Repeat )
to change the play mode
Touch button enter to playing settings menu a related list will
show as follows:
Back to Home
Repeat
Repeat settings
Sound settings
Bookmarks
Delete
Add to playlist
Remove from playlist
How to start A-B repeat play ?
On the music playing interface, touch the button enter to the playing setting menu
Hold / button to Rewind / Fast forward the currently playingsong

05
then choose the "Repeat settings" and then choose the "Repeat Mode". After that you
will see the letter "A" begins to flashing, then touch the letter B to confirm the repeat
start point (Point A ), on the same time the point "B" will start to flashing, touch the
letterB again to confirm the end point (Point B) then it will start to repeat play music
from A point to B.
Replay Times: Set A-B repeat times from 1~ 10 times.
Replay Interval: Set the time interval (1s to 7s ) for each repeat play.
How to set the music playing speed?
On the music playing interface, touch the button enter to the music playing setting
menu, then choose the option ”sounds setting ” and then choose the option”Variable
Speed Playback” and then you could adjust the music playing speed from -8~+8
Noted:
The formats that could be supported by this mp3 player as below:
MP3: Bitrate: 8Kbps~320Kbps, Sampling rate: 8MHz~48MHz;
WMA: Bitrate: 5Kbps~384Kbps, Sampling rate: 8MHz~48MHz;
APE: Bitrate: 800Kbps~1000Kbps(FAST normal compressed)
Sampling rate: 8MHz~48MHz;
WAV: Bitrate: 32Kbps~384Kbps, Sampling rate: 8MHz~48MHz;
FLAC: Bitrate: 1000Kbps~1200Kbps(L0~L8),
Sampling rate:8MHz~48MHz
ACC-LC: Bitrate: 8Kbps~320Kbps, Sampling rate: 8MHz~48MHz
2.Movie
Touch the “Movie” on main interface to access to its function. (Remark: While without
the TF card, all the video files will listed on the Movie menu While the device insert the

06
TF card, there will have “Local folder” and “Card folder ” listed on the Movie menu ).
While Playing Video
Touch button to play / Pause
Touch / button to start to play the last video/Next video
Hold / button to Rewind / Fast forward the currently playing video
Touch button enter to video playing settings menu.
Touch to return
Remark:
The Video format supported AMV/ AVI only
Video resolution size:128*160.
To get video conversion tool please visit our website:
http://www.jolike.com.cn
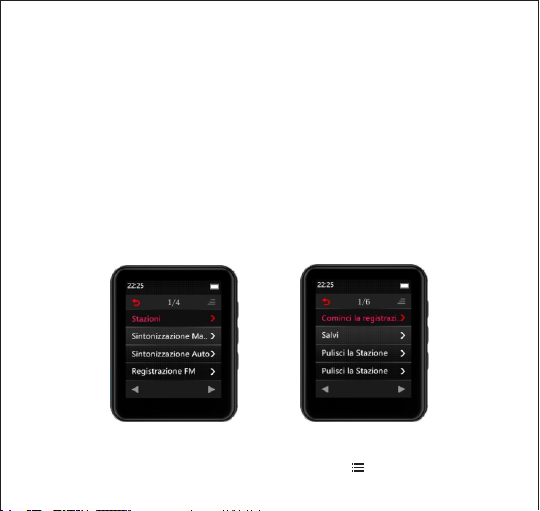
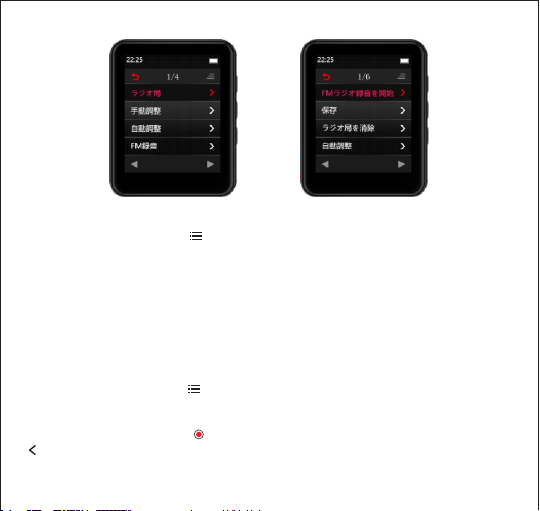
3.FM Radio
Touch the “FM Radio” on main interface to access to its function.
A related list will show as follows:
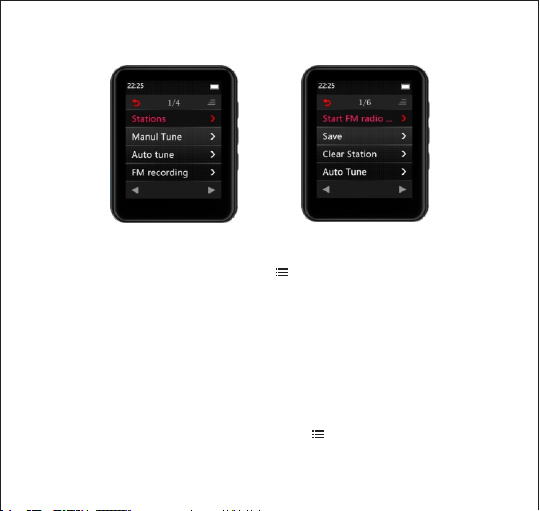
07
Stations、Manul Tune、Auto tune、FM recording
FM Radio Settings
On the FM Radio Playing interface, touch the button to access to the FM radio settings
menu, a related list will show as follows:
Start FM radio recording
Save
Clear station
Auto tune
Tuner region
FM recording
How to FM Recording ?
While on the FM Radio playing interface, touch the button to access to the FM radio
settings menu and choose the option "Start FM radio recording " it will begin to record
the FM radio .
08
On the FM radio recording interface touch the button to suspend, touch again to
continue . Touch button will pop up a prompt window "Save the recording ?" Choose
"Yes" to save the FM recording, choose "No" will cancel the FM recording.
How to select the FM Band?
On the FM radio settings menu, touch the option "Tuner Region"
then you could select the different Band.
Common Band: 87.0 MHZ ~ 108.0 MHZ
Japan Band: 76MHZ ~ 90MHZ
Euro Band: 87.0 MHZ ~ 108.0 MHZ
4.Bluetooth
Touch the “Bluetooth” on main interface to access to its function.A related list will show
as follows:
Bluetooth switch control
Search for device
Device list
BT Upgrade
How to pair this mp3 player with Bluetooth speaker or Bluetoothheadset?
1.Make sure the bluetooth speaker or bluetooth headset power on and open the
bluetooth mode
2.Turn on the bluetooth mode on mp3 player, and start to searchfor the bluetooth
device around.
3.After find the bluetooth device then choose the bluetooth deviceto start to pair with
bluetooth speaker or bluetooth headset.

09
Remark:
1.Under Bluetooth playing mode only support following formats: Mp3, WMA, WAVE, FLAC,
APE. This mp3 player can not pair with smart phone.
2.Plug in wired headphones when play FM radio in Bluetooth Mode. Videos, Photo,
Record,can not be used during Bluetooth Mode.
3.If you still have trouble to pair with your headphones or speaker,please contact us by
our customer service.(See Cover)
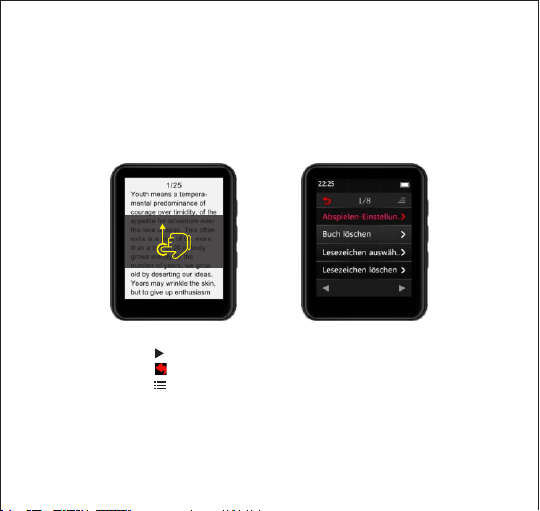
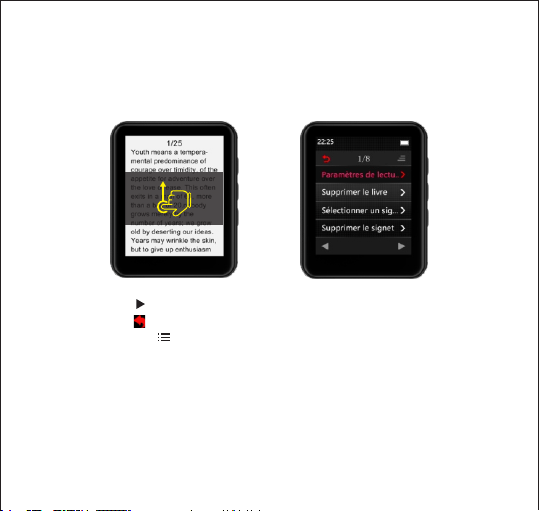
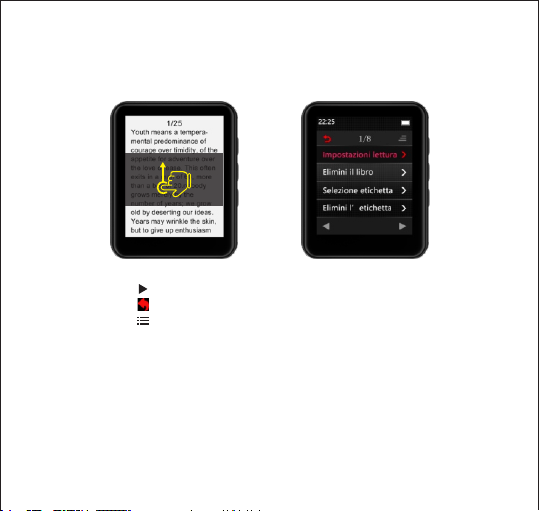
5.E-book
Touch the “Ebook” on main interface to access to its function.(Remark: if without the TF
card in the device, all the ebook fileswill listed on the ebook menu, if the device insert
the TF card, there will have “Local folder” and “Card folder ” listed on the ebook menu ).
On the ebook reading interface,Swipe up or down with your fingeron the screen to read
thenext page or the previous page.
Touch the button will start automatic page-turning mode
Touch the button to return
Touch the button button enter to the ebook settings menu a related list will show as
follows:
Play Settings
Delete Book
Bookmark Select
Delete Bookmark
Add Bookmark
Page Select
Font size
Book Background
Remark : This mp3 player can only supported TXT files.
6.Settings
Touch the “Setting” on main interface to access to its function. A related list will show
as follows:
Language: there have 28 kinds of languages
Display setting:
1. Brightness: Touch the option "Brightness" to access to the brightness adjustment
interface, touch the button up or down to adjust the brightness, touch "OK " Button to
save the brightness setting
2. Backlight timer: Set the backlight timer for 10s/20s/30s/Always on.
3. Screensaver: None / Digital clock / Digtal clock 2.
Shutdown Setting:
1. Auto shutdown: 3min/ 10min/ 30min/off
10

2. Sleep timer: OFF/ set sleep timer from 0~ 99 mins
Date and time:
1.Time settings: Set time format (12-hours / 24-hours ) / Set time
2.Date settings: Set date format / set date
Speaker ON/OFF: Turn ON/OFF the speaker built-in the mp3 player
Information: Information (to see the software version ) / Disk space (To see the SD
card or internal memory )
Format device: Choose this setting option to format the device. (Noted: after format
device all data will be deleted, please make sure you have backup your files in the
device before you doing the settings )
Factory Settings: Choose this option to do factory setting.
7.Browser
Touchthe “Browser” on main interface to access to its function.
When you insert a SD card into JOLIKE MP3 Player, 2 new options will show in “Browser”.
Local folder: View files in MP3’s memory.
Card folder: View files in SD card’s memory.
JOLIKE MP3 player works with any brand SD card up to 128 GB. If SD card can’t be read,
please make sure the card can be readby other device first. If you believe the card is
fine, please contact us for further help.(See Cover)
11

(1)Create your own Playlists
When you connect mp3 player to PC, you can create folders in the mp3 player or SD
Card. These folders can be used a Playlists. If you drop some musics in one folder, and
then unplug and go to “Browser” icon on MP3, you can only play and shuffle these
musics in the folder.
(2)Sorting as same as on PC
Audio Book lovers usually need to make sure all files in the order they want.
Unfortunately MP3 or SD Card’s memory designed different from PC’s storage. Thus you
need some trick to sort files as same as on PC.
Here’s the steps:
(1), Prepare the audio files and sort them on PC.
(2), Select all files, but do not copy (Important).
(3), Move your mouse cursor to the first file, and copy.
(4), Paste files to mp3.
(5), Unplug mp3 and go to “Browser”, all files will be sorted exactly as same as on PC.
MP3 and SD card’s memory will sort file by edit time, the first file be dropped in will be
list as first edited file. If you change the file name or do some other modification, it’ll go
the last of the list. This trick only works on “Browser” icon, not on “Music” icon.
Don’t forget add a bookmark when you use audio book.
Support and Troubleshooting
Q: How to transfer music to the mp3 player?
A: Download music to your computer first, and then connect mp3 player with your
12

computer thru charging cable. A new disk will pop on as flash driver, and drop all your
musics to the disk. You can create folders in the disk to sort your music.
Q: Why my computer can’t detect mp3 player?
A: JOLIKE Mp3 player can be paired for all computer system with latest USB driver.
Please update your USB driver before plug in Mp3 player or try another charging cable.
It you still can’t connect JOLIKE Mp3 Player to you computer, please contact JOLIKE
customer service team for additional help(See Cover).
Q: How can I continue audio play after turn the player off?
A: You can not continue your play after turn off the player. However, if the player is in
sleep mode, you can continue your play by wake it up. See “Basic Operations” about
how to get into sleep mode.
13
14
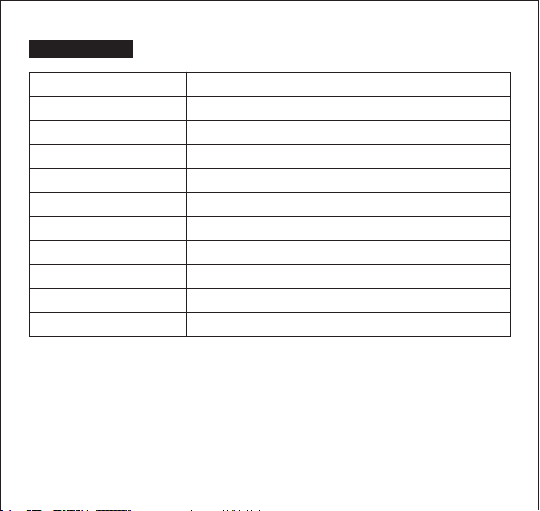
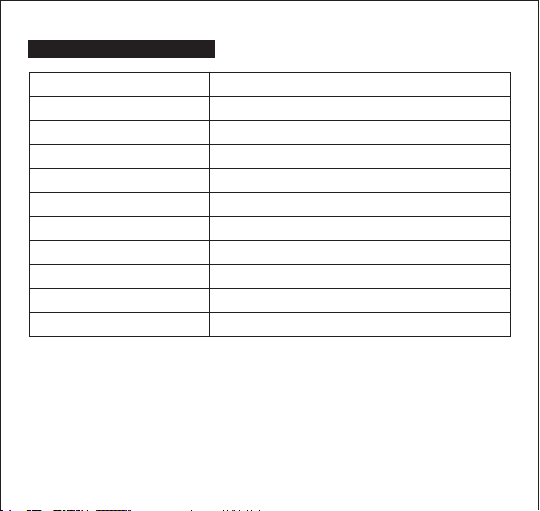
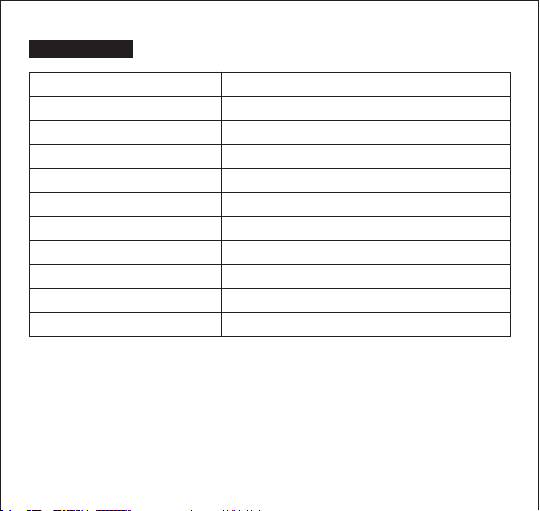
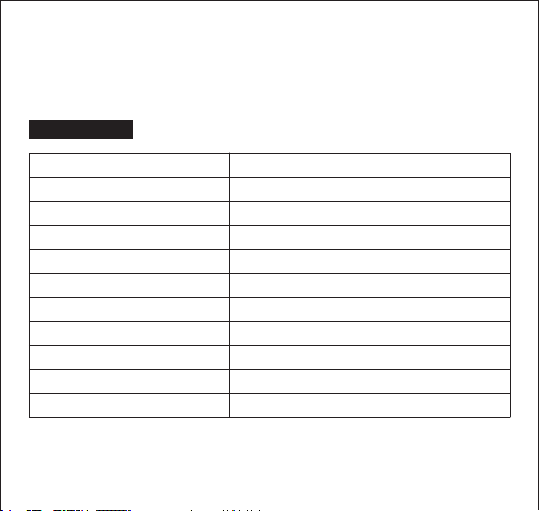
Specification
Screen 1.8 Inch 128 x 160 LCD screen
Weight 51g
Dimension 41.5*50.5*12.5 mm
Flash memory 16GB
Audio format MP3/WAV/APE/WMA/FLAC etc.
Video format AMV/AVI
Recording format MP3/WAV
Battery 3.7 V/550 mAh
Charging time 2-3 hours
SD card expansion Up to 128G
Lyric Format LRC

Kopfhöreranschluss
USB-Anschluss
Lautstärke +
Lautstärke -
Einschalten
Ausschalten
15
1.8-Zoll-TFT-Voll-Touchscreen
TF-Karten-Slot
Zurücksetzen
16
1.Ein-/Ausschalten
Halten Sie den Netzschalter 3 Sekunden lang gedrückt, um das Gerät EIN/AUSzuschalten.
Drücken Sie im eingeschalteten Zustand kurz auf die “Ein-/Ausschalten”-Taste, um die
Bildschirmbeleuchtung auszuschalten
Basisbetrieb
2.Den Spieler aufladen
Schließen Sie das beiliegende USB-Kabel an den USB-Anschluss eines Computers an,
um den Spieler aufzuladen. Wenn Sie mit dem Aufladen beginnen, werden zwei
Optionen angezeigt:“Aufladen & Übertragen” und “Aufladen & Abspielen”. Ein Hinweis
oben rechts zeigt die Ladestatue an.
Hinweis: Verwenden Sie zum Aufladen nur das 5V/500mA-Ladegerät, da dies zu einem
Produktausfall führen kann.
4.Zurückkehren
Drücken Sie während der Wiedergabe der Benutzeroberfläche die Taste , um das
Menü zu verlassen.
3.Date Transfer
Schließen Sie es an Ihren Computer an und kopieren Sie Mediendateien mit dem
angeschlossenen USB-Kabel wie mit einem Flash-Treiber oder verwenden Sie
Musikverwaltungssoftware wie Windows Media Player, um die Dateien zu übertragen
(nicht unterstützt für iTune) Hinweis: Wenn Ihr Computer den MP3-Spieler nicht
erkennen kann, versuchen Sie, Ihren USB-Treiber zu aktualisieren oder ein anderes Kabel
zu verwenden. Wenn es bei Ihnen immer noch nicht funktioniert. Verbinden Sie den
JOLIKE Kundenservice für zusätzliche Hilfe. (Siehe Umschlag)

17
5.Lautstärkeregelung
Verwenden Sie die Lautstärkeregelungstaste auf der rechten Seite, um die Lautstärke
einzustellen.Hinweis: Der MP3-Spieler verfügt über einen eingebauten Lautsprecher, der
sich automatisch einschaltet, wenn keine Ohrhörer eingesteckt sind.
6.Kopfhörer und Lautsprecher
JOLIKE MP3-Spieler unterstützen nur Kopfhörer mit Impedanz 16Ωoder 32Ω.
EingebauterLautsprecher kann ausgeschaltet werden, siehe„ Einstellungen“.
7.Zurücksetzen
Stechen Sie mit einer dünnen Nadel in das Rücksetzloch, um die Werkseinstellungen des
Geräts wiederherzustellen
Betrieb der Hauptfunktionen
1.Musik
Berühren Sie die“Musik” auf der Hauptoberfläche, um auf ihre Funktion zuzugreifen. Eine
verwandte Liste wird wie folgt angezeigt:
(OhneTF-Karteneinsatz)
(MitTF-Karteneinsatz)

18
Berühren Sie zurück, um den Vorgang zu beenden.
Berühren Sie , um jede Option aus der Menüliste auszuwählen
Berühren Sie “Jetzt abspielen”, um wie folgt in die Wiedergabeoberfläche des gerade
gespielten Liedes zu gelangen
Berühren Sie die Taste zum Abspielen / Pausieren
Berühren Sie die Taste/ , um die Wiedergabe des letzten Liedes / Nächsten Liedes
zu starten
Halten Sie die Taste/ gedrückt, um das aktuell wiedergegebene Lied zurück- oder
vorzuspulen
Berühren Sie das Symbol für den Wiedergabemodus (Sequentielle Wiedergabe / Eine
wiederholen / Alle wiederholen / Zufallswiedergabe + Wiederholen), um den
Wiedergabemodus zu ändern
Berühren Sie die , um das Menü mit den Wiedergabeeinstellungen aufzurufen, eine
verwandte Liste wird wie folgt angezeigt:
Zurück zu Startseite

19
Wiederholen
Wiederholen-Einstellungen
Sound-Einstellungen
Lesezeichen
Löschen
Zur Wiedergabeliste hinzufügen
Aus Wiedergabeliste entfernen
Wie startet man A-B-Wiedergabe wiederholen?
Berühren Sie auf der Musikwiedergabe-Oberfläche die Taste , um zum Menü für die
Wiedergabeeinstellungen zu gelangen, wählen Sie dann die “Wiederholen-Einstellungen”
und anschließend den “Wiederholungsmodus”. Danach beginnt der Buchstabe “A” zu
blinken, dann berühren Sie den Buchstaben B, um den Startpunkt der Wiederholung zu
bestätigen (Punkt A), gleichzeitig beginnt der Punkt “B” zu blinken, berühren Sie erneut
den Buchstaben B, um den Endpunkt zu bestätigen (Punkt B), dann beginnt die
Wiederholung der Musikwiedergabe von Punkt A nach B.
Wiedergabe-Male: Stellen Sie die A-B-Wiedergabe-Male von 1~10 Mal ein.
Wiedergabe-Interval: Stellen Sie das Zeitintervall (1s bis 7s ) für jede Wiederholung ein.
Wie stellt man die Musikwiedergabegeschwindigkeit ein?
Berühren Sie auf der Musikwiedergabe-Oberfläche die Taste , um zum Menü für die
Musikwiedergabe-Einstellungen zu gelangen, wählen Sie dann die Option “Sound-
Einstellungen” und dann die Option “Variable Geschwindigkeitswiedergabe”.
Anschließend können Sie die Musikwiedergabegeschwindigkeit von -8~+8 einstellen
Hinweis:
Die Formate, die von diesem MP3-Spieler unterstützt werden könnten, sind nachstehend

20
aufgeführt:
MP3: Bitrate: 8Kbps~320Kbps, Abtastrate: 8MHz-48MHz;
WMA: Bitrate: 5Kbps~384Kbps, Abtastrate: 8MHz-48MHz;
APE: Bitrate: 800Kbps~1000Kbps (FAST normal komprimiert),
Abtastrate: 8MHz-48MHz;
WAV: Bitrate: 32Kbps~384Kbps, Abtastrate: 8MHz-48MHz;
FLAC: Bitrate: 1000Kbps~1200Kbps (L0~L8),
Abtastrate: 8MHz-48MHz;
ACC-LC: Bitrate: 8Kbps~320Kbps, Abtastrate: 8MHz-48MHz;
2.Film
Berühren Sie den “Film” auf der Hauptoberfläche, um auf seine Funktion zuzugreifen.
(Bemerkung: Ohne TF-Karte werden alle Videodateien im Filmmenü aufgelistet
Während das Gerät die TF-Karte einführt, werden “Lokaler Ordner” und “Kartenordner” im
Filmmenü aufgeführt).
Während der Videowiedergabe
Berühren Sie die Taste zum Abspielen / Pausieren
Berühren Sie die Taste / , um die Wiedergabe des letzten Videos / Nächsten Videos

21
zu starten
Halten Sie die Taste/ gedrückt, um das aktuell wiedergegebene Video zurück- /
vorzuspulen
Berühren Sie die Taste , um das Menü mit den Einstellungen für die Videowiedergabe
aufzurufen.
Berühren Sie zum Zurückkehren
Bemerkung:
Das Videoformat unterstützt nur AMV/AVI
Größe der Videoauflösung: 128*160.
Um ein Videokonvertierungstool zu erhalten, besuchen Sie bitte unsere Website:
http://www.jolike.com.cn/
3.FM-Radio
Berühren Sie “FM-Radio” auf der Hauptoberfläche, um auf seine Funktion zuzugreifen.
Eine verwandte Liste wird wie folgt angezeigt: Stationen、Manul-Melodie、Auto-Melodie
FM-Aufnahme

22
FM-Radio-Einstellungen
Berühren Sie auf der FM-Radio-Wiedergabe-Oberfläche die , um auf das FM-Radio-
Einstellungsmenü zuzugreifen; eine verwandte Liste wird wie folgt angezeigt:
FM-Radioaufnahme starten
Speichern
Station leeren
Auto-Melodie
Tuner-Region
FM-Aufnahme
Wie FM-Aufnahme?
Während auf der FM-Radio-Wiedergabe-Oberfläche, berühren Sie die Taste , um auf
das FM-Radio-Einstellungsmenü zuzugreifen, und wählen Sie die Option
“FM-Radioaufnahme starten”, es wird mit der Aufnahme des FM-Radios beginnen.
Berühren Sie auf der FM-Radioaufnahme-Oberfläche die Taste , um die Aufnahme zu
unterbrechen, berühren Sie sie erneut, um fortzufahren. Wenn Sie die Taste berühren,
öffnet sich ein Fenster mit der Aufforderung “Aufnahme speichern”? Wählen Sie “Ja”,
um die FM-Aufnahme zu speichern, wählen Sie “Nein”, wird die FM-Aufnahme
abgebrochen.
Wie wählt man das FM-Band aus?
Berühren Sie im FM-Radio-Einstellungsmenü die Option “Tuner-Region”, dann können
Sie die verschiedenen Bänder auswählen.
Allgemeines Band: 87.0 MHZ ~ 108.0 MHZ
Japan-Band: 76MHZ ~ 90MHZ
Euro-Band: 87.0 MHZ ~ 108.0 MHZ

23
4.Bluetooth
Berühren Sie den “Bluetooth” auf der Hauptoberfläche, um auf seine Funktion zuzugreifen.
Eine verwandte Liste wird wie folgt angezeigt:
Bluetooth-Schalter-Steuerung
Gerät suchen
Geräteliste
BT-Upgrade
Wie koppelt man diesen Mp3-Spieler mit einem Bluetooth-Lautsprecher oder Bluetooth
-Kopfhörer?
1.Vergewissern Sie sich, dass der Bluetooth-Lautsprecher oder das Bluetooth-Kopfhörer
eingeschaltet ist und öffnen Sie den Bluetooth-Modus
2.Schalten Sie den Bluetooth-Modus am Mp3-Spieler ein, und beginnen Sie mit der
Suche nach dem Bluetooth-Gerät in der Umgebung.
3.Nachdem Sie das Bluetooth-Gerät gefunden haben, wählen Sie das Bluetooth-Gerät
aus, das mit dem Bluetooth-Lautsprecher oder dem Bluetooth-Kopfhörer gekoppelt
werden soll.
Bemerkung:
1.Im Bluetooth-Wiedergabemodus werden nur die folgenden Formate unterstützt: MP3,
WMA, WAVE, FLAC, APE. Dieser Mp3-Spieler kann nicht mit einem Smartphone gekoppelt
werden.
2.Schließen Sie kabelgebundene Kopfhörer an, wenn Sie FM-Radio im Bluetooth-Modus
wiedergeben. Videos, Fotos und Aufnahmen können im Bluetooth-Modus nicht
verwendet werden.
3.Wenn Sie immer noch Probleme mit der Kopplung mit Ihrem Kopfhörer oder
Lautsprecher haben, wenden Sie sich bitte über unseren Kundendienst an uns.
(Siehe Umschlag)
24
5.E-book
Berühren Sie das “Ebook” auf der Hauptoberfläche, um auf seine Funktion zuzugreifen.
(Bemerkung: Ohne TF-Karte werden alle Ebook-Dateien im Ebook-Menü aufgelistet
Wenn das Gerät die TF-Karte einführt, werden “Lokaler Ordner” und “Kartenordner” im
Ebook-Menü aufgeführt). Streichen Sie auf der E-Book-Leseoberfläche mit dem Finger
auf dem Bildschirm nach oben oder unten, um die nächste Seite oder die vorherige
Seite zu lesen.
Berühren Sie die Taste , um den automatischen Seitenumblattmodus zu starten
Berühren Sie die Taste , um zurückzukehren
Berühren Sie die Taste , um in das Ebook-Einstellungsmenü zu gelangen, eine
verwandte Liste wie folgt angezeigt wird:
Abspielen-Einstellungen
Buch löschen
Lesezeichen auswählen
Lesezeichen löschen

25
Lesezeichen hinzufügen
Seite auswählen
Schriftgröße
Hintergrund des Buches
Bemerkung: Dieser MP3-Spieler kann nur TXT-Dateien unterstützen.
6.Einstellungen
Berühren Sie die “Einstellung” auf der Hauptoberfläche, um auf ihre Funktion zuzugreifen.
Eine verwandte Liste wird wie folgt angezeigt:
Sprache: es gibt 28 Arten von Sprachen
Bildschirmeinstellung:
1.Helligkeit: Berühren Sie die Option “Helligkeit”, um auf die Oberfläche zur
Helligkeitseinstellung zuzugreifen, berühren Sie die Taste nach oben oder unten, um die
Helligkeit einzustellen, berühren Sie die Taste “OK”, um die Helligkeitseinstellung zu
speichern
2.Hintergrundbeleuchtungs-Timer: Stellen Sie Hintergrundbeleuchtungs-Timer auf 10s /
20s / 30s / Immer an.
3.Bildschirmschoner: Keine / Digitaluhr / Digitaluhr 2.
Abschaltung-Einstellung:
1.Automatische Abschaltung: 3min / 10min / 30min / aus
2.Einschlaf-Timer: AUS / Einschlaf-Timer von 0 ~ 99 Minuten einstellen
Datum und Zeit:
1.Zeit-Einstellungen: Zeitformat einstellen (12-Stunden / 24-Stunden) / Zeit einstellen
2.Datum-Einstellungen: Datumformat einstellen / Datum einstellen

26
Lautsprecher EIN/AUS: Schalten Sie den im MP3-Spieler eingebauten Lautsprecher EIN/
AUS
Information: Informationen (um die Software-Version zu sehen) / Speicherplatz (Um
die SD-Karte oder den internen Speicher zu sehen)
Gerät formatieren: Wählen Sie diese Einstellungsoption, um das Gerät zu formatieren.
(Hinweis: nach dem Formatieren des Geräts werden alle Daten gelöscht, bitte stellen
Sie sicher, dass Sie ein Backup Ihrer Dateien auf dem Gerät haben, bevor Sie die
Einstellungen vornehmen )
Werkseinstellungen: Wählen Sie diese Option, um die Werkseinstellungen vorzunehmen.
7.Browser
Berühren Sie den “Browser” auf der Hauptoberfläche, um auf seine Funktion zuzugreifen.
Wenn Sie eine SD-Karte in den JOLIKE MP3-Spieler einlegen, werden im “Browser” 2 neue
Optionen angezeigt.
Lokaler Ordner: Dateien im MP3-Speicher anzeigen.
Kartenordner: Dateien im Speicher der SD-Karte anzeigen.
Der JOLIKE MP3-Spieler funktioniert mit jeder Marken-SD-Karte bis zu 128 GB.
Wenn die SD-Karte nicht gelesen werden kann, vergewissern Sie sich bitte zuerst, dass
die Karte von einem anderen Gerät gelesen werden kann. Wenn Sie glauben, dass die
Karte in Ordnung ist, kontaktieren Sie uns bitte für weitere Hilfe (siehe Umschlag).
(1)Erstellen Sie Ihre eigenen Wiedergabelisten

27
Wenn Sie den MP3-Spieler an den PC anschließen, können Sie Ordner im MP3-Spieler
oder auf der SD-Karte erstellen. Diese Ordner können als Wiedergabelisten verwendet
werden.
Wenn Sie einige Musikstücke in einem Ordner ablegen und dann den Stecker ziehen
und auf das “Browser”-Symbol auf MP3 gehen, können Sie diese Musikstücke nur in dem
Ordner abspielen und mischen.
(2)Sortieren wie am PC
Liebhaber von Hörbüchern müssen in der Regel sicherstellen, dass alle Dateien in der
von ihnen gewünschten Reihenfolge vorliegen. Leider ist der Speicher von MP3- oder
SD-Karten anders konzipiert als der Speicher eines PCs. Daher benötigen Sie einen Trick,
um die Dateien genauso zu sortieren wie am PC.
Hier sind die Schritte:
(1), Bereiten Sie die Audiodateien vor und sortieren Sie sie am PC.
(2), Alle Dateien auswählen, aber nicht kopieren (Wichtig).
(3), Bewegen Sie den Mauszeiger auf die erste Datei und kopieren Sie diese.
(4), Dateien in MP3 einfügen.
(5), Ziehen Sie den MP3-Stecker und gehen Sie auf “Browser”, alle Dateien werden
genau wie am PC sortiert.
Der Speicher von MP3- und SD-Karten sortiert die Dateien nach der Bearbeitungszeit,
die erste Datei, in der sie abgelegt werden, wird als erste bearbeitete Datei aufgelistet.
Wenn Sie den Dateinamen ändern oder eine andere Änderung vornehmen, wird die
Datei an den letzten Platz in der Liste gestellt.
Dieser Trick funktioniert nur auf dem “Browser”-Symbol, nicht auf dem “Musik”-Symbol.

28
Q: Wie überträgt man Musik auf den MP3-Spieler ?
A: Laden Sie zuerst Musik auf Ihren Computer herunter und schließen Sie dann den
MP3-Spieler über ein Ladekabel an Ihren Computer an. Eine neue Diskette erscheint als
Flash-Treiber und legt alle Ihre Musikstücke auf der Diskette ab.
Sie können Ordner auf der Festplatte erstellen, um Ihre Musik zu sortieren.
Q: Warum kann mein Computer keinen MP3-Spieler erkennen?
A: Der JOLIKE MP3-Spieler kann für alle Computersysteme mit aktuellem USB-Treiber
gekoppelt werden. Bitte aktualisieren Sie Ihren USB-Treiber vor dem Anschließen des
MP3-Spieler oder versuchen Sie ein anderes Ladekabel. Wenn Sie den JOLIKE
MP3-Spieler immer noch nicht an Ihren Computer anschließen können, wenden Sie sich
bitte an den JOLIKE Kundendienst für weitere Hilfe (Siehe Umschlag).
Q: Wie kann ich die Audiowiedergabe nach dem Ausschalten des Spielers fortsetzen?
A: Sie können Ihre Wiedergabe nach dem Ausschalten des Spielers nicht fortsetzen.
Wenn sich der Spieler jedoch im Schlafmodus befindet, können Sie Ihre Wiedergabe
fortsetzen, indem Sie ihn aufwecken. Siehe“Basisbetrieb” über den Übergang in den
Schlafmodus.
Support and Troubleshooting
29
Support and Troubleshooting
Bildschirm 1.8 Inch 128 x 160 LCD screen
Gewicht 51g
Dimension 41.5*50.5*12.5 mm
Flash-Speicher 16GB
Audioformat MP3/WAV/APE/WMA/FLAC etc.
Videoformat AMV/AVI
Aufnahmeformat MP3/WAV
Batterie 3.7 V/550 mAh
Ladezeit 2-3 hours
SD-Karten-Erweiterung Up to 128G
Lyrisches Format LRC
Prise casque
Port USB
Écran tactile complet TFT 1.8 pouces
Fente pour
carte TF
Volume +
Le volume -
Marche / arrêt
30
Réinitialiser

31
1.Mise sous/hors tension
Maintenez le bouton Mise sous tension enfoncé pendant 3s pour allumer/éteindre
l'appareil. En état de marche, appuyez brièvement sur le bouton Mise sous/hors tension
pour éteindre la lumière de l'écran
Fonctionnement de base
2.Charger le lecteur
Branchez le câble USB joint au port USB d'un ordinateur pour charger le lecteur. Lorsque
vous commencez à charger, deux options s'affichent : Charge & Transfert et Charge &
Lecture. Une indication en haut à droite montrera la statue de charge.
Noté : N'utilisez que le chargeur 5V/500mA pour la charge sinon cela peut entraîner
unedéfaillance du produit.
3.Date du transfert
Branchez-le sur votre ordinateur et copiez les fichiers multimédia à l'aide du câble USB
joint comme s'il s'agissait d'un pilote flash ou utilisez un logiciel de gestion de musique
tel que Lecteur média Windows pour transférer les fichiers (non pris en charge par
iTune).
Remarque : si votre ordinateur ne peut pas détecter le lecteur MP3, essayez de mettre
à jour votre pilote USB ou utilisez un autre câble. S'il ne fonctionne toujours pas pour
vous. Connectez le service clientèle de JOLIKE pour obtenir une aide supplémentaire.
(Voir la couverture)
4.Retour
Pendant la lecture de l'interface, appuyez sur le bouton pour sortir.
32
5.Ajustement du volume
Utilisez le bouton de contrôle du volume sur la droite pour régler le volume. Note : le
lecteur MP3 est équipé d'un haut-parleur intégré, qui se met en marche
automatiquement lorsqu'aucun écouteur n'est branché.
6.Écouteurs et haut-parleur
Le lecteur MP3 JOLIKE ne prend en charge que les casques d'une impédance de 16Ω ou
32Ω . Le haut-parleur intégré peut être désactivé, voir Réglages.
7.Réinitialiser
Poussez le trou de réinitialisation avec une aiguille fine pour restaurer l'appareil à
réglages d'usine.
Fonctionnement des principales fonctions
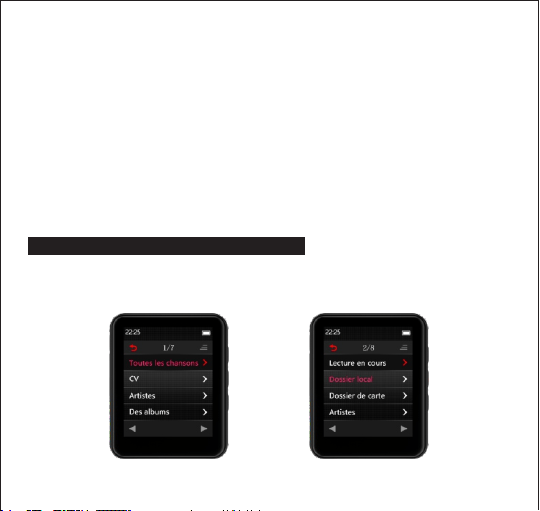
1.Musique
Touchez la Musique sur l'interface principale pour accéder à sa fonction. Une liste
connexe s'affichera comme suit :
(Sans insertion de carte TF)
(Avec insertion d'une carte TF)
33
Cliquez sur pour sortir.
Cliquez pour sélectionner chaque option dans la liste des menus.
Cliquez en cours de lecture pour entrer dans l'interface de lecture de la chanson en
cours de lecture comme suit
Cliquez surle bouton pour Lecture / Pause
Cliquez sur le bouton / pour commencer à jouer la dernière chanson/la chanson
suivante
Maintenez le bouton / enfoncée pour rembobiner / faire avancer rapidement la
chanson en cours de lecture
Cliquez sur l'icône du mode de lecture (Lecture séquentielle / Répéter un / Répéter tout
/ Aléatoire + Répéter) pour changer le mode de lecture
Appuyez sur le bouton pour entrer dans le menu des paramètres de lecture ; une
liste correspondante s'affiche alors
Retour à la page d'accueil
Répéter

34
Réglages de répétition
Réglages du son
Signets
Supprimer
Ajouter à la liste de lecture
Retirer de la liste de lecture
Comment lancer la répétition A-B ?
Sur l'interface de lecture de musique, appuyez sur le bouton pour entrer dans le
menu des paramètres de lecture, puis choisissez Réglages de répétition et enfin Mode
de répétition. Après cela, vous verrez la lettre A commencer à clignoter, puis touchez
la lettre B pour confirmer le point de départ de la répétition (point A), au même
moment le point B commencera à clignoter, touchez la lettre B à nouveau pour
confirmer le point final (point B) puis il commencera à répéter la musique du point A
vers le point B.
Temps de rediffusion: Régler les temps de répétition A-B de 1 à 10 fois.
Intervalle de rediffusion: Définir l'intervalle de temps (1s à 7s) pour chaque rediffusion.
Comment régler la vitesse de lecture de la musique ?
Sur l'interface de lecture de la musique, appuyez sur le bouton pour entrer dans le
menu des paramètres de lecture de la musique, puis choisissez l'option paramètres
des son et choisissez ensuite l'option Lecture à vitesse variable. Vous pouvez alors régler
la vitesse de lecture de la musique entre -8~+8
Noté:
Les formats qui pourraient être pris en charge par ce lecteur mp3 comme ci-dessous :
Mp3: Bitrate: 8Kbps~320Kbps, Taux d'échantillonnage 8MHz~48MHz;
35
WMA: Bitrate: 5Kbps~384Kbps, Fréquence d'échantillonnage: 8MHz~48MHz,
APE: Bitrate: 800Kbps~1000Kbps(FAST normal compressé) Taux d'échantillonnage: 8MHz
~48MHz;
WAV: Bitrate: 32Kbps~384Kbps, Fréquence d'échantillonnage 8MHz~48MHz ;
DRAPEAU: Bitrate: 1000Kbps~1200Kbps(L0- L8),
Fréquence d'échantillonnage: 8MHz~48MHz
ACC-LC: Bitrate: 8Kbps~320Kbps, Taux d'échantillonnage: 8MHz~48MHz
2.Movie
Touchez Film sur l'interface principale pour accéder à sa fonction. (Remarque : Sans la
carte TF, tous les fichiers vidéo seront listés dans le menu Film
Pendant que l'appareil insère la carte TF, le dossier local et le dossier de la carte seront
listés dans le menu Film).
Pendant la lecture de la vidéo
Touchez le bouton pour Lecture / Pause
Touchez le bouton / pour lancer la lecture de la dernière vidéo / de la prochaine
vidéo
Maintenez le bouton / enfoncé pour rembobiner / avancer rapidement la vidéo en

36
cours de lecture
Touchez le bouton pour entrer dans le menu des paramètres de lecture vidéo
Touchez pour revenir
Remarque:
Le format vidéo ne prend en charge que les formats AMV/ AVI
Taille de la résolution vidéo: 128*160
Pour obtenir un outil de conversion vidéo, veuillez consulter notre site web:
http://www.jolike.com.cn/
3.Radio FM
Touchez la radio FM sur l'interface principale pour accéder à sa fonction
Une liste connexe s'affiche comme suit :
Stations
Manul Tune
Auto tune
Enregistrement FM
37
Réglages de la radio FM
Sur l'interface de lecture de la radio FM, touchez le bouton pour accéder au menu
desparamètres de la radio FM, une liste connexe s'affichera comme suit :
Démarrer l'enregistrement de la radio FM
Sauvegarder
Dégager la station
Auto tune
Région de Tuner
Enregistrement FM
Comment enregistrer en FM ?
Lorsque vous êtes sur l'interface de lecture de la radio FM, appuyez sur le bouton
pour accéder au menu des paramètres de la radio FM et choisissez l'option Démarrer
l'enregistrement de la radio FM.
Sur l'interface d'enregistrement de la radio FM, appuyez sur le bouton pour suspendre,
appuyez à nouveau pour continuer. Appuyez sur le bouton pour faire apparaître une
fenêtre Enregistrer l'enregistrement ? Choisissez Oui pour enregistrer l'enregistrement FM,
choisissez Non pour annuler l'enregistrement FM.
Comment sélectionner la bande FM ?
Dans le menu des paramètres de la radio FM, touchez l'option Région du tuner puis
vous pourrez sélectionner les différentes bandes.
Bande commune: 87.0 MHZ ~ 108 0 MHZ
Bande Japon: 76MHZ ~ 90MHZ
Bande Euro: 87,0 MHZ ~ 108,0 MHZ

38
4.Bluetooth
Touchez Bluetooth sur l'interface principale pour accéder à sa fonction Une liste connexe
s'affichera comme suit:
Contrôle du commutateur Bluetooth
Recherche d'un appareil
Liste d'appareils
Mise à niveau BT
Comment coupler ce lecteur mp3 avec un haut-parleur ou un casque Bluetooth ?
1. Assurez-vous que le haut-parleur ou l'oreillette Bluetooth est allumé et ouvrez le mode
Bluetooth
2. Activez le mode bluetooth sur le lecteur mp3, et commencer à rechercher le
périphérique bluetooth
3. Après avoir trouvé le dispositif bluetooth, choisissez le dispositif bluetooth à coupler
avec le haut-parleur bluetooth ou le casque bluetooth
Remarque:
1.En mode de lecture Bluetooth, seuls les formats Mp3, WMA, WAVE, FLAC, APE sont pris
en charge. Ce lecteur mp3 ne peut pas être couplé avec un smart phone.
2.Branchez des écouteurs filaires lorsque vous écoutez la radio FM en mode Bluetooth.
Les vidéos, photos et enregistrements ne peuvent pas être utilisés en mode Bluetooth.
3. Si vous avez toujours des difficultés à vous connecter à vos écouteurs ou à votre
haut-parleur, veuillez contacter notre service clientèle. (Voir couverture)
5.E-book
Touchez Ebook sur l'interface principale pour accéder à sa fonction (Remarque: si la
carte TF n'est pas dans l'appareil, tous les fichiers de l'ebook seront répertoriés dans le
39
menu ebook, si l'appareil insère la carte TF, le dossier local et le dossier de la carte
seront répertoriés dans le menu ebook).
Sur l'interface de lecture des livres électroniques. Faites glisser votre doigt sur l'écran
vers le haut ou vers le bas pour lire la page suivante ou la page précédente.
Touchez le bouton pour démarrer le mode de rotation automatique des pages
Touchez le bouton pour revenir
Appuyez sur le bouton pour entrer dans le menu des paramètres de l'ebook, une
11ème page correspondante s'affichera comme suit:
Paramètres de lecture
Supprimer le livre
Sélectionner un signet
Supprimer le signet
Ajouter un signet
Sélectionner la page
Taille du front

40
Contexte du livre
Remarque : Ce lecteur mp3 ne peut prendre en charge que les fichiers TXT
6.Paramètres
Touchez le Paramètre sur l'interface principale pour accéder à sa fonction.
Une liste connexe s'affiche comme suit:
Langue: il existe 28 types de langues
Réglage de l'affichage:
1. Luminosité: touchez l'option Luminosité pour accéder à l'interface de réglage de la
luminosité, touchez le bouton vers le haut ou vers le bas pour régler la luminosité,
touchez le bouton OK pour enregistrer le réglage de la luminosité
2. Minuterie de rétro-éclairage : Réglez la minuterie de rétro-éclairage sur 10s/20s/30s/
toujours en marche
3. Economiseur d'écran: aucun / Horloge numérique / Horloge numérique 2.
Réglage de l'arrêt
1. Arrêt automatique: 3 min/ 10 min/ 30min /arrêt
2. Minuterie de sommeil: Arrêt/ régler la minuterie de sommeil de 0 à 99 minutes
Date et heure
1. Réglages de l'heure: Réglage du format de l'heure (12 heures / 24 heures) / Réglage
de l'heure
2. Réglages de la date: Format de la date fixe / date fixe
Haut-parleur Marche/Arrêt: Allumer/éteindre le haut-parleur intégré au lecteur mp

41
Information : Information (pour voir la version du logiciel) / Espace disque (pour voir la
carte SD ou la mémoire interne)
Formater l'appareil : Choisissez cette option de réglage pour formater l'appareil
(Remarque : après le formatage de l'appareil, toutes les données seront supprimées,
veuillez vous assurer que vous avez sauvegardé vos fichiers dans l'appareil avant de
procéder aux réglages)
Réglages d'usine : Choisissez cette option pour effectuer le réglage en usine
7.Navigateur
Touchez le navigateur sur l'interface principale pour accéder à sa fonction
Lorsque vous insérez une carte SD dans le lecteur MP3 JOLIKE, 2 nouvelles options
s'affichent dans le navigateur.
Dossier local : Afficher les fichiers dans la mémoire du MP3.
Dossier de cartes : Afficher les fichiers dans la mémoire de la carte SD.
Le lecteur MP3 JOLIKE fonctionne avec toute carte SD de marque jusqu'à 128 Go.
Si la carte SD ne peut pas être lue, veuillez d'abord vous assurer que la carte peut être
lue par un autre appareil. Si vous pensez que la carte est en bon état, veuillez nous
contacter pour obtenir de l'aide (voir la couverture).
(1) Créez vos propres listes de lecture
Lorsque vous connectez le lecteur mp3 au PC, vous pouvez créer des dossiers dans le
lecteur mp3 ou la carte SD. Ces dossiers peuvent être utilisés comme des listes de
lecture. Si vous déposez des musiques dans un dossier, puis débranchez et allez à

42
l'icône Navigateur sur MP3, vous ne pouvez jouer et mélanger ces musiques que dans
le dossier.
(2) Triage comme sur un PC
Les amateurs de livres audio doivent généralement s'assurer que tous les fichiers sont
classés dans l'ordre qu'ils souhaitent. Malheureusement, la mémoire des MP3 ou des
cartes SD a été conçue différent de celui du stockage des PC. Il vous faut donc une
astuce pour trier les fichiers de la même manière que sur un PC.
Voici les étapes
(1), Préparer les fichiers audio et les trier sur PC
(2), Sélectionnez tous les fichiers, mais ne les copiez pas (Important)
(3), Déplacez le curseur de votre souris sur le premier fichier, et copiez
(4), Collez les fichiers en mp3
(5), Débranchez le mp3 et allez dans Navigateur, tous les fichiers seront triés exactement
de la même manière que sur le PC
La mémoire du MP3 et de la carte SD triera les fichiers par heure d'édition, le premier
fichier déposé sera listé comme premier fichier édité. Si vous changez le nom du fichier
ou effectuez une autre modification, il sera placé en dernier dans la liste. Cette astuce
ne fonctionne que sur l'icône Navigateur, pas sur l'icône Musique. N'oubliez pas d'ajouter
un signet lorsque vous utilisez un livre audio.
Soutien et dépannage
Q: Comment transférer de la musique sur le lecteur mp3 ?
R: Téléchargez d'abord la musique sur votre ordinateur, puis connectez le mp3 avec

43
votre ordinateur par le biais du câble de chargement. Un nouveau disque s'affichera en
tant que pilote flash, et y déposera toutes vos musiques.
Vous pouvez créer des dossiers dans le disque pour trier votre musique
Q: Pourquoi mon ordinateur ne peut-il pas détecter le lecteur mp3 ?
R: Le lecteur mp3 JOLIKE peut être couplé pour tout système informatique avec le
dernier pilote USB. Veuillez mettre à jour votre pilote USB avant de brancher le lecteur
mp3 ou essayez un autre câble de chargement. Si vous ne parvenez toujours pas à
connecter le lecteur MP3 JOLIKE à votre ordinateur, veuillez contacter le service clientèle
de JOLIKE pour obtenir une aide supplémentaire (voir couverture)
Q: Comment puis-je poursuivre la lecture audio après avoir éteint le lecteur ?
R: Vous ne pouvez pas continuer votre lecture après avoir éteint le lecteur.
Cependant, si le lecteur est en mode veille, vous pouvez continuer votre lecture en le
réveillant. Voir Opérations de base pour savoir comment passer en mode veille.
44
Spécification
Écran
Poids
Dimension
Mémoire flash
Format audio
Format vidéo
Format d'enregistrement
Batterie
Temps de chargement
Extension de la carte SD
Format des paroles
Écran TFT de 1.8 pouces
51g
41.5mm×50.5mm×12.5 mm
16GB
MP3/WAV /APE /WMA /FLAC etc
AMV /AVI
MP3/WAV
3.7 V/550 mAh
2-3 heures
Jusqu'à 128G
LRC

Toma de auriculares
Puerto USB
Pantalla táctil completa TFT de 1.8 pulgadas
Ranura para
tarjetas TF
Volumen +
Volumen -
Encendido /
Apagado
45
Reiniciar
46
1.Encendido/apagado
Mantenga presionado el botón de encendido durante 3 segundos para encender /
apagar el dispositivo. En el estado de encendido, presione brevemente el botón
"Encendido / apagado" para apagar la luz de la pantalla
2.Cargar el reproductor
Conecte el cable USB incluido al puerto USB de una computadora para cargar el
reproductor. Cuando comience a cargar, mostrará dos opciones: "Cargar y transferir"
y "Cargar y reproducir". Una indicación en la parte superior derecha mostrará la
estatua de carga.
Nota: Utilice únicamente un cargador de 5V / 500mA para cargar, de lo contrario
puede provocar una falla del producto.
3.Transferencia de datos
Conéctelo a su computadora y copie los archivos de multimedia con el cable USB
incluido como si fuera un controlador flash o use un software de administración de
música como Windows Media Player para transferir los archivos (no compatible con
iTune).
Nota: Si su computadora no puede detectar el reproductor MP3, intente actualizar su
controlador USB o use otro cable. Si aún así no funciona para usted, conecte el Servicio
al Cliente de JOLIKE para obtener ayuda adicional. (Ver portada)
4.Regreso
Mientras está en la interfaz de reproducción, presione el botón para salir.
Operación básica

47
5.Ajuste de volumen
Use el botón de control de volumen a la derecha para ajustar el volumen. Nota: Hay un
altavoz incorporado en el reproductor de MP3, el altavoz se encenderá
automáticamente cuando no se conecten auriculares.
Operación de funciones principales
1.Música
Toque "Música" en la interfaz principal para acceder a su función. Una lista relacionada
se mostrará de la siguiente manera
(Sin inserción de tarjeta TF)
(Con inserción de tarjeta TF)
6.Auriculares y altavoz
El reproductor MP3 JOLIKE solo admite auriculares con impedancia de 16Ωo 32Ω. El
altavoz incorporado se puede apagar, consulte por favor "Configuración"..
7.Reiniciar
Haga el orificio de reinicio con una aguja fina para restaurar el dispositivo a
ajustes de fábrica

48
Toque para salir.
Toque para seleccionar cada opción de la lista del menú.
Toque "en reproducción" para ingresar a la interfaz de reproducción de la canción que
se está reproduciendo de la siguiente manera.
Toque el botón para reproducir / Pausar.
Toque el botón / para comenzar a reproducir la última canción / siguiente canción.
Mantenga presionado el botón/ para rebobinar / avanzar rápidamente la canción
que se está reproduciendo actualmente.
Toque el icono del modo de reproducción (Reproducción secuencial / repito uno /
repito todo / Aleatorio + Repetir) para cambiar el modo de reproducción.
Toque el botón para ingresar al menú de configuración de reproducción y se
mostrará una lista relacionada de la siguiente manera
Volver al inicio
Repetir

49
Configuración de repetición
Configuración de sonido
Marcadores
Eliminar
Agregar a la lista de reproducción
Eliminar de la lista de reproducción
Cómo iniciar la repetición A-B?
En la interfaz de reproducción de música, toque el botón para ingresar al menú de
configuración de reproducción, luego elija "Configuración de repetición" y luego elija el
"Modo de repetición". Después de eso, verá que la letra "A" comienza a parpadear, luego
toque la letra B para confirmar el punto de inicio de la repetición (Punto A), al mismo
tiempo el punto "B" comenzará a parpadear, toque la letra B nuevamente para
confirmar el punto final (Punto B) y luego comenzará a repetir la reproducción de
música desde el punto A a B
Tiempos de repetición: establezca tiempos de repetición A-B de 1 a 10 veces.
Intervalo de repetición: establezca el intervalo de tiempo (1s a 7s) para cada repetición.
Cómo establecer la velocidad de reproducción de la música?
En la interfaz de reproducción de música, toque el botón para ingresar al menú de
configuración de reproducción de música, luego elija la opción "configuración de
sonidos" y luego elija la opción "Reproducción de velocidad variable" y luego puede
ajustar la velocidad de reproducción de música de -8- + 8
Notas
Los formatos que podrían ser compatibles con este reproductor de mp3 son los
siguientes
50
MP3: tasa de bits: 8Kbps-320Kbps, tasa de muestreo: 8MHz-48MHz;
WMA: tasa de bits: 5Kbps-384Kbps, tasa de muestreo: 8MHz-48MHz;
APE: tasa de bits: 800Kbps-1000Kbps(RÁPIDO normal comprimido),tasa de muestreo:
8MHz-48MHz;
WAV: tasa de bits: 32Kbps-384Kbps,tasa de muestreo: 8MHz-48MHz;
FLAG: tasa de bits: 1000Kbps-1200Kbps(LL0-L8),tasa de muestreo:8MHz-48MHz;
ACC-LC: tasa de bits: 8Kbps-320Kbps,tasa de muestreo: 8MHz-48MHz;
2.Película
Toque "Película" en la interfaz principal para acceder a su función (Observación:
mientras no tenga la tarjeta TF, todos los archivos de video aparecerán en el menú
Película.
Mientras el dispositivo inserta la tarjeta TF, aparecerá "Carpeta local" y "Carpeta de
tarjeta" en el menú Película)
Durante la reproducción de video
Toque el botón para reproducir / Pausar.
Toque el botón / para comenzar a reproducir el último video / Siguiente video

51
Mantenga presionado el botón / para rebobinar / avanzar rápidamente el video
que se está reproduciendo actualmente.
Toque el botón para ingresar al menú de configuración de reproducción de video.
Toque para volver
Observación
El formato de video solo admite AMV / AVI
Tamaño de resolución de video: 128 * 160
Para obtener la herramienta de conversión de video, visite nuestro sitio web
http://www.jolike.com.cn/
3.Radio de FM
Toque la "Radio FM" en la interfaz principal para acceder a su función.Una lista
relacionada se mostrará como la siguiente: Estaciones、Sintonización manual
Sintonización automática、Grabación de FM
52
Configuración de radio FM
En la interfaz de reproducción de radio FM, toque el botón para acceder al menú de
configuración de la radio FM, se mostrará una lista relacionada de la siguiente manera
Iniciar la grabación de radio FM
Guardar
Estación clara
Sintonización automática
Región del sintonizador
Grabación de FM
Cómo grabar FM?
Mientras está en la interfaz de reproducción de Radio FM, toque el botón para
acceder al menú de configuración de la radio FM y elija la opción "Iniciar grabación de
radio FM". Comenzará a grabar la radio FM.
En la interfaz de grabación de radio FM, toque el botón para suspender, toque de
nuevo para continuar. Toque el botón y aparecerá una ventana emergente "Guardar
la grabación" . Elija "Sí" para guardar la grabación de FM, elija "No" para cancelar la
grabación de FM .
Cómo seleccionar la banda de FM?
En el menú de configuración de la radio FM, toque la opción "Región del sintonizador" y
luego podrá seleccionar la banda diferente.
Banda común: 87.0 MHZ - 108 0 MHZ
Banda japonesa: 76MHZ - 90MHZ
Banda del euro: 87,0 MHZ - 108,0 MHZ

53
4.Bluetooth
Toque el "Bluetooth" en la interfaz principal para acceder a su función. Una lista
relacionada se mostrará como siguiente:
Control de encendido de Bluetooth
Buscardispositivo
Lista de dispositivos
Actualización BT
Cómo emparejar este reproductor de mp3 con altavoz Bluetooth o auriculares
Bluetooth?
1.Asegúrese de que el bluetooth de altavoz o los auriculares esté activado y abra el
modo bluetooth.
2.Encienda el modo bluetooth en el reproductor de mp3 y comience a buscar el
dispositivo bluetooth alrededor.
3.Después de encontrar el dispositivo bluetooth, elija el dispositivo bluetooth para
comenzar a emparejar con el bluetooth de altavoz o los auriculares.
Observación
1.En el modo de reproducción Bluetooth solo se admiten los siguientes formatos MP3,
WMA, WAVE, FLAC, APE. Este reproductor de mp3 no se puede emparejar con un
teléfono inteligente.
2.Conecte auriculares con cable cuando reproduzca radio FM en modo Bluetooth.
Videos, fotos, grabación, no se pueden usar durante el modo Bluetooth.
3 Si aún tiene problemas para emparejar sus auriculares o altavoz, comuníquese con
nosotros a través de nuestro servicio de atención al cliente (ver portada).
54
5.E-libro
Toque el "E-libro" en la interfaz principal para acceder a su función (Observación: si no
tiene la tarjeta TF en el dispositivo, todos los archivos del libro electrónico aparecerán
en el menú del libro electrónico, si el dispositivo inserta la tarjeta TF, tendrá una "
Carpeta local" y "Carpeta de tarjetas" que aparecen en el menú del libro electrónico)
En la interfaz de lectura de libros electrónicos, deslice el dedo hacia arriba o hacia
abajo en la pantalla para leer la página siguiente o la página anterior.
Toque el botón para iniciar el modo de cambio de página automático
Toque el botón para volver
Toque el botón para ingresar al menú de configuración del libro electrónico y se
mostrará una lista relacionada de la siguiente manera
Configuración de reproducción
Eliminar libro
Seleccionar marcador de libro

55
Eliminar marcador de libro
Añadir marcadir de libro
Seleccionar página
Tamaño de fuente
Fondo de libro
Observación: este reproductor de mp3 solo admite archivos TXT
6.Configuraciones
Toque "Configuración" en la interfaz principal para acceder a su función Una lista
relacionada se mostrará como siguiente
Idioma: hay 28 tipos de idiomas.
Configuración de pantalla
1.Brillo: toque la opción "Brillo" para acceder a la interfaz de ajuste de brillo, toque el botón
hacia arriba o hacia abajo para ajustar el brillo, toque el botón "Aceptar" para guardar l
a configuración de brillo
2.Temporizador de luz de fondo: establezca el tiempo de luz de fondo para 10s / 20s /
30s / Siempre encendido
3.Protector de pantalla: Ninguno / Reloj digital / Reloj digital 2
Configuración de apagado
1.Apagado automático: 3 min / 10 min / 30 min / apagado
2.Temporizador de sueño: apagado / configurar el tiempo de sueño de 0 a 99 minutos

56
Fecha y hora
1.Configuración de hora: Establecer formato de hora (12 horas / 24 horas) / Establecer
hora
2.Configuración de fecha: establecer formato de fecha / establecer fecha
Altavoz encendido / apagado: para encender / apagar el altavoz integrado en el
reproductor de mp3.
Información: Información (para ver la versión del software) / Espacio en disco (para ver
la tarjeta SD o la memoria interna)
Formatear dispositivo: elija esta opción de configuración para formatear el dispositivo
(Nota: después de formatear el dispositivo, todos los datos se eliminarán, asegúrese de
tener una copia de seguridad de sus archivos en el dispositivo antes de realizar la
configuración)
Configuración de fábrica: elija esta opción para realizar
7.Navegador
Toque el "Navegador" en la interfaz principal para acceder a su función
Cuando inserta una tarjeta SD en reproductor JOLIKE MP3, se mostrarán 2 nuevas
opciones en "Navegador"
Carpeta local: ver archivos en la carpeta de la tarjeta de memoria
Carpeta: Ver archivos, en la memoria de la tarjeta SD

57
El reproductor MP3 JOLIKE funciona con cualquier marca de tarjetas SD de hasta 128 GB
Si no se puede leer la tarjeta SD, primeramente asegúrese de que otro dispositivo pueda
leerla . Si cree que la tarjeta está bien, comuníquese con nosotros para obtener más
ayuda (ver portada).
(1)Crea tus propias listas de reproducción
Cuando conecta el reproductor de mp3 a la PC, puede crear carpetas en el reproductor
de mp3 o en la tarjeta SD. Estas carpetas se pueden utilizar como listas de reproducción
Si colocas algunas músicas en una carpeta y luego lo desconectas y vas al ícono
"Navegador" en MP3, solo puedes reproducir y mezclar estas músicas en la carpeta.
(2)Clasificación igual que en PC
Los amantes de los libros de audio generalmente deben asegurarse de que todos los
archivos estén en el orden que desean. Desafortunadamente, la memoria de la tarjeta
MP3 o SD se diseñó de manera diferente al almacenamiento de la PC. Por lo tanto,
necesita algún truco para ordenar los archivos de la misma manera que en la PC
Aquí están los pasos
(1), Preparar los archivos de audio y ordenarlos en la PC
(2), Seleccione todos los archivos, pero no los copie (Importante)
(3), Mover el cursor del mouse al primer archivo y copie
(4), Pegar archivos en mp3
(5), Desenchufe mp3 y vaya a "Navegador", todos los archivos se ordenarán
exactamente igual que en la PC

58
La memoria de la tarjeta MP3 y SD clasificará el archivo por tiempo de edición, el primer
archivo que se coloque se listará como el primer archivo editado. Si cambia el nombre
del archivo o hace alguna otra modificación, irá al último de la lista. Este truco solo
funciona en el ícono del "Navegador", no en el ícono de "Música". No olvide agregar un
marcador cuando use audiolibros
Soporte y solución de problema
La memoria de la tarjeta MP3 y SD clasificará el archivo por tiempo de edición, el primer
archivo que se coloque se listará como el primer archivo editado. Si cambia el nombre
del archivo o hace alguna otra modificación, irá al último de la lista. Este truco solo
funciona en el ícono del "Navegador", no en el ícono de "Música". No olvide agregar un
marcador cuando use audiolibros
Q: Cómo transferir música al reproductor de mp3?
A·Primeramente descargue música a su computadora y luego conecte el reproductor de
mp3 con su computadora a través del cable de carga. Aparecerá un nuevo disco como
controlador flash y colocará todas sus músicas en el disco. Puede crear carpetas en el
disco para ordenar su música
Q: Por qué mi computadora no puede detectar el reproductor de mp3?
A. El reproductor Mp3 JOLIKE se puede emparejar para todos los sistemas informáticos
con el último controlador USB. Actualice su controlador USB antes de conectar el
reproductor Mp3 1n o pruebe con otro cable de carga. Si aún no puede conectar el

59
reproductor MP3 JOLIKE a su computadora, comuníquese con el equipo de servicio al
cliente de JOLIKE para obtener ayuda adicional (ver portada)
Q:Cómo puedo continuar con la reproducción de audio después de apagar el
reproductor?
A: No puede continuar jugando después de apagar el reproductor.
Sin embargo, si el reproductor está en modo de suspensión, puede continuar jugando
activándolo. Consulte "Operaciones básicas" sobre cómo entrar en el modo de suspensión.

Especificación
Pantalla
Peso
Dimensión
Memoria flash
Formato de audio
Formato de audio
Formato de grabación
Batería
Tiempo de carga
Expansión de tarjeta SD
Formato de letra
Pantalla TFT de 1.8 pulgadas
51g
41.5mm×50.5mm×12.5 mm
16GB
MP3/WAV /APE /WMA /FLAC etc
AMV /AVI
MP3/WAV
3 7 V/550 mAh
2-3 horas
Hasta 128G
LRC
60
Jack per cuffie
Porta USB
Schermo TFT Full Touch da 1.8 pollici
Slot per
scheda TF
Accensione /
Spegnimento
61
Volumen +
Volumen -
Ripristina

62
1.Accensione/Spegnimento
Tenere il pulsante d‘Alimentazione per 3s per accendere/spegnere il dispositivo. Nello
stato acceso, premere sul pulsante “Accensione/Spegnimento” per spegnere lo schermo.
Operazione di base
2.Ricaricare il Lettore
Inserire il cavo USB a corredo nella porta USB del computer per ricaricare il lettore.
Quando avvii la ricarica, ci saranno due opzioni: “Ricarichi e Trasferisci” e “Ricarichi e
leggi”. Un indicatore in alto a destra presenterà lo stato di ricarica.
Nota: Usare soltanto il caricabatterie a 5V/500 mA per ricarica, altrimenti si porterà al
fallimento del prodotto.
3.Trasferimento di dati
Inserirlo nel computer e copiare i file di media con il cavo USB a corredo come se sia
un flash driver o usare il software di gestione musicale come Windows Media Player per
trasferire i file. (Non disponibile a iTune) Nota: qualora il Suo computer non rileva il
Lettore MP3, si prega di aggiornare il Suo driver USB o usare l’altro cavo. Qualora il
problema persiste, contattare l’Assistenza Clientela JOLIKE per aiuto aggiunto.
(Vede la copertina)
4.Ritorno
Dall’interfaccia di lettura, premere sul pulsante per uscire.
5.Regolazione del Volume
Usare il pulsante di Controllo del Volume a destra per regolare il volume.
Nota: c’è un altoparlante inserito nel lettore MP3, l'altoparlante ritornerà in automatico
qualora nessuna cuffia è inserita.
63
6.Cuffie ed altoparlante
Lettore MP3 JOLIKE sostiene soltanto le cuffie con impedenza di 16Ωo 32Ω.
L’altoparlanteinserito può essere spento, per cui si rimanda a “Impostazioni”.
7.Ripristina
Colpisci il foro di ripristino con un ago sottile per ripristinare il dispositivoimpostazioni
di fabbrica.
Operazione delle funzioni principali
1.Musica
Toccare la “Musica” dall’interfaccia principale per accendere alla sua funzione. Un
elenco relativo sarà presente come seguente
(Senza inserto della scheda TF)
(Con inserto della scheda TF)
Toccare nuovamente per uscire.
64
Toccare per selezionare qualsiasi opzione dall’elenco del menù.
Toccare “Leggi adesso” per accendere all’interfaccia di lettura della canzone in corso
come seguente
Toccare il pulsante per leggere/sospendere
Toccare il pulsante / per avviare la lettura dell’ultimo brano/brano prossimo
Tenere premuto il pulsante/ per portare all’indietro/ avanti rapidamente il brano
in corso
Toccare l’icona della modalità di lettura(Lettura sequenziale/Ripeti Uno/Ripeti Tutti/
Mescoli+ Ripeti) per cambiare la modalità di lettura
Toccare il pulsante per accendere al menù di impostazioni, un relativo elenco sarà
presente come seguente:
Ritorni a Home
Ripeti
Impostazioni ripetizione

65
Impostazioni suono
Etichette
Elimini
Aggiungi al playlist
Rimuovi dal playlist
Come avviare la lettura ripetitiva A-B?
Dall’interfaccia della lettura musicale, toccare il pulsante ,accendere al menu
d’impostazione della lettura, scegliere poi “Impostazioni ripetizione”e poi la“Modalità di
ripetizione”. Dopo aver visto il lampeggio della lettera “A”, toccare la lettera B per
confermare il punto iniziale della ripetizione(Punto A), nello stesso tempo il punto “B”
comincerà a lampeggiare, toccare nuovamente la lettera B per confermare il punto
finale(Punto B), si comincerà a ripetere la lettura della musica da A a B.
Volte di ripetizione: Impostare le volte di ripetizione A-B nella gamma di 1-10.
Intervallo di ripetizione: Impostare l’intervallo temporale(1-7s) per ogni lettura ripetitiva.
Come impostare la velocità di lettura musicale?
Dall’interfaccia della lettura musicale, toccare il pulsante , accendere al menù
d’impostazione della lettura musicale, poi scegliere l’opzione “Impostazione suono”e
l’opzione “Riproduzione a velocità variabile”e regolare la velocità della lettura musicale
da -8 a +8
Nota:
I formati che possono essere sostenuti da questo lettore mp3 come seguente:
MP3: Bitrate: 8Kbps-320Kbps, frequenza di campionamento: 8MHz-48MHz;
WMA: Bitrate: 5Kbps-384Kbps, frequenza di campionamento: 8MHz-48MHz;
APE: Bitrate:80Kbps-1000Kbps(VELOCE compressione normale)

66
Frequenza di campionamento: 8MHz-48MHz;
WAV: Bitrate: 32Kbps-384Kbps, frequenza di campionamento: 8MHz-48MHz;
FLAC: Bitrate: 1000Kbps-1200Kbps(L0-L8),
Frequenza di campionamento: 8MHz-48MHz
ACC-LC: Bitrate: 8Kbps-320Kbps, frequenza di campionamento: 8MHz-48MHz;
2.Film
Toccare il “Film” dall’interfaccia principale per accendere alla sua funzione.
(Nota: in assenza della scheda TF, tutti i file di video saranno elencati sul Menù del film
Quando la scheda TF è inserita nel dispositivo, ci saranno “Cartella Locale”e“Cartella
della scheda”elencate sul menù dei film).
Durante la lettura del video
Toccare il pulsante per leggere/sospendere
Toccare il pulsante per cominciare a leggere l’ultimo video/video prossimo
Tenere premuto il pulsante per portare rapidamente all’indietro/avanti il video in
corso
Toccare il pulsante per accendere al menù d’impostazione di lettura del video.
Toccare per ritornare.
67
Note
Si sostengono soltanto i formati di video AMV/AVI
Risoluzione: 128*160
Per ottenere lo strumento di conversione, per favore visitare il ns. sito:
http://www.jolike.com.cn/
3.Radio FM
Toccare “FM Radio” dall’interfaccia principale per accendere alla sua funzione.
Un relativo elenco sarà presente come seguente:
Stazioni
Sintonizzazione Manuale
Sintonizzazione Auto
Registrazione FM
Impostazione Radio FM
Dall’interfaccia di lettura del Radio FM, toccare il pulsante per accendere al menù
68
delle impostazioni del radio, un relativo elenco sarà presente come seguente:
Cominci la registrazione radio FM
Salvi
Pulisci la Stazione
Pulisci la Stazione
Sintonizzazione Auto
Area sintonizzatore
Registrazione FM
Come effettuare la registrazione FM?
Dall’interfaccia di lettura del radio FM, toccare il pulsante per accendere al menù
delle impostazioni del radio FM e scegliere l’opzione “Cominci la registrazione radio FM”,
si comincerà a registrare il radio FM.
Dall’interfaccia di registrazione del radio FM, toccare il pulsante per sospendere,
toccare nuovamente per continuare. Il tocco sul pulsante farà spuntare la finestra
di promemoria “Salvi la registrazione?”Scegliere “Sì”per salvare la registrazione FM e “No”
per eliminarla.
Come selezionare la Banda FM?
Dal menù delle impostazioni del radio FM, toccare l’opzione “Area sintonizzatore”, poi
può selezionare la diversa Banda.
Banda Comune: 87.0–108,0 MHZ
Banda giapponese: 76-90MHZ
Banda europea: 87,0-108,0MHZ

69
4.Bluetooth
Toccare “Bluetooth”dall’interfaccia principale per accendere alla funzione, un relativo
elenco sarà presente come seguente:
Controllo della commutazione Bluetooth
Ricerca del servizio
Elenco di dispositivi
Aggiornamento BT
Come associare questo lettore MP3 all’altoparlante o cuffie di Bluetooth?
1.Assicurare l’accensione dell’altoparlante o cuffie Bluetooth ed aprire la modalità BT
2.Attivare la modalità Bluetooth dal lettore mp3, e cominciare a ricercare il dispositivo
BT nelle vicinanze.
3.Dopo aver trovato il dispositivo BT, scegliere il dispositivo BT per associare
l’altoparlante o le cuffie BT.
Note:
1.La modalità di lettura BT sostiene soltanto i formati seguenti:
Mp3, WMA, WAVE, FLAC, APE. Il lettore di mp3 non si associa allo smartphone.
2.Inserire le cuffie con fili qualora si legge il radio FM nella modalità Bluetooth. I video,
le foto, le registrazioni non possono essere registrati nella modalità BT.
3 Qualora non riesce ancora ad associare le cuffie o l’altoparlante, non esitare a
contattarci mediante la ns. assistenza clientela. (Vede la copertina)
5.E-book
Toccare “E-book”dall’interfaccia principale per accendere a codesta funzione.
(Nota: in assenza della scheda TF nel dispositivo, tutti i file di ebook saranno elencati
nel relativo menù, qualora la scheda TF è inserita nel dispositivo, si elencheranno
70
“Cartella locale”e“Cartella della scheda”nel menù di ebook).
Dall’interfaccia di lettura di ebook, far scivolare in su o in giù il Suo dito sullo schermo
per leggere la pagina prossima o precedente.
Toccare il pulsante per avviare la modalità di cambio automatico della pagina.
Toccare il pulsante per ritornare
Toccare il pulsante per accendere al menù delle impostazioni di ebook, il relativo
elenco Impostazioni lettura
Elimini il libro
Selezione etichetta
Elimini l’etichetta
Aggiungi l’etichetta
Dimensione del font
Sfondo del libro
Nota: questo lettore mp3 sostiene soltanto i file TXT.

71
6.Impostazioni
Toccare l”Impostazione” dall’interfaccia principale per accendere alla relativa funzione,
un elenco relativo sarà presente come seguente:
Lingua: ci sono 28 lingue
Impostazione del display: Configuración de pantalla
1.Luminosità: toccare l’opzione “Luminosità”per accendere all’interfaccia di regolazione
della luminosità, toccare il pulsante in su o in giù per regolare la luminosità, toccare il
pulsante “OK”per salvare l’impostazione della luminosità
2.Timer controluce: impostare il timer controluce per 10s/20s/30s/Sempre acceso.
3.Salvaschermo> Nulla/Orologio Digitale/Orologio digitale 2.
Impostazione dello spegnimento:
1.Spegnimento auto: 3min/10min/30min/off
2.Timer del sonno: OFF/ imposti il timer del sonno in 0/99 min
Data ed ora:
1.Impostazioni dell’ora: imposti il formato dell’ora (12 ore/24 ore)/Imposti l’ora
2.Impostazioni della data: imposti
Altoparlante acceso/spento: accendere/spegnere l’altoparlante inserito nel lettore mp3
Informazione: Informazione (vedi la versione del software)/Spazio del disco(vedi la
scheda SD o la memoria interna)
Dispositivo di formattazione: scegliere l’opzione dell’impostazione per ripristinare
l’impostazione di fabbrica.(Nota: dopo che il dispositivo di formattazione abbia
eliminato tutti i dati, per favoreassicurare che ha riservato tutti i file nel dispositivo

72
prima di procedere alle impostazioni)
Impostazioni di fabbrica: scegliere l’opzione per ripristinare le impostazioni di fabbrica.
7.Browser
Toccare il “Browser”dall’interfaccia principale per accendere alla funzione.
Qualora inserisce una scheda SD nel lettore MP3 di JOLIKE, 2 nuove opzioni saranno
presenti nel “Browser”.
Cartella locale:visionare i file nella memoria di MP3.
Cartella della scheda: visionare i file nella memoria della scheda SD.
Il lettore MP3 di JOLIKE è compatibile con la scheda SD di qualsiasi marchio fino a 128GB.
Qualora la scheda SD non può essere letta, per favore assicurare che la scheda può
essere letta dall’altro dispositivo prima. Qualora la scheda non è ritenuta buona, per
favore contattarci per assistenza ulteriore. (Vede la copertina)
(1)Creare il Suo playlist
Qualora connette il lettore mp3 al PC, può creare le cartelle nel lettore mp3 o scheda
SD. Queste cartelle possono essere usate come Playlist. Qualora scarica alcuni brani in
una cartella, poi uscire ed andare all’icona “Browser”su MP3, può leggere e mescolare
soltanto questi brani nella cartella.
(2)Classificare nella stessa modalità su PC
I tifosi del Libro Audio necessitano di assicurare tutti i documenti nell’ordine desiderato.
Sfortunatamente, la memoria del MP3 o la scheda SD è progettata diversa dalla
conservazione del PC. Quindi ci vogliono delle tecniche per classificare i file come su PC.
Si procede come seguente:

73
(1), Preparare i file d’audio e classificarli su PC.
(2), Selezionare tutti i file senza copiare(Importante).
(3), Spostare il cursore del mouse al primo file e copiarlo.
(4), Incollare i file a mp3.
(5), Disinserire mp3 ed andare a “Browser”, tutti i file saranno classificati esattamente
come su PC.
La memoria del mp3 e della scheda Sd classificherà i file in base al tempo di modifica,
il primo file inserito sarà elencato come primo. Qualora cambi il nome del file od
apporre altre modifiche, il file sarà l’ultimo nell’elenco.
Questa tecnica si applica soltanto all’icona di “Browser”, ma non alla “Musica”.
Non dimenticare di aggiungere un’etichetta qualora usa il libro audio.
Sostegno e risoluzione delle problematiche
Q: Come Trasferire il brano al lettore mp3?
R: Scaricare il brano al computer prima, poi connettere il lettore mp3 al computer
mediante il cavo di ricarica. Un nuovo disco spunterà come flash driver ed inserirà tutti
i suoi brani al disco.
Può creare le cartelle nel disco per classificare i Suoi brani.
Q: Perché il mio computer non rileva il lettore mp3?
A: Lettore Mp3 JOLIKE può essere associato con tutti i sistemi del computer con l’ultimo
driver USB. Per favore aggiornare il Suo driver USB prima di inserire il lettore Mp3 o
provare l’altro cavo di ricarica. Qualora non può connettere il lettore Mp3 JOLIKE al Suo
computer, per favore contattare il team d’assistenza clientela JOLIKE per assistenza
ulteriore (Vede la copertina).
74
Q: Come posso proseguire la lettura d’audio dopo aver spento il lettore?
A: Non può proseguire la lettura dopo aver spento il lettore. Tuttavia, qualora il lettore è
nella modalità di sonno, può farla mediante la sveglia. Per il modo di accendere alla
modalità del sonno, si rimanda al “Operazioni di base”.
Especificación
Schermo
Peso
Dimensione
Memoria Flash
Formato d’Audio
Formato di Video
Formato di registrazione
Batteria
Durata di ricarica
Espansione della scheda SD
Formato lirico
Schermo TFT a 1.8 pollici
51g
41.5mm×50.5mm×12.5mm
16GB
MP3/WAV/APR/WMA/FLAC ecc.
AMV/AVI
MP3/WAV
3,7V/550 mAh
2/3 ore
Fino a 128 G
LRC
ヘッドフォンジャック
USBポート
1.8インチTFTフルタッチスクリーン
Tfカードスロット
⾳量+
⾳量-
電源ON/OFF
75
リセット
基本操作
1.電源ON/OFF
電源ボタンを3秒間押し続けて、デバイスをON/OFFにします。電源が⼊った状態で、「電源ON/OFF」ボタ
ンを短く押すと画⾯をオフにします。
2.プレーヤーの充電⽅法
付属のUSBケーブルをコンピューターのUSBポートに接続して、プレーヤーを充電します。充電を開始す
ると、2つのオプションが表⽰されます:「充電&転送」と「充電&再⽣」。右上の表⽰は充電状態を⽰します。
注意:5V/500mA充電器のみを使⽤してください。ほかの仕様の製品の故障につながる可能性があります。
3.データー転送
コンピューターに接続し、フラッシュドライバーのように、付属のUSBケーブルでメディアファイルをコピー
するか、またはWindowsMediaPlayerなどの⾳楽管理ソフトウェアでファイルを転送します(iTunes
をサポートしません)。
注意:コンピューターがMP3プレーヤーを検出できない場合は、USBドライバーを更新するか、または別の
ケーブルを使⽤してください。それでも使えない場合、JOLIKEカスタマーサービスまでお問い合わせくだ
さい。([email protected]om)
4.戻る
再⽣インターフェイスで、ボタンを押して終了します。
5.⾳量調整
右側の⾳量制御ボタンで⾳量を調整します。注意:MP3プレーヤーには内蔵スピーカーがあり、イヤホン
が接続されていないときにスピーカーが⾃動的にオンになります。
6.ヘッドフォンとスピーカー
76
JOLIKEMP3プレーヤーは、インピーダンス16Ωまたは32Ωのヘッドフォンのみをサポートします。内蔵スピ
ーカーはオフにすることはできます。「設定」を参照してください。
7.リセット
デバイスを出荷時の設定に戻すには、細い針でリセット⽳を突きます。
メイン機能の操作
1.⾳楽
メインインターフェイスの「⾳楽」ボタンをタッチして、この機能を使⽤します。関連するリストは以下の通り
です:
(Tfカード挿⼊なし) (Tfカード挿⼊済み)
を押して終了します。
を押してメニューリストから関連するオプションを選択します。
次のように、「再⽣中」をタッチして、再⽣中の曲の再⽣インターフェイスに⼊ります。
ボタンをタッチして再⽣/⼀時停⽌します。
77
ボタンをタッチして、最後の曲/次の曲の再⽣を開始します。
ボタンを⻑押しすると、再⽣中の曲を巻き戻し/早送りします。
再⽣モードアイコン(シーケンシャル再⽣/1回リピート/全曲リピート/シャッフル+リピート)をタッチして、
再⽣モードを切り替えます。
ボタンをタップして、⾳楽設定インターフェイスに⼊ると、関連リストが次の通りです:
ホームに戻る
リピート再⽣
リピート再⽣設定
⾳声設定
ブックマーク
削除
再⽣リストに追加
再⽣リストから削除
A-Bリピートをどのように開始しますか?
⾳楽再⽣インターフェースで、ボタンを押して、再⽣設定メニューに⼊り、「リピート設定」を選択してか
78

ら「リピートモード」を選択します。
⽂字「A」が点滅し始めると、⽂字Bをタッチしてリピートの開始ポイント(ポイントA)を確認します。同時に
ポイント「B」が点滅し始め、もう⼀度⽂字Bをタッチして終了ポイント(ポイントB)を確認します。こうする
ことで、ポイントAからBまで⾳楽再⽣が開始されます。
再⽣回数:A-Bリピートの再⽣回数を1〜10回に設定することはできます。
再⽣区間:リピート再⽣毎に時間区間(1秒-7秒)を設定します。
⾳楽の再⽣スピードをどのように設定しますか?
⾳楽再⽣インターフェースで、ボタンをタッチして、⾳楽再⽣設定メニューに⼊り、「⾳声設定」を選択し、
次に「変速再⽣」を選択します。⾳楽の再⽣速度を-8〜+8から調整できます。
注意:
本製品はサポートしているフォーマットが以下のとおりです:
MP3:ビットレート:8Kbps〜320Kbps、サンプリングレート:8MHz〜48MHz
WMA:ビットレート:5Kbps〜384Kbps、サンプリングレート:8MHz〜48MHz
APE:ビットレート:800Kbps〜1000Kbps(FAST通常圧縮)、サンプリングレート:8MHz〜48MHz
WAV:ビットレート:32Kbps〜384Kbps、サンプリングレート:8MHz〜48MHz
FLAC:ビットレート:1000Kbps〜1200Kbps(L0〜L8)、サンプリングレート:8MHz〜48MHz
ACC-LC:ビットレート:8Kbps〜320Kbps、サンプリングレート:8MHz〜48MHz
2.動画
メインインターフェイスの「動画」ボタンをタッチして、この機能を使⽤します。(注意:TFカードがない場合、
すべてのビデオファイルは「動画」メニューに表⽰されます。
デバイスにTFカードが差し込まれる場合、「動画」メニューに「ローカルフォルダ」と「カードフォルダ」が表
⽰されます)。
79

動画の再⽣中、
ボタンをタッチして再⽣/⼀時停⽌します。
ボタンをタッチして、最後の動画/次の動画を再⽣します。
ボタンを⻑押しすると、再⽣中のビデオを巻き戻し/早送りします。
ボタンをタッチすると、ビデオ再⽣の設定メニューに⼊ります。
をタッチして戻ります。
注意:
動画のフォーマットはAMV/AVIのみの(動画解像度:128*160)をサポートします。
動画変換ツールについては、当社のウェブサイトにアクセスしてください:http://www.jolike.com.cn
3.FMラジオ
メインインターフェイスの「FMラジオ」ボタンをタッチして、この機能を使⽤します。関連するリストは以下の
通りです:
ラジオ局
⼿動調整
⾃動調整
FM録⾳
80
Fmラジオ設定
FMラジオ再⽣インターフェイスで、ボタンをタッチしてFMラジオ設定メニューに⼊ります。関連リストが
次の通りです:
FMラジオ録⾳を開始
保存
ラジオ局を削除
⾃動調整
周波数範囲
Fm録⾳
FM録⾳をどのように⾏いますか?
FMラジオ再⽣インターフェイスで、 ボタンをタッチしてFMラジオ設定メニューに⼊り、「FMラジオの録⾳
を開始」オプションを選択すると、FMラジオの録⾳が開始されます。
FMラジオの録⾳インターフェイスでボタンをタッチすると⼀時停⽌し、もう⼀度タッチすると続⾏します。
ボタンをタッチすると、「録⾳を保存しますか?」というプロンプトウィンドウがポップアップします。
FM録⾳を保存するには「はい」を選択し、「いいえ」を選択するとFM録⾳をキャンセルします。
81

FM帯域をどのように選択しますか?
FMラジオ設定メニューで、「周波数範囲」をタッチすると、異なる帯域を選択できます。
共通帯域:87.0MHZ〜108.0MHZ⽇本帯域76MHZ〜90MHZ
欧州帯域:87.0MHZ〜108.0MHZ
4.Bluetooth
メインインターフェイスの「Bluetooth」ボタンをタッチして、この機能を使⽤します。関連するリストは以下
の通りです:
Bluetoothスイッチコントロール
デバイスの検索
デバイスリスト
BTアップグレード
mp3プレーヤーをBluetoothスピーカーまたはBluetoothヘッドセットとペアリングする⽅法は?
1.BluetoothスピーカーまたはBluetoothヘッドセットの電源がONであり、BluetoothモードがONになっ
ていることを確認します。
2.MP3プレーヤーでBluetoothモードをオンにすると、周囲のBluetoothデバイスの検索を開始します。
3.Bluetoothデバイスを⾒つけたら、Bluetoothデバイスを選択して、Bluetoothスピーカーまたは
Bluetoothヘッドセットとのペアリングを開始します。
注意:
1.Bluetooth再⽣モードでは、次の形式のみがサポートされます:Mp3、WMA、WAVE、FLAC、APE。mp3プ
レーヤーはスマートフォンとペアリングできません。
2.BluetoothモードでFMラジオを再⽣するときは、有線ヘッドフォンを接続します。ビデオ、写真、録⾳は、
Bluetoothモードでは使⽤できません。
3.また、ヘッドフォンまたはスピーカーとペアリングできない場合は、カスタマーサービスまでご連絡くださ
い([email protected])。
82
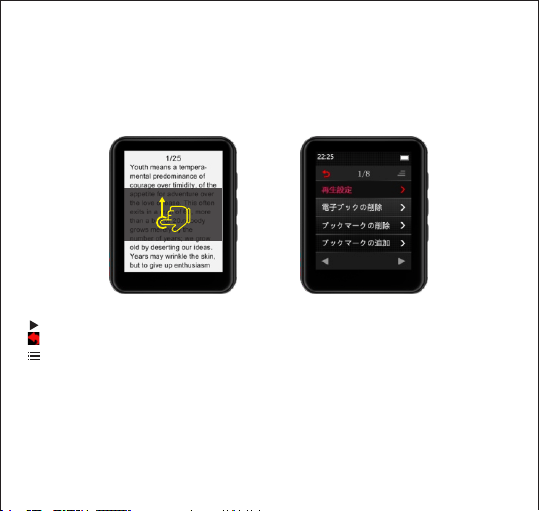
5.電⼦ブック
メインインターフェイスの「電⼦ブック」ボタンをタッチして、この機能を使⽤します。(注意:デバイスにTFカ
ードがない場合、すべての電⼦ブックファイルが電⼦ブックメニューに表⽰されます。デバイスにTFカード
が差し込まれると、電⼦ブックメニューに「ローカルフォルダ」と「カードフォルダ」が表⽰されます)。電⼦ブ
ックの読み取りインターフェイスで、画⾯を指で上または下にスワイプして、次のページまたは前のページ
を読みます。
ボタンをタッチすると⾃動ページめくりモードが開始します。
ボタンをタッチすると戻ります。
ボタンをタップして、電⼦ブック設定メニューに⼊ると、関連リストが次の通りです:
再⽣設定
電⼦ブックの削除
ブックマークの削除
ブックマークの追加
ページの選択
フォントサイズの選択
電⼦ブックの背景
83

注意:このmp3プレーヤーはTXTファイルのみをサポートします。
6.設定
メインインターフェイスの「設定」ボタンをタッチして、この機能を使⽤します。関連するリストは以下の通り
です:
⾔語:28種類の⾔語から選択できます
表⽰設定:
1.輝度:「輝度」をタッチして輝度調整インターフェイスに⼊り、ボタンを上下にタッチして輝度を調整し、
「OK」ボタンをタッチして輝度設定を保存します。
2.バックライトタイマー:バックライトタイマーを10s/20s/30s/常時ONに設定します。
3.スクリーンセーバー:なし/デジタル時計/デジタル時計2。
シャットダウン設定:
1.⾃動シャットダウン:3分/10分/30分/オフ
2.スリープタイマー:OFF/スリープタイマーを0〜99分に設定します
⽇付と時間:
1.時間設定:時間フォーマットを設定(12時間制/24時間制)/時間設定
2.⽇付設定:⽇付のフォーマットを設定/⽇付を設定
スピーカーON/OFF:mp3プレーヤーに内蔵されているスピーカーをオン/オフにします
情報:情報(ソフトウェアバージョンをチェックする)/空き容量(SDカードまたは内部メモリをチェックする)
デバイスのフォーマット:デバイスをフォーマットするには、この設定オプションを選択します。(注意:デバ
イスのフォーマット後、すべてのデータが削除されます。これを⾏う前に、デバイスにファイルをバックアップ
したことを確認してください)
84

⼯場出荷時設定:⼯場出荷時設定に戻すには、このオプションを選択します。
7.ブラウザー
メインインターフェイスの「ブラウザー」ボタンをタッチして、この機能を
使⽤します。
SDカードをJOLIKEMP3プレーヤーに挿⼊すると、「ブラウザー」に2つの新しいオプションが表⽰されます。
ローカルフォルダー:MP3のメモリカードでファイルをチェックします。カードフォルダー:SDカードメモリの
中のファイルをチェックします。
JOLIKEMP3プレーヤーは、最⼤128GBのSDカードをサポートします。SDカードを読み取れない場合は、
まず他のデバイスでカードを読み取れることを確認してください。カードに問題がないと思われる場合は、
弊社までご連絡ください([email protected])。
(1)個⼈再⽣リストを作成
mp3プレーヤーをPCに接続すると、mp3プレーヤーまたはSDカードにフォルダーを作成できます。これら
のフォルダーは再⽣リストとして使⽤できます。
⼀部の⾳楽を1つのフォルダーにドロップしてから取り外し、MP3の「ブラウザー」アイコンをタッチすると、
フォルダー内のこれらの⾳楽のみを再⽣・シャッフルできます。
2)PCと同じように仕分け
オーディオブック愛好家は通常、すべてのファイルが希望の順序で並べ替えます。残念ながら、MP3または
SDカードのメモリはPCのストレージとは異なる設計になっています。したがって、PCと同じようにファイル
を分類するためのいくつかの⼿順が必要です。
⼿順は以下の通りです:
1、オーディオファイルを準備して、PCで分類します。
85

2、すべてのファイルを選択しますが、コピーしないでください(重要)。
3、マウスカーソルを最初のファイルに移動し、コピーします。
4、ファイルをmp3に貼り付けます。
5、mp3を取り外して「ブラウザー」に⼊ると、すべてのファイルがPCと同じように並べ替えられます。
MP3とSDカードのメモリでは、編集時間でファイルをソートし、最初にドロップされたファイルが⼀番⽬の
編集ファイルとしてリストされます。ファイル名を変更したり、その他の変更を加えたりすると、リストの最後
に移動します。
このトリックは「ブラウザー」アイコンでのみ機能し、「⾳楽」アイコンでは機能しません。オーディオブックを
使⽤するときは、ブックマークを追加することを忘れないでください。
サートとトラブルシューティング
Q:MP3プレーヤーに⾳楽をどのように転送しますか?
A:まずコンピューターに⾳楽をダウンロードし、充電ケーブルを介してmp3プレーヤーをコンピューター
に接続します。新しいディスクがフラッシュドライバーとして表⽰され、すべての⾳楽をディスクにドロップ
できます。ディスクにフォルダーを作成して、⾳楽を並べ替えることができます。
Q:コンピューターがMP3プレーヤーを検出できないのはなぜですか?
A:JOLIKEMp3プレーヤーは、最新のUSBドライバーを備えたすべてのコンピューターシステムとペアリン
グできます。Mp3プレーヤーを接続する前にUSBドライバーを更新するか、または別の充電ケーブルを試
してください。それでもJOLIKEMp3プレーヤーをコンピューターに接続できない場合は、JOLIKEカスタ
マーサービスチームまでお問い合わせください(表紙に⽰しています)。
Q:プレーヤーをオフにした後、どのようにオーディオ再⽣を継続しますか?
A:プレーヤーの電源を切った後は、再⽣を続けることができません。ただし、プレーヤーがスリープモード
になっている場合は、スリープ状態を解除して再⽣を続けることができます。スリープモードに切り替え
るには、「基本操作」を参照してください。
86
画⾯
本体重量
⼨法
フラッシュメモリ
オーディオのフォーマット
ビデオのフォーマット
録⾳フォーマット
電池
充電時間
SDカード拡張
歌詞フォーマット
製品仕様
1.8インチ128x160LCD画⾯
51g
41.5*50.5*12.5mm
16GB
MP3/WAV/APE/WMA/FLACなど
AMV/AVI
MP3/WAV
3.7V/550mAh
2〜3時間
最⼤128G
LRC
87

Address: A306 Room Building B, Western Silicon Valley
BaoanDistrict, Shenzhen City, China
Company: Shenzhen Yunjiang Shi Ji Technology CO.,LTD

