Frigidaire
Laundry Center
Record in the space provided below the Model No. and Serial No. of this
appliance__._T__he3___nu_m__be_rs_ar_e_foNod_oath.e_serial_plate_lctc ated_on inside_o f the
dryer door.
Model No.
Serial No.
Retain these numbers for future reference.
IMPORTANT: Keep a copy of your bill of sale. The date on the bill
establishes the warranty period should service be required. If service is per-
formed, it is in your best interest to obtain and keep all receipts.
PLEASE DO THIS NOW[
The self-addressed PRODUCT REGISTRATION CARD should be filled in
completely, signed, and returned.
i
i This information will register your product and help us to serve you quickly in
the future if necessary.
_i!ii_iiiSiii
Important Safety Instructions ...................................................................... 3-4
Washer Operating Steps ................................................................................ 5-6
Washer Cycle Selection ............................................................................... 6-8
Washer Features ......................................................................................... 9-10
Dryer Operating Steps .................................................................................... 11
Dryer Cycle Selection .............................................................................. 12-13
Dryer Control Settings Chart ................................................................... 14-15
Care and Cleaning .................................................................................... 16-17
Avoid Service Checklist .......................................................................... 18-24
If You Need Service ...................................................................................... 25
Warranty ........................................................................................................ 28
This Owner's Guide provides specific operating instructions for your model.
Use the Laundry Center only as instructed in this Owner's Guide and the Total
Laundry Care book included with your Laundry Center.
FOR YOUR SAFETY
If you smell gas:
1. Open the windows.
2. Don't touch electrical switches.
3. Extinguish any open flames.
4. Immediately call your gas supplier.
FOR YOUR SAFETY
Do not store or use gasoline or other flammable vapors mad
liquids in the vicinity of this or any other appliance.
O 1989 White Consolidated Industries, Inc.
All rights reserved. 2
Read all instructions before using this Laundry Center.
[_kWARNING[ To reduce the risk of fire, electric shock, or injury to persons when
using your washer and dryer, follow basic precautions, including the following:
Prevent Fire
I_kWARNINGIDo not wash or dry articles that have been previously cleaned in,
soaked in, or spotted with gasoline, cleaning solvents, kerosene, cooking oils,
waxes, etc. These substances give off vapors that could ignite or explode.
Do not add gasoline, cleaning solvents, or other flammable or
explosive substances to the wash water. These substances give off vapors that
could ignite or explode.
I_kWARNINGITo prevent fire, do not use heat to dry articles containing plastic,
foam rubber or similarly textured rubber-like materials or pillows and clothing
with feathers/down. Use the AIR FLUFF (no heat) setting only.
IAWARNINGIUnder certain conditions, hydrogen gas may be produced in a hot
water system that has not been used for 2 weeks or more. HYDROGEN GAS
IS EXPLOSIVE. If the hot water system has not been used for such a period,
before using the washer, turn on all hot water faucets and let the water flow from
each for several minutes. This will release any accumulated hydrogen gas. As
the gas is flammable, do not smoke or use an open flame during this time.
[_kWARNINGI Clean lint screen before or after each load. The interior of the
machine, lint screen housing and exhaust duct should be cleaned approximately
every 18 months by qualified service personnel. An excessive amount of lint
build-up in these areas could result in inefficient drying and possible fire. See
the "Care and Cleaning" section in this manual.
[_WARNINGIKeep area around the exhaust opening and adjacent surrounding
areas free from the accumulation of lint, dust and dirt.
[_kWARNING[ Fluorocarbon aerosol spray fabric softeners are not recommended
for use in this dryer. Damage resulting from use of this type of softener can be
considered as misuse of the dryer.
[] Failure to comply with these warnings could result in fire, explosion,
serious bodily injury and/or damage to the rubber or plastic parts of the washer
or dryer.
Protect Children
[_kWARNINGIDOnot allow children to play on or in the Laundry Center. Close
supervision of children is necessary when the Laundry Center is used near
children. As children grow, teach them the proper, safe use of all appliances.
I_,WARNING!Destroy the carton, plastic bags and metal band after Laundry
Center is unpacked. Children might use them for play. Cartons covered with
rugs, bedspreads or plastic sheets can become airtight chambers.
I_kWARNING[Keep laundry products out of children's reach. To prevent personal
injury, observe all warnings on product labels.
INSTRUCTIONS : i
i¸ , .
electric shock. Do not use an
adapter plug, extension cord or
remove grounding prong from
power supply cord.
................................................................ i
iMPORTANT
SAFETY
iNSTRUCTiONS
(continUed)
i
FOR YOUR SAFETY
Do not obstruct the flow
ventilating air from the dryer.
!/ii
_i_;_i
NOTE: The instructions ap-
pearing in this Owner's Guide
and Total Laundry Care book
are not meant to cover every
possible condition and situation
that may occur. Common sense
and caution must be practiced
when installing, operating and
maintaining any appliance.
[,/IWARNINGI Before the Laundry Center is removed from service or discarded, re-
mo_v_e_theJickto_thec_zashing_and_dL-y_ing_com__partments to _prevent accidental
entrapment.
[] Failure to comply with these warnings could result in serious personal
injuries.
Prevent Injury
[,_II_WARNING!The Laundry Center must be installed and electrically grounded in
accordance with local codes by a qualified service person to prevent shock
hazard and assure stability during operation. Installation instructions are
packed in the Laundry Center for installer's reference. Refer to INSTALLA-
TION INSTRUCTIONS for detailed grounding procedures. If the appliance
is moved to a new location, have the Laundry Center checked and reinstalled by
a qualified service person.
[_WARNINGI To prevent personal injury or damage to the Laundry Center, the
electrical cord of a gas dryer nmst be plugged into a properly grounded mad
polarized 3-prong outlet. The third grounding prong must never be re-
moved. Never ground the dryer to agas pipe. Do not use an extension cord.
[I_WARNING] Follow package directions when using laundry products° IncolTect
usage cma produce poisonous gas - resulting in serious injury or death.
o Do not combine laundry products for use in one load unless specified on the
labe!.
DO NOT mix chlorine bleach with ammonia or acids such as vinegar.
[_WARNING I To prevent injury and damage to the Laundry Center:
oDo not repair or replace any part of the washer or dryer or attempt any servicing
unless specifically recommended in this Owner's Guide. Use only authorized
WCI Parts.
• Do not tmnper with controls.
•Do not install or store this Laundry Center where it will be exposed to the
weather.
[,I_WARNING] ALWAYS disconnect the Laundry Center from the electrical sup-
ply before attempting may service or cleaning. Failure to do so can result in
electrical shock or injury.
I_I,WARNING] To prevent injury, never reach into the washer while parts are
moving. Before loading, unloading or adding items, push in the timer knob and
allow the tub to coast to a complete stop before reaching inside.
[_I_WARNINGI To prevent injury, do not reach into the dryer if the drum is moving.
Wait until the machine has stopped completely before reaching into the drum.
[] Failure to comply with these warnings could result in serious personal
injuries.
SAVE THESE INSTRUCTIONS
I_[kWARNING[ To reduce the risk of fire, electric shock, or injury to persons, read
the IMPORTANT SAFETY INSTRUCTIONS before operating this appliance.
For detailed information on laundry preparation, sorting, factors affecting per-
formance and laundry products, see the Total Laundry Care (TLC) book.
-- Washer
Operating Steps
1. Prepare laundry according to directions in Total Laundry Care book.
2. Estimate the size of the wash load.
.
.
Add measured detergent to empty tub. Accurately measure detergent
before adding it to the washer. For best results, follow package directions.
If the water is hard or the load is heavily soiled or larger than usua!, more
detergent may be needed. If the water is soft or the load is lightly soiled or
smaller than usual, less detergent may be needed.
If excess sudsing occurs when using the suggested amount of detergent,
change to a low-sudsing detergent. Excess suds are not necessary to get
clothes clean and can hamper wash action.
Add liquid bleach, if desired, to the wash tub as directed in the section,
"Bleach Dispenser".
5. If desired, add fabric softener. See instructions for "Fabric Softener
.
Dispenser."
When adding fabric softener or[
bleach, carefully follow the[
manufacturer's directions. Also[ i:_
read the "Laundry Aids" section [::i_
in the Total Laundry Care book. [:_i
ii!!!ii :
Load elothes loosely. Dry load level should be no higher than the top 'i:! _: . " i=::i
row of circular holes in the wash tub. Do not load articles on top of the _........ .:, :: .... ..... : _= ': '_
agitator or wind them around it. For best results, mix large items with small _..... :.......... ......... •=:::
ones. When washing a single heavy item, such as a shag rug or bedspread,
add one or two smaller articles to balance the load. Large items should be
no more than half the total load.
.Set the controls. Choose the control settings according to the type of load
and the amount of soil. Refer to the Control Settings Chart for suggested
cycles, wash times and water temperatures.
• Water Temperature Control - Press the water temperature control
button to select the desired wash/rinse tempeature.
• Water Level Control - For best economy and washing results, set the
water level control according to the size of the load.
.Push in timer knob and turn clockwise to the desired wash cycle
and wash time. For best washing results, follow the fabric care labels in
clothes for washing instructions. If in doubt, check the "Cycle Selection
Guide" and the Total Laundry Care book for suggested wash cycle and
time. See "Cycle Selection" for wash cycle descriptions.
i_ • 8.
Washer =
Operating Steps
(continued) _: ;i
i
i
[_.CAUTION I To prevent injury,
never reach into the washer while
in operation. Before loading,
unloading or adding items, push
in the timer knob. Wait until the
machine has stopped completely
before opening the lid.
.
Start the washer by closing the lid firmly and pulling out timer knob. The
_asher _willoperate__ith the_do_or_open,ho_e_v_er,_it 7¢il1not goJnto_ the spin_
:ycle unless the lid is closed. To stop the washer, push in timer knob. To
change the cycle, push in timer knob and turn it clockwise to the desired
function.
Remove clothes when the cycle is completed. SAFETY LID LOCK: As
a safety measure, the lid will AUTOMATICALLY LOCK during the spin
portion of each cycle. The lid will unlock approximately 1 minute after the
end of the spin cycle.
To open the lid during the spin cycle, push in the timer kalob and wait
for the lid lock to release.
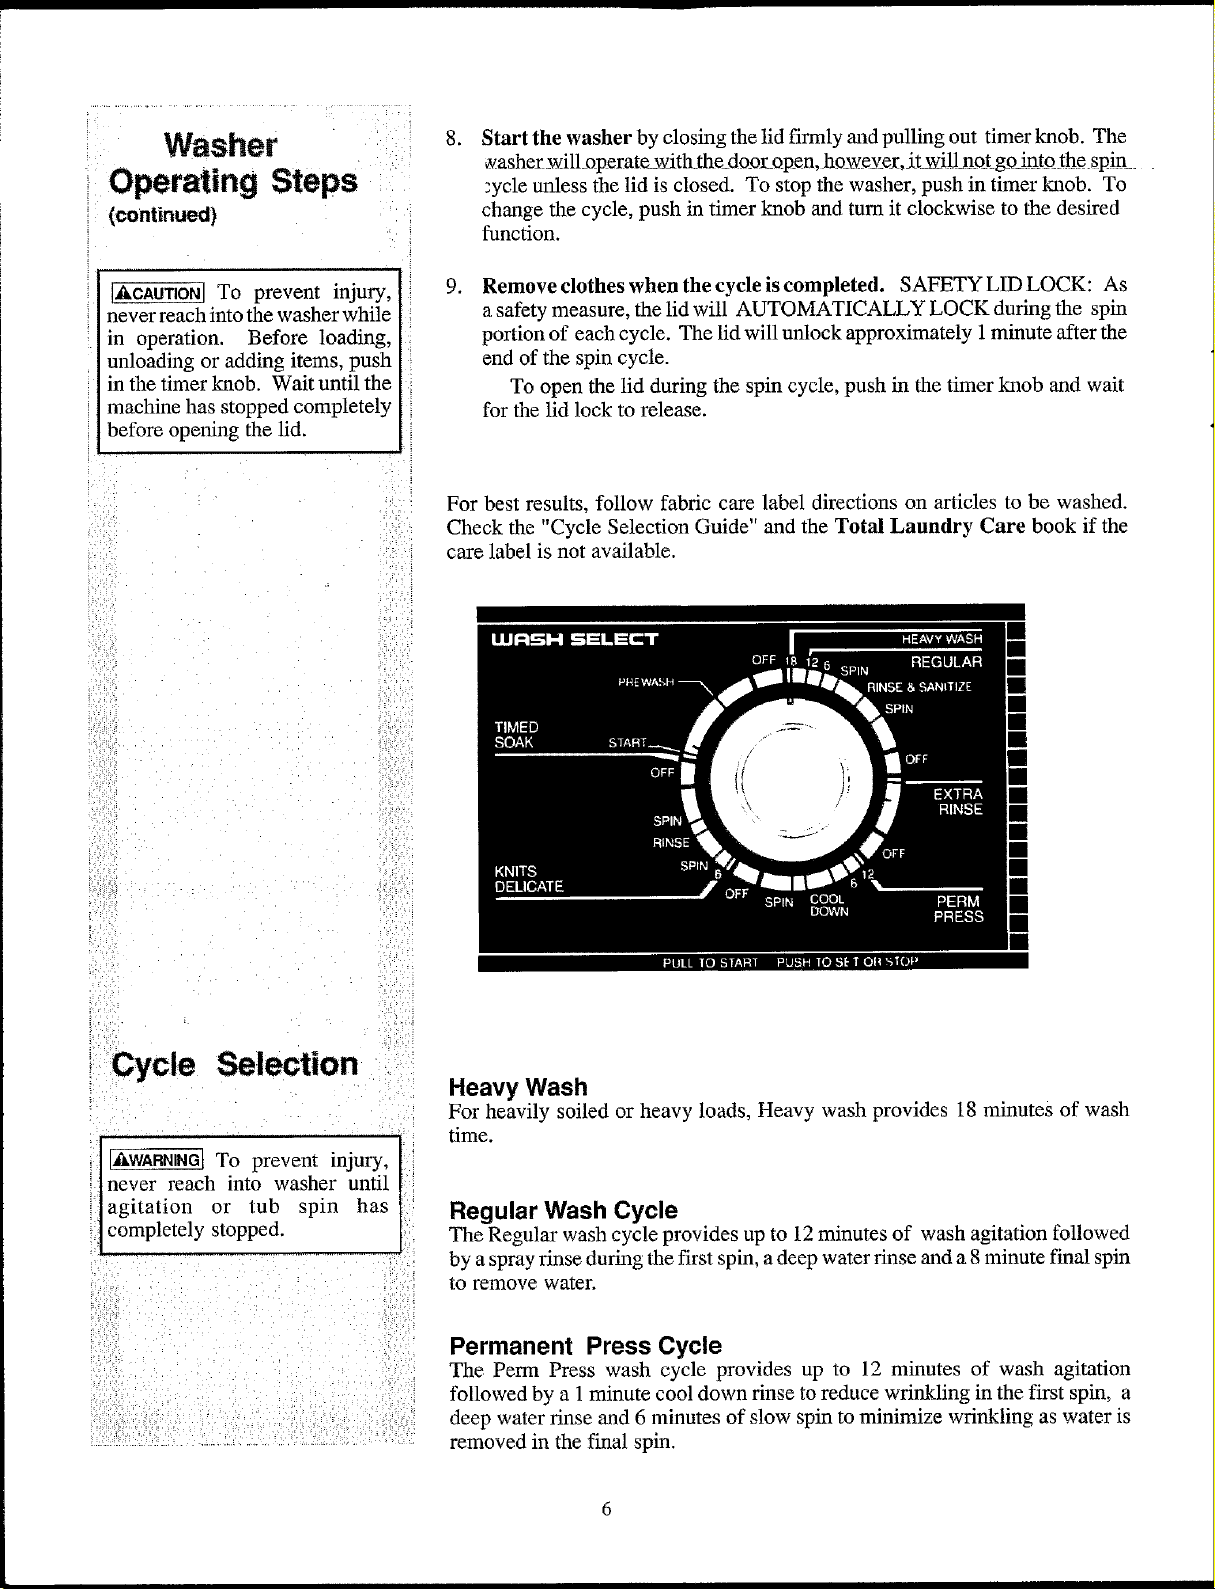
For best results, follow fabric care label directions on articles to be washed.
Check the "Cycle Selection Guide" and the Total Laundry Care book if the
care label is not available.
Selection
Topreventinjury,11
[never reach into washer until [;
]agitation or tub spin has [!
I completely stopped. [
I|] qll[i]_'_lf,* :: _ - _ _ _-_7-:'_II |el iii,iiii
Heavy Wash
For heavily soiled or heavy loads, Heavy wash provides 18 minutes of wash
time.
Regular Wash Cycle
The Regular wash cycle provides up to 12 minutes of wash agitation followed
by a spray rinse during the first spin, a deep water rinse mada 8 minute final spin
to remove water.
Permanent Press Cycle
The Perm Press wash cycle provides up to 12 minutes of wash agitation
followed by a 1 minute cool down rinse to reduce wrinkling in the first spin, a
deep water rinse and 6 minutes of slow spin to minimize wrinkling as water is
removed in the final spin.
Knits/Delicates Cycle
The Knits/Delicates wash cycle provides six minutes of slow agitation for the
genre care of delicate articles. There is a spray rinse during the first spin,
followed by a deep water rinse and six minutes of slow spin to minimize
wrinkling as water is removed in the final spin.
Sanitize
During periods of family illness, you may wish to santize your washer. The
Sanitize cycle provides an extra rinse and spin to help in preventing spread of
germs. For more information, refer to the "Sanitizing Laundl3," section in the
Total Laundry Care book.
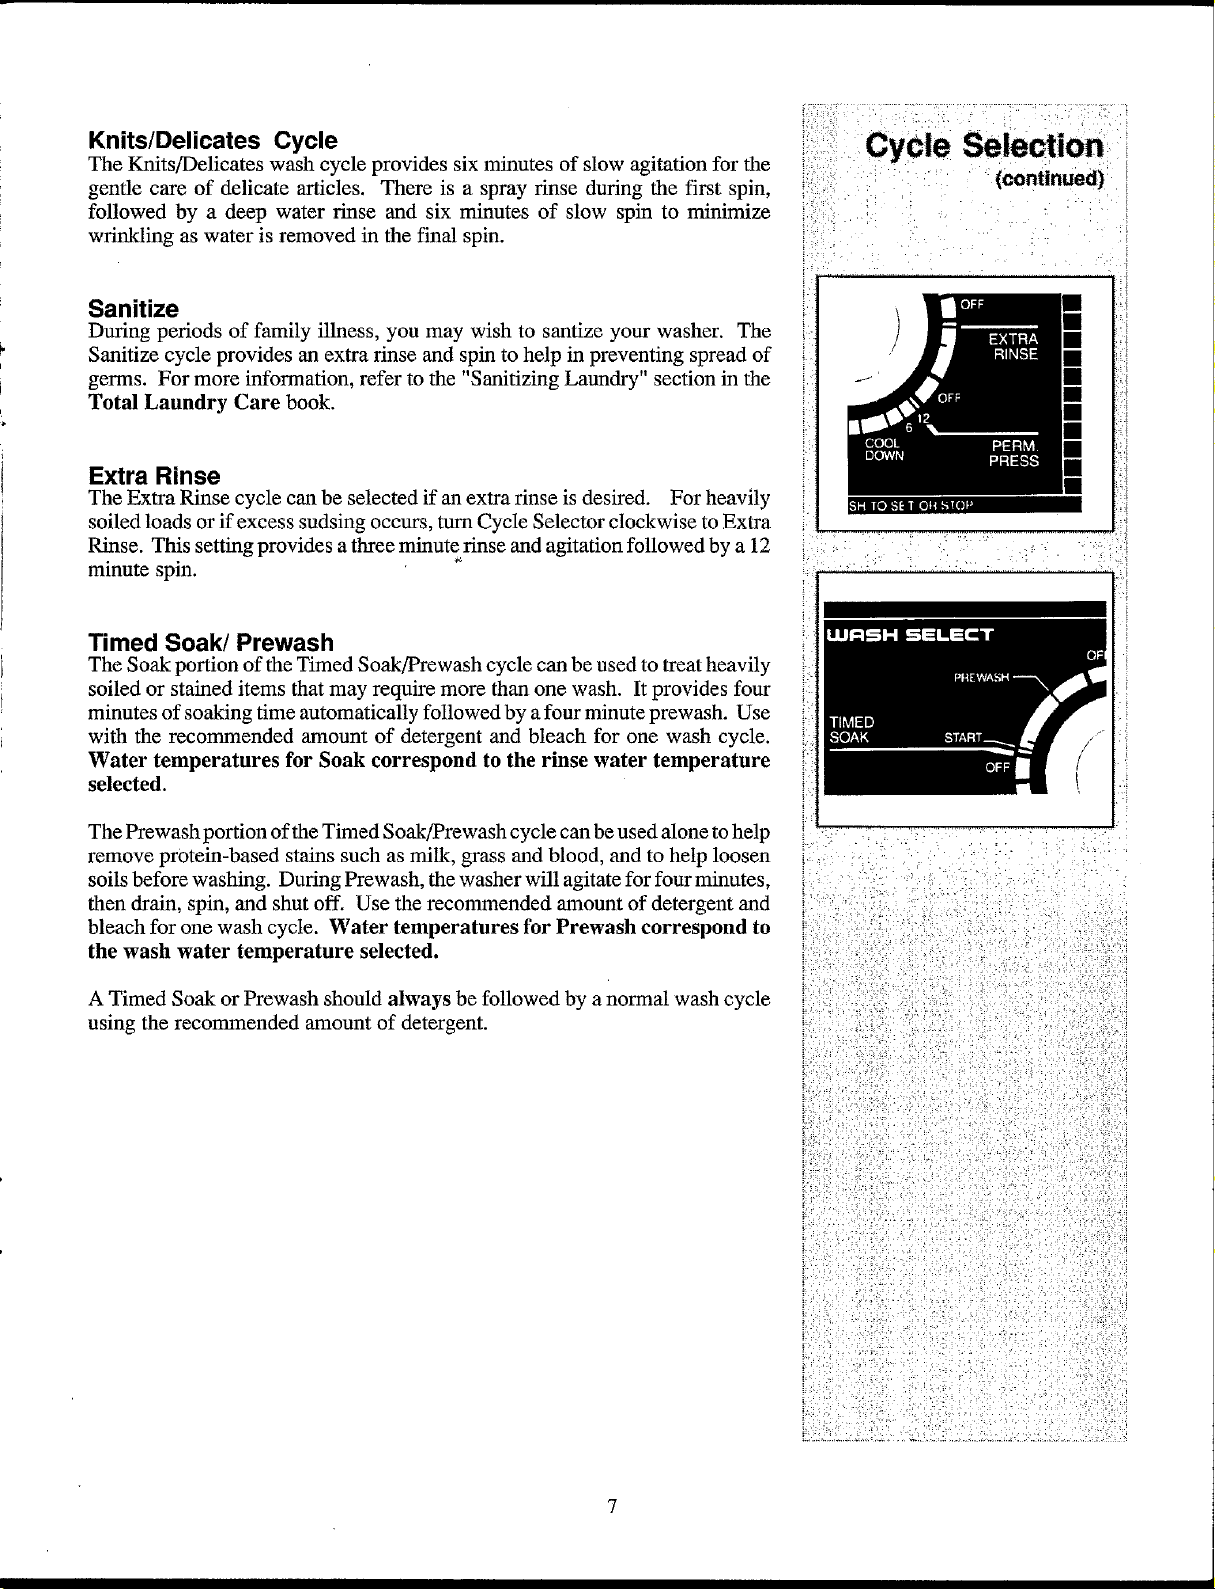
Extra Rinse
The Extra Rinse cycle can be selected if an extra rinse is desired. For heavily
soiled loads or if excess sudsing occurs, turn Cycle Selector clockwise to Extra
Rinse. This setting provides a three minuterinse and agitation followed by a 12
minute spin.
Timed Soak/Prewash
The Soak portion of the Timed Soak/Prewash cycle can be used to treat heavily
soiled or stained items that may require more than one wash. It provides four
minutes of soaking time automatically followed by a four minute prewash. Use
with the recommended amount of detergent and bleach for one wash cycle.
Water temperatures for Soak correspond to the rinse water temperature
selected.
The Prewash portion of the Timed Soak/Prewash cycle can be used alone to help
remove protein-based stains such as milk, grass and blood, and to help loosen
soils before washing. During Prewash, the washer will agitate for four minutes,
then drain, spin, and shut off. Use the recommended amount of detergent and
bleach for one wash cycle. Water temperatures for Prewash correspond to
the wash water temperature selected.
A Timed Soak or Prewash should always be followed by anormal wash cycle
using the recommended amount of detergent. +..
i•:• ++,-i:-::i:: "_•:•2.• : .... °.:
i-
i _ _,- • _ -'L- + " " q +" "• + "
i iiii!!,
!,: +
+
..... • •+: ,:
Cycle Selection
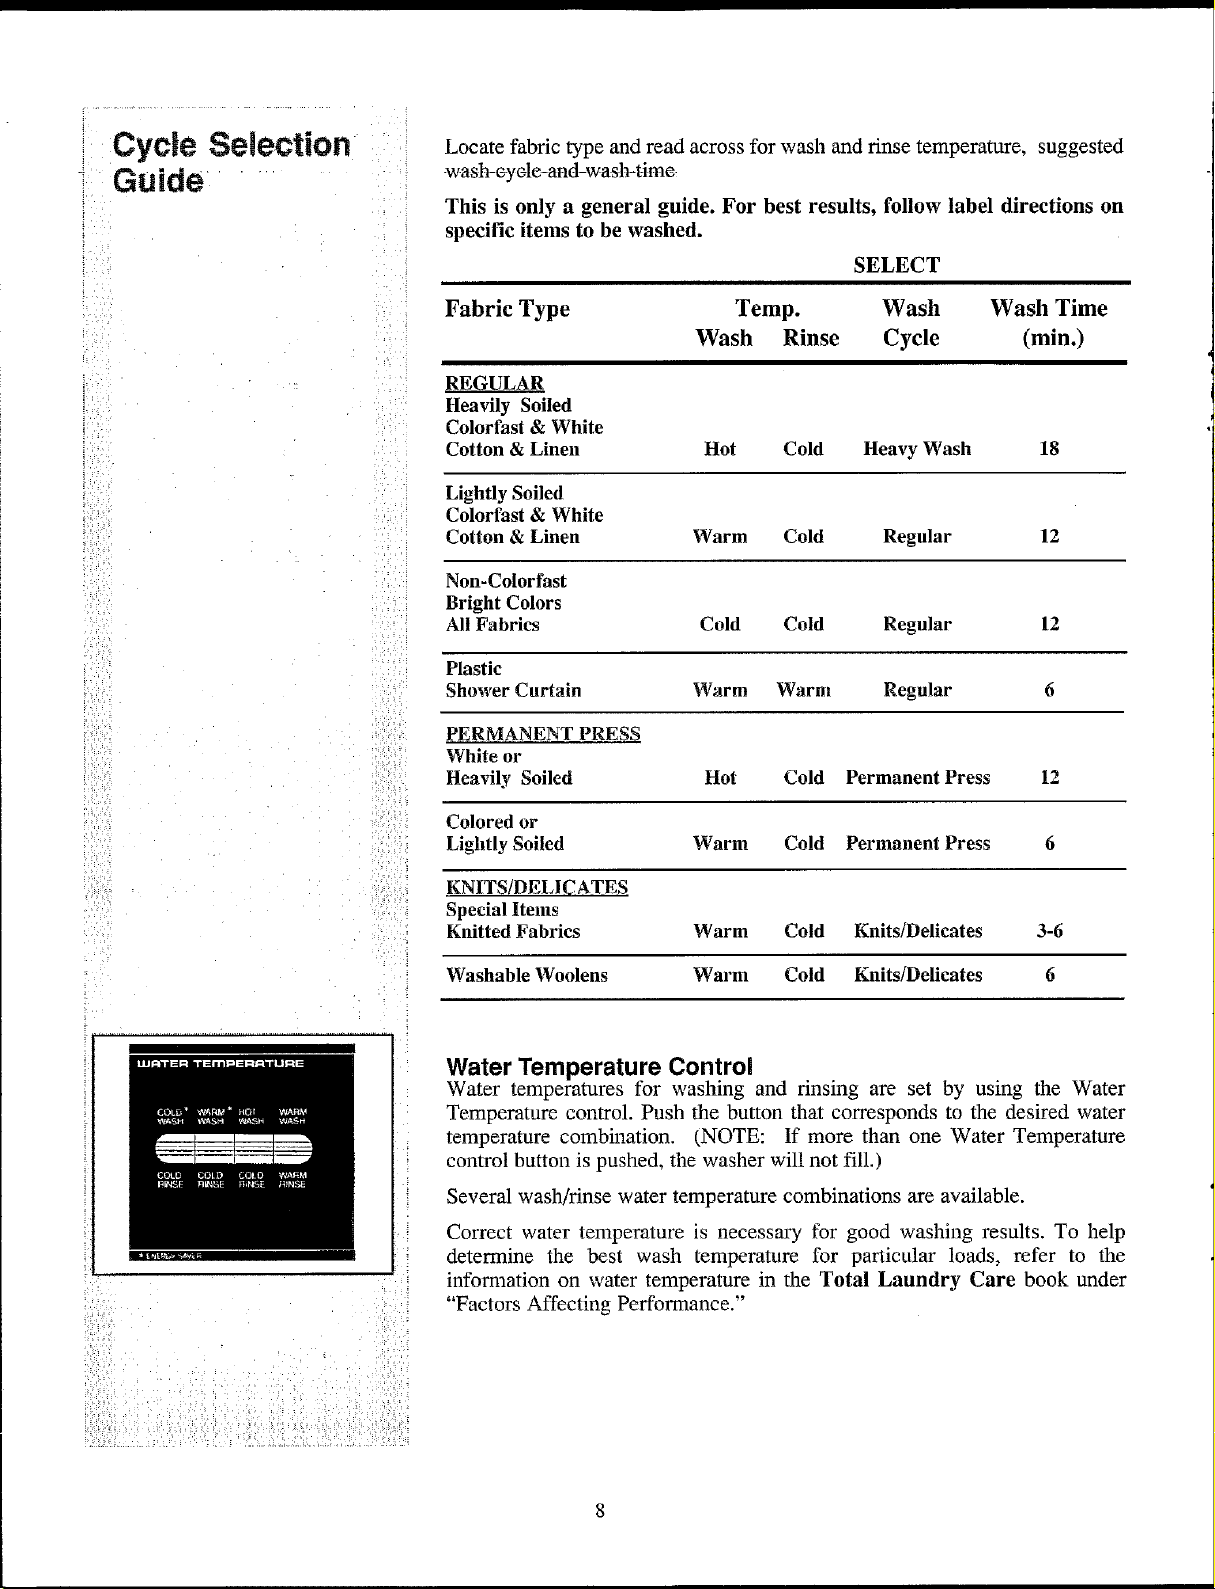
Guide Locate fabric type and read across for wash and rinse temperature, suggested
wash-_yc4e-and-wash-time_
This is only a general guide. For best results, follow label directions on
specific items to be washed.
SELECT
Fabric Type Temp. Wash Wash Time
Wash Rinse Cycle (min.)
REGULAR
Heavily Soiled
Colorfast & White
Cotton & Linen Hot Cold Heavy Wash 18
Lightly Soiled
Colorfast & White
Cotton & Linen Warm Cold Regular 12
Non-Colorfast
Bright Colors
All Fabrics Cold Cold Regular 12
Plastic
Shower Curtain Warm Warm Regular 6
PERMANENT PRESS
White or
Heavily Soiled Hot Cold Permanent Press 12
Colored or
Lightly Soiled Warm Cold Permanent Press 6
KNITS/DELI_ATES
Special Items
Knitted Fabrics Warm Cold Knits/Delicates 3-6
Washable Woolens Warm Cold KnitsiDelicates 6
if:__!!= _;_: _
Water Temperature Control
Water temperatures tbr washing and rinsing are set by using the Water
Temperature control. Push the button that corresponds to the desired water
temperature combination. (NOTE: If more than one Water Temperature
control button is pushed, the washer will not fill.)
Several wash/rinse water temperature combinations are available.
Correct water temperature is necessary for good washing results. To help
determine the best wash temperature for particular loads, refer to the
information on water temperature in the Total Laundry Care book under
"Factors Affecting Performance."

Water Level Control
The Water Level control provides the proper amount of wash and rinse water
when set for specific wash load sizes. This control allows you to conserve water
and achieve the best washing results. (NOTE: If more than one Water Level
control button is pushed, the washer will not fill.)
The Water Level control can be set at the settings indicated. The bulkiness of
wash loads is important when determining a water level. Articles that absorb a
large amount of water, such as blankets and rugs require more water. For best
results when washing bulky items, set the Water Level for the largest possible
anaount of water.
Bleach Dispenser
When using bleach, add it to the wash tub before clothes are added. To add
bleach, use the Bleach Dispenser located in the left front comer of the machine
under the lid. Always use the LARGE Water Level setting when using bleach.
Measure liquid bleach in a measuring cup. Use 3/4 cup for small loads, 1 cup
for large loads and 1 1/4 cups cups for extra large loads. Pour the bleach directly
into the dispenser, then pour in one cup of water.
The bleach dispenser automatically dispenses the diluted liquid bleach into the
wash water.
Powdered bleach must not be used in the Bleach Dispenser. Before adding
articles, add powdered bleach to the wash water following directions on the
package.
Fabric Softener Dispenser
If desired, fabric softener can be added to the final rinse w_ter through the Fabric
Softener Dispenser.
After loading, but before starting the washer, place the dispenser on top of the
agitator. Press down gently until the dispenser is firmly seated in place.
Following label directions, pour recommended amount of softener for one load
into the dispenser. Add water to bring the liquid level to the top point in center
of dispenser. Do not fill the dispenser above this level. Do not stop and restart
washer during spin when the fabric softener dispenser is in use. The fabric
softener solution is spun out of the center cup at the beginning of the first spin
and is retained in the outer shell. When wash spin stops, the solution is released
into the final rinse water.
Clean the Fabric Softener Dispenser occasionally by thoroughly flushing it out
with warm water. Run the washer through a short but complete wash cycle to
remove the water and fabric softener.
i :;: i_ : :.... :••• • •::.... :i:i•:i
, _••: i,!2 .... • •.•_•• •:_:
Safety Lock Lid
For your safety, the washer lid_l_o_c_ks2aut_omaticall_y_at_he_beginnm"g_o£eackspir
cycle and remains locked until the spin portion of each cycle is completed. The
lid will automatically malock approximately one mhmte after the end of the spin
cycle.
To open the lid during the spin cycle, push in the timer knob and wait for the lid
lock to release before opening.
Tub Interior Light
For ease in loading and unloading your washer, a light inside the washer tub will
turn on when the lid is open. Closing the lid will turn the light off. To turn the
light off when the lid is open, push in timer knob.
!0
IJ_,WARNINGI --To reduce the risk of fire, electric shock, or injury to persons, read
the IMPORTANT SAFETY INSTRUCTIONS before operating this appliance.
For detailed information on laundry preparation, sorting, factors affecting per-
formance and laundry products, see the Total Laundry Care (TLC) book.
1. Check to be sure the lint screen is clean before drying clothes.
2. Place clothes in the dryer. See the Total Laundry Care book for specific
guidelines on sorting and loading. Add a sheet of dryer fabric softener if
desired.
3. Close the dryer door. The dryer will not operate unless the door is closed.
4. Set the Fabric Temperature Control to the desired temperature. Refer
to the "Control Settings Chart" or fabric selection on the Fabric Tempera-
ture control for suggested settings according to fabric type.
5. Turn the Timer Knob cloek_ise to the desired setting. (See "Control
Setdngs Chart".) The setting can be changed any time during the cycle.
6. To start the dryer, push and hold the Start button for two seconds. The
dryer will always stop when the door is opened. If the door is open during
the cycle, the Start button must be pushed in to restart the dryer. If the timer
knob is in the OFF position when you push the Start button, a cycle signal
will sound and the dryer will not start.
7. A cycle signal will sound at the end of the cycle. Remove items
immediately to help prevent wrinkling. If the load is removed before time
has elapsed, turn Cycle Selector to OFF.
At the end of the Automatic Perm Press and Regular cycles, the dryer auto-
matically advances into the COOL DOWN period. The cycle end signal
will sound every 5 minutes for 40 minutes or until timer knob is advanced
to OFF. Refer to "Automatic Penn Press" and "Automatic Regular" sec-
tions under Cycle Settings for detailed information.
Dryer
Operating Steps
8. Clean lint screen after every load. Refer to "Care and Cleaning" section.
Adding or Removing Articles
To add or remove articles when the dryer is running, open the door. Allow the
dryer drum to coast to acomplete stop before reaching inside.
To restart the dryer, close the door mad push and hold the Start button for about
two seconds. The dryer will stop if the button is released too soon. If this
happens, push and hold the Start button again.
11
i:::Cycle Selections :For best results, follow fabric care label directions on specific articles to be
:::_----- .... ..... dfied.-Check-the-,,Control-Settings-_hartU-and-_the-Total-L-aundryC-are-book
i.... if the care label is not available.
?
NOTE: The Fabric Temperature
]control should be set to proper
i [temperaturefor each load.
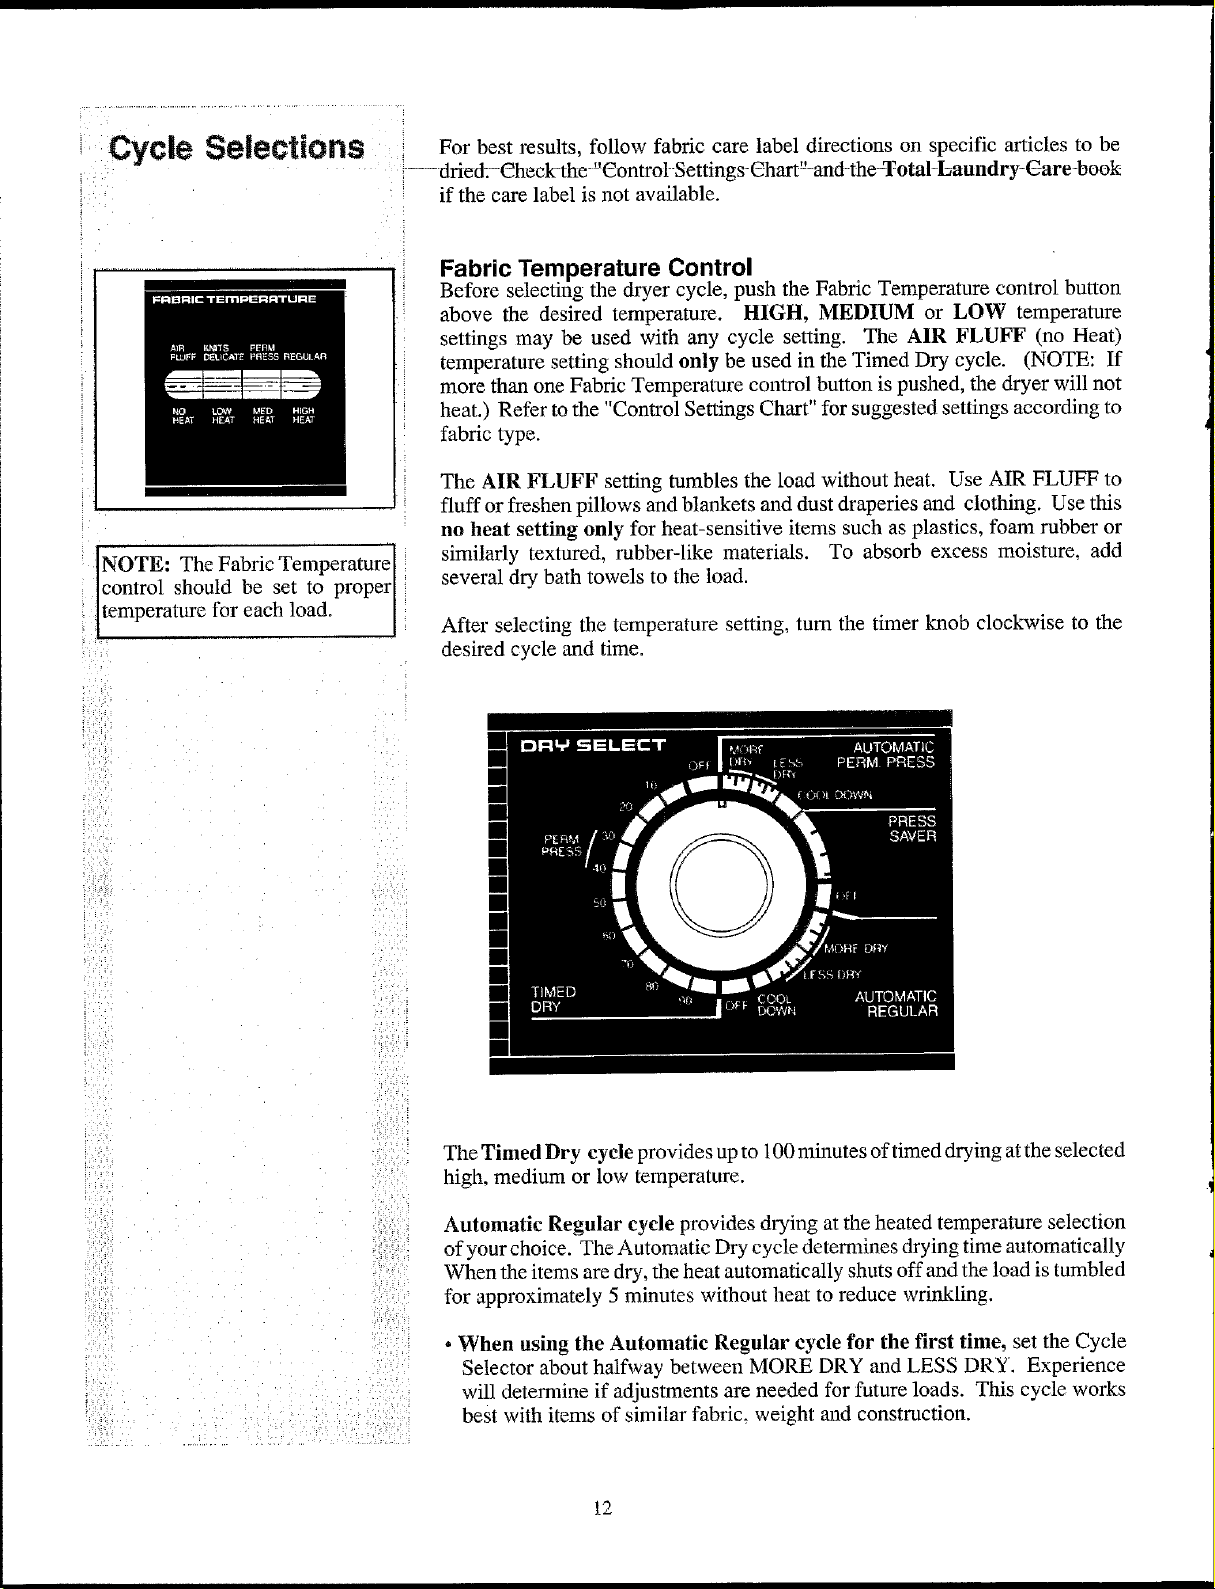
Fabric Temperature Control
Before selecting the dryer cycle, push the Fabric Temperature control button
above the desired temperature. HIGH, MEDIUM or LOW temperature
settings may be used with any cycle setting. The AIR FLUFF (no Heat)
temperature setting should only be used in the Timed Dry cycle. (NOTE: If
more than one Fabric Temperature control button is pushed, the dryer will not
heat.) Refer to the "Control Settings Chart" for suggested settings according to
fabric type.
The AIR FLUFF setting tumbles the load without heat. Use AIR FLUFF to
fluff or freshen pillows and blankets and dust draperies and clothing. Use this
no heat setting only for heat-sensitive items such as plastics, foam rubber or
similarly textured, rubber-like materials. To absorb excess moisture, add
several dry bath towels to the load.
After selecting the temperature setting, turn the timer knob clockwise to the
desired cycle and time.
The Timed Dry cycle provides up to 100 minutes of timed drying at the selected
high. medium or low temperature.
Automatic Regular cycle provides drying at the heated temperature selection
of your choice. The Automatic Dry cycle deterufines drying time automatically
When the items are dry, the heat automatically shuts off and the load is tumbled
for approximately 5 minutes without heat to reduce wrinkling.
, When using the Automatic Regular cycle for the first time, set the Cycle
Selector about halfway between MORE DRY and LESS DRY. Experience
will determine if adjustments are needed for future loads. This cycle works
best with items of similar fabric, weight mad construction.
12
Automatic Permanent Press and Automatic Press Saver cycles provide
drying for permanent press garments and delicate garments that can be tunable
dried. Always follow the drying instructions found on the garment label.
• MEDIUM heat is recommended for drying permanent press items and LOW
heat is suggested for "knits, delicates and synthetics. A cool-down period
during the last 5 minutes of the cycle prevents wrinkling. .
• PRESS SAVER tumbles the wash load for a total of 40 minutes to help prevent
wrinkles if the load is not removed immediately. The cycle signal will sound
every 5 minutes to remind you that the drying cycle is completed.
SApecial Safety Features "
Asafety door switch stops the dryer automatically if"the door is opened while " .i (
the dryer is operating. The drying cycle may be resumed by simply closing
the door and pushing the start button again.
• A safety door latch allows the dryer to be opened from the inside.
• The dryer heating element automatically shuts off when the motor stops to i • _
prevent overheating of clothes. .... . :.,!: !:
• For easy viewing, a light inside the dryer drum will turn on when the door is i
open. Closing the door will automatically turn the light off.
• A Thermal Limiter Switch automatically shuts down the dryer motor in the
unlikely event of an overheated situation (electric models only). ,
. @
."i r_,_i-_, .
13
Control
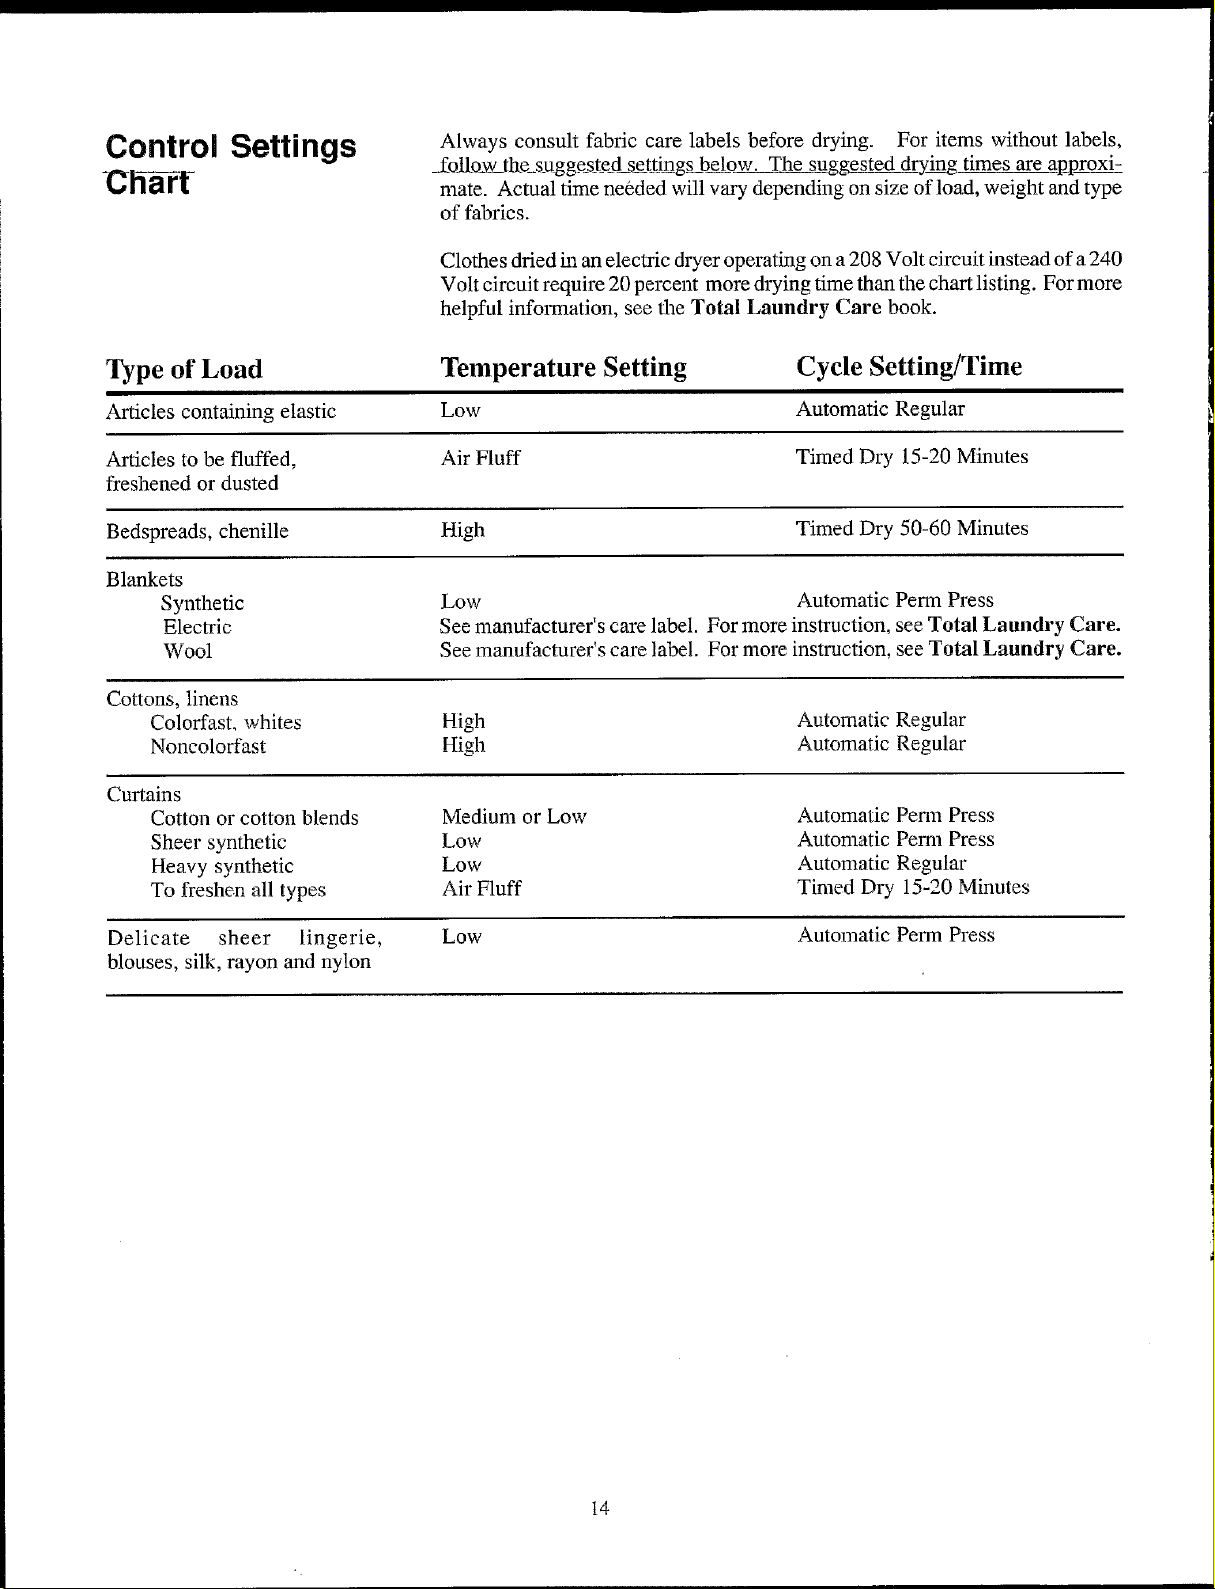
Ch- t- Settings Always consult fabric care labels before drying. For items without labels,
_£oJlo_wJke_s_ugges_te_ds_ttjngs below. The sug_yj_g times are aBproxi-
mate. Actual time needed will vary depending on size of load, weight and type
of fabrics.
Clothes dried ha an electric dryer operating on a 208 Volt circuit instead of a 240
Volt circuit require 20 percent more drying time than the chart listing. For more
helpful information, see the Total Laundry Care book.
Type of Load Temperature Setting Cycle Setting/Time
Articles containing elastic Low Automatic Regular
Articles to be fluffed, Air Fluff Timed Dry 15-20 Minutes
freshened or dusted
Bedspreads, chenille High Timed Dry 50-60 Minutes
Blankets
Synthetic Low Automatic Perm Press
Electric See manufacturer's care label. For more instruction, see Total Laundry Care.
Wool See manufacturer's care label. For more instruction, see Total Laundry Care.
Cottons, linens
Colorfast, whites High Automatic Regular
Noncolorfast High Automatic Regular
Curtains
Cotton or cotton blends
Sheer synthetic
Heavy synthetic
To freshen all types
Medium or Low
Low
Low
Air Fluff
Automatic Penn Press
Automatic Perm Press
Automatic Regular
Timed Dr,./ 15-20 Minutes
Delicate sheer lingerie, Low Automatic Penn Press
blouses, silk, rayon and nylon
14
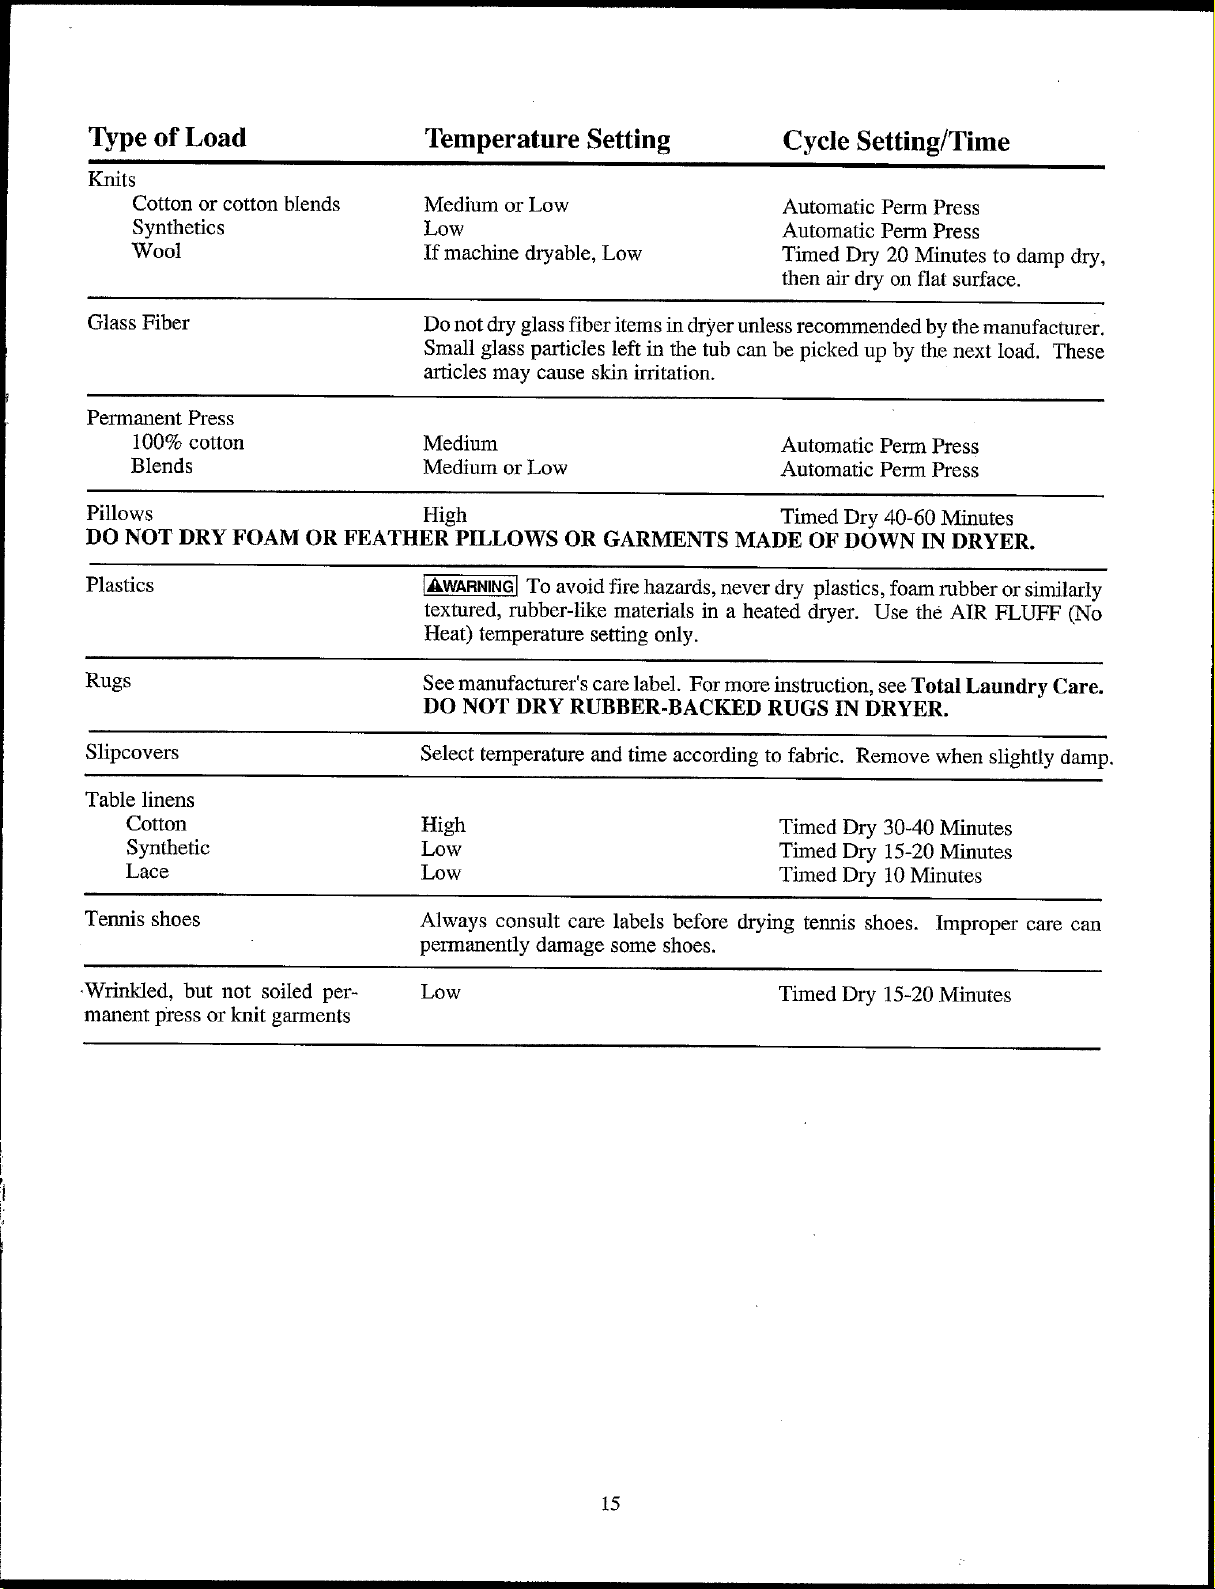
Type of Load Temperature Setting Cycle Setting/Time
Knits Cotton or cotton blends
Synthetics
Wool
Medium or Low
Low
If machine dryable, Low
Automatic Perm Press
Automatic Penn Press
Timed Dry 20 Minutes to damp dry,
then air dry on flat surface.
Glass Fiber Do not dry glass fiber items in dryer unless recommended by the manufacturer.
Small glass particles left in the tub can be picked up by the next load. These
articles may cause skin irritation.
Permanent Press
100% cotton Medium Automatic Perm Press
Blends Medium or Low Automatic Perm Press
Pillows High Timed Dry 40-60 Minutes
DO NOT DRY FOAM OR FEATHER PILLOWS OR GARMENTS MADE OF DOWN IN DRYER.
Plastics I_WARNINGI To avoid fire hazards, never dry plastics, foam rubber or similarly
textured, rubber-like materials in a heated dryer. Use the AIR FLUFF (No
Heat) temperature setting only.
Rugs See manufacturer's care label. For more instruction, see Total Laundry Care.
DO NOT DRY RUBBER-BACKED RUGS IN DRYER.
Slipcovers Select temperature and time according to fabric. Remove when slightly damp.
Table linens
Cotton High
Synthetic Low
Lace Low
Timed Dry 30-40 Minutes
Timed Dry 15-20 Minutes
Timed Dry 10 Minutes
Tennis shoes Always consult care labels before drying tennis shoes. Improper care can
permanently damage some shoes.
-Wrinkled, but not soiled per- Low Timed Dry 15-20 Minutes
manent press or knit garments
15
_!:___=!_![
i,i,i_!!_i¸ !iiii_i_'_>!
iii__;i!i ....
,! _ - _!_i i, _
m
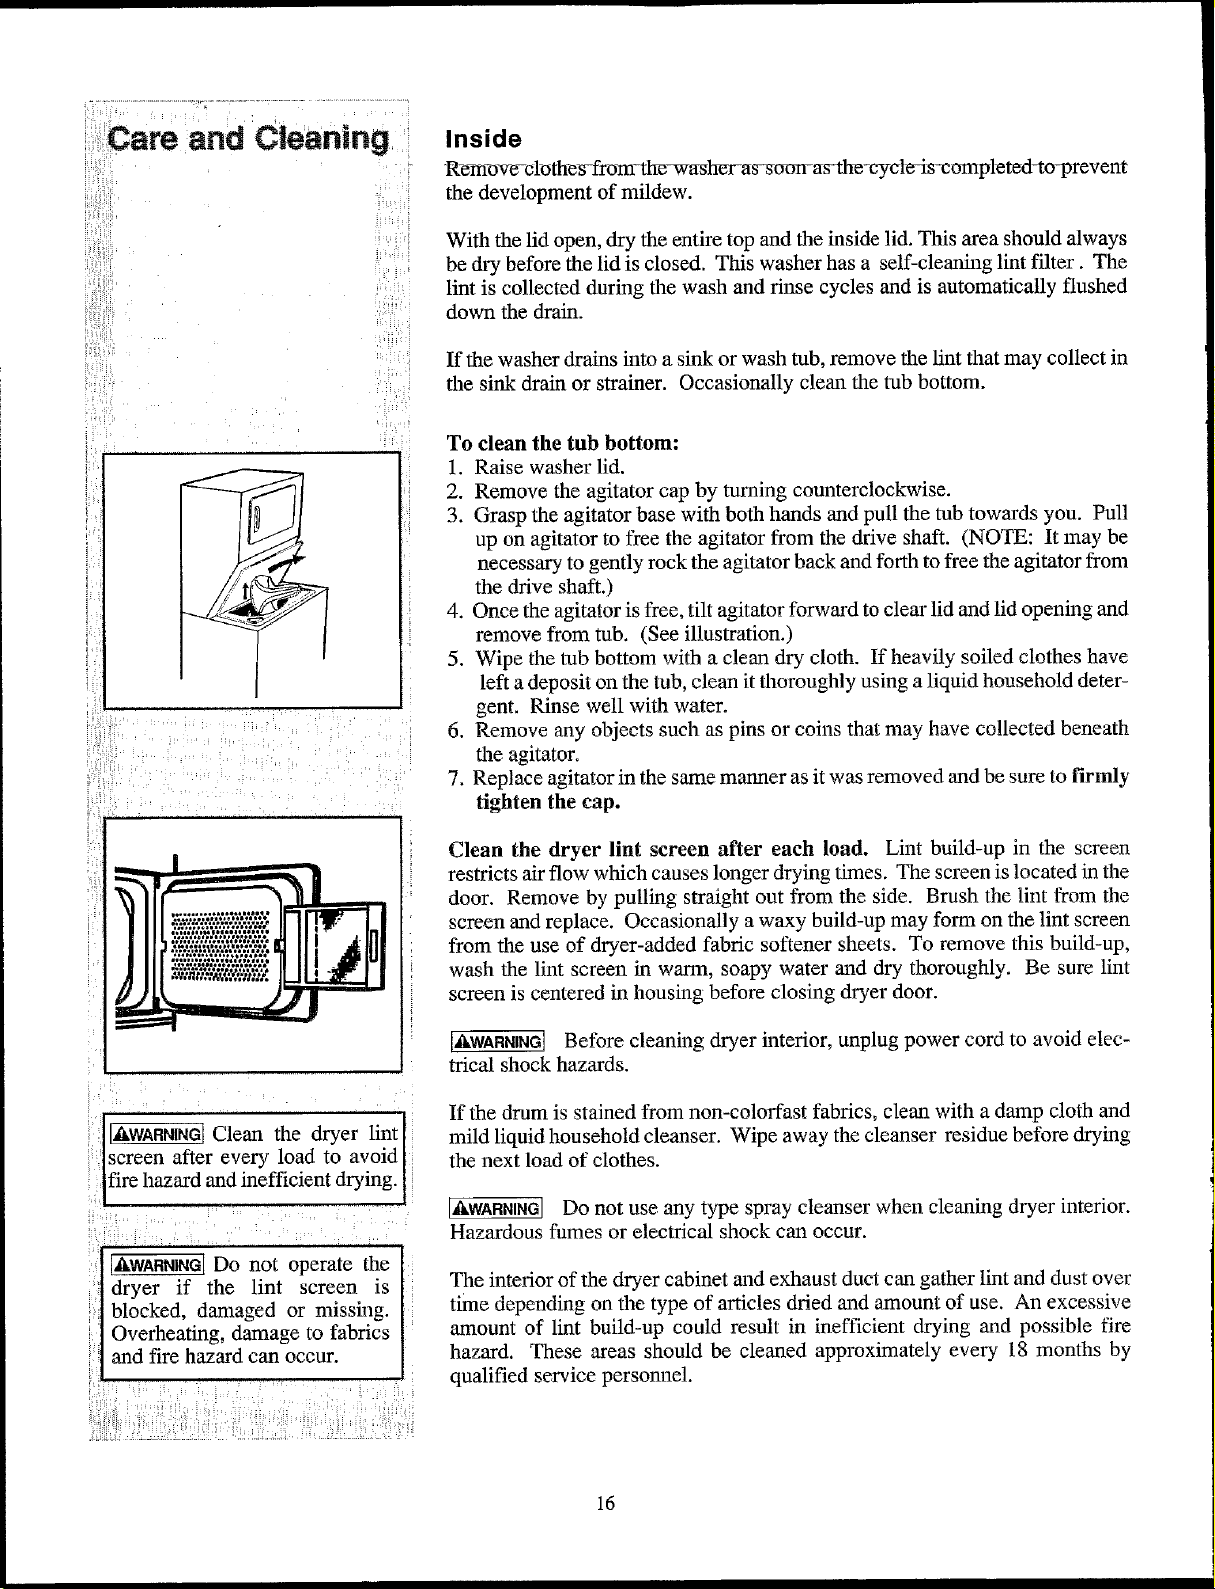
]IA'*R'"¢ICleanthedryerlint]
:[screen after every load to avoid[
lfire hazard and inefficient drying. [
I/kWARNING[ Do not operate the
dryer if the lint screen is
blocked, danlaged or missing.
Overheating, damage to fabrics
and fire hazard can occur.
Inside
R-em-ove-c lo ttres-from-the-washer-as-soon-as-the-c-ycle-is-comple ted_to-prev ent
the development of mildew.
With the lid open, dry the entire top and the inside lid. This area should always
be dry before the lid is closed. This washer has a self-cleanhag lint filter. The
lint is collected during the wash and rinse cycles and is automatically flushed
down the drain.
If the washer drains into a sink or wash tub, remove the lint that may collect in
the sink drain or strainer. Occasionally clean the tub bottom.
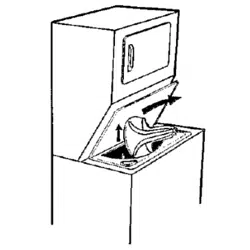
To clean the tub bottom:
1. Raise washer lid.
2. Remove the agitator cap by turning counterclockwise.
3. Grasp the agitator base with both hands and pull the tub towards you. Pull
up on agitator to free the agitator from the drive shaft. (NOTE: It may be
necessary to gently rock the agitator back and forth to free the agitator from
the drive shaft.)
4. Once the agitator is free, tilt agitator forward to clear lid and lid opening and
remove from tub. (See illustration.)
5. Wipe the tub bottom with a clean dry cloth. If heavily soiled clothes have
left a deposit oll the tub, clean it thoroughly using a liquid household deter-
gent. Rinse well with water.
6. Remove any objects such as pins or coins that may have collected beneath
the agitator.
7. Replace agitator in the same mariner as it was removed and be sure to firmly
tighten the cap.
Clean the dryer lint screen after each load. Lint build-up in the screen
restricts air flow which causes longer drying times. The screen is located in the
door. Remove by pulling straight out from the side. Brush the lint from the
screen and replace. Occasionally a waxy build-up may foma on the lint screen
from the use of dryer-added fabric softener sheets. To remove this build-up,
wash the lint screen in warm, soapy water mad dry thoroughly. Be sure lint
screen is centered in housing before closing dryer door.
[_I_WARNINGI Before cleaning dryer interior, unplug power cord to avoid elec-
trical shock hazards.
If the drum is stained from non-colorfast fabrics, clean with a damp cloth and
mild liquid household cleanser. Wipe away the cleanser residue before drying
the next load of clothes.
[_WARNING] Do not use any type spray cleanser when cleaning dryer interior.
Hazardous fumes or electrical shock can occur.
The interior of the dryer cabinet and exhaust duct can gather lint and dust over
time depending on the type of articles dried mad amount of use. An excessive
amount of lint build-up could result in inefficient drying and possible fire
hazard. These areas should be cleaned approximately every 18 months by
qualified service personnel.
16
Outside
When the washer is not in use, turn the water faucets off to prevent pressure
build- up in the hoses.
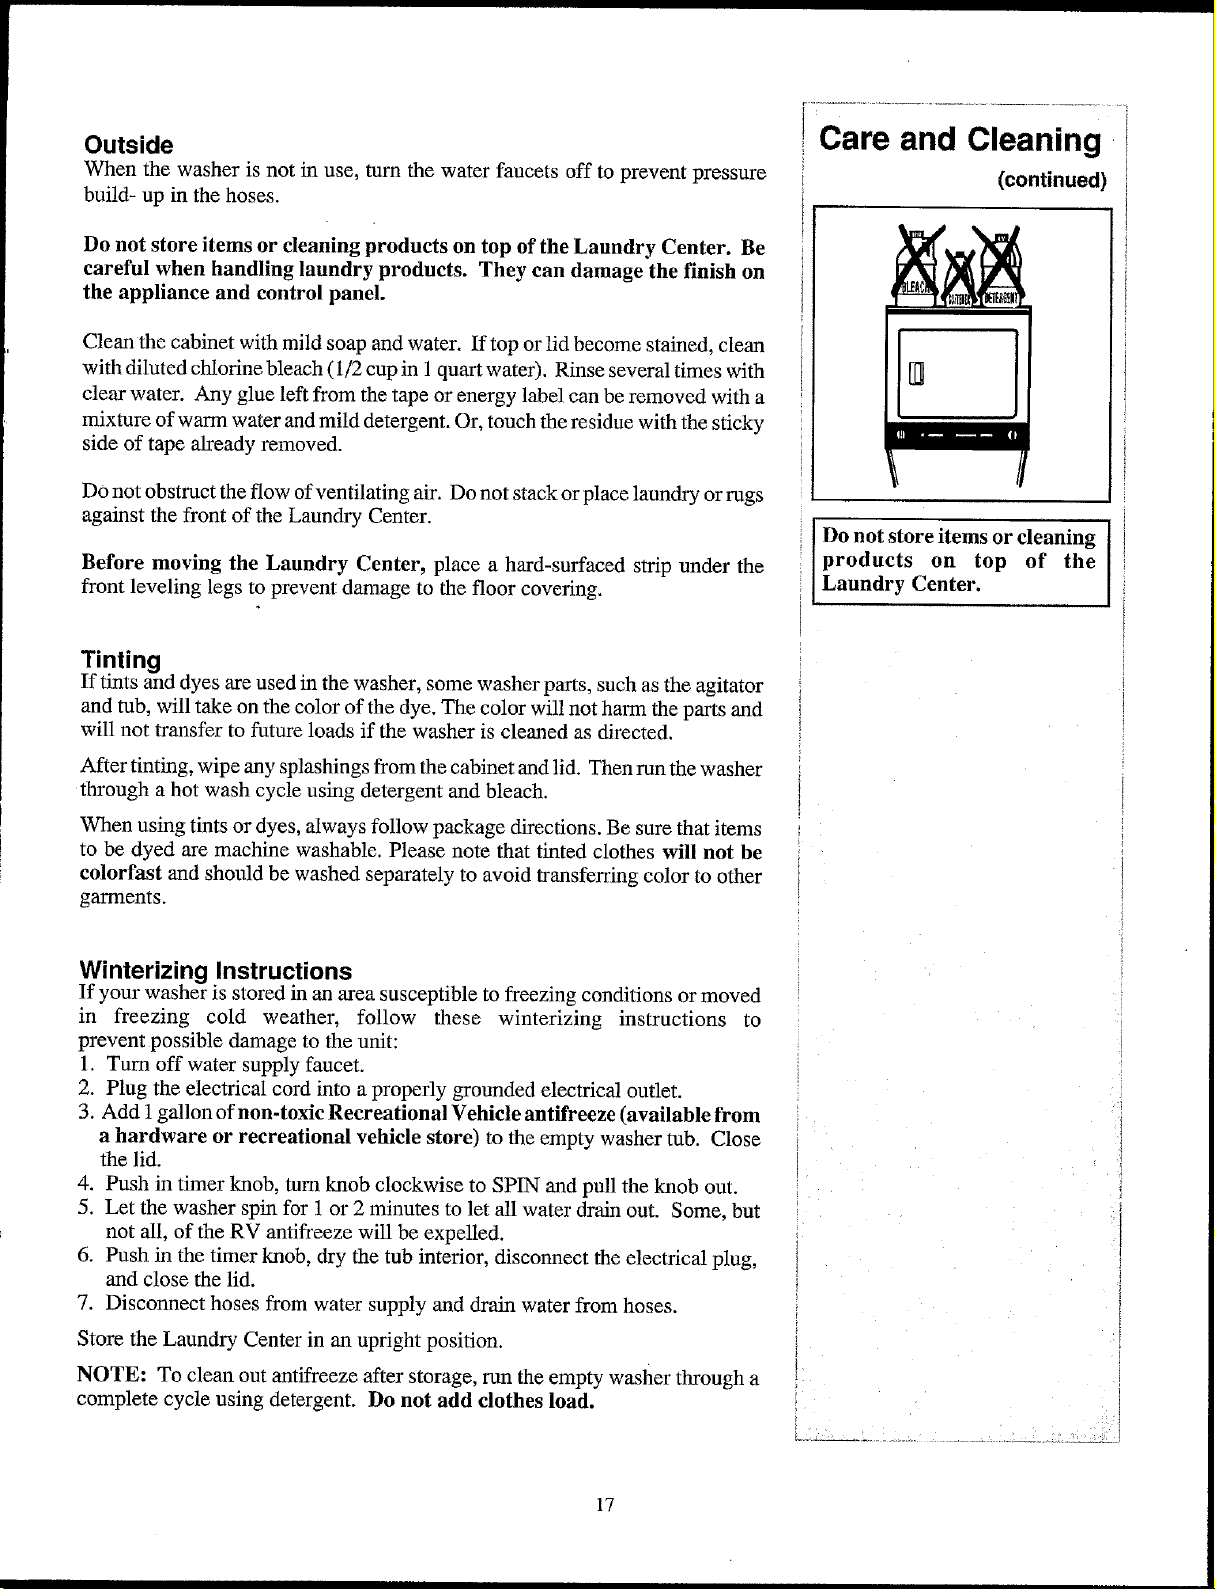
Do not store items or cleaning products on top of the Laundry Center. Be
careful when handling laundry products. They can damage the finish on
the appliance and control panel.
Clean the cabinet with mild soap and water. If top or lid become stained, clean
with diluted chlorine bleach (1/2 cup in 1 quart water). Rinse several times with
clear water. Any glue left from the tape or energy label can be removed with a
mixture of warm water and mild detergent. Or, touch the residue with the sticky
side of tape already removed. Jill
Do not obstruct the flow of ventilating air. Do not stack or place laundry or rugs
against the front of the Laundry Center.
Before moving the Laundry Center, place a hard-surfaced strip under the
front leveling legs to prevent damage to the floor covering.
Care and Cleaning
(continued)
Do not store items or cleaning
products on top of the
Laundry Center.
Tinting
If tints and dyes are used in the washer, some washer parts, such as the agitator
and tub, will take on the color of the dye. The color will not harm the parts and
will not transfer to future loads if the washer is cleaned as directed.
After tinting, wipe any splashings from the cabinet and lid. Then run the washer
through a hot wash cycle using detergent and bleach.
When using tints or dyes, always follow package directions. Be sure that items
to be dyed are machine washable. Please note that tinted clothes will not he
colorfast and should be washed separately to avoid transferring color to other
garments.
Winterizing Instructions
If your washer is stored in an area susceptible to freezing conditions or moved
in freezing cold weather, follow these winterizing instructions to
prevent possible damage to the unit:
1. Turn off water supply faucet.
2. Plug the electrical cord into a properly grounded electrical outlet.
3. Add i gallon of non-toxic Recreational Vehicle antifreeze (available from
a hardware or recreational vehicle store) to the empty washer tub. Close
the lid.
4. Push in timer knob, turn knob clockwise to SPIN and pull the knob out.
5. Let the washer spin for 1 or 2 minutes to let all water drain out. Some, but
not all, of the RV antifreeze will be expelled.
6. Push in the timer knob, dry the tub interior, disconnect the electrical plug,
and close the lid.
7. Disconnect hoses from water supply and drain water from hoses.
Store the Laundry Center in an upright position.
NOTE: To clean out antifreeze after storage, run the empty washer through a
complete cycle using detergent. Do not add clothes load.
17
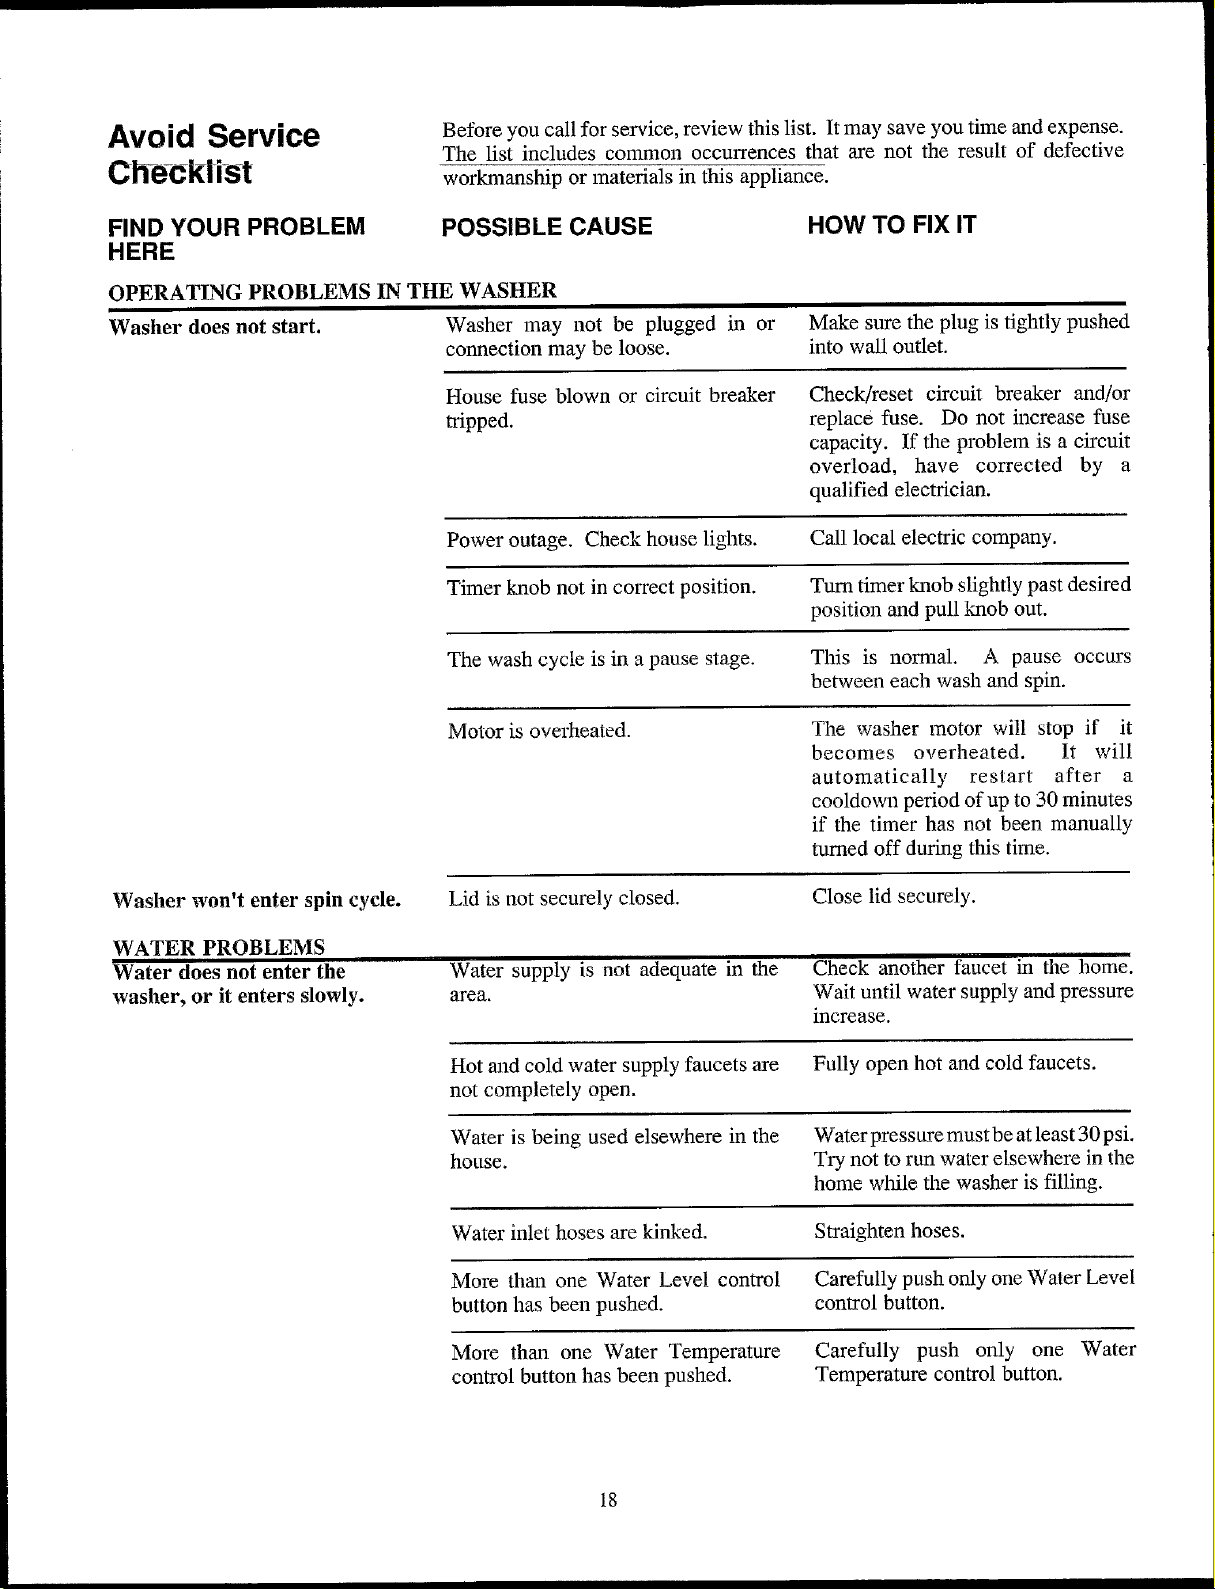
Avoid Service
Ch-eckli-st
Before you call for service, review this list. It lnay save you time and expense.
The list includes common occurrences that are not the result of defective
workmanship or materials in this appliance.
FIND YOUR PROBLEM
HERE POSSIBLE CAUSE HOW TO FIX IT
OPERATING PROBLEMS IN THE WASHER
Washer does not start. Washer may not be plugged in or Make sure the plug is tightly pushed
connection may be loose, into wall outlet.
House fuse blown or circuit breaker
tripped.
Check!reset circuit breaker and/or
replace fuse. Do not hacrease fuse
capacity. If the problem is a circuit
overload, have corrected by a
qualified electrician.
Power outage. Check house lights. Call local electric company.
Timer knob not in correct position. Turn timer knob slightly past desired
position and pull knob out.
The wash cycle is in a pause stage. This is normal. A pause occurs
between each wash and spin.
Motor is overheated. The washer motor will stop if it
becomes overheated. It will
automatically restart after a
cooldown period of up to 30 minutes
if the timer has not been manually
turned off during this time.
Washer won't enter spin cycle. Lid is not securely dosed. Close lid securely.
WATER PROBLEMS
Water does not enter the
washer, or it enters slowly. Water supply is not adequate in the
area.
Check another faucet in the home.
Wait until water supply and pressure
increase.
Hot and cold water supply faucets are Fully open hot and cold faucets.
not completely open.
Water is being used elsewhere in the Waterpressuremustbeat least30psi.
house. Try not to run water elsewhere in the
home while the washer is filling.
Water inlet hoses are kinked. Straighten hoses.
More than one Water Level control Carefully push only one Water Level
button has been pushed, control button.
More than one Water Temperature Carefully push only one Water
control button has been pushed. Temperature control button.
18
FIND YOUR PROBLEM POSSIBLE CAUSE HOW TO FIX IT
HERE
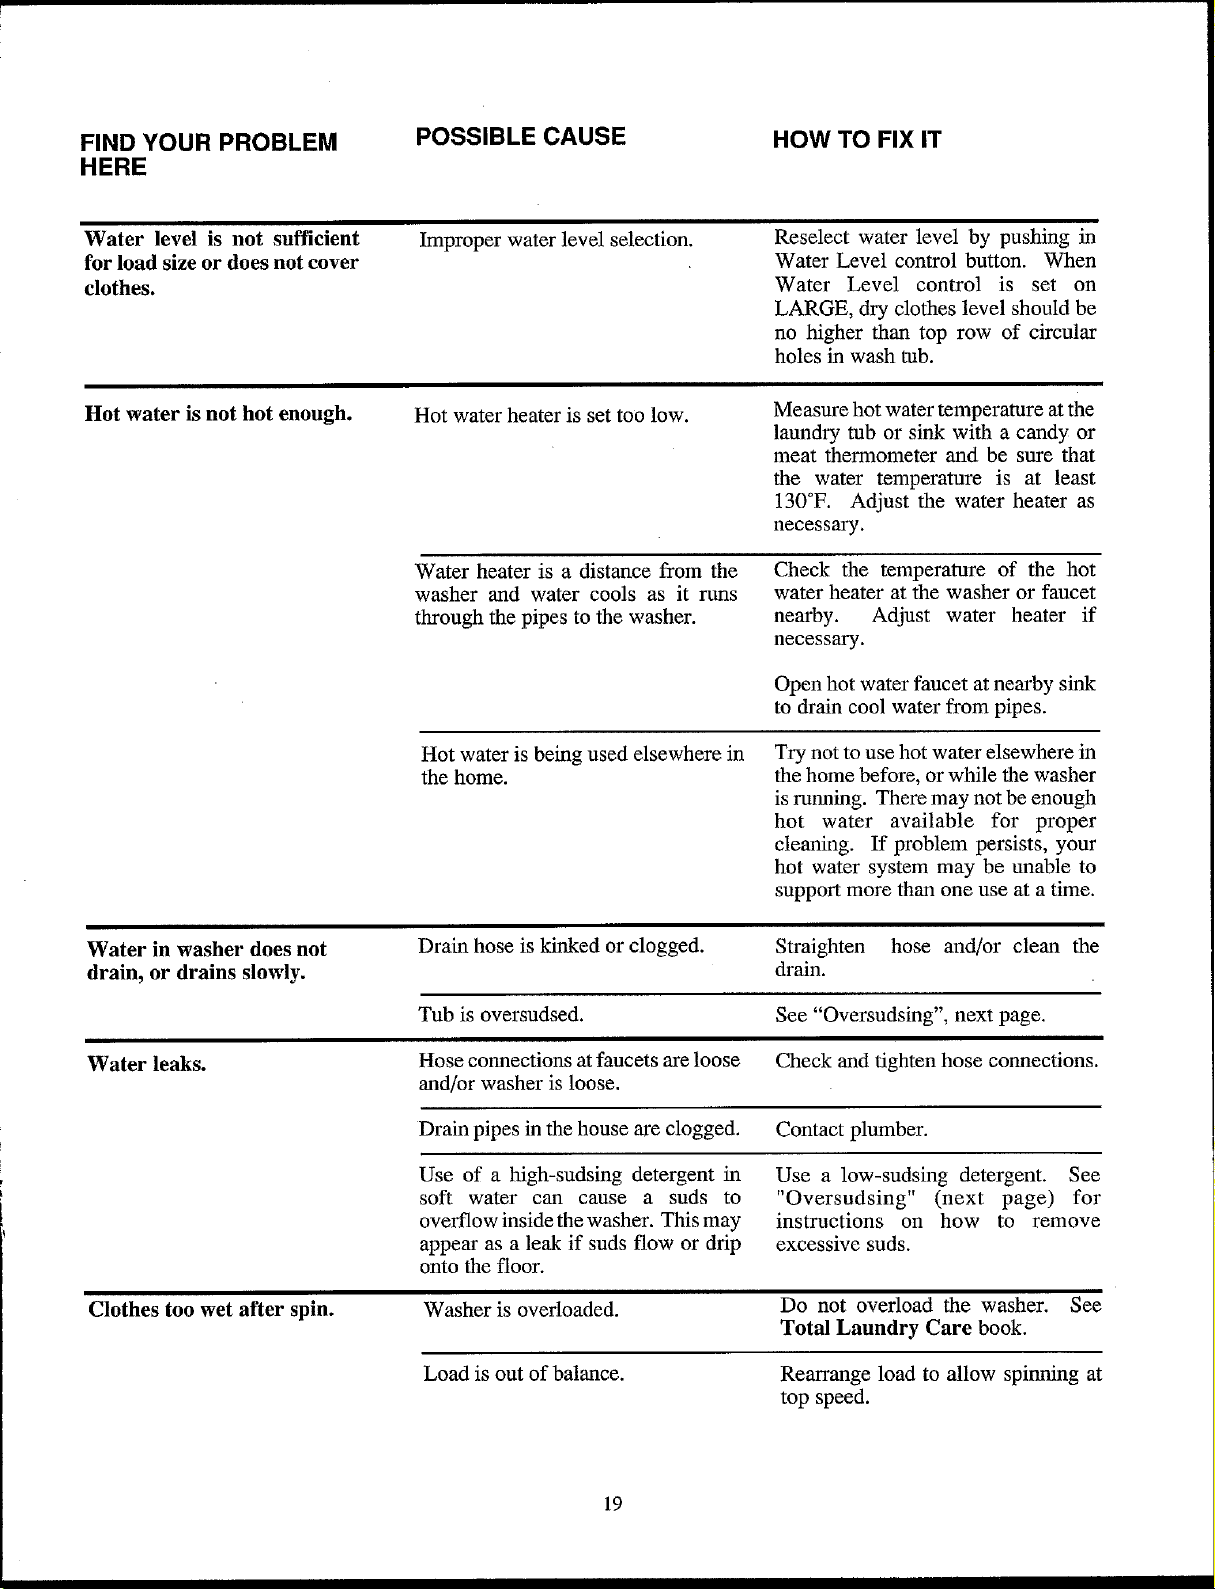
Water level is not sufficient
for load size or does not cover
clothes.
Improper water level selection. Reselect water level by pushing in
Water Level control button. When
Water Level control is set on
LARGE, dry clothes level should be
no higher than top row of circular
holes in wash tub.
Hot water is not hot enough. Hot water heater is set too low. Measure hot water temperature at the
laundry tub or sink with a candy or
meat thermometer and be sure that
the water temperature is at least
130°F. Adjust the water heater as
necessary.
Water heater is a distance from the
washer and water cools as it runs
through the pipes to the washer.
Check the temperature of the hot
water heater at the washer or faucet
nearby. Adjust water heater if
necessary.
Open hot water faucet at nearby sink
to drain cool water from pipes.
Hot water is being used elsewhere in
the home. Try not to use hot water elsewhere in
the home before, or while the washer
is running. There may not be enough
hot water available for proper
cleaning. If problem persists, your
hot water system may be unable to
support more than one use at a time.
Water in washer does not
drain, or drains slowly.
Water leaks.
Drain hose is kinked or clogged.
Tub is oversudsed.
Hose connections at faucets are loose
and/or washer is loose.
Straighten hose and/or clean the
drain.
See "Oversudsing", next page.
Check and tighten hose connections.
Drain pipes in the house are clogged. Contact plumber.
Use of a high-sudsing detergent in
soft water can cause a suds to
overflow inside the washer. This may
appear as a leak if suds flow or drip
onto the floor.
Use alow-sudsing detergent. See
"Oversudsing" (next page) for
instructions on how to remove
excessive suds.
Clothes too wet after spin. Washer is overloaded. Do not overload the washer. See
Total Laundry Care book.
Load is out of balance. Rearrange load to allow spinning at
top speed.
19
FIND YOUR PROBLEM POSSIBLE CAUSE HOW TO FIX IT
HERE
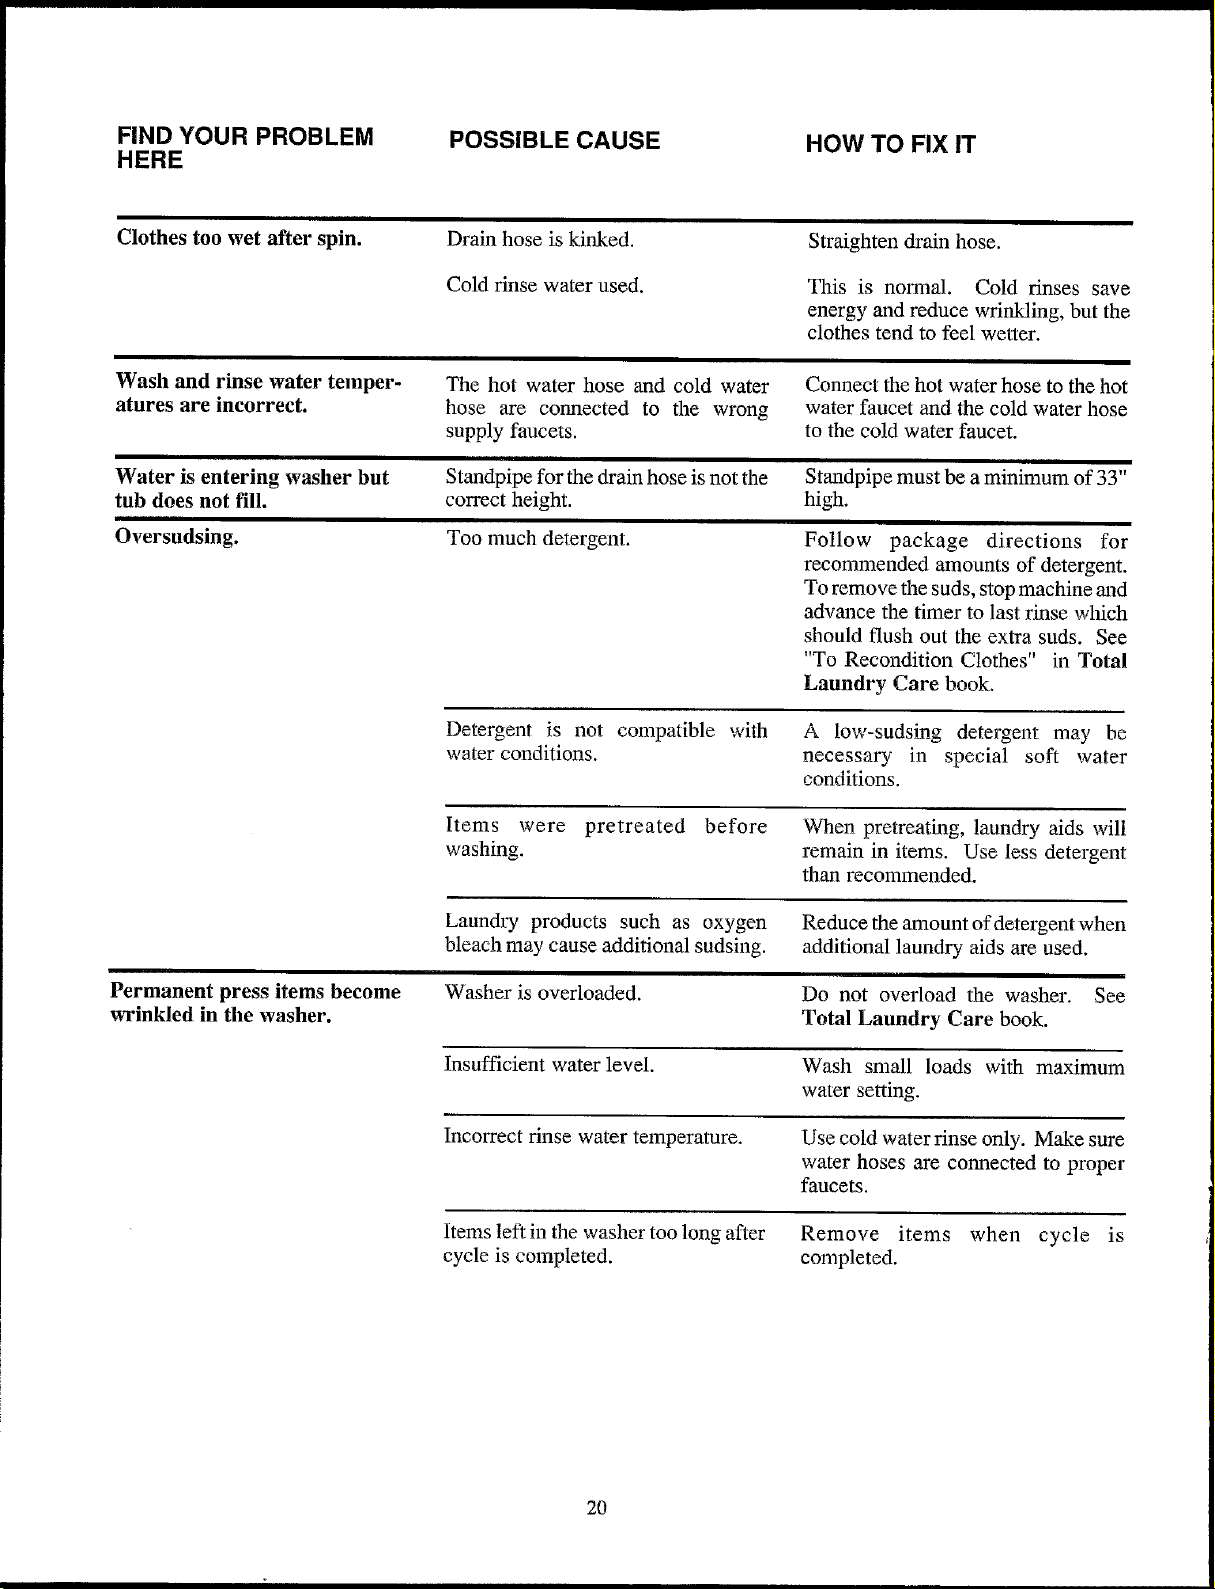
Clothes too wet after spin. Drain hose is kinked. Straighten drain hose.
Cold rinse water used. This is normal. Cold rinses save
energy and reduce wrinkling, but the
clothes tend to feel wetter.
Wash and rinse water temper- The hot water hose and cold water Connect the hot water hose to the hot
atures are incorrect, hose are connected to the wrong water faucet and the cold water hose
supply faucets, to the cold water faucet.
Water is entering washer hut Standpipe for the drain hose is not the Standpipe must be a minimum of 33"
tub does not fill. correct height, high.
Oversudsing. Too muchdetergent. Follow package directions for
recommended amounts of detergent.
To remove the suds, stop machine mad
advance the timer to last rinse which
should flush out the extra suds. See
"To Recondition Clothes" in Total
Laundry Care book.
Detergent is not compatible with A low-sudsing detergent may be
water conditions, necessary in special soft water
conditions.
Items were pretreated before When pretreating, laundry aids will
washing, remain in items. Use less detergent
than recolmnended.
Laundry products such as oxygen Reduce the amount of detergent when
bleach may cause additional sudsing, additional laundry aids are used.
Permanent press items become
wrinkled in tile washer. Washer is overloaded. Do not overload the washer. See
Total Laundry Care book.
Insufficient water level. Wash small loads with maximum
water setting.
Incorrect rinse water temperature. Use cold water rinse only. Make sure
water hoses are connected to proper
faucets.
Items left in the washer too long after Remove items when cycle is
cycle is completed, completed.
2O
FIND YOUR PROBLEM POSSIBLE CAUSE HOW TO FIX IT
HERE
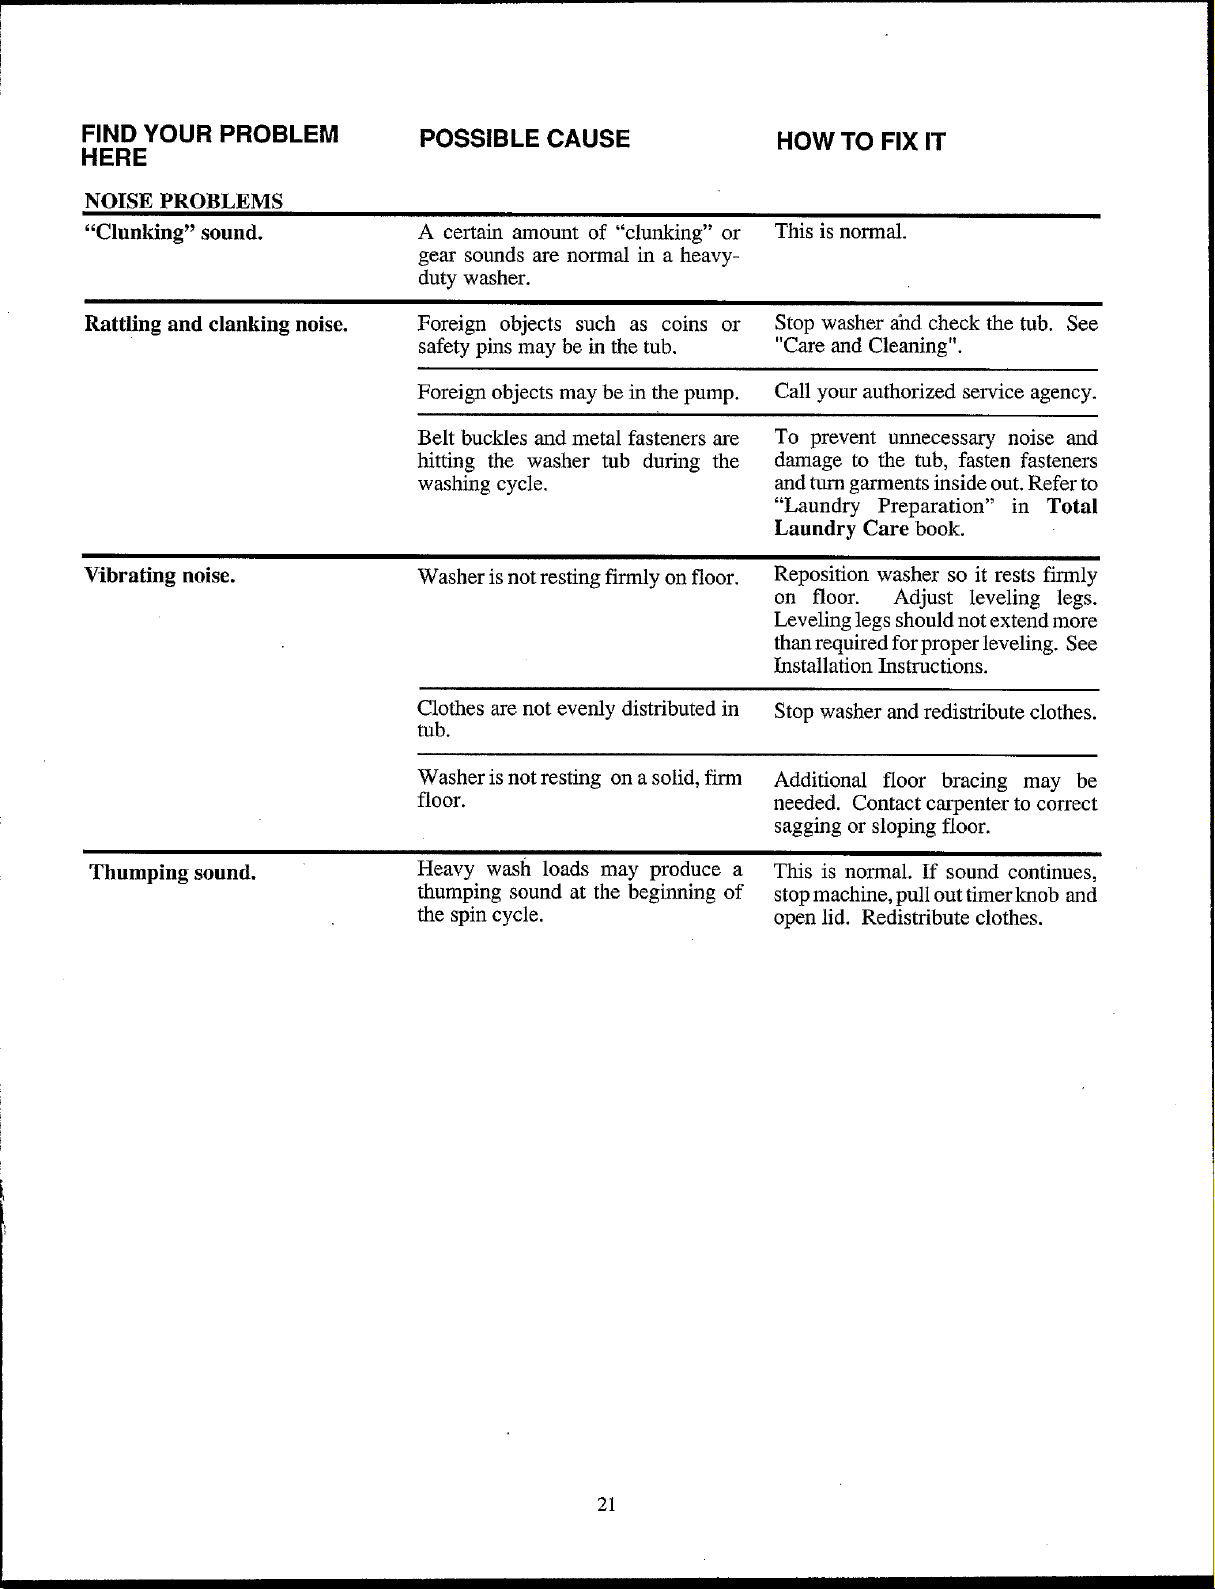
NOISE PROBLEMS
"Clunking" sound. A certain amount of "clunking" or This is normal.
gear sounds are normal in a heavy-
duty washer.
Rattling and clanking noise. Foreign objects such as coins or Stop washer ahd check the tub. See
safety pins may be in the tub. "Care and Cleaning".
Foreign objects may be in the pump. Call your authorized service agency.
Belt buckles and metal fasteners are
hitting the washer tub during the
washing cycle.
To prevent unnecessary noise and
damage to the tub, fasten fasteners
and turn garments inside out. Refer to
"Laundry Preparation" in Total
Laundry Care book.
Vibrating noise. Washer is not resting firmly on floor. Reposition washer so it rests firmly
on floor. Adjust leveling legs.
Leveling legs should not extend more
than required for proper leveling. See
Installation Instructions.
Clothes are not evenly distributed in Stop washer and redistribute clothes.
tub.
Thumping sound.
Washer is not resting on a solid, firm Additional floor bracing may be
floor, needed. Contact carpenter to correct
sagging or sloping floor.
Heavy wash loads may produce aThis is normal, ff sound continues,
thumping sound at the beginning of stop machine, pull out timer knob and
the spin cycle, open lid. Redistribute clothes.
21
FIND YOUR PROBLEM POSSIBLE CAUSE HOW TO FIX IT
HERF
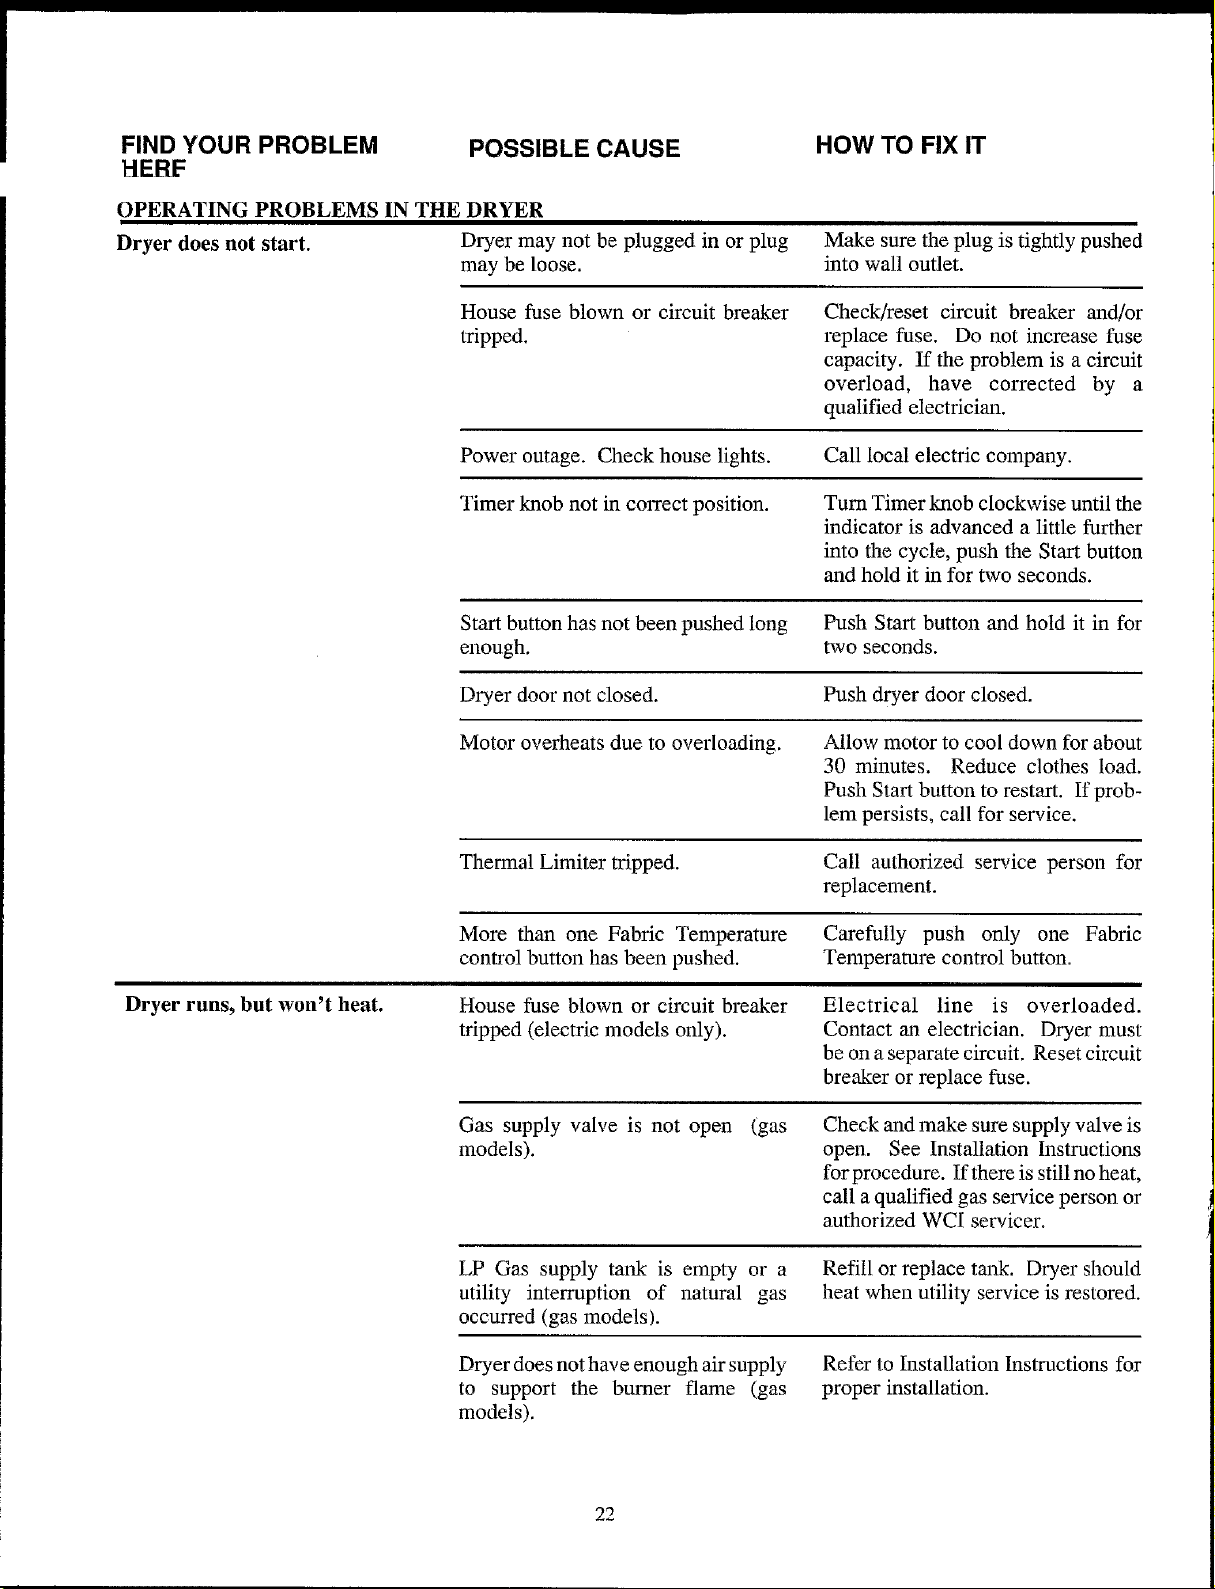
OPERATING PROBLEMS IN THE DRYER
Dryer does not start. Dryer may not be plugged in or plug Make sure the plug is tightly pushed
may be loose, into wall outlet.
House fuse blown or circuit breaker
tripped. Check/reset circuit breaker and/or
replace fuse. Do not increase fuse
capacity. If the problem is a circuit
overload, have corrected by a
qualified electrician.
Power outage. Check house lights. Call local electric company.
Timer knob not in correct position. Turn Timer knob clockwise until the
indicator is advanced a little further
into the cycle, push the Start button
and hold it in for two seconds.
Start button has not been pushed long Push Start button and hold it in for
enough, two seconds.
Dryer door not closed. Push dryer door closed.
Motor overheats due to overloading. Allow motor to cool down for about
30 minutes. Reduce clothes load.
Push Start button to restart. If prob-
lem persists, cal! for service.
Therma! Limiter tripped. Call authorized service person for
replacement.
More than one Fabric Temperature Carefully push only one Fabric
control button has been pushed. Temperature control button.
Dryer runs, but won't heat. House fuse blown or circuit breaker
tripped (electric models only).
Electrical line is overloaded.
Contact an electrician. Dryer must
be on a separate circuit. Reset circuit
breaker or replace fuse.
Gas supply valve is not open (gas
models). Check and make sure supply valve is
open. See Installation Instructions
for procedure. If there is still no heat,
call a qualified gas service person or
authorized WCI servicer.
LP Gas supply tank is empty or a Refill or replace tank. Dryer should
utility interruption of natural gas heat when utility service is restored.
occurred (gas models).
Dryer does not have enough air supply Refer to Installation Instructions for
to support the burner flame (gas proper installation.
models).
22
FIND YOUR PROBLEM POSSIBLE CAUSE HOW TO FIX IT
HERE
OPERATING PROBLEMS
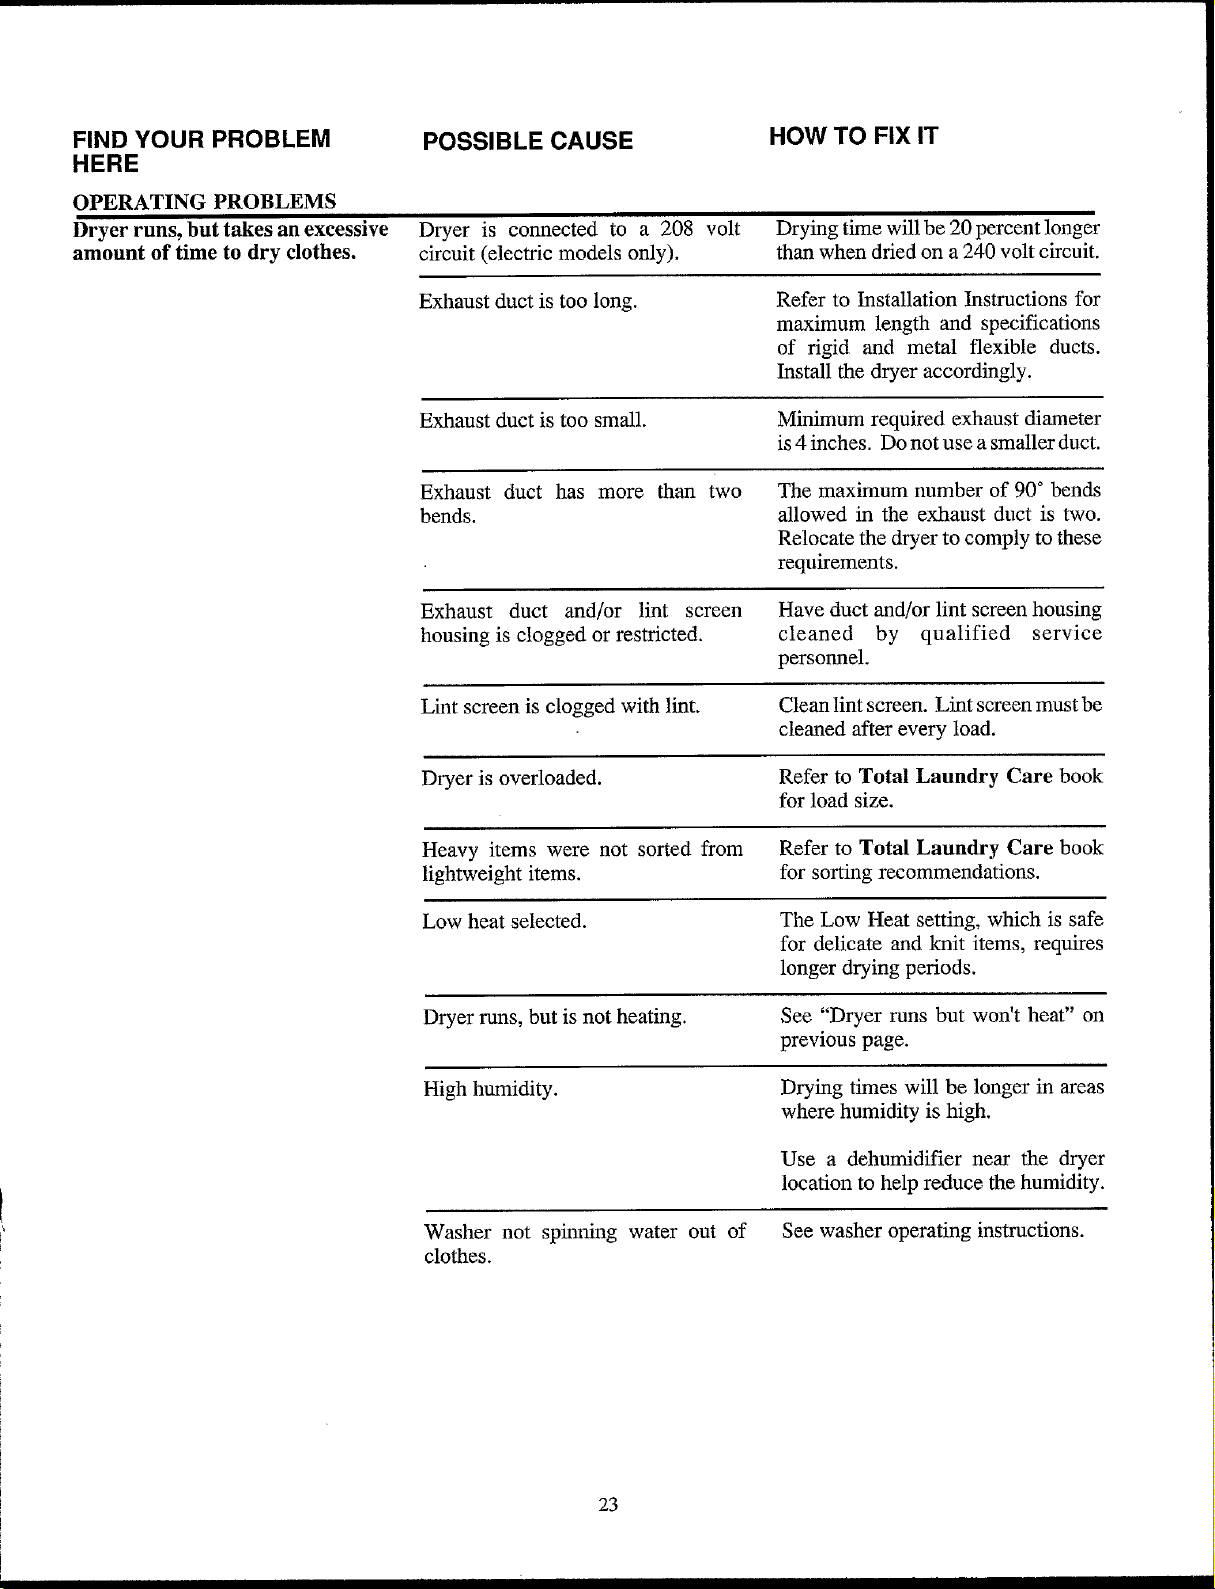
Dryer runs, but takes an excessive Dryer is connected to a 208 volt Drying time willbe 20 percent longer
amount of time to dry clothes, circuit (electric models only), than when dried on a 240 volt circuit.
Exhaust duct is too long. Refer to Installation Instructions for
maximum length and specifications
of rigid and metal flexible ducts.
Install the dryer accordingly.
Exhaust duct is too small. Minimum required exhaust diameter
is 4 inches. Do not use a smaller duct.
Exhaust duct has more than two The maximum number of 90 ° bends
bends, allowed in the exhaust duct is two.
Relocate the dryer to comply to these
requirements.
Exhaust duct and/or lint screen Have duct and/or lint screen housing
housingis cloggedor restricted, cleaned by qualified service
personnel.
Lint screen is clogged with lint. Clean lint screen. Lint screen must be
cleaned after every load.
Dryer is overloaded. Refer to Total Laundry Care book
for load size.
Heavy items were not sorted from Refer to Total Laundry Care book
lightweight items, for sorting recommendations.
Low heat selected. The Low Heat setting, which is safe
for delicate and knit items, requires
longer drying periods.
Dryer runs, but is not heating. See "Dryer runs but won't heat" on
previous page.
High humidity. Drying times will be longer in areas
where humidity is high.
Use a dehumidifier near the dryer
location to help reduce the humidity.
Washer not spinning water out of See washer operating instructions.
clothes.
23
FIND YOUR PROBLEM
HERE POSSIBLE CAUSE HOW TO FIX IT
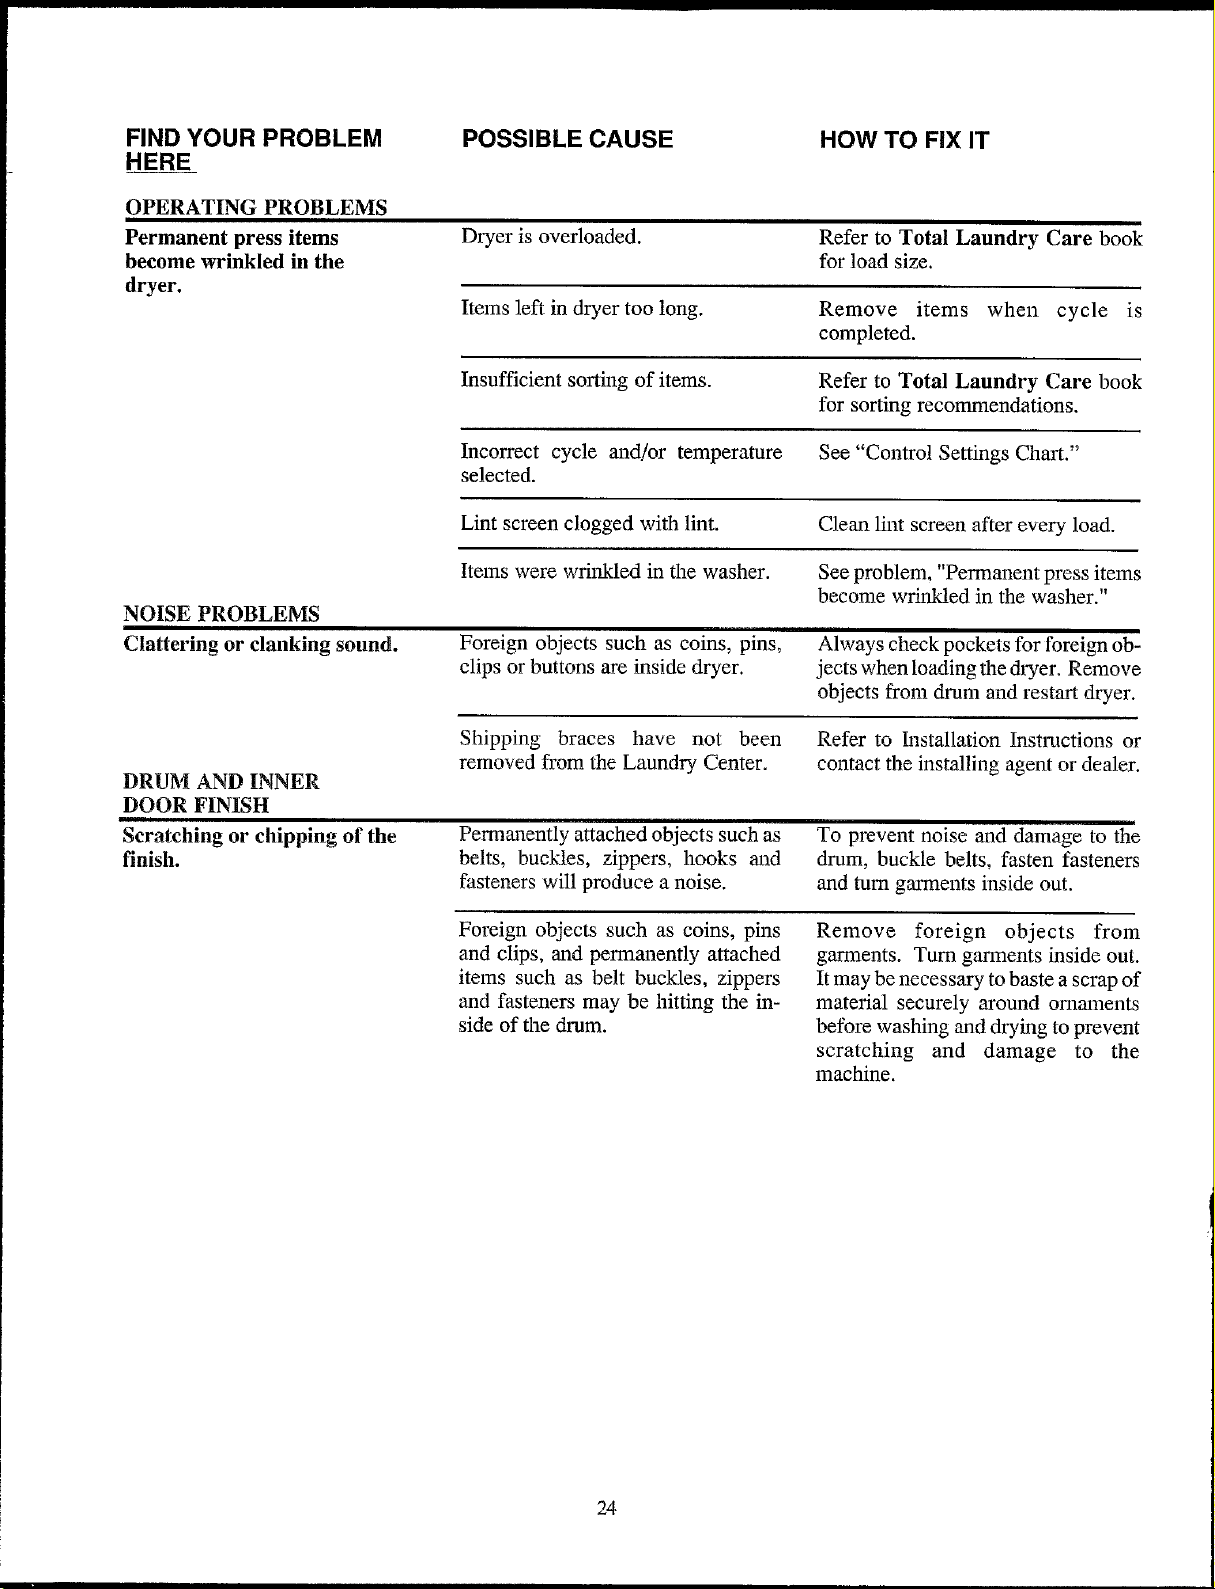
OPERATING PROBLEMS
Permanent press items
become wrinkled in the
dryer.
Dryer is overloaded. Refer to Total Laundry Care book
for load size.
Items left in dryer too long. Remove items when cycle is
completed.
Insufficient sorting of items. Refer to Total Laundry Care book
for sorting recommendations.
Incorrect cycle and!or temperature See "Contro! Settings Chart."
selected.
Lint screen clogged with lint. Clean lint screen after every load.
Items were wrinkled in the washer. See problem, "Permanent press items
become wrimkled in the washer."
NOISE PROBLEMS
Clattering or clanking sound. Foreign objects such as coins, pins,
clips or buttons are inside dryer. Always check pockets for foreign ob-
jects when loading the dryer. Remove
objects from drum and restart dryer.
DRUM AND INNER
DOOR FINISH
Scratching or chipping of the
finish.
Shipping braces have not been
removed from the Laundry Center.
Permanently attached objects such as
belts, buckles, zippers, hooks and
fasteners will produce a noise.
Refer to Installation Instructions or
contact the installing agent or dealer.
To prevent noise and damage to the
drum, buckle belts, fasten fasteners
and turn garments inside out.
Foreign objects such as coins, pins
and clips, and permanently attached
items such as belt buckles, zippers
and fasteners may be hitting the in-
side of the drum.
Remove foreign objects from
garments. Turn gannents inside out.
It may be necessary to baste a scrap of
material securely around ornaments
before washing and drying to prevent
scratching and damage to the
machine.
24.
To avoid unnecessary cost and inconvenience, make a few simple checks before
calling for service. Be sure you have followed the instructions in this Owner's
Guide and the Total Laundry Care book. Incorrect control settings often cause
problems. Check fuses and circuit breakers if the product does not operate.
ff you are unable to locate the cause of a problem, call for service. Insist on
factory service by WCI Consumer Parts & Service or a Frigidaire authorized
service agency.
IF YOU HAVE A PROBLEM WITH YOUR APPLIANCE,
FOLLOW THESE STEPS, IN ORDER:
1. Read the Avoid Service Checklist. This could help prevent charges for an
unnecessary service call, both during and after the warranty period. Com-
mon occurrences and their solutions can be found in the checklist.
2. Call Frigidaire Service. If your problem cannot be solved by using the
Avoid Service Checklist, call your Frigidaire dealer. If your dealer does not
have a service department, call the local WCI Consumer Parts & Service or
Frigidaire authorized service agent as directed in the wan'anty.
3. Call Frigidaire Customer Relations. If service cannot be obtaiiaed or the
service you receive is not satisfactory, you may write or call:
Frigidaire Company
Customer Relations Department
P.O. Box 7181
Dublin, Ohio 43017
(800) 451-7007.
4. Place the name, address and telephone number of your service agent in
the spaces below.
Product and feature specifications as described or illustrated are subject to
change without notice.
If You Need
Service
Parts &
Service
Nationwide
WCI Consumer
Parts & Service
White Consolidated Industries,
Inc. maintains a vast network of
factory authorized servicers to
provide prompt, courteous, pro-
fessional service for your
appliance anywhere you live or
move in the U.S.A.
25

_ _ iiii!iiii,_ _il_i _i_
Notes i
i,
26
Notes
27
You_r_Frig!daireLaundryCenter isprotected by this warranty
FULL ONE-YEAR WARRANTY (Excluding Alaska)
Frigidaire Company, aDivision ofWhite Consolidated Industries, Inc.,
warrants that Frigidaire will repair, without charge, any defect or
malfunction occurring in this Laundry Center during thefirst year a_er
date of purchase by the original consumer-owner.
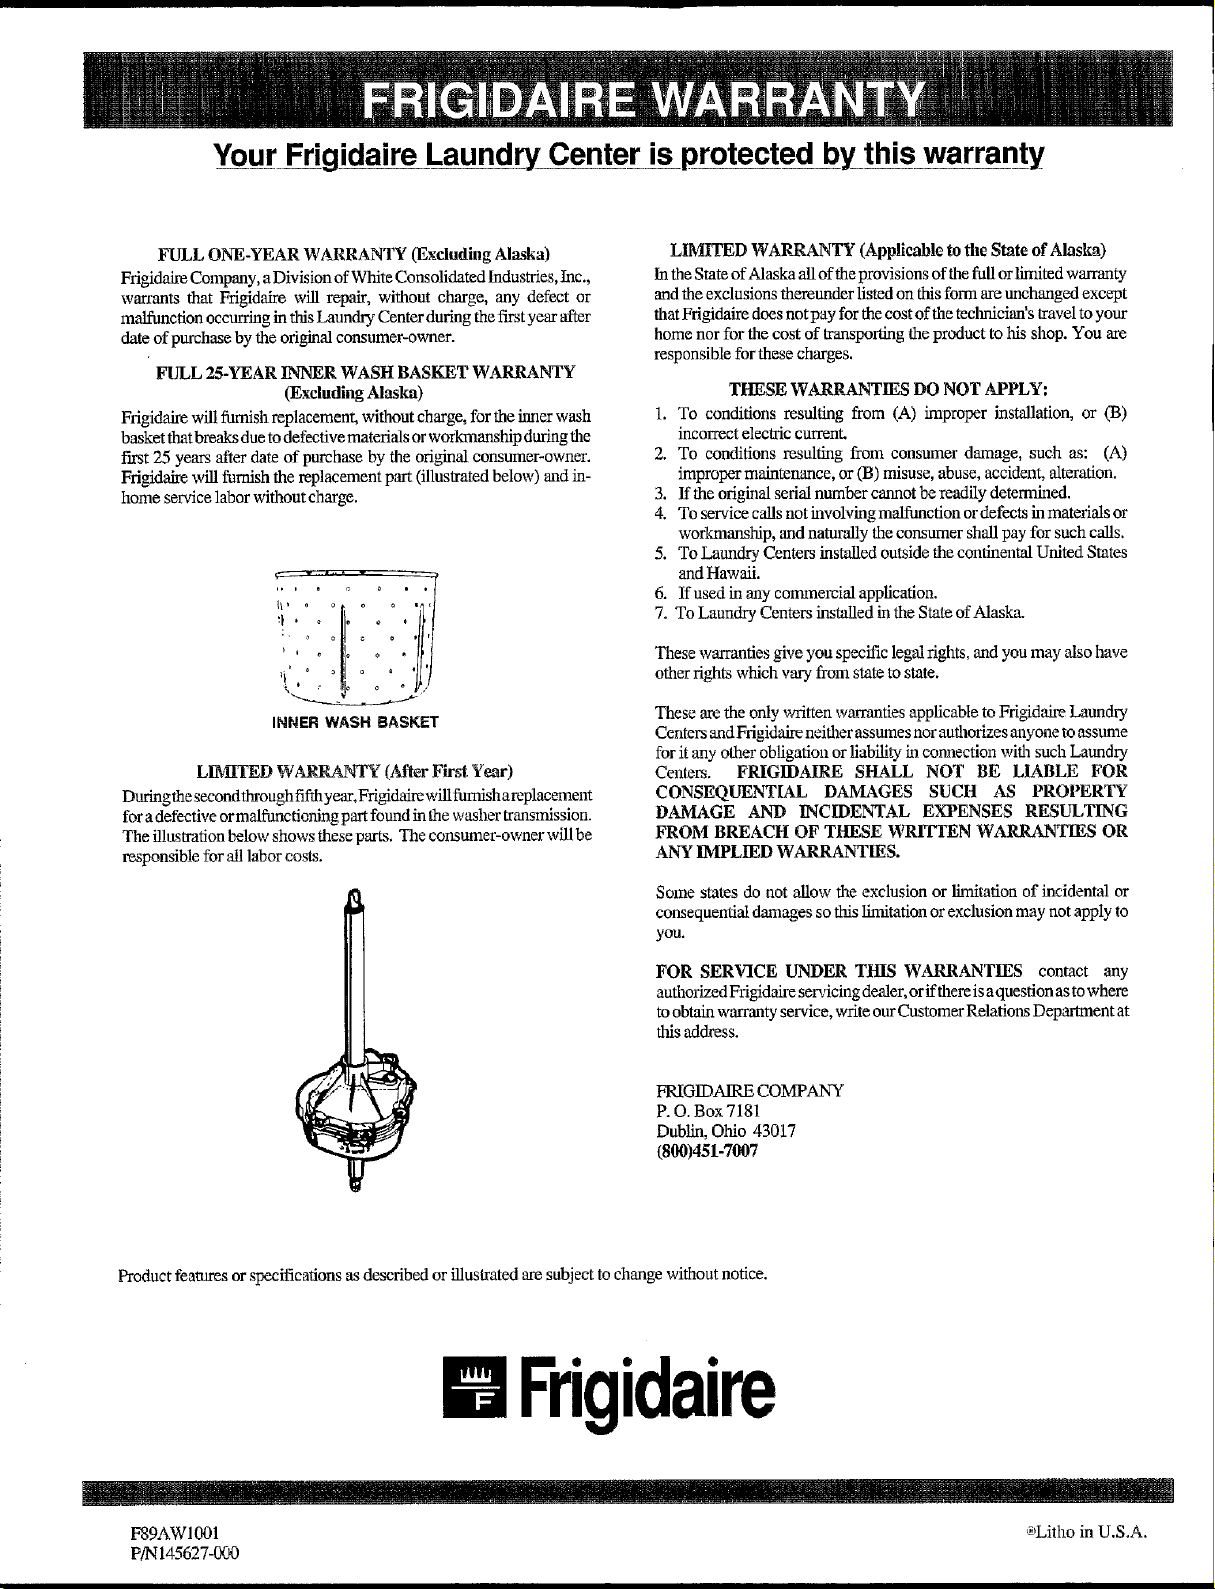
FULL 2,5-YEAR INNER WASH BASKET WARRANTY
(Excluding Alaska)
Frigidaire will furnish replacement, without charge, for the inner wash
basket that breaks due to defective materials orworkmanship during the
first 25 years after date of purchase by the original consumer-owner.
Frigidaire wi_ furnish the replacement part (ifinstmtod below) and in-
home service labor without charge.
iii01ii.....o
i ,'o °t,o°o'. 'fLt
INNERWASHBASKET
LIrvIVfEDWARIL_VI_ {After First Year)
Dudngthe secondthroughflfth year.Frigi'dairewill furnish areplacement
foradefective ormalfunctioning part found in thewasher transmission.
The illustration below shows these parts. The consumer-owner will be
responsible for 'alllaborcosts.
LIMITED WAILrO_NTY(Applicable tothe State of Alaska)
In the State ofAlaska all of theprovisions of thefull or limited warranty
andthe exclusions thereunder listed on this form areunchanged except
that Frigidaire does nnt pay for the cost of the technician's travel to your
home nor for the cost of transporting the product to his shop. You are
responsible for these charges.
THESE WARRANTIES DO NOT APPLY:
1. To conditions resulting from (A) improper installation, or 03)
incorrect electric current.
2. To conditions resulting from consumer damage, such as: (A)
improper maintenance, or 03) misuse, abuse, accident, alteration.
3. If the original serial number cannot be readiIy determined.
4. To service calls not involving malfunction ordefects in materials or
workmanship, and natumUy the consumer shall pay for such calls.
5. To Laundry Centers installed outside the continealtal United States
andHawaii.
6. If used in any commercial application.
7. To Laundry Centers installed in the State of Alaska.
Tliese warranties give you specific legal rights, and you may _so have
otherrights which vary from state to state.
These are the only written warraxlfies applicable to Frigidake Laundry
Centers and Frigidaire neither assumes nor authorizes anyoue to assunae
for it any other obligation or liability in connection with such Laundry
Ceuters. FRIGIDAIRE SHALL NOT BE LIABLE FOR
CONSEQUENTIAL DAMAGES SUCH AS PROPERTY
DAMAGE AND INCIDENTAL EXPENSES RESULTING
FROM BREACH OF THESE WRITTEN WARP_CFIES OR
ANY IMPLIED WARRANTIES.
Some s 'rates do not allow the exclusion or limitation of incidental or
consequentialdamages so this Iimitatinn or exclusion may not apply to
you.
FOR SERVICE UNDER THIS WARRANTIES contact any
authorized Frigidaire servicing dealer, orffthere isa question as towhere
toobtain warranty service, write ourCustomer Relations Deparlment at
thisaddress.
FRIGIDAIRE COMPANY
P. O. Box 7181
Dublin, Ohio 43017
(800)451-7007
Product features or specifications as described or illustrated are subject to change without notice.
mFrigidaire
F89AWI001 ®Litlio in U,S,A.
PiN 145627-000