
1
English
Español p. 16 Français p. 32
Important Instructions ........................................................................2
Getting Started ................................................................................... 6
Features ..............................................................................................8
Controls ...............................................................................................9
How To Use ....................................................................................... 11
Remote Control .................................................................................12
Grille & Blade Removal ..................................................................... 13
Cleaning ............................................................................................14
Troubleshooting ............................................................................... 15
CONTENTS
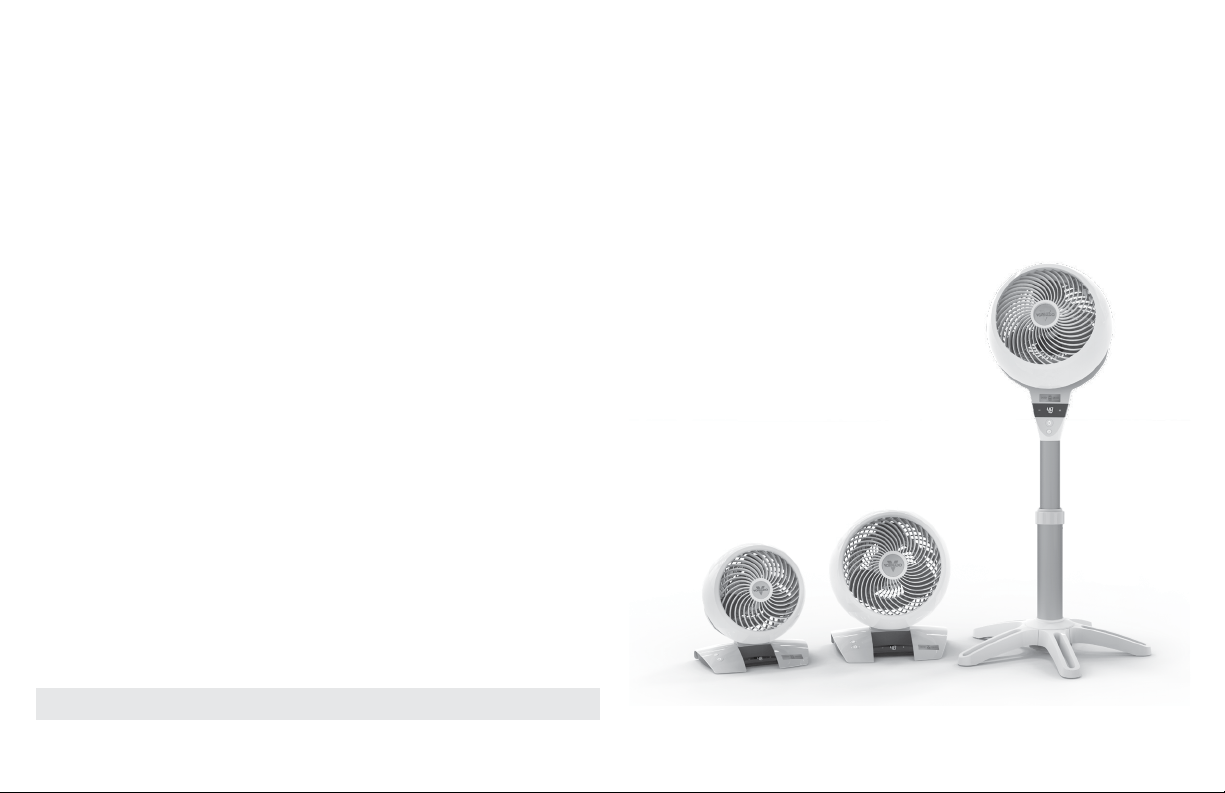
MODELS 5303DC, 6303DC, 6803DC OWNER’S GUIDE
GUÍA DEL PROPIETARIO DE MODELOS 5303DC, 6303DC, 6803DC
GUIDE D’UTILISATION – MODÈLES 5303DC, 6303DC, 6803DC
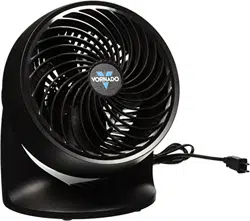
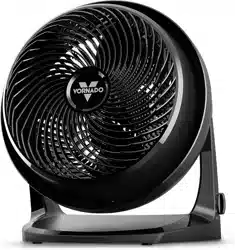
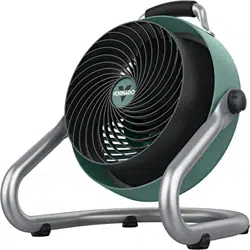
5303DC 6303DC 6803DC

2 English
READ AND SAVE THESE INSTRUCTIONS
IMPORTANT SAFETY INSTRUCTIONS
This owner’s guide and any additional inserts are considered part of
the product. They contain important information about safety, use
and disposal. Before using the product, please familiarize yourself
with all operating and safety instructions. Please keep all documents
for future reference and pass these documents on, together with
the product, to any future owner. See www.vornado.com/circulators-
manuals to view, download and print the most current version of
these instructions.
INTENDED USE: This product is intended to circulate the air in
indoor living spaces only in the United States and Canada. This
product is not intended for commercial or industrial use. The
manufacturer assumes no responsibility for damage or injury due to
unauthorized use or product modication. Failure to follow these
directions will void the product warranty.
WARNING: Risk to Children and Impaired Persons
Supervision is required during the installation, operation, cleaning
and maintenance of this product by children 12 years of age and
younger and anyone with reduced physical, sensory or mental
capabilities. Children should be supervised to ensure that they do not
play with the appliance, its parts and packaging material.
WARNING: Chemical burn hazard. Keep batteries away from
children.
WARNING: KEEP NEW AND USED BATTERIES AWAY FROM
CHILDREN. This product contains a lithium button/coin cell battery.
If a new or used lithium button/coin cell battery is swallowed or
enters the body, it can cause severe internal burns and can lead to
death in as little as 2 hours. Always completely secure the battery
compartment. If the battery compartment does not close securely,
stop using the product, remove the batteries, and keep it away from
children. If you think batteries might have been swallowed or placed
inside any part of the body, seek immediate medical attention. In the
US call the National Poison Control Center at 1-800-222-1222 or 202-
625-3333. In Canada call 416-813-5900.
INSTALLATION WARNING—To reduce risk of re, electrical
shock and injury to persons, observe the following:
- Place this product away from curtains, draperies, tablecloths and
other fabrics, since they may be drawn into the product, damage
the motor and/or cause a re.
- No part of this product (the appliance, power cord, plug,
packaging, etc.) should be placed near furnaces, replaces, stoves
or other high temperature heat sources. Do not use this product in
a window, on an uneven or unstable surface, or near water.
- The appliance, power supply, power cord and plug cannot come
into contact with water. Do not use this product on wet surfaces.
Do not use this product in a bathtub or shower or position product
where it may fall into a bathtub, laundry, swimming pool or other
water container. Do not use this product outdoors or expose it to
weather or elements.
- Do not run cord under carpeting. Do not cover cord with throw
rugs, runners, or similar coverings. Do not route cord under

3
English
furniture or appliances. Arrange cord away from trafc area and
where it will not be tripped over. The cord should not hang over
edges of counters or be placed where it can be crimped or closed
in doors. Place appliance near an easily accessible outlet so the
product can be unplugged quickly during an emergency.
SAFE USE WARNING—To reduce risk of re, electrical shock and
injury to persons, observe the following:
- WARNING: To reduce likelihood of circuit overload, re and electric
shock, do not operate with a solid state speed device, such as a
dimmer control switch.
- Do not operate any fan with a damaged cord or plug. Discard fan
or return to an authorized service facility for examination and/or
repair.
- Do not operate unit if the unit has been dropped or damaged. Do
not use this product if it has a damaged power cord or plug. To
avoid risk of electrical shock, do not attempt to repair or replace
parts. Only original replacement parts may be used. If the power
cord is damaged, it must be replaced by the manufacturer, its
service agent, or similarly qualied persons in order to avoid a
hazard. Contact Vornado Consumer Service at 1-800-234-0604
(phone) or [email protected] (email) for further
instructions about replacement and repair.
- Risk of re. Your appliance may be equipped with a detachable
power supply or a cord/plug with a safety device such as a fuse. Use
only the power cord and plug provided. The detachable external
power supply and cord have no user replaceable parts.
- Before plugging power cord into electrical outlet, be sure that
all electrical information on the rating label, including voltage, is
compatible with your outlet’s power supply.
- Do not sit or stand on product.
- Never use the cord as a handle or otherwise yank, strain or stretch
the power cord.
- While the product is plugged in, do not insert or allow foreign
objects to enter any input or output opening as this may cause risk
of electric shock or re, or damage the product.
- A loose t between wall outlet (receptacle) and plug may cause
overheating and distortion of the plug. Discontinue use of the
product in this outlet. Contact a qualied electrician to replace
loose or worn outlets.
- This appliance (models 5303DC, 6303DC only) has a polarized plug
(one blade is wider than the other). To reduce the risk of electric
shock, this plug is intended to t in a polarized outlet only one way.
If the plug does not t fully in the outlet, reverse the plug. If it still
does not t, contact a qualied electrician. Do not attempt to defeat
this safety feature.
- Before moving, repositioning, servicing, cleaning and when not in
use, use the product controls to turn off the power and then unplug.
To disconnect from outlet, grasp and pull only the plug. Also, power
off and unplug if the product will be left unattended for an extended
period of time or during electrical storms.
SERVICING WARNING—To reduce risk of re, electrical shock
and injury to persons, observe the following:
- Clean your product regularly, only as is instructed in this manual.
Prior to cleaning, turn off the power on your product and unplug. Do
not use gasoline, thinners, solvents, ammonias or other chemicals
for cleaning. Refer to the CLEANING instructions provided.
- Do not open appliance housing while product is plugged in. To
avoid risk of shock, all service and/or repairs must be done by a
Vornado Authorized Service Center.
- This product (models 5303DC, 6303DC only) employs overload
4 English
protection (fuse). A blown fuse indicates an overload or short-circuit
situation. If the fuse blows, unplug the product from the outlet.
Replace the fuse as per the user servicing instructions (follow
product marking for proper fuse rating) and check the product. If
the replacement fuse blows, a short-circuit may be present and the
product should be discarded or returned to an authorized service
facility for examination and/or repair.
User Servicing Instructions
1. Using the product controls, turn off the appliance.
2. Grasp the plug (not the cord) and disconnect from the outlet.
3. Risk of Fire. Replace fuse only with 2.5 Amp, 125 Volt fuse as
approved by Vornado Consumer Service. For an authorized
replacement fuse, please contact Vornado Consumer Service.
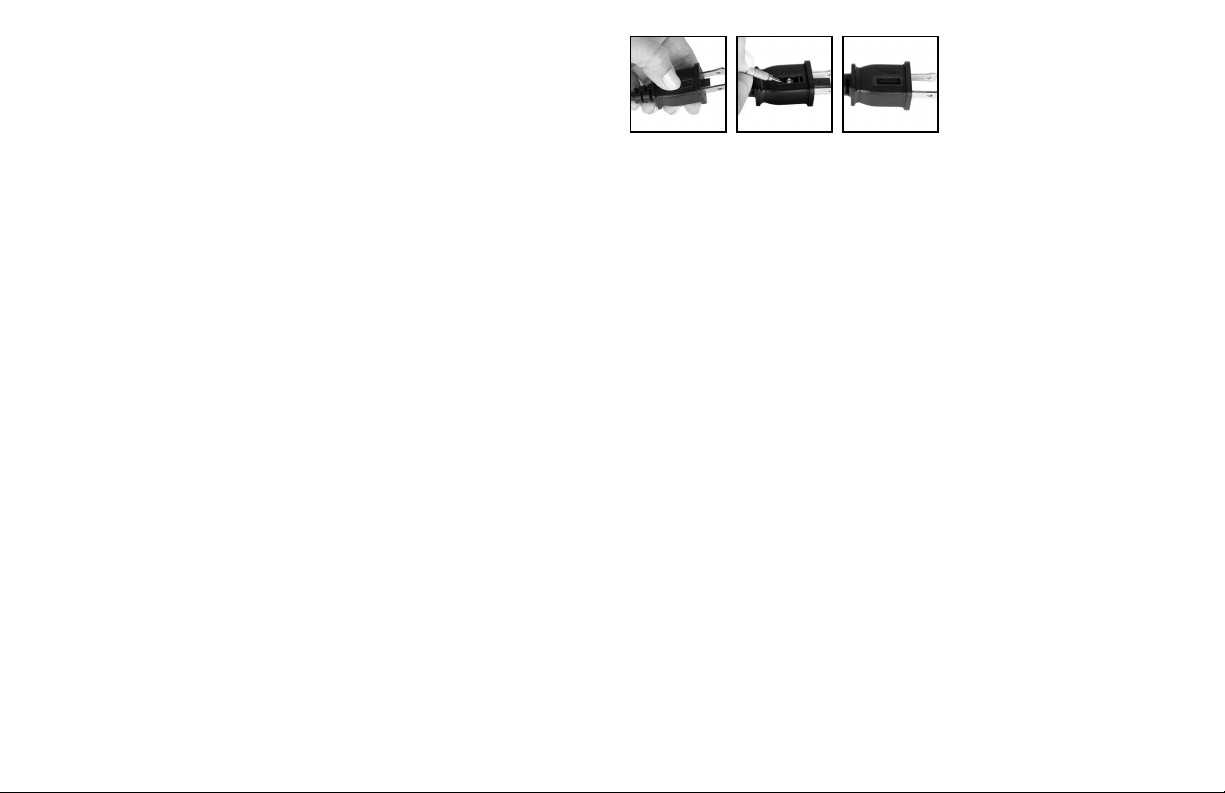
4. Once the replacement is received, use a small at-head
screwdriver to slide open the fuse cover (located on the plug)
(See Fig. A).
5. Remove fuse by using the screwdriver to gently lift each end of
the fuse (See Fig. B).
6. Install the replacement fuse by using the screwdriver to gently
push each metal end of the fuse into the receptacle one at a
time. Do not push on the center of the fuse—it is fragile and
may break.
7. Slide the fuse cover closed using the screwdriver. When
closed, the cover should t completely in the plug. No part of
the cover should stick out (See Fig. C).
8. Plug your appliance into the outlet and turn the power on.
9. If the replacement fuse blows, a short-circuit may be present
and the product should be discarded or returned to an
authorized service facility for examination and/or repair.
Risk of re. Do not replace attachment plug. Contains a safety device
(fuse, AFCI, LCDI) that should not be removed. Discard product if the
attachment plug is damaged.
FCC Compliance Statement
NOTE: This equipment has been tested and complies with Part 15 of
the FCC Rules. Operation is subject to the following two conditions:
(1) This device may not cause harmful interference, and (2) this device
must accept any interference received, including interference that may
cause undesired operation.
This equipment has been tested and found to comply with the
limits for a Class B digital device, pursuant to Part 15 of the FCC
Rules. These limits are designed to provide reasonable protection
against harmful interference in a residential installation. This product
generates, uses and can radiate radio frequency energy and, if not
installed and used in accordance with the instructions, may cause
harmful interference to radio communications.
However, there is no guarantee that interference will not occur in a
particular installation. If this product does cause harmful interference
to radio or television reception, which can be determined by turning
the product off and on, the user is encouraged to try to correct the
interference by one or more of the following measures:
- Reorient or relocate the receiving antenna.
- Increase the separation between the product and the receiver.
Fig. A Fig. B Fig. C

5
English
- Connect the product into an outlet on a circuit different from that to
which the receiver is connected.
- Contact Vornado Consumer Service or dealer or an experienced
radio/TV technician for help.
This Class B digital apparatus complies with Canadian ICES-003.
Changes or modications to this unit not expressly approved by the
party responsible for compliance could void the user’s authority to
operate the product.
Supplier's FCC Declaration of Conformity
Unique Identier: Vornado Models 5303DC, 6303DC, 6803DC
Responsible Party: Vornado Air LLC
Mailing Address : 415 E. 13th St., Andover, KS 67002
Contact: www.vornado.com
WARNING: Batteries may pose a choking hazard. Do not let
children handle batteries.
BATTERY DISPOSAL: Please dispose of batteries according to the
local laws and regulations of your region, and while keeping them
away from children. Some batteries may be recycled and accepted
for disposal at your local recycling center. DO NOT DISPOSE OF
BATTERIES IN FIRE. BATTERIES MAY EXPLODE OR LEAK. New
and used batteries may cause injury. Keep new and used cells (or
batteries) away from children.
SAVE THESE INSTRUCTIONS
6 English
Lock Release
Button
D
C
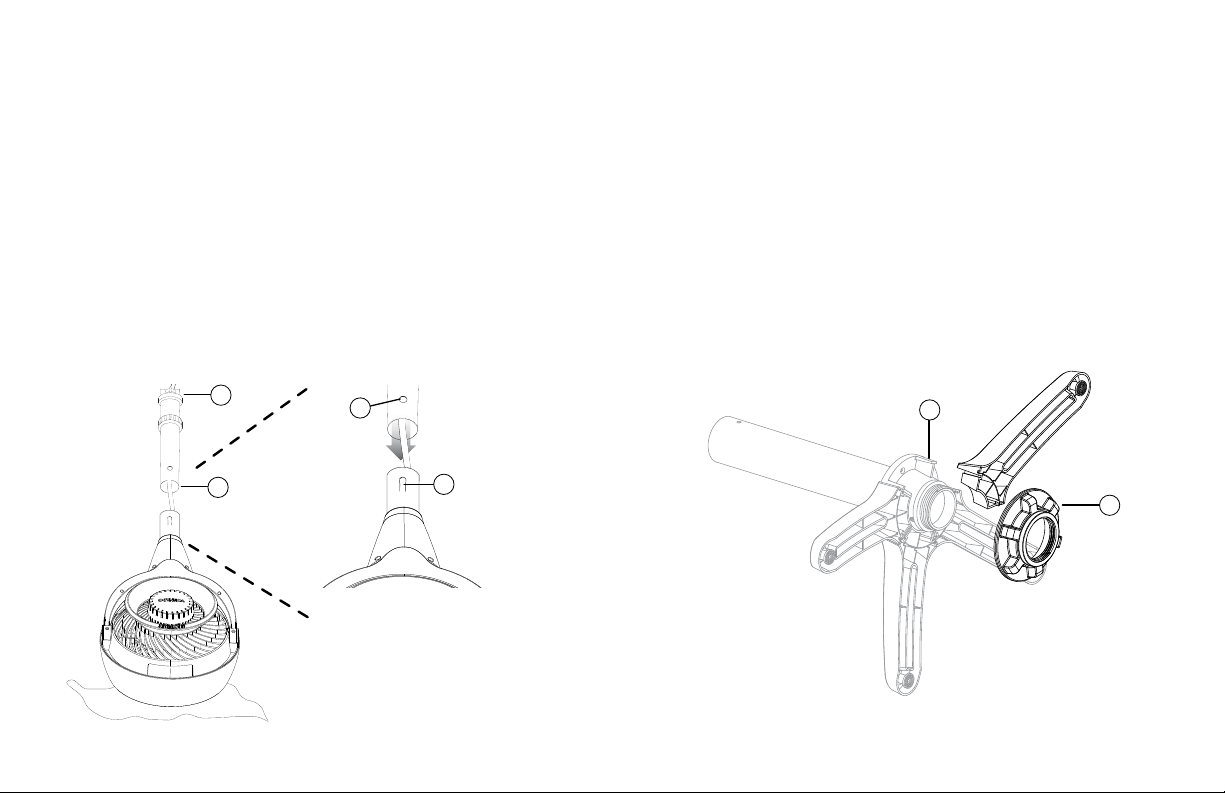
Installing Circulator Head (Model 6803DC Only)
No tools required!
1. Gently place the circulator head face down on the ground on a
soft cloth to avoid scratches or damages to the unit. Insert power
cord into the top of pole (A) and pull through the bottom (B). Align
the Lock Release Button (C) on circulator head with the hole (D)
located on the pole. Push the pole onto the circulator head until
the Lock Release Button snaps into place.
A
B
Stand Assembly (Model 6803DC Only)
1. The upper pole and lower pole are pre-assembled, with the
fastening nut (E) secured on the underside of the base. Rotate
fastening nut counter- clockwise to remove.
2. The legs are designed to t into the grooves (F) on the underside
of the base cap. Assemble all the legs onto the pole, then
replace fastening nut by rotating clockwise to secure all the legs
in place.
E
F
GETTING STARTED
7
English
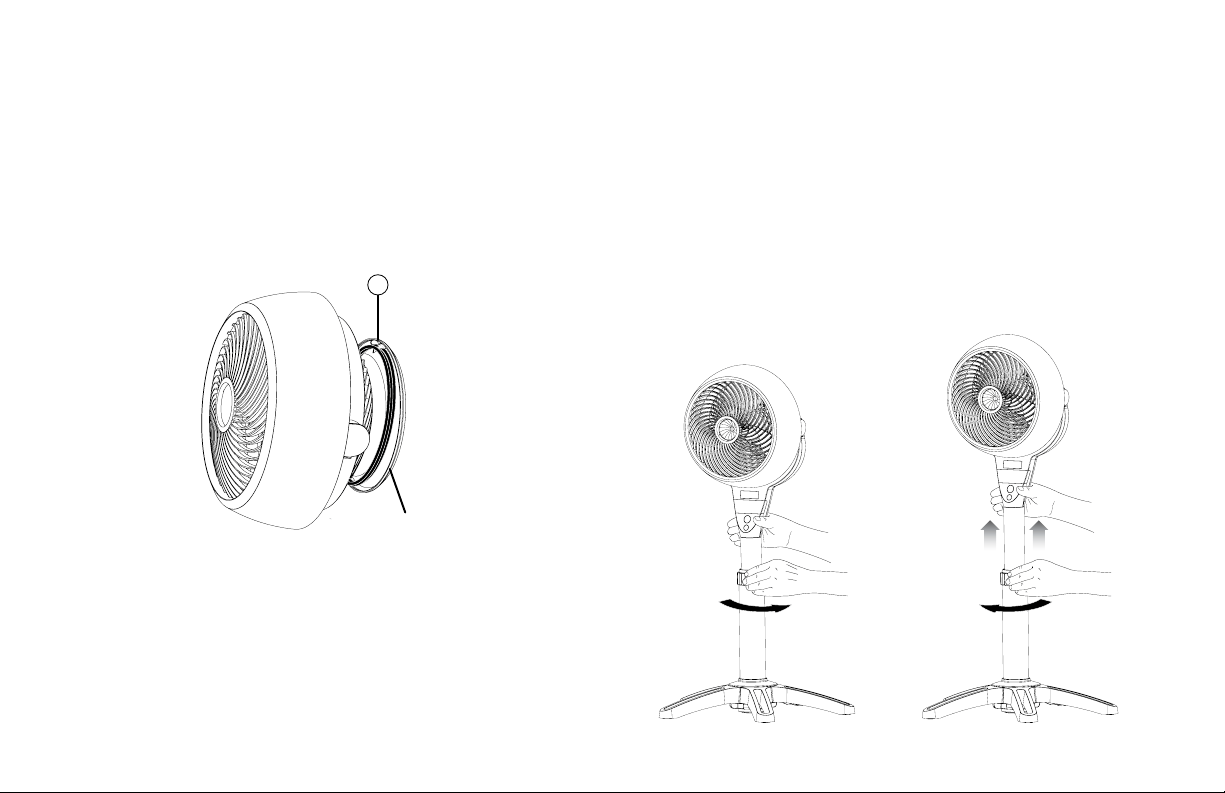
Adjusting Height (Model 6803DC Only)
1. Before adjusting the height of the circulator, support the
circulator head with one hand. Use your other hand to loosen the
height adjustment collar by gently rotating it counter-clockwise.
2. Slowly raise or lower the pole to the desired height and secure
into position by rotating the adjustment collar clockwise until tight.
Air Accelerator
G
Cord Management (Models 5303DC, 6303DC Only)
1. Wrap cord around Air Accelerator, located on back of
unit. Secure cord with three clips (G) located at 2, 6 and 10
o'clock positions.
GETTING STARTED
(Continued)
8 English
FEATURES
SILICON FEET
Non-marking feet added
for stability.
FINGER FRIENDLY
DESIGN
Resists curious ngers.
DIRECTABLE AIRFLOW
Direct the airow where
you want it.
CORD MANAGEMENT
Integrated cord wrap.
REMOTE CONTROL
Convenience at your ngertips.
ENERGY-SAVING TIMER
1–12 hour timer.
TOUCH-SENSITIVE
CONTROLS (99 SPEEDS)
A speed setting for every
comfort level.
9
English
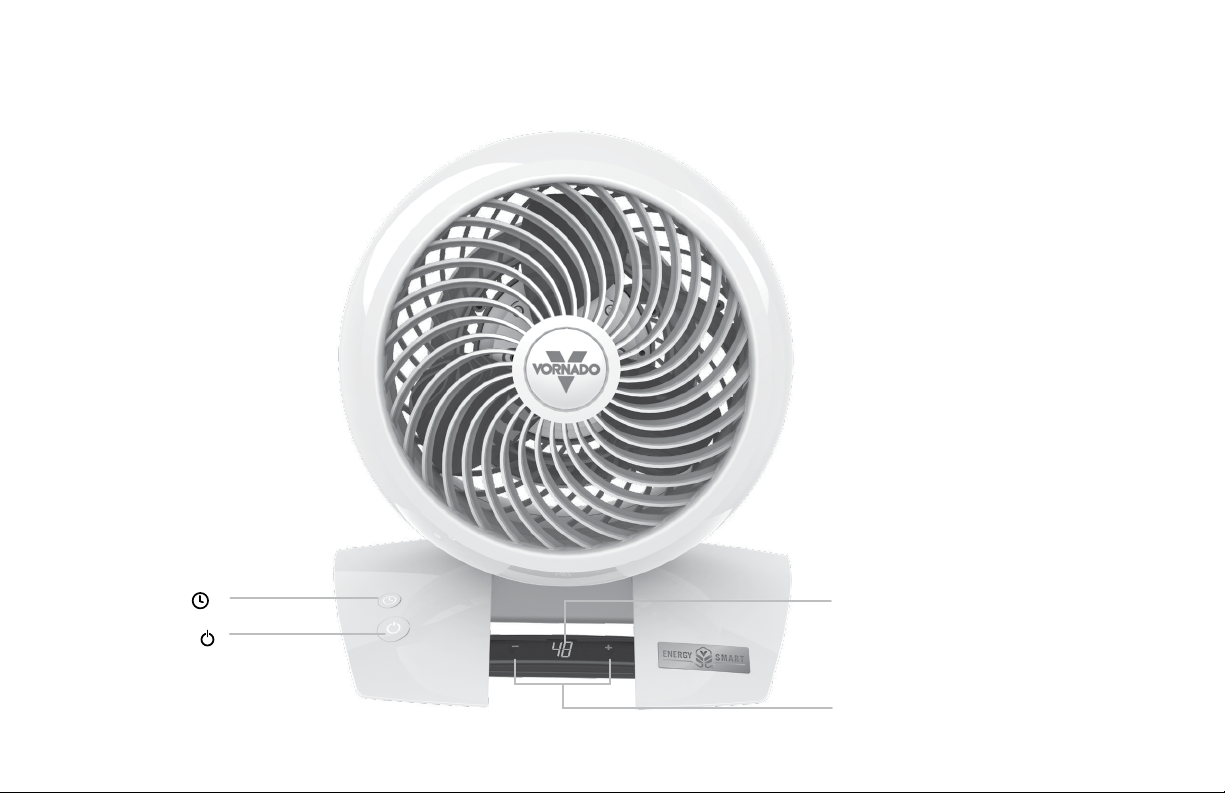
CONTROLS
Models 5303DC, 6303DC Only
SPEED/TIMER
ADJUSTMENT BUTTONS -/+
TIMER BUTTON
POWER ON/OFF
SPEED/TIMER
INDICATOR DISPLAY
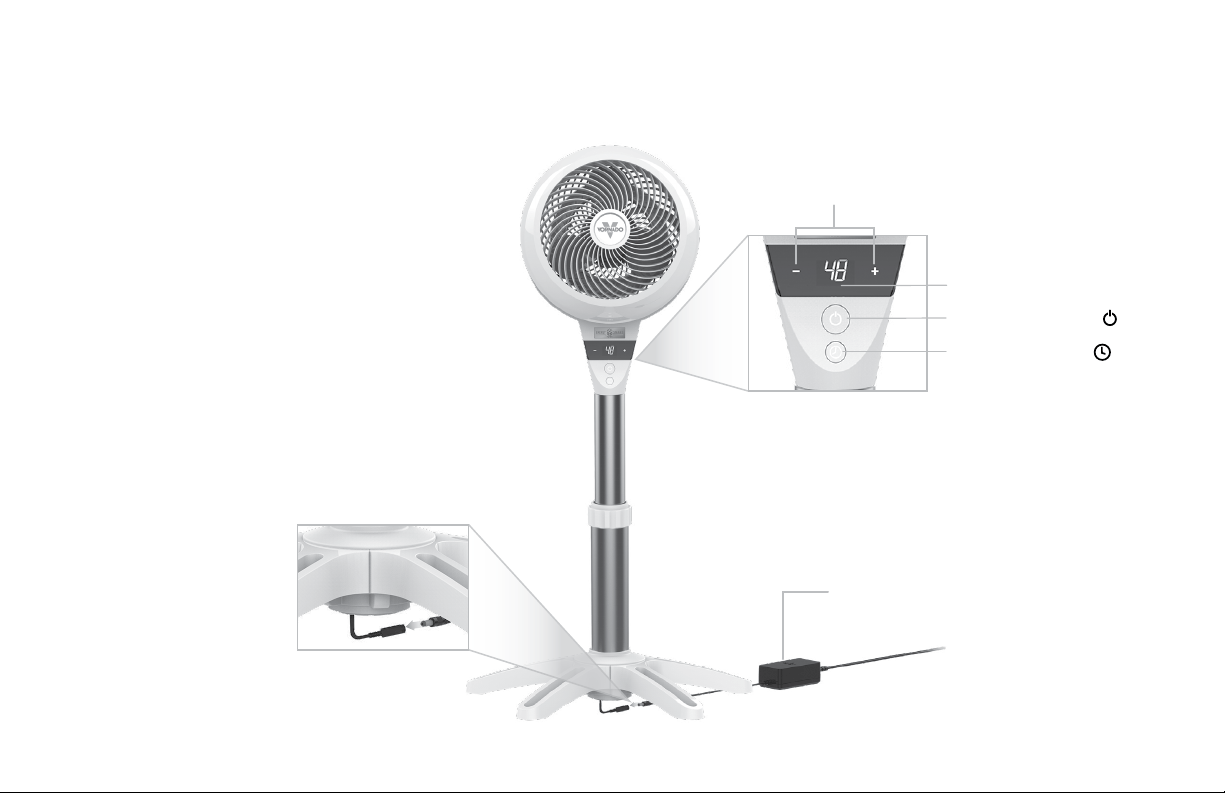
10 English
TIMER BUTTON
POWER ON/OFF
1. Insert DC power cord plug
into port that extends from
the bottom of circulator.
2. Connect the AC power
cord to the power supply.
3. Plug the power cord into
a power outlet.
POWER SUPPLY
(24V DC/2.5 AMP)
CONTROLS
Model 6803DC Only
SPEED/TIMER
ADJUSTMENT BUTTONS -/+
SPEED/TIMER
INDICATOR DISPLAY
Note: The external
power supply may
become slightly
warm to the touch
during normal
operation.
11
English
HOW TO USE
4. To adjust timer, repeat Step Three.
5. To cancel timer, repeat Step Three and
set timer for 0.
CORD MANAGEMENT
1. Wrap cord around Air Accelerator,
located on back of unit. Secure cord with
three clips located at 2, 6 and 10 o'clock
positions.
1. Touch to power on.
Your circulator returns to last saved
memory setting.
2. Select desired speed by pressing -/+.
Press and hold -/+ to adjust speed up
or down in 5 speed increments. Speed is
indicated by number shown on Speed/
Timer Indicator Display.
3. Press
to activate timer. The
illuminates and Speed/Timer Indicator
Display ashes 0 to indicate Timer
Adjustment Mode. While in this mode,
select amount of time in one-hour
intervals by pressing -/+. After three
seconds, ashing stops and display shows
hours to indicate timer is set. The display
returns to the last speed selected. Touch
to quickly tell how many hours are
remaining on the timer.
12 English
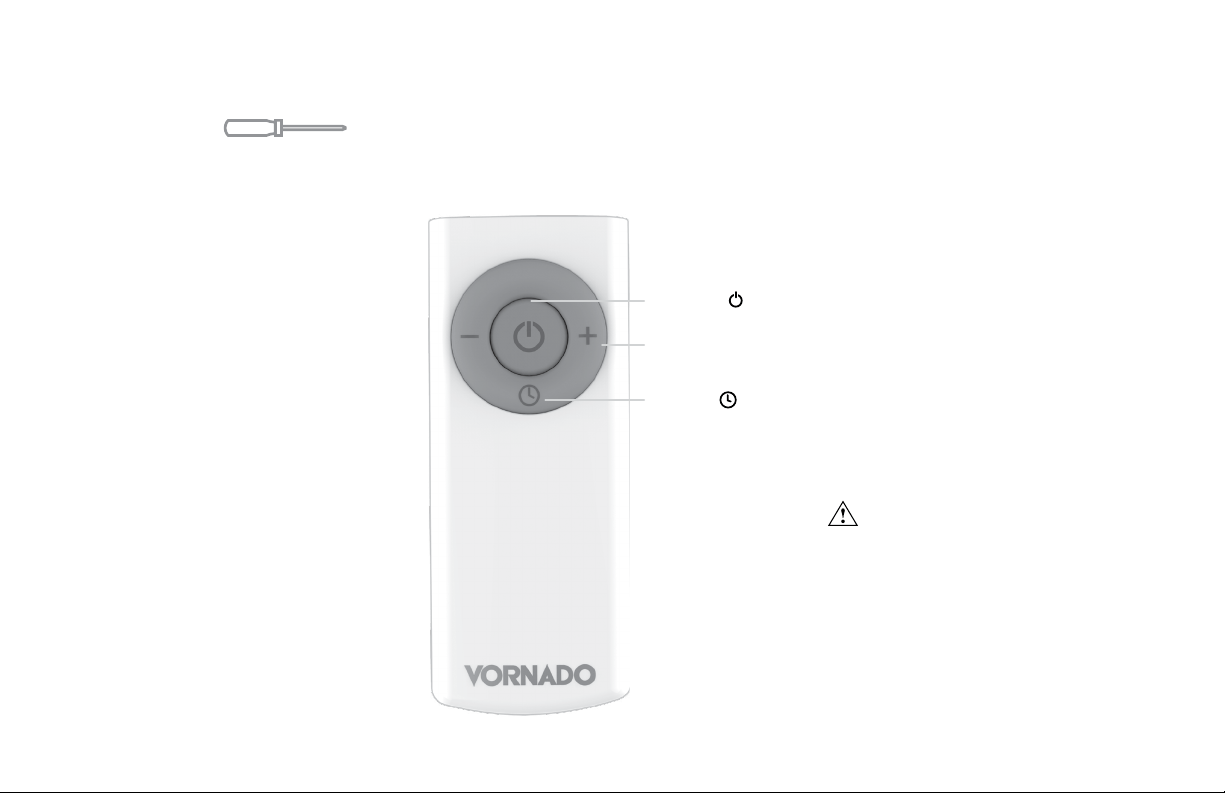
REMOTE CONTROL
Screwdriver required.
1. For battery replacement, the remote
requires one coin style 3V CR2032 battery.
Always use the correct size and grade of
battery for this product.
2. To replace battery, open battery door on
the back side of the remote control (you
will need to loosen the small screw on
door using a #1 Phillips screwdriver). If
necessary, clean the battery contacts and
also those of the device prior to battery
installation. Remove any plastic protection
from the battery and place it in the
remote with the + side facing out. Ensure
the battery is installed correctly with
regard to polarity. Replace the battery
door and screw.
Note: Remove battery from the remote
control when not in use for an extended
period of time and always remove dead
battery immediately and replace with fresh.
Do not store dead battery in remote.
The remote control functions are the same as
the control panel on the circulator.
The remote requires a line-of-sight path to
allow for the signal to be received by the
circulator. Point the remote control at the
display panel for best reception.
Your circulator remote includes (1) coin style 3V CR2032 battery. Battery comes pre-installed. Remove battery pull tab before rst use.
POWER
TIMER
SPEED/TIMER
ADJUSTMENT -/+
WARNING: This product contains a
button battery. If swallowed, it could cause
severe injury or death in just 2 hours. Seek
medical attention immediately.
13
English
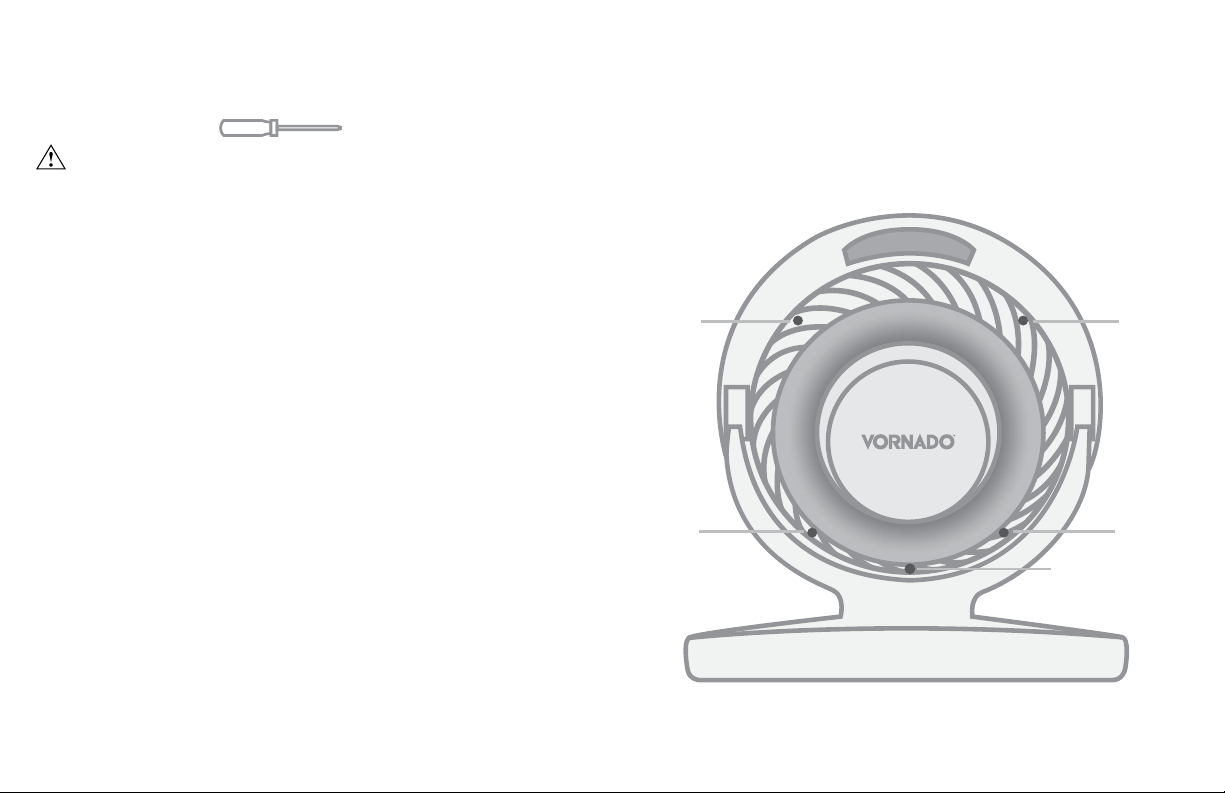
GRILLE & BLADE REMOVAL
Screwdriver required.
REMOVABLE GRILLE
1. Using a phillips head screwdriver, remove grille by unscrewing the
4 screws located along the perimeter of the inlet grille at roughly
2, 5, 7, and 10 o’clock positions. This will release the grille. To
reattach, position grille so the logo in the center of the grille is
straight. Align the Locator Pin to reconnect grille. Once aligned
replace screws.
2. Dust or wash with a mild dishwashing soap. Do not place grille in
the dishwasher. The excessive heat can distort the plastic.
BLADE REMOVAL
1. It is possible to remove the blade should something accidentally
get wrapped around the motor shaft. First, remove the nut from
the shaft. Turn the nut clockwise to loosen. Pull the blade straight
out from the shaft. When replacing, the blade can only go on the
shaft one way. Be certain the at side of the shaft aligns directly
with the corresponding at side on the blade’s socket. Push the
blade all the way on the shaft until it bottoms out. Do not use a
hammer as this could result in bearing damage. Reinstall nut.
2. Wipe blade with a damp cloth. If your Air Circulator is used in a
greasy environment, such as a kitchen, mild soap or a common
household cleaner may be necessary. Do not use solvents.
WARNING: To reduce the risk of electrical shock and injury to persons, unplug the circulator before removing grille or blade.
Screw
ScrewScrew
Screw
Locator Pin
14 English
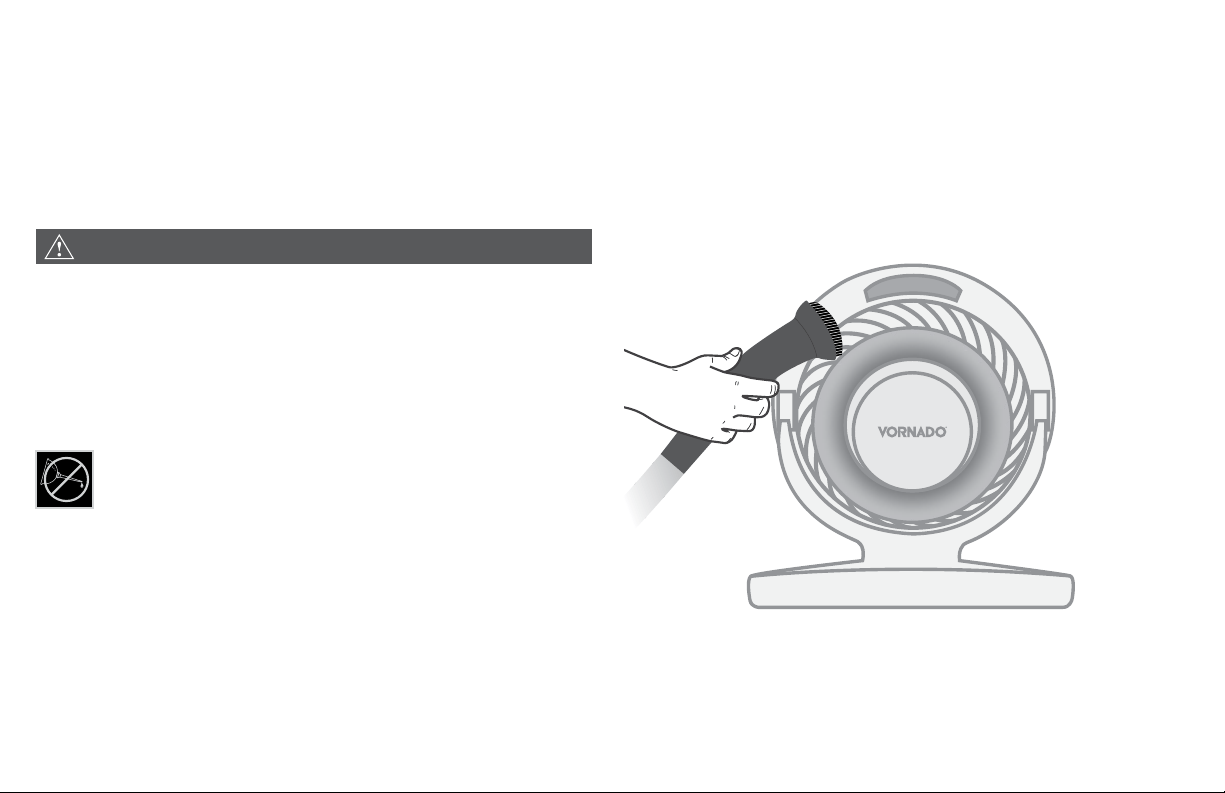
CLEANING
Because your product moves a substantial amount of air, it will need regular cleaning to remove lint, dust and grime. Never clean the product in
any manner other than instructed in this owner's guide.
WARNING
Observe the following safety information to avoid risks and
property damage.
Do unplug your product before cleaning.
Do Not use gasoline, thinners, solvents, ammonias or other
chemicals for cleaning.
Do Not attempt to repair or replace parts.
The motor is permanently lubricated and requires no oiling.
1. Dust or wipe the circulator with a damp cloth.
2. Use the brush attachment on your household vacuum cleaner to
vacuum any accumulated dust.

15
English
TROUBLESHOOTING
POSSIBLE CAUSE AND SOLUTIONPROBLEM
Unit is not plugged in. Plug Power Cord into electrical outlet. Model 6803DC Only - Ensure the AC power
cord is plugged into the power supply and ensure DC power cord is plugged into the circulator.
Ensure unit fan speed setting is selected.
Plug fuse has blown (USA Models 5303DC, 6303DC Only). Replace fuse. See USER SERVICING
INSTRUCTIONS.
Unit is damaged or in need of repair. Cease usage and unplug. Contact Consumer Service for assistance.
The outlet is worn or damaged. Try another outlet or contact a qualied electrician.
Unit set to a low speed setting. Adjust to a higher speed setting.
Airow is blocked. Remove obstruction.
Adjust direction of airow towards the user.
Under certain conditions, it is possible for a reset GFCI (Ground Fault Circuit Interrupter) outlet to trip
when the user is changing speeds on a Vornado circulator. In this event, change to an outlet that is not
connected to a GFCI device. It could also indicate a weak or defective GFCI outlet. Contact a qualied
electrician to check the GFCI outlet.
The battery is dead. Replace with (1) new 3 volt CR2032 battery. Refer to REMOTE CONTROL.
The remote requires a line-of-sight path to allow for the signal to be received by the unit. Position the unit
so the receiver lens (located inside the display panel) is visible from the remote control.
The unit fails to power on.
Airow is weak or slow.
GFCI has tripped.
Remote control is
notworking.

16 Français
DÉPANNAGE
CAUSE POSSIBLE ET SOLUTIONPROBLÈME
L’appareil n’est pas branché. Branchez le cordon d’alimentation dans une prise électrique. Modèle 6803DC seulement – Assurez-
vous que le cordon d’alimentation CA est branché dans le bloc d’alimentation et que le cordon d’alimentation CC est branché
dans le ventilateur.
Assurez-vous d’avoir sélectionné un réglage de vitesse.
Le fusible de la che électrique a sauté (modèles des É.-U. seulement 5303DC, 6303DC, 7503DC). Remplacez le fusible (voir
INSTRUCTIONS DE RÉPARATION À L’INTENTION DE L’UTILISATEUR.
L’appareil est endommagé ou il doit être réparé. Cessez d’utiliser l’appareil et débranchez-le. Contactez le service à la clientèle
pour obtenir de l’aide.
La prise est usée ou endommagée. Utilisez une autre prise ou contactez un électricien compétent.
L’appareil a été réglé à vitesse faible. Utilisez une vitesse plus élevée.
La circulation d’air est entravée. Enlevez ce qui entrave la circulation d’air.
Dirigez la circulation d’air vers l’utilisateur.
Dans certaines conditions, il est possible qu’un DDFT (disjoncteur de fuite de terre) avec touche de réinitialisation soit déclenché
quand l’utilisateur change la vitesse d’un ventilateur Vornado. Dans ce cas, branchez l’appareil dans une prise non reliée à
un DDFT. Le problème peut aussi indiquer que la prise reliée au DDFT est faible ou défectueuse. Contactez un électricien
compétent pour faire vérier la prise reliée au DDFT.
La pile est morte. Remplacez-la par une (1) nouvelle pile CR2032 de 3 volts. Voir TÉLÉCOMMANDE.
Pour que l’appareil capte le signal de la télécommande, aucun obstacle ne doit entraver la portée optique de la télécommande.
Placez l’appareil de façon que la lentille du récepteur (située à l’intérieur du tableau de l’afcheur) soit visible à partir de
la télécommande.
L’appareil ne se met
pas sous tension.
La circulation d’air est
faible ou lente.
Le DDFT a été
déclenché.
La télécommande ne
fonctionne pas.

17
Français
ANS
SATISFACTION
GARANTIE
Vornado Air LLC ("Vornado") garantit au consommateur ou acheteur original cela
Vornado ® ensemble salle circulateur ("produit") est exempt de tout défaut de matériau ou de
fabrication pendant une période de dix (10) ans à compter de la date d'achat. Si un tel défaut
est découvert pendant la période de garantie, Vornado, à son gré, réparera ou remplacera le
produit sans frais.
Pour réparation sous garantie ou service :
Appelez le 1-800-234-0604 ou par courriel [email protected] pour obtenir un formulaire
d'autorisation de retour ("RA"). S'il vous plaît avoir ou inclure le numéro de modèle de votre
produit et le numéro de série, ainsi que votre nom, adresse, ville, État, code postal et numéro
de téléphone lorsque vous communiquez avec Vornado service sous garantie.
Après avoir reçu le formulaire RA, expédier votre produit à :
Vornado Air LLC Attn: Garantie & réparation 415 East 13th Street Andover, KS 67002. Pour
votre commodité, veuillez avoir votre numéro de modèle et le numéro de série lorsque vous
communiquez avec
Vornado avec les demandes de service. An d'assurer une gestion correcte, paquets doivent
porter clairement le numéro RA. Paquets non clairement marqués du numéro RA peuvent être
refusées au quai de réception. S'il vous plaît permettre 1-2 semaines pour la réparation et le
retour de votre produit après réception du produit.
Réparations non couvertes par la garantie ou en dehors de la période de garantie exigera une
taxe pour couvrir le coût des matériaux, main de œuvre, de manutention et d'expédition. Cette
garantie ne s'applique pas aux défauts résultant de l'abus du produit, modication, altération,
réparation ou entretien du produit par quiconque autre que Vornado, manipulation inadé-
quate, une mauvaise maintenance, commercial l'utilisation du produit, les dommages qui se
produisent lors de l'expédition ou sont attribuées aux cas de force majeure. RÉPARATION OU
REMPLACEMENT SELON LES TERMES DE CETTE GARANTIE EST LE RECOURS EXCLUSIF
DU CONSOMMATEUR. VORNADO DÉCLINE TOUTE RESPONSABILITÉ POUR TOUT DOM-
MAGE INDIRECT POUR VIOLATION DE TOUTE GARANTIE EXPRESSE OU IMPLICITE SUR CE
PRODUIT. SAUF DANS LA MESURE INTERDITE PAR LA LOI APPLICABLE, TOUTE GARANTIE
IMPLICITE DE QUALITÉ MARCHANDE OU D'ADEQUATION A UN USAGE PARTICULIER SUR
CE PRODUIT EST LIMITÉE À LA DURÉE DE CETTE GARANTIE. Certains États ne pas per-
mettre l'exclusion ou la limitation des dommages accessoires ou indirects, ou permettent la
limitation sur la durée des garanties implicites, il est possible donc les limitations ou exclusions
ci-dessus peuvent ne pas vous concerner. Cette garantie vous donne des droits légaux spéci-
ques et vous pouvez avoir d'autres droits qui varient d'un État à l'autre.
Tous les noms de sociétés et noms de produit sont des marques déposées de leurs pro-
priétaires respectifs. © Tous droits réservés. Toutes les informations techniques, données et
instructions pour l'installation, le raccordement et l'exploitation contenues dans ces instruc-
tions d'utilisation correspondent aux informations plus récentes disponibles au moment de
l'impression. Le contenu de ce manuel peut-être différer légèrement du produit réel. Observer
tous les suppléments additionnels.
Le fabricant n'assume aucune responsabilité pour les dommages résultant du non-respect de
ces instructions ou produit une mauvaise utilisation. Toute cette action annulera la garantie du
produit.
Toute modication du produit non homologué, réparation par un centre de réparation non au-
torisée, ou l'utilisation de pièces de rechange non agréée n'est pas recommandée et toutes les
conséquences ne seront pas couverts par les services d'assistance ou de garanties du produit.
GARANTIE
Nous espérons que ce produit est parfait. Si vous n'êtes pas satisfait avec ce produit, faites-nous savoir.
Nous Sommes Là Pour Aider
800.234.0604
vornado.com
© 2021 Vornado Air LLC Andover, KS 67002 É.U. Brevet en instance. Spécifications sujettes à
modification sans préavis. Vornado ® est une marque détenue par Vornado Air LLC.
Conception, mise au point et soutien technique effectués à Andover, au KS.