Specifications
Indexed Terms: Bottom Freezer Refrigerator, Kenmore Elite Series, Refrigerator, Refrigerator-freezer
Kenmore 79574049411 Questions and Answers

Table of Contents
SETTING THE CONTROLS
Temperature
NOTE: When changing control settings, wait 24 hours before making additional adjustments. The controls are set correctly when milk or juice is as cold as you would like and when ice cream is firm. If the temperature in either compartment is too cold or too warm, change the setting one increment at a time. Wait 24 hours for the change to stabilize before adjusting again.
Airflow
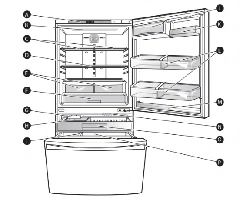
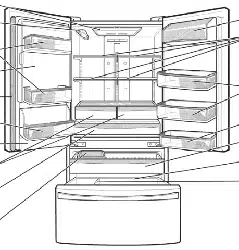
Be sure not to block vents while packing your refrigerator, Doing so will restrict airflow and may cause the refrigerator temperature to become too warm or cause interior moisture buildup, (See air flow diagram below,)
Dispenser
The dispenser will dispense water, cubed ice or crushed ice. Press the appropriate icon of your choice: ((_)) water ((_)) cubed ice ((_)) crushed ice. When pressed the icon will illuminate.
NOTE: The dispenser will not work if any door is left open or if the control lock is engaged.
NOTE: If the Control Lock icon is illuminated, the Dispenser will not work. Disable the Control Lock to use the Dispenser again.
CAUTION: The control display is operated by touch. Excessive moisture on the display may cause a malfunction. Please keep the display clean and dry.
Using Your Refrigerator
Air Filter
The Air Filter helps remove odors from the refrigerator. The Air Filter has two settings, Auto and MAX. In Auto mode, the Air Filter will cycle on and off in increments of ten minutes on and one hundred and ten minutes of{. if set to the MAX mode, the Air Filter will stay on continuously for four hours, cycling on and of{ in increments of ten minutes on and five minutes off. After four hours, the Air Filter will switch to Auto mode.
Air Filter Reset
When the CHANGE icon turns on, the air filter needs to be replaced. After replacing the air filter, press and hold the Air Filter button for three seconds to turn the icon light off. It is recommended to change the air filter approximately every 6 months
ice Maker ON/OFF
* To switch the icemaker ON or OFF, press the Ice Maker button.
Ultra ice
NOTE: While you are selecting the Ultra Ice function, the Ice Maker icon will briefly switch to OFF, then return to ON. This is normal.
Water Filter Reset
When the CHANGE icon turns on, you need to change the water filter. After changing the water filter, press and hold the Water Filter button for three seconds to turn the indicator light of{. You need to change the water filter approximately every six months.
Dispenser Light
This light has three settings: On, Off: and Dim. Select the Dim option at night. The light will automatically turn on at full brightness when the dispenser pad is pushed.
Articulating Mullion
This feature is a metal strip attached to the left door that articulates (rotates) 90 degrees as the door is closed, forming a mullion (base) for the left and right door gaskets to seal against.
CAUTION To reduce the risk of scratching the door or breaking the door mullion, make sure that the refrigerator door mullion is always folded in.
Door Alarm
Control Lock
Temperature Mode Switch Function (°F °C)
If you want to convert °F to °C or vice versa, press and hold the Freezer Temp and Refrigerator Temp buttons at the same time for approximately five seconds.
Demo Mode (For Store Use Only)
The Demo Mode disables all cooling in the refrigerator and freezer sections to conserve energy while on display in a retail store. When activated, OFF will display on the control panel.
To deactivate:
With either refrigerator door opened, press and hold the Refrigerator Temp and Ice Maker buttons at the same time for five seconds. The control panel will beep and the temperature settings will display to confirm that Demo Mode is deactivated. Use the same procedure to activate the Demo Mode.
Reference file: Kenmore Elite 79574049411 Bottom freezer refrigerator
Additionally, the document applies to other Kenmore models: 795.7402*, 7404*