Use & Care Guide
30" Free-Standin 9 Wave-Touch TM Electric Range
:!!!_!:!!i!i;ii_;_!_!!iiii!;i!;!_i!i!_i!!!_i_i_i!_!_!i_!_!i_!_!i_!_!i_!_!ii_i_;_i_;_i!_!_i_i_!ii_i_:_!!i!_i_i_!_!_!_!_!_!_!_!_!_i_i!i!i!_!ii;i_!i_;!;_i_!
Finding Information
Table of contents Please read & save this guide
Findinginformation ..................................................... 2 ThankyouforchoosingElectrolux, thenewpremium
SAFETY ................................................................... 3-5 brandinhomeappliances. This Use&CareGuideis
Features .................................................................. 6-9 partofourcommitmenttocustomersatisfactionand
GettingStarted ................................................... 10-11 productqualitythroughouttheservicelifeofyournew
• Power up contro d sp ay modes & t mers 10 a--liance
Control lock & oven lights ................................... 11
SettingsforBestResults .................................... 12-13 Weviewyour purchaseasthe beginning of a
SurfaceCooking ....................................................... 14 relationship. Toensureourabilitytocontinueserving
SettingSurfaceControls .................................... 15-18 you pleaseusethis pagetorecord important
• Settingcooktopcontrols ............................... 16-17 productinformation.
• Settingwarmerzone ........................................... 18
Lstofdspayedabbrevatons 19 K_n = r_nrA fnr n- i-k
• vv F _ v_ _ _ _
Settmg Oven Controls ......................................... 20-42
Rap_dpreheat......................................................2O reference
Bake .................................................................... 21
Usingcooktime ..................................................22
Us ngcookt mewth endt me 23 ---
Broil .............................................................. 24-25 Purchasedate
Convectionbake ................................................. 26
Usingconvectionconvert .................................... 27 ------
........Convectionroast...........................................28-29 Electroluxmodelnumber
Probe ............................................................ 30-31
Convection broil .................................................. 32
Keepwarm .......................................................... 33 Electroluxserialnumber
Slow cook ........................................................... 34
Perfect Turkey TM .................................................. 35
Defrost ................................................................ 36
Dehydrate ............................................................ 36
Bread proof ......................................................... 37
Saving & recalling my favorite recipes .................. 38
Multi stage cooking ....................................... 39-40
Setting Sabbath mode ................................... 41-42
Setting Lower Oven Controls ............................. 43-45
Bake .............................................................. 43-44
Keep warm .................................................... 44-45
Setting Your Preferences ................................... 46-51
Setting clock ....................................................... 46
Setting clock display (CLO) ................................. 46
Setting 12 or 24 hour mode (CLO) ....................... 47
Changing between F° or C ° (F-C) ........................ 47
Setting 12hr energy saving mode (ES) ................. 48
Setting audio mode (AUD) ................................... 48
Adjusting oven temperature (UPC) ...................... 49
Adjusting lower oven temperature (UPC) ............. 49
Factory default reset (RST) ................................... 50
User preferences chart ......................................... 51
Self-Clean ........................................................... 52-53
Care & Cleaning .................................................. 54-61
Cleaning recommendations ........................... 54-55
Cooktop maintenance ......................................... 56
Cooktop cleaning .......................................... 56-57
Oven door removal ........................................ 58-59
Changing oven lights .................................... 60-61
Solutions to Common Problems ......................... 62-64
Warranty 67
#P2007 Electrolux Home Products, Inc.
For toll-free telephone support in the U.S. and
Canada:
1-877-4ELECTROLUX (1-877-435-3287)
For online support and Internet production
information visit http://www.electroiuxusa.com
All rights reserved. Printed in the USA
Safety
important safety instructions
Recognize safety symbols, words and
labels
Safety items throughout this manual are labeled with
a WARNING or CAUTION based on the risk type as
described below:
This symbol alerts you to situations that may
cause serious body harm, death or property
damage.
This symbol alerts you to situations that may
cause bodily injury or property damage.
Read all of the following safety instructions
before using this appliance:
• Remove all tape and packaging before using
the range. Destroy the carton and plastic bags
after unpacking the range. Never allow children
to play with packaging material.
• Proper Installation--Be sureyour appliance is
properly installed and grounded by a qualified
technician in accordance with the National
Fuel Gas Code ANSi Z223- latest edition, or in
Canada CAN/CGA B149.1 and CAN/GGA
B149.2, and the National Electrical Code
ANSI/NFPA No.70-1atest edition, or in Canada
CSA Standard C22.1, Canadian Electrical
Code, Part 1, and local code requirements.
Install only per installation instructions provided
in the literature package for this range.
Ask your dealer to recommend a qualified
technician and an authorized repair service.
Know how to disconnect the power to the range
at the circuit breaker or fuse box in case of an
emergency.
° User servicing--Do not repair or replace any
part of the appliance unless specifically
recommended in the manuals. All other
servicing should be done only by a qualified
technician. This may reduce the risk of personal
injury and damage to the range,
° Never modify or alter the construction of a
range by removing leveling legs, panels, wire
covers, anti-tip brackets/screws, or any other
part of the product.
Save these instructions for future
reference.
surface zones and oven heating elements may
be hot even though they are dark in color. Areas
near surface zones may become hot enough to
cause burns. During and after use, do not touch,
or let clothing or other flammable materials touch
these areas until they have had sufficient time to
cool. Among these areas are the cook top,
surfaces facing the cook top, the oven vent
openings and surfaces near these openings,
oven door and window.
Wear proper apparel--Loose-fitting or
hanging garments should never be worn
while using the appliance, Do not let clothing or
other flammable materials contact hot surfaces.
* Do not use water or flour on grease fires--
Smother the fire with a pan lid, or use baking
soda, a dry chemical or foam-type
extinguisher.
* When heating fat or grease, watch it closely.
Fat or grease may catch fire if allowed to
become too hot.
Use only dry potholders - Moist or damp
potholders on hot surfaces may result in
burns from steam. Do not let potholders touch
hot heating elements. Do not use a towel or other
bulky cloth instead of a potholder.
before turning it on, and turn the zone off before
removing the pan.
• Use proper pan size--This appliance is
equipped with one or more surface units of
different sizes. Select utensils having flat bottoms
large enough to cover the surface unit heating
element. The use of undersized utensils will
expose a portion of the heating element to direct
contact and may result in ignition of clothing.
Proper relationship of utensil to element will also
improve efficiency.
° Utensil handles should be turned inward and
not extend over adjacent surface elements--To
reduce the risk of burns, ignition of flammable
materials, and spillage due to unintentional
contact with the utensil, the handle of the utensil
should be positioned so that it is turned inward,
and does not extend over adjacent surface units.
• Never leave surface elements unattended at
high heat settings--Boilovers cause smoking
and greasy spillovers that may ignite, or a pan
that has boiled dry may melt.
° Do not immerse or soak removable heating
elements--Heating elements should never be
immersed in water. Heating elements clean
themselves during normal operation.
Safety
important safety instructions
• Glazed cooking utensils--Only certain typesof
glass, glass/ceramic, ceramic, earthenware, or
other glazed utensils are suitable for cook top
service without breaking due to the sudden
change intemperature. Check the manufacturer's
recommendations for cook top use.
• When flaming foods under a ventilating hood,
turn the fan on.
For Ceramic-glass cooktop models
° Do not cook on broken cook top--If cook top
should break, cleaning solutions and spillovers
may penetrate the broken cook top and create a
risk of electric shock. Contact a qualified
technician immediately.
° Clean cook top with caution--If a wet sponge
or cloth is used to wipe spills on a hot cooking
area, be careful to avoid a steam burn. Some
cleaners can produce noxious fumes if applied
to a hot surface.
Important instructions for using your oven
° Use care when opening oven door or lower
oven drawer (if equipped)--Stand to the side of
the range when opening the door of a hot oven.
Let hot air or steam escape before you remove
or replace food in the oven.
° Keep oven vent ducts unobstructed. The oven
vent is located under the left rear surface
element if your model is equipped with coil
elements. The oven vent is located below the
backguard for models equipped with ceramic-
glass cook tops. Touching the surfaces in this
area when the oven is operating may cause
severe burns. Also, do not place plastic or heat-
sensitive items on or near the oven vent. These
items could melt or ignite.
• Placement of oven racks. Always place oven
racks in desired location while oven is cool. If
rack must be moved while oven is hot use
extreme caution. Use potholders and grasp the
rack with both hands to reposition. Do not let
potholders contact the hot heating elements in
the oven. Remove all utensils from the rack
before moving.
° Do not use the broiler pan without its insert.
The broiler pan and its insert allow dripping fat
to drain and be kept away from the high heat of
the broiler.
• Do not cover the broiler insert with aluminum
foil. Exposed fat and grease could ignite.
° Cold temperatures can damage the electronic
control. When using the appliance for the first
time, or when the appliance has not been used
for an extended period of time, be certain the
unit has been intemperatures above 32°F (O°C)
for at least 3 hours before turning on the power
to the appliance.
Important instructions for cleaning your
range
• Clean the range regularly to keep all parts free
of grease that could catch fire. Pay particular
attention to the area underneath each surface
element. Do not allow grease to accumulate.
° Kitchen cleaners and aerosols--Always follow
the manufacturer's recommended directions
for use. Be aware that excess residue from
cleaners and aerosols may ignite causing
damage and injury.
• Clean ventilating hoods frequently--Grease
should not be allowed to accumulate on the
hood or filter. Follow manufacturer's
instructions for cleaning.
Self cleaning ovens
• Clean in the self-cleaning cycle only the parts
listed in this Use & Care Manual. Before self
cleaning the oven, remove the broiler pan and
any utensils or foods from the oven.
° Do not use OVeRcleaners--No commercial oven
cleaner or oven liner protective coating of any kind
should be used in or around any part of the oven.
• Do not clean door gasket--The door gasket is
essential for a good seal. Care should be taken
notto rub, damage or move the gasket.
• The health of some birds is extremely sensitive
to the fumes given off during the self-cleaning
cycle of any range. Move birds to another well-
ventilated room.
Important safety notice
The California Safe Drinking Water and Toxic
Enforcement Act requires the Governor of California
to publish a list of substances known to the state
to cause cancer, birth defects or other reproductive
harm, and requires businesses to warn customers
of potential exposure to such substances.
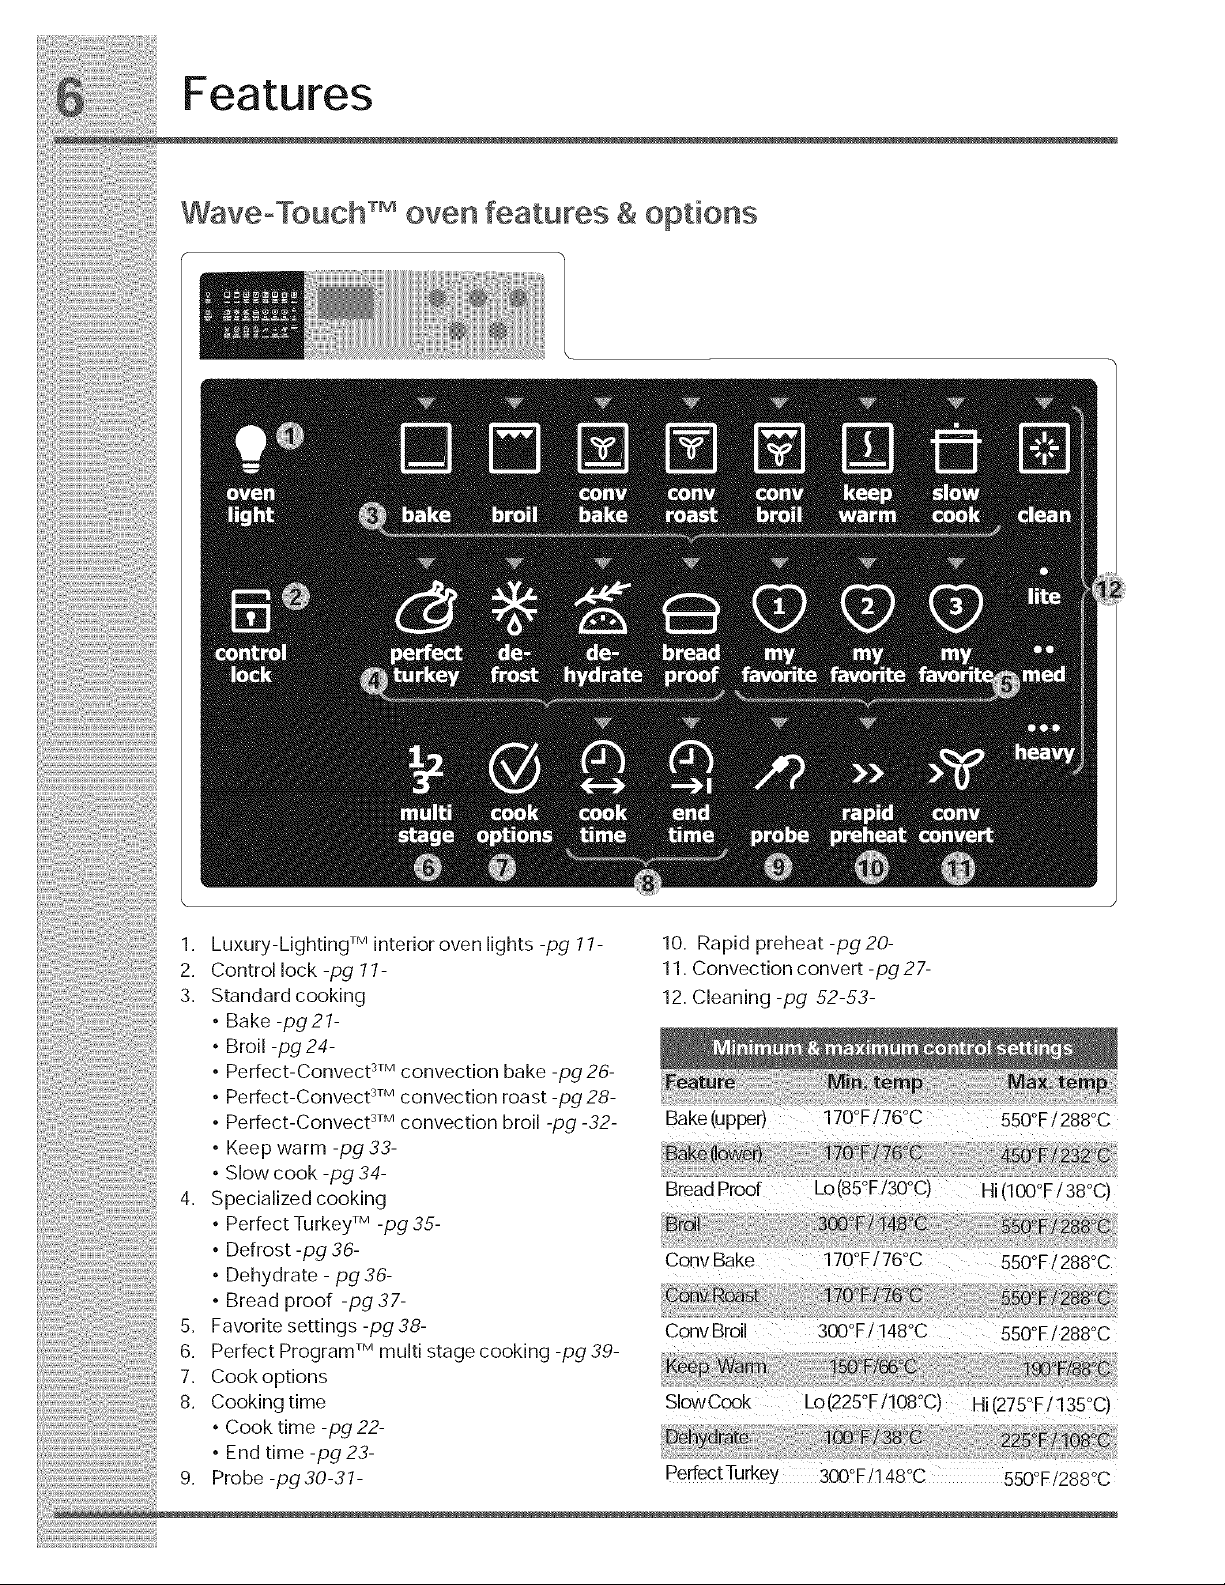
1. Luxury-LightingTM interior oven lights -pg 11-
2. Control lock -pg 11-
3. Standard cooking
• Bake-pg21-
• Broil -pg 24-
• Perfect-Convect 3TMconvection bake -pg 26-
• Perfect-Convect 3TMconvection roast -pg 28-
• Perfect-Convect 3TMconvection broil -pg -32-
• Keep warm -pg 33-
° Slow cook -pg 34-
4. Specialized cooking
° Perfect Turkey TM -pg 35-
° Defrost -pg 36-
° Dehydrate - pg 36-
° Bread proof -pg 37-
5. Favorite settings -pg 38-
6. Perfect Program TM multi stage cooking -pg 39-
7. Cook options
8. Cooking time
° Cook time -pg 22-
° End time -pg 23-
9. Probe-pg30-31-
10. Rapid preheat -pg 20-
11. Convection convert -pg 27-
12. Cleaning -pg 52-53-
Bake(upper) 170°F/76°C 550°F/288°C
Bread Proof Lo(85°F/30°C) Hi (100°F/ 38°C)
Conv Bake 170°F/760C 550QF/288°C
Conv Broil 300°F/148°C 550oE/288oc
S owCook Lo(2250F/108°C) Hi(275OF/135oc)
Perfect Turke o o
300°F/i48°C 550 F/288 C

Features
WaveoTouch TMoven control display & keys
13. Perfect-Pair TM oven key pads
• Sure-2-fit TM Upperoven
• Lower oven
14. User preferences -pg 46-51-
The following options are available under User
Preferences:
• Clock setting -pg 10&46-
• Clock display setting -pg 46-
• 12hr/24hr-pg47-
• Fahrenheit / Celsius -pg 47-
• 12 Hr energy save mode on/off-pg 48-
° Audio mode-pg48-
° UPO offset (temp. adjust) or reset -pg 49-
° Factory default reset-pg 50-
15,Oven display
16. Timers -pg 10-
17, Cancel & Start key pads
18. Numeric key pads
Timer 1 lmin 11hr59min
Clock 12 hr i:00hr 11hr59min
Cook time 12 hr i min i hr 59 min
End time 12 hr l:00hr 12 hr59 min
Clean duration Lite (2 hr) Heavy (4 hr)

Cooktopcontrols- pg 15-18-
19, Left rear 6 in, single radiant element (1200W)
20, Warmer zone 6 in, element (100W)
21, Right rear 5/7 in, expandable radiant element (750/1800W)
22, Left front 6/9/12 in, expandable radiant element (1000/2000/2700W)
23, Right front 6/9 in, high wattage expandable radiant element (1200/3000W)
Features
e features
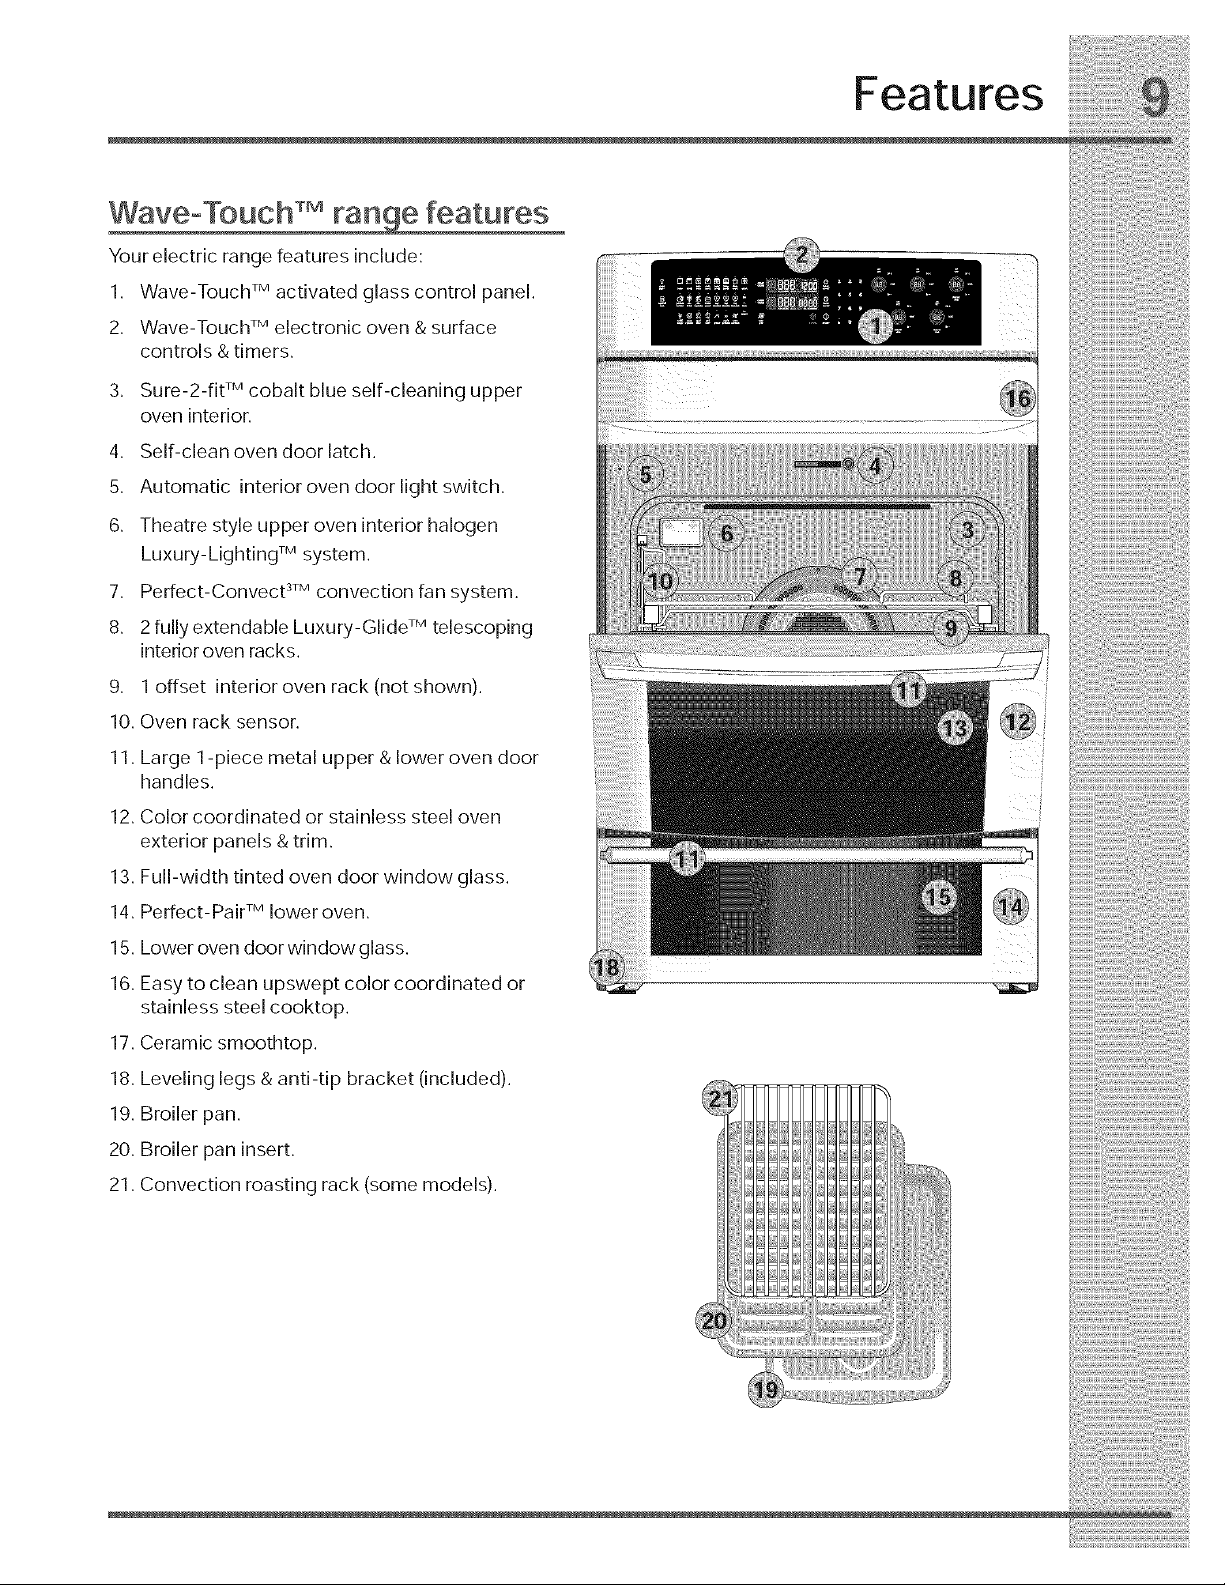
Your electric range features include:
1. Wave-Touch TMactivated glass control panel.
2. Wave-Touch TMelectronic oven & surface
controls & timers.
3. Sure-2-fW Mcobalt blue self-cleaning upper
oven interior.
4. Self-clean oven door latch.
5. Automatic interior oven door light switch.
6. Theatre style upper oven interior halogen
Luxury-Lighting TMsystem.
7. Perfect-Convect 3TMconvection fan system.
8. 2 fully extendable Luxury-Glide TMtelescoping
interior oven racks.
9. 1 offset interior oven rack (not shown).
10. Oven rack sensor.
11. Large 1-piece metal upper & lower oven door
handles.
12. Color coordinated or stainless steel oven
exterior panels & trim.
13. Full-width tinted oven door window glass.
14. Perfect- PairTMlower oven.
15. Lower oven door window glass.
16. Easy to clean upswept color coordinated or
stainless steel cooktop.
17. Ceramic smoothtop.
18. Leveling legs & anti-tip bracket (included).
19. Broiler pan.
20. Broiler pan insert.
21. Convection roasting rack (some models).
Getting Started
Setting clock at power up
You will be prompted to enter the time of day in the
event of a power failure or when you first provide
electric power to your appliance.
• When your appliance is first powered up, 12:00
will flash in the display.
• Enter the time of day using the numeric key
pads and press START to set.
If an invalid time of day is entered, the control will
triple beep. Re-enter a valid time of day and press
START. If CANCEL is pressed your clock will start
with the time set for 12:00.
Select the user pref key to modify the time of day
during other situations such as day light savings.
WaveoTouch TMdisplay modes
The two timers provided with the oven control
serve as extra reminders in the kitchen. When a
timer reaches less than 1 minute the display will
start to count down in seconds. When the time
runs out the active timer will beep, "00:00" will
display and the timer key will flash.
The following time settings apply to the timers:
• Min. time: 1 minute
• Max. time: 11 hours 59 minutes
See example below to set the timer for 5 minutes:
Step Press
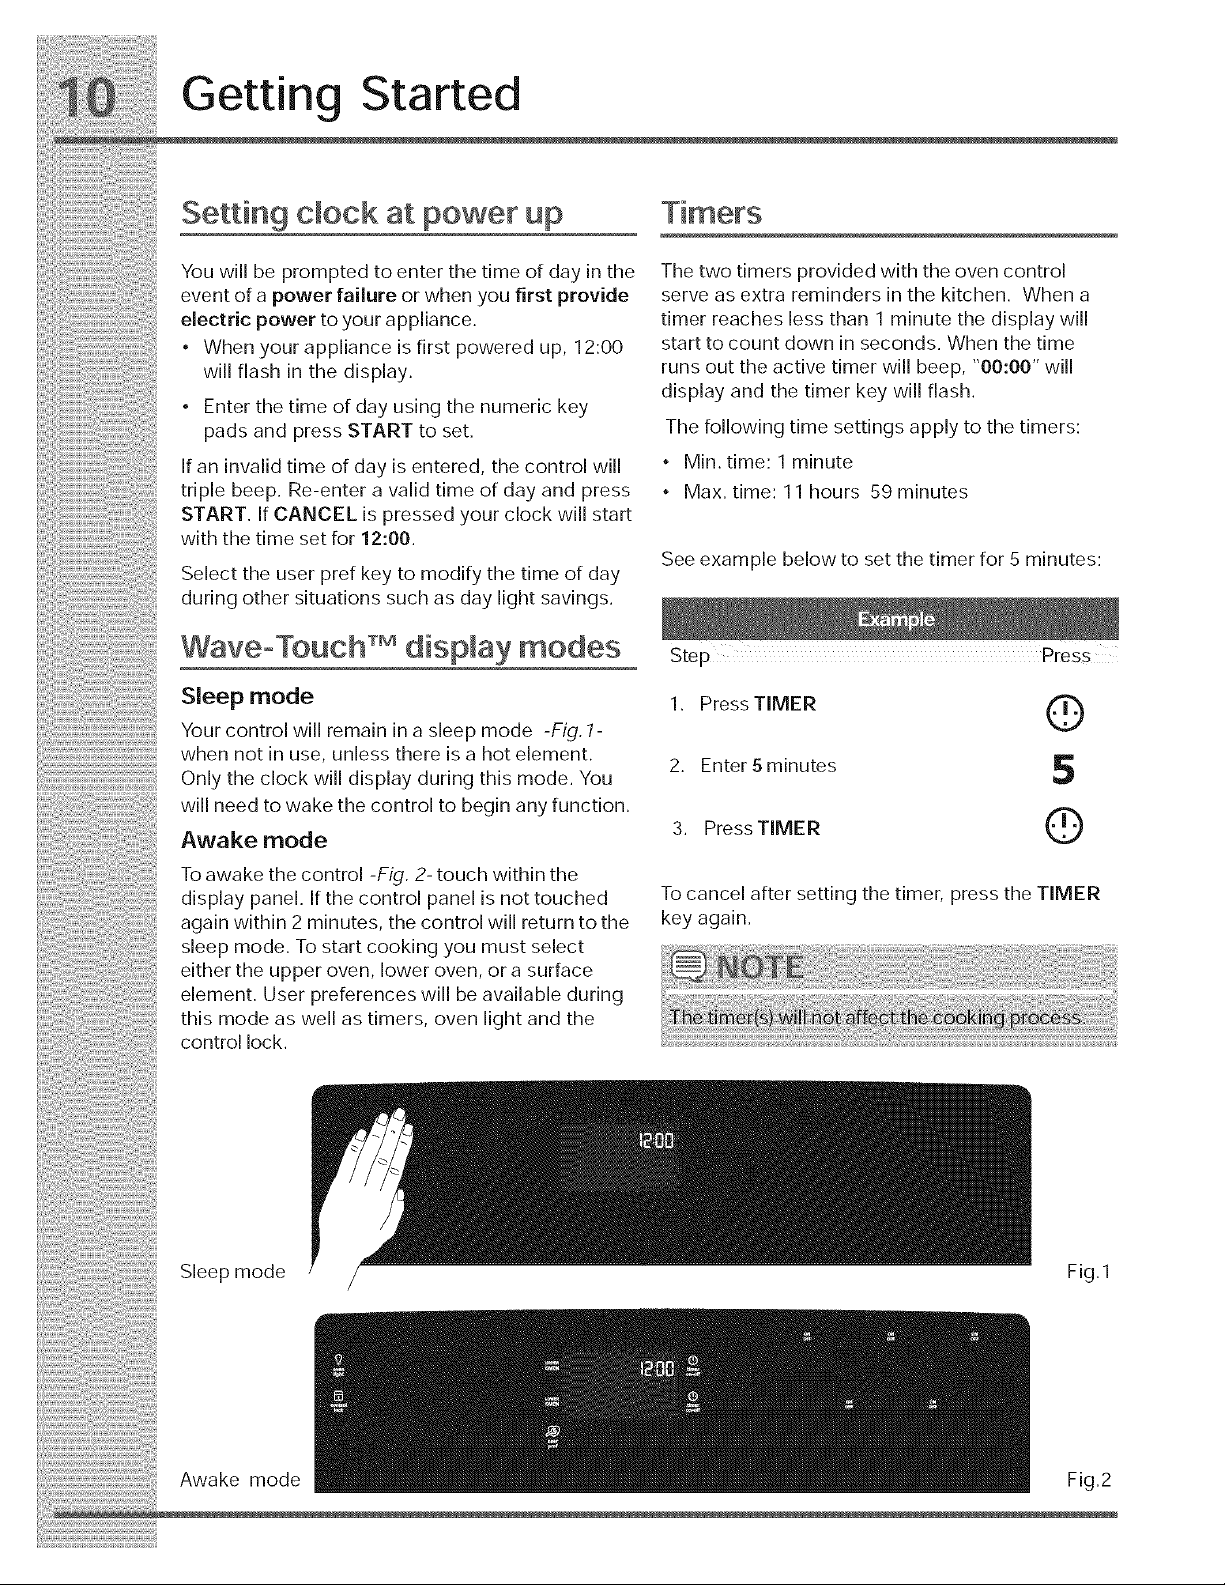
Sleep mode 1. Press TIMER
Your control will remain in a sleep mode -Fig. 1-
when not in use, unless there is a hot element.
2. Enter 5minutes
Only the clock will display during this mode. You
will need to wake the control to begin any function.
Awake mode 3. PressTIMER
To awake the control -Fig, 2- touch within the
display panel. If the control panel is not touched
again within 2 minutes, the control will return to the
sleep mode. To start cooking you must select
either the upper oven, lower oven, or a surface
element. User preferences will be available during
this mode as well as timers, oven light and the
control lock.
O
S
@
To cancel after setting the timer, press the TIMER
key again.
Sleep mode Fig.1
Awake mode
Getting Started
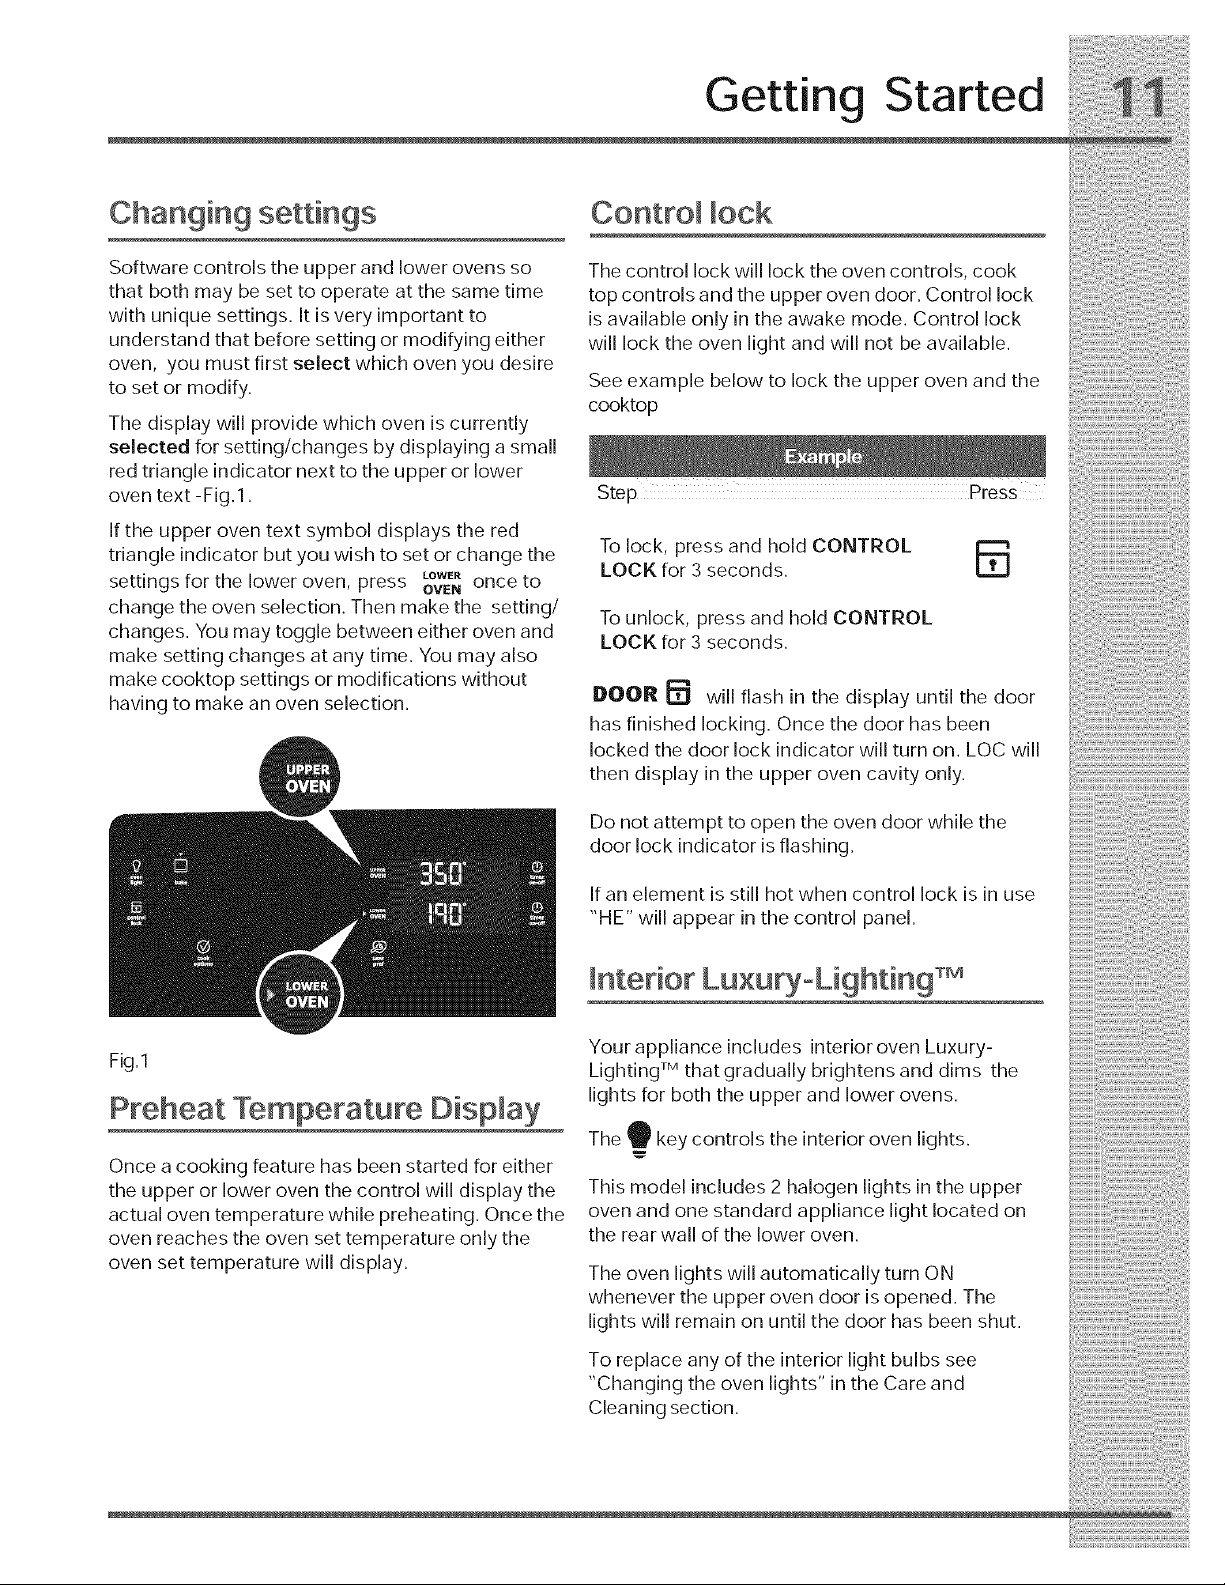
Changing settings
Software controls the upper and lower ovens so
that both may be set to operate at the same time
with unique settings. It is very important to
understand that before setting or modifying either
oven, you must first select which oven you desire
to set or modify.
The display will provide which oven is currently
selected for setting/changes by displaying a small
red triangle indicator next to the upper or lower
oven text -Fig.1.
If the upper oven text symbol displays the red
triangle indicator but you wish to set or change the
settings for the lower oven, press LOWE.
OVENonce to
change the oven selection. Then make the setting/
changes. You may toggle between either oven and
make setting changes at any time. You may also
make cooktop settings or modifications without
having to make an oven selection.
Control lock
The control lock will lock the oven controls, cook
top controls and the upper oven door. Control lock
is available only in the awake mode. Control lock
will lock the oven light and will not be available.
See example below to lock the upper oven and the
cooktop
Step Press
To lock, press and hold CONTROL
LOCK for 3 seconds. UU
To unlock, press and hold CONTROL
LOCK for 3 seconds.
DOOR _ will flash in the display until the door
has finished locking. Once the door has been
locked the door lock indicator will turn on, LOC will
then display in the upper oven cavity only,
Do not attempt to open the oven door while the
door lock indicator is flashing,
If an element is still hot when control lock is in use
"HE" will appear in the control panel,
Interior Lu×uryoLightin9 TM
Fig.1
Preheat Temperature Display
Once a cooking feature has been started for either
the upper or lower oven the control will display the
actual oven temperature while preheating. Once the
oven reaches the oven set temperature only the
oven set temperature will display.
Your appliance includes interior oven Luxury-
Lighting TM that gradually brightens and dims the
lights for both the upper and lower ovens.
The 9 key controls the interior oven lights.
This model includes 2 halogen lights in the upper
oven and one standard appliance light located on
the rear wall of the lower oven.
The oven lights will automatically turn ON
whenever the upper oven door is opened, The
lights will remain on until the door has been shut,
To replace any of the interior light bulbs see
"Changing the oven lights" in the Care and
Cleaning section.
iiii!_iii@i:i!_:ili{(!i!:!:ii!,_i_iii@:(_!iii@i@iii,!i_£i
Setting for Best Results
Upper oven racks
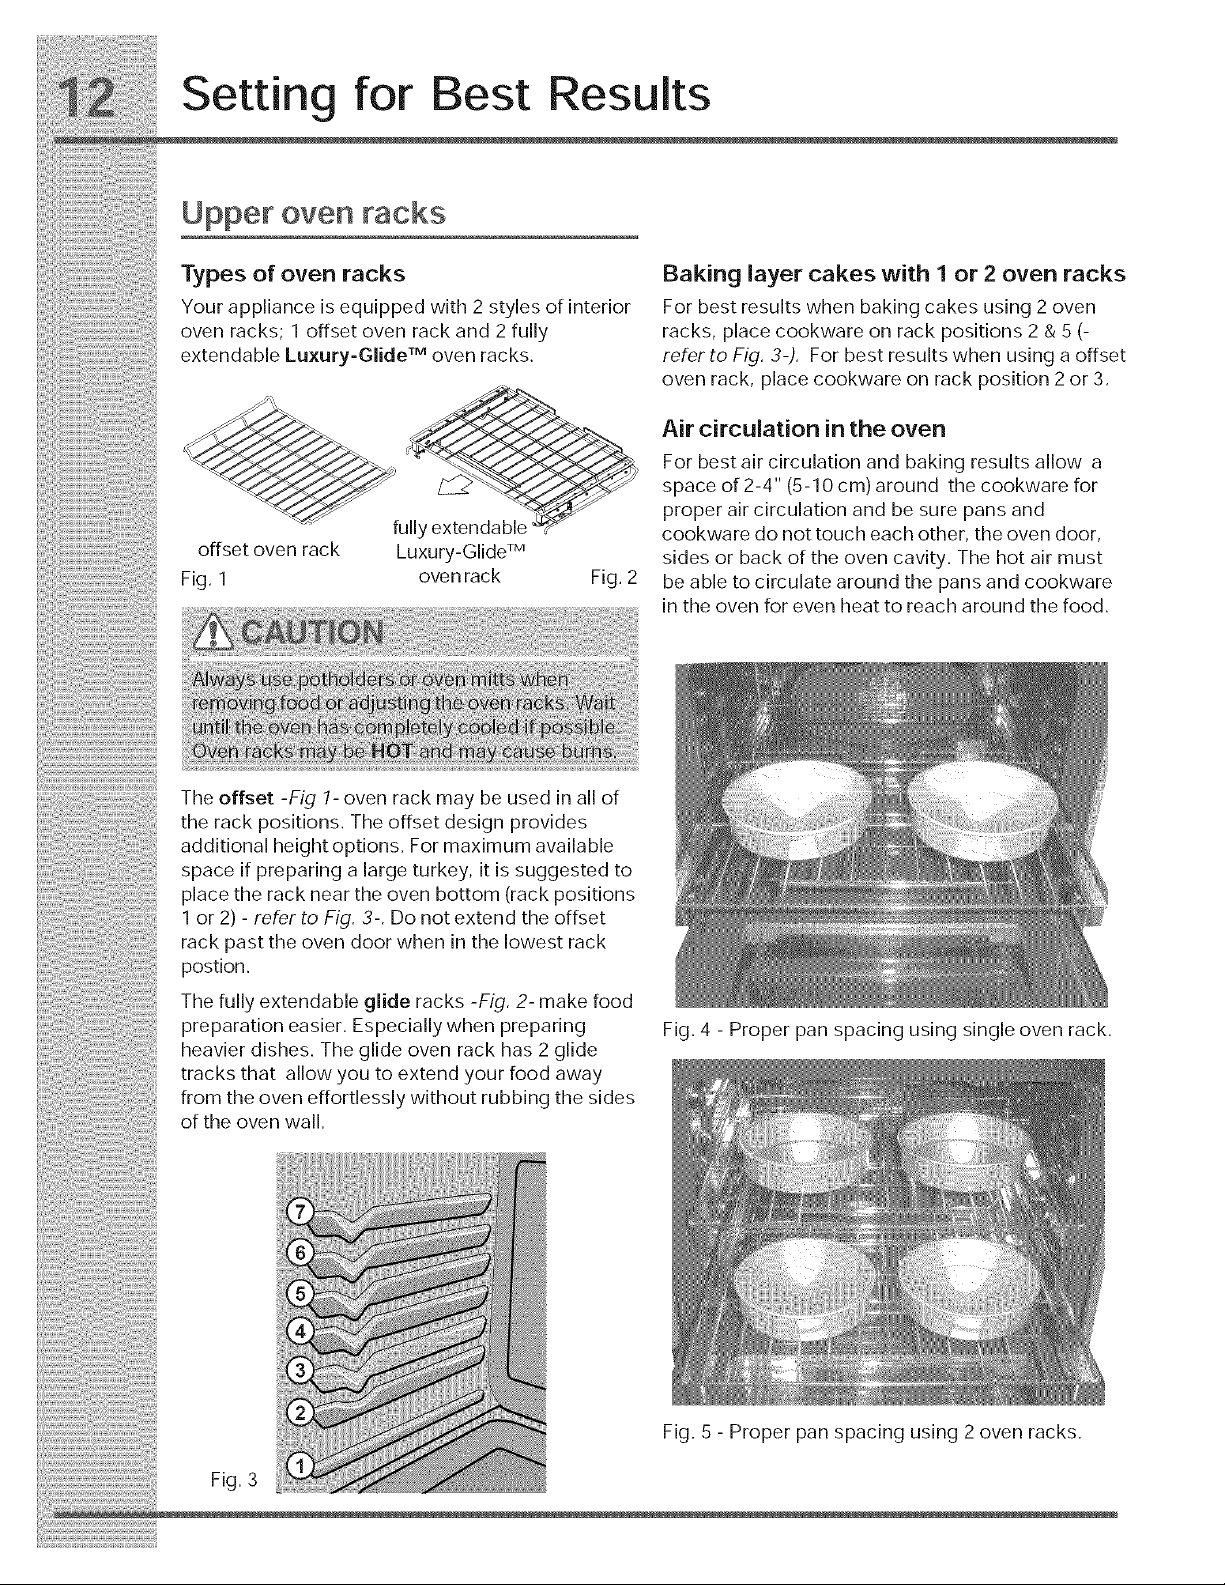
Typesofovenracks Bakinglayercakeswithlor2ovenracks
Your appliance is equipped with 2 styles of interior For best results when baking cakes using 2 oven
oven racks; 1 offsetoven rackand 2fully racks, placecookwareon rack positions2 &5 (-
extendableLuxury-GlideT"ovenracks, refertoFig. 3-). Forbestresultswhen usingaoffset
_. oven rack, placecookware on rack position 2 or 3.
__ _ Aircirculationintheoven
___j For best air circulation and baking results allow a
"__._._._ " z__ y spaceof2-4" (5-10cm) around thecookwarefor
"_1_':_ "__ properaircirculationandbesurepansand
_ fully extendable
" Y _ cookware do nottouch each other theoven door
offset oven rack Luxur -Glide TM • • •
Y s_des or back of the oven cawty. The hot air must
Fig. 1 ovenrack Fig. 2 beabletocirculatearoundthe pansandcookware
.......... in the oven foreven heattoreach around thefood.
The offset -Fig 1- oven rack may be used in all of
the rack positions. The offset design provides
additional height options. For maximum available
space if preparing a large turkey, it is suggested to
place the rack near the oven bottom (rack positions
1 or 2) - refer to Fig. 3-. Do not extend the offset
rack past the oven door when in the lowest rack
postion.
The fully extendable glide racks -Fig. 2- make food
preparation easier. Especially when preparing
heavier dishes. The glide oven rack has 2 glide
tracks that allow you to extend your food away
from the oven effortlessly without rubbing the sides
of the oven wall.
Fig. 4 - Proper pan spacing using single oven rack.
Fig. 3
Fig. 5 - Proper pan spacing using 2 oven racks.
Setting for Best Results
Upper oven racks
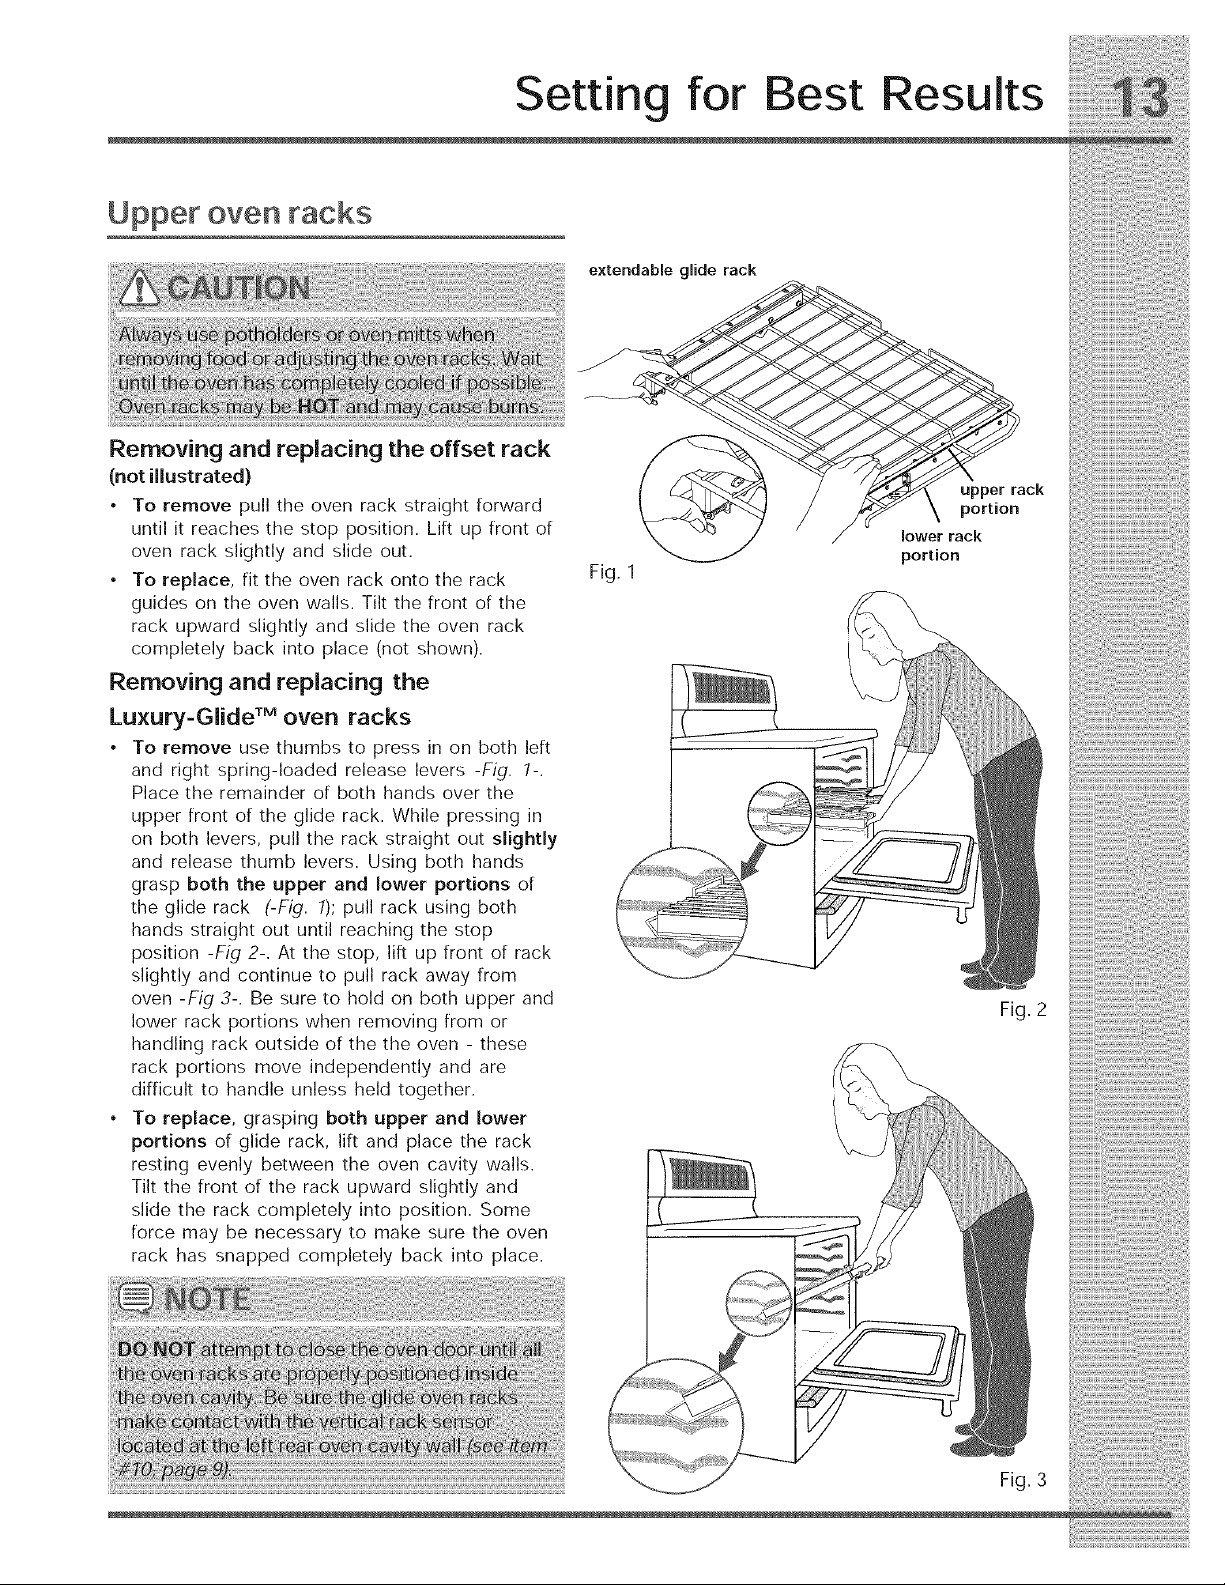
Removing and replacing the offset rack
(not illustrated)
• To remove pull the oven rack straight forward
until it reaches the stop position. Lifi up front of
oven rack slightly and slide out.
• To replace, fit the oven rack onto the rack
guides on the oven walls. Tilt the front of the
rack upward slightly and slide the oven rack
completely back into place (not shown).
Removing and replacing the
Luxury-Glide TM oven racks
• To remove use thumbs to press in on both left
and right spring-loaded release levers -Fig. 1-.
Place the remainder of both hands over the
upper front of the glide rack. While pressing in
on both levers, pull the rack straight out slightly
and release thumb levers. Using both hands
grasp both the upper and lower portions of
the glide rack (-Fig. 1); pull rack using both
hands straight out until reaching the stop
position -Fig 2-. At the stop, lift up front of rack
slightly and continue to pull rack away from
oven -Fig 3-. Be sure to hold on both upper and
lower rack portions when removing from or
handling rack outside of the the oven - these
rack portions move independently and are
difficult to handle unless held together.
• To replace, grasping both upper and lower
portions of glide rack, lift and place the rack
resting evenly between the oven cavity walls.
Tilt the front of the rack upward slightly and
slide the rack completely into position. Some
force may be necessary to make sure the oven
rack has snapped completely back into place.
extendable glide rack
Fig, 1
lower rack
portion
Fig, 2
Fig. 3
i_!_;_!_i!;!;_i_i_i_i_!_!_i;_!_!i!;_i_;_;_@_!_!i_:_i_i_i_i
14 Surface Cooking
Cookwsre
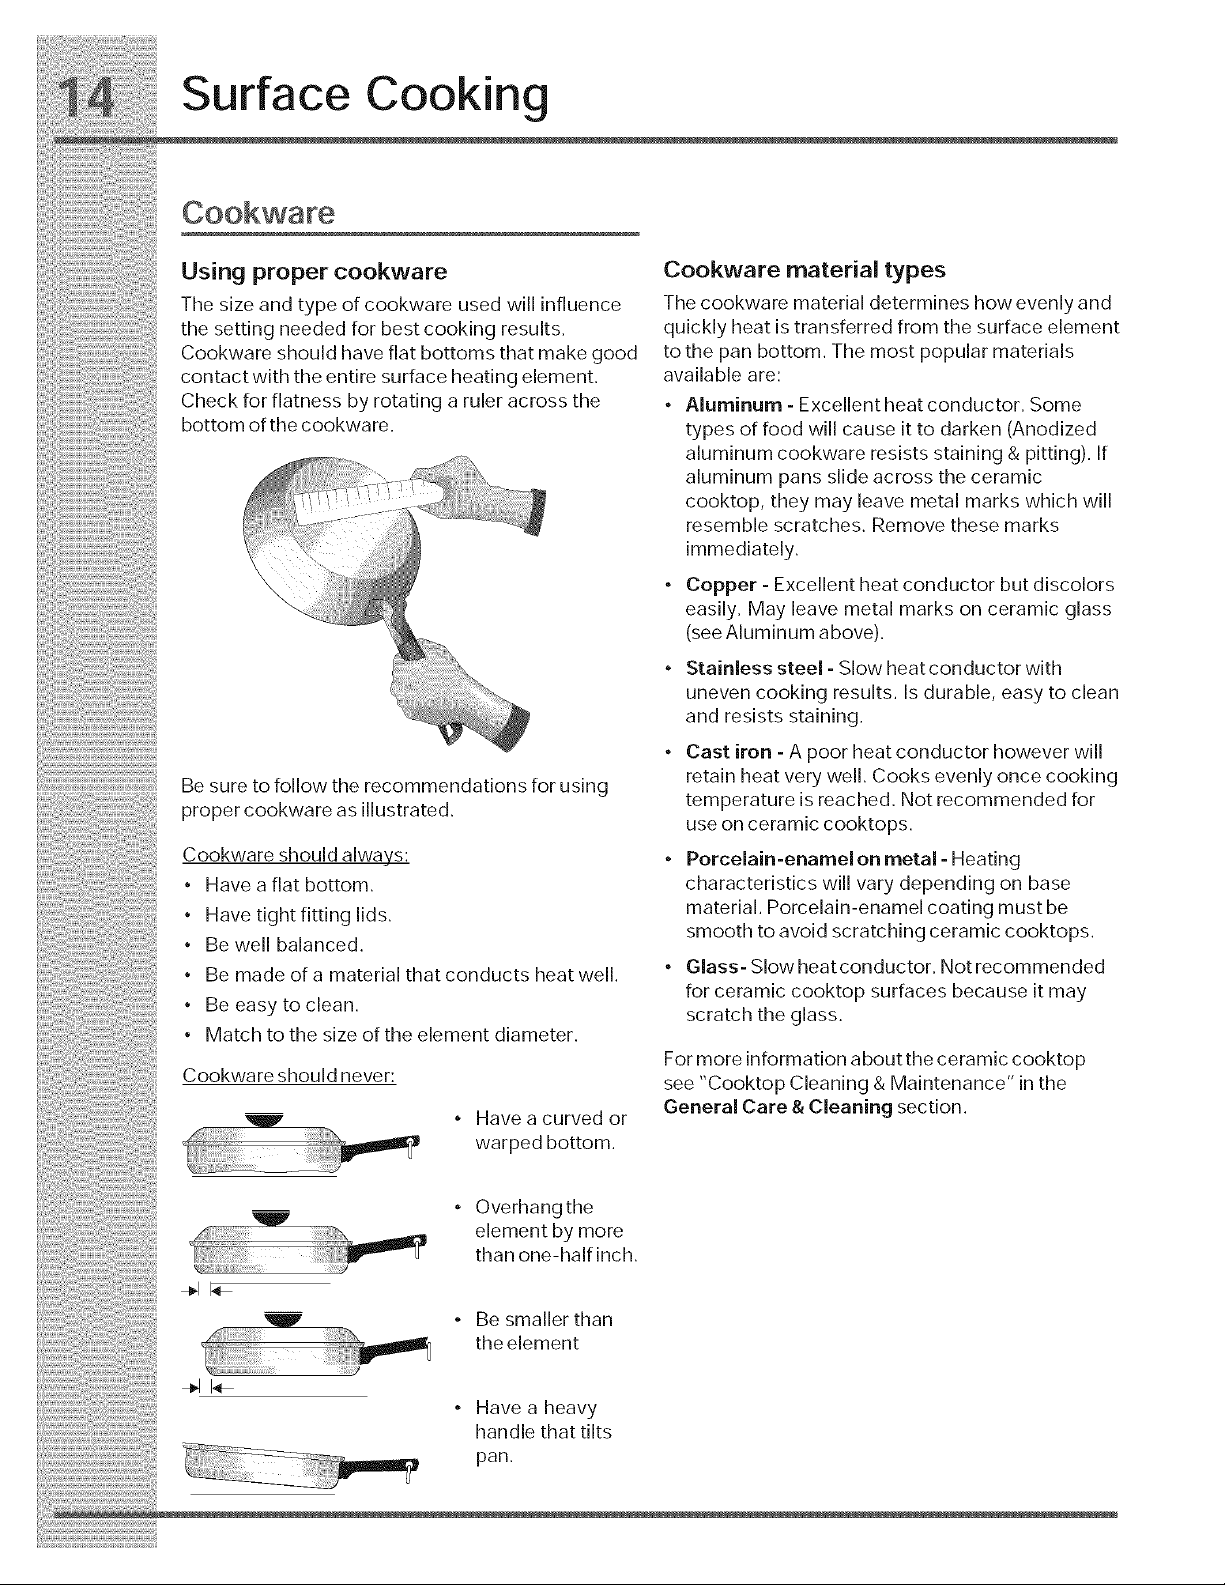
Using propercookware Cookwarematerialtypes
Thesizeandtypeofcookware used will influence Thecookwarematerialdetermineshowevenlyand
thesettingneededforbestcookingresults, quicklyheatistransferredfromthesurfaceelement
Cookwareshouldhaveflatbottomsthatmakegood tothepan bottom, Themostpopularmaterials
contactwiththeentire surfaceheatingelement, available are:
Checkforflatnessbyrotatingaruleracrossthe • Aluminum-Excelentheatconductor. Some
bottomofthecookware, typesoffoodwillcauseittodarken(Anodized
:. aluminumcookwareresistsstaining& pitting). If
aluminum pansslideacrosstheceramic
............. ! cooktop, theymayleave metal markswhichwill
resemble scratches. Remove these marks
• immediately,
Copper-Exce,entheatconductorbutd sco ors
easily, May leave metal marks on ceramic glass
, (seeAluminumabove).
StainlesssteeI-Slowheatconductorwith
.nevencook ngresu ts. sduraUe,easytodean
and resists staining.
..... • Cast iron - A poor heat conductor however will
Be sure to follow the recommendations for using
proper cookware as illustrated.
Cookware should always:
• Have a flat bottom.
• Have tight fitting lids.
• Be well balanced.
• Be made of a material that conducts heat well.
• Be easy to clean.
• Match to the size of the element diameter.
Cookware should never:
° Have a curved or
warpedbottom.
retain heat very well, Cooks evenly once cooking
temperature is reached, Not recommended for
use on ceramic cooktops,
Porcelain-enamel on metal - Heating
characteristics will vary depending on base
material. Porcelain-enamel coating must be
smooth to avoid scratching ceramic cooktops,
Glass- Slow heat conductor, Not recommended
for ceramic cooktop surfaces because it may
scratch the glass.
For more information about the ceramic cooktop
see "Cooktop Cleaning & Maintenance" in the
General Care & Cleaning section.
• Overhang the
element by more
than one-half inch.
_' • Be smaller than
the element
° Havea heavy
handle that tilts
pan,
Setting Surface Controls
How the cooktop works
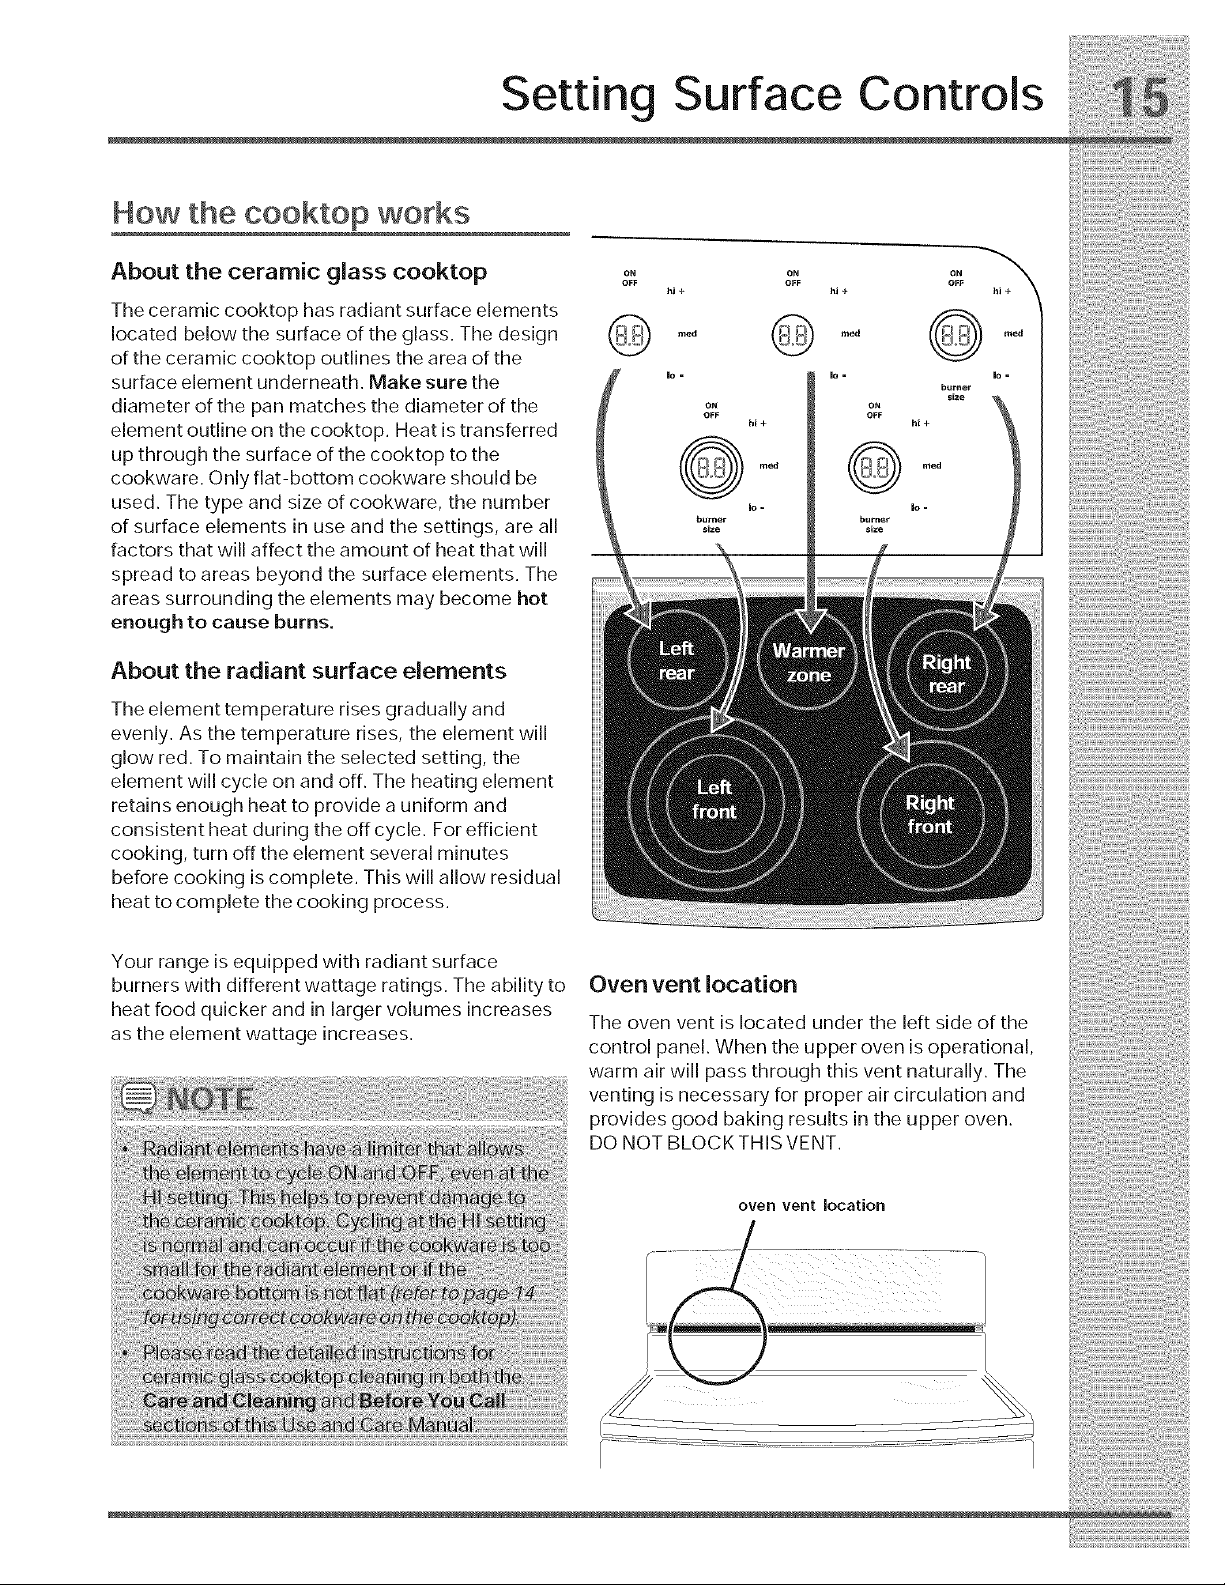
About the ceramic glass cooktop
The ceramic cooktop has radiant surface elements
located below the surface of the glass. The design
of the ceramic cooktop outlines the area of the
surface element underneath. Make sure the
diameter of the pan matches the diameter of the
element outline on the cooktop. Heat is transferred
up through the surface of the cooktop to the
cookware. Only fiat-bottom cookware should be
used. The type and size of cookware, the number
of surface elements in use and the settings, are all
factors that will affect the amount of heat that will
spread to areas beyond the surface elements. The
areas surrounding the elements may become hot
enough to cause burns.
About the radiant surface elements
The element temperature rises gradually and
evenly. As the temperature rises, the element will
glow red. To maintain the selected setting, the
element will cycle on and off. The heating element
ON ON
OFF OFF
hi+ hi+
med reed
ON ON
OFF OFF
OFF
@oed
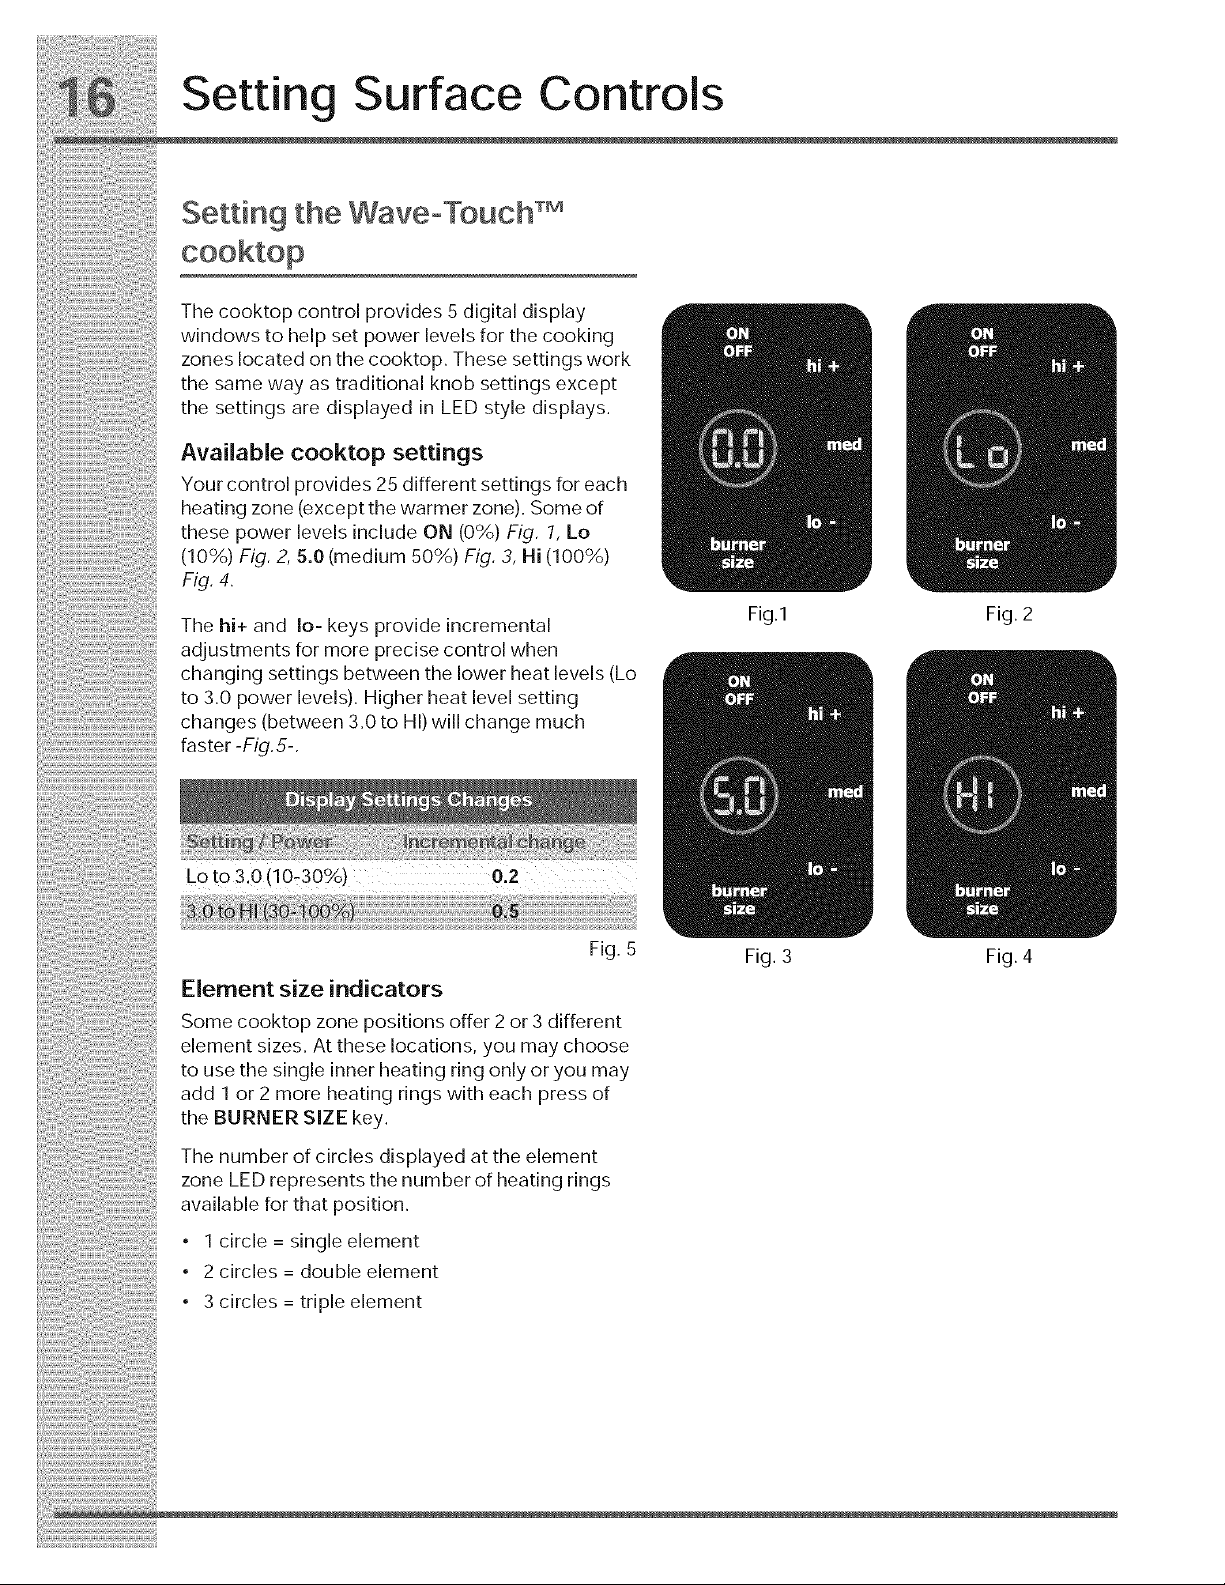
Fig. 5
Element size indicators
Some cooktop zone positions offer 2 or 3 different
element sizes. At these locations, you may choose
to use the single inner heating ring only oryou may
add 1 or 2 more heating rings with each press of
the BURNER SIZE key.
The number of circles displayed at the element
zone LED represents the number of heating rings
available for that position.
• 1 circle = single element
• 2 circles = double element
• 3 circles = triple element
Fig. 3 Fig. 4
Setting Surface Controls
Setting the WaveoTouch TM
Setting cooktop elements
• If needed, wake the control panel.
• Touch the ON OFF key for the desired heating
zone.
• If the heating zone has more than one burner ring
size available, press and continue to press the
BURNER SIZE key for the desired heating zone
to change the ring size.
• Press the desired power level key (hi+, reed or
Io-) or for more precise level settings use the hi+
or Io- keys to make specific level changes.
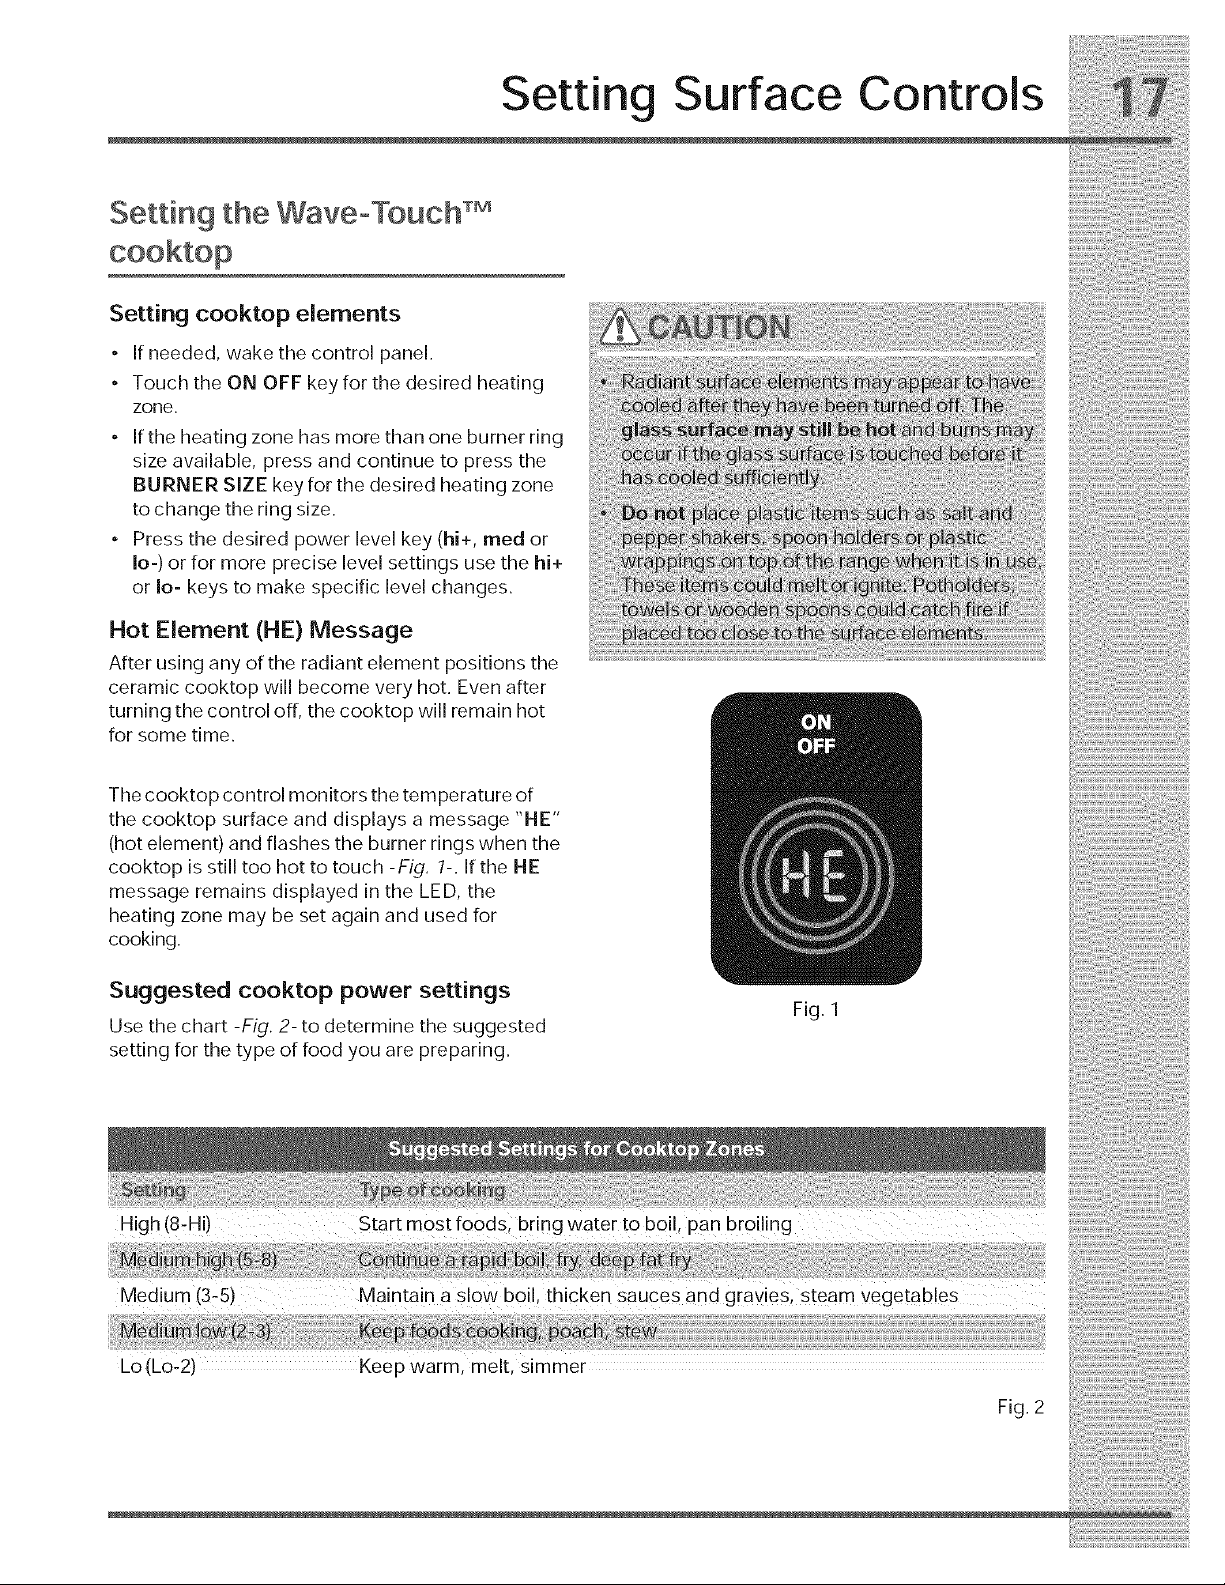
Hot Element (HE) Message
After using any of the radiant element positions the
ceramic cooktop will become very hot. Even after
turning the control off, the cooktop will remain hot
for some time.
The cooktop control monitors the temperature of
the cooktop surface and displays a message "HE"
(hot element) and flashes the burner rings when the
cooktop is still too hot to touch-Fig, 1-. If the HE
message remains displayed in the LED, the
heating zone may be set again and used for
cooking.
Suggested cooktop power settings
Fig. 1
Use the chart -Fig. 2- to determine the suggested
setting for the type of food you a re pre paring.
I
High (8:H i) Start mOSt [oodsl bring water tO boi I, Pan broiling
Medium (3:5)Maintain a Sl0W boil, thicken Sauces and gravieS: Steam Vegetab!es
Lo (L0:2) Keep Warm: melt, Simmer
Fig.2
Setting Surface Controls
About the warming zone
Use the warming zone (Fig. 6) to keep hot cooked
foods warm such as; vegetables, gravies,
casseroles, soups, stews, breads, pastries and
oven-safe dinner plates. DO NOT heat cold food
using the warming zone.
Use only plates, cookware and utensils
recommended for oven and ceramic cooktop use,
Do not use plastic wrap or aluminum foil to
cover foods. Plastic or aluminum foil may melt onto
the ceramic cooktop.
For best results
• Always start with hot cooked food.
• When warming pastries or breads the cover
should have an opening to allow moisture to
escape.
All food placed on the warmer zone should be
covered with a lid to maintain moisture.
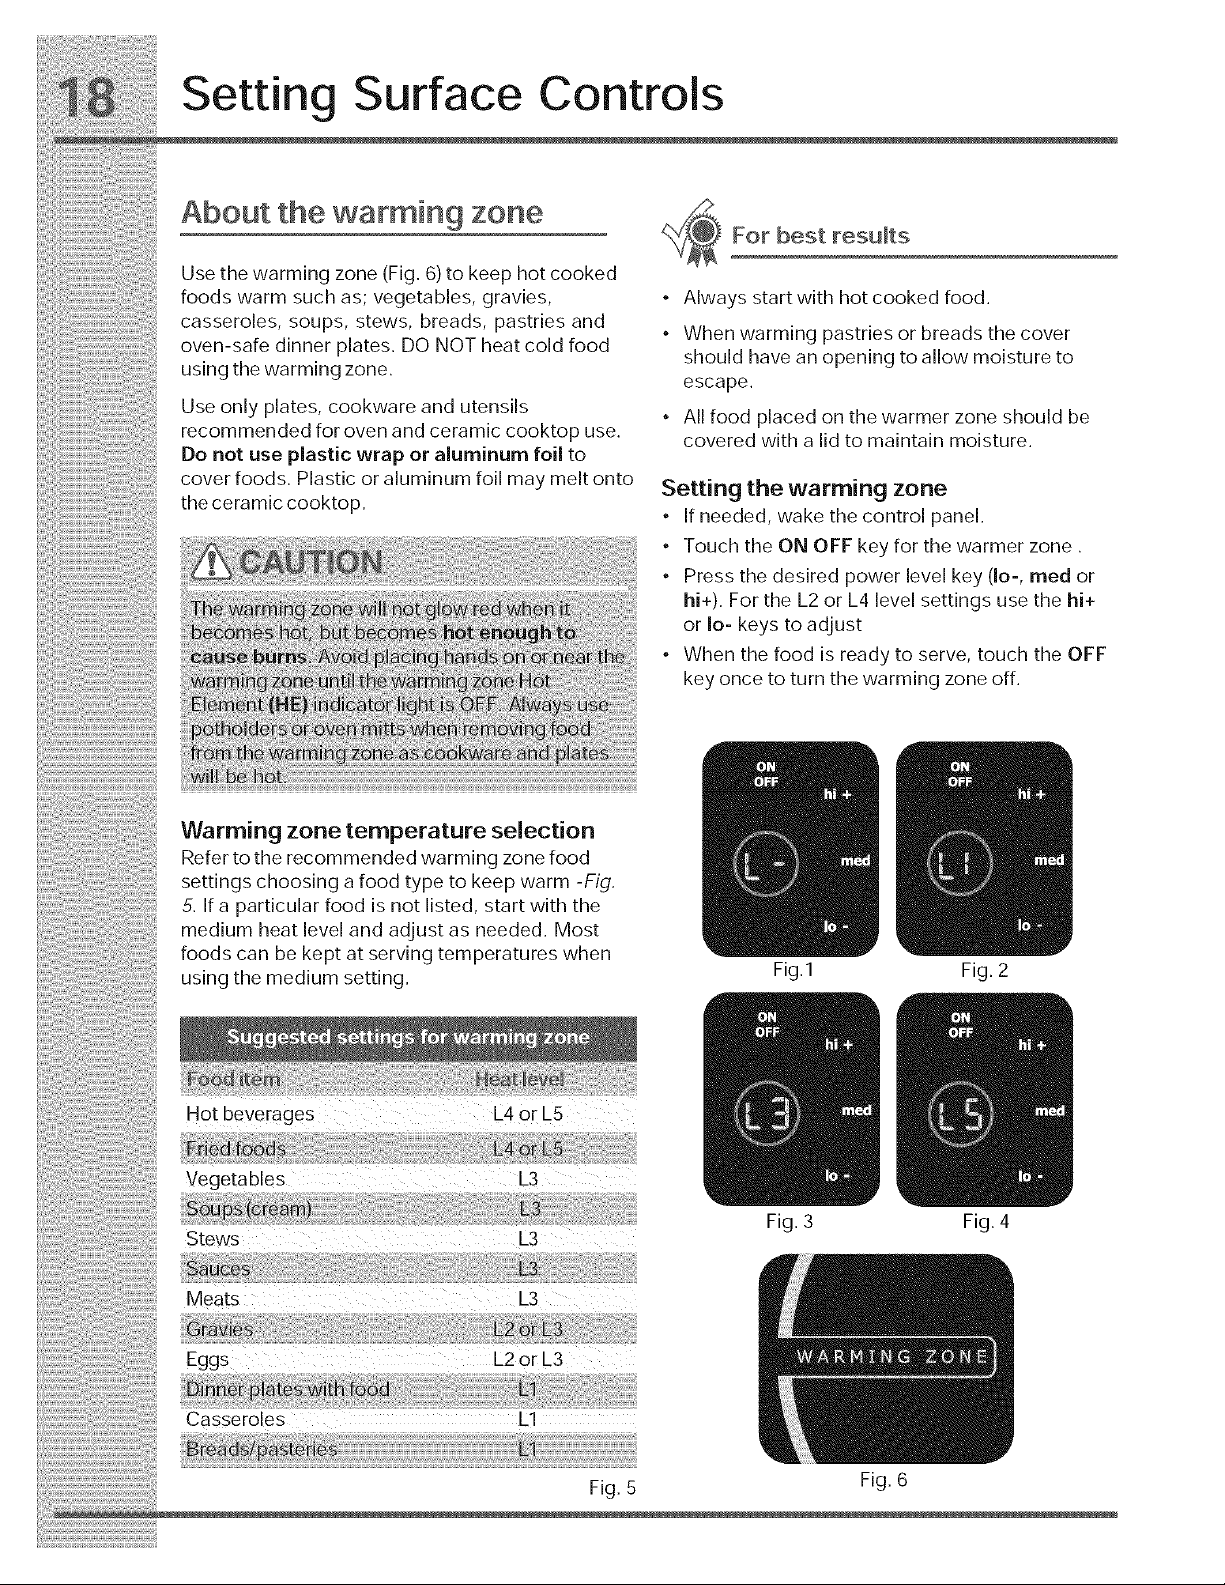
Setting the warming zone
• If needed, wake the control panel.
• Touch the ON OFF key for the warmer zone,
• Press the desired power level key (Io-, reed or
hi+). For the L2 or L4 level settings use the hi+
or Io- keys to adjust
• When the food is ready to serve, touch the OFF
key once to turn the warming zone off,
Warming zone temperature selection
Refer to the recommended warming zone food
settings choosing a food type to keep warm -Fig.
5. If a particular food is not listed, start with the
medium heat level and adjust as needed. Most
foods can be kept at serving temperatures when
using the medium setting.
Stews 1_3
Eggs L2orL3
Casseroles L1
Fig. 5
Fig.1 Fig. 2
Fig. 3 Fig. 4
Fig. 6
Display Abbreviations
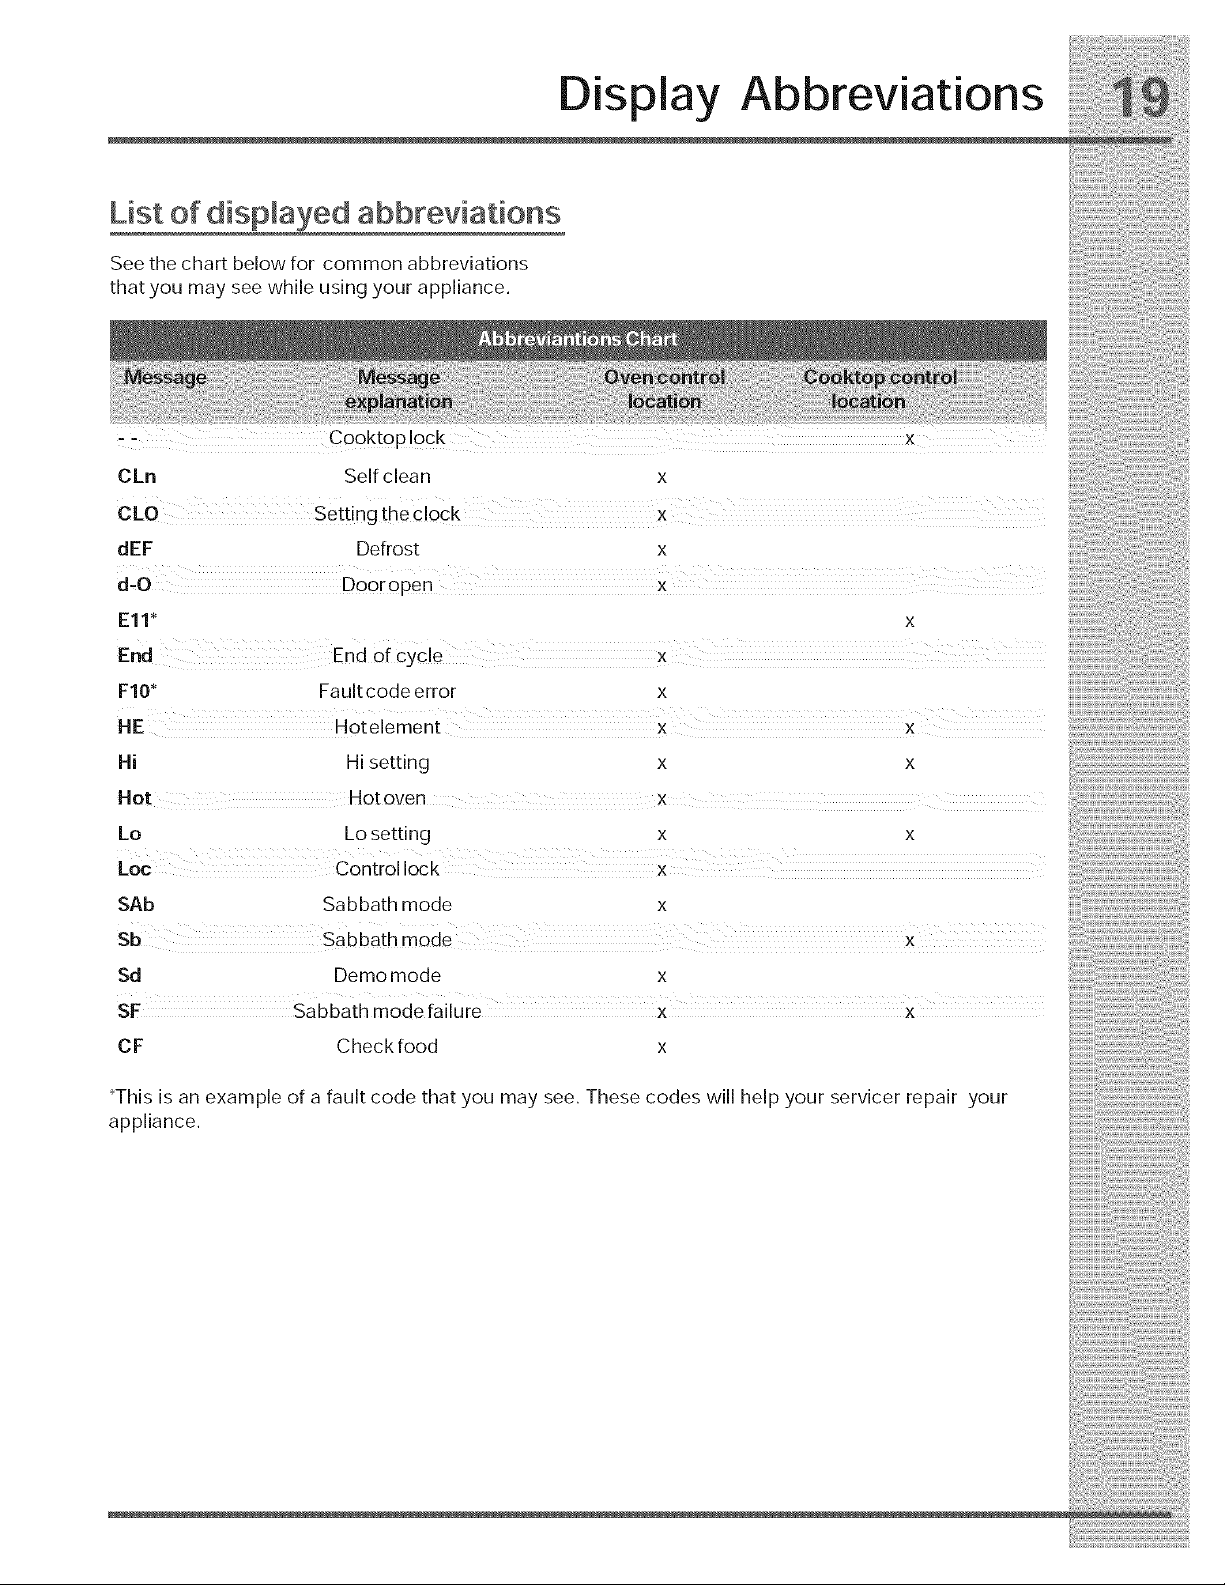
List of displayed abbreviations
See the chart below for common abbreviations
that you may see while using your appliance.
CLn Self clean
dEF Defrost
Ell _ x
End End of Cycle X
FIO* Faultcode error x
HJ Hi setting x x
Hot Hotoven x
Lo Lo setting x x
SAb Sabbath mode
Sd Demo mode x
SF Sabbath mode failure x x
CF Check food
_This is an example of a fault code that you may see, These codes will help your servicer repair your
appliance,

!_!;!!_i_i_i_:_!iii_i_!i_i_i_i_ii_ii_!iii!!iiiii!i;:i_!ii!i_!_i!i_i_i!i_i_i!_#!i_!_!_#i#_!:i;ii#
Setting Oven Controls
About rapid preheat
[ Use the rapid preheat option on single rack baking
[ to quickly bring the upper oven to baking []
temperature.
The rapid preheat option may be set with the : :th ro
_ollowing cooking features:
, Bake To add or change any cook settings after this
Conv bake feature has started:
• Convroast -- Wakecontrol panelfromthesleepmodeif
o necessary•
The following temperature settings apply to the Select the UPPER or LOWER oven you wish to
ra id reh change Make temperature changes us ng the +
p p eat feature:
, . o o or-keys Each press of+or-w adjust the
Auto-suggest(defau t)sett ng'350 F/176 C ....... ,' ._ _. _oc_.-)or-_
• M n rap d preheat sett rig" 170 F/76 C ,
• " o o If changing cooking times, select the cook time
• Max. rapid preheat setting: 550 F/ 288 C or end time keys needed to make the changes.
Setting rapid preheat
For best results
..... See example below to set a rapid preheat with
bake to start immediately using default
° Singleoven rack cooking ONLY.
temperature.
° Use in oven rack postions 2 or 3.
I. Press UPPER OVEN
2. Press BAKE
3. Press COOK OPTIONS
UPPER
OVEN
4. Press RAPID PREHEAT _,_
5. Press START/enter <_
When START is pressed the oven will preheat
quickly. The control will display PRE-HEATING
during this time. While PREHEATING the Convection
fan may operate.
After a few minutes a beep will sound and PRE-
HEATING will no longer display. Place prepared
food on a single oven rack. The oven will continue
to bake at the set temperature until bake is canceled•
Setting Oven Controls
About baking in upper oven
Use the bake feature to cook most food items that
require normal cooking temperatures.
Bake may be set with the following options:
• Rapid preheat
• Cooktime
• Cook time with end time
• Probe
The following temperature settings apply to the
bake feature:
• Auto-suggest(default) setting:350°F/176°C
• Min. bake setting: 170°F/77°0
• Max. bake setting: 550°F/288°C
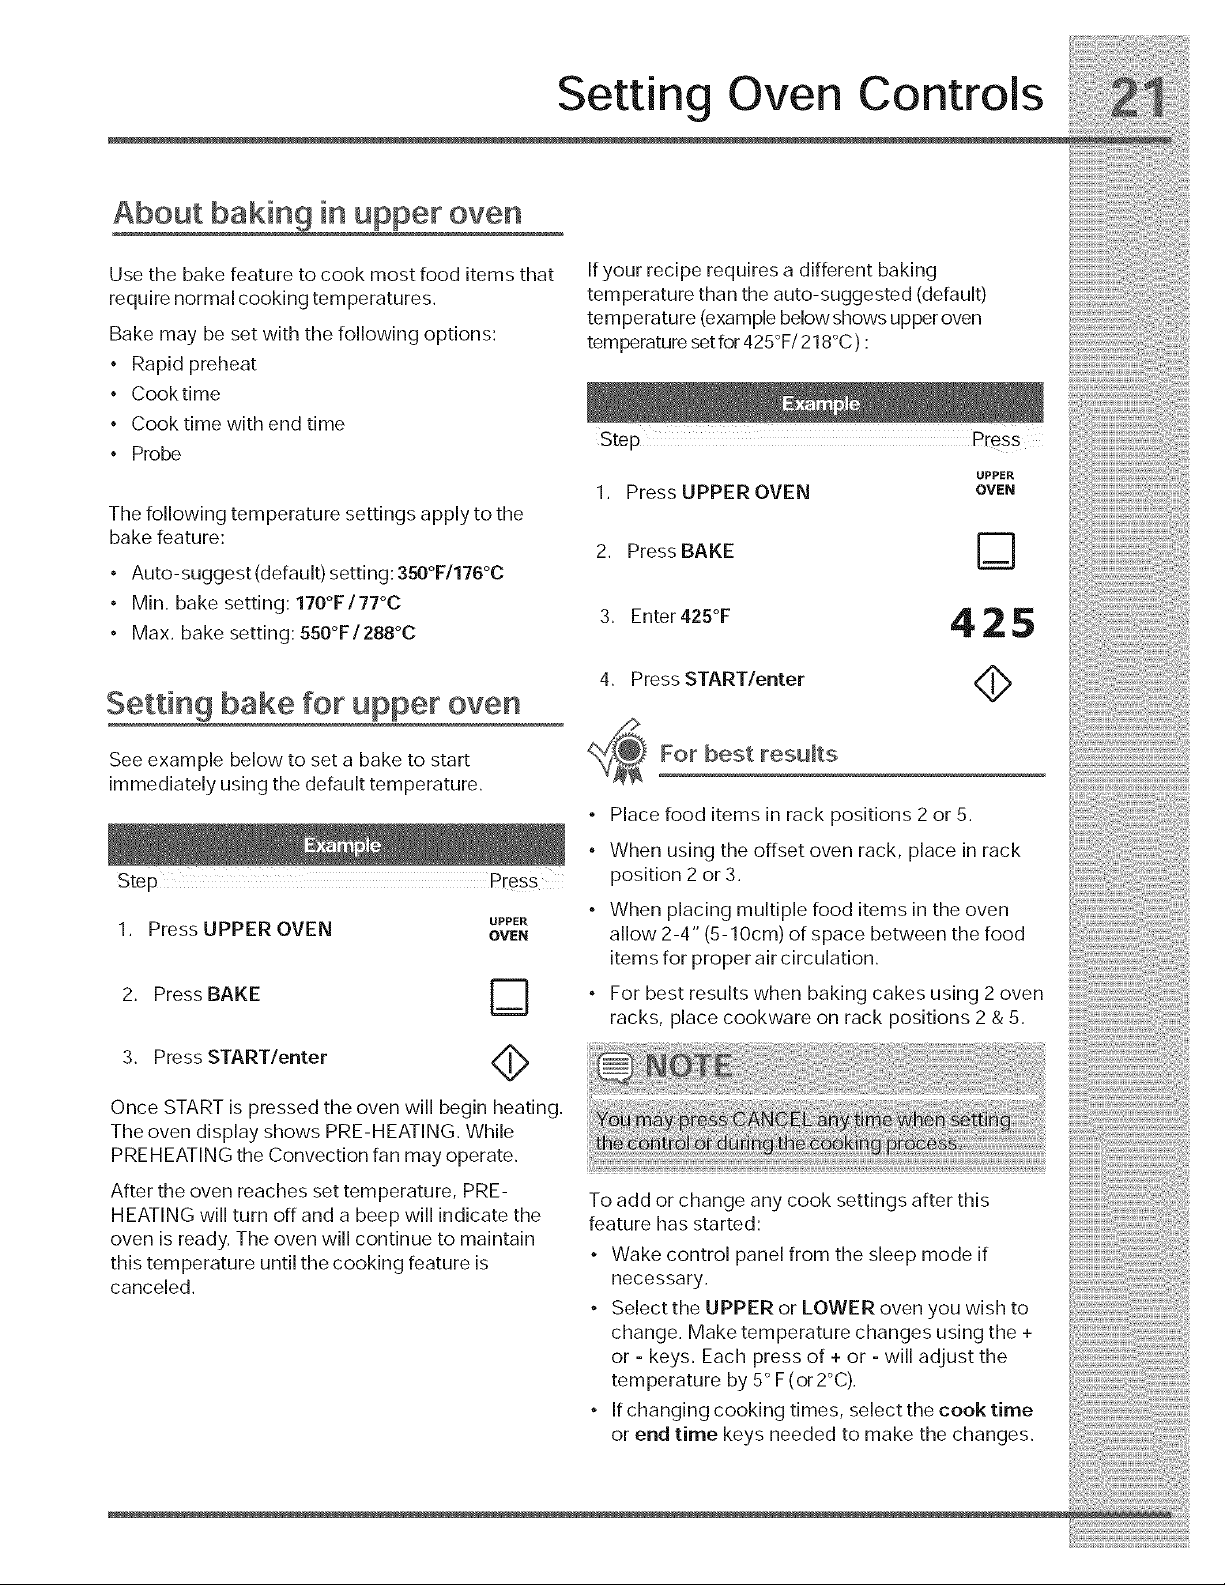
Setting bake for upper oven
See example below to set a bake to start
immediately using the default temperature.
UPPER
1. Press UPPER OVEN OVEN
2. Press BAKE D
3. Press START/enter <_
Once START is pressed the oven will begin heating.
The oven display shows PRE-HEATING. While
PREHEATING the Convection fan may operate.
After the oven reaches set temperature, PRE-
HEATING will turn off and a beep will indicate the
oven is ready. The oven will continue to maintain
this temperature until the cooking feature is
canceled.
Ifyour recipe requires a different baking
temperature than the auto-suggested (default)
temperature (example below shows upper oven
temperature setfor 425°F/218°C) :
UPPER
I. PressUPPER OVEN OVEN
2, Press BAKE D
3. Enter425°F 4 2 5
4. Press START/enter <_
For best results
° Place food items in rack positions 2 or 5.
• When using the offset oven rack, place in rack
position 2 or 3.
° When placing multiple food items in the oven
allow 2-4" (5-10cm) of space between the food
items for proper air circulation.
• For best results when baking cakes using 2 oven
racks, place cookware on rack positions 2 & 5.
To add or change any cook settings after this
feature has started:
° Wake control panel from the sleep mode if
necessary.
• Select the UPPER or LOWER oven you wish to
change. Make temperature changes using the +
or - keys. Each press of + or - will adjust the
temperature by 5° F (or 2°C).
° If changing cooking times, select the cook time
or end time keys needed to make the changes.
!i!_!!iiiiili:ii:ii@!i!ii@i!i!:!iii!:!!@i!!_@@ii}iil
Setting Oven Controls
Using cook time in upper oven
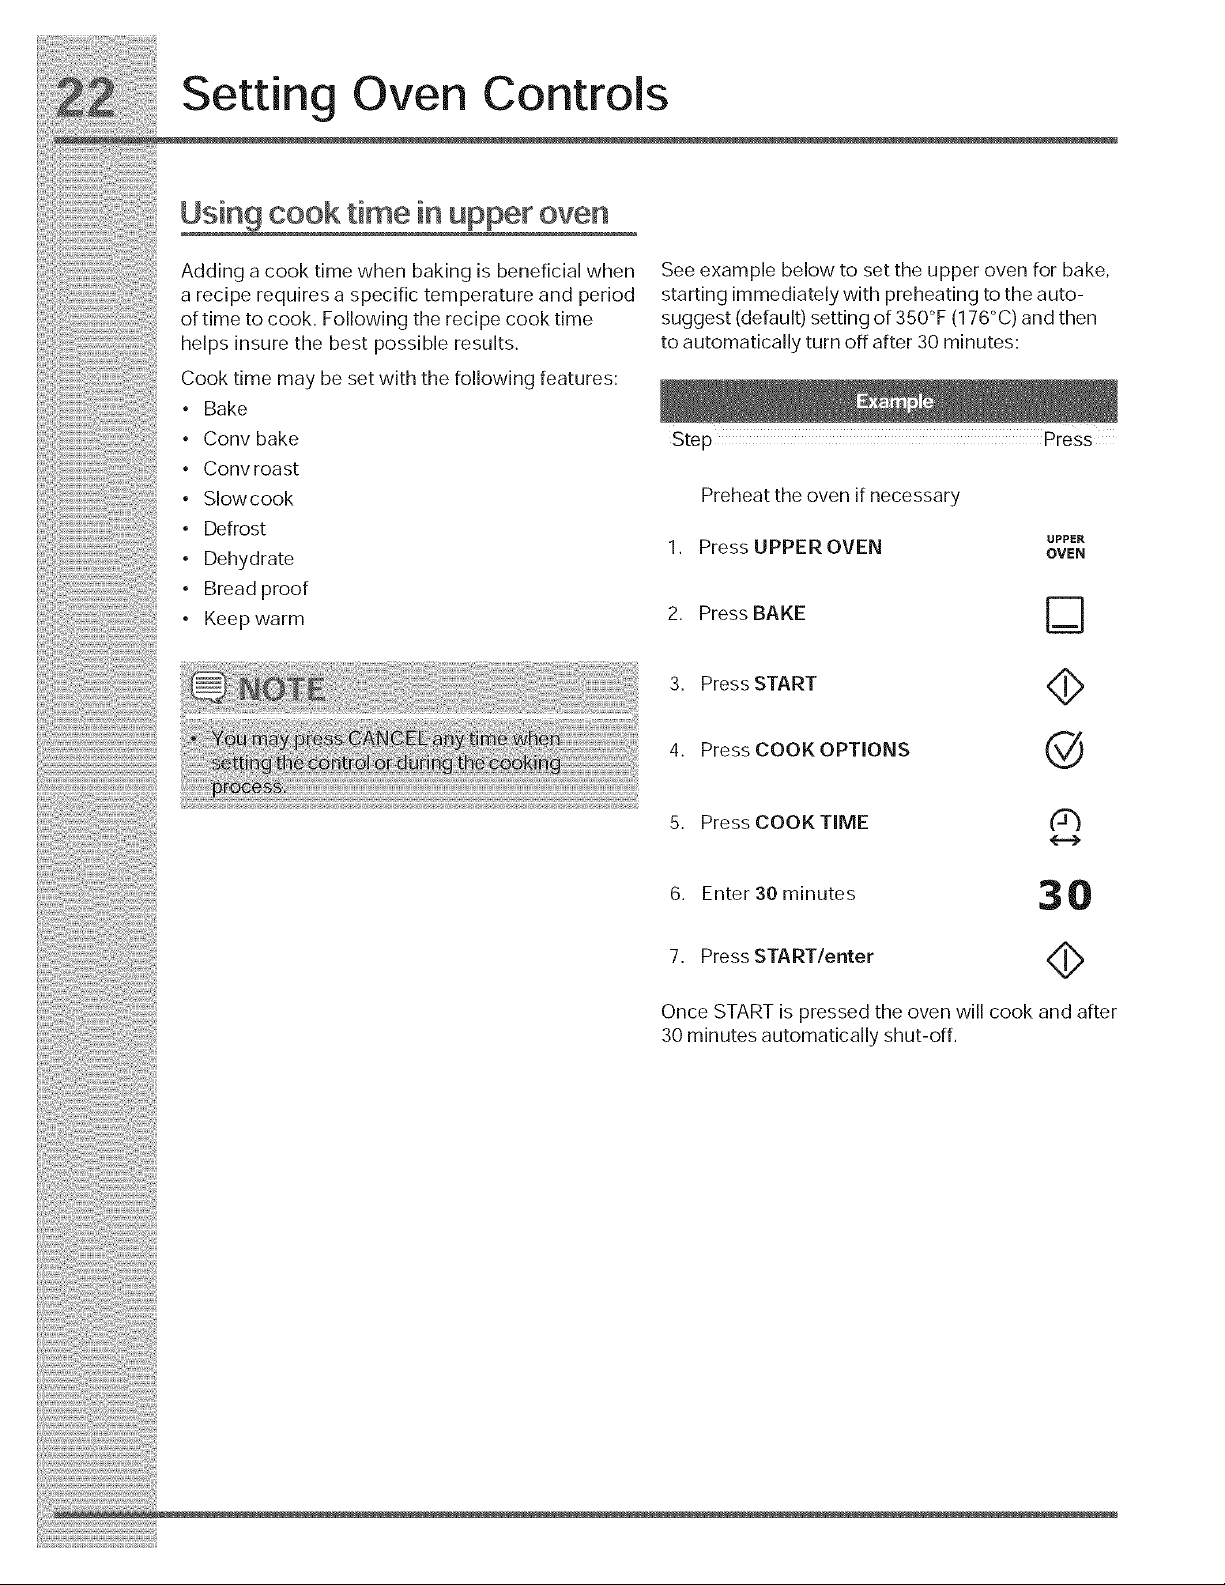
Adding a cook time when baking is beneficial when See example below to set the upper oven for bake,
a recipe requiresa specific temperatureand period startingimmediatelywith preheatingtotheauto-
oftimetocook. Followingtherecipecooktime suggest(default) settingof350 F (176 C) andthen
helpsinsurethe bestpossibleresults, toautomaticallyturnoffafter30minutes:
?ooktimemaybesetwiththefollowingfeatures:
Bake
:Conv bake Step PreSs
• Convroast
:: , SIowcook Preheattheovenifnecessary
Defrost UPPER
. _. ,,4_o,_ 1 Press UPPEROVEN OWN
Breadproof
. Keep warm 2 Press BAKE
• D
3. PFessSTART ,_
..... 4. PressCOOKOPTIONS @
5. Press COOKTIME _)
30
Once START is pressed the oven will cook and after
30 minutes automatically shut-off.
6. Enter 30 minutes
7. Press START/enter
Setting Oven Controls
Using cook time with end time
in upper oven
Adding a cook time along with a specific end time
gives the same benefits as the cook time option in
addition to controlling exactly when the cooking
process will begin and end.
Cook time and end time may be set with the
following features:
• Bake
Convection bake
Convection roast
Slowcook
• Clean (delayed Clean uses end time only)
• Defrost
• Dehydrate
• Bread proof
• Keep warm
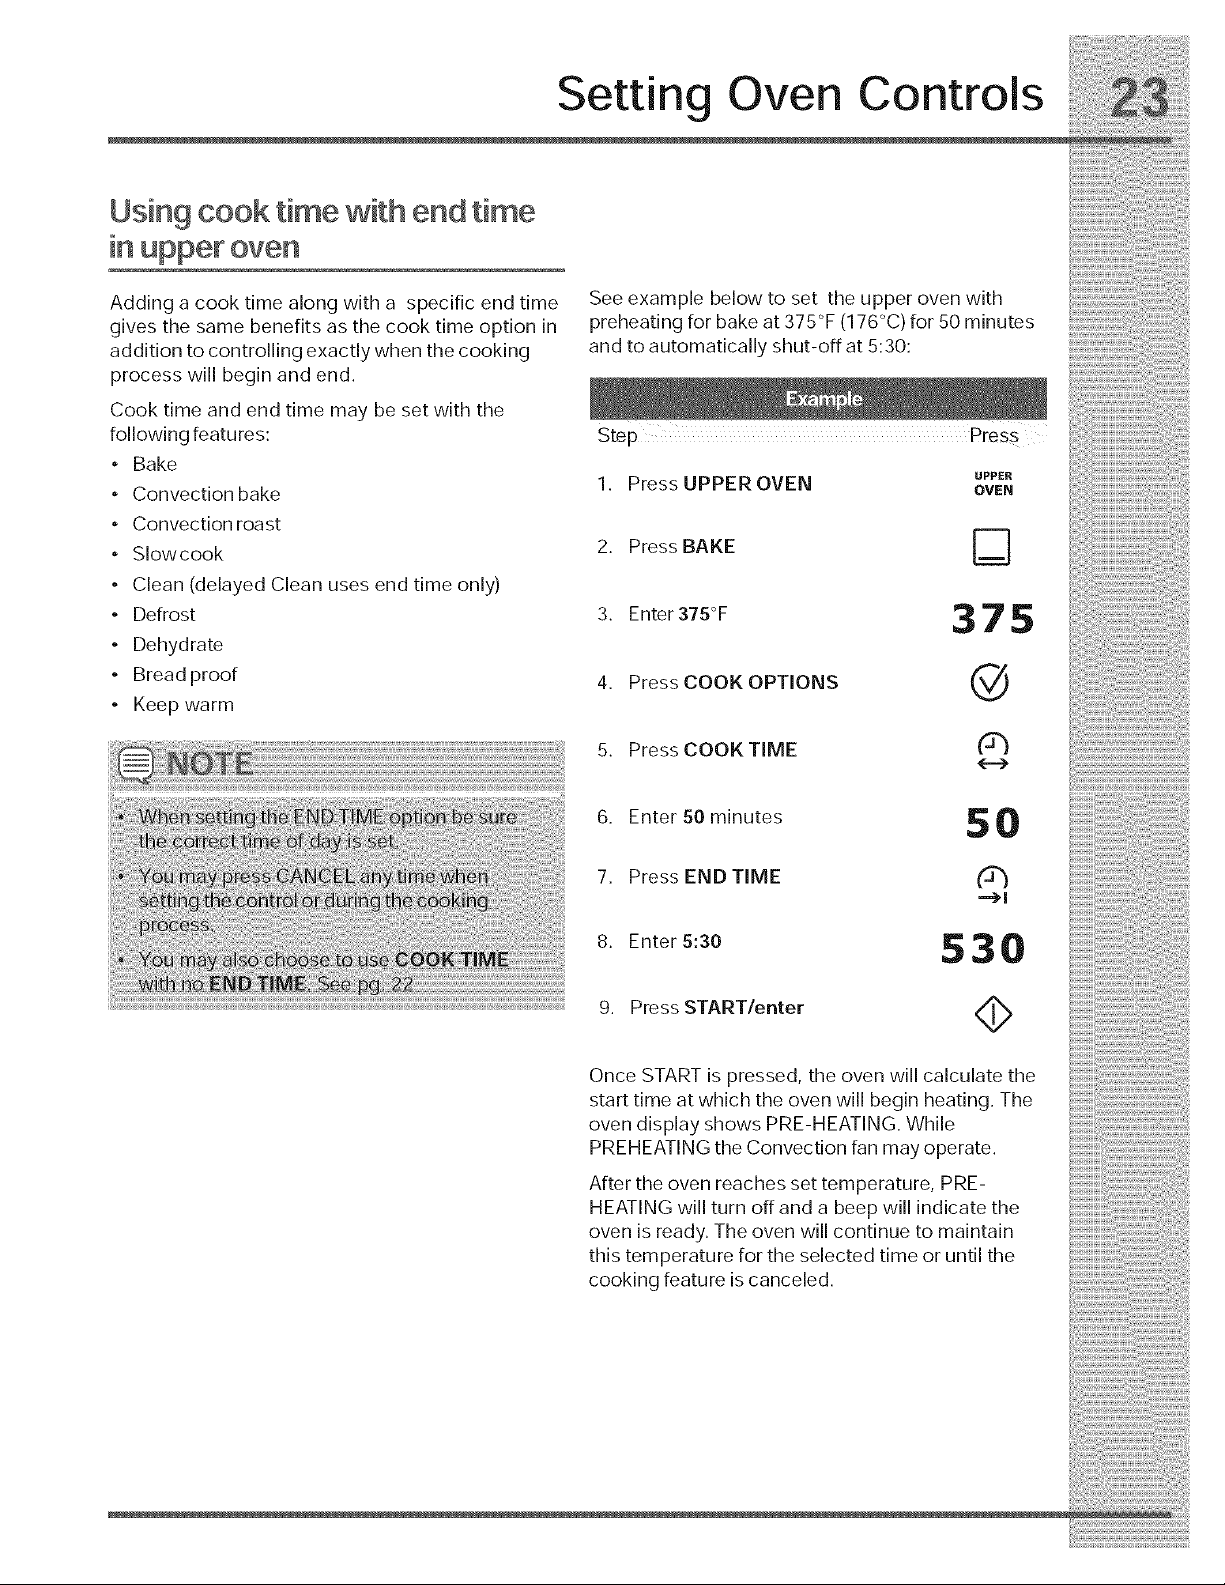
See example below to set the upper oven with
preheating for bake at 375°F (176°C) for 50 minutes
and to automatically shut-off at 5:30:
Step Press
UPPER
1. Press UPPER OVEN OVeN
2, Press BAKE D
3. Enter375°F 3 7 5
4. Press COOK OPTIONS @
5. Press COOK TIME (3"}
6. Enter 50 minutes 5 0
7. Press END TIME (3_
8. Enter 5:30 5 3 O
9. Press START/enter <_
Once START is pressed, the oven will calculate the
start time at which the oven will begin heating. The
oven display shows PRE-HEATING. While
PREHEATING the Convection fan may operate.
After the oven reaches set temperature, PRE-
HEATING will turn off and a beep will indicate the
oven is ready. The oven will continue to maintain
this temperature for the selected time or until the
cooking feature is canceled.
Setting Oven Controls
Broiling in upper oven Setting broil
:: Use the broil feature to cook meats that require See example below to set broil for the upper oven
directexposuretoradiantheatforoptimum startingimmeadiatelywiththeauto-suggest(de-
browningresults. Thiscookingfeatureisonly fault) setting:
available intheupperoven.
Usetheconvbroilfeaturetocookthickercutsof
meats that requ re d rect exposure to rad ant heat Ste Press
P
and theconvectlon fan foroptlmum browning
: results-p.32- 1. Placethebroilerinsertonthebroilerpan, then
The following temperature settings apply to the place the meat on the insert. Remember to
broilfeature: o o followall warningsand cautions.
• Auto-suggest(default)setting:550 F/288 C 2. Arrangetheinteriorovenracktorackpos[tion
• Min. broilsetting: 300F/1480_'° recommendations-p. 25Figs. 2&4-.Besure
, _ o o to p ace the prepared food and pan d rect y
Max DrO sett ng 550 F/288 C
under broil element. Leave the oven door
openslightly(about4inches)inthebroil
position.- ,25F,g,,-
3. PressUPPEROVE.
4. Press BROIL I'"I
L_J
5. Press START/enter
For best results
• Use the recommended pans and oven rack
positions for the type of meat being prepared -
p.25 Figs. 3&4-.
• For optimum browning results, allow the oven to
preheat 5-6 minutes before placing the food in
the oven.
To add or change any cook settings after this
feature has started:
• Wake control panel from the sleep mode if
necessary.
• Select the UPPER or LOWER oven you wish to
change. Make temperature changes using the +
or - keys. Each press of + or - will adjust the
temperature by 5° F (or 2°C).
• If changing cooking times, select the cook time
or end time keys needed to make the changes.
i_i!_!_i!i_ii_!i!_!_i!i_ii_!i!_!_i!i_ii_!i!_!_i!i_ii_!i!_!_i!i_ii_!i!_!_i!i_ii_!i!_!_i!i_ii_!i!_!_i!i_ii_!i!_!_i!i_ii_!i!_!_i!i_ii_!i!_!_i!i_i
Setting Oven Controls
Setting broil
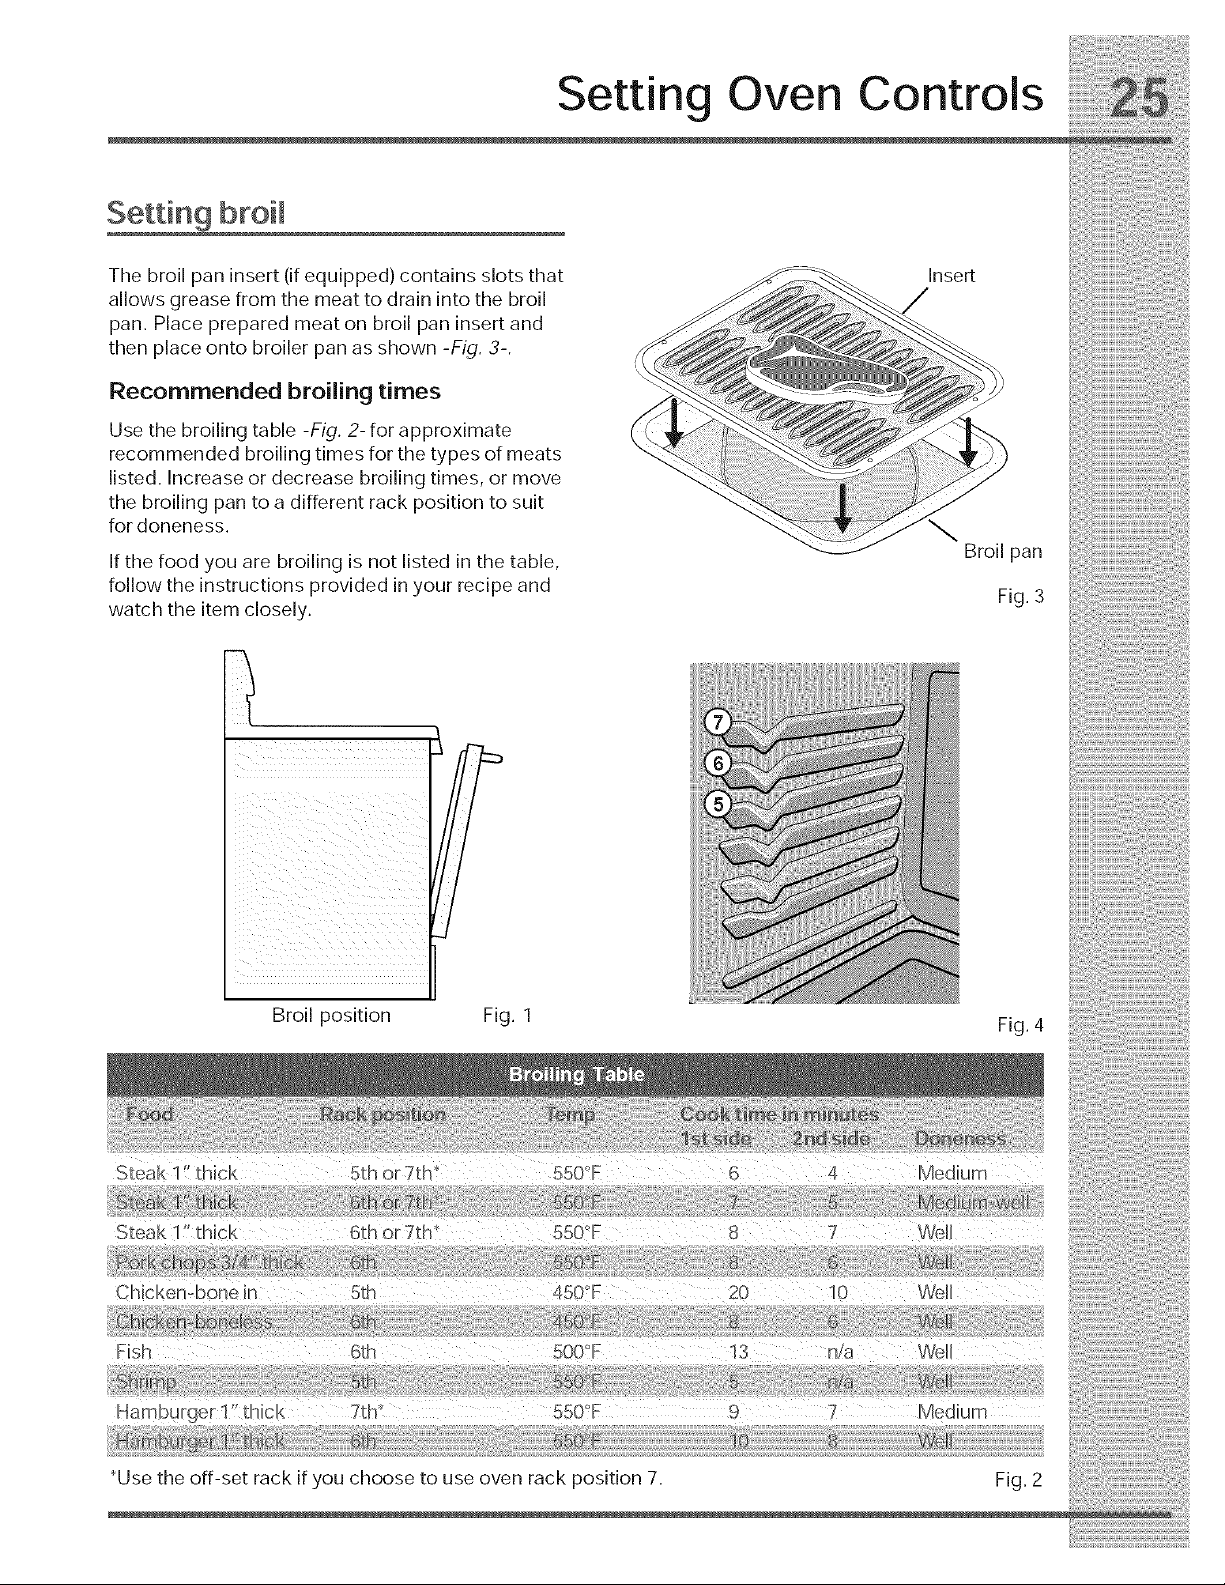
The broil pan insert (if equipped) contains slots that
allows grease from the meat to drain into the broil
pan. Place prepared meat on broil pan insert and
then place onto broiler pan as shown -Fig. 3-.
Recommended broiling times
Use the broiling table -Fig. 2- for approximate
recommended broiling times for the types of meats
listed. Increase or decrease broiling times, or move
the broiling pan to a different rack position to suit
for doneness.
If the food you are broiling is not listed in the table,
follow the instructions provided in your recipe and
watch the item closely.
Insert
Broil pan
Fig. 3

Convbakemaybesetwiththefollowingoptions:
• Convconvert
• Cook time or cook time with end time
• Probe
• Rapid preheat
Benefits of convection bake:
• Superior multiple oven rack performance.
• Some foods cook up 25 to 30% faster, saving
time and energy.
• No special pans or bakeware required.
3. Press START/enter
Once START is pressed the oven will begin
heating. The oven display shows PRE-HEATING
during this time.
After the oven reaches set temperature, PRE-
HEATING will turn off and a beep will indicate the
oven is ready. The oven will continue to maintain
thistemperature until the cooking feature is canceled.
For best results
When baking with a single rack use rack
positions 2 or 3. When using 2 racks use rack
positions 2 & 5. When using 3 racks use rack
positions 2, 3 & 5.
Cookies and biscuits should be baked on pans
with no sides or very low side to allow heated air
to circulate around the food,
Food baked on pans with a dark finish will cook
faster,
When placing multiple food items in the oven
allow 2-4" (5-10cm) of space between the food
items for proper air circulation.
Setting Oven Controls
Using convection convert
The conv convert option allows you to convert any
normal baking recipe using the convection bake
feature. The control uses the normal recipe settings
and adjusts to a lower temperature for convection
baking. Conv convert must be used with CONV
BAKE feature.
Benefits of cony bake using cony
convert option:
• Superior multiple oven rack performance.
• Some foods cook up 25 to 30% faster, saving
time and energy.
• No special pans or bakeware required.
For best results
° Place food items using the recommended rack
positions. When baking with a single rack use
rack positions 2 or 3. When using 2 racks use
rack positions 2 and 5. When using 3 racks use
rack positions 2, 3 and 5.
° Cookies and biscuits should be baked on pans
with no sides or very low side to allow heated air
to circulate around the food.
• Food baked on pans with a dark finish will cook
faster.
° When placing multiple food items in the oven
allow 2-4" (5-10cm) of space between the food
items for proper air circulation.
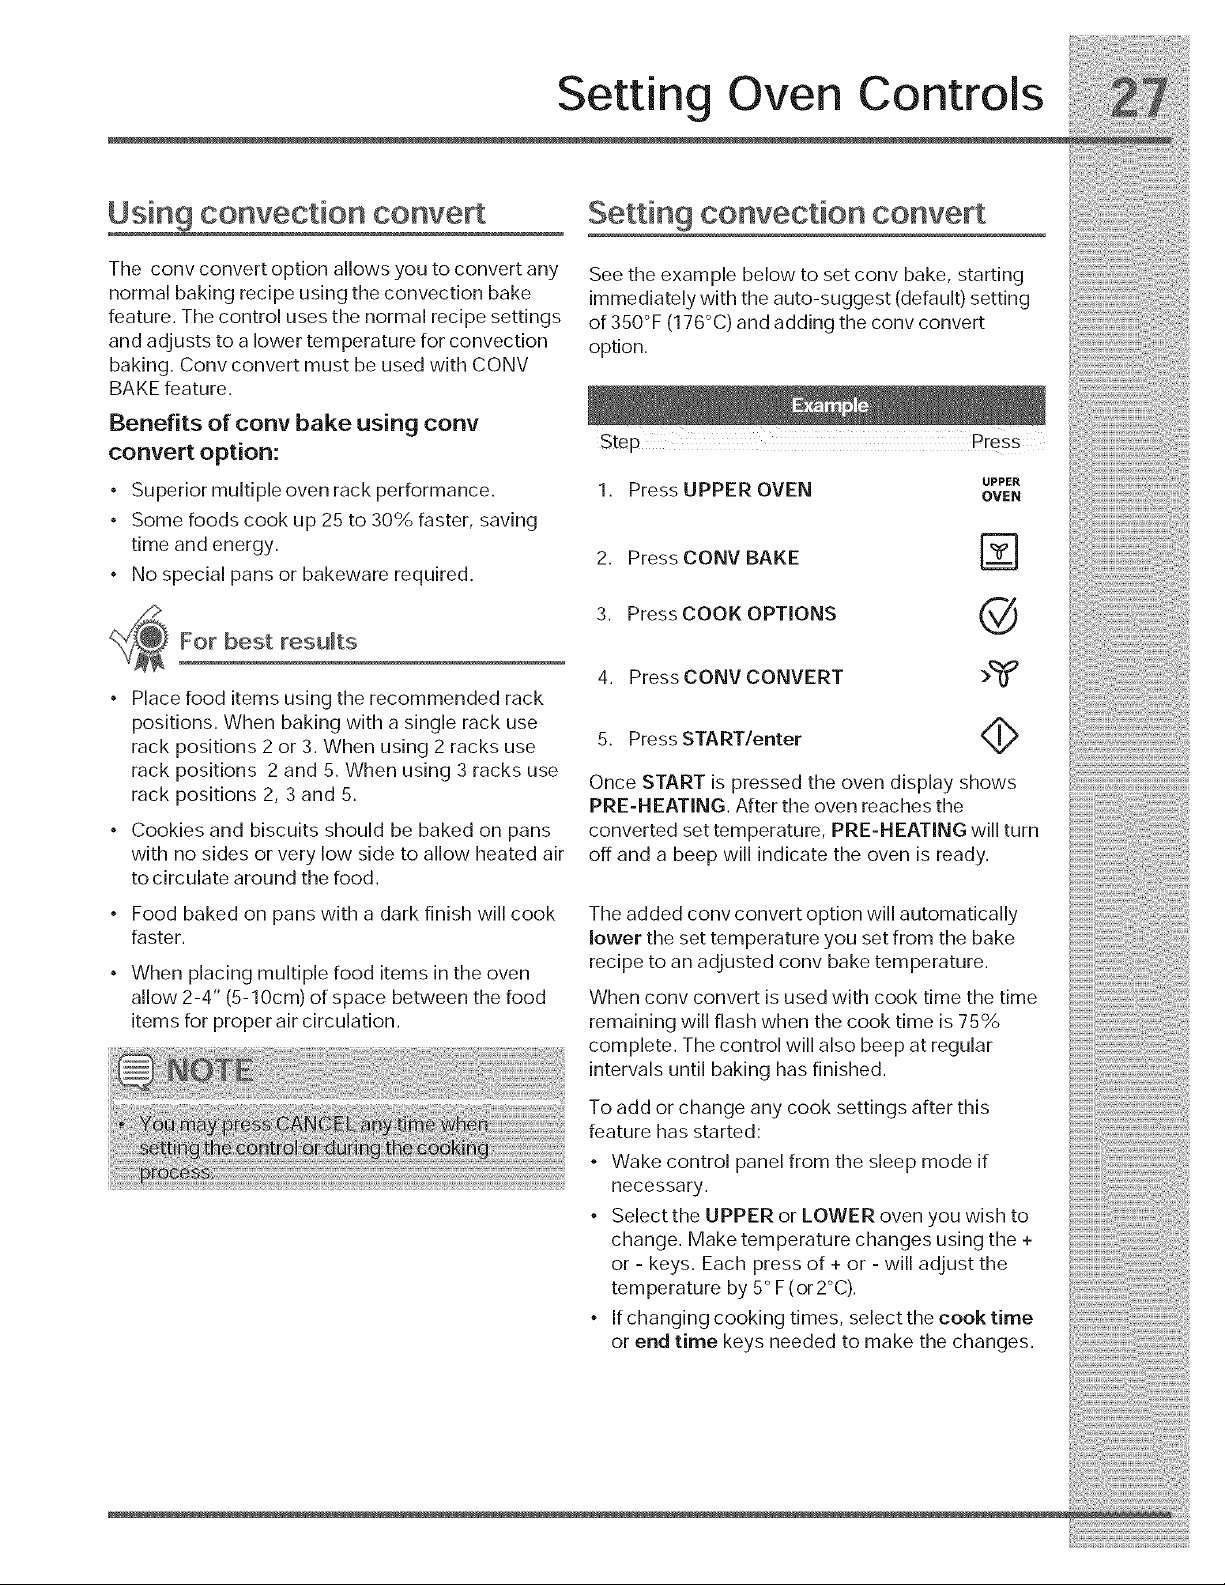
Setting convection convert
See the example below to set conv bake, starting
immediately with the auto-suggest (default) setting
of 350°F (176°C) and adding the conv convert
option.
Step Press
UPPER
1. Press UPPER OVEN OVEN
2. %
3. Q
4.
5. Press START/enter <_
Once START is pressed the oven display shows
PRE-HEATING After the oven reaches the
converted set temperature, PRE-HEATING will turn
off and a beep will indicate the oven is ready.
Press CONV BAKE
Press COOK OPTIONS
Press CONV CONVERT
The added conv convert option will automatically
lower the set temperature you set from the bake
recipe to an adjusted conv bake temperature.
When conv convert is used with cook time the time
remaining will flash when the cook time is 75%
complete. The control will also beep at regular
intervals until baking has finished.
To add or change any cook settings after this
feature has started:
Wake control panel from the sleep mode if
necessary.
• Select the UPPER or LOWER oven you wish to
change. Make temperature changes using the +
or - keys. Each press of + or - will adjust the
temperature by 5° F (or 2°C).
° If changing cooking times, select the cook time
or end time keys needed to make the changes.
Setting Oven Controls
About convection roast
How convection roast works
Convection roast is part of the Perfect-Convect 3TM
system. Convection roast combines a cook cycle
with the convection fan and element to rapidly
roast meats and poultry. Heated air circulates
around the meat from all sides, sealing in juices
and flavors. Meats cooked with this feature are
crispy brown on the outside while staying moist on
the inside. In addition, there is no need to reduce
the oven temperature when using convection roast.
Convection roast may be set with the following
options:
• Probe
• Cook time or cook time with end time
• Rapid preheat
The following temperature settings apply to
convection roast:
• Factory auto-start default: 350°F/176°C
• Minimum: 170°F/76°0
• Maximum: 550°F/288°C
Benefits of convection roast:
• Superior multiple oven rack performance.
• Some foods cook up 25 to 30% faster, saving
time and energy.
• No special pans or bakeware required.
For best results
• Preheating is not necessary for most meats and
poultry.
• Place food items using the recommended rack
positions for the type of food being prepared.
• When placing multiple food items in the oven
allow 2-4" (5-10cm) of space between the food
items for proper air circulation.
• Be sure to carefully follow your recipe's
temperature and time recommendations or refer
to the convection roast chart for additional
information -p. 29, Fig. 2-.
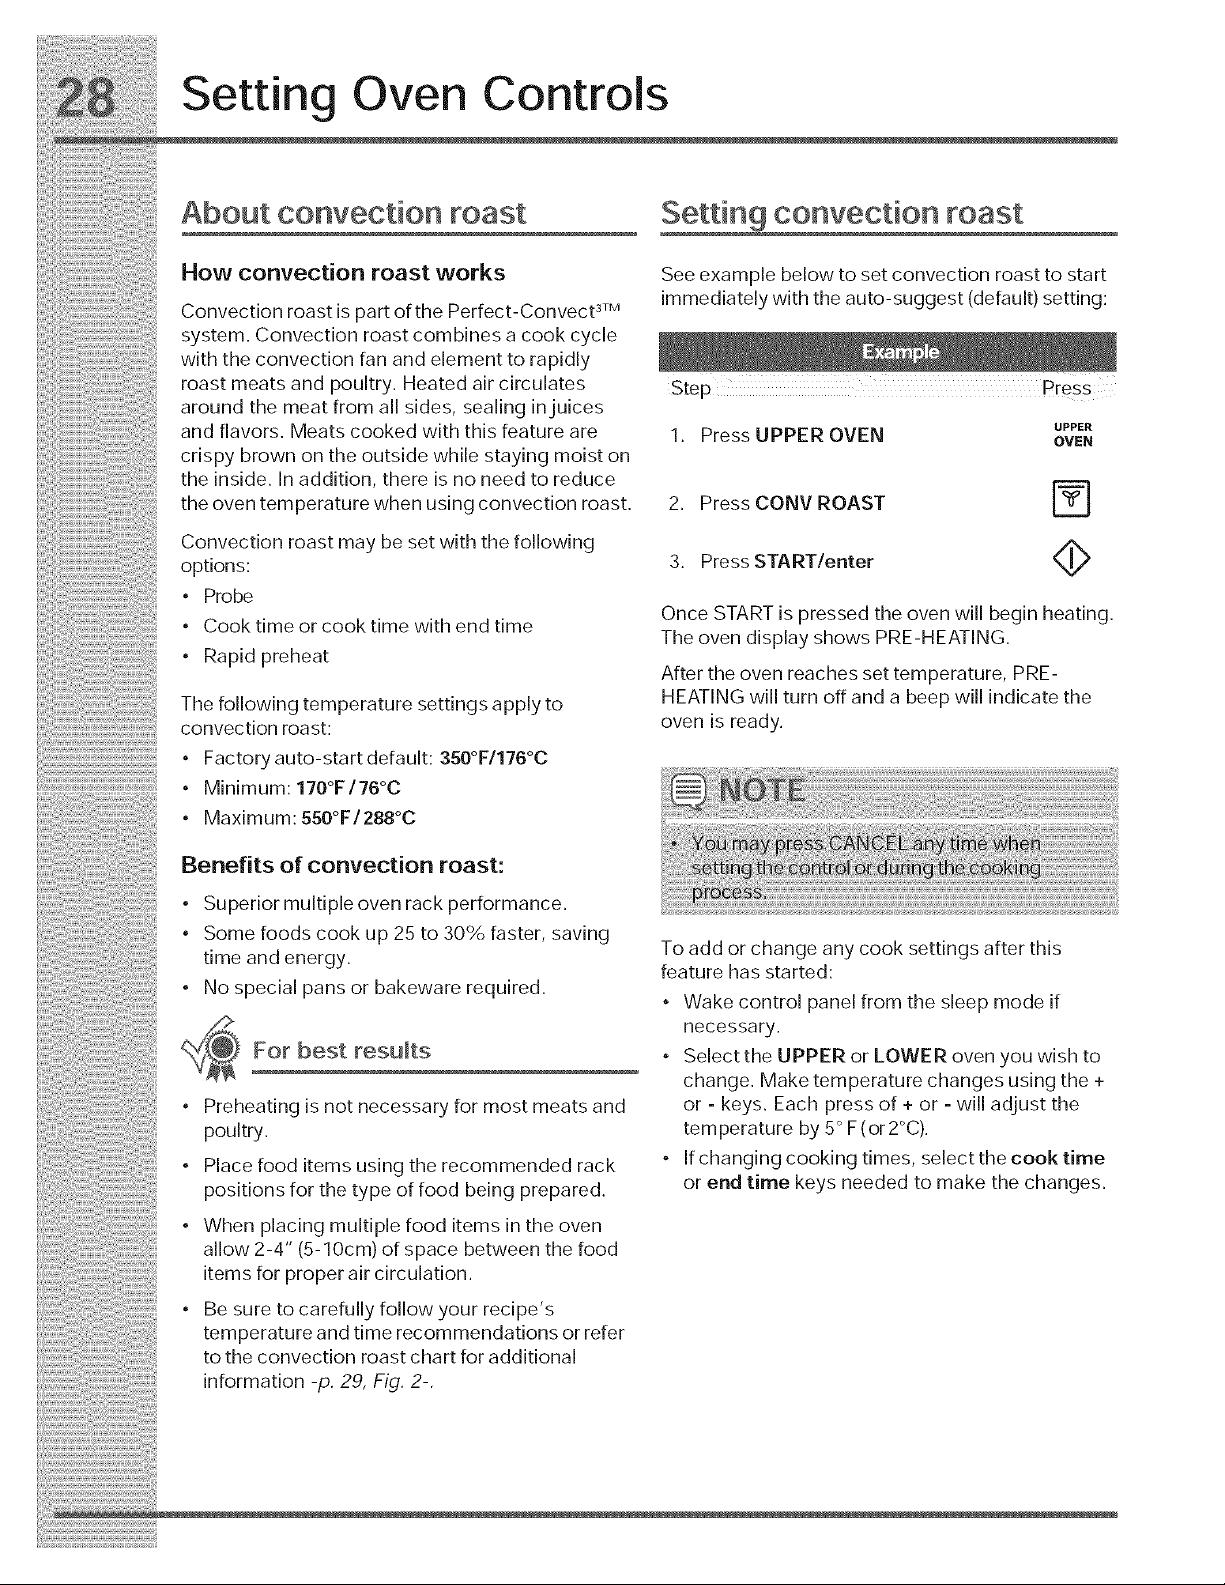
Setting convection roast
See example below to set convection roast to start
immediately with the auto-suggest (default) setting:
UPPER
1. Press UPPER OVEN OVEN
2. Press CONV ROAST r_
3. Press START/enter 4_
Once START is pressed the oven will begin heating.
The oven display shows PRE-HEATING.
After the oven reaches set temperature, PRE-
HEATING will turn off and a beep will indicate the
oven is ready.
To add or change any cook settings after this
feature has started:
• Wake control panel from the sleep mode if
necessary.
• Select the UPPER or LOWER oven you wish to
change. Make temperature changes using the +
or - keys. Each press of + or - will adjust the
temperature by 5° F (or 2°C).
• If changing cooking times, select the cook time
or end time keys needed to make the changes.
Setting Oven Controls
Roasting recommendations
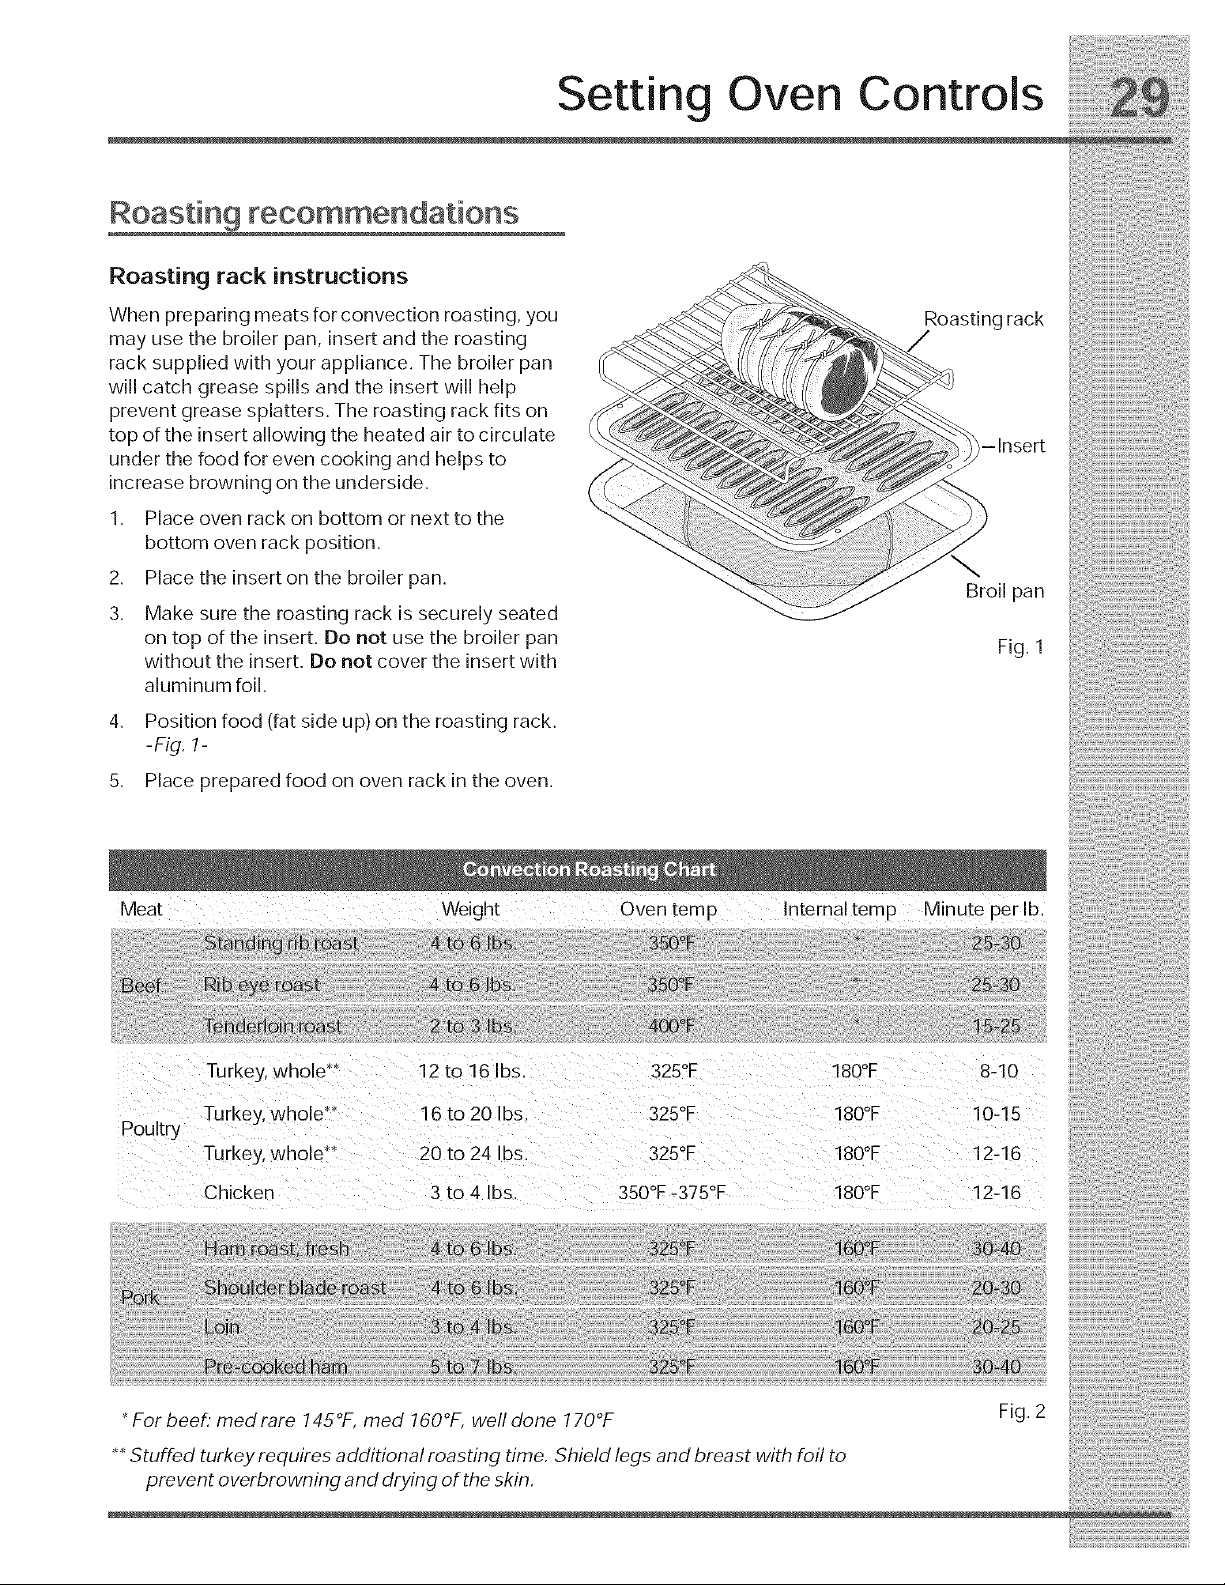
Roasting rack instructions
When preparing meats for convection roasting, you
may use the broiler pan, insert and the roasting
rack supplied with your appliance. The broiler pan
will catch grease spills and the insert will help
prevent grease splatters. The roasting rack fits on
top of the insert allowing the heated air to circulate
under the food for even cooking and helps to
increase browning on the underside.
1. Place oven rack on bottom or next to the
bottom oven rack position.
2. Place the insert on the broiler pan.
3. Make sure the roasting rack is securely seated
on top of the insert. Do not use the broiler pan
without the insert. Do not cover the insert with
aluminum foil.
4. Position food (fat side up) on the roasting rack.
-Fig, 1-
5. Place prepared food on oven rack in the oven.
Roasting rack
-Insert
\
Broil pan
Fig. 1
Meat Weight 0ventemp Internaltemp Minute perlb,
Poultry
Turkey, whole** 12 to 16 Ibs. 325°F 18001: 8-10
Turkey, whole** 16 to 20 Ibs 325°F 180°F 10-15
Turkey, whole *_ 20 to 24 Ibs 325°F 180°F 12-16
Chicker 3 to 4 Ibs. 350°F-375°F 180°F 12-16
* For beeL" med rare 145 °F, med 160°F, well done 170°F
.....Stuffed turkey requires additional roasting time, Shield legs and breast with foil to
prevent overbrowning and drying of the skin,
Fig. 2
i@;!zii!;i,li:iiiii:iiiiiiiil¸fill¸ilili!i@iiii:!iii:!@i@i!!i!!
Setting Oven Controls
About the probe function
Checkingthe internaltemperatureofyourfood is
themost effectiveway ofinsudngthatyour food
Has been properlycooked, When cooMng meat
such as roasts,hams or poultryyou can usethe
probetocheck theintemaltemperaturewithoutany
guesswork.
Your oven willautomaticallychange fromcooMng
tokeepwarm once theprobehasreachedtheset
temperature.
The followingtemperaturesettingsapplytothe
probe function:
• Default: 170°F/76°co
• Minimum: 1:30 F/54 C
• Maximum: 210 F/98 C
.....................................................s÷t h÷p ob÷
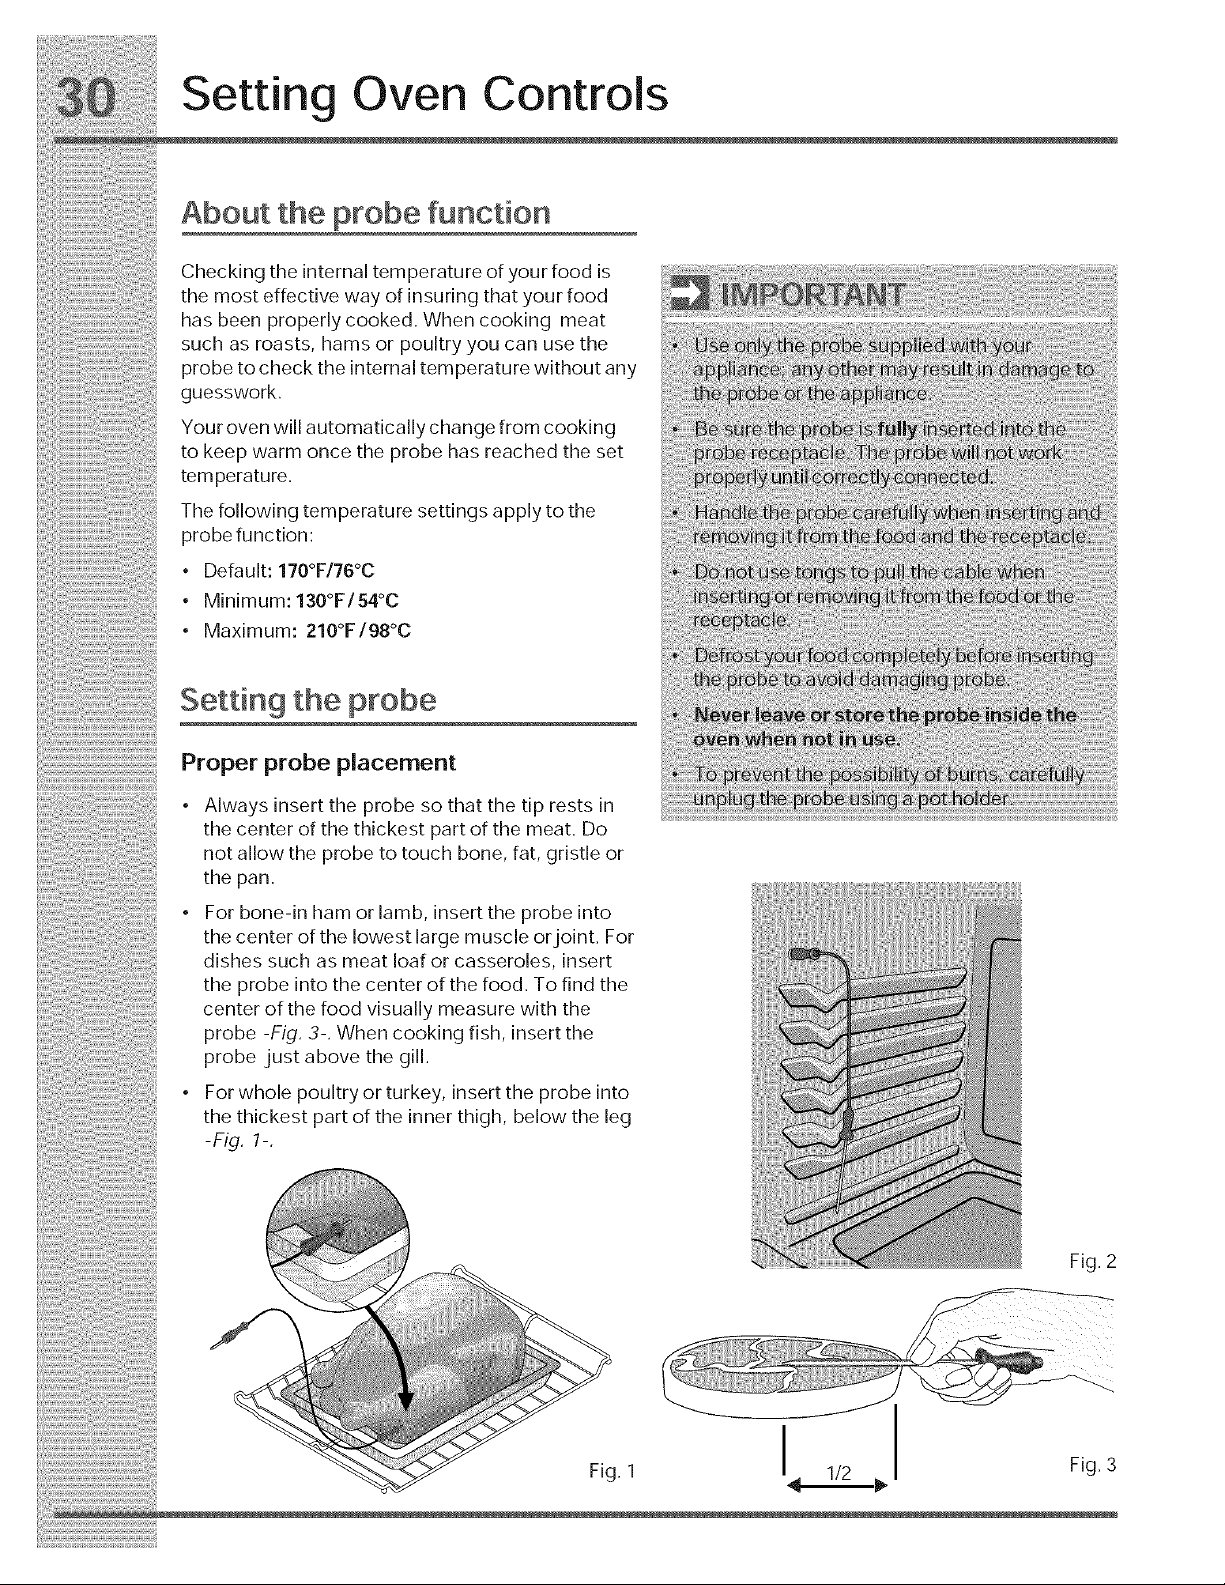
P,opo,p,o op,oco oo,
• Always insert the probe so that the tip rests in
the center of the thickest part of the meat. Do
not allow the probe to touch bone, fat, gristle or
the pan.
• For bone-in ham or lamb, insert the probe into
the center of the lowest large muscle or joint. For
dishes such as meat loaf or casseroles, insert
the probe into the center of the food. To find the
center of the food visually measure with the
probe -Fig, 3-. When cooking fish, insert the
probe just above the gill.
• For whole poultry or turkey, insert the probe into
the thickest part of the inner thigh, below the leg
-Fig. 1-.
Fig. 3
Setting Oven Controls
Setting the probe
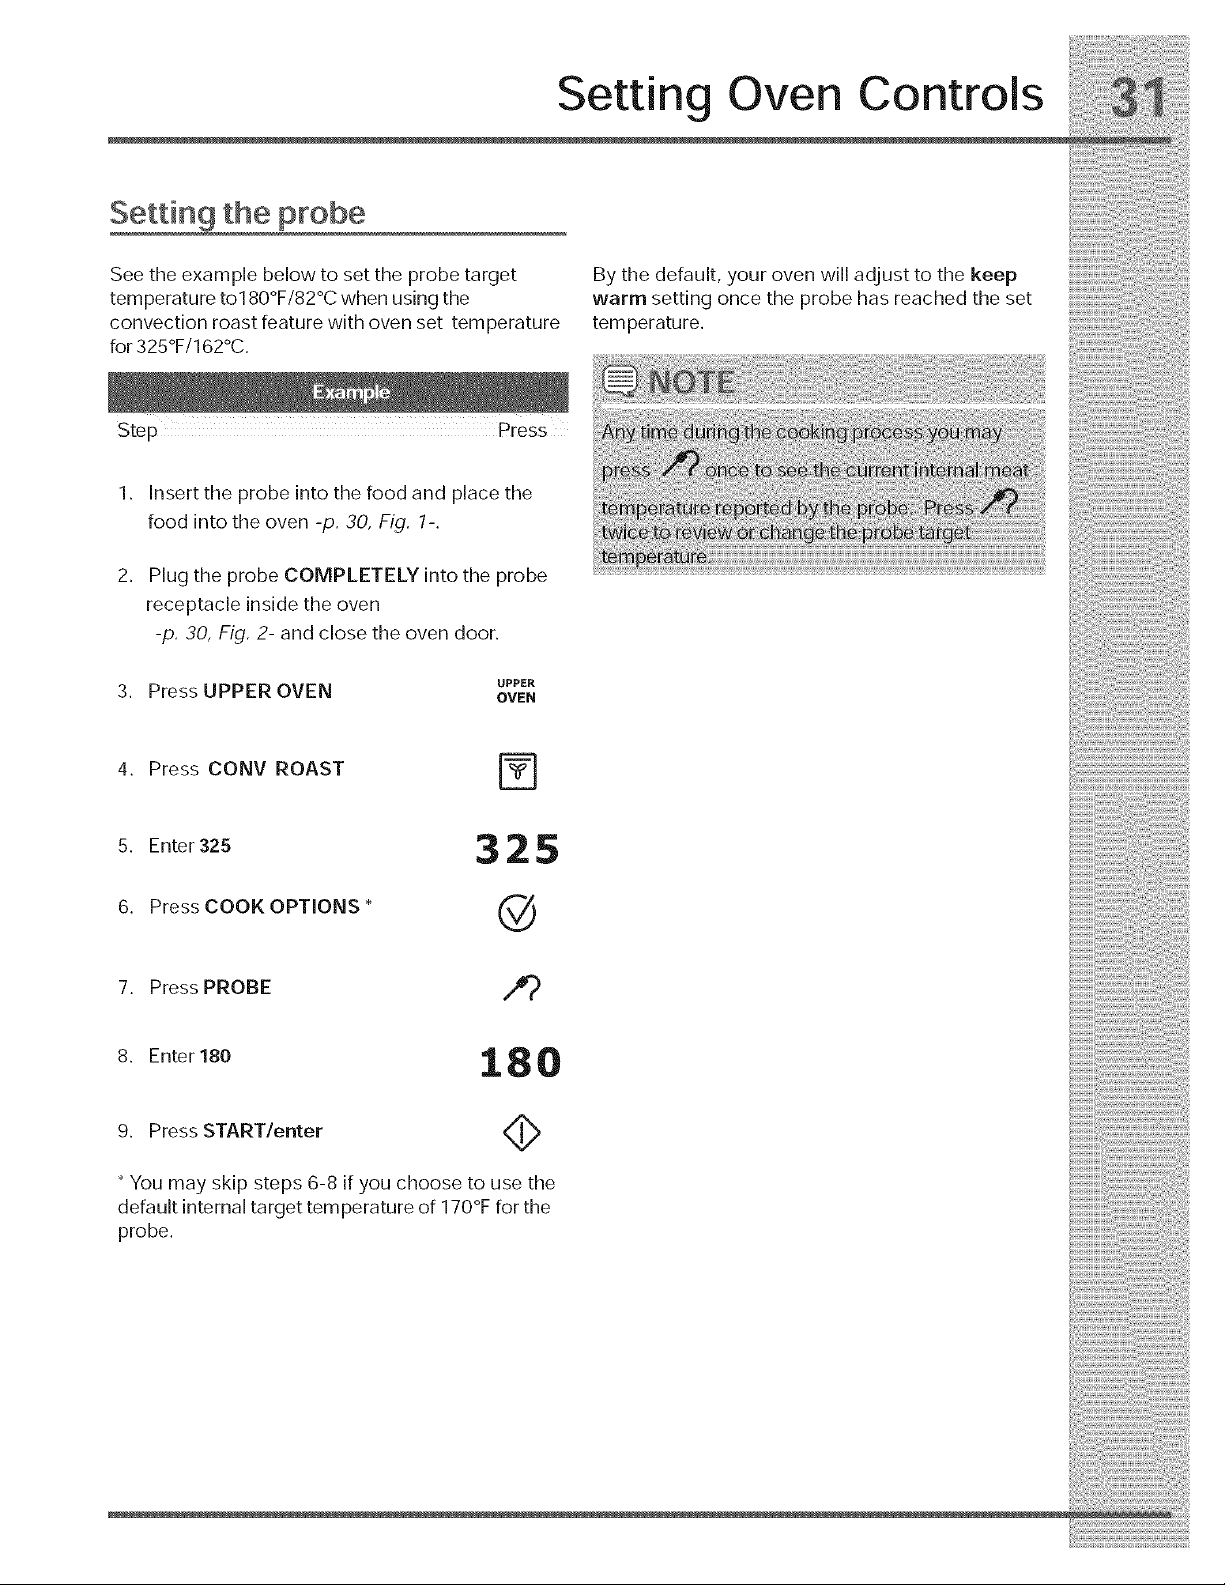
See the example below to set the probe target
temperature to180°F/82°C when using the
convection roast feature with oven set temperature
for 325°F/162°C.
Step Press
By the default, your oven will adjust to the keep
warm setting once the probe has reached the set
temperature.
1.
2.
Insert the probe into the food and place the
food into the oven -p. 30, Fig. 1-.
Plug the probe COMPLETELY into the probe
receptacle inside the oven
-p. 30, Fig. 2- and close the oven door.
UPPER
3. Press UPPER OVEN OVEN
4. Press CONV ROAST
5. Enter 325 3 2 5
6. Press COOK OPTIONS* Q
7. Press PROBE /e_
8. Enter 180 180
9. Press START/enter 4_
* You may skip steps 6-8 if you choose to use the
default internal target temperature of 170°F for the
probe.
Setting Oven Controls
About convection broiling Setting convection broil
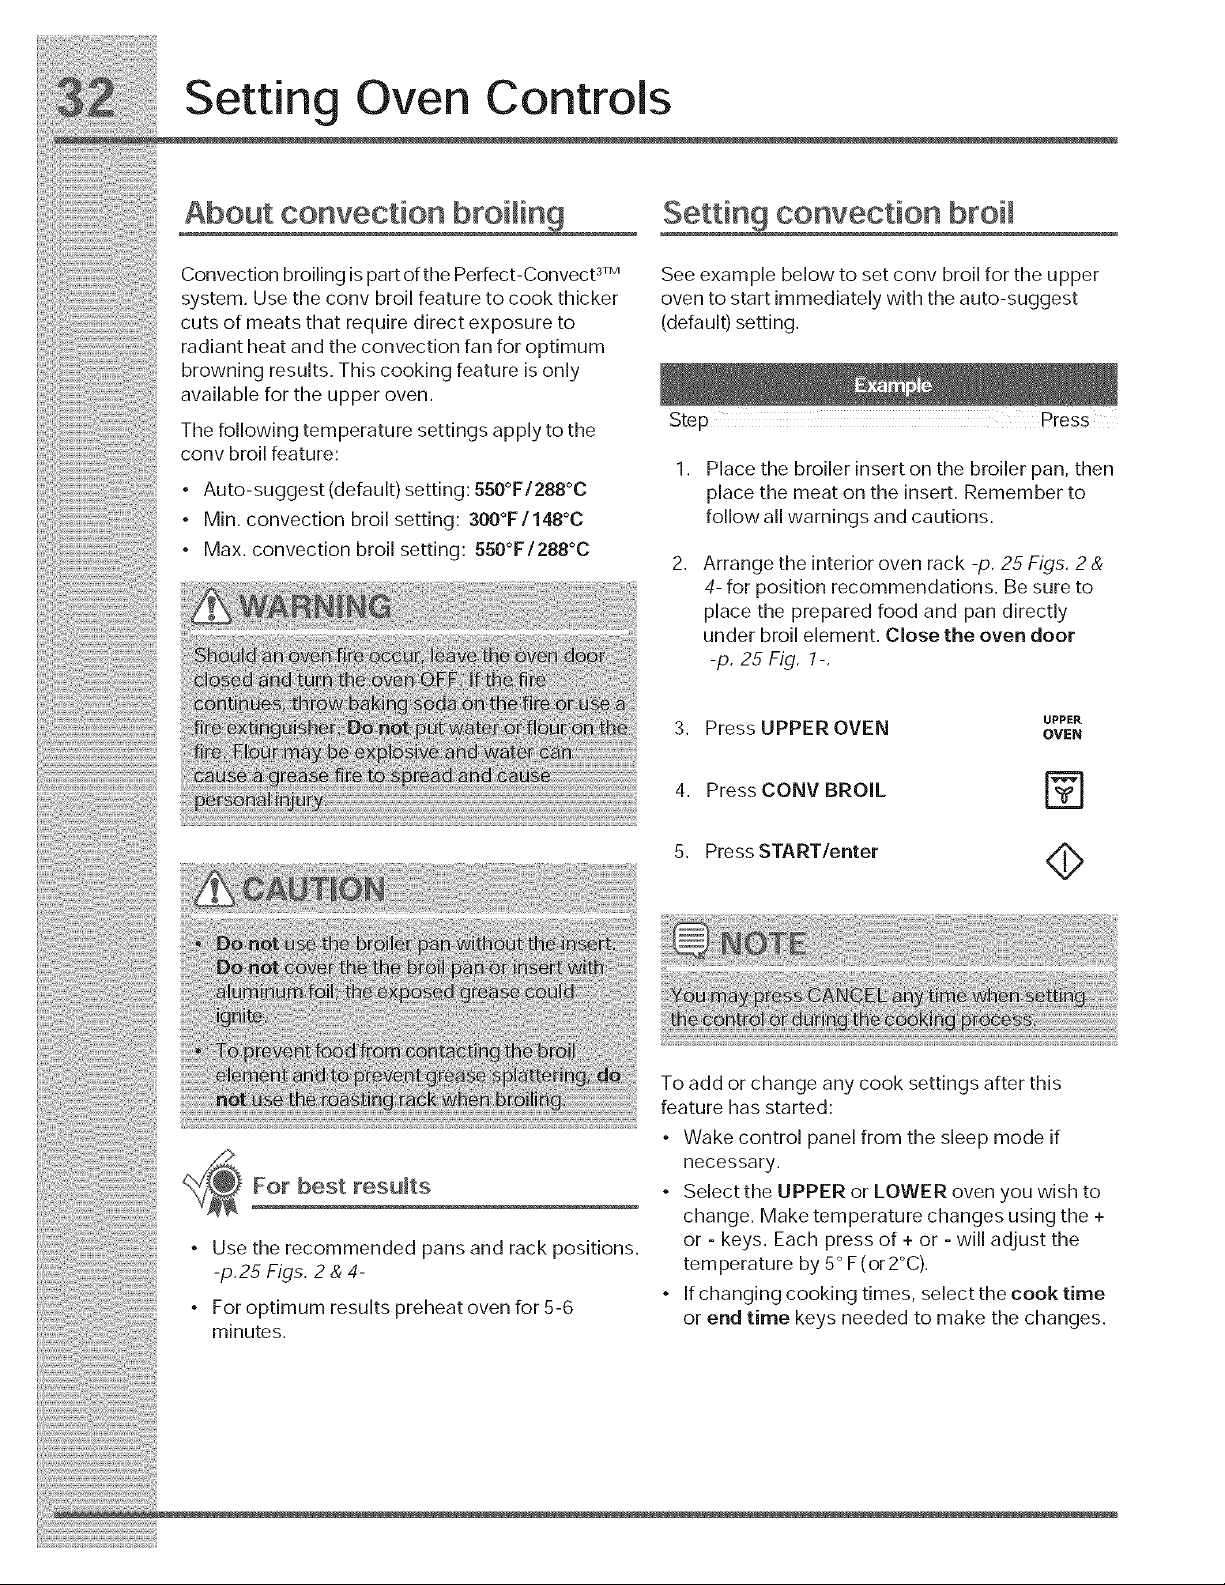
Convection broiling is part of the Perfect-ConvecPTM See example below to set conv broil for the upper
system. Use the cony broil feature to cook thicker oven to start immediately with the auto-suggest
: cuts of meats that require direct exposure to (default) setting.
radiant heat and the convection fan for optimum
browning results. This cooking feature is only
available for the upper oven.
The following temperature settings apply to the Step Press
conv broil feature:
: o o 1 Place the broiler insert on the broiler pan, then
• Auto-suggest(default)setting:B50 'F/288_c place the meat on the insert. Rememberto
• Min. convection broil setting: 300"°_°F/148C follow all warnings and cautions.
, Max convectonbro settng 550F/2880°' °"
2. Arrange the interior oven rack -p. 25 Figs. 2 &
4-for position recommendations. Be sure to
place the prepared food and pan directly
under broil element. Close the oven door
25Fig.7.
3. Press UPPER OVEN _
4. Press CONV BROIL [_]
• Use the recommended pans and rack positions.
-p.25 Figs. 2 & 4-
• For optimum results preheat oven for 5-6
minutes.
5, Press START/enter
To add or change any cook settings after this
feature has started:
• Wake control panel from the sleep mode if
necessary.
• Select the UPPER or LOWER oven you wish to
change. Make temperature changes using the +
or - keys. Each press of + or - will adjust the
temperature by 5° F (or 2°C).
° If changing cooking times, select the cook time
or end time keys needed to make the changes.
Setting Oven Controls
About keep warm
Use the keep warm feature to keep hot foods
warm. Keep warm may be set with the following
options:
• Cooktime
• Cook time with end time
The following temperature settings apply to the
keep warm feature:
• Auto-suggest (default) setting: 170°F/76°0
• Min. keep warm setting: 150°F/66°0
• Max. keep warm setting: 190°F/88°0
Setting keep warm
See example below to set keep warm for the upper
oven to start immediately with the auto-suggest
(default) setting.
Step Press
UPPER
1. Press UPPER OVEN OVEN
2. Press KEEPWARM [_]
3. Press START/enter <_>
To add or change any cook settings after this
feature has started:
° Wake control panel from the sleep mode if
necessary.
° Select the UPPER or LOWER oven you wish to
change. Make temperature changes using the +
OF- keys. Each press of + or - will adjust the
temperature by 5° F (or 2°C).
• If changing cooking times, select the cook time
or end time keys needed to make the changes.
Setting Oven Controls
About slow cook Settingslow cook
Theslowcookfeaturemay beusedtocookfoods Seetheexample belowtoseta slowcookon Lo.
moreslowlyatloweroventemperatures. The
cookingresultswillbelikethatofaSIowCookeror
:::::: Crock-Pot. Thisfeatureisidealforroasting beef,
pork & pou try Sow cook ng meats may resu t n Ste Press
• p
the exteriorofmeats becoming dark but not burnt;
this is normal. Slowcook may be set in the upper _pE_
orloweroven. 1. Press UPPEROVEN* ow.
Slow cook may be set with the following options:
2. Press SLOWCOOK LU
i Cook time
• Cooktimewithendtime
Probe 3. Press-lo tochoosetheLo "
option -Fig. 2-. |o
Thefollowingtemperaturesettingsapplytothe
slowcookfeature: 4. PressSTART/ente, 4_>
• Hl:275°F/134°C(default)forcooking4to5hours
• Lo:225 F/108 Cforcooking8to9hours
..... _Choosetheloweroventouseslowcookinthe
lower oveR,
/t>
@_ For best results
• Completely thaw all frozen foods before cooking•
• When using a single oven rack, place in position
2or3.
I!
Fig.1 Fig. 2
• Position multiple racks to accommodate size of
cooking utensils when cooking multiple food
item.
• Add any cream or cheese sauces during the last
hour of cooking.
• Do not open the oven door often or leave the
door open when checking foods• The more heat
that is lost, the longer the food will need to cook.
• Cover the foods to keep them moist or use a
loose or vented type cover to allow foods to turn
crisp or brown•
• Roasts may be left uncovered so browning can
occur• Cook times will vary depending on the
weight, fat content, bone & the shape of the
roast.
To add or change any cook settings after this
feature has started:
• Wake control panel from the sleep mode if
necessary.
° Select the UPPER or LOWER oven you wish to
change• Make temperature changes using the +
or - keys. Each press of + or - will adjust the
temperature by 5° F(or 2°C).
• If changing cooking times, select the cook time
or end time keys needed to make the changes.
• Use the probe to check the temperature to
determine when your food is done.
• Preheating the oven will not be necessary•
Setting Oven Controls
About Perfect Turkey TM
Heated air circulates around the turkey from all
sides, sealing injuices and flavors. Poultry cooked
with this feature are crispy brown on the outside
while staying moist on the inside.
Perfect turkey combines a cook cycle with the
convection fan. The probe is used to monitor the
exact internal temperature of the turkey while
cooking. Once the turkey has reached the set
temperature, the oven will stop cooking and
change to keep warm.
Before setting the perfect turkey feature, or if you
would like to change the probe target temperature,
be sure to carefully read and follow setting the
probe instructions - See steps 6-9, p. 37.
Setting Perfect Turkey TM
See the example below to use perfect turkey at the
default setting of 325°F and the probe at the default
setting of 180°F (82°C).
1.
2,
Insert the probe into the thickest part of the
meat and place the turkey in the oven -p. 30
Fig 7.
Plug the probe into the probe receptacle inside
the upper oven.
UPPER
3. Press UPPER OVEN oven
4. Press PERFECT TURKEY
Probe indicator will flash and
Perfect Turkey will not start until the
probe has been plugged in.
5. Press START/enter 4_
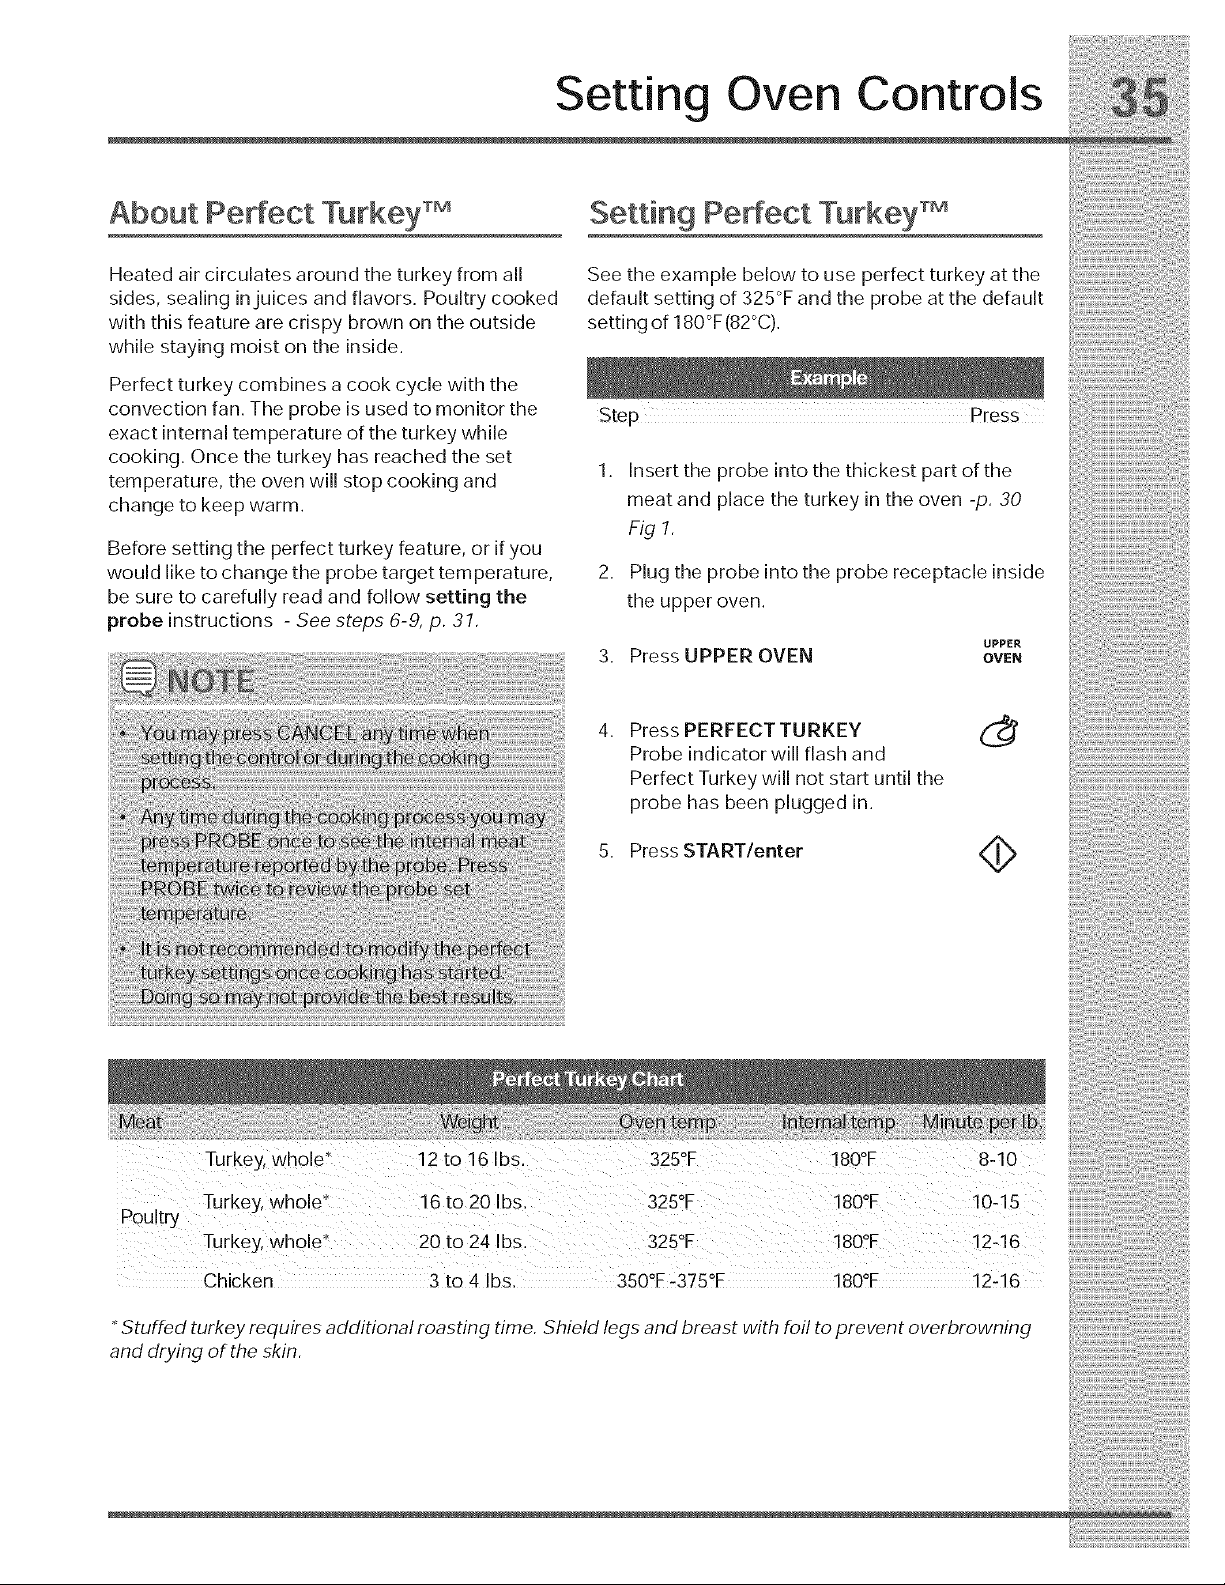
Poultry
Turkey, whole _ 12 to 16 Ibs. 325°F 180°F 8-10
Turkey, whole 16 to 20 Ibs. 325°F 180°F 10-15
Turkey, whole' 20 to 24 Ibs. 325°F 180°F 12-16
Chicken 3 to 4 Ibs. 350°F-375°F 180°F 12-16
Stuffed turkey requires additional roasting time. Shield legs and breast with foil to prevent overbrowning
and drying of the skin.
iii!@_!zii:!@iii@_!i!:iiiii!!!!@iiii_i{ii!ii!!!i!@
Setting Oven Controls
About defrost Setting dehydrate
Use the defrost feature to thaw small portions of See the example below toset dehydrate at the
food at room temperature. Defrost may be set in the default temperature of 120 F.
upper oven only. The Convection fan will operate
Defrost may be set with the following options: Step Press
* Cook time U_PER
, _, __ , _, _,_ _ _ 1 Press UPPER OVEN OVEN
Cuur_ LJIII_ w,iL. _.u LJlll_
Settmg defrost 2. Press DEHYDRATE
See the example below to set defrost. _ ........ /t_
To add or change any cook settings after this
P feature has started:
. Wak oo,t o mod
..... , Select the UPPER or LOWER oven you wish to
:_ change. Make temperature changes using the +
2. Press DEFROST or- keys. Each press of + or- will adjust the
temperature by 5° F(or 2°C).
3. PressSTART/enter _/_ • Ifchangingcookingtimes, select the cook ti_e
or end time keys needed to make the changes.
FOr best results
, Dr}/most fruits and vegetables at 140°F. Dry
herbs at 100°f.
* Drying times vary depending on the moisture
About dehydrate and sugar content of the food, the size of the
pieces, the amount being dried and the humidity
The dehydrate feature dries with heat from the in the air.
convection element. The heat is circulated
throughout the oven by the convection fan. Use • Treat fruits with antioxidants to avoid discoloration.
dehydrate to dr}/and/or preserve foods such as • Tightly woven cooling racks can be used to
fruits, vegetables, herbs and very thin slices of allow the air to circulate around the food; or use
meat. Dehydrate may be set in the upper oven drying racks to allow the air to circulate around
only. The Convection fan may operate while the food (this type of oven rack is not supplied
dehydrating, with this appliance).
The following temperature settings apply to the • Consult a food preservation book or library for
dehydrate feature: information.
. Auto-suggest (default) setting: 120°F/48°0
, Min. dehydrate setting: 100°F/S8°O
, Max. dehydrate setting: 225°F/108°O
Setting Oven Controls
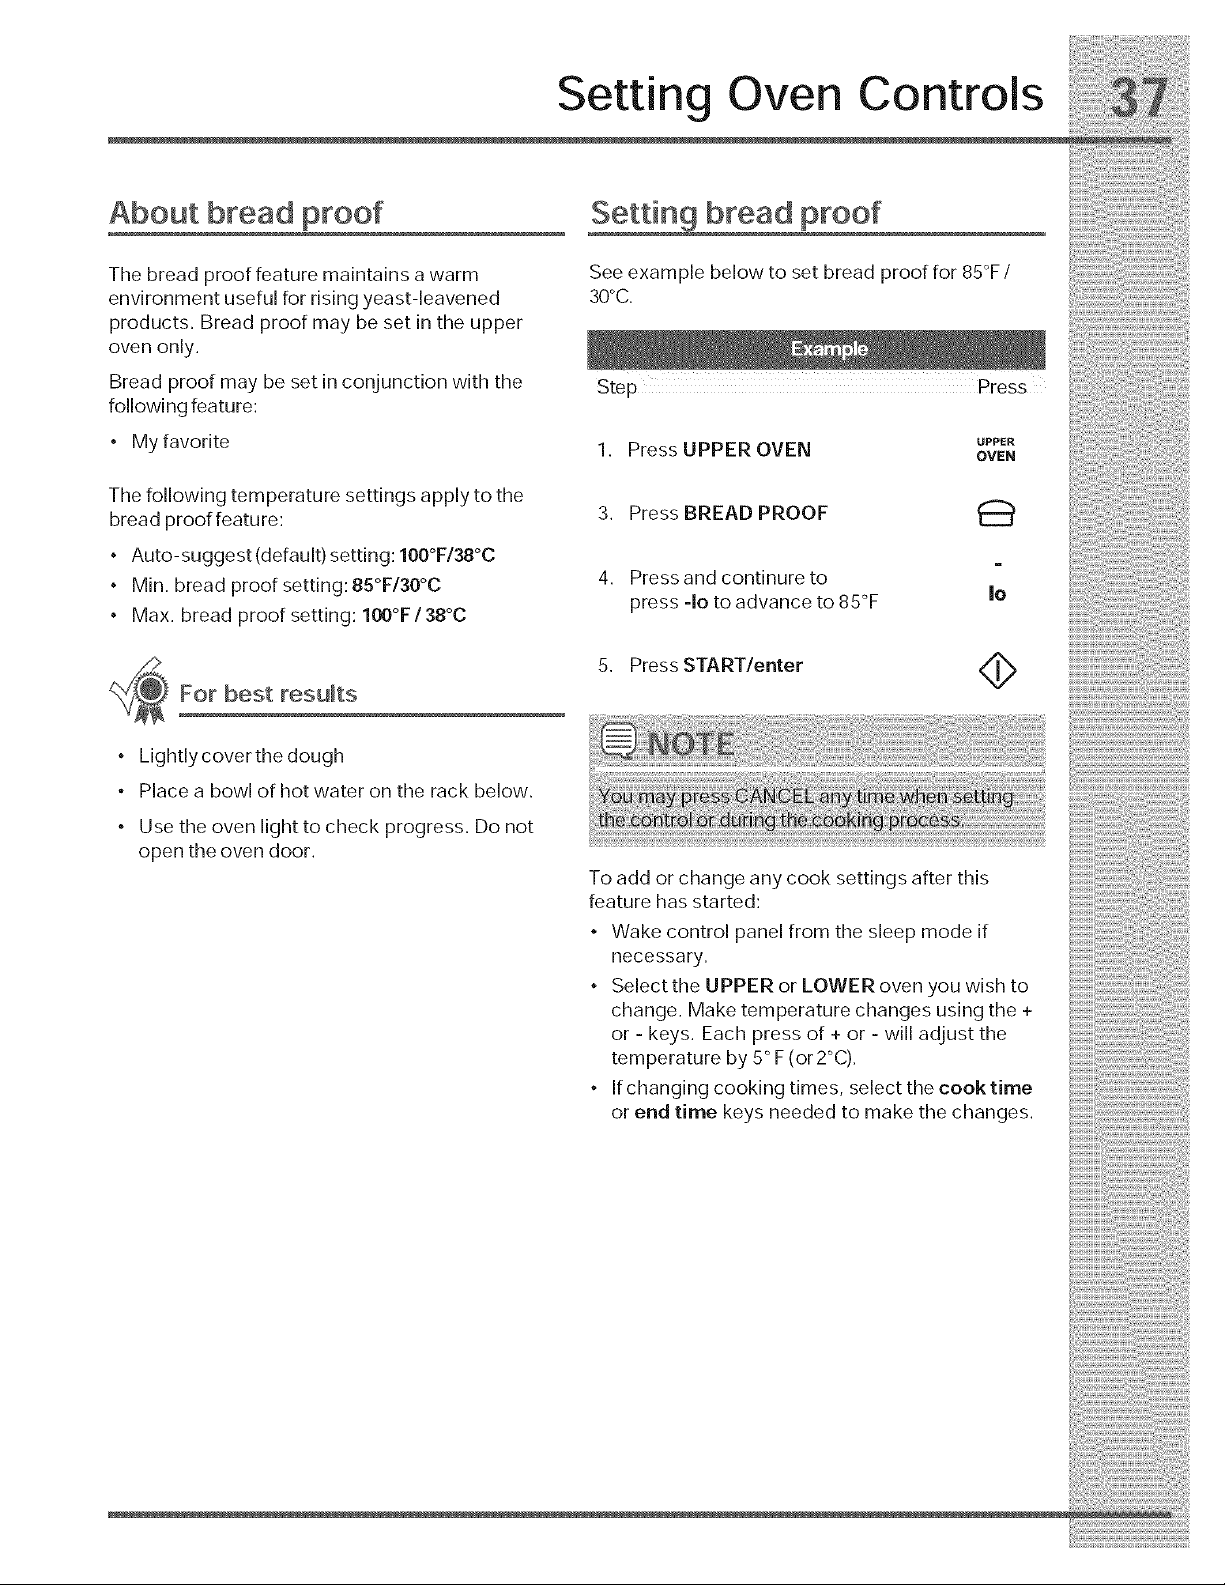
About bread proof
The bread proof feature maintains a warm
environment useful for rising yeast-leavened
products. Bread proof may be set in the upper
oven only.
Bread proof may be set in conjunction with the
following feature:
• My favorite
The following temperature settings apply to the
bread proof feature:
Auto-suggest(default) setting: 100°F/38°C
Min. bread proof setting: 85°F/30°C
Max. bread proof setting: 100°F/38°C
For best results
Setting bread proof
See example below to set bread proof for 85°F/
30°C.
Step Press
UPPER
1. Press UPPER OVEN OVEN
3. Press BREAD PROOF
m
4. Press and continure to
press -Io to advance to 85°F Io
5. Press START/enter <_
Lightly cover the dough
• Place a bowl of hot water on the rack below.
Use the oven light to check progress. Do not
open the oven door.
To add or change any cook settings after this
feature has started:
Wake control panel from the sleep mode if
necessary.
Select the UPPER or LOWER oven you wish to
change. Make temperature changes using the +
or - keys. Each press of + or - will adjust the
temperature by 5° F (or 2°C).
• If changing cooking times, select the cook time
or end time keys needed to make the changes.

iii!@;!_i!i!i_iiii@@i!!iii!i;:@:_ii@_i!iiii!iiii_!il
Setting Oven Controls
Aboutmyfavorite RecaHingafavorite
¥oumaystoreupto ofyourmostfrequentIyused
heat settings and cooking times, three for each
oven. These keyswill lightinthe displaywhen they Step PreSs
areavailableforsettingorrecalling.
Eachkeywillallowyoutostoreacookingfeature, 1 PressUPPEROVEN UP,ER
ovensettemperatureandacooktimeforeitherthe ' OWN
upperovenorloweroven.
2.ChooseMYFAVORITEq)
Savingmyfavoriteinstructions ..
3. PressSTART/enter _d_
All the favorite keys will display after selecting the
upperorloweroven. Theexample belowshows
howtosaveafavortecookngnstructonforthe O ! in " v rwri °in f v ri °
upperoven.
Oncea, favor,teshavebeenf,,edyoumay
choose to overwrite an existing favorite. Follow the
Step Press sameinstructionstosavea recipe; choosethe
favorite you wish to overwrite and hold for 3
1. PressUPPEROVEN _ seconds.
2. Input the cooking instructions using the control
keypads and any additional options you wish
to save and later recall.
3. Press START <_
It is not necessary to delete a favorite before
saving another, Choose one of the favorite keys
you no longer wish to keep and store the new
cooking instructions using the overwriting
instructions.
4. Press and hold the available i'_
MY FAVORITE for 3 seconds
5. Press CANCEL/off* @
You will hear a beep and a red light will display
above the selected favorite to indicate that your
favorite recipe has been stored.
*If you wish to store the cooking instructions but
not start the oven,

Setting Oven Controls
Perfect Program TM multi stage
Multi stage will allow you to program up to 3 stages
of cooking. Each stage may be programmed with a
cooking feature, set temperature and a cook time.
Multi stage is ideal when you want to add a keep
warm after a cooking function.
The following functions may be set with multi stage:
• Bake/conv bake
• Broil/conv broil (10 minutes max.)
• Conv roast
° Bread Proof
• Keep warm
Stage 2
8. Press BROIL
9. Enter 500°F
10. Press START/enter
11. Enter 4 minutes
12. Press START/enter a total
of 2 times to program only 2
stages and begin cooking.
mq
500
4
Setting multi stage
See the example to program a multi stage feature
for a casserole. For stage 1, bake at 350°F for 1 hr.
For stage 2, to brown, broil for at 500°F for 4
minutes.
1. Press UPPER OVEN
2. Press MULTI STAGE
UPPER
OVEN
Stage 1
3. Press BAKE r--]
4. Enter350°F 3 5 0
5. Press START/enter <_
6. Enter 60 minutes 6 0
7. Press START/enter <_
iiii_!i!!i_!_i_!i_i:!i!i!;i!i!;i_ii_!_i_!!!_!i_i_!_!_:!_i_#:_ii_i_i_z:i_!!!_;_#!!!!i!!ii!_;_z_i!_:_
40 Setting Oven Controls
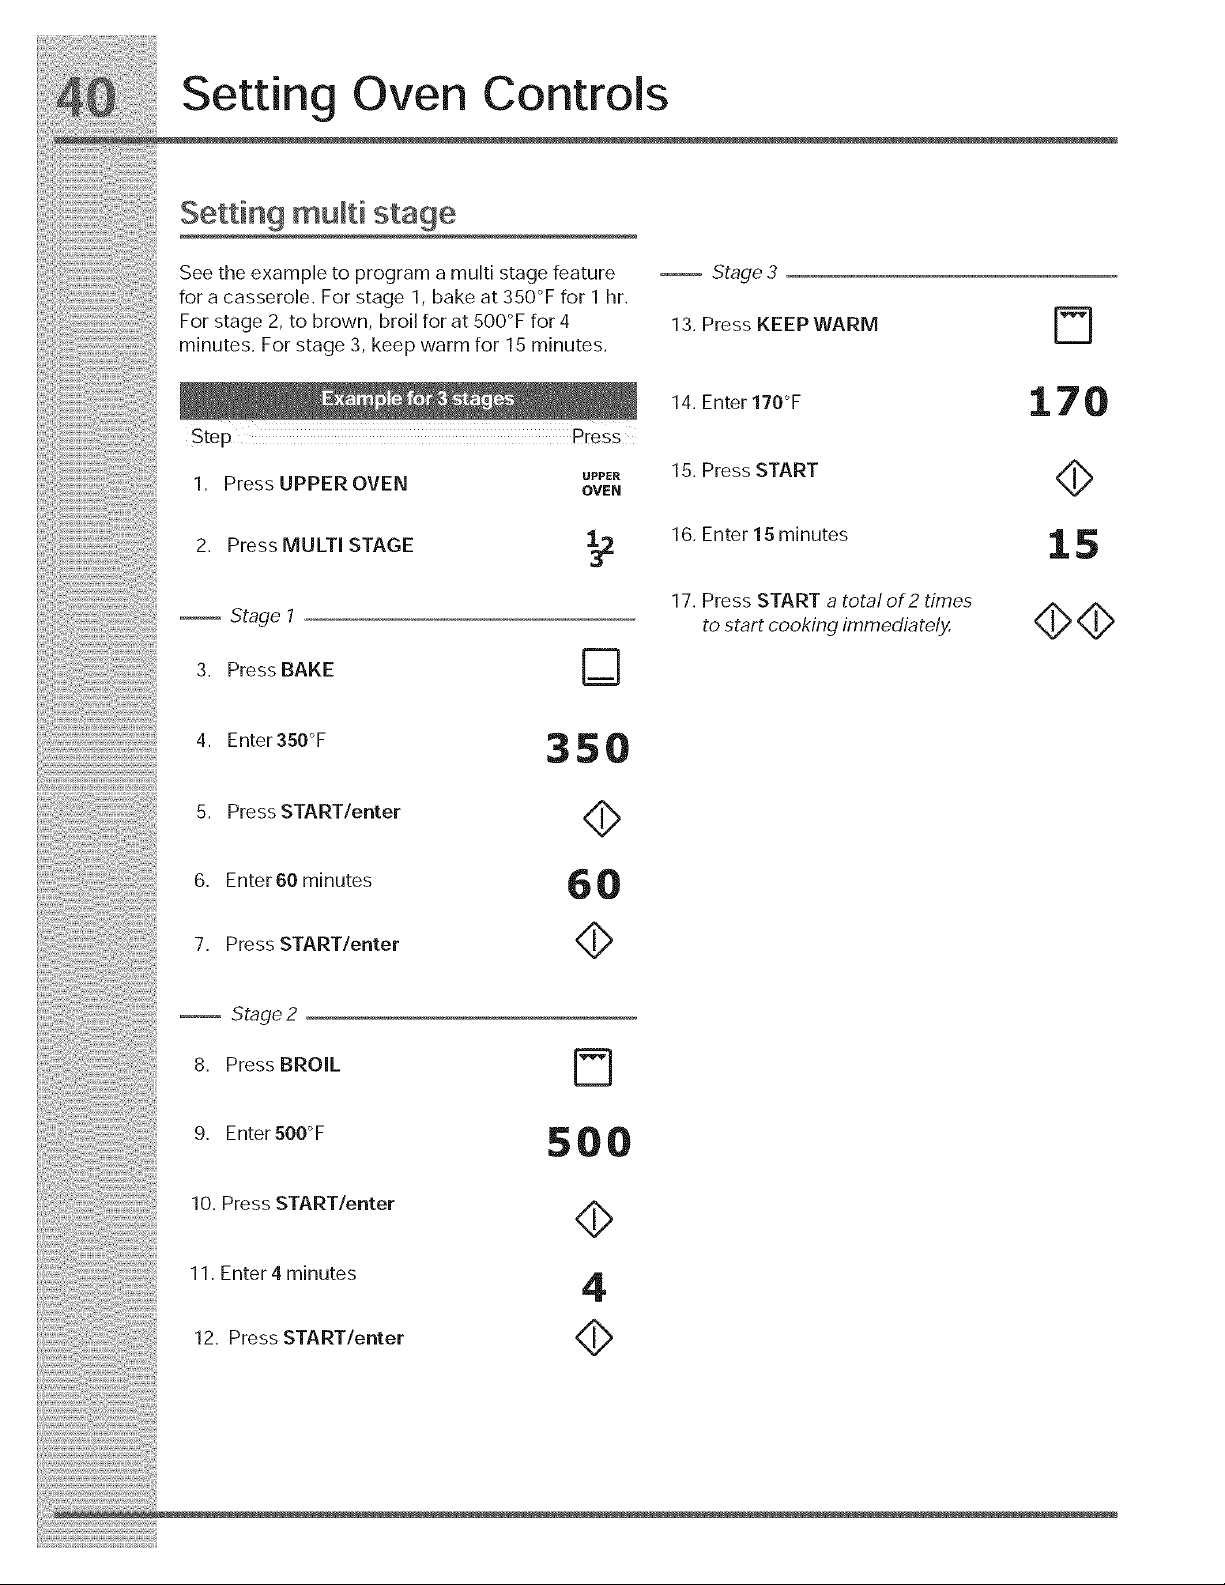
Setting multi stage
Seetheexampletoprogramamulti stagefeature _ Stage3 _
foracasserole. Forstage 1, bakeat350 Fforl hr.
Forstage2, tobrown, broilforat500 Ffor4 13. PressKEEPWARM D
minutes. For stage 3, keep warm for 15 minutes, o
14. Enter170F 170
Step PreSs
uPp,. 15 PFessSTART /b,,
I. PressUPPEROVEN OVEN '
2 PressMULT STAGE 1 16. Enter15minutes 1 5
17. Press START a totalof2times ..A
--Stage___ -- tostartcookingimmediatd__q>
3 PressBAKE D
..... 4. Enter350°F 350
5. PressSTARTlenter <_
6. Enter60 minutes 6 0
7. Press STARTlenter <_
StAge 2
8. Press BROIL
9. Enter500°F 5 0 0
10. Press STARTlenter
11. Enter 4 minutes
12. Press START/enter
4>
4
4>

Setting Oven Controls
Sabbath mode
This appliance provides special settings for use
when observing the Jewish Sabbath/Holidays. This
mode will turn off all audible tones or visual
display changes normally provided by the oven
control. BAKE and cooktop heating are the only
cooking features available while in the Sabbath
mode.
You must first set the BAKE feature and
temperature(s) needed for the upper/lower oven(s),
the COOK TIME option if needed and any cooktop
power levels before setting the Sabbath mode. Any
settings made prior to setting the Sabbath mode
will be visible in the displays. The COOK TiME
option, if set prior to the Sabbath mode, will give 1
audible alert at the end of COOK TIME.
The Sabbath mode will override the factory preset
12 Hour Energy Saving mode and the appliance
will stay on until the cooking features are
cancelled. If any of the cooking features are
cancelled when the appliance is in the Sabbath
mode, no audible or visual indicators will be
available to verify the cancellation.
If the oven interior lights are needed, be sure to
activate them prior to setting the Sabbath mode.
Once the oven light is turned ON and the Sabbath
mode is active, the oven light will remain on until
the Sabbath mode is turned offand the oven lights
are turned off. The oven door will not activate the
oven interior lights when the oven door is opened
or closed.
It is recommended that any oven temperature
modification made within an active Sabbath mode
be followed with 2 presses of the START key. This
will insure the oven remains ON even if an attempt
is made to set the oven temperature outside of its
temperature range. If the oven temperature is set
outside of the temperature range, the oven will
default to the nearest available temperature. Try to
set the desired oven temperature again.
The cooktop settings may also be changed even
after the appliance has been set for the Sabbath
mode (Jewish Holidays only).
Should a power failure or interruption occur during
the Sabbath/Holidays, the appliance will shut OFF.
When power is restored the appliance will not turn
back on automatically to the original BAKE feature
settings. SF will appear in all the control display
panels indicating a Sabbath mode failure. - Figs. 1
&2-
After a power failure, the food may be safely
removed from the oven while still in the Sabbath
mode.
Fig. 2
Fig. 1
For further assistance, guidelines for
proper usage and a complete list of
models with the Sabbath feature,
please vist the web at http:\\www.star-k.org.
iiii_!i!!i_i!i!!!_i!i_!_!i:;!_i:;!i_iii_i!i;:_!i!_!;!_!_i_:_i_:_;_;:i_!i!_i;!!_!_i_:!!_!_!_i!i_i!i!i_!i_i_i!_;_!_!;_
42. Setting Oven Controls
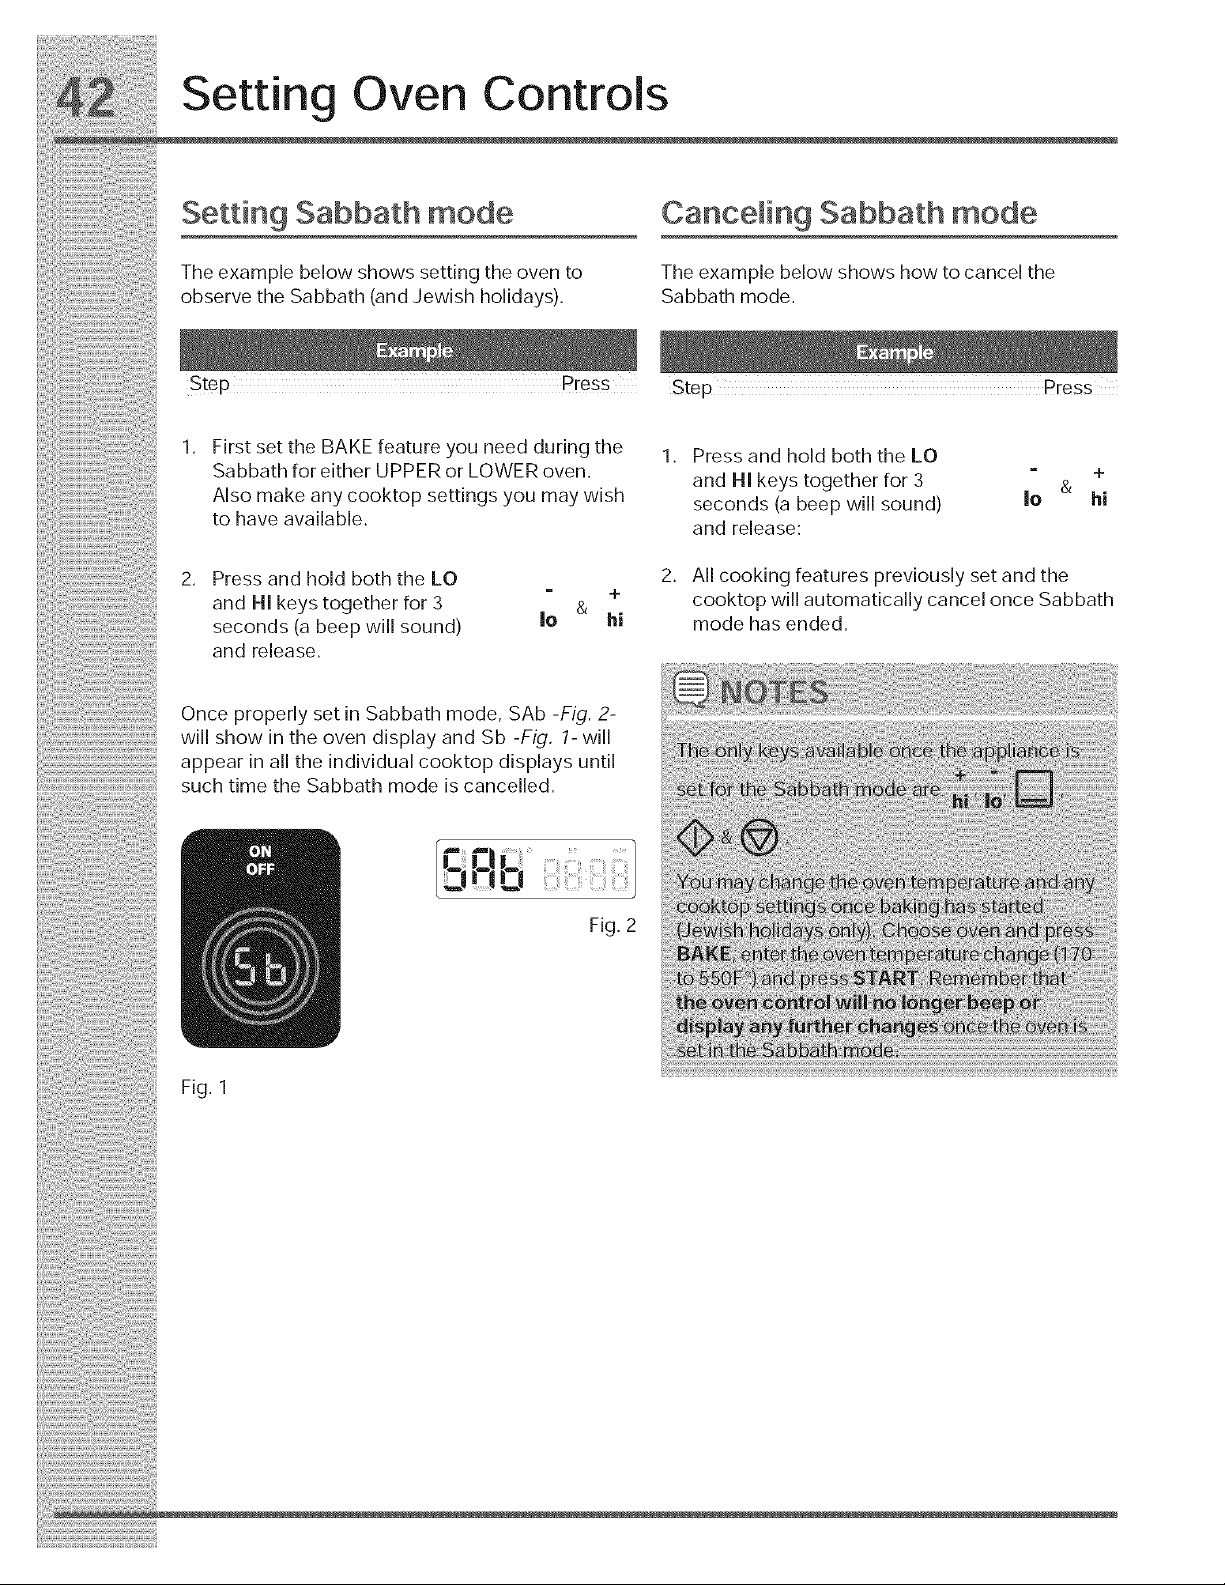
Setting Sabbath mode Canceling Sabbath mode
Th_×_mpl_b_low_how_tti.gth_ov_.to Th_×_mpl_b_low_how_howtooa.o_lth_
observetheSabbath(andJewish holidays), Sabbathmode.
P Step PFess
1. FirstsettheBAKEfeatureyouneedduringthe 1 PressandhodboththeLO
Sabbath foreither UPPER or LOWER oven. and HI keys together for 3 " +
Alsomakeanycooktopsettingsyoumaywish seconds_a beeDw sound) Io & hi
tohaveavailable, andrelease: " "
2. Press and hold both the LO 2. All cooking features previously set and the
and HI kevstoqetherfor3 " x, + cooktopwillautomaticallycancelonceSabbath
seconds (a beeF)will sound) Io _ hi mode has ended.
and release.
OnceproperlysetinSabbathmode, SAb-Fig, 2-
willshowintheovendisplayandSb -Fig. /-will
...... appear in all the individual cooktop displays until
such time the Sabbath mode iscancelled,
2JmlO
Fig. 2
Fig. 1
Setting Lower Oven Controls
Perfect Pair lower oven
The lower oven provides two basic modes, cooking
and warming. The lower oven is ideal for cooking
foods such as pizza, casseroles, baked potatoes
and frozen convenience foods. Use the keep warm
feature to keep hot cooked foods at serving
tern perature.
These features are available for the lower oven,
• Bake
• Slowcook-pg.34,
• Keep warm
For best results
Recommendations for lower oven
• When placing food in the lower oven always use
a baking sheet or pan with 4 raised sides to
prevent food from sliding off.
• DO NOT LINE THE OVEN DRAWERWITH
FOIL OR COVER THE OVEN RACK WITH
FOIL, This may result in damage to your oven.
• The maximum height of foods and utensils that
may be used in the lower oven is 4". The
maximum width is 15". Pay close attention to
foods that have potential to rise beyond the
recommended 4" maximum height.
° Use pans in the lower oven large enough to
contain food and any juices created from the
cooking process.
• Do not use plastic wrap to cover food. Plastic
may melt onto the drawer or surrounding
areas and be very difficult to clean. Use a lid or
aluminum foil instead. Use only utensils and
cookware in the oven drawer that are
recommended for oven use in the upper oven.
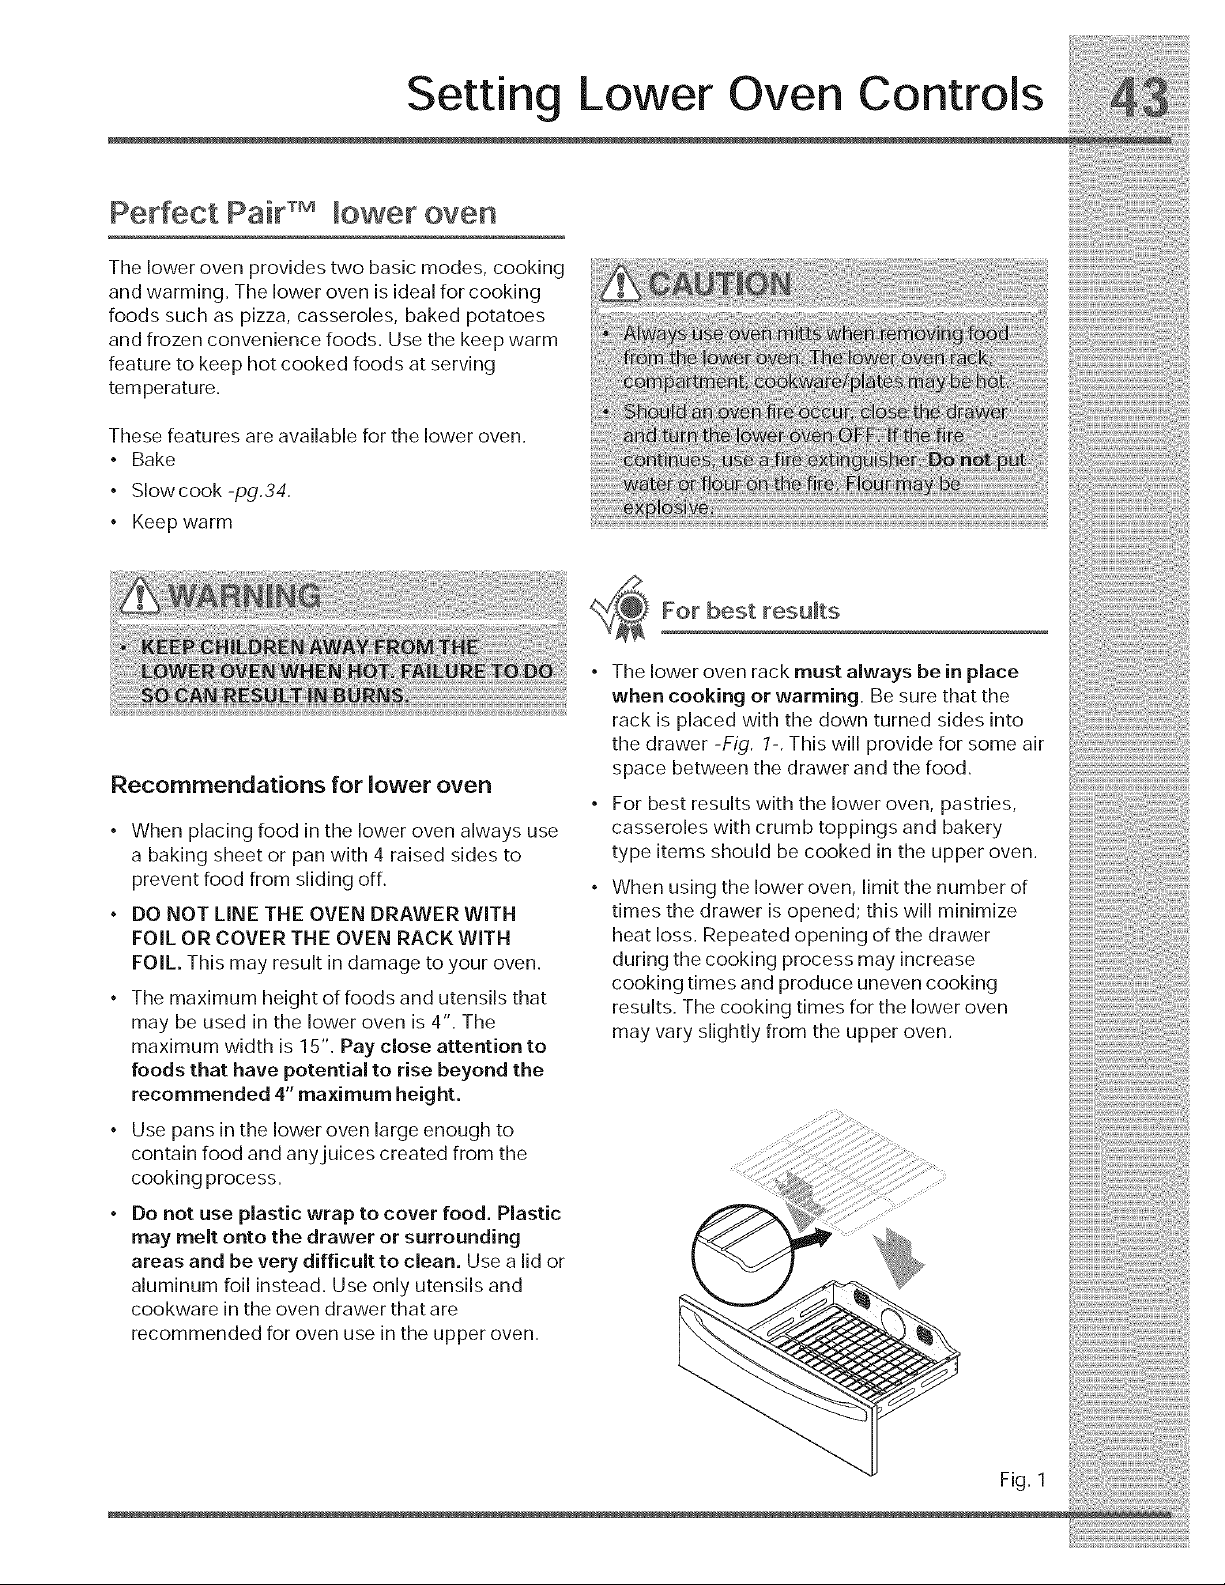
° The lower oven rack must always be in place
when cooking or warming. Be sure that the
rack is placed with the down turned sides into
the drawer -Fig. 1-. This will provide for some air
space between the drawer and the food.
° For best results with the lower oven, pastries,
casseroles with crumb toppings and bakery
type items should be cooked in the upper oven.
• When using the lower oven, limit the number of
times the drawer is opened; this will minimize
heat loss. Repeated opening of the drawer
during the cooking process may increase
cooking times and produce uneven cooking
results. The cooking times for the lower oven
may vary slightly from the upper oven.
Fig. 1
_5_i_!_i_i_i_!_!_i!_i_i_!_i_!i_!_i_:`_!i_i_i!:_:_!_!_;_i_i_!_!_!_
Setting Lower Oven Controls
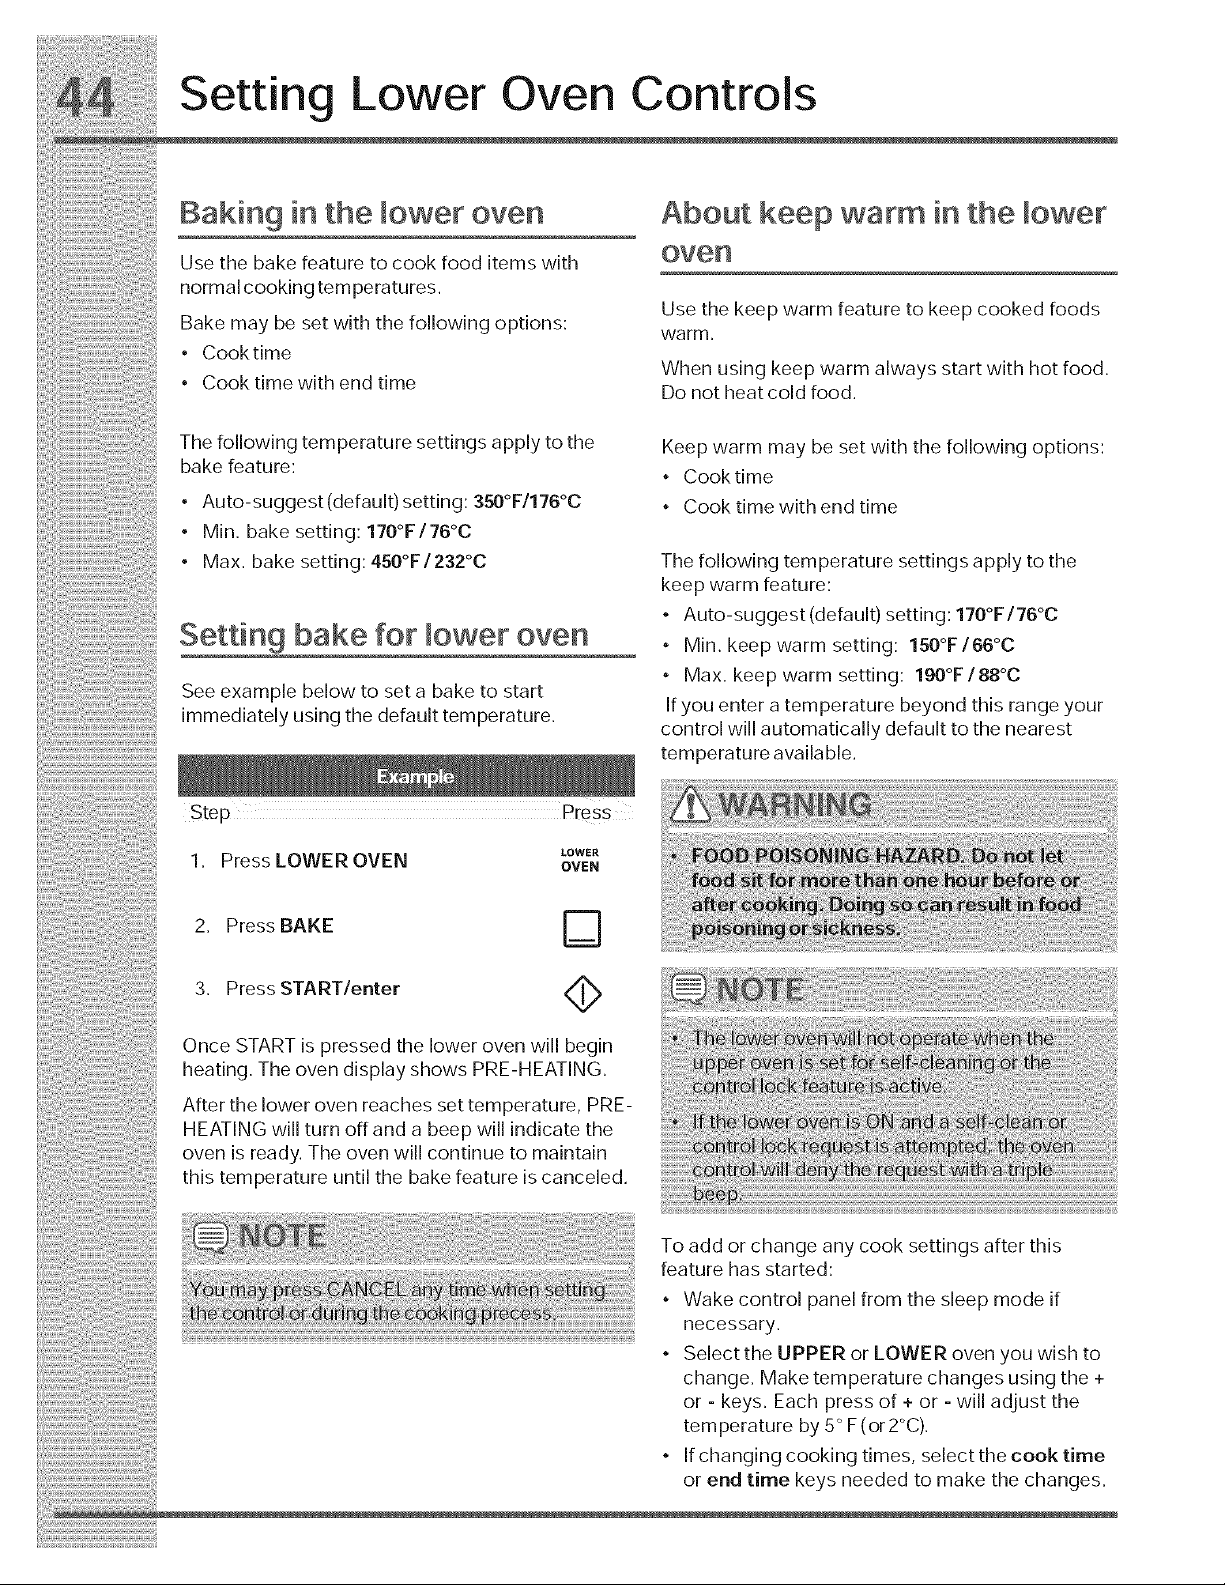
Baking in the lower oven About keep warm in the lower
Usethe bakefeaturetocookfood itemswith OVen
normalcookingtemperatures.
............. Use the keep warm feature to keep cooked foods
BaKe may De se[wlm me [oHowmg op[Ions: warm
• Cookt me
• When us ng keep warm a ways start w th hot food
Cooktimewithendtime Donotheatcoldfood.
The following temperature settings apply to the Keep warm may be set with the following options:
bake feature' • _ -
• o o _ook time
• Auto-suggest(default)setting:350 F/1760 • Cooktimewithendtime
• Min. bakesetting:170:/760'°°'
• Max. bake setting: 450 F/232 C The following temperature settings apply to the
keepwarmfeature: o o
._ • Auto-suggest(default) settinl:170 1/76C
Settin 9 bake for lower oven • M n kee _ warm settn _' 150 F/66 C
, p, Lj, o o
• Max. keepwarm setting: 190 F/88 C
bee example below to set a DaKeto start
If you enter a temperature beyond this range your
immediatelyusingthedefaulttemperature, controlwillautomaticallydefaulttothenearest
..... temperatureavailable.
Step P[ess
LOWE_
1. Press LOWER OVEN OVEN
OnceSTARTispressedthelowerovenwill begin
heating. TheovendisplayshowsPRE-mEATING.
Afterthelowerovenreachessettemperature, PRE-
HEATINGwilltumoffanda beepwill indicatethe
oven isready. Theovenwillcontinuetomaintain
thistemperatureuntilthe bakefeatureiscanceled.
To add or change any cook settings after this
feature has started:
waKe con[rol panel [rom me sleep moae i[
:::_B_ _ n e Ce Ssa r
• Y
'.....................................................................................................................................................................................................................................................................SelecttheUPPERorkOWERovenyouwishto
change. Maketemperaturechangesusingthe +
or- keys. Each p[essof_ or -will adjustthe
. temperatureby5 F(or2C).
Ifchangingcookingtimes, selectthecooktime
orendtimekeysneededtomakethechanges.
Setting Lower Oven Controls
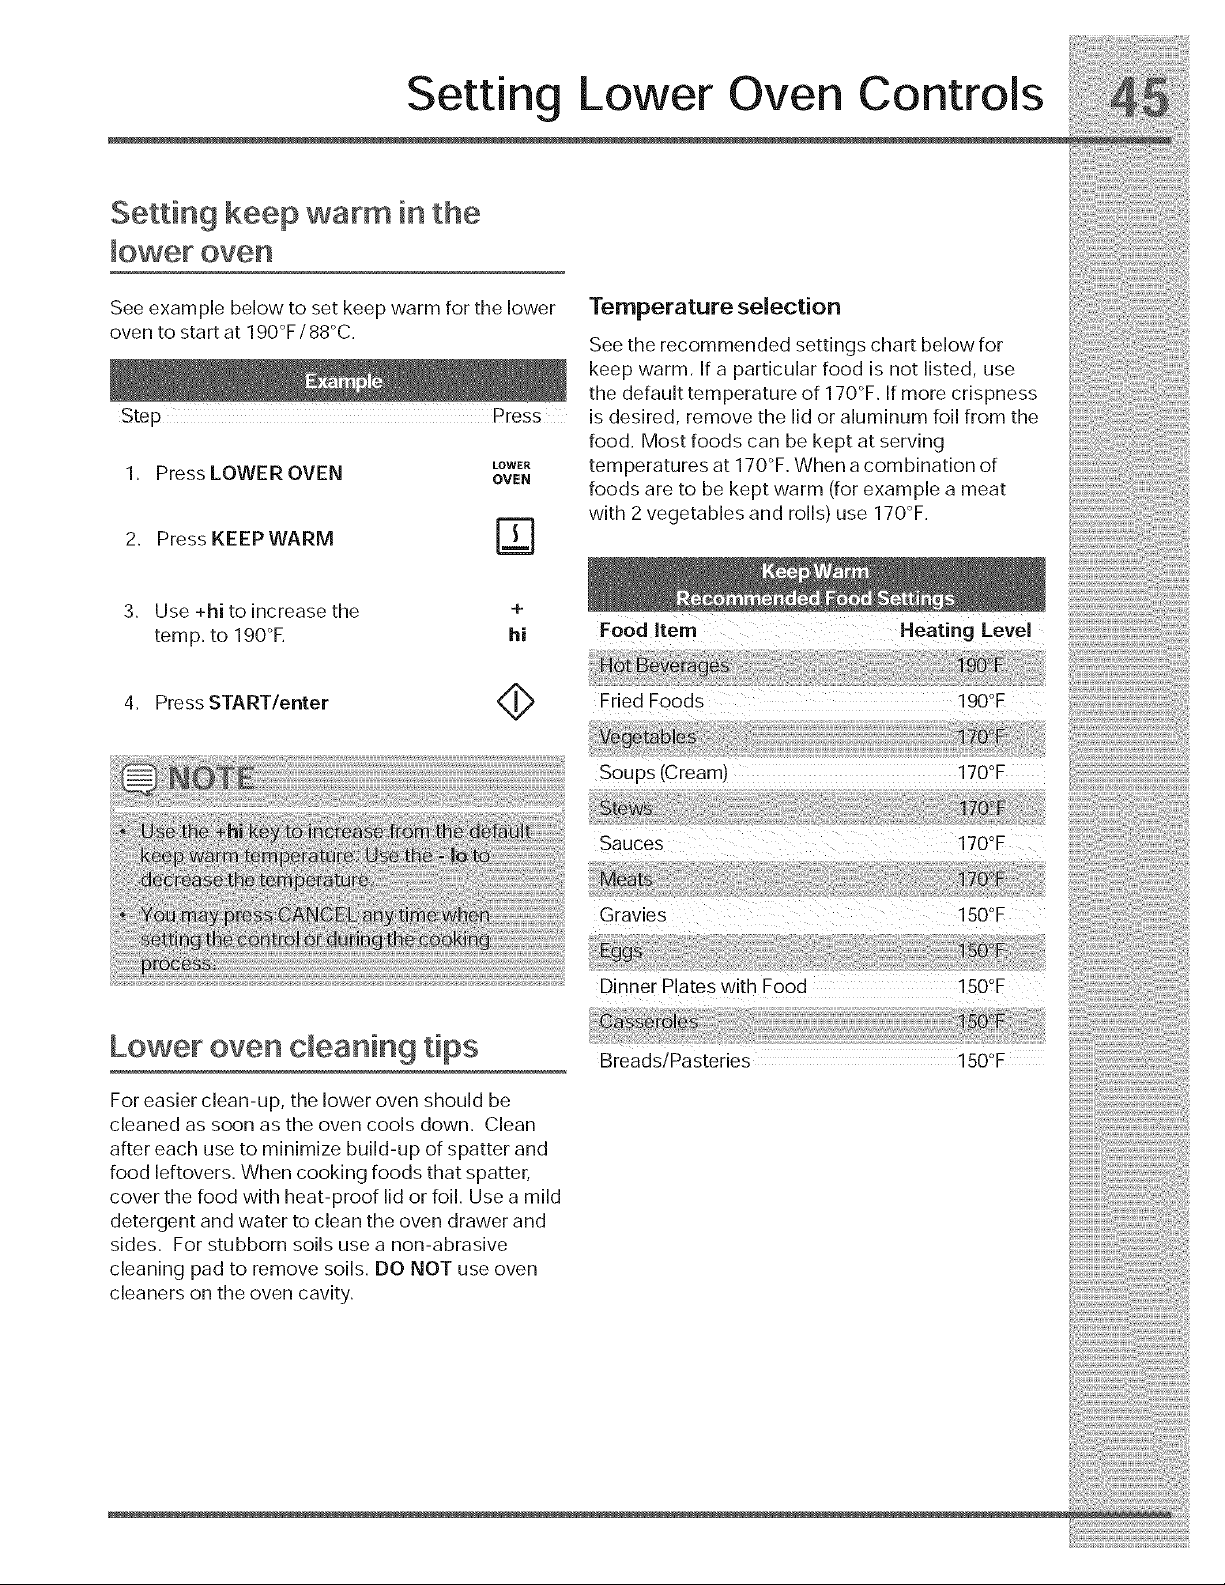
Setting keep warm [n the
lower oven
See example below to set keep warm for the lower
oven to start at 190°F / 88°C.
LOWER
1. Press LOWER OVEN OVEN
2. Press KEEPWARM [_]
Temperature selection
See the recommended settings chart below for
keep warm. If a particular food is not listed, use
the default temperature of 170°F. If more crispness
is desired, remove the lid or aluminum foil from the
food. Most foods can be kept at serving
temperatures at 170°F. When a combination of
foods are to be kept warm (for example a meat
with 2 vegetables and rolls) use 170°F.
3. Use +hi to increase the +
temp. to 190°E hi
4. Press START/enter 4_
Fried Foods 190QE
Soups(Cream) !7OOF
Dinner Plates With F00d 150OF
Lower oven cleaning tips
For easier clean-up, the lower oven should be
cleaned as soon as the oven cools down. Clean
after each use to minimize build-up of spatter and
food leftovers. When cooking foods that spatter,
cover the food with heat-proof lid or foil. Use a mild
detergent and water to clean the oven drawer and
sides. For stubborn soils use a non-abrasive
cleaning pad to remove soils. DO NOT use oven
cleaners on the oven cavity.
BreadsiPaSteries 150°F
Setting Your Preferences
user preferences
The _ key controls options for preferences. The
display will show a digital abbreviation and a value
for every preference each time a key is pressed
one at a time.
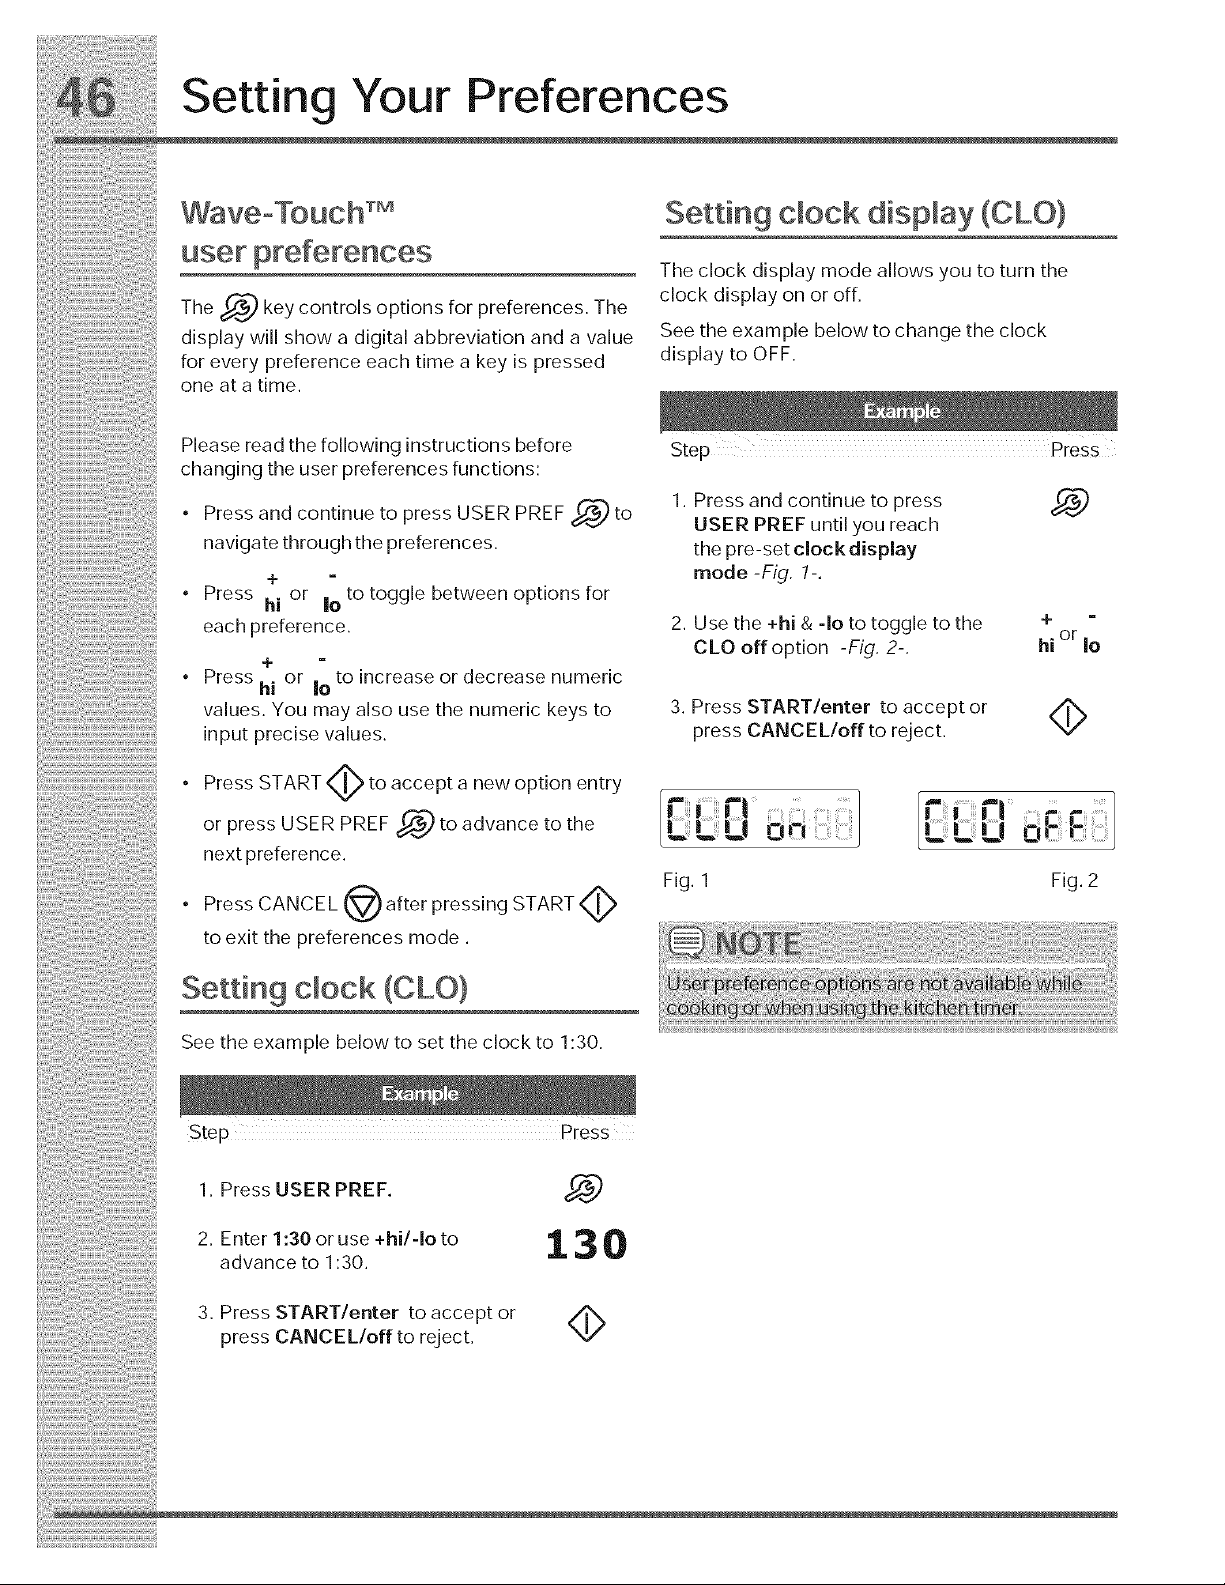
Setting clock display (CLO)
The clock display mode allows you to turn the
clock display on or off.
See the example below to change the clock
display to OFF.
Please read the following instructions before
changing the user preferences functions:
• Press and continue to press USER PREF _(_,) to
navigate through the preferences.
4-
Press or to toggle between options for
hi Io
each preference.
4-
Press hi or Io to increase or decrease numeric
values. You may also use the numeric keys to
input precise values.
Press START
<,_ to accept a new option entry
USER PREF _ to advance to the
or
press
next preference.
Press CANCEL _VJ after pressing START _l_
o
to exit the preferences mode.
Setting clock (CLO)
See the example below to set the clock to 1:30.
Step Press
1. Press and continue to press
USER PREF until you reach
the pre-set clock display
mode-Fig, 1-.
2. Use the +hi & -Io to toggle to the
CLO off option -Fig. 2-.
4-
hi or Io
3. Press START/enter to accept or
press CANCEL/off to reject,
4>
...........
Fig. 1
U
Fig. 2
1. Press USER PREF. __,:gJ
2. Enter 1:30 or use +hi/-,o to 1 3 0
advance to 1:30.
3. Press START/enter to accept or Z/_%
press CANCEL/off to reject.
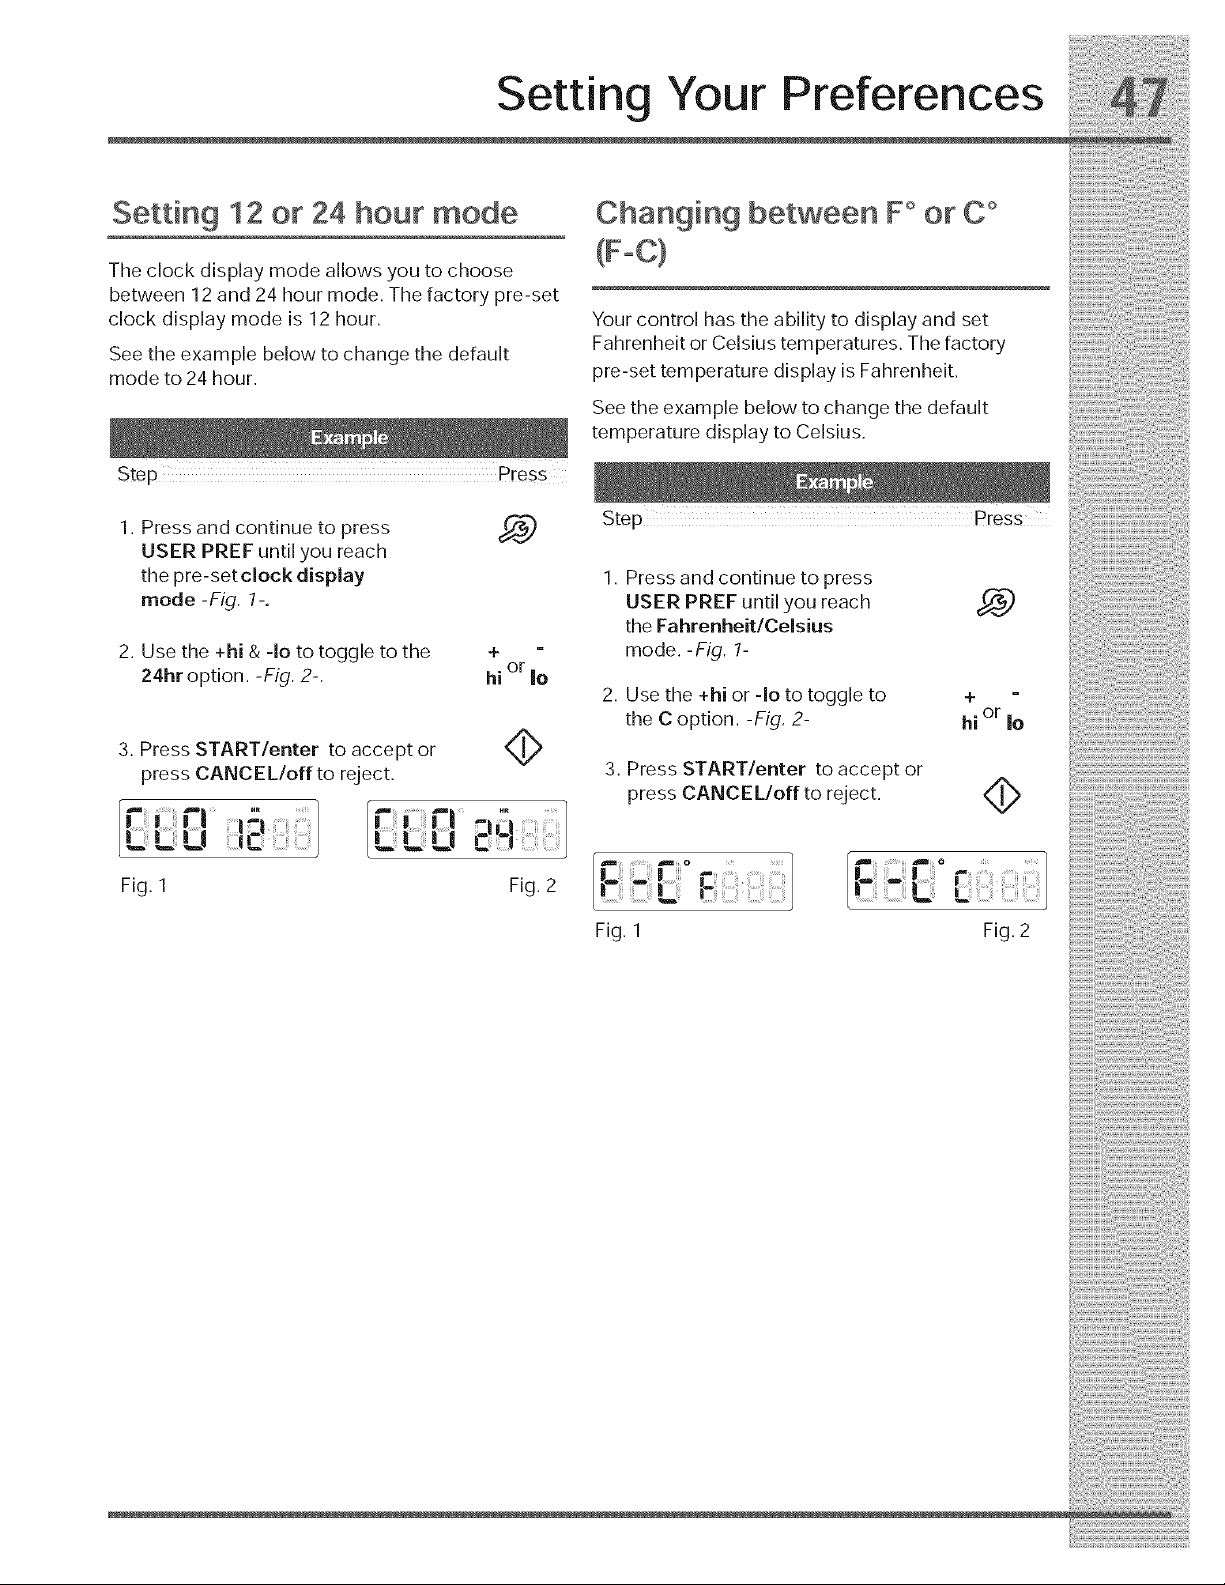
Setting Your Preferences
Setting 12 or 24 hour mode
The clock display mode allows you to choose
between 12 and 24 hour mode. The factory pre-set
clock display mode is 12 hour.
See the example below to change the default
mode to 24 hour,
Changing between F° or C °
Your control has the ability to display and set
Fahrenheit or Celsius temperatures. The factory
pre-set temperature display is Fahrenheit,
See the example below to change the default
temperature display to Celsius,
1. Press and continue to press
USER PREF until you reach
the pre-set clock display
mode-Fig, 1-.
2. Use the +hi & -Io to toggle to the
24hr option. -Fig, 2-,
+
or
hi |O
3. Press START/enter to accept or
press CANCEL/off to reject.
U L
Fig. 1 Fig. 2
Step Press
1. Press and continue to press
USER PREF until you reach
the Fahrenheit/Celsius
mode.-Fig, 1-
2. Use the +hi or -Io to toggle to
the C option. -Fig, 2-
3. Press START/enter to accept or
press CANCEL/off to reject.
+
hi or Io
4>
Fig. 1 Fig. 2
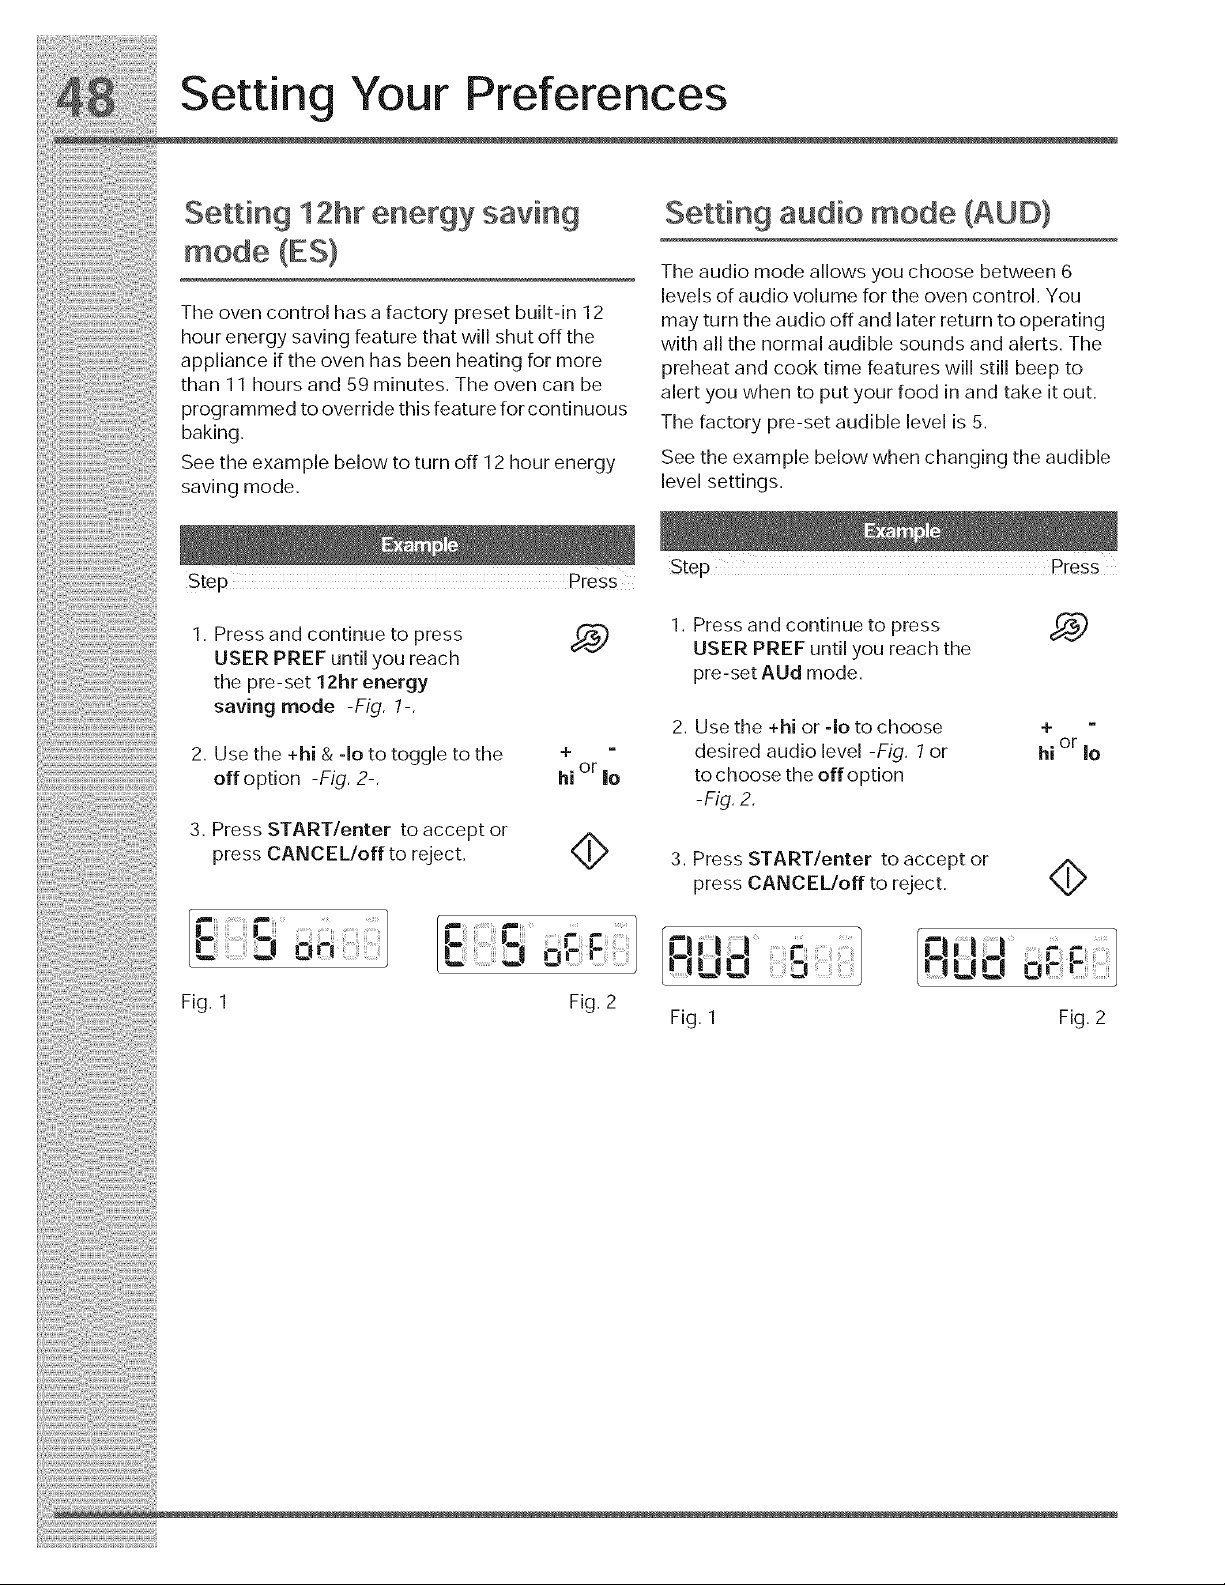
Setting Your Preferences
Setting 12hr energy saving
mode (ES)
The oven control has a factory preset built-in 12
hour energy saving feature that will shut off the
appliance if the oven has been heating for more
than 11 hours and 59 minutes. The oven can be
programmed to override this feature for continuous
baking•
See the example below to turn off 12 hour energy
saving mode.
Setting audio mode (AUD}
The audio mode allows you choose between 6
levels of audio volume for the oven control• You
may turn the audio off and later return to operating
with all the normal audible sounds and alerts. The
preheat and cook time features will still beep to
alert you when to put your food in and take it out.
The factory pre-set audible level is 5.
See the example below when changing the audible
level settings,
1. Press and continue to press
USER PREF until you reach
the pre-set 12hr energy
saving mode -Fig, 1-,
2. Use the +hi & -Io to toggle to the
off option -Fig. 2-.
3. Press START/enter to accept or
press CANCEL/off to reject,
4-
hi or |o
Fig. 1 Fig. 2
1. Press and continue to press
USER PREF until you reach the
pre-set AUd mode.
2. Use the +hi or -Io to choose
desired audio level -Fig. 1 or
to choose the offoption
-Fig. 2.
4-
hi or Io
3. Press START/enter to accept or
press CANCEL/off to reject,
4>
Q ul
Fig. 1
r •
Q Jl_!
!IUO Or r'
Fig. 2
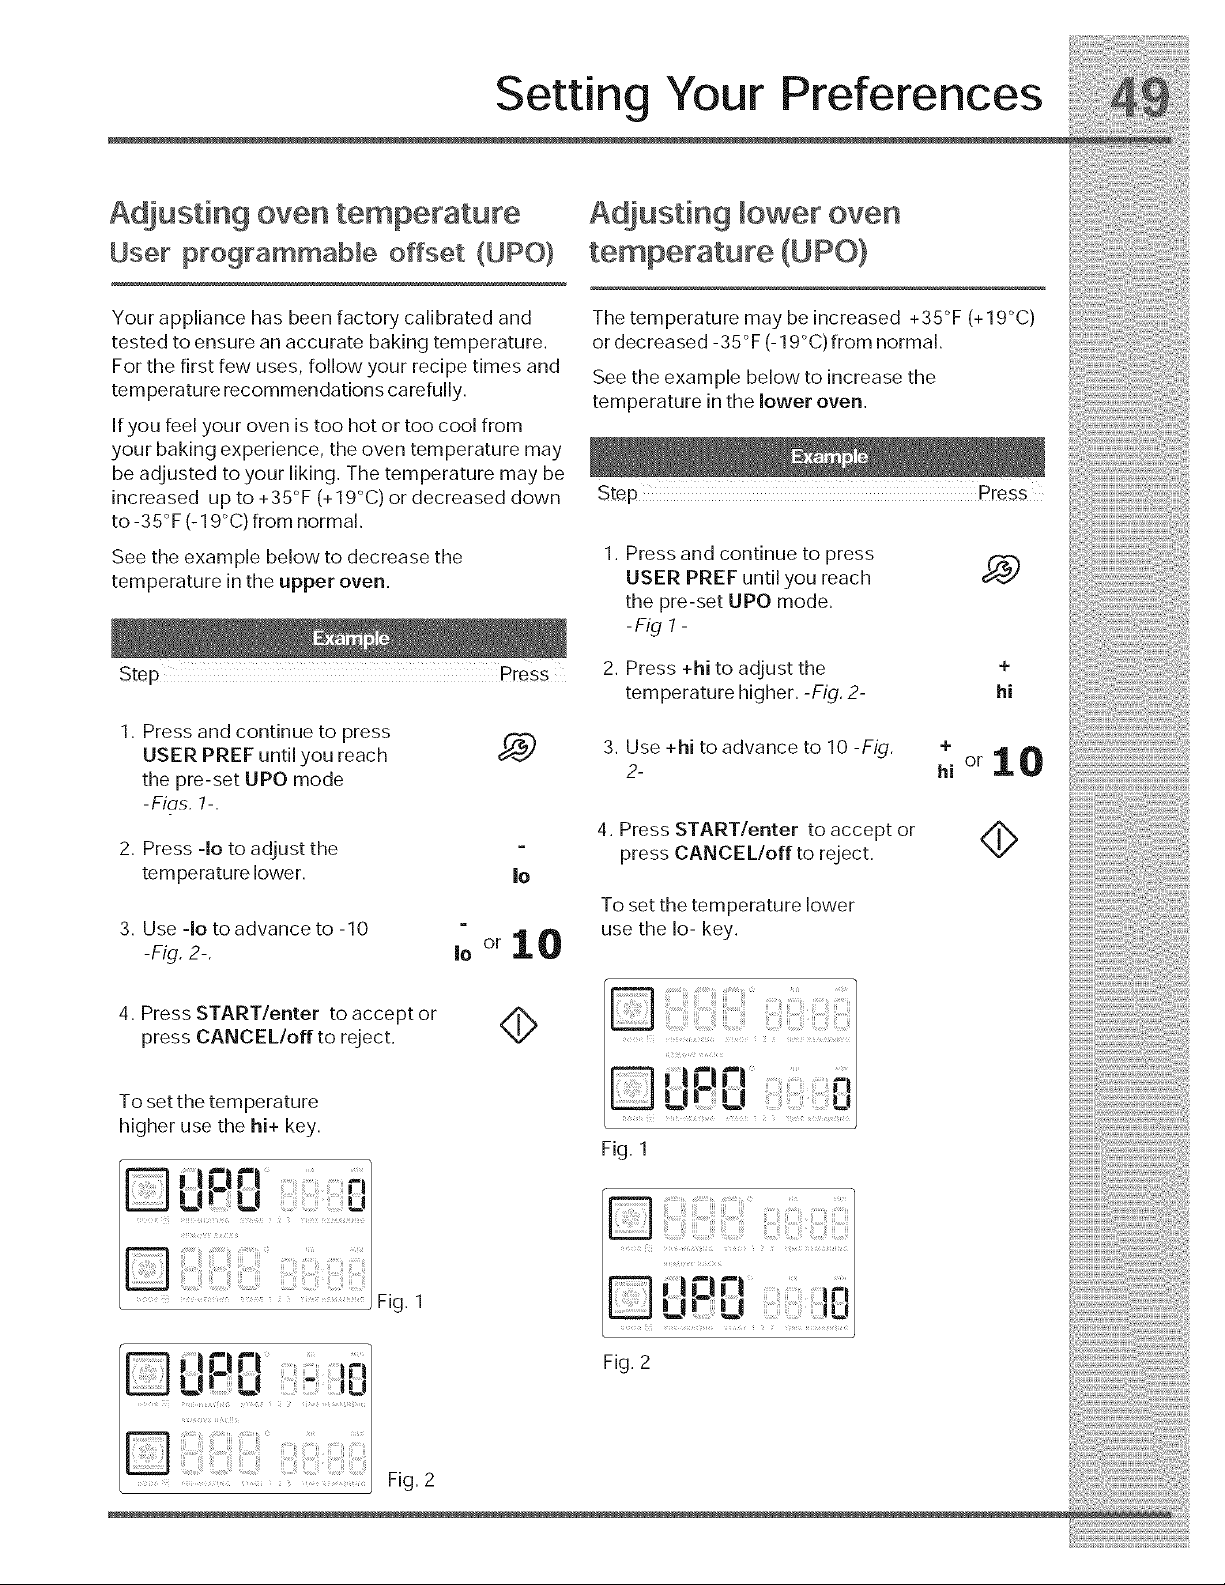
Setting Your Preferences
Adjusting oven temperature
User programmable offset (UPO}
Your appliance has been factory calibrated and
tested to ensure an accurate baking temperature.
For the first few uses, follow your recipe times and
temperature recommendations carefully.
If you feel your oven is too hot or too cool from
your baking experience, the oven temperature may
be adjusted to your liking. The temperature may be
increased up to +35°F (+19°C) or decreased down
to -35°F (-19°C) from normal.
See the example below to decrease the
temperature in the upper oven.
1. Press and continue to press
USER PREF until you reach
the pre-set UPO mode
-Fios. 1-.
2. Press -Io to adjust the
tern perature lower.
3. Use -Io to advance to -10
-Fig. 2-.
|O
4. Press START/enter to accept or
press CANCEL/off to reject.
4>
To set the tern perature
higher use the hi+ key.
Fig. 1
Fig. 2
Adjusting lower oven
temperature (UPO)
The temperature may be increased +35°F (+19°C)
or decreased -35°F (- 19°C) from normal.
See the example below to increase the
temperature in the lower oven.
Step Press
2.
Press and continue to press
USER PREF until you reach
the pre-set UPO mode.
-FigT-
Press +hi to adjust the
temperature higher. -Fig. 2-
3. Use +hi to advance to 10 -Fig.
2-
+
hi
+
hi
4. Press START/enter to accept or
press CANCEL/off to reject.
To set the temperature lower
use the Io- key.
4>
Fig. 1
Fig. 2

_i_:_!_!_i_!_i_!_;!_!_!_i_!_!_ii_:_!;_!i_!i_!_!_!i_
_0 Setting Your Preferences
Factory default reset (RST)
Youmaychoosetorestoreyourfactorysettings.
[ Thiswilleraseallsettingsorfavoritesthatyou
havesaved.
Seetheexamplebelowresetyourcontrol.
:: p
1. Pressandcontinuetopress
USER PREF until you reach the _'.J
factorydefaultresetmode.
-F_g.7-
2. Usethe +hior -Iototoggleto + -
theyesoptiontoreset -Fig. 1-. hi°rio
3. PressCANCEL/offifyou
..... decide notto reset,
_m ....
'--'- c
..........,_| _ ZJCZI
Fig. 1
i,-b
_ii _!!:i_Oi!::::i:i¸_II:I
Fig. 2
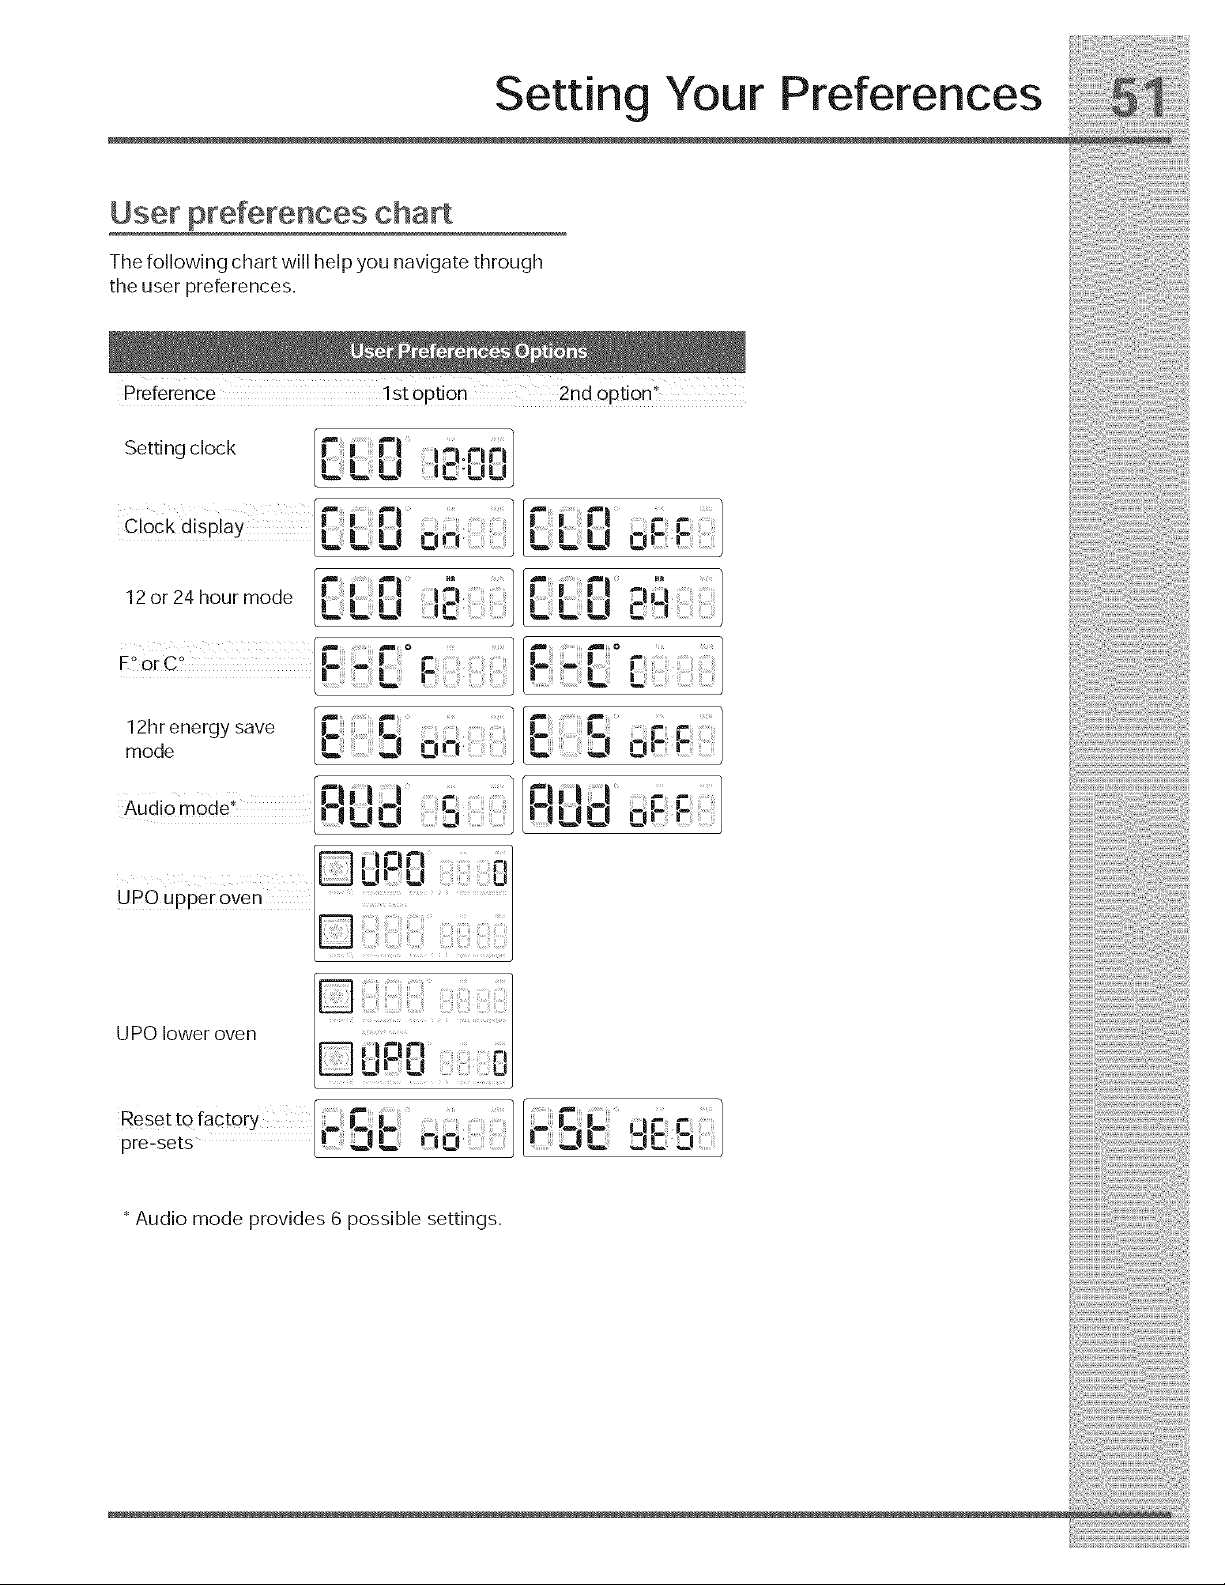
i!i!
UPO lower oven i::IP_t[I ,n
U_U
pre-sets 7
Li-J2.! zic
* Audio mode provides 6 possible settings.
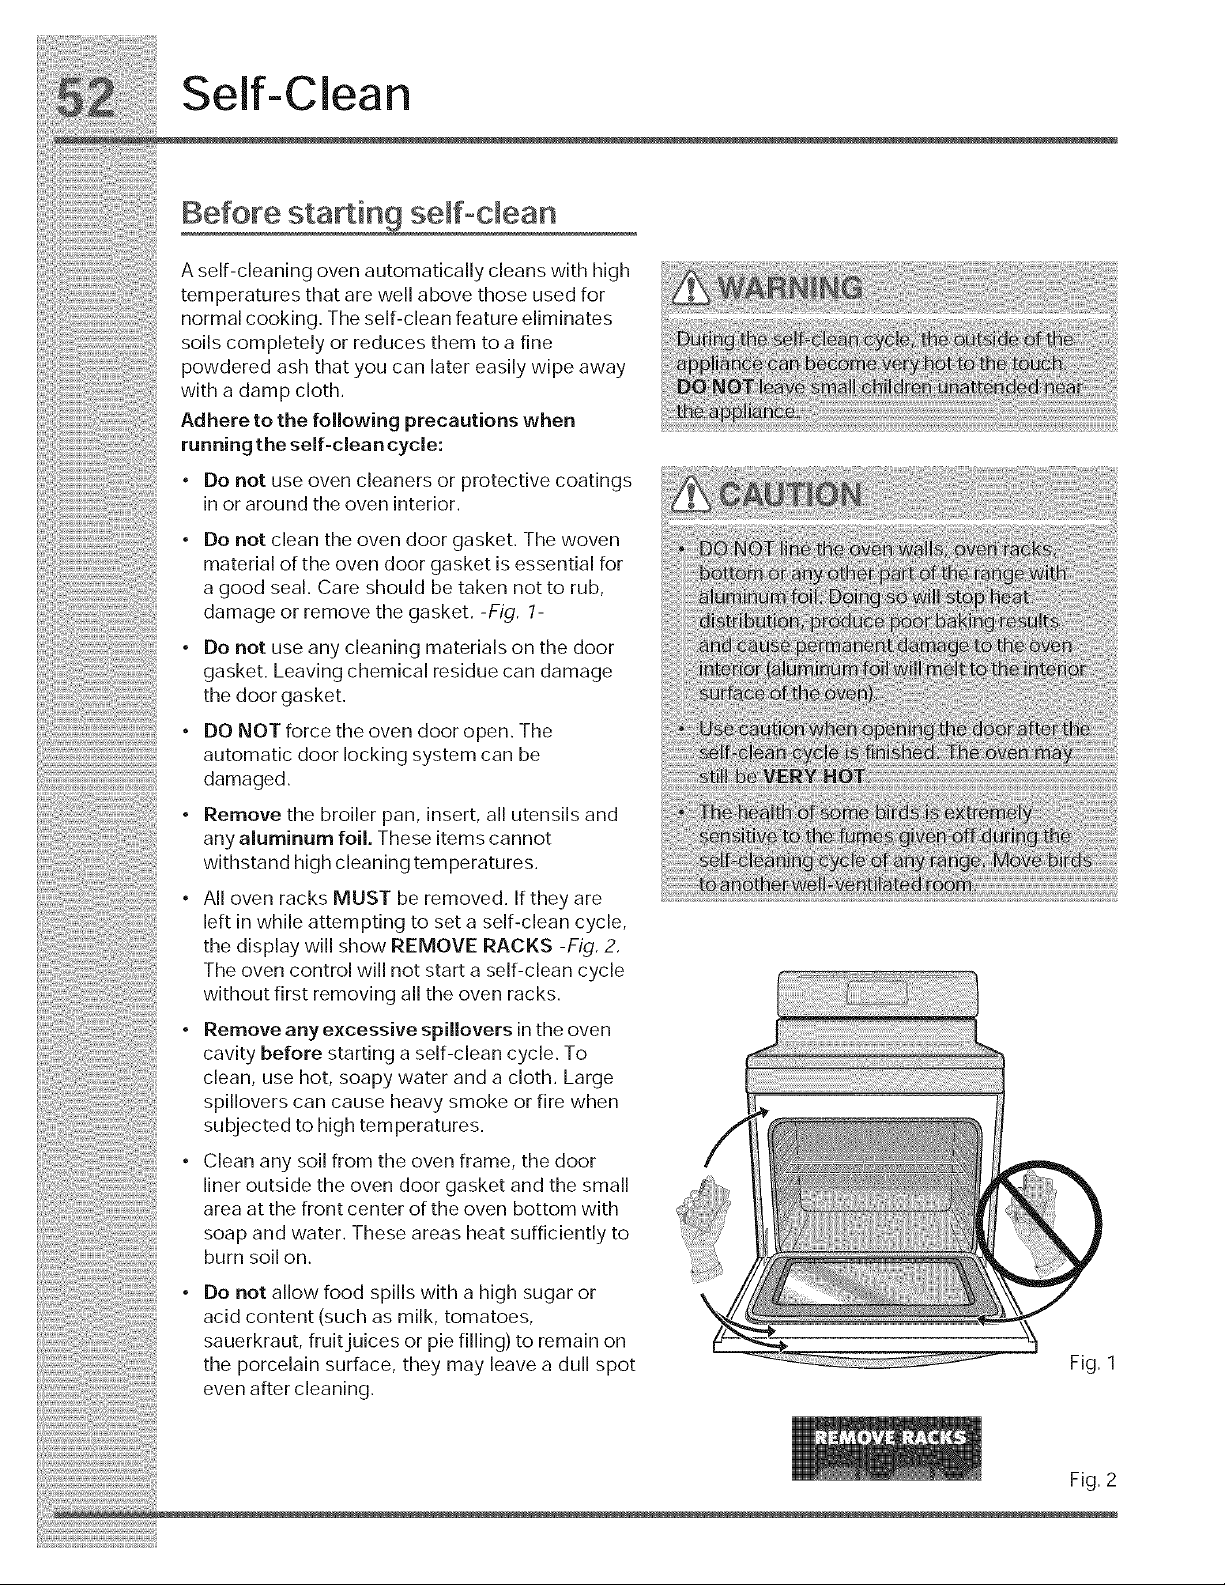
DONOTforcetheovendooropen.The
automaticdoorlockingsystemcanbe
damaged.
• Removethebroilerpan,insert,allutensilsand
anyaluminumfoil.Theseitems cannot
withstand high cleaning temperatures.
• All oven racks MUST be removed. If they are
left in while attempting to set a self-clean cycle,
the display will show REMOVE RACKS -Fig. 2.
The oven control will not start a self-clean cycle
without first removing all the oven racks.
• Remove any excessive spillovers in the oven
cavity before starting a self-clean cycle. To
clean, use hot, soapy water and a cloth. Large
spillovers can cause heavy smoke or fire when
subjected to high temperatures.
• Clean any soil from the oven frame, the door
liner outside the oven door gasket and the small
area at the front center of the oven bottom with
soap and water. These areas heat sufficiently to
burn soil on.
Do not allow food spills with a high sugar or
acid content (such as milk, tomatoes,
sauerkraut, fruit juices or pie filling) to remain on
the porcelain surface, they may leave a dull spot
even after cleaning.
Fig. 1
Fig. 2
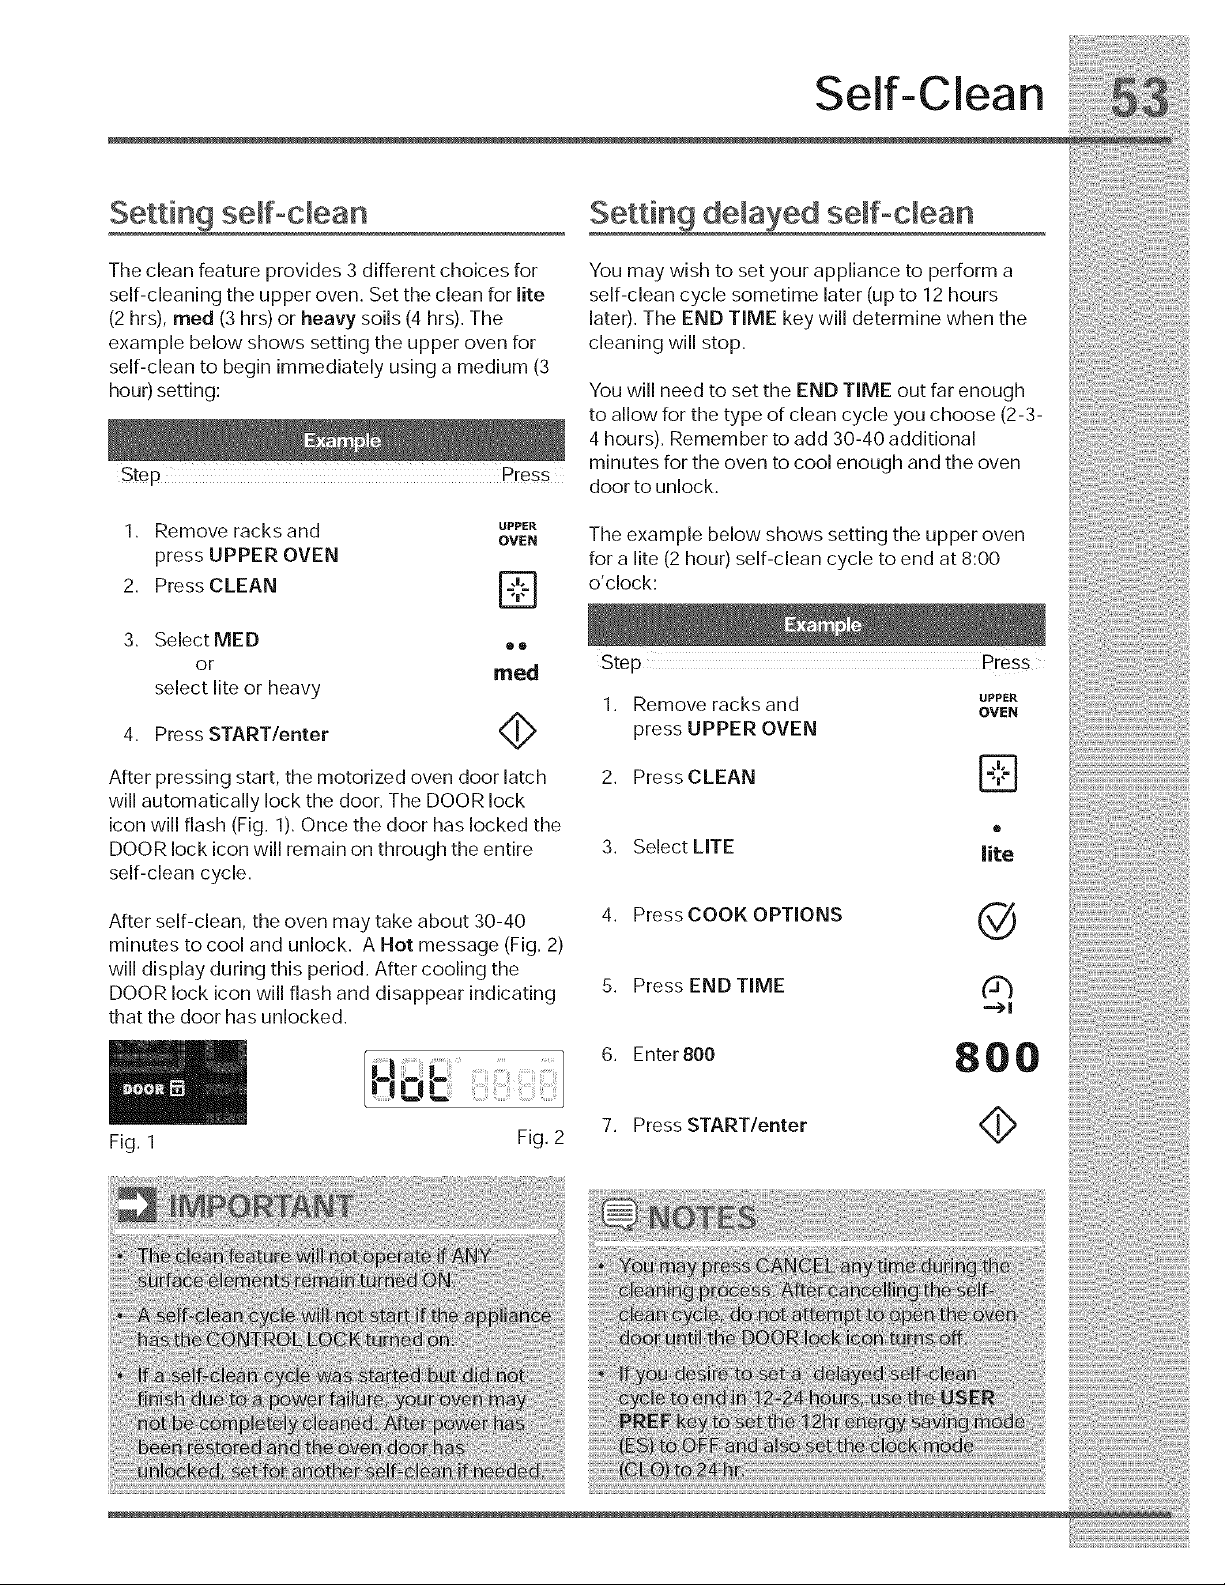
Self-Clean
Settin 9 se+f°c+ean
The clean feature provides 3 different choices for
self-cleaning the upper oven• Set the clean for lite
(2 hrs), reed (3 hrs) or heavy soils (4 hrs). The
example below shows setting the upper oven for
self-clean to begin immediately using a medium (3
hour) setting:
I. Remove racksand UPPER
OVEN
press UPPER OVEN
2. Press CLEAN
LL£J
3•
Select MED • +
or reed
select lite or heavy
4. Press START/enter <_
After pressing start, the motorized oven door latch
will automatically lock the door. The DOOR lock
icon will flash (Fig. 1). Once the door has locked the
DOOR lock icon will remain on through the entire
self-clean cycle•
After self-clean, the oven may take about 30-40
minutes to cool and unlock• A Hot message (Fig. 2)
will display during this period. After cooling the
DOOR lock icon will flash and disappear indicating
that the door has unlocked.
Fig. 1 Fig. 2
Setting de+ayed se+f+c+ean
You may wish to set your appliance to perform a
self-clean cycle sometime later (up to 12 hours
later). The END TIME key will determine when the
cleaning will stop•
You will need to set the END TIME out far enough
to allow for the type of clean cycle you choose (2-3-
4 hours). Remember to add 30-40 additional
minutes for the oven to cool enough and the oven
door to unlock•
The example below shows setting the upper oven
for a lite (2 hour) self-clean cycle to end at 8:00
o'clock:
I Remove racksand UPPER
• OVEN
press UPPER OVEN
2, Press CLEAN
®
3, Select LITE lite
4. PressCOOK OPTIONS @
5. Press END TIME (3_
.=_|
6. Enter 800 8 0 0
7. Press START/enter
ci ii0c,eao,o0
• S yp CHeanin9 Recommendation
Aluminum (trim pieces) & vinyl Use hot, soapy water and a cloth. Dry with a
clean cloth.
Painted and plastic control knobs For general cleaning, use hot, soapy water and a
Body parts, cloth. For more difficult soils and built-up grease
, Pa" teddeco ativetri app y a qu d detergent d recty onto the so
N r m
Leave on soil for 30 to 60 minutes. Rinse with a
damp cloth and dry. Do not use abrasive
cleaners on any of these materials; they can
scratch. To remove control knobs turn to the OFF
position; grasp firmly and pu I straight off the
shaft. TO replace knobs after cleaning, line up the
flat sides of both the knob and the shaft then
. push the knob into place.
Chrome control panel (some models) Before cleaning the controlpanel, turn all controls
• Decorat vetr m (some mode s) to OFF and remove the control knobs. To remove,
. _ .... - , , pull each knob straight off the shaft. Clean using
b_ammss s_eel [some models) hot, soapy water and a dishcloth. Rinse with a
clean water using a dishcloth. Be sure to squeeze
excess water from the cloth before wiping the
panel; especially when wiping around the
controls. Excess water in or around the controls
may cause damage to the appliance.To replace
knobs after cleaning, line up the flat sides of both
the knob and the shaft; then push the knob into
place.
Stainless Steel (some models). Clean the
stainless with warm soapy water using a clean
sponge or cloth. Rinse with clean water and dry
with a soft clean cloth. Do not use harsh
scrubbing cleaners. Only use kitchen cleaners that
are especially made for cleaning Stainless Steel.
Always be sure to rinse the cleaners from the
surface as bluish stains may occur during heating
that cannot be removed.
, Porcelainenameibroilerpanand ....
• . . Gentle scouring with a soapy scouring pad wll
riser[ (f equ pped)
remove most spots. Rinse with a 1:1 solution of
• Door net & body parts clear water and ammonia. If necessary cover
. . difficult spots with an ammonia-soaked paper
For Lower Oven cleaning
towel for 30 to 40 minutes, Rinse with clean water
instructions see the Lower Oven
and a damp cloth, and then scrub with a soap-
sect'on
" filled scouring pad. Rinse and wipe dry with a
clean cloth. Remove all cleaners or the porcelain
may become damaged during future heating. Do
not use spray oven cleaners on the cooktop.
Care and Cleaning
Oven racks
Oven door
Ceramic cooktop
Oven racks must be removed. Clean by using a
mild, abrasive cleaner following manufacturer's
instructions. Rinse with clean water and dry.
Use soap & water to thoroughly clean the top,
sides and front of the oven door. Rinse well. You
may use a glass cleaner on the outside glass of the
oven door. Do not immerse the door in water. Do
not spray or allow water or the glass cleaner to
enter the door vents. Do not use oven cleaners,
cleaning powders or any ha _shabrasive cleaning
materials on the outside of the oven door
Do not clean the oven door gasket. The oven door
gasket is made of a woven material, on Self-
Cleaning models, which is essential for a good
seal. Care should be taken not to rub, damage or
remove this gasket.
See Cooktop Cleaning and Maintenance in the
Care & Cleaning section.
i i i ii i ii i i ii i i ii i ii i i ii i i ii i ii i i i
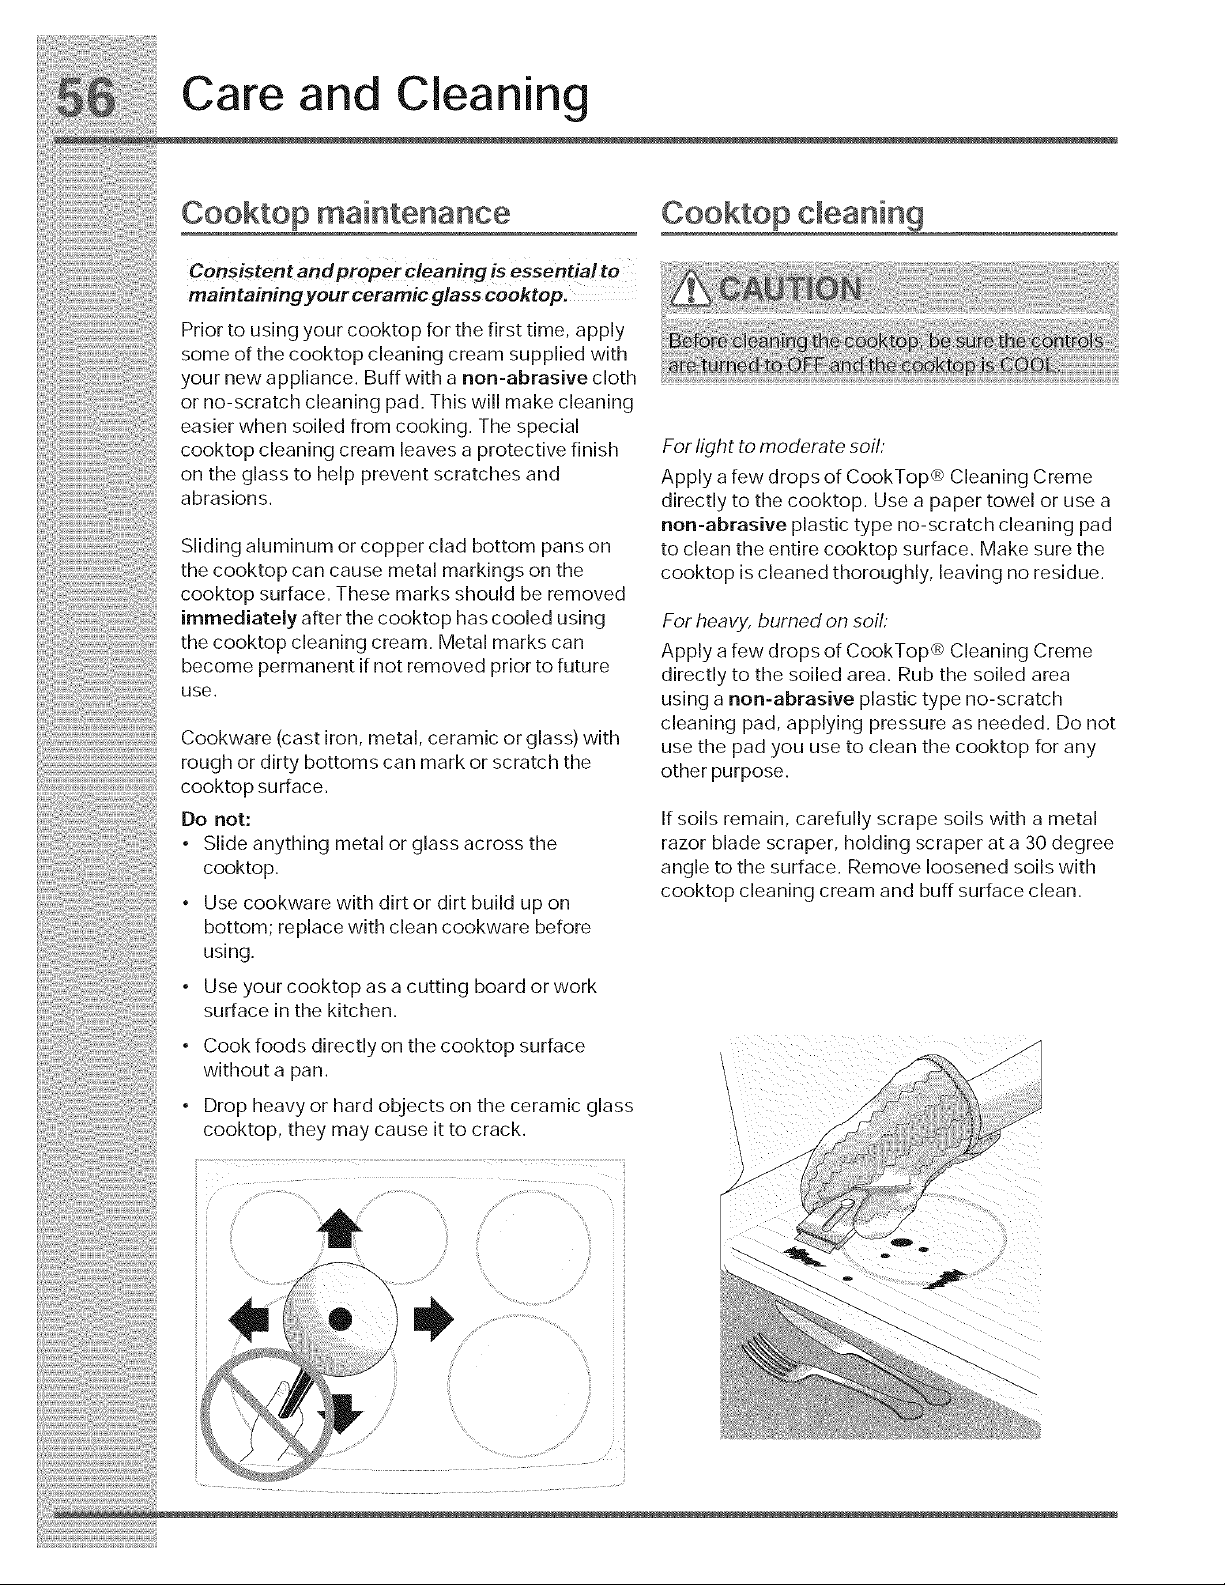
1_ii!i_!_!7_!i_ii_i_i_i!_i!ii!i!iiii_!iiii_!iiii!_i_!_i_!i_;_!ii_i_iii_i_!!!_!_:_i!_i!_i_!_i_!!ii_!:i!ii_i_!!!i!!:!!_!_!!!_!i:!
Care and Cleaning
Cooktop maintenance Cooktop cleaning
maintaining your ceramic glass cooktop.
Pr orto us ng yourcooktop for the f rst t me app y
' _ _ _ ean _g_n
some of the cooktop c ean ng cream supped w th
your new apphance. Buff w_th a non-abrasive cloth
orno-scratchdeaningpad. Thiswillmakedeaning
easierwhensoiledfromcooking. Thespecial
cooktopcleaningcream leavesa protectivefinish Forlighttomoderatesoil:
on the glass to help preventscratches and ApplyafewdropsofCookTop® Cleaning Creme
abrasions, directlytothecooktop. Usea papertowelorusea
non-abrasiveplastictypeno-scratchcleaningpad
Slidingaluminumorcopperclad bottom panson tocleantheentirecooktopsurface. Makesurethe
thecooktopcancause metal markingsonthe cooktopiscleanedthoroughly, leavingnoresidue.
cooktop surface. These marks should be removed
JmmediateJyafterthecooktophascooJedusJng Forheavy, bumedonsoil:
!hecooktopcleanlngcream. Metal markscan ApplyafewdropsofCookTop® Cleaning Creme
becomepermanent,tnotremovedpnortofuture dJrectlytothesoJledarea. Rubthe soiled area
use. usinganon-abrasiveplastictypeno-scratch
• . . cleaning pad, applying pressureasneeded. Uonot
Cookware (cast _ron metal ceramic or glass) w_th
' ' use the pad you use to clean the cooktop forany
rough or dirty bottoms can mark or scratch the other purpose.
cooktop surface.
Do not:
• Slide anything metal or glass across the
cooktop.
• Use cookware with dirt or dirt build up on
bottom; replace with clean cookware before
using.
• Use your cooktop as a cutting board or work
surface in the kitchen.
• Cook foods directly on the cooktop surface
without a pan.
• Drop heavy or hard objects on the ceramic glass
cooktop, they may cause it to crack.
If soils remain, carefully scrape soils with a metal
razor blade scraper, holding scraper at a 30 degree
angle to the surface. Remove loosened soils with
cooktop cleaning cream and buff surface clean.
,_i_' _ ili
.... ............ _i i!i
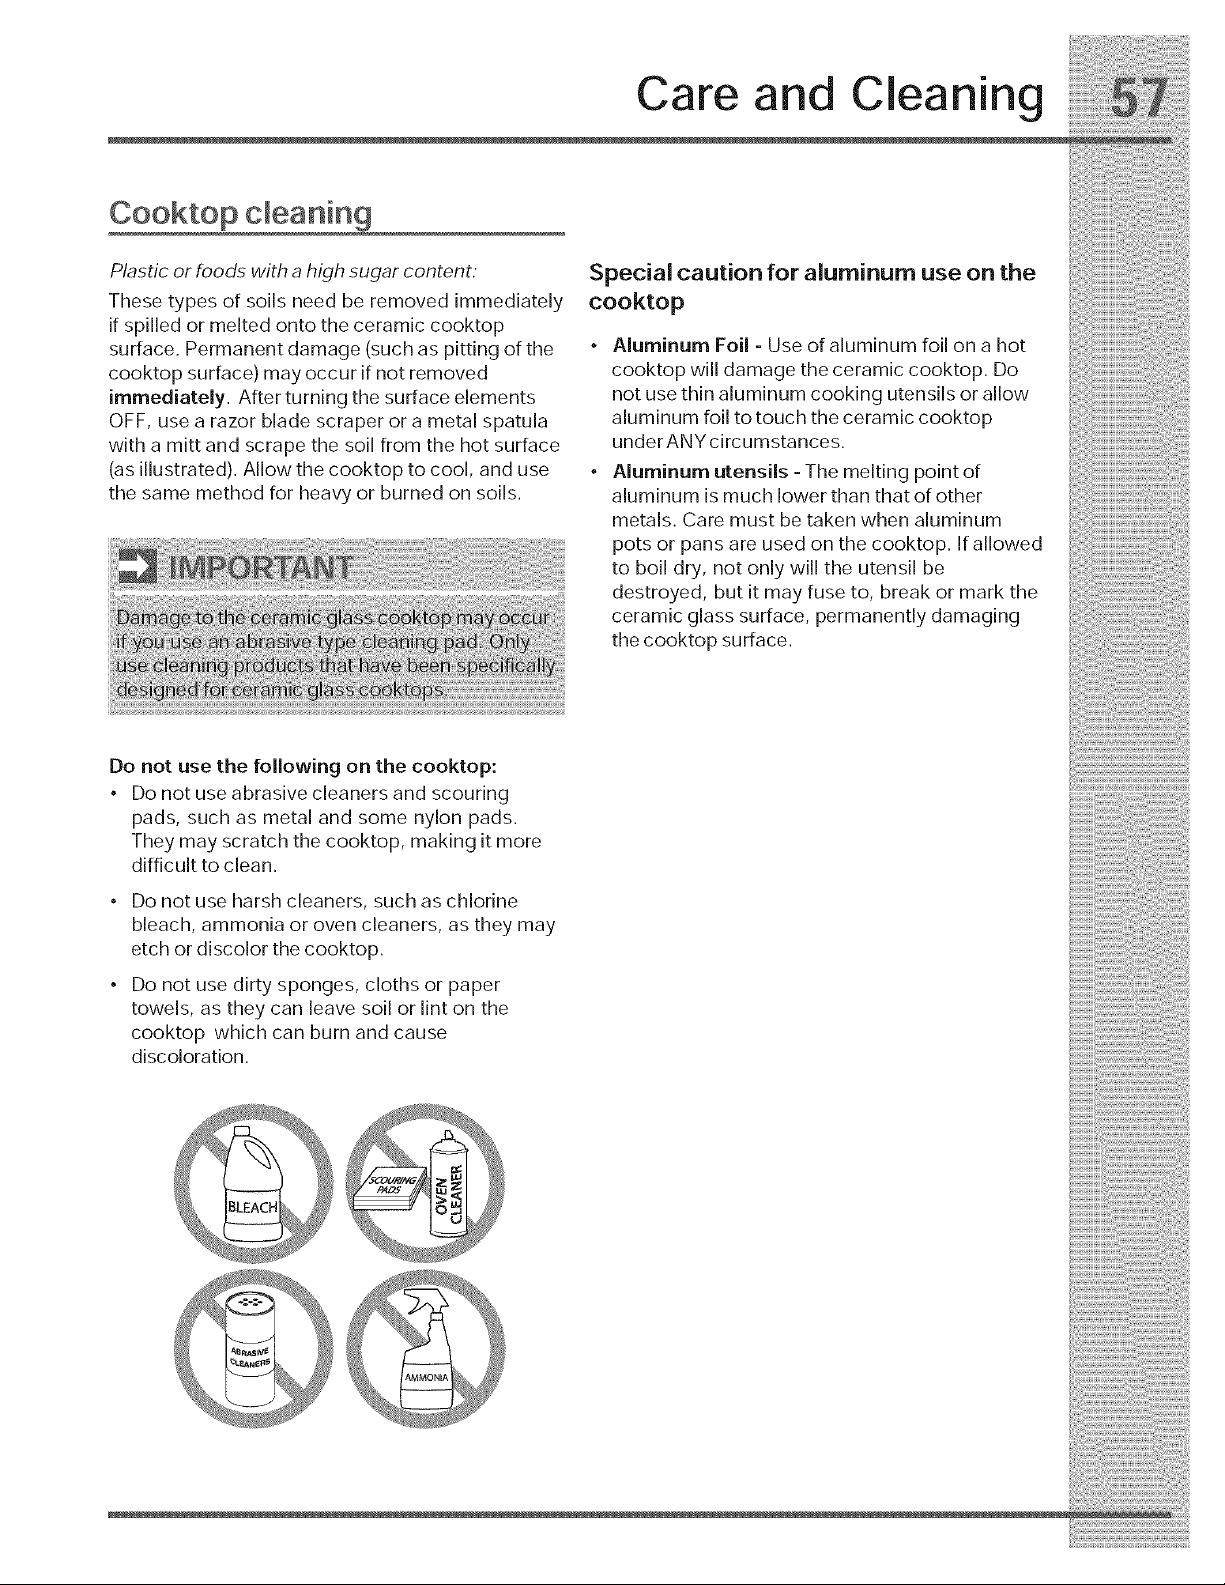
Care and Cleaning
Cooktop cleaning
Plastic or foods with a high sugar content:
These types of soils need be removed immediately
if spilled or melted onto the ceramic cooktop
surface. Permanent damage (such as pitting of the "
cooktop surface) may occur if not removed
immediately. After turning the surface elements
OFF, use a razor blade scraper or a metal spatula
with a mitt and scrape the soil from the hot surface
(as illustrated). Allow the cooktop to cool, and use •
the same method for heavy or burned on soils.
Special caution for aluminum use on the
cooktop
Aluminum Foil - Use of aluminum foil on a hot
cooktop will damage the ceramic cooktop. Do
not use thin aluminum cooking utensils or allow
aluminum foil to touch the ceramic cooktop
under ANY circumstances.
Aluminum utensils - The melting point of
aluminum is much lower than that of other
metals. Care must be taken when aluminum
pots or pans are used on the cooktop. If allowed
to boil dry, not only will the utensil be
destroyed, but it may fuse to, break or mark the
ceramic glass surface, permanently damaging
the cooktop surface.
Do not use the following on the cooktop:
• Do not use abrasive cleaners and scouring
pads, such as metal and some nylon pads.
They may scratch the cooktop, making it more
difficult to clean.
• Do not use harsh cleaners, such as chlorine
bleach, ammonia or oven cleaners, as they may
etch or discolor the cooktop.
• Do not use dirty sponges, cloths or paper
towels, as they can leave soil or lint on the
cooktop which can burn and cause
discoloration.
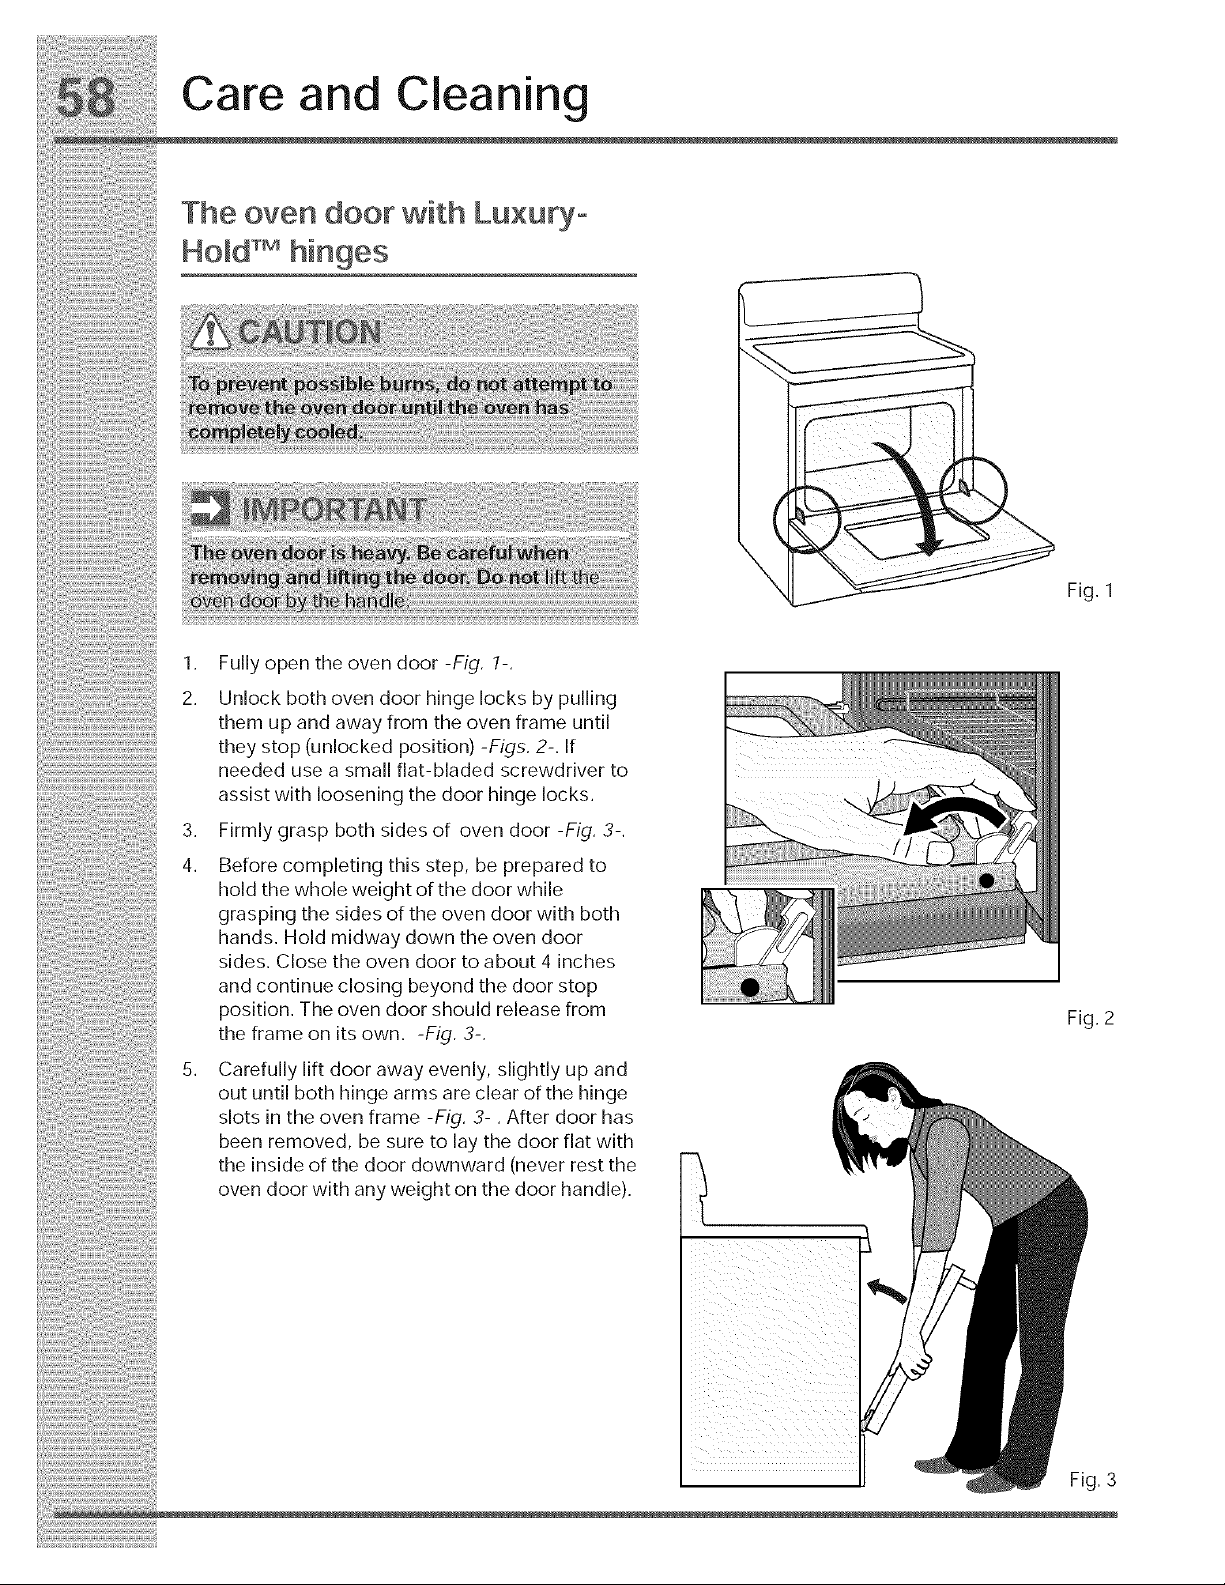
Care and Cleaning
The oven door with Luxury°
Hold hinges
1. Fully open the oven door -Fig, 1-,
2. Unlock both oven door hinge locks by pulling
them up and away from the oven frame until
they stop (unlocked position) -Figs, 2-. If
needed use a small flat-bladed screwdriver to
assist with loosening the door hinge locks.
3. Firmly grasp both sides of oven door -Fig, 3-.
4, Before completing this step, be prepared to
hold the whole weight of the door while
grasping the sides of the oven door with both
hands. Hold midway down the oven door
sides. Close the oven door to about 4 inches
and continue closing beyond the door stop
position. The oven door should release from
the frame on its own. -Fig, 3-,
5, Carefully lift door away evenly, slightly up and
out until both hinge arms are clear of the hinge
slots in the oven frame -Fig, 3-, After door has
been removed, be sure to lay the door flat with
the inside of the door downward (never rest the
oven door with any weight on the door handle).
Fig. 1
Fig. 2
Fig. 3
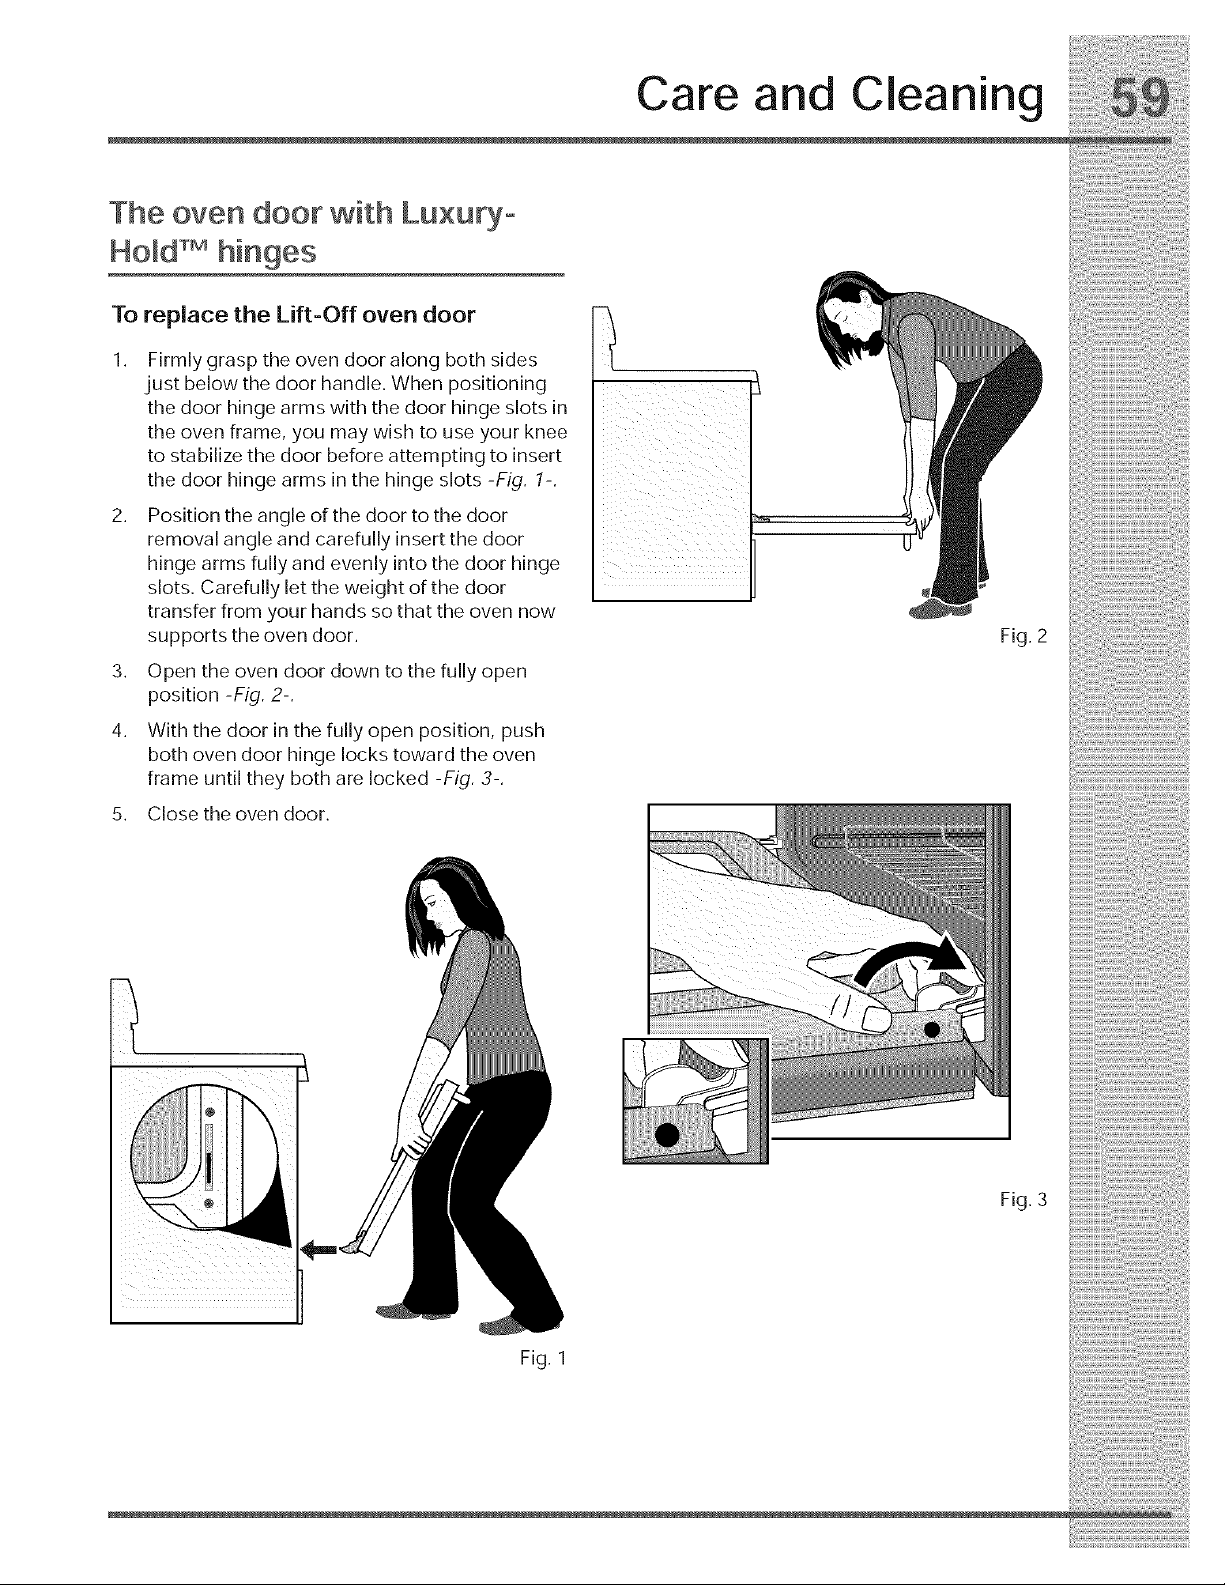
iiiii#:i!i!ii!_i:i:i:#i:i!#ili##i#!iiii#ii!i!ii#ii_iiiii_!i
Care and Cleaning
The oven door with Luxury- -_
Hold _ hinges
To.o.,oce,.eU.-O.o.e°.oo.
I. Firmlygrasptheoven dooralong both sides _
just below the door handle. When positioning
the door hinge arms with the door hinge slots in
the oven frame, you may wish to use your knee
to stabilize the door before attempting to insert
the door hinge arms in the hinge slots -Fig. 7-.
2. Position the angle of the door to the door ---
rem ova I ang Ie a nd c are fu Ily inse rt t he d oor
hinge arms fully and evenly into the door hinge
slots. Carefully let the weight of the door
transfer from your hands so that the oven now
supports the oven door. Fig. 2
3. Open the oven door down to the fully open
position -Fig. 2-.
4. With the door in the fully open position, push
both oven door hinge locks toward the oven
frame until they both are locked -Fig. 3-.
5. Close the oven door.
Fig. 3
Fig. 1
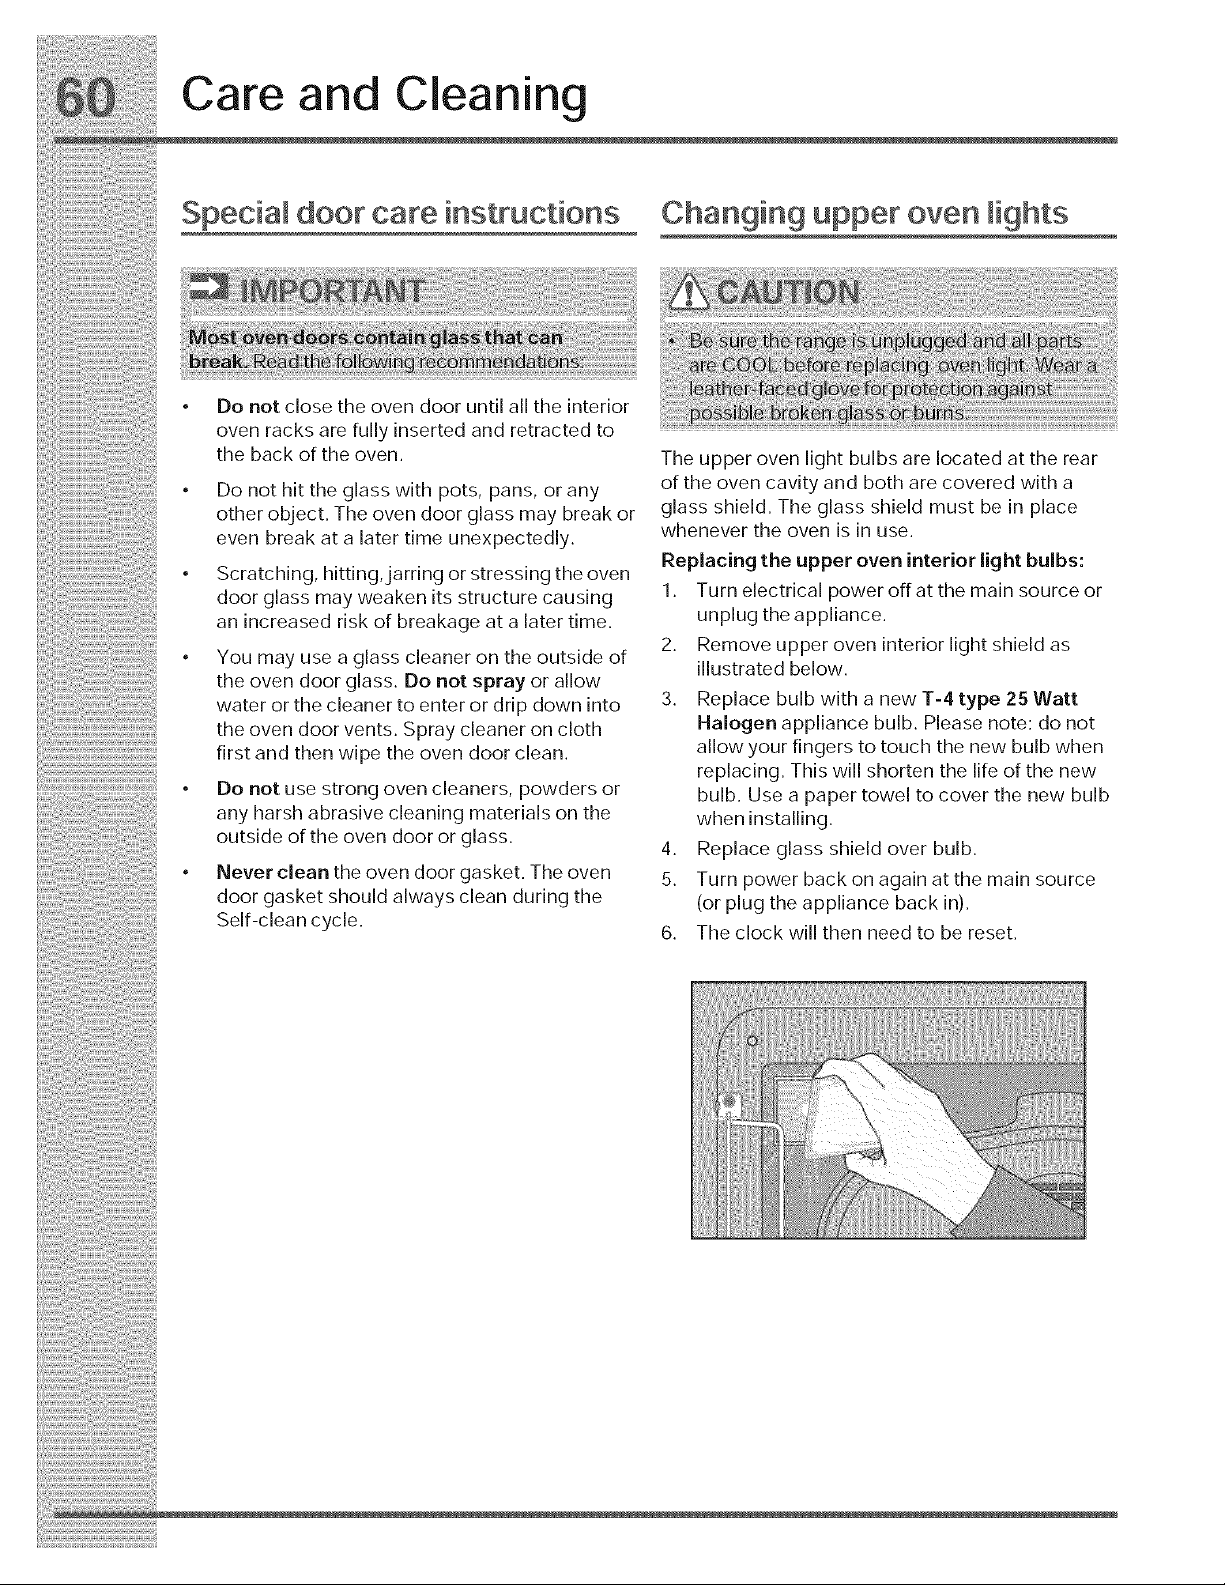
.
!i:i_i!!i_ii_i_i_i_i!i!_!_:_!_i_i_ii_!i_i_i_i_ii!i!_!_i_!i!!_ii!_i!_ii_i!_i_ii!_!i!i_ii!i!_i!i!_i:ii_i!:_i!i!:!_!ii:!_ii:!_!i
Care and Cleaning
Special door care instructions Changing upper oven lights
i ..................................................................................................................................
Do notcosethe_ oven doorunt a the nteror B N _::: ::
oven racks are Tully insertea and retracted to
thebackoftheoven. Theupperovenlightbulbsarelocatedattherear
• Do not hit the -lass with _ots _ans or an of the oven cav ty and both are covered w th a
y [a , p , v . . .
otherobject. Theoven doorglass may breakor glass sh,eld. The glass sh,eld must be m place
even breakata latertime unexpectedly, wheneverthe oven ,s m use.
• Rep ac ng the upper oven nter or ght bu bs
Scratching, hitting,jarring or stressing the oven
doorglassmajweakenitsstructurecausing 1 Turneectrca poweroffatthema nsourceor
anincreased riskofbreakageatalatertime, unplugtheappliance.
• 2 Remove upper oven nter or ght she d as
You may use a g ass c eaner on the outs de of
ustrated De OW
:, the oven aoor glass, uo not spray or aHow
3 Replace bulb with a new T 4type 25 Watt
waterorthecleanertoenterordripdowninto . . "
Halogen apphance bulb Please note do not
theoven doorvents. Spraycleaneroncloth . :
first and then wi e the oven door clean allow your fingers to touch the new bulb when
..... P .
replacing. This will shorten the life of the new
Do not use strong oven cleaners, powders or
any harsh abrasive cleaning materials on the
outside of the oven door or glass.
Never clean the oven door gasket. The oven
door gasket should always clean during the
Self-clean cycle.
bulb. Use a paper towel to cover the new bulb
when installing.
4. Replace glass shield over bulb.
5. Turn power back on again at the main source
(or plug the appliance back in).
6. The clock will then need to be reset.
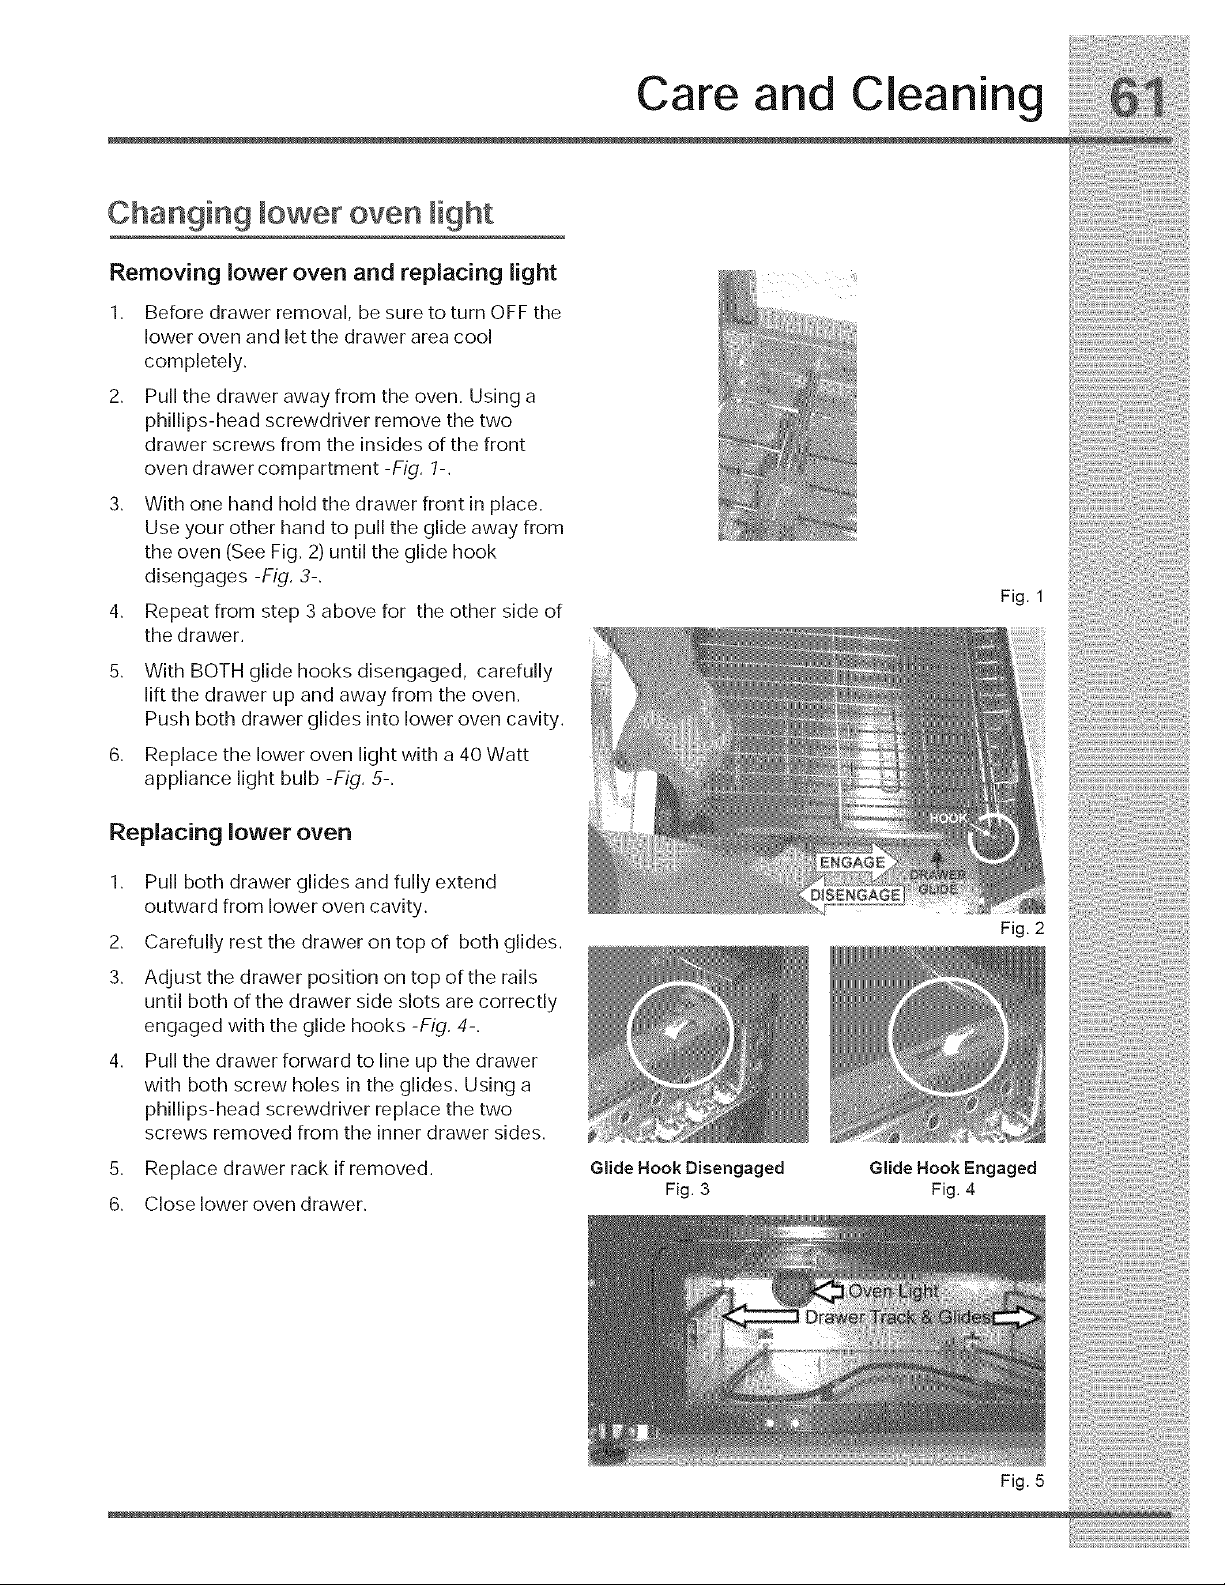
Care and Cleaning
Changing lower oven light
Removing lower oven and replacing light
1. Before drawer removal, be sure to turn OFF the
lower oven and let the drawer area cool
completely.
2. Pull the drawer away from the oven. Using a
phillips-head screwdriver remove the two
drawer screws from the insides of the front
oven drawer compartment -Fig. 1-.
3. With one hand hold the drawer front in place.
Use your other hand to pull the glide away from
the oven (See Fig. 2) until the glide hook
disengages -Fig. 3-.
4. Repeat from step 3 above for the other side of
the drawer.
5. With BOTH glide hooks disengaged, carefully
lift the drawer up and away from the oven.
Push both drawer glides into lower oven cavity.
6. Replace the lower oven light with a 40 Watt
appliance light bulb -Fig. 5-.
Fig. 1
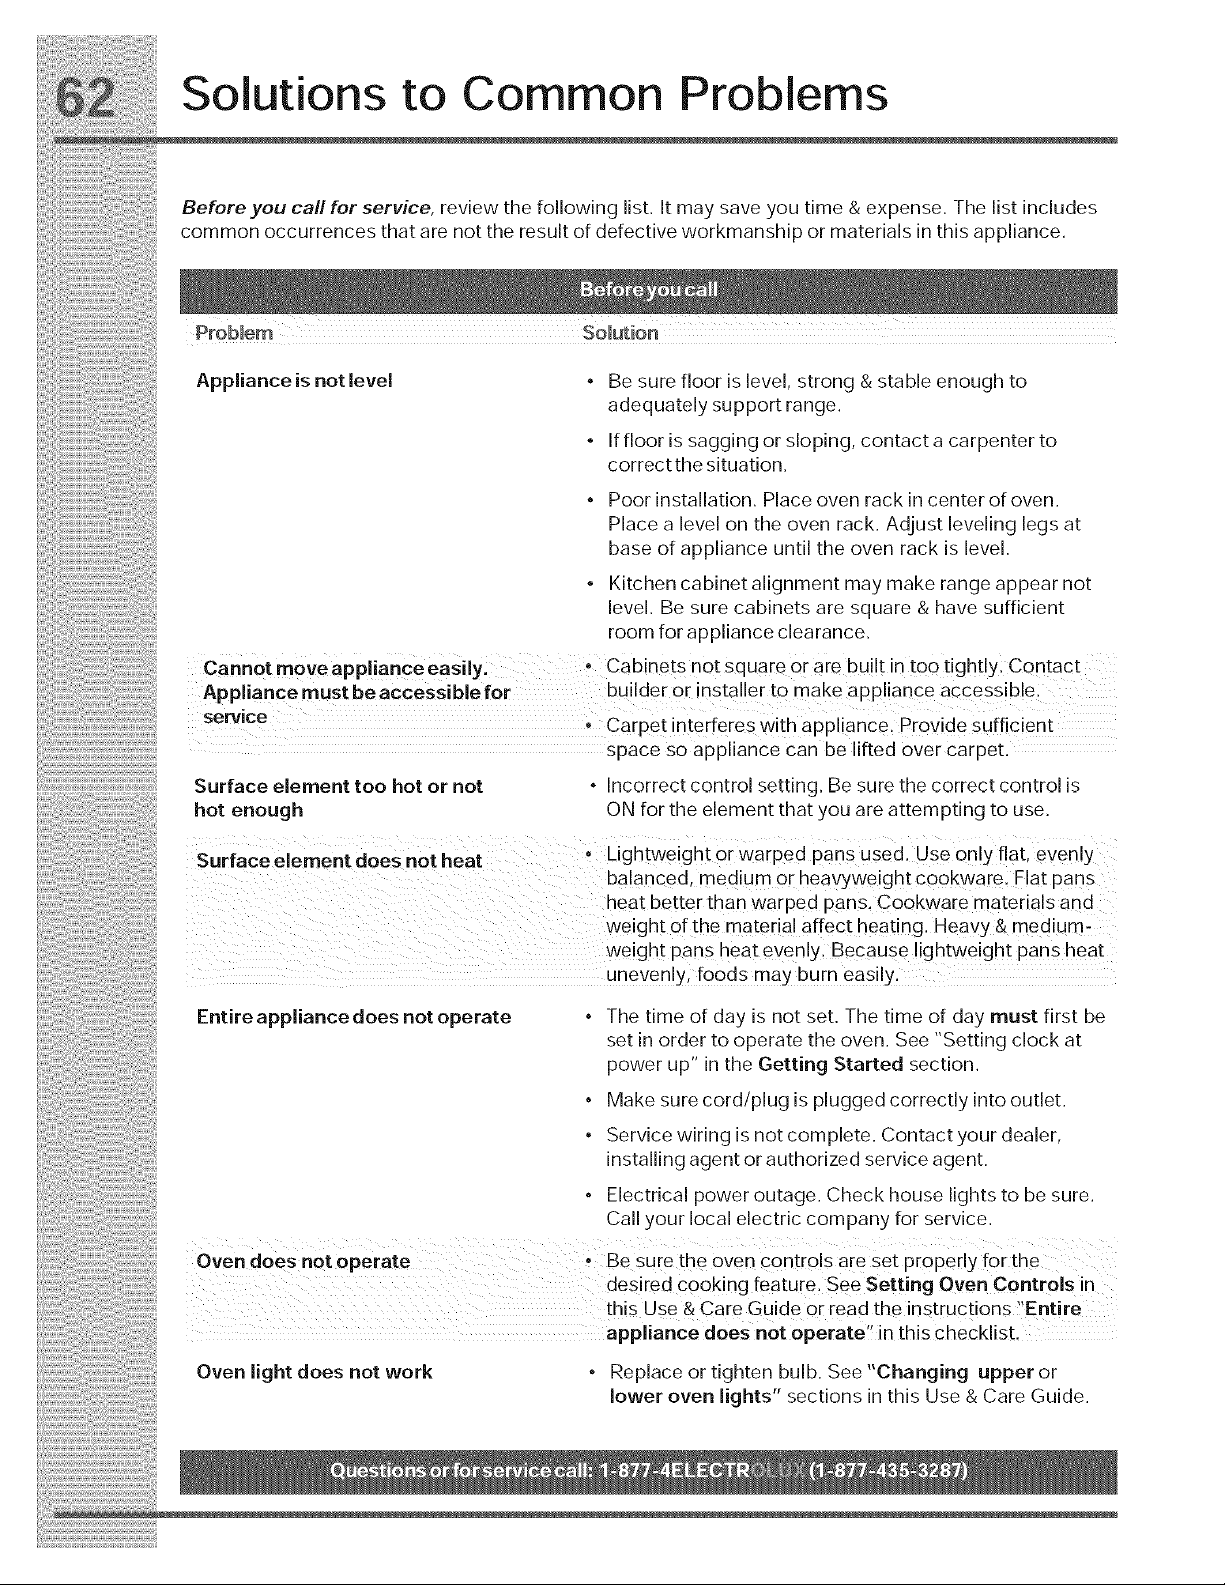
!i_i;ii_i_ii_ii_i_i_i_!_i_!i!i_i:i:;_i!i!ii!i_i!i_ii_iii_!:i_!_!!iii_!_!_!;!_!_i!i!!i!:!_!!_!i_!_!;_i!_!;_!_!_i!;_;!i_ii1i_
y " , e " g .It y y " pense. The list includes
c_mm_n_ccurrencesthataren_ttheresult_fdefectivew_rkmanship_rmaterialsinthisapp_iance_
:::: PrObM÷m Solution
: Applianceisnotlevel - Besurefloorislevel, strong &stableenoughto
° adequatelysupportrange.
Iffloorissaggingorsloping, contactacarpenterto
, correctthesituation.
Poorinstallation. Placeoven rackin centerofoven.
Placea levelontheoven rack. Adjustlevelinglegsat
, baseofapplianceuntiltheoven rackislevel.
: Kitchencabinetalignmentmaymakerangeappearnot
level. Be surecabinetsare square & have sufficient
. roomforapplianceclearance.
cannot move appliance easily: cabinets not Square or arebu It in toe tightly Contact
Appliance must beaccessible for builder Oi installer to make appliance accessible
Sence carpet interferes With appliance, Provide Sufficient
Spacesoappliancecan belifted overcarpet.
Surfaceelementtoo hotornot • Incorrectcontrol setting. BesurethecorrectcontrolJs
hot enough ON for the element that you are attempting to use.
Surface element does not heat" Lightweight 0r Waiped pans Used' use on!y flat, even!y
ba!anced, medium 0r heavyweight co0kwa[e, E!at pans
heat better than Warped pans, Gookware materials and
weight of the material affect heating. Heavy & medium,
weight pans heat evenlyl Because lightweight pans heat
uneven!y, foods may burn easi!_
Entire appliance does not operate • The time of day is not set. The time of day must first be
set in order to operate the oven. See "Setting clock at
power up" in the Getting Started section.
° Make sure cord/plug is plugged correctly into outlet.
• Service wiring is not complete. Contactyour dealer,
installing agent or authorized service agent.
• Electrical power outage. Check house lights to be sure.
Call your local electric company for service.
Oven does nOtoperate • Be su[eth@ oven contr0!s are set propedy for the
desired cooking feature. See Setting Oven ContrOls in
this Use & Care Guide or read the instructions :iEntire
appliance does not operateff in this checklist,
Oven light does not work ° Replace or tighten bulb. See "Changing upper or
lower oven lights" sections in this Use & Care Guide.
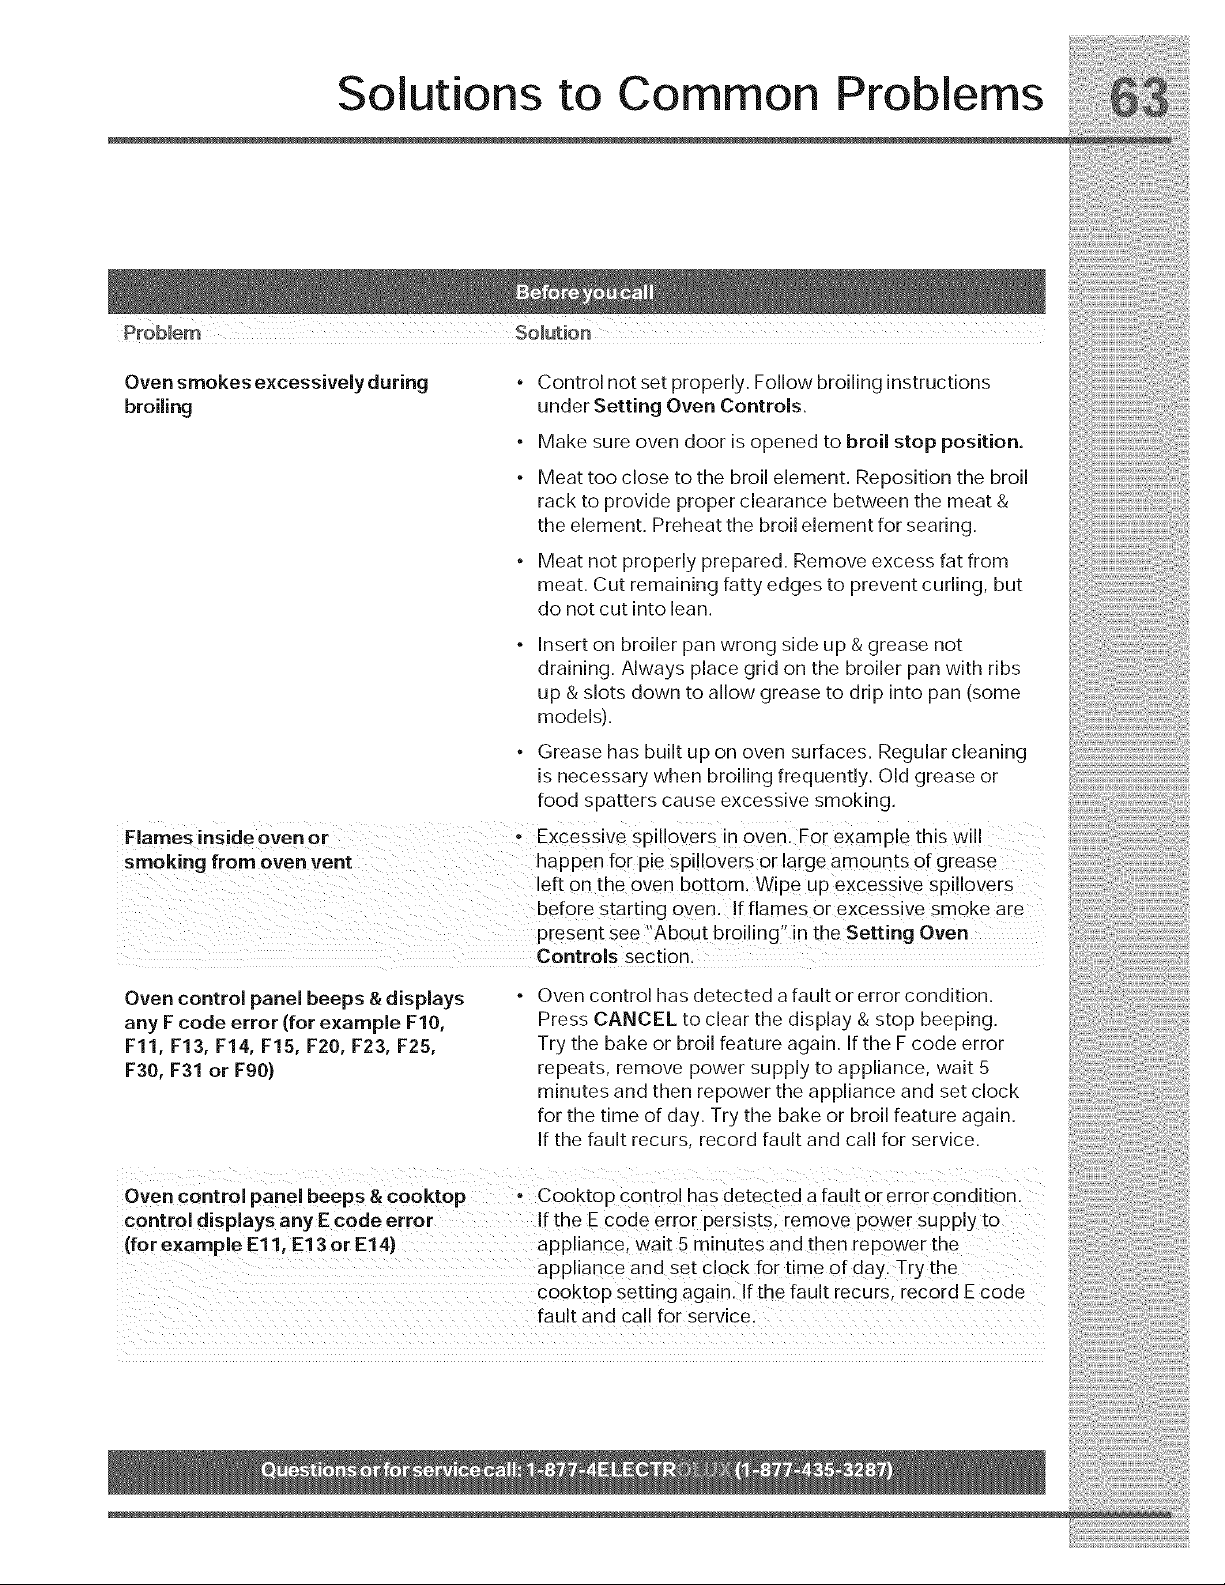
• Meatnotproperlyprepared.Removeexcessfatfrom
meat.Cutremainingfattyedgesto preventcurling,but
do notcutintolean.
• Insertonbroilerpanwrongsideup&greasenot
draining.Alwaysplacegridonthebroilerpanwithribs
up &slotsdowntoallowgreaseto dripintopan(some
models).
• Greasehasbuiltuponovensurfaces.Regularcleaning
isnecessarywhenbroilingfrequently.Oldgreaseor
foodspatterscauseexcessivesmoking.
Flames inside oven or ,Excessive Spillovers in oven. For example this will
smoking from oven vent happen for pie Spi lovers or la[ge amounts of grease
left on the oven bottom. Wipe up excessive Spi!lovers
before Starting oven. !f flames or excessive Smoke ale
pEesent See About broiling in the Setting Oven
Controls Section.
Oven control panel beeps & displays • Oven control has detected a fault or error condition.
any F code error (for example F10, Press CANCEL to clear the display & stop beeping.
Fll, F13, F14, F15, F20, F23, F25, Try the bake or broil feature again. If the F code error
F30, F31 or Fg0) repeats, remove power supply to appliance, wait 5
minutes and then repower the appliance and set clock
for the time of day. Try the bake or broil feature again.
If the fault recurs, record fault and call for service.
Oven control panel beeps & cooktop • Cooktop control has detected a fault or error condition
control displays any E code error r the E code error persists, remove power supply to
(for example E11, E13 or E14) ap Dliance. wait 5 minutes and then repower the
appliance and set clock for time of day, Try the
cooktop setting again. If the fault recurs, record E code
fault and call for service ....
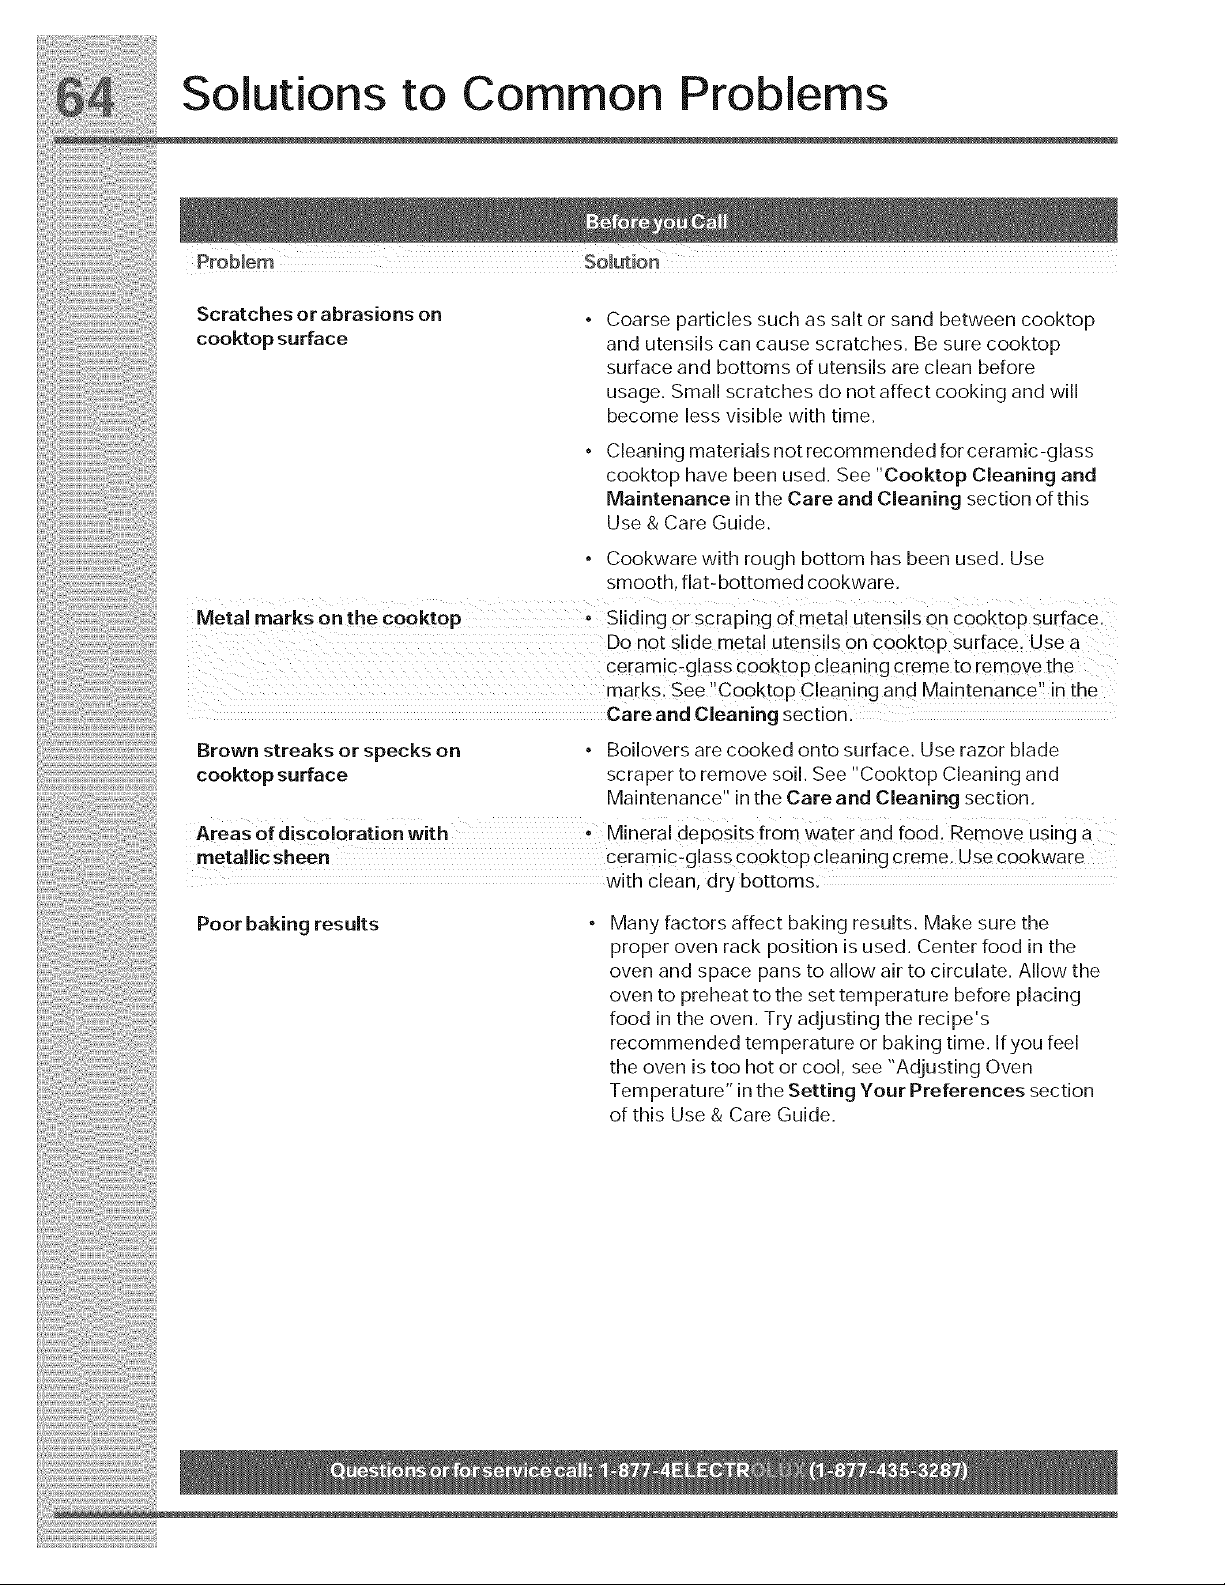
!i_ii!_i_ii_i_i_i_i_!_!!i_i_ii_i_ii!!i!;!_!_i_i!i_!_i_!_!_i_!_!_i_!_!_!i!i_:_i_i!_!_i_!i!i_!i!i_!i!i_!i!i_!i_i_!!i!_!i!_!!ii_:!_:_!i_i
ii t,ons,oCom ilP,ob'ems
Scratches or abrasions on ° Coarse partides such as salt or sand between cooktop
cooktopsurface and utensils can cause scratches. Be sure cooktop
:;; :;; ; surface and bottoms of utensils are clean before
usa ge. S maII sc ratc hes d o not affe ct cookin g a nd will
. become less visible with time.
Clea ning mater iaIs n otrec om mended for cera mic -gla s s
cooktop have been used. See "Cooktop Cleaning and
: Ma int enan c e in t he Car e and C lea ning sect ion of this
° Use & Care Guide.
Cookware with rough bottom has been used. Use
, smooth, flat- bottomed cookware.
Metal marks on the Sliding or scraping 0f meta! utensils on C00kt0p surface:
D0n0t Slide metal utensils on cooktop Surface, Use a
Ceramic*g!a,ss CooktoP C!eaning creme to remove the
marks: See Cookt0p Cleaning and Maintenance in the
care and Cleaning section.
..... Brown streaks or specks on ° Boilovers are cooked onto surface. Use razor blade
cooktop surface scraper to remove soil. See "Cooktop Cleaning and
Maintenance" in the Care and Cleaning section.
Areas of discoloration with • Mineral deposits from Water and food. Remove using a
metallic sheen ceramic:g!ass cooktop cleaning creme. Use c00kware
with Clean, dry bottoms.
Poor baking results
Many factors affect baking results. Make sure the
proper oven rack position is used. Center food in the
oven and space pans to allow air to circulate. Allow the
oven to preheat to the set temperature before placing
food in the oven. Try adjusting the recipe's
recommended temperature or baking time. If you feel
the oven is too hot or cool. see "Adjusting Oven
Temperature" in the Setting Your Preferences section
of this Use & Care Guide.

N o t e $

Notes
i_i!_!_i!i_ii_!i!_!_i!i_ii_!i!_!_i!i_ii_!i!_!_i!i_ii_!i!_!_i!i_ii_!i!_!_i!i_ii_!i!_!_i!i_ii_!i!_!_i!i_ii_!i!_!_i!i_ii_!i!_!_i!i_ii_!i!_!_i!i_i
Maor Appliance Warranty Information
Your appliance is covered by a one year limited warranty. For one year from your original date of purchase, Electrolux will
repair or replace any parts of this appliance that prove to be defective in materials or workmanship when such appliance is
installed, used, and maintained in accordance with the provided instructions. In addition, the glass cooktop or radiant surface
element of your appliance (excluding built-in and free-standing range appliances) is covered by a two through five year
limited warranty. During the 2nd through 5th years from your original date of purchase, Electrolux will provide a replacement
glass cooktop or radiant surface element for your appliance which has proven to be defective in materials or workmanship
when such appliance is installed, used, and maintained in accordance with the provided instructions.
Exclusions
This warranty does not cover the following:
1. Products with original serial numbers that have been removed, altered or cannot be readily determined.
2. Product that has been transferred from its original owner to another party or removed outside the USA or Canada.
3. Rust on the interior or exterior of the unit.
4. Products purchased "as-is" are not covered by this warranty.
5. Products used in a commercial setting.
6. Service calls which do not involve malfunction or defects in materials or workmanship, or for appliances not in
ordinary household use or used other than in accordance with the provided instructions.
7. Service calls to correct the installation of your appliance or to instruct you how to use your appliance.
8. Expenses for making the appliance accessible for servicing, such as removal of trim, cupboards, shelves, etc.,
which are not a part of the appliance when it is shipped from the factory.
9. Service calls to repair or replace appliance light bulbs, air filters, water filters, other consumables, or knobs,
handles, or other cosmetic parts.
10. Labor or in-home service costs during the additional limited warranty periods beyond the first year from your
original date of purchase.
11. Pickup and delivery costs; your appliance is designed to be repaired in the home.
12. Surcharges including, but not limited to, any after hour, weekend, or holiday service calls, tolls, ferry trip charges, or
mileage expense for service calls to remote areas, including the state of Alaska.
13. Damages to the finish of appliance or home incurred during transportation or installation, including but not limited to
floors, cabinets, walls, etc.
14. Damages caused by: services performed by unauthorized service companies; use of parts other than genuine
Electrolux parts or parts obtained from persons other than authorized service companies; or external causes such
as abuse, misuse, inadequate power supply, accidents, fires, or acts of God.
DISCLAIMER OF IMPLIED WARRANTIES; LIMITATION OF REMEDIES
CUSTOMER'S SOLE AND EXCLUSIVE REMEDY UNDER THIS LIMITED WARRANTY SHALL BE REPAIR OR REPLACE-
MENT AS PROVIDED HEREIN. CLAIMS BASED ON IMPLIED WARRANTIES, INCLUDING WARRANTIES OF MER-
CHANTABILITY OR FITNESS FOR A PARTICULAR PURPOSE, ARE LIMITED TO ONE YEAR OR THE SHORTEST
PERIOD ALLOWED BY LAW, BUT NOT LESS THAN ONE YEAR. ELECTROLUX SHALL NOT BE LIABLE FOR CONSE-
QUENTIAL OR INCIDENTAL DAMAGES SUCH AS PROPERTY DAMAGE AND INCIDENTAL EXPENSES RESULTING FROM
ANY BREACH OF THIS WRITTEN LIMITED WARRANTY OR ANY IMPLIED WARRANTY, SOME STATES AND PROVINCES
DO NOT ALLOW THE EXCLUSION OR LIMITATION OF INCIDENTAL OR CONSEQUENTIAL DAMAGES, OR LIMITATIONS ON
THE DURATION OF IMPLIED WARRANTIES, SO THESE LIMITATIONS OR EXCLUSIONS MAY NOT APPLY TO YOU. THIS
WRITTEN WARRANTY GIVES YOU SPECIFIC LEGAL RIGHTS, YOU MAY ALSO HAVE OTHER RIGHTS THAT VARY FROM
STATE TO STATE,
If You Need Service
Keep your receipt, delivery slip, or some other appropriate payment record to establish the warranty period should service be
required. If service is performed, it is in your best interest to obtain and keep all receipts. Service under this warranty must be
obtained by contacting Electrolux at the addresses or phone numbers below.
This warranty only applies in the USA, Puerto Rico and Canada. In the USA and Puerto Rico, your appliance is warranted by
Electrolux Major Appliances North America, a division of Electrolux Home Products, Inc. In Canada, your appliance is war-
ranted by Electrolux Canada Corp. Electrolux authorizes no person to change or add to any obligations under this warranty.
Obligations for service and parts under this warranty must be performed by Electrolux or an authorized service company.
Product features or specifications as described or illustrated are subject to change without notice.
USA
1-877-435-3287
Electrolux Major Appliances North America
RO. Box 212378
Augusta, GA 30907
Canada
1-800-265-8352
Electrolux Canada Corp.
5855 Terry Fox Way
Mississauga, Ontario, Canada LSV 3E4


