hi-Q NUTRI SMART
BLENDER
INSTRUCTION MANUAL
Before operating your new appliance, please read all instructions carefully and keep for
future reference.
MODEL: EPB-5455
Questions? Elite's customer service team is ready to help.
Call us toll-free at 800-365-6133 ext. 120/105.
For more Elite products, visit us at www.maxi-matic.com.
Recipes are included in this manual.


TABLE OF CONTENTS
IMPORTANT SAFEGUARDS
PURPOSE OF USE
PARTS IDENTIFICATION
BEFORE FIRST USE
ASSEMBLING AND DISASSEMBLING
HOW TO USE
QUICK GUIDE TO PROCESSING INGREDIENTS
CLEANING AND MAINTENANCE
STORAGE
TROUBLESHOOTING
RECIPES
WARRANTY POLICY
RETURN INSTRUCTIONS
2
3
4
5
5
6
7
7
8
8
9
21
22

2
Questions? We’re here to help!
Visit: www.maxi-matic.com for support on this product.
IMPORTANT SAFEGUARDS
The Elite Brand takes consumer safety very seriously. Products are designed and
manufactured with our valued consumers’ safety in mind. Additionally, we ask that
you exercise a level of caution when using any electrical appliance by following all
instructions and important safeguards.
READ ALL INSTRUCTIONS BEFORE USE AND SAVE FOR FUTURE
REFERENCE
WARNING: When using electrical appliances, basic safety precautions should
always be followed as below:
1. This appliance may be used by
persons with physical or mental
impairments or by inexperienced
persons, if they are properly
supervised or have been informed
about how to use the appliance in
a safe manner and understand the
potential dangers.
2. Children must not use this appliance
or play with it. Keep this appliance
and the power cord out of reach.
3. The appliance is intended for
household use and is designed for
processing a standard amount of
food in the household.
4. Before connecting this appliance to a
power socket, make sure the voltage
stated on its rating label corresponds
to the voltage in our power socket.
We do not recommend using an
extension cord.
5. Do not use the appliance in an
industrial environment or outdoors.
6. Do not place the appliance on an
electric or gas stove or in its vicinity,
on a kitchen sink drain board, on the
edge of a table or on an unstable
surface. Only place the appliance on
an even dry and stable surface.
7. Only use the appliance with the
original accessories that came with it.
8. Do not use the appliance for any
other purposes than those for which
it is intended.
9. Warning: Improper use can lead to
injury.
10. Make sure that the appliance is
correctly assembled before putting it
into operation.
11. Pay increased attention when handling
hot liquids because they may release
steam or they could spray and cause
burns. Allow hot liquids and foodstuffs
to cool down to a temperature of at
least 45 °C before putting them into
the blending jar and blending them.
12. Do not leave the appliance in
continuous operation for longer than
1 minute. Before turning it on again,
allow it to cool down for at least 3
minutes
13. The appliance is equipped with a
thermal fuse protecting the motor
from damage in case of overload. If
automatic shut-off of the appliance
occurs in consequence of motor
overload, disconnect it from the
network socket and let it cool for at
least 30 minutes. Then bring the
appliance back in operation.
14. If ingredients stick to the blade
assembly or inside walls of the
blending jar, turn the appliance off
and unplug it from the power supply.
Make sure that the blade assembly has
stopped rotating. Take the blending jar
assembly off the motor unit and turn it
over so that the blade assembly points
upwards. Remove the blade assembly.
Use a plastic spatula to clean the blade
assembly and the walls of the blending
jar. Reassemble the blending jar and
mount it back on the motor unit. Plug
the power cord into a power socket
and continue blending.
15. Do not submerge the motor unit and
its power cord in water or any other
liquid, or wash these parts under
running water.

3
Questions? We’re here to help!
Visit: www.maxi-matic.com for support on this product.
IMPORTANT SAFEGUARDS (cont.)
16. When handling the blade assembly,
taking it out of blending jar, and
cleaning it, take special care to avoid
injury on the blades. Always hold the
blade unit by the bottom plastic part.
Do not attempt to sharpen the blades.
17. The blender accessories are not
intended to be heated in a microwave
oven. Do not expose the blending jar
to extreme temperature changes.
18. Do not turn on the appliance when it
is empty. This may negatively affect its
lifetime.
19. Always turn off the appliance and
disconnect it from the power socket
if you will not be using it, leaving it
without supervision, before assembly,
disassembly, replacing accessories and
before cleaning or moving it.
20. Check that the motor unit is turned off,
disconnected from the power socket
and that the rotating parts have come
to a complete stop before removing
the blending jar from the motor unit.
DO NOT OPEN THE BLENDING JAR
UNTIL THE BLADE ASSEMBLY COMES
TO A STOP.
21. Ensure that the power plug does not
come into contact with moisture. Do
not place heavy items on the power
cord. Make sure the power cord does
not hang over the edge of a table or
that it is not touching a hot surface.
22. Do not disconnect the appliance from
the power socket by pulling on the
power cord. This could damage the
power cord and the power socket.
Disconnect by gently pulling on the
plug of the power cord.
23. If the power cord is damaged, have it
replaced at a professional service
center. Do not use the appliance if it
has a damaged power cord or plug.
24. Do not use the appliance when it is
not functioning properly or showing
any signs of damage.
25. Do not repair the appliance yourself
or modify it in any way. Have all
adjustments/repairs performed at an
authorized service center. By
tampering with the appliance, you
risk voiding your legal rights arising
from unsatisfactory performance or
quality warranty.
SAVE THESE INSTRUCTIONS.
THIS PRODUCT IS FOR
HOUSEHOLD USE ONLY.
PURPOSE OF USE
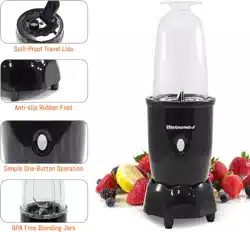
This nutritional blender is ideal for making fresh fruit or tness beverages,
milkshakes and other cocktails, mixed drinks, outstanding salsas, creamy soups,
sauces, blended baby food and it may also be used for blending ice. It is equipped
with a single four-blade assembly made from quality stainless steel and two sizes of
blending jars. The blending jars are made from quality durable plastic that does not
contain the toxic hydrocarbon BPA (Bisphenol A) and can also serve as convenient
drink bottles. Both bottles can be closed with a cap with or without a drinking
spout for comfortable carrying without risking spilling the beverage. Its anti-slip
feet provide excellent stability to the blender during its operation. The bottles, caps
and the blade assembly can be safely washed in the top rack of a dishwasher.
4
Questions? We’re here to help!
Visit: www.maxi-matic.com for support on this product.
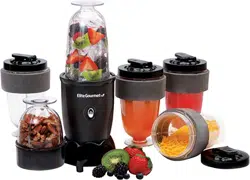
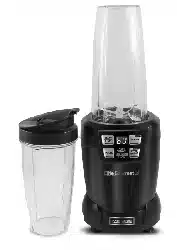
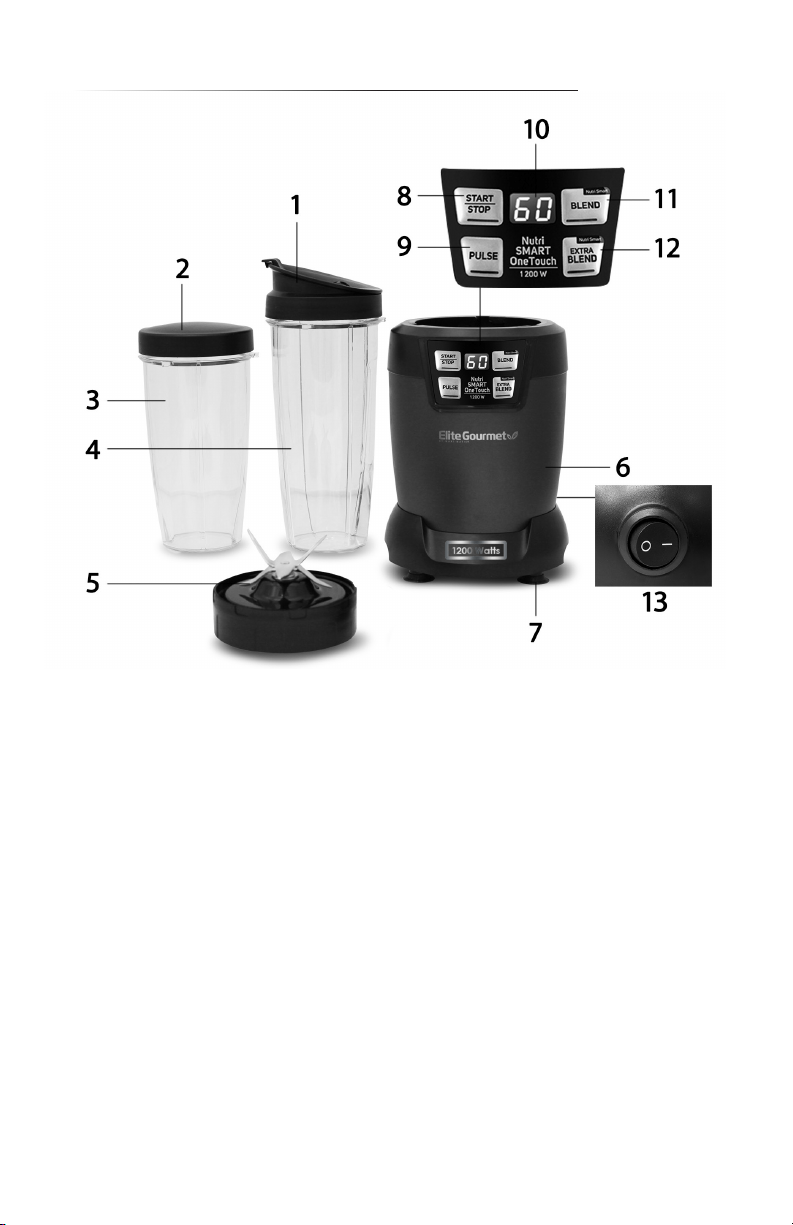
PARTS IDENTIFICATION
1. Screw-on cap with a close-able drinking spout can be screwed onto both
bottles.
2. Screw-on cap without a drinking spout can be screwed onto both bottles.
3. Small 24oz. blending jar made from quality BPA-free titan material. It also
serves as a drinking bottle.
4. Large 34oz. blending jar made from quality BPA-free titan material. It also
serves as a drinking bottle.
5. Blade assembly with 6 quality stainless steel blades.
6. Motor unit
7. Anti-slip feet are located on the bottom of the motor unit.
8. START/STOP program suitable for grinding our, spices and crushing nuts.
9. PULSE program serves to chop/mix larger tough pieces of food and crushing
ice.
10. Backlit LED display showing the count-down blending time.
11. BLEND program suitable for making fruit smoothies (45 seconds).
12. EXTRA BLEND program suitable for making vegetable smoothies (60 seconds).
13. Power switch to turn ON/OFF the blender.

5
Questions? We’re here to help!
Visit: www.maxi-matic.com for support on this product.
BEFORE FIRST USE
1. Take the appliance and its accessories out of the packaging materials.
2. Thoroughly wash all parts intended for contact with food (large and small
blending jars, caps and the blade assembly), using warm water and a neutral
kitchen detergent. Then rinse with clean water and allow these parts to dry
naturally or dry them out thoroughly using a wiping cloth. All removable parts
can also be safely washed in the top rack of a dishwasher.
ATTENTION: When cleaning the blade assembly, take special care to avoid injury. The
blades are sharp. The blade assembly has a gasket seal to ensure that the blending jar
remains air-tight during the blending process. If the blade assembly is washed in a
dishwasher, this gasket seal may come loose due to heat. After washing the blade
assembly, always check that the gasket sea is in its place.
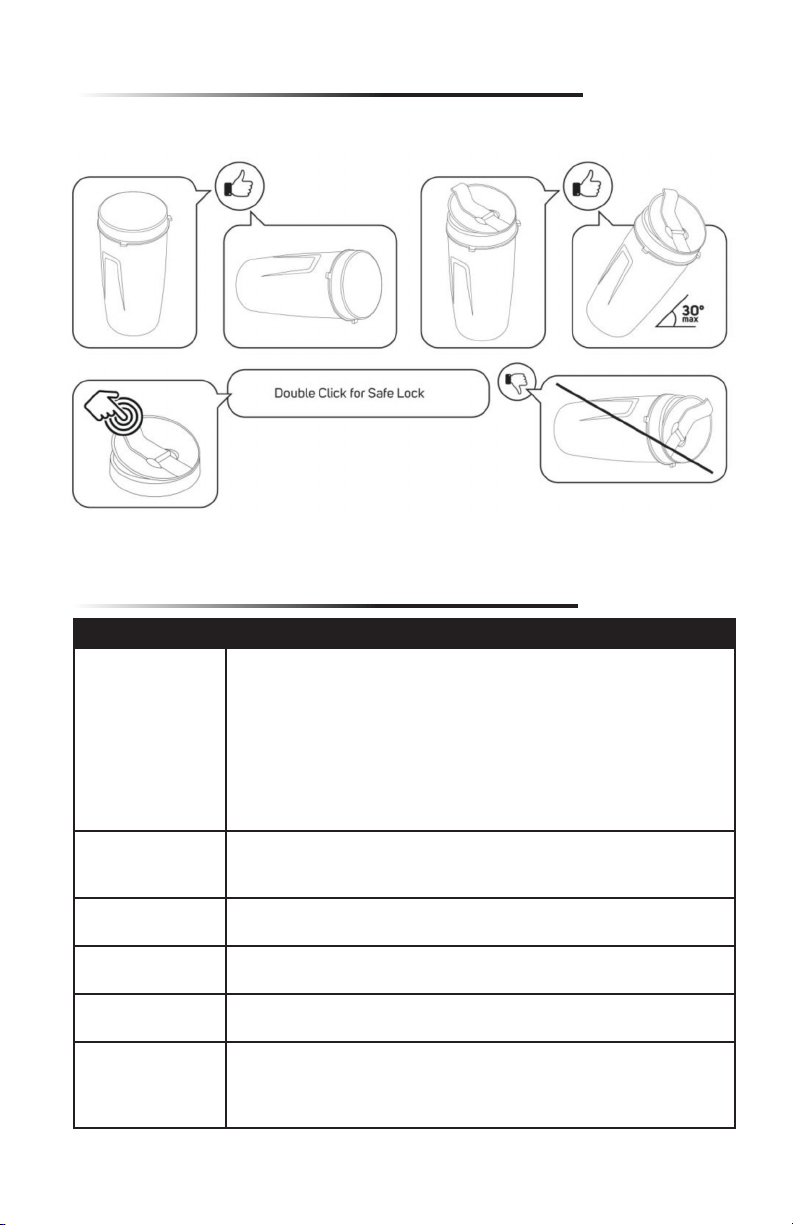
ASSEMBLING AND DISASSEMBLING
Before you start assembling or disassembling the appliance, check that the motor
unit is turned off and disconnected from the power socket and that the rotating
parts have come to a complete stop.
1. Turn the blending jar over so that the neck points upwards.
2. Check that the gasket seal on the blade assembly is in its place. Place the blade
assembly on to the neck of the blending jar so that the blades point inwards
and screw it clockwise on to the neck of the blending jar.
NOTE: Place the ingredients into the blending jar before attaching it to the blade
assembly. When lling the blending jar do not exceed the MAX mark.
3. Turn the assembled blending jar over so that the blade assembly points
downwards and insert it into the motor unit so that the tabs along the outer
perimeter of the blending bottle slide into the slots on the motor unit.
4. To disassemble, proceed in the reverse sequence.

6
Questions? We’re here to help!
Visit: www.maxi-matic.com for support on this product.
HOW TO USE
1. Make sure that the motor unit is disconnected from the
power socket.
2. Add the ingredients that you wish to blend into the
blending jar. The maximum amount of ingredients that can
be put into the blending jar is marked by the MAX mark.
Do not overll the blending jar with food or liquids.
3. Assemble the blending jar according to the instructions in
the section “ASSEMBLING AND DISASSEMBLING.” Turn the
assembled blending jar over so that the blade assembly
points downwards and insert it into the motor unit so that
the tabs along the outer perimeter of the blending bottle
slide into the slots on the motor unit.
4. Connect the motor unit to a
power socket. To start the
blender, rotate the assembled
blending jar clockwise and then
select your chosen program.
The blender is equipped with
a safety mechanism that will prevent
it from being started unless the blending jar assembly is
properly attached to the motor unit.
5. If ingredients are getting stuck on the blade assembly
or on the walls of the blending jar, turn the blender off
by pressing the STOP button. Make sure that the blade
assembly has stopped rotating. Take the blending jar
assembly off the motor unit and turn it over so that the
blade assembly points upwards. Screw off the blade
assembly. Use a plastic spatula to clean the blade assembly
and the walls of the blending jar. Reassemble the blending
jar and insert it back into the motor unit. Plug the power
cord into a power socket, turn the blending jar clockwise
and select your chosen program and continue blending.
6. To nish blending, press the STOP button and rotate the
blending jar counter-clockwise. Press ”o“ to power OFF the
blender. Disconnect the power cord from the power
socket. Check that the blade assembly has stopped
rotating and take the blending jar assembly off the motor
unit.
7. Turn the blending jar over so that the blade assembly
points upwards. Take off the blade assembly and as
required, close the blending jar with the cap or pour its
contents into another suitable container.
CAUTION:
Allow hot liquids and
foodstuffs to cool
down to a temperature
of at least 45°C before
putting them into
the blending jar and
blending them.
The maximum
operating time is 1
minute. Do not leave
the appliance in
continuous operation
for longer. Allow the
appliance to cool
down for 3 minutes.
When processing dry
ingredients, do not
leave the appliance in
continuous operation
for longer than 30
seconds.
NOTE:
Some liquids gain
volume during the
blending process.
There is a power
switch located near
the back right side
of the blender. Press
”-“ to power ON the
blender.
To close the bottle
you may use the
cap. Always properly
tighten the cap to
prevent the bottle’s
contents from leaking
out. When using cap,
make sure that the
drinking spout is
properly closed so as
not to spill the bottle’s
contents when carry-
ing it.
-
-
-
-
-
-

7
Questions? We’re here to help!
Visit: www.maxi-matic.com for support on this product.
QUICK GUIDE TO
PROCESSING INGREDIENTS
Cut food with a rm consistency, such as fruit and vegetables,
into smaller pieces (1-1½ inches), then blend it.
FOOD RECOMMENDED BLENDING TIME
Fruits/vegetables (small pieces) 30s
Smoothies/cocktails 40s
Salsa 30s
Soups 30s
Baby food 40s
NOTE:
The processing times
are only a reference.
The actual blending
time depends on the
size of the ingredients,
their amount and the
required consistency.
CLEANING & MAINTENANCE
1. Before cleaning, make sure that the appliance is turned off
and disconnected from the power socket. Make sure the
rotating parts have stopped and remove the assembled
blending jar from the motor unit.
2. Remove the blade assembly from the blending jar and
thoroughly wash the individual parts in warm water using
neutral kitchen detergent. Then rinse them under clean
running water and wipe them dry with a ne wiping cloth
or allow them to dry naturally. If you used the cap, clean it
out in the same way. Removable parts can also be safely
washed in the top rack of the dishwasher. To thoroughly
clean out the blade assembly, use a ne nylon brush.
3. We recommend that you always wash the accessories
immediately after use to prevent the ingredients from
drying on. Ingredients that have dried on, are more difcult
to remove. To remove dried on ingredients, you may start
the blender with the blending jar lled up to 2/3 with hot
water. If the dried on ingredients are not released, repeat
the procedure.
4. To clean the outer surface of the motor unit, use a cloth
dipped in a weak detergent solution. After applying the
kitchen detergent, wipe the surface with a cloth lightly
dampened in clean water and then wipe dry.
5. Never submerge the motor unit or the power cord in water
or in any other liquid. Do not use thinners or solvents or
cleaning agents causing abrasion to clean the appliance.
Otherwise, the surface of the appliance may be damaged.
NOTE:
When removing and
cleaning the blade
assembly take special
care to avoid injury.
The edges on the
blade assembly are
sharp.
The blade assembly
has a gasket seal
to ensure that the
blending jar remains
air-tight during the
blending process. If
the blade assembly is
washed in a
dishwasher, this
gasket seal may come
loose due to heat.
After washing the
blade assembly,
always check that the
gasket seal is in its
place.
Certain foods may
cause discoloration
of the blending jar.
However, this does
not have any effect on
the functionality of
the appliance.
-
-
-
7
8
Questions? We’re here to help!
Visit: www.maxi-matic.com for support on this product.
STORAGE
When not using the appliance, store it in a dry place out of children’s reach. Keep
the blade assembly attached to the blending jar to avoid injury.
TROUBLESHOOTING
PROBLEM POSSIBLE SOLUTION
The blender does
not start.
The motor unit is not connected to a power source. Plug it into a power
socket.
The blending jar assembly is not correctly inserted into the motor unit.
When inserting the blending jars into the motor unit, ensure that the
tabs on the perimeter of the jar slide into the corresponding slots in
the motor unit. To start the blender, rotate the blending jar assembly
clockwise and then press the main switch to position 1 and select your
chosen program.
The blending jar
assembly is leaking.
Check that the gasket seal on the blade assembly is in its place. Seat the
blade assembly on to the blending jar and screw it in properly in the
clockwise direction
Ingredients are
blended unevenly.
Too many ingredients are processed at one time. Blend the ingredients
in smaller batches and run the blender repeatedly in short intervals.
Ingredients are
blended too nely.
Blending time is too long. To achieve optimal results, blend the
ingredients in short bursts and repeatedly.
The blending result
is unsatisfactory.
Blend the ingredient in smaller batches and run the blender repeatedly
in short intervals. Process frozen ingredients in 2 to 5 second intervals.
Unsuccessful in
blending ice cubes.
Ice cubes must be blended immediately, otherwise, they will start
melting, stick together, and cannot be blended. Make sure that the
blending jar is completely dry before placing ice cubes into it. Blend the
ice cubes in short bursts and repeatedly.

9
Questions? We’re here to help!
Visit: www.maxi-matic.com for support on this product.
MAKE AHEAD SMOOTHIES
1) Prepare, cut up
and measure out
ingredients.
2) Place ingredients
into labeled
freezer-safe bags
and freeze.
3) When ready to use,
add ingredients plus
2 cups of liquid into
blender and mix.
*Liquids: almond milk,
juice, water, soy or rice
milk, coconut milk. For
a thicker smoothie,
replace ½-1 cup of
liquid with plain
yogurt for a thicker
smoothie.
GREEN MONSTER
SMOOTHIE
Yields 2 cups
2 grapefruits
2 bananas
2 cups pineapple
2 cups raw spinach
PEACH RASPBERRY
PUNCH SMOOTHIE
Yields 2 cups
2 peaches
1 cup raspberries
½ tsp vanilla extract
A VERY BERRY
BLAST SMOOTHIE
Yields 2 cups
2 cups raspberries
2 cups blueberries
2 cups strawberries
1 cup raw spinach
MANGO BERRY
SUNSET SMOOTHIE
Yields 2 cups
1 cup raspberries
2 cups strawberries
2 cups mangoes
RECIPES
SPECIALTY SMOOTHIES & SHAKES
BREAKFAST POWER SMOOTHIE Yields 2 cups
• Blend ingredients until smooth.
1 cup good quality orange juice
¼ cup whole grain oats
½ cup vanilla Greek yogurt
1 banana
1 ½ cups frozen blueberries
3 cups baby spinach leaves
1 cup ice
PINE-ANGO-BEET-TANGO SMOOTHIE Yields 2 ½ cups
• Blend ingredients until smooth.
½ cup frozen mango chunks
½ cup frozen strawberries
½ cup frozen pineapple chunks
¼ medium-size beet, peeled and
chopped
1 cup freshly squeezed orange juice
MANGO-GINGER SMOOTHIE Yields 2 ½ cups
• Blend ingredients until smooth.
1 cup frozen mango chunks (or substitute half the
measurement with fresh mango)
¼ peeled lime
1/8 tsp cayenne pepper
1 cup freshly squeezed orange juice
1 medium carrot, chopped
1 ½ inch piece ginger, peeled
2 tbsp coconut butter

10
Questions? We’re here to help!
Visit: www.maxi-matic.com for support on this product.
THE SUBLIMINATOR SMOOTHIE Yields 2 cups
• Blend ingredients until smooth.
1 ½ cups frozen banana
¼ cup frozen blueberries
¼ cup frozen cherries
1 ½ apples, juiced (or 1 cup store-bought juice)
1 tbsp peanut butter
2 tsp rice-protein powder
1 tsp axseed oil
GREEN YOGA SMOOTHIE Yields 2 cups
• Place all the ingredients except the raspberries in a high-speed blender and mix until
smooth and creamy. Taste and adjust to your preference.
• Spoon the raspberries into 2 jars or glasses, pour the green smoothie over and serve with
a spoon.
1 ripe mango; peeled (or thawed frozen)
Juice of ½ lemon
1 inch fresh ginger or ½ tsp ground ginger
1 large handful ice cubes
2 handfuls leafy greens (spinach, kale, etc.)
1 cup natural coconut water or unsweetened
plant milk
1-2/3 cups fresh/thawed frozen raspberries,
crushed
RECIPES (cont.)
PASSION FRUIT & AVOCADO DRINK Yields 2 cups
• Scoop the avocado esh and passion fruit pulp into a blender.
• Add all the remaining ingredients and process until smooth. Add water to thin, if needed.
• Serve in glasses with straws. Drink immediately.
½ avocado, stoned
3 large passion fruit, halved
2 thick slices pineapple, peeled and cubed
½ mango, peeled and esh cut off stone
1 orange, peeled and segmented
4 ice cubes
BLUEBERRY CHEESECAKE BREAKFAST PROTEIN SHAKE Yields 2 cups
• To a blender add ker, cottage cheese, almond milk, honey, vanilla, blueberries and
banana. Process until combined then add ice if desired and process until smooth. Serve
immediately.
1 cup low-fat plain ker
1 cup low-fat cottage cheese
½ cup unsweetened almond milk, or more
if needed
2 tsp honey
½ tsp vanilla extract
1 ½ cups frozen blueberries
1 very ripe banana, peeled, diced into 3
pieces and frozen
4 ice cubes (optional)

11
Questions? We’re here to help!
Visit: www.maxi-matic.com for support on this product.
DRINK YOUR SALAD Yields 2 cups
• Blend ingredients until smooth.
1 cup water
½ cup raw unsalted cashews, soaked for 2-4 hours,
then drained
1 cup torn green kale leaves, plus more to taste
2 ripe bananas, fresh or frozen
1/8 cup diced pitted dates
½ tsp natural vanilla extract
2 cups ice cubes (less if using frozen
bananas)
¼ tsp minced ginger, plus more to taste
CREAMY COCONUT DATE SHAKE
• Throw everything in the high-blender and puree until smooth and creamy.
1 cup homemade raw almond milk
1 cup coconut water
6-8 pitted dates
2 frozen very ripe bananas
1 tsp natural vanilla extract
Pinch of Celtic sea salt
RECIPES (cont.)
DRAGON FRUIT MILKSHAKES
• Peel the dragon fruit and banana, cut them in large pieces and place in a blender.
• Open the young coconut and pour the water into a measuring jug.
• Pour 250ml (8 ½ oz/1 cup) of the coconut water over the fruit, then scoop out 125 g
(4 oz or ½ cup) of the soft coconut meat and add to the blender.
• Add the ice cubes and blend until smooth. Serve immediately in tall glasses with straws.
1 dragon fruit
1 banana
1 young ‘drinking’ coconut or a 400 ml (14 oz) can coconut milk
1 large handful ice cubes

12
Questions? We’re here to help!
Visit: www.maxi-matic.com for support on this product.
SOUPS
CREAMY BROCCOLI SOUP
• Slice the white and light green parts of the leek into rings. Using a strainer, rinse the leeks
thoroughly.
• Heat the olive oil in a large pot over medium heat. Add the leek, garlic and a few
generous pinches of salt and pepper. Stir and cook until the leek is soft, about 5 minutes.
• Chop the broccoli, stems and all, into coarse orets and add them to the pot. Stir and
cook until just softened, about 3 minutes.
• Stir in the white wine vinegar, then add the vegetable broth and coconut milk. Reduce
the heat to low and simmer for 5 minutes.
• Let the soup cool slightly, then transfer to a blender (you can work in batches if you need
to). Blend until smooth. Add the amaranth greens and blend again. Taste and adjust the
seasonings, adding a bit of lemon juice to brighten it up a bit if you like.
• Garnish with a drizzle of coconut milk and olive oil. Sprinkle with red pepper akes, if
desired.
1 large leek
1 tbsp extra virgin olive oil, plus extra for
garnish
2 garlic cloves, crushed
1 medium head broccoli
1 ½ tsp white wine vinegar
2 cups vegetable broth
1 cup light coconut milk, plus ¼ cup (60 ml) extra
for garnish
2 to 3 cups loosely packed spinach
Sea salt and freshly ground black pepper
Juice or 1 small lemon (optional)
Red pepper akes (optional)
CARROT GAZPACHO WITH LEMONGRASS
• Optional garnishes: hemp seeds, pepitas, microgreens, drizzles of coconut milk.
• Prepare the lemongrass by cutting off the root end and the tough upper stem of the
stalk. Remove the rst one or two layers of outer leaves and nely chop the tender,
aromatic part of the lemongrass.
• Using a high speed blender, combine the lemongrass, carrots, coconut milk, garlic, olive
oil, sherry vinegar, red curry paste, water, and a few generous pinches of salt and pepper.
Blend until smooth.
• If you’re not using a high speed blender, strain the soup and blend again until smooth.
• Chill for at least 4 hours. If the soup thickens in the fridge, stir in a little more cold water.
• Add more salt and pepper, to taste.
• Drizzle with olive oil and serve with desired garnishes.
1 stalk lemongrass
16 ounces peak season carrots, peeled and
sliced, about 2 bunches
1-14 ounce can light or full fat coconut milk,
reserve ¼ cup for garnish
1 garlic clove
2 tbsp sherry vinegar
1 tsp red curry paste
½ cup ltered water
Sea salt and freshly ground black pepper
2 tbsp extra virgin olive oil, plus more for
drizzling
RECIPES (cont.)

13
Questions? We’re here to help!
Visit: www.maxi-matic.com for support on this product.
ROASTED CAULIFLOWER & RED PEPPER SOUP
• Preheat the oven to 400°F
• Line two baking sheets with parchment paper. Fill one sheet with the cauliower orets
and the other with the sliced onion and garlic cloves.
• Drizzle both sheets with olive oil, season with salt and pepper, and toss to combine.
• Roast 20 to 30 minutes, until golden brown. Check at 20 minutes, as the onion might
roast faster than the cauliower.
• Reserve 1 cup (250 ml) of the roasted orets for garnish.
• Drain and rinse the cashews and place them in a high speed blender.
• Peel the roasted garlic cloves and add them to the blender with the cauliower, onion,
miso paste, fresh water, cumin, coriander, cayenne pepper and roasted red bell peppers.
• Blend until creamy. Season with salt and pepper to taste.
• For extra brightness, add a splash of sherry vinegar or white wine vinegar.
• Garnish with a drizzle of olive oil and the reserved roasted cauliower.
1 small head cauliower, cut into orets
1 small yellow onion, sliced
3 garlic cloves, unpeeled
Extra virgin olive oil, for drizzling
½ cup raw unsalted cashews, soaked 3 to 4
hours, preferable overnight
3 tbsp white miso paste
3 cups water
½ tsp cumin
½ tsp coriander
Pinch of cayenne pepper
3 roasted red bell peppers, fresh or from a jar
Sea salt and freshly ground black pepper
1 tsp sherry vinegar/white wine vinegar (optional)
RECIPES (cont.)
ROASTED RED PEPPER & CARROT SOUP
• Heat the olive oil in a large pot over medium heat. Add the onion and a pinch of salt and
pepper and cook until translucent, about 5 minutes.
• Add the garlic, fennel, carrots and thyme leaves. Stir and cook until the carrot edges
begin to brown, about 10 minutes.
• Add the balsamic vinegar, bell pepper, cannellini beans, tomato paste, vegetable broth,
and another few pinches of salt. Simmer until the carrots are tender, 15 to 20 minutes.
• Add the simmered soup to a high speed blender (you can work in batches if you need to)
and puree until smooth. Taste and adjust the seasonings.
• Serve in bowls with a drizzle of olive oil and the croutons on top.
½ medium yellow onion, chopped
½ small fennel bulb, coarsely chopped
2 large carrots, chopped
1 tbsp fresh thyme leaves
1 tbsp balsamic vinegar
1 roasted red bell pepper, fresh or from a jar
¼ cup cooked cannellini beans, drained and rinsed
1 tbsp tomato paste
2 cups vegetable broth
Sea salt and freshly ground black pepper

14
Questions? We’re here to help!
Visit: www.maxi-matic.com for support on this product.
CURRIED PARSNIP & WHITE BEAN SOUP
• In a large pot, heat the olive oil over medium heat. Add the onion and a few generous
pinches of salt and pepper and cook until soft, about 2 minutes.
• Add the garlic and ginger and stir. Add the parsnips, apple, curry powder, cardamom and
cannellini beans (reserve ¼ cup (60 ml) for garnish). Stir and cook until the parsnips are
lightly browned, about 2 minutes.
• Add the vegetable broth and simmer until the parsnips are tender, about 20 minutes.
• Let the soup cool slightly, then transfer it to a blender in batches and puree until creamy.
• Season with more salt and pepper to taste. Garnish with the reserved cannellini beans
and chopped chives.
3 tbsp extra virgin olive oil
1 medium yellow onion, chopped
3 garlic cloves, minced
1 tsp freshly grated ginger
5 to 6 medium parsnips, peeled and chopped
1 Gala apple, peeled, cored and chopped
1 tsp curry powder
½ tsp ground cardamom
1 ½ cups cooked cannellini beans, drained
and rinsed
4 cups vegetable broth
¼ cup chopped chives
Sea salt and freshly ground black pepper
RECIPES (cont.)
CHILLED AVOCADO SOUP
• Blend until smooth. Serve with a drizzle of cold-pressed olive oil and ½ cup pumpkin
seeds, lightly toasted
2 ripe avocados, halved and stone removed
Finely grated zest of 1 lemon
4 tbsp lemon juice
½ small shallot, peeled
3 sprigs of dill, plus extra to garnish
½ tsp sea salt
3 sprigs of coriander (cilantro), leaves picked, or
chive stalks, chopped, plus extra to garnish
4-8 drops if Tabasco or pinch of ground cayenne
1 cup plain yoghurt (or use water/coconut
water for a non-dairy version)
GREEN GAZPACHO
• In a blender, combine the cucumber (reserve ½ cup for garnish), tomatoes, scallions,
garlic, cilantro, sherry vinegar, olive oil, sunower seeds, and Serrano pepper, if using.
Blend until smooth and season to taste.
• Depending on the sweetness of your tomatoes, you may want to add a drizzle of honey
or a few pinches of sugar. Chill for at least 30 minutes.
• Garnish the soup with the reserved chopped cucumbers and a drizzle of olive oil.
1 large English cucumber, chopped
6 small to medium yellow tomatoes, quartered
2 scallions
1 garlic clove
½ cup cilantro
¼ cup sherry vinegar
¼ cup extra virgin olive oil, plus more for
drizzling
½ cup raw sunower seeds
Sea salt and freshly ground black pepper
½ Serrano pepper (optional)
1 tsp honey or raw cane sugar (optional)

15
Questions? We’re here to help!
Visit: www.maxi-matic.com for support on this product.
DESSERTS
APPLE PIE IN A GLASS Serves 2
• Throw everything into blender and blast on high for 30 to 60 seconds, until smooth and
creamy. Tweak avor to taste (you may want to add more vanilla, cinnamon, or
sweetener)
• Note: use the soaked dates with high-speed blenders and the maple syrup with
conventional blenders.
1 cup unsweetened almond milk
(strained if homemade)
1 cup unsweetened applesauce or
stewed apples
1 cup ice cubes
½ tsp ground cinnamon, plus more to taste
2 chopped, pitted, and soaked dates, or 1 tbsp
pure maple syrup
2 tsp natural vanilla extract, plus more to taste
CHOCOLATE MOUSSE & RASPBERRY CREAM Serves 8
• Mix the raspberries with sour cream and sugar in blender and puree it until smooth.
• Melt the chocolate and mix it gently in with the whipped cream.
• Spoon a layer of chocolate mousse and then alternately a layer of raspberry cream into
serving glass/cup.
• Chill the glass/cup in refrigerator for 30-minutes or more.
• Serve with fresh raspberries or chocolate as garnish.
1½ cup of raspberries
2 tbsp sugar
1 cup crème fraîche (sour cream)
½ cup dark chocolate
½ cup cream (sweetened and whipped,
semi-rigid)
RECIPES (cont.)
FLOURLESS FUDGY BANANA MUFFINS Serves 8
• Preheat the oven to 350 F and line 8-9 mufn cups.
• Drain the beans and rinse extremely well, then pat dry. (This is important because it gets
rid of any bean avor.)
• Blend all ingredients until smooth in a blender. (If using a blender without a tamper, stop
occasionally to stir ingredients with a spoon so they will blend evenly.)
• Pour into the mufn cups – don’t overll or they will rise and then sink in the centers.
Bake 20 minutes. They will appear underdone – let sit 20 minutes and they will rm up.
• *Mufns last for 3-4 days refrigerated or 2-3 weeks frozen.
½ cup quick oats or quinoa akes (40g)
¾ tsp baking powder
¼ tsp salt
1/8 tsp baking soda
½ cup mashed over-ripe banana (120g)
1 can white beans (250g without liquid) or
250g cooked beans
¼ cup peanut butter or allergy-friendly
substitution
¼ cup pure maple syrup or honey
2 tsp pure vanilla extract
Optional handful mini chocolate chips,
crushed walnuts, shredded coconut, pinch
cinnamon, etc.

16
Questions? We’re here to help!
Visit: www.maxi-matic.com for support on this product.
BITE SIZE KEY LIME PIE Serves 4
• Blend all lling ingredients together. Set aside. Clean out blender.
• For the crust, process dates almond pulp, and salt together until semi-smooth.
• Press the crust into greased or lined mufn tins.
• Spoon in lling. Freeze for 1-2 hours.
• If it freezes hard, like ice cream, just leave out for 5 minutes before eating.
Filling:
2 avocados
2 tbsp lime juice
½ cup coconut oil
2 tbsp honey
Crust:
½ cup almond pulp; ground up almonds
½ cup dates (not soaked)
pinch of salt
SMOOTH & CREAMY MOCHA CHIA PUDDING Serves 4
• Combine chia seeds, 1 ½ cups almond milk, coffee, and pitted dates in blender jar, stir
with a spoon to do not mix yet.
• Refrigerate at least 8 hours, or overnight.
• Remove from refrigerator and now blend the chilled ingredients until smooth.
• Add in the cocoa powder, vanilla, and espresso powder. Blend until very smooth.
• Stream in extra almond milk, 1 tbsp at a time, to reach desired consistency. If the pud-
ding isn’t quite sweet enough for your taste, add liquid sweetener, 1 tsp at a time, until
desired sweetness is reached.
• For optimal results, chill nished pudding in the fridge for 2 hours before serving.
½ cup chia seeds
1 ½ cups unsweetened vanilla almond milk
½ cup brewed coffee, room temperature
½ cup pitted soft Medjool dates
1/3 cup unsweetened cocoa powder
1 tsp pure vanilla extract
1 tsp instant espresso powder
pure maple syrup or honey to taste
optional: shaved dark chocolate with
espresso beans/cacao nibs, for serving
RECIPES (cont.)
BLACK BEAN BROWNIES Serves 10
• Preheat oven to 350 F.
• Combine all ingredients except chips in blender, and blend until smooth.
• Stir in the chips, then pour into a greased 8×8 pan.
• Bake the black bean brownies 15-18 minutes, then let cool at least 10 minutes before
trying to cut. If they appear undercooked, place in the fridge overnight and they rm up!
1 ½ cups black beans (or a 15-oz can, drained
and rinsed very well)
2 tbsp cocoa powder
½ cup quick oats
¼ tsp salt
1/3 cup honey
2 tbsp sugar
¼ cup coconut or vegetable oil
2 tsp pure vanilla extract
½ tsp baking powder
½ cup to 2/3 cup chocolate chips

17
Questions? We’re here to help!
Visit: www.maxi-matic.com for support on this product.
GLUTEN-FREE CARROT CAKE FUDGE Serves 6
• Place carrot puree and coconut butter in blender and blend until smooth.
• Add maple syrup and spices. Continue to blend.
• Pour carrot fudge batter into a 6 inch pan. Set in refrigerator.
• Next make coconut cream topping. Remove the solid cream layer from a cold can of
coconut milk. Place cream in a large bowl. Beat with hand mixers to make whipped
cream.
• Remove carrot cake fudge from fridge and place whipped coconut cream on top.
• Place fudge back in refrigerator to set for a few hours.
• Remove and top with desired toppings. Slice and enjoy--slightly chilled.
2 cups of carrots; steamed and pureed
½ cup of coconut butter
2 tbsp maple syrup
1 tsp cinnamon
½ tsp ginger
¼ tsp nutmeg
coconut whipped cream
1 can of thick coconut cream
optional toppings: sprinkles of shredded carrots,
walnut pieces, and dash of nutmeg
RECIPES (cont.)
DIPS, DRESSINGS & SAUCES
CHIPOTLE BLACK BEAN DIP
• Combine all ingredients in blender. Process until smooth.
• Serve with salsa, sour cream and tortilla chips.
2 (15-oz) cans organic black beans - drained
and rinsed
1 garlic clove - chopped
1 small chipotle pepper - chopped
1 tbsp adobo sauce
2 tbsp olive oil or to desired consistency
handful fresh cilantro
pinch sea salt to taste
¼ tsp cumin
juice of 1 lime
CUCUMBER LEMON CASHEW DIP
]
• Combine all ingredients in blender. Process until smooth.
• This will keep in the fridge for up to 5 days in a sealed glass container. Separation may
happen and is totally natural, just stir before serving again.
4 cups of raw cashews
½ cup roma tomatoes, chopped
1 small handful fresh basil
½ cup cucumber, chopped
½ lemon, skin removed
salt to taste
water

18
Questions? We’re here to help!
Visit: www.maxi-matic.com for support on this product.
TOMATO BASIL CASHEW DIP
• Place the cashews into your blender and add just enough water to barely cover the
cashews. blend until smooth. Add the tomatoes, basil and salt. blend until smooth.
• Serve with crackers or on toast!
2 cups cashews
½ cup chopped roma tomatoes
small handful of fresh basil leaves
water
salt to taste
5-MINUTE SALSA
• Place tomatoes and their juice, cilantro, onion, lime, serrano pepper, garlic, and cumin in
a food processor or blender.
• Pulse until blended into salsa; add salt and pepper to taste.
• Cover and refrigerate until ready to serve.
2 15-oz cans diced tomatoes (do not drain)
1 handful cilantro
½ cup red onion (roughly chopped)
2 limes (juiced with pulp)
1-2 serrano peppers (seeded; roughly chopped)
1 clove garlic (nely grated)
¼ tsp cumin
salt and pepper to taste
RECIPES (cont.)
5-MINUTE HUMMUS
• Remove the the chickpeas skins. Simply pinching them until the skin comes off then
discard the skins.
• Place the chickpeas in the blender with garlic, olive oil, ¼ cup water, and salt.
• Blend until smooth, adding the remaining water one tbsp at a time to help the mix
evenly blend.
• Blend an additional 30 seconds and stream a small amount of olive oil in for additional
smoothness.
• Garnish with a sprinkle of paprika and olive oil.
2 cans chickpeas
1 clove garlic, pressed or minced
3 tbsp olive oil
½ cup water
½ tsp salt
pinch of paprika

19
Questions? We’re here to help!
Visit: www.maxi-matic.com for support on this product.
HEALTHY CREAMY AVOCADO CILANTRO LIME DRESSING
• Place all the ingredients in a food processor or blender and blend until smooth, stopping
to scrape down the sides a few times.
• Thin the salad dressing out with about 1/3 cup water (give or take) until it reaches a
desired consistency.
• Keep in an airtight container for 1-2 weeks.
1 avocado
1 clove garlic, peeled coupons
¼ cup roughly chopped cilantro
¼ cup low-fat sour-cream or greek
yogurt
1 tbsp fresh lime or lemon juice (or white vinegar)
3 tbsp olive oil
¼ tsp kosher salt
¼ tsp ground black pepper
water
CREAMY AVOCADO BASIL PESTO
• Add basil, avocado, garlic, pine nuts and lemon juice to a food processor and pulse for 20
seconds or until pesto is chopped.
• Add in water and process again until completely smooth. You may need to add more
water to get it to your desired consistency.
• Transfer to a bowl and stir in the cheese.
• Store in an airtight container and refrigerate. Pesto is best if used within a few days,
otherwise you can freeze it for several months.
1 cup packed fresh basil leaves
½ large ripe avocado
2 cloves garlic
2 tbsp pine nuts
1 tbsp fresh lemon juice
3 tbsp water, plus more if necessary
¼ cup grated parmesan cheese
sea salt, to taste
RECIPES (cont.)
CHIMICHURRI SAUCE
• Add all ingredients except the olive oil to a food processor, and pulse a few times until
chopped.
• Slowly stream in the olive oil, while pulsing the mixture a few more times until the olive
oil is combined, and stopping to scrape down the sides of the food processor if needed.
• Serve immediately, or refrigerate in a sealed container for up to 3 days.
1 cup fresh at-leaf parsley (about 1 bunch)
1 cup fresh cilantro (about 1 bunch of cilantro)
½ cup diced red onion
3 tbsp fresh oregano (optional)
3 cloves of garlic, peeled
2 tbsp fresh lemon or lime juice
2 tbsp red wine vinegar
¼ tsp sea salt
¼ tsp freshly-ground black pepper
¼ tsp red pepper akes, or more, to taste
½ cup good-quality olive oil

20
Questions? We’re here to help!
Visit: www.maxi-matic.com for support on this product.
SWEET & SPICY MANGO SALAD DRESSING
• Combine mango, lime juice, orange juice, honey, cumin, garlic and salt in a blender
container. Puree on medium speed until smooth. Transfer to a medium size jar.
• Add oil to the mixture in the jar in a slow, steady stream while stirring continuously with
a fork or small whisk.
• Add nely chopped chili pepper, cilantro and black pepper. Taste and add a bit more salt,
if needed.
• Store in refrigerator for up to 1 week. Shake well before using.
1 large mango, peeled, pitted and
roughly chopped
¼ cup fresh lime juice,
¼ cup fresh orange juice
2 tbsp honey
½ tsp cumin
1 clove garlic
½ tsp salt
1/3 cup extra virgin olive oil
1-2 tbsp nely chopped Fresno chili pepper
2 tbsp nely chopped cilantro
¼ tsp freshly ground black pepper
CHIPOTLE-LIME RANCH
• Add all ingredients to a food processor and pulse until chipotle peppers are well minced.
• Add in a few more tablespoons of buttermilk to thin as needed. Store in refrigerator in
an airtight container.
1 cup low-fat plain Greek yogurt
¼ cup light mayonnaise
¼ cup buttermilk, then more as needed
2 tbsp fresh lime juice
1 - 2 chipotle chile peppers in adobo
1 clove garlic
1 clove garlic
2 tsp dried parsley
½ tsp onion powder
½ tsp dried dill
½ tsp dried chives
¼ tsp paprika
Salt and freshly ground pepper, to taste
RECIPES (cont.)

21
Questions? We’re here to help!
Visit: www.maxi-matic.com for support on this product.
LIMITED WARRANTY* ONE (1) YEAR
WARRANTY IS ONLY VALID WITH A DATED PROOF OF PURCHASE
PLEASE DO NOT RETURN TO STORE OF PURCHASE.
If you have any problems with this unit, contact Customer Service for support.
1. Your small kitchen appliance is warranted to the original purchaser to be free from any
manufacturing defects under normal use and conditions for one (1) year, cord excluded.
This Warranty applies only to the original purchaser of this product.
2. Retail stores/merchants selling this product do not have the right to alter, modify, or in any
way revise the terms and conditions of the warranty.
3. If you use your appliance for household use and according to instructions, it should give
you years of satisfactory service.
4. At its sole discretion, Maxi-Matic USA will either repair or replace the product found to be
defective during the warranty period.
5. The repaired or replacement product will be in warranty for the remaining balance of the
one-year warranty period and an additional one-month period.
6. Consumer’s remorse is not an acceptable reason to return a product to our Service Center.
7. This limited warranty covers appliances purchased and used within the 50 U.S. states plus
the District of Columbia and does NOT cover normal wear of parts or:
- Damages caused by unreasonable use, neglect, normal wear and tear, commercial
use, improper assembly or installation of product.
- Damages caused in shipping.
- Damages caused by replacement or resetting of house fuses or circuit breakers.
- Defects other than manufacturing defects.
- Breakage caused by misuse, abuse, accident, alteration, lack of proper care
and maintenance, or incorrect current or voltage.
- Lost or missing parts of the product. Parts will need to be purchased separately.
- Damages of parts that are not electrical; i.e. cracked or broken plastic/glass,
scratched/dented inner pots.
- Damage from service or repair by unauthorized personnel.
- Extended warranties purchased via a separate company or reseller.
- Acts of nature such as re, oods, hurricanes, tornadoes, etc.
8. This warranty does not apply to re-manufactured merchandise.
Maxi-Matic, USA shall not be liable for any incidental or consequential damages caused by the
breach of any express or implied warranty. Apart from the extent prohibited by applicable law,
any implied warranty of merchantability or tness for a particular purpose is limited in time to
the duration of the warranty.
*One Year Limited Warranty valid only in the 50 U.S. states plus the District of Columbia,
excluding Puerto Rico and the Virgin Islands.
This warranty is effective only if the product is purchased and operated in the USA; product us-
age which is in violation of the written instructions provided with the unit will void this warranty.
For international warranty, please contact the local distributor.
This warranty gives you special legal rights and you may also have other rights to which you are
entitled which may vary by state, province, and/or jurisdiction.
**Any instruction or policy included in this manual may be subject to change at any time.
MAXI-MATIC, USA
18401 E. Arenth Ave. City of Industry, CA 91748
Customer Support Hours of Operation MON-FRI 8:30 AM - 5:00 PM PST
(800) 365-6133 Ext: 120/107/105; (626) 912-9877 Ext: 120/107/105
Visit: www.maxi-matic.com for Live Chat Support and Contact Us Form

22
Questions? We’re here to help!
Visit: www.maxi-matic.com for support on this product.
RETURN INSTRUCTIONS
RETURNS:
A. Any return of defective merchandise to the manufacturer must be
processed accordingly by rst contacting customer service (info@
maxi-matic.com) to obtain an RA # (Return Authorization Number). We
will not accept any returns of merchandise without an applicable RA #.
B. IMPORTANT RETURN INSTRUCTIONS. Your Warranty depends on your
following these instructions if you are returning the unit to Maxi-Matic,
USA:
1. Carefully pack the item in its original carton or other suitable
box with sufcient cushioning to avoid damage in shipping.
2. Before packing your unit for return, be sure to enclose:
a) Your name, full address with zip code, daytime telephone
number, and RA#,
b) A dated sales receipt or PROOF OF PURCHASE,
c) The model number of the unit and the problem you
are having (Enclose in an envelope and tape directly to
the unit before the box is sealed,) and
d) Any parts or accessories related to the problem.
3. Maxi-Matic, USA recommends that you ship the package via UPS
ground service for tracking purposes. We cannot assume
responsibility for lost or damaged products returned to us
during incoming shipment. For your protection, always carefully
package the product for shipment and insure it with the carrier.
C.O.D shipments cannot be accepted.
4. All return shipping charges must be prepaid by you.
5. Once your return has been received by our warehouse, Maxi-Matic,
USA will repair or replace the product if it is defective in material or
workmanship, subject to the conditions in paragraph B.
6. Maxi-Matic will pay the shipping charges to ship the repaired or
replacement product back to you.

Elite Customer Service Center
Elite is a registered trademark of Maxi-Matic, USA.
Copyright Elite by Maxi-Matic.
Actual product may vary from the images/illustrations in this manual due to continual product improvement.
Mail:
Phone:
Website:
Maxi-Matic, USA
18401 E. Arenth Ave
City of Industry, CA
91748-1227
800-365-6133 ext. 120/105
www.maxi-matic.com
Visit our website for Live Chat Support
& Contact Us Form
Register your product online
elitebymaximatic @elite_by_maximatic
MODEL: EPB-5455