Loading ...
Loading ...
Loading ...
[o_o)_l
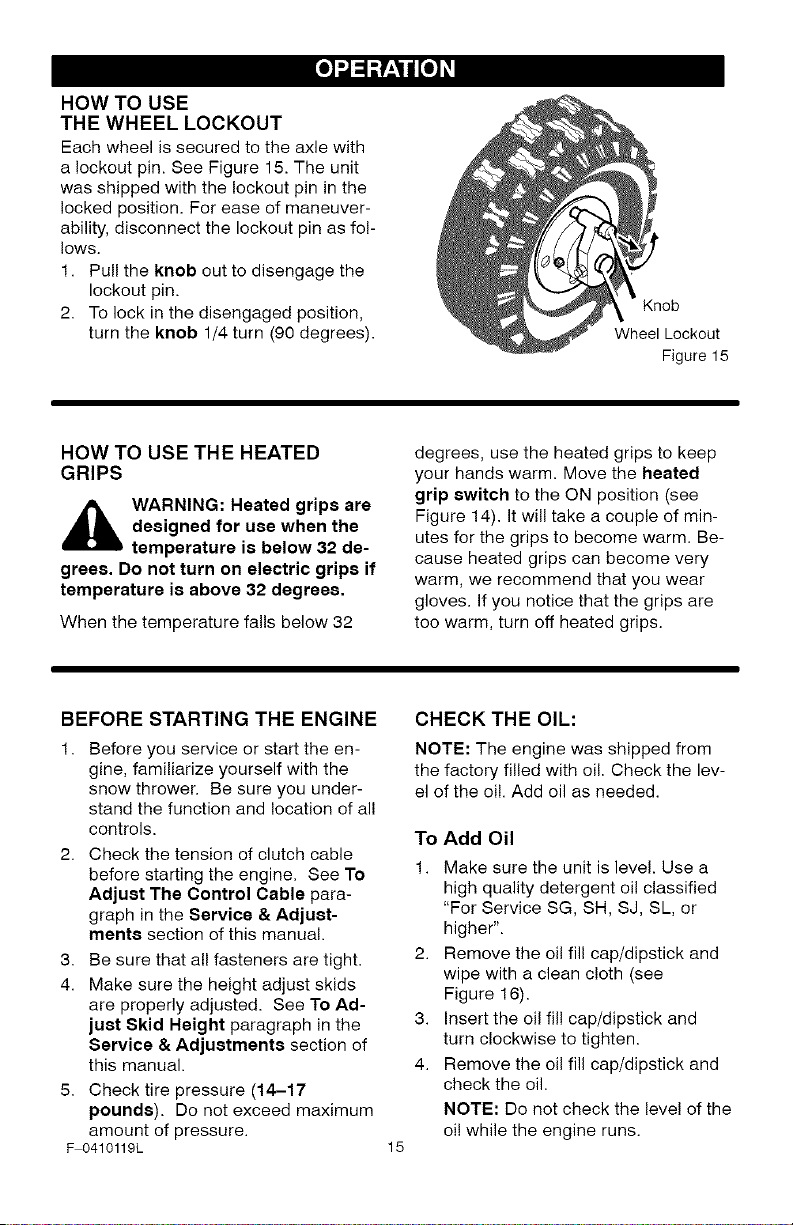
HOW TO USE
THE WHEEL LOCKOUT
Each wheel is secured to the axle with
a lockout pin. See Figure 15. The unit
was shipped with the lockout pin in the
locked position. For ease of maneuver-
ability, disconnect the lockout pin as fo!-
lows.
1. Pull the knob out to disengage the
lockout pin.
2. To lock in the disengaged position,
turn the knob 1/4 turn (90 degrees).
Knob
Wheel Lockout
Figure 15
HOW TO USE THE HEATED
GRIPS
,_ WARNING: Heated grips are
designed for use when the
temperature is below 32 de-
grees. Do not turn on electric grips if
temperature is above 32 degrees.
When the temperature falls below 32
degrees, use the heated grips to keep
your hands warm. Move the heated
grip switch to the ON position (see
Figure 14). It will take a couple of min-
utes for the grips to become warm. Be-
cause heated grips can become very
warm, we recommend that you wear
gloves. If you notice that the grips are
too warm, turn off heated grips.
BEFORE STARTING THE ENGINE
1. Before you service or start the en-
gine, familiarize yourself with the
snow thrower. Be sure you under-
stand the function and location of all
controls.
2. Check the tension of clutch cable
before starting the engine. See To
Adjust The Control Cable para-
graph in the Service & Adjust-
ments section of this manual.
3. Be sure that all fasteners are tight.
4. Make sure the height adjust skids
are properly adjusted. See To Ad-
just Skid Height paragraph in the
Service & Adjustments section of
this manual.
5. Check tire pressure (14-17
pounds). Do not exceed maximum
amount of pressure.
F 0410119L
CHECK THE OIL:
NOTE: The engine was shipped from
the factory filled with oil. Check the lev-
el of the oi!. Add oil as needed.
15
To Add Oil
1.
3.
4.
Make sure the unit is level. Use a
high quality detergent oil classified
"For Service SG, SH, SJ, SL, or
higher".
Remove the oil fill cap/dipstick and
wipe with a clean cloth (see
Figure 16).
Insert the oil fill cap/dipstick and
turn clockwise to tighten.
Remove the oil fill cap/dipstick and
check the oil.
NOTE: Do not check the level of the
oi! while the engine runs.
Loading ...
Loading ...
Loading ...