Loading ...
Installation Instructions
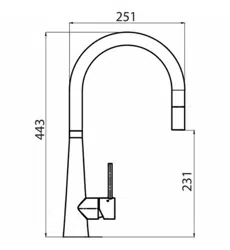
Installation Instructions SS2525 SS2575
General Note: This product is to be installed by a licensed plumber, installation must comply with AS/NZS 3500 and local
plumbing codes.
Pressures & Temperatures
Maximum Hydrostatic Pressure – 500 kpa. (As per AS/NZS3500)
Note: AS/NZS 3500.1-2003 (Clause 3.3.4) states that “Provision shall be made to ensure that the maximum
static pressure at any outlet, other than a fire service outlet, within a building does not exceed 500 kPa.
Note: Pressures above 500kPa can cause damage from water hammer, reduced life of appliances, taps
and fittings, and cause excessive noise in the system.
Minimum Hydrostatic Pressure – 100 kpa
The Maximum operating temperature for the Mixer Tap is 65
o
C.
Please ensure that the lines are flushed prior to installation as contaminates in the water can damage the Ceramic
Cartridge, flow regulator and also affect the performance of the Mixer.
N.B This mixer is designed to have the Handle to the right hand side of the mixer, doing so will put the cold inlet to the
front of the mixer, the purpose is to assist with accidental scalding if a child pulls the handle forward trying to turn on
the mixer, installing the handle to the centre will put the cold on the left hand side which is not recommended.
1. Remove product from packaging and check for damages, if the product is damaged do not install and return to store
of purchase.
2. The WELS compliant aerator has been pre-assembled into the mixer outlet. To comply with WELS the flow
regulated aerator must remain in place.
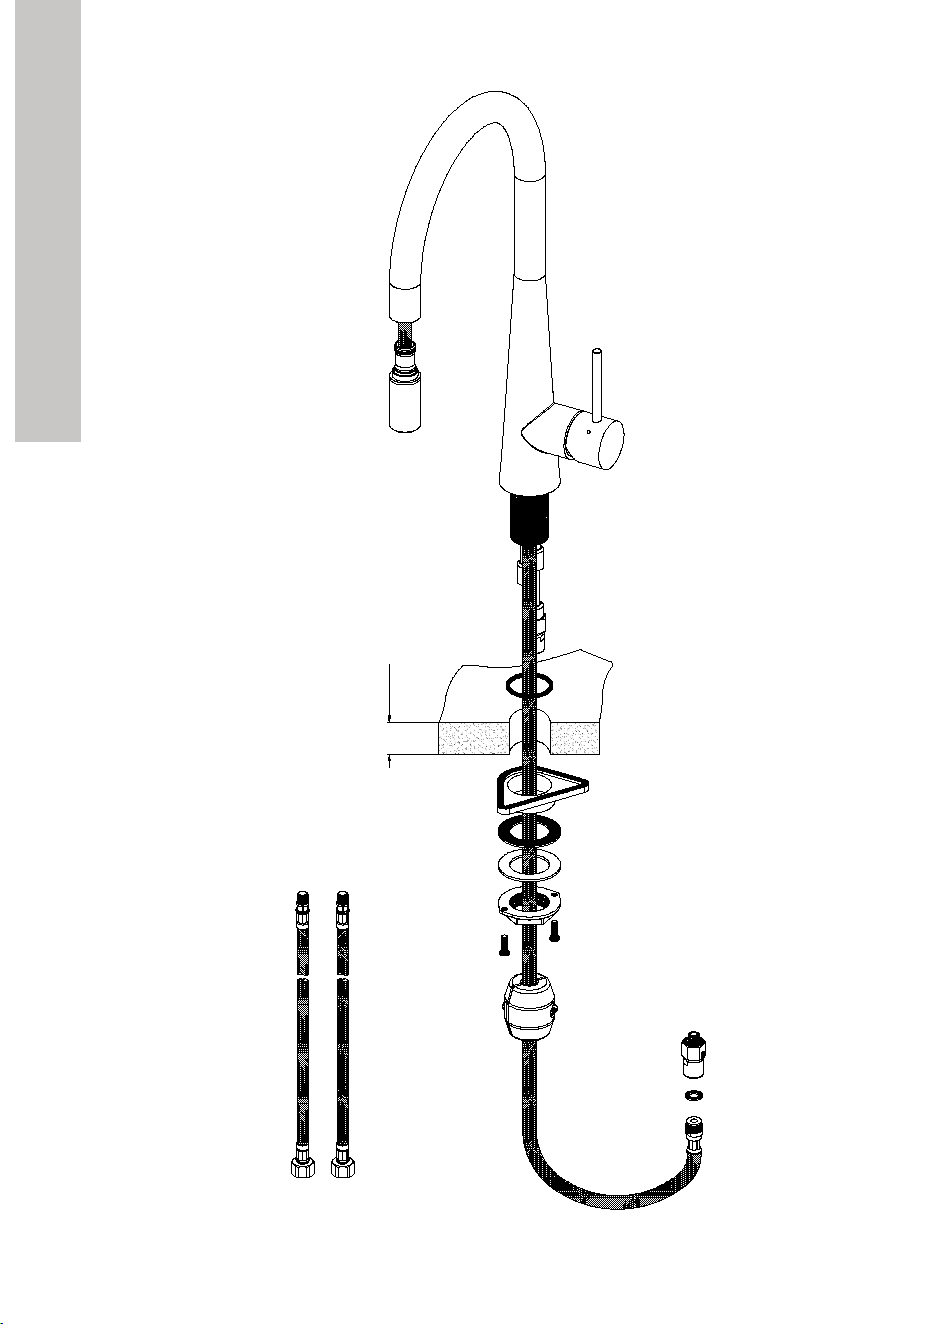
3. Ensure Product is complete as per exploded drawing.
4. A single 35mm Hole is required in the mounting surface.
5. The maximum mounting surface thickness cannot exceed 37mm.
6. Fit O’ring (A) to bottom of mixer body.
7. Screw the Mixer tails (B) into base of the Mixer being careful to avoid damage to the o’ring seals
8. Feed Male end of braided hose (H) through top of mounting surface.
N.B Hose Adaptor (J) & Washer (I) are lightly screwed to male end of Hose (H), this fitting will need to removed for
ease of feeding hose through mounting surface.
9. Feed the Mixer tails (B) through the mounting surface, each Tail alternatively.
10. The Mixer inlet ports are colour coded, Red for hot and Blue for cold.
11. Position the mixer on the mounting surface ensuring the sealing washer (A) is positioned correctly.
12. Feed Mixer tails, each alternatively through Stabiliser Plate (C).
13. Slide Rubber Washer (D) onto Mixer thread followed by Metal Washer (E).
14. Using Fixing Nut (F) tighten Mixer to mounting Surface, lock Fixing nut in place with screws (G)
15. Screw Hose adaptor (J) to Male threaded end of hose (H) ensuring sealing washer (I) is in place.
16. Screw hose adaptor (J) to Mixer Water Outlet port being careful to avoid damage to the o’ring seals
17. Connect Mixer tails (B) to Mains Water supply line.
18. N.B Ensure the Mixer tails are not Kinked, Bent, stretched or twisted when assembling to the Mains Water
Supply. The Mixer Tail connection between the mixer and the Water supply must have a natural curve.
Ensure Mixer tails are not exposed to Abrasions, corrosive agents or alike.
19. It is recommended that In-Line filters be installed to ensure a cleaner flow of water to the mixer.
20. The Braided hose will have a natural curve under the mounting surface, on the hand piece side of the curve fit the
Return Weight (K) using the two screws provided. Fit the weight approximately 100mm up from the bottom of the
curve, the position can be adjusted to suit but the weight must remain on the hand piece side of the curve.
To the consumer
1. The Mixer is to only be cleaned with warm soapy water.
2. Under No Circumstances should any abrasive, cream or acid based cleaning agents be used as these types of
cleaners will damage the chrome finish, Cartridge, seals and aerators.
TF 182b - SS2525 installation instructions.pdf
A
C
D
E
F
G
J
I
H
B
Max 37
K