IMPORTANT SAFEGUARDS
When using an electrical appliance, basic precautions should always be followed, inck_ding the following:
READ ALL iNSTRUCTiONS BEFORE USING THiS VACUUM CLEANER.
WARNING
To reduce the risk of fire, e_ectric shock, or injury:
Do not use outdoors or on wet surfaces,
Do not leaw._ wJ.cuum ck_aner when plugged in. Turn off the switch and unplug the electrical cord when not in use and before servicing.
Do not allow to be used as a toy. Close attention is necessary when used by or near children.
Use only as described in this manual.
Do not use with damaged cord or plug. If vacuum cleaner is not working as it should, has been dropped, damaged, left outdoors, or dropped
into water, return it to a service center before using.
Do not pull or carry by cord, use cord as a handle, close a door on cord, or pull cord around sharp edges or corners. Do not run vacuurr_
cleaner over cord. Keep cord away from heated surfaces.
Do not use extension cords or outlets with inadequate current carrying capacity.
Turn off all controls before unplugging.
Do not unplug by pulling on cord. To unplug, grasp the pk_g, not the cord.
Do not handle plug or vacuum cleaner with wet hands.
Do not put any object into openings. Do not use with any opening blocked; keep free of dust, lint, hair, and anything that may reduce airflow.
This vacuum cleaner creates suction and contains a revolving brush roll. Keep hair, loose clothing, fingers, and all Darts of body away from openings
and moving parts.
Do not place cleaner on furniture as the brush roll rnay cause damage.
Do not pick up anything that is burning or srnoking, such as cigarettes, matches, or hot ashes.
Do not use without dust bag or filter(s) in place.
Belt pulleys can become hot during normal use. To prevent bums, avoid touching the belt pulley when servicing the drive belt.
Use extra care when cleaning on stairs.
Do not use to pick up flammable or combustible liquids such as gasoline, or use in areas where they may be present.
Store your cleaner indoors in a cool, dry area.
Keep your work area well lighted.
Unpk_g electrical appliances before vacuurning them.
Hold plug when rewinding onto cord reel. Do not allow pk_g to whip when rewinding.
Brushroll could suddenly restart. Unpk;g before servicing.
SAVE THESE INSTRUCTIONS
FOR HOUSEHOLD USE ONLY
To reduce the risk of e_ectric shock, this appliance has a polarized pk;g (one blade is wider than the other).. This plug will fit in a polarized outlet
only one way. If the plug does not fit fully into the outlet, reverse the pk;g. f it still does not fit, contact a qualified electrician to install the proper
outlet.. Do not change the pk.;g in any way..
Thermal Cut Off
This vacuum cleaner has a special thermostat that protects the cleaner in case of motor overheating. If the cleaner suddenly shuts off, push the on/off
switch off (0} and unplug the cleaner. Check the cleaner for a possible source of overheating such as a full dust bag, a blocked airway or clogged
filter. If these conditions are found, fix them and wait at least 30 minutes before attempting to use the cleaner.. After the 30 minute period, pk_g the
cleaner back in and push the on/off switch on (I). f the cleaner still does not run, then take it to an Electrok;x Authorized Service Center for repair..
CONSIGNES DE SECURITE IMPORTANTES
Cet appareil electrJque doit _tre utilJse en respectant des consignes de securJt6 de base, en particulier :
LIRE TOUTES LES INSTRUCTIONS AVANT D'UTILISER CET ASPIRATEUR
AVE RTISSE M E NT
Pour reduire le risque de feu, de choc 6_ectrique ou de Nessure :
N'utilisez pas & Fext@ieur ou sur des surfaces mouill_es.
Ne laissez jarnais I'aspirateur seul quand il est branch6. Mettez Finterrupteur sur arr6t (<_OFF _) et d_}branchez Fappareil Iorsque vous ne
Futilisez pas ou avant tout travail de nettoyage ou d'entretien.
Ne permettez pas que Faspirateur soit utilisd_ comme un ]ouet. Une attention particuli@e est n6cessaire Iorsqu'il est utilisds par ou pr_3s d'un enfant.
Suivez les recommandations d'utilisation de ce manuel.
N'utilisez pas Faspirateur si le cordon ou la fiche est endommag6. Si I'aspirateur ne fonctionne pas comme il le devrait, s'il a @6 6chapp6, s'il
est endommag6, s'il a 6t_5 laiss_ & Fext@ieur ou 6chapp6 dans de I'eau, retournezde & un centre de service avant de I'utiliser..
Ne tirez ni ne transportez Faspirateur par le cordon. N'utilisez pas le cordon en guise de poign_se. Ne fermez pas une porte sur le cordon ou tirez le
cordon sur des coins ou bordures pointus. Ne circulez pas sur le cordon avec Faspirateur.. _snez le cordon & distance des surfaces chauffantes.
N'utilisez pas des rallonges ou des prises qui n'ont pas une capacite suffisante pour transporter le courant.
Mettez Finterrupteur sur art@ (<_OFF _>)avant de d_brancher.
Ne debranchez pas Faspirateur en tirant sur le cordon. Pour d6brancher, tenez la fiche et non le cordon.
Ne manipulez pas la fiche ou Faspirateur avec les mains mouill_es.
N'ins@ez den dans les ouvertures. N'utilisez pas I'aspirateur avec une ouverture bloqu6e. Les ouvertures doivent _Stre d6gag6es de poussi@e,
de mousse, de cheveux ou de tout autre chose qui pourrait r(_,duire le passage de Fair..
Cet aspirateur cr6e de Faspiration. Tenez les cheveux, les habits, les doigts et tout autre pattie du corps loin des parties mobiles et des
ouvertures de I'aspirateur..
Ne mettez pas Faspirateur sur les meubles car le rouleau._brosse peut les ab_mer..
Ne ramassez pas des ob]ets qui brOlent ou fument comme les cigarettes, les allumettes ou les cendres chaudes..
N'utilisez pas I'aspirateur sans que le sac & poussi@e et le(s) filtre(s) ne soient en place.
Les poulies de la courroie peuvent devenir chaudes pendant Futilisation normale.. Pour pr6venir des br0k._res, 6vitez de toucher la poulie de la
courroie lots de travaux d'entretien de la courroie.
Portez une attention particuli@e Iorsque vous nettoyez les escaliers.
N'utilisez pas I'aspirateur pour ramasser des liquides inflammables ou combustibles comme de Fessence.. N'utilisez pas Faspirateur dans les
endroits oQ ces liquides pourraient 6tre pr6sents..
Entreposez votre aspirateur & I'int@ieur dans un endroit sec et frais..
Maintenez un bon (_clairage & I'endroit oQ vous travaillez.
D6branchez les appareils {4ectriques avant de les nettoyer avec I'aspirateur.
Tenir la fiche lots du rembobinage du cordon. Ne laissez la fiche fouetter Fair lots du rembobinage..
La brosse rotative pourrait se remettre a toumer soudainement.. D6pdser avant toute intervention d'entretienod6pannage..
CONSERVER CES INSTRUCTIONS
UTILISER L'ASPIRATEUR UNIQUEMENT DANS UN ENVIRONNEMENT DOMESTIQUE
Pour reduire _e risque de choc _ectrique, cet appareil est rnuni d'une fiche polaris#)e (une lame est plus large que I'autre). Cette fiche ne peut
s'ins@er dans une prise polaris_Se que d'une seule fagon_ Si la fiche ne s'ins_re pas dans la prise, retournez la fiche. Si elle ne peut toujours pas
s'ins@er, faites installer une prise adequate par un 61ectricien qualifi6. Vous ne devez en aucun cas modifier la fiche.
Coupure thermique
Cet aspirateur est muni d'un thermom6}tre sp6cial qui prot_ge Fappareil en cas de surchauffe du moteur. Si I'appareil s'arr6te subiternent, mettez
Finterrupteur sur arr6t (O) et d6branchez Faspirateur. Inspectez Faspirateur pour trouver la raison de la surchauffe. II faudra peut-6tre vider le sac
poussi@e, enlever une obstruction du tuyau ou nettoyer le filtre si ce dernier est encrass6. Apr_._s avoir r6gl6 le probl_me, attendez au rnoins 30
minutes avant de remettre Faspirateur en marche. Apres 30 minutes, branchez Faspirateur et mettez Finterrupteur sur (l).. Si Faspirateur ne marche
toujours pas, il faut le retourner & un centre de service agr_6 par Electrok._x pour une r_paration..
IMPORTANTE MEDIDAS DE PROTECCION
Cuando utilJce un aparato electrico, se deben tomar algunas precauciones b_.sicas, JncluJdas las siguJentes:
LEA TODAS LAS INSTRUCCIONES ANTES DE UTILIZAR ESTA ASPIRADORA
ADVERTENOIA
Para reducir el riesgo de incendio, descarga e_6ctrica o _esiones:
No use la aspiradora a la intemperie ni sobre superficies mojadas.
No deje la aspiradora cuando este enchufada. Apague el interruptor de corriente y desenchufe el cord6n el6ctdco cuando no la est6 usando y
antes de limpiada.
No deje que se use como un iuguete.. Preste especial atenci6n cuando un ni_io la usa o cuando un ni_io estA cerea..
0sela s61o como Io indica este manual.
No la use con el cord6n o enchufe en real estado. Si la aspiradora no funciona bien, si ha recibido un golpe, esta daY_ada, si se ha dejado a la
intempede o se ha deiado caer en agua, devu61vala al centro de servicio de reparaciones y partes antes de volver a usada.
No la iale ni la Ileve del cord6n, ni use el cord6n como un mango, no cierre puertas sobre el cord6n, ni la jale de modo que el cord6n roce
esquinas o bordes filosos. AI usar la aspiradora no la pase sobre el cord6n.. Evite la proximidad del cord6n a superficies calientes..
No use cordones el6ctricos extra o toma corrientes con menos capacidad de cordente que la necesada..
Apague todos los controles antes de desenchufada.
No la desenchufe jalando del cord6n. Para desenchufarla tome el enchufe, no el cord6n.
No toque el enchufe o la aspiradora con las manos hOmedas.
No coloque ningqn objeto en las aberturas.. No use la aspiradora si nota que cualquiera de las aberturas estA bloqueada; mant6ngala libre de
polvo, pelusa, cabello o cudquier cosa que impida el paso del aire.
Esta aspiradora crea succbn y contiene un cepillo circular giratodo.. Mantenga cabeflo, ropa suelta, dedos y todas las partes del cuerpo
alejados de las aberturas y partes movibles.
No coloque la aspiradora sobre muebles porque el cepillo circular puede da¢%dos..
No aspire nada que se est_S quemando o humeando, como cigarrillos, f6sforos (cerillos) o cenizas calientes.
No la use sin la bolsa para polvo o filtro(s) en su lugar.
Las poleas de la correa pueden calentarse durante el uso normal Para evitar quemaduras, no toque la polea de la correa cuando cambia la
correa de transrnisi6n.
Tenga cuidado especial al limpiar las escderas.
No la use para aspirar liquidos inflamables o combustibles, tales como gasolina, ni la use en &teas donde puede habedos.
Guarde su aspiradora bajo techo en un k._gar fresco y seco.
Mantenga bien ik._minada su area de trabajo.
Desconecte los aparatos el6ctdcos antes de aspirados.
Sujete el enchufe cuando Io est6 enrollando en el carrete del cord6n. No deje que el enchufe se golpee cuando est_ enrollando el cord6n.
El cepillo giratorio podria volver a arrancar de repente. Desenchufe el artefacto antes de realizar el servicio.
GUARDE ESTAS INSTRUCCIONES
SOLO PARA USO DOMESTICO
Para _educir el riesgo de una descarga electrica, esta aspiradora cuenta con un enchufe poladzado (uno de los dientes es m_.s ancho que el otto).
Este enchufe puede entrar en un toma corriente poladzado de una sola manera. Si el enchufe no entra del todo en el toma corriente, delo vuelta. Si
todavia no entra, busque un electricista calificado para que instale el toma corriente correcto.. No modifique el enchufe de ninguna manera_
Apagado t@mico
Esta aspiradora tiene un termostato especial que la protege en caso que el motor se recafiente. Si la aspiradora se apaga sObitamente, presione
el interruptor de corriente a la posicbn (0) y desenchufe la aspiradora. Revise la aspiradora para encontrar la posible raz6n del recalentamiento,
como puede set un recipiente para polvo Ileno, una manguera bloqueada o un filtro atorado. Si se descubren estas condiciones, arrCsglelas y
espere pot Io menos 30 minutos antes de tratar de usar la aspiradora. Despud_s del periodo de 30 minutos, vuelva a enchufar la aspiradora y
prenda el interruptor de corriente a la posicbn (I).. Si la aspiradora todavia no funciona, entonces 116vela al centro autodzado de servicio de
reparaciones y partes de Electrok._x para set reparada..
FuH.-sizepoweriHacompactdesig_,,
TheIntensty" uprightisdesig_edspecifcalyto
helpyouwithyour"everydaycleanin%Designed
forconvenientandpowerfulperformanceon
carpetsandbarefloors,theIntensityhasno
attachmentsforabove-theo-foorceaningThis
reducescleanerweightandsimplifesthearpath
forpowefulno-clogcleaningTheIntensity
probablywon'tbeyouronyvacuumcleaner,butit
w beyourfavote
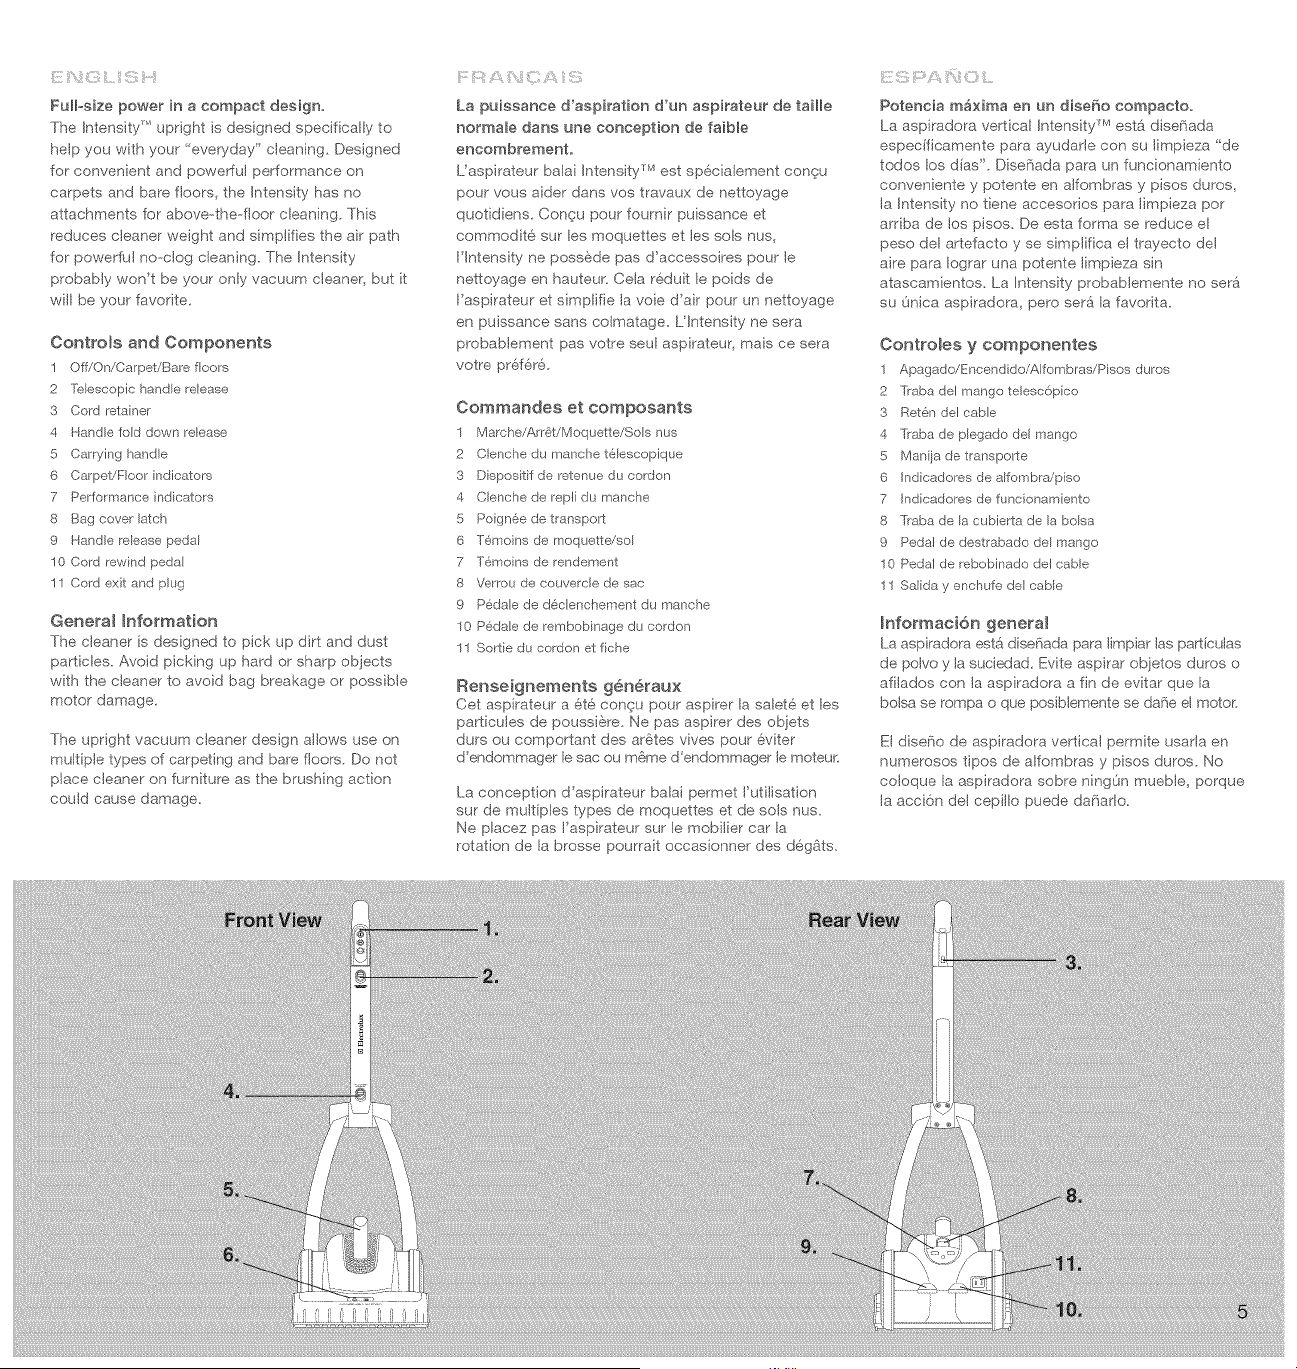
Controls and Components
1 Off/On/Carpet/Bate floors
2 Tbescopic handb release
3 Cord retainer
4 Hande fold down release
5 Carrying hande
6 Carpet/Foor indicators
7 Performance ndcstols
8 Bag cover atch
9 Hande reease pedal
10 Cord rewnd pedal
11 Cord ext and pug
Gene_a_ hfotmation
The cleane is des gned to pick up dirt and dsst
particles Avoid pckng up hard or sharp objects
wth the c eaner to avod bag breakage or poss b e
motor damage
The upright vacuum cleaner design allows use on
miple types of carpeting and bare floors Do not
place cleaner on furniture as the br sshing action
coud cause damage.
La puissa_ee d'asp[ration d'un aspirateur de taiHe
Hormab da_s une conception de faibb
e_:_eombremento
Laspirateur baa Intensity M est sp_cia ement congu
pour vous aider darts yes trava _x de nettoyage
q sot diens. Conga [sour foumir pu ssance et
commod t_ s_r les moquettes et les sob nus,
I%_tens ty ne poss6de pas d'accesso res pour e
nettoyage en hauteur. Cela redut le poids de
I'asp rateur et simplifie la voie d'ar post un nettoyage
en puissance sans co matage. L Intens ty ne sera
probablement pas votre seu asp rateur mais ce sera
votre pref@¢.
Commandes et composants
1 Marche!Ar_,'t/MoqtelteiSols nLs
2 C[enche d_ manche t#,_escopique
3 Dispostif de retente dL cordon
4 Cenche de repli dL manche
5 Poign6e de t ansport
6 T6mons de rnoquette!so}
7 T6mons de _endement
8 Verou de couve_c e de sac
9 P6dale de d6cbnchement d_ manche
10 P6dale de rernbob nage du cordon
11 Sortie du cordon et fche
Renseignements 9enSraux
Cet aspirate sr a ¢et6congu pour asp rer la saete et es
pa ticules de poussi6re Ne pas aspirer des objets
dsrs ou comportant des ar6tes vves pour evter
d'endommager le sac o n%me d'endommager le moteuL
La conception d aspirate sr balai permet I utilisation
s_r de mut pies types de moquettes et de sols nus,
Ne placez pas I aspirateur sur le mobilie car la
rotation de la brosse po srrait occasionner des d6gAts
Poteneia maxima er_ un diseSo eompaeto.
La aspiradora vertical Intensity M est{_ d seff_ada
especificamente para ayudade con su I mpieza "de
todos los das" Disefiada para un funcionamiento
conveniente y potente en alfombras y pisos dures
la Intens ty no tiene accesorios para limpieza po
arnba de os pisos, De esta forma se reduce el
peso del artefacto y se simplifica el trayecto de
aire para Iograr una potente I mpieza sin
atascamientos. La hstens ty p obablemente no sera
suOncaaspradoa peroseralafavorta
Cont_o_es y componentes
1 Apagado!Encenddo/AIfombras/Psos duros
2 Traba del mango tebsc6pico
3 Ret6n del cable
4 Traba de pegado del mango
5 Maniia de transporte
6 Indicadores de aifombra_piso
7 Indicadores de funconamiento
8 Traba de }a cubierta de }a bo}sa
9 Pedal de dest abado de} mango
10 Pedal de rebobinado del cane
11 Salida y enchufe del cabe
Informaci6n genera_
La aspiradora esta disedada para mpiar as partic _las
de polvo y la s sciedad. Evte asp rat objetos d_res o
afilados con la aspiradora a fin de evitar que la
bosa se rompa o que pos blemente se dafle el meto_,
El diseff_o de aspiradora vertical permite usarla en
numeresos tipos de alfombras y pisos duros No
coloque la aspiradora sobre nngOn m sebb, porque
la acci6n del cepillo puede dafiado.
_ (:3Li _3_
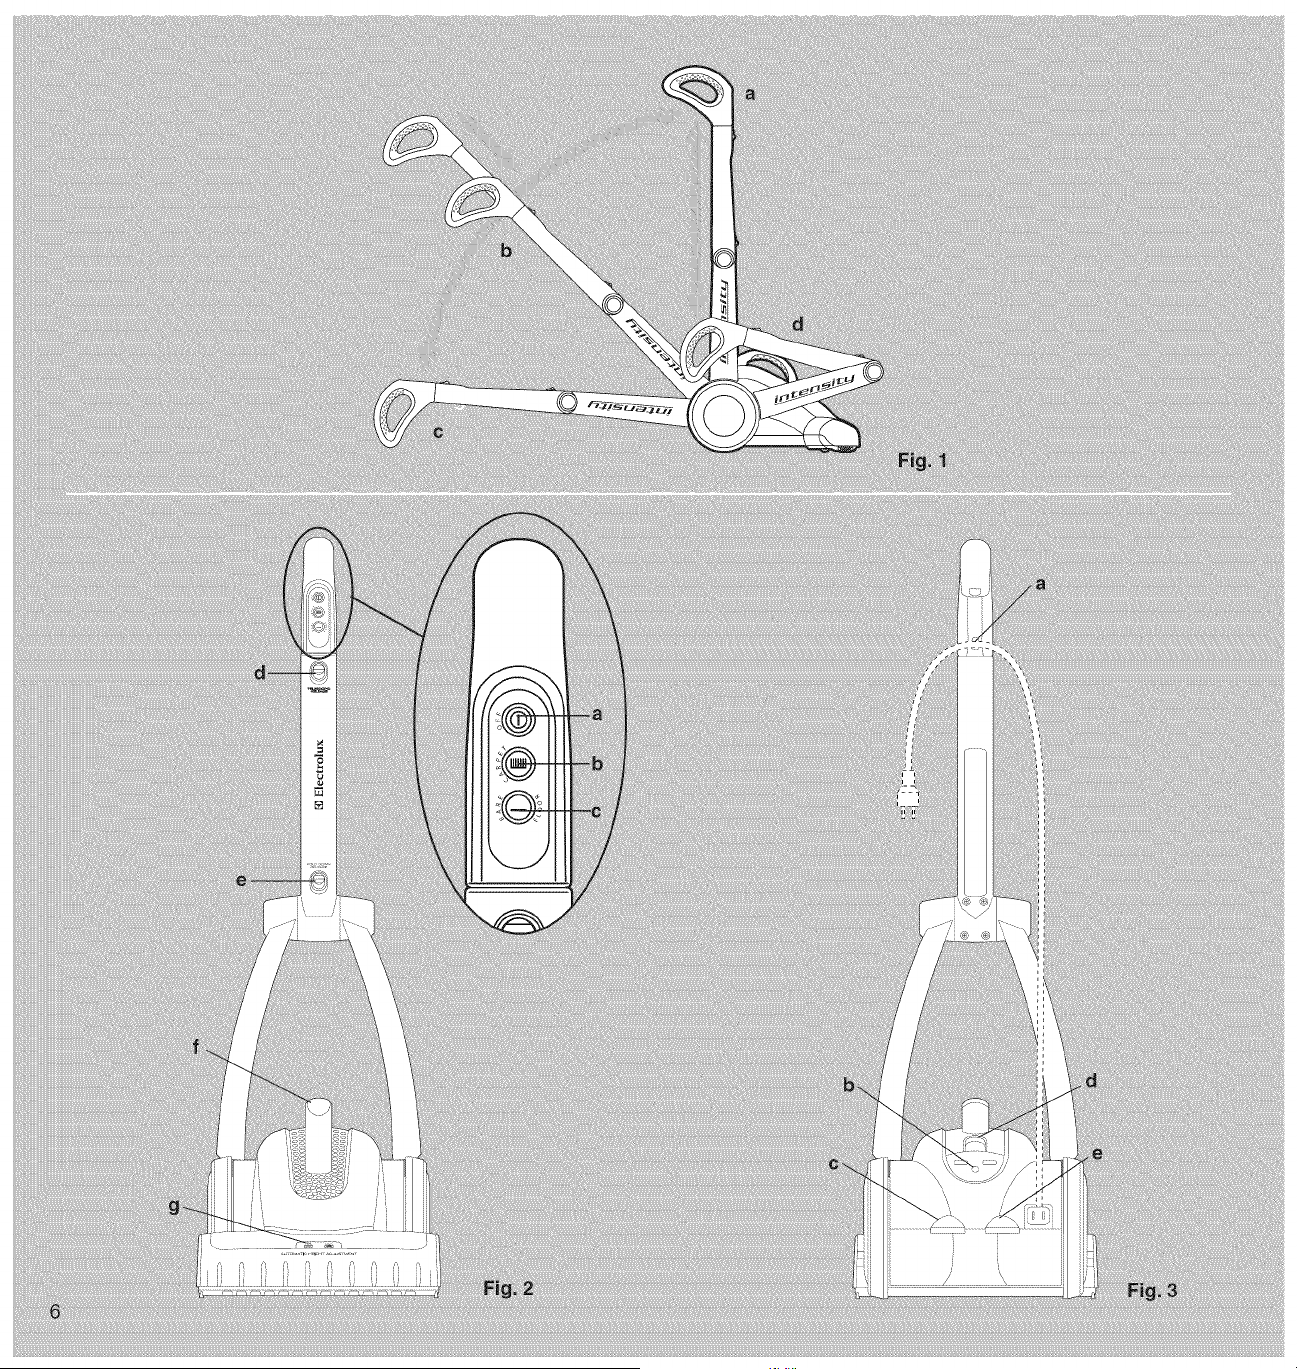
USINGTHECLEANER
I Raisethehandefroms4oagepositiontothe
'parkedposton(Fig.1@bysimplyIflingstraight
uponthehandlegripuntithehandelocksinthe
verticalpostion
2 Wthyourthumb,sidetelescopicreease(Fig.2d)
downwardandgentlyputhehandgrpupto
extendthehandeheighttoacomfortablepostion
3 Pullthecordbytheplugfromthecleaneuntil
completeyextendedRoutethecordthrougsthe
cordr_tainertobettermanagethecordasyou
clean(Fig.3@.Plugintooutet,
4 Depressthehandlereleasepedal(Fig.3c)and
tit thehandebackfromitsparkedpositionto
normaloperatngposition(Fig.1b).
5 Tostartthecbanerpresseitherthecarpetor
barefloorbutton(Fig.2bor2c).Thecleanngmode
isindicatedonthehoodd the cleaner (Fig. 2@.
Note: For safety rsasons, the bmshmll (ea#s,et
rood@ will not turn if the handle is folded
£>rward in the stor_sge position, or if it is its
the vertica/ parked position,/t must be its
the opera,ring position to function (Fig, l b},
6 The clean ng head adjusts automaticaly to
d fferent carpet heights.
7 Tam off the cleaner by push ng the OFF button
(Fig. 2@.
8 Wh e the cleaner is operatng normally the blue
OPTIMUM ght is on (Fig 3b). If the OPTIMUM
Ight is not lit, ma;ntenance is requ reG (See Pg, 9
Tro sbleshooting).
9 To lower the handle fro'n normal operating
position to the lowest pos t on for access under
fum ture, press the hande release pedal (Fig 3c)
and lower t'_e hande (Fig, I@.
CARRYINGOR STORING[HE CLEANER
I0 Remove the cord from the cord retainer
(Fig 3a) and depress the cord rewind peda
(Fig 3e). Hod the cord as it few nds to preve_t
accdental injury Lowe the telescopic handle
I1 With yosr thumb, sde the "Fold Down
Release" b£ton (Fig. 2e) upward, at the same
time fold ng the hande into the co apsed
storage position (Fig. ld)
I2 Pick the cleaner up by grasp ng t'_e carry ng
hande (Fig. 29
UT LISA] ION DE UASPIRATEUR
I Relevez le manche de la postion de rangement _] la
postion <<parque >>(Fig 1@ en rebvant simplement
la po gnee du manche ] _squ a ce que ce u -ci se
verrouille en posit on verticMe.
2 Du pouce, co_ ssez la cenche telescopique
(Fig 2@ vers le bas et tirez delicatement sur la
po gnee pour al onger le manche ]usqu a une
pos tion confortable
3 Tirez sur e cordon par la fche pour le sortir
compl6tement de I aspirateur, Acheminez le cordon
par e disposit f de retenue du cordon po_r mieux
mainten r e cordon a I ecart quand on nettoe
(Fig. 3@. Branchez sur a prise murale
4 Appuyez sur la pedale de declenchement du
manche (Fig. 3c) et bascu ez le manche de sa
pos tion parquee a sa pos tion de fonctionnement
normab.
5 Pour rnettre I aspirateur en service, appuyez sur le
bouton rnoquette ou sure bouton sol nu (Fg 2b
ou 2c) Le mode de nettoyage est ind que sur le
capot de I aspirateur (Fig. 2@
Rema£tue : Pour @s rs£ons @ s_curfM, /a brosse
t'otadve (mode moquett@ ne toume pas quand /e
manche est rspfi& vers /'avant en position de
t'angement, ou quand // est dons/a pos/tMn
vertica/e parwu_e, /1 dolt &#s dons/a position de
tr_vai/ pour fonct/onner (Fig, lb},
6 La t6te de nettoyage se r6gle automatiquement en
fonction des d ff@e_tes haute srs de moquette.
7 Arr6tez Yaspipateur en appuyant sur e bouton
<<OFF>>(Arr6t) (Fg. 2@.
8 Quand 'aspirateur fonctior_ne normalement, le
temon bleu OPTIMUM est all sm6 (Fig, 3b). Quand
le temoin OPTIMUM est d_teint, il faut entreten r
Yaspirateur. (Voir Pg. 9 Depannage).
9 Pour abaisser le manche de a position de travail
normale 8] sa position la pus basse pour passer
soss le mobilieh appuyez la pedale de
declenchement de manche (Fig, 3c) en abaissez
le manche (Fig. Ic).
TRANSPORTOU RANGEMENTDE UASPIR/},EEUR
I0 Ret fez e cordon dud spositif de retenue de
cordon (Fg 3a) et appuyez ssr la p_,_dalede
rembobinage d_ cordon (Fig 3e). Tenez le cordon
pendant qsil se rembobine afin d eviter les blessures
accidentelles Abaissez le manche teescopique
11 Du pouce, gl ssez e bouton "Cbnche de repliage
du manche >>(Fg 2e) vers le haut, tout en mettant
le manche dons la position repli_,'e (Fig. 1@
I2 Sou evez I aspirateur e_ le sais ssant par la
po gnee de transport (Fig. 29
USO DE LA ASPIRADORA
I Levante el mango de la posici6n de
almacenamiento a a de "estacionamiento" (Fig,
I a) elevando s mpbmente la agarradera de
mismo hasta que el mango quede trabado en
posici6n vert cal
2 Con el pulgar} deslice la traba del mango
tebsc6pico (Fig. 2@ hacia aba]o y ]ale suavemente
la agarradera hacia arriba para extender la altura
del rnango a una posici6n c6moda.
3 Jab el cable po el enchufe para extraedo de la
aspiradora hasta que est_ comple4:amente
extendido Guie el cable a tra\@s de reten del
mismo para pode manqado mqor mientras Impa
(Fig 3@. EnchOfeo e_ el tomacorr ente
4 Presione el pedal de destrabado del mango
(Fig 3@ e incl ne el mango hacia atMs desde su
posici6n de estacionamiento a la posc 6n de
operaci6n normal (Fg, 1b)
5 Para encender la aspiradora, pulse el bot6n de
alfombra o piso duro (Fig 2b o 2c) El modo de
I mpieza se ndca en a cub erta de a aspirado a
(Fig. 2@
Nora; Pot rszones de seguridad, el cepil/o
gMstorfo (modo de fimpieca de alfombr_ss} no dr_
si el mango esM plegado hac/_s delante en
pos/ci6n de almacenamiento o vert/cal en
pos/ci6n de estacionamiento, Par_s que funcione,
debe estar en pos/cidn de ope£,sci6n (Fig, 1@,
6 El cabezal de mpieza se ajusta automaticamente
a diferentes alturas de aJfombra.
7 Apague la aspiradora pu sando el bot6n a OFF
(Fig. 2a).
8 C sando la aspiradora func ona normalmente, se
enciende la luz azul OPTIMUM (Fg. 3b). Sila luz
no se enciende, s gnifica q_e se requ ere
manten miento. (Vea la pag, 9 Local zac 6n
soluc 6n de averias).
9 Para ba]ar eI mango desde la posici6n de
func onamiento normal a la posici6n mas ba]a a
fn de acceder deba]o de muebles presione el
pedal de destrabado de mango (Fig, 3@ y baje
e mango (Fig, I@.
TRANSPORTEO ALMACENAMIENYODEI.JkASPIRADORA
I0 Retire el cabe del reten del mismo (Fg. 3@ y
presione el pedal de rebobinado (Fig 3e)
Sostenga el cable rnie_tras se rebobina para
preven r lesiones accde_tales Baje e mango
te esc6pico
11 Con el pu gar_ deslice el bot6n de "traba de
p egado" (Fig. 2@ hacia art ba, plegando al
mismo tempo e mango a la pos c 6n de
almacenamiento (Fig. I@.
I2 Recoja la aspiradora tomandoa po la mania
de transporte (Fig. 29
TROUBLESHOOT}NG
CAUTRON:Turnofftheceanerandunplug the e ectrical
cord before serv c rig,
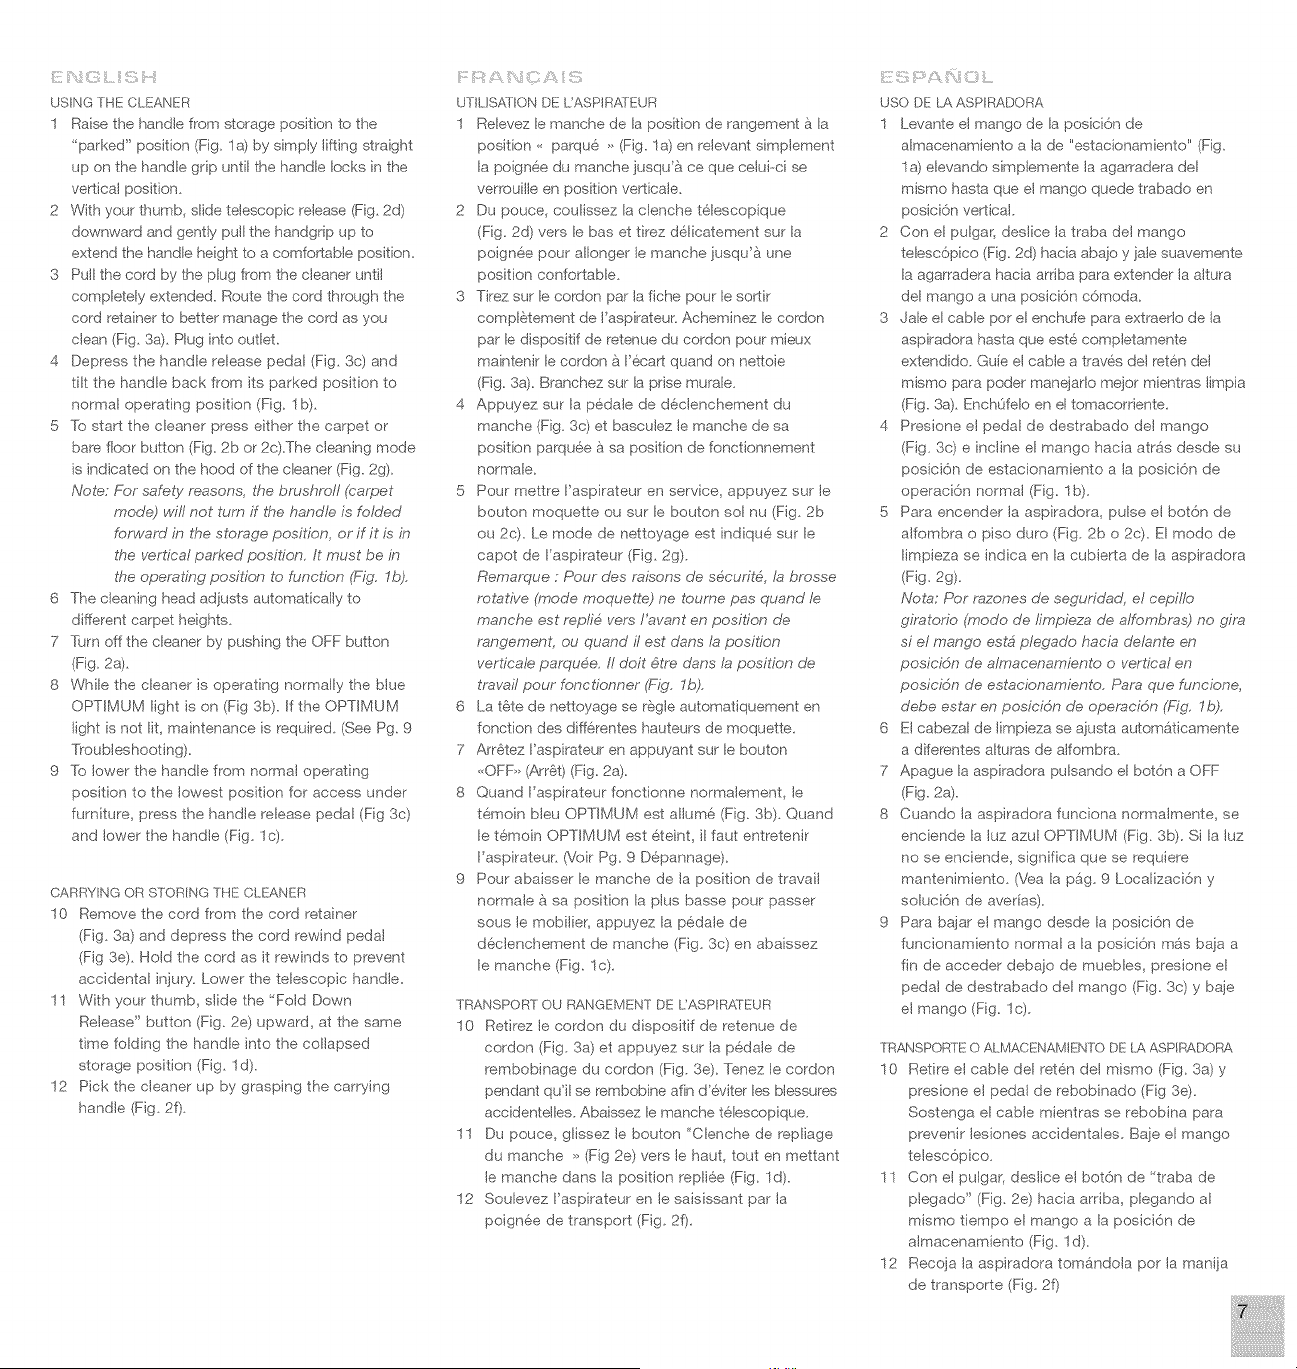
I3 _f the b_ue OPTIMUM Light is r_ot _it (Fig. 4@,
one of several items needs attention. If the bag
or exha sst filter needs chang ng the apprepnate
Ight will illsminate (Fig 4a or 4b) See Bag and
Fiter change instructions If the Carpet/Bare
Floor ind cators flash on and off repeatedly
(Fig 5), the br sshroll is stalled because of an
obstr ction Once the obstrsction (rug fringe,
sock, etc) is removed, pug in the cleaner and
return to normal use
I4 _f the brushroH is not turning but the carpet
indicator is Iluminated, the hande is not in the
operat ng position (Fg lb o lc on page 6). If
the handle is foded fo ward in the storage
posit on, or if it s in the vertica parked pos tion
(Fig 1@, the brsshroll will not operate
I5 _f the c_eaner is p_ugged in but the c_eaner
will r_ot turn on and no indicators i uminate,
check to ens are that the bag cover (Fig. 6) is
securely in pace If it is not, atch t correctly
and turn on the cleaner
I6 _f the c_eaner sudder_y shuts off and none of
the ind cators are illuminated, t is probable that
the suct on motor has overheated Unplug the
cleaner and check for a full bag, blocked fter,
or other obstruction. If any of those cond tions
are found, correct the problem, wait 30
minutes, then plug in the c eaner and return to
normal use
CHANGING THE DJST BAG (Bag styJe EL20@
CAUTION: Turn off the c eaner and unplug the e ectrical
cord befoe serv c ng.
When the BAG CHANGE indicator is lit:
I7 Push the bag cover atch and re'_tove the cover
as shown (Fg. 6).
I8 Piw£ the bag collar away from the bag inet
(Fig. 7) and Ift the bag by the coar tab out of
the chamber.
I9 Place the new bag and colar into the chambe
and slide the colar into the track with the collar
tab pointing @ward. Push the coar onto the
bag inlet so that it is snugy in place Tuck
rema nder of bag inside the bag compartment
The bag collar must be secured over the inet
tube for the bag cover to close preperly
Note: The cleaner will not turn on unless the bad
cover is securely latched in place
20 A preo-motor filter is included wth each
package of replacement bags. It is a good idea
to replace the fter (see Fig. 8) when yo_ instal
the ast bag from your replacement bag
package Slide the filter frame spward and
remove the dirty filter. Install a clean fter and
slide the frame back into place
21 Place the front of the bag cover into its locating
slets and push to latch s_ut
DEPANNAG8
ATTENTION : Arr6tez }'asp rater r arrfft et depdsez le cordon
d'al mentation avant tcute intervention d'entretiemd6pannage_
I3 Si _e t@_o[n b_eu Optimum eat _tei_t (Fig 4c) il
fast contr6br tout ce qu suit. Si le sac ou le filtre
d'6chappement doivent 6tre remplac6s, b temon
adequat s'al umera. Veir les instructions
concemant le remplacement ds sac et du fitre S
les temo ns de moquette/sol nu clignotent de
faqon r6pet6e (Fig 5) la brosse retative est
immobilis_ par un colmatage Une fois le
colmatage s @pr n% (frange de tapis, chaussette,
etc), prsez a nouveau I aspirateur et retournez
une _t lisation normale
I4 Si _a brosse rotative ne tourne pas alo[s que le
temoin de moquette est all am6, le manche n'est
plus ssr la position de fonctionne sent (Fig lb ou
Ic a la page 6). S e manche est replie vers
I avant dans la postion de rangement os s' est
dans la position parquee verticale (Fig. 1a), la
brosse rotative ne tosrnera pas
15 Si _'aspirateur est pris_ mais r_e s'aHume pas et
s ascun t_moin ne s'allume, verifie q_e e
couvercb de sac (Fig. 6) est bien assqetti en
pace. S'il ne I'est pas, verrou ezo- e correctement
et aumer I'aspirateur.
I6 Si _'aspirateur s'a_rSte soudain et si aucsn des
t_mo ns ne s'al ume, il est probable que le mote sr
d'asp rat on a s _mhauf%. D_pdsez I'aspirateur et
verifiez que Is sac n'est pas plen, que le filtre
n'est pas colmate ou qu'il n'y a aucun autre
colmatage. Si lun de ces etats est responsable
de a situation, remediez au probl@se, attendez
30 minutes puis prsez I asp rateur et servez--vous
en no r/salement.
CHANGEMENT DE S¢,_ A R}USSI_[RE (lbj_ de sac 8_}
ATTSNT_ON: Arr@tez 'asp stet _ arr6t et d_pr set le cordon
d'al mentation avant route intervent on d'ent_et en--d6pannage_
Quand le temoin BAG CHANGE (Remp aceme st du
sac) est allume:
17 Poussez le verrou du couvercle de sac et retirez--
e de la mani6re illustree (Fig. 6).
I8 Faites pivoter le cdlier du sac a I'oppose de
I'entr6e du sac (Fig. 7) et retirez Is sac du
ogement en le so s evant par le collier.
I9 Placez Is sac neuf et le col ier dans Is Iogement et
glissez le coler dans la gl ss 6re avec I'ongbt du
collier dirige vers Is haut. Poussez le collier sur
I'entr6e du sac de sorte qs' tienne fermement en
place. Poussez Is reste ds sac dans le Iogement
du sac. Le coil er du sac doit 6tre assu]etti sur le
tube d'admission pour que e couvercle de sac se
ferme norma ement.
Remarque : L'asp/rateur ne se met pas en mamhe s/ /e
couvem/e de sac n'est pas refinement ver_oui//4,
en place.
20 Un prefiltre de moteur est foum avec chaqse
paquet de sacs de rechange. II vaut mieux
remplacer le filtre (vor Fig. 8) quand on monte le
dern er sac du paq _et de sacs de rechange.
Cos ssez e chass s de filtre vers le haut et retirez
le fitre sale. Montez un fltre propre et cou ssez le
chassis de nouveau en place.
21 Placez le couvercb de sac avant dans ses fentes de
local sation et poussez pour enclencher la fermeture.
LOCAUZACION Y SOLUC_ON D_ AVER_AS
PREOAUO_ON: Antes de realza e servicio, apag _e la
asp radora y desenchufe e cord6n el#sctrico.
I3 Si _a _uz azu_ Optimum r}o est8 e_cendida
(Fig_ 4@, alguno de los elementos necesita
atenci6n Ses necesario cambar la bosa o e
fltro de descarga, se enciende la luz
correspondiente (Fig. 4a o 4b). Vea as
instrucconesdecambodebosaofltre Silos
indicadores de alfombrdpiso d_ro destellan
repetidamente (Fig. 5), significa que el cepo
giratodo esta atascado debido a una
obstrucci6n Una vez eliminada la obstrucci6n
(fieco de felpudo ca cetin, etc.), enchufe la
aspiradora y v selva a usada normalmente
I4 Si e_ cepiHo no gila pete el indicador de
alfombra est& encendido, sign fica que el
mango no est{_ en posici6n de operaci6n
(Fg. lb o lc de la pagina 6). Si el mango se
piega haca adelante en posici6n de
almacenamiento o s esta estacionado en
posici6nvertica (Fig. 1a) elcep o girato ono
funciona
I5 Si _a aspiradora est_ e_chufada pete r_o se
e_cier_de y no se i uminan los ndicadores,
verifique qse a cubierta de la bolsa (Fg. 6) este
firmemente colocada en su sitio.
I6 Si _a aspiradora se detier_e bruscame_te y no
queda encendido ninguno de los indicadores,
es probable que el motor de s _cci6n se haya
recalentado Desenchufe la aspiradora y
ver f que si la boba esta Ilena, el filtro esta
bloq seado o hay alguna otra obstrucci6n. Si se
descubre agna de estas condiciones, cordja
el prob ema, espe_ 30 m nutos, hego enchufe
Ja aspiradora y wselva a usarla norma mente
CAMBO DE LA BOLSA RARAPOL'.JO(Bol_ ti_ E_}
PREOAUOION: Antes de realizar e servicio, apague la
aspkadora y desench ]fee cord6n e _sctrico_
Cuando se enciende e ind cador BAG CHANGE
(Cambiar be sa):
17 Pres one la traba de la cubierta de la bolsa y
retire la cubierta come se muestra (Fig. 6).
I8 Gre el aro de la boba alejandolo de la entrada
de a misma (Fg 7) y levante la bolsa
tom{]ndola per la leng0eta de aro para
extraerla de la camara
I9 Coloq se la nueva boba y el aro en la camara y
deslice el aro a su pista con la leng0eta del
mismo apuntando hacia arriba Presione el aro
hacia adentro de la entrada de la boba de
mode que quede colocado a]ustadamente en
su sitio Introduzca el resto de a boba en el
compartimiento de la misma. Para q_e la cubierta
de la bosa cierre correctamente, el aro de la
boba debe estar fi]ado sobre el tube de entrada
Nora: La aspk_dora no se enc/ende s/ la cub/erta de
la bo/sa no eat4 fir_cnemente tr_bada en su sit/(}.
20 Se inchye sn prefiltro del motor con cada
paquete de bobas de reemplazo Es buena
idea reemp azar el filtre (yea la Fig 8) cuando
instala la Otma bolsa de s_ paquete de bobas
de reemp azo Desce el bastidor del filtro haca
arriba y retire el fltro sucio Instale un filtro
Impio y deslice el bastidor a su sitio
21 Coloque el frente de la c _bierta de la boba en sus
ranuras gua y presi6ne a para cerar la traba

CHANGINGTHEEXHAUSTFII.JER
(EXNAUS'TfilterstyleEL01@
CAUTRON:-R_rnoffthec}eanerandunplugtheeectrical
cordbeforeservcng.
21WhentheFILTERCHANGEindcaterislit:
22PLAshthebagcoverlatchandremovetqecover
asshown(Fig.g).
23Squeezethefiltertabs(Fig,I0)andIftthefter
fromthecleaner,
24Positionnewfterandpressdowntosnapin
pace
25Placethefrontofthebagcoverintoitsocating
slotsandclosetqecoverItw automaticaly
latch
CHANGINGTHEBELi[ORBRUSHROLL(Be_tstybEL09@
CAUTmON:Turnofftheceanerandunplugtheeectrical
cordbeforesevcing.
26Removethethreescrewsthatsecurethebase
patethatcoversthebrushrol(FigII1
27LiftoutbrushrolIandremovehairandthreads
28Ifinstalinganewbeltspbetoverrbbed
motepuiey
29Threadpulleyendofbrushrothroughbet
(Fig12).
30Installtheleftsideofbrushrel(nearestthebelt)
frst,makingsureendisfuiyseatedPvotthe
rghtsideofbrushroIintoplacemakingssre
thesquareendofthebrushroendcapaigns
andslidesintotheslot(Fg13).Rotatebr_shro
byhandtomakesureitrotatesfreely.
31Replacethebasepateandsecurethethree
screws
CH/},aNGEMENTDEFILlRED'EICHAPPEMENI
_y[_defllt_8d'EO_PPE_7_SNTBLOl@
ATTENTION:ArrOtez'asprateurarr_tet@}prser}ecordon
d'almentationavanttorteinterventiond'entretien-d@annage_
21Q_andlet@monFH..JTERCHANGE
(Rempacementdufiitre)estalume:
22Pc_ssezeverroud_couverdedesacetretirez-
edeaman_ereillustree(Fig,g).
23Pncezesongletsdufitre(Fg10)etretireze
ftredeJaspirateurenJesouJevant
24PositionnezJeftreneufetappuyezdessuspour
Ienclencherenplace
25Placezlecouvemedesacavantdanssesfentes
deIocaisatonetfermezlecouvercleI se
verroueraauto'Ttatique'Ttent
CHANGEMENTDELACOURROEOUDELABROSSE
RO]X,_TIVE_yp÷debrosseEL09@
ATTENTION:ArrOtezI'asprateurarr_tetdOprserecordon
d'almentationavanttolteinterventiond'entreten-dOpannage.
26RetirezJestroisvisquassujettissentaplaquede
basecosvrantJabrosseretative(Fg111,
27RetirezJabrosserotativeenlaso evantetretirez
escheve_xetJesfiJs
28Svousmontezunecourreieneuve,glissezla
couroies_rlapouiiecrant_kedumoteur.
29Glissezeboutdelabresseretativedansla
courroie(Fig.12).
30Montezlecot@gauchedelabrosserotative(le
phsprechedelacosrreie)d'abord,ens'assurant
queleboutestco'_splOtementassis.Faitespivoter
lec6t@droitdelabrosserotatveenplaceafnde
faireensortequeeboutcart@deYembout de la
bresse rotative s'a gne avec a fente et s'y
engage (Fg. 13}. Faites tourner la brosse retative
Ja main pour s'assurer qu'ele tourne brement,
31 Remonte lapaquedebaseetvsse lestrosvs
{
CAM%O DEL FITRO DE SAUDA
(FHtro de SALIDA tipe EL01@
PREOAUOION: Antes de real zar el servicio, apsgue Is
asp faders y desenchufe e cord6n e 6ctrico_
21 Cuando se enciende e indicador FK.JTER
CHANGE (Cambiar fiJtre/:
22 Pres one Ja traba de Ja cubierta de la boba y
retire Ja cub erta come se muestra (Fig. 9)
23 Apdete las leng0etas del ftro (Fig 10) y
levante o para extraerlo de a asp faders
24 Posicione el fiJtro nuevo y presi6neJo haca
aba]o pars colocado a presi6n
25 Coloq _e el frente de a c sbierta de a bolsa en
sus ranuras guia y cierre Ja cub erta, Quedara
enganchada auto'_taticame _te,
CAM%O DE LA CORREA OU EL CEPILLO GIR_iIORIO
(Oorrea ripe EL09@
PREOAUO_ON: Antes de real zar el servicio, apague la
aspiradera y desench _fe e cordon elOctrico.
26 Reqreiostrestorn osqueaseguranlapaca
base que cubre el cepiI o (Fg. 11).
27 Levante el cepio girator o y retire los cabe os
y los hilos,
28 Sivaa nstalar snacorreanueva, des cea
sobre la poles estriada del motor,
29 Coloque el extreme de la polea de cep o
giratorio en la correa (Fg I2).
30 Instaieprmeroe ladoizquerdode cep o(el
mas cercano a a cortes), asegurandose de que
e extreme cace completamente Gire el ado
derecho del cepiiIo hasta que quede en su
Jugar_ ten endo en cuenta que eI extreme
cuadrado del capuch6n del extreme del cepillo
quede alineado y se deslice dentro de a ranura
(Fig 131. Gire e cepio con a mane para
asegurarse de q_e gira libremente
31 Vuelva a colocar la paca base y cooque los
tres ton os

THE ELECTROLUX LIMITED WARRANTY
YeurElectrok_xcleaneriswarrantedtobefreefromaldefectsinmaterialandworkmanshpinnormalhouseholduseforaperiodoftwoyearsThewarranty
isgrantedonytot'_eoginalpurchaserandmembersofhsoherimmedatehousehodThewarrantyissubjecttot'_efoowngprovsons
Thiswarrantydoesnotcoverpartsofthecleanerthatrequrereplacementsndernormasse,suchasdsposabledustbags,fans_filters,drivebelts,brushrol
bristles,impelersandcleaningAnydamagesormalf_nctionscausedbynegligence,abuse,orusenotinaccordancewththeOwnersG_idearenotcoveredby
thswarrantyLikewseanydefectso damagescausedbyunauthozedservceo theuseofothert'_anGe_uneEbctrouxpartsisnotcovered
Ebctroluxwill,attsoption,repairorrepaceadefectivecleanero cleanerpartthatiscoveredbythswarrantyAsamatterofwarrantypocyEbctrouxw not
refundtheconsumer'spurchaseprce
Teregisteyourwarrantypeasevstwwweectrouxusaco'n(USA)wwweectrouxcacorn(Canada)o f outandreturntheattac'_edwarrantyregistrationcard
Teobtainwarrantyserviceyoumustreturnthedefectivecleanerorcleanerpartsalongwithproofofp_rchasetoanyElectreluxAuthorizedWarrantyStation
Fort'_elocationofthenearestEbctrouxAuthozedWarrantyStationo feservceinformationintheUntedStateso Canadapeaseteephoneto free:
You may also vsit us online at
wwwoe[ectro[uxusa,com (USA} or
www, e[ectro[uxca,com (Canada}
FURTHER LIMITATIONS AND EXCLUSIONS ARE AS FOLLOWS
Any warranty that may be impl ed n connection wth your purchase or use of the cleaner, nc ud ng any warranty of Merchantabi ty or any warranty for F tness For
A Particu ar Purpose is [ mited to the duration of ths warranty So'he states do not a[ow [ mitations on how long an imped warranty lasts so the above [ mitations
may not appy to you
Yeur relief for the breach of ths warranty is limited to the relef expressly provided above In no event shal Electrolux be liable for any consequential or ncidental
damages yo_ may incur n connection with your p _rchase or use of the cleaner Some states do not Mow the exclus on o [ mitation of inc dental o consequential
damages so the above [ mitation o exclus on may not appy to you
Ths warranty gives you spec f c legal rghts Yeu may also have other rghts whch vary by state
REGISTRATION
Please register your new Electro ux home care product electron cally by vs ting www.ebctroluxusa.com (USA/) or www.electroluxca.com (Canada) o
use the attached postage-paid card Registe ng your new Electro ux product entities you to the most up--to-date Electro ux product warranty and pro'notion
info mation
ii:___ _ _i__L___
LA GARANTIE LIMITEE ELECTROLUX
Votre aspirateur Electro ux est garant exempt de tout vce de mati@e et de fabrication Iors dune utiiisation domestique normaJe pendant une pe iode de deux ans
La garantie est acco dee _ I acqeteur in tial seu eTtent et aux membres immed ats de son foyer. La garantie est soumise aux cond tions su vantes
Cette garantie ne couvre pas les pieces de I asp ratesr devant @tre remplac_kes apr@s un usage noma, comme sacs 8spouss @e, ventiiateur f tres, courroies, fibres
de rouieau-brosse, turbine et nettoyage Teut dommage ou d6faut de fonct onnement decou ant dune negligence, dan mauvais traitement ou dun emplo non
conforme avec le guide du preprietaire, ne sont pas couvert par cette garantie, De m6me, toss dommages o d6fectuos t6s causes par un entretien non auto se ou
I uti sation de p6ces autres que des p6ces autres que des p6ces Ebctro ux authentiques ne sont pas couverts
Ebctro ux r6parera os remplacera a son gre un aspirateur ou une piece de I aspiratesr qu serait defectueux et quest couvert par la pr6se_te garantie En vertu de
la po tique de garantie Electro ux ne remboursera pas le prx d achat au consoTtmateur
Pour en_egistrer votre garantie veu ez consu te www e ectro uxca COTt OU _empr et _etourner la carte d en_egistreme_t de la garantie c --]o nte
Po_r obtenir le servce apr_es-vente de garant e, faut _etourner I aspirateur ou les pi_eces s's sont defectueux, en les accompagnant de la preuve d achat,
n"importe que centre de serv ce apr6s-vente agr6e de garantie Electreksx Pour le ce _tre de servce apr6s--vente age6 de garantie Ebctro ux Je pus procqe de chez
vous ou des tense gneme_ts sur le serv ce apr6s--vente composez sans frais le:
Vous pouvez aussi nous consulter sur :
wwwoe_ectro_uxcaooom
D'AUTRES RESTRICTIONS ET EXCLUSIONS
Teute garantie qu peut 6tre imp cte re ativement a I acqat ou a I uti sation de cet asp rateur incluant toute garantie de qual te marchande ou d aptitude a effectuer
une tAche partic i@e, est limit_e a a durkee de cette garantie Certains etats/prov nces ne permettant pas de restr ctions quanta la duree dune garantie imp cte
les restr ctions ci--dessus peuvent ne pas s"app quer.
Votre recours en cas de non-respect de cette garantie est limite & cels mentionne ci-dessus Electrol _x ne peut en aucun cas @re tense responsab e de tout
dommage drect ou fertu t resultant de achat ou de I £i sation de cet asp rateur, Certains etats/prov nces ne permettant pas I exclus on ou les restr ctions de
doTtmages ind rects ou fertu ts les restr ctions c --dessus peuvent ne pas s"app quer.
Cette garantie donne drot a des recours legaux spec f ques et est egaleme _t susceptible d acco der d autres drots variant dun etat/d une prov nce a I autre
ENREGISTRANT
Veuiiiez enregistre votre no svel appare domestiq se Electrelux par voie eectron que sur www.electroluxusa.com (USA) ou www.efeotro uxca.com
(Canada) o_ uti isez la carte port payee ci-jo nte Uenregistreme_t de votre nouveau produ t Electro ux vous permet d obte_ r la garantie Ebctro ux et les
tense gneme_ts proTtotionne s Jes pus rece_ts
LA GARANT[A LIMITADA DE ELECTROLUX
SuaspiradoraElectrohxestagarantizadacontratodoslosdefectosdematerialyfabrcaci6nduranteusonormalenelhogarpotunperiododedosaflosLa
garantiaesotorgadasoame_tealco'npradooginalyalosmiembrosdesuhogar.Lagarantiaestasujetaalassgue_tesestipuacones
Estagarantianocubreaqueliaspiezasdea aspiradoraquenecestansetreempiazadasbajousonormal,tacomobobasparaelpolvodesechables,ventiiadores
ftroscorreasmotrices,escobiiia,cekdasdelceporotativo,impusoresylimpiezaEstagarantianocubrenng0nda[ioomaifuncionamientocausadopot
negligencia,abusoousoquenoestedeac_erdoconelMan_aldeUsuarioAsimismo,nosecubrenngOndefectoodaflocausadopo reparaconesno
autozadasopoe usodeotrosrepuestosquenoseanrepuestosElectrouxautenticos
Electroluxasuopci6n,repararaoreempiazaraunaaspiradorao_napiezaddectuosaqueestecubertabajoestagarantiaEncutupmientodelapoticadela
garantiaElectrouxnoreembosaraalconsumidore precodeco'npra
Pararegistrarsugarantiapotfavorvstewwweectrouxusaco'noco'ripereydevuevalatarjetaderegistrodelagarantiaqueseadjunta
Paraobtenerservciobajolagarantia_steddebedevolverlaaspiradoraopezasdefectuosasjuntoconelcomprobantedecompraacuaiquerCentrodeGarantia
AutozadodeElectrouxoparainformac6nsobreservcoenlosEstadosUndosoCanadapofavolamegratutame_teal:
]_mb 6n puede vstar nuestro stio web en
www, electroluxusa,¢om
LAS SIGUIENTES SON OTRAS LIMITACIONES Y EXCLUSIONES ADICIONALES
C _aiqu e garantia implicita relacionada con su compra o uso de la aspiradora, inchyendo cualquier garantia de comercia dad o cua qu e garantia de aptit d para
un prop6s to determinado se Imita a la durac 6n de esta garantia En algunos estados no se permiten I mitac ones a la durac6n de las garantias imp ctas po Io
tanto las I mitac ones anter ores pueden no ap carse en su caso
Su compensaci6n pot el incumplim ento de esta garantia se limita a la compe_saci6n descrita anterior _sente Bajo n nguna circunstancia Electro ux sera
responsab e pot nngOn dafio consecuente o incidental que _sted pueda sufrr debido a la compra o uso de esta asp radora. En algunos estados no se permite la
exclus6nolmitac6ndedaflosconsecue_tesoincdentales po Iotantolalmitac6noexcius6nanteror puedenoapcarseensucaso
Esta garantia le otorga derechos legales especif cos Usted ademas puede te _er otros derechos que varan de un estado a otto
REGISTRANDO
S rvase reg strar su nuevo prod scto de uso doTt(_stico en forma eJectr6n ca vis tando el stio www.ebctroluxusa.com (Estados Unidos de Amedca) o
www.e ectro uxca.com (Canada), o uti zando la tarjeta de correo prepago adjunta El registrar su nuevo producto Electro ux le permite acceder a la
info mac 6n mas actual zada sobre garantia y proTtoc ones de productos Electro ux

15