BE A PRO IN YOUR KITCHEN
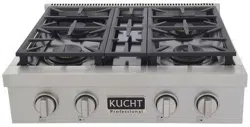
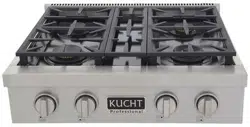
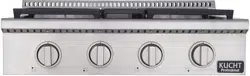
GAS RANGE TOP
www.kucht.com
APPLICABLE MODEL: KRT3618U, KRT3003U.
INSTALLATION GUIDE AND USER MANUAL
36” 6
30” 4
FOR MORE DETAILS AND INFORMATION, PLEASE VISIT OUR WEBSITE WWW.KUCHT.COM
INSTALLATION GUIDE AND USER MANUAL
PROFESSIONAL
GAS RANGE
TOP NG & LPG CONVERTIBLE
Installation and Owner’s
Manual
This manual contain for:
Important Safe guards
Installation
Use and Care
Certain range tops come equipped with special features. Determine from a
study of your range top which of the instructions given in this booklet pertain
to your range top. This booklet is valuable instructions covering the installation
and adjustment and use of your range top.
How to Obtain Service and/or Parts
When your range top does not operate in accordance with the instructions in
the manual, you should contact the dealer in your immediate vicinity for
service.
The
purchaser may contact the service organization noted on the warranty.
Important
TO THE OWNER OF THE RANGE TOP: Retain this owner’s manual for
future reference.
TO THE INSTALLER: Leave this owner’s manual with the range.
FOR MORE DETAILS AND INFORMATION, PLEASE VISIT OUR WEBSITE WWW.KUCHT.COM
INSTALLATION GUIDE AND USER MANUAL
Read and Save These Instructions
FOR MORE DETAILS AND INFORMATION, PLEASE VISIT OUR WEBSITE WWW.KUCHT.COM
INSTALLATION GUIDE AND USER MANUAL
T
able
of Contents
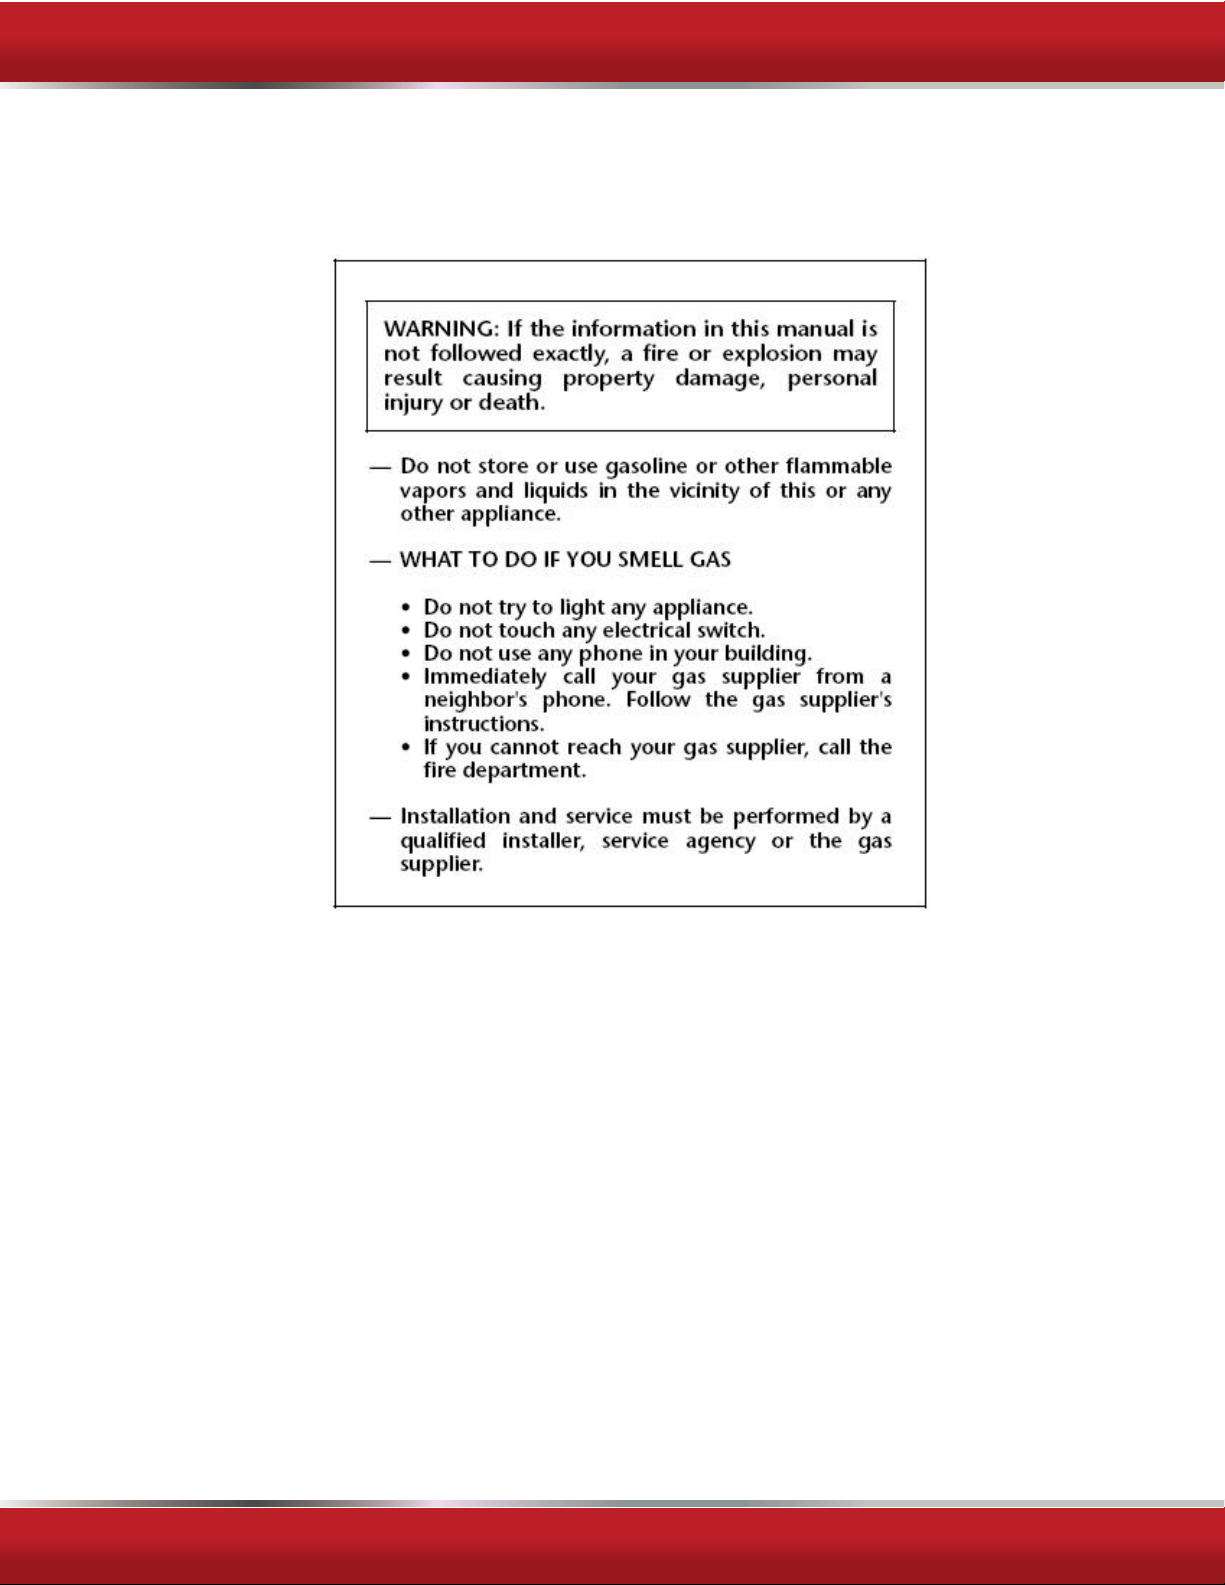
Contents
Important Safeguards
Page 1 - 5
Installation Instructions and Clearances
Page 6-14
Operation of Range top
Page 15 – 21
Cleaning the Range top
Page 22-23
Gas Range top Conversion and Adjustment
Guide
Pages 23-27
Troubleshooting
Pages 27-28
Note: For warranty and service information, please see attachments packaged with range top.

FOR MORE DETAILS AND INFORMATION, PLEASE VISIT OUR WEBSITE WWW.KUCHT.COM
INSTALLATION GUIDE AND USER MANUAL
PLEASE
READ AND
SAVE
THESE INSTRUCTIONS
This manual provides specific operation in structions
for
your model. Use your
range top
only as instructed
in this
manual. These instructions are
not meant to
cover every
possible
condition
and
situation
that
may occur.
Common
sense
and
caution
must be practiced
when installing, operating
and
maintaining
the appliance
Record in the space provided below the
Model
No. and
Serial
No. of this appliance.
These numbers are
found on the
serial plate located
at
back
of range top.
Model
No.
Type
Numb
er
Serial
No.
Purchase
Date
Record these numbers
for future
use.
IMPORTANT: Keep a copy of your bill of sale. The date on the bill
establishes
the
warranty period should service be required. If service is performed, it is in your best
interest
to obtain and
keep all
receipts.
PLEASE
DO THIS NOW!
The PRODUCT REGISTRATION CARD should be
filled
in
completely,
signed and
returned. This information
will register
your product and help us to
serve
you
quickly
in
the future
if
necessary.
FOR MORE DETAILS AND INFORMATION, PLEASE VISIT OUR WEBSITE WWW.KUCHT.COM
INSTALLATION GUIDE AND USER MANUAL
2
.
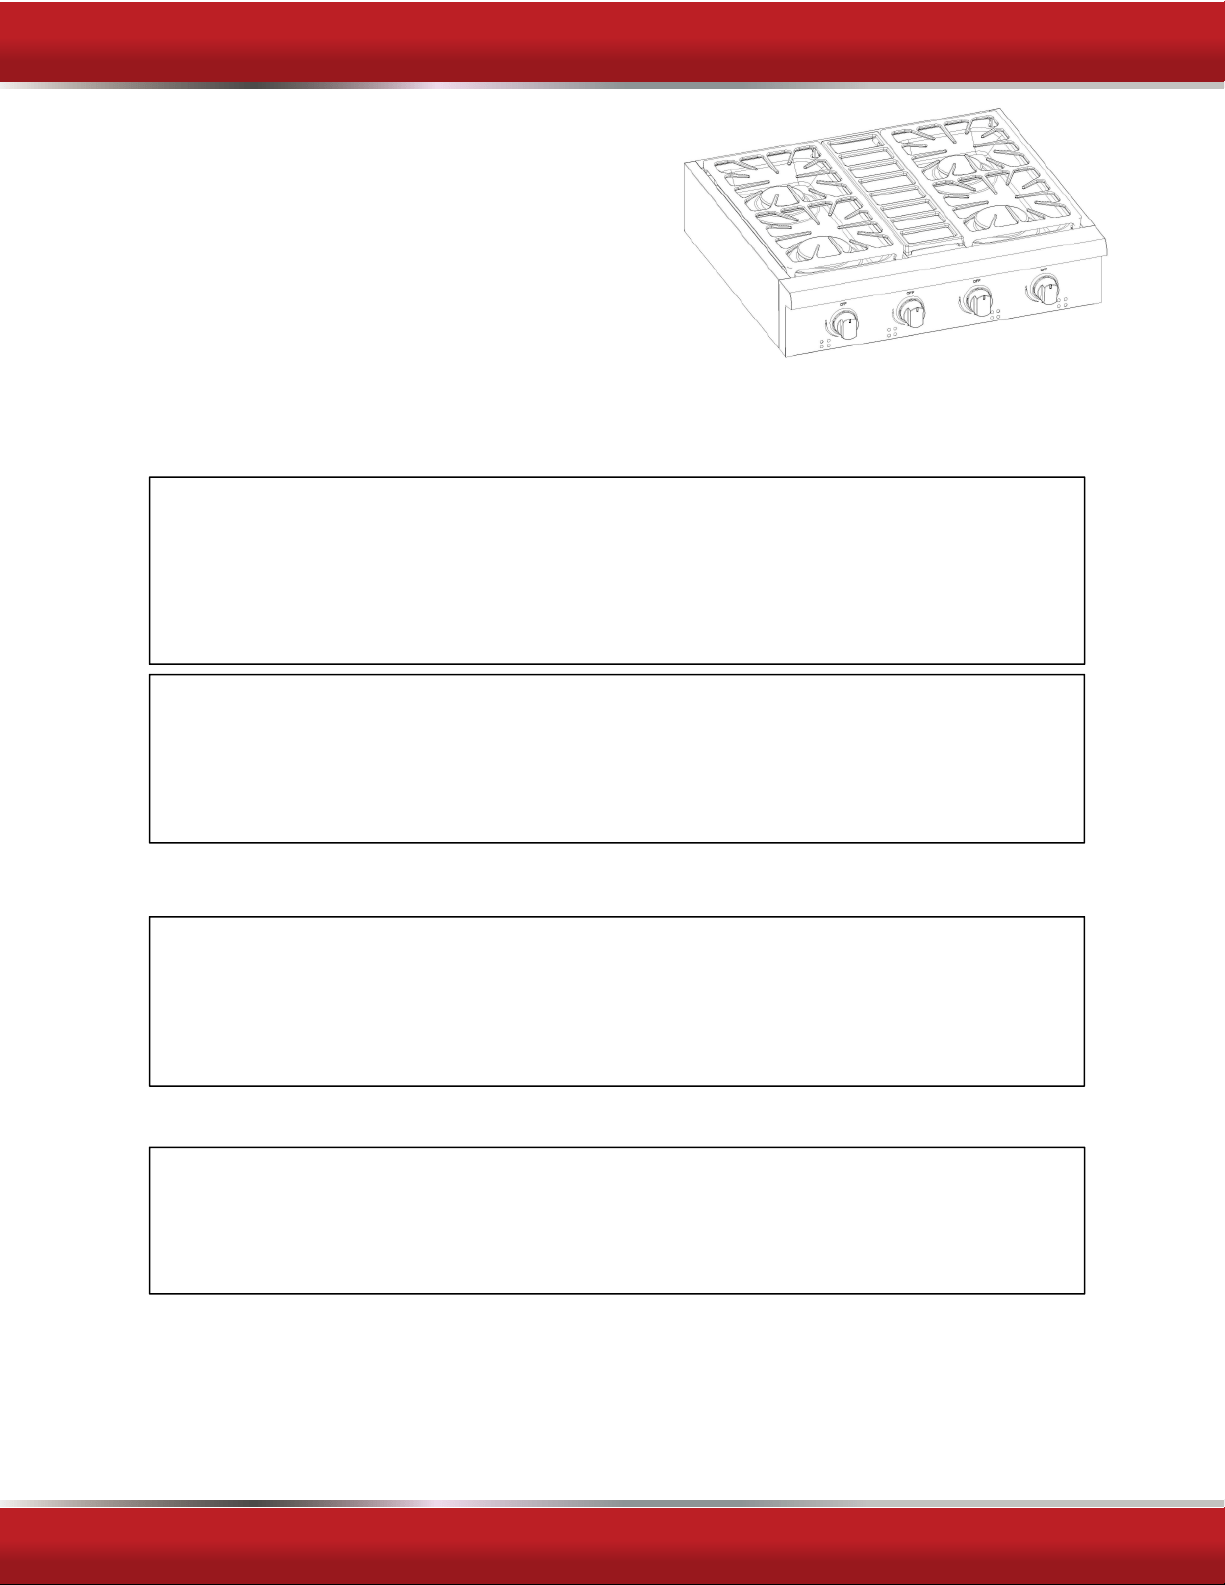
READ ALL IMPORTANT SAFE GUARDS AND
ALL INSTRUCTIONS BEFORE USING THE
APPLIANCE.
If you smell
gas
Open windows
Don’t touch
electrical
switches
Extinguish any
open flame
Immediate call your gas
supplier
For your Safety
Keep
appliance is a clear
and
free
from
combustible materials, gasoline
and other
flammable vapors
and liquids.
Warnings
Destroy the carton and
plastic
bags after the range top is
unpacked. Children
should not
use
packaging material
for
play,
cartons covered with rugs,
bedspreads,
or
plastic
sheets
can become
air-tight
chambers. Remove all staples from the carton. Staples can cause
severe cuts
and
destroy finishes if they contact with
other
appliances
or furniture.
Be safety conscious. The
preparation
of food on a
range top requires temperatures
that
could cause severe burns. Before using this new
appliance, carefully
read and follow all
instructions.
The
California Safe
Drinking
Water
and Toxic Enforcement
Act
of
1986
(Pro position 65)
requires
the Governor of
California
to
publish
a
list of substances known to the State of
California
to cause cancer or
reproductive harm.
In
addition, businesses
must
warn customers
of
potential exposure
to
such
substances.
Users of this appliance
are here by warned
that the
burning
of
gas
can
result
in
low
level exposure to some of the listed
substances, including formaldehyde,
benzene, soot
and carbon monoxide. This is caused
primarily
from the
incomplete
combustion of
natura
l
gas or LP fuel. Properly adjusted burners will minimize incomplete
combustion.
FOR MORE DETAILS AND INFORMATION, PLEASE VISIT OUR WEBSITE WWW.KUCHT.COM
INSTALLATION GUIDE AND USER MANUAL
3
Exposure to these
substance s
can also be
minimized
by
properly venting
the burners by
opening
a
window
or
using
a
ventilating
hood or fan.
Notice
:
Never keep pet bird s
in
the kitchen. Birds have a very sensitive
respirato
r
y
system. Fumes released during the
self-cleaning
cycle, overheated cooking oil, fat,
margarine
or
overheated non-stick cookware may
be
harmful
or
fatal
to birds.
PROPER INSTALLATION: Be sure your appliance is properly installed and
grounded by
a
qualified technician
in
accordance with
the
National Fuel
Gas Code ANSI
Z223.1-latest edition, and the National Electrical Code ANSI/NFPA No. 70-latest
edition. Install only
per
installation instructions provided
in the
literature package
for this
range top.
Ask your dealer
to
recommend
a
qualified technician
and an
authorized repair
service.
Have the
technician familiarize
you with the
locations
of the manual gas shut off valve
and
gas
meter in the even tit is
necessary
to shut off
gas supply
to the
range top during
an emergency.
USER
SERVICING:
Do not
repair
or replace any
part
of the appliance unless
specifically recommended in this
owner’s
guide.
All
other
servicing
should be
done
only
by a
qualified technician.
This
will reduce
the
risk
of
personal injury
and
damage
to the range top.
Storage
in or on
appliance:
Flammable materials
should not be stored near surface
burners. These
include
paper,
plastic
and cloth
items (such
as
cook books,
plastic
ware
and
towels)
as
well
as
flammable liquids.
Do not store
explosives,
such as aero
sol cans,
on or near the range top.
The following situations could cause bodily
injury
or property
damage.
DO NOT TOUCH
SURFACE
BURNERS OR
AREAS
NEAR
TH
ESE
BURNERS.
Surface
burners
may
be hot even though the
flame
is not
visible.
Areas
near
surface
burners
may
be come hot enough to
cause
burns. During and after use,
do not touch, or let
clothing
or other
flammable materials
touch these
areas
until
they
have had
sufficient
time to cool.
NEVER use this appliance as a space
heater
to heat or
warm
the room. Doing
so
may result
in carbon
monoxide
poisoning.

FOR MORE DETAILS AND INFORMATION, PLEASE VISIT OUR WEBSITE WWW.KUCHT.COM
INSTALLATION GUIDE AND USER MANUAL
4
Wear proper apparel.
Loose
fitting
or
hanging garments
should never be worn
while using
the
appliance.
Do not let
clothing
or other
flammable materials
contact
surface
burners until
they
have had
sufficient
time to cool.
When
heating fa-tor grease, watch it closely and do not leave unattended.
Fa-tor
grease may
catch fire if
allowed
to become too hot.
Do not use
water
or
flour
on grease fires.
Smother
the fire with a pan
lid,
baking
soda or use a dry
chemical
or
foam-type
extinguisher.
Operate of the
Surface Burners.
When the burners are operated for the first
time,
a
small
amount of
smoke may
be
generated
due to tape
residue
or
manufacturing lubrication.
THIS IS NOT DANGEROUS. Operate the burners
for about
five
minutes to rid the burners of this
material
before cooking.
Use only
dry
pot holders. Wet or damp pot holders on hot
surfaces
can result in burns
from steam. Do not let the pot holder touch hot heating areas. Do not use a towel or
other
bulky clothing stead
of a pot holder.
Use
proper
flame size.
Adjust flame size
that so it does not extend beyond the
edge
of
the
utensil.
The
use
of
under sized cookware
will expose
apportion of the burner
flame
and may result in severe burns or direct contact and ignition of clothing. Also, proper
relationship
of
utensil
to burner
will improve
efficiency.
Know which knob controls each
burner.
Place a pan of food on the burner
before turn ignition, and turn the burner off before
removing
the pan.
Always
turn to the ignite position when lighting top burners. Then adjust the flame size
so it does not extend
beyond
the
edge
of the utensil.
Utensil handles should be turned inward and not extend over adjacent surface
burners.
To
reduce
the
risk
of burns,
ignition
of
flammable e materials,
and
spillage
due
t
o
unintentional
contact
with
the
utensil,
the
handle
of a
utensil should
be
positioned
so
that it
is
turned
inward,
and does not
extend
over
adjacent surface
burners.
Never leave the
surface burners
unattended.
Boil over s
can
leave greasy spills
that can
create excess smoke
or a
fire hazard,
and
cookware
that has
boiled dry may warp
or melt.
Allow
parts
to cool to room
temperature
before touching or removing them from
the range top. When a surface burner is first turned off, the burner and grate are hot
enough
to
cause
burns.
Clean the
r
a
nge top
r
e
gularly
to keep all parts clean of grease or residue which
could catch
fire.
Pay particular
attention to the
area under neath each surface
burner.
Do
not allow fa-tor grease to
accumulate.
If a hood has been installed for use with the
range top, ensure that it is kept
clean
and in good
working
order.
Greasy
deposits in the
fan
could catch fire. Refer
to the hood
manufacturer’s instructions
for cleaning.
FOR MORE DETAILS AND INFORMATION, PLEASE VISIT OUR WEBSITE WWW.KUCHT.COM
INSTALLATION GUIDE AND USER MANUAL
5
These cook tops must be installed in conjunction with a suitable overhead vent
hood. Due to the high capacity of these professional cook tops, attention shoul
d
be paid to the hood and duct work installation to ensu
r
e
it meets local building
codes.
To eliminate risk of burns or fire by reaching
over
heated surfaces, unit cabinet’s
storage located above the cooking
surface
should be avoided
Do not use a “cyclonic” range top hood with this product. Some range top
hoods
circulate air by blowing downward toward
the
range top
then
drawing
the
air
back
up into the hood. This
creates
a
“cyclonic” air wash
that is
designed
for
electric range tops only.
A
“cyclonic”
hood
may cause
the
burners
of a
gas range
top
to
operate
improperly.
Glazed cooking utensils: Only certain types of glass, glass/ceramic, ceramic,
earthenware,
or other
glazed utensils are suitable
for
cooking
due to the sudden
change
in
temperature. Check
the
manufacturer’s recommendations
for
range top
use.
Do not place plastic salt and pepper shakers, spoon holders or plastic
wrappings on top of the
range top.
These
items could
melt or
ignite. Pot
holders, towels
or wooden spoons
could catch fire if place
too
close
to the flame.
Do not use a wok equipped with a metal
ring that
extends beyond the
burner.
Because
this
ring
traps
heat,
the burner and
grate could
be
damaged.
Also,
the burner may not
work properly, creating
a carbon
monoxide level above
current
health
standards.
Flexible
Connectors:
If the gas
range top
is connected to a gas supply
with a metal flexible connector, disconnect the range top with CAUTION
for service or cleaning.
Flexible connectors are not intended
for
repeated bending. Do not allow
cleaners to make contact with flexible connectors.
The connect or and its fittings
are
designed
for
use only on the
original
installation and are not to be reused
for another
appliance or at
an other
location.Connectors must comply with A NSIZ 21.24.
It is good practice
for
each household to have an
appropriate fire
extinguisher for
use in the event of a house fire.

FOR MORE DETAILS AND INFORMATION, PLEASE VISIT OUR WEBSITE WWW.KUCHT.COM
INSTALLATION GUIDE AND USER MANUAL
6
Installation Instructions
Be sure the
range top
is
properly in stalled
and grounded by a
qualified technician.
It is
the
responsibility
of the
technician
to make certain that your range top is properly
installed. Situations cause by improper
installation
are not covered under the
warranty.Any expenses incurred due to such situations
will
not be paid by the
manufacturer of the range top.
Leak testing of the appliance shall be conducted according to the manufacturer’s
instructions,
or
according
to
local building codes
and
gas regulations
in
your
area.
GAS
CONNECTIONS (All Units)
NOT ICE TO
MASSACHUSETTS
APPLIANCE DEALERS:
Be sure this document is
included
in
all gas range top appliances
sold to
consumers
in
the
State
of Massachusetts.
NOTICE:Massachusetts law
requires
the following:
Appliances
must be
installed
by a
licensed
plumber or
gas
fitter.
Appliances
must be connected with a three
(3)
foot
(36”maximum
length)
Flexible gas
connect or and
A“T”
handle type manual gas valve
in the
gas supply line
to the appliance.
Have the
dealer where
you
purchase
your new
range top install
it or have them
recommend a
qualified installer.Installation
must conform with
local codes.
In the
absence
of
local codes,
the
installation
must conform with the
National
Fuel Gas
Code,A NSI
Z223.1-Latest
Edition in the
U.S.A.
or the CAN/CGA
B149.1
or.2
Installation
Codes in Canada.
The
range top
should be connected to the
supply line
with 1/2-inch
black
iron
pipe or a
certified flexible type
stove connector.Top revent
gas leaks,
put an
approved
sealing
compound
which
is
resistant
to
liquefied petroleum gases
on
all
threaded connections.
Important:
Do not
apply pressure directly
to the range top
manifold
pipe when
tightening supply connections.
The
manifold
pipe should be held
securely
at the
pressure regulator
to prevent
twisting.
Hold the
pressure regulator
with a wrench
during
the
tightening
of the
connection,
or the
manifold
pipe
may
be
twisted
and
split
and
cause
a
dangerous
leak.
The
installation
of
range tops designed
for
manufactured(mobile)
home installation
must conform with the
Manufactured Construction
and
Safety,Title
24
CFR,
Part
3280,[formerly
the
Federal standard
for
Mobile
Home
Construction
and Safety,
Title
24,HUD(Part
280)]
in the
U.S.A.
or
C.S.A.Standard
CAN/CGA
Z240.4.2
in
Canada
or,when such
standards
are not
applicable,
with
local
codes.
FOR MORE DETAILS AND INFORMATION, PLEASE VISIT OUR WEBSITE WWW.KUCHT.COM
INSTALLATION GUIDE AND USER MANUAL
7
The
installation
of
range tops designed
for
recreational vehicle installation
must
conform with state or other codes or,in the
absence
of such
codes,
with the
Standard
for
recreational vehicles.
ANSI
A 119.2.2–1982
in the
U.S.A.
or
CA
N/CGA
Z240.4.2
in Canada.
The
installation
of
appliances designed
for
recreational
park
trailers
must conform
with state or other codes or,in the
absence
of such
codes,
with the
standard
for
recreational
park
trailers,
ANSIA119.5.
Note:
Check all piping connections
in the unit for
leaks.
Never use an open
flame
to
check
for
gas leaks.
Use a soap
solution,
75%
water,
25% dish
washing
soap.It is
possible
for
connections
made at the
factory
to
leak,
due to
vibration encountered
in
transportation.Make certain
you have
checked
them
all,
and
repair any
connections
that leak.
The
appliance
and its
individual
shut-off
valve
must be
disconnected
from the gas
supply piping system during any pressure testing
of that
system
attest
pressures
in
excess
of½ p sig.
The
appliance
must be
isolated
from the
gas supply piping system
by
closing
its
individual manual
shut-off
valve during any pressure testing
of the
gas supply
piping
system
at test
pressures equal
to or
less
than 1/2psig.
Gas line shut-off
valve
To
reduce
the
possibility
of
gas leaks,apply
Teflon tape
or a thread compound approved for use with LP or
Natural
gases
to
all threaded
connections.
Connect the
supplied
½”
threaded
pipe to the units
regulator located
on the back left of the unit.We suggest
using
a½”
female
to 3/8”
male fl are
adapt or on the end
of the½”
threaded
pipe supplied.
Use a 5/8”
flexible appliance
connect or to connect your
gas supply
to the
appliance.
A3 foot leng this
recommended
for
ease
of
installation
but other lengths
are
acceptable.
Never use an old connector when
installing
a new range.
Check
for
leaks using
a
leak
detector or
soapy water,
75%
CLEARANCES
water,
25% dish
washing
soap.
All
units must be
installed
in
accordance
to
minimum
rear and
side wall
clearances
and
clearances extended vertically
above
cooking
top
which
are state don the serial
plate (the
serial
plate is
located
on the back of the unit.)
Make
sure that the
wall coverings,
counter tops and
cabinets
around the
range top
can
with stand temperatures
of up to
200˚
F/93˚C
generated
by the range top.
FOR MORE DETAILS AND INFORMATION, PLEASE VISIT OUR WEBSITE WWW.KUCHT.COM
INSTALLATION GUIDE AND USER MANUAL
8
It is the
responsibility
of the
installer
to
make certain
that the
range top
is properly
adjusted
at the time of
installation Situations caused
by improper
adjustments
or
improper
installation
are not
covered
under the
warranty.Any expenses incurred
due
to such
situations will
not be paid by the
manufacturer
of the appliance.
Note:
Ba
sed
on 24” (61
cm)
deep cabinet
This
range top may
be
installed directly adjacent
to
existing
36”
(91.4
cm)
High base cabinets.
The
range top
CAN NOT be
installed directly adjacent
to
side walls,
tall
cabinets,tall appliances,
or other
side vertical surfaces
above 36”
(91.4
cm)
high.
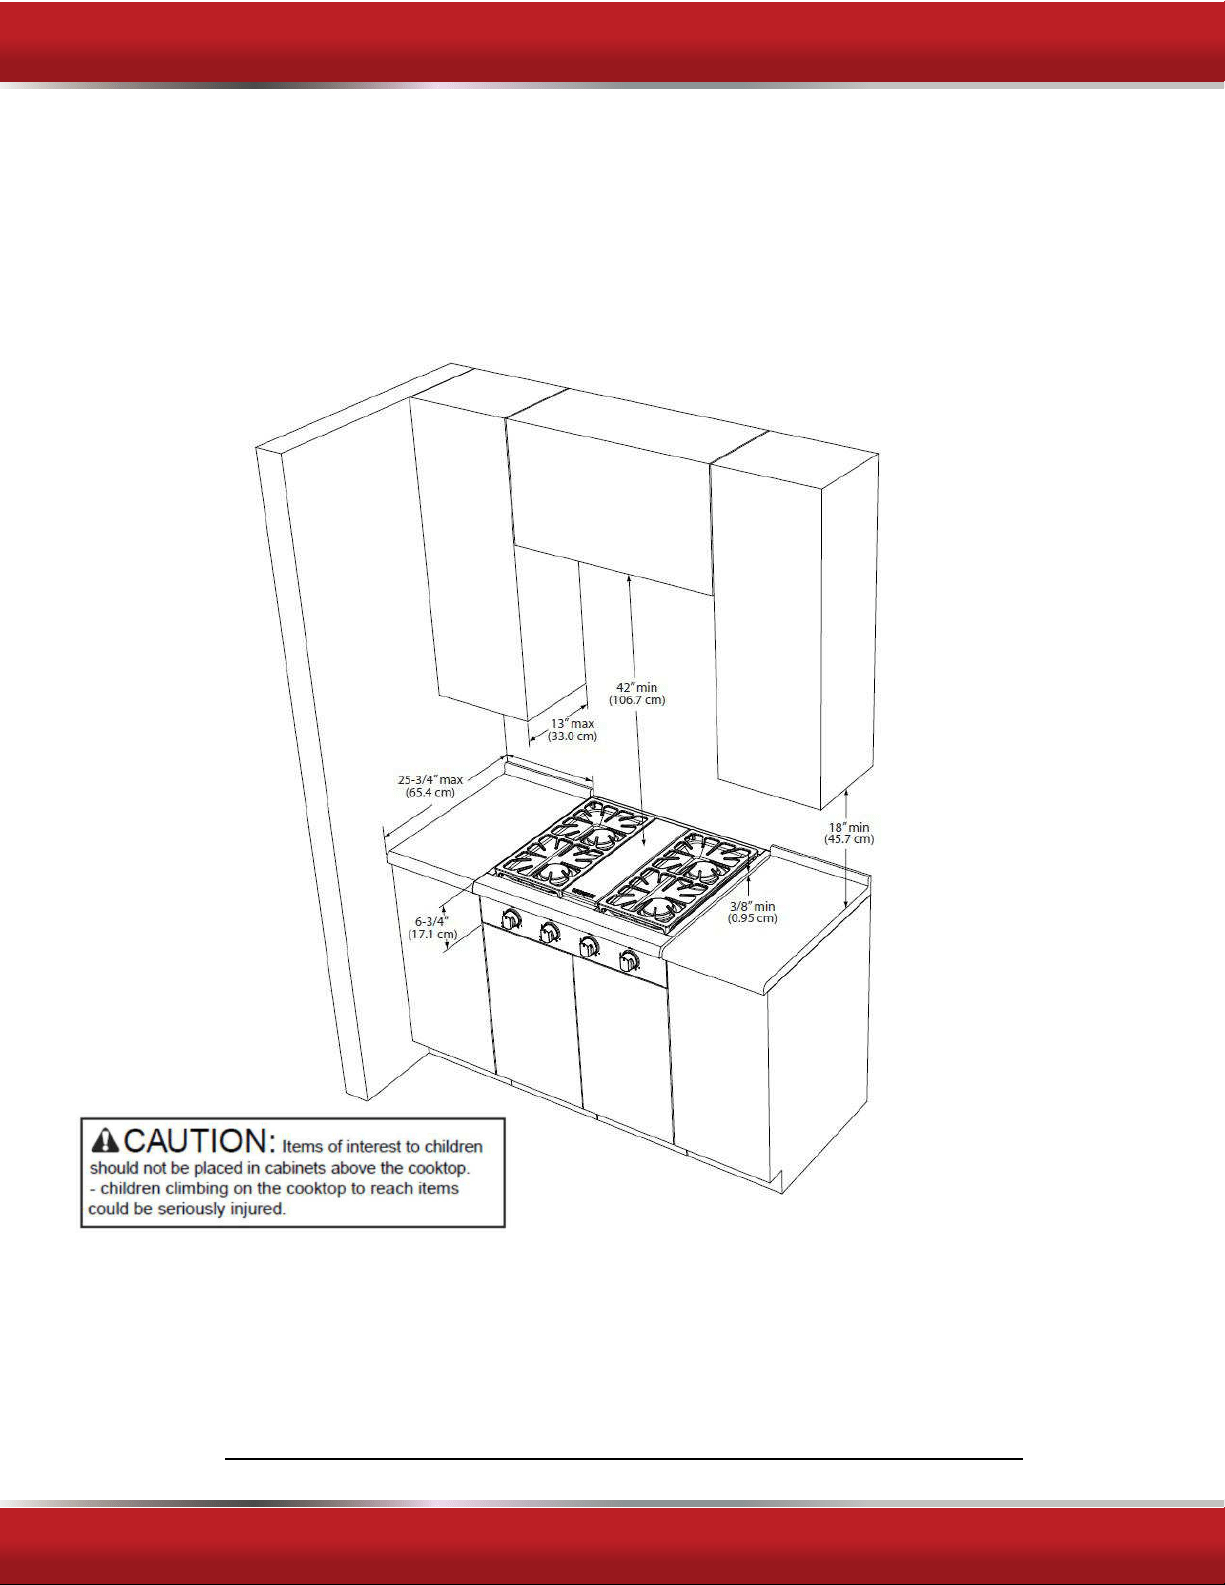
Th re must be a
minimum
of 6”
(15.2
cm)
side clearance
from the
FOR MORE DETAILS AND INFORMATION, PLEASE VISIT OUR WEBSITE WWW.KUCHT.COM
INSTALLATION GUIDE AND USER MANUAL
9
Range top
to such
combustible surfaces
above the 36”
(91.4
cm)counter
height.
Within
the 6”
(15.2
cm)
side clearance
to
combustible vertical surfaces
above
36”
(91.4cm),
the
maximum wall cabinet
depth must be 13”
(33.0
cm)and
wall cabinets within
this 6”
(15.2
cm)
side clearance
must be 18”
(45.7
cm)
above the 36”
(91.4
cm)high counter top.
Wall cabinets
above the range top must be a
minimum
of 42”
(106.7
cm)
above the range top
cooking surface
for the
full
width of the
range
top.
This
minimum
height
requirement
does not
apply
if a
range top
hood
is installed over the
cooking
surface.
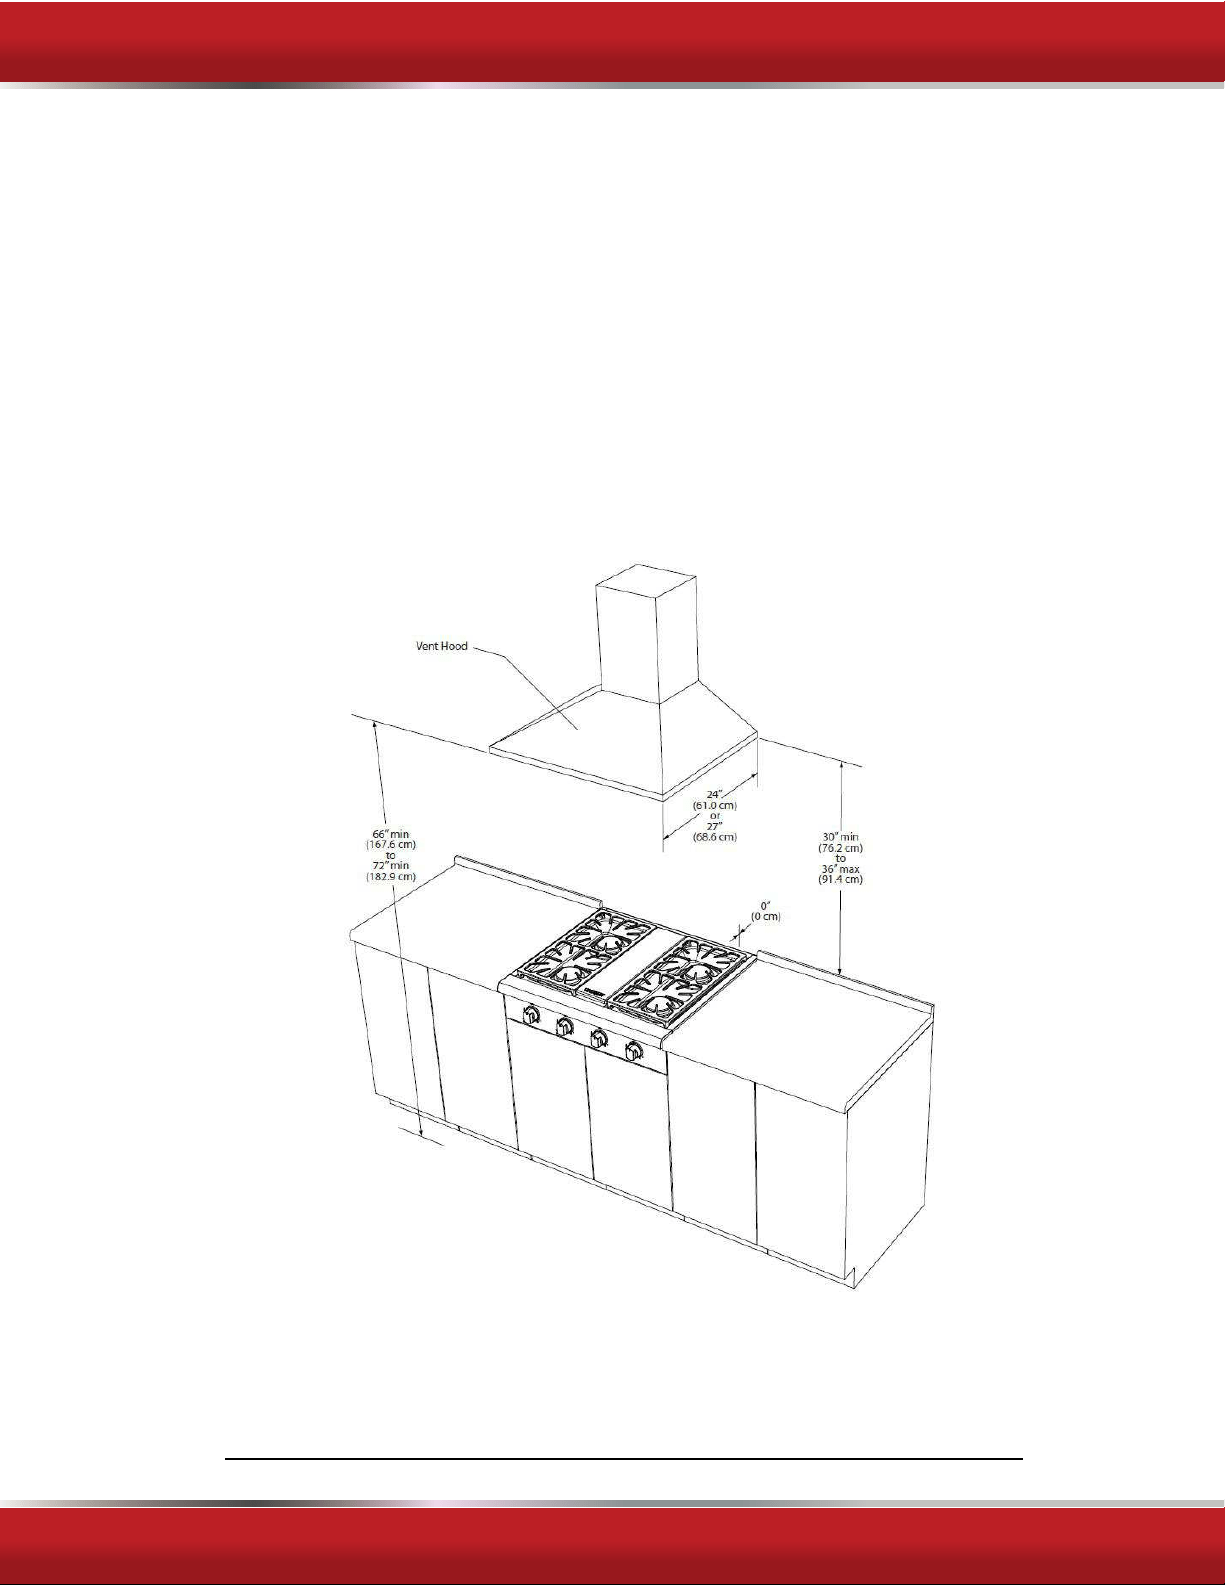
Wall
Installation
Note
:
Minimum clearance
for back wall
is 0” with
back guard
or high shelf.
If a
range
hood is
installed
above the
range top,maintain
a 30”
(76.2
cm)minimum
clearance between
the range top and the bottom of the
range
hood.The
range
hood
must
exhaust outside.
For best
smoke elimination,
the
lower edge
of the hood
10
Should be
installed
a
minimum
of 30”to a
maximum
of 36”above the cook top
surface.Recommended
CFM should beg
450
cfm for the 30”range top.
Do not
install
with a down draft
ventilation
system
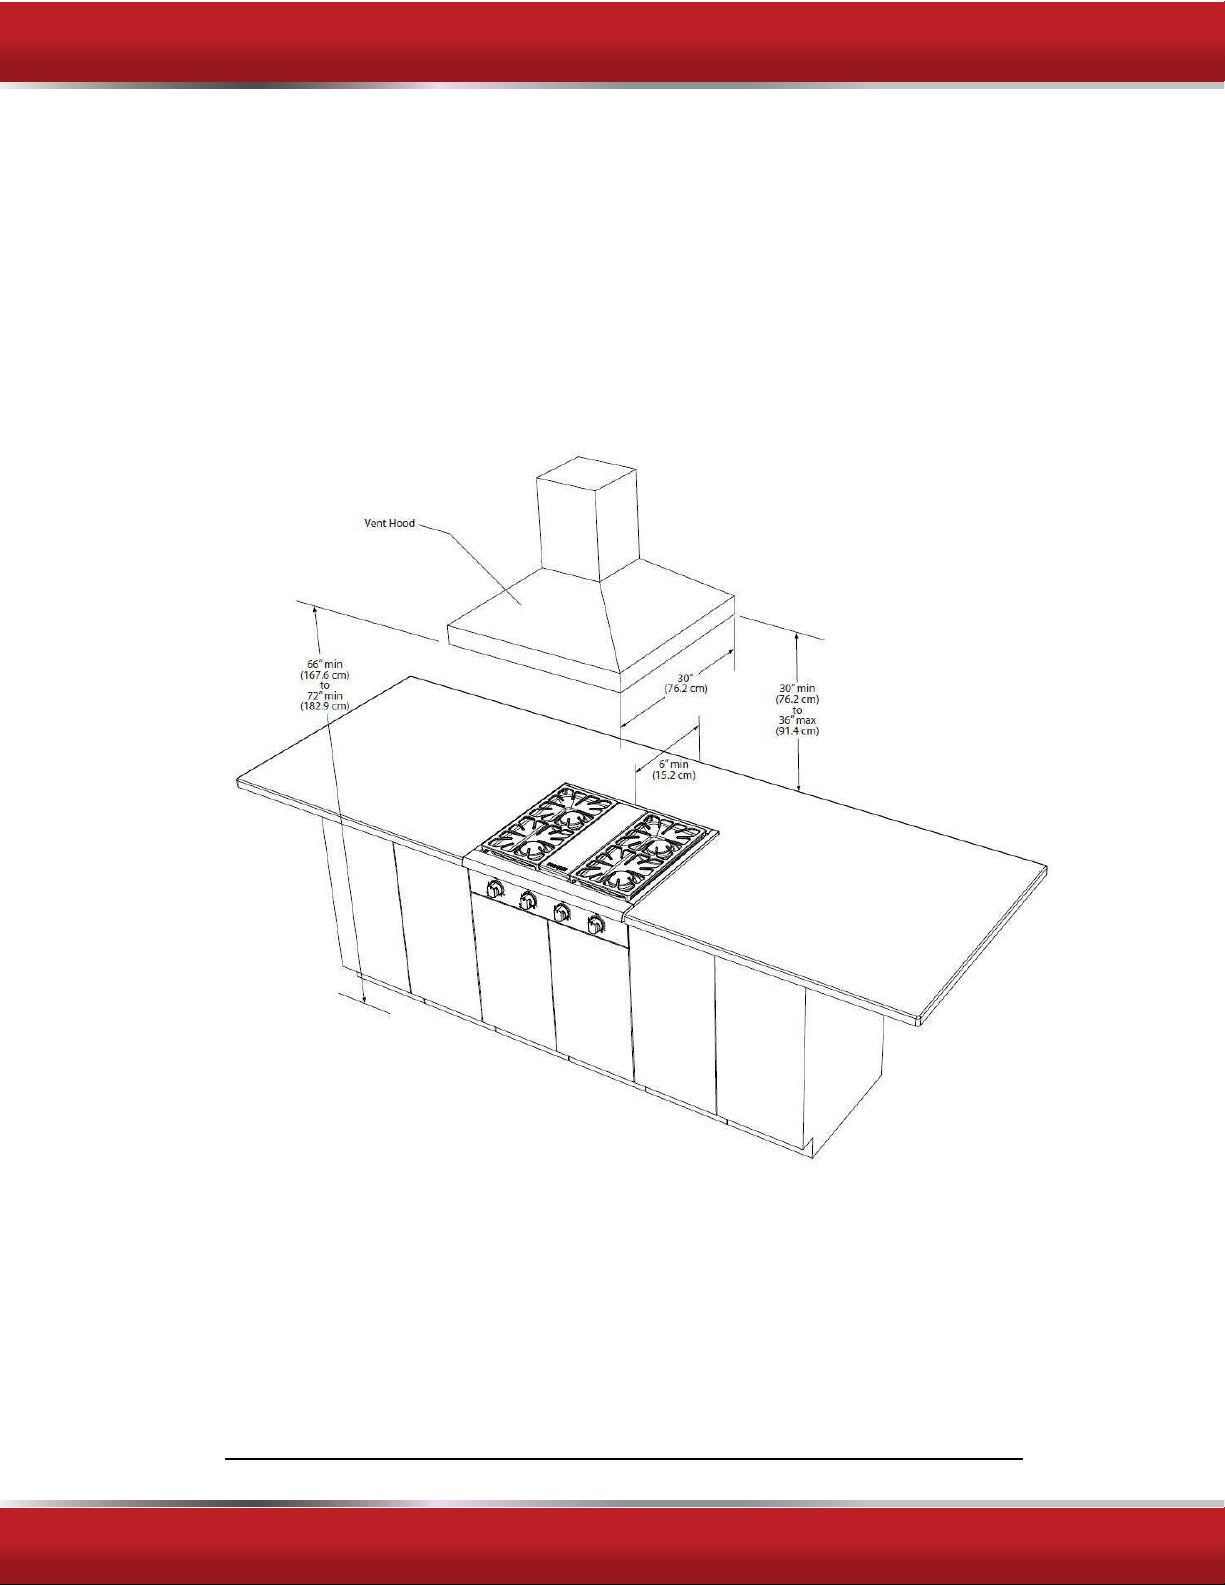
Island
Installation
Note:There must be a
minimum
of 6”
(15.2
cm)
clearance
from rear of range top to a
combustible wall.Clearances
from
non-combustible materials
are not part of the ANSIZ21.1
scope and are not
certified by CSA. Clearances
to
non-combustible materials
must be approved
by the
authority having
jurisdiction.
This
range top may
be
installed directly adjacent
to
existing
36”
(91.4
cm)
High base cabinets.
The
rangetop
CANNOTbe
installeddirectlyadjacent
to
sidewalls,
tall
cabinets,tall appliances,
or other
side vertical surfaces
above 36”
(91.4
cm)
FOR MORE DETAILS AND INFORMATION, PLEASE VISIT OUR WEBSITE WWW.KUCHT.COM
INSTALLATION GUIDE AND USER MANUAL
FOR MORE DETAILS AND INFORMATION, PLEASE VISIT OUR WEBSITE WWW.KUCHT.COM
INSTALLATION GUIDE AND USER MANUAL
11
high.
There must be a
minimum
of 6”
(15.2
cm)
side clearance
from the
range top
to such
combustible surfaces
above the 36”
(91.4
cm)counter
height.
Within
the 6”
(15.2
cm)
side clearance
to
combustible vertical surfaces
above
36”
(91.4 cm),
the
maximum wall cabinet
depth must be 13”
(33.0
cm)and
wall cabinets within
this 6”
(15.2
cm)
side clearance
must be 18”
(45.7
cm)
above the 36”
(91.4
cm)high counter top.
Wall cabinets
above the range top must be a
minimum
of 42”
(106.7
cm)
above the range top
cooking surface
for the
full
width of the
range
top.
This
minimum
height
requirement
does not
apply
if a
range top
hood
is installed over the
cooking
surface.
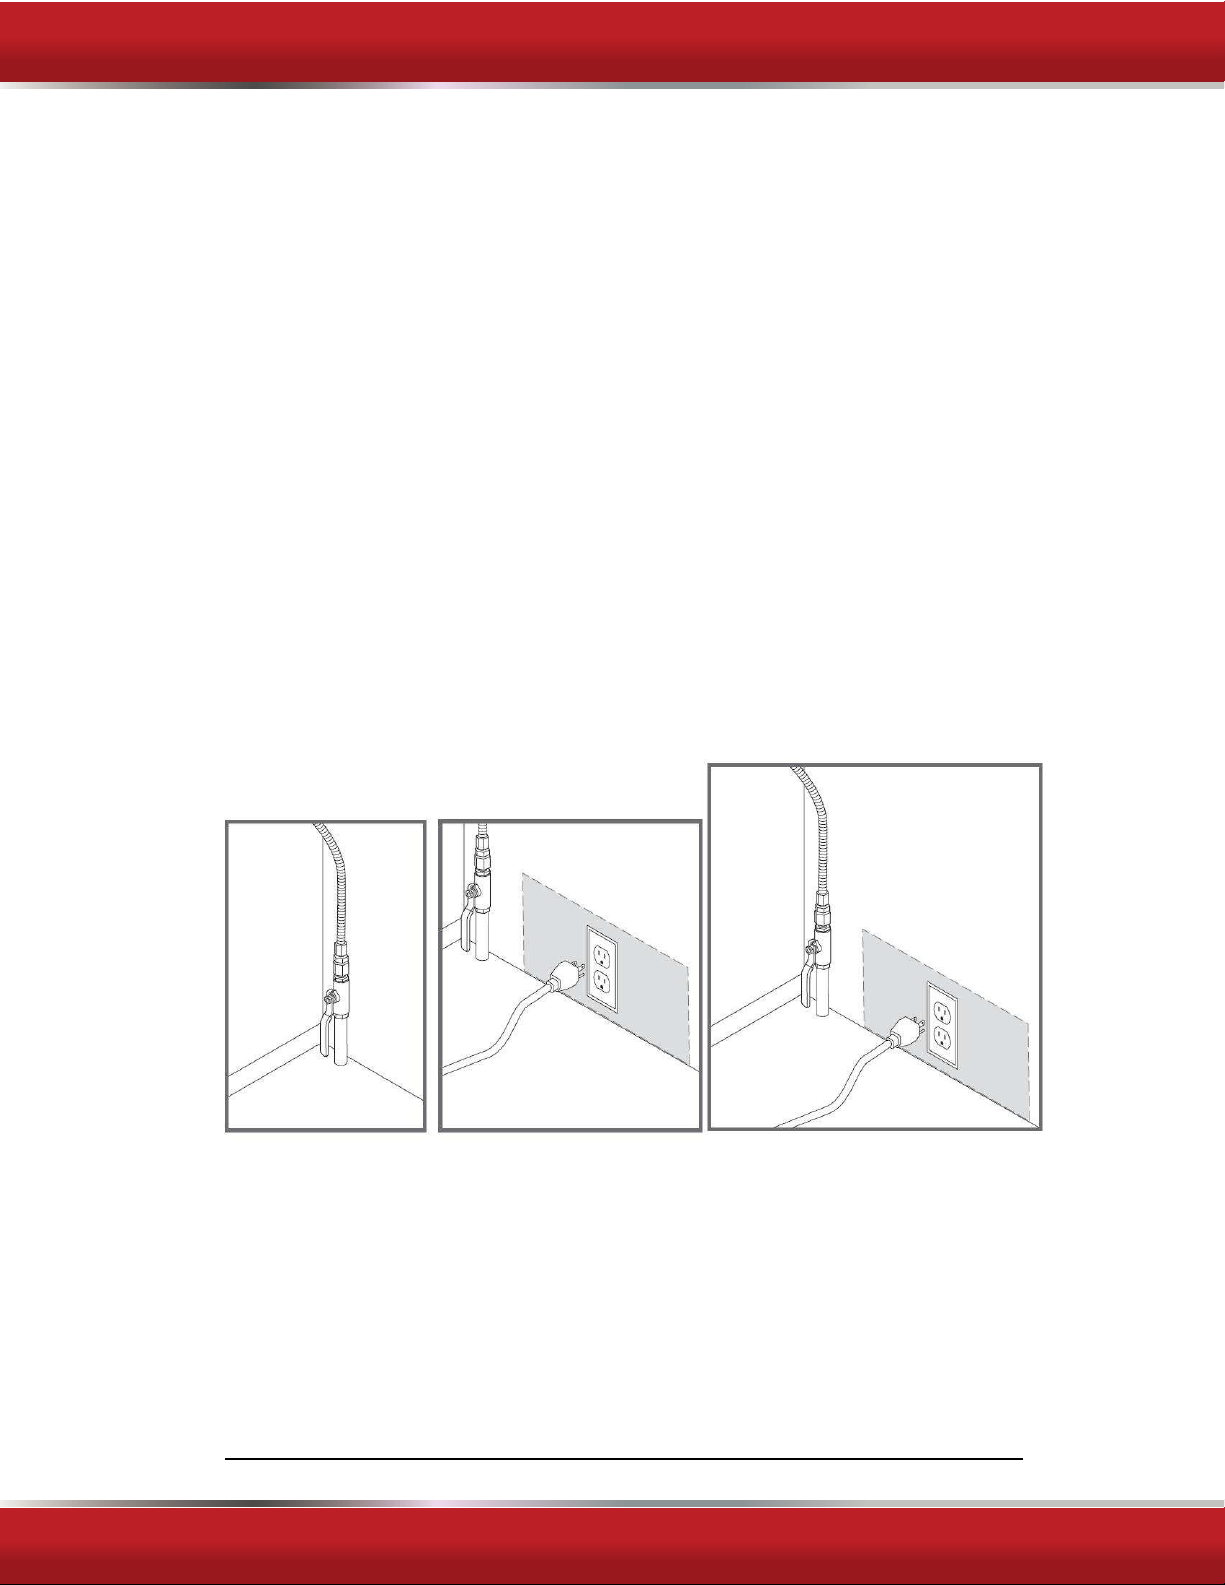
Make
sure there is a power out let
within
the reach of the
range top’s
power
supply
cable(within
36"/30 cm from the right
side
of the
range top).
The outlet
should be
accessible
with the
range top
installed.
FOR MORE DETAILS AND INFORMATION, PLEASE VISIT OUR WEBSITE WWW.KUCHT.COM
INSTALLATION GUIDE AND USER MANUAL
12
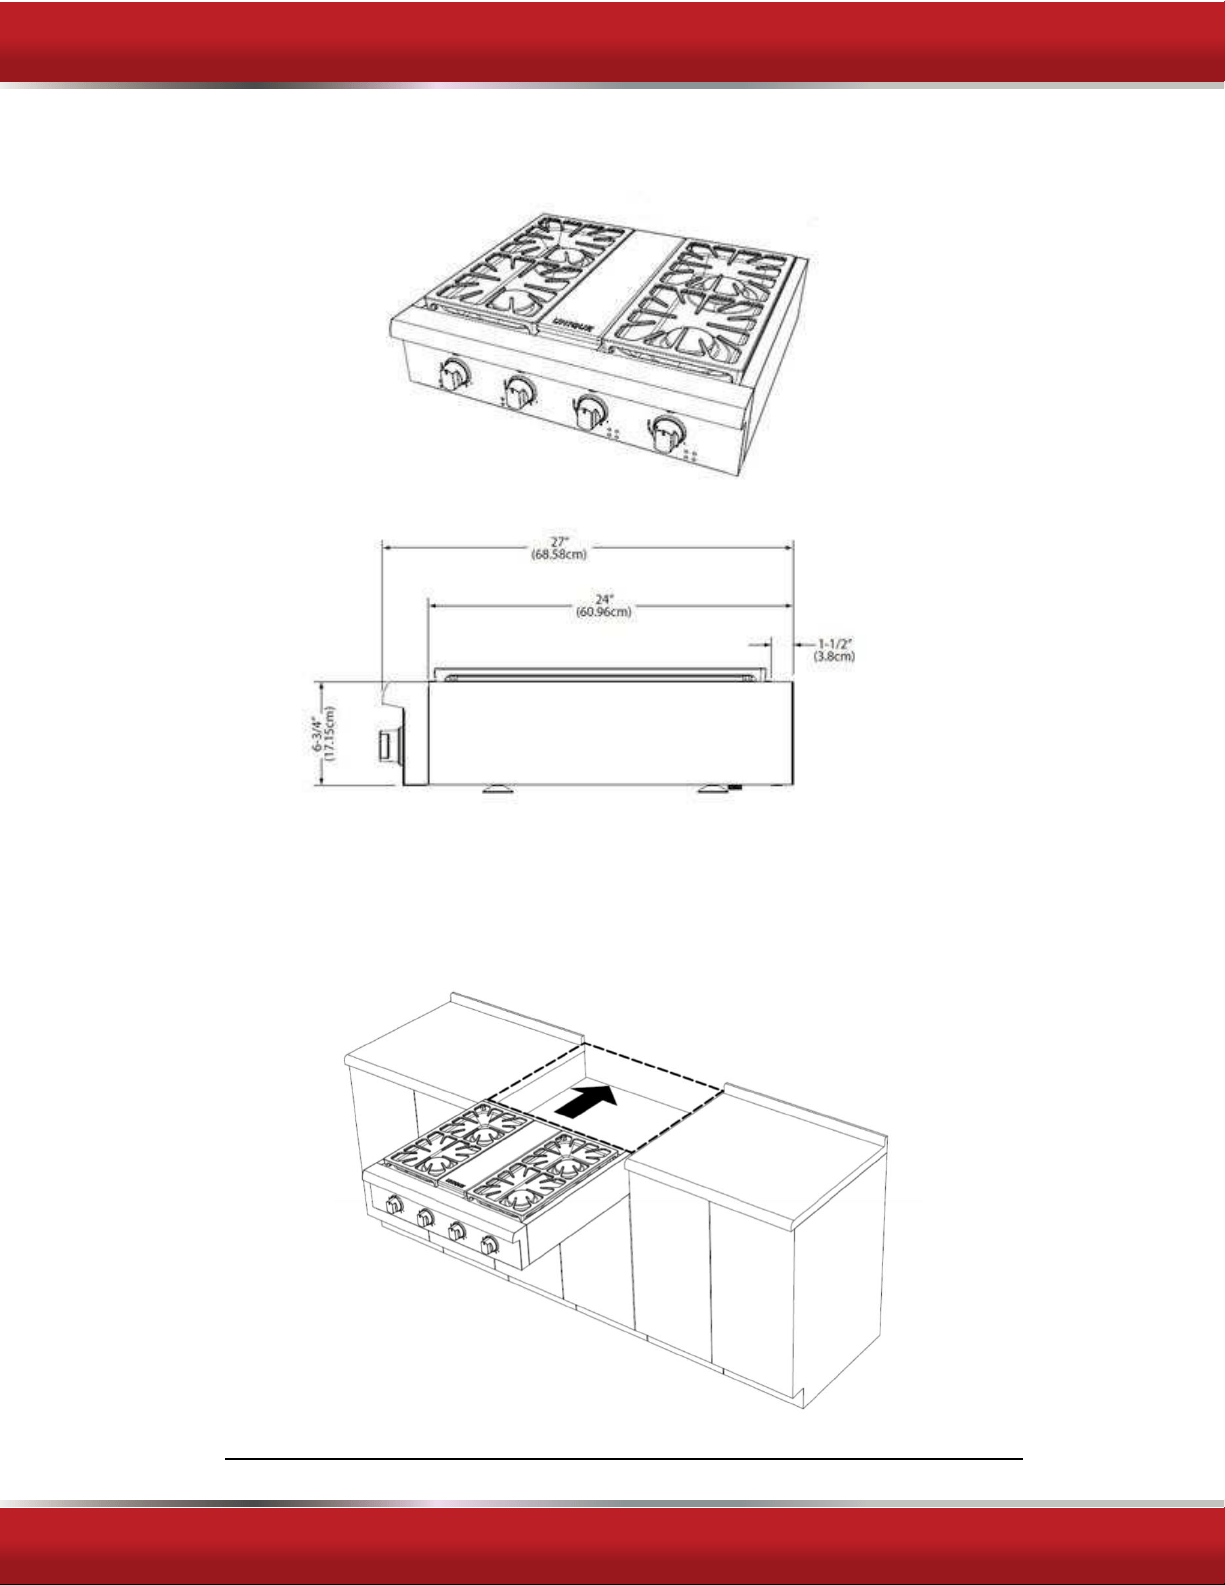
Make
the counter top cut-out
following
the
dimensions given
in the
illustration
above.
Base below range top must be of an on-combustible
material.

FOR MORE DETAILS AND INFORMATION, PLEASE VISIT OUR WEBSITE WWW.KUCHT.COM
INSTALLATION GUIDE AND USER MANUAL
13
Installing the Range top
Remove
the
range top
from its
package
and set
aside all
burners,burner caps
and grates.
Gently slide in
the cook top in to the cut-out,
make
sure your cut-outs are
there for the
gas
connection and
electrical
hookup
(if
you choose to use it).
Once this is done
you’re
now
ready
to
slide
the
range top all
the
way
back
to
the wall.
Install all
burners and burner caps
Install all
grates.
Connecting gas to range top
This
range top
is
designed
to operate at a
pressure
of 4”of
water
column on
natural
gas
or 10”of
water
column on propane
gas
(LPG).
Make
sure you are
supplying
your
range top
with the
type
of
gas
for
which
it is
designed.
It’s shipped
for
use with NG. This range top is
convertible
for use on
natural gas
(LPG)
also.
When
using
this
range top
on LPG
gas,conversion
must be
made by a
qualified
LPG
installer
before
attempting
tooperatetherangetoponthat gas.
For correct
operation,
the
pressure
of
natural gas supplied
to the
regulator
should be
between
4”and 5”of
water column.
For LP
gas,
the
pressure supplied
must be
between
10”and 12”of
water
column.
When
checking
for correct operation of the
regulator,
the
inlet pressure
must beat
least
1”more than the
operating manifold pressure
as
given
above.
The
pressure regulator located
at the
inlet
of the
range top manifold
must
remain
in
the
supply line regardless
of whether Natural(NG)or Propane
(LP)gas
is being
used.
A
flexible metal appliance
connect or used to connect the
range top
to the
gas
supply should be 3 feet/91.4 cm
max.
in length for
easy installation.
In
Canada,
flexible connectors should be
single wall metal
connectors
less
than 6
feet/182.9 cm in length.
Shut off the main
gas supply valve
before
removing
the old
cooking appliance
(if
applicable)
and
leave
it of fun til the new hook-up has been
completed.
Don’t forget
to
relight
the pilots on other
gas appliances
when you turn the
gas
back on.
Because
hard
piping restricts
movement of the
range top,
the use of a
CSA
certified
flexible metal appliance
connector is
recommended unless local
codes
require
a hard-

FOR MORE DETAILS AND INFORMATION, PLEASE VISIT OUR WEBSITE WWW.KUCHT.COM
INSTALLATION GUIDE AND USER MANUAL
14
Piped
connection.
Never
reuse an
old connect or when
installing
a new
range top.
If
the hard
piping
method is
used,
you must
care fully align
the pipe.
To prevent
gas leaks,
use pipe joint compound
resistant
to NG
gases
on
all
male
external
pipe threads.
1. In an
easily accessible location,install
a
service manual gas
shut off
valve.
Be
sure
every one operating
the
range top
knows
where
and how to shut off the
gas supply
to the cook
to
p.
2. Use a
flexible gas line
to connect to the 1/2”
fitting,located
on the botto
m
right hand corner under neath the range top.
3. When
all
connections have been
made,
be sure
all range top
controls are in
the off position and turn on the main
gas supply valve.Check
for
gas
leaks
by
using
a 75 %
water,
25% dish
washing
soap
solution.
If a
gas leak
is
present,shut off
gas immediately,
tighten
all connections,
and retest for
leaks.
#
4.
Any
opening in the
wall
behind the
appliance
and
in
the floor under the
Appliance shall
be sealed.
FOR MORE DETAILS AND INFORMATION, PLEASE VISIT OUR WEBSITE WWW.KUCHT.COM
INSTALLATION GUIDE AND USER MANUAL
15
OPERATION
OF
RANGE TOP
HRT3609U
FOR MORE DETAILS AND INFORMATION, PLEASE VISIT OUR WEBSITE WWW.KUCHT.COM
INSTALLATION GUIDE AND USER MANUAL
16
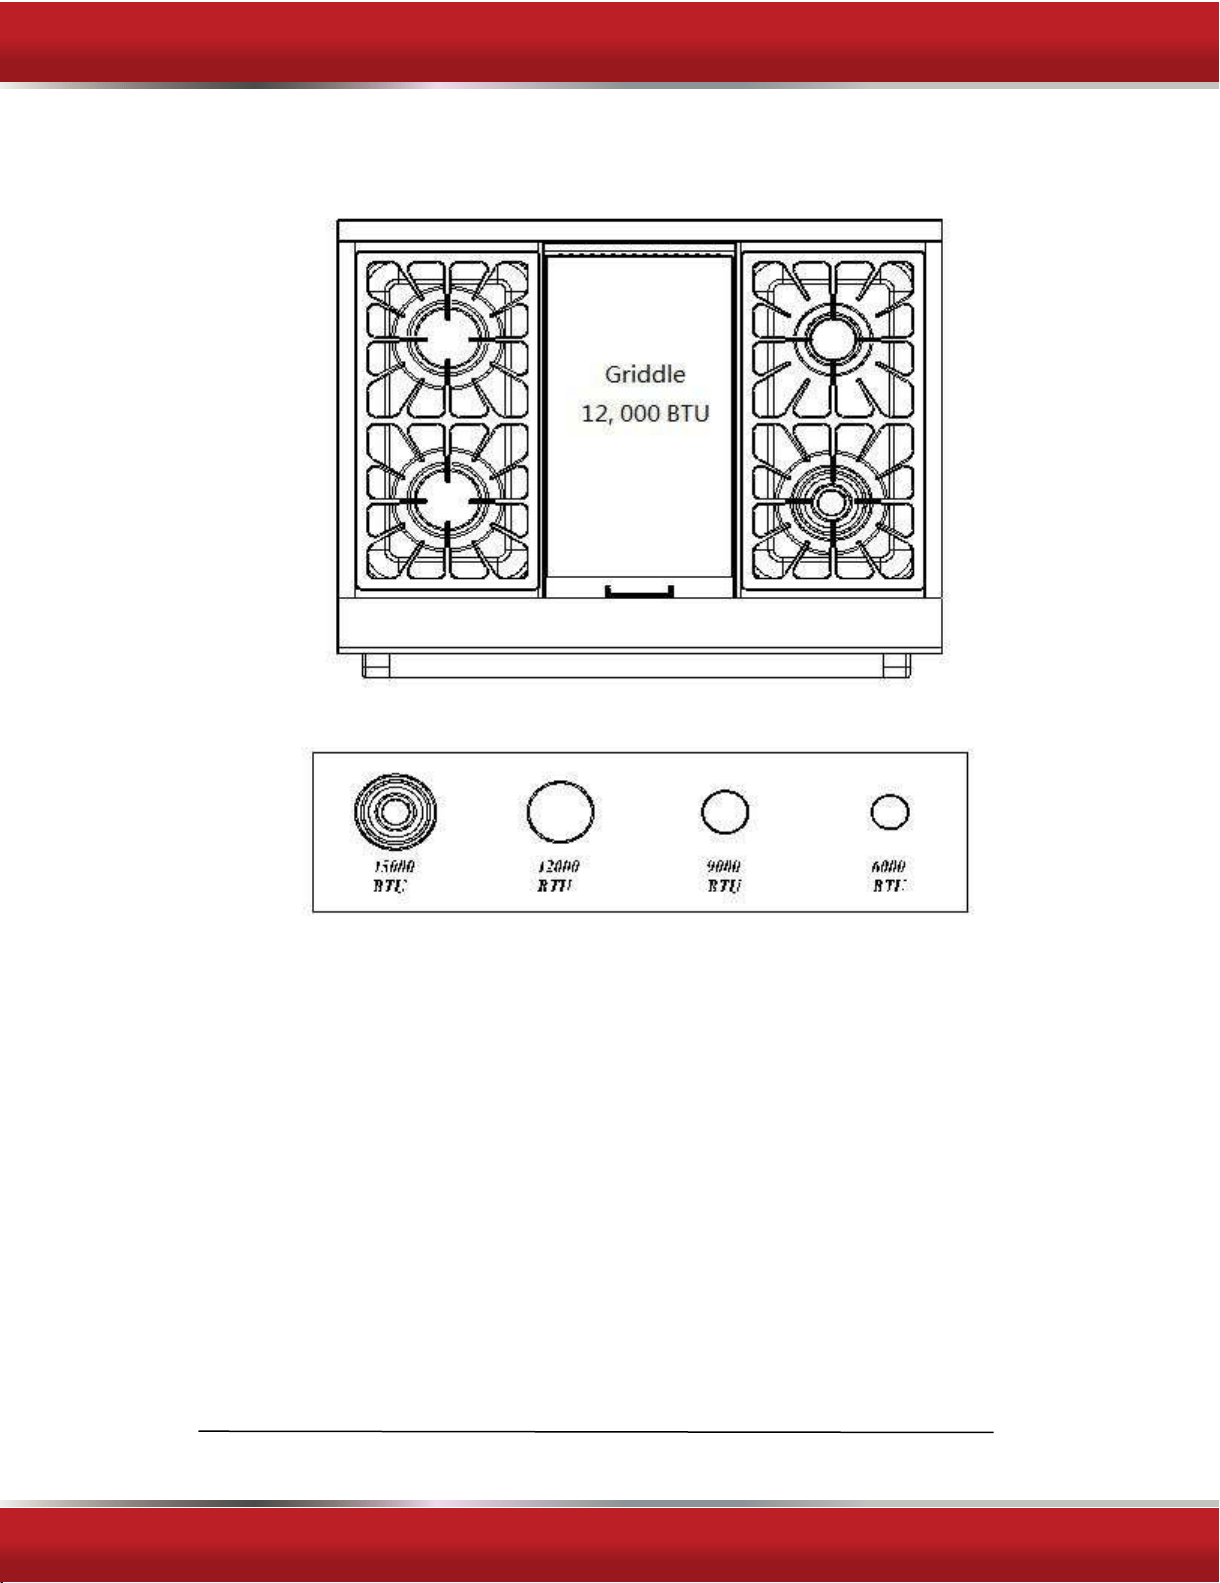
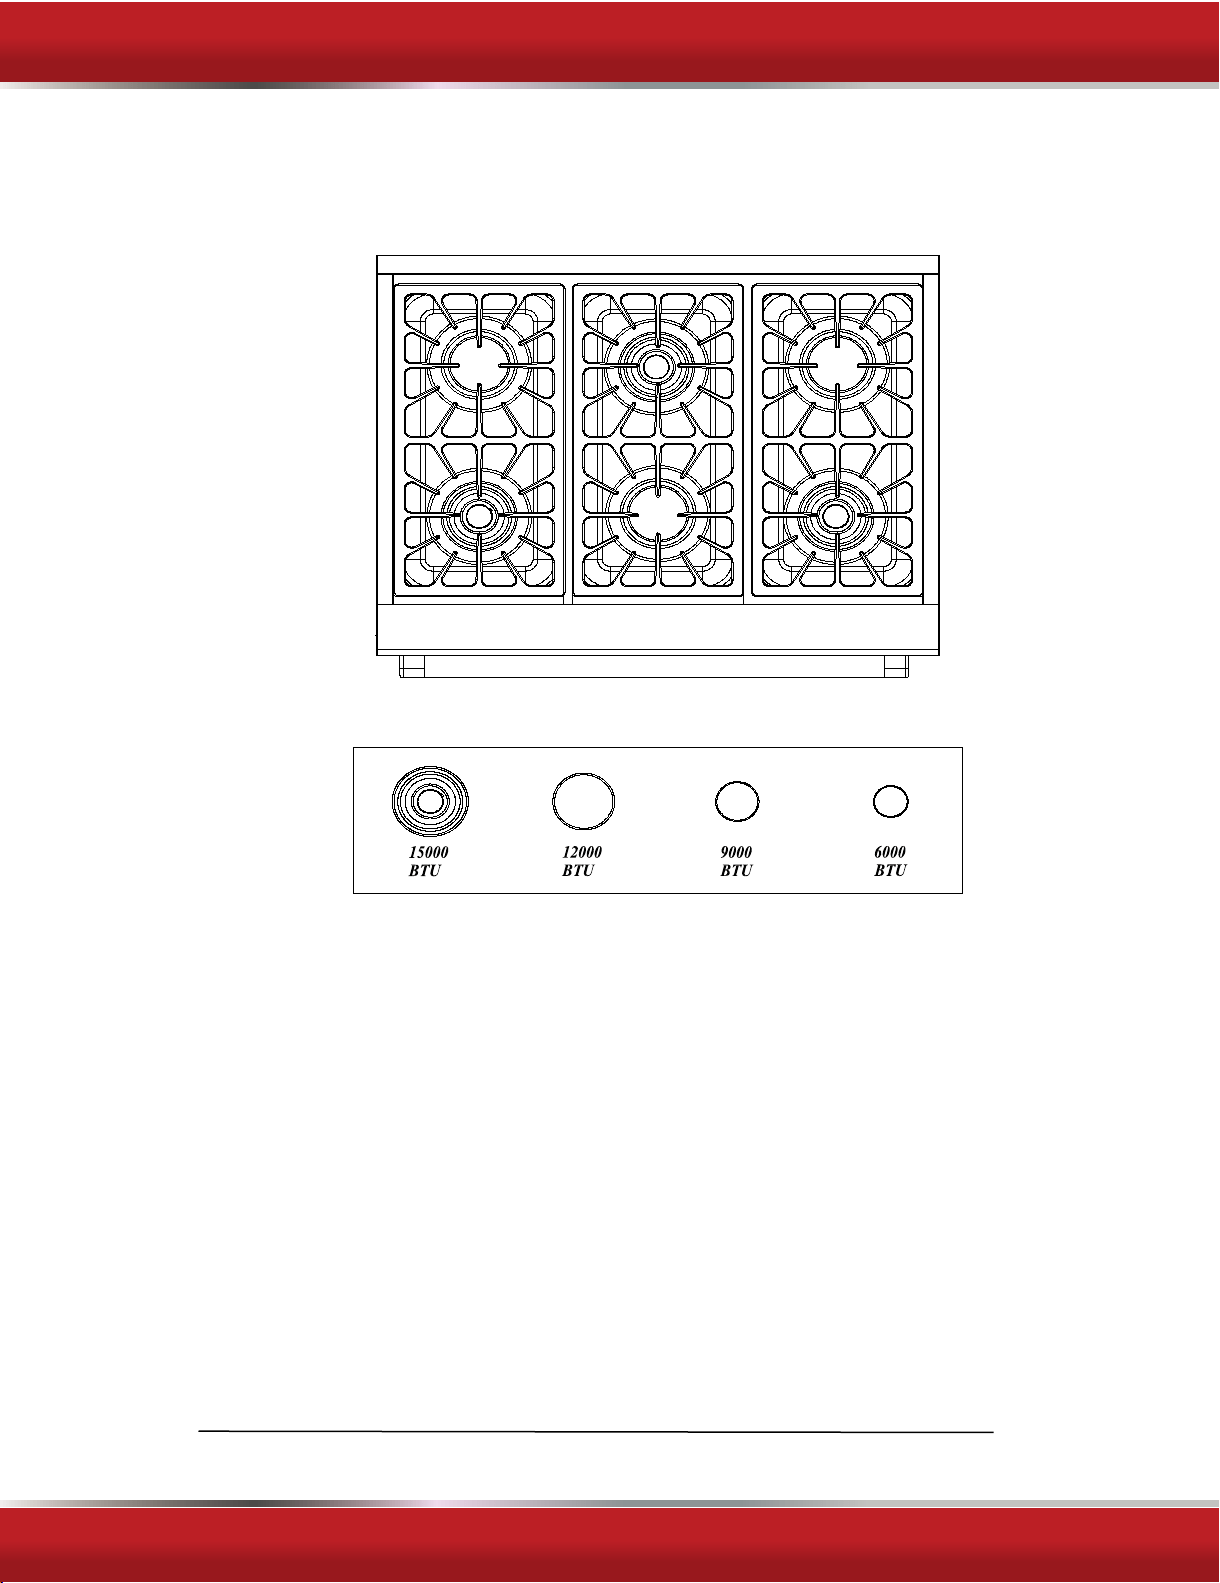
HRT36”
FOR MORE DETAILS AND INFORMATION, PLEASE VISIT OUR WEBSITE WWW.KUCHT.COM
INSTALLATION GUIDE AND USER MANUAL
17
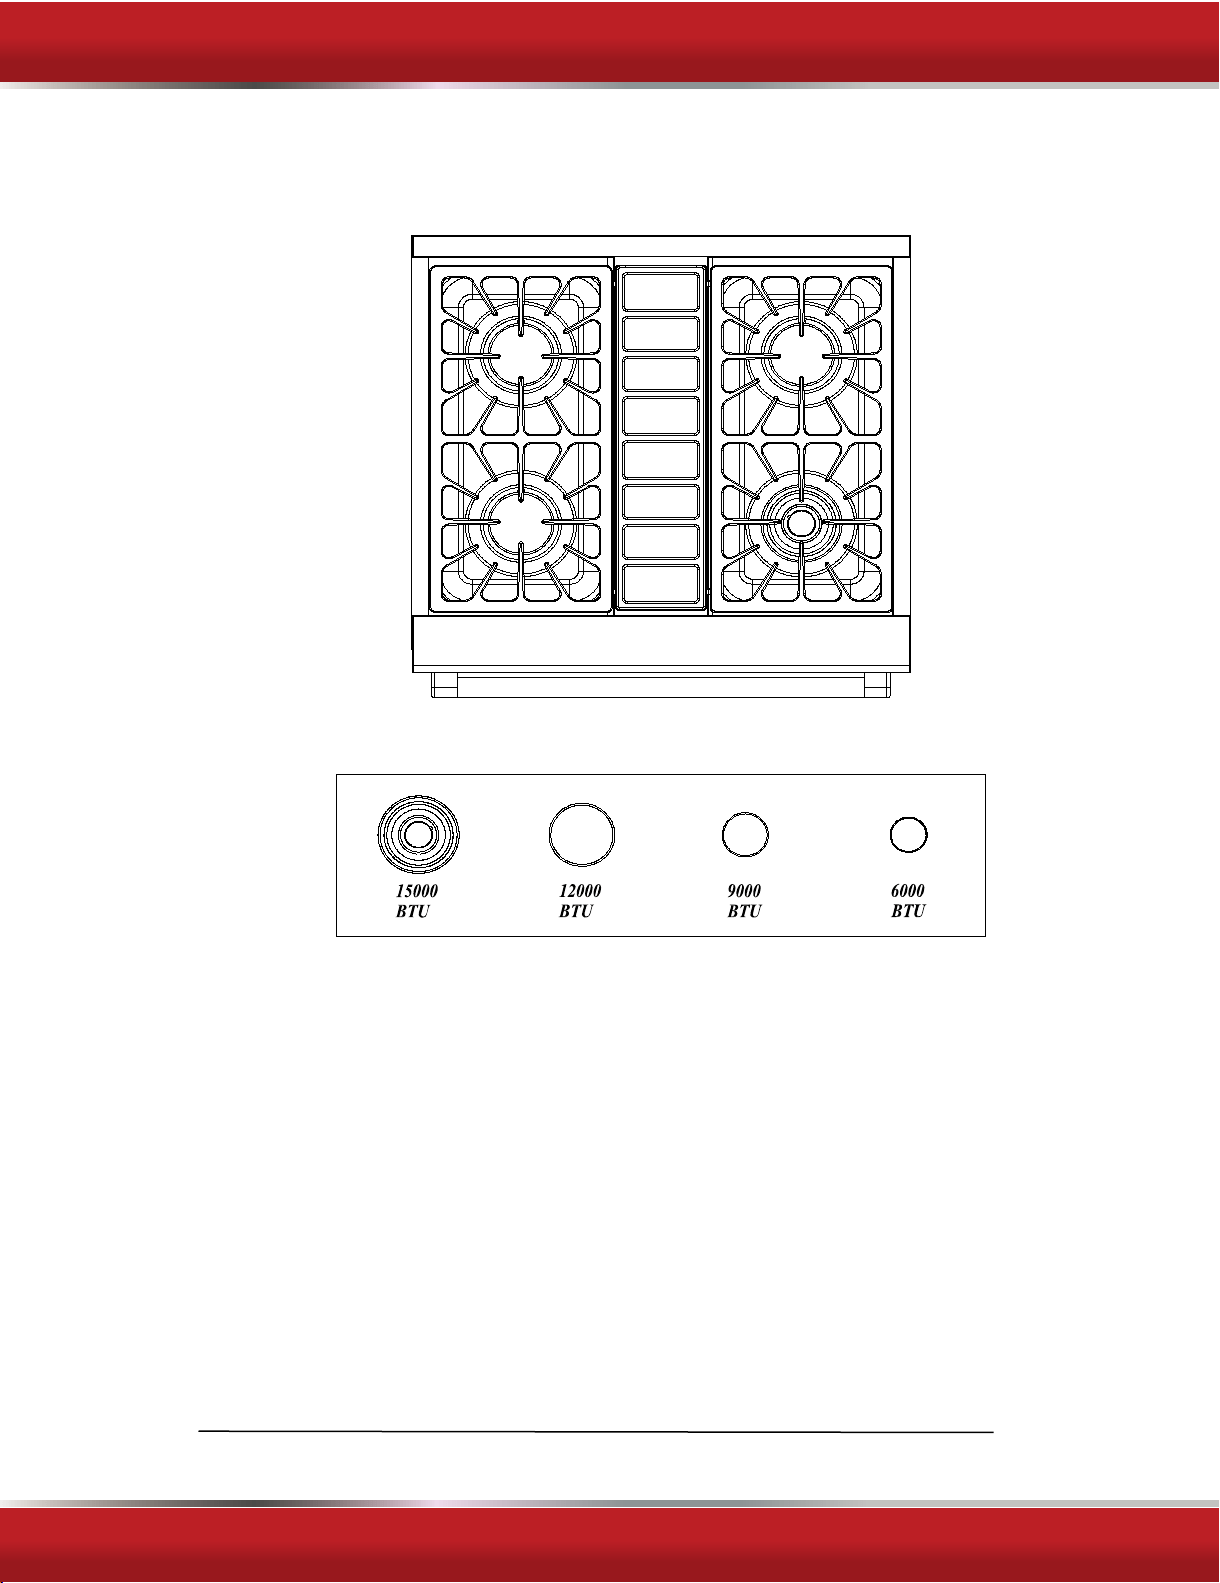
HRT30”
18
Guidelines for using range top burners
There are dual burners have the same low turn-down setting (SIM) for gentle simmering
(620 BTU/hr). Use the SIM setting for melting chocolate and butter, cooking rice and
delicate sauces, simmering soups and stews, and keeping cooked food hot.
Never leave the cook top unattended when in use. Boil over causes smoking and greasy
spills that may ignite.
Never allow flames to extend beyond cookware or curl up its sides. This could discolor
and damage the utensil and you may get burned touching a hot handle.
Keep handles out of the way. Turn handles so that they don’t extend over the edge of the
range or another burner that is on.
Take care when deep-frying. Oil or fat can overheat very quickly, particularly on a high
setting.
Make sure that all burner parts are properly in place. Incorrectly or incompletely
assembled burners may produce dangerous flames. See‘Replacing the burner parts’ in
‘Care and cleaning’.
Keep the burners clean. Especially after a spill or boil over, make sure you clean the
affected burners before using them again. Food residue may clog the igniter and the
notches of the flame spreader, stopping the burner from functioning correctly. See ‘Care
and cleaning’ for instructions.
Check that the burner flames are regular. They should be blue with no yellow tipping,
and burn without fluttering all around the burner cap. If not, see ‘Troubleshooting’ for
advice.
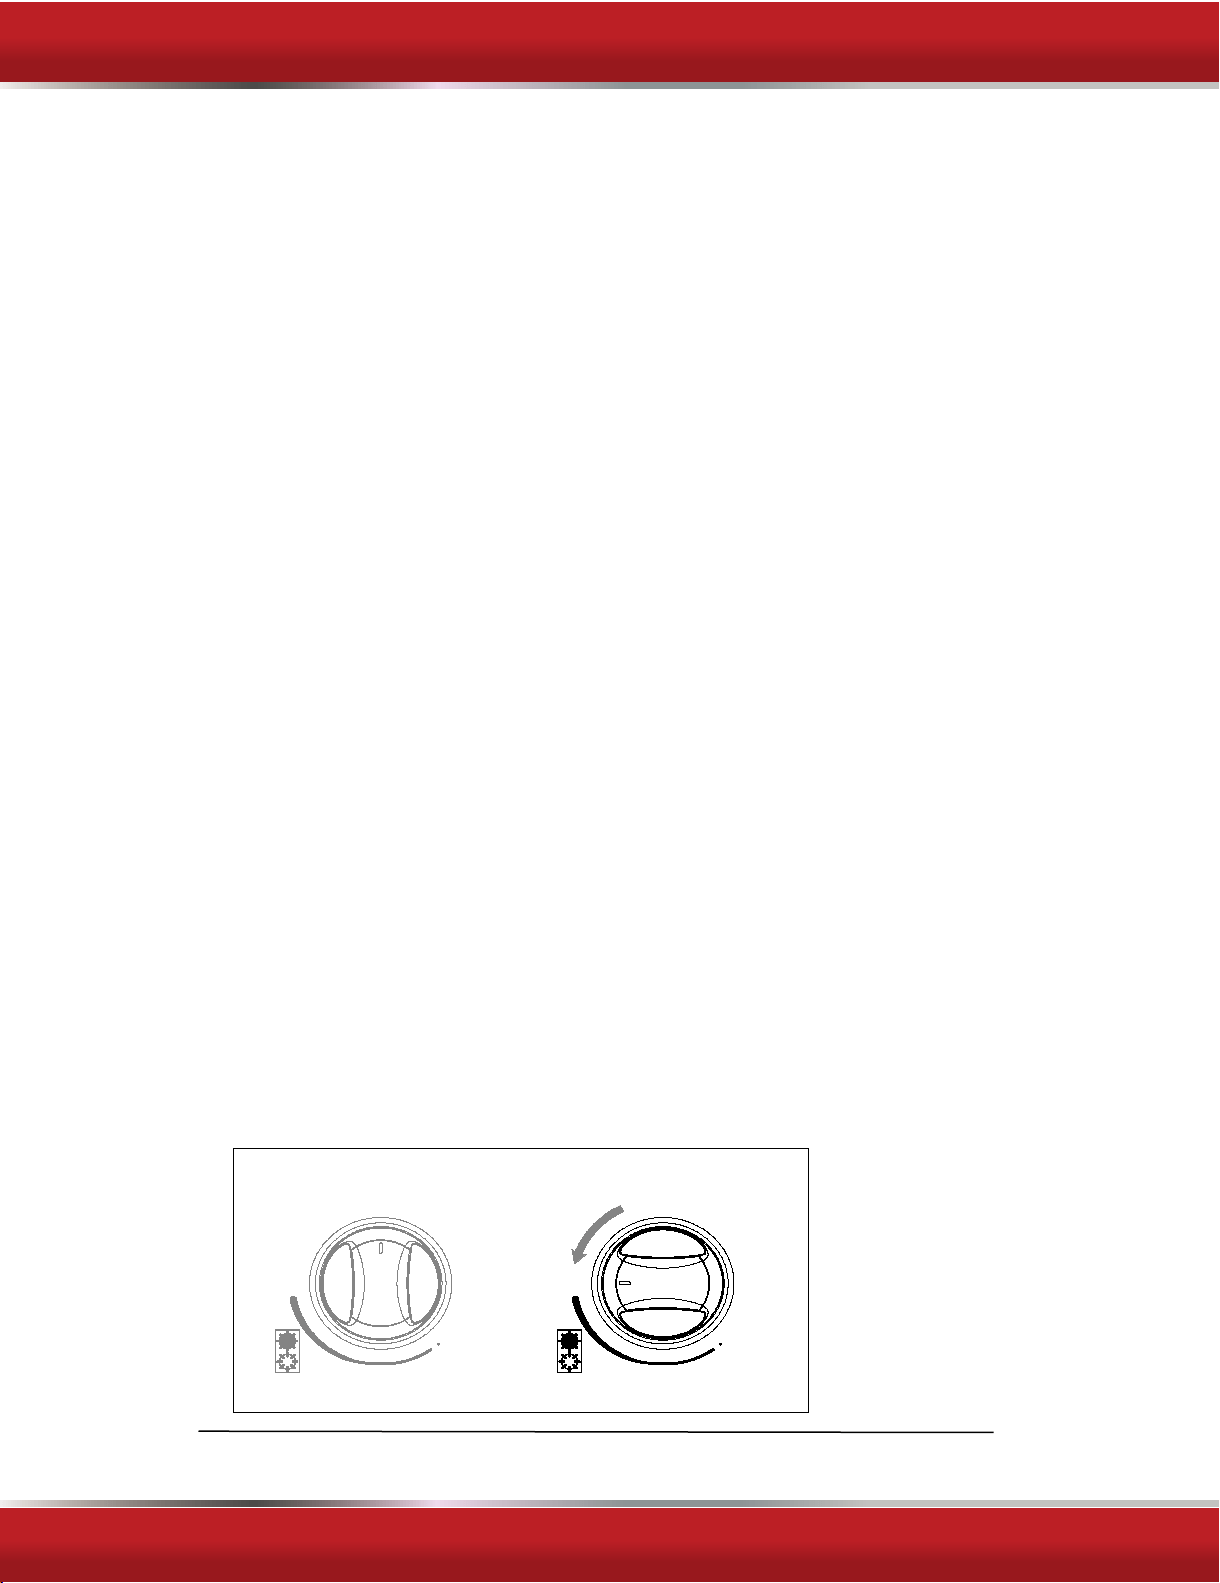
Surface Burner Ignition
HI
SIM
OFF
HI
SIM
OFF
Cooktop
Knob
Open
FOR MORE DETAILS AND INFORMATION, PLEASE VISIT OUR WEBSITE WWW.KUCHT.COM
INSTALLATION GUIDE AND USER MANUAL
19
To light the top burners, push and turn the appropriate control knob counter clockwise to
the “HI” position. You will hear a clicking noise – the sound of the electric spark
igniting the burner. Once burner ignition has been achieved, then turn the burner control
knob to adjust the the desired heat setting.
NOTE:When one burner is turned to the “HI” position, the burner igniters will park.
Do not attempt to disassemble or clean around any burner while another burner is on. Do
no
t touch any burner cap, burner base, or igniter while the igniters are sparking.
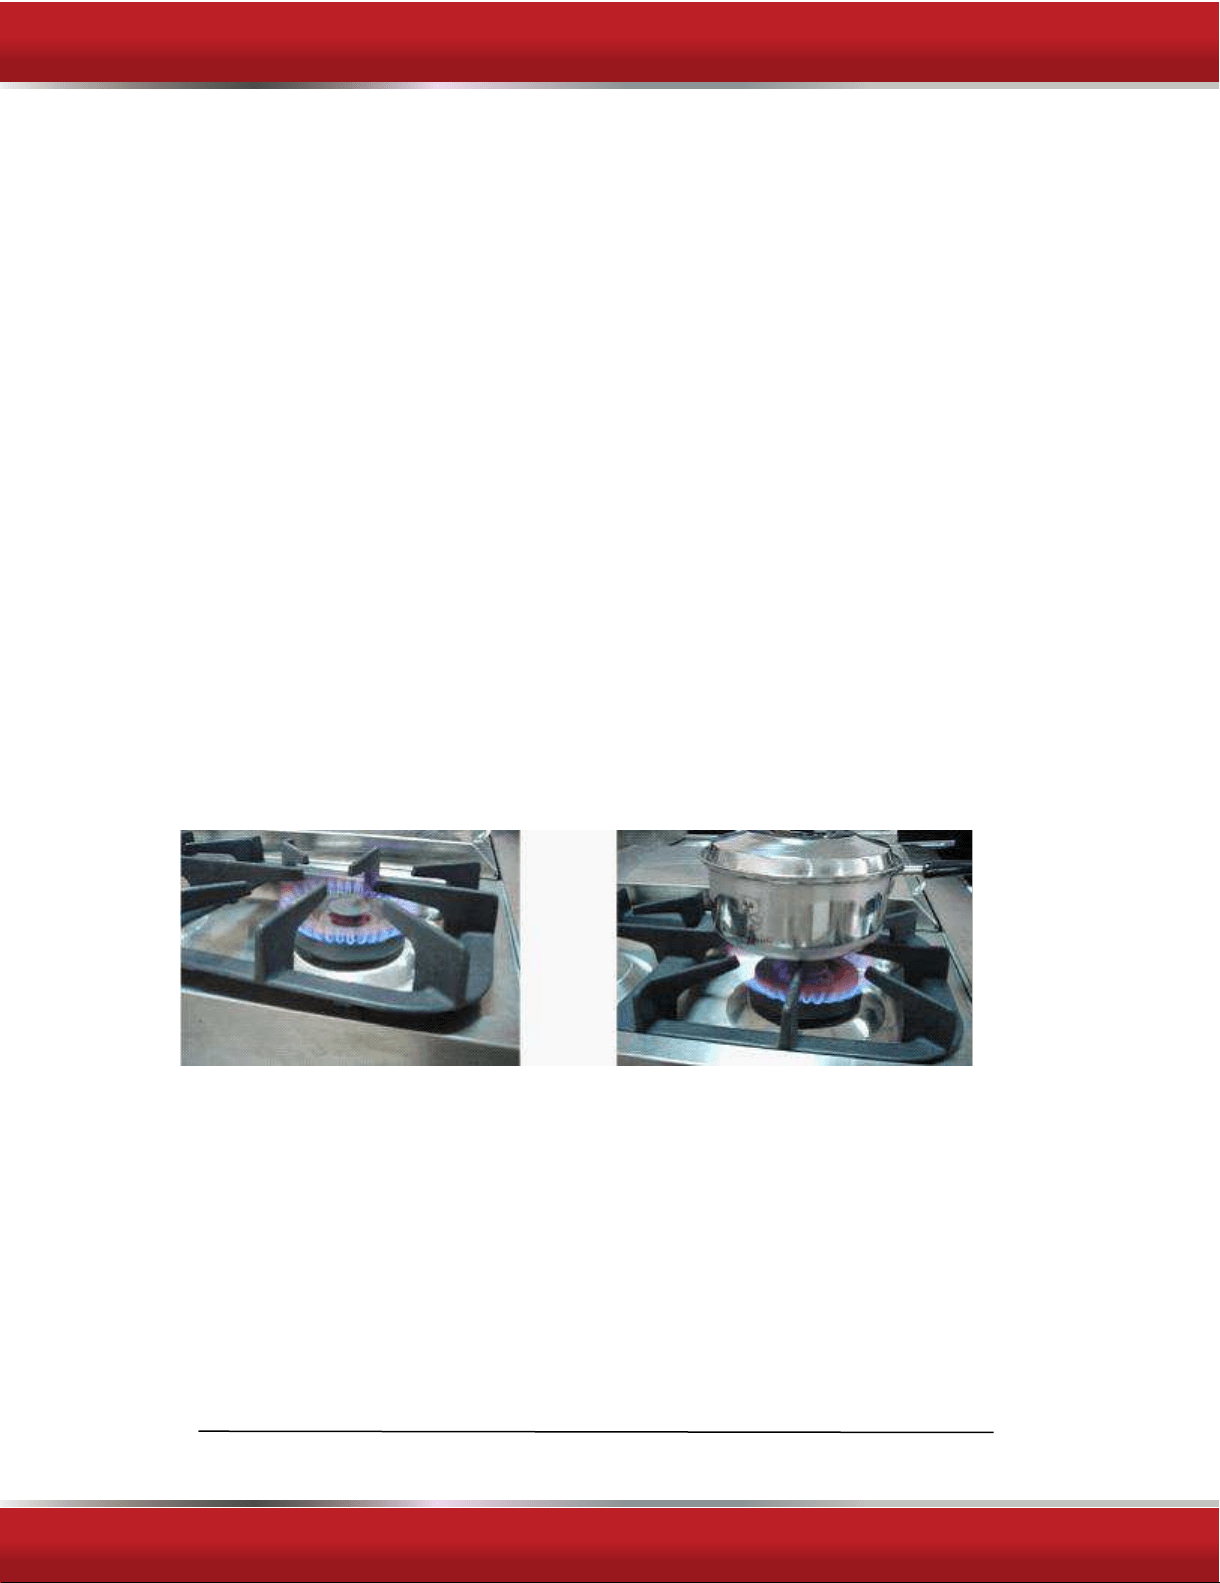
Simmer and Boil
1. A smaller flame will give the best simmer results. Small flames offer precise cooking
performance for delicate foods, keeping food warm, melting chocolate or butter, and for
cooking that need to cook over low heat for a long time.
2. The highest (larger) flame settings provide the maximum heat that is available on your
range. This setting should be used for heavy cooking loads such as water boiling or pasta
cooking.
Flame Size
When you select the flame size, watch the flame when you turn the knob.
Any flame larger than the bottom of the cookware is wasted.
The flame should be steady and blue in color. Foreign material in the gas line may cause
an orange flame during initial operation.
FOR MORE DETAILS AND INFORMATION, PLEASE VISIT OUR WEBSITE WWW.KUCHT.COM
INSTALLATION GUIDE AND USER MANUAL
20
Power Failure
If the gas does not ignite within four seconds, turn off the valve and allow at least five
minutes for any gas to dissipate. Repeat the lighting procedure.
If the power fails, it is not capable of being safely placed in operation and user that no
attempt should be made to operate during power failure.
Cook top
To prevent the cook top from discoloring or staining, clean cook top after each use, and
wipe up acidic or sugary spills as soon as the cook top has cooled.
The sealed burners of your range are not sealed to your cook top and are designed to be
removed. Boil overs or spills will not seep underneath the cook top. The burners should
be cleaned after each use.
Burner Grates
The grates must be properly positioned before cooking. Improper installation of the
grates may result in scratching of the cook top and / or poor combustion.
FOR MORE DETAILS AND INFORMATION, PLEASE VISIT OUR WEBSITE WWW.KUCHT.COM
INSTALLATION GUIDE AND USER MANUAL
21
For the models with Griddle
Before Using the Griddle
1. Clean the griddle thoroughly with warm, soapy water to remove dust or any protective
coating.
2. Rinse with clean water and wipe off to dry with soft, clean, lint-free cloth.
3. A stainless steel cover that is sized to fit on top of the surface when the griddle is not
being used is provided. Please note that the cover must be removed before turning the
griddle on.
4. Make sure the grease tray is under the front edge of the griddle. Position the tray under
the griddle overhang to catch grease or food residue.
Use of the griddle
1. Push and turn the control knob counter-clockwise to the preferred cooking temperature.
2. Preheat the griddle for 10-12 minutes.
3. When the griddle is preheated to the desired temperature, the indicator light will turn
on.
4. Butter or cooking oil can be added for more flavor, then plate the food to cook.
The surface of the griddle is hot after use. Please allow sufficient time for the griddle to
cool prior to cleaning.
FOR MORE DETAILS AND INFORMATION, PLEASE VISIT OUR WEBSITE WWW.KUCHT.COM
INSTALLATION GUIDE AND USER MANUAL

22
CLEANING THE RANGE TOP
Cleaning guidelines
Read the“IMPORTANT SAFETY INSTRUCTIONS”on page 2 and these‘CARE
AND CLEANING”
guidelines
before
you
start
cleaning your
range top.
See
the
pages following
for
instructions
on
removing
and
replacing
different parts of
the range for cleaning and maintenance.To help you identify parts,seethe cooktop
Diagrams
on
pages
24-26.
Before cleaning
or
removing any
part,
make
sure that
all settings
on the range
top
are
set to“OFF”.
Make sure all
parts of the
range to pare cool
to the touch.
If you need to hand lea warm or hot part of the range top
(e.g.
a range
grate)
be
sure
to
wear
oven
mitts
and
take extreme care
to
avoid
burns or
injury.
Do not use aerosol cleaners until the range top has completely cooled.The
propellant substance
in
these cleaners could catch fire
in the
presence
of heat.
Do not let
grease
or food residue
accumulate any where
in or on the
range top.
This will make
future
cleaning
more
difficult
and
may
present a
fire
hazard.
Do not use
any abrasive
or harsh
cleaners, cloths,scouring
pads or
steel wool
on the
exterior,these will scratch
and
damage
the appearance.
Do not use as team clean
e
r
to clean
any part
of the
range or
oven.
Do not perform
any cleaning
or
maintenance
on parts not
specifically listed
in
the
chart below.
If in doubt,contact
Customer
Care.
Burner
and
Burner
Caps
Check
that the burner is turned OFF and
allow
it to cool.Lift off the burner cap.Use
as on brush or
straight-ended
paper clip to clear the notches of the burner.Wash
them
with
a
mild detergent
in hot
water,rinse,
and
dry.Replace
the burner cap correctly.
Range top
Surface
and
Control P
anel
Clean
the cook top
surface with
a
solution
of
mild detergent
and
warm
water.
Do
not use harsh or abrasive cleaning agents,waxes,polishes,or
commercia
l
cook top
cleaners
to
clean
the cook top.
Treat stubborn,burnt-on grease and residue with the same solution of mild
detergent
and hot
water,let
it
s it
a
few minutes
and then
wipe
clean.
FOR MORE DETAILS AND INFORMATION, PLEASE VISIT OUR WEBSITE WWW.KUCHT.COM
INSTALLATION GUIDE AND USER MANUAL
23
FOR MORE DETAILS AND INFORMATION, PLEASE VISIT OUR WEBSITE WWW.KUCHT.COM
INSTALLATION GUIDE AND USER MANUAL
To protect the
appliance
finish,only use a sponge,soft cloth,fibrous or plastic
brush,and pad for cleaning.
Allow all
components to
dry thoroughly
before
using
the range top.
Gas Range top Conversion and Adjustment Guide
The
range top
is set for use with Natural Gas(NG).(The
factory setting
is
indicated on the
serial plate.
When set for
Natural
Gas(NG) Gas
operation,
the
pressure
regulator will regulate
the
gas
to 4”
inches water
column
pressure.
When
set for
Liquefied
Propane Gas(LPG)
operation,
the
pressure regulator will regulate
the
pressure
to 11”
inches water
column
NG to LPG Conversion
Convertible Pressure Regulator
The
range tops
are shipped to operate on Natural Gas(NG).Propane(LPG)
orifices are shipped with the unit in a
separate envelope
with the
manual.Save
the
NG
or if ices removed
from the
appliance
for future use,
make
sure you note
which
orifices
are for
which
burner if you plan on
converting
back to
NG.
The
inlet pressure
of the
gas supply shall
be in
accordance
with the
nominal
inlet
pressure
of the
regulator
used on the range top or 1/2
psig maximum.
The range
top should be tested by
pressurizing
the
regulator
withan
inletpressure
at
least
1inch
water
column above the
manufacturer's specified manifold pressure
shown on the
serial
plate.
1. Shut off
gas leading
to appliance.
2.
Unplug any electrical connections
if you are
using
the
110V
option,usually
located
under the range top.
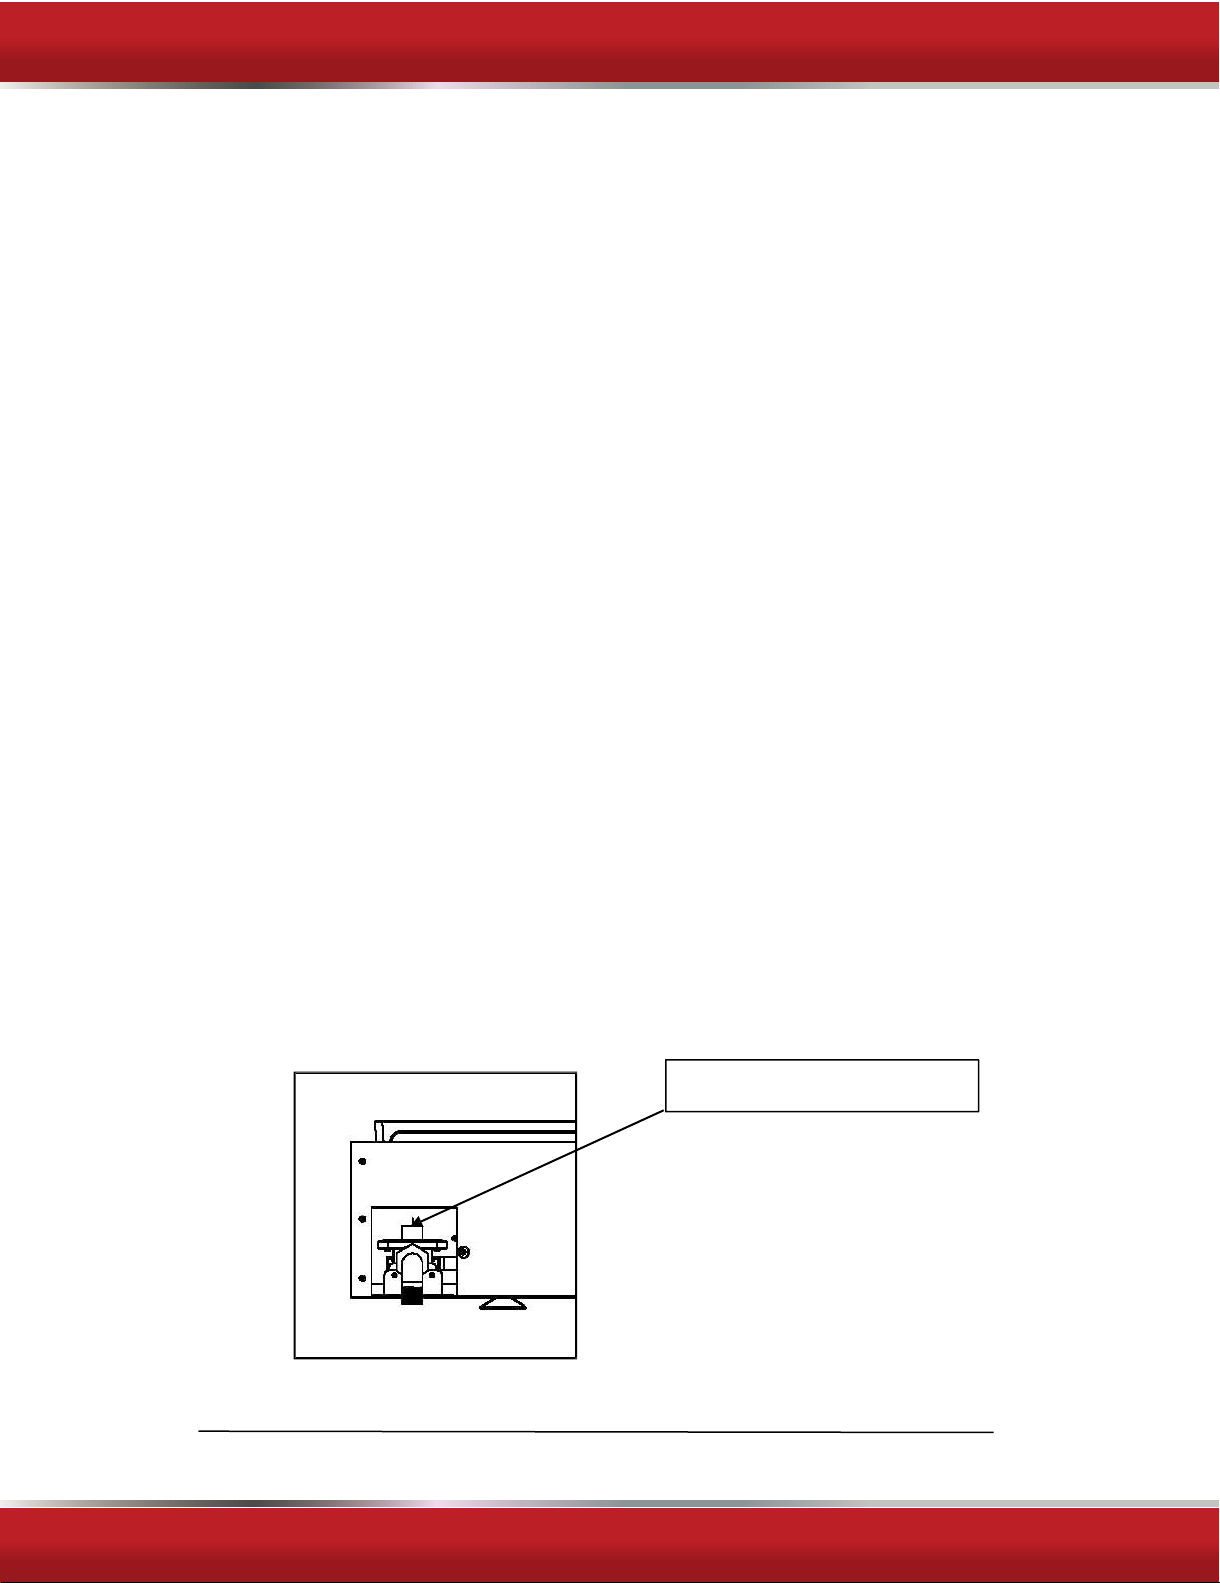
3.
Locate convertible regulator
at the back of the
range top,
remove cap.
Cap
located
here– back right of
range top
while facing
it.
24
FOR MORE DETAILS AND INFORMATION, PLEASE VISIT OUR WEBSITE WWW.KUCHT.COM
INSTALLATION GUIDE AND USER MANUAL
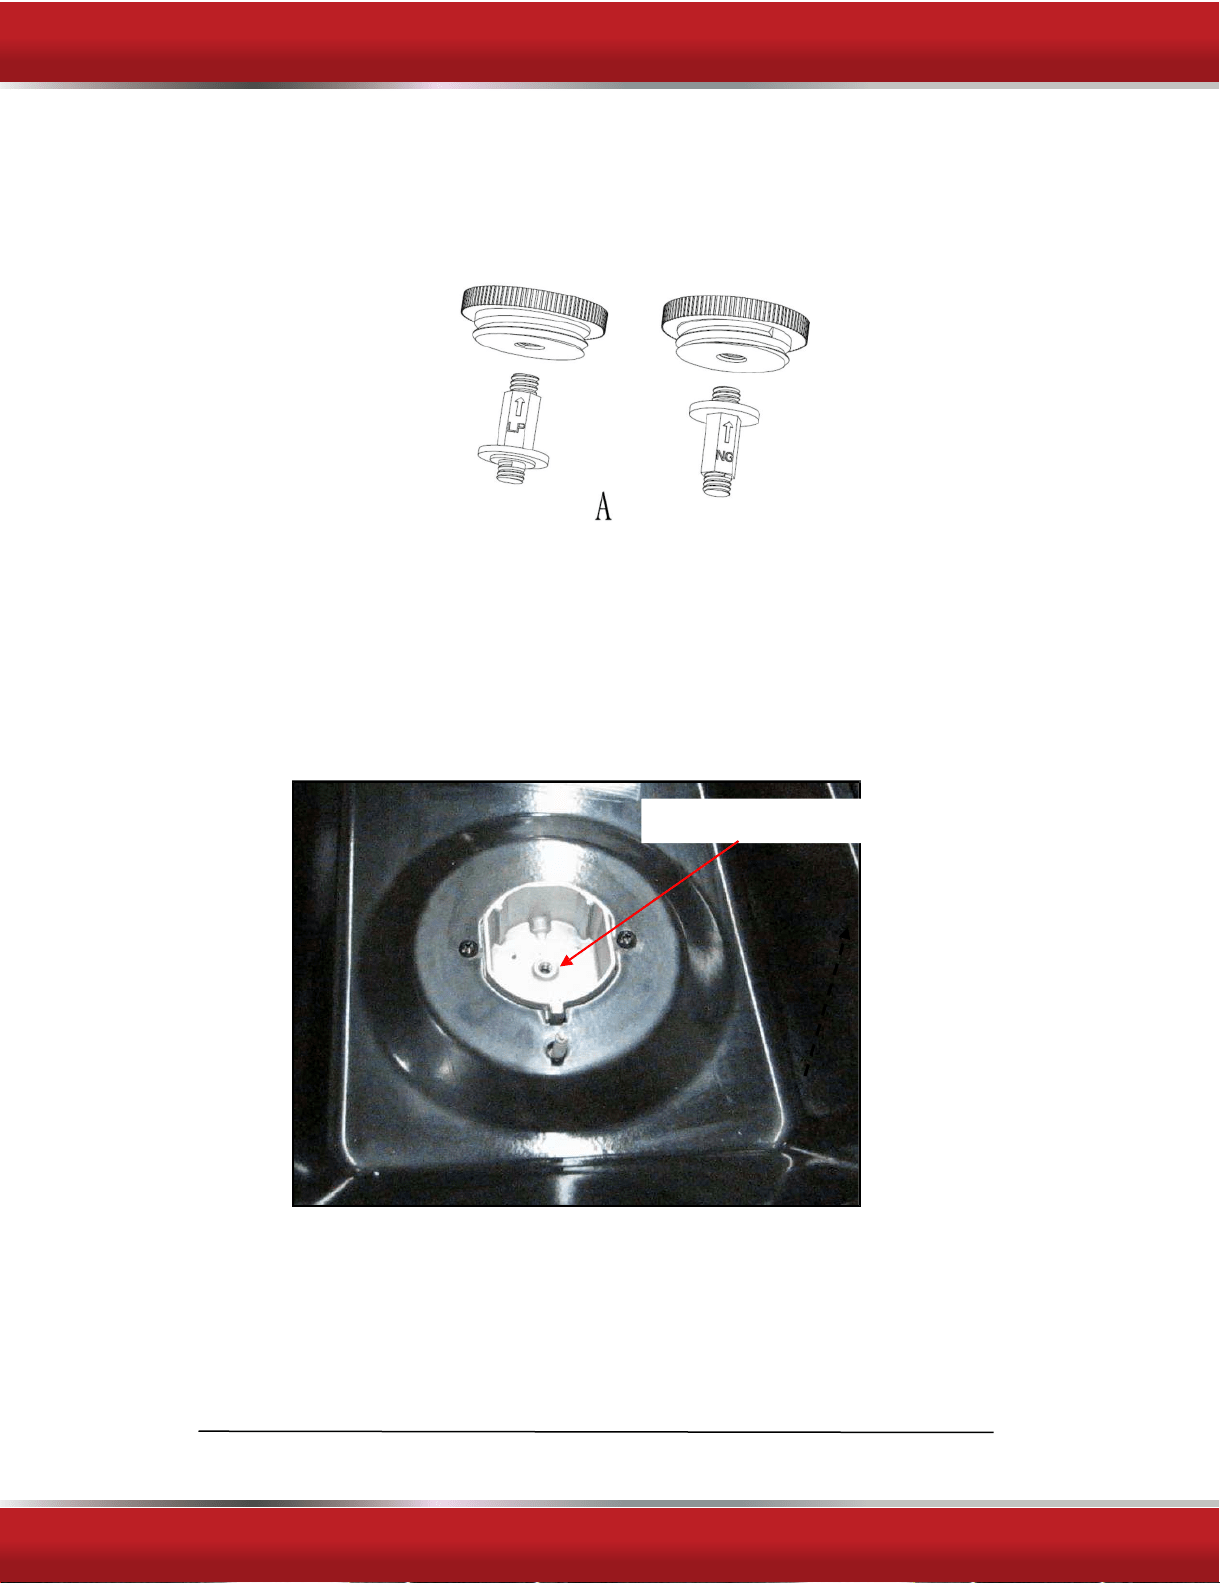
4.
Unscrew
the
plastic
insert from the cap and turn it overs other shorter
stem is
facing downwards
for NG
(Fig.A).Replace
insert on the cap.
5.
Replace
the
cap back
on the regulator.
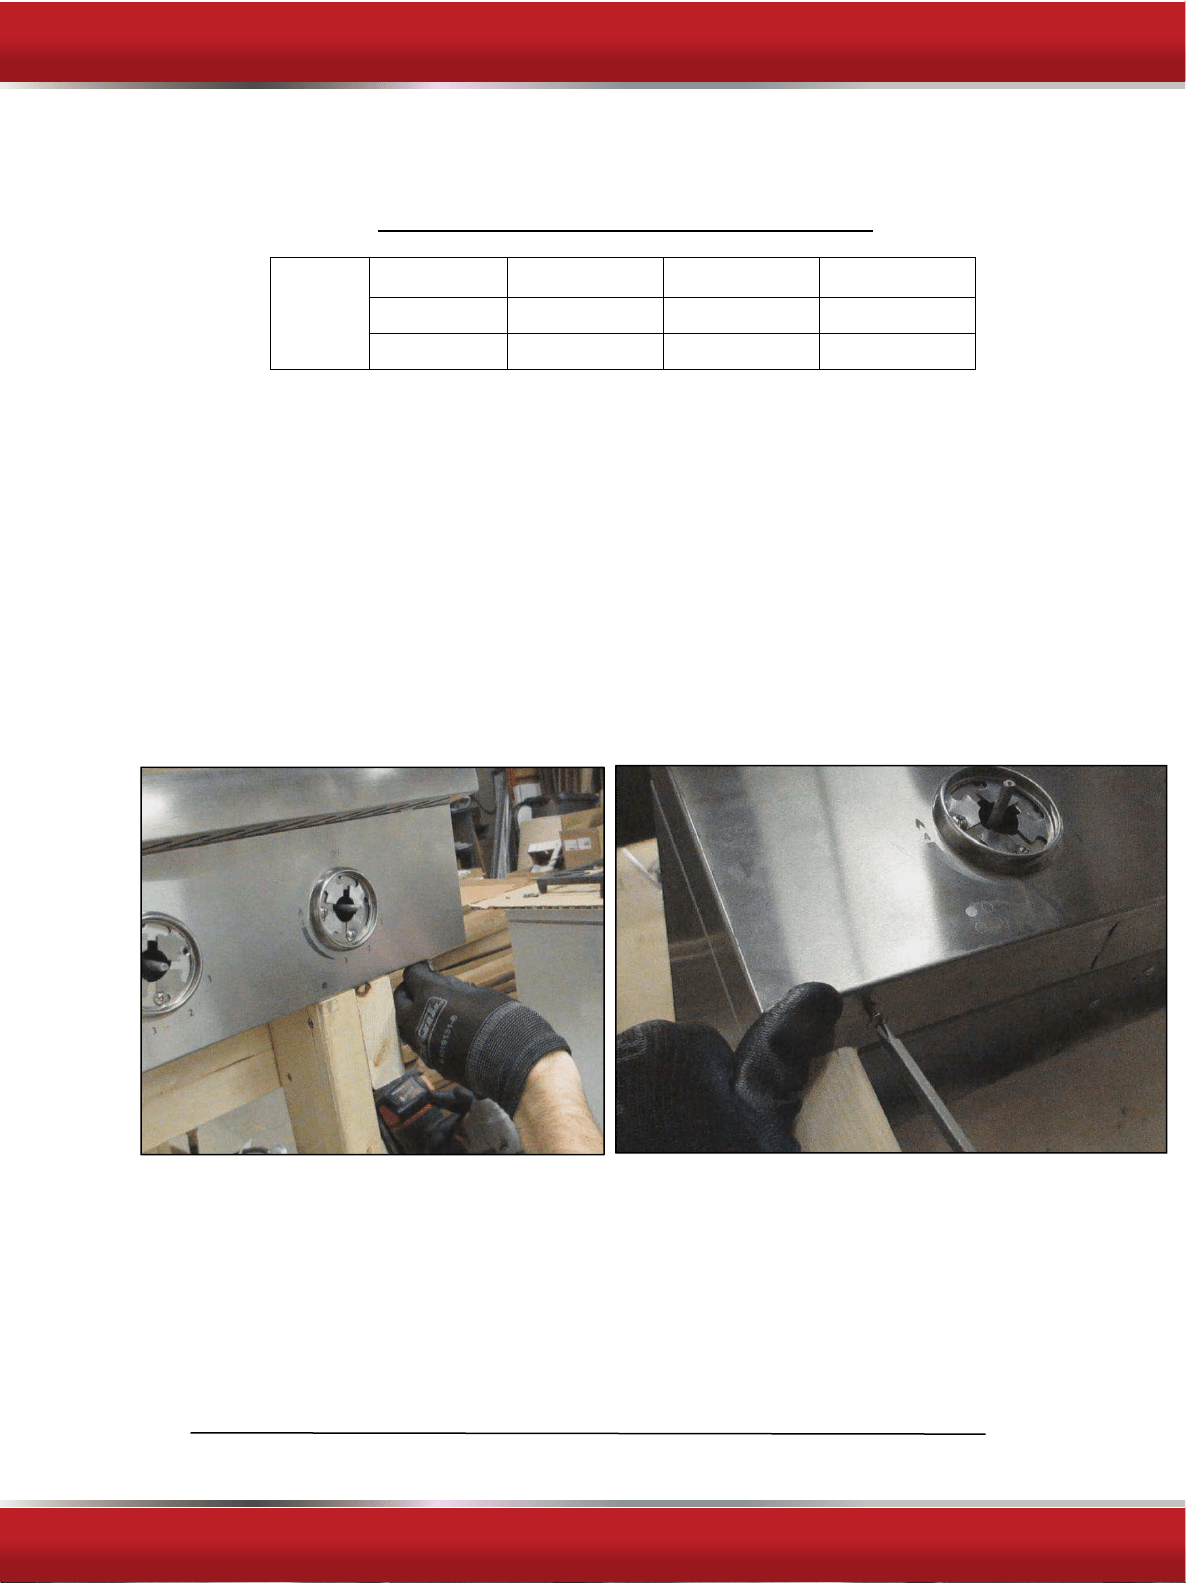
6. Next you
will
remove the
grates,
burners and burner caps from the range top
to
access
the orifices.
7. You
will
need a 7 mm socket wrench to remove the
orifices.
Each
orifice
can
be
accessed
easily.
Orifice removed
8. Remove
all
NG
orifices
and
place
in a
separate
bag and store with your
manual for
future
use.
Label your orifices
as you
remove from
the range
top.
9. Take the LPG
orifices
provided and
install
as shown be low in the chart–each
orifice is
stamped with the size. You may require a magnifying
glass
to see
this stamping.
25
FOR MORE DETAILS AND INFORMATION, PLEASE VISIT OUR WEBSITE WWW.KUCHT.COM
INSTALLATION GUIDE AND USER MANUAL
See below
for rating
of
LPG
orifices
for
each mod
e
l
LPG
Left F
r
o
n
t
Left
Rear
Right F
r
ont
Right
Rea
r
18,000
b
t
u
12,000
btu
18,000
btu
12,000
btu
1.24mm
1.00mm
1.24mm
1.00mm
10.Once
all
the
orifices are installed,replace all
burner sand burner
caps,
then
fire
up the
burners
to
check
the
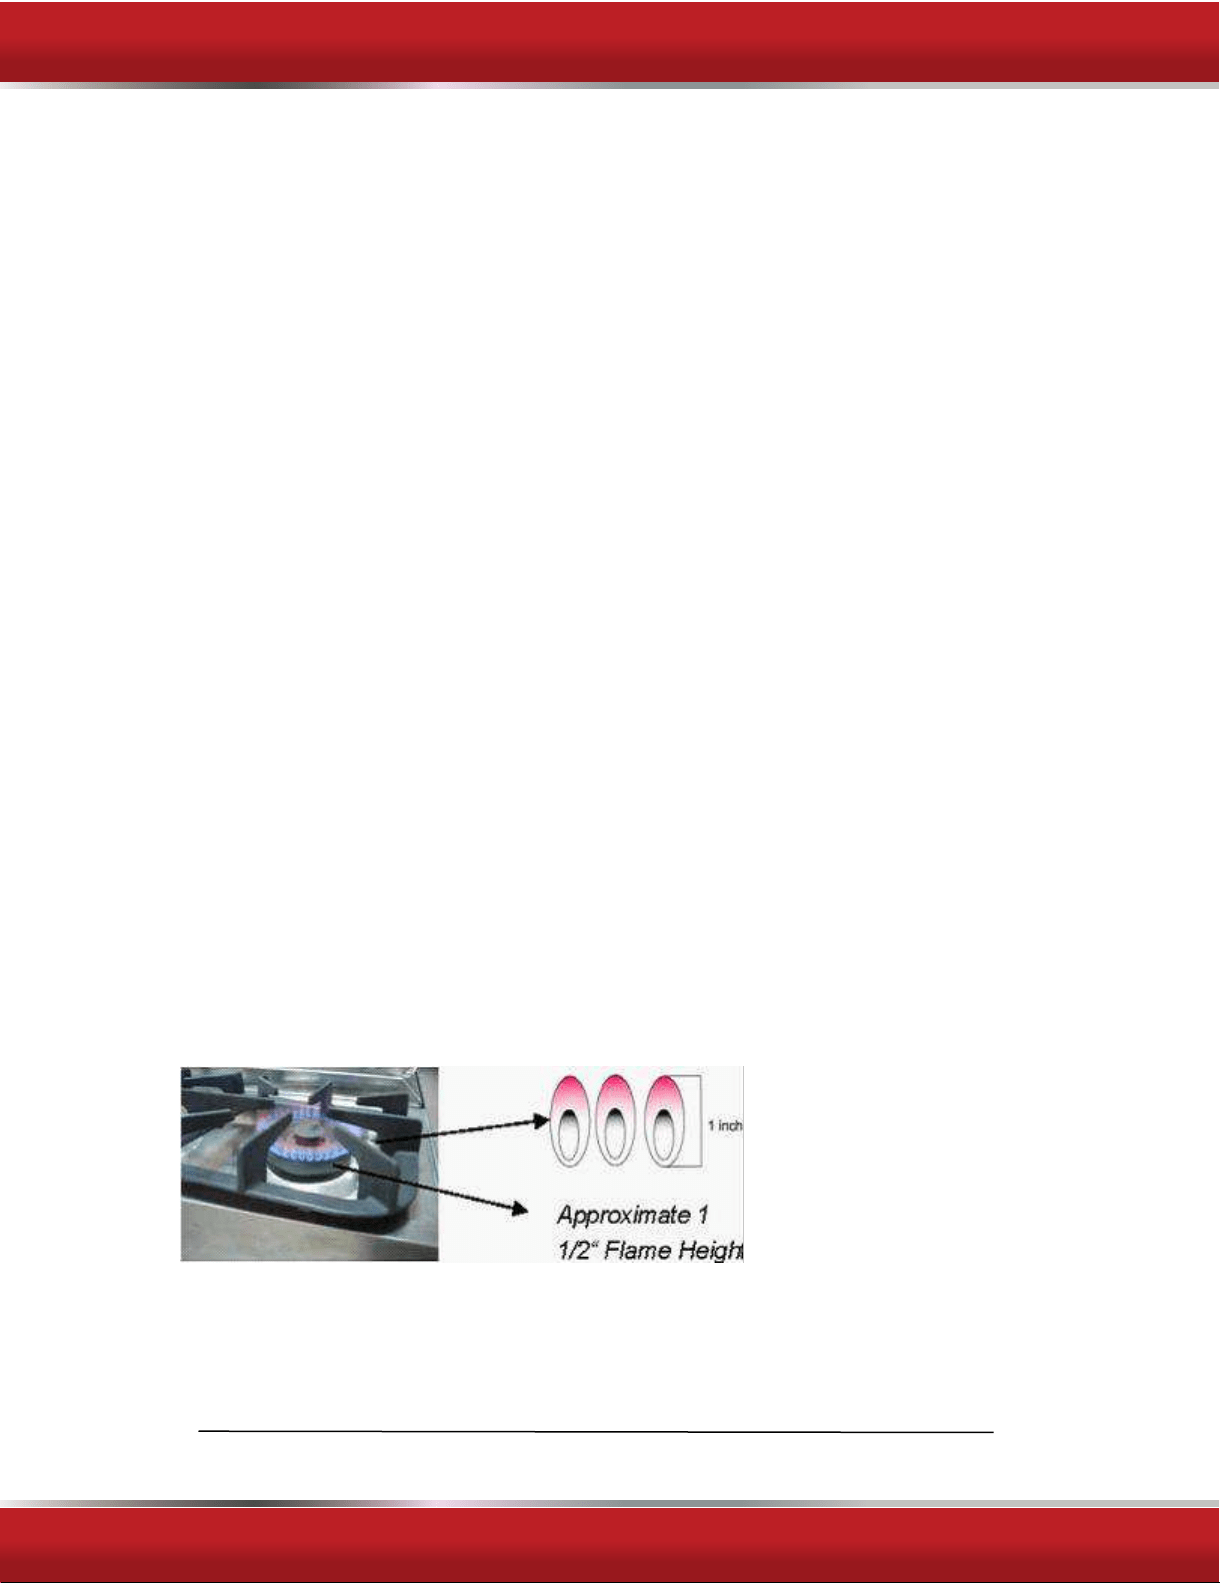
minimum flame
height.
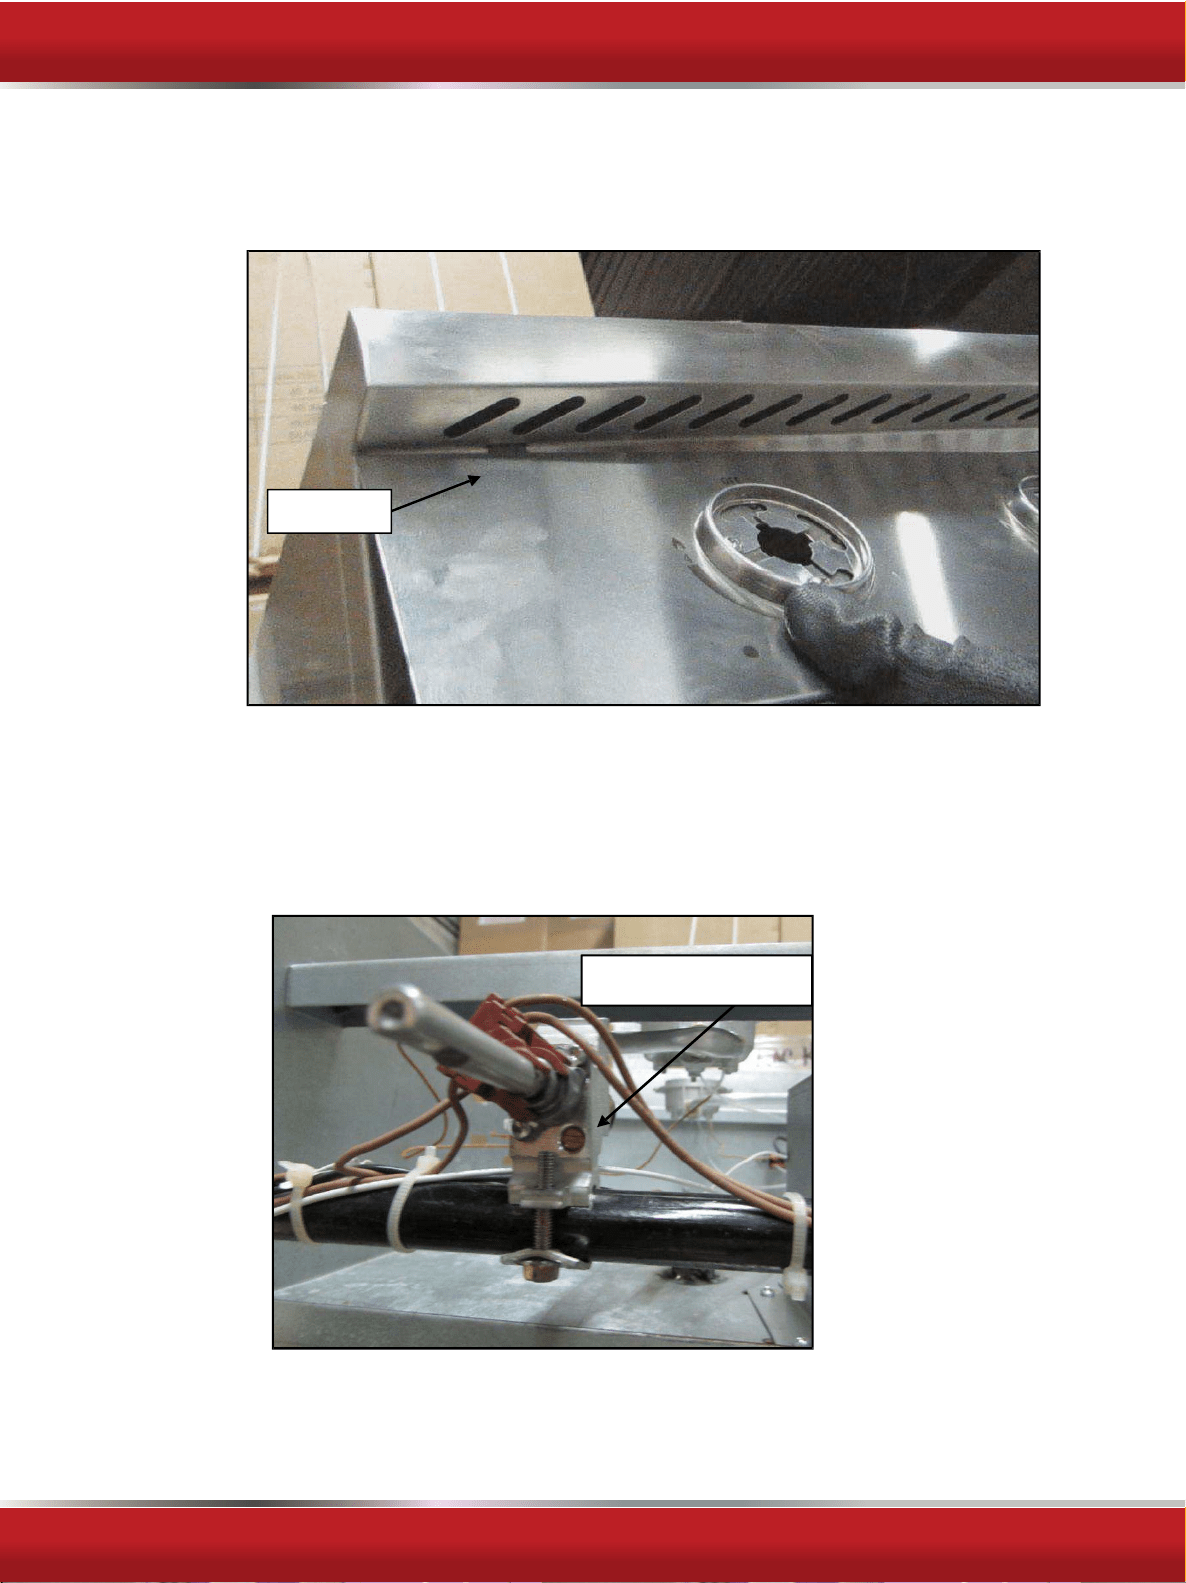
11.Minimum flame height should be approx.¼” tall.You will want a small
minimum flame
for
simmering.
There is a
small adjustment screw located
on
the valve itself, the front control panel must be removed in order to make
the adjustment.
12.To remove the control panel remove the two bottom
screws
holding the
panel
on.
FOR MORE DETAILS AND INFORMATION, PLEASE VISIT OUR WEBSITE WWW.KUCHT.COM
INSTALLATION GUIDE AND USER MANUAL
13.Next
slide
out the
panel,
there
are
notches at the top
positing
the
panel
in place.
Notch
14.
Using
a 3/32''X3”
screw driver
or
similar
you can
make
the
adjustment.
Turn
t
o
minimumflame
then
adjust
the
screw
counter
clockwise
fora
smallerflame
and
clock wise
for a larger flame.Replace the lid, burners,burner caps and
grates,
adjust
and
recheck
the flame.
Adjustment
screw
15.Once your happy with the minunim
flame
height
replace
the front control
panel
with
the two
screws earlier
removed.
FOR MORE DETAILS AND INFORMATION, PLEASE VISIT OUR WEBSITE WWW.KUCHT.COM
INSTALLATION GUIDE AND USER MANUAL
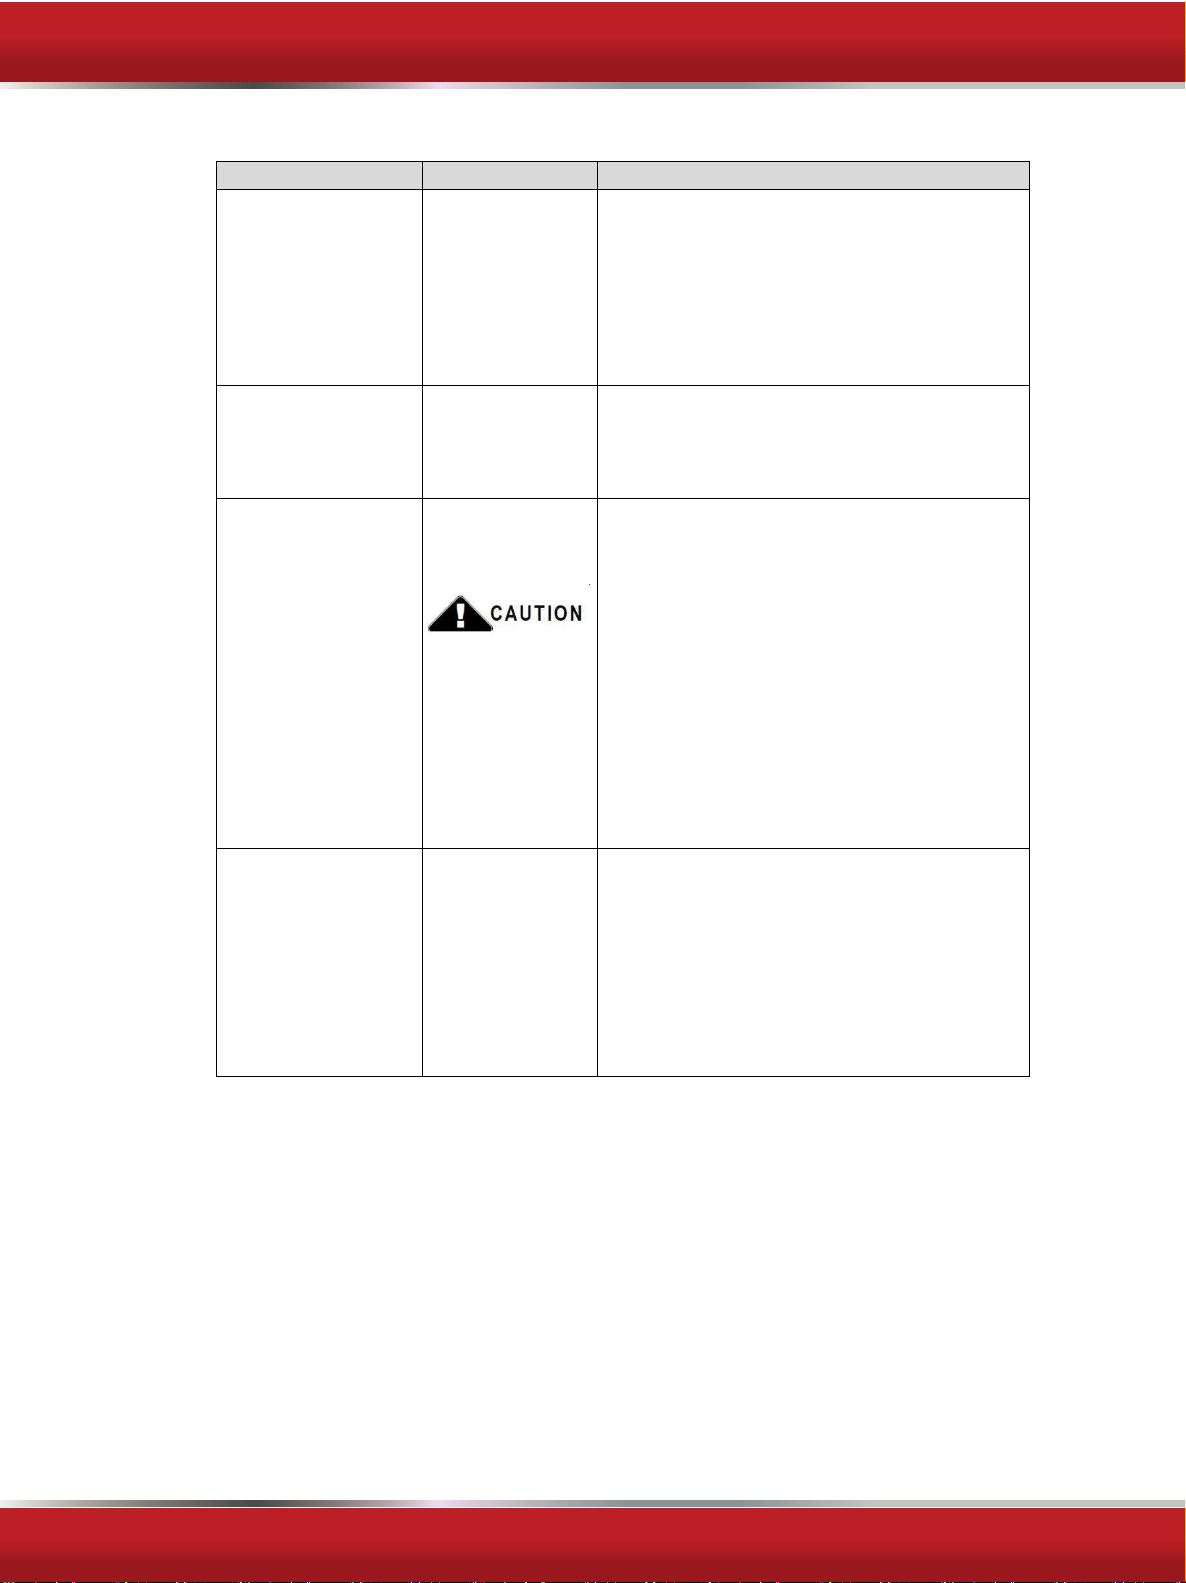
Trouble shooting Tips
Symptom
Possible Cause
Solution
BURNERS WILL
NOT
LIGHT.
Burner parts or
Igniters maybe
wet,dirty or
misaligned.
Check that the burner parts are clean,dry
And correctly assembled.Check that the
igniters are clean and dry.
TOP BURNER WILL
NOT STAY LIT
Failed
Thermonuclear
Replace thermocouple
FLAMES DO NOT
BURN ALL
AROUND THE
BURNER CAP.
Burner parts
Maybe dirty or
misaligned.
See“Care and Cleaning”instructions.
BURNER FLAMES
ARE VERY
LARGE AND
YELLOW.
Burner bezel
Ports are
clogged.
Burner ports or
burner caps are
not positioned
properly.
Range top is
being operated
with the wrong
type of gas.
Regulator is not
installed,is
faulty,or is set
for the wrong
type of gas.
Clean burner be zelring ports with
Straightened paperclip,needle,or wire.
Remove and carefully re
‐
install burner
bezel and caps.
Ensure that the type of range top matches the
gas supply.
Check installation,replace regulator,or set
regulator for proper gas.
IGNITERS ARE
SPARKING BUT
BURNERS ARE
NOT IGNITING.
Gas shut
‐
off
Valve is in the
“OFF”position.
Turn shut
‐
off valve to the“ON”position.
28
FOR MORE DETAILS AND INFORMATION, PLEASE VISIT OUR WEBSITE WWW.KUCHT.COM
INSTALLATION GUIDE AND USER MANUAL
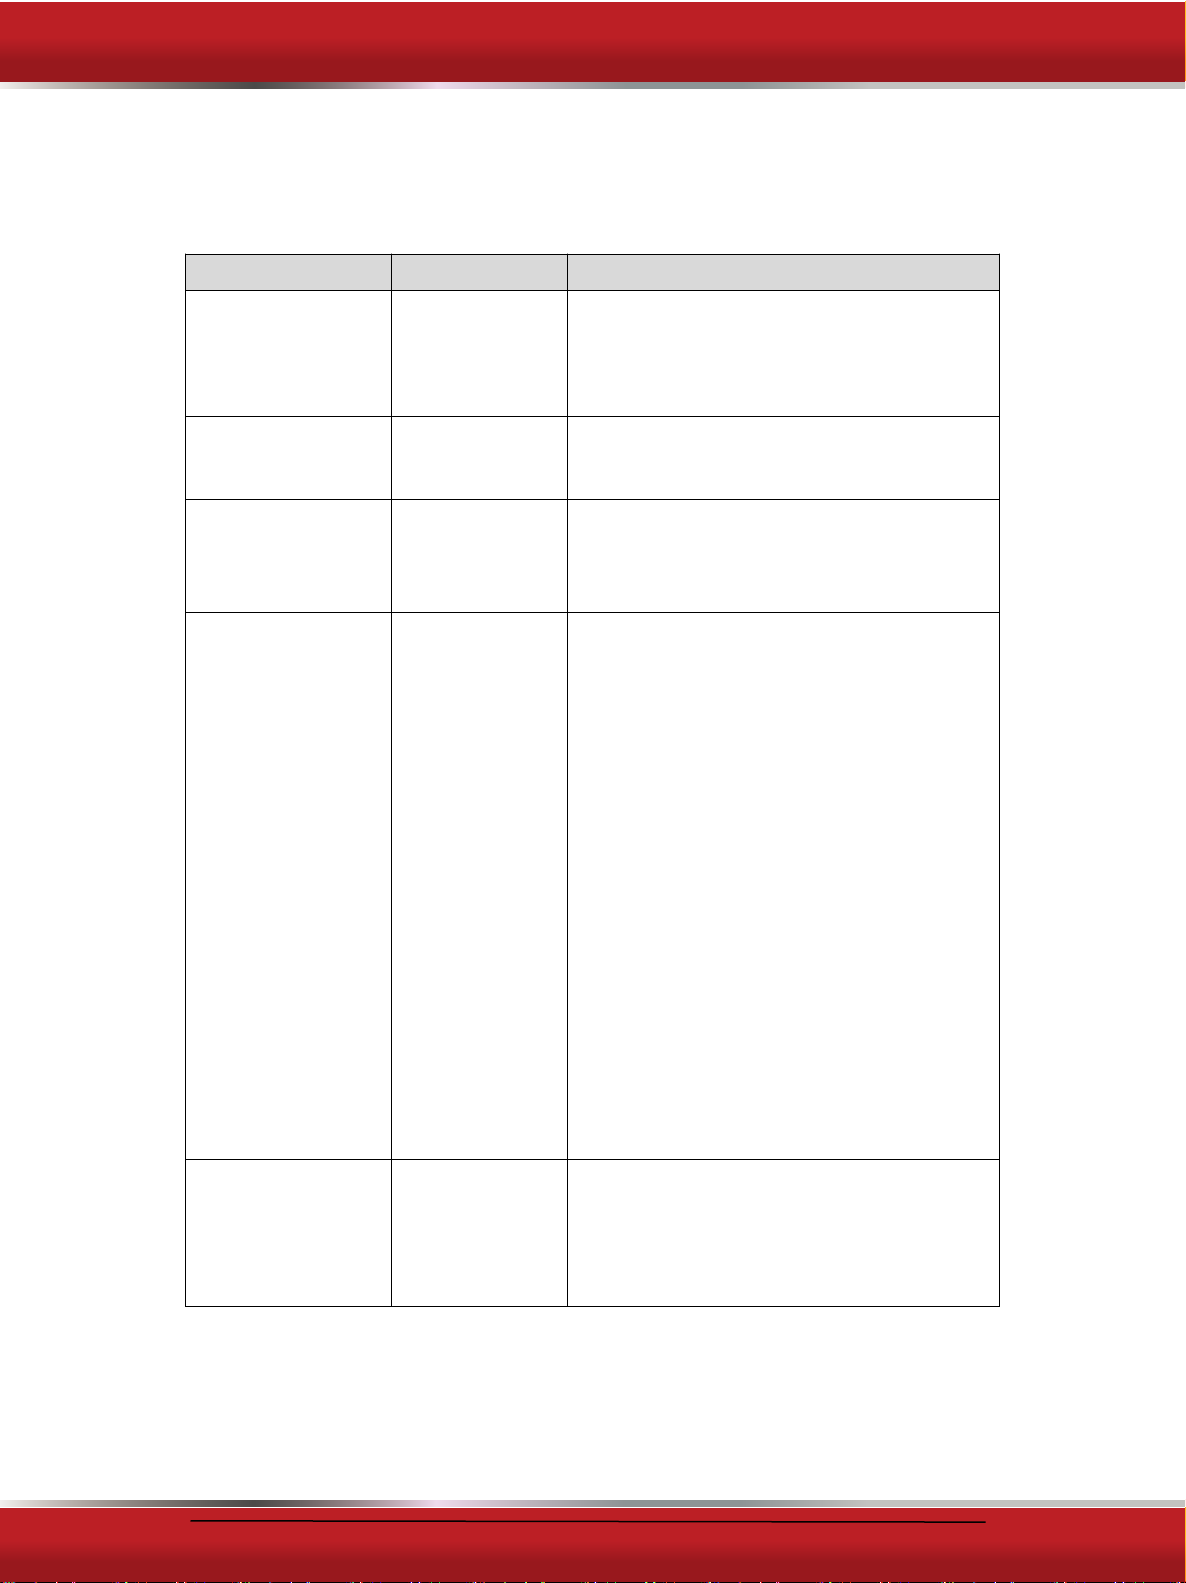
Symptom
Possible Cause
Solution
BURNER FLAME
GOES OUT AT
LOW SETTING.
Low gas
pressure.
Air in take
holes around
burners are
obstructed.
Contact gas company.
Remove obstruction from air in take holes.
Simmer setting is to low
THE FLAME
SHAVE
SUDDENLY
GONE OUT.
A draft or spill
Has extinguished
the flame.
Turn the burners off,cleaning the burners
And sump area.See“Care and Cleaning”for
instructions.Once clean reignite top burners.
NO IGNITION
SPARK
Dead batteries
Or ignition
module failed.
Replace batteries and attempt ignition.If
There is still no spark ignition,the range top
burner scan still be used.
To light them:
1.) Holding a lit match to the flame spreader,
pushing on the control knob and turn
counter clock wise to LIGHT.
2.) When the flame is burning all the way
around the burner,you may adjust the
heat.
“CRACKING”
OR
“POPPING”SOUN
D IS HEARD
COMING FROM
RANGE TOP
This is the sound
Of metal heating
and cooling.
This is normal.