Manual v2.0
Portable Countertop Ice Maker
Machine à Glaçons
AI-215SS
AI-215R
OWNER’S MANUAL
Manuel de L'utilisateour

www.newair.com 2
LANGUAGE INDEX
English Manual ...................................................................................... 3
Manuel en Français .............................................................................. 18
EN
www.newair.com 3
A Name You Can Trust
Trust should be earned and we will earn yours. Customer happiness is the focus
of our business.
From the factory to the warehouse, from the sales floor to your home, the
whole Newair family promises to provide you with innovative products,
exceptional service, and support when you need it the most.
Count on Newair
As a proud Newair owner, welcome to our family. There are no robots here,
real people shipped your product and real people are here to help you.
Contact Us
Please reach out to our customer service team before making a return to your
store of purchase. We are happy to help with any questions or concerns!
Mon-Fri from 8-4 PST at:
Call:
1-855-963-9247
Email:
support@newair.com
Online:
www.newair.com
A team member will respond to you within 24 hours.
Follow Us
Facebook.com/newairusa
Instagram.com/newairusa
YouTube.com/newairusa
Twitter.com/newairusa

EN
www.newair.com 4
READ AND SAVE THESE INSTRUCTIONS
TABLE OF CONTENTS
Specifications ................................................................................................... 5
Register Your Product Online ........................................................................... 6
Safety Information & Warnings ........................................................................ 7
Parts List .......................................................................................................... 9
Control Panel Diagram ............................................................................ 10
Assembly & Installation .................................................................................. 11
Operating Instructions ................................................................................... 12
Cleaning & Maintenance ................................................................................ 14
Troubleshooting ............................................................................................. 15
Limited Manufacturer’s Warranty .................................................................. 17

EN
www.newair.com 5
SPECIFICATIONS
MODEL NO. AI-215SS, AI-215R
RATED VOLTAGE: 115V / 60Hz
CURRENT: 2.0/2.7 amps
POWER CONSUMPTION: 170 watts
REFRIGERANT:
CAPACITY (DAILY): 50 pounds
CAPACITY (PER CYCLE): 12 pieces
ICE SIZES: 3
R290
EN
www.newair.com 6
REGISTER YOUR PRODUCT ONLINE
Register Your Newair Product Online Today!
Take advantage of all the benefits product registration has to offer:
Service and Support
Diagnose troubleshooting and service issues faster and more accurately
Recall Notifications
Stay up to date for safety, system updates and recall notifications
Special Promotions
Opt-in for Newair promotions and offers
Registering your product information online is safe & secure and takes less than
2 minutes to complete:
Alternatively, we recommend you attach a copy of your sales receipt below and
record the following information, located on the manufacturer’s nameplate on
the rear of the unit. You will need this information if it becomes necessary to
contact the manufacturer for service inquiries.
Date of Purchase: ___________________________________________
Serial Number: ____________________________________________
Model Number: ____________________________________________
newair.com/register
EN
www.newair.com 7
SAFETY INFORMATION & WARNINGS
As with any electrical appliance, basic safety precautions must be
followed in order to reduce the risk of fire, electrical shock and/or
injury to persons or property. Be sure to read all instructions before
using this appliance and observe the following safety tips:
• Do not operate this appliance if it has a damaged cord.
• Only connect the ice maker to a properly polarized outlet. No other
appliance should be plugged into the same outlet. Make sure the plug is fully
inserted into the receptacle.
• An extension cord is not recommended, as it may overheat and become a
fire risk. If necessary, use an extension cord with a minimum size of No. 14
AWG and rated for no less than 1875 watts.
• Do not place hands or objects on or near the ice maker’s evaporator when it
is in operation.
• Do not run the power cord over carpeting or heat insulators. Do not cover
the cord. Keep the cord away from high traffic areas and never submerge it
in water.
• Always turn off and unplug the ice maker from the power supply before
cleaning and servicing.
• Do not use your ice maker outdoors.
• Do not use liquids other than water to make ice cubes.
• Exercise caution and make sure there is supervision when this appliance is
being used near children.
• If the ice maker is brought in from the outside in the winter, allow the ice
maker to warm up to your room’s temperature for a few hours before
plugging it in.
• Do not clean your ice maker with flammable fluids. The fumes can create a
fire hazard or cause an explosion.
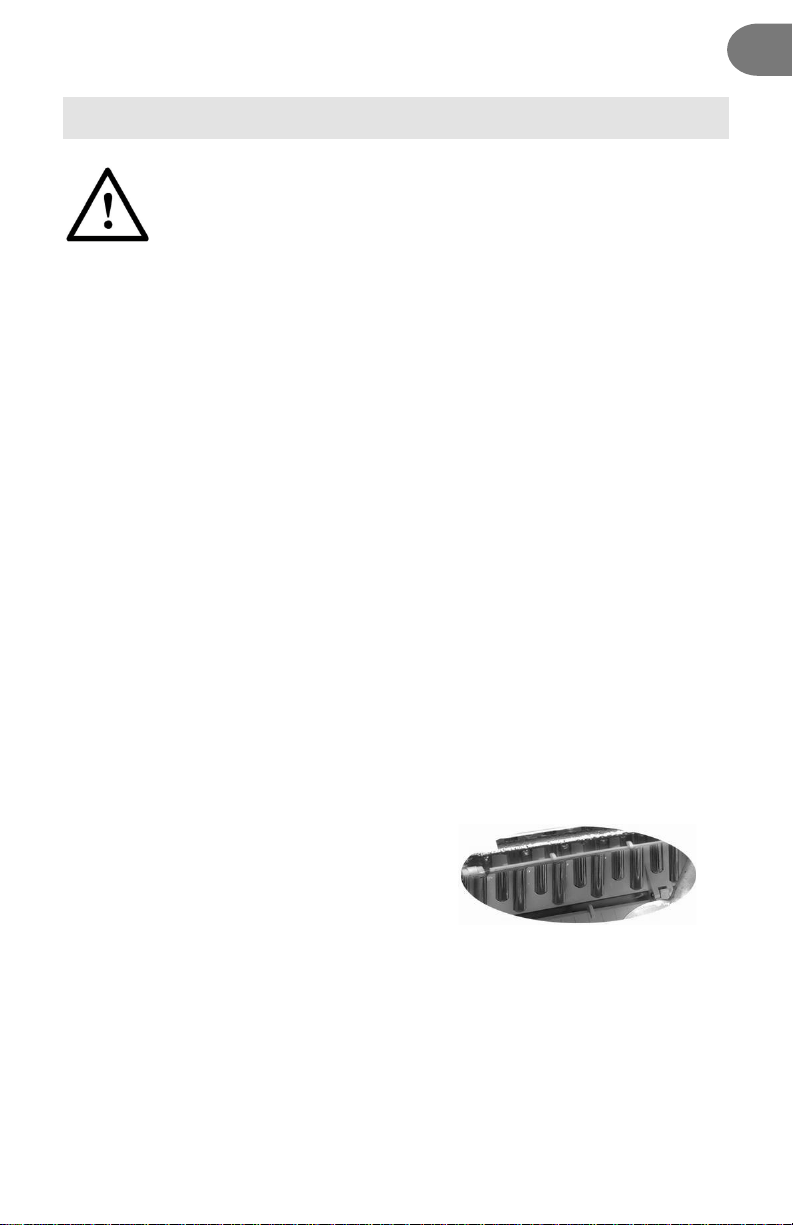
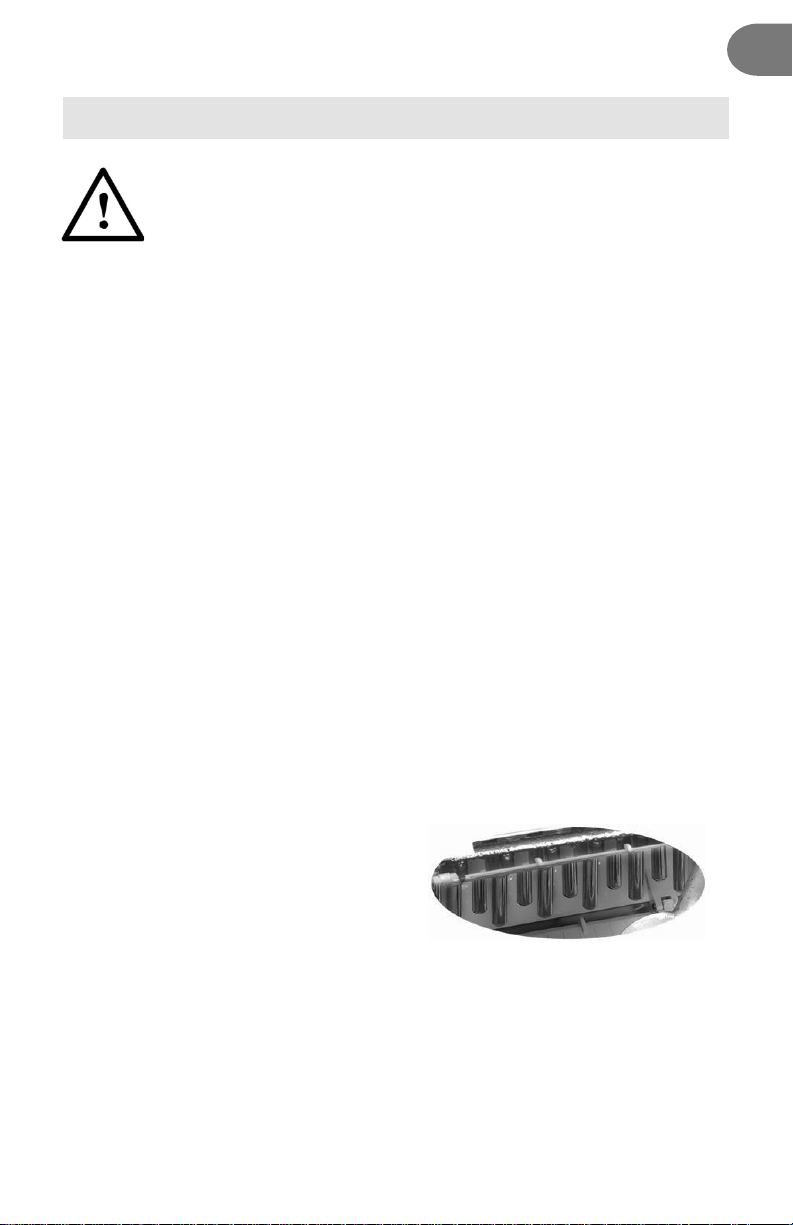
• Do not touch the evaporator while the
unit is in use or during the ice making
process. It may cause severe burning.
EN
www.newair.com 8
WARNING: This appliance must be grounded.
DANGER: Risk of fire or explosion. Flammable refrigerant used. Do not
use mechanical devices to defrost ice maker. Do not puncture
refrigerant tubing.
DANGER: Risk of fire or explosion. Flammable refrigerant used. To be
repaired only by trained service personnel. Do not puncture refrigerant
tubing.
CAUTION: Risk of fire or explosion. Flammable refrigerant used. Consult
the repair manual/owner’s guide before attempting to install or service
this product. All safety precautions must be followed.
CAUTION: Risk of fire or explosion. Flammable refrigerant used.
Dispose properly in accordance with Federal or local regulations.
CAUTION: Risk of fire or explosion due to puncturing of refrigerant
tubing. Follow handling instructions carefully. Flammable refrigerant
used.
CAUTION: The ice maker should be installed in accordance with the
safety standard for refrigeration systems, ASHRAE15. The ice maker
should not be installed in corridors or hallways of public buildings.
CAUTION: If there is a problem with the unit, servicing should always
be done by factory authorized personnel, in order to minimize the risk
of possible ignition due to incorrect parts or improper service
EN
www.newair.com 9
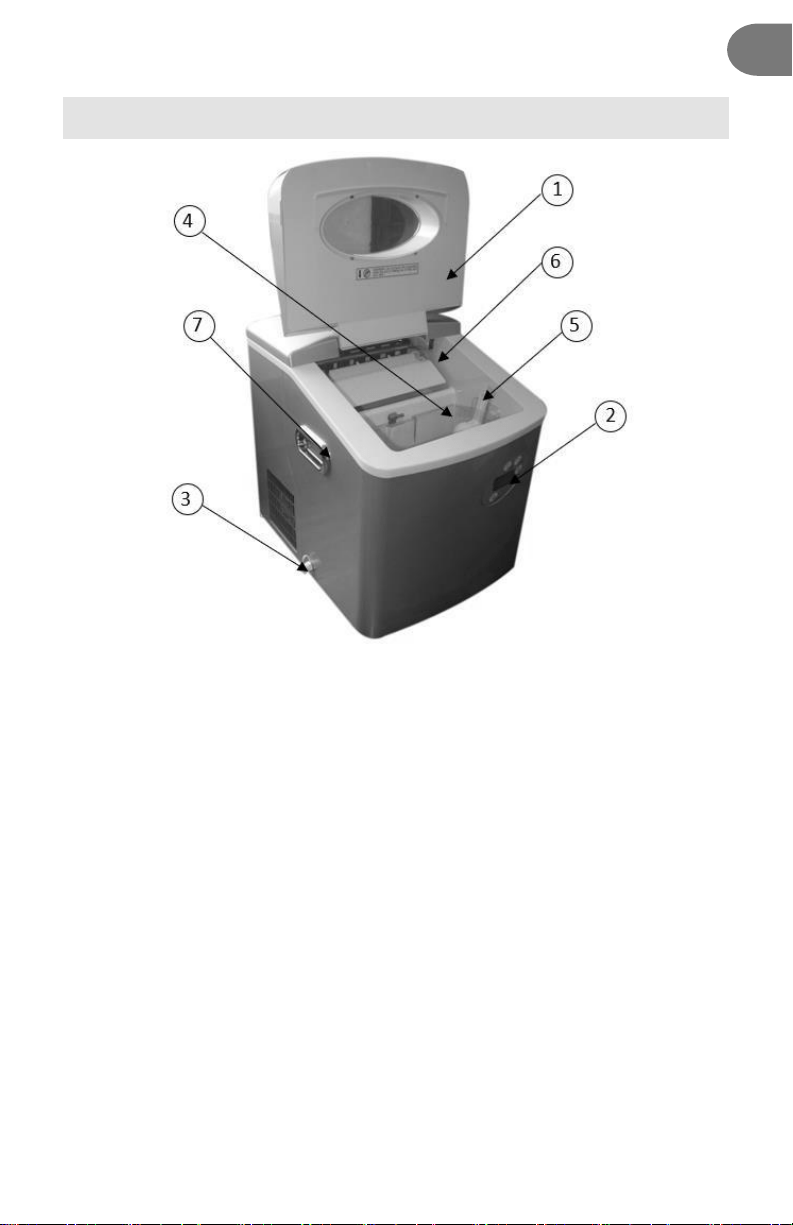
PARTS LIST
1. Cover
2. Control Panel
3. Water Drain Cap
4. Ice Basket
5. Ice Scoop
6. Ice Shovel
7. Handle
EN
www.newair.com 10
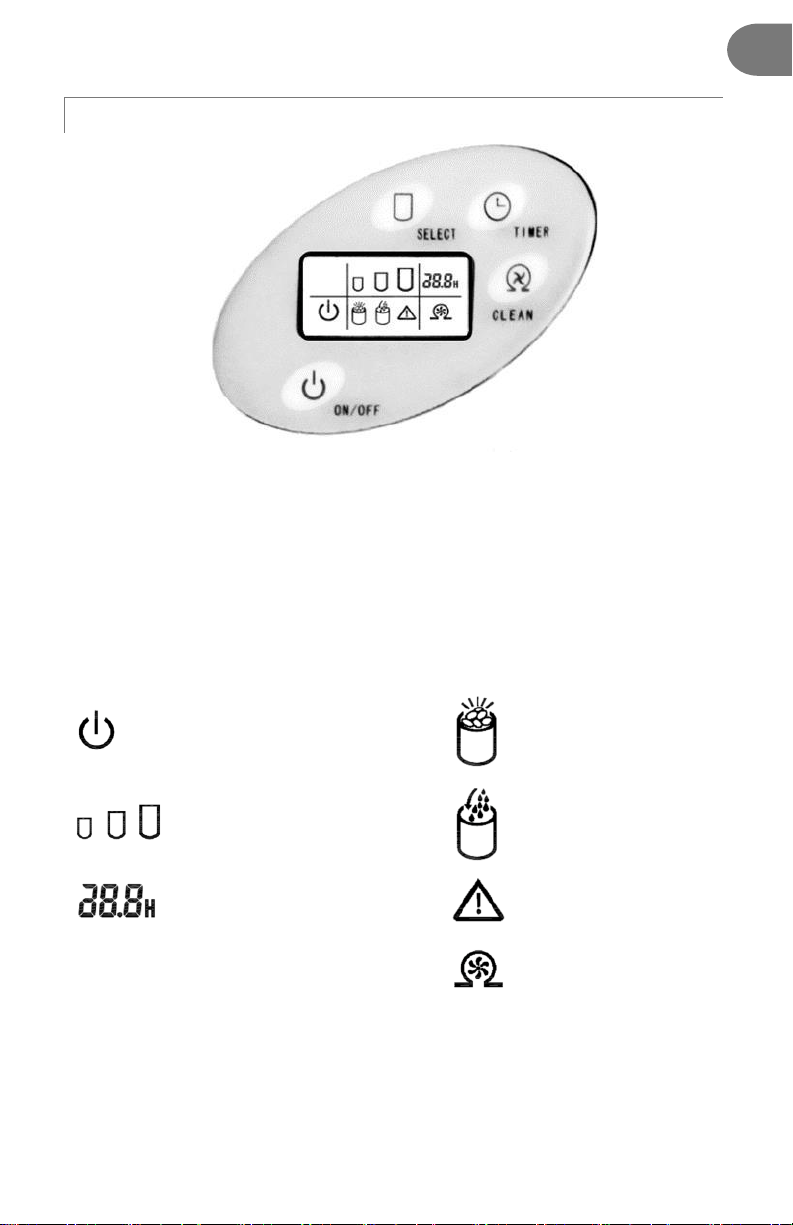
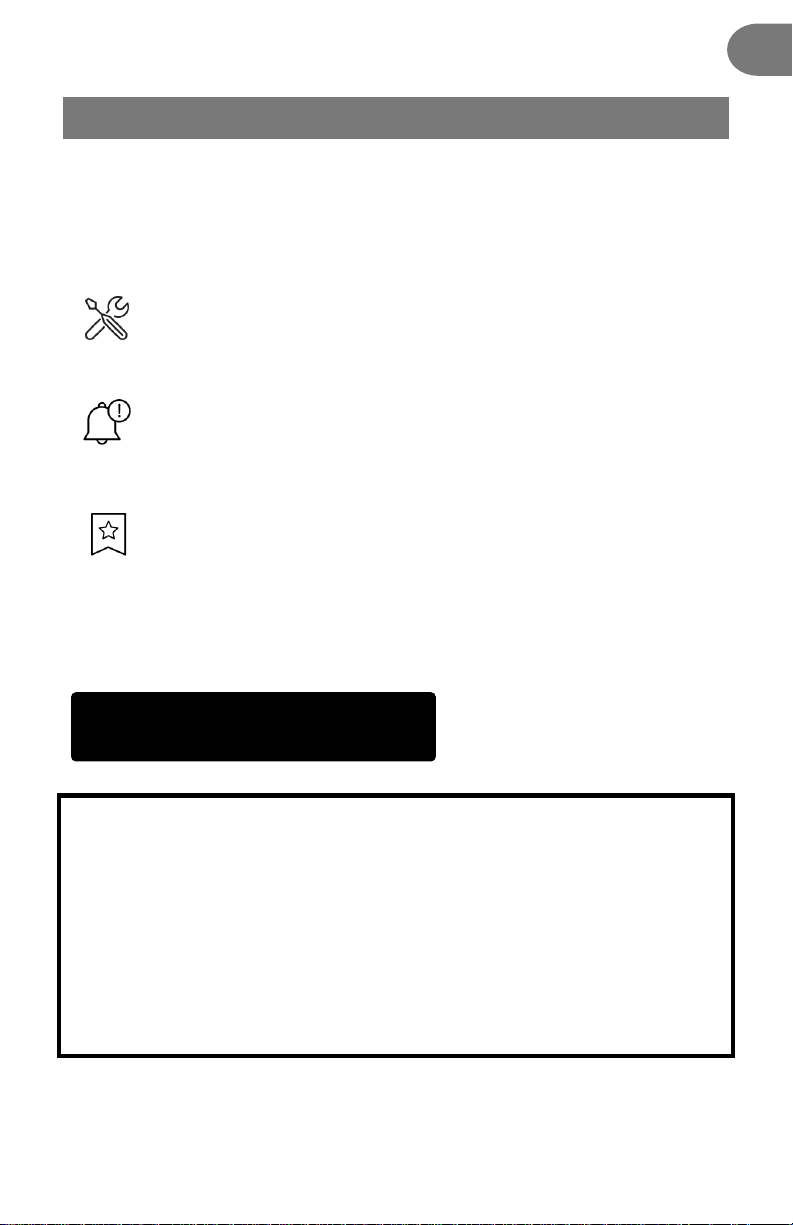
CONTROL PANEL DIAGRAM
BUTTONS:
ON/OFF – Use to start or stop the unit
SELECT - Selects ice size
TIMER – Set or cancel timer (refer to page 11)
CLEAN – Begin self-cleaning function (refer to page 13)
LCD DISPLAY SYMBOLS:
Power indicator
Ice Bucket Full
Indicator
Ice size selected (small,
medium or large)
Add Water Indicator
(flashes when water
needs to be added)
Timer display
Warning Indicator –
problem with unit
Self-Cleaning Indicator

EN
www.newair.com 11
ASSEMBLY & INSTALLATION
1. Remove the exterior and interior packaging. Check that the ice basket and
ice scoop are included. If any parts are missing, please contact customer
service.
2. Clean the interior with lukewarm water and a soft cloth. Take out the ice
basket and clean it.
3. Place your ice maker in a location that is protected from direct sunlight and
other heat sources (e.g., stove, furnace, and radiator). Make sure it is on a
level surface with at least 4 inches of space between the back and sides of
the unit and the wall.
4. Allow two hours for the refrigerant fluid to settle in the compressor before
plugging the ice maker in.
NOTICE: After unpacking your ice maker, it must rest in an upright
position for at least two hours before you plug it in or the
compressor may be damaged, shortening the life span of the unit.
5. Plug your appliance into an exclusive, properly installed and grounded wall
outlet. Do not under any circumstances cut or remove the third (ground)
prong from the power cord. Any questions concerning power and/or
grounding should be directed to a certified electrician.
We recommend you clean your ice maker thoroughly before using it. Please
see Cleaning & Maintenance on page 13 of this guide.

EN
www.newair.com 12
OPERATING INSTRUCTIONS
MAKING ICE
1. Open the unit’s cover, remove the ice basket, and pour water into the
water reservoir. Keep the water level below the “MAX” line marked inside
the reservoir.
2. Plug in the unit to the grounded power supply outlet.
3. Press the “ON/OFF” button on the control panel to begin the ice making
cycle.
4. Select the size of the ice cube by pressing the “SELECT” button. If the room
temperature is lower than 60°F, it is recommended to select small or
medium ice in order to avoid the ice sticking together.
5. The ice making cycle lasts anywhere from 7 to 13 minutes, depending on
the size of the ice cubes you select and the ambient room temperature. Ice
making time may vary significantly in extremely high room temperatures.
6. Periodically verify the water level in the water reservoir when the ice
maker is on. If the water level is too low, the ice maker will automatically
stop and the “Add Water” indictor light will flash in the LCD display
window. Press the “POWER” button to stop the unit and unplug it. Fill the
reservoir with water up to the level mark. Plug it in and press the “POWER”
button again to restart the unit. Allow at least 3 minutes for the
refrigerant inside the compressor to settle before restarting.
7. The ice maker automatically stops working when the ice basket is full. The
“Ice Bucket Full” indicator will also turn on at this time.
8. Change the water in the reservoir every 24 hours to ensure hygienic ice. If
the ice maker will not be used for an extended period of time, drain the
water from the reservoir by unplugging the drain off cap located on the
side of the ice maker.
USING THE TIMER
How to Set the ON-TIMER Program
When the unit is off, you can program the timer to start the unit after a set
number of hours.
1. Press the TIMER button on the control panel. “1.0H” will flash in the Timer
Set Display Window.
2. Press the SELECT button to set the Timer delay to a time between 1.0 and
18.0 hours, in half hour increments.

EN
www.newair.com 13
3. After the desired time is set, the display will show the time remaining and
will decrease in 0.1-hour increments. When the timer reaches ZERO and
disappears, the unit will start to run automatically according to your
settings.
To cancel when the time is set but not yet running, press the TIMER button
twice to cancel it.
How to Set the OFF-TIMER Program
When the unit is on, program the OFF-TIMER to stop the unit after a set time.
1. Press the TIMER button on the control panel. “1.0H” will flash in the Timer
Set Display Window.
2. Press the SELECT button to set the Timer delay to a time between 1.0 and
18.0 hours, in half hour increments.
3. After the desired time is set, the display will show the time remaining and
will decrease in 0.1-hour increments. When the timer reaches ZERO and
disappears, the unit will stop running automatically.
To cancel while the unit is running, press the TIMER button twice to cancel the
TIMER-OFF setting.

EN
www.newair.com 14
CLEANING & MAINTENANCE
Clean the outside of the ice maker with a mild detergent solution and warm
water. Use a soft cloth to wipe to avoid scratching or damaging the surface of
the unit. Use the unit’s self-clean function to clean the interior of the unit:
1. Remove the ice basket.
2. Add 1:1 mixture of water and vinegar.
3. Plug in the unit. Hold down the CLEAN button for at least 6 seconds and
release. The unit will automatically enter the self-clean program. This
process will last about 5-6 minutes, after which the unit will automatically
power down again. During this process the “Add Water Indicator” and the
“Self-Cleaning Indicator” will light in the LCD display window, and the fan
blades in the self-clean symbol will always rotate. This process will rinse
the inside parts of the ice maker thoroughly.
4. After the self-clean program is completed, drain out the water by
unplugging the drain cap on the side. Then close the drain cap.
5. Unplug the unit and add fresh water into the interior tank, up to the water
level mark.
6. Re-plug the unit to the power supply, and rerun the self-cleaning program
again as described in Step 3.
7. When the self-cleaning program is completed, unplug the unit and drain
out the water by unplugging the drain cap on the side.
8. Dry the interior and exterior with a soft cloth.
9. Tighten the drain cap. Replace the ice basket and plug the unit in again.
To remove the build-up of calcium or other impurities, add a capful of vinegar
or lemon juice to the water in the reservoir and run for two or three ice-making
cycles. Drain and refill the reservoir with clean, warm water. Run two more
cycles to rinse the vinegar or lemon-juice. When the machine is not in use open
the water drain cap to completely drain the water reservoir.
STORAGE
Before storing your ice maker, clean it according to the directions above and
allow it to dry thoroughly – at least 24 hours – in order to prevent the growth
of mold or mildew. Store your ice maker in the original packaging, or cover with
a soft cloth or plastic sheet.
EN
www.newair.com 15
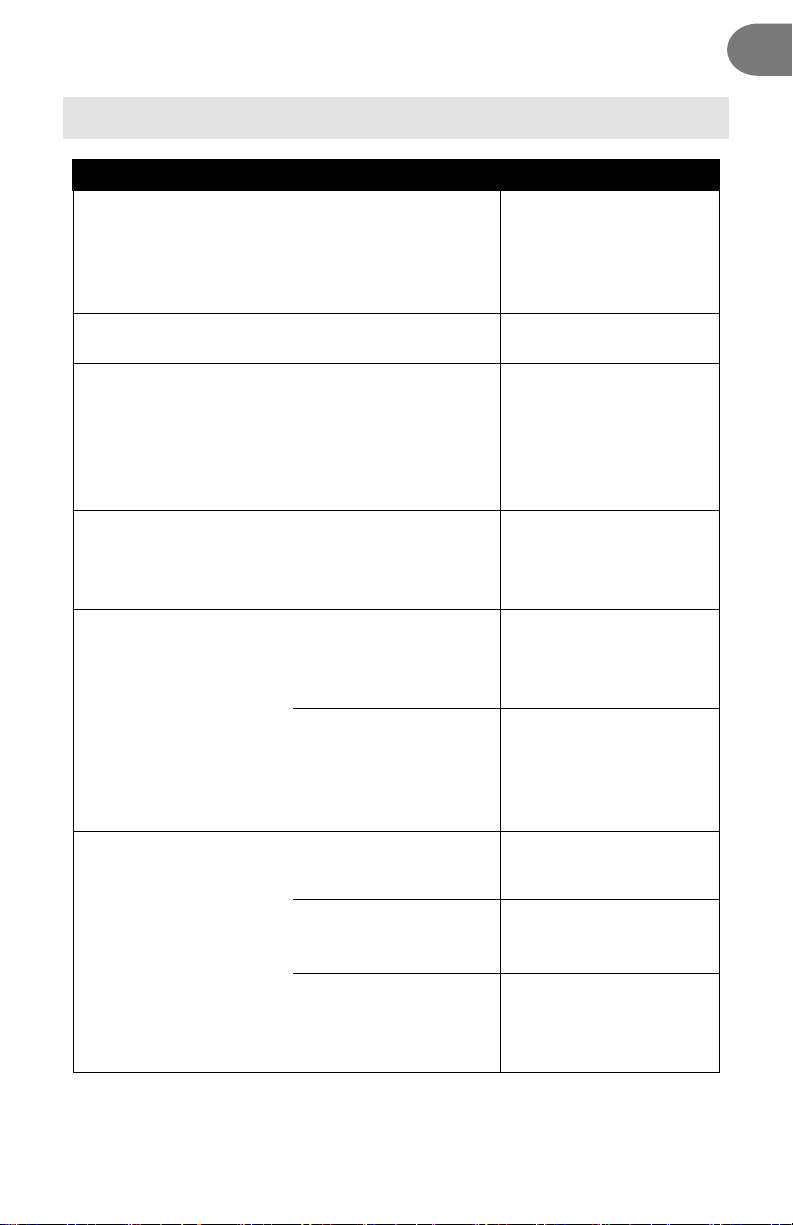
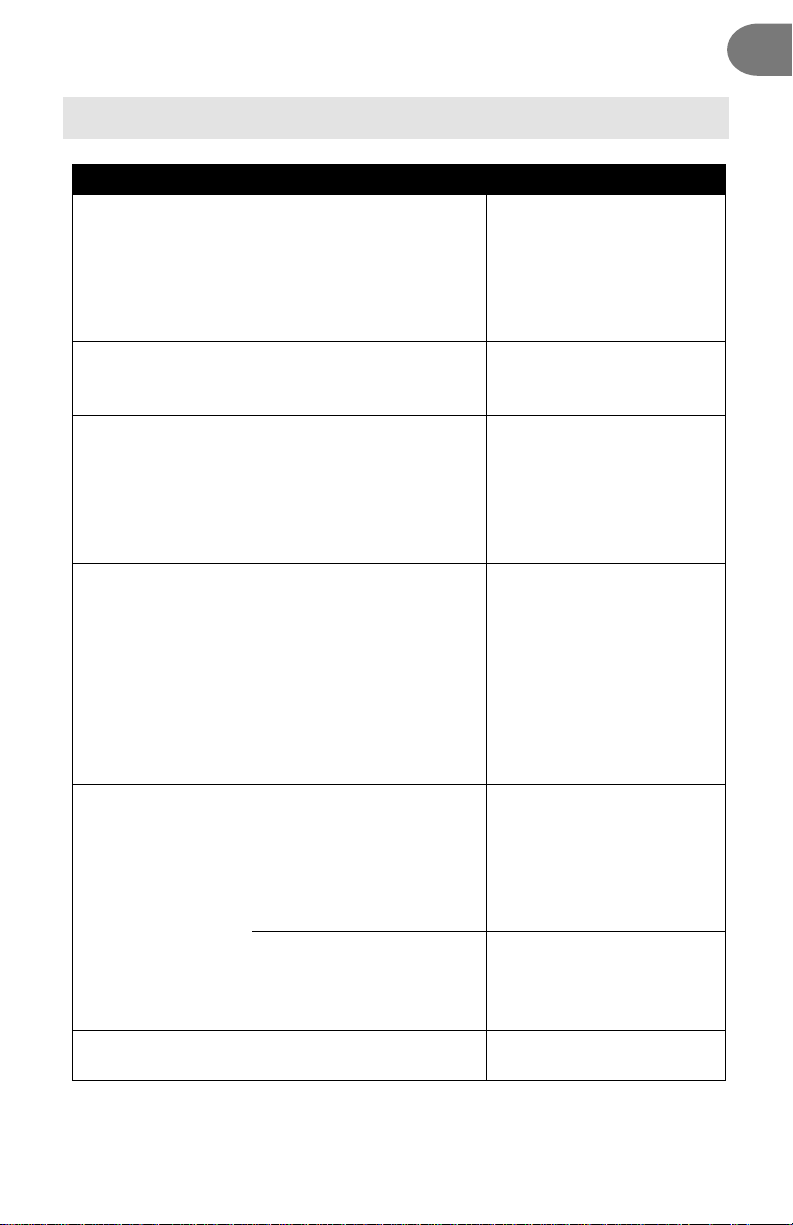
TROUBLESHOOTING
Problem
Possible Cause
Solution
The “ADD WATER”
indicator light is on.
There is not enough
water in the tank.
Press “POWER” to turn
off the unit. Fill the
reservoir with water.
Press “POWER” to
restart.
The “ICE BUCKET FULL”
indicator light is on.
The ice basket is full.
Remove ice from the
basket.
The “WARNING”
indicator light is on.
Ice shovel cannot
rotate.
Check if ice cubes are
blocking the ice shovel;
otherwise, consult a
certified technician to
check the motor and
micro switch.
The “WARNING”
indicator flashes for 20
seconds when starting
or during operation.
Ice-full detecting
sensor on the edge of
interior tank is
malfunctioning.
Consult a qualified
technician to check the
sensor or change to a
new one.
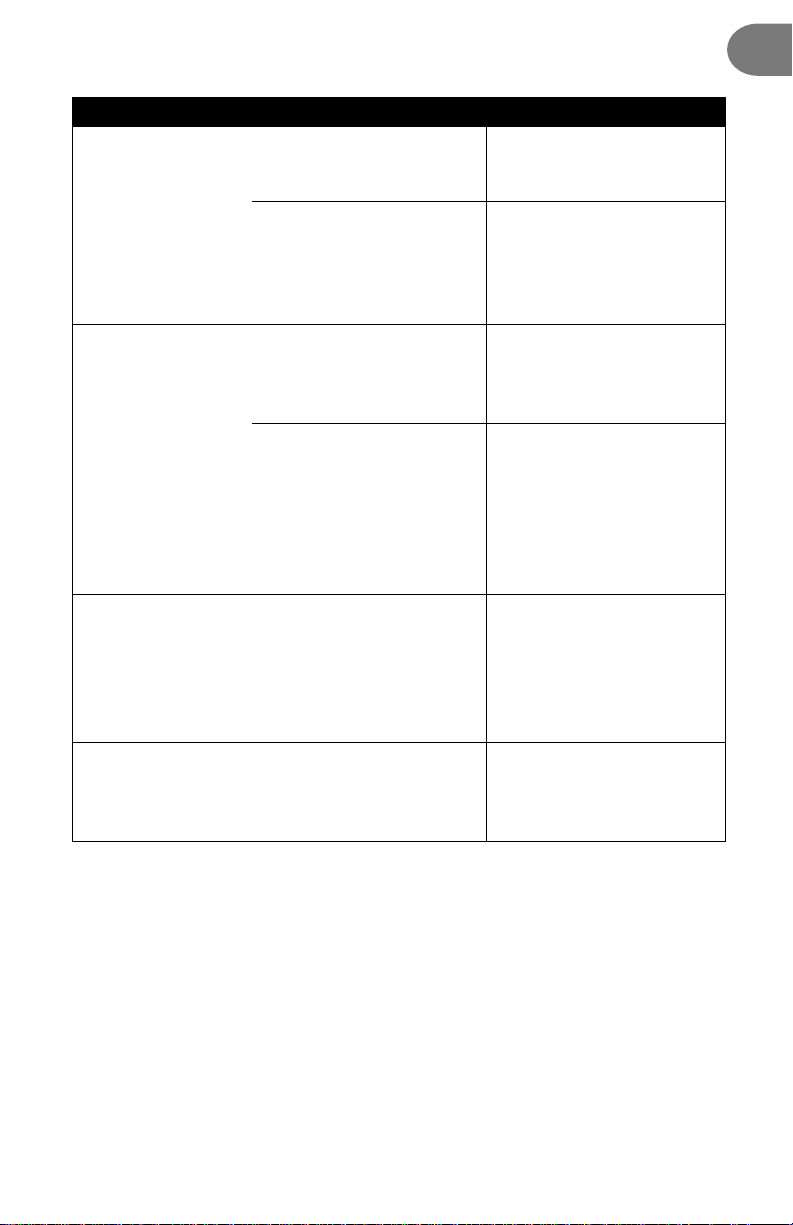
Ice cubes stick
together.
The ice cycle is too
long.
Stop the ice maker and
allow ice block to melt.
Select smaller size and
restart.
Water temperature in
inner tank is too low.
Change the water in the
inner tank.
Temperature of water is
best between 45°F -
90°F.
The ice making cycle
appears to be normal
but no ice is being
produced.
The refrigerant may
be leaking.
Consult a qualified
technician.
A pipe in the cooling
system may be
blocked.
Consult a qualified
technician.
Ambient temperature
or water temperature
in inner tank is too
high.
Please run the ice
maker below 90°F and
pour colder water into
the tank.

EN
www.newair.com 16
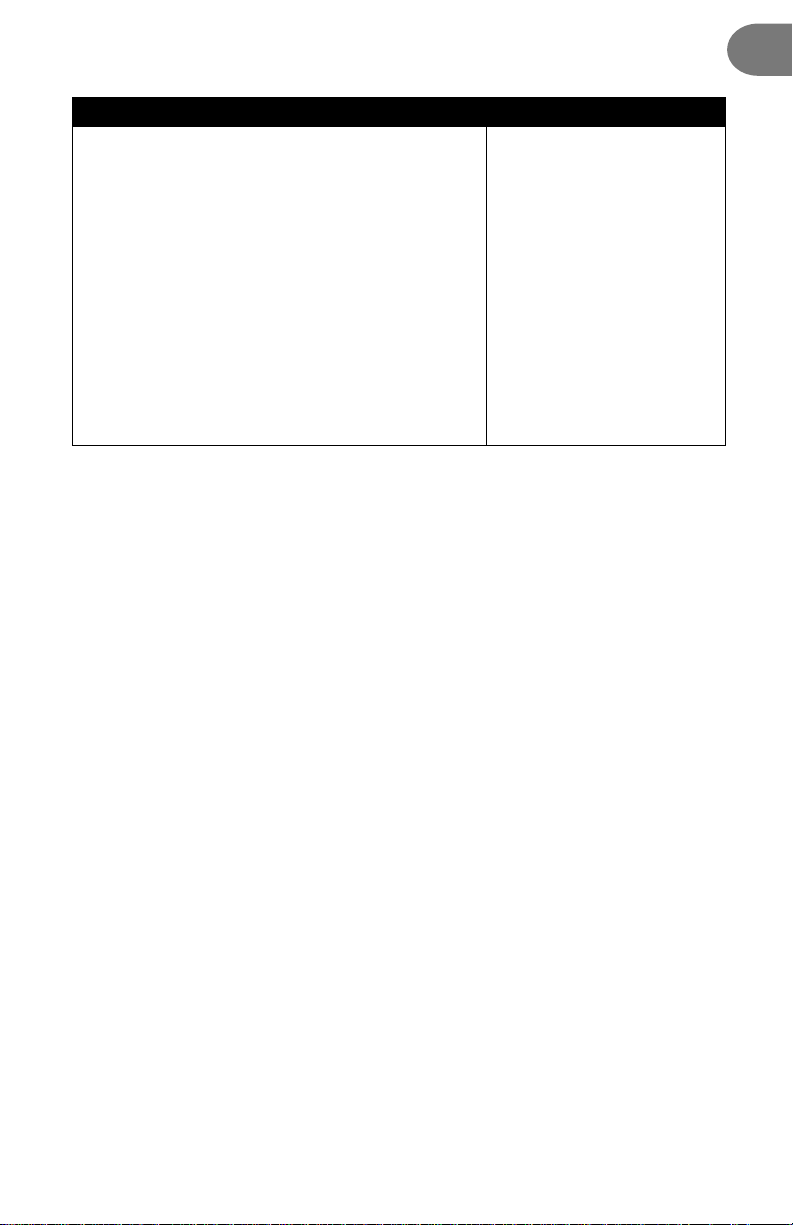
Problem
Possible Cause
Solution
The ice cubes are too
small.
The ambient
temperature or water
temperature may be
too high.
Select large sized ice
cubes by pressing the
“SELECT” button.
The compressor may
need to warm up.
If this is the first time
the unit is being used,
allow the ice maker to
cycle a few times. This
should result in larger
cubes.
The ice has a “plastic”
taste.
The unit’s interior may
need to be cleaned.
Add a tablespoon of
lemon juice or vinegar
to a full tank of water
and allow the ice maker
to cycle a few times.
The unit produces a
large block of ice
instead of cubes.
The ambient
temperature may be
too low.
Unplug the unit and let
the ice thaw out. Allow
the ice maker to defrost
for a few hours and
restart the unit.
The ice cubes have a
cloudy appearance.
There may be trace
minerals in your water
or ice is being
produced too quickly.
Ice cubes may develop
cloudiness when water
is frozen quickly. As ice
develops on the surface
of water, certain gases
can no longer remain
dissolved and begin to
surface as microscopic
bubbles. This cloudiness
is normal.

EN
www.newair.com 17
LIMITED MANUFACTURER’S WARRANTY
This appliance is covered by a limited manufacturer’s warranty. For one year
from the original date of purchase, the manufacturer will repair or replace any
parts of this appliance that prove to be defective in materials and
workmanship, provided the appliance has been used under normal operating
conditions as intended by the manufacturer.
Warranty Terms:
During the first year, any components of this appliance found to be defective
due to materials or workmanship will be repaired or replaced, at the
manufacturer’s discretion, at no charge to the original purchaser. The
purchaser will be responsible for any removal or transportation costs.
Warranty Exclusions:
The warranty will not apply if damage is caused by any of the following:
• Power failure
• Damage in transit or when moving the appliance
• Improper power supply such as low voltage, defective household
wiring or inadequate fuses
• Accident, alteration, misuse or abuse of the appliance such as using
non-approved accessories, inadequate air circulation in the room or
abnormal operating conditions (extreme temperatures)
• Use in commercial or industrial applications
• Fire, water damage, theft, war, riot, hostility or acts of God such as
hurricanes, floods, etc.
• Use of force or damage caused by external influences
• Partially or completely dismantled appliances
• Excess wear and tear by the user
Obtaining Service:
When making a warranty claim, please have the original bill of purchase with
the purchase date available. Once confirmed that your appliance is eligible for
warranty service, all repairs will be performed by a Newair™ authorized repair
facility. The purchaser will be responsible for any removal or transportation
costs. Replacement parts and/or units will be new, re-manufactured or
refurbished and is subject to the manufacturer’s discretion. For technical
support and warranty service, please email support@newairusa.com.

FR
www.newair.com 18
Un nom de confiance
La confiance doit être gagnée et nous allons mériter la vôtre. La satisfaction du
client est notre priorité.
De l’usine à l’entrepôt et de la surface de vente à votre domicile, les fabricants
des produits Newair font la promesse de vous fournir des produits novateurs,
un service exceptionnel et un soutien au moment où vous en avez le plus
besoin.
Vous pouvez compter sur Newair
En votre qualité de fier propriétaire d’un produit Newair, nous vous souhaitons
la bienvenue dans notre famille. Notre entreprise n’utilise aucun robot,
uniquement de véritables personnes pour vous livrer votre produit et de
véritables personnes pour vous aider.
Contactez-nous
Veuillez contacter notre équipe du service client avant de faire un retour dans
votre magasin d'achat. Nous sommes heureux de répondre à toutes vos
questions ou préoccupations!
Contactez-nous du lundi au vendredi de 8h à 4h HNP au:
Téléphone :
1 855 963-9247
Courriel :
support@newair.com
En ligne :
www.newair.com
Un membre de l'équipe vous répondra dans les 24 heures.
Suivez-nous :
Facebook.com/newairusa
Instagram.com/newairusa
YouTube.com/newairusa
Twitter.com/newairusa

FR
www.newair.com 19
LISEZ ET CONSERVEZ CES INSTRUCTIONS
TABLE DES MATIÈRES
Caractéristiques ............................................................................................. 20
Enregistrer Votre Produit En Ligne.................................................................. 21
Consignes De Sécurité Et Mises En Garde ....................................................... 22
Liste Des Pièces .............................................................................................. 24
Diagramme Du Panneau De Commande ................................................. 25
Assemblage Et Installation ............................................................................. 26
Mode d’Emploi .............................................................................................. 27
Nettoyage Et Entretien ................................................................................... 29
Dépannage .................................................................................................... 31
Garantie Limitée Du Fabricant ........................................................................ 34

FR
www.newair.com 20
CARACTÉRISTIQUES
N
O
DU MODÈLE : AI-215SS, AI-215R
TENSION NOMINALE : 115V / 60Hz
COURANT : 2,0/2,7 A
CONSOMMATION ÉLECTRIQUE : 170W
RÉFRIGÉRANT :
CAPACITÉ (QUOTIDIENNE) : 50 lb
CAPACITÉ (PAR CYCLE) : 12 glaçons
TAILLES DES GLAÇONS : 3
R290
FR
www.newair.com 21
ENREGISTRER VOTRE PRODUIT EN LIGNE
Enregistrer votre produit Newair en ligne dès aujourd’hui!
Profitez de tous les avantages de l’enregistrement de votre produit :
Services et soutien
Faites un diagnostic des problèmes d’utilisation et de service plus
rapidement et plus efficacement
Avis de rappel
Restez à l’affût des mises à jour du système et de sécurité, et des avis
de rappel
Promotions spéciales
Abonnez-vous pour recevoir les promotions et offres de Newair
Enregistrer l’information relative à votre produit en ligne est sécuritaire et
prendra moins de 2 minutes :
Alternativement, nous vous recommandons de joindre une copie de votre reçu
de vente ci-dessous et de noter les informations suivantes, situées sur la plaque
signalétique du fabricant à l'arrière de l'appareil. Vous aurez besoin de ces
informations pour contacter le fabricant pour des demandes de service.
Date d’Achat : ____________________________________________
Numéro De Série : ____________________________________________
Numéro De Modèle : ____________________________________________
newair.com/register
FR
www.newair.com 22
CONSIGNES DE SÉCURITÉ ET MISES EN GARDE
Lorsque vous utilisez un appareil électrique, les précautions de base,
incluant les suivantes, devraient toujours être respectées afin
d’éviter un risque d’incendie, de choc électrique, et de blessures
corporelles. Veuillez lire toutes les instructions avant d’utiliser cet
appareil et respecter les conseils de sécurité suivants :
• Ne pas utiliser cet appareil si le cordon endommagé.
• Brancher la machine à glaçons uniquement dans une prise correctement
polarisée. Aucun autre appareil ne doit être branché dans la même prise.
Assurez-vous que la fiche est complètement enfoncée dans la prise.
• L’utilisation d’une rallonge est déconseillée, car cela peut faire surchauffer
l’appareil et provoquer un risque d’incendie. Le cas échéant, utiliser une
rallonge d’un calibre de fil no 14 AWG avec une puissance minimale d’au
moins 1 875 watts.
• Ne pas placer des objets ou les mains sur ou à proximité de l’évaporateur de
la machine à glaçons lorsqu’elle est en marche.
• Ne pas laisser courir le cordon d’alimentation sur une moquette ou des
isolants thermiques. Ne pas couvrir le cordon. Tenir le cordon loin des
endroits achalandés et ne jamais l’immerger dans l’eau.
• Toujours éteindre et débrancher la machine à glaçons de la prise de courant
avant de le nettoyer ou d’en faire l’entretien.
• Faire preuve de prudence lorsque cet appareil est utilisé près d’un enfant.
• Si la machine à glaçons est rentrée de l’extérieur pendant les mois d’hiver, la
laisser se réchauffer à la température ambiante pendant quelques heures
avant de la brancher.
• Ne pas nettoyer la machine à glaçons en utilisant des liquides inflammables.
Les vapeurs peuvent provoquer un incendie ou une explosion.
• Ne pas toucher l’évaporateur lorsque
l’appareil est en marche ou pendant le
processus de préparation des glaçons.
Cela pourrait causer des blessures
graves.
FR
www.newair.com 23
MISE EN GARDE: Cet appareil doit être mis à la terre.
DANGER: Risque d'incendie ou d'explosion. Fluide frigorigène
inflammable utilisé. Ne pas utiliser de dispositifs mécaniques pour
dégivrer la machine à glaçons. Ne pas perforer le tuyau de réfrigérant.
DANGER: Risque d'incendie ou d'explosion. Fluide frigorigène
inflammable utilisé. L’appareil doit être réparé uniquement par une
personne qualifiée. Ne pas perforer le tuyau de réfrigérant.
AVERTISSEMENT: Fluide frigorigène inflammable utilisé. Consulter le
manuel de l’utilisateur/guide de réparation avant d’installer ou de
réparer ce produit. Toutes les précautions de sécurité doivent être
respectées.
AVERTISSEMENT: Risque d'incendie ou d'explosion. Fluide frigorigène
inflammable utilisé. Mettre au rebut conformément aux règlements
fédéraux ou locaux.
AVERTISSEMENT: Risque d'incendie ou d'explosion si le tuyau de
réfrigérant est perforé. Respecter attentivement les instructions de
manipulation. Fluide frigorigène inflammable utilisé.
AVERTISSEMENT: La machine à glaçons doit être installée
conformément à la norme de sécurité relative aux systèmes de
réfrigération ASHRAE15. La machine à glaçons ne doit pas être
installée dans les couloirs ou corridors des bâtiments publics.
AVERTISSEMENT: En cas de problème de fonctionnement de
l’appareil, celui-ci doit toujours être réparé par du personnel autorisé
de l'usine de fabrication afin de réduire au minimum le risque
d’inflammabilité en raison de pièces ou d’un service non conformes.

FR
www.newair.com 24
LISTE DES PIÈCES
1. Couvercle
2. Panneau de commande
3. Valve avec bouchon
4. Bac à glace
5. Pelle
6. Récupérateur de glaçons
7. Poignée

FR
www.newair.com 25
DIAGRAMME DU PANNEAU DE COMMANDE
TOUCHES :
ON/OFF – Marche et arrêt de l’appareil
SELECT – Sélection de la taille des glaçons
TIMER – Programmer ou annuler la minuterie (consulter la page 26)
CLEAN – Démarre la fonction d’auto-nettoyage (consulter la page 27)
SYMBOLES DE L’AFFICHAGE À DEL :
Indicateur de mise en
marche
Indicateur de bac plein
Taille de glaçons
sélectionnée (petit, moyen
ou grand)
Ajouter de l’eau
(clignote lorsque de
l’eau doit être ajoutée)
Minuterie
Avertissement – un
problème est signalé
Indicateur d’auto-
nettoyage
FR
www.newair.com 26
ASSEMBLAGE ET INSTALLATION
1. Retirer le matériau d’emballage à l’intérieur et à l’extérieur. Vérifier si le
panier et la pelle se trouvent à l’intérieur. Si des pièces sont manquantes,
veuillez communiquer avec le service à la clientèle.
2. Nettoyer l’intérieur avec l’eau tiède et un chiffon doux. Sortez le bac
récupérateur de glaçons et nettoyez-le.
3. Installer votre machine à glaçons dans un endroit à l’abri de la lumière
directe du soleil et autres sources de chaleur (cuisinière, four et radiateur).
Assurez-vous qu’il se trouve sur une surface horizontale, en laissant un
dégagement d’au moins 5 pouces entre l’arrière et les côtés de l’appareil,
et le mur.
4. Attendre une heure afin de permettre au réfrigérant de se stabiliser dans
le compresseur avant de brancher l’appareil à la prise murale.
AVERTISSEMENT : Après avoir déballé votre appareil, celui-ci doit
être immobilisé en position verticale pendant au moins une heure
avant de le brancher, sinon, le compresseur pourrait
s’endommager et écourter la durée de vie de l’appareil.
5. Brancher l’appareil correctement dans une prise murale mise à la terre
réservée exclusivement à l’appareil. Ne pas couper ou retirer en aucun cas
la troisième broche (mise à la terre) du cordon d’alimentation. Toute
question sur l’alimentation ou la mise à la terre doit être adressée à un
électricien certifié.
Nous vous recommandons de nettoyer votre machine à glaçons à fond avant
de l’utiliser. Veuillez-vous reporter à la section Nettoyage et entretien à la page
27 de ce guide.

FR
www.newair.com 27
MODE D’EMPLOI
PRÉPARATION DES GLAÇONS
1. Ouvrir le couvercle de l’appareil, retirer le bac et verser de l’eau dans le
réservoir. Maintenir le niveau d’eau sous la ligne « MAX » indiquée à
l’intérieur du réservoir.
2. Brancher l’appareil à une prise de courant mise à la terre.
3. Appuyer sur la touche « ON/OFF » sur le panneau de commande pour
démarrer le cycle de préparation de glaçons.
4. Sélectionner la taille des glaçons en appuyant sur la touche « SELECT ». Si
la température ambiante est inférieure à 60 °F, nous vous recommandons
de sélectionner des glaçons de tailles petite ou moyenne afin d’empêcher
qu’ils ne collent entre eux.
5. Le cycle de préparation durera de 7 à 13 minutes, selon la taille des glaçons
sélectionnée et la température ambiante. La durée de préparation peut
varier considérablement dans les pièces où la température est
extrêmement élevée.
6. Vérifier périodiquement le niveau d’eau dans le réservoir lorsque la
machine à glaçons est en marche. Si le niveau d’eau est trop bas, la
machine s’arrêtera automatiquement et le voyant « ADD WATER »
s’allumera. Appuyer sur la touche « POWER », remplir le réservoir d’eau
jusqu'à la ligne puis appuyer de nouveau sur la touche « POWER » pour
redémarrer l’appareil. Attendre au moins trois minutes afin que le
réfrigérant se stabilise dans le compresseur avant de redémarrer
l’appareil.
7. La machine à glaçons s’arrête automatiquement lorsque le bac est rempli
de glaçons. Le voyant « ICE » s’allumera également simultanément.
8. Changer l’eau du réservoir toutes les 24 heures afin d’assurer la
préparation de glaçons hygiénique. Si la machine n’est pas utilisée pendant
une période de temps prolongée, vider l’eau du réservoir en retirant le
bouchon de la valve d’évacuation sur le côté de la machine à glaçons.

FR
www.newair.com 28
UTILISATION DE LA MINUTERIE
Pour programmer l’heure de démarrage ON-TIMER
Lorsque l’appareil est en position éteinte, vous pouvez programmer la
minuterie pour mettre en marche l’appareil après une heure définie.
1. Appuyer sur la touche « TIMER » sur le panneau de commande.
L’indication « 1.0 H » clignotera dans la fenêtre d’affichage de réglage de la
minuterie.
2. Appuyer sur la touche « SELECT » pour programmer le délai de la minuterie
entre 1,0 et 18,0 heures, par tranches d’une demi-heure.
3. Après avoir programmé l’heure souhaitée, l’affichage indiquera la durée
restante et diminuera par incréments de 0,1 heure. Lorsque la minuterie
atteint ZERO puis disparaît, l’appareil commencera à se mettre en marche
automatiquement en fonction de vos réglages.
Pour annuler l’heure programmée avant que l’appareil est en marche, appuyer
sur la touche « TIMER » deux fois.
Pour programmer l’heure d’arrêt OFF-TIMER
Lorsque l’appareil est en marche, programmer l’heure d’arrêt OFF-TIMER pour
arrêter l’appareil après une heure définie
1. Appuyer sur la touche « TIMER » sur le panneau de commande.
L’indication « 1.0 H » clignotera dans la fenêtre d’affichage de réglage de la
minuterie.
2. Appuyer sur la touche « SELECT » pour programmer le délai de la minuterie
entre 1,0 et 18,0 heures, par tranches d’une demi-heure.
3. Après avoir programmé l’heure souhaitée, l’affichage indiquera la durée
restante et diminuera par incréments de 0,1 heure. Lorsque la minuterie
atteint ZERO puis disparaît, l’appareil commencera à se mettre en marche
automatiquement en fonction de vos réglages.
Pour annuler l’heure programmée avant que l’appareil se mette en marche,
appuyer deux fois sur la touche « TIMER ».

FR
www.newair.com 29
NETTOYAGE ET ENTRETIEN
Nettoyer l’extérieur de la machine à glaçons avec une solution d’eau tiède et
de détergent doux. Utiliser un chiffon doux afin de ne pas égratigner ou
endommager la surface de l’appareil. Utiliser la fonction d’auto-nettoyage pour
nettoyer l’intérieur de l’appareil
1. Retirer le bac à glaçons.
2. Ajouter un mélange 1:1 d’eau et de vinaigre.
3. Brancher l’appareil. Maintenir la touche CLEAN pendant au moins 6
secondes puis relâcher. L’appareil saisira automatiquement le programme
d’auto-nettoyage. Ce processus durera environ 5 à 6 minutes, après quoi
l’appareil s’éteindra de nouveau automatiquement. Pendant ce processus,
les voyants « Add Water » et « Self Cleaning » s’allumeront dans la fenêtre
d’affichage à DEL et l’hélice du ventilateur dans le symbole d’auto-
nettoyage tournera de façon ininterrompue. Ce processus permettra de
rincer à fond les parties intérieures de la machine.
4. Une fois le programme d’auto-nettoyage terminé, vider l’eau en retirant le
bouchon de la valve d’évacuation sur le côté. Remettre ensuite le bouchon
en place.
5. Débrancher l’appareil et ajouter de l’eau fraîche dans le réservoir à
l’intérieur jusqu’à la ligne de niveau d’eau.
6. Rebrancher l’appareil dans la prise de courant et relancer le programme
d’auto-nettoyage comme décrit à l’étape 3.
7. Une fois que le programme de nettoyage automatique sera terminé,
débrancher l’appareil et vider l’eau en retirant le bouchon de la valve sur le
côté.
8. Assécher l’intérieur et l’extérieur de l’appareil avec un chiffon doux.
9. Replacer le bouchon sur la valve et bien serrer. Remettre le bac à glaçons
dans l’appareil et le rebrancher.
Pour éliminer l’accumulation de calcium ou autres impuretés, ajouter un
bouchon de jus de citron ou de vinaigre à l’eau du réservoir et faire fonctionner
l’appareil pendant deux ou trois cycles de préparation de glaçons. Vider et
remplir le réservoir avec de l’eau propre et chaude. Refaire deux autres cycles
pour rincer le vinaigre ou le jus de citron. Lorsque la machine n’est pas utilisée,
retirer le bouchon de la valve d’évacuation de l’eau pour vider complètement
le réservoir.

FR
www.newair.com 30
ENTREPOSAGE
Avant de ranger votre machine à glaçons, nettoyez-le en suivant les directives
fournies ci-dessus et laissez sécher à fond (pendant au moins 24 heures) afin de
prévenir la formation de moisissures.
Ranger votre machine à glaçons dans son emballage original ou le couvrir d’un
tissu doux ou d’une feuille de plastique.
FR
www.newair.com 31
DÉPANNAGE
Problème
Causes possibles
Solution
Le voyant « ADD
WATER » s’allume.
Le niveau d’eau est peut-
être trop bas dans le
réservoir.
Appuyer sur la touche
« POWER » pour éteindre
l’appareil. Remplir le
réservoir d’eau. Appuyer
sur « POWER » pour le
redémarrer.
Le voyant « ICE
BUCKET FULL »
s’allume.
Le bac à glaçons est plein.
Retirer les glaçons du bac.
Le voyant
« WARNING »
s’allume.
Le récupérateur de
glaçons ne tourne pas.
Vérifier si des cubes
bloquent le récupérateur;
autrement, consulter un
technicien certifié pour
vérifier le moteur et le
micro-interrupteur.
Le voyant «
WARNING »
clignote pendant
20 secondes au
moment de mettre
en marche
l’appareil ou
pendant son
fonctionnement.
Le capteur de détection de
niveau plein qui se trouve
sur le bord intérieur du
réservoir ne fonctionne
pas normalement.
Consulter un technicien
qualifié pour ou remplacer
le capteur.
Les glaçons collent
ensemble.
Le cycle de préparation de
glaçons est trop long.
Éteindre la machine et
laisser fondre le bloc de
glace. Sélectionner la taille
de glaçons la plus petite
puis redémarrer la
machine.
La température de l’eau
dans le réservoir est trop
basse.
Remplacer l’eau dans le
réservoir. La température
de l’eau idéale est entre 45
°F – 90 °F.
Le cycle de
préparation de
Il se peut qu’il y ait une
fuite du réfrigérant.
Consulter un technicien
qualifié.
FR
www.newair.com 32
Problème
Causes possibles
Solution
glaçons semble
normal, mais il n’y
a aucun glaçon.
Un tuyau du système de
refroidissement pourrait
être bloqué.
Consulter un technicien
qualifié.
La température ambiante
ou de l’eau est trop
élevée.
Veuillez régler la
température de la machine
à glaçons à moins de 90 °F
et verser de l’eau plus
froide dans le réservoir.
Les glaçons sont
trop petits.
La température ambiante
ou de l’eau pourrait être
trop élevée.
Sélectionner des glaçons
de taille grande en
appuyant sur la touche
« SELECT ».
Le compresseur a peut-
être besoin de se
réchauffer.
S’il s’agit de la première
fois que l’appareil est
utilisé, exécuter plusieurs
cycles de préparation de
glaçons. Cela devrait
donner des cubes de plus
grande taille.
Les glaçons ont un
goût de
« plastique ».
L’intérieur de l’appareil
pour avoir besoin d’être
nettoyé.
Ajouter une cuillère à
soupe de jus de citron ou
de vinaigre à un réservoir
d’eau plein et exécuter
quelques cycles de
préparation de glaçons.
Il y a un gros bloc
de glace au lieu de
cubes dans
l’appareil.
La température ambiante
est trop basse.
Débrancher l’appareil et
laisser fondre la glace
pendant quelques heures
puis redémarrer l’appareil.
FR
www.newair.com 33
Problème
Causes possibles
Solution
Les glaçons ont une
apparence opaque.
Des traces de minéraux
pourraient se trouver dans
l’eau ou la préparation des
glaçons est peut-être trop
rapide.
Des cubes de glace
peuvent prendre un aspect
opaque lorsque l’eau est
gelée rapidement. À
mesure que la glace se
forme sur la surface de
l’eau, certains gaz
pourraient ne pas
demeurer à l’état dissout
et commencer à se former
à la surface sous forme de
bulles microscopiques. Cela
est normal.

FR
www.newair.com 34
GARANTIE LIMITÉE DU FABRICANT
Cet appareil est couvert par la garantie limitée du fabricant. Pour une période d’un an à
compter de la date d’achat, le fabricant réparera ou remplacera les pièces de cet appareil
qui s’avéreraient défectueuses en raison de vices de matériaux ou de main-d’œuvre,
pourvu que l’appareil ait été utilisé dans des conditions normales recommandées par le
fabricant.
Conditions de la garantie :
Au cours de la première année, toutes les composantes de l’appareil défectueuses en
raison d’un vice de matière ou de fabrication seront réparées ou remplacées
gratuitement, à la discrétion du fabricant. L’acheteur devra assumer les frais de
déplacement ou de transport.
Exclusions de la garantie :
La garantie ne s’applique pas si des dommages sont survenus pour les raisons suivantes :
• Panne de courant
• Dommages pendant le transport ou le déplacement de l’appareil
• Une mauvaise alimentation en courant comme une basse tension, un câblage
défectueux ou des fusibles inadaptés
• Un incident, une altération, une mauvaise utilisation ou un abus de l’usage de
l’appareil comme l’utilisation d’accessoires non agréés, une circulation d’air
insuffisante dans la pièce ou des conditions d’utilisation anormales
(températures extrêmes)
• Utilisation dans des applications commerciales ou industrielles
• Incendie, dégâts d’eau, vol, guerre, émeute, hostilité ou catastrophes naturelles
comme les ouragans, inondations, etc.
• Utilisation de la force ou dommages causés par des influences extérieures
• Appareils partiellement ou complètement désassemblés
• Usure excessive par l’utilisateur
Pour obtenir des services :
Pour invoquer la garantie, veuillez avoir la facture d’achat originale indiquant la date
d’achat. Après avoir reçu la conformation que votre appareil est admissible à la garantie,
toutes les réparations doivent être effectuées par un atelier de réparation Newair™
agréé. L’acheteur devra assumer les frais de déplacement ou de transport. Les pièces ou
appareils de remplacement seront à l’état neuf, reconditionnés ou remis à neuf et sont
assujettis à la discrétion du fabricant. Pour obtenir un soutien technique et un service
sous garantie, veuillez envoyer un courriel à support@newair.com