For your safety and continued enjoyment of this product, always read the instruction booklet carefully before using.
Instruction & Recipe Booklet
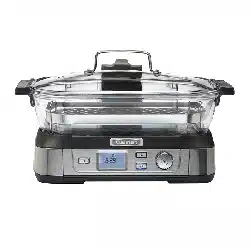
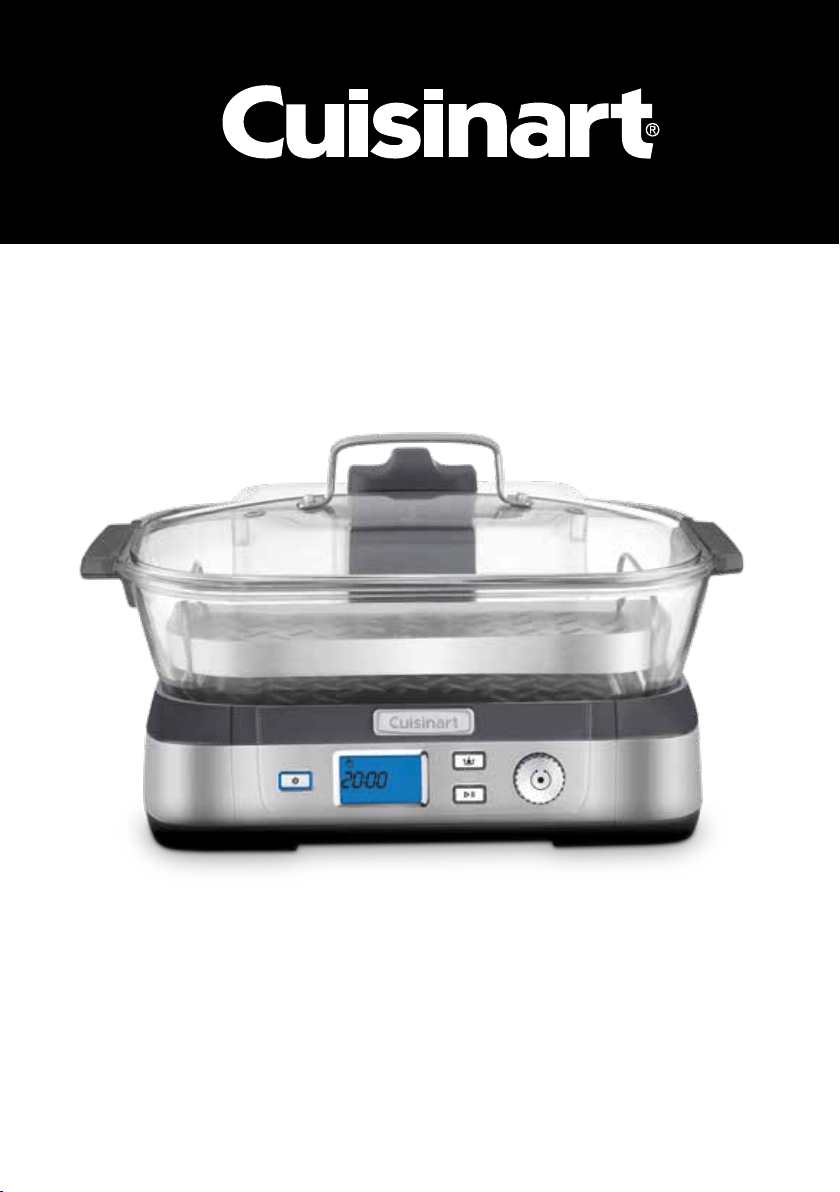
CookFresh™ Digital Glass Steamer - STM-1000XA
2
IMPORTANT
SAFEGUARDS
READ ALL INSTRUCTIONS
BEFORE USING
When using any electrical appliance, especially
when children are present, basic safety
precautions should always be taken to reduce
the risk of fire, electric shock and/or injury,
including the following:
• Never leave unattended while cooking to
avoid possibility of fire.
• This appliance is intended for HOUSEHOLD
USE ONLY and similar applications such as:
- staff kitchen areas in shops, offices and
other working environments;
- farmhouses;
- clients in hotels, motels and other
residential type environments;
- bed and breakfast settings
• This appliance is not intended for use by
persons (including children) with reduced
physical, sensory, or mental capabilities, or
lack experience and knowledge unless, they
have been given instruction and or guidance
concerning use of the appliance by a person
responsible for their safety.
•
Use only on an appropriate benchtop and
indoors only, sitting away from flammable
materials such as curtains, draperies and walls
of similar nature as a fire may occur if comes in
contact or becomes covered during operation.
• Do not place on or near a hot gas, electric
burner, or in a heated oven.
• Do not use appliance for other than its
intended use.
•
This appliance is under 220V~240V use only.
Check voltage to be sure the voltage indicated
on the nameplate agrees with your voltage.
• Always attach plug to unit first, then plug
cord to wall outlet. To safely disconnect,
press the
power button to stop cooking
cycle and remove plug from electrical outlet.
• To avoid the possibility of the unit being
accidentally pulled off the working area,
which could result in damage to the unit or
personal injury, do not let the cord hang over
the edge of a table or benchtop.
• To avoid damage to the cord and possible
fire or electrocution hazard, do not let cord
come into contact with any hot surfaces
including a stovetop.
• Do not operate this appliance if it has been
dropped or damaged (including the cord) in
any manner or is not operating correctly.
• Do not operate this appliance in an
appliance cabinet or under a wall cabinet.
When storing in an appliance cabinet, always
unplug the unit from the electrical outlet.
Not doing so could create a risk of fire,
especially if the unit is in contact with the
walls of any cabinetry or on closing the
cabinet door and touching the unit.
• Keep hands hair and clothing away during
operation to reduce the risk of injury.
• Always unplug from the electrical outlet
when not in use before putting on or taking
off parts and before cleaning.
• The use of attachments not recommended
by Cuisinart may be hazardous.
• At no time, before or during cooking and
cleaning immerse unit, plug or cord in water,
or any other liquids similarly under running
water too – this is to protect against the
starting of a fire and electric shock that could
induce injury to persons. If the unit, plug or
cord should fall into water or other liquids,
unplug the cord from the electrical output
immediately. DO NOT reach into the water.
• The temperature of accessible surfaces may
be high when the appliance is operating.
Surfaces marked with this symbol will be very
hot to touch during use – only use
handles and/or knobs. DO NOT
TOUCH until the unit has cooled
down.
• Avoid sudden temperature changes, such as
adding refrigerated foods into the glass dish.
• Be certain the steamer lid is securely in place
before operating.
• No object should ever be rested on the glass
dish. This includes cooking utensils and
baking dishes.
• Do not place sealed or airtight containers in
the glass dish.
• Do not place paper, cardboard, plastic or
similar products in the glass dish.
• Use extreme caution when removing lid and
steaming tray or when moving the unit itself
that may be very hot.
• Do not clean with metal scouring pads.
Pieces can break off the pad and touch
electrical parts, involving a risk of electric
shock.

3
SPECIAL CORDSET
INSTRUCTIONS
A short power supply cord is provided to reduce
the risks resulting from becoming entangled in or
tripping over a longer cord.
Extension cords may be used if care is exercised
in their use.
If an extension cord is used, the marked electrical
rating of the extension cord must be at least as
great as the electrical rating of the appliance, and
the longer cord should be arranged so that it will
not drape over the countertop or tabletop where
it can be tripped over unintentionally or pulled on
by children.
SAVE THESE
INSTRUCTIONS
BEFORE THE FIRST USE
Before using your CookFresh™ Digital Glass
Steamer for the first time, remove any dust from
shipping by wiping the housing, steam tower and
control panel.
Be sure to thoroughly clean all accessories before
first use. The removable water reservoir, lid, glass
dish and steaming tray should be hand-washed in
hot, sudsy water and thoroughly rinsed.
Before using your CookFresh™ Digital Glass
Steamer, ensure it is 15cm away from the wall
or from any items on the benchtop. Do not use
on heat-sensitive surfaces.
CONTENTS
Important Safeguards ......................................... 2
Special Cordset Instructions ............................... 3
Before the First Use ............................................ 3
Parts & Features ................................................. 4
Getting To Know Your Control Panel ................. 5
Operating Instructions ........................................ 6
Cleaning & Maintenance .................................... 7
4
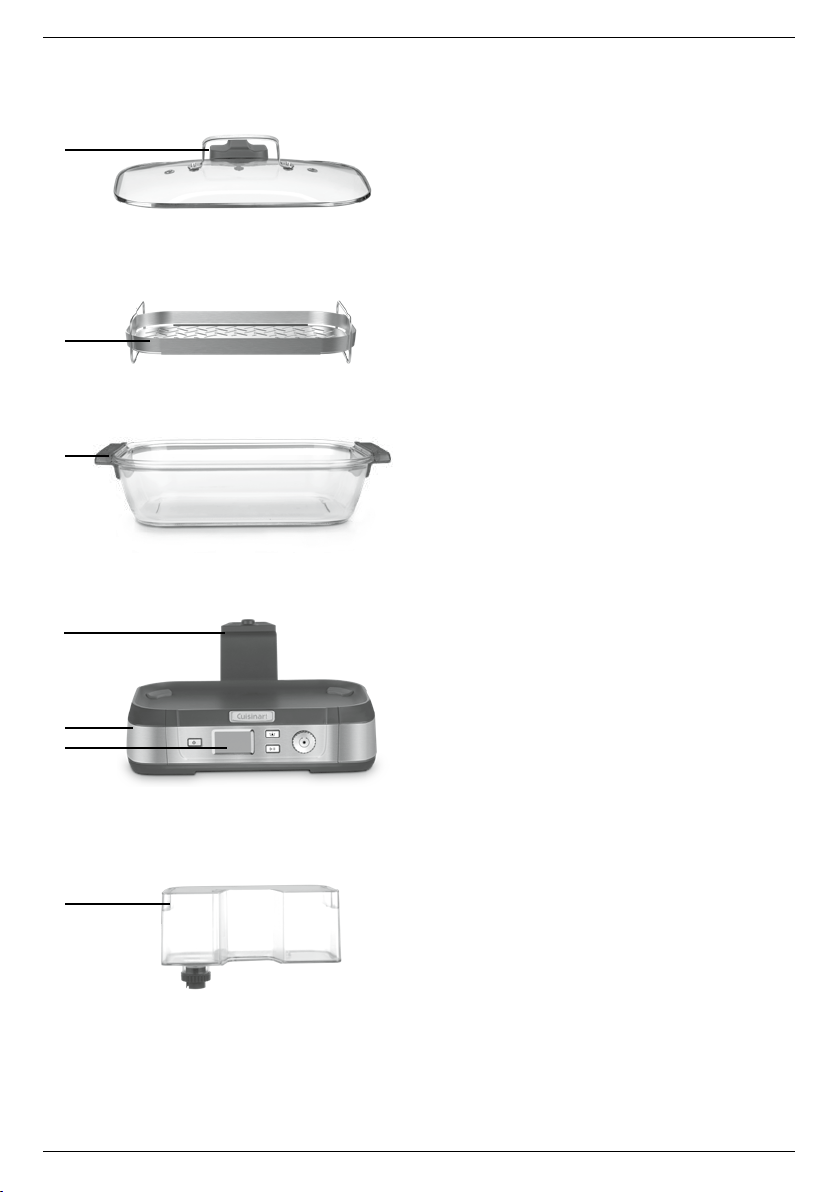
PARTS & FEATURES
A. Glass Lid with Stainless Steel Rim
Provides clear view of food as it steams;
features two release vents.
B. Reversible Stainless Steel Steaming Tray
Flips to accommodate different foods, &
elevates food for even steaming; side bars
prevent small items from falling off. Dishwasher
safe.
C. 5-Litre Glass Steaming Dish
Provides clear view of food as it steams.
Dishwasher safe. Can also be used as a
serving dish.
D. Steam Tower
Attached to the lid, disburses steady stream of
steam from the top down, circulating it around
food for even results.
E. Control Panel
See following page.
F. Base with Brushed Stainless
Steel Housing
G. Removable 1-Litre Water Reservoir
Allows for uninterrupted steaming. Lifts off for
easy filling.
H. Audible Alert (not shown)
Signals when steam cycle ends & water needs
to be refilled.
I. Water Release Drain (not shown)
D
E
F
G
B
C
A
5
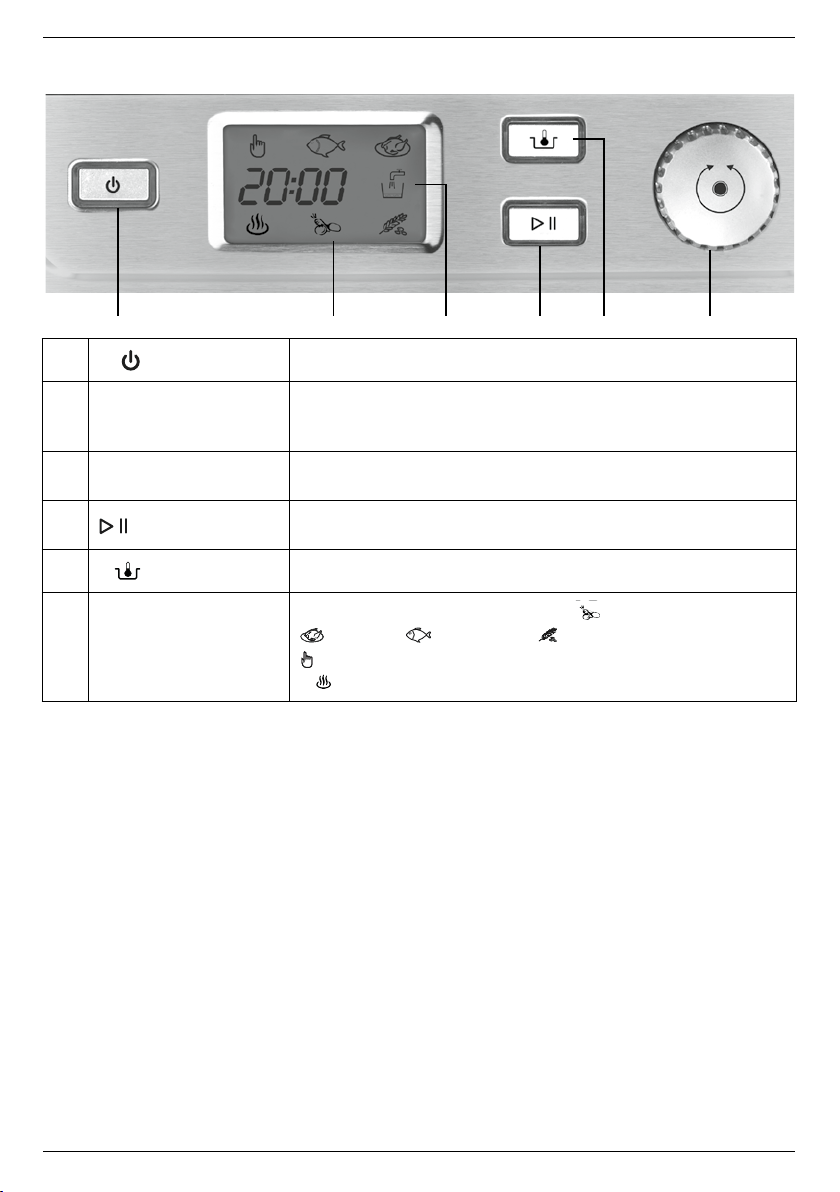
GETTING TO KNOW YOUR CONTROL PANEL
BA FEC D
A.
On/Off Button
Press to start or manually stop the steaming process.
B. LCD Display
The backlit LCD screen displays function menu, illuminates func-
tion selected, shows steaming time & displays “add water” icon
when water reservoir needs refilling.
C. Add Water
Icon appears in LCD to let you know when to refill water reser-
voir. An audible alert will also sound.
D.
Pause/Play Button
Press to pause steam-flow before removing lid during the steam-
ing process. Timer will pause; press again to resume steaming.
E.
Reheat Button
Press to bring food up to serving temperature.
F. Selector Dial
Use to select food category presets:
VEGETABLES,
POULTRY, SEAFOOD & GRAINS.
MANUAL (use to increase or decrease steam time if desired.)
&
KEEP WARM settings can also be selected.
QUICK TIPS
• Steaming times stated in the recipe booklet
are to be used as a guide;
- Times may vary depending on the quantity,
consistency of sizes of pieces, temperature,
freshness of foods, spacing/placement of
food on the steaming tray, and personal
preference/taste
• Meat, poultry and seafood should always be
thawed completely before steaming.
• Never add seasonings, broth or herbs to the
water reservoir.
• No liquids other than water should be used in
the water reservoir.
• Some foods, such as grains and rice, can be
steamed in ovenproof dishes and covered with
aluminium foil.
• For meats and chicken, check the internal
temperature. The recommended temperature
for chicken breast is 74°C. The recommended
temperature for fish is 63°C.
• For reheating food, use the REHEAT button for
bringing food up to serving temperature. The
recommended serving temperature for food is
at least 74ºC.
• To check on food during the steam cycle, press
the PAUSE button to stop flow of steam. Wait
a second before lifting the side of the lid
farthest away from you first, to allow steam to
escape away.
• Be sure to cover foods placed into steamer in
dishes to avoid steam condensing in bottom of
dish - We suggest using aluminum foil.
• Use mitts or potholders to lift tray out of
steamer before removing food.
6
OPERATING INSTRUCTIONS
Plug steamer into an 220V~240V electrical
outlet.
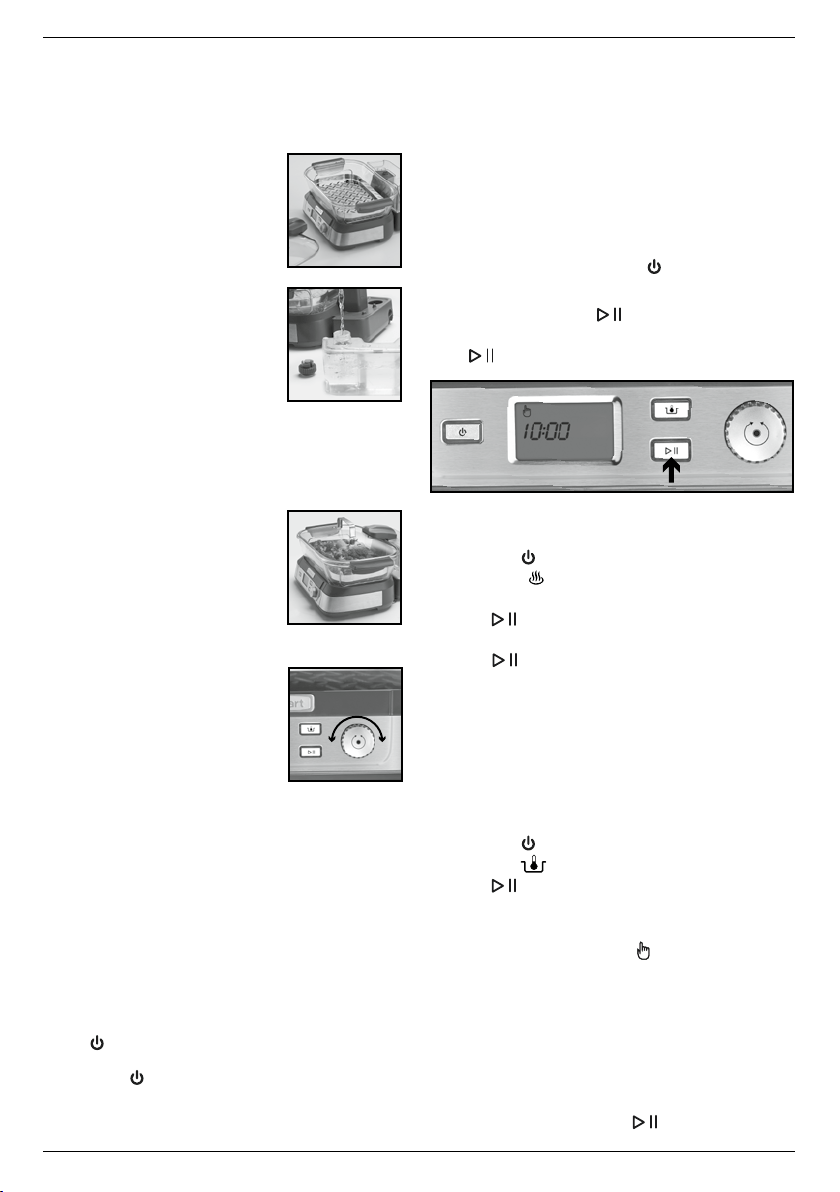
1. Prepare the Steamer
Position the steamer
where you want to do your
cooking. Choose a flat, dry,
sturdy surface. Set the glass
steaming dish in place on
the base.
2. Fill Water Reservoir
Remove the water reservoir
and twist the grey cap
counterclockwise to open.
Fill with cold water, twist
the cap clockwise to close,
and set reservoir back into the steamer.
3. Add Food
Place steaming tray in the desired position.
Place food onto the steaming tray.
4. Cover Dish
Place lid on glass dish,
positioning the steam-cover
cover over the steam tower.
5. Select Steaming Time
Turn the dial until the food type you are
steaming illuminates in
the LCD display, then
press the dial to select it.
Recommended steaming
time will appear in the LCD
display. Turn the dial to
increase or decrease preset
time for personal preference. If you wish
to return to the food-type menu, press the
Dial.
NOTE: Cooking time will vary depending
on the quantity and density of food, size of
pieces, and other factors. As you get to know
your steamer and cook different foods, you’ll
learn how much time is needed to get the
exact results you want.
6. Use in “Pre-set cook” mode
• Plug into the socket.
The
button lights up. It will switch off
automatically after 30 seconds if not used.
• Press the
button. The display lights up.
• Turn the dial to run through the food
categories on the display.
• When the desired category flashes, press
the dial once to confirm the selection. The
chosen category is displayed on its own and
the time indicator flashes.
• Change the pre-set time if desired, by
turning the dial, and then press the button to
start cooking.
Warning: Never touch any parts that may be hot
during cooking, such as the lid, tray or appliance
base.
NOTE: To switch the appliance off before the
programme ends, press the button.
To change cooking duration while in progress,
press the Pause/Play
button, use the dial
to change the duration and then press Pause /
Play once again.
7. Use in “Keep Warm” mode
To keep the food warm:
• Press the
button. The screen comes on.
• Select the icon with the setting wheel.
The time is displayed as 0:00.
• Press to launch the timer-free
programme or select a time first and then
press .
NOTE: Without a timer, maximum cooking
time is 3 hours and 59 minutes (the time it
takes for a full tank to evaporate).
With the timer, maximum cooking time is 59
minutes and 59 seconds.
8. Use in “Reheat” mode
To reheat food:
• Press the
button. The screen turns on.
• Press the
button.
• Press to launch the timer-free
programme or select a time first and then
press.
9. Use in “Manual” mode
Manual mode enables cooking time to be
adjusted directly or cooking to be started
without a timer.
To select cooking time directly:
• Use the dial to select manual mode on the
display.
• Select the desired cooking time by turning
the dial, and then press
to start cooking.
7
To start cooking without a timer:
• Use the dial to select manual mode.
• Press the button directly to start
cooking.
Note: in Manual mode, maximum cooking
time is 59 minutes and 59 seconds.
10. Water needed” signal
When there is not much water in the tank, the
icon appears and an audible warning sounds
every 30 seconds. When the tank is empty, the
appliance stops operating, the icon
starts
flashing and a continuous audible warning
sounds until the tank is filled.
• Fill the tank (as explained above) and press
button to re-start the cooking.
11. Remove Food When Ready to Serve
Use oven mitts to remove lid, lifting the
side farthest from you, allowing any excess
moisture to drip back in the dish and
allowing steam to escape away from you.
Caution: Be careful when removing
lid from glass dish after cooking has
completed as hot steam vapour will
escape. Lift lid from farthest side from you
slowly.
12. After Cooking Is Complete
• Remove plug from power outlet.
• Allow water in steaming dish to cool
completely before emptying.
• During cooking cycle, condensation causes
hot water to accumulate in the steamer
base. Empty carefully when cooled.
• Follow cleaning instructions below.
CLEANING & MAINTENANCE
Always allow the steamer to cool completely
before cleaning and always be unplugged from
the power outlet.
• Wash all parts (except the steamer base) in
warm, soapy water then rinse and dry
thoroughly.
• The glass dish, tray and lid can also be cleaned
on the top rack of a dishwasher.
• Do not use chlorine bleach or abrasive
cleaners on any part of the steamer.
• Never put the steamer base in dishwasher or
immerse it in water. The base can be wiped
with a damp cloth to remove residue.
• To clean the inner area of the steamer base
where the steaming dish sits, sprinkle a clean,
damp sponge with a teaspoon of baking soda,
and wipe carefully. Wipe again with a clean,
damp sponge.
• Empty Water Release Drain over a kitchen sink
before storing the unit. Water Release Drain is
located below the water reservoir on back of
unit.
• Store your steamer in a dry place, out of the
reach of children.
• Any other servicing should be performed by
an authorised service representative.
DESCALING
After several months of use, calcium deposits
may build up in the steam tube of your steamer.
This process is normal. You should descale
regularly to maintain maximum steam production
and extend the life of your steamer.
1. Fill the water reservoir to the maximum level
with equal parts of water and white vinegar
(not cider or wine vinegar).
2. Plug the unit into an electrical outlet. The glass
dish and lid should be in place. Set timer for
60 minutes and begin steaming.
3. When the timer sounds, unplug and allow to
cool completely before pouring out vinegar
solution.
4. Rinse the water reservoir, steaming dish and lid
several times with fresh, cold water.
5. Fill the reservoir with cold water and place on
base. Set timer for 30 minutes and begin
steaming to remove any residual vinegar from
the steamer.
NOTE: We also recommend using the descaling
method to clean the steamer after steaming
seafood.
IB-20/330
©2020 Cuisinart
Suite 101 Ground Floor
18 Rodborough Rd
Frenchs Forest NSW, 2086
Australia
Visit our Website:
www.cuisinart.com.au
Printed in China
Trademarks or service marks of third parties referred Printed in China to
herein are the trademarks or service marks of their respective owners.
www.cuisinart.com.au