
Use & Care Guide
Built-In Coffee Maker
81Electrolux I ,c o NTM
E24CM75GSS E24CM76GSS 102220RevD-2
2
Finding Information
PLEASE READ AND SAVETHIS GUIDE
[] [] [] [] [] [] [] [] [] [] [] [] [] [] [] [] [] [] [] [] [] []
Thank you for choosing Electrolux, the new premium brand in home appliances.
This Use & Care Guide is part of our commitment to customer satisfaction and
product quality throughout the service life oF your new coffee maker. We view
your purchase as the beginning of a relationship. To ensure our ability to continue
serving you, please use this page to record key product information.
IMPORTANT
PLEASE READ all instructions completely before attempting to install or
operate the unit.
Once you have your unit installed, we suggest you keep this manual in a safe
place For Future reference. Should any problems occur, refer to the Solutions to
Common Problems section of this manual. This information will help you quickly
identify a problem and get it remedied. In the event you require assistance, please
contact the dealer where you purchased your unit.
MAKE A QUICK REFERENCERECORD
[] [] [] [] [] [] [] [] [] [] [] [] [] [] [] [] [] [] [] [] [] []
Whenever you call to request information or service, you will need to know your
model number and serial number plate. You can rind this information on the serial
plate located inside the brewing compartment. See page 13 For the location.
© 2007 Electrolux Home Products, Inc.
Post Office Box 212378, Augusta, Georgia 30917, USA
All rights reserved. Printed in the USA
Finding Information
3
PRODUCT REGISTRATION CARD
Ii [] [] [] [] [] [] [] [] [] [] [] [] [] [] [] [] [] [] [] [] []
The package containing this manual also includes your product registration
information. Warranty coverage begins at the time your Electrolux coffee maker
was purchased.
If you received a damaged product, immediately contact your dealer or builder. Do
not install or use a damaged appliance.
NOTE
Registering your product with Electrolux enhances our ability to serve
you. You can register online (at the Internet address below) or by dropping
your Product Registration Card in the mail. Complete and mail the Product
Registration Card as soon as possible to validate the registration date.
Please record the purchase date of your Electrolux unit and your dealer's name,
address and telephone number.
Purchase Date
Electrolux Model Number
Electrolux Serial Number
Dealer Name
Dealer Address
Dealer Telephone
Keep this manual and the sales receipt together in a safe place for further
reference.
QUESTIONS?
I [] [] I [] m [] [] [] [] [] [] [] [] [] []
For toll-free telephone support in the U.S. and Canada:
1-877- 4ELECTROLUX (1-877-435-3287)
For online support and Internet product information:
www.electroluxusa.com
[] [] [] [] [] []
4
Finding Information
TABLE OF CONTENTS
[] [] [] [] [] [] [] [] [] [] []
Finding Information ...............................................2
Make a Quick Reference Record ......2
Product Registration Card ..................3
Safety ...........................................................................5
Important Safety Instructions ...........5
Feature Overview ....................................................9
Types of Drinks You Can Make ..........9
Exterior ....................................................10
How Your Coffee Maker Works ......11
Interior .....................................................12
Accessories And Parts ........................12
Getting Started .......................................................14
Preparing For Installation .................14
Operating Instructions ........................................16
Before Using Your Coffee Maker... 16
Turning On Your Coffee Maker ...... 17
Turning On The Lights ........................17
Loading Your Coffee Maker .............18
!! [] [] [] il [] [] [] [] [] []
Making Espresso ..................................19
Making Cafe Latte ...............................20
Making Regular Coffee ...................... 21
Decaffeinated And Ground Coffee 22
Hot Water For Tea Or
Other Drinks ...........................................23
Making A Cappuccino .........................24
Steaming Milk ........................................25
Foaming Milk ..........................................26
Opening The Front Panel ..................27
Care and Cleaning .................................................29
Adjusting The Coffee Grinder .......... 29
Cleaning Schedule ................................30
Cleaning The Water Tank ..................31
Routine Cleaning Instructions .........32
Cleaning The Outside Surfaces .......34
Decalcification Instructions .............34
Flushing Out The Coffee Maker .....39
Solutions to Common Problems ......................40
Warranty Information ..........................................43
Safety
5
IMPORTANT SAFETY INSTRUCTIONS
[] [] [] [] [] [] [] [] [] [] II [] [] [] [] [] [] II [] II [] []
Safety Precautions
Do not attempt to install or operate this appliance until you read the safety
precautions in this guide. Safety items throughout this guide are labeled with a
WARNING or CAUTION based on the risk type.
Definitions
_ti This symbol is the safety alert symbol. It is used to alert you to potential
personal injury hazards. Obey all safety messages that follow it to avoid
possible injury or death.
Z_WARNING
WARNING indicates a potentially hazardous situation which, if not avoided,
could result in death or serious injury,
Z_CAUTION
CAUTION indicates a potentially hazardous situation which, if not avoided,
may result in minor or moderate injury.
CAUTION
CAUTION used without the safety alert symbol indicates a potentially
hazardous situation which, if not avoided, may result in property damage.
IMPORTANT
Indicates installation, operation or maintenance information which is
important but not hazard related.
6
Safety
General Precautions
Z WARNING
To reduce the risk of fire, electrical shock, or injury when using your coffee
maker, follow basic precautions including the following:
Read all instructions before operating the coffee maker.
IMPORTANT: Before performing any type of service or installation, make sure
that electric power to the coffee maker is disconnected.
IMPORTANT: To avoid the possibility of explosion or fire, do not store or use
combustible, flammable or explosive liquids or vapors (such as gasoline) inside
or in the vicinity of this or any other appliance.
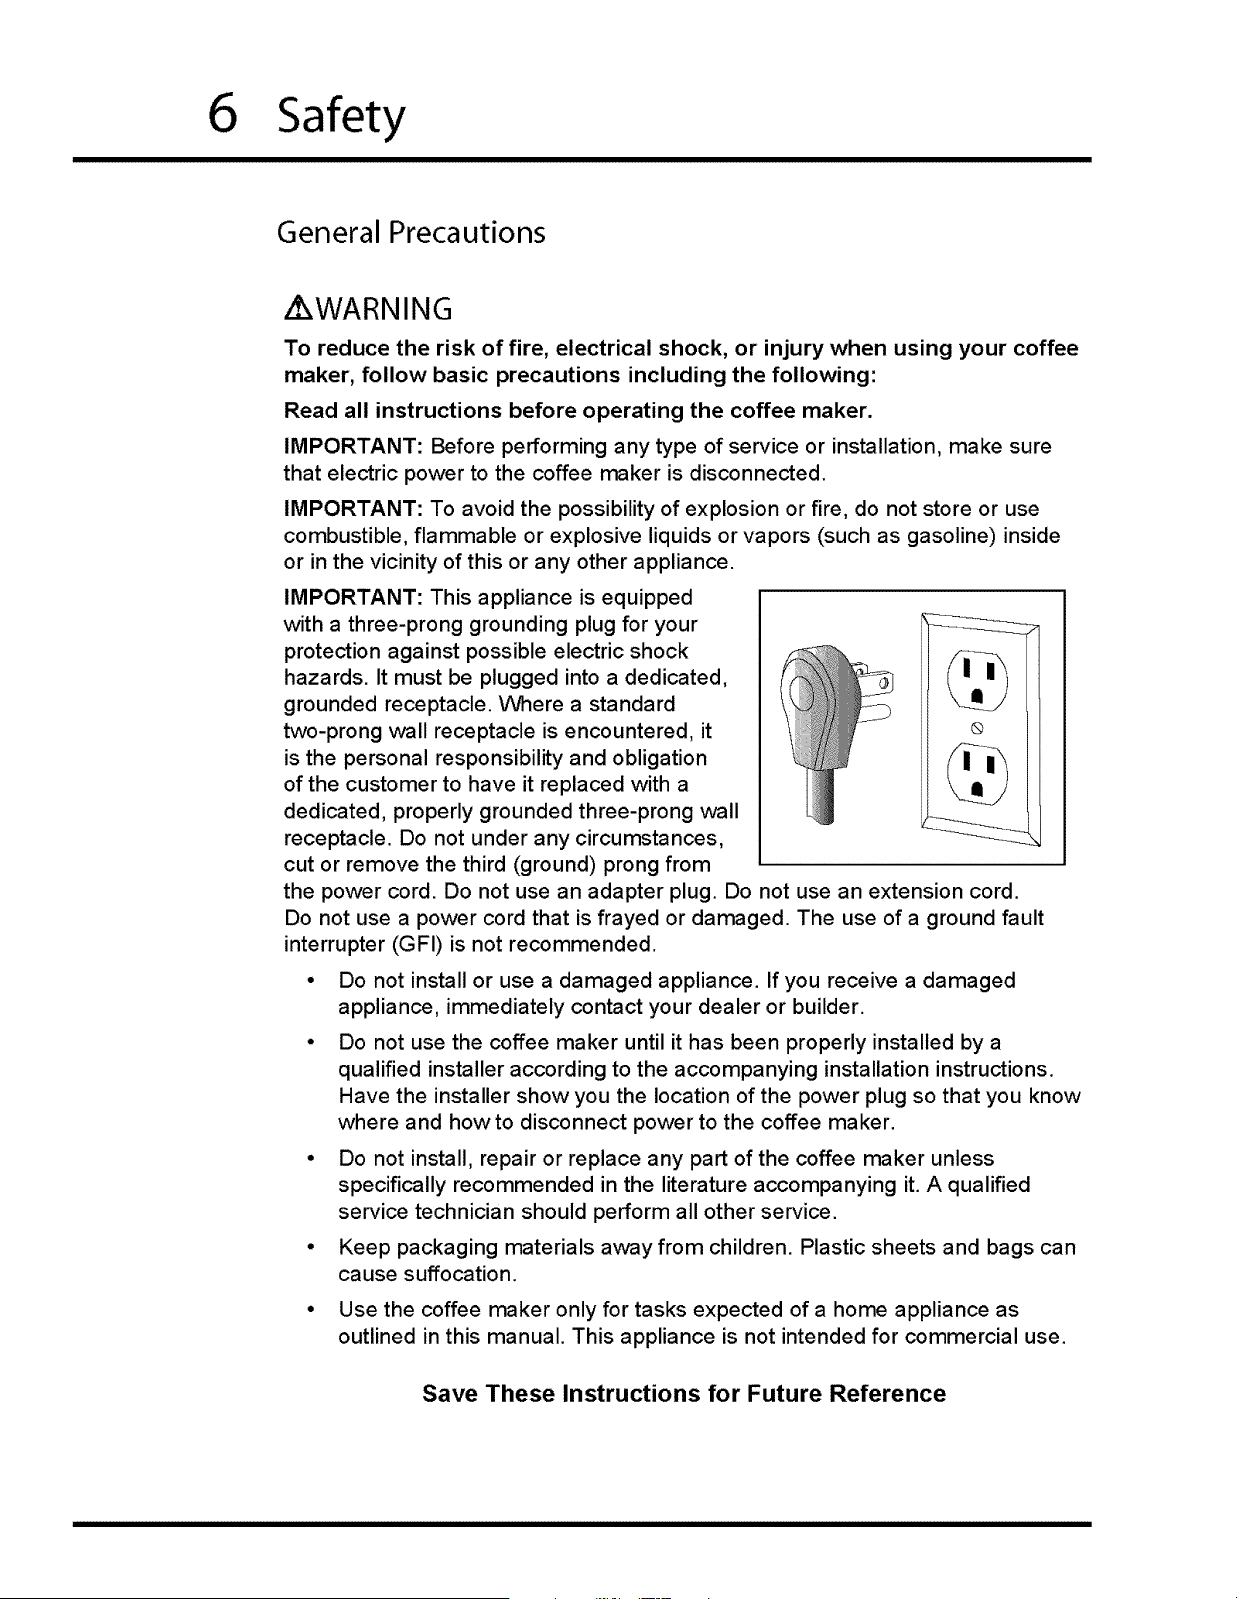
IMPORTANT: This appliance is equipped
with a three-prong grounding plug for your
protection against possible electric shock
hazards. It must be plugged into a dedicated,
grounded receptacle. Where a standard
two-prong wall receptacle is encountered, it ®
is the personal responsibility and obligation
of the customer to have it replaced with a
dedicated, properly grounded three-prong wall
receptacle. Do not under any circumstances,
cut or remove the third (ground) prong from
the power cord. Do not use an adapter plug. Do not use an extension cord.
Do not use a power cord that is frayed or damaged. The use of a ground fault
interrupter (GFI) is not recommended.
• Do not install or use a damaged appliance. If you receive a damaged
appliance, immediately contact your dealer or builder.
Do not use the coffee maker until it has been properly installed by a
qualified installer according to the accompanying installation instructions.
Have the installer show you the location of the power plug so that you know
where and how to disconnect power to the coffee maker.
• Do not install, repair or replace any part of the coffee maker unless
specifically recommended in the literature accompanying it. A qualified
service technician should perform all other service.
• Keep packaging materials away from children. Plastic sheets and bags can
cause suffocation.
• Use the coffee maker only for tasks expected of a home appliance as
outlined in this manual. This appliance is not intended for commercial use.
Save These Instructions for Future Reference
Safety
7
i WARNING
DO NOT PUSH ANY BUTTONS ON THE CONTROL PANEL UNTIL
ALL BODY PARTS AND CLOTHING ARE CLEAR OF THE BREWING
COMPARTMENT. KEEP ALL BODY PARTS AWAY FROM THE
BREWING COMPARTMENT DURING OR IMMEDIATELY AFTER DRINK
DISPENSING. HOT LIQUIDS AND STEAM CAN CAUSE SEVERE
BURNS.
• Make sure individuals who use the coffee maker are able to operate it
properly.
• Never allow anyone, including children to sit, stand or climb on any part of
the coffee maker. Doing so may cause damage, serious injury or death.
Do not leave children alone or unattended in the area around the coffee
maker. Do not allow children to play with the controls, or touch other parts
of it.
Do not store items of interest to children on top of or above the coffee
maker. Children could be burned or injured while climbing on the appliance.
Do not tamper with the controls.
Clean the coffee maker thoroughly according to the Flushing Out the
Coffee Maker section on page 39 before operating it for the first time. This
process is strongly recommended before using the unit after installation.
Clean and maintain the coffee maker according to the maintenance
schedule on page 8. Clean it only in the manner indicated in the Care and
Cleaning section of this manual. Use only the cleaning agents specified.
Do not use a steam or pressure cleaner to clean the coffee maker or any
part of it. Damage caused by cleaning the unit in this manner could result in
electric shock, fire or explosion.
Allow the coffee maker to cool before cleaning.
On model E24CM75GSS: change the water in the tank daily to prevent
sickness due to bacteria growth.
When cleaning the mechanical parts of the coffee maker, exercise care with
hands and arms around the metal edges.
Many metal surfaces behind the front panel and inside the brewing
compartment are hot when power is on. Exercise care around metal
surfaces in these areas when the power switch is in the on position.
During normal operation, the person using the coffee maker must pull it out
from the cabinet to fill the coffee bins, etc. To prevent personal injury, when
pushing the coffee maker back into the cabinet, make sure body parts and
clothing are clear of the portion of the coffee maker behind the front panel.
8 Safety
General Precautions (continued)
CAUTION
To prevent jamming of the grinding mechanism, use only the types of coffee
beans specified in this manual.
Remove the drip tray before closing the front panel door. Closing the front
panel door without the drip tray removed could damage parts of the coffee
maker.
• To prevent clogging of the internal parts, use only filtered water as specified
below. Do not used distilled water.
Do not put any part of your coffee maker in a dishwasher. Many of the parts
are not dishwasher safe.
Before
Keep the coffee maker keys in a safe place. Replacement keys are not
covered by the warranty.
Clean the coffee maker regularly according to the chart below. See the
Care and Cleaning section for complete instructions.
operating your coffee maker for the first time...
1) Make sure you are using the right type of water.
• Call your local water company. Ask them for the water hardness level of the water
supplied to the building where your coffee maker will be installed.
• If the water hardness level is above four grains per gallon (4 gpg):
>> For model E24CM76GSS, contact a water treatment specialist and have a water
treatment system installed to reduce the water hardness level to 4 gpg or less
according the installation instructions.
>> For model E24CM75GSS, pour only filtered water with a hardness level of 4 gpg or
less into the water tank. Do not use distilled water.
2) Flush the system to remove bacteria that may have accumulated during storage and
shipping (See page 39).
IMPORTANT: For model E24CM76GSS, regardless of the water hardness
measured, Electrolux highly recommends installation of the Electrolux filter kit. The
coffee maker requires periodic decalcification. Decalcification will be much simpler
with the filter kit installed according to the installation instructions.
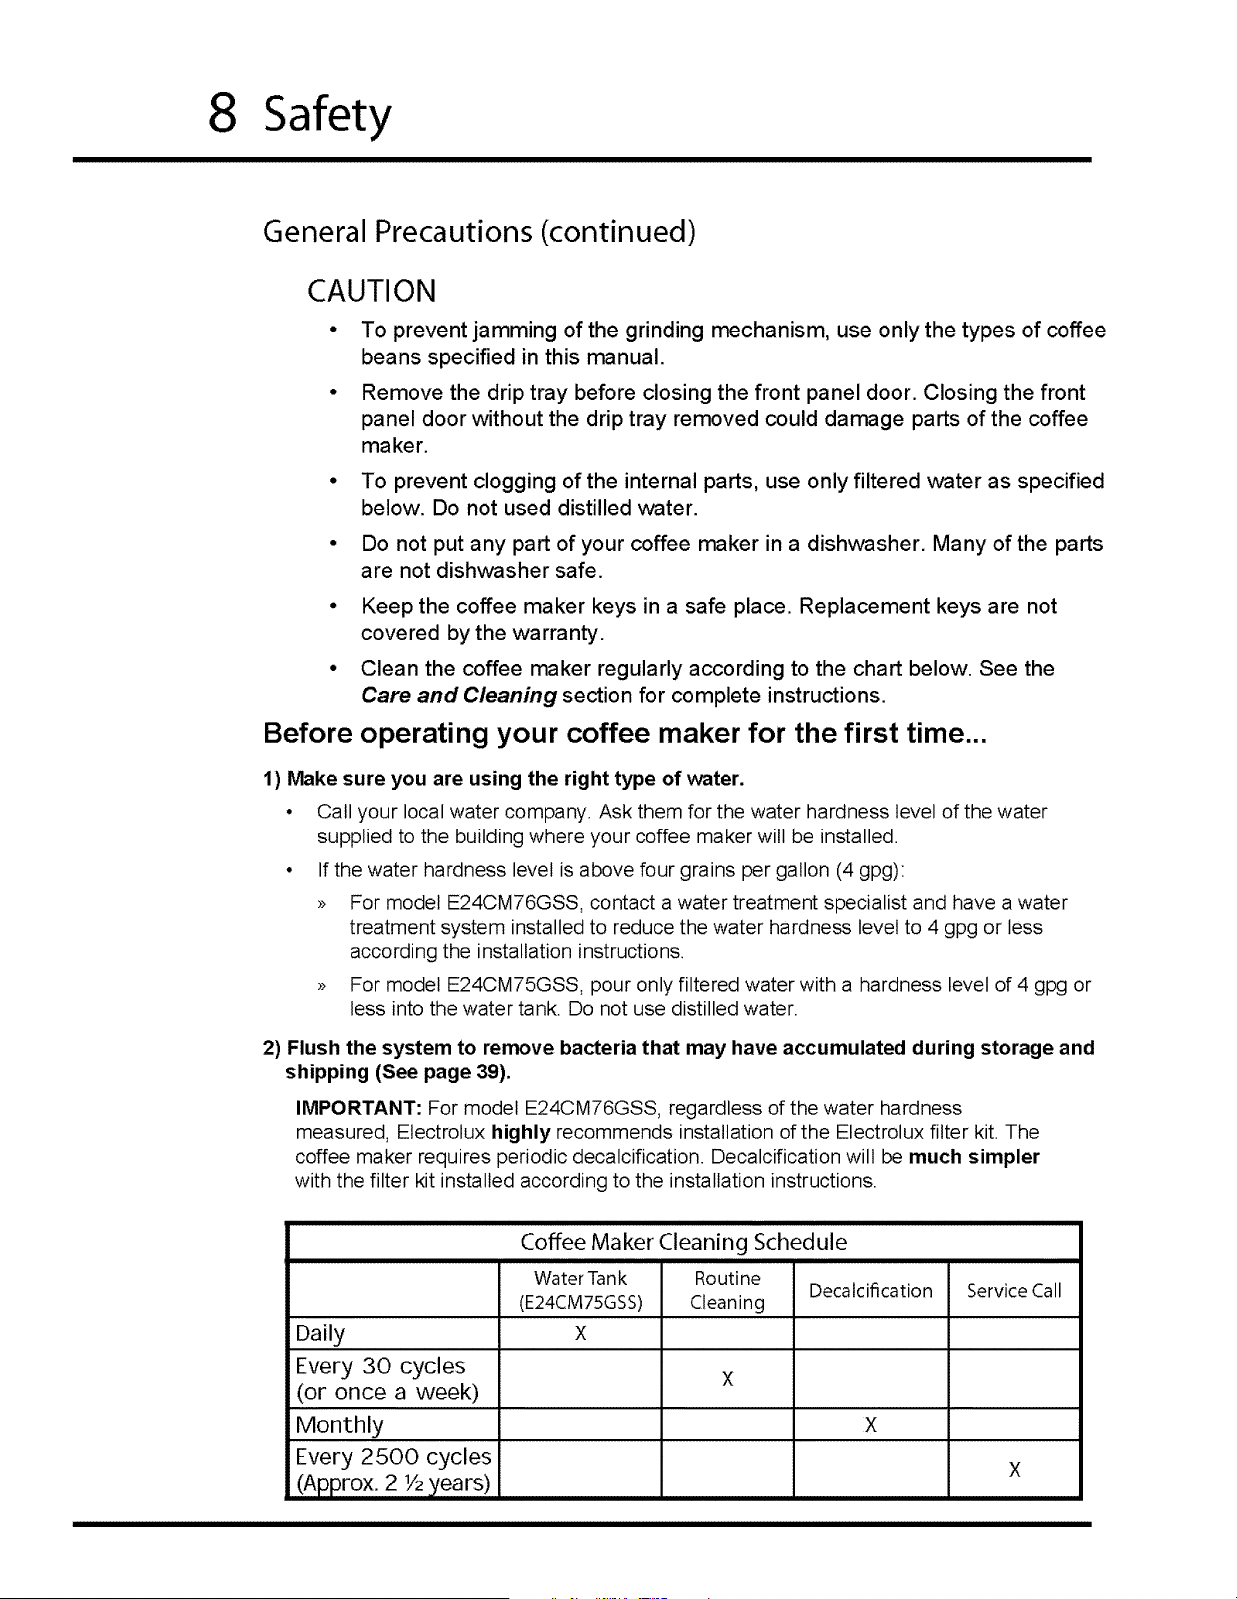
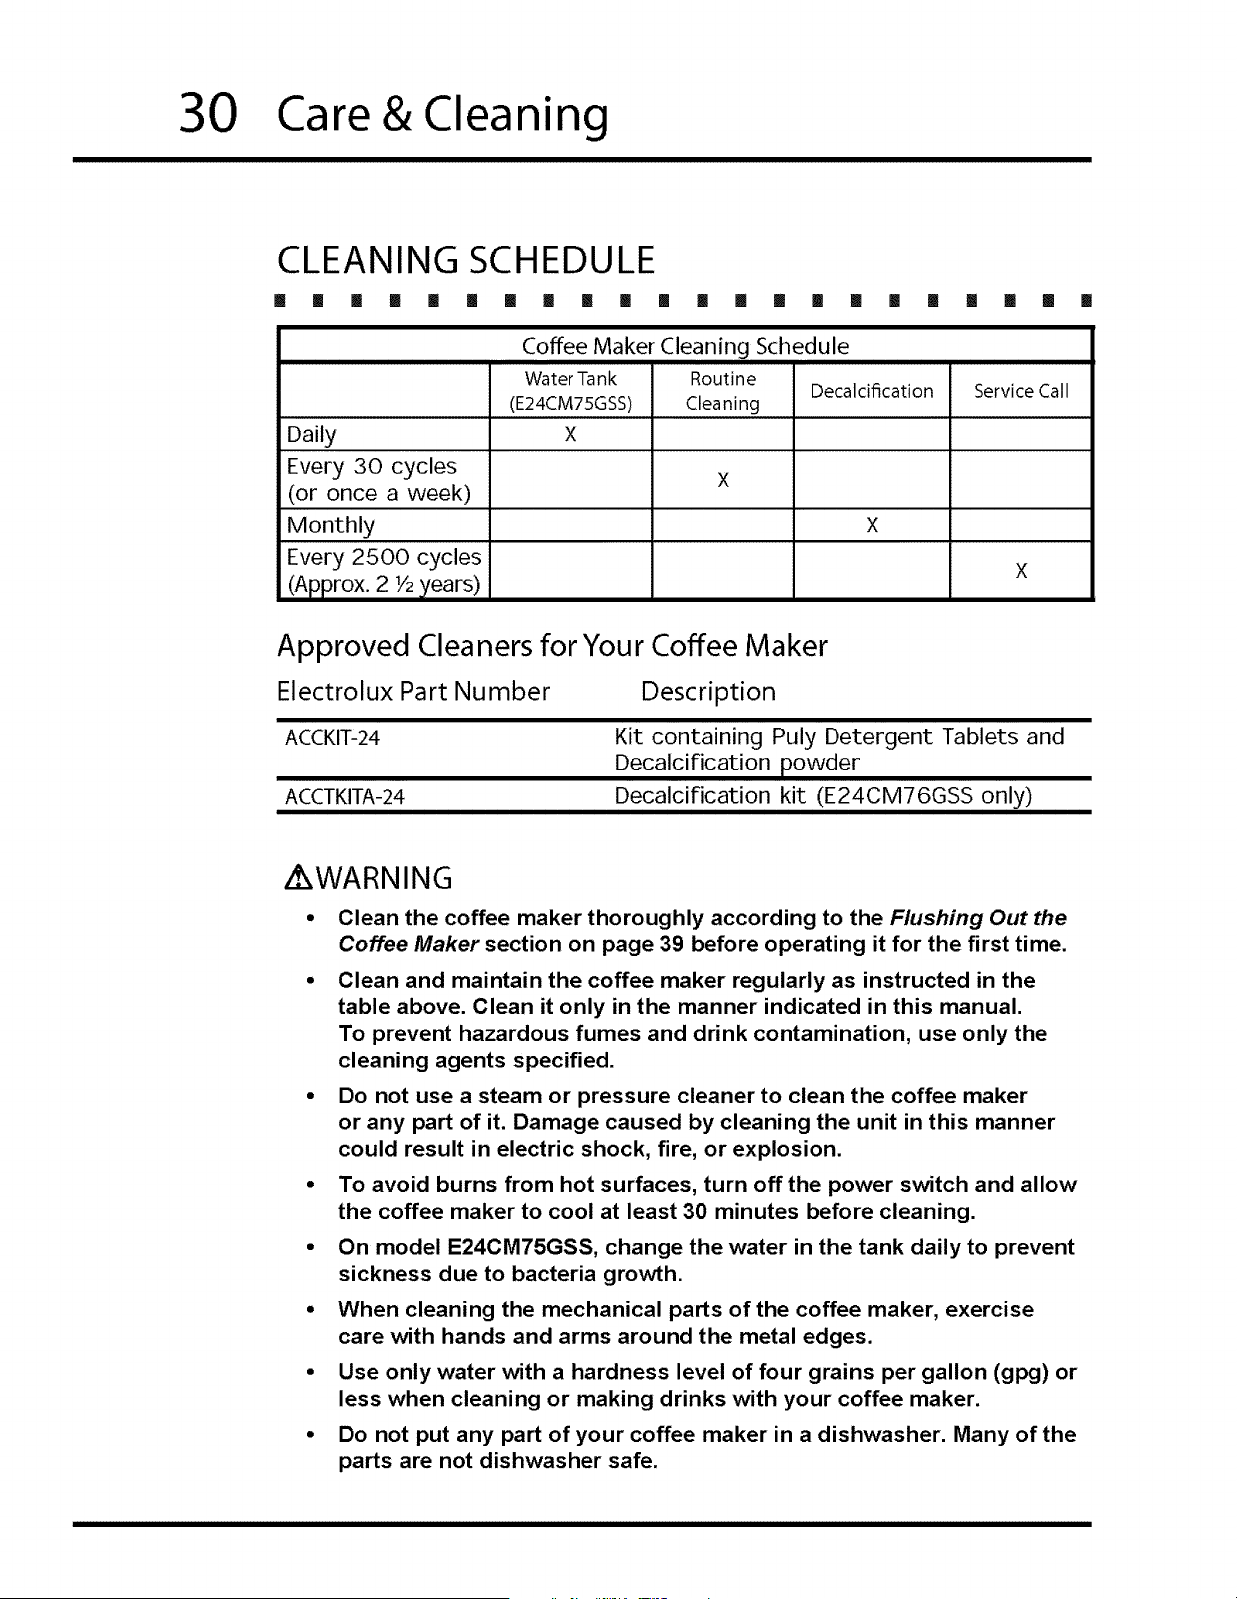
Coffee Maker Cleaning Schedule
WaterTank Routine
Decalcification Service Call
(E24CM75GSS) Cleaning
Daily X
Every 30 cycles X
(or once a week)
Monthly X
Every 2500 cycles X
(Approx.2 1/2)/ears)
Feature Overview 9
TYPES OF DRINKS YOU CAN MAKE
I [] m [] ! [] [] [] B [] [] [] [] [] [] [] [] [] [] I [] []
Your coffee maker comes from the factory set up to make the types of drinks listed
below. See the Operating Instructions section for step by step instructions.
Espresso One "shot" of espresso is a little over one ounce of strong
coffee. The Single Espresso button brews one shot of
espresso. The Double Espresso button brews two shots.
Care Latt_ Care latte is a large espresso (about three ounces) with
six ounces of steamed milk. Use the care latte buttons and
Cappuccino Steamer to make a care latte.
Large Coffee Coffee is less concentrated than espresso and larger in
volume.
Tea and Hot Use the HotWater button to brew tea and other hot flavored
Chocolate drinks.
Cappuccino Cappuccino is a coffee drink with about one ounce of
espresso and one ounce of foamed milk on top. Use the
espresso buttons and the Cappuccino Steamer to make a
cappuccino.
Steamed milk is milk that is heated with few bubbles using the
Cappuccino Steamer.
Foamed milk is hot milk with large bubbles. Use the
Cappuccino Steamer to created foamed milk.
Steamed Milk
Foamed Milk
• You can add "just a touch" of espresso, coffee or hot water to any drink.
° Make your favorite drink according to the operating instructions.
• Push the Single Espresso, Large Coffee or Hot Water button.
° Push the Single Espresso, Large Coffee or Hot Water button again
to make the coffee maker stop so that only the amount you want is
dispensed.
• You can experiment to come up with all sorts of drinks that suit your
personal preference!
10
Feature Overview
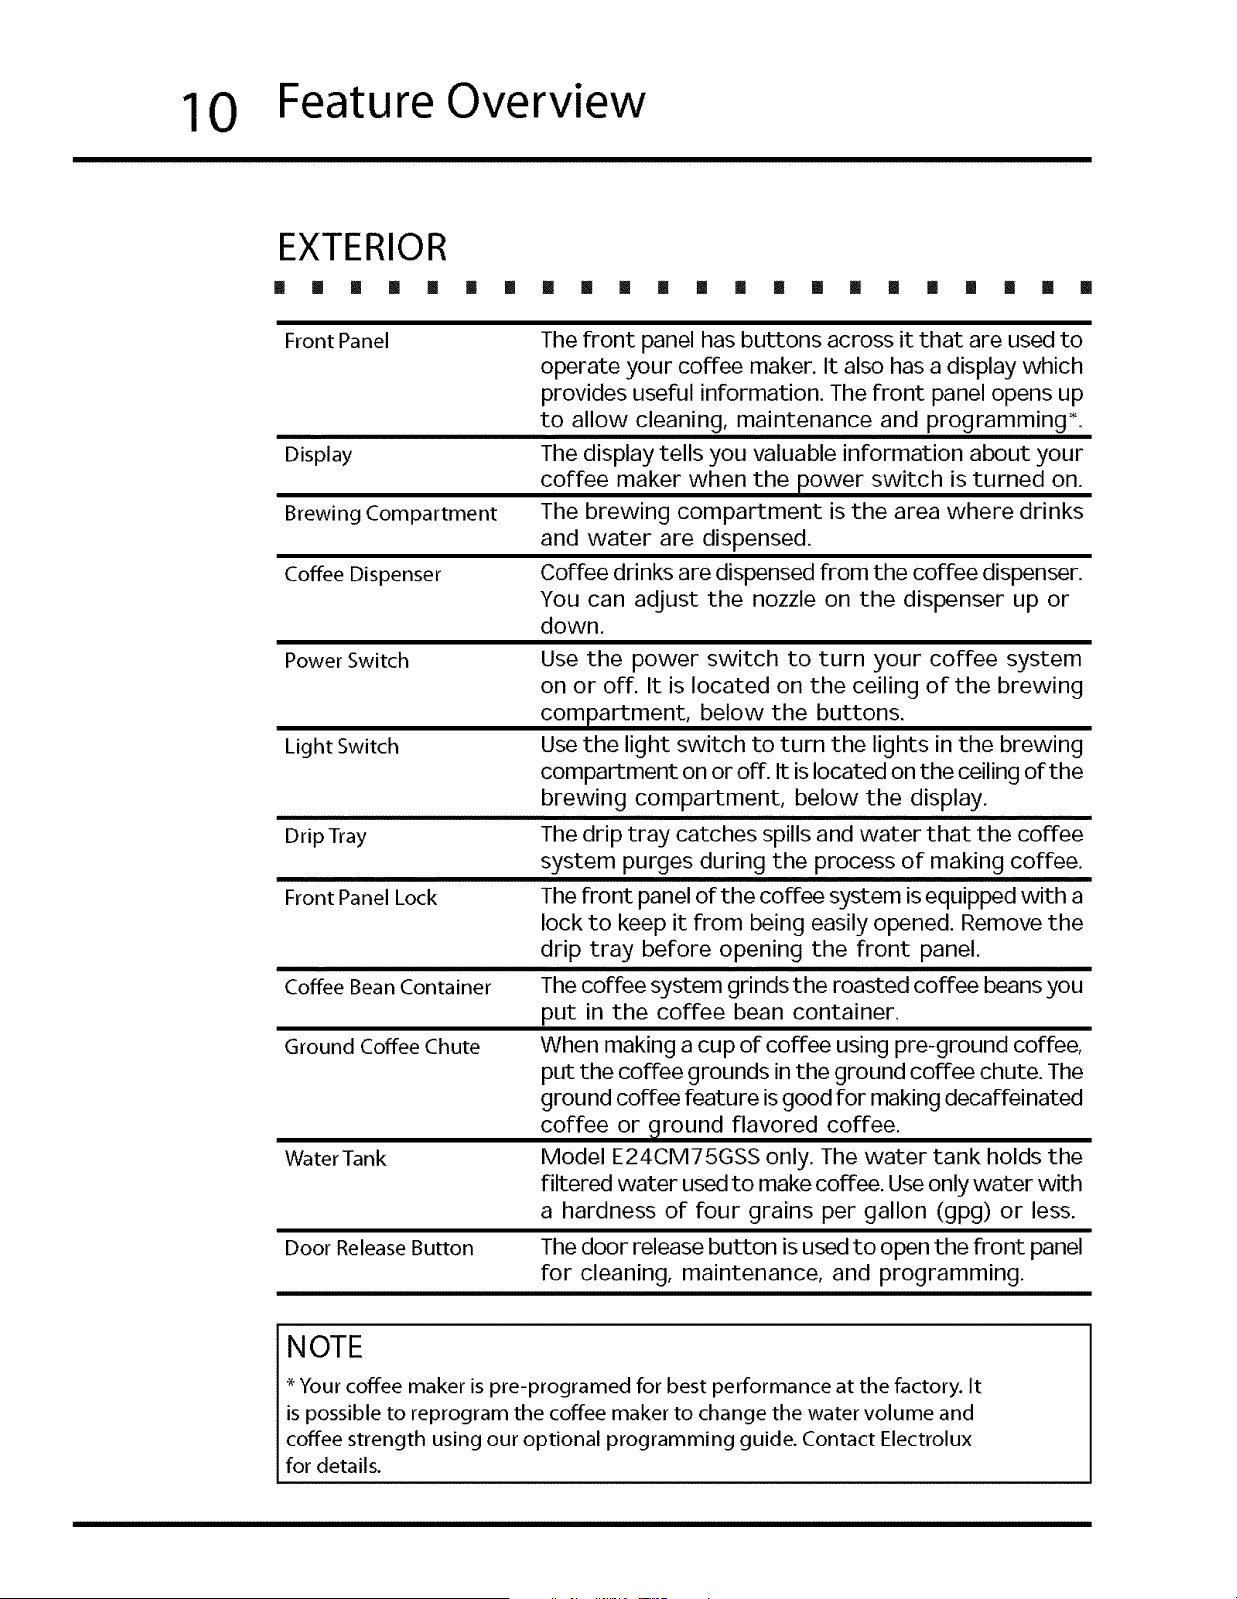
EXTERIOR
[] II [] [] [] [] [] III II [] [] [] [] [] [] [] [] [] [] [] [] II
Front Panel
Display
Brewing Compartment
Coffee Dispenser
The front panel has buttons across it that are used to
operate your coffee maker. It also has a display which
provides useful information. The front panel opens up
to allow cleaning, maintenance and programming*.
The display tells you valuable information about your
coffee maker when the power switch is turned on.
The brewing compartment is the area where drinks
and water are dispensed.
Coffee drinks are dispensed from the coffee dispenser.
You can adjust the nozzle on the dispenser up or
down.
Power Switch
Light Switch
Drip Tray
Front Panel Lock
Coffee Bean Container
Ground Coffee Chute
Water Tank
Door Release Button
Use the power switch to turn your coffee system
on or off. It is located on the ceiling of the brewing
compartment, below the buttons.
Use the light switch to turn the lights in the brewing
compartment on or off. It is located on the ceiling of the
brewing compartment, below the display.
The drip tray catches spills and water that the coffee
system purges during the process of making coffee.
The front panel of the coffee system is equipped with a
lock to keep it from being easily opened. Remove the
drip tray before opening the front panel.
The coffee system grinds the roasted coffee beans you
put in the coffee bean container.
When making a cup of coffee using pre-ground coffee,
put the coffee grounds in the ground coffee chute. The
ground coffee feature is good for making decaffeinated
coffee or _tround flavored coffee.
Model E24CM75GSS only. The water tank holds the
filtered vvater used to make coffee. Use only water with
a hardness of four grains per gallon (gpg) or less.
The door release button is used to open the front panel
for cleaning, maintenance, and programming.
NOTE
* Your coffee maker is pre-programed for best performance at the factory. It
is possible to reprogram the coffee maker to change the water volume and
coffee strength using our optional programming guide. Contact Electrolux
for details.
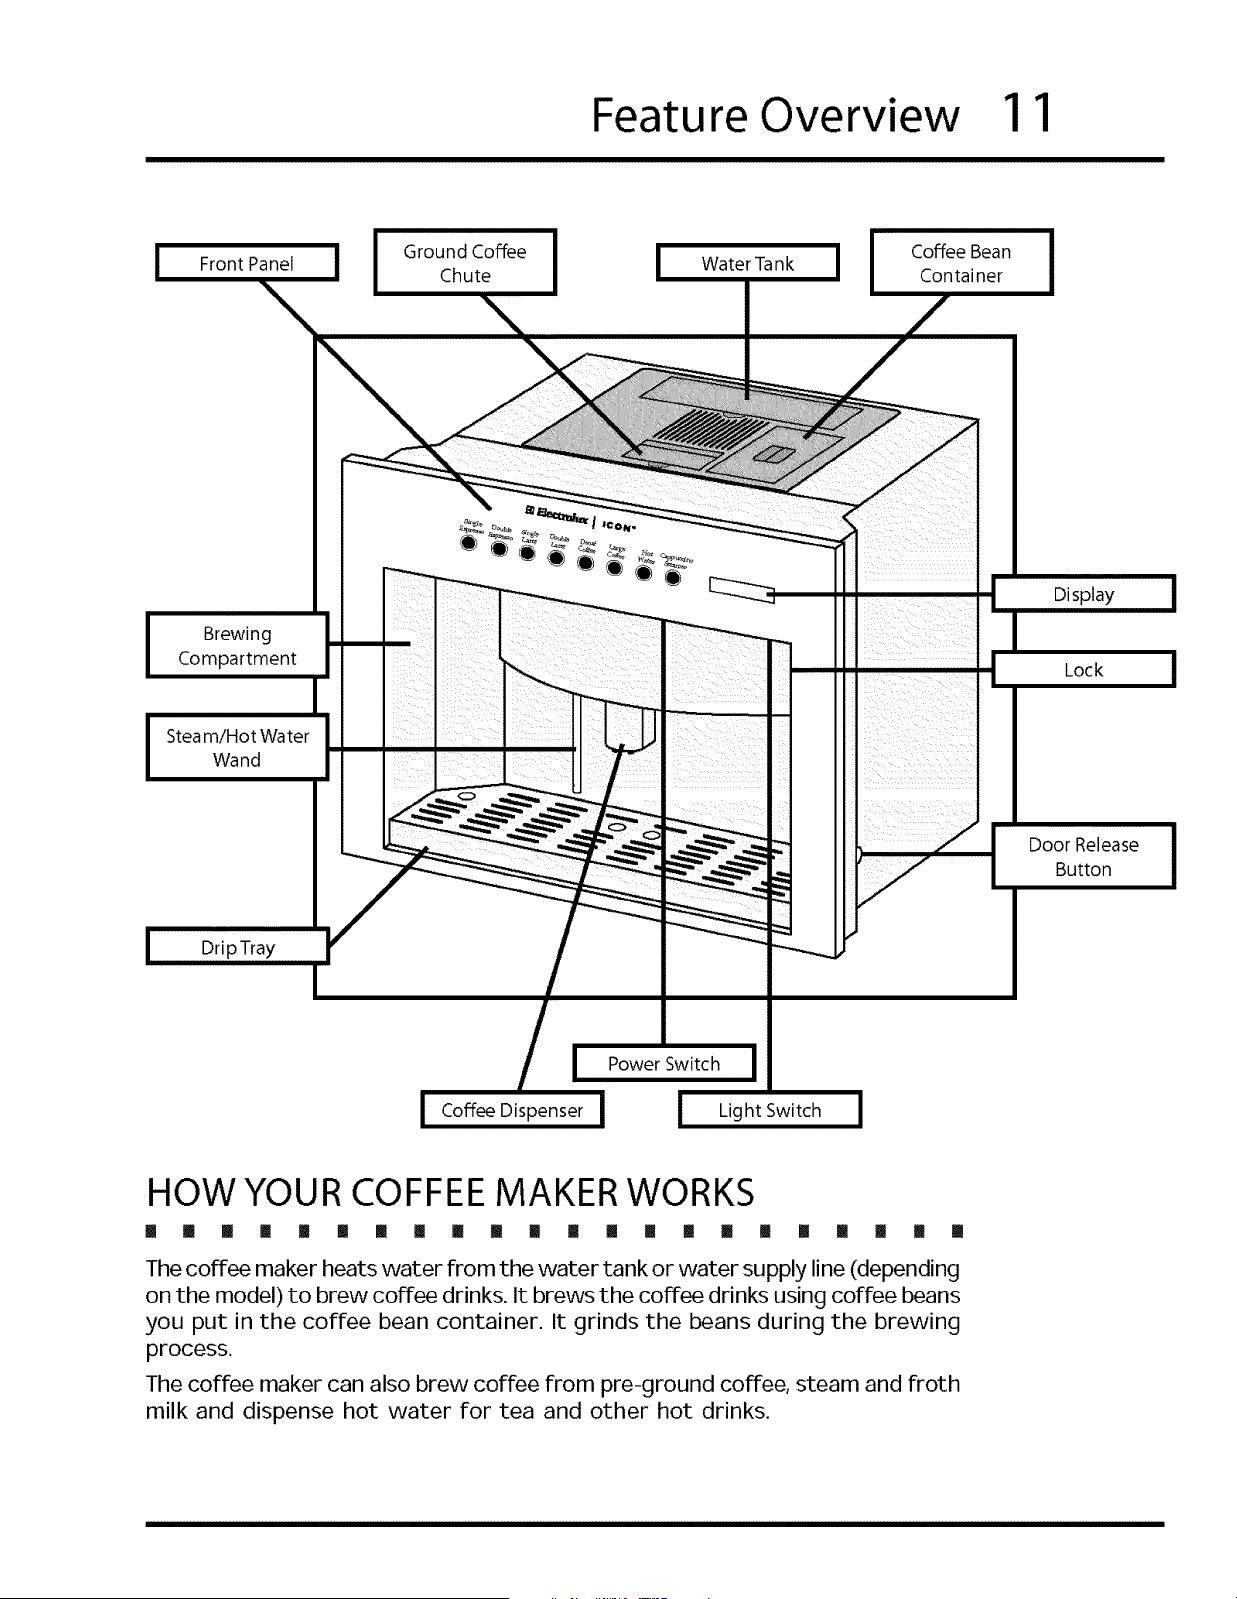
Feature Overview 11
I
Front Panel
I
Ground Coffee I
Chute
I
Water Tank J I Coffee Bean
Container
I
Brewing
Compartment
Steam/Hot Water
Wand
Drip Tray
J Power Switch J
Coffee Dispenser I ! Light Switch !
Display
Lock
Door Release
Button
HOW YOUR COFFEE MAKER WORKS
[] il [] [] [] [] [] [] [] !! [] [] [] [] [] [] [] [] [] [] [] []
The coffee maker heats water from the water tank or water supply line (depending
on the model) to brew coffee drinks. It brews the coffee drinks using coffee beans
you put in the coffee bean container. It grinds the beans during the brewing
process.
The coffee maker can also brew coffee from pre-ground coffee, steam and froth
milk and dispense hot water for tea and other hot drinks.
12 Feature Overview
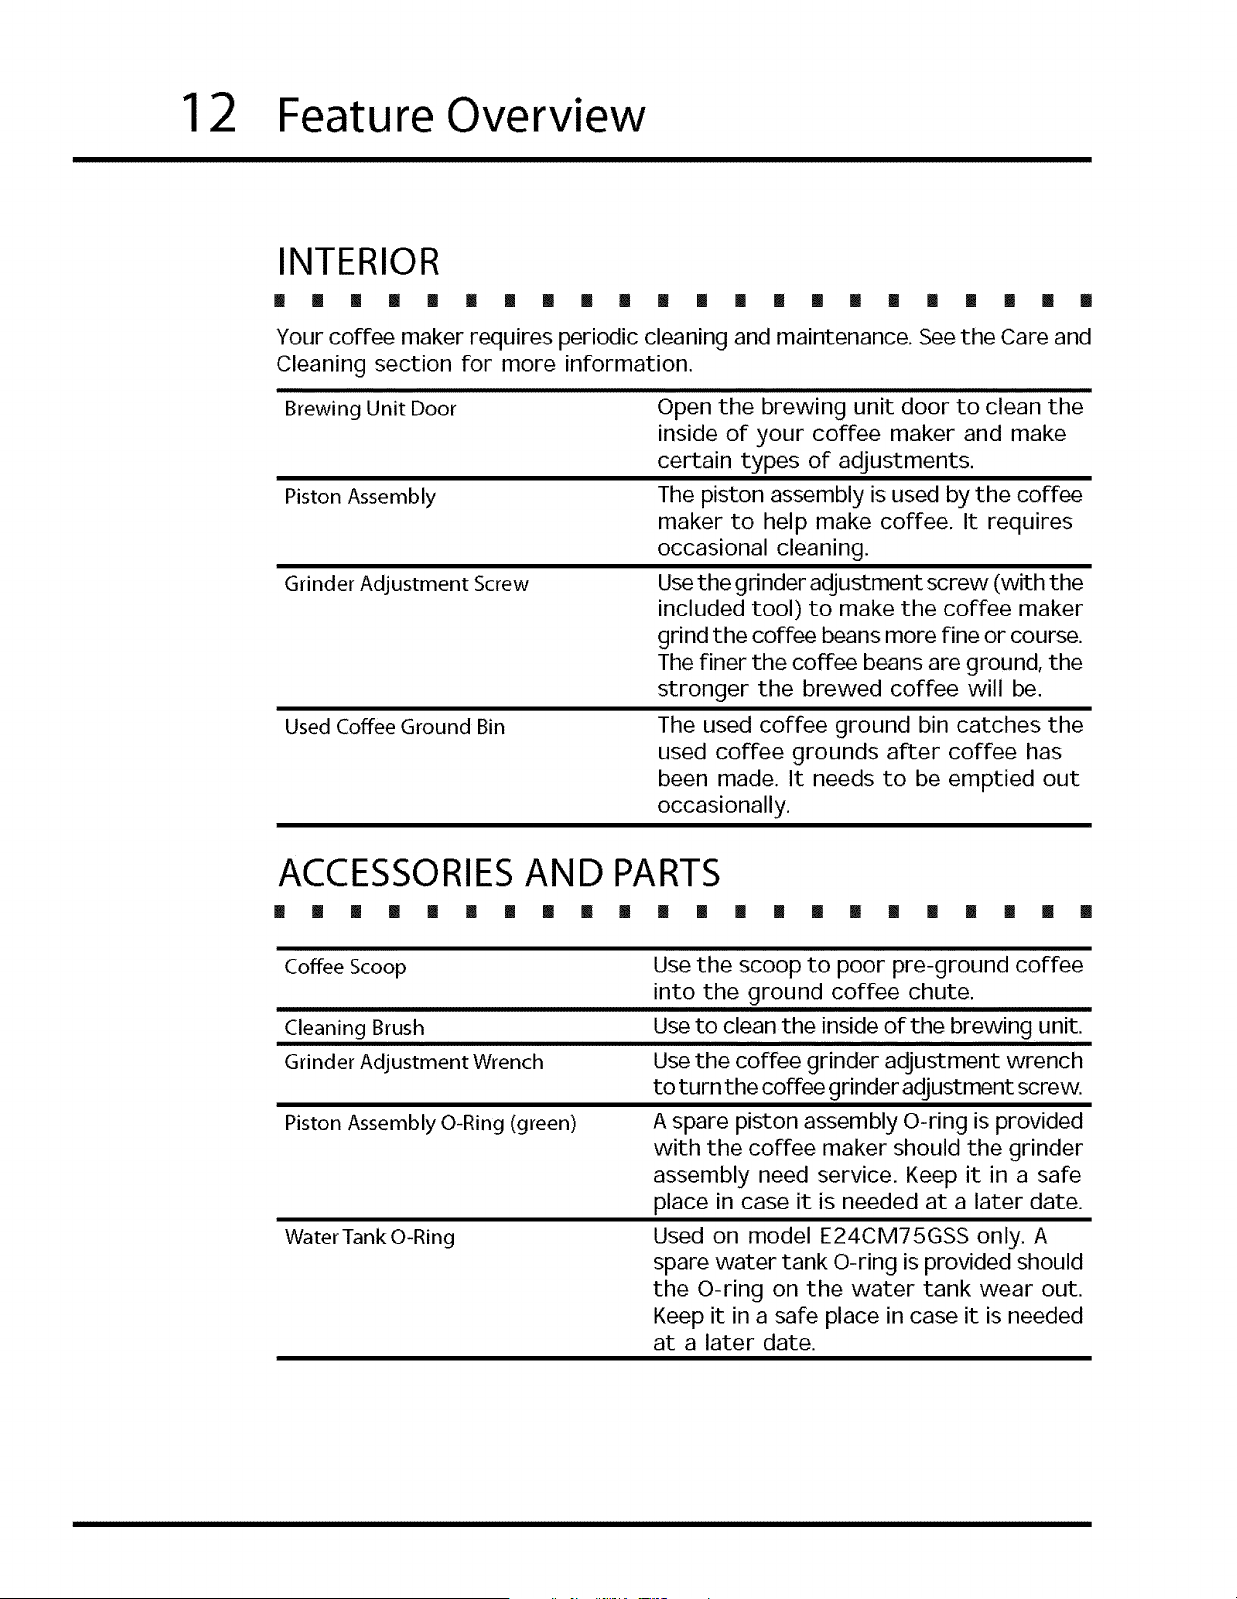
INTERIOR
! [] [] [] [] [] [] [] [] [] ! [] [] [] [] [] [] [] [] [] [] []
Your coffee maker requires periodic cleaning and maintenance. See the Care and
Cleaning section for more information.
Brewing Unit Door
Piston Assembly
Grinder Adjustment Screw
Used Coffee Ground Bin
Open the brewing unit door to clean the
inside of your coffee maker and make
certain types of adjustments.
The piston assembly is used by the coffee
maker to help make coffee. It requires
occasional cleaning.
Use the grinder adjustment screw (with the
included tool) to make the coffee maker
grind the coffee beans more Fine or course.
The finer the coffee beans are ground, the
stronger the brewed coffee will be.
The used coffee ground bin catches the
used coffee grounds after coffee has
been made. It needs to be emptied out
occasionally.
ACCESSORIESAND PARTS
[] [] [] II [] [] [] [] [] [] [] [] [] [] [] [] [] [] [] [] [] []
Coffee Scoop
Cleaning Brush
Grinder Adjustment Wrench
Piston Assembly O-Ring (green)
Water Tank O-Ring
Use the scoop to poor pre-ground coffee
into the ground coffee chute.
Use to clean the inside of the brewing unit.
Use the coffee grinder adjustment wrench
to turn the coffee grinder adjustment screw.
A spare piston assembly O-ring is provided
with the coffee maker should the grinder
assembly need service. Keep it in a safe
place in case it is needed at a later date.
Used on model E24CM75GSS only. A
spare water tank O-ring is provided should
the O-ring on the water tank wear out.
Keep it in a safe place in case it is needed
at a later date.
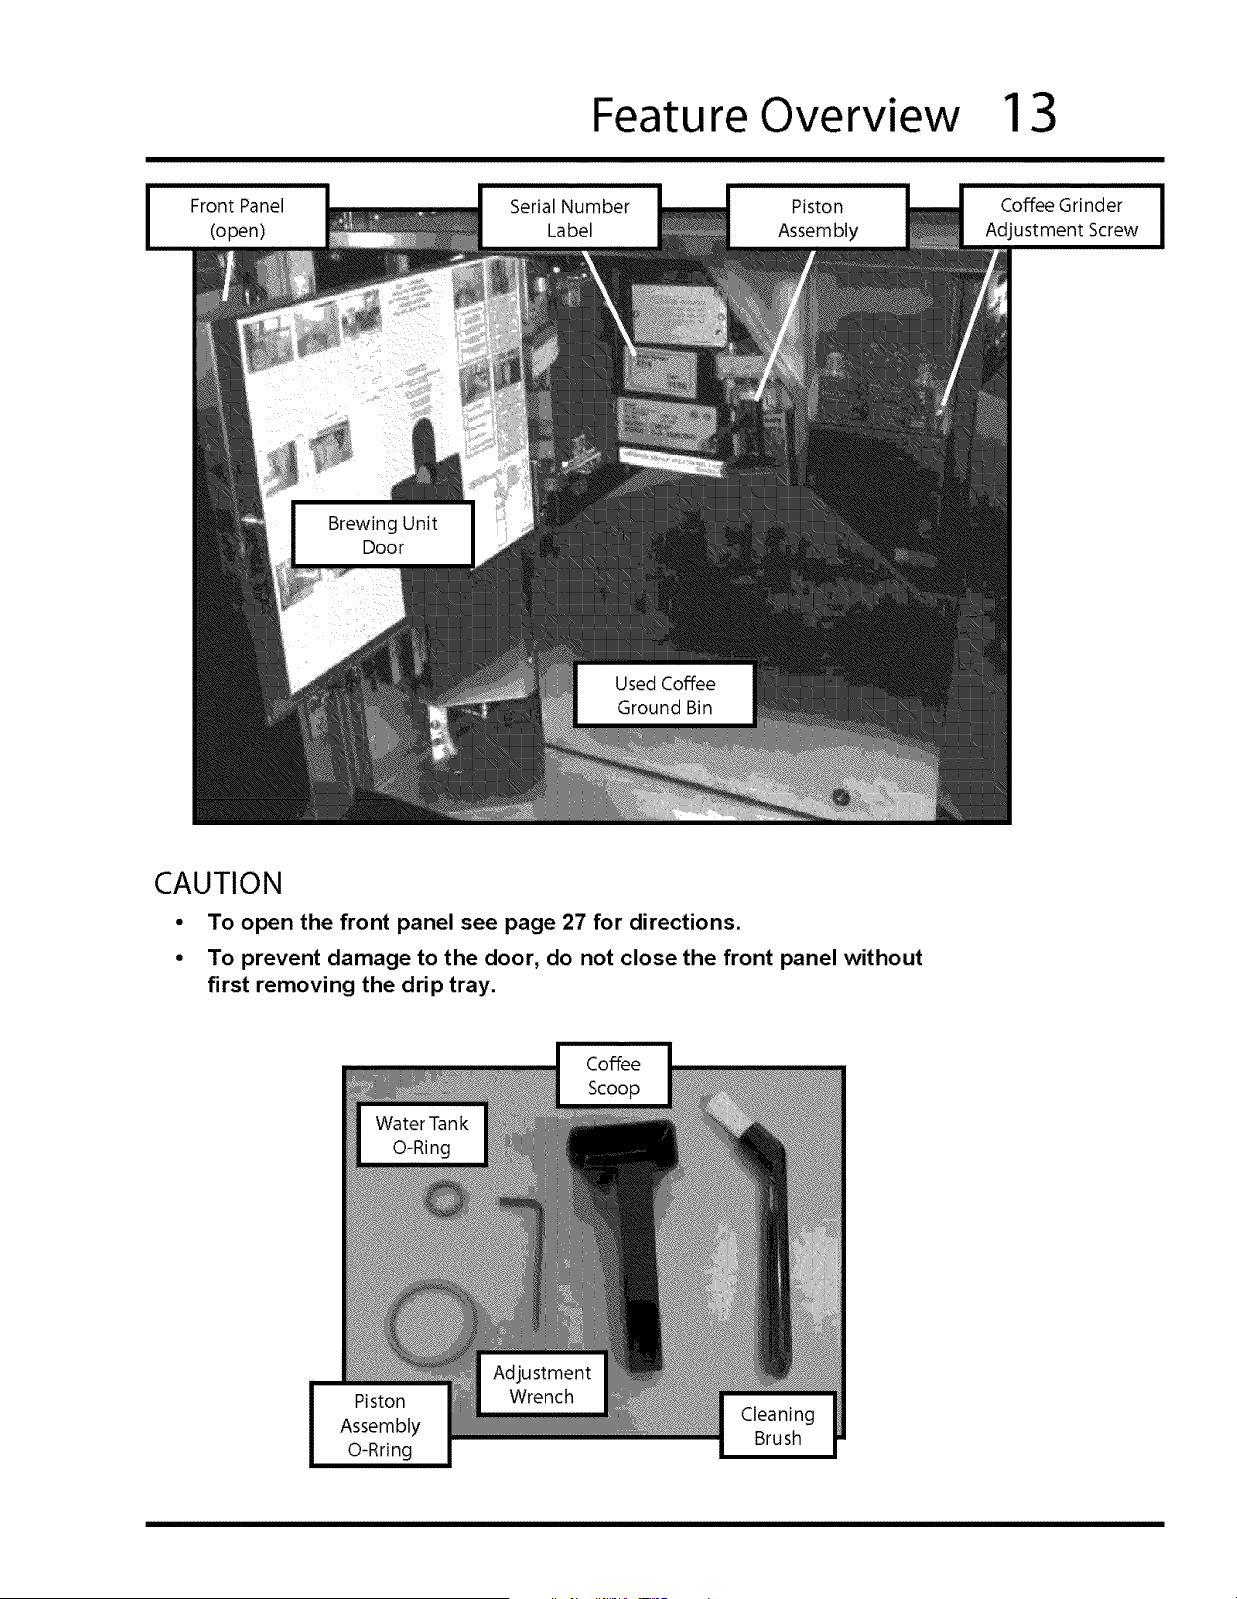
Feature Overview 13
Front Panel
(open)
Brewing Unit
Door
Serial Number
Label
Used Coffee
Ground Bin
Piston
Assembly
Coffee Grinder
Adjustment Screw
CAUTION
• To open the front panel see page 27 for directions.
• To prevent damage to the door, do not close the front panel without
first removing the drip tray.
Cleaning
Brush
14
Getting Started
PREPARING FOR INSTALLATION
[] [] [] [] [] [] [] !i [] [] [] [] [] [] Ii [] [] [] [] [] [] []
Before Installing Your Coffee Maker...
1. Call your local water company. Ask them for the water hardness level of the
water supplied to the building where your coffee maker will be installed.
2. If the water hardness level is above four grains per gallon (4 gpg):
<> If you are installing model E24CM76GSS (plumbed model), contact a water
treatment specialist and have a water treatment system installed to reduce
the water hardness level to 4 gpg or less.
If you are installing model E24CM75GSS (tank model), pour only filtered
water with a hardness level of 4 gpg or less into the water tank. DO NOT
use distilled water.
.
,
Have a licensed electrician install a dedicated, grounded power receptacle
near the coffee maker, if one is not available.
Have a qualified installer install the coffee maker in the desired location
according to the accompanying installation instructions.
After Installing Your Coffee Maker...
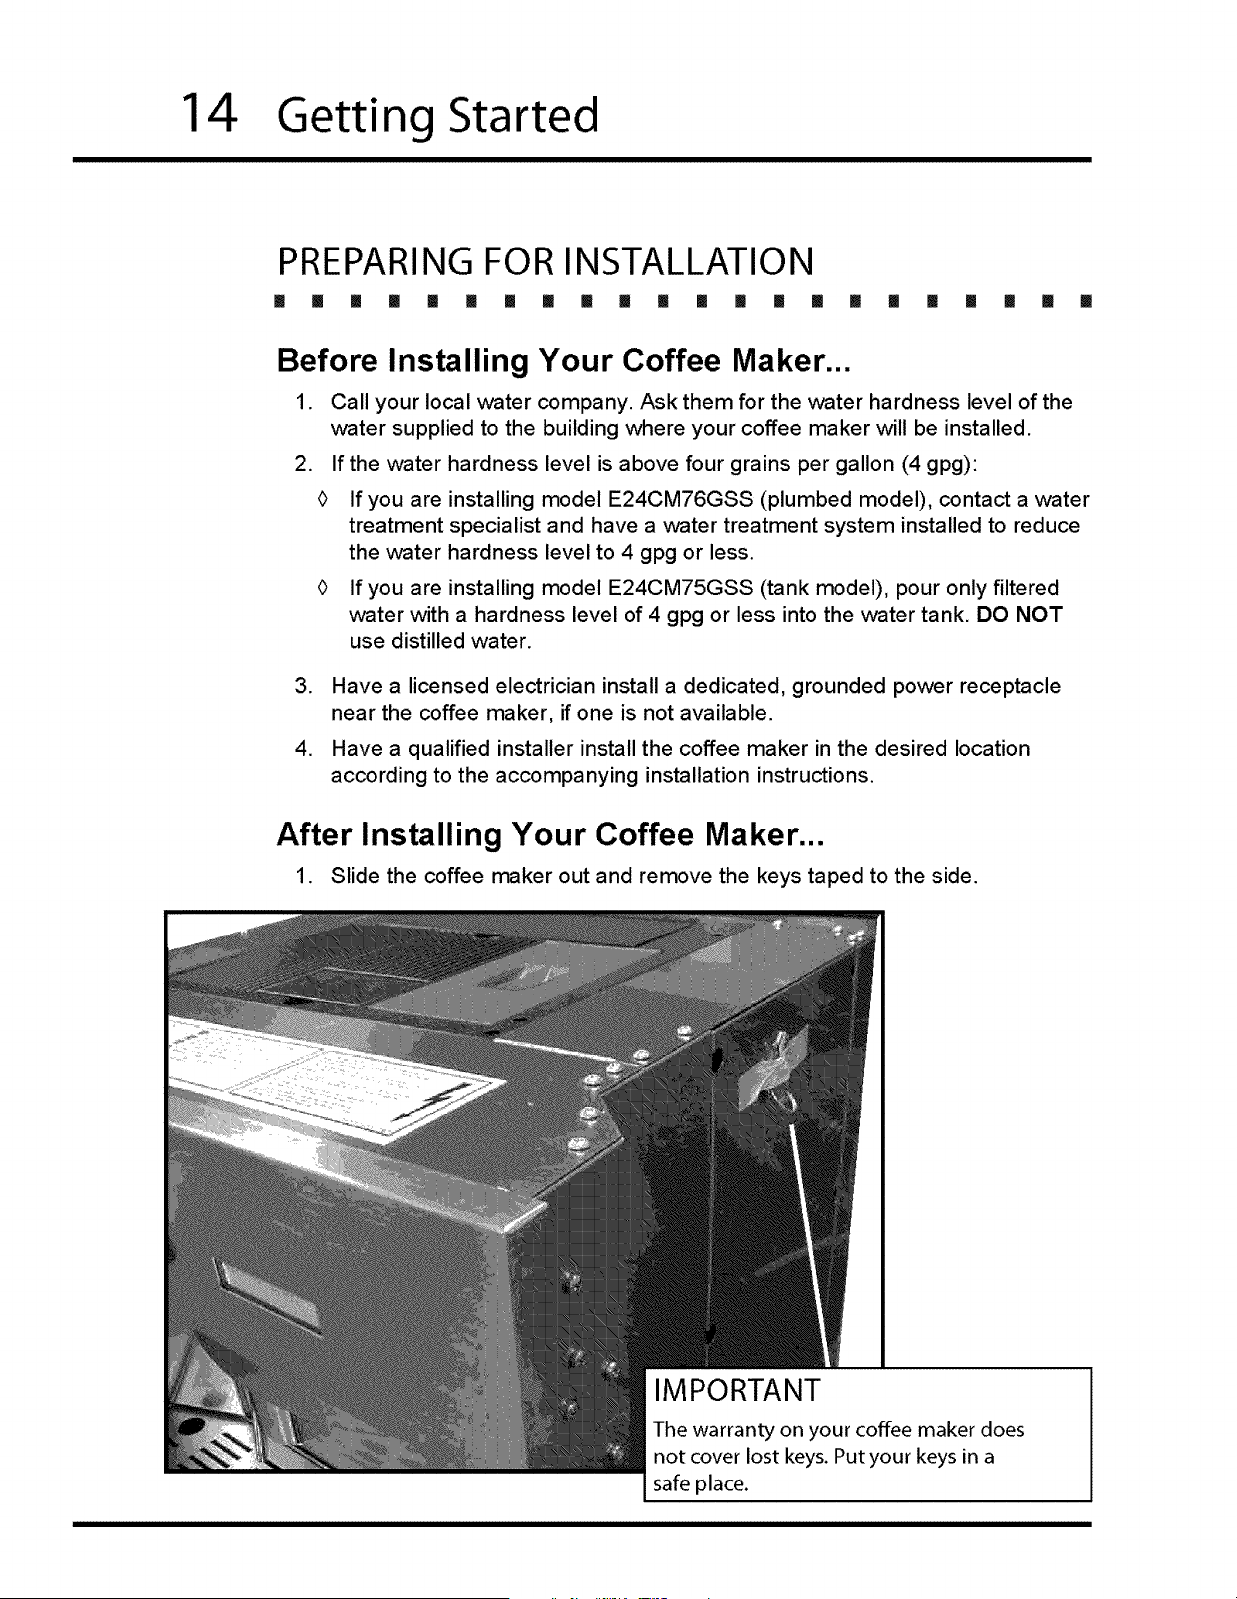
1. Slide the coffee maker out and remove the keys taped to the side.
IMPORTANT
The warranty on your coffee maker does
not cover lost keys. Putyour keys in a
safe place.
Getting Started
15
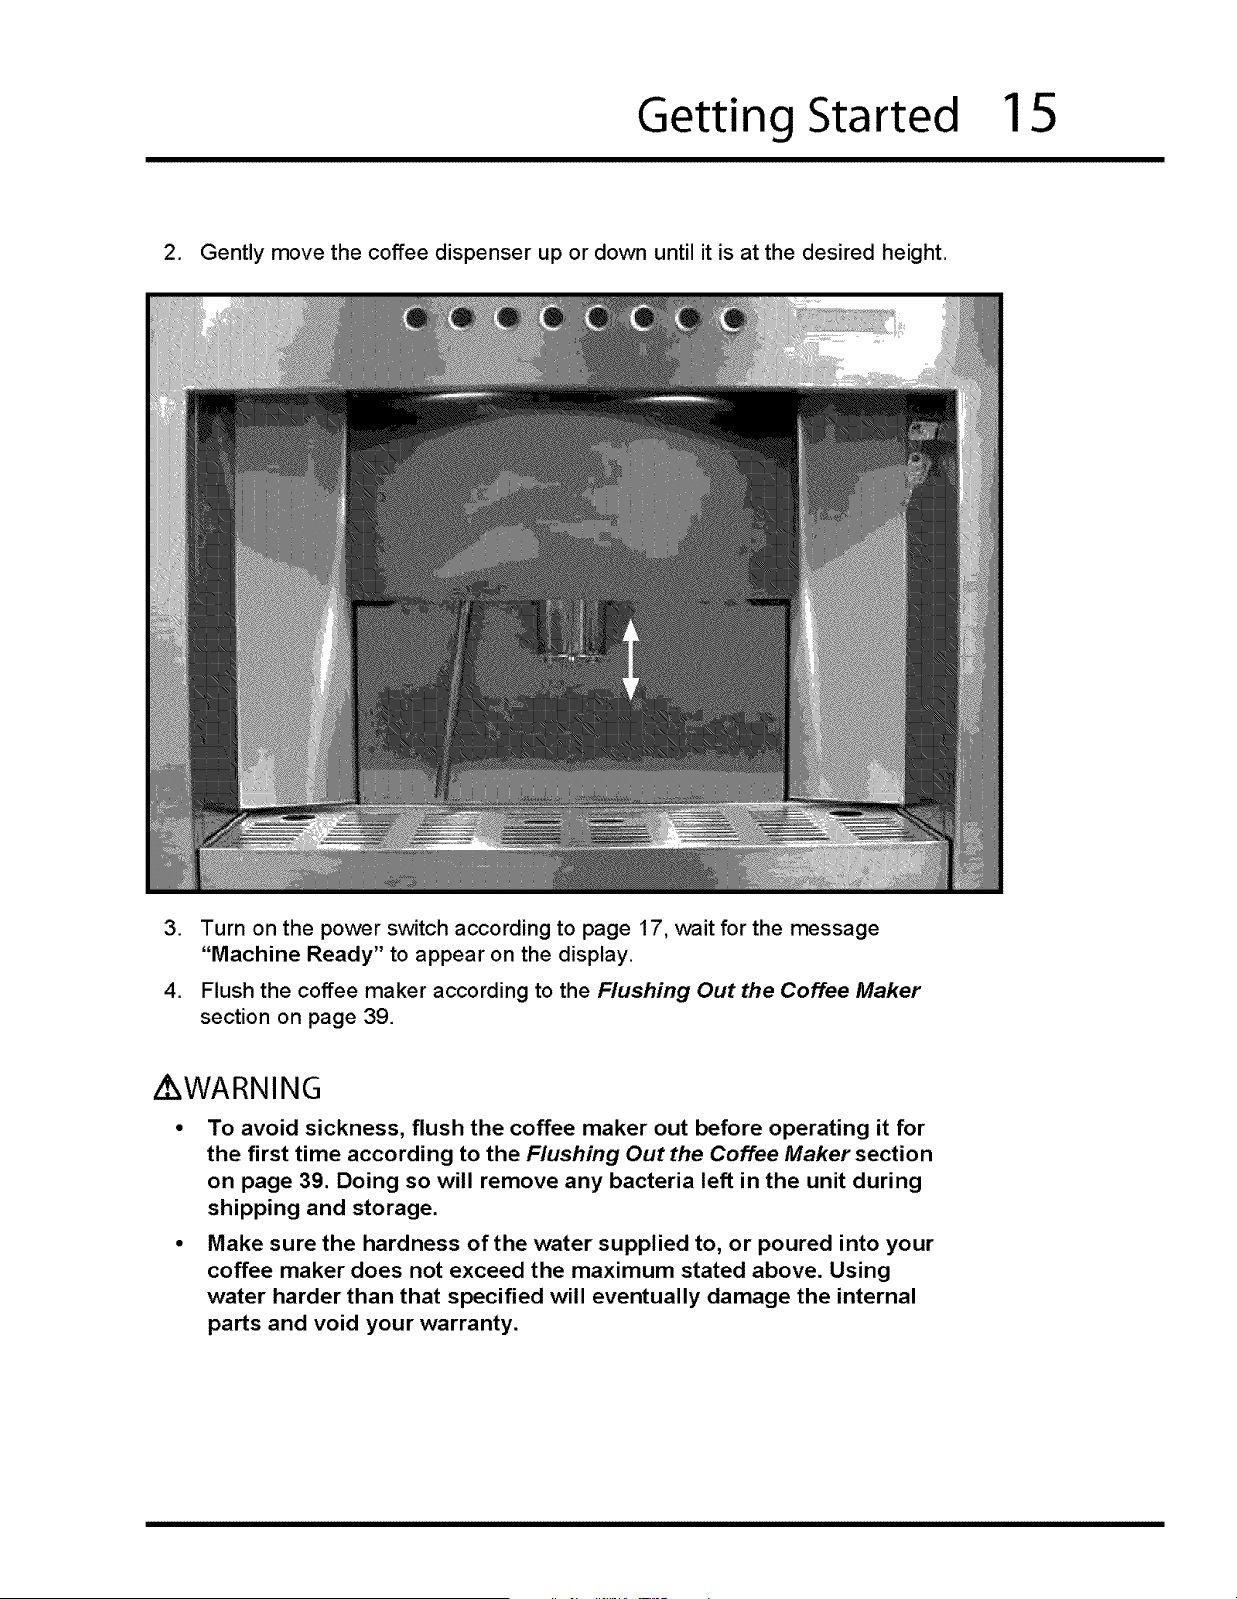
2. Gently move the coffee dispenser up or down until it is at the desired height.
,
,
Turn on the power switch according to page 17, wait for the message
"Machine Ready" to appear on the display.
Flush the coffee maker according to the Flushing Out the Coffee Maker
section on page 39.
Z WARNING
To avoid sickness, flush the coffee maker out before operating it for
the first time according to the Flushing Out the Coffee Maker section
on page 39. Doing so will remove any bacteria left in the unit during
shipping and storage.
Make sure the hardness of the water supplied to, or poured into your
coffee maker does not exceed the maximum stated above. Using
water harder than that specified will eventually damage the internal
parts and void your warranty.
16
Operating Instructions
BEFORE USING YOUR COFFEE MAKER
[] II [] [] [] [] [] I [] [] [] [] [] [] [] [] [] [] [] [] [] []
Z WARNING
DO NOT PUSH ANY BUTTONS ON THE CONTROL PANEL UNTIL ALL BODY
PARTSAND CLOTHING ARE CLEAR OF THE BREWING COMPARTMENT.
KEEPALL BODY PARTS AWAY FROM THE BREWING COMPARTMENT
DURING OR IMMEDIATELY AFTER DRINK DISPENSING. HOT LIQUIDS AND
STEAM CAN CAUSE SEVEREBURNS.
CAUTION
Use only filtered water with a hardness of 4 gpg or lower. See Before
Installing Your Coffee Maker on page 14.
"Clean Group" will appear on the display when the coffee maker needs a
routine cleaning. The "Clean Group" message will disappear after you follow
the Routine Cleaning Instructions on page 32.
A small amount of dripping from the dispensers is normal after drinks are
dispensed.
This coffee maker is designed to make one (in some cases two) hot drink(s)
at a time.
• Drink volume may vary due to coffee type, grind time, temperature, tamping
time and pre-brewing time.
• For proper operation, clean your coffee maker regularly according to the
cleaning schedule on page 30.
/kWARNING
On model E24CM75GSS, clean the water tank daily to avoid sickness due to
bacteria growth.
When the coffee maker makes coffee, it dumps the used coffee grounds into
the used coffee ground bin. You must empty out the bin when it becomes
full. "Drawer Full" will appear on the display. See the Routine Cleaning
Instructions on page 32.
The coffee maker purges water into the drip tray to ensure that the water
used for drink making is hot. Empty out the drip tray when it starts to get full.
Operating Instructions
17
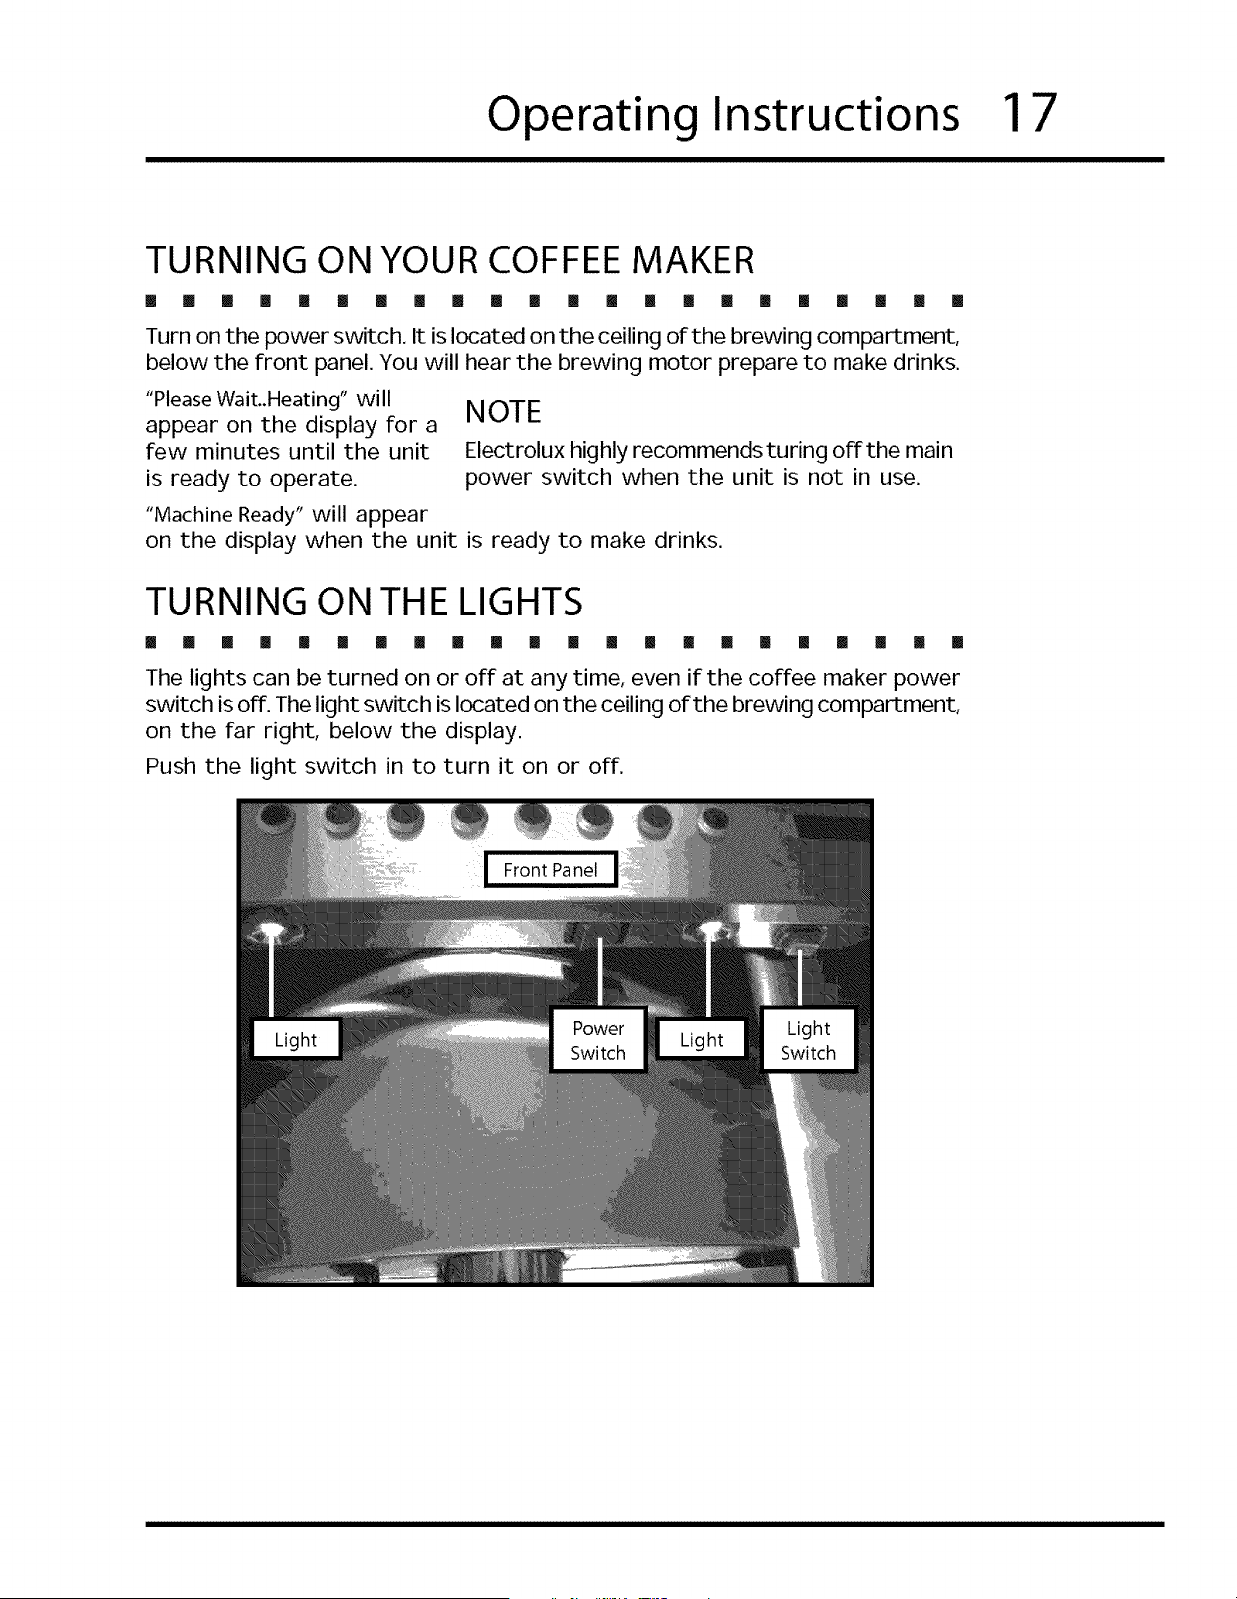
TURNING ON YOUR COFFEE MAKER
[] [] [] [] [] [] [] [] [] I! [] [] [] [] [] [] [] [] [] [] [] []
Turn on the power switch. It is located on the ceiling of the brewing compartment,
below the front panel. You will hear the brewing motor prepare to make drinks.
"Please Wait..Heating" will
appear on the display for a
few minutes until the unit
is ready to operate.
"Machine Ready" will appear
on the display when the unit is ready to make drinks.
NOTE
Electrolux highly recommends turing off the main
power switch when the unit is not in use.
TURNING ON THE LIGHTS
[] [] [] [] [] [] [] [] [] !1 [] [] [] [] [] Ii [] [] [] [] [] []
The lights can be turned on or off at any time, even if the coffee maker power
switch is off. The light switch is located on the ceiling of the brewing compartment,
on the far right, below the display.
Push the light switch in to turn it on or off.
18
Operating Instructions
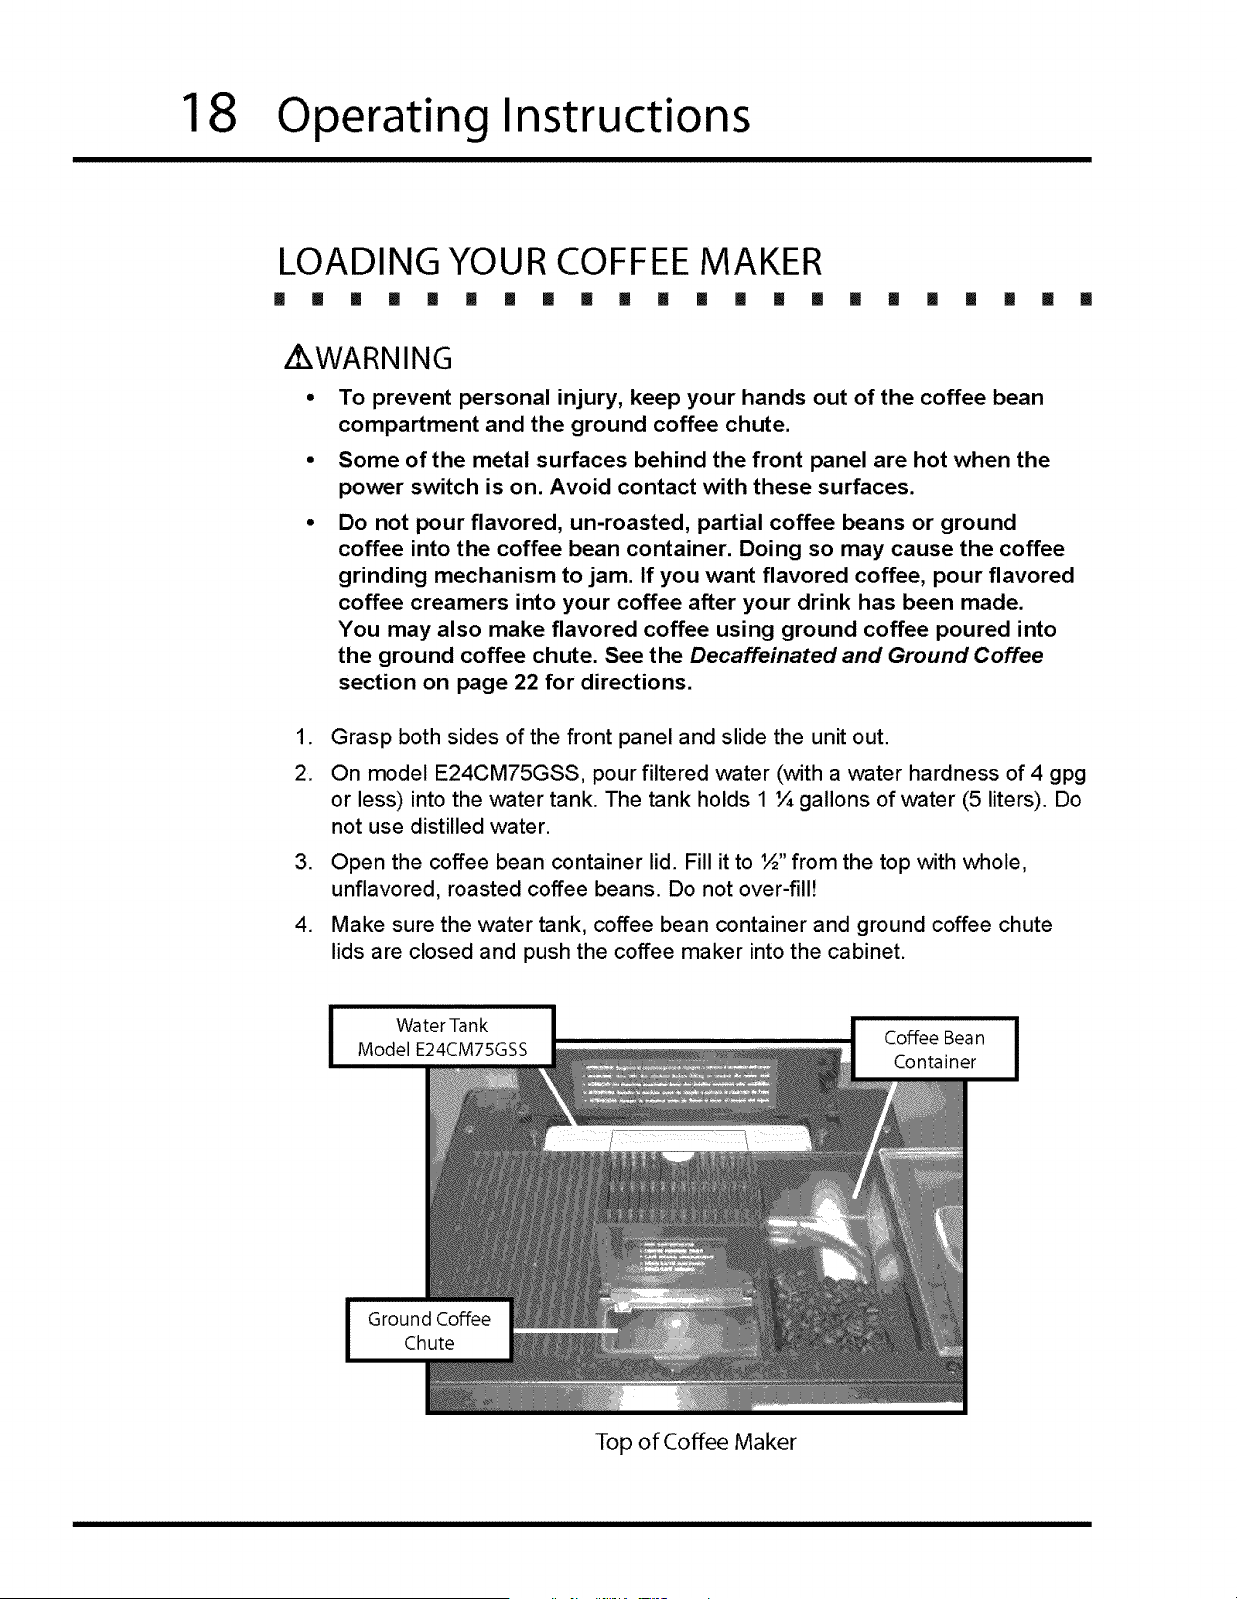
LOADING YOUR COFFEE MAKER
[] [] [] [] [] [] [] [] [] il [] [] [] [] [] [] [] [] [] [] [] []
i WARNING
To prevent personal injury, keep your hands out of the coffee bean
compartment and the ground coffee chute.
Some of the metal surfaces behind the front panel are hot when the
power switch is on. Avoid contact with these surfaces.
Do not pour flavored, un-roasted, partial coffee beans or ground
coffee into the coffee bean container. Doing so may cause the coffee
grinding mechanism to jam. If you want flavored coffee, pour flavored
coffee creamers into your coffee after your drink has been made.
You may also make flavored coffee using ground coffee poured into
the ground coffee chute. See the Decaffeinated and Ground Coffee
section on page 22 for directions.
.
2.
,
,
Grasp both sides of the front panel and slide the unit out.
On model E24CM75GSS, pour filtered water (with a water hardness of 4 gpg
or less) into the water tank. The tank holds 1 ¼ gallons of water (5 liters). Do
not use distilled water.
Open the coffee bean container lid. Fill it to ½" from the top with whole,
unflavored, roasted coffee beans. Do not over-fill)
Make sure the water tank, coffee bean container and ground coffee chute
lids are closed and push the coffee maker into the cabinet.
Top of Coffee Maker
Operating Instructions
19
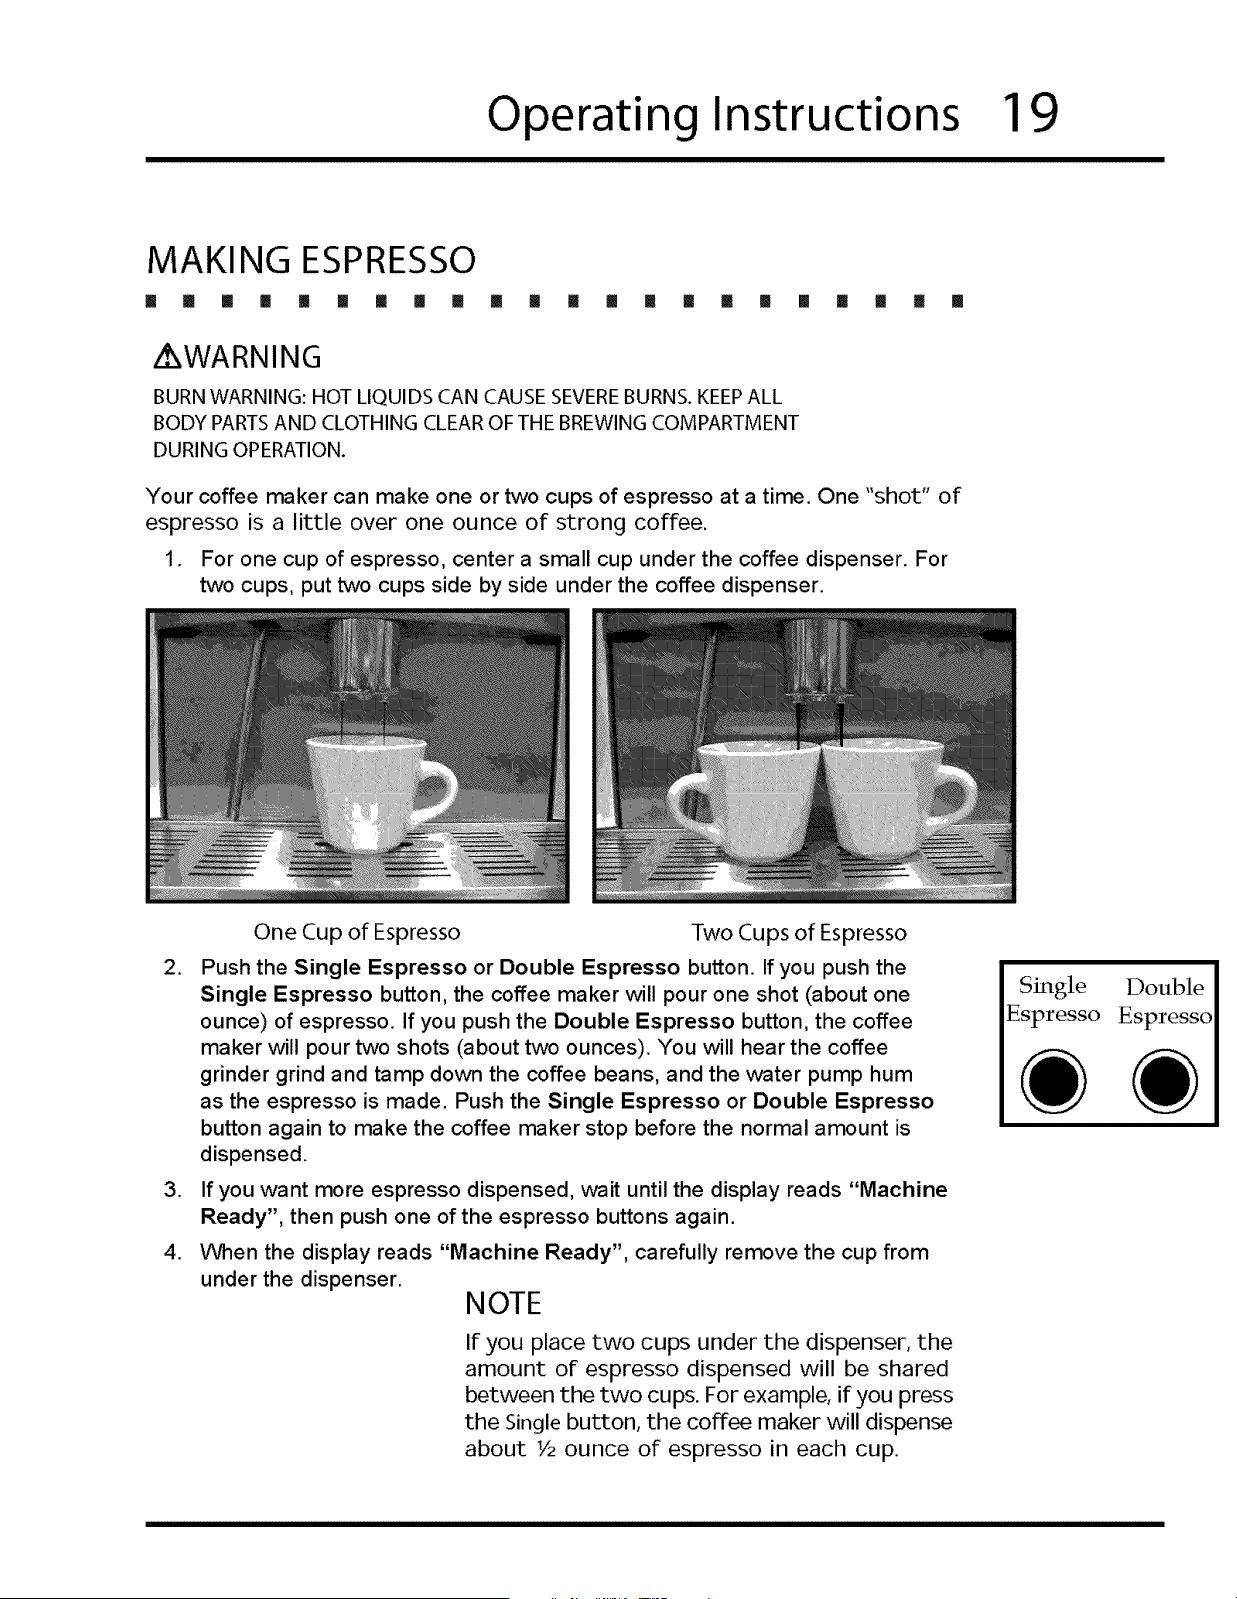
MAKING ESPRESSO
[] [] [] [] [] [] [] [] [] !1 [] [] [] [] II []1 [] [] [] [] [] []
/ WARNING
BURN WARNING: HOT LIQUIDS CAN CAUSE SEVEREBURNS. KEEP ALL
BODY PARTS AND CLOTHING CLEAR OF THE BREWING COMPARTMENT
DURING OPERATION.
Your coffee maker can make one or two cups of espresso at a time. One "shot" of
espresso is a little over one ounce of strong coffee.
1. For one cup of espresso, center a small cup under the coffee dispenser. For
two cups, put two cups side by side under the coffee dispenser.
One Cup of Espresso
2.
,
.
Two Cups of Espresso
Push the Single Espresso or Double Espresso button. If you push the
Single Espresso button, the coffee maker will pour one shot (about one
ounce) of espresso. If you push the Double Espresso button, the coffee
maker will pour two shots (about two ounces). You will hear the coffee
grinder grind and tamp down the coffee beans, and the water pump hum
as the espresso is made. Push the Single Espresso or Double Espresso
button again to make the coffee maker stop before the normal amount is
dispensed.
If you want more espresso dispensed, wait until the display reads "Machine
Ready", then push one of the espresso buttons again.
When the display reads "Machine Ready", carefully remove the cup from
under the dispenser.
NOTE
If you place two cups under the dispenser, the
amount of espresso dispensed will be shared
between the two cups. For example, if you press
the Single button, the coffee maker will dispense
about V2 ounce of espresso in each cup.
Single Double
Espresso Espresso
20
Operating Instructions
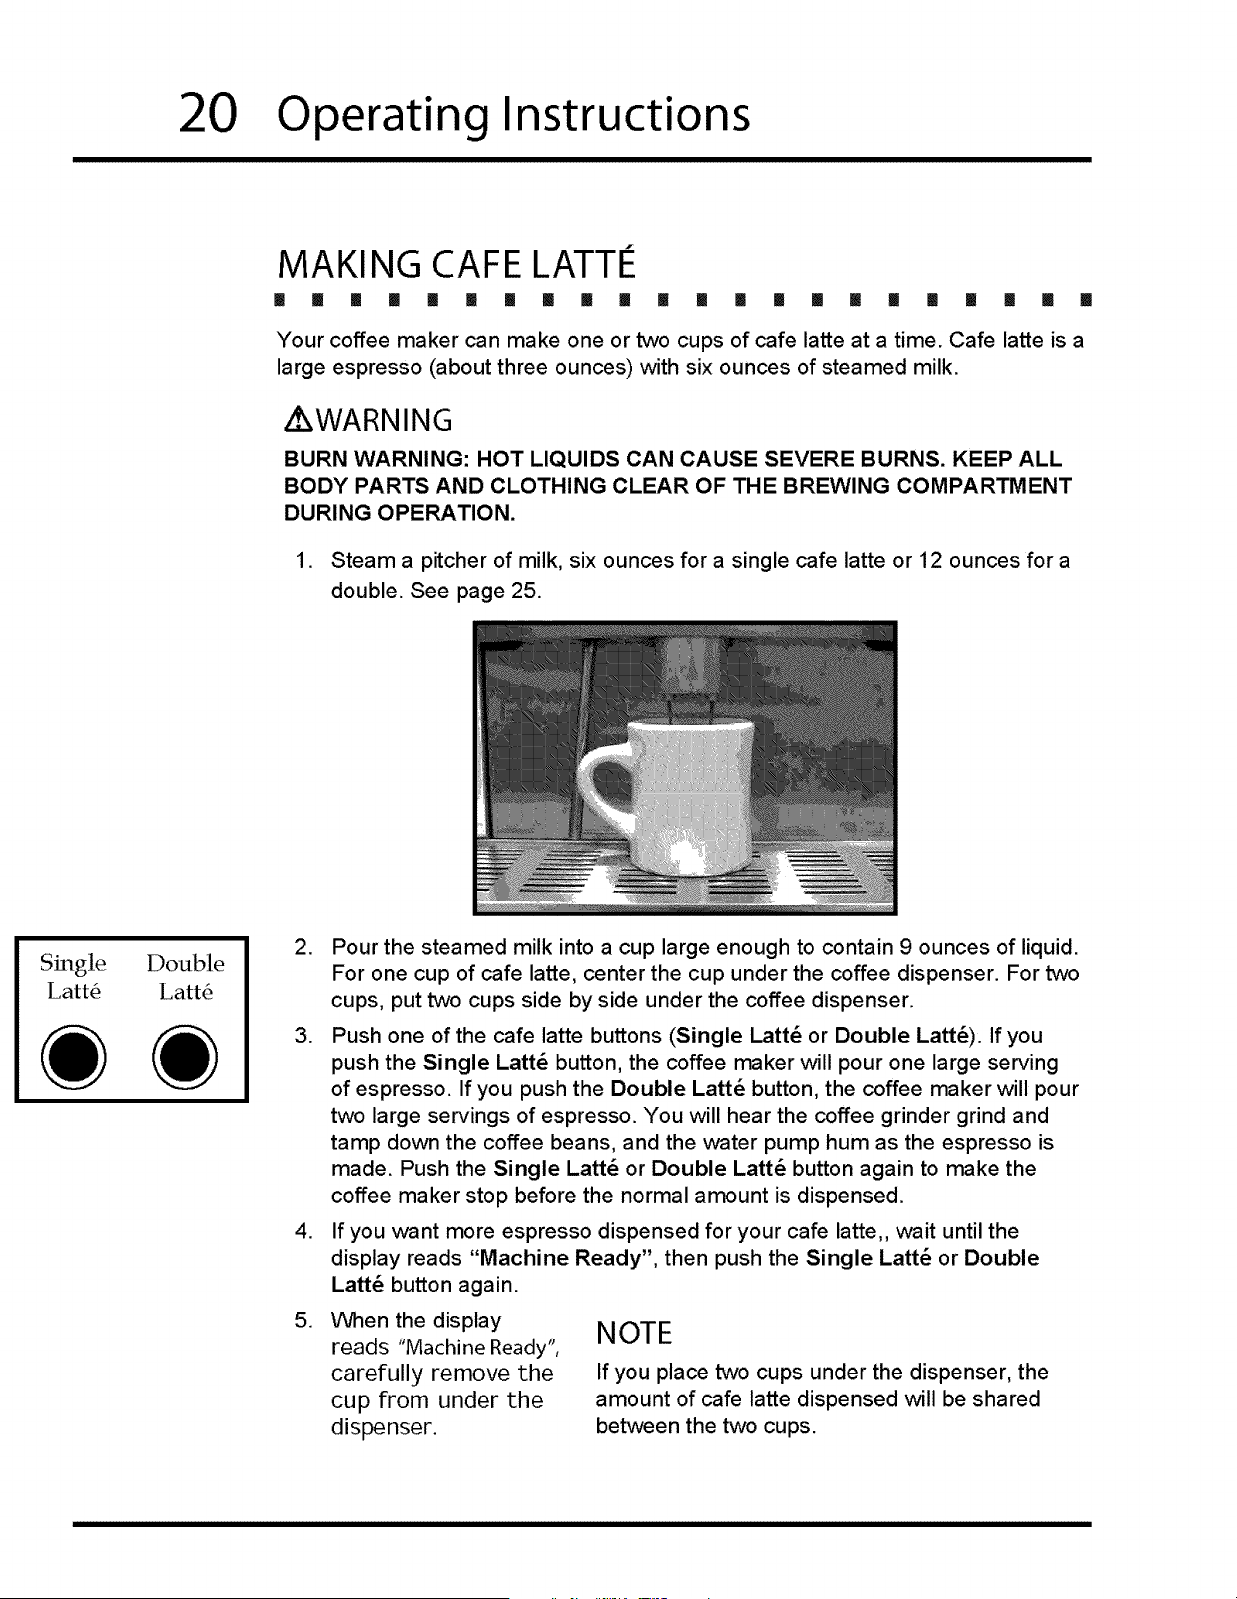
MAKING CAFE LATTIe
[] I! [] [] !1 I! [] II II [] ii [] [] [] [] [] [] [] [] [] [] []
Your coffee maker can make one or two cups of cafe latte at a time. Oafe latte is a
large espresso (about three ounces) with six ounces of steamed milk.
AXWARNING
BURN WARNING: HOT LIQUIDS CAN CAUSE SEVERE BURNS. KEEP ALL
BODY PARTS AND CLOTHING CLEAR OF THE BREWING COMPARTMENT
DURING OPERATION.
1. Steam a pitcher of milk, six ounces for a single cafe latte or 12 ounces for a
double. See page 25.
Single Double
Latt6 Latt6
.
.
.
.
Pour the steamed milk into a cup large enough to contain 9 ounces of liquid.
For one cup of cafe latte, center the cup under the coffee dispenser. For two
cups, put two cups side by side under the coffee dispenser.
Push one of the cafe latte buttons (Single l,att_ or Double I_att_). If you
push the Single Latt_ button, the coffee maker will pour one large serving
of espresso. If you push the Double I_att_ button, the coffee maker will pour
two large servings of espresso. You will hear the coffee grinder grind and
tamp down the coffee beans, and the water pump hum as the espresso is
made. Push the Single Latt_ or Double I_att_ button again to make the
coffee maker stop before the normal amount is dispensed.
If you want more espresso dispensed for your cafe latte,, wait until the
display reads "Machine Ready", then push the Single I_att_ or Double
l,att4 button again.
When the display
reads "Machine Ready",
carefully remove the
cup from under the
dispenser.
NOTE
If you place two cups under the dispenser, the
amount of cafe latte dispensed will be shared
between the two cups.
Operating Instructions
21
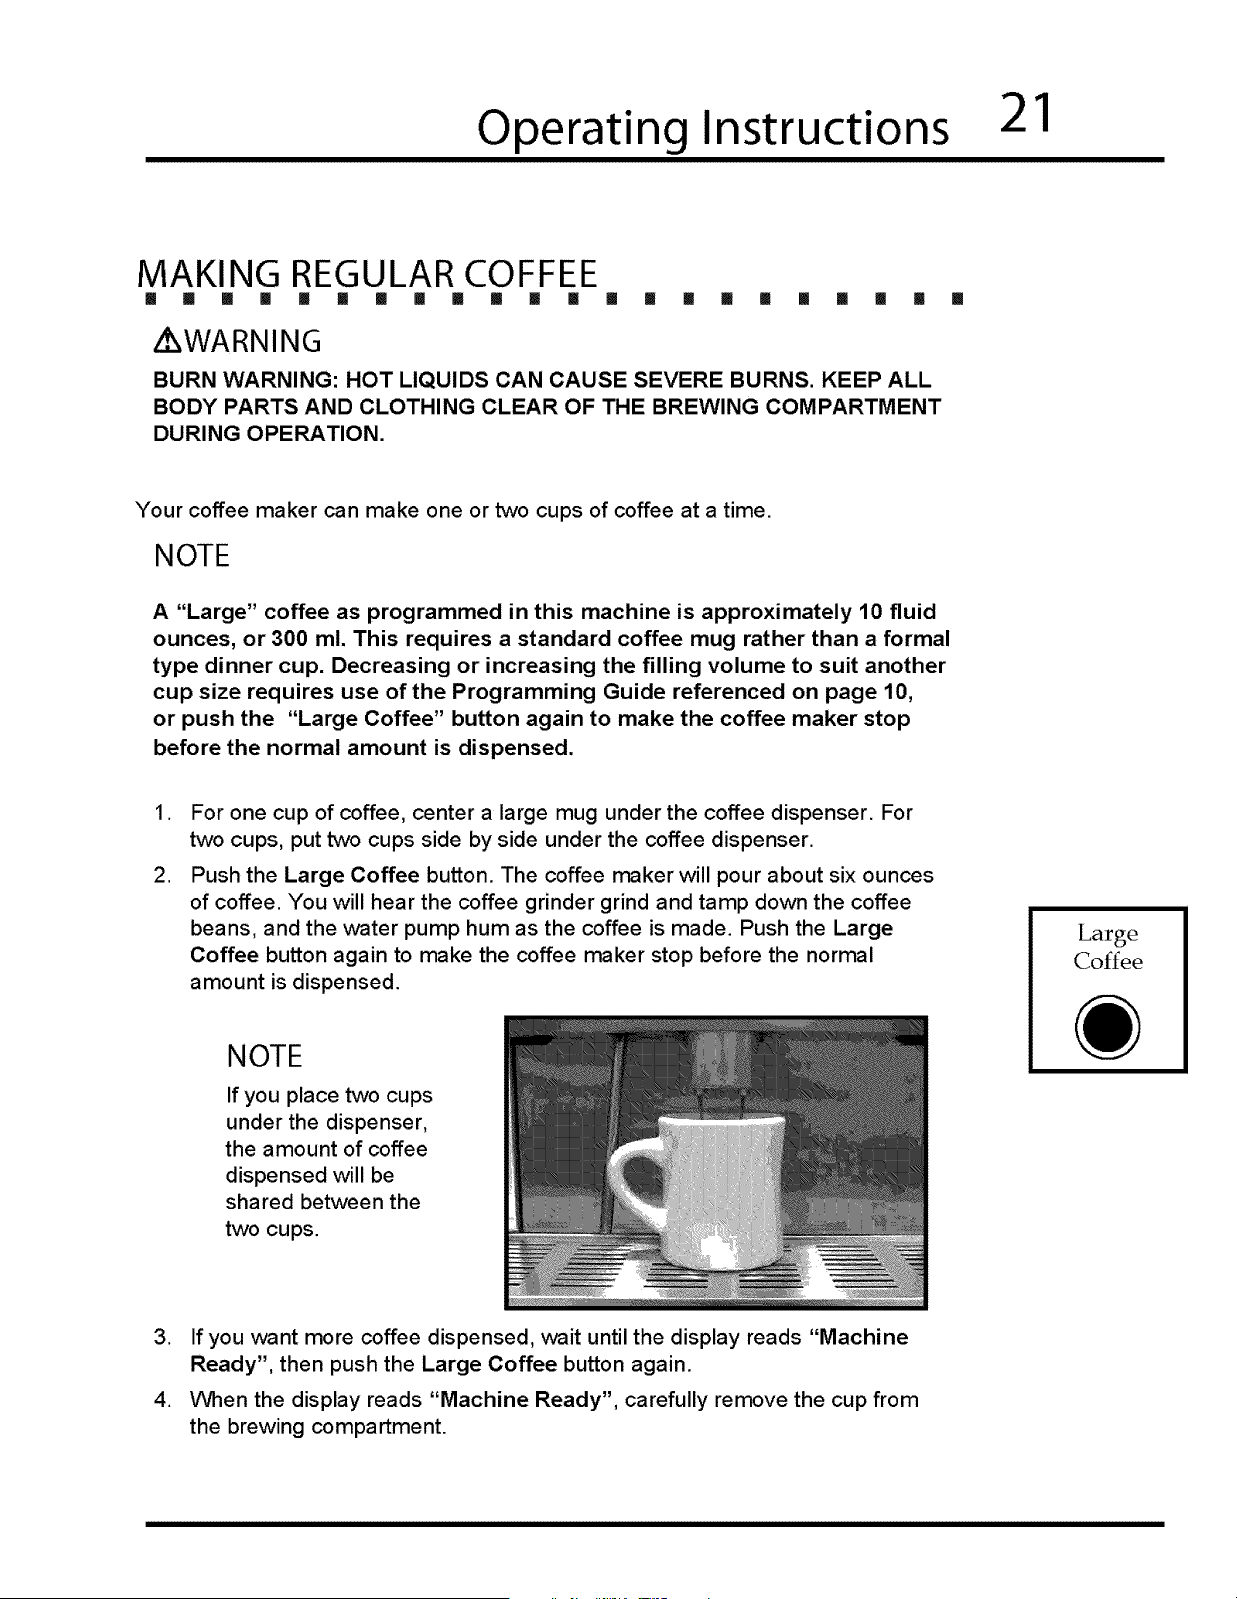
MAKING REGULAR COFFEE
[] [] [] [] !1 [] III [] [] [] [] III [] [] [] [] [] [] [] [] []
i WARNING
BURN WARNING: HOT LIQUIDS CAN CAUSE SEVERE BURNS. KEEP ALL
BODY PARTS AND CLOTHING CLEAR OF THE BREWING COMPARTMENT
DURING OPERATION.
[]
Your coffee maker can make one or two cups of coffee at a time.
NOTE
A "Large" coffee as programmed in this machine is approximately 10 fluid
ounces, or 300 ml. This requires a standard coffee mug rather than a formal
type dinner cup. Decreasing or increasing the filling volume to suit another
cup size requires use of the Programming Guide referenced on page 10,
or push the "Large Coffee" button again to make the coffee maker stop
before the normal amount is dispensed.
,
.
For one cup of coffee, center a large mug under the coffee dispenser. For
two cups, put two cups side by side under the coffee dispenser.
Push the Large Coffee button. The coffee maker will pour about six ounces
of coffee. You will hear the coffee grinder grind and tamp down the coffee
beans, and the water pump hum as the coffee is made. Push the Large
Coffee button again to make the coffee maker stop before the normal
amount is dispensed.
NOTE
If you place two cups
under the dispenser,
the amount of coffee
dispensed will be
shared between the
two cups.
Large
Coffee
,
,
If you want more coffee dispensed, wait until the display reads "Machine
Ready", then push the Large Coffee button again.
When the display reads "Machine Ready", carefully remove the cup from
the brewing compartment.
22
Operating Instructions
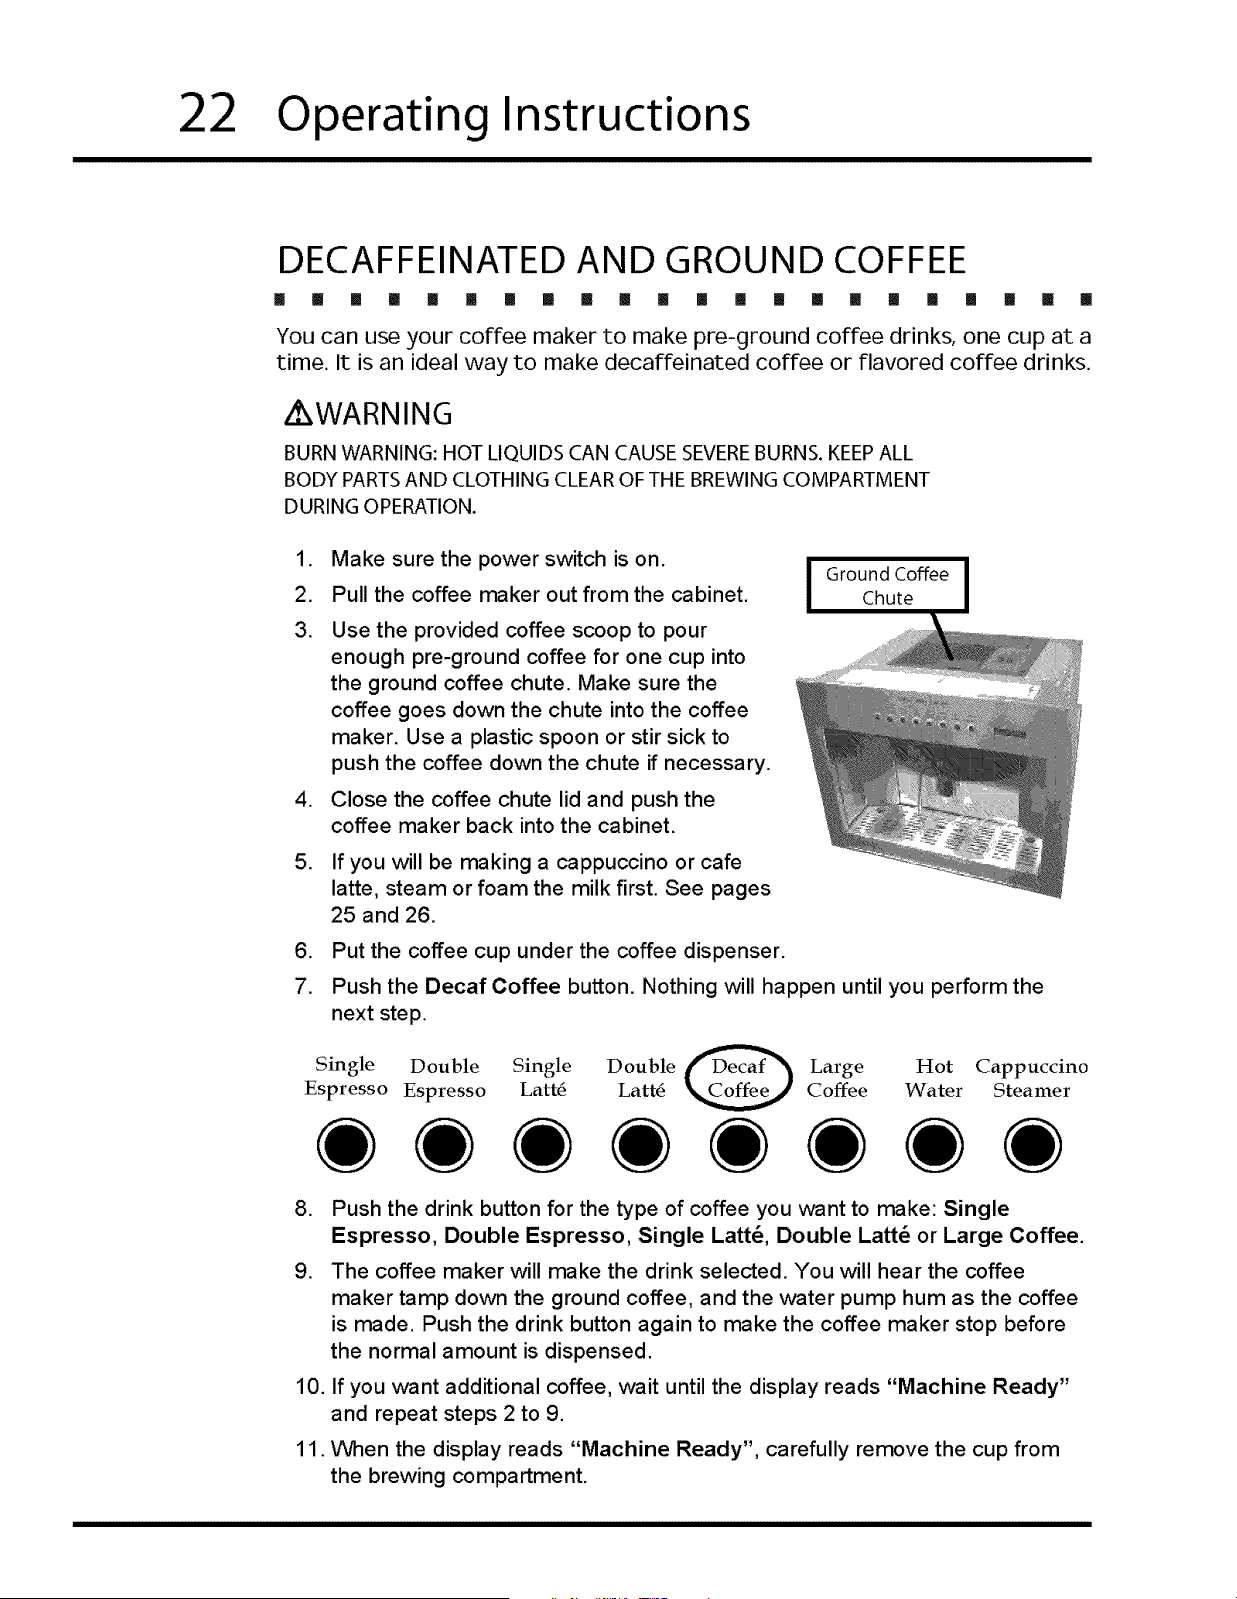
DECAFFEINASED AND GROUND COFFEE
[] [] [] [] [] [] [] [] [] [] [] [] [] [] [] [] [] [] [] [] [] []
You can use your coffee maker to make pre-ground coffee drinks, one cup at a
time. It is an ideal way to make decaffeinated coffee or flavored coffee drinks.
WARNING
BURN WARNING: HOT LIQUIDS CAN CAUSE SEVEREBURNS. KEEPALL
BODY PARTS AND CLOTHING CLEAR OF THE BREWING COMPARTMENT
DURING OPERATION.
.
2.
3.
.
Make sure the power switch is on. I Ground Coffee I
Pull the coffee maker out from the cabinet. I Chute I
Use the provided coffee scoop to pour
enough pre-ground coffee for one cup into
the ground coffee chute. Make sure the
coffee goes down the chute into the coffee
maker. Use a plastic spoon or stir sick to
push the coffee down the chute if necessary.
Close the coffee chute lid and push the
coffee maker back into the cabinet.
5. If you will be making a cappuccino or cafe
latte, steam or foam the milk first. See pages
25 and 26.
6. Put the coffee cup under the coffee dispenser.
7. Push the Decaf Coffee button. Nothing will happen until you perform the
next step.
Single Double Single Double fDecaf_'_ Large Hot Cappuccino
Espresso Espresso Latt6 Latt6 K__ Coffee Water Steamer
,
.
10.
11.
Push the drink button for the type of coffee you want to make: Single
Espresso, Double Espresso, Single Latt_, Double Latt_ or Large Coffee.
The coffee maker will make the drink selected. You will hear the coffee
maker tamp down the ground coffee, and the water pump hum as the coffee
is made. Push the drink button again to make the coffee maker stop before
the normal amount is dispensed.
If you want additional coffee, wait until the display reads "Machine Ready"
and repeat steps 2 to 9.
When the display reads "Machine Ready", carefully remove the cup from
the brewing compartment.
Operating Instructions
23
HOT WATER FOR TEA OR OTHER DRINKS
[] [] [] [] [] [] [] [] [] [] [] [] [] [] [] [] [] [] [] [] [] []
Z WARNING
BURN WARNING: HOT LIQUIDS CAN CAUSE SEVEREBURNS. KEEP ALL
BODY PARTS AND CLOTHING CLEAR OF THE BREWING COMPARTMENT
DURING OPERATION.
Use the Hot Water button to brew tea and other hot flavored drinks. The
coffee maker dispenses about four ounces of hot water at a time.
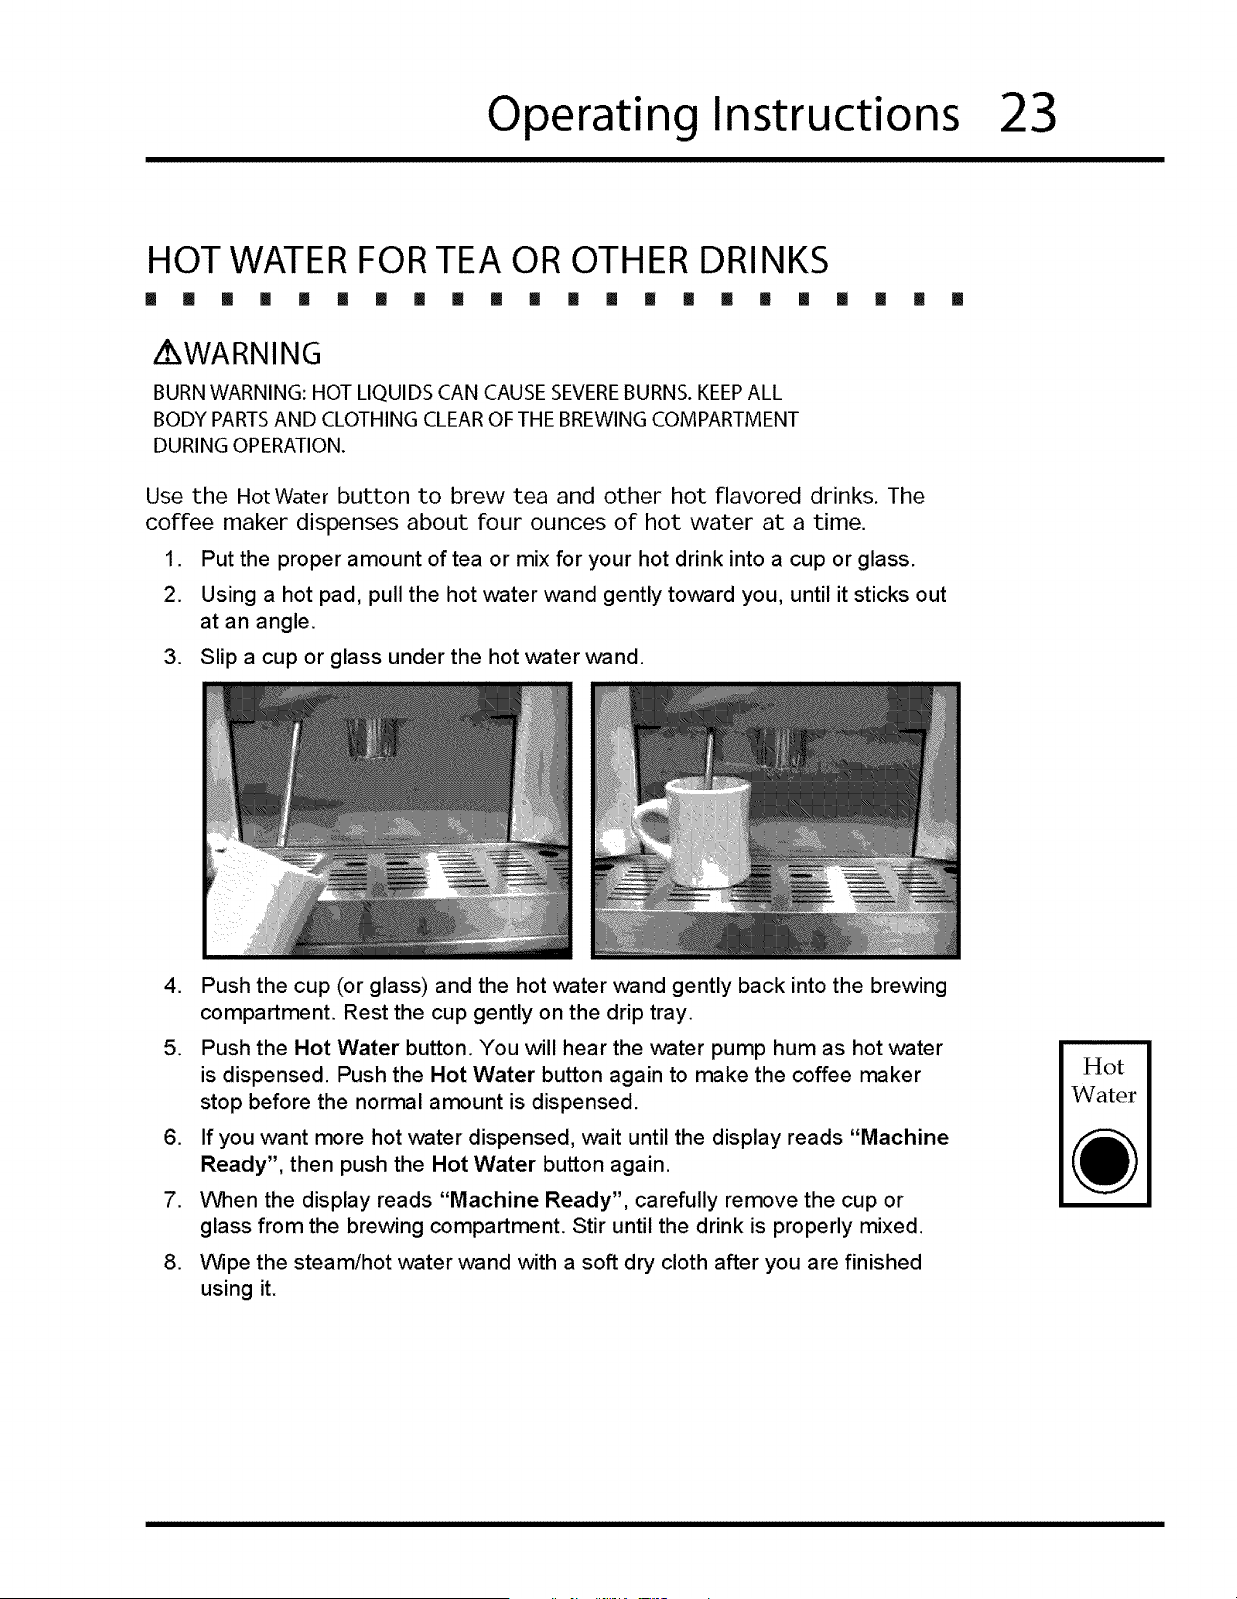
1. Put the proper amount of tea or mix for your hot drink into a cup or glass.
2. Using a hot pad, pull the hot water wand gently toward you, until it sticks out
at an angle.
3. Slip a cup or glass under the hot water wand.
,
.
Push the cup (or glass) and the hot water v_and gently back into the brewing
compartment. Rest the cup gently on the drip tray.
Push the Hot Water button. You will hear the water pump hum as hot water
is dispensed. Push the Hot Water button again to make the coffee maker
stop before the normal amount is dispensed.
6. If you want more hot water dispensed, wait until the display reads "Machine
Ready", then push the Hot Water button again.
7. When the display reads "Machine Ready", carefully remove the cup or
glass from the brewing compartment. Stir until the drink is properly mixed.
.
Wipe the steam/hot water wand with a soft dry cloth after you are finished
using it.
Hot
Water
24
Operating Instructions
MAKING A CAPPUCCINO
[] [] [] [] [] [] [] [] !! [] [] [] [] [] [] [] Ii II If [] [] []
Oappuccino is a coffee drink with about one ounce of espresso with one ounce of
foamed milk on top. To make a cup of cappuccino:
/ WARNING
BURN WARNING: HOT LIQUIDS CAN CAUSE SEVEREBURNS. KEEPALL
BODY PARTS AND CLOTHING CLEAR OF THE BREWING COMPARTMENT
DURING OPERATION.
.
.
Prepare an ounce of foamed milk according to page 26. To make two
cappuccinos or a large cappuccino, prepare two ounces of foamed milk.
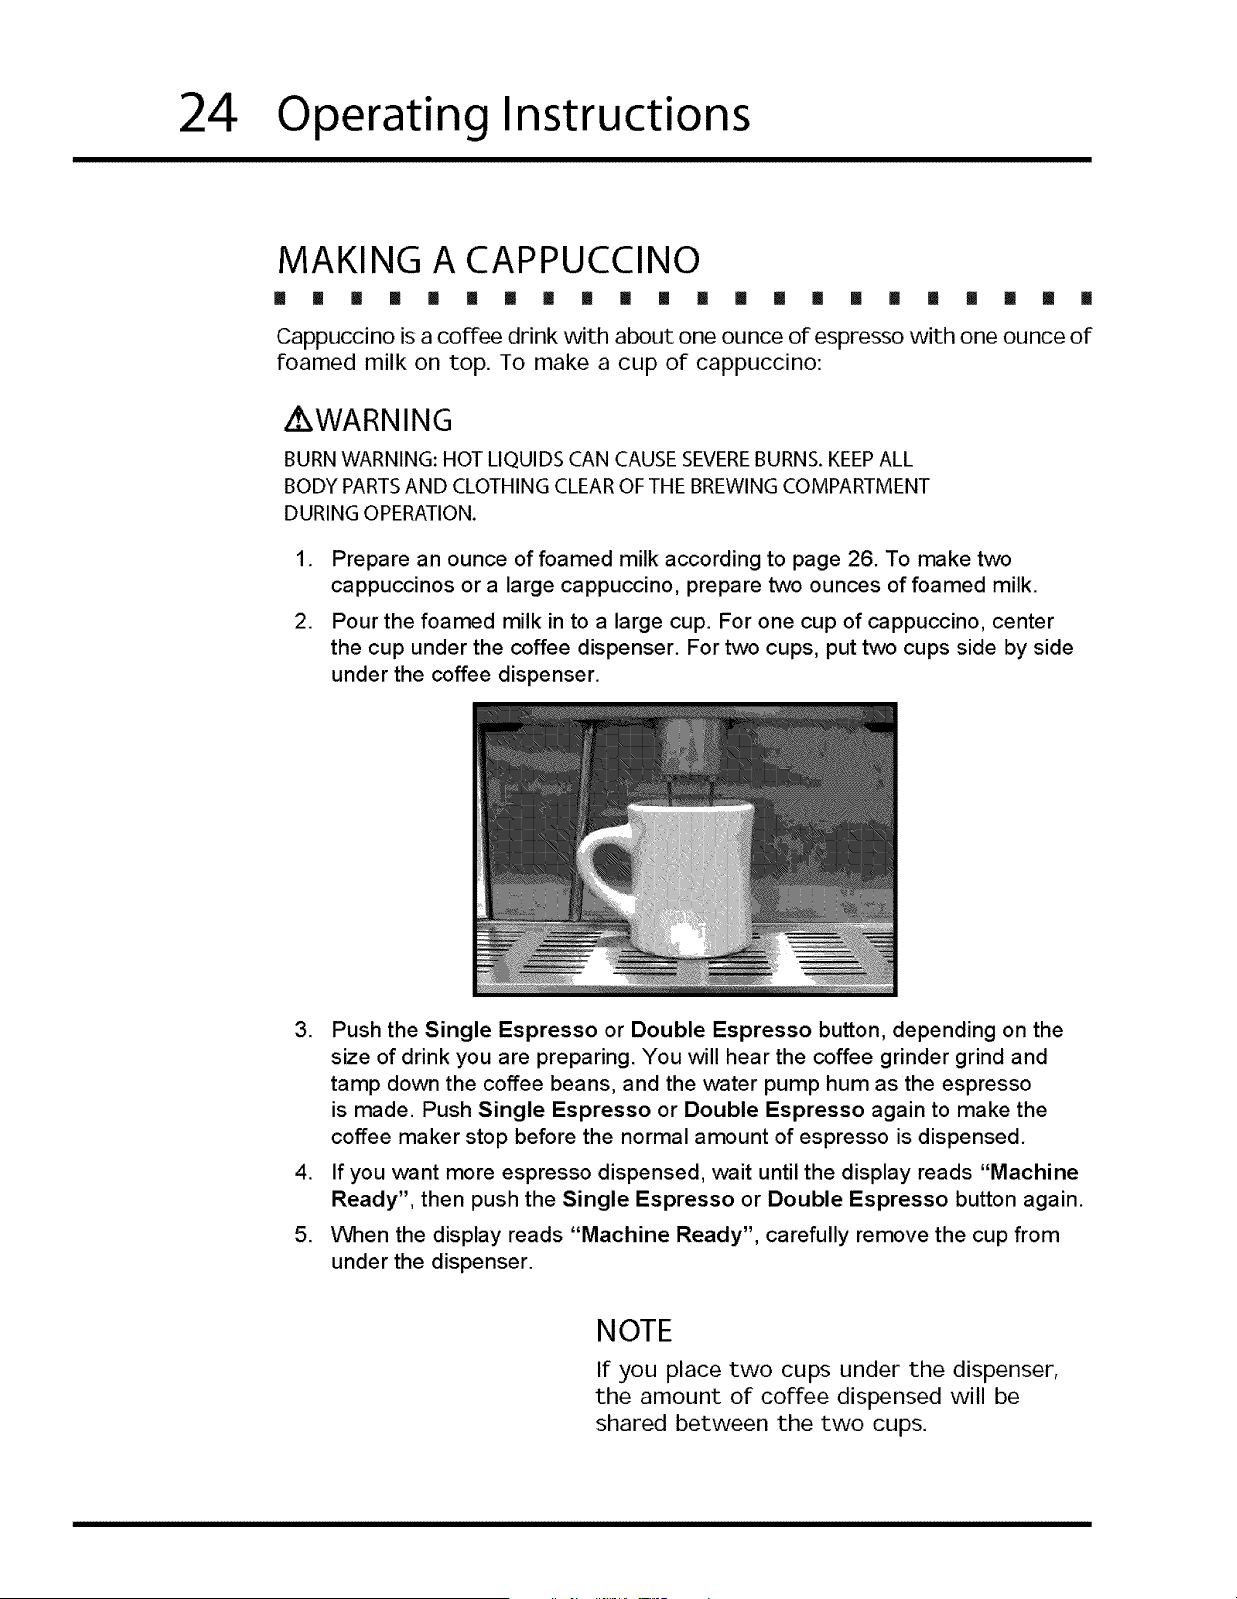
Pour the foamed milk in to a large cup. For one cup of cappuccino, center
the cup under the coffee dispenser. For two cups, put two cups side by side
under the coffee dispenser.
3,
.
5,
Push the Single Espresso or Double Espresso button, depending on the
size of drink you are preparing. You will hear the coffee grinder grind and
tamp down the coffee beans, and the water pump hum as the espresso
is made. Push Single Espresso or Double Espresso again to make the
coffee maker stop before the normal amount of espresso is dispensed.
If you want more espresso dispensed, ,wait until the display reads "Machine
Ready", then push the Single Espresso or Double Espresso button again.
When the display reads "Machine Ready", carefully remove the cup from
under the dispenser.
NOTE
If you place two cups under the dispenser,
the amount of coffee dispensed will be
shared between the two cups.
Operating Instructions
25
STEAMING MILK
I! [] [] [] [] [] [] [] [] [] [] [] [] [] [] III [] [] [] [] [] []
Steamed milk is milk that is heated with few bubbles using the cappuccino
steamer.
Z WARNING
BURN WARNING: STEAM AND HOT LIQUIDS CAN CAUSE SEVEREBURNS.
KEEPALL BODY PARTSAND CLOTHING CLEAR OF THE STEAM WAND
AND THE MOUTH OF THE MUG OR PITCHER DURING OPERATION.
.
.
.
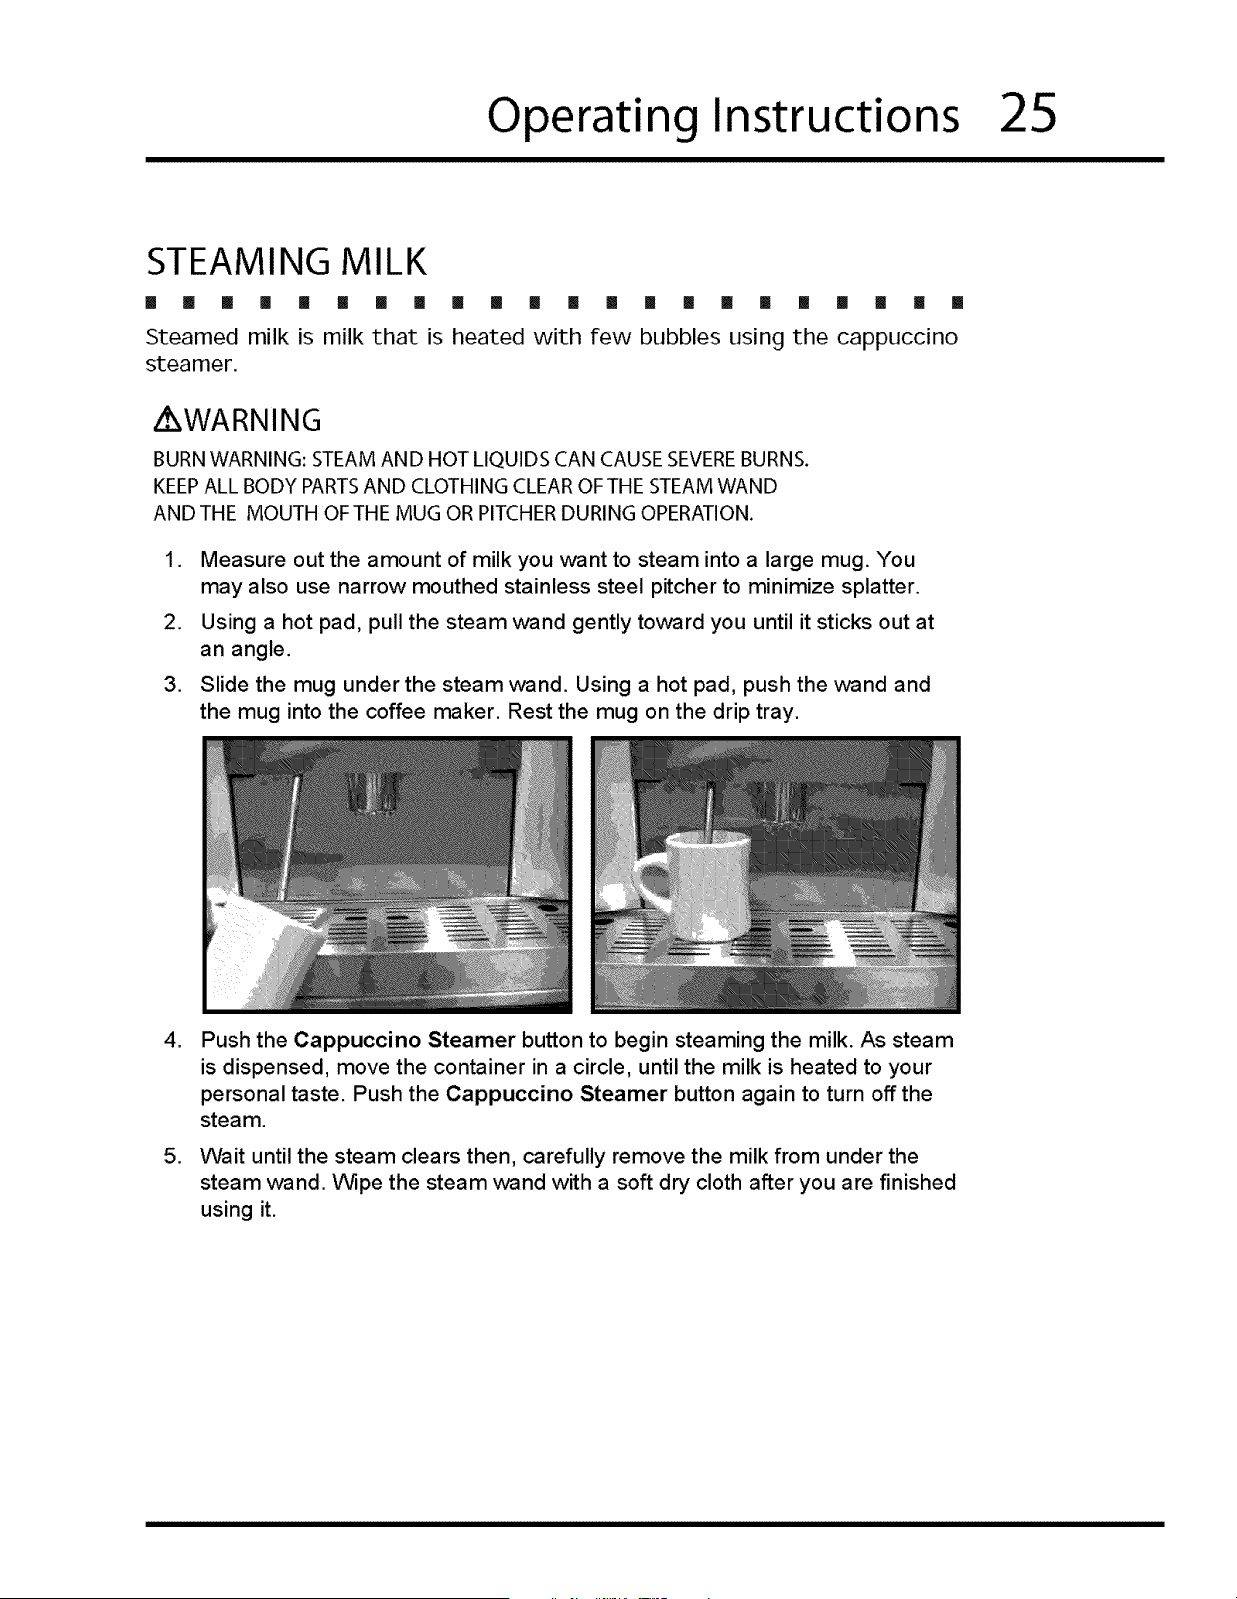
Measure out the amount of milk you want to steam into a large mug. You
may also use narrow mouthed stainless steel pitcher to minimize splatter.
Using a hot pad, pull the steam ,wand gently toward you until it sticks out at
an angle.
Slide the mug under the steam wand. Using a hot pad, push the wand and
the mug into the coffee maker. Rest the mug on the drip tray.
,
.
Push the Cappuccino Steamer button to begin steaming the milk. As steam
is dispensed, move the container in a circle, until the milk is heated to your
personal taste. Push the Cappuccino Steamer button again to turn off the
steam.
Wait until the steam clears then, carefully remove the milk from under the
steam wand. Wipe the steam wand with a soft dry cloth after you are finished
using it.
26
Operating Instructions
FOAMING MILK
[] []1 [] [] [] !! [] III [] [] [] [] [] [] [] [] [] [] [] []
Foamed milk is hot milk with large bubbles. Use the cappuccino steamer to
created foamed milk.
[] []
WARNING
BURN WARNING: STEAM AND HOT LIQUIDS CAN CAUSE SEVEREBURNS.
KEEPALL BODY PARTS AND CLOTHING CLEAR OF THE STEAM WAND
ANDTHE MOUTH OFTHE MUG OR PITCHER DURING OPERATION.
,
.
,
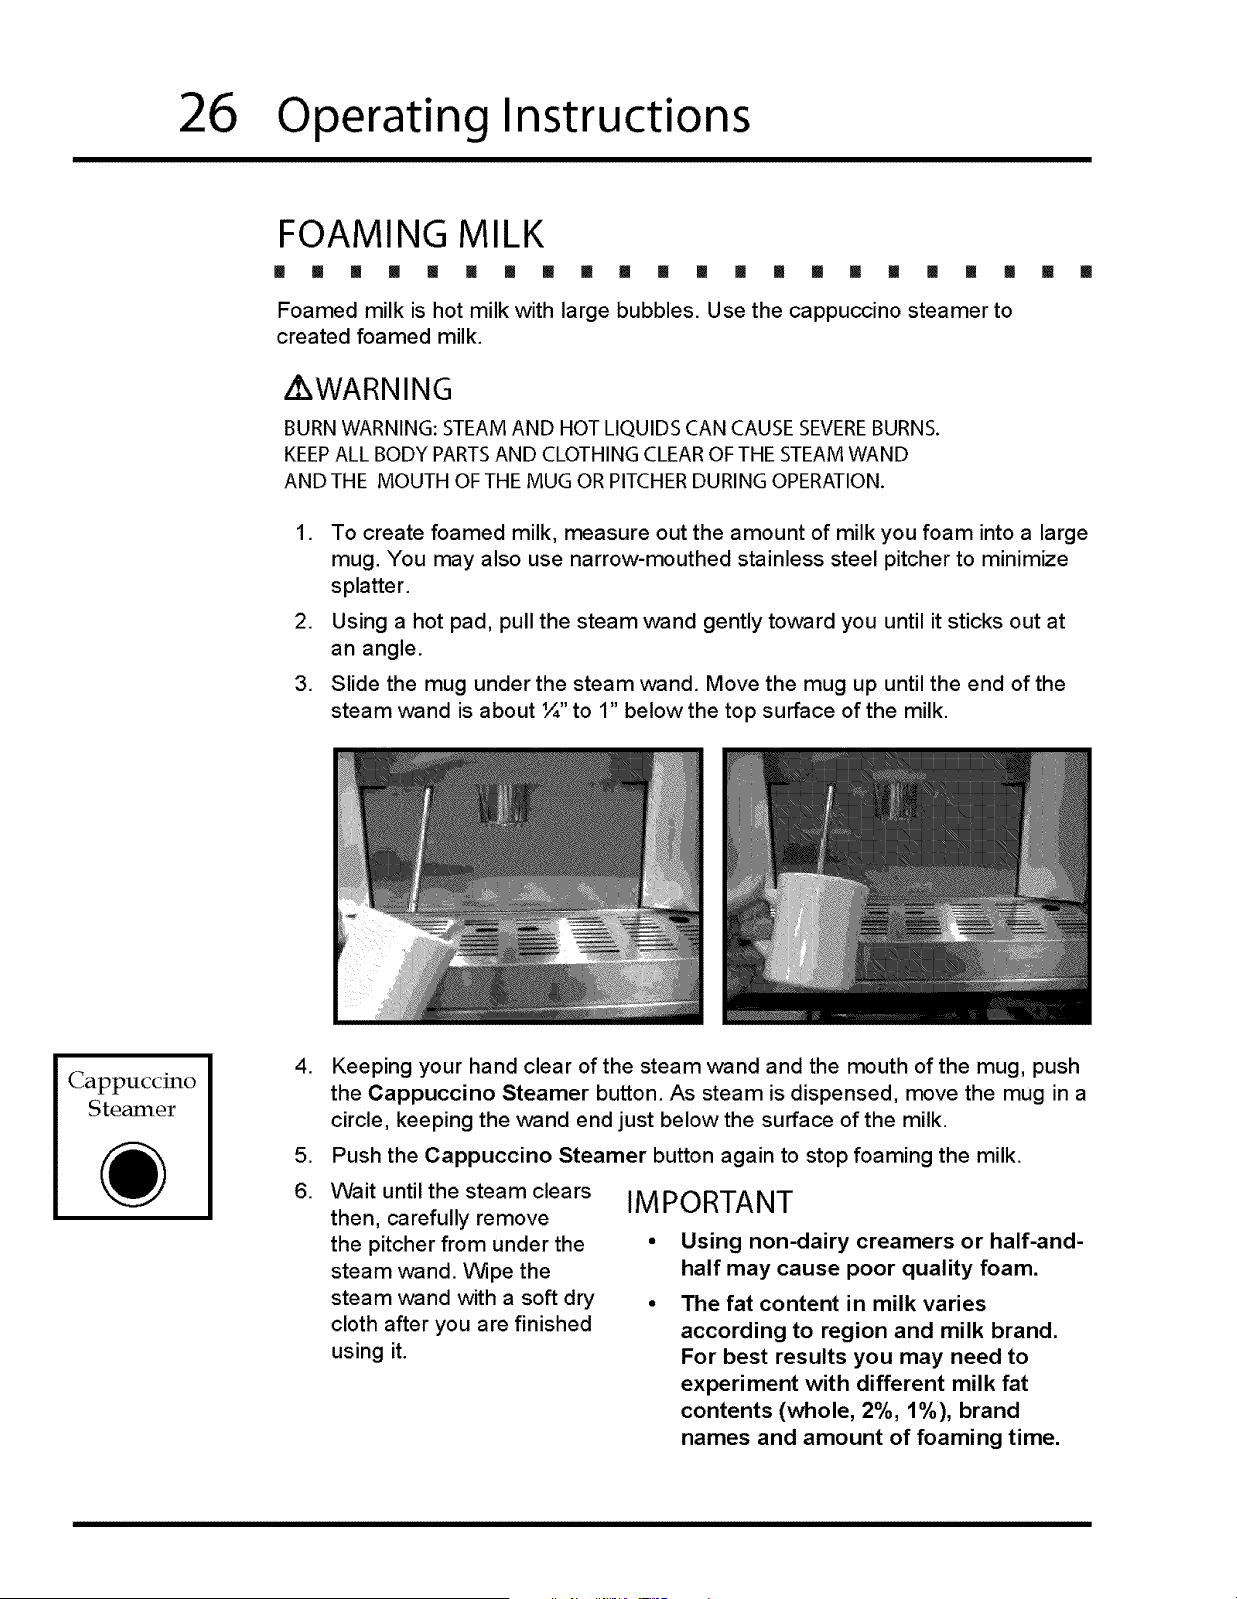
To create foamed milk, measure out the amount of milk you foam into a large
mug. You may also use narrow-mouthed stainless steel pitcher to minimize
splatter.
Using a hot pad, pull the steam wand gently toward you until it sticks out at
an angle.
Slide the mug under the steam wand. Move the mug up until the end of the
steam ,wand is about ¼" to 1" below the top surface of the milk.
Cappuccino
Steamer
,
.
6,
Keeping your hand clear of the steam wand and the mouth of the mug, push
the Cappuccino Steamer button. As steam is dispensed, move the mug in a
circle, keeping the wand end just below the surface of the milk.
Push the Cappuccino Steamer button again to stop foaming the milk.
Wait until the steam clears
then, carefully remove
the pitcher from under the
steam wand. Wipe the
steam wand with a soft dry
cloth after you are finished
using it.
IMPORTANT
Using non-dairy creamers or half-and-
half may cause poor quality foam.
The fat content in milk varies
according to region and milk brand.
For best results you may need to
experiment with different milk fat
contents (whole, 2%, 1%), brand
names and amount of foaming time.
Operating Instructions
27
OPENING THE FRONT PANEL
[] [] [] [] [] [] [] [] [] [] [] II []
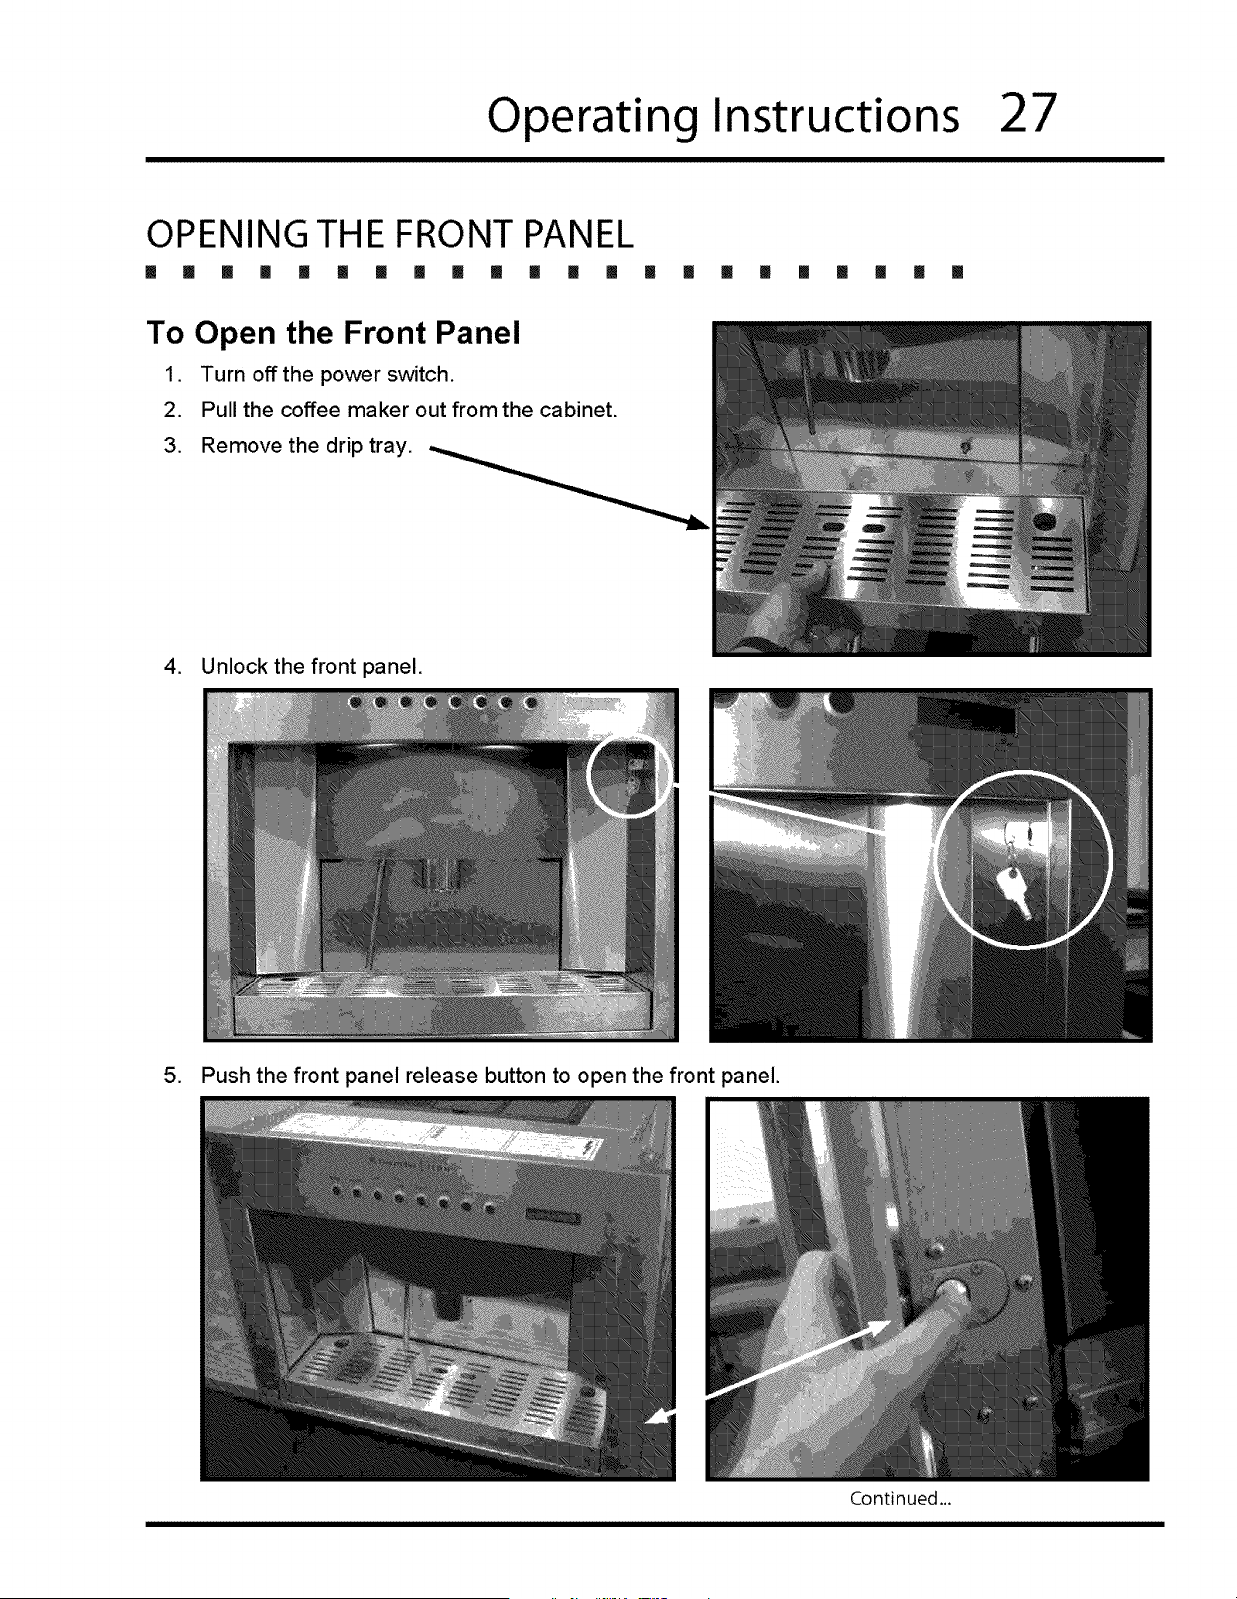
To Open the Front Panel
1. Turn off the power switch.
2. Pull the coffee maker out from the cabinet.
3. Remove the drip tray.
[] I [] [] [] [] [] [] []
4. Unlock the front panel.
5. Push the front panel release button to open the front panel.
Continued.,.
28
Operating Instructions
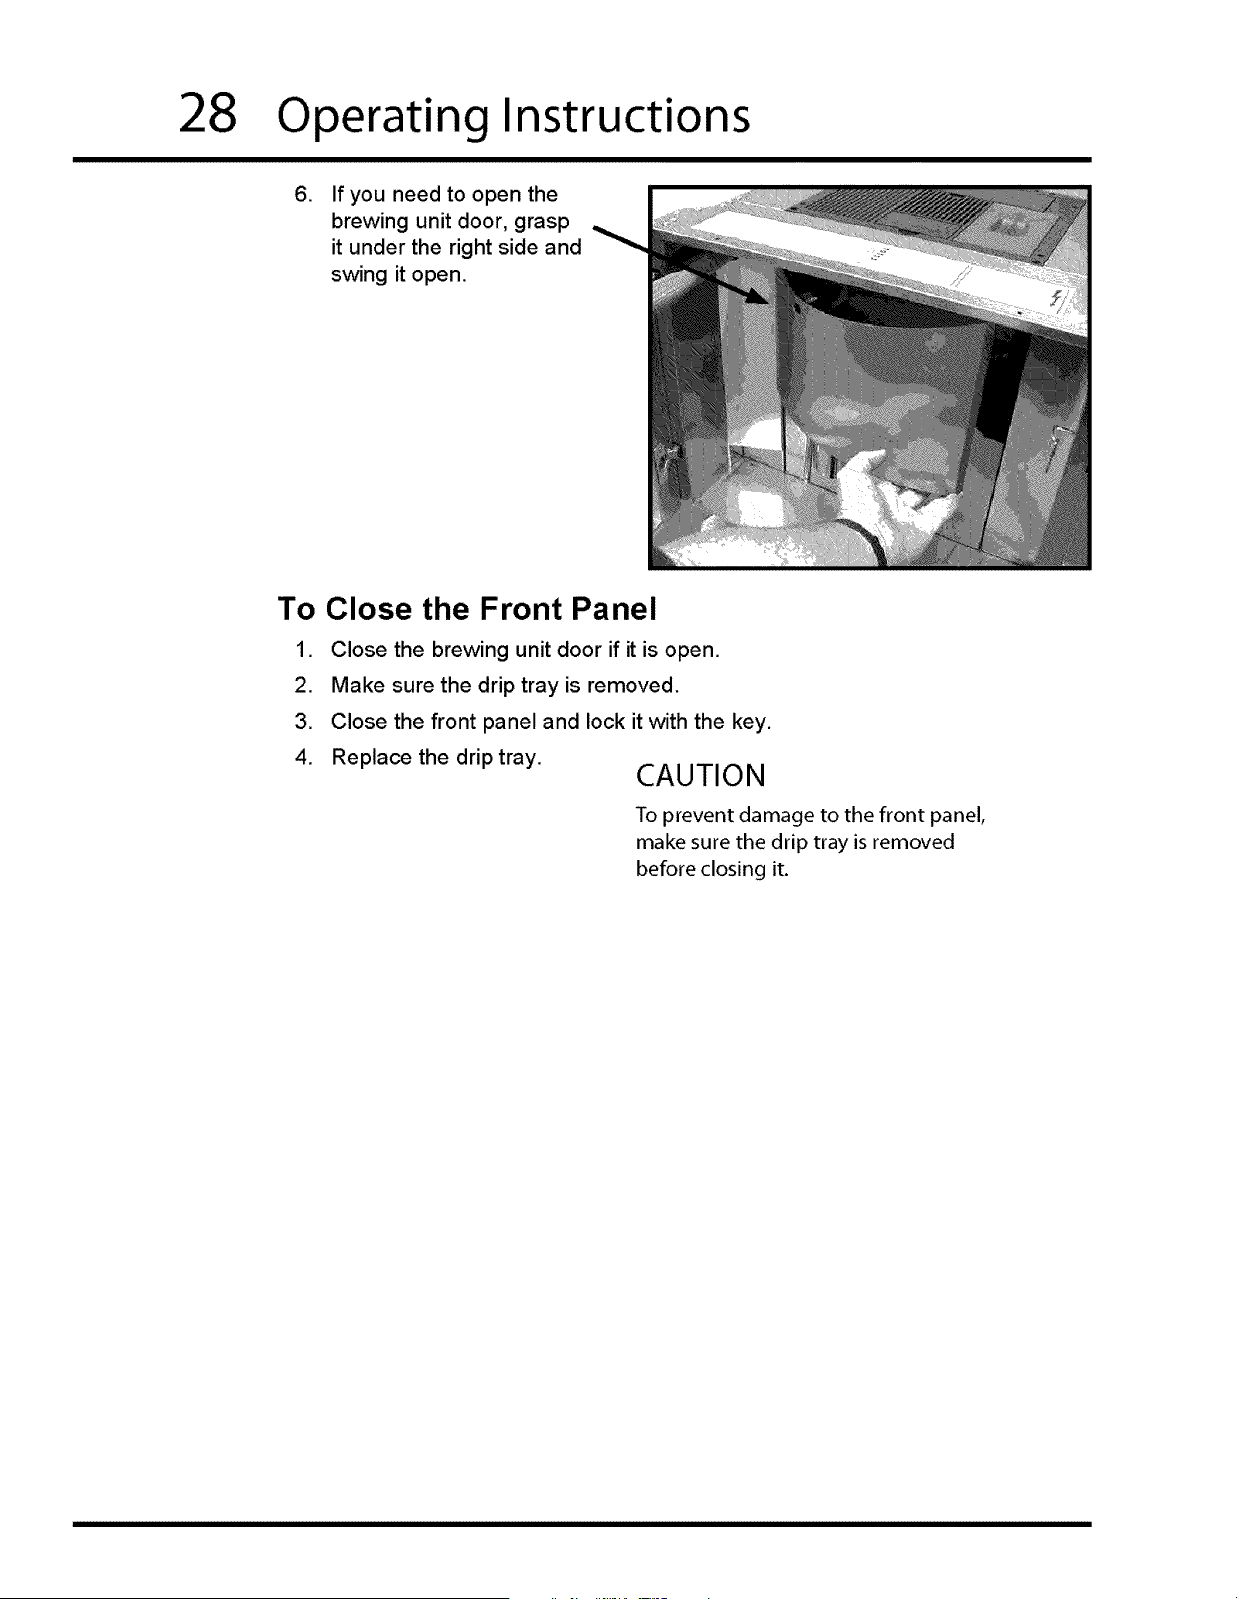
,
If you need to open the
brewing unit door, grasp
it under the right side and
swing it open.
To Close the Front Panel
1. Close the brewing unit door if it is open.
2. Make sure the drip tray is removed.
3. Close the front panel and lock it with the key.
4. Replace the drip tray.
CAUTION
To prevent damage to the front panel,
make sure the drip tray is removed
before closing it.
Care and Cleaning
29
I [] m I [] [] I I m m [] I [] i I m I I [] I ! []
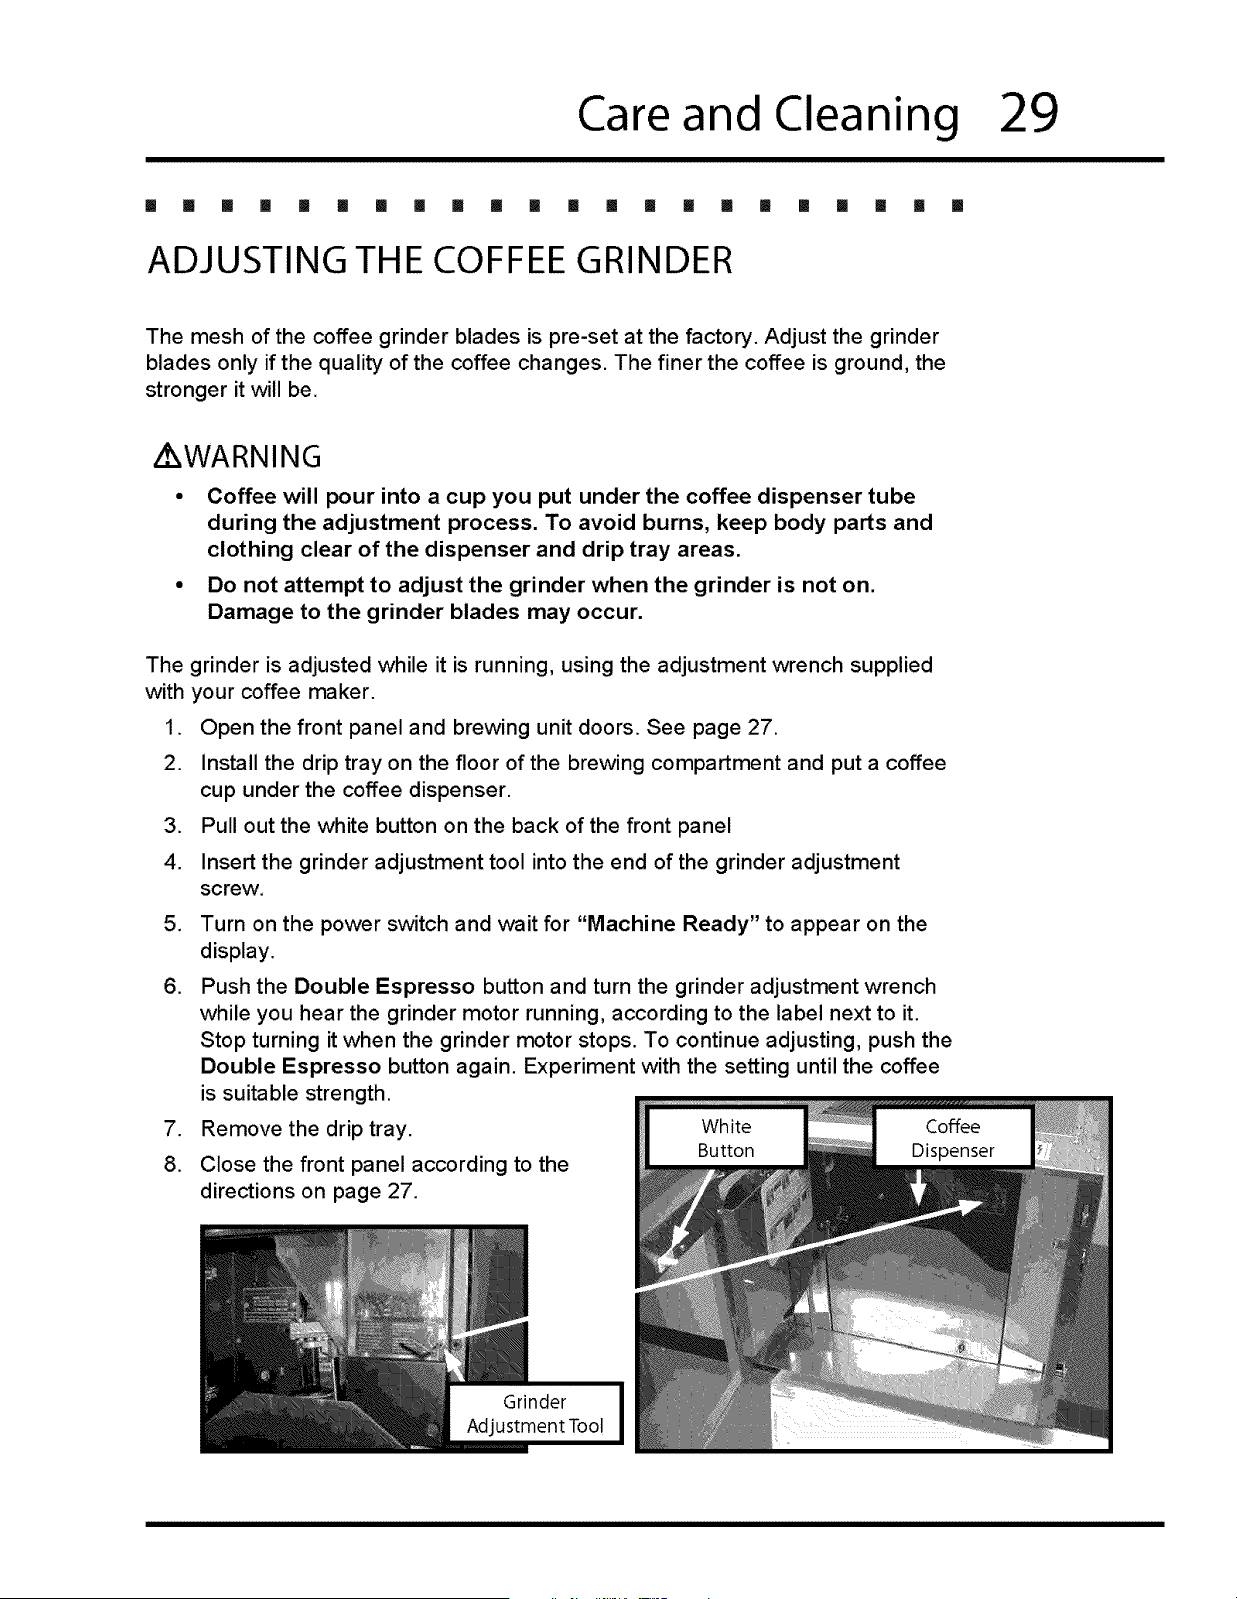
ADJUSTING THE COFFEE GRINDER
The mesh of the coffee grinder blades is pre-set at the factory. Adjust the grinder
blades only if the quality of the coffee changes. The finer the coffee is ground, the
stronger it will be.
WARNING
Coffee will pour into a cup you put under the coffee dispenser tube
during the adjustment process. To avoid burns, keep body parts and
clothing clear of the dispenser and drip tray areas.
Do not attempt to adjust the grinder when the grinder is not on.
Damage to the grinder blades may occur.
The grinder is adjusted while it is running, using the adjustment wrench supplied
with your coffee maker.
1. Open the front panel and brewing unit doors. See page 27.
2. Install the drip tray on the floor of the brewing compartment and put a coffee
cup under the coffee dispenser.
3. Pull out the white button on the back of the front panel
4. Insert the grinder adjustment tool into the end of the grinder adjustment
screw.
5,
,
.
8.
Turn on the power switch and wait for "Machine Ready" to appear on the
display.
Push the Double Espresso button and turn the grinder adjustment wrench
while you hear the grinder motor running, according to the label next to it.
Stop turning it when the grinder motor stops. To continue adjusting, push the
Double Espresso button again. Experiment with the setting until the coffee
is suitable strength.
Remove the drip tray.
Close the front panel according to the
directions on page 27.
30
Care&Cleaning
CLEANING SCHEDULE
[] [] [] [] [] [] [] [] [] [] [] [] [] [] [] [] [] [] [] [] [] []
Coffee Maker Cleaning Schedule
Water Tank Routine
Decalcification Service Call
(E24CM75GSS) Cleaning
Daily X
Every :30 cycles X
(or once a week)
Monthly X
Every 2500 cycles X
(Approx. 2 V2)/ears)
Approved Cleaners for Your Coffee Maker
Electrolux Part Number Description
ACCKIT-24 Kit containing Puly Detergent Tablets and
Decalcification powder
ACCTKITA-24 Decalcification kit (E24CM76GSS only)
Z WARNING
Clean the coffee maker thoroughly according to the Flushing Out the
Coffee Maker section on page 39 before operating it for the first time.
Clean and maintain the coffee maker regularly as instructed in the
table above. Clean it only in the manner indicated in this manual.
To prevent hazardous fumes and drink contamination, use only the
cleaning agents specified.
Do not use a steam or pressure cleaner to clean the coffee maker
or any part of it. Damage caused by cleaning the unit in this manner
could result in electric shock, fire, or explosion.
To avoid burns from hot surfaces, turn off the power switch and allow
the coffee maker to cool at least 30 minutes before cleaning.
On model E24CM75GSS, change the water in the tank daily to prevent
sickness due to bacteria growth.
When cleaning the mechanical parts of the coffee maker, exercise
care with hands and arms around the metal edges.
Use only water with a hardness level of four grains per gallon (gpg) or
less when cleaning or making drinks with your coffee maker.
Do not put any part of your coffee maker in a dishwasher. Many of the
parts are not dishwasher safe.
Care & Cleaning
31
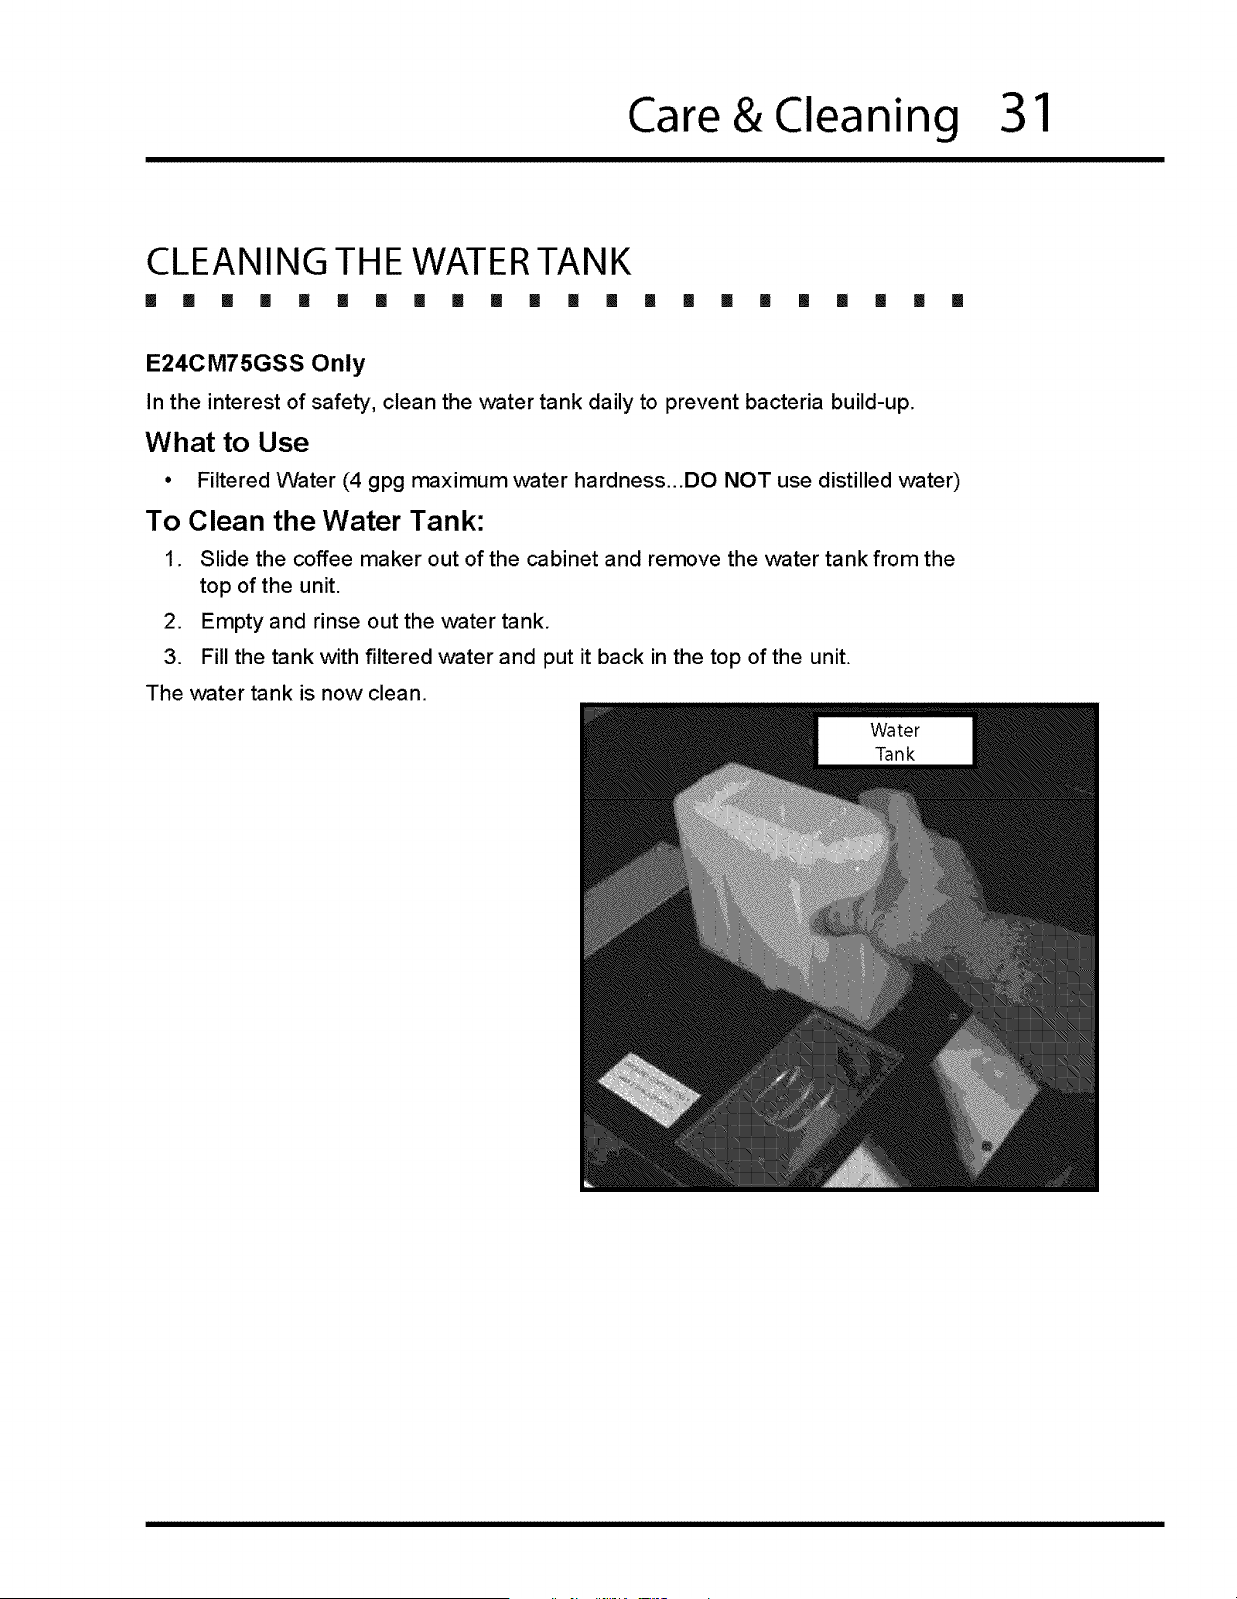
CLEANING THE WATERTANK
[] [] [] [] [] [] [] [] [] [] [] [] [] [] il !! II [] [] [] [] []
E24CM75GSS Only
In the interest of safety, clean the water tank daily to prevent bacteria build-up.
What to Use
• Filtered Water (4 gpg maximum water hardness...DO NOT use distilled water)
To Clean the Water Tank:
1. Slide the coffee maker out of the cabinet and remove the water tank from the
top of the unit.
2. Empty and rinse out the water tank.
3. Fill the tank with filtered water and put it back in the top of the unit.
The water tank is now clean.
32
Care&Cleaning
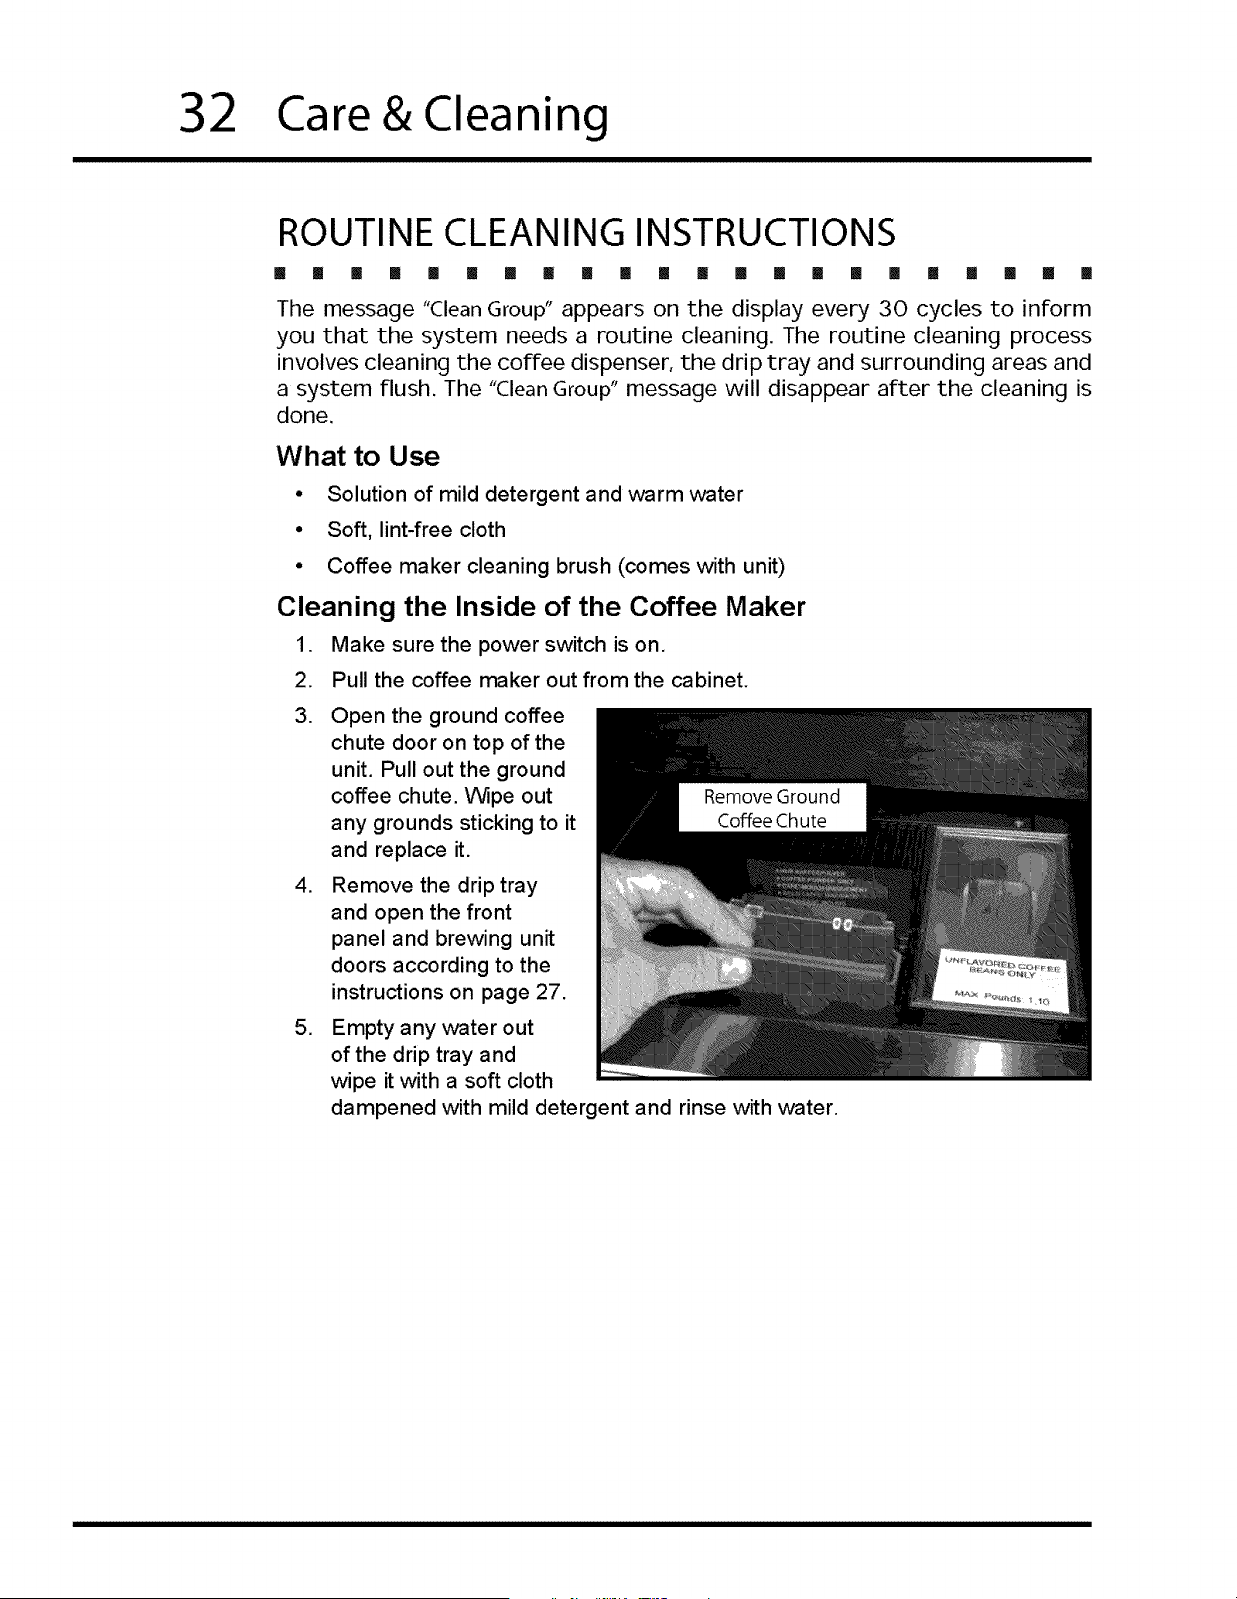
ROUTINE CLEANING INSTRUCTIONS
[] [] [] [] [] [] [] [] [] [] [] [] [] [] [] [] [] [] [] [] [] []
The message "Clean Group" appears on the display every 30 cycles to inform
you that the system needs a routine cleaning. The routine cleaning process
involves cleaning the coffee dispenser, the drip tray and surrounding areas and
a system flush. The "Clean Group" message will disappear after the cleaning is
done.
What to Use
• Solution of mild detergent and warm water
• Soft, lint-free cloth
° Coffee maker cleaning brush (comes with unit)
Cleaning the Inside of the Coffee Maker
1. Make sure the power switch is on.
2. Pull the coffee maker out from the cabinet.
.
.
.
Open the ground coffee
chute door on top of the
unit. Pull out the ground
coffee chute. Wipe out
any grounds sticking to it
and replace it.
Remove the drip tray
and open the front
panel and brewing unit
doors according to the
instructions on page 27.
Empty any water out
of the drip tray and
wipe it with a soft cloth
dampened with mild detergent and rinse with water.
Care & Cleaning
33
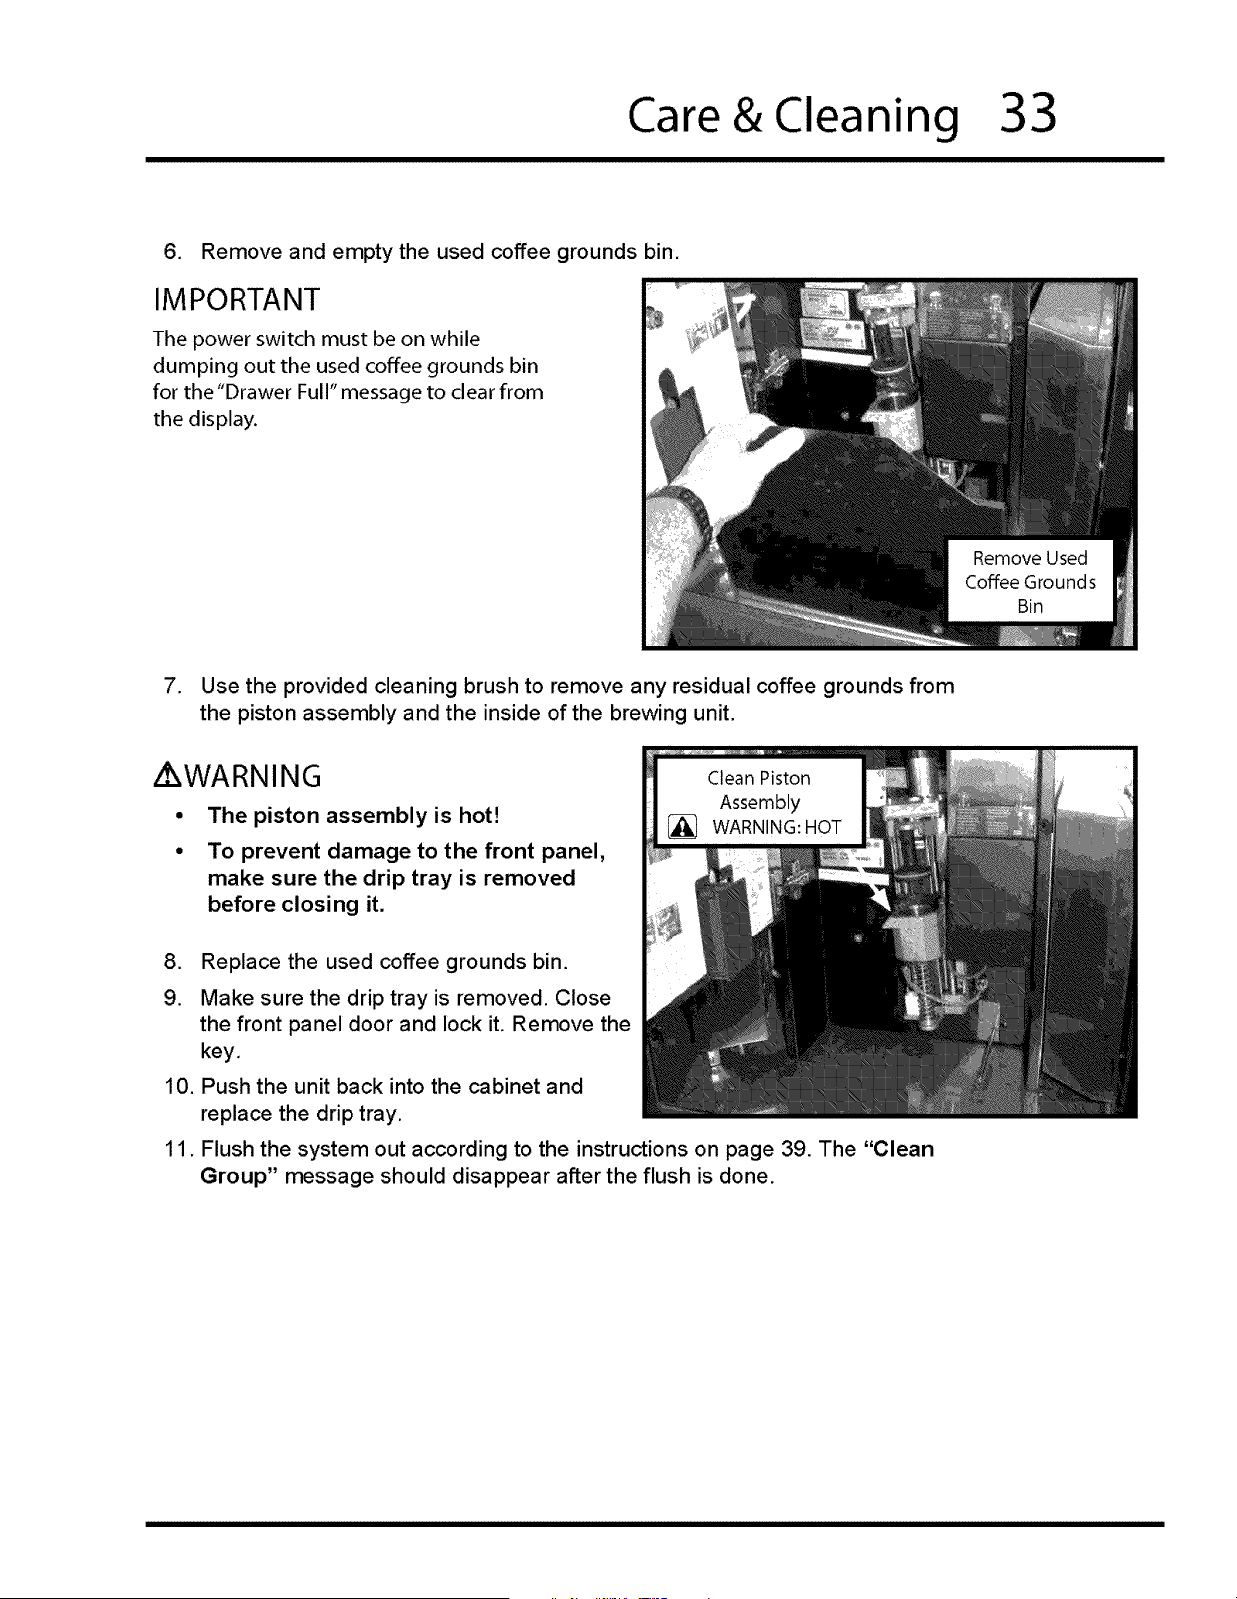
6. Remove and empty the used coffee grounds bin.
IMPORTANT
The power switch must be on while
dumping out the used coffee grounds bin
for the "Drawer Full" message to clear from
the display.
7. Use the provided cleaning brush to remove any residual coffee grounds from
the piston assembly and the inside of the brewing unit.
Z WARNING
The piston assembly is hot!
To prevent damage to the front panel,
make sure the drip tray is removed
before closing it.
,
9.
10.
11.
Replace the used coffee grounds bin.
Make sure the drip tray is removed. Close
the front panel door and lock it. Remove the
key,
Push the unit back into the cabinet and
replace the drip tray.
Flush the system out according to the instructions on page 39. The "Clean
Group" message should disappear after the flush is done.
34
Care&Cleaning
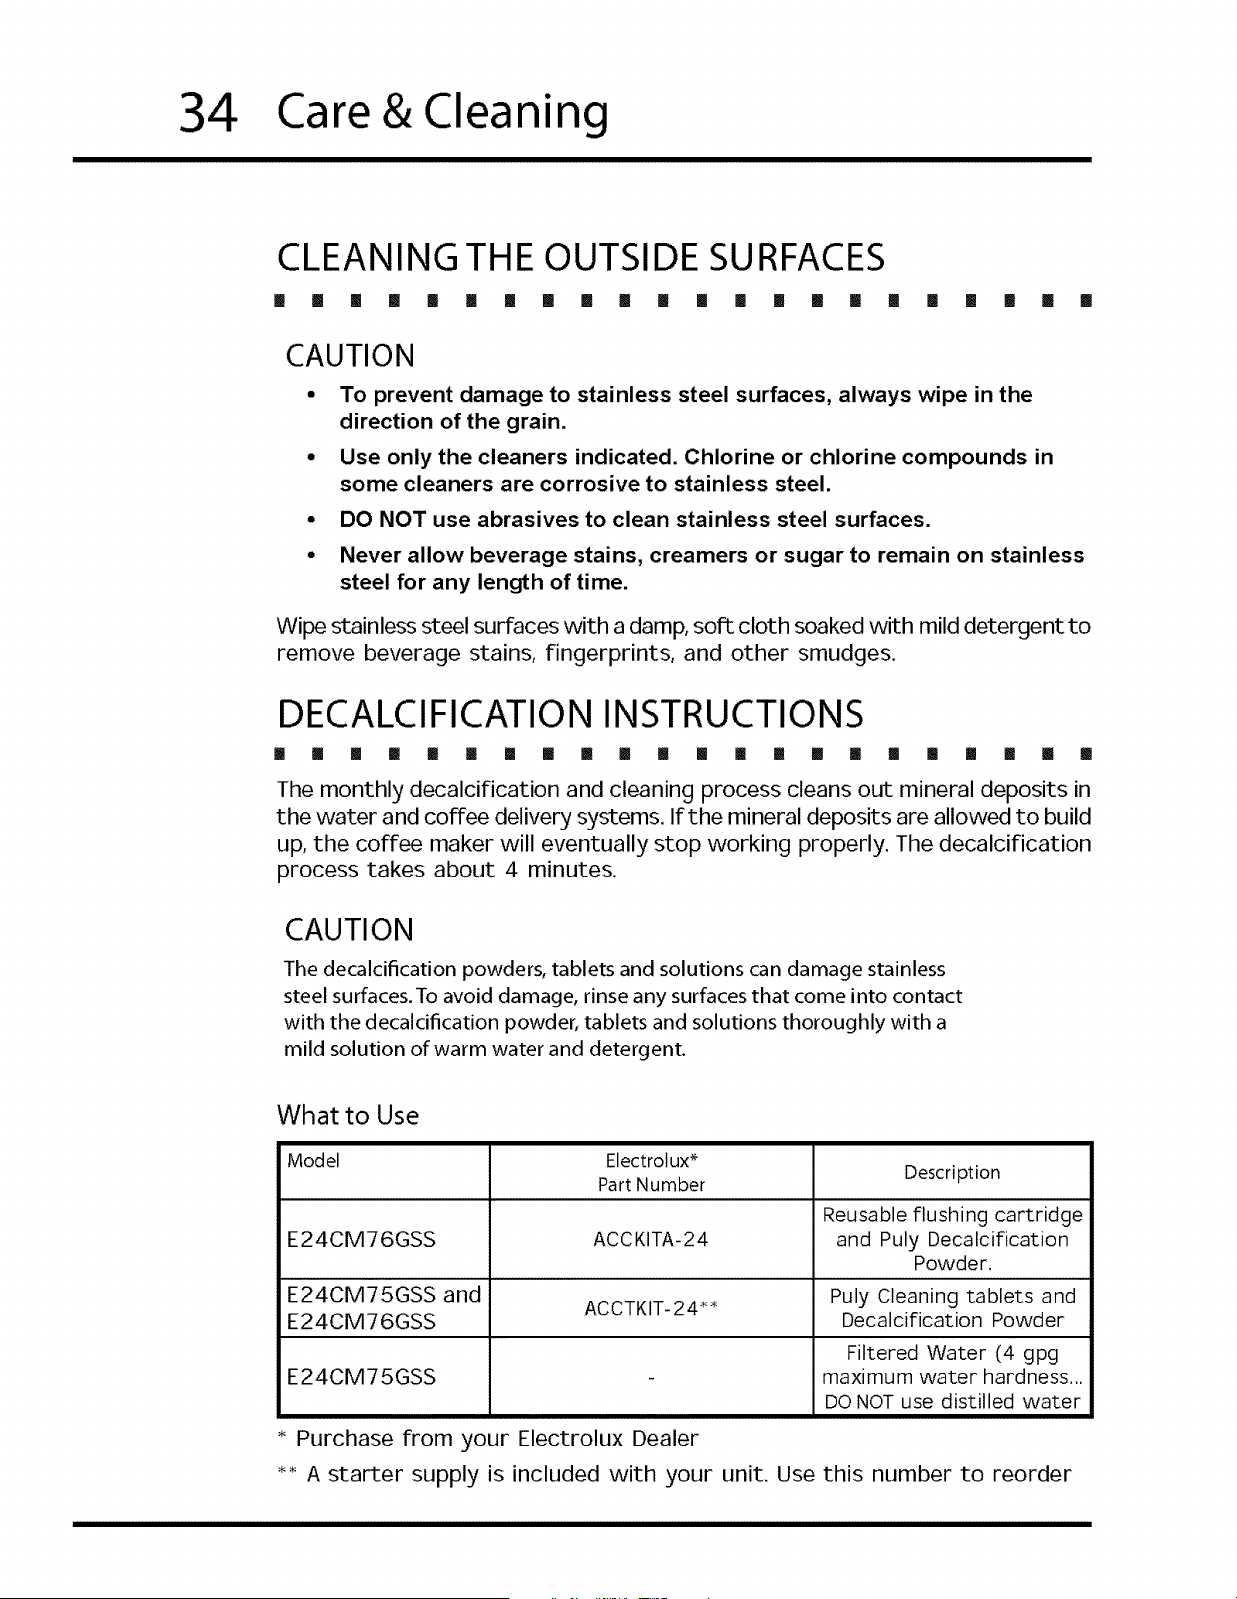
CLEANING THE OUTSIDE SURFACES
[] [] [] [] [] [] [] [] [] [] [] [] [] [] [] !! [] [] [] [] [] []
CAUTION
• To prevent damage to stainless steel surfaces, always wipe in the
direction of the grain.
° Use only the cleaners indicated. Chlorine or chlorine compounds in
some cleaners are corrosive to stainless steel.
• DO NOT use abrasives to clean stainless steel surfaces.
• Never allow beverage stains, creamers or sugar to remain on stainless
steel for any length of time.
Wipe stainless steel surfaces with a damp, soft cloth soaked with mild detergent to
remove beverage stains, fingerprints, and other smudges.
DECALCIFICATION INSTRUCTIONS
[] [] [] [] [] [] [] [] [] [] [] [] [] [] [] [] [] [] [] [] [] []
The monthly decalcification and cleaning process cleans out mineral deposits in
the water and coffee delivery systems. If the mineral deposits are allowed to build
up, the coffee maker will eventually stop working properly. The decalcification
process takes about 4 minutes.
CAUTION
The decalcification powders, tablets and solutions can damage stainless
steel surfaces. To avoid damage, rinse any surfaces that come into contact
with the decalcification powder, tablets and solutions thoroughly with a
mild solution of warm water and detergent.
What to Use
Model Electrolux _
Part Number Description
Reusable flushing cartridge
E24CM76GSS ACCKITA-24 and Puly Decalcification
Powder.
E24CM75GSS and ACCTKIT-24** Puly Cleaning tablets and
E24CM76GSS Decalcification Powder
Filtered Water (4 gpg
E24CM75GSS - maximum water hardness...
DO NOT use distilled water
* Purchase from your Electrolux Dealer
*_ A starter supply is included with your unit. Use this number to reorder
Care & Cleaning
35
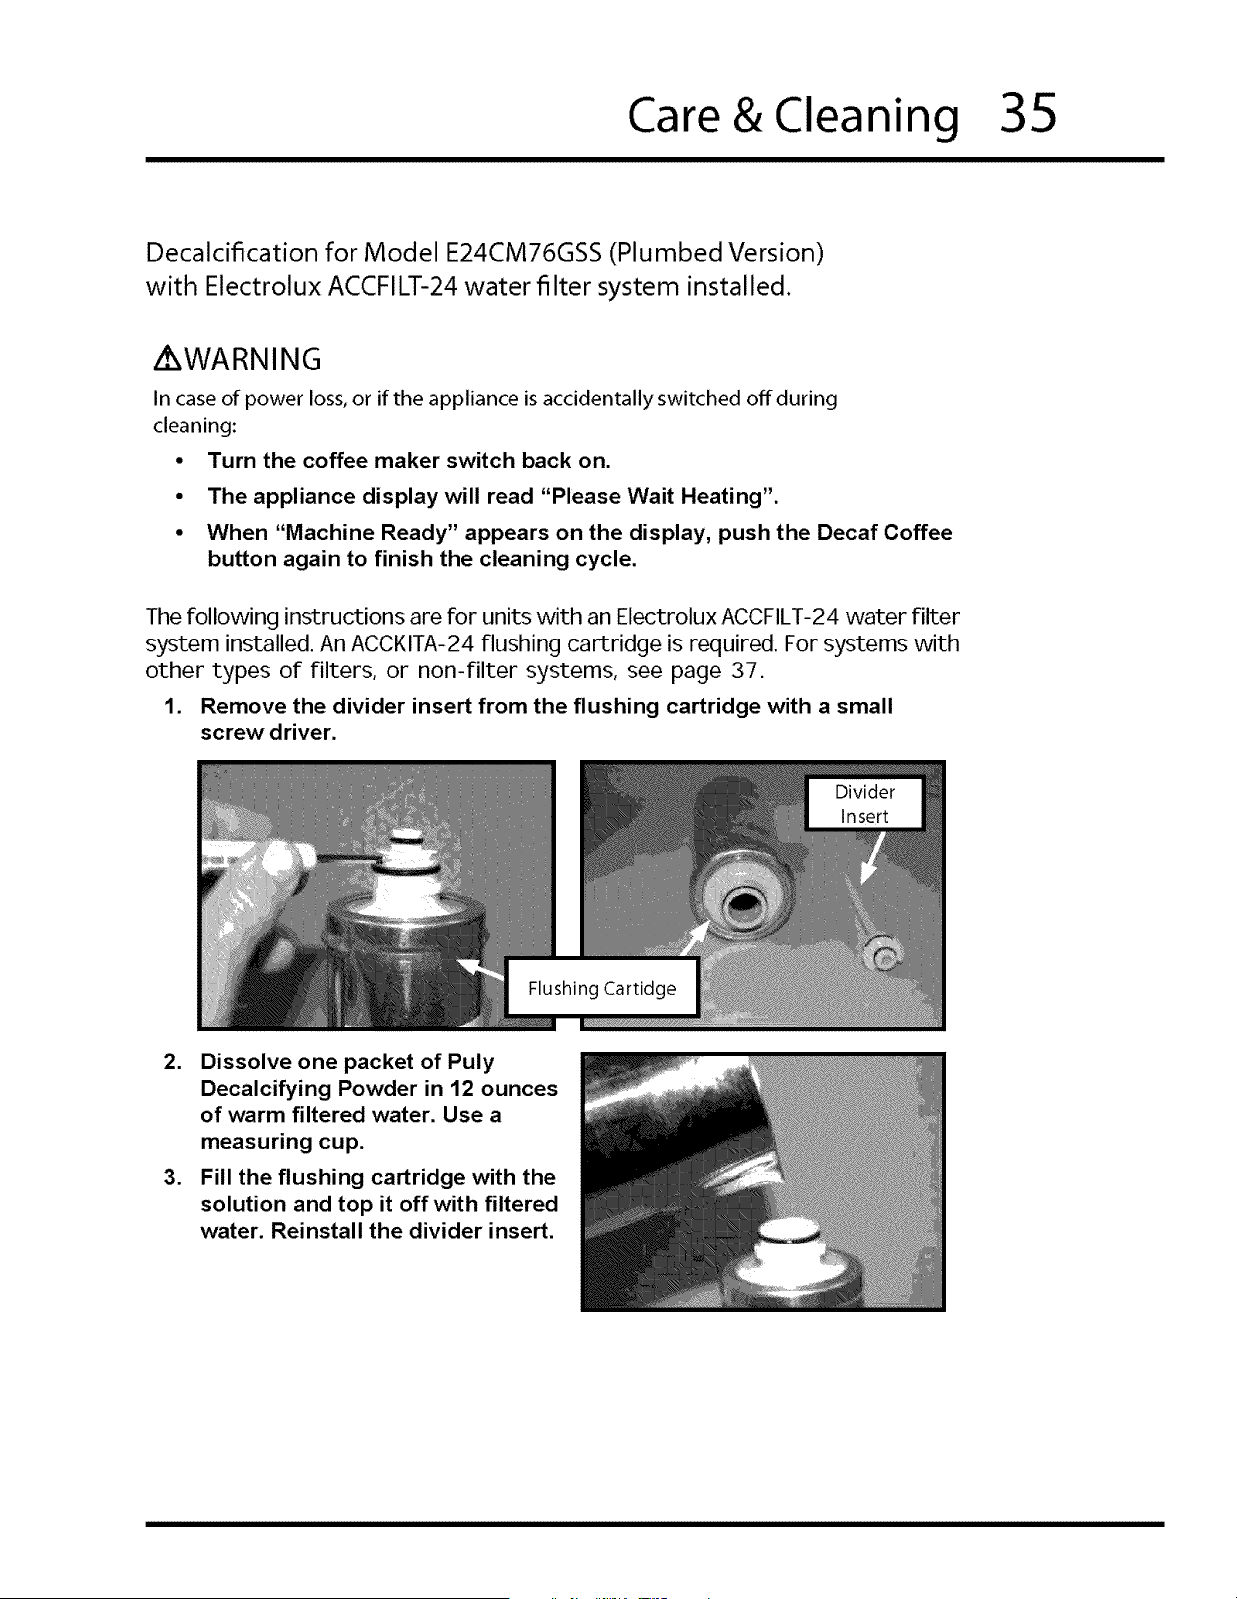
Decalcification for Model E24CM76GSS (Plumbed Version)
with Electrolux ACCFILT-24 water filter system installed.
iKWARNING
In case of power loss, or if the appliance is accidentally switched off during
cleaning:
• Turn the coffee maker switch back on.
• The appliance display will read "Please Wait Heating".
• When "Machine Ready" appears on the display, push the Decaf Coffee
button again to finish the cleaning cycle.
The following instructions are for units with an Electrolux ACCFILT-24 water filter
system installed. An ACCKITA-24 flushing cartridge is required. For systems with
other types of filters, or non-filter systems, see page 37.
1. Remove the divider insert from the flushing cartridge with a small
screw driver.
.
.
Dissolve one packet of Puly
Decalcifying Powder in 12 ounces
of warm filtered water. Use a
measuring cup.
Fill the flushing cartridge with the
solution and top it off with filtered
water. Reinstall the divider insert.
36
Operating Instructions
Hot
Water
Decaf
Coffee
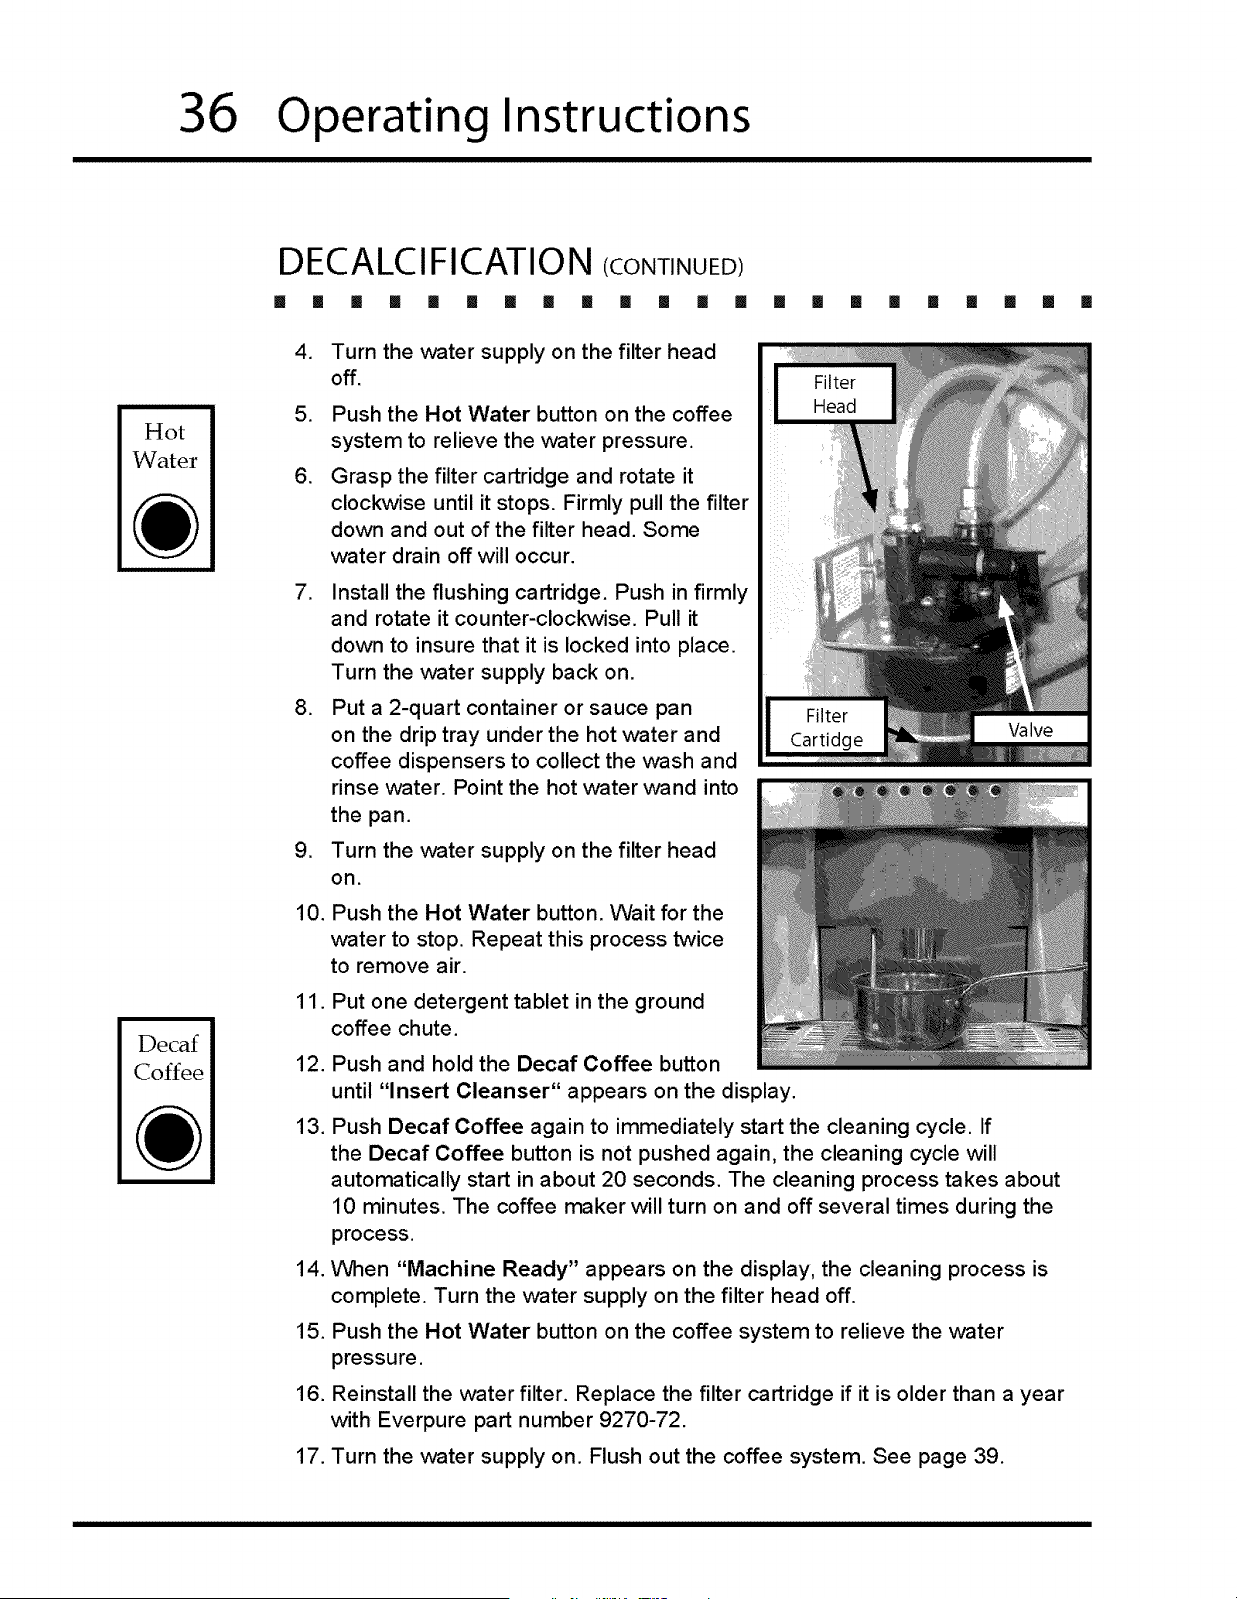
DECALCIFICATION (CONTINUED)
[] [] [] [] [] [] [] [] [] [] [] [] [] [] [] [] [] [] [] [] []
.
.
.
.
.
.
10.
11.
12.
13.
14.
15.
16.
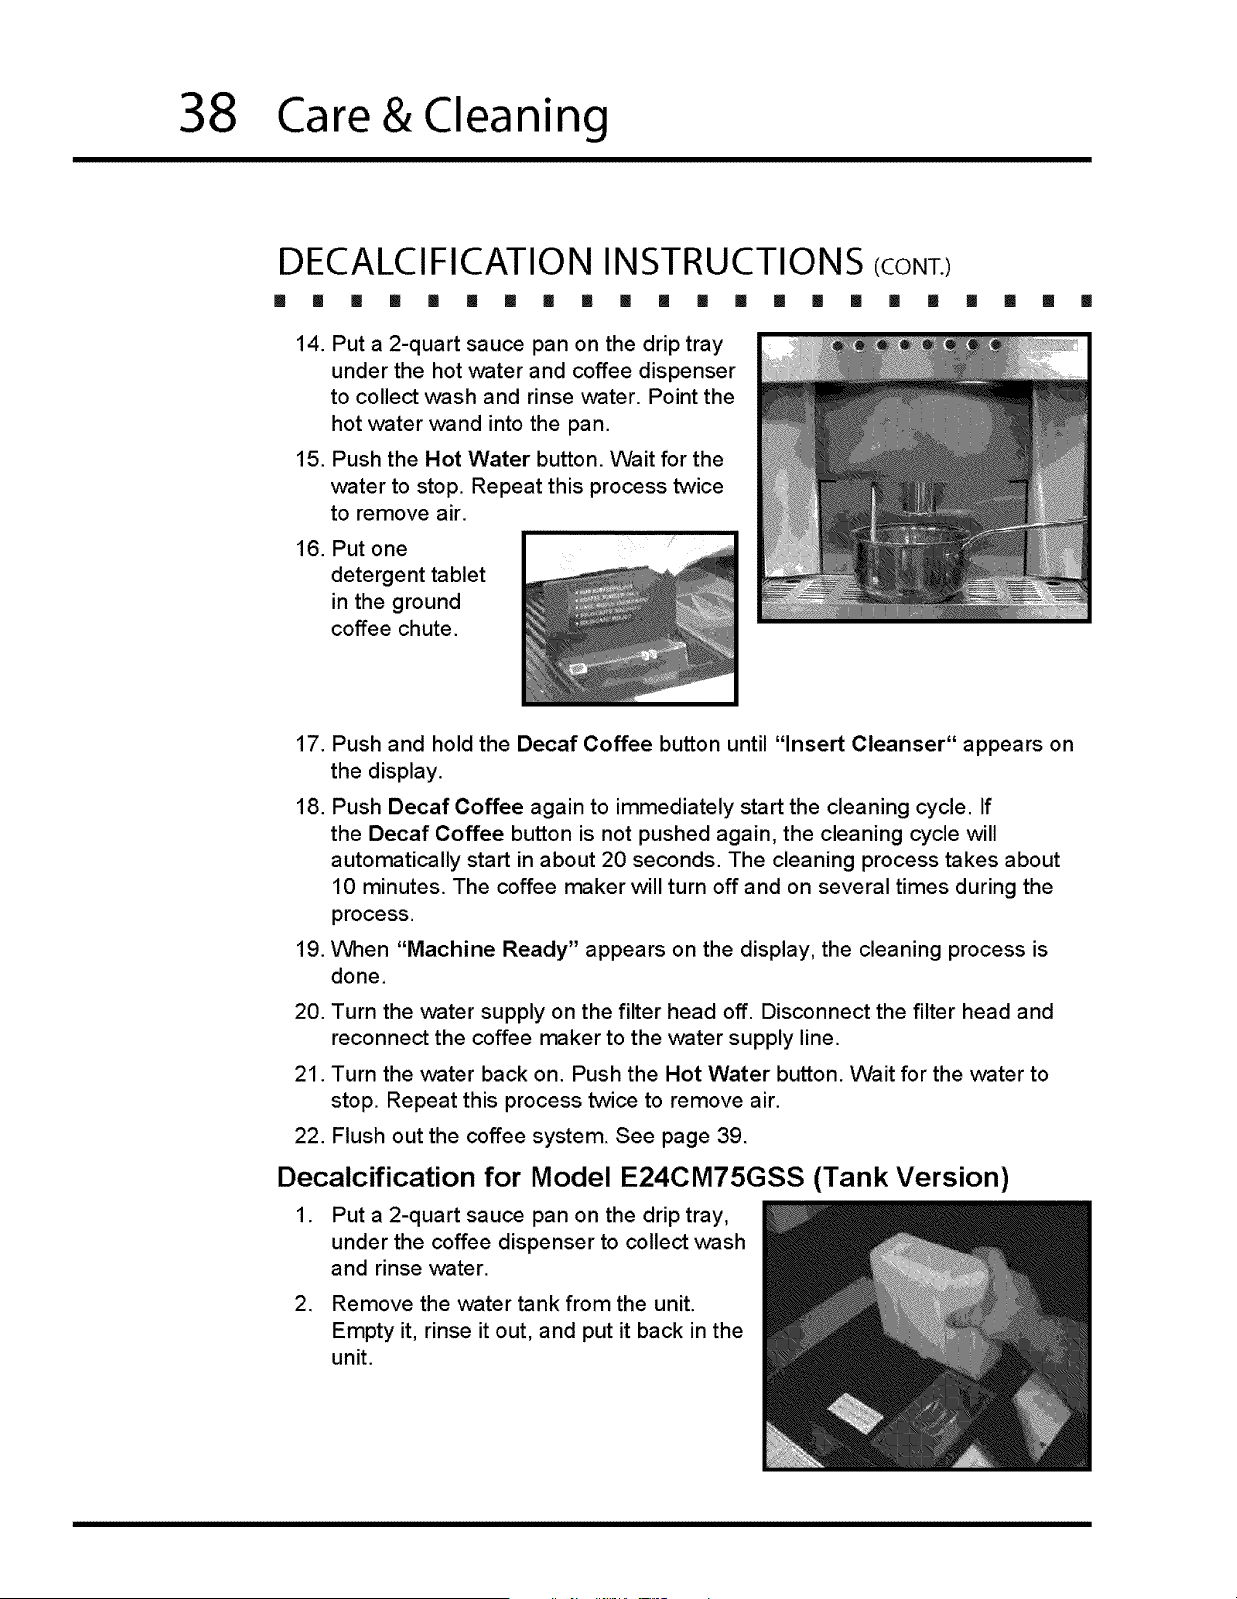
Turn the v_ater supply on the filter head
off.
Push the Hot Water button on the coffee
system to relieve the water pressure.
Grasp the filter cartridge and rotate it
clockwise until it stops. Firmly pull the filter
down and out of the filter head. Some
water drain off will occur.
Install the flushing cartridge. Push in firmly
and rotate it counter-clockwise. Pull it
down to insure that it is locked into place.
Turn the water supply back on.
Put a 2-quart container or sauce pan
on the drip tray under the hot water and
coffee dispensers to collect the wash and
rinse water. Point the hot water wand into
the pan.
Turn the water supply on the filter head
on.
Push the Hot Water button. Wait for the
water to stop. Repeat this process twice
to remove air.
Put one detergent tablet in the ground
coffee chute.
Push and hold the Decaf Coffee button
until "Insert Cleanser" appears on the display.
Push Decaf Coffee again to immediately start the cleaning cycle. If
the Decaf Coffee button is not pushed again, the cleaning cycle will
automatically start in about 20 seconds. The cleaning process takes about
10 minutes. The coffee maker will turn on and off several times during the
process.
When "Machine Ready" appears on the display, the cleaning process is
complete. Turn the water supply on the filter head off.
Push the Hot Water button on the coffee system to relieve the water
pressure.
Reinstall the water filter. Replace the filter cartridge if it is older than a year
with Everpure part number 9270-72.
17. Turn the water supply on. Flush out the coffee system. See page 39.
[]
Care & Cleaning
37
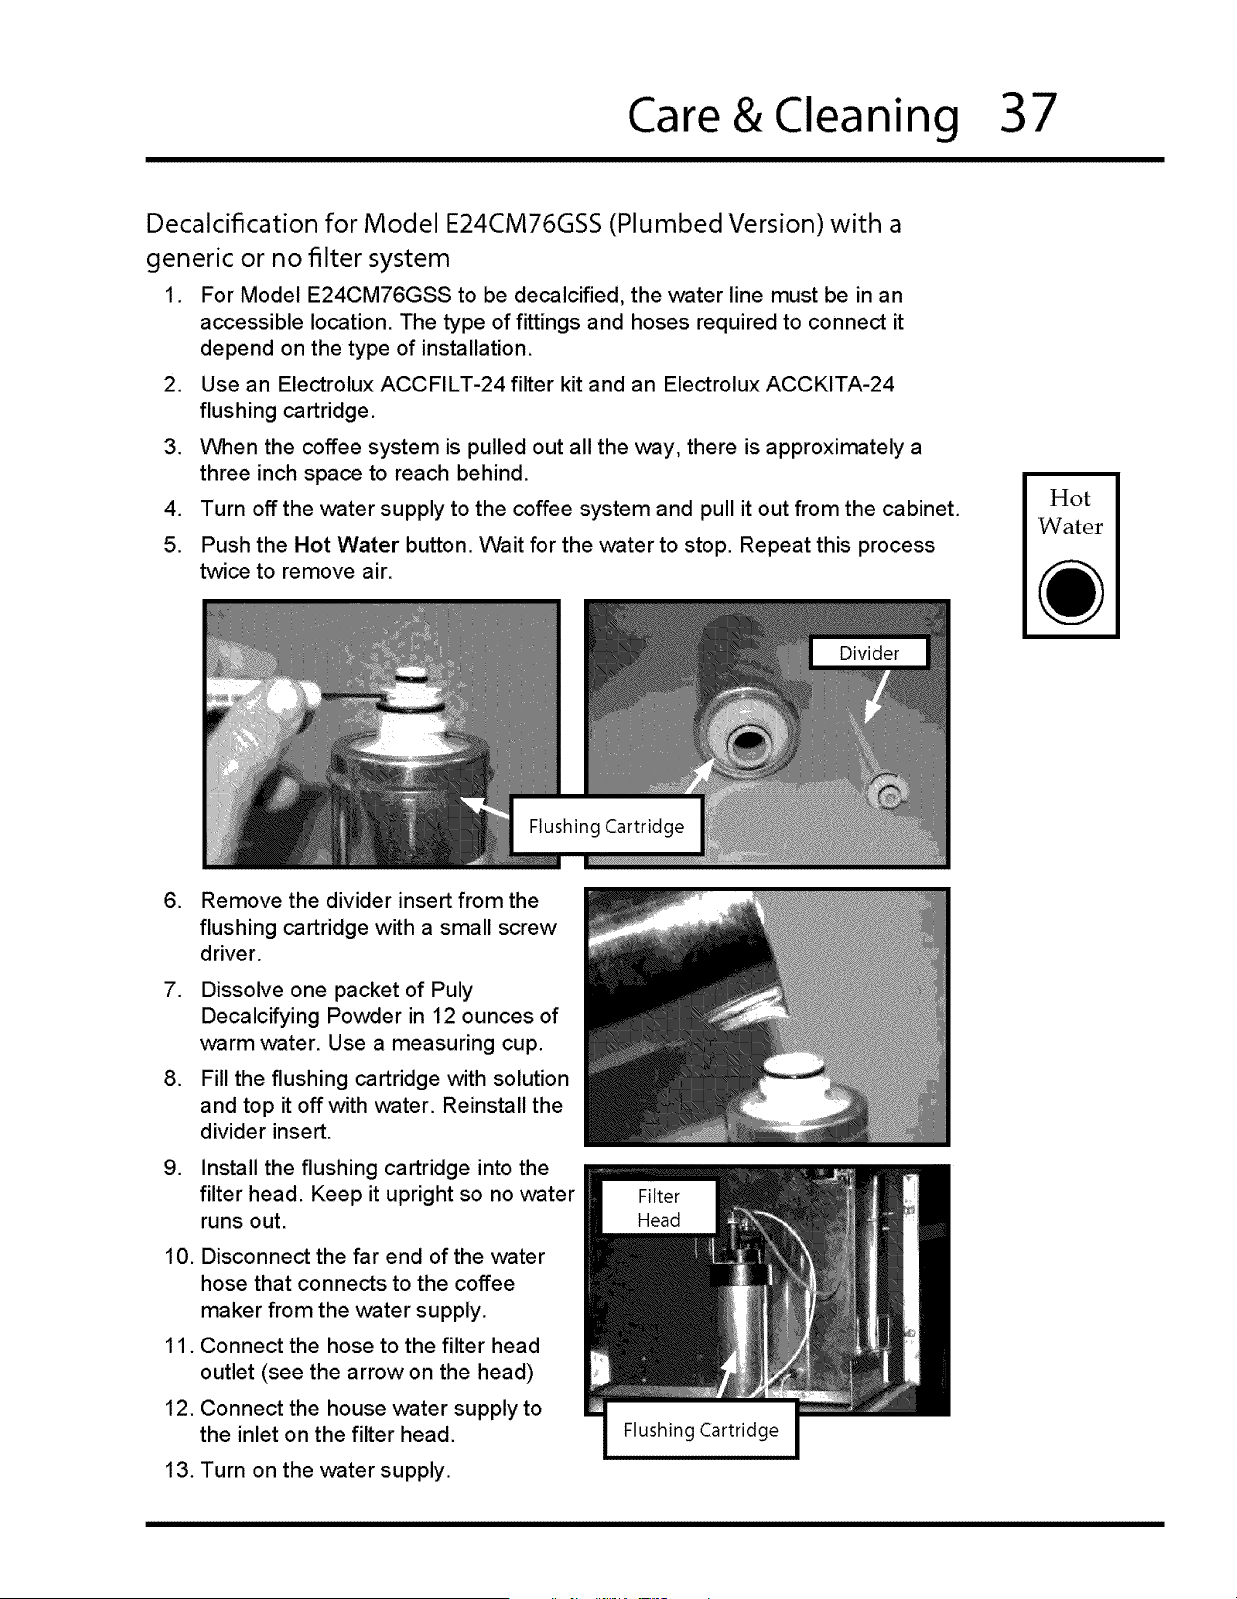
Decalcification for Model E24CM76GSS (Plumbed Version) with a
generic or no filter system
1. For Model E24CM76GSS to be decalcified, the water line must be in an
accessible location. The type of fittings and hoses required to connect it
depend on the type of installation.
2. Use an Electrolux ACCFILT-24 filter kit and an Electrolux ACCKITA-24
flushing cartridge.
3. When the coffee system is pulled out all the way, there is approximately a
three inch space to reach behind.
4. Turn off the water supply to the coffee system and pull it out from the cabinet.
5. Push the Hot Water button. Wait for the water to stop. Repeat this process
twice to remove air.
Hot
Water
.
,
.
.
Remove the divider insert from the
flushing cartridge with a small screw
driver.
Dissolve one packet of Puly
Decalcifying Powder in 12 ounces of
warm water. Use a measuring cup.
Fill the flushing cartridge with solution
and top it off with water. Reinstall the
divider insert.
Install the flushing cartridge into the
filter head. Keep it upright so no water
runs out.
10. Disconnect the far end of the water
hose that connects to the coffee
maker from the water supply.
11. Connect the hose to the filter head
outlet (see the arrow on the head)
12. Connect the house water supply to
the inlet on the filter head.
13. Turn on the water supply.
38
Care&Cleaning
DECALCIFICATION INSTRUCTIONS/CONr.l
[] [] [] [] [] [] [] [] [] [] [] [] [] [] [] [] [] []
14.
15.
16.
Put a 2-quart sauce pan on the drip tray
under the hot water and coffee dispenser
to collect wash and rinse water. Point the
hot water wand into the pan.
Push the Hot Water button. Wait for the
water to stop. Repeat this process twice
to remove air.
Put one
detergent tablet
in the ground
coffee chute.
II [] [] []
17.
18.
19.
Push and hold the Decaf Coffee button until "Insert Cleanser" appears on
the display.
Push Decaf Coffee again to immediately start the cleaning cycle. If
the Decaf Coffee button is not pushed again, the cleaning cycle will
automatically start in about 20 seconds. The cleaning process takes about
10 minutes. The coffee maker will turn off and on several times during the
process.
When "Machine Ready" appears on the display, the cleaning process is
done,
20. Turn the water supply on the filter head off. Disconnect the filter head and
reconnect the coffee maker to the water supply line.
21. Turn the water back on. Push the Hot Water button. Wait for the water to
stop. Repeat this process twice to remove air.
22. Flush out the coffee system. See page 39.
Decalcification for Model E24CM75GSS (Tank Version)
1. Put a 2-quart sauce pan on the drip tray,
under the coffee dispenser to collect wash
and rinse water.
2. Remove the water tank from the unit.
Empty it, rinse it out, and put it back in the
unit.
Care & Cleaning
39
,
.
5.
6.
.
.
Pour a packet of Puly Decalcifying Powder into a 16 ounce bottle. Fill the
bottle with warm filtered water and shake well until the powder is dissolved.
Pour the mixture into the water tank.
Fill the tank with filtered water until it is half full.
Push and hold the Decaf Coffee button until "Insert Cleanser" appears on
the display.
Push Decaf Coffee again to immediately start the cleaning cycle. If
the Decaf Coffee button is not pushed again, the cleaning cycle will
automatically start in about 20 seconds. The cleaning process takes about
10 minutes. The coffee maker will turn off and on several times during the
process.
V'_en "Machine Ready" appears on the display, the cleaning process is
done.
9. Push the Hot Water button to clean out the water dispenser. Wait until water
stops coming out of the dispenser.
10. Repeat step 9, four more times.
11. Flush the residual detergent out of the system (see below).
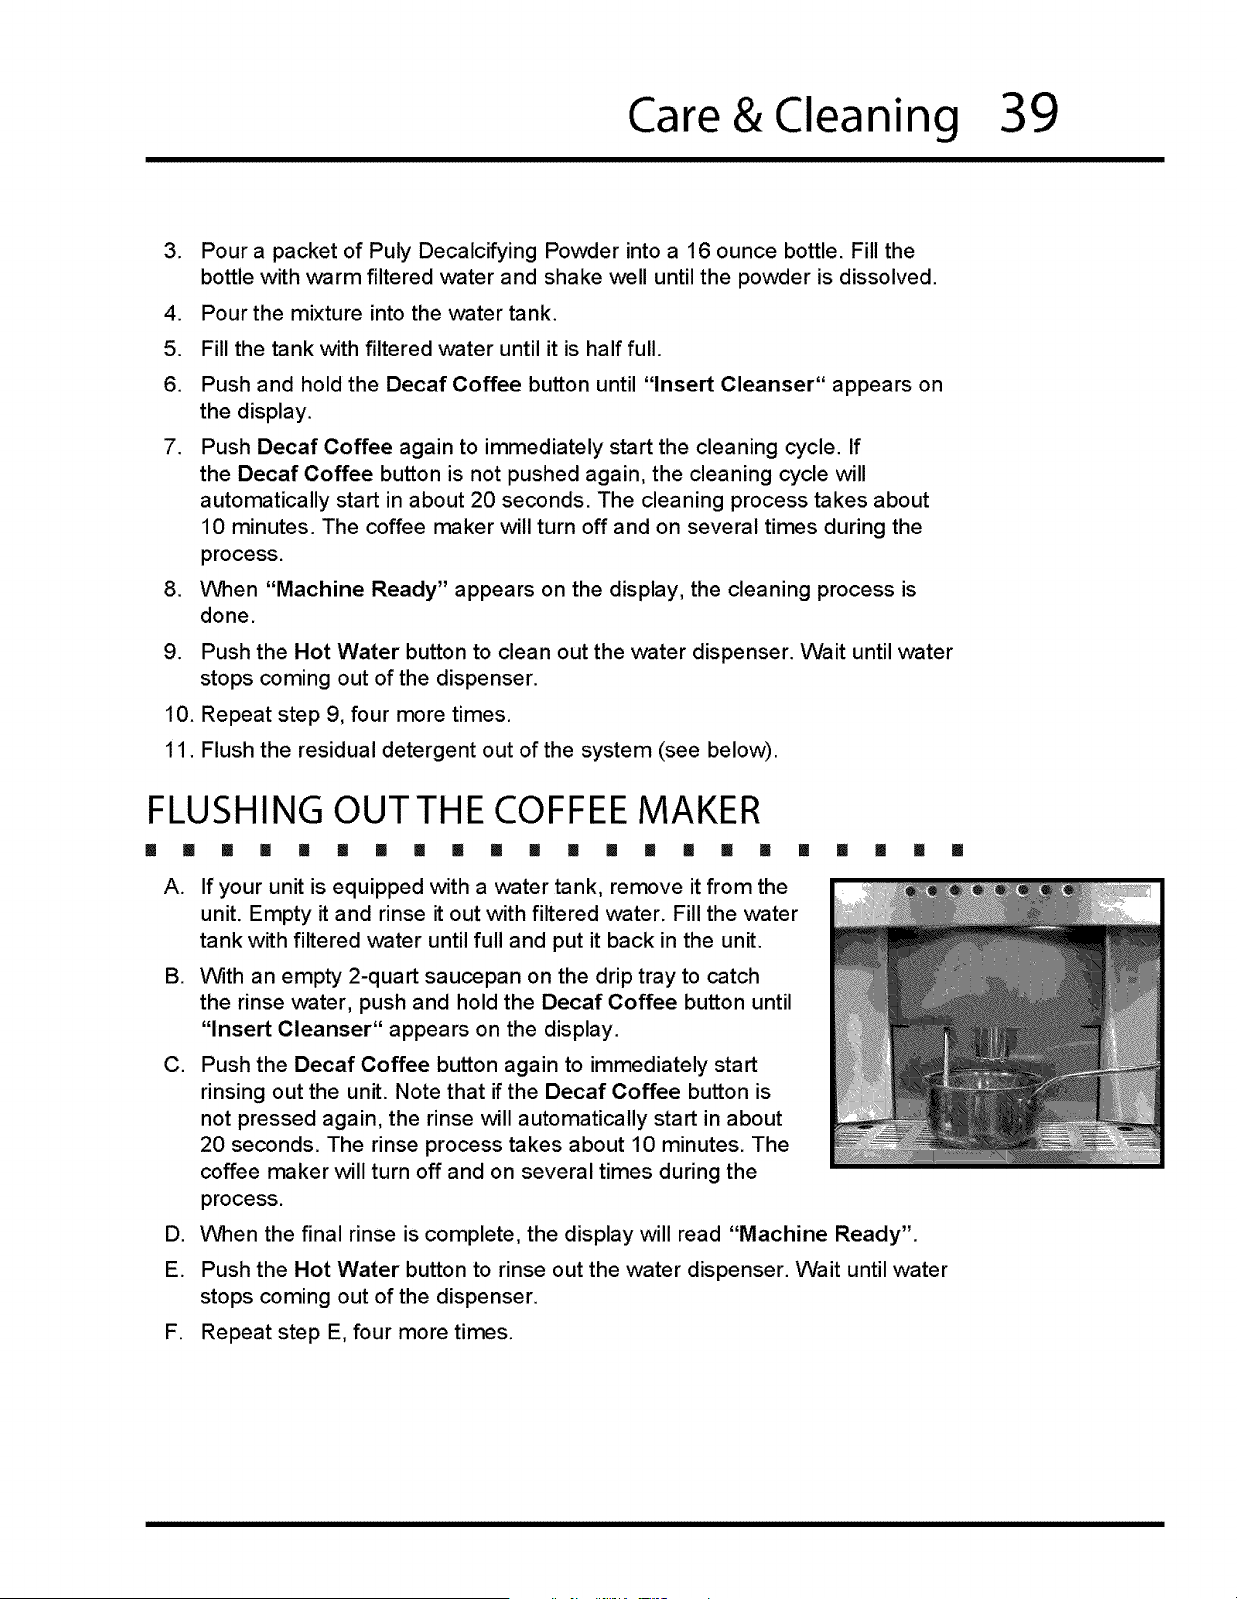
FLUSHING OUT THE COFFEE MAKER
[] Iii [] [] [] [] [] [] [] [] [] [] [] [] [] [] [] [] [] [] [] III
A.
g.
C,
D.
E.
If your unit is equipped with a water tank, remove it from the
unit. Empty it and rinse it out with filtered water. Fill the vv-ater
tank with filtered ,water until full and put it back in the unit.
With an empty 2-quart saucepan on the drip tray to catch
the rinse water, push and hold the Decaf Coffee button until
"Insert Cleanser" appears on the display.
Push the Decaf Coffee button again to immediately start
rinsing out the unit. Note that if the Decaf Coffee button is
not pressed again, the rinse will automatically start in about
20 seconds. The rinse process takes about 10 minutes. The
coffee maker will turn off and on several times during the
process.
V'_en the final rinse is complete, the display will read "Machine Ready".
Push the Hot Water button to rinse out the water dispenser. Wait until water
stops coming out of the dispenser.
F. Repeat step E, four more times.
4O Solutions to Common Problems
Check these points to help save time and money.
Problem
Possible Solution
Nothing works. • Connect coffee maker power plug to dedicated,
grounded power receptacle.
• Turn power on at junction box. Check for tripped
circuit breaker or blown fuse.
• Turn on power switch. See Operating Instructions
section.
Lights don't work.
• Power outage. Contact power company.
Loud buzzing noise. No
coffee or water comes out of
° See Nothing works above.
° Turn on light switch.
• Lights burned out. Call for service.
nozzle.
• Fill water tank (Model E24CM75GSS).
° Check to make sure the water supply is connected
and turned on (Model E24CM76GSS).
• No coffee loaded in the ground coffee chute when
Decal button is pushed. Turn on power switch first
then, pour ground coffee in ground coffee chute.
Grinding noise while coffee
is being made.
• Coffee maker is grinding coffee beans during coffee
brewing..normal sound.
Whining noise when power
switch is first turned on or
door is opened and closed.
• Tamper motor initializing..normal sound.
Water comes out with no
coffee or is pale brown. Loud
humming noise.
Coffee too strong or too
weak.
° Coffee beans jammed in the dispenser. Turn off
power, remove all coffee beans from coffee bean
container. Check for beans that are jammed in the
dispenser and remove. Replace beans in the coffee
bean container and try brewing again.
° Wrong type of coffee beans used (flavored, un-
roasted or partial coffee beans). Call for service if
necessary.
° Use stronger type of coffee beans.
° Changing to a different roast level of coffee (light,
medium or dark roast coffee).
• Coffee grinder out of adjustment. See Adjusting the
Coffee Grinder section.
Water goes into drip tray
when coffee is made.
Water or coffee drips out
of dispenser after coffee or
water dispensed.
• Coffee maker clears water out of pipes after making
coffee. Normal operation.
° Small amount of fluid dripping after dispensing is
normal.

Solutions to Common Problems 41
Problem
Amount of coffee made is
too small.
Coffee maker will not make
coffee drinks from ground
coffee.
Display reads: "Please
Wait Heating"
Display reads: "Drawer
Full" (buttons also don't
work).
Display reads: "Machine
Ready - Drawer Out"
(buttons also don't work).
Possible Solution
• Normal size of a cup of espresso is about one
ounce. Push espresso or double espresso button
multiple times.
° Put pre-ground coffee in ground coffee chute before
the power switch is turned on.
• Appliance still heating up. Wait until display reads
"Machine Ready" (3-5 minutes).
° Empty used coffee grounds bin. See Routine
Cleaning Instructions section.
° Drawer was emptied with power switch off. Leave
power switch on when emptying the used coffee
grounds bin.
• Check to make sure used coffee grounds drawer
is properly installed. See Routine Cleaning
Instructions section
Display reads: "System
Off- Front Panel Open"
(buttons also don't work).
Display reads: "Clean
Group"
Display reads: "Xxxxxx
Group Error" (buttons also
don't work).
Display reads: "Timeout
Filling Up Broiler" (buttons
also don't work).
Display reads: "Flow Meter
Error" (buttons also don't
work).
Display reads: "Error
- Coffee Temperature"
or "Error - Steam
Temperature" (buttons
also don't work).
Display reads: "Too Much
Coffee".
• Check to make sure front panel is closed and
locked. Call for service if message repeats.
• System needs a routine cleaning. See Routine
Cleaning Instructions. "Clean Group" message
will disappear after the routine cleaning is complete.
• Operation problem detected.Open and close front
panel. Call for service if message repeats.
Operation problem detected. Turn power switch off,
then on. Call for service if message repeats.
• Pour water in tank (Model E24CM75GSS) or check
to make sure the water supply is connected and
turned on Model (E24CM76GSS).
• Operation problem detected.Call for service.
• Reduce the amount of coffee you put in the ground
coffee chute.
NOTE: If you have used the Coffee Maker Programming Guide to change the
control panel settings, consult the guide for additional solutions.

42 Notes
Warranty Information
43
COFFEE MAKER WARRANTY
Your coffee maker is protected by this warranty
WARRANTY THROUGH OURAUTHORIZED
PERIOD SERVICESWEWILL:
FULL ONE-YEAR One year from
WARRANTY original purchase
date
Time periods listed
above.
LIMITED WARRANTY
(Applicable to the state
of Alaska)
Pay all costs for repairing or
replacing any parts of this product
which prove to be defective in
materials or workmanship.
All of the provisions of the full
warranties above and the exclusions
listed below apply.
THE CONUSMERWILL BE
RESPONSIBLEFOR
Costs of service calls that
are listed under NORMAL
RESPONSIBILITIES OF THE
CONSUMER.*
Costs of the technician's travel to
the home and any costs for pick
up and delivery of the appliance
required because of service.
In the U.SA., your appliance is warranted by Electrolux Home Products, Inc. We authorize no person to change or add to any
of our obligations under this warranty. Our obligations for service and parts under this warranty must be performed by us or an
authorized Electrolux Home Products, Inc. servicer. In Canada, your appliance is warranted by Electrolux Canada Corp.
*NORMAL RESPONSIBILITIES
OFTHE CONSUMER:
EXCLUSIONS:
IF YOU NEED SERVICE:
This warranty applies only to products in ordinary household use, and the consumer is
responsible for the items listed below:
1. Proper use of the appliance in accordance with instructions provided with the product.
2. Proper installation by an authorized servicer in accordance with instructions provided with the
appliance and in accordance with all local plumbing, electrical and/or gas codes.
3. Proper connection to a grounded power supply of sufficient voltage, replacement of blown
fuses, repair of loose connections or defects in house wiring.
4. Expenses for making the appliance accessible for servicing, such as removal of trim,
cupboards, shelves, etc., which are not a part of the appliance when it was shipped from the
factory.
5. Damages tofinish after installation.
6. Replacement of light bulbs and/or fluorescent tubes (on models with these features).
This warranty does not cover the following:
1, CONSEQUENTIAL OR INCIDENTAL DAMAGES SUCH AS PROPERTY DAMAGE AND
INCIDENTAL EXPENSES RESULTING FROM ANY BREACH OF THIS WRITTEN OR
ANY IMPLIED WARRANTY. NOTE: Some states do not allow the exclusion or limitation of
incidental or consequential damages, so this limitation or exclusion may not apply to you.
2. Service calls which do not involve malfunction or defects in workmanship or material, or for
appliances not in ordinary household use. The consumer shall pay for such service calls.
3. Damages caused by services performed by servicers other than Electrolux Home Products
North America or its authorized servicers; use of parts other than genuine Electrolux Home
Products parts; obtained from persons other than such servicers; or external causes such as
abuse, misuse, inadequate power supply or acts of God.
4. Products with original serial numbers that have been removed or altered and cannot be readily
determined,
Keep your bill of sale, delivery slip or some other appropriate payment record. The date on the bill
establishes the warranty period should service be required. If service is performed, it is in your
best interest to obtain and keep all receipts. This written warranty gives you specific legal rights.
You may also have other rights that vary from state to state. Service under this warranty must be
obtained by contacting Electrolux Home Products, Inc or in Canada, Electrolux Canada Corp.
This warranty only applies in the 50 states of the U.S.A., Puerto Rico, and Canada. Product
features or specifications as described or illustrated are subject to change without notice. All
warranties are made by Electrolux Home Products, Inc. In Canada, your appliance is warranted by
Electrolux Canada Corp.
USA
1,877.4Electrol ux
Electrolux Home Products, Inc.
P.O. Box 212378
Augusta, GA 30917
Canada
1,8774Electrolux
Electrolux Canada Corp.
6150 McLaughlin Road
Mississauga, Ontario
L5R 4C2

L_Electrolux _
www.etectrduxusa.com
1-877-4Electrolux www.etectroluxca.com


