Owner 's Manual for LG Electronics SPQ8-S
Table of Contents
Wireless Receiver Quick Guide
Installing and using the Product


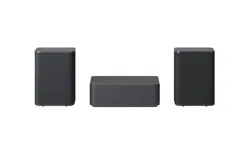
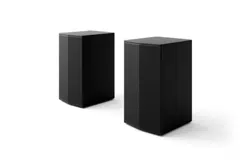
A Rear Speakers
B Wireless Receiver
1 Connect the rear speakers to the wireless receiver via a speaker cable. When connecting the rear speakers to the wireless receiver, connect the black striped cable to the negative terminal of each speaker and the remaining cable to the positive terminal of each speaker.
2 Connect to power in the following order: wireless receiver  sound bar. Then, turn on the sound bar. When the connection is automatically established with the sound bar, the LEDs on the wireless receiver will light up green.
If you see a red LED on the front of the wireless receiver, it means that the sound bar is not connected to the speakers. If this is the case, connect them in the following order.
- Press the Power
 button on the sound bar to turn it off.
- Press the PAIRING button on the back of the disconnected wireless receiver. Check if each LED blinks green.
- Press the Power button on the sound bar to turn it on.
- When the connection is established, you will see a green LED light on the front of the wireless receiver light up green.
Installation
Connecting the Product
Connecting the rear speakers to the wireless receiver
Automatic connection
After completing installation, the wireless receiver will automatically be connected to the sound bar. Connect the sound bar to the wireless receiver in the following order
- Connect the speaker cables to the corresponding terminals on the rear speakers (left, right). Connect the black striped cable to the negative terminal and the other cable to the positive terminal.
- Connect the speaker cables on the rear speakers (left, right) to the wireless receiver
Receiver Terminal Colour. Speaker Position
Blue  Left rear
Grey  Right rear

3. Plug the power cable into the wireless receiver.
4. Plug the power cable connected to the wireless receiver into an outlet.
5. Press the Power button on the sound bar to turn it on.
6. When the connection is automatically established, you will see the LED on the front of the wireless receiver light up green.
 Note
Note
• Please only use the speakers provided with the product. Using other speakers may cause malfunction.
• Connect the speaker cables to the corresponding terminals. Connect to the positive cable to the positive terminal and the negative cable to the negative terminal. An incorrectly connected cable will distort the sound or produce no bass.
Checking connection status with the LED colour
You can check the connection status with the LED on the front of the wireless receiver
Blinking green - Connecting In progress
Green - Connected successfully
Red - Bad connection, or the receiver is in standby
Off - Power cable not connected
Manual connection
If you see a red LED on the front of the wireless receiver, it means that the sound bar is not connected to the receiver. If this is the case, connect them in the following order.
- Press the Power button on the sound bar to turn it off.
- Press the PAIRING button on the back of the wireless receiver. Check if the LED on the front of the wireless receiver is blinking green.

3. Press the Power button on the sound bar to turn it on.
4. When the connection is established, you will see the LED light on the front of the wireless receiver light up green.
Note
• Keep the rear speakers at least 30 cm away from the TV or monitor.
• To prevent wireless interference, maintain a distance of at least 1 m between the sound bar or the wireless receiver and any peripheral devices that generate strong electromagnetic waves (ex. wireless routers, microwave ovens, etc.).

Setting up surround sound
Turning surround sound on/off
1. Press Settings button. The product enters the setting mode and you can see “OFF-AUTO POWER” or “ON-AUTO POWER”.

2. While the “OFF-AUTO POWER” or “ON-AUTO POWER” is scrolling in the status display, press Left/ Right button to select the surround sound setting. You can see the status of the surround sound, “OFFSURROUND” or “ON-SURROUND”.

3. While the “OFF-SURROUND” or “ON-SURROUND” is scrolling in the status display, press Up/Down button to turn on or off the surround sound.

Safety Precautions
Safety and Regulatory


CAUTION: TO REDUCE THE RISK OF ELECTRIC SHOCK DO NOT REMOVE COVER (OR BACK) NO USER SERVICE ABLE PARTS INSIDE REFER SERVICING TO QUALIFIED SERVICE PERSONNEL.
This lightning flash with arrowhead symbol within an equilateral triangle is intended to alert the user to the presence of uninsulated dangerous voltage within the product’s enclosure that may be of sufficient magnitude to constitute a risk of electric shock to persons.
The exclamation point within an equilateral triangle is intended to alert the user to the presence of important operating and maintenance (servicing) instructions in the literature accompanying the product.
WARNING:
• TO PREVENT FIRE OR ELECTRIC SHOCK HAZARD, DO NOT EXPOSE THIS PRODUCT TO RAIN OR MOISTURE.
• Do not install this equipment in a confined space such as a book case or similar unit.
CAUTION:
• Do not use high voltage products around this product. (ex. Electrical swatter) This product may malfunction due to electrical shock.
• No naked flame sources, such as lighted candles, should be placed on the apparatus.
• Do not block any ventilation openings. Install in accordance with the manufacturer’s instructions. Slots and openings in the cabinet are provided for ventilation and to ensure reliable operation of the product and to protect it from over heating. The openings should never be blocked by placing the product on a bed, sofa, rug or other similar surface. This product shall not be placed in a built-in installation such as a bookcase or rack unless proper ventilation is provided or the manufacturer’s instruction has been adhered to.
• The apparatus should not be exposed to water (dripping or splashing) and no objects filled with liquids, such as vases, should be placed on the apparatus.
• For safety marking information including product identification and supply ratings, please refer to the main label on the bottom or the other surface of the product.
• Be careful to make sure children do not put their hands or any objects into the *speaker duct.
- * speaker duct: A hole for plentiful bass sound on speaker cabinet. (enclosure)
CAUTION concerning the Power Cord
The Power Plug is the disconnecting device. In case of an emergency, the Power Plug must remain readily accessible. Check the specification page of this owner’s manual to be certain of the current requirements. Do not overload wall outlets. Overloaded wall outlets, loose or damaged wall outlets, extension cords, frayed power cords, or damaged or cracked wire insulation are dangerous. Any of these conditions could result in electric shock or fire. Periodically examine the cord of your device, and if its appearance indicates damage or deterioration, unplug it, discontinue use of the device, and have the cord replaced with an exact replacement part by an authorised service centre. Protect the power cord from physical or mechanical abuse, such as being twisted, kinked, pinched, closed in a door, or walked upon. Pay particular attention to plugs, wall outlets, and the point where the cord exits the device.
For models using an adapter
Only use the AC adapter supplied with this device. Do not use a power supply from another device or another manufacturer. Using any other power cable or power supply may cause damage to the device and void your warranty.
For models using a Laser device

This product employs a Laser System. To ensure proper use of this product, please read this owner’s manual carefully and retain it for future reference. Shall the unit require maintenance, contact an authorised service centre. Use of controls, adjustments or the performance of procedures other than those specified herein may result in hazardous radiation exposure. To prevent direct exposure to laser beam, do not try to open the enclosure.
For models using a battery
This device is equipped with a portable battery or accumulator.
CAUTION: Risk of fire or explosion if the battery is replaced by an incorrect type. For models using a built-in battery Do not store or transport at pressures lower than 11.6 kPa and at above 15,000 m altitude.
• replacement of a battery with an incorrect type that can defeat a safeguard (for example, in the case of some lithium battery types);
• disposal of a battery into fire or a hot oven, or mechanically crushing or cutting of a battery, that can result in an explosion;
• leaving a battery in an extremely high temperature surrounding environment that can result in an explosion or the leakage of flammable liquid or gas; and
• a battery subjected to extremely low air pressure that may result in an explosion or the leakage of flammable liquid or gas.
Symbols
 Alternating current (AC).
 Direct current (DC).
 This is a class II equipment.
 Standby power state.
 The power is turned on.
 Danger voltage.
Before Reporting Product Malfunction
Troubleshooting
If you experience the following issues while using the product, please perform several checks, as they may not be malfunctions.
General Errors
The product does not work properly
• Unplug the power cables and any external devices such as your TV, subwoofer, or amplifier from the product, then plug them in again.
The power does not turn on
• Is the power cord plugged into the outlet properly?
- Connect the power plug to the outlet correctly.
The rear speakers do not produce sound
• Is the wireless receiver properly connected to the sound bar?
- If the LED on the back of the wireless receiver is blinking green or lit in red, it means it is not connected. If the connection is established, a green light will appear. Reconnect the wireless receiver to the sound bar. ([ See “Connecting the Product” on page 6.)
• Is the rear speakers properly connected to the wireless receiver?
- Check whether the speaker cables are properly connected to the corresponding terminals on the rear speakers and the wireless receiver. ([ See “Connecting the Product” on page 6.)
Problems in Wireless Connection
There is radio interference
• Install the wireless receiver and the sound bar as close to each other as possible.
• Do not install the product on metal furniture.
• Wireless communication may not work properly in weak signal areas.
Handling the Product
When shipping the Product
Please save the original shipping carton and packing materials. If you need to ship the product, for maximum protection, re-pack the product as it was originally packed at the factory.
Keeping the exterior surfaces clean
• Do not use volatile liquids such as insecticide spray near the product.
• Wiping with strong pressure may damage the surface.
• Do not leave rubber or plastic products in contact with the product for a long period of time.
Cleaning the product
To clean the product, use a soft, dry cloth. If the surfaces are extremely dirty, use a soft cloth lightly moistened with a mild detergent solution. Do not use strong solvents such as alcohol, benzine, or thinner, as these might damage the surface of the product.