CERT NO. 23033
AS/NZS 3718:2005
User Guide
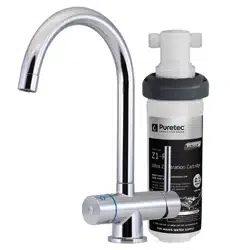
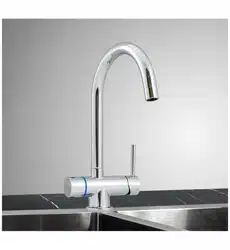
Puretec Tripla™ | Triple Action Tapware
Tripla™
For correct operation & installation it is essential to observe these instructions.NOV 2019

2
Installation & Operation Manual Copyright © Puretec Pty Ltd 2019
Puretec Customer Service
Thank you for purchasing a Puretec Tripla. Your tap is manufactured from only quality
materials and will last for years, if maintained and installed properly.
The system is designed for metropolitan supply water but can be used in other
situations. For other types of water supply please contact your local Puretec stockist or
call our Puretec Customer Service Helpline prior to installing the tap.
Customer Service Helpline 1300 140 140 (Australia) 0800 130 140 (New Zealand)
What's inside
Operation ...................................................................................................................................... 2
Servicing........................................................................................................................................ 3
Technical Information
............................................................................................................ 3
Recommended Working Pressures
................................................................................. 3
Installation Guide
..................................................................................................................... 4
Assembly
...................................................................................................................................... 5
Water Connection Patterns
......................................................................................................6
Battery Installation
.......................................................................................................................7
Replacement of Ceramic Disc Cartridge(s)
................................................................ 7
Tripla T1 Parts Description
.................................................................................................. 8
Tripla T2 Parts Description
.................................................................................................. 9
Tripla T3 Parts Description
............................................................................................... 10
Tripla T4 Parts Description
............................................................................................... 11
Tripla T5 Parts Description
............................................................................................... 12
Tripla T6 Parts Description
............................................................................................... 13
Warranty
..........................................................................................................................................14
What's Inside
This product contains a button battery. Accidental ingestion may
occur and can be fatal. Please keep out of reach from infants. If you
suspect an accidental ingestion please contact emergency services.

3
Copyright © Puretec Pty Ltd 2019 Puretec Tripla™ |
Triple Action Tapware
Operation
Chrome Plated Surface - should only be cleaned with liquid detergent or soap and water.
Under no circumstance should any abrasive or acid base cleaning agents be used.
Servicing
Periodically clean the aerator for any lodged sediment that may restrict ow. A Puretec
water lter is highly recommended for product longevity.
Should it be necessary to have your mixer serviced while under warranty, please carry
out the following procedure:
1. Firstly call the plumber, preferably the one that has installed it, (most problems
are caused by the supply lines not being cleaned out properly, prior to connecting
the mixers).
2. Make sure that the plumber has installed your mixer according to the Instruction
Guide.
3. If the plumber is satised that he cannot rectify the problem then contact your
plumbing supply store or your local Puretec stockist.
Important: We do not recommend the dismantling of any internal part of the mixer
purely to see what is inside as this will breach your warranty.
Technical Information
Puretec mixers can be used in conjunction with:
• Pressure storage hot water system
• Any mains water pressure not exceeding 500 kPa
• Maximum hot water temperature of 60°C
• Instantaneous hot water system
Recommended Working Pressures
• Minimum working pressure 50 kPa (7.5 PSI)
• Maximum working pressure 500 kPa
It should be noted that water mains pressure builds up during o peak periods, mainly
at night, sometimes doubling or trebling normal daytime pressures.
Note: Not suitable for unequal pressure. On high pressure areas where the pressure
exceeds the recommended working pressure as indicated above pressure limiting valves
must be installed or warranty is voided.
Introduction
4
Installation & Operation Manual Copyright © Puretec Pty Ltd 2019
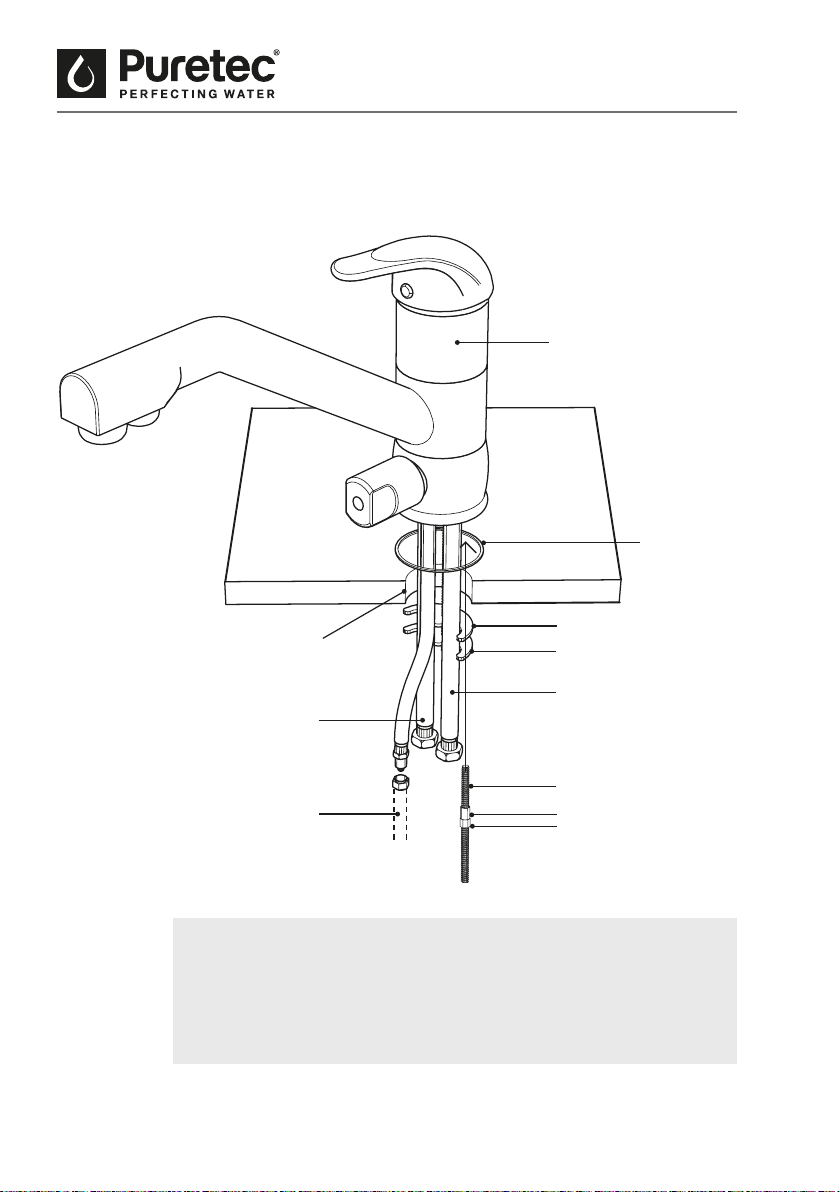
HOT
Mixer Tap
Rubber Washer
Sink Faucet
Hole (Ø33mm)
Water Filter
COLD
Metal Washer
Rubber Washer
Locking Nut
Retainer Screw
Metal Pipe
Installation Guide
Note: It is important to ush out the supply pipes to the mixer
before connecting the exible hoses, with the initial installation, so
no foreign matter can enter into the cartridges.
A Puretec Water Filter is highly recommended for product longevity.
Installation Guide
5
Copyright © Puretec Pty Ltd 2019 Puretec Tripla™ |
Triple Action Tapware
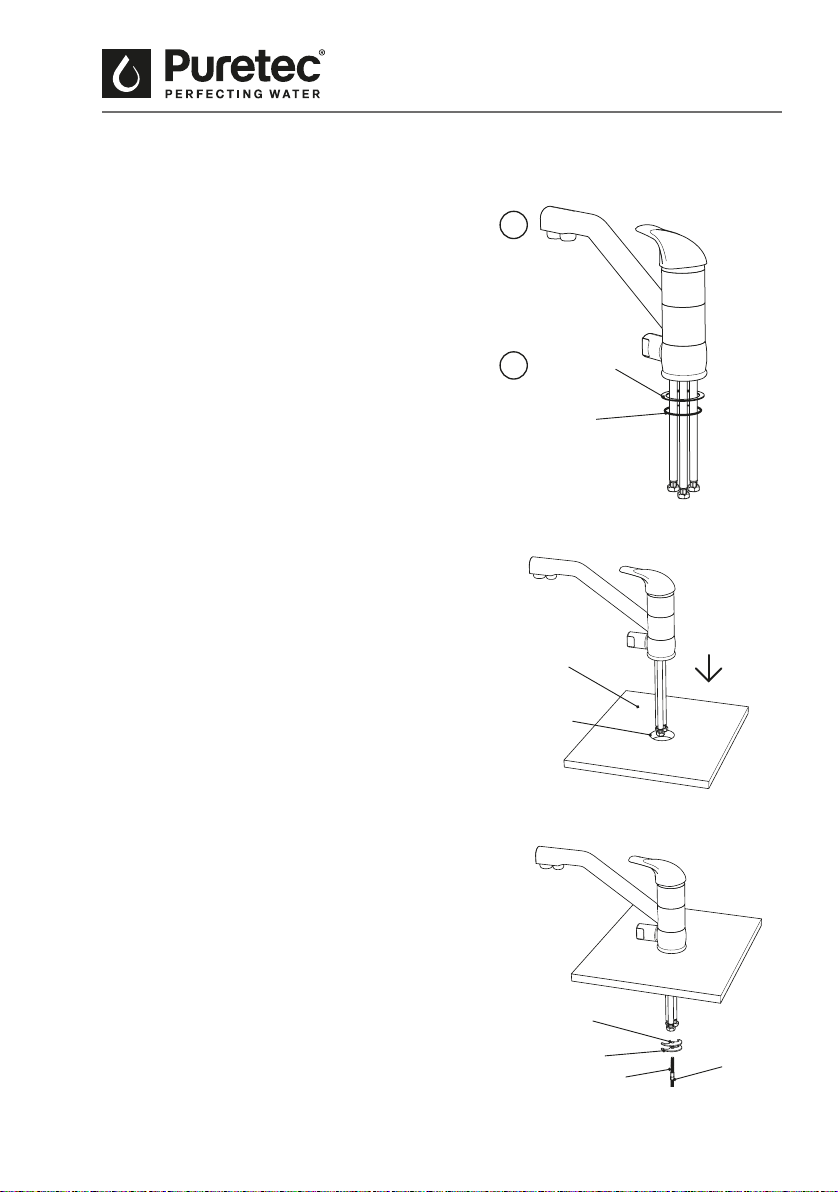
Assembly
Step 4. Place the Retainer Screw
through the hole in each Spacer and
screw to the hole on the bottom of
the faucet.
Then, use a wrench to lock the
Retainer Nut.
Rubber Spacer
Retaining
Nut
Retainer Screw
Zinc Spacer
Assembly
O-Ring
Brass Base
1
2
Step 1. Connect the hoses to the
faucet and tighten them.
Only use hand to screw the exible
hose. Do not over tight. Don't use any
tools.
Step 2. Put Brass Base with O-Ring to
the bottom of the faucet.
Basin or Sink
33mm dia.
Hole
Step 3. Put the hoses through the
Basin or Sink. Required through hole
size is Ø33mm.
6
Installation & Operation Manual Copyright © Puretec Pty Ltd 2019
Retainer
Screw
HOT Water
Connection
COLD Water
Connection
Water Filter
Connection
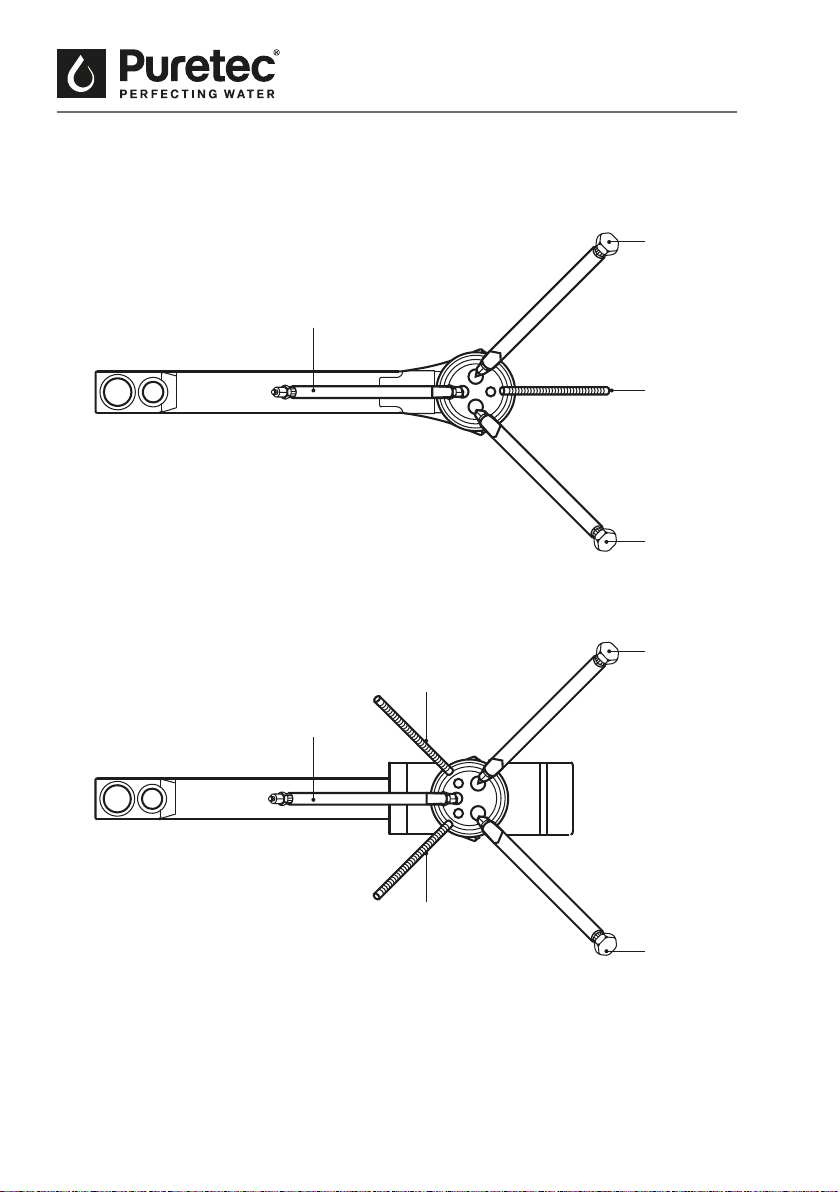
For TRIPLA T1 & T2
Water Connection Patterns
Retainer
Screw
HOT Water
Connection
COLD Water
Connection
Water Filter
Connection
For TRIPLA T3 to T6
Retainer
Screw
Connections
7
Copyright © Puretec Pty Ltd 2019 Puretec Tripla™ |
Triple Action Tapware
Maintenance
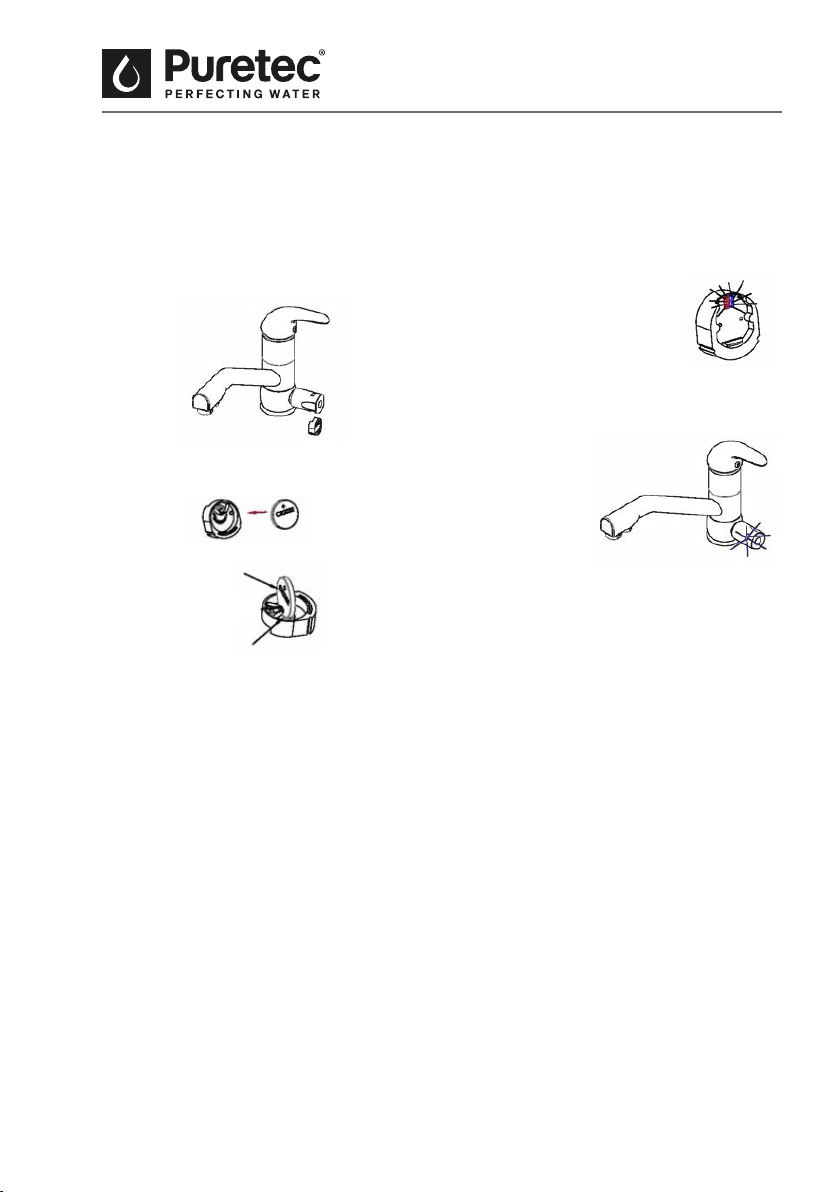
Replacement of Ceramic Disc Cartridge(s)
1. Hot/Cold Outlet
• Remove hot and cold water indicator then release screw in lever and li lever o,
now you can unscrew dome cap and loosen the cartridge lock nut.
• Li out old cartridge and clean inside making sure no old O-rings are still stuck
inside cartridge housing.
• Insert new cartridge making sure O-rings on bottom of new cartridge have not
fallen o and lugs in bottom of cartridge line up with holes in cartridge housing.
• Now you can tighten lock nut with a torque wrench to 14 newton meters, then
reinstall dome cap, lever screw and hot and cold water indicator.
2. Filtered/Rain Ancillary Outlet
• Remove front button cover using ne-edged 1.2mm screwdriver.
• Unscrew handle then remove cartridge by unscrewing it anti-clockwise, using 5/8”
socket. Install cartridge by completing removal instructions as above, in reverse
order.
• Ensure cartridge is rmly tightened not over tightened.
Battery Installation - LED reminder light
1. Remove the black battery seat from the
faucet canopy.
2. Install battery into the battery seat,
positive side up.
Note: Red light ashes
twice and then followed
by the blue light.
3. Reinstall battery seat assembly into the
faucet canopy.
Important note: Battery must be replaced when changing cartridges. WARNING! This
product contains a battery. Accidental ingestion may occur and can be fatal. Please
keep out of reach from infants. If you suspect an accidental ingestion please contact
emergency services.
5. Red light ashes indicates your cartridges
are due to be changed (usage has
exceeded 3,000 minutes or 12 months).
Please change the battery when
changing the lter cartridge(s).
Positive
side up.
Negative on
the PCB.
4. Blue light ashes during
normal operation.
8
Installation & Operation Manual Copyright © Puretec Pty Ltd 2019
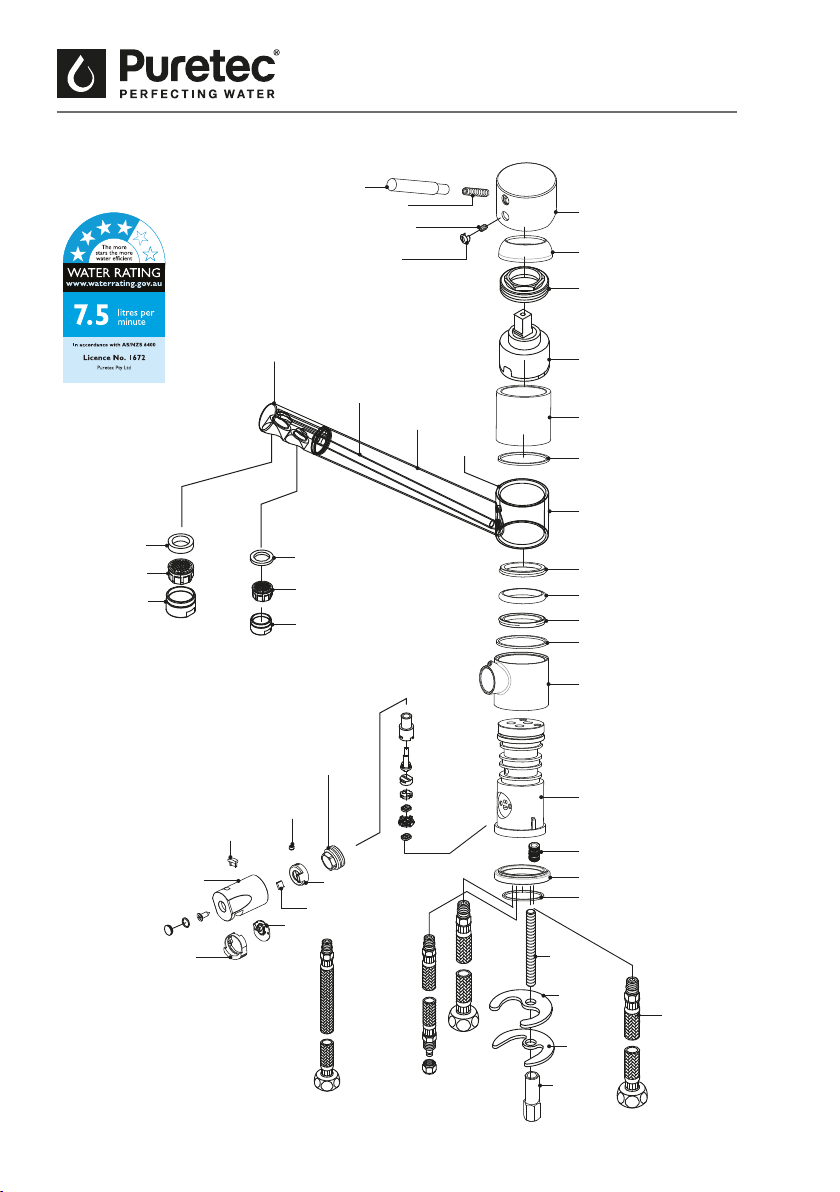
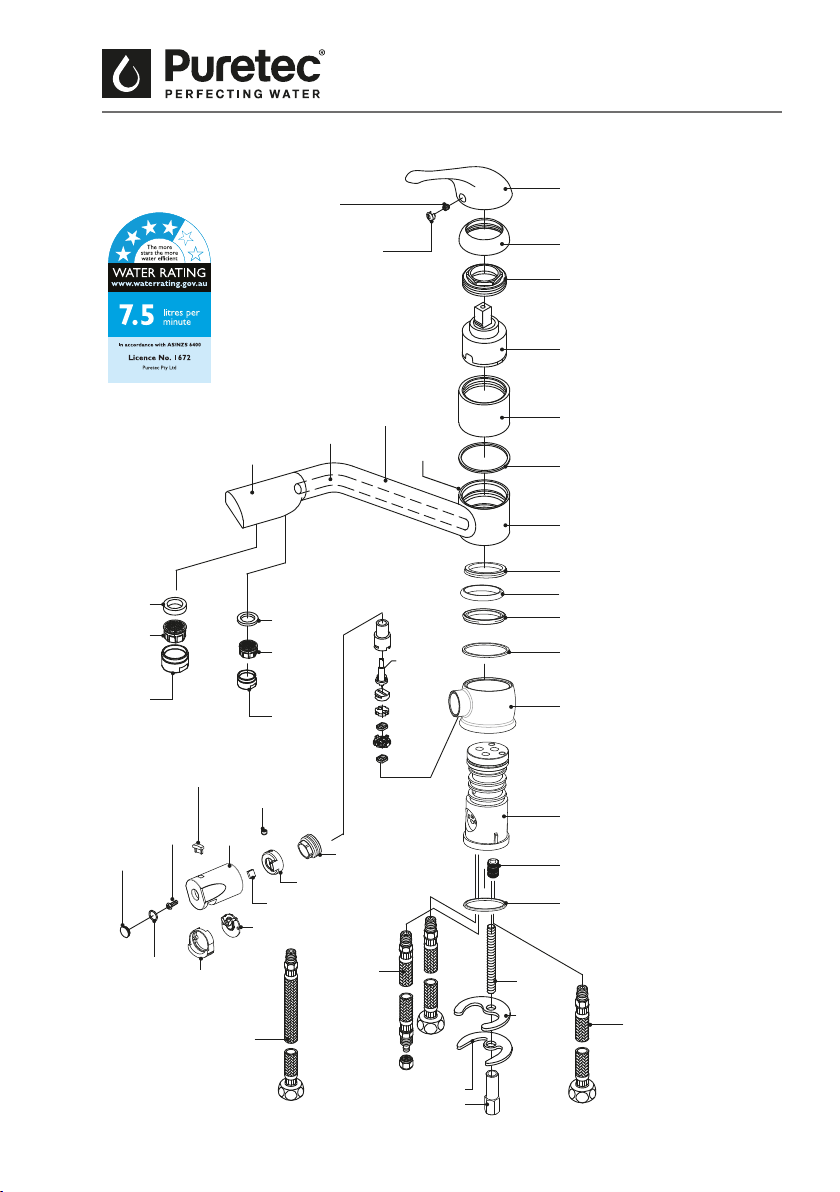
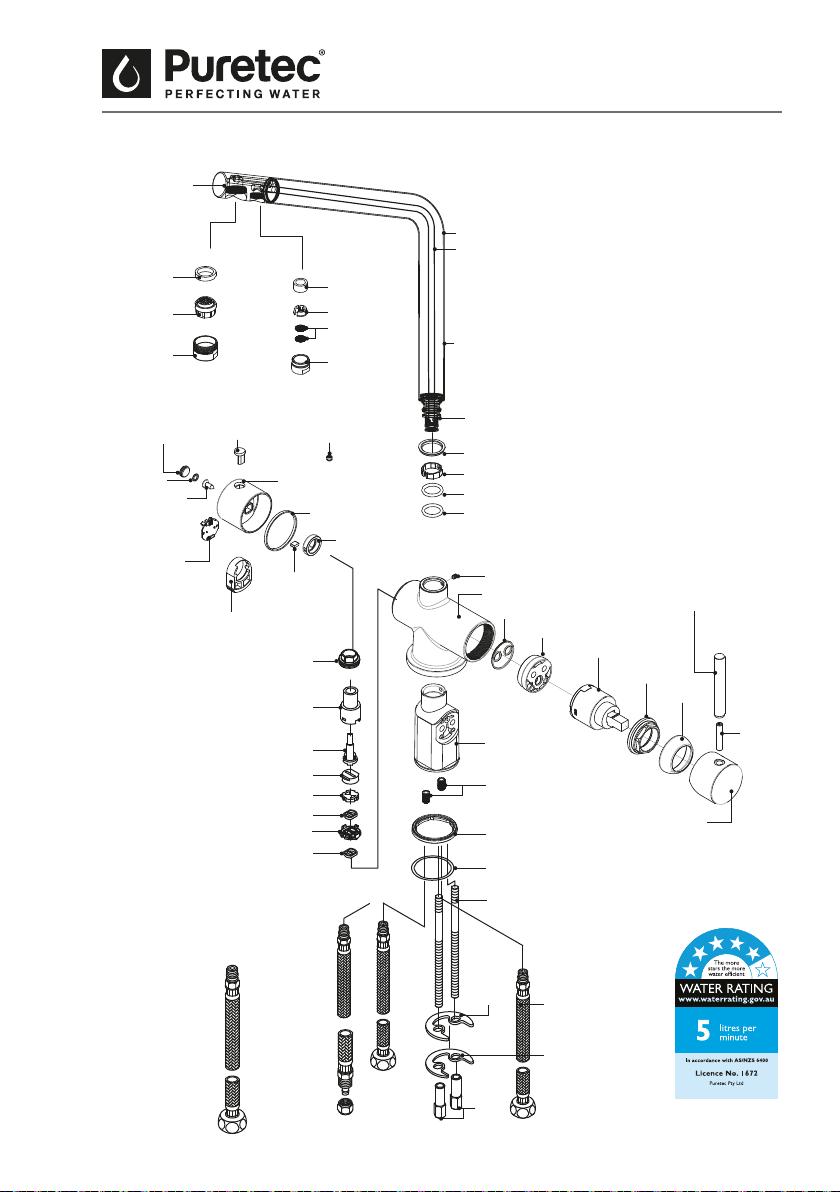
TRIPLA T1 Parts Description
2. Screw
3. Screw
5. Handle
1. Handle
10. Teflon Washer
10. Teflon Washer
28. Washer
34. Regular Seat
38. Handle Cap
41. Battery Seat
31. EPDM washer
12. EPDM Washer
12. EPDM Washer
13. EPDM Washer
29. Aerator Insert
32. Aerator Insert
30. Aerator Cap
33. Aerator Cap
16. Rubber Washer
15-2 Nut
19. Rubber
Washer
20.
Stainless
Washer
21. Brass
Nut
18. Screw
35. Screw
39. Display
9. Cover Stem
7. Plunger
11. Spout
11-1 Body
14. Body Stem
15-1 Body
11-2 Tube
11-3 Inner Tube
11-4 Connector
4. Cap
6. Cap
8. Stem / Cartridge
45. Flexible
Tube ½"
Inlet/Outlet
Hose
Parts Description
17. Housing
36. Magnetic Seat
40. Circuit Board
37. Magnet
9
Copyright © Puretec Pty Ltd 2019 Puretec Tripla™ |
Triple Action Tapware
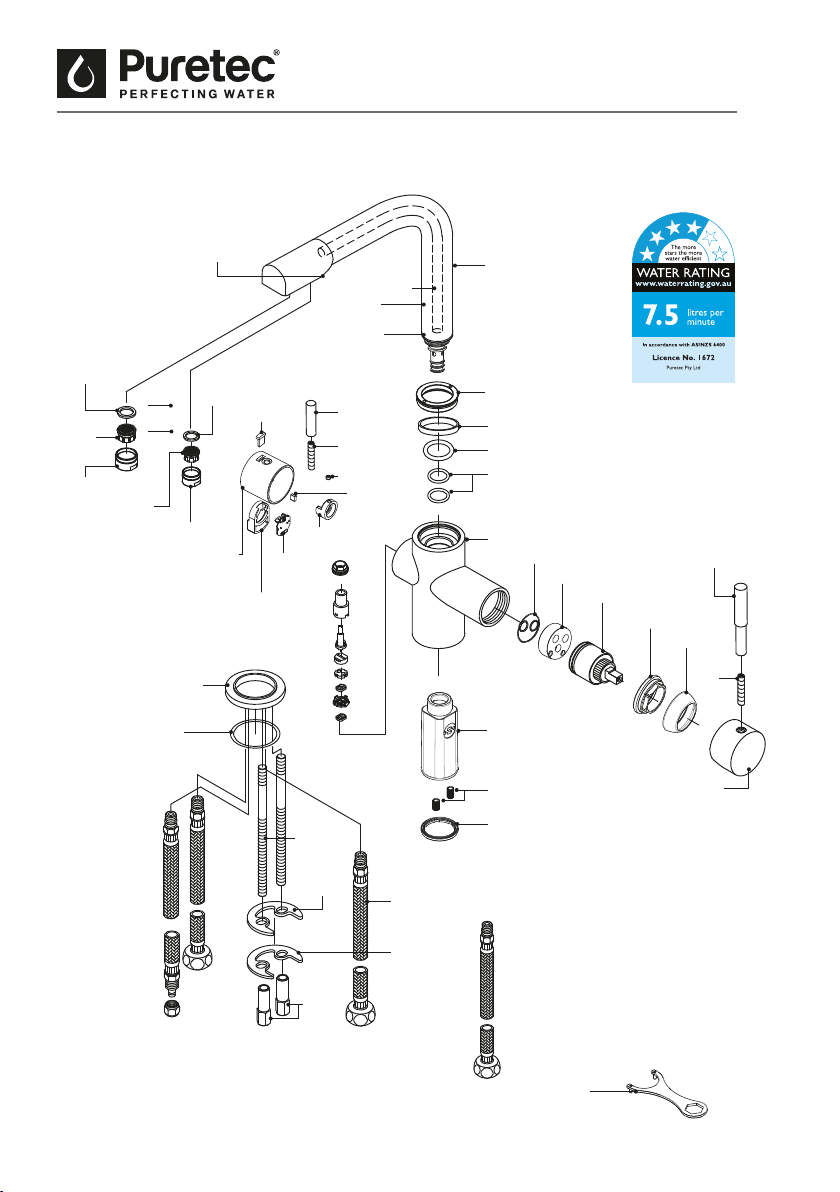
TRIPLA T2 Parts Description
18. Brass Nut
17. Stainless Washer
1. Screw
3. Handle
8. Teflon Washer
8. Teflon Washer
10. EPDM Washer
25. EPDM
Washer
28. EPDM
Washer
11. EPDM Washer
10. EPDM Washer
14. EPDM washer
16.
Rubber
Washer
15. Screw
9-1. Body
39.
Handle
Cap
37.
Screw
36. Display
32. Screw
31. Plunger
33. Magnet Seat
34. Strong Magnet
35.
Handle
Cap
7. Cover Stem
12. Body Stem
38. O-Ring
41. Battery Seat
40. Circuit Board
5. Plunger
9. Spout
2. Cap
4. Cap
6. Stem / Cartridge
42. Flexible Tube ½"
44. Flexible Tube ½"
44. Flexible
Tube ½"
Parts Description
13-1. Body Stem
13-2. Body Stem
9-2. Brass Tube
9-4. Connector
9-3. Inner Tube
26. Aerator
Insert
29. Aerator
Insert
27. Aerator
Cap
30. Aerator
Cap
10
Installation & Operation Manual Copyright © Puretec Pty Ltd 2019
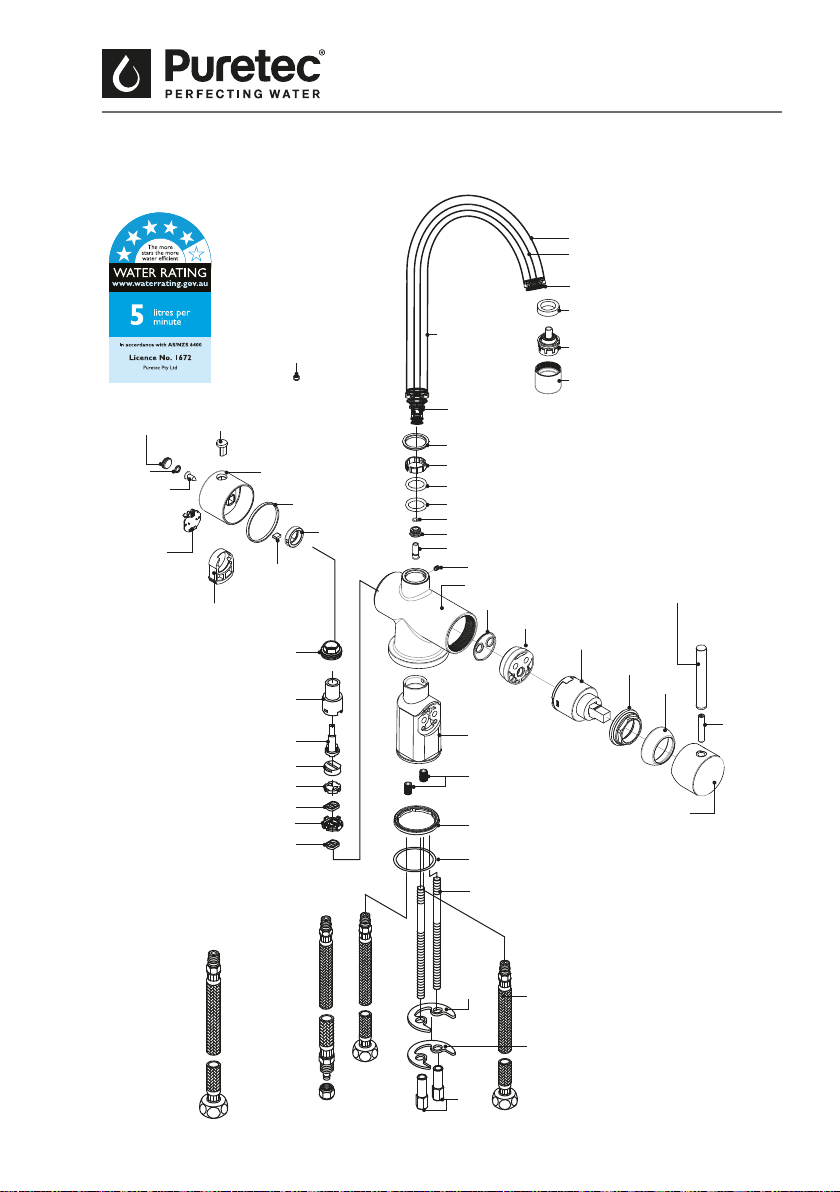
TRIPLA T3 Parts Description
Parts Description
7. Handle
10. Handle Cap
23-4 Connector
33. Handle
8.
Screw
34. Canopy
47. Wrench
4. Washer
25. Washer
38. Housing
5. Aerator Insert
39. O-Ring
6. Aerator Cap
9. Display
41.
Washer
42.
Washer
43.
Brass
Nut
8. Screw
40. Screw
26. O-Ring
23. spout
28. Body
35. Body
36. Nut
23-3 Inner Tube
23-2 Tube
11. Screw
24. Cap
44. Flexible Tube
1. Washer
2. Aerator
Insert
3. Aerator Cap
23-1 Body
27. O-Ring
29. O-Ring
30. Connector
30-2. Cartridge
31. Plunger
32. Cap
37. Stopper
12. Strong
Magnet
14. Battery
Seat
15. Circuit
Board
13. Magnet Seat
11
Copyright © Puretec Pty Ltd 2019 Puretec Tripla™ |
Triple Action Tapware
42.
Washer
43.
Washer
44.
Brass
Nut
41. Screw
45. Flexible Tube
TRIPLA T4 Parts Description
1. Spout
1-3. Inner Tube
1-4. Connector
2. Washer
3. Aerator Insert
1-2. Tube
1-1. Body
5. Gasket
4. Aerator Cap
6. Washer
7. O-Ring
8. O-Ring
9-1. Washer
9-2. Gasket
9-3. Gasket
28. Screw
35. Handle
36. Screw
37. Handle Cap
29. Body
38-1. Body
38-2. Nut
30. O-Ring
31. Connector
32. Stem
33. Plunger
34. Cap
39. Stopper
40. Washer
17. Circuit
Board
10. Cap
13. Display
16. Screw
11. O-Ring
12. Screw
15. Washer
21. Plunger
22. Turn Stem Body
23. Stem Post
24. Upper
25. Lower
14. Handle Cap
18. Bat-
tery Seat
20. Magnet
Seat
19. Strong
Magnet
26. Seat
27. Stopper
26. Seat
Parts Description
12
Installation & Operation Manual Copyright © Puretec Pty Ltd 2019
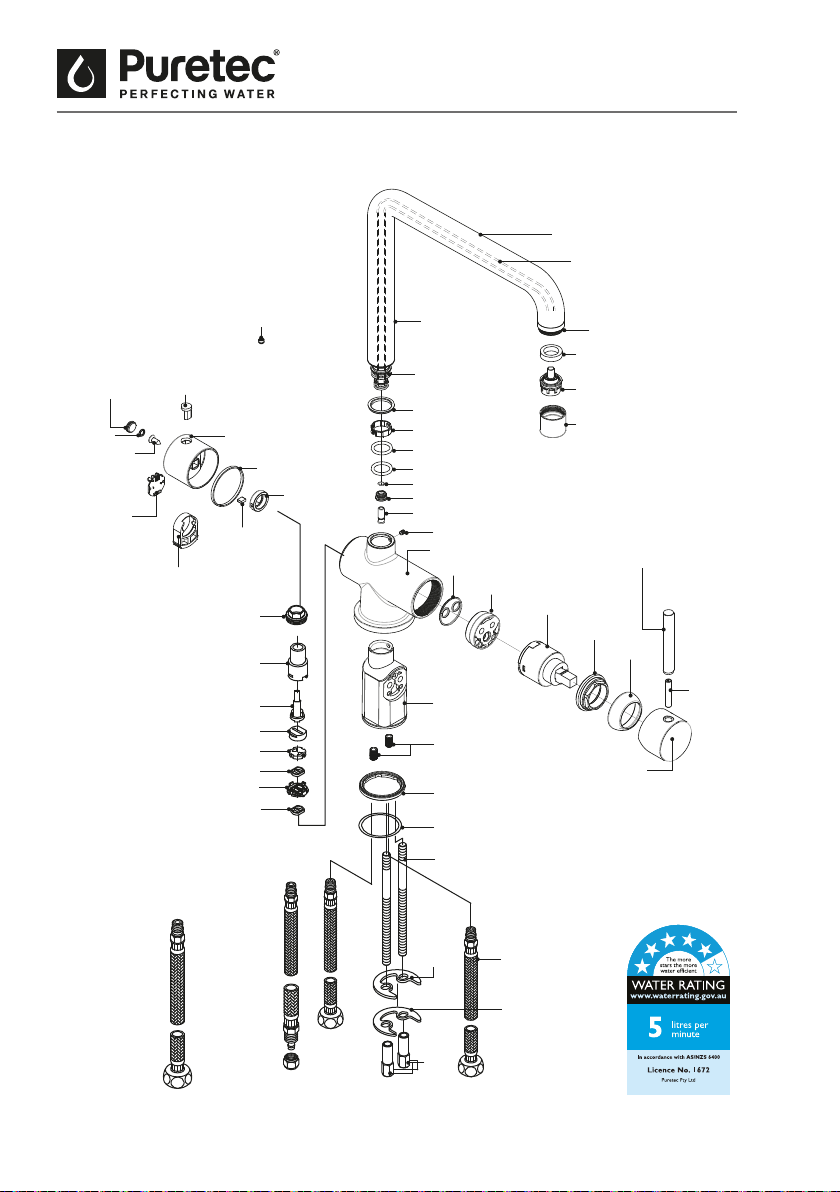
TRIPLA T5 Parts Description
Parts Description
42.
Washer
43.
Washer
44.
Brass
Nut
41. Screw
45. Flexible Tube
1. Spout
1-3. Inner Tube
1-4. Connector
2. Washer
3. Aerator Insert
1-2. Tube
1-1. Body
5. Gasket
4. Aerator Cap
6. Washer
7. O-Ring
8. O-Ring
9-1. Washer
9-2. Gasket
9-3. Gasket
28. Screw
35. Handle
36. Screw
37. Handle Cap
29. Body
38-1. Body
38-2. Nut
30. O-Ring
31. Connector
32. Stem
33. Plunger
34. Cap
39. Stopper
40. Washer
17. Circuit
Board
10. Cap
13. Display
16. Screw
11. O-Ring
12. Screw
15. Washer
21. Plunger
22. Turn Stem Body
23. Stem Post
24. Upper
25. Lower
14. Handle Cap
18. Battery Seat
20. Magnet
Seat
19. Strong
Magnet
26. Seat
27. Stopper
26. Seat
13
Copyright © Puretec Pty Ltd 2019 Puretec Tripla™ |
Triple Action Tapware
45.
Washer
46.
Washer
47.
Brass
Nut
44. Screw
48. Flexible Tube
TRIPLA T6 Parts Description
1. Spout
1-3. Inner Tube
5. Washer
6. Filter Net
7. Filter
8. Aerator Cap
1-4. Connector
2. Washer
3. Aerator Insert
1-2. Tube
1-1. Body
9. Gasket
4. Aerator Cap
10. Washer
11. O-Ring
12. O-Ring
31. Screw
38. Handle
39. Screw
40. Handle Cap
32. Body
41. Body
41-1. Nut
33. O-Ring
34. Connector
35. Stem
36. Plunger
37. Cap
42. Stopper
43. Washer
20. Circuit
board
13. Cap
16. Display
19. Screw
14. O-ring
15. Screw
18. Washer
24. Plunger
25. Turn Stem Body
26. Stem Post
27. Upper
28. Lower
17. Handle cap
21. Battery
Seat
23. Magnet
seat
22. Strong
magnet
29. Seat
30. Stopper
29. Seat
Parts Description

14
Installation & Operation Manual Copyright © Puretec Pty Ltd 2019
Notes
The complete range of Puretec products are developed, rened and made to meet and
exceed stringent specications for the worldwide market.
Important Note: Sales of products are subject to our Terms & Conditions which are
available upon request. All specications, prices and photos are a guide only and are
subject to change without notice. Please ring to conrm details. Do not use products with
microbiological unsafe water without adequate disinfection. Under normal circumstances
a pressure limiting valve is not required. If incoming water pressure is excessive it may
however be necessary to install an approved pressure limiting valve. Maximum ow
depends on cartridge, vessel, pressure, impurities etc.
Installation Note: A water lter system/tap, like any product, has a limited life and may
eventually fail. Also sometimes failure happens early due to unforeseen circumstances.
To avoid possible property damage, this product should be regularly examined for
leakage and/or deterioration and replaced when necessary. A drain pan, plumbed to an
appropriate drain or outtted with a leak detector, should be used in those applications
where any leakage could cause property damage, and/or the water supply should be
turned o if no one is home/present.
Warranty
This warranty commences from the date of purchase. To make a claim under the
warranty, take the product and proof of purchase to place where you purchased
the product, and they will lodge a Warranty Request with Puretec. In addition to the
guaranties provided under the law, Puretec oer warranties as follows: 6 year warranty
is 1 year parts and labour, plus 5 years parts only.
Puretec will pay your reasonable, direct expenses of claiming under this warranty.
You may submit details and proof of your expense claim to place of purchase for
consideration.
The warranty only applies if the product was used and/or installed in accordance with
the user guide and/or installation instructions. This warranty is given in lieu of all other
express or implied warranties and manufacturer shall in no circumstance be held liable
for damages consequential or otherwise or delays caused or faulty manufacturing
except as excluded by law.
Applicable to all above, is that the warranties need to be approved by Puretec to ensure
product was not incorrectly used, installed or claimed. False and incorrect claims will
be pursued at Puretec’s discretion, including chargeable inspection and labour costs
incurred.

15
Copyright © Puretec Pty Ltd 2019 Puretec Tripla™ |
Triple Action Tapware
Warranty
Warranty/Australia
This warranty is given by Puretec Pty Ltd, ABN 44 164 806 688, 37-43 Brodie Road,
Lonsdale SA 5160, telephone no. 1300 140 140 and email at [email protected].
This warranty is provided in addition to other rights and remedies you have under
law: Our goods come with guarantees which cannot be excluded under the Australian
Consumer Law. You are entitled to replacement or refund for a major failure and to
compensation for other reasonably foreseeable loss or damage. You are also entitled to
have the goods repaired or replaced if the goods fail to be of acceptable quality and the
failure does not amount to a major failure.
Warranty/New Zealand
This warranty is given by Puretec Ltd, Reg. No 4464398, PO Box 875 Cambridge 3450 NZ,
telephone no. 0800 130 140 and email at [email protected].
This warranty is provided in addition to other rights and remedies you have under
law: Our goods come with guarantees which cannot be excluded under the Consumer
Guarantees Act. You are entitled to replacement or refund for a major failure and to
compensation for other reasonably foreseeable loss or damage. You are also entitled to
have the goods repaired or replaced if the goods fail to be of acceptable quality and the
failure does not amount to a major failure.
Register Your Warranty Online
In order to register your warranty online you must do so within 30 days of your product
purchase.
Follow these 3 simple steps:
1. Go to puretecgroup.com/warranty
2. Enter the required details and hit submit.
3. You will receive an email conrming your warranty.
Authorization code: 1874752
Terms and conditions apply. Proof of purchase must be retained.
Go to puretecgroup.com for full details.