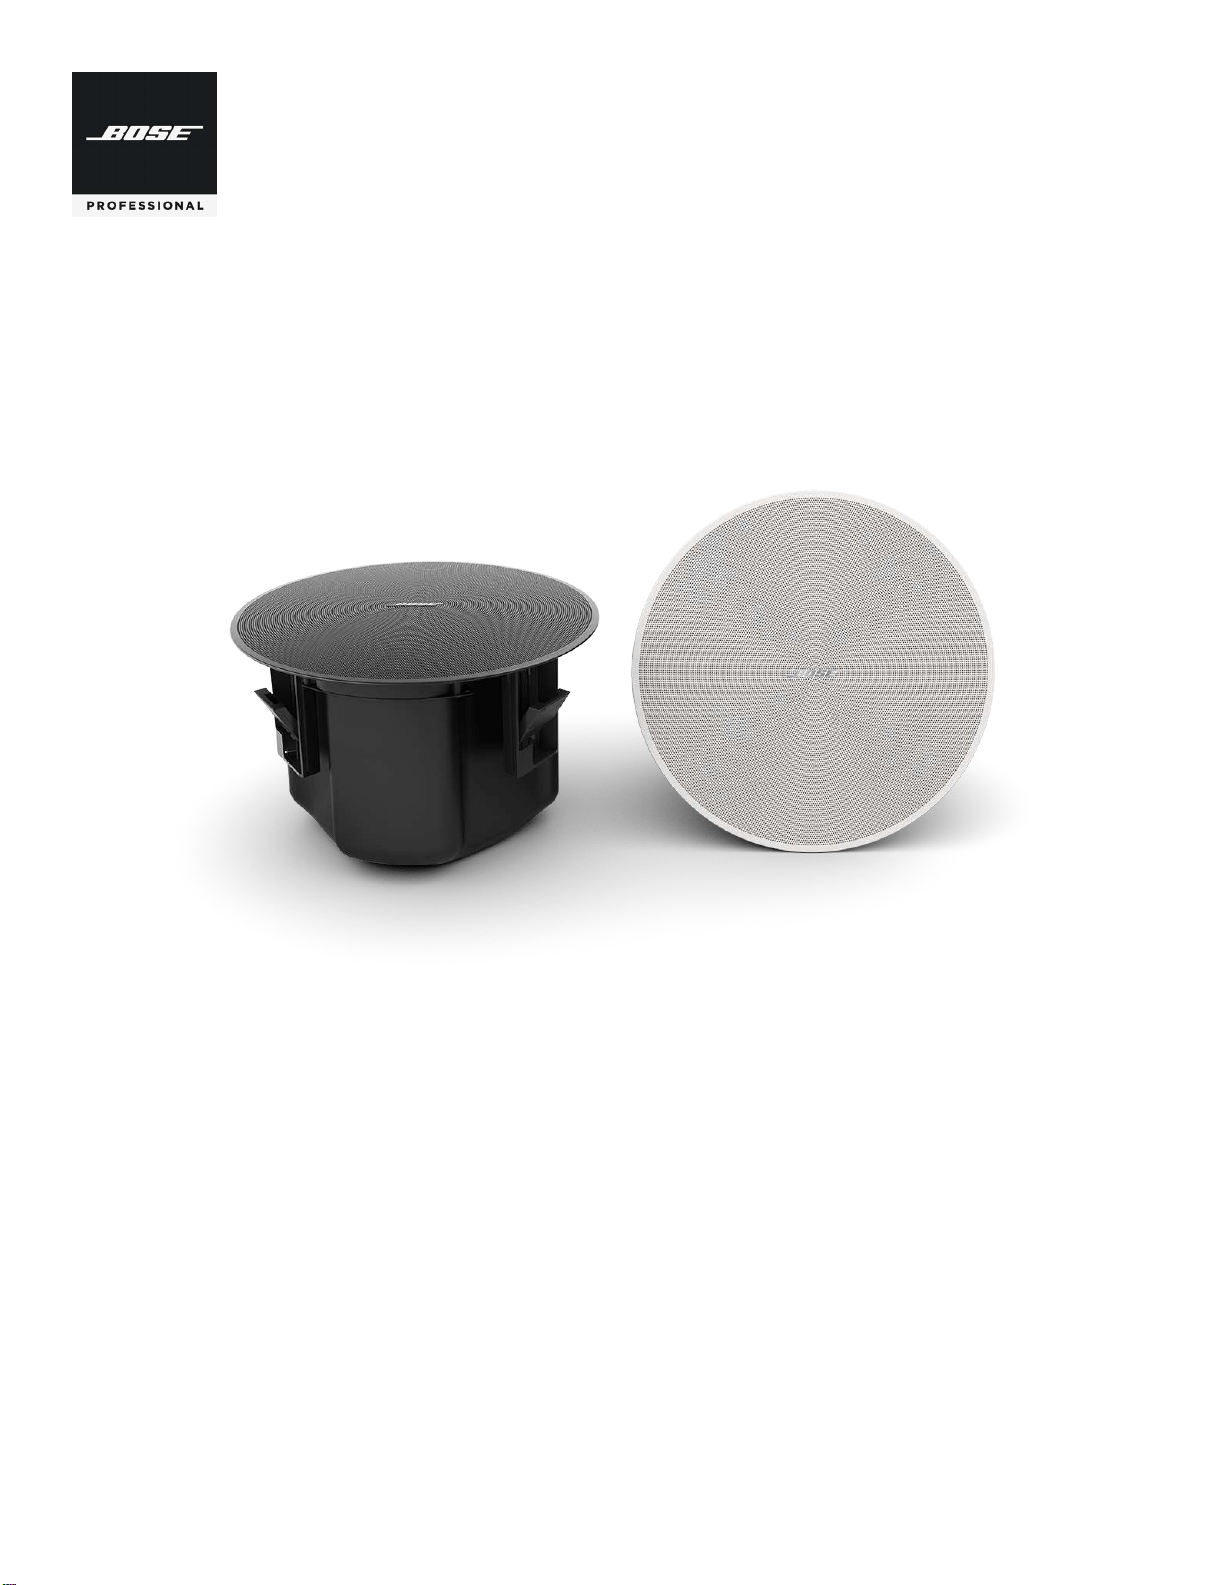
DesignMax DM6C
In-ceiling Loudspeaker
Installation Guide .......................2
Guía de instalación .....................8
Notice d’installation ................... 14
Installationsanleitung ..................20
Guida all'installazione ..................26
Installatiehandleiding ..................32
Monterings v eiledning ..................38
Instrukcja montażu ....................44
安装指南 ..............................50
安裝指南 ..............................56
設置ガイド .............................62
68 . . . . . . . . . . . . . . . . . . . . . . . . . . . . . .
DesignMax DM6C • Installation Guide
PRO.BOSE.COM
2 • English
Important Safety Instructions
Please read and keep all safety and use instructions.
This product is intended for installation by professional installers only! This document is
intended to provide professional installers with basic installation and safety guidelines for this
product in typical fixed-installation systems. Please read this document and all safety warnings
before attempting installation.
Do not attempt to service this product yourself. Refer all servicing to authorized service centers,
installers, technicians, dealers or distributors. To contact Bose Professional or to find a dealer or
distributor near you, visit PRO.BOSE.COM.
1. Read these instructions.
2. Keep these instructions.
3. Heed all warnings.
4. Follow all instructions.
5. Do not use this apparatus near water.
6. Clean only with a dry cloth.
7. Do not block any ventilation openings. Install in accordance with the manufacturer’s
instructions.
8. Do not install near any heat sources such as radiators, heat registers, stoves, or other
apparatus (including amplifiers) that produces heat.
9. Only use attachments/accessories specified by the manufacturer.
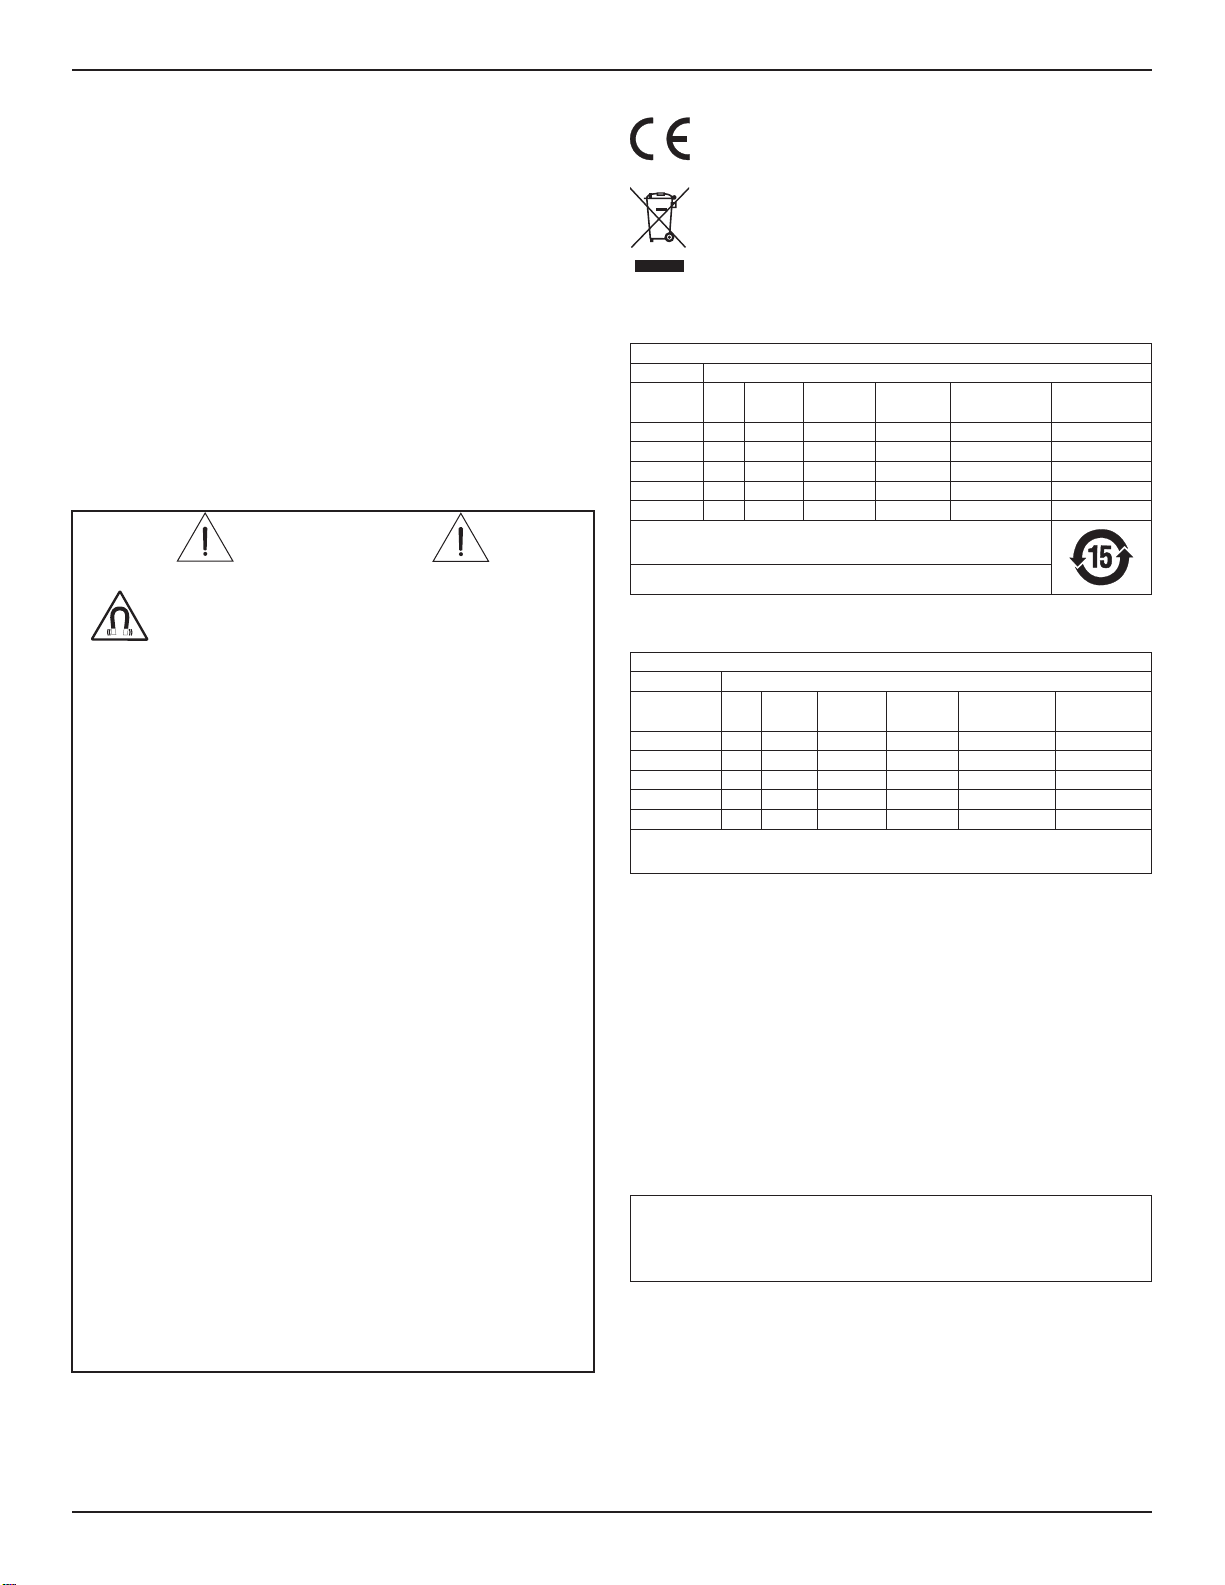
Regulatory Information
This product conforms to all applicable EU directive requirements. The complete
declaration of conformity can be found at: www.Bose.com/compliance.
This symbol means the product must not be discarded as household waste, and
should be delivered to an appropriate collection facility for recycling. Proper
disposal and recycling helps protect natural resources, human health and the
environment. For more information on disposal and recycling of this product,
contact your local municipality, disposal service, or the shop where you bought this
product.
China Restriction of Hazardous Substances Table
Names and Contents of Toxic or Hazardous Substances or Elements
Toxic or Hazardous Substances and Elements
Part Name
Lead
(Pb)
Mercury
(Hg)
Cadmium
(Cd)
Hexavalent
(CR(VI))
Polybrominated
Biphenyl
(PBB)
Polybrominated
diphenylether
(PBDE)
PCBs X O O O O O
Metal Parts X O O O O O
Plastic Parts O O O O O O
Speakers X O O O O O
Cables X O O O O O
This table is prepared in accordance with the provisions of SJ/T 11364.
O: Indicates that this toxic or hazardous substance contained in all of the homogeneous materials
for this part is below the limit requirement of GB/T 26572.
X: Indicates that this toxic or hazardous substance contained in at least one of the homogeneous
materials used for this part is above the limit requirement of GB/T 26572.
Taiwan Restriction of Hazardous Substances Table
Equipment name: DesignMax DM6C, Type designation: 829679
Restricted substances and its chemical symbols
Unit
Lead
(Pb)
Mercury
(Hg)
Cadmium
(Cd)
Hexavalent
chromium
(Cr+6)
Polybrominated
biphenyls (PBB)
Polybrominated
diphenyl ethers
(PBDE)
PCBs
-
Metal Parts
-
Plastic Parts
Speakers
-
Cables
-
Note 1: “” indicates that the percentage content of the restricted substance does not exceed the percentage of reference
value of presence.
Note 2: The “−” indicates that the restricted substance corresponds to the exemption.
Date of Manufacture: The eighth digit in the serial number indicates the year of manufacture;
“7” is 2007 or 2017.
China Importer: Bose Electronics (Shanghai) Company Limited, Part C, Plant 9,
No. 353 North Riying Road, China (Shanghai) Pilot Free Trade Zone
EU Importer: Bose Products B.V., Gorslaan 60, 1441 RG Purmerend, The Netherlands
Mexico Importer: Bose de México, S. de R.L. de C.V. , Paseo de las Palmas 405-204, Lomas de
Chapultepec, 11000 México, D.F. For importer & service information: +5255 (5202) 3545
Taiwan Importer: Bose Taiwan Branch, 9F-A1, No. 10, Section 3, Minsheng East Road, Taipei City
104, Taiwan. Phone Number: +886-2-2514 7676
Bose and DesignMax are trademarks of Bose Corporation.
Bose Corporation Headquarters: 1-877-230-5639
©2019 Bose Corporation. No part of this work may be reproduced, modified, distributed or
otherwise used without prior written permission.
Warranty Information
This product is covered by a limited warranty.
For warranty details, visit PRO.BOSE.COM.
Product Ratings:
Input Voltage: 70V/100V
Impedance: 8 Ω, 100 W
Current or Power: (70V): 2.5W, 5W, 10W, 20W, 40W, 80W; (100V): 5W, 10W, 20W, 40W, 80W
WARNINGS/CAUTIONS
This product contains magnetic material. Consult your physician on whether
this might aect your implantable medical device.
• All Bose products must be installed in accordance with local, state, federal and industry
regulations. It is the installer’s responsibility to ensure installation of the loudspeakers
and mounting system is performed in accordance with all applicable codes, including
local building codes and regulations. Consult the local authority having jurisdiction
before installing this product.
• Unsafe mounting or overhead suspension of any heavy load can result in serious
injury or death, and property damage. It is the installer’s responsibility to evaluate the
reliability of any mounting method used for their application. Only professional installers
with the knowledge of proper hardware and safe mounting techniques should attempt
to install any loudspeaker overhead.
• Do not mount the product in locations where it may be exposed to water or
condensation.
• This product is not intended for installation or use in indoor water facility areas
(including, without limitation, indoor pools, indoor water parks, hot tub rooms, saunas,
steam rooms and indoor skating rinks).
• Do not mount on surfaces that are not sturdy, or that have hazards concealed behind
them, such as electrical wiring or plumbing. If you are not sure about installing the
bracket, contact a qualified professional installer. Ensure the bracket is installed
according to local building codes.
• Use only the hardware and accessories included or specified by Bose for use with
DesignMax DM6C loudspeakers. For information on compatible accessories, see the
product's technical data sheet at PRO.BOSE.COM.
• Keep the product away from fire and heat sources. Do not place naked flame sources,
such as lighted candles, on or near the product.
• Do not make unauthorized alterations to this product.
• Do not expose loudspeaker or mounting components to any chemical substances
that are not specified by Bose, including but not limited to lubricants, cleaning agents,
contact sprays, or other hydrocarbon-based solvents. Exposure to such substances can
lead to degradation of the plastic material, resulting in cracking and creating a falling
hazard.
• Clean speakers using only a dry cloth. Do not expose loudspeaker to soap, detergent,
mineral oil, alcohol or other cleaning agents or chemicals.
• The grille is equipped with a safety lanyard pin designed for a single use.
English • 3Installation Guide • DesignMax DM6C
PRO.BOSE.COM
Overview
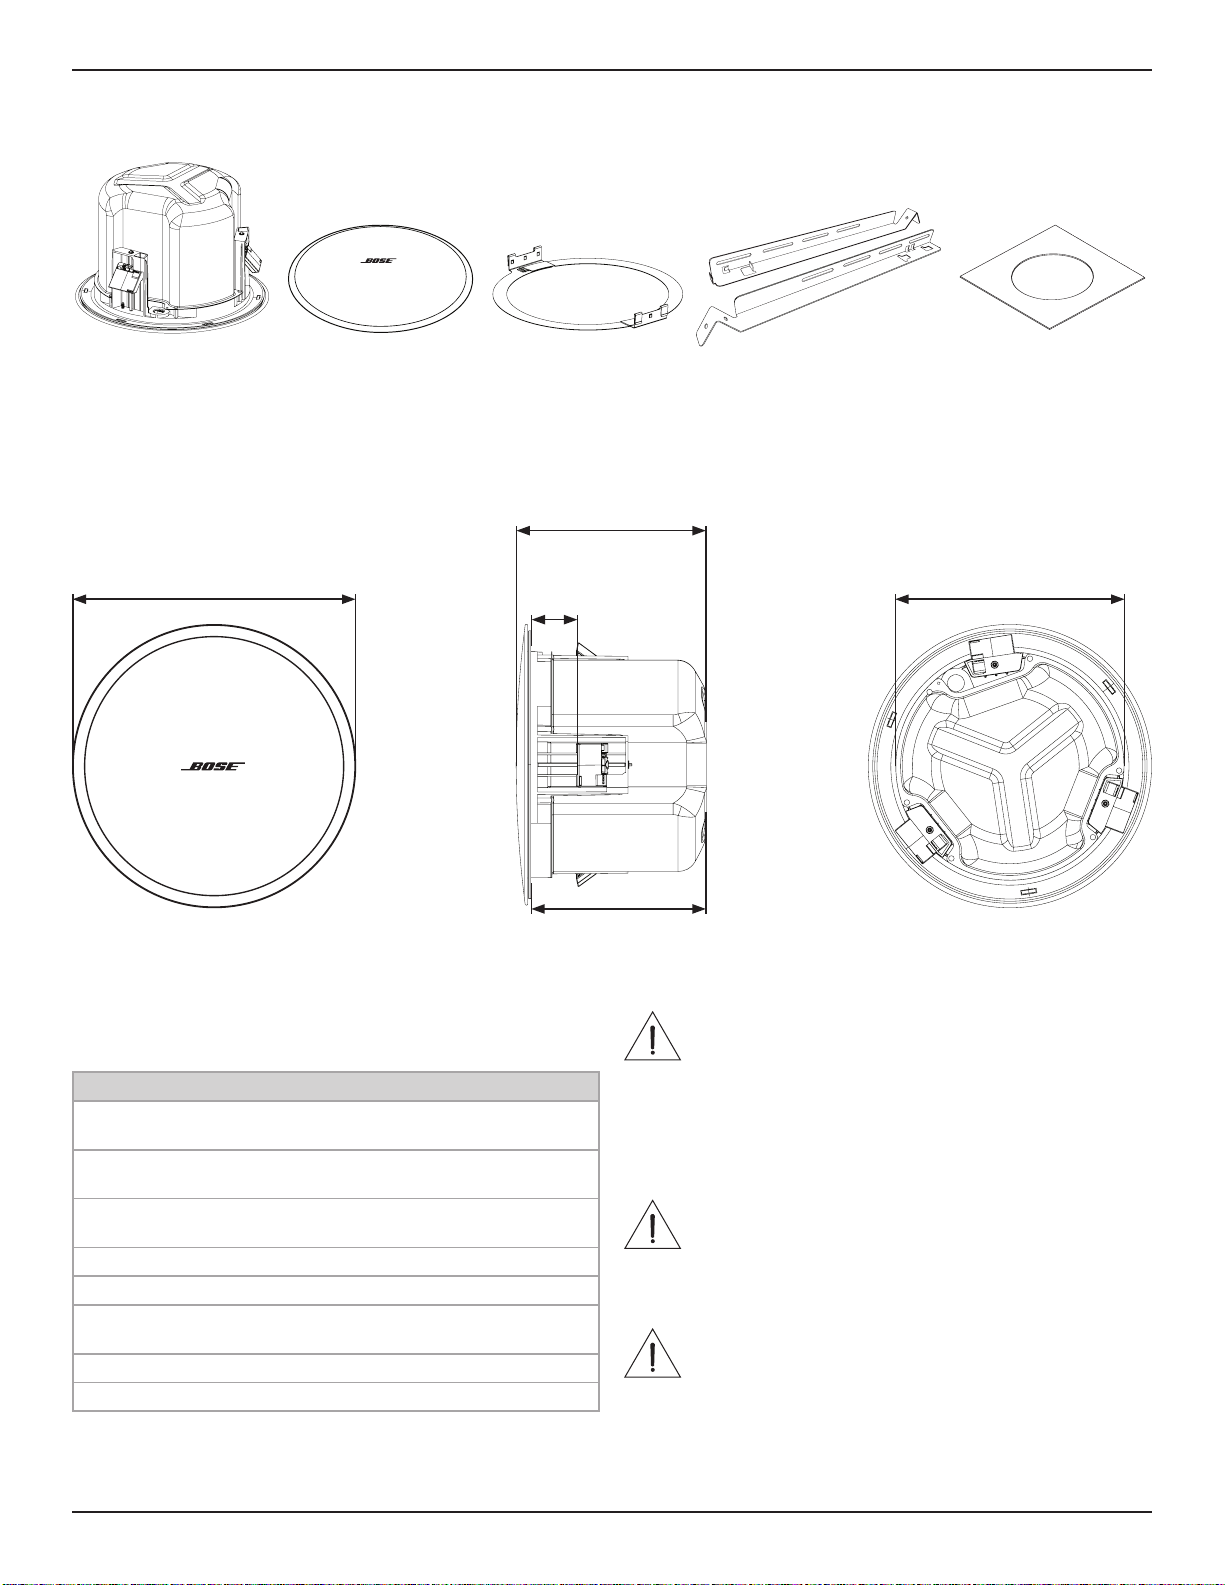
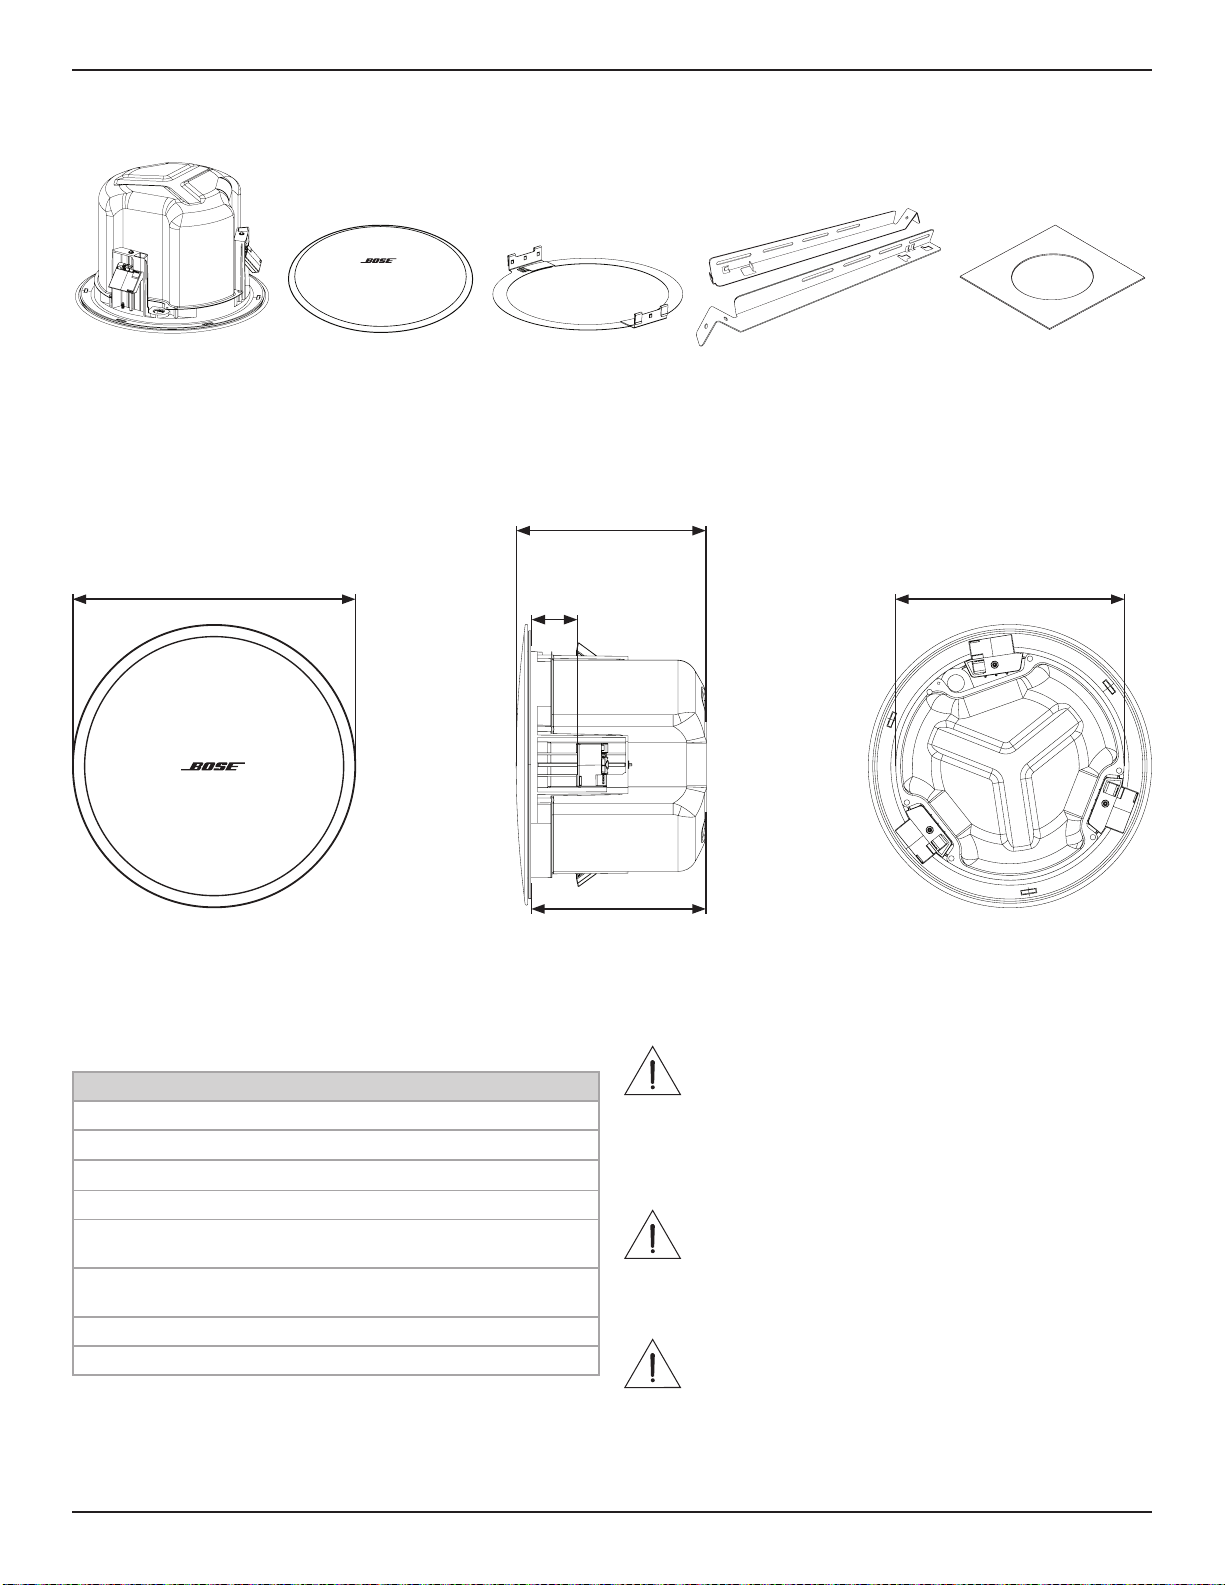
Package Contents
Product Dimensions
×2 ×2 ×4×2 ×1
356 mm
14.00 in
288 mm
11.34 in
57 mm
2.25 in
223 mm
8.78 in
239 mm
9.41 in
Technical Specifications
For additional specifications, see the DesignMax DM6C
technical data sheet at PRO.BOSE.COM.
Physical
Product Dimensions Grille diameter: 356 mm
(14.00 in)
Enclosure diameter: 288 mm
(11.34 in)
Backcan depth: 223 mm
(8.78 in)
Hole cutout 292 mm (11.5 in)
Maximum Ceiling Thickness 57 mm (2.25 in)
Net Weight, Loudspeaker with
grille (single)
6.50 kg (14.3 lb)
Net Weight, Tile Bridge (single) 0.82 kg (1.8 lb)
Shipping Weight (pair) 17.74 kg (39.1 lb)
Important Installation Information
This product is intended for indoor use only.
It is the installer’s responsibility to ensure installation of the
loudspeakers and mounting system is performed in accordance with
all applicable codes, including local building codes and regulations.
Consult the local authority having jurisdiction before installing this
product.
It is the responsibility of the installer to ensure the safety of the
loudspeaker installation. Failure to properly install the loudspeaker
could result in damage, injury, or death.
Do not mount the product in locations where it may be exposed to
water or condensation.
This product is not intended for installation or use in indoor water
facility areas (including, without limitation, indoor pools, indoor water
parks, hot tub rooms, saunas, steam rooms and indoor skating rinks).
Do not block any ventilation openings. Install in accordance with the
manufacturer’s instructions.
Do not install near any heat sources such as radiators, heat registers,
stoves, or other apparatus (including amplifiers) that produces heat.
Do not mount on surfaces that are not sturdy, or that have hazards
concealed behind them, such as electrical wiring or plumbing. If you
are not sure about installing the bracket, contact a qualified
professional installer. Ensure the bracket is installed according to local
building codes.
Do not expose loudspeaker or mounting components to any chemical
substances that are not specified by Bose, including but not limited
to lubricants, cleaning agents, contact sprays, or other hydrocarbon-
based solvents. Exposure to such substances can lead to degradation
of the plastic material, resulting in cracking and creating a falling
hazard.

4 • English DesignMax DM6C • Installation Guide
PRO.BOSE.COM
Setup
Installation Options
Installation Options and Accessories
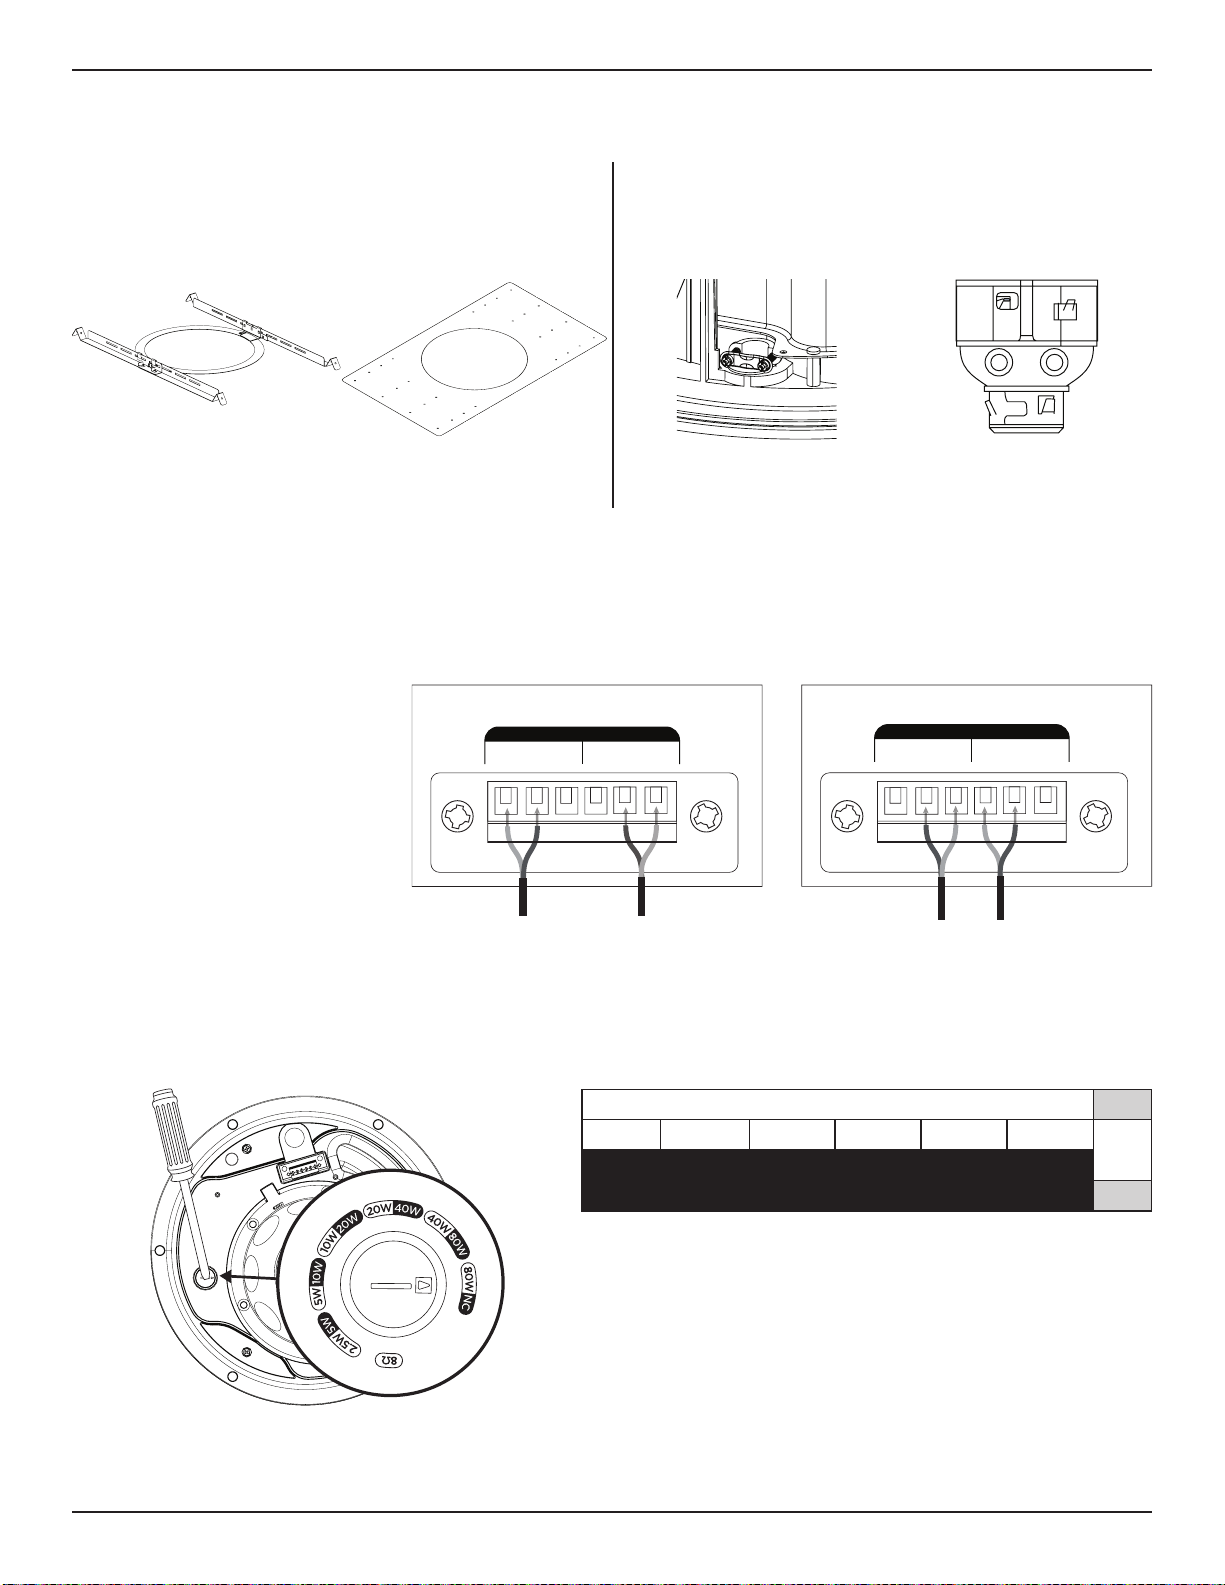
q Adjustable Tile Bridge (included)
w Rough-in Pan (optional)
Conduit Fitting
If using a flexible metal conduit, use with a ⅜-inch conduit
fitting or a ⅜-inch dual (duplex) connector.
Note: Conduit fittings are not provided.
q
w
⅜-inch single in ⅜-inch duplex in/loop
Wiring the Loudspeaker
Wire Gauge
The DesignMax DM6C loudspeaker is designed to work with 18 AWG (0.8 mm
2
) to 14 AWG (2.1 mm
2
) size wire only.
Loudspeaker Settings
70V
2.5W 5W 10W 20W 40W 80W*
8Ώ
5W 10W 20W 40W 80W NC**
100V
** NC: No Connection (do not use)* Factory default
Transformer Tap Setting
Set tap by turning. Use a flat head screwdriver.
Connection Diagrams
Expose six millimeters (¼ inch)
of bare wire to attach to the
terminals.
70V/100V
8Ω
OUT
IN
70/
100V COM8Ω8ΩCOM
70/
100V
OUT
IN
70/
100V COM8Ω8ΩCOM
70/
100V

English • 5Installation Guide • DesignMax DM6C
PRO.BOSE.COM
Setup
Preparing the Installation
Using a Safety Cable
Some regional construction codes require the use
of a secondary method of securing loudspeakers to
support structures to provide additional safety. Choose
a mounting position, method, and hardware consistent
with local building codes and regulations.
Bose recommends using (1) a safety wire or (2) a safety
cable as a secondary securing mechanism. See the
diagrams below for safety attachment points.
Follow the manufacturer’s instructions for any secondary
securing mechanism implemented.
q
e
w
Assembling the Tile Bridge
Note: If you are installing in a hard ceiling, assemble the tile
bridge after inserting the rails and ring through the hole
cutout (see page 6).
1. Align the rails and insert the tabs into the slots.
2. Pull the rails outward to secure them together.
3. Align the rails parallel to each other and press the tile
bridge ring down to secure the ring to the rails.
qw
q
Cutting the Ceiling Tile
1. Remove the tile and use the template to trace
a loudspeaker hole onto the tile. To center the
template on the tile, draw an X by connecting
the corners diagonally and center the template
using the crossing point.
2. Cut a hole into the tile.
q w
Preparing Acoustic Ceiling Tile
Installing the Tile Bridge
1. Place the assembled tile bridge across the
ceiling grid. If necessary, adjust the tile bridge
so the rails rest on the ceiling grid.
2. Replace the tile in the ceiling.
q w
Note: Installation in close proximity to cooking surfaces
where the loudspeaker may be directly exposed to
cooking oils, such as in commercial cooking environments,
may decrease the performance or functionality of the
loudspeaker.

6 • English DesignMax DM6C • Installation Guide
PRO.BOSE.COM
Installation
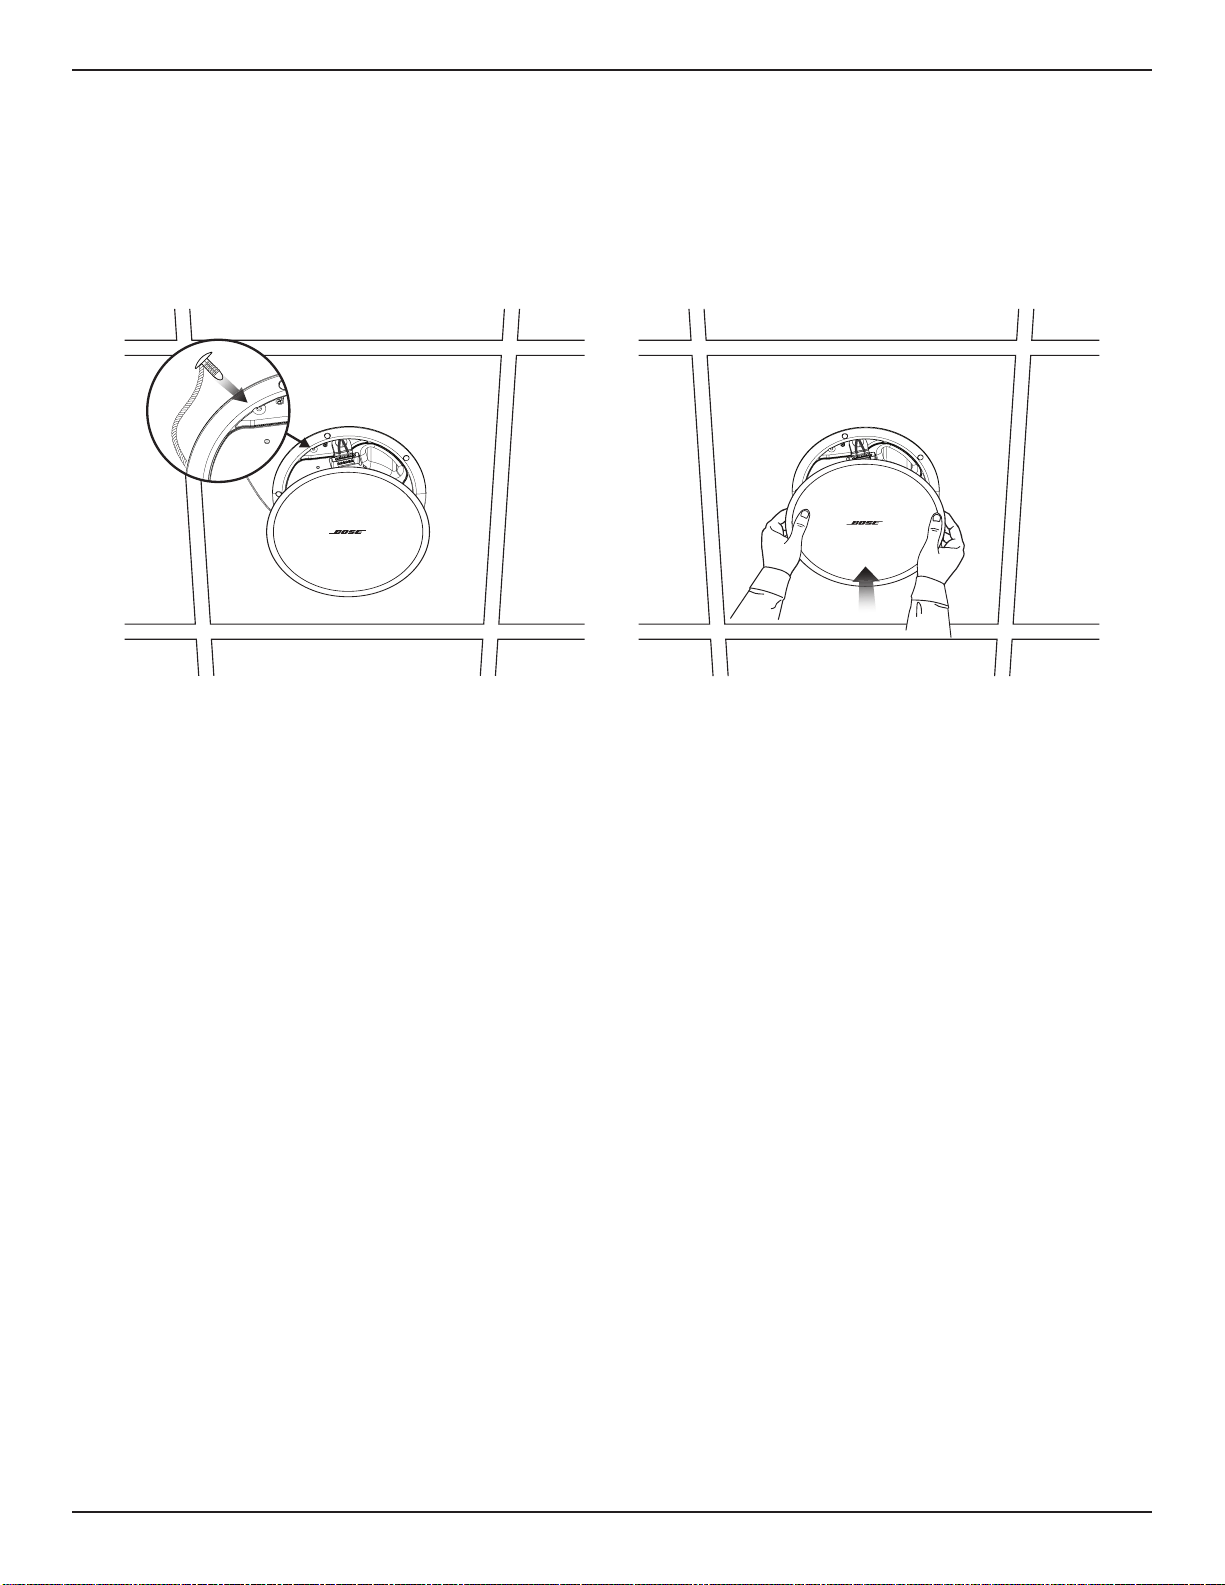
Mounting the Loudspeaker
1. Pass the audio wire through the wire opening.
2. Insert the loudspeaker through the hole and into the tile bridge. Make sure the anchors engage on the tile bridge
before loosening your grip on the loudspeaker.
3. Remove the connector, wire the connector, and reinsert the connector into the loudspeaker. For wiring information, see
Wiring the Loudspeaker on page4.
4. Tighten the anchor arm screws to secure the loudspeaker. If using a power drill, set to a low torque setting.
WARNING: Over-tightening the screws may result in damage to the anchor attachment point or the ceiling,
which could lead to a falling hazard.
q
e
w
r
Cutting the Ceiling
1. Use the template to trace a hole onto
the ceiling.
2. Cut a hole into the ceiling.
q w
Preparing Hard Ceiling (Existing Construction)
Installing the Tile Bridge
1. Insert the tile bridge rails and ring
through the hole and place the rails
parallel to each other across the
ceiling grid or ceiling furring.
2. Assemble the tile bridge.
q w
English • 7Installation Guide • DesignMax DM6C
PRO.BOSE.COM
Installation
Installing in Hard Ceiling Using a Rough-in Pan (New Construction)
For information on installing a rough-in pan, see the DesignMax Rough-in Pan installation guide at PRO.BOSE.COM. Once
the rough-in pan is installed, see Mounting the Loudspeaker on page 6.
Attaching the Grille
Insert the safety lanyard pin into the hole in the loudspeaker. Using both hands, position the grille against the loudspeaker.
The grille secures to the loudspeaker magnetically.
Safety and Regulatory Compliance
The Bose DesignMax DM6C loudspeaker has passed testing and complies with the following specifications and uses:
Listed to ANSI/UL 1480A-2016, Speakers for Commercial & Safety Professional Use
General-Purpose Use - UL Category UEAY, File Number S 5591 Control Number 3N89
UL-2043, 2013, Fire Test and Visible Smoke Release for Discrete Products and their Accessories Installed in Air
Handling Spaces. Suitable for use in air handling (plenum) spaces.
Suitable for installation using Class 1, Class 2, Class 3 wiring methods in accordance with NFPA 70, National
Electrical Code, 2017, Article 640
NFPA 70, National Electrical Code, 2017, Article 300-22(c)
NFPA 90-A, 2015, Installation of Air Conditioning and Ventilation Systems, Paragraph 4.3.11.2.6.5
The DesignMax DM6C loudspeaker has been designed to the requirements defined in the following European regulatory
specification for combination systems:
Tested to IEC60268-5, 2007
Guía de instalación de • DesignMax DM6C
PRO.BOSE.COM
8 • Español
Instrucciones importantes de seguridad
Lea y conserve todas las instrucciones de uso y seguridad.
Este producto está diseñado para ser instalado únicamente por instaladores profesionales.
Este documento está diseñado para proveer las pautas de seguridad e instalación básicas a los
instaladores profesionales de este producto en sistemas de instalación fija comunes. Lea este
documento y todas las advertencias de seguridad antesdecomenzar la instalación.
No intente reparar este producto por su cuenta. Remita todas las reparaciones a centros
de servicio, instaladores, técnicos o distribuidores autorizados. Para comunicarse con
BoseProfessional o para encontrar un distribuidor cerca de usted, visite PRO.BOSE.COM.
1. Lea estas instrucciones.
2. Guarde estas instrucciones.
3. Preste atención a las advertencias.
4. Siga todas las instrucciones.
5. No use este aparato cerca del agua.
6. Límpielo solamente con un paño seco.
7. No obstruya ninguna abertura de ventilación. Realice la instalación conforme a las
instrucciones del fabricante.
8. No lo instale cerca de una fuente de calor, como radiadores, rejillas de calefacción, estufas
u otros aparatos (incluidos los amplificadores) que produzcan calor.
9. Utilice solamente los accesorios especificados por el fabricante.
Información normativa
Este producto cumple con todos los requisitos correspondientes de la Directiva de
la UE. La declaración de conformidad completa se puede encontrar en:
www.Bose.com/compliance.
Este símbolo indica que el producto no se debe desechar como residuo doméstico
y se debe enviar a una planta para tratamiento de residuos apropiada para su
reciclado. Una eliminación y un reciclado adecuados ayudan a proteger los
recursos naturales, la salud humana y el medioambiente. Para obtener más
información acerca de la eliminación y el reciclado de este producto, comuníquese
con su municipalidad local, un centro de servicios de desecho o la tienda donde
compró este producto.
Fecha de fabricación: El octavo dígito del número de serie indica el año de fabricación;
p.ej., "7" es 2007 o 2017.
Importador para China: Bose Electronics (Shanghái) Company Limited, Part C, Plant 9,
nro. 353 North Riying Road, China (Shanghái), Zona franca piloto
Importador para la UE: Bose Products B.V., Gorslaan 60, 1441 RG Purmerend, Países Bajos
Importador para México: Bose de México, S. de R.L. de C.V. , Paseo de las Palmas 405-204,
Lomas de Chapultepec, 11000 México, D.F. Para obtener información sobre el servicio y el
importador, comuníquese al: +5255 (5202) 3545
Importador para Taiwán: Bose Taiwan Branch, 9F-A1, Nº 10, Section 3, Minsheng East Road,
Taipei City 104, Taiwán. Número telefónico: +886-2-2514 7676
Bose y DesignMax son marcas comerciales de Bose Corporation.
Oficinas centrales de Bose Corporation: 1-877-230-5639
©2019 Bose Corporation. Ninguna parte de este trabajo podrá reproducirse, modificarse,
distribuirse ni usarse sin un permiso previo por escrito.
Información de la garantía
Este producto está cubierto con una garantía limitada.
Para ver los detalles de la garantía, visite PRO.BOSE.COM.
Especificaciones del producto:
Voltaje de entrada: 70 V/100 V
Impedancia: 8 Ω, 100 W
Opciones de potencia de salida: (70 V): 2.5W, 5W, 10W, 20W, 40W, 80W; (100V): 5W,
10W, 20W, 40W, 80W
ADVERTENCIAS/PRECAUCIONES
Este producto contiene materiales magnéticos. Consulte con su médico si esto
podría llegar a afectar un dispositivo médico implantado.
• Todos los productos Bose deben instalarse conforme a las leyes locales, estatales,
federales y del sector. Es responsabilidad del instalador garantizar que la instalación del
sistema de soporte y los altavoces se realice conforme a los códigos aplicables, incluidos
los códigos y las reglamentaciones de construcción locales. Consulte a la autoridad local
competente antes de instalar este producto.
• El montaje inseguro o la suspensión en altura de cualquier carga pesada
puedenprovocar lesiones graves o la muerte, además de daños a la propiedad. Es
responsabilidad del instalador evaluar la confiabilidad de cualquier método de montaje
utilizado para su aplicación. Únicamente los instaladores profesionales con conocimiento
de las herramientas adecuadas y las técnicas de montaje segurodeberían intentar
instalar cualquier altavoz en altura.
• No monte el producto en lugares donde pueda estar expuesto al agua o a la
condensación.
• Este producto no está diseñado para ser instalado ni utilizado en zonas de instalaciones
acuáticas en interiores (incluidos, entre otros, piscinas techadas, parques acuáticos
techados, jacuzzis, saunas, salas de vapor y pistas de patinaje techadas).
• Monte únicamente en superficies que sean resistentes o que no presenten peligros
ocultos, como cableado eléctrico o plomería. Si no está seguro acerca de cómo instalar
el soporte, comuníquese con un instalador profesional cualificado. Asegúrese de que el
soporte esté instalado de acuerdo con los códigos locales de construcción.
• Utilice solo el hardware y los accesorios incluidos, o bien los que Bose especifica
como aptos para los altavoces DesignMax DM6C. Para obtener información sobre
losaccesorios compatibles, consulte la hoja de datos técnicos del producto en
PRO.BOSE.COM.
• Mantenga el producto lejos del fuego y de fuentes de calor. No coloque sobre
el producto, o en su proximidad, fuentes de llamas sin protección; por ejemplo,
velasencendidas.
• No realice alteraciones no autorizadas a este producto.
• No exponga el altavoz ni los componentes de montaje a sustancias químicas que
no hayan sido especificadas por Bose, incluidos, entre otros, lubricantes, productos
de limpieza, aerosoles de contacto u otros disolventes a base de hidrocarburos.
Laexposición a estas sustancias puede degradar el plástico, lo que produce
grietas y el riesgo de que se caiga el dispositivo.
• Limpie los altavoces solo con un paño seco. No exponga los altavoces a detergentes,
aceite mineral, alcohol ni otros agentes o químicos de limpieza.
• La rejilla cuenta con un cordón con amarre de seguridad diseñado para usarlo solo una
vez.

Español • 9Guía de instalación de • DesignMax DM6C
PRO.BOSE.COM
Descripción general
Contenido de la caja
Dimensiones del producto
× 2 × 2 × 4× 2 × 1
356 mm
(14.00")
288 mm
(11.34")
57 mm
(2.25")
223 mm
(8.78")
239 mm
(9.41")
Especificaciones técnicas
Para conocer más especificaciones, consulte la hoja de
datos técnicos de DesignMax DM6C en PRO.BOSE.COM.
Datos físicos
Dimensiones del producto Diámetro de la rejilla: 356 mm
(14.00")
Diámetro de la carcasa:
288mm (11.34")
Profundidad de la carcasa
posterior: 223 mm (8.78")
Medida de calado/perforación 292 mm (11.5")
Grosor máximo del techo 57 mm (2.25")
Peso neto, altavoz con rejilla
(individual)
6.50 kg (14.3 lb)
Peso neto, puente de mosaico
(individual)
0.82 kg (1.8 lb)
Peso de envío (par) 17.74 kg (39.1 lb)
Información importante sobre la
instalación
Este producto está destinado solo para uso en áreas interiores.
Es responsabilidad del instalador garantizar que la instalación
del sistema de soporte y los altavoces se realice conforme a los
códigos aplicables, incluidos los códigos y las reglamentaciones de
construcción locales. Consulte a la autoridad local competente antes
de instalar este producto.
Es responsabilidad del instalador garantizar que la instalación de
los altavoces sea segura. Si no se instala el altavoz correctamente,
podría provocar daños, lesiones o la muerte.
No monte el producto en lugares donde pueda estar expuesto
alagua o a la condensación.
Este producto no está diseñado para ser instalado ni utilizado
enzonas deinstalaciones acuáticas en interiores (incluidos, entre
otros, piscinas techadas, parques acuáticos techados, jacuzzis,
saunas, salas de vapor ypistas de patinaje techadas).
No obstruya ninguna abertura de ventilación. Realice la instalación
conformea las instrucciones del fabricante.
No lo instale cerca de una fuente de calor, como radiadores,
rejillas de calefacción, estufas u otros aparatos (incluidos los
amplificadores) que produzcan calor.
Monte únicamente en superficies que sean resistentes o que no
presenten peligros ocultos, como cableado eléctrico o plomería. Sino
está seguro acerca de cómo instalar el soporte, comuníquese con un
instalador profesional cualificado. Asegúrese de que el soporte esté
instalado deacuerdo con los códigos locales de construcción.
No exponga el altavoz ni los componentes de montaje a sustancias
químicas que no hayan sido especificadas por Bose, incluidos, entre
otros, lubricantes, productos de limpieza, aerosoles de contacto u
otros disolventes a base de hidrocarburos. La exposición a estas
sustancias puede degradar el plástico, lo queproduce grietas y el
riesgo de que se caiga el dispositivo.

10 • Español Guía de instalación de • DesignMax DM6C
PRO.BOSE.COM
Configuración
Opciones de instalación
Opciones y accesorios de instalación
q Puente de mosaico ajustable (incluido)
w Bandeja empotrada (opcional)
Accesorios de conductos
Si utiliza un conducto metálico flexible, hágalo con un
accesorio de conducto de ⅜ pulgadas o un conector doble
(dúplex) de ⅜ pulgadas.
Nota: No se proporcionan los accesorios de conducto.
q
w
Entrada única de
⅜ pulgadas
Entrada dúplex/
loop de ⅜ pulgadas
Cableado de los altavoces
Calibre de cable
El altavoz DesignMax DM6C está diseñado para funcionar únicamente con cables que midan de 18 AWG (0.8 mm
2
)
a 14 AWG (2.1 mm
2
).
Configuración de altavoz
70 V
2.5 W 5 W 10 W 20 W 40 W 80 W*
8Ώ
5 W 10 W 20 W 40 W 80 W NC**
100 V
** NC: Sin conexión (no utilizar)* Predeterminado de
fábrica
Configuración de la toma del transformador
Gire la toma para establecer la configuración. Utilice un
destornillador de cabeza plana.
Diagramas de conexión
Exponga 6 milímetros (¼")
de cable sin aislación para
conectarlo a los terminales.
70 V/100 V
8 Ω
OUT
IN
70/
100V COM8Ω8ΩCOM
70/
100V
OUT
IN
70/
100V COM8Ω8ΩCOM
70/
100V

Español • 11Guía de instalación de • DesignMax DM6C
PRO.BOSE.COM
Configuración
Preparación de la instalación
Uso de un cable de seguridad
En algunos códigos regionales de construcción, se
exige el uso de un método secundario de fijación de los
altavoces a estructuras de apoyo con el propósito de
brindar mayor seguridad. Elija una posición de montaje,
un método y los componentes que cumplan con los
códigos y los reglamentos locales de construcción.
Bose recomienda utilizar un alambre de seguridad (1)
oun cable de seguridad (2) como mecanismo secundario
de fijación. Consulte los siguientes diagramas para
conocer los puntos de fijación de seguridad.
Siga las instrucciones del fabricante en la instalación de
cualquier mecanismo de fijación secundario que desee
implementar.
q
e
w
Montaje del puente de mosaico
Nota: Si está realizando la instalación en un techo duro,
monte el puente de mosaico después de insertar los rieles
yel anillo a través de la perforación (consulte la página 12).
1. Alinee los rieles e inserte las lengüetas en las ranuras.
2. Tire los rieles hacia afuera para asegurarlos.
3. Alinee los rieles de manera paralela y presione el anillo
del puente de mosaico para asegurarlo a los rieles.
qw
q
Corte del mosaico de techo
1. Retire el mosaico y utilice la plantilla para
marcar un orificio para el altavoz en el mosaico.
Para centrar la plantilla sobre el mosaico,
conecte las esquinas diagonalmente dibujando
una X, luego alinee la plantilla utilizando el
punto de cruce.
2. Haga un orificio en el mosaico.
q w
Preparación del mosaico acústico para techo
Instalación del puente de mosaico
1. Ubique el puente de mosaico montado en la
cuadrícula del techo. Si es necesario, ajuste
el puente de mosaico de modo que los rieles
descansen sobre la cuadrícula del techo.
2. Reemplace el mosaico del techo.
q w
Nota: Si el altavoz se instala cerca de superficies de cocina,
como entornos comerciales de cocina en los que quede
expuesto directamente a aceites, es posible que disminuya el
rendimiento o la operatividad del dispositivo.

12 • Español Guía de instalación de • DesignMax DM6C
PRO.BOSE.COM
Instalación
Montaje del altavoz
1. Pase el cable de audio a través de la apertura para cables.
2. Inserte el altavoz a través del orificio y en el puente de mosaico. Asegúrese de que los anclajes se ajusten
correctamente en el puente de mosaico antes de soltar los altavoces.
3. Retire el conector, conéctele los cables y vuelva a insertarlo en el altavoz. Para obtener información sobre el cableado,
consulte Cableado de los altavoces en la página 10.
4. Fije los tornillos del brazo de anclaje para sujetar el altavoz. Si utiliza un taladro eléctrico, ajústelo a una posición para
torque bajo.
ADVERTENCIA: Apretar demasiado los tornillos puede dañar el punto de conexión del anclaje o el techo, loque
puede producir el riesgo de que se caiga el dispositivo.
q
e
w
r
Corte del techo
1. Utilice la plantilla para marcar
elorificio en el techo.
2. Haga un orificio en el techo.
q w
Preparación de un techo duro (construcción existente)
Instalación del puente de
mosaico
1. Inserte los rieles de puente y el anillo a
través del orificio y coloque los rieles
de manera paralela en la cuadrícula o
el enrasillado del techo.
2. Montaje del puente de mosaico.
q w

Español • 13Guía de instalación de • DesignMax DM6C
PRO.BOSE.COM
Instalación
Instalación en techos duros con una bandeja empotrada (construcción nueva)
Para obtener información sobre la instalación de una bandeja empotrada, consulte la guía de instalación de la bandeja
empotrada del DesignMax en PRO.BOSE.COM. Cuando la bandeja empotrada esté instalada, consulte Montaje del altavoz
en la página 12.
Fijación de la rejilla
Inserte el cordón con amarre de seguridad en el orificio del altavoz. Coloque la rejilla frente al altavoz usando ambas
manos. La rejilla se fija al altavoz con imanes.
Cumplimiento de las normativas y los reglamentos de
seguridad
El altavoz Bose DesignMax DM6C ha superado pruebas y cumple con los siguientes usos y especificaciones:
Registrados en el estándar ANSI/UL 1480A-2016 para altavoces de uso comercial y profesional seguro
Uso general: estándar UL categoría UEAY, número de archivo S 5591, número de control 3N89
Estándar UL-2043, 2013, prueba de fuego y liberación de humo visible para productos diferenciados y sus
accesorios instalados en espacios de circulación de aire. Apto para el uso en espacios con circulación de aire
exterior (cámaras de aire).
Apto para la instalación con métodos de cableado Clase 1, Clase 2 y Clase 3 de conformidad con el estándar
NFPA 70, Código Eléctrico Nacional, 2017, Artículo 640
Estándar NFPA 70, Código Eléctrico Nacional, 2017, Artículo 300-22(c)
Estándar NFPA 90-A, 2015, instalación de sistemas de aire acondicionado y ventilación, Párrafo 4.3.11.2.6.5
El altavoz DesignMax DM6C se diseñó según los requisitos definidos en la siguiente especificación reglamentaria europea
para sistemas combinados:
Probado según IEC60268-5, 2007
DesignMax DM6C • Guide d’installation
PRO.BOSE.COM
14 • Français
Consignes de sécurité importantes
Merci de lire et de conserver le manuel d’instruction et de respecter
lesconsignes de sécurité.
Ce produit doit être installé par un technicien professionnel! Ce document est destiné
àfournir aux techniciens professionnels les directives de montage et de sécurité relatives
àce produit dédié à une installation fixe. Veuillez lire ce document, ainsi que l’ensemble
desavertissements de sécurité avant de procéder à l’installation.
Ne tentez pas de réparer ce produit vous-même. Confiez toutes les opérations de maintenance
à des centres de service, installateurs, techniciens, revendeurs ou distributeurs agréés. Pour
contacter Bose Professional ou pour trouver un revendeur ou un distributeur près de chez vous,
rendez-vous à l’adresse PRO.BOSE.COM.
1. Veuillez lire ces consignes.
2. Veuillez conserver ces consignes.
3. Respectez tous les avertissements.
4. Suivez toutes les consignes.
5. N’utilisez pas cet appareil à proximité d’eau ou de toute autre source d’humidité.
6. Utilisez uniquement un chion sec pour le nettoyage.
7. Ne bloquez jamais les orifices d’aération. Suivez les instructions du fabricant pour
l’installation.
8. N’installez pas cet appareil à proximité d’une quelconque source de chaleur, telle
qu’un radiateur, une arrivée d’air chaud, un four ou tout autre appareil (notamment
lesamplificateurs) produisant de la chaleur.
9. Utilisez uniquement les accessoires spécifiés par le fabricant.
Informations réglementaires
Ce produit est conforme à toutes les directives de l’Union européenne qui s’y
appliquent. La déclaration de conformité complète est disponible à l’adresse
suivante: www.Bose.com/compliance.
Ce symbole signifie que le produit ne doit pas être jeté avec les déchets ménagers,
mais doit être déposé dans un centre de collecte approprié pour recyclage. La mise
au rebut adéquate et le recyclage permettent de protéger lesressources naturelles,
la santé humaine et l’environnement. Pour plus d’informations sur l’élimination et
le recyclage de ce produit, contactez votre mairie, votre service d’enlèvement des
ordures ou le magasin où vous avez acheté ce produit.
Date de fabrication: le huitième chire du numéro de série indique l’année de fabrication; par
exemple, «7» correspond à 2007 ou à 2017.
Importateur pour la Chine: Bose Electronics (Shanghai) Company Limited, Part C, Plan 9
No. 353 North Riying Road, China (Shanghai) Pilot Free Trade Zone
Importateur pour l’UE: Bose Products B.V., Gorslaan 60, 1441 RG Purmerend, Pays-Bas
Importateur pour le Mexique: Bose de México, S. de R.L. de C.V. , Paseo de las Palmas
405-204, Lomas de Chapultepec, 11000 México, D.F. Pour plus d’informations sur l’importateur
etle service: +5255 (5202) 3545
Importateur pour Taïwan: Bose Taiwan Branch, 9F-A1, No. 10, Section 3, Minsheng East Road,
Taipei City 104, Taïwan. Numéro de téléphone: +886-2-2514 7676
Bose et DesignMax sont des marques commerciales de Bose Corporation.
Siège de Bose Corporation: 1-877-230-5639
©2019 Bose Corporation. Toute reproduction, modification, distribution ou autre utilisation,
même partielle, de ce document est interdite sans autorisation écrite préalable.
Informations relatives à la garantie
Cet appareil est couvert par une garantie limitée.
Pour avoir plus d’information sur la garantie, visitez PRO.BOSE.COM.
Spécifications du produit:
Tension d’entrée: 70V/100V
Impédance: 8Ω, 100W
Courant ou puissance: (70V): 2,5W, 5W, 10W, 20W, 40W, 80W; (100 V): 5W, 10W, 20W,
40W, 80W
AVERTISSEMENTS/PRÉCAUTIONS
Ce produit contient des composants magnétiques. Consultez votre médecin
afin de savoir si ces composants peuvent avoir une incidence sur tout dispositif
médical implanté.
• Tous les produits Bose doivent être installés dans le respect des réglementations locales
et nationales. L’installateur est responsable du respect de tous les codes et règlements
locaux et nationaux en vigueur applicables à l’installation et au montage des enceintes.
Consultez les autorités locales compétentes avant d’installer ce produit.
• Tout montage non sécurisé ou suspension d’une lourde charge peut provoquer des
dégâts matériels et des blessures graves, voire la mort. Il est de la responsabilité de
l’installateur d’évaluer la fiabilité de la méthode de montage utilisée, en fonction de
l’application. Seul un installateur professionnel connaissant les accessoires et techniques
de montage adaptés est qualifié pour installer des enceintes suspendues.
• Ne montez pas le produit dans des endroits où il peut être exposé à l’eau ou à la
condensation.
• Ce produit n’est pas destiné à être monté ou utilisé dans des installations humides en
intérieur (par exemple piscine intérieure, parc aquatique intérieur, baignoire à remous,
sauna, hammam, patinoire intérieure, etc.).
• Veillez à ne pas installer sur des surfaces peu résistantes ou dans lesquelles peuvent être
intégrés des fils électriques ou des tuyaux de plomberie. En cas de doute, faites appel à
un installateur professionnel. Veillez à installer le support conformément aux normes de
construction locales.
• N’utilisez que le matériel et les accessoires livrés ou spécifiés par Bose pour une utilisation
avec les enceintes DesignMax DM6C. Pour plus d’informations sur les accessoires
compatibles, reportez-vous à la fiche technique du produit sur PRO.BOSE.COM.
• Tenez le produit à l’écart du feu et des sources de chaleur. Ne placez jamais d’objets
enflammés, tels que des bougies allumées, sur l’appareil.
• Veillez à ne pas eectuer de modifications non autorisées sur ce produit.
• N’exposez pas l’enceinte ou les accessoires de montage à des substances chimiques
qui ne sont pas spécifiées par Bose, y compris, mais sans s’y limiter, les lubrifiants, les
produits de nettoyage, les sprays de contact ou autres solvants à base d’hydrocarbures.
L’exposition à de telles substances peut provoquer une dégradation du matériau
plastique, se traduisant par des fêlures pouvant conduire à une chute de l’enceinte.
• Nettoyez uniquement les enceintes avec un chion sec. N’exposez pas l’enceinte à du
savon, des détergents, des huiles minérales, de l’alcool ou d’autres agents nettoyants ou
chimiques.
• La grille est équipée d’un cordon de sécurité à usage unique.

Français • 15Guide d’installation • DesignMax DM6C
PRO.BOSE.COM
Présentation
Contenu de l’emballage
Dimensions du produit
x 2 x 2 x 4x 2 x 1
356mm
14,00po
288mm
11,34po
57mm
2,25po
223mm
8,78po
239mm
9,41po
Caractéristiques techniques
Vous trouverez des caractéristiques supplémentaires dans
la fiche technique des enceintes DesignMax DM6C sur PRO.
BOSE.COM.
Caractéristiques physiques
Dimensions du produit Diamètre de la grille: 356mm
(14,00po)
Diamètre du boîtier: 288mm
(11,34po)
Profondeur du boîtier:
223mm (8,78po)
Ouverture à découper 292mm (11,5po)
Épaisseur maximale du plafond 57mm (2,25po)
Poids net, enceinte avec grille
(une seule enceinte)
6,50kg (14,3lb)
Poids net, plaque de renfort
pour plafond à dalles (une
seule enceinte)
0,82kg (1,8lb)
Poids brut (paire d’enceintes) 17,74kg (39,1lb)
Informations importantes
concernant l’installation
Ce produit est destiné à un usage en intérieur uniquement.
L’installateur est responsable du respect de tous les codes
et règlements locaux et nationaux en vigueur applicables à
l’installation et au montage des enceintes. Consultez les autorités
locales compétentes avant d’installer ce produit.
Il incombe à l’installateur d’assurer la sécurité de l’installation de
l’enceinte. L’installation incorrecte de l’enceinte est susceptible
d’entraîner des dommages etdes blessures, voire la mort.
Ne montez pas le produit dans des endroits où il peut être exposé à
l’eau ou à la condensation.
Ce produit n’est pas destiné à être monté ou utilisé dans des
installations humides en intérieur (par exemple piscine intérieure,
parc aquatique intérieur, baignoire àremous, sauna, hammam,
patinoire intérieure, etc.).
Ne bloquez jamais les orifices d’aération. Suivez les instructions
dufabricant pour l’installation.
N’installez pas cet appareil à proximité d’une quelconque source de
chaleur, telle qu’un radiateur, une arrivée d’air chaud, un four outout
autre appareil (notamment les amplificateurs) produisant de la
chaleur.
Veillez à ne pas installer sur des surfaces peu résistantes ou derrière
lesquelles peuvent être intégrés des fils électriques ou des tuyaux
deplomberie. En cas de doute, faites appel à un installateur
professionnel. Veillez à installer le support conformément aux
normes de construction locales.
N’exposez pas l’enceinte ou les accessoires de montage à des
substances chimiques qui ne sont pas spécifiées par Bose, y
compris, mais sans s’y limiter, les lubrifiants, les produits de
nettoyage, les sprays de contact ou autres solvants à base
d’hydrocarbures. L’exposition à de telles substances peut provoquer
une dégradation du matériau plastique, se traduisant par des fêlures
pouvant conduireà une chute de l’enceinte.

16 • Français DesignMax DM6C • Guide d’installation
PRO.BOSE.COM
Installation
Options d’installation
Options d’installation et accessoires
q Plaque de renfort réglable pour plafond à dalles (inclus)
w Plaque de montage en faux-plafond (en option)
Raccord de conduit
Si vous utilisez un conduit en métal flexible, associez-le à
un raccord de conduit ⅜ pouce ou à un connecteur double
(duplex) ⅜ pouce.
Remarque: les raccords de conduit ne sont pas fournis.
q
w
Entrée simple
⅜ pouces
Entrée duplex/
boucle ⅜ pouces
Câblage de l’enceinte
Épaisseur des câbles
L’enceinte DesignMax DM6C est conçue pour fonctionner avec des câbles de taille 18 (0,8mm
2
) à 14AWG (2,1 mm
2
)
uniquement.
Réglages de l’enceinte
70V
2,5W 5W 10W 20W 40W 80W*
8Ώ
5W 10W 20W 40W 80W NC**
100V
** NC: pas de connexion (ne pas utiliser)* Réglage d’usine par
défaut
Réglage de la prise du transformateur
Réglez la prise en la tournant. Utilisez un tournevis à tête plate.
Diagrammes de connexion
Exposez sixmillimètres (¼po) de
fildénudé à relier aux bornes.
70V/100V
8Ω
OUT
IN
70/
100V COM8Ω8ΩCOM
70/
100V
OUT
IN
70/
100V COM8Ω8ΩCOM
70/
100V

Français • 17Guide d’installation • DesignMax DM6C
PRO.BOSE.COM
Installation
Préparation de l’installation
Utilisation d’un câble de sécurité
Le code de l’urbanisme de certaines régions impose
l’utilisation d’une méthode secondaire de fixation des
enceintes aux structures porteuses pour apporter une
sécurité supplémentaire. Pour le montage, choisissez une
position, une méthode et des accessoires compatibles
avec le code de l’urbanisme local.
Bose recommande l’utilisation de: (1) un fil de sécurité
ou (2) un câble de sécurité comme dispositif de sécurité
secondaire. Voir les schémas ci-dessous pour les points
de fixation de sécurité.
Suivez les instructions du fabricant pour toute
implémentation d’un dispositif de sécurité secondaire.
q
e
w
Assemblage de la plaque de renfort pour
plafond à dalles
Remarque: en cas d’installation dans un plafond dur,
assemblez la plaque de renfort après avoir inséré les bras et
l’anneau à travers l’ouverture découpée (voir page18).
1. Alignez les bras et insérez les languettes dans les fentes.
2. Tirez les bras vers l’extérieur pour les fixer les uns
auxautres.
3. Alignez les bras de façon parallèle et enfoncez l’anneau
de la plaque de renfort dans les bras pour le fixer.
qw
q
Découpe de la dalle du plafond
1. Retirez la dalle et utilisez le gabarit pour tracer
le contour d’une enceinte sur la dalle. Pour
centrer le gabarit sur la dalle, dessinez une
croix (X) en reliant les angles en diagonale,
etcentrez le gabarit au point d’intersection.
2. Découpez une ouverture dans la dalle.
q w
Préparation de la dalle acoustique
de plafond
Installation de la plaque de renfort
pour plafond à dalles
1. Placez la plaque de renfort sur l’ossature
duplafond. Si nécessaire, ajustez la plaque
de renfort de sorte que les bras reposent
surl’ossature.
2. Remettez en place la dalle au plafond.
q w
Remarque: une installation à proximité immédiate de
surfaces de cuisson, où l’enceinte peut être exposée
directement à des huiles de cuisson, comme par exemple
dans une cuisine en milieu professionnel, peut réduire
lesperformances ou compromettre le fonctionnement
del’enceinte.

18 • Français DesignMax DM6C • Guide d’installation
PRO.BOSE.COM
Installation
Montage de l’enceinte
1. Faites passer le câble audio par l’ouverture de passage.
2. Insérez l’enceinte dans l’ouverture et à l’intérieur de la plaque de renfort. Vérifiez que les fixations de l’enceinte sont
engagées dans la plaque de renfort avant de relâcher votre prise sur l’enceinte.
3. Retirez le connecteur, raccordez le connecteur, puis insérez à nouveau le connecteur dans l’enceinte. Consultez la
section Câblage de l’enceinte à la page16 pour plus d’informations sur le câblage.
4. Serrez les vis des bras de fixation pour fixer l’enceinte. Si vous utilisez une visseuse électrique, réglez-la sur un
couplefaible.
AVERTISSEMENT: un serrage excessif des vis peut endommager les points de fixation ou le plafond, ce qui
pourrait créer un risque de chute.
q
e
w
r
Découpe du plafond
1. Utilisez le gabarit pour tracer
uneouverture sur le plafond.
2. Découpez une ouverture dans
leplafond.
q w
Préparation du plafond dur (construction existante)
Installation de la plaque de
renfort pour plafond à dalles
1. Insérez les bras de la plaque de
renfort et l’anneau dans l’ouverture et
placez les bras de façon parallèle sur
l’ossature du plafond ou la fourrure.
2. Assemblez la plaque de renfort.
q w

Français • 19Guide d’installation • DesignMax DM6C
PRO.BOSE.COM
Installation
Installation dans un plafond dur avec plaque de montage
(nouvelle construction)
Pour plus d’informations sur l’installation d’une plaque de montage, consultez le guide d’installation de la plaque
de montage DesignMax à l’adresse PRO.BOSE.COM. Une fois la plaque de montage installée, consultez la section
Montagede l’enceinte en page18.
Pose de la grille
Insérez la broche du cordon de sécurité dans l’orifice de l’enceinte. En utilisant les deux mains, positionnez la grille
surl’enceinte. La grille à fixation aimantée adhère à l’enceinte.
Conformité aux réglementations et aux normes de sécurité
envigueur
L’enceinte Bose DesignMax DM6C a été soumise avec succès à une phase complète de tests et elle est conforme aux
spécifications et utilisations suivantes:
Conformes à la norme ANSI/UL 1480A-2016, Enceintes destinées à un usage professionnel (sécurité) et commercial
Utilisation générale, catégorie UL UEAY, dossier S5591, numéro de contrôle 3N89
UL-2043, 2013, Essai de réaction au feu et dégagement de fumée visible pour les produits autonomes et
leurs accessoires installés dans des emplacements ventilés. Convient à une utilisation dans des emplacements
ventilés(plenum).
Convient à une installation suivant les méthodes de câblage de classe 1, 2 ou 3 selon la norme NFPA70,
NationalElectrical Code, 2017, Article640
NFPA70, National Electrical Code, 2017, Article300-22(c)
NFPA 90-A, 2015, Installation de systèmes de climatisation et de ventilation, Paragraphe 4.3.11.2.6.5
L’enceinte DesignMax DM6C a été conçue en conformité avec les exigences définies dans les spécifications réglementaires
européennes suivantes relatives aux systèmes utilisés en combinaison:
Testée conforme à la norme CEI 60268-5, 2007
DesignMax DM6C • Installationsanleitung
PRO.BOSE.COM
20 • Deutsch
Wichtige Sicherheitshinweise
Bitte lesen Sie alle Sicherheitshinweise und Gebrauchsanleitungen durch
und bewahren Sie sie auf.
Dieses Produkt darf nur von fachkundigen Monteuren installiert werden! Dieses Dokument
soll fachkundigen Monteuren grundlegende Installations- und Sicherheitsrichtlinien für dieses
Produkt in typischen Festinstallationen bieten. Bitte
lesen Sie dieses Dokument und alle Sicherheitshinweise vor der Installation durch.
Versuchen Sie nicht, dieses Produkt selbst zu warten. Lassen Sie jegliche Reparatur- und
Wartungsarbeiten nur von autorisierten Servicepartnern, Monteuren, Technikern, Händlern
oder Distributoren durchführen. Die Bose Professional Kontaktdaten für Ihr Land finden Sie auf
PRO.BOSE.COM.
1. Lesen Sie die folgenden Anweisungen.
2. Bewahren Sie die Anweisungen auf.
3. Beachten Sie alle Warn- und Sicherheitshinweise.
4. Befolgen Sie alle Anweisungen.
5. Verwenden Sie dieses Gerät nicht in der Nähe von Wasser.
6. Reinigen Sie das Gerät nur mit einem sauberen, trockenen Tuch.
7. Achten Sie darauf, dass die Lüftungsönungen nicht blockiert sind. Stellen Sie das
Gerätnur in Übereinstimmung mit den Herstelleranweisungen auf.
8. Stellen Sie das Gerät nicht in der Nähe von Wärmequellen auf, wie zum Beispiel
Heizkörpern, Wärmespeichern, Öfen oder anderen Geräten (auch Verstärkern), dieWärme
erzeugen.
9. Verwenden Sie nur Zubehör-/Anbauteile, die vom Hersteller zugelassen sind.
Gesetzliche Hinweise
Dieses Produkt entspricht allen Anforderungen der geltenden EU-Richtlinien. Die
vollständige Konformitätserklärung ist einsehbar unter:
www.Bose.com/compliance.
Dieses Symbol bedeutet, dass das Produkt nicht mit dem Hausmüll entsorgt
werden darf, sondern bei einer geeigneten Sammelstelle für das Recycling
abgegeben werden muss. Die ordnungsgemäße Entsorgung und das Recycling
tragen dazu bei, die natürlichen Ressourcen, die Gesundheit und die Umwelt zu
schützen. Weitere Informationen zur Entsorgung und zum Recycling dieses
Produkts erhalten Sie von Ihrer zuständigen Kommune, Ihrem Entsorgungsdienst
oder dem Geschäft, in dem Sie dieses Produkt gekauft haben.
Herstellungsdatum: Die achte Zier in der Seriennummer gibt das Herstellungsjahr an:
„7“ ist 2007 oder 2017.
Importeur aus China: Bose Electronics (Shanghai) Company Limited, Part C, Plant 9,
No. 353 North Riying Road, China (Shanghai) Pilot Free Trade Zone
Importeur aus der EU: Bose Products B.V., Gorslaan 60, 1441 RG Purmerend, Niederlande
Importeur aus Mexiko: Bose de México, S. de R.L. de C.V., Paseo de las Palmas 405-204, Lomas
de Chapultepec, 11000 México, D.F. Importeur- und Serviceinformationen erhalten Sieunter:
+5255 (5202) 3545
Importeur aus Taiwan: Bose Taiwan Branch, 9F-A1, No. 10, Section 3, Minsheng East Road,
Taipei City 104, Taiwan. Tel.: +886-2-2514 7676
Bose und DesignMax sind Marken der Bose Corporation.
Hauptsitz der Bose Corporation: 1-877-230-5639
©2019 Bose Corporation. Dieses Dokument darf ohne vorherige schriftliche Genehmigung
weder ganz noch teilweise reproduziert, verändert, vertrieben oder in anderer Weise
verwendet werden.
Garantiehinweise
Für dieses Produkt gilt eine eingeschränkte Garantie.
Informationen zur Gewährleistung finden Sie unter PRO.BOSE.COM.
Leistungsdaten:
Eingangsspannung: 70V/100V
Impedanz: 8Ω, 100W
Nennleistung: (70V): 2,5W, 5W, 10W, 20W, 40W, 80W; (100V):
5W, 10W, 20W, 40W, 80W
WARNHINWEISE
Dieses Produkt enthält magnetische Materialien. Wenden Sie sich an Ihren Arzt,
wenn Sie wissen möchten, ob dies den Betrieb Ihres implantierten
medizinischen Geräts beeinflussen kann.
• Alle Produkte von Bose müssen gemäß den örtlichen und staatlichen Vorschriften
sowie gemäß allen Branchenbestimmungen installiert werden. Der Monteur ist dafür
verantwortlich, sicherzustellen, dass die Installation der Lautsprecher und der Halterung
gemäß allen geltenden Vorschriften durchgeführt wird, einschließlich örtlicher
Bauvorschriften und -bestimmungen. Wenden Sie sich vor der Installation dieses
Produkts an die zuständige abnehmende Behörde.
• Eine nicht ausreichend gesicherte Montage schwerer Lasten oder deren Aufhängung
über Kopf kann zu schweren oder tödlichen Verletzungen und Sachschäden führen.
Der Monteur ist dafür verantwortlich, die Zuverlässigkeit der für die Anwendung
verwendeten Befestigungstechniken zu prüfen. Nur fachkundige Monteure mit
Wissen über sachgemäße Befestigungselemente und sichere Befestigungstechniken
sollten Lautsprecher über Kopf installieren.
• Montieren Sie das Produkt nicht an Orten, an denen es starker Feuchtigkeit
ausgesetzt ist oder Kondenswasser auftreten kann.
• Dieses Produkt ist nicht für die Installation oder Verwendung in Feuchtbereichen (zum
Beispiel Schwimmbädern, Wasserparks, Räumen mit Whirlpools, Saunas, Dampfbädern
und Eislaufbahnen) gedacht.
• Bei der Montage ist auf eine tragfähige Oberfläche zu achten, in deren Nähe sich keine
Einrichtungen wie strom- oder wasserführende Leitungen befinden. Wenden Sie sich
im Zweifelsfall mit der Montage der Halterung an einen fachkundigen Monteur. Bei der
Montage der Halterung ist auf die Einhaltung der örtlichen Bauvorschriften zu achten.
• Verwenden Sie für die Montage ausschließlich die im Lieferumfang enthaltenen oder
von Bose für die Verwendung mit den DesignMax DM6C Lautsprechern zugelassene
Hardware und entsprechende Zubehörteile. Informationen zu kompatiblen
Zubehörteilen finden Sie in den technischen Datenblättern auf PRO.BOSE.COM.
• Halten Sie das Produkt von Feuer und Wärmequellen fern. Stellen Sie keine brennenden
Kerzen oder ähnliches auf das Gerät oder in die Nähe des Geräts.
• Nehmen Sie keine nicht genehmigten Änderungen an diesem Produkt vor.
• Stellen Sie sicher, dass der Lautsprecher und die Montagekomponenten nicht mit
chemischen Substanzen in Berührung kommen, die nicht von Bose zugelassen sind.
Dies umfasst unter anderem Schmiermittel, Reinigungsmittel, Kontaktspray oder andere
Lösungsmittel auf Kohlenwasserstobasis. Der Kontakt mit solchen Mitteln kann zu
Rissen im Kunststomaterial und infolgedessen zum Herunterfallen führen.
• Die Lautsprecher nur mit einem weichen, trockenen Tuch reinigen. Verwenden Sie zur
Reinigung niemals Seife, Spülmittel, Mineralöl, Alkohol oder sonstige Reinigungsmittel
oder Chemikalien.
• Das Abdeckgitter verfügt über einen Sicherheitssperrbolzen mit Sicherungsseil fürden
einmaligen Gebrauch.

Deutsch • 21Installationsanleitung • DesignMax DM6C
PRO.BOSE.COM
Übersicht
Verpackungsinhalt
Produktabmessungen
×2 ×2 ×4×2 ×1
356mm 288mm
57mm
223mm
239mm
Technische Spezifikationen
Weitere technische Spezifikationen können Sie dem
technischen Datenblatt für den DesignMax DM6C auf
PRO.BOSE.COM entnehmen.
Material, Abmessungen, Gewicht
Produktabmessungen Durchmesser Abdeckgitter:
356mm
Gehäusedurchmesser:
288mm
Tiefe Rückwand: 223mm
Deckenausschnitt 292mm
Maximale Deckenstärke 57mm
Nettogewicht– Lautsprecher
und Abdeckgitter (1 Stück)
6,5kg
Nettogewicht– Tile Bridge
(1 Stück)
0,82kg
Versandgewicht (2 Stück) 17,74kg
Wichtige Installationshinweise
Dieses Produkt ist nur für den Gebrauch im Innenbereich bestimmt.
Der Monteur ist dafür verantwortlich, sicherzustellen, dass die
Installation der Lautsprecher und der Halterung gemäß allen
geltenden Vorschriften durchgeführt wird, einschließlich örtlicher
Bauvorschriften und -bestimmungen. Wenden Sie sich vor der
Installation dieses Produkts an diezuständige abnehmende Behörde.
Die Gewährleistung der Sicherheit der Lautsprechermontage
obliegt demjenigen, der den Lautsprecher anbringt. Die fehlerhafte
Montage desLautsprechers kann zu Sach- und Personenschäden bis
hin zur Todesfolge führen.
Montieren Sie das Produkt nicht an Orten, an denen es starker
Feuchtigkeit ausgesetzt ist oder Kondenswasser auftreten kann.
Dieses Produkt ist nicht für die Installation oder Verwendung in
Feuchtbereichen (zum Beispiel Schwimmbädern, Wasserparks,
Räumen mitWhirlpools, Saunas, Dampfbädern und Eislaufbahnen)
gedacht.
Achten Sie darauf, dass die Lüftungsönungen nicht blockiert
sind. Stellen Sie das Gerät nur in Übereinstimmung mit den
Herstelleranweisungen auf.
Stellen Sie das Gerät nicht in der Nähe von Wärmequellen auf, wie
zum Beispiel Heizkörpern, Wärmespeichern, Öfen oder anderen
Geräten (auchVerstärkern), die Wärme erzeugen.
Bei der Montage ist auf eine tragfähige Oberfläche zu achten, in
deren Nähesich keine Einrichtungen wie strom- oder
wasserführende Leitungen befinden. Wenden Sie sich im Zweifelsfall
mit der Montage der Halterung aneinen fachkundigen Monteur. Bei
der Montage der Halterung ist auf die Einhaltung der örtlichen
Bauvorschriften zu achten.
Stellen Sie sicher, dass der Lautsprecher und die Montagekomponenten
nicht mit chemischen Substanzen in Berührung kommen, die nicht
von Bose zugelassen sind. Dies umfasstunter anderem Schmiermittel,
Reinigungsmittel, Kontaktspray oder andere Lösungsmittel auf
Kohlenwasserstobasis. Der Kontakt mit solchenMitteln kann zu Rissen
imKunststomaterial und infolgedessen zumHerunterfallenführen.
22 • Deutsch DesignMax DM6C • Installationsanleitung
PRO.BOSE.COM
Systemeinrichtung
Installationsoptionen
Installationsoptionen und Montagezubehör
q Einstellbare Tile Bridge (im Lieferumfang enthalten)
w Rough-in-Pan-Montageplatte (optional erhältlich)
Kabelverschraubung (Zugentlastung)
Bei Verwendung eines Kabelschutzrohres aus Metall ist
eine einzelne ⅜-Zoll-Kabelverschraubung oder ein ⅜-Zoll-
Duplex-Anschluss zu verwenden.
Hinweis: Kabelverschraubungen sind nicht im Lieferumfang
enthalten.
q
w
⅜Zoll-
Einzelanschluss
⅜Zoll Duplex-Anschluss/
Schleife
Verkabeln des Lautsprechers
Kabeldurchmesser
Der DesignMax DM6C Lautsprecher wurde für den ausschließlichen Gebrauch mit Kabeln der Größen 18AWG (0,8 mm
2
)
bis 14 AWG (2,1 mm
2
) entwickelt.
Lautsprechereinstellungen
70V
2,5W 5W 10W 20W 40W 80W*
8Ώ
5W 10W 20W 40W 80W KA**
100 V
** KA: Kein Anschluss (nicht verwenden)* Werkseinstellung
Einstellen des Leistungsabgries am Übertrager
Stellen Sie die Leistungsabgabe durch Drehen ein. Verwenden
Sie dafür einen Schlitzschraubendreher.
Anschlussdiagramme
Isolieren Sie einen Teil des
Drahtes (6 mm) für den
Anschluss an die Anschlüsse ab.
70V/100V
8Ω
OUT
IN
70/
100V COM8Ω8ΩCOM
70/
100V
OUT
IN
70/
100V COM8Ω8ΩCOM
70/
100V

Deutsch • 23Installationsanleitung • DesignMax DM6C
PRO.BOSE.COM
Systemeinrichtung
Vorbereitung der Montage
Verwendung eines Sicherungsseils
Einige Bauvorschriften schreiben als Sicherheitsvorkehrung
vor, den Lautsprecher an einer tragenden Konstruktion
zusätzlich abzusichern. Wählen Sie eine Montageposition
und -methode sowie Werkzeuge, die den örtlichen
Bauvorschriften entsprechen.
Bose empfiehlt die Verwendung (1) eines
Sicherungsdrahtes oder (2) eines Sicherungsseils
zur zusätzlichen Absicherung der Konstruktion.
Befestigungspunkte für Sicherheitsaufhängungen können
Sie den untenstehenden Diagrammen entnehmen.
Befolgen Sie bei der Montage zusätzlicher Sicherheits-
aufhängungen die Anweisungen des Herstellers.
q
e
w
Montage der Tile Bridge
Hinweis: Beim Einbau in eine durchgängig feste Decke
erfolgt die Montage der Tile Bridge nach dem Einführen
der Schienen und des Rings durch die Aussparung für den
Lautsprecher (siehe Seite24).
1. Richten Sie die Schienen aus und passen Sie die Laschen
in die Aussparungen ein.
2. Ziehen Sie die Schienen nach außen, um sie zu befestigen.
3. Richten Sie die Schienen parallel zueinander aus und
drücken Sie den Ring der Tile Bridge abwärts, um den
Ring an den Schienen zu befestigen.
qw
q
Zuschneiden der Deckenplatte
1. Entfernen Sie die Deckenplatte und zeichnen
Sie unter Verwendung der Schablone den
Ausschnitt für den Lautsprecher auf die Platte.
Um die Schablone mittig aufzulegen, verbinden
Sie zunächst die Eckpunkte der Platte zu einem
„X“ und richten Sie anschließend die Schablone
anhand des Schnittpunkts aus.
2. Schneiden Sie den Ausschnitt in die Platte.
q w
Vorbereitung einer akustischen Deckenplatte
Installieren der Tile Bridge
1. Setzen Sie die Tile Bridge in die
Unterdeckenkonstruktion ein. Passen
Sie gegebenenfalls die Länge der Tile
Bridge-Ausleger an, um ein Aufliegen
zugewährleisten.
2. Setzen Sie die Deckenplatte wieder ein.
q w
Hinweis: Eine Installation in unmittelbarer Nähe einer
Kochstelle, wo der Lautsprecher Speiseöl ausgesetzt ist
(wie z.B. in gewerblichen Räumlichkeiten mit Kochstellen),
kann die Leistung oder Funktionen des Lautsprechers
beeinträchtigen.

24 • Deutsch DesignMax DM6C • Installationsanleitung
PRO.BOSE.COM
Installation
Befestigung des Lautsprechers
1. Führen Sie das Audiokabel durch die Kabelaussparung.
2. Führen Sie den Lautsprecher in die Tile Bridge ein. Stellen Sie sicher, dass die Verankerungen an der Tile Bridge
einrasten, bevor Sie den Lautsprecher loslassen.
3. Entfernen Sie den Anschlussstecker, verkabeln Sie ihn und setzen Sie ihn wieder in den Lautsprecher ein.
WeitereInformationen zur Verkabelung finden Sie unter Verkabeln des Lautsprechers auf Seite22.
4. Ziehen Sie die Halterungsschrauben fest, um den Lautsprecher zu fixieren. Wenn Sie einen Akkuschrauber verwenden,
stellen Sie eine niedrige Drehmomentstufe ein.
WICHTIGER HINWEIS: Ein Überdrehen der Schrauben kann die Stabilität des Verankerungspunkts
oderderDecke beeinträchtigen und möglicherweise zum Herunterfallen führen.
q
e
w
r
Zuschneiden der Deckenplatte
1. Verwenden Sie die Schablone, um den
Ausschnitt auf der Platte aufzuzeichnen.
2. Schneiden Sie die Önung in die Platte.
q w
Vorbereitung von durchgängig festen Decken (bestehende Konstruktion)
Installieren der Tile Bridge
1. Führen Sie die Tile Bridge-Schienen
und den Ring durch die Aussparung
und positionieren Sie die Schienen
parallel zueinander im Deckenraster
oder in der Lattung.
2. Montieren Sie die Tile Bridge.
q w

Deutsch • 25Installationsanleitung • DesignMax DM6C
PRO.BOSE.COM
Installation
Installation in durchgängig festen Decken mithilfe einer Rough-in-Pan-
Montageplatte (Neubauten)
Informationen zum Installieren einer Rough-in-Pan-Montageplatte finden Sie in der entsprechenden DesignMax
Anleitung unter PRO.BOSE.COM. Befolgen Sie nach der Installation der Rough-in-Pan-Montageplatte die Anleitung
unterBefestigung des Lautsprechers auf Seite24.
Anbringen der Frontabdeckung
Führen Sie den Sicherheitssperrbolzen in das dafür vorgesehene Loch des Lautsprechers. Platzieren Sie das Abdeckgitter
mit beiden Händen auf dem Lautsprecher. Das Abdeckgitter haftet magnetisch am Lautsprecher.
Sicherheitshinweise und gesetzliche Bestimmungen
Der Bose DesignMax DM6C Lautsprecher hat die Testreihen bestanden und entspricht den folgenden Normen und
Einsatzanforderungen:
Zertifiziert gemäß ANSI/UL 1480A-2016, Speakers for Commercial& Professional Use
Allgemeine Gebrauchsfähigkeit– UL-Kategorie UEAY, Aktenzeichen S5591 Kontrollnummer3N89
UL-2043, 2013, Brandprüfung für die Abgabe von Wärme und sichtbarem Rauch durch Einzelprodukte und ihre
Zubehörteile in Klimaräumen. Geeignet für den sicheren Gebrauch in abgehängten Decken.
Geeignet für die Installation mit Class1, Class2 und Class3 Verkabelungsverfahren gemäß NFPA70,
NationalElectrical Code, 2017, Article640
NFPA 70, National Electrical Code, 2017, Article 300-22(c)
NFPA 90-A, 2015, Installation of Air Conditioning and Ventilation Systems, Paragraph 4.3.11.2.6.5
Der DesignMax DM6C Lautsprecher wurde gemäß den Anforderungen der folgenden EU-Norm für kombinierte Systeme
entwickelt:
Getestet gemäß IEC60268-5, 2007

DesignMax DM6C • Guida all’installazione
PRO.BOSE.COM
26 • Italiano
Informazioni importanti sulla sicurezza
Leggere e conservare tutte le istruzioni per la sicurezza e per l’uso.
Questo prodotto deve essere installato esclusivamente da installatori professionisti.
Ilpresente documento ha lo scopo di fornire agli installatori professionisti le istruzioni di base
per l’installazione e la sicurezza di questo prodotto in tipici sistemi da installazione fissa. Prima
dell’installazione, leggere questo documento e le avvertenze sulla sicurezza.
Non tentare di riparare il prodotto autonomamente. Per tutti gli interventi di assistenza, rivolgiti
ai centri assistenza, agli installatori, ai tecnici, ai rivenditori o ai distributori autorizzati. Per
contattare Bose Professional o per trovare il rivenditore o distributore piùvicino, visita
PRO.BOSE.COM.
1. Leggere queste istruzioni.
2. Conservare queste istruzioni.
3. Prestare attenzione a tutte le avvertenze.
4. Seguire tutte le istruzioni.
5. Non utilizzare l’apparecchio in prossimità di acqua.
6. Per la pulizia utilizzare un semplice panno asciutto.
7. Non ostruire le aperture di ventilazione. Installare il prodotto in conformità con le istruzioni
fornite dal produttore.
8. Non installare in prossimità di fonti di calore, quali termosifoni, radiatori, stufe o altri
apparecchi (compresi gli amplificatori) che generino calore.
9. Utilizzare solo sistemi di fissaggio/accessori specificati dal produttore.
Informazioni sulle normative
Questo prodotto è conforme a tutti i requisiti pertinenti delle direttive UE.
La dichiarazione di conformità completa è disponibile all’indirizzo:
www.Bose.com/compliance.
Questo simbolo indica che il prodotto non deve essere smaltito con i rifiuti
domestici, ma deve essere consegnato a una struttura di raccolta appropriata per il
riciclaggio. Uno smaltimento e un riciclaggio corretti aiutano a preservare le risorse
naturali, la salute e l’ambiente. Per ulteriori informazioni sullo smaltimento e sul
riciclaggio di questo prodotto, rivolgersi alle autorità locali, al servizio di
smaltimento dei rifiuti o al negozio presso il quale è stato acquistato.
Data di produzione: l’ottava cifra del numero di serie corrisponde all’anno di produzione;
adesempio “7” indica 2007 o 2017.
Importatore per la Cina: Bose Electronics (Shanghai) Company Limited, Part C, Plant 9,
No. 353 North Riying Road, China (Shanghai) Pilot Free Trade Zone
Importatore per l’UE: Bose Products B.V., Gorslaan 60, 1441 RG Purmerend, Paesi Bassi
Importatore per il Messico: Bose de México, S. de R.L. de C.V. , Paseo de las Palmas 405-204,
Lomas de Chapultepec, 11000 México, D.F. Per informazioni su importatori e servizi: +5255
(5202) 3545
Importatore per Taiwan: Bose Taiwan Branch, 9F-A1, No. 10, Section 3, Minsheng East Road,
Taipei City 104, Taiwan. N. telefono: +886-2-2514 7676
Bose e DesignMax sono marchi commerciali di Bose Corporation.
Sede principale di Bose Corporation: 1-877-230-5639
©2019 Bose Corporation. Nessuna parte di questo documento può essere riprodotta,
modificata, distribuita o usata in altro modo senza previa autorizzazione scritta.
Informazioni sulla garanzia
Questo prodotto è coperto da una garanzia limitata.
Per i dettagli sulla garanzia, visitare PRO.BOSE.COM.
Specifiche di prodotto
Tensione d’ingresso: 70 V/100 V
Impedenza: 8 Ω, 100 W
Corrente o potenza: (70 V): 2,5 W, 5 W, 10 W, 20 W, 40 W, 80 W; (100 V):
5 W, 10 W, 20 W, 40 W, 80 W
AVVISI/AVVERTENZE
Questo prodotto contiene materiale magnetico. Rivolgersi al proprio medico
per eventuali domande sui possibili eetti del prodotto sui dispositivi medici
impiantati nel corpo umano.
• Tutti i prodotti Bose devono essere installati in conformità con gli standard locali, statali,
federali e di settore. È responsabilità dell’installatore assicurare che l’installazione dei
diusori e del sistema di montaggio venga eseguita in conformità con le normative
vigenti, compresi i regolamenti edilizi locali. Prima di installare il prodotto, chiedere
informazioni all’autorità locale preposta.
• L’installazione o la sospensione non sicura di carichi pesanti può causare gravi lesioni
alle persone e danni materiali. È responsabilità dell’installatore valutare l’adabilità
del metodo di installazione utilizzato per l’applicazione specifica. Solo installatori
professionisti esperti di tecniche di installazione sicura dell’hardware possono installare
un diusore in posizione sospesa.
• Non posizionare il prodotto in punti dove possa essere esposto ad acqua o condensa.
• Il prodotto non deve essere installato né utilizzato in aree di servizio o intrattenimento
vicine all’acqua (ad es. piscine coperte, parchi acquatici al chiuso, sale con vasche
riscaldate, saune, bagni turchi e piste di pattinaggio al chiuso).
• Non eseguire l’installazione su superfici non sucientemente robuste o dietro le quali
si nascondono elementi potenzialmente pericolosi, quali cavi elettrici o tubazioni
idrauliche. In caso di dubbi durante l’installazione della staa, contattare uninstallatore
professionista. Verificare che la staa sia installata in accordo ai parametri costruttivi
locali.
• Utilizzare solo componenti e accessori forniti o specificati da Bose per l’uso con idiusori
DesignMax DM6C. Per informazioni sugli accessori compatibili, consultarelascheda
tecnica del prodotto all’indirizzo PRO.BOSE.COM.
• Tenere il prodotto lontano dal fuoco e da fonti di calore. Non collocare sorgenti di
fiamme libere (ad esempio, candele accese) sull’apparecchio o in prossimità di esso.
• Non apportare alterazioni non autorizzate al prodotto.
• Evitare di esporre il diusore o i suoi componenti di montaggio a sostanze chimiche
non specificate da Bose, incluse senza limitazione quelle lubrificanti e detergenti, gli
spray per contatti e altri solventi a base di idrocarburi. L’esposizione a tali sostanze può
danneggiare i materiali plastici e causare spaccature, con conseguenti rischi di caduta.
• Utilizzare esclusivamente un panno asciutto per pulire i diusori. Non esporre il diusore
a saponi, detergenti, oli minerali o alcol, né ad altri detergenti o prodotti chimici.
• La griglia è dotata di un perno con cordino di sicurezza concepito per un solo uso.
Italiano • 27Guida all’installazione • DesignMax DM6C
PRO.BOSE.COM
Panoramica
Contenuto della confezione
Dimensioni del prodotto
2 pz. 2 pz. 4 pz.2 pz. 1 pz.
356 mm 288 mm
57 mm
223 mm
239 mm
Specifiche tecniche
Per ulteriori specifiche, consultare la scheda tecnica del
diusore DesignMax DM6C all’indirizzo PRO.BOSE.COM.
Caratteristiche fisiche
Dimensioni del prodotto Diametro griglia: 356 mm
Diametro cabinet: 288 mm
Profondità backcan: 223 mm
Dimensione del foro 292 mm
Spessore massimo del
controsotto
57 mm
Peso netto del diusore con
griglia (singolo)
6,50 kg
Peso netto tile bridge (singolo) 0,82 kg
Peso di spedizione (coppia) 17,74 kg
Informazioni importanti
sull’installazione
Questo prodotto è destinato esclusivamente all'utilizzo in interni.
È responsabilità dell’installatore assicurare che l’installazione dei diusori
e del sistema di montaggio venga eseguita in conformità con le normative
vigenti, compresi i regolamenti edilizi locali. Prima di installare il prodotto,
chiedere informazioni all’autorità locale preposta.
È responsabilità dell’installatore garantire un’installazione sicura del
diusore. Un’installazione non corretta del diusore può causare danni
materiali e gravi lesioni alle persone.
Non posizionare il prodotto in punti dove possa essere esposto ad acqua o
condensa.
Il prodotto non deve essere installato né utilizzato in aree di servizio o
intrattenimento vicine all’acqua (ad es. piscine coperte, parchi acquatici
alchiuso, sale con vasche riscaldate, saune, bagni turchi e piste di
pattinaggio al chiuso).
Non ostruire le aperture di ventilazione. Installare il prodotto in conformità
con le istruzioni fornite dal produttore.
Non installare in prossimità di fonti di calore, quali termosifoni, radiatori,
stufe o altri apparecchi (compresi gli amplificatori) che generino calore.
Non eseguire l’installazione su superfici non sucientemente robuste
odietro le quali si nascondono elementi potenzialmente pericolosi, quali
cavi elettrici o tubazioni idrauliche. In caso di dubbi durante l’installazione
della staa, contattare un installatore professionista. Verificare che la staa
sia installata in accordo ai parametri costruttivi locali.
Evitare di esporre il diusore o i suoi componenti di montaggio a
sostanze chimiche non specificate da Bose, incluse senza limitazione
quelle lubrificanti e detergenti, gli spray per contatti e altri solventi a base
diidrocarburi. L’esposizione a tali sostanze può danneggiare i materiali
plastici e causare spaccature, con conseguenti rischi di caduta.

28 • Italiano DesignMax DM6C • Guida all’installazione
PRO.BOSE.COM
Configurazione
Opzioni di installazione
Opzioni ed accessori di installazione
q Tile bridge regolabile (incluso)
w Rough-in pan (opzionale)
Raccordo del tubo protettivo
Se si utilizza un tubo protettivo metallico flessibile,
usarlocon un raccordo da 9,5 mm o un connettore
doppio(duplex) da 9,5 mm.
Nota: raccordi del tubo protettivo non in dotazione.
q
w
Ingresso singolo
da 9,5 mm
Ingresso duplex/ad anello
da 9,5 mm
Cablaggio del diusore
Diametro dei cablaggi
Il diusore DesignMax DM6C è concepito esclusivamente per l’impiego con cavi di dimensioni comprese tra 18 AWG
(0,8 mm
2
) e 14 AWG (2,1 mm
2
).
Impostazioni del diusore
70 V
2,5 W 5 W 10 W 20 W 40 W 80 W*
8Ώ
5 W 10 W 20 W 40 W 80 W NC**
100V
** NC: nessuna connessione (non utilizzare)* Impostazioni di fabbrica
Impostazione potenza del trasformatore
Selezionare la potenza ruotando il potenziometro tramite
uncacciavite a testa piatta.
Schemi di collegamento
Scoprire 6 mm di filo non
rivestito da collegare ai terminali.
70 V/100 V
8 Ω
OUT
IN
70/
100V COM8Ω8ΩCOM
70/
100V
OUT
IN
70/
100V COM8Ω8ΩCOM
70/
100V

Italiano • 29Guida all’installazione • DesignMax DM6C
PRO.BOSE.COM
Configurazione
Preparazione dell’installazione
Uso di un cavo di sicurezza
Alcune normative edilizie regionali richiedono l’impiego
di un secondo metodo di fissaggio dei diusori alle
strutture di supporto, allo scopo di garantire una maggior
sicurezza. Scegliere posizione, metodo e accessori di
fissaggio conformi alle normative edilizie locali.
Bose raccomanda l’utilizzo di (1) un cavo di frenatura o di
(2) un cavo di sicurezza come meccanismo di fissaggio
secondario. Vedere gli schemi riportati di seguito per i
punti di fissaggio di sicurezza.
Attenersi alle istruzioni del produttore per qualsiasi
meccanismo di fissaggio secondario utilizzato.
q
e
w
Assemblaggio del tile bridge
Nota: in caso di installazione su controsotto fisso,
assemblare il tile bridge dopo aver inserito le barre
e l’anello nell’apertura del foro (vedere a pag. 30).
1. Allineare le barre ed inserire le linguette nelle scanalature.
2. Tirare le barre in direzione opposta per fissarle l’una
all’altra.
3. Allineare le barre in modo che siano parallele l’una
all’altra, quindi premere l’anello del tile bridge per fissarlo
alle barre.
qw
q
Taglio del pannello a sotto
1. Rimuovere il pannello ed utilizzare la dima
per tracciare il foro per il diusore sul
pannello stesso. Per centrare la dima rispetto
al pannello, tracciare una X collegando gli
angoli in diagonale e centrare il modello sul
punto diintersezione.
2. Eettuare un foro nel pannello.
q w
Preparazione del pannello a sotto
Installazione del tile bridge
1. Posizionare il tile bridge assemblato lungo la
griglia del sotto. Se necessario, regolare le
barre del tile bridge in modo che poggino sui
montanti della griglia del sotto.
2. Rimontare il pannello sul sotto.
q w
Nota: l’installazione in prossimità di piani di cottura dove il
diusore possa essere direttamente esposto a oli alimentari,
come ad esempio in cucine commerciali, può ridurre le
prestazioni o la funzionalità del diusore.
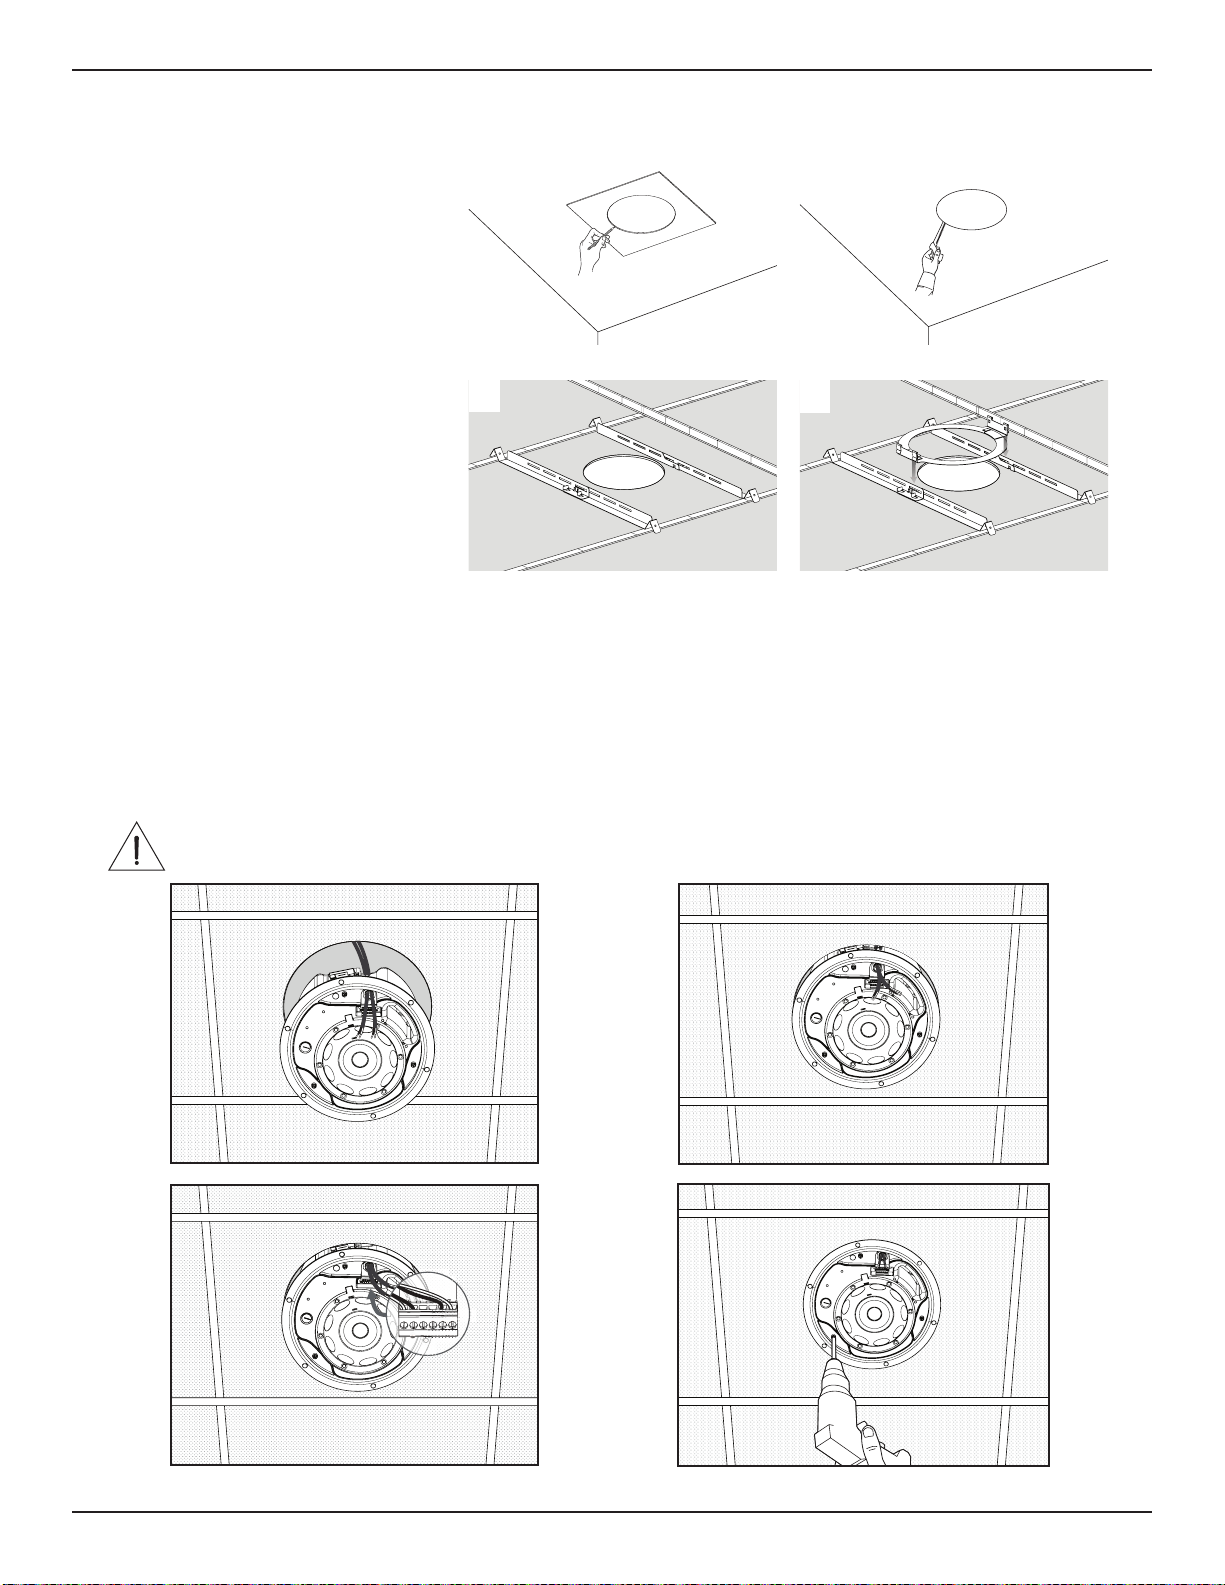
30 • Italiano DesignMax DM6C • Guida all’installazione
PRO.BOSE.COM
Installazione
Installazione del diusore
1. Far passare il cavo audio attraverso l’apposita apertura.
2. Far passare il diusore attraverso il foro ed inserirlo nel tile bridge. Verificare che gli ancoraggi siano innestati sul tile
bridge prima di allentare la presa sul diusore.
3. Rimuovere il connettore, cablarlo e reinserirlo nel diusore. Per informazioni sul cablaggio, vedere Cablaggio del
diusore a pag.28.
4. Serrare le viti della staa di ancoraggio per fissare il diusore. Se si utilizza un avvitatore elettrico, impostare un basso
valore di coppia.
AVVERTENZA: un serraggio eccessivo delle viti può danneggiare il punto di aggancio dell’elemento
diancoraggio o il sotto, con conseguenti rischi di caduta.
q
e
w
r
Taglio del sotto
1. Utilizzare la dima per tracciare unforo
sul sotto.
2. Eettuare un foro nel sotto.
q w
Preparazione in caso di controsotto fisso (struttura esistente)
Installazione del tile bridge
1. Far passare le barre e l’anello del tile
bridge attraverso il foro e posizionare
le barre parallele l’una all’altra.
2. Assemblare il tile bridge.
q w

Italiano • 31Guida all’installazione • DesignMax DM6C
PRO.BOSE.COM
Installazione
Installazione a controsotto fisso con rough-in pan (nuova costruzione)
Per informazioni sull’installazione del rough-in pan, vedere la guida all’installazione del rough-in pan DesignMax sul
sitoPRO.BOSE.COM. Una volta installato il rough-in pan, vedere Montaggio del diusore a pag. 30.
Fissaggio della griglia
Inserire il perno per cordino di sicurezza nel foro del diusore. Con entrambe le mani, posizionare la griglia contro
ildiusore. La griglia si aggancia magneticamente al diusore.
Conformità alle norme di sicurezza
Il diusore Bose DesignMax DM6C ha superato i test ai quali è stato sottoposto, risultando conforme alle specifiche
e alle applicazioni indicate di seguito:
Conforme alle specifiche ANSI/UL 1480A-2016, Diusori per uso professionale e commerciale e di sicurezza
Utilizzo generico - UL Categoria UEAY, Numero file S 5591 Numero controllo 3N89
UL-2043, 2013, Test antincendio e rilascio di fumo per prodotti e relativi accessori installati in controsotti
sigillati. Adatti per l’uso in controsotti sigillati.
Adatto per l’installazione mediante metodi di cablaggio Classe 1, Classe 2 o Classe 3 in conformità a NFPA 70,
National Electrical Code, 2017, Articolo 640
NFPA 70, National Electrical Code, 2017, Articolo 300-22(c)
NFPA 90-A, 2015, Installazione di sistemi di condizionamento dell’aria e ventilazione, Paragrafo 4.3.11.2.6.5
Il diusore DesignMax DM6C è stato progettato in conformità ai requisiti previsti dalle seguenti normative europee
relative ai sistemi combinati:
Collaudato in conformità a IEC60268-5, 2007
DesignMax DM6C • Installatiehandleiding
PRO.BOSE.COM
32 • Nederlands
Belangrijke veiligheidsinstructies
Lees alle veiligheidsinstructies en de gebruiksaanwijzing door enbewaar
deze.
Dit product is uitsluitend bestemd voor installatie door professionele installateurs!
Dit document is bedoeld om professionele installateurs essentiële installatie- en
veiligheidsrichtlijnen te bieden voor dit product in standaardsystemen voor vaste installatie.
Lees dit document en alle veiligheidswaarschuwingen voordat u een systeem probeert
teinstalleren.
Probeer dit product niet zelf te repareren. Neem voor alle onderhoud contact op met een
geautoriseerd servicecenter, installateur, technicus, dealer of distributeur. Om contact op te
nemen met Bose Professional en voor informatie over de dichtstbijzijnde dealer ofdistributeur,
gaat u naar PRO.BOSE.COM.
1. Lees deze instructies door.
2. Bewaar deze instructies.
3. Neem alle waarschuwingen in acht.
4. Volg alle instructies.
5. Gebruik dit product niet in de buurt van water.
6. Alleen met een droge doek reinigen.
7. Zorg dat u de ventilatieopeningen niet blokkeert. Installeer het product volgens
deinstructies van de fabrikant.
8. Installeer het product niet in de buurt van warmtebronnen, zoals radiatoren,
warmteroosters, kachels of andere apparaten (waaronder versterkers) die
warmteproduceren.
9. Gebruik uitsluitend aansluitonderdelen/accessoires die door de fabrikant worden
gespecificeerd.
Wettelijk verplichte informatie
Dit product voldoet aan alle vereisten van de van toepassing zijnde
EU-richtlijnen. De volledige conformiteitsverklaring kunt u vinden op:
www.Bose.com/compliance.
Dit symbool betekent dat het product niet mag worden weggegooid als
huishoudelijk afval en naar een geschikt inzamelpunt voor recycling moet worden
gebracht. Het op de juiste wijze afvoeren en recyclen helpt natuurlijke
hulpbronnen, de menselijke gezondheid en het milieu te beschermen. Voor meer
informatie over het afvoeren en recyclen van dit product neemt u contact op met
de gemeente waar u woont, de afvalverwerkingsdienst of de winkel waar u dit
product hebt gekocht.
Fabricagedatum: Het achtste cijfer in het serienummer geeft het fabricagejaar aan. ‘7’ is 2007
of 2017.
Importeur in China: Bose Electronics (Shanghai) Company Limited, Part C,
Plan 9, No. 353 North Riying Road, China (Shanghai) Pilot Free Trade Zone
Importeur in de EU: Bose Products B.V., Gorslaan 60, 1441 RG Purmerend, Nederland
Importeur in Mexico: Bose de México, S. de R.L. de C.V. , Paseo de las Palmas 405-204, Lomas
de Chapultepec, 11000 México, D.F. Gegevens importeur en service-informatie:
+52 55 52 02 35 45
Importeur in Taiwan: Bose Taiwan Branch, 9F-A1, No.10, Section 3, Minsheng East Road, Taipei
City 104, Taiwan. Telefoonnummer: +886 2 25 14 76 76
Bose en DesignMax zijn handelsmerken van Bose Corporation.
Hoofdkantoor Bose Corporation: 1 877 230 5639
©2019 Bose Corporation. Niets in deze uitgave mag worden gereproduceerd, gewijzigd,
gedistribueerd of op andere wijze worden gebruikt zonder voorafgaande schriftelijke
toestemming.
Garantie-informatie
Dit product wordt gedekt door een beperkte garantie.
Ga naar PRO.BOSE.COM voor garantie-informatie.
Productvermogen:
Ingangsspanning: 70 V/100 V
Impedantie: 8 Ω, 100 W
Stroomsterkte: (70 V): 2,5 W, 5 W, 10 W, 20 W, 40 W, 80 W;
(100 V): 5 W, 10 W, 20 W, 40 W, 80 W
WAARSCHUWINGEN
Dit product bevat magnetisch materiaal. Raadpleeg uw arts om te vragen of dit
invloed kan hebben op uw geïmplanteerde medische hulpmiddel.
• Alle Bose-producten moeten worden geïnstalleerd volgens de plaatselijke en landelijke
voorschriften en industrienormen. Het is de verantwoordelijkheid van de installateur om
ervoor te zorgen dat de installatie van de luidsprekers en het montagesysteem gebeurt
met inachtneming van alle van toepassing zijnde voorschriften, waaronder plaatselijke
bouwvoorschriften. Neem contact op met de juiste plaatselijke overheidsinstanties
voordat u dit product installeert.
• Het onveilig monteren of ophangen van een zware last kan leiden tot beschadiging van
uw eigendommen, ernstig letsel en overlijden. Het is de verantwoordelijkheid van de
installateur om de betrouwbaarheid te evalueren van de gebruikte montagemethode.
Alleen professionele installateurs met kennis van het juiste gereedschap en veilige
montagetechnieken mogen luidsprekers hoog ophangen.
• Monteer het product niet op locaties waar het kan worden blootgesteld aan water
ofcondensatie.
• Dit product is niet bedoeld voor installatie of gebruik in overdekte ruimten voor
wateractiviteiten (waaronder overdekte zwembaden, overdekte waterparken,
stoomruimten, sauna’s, bubbelbadkamers en overdekte ijsbanen).
• Niet bevestigen aan oppervlakken die niet sterk zijn of die mogelijke risico's opleveren,
bijvoorbeeld vanwege elektrische bedrading of waterleidingen. Als u niet zeker weet
hoe de beugel moet worden bevestigd, raadpleegt u een bevoegde installateur. Zorg
ervoor dat de beugel wordt bevestigd volgens de plaatselijke bouwvoorschriften.
• Gebruik alleen de hardware en accessoires die zijn meegeleverd of gespecificeerd door
Bose voor gebruik met de DesignMax DM6C loudspeakers. Raadpleeg voor informatie
over compatibele accessoires het datasheet met technische gegevens opPRO.BOSE.
COM.
• Houd het product uit de buurt van vuur en warmtebronnen. Plaats geen open vlam,
zoals een brandende kaars, op of bij het product.
• Er mogen geen wijzigingen aan dit product worden aangebracht door onbevoegden.
• Stel de luidspreker of de montageonderdelen niet bloot aan chemische substanties
die niet zijn gespecificeerd door Bose, met inbegrip van, maar niet beperkt tot
smeermiddelen, reinigingsmiddelen, contactsprays of andere oplosmiddelen op basis
van koolwaterstoen. Blootstelling aan dergelijke stoen kan nadelige gevolgen
hebbenvoor het kunststof materiaal, wat kan leiden tot scheuren en een risico op vallen.
• Reinig de luidsprekers alleen met een droge doek. Stel de luidspreker niet bloot
aan zeep, reinigingsmiddel, minerale olie, alcohol of andere reinigingsmiddelen
ofchemicaliën.
• De grille is voorzien van een veiligheidspin voor eenmalig gebruik.
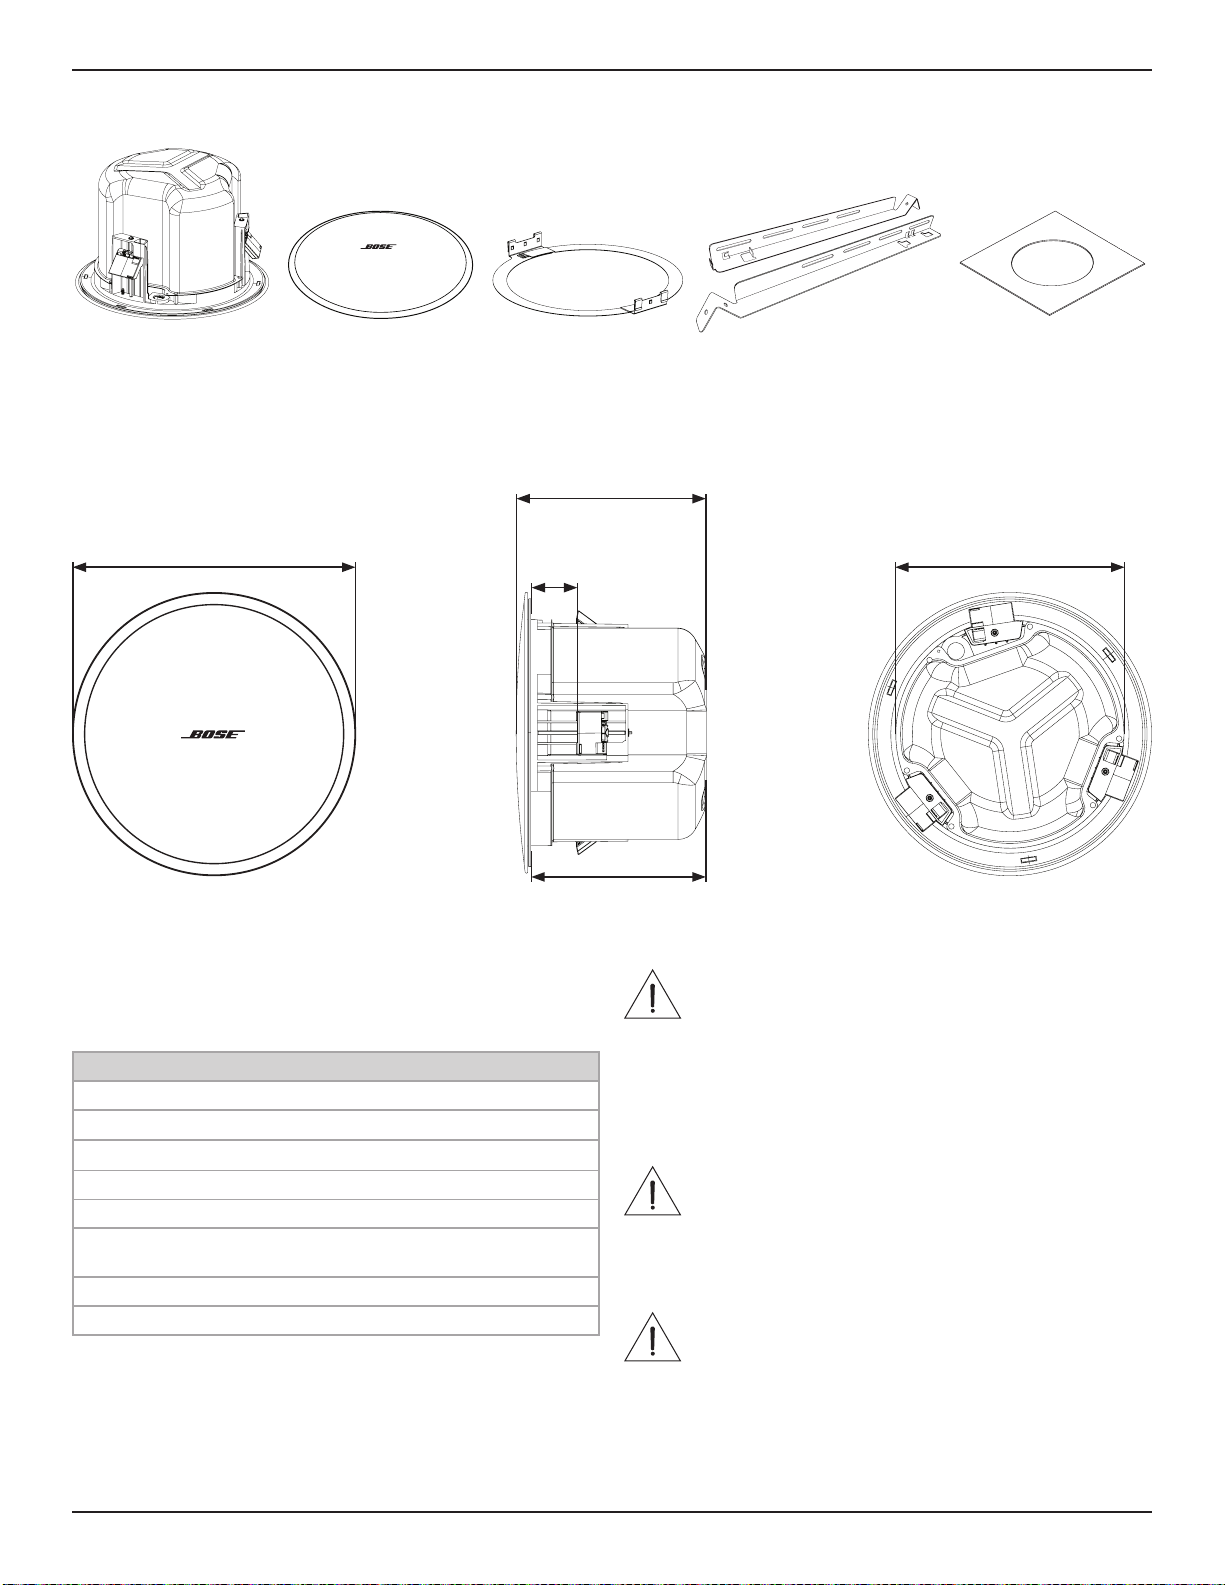
Nederlands • 33Installatiehandleiding • DesignMax DM6C
PRO.BOSE.COM
Overzicht
Inhoud van de doos
Afmetingen van het product
×2 ×2 x4×2 ×1
356 mm 288 mm
57 mm
223 mm
239 mm
Technische specificaties
Raadpleeg voor aanvullende specificaties het datasheet
met technische gegevens voor de DesignMax DM6C op
PRO.BOSE.COM.
Fysiek
Afmetingen van het product Diameter grille: 356 mm
Diameter behuizing: 288 mm
Diepte achtermantel: 223 mm
Uit te snijden gat 292 mm
Maximale dikte plafond 57 mm
Nettogewicht, luidspreker met
grille (enkel)
6,50 kg
Nettogewicht tegelbrug (enkel) 0,82 kg
Verzendgewicht (paar) 17,74 kg
Belangrijke installatie-informatie
Dit product is alleen bestemd voor binnengebruik.
Het is de verantwoordelijkheid van de installateur om ervoor
te zorgen dat de installatie van de luidsprekers en het
montagesysteem gebeurt met inachtneming van alle van toepassing
zijnde voorschriften, waaronder plaatselijke bouwvoorschriften.
Neem contact op met de juiste plaatselijke overheidsinstanties
voordat u dit product installeert.
Het is de verantwoordelijkheid van de installateur om de luidspreker
veilig te installeren. Onjuiste installatie van de luidspreker kan leiden
tot schade, letsel of een dodelijk ongeval.
Monteer het product niet op locaties waar het kan worden
blootgesteld aan water ofcondensatie.
Dit product is niet bedoeld voor installatie of gebruik in overdekte
ruimten voor wateractiviteiten (waaronder overdekte zwembaden,
overdekte waterparken, stoomruimten, sauna’s, bubbelbadkamers
en overdekte ijsbanen).
Zorg dat u de ventilatieopeningen niet blokkeert. Installeer het
product volgens deinstructies van de fabrikant.
Installeer het product niet in de buurt van warmtebronnen,
zoals radiatoren, warmteroosters, kachels of andere apparaten
(waaronder versterkers) die warmteproduceren.
Bevestig niet aan oppervlakken die niet stevig zijn of die mogelijke
risico’s opleveren, bijvoorbeeld vanwege elektrische bedrading of
waterleidingen. Als u niet zeker weet hoe de beugel moet worden
bevestigd, raadpleegt u een bevoegde installateur. Zorg ervoor
datde beugel wordt bevestigd volgens de plaatselijke
bouwvoorschriften.
Stel de luidspreker of de montageonderdelen niet bloot aan
chemische substanties die niet zijn gespecificeerd door Bose,
met inbegrip van, maar niet beperkt tot smeermiddelen,
reinigingsmiddelen, contactsprays of andere oplosmiddelen op
basis van koolwaterstoen. Blootstelling aan dergelijke stoen
kan nadelige gevolgen hebben voor het kunststof materiaal,
wat kan leiden tot scheuren en een risico op vallen.

34 • Nederlands DesignMax DM6C • Installatiehandleiding
PRO.BOSE.COM
Installatie
Installatieopties
Installatieopties en -accessoires
q Verstelbare tegelbrug (meegeleverd)
w Inbouwplaat (optioneel)
Geleiding
Gebruik de flexibele metalen geleider in combinatie met
een leidinghulpstuk van 9,5 mm of een dubbele (duplex)
connector van 9,5 mm.
Opmerking: Leidinghulpstukken zijn niet meegeleverd.
q
w
9,5 mm enkel in 9,5 mm duplex in/lus
De luidspreker bekabelen
Bekabelingsdiameter
De DesignMax DM6C loudspeaker is uitsluitend ontworpen voor bedrading van 18 AWG (0,8 mm
2
) tot 14 AWG (2,1mm
2
).
Luidsprekerinstellingen
70 V
2,5 W 5 W 10 W 20 W 40 W 80 W*
8 Ώ
5 W 10 W 20 W 40 W 80 W NC**
100 V
** NC: No Connection (geen aansluiting;
niet gebruiken)
* Fabrieksinstelling
Transformatorinstelling
Draai om de transformator in te stellen. Gebruik een
schroevendraaier met platte kop.
Aansluitdiagrammen
Strip zes millimeter van de
kabelisolatie voor bevestiging
van de kale kabel aan de
aansluitingen.
70 V/100 V
8 Ω
OUT
IN
70/
100V COM8Ω8ΩCOM
70/
100V
OUT
IN
70/
100V COM8Ω8ΩCOM
70/
100V

Nederlands • 35Installatiehandleiding • DesignMax DM6C
PRO.BOSE.COM
Installatie
De installatie voorbereiden
Een veiligheidskabel gebruiken
In sommige regio’s bent u volgens de bouwvoorschriften
verplicht luidsprekers dubbel gezekerd te bevestigen
voor extra veiligheid. De gekozen locatie, montagewijze
en gebruikte montagemiddelen moeten voldoen aan de
geldende bouwvoorschriften en -verordeningen.
Bose raadt aan (1) een veiligheidsdraad of (2)
veiligheidskabel te gebruiken als secundaire
bevestigingsmethode. Raadpleeg de onderstaande
schema’s voor bevestigingspunten.
Volg de instructies van de fabrikant voor eventueel al
ingebouwde secundaire beveiligingsmechanismen.
q
e
w
De tegelbrug in elkaar zetten
Opmerking: Bij installatie in een hard plafond monteert u
de tegelbrug nadat u de rails en ring door de opening hebt
gehaald (zie pagina 36).
1. Lijn de rails uit en steek de lipjes door de openingen.
2. Trek de rails naar buiten om de onderdelen te bevestigen.
3. Zorg dat de rails evenwijdig aan elkaar liggen en druk de
ring van de tegelbrug naar beneden om de ring aan de
rails te bevestigen.
qw
q
Een opening in de plafondtegel
zagen
1. Verwijder de tegel en teken met behulp van het
sjabloon een opening op de tegel. Teken een ‘X’
diagonaal vanuit de hoeken van de tegel, zodat
u het sjabloon kunt centreren ophet snijpunt.
2. Zaag een opening in de tegel.
q w
De akoestische plafondtegel voorbereiden
De tegelbrug plaatsen
1. Plaats de gemonteerde tegelbrug op het
plafondraster. Verstel indien nodig de tegelbrug
zo dat de rails op het plafondraster rusten.
2. Plaats de tegel terug in het plafond.
q w
Opmerking: Installatie in de nabijheid van kookoppervlakken
waar de luidspreker direct kan worden blootgesteld aan
bakolie (zoals in professionele keukens) kan de prestaties of
betrouwbaarheid van de luidspreker verminderen.

36 • Nederlands DesignMax DM6C • Installatiehandleiding
PRO.BOSE.COM
Installatie
De luidspreker bevestigen
1. Haal de audiokabel door de kabelopening.
2. Steek de luidspreker door de opening en de tegelbrug. Zorg ervoor dat de ankers in de tegelbrug grijpen voordat ude
luidspreker loslaat.
3. Verwijder de connector, sluit de bekabeling aan op de connector en plaats de connector weer terug in de luidspreker.
Raadpleeg voor bekabelingsinformatie De luidspreker bekabelen op pagina34.
4. Draai de ankerarmschroeven vast om de luidspreker te bevestigen. Stel bij gebruik van een elektrische boor-/
schroefmachine het apparaat in op een laag koppel.
WAARSCHUWING: Wanneer u de schroeven te vast draait, kan het ankerbevestigingspunt of het plafond
beschadigen, wat kan leiden tot een risico op vallen.
q
e
w
r
Een opening in het plafond
zagen
1. Teken met behulp van het sjabloon
een opening af in het plafond.
2. Zaag een opening in het plafond.
q w
Een hard plafond voorbereiden (bestaande constructie)
De tegelbrug plaatsen
1. Haal de rails en ring van de
tegelbrug door de opening en leg
de rails evenwijdig aan elkaar op
hetplafondraster of belegstuk.
2. Zet de tegelbrug in elkaar.
q w

Nederlands • 37Installatiehandleiding • DesignMax DM6C
PRO.BOSE.COM
Installatie
Installatie in een hard plafond met een inbouwplaat (nieuwbouw)
Raadpleeg voor informatie over het installeren van de inbouwplaat de installatiehandleiding voor de DesignMax-
inbouwplaat op PRO.BOSE.COM. Raadpleeg na installatie van de inbouwplaat De luidspreker bevestigen op pagina 36.
De grille plaatsen
Steek de veiligheidspin in het gat in de luidspreker. Plaats met beide handen de grille tegen de luidspreker. De grille wordt
magnetisch aan de luidspreker bevestigd.
Veiligheid en naleving van regelgeving
De Bose DesignMax DM6C loudspeaker is getest en voldoet voor onderstaande specificaties en toepassingen:
ANSI/UL 1480A-2016, Speakers for Commercial & Safety Professional Use
General-Purpose Use - UL Category UEAY, File Number S 5591 Control Number 3N89
UL-2043, 2013, Fire Test and Visible Smoke Release for Discrete Products and their Accessories Installed in Air
Handling Spaces, geschikt voor gebruik in luchtbehandelingsruimten.
Geschikt voor installatie middels bekabelingsmethoden Klasse 1, Klasse 2 en Klasse 3 volgens NFPA 70, National
Electrical Code, 2017, artikel 640
NFPA 70, National Electrical Code, 2017, artikel 300-22(c)
NFPA 90-A, 2015, Installation of Air Conditioning and Ventilation Systems, Paragraph 4.3.11.2.6.5
De DesignMax DM6C loudspeaker is ontworpen volgens de vereisten die zijn vastgelegd in onderstaande specificatie van
Europese regelgeving voor combinatiesystemen:
Getest volgens IEC60268-5, 2007

DesignMax DM6C • Monteringsveiledning
PRO.BOSE.COM
38 • Norsk
Viktige sikkerhetsinstruksjoner
Les og ta vare på alle sikkerhets- og bruksinstruksjoner.
Dette produktet skal bare monteres av profesjonelle montører! Formålet med dette
dokumentet er å gi profesjonelle montører grunnleggende monterings- ogsikkerhetsveiledning
for dette produktet i typiske fastmonteringssystemer. Lesdettedokumentet og alle
sikkerhetsadvarsler før du starter monteringen.
Ikke prøv å utføre vedlikehold på dette produktet selv. Henvis alt vedlikehold til autoriserte
servicesentre, montører, teknikere, forhandlere eller distributører. Hvis du vil kontakte Bose
Professional eller finne en forhandler eller distributør i nærheten, går du til PRO.BOSE.COM.
1. Les disse instruksjonene.
2. Ta vare på disse instruksjonene.
3. Ta hensyn til alle advarsler.
4. Følg alle instruksjoner.
5. Ikke bruk dette apparatet i nærheten av vann.
6. Rengjør bare med en ren klut.
7. Ikke blokker ventilasjonsåpninger. Plasser i henhold til produsentens instruksjoner.
8. Ikke plasser produktet nær varmekilder som radiatorer, ventilasjonsgitter, ovner eller andre
apparater (inkludert forsterkere) som produserer varme.
9. Bare bruk fester/tilbehør som er angitt av produsenten.
Informasjon om forskrifter
Produktet overholder alle kravene i gjeldende EU-direktiver. Du finner den
fullstendige samsvarserklæringen på: www.Bose.com/compliance.
Dette symbolet betyr at produktet ikke må kasseres som husholdningsavfall, ogat
det skal leveres til en passende innsamlingsanlegg for gjenvinning. Riktig
håndtering og gjenvinning bidrar til å beskytte naturressurser, helse og miljø. Hvis
du vil ha mer informasjon om avfallshåndtering og resirkulering av dette
produktet, kontakter du de lokale myndighetene, avfallsorganisasjonen eller
butikken hvor du kjøpte dette produktet.
Produksjonsdato: Det åttende tallet i serienummeret viser produksjonsåret:
7 er 2007 eller 2017.
Importør i Kina: Bose Electronics (Shanghai) Company Limited, Part C, Plant 9,
No. 353 North
Riying Road, Kina (Shanghai) pilotfri handelssone
Importør i EU: Bose Products B.V., Gorslaan 60, 1441 RG Purmerend, Nederland
Importør i Mexico: Bose de México, S. de R.L. de C.V. , Paseo de las Palmas 405-204,
Lomas de Chapultepec, 11000 México, D.F. For informasjon om importør og service:
+5255 (5202) 3545
Importør i Taiwan: Bose Taiwan Branch, 9F-A1, No. 10, Section 3, Minsheng East Road,
Taipei City 104, Taiwan. Telefonnummer: +886-2-2514 7676
Bose og DesignMax er varemerker som tilhører Bose Corporation.
Hovedkontoret til Bose Corporation: 1-877-230-5639
©2019 Bose Corporation. Ingen del av dette arbeidet kan bli reprodusert, endret,
distribuert eller på annen måte brukt uten skriftlig tillatelse på forhånd.
Garantiinformasjon
Dette produktet er dekket av en begrenset garanti.
Hvis du vil ha informasjon om garanti, går du til PRO.BOSE.COM.
Produktklassifisering:
Inngangsspenning: 70/100V
Impedans: 8Ω, 100W
Strøm eller eekt: (70V): 2,5W, 5W, 10W, 20W, 40W, 80W, (100V): 5W, 10W, 20W, 40W,
80W
ADVARSLER/FORHOLDSREGLER
Dette produktet inneholder magnetisk materiale. Kontakt lege hvis du vil finne
ut om dette kan påvirke implantert medisinsk utstyr.
• Alle Bose-produkter må monteres i henhold til bransjeforskrifter og lokale og
nasjonale forskrifter. Det er montørens ansvar å sikre at monteringen av høyttalerne
og monteringssystemet utføres i henhold til alle gjeldende forskrifter, inkludert
lokale byggeforskrifter og bestemmelser. Kontakt de lokale myndighetene som
hardomsmyndighet før du monterer dette produktet.
• Utrygg montering eller opphenging av tunge gjenstander kan forårsake alvorlig
skadeeller død, samt skade på eiendom. Det er montørens ansvar å vurdere
påliteligheten til alle monteringsmetodene de bruker. Takmonterte høyttalere skalbare
monteres av profesjonelle montører med kunnskap om det riktige utstyretog trygge
monteringsteknikker.
• Ikke monter produktet på steder der det kan bli eksponert for vann eller kondens.
• Dette produktet er ikke ment for montering eller bruk i innendørs vannanlegg (inkludert,
men ikke begrenset til, innendørs basseng, innendørs badeland, rom med badestamp,
badstuer, damprom og innendørs skøytebaner).
• Må ikke monteres på overflater som ikke er solide, eller som har skjulte faremomenter
bak seg, for eksempel elektriske kabler eller rør. Kontakt en kvalifisert montør hvis du er
usikker på hvordan braketten skal monteres. Sørg for at braketten er montert ihenhold
til lokale byggeforskrifter.
• Bruk bare utstyret og tilbehøret som følger med, eller som er spesifisert av Bose for bruk
med DesignMax DM6C-høyttalere. Hvis du vil ha informasjon om kompatibelt tilbehør,
kan du se produktets tekniske dataark på PRO.BOSE.COM.
• Hold produktet unna ild og andre varmekilder. Ikke plasser kilder til bar ild, foreksempel
tente stearinlys, på eller nær produktet.
• Ikke foreta uautoriserte endringer på dette produktet.
• Ikke eksponer høyttaleren eller monteringskomponentene for kjemikalier som ikke er
spesifisert av Bose, inkludert, men ikke begrenset til, smøremidler, rengjøringsmidler,
kontaktsprayer eller andre hydrokarbonbaserte oppløsningsmidler. Slike midler
kan forårsake at plastmaterialet brytes ned, som igjen kan forårsake sprekker og at
høyttaleren faller ned.
• Bruk bare en tørr klut når du skal rengjøre høyttalerne. Ikke bruk såpe, vaskemiddel,
mineralolje, alkohol eller andre rengjøringsmidler eller kjemikalier når du rengjør
høyttaleren.
• Grillen er utstyrt med en sikkerhetsfestesnor som er designet for bruk én gang.
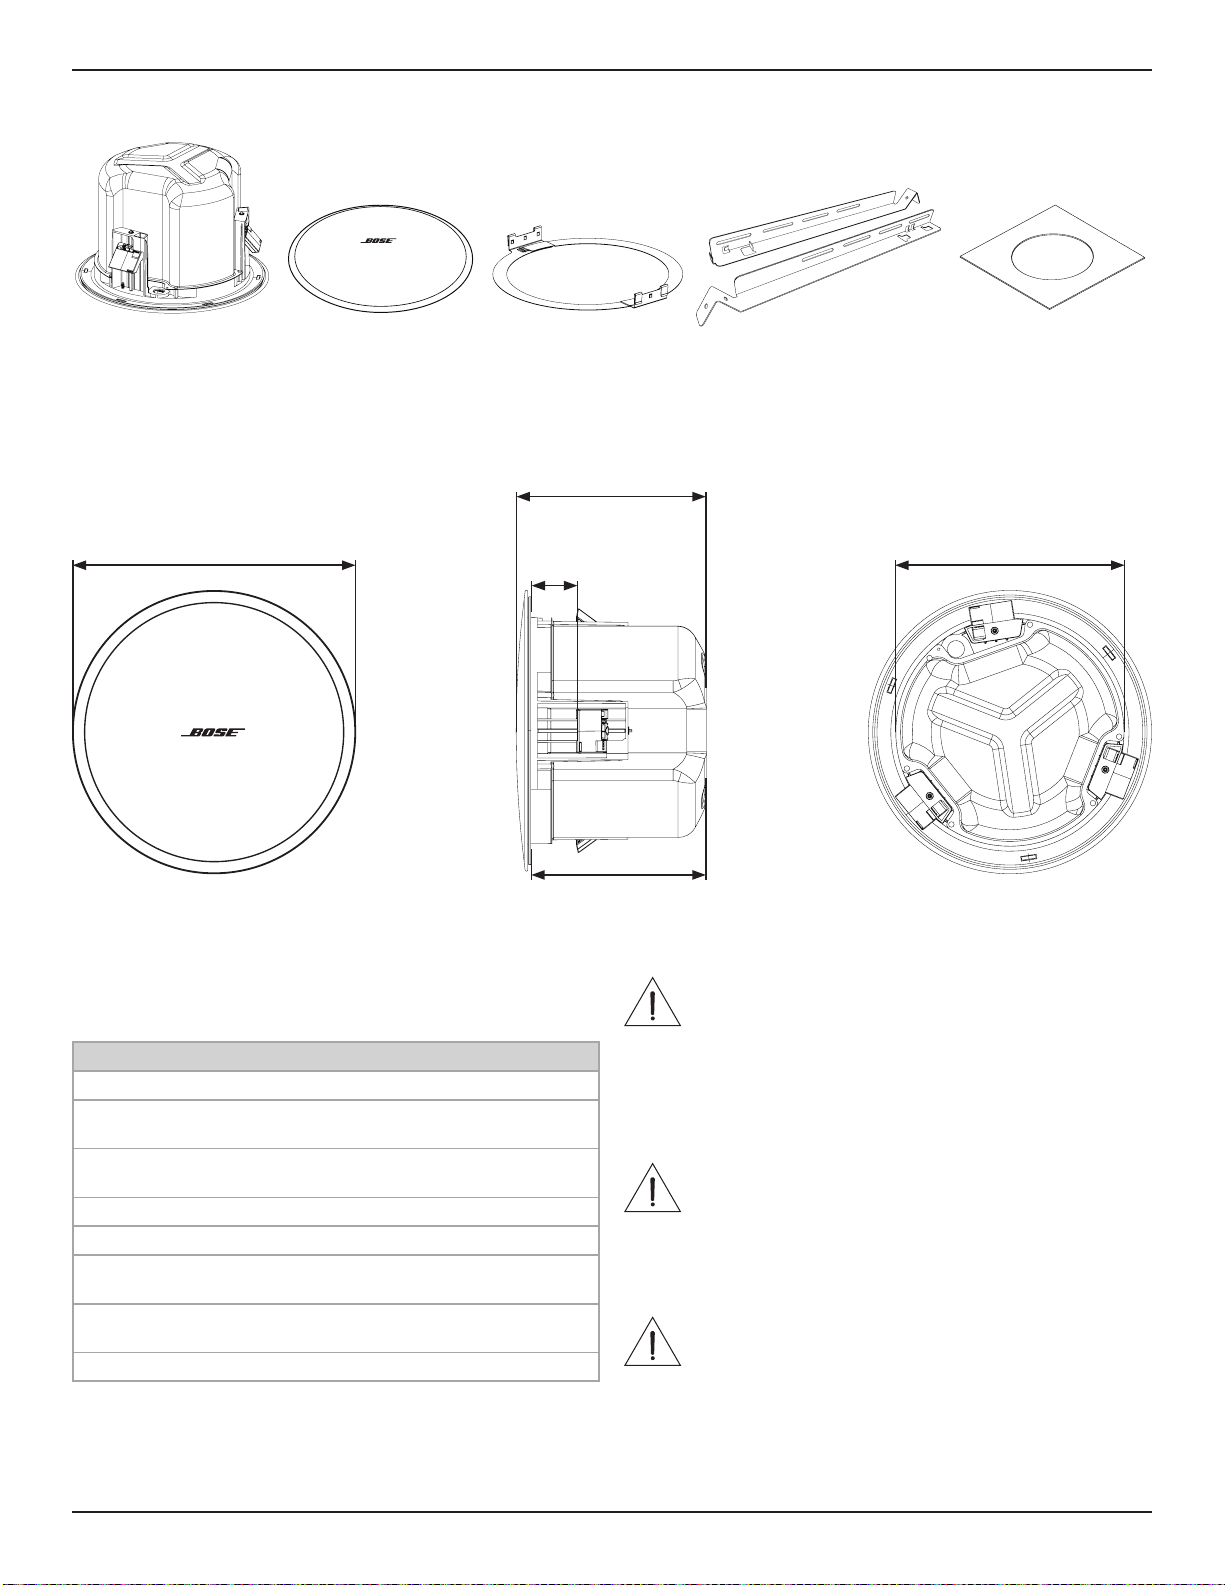
Norsk • 39Monteringsveiledning • DesignMax DM6C
PRO.BOSE.COM
Oversikt
Innhold i pakken
Produktmål
×2 ×2 ×4×2 ×1
356 mm
288 mm
57 mm
223 mm
239 mm
Tekniske spesifikasjoner
Hvis du vil ha flere spesifikasjoner, kan du se det tekniske
dataarket for DesignMax DM6C på PRO.BOSE.COM.
Fysisk
Produktmål Nettingdiameter: 356 mm
Diameter på høyttalerhus:
288 mm
Dybde på høyttalerbrønn: 223
mm
Utskåret hull 292 mm
Maksimal taktykkelse 57 mm
Nettovekt, Høyttaler med grill
(enkel)
6,50kg
Nettovekt, Monteringsbro
(enkel)
0,82kg
Forsendelsesvekt (par) 17,74kg
Viktig informasjon om montering
Dette produktet er kun ment for innendørsbruk.
Det er montørens ansvar å sikre at monteringen av høyttalerne og
monteringssystemet utføres i henhold til alle gjeldende forskrifter,
inkludert lokale byggeforskrifter og bestemmelser. Kontakt de lokale
myndighetene som har domsmyndighet før du monterer dette
produktet.
Montøren har ansvaret for at høyttaleren er sikkert montert. Hvis
høyttaleren ikke er montert på riktig måte, kan dette forårsake skade og
død.
Ikke monter produktet på steder der det kan bli eksponert for vann
ellerkondens.
Dette produktet er ikke ment for montering eller bruk i innendørs
vannanlegg (inkludert, men ikke begrenset til, innendørs basseng,
innendørs badeland, rom med badestamp, badstuer, damprom og
innendørs skøytebaner).
Ikke blokker ventilasjonsåpninger. Plasser i henhold til produsentens
instruksjoner.
Ikke plasser produktet nær varmekilder som radiatorer,
ventilasjonsgitter, ovner eller andre apparater (inkludert forsterkere) som
produserer varme.
Må ikke monteres på overflater som ikke er solide, eller som har
skjultefaremomenter bak seg, for eksempel elektriske kabler eller rør.
Kontakt en kvalifisert montør hvis du er usikker på hvordan braketten
skal monteres. Sørg for at braketten er montert i henhold til lokale
byggeforskrifter.
Ikke eksponer høyttaleren eller monteringskomponentene for
kjemikalier som ikke er spesifisert av Bose, inkludert, men ikke
begrenset til, smøremidler, rengjøringsmidler, kontaktsprayer eller
andrehydrokarbonbaserte oppløsningsmidler. Slike midler kan
forårsake at plastmaterialet brytes ned, som igjen kan forårsake sprekker
og at høyttaleren faller ned.

40 • Norsk DesignMax DM6C • Monteringsveiledning
PRO.BOSE.COM
Konfigurering
Monteringsalternativer
Monteringsalternativer og tilbehør
q Justerbar monteringsbro (følger med)
w Rough-in Pan (tilleggsutstyr)
Rørforbindelse
Hvis du bruker et fleksibelt metallrør, må du bruke det med
en ⅜-tommers rørforbindelse eller en ⅜-tommers dobbel
kontakt.
Merk: Rørforbindelser følger ikke med.
q
w
⅜-tommers enkel
inngang
⅜-tommers dobbel
inngang/ sløyfe
Kable høyttaleren
Kabeldiameter
DesignMax DM6C-høyttaleren er utformet for å fungere kun med kabler på mellom 18AWG (0,8mm
2
) til 14AWG (2,1mm
2
).
Høyttalerinnstillinger
70V
2,5W 5W 10W 20W 40W 80W*
8Ώ
5W 10W 20W 40W 80W NC**
100V
** NC: Ingen tilkobling (ikke bruk)* Fabrikkstandard
Innstilling av omformerkontakt
Vri for å stille inn kontakten. Bruk en skrutrekker med flatt hode.
Koblingsdiagrammer
Eksponer seks millimeter
av ledningen for å feste til
terminalene.
70/100V
8Ω
OUT
IN
70/
100V COM8Ω8ΩCOM
70/
100V
OUT
IN
70/
100V COM8Ω8ΩCOM
70/
100V

Norsk • 41Monteringsveiledning • DesignMax DM6C
PRO.BOSE.COM
Konfigurering
Forberede monteringen
Bruke en sikkerhetskabel
Noen regionale byggeforskrifter krever at du sikrer
høyttalerne ytterligere ved hjelp av en sekundær
sikringsmetode. Velg monteringssted, -metode-
og-utstyr som samsvarer med lokale byggeforskrifterog
bestemmelser.
Bose anbefaler at du bruker (1) en sikkerhetsledning,
(2)en sikkerhetskabel som sekundær sikringsmekanisme.
Se diagrammene nedenfor for å se punkter om
sikkerhetsfeste.
Følg produsentens instruksjoner for eventuelle
sekundære festemekanismer som brukes.
q
e
w
Sette sammen monteringsbroen
Merk: Hvis du monterer i et hardt tak, setter du sammen
dumonteringsbroen etter å ha satt inn skinner og ring
gjennom det utskårede hullet (se side 42).
1. Sett skinnene over hverandre og sett inn tappene
isporene.
2. Dra skinnene utover for å feste dem sammen.
3. Sett skinnene parallelt med hverandre og trykk ned
monteringsbroringen for å feste ringen til skinnene.
qw
q
Skjære takplaten
1. Fjern platen, og bruk malen til å tegne et
høyttalerhull på platen. Hvis du vil plassere
malen midt på platen, tegner du en X ved å
streke opp diagonale linjer mellom hjørnene og
plassere malen på krysningspunktet.
2. Skjær et hull i platen.
q w
Klargjøre lyddempende takplate
Installere monteringsbroen
1. Plasser den monterte monteringsbroen
over takristen. Juster om nødvendig
monteringsbroen slik at skinnene hviler
påtakristen.
2. Sett takplaten tilbake på plass.
q w
Merk: Montering på steder hvor høyttaleren kan komme
i kontakt med matolje, for eksempel på storkjøkken, kan
redusere ytelsen eller funksjonaliteten til høyttaleren.

42 • Norsk DesignMax DM6C • Monteringsveiledning
PRO.BOSE.COM
Montering
Montere høyttaleren
1. Tre lydkabelen gjennom kabelåpningen.
2. Før høyttaleren gjennom hullet og inn i monteringsbroen. Kontroller at ankrene er i kontakt med monteringsbroen før
du løsner grepet på høyttaleren.
3. Ta ut kontakten, kable den, og sett den tilbake i høyttaleren. Hvis du vil ha mer informasjon om kabling, kan du se Kable
høyttaleren på side 40.
4. Stram skruene på ankerarmen for å feste høyttaleren. Hvis du bruker en elektrisk drill, må du stille den inn på lavt
dreiemoment.
ADVARSEL: Hvis skruene strammes for mye, kan dette forårsake skade på ankerfestepunktet eller taket,
og at høyttaleren faller ned.
q
e
w
r
Skjære i taket
1. Bruk malen til å tegne opp et hull
itaket.
2. Skjær et hull i taket.
q w
Klargjøre hardt tak (eksisterende konstruksjon)
Installere monteringsbroen
1. Sett inn monteringsbroskinnene
ogringen gjennom hullet og plasser
skinnene parallelt med hverandre over
takristen eller -lekten.
2. Montere monteringsbroen.
q w

Norsk • 43Monteringsveiledning • DesignMax DM6C
PRO.BOSE.COM
Montering
Montering i hardt tak ved hjelp av Rough-in Pan (ny konstruksjon)
Hvis du vil ha informasjon om hvordan du monterer rough-in pan, kan du se monteringsveiledningen for DesignMax
Rough-in Pan på PRO.BOSE.COM. Når rough-in pan er montert, kan du se Montere høyttaleren på side 42.
Feste grillen
Stikk sikkerhetsfestesnoren inn i hullet i høyttaleren. Bruk begge hendene når du plasserer grillen mot høyttaleren. Grillen
festet til høyttaleren ved hjelp av magneter.
Samsvar med sikkerhet og forskrifter
Bose DesignMax DM6C-høyttaleren har bestått tester og samsvarer med følgende spesifikasjoner og bruksområder:
Oppført i ANSI/UL 1480A-2016, høyttalere for profesjonell kommersiell bruk og sikkerhetsformål
Generell bruk – UL kategori UEAY, filnummer S 5591 kontrollnummer 3N89
UL-2043, 2013, branntest og utløser for synlig røyk for diskré produkter og tilbehør som er montert i
ventilasjonsområder. Egnet for bruk i ventilasjonsområder (under overtrykk).
Kan brukes til montering ved hjelp av kabelmetoder i klasse 1, klasse 2 eller klasse 3, i samsvar med NFPA 70,
National Electrical Code, 2017, artikkel 640
NFPA 70, National Electrical Code, 2017, artikkel 300-22(c)
NFPA 90-A, 2015, montering av klimaanlegg og ventilasjonssystemer, paragraf 4.3.11.2.6.5
DesignMax DM6C-høyttaleren er utformet i henhold til kravene som er definert i følgende europeiske forskrifter for
kombinasjonssystemer:
Testet i samsvar med IEC60268-5, 2007

DesignMax DM6C • Podręcznik instalacji
PRO.BOSE.COM
44 • Polski
Ważne zalecenia dotyczące bezpieczeństwa
Należy zapoznać się ze wszystkimi zaleceniami dotyczącymi
bezpieczeństwa oraz instrukcjami użytkowania izachować je.
Instalację niniejszego produktu może przeprowadzić wyłącznie specjalista! Niniejszy
dokument ma na celu dostarczenie profesjonalnym instalatorom podstawowych wskazówek
dotyczących instalacji ibezpieczeństwa tego produktu wtypowych, stałych instalacjach.
Przed przystąpieniem do instalacji należy zapoznać się zniniejszym dokumentem iwszystkimi
ostrzeżeniami dotyczącymi bezpieczeństwa.
Nie wolno serwisować urządzenia samodzielnie. Wszystkie czynności serwisowe muszą być
wykonywane przez pracowników autoryzowanych centrów serwisowych, autoryzowanych
instalatorów, techników, sprzedawców lub dystrybutorów. Aby skontaktować się zfirmą Bose
Professional, zesprzedawcą bądź dystrybutorem wokolicy, odwiedź stronę PRO.BOSE.COM.
1. Należy przeczytać instrukcje.
2. Należy zachować instrukcje.
3. Należy stosować się do wszystkich ostrzeżeń.
4. Należy postępować zgodnie zinstrukcjami.
5. Nie należy korzystać ztego urządzenia wpobliżu wody.
6. Urządzenie należy czyścić wyłącznie przy użyciu suchej ściereczki.
7. Nie wolno blokować otworów wentylacyjnych. Urządzenie należy zainstalować zgodnie
zzaleceniami producenta.
8. Nie wolno instalować urządzenia wpobliżu źródeł ciepła, takich jakkaloryfery, przewody
kominowe, piece lubinne urządzenia wydzielające ciepło (np.wzmacniacze).
9. Należy korzystać wyłącznie zdodatków iakcesoriów zalecanych przez producenta.
Informacje prawne
Ten produkt jest zgodny zewszystkimi obowiązującymi wymaganiami
dyrektywUE. Pełna treść Deklaracji zgodności jest dostępna wwitrynie:
www.Bose.com/compliance.
Ten symbol oznacza, że produktu nie należy wyrzucać razem zinnymi odpadkami
zgospodarstwa domowego. Produkt należy dostarczyć do odpowiedniego miejsca
zbiórki wcelu recyklingu. Właściwy sposób utylizacji irecyklingu pomaga chronić
zasoby naturalne, ludzkie zdrowie iśrodowisko naturalne. Aby uzyskać więcej
informacji na temat utylizacji irecyklingu tego produktu, skontaktuj się
zsamorządem lokalnym, zakładem utylizacji odpadówalbo ze sklepem, wktórym
produkt został nabyty.
Data produkcji: Ósma cyfra numeru seryjnego oznacza rok produkcji, np. cyfra „7” oznacza rok
2007 lub 2017.
Importer na terenie Chin: Bose Electronics (Shanghai) Company Limited, Part C, Plant 9,
No. 353 North Riying Road, China (Shanghai) Pilot Free Trade Zone
Importer na terenie UE: Bose Products B.V., Gorslaan 60, 1441 RG Purmerend, Holandia
Importer na terenie Meksyku: Bose de México, S. de R.L. de C.V., Paseo de las Palmas
405-204, Lomas de Chapultepec, 11000 México, D.F. W celu uzyskania informacji oimporterze
iusługach: +5255 (5202) 3545
Importer na terenie Tajwanu: Bose Taiwan Branch, 9F-A1, No.10, Section 3,
Minsheng EastRoad, Taipei City 104, Taiwan. Numer telefonu: +886-2-2514 7676
Bose and DesignMax są znakami towarowymi firmy Bose Corporation.
Siedziba główna firmy Bose Corporation: 1-877-230-5639
© 2019 Bose Corporation. Żadnej części tego dzieła nie wolno reprodukować, modyfikować,
rozpowszechniać ani winny sposób wykorzystywać bez uprzedniego uzyskania pisemnego
pozwolenia.
Informacje ogwarancji
Opisywany produkt objęty jest ograniczoną gwarancją.
Szczegółowe informacje na temat gwarancji można znaleźć na stronie PRO.BOSE.COM.
Klasyfikacja produktu:
Napięcie wejściowe: 70V / 100V
Impedancja: 8Ω, 100W
Prąd lub moc: (70V): 2,5W, 5W, 10W, 20W, 40W, 80W; (100V):
5W, 10W, 20W, 40W, 80W
OSTRZEŻENIA/PRZESTROGI
Produkt zawiera elementy magnetyczne. Aby dowiedzieć się, czy mogą
onemieć wpływ nafunkcjonowanie implantów medycznych, należy
skonsultowaćsię zlekarzem.
• Wszystkie produkty Bose muszą być instalowane zgodnie zprzepisami lokalnymi,
krajowymi, federalnymi ibranżowymi. Instalator jest zobowiązany zainstalować głośniki
isystem montażowy zgodnie zewszystkimi obowiązującymi regulaminami, wtym
regulaminami iprzepisami obowiązującymi wbudynku. Przed instalacją produktu należy
skonsultować się zodpowiednimi władzami.
• Niebezpieczny montaż lubpodwieszenie ciężkiego ładunku może spowodować poważne
obrażenia lubśmierć orazuszkodzenie mienia. Do obowiązków instalatora należy
ocena niezawodności każdej metody montażu stosowanej wtymprzypadku. Montaż
podwieszanych głośników może być przeprowadzany wyłącznie przezprofesjonalnych
instalatorów posiadających wiedzę oodpowiednim sprzęcieibezpiecznych technikach
montażu.
• Nie wolno montować produktu w miejscach, w których może być on narażony na kontakt z
wodą lub ze skroploną parą wodną.
• Niniejszy produkt nie jest przeznaczony do instalacji anistosowania wpomieszczeniach
mających stały kontakt zwodą (w tym m.in. basenach wewnętrznych, parkach wodnych,
pomieszczeniach zjacuzzi, saunach, łaźniach parowych ilodowiskach).
• Niemontować uchwytu napowierzchniach niewystarczająco solidnych lubstwarzających
zagrożenia związane naprzykład zinstalacją elektryczną lubhydrauliczną. Wprzypadku
wątpliwości związanych zmontażem uchwytu skontaktować się zwykwalifikowanym
instalatorem. Upewnić się, żeuchwyt został zamontowany zgodnie zlokalnymi przepisami
budowlanymi.
• Należy używać wyłącznie sprzętu iakcesoriów dostarczonych lubokreślonych przez firmę
Bose jakoodpowiednie dogłośników DesignMax DM6C. Informacje natemat zgodnych
akcesoriów można znaleźć warkuszu danych technicznych produktu pod adresem PRO.
BOSE.COM.
• Produkt musi być umieszczony zdala od ognia iźródeł ciepła. Na urządzeniu lub wjego
pobliżu nie należy umieszczać źródeł otwartego ognia, np. zapalonych świec.
• Nie wolno dokonywać modyfikacji produktu bez zezwolenia.
• Nie wolno narażać głośnika lub elementów montażowych na działanie substancji
chemicznych, które nie zostały dozwolone przez firmę Bose, w tym m.in. środków
smarnych i czyszczących, środków do ochrony instalacji elektrycznych oraz innych
rozpuszczalników na bazie węglowodorów. Narażenie nadziałanie takich substancji może
prowadzić dodegradacji materiałów plastikowych, awrezultacie dopękania istworzenia
zagrożenia upadkiem.
• Głośniki należy czyścić wyłącznie suchą szmatką. Nie należy wystawiać głośnika
na działanie mydła, detergentów, oleju mineralnego, alkoholu ani innych środków
czyszczących lub chemikaliów.
• Osłona wyposażona jest wlinkę bezpieczeństwa przeznaczoną do jednorazowego użytku.

Polski • 45Podręcznik instalacji • DesignMax DM6C
PRO.BOSE.COM
Omówienie
Zawartość opakowania
Wymiary produktu
×2 ×2 ×4×2 ×1
356 mm
14 cali
288 mm
11,34 cala
57 mm
2,25 cala
223 mm
8,78 cala
239 mm
9,41 cala
Dane techniczne
Dodatkowe dane techniczne można znaleźć warkuszu
danych technicznych DesignMax DM6C na stronie
PRO.BOSE.COM.
Fizyczne
Wymiary produktu Średnica maskownicy:
356mm (14,00 cali)
Średnica obudowy: 288 mm
(11,34 cala)
Głębokość tylnej puszki:
223mm (8,78 cala)
Wycięcie otworu 292 mm (11,5 cala)
Maksymalna grubość sufitu 57 mm (2,25 cala)
Waga netto — głośnik zosłoną
(pojedynczy)
6,50 kg (14,3 funta)
Waga netto — mostek płytkowy
(pojedynczy)
0,82 kg (1,8 funta)
Waga przesyłki (para) 17,74 kg (39,1 funta)
Ważne informacje dotyczące instalacji
Produkt jest przeznaczony wyłącznie do użytku w pomieszczeniach.
Instalator jest zobowiązany zainstalować głośniki isystem
montażowy zgodnie zewszystkimi obowiązującymi regulaminami,
wtym regulaminami iprzepisami obowiązującymi wbudynku.
Przed instalacją produktu należy skonsultować się zodpowiednimi
władzami.
Odpowiedzialność zabezpieczeństwo instalacji głośników spoczywa
nainstalatorze. Nieprawidłowe zamontowanie głośnika może
spowodować uszkodzenie urządzenia, obrażenia ciała lub śmierć.
Nie wolno montować produktu w miejscach, w których może być
ono narażone na kontakt z wodą lub ze skroploną parą wodną.
Niniejszy produkt nie jest przeznaczony do instalacji anistosowania
wpomieszczeniach mających stały kontakt zwodą (w tym m.in.
basenach wewnętrznych, parkach wodnych, pomieszczeniach
zjacuzzi, saunach, łaźniach parowych ilodowiskach).
Nie wolno blokować otworów wentylacyjnych. Urządzenie należy
zainstalować zgodnie zzaleceniami producenta.
Nie wolno instalować urządzenia wpobliżu źródeł ciepła, takich
jakkaloryfery, przewody kominowe, piece lubinne urządzenia
wydzielające ciepło (np.wzmacniacze).
Niemontować napowierzchniach niewystarczająco solidnych
lubstwarzających zagrożenia związane naprzykład zinstalacją
elektryczną lubhydrauliczną. Wprzypadku wątpliwości związanych
zmontażem uchwytu skontaktować się zwykwalifikowanym
instalatorem. Upewnić się, żeuchwyt został zamontowany zgodnie
zlokalnymi przepisami budowlanymi.
Nie wolno narażać głośnika lub elementów montażowych na
działanie substancji chemicznych, które nie zostały dozwolone przez
firmę Bose, wtym m.in. środków smarnych i czyszczących, środków
do ochrony instalacji elektrycznych oraz innych rozpuszczalników na
bazie węglowodorów. Narażenie nadziałanie takich substancji może
prowadzić dodegradacji materiałów plastikowych, awrezultacie
dopękania istworzenia zagrożeniaupadkiem.

46 • Polski DesignMax DM6C • Podręcznik instalacji
PRO.BOSE.COM
Konfiguracja
Opcje montażu
Opcje montażu iakcesoria
q Regulowany mostek do płytek (w zestawie)
w Podkładka montażowa (opcjonalna)
Przepust kablowy
W przypadku korzystania zelastycznego metalowego
kanału kablowego należy użyć łącznika ⅜ cala lub
podwójnego złącza ⅜ cala (dupleksu).
Uwaga: przepusty kablowe nie są dołączone do zestawu.
q
w
⅜ cala, pojedynczy ⅜ cala, podwójne
wejście/pętla
Okablowanie głośnika
Grubość przewodu
Do montażu głośnika DesignMax DM6C należy stosować wyłącznie przewody orozmiarze od 18AWG (0,8mm
2
)
do14AWG (2,1mm
2
).
Ustawienia głośnika
70V
2,5W 5W 10W 20W 40W 80W*
8Ώ
5W 10W 20W 40W 80W NC**
100V
** NC brak połączenia (nie używać)* Ustawienia fabryczne
Ustawienie gwintownika transformatora
Ustaw gwintownik, obracając go. Użyj płaskiego śrubokrętu.
Schematy połączeń
Odsłonić sześć milimetrów
(¼cala) nieizolowanego
przewodu, aby podłączyć
go do zacisków.
70V / 100V
8 Ω
OUT
IN
70/
100V COM8Ω8ΩCOM
70/
100V
OUT
IN
70/
100V COM8Ω8ΩCOM
70/
100V
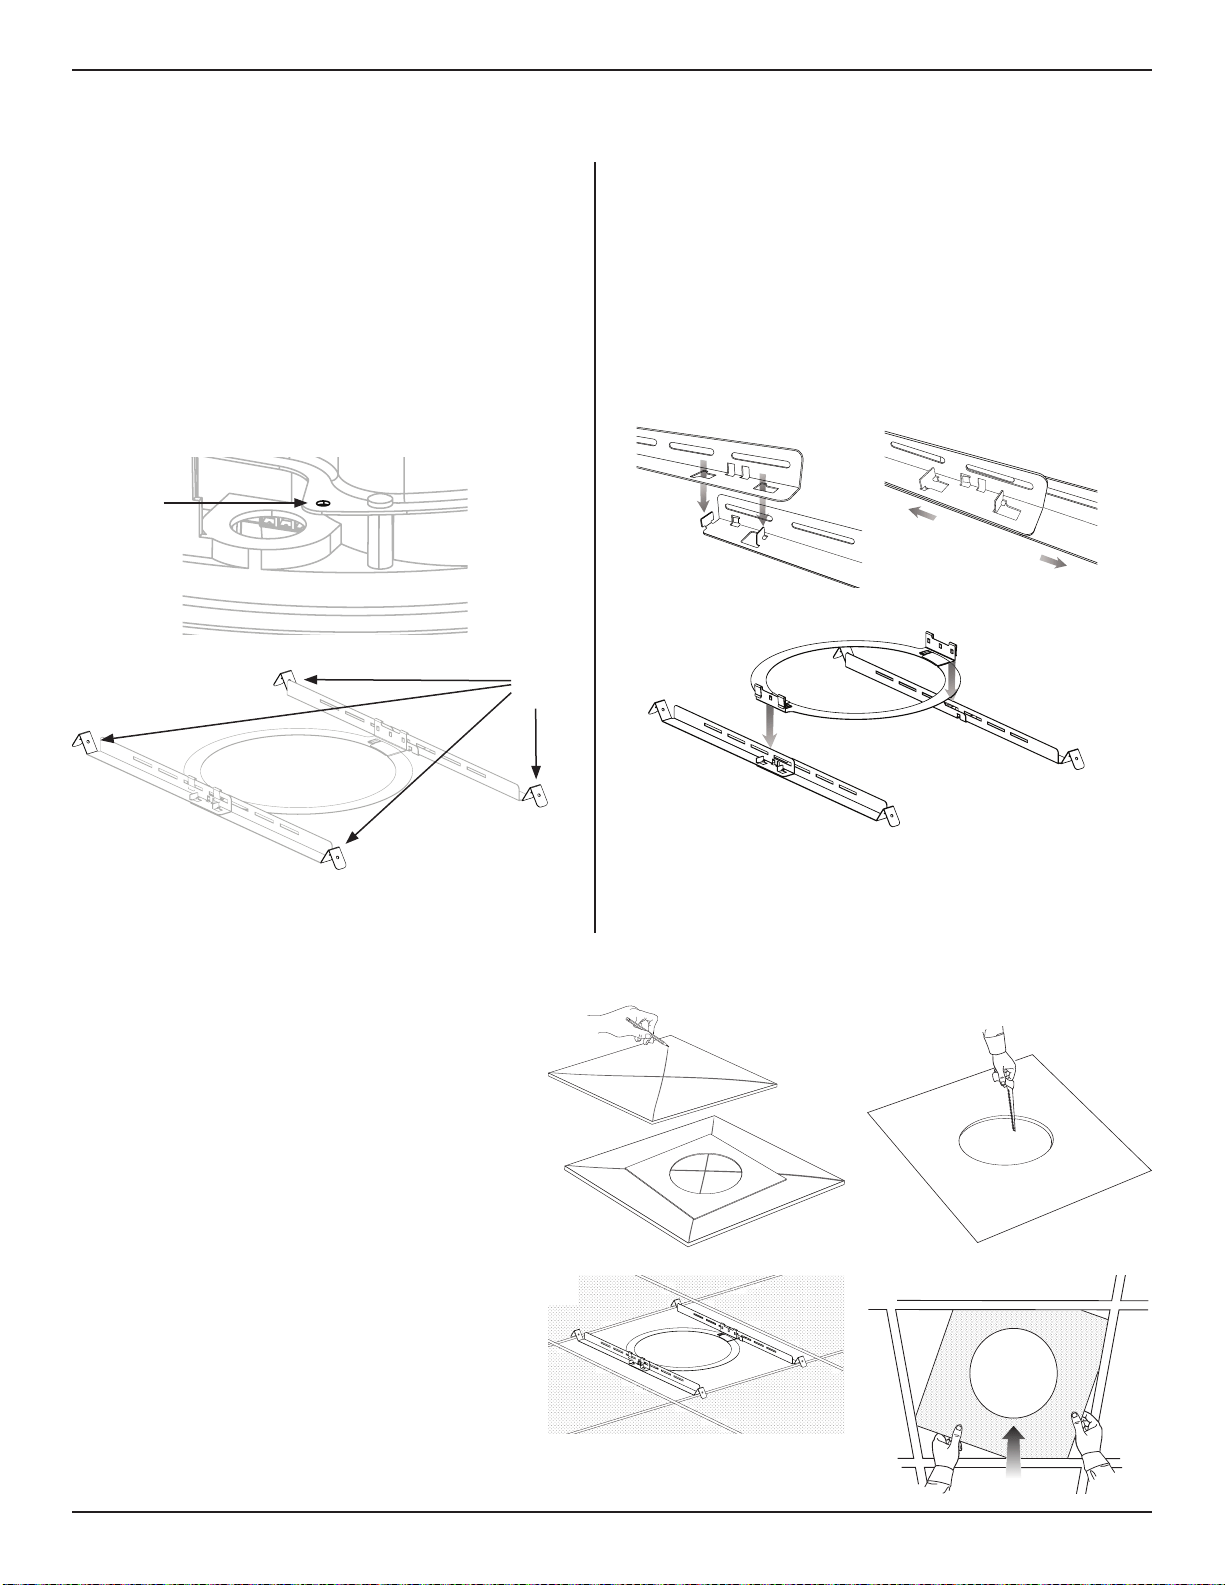
Polski • 47Podręcznik instalacji • DesignMax DM6C
PRO.BOSE.COM
Konfiguracja
Przygotowanie do montażu
Korzystanie zkabla zabezpieczającego
Niektóre regionalne przepisy budowlane wymagają
zastosowania dodatkowej metody zabezpieczania
głośników wcelu zapewnienia dodatkowego
bezpieczeństwa. Pozycja, sposób ielementy montażu
muszą być zgodne zlokalnymi normami iprzepisami
budowlanymi.
Firma Bose zaleca użycie (1) przewodu
zabezpieczającego lub (2) kabla zabezpieczającego
jakododatkowego mechanizmu zabezpieczającego.
Punkty mocowania osprzętu zabezpieczającego
przedstawiono na poniższych schematach.
Należy przestrzegać instrukcji producenta dotyczących
dodatkowego mechanizmu zabezpieczającego.
q
e
w
Montaż mostka płytkowego
Uwaga: wprzypadku montażu wsuficie twardym należy
zmontować mostek płytkowy po włożeniu szyn ipierścienia
przez otwór (patrz strona 48).
1. Wyrównać szyny iwsunąć zaczepy do szczelin.
2. Pociągnąć szyny na zewnątrz, aby je zamocować.
3. Ustawić szyny równolegle do siebie iwcisnąć
pierścieńmostka płytkowego, aby zamocować
pierścieńna szynach.
qw
q
Przycinanie płytki sufitowej
1. Usunąć płytkę iużyć szablonu do zaznaczenia
otworu głośnika na płytce. Aby wyśrodkować
szablon na płytce, narysować znak X, łącząc
narożniki po przekątnej iwyśrodkować szablon,
używając punktu przecięcia.
2. Wyciąć otwór wpłytce.
q w
Przygotowanie akustycznej
płytki sufitowej
Montaż mostka płytkowego
1. Umieścić złożony mostek płytkowy wpoprzek
kratki sufitowej. W razie potrzeby wyregulować
położenie mostka, tak aby szyny spoczywały na
kratce sufitowej.
2. Zamontować płytkę wsuficie.
q w
Uwaga: montaż wpobliżu powierzchni służących do
gotowania, gdzie głośnik może być bezpośrednio
wystawiony na działanie olejów, np. wkomercyjnych
punktach przygotowywania posiłków, może obniżyć
wydajność lub funkcjonalność głośnika.

48 • Polski DesignMax DM6C • Podręcznik instalacji
PRO.BOSE.COM
Instalacja
Montaż głośnika
1. Przeciągnąć przewód audio przez otwór na kable.
2. Wsunąć głośnik przez otwór ido mostka płytkowego. Przed poluzowaniem uchwytu na głośniku należy upewnić się, że
zaczepy na mostku zostały zablokowane.
3. Odłączyć złącze, podłączyć okablowanie do złącza iponownie podłączyć złącze do głośnika. Informacje na temat
okablowania można znaleźć wsekcji Podłączanie okablowania do głośnika na stronie 46.
4. Dokręcić śruby ramienia kotwiącego, aby zamocować głośnik. W przypadku używania wiertarki udarowej należy
ustawić niski moment obrotowy.
OSTRZEŻENIE: zbyt mocne dokręcenie śrub może spowodować uszkodzenie punktu mocowania zaczepu
lubsufitu, co może prowadzić do zagrożenia upadkiem.
q
e
w
r
Przycinanie sufitu
1. Użyć szablonu do zaznaczenia otworu
wsuficie.
2. Wyciąć otwór wsuficie.
q w
Przygotowanie sufitu twardego (istniejąca konstrukcja)
Montaż mostka płytkowego
1. Wsunąć szyny mostka płytkowego
wotwór iumieścić szyny równolegle
do siebie wpoprzek kratki sufitowej
lub podkładki sufitowej.
2. Zmontować mostek płytkowy.
q w

Polski • 49Podręcznik instalacji • DesignMax DM6C
PRO.BOSE.COM
Instalacja
Montaż wsuficie twardym zwykorzystaniem podkładki montażowej
(nowa konstrukcja)
Informacje na temat instalacji podkładki montażowej można znaleźć wpodręczniku instalacji podkładki montażowej
DesignMax na stronie PRO.BOSE.COM. Po zamontowaniu podkładki montażowej należy zapoznać się zinformacjami
zawartymi wsekcji Montaż głośnika na stronie 48.
Mocowanie osłony głośnika
Włożyć kołek linki bezpieczeństwa do otworu wgłośniku. Oburącz nałożyć osłonę na głośnik. Osłona jest mocowana
dogłośnika magnetycznie.
Informacje dotyczące bezpieczeństwa izgodności
Głośnik Bose DesignMax DM6C przeszedł testy ijestzgodny znastępującymi specyfikacjami izastosowaniami:
Zgodność znormami ANSI/UL 1480A-2016, Głośniki do bezpiecznego użytku komercyjnego ispecjalistycznego
Do zastosowań ogólnych – kategoria UL UEAY, numer pliku S5591, numer kontrolny 3N89
UL-2043, 2013, Test pożarowy iwidzialne uwalnianie dymu dla produktów dyskretnych iich akcesoriów
zainstalowanych wprzestrzeniach wentylacyjnych. Nadaje się do użytku wprzestrzeniach wentylacyjnych
(plenum).
Głośniki nadają się do instalacji przy użyciu okablowania klasy1, klasy2 lub klasy3, zgodnie znormą NFPA 70,
National Electric Code, 2017, art. 640
NFPA 70, National Electric Code, 2017, art. 300-22(c).
NFPA 90-A, 2015, Instalacja systemów klimatyzacji iwentylacji, paragraf 4.3.11.2.6.5
Głośnik DesignMax DM6C został zaprojektowany zgodnie zwymaganiami określonymi wnastępujących europejskich
przepisach dotyczących systemów łączonych:
testy zgodne znormą IEC60268-5, 2007.
DesignMax DM6C •
安装指南
PRO.BOSE.COM
50 •
简体中文
重要安全说明
请阅读并保留所有安全和使用说明。
本产品仅适合由专业安装人员安装!本文档旨在为专业安装人员提供在典
型的固定安装系统中安装此产品时适用的基本安装和安全指南。请先阅读
本文档和所有安全警告,再尝试安装。
请勿尝试自行维修此产品。所有维修服务必须由授权服务中心、安装人
员、技术人员、经销商或分销商提供。要联系 Bose Professional 或查找您附近
的经销商或分销商,请访问 PRO.BOSE.COM。
1. 请阅读这些说明。
2. 请保留这些说明。
3. 请注意所有警告。
4. 请遵守所有说明。
5. 请勿在近水区域使用本设备。
6. 只能使用干布进行清洁。
7. 请勿堵塞任何通风口。请按照制造商的说明进行安装。
8. 请勿安装在靠近任何热源的位置,例如暖气片、热调节装置、
火炉或可产生热量的其他设备(包括功率放大器)。
9. 只能使用制造商指定的附件/配件。
规范信息
本产品符合所有适用的欧盟指令要求。您可以从以下网址找到完
整的合规声明:www.Bose.com/compliance。
此符号表示不得将此产品作为生活垃圾丢弃,应将其送到合适的
回收站点进行回收。正确处理和回收有助于保护自然资源、人类
健康和环境。想要获得更多关于此产品的处理和回收的信息,请
联系当地市政当局、垃圾处理服务部门或您购买此产品的商店。
中国危险物质限用表
有毒或有害物质或元素名称及成分
有毒或有害物质和元素
零件名称
铅
(Pb)
汞
(Hg)
镉
(Cd)
六价铬
(CR(VI))
多溴化
联苯
(PBB)
多溴
二苯醚
(PBDE)
印刷电路板
X O O O O O
金属零件
X O O O O O
塑料零件
O O O O O O
扬声器
X O O O O O
线缆
X O O O O O
此表格依据 SJ/T 11364 的要求制定。
O: 表示此零件中所有均质材料所包含的此类有毒或有害物质均低于
GB/T 26572 中的限定要求。
X: 表示此零件所用全部均质材料中至少有一种包含的有毒或有害物质高于
GB/T 26572 中的限定要求。
生产日期:序列号中第八位数字表示生产年份;“7”表示 2007 年或
2017 年。
中国进口商:博士视听系统(上海)有限公司,地址:中国(上海)自由
贸易试验区日樱北路 353 号,9 号厂房 C 部位
欧洲进口商:Bose Products B.V., Gorslaan 60, 1441 RG Purmerend, The Netherlands
墨西哥进口商:Bose de México, S. de R.L. de C.V., Paseo de las Palmas 405-204,
Lomas de Chapultepec, 11000 México, D.F.进口商和服务信息:+5255 (5202) 3545
中国台湾进口商:Bose 台湾分公司,台湾 104 台北市民生东路三段
10 号,9F-A1。电话:+886-2-2514 7676
Bose 和 DesignMax 是 Bose Corporation 的商标。
Bose Corporation 总部:1-877-230-5639
©2019 Bose Corporation。未经事先书面许可,不得复制、修改、分发或以其他
方式使用本文档的任何部分。
质保信息
本产品享有有限保修。
有关质保的详细信息,请访问 PRO.BOSE.COM。
产品额定值:
输入电压:70V/100V
阻抗:8 Ω,100 W
电流或功率:(70V):2.5W、5W、10W、20W、40W、80W;
(100V):5W、10W、20W、40W、80W
警告/小心
本产品含有磁性材料。有关这是否会影响到您的植入式医疗器
械,请咨询您的医生。
• 所有 Bose 产品的安装必须遵守当地、州、联邦和行业规范。安装人
员有责任确保扬声器和安装系统的安装都符合适用的法规,包括当地
的建筑法规和规定。安装本产品前,请咨询拥有司法权的当地监管机
构。
• 不安全地登高安装或吊装任何重物可能导致严重的人身伤害和财产
损失。安装人员有责任评估在其应用中所使用的任何安装方法的可靠
性。只有正确了解硬件且掌握安全安装技术的专业安装人员才能尝试
安装任何吊装式扬声器。
• 请勿将产品安装在暴露于水或可能发生冷凝的位置。
• 此产品不适合在室内涉水设施区域安装或使用(包括但不限于室内游
泳馆、室内水上乐园、有热水浴缸的房间、桑拿房、蒸汽浴室以及室
内溜冰场)。
• 请勿将其安装在不结实或有潜在危险的表面,比如布线或铺设管道的
地方。如果您不确定如何安装支架,请联系拥有相应资质的专业安装
人员。安装支架时,应确保遵循当地建筑规范的要求。
• 仅使用随附安装紧固件和附件或 Bose 指定与 DesignMax DM6C 扬声器配
合使用的安装紧固件和附件。有关兼容附件的信息,请参阅
PRO.BOSE.COM 上的产品技术参数表。
• 请将本产品放置到远离火源和热源的地方。请勿将明火火源(如点燃
的蜡烛)置于本产品上或靠近本产品。
• 未经授权切勿改装本产品。
• 请勿将扬声器或安装组件暴露在 Bose 未指定的任何化学物质中,
包括但不限于润滑剂、清洁剂、触点喷雾或其他烃类溶剂。 暴露于
此类物质中可能会导致产品塑料材料老化,从而导致产品开裂和坠落
危险。
• 只能使用干布清洁扬声器。请勿将扬声器暴露在肥皂、清洁剂、
矿物油、酒精或其他清洁剂或化学制品中。
• 网罩配有专门的一次性安全绳索。
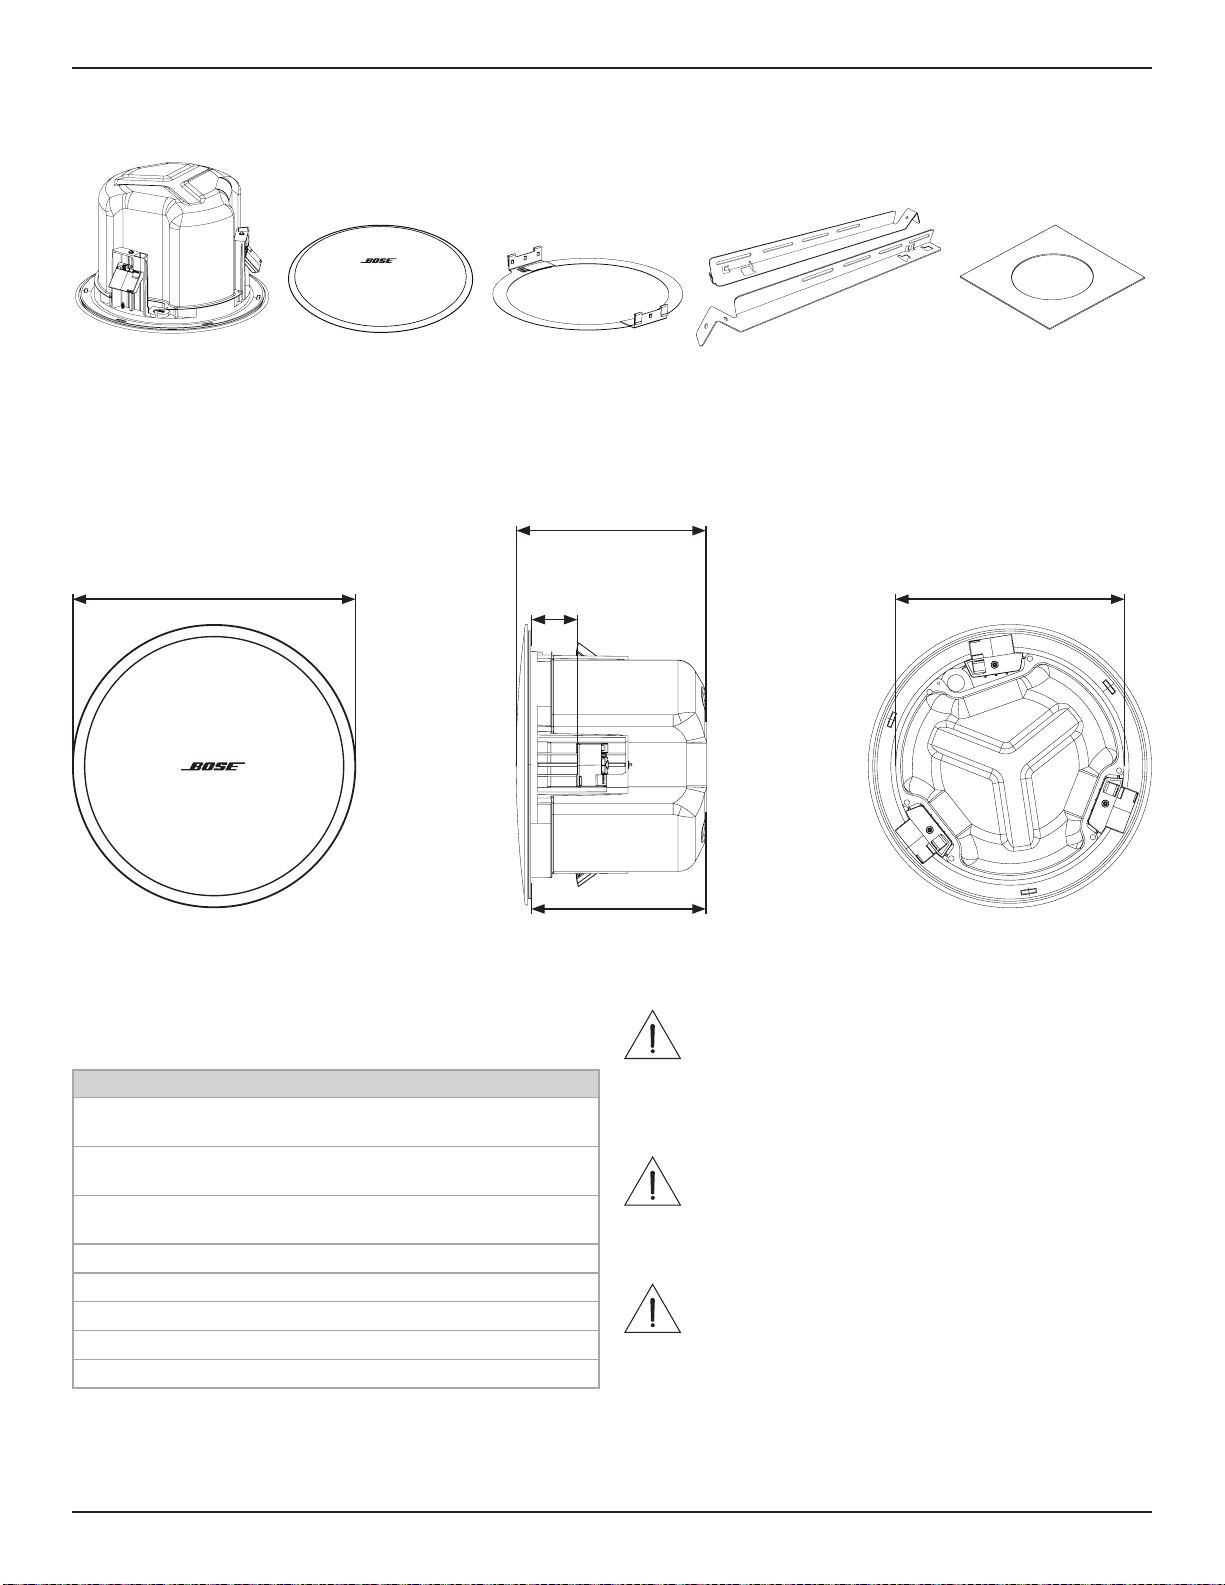
简体中文
• 51
安装指南
• DesignMax DM6C
PRO.BOSE.COM
概述
包装清单
产品尺寸
×2 ×2 ×4×2 ×1
356 毫米
14.00 英寸
288 毫米
11.34 英寸
57 毫米
2.25 英寸
223 毫米
8.78 英寸
239 毫米
9.41 英寸
技术规格
关于其他规格,请参阅 PRO.BOSE.COM上的 DesignMax DM6C
技术参数表。
外观
产品尺寸
网罩直径:356 毫米
(14.00 英寸)
外壳直径:288 毫米
(11.34 英寸)
后盖深度:223 毫米
(8.78 英寸)
开孔
292 毫米(11.5 英寸)
天花板最大厚度
57 毫米(2.25 英寸)
带网罩的扬声器净重(单个)
6.50 千克(14.3 磅)
桥板净重(单个)
0.82 千克(1.8 磅)
装运重量(成对)
17.74 千克(39.1 磅)
重要安装信息
本产品仅可在室内使用。
安装人员有责任确保扬声器和安装系统的安装都符合适用的法规,
包括当地的建筑法规和规定。安装本产品前,请咨询拥有司法权的
当地监管机构。
安装人员负责确保扬声器安装的安全。如果未正确安装扬声器,可
能导致损坏或人员伤亡。
请勿将产品安装在暴露于水或可能发生冷凝的位置。
此产品不适合在室内涉水设施区域安装或使用(包括但不限于室内
游泳馆、室内水上乐园、有热水浴缸的房间、桑拿房、蒸汽浴室以
及室内溜冰场)。
请勿堵塞任何通风口。请按照制造商的说明进行安装。
请勿安装在靠近任何热源的位置,例如暖气片、热调节装置、
火炉或可产生热量的其他设备(包括功率放大器)。
请勿将其安装在不结实或有潜在危险的表面,比如布线或铺设管道
的地方。如果您不确定如何安装支架,请联系拥有相应资质的专业
安装人员。安装支架时,应确保遵循当地建筑规范的要求。
请勿将扬声器或安装组件暴露在 Bose 未指定的任何化学物质中,
包括但不限于润滑剂、清洁剂、触点喷雾或其他烃类溶剂。暴露
于此类物质中可能会导致产品塑料材料老化,从而导致产品开裂
和坠落危险。

52 •
简体中文
DesignMax DM6C •
安装指南
PRO.BOSE.COM
设置
安装选件
安全选件和配件
q 可调节桥板(内含)
w 螺丝孔型桥板(可选)
导管配件
如果使用金属软管,请使用 ⅜ 英寸的单导管配件,或 ⅜ 英寸的双
连接件。
注意:不提供导管配件。
q
w
⅜ 英寸单软管 ⅜ 英寸双连接件输入/环出
扬声器接线
线规
DesignMax DM6C 扬声器仅可与规格为 18 AWG(0.8 平方毫米
)至 14 AWG(2.1 平方毫米
)的接线一起使用。
扬声器设置
70V
2.5W 5W 10W 20W 40W 80W*
8Ώ
5W 10W 20W 40W 80W NC**
100V
** NC:无连接(不使用)
* 出厂默认设置
变压器抽头设置
转动设置抽头。使用平头螺丝刀。
接线图
露出六毫米(¼ 英寸)长的裸线以连
接到端子。
70V/100V
8Ω
OUT
IN
70/
100V COM8Ω8ΩCOM
70/
100V
OUT
IN
70/
100V COM8Ω8ΩCOM
70/
100V

简体中文
• 53
安装指南
• DesignMax DM6C
PRO.BOSE.COM
设置
准备安装
使用安全绳索
某些地区的施工规范要求使用辅助方法将扬声器固定到支撑结
构,以提供额外的安全保障。选择符合当地建筑规范和条例的安
装位置、方法和硬件。
Bose 建议使用 (1) 一根保险钢丝或 (2) 一根安全绳作为辅助固定
装置。有关安全连接点,请参阅下图。
对于已实施的任何辅助固定装置,请遵循制造商的说明。
q
e
w
组装桥板
注意:如果您要安装到硬质天花板,请在导轨和扣圈插入开孔后组装
桥板(请参见第 54 页)。
1. 对齐导轨并将卡舌插入槽口。
2. 向外拉动导轨以将其固定在一起。
3. 将导轨彼此平行对齐,然后向下按压桥板扣圈,以将扣圈固定到
导轨上。
qw
q
切割吊顶板
1. 卸下吊顶板,然后使用模板在吊顶板上描画扬声器
孔。为了将模板放在吊顶板的中心位置,可连接对角
线画一个“X”,然后利用交叉点使模板居中。
2. 在吊顶板上切割一个孔。
q w
准备吊顶板
安装桥板
1. 将组装的桥板穿过吊顶龙骨放置。必要时,
调节桥板,使滑轨靠在吊顶龙骨上。
2. 更换天花板上的吊顶板。
q w
注意:安装在靠近烹饪台的位置(例如在商业烹饪环境中)时,扬声
器可能直接暴露在烹饪油烟之下,这可能会降低扬声器的性能或可
靠性。

54 •
简体中文
DesignMax DM6C •
安装指南
PRO.BOSE.COM
安装
安装扬声器
1. 将音响线穿过进线口。
2. 将扬声器穿过孔插入桥板。松开扬声器上的手柄之前,请确保锚栓与桥板接合。
3. 拔下接线端子并接线,然后将端子重新插入扬声器。有关接线信息,请参阅第 52 页的扬声器接线。
4. 紧固锚臂螺钉,固定扬声器。如果使用电钻,请设为低扭矩设置。
警告:过度紧固螺钉可能会导致锚柱安装点或天花板损坏,从而导致坠落危险。
q
e
w
r
切割天花板
1. 使用模板将孔描到天花板上。
2. 在天花板上切割一个孔。
q w
准备硬顶天花板(现有结构)
安装桥板
1. 将桥板和扣圈插入孔眼,并将导轨平行放
置在天花板龙骨或天花板内垫条上。
2. 组装桥板。
q w

简体中文
• 55
安装指南
• DesignMax DM6C
PRO.BOSE.COM
安装
使用螺丝孔型桥板在硬顶天花板上安装(新结构)
有关螺丝孔型桥板的信息,请参阅 PRO.BOSE.COM 上的 DesignMax 螺丝孔型桥板安装指南。安装好螺丝孔型桥板后,请参阅第 54
页的安装扬声器。
安装网罩
将安全绳销插入扬声器中的孔。用双手将网罩定位在扬声器上。网罩通过磁力固定在扬声器上。
安全与法规遵从
Bose DesignMax DM6C 扬声器经过测试,符合以下规格和用途:
列出的扬声器符合 ANSI/UL 1480A-2016,适合商业和安全专业用途
通用 - UL 类别 UEAY,文件号 S 5591 控制号 3N89
UL-2043 (2013),在空气调节场所中安装的分离性产品及其附件的防火测试及可见烟雾释放。适合在空气调节(微高压)
场所中使用。
适合使用 1 级、2 级、3 级接线方法安装,符合 NFPA 70 美国国家电气法规 (2017) 第 640 条
NFPA 70 美国国家电气法规 (2017),第 300-22(c) 条
NFPA 90-A (2015),空调和通风系统的安装,第 4.3.11.2.6.5 节
DesignMax DM6C 扬声器是根据以下有关组合系统的欧洲监管规范中规定的要求进行设计的:
按照 IEC60268-5 (2007) 标准进行测试。
DesignMax DM6C •
安裝指南
PRO.BOSE.COM
56 •
繁體中文
重要安全指示
請閱讀並保管好所有安全和使用指示。
本產品僅限由專業安裝人員安裝!本文件包含本產品採一般固定式安裝系
統時的相關基本安裝資訊與安全基準,以供專業安裝人員參考。在嘗試進
行安裝以前,請先閱讀本文件與所有的安全警告。
請勿自行維修本產品。如需任何維修服務,請洽授權服務中心、安裝人
員、技術人員、經銷商或分銷商。若要聯絡 Bose Professional 或尋找附近的經
銷商或分銷商,請造訪 PRO.BOSE.COM。
1. 閱讀這些指示。
2. 保留這些指示。
3. 注意所有警告。
4. 遵守所有指示。
5. 請勿在水邊使用此裝置。
6. 只能用乾布清潔。
7. 請勿堵塞任何通風口。請按照製造商的指示安裝。
8. 請勿在熱源附近安裝,如暖氣片、熱調節裝置、火爐或可發熱的其他裝
置 (包括擴大機)。
9. 只能使用製造商指定的附件/配件。
法規資訊
本產品符合所有適用的歐盟指令要求。符合聲明全文載於:
www.Bose.com/compliance。
此符號表示本產品不得以家庭廢棄物方式丟棄,而應將其送到合
適的收集設施進行回收。妥善處理及回收有助於保護天然資源、
人類健康和環境。如欲獲得有關處理和回收本產品的更多資訊,
請聯絡當地政府機關、廢棄物處理服務或您購買本產品的商家。
台灣 BSMI 限用物質含有情況標示
設備名稱 : 揚聲器 型號 :
829679
限制物質及其化學符號
裝置
鉛
(Pb)
汞
(Hg)
鎘
(Cd)
六價鉻
(Cr+6)
多溴化聯苯
(PBB)
多溴聯苯醚
(PBDE)
印刷電路板 - ○ ○ ○ ○ ○
金屬零件 - ○ ○ ○ ○ ○
塑膠零件 ○ ○ ○ ○ ○ ○
揚聲器 - ○ ○ ○ ○ ○
連接線 - ○ ○ ○ ○ ○
備註 1 : 「○」表示限制物質的濃度百分比含量未超過參考值。
備註 2 :「–」表示限制物質屬於豁免項目範圍。
製造日期:序號第八位數代表製造年份;「7」代表 2007 或 2017。
中國進口商:Bose Electronics (Shanghai) Company Limited,中國 (上海) 自由貿易
試驗區,日櫻北路 353 號,9 號廠房 C 部
歐盟進口商:Bose Products B.V., Gorslaan 60, 1441 RG Purmerend, The Netherlands
墨西哥進口商:Bose de México, S. de R.L. de C.V., Paseo de las Palmas 405-204,
Lomas de Chapultepec, 11000 México, D.F.進口商與服務資訊:+5255 (5202) 3545
台灣進口商:Bose 台灣分公司,台灣 104 台北市民生東路三段 10 號 9 樓
A1 室。電話號碼:+886-2-2514 7977
Bose 和 DesignMax 是 Bose Corporation 的商標。
Bose Corporation 總部:1-877-230-5639
©2019 Bose Corporation。未經事先書面許可,不得複製、修改、散佈或以其他
方式使用本資料的任何部分。
保固資訊
此產品享有有限保固。
如需保固詳細資料,請造訪 PRO.BOSE.COM。
產品額定值:
輸入電壓:70V/100V
阻抗:8 Ω,100 W
電流或功率:(70V):2.5W、5W、10W、20W、40W、80W;
(100V):5W、10W、20W、40W、80W
警告/小心
本產品含有磁性材料。請諮詢醫生以瞭解這是否會影響您的植
入式醫療設備。
• 所有 Bose 產品的安裝必須遵守當地、州、聯邦和行業規範。安裝人
員有責任確保揚聲器和安裝系統的裝設都符合適用的法規,包括當地
的建築法規和規定。安裝本產品前,請諮詢擁有司法權的當地政府機
關。
• 以不安全的方式安裝或高處懸吊任何重物都可能導致嚴重的人身傷害
或死亡,以及財產損失。安裝人員須負責評估其應用情形中所採用之
任何安裝方式是否穩定可靠。只有具備適當五金部件知識與安全安裝
技術的專業安裝人員,才可嘗試安裝任何高處懸吊揚聲器。
• 請勿將本產品安裝於可能接觸水或結露的位置。
• 本產品並不適合安裝或用於室內有水設施區域 (包括但不限於:室內
泳池、室內戲水區、熱水浴池、桑拿、蒸氣室與室內溜冰場等)。
• 請勿安裝在不穩定或有潛在危險的表面,比如佈線或鋪設管道的地
方。如果您不確定如何安裝本支架,請聯絡合格的專業安裝人員。
請務必遵循當地建築法規安裝支架。
• 僅限使用 Bose 隨附或指定用於 DesignMax DM6C loudspeakers 揚聲器的五
金部件與配件。如需相容配件的相關資訊,請參閱 PRO.BOSE.COM
上的產品技術資料表。
• 使產品遠離火源和熱源。請勿將明火火源 (例如點燃的蠟燭) 置於本
產品上或本產品附近。
• 未經授權請勿擅自改裝本產品。
• 請勿使揚聲器或安裝組件接觸任何非由 Bose 指定的化學物質,包括但
不限於潤滑劑、清潔劑、觸點噴劑或其他碳氫溶劑。 接觸該等物質會
使塑膠材質劣化,進而導致破裂並產生墜落危險。
• 請僅使用乾布來清潔揚聲器。請勿使揚聲器接觸肥皂、去污劑、
礦物油、酒精或其他清潔劑或化學品。
• 網罩配備一次性安全短繩針。

繁體中文
• 57
安裝指南
• DesignMax DM6C
PRO.BOSE.COM
概觀
包裝內容物
產品尺寸
×2 ×2 ×4×2 ×1
356 公釐
14.00 吋
288 公釐
11.34 吋
57 公釐
2.25 吋
223 公釐
8.78 吋
239 公釐
9.41 吋
技術規格
如需其他規格資訊,請參閱 PRO.BOSE.COM 上的 DesignMax
DM6C 技術資料表。
外觀
產品尺寸
網罩直徑:356 公釐
(14.00 吋)
外殼直徑:288 公釐
(11.34 吋)
背殼深度:223 公釐
(8.78 吋)
孔洞
292 公釐 (11.5 吋)
天花板最大厚度
57 公釐 (2.25 吋)
淨重,揚聲器加網罩 (單件)
6.50 公斤 (14.3 磅)
淨重,天花板跨橋板 (單件)
0.82 公斤 (1.8 磅)
裝運重量 (成對)
17.74 公斤 (39.1 磅)
重要安裝資訊
本產品僅供室內使用。
安裝人員有責任確保揚聲器和安裝系統的裝設都符合適用的法規,
包括當地的建築法規和規定。安裝本產品前,請諮詢擁有司法權的
當地政府機關。
安裝人員須負責確保揚聲器安裝的安全。若未正確安裝揚聲器,則
可能導致損害、傷害或死亡。
請勿將本產品安裝於可能接觸水或結露的位置。
本產品並不適合安裝或用於室內有水設施區域 (包括但不限於:
室內泳池、室內戲水區、熱水浴池、桑拿、蒸氣室與室內溜
冰場等)。
請勿堵塞任何通風口。請按照製造商的指示安裝。
請勿在熱源附近安裝,如暖氣片、熱調節裝置、火爐或可發熱的其
他裝置 (包括擴大機)。
請勿安裝在不穩定或有潛在危險的表面,比如佈線或鋪設管道的地
方。如果您不確定如何安裝本支架,請聯絡合格的專業安裝人員。
請務必遵循當地建築法規安裝支架。
請勿使揚聲器或安裝組件接觸任何非由 Bose 指定的化學物質,包
括但不限於潤滑劑、清潔劑、觸點噴劑或其他碳氫溶劑。 接觸該
等物質會使塑膠材質劣化,進而導致破裂並產生墜落危險。

58 •
繁體中文
DesignMax DM6C •
安裝指南
PRO.BOSE.COM
設定
安裝選項
安裝選項與配件
q 可調式天花板跨橋板 (隨附)
w 放樣板 (選配)
導管接頭
若使用金屬軟管,請搭配使用 ⅜ 吋導管接頭或 ⅜ 吋雙連接器
(雙工連接器)。
備註:本產品並未隨附導管接頭。
q
w
⅜ 吋單工連接器 ⅜ 吋雙工連接器/
Loop 連接器
揚聲器接線
線規
DesignMax DM6C loudspeaker 揚聲器的設計僅可使用 18 AWG (0.8 mm
2
) 至 14 AWG (2.1 mm
2
) 的線材。
揚聲器設定
70V
2.5W 5W 10W 20W 40W 80W*
8Ώ
5W 10W 20W 40W 80W NC**
100V
** NC:無連線 (請勿使用)
* 原廠預設
變壓器抽頭設定
轉動以設定抽頭功率。請使用平頭螺絲起子。
接線圖
露出六公釐 (¼ 吋) 的裸線以連接至
端子。
70V/100V
8Ω
OUT
IN
70/
100V COM8Ω8ΩCOM
70/
100V
OUT
IN
70/
100V COM8Ω8ΩCOM
70/
100V

繁體中文
• 59
安裝指南
• DesignMax DM6C
PRO.BOSE.COM
設定
安裝準備
使用安全纜線
部分地區的建築法規要求使用輔助方式固定揚聲器以增強結構支
撐力,加強安全性。請遵守當地的建築法規和規定,選擇合適的
安裝位置、方式和五金部件。
Bose 建議使用 (1) 安全索或 (2) 安全纜索來作為輔助固定機制。
請參見下圖,瞭解安全安裝點。
請遵守製造商的指示來施作任何輔助固定機制。
q
e
w
組裝天花板跨橋板
備註:若安裝於硬式天花板,請將軌道及圓環穿過孔洞後,再組裝天
花板跨橋板 (請參閱第 60 頁)。
1. 對準軌道並將凸耳插入凹槽。
2. 將軌道兩端往外拉,以固定在一起。
3. 使兩段軌道彼此平行,將天花板跨橋板環下壓,將圓環固定於軌
道上。
qw
q
裁切天花板板材
1. 取下天花板板材,然後使用定位卡將揚聲器孔洞描繪
於板材上。為將定位卡置於板材正中央,請自四個角
畫出交叉的對角線,利用交叉點將定位卡置中。
2. 在板材上裁切出一個孔洞。
q w
吸音天花板板材準備工作
安裝天花板跨橋板
1. 將組裝好的天花板跨橋板架在天花板框架上。可視情
況需要調整天花板跨橋板,使軌道緊貼天花板框架。
2. 將板材裝回天花板。
q w
備註:若揚聲器安裝的位置靠近料理檯面,便可能直接接觸烹調油脂
(例如商業料理環境),恐因此降低揚聲器的效能或功能性。
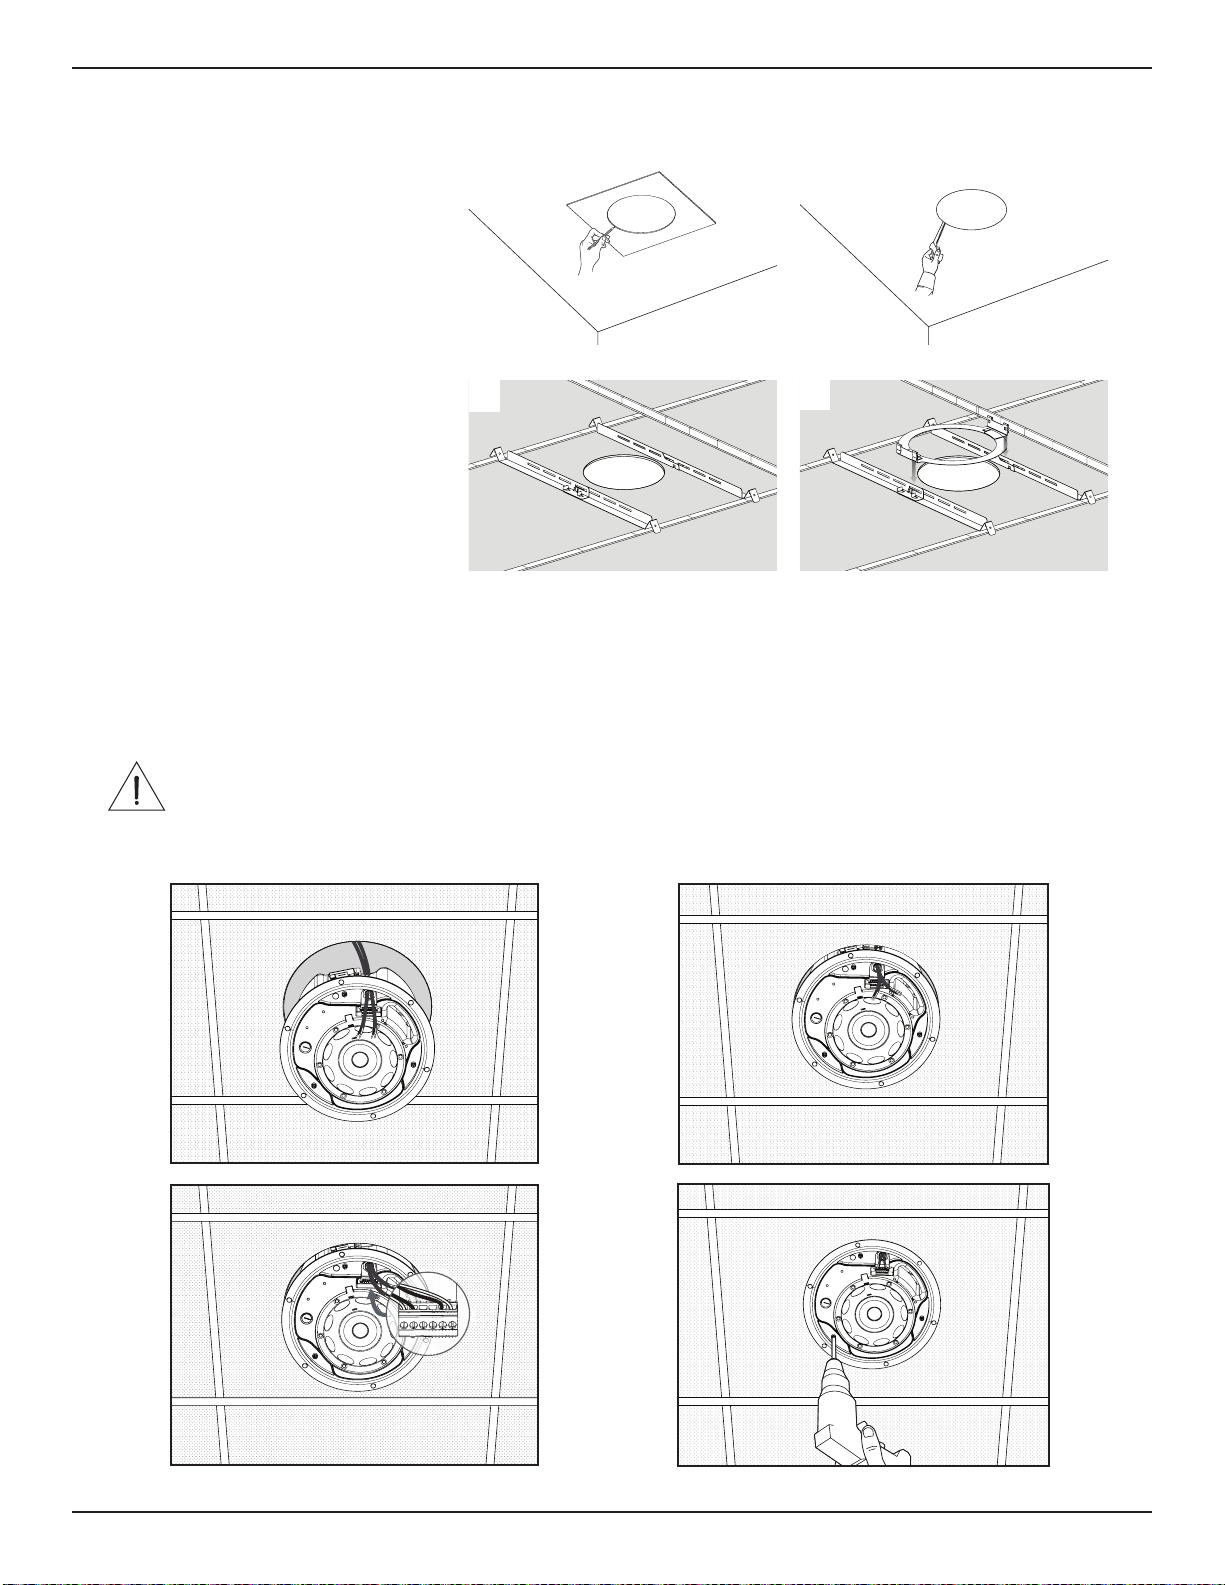
60 •
繁體中文
DesignMax DM6C •
安裝指南
PRO.BOSE.COM
安裝
安裝揚聲器
1. 將音訊佈線穿過配線開口。
2. 將揚聲器穿過孔洞並置入天花板跨橋板。在放開揚聲器之前,請務必確認錨座已確實與天花板跨橋板接合。
3. 取下連接器,將連接線接入連接器,然後將連接器重新插入揚聲器。如需瞭解配線資訊,請參見第 58 頁「揚聲器接線」。
4. 鎖緊錨座支臂螺絲以固定揚聲器。如果使用電動工具,請調整為低扭力設定。
警告:螺絲過度鎖緊可能會對錨座安裝點或天花板造成損壞,進而導致墜落危險。
q
e
w
r
裁切天花板
1. 使用定位卡將孔洞描繪於天花板上。
2. 在天花板上裁切出一個孔洞。
q w
硬式天花板 (現有工程) 準備工作
安裝天花板跨橋板
1. 將天花板跨橋板軌道及圓環穿過孔洞,
讓兩段軌道呈平行,架在天花板框架或
天花板角材上。
2. 組裝天花板跨橋板。
q w

繁體中文
• 61
安裝指南
• DesignMax DM6C
PRO.BOSE.COM
安裝
使用放樣板在硬式天花板安裝揚聲器 (新建工程)
如需安裝放樣板的相關資訊,請參閱 PRO.BOSE.COM 上的《DesignMax 放樣板安裝指南》。放樣板安裝完成之後,請參見第 60
頁「安裝揚聲器」。
安裝網罩
將安全短繩針插入揚聲器的孔洞。請使用雙手將網罩對準揚聲器。網罩會以磁力吸附在揚聲器上。
安全與規章遵循
Bose DesignMax DM6C loudspeaker 揚聲器通過測試,且符合下列規格及用途:
名列 ANSI/UL 1480A-2016 適合商業及安全專業用途的揚聲器
一般用途 - UL Category UEAY,案號 S 5591,控制號 3N89
UL-2043,2013 年,《Fire Test and Visible Smoke Release for Discrete Products and their Accessories Installed
in Air Handling Spaces》(裝於空氣調節空間之分離性產品及其配件的防火測試及可視煙霧釋放)。適合用於空氣調節 (氣室)
空間。
根據 NFPA 70 2017 年《National Electrical Code》(美國國家電氣規程) 第 640 條,適合使用 Class 1、Class 2、Class 3
配線方式安裝
NFPA 70,2017 年,《National Electrical Code》(美國國家電氣規程) 第 300-22(c) 條
NFPA 90-A,2015 年,《Installation of Air Conditioning and Ventilation Systems》(空調與排氣系統安裝),
第 4.3.11.2.6.5 項
DesignMax DM6C loudspeaker 揚聲器的設計符合下列歐洲組合系統法規所定義之要求:
經測試符合 IEC60268-5,2007 年
DesignMax DM6C •
設置ガイド
PRO.BOSE.COM
62 •
日本語
安全上の重要な注意事項
安全上の留意項目および使用方法をよく読み、いつでも参照
できるように保管してください。
本製品は、専門の施工業者による設置のみを想定した製品です。本書は、一般
的な固定設置システムにおける本製品を対象に、基本的な設置と安全上のガ
イドラインを施工業者様に提供します。設置する前に、本書とすべての安全に
関する警告をお読みください。
ご自身で製品を修理しないでください。修理が必要な際には、正規サービス
センター、ボーズ認定の施工業者、技術者、ディーラーまたはディストリビュー
ターにお問い合わせください。Bose Professionalに連絡する、またはお近くのディ
ーラーまたはディストリビューターを検索するには、PRO.BOSE.COMにアクセスし
てください。
1. このガイドをよくお読みください。
2. 必要な時にご覧になれるよう、本書を保管してください。
3. すべての注意事項に留意してください。
4. すべての指示に従ってください。
5. この製品を水の近くで使用しないでください。
6. 清掃の際は乾いた布を使用してください。
7. 通気孔は塞がないでください。製造元の指示に従って設置してください。
8. ラジエータ、暖房送風口、ストーブ、その他の熱を発する装置(アンプを含
む)の近くには設置しないでください。
9. 必ず製造元より指定された付属品、あるいはアクセサリーのみをご使用
ください。
規制に関する情報
This product conforms to all applicable EU directive requirements. The complete
declaration of conformity can be found at: www.Bose.com/compliance.
This symbol means the product must not be discarded as household waste, and
should be delivered to an appropriate collection facility for recycling. Proper
disposal and recycling helps protect natural resources, human health and the
environment. For more information on disposal and recycling of this product,
contact your local municipality, disposal service, or the shop where you bought this
product.
製造日: シリアル番号の8桁目の数字は製造年を表します。「7」は2007年また
は2017年です。
中国における輸入元: Bose Electronics (Shanghai) Company Limited, Part C, Plant 9,
No. 353 North Riying Road, China (Shanghai) Pilot Free Trade Zone
EUにおける輸入元: Bose Products B.V., Gorslaan 60, 1441 RG Purmerend,
The Netherlands
メキシコにおける輸入元: Bose de México, S. de R.L. de C.V., Paseo de las Palmas
405-204, Lomas de Chapultepec, 11000 México, D.F.輸入元およびサポート情報:
+5255(5202) 3545
台湾における輸入元: Bose Taiwan Branch, 9F-A1, No. 10, Section 3, Minsheng East Road,
Taipei City 104, Taiwan.Phone Number: +886-2-2514 7676
BoseおよびDesignMaxは、Bose Corporationの商標です。
Bose Corporation Headquarters: 1-877-230-5639
©2019 Bose Corporation.本書のいかなる部分も、書面による事前の許可のない複
写、変更、配布、その他の使用は許可されません。
保証情報
保証の内容および条件につきましては、付属の保証書をご覧ください。
保証の詳細については、PRO.BOSE.COMをご覧ください。
仕様:
入力電圧: 70V/100V
インピーダンス: 8 Ω、100 W
電流またはパワー: (70V): 2.5W、5W、10W、20W、40W、80W (100V):
5W、10W、20W、40W、80W
警告/注意
この製品には磁性材料が含まれています。体内に埋め込まれて
いる医療機器への影響については、医師にご相談ください。
• ボーズ製品を設置する際は、必ず地域と業界指導の安全基準に従って
ください。各地域の建築に関する条例や規制など、適用される全ての法
律に従って本製品およびそのマウントシステムを設置することは施工業
者の責任です。本製品を設置する前に、各地域の管轄官庁に相談してく
ださい。
• 重量物の不安定な設置や頭上吊り下げは、重傷または死亡、および設備
機器等への損傷の原因となる可能性があります。適用する設置方法の
信頼性を評価することは、施工業者の責任です。適切な部品および安全
な設置技術の知識を持つ専門の施工業者のみが、天井へのス
ピーカーの設置を行うことができます。
• 結露や水に晒される場所に本体を設置しないでください。
• この製品は屋内の水を使用するエリア(屋内プール、屋内ウォーター
パーク、浴室、サウナ、スチームサウナ、屋内スケートリンクなど)での
設置または使用を意図していません。
• 設置面の強度が不十分な場合や、設置面の裏側に電線や配管などが隠
れている場合は、本製品を設置しないでください。ブラケットの取り付け
方法がわからない場合は、専門業者に作業を依頼してください。ブラケッ
トを取り付ける際は、建築関連法規に従ってください。
• DesignMax DM6Cには、本体付属またはボーズ指定の取り付け部品および
アクセサリーのみをご使用ください。使用可能なアクセサリーの詳細に
ついては、PRO.BOSE.COMに用意されている本製品のテクニカルデータ
シートを参照してください。
• 火気や熱源などの近くで使用しないでください。火の付いたろうそくな
どの火気を、製品の上や近くに置かないでください。
• 許可なく製品を改造しないでください。
• スピーカーや取り付けコンポーネントを、潤滑剤、洗浄剤、接点復活剤、
およびその他の炭化水素を基剤とする溶剤などを含む、ボーズ指定以
外の化学物質にさらさないでください。 製品がこうした物質に触れる
と、プラスチック素材の劣化につながり、ひび割れが生じて落下事故を
招くおそれがあります。
• スピーカーの汚れ落としには、必ず乾いた布をお使いください。スピーカ
ーを石けん、洗剤、鉱油、アルコールなどの洗浄剤、化学物質に触れ
る可能性がある場所で使用しないでください。
• 単体で使用する安全ストラップピンがグリルに付属しています。

日本語
• 63
設置ガイド
• DesignMax DM6C
PRO.BOSE.COM
概要
パッケージ内容
製品寸法
×2 ×2 ×4×2 ×1
356 mm 288 mm
57 mm
223 mm
239 mm
技術仕様
詳細な仕様は、PRO.BOSE.COMに用意されている、DesignMax
DM6Cのテクニカルデータシートを参照してください。
物理的仕様
製品寸法
グリル直径: 356 mm
エンクロージャーの直径:
288 mm
バックカン奥行き: 223 mm
開口寸法
292 mm
最大対応板厚
57 mm
質量(スピーカーとグリル、単体)
約6.50 kg
質量(タイルブリッジ単体)
約0.82 kg
梱包質量(ペア)
約17.74 kg
設置に関する重要な情報
この製品は屋内専用です。
各地域の建築に関する条例や規制など、適用される全ての法律に
従って本製品およびそのマウントシステムを設置することは施工業
者の責任です。本製品を設置する前に、各地域の管轄官庁に相談し
てください。
スピーカー設置時の安全確保は、施工業者の責任で実施してくださ
い。スピーカーの設置が不適切だった場合、損傷、人身への傷害、死
亡事故等の原因となるおそれがあります。
結露や水に晒される場所に本体を設置しないでください。
この製品は屋内の水を使用するエリア(屋内プール、屋内ウォーター
パーク、浴室、サウナ、スチームサウナ、屋内スケートリンクなど)での
設置または使用を意図していません。
通気孔は塞がないでください。製造元の指示に従って設置してくだ
さい。
ラジエータ、暖房送風口、ストーブ、その他の熱を発する装置(アンプ
を含む)の近くには設置しないでください。
設置面の強度が不十分な場合や、設置面の裏側に電線や配管など
が隠れている場合は、本製品を設置しないでください。ブラケットの
取り付け方法がわからない場合は、専門業者に作業を依頼してくだ
さい。ブラケットを取り付ける際は、建築関連法規に従ってください。
スピーカーや取り付けコンポーネントを、潤滑剤、洗浄剤、接点復活
剤、およびその他の炭化水素を基剤とする溶剤などを含む、ボーズ
指定以外の化学物質にさらさないでください。 製品がこうした物質
に触れると、プラスチック素材の劣化につながり、ひび割れが生じて
落下事故を招くおそれがあります。

64 •
日本語
DesignMax DM6C •
設置ガイド
PRO.BOSE.COM
セットアップ
設置オプション
設置オプションとアクセサリー
q アジャスタブルタイルブリッジ(同梱)
w ラフインパン(オプション)
導管器具の設置
フレキシブルメタル導管を使う場合は、⅜インチのシングル導管か
⅜インチの複式導管コネクターを使ってください。
注: 導管器具は付属していません。
⅜インチシングル導管 ⅜インチ複式導管
スピーカーの配線
ケーブルゲージ
DesignMax DM6Cで使用できるケーブル径は、18 AWG(0.8 mm
2
)~14 AWG(2.1 mm
2
)のみです。
スピーカーの設定
70V
2.5W 5W 10W 20W 40W 80W*
8Ω
5W 10W 20W 40W 80W NC**
100V
**NC: 未接続(使用しない)
*工場出荷時設定
トランスフォーマータップの設定
回転させてタップを設定します。マイナスドライバーを使用します。
接続図
裸線を長さ6 mm(¼インチ)露出して
端子に接続します。
70V/100V
8 Ω
OUT
IN
70/
100V COM8Ω8ΩCOM
70/
100V
OUT
IN
70/
100V COM8Ω8ΩCOM
70/
100V
q
w

日本語
• 65
設置ガイド
• DesignMax DM6C
PRO.BOSE.COM
セットアップ
設置の準備
安全ケーブルの使用
お住まいの地域により、安全性の強化のため、スピーカーの構造物
に対する固定に二次的な方法も用いることが法令により義務づけ
られている場合があります。適用される建築基準や規制を満たす
設置場所や設置方法、器具を選択してください。
安全確保のための補助的な器具として、(1)落下防止ワイヤー、
(2)安全ケーブルのいずれかの使用をお勧めします。安全器具の
取り付けポイントについては、下の図を参照してください。
補助的な安全器具をご使用になる際は、製造元の指示に従ってく
ださい。
タイルブリッジを組み立てる
注: 硬い天井に設置するときは、切れ込みを通してレールとリングを挿
入した後にタイルブリッジを組み立てます(66ページを参照)。
1. レールの位置を合わせ、タブをスロットに挿入します。
2. レールを外側に引いて、2つの部品をしっかりと固定します。
3. 両方のレールが平行になるように位置を合わせたら、タイルブリッ
ジリングを下方向に押して、リングをレールに固定します。
タイル天井を切り抜く
1. タイルを取り外し、テンプレートを使ってスピーカーの
穴の位置を示す線をタイルに引きます。タイルの中央
にテンプレートを合わせるには、角を対角線で結んで
「X」を書き、交点を使います。
2. タイルに穴を開けます。
タイルブリッジを設置するタイル天井の準備
タイルブリッジを設置する
1. 組み立てたタイルブリッジを天井グリッドに渡します。必
要に応じてタイルブリッジを調節して、レールが天井の
グリッドにしっかり引っかかるようにします。
2. タイルを天井に戻します。
注: スピーカーは、食用油に直接晒される可能性がある加熱調理スペー
ス(商業店舗の厨房など)の近くに設置すると、性能や機能が低下する
おそれがあります。
qw
q
q w
e
q w
q w

66 •
日本語
DesignMax DM6C •
設置ガイド
PRO.BOSE.COM
設置
スピーカーの取り付け
1. オーディオケーブルを配線用の開口部に通します。
2. スピーカーを穴からタイルブリッジに差し込みます。アンカーとタイルブリッジが噛み合ったのを確認してから、スピーカーから手を放しま
す。
3. スピーカーからコネクタを外し、ケーブルを配線し、コネクタを元に戻します。配線について詳しくは、64ページの「スピーカーの配線」を参照
してください。
4. アンカーアームのネジを締めてスピーカーを固定します。電動ドリルを使用する場合は、トルクを低く設定してください。
警告: ネジを強く締めすぎると、アンカーの取り付けポイントや天井が壊れて、落下事故を招くおそれがあります。
天井を切り抜く
1. 同梱のテンプレートを利用して、天井に開け
る穴を示す線を引きます。
2. 天井に穴を開けます。
硬い天井にタイルブリッジを設置する
タイルブリッジを設置する
1. タイルブリッジのレールとリングを、穴を通
して挿入します。天井のグリッドまたは支え
に渡し、レール同士が平行になるように配置
します。
2. タイルブリッジを組み立てます。
q w
q w
q
e
w
r

日本語
• 67
設置ガイド
• DesignMax DM6C
PRO.BOSE.COM
設置
ラフインパンを使用して新築時の硬い天井に設置する
ラフインパンの取り付けに関して詳しくは、PRO.BOSE.COMに用意されている、DesignMax用ラフインパンの設置ガイドを参照してくださ
い。ラフインパンの取り付けが終わったら、66ページの「スピーカーの取り付け」を参照してください。
グリルを取り付ける
安全ストラップピンをスピーカーの穴に挿入します。両手を使って、スピーカーにグリルを取り付けます。グリルは磁石でスピーカーに固定され
ます。
安全上のコンプライアンス
Bose DesignMax DM6Cは幅広いテストに合格しており、次の仕様と使用例に準拠しています。
ANSI/UL 1480A-2016のSpeakers for Commercial & Safety Professional Useに準拠
一般用途向けの使用 - UL Category UEAY、File Number S 5591 Control Number 3N89
UL-2043、2013年、Fire Te st and Visible Smoke Release for Discrete Products and their Accessories Installed in Air
Handling Spaces空調(プレナム)空間内での使用に対応
NFPA 70、米国電気工事規程(2017年、第640条)に準拠したクラス1、クラス2、クラス3の配線による設置に対応
NFPA 70、米国電気工事規程、2017年、第300-22(c)条
NFPA 90-A、2015年、Installation of Air Conditioning and Ventilation Systems、第4.3.11.2.6.5節
DesignMax DM6Cは、コンビネーションシステム向けの以下の欧州規制仕様で規定されている要件に適合するように作られています。
IEC60268-5準拠試験を実施、2007年
68
DesignMax DM6C
•
PRO.BOSE.COM
Bose
.PRO.BOSE.COM
1 .
2 .
3 .
4 .
5 .
6 .
7 .
8 .
9 .
.www.Bose.com/compliance
20077
.2017
:
Zone
:
:
.
:
+886-2-2514 7676
.Bose
1-877-230 -5639 :Bose
2019
.PRO.BOSE.COM
10070
1008
80402010570
804020105100
•
Bose
•
•
•
•
•Bose
.PRO.BOSE.COM
•
•
•Bose
•
•
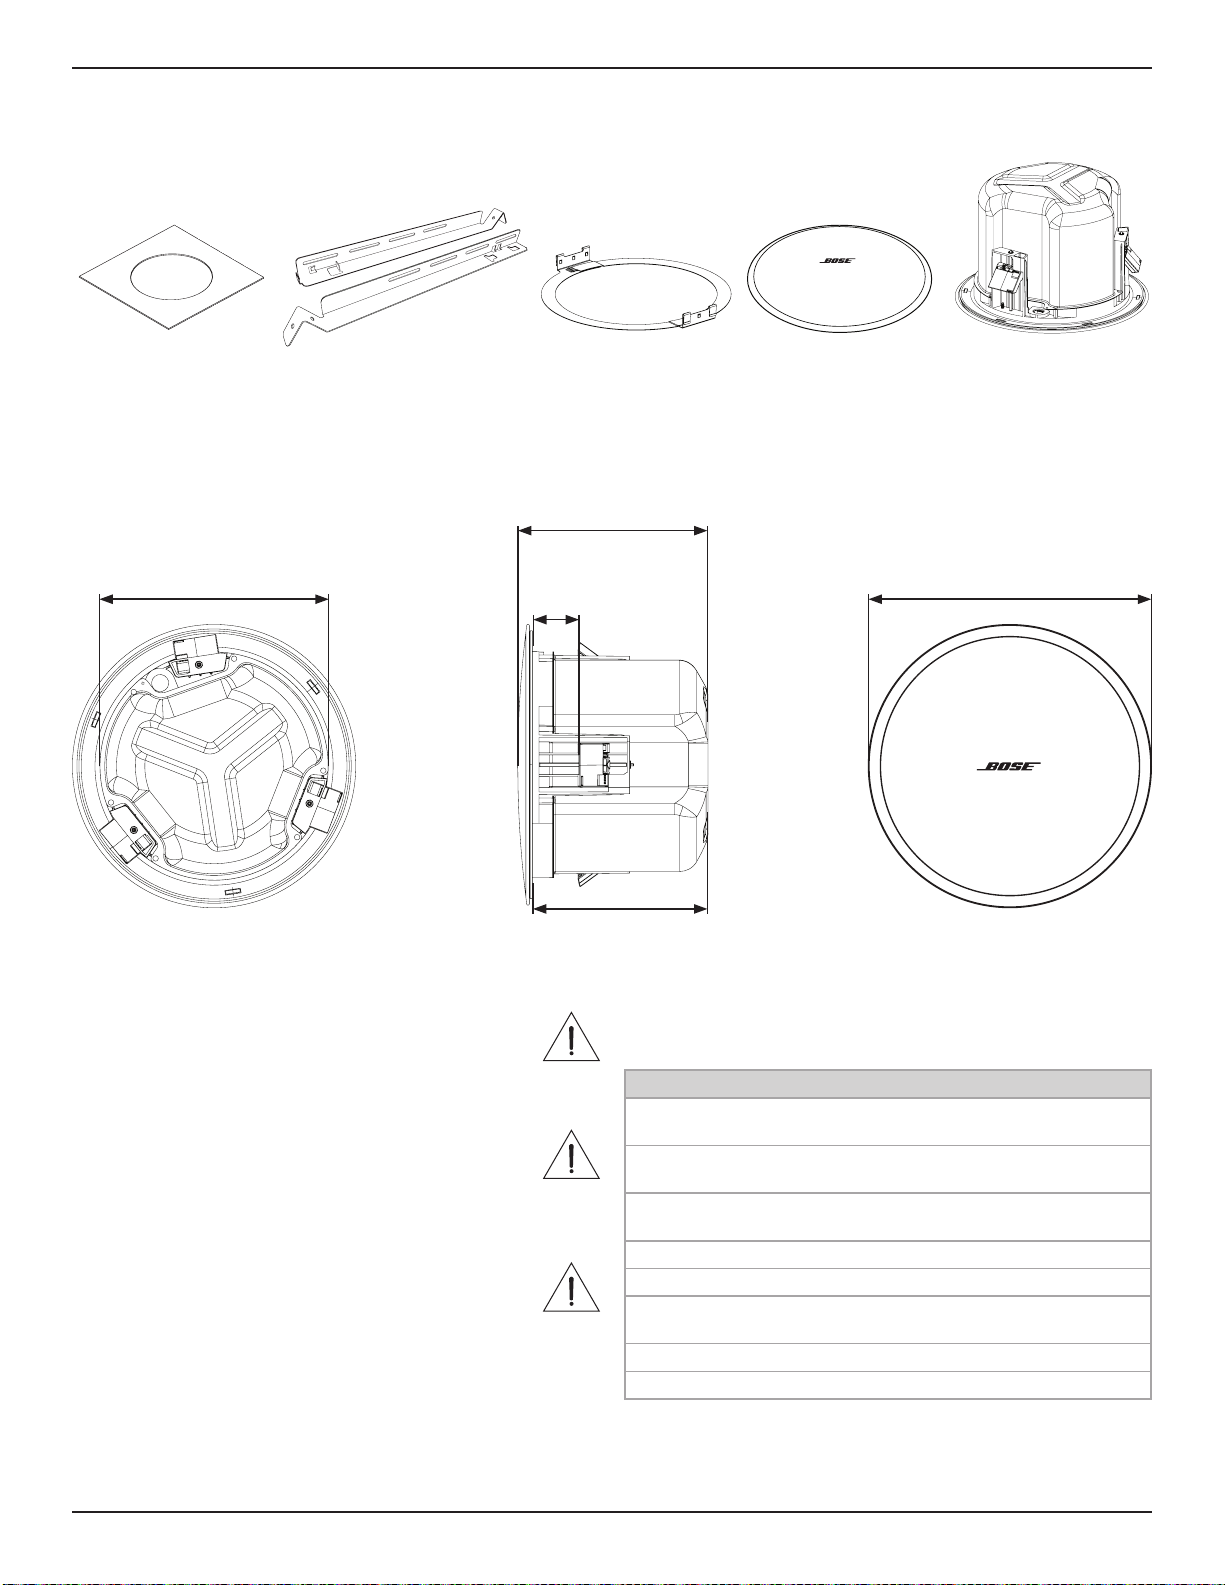
• 69
•
DesignMax DM6C
PRO.BOSE.COM
2×2×4× 2×1×
356
288
57
223
239
.PRO.BOSE.COM
356
288
223
292
57
Bose
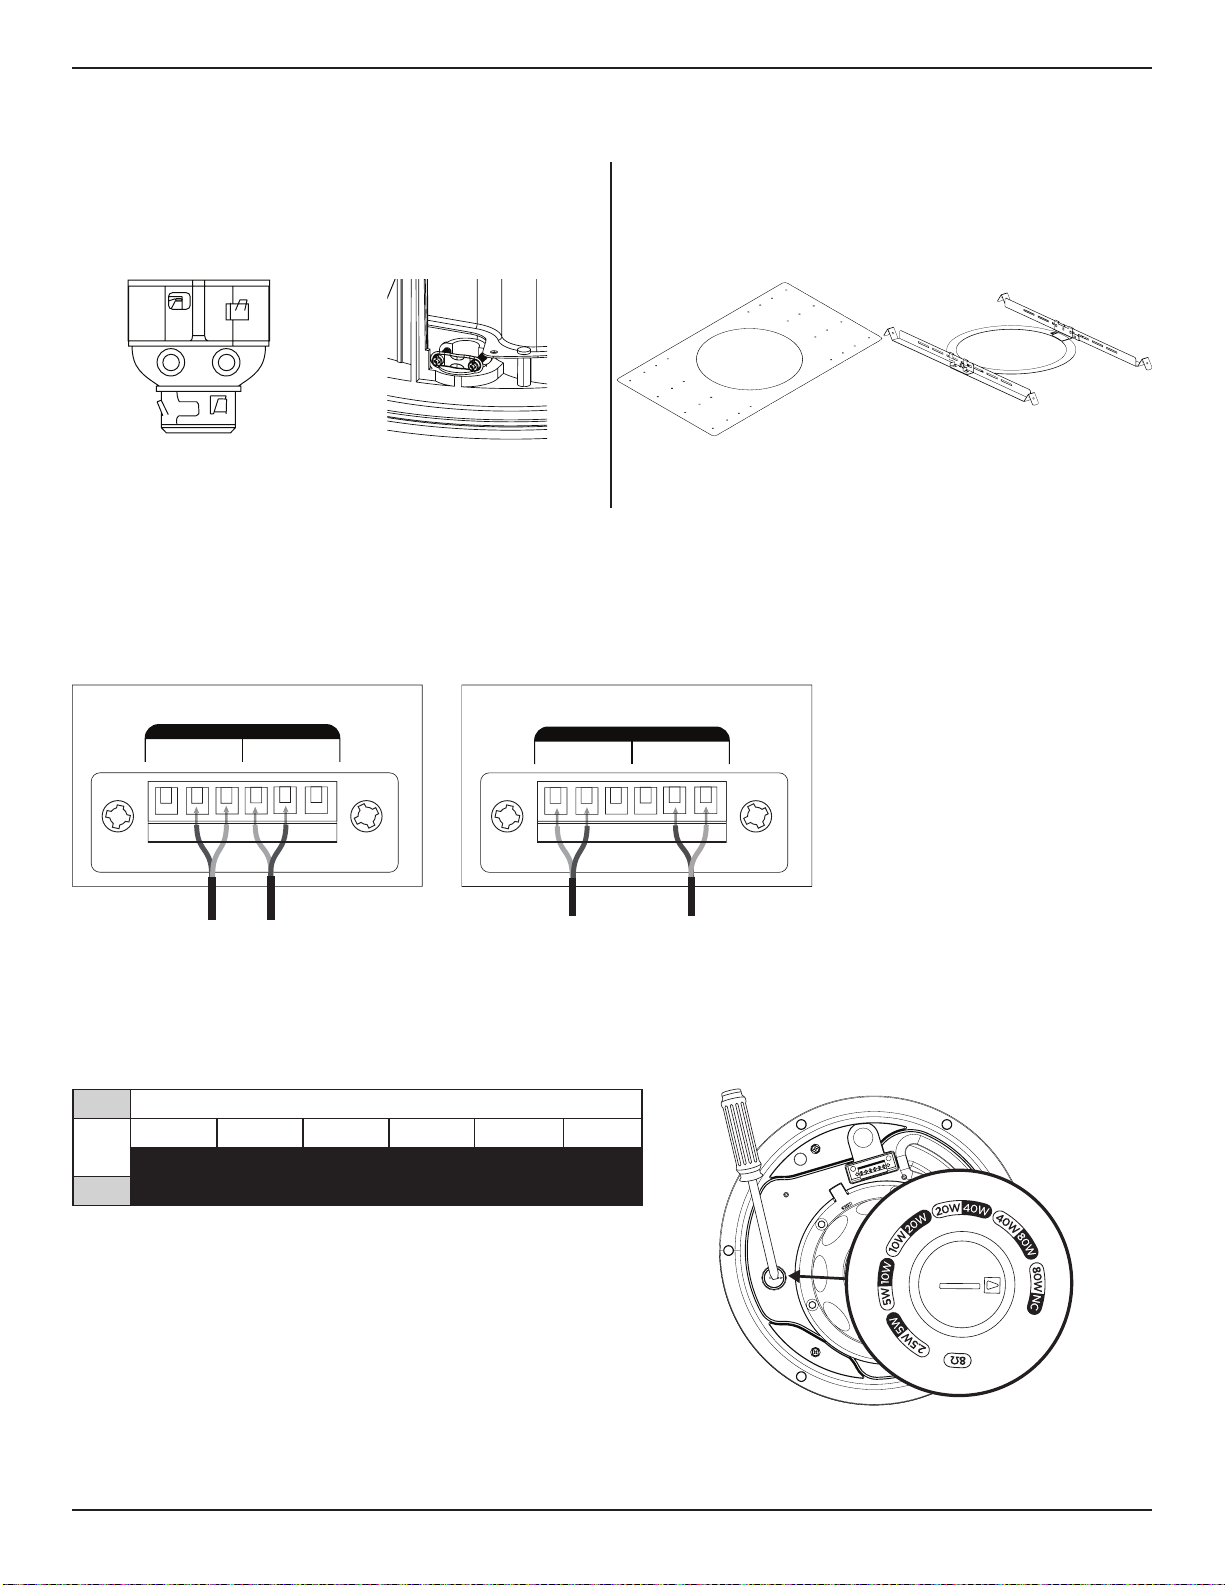
70
DesignMax DM6C
•
PRO.BOSE.COM
q
w
q
w
2
14
2
0.818
70
2.5510204080
8
510204080**
100
**
10070
8
OUT
IN
70/
100V COM8Ω8ΩCOM
70/
100V
OUT
IN
70/
100V COM8Ω8ΩCOM
70/
100V
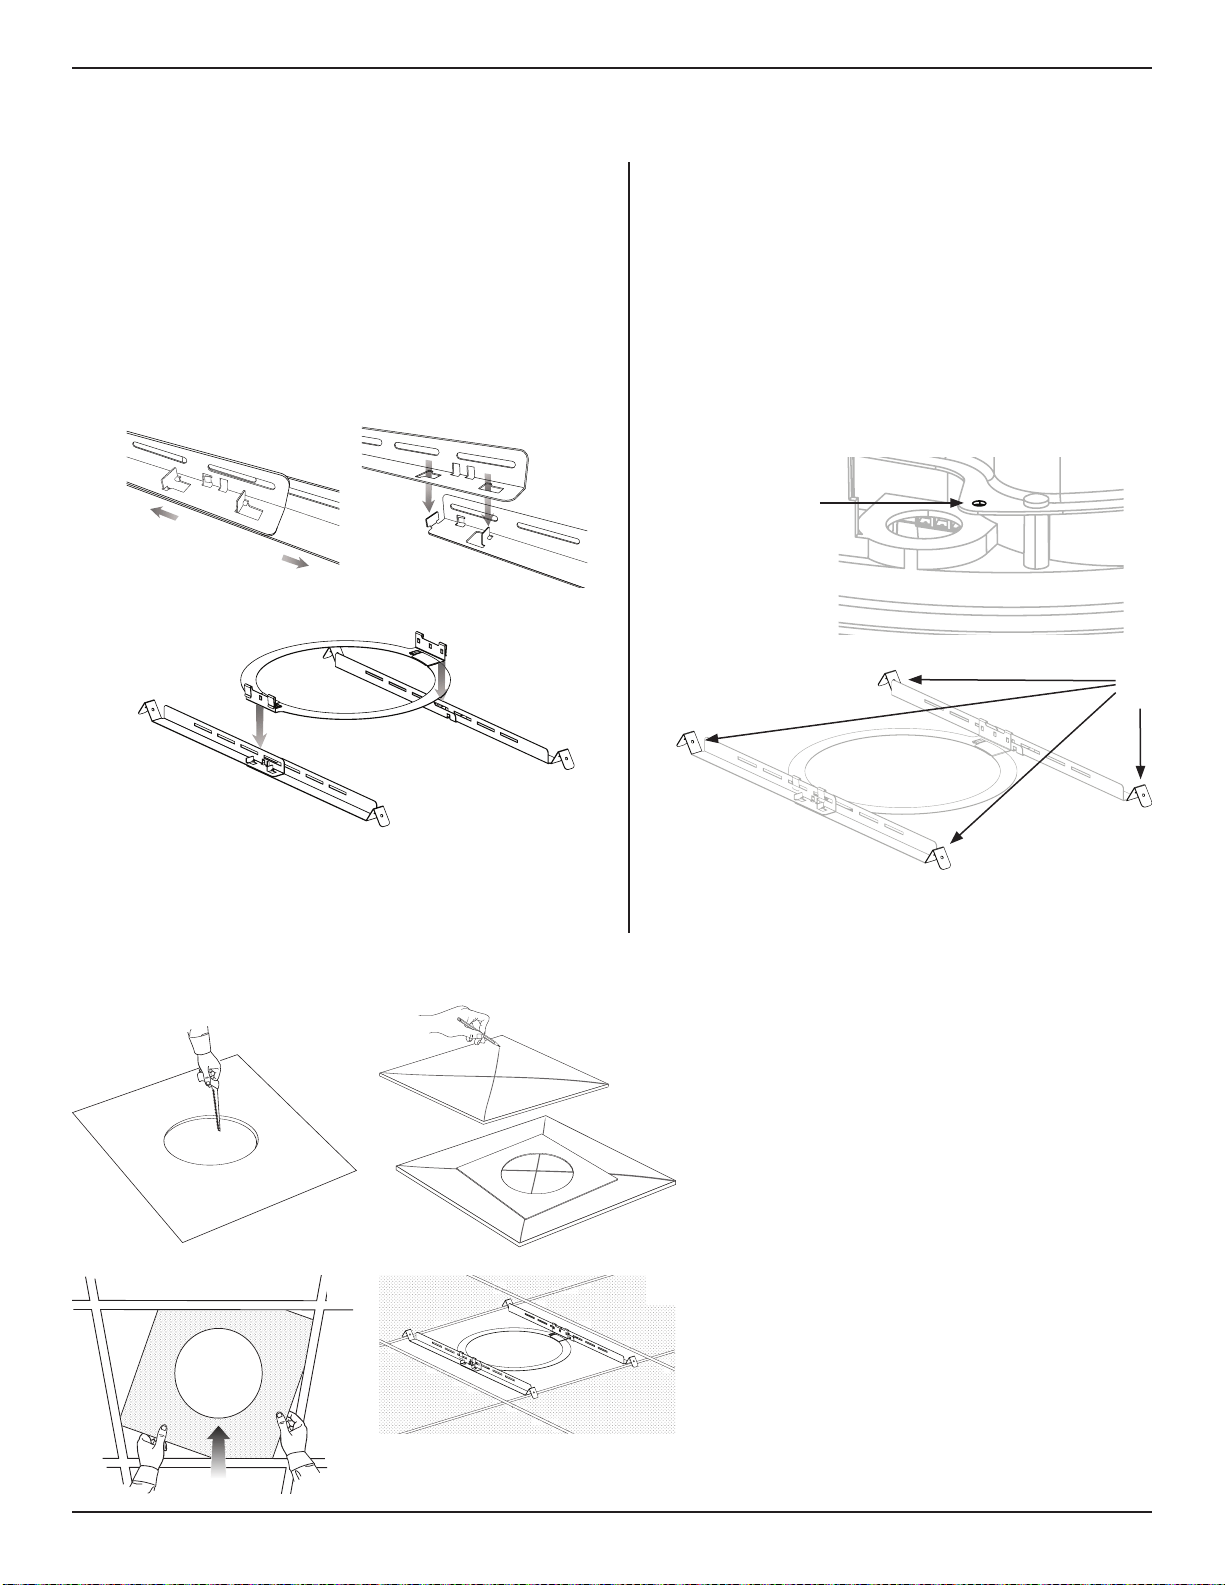
• 71
•
DesignMax DM6C
PRO.BOSE.COM
21Bose
q
e
w
72
1 .
2 .
3 .
qw
q
1 .
X
2 .
qw
1 .
2 .
qw
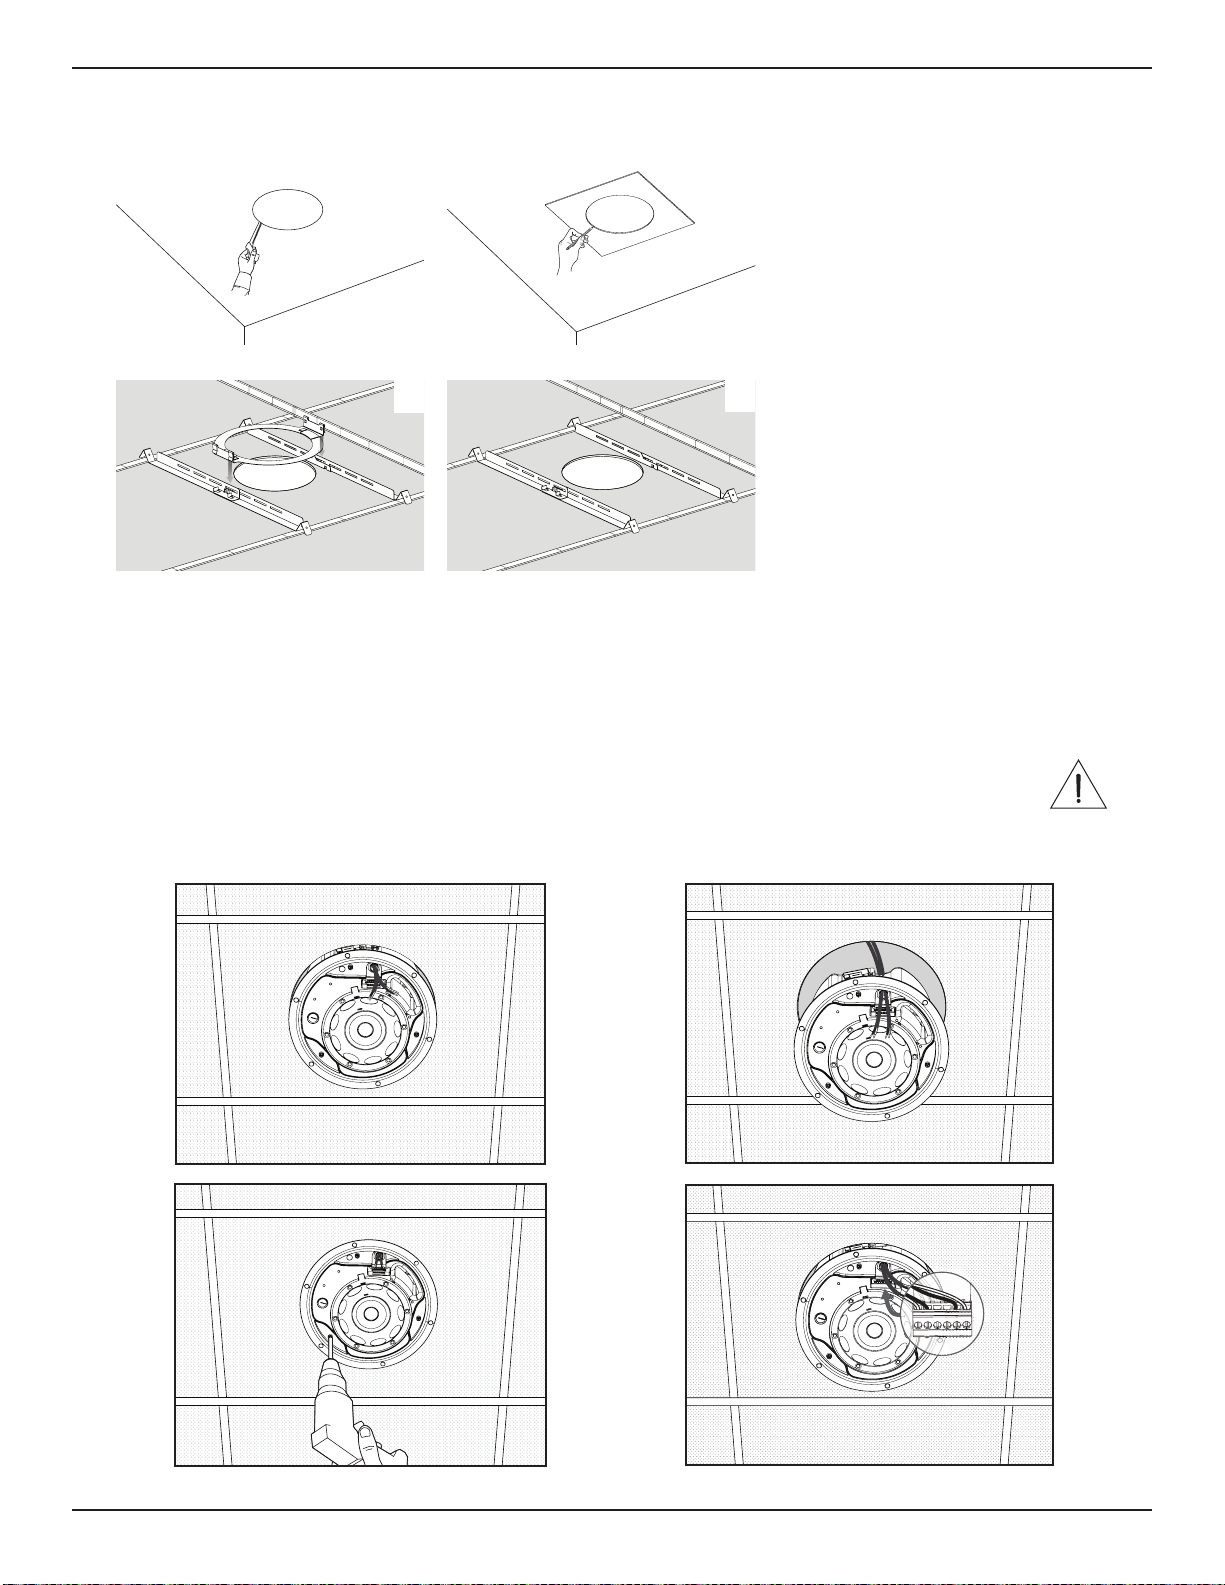
72
DesignMax DM6C
•
PRO.BOSE.COM
1 .
2 .
3 ..70
4 .
:
q
e
w
r
1 .
2 .
qw
1 .
2 .
qw
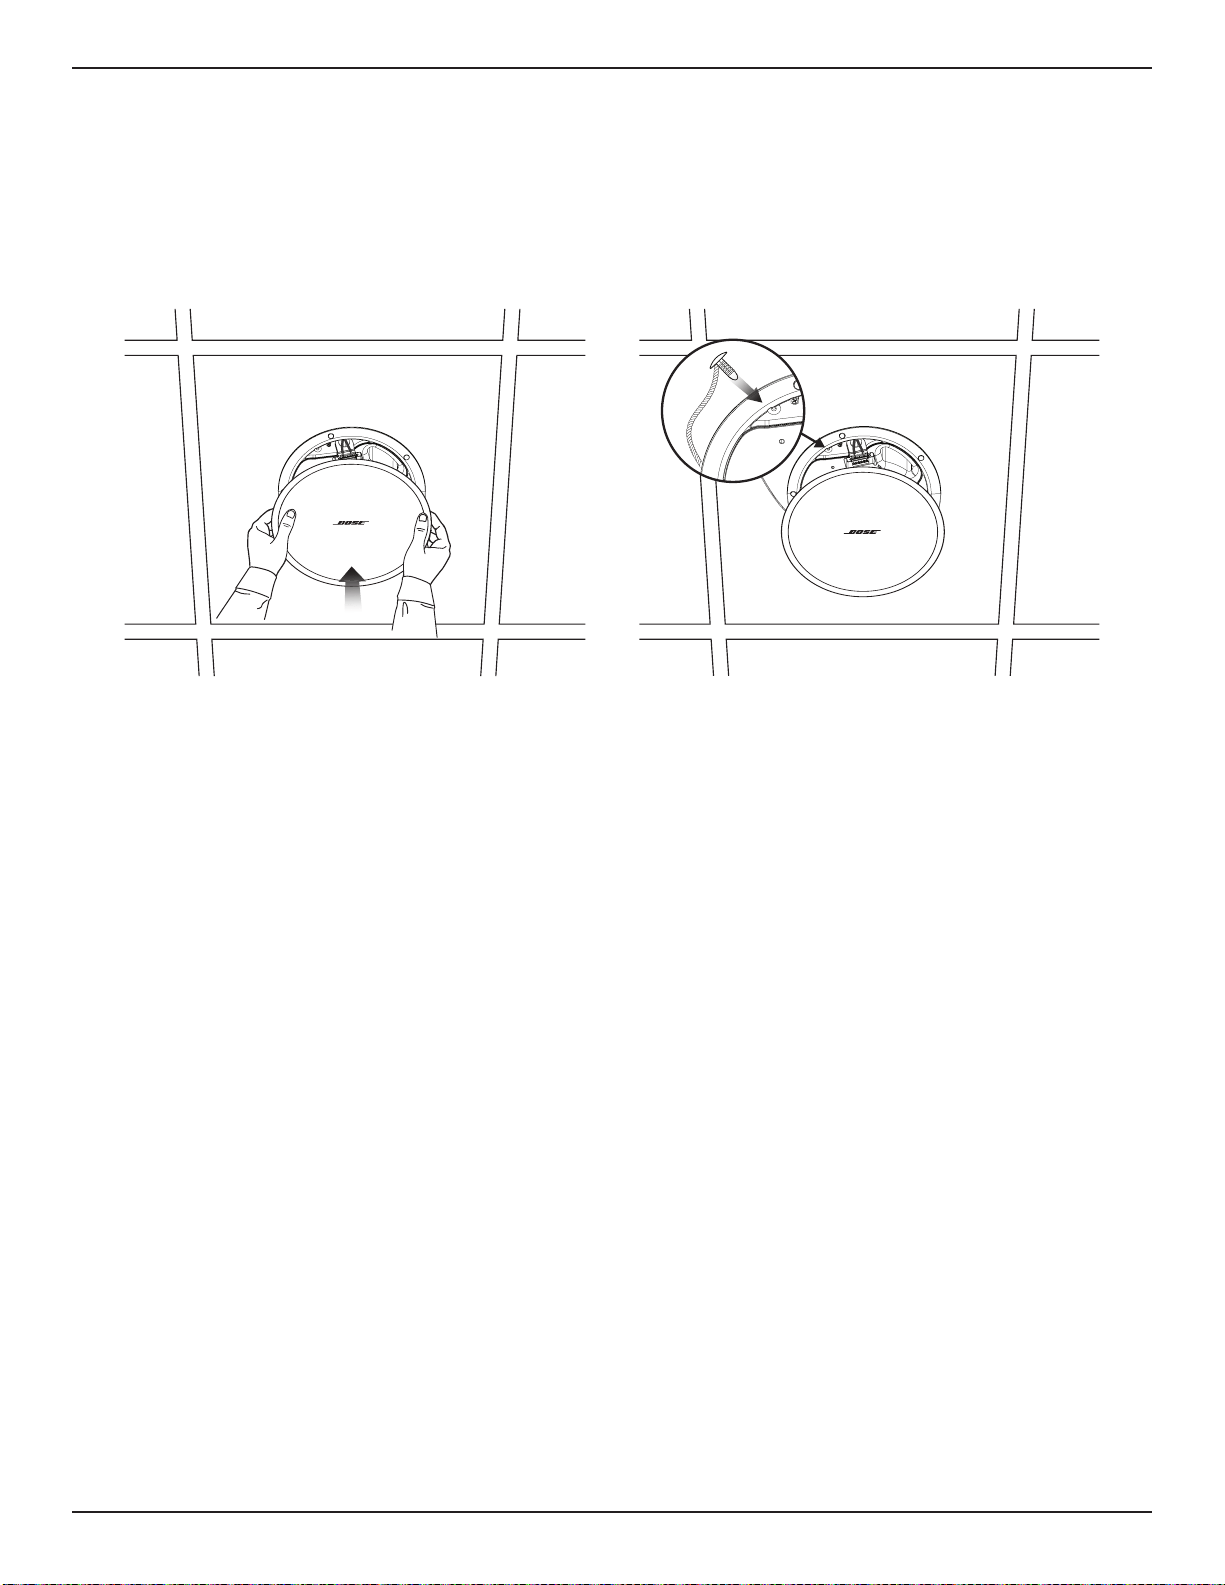
• 73
•
DesignMax DM6C
PRO.BOSE.COM
PRO.BOSE.COM
.72
Bose
2013
6402017321
.2017
4.3.11.2.6.52015
2007


©2019 Bose Corporation, All rights reserved.
Framingham, MA 01701-9168 USA
PRO.BOSE.COM
AM837250 Rev. 01
July 2019