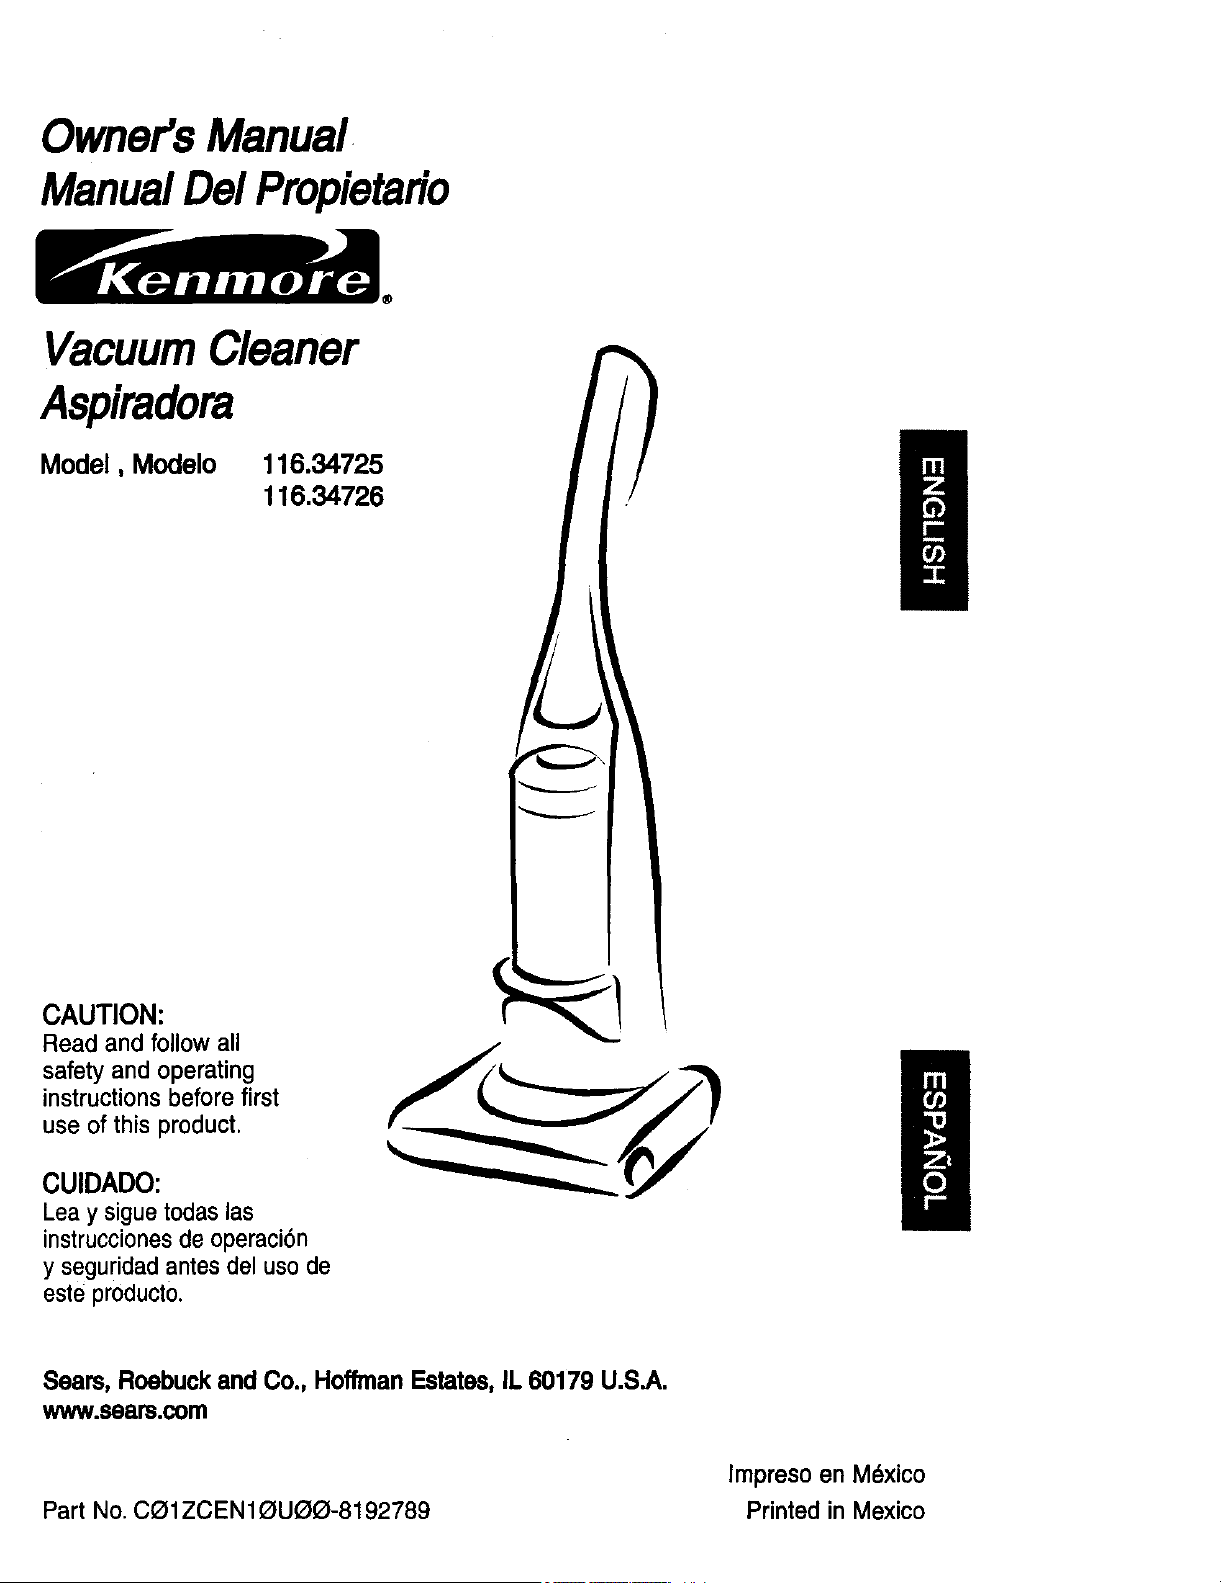
Owner'sManual
ManualDelPropietario
VacuumCleaner
Aspiradora
Model, Modelo
116.34725
116.34726
CAUTION:
Read and follow all
safety and operating
instructions before first
use of this product.
CUIDADO:
Lea y sigue todas ias
instrucciones de operaci6n
y seguridad antes del uso de
este producto.
Sears,Roebuckand Co.,HoffrnanEstates,IL60179 U.S.A.
www.sears.com
Impreso en M6xico
Part No. C01ZCEN1_U_-8192789 Printed inMexico
Before UsingYour New Vacuum ........ 2
KenmoreVacuum Cleaner Warranty .... 2
ImportantSafety Instructions........... 3
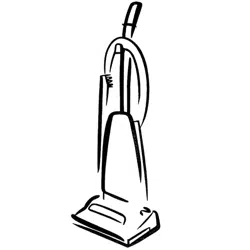
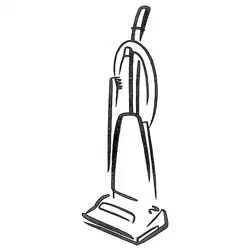
Parts and Features ................... 4
Assembly Instructions ............... 5-6
Operating Instructions ................. 6
Pile Height Selection and Setting ........ 7
Carpet/Bare FloorSelector ............ 7
Releasing the Handle ................. 8
ON/OFF Switch ..................... 8
Attachments ..................... 8-10
Attachment Use Chart ............... 11
Vacuuming Tips .................... 11
PerformanceFeatures ............. 12-13
Vacuum Cleaner Care ............... 14
vacuum Storage ................... 14
Cleaning Exterior and Attachments ..... 14
Dust BinCleaning ................ 15-16
Secondary FilterCleaning ....... . .... 16
Filter Changing/Cleaning ............. 17
Belt Changingand AgitatorCleaning .. 18-20
Clog Removal ..................... 21
LightBulbChanging ................. 22
Agitator Servicing ................... 23
AgitatorAssembly .................. 23
Troubleshooting ..................... 24
Requesting Assistance
Or Service ................... BackPage
Please read this guide. It will help you assemble and operate your new Kenmore vacuum in
the safest and most effective way.
For more information about vacuum cleaner care and operation, call your nearest Sears store.
You will need the complete model and serial numbers when requesting information.Your vacu-
um's model and serial numbers are located on the Model and Serial Number Plate.
Use the space below to record the model number and serial number of your new Kenmore
vacuum.
Model No.
Serial No.
Date of Purchase
Keep this book and your sales check (receipt) in a safe place for future reference.
........ v
LIMITED ONE YEAR WARRANTY ON KENMORE VACUUM CLEANER
This warranty is for one year from the date of purchase, and includes only private household
vacuum cleaner use. During the warranty year, when this vacuum cleaner is operated and
maintained according to the owner's manual instructions, Sears will repair any defects in
material or workmanship free of charge.
This warranty excludes vacuum bags, belts, light bulbs, and filters, which are expendable parts
and become worn during normal use.
Forwarrantyservice, returnthis vacuum cleaner to the nearest Seam Service Center inthe
UnitedStates.
This warranty applies only while this product is in use in the United States. This warranty gives
you specific legal rights, and you may also have other rights which vary from state 1ostate.
Seam, Roebuck and Co., D/817 WA, Hoffman Estates, IL 60179
2
Your safety is importantto us. To reduce the riskof fire, electricalshock,injuryto
personsor damage when usingyour vacuum cleaner, follow basic safety precau-
tlons including the following:
Read this manual before assembling or
using your vacuum cleaner.
Use your cleaner only as described in
this manual. Use only withSears recom-
mended attachments.
To reduce the risk of electricalshock -
Do not use outdoors or on wet surfaces.
Disconnectelectrical supplybefore any
servicing or cleaning. Failure to do so
could result in electrical shock or per-
sonal injury.
Always turn cleaner off before unplug-
ging.
Do not unplug by pulling on cord. To
unplug, grasp the plug, not the cord.
Do not use with damaged cord or plug.
If cleaner is not working as it should,
has been dropped, damaged, left out-
doors, or dropped into water, return it to
a Sears Service Center.
DO not pull or carry by cord, use cord as
a handle, close door on cord, or pull
cord around sharp edges or corners.
Do not run cleaner over cord. Keep cord
away from heated surfaces.
DOnot leave cleaner when plugged in.
Unplug from outlet when not in use and
before servicing.
Do not allow to be used as a toy. Close
attention is necessary when used by or
near children.
DOnot handle plug or cleaner with wet
hands.
Do not put any objects intoopenings.
DO not use with any opening blocked;
keep free of dust, lint, hair and anything
that may reduce air flow.
Keep hair, loose clothing, fingers, and
all parts of body away from openings
and moving parts.
Do not use cleaner withoutdust bin
and/or filters in place.
Always clean the dust bin after vacuum-
ing carpet cleaners or freshener, pow-
ders and fine dust. These products clog
the filters, reduce airflow and can cause
damage to the cleaner. Failure to clean
the dust bin could cause permanent
damage to the cleaner.
Do not use the cleaner to pick up sharp
hard objects, small toys, pins, paper
clips, etc. They may damage the clean-
er or dust bin.
DOnot pick up anything that is burning
or smoking, such as cigarettes, match-
es, or hot ashes.
Do not use cleaner to pick up flammable
or combustible liquids (gasoline, clean-
ing fluids, perfumes, etc.), or use in
areas where they may be present. The
fumes from these substances can cre-
ate a fire hazard or explosion.
Use extra care when cleaning on stairs.
Do not put on chairs, tables, etc. Keep
on floor.
You are responsible for making sure
that your vacuum cleaner is not used by
anyone unable to operate it properly.
SAVE THESE INSTRUCTIONS
Proper assembly and safe use of your vacuum cleaner are your responsibilities. Your
cleaner is intended only for household use. Read this Owner's Manual carefully for
important use and safety information. This guide contains safety statements under
warning and caution symbols. Please pay special attention to these boxes and follow
any instructions given. WARNING statements alert you to such dangers as fire, elec-
trical shock, burns and personal injury. CAUTION statements alert you to such dan-
gers as personal injury and/or property damage.

It is important to know your vacuum cleaner's parts and features to assure its proper and safe
use. Review these before using your cleaner.
Item Part No. Part No.
In U.S. In Canada
Exhaust Filter 20-86889 20-86889C
Headlight Bulb 20-5240 20-40600
Belt 20-5275 20-40096
Switch
• Dirt Sensor
(Some Models)
Quick Release
Height
Lower
Cord Hooks Level
Carry
Crevice
Tool
Telescoping
Dusting
Combination
Brush
Handle
Release
Model/Sedal
Numbers
IIII
Dust Bin
Release
Dust
Performance
Indicator
(Some Mode/s)
Exhaust Filter
(Inside)
Floor Selector
Ready-to-Use
Swivel Hose
Headflght
Cover
Latch
Base
Belt
(Underneath)
Stretch Hose
MoOr
Protec_r
Agitator
(Underneath)
EXTENSION HOSE KITS
SOME MODELS
Extension Hose
[lUlUlltUlllIIllllllIlll,flfllfllllflflfflllll
_FI _._SOME MODELS
(_ Adaptor
oor BrUShan d
4
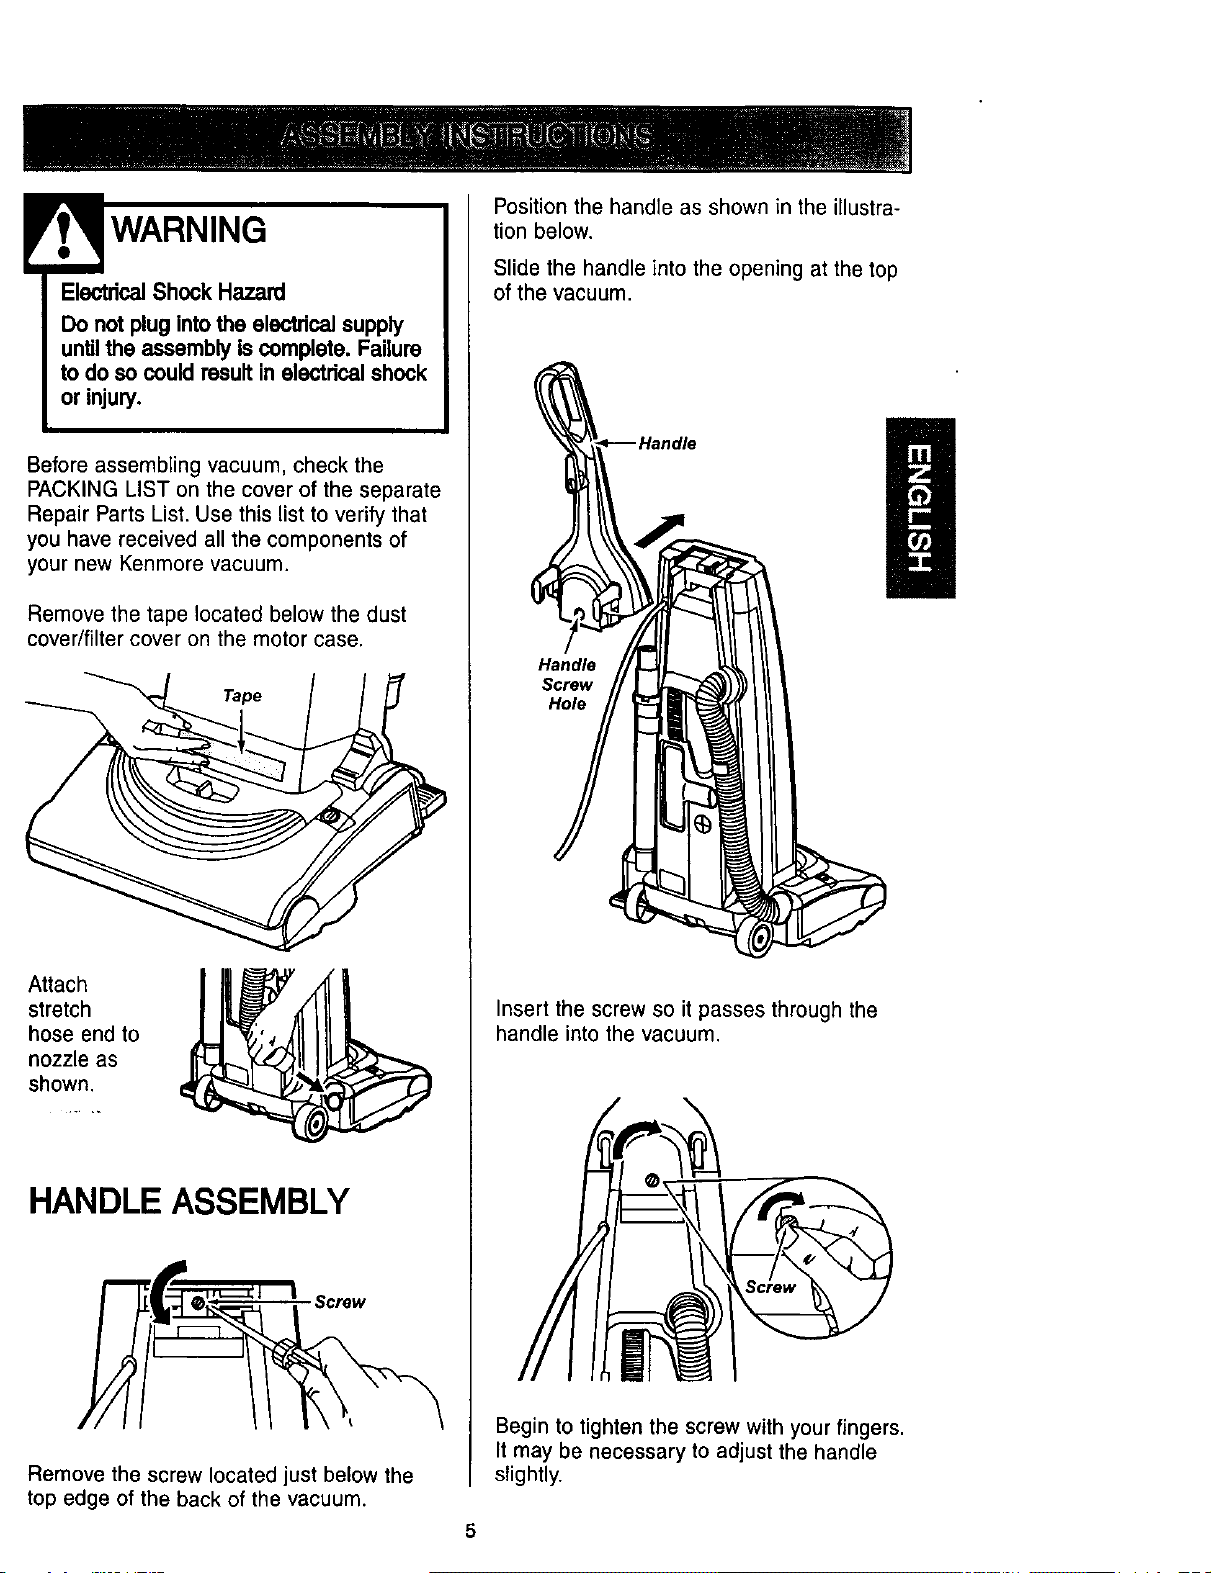
WARNING I
EloctdcalShock Hazard
Do not pluginto the electricalsupply
untilthe assembly is complete. Failure
to do so could resultin eloctdcalshock
or injury.
Before assembling vacuum, check the
PACKING LIST on the cover of the separate
Repair Parts List. Use this list to verify that
you have received all the components of
your new Kenmore vacuum.
Remove the tape located below the dust
cover/filter cover on the motor case.
Tape
Attach
stretch
hose end to
nozzle as
shown.
HANDLE ASSEMBLY
Remove the screw located just below the
top edge of the back of the vacuum.
Position the handle as shown in the illustra-
tion below.
Slide the handle into the opening at the top
of the vacuum.
Handle
Screw
Hole
Insert the screw so it passes through the
handle into the vacuum.
Begin to tighten the screw with your fingers.
It may be necessary to adjust the handle
slightly.
5
Usinga
screw
driver
tighten
the
screw.
\
Do not overtlghten
Overtighteningcould stripthe screw
holes
Do notoperate the cleaner withoutthe
screw in place
CORD ASSEMBLY
Make sure the quick release upper cord
hook is in the upright position. Remove the
wire tie from the power cord.
Lock the cord into
place by forcing it
into the locking
notch on the body of
the quick release
upper cord hook as
shown. This helps
keep the power cord
out from under the
vacuum cleaner agi-
tator.
Notch
Power
Wrap the power cord around the upper and
lower cord hooks and lock the power cord
plug onto the power cord.
Quick Release
Upper Cord
Hook
Power
Cord
Lower
Cord
II
HOW TO START
Quick Release
per Cord
k
Turn the quick
release upper
cord hook to
either side
and down to
release the
power cord.
Release the power cord plug from the
power cord and pull the cord off the quick
release upper cord hook. Check to be sure
the power cord is still locked into the lock in
the quick release upper cord hook.
Note: To reduce the risk of electric shock,
this vacuum cleaner has a polarized plug,
one blade is wider than the other.
This plug will fit in a polarized outlet only
one way. If the plug does not fit fully in the
outlet, reverse the plug. If it still does not fit,
contact a qualified technician to install the
proper outlet. Do not change the plug in any
way.
Plug the polarized power cord into a 120
Volt outlet located near the floor.
Personal Injuryand ProductDamage
Hazard
• DO NOT plug In ifswitchIs Inthe ON
position PersonalInjuryor damage
could result
• DO NOT useoutletsabove counters
Damage from cord to itemsIn surround-
ing area could occur
6
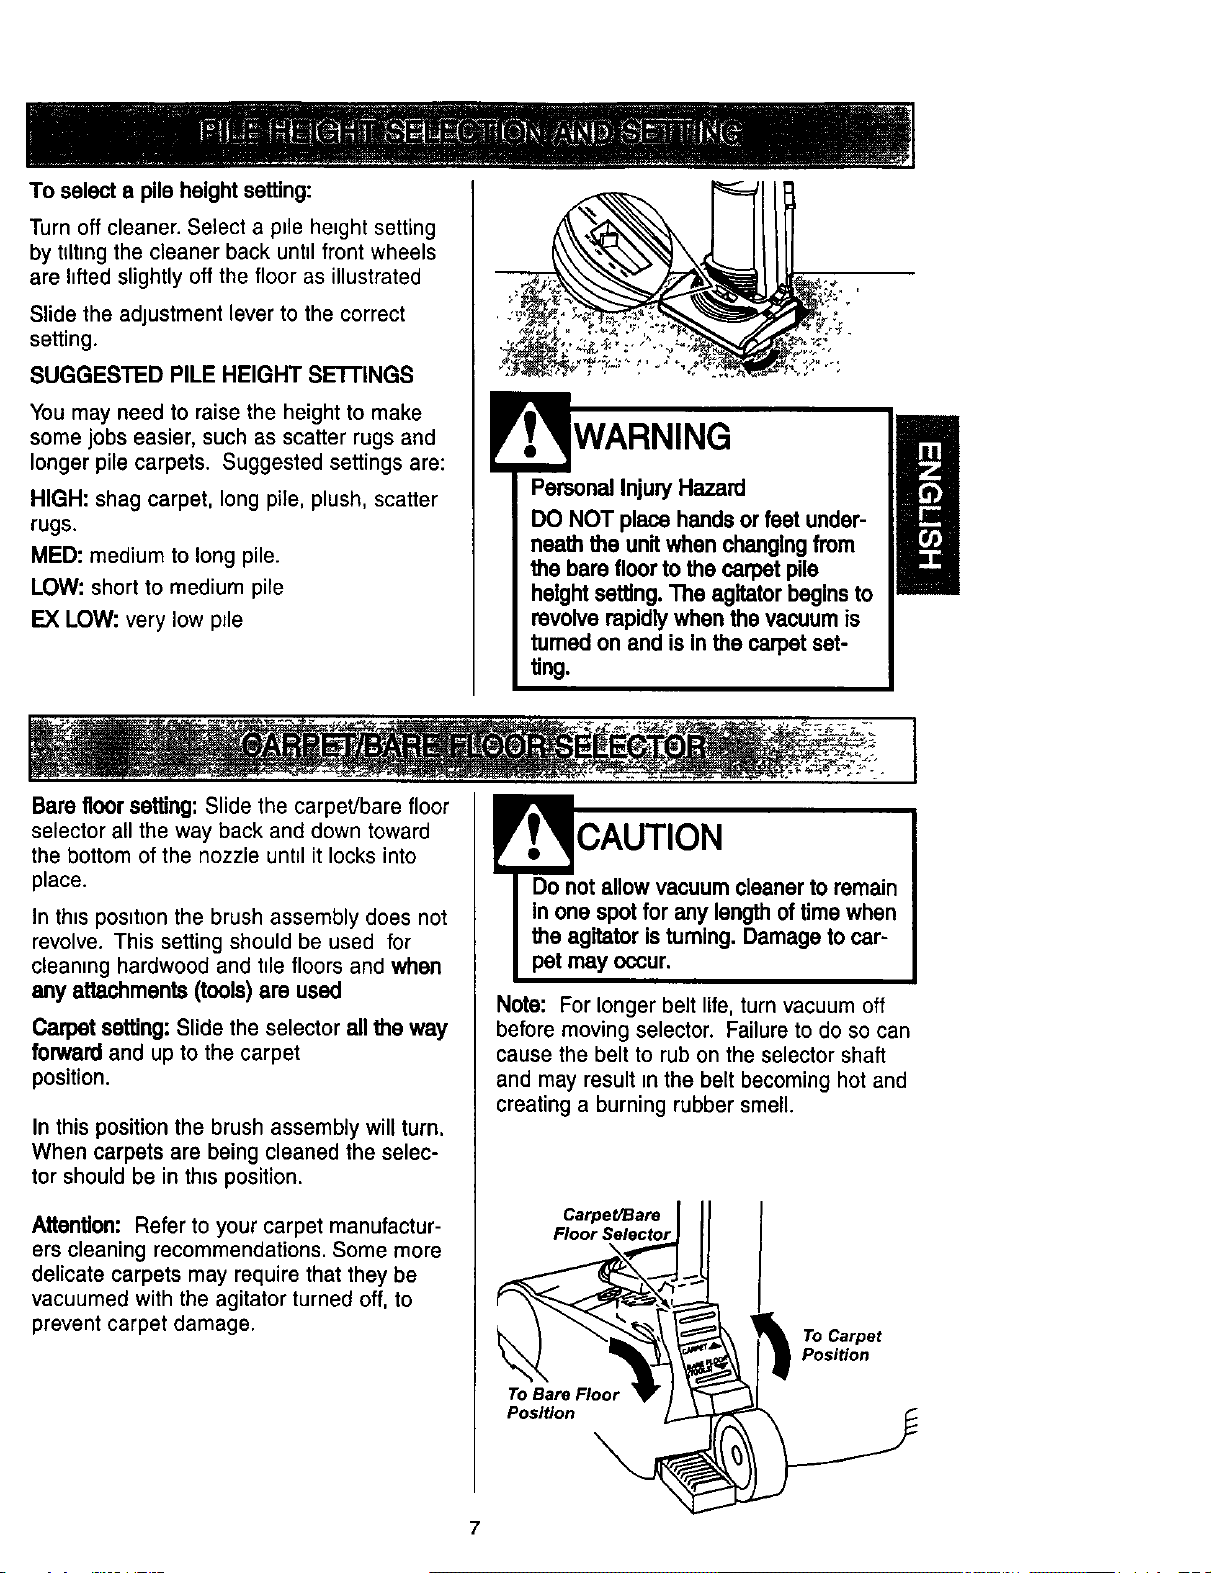
To select a pile heightsetting:
Turn off cleaner. Select a ptle height setting
by tdtmg the cleaner back unt=l front wheels
are lifted slightly off the floor as illustrated
Slide the adjustment lever to the correct
setting.
SUGGESTED PILE HEIGHT SE'I-I'INGS
You may need to raise the height to make
some jobs easier, such as scatter rugs and
longer pile carpets. Suggested settings are:
HIGH: shag carpet, long pile, plush, scatter
rugs.
MED: medium to long pile.
LOW: short to medium pile
EX LOW: very low p_le
WARNING
Personal InjuryHazard
DO NOT place handsor feet under-
neath the unitwhen changingfrom
the bare floorto the carpet pile
height setting.The agitatorbeginsto
revolverapidlywhen the vacuum is
turnedon and is in the carpet set-
Ung.
Bare floor setting: Slide the carpet/bare floor
selector all the way back and down toward
the bottom of the nozzle unt=l it locks into
place.
In th_s pos_hon the brush assembly does not
revolve. This setting should be used for
cleaning hardwood and hie floors and when
any attachments (tools) are used
Carpet setting:Slide the selector allthe way
forward and up to the carpet
position.
In this position the brush assembly will turn.
When carpets are being cleaned the selec-
tor should be in this position.
Attention: Refer to your carpet manufactur-
ers cleaning recommendations. Some more
delicate carpets may require that they be
vacuumed with the agitator turned off, to
prevent carpet damage.
!
r. . CAUTION
Do not allow vacuum cleaner to remain
in one spot for any length of time when
the agitator is tuming. Damage to car-
pet may occur.
Note: For longer belt life, turn vacuum off
before moving selector. Failure to do so can
cause the belt to rub on the selector shaft
and may result in the belt becoming hot and
creating a burning rubber smell.
Carpe_are
Floor Selector
To Bare Floor
Position
To Carpet
Position
7
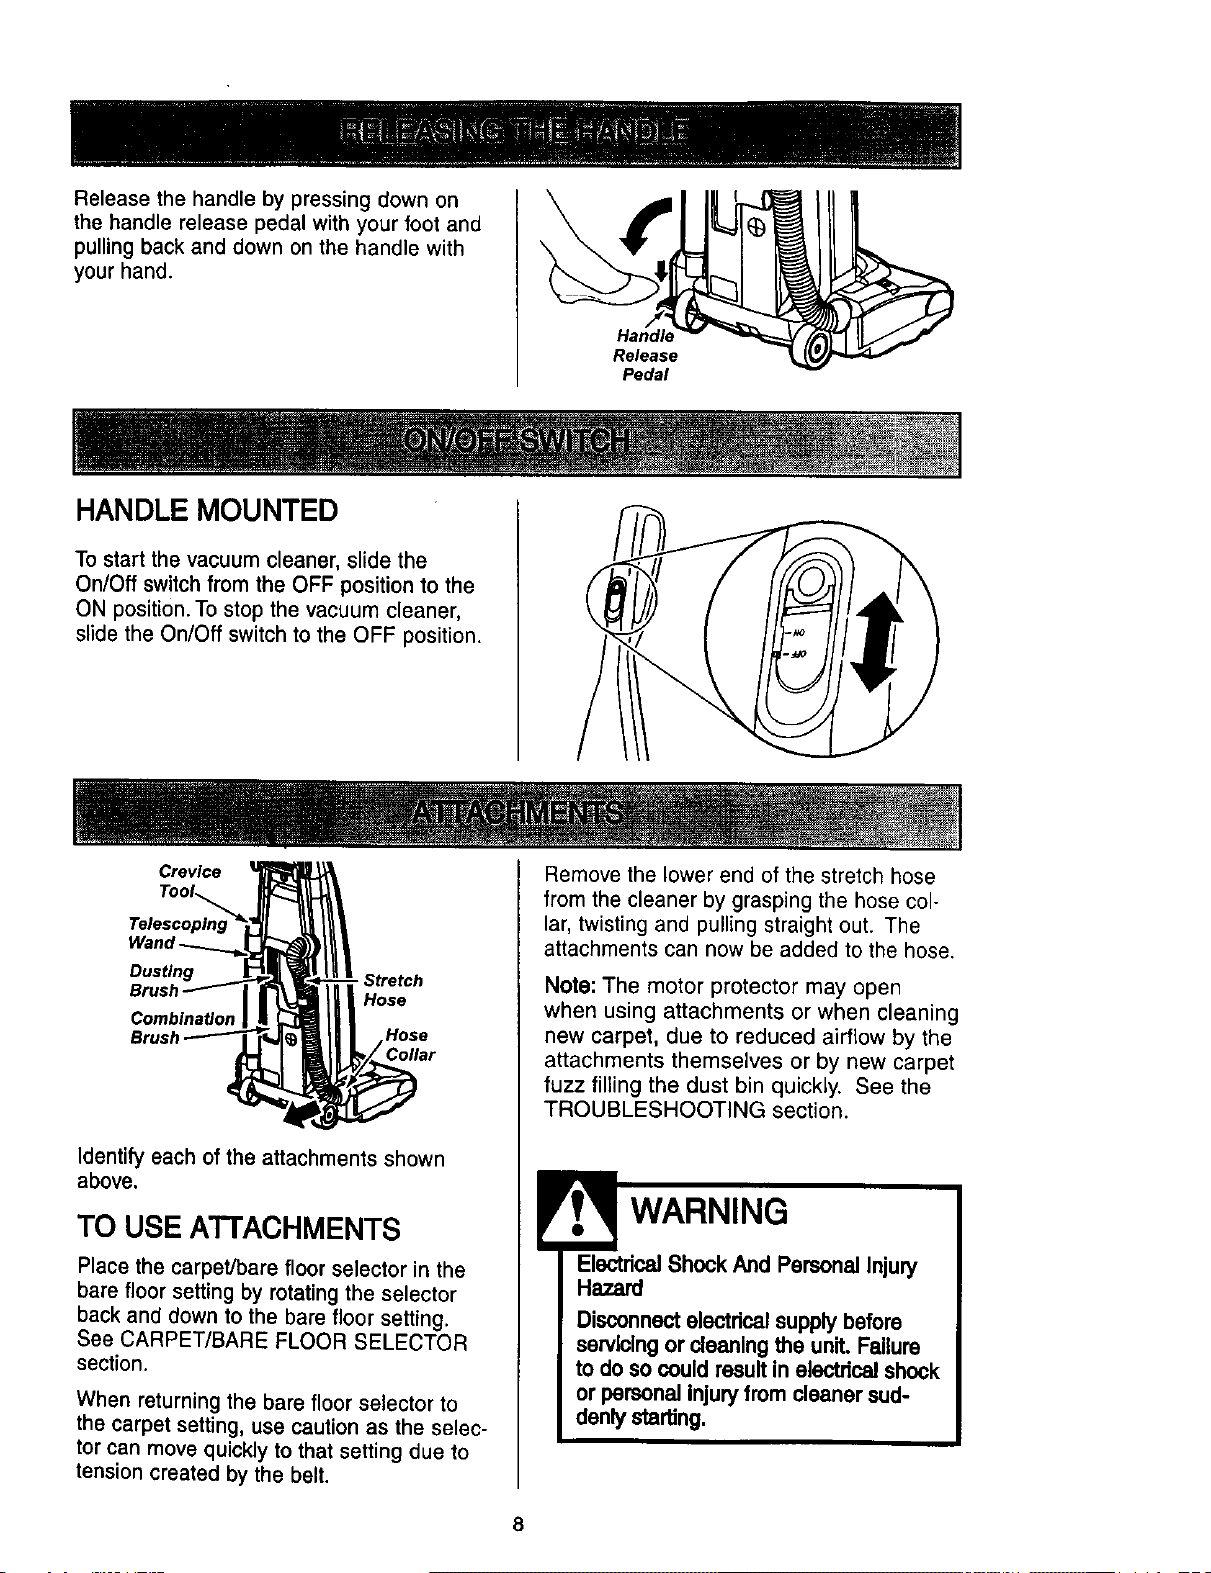
Release the handle by pressing down on
the handle release pedal with your foot and
pulling back and down on the handle with
your hand.
Release
Pedal
HANDLE MOUNTED
Tostart the vacuum cleaner, slide the
On/Off switchfrom the OFF positionto the
ON position.To stop the vacuumcleaner,
slide the On/Off switchto the OFF position,
Crevice Remove the lower end of the stretch hose
Telescopln!
Dusting
Combination
Stretch
Hose
Identify each ofthe a_achments shown
above.
TO USE ATTACHMENTS
Place the carpet/bare floor selector in the
bare floor setting by rotating the selector
back and down to the bare floor setting.
See CARPET/BARE FLOOR SELECTOR
section.
When returning the bare floor selector to
the carpet setting, use caution as the selec-
tor can move quickly to that setting due to
tension created by the belt.
from the cleaner by grasping the hose col-
lar, twisting and pulling straight out. The
attachments can now be added to the hose.
Note: The motor protector may open
when using attachments or when cleaning
new carpet, due to reduced airflow by the
attachments themselves or by new carpet
fuzz filling the dust bin quickly. See the
TROUBLESHOOTING section.
ElectricaJShock And Personal Injury
Hazard
Disconnectelectricalsupplybefore
servicingor cleaning the unit.Failure
to do so could resultin electricalshook
or personalInjuryfrom cleaner sud-
denlystarting.

The attached
hose swivels to
make cleaning
easier in every
direction. Swivel
Remove the
hose from the
hose clip by
pulling
straight out.
TELESCOPING WAND WITH
SUCTION CONTROL SLIDE
SOME MODELS
Remove the
Crevice telescoping
Tool
wand from
its storage
Telescoping position.
Wand
Remove the crevice tool from its storage
position in the wand. Turn the locking ring to
the UNLOCK position.
Extend the wand to its full length. Turn the
locking ring to the LOCK position. Attach the
extension wand onto the open end of the
hose.
Lower_ Suction
Wand __h_ Control Slide
( Wend
\ oe.ing.ingI--
_Unlock _/-_ Upper
Wand
Align the tabs on the extension wand with
the "J" slots in the hose. Push the wand into
the hose and twist to the right to lock.
To achieve maximum reach
with the attachments, Hose
add the crevice tool to
the end of the Suction
wand by inserting Control
and twisting
Telescoping
Wand
Tool
The dusting
brush or the
combination
r
brush may be
attached
directly to the
wand or
placed on the
end of the crevice tool.
TO OPERATE SUCTION
CONTROL SLIDE
Telescoping Wand
When using attachments for cleaning
draperies, small rugs with low pile and other
delicate items, twist the suction control slide
to the open position. This will reduce suction
for ease of cleaning. Suction
Control
The slide is Slide
located on the
telescoping wand,
close to the hose.
Note: Return suction controlslide to the
closed position for normal cleaning.
When usingattachments, be carefulnot
to overextendthe stretchhose when
reaching.Tryingto roachbeyond the
hose stretchcapability could causethe
cleanerto tip over. Make surethe car-
bet/bare floorselectoris In the bare floor
position. Damage to thefloor surface
may occurffthe carpet settingIs used.
9
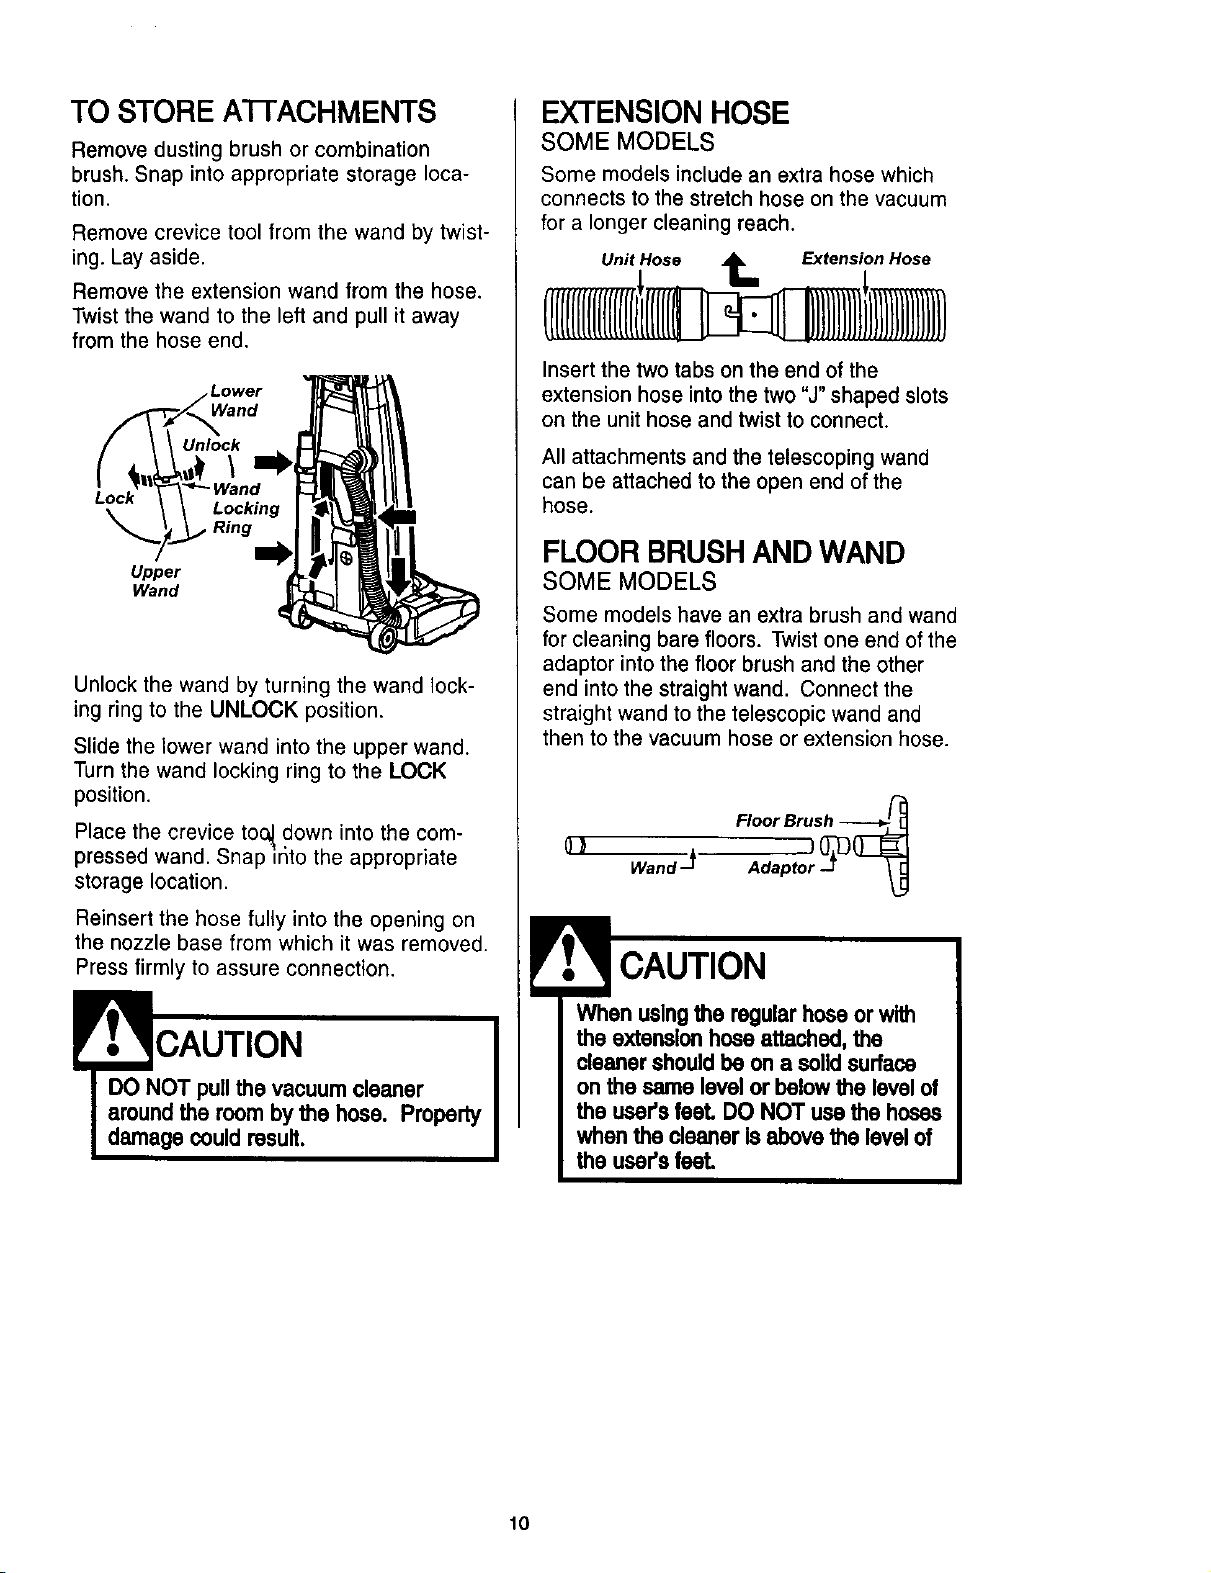
TO STORE A'I-FACHMENTS
Remove dusting brush or combination
brush. Snap into appropriate storage loca-
tion.
Remove crevice tool from the wand by twist-
ing. Lay aside.
Remove the extension wand from the hose.
Twist the wand to the left and pull it away
from the hose end.
Lower
Unlock
\
Lock
Locking
Ring
Upper
Wand
Unlock the wand by turning the wand lock-
ing ring to the UNLOCK position.
Slide the lower wand into the upper wand.
Turn the wand locking ring to the LOCK
position.
Place the crevice too,[ down into the com-
pressed wand. Snap ir_to the appropriate
storage location.
Reinsert the hose fully into the opening on
the nozzle base from which it was removed.
Press firmly to assure connection.
CAUTION
EXTENSION HOSE
SOME MODELS
Some models include an extra hose which
connects to the stretch hose on the vacuum
for a longer cleaning reach.
Unit Hose _ Extension Hose
Insert the two tabs on the end of the
extension hose into the two "J" shaped slots
on the unit hose and twist to connect.
All attachments and the telescoping wand
can be attached to the open end of the
hose.
FLOOR BRUSHAND WAND
SOME MODELS
Some models have an extra brush and wand
for cleaning bare floors. Twist one end of the
adaptor into the floor brush and the other
end into the straight wand. Connect the
straight wand to the telescopic wand and
then to the vacuum hose or extension hose.
CAUTION
When usingthe regular hoseor with
the extension hose attached, the
cleanershould be ona solidsurface
on the same levelor belowthe level of
the user'sfeet. DO NOT use the hoses
when the cleaner Is above the levelof
the user'sfeet.
10
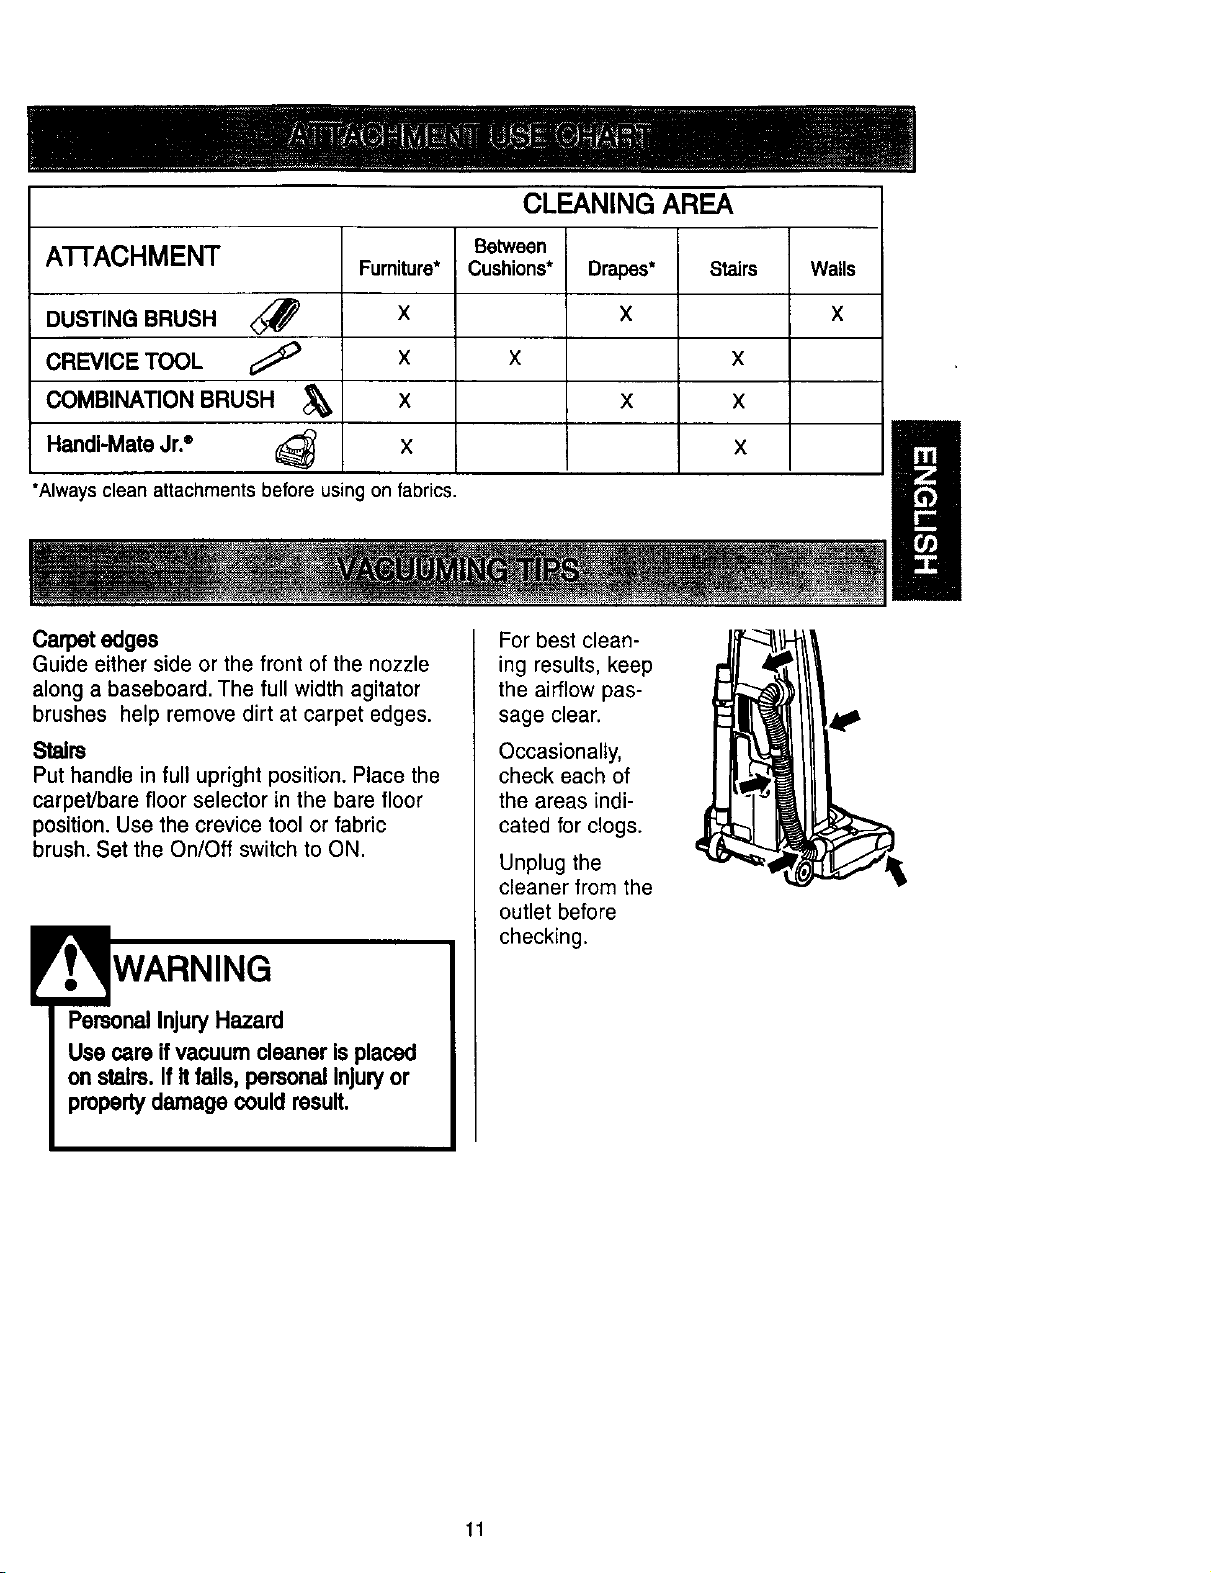
CLEANING AREA
Between
A'i-I-ACHMENT Fumiture* Cushions* Drapes* Stairs Walls
DUSTING BRUSH _ X X X
CREVICE TOOL _ X X X
COMBINATION BRUSH _ X X X
Handi-Mate Jr." _ X X
"Alwaysclean attachments beforeusingon fabrics.
Carpet edges
Guide either side or the front of the nozzle
along a baseboard. The full width agitator
brushes help remove dirt at carpet edges.
Stair8
Put handle in full upright position. Place the
carpet/bare floor selector in the bare floor
position. Use the crevice tool or fabric
brush. Set the On/Off switch to ON.
PersonalInjuryHazard
Use care ifvacuum cleaner is placed
on stairs. If Itfalls, personal InJuwor
propertydamage could result.
For best clean-
ing results, keep
the airflow pas-
sage clear.
Occasionally,
check each of
the areas indi-
cated for clogs.
Unplug the
cleaner from the
outlet before
checking.
11
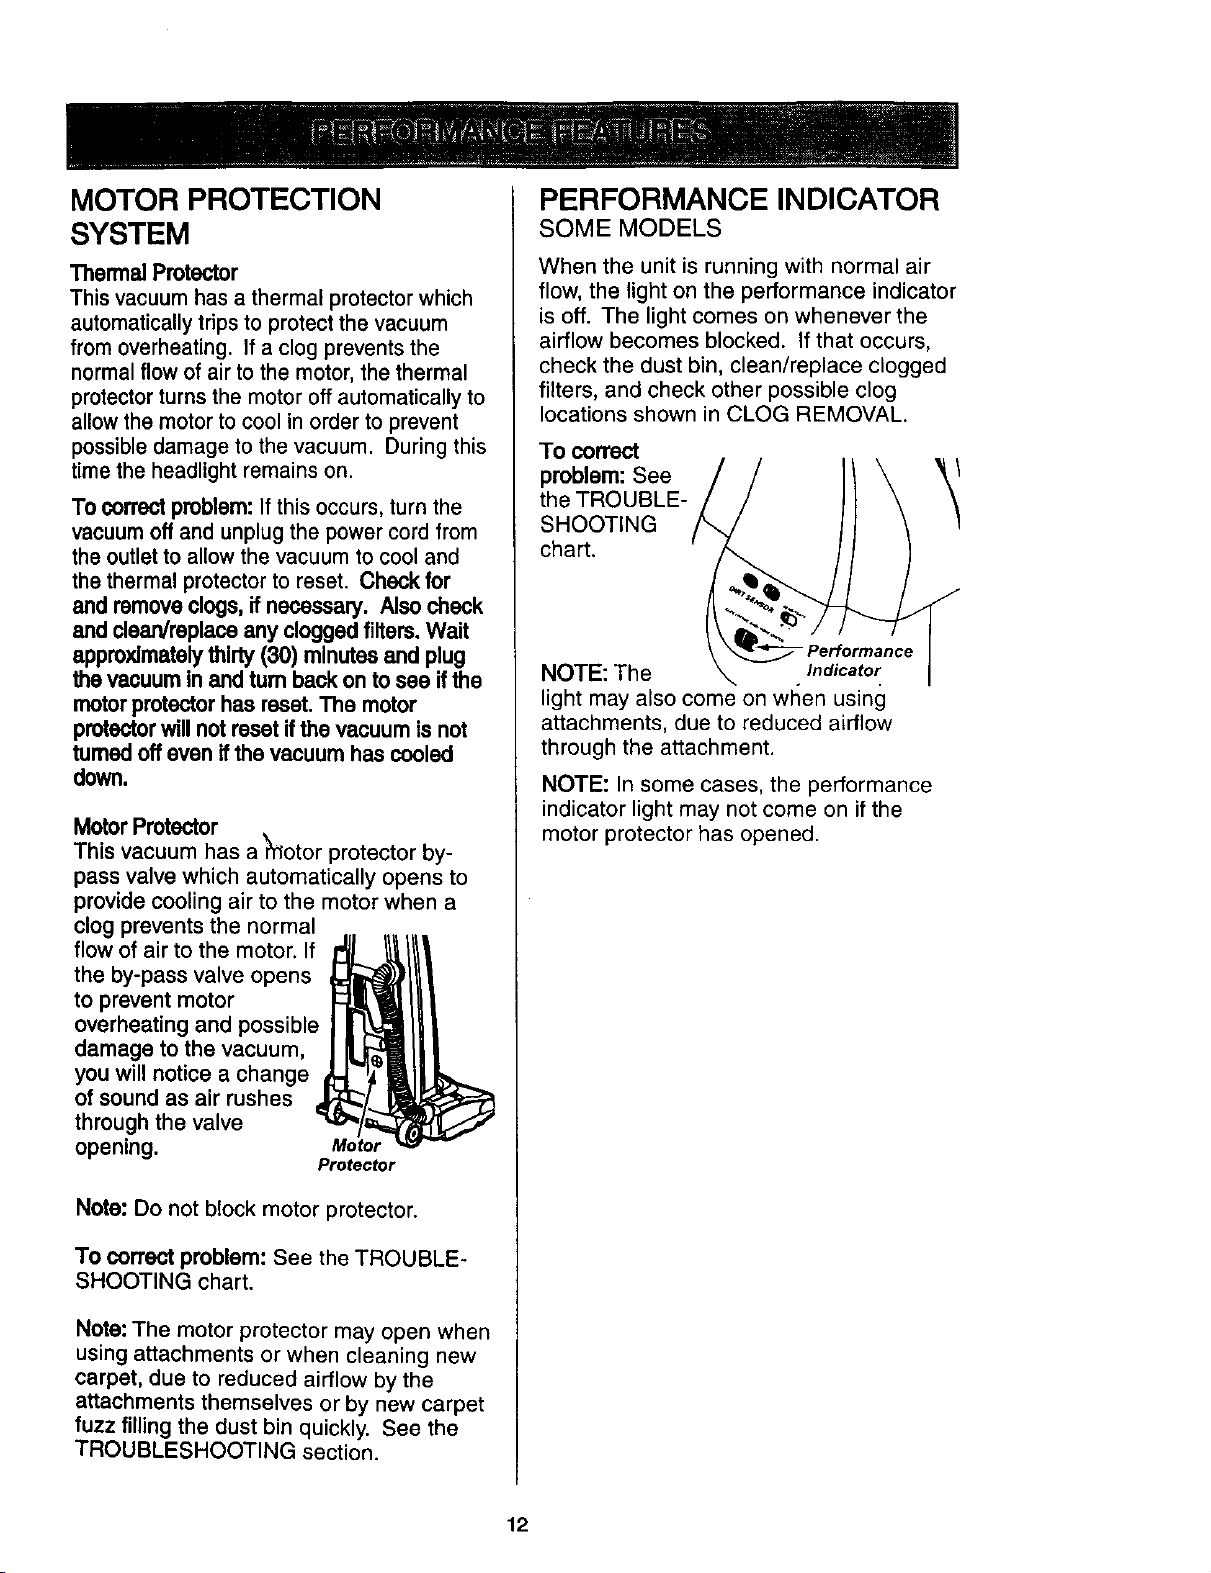
MOTOR PROTECTION
SYSTEM
ThermalProtector
This vacuum has a thermal protector which
automaticallytripsto protectthe vacuum
from overheating. If a clog preventsthe
normalflowof air tothe motor, the thermal
protectorturnsthe motoroffautomaticallyto
allowthe motortocool inorder to prevent
possibledamage to thevacuum. During this
timethe headlightremains on.
To correctproblem:If this occurs, turn the
vacuumoff and unplugthe power cordfrom
the outletto allowthe vacuum to cool and
the thermalprotectorto reset. Check for
and removeclogs, if necessary. Also check
and clean/replaceany cloggedfilters. Wait
approximatelythirty(30) minutesand plug
the vacuum in and tum back onto see ifthe
motorprotectorhas reset. The motor
protectorwill notreset ifthe vacuum is not
turnedoff even if the vacuum has cooled
dowR,
Motor Protector L
This vacuum has a Rotor protector by-
pass valve which automatically opens to
provide cooling air to the motor when a
clog prevents the normal
flow of air to the motor. If
the by-pass valve opens
to prevent motor
overheating and possible
damage to the vacuum,
you will notice a change
of sound as air rushes
through the valve
opening.
Motor
Protector
Note: Do not block motor protector.
To correct problem: See the TROUBLE-
SHOOTING chart.
Note: The motor protector may open when
using attachments or when cleaning new
carpet, due to reduced airflow by the
attachments themselves or by new carpet
fuzz filling the dust bin quickly. See the
TROUBLESHOOTING section.
PERFORMANCE INDICATOR
SOME MODELS
When the unit is running with normal air
flow, the light on the performance indicator
is off. The light comes on whenever the
airflow becomes blocked. If that occurs,
check the dust bin, clean/replace clogged
filters, and check other possible clog
locations shown in CLOG REMOVAL.
To correct
problem: See
the TROUBLE-
SHOOTING
chart.
NOTE: The Indicator
light may also come on wtlen using
attachments, due to reduced airflow
through the attachment.
NOTE: In some cases, the performance
indicator light may not come on if the
motor protector has opened.
12
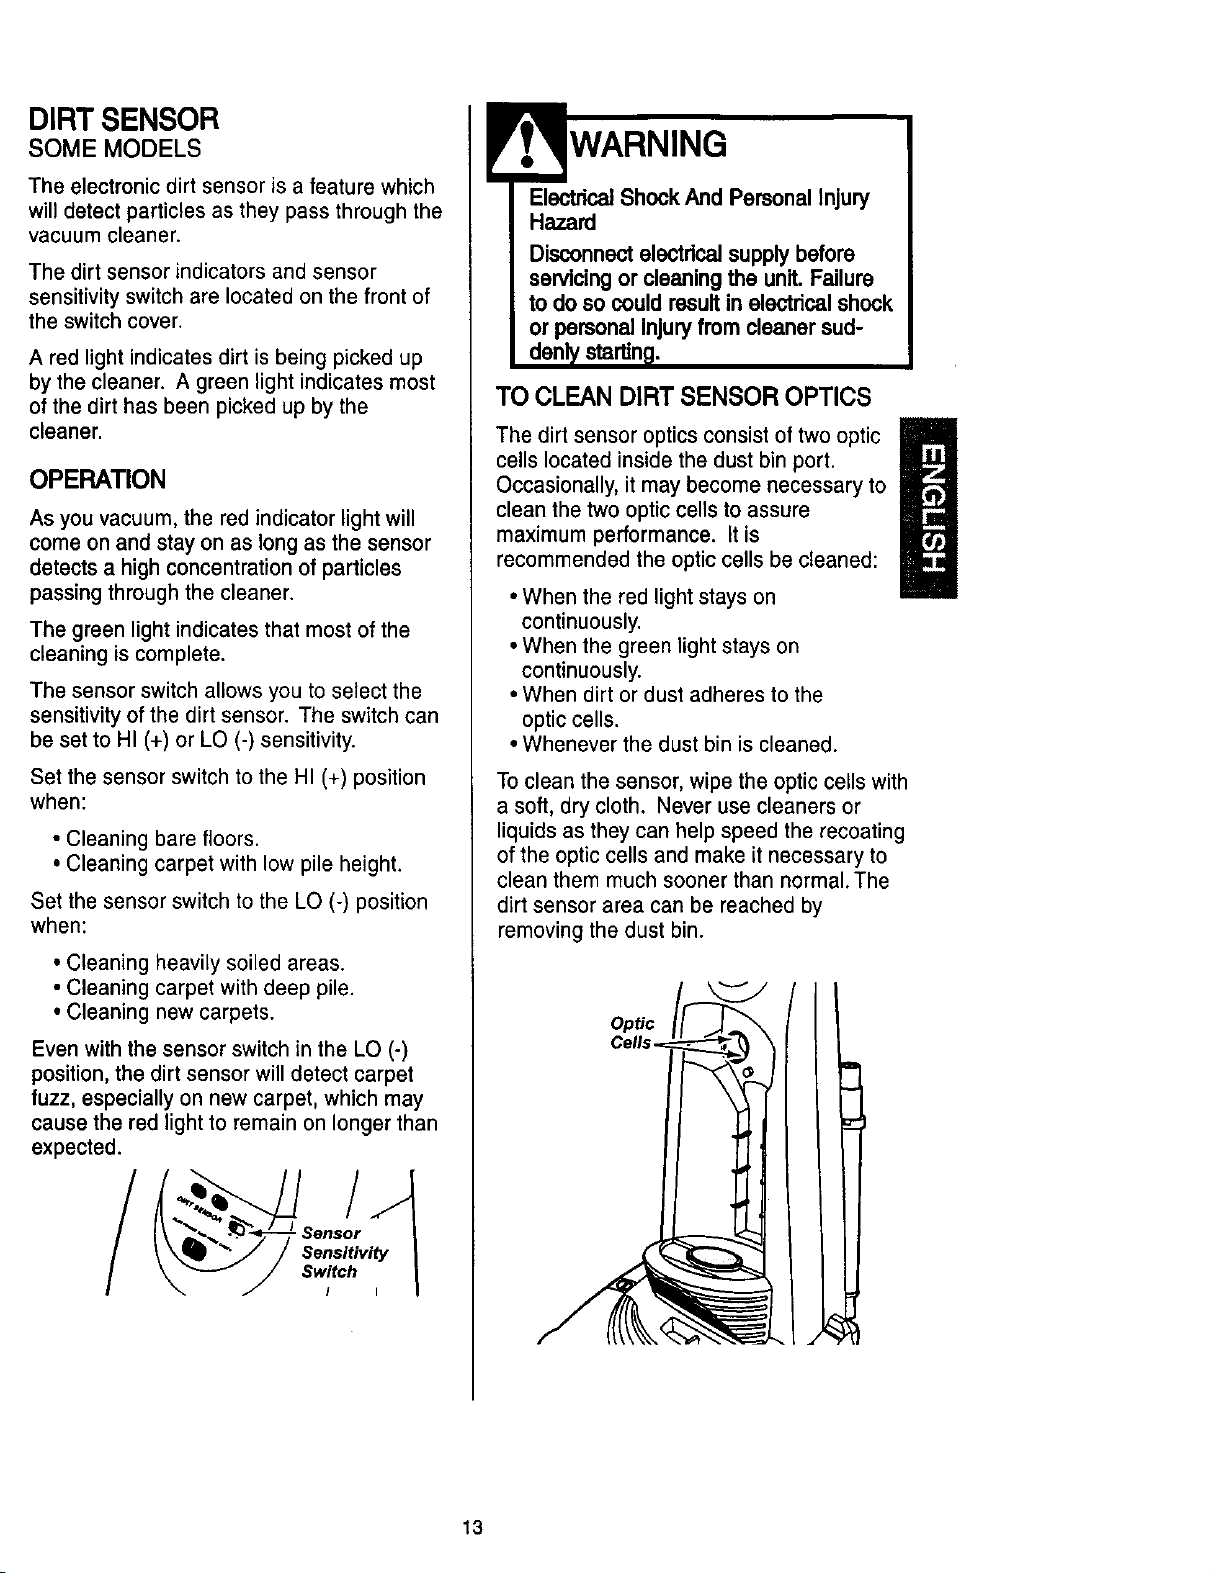
DIRT SENSOR
SOME MODELS
The electronic dirt sensor is a feature which
will detect particles as they pass through the
vacuum cleaner.
The dirt sensor indicators and sensor
sensitivity switch are located on the front of
the switch cover.
A red light indicates dirt is being picked up
by the cleaner. A green light indicates most
of the dirt has been picked up by the
cleaner.
OPERATION
As you vacuum, the red indicatorlight will
come onand stay on as longas the sensor
detects a high concentration of particles
passing through the cleaner.
The green light indicates that most of the
cleaning is complete.
The sensor switch allows you to select the
sensitivity of the dirt sensor. The switch can
be set to HI (+) or LO (-) sensitivity.
Set the sensor switch to the HI (+) position
when:
• Cleaning bare floors.
• Cleaning carpet with low pile height.
Set the sensor switch to the LO (-) position
when:
• Cleaning heavily soiled areas.
• Cleaning carpet with deep pile.
• Cleaning new carpets.
Even with the sensor switch in the LO (-)
position, the dirt sensor will detect carpet
fuzz, especially on new carpet, which may
cause the red light to remain on longer than
expected.
I\ =_.'- _ . Sensor |
\ _ _/ / Sensitivity I
\--- j s ,o. I
ElectricalShock And Personal Injury
Hazard
Disconnecteloctdcai supplybefore
servicingor cleaningthe unit. Failure
to do so could result in eloctdcalshock
or personalInjuryfrom cleaner sud-
danlystarting.
TO CLEAN DIRT SENSOR OPTICS
The dirt sensor optics consist of two optic
cells located inside the dust bin port.
a
Occasionally, it may become necessary to
clean the two optic cells to assure
maximum performance. It is
recommended the optic cells be cleaned:
• When the red light stays on
continuously.
• When the green light stays on
continuously.
• When dirt or dust adheres to the
optic cells.
• Whenever the dust bin is cleaned.
To clean the sensor, wipe the optic cells with
a soft, dry cloth. Never use cleaners or
liquids as they can help speed the recoating
of the optic cells and make it necessary to
clean them much sooner than normal. The
dirt sensor area can be reached by
removing the dust bin.
Opec
13
Always follow all safety precautions when
cleaning and servicing the vacuum
cleaner.
ElectdcalShock And PersonalInjury
Hazard
Disconnectelectrical supply before
servicingor cleaningthe unit. Failure
to do so could resultin electrical shock
or personalinjuryfromcleaner sud-
denlystarting.
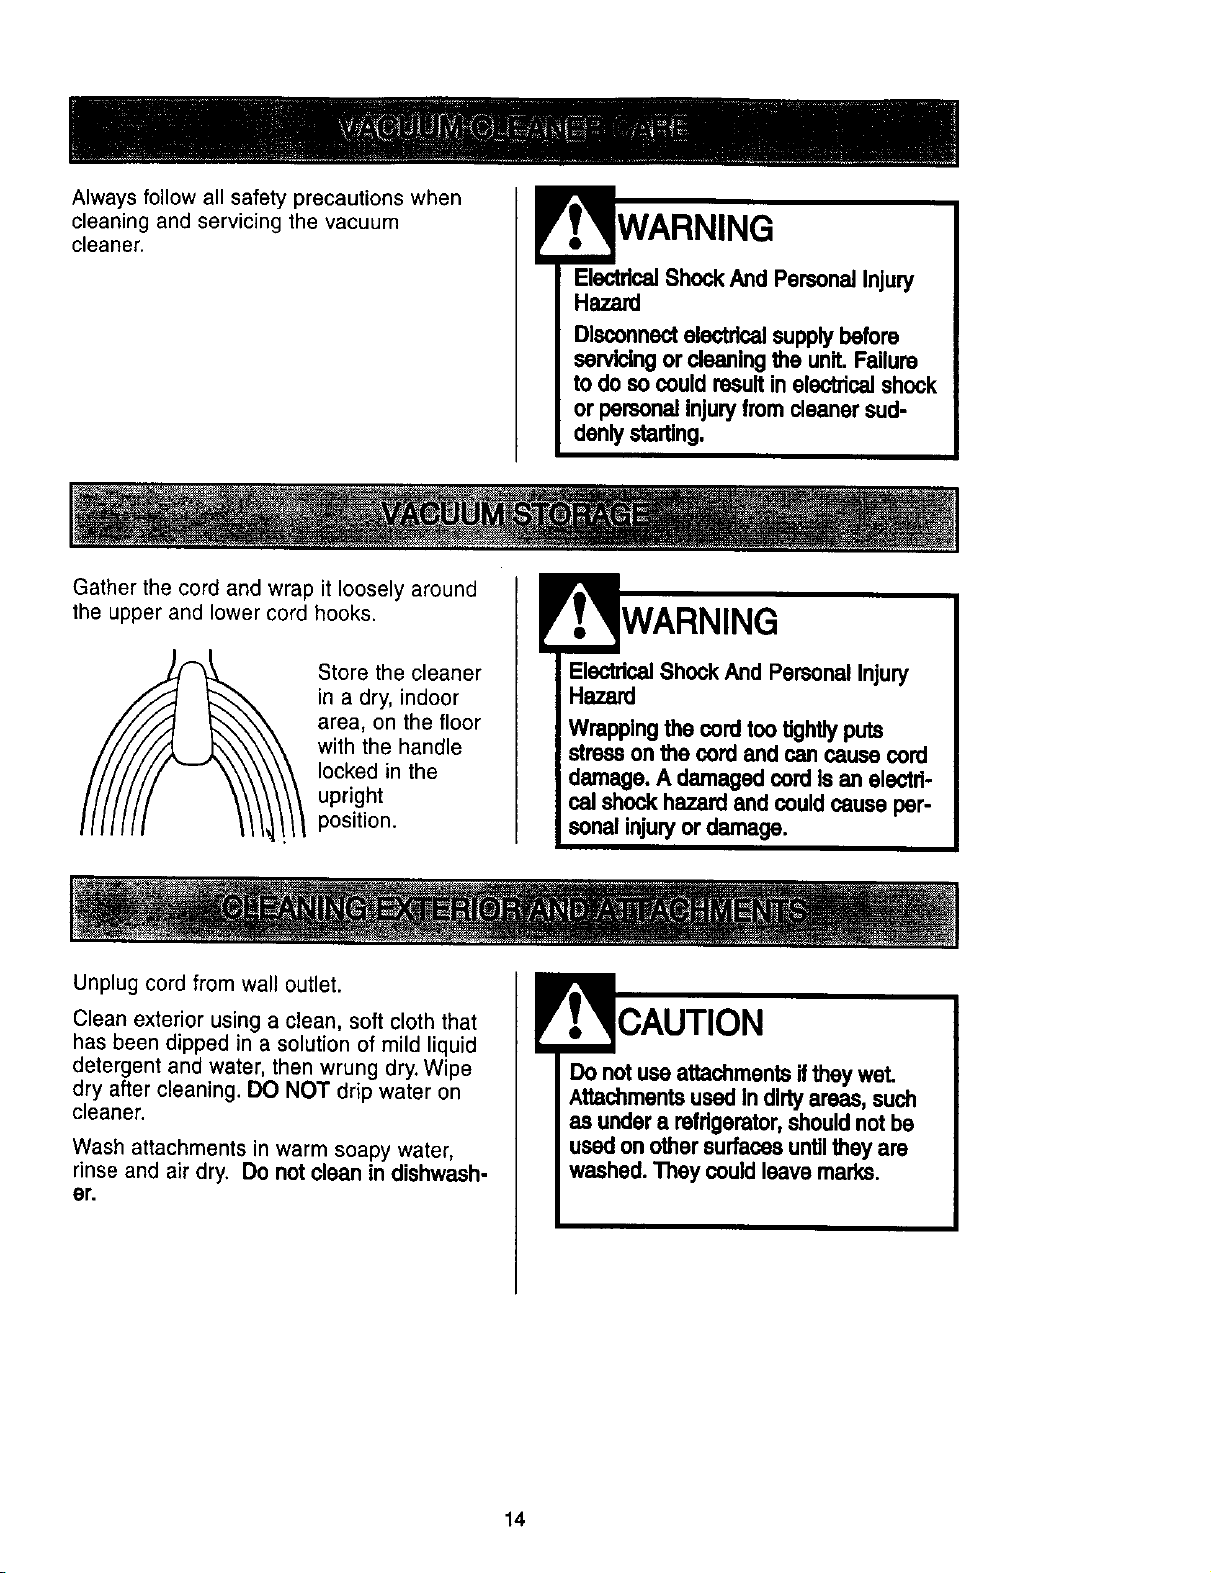
Gather the cord and wrap it loosely around
the upper and lower cord hooks.
Store the cleaner
in a dry, indoor
area, on the floor
with the handle
locked in the
upright
position.
ElectdcalShock And PersonalInjury
Hazard
Wrappingthe cord tootightlyputs
stressonthe cord and cancause cord
damage. A damaged cord Is an electd-
cal shock hazard and couldcause per-
sonalinjuryor damage.
Unplug cord from wall outlet.
Clean exterior using a clean, soft cloth that
has been dipped in a solution of mild liquid
detergent and water, then wrung dry. Wipe
dry after cleaning. DO NOT drip water on
cleaner.
Wash attachments in warm soapy water,
rinse and air dry, Do not clean in dishwash-
er.
Do notuse attachmentsifthey wet.
AttachmentsusedIn dirtyareas, such
as under a refdgerator, shouldnot be
used onother surfacesuntilthey are
washed. They couldleave marks.
14
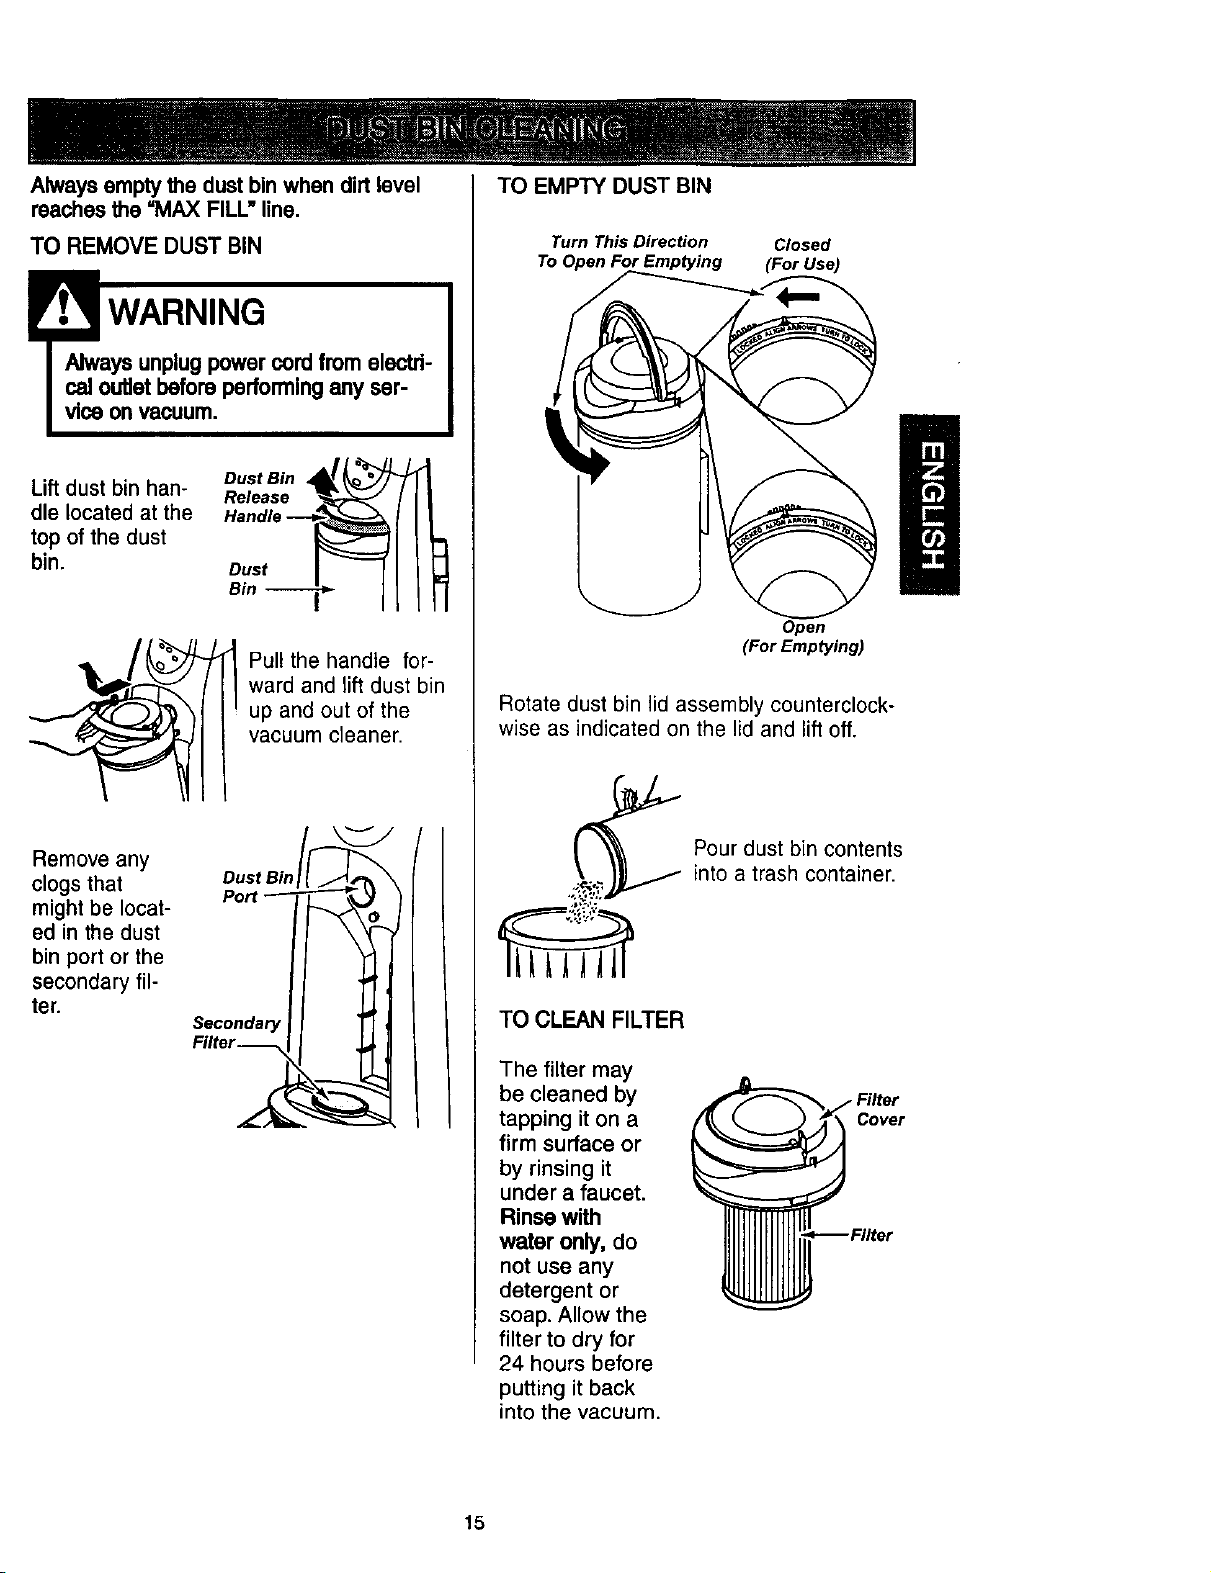
Alwaysempty the dust bin when dirt level
reaches the =MAX FILL" line.
TO REMOVE DUST BIN
! WARNING
Always unplug power cord from electri-
cal outlet before performing any ser-
vice onvacuum.
• . DustBin .,A !_'_=_!%
Lift dust bm han- Release -I_,_,._
die located at the Handle ---._,____._
top of the dust _ _'1
bin. Dust I
H
Bin -_
Pul! the handle for-
ward and lift dust bin
up and out of the
vacuum cleaner.
Remove any
clogs that DustBin
might be locat-
ed in the dust
bin port or the
secondary fil-
ter.
Secondary
Filter--
TO EMPTY DUST BIN
Turn This Direction Closed
U
Open
(For Emptying)
Rotate dust bin lid assembly counterclock-
wise as indicated on the lid and lift off.
.;e4_
TO CLEAN FILTER
The filter may
be cleaned by
tapping it on a
firm surface or
by rinsing it
under a faucet•
Rinse with
water only, do
not use any
detergent or
soap. Allow the
filter to dry for
24 hours before
putting it back
into the vacuum.
Pour dust bin contents
into a trash container.
Cover
15
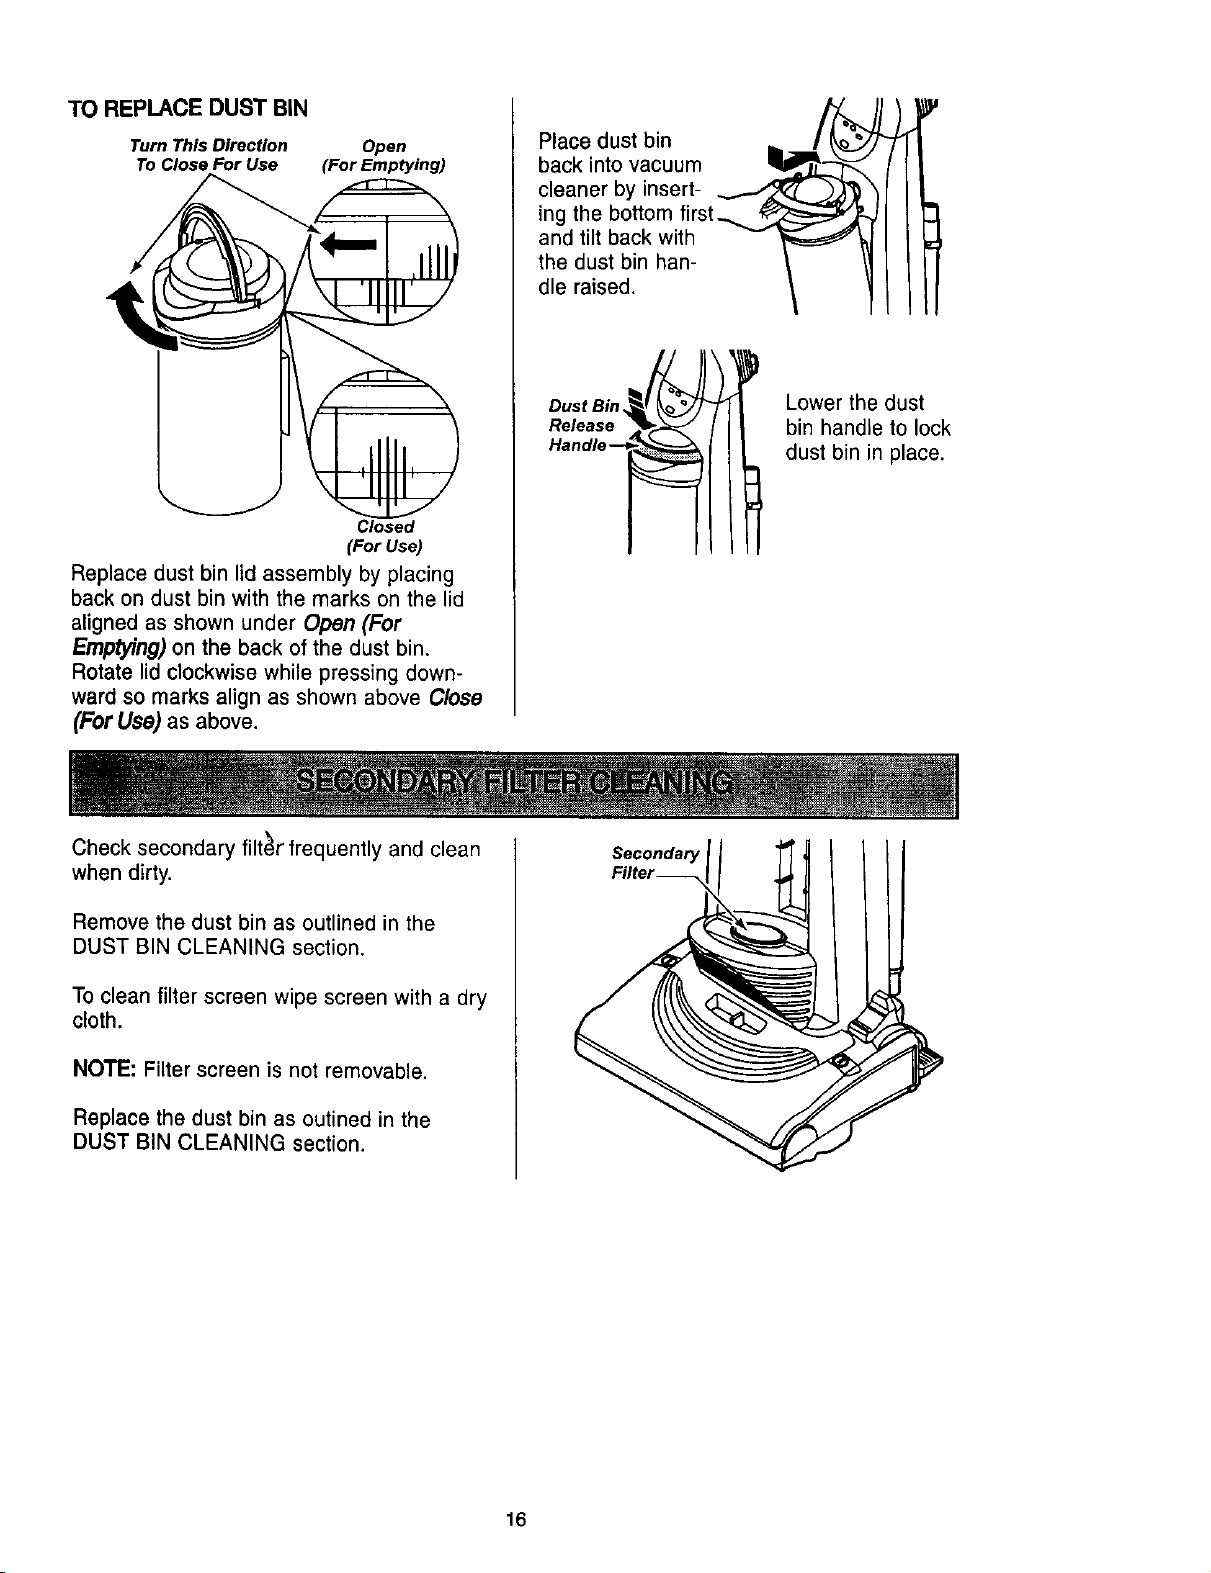
TO REPLACE DUST BIN
Turn This Direction Open
To Close For Use (For Emptying)
Closed
(For Use)
Replace dust bin lid assembly by placing
back on dust bin with the marks on the lid
aligned as shown under Open (For
Emptying) on the back of the dust bin.
Rotate lid clockwise while pressing down-
ward so marks align as shown above Close
(For Use) as above.
Place dust bin
back into vacuum
cleaner by insert-
ing the bottom first_
and tilt back with
the dust bin han-
dle raised.
Dus,Bin
Release
Handle --
Lower the dust
bin handle to lock
dust bin in place.
Check secondary filter' frequently and clean Secondary
when dirty. Filter--
Remove the dust bin as outlined in the
DUST BIN CLEANING section.
To clean filter screen wipe screen with a dry
cloth.
NOTE: Filter screen is not removable.
Replace the dust bin as outined in the
DUST BIN CLEANING section.
16
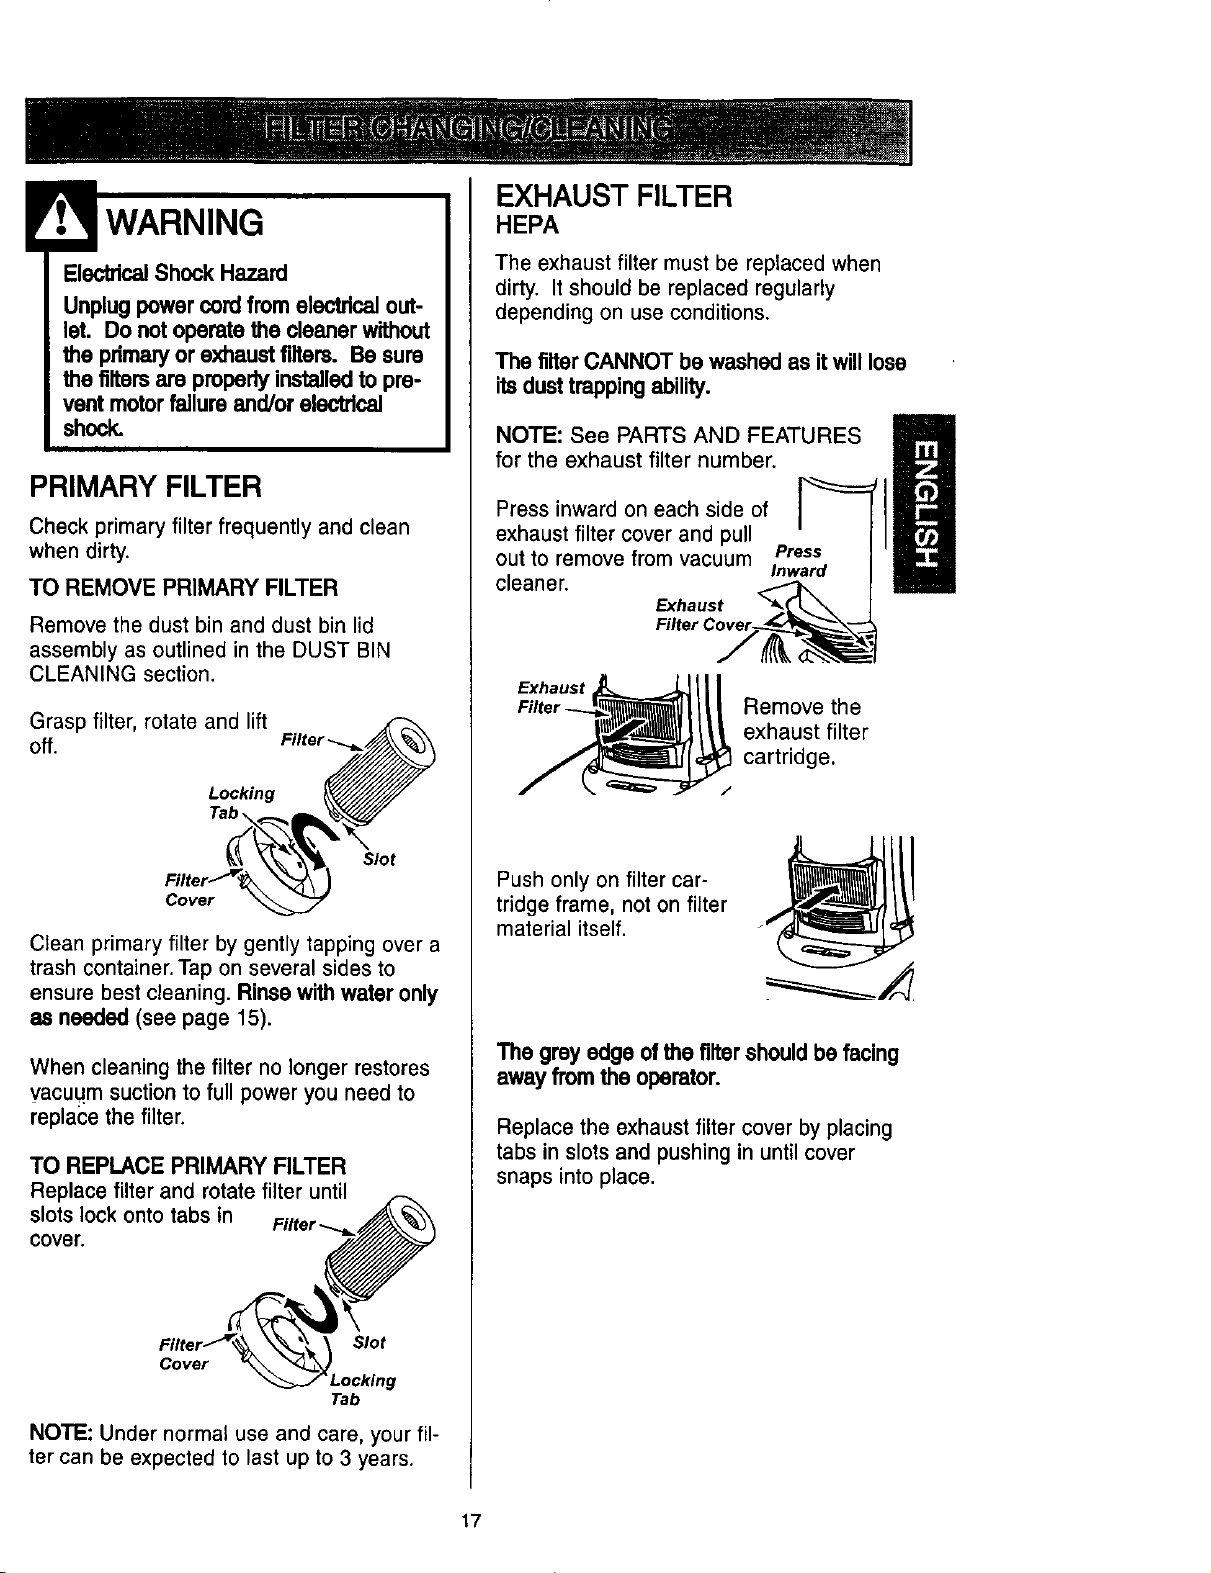
ElectricalShock Hazard
Unplugpowercord fromeloctrlcalout-
let. Do not operate the cleaner without
the pdmaryor exhaust filters. Be sure
the filtersam properlyinstalledto pre-
ver_ motorfailure and/or electrical
shock.
PRIMARY FILTER
Check primary filter frequently and clean
when dirty.
TO REMOVE PRIMARY FILTER
Remove the dust bin and dust bin lid
assembly as outlined in the DUST BIN
CLEANING section.
Grasp filter, rotate and lift
off. Filte
Locking
SIot
Cover
Clean primary filter by gently tapping over a
trash container. Tap on several sides to
ensure best cleaning.Rinse withwater only
as needed (see page 15).
When cleaning the filter no longer restores
vacuum suction to full power you need to
replace the filter.
TO REPLACE PRIMARY FILTER
Replace filter and rotate filter until
slots lock onto tabs in
cover.
Slot
Cover
Tab
NOTE: Under normal use and care, your fil-
ter can be expected to last up to 3 years.
EXHAUST FILTER
HEPA
The exhaust filter must be replaced when
dirty. It should be replaced regularly
depending on use conditions.
The filter CANNOT be washed as it willlose
itsdust trappingability.
.OTESeePA S m
AND FEATURES
for the exhaust filter number.
Press inward on each side of
exhaust filter cover and pull
Press
out to remove from vacuum
Inward
cleaner.
Exhaust
Remove the
exhaust filter
cartridge.
Push only on filter car-
tridge frame, not on filter
material itself.
The grey edge ofthe filtershouldbe facing
away fromthe operator.
Replace the exhaust filter cover by placing
tabs in slots and pushing in until cover
snaps into place.
17
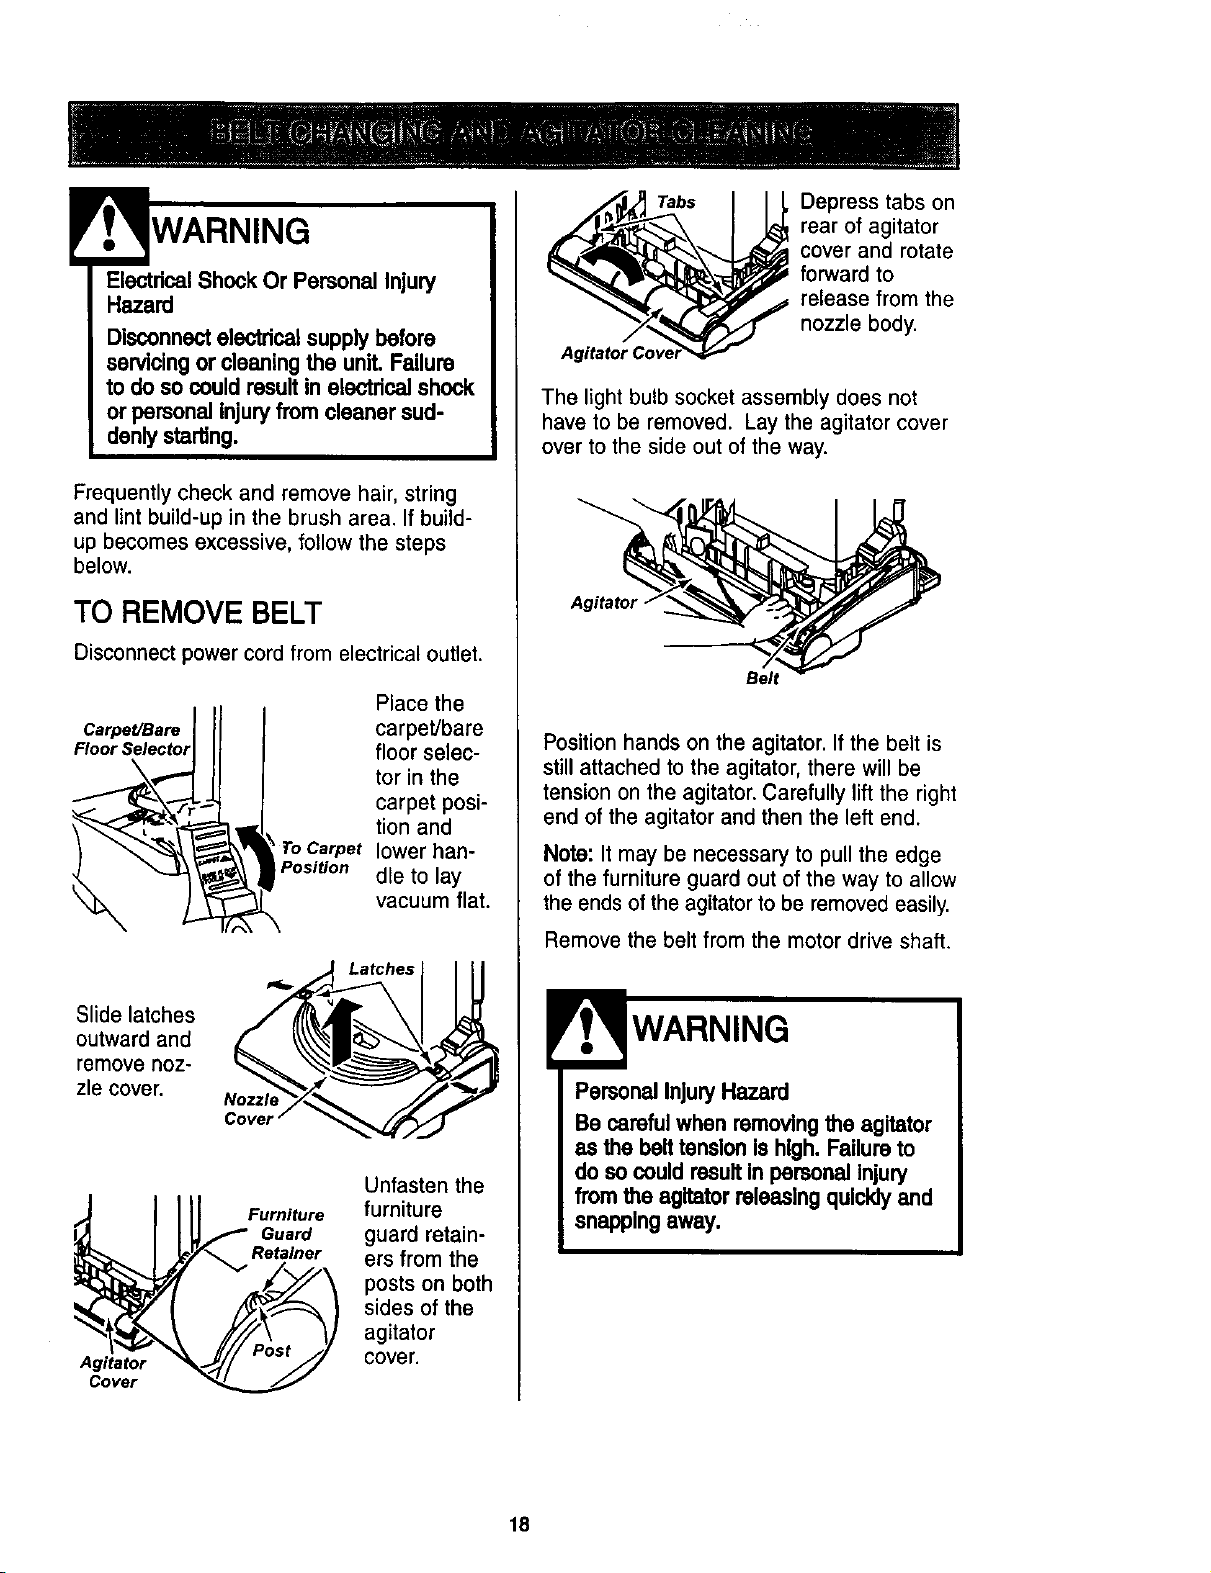
ElectricalShockOr Personal Injury
Hazard
Disconnectelectricalsupplybefore
servicingor cleaning the unit. Failure
to do so could resultin electricalshock
or personal injuryfrom cleaner sud-
denlysta_ng.
Frequently check and remove hair, string
and lint build-up in the brush area. If build-
up becomes excessive, follow the steps
below.
TO REMOVE BELT
Disconnect power cord from electrical outlet.
Carpet/Bare
Floor Selector
Place the
carpet/bare
floor selec-
tor in the
carpet posi-
tion and
To Carpet lower hart-
Position die to lay
vacuum flat.
Slide latches
outward and
remove noz-
zle cover.
Nozzle
Latches
Agitator
Cover
Furniture
Guard
Retainer
Unfasten the
furniture
guard retain-
ers from the
posts on both
sides of the
agitator
cover.
Tabs
Depress tabs on
rear of agitator
cover and rotate
forward to
release from the
nozzle body.
The light bulb socket assembly does not
have to be removed. Lay the agitator cover
over to the side out of the way.
Belt
Position hands on the agitator. If the belt is
still attached to the agitator, there will be
tension on the agitator. Carefully lift the right
end of the agitator and then the left end.
Note: It may be necessary to pull the edge
of the furniture guard out of the way to allow
the ends of the agitator to be removed easily.
Remove the belt from the motor drive shaft.
Personal InjuryHazard
Be careful when removingthe agitator
as the belt tensionIs high, Failure to
do so could result In personal Injury
fromthe agitator releasing qulcldyand
snappingaway.
18
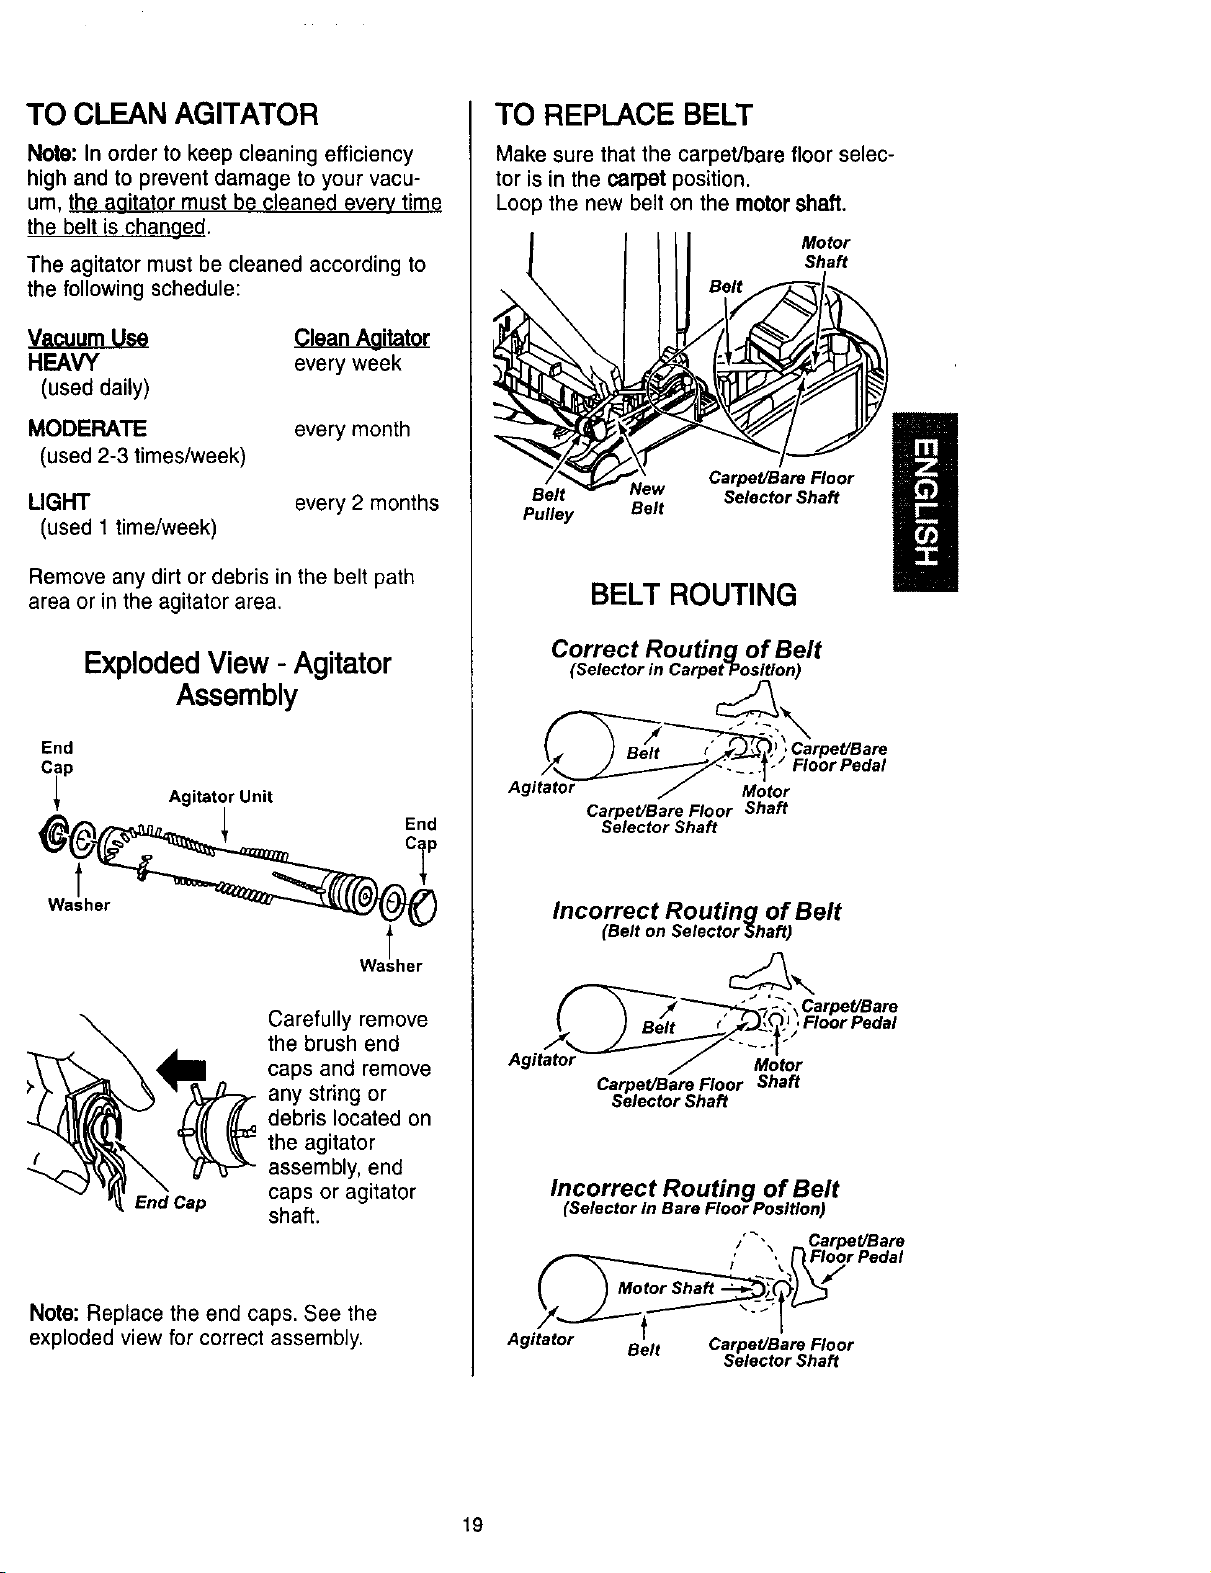
TO CLEAN AGITATOR
Note" In order to keep cleaning efficiency
high and to prevent damage to your vacu-
um, the agitator must be cleaned every time
the belt is changed.
The agitator must be cleaned according to
the following schedule:
Vacuum Use
HEAVY
(used daily)
MODERATE
(used 2-3 times/week)
Clean Agitator
every week
every month
UGHT
(used 1 time/week)
every 2months
Remove any dirt or debris in the belt path
area or in the agitator area,
End
t
Washer
ExplodedView - Agitator
Assembly
Agitator Unit
End
End Cap
Carefully remove
the brush end
caps and remove
any string or
debris located on
the agitator
assembly, end
caps or agitator
shaft.
Note: Replace the end caps. See the
exploded view for correct assembly.
TO REPLACE BELT
Make sure that the carpet]bare floor selec-
tor is in the carpet position.
Loop the new belt on the motor shaft.
Carpet/Bare Floor
Belt New Selector Shaft
Pulley Belt
BELT ROUTING
Correct Routing of Belt
(Selector in Carpet Positlon)
Agitator Motor
Carpet/Bare Floor Shaft
Selector Shaft
Incorrect Routing of Belt
(Belt on Selector Shaft)
'\ Carpet/Bare
,Roor Pedal
Agitator Motor
Carpet/Bare Floor Shaft
Selector Shaft
Incorrect Routing of Belt
(Selector In Bare Floor Posftlon)
Agitator Belt Carpet/Bare Floor
Selector Shaft
19
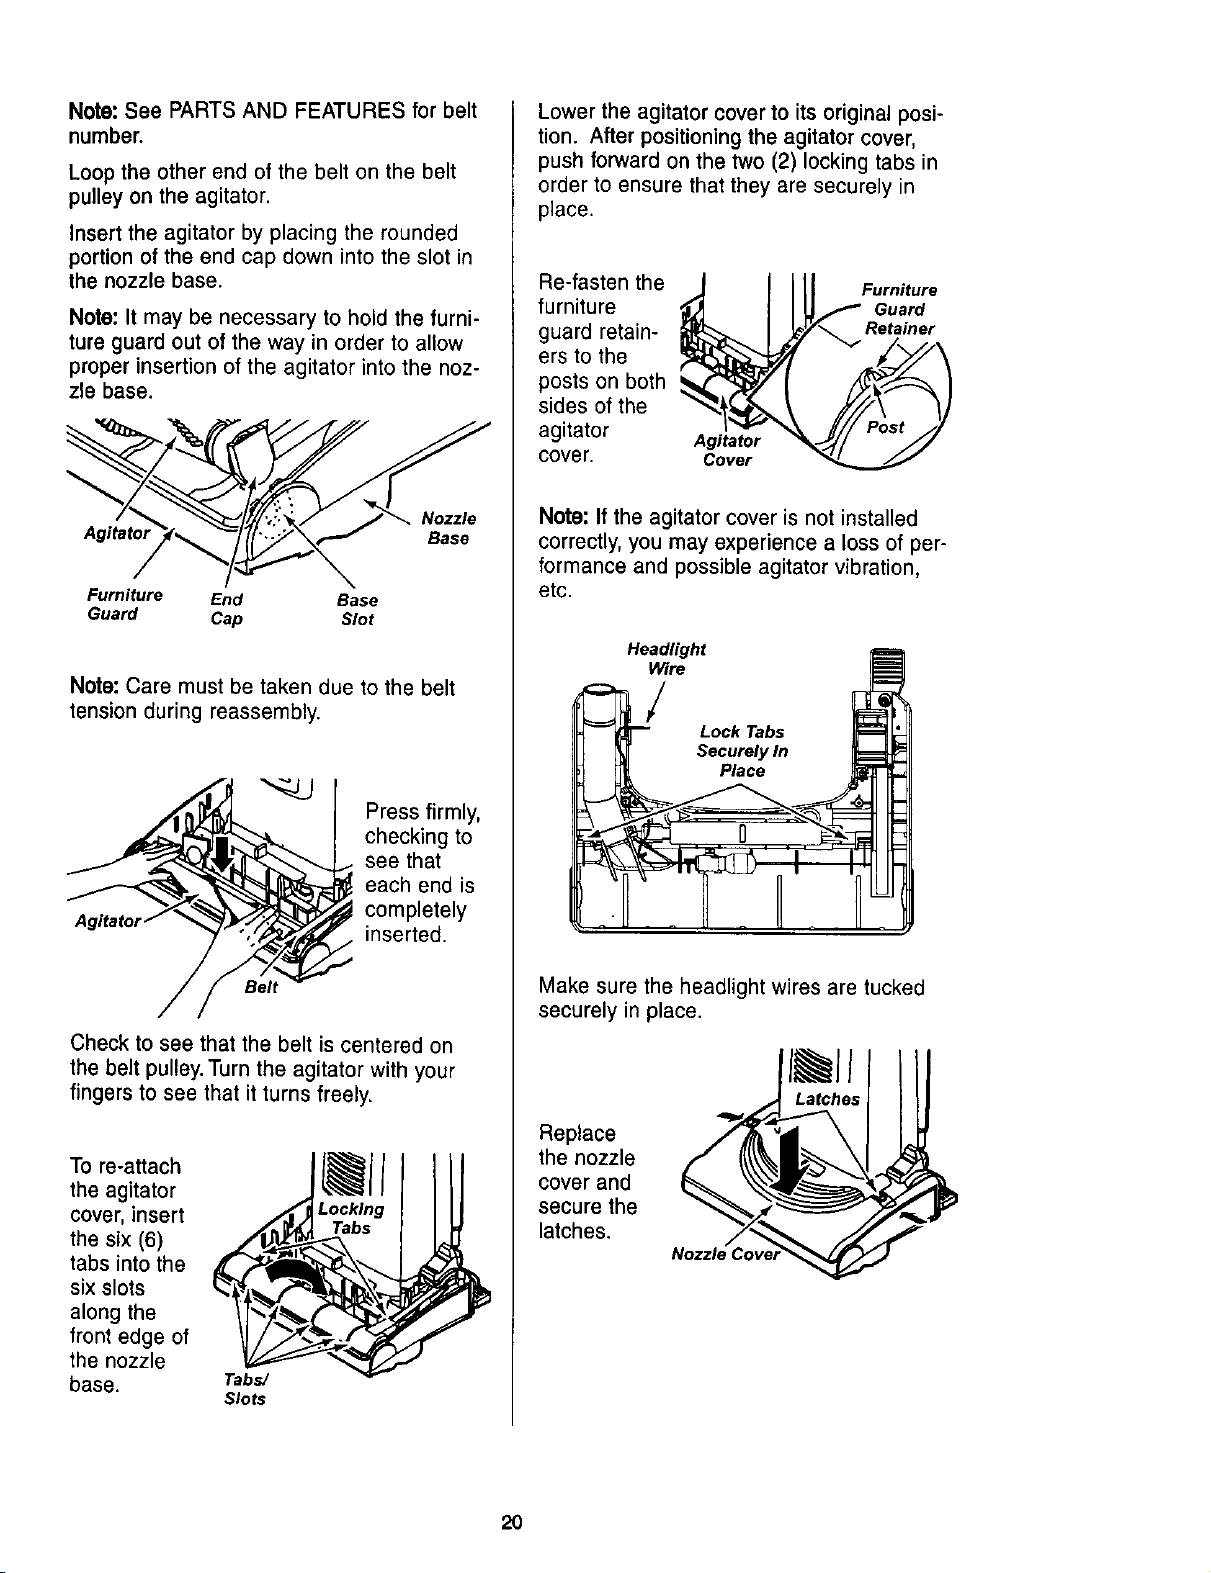
Note: See PARTS AND FEATURES for belt
number.
Loop the other end of the belt on the belt
pulley on the agitator.
Insert the agitator by placing the rounded
portion of the end cap down into the slot in
the nozzle base.
Note: It may be necessary to hold the furni-
ture guard out of the way in order to allow
proper insertion of the agitator into the noz-
zle base.
Nozzle
Agitator Base
Furniture End Base
Guard Cap Slot
Note: Care must be taken due to the belt
tension during reassembly.
Press firmly,
checking to
see that
each end is
completely
inserted.
Check to see that the belt is centered on
the belt pulley. Turn the agitator with your
fingers to see that it turns freely.
To re-attach
the agitator
cover, insert
the six (6)
tabs into the
six slots
along the
front edge of
the nozzle
base.
Tabs/
Slots
Lower the agitator cover to its original posi-
tion. After positioning the agitator cover,
push forward on the two (2) locking tabs in
order to ensure that they are securely in
place.
Re-fasten the
furniture
guard retain-
ers to the
posts on both
sides of the
agitator Agitator
cover. Cover
Furniture
Guard
Retainer
Note: If the agitator cover is not installed
correctly, you may experience a loss of per-
formance and possible agitator vibration,
etc.
Headlight
Wire
/
Lock Tabs
Securely In
Place
Make sure the headlight wires are tucked
securely in place.
Replace
the nozzle
cover and
secure the
latches.
Nozzle
20
Always follow al! safety precautions when
cleaning and servicing the vacuum cleaner.
ElectricalShock Or Personal Injury
Hazard
Disconnectelectricalsupplybefore
sendclngor cleaningthe unit. Failure
to do so could resultin elsotdcalshock
or personalinjuryfrom cleaner sud-
danlystarting.
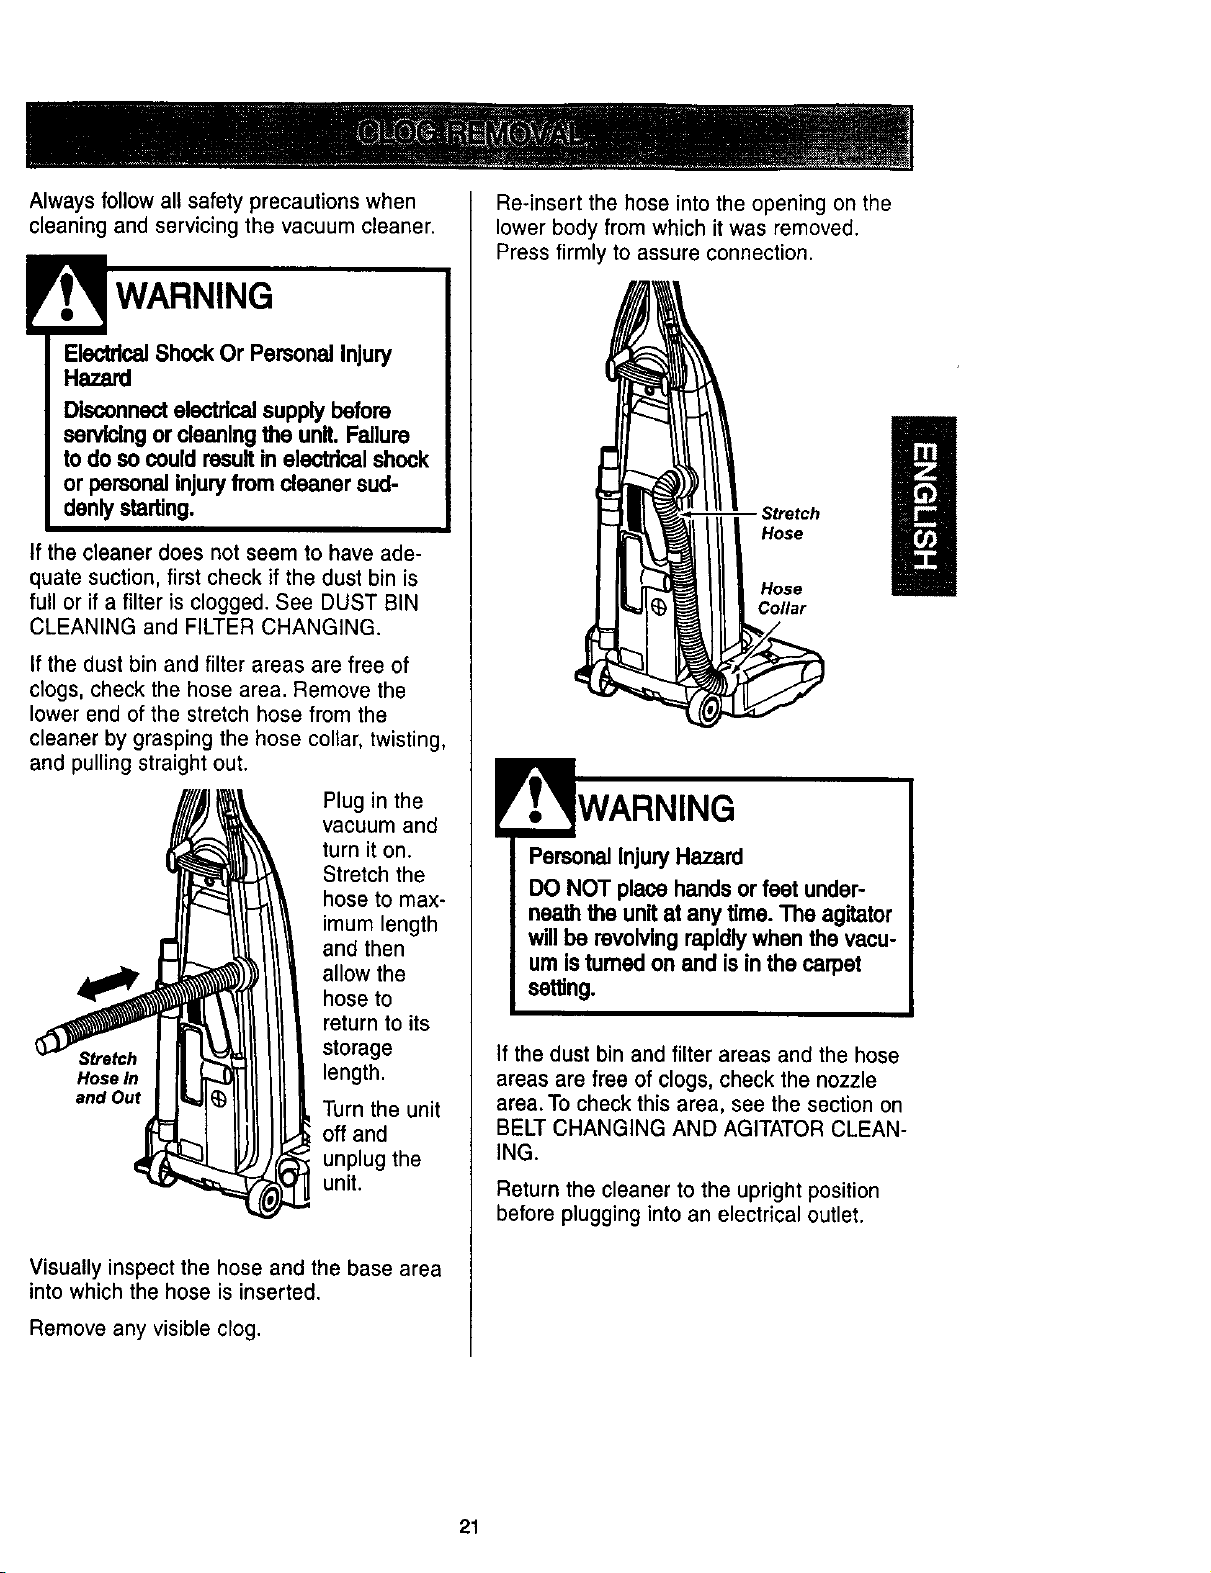
tf the cleaner does not seem to have ade-
quate suction, first check if the dust bin is
full or if a filter is clogged. See DUST BIN
CLEANING and FILTER CHANGING.
If the dust bin and filter areas are free of
clogs, check the hose area. Remove the
lower end of the stretch hose from the
cleaner by grasping the hose collar, twisting,
and pulling straight out.
Plug in the
vacuum and
turn it on.
Stretch the
hose to max-
imum length
and then
allow the
hose to
return to its
Stretch storage
Hose In length.
and Out Turn the unit
off and
unplug the
unit.
Visually inspect the hose and the base area
into which the hose is inserted.
Remove any visible clog.
Re-insert the hose into the opening on the
lower body from which it was removed.
Press firmly to assure connection.
Hose
Hose
Coflar
Personal InjuryHazard
DO NOT place hands or feet under-
neath the unitat any time. The agitator
willbe revoMng rapidlywhen the vacu-
um istumed on and is in the carpet
setting.
If the dust bin and filter areas and the hose
areas are free of clogs, check the nozzle
area. To check this area, see the section on
BELT CHANGING AND AGITATOR CLEAN-
ING.
Return the cleaner to the upright position
before plugging into an electrical outlet.
21
ElectricalShockOr Personal Injury
Hazard
Disconnectelectricalsupplybefore
servicingor cleaning the unit. Failure
to do so could resultin electricalshock
or personal injuryfrom cleaner sud-
denlystarting.
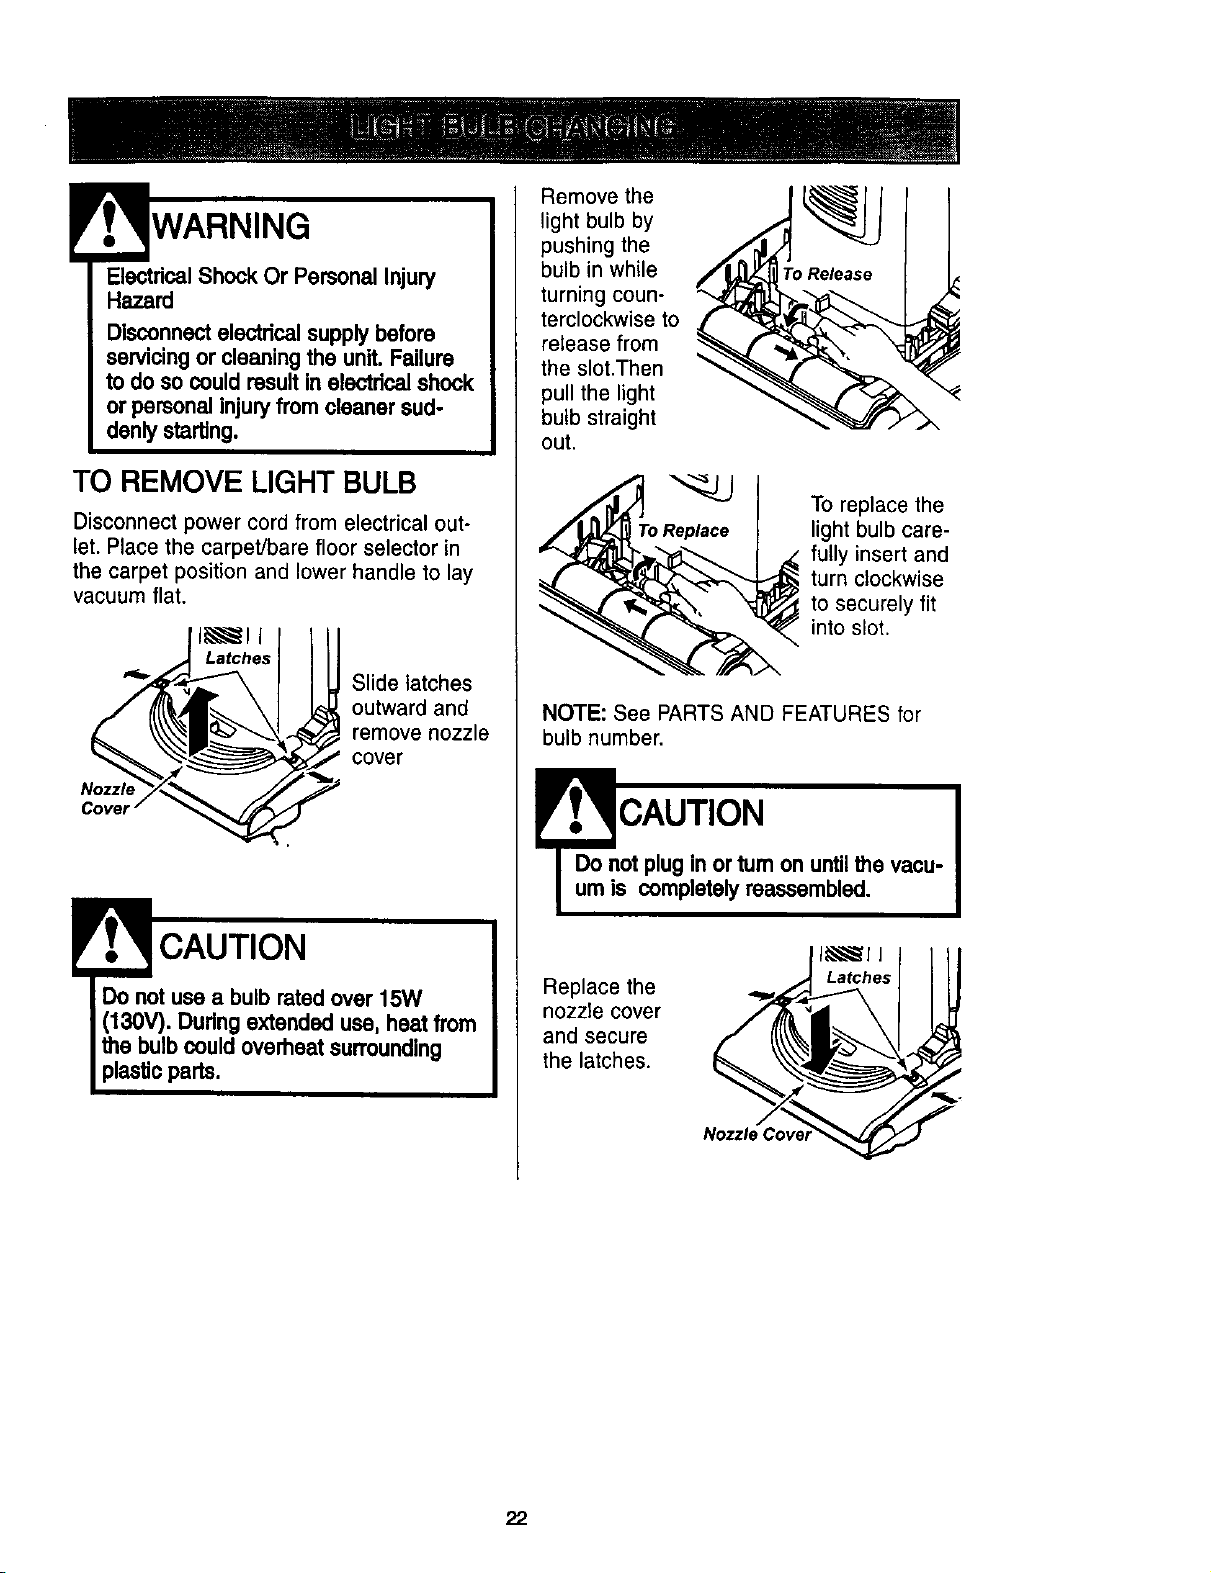
TO REMOVE LIGHT BULB
Disconnect power cord from electrical out-
let. Place the carpet/bare floor selector in
the carpet position and lower handle to lay
vacuum flat.
i_ll I III
,_. Latches I I I I
___ Slide latches
outward and
remove nozzle
cover
CAUTION
Do not use a bulb rated over 15W
(130V). During extended use, heat from
the bulbcould overheat surrounding
plasticparts.
Remove the
light bulb by
pushing the
bulb in while
turning coun-
terclockwise to
release from
the slot.Then
pull the light
bulb straight
out.
Replace
To replace the
light bulb care-
fully insert and
turn clockwise
to securely fit
into slot.
NOTE: See PARTS AND FEATURES for
bulb number.
E'.'.3 I
CAUTION
Do not pluginorturnon untilthe vacu-
um is completely reassembled.
Replace the
nozzle cover
and secure
the latches.
Latches
22
ElectricalShock Or Personal Injury
Hazard
Disconnectelectricalsupplybefore
servicingor cleaningthe unit.Failure
to do so could resultin electricalshock
or personal injuryfrom cleaner sud-
denlystarting.
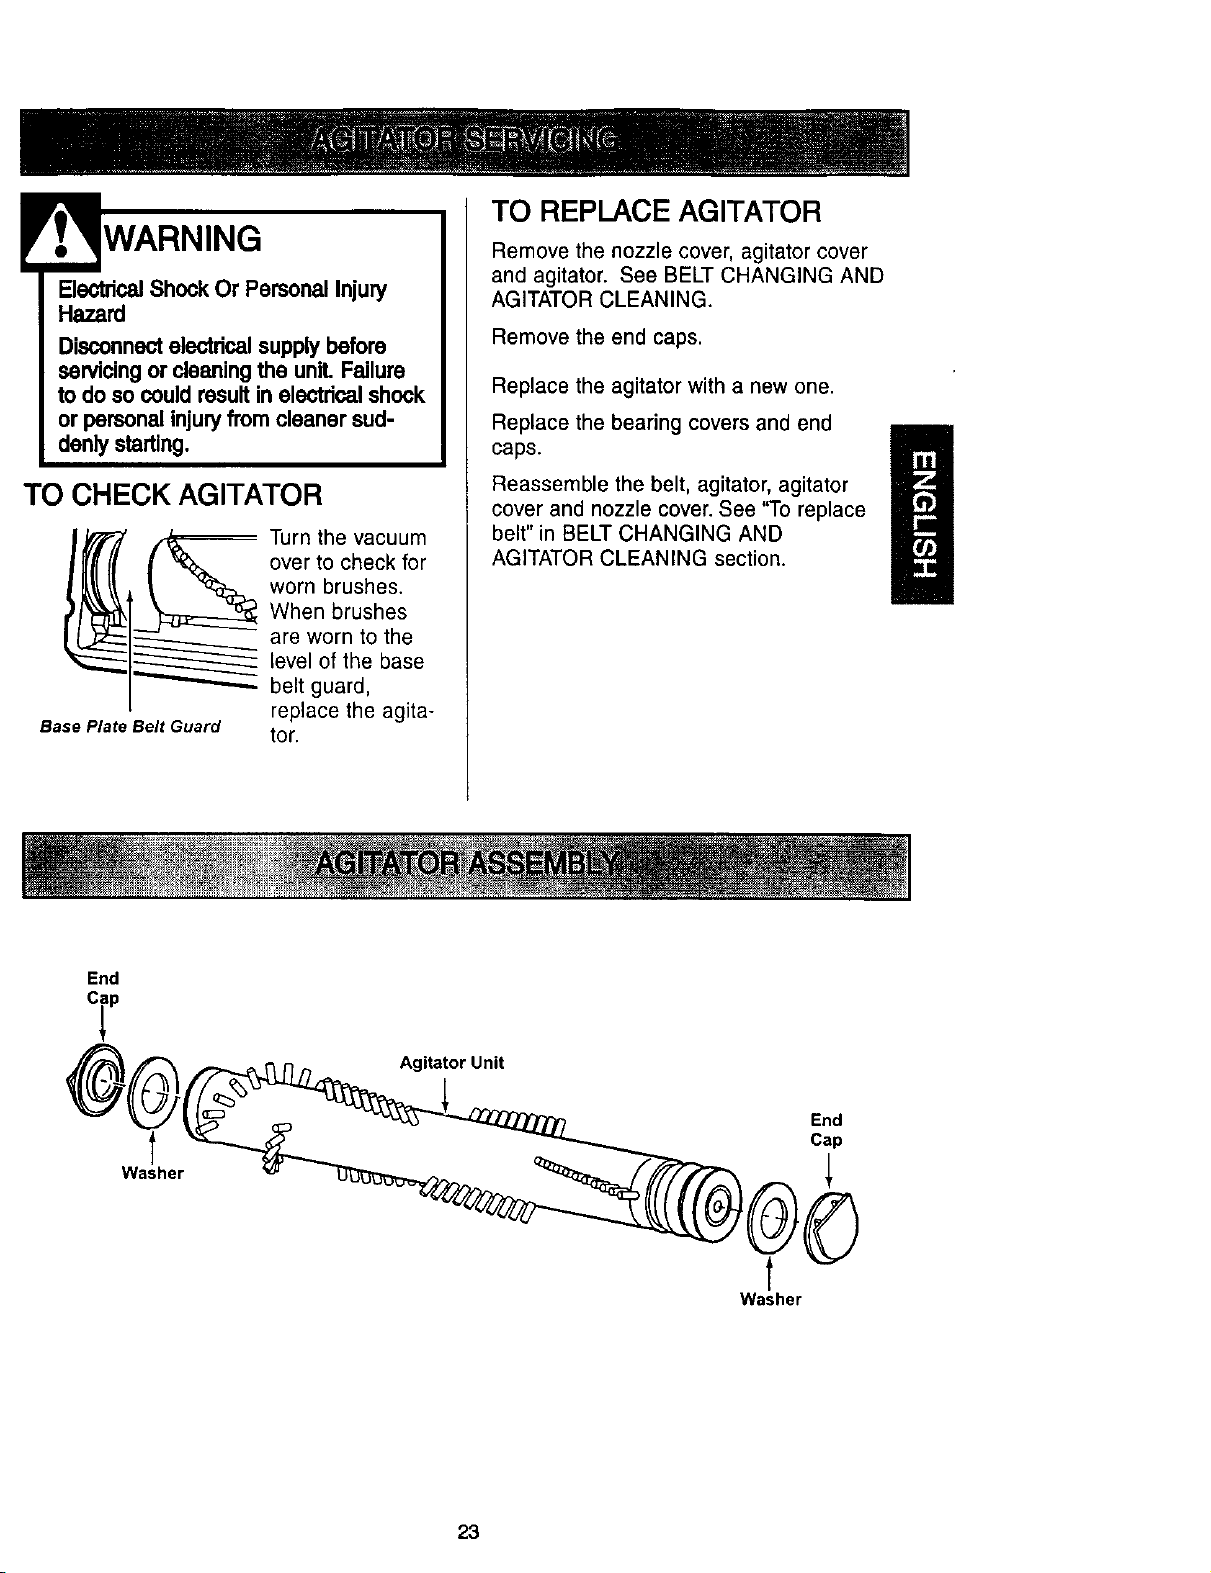
TO CHECK AGITATOR
Base Plate Belt Guard
-- Turn the vacuum
over to check for
worn brushes.
When brushes
are worn to the
level of the base
belt guard,
replace the agita-
tor.
TO REPLACE AGITATOR
Remove the nozzle cover, agitator cover
and agitator. See BELT CHANGING AND
AGITATOR CLEANING.
Remove the end caps.
Replace the agitator with a new one.
Replace the bearing covers and end
caps.
Reassemble the belt, agitator, agitator
cover and nozzle cover. See "To replace
belt" in BELT CHANGING AND
AGITATOR CLEANING section.
End
Agitator Unit
t
Washer
End
Cap
t
Washer
23
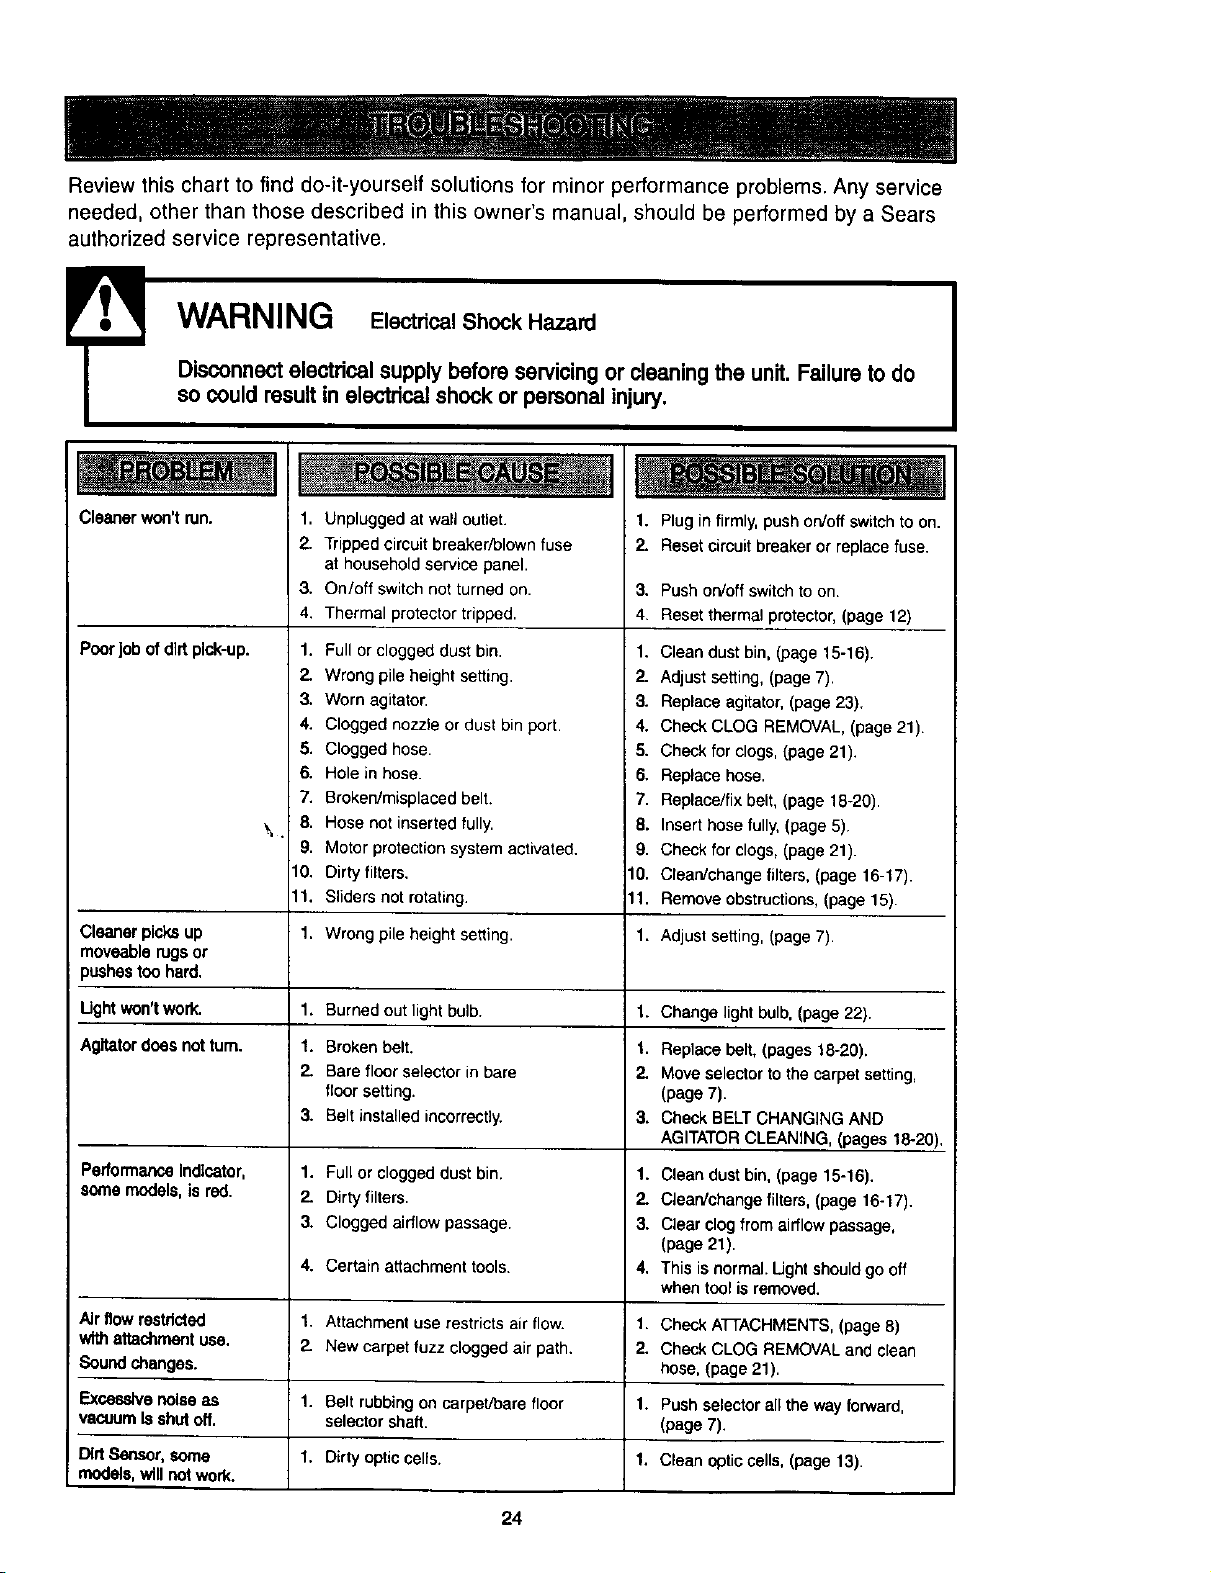
Review this chart to find do-it-yourself solutions for minor performance problems. Any service
needed, other than those described in this owner's manual, should be performed by a Sears
authorized service representative.
l WARNING E,oo-t.calShockHazard
Disconnect electrical supply before servicingor cleaningthe unit. Failure to do
so could result in electrical shock or personal injury.
llUil
Cleaner won'trun.
Poor Jobof dirtpick-up.
1,
2.
Unplugged at wall outlet.
Tripped circuit breaker/blown fuse
at household service panel.
On/off switch not turned on.
Thermal protector tripped.
1. Plug in firmly, push on/off switch to on.
2. Reset circuit breaker or replace fuse.
3. Push on/off switch to on.
4. Reset thermal protector, (page 12)
Full or clogged dust bin. 1.
Wrong pile height setting. 2.
Worn agitator. 3.
Clogged nozzle or dust bin port. 4.
Clogged hose. 5.
Hole in hose. 6.
Broken/misplaced belt. 7.
Hose notinserted fully. 8.
Motor protection system activated. 9.
Dirty filters. 10.
Sliders not rotating. 11.
Clean dust bin, (page 15-16).
Adjust setting,(page 7).
Replace agitator, (page 23).
Check CLOG REMOVAL, (page 21).
Check for clogs, (page 21).
Replace hose.
Replace/fix belt, (page 18-20).
Insert hose fully, (page 5).
Check for clogs, (page 21).
Clean/change filters, (page 16-17).
Remove obstructions, (page 15).
3.
4.
1.
2.
3.
4.
5.
6.
7.
\, B.
9.
10.
I1.
1.
1.
1.
2.
3.
1.
2.
3.
4.
1.
2.
1.
1.
Cleaner picksup Wrong pile height setting. 1. Adjust setting, (page 7).
moveable rugs or
pushes too hard.
Ught won't work. Burned out light bulb. Change light bulb,(page 22).
Agitatordoes not turn.
PerformanceIndicator,
somemodels,is red.
Broken belt.
Bare floor selector in bare
floor setting.
Belt installed incorrectly.
Full or clogged dust bin.
Dirty filters.
Clogged airflow passage.
Certain attachmenttools.
1.
1. Replase belt, (pages 18-20).
2. Move selector to the carpet setting,
(page 7).
3. Check BELT CHANGING AND
AGITATORCLEANING, (pages 18-20),
Airflow restricted
withattachmentuse.
Soundchanges.
Excessivenoiseas
vacuumIsshutoff.
DirtSensor,SOme
models,will notwork.
1. Clean dust bin, (page 15-16).
2. CJeanichange filters,(page 16-17).
3. Clear clogfromairflow passage,
(page 21),
4. This is normal. Light should go off
when tool is removed.
Attachment use restricts air flow. 1.
New carpet fuzz clogged air path, 2.
Belt rubbing on carpet/bare floor 1.
selector shaft.
Dirty optic cells, 1.
Check ATTACHMENTS,(page 8)
Check CLOG REMOVALand clean
hose, (page 21).
Push selectorallthe way forward,
(page 7).
Clean optic cells, (page 13).
24
Antesde usarsuaspiradoranueva ....... 1
Garantiade la asplradorade Kenmore..... t
Instrucdonesimportantesde
seguddad ............................. 2
Piezesy caracterfsticas................. 3
Instruccionesde ensamblamiento ....... 4-5
Instrucciones de operaci6n............... 5
Ajustey selecciOnde nivelde pelode la
alfombra ............................ 6
Selectorde pisosconalfombray .......... 6
sin alfombra
Desprendimientodel mango.............. 7
Interruptordeencendido/apagado......... 7
Accesorios......................... 7-9
Cuadrode usodelos accesorios......... 10
Sugerenciasparaaspirar ............... 10
Caracteristicasde rendimiento ........ t1-12
Cuidado de la aspiradora ............... 13
Almacenamientode laaspiradora ........ 13
Limpiezadel exteriory de los accesorios... 13
Limpiandoelcubode labasura........ 14-15
Limpiezadelfiltro secundario ........... 15
Cambio/limpiedelfiltros ............... 16
Cambiode la correay limpiezadel
agitador ......................... 17-19
C6moeliminarlos residuosdebasura
enlosconductos..................... 20
Cambiode la bombilla................. 21
Cuidadodel agitador .................. 22
Ensambledel agitador................. 22
Resonocimiento de problemas ........... 23
InformadSn de essistancia
0 servic]o ................. PosteriorCubierta
Por favor leaesta guia que le ayudara a assemblary operar su aspiradora nuevade Kenmoreen una manera
mas segura y effectiva.
Para mas informacibnacercadel cuidadoy operacion de esta aspirador, Ilamea su tienda Sears mas cercana.
Cuando prequnte por informacibn usted necisitar_ el n6mero completode serie y modelo de la aspiradora que
est& Iocadoen la placade los n_meros de modeloy serie.
Use el espacio de abajo para registrar el nL_merode modeloy serie para su nueva aspiradorade Kenmore.
NLimemde Modelo
NL_merode Serie
Fechade Compra
Matenga este libro y surecibo en ulugar seguro para referenciasfuturas.
GAFIANT[ALIMITADADE UN ANO DE LAASPIRADORAKENMORE
Estagarantia es pot un aSodesde la fecha de compra,e incluye solamenteel usode la aspiradoraen
hogaresprivados.Durante el aSo de garanfia, cuando la aspiradoraes operada y mantenida de acuerdo al
manualde instruccionesdel dueho, Sears reparar_lcualquierdefectoen materialeso fabricaciSnlibra de cargo.
Estagarantia excluyelas bolsasde coleccibn, correas,lamparillas,y filtros, lascualesson partes gastablesque
se deteriorancon el uso normal.
Para elserviciodegarantla,retomeesta aspiradoraal CentrodeServicloSearsmm_scercanoen los Estados
Unidos.
Esta garantiase aplicasolamentemientras este producto est',en usoen los EstadosUnidos.Estagarantia le
da a ustedderechoslegalesespecificos, y usted puede tener tambi_n otros derechos los cuales varian de
estado a estado.
Sears, RoebuckandCo., D/817 WA, Hoffman Estates,IL60179
Susegufldades muyimportanteparanosotros.Parareducirel desgode incendio,choqueeldctrlco,
lesi6ncorporalo dailosal utilizarsu asplradora,actdede acuerdocon precaucionesbdaleasde
segufldad,entreelias:
Lea este manual antes de armar o utilizar su
aspiradora.
Use su aspiradora0nicamente enla forma
descritaen este manual. Use t_nicamentecon
accesorios recomendadospor Sears.
Para reducirel riesgo de choque electrico, no use
su aspiradoraalaire libre ni sobre superficies
mojadas.
Desconectela fuente de electricdad antes de dar
servicio o limpiar. De Iocontrario podria causar
un choque electrico o lesion corporal.
Siempredebe apagar su aspiradora antes de
desconectarla.
No desconecte la aspiracloratirandodel cordon
electrico. Paradesconectarla, hale el enchufe, no
el cord6n.
No use la aspiradora siel cord6n o el enchufe
est', daSado.Si la aspiradora no estD.
funcionando adecuadamenteo si se ha dejado
caer, est,. dahada, s_ ha dejado expuestaa la
intemperieo se ha dejado caer en agua, devuel-
vala a un Centro/Departamento de servicio de
Sears.
Nohaleni transporte la aspiradora por el cord6n;
no use el cord6ncomo mango; no cierre puertas
sobreel cord6n; no hale el cord6n sobre rebor-
desagudos niesquinas.No pase la aspiradora
sobreel cord6n. Mantengael cordon alejado de
superficiescalientes.
Noabandone la aspiradoracuando este conec-
tada. Descon_ctelacuando nola este usando y
antes de darle servicio.
Nopermita que sea utilizada como juguete. Se
requiere tenet mayoreuidado cuando sea
utilizada en la proximidadde niSosopot niSos.
Notoque la aspiradorani el enchufe con las
manos mojadas.
Nocoloque objetosen las aberturas.
No utilice la aspiradorasi algunaabertura esff,
bloqueada;mantengala libre de polvo,pelusa,
cabellos y cualquiera cosa que podria disminuir
el flujo de aire.
Mantengael cabello, ropasuelta,dedos y todas
laspartesdel cuerpo alejadosde las aberturas y
piezas mecanicas.
No use la aspiradorasin tenet instaladala cubo
de la basuray/olos filtros.
Umpie siempre el cubo de la basuradespu_sde
aspirarde la alfombra limpiadores o refrescant-
es, polvos y dep6sitosfinos. Estosproductos
tapan los filtros, reducen el flujo de aire y pueden
causar daSoa la limpiadora.
No use laaspiradorapara levantarobjetos agu-
dos, juguetes pequeSos,alfileres,sujetapapeles,
etc. Podrfanda5ar la aspiradorao la cubo de la
basura.
No levante ningunacosa que seeste quemando
o emitiendo humo,come cigarrillos,cerilloso
cenizas calientes.
No use laaspiradorapara aspirar liquidos
inflamablesocombustibles(gasolina,liquidos
para limpieza, perfumes,etc.) ni la useen
lugares donde _stospodrfan estarpresentes.Los
vapores de estas sustanciaspuedencrear un
peligro de incendiooexplosi6n.
Tengaculdadoespecial al utilizarla aspiradora
en escalones.No la coloquesobre sillas,mesas,
etc. Mant_ngalaen el piso.
Ustedes responsablede asegurar que su aspira-
dora no sea utilizadapot ninguna personaqueno
pueda manejarlacorrectamente.
GUARDE ESTAS INSTRUCClONES
El armado y usoseguro desu aspiradorason su responsabilidad.Esta aspiradoraha sidodise,fada
exclusivamentepara usodomestico. Laaspiradora debera almacenarsaen un lugar seco y en el inte-
rior.Leaeste Manualdal propietario detenidamente, pues contiene informaci6nimportante sobresegu-
ridad y uso. Estaquia contiene informaci6n sobre seguridaddebajo de simbolosde advertiencia
cuidado. Por favor ponga atencibn especial a estas instruccionesdadas. Advertenda:Este informaci6n
le alertar._con el poligro de fuego, choques electricos, quemadas y lesiones. Cuidado: Este
informaci6nlealertara a peligros como lesiones y daSosde propiedad.
2
Es importante concer las piezas y caracteristicas de su aspiradorapara asegurar su uso adecuadoy seguro.
Examinelas antes de usarsu aspiradora.
Objeto Pieza No Pieza N°
en EUA en Canada.
Filtro de escape 20-86889 20-86889C
Bombilla de farol 20-5240 20-40600
Correa 20-5275 20-40096
de encendido!
apagado
ManUs de
soltar el
cubo de la
\
polvo(algunos
modelos)
•lndicador de
rendimlento
(algunos modelos)
Sujetador superio,
de liberaci6n r#pida
Cubo de la
Cord6n
del cord6n
Filtrode
(dentro)
Selector de pisos
con alfombra y
sin alfombra
Mango para
transportsr -
Herramientas
para
hendiduras
Tubo
Cepillo para
Cepiflo para
combinaci6n
Pedalde
liberaci6n
delmango
Ndmeros de
del modelo
- Manguera
giratoria list
para usar
iiii
Protector
de motor
Agitador
(Abajo)
la cublerta de
boquilla
Correa
(abajo)
JUEGOS DE MANGUERA
DEEXTENSI6N
ALGUNOS MODELOS
Manguera de extensl6n
1
i{U(I{[UllI{I{(IlU({I[(ILi
_c ALGUNOS
MODELOS
_'-- Adaptador
epfllo para plsos
Tubo
Pellgrode choqueel_tdco
No conectela aspiradorahastaque termine
de armada.De Iocontradopodrfacausarun
choqueele_dco o lesi6ncorporal.
AntAntes de armar la aspiradora, chequee la LISTA
DE EMBALAJEen la cubierta separadade la Lista
de Partes para Reparaci6n. Use esta lista paraveri-
ficar que ha recibido todas las componentes de su
nuevaaspiradora Kenmore.
Retrarla banda adhesiva ubicada debajo de la
cubierta de polvo en la caja del motor.
Fije el cabode I1|_
la manguera
expansiblea la
boquillacomo
se muestra.
MONTAJEDELMANGO
Tornillo
Quite el tornillo del mango Iocalizadojusto debajo
del borde superior de la parte posterior de la aspi-
radora,ver ilustraci6nde arriba.
Coloque el mangocomoseve en el diagrama
abajo.
AI mantener la manguerade maneraque no inter-
fera, mueva el mango a la abertura en la parte
superior de la aspiradora.
Orificio del
tornillo en
Inserteel tornillo para que pase por el mangode la
aspiradora.
Ill
Empiece a apretar el tomillo con losdedos. Quiza
sea necesario ajustar un poco el mango.
4
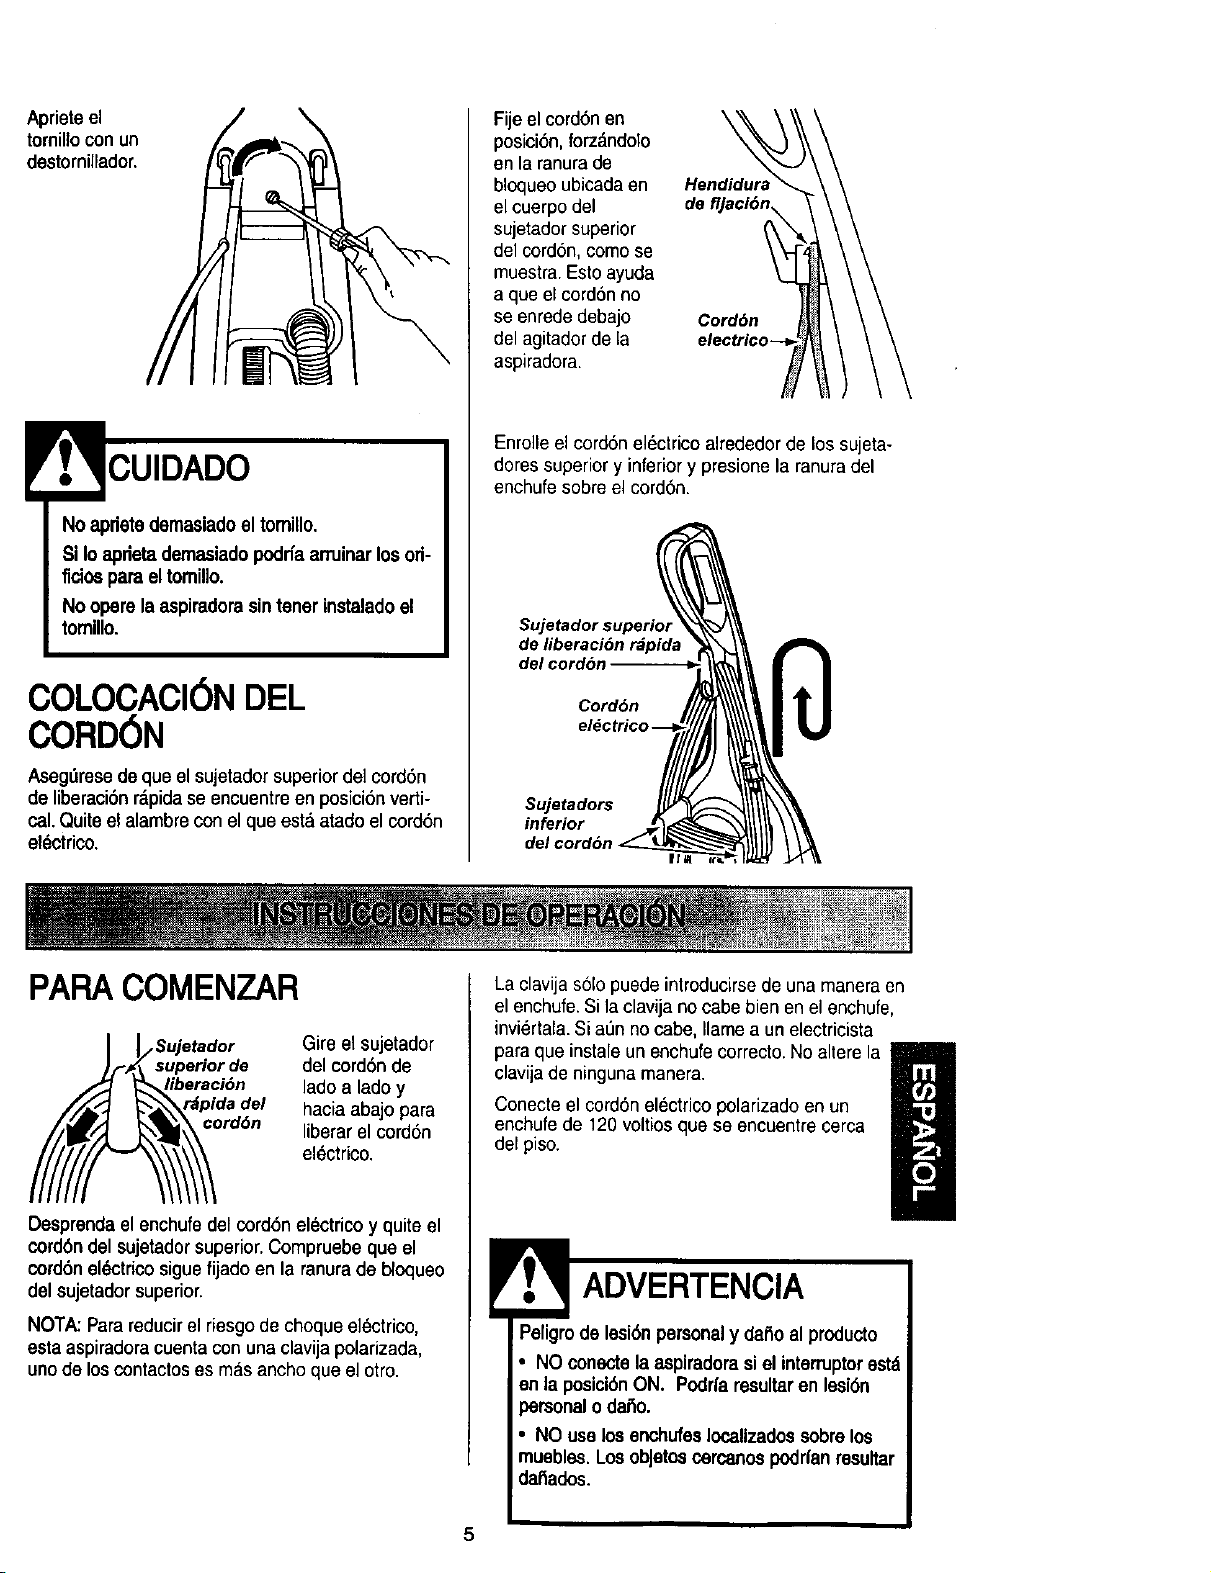
Aprieteel
tornilloconun
destornillador.
No apdetedemasiadoeltomillo.
SiIo aprietademasiadopodrfaarruinar losori-
fidos paraeltomillo.
No operelaaspiradorasintener instaladoel
tomlllo.
COLOCACIONDEL
CORD6N
Aseg_msede que el sujetador superior del cord6n
deliberaci6nr_,pidase encuentreen posicibn verti-
cal.Quiteelalambreconel queest&atado el cord6n
el_ctrico.
Fije el cord6nen
posici6n, forz_ndoTo
en la ranura de
bloqueo ubicadaen Hendidura
el cuerpo del de1
sujetador superior
del cordon, come se
muestra. Esto ayuda
a que el cord6n no
se enrede debajo Cord6n
del agitadorde la e/ec
aspiradora.
Enrolle el cord6n el6ctrico alrededorde los sujeta-
dores superior y inferior y presione la ranura del
enchufe sobre el cord6n.
Sujetador superiol
de liberaci6n r_pida
del cord6n
Cord6n
PAPACOMENZAR
_o sujetad°r
uperior de
eraci6n
pida del
rd6n
Gire el sujetador
del cord6n de
lado a lado y
hacia abajo para
liberar el cord6n
elSctrico.
Desprendaelenchufedel cord6n electrico y quiteel
cord6ndel sujetadorsuperior.Compruebe que el
cord6nel_ctricosiguefijado en la ranurade tYoqueo
delsujetadorsuperior.
NOTA:Para reducirel riesgode chequeelectrico,
esta aspiradoracuentacon unaclavija polarizada,
unode loscontactos es masancho que el otro.
La clavija solo puede introducirsede una maneraen
el enchufe.Sila clavija no cabe bien en el enchufe,
invi_rtala.Sia,',nnocabe, Ilamea un electricista
para que instale un enchufecorrecto.No altere la
clavijade ninguna manera.
Conecteel cord6n electrico polarizado en un
enchufede 120 voltiosque se encuentre cerca
del piso.
Peligrode lesi6npersonaly dafio alproducto
• NOconecte laaspiradora siel interruptor estd
en la pesici6n ON. Podrfaresultar en lesi6n
personalo da_o.
• NO use los enchufesIocallzadossobre los
muebles. LosobJetoscarcanos podrfan resultar
da_ados.
5
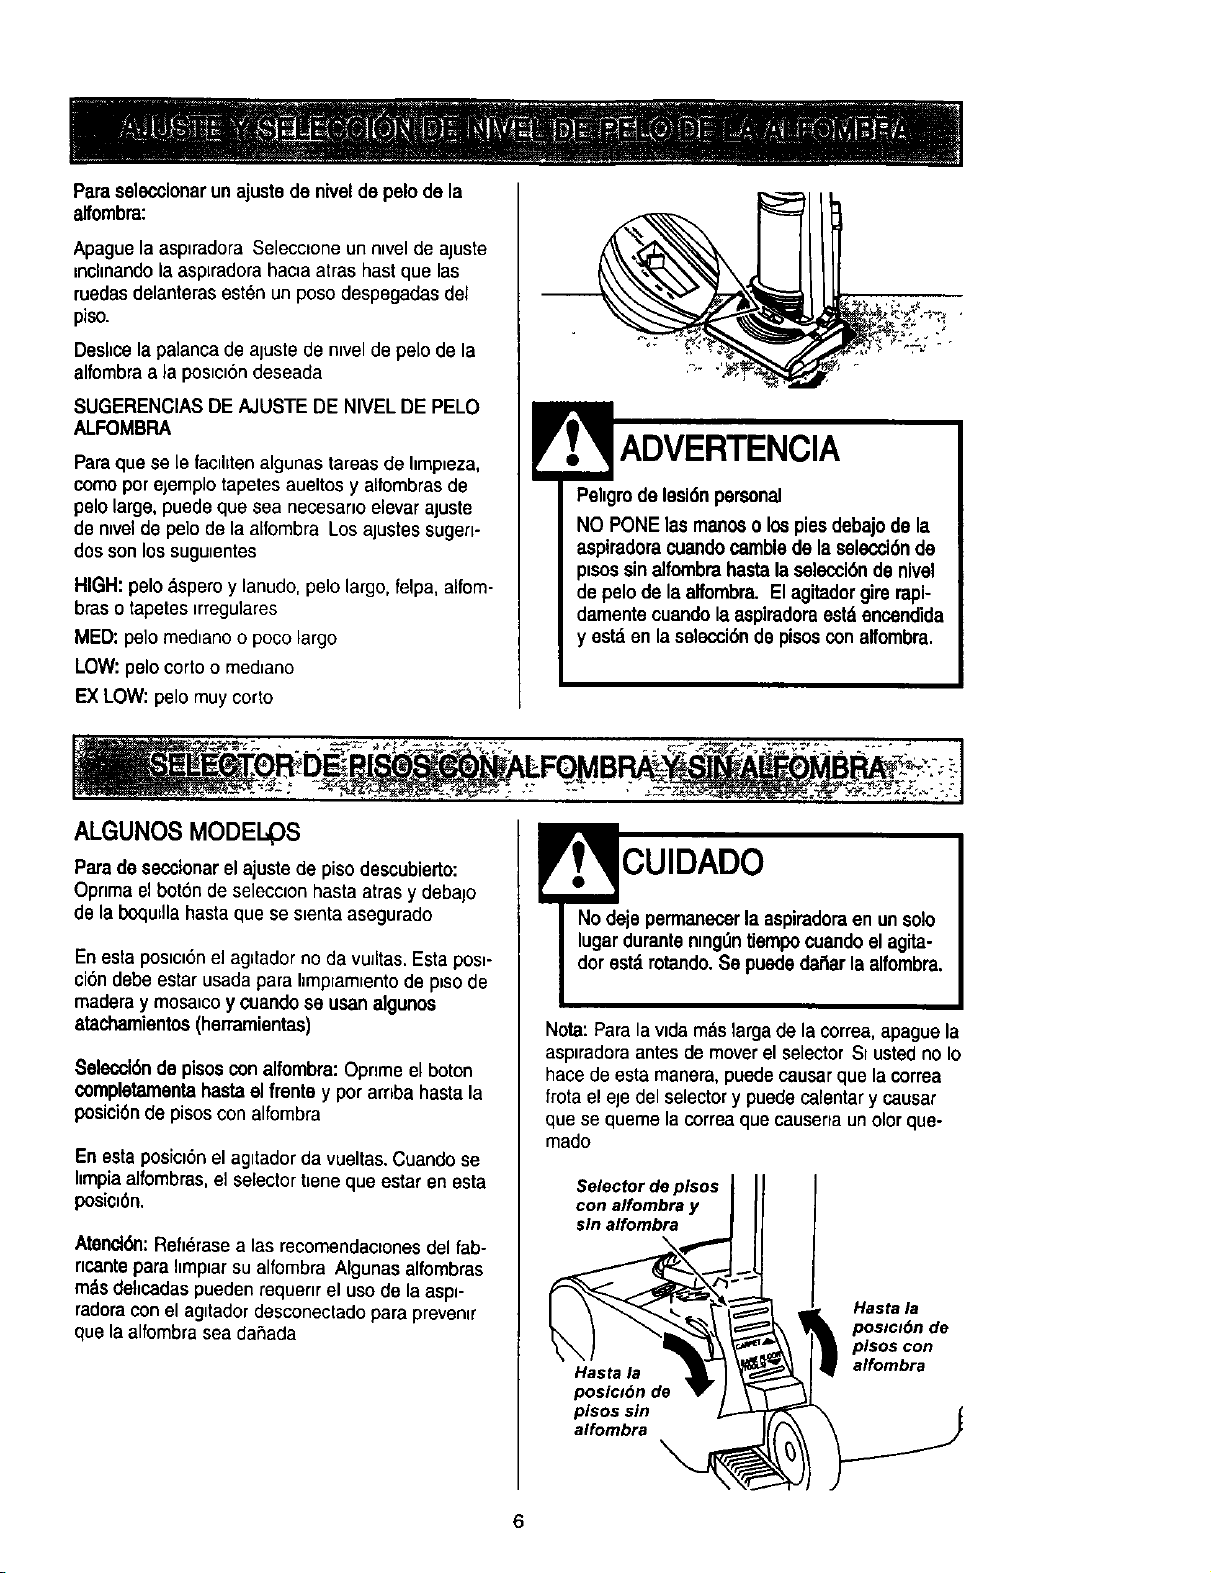
PareseleccJonarun ajustede nivelde pelode la
alfombra:
Apague la asplradora Seleccione unnwel de ajuste
=nchnandola asp[radorahac_aatras hast que las
ruedasdelanterasestOnun poso despegadas del
piso.
Deshcela palancade aluste de n_velde peLode la
alfombraa }a posiciondeseada
SUGERENCIASDE AJUSTEDE NIVELDE PELO
ALFOMBRA
Paraque Bele facliltenalgunas tareas de Ilmp_eza,
como por ejemplo tapetes aueltos y aLfombrasde
pelolarge, puede que sea necesanoelevar ajuste
de n=velde pelo de la alfombra Los ajustes sugem
dos son los sugu=entes
HIGH:pelo_lsperoy lanudo, pelo largo, felpa, alfom-
bras o tapetes =rregulares
MED: pelo med_anoo poco largo
LOW:pelo corto o med=ano
F_XLOW: pelo muy corto
IL
Pehgrode lesldnpersonal
NO PONE lasmanoso lospiesdebajode la
espiradora cuandocamblede laselecci6nde
p=sossinalfombra hastalasalecci6ndenlvel
depelode laaffombra. El agitadorgim rapi-
damentecuandola espiradom est&encendida
y est_ enla selecoi6nde pisosconaffombra.
ALGUNOS MODEI.. OS
Paradeseccionarel ajuste de piso descubierto:
Opnma el bot6n de selecc_onhasta arrasy debalo
de la boqutllahasta que Bes_entaasegurado
En esta pos=c_6nel ag=tadorno de vuJItas.Esta pos_-
ci6n debe estarusada para hmp=amtentode ptso de
maderay mosatcoy cuando se osan algunos
atachamientos(herramientas)
Selecci6nde pisoscon alfombra:Opnme el boton
completamentahasteel frentey per arriba hesta la
posickSnde pisosconalfombra
En estaposici6n el agitadorda vueltes. Cuando se
hmpiaalfombras,el selector beneque estar en esta
posici6n.
Atenck_'l:Reflerasealas recomendaclones del fab-
ncante para hmpiarsu alfombra Algunesalfombras
m-_sdehcadas pueden requer=rel uso de la esp=-
radora con el ag=tadordesconectadopara preven=r
que la alfombra sea dafiada
CUIDADO
Note: Pare lavidem_islarga de la correa,apaguela
espiradora antes de mover el selectorSI usted no Io
hace de esta manera, puede causar que la correa
frota el ele del selectory puedecalentar y causar
que se queme la correaque causerla un olor que-
mado
Selector de plsos
con alfombra y
sin alfombra
Haste la
posic_n de
pisos sin
alfombra
\
Hasta la
pos_c#_n de
pisos con
alfombra

Desprendael mango pisandoel pedal de Itberact6n
y trrandade1mangohacta abajo con lamano
MONTADO EN EL MANGO
Paraarrancar la aspkradora,desltceel mterruptor de
encendldo/apagado de la poslc_6nOFF a la posic[6n
ON Paradetenerla, coloque el interruptor en laposl-
clSnOFF
Herramienta
para hendidura
Tubo
Cep/llo -Manguera
expansible
Cepillo para
comb/nacibn _ Collar de
manguera
Identtftque cada uno de los accesortos mostrados a
contlnuacion
C6MO UTILIZAR LOS
ACCESORIOS
Paraselect=onarla selecc_6nde ptsos s=nalfombra,
glra el selectoraltrasy abajo hasta la selecclonde
plsos sin alfombra Vet secct6n de PISOSCON
ALFOMBRAY SIN ALFOMBRA
Cuando regresehasta laselecci6n de ptsoscon
alfombra,cu_daque el selector puede moverse rdpi-
damente hasta la selecct6n a causa de la tenst6n
de la correa.
Sacala parte inferiordo la mangueraexpanstblede
la asp_radoray hrandopor atrds Ahora sepuede
conectar la manguera.
mum
Nota: La v._lvula de desvtaci6n puede estar H
ab=erta mientras se usan los accesorlos o
H
para limp=ar una alfombra nueva a causa de
un flujo reducldo de a=repor los accesorios
mlsmos o
por la pelusa de la alfombra que Ilene el
cubo de la basura rap=damente. Consulte el
cuadro RECONOClMIENTO DE PROBLE-
MAS.
Pellgrodechoqueeldctricoo lesi6ncorporal
Desconestelaunidadantesdo Iimplarlao
dadeservldo.Do Iocontrado podrfaprodu-
drse unchoqueeldctrlcoo causarlesl6ncor-
poralsltaesplradora arrancade manera
Imprevlsta.
7
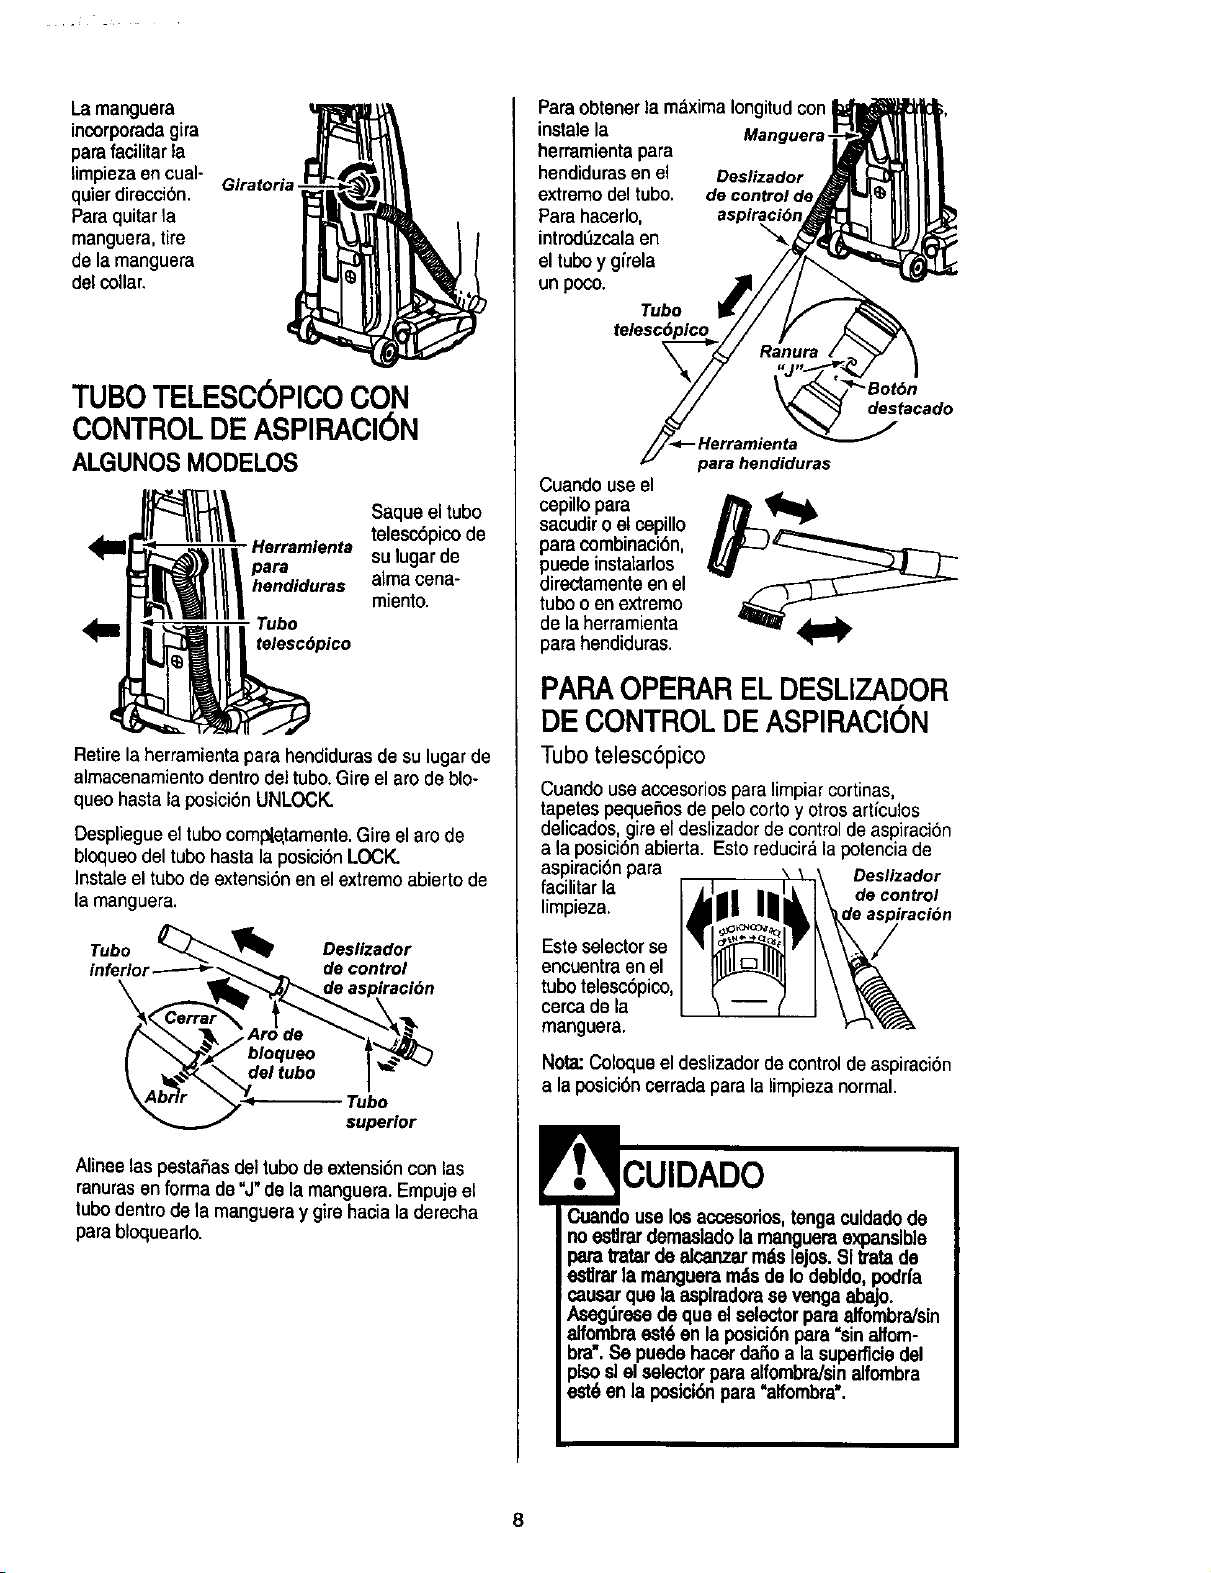
Lamanguera
incorporadagira
parafacilitarla
limpiezaen cual- Giratoria,
quier direcci6n.
Paraquitar la
manguera,tire
de la manguera
del collar.
TUBOTELESC6PICOCON
CONTROLDEASPIRACI6N
ALGUNOSMODELOS
Saque el tubo
telesc6pico de
Herramlenta sulugar de
pare
hendiduras almacena-
miento.
Tubo
telesc6pico
Retire la herramientapara hendidurasde su lugar de
almacenamientodentro del tubo.Gire el aro de blo-
queo hasta la posici6n UNLOCK.
Despliegueel tubo coml_e,tamente. Gire el aro de
bloqueodel tubo hasta la posici6n LOCK.
Instaleel tubode extensi6nen el extremoabierto de
la manguera.
___:< TUub°rior
Alinee las pestafias del tubode extensi6ncon las
ranurasenforma de "J" dela manguera.Empujeel
tubo dentrode la mangueray gira hacia la derecha
para bloquearlo.
Paraobtener la ma.ximaIongitudcon
instale la Manguera,
herramientapara
hendidurasen el
extremo del tubo.
Parahaoerlo,
introdt_zcalaen
el tubo y gfrela
un poco.
Tubo
telescdpicc
destacado
Cuando use el
cepillo para
sacudir o el cepillo
para combinaci6n,
puedeinstalarlos
directamente en el
tubo o en extremo
de la herramienta
para hendiduras.
para hendiduras
PARAOPERAREL DESLIZADOR
DECONTROLDEASPIRACI6N
Tubo telesc6pico
Cuando useaccesorios paralimpiar cortinas,
tapetes pequefios de pelo corto yotrosartfculos
delicados,gireel deslizadorde control de aspiracion
a la.posici6n abierta. Esto reducira la potenciade
asplraclon para Deslizador
facilitarla decontrol
limpieza.
Esteselectorse
encuentraenel
tubotelesc6pico,
cercade la
manguera.
Note Coloqueel deslizadorde controlde aspiraci6n
a la posici6n cerradapara la limpieza normal.
Cuandouselos accesorios,tenga culdadode
noestlrardemasladola mangueraexpansible
paratmtardealcanzarmdslejos. Si1ratade
ost_rarla manguerarodsde Iodebldo podrfa
causarque laasplradoraae vengaabajo.
AsegtJresedoqua elselectorparaalfombra/sin
alfombraest6en la posioi6npara"sinalfom-
_ra'.Sopuedehacerdetio a la superndedel
_lsoslelselectorpara alfombra/sinalfombra
_'t6 on la posici6npara"alfombra',
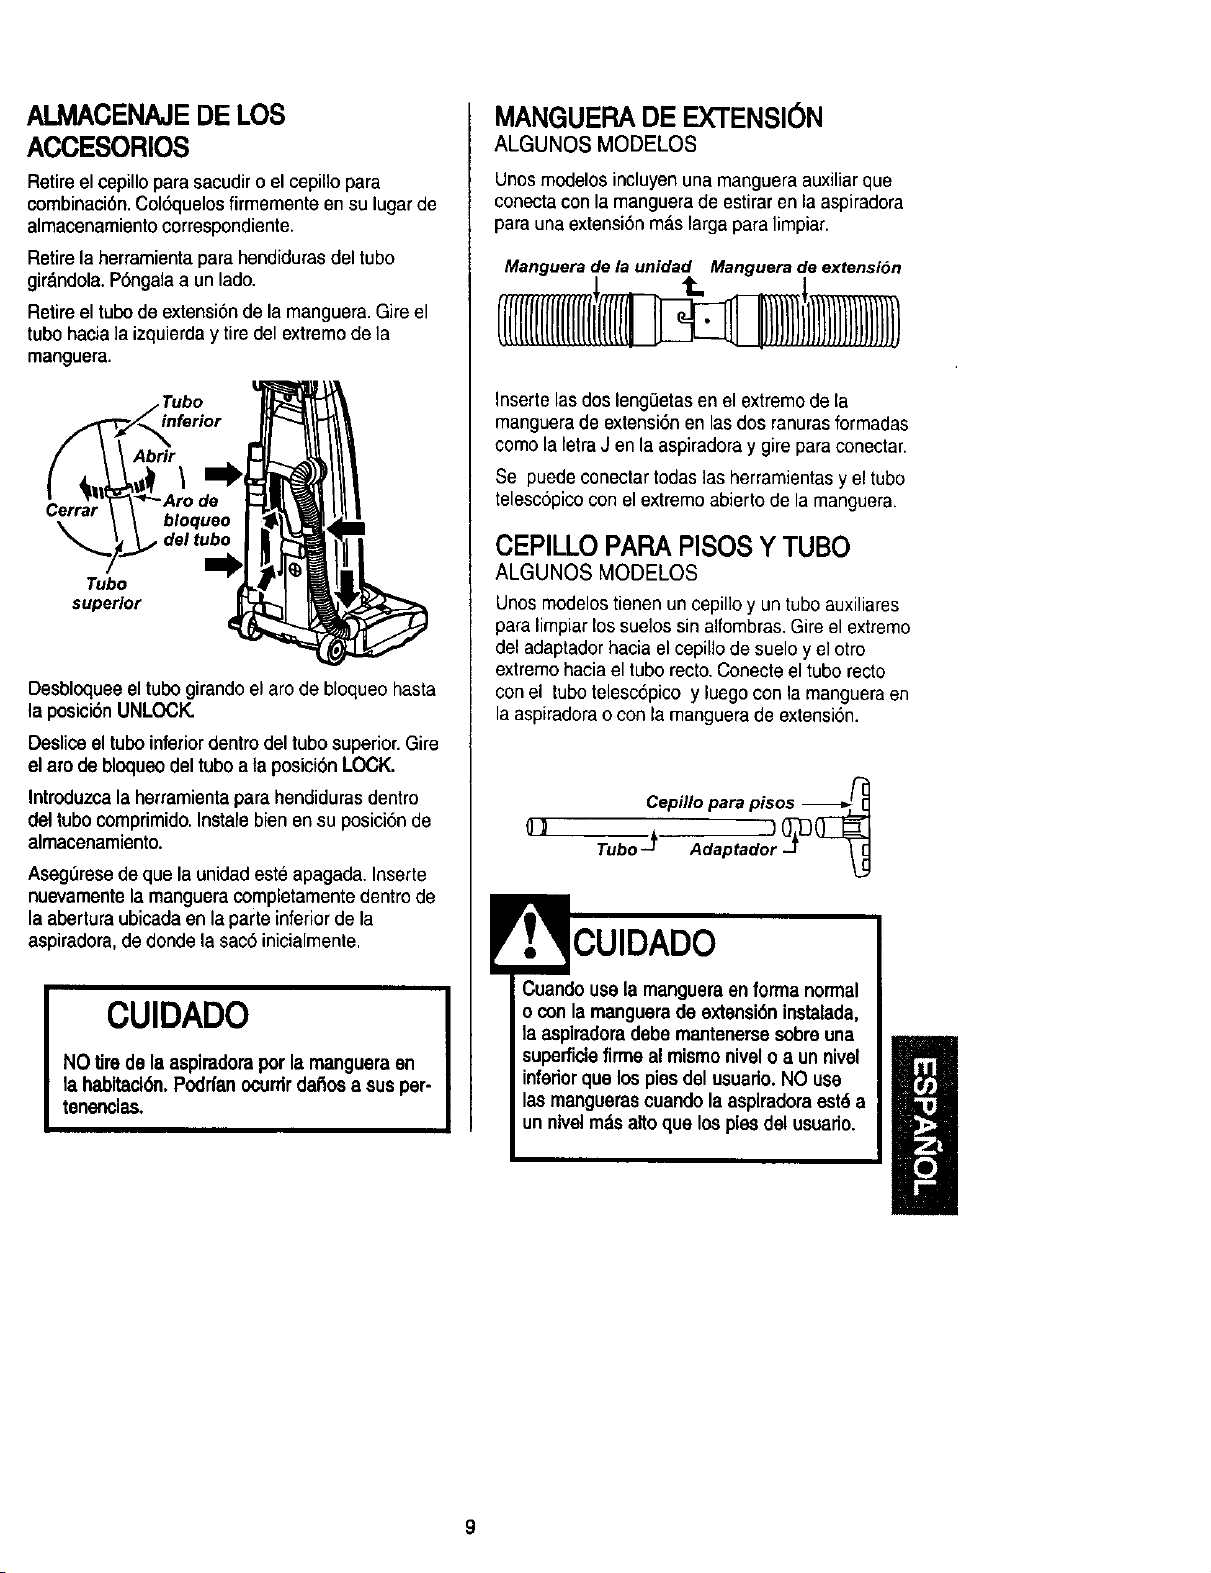
ALMACENAJEDE LOS
ACCESORIOS
Retireel copillo para sacudir o el cepillopara
combinaci6n.Col6quelos firmemente en su lugar de
almacenamiento correspondiente.
Retirela herramienta para hendidurasdel tubo
gir&ndola.P6ngalaa un lado.
Retireel tubode extensibndela manguera.Gire el
tubo hacia la izquierday tire del extremede la
manguera.
Abrir
Cerrar
Tubo
superior
Desbloqueeel tubogirandoel are de bloqueo hasta
la posici6n UNLOCK.
Deslicoel tuboinferiordentrodel tubo superior. Gire
el aro de bloqueodel tubo a la posici6n LOCK.
Introduzca laherramientaparahendidurasdentro
del tubo comprimido.Instale bien en su posici6n de
almacenamiento.
Aseg_rese de que la unidad este apagada. Inserte
nuevamentela mangueracompletamente dentrode
la abertura ubicadaen la parte inferior de la
aspiradora,de donde la sac6 inicialmente,
CUIDADO
NO tirede la aspimdoraporlamangueraen
la habitaci6n,Podrfanocurrirdaitosa susper-
tenenclas,
MANGUERA DE EXTENSION
ALGUNOS MODELOS
Unos modelos incluyen una manguera auxiliarque
conectacon lamanguerade estirar en la aspiradora
para una extensi6nmas larga para limpiar.
Manguera de la unidad Manguera de extensi6n
Inserte lasdos leng0etasen el extremede la
manguerade extensi6nen las dos ranurasformadas
como la letraJ enla aspiradoray gire para conectar.
Se puede conectartodas las herramientasyel tubo
telescopico con el extremoabierto de lamanguera.
CEPILLO PARA PISOS Y TUBO
ALGUNOS MODELOS
Unos modelostienen un cepilloy un tubo auxiliares
para limpiar lossuelos sin alfombras.Gire el extremo
del adaptadorhaciael cepillode suelo yel otro
extremohacia eltubo recto.Conecteel tubo recto
con el tubetelesc6picoy luego con lamangueraen
la aspiradorao con lamanguerade extensi6n.
Cepillo para pisos -_
Q _ Tubo -_ Adaptado_ _
Cuandousela mangueraen forma normal
oconla manguerade extensi6ninstalada,
laaspiradoradebemantenersesobreuna
superficiefirme almismonivelo a unnivel
inferiorque lospiesdel usuario.NO use
lasmanguerascuandolaasplradoraest_a
unnlvelm_saltoque lospiesdel usuario.
II
9
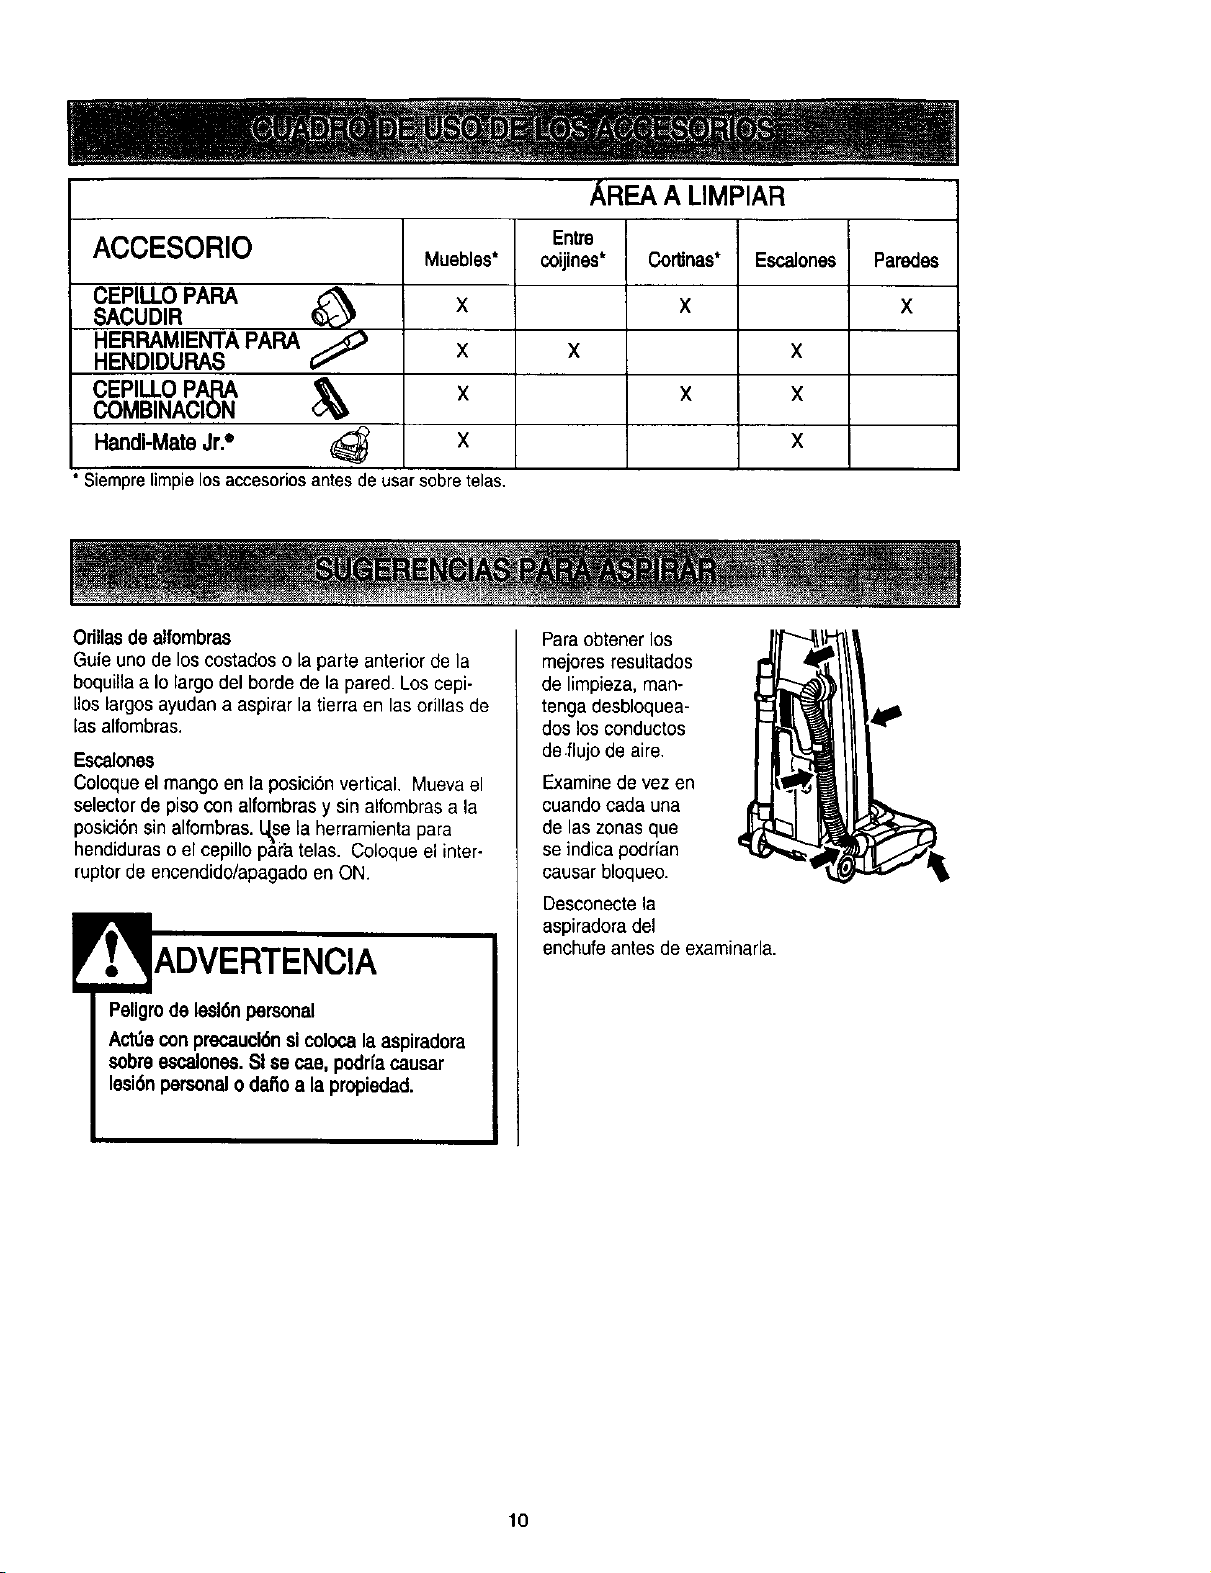
AREA A LIMPIAR
ACCESORIO
CEPILLOPARA
SACUDIR
HERRAMIENTAPARA
HENDIDURAS
CEPILLOPARA
COMBINACION
Entre
coijines*
Mueblas*
x
x
x
x
Co_nas*
X
Escalones
X X
X X
Handi-MateJr." x
• Siemprelimpielosaccesoriosantesde usarsebretelas.
Paredes
X
Orillas de alfombras
Guie uno de los costados o la parte anterior de la
boquilla a Io largo del borde de la pared. Los cepi-
Iloslargos ayudana aspirar latierra en las orillas de
lasalfombras.
Escalones
Coloqueel mangoen la posici6n vertical. Muevael
selectorde pisocon alfombrasy sin alfombrasa la
posici6nsin alfombras. U_sela herramienta para
hendldurasoel cepillo p_r_,telas. Coloque e nter-
ruptor de encendido/apagado en ON.
Peligrode lesl_ personal
Act_econ precaucl6nsi colocalaaspiradora
sobreescalones.SI se cae, podriacausar
lesi6npersonalodallo a lapropiedad.
Paraobtener los
mejores resultados
de limpieza, man-
tenga desbloquea-
dos los conductos
de.flujo de aire.
Examine de vez en
cuandocada una
de laszonas que
se indica podrian
causar bloqueo.
Desconecte la
aspiradoradel
enchufe antes de examinarla.
10
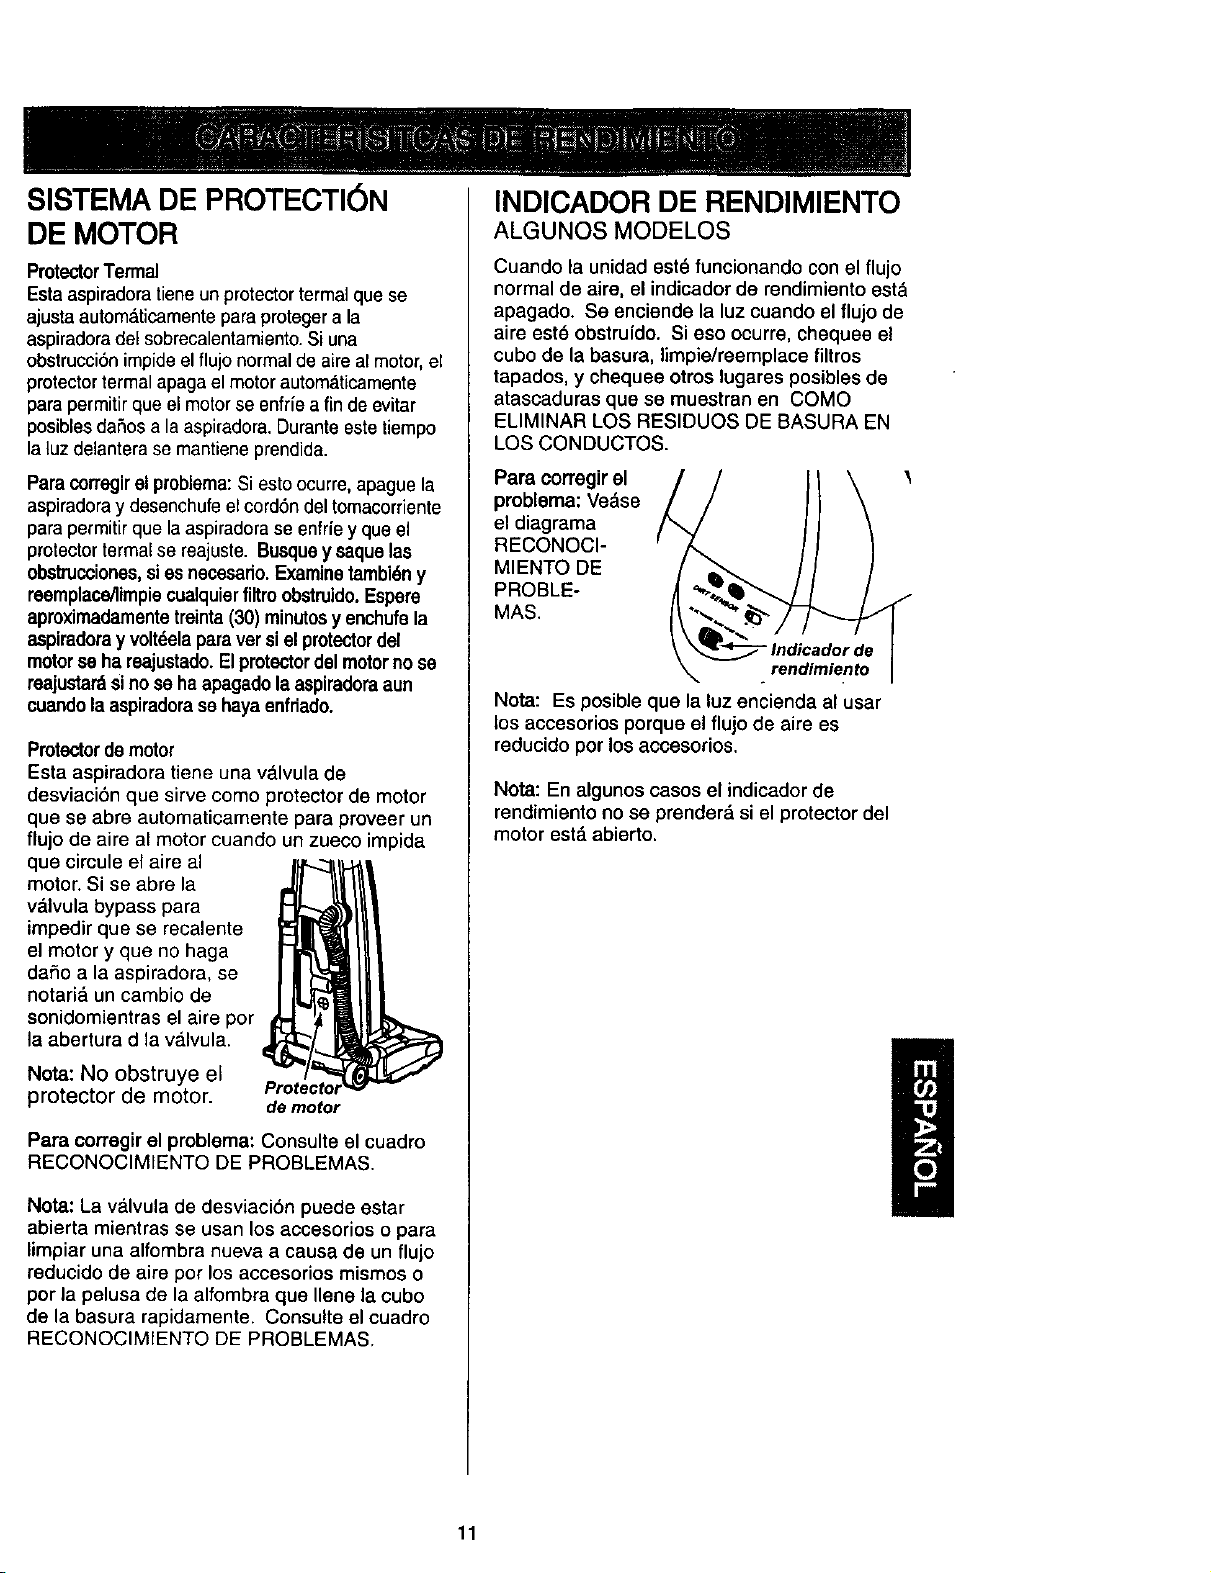
SISTEMA DE PROTECTI6N
DE MOTOR
ProtectorTermal
Esta aspiradora tieneun protectortermalque se
ajusta automaticamente para protegera la
aspiradoradel sobrecalentamiento.Si una
obstrucci6n impide el flujo normalde aire al motor,el
protectortermal apaga el motor autom&ticamente
para permitir que el motor se enffie a finde evitar
posibles dafios a la aspiradora. Durante este tiempo
la luzdelantera se mantieneprendida.
Para corregirelproblema:Si esto ocurre, apague la
aspiradoray desenchufe elcord6ndel tomacorriente
para permitir que la aspiradorase enfriey que el
protector termal se reajuste. Busquey saquelas
obstrucciones,siesnecesado.Examinetambi6ny
raemplace/limpiecualquierfiltra obstruido.Espere
apraximadamentetreinta(30) minutosy enchufela
aspiradoray volt_elaparaversiel protectordel
motorse ha reajustado.El protectordel motornose
reajustar,_sinose haapagadola aspiradoraaun
cuandolaaspiradorasehayaenfriado.
Protectordemotor
Esta aspiradora tiene una v_.lvulade
desviaci6n que sirve como protector de motor
que se abre automaticamente para proveer un
flujo de aire al motor cuando un zueco impida
que circule el aire al
motor. Si se abre la
valvula bypass para
impedir que se recalente
el motor y que no haga
dafio a la aspiradora, se
notari_ un cambio de
sonidomientras el aire por
la abertura d la v_.lvula.
Nota: No obstruye el
protector de motor.
de moor
Para corregir el problema: Consulte el cuadro
RECONOCIMIENTO DE PROBLEMAS.
Nota: La valvula de desviaci6n puede estar
abierta mientras se usan los accesorios o para
limpiar una alfombra nueva a causa de un flujo
reducido de aire por los accesorios mismos o
por la pelusa de la alfombra que Ilene la cubo
de la basura rapidamente. Consulte el ouadro
RECONOCIMIENTO DE PROBLEMAS.
INDICADOR DE RENDIMIENTO
ALGUNOS MODELOS
Cuando la unidad este funcionando con el flujo
normal de aire, el indicador de rendimiento est&
apagado. Se enciende la luz cuando el flujo de
aire este obstruido. Si eso ocurre, chequee e!
cubo de la basura, limpie/reemplace filtros
tapados, y chequee otros lugares posibles de
atascaduras qua se muestran en COMO
ELIMINAR LOS RESIDUOS DE BASURA EN
LOS CONDUCTOS.
Para corregir el
problema: Ve&se
el diagrama
RECONOCI-
MIENTO DE
PROBLE-
MAS.
de
Nota: Es posible que la luz encienda al usar
los accesorios porque el flujo de aire es
reducido por los accesorios.
Nota: En algunos casos el indicador de
rendimiento no se prender& si el protector del
motor est& abierto.
11
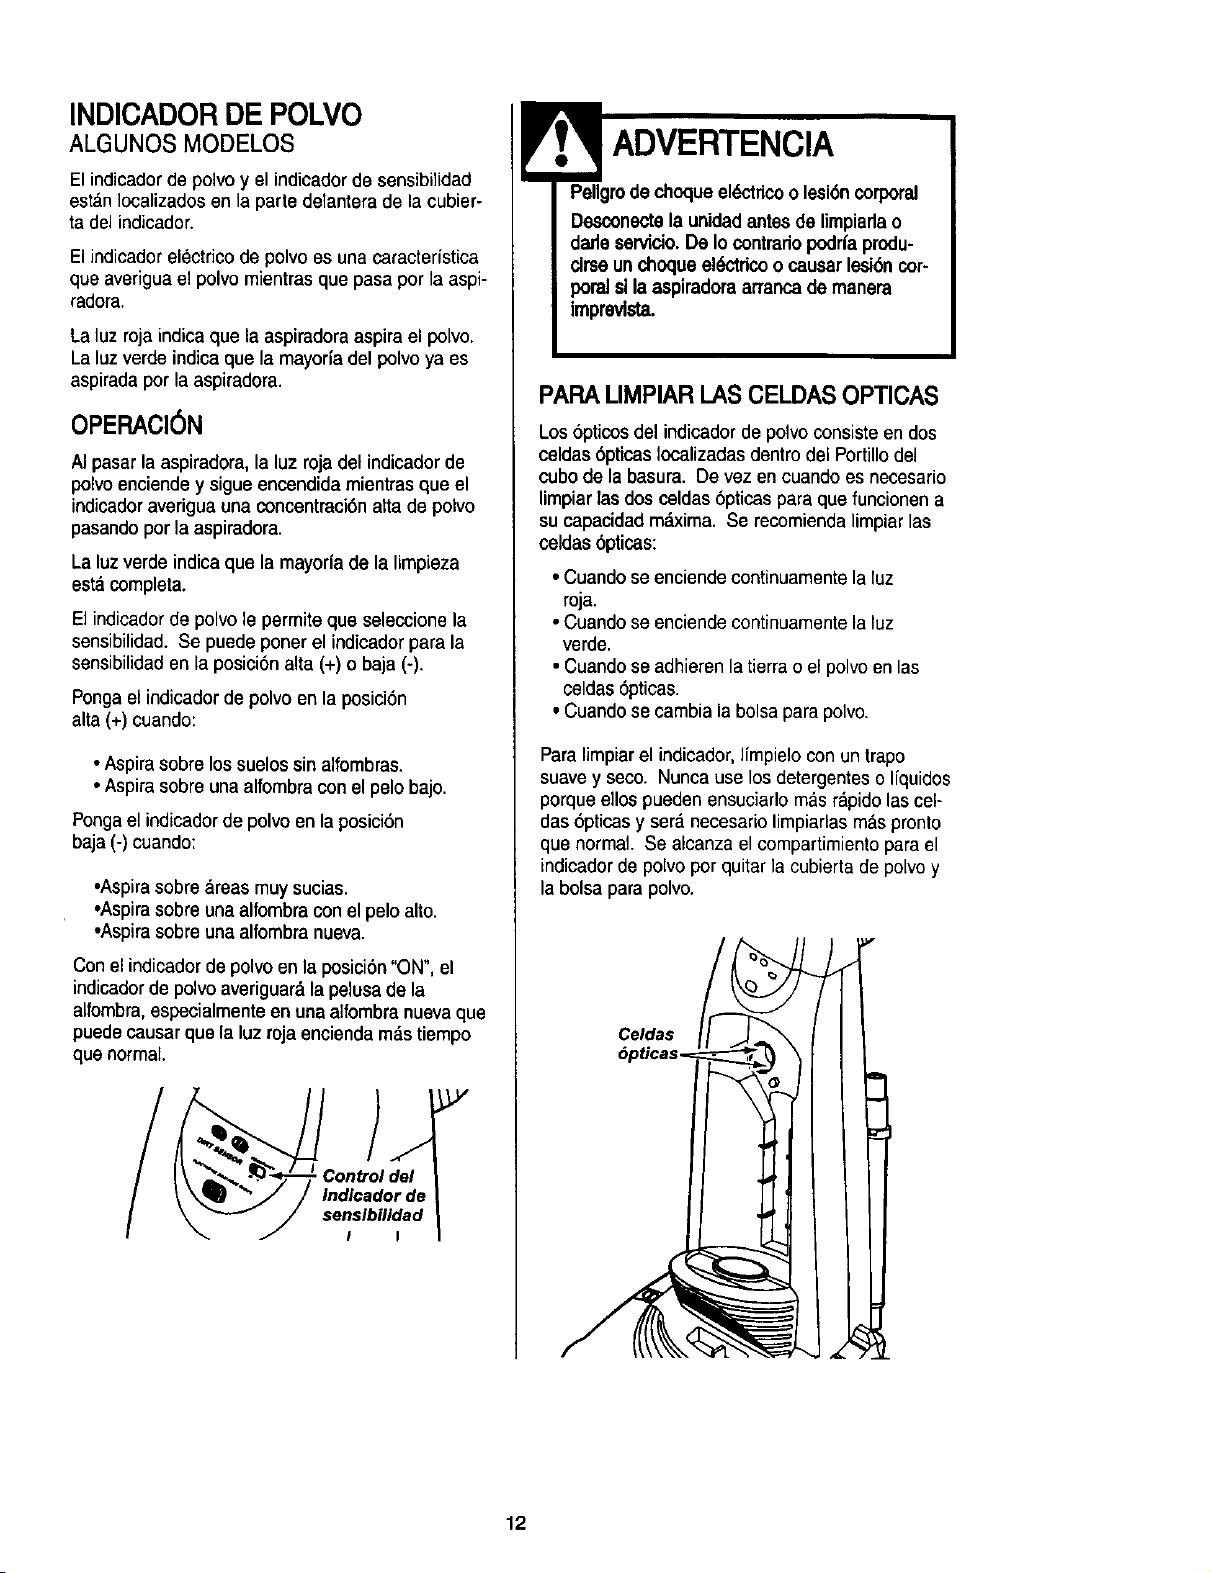
INDICADOR DE POLVO
ALGUNOS MODELOS
El indicadorde polvoy el indicadordesensibilidad
estan Iocalizados en la parte delantera de la cubier-
ta del indicador.
El indicadorelectricode polvo es una caracteristica
que averiguael polvo mientras que pasa por la aspi-
radora.
La luz roja indicaque la aspiradoraaspira el polvo.
La luz verde indica que la mayoda del polvo ya es
aspiradapor la aspiradora.
OPERACl6N
AI pasarla aspiradora, la luz roja del indicador de
polvo enciendey sigue encendida mientras que el
indicadoraverigua una concentraci6n alta de polvo
pasando por la aspiradora.
La luzverde indica que la mayoria de la limpieza
esta completa.
El indicadorde polvo le permite que seleccione la
sensibilidad. Se puede poner el indicador para la
sensibilidaden la posici6n alta (+) o baja (-).
Pongael indicadorde polvoen la posici6n
alta(+) cuando:
• Aspirasobre los suelos sinalfombras.
• Aspirasobre una alfombra con el pelo bajo.
Pongael indicadordepolvo en la posici6n
baja (-) cuando:
,Aspira sobre areas muy sucias.
•Aspirasobreunaalfombra con elpelo alto.
•Aspirasobre una alfombra nueva.
Con el indicadorde polvoen la posici6n "ON",el
indicadorde polvoaveriguar&la pelusade la
alfombm, especialmente en una alfombra nuevaque
puede causar que la luz roja encienda m._stiempo
que normal.
Y
PellgrodechoqueelL,ctdcoolesi6ncorporal
Desconectela unidadantesde limpiadao
darleservicio.De Io contrariopodrfaprodu-
drse unchoqueele_ctdcoocausarlesi6ncor-
poralsilaaspiradoraarrancademanera
imprevlsta.
PAPA LIMPIAR LASCELDASOPTICAS
Los 6pticosdel indicador de polvoconsiste en dos
celdas6pticas Iocalizadasdentrodel Portillodel
cubo de la basura. Devez en cuando es necesario
limpiar lasdos celdas6pticas para que funcionen a
su capacidad mbxima. Se recomienda limpiar las
celdas 6pticas:
•Cuando seenciende continuamente la luz
roja.
•Cuando se enciendecontinuamente la luz
verde.
• Cuandose adhieren la tierra o el polvo en las
celdas 6pticas.
• Cuandose cambia la bolsa para polvo.
Para limpiarel indicador, limpielo con untrapo
suavey seco. Nuncauselos detergentesoliquidos
porque ellos pueden ensuciarlo m&sr_pido lascel-
das6pticas y ser:_necesario limpiadas m_,spronto
que normal. Se alcanza el compartimiento para el
indicadorde polvo por quitar la cubierta de polvoy
la bolsa para polvo.
Celdas
12
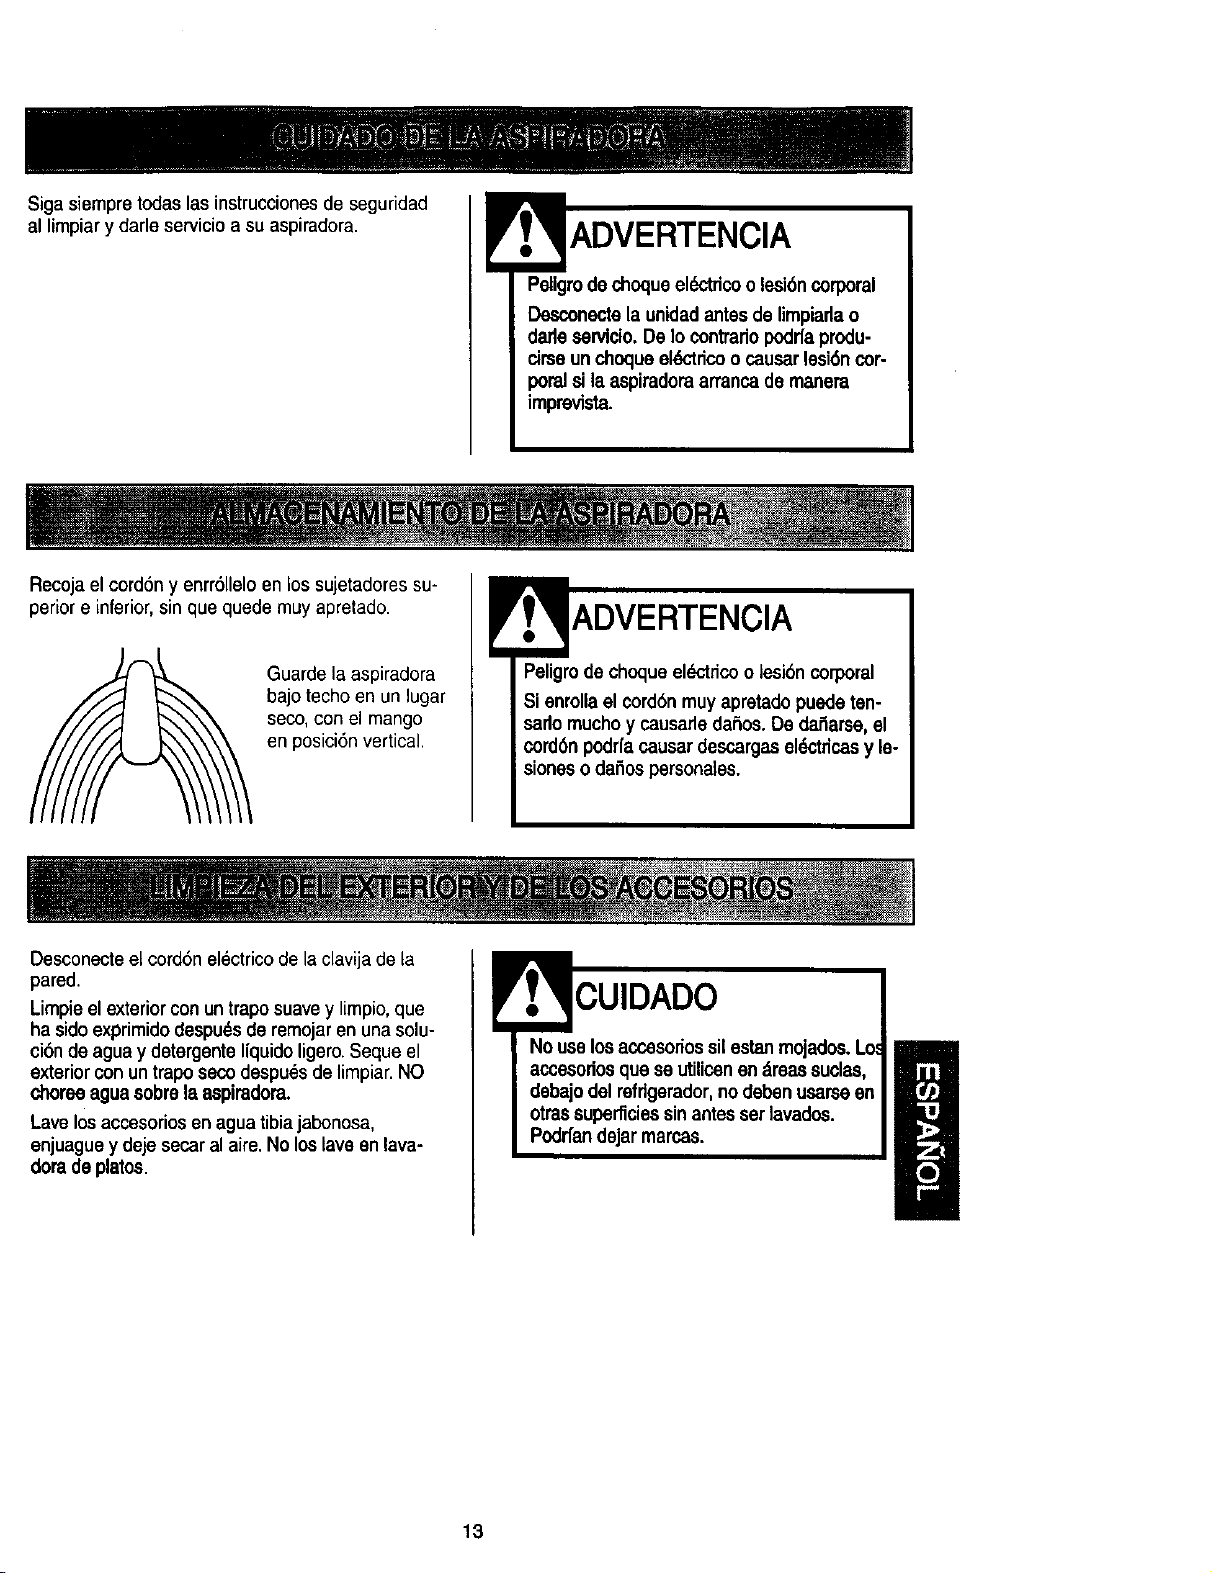
Sigasiempretodas las instruccionesde seguridad
al limpiar y darle servicio a su aspiradora.
PelJgmdechoqueel6ctricoo lesi6ncorporal
Desconectela unidadantesdelimpiarlao
dadeservicio.De Iocontrario podrfaprodu-
cirseunchoqueel_'tdcoocausarlesi6ncor-
poralsilaaspiradoraarrancade manera
imprevista.
Recoja el cord6n y enrr611eloen los sujetadores su-
perior e inferior,sin que quede muy apretado.
Guarde la aspiradora
bajo techo en un lugar
seco,con el mango
en posiciSnvertical.
Peligrode choqueelL,ctricoo lesi6ncorporal
Si enrolla el cord6nmuy apretadopuedeten-
sarlomuchoy causarledafios.De dar3arse,el
cordbn podrfacausardescargaseR_tricasy le-
sioneso da5ospersonales.
Desconecteelcordbn electricode la clavija de la
pared.
Limpieel exterior con un traposuave y limpio, que
ha sido exprimido despu_s de remojar en una solu-
eibnde agua y detergente liquido ligero.Seque el
exterior con untrapo secodespu_s de limpiar. NO
choreeaguasobrela aspiradora.
Lavelosaccesoriosen aguatibiajabonosa,
enjuague y dejesecaral aire.No loslaveenlava-
doradeplatos.
CUIDADO
accesodos quese utiliconen _reas suclas,
debajodal refrlgerador,no debenusarseen
otrassuperliciessinantesserlavados.
Podrfandejarmarcas.
13

Siemprevacle elcubodela basuracuandoel nivel
de basuraalcanzala Ifnea"MAX FILL,"
PAPASACAR ELCUBO DE LA BASURA:
ADVERTENCIA
Siempredesconecteelcord6ndlectricoantes
derepararalgunapartede la aspiradora.
Levantela mani-
ja del cubo de la
basuraubicada
al tope del cubo
de la basura.
Remueva
cualquier
obst_culoque
pueda estar
Iocalizadoen
la entrada del
cubo de la
basurao en
el filtro secun-
dario.
Manijade _o_
soltar el cubo_
de labasura---_
Cubode |
labasura--_
Tire de la manija
hacia adelantey lev-
ante el cubo de la
basurahacia arriba y
afuerade la aspi-
radora.
basura__
Filtro I I H t
secundario--_
PARAVACIARELCUBO DE LA BASURA
Torne en esta Abierto
direcci6n para abrir y vaciar (Para vaciar)
CerraOo
(Parausar)
Roteel montajede latapa del canasto de basura
contra las agujas del reloj como esta indicado en la
tapa y levantela haciaafuera.
14
Vacieel contenido del
cubo de la basura adentro
del tarrode basura.
PAPA LIMPIAR EL PRE-FILTRO
Elfiltro puede
limpiarse
golpeandolo
soloreuna
superficie firme
o enjuagandolo
bajo una Ilarede
agua. Enjuagar
con agua
solamente, no
utilizar
detergente o
jabbn. Dejarque
el filtro se seque
por 24 horas
antes de poner
de regresoen la aspirdora.
Cublerta
del filtro

PARAREEMPI..AZARELCUBODE LABASURA
Tome en esta Ablerto
direccl6n para cerrar y usar (Para vaclar)
Cerrado
(Para usar)
Reemplaceel montaje de la tapadel canasto de
basura poni_ndolo de vueltasobreel canasto de
basuracon las marcasen la tapa alineadas como
se muestrabajo Abierto (Para Vaciar)en la parte
de atff,s del canasto debasura. Rote [a tapa como
las agujas del reloj mientras apfieta hacia abajo de
modo que las marcas se alinean como se muestra
arriba de Cerrado (Para Usar).
Pongael cubode la
basura de vueltaaden-
trode la aspiradora
insertandoelrondo
primeroe inclinando
arrasconla manijadel
cubode la basuralev-
antada.
Man.,°,JL))
h
Baje la manija
del cubode la
basurapara
ajustar el cubo
de la basuraen
su lugar
Revisar frecuentemente el filtro secundario y
limpiarlo cuando est_ sucio.
Remueva el cubo para basura como en la ilus-
traci6n en la secci6n de LIMPIEZA DEL CUBO
PARA BASURA.
Para limpiar la cubierta del filtro, [impiela con un
trapo seco.
NOTA: La cublertadel filtroes removible.
Reempiace el cubo de basura como en [a ilus-
traci6n en la secci6n de LIMPIEZA DEL CUBO
PARA BASURA.
Filtre
15
Pellgro dechcqueel_,trico
Desenchufeel cablede poderdal tomacord-
ente. No opereia limpiadomsinel fillropd-
n_rio oel flltrode escape. Est6 seguroqueel
filtroeest_ Ins_lado propi_'nenlepare pre-
venirf_lla delmotory/osacudidael(_'tdca.
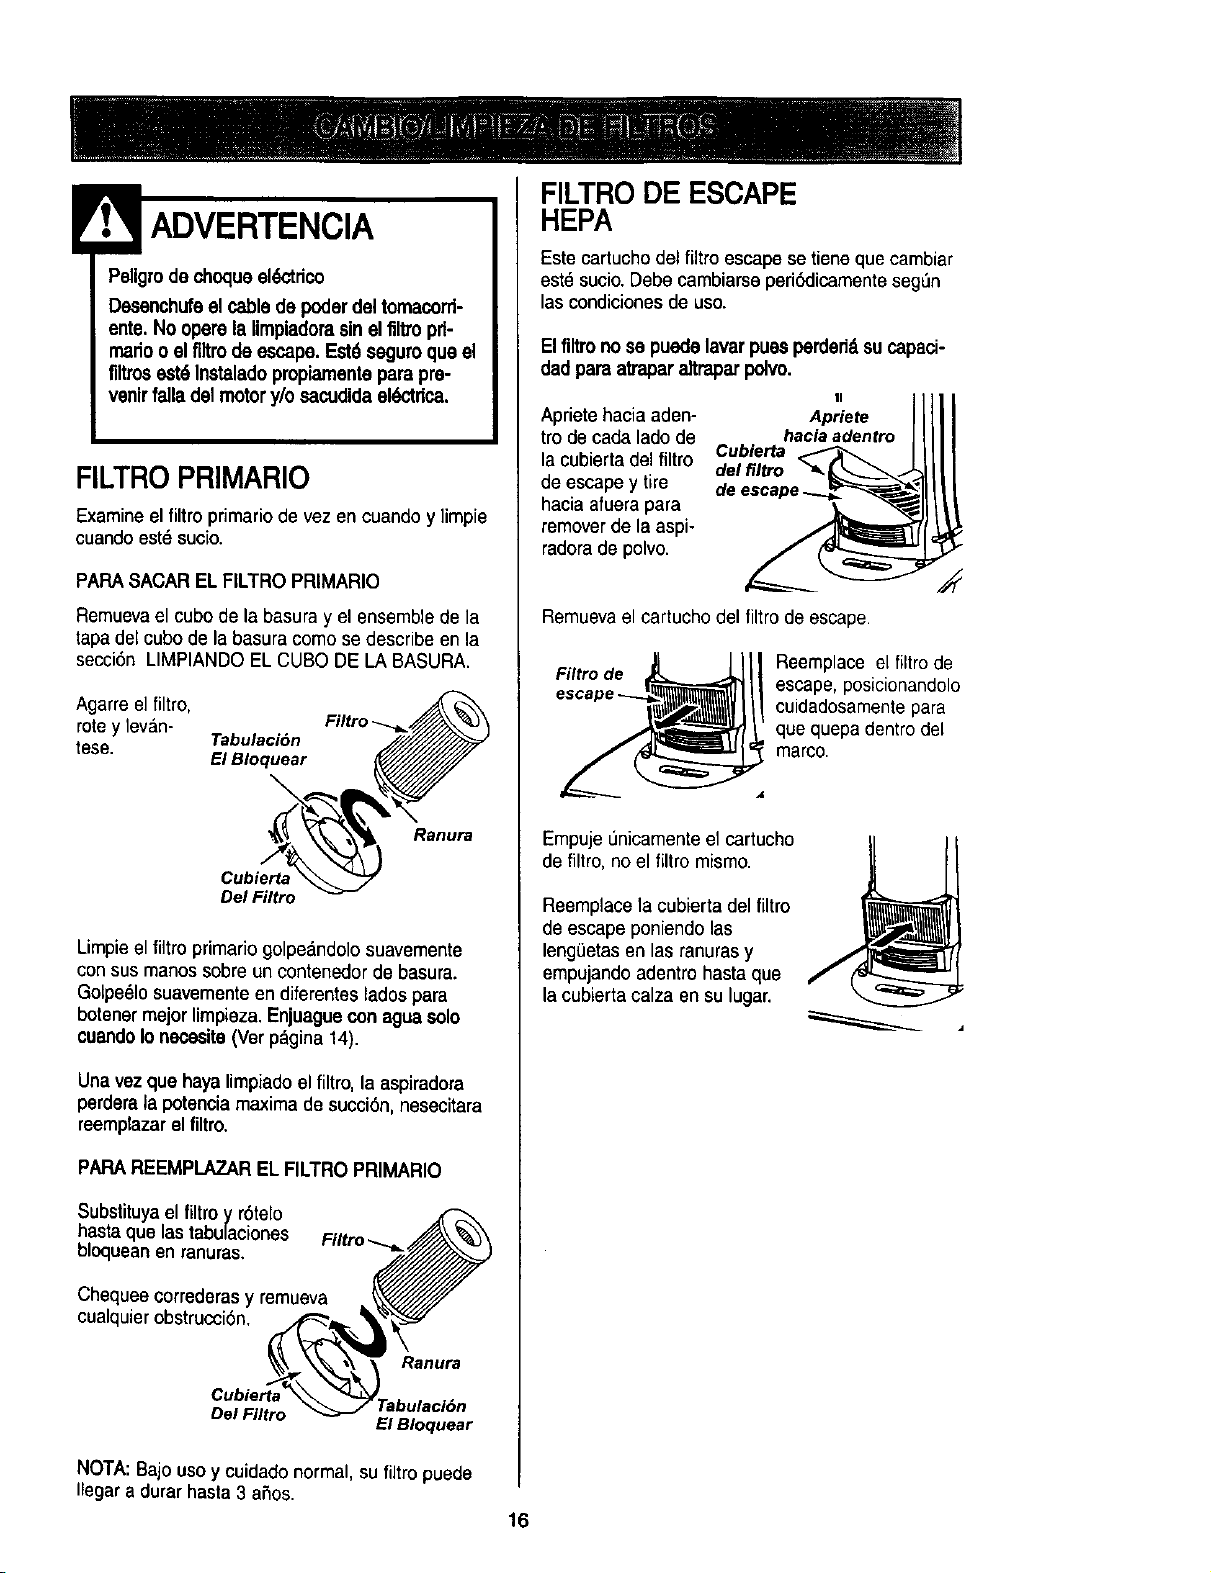
FILTRO PRIMARIO
Examineel filtro primariode vez en cuando y limpie
cuando est,}sucio.
PARASACAREL FILTROPRIMARIO
Remuevael cube de labasura y el ensemble de la
tapadel cubode la basura como sedescribe en la
secci6n LIMPIANDO EL CUBO DE LA BASURA.
Agarre el filtro,
rotey lev&n-
tese. Tabulacibn
El Bloquear
Ranura
Cubierta
Del Filtro
Limpieel filtro primario golpe_lndolosuavemente
con sus manos sobre un contenedor de basura.
Golpe_lo suavemente en diferentes ladospara
botener mejor limpieza.Enjuague con aguasolo
cuandoIonsoesite(Ver p_gina 14).
Unavezque hayalimpiadoel filtro, la aspiradora
perdera la potenciamaxima de succi6n, nesecitara
reemplazarel filtro.
PARAREEMPLAZAREL FILTROPRIMARIO
Substituya el filtroy r6telo
hasta que las tabulaciones Filtro
bloquean en ranuras.
Chequee correderas y remueva
cualquier obstrucci6n.
Ranura
Del Filtro
El Bloquear
FILTRO DE ESCAPE
HEPA
Este cartucho del filtroescape se tiene que cambiar
est_ sucio. Debecambiarse peri_licamente segL_n
las condiciones de uso.
Elfiltro nose puedelavar puesperdeddsucapaci-
dadpara atraparaitraparpolvo.
Aprietehacia aden- Apriete
tro de cada ladede haciaadentro
la cubierta del filtro Cubierta
del filtro
de escape y tire
hacia afuera para
remover de la aspi-
radorade polvo.
Remuevael cartucho del filtro de escape.
Filtro de
Reemplace el filtro de
escape,posicionandolo
cuidadosamente para
que quepa dentro del
marco.
Empuje L_nicamenteel cartucho
de filtro, no el filtro mismo.
Reemplacela cubierta del filtro
de escape poniendo las
lengeetas en las ranurasy
empujando adentro hasta que
la cubierta calza en su lugar.
NOTA: Bajo use y cuidadonormal, su filtropuede
Ilegara durarhasta 3 ahos.
16
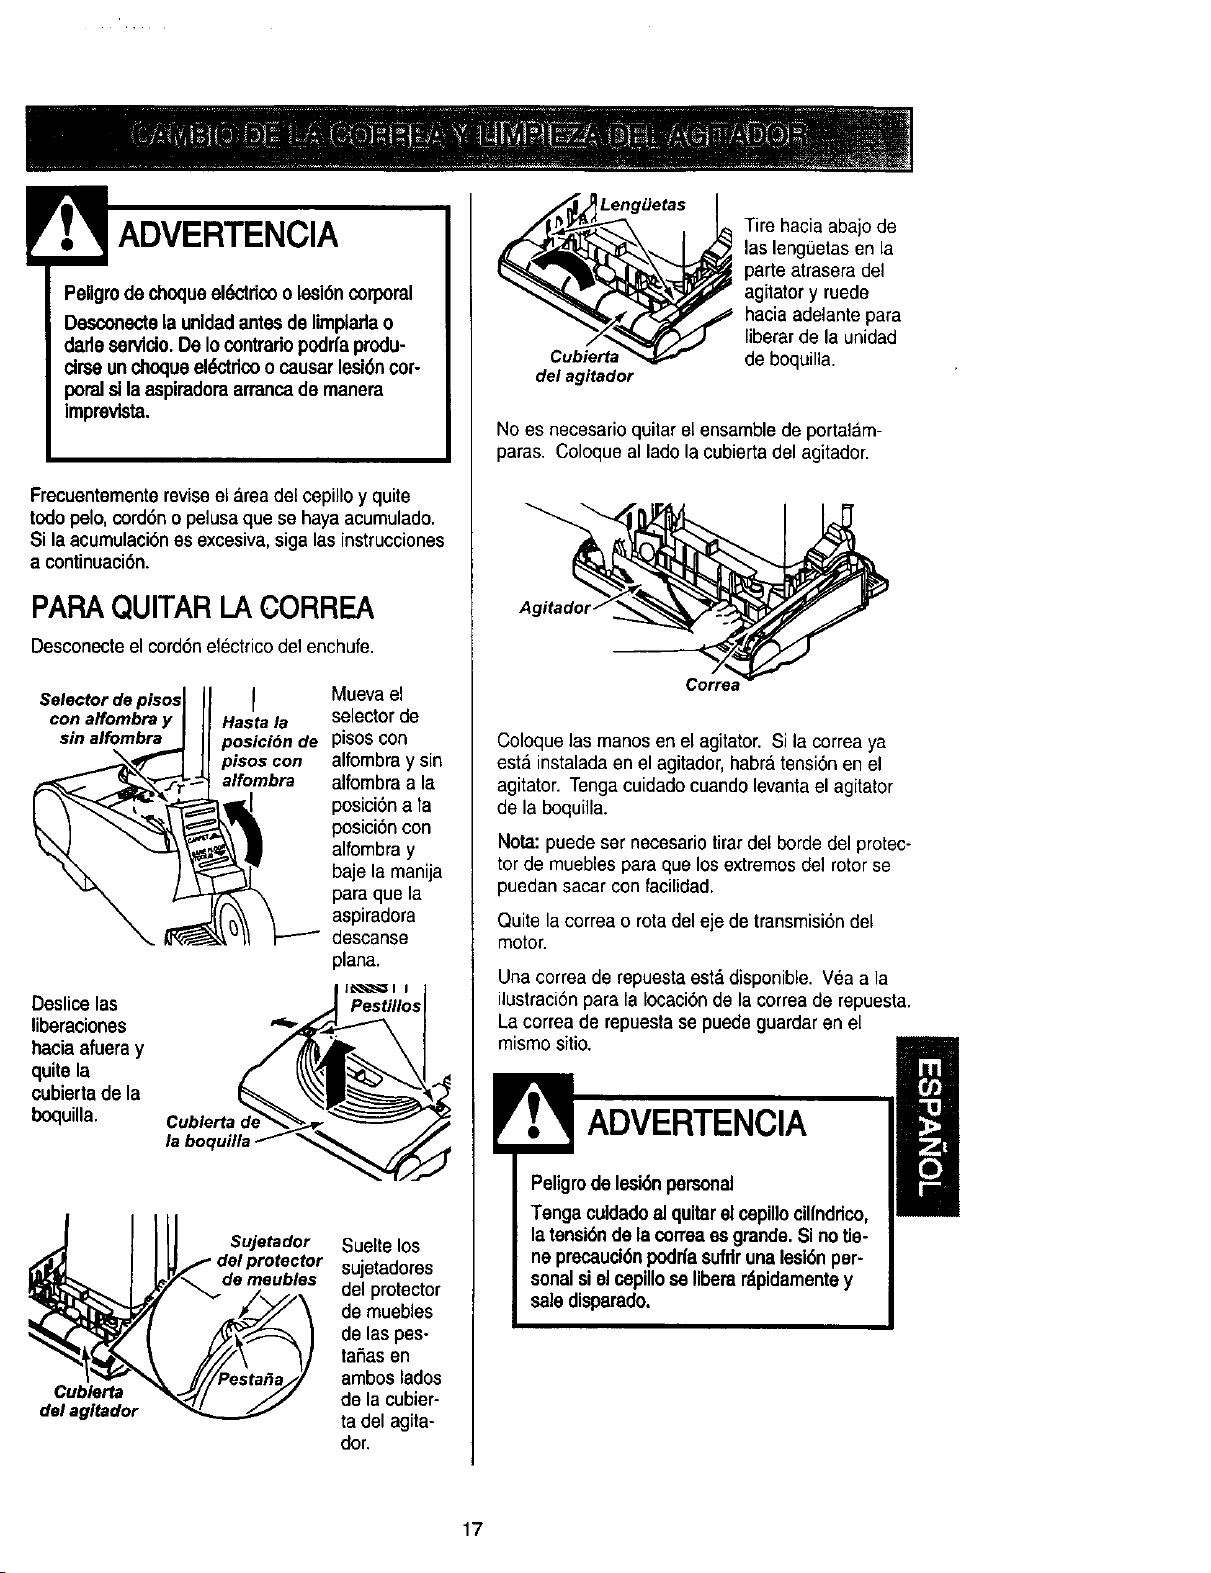
Pellgrode choqueeldctdcoolesi6ncorporal
Desconestela unldadantesdelimpladao
darleservicio.DeIocontradopodrfaprodu-
cirseunchoqueel_tdco ocausarlesi6ncor-
poralsilaaspiradomarranca demanera
imprevista.
Frecuentementereviseelareadel cepilloy quite
todopelo, cord6no pelusaquese haya acumulado.
Si la acumulaci6nes excesiva,siga las instrucciones
a continuaci6n.
PAPAQUITARLACORREA
Desconecteel cord6netectricodet enehufe.
Selector de pisos I
con alfombra y Hasta la
sin alfombra posici6n de
pisos con
alfombra
Deslice las
liberaciones
haciaafueray
quite la
cubiertade la
boquilla.
/a
Mueva el
selector de
pisos con
alfombra y sin
alfombra a la
posici6n a la
position con
alfombra y
baje la manija
para que la
aspiradora
descanse
plana.
PesUllos
Cublerta
del agltador
Sujetador
de meubles
Sueltelos
sujetadores
del protector
de muebles
de las pes-
tafias en
ambos lados
de la cubier-
ta del agita-
dot.
Leng_etas
Cubierta
del agitador
Tire hacia abajo de
las lengOetasen la
parte atrasera del
agitator y ruede
hacia adelantepara
liberar de la unidad
de boquilla.
No es necesario quitar el ensamble de portalam-
paras. Coloque al lado la cubierta del agitador.
Correa
Coloque las manos en el agitator. Si la correaya
esta instalada en el agitador, habratensi6n en el
agitator• Tengacuidadocuando levantael agitator
de la boquilla.
Nota:puede ser necesario tirardel borde del protec-
tor de muebles para que losextremosdel rotorse
puedan sacar con facilidad.
Quite la correa o rotadeleje de transmisi6n del
motor•
Unacorrea de repuesta est', disponible. Vea a la
ilustraci6npara la Iocaci6nde la correa de repuesta.
La correa de repuesta se puede guardar en el
mismositio.
ADVERTENCIA
Peligrodelesi6npersonal
Tenga culdadoalquitarelcepillocilfnddco,
latensi6nde lacorreaes grande.Sino tie-
neprecaud6npodrfasufdrunalesi6nper-
sonalsielsapillose liberardpidamentey
saledisparado.
17
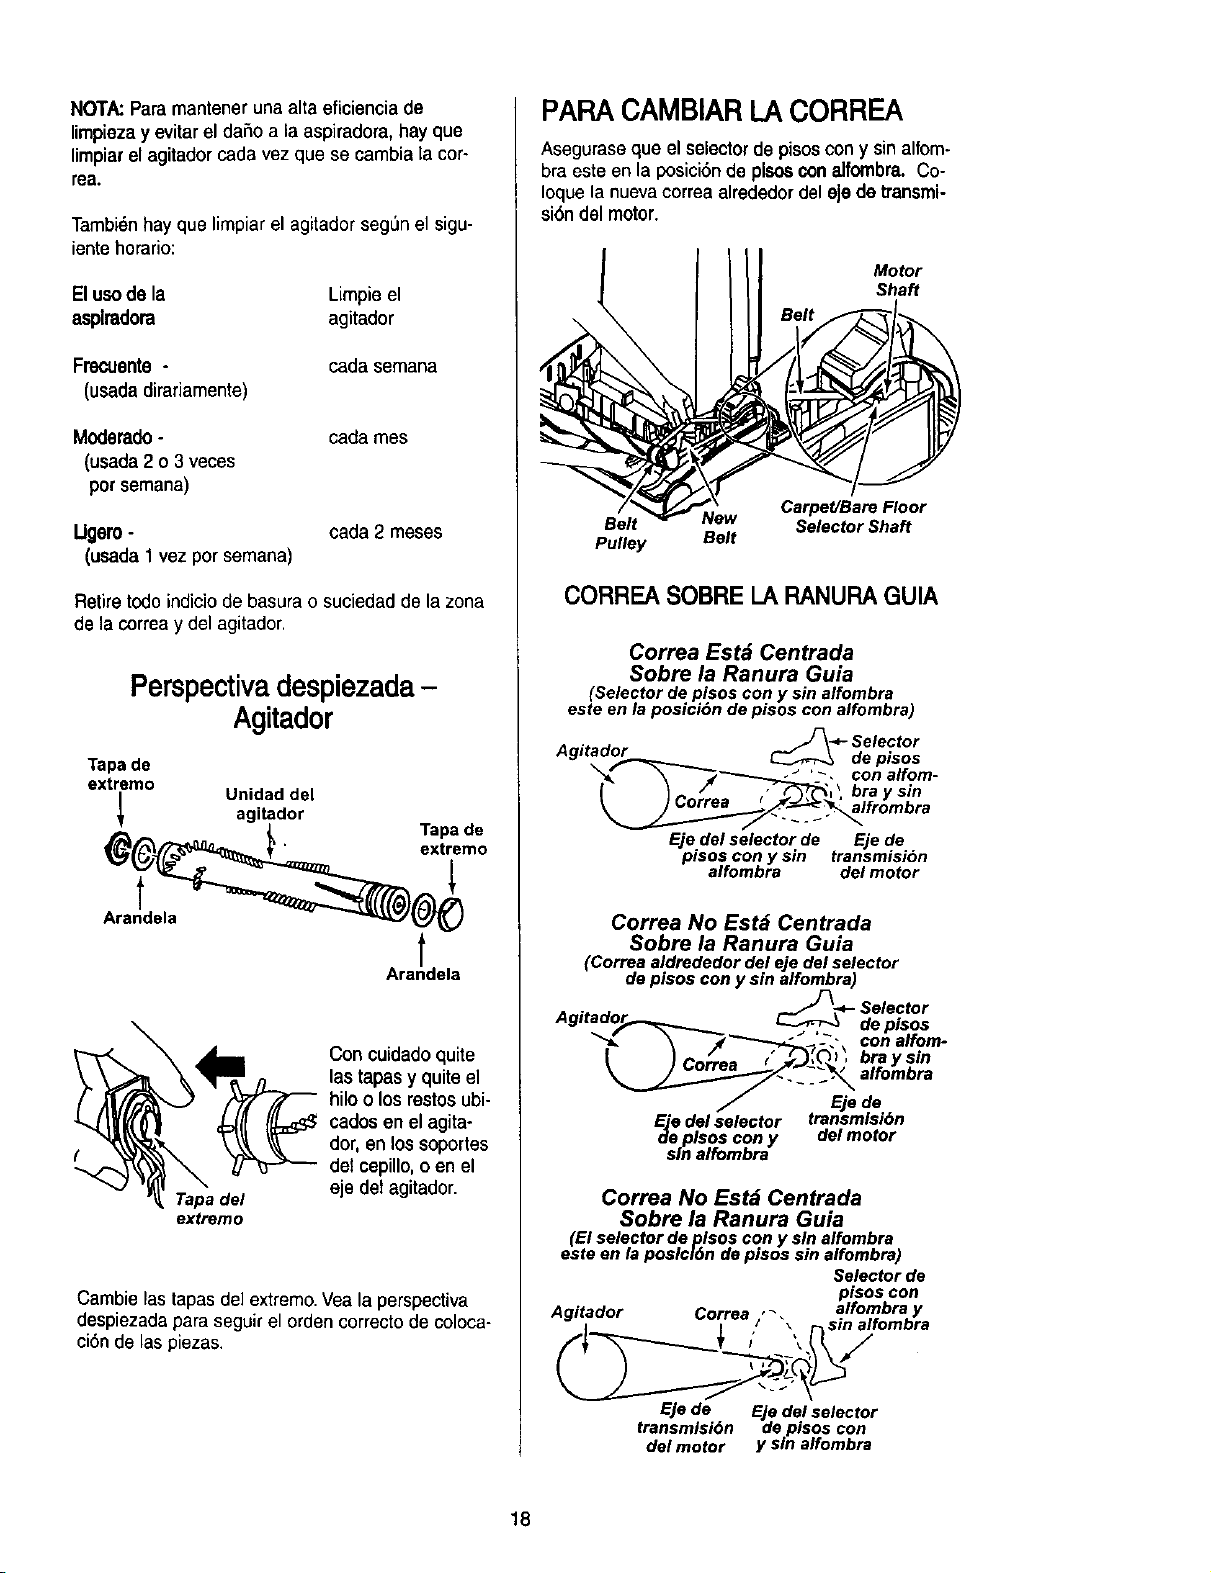
NOT/_ Paramantener una alta eficienciade
limpiezay evitar el daSo a la aspiradora, hay que
limpiar el agitador cada vez que se cambia la cor-
rea.
Tambi6nhay que limpiar el agitador seg_n el sigu-
ientehoratio:
Elusodela Limpie el
asplradora agitador
Frecuente -
(usadadirariamente)
Moderado-
(usada2 o 3 veces
porsemana)
cada semana
cada mes
Ugero -
(usada 1 vez por semana)
cada 2 meses
Retire todo indicio de basura o suciedad de la zona
de la correay del agitador.
Perspectivadespiezada-
Agitador
Tapade
extremo
Unidaddel
agitador
Tapade
_. _' extremo
Arandela
Ara!dela
Tapa del
extremo
Con cuidadoquite
las tapasy quite el
hilo o los restos ubi-
cados en el agita-
dor, en los soportes
del cepillo, o en el
eje det agitador.
Cambie lastapas de]extremo.Vea la perspectiva
despiezada para seguir el orden correcto de coloca-
ci6n de laspiezas.
PARA CAMBIAR LA CORREA
Asegurase que el selectorde pisoscon y sin alfom-
bra este en la posici6n de plsosconalfombra. Co-
Ioque la nuevacorrea alrededor del eje de transmi-
si6n del motor.
Motor
Shaft
Carpet/Bare Floor
Belt New Selector Shaft
Pulley Belt
CORREA SOBRE LA RANURAGUIA
Correa Estd Centrada
Sobre la Ranura Guia
(Selectordepisoscon y sin alfombra
este enla posici6n de pisoscon alfombra)
_J-_- Selector
Agitador _ depisos
___ '_, con alfom-
(- ) Corfrrea _"_. ba[_ty sin
Eje del selector de Eje de
pisos con y sin transmisi6n
alfombra del motor
Correa No Estd Centrada
Sobre la Ranura Guia
(Correa aldrededordel ejedelselector
depisoscon y sin alfombra)
• _-_-*- Selector
Agttado_-_..__ _ depisos
_, _'_.'-"- con alfom-
=y=
/ Ejede
_ee delselector transmlsi6n
plsos cony del motor
sinalfombra
Correa No Estd Centrada
Sobre la Ranura Guia
(Elselectordepl$os con y sin alfombra
esteen laposlcl6n de pisos sin alfombra)
Selectorde
pisoscon
Agitador Correa 1"_" alfombray
I ! \ r_Sln alfombra
Eje de Eje del selector
transmlsi6n de pisos con
del motor y sin alfombra
18
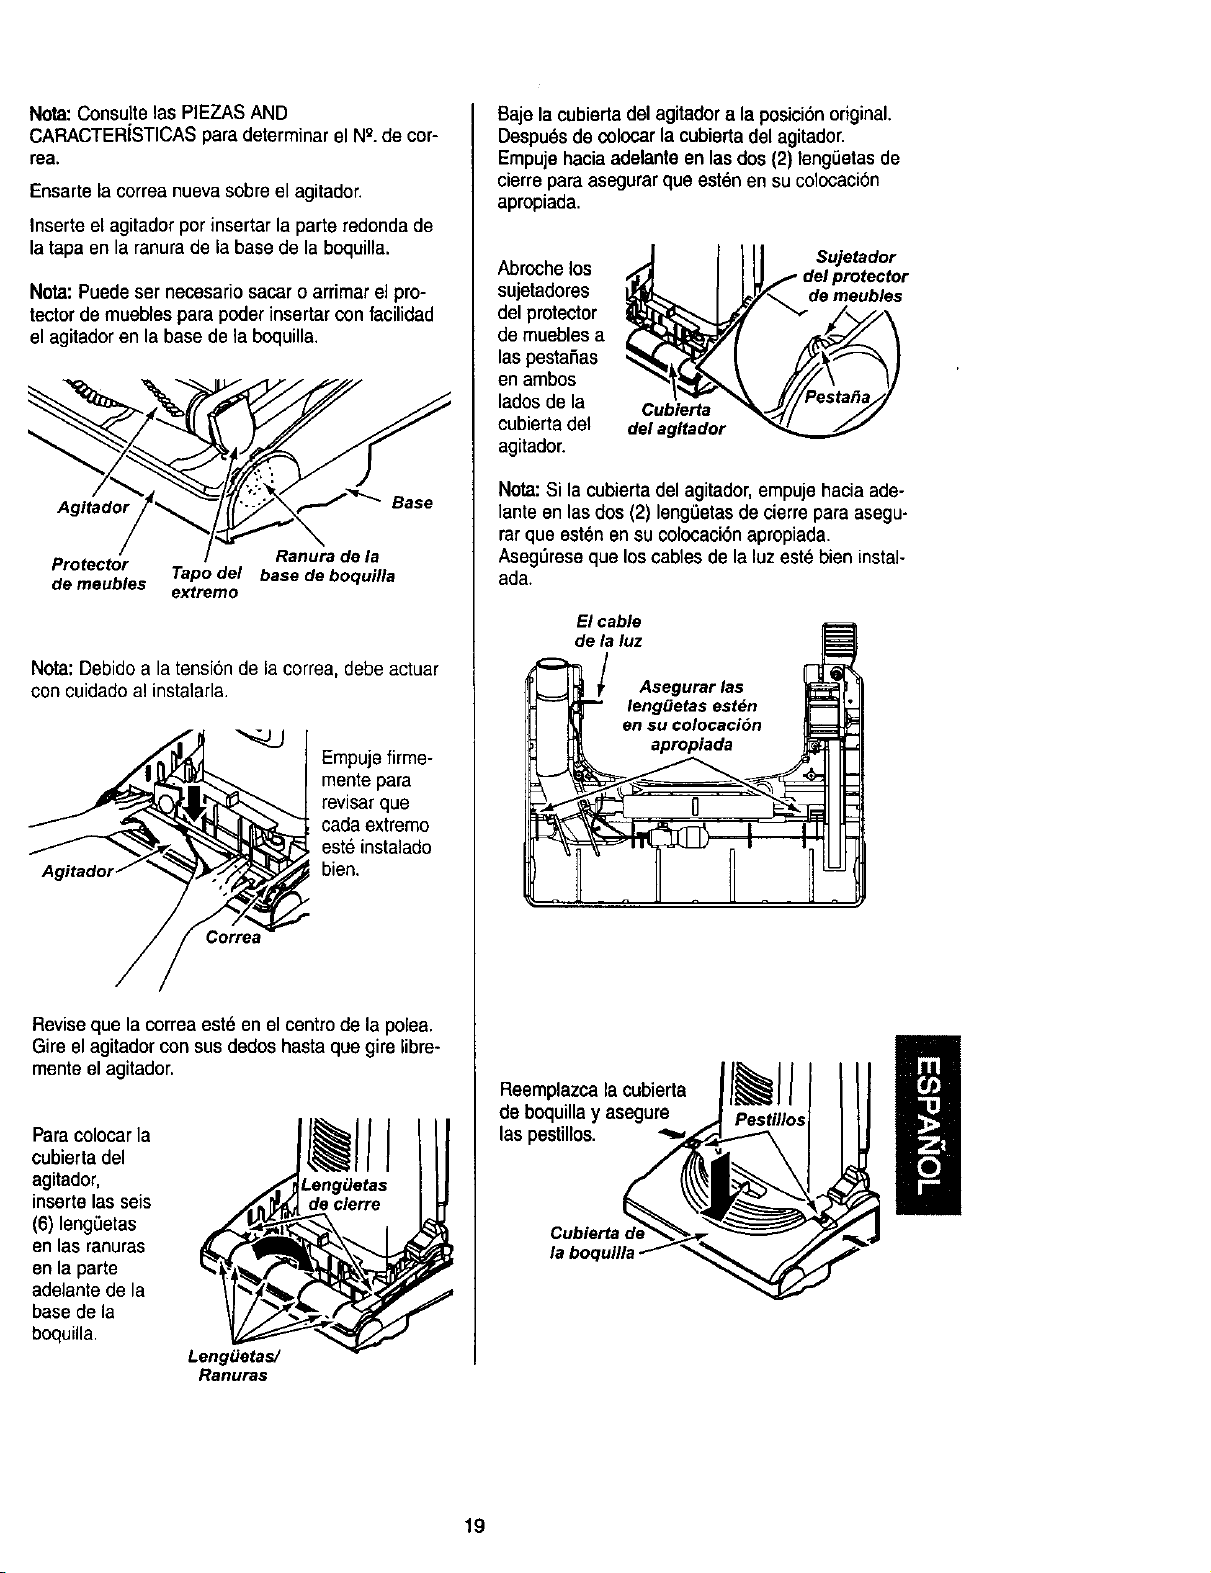
Nota: Consulte las PIEZAS AND
CARACTER[STICAS para determinar el NQ.de cor-
rea.
Ensarte la correa nuevasobre el agitador.
Inserte el agitador per insertar la parte redonda de
la tapa en la ranura de la base de la boquilla.
Nota:Puede set necesario sacar o arrimar el pro-
tector de muebles para poder insertar con facilidad
el agitador en la base de la boquilla.
Agitador Base
Ranura de la
Protector Tapo del base de boquilla
de meubles extremo
Nota: Debido a la tensi6n de la correa, debe actuar
con cuidado al instalarla.
Empuje firme-
mente para
revisar que
cada extreme
este instalado
bien.
Reviseque la correa este en el centrode la polea.
Gire el agitadorcon sus dedos hasta que gire libre-
mente el agitador.
Paracolocarla
cubierta del
agitador,
inserte las seis
(6) leng0etas
en las ranuras
en la parte
adelante de la
base de la
boquilla.
LengOetas/
Ranura$
II
Baje la cubierta del agitadora la posici6n original.
Despuesdecolocar la cubierta del agitador.
Empujehacia adelante enlas dos (2) leng,",etasde
cierre para asegurar que est6n en su colocaci6n
apropiada.
Abroche los
sujetadores
del protector
de muebles a
laspestafias
en ambos
ladesde la
cubierta de1
agitador.
Cubierta
del agltador
Sujetador
de meubles
Nora:Si la cubierta del agitador, empujehacia ade-
lanteenlas dos (2) leng0etas de cierre para asegu-
rar que est6n en su colocaci6napropiada.
Aseg=',reseque los cables de la luzeste bien instal-
ada.
El cable
dela luz I_[
_ l Asegurarlas _;_
--_--= leng_etas est_n H_
enaucolocaci6n
Reemplazca lacubierta
de boquilla y asegura
las pestillos. _=
I
19
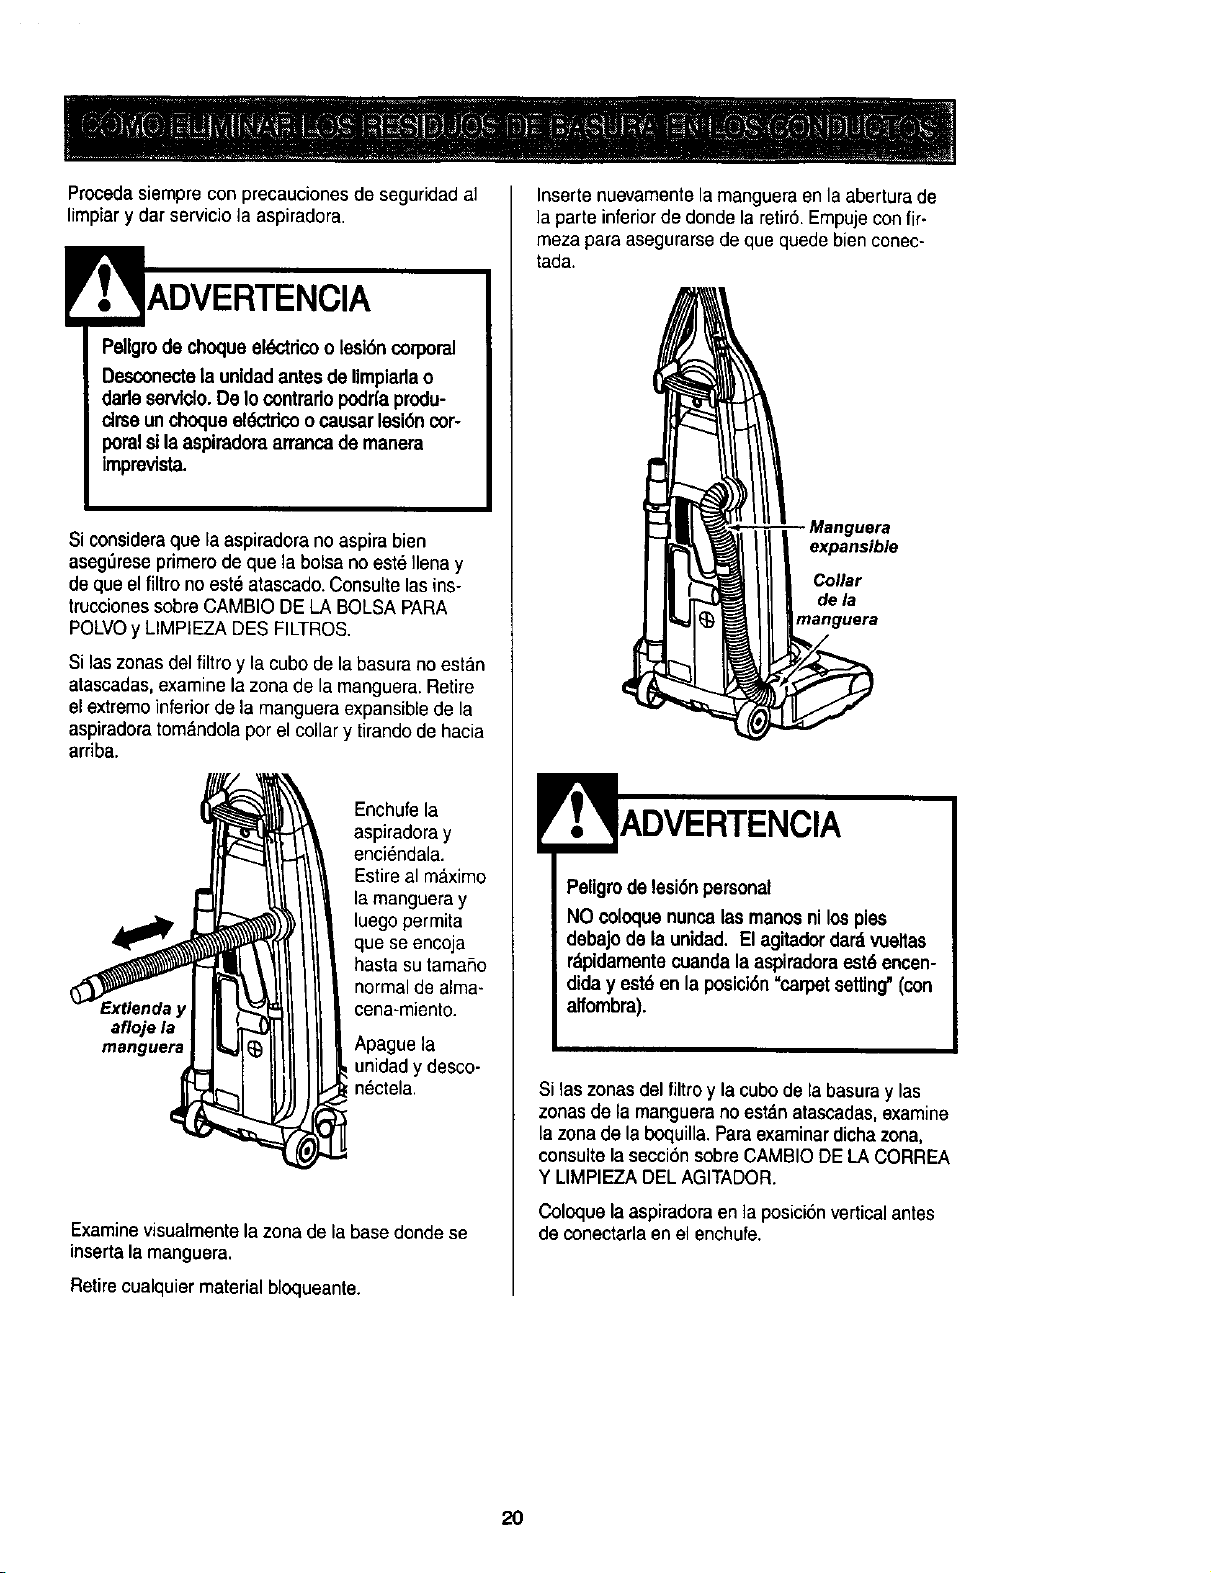
Procedasiempre con precauciones de seguridad al
limpiar y dar servicio la aspiradora.
Pellgrodechoqueel_tdco oIosi6n corporal
Oesconectela unidadantes de limpiarlao
dade servlclo.De Iocontrario podn'aprodu-
drse unchoqueel_ctdcoocausarlesi6ncor-
poralsilaaspiradoraarrancade manera
imprevista.
Si consideraque la aspiradora no aspira bien
aseg_reseprimerode que la bolsa no est_ Ilena y
de que el filtro no est8 atascado.Consulte las ins-
trucciones sobreCAMBIO DELA BOLSA PARA
POLVOy LIMPIEZA DES FILTROS.
Si las zonas del filtro y la cubo de la basura no estan
atascadas,examine lazona de la manguera.Retire
el extremoinferior dela manguera expansiblede la
aspiradoratom&ndolapor el collar y tirando de hacia
arriba.
afloje la
manguera
Enchufe la
aspiradora y
enciendala.
Estire al m_ximo
la mangueray
luego permita
que se encoja
hasta su tama_o
normal de alma-
cena-miento.
Apague la
, unidad y desco-
';nectela.
Examinevisualmentelazona dela basedonde se
inserta lamanguera.
Retirecualquier material blcqueante.
Inserte nuevamentela manguera enla abertura de
la parte inferior dedonde la retiro. Empujeconfir-
meza para asegurarse de que quede bien conec-
tada.
expans_
Collar
dela
rnanguera
Peligro delesi6n personal
NO coloquenuncalasmanosni lospies
debajode la unidad. El agitadordardvueltas
rdpidamentecuandalaaspiradoraest6encen-
diday ostd en la posici6n"carpetsetting'(con
affombra).
Si laszonasdel filtro y la cubode la basura y las
zonas de la mangueranoest_n atascadas,examine
la zona de la boquilla.Paraexaminardichazona,
consulte la seccibn sobreCAMBIO DELA CORREA
Y LIMPIEZA DELAGITADOR.
Coloque la aspiradoraen laposicibn verticalantes
de conectarla en el enchufe.
20
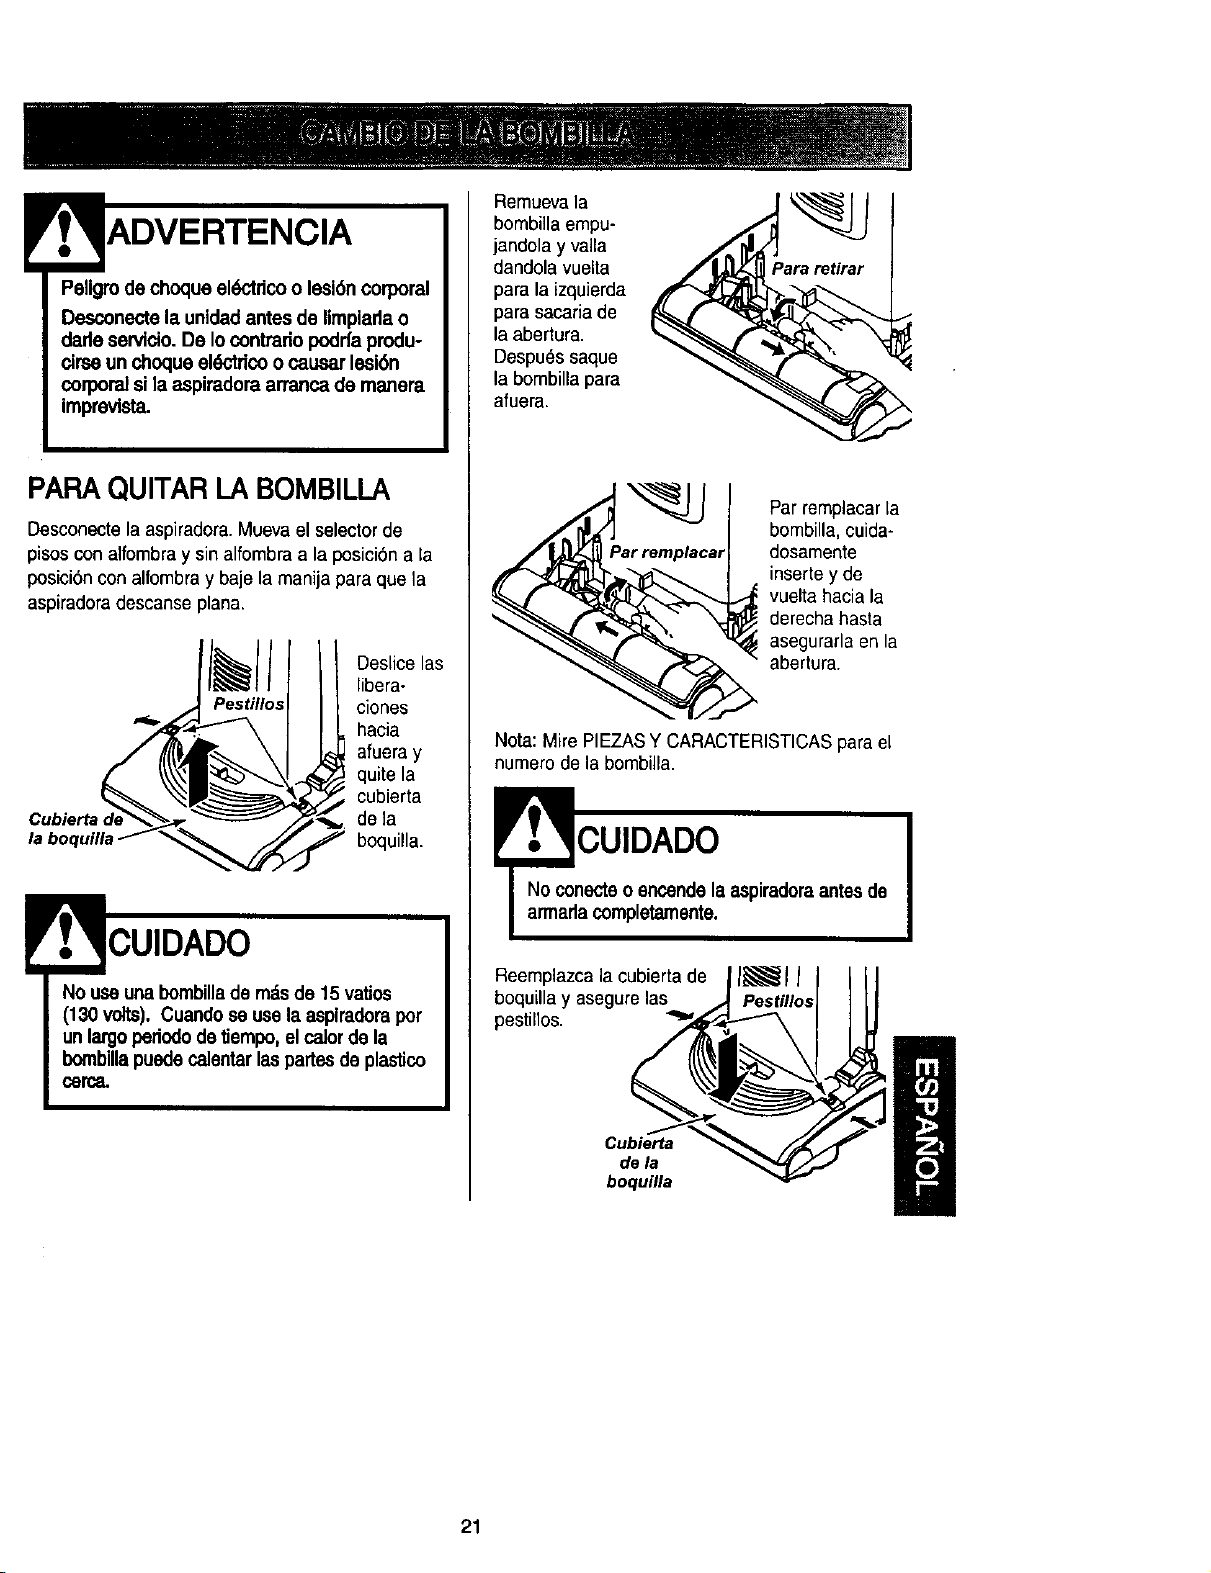
.T, ADVERTENCIA
Pellgm dechoque el_Y_'tdcoo lesl6ncorporal
Desconectela unidadantes de limpladao
dade servicio.De Iocontrariopodrfaprodu-
drse un choque ek_3ctdcoo causarlesi6n
corporalsi la aspiradoraarranca de manera
imprevista.
PARA QUITAR LA BOMBILLA
Desconectelaaspiradora. Muevael selectorde
pisos con alfombray sin alfombra a la posici6n a la
posici6n con alfombra y baje la manija para que la
aspiradoradescanse plana.
Pestillos
Deslice las
libera-
ciones
hacia
afuera y
quite la
cubierta
de la
boquilla.
CUIDADO
No useunabombillade m:_sde 15vatios
(130 volts). Cuandose usela aspiradorapor
unlargopedododetiempo,elca]orde la
bombillapuedecalentarlaspartesde plastico
cerc_L
Remuevala
bombilla empu-
jandola y valla
dandola vuelta
para la izquierda
para sacaria de
la abertura.
Despuessaque
la bombilla para
afuera.
Par remplacarla
bombilla,cuida-
_arremplacar dosamente
insertey de
vuelta haciala
derecha basra
asegurarla en la
abertura.
Nota: Mire PIEZASY CARACTERISTICASpara el
numero de la bombilla.
I
CUIDADO
No conecteoencendela aspiradoraantesde
armada completamente.
Reemplazca la cubierta de I_,l I
boquilla y asegurelas Pestillos
pestinos.
Cubierta
de la
boquilla
21
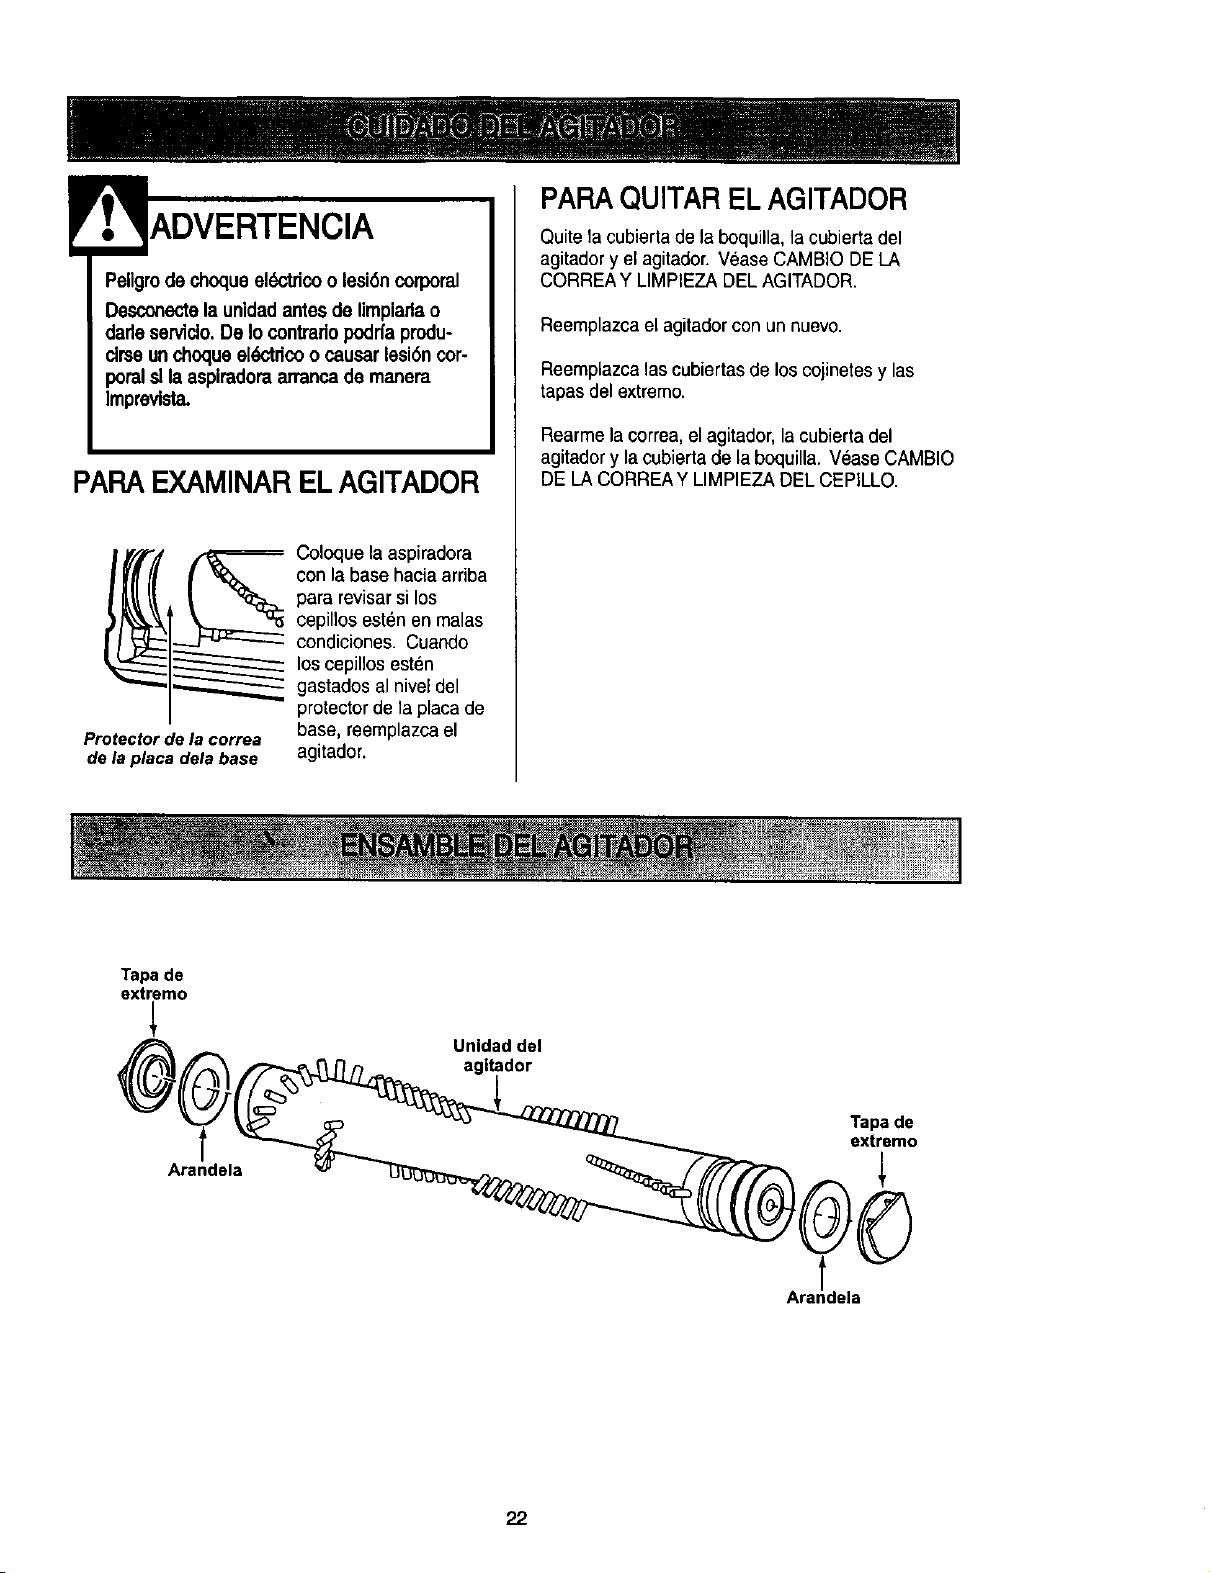
Peligrode choqueek_-tricoo lesi6ncorporal
Desconectela unidadantesde limplada o
dadeserviclo.De Iocontradopodrfaprodu-
clrseunchoqueel_tfico o causarlesi6ncor-
poralsl laaspiradoraarrancade manem
Imprevlsta.
PARAEXAMINAR EL AGITADOR
Protector de la correa
de la placa dela base
Coloque laaspiradora
con la base hacia arriba
para revisarsi los
cepillos est_n en malas
condiciones. Cuando
los cepillos esten
gastados al niveldel
protector de la placa de
base, reemplazcael
agitador.
PARA QUITAR EL AGITADOR
Quitela cubiertade la boquilla,la cubierta del
agitadory el agitador. Wase CAMBIO DE LA
CORREAY LIMPIEZA DELAGITADOR.
Reemplazca eLagitadorcon un nuevo.
Reemplazca lascubiertas de los cojinetesy las
tapas del extremo.
Rearme la correa, el agitador, lacubierta del
agitadory la cubierta de la boquilla. Vease CAMBIO
DE LA CORREAY LIMPIEZA DEL CEPILLO.
Tapade
extremo
Unldad del
agitador
Arandela
Tapade
extremo
22
Consulte este cuadro para encontrar soluciones que usted mismo puede realizarcuando tenga problemas
menores de rendimiento. Cualquier servicio que necesiteaparte de otros descritos en este manual tienen que
ser hechos por un represetante de servicio autorizadoSears,
ADVERTENCIAPeligrode choque el_dco
Desconectela aspiradora antesdedade se_,lcioo limpiarla.De Io contradopodrfaprodu-
cirseunchoqueel_"tricoo causarlesi6ncorporal.
No asplrasa_sfactodame_te.
1. Esla desconectada.
2. Cortacircuitos botado o lusibie quemado en
el lablero de servicio de la residencia.
3. Interruplor de encendido/apagado no
estd en la posici6n ON.
4. Prolector termel activado.
1. Cubo de la basura Ileno o alascado
2. Ajuste incorrecto de nivel de pelode la alfombra.
3. Agitador desgastado.
4. Boquilla, o portillo de la cubo de la basura
alascada.
5. Manguera atascado
6. Manguera rota.
7. Correa rota
8. La manguera no esta bien insedada
9, Activaci6n del sistema de protecli6n del motor.
10. Filtros de seguridad.
11. Correderas no rotando.
1. Conecte bien, opnma selector de
encendido/apagado a la posici6n ON.
2. Reslablezca el cortacircuitos o
cambie el fusil_e,
3. Celoque el interruptorde encend_o/apagado
en la posici_n ON,
4. Reajuste el protector termal, (pagina 12)
1. Cubo de la basura limpio, (p_gina 14).
2. Ajuste el nivel, (p&gina 7).
3. Cambie el agitador, (ptLgina 23).
4. Revue COMO EUMINAR LO_ RESIOU_ DE
BASURA EN LOS CONDLICTOS, (p_gina 21).
5. Limpiar tubo para el mugre, (p_gina 21)
6. Cambie la manguera
7. Cambielacorrea, (l_ginas !8-20).
8. Inserte bien la manguera, (p_gina 21).
9. Delermine si existen bloqueos, (pdgina 10).
10. Limpielcambie el filtros, (p&ginas 16-17).
11. Remueva obstrucciones.(l_ginas 15-16)
LI it,_radora levantatapetes 1. Ajuste incorrectodenivelde pelode laalfombra. 1. Ajuste elnivel, (pdgina7).
oe6dlffculempujar.
La_znolunciona. 1. Bombillafundida. 1. Cambielabombitla.(p_gina22)
Be_lambledelagitador 1. Correarota. 1. Cambielacorrea,(l_ginas18-20).
noglr_L 2. Selectordepisoconalfombraypisosin 2. Cambieelselect_xenlaseleccibn
alfombraen la selecci6nde pisosinalfombra, conalfombra,(p_lgina7).
3. Correainstaladaincorrectamente. 3. Re_IseCAMBIODELACORREAYUMREZA
DELCEPILLO,(paginas18-20).
El_dersndlmle_to, 1. Cubodelabasurallenooalascado. 1. Cubodelabasurallmpio,(l_ginas15-16).
algt_oornodel_. 8stdroJo. 2. Filtrosdeseguddad, 2. LimpieJcambieel filtros,(pdginas16-17).
3, Conductode tlujodeairsatascado. 3. Retireel matedalblcqueantedel conduclo
deairs,(l_gina 21),
4. Ciertosaccesorios. 4. Esloesnormal.La luzdebeapagarseal
quilarla herramienta.
Re_ltdod_delfluJo deel 1. Elusodelosaccesodoslimitaelflujodeaire. 1. FleVJ_USODELOSACCESO_(ptona8).
ullodelosaccesodo_ 2. Lapelusadeunaalfombranueva 2. ReviseC_MOELIMINARLOSRESIDUOS
Camb_ deIo_ldo. obstruyeel pasodeaire. DE BASURAENLOSCONOUCTOS
ylimpielamanguera,(pdgina21).
Ruidoexcet,Nocu_uldose 1. Selectordepiso/alfombranoestt= 1. Oprimeelboloncomplelamente
apagala a_rsdors, empujandocompietamenteal frenle, haslael frenle, (p_gina7).
Indl_depoivo, algunos 1. Celdas6plicasest_Insucias 1. Limpielasceldas6plicas,(p_gina13)
modek_,nolundona.
/
23
Your Home
i!i!iii!iiii!
!_!:_!_!_i!¸i¸
For repair - in your home - of all major brand appliances,
lawn and garden equipment, or heating and cooling systems,
no matter who made it, no matter who sold it!
For the replacement parts, accessories and
owner's manuals that you need to do-it-yourself.
i_i!i)!iil;i;
s _ ....
iii!i;iii!
)i:i
ili;iii!i_;i
For Sears professional installation of home appliances
and items like garage door openers and water heaters.
1-800-4-MY-HOME ® Anytime, day or night
(1-800-469-4663) (U.S.A. and Canada)
www.sears,com www.sears.ca
Our Home
For rep_air of carry-in products like vacuums, lawn equipment,
_rld electronics, call or go on-line for the nearest
Sears Parts and Repair Center.
1-800-488-1222 Anytime, day or night (U.S.A. only)
www.sears.com
To purchase a protection agreement (U.S.A.)
or maintenance agreement (Canada) on a product serviced by Sears:
1-800-827-6655 (U.S.A.) 1-800-361-6665 (Canada)
Para pedir servicio de reparacibn
a domicilio, y para ordenar piezas:
1-888-SU-HOGAR sM
(1-888-784-6427)
Au Canada pour service en franc_ais:
1-800-LE-FOYER _:
(1-800-533-6937)
www.sears.ca
i _: ii;i;il
© Sears, Roebuck and CO.
® Registered Trademark / Ta Trademark / sa Service Mark of Sears, Roebuck and Co.
® Marca Registrada / ;M Marca de Fabrica / sa Marca de Servicio de Seam, Roebuck and Co.
ac Marque de commerce / MOMarque d_posee de Sears, Roebuck and Co.