Loading ...
Loading ...
Loading ...
5
WaterPressure
Acoldwatersupplywithwaterpressureofbetween30and
120psi(207and827kPa)isrequiredtooperatethewater
dispenserandicemaker.Ifyouhavequestionsaboutyourwater
pressure,callalicensed,qualifiedplumber.
ReverseOsmosisWaterSupply
IMPORTANT:Thepressureofthewatersupplycomingoutofa
reverseosmosissystemgoingtothewaterinletvalveofthe
refrigeratorneedstobebetween30and120psi(207and
827kPa).
Ifareverseosmosiswaterfiltrationsystemisconnectedtoyour
coldwatersupply,thewaterpressuretothereverseosmosis
systemneedstobeaminimumof40to60psi(276to414kPa).
Ifthewaterpressuretothereverseosmosissystemislessthan
40to60psi(276
to414kPa):
Checktoseewhetherthesedimentfilterinthereverse
osmosissystemisblocked.Replacethefilterifnecessary.
Allowthestoragetankonthereverseosmosissystemtorefill
afterheavyusage.
Ifyouhavequestionsaboutyourwaterpressure,callalicensed,
qualifiedplumber.
Connect the Water Supply
Readalldirectionsbeforeyoubegin.
IMPORTANT:Ifyouturntherefrigeratoronbeforethewaterlineis
connected,turntheicemakeroff.
ConnecttoWaterLine
1.Unplugrefrigeratorordisconnectpower.
2.Turnoffmainwatersupply.Turnonnearestfaucetlong
enoughtoclearlineofwater.
3.Locatea½"to1¹⁄₄"(1.25cmto3.18cm)verticalcoldwater
pipeneartherefrigerator.
IMPORTANT:
Makesureitisacoldwaterpipe.
Horizontalpipewillwork,butdrillonthetopsideofthe
pipe,notthebottom.Thiswillhelpkeepwaterawayfrom
thedrillandnormalsedimentfromcollectinginthevalve.
4.Determinethelengthofcoppertubingyouneed.Measure
fromtheconnectiononthelower-leftrearofrefrigeratortothe
waterpipe.Add7ft(2.1m)toallowforcleaning.Use¹⁄₄"
(6.35mm)O.D.(outsidediameter)coppertubing.Besureboth
endsofcoppertubingarecutsquare.
5.Usingacordlessdrill,drilla¹⁄₄"holeinthecoldwaterpipeyou
haveselected.
6.Fastentheshut-offvalvetothecoldwaterpipewiththepipe
clamp.Besuretheoutletendissolidlyinthe¹⁄₄"drilledholein
thewaterpipeandthatthewasherisunderthepipeclamp.
Tightenthepackingnut.Tightenthepipeclampscrewsslowly
andevenlysowashermakesawatertightseal.Donot
overtightenoryoumaycrushthecoppertubing.
7.Slipthecompressionsleeveandcompressionnutonthe
coppertubingasshown.Inserttheendofthetubingintothe
outletendsquarelyasfarasitwillgo.Screwcompressionnut
ontooutletendwithadjustablewrench.Donotovertighten.
8.Placethefreeendofthetubinginacontainerorsinkandturnon
themainwatersupply.Flushthetubinguntilwaterisclear.Turn
offtheshut-offvalveonthewaterpipe.Coilthecoppertubing.
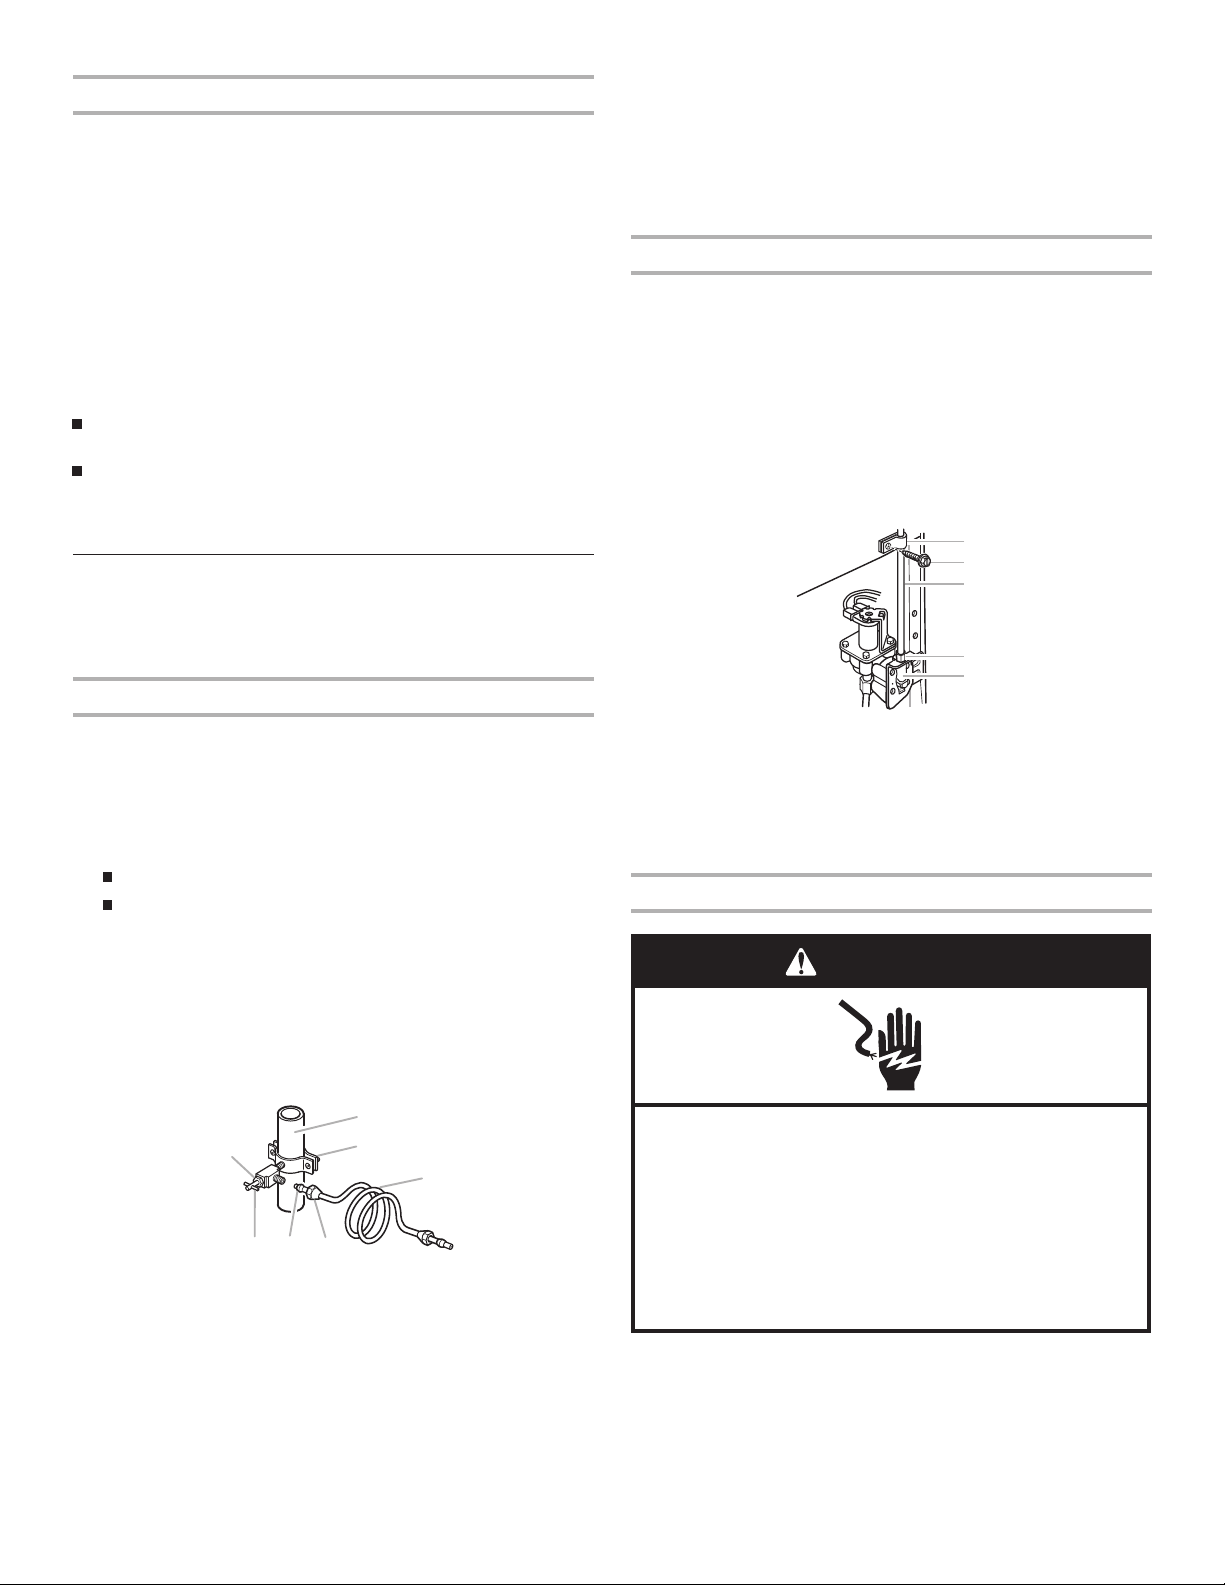
ConnecttoRefrigerator
1.Unplugrefrigeratorordisconnectpower.
2.Attachthecoppertubingtothevalveinletusinga
compressionnutandsleeveasshown.Tightenthe
compressionnut.Donotovertighten.
3.Usethetubeclamponthebackoftherefrigeratortosecure
thetubingtotherefrigeratorasshown.Thiswillhelpavoid
damagetothetubingwhentherefrigeratorispushedback
againstthewall.
4.Turnshut-offvalveon.
5.Checkforleaks.Tightenanyconnections(including
connectionsatthevalve)ornutsthatleak.
6.Theicemakerisequippedwithabuilt-inwaterstrainer.Ifyour
waterconditionsrequireasecondwaterstrainer,installitin
the¹⁄₄"
(6.35mm)waterlineateithert
ubeconnection.Obtain
awaterstrainerfromyournearestappliancedealer.
CompletetheInstallation
1.Plugintoagrounded3prongoutlet.
NOTE:Allow24hourstoproducethefirstbatchofice.Discard
thefirstthreebatchesoficeproduced.Allow3daystocompletely
fillicecontainer.
A. Cold water pipe
B. Pipe clamp
C. Copper tubing
D. Compression nut
E. Compression sleeve
F. Shut-off valve
G. Packing nut
A
B
C
DEF
G
A. Tube clamp
B. Tube clamp screw
C. Copper tubing
D. Compression nut
E. Valve inlet
A
C
B
D
E
Electrical Shock Hazard
Plug into a grounded 3 prong outlet.
Do not remove ground prong.
Do not use an adapter.
Do not use an extension cord.
Failure to follow these instructions can result in death,
fire, or electrical shock.
WARNING
Loading ...
Loading ...
Loading ...