Loading ...
Loading ...
Loading ...
8
20308184
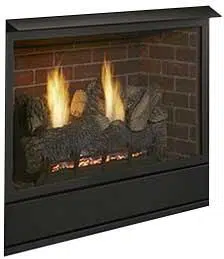
VFF Vent Free Fireplace System
GETTING STARTED
Make sure you have received all parts. Check your packing
list to verify that all listed parts have been received. You
should have the following:
• Unvented gas heater
• Installation/operating instruction
• Canopy and three (3) screws
• Glass media (Contemporary model only)
• Refractory cemet or ceramic ber logs sold sepa-
rately
Carefully inspect the contents for shipping damage. If
any parts are missing or damaged, immediately inform
the dealer from whom you purchased the appliance.
Do not attempt to install any part of the appliance
unless you have all parts in good condition.
WHAT YOU WILL NEED FOR INSTALLATION:
You must have the following items available before pro-
ceeding with installation:
• External regulator (for propane/LPG only)
• Manual shutoff valve
• Piping which complies with local codes
• Sediment trap
• Phillips head screwdriver
• Tee joint
• Pipe sealant approved for use with propane/LPG
• Pipe wrench (resistant to sulfur compounds)
When planning the installation for the replace it is nec-
essary to determine where the unit is to be installed and
whether optional accessories are desired. Gas supply
piping should also be planned. The following steps repre-
sent the normal sequence of installation. Each installation
is unique, however, and might require a different sequence.
1. Position fireplace in desired location. Refer to the
Location of Fireplace and Clearances and Height
Requirements, and Firebox Framing sections found in
this manual.
NOTE: Be sure all packing material has been removed
from underside the unit.
PRE-INSTALLATION INFORMATION
• Gloves are recommended when handling
refractory cement or ceramic ber logs to
prevent skin irritation from loose fibers.
Logs are fragile — handle with care.
WARNING:
WARNING—Do not install the heater:
• Where curtains, furniture, clothing, or
other ammable objects are less than
42" from the front of the heater.
• In high trafc areas.
• In windy or drafty areas.
WARNING: If the area in which the heater
is operated does not meet the required
volume for indoor combustion air, combustion
and ventilation air shall be provided by one of
the methods described in the National Fuel Gas
Code, ANSI Z223.1/NFPA 54, the International
Fuel Gas Code or applicable local codes.
2. Install canopy and logs per instructions found in this
manual. The canopy MUST be installed for safe oper-
ation of the unit.
3. Field wire main power supply to units with fan kit. Refer
to the Electrical Section found in this manual. (Electrical
connections should only be performed by an experi-
enced, licensed certied tradesman).
4. Install optional ON/OFF kit on units with millivolt control.
Refer to the installation instructions included with the
kit and also refer to the Electrical Wiring section found
in this manual.
5. Plumb gas line. Refer to the Connecting the Gas
section found in this
manual. (Gas connections should only be performed
by an experienced,
licensed/certied tradesman).
6. Complete nish wall material and/or surround.
ADEQUATE COMBUSTION AND VENTILA-
TION AIR
This heater shall not be installed in a conned space or
unusually tight construction unless provisions are provided
for adequate combustion and ventilation air.
The National Fuel Gas Code, (ANSI Z223.1/NFPA54),
denes a conned space as a space whose volume is less
than 50 cubic feet per 1,000 BTU per hour (4.8m
3
per kw) of
the aggregate input rating of all appliances installed in that
pace, and an unconned space as a space whose volume
is not less than 50 cubic feet per 1,000 BTU per hour (4.8
m
3
per kw) of the aggregate input rating of all appliances
installed in that space. Rooms communicating directly with
the space in which the appliances are installed, through
openings not furnished with doors, are considered a part
of a conned space.
Loading ...
Loading ...
Loading ...