
i
Important Safety Information
Improper handling can cause serious damage to the appliance and/or to the user. Please read the
following safety information.
Warning: The water produced by the window AC is not potable or suitable for drinking.
Do not drink the water drained from the unit as it contains contaminates and could make you sick.
Electrical Safety
• Make sure your hands are dry and not wet before operating the unit.
• Make sure the unit is properly grounded.
• Do not wet the front housing or control panel.
• Do not directly spray water on this Air Conditioner.
• Do not pull the unit by the cord.
• Always turn the unit off and unplug it from the socket when cleaning.
• Unplug the unit if it is not going to be used for a long period of time.
• Do not operate the unit with a damaged or loose plug and/or socket.
• Use only the correct power supply with appropriate amperage.
• If the power cord is damaged, it must be replaced by the manufacturer, a service agent, or qualified
technician.
• Do not turn the unit off or on by inserting or pulling the power plug.
• Do not modify the power cord length or share the outlet with another appliance.
• Do not use this unit with an extension cord and/or adapter plug.
• Do not use this unit near flammable gases/combustibles or in close proximity to heating appliances.
• During operation do not remove any part of the outside casing.
Electrical Requirements
• A 115 volt (103.5 minimum, 126.5 maximum), 60 Hertz, AC only, 15 Ampere fused electrical supply
is required. A time delay fuse or time delay circuit breaker is also required. A separate circuit, serving
only this appliance, MUST be provided.
General Safety
• Do not let people or pets sit or set an object directly in front of air flow.
• If a strange sound, smell, or smoke comes from the unit, turn it off and review the troubleshooting
page of this manual.
• Stop operation and unplug unit in the event of a severe storm.
• To ensure proper air flow and intake, make sure the air vents are not obstructed.
• See instructions for cleaning air filters and how often cleaning should occur.
• Do not use strong detergents when cleaning.
• Children should be supervised when operating this unit.
• Do not allow children to play with the controls or drop any objects into the air outlets or vents.
• Do not place objects or let any person sit on top of the unit.
• Route the power cord carefully to avoid a tripping hazard.
• This unit is intended for domestic home use only. Do not use the window air conditioner for
commercial or industrial use. Any other use may invalidate the warranty.
• Use caution when unpacking and installing the unit as there may be some sharp edges.
ii
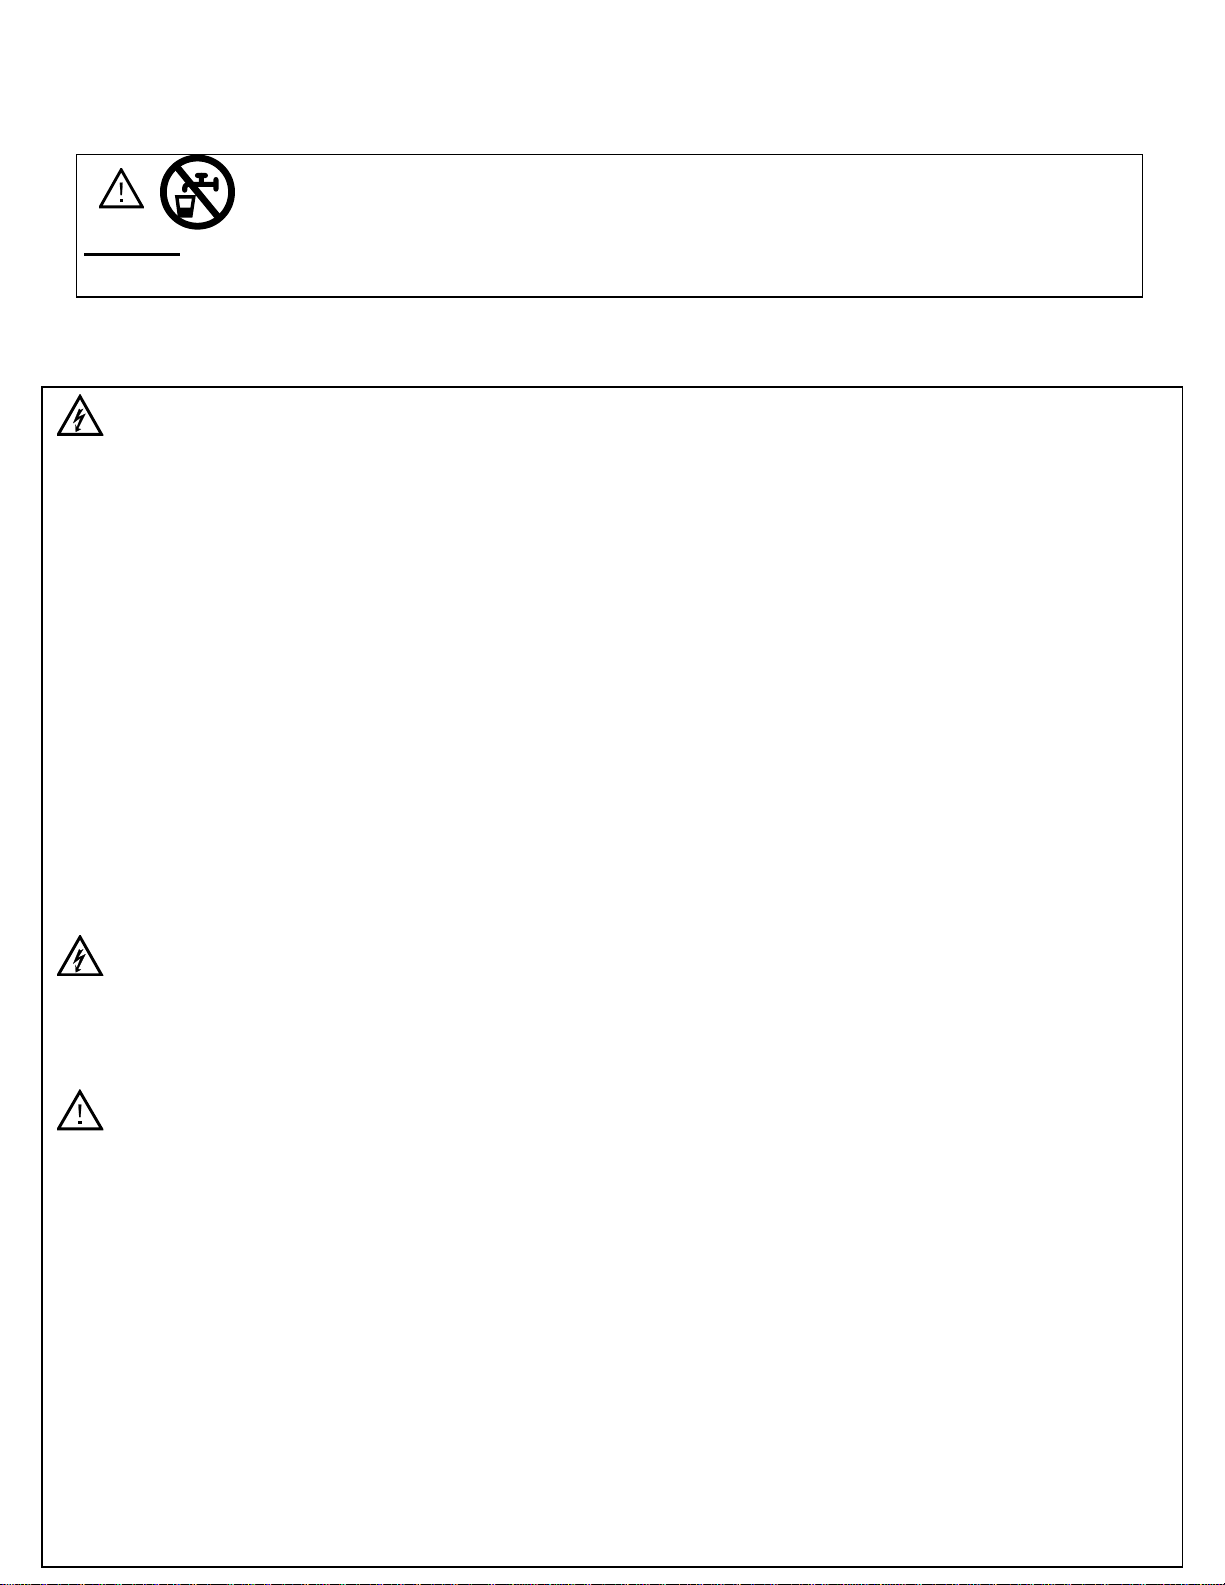
Operation of Safety Plug
Your window air conditioner is supplied with a Leakage-Current Detection and Interruption (LCDI)
safety plug. This device provides protection to reduce the risk of fire due to arcing faults in the
power supply cord. Before using your window air conditioner, follow the instructions below to
ensure that the LCDI plug is working properly:
1. Plug the power cord into a grounded outlet.
2. Press the TEST button on the LCDI plug. This should trip the plug and cut the power to the air
conditioner. If the plug does not trip and you are able to turn on the unit, please contact Koldfront
support.
DO NOT USE YOUR WINDOW AIR CONDITIONER IF THE TEST FAILS.
3. Press the RESET button to start using your air conditioner.
Note: Electrical products should not be disposed of with household waste. Please contact your
local recycling center for more information on how to recycle electronic waste.
Notes:
• Always make sure the “Reset” button is pushed in for proper operation.
• The power supply cord with LCDI plug must be replaced if it fails to reset.
• Do not use the TEST and RESET buttons as an ON/OFF switch.

iii
Table of Contents
IMPORTANT SAFETY INFORMATION ...................................................................................................................................................... I
TABLE OF CONTENTS ........................................................................................................................................................................... III
INTRODUCTION ..................................................................................................................................................................................... 1
PARTS IDENTIFICATION ......................................................................................................................................................................... 2
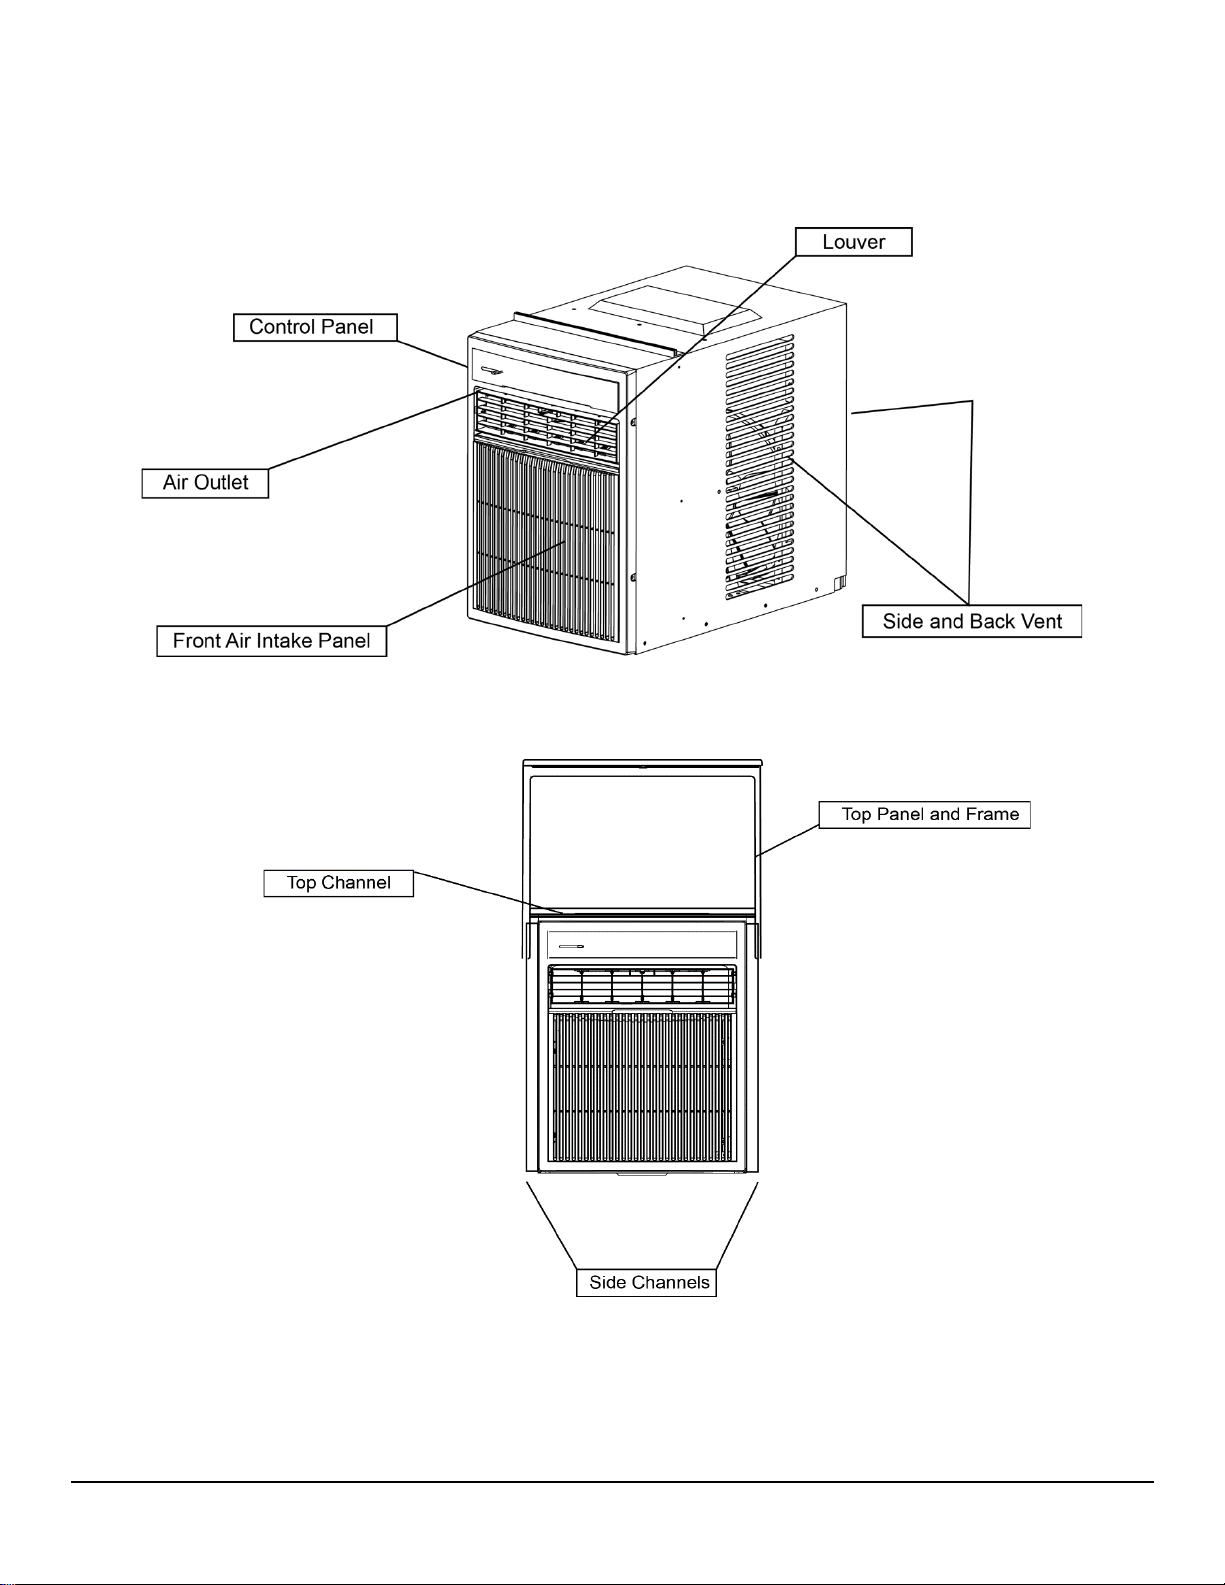
Side View ................................................................................................................................................................................. 2
Front View ............................................................................................................................................................................... 2
PREPARATIONS FOR INSTALLATION ...................................................................................................................................................... 3
WINDOW INSTALLATION INSTRUCTIONS .............................................................................................................................................. 4
Preparing the Unit for Installation ........................................................................................................................................... 4
Attach the Window Platform to the Window .............................................................................................................................. 4
Attach Window Panel Frame and Side Panels ............................................................................................................................. 6
Remove the Front Panel .............................................................................................................................................................. 7
Installing Air Conditioner into a Slider Window ....................................................................................................................... 8
Installing Air Conditioner into a Casement Window ................................................................................................................. 9
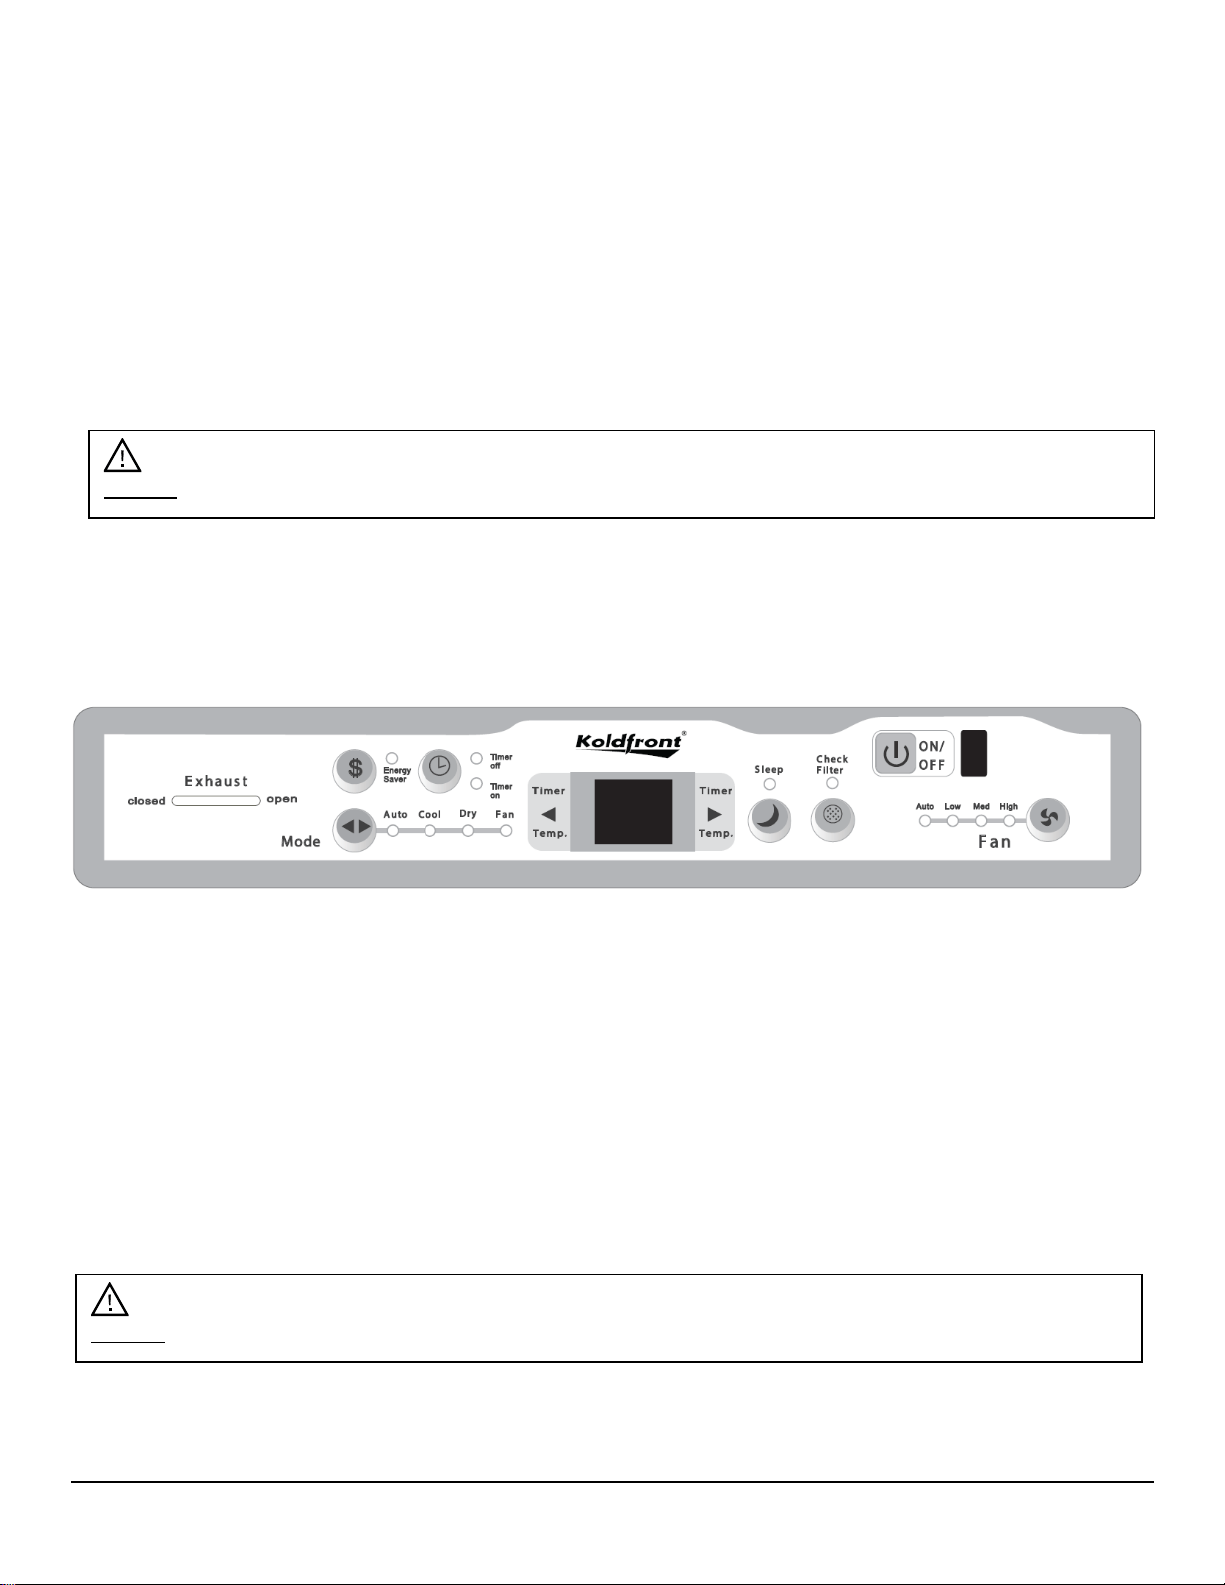
CONTROL PANEL OPERATIONS ........................................................................................................................................................... 10
Using the Control Panel ......................................................................................................................................................... 10
Digital Display: ........................................................................................................................................................................... 10
To Turn the Unit On: .................................................................................................................................................................. 10
To Change Temperature: ........................................................................................................................................................... 11
To Adjust Fan Speeds: ................................................................................................................................................................ 11
To Select Operating Mode: ........................................................................................................................................................ 11
To Operate in Auto Mode: ......................................................................................................................................................... 11
To Operate in Cool Mode: ......................................................................................................................................................... 11
To Operate in Dry Mode: ........................................................................................................................................................... 11
To Operate in Fan Mode: ........................................................................................................................................................... 12
Energy Saver Feature ............................................................................................................................................................. 12
Timer (Auto Start/Stop) Feature ............................................................................................................................................ 12
Sleep Feature ......................................................................................................................................................................... 12
Filter Check Feature ............................................................................................................................................................... 12
Air Directional Louvers ........................................................................................................................................................... 13
Exhaust Control ...................................................................................................................................................................... 13
REMOTE CONTROL OPERATIONS ........................................................................................................................................................ 14
Using the Remote Control ...................................................................................................................................................... 14
Installing the Batteries ........................................................................................................................................................... 15
MAINTENANCE ................................................................................................................................................................................... 16
Air Filter Cleaning .................................................................................................................................................................. 16
Cabinet Cleaning .................................................................................................................................................................... 16
NORMAL SOUNDS ............................................................................................................................................................................... 17
ERROR CODES ..................................................................................................................................................................................... 17
ENERGY SAVING GUIDE ....................................................................................................................................................................... 17
TROUBLESHOOTING............................................................................................................................................................................ 18
SPECIFICATIONS .................................................................................................................................................................................. 20
EDGESTAR LIMITED WARRANTY ......................................................................................................................................................... 21
1
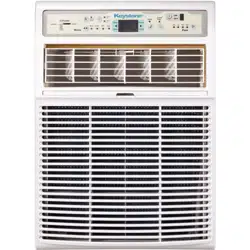
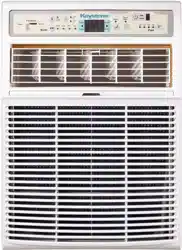
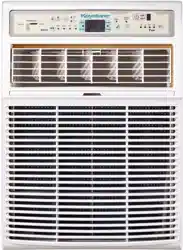
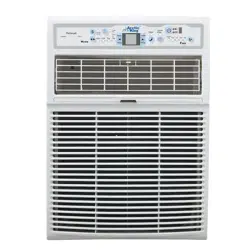
Introduction
Thank you for purchasing this Koldfront casement window air conditioner. We hope that this
purchase will be the beginning of a lasting and rewarding relationship between you and Koldfront.
We will provide the customer support and exemplary products necessary to nurture that
relationship.
This manual contains important information regarding the proper installation, use and
maintenance of your window air conditioner. Following this manual will ensure that your product
will work at its peak performance, efficiency, and safety.
Please save the original product packaging in case you need to safely transport your window air
conditioner.
For Your Records:
Please write down the model number and serial number below for future reference.
Both numbers are located on the ratings label on the back of your unit and are
needed to obtain warranty service. You may also want to staple your receipt to this
manual as it is the proof of your purchase and is also needed for service under your
warranty.
Model Number:
Serial Number:
Date of Purchase:
For a more efficient experience, please do the following before contacting customer service:
• If you received a damaged product, immediately contact the dealer that sold you the
product.
• Read and follow this instruction manual carefully to help you install, use and maintain your
window air conditioner.
• Read the troubleshooting section of this manual as it will help you diagnose and solve
common issues.
• Visit us on the web at www.koldfront.com for product guides, additional troubleshooting
resources and up-to-date information. If you need service, our friendly customer service
representatives are available via email at [email protected].
2
Parts Identification
Side View
Front View
3
Preparations for Installation
NOTE: To avoid risk of injury and/or product/property damage, please take the following
precautions:
- Two or more people are needed to properly handle and install.
- Use proper lifting and carrying techniques.
- Before installation, make sure to inspect the window and sill to ensure they can handle the weight
and size of this unit.
- Wearing protective gloves will help to avoid injury from sharp edges.
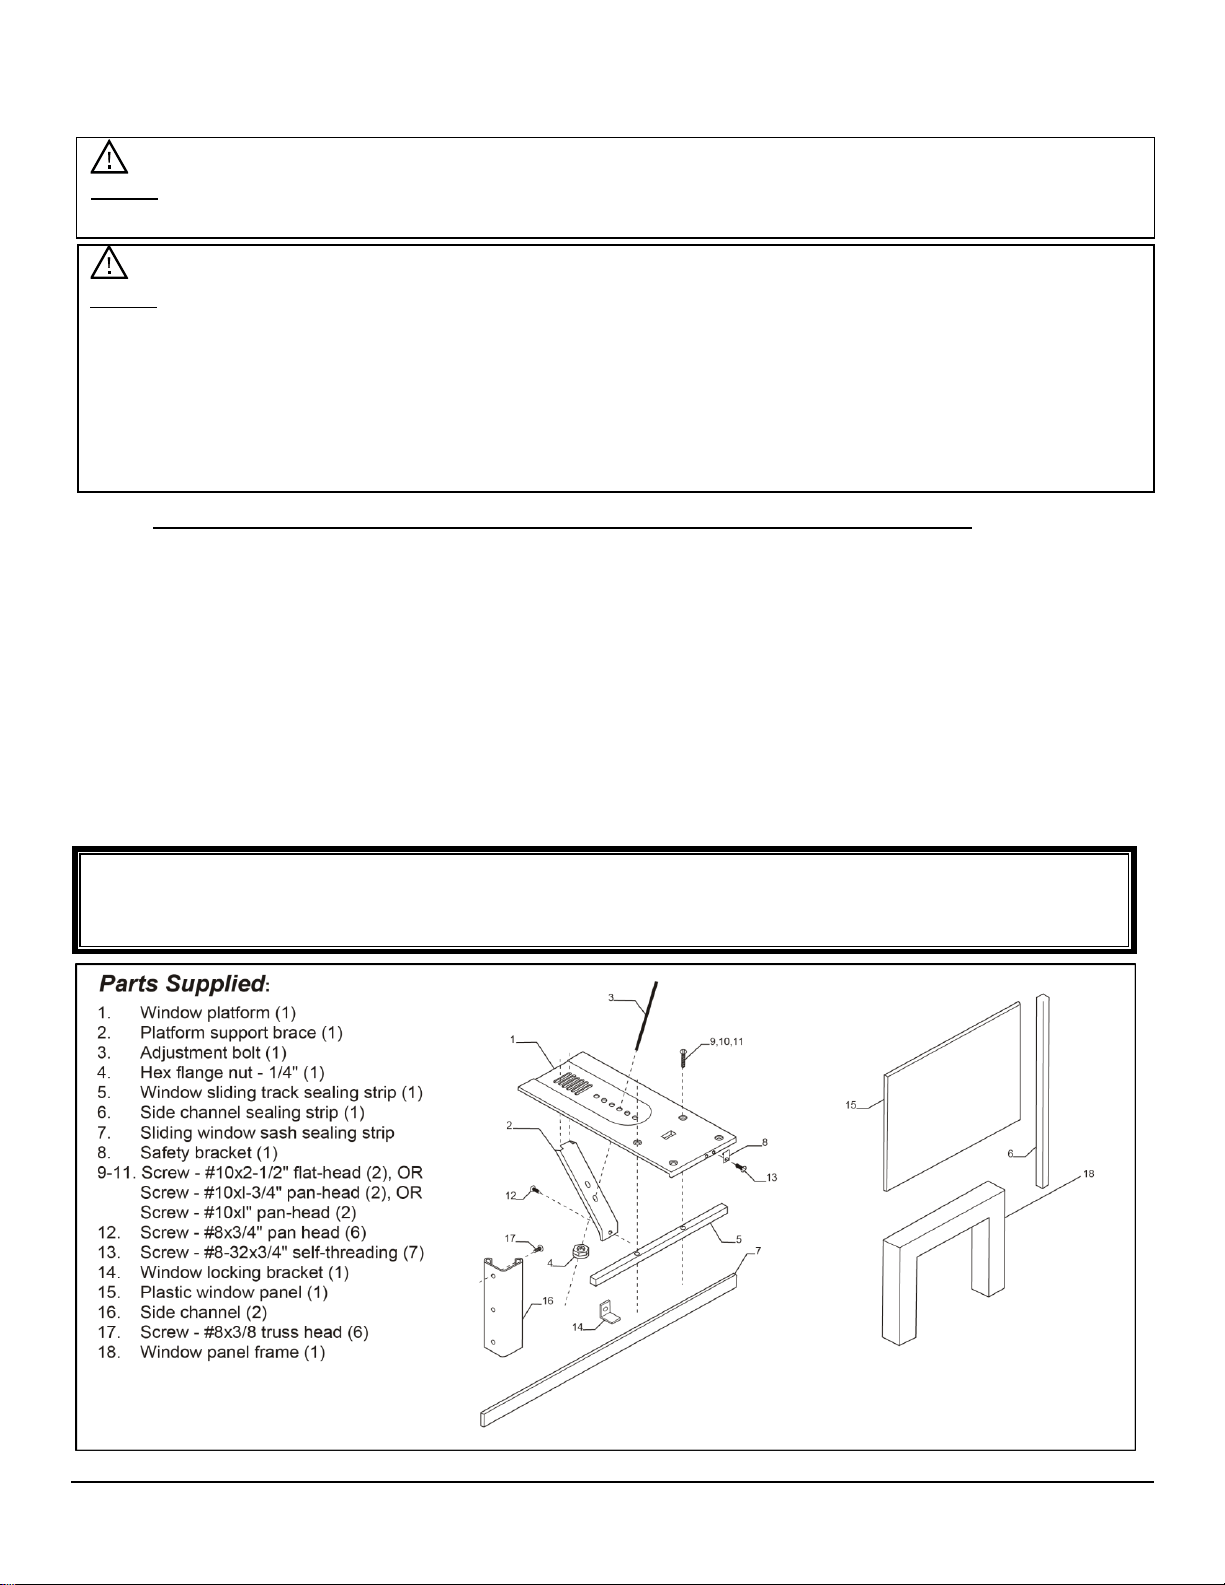
Before you begin, make sure you have all the parts necessary for installation.
If you have multiple windows, choose one that is near an electrical outlet that will be able to
provide sufficient power to your unit. See the power requirements listed on the product label
printed on the side or the back of your window air conditioner.
The following measurements are required to properly install the air conditioner.
• 15-1/2 inches minimum width
• 16-1/4 inches maximum width (for casement windows)
• 21-1/4 inches minimum height (with window panel frame)
• 20-5/16 inches minimum height (without window panel frame)
• 39-7/16 inches maximum height
Tools Needed:
• Flat Screwdriver • Phillips Screwdriver • Tape Measure • Level • Scissors • Pencil • Electric Drill
• Fine Tooth Saw
NOTE: You may need to contact your electrician if your room’s circuit is not able to power your
unit.
4
Window Installation Instructions
Preparing the Unit for Installation
Attach the Window Platform to the Window
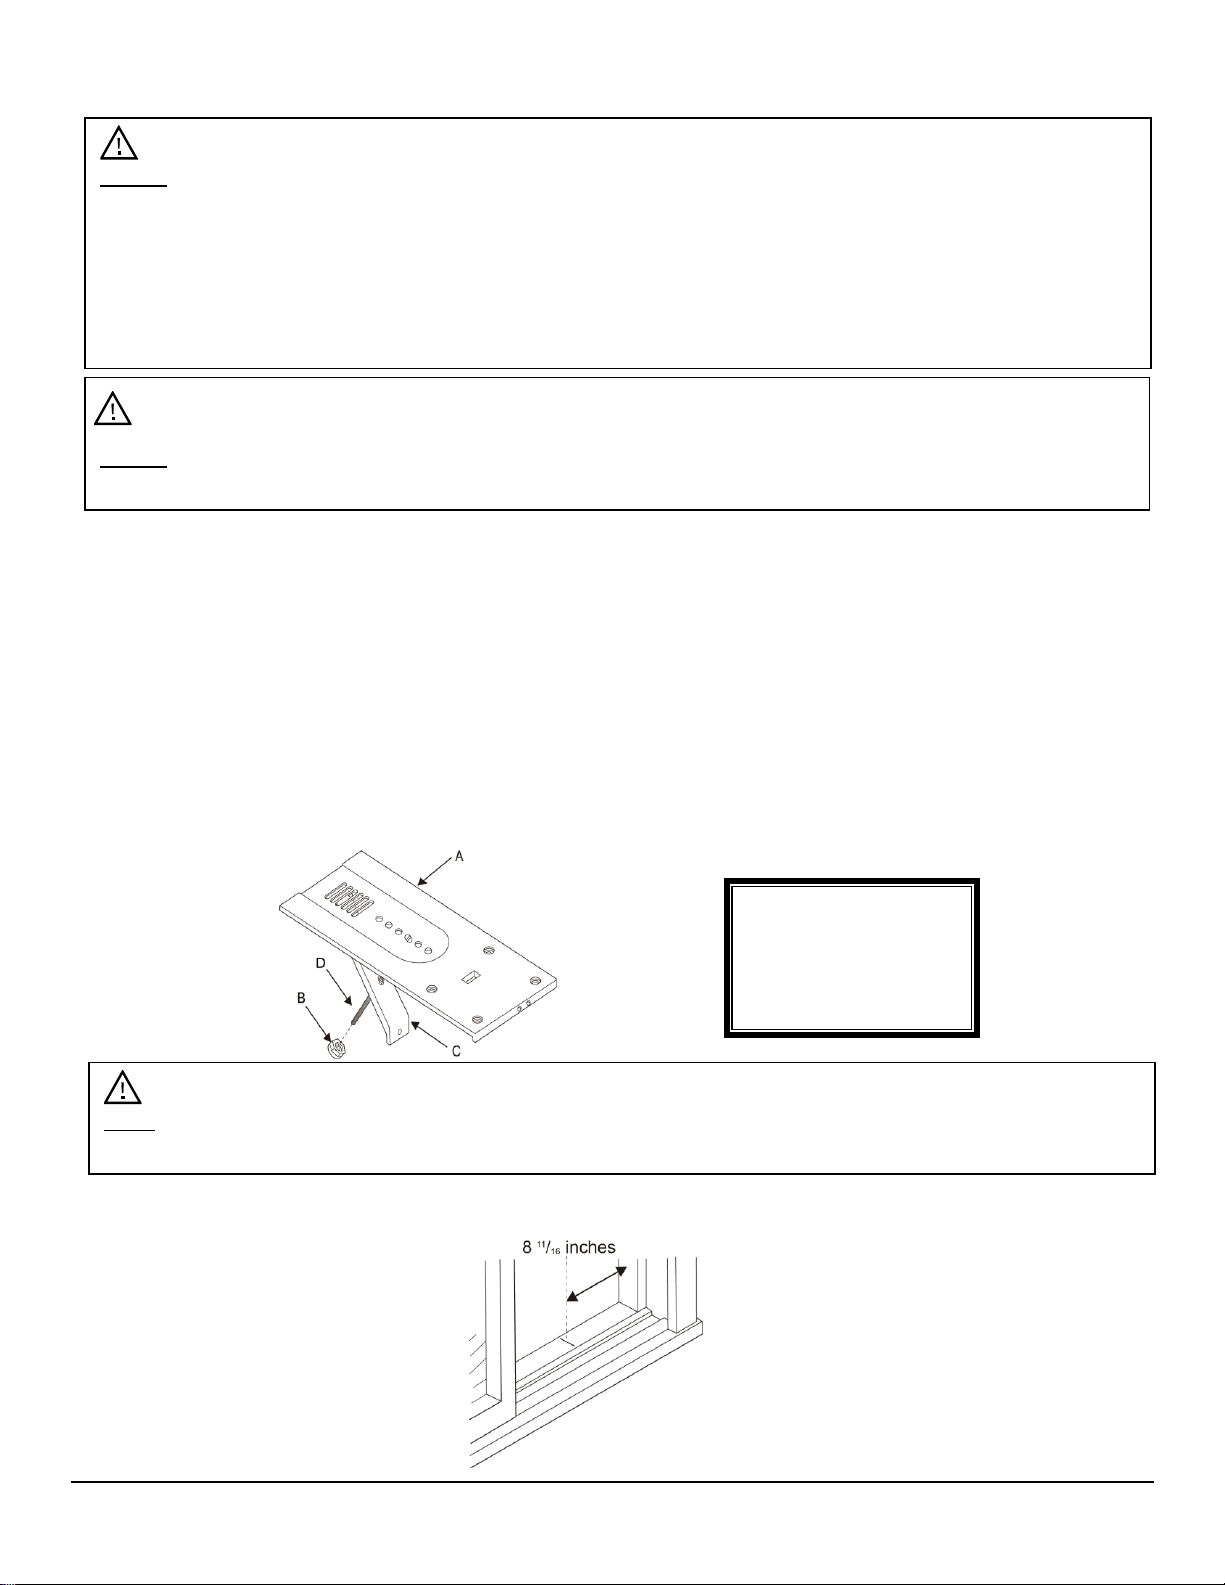
1. Using the adjustment bolt and the hex flange nut, secure the platform support brace to the
window platform. Choose a slot for the adjustment bolt on both the platform and the
support brace that will create a 45° angle between the two pieces.
• Place the window platform assembly in the installation window to determine if the
platform sits properly and will provide the proper slope (3/16” (~3°) lower on the
outside).
• If the platform does not provide the proper slope, then move the adjustment bolt to
a different slot in the platform and support brace and test again.
2. Measure 8 11/16” from the window jamb and lightly draw a line in pencil.
NOTE: When choosing your window, make sure power supply cord is within 6 feet of a grounded
3-prong outlet. Do not use an extension cord.
NOTE:
• These instructions are for installation in a standard slider or casement window only.
• If installing the unit into a casement window, open the window to the maximum amount to allow
for clearance of the cabinet.
• If the window cannot open more than 15 ½” for the cabinet to clear the window, the entire
window can be removed. If this is necessary, contact a professional to ensure proper
installation.
Note: If you are planning to use a siding protection board (step 5) on the outside of the house,
hold down the window platform flat while testing.
A. Window platform
B. Hex flange nut
C. Platform support
brace
D. Adjustable bolt

5
3. Center the window platform on the newly drawn line with the inner (second) tab on the
bottom of the platform pressed against the inside edge of the window track. Mark two
holes on the window track or sill using the two holes on the window platform on either side
of the platform tab. Remove the window platform and then drill two 9/64” holes in either the
window track or sill in the two marked spots.
4. Apply the adhesive window sliding track sealing strip by first removing the protective
backing and then placing it to the room side of the window track. The center of the sealing
strip should coincide with the line draw in step 2. The two screw holes drilled in step 3
should be directly above the sealing strip on the inner track.
5. Securely attach a siding-protection board to the side of the house.
6. Place the window platform with the platform tab against the inside of the window track.
Fasten the window platform (allowing for some adjustment space) to the window track or
sill using the previously drilled holes and the appropriate length screws (items 9 through
11 in Parts Supplied).
7. Confirm that, when secured, the outside edge of the window platform is 5/16” (~4°) lower
than the inside. If this is not the case, adjust the window platform until it is in the correct
position and then secure it in place by tightening the screws.
A. Window track
B. Window platform
(tab).
C. Alternate drilling
location (depending
on window sill depth)
Note: This step is optional. If you have no intention of using a siding-protection board please
proceed with step 6.
A. Siding-protection
board
B. Inside Wall
C. Window platform
6
8. Use a level to make sure that the platform is flat. Adjust the screws and use leveling shims
if necessary.
Attach Window Panel Frame and Side Panels
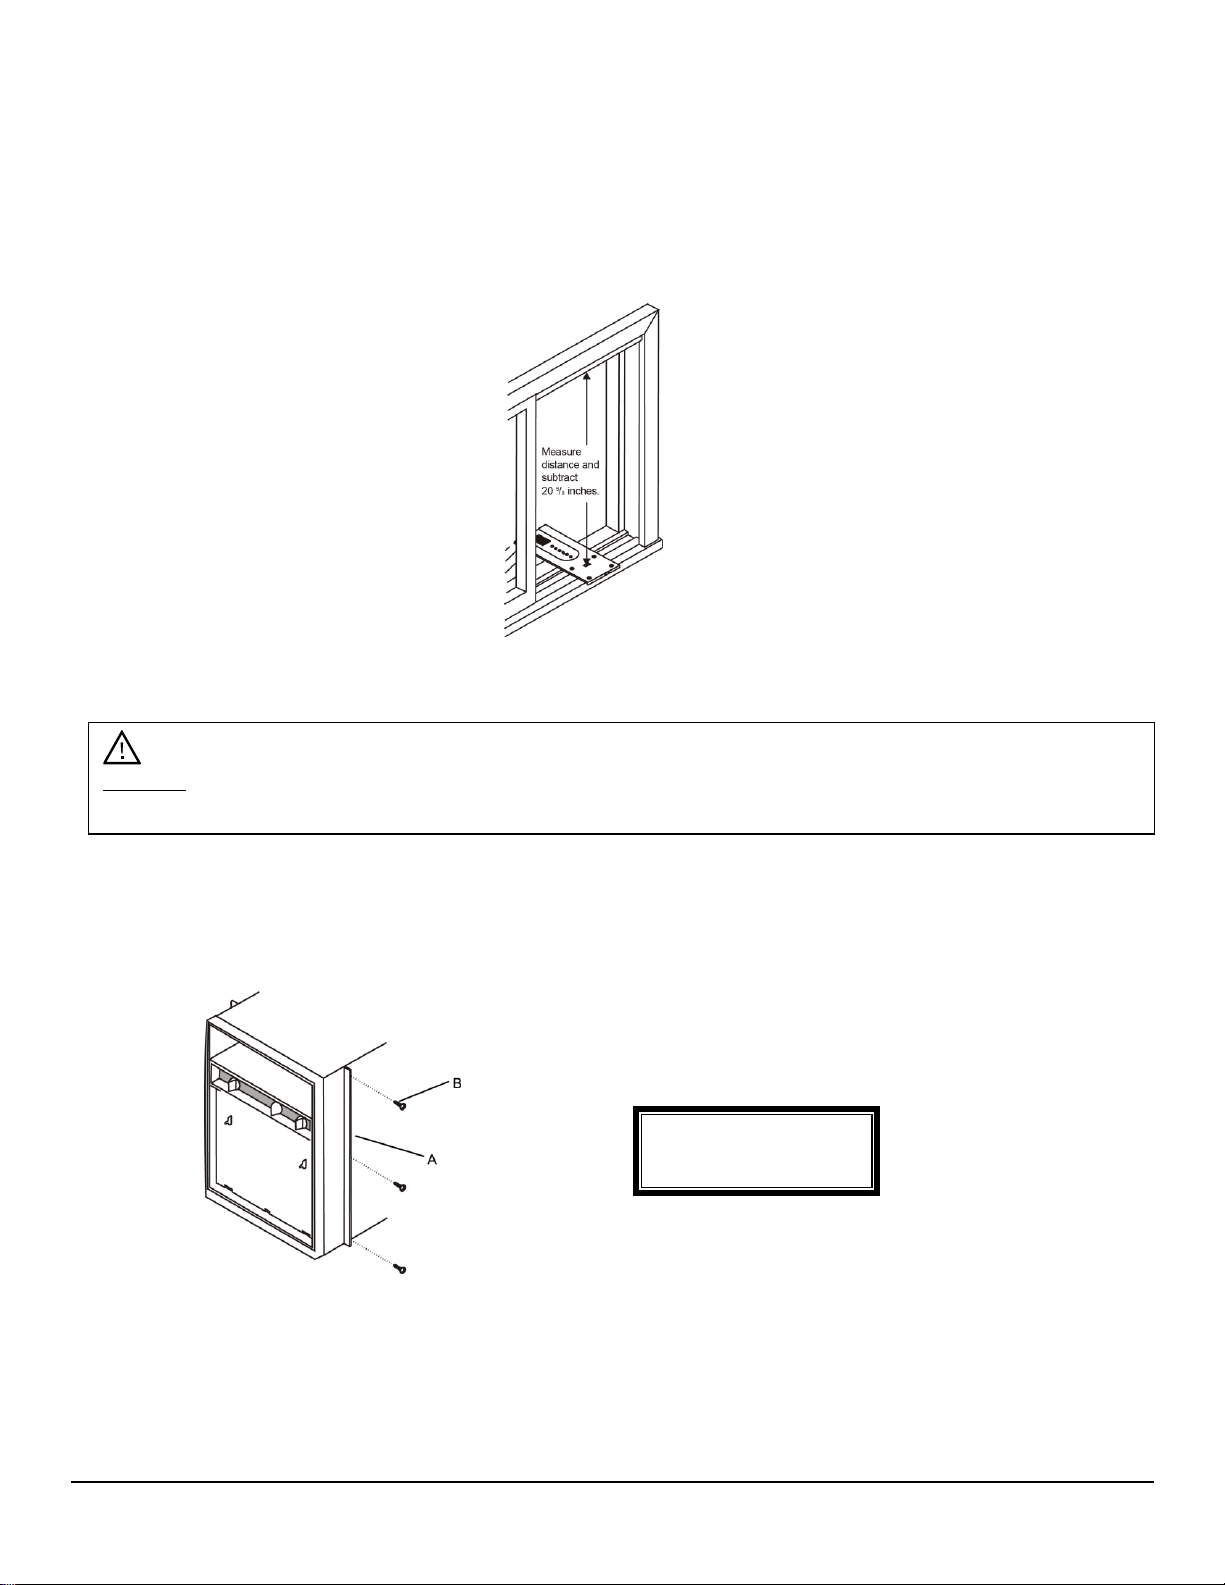
1. Measure the height of the window opening from the top of the window platform. Subtract
20 5/8” from this measurement and take note of the length for step 2.
2. Cut the plastic window panel along the longer side to the length measured in step 1 using a
fine tooth saw. Remove any burrs with a file.
3. Fasten the side channels to the sides of the air conditioner using three #8x3/8 screws (item
17 in the parts supplies list) per channel. When fastening the screws start with the top
screw and make sure that the curved ends on the long end of the channel face back
towards the air conditioner.
4. Slide the plastic window panel into the window panel frame with the smooth side facing the
flat edges of the panel frame. Once the plastic window panel is in place, slide the panel
frame assembly down into the side channels until the bottom of the plastic panel rests
inside the groove on top of the air conditioner.
A. Side Channel
B. #8x3/8 screw
Caution: Take proper precautions when using the fine tooth saw. To avoid injury make sure that
the plastic window panel is secure before cutting.
7
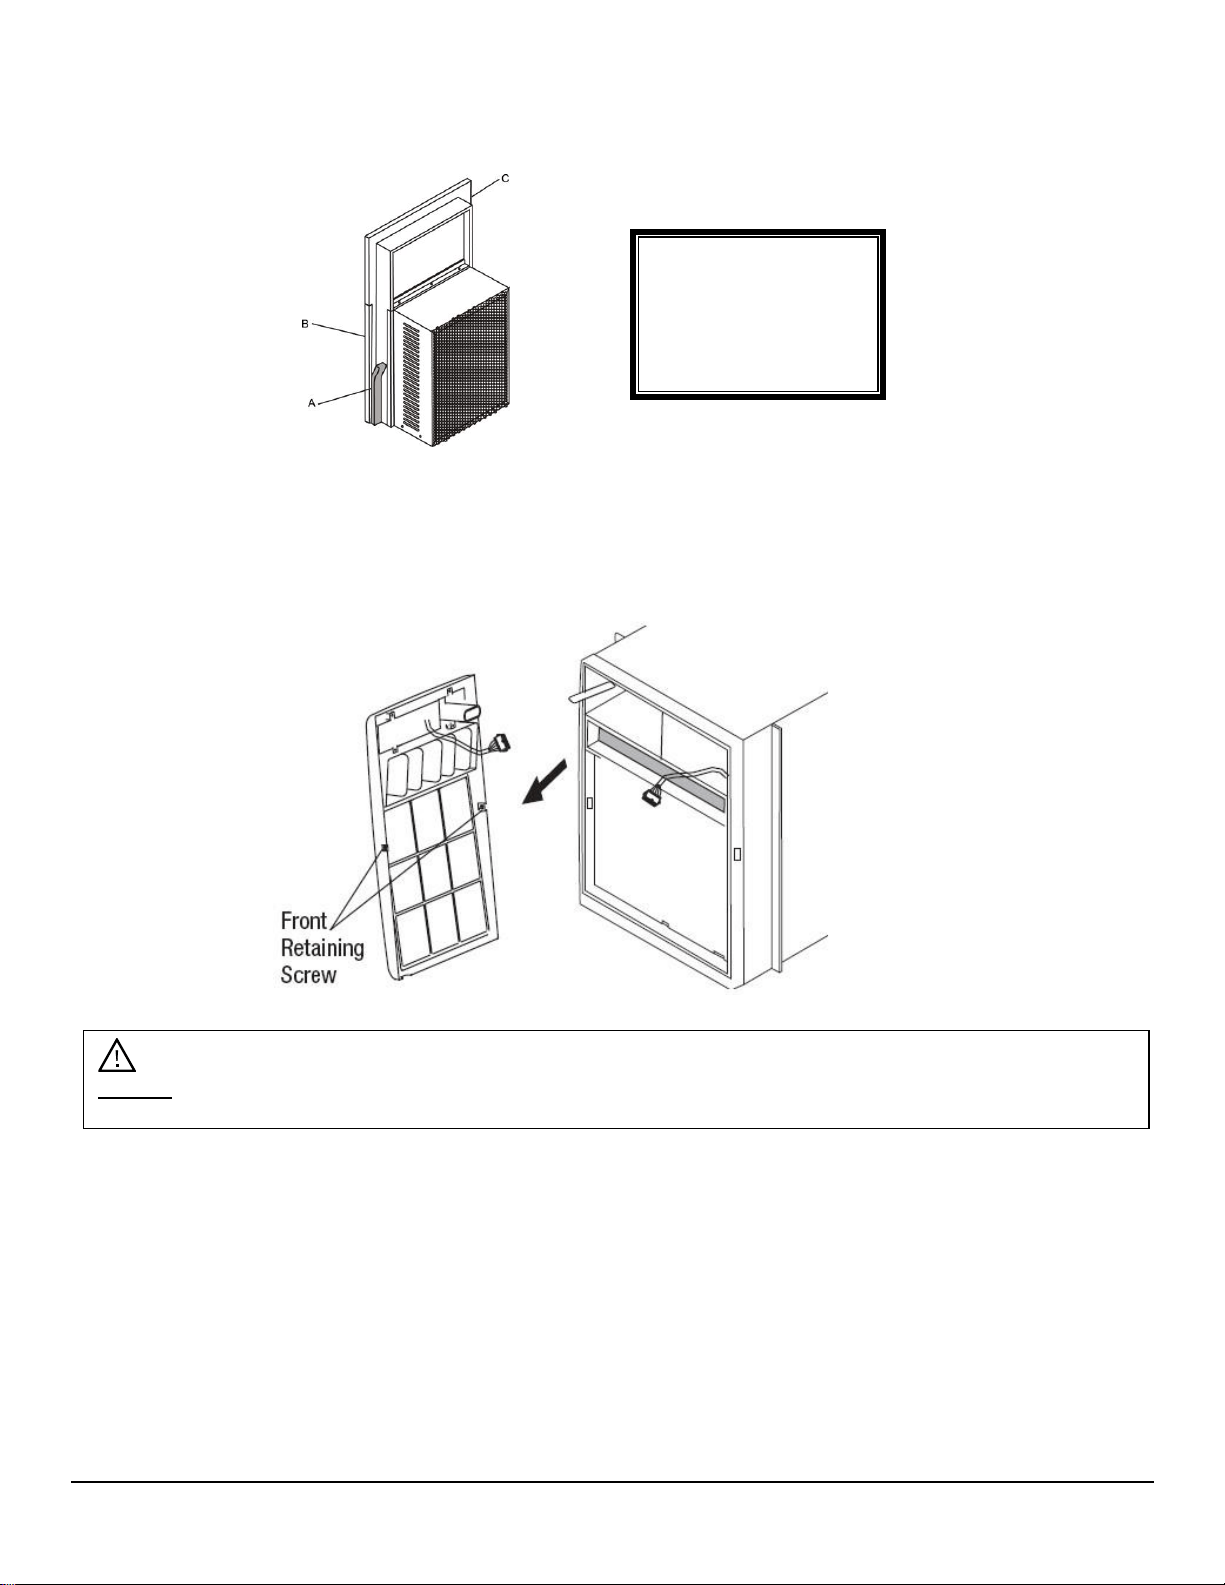
5. Cut the side channel sealing strip into two equal lengths. Remove the protective backing
and apply it to the back of the side channel starting just below the window panel frame.
Remove any excess length so that the seal is even with the bottom of the side channel.
Remove the Front Panel
1. Remove the two (2) front retaining screws from the front frame.
2. Gently pull the front out and lift up to release it from the case.
3. Release the control board plug.
A. Side channel
sealing strip
B. Side channel
C. Window panel
frame
NOTE: Be careful not to push or pull the louvers when removing the front panel.
8
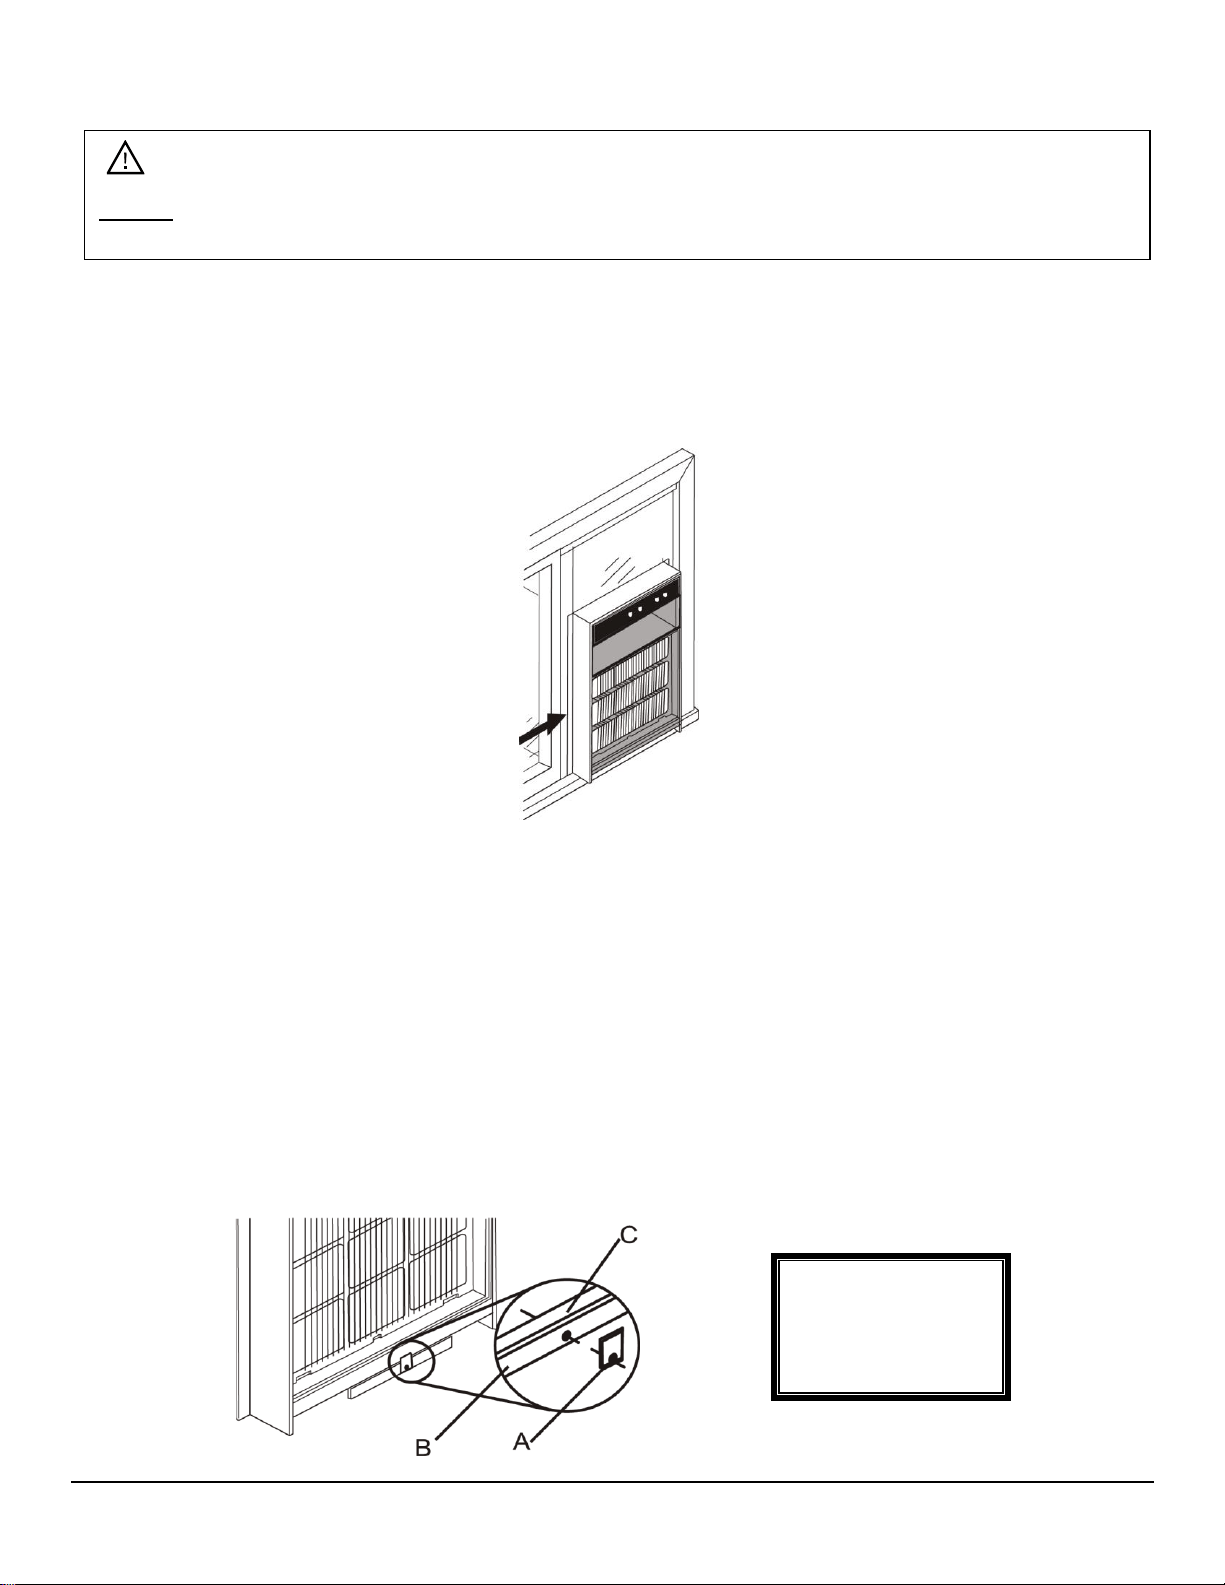
Installing Air Conditioner into a Slider Window
Follow the steps listed below to install the air conditioner into the window:
1. Using two (2) or more persons, safely lift the air conditioner into the windowsill on top of the
previously installed window platform:
• The air conditioner should sit so that the window panel frame and side channels are
against the top and side window jambs.
2. Slide the window firmly against the side of the cabinet, making sure not to peel the sealing
strips from the window track and side channels.
• If the window does not fit snugly against the window panel frame it can be secured with
screws.
• Using the partially plugged holes in the window panel frame, drill 1/8” pilot holes for the
screws.
• Secure the window panel frame to the slider window with #8x3/4” or #8-32x3/4” screws.
3. Install the window Safety Bracket to prevent movement of the air conditioner (in or out):
• Place the window safety bracket over the base of the air conditioner and the front of the
window platform.
• Secure the window safety bracket to the window platform using a #8-32x3/4” self-
threading screw.
A. Window safety
bracket
B. Window platform
C. Air conditioner
NOTE: When choosing your window make sure the power supply cord is within 6 feet of a
grounded 3-prong outlet.
9
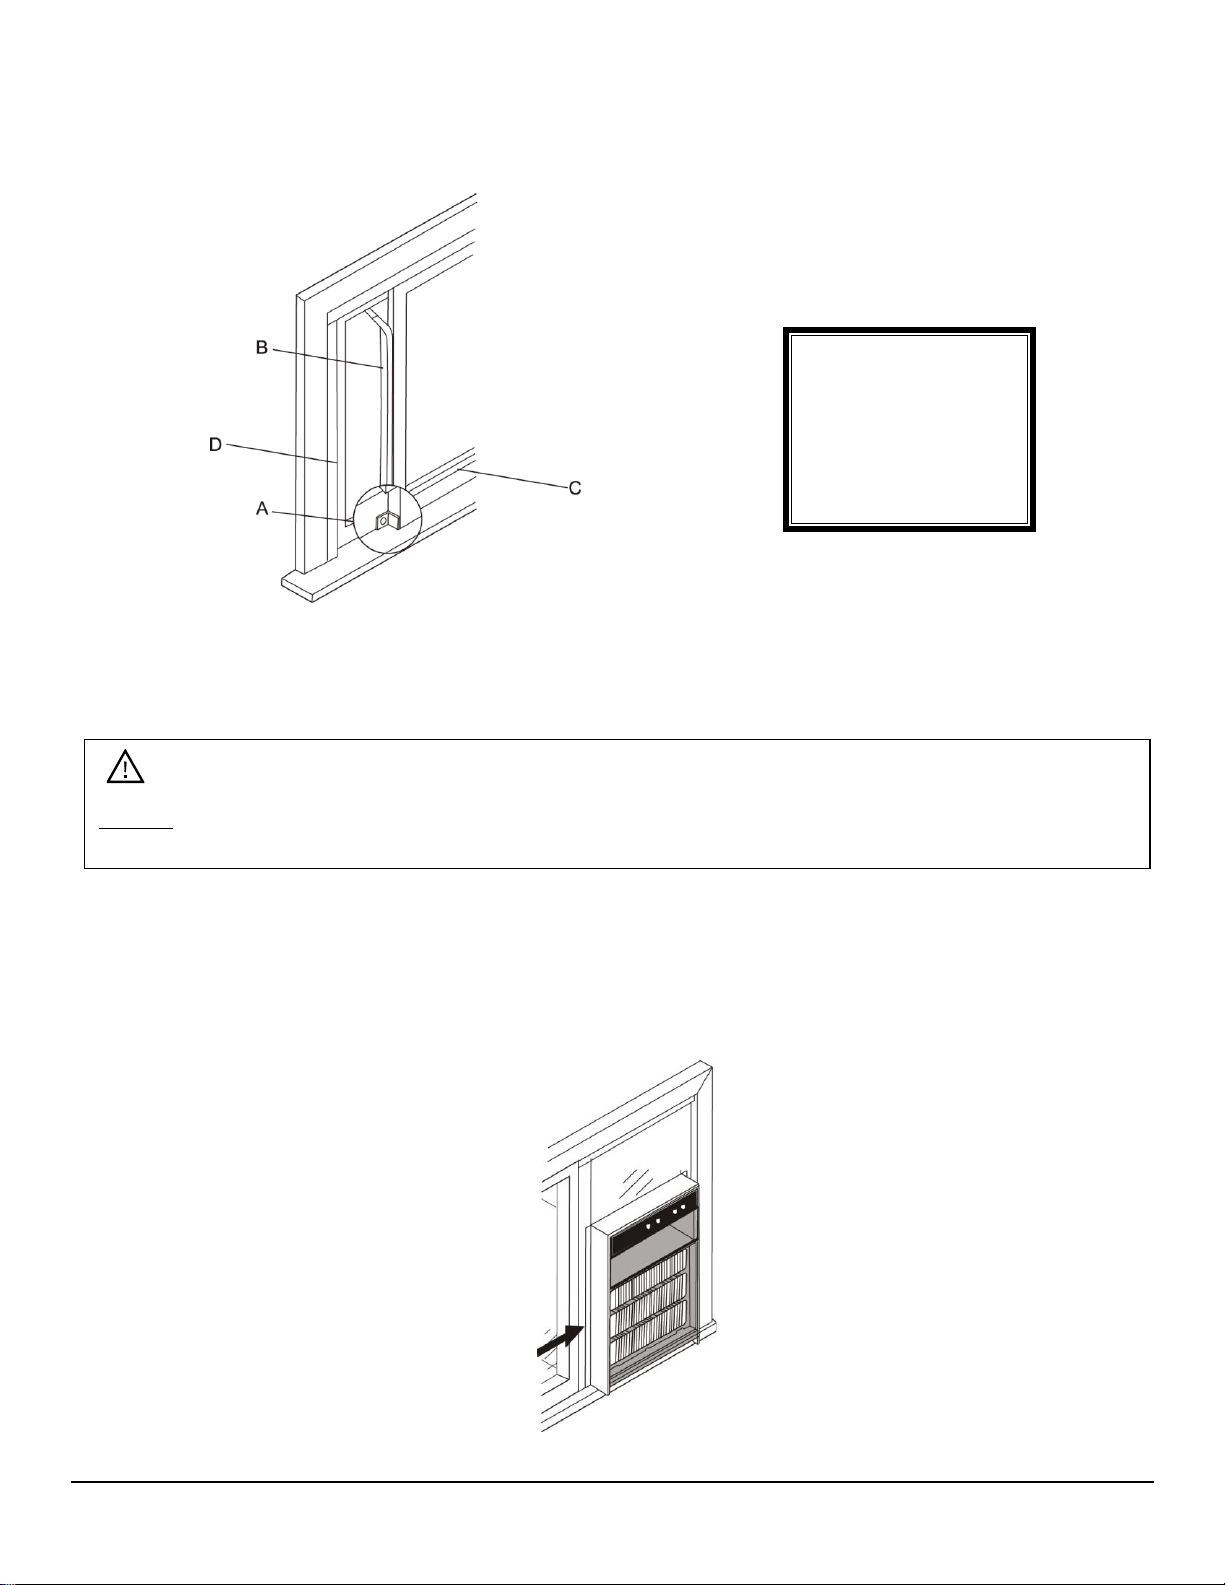
4. Place the sliding window sash sealing strip between the far vertical edge of the inner window
and the glass of the outer window.
5. Install the window locking bracket to lock the inner window to the base of the outer window.
• Use one #8x3/4” screw or #8-32x3/4” self-threading screw to fasten the window locking
bracket in place.
6. Replace the front panel by reversing the steps in the “Remove the Front Panel” section. Make
sure the exhaust control level passes through the front in the proper location.
Installing Air Conditioner into a Casement Window
Follow the steps listed below to install the air conditioner into the window:
1. Using two (2) or more persons, safely lift the air conditioner into the windowsill on top of the
previously installed window platform:
• The air conditioner should sit so that the window panel frame and side channels are
against the top and side window jambs. The side channels should overlap the side
window jambs equally.
A. Window locking
bracket
B. Window sash
sealing strip
C. Inner window
D. Outer window
NOTE: When choosing your window make sure the power supply cord is within 6 feet of a
grounded 3-prong outlet.
10
2. Secure the window panel frame to the top window jamb:
• Drill two 9/64” diameter pilot holes in the top window jamb that are in line with the
partially plugged holes in the window panel frame.
• Secure the window panel frame with two #8-32x3/4” self-threading screws.
• If additional support is needed, two screws may be used on the sides of the panel frame
as well.
3. Secure the side panels to the side window jambs:
• Drill two screw holes in the side channels near the bottom of the channels.
• Drill two 9/64” diameter pilot holes in the side window jambs.
• Secure the side channels using two #8-32x3/4” self-threading screws.
4. Replace the front panel by reversing the steps in the “Remove the Front Panel” section.
Control Panel Operations
Using the Control Panel
Digital Display:
• Displays the set temperature in degrees Celsius or Fahrenheit while in most modes.
However, while in Fan Only mode, it shows the ambient room temperature.
• To change the display from °F to °C press both the Left and Right button simultaneously
for 3 seconds.
To Turn the Unit On:
Press the On/Off button.
NOTE: Be careful not to twist the side channels seals when fastening the screws.
NOTE: The Energy Saver feature will automatically turn on in “Cool,” “Dry,” and “Auto” modes.
11
To Change Temperature:
Press or hold either the Left (Decrease) or Right (Increase) button until desired temperature is
seen on the digital display. This temperature will be automatically maintained anywhere between
62°F (17°C) and 86°F (30°C).
To Adjust Fan Speeds:
To select the speed of the fan, press the Fan Speed button which cycles through four (4) steps:
Auto, Low, Medium, and High. Each time the button is pressed the fan speed mode is shifted to
the next speed option.
To Select Operating Mode:
To choose the operating mode, press the Mode button. Each time you press the button, a mode
is selected in a sequence that cycles from Auto -> Cool -> Dry -> Fan. The indicator light beside
the mode button will be illuminated and remain on once the mode is selected. The unit will
automatically initiate the Energy Saver function in Auto, Cool and Dry modes.
To Operate in Auto Mode:
• When you set the unit to “Auto” mode the unit will automatically select cooling or fan
depending on the temperature selected and the current room temperature. The air
conditioner will automatically maintain room temperature around the selected
temperature.
• In this mode the fan speed cannot be adjusted. It starts automatically at the appropriate
speed to reach and maintain the selected temperature most efficiently.
To Operate in Cool Mode:
• When the unit is set to “Cool” mode it will cool the room to maintain the desired set
temperature.
• When the desired temperature has been reached, the unit will automatically maintain the
temperature.
• Press the Right and Left buttons to adjust the desired temperature and press the Fan
button to adjust the fan speed.
To Operate in Dry Mode:
• In this mode, the air conditioner will operate as a dehumidifier. Because the conditioned
space is closed or sealed, some degree of cooling will continue to occur.
• In Dry mode the fan runs at Low speed, which cannot be adjusted.
Note:
• The unit does not constantly take temperature readings. The unit will take a temperature
reading periodically while operating in AUTO mode, or immediately upon adjustment of the
desired set temperature.
• When operating in AUTO MODE the unit may not switch between Cooling and Fan Mode at the
exact moment when a temperature change has occurred.
• Room temperature may be different than the temperature sensed in front of the air conditioner.
NOTE: While in “Dry” mode, the fan speed is automatically set to Low and cannot be adjusted.
12
To Operate in Fan Mode:
• Use this function only when cooling is not desired, such as for room circulation or to
exhaust air (remember to open the vent). You can choose any fan speed you prefer.
• In Fan mode, the display will show the actual room temperature.
• In Fan mode, you cannot adjust the set temperature.
Energy Saver Feature
• Press the Energy Saver button to initiate this feature. This feature is available in Auto,
Cool or Dry modes.
• In this mode, the fan will continue to run for three (3) minutes after the compressor
shuts off. The fan then cycles on for two (2) minutes, at ten (10) minute intervals, until
the room temperature is above the set temperature at which time the compressor turns
back on and cooling resumes.
• The Fan Speed can be adjusted when using this feature.
Timer (Auto Start/Stop) Feature
• To initiate the Auto Start program, press the Timer button when the unit is off.
• To initiate the Auto Stop program, press the Timer button when the unit is on.
• Press or hold the Left (Decrease) or Right (Increase) button to change the Auto Time by
½ hour increments up to 10 hours, and then one (1) hour increments up to 24 hours.
• The selected time will register in five (5) seconds and the system will automatically
revert back to display the previous temperature setting or room temperature when the
unit is on.
• Turning the unit on or off at any time or adjusting the timer setting to 0.0 will cancel the
Auto Start/Stop program.
Sleep Feature
• Press the Sleep button to initiate this feature.
• In this mode, the selected temperature will increase by 2°F (1°C) 30 minutes after the
feature is selected. The temperature will then increase by another 2°F (1°C) after an
additional 30 minutes.
• This new temperature will be maintained for six (6) hours before it automatically returns
to the originally selected temperature. This ends the Sleep feature and the unit will
continue to operate as initially programmed.
• The Sleep feature can be canceled at any time by pressing the Sleep button again.
• The Sleep feature is only available in Auto or Cool modes.
Filter Check Feature
This feature is a reminder to clean the Air Filter for more efficient operation. The LED
light will illuminate after 250 hours of operation. To reset after cleaning the filter, press
the Filter Check button and the indicator light will turn off.
Note: When the unit is powered off, there is no display.
13
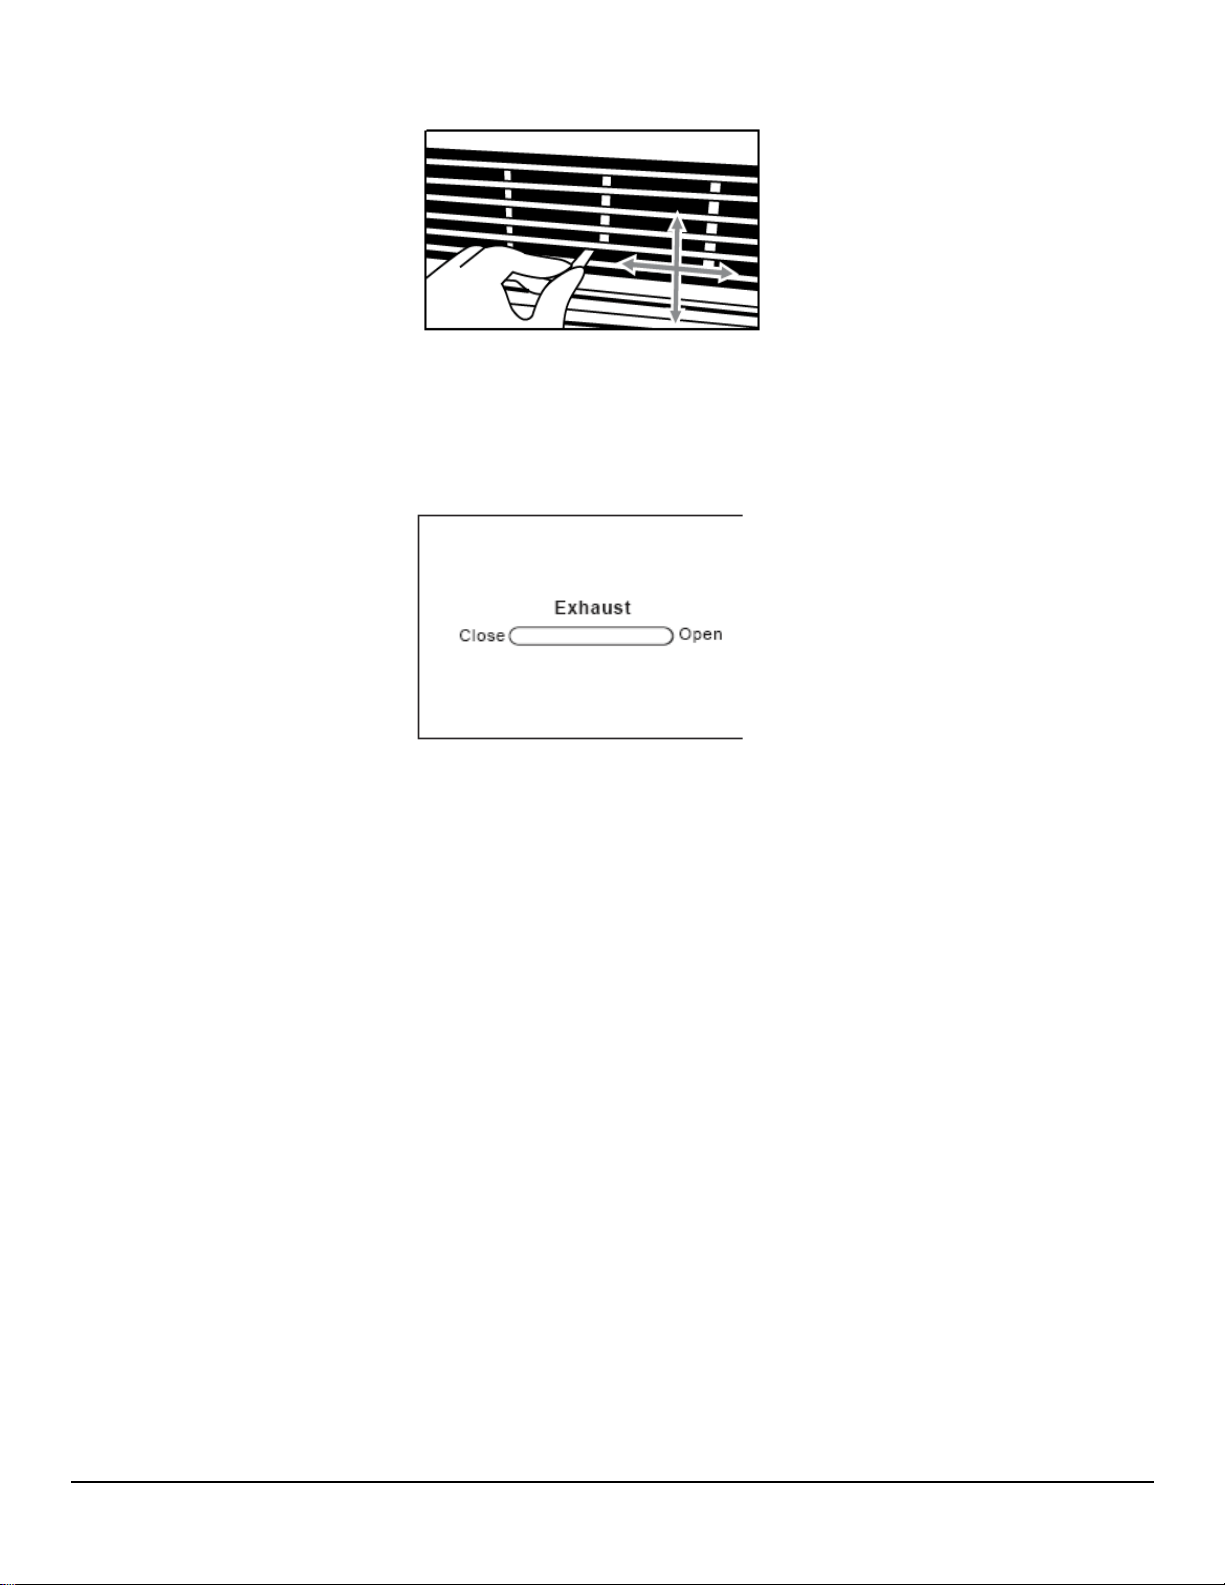
Air Directional Louvers
The 4-way air directional louvers allow you to direct the air flow Up, Down, Left, and Right
throughout the room as needed. To adjust the air directional louvers side to side, use the center
handles as you move side to side.
Exhaust Control
The Exhaust Control allows the air conditioner to either circulate inside air (Closed) or exhaust
air to the outside (Open.) The Closed position is used when maximum cooling is desired. The
Open position removes stale air from the room and exhausts it to the outside.

14
Remote Control Operations
The included remote is a universal remote control. Some functions may be found on the remote
that this model of air conditioner does not have. If an unavailable function is selected the unit will
continue operating under its current running status. Use the remote control to change modes, fan
speed, timer, and temperature settings as well as to set sleep mode.
Using the Remote Control
Button
Function
This button powers the unit on or off.
MODE
This button allows you to cycle through the
following modes: Auto, Cool, Dry, and Fan.
This button decreases the set temperature, or
the time when the Timer is enabled.
This button increases the set temperature, or
the time when the Timer is enabled.
TIMER
This button is used to enable the timer. Press it
twice to cancel the programmed Auto
Start/Start time. See “Timer Feature” for
operating details.
SPEED
This button allows you to cycle through the
following fan speeds: Auto, Low, Medium or
High.
ENERGY
SAVER
This button activates the Energy Saver feature.
Press it again to shut off the feature. See
“Energy Saver Feature” section for operating
details.
ONE TOUCH
When this button is pressed the system will
shift to Cool mode and Auto fan speed. The
set temperature will automatically adjust to
80°F (26°C.) Pressing will cancel timer
settings.
SLEEP
This button is used to enable the Sleep
feature. This feature is available in Auto and
Cool modes. Press the button again to turn off
the Sleep feature. See “Sleep Feature”
section of this manual for operating details.
Note: Be careful not to drop the remote control. Do not place the remote control in a location
exposed to direct sunlight.
15
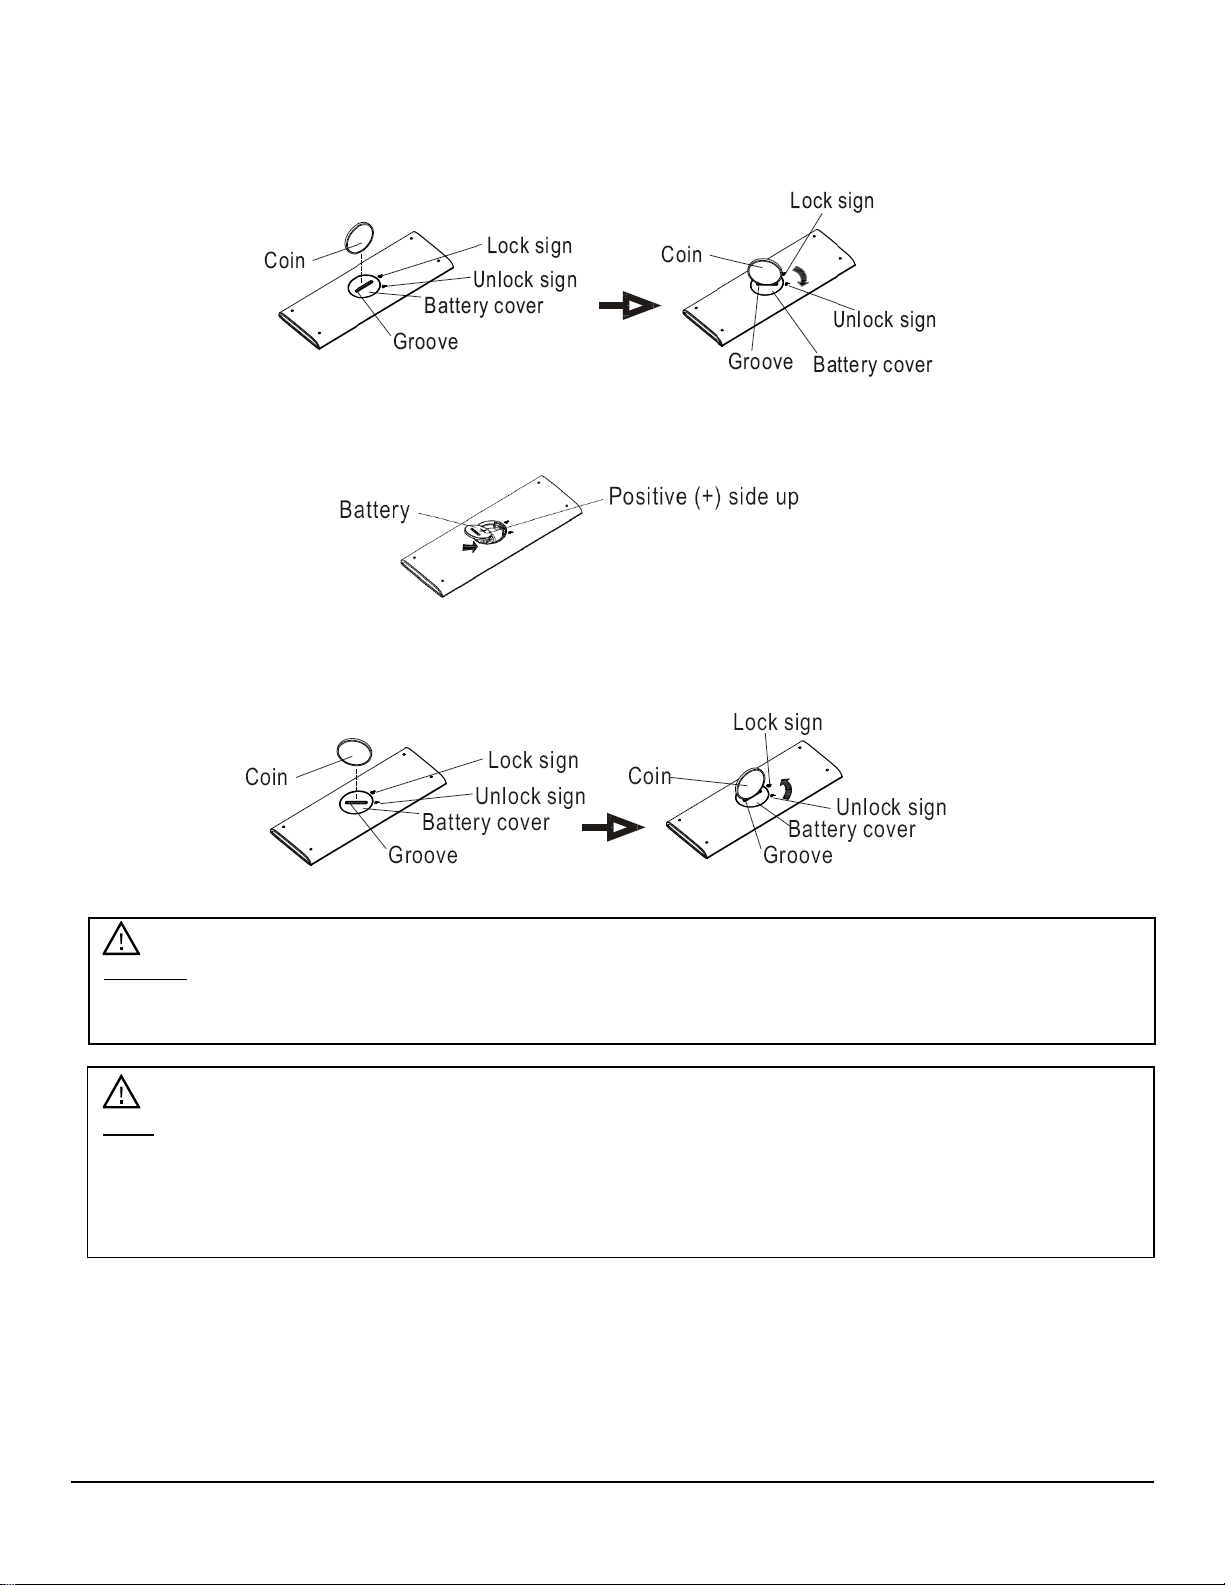
Installing the Batteries
1. Insert a coin into the grove on the battery cover and turn it clockwise until the grove is aligned
with the “unlock” symbol and remove the battery cover.
2. Insert the battery into the remote control with the Positive (+) side facing up.
3. Install the battery cover back on the remote control using a coin and turning it
counterclockwise until the grove aligns with the “lock” symbol.
Note:
• In order for the remote to function properly, the distance between the remote and the air
conditioner should not exceed 16ft (5m).
• Electronics may interfere with the signal from the remote. This can be resolved by moving
closer to the air conditioner when using the remote.
Caution: Use only a CR2025 3V battery. Remove the battery if the remote control will not be used
for one month or longer. Do not attempt to recharge batteries that are not designed to be
recharged. Do not dispose of batteries in a fire as they may explode.
16
Maintenance
Clean the air conditioner and filters regularly to maximize performance and efficiency and prolong
the unit’s life. Be sure to always unplug the air conditioner from the power outlet before cleaning.
Air Filter Cleaning
The air filter should be checked at least once a month to see if cleaning is necessary. Trapped
particles in the filter can build up and potentially cause an accumulation of frost on the cooling
coils.
1. Push the vent handle to the “vent closed” position.
2. Grasp the filter, pull up and out.
3. Wash the filter using liquid dishwashing detergent and warm water. Rinse the filter thoroughly.
4. Gently shake excess water from the filter. Be sure the filter is thoroughly dry before replacing
it.
5. You also have the option of cleaning the filter with a vacuum.
Cabinet Cleaning
• Be sure to unplug the air conditioner to prevent shock or fire hazard. The cabinet and front
may be dusted with an oil-free cloth or washed with a cloth dampened in a solution of warm
water and mild dishwashing detergent. Rinse thoroughly and wipe dry.
• Never use harsh cleaners, wax, or polish on the cabinet front.
• Be sure to wring excess water from the cloth before wiping around the controls. Excess water
in or around the controls may cause damage to the air conditioner.
NOTE: Winter Storage- If you plan to store the air conditioner during the winter, remove it carefully
from the window according to the installation instructions. Make sure to clean the unit thoroughly
and cover it with plastic or return it to the original carton. Always store the unit upright in a cool, dry
location.
Warning: Never use hot water over 104°F (40°C) to clean the air filter. Never attempt to operate
the unit without the air filter.
17
Normal Sounds
• High Pitched Chatter-High efficiency compressors may have a high-pitched chatter during the
cooling cycle.
• Sound of Rushing Air-At the front of the unit, you may hear the sound of rushing air being
moved by the fan.
• Gurgle/Hiss-Gurgling or Hissing noise may be heard due to refrigerant passing through the
evaporator during normal operation.
• Vibration-The unit may vibrate and make noise because of poor wall or window construction or
incorrect installation.
• Pinging or Switching-Droplets of water hitting the condenser during normal operation may
cause these sounds.
Error Codes
If any of the codes found below should appear on the display of the air conditioner please turn the
unit off and back on to see if the code clears. If the error code continues to display, please visit
www.edgestar.com for service.
AS - Room temperature sensor error
• - Evaporator temperature sensor error
Energy Saving Guide
Read and follow the guide below to get the best performance and efficiency from your window air
conditioner:
• Do not cover the air outlet (exhaust) while in use.
• Use the timer to operate the unit before it is needed. For example, set the timer to turn on
the unit in cooling mode for three (3) or more hours to cool the room before you arrive. You
may want to operate the unit all day if you live in a warmer climate.
• Minimize the heat sources (direct sunlight, computers, servers, people, etc.) in the room.
• Close all windows and doors.
• Use the unit in a contained room. For example, a room with four walls and a ceiling, instead
of a partitioned studio, or warehouse.
• Make sure the unit is secure with no gaps where air can escape.
• Minimize the amount of humidity in the room. For example, run the unit as a dehumidifier.
• To prolong the compressor's life, please wait at least 3 minutes before turning the unit back
on after shutting it off.
• Inspect and keep the air filters clean by cleaning regularly.
• Perform routine maintenance.
NOTE: If an error code occurs in Fan mode, the unit will display “LO” (open/loose connection) or
“HI” (short circuit.)
18
Troubleshooting
Follow the troubleshooting guide below to resolve common issues.
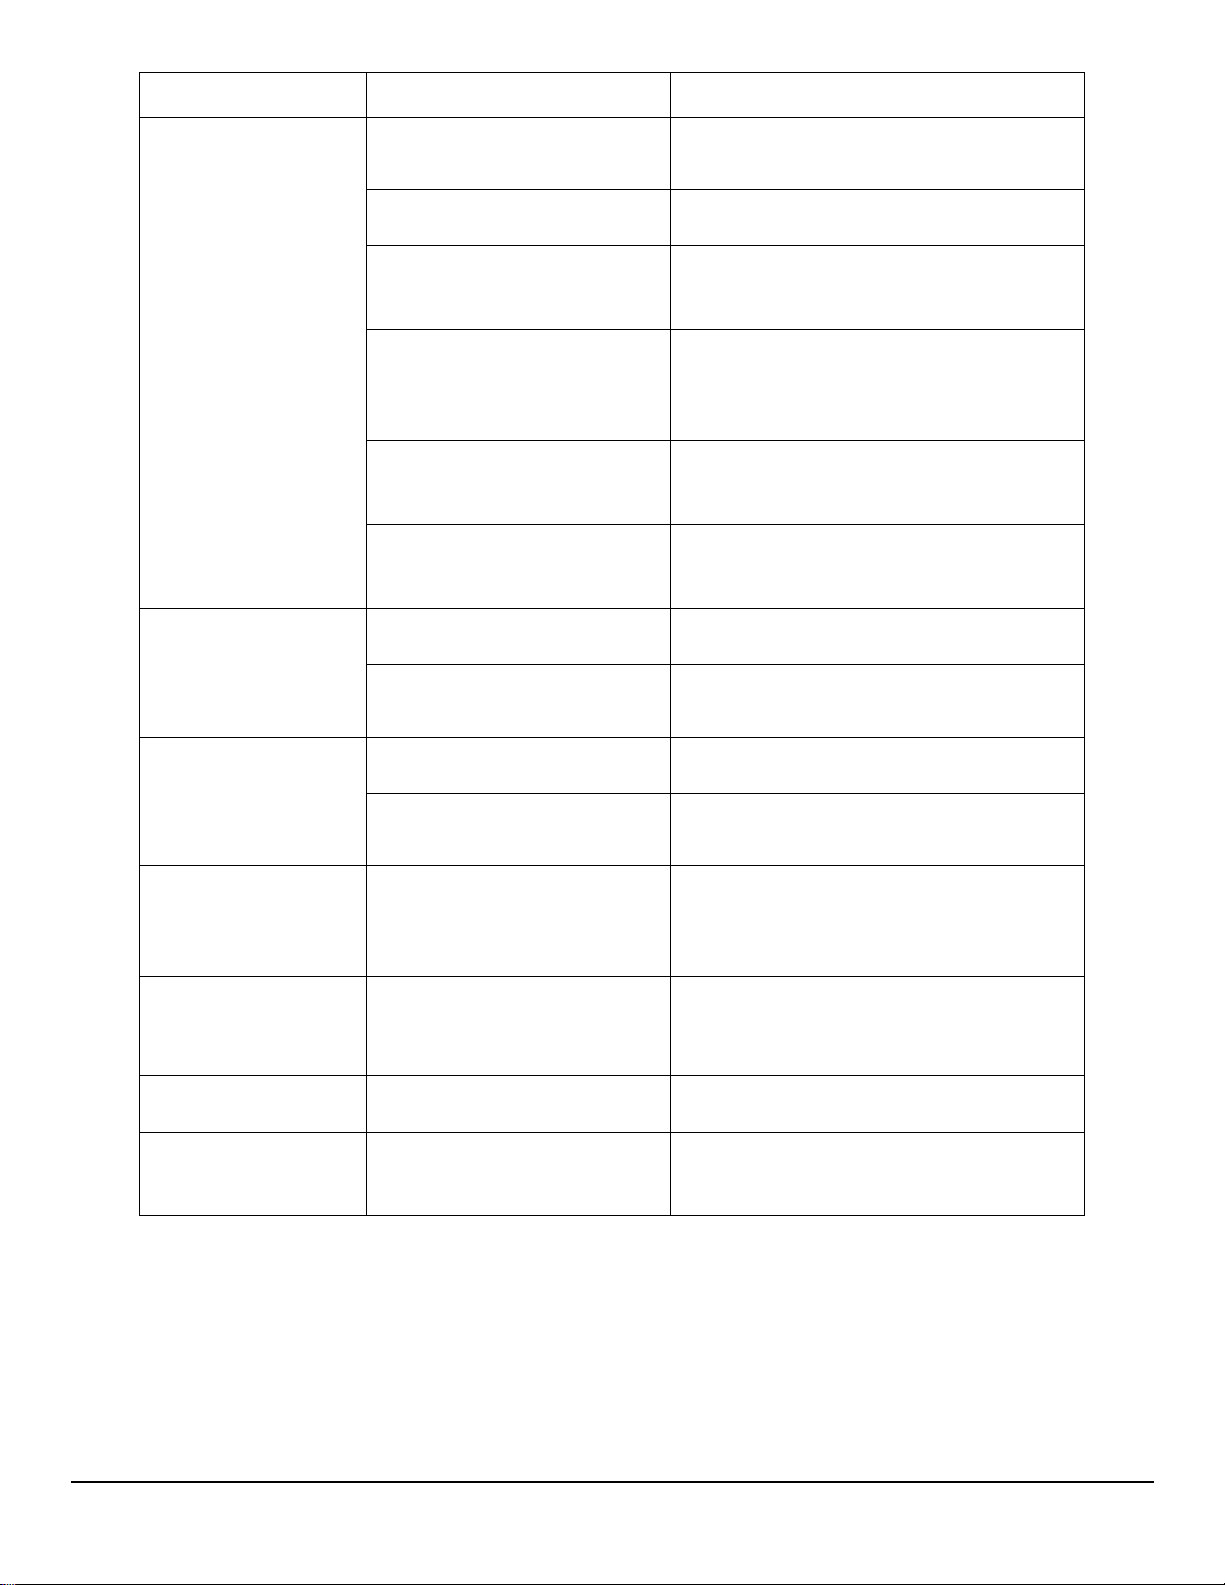
Problem
Possible Cause
Solution
Air conditioner
does not function
at all.
Wall plug is disconnected.
Insert plug firmly into proper wall
outlet.
House fuse blown or
circuit breaker tripped.
Replace fuse with time delay type or
reset circuit breaker.
Power cord is tripped.
Press the RESET button on the power
cord.
Unit is turned OFF.
Turn unit ON and set to desired
setting.
Ribbon cable to control
panel is disconnected.
Remove front grill and reconnect
cable.
Loose or disconnected
wiring on main PCB.
Remove front grill and outer shell.
Check all connections to the PCB and
reconnect any loose or disconnected
leads.
Air from unit
does not feel
cold enough.
Room temperature is
below 62℉ (17℃).
Cooling will not occur until room
temperature rises above 62℉ (17℃).
Temperature sensor
behind the front grill and
air filter is touching the
cold evaporator.
Realign sensor so it does not touch
the evaporator coil. It should only be
sensing the air temperature leaving
the evaporator.
Set temperature is too
high.
Set to a Lower temperature.
Compressor is shut-off by
changing modes.
Wait approximately 3 minutes and
listen for compressor to restart when
set in COOL mode.
Air conditioner
cooling, but room
is too warm - ice
forming on
cooling coil
behind front grill.
Outdoor temperature
below 62℉ (17℃).
To defrost the coil, set to FAN ONLY
mode.
Air filter may be dirty.
Clean filter. Refer to Installation and
Cleaning section. To defrost, set to
FAN ONLY mode.
Thermostat set too cold
for night-time cooling.
To defrost the coil, set to FAN ONLY
mode. Then set temperature to a
Higher setting.
19
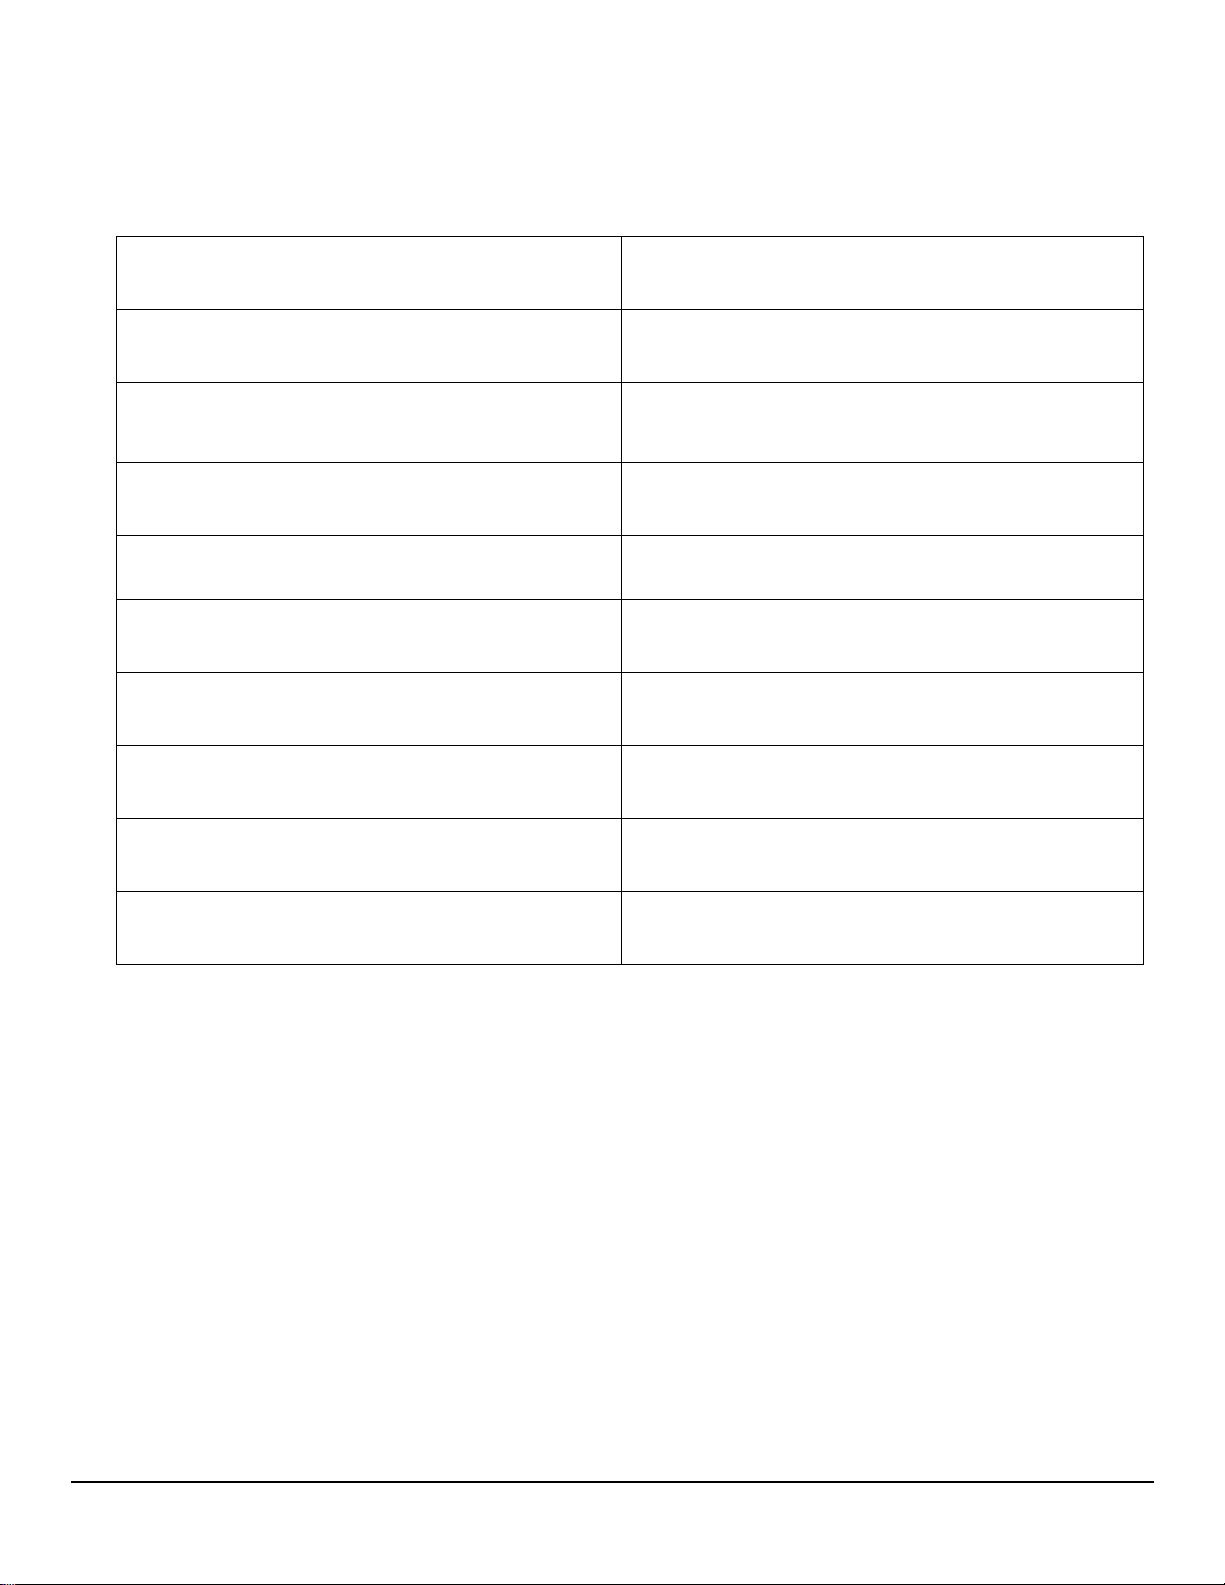
Problem
Possible Cause
Solution
Air conditioner
cooling, but room
is too warm - NO
ice forming on
cooling coil behind
front grill.
Dirty air filter- air
restricted.
Clean air filter. Refer to Installation
and Cleaning section.
Temperature is set too
High.
Set to a Lower temperature.
The directional louvers on
the front are positioned
improperly.
Position louvers for better air
distribution.
Front of unit is blocked by
drapes, blinds, furniture,
etc. and is restricting air
distribution.
Clear blockage in front of unit.
Doors, windows, registers,
etc. are open and cold air
is escaping.
Close doors, windows, registers.
Unit recently turned on in
hot room.
Allow additional time for unit to
remove stored heat from walls,
ceiling, floor and furniture.
Air conditioner
turns on and off
frequently.
Dirty air filter- air
restricted.
Clean air filter.
Outside temperature is
extremely hot.
Set FAN speed to a Higher setting to
push more air through the coils.
Noise when unit is
cooling.
Air movement sound.
This is normal. If too loud, set to a
slower FAN setting.
Window vibration - poor
installation.
Refer to installation instructions or
check with installer.
Water dripping
INSIDE when unit
is cooling.
Improper installation.
Tilt air conditioner slightly downward
toward the outside to allow water
drainage. Refer to installation
instructions - check with installer.
Water dripping
OUTSIDE when
unit is cooling.
Unit removing large
quantity of moisture from
humid room.
This is normal during very humid
days.
Room too cold
Set temperature is too
low.
Increase the set temperature.
Set temperature
cannot be adjusted
The unit is in Auto mode
Press the Mode button on the
control panel or remote to take the
unit out of Auto mode
20
Specifications
Description of product
Casement Window Air Conditioner
Model
CAC10000W
Voltage/Frequency
115V / 60Hz
Cooling Capacity (BTUs)
10000
Current
8.5A
Color
White
Refrigerant
R410A: 17.64 oz.
Timer
24 Hour
Dimensions
W x D x H
14 1/2” x 23 1/2” x 20 7/8”
Weight
76.9 lbs.

21
EdgeStar Limited Warranty
Full Two-Year Parts and Labor
This product is warrantied by EdgeStar and is subject to any conditions set forth as follows:
WHAT IS COVERED:
For a period of TWO (2) YEARS from the date of original retail purchase, EdgeStar will repair or replace any part free of charge,
including labor, that fails due to a defect in materials or workmanship. Labor will be performed free of charge at an authorized
EdgeStar repair facility and EdgeStar will supply new, rebuilt, or refurbished parts free of charge. EdgeStar may request a defective
part be returned in exchange for the replacement part. All replacement parts or products will be new, remanufactured, or
refurbished. All products and parts replaced by EdgeStar under warranty service become the property of EdgeStar. After the 24
month period, EdgeStar will no longer be responsible for labor charges incurred or replacement parts. All defective products and
parts covered by this warranty will be repaired or replaced on a mail-in basis to an EdgeStar authorized repair facility.
This warranty applies to the original purchaser only, and only covers defects in workmanship experienced during operation of the
product under normal service, maintenance, and usage conditions. This warranty applies to the purchase and use of this product in
residential settings within the contiguous United States of America.
Exceptions: Commercial or Rental Use Warranty
90 days labor and parts from date of original purchase. No other warranty applies.
WHAT IS NOT COVERED - The following limitations apply to the coverage of this warranty. This warranty does not cover:
-Labor charges for installation, setup, or training to use the product.
-Shipping damage, and any damage caused by improper packaging for shipment to an authorized service center, and any
damaged caused by improper voltage or any other misuse, including abnormal service, handling, or usage.
-Cosmetic damage such as scratches and dents.
-Normal wear and tear on parts or replacement of parts designed to be replaced, e.g. filters, cartridges, batteries.
-Service trips to deliver, pick-up, or repair; install the product; or to instruct in proper usage of the product.
-Damages or operating problems resulting from misuse, abuse, operation outside environmental specifications, uses contrary to
instructions provided in the owner’s manual, accidents, acts of God, vermin, fire, flood, improper installation, unauthorized service,
maintenance negligence, unauthorized installation or modification, or commercial use.
-Labor, service, transportation, and shipping charges for the removal and replacement of defective parts, beyond the initial 24
month period.
-Products that have been modified to perform outside of specifications without the prior written permission of EdgeStar.
-Products lost in shipment, or theft.
-Products sold AS IS or from an unauthorized reseller.
-Products with serial numbers that have been removed, defaced, or invalidated.
-Damage from other than normal use.
-Replacement or repair of household fuses, circuit breakers, wiring, or plumbing.
-Damage to personal property from use of product.
-Damage from service other than from an authorized EdgeStar repair facility.
-Hoses, knobs, lint trays and all attachments, accessories, and disposable parts.
-Any service charges not specifically identified as normal such as normal service area or hours.
-Any special or consequential damages arising out of the use of the product.
OBTAINING WARRANTY SERVICE: If you believe your product is defective, contact EdgeStar Customer Support for
troubleshooting assistance and warranty service at www.edgestar.com or call 1-866-319-5473. Before contacting Customer
Support you are required to have your model number, serial number, and proof of purchase available upon request. Once
an EdgeStar authorized representative has confirmed that your product is defective and eligible for warranty service, the
product must be returned to an EdgeStar authorized repair facility. EdgeStar is not responsible for damage resulting from
shipper mishandling or improper packaging. Do not return a defective product to the place of purchase. Products received
without a return authorization number will be refused.
THIS WARRANTY IS IN LIEU OF ANY OTHER WARRANTY, EXPRESS OR IMPLIED, INCLUDING WITHOUT LIMITATION, ANY WARRANTY OF MERCHANTABILITY OR FITNESS FOR A
PARTICULAR PURPOSE. TO THE EXTENT ANY IMPLIED WARRANTY IS REQUIRED BY LAW, IT IS LIMITED IN DURATION TO THE EXPRESS WARRANTY PERIOD ABOVE. NEITHER THE
MANUFACTURER NOR ITS DISTRIBUTORS SHALL BE LIABLE FOR ANY INCIDENTAL, CONSEQUENTIAL, INDIRECT, SPECIAL, OR PUNITIVE DAMAGES OF ANY NATURE, INCLUDING
WITHOUT LIMITATION, LOST REVENUES OR PROFITS, OR ANY OTHER DAMAGE WHETHER BASED IN CONTRACT, TORT, OR OTHERWISE. IN NO EVENT AND UNDER NO
CIRCUMSTANCE OF ANY TYPE OR KIND SHALL THE SELLER, MANUFACTURER, AND/OR DISTRIBUTOR BE LIABLE FOR ANY REASON, UNDER ANY
THEORY, FOR MORE THAN THE BASIC COST OF THE PRODUCT TO THE PURCHASER OR END USER. SOME STATES DO NOT ALLOW THE EXCLUSION OF
INCIDENTAL OR CONSEQUENTIAL DAMAGES, SO THE ABOVE EXCLUSION MAY NOT APPLY TO YOU. THIS WARRANTY GIVES YOU SPECIFIC LEGAL RIGHTS. YOU MAY HAVE OTHER
RIGHTS THAT VARY FROM STATE TO STATE.