Loading ...
Loading ...
Loading ...
8
INSTALLATION AND POWER
SUPPLY
CAUTION:
● Be careful not to pinch your ngers when opening
and closing the battery cover.
● Return the battery compartment locker to the
original position, after installing or removing
battery cartridge. If not, battery cartridge may
accidentally fall out of the radio, causing injury to
you or someone around you.
● Always close and lock the battery compartment
locker before moving the radio.
● Always switch off the radio before installing or
removing the battery cartridge.
● Be careful not to drop or strike the radio. Broken
shell may slash your nger or stab your body.
Damaged radio may exhibit unpredictable
behaviour resulting in re, explosion or risk of
injury.
● Hold the tool and the battery cartridge rmly when
installing or removing battery cartridge.
IMPORTANT:
● Reduced power, distortion, “stuttering sound” or when
“
Battery Low” appears on the display are all the
signs that the main battery pack needs to be replaced.
● The battery cartridge can’t be charged via the supplied
AC power adapter.
● The battery cartridge is not included as standard
accessories.
Installing or removing slide battery
cartridge (Fig. 2-5)
● To install the battery cartridge, align the tongue on the
battery cartridge with the groove in the housing and slip
it into place. Always insert it all the way until it locks in
place with a little click.
● If you can see the red indicator on the upper side of the
button, it is not locked completely. Install it fully until the
red indicator cannot be seen. If not, it may accidentally
fall out of the radio, causing injury to you or someone
around you.
● Do not use force when installing the battery cartridge.
If the cartridge does not slide in easily, it is not being
inserted correctly.
● To remove the battery cartridge, slide it from the radio
while sliding the button on the front of the cartridge.
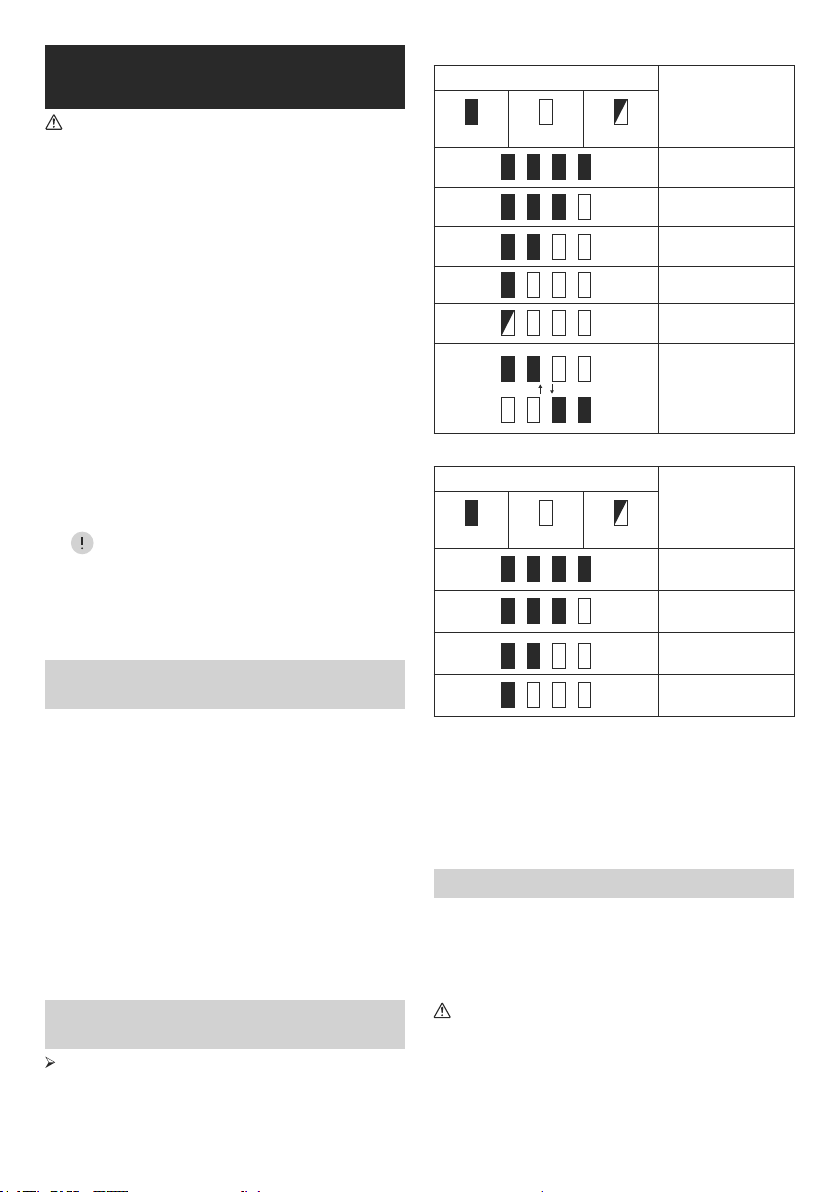
Indicating the remaining battery capacity
(Fig. 6-8)
1. Indicator lamps 2. Check button
Press the check button on the battery cartridge to indicate
the remaining battery capacity. The indicator lamps light
up for few seconds.
● XGT/LXT battery cartridge
Indicator or lamps
Remaining capacity
Lighted Off Blinking
75% ~ 100%
50% ~ 75%
25% ~ 50%
0% ~ 25%
Charge the battery
The battery may
have malfunctioned
● CXT battery cartridge
Indicator or lamps
Remaining capacity
Lighted Off Blinking
75% ~ 100%
50% ~ 75%
25% ~ 50%
0% ~ 25%
NOTE:
● Depending on the conditions of use and the ambient
temperature, the indication may differ slightly from the
actual capacity.
● The rst (far left) indicator lamp will brink when the
battery protection system works. (For XGT and LXT
battery cartridges only)
Using supplied AC power adapter
Remove the rubber protector and insert the adapter
plug into the DC socket on the right hand side of the
radio. Plug the adapter into a standard mains socket
outlet. Whenever the adapter is used, the battery pack is
automatically disconnected.
CAUTION:
● Always disconnected the AC power adapter
completely before moving the radio. If the AC
adapter is not removed, it may cause an electric
shock.
Loading ...
Loading ...
Loading ...