2023 GOLD WING
NAVIGATION SYSTEM
MANUAL

This manual should be considered a permanent part of the vehicle and should remain with the vehicle when it is resold.
This manual covers the GL1800 Navigation System. The illustrations are based on the model equipped with the airbag system.
You may find descriptions of equipment and features that are not on your particular model.
This publication includes the latest production information available before printing. Honda Motor Co., Ltd. reserves the right to make
changes at any time without notice and without incurring any obligation.
No part of this publication may be reproduced without written permission.
The vehicle pictured in this owner’s manual may not match your actual vehicle.
©2022 Honda Motor Co., Ltd.
31MLJT00.book 0 ページ 2022年5月19日 木曜日 午前11時31分
A Few Words About Safety
The Navigation System is one of many
items on the vehicle that can distract you.
Remember that your primary focus should
always be on the road.
To operate the Navigation System, enter
information into the system before you
begin riding or when your vehicle is
stopped. Then, as you ride, listen to the
voice guidance and glance at the screen
information when it is safe to do so.
When your vehicle is moving, only the left
handlebar controls and sub menus for the
navigation system will operate.
Pull off the road if you need more time to
study the screen or operate the controls.
The Navigation System is designed to
provide route information to help you
reach your destination. However, this
route guidance may sometimes conflict
with road conditions such as street
closures, road construction, and detours.
Additionally, the system itself has certain
limitations.
2 P. 81
Therefore, you must verify the voice
guidance and visual route information
provided by the system by carefully
observing the roadway, signs, and signals,
etc. If you are unsure, proceed with
caution. Always use your own good
judgment, and obey traffic laws while
riding.
WARNING
Using the Navigation System while
riding can take your attention away
from the road, causing a crash in
which you could be seriously injured
or killed.
Glance at the navigation screen only
when it is safe to do so.
31MLJT00.book 1 ページ 2022年5月19日 木曜日 午前11時31分

Contents
Preface
P. 4
Introduction P. 5
Operation Guide
P. 7
Overview—Functions at a Glance P. 7 Navigation System Controls P. 8 Basic Operations P. 10 How to Enter Information
P. 12
Home Screen and Map/Navigation Menu P. 13
Map Screen Legend P. 14
During Route Guidance
P. 15 Home Location and Going Home P. 16
Entering a Destination—Selecting a Favorite Place P. 17 Changing Route or Destination
P. 18 Viewing Traffic Information
P. 20
System Setup
P. 21
Start-up
P. 22 Home Location
P. 23 Favorite Places
P. 24
Routes
P. 27 Guidance Mode Settings
P. 31 Map/View Settings
P. 32
Track Log Setup
P. 36 Other Navigation Settings
P. 39 Restore All Settings
P. 42
Navigation
P. 43
Map Menu
P. 44 Navigation Menu
P. 45 Entering a Destination
P. 46
Calculating the Route
P. 57 Riding to Your Destination
P. 61 Changing Your Route
P. 63
Changing Your Destination
P. 66 Viewing Information
P. 68
Troubleshooting
P. 71
System Messages
P. 72 Troubleshooting
P. 74
Technical & Consumer Information
P. 80
System Limitations
P. 81 Customer Support
P. 85 Legal Information
P. 86
Index
P. 89
31MLJT00.book 3 ページ 2022年5月19日 木曜日 午前11時31分


5
Preface
Introduction
Your Navigation System is a highly-
sophisticated yet easy-to-use system with
visual and voice guidance that uses
satellites and a map database to show you
where you are and help guide you to a
desired destination.
The Navigation System receives signals
from the Global Positioning System (GPS), a
network of 24 satellites in orbit around the
earth. By receiving signals from several of
these satellites, the Navigation System can
determine the latitude, longitude, and
other positioning information for your
vehicle. In addition, a speed sensor on your
vehicle keeps track of the speed of
travel at all times.
GPS is operated by the U.S. Department of
Defense. The system is subject to changes
that could affect the accuracy and
performance of all GPS equipment, including
your Navigation System. For example, you
may be riding down a highway and your Navi
system, relying on GPS data, will tell you that
you are on the frontage road adjacent to the
highway you are actually on. However, you
should find your experience with GPS
navigation highly satisfactory.
The Navigation System is easy to use.
The locations of many places of business
and entertainment are already entered in
the system. You can select any of them as a
destination by using the center panel and
left handlebar controls. If a desired
destination is not in the system’s database,
you can still enter it and the system should
be able to direct you to it in most cases.
You can also save (store) locations in the
system's Favorite List. The system also
retains your last 30 destinations as
Previous Destination so you can easily
return to them, and allows you to store a
home address to simplify returning home
from your destination.
The system provides map coverage for the
United States of America, Canada, and
Mexico. The coverage consists of accurately
mapped metropolitan and rural areas.
Roads within metropolitan areas, interstate
highways, and major roads connecting
cities are typically verified.
Verified roads have been driven by the
database supplier and information like the
road’s average speed, turn restrictions, or
whether it is a one-way street are
contained in the Navigation System.
The route calculated by the system may not
be the shortest possible because only major
roads are mapped in non-detailed areas.
You may be aware of secondary roads that
shorten the travel distance and time.
While you are riding, the Navigation System
provides voice guidance so you do not have
to take your eyes off the road. These
instructions are provided in advance of the
actual riding maneuver so you have time to
slow down and prepare for the maneuver.
Navigation System operation is subject to
the condition that this device does not
cause harmful interference.
31MLJT00.book 5 ページ 2022年5月19日 木曜日 午前11時31分
Introduction u How to Use this Manual
6
Preface
How to Use this Manual
You have two options:
●
Read the entire manual.
●
Read the Operation Guide section to gain
an overview of what the system can do.
Then begin learning the controls and
screen displays. You can reference the
more detailed sections of the manual
whenever you need to.
Regardless of your choice, be sure to store
this manual on your vehicle along with your
Owner’s Manual for reference.
System Controls Operation
While Riding
Certain controls are automatically disabled
while your vehicle is in motion. While
riding, you can use the left handlebar
controls to operate the navigation system.
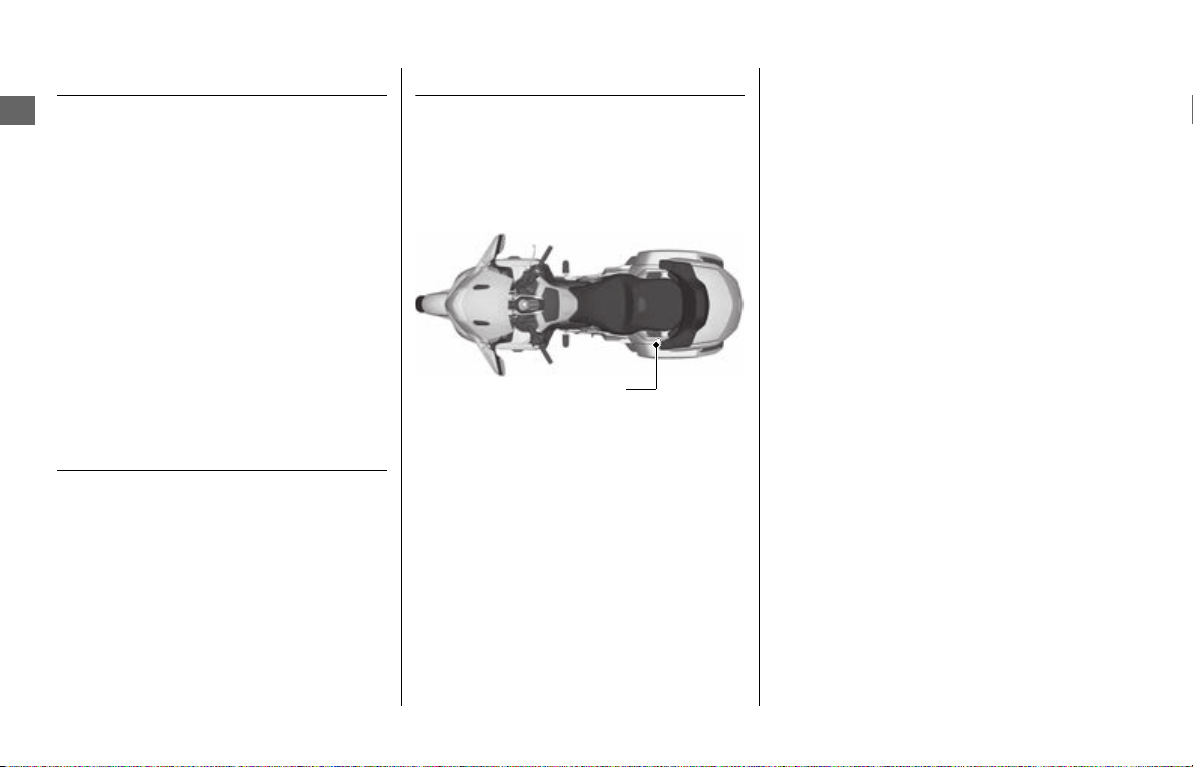
Accessory Precautions
Installing metallic or metalized accessories
near the left saddlebag can seriously
degrade or prevent GPS reception because
the GPS antenna is located near the left
saddlebag.
If you plan to install electronic components
such as vehicle location devices, additional
amplifiers, or other audio components,
ensure that they are not located near the
navigation control unit behind the seat or
near the left saddlebag. Electronic signals
from these devices can cause intermittent
disruption of the navigation system.
GPS antenna
31MLJT00.book 6 ページ 2022年5月19日 木曜日 午前11時31分

7
Operation Guide
Overview—Functions at a Glance
This section is designed to give you a quick overview of your navigation system before you begin using it on your own.
Again, we recommend reading the entire manual, but reading this section will definitely accelerate your learning curve.
Store home location
(P 23)
Register your home location.
Store favorite locations
(P 24)
Store locations to use as the destination.
Enter destination
(P 46)
Select your destination using several methods.
Calculate route
(P 57)
Set route preferences and roads to detour around.
Track route
(P 61)
Follow your route in real-time with voice guidance.
Traffic Information
(P 69)
View and avoid congestion and traffic incidents.
Add waypoints
(P 64)
Add “pit stops” along your route.
While not in motion, you can use the center panel and left handlebar controls.
However, while in motion, you can use only the left handlebar controls to operate the navigation system.
31MLJT00.book 7 ページ 2022年5月19日 木曜日 午前11時31分

8
Operation Guide
Navigation System Controls
You can operate the navigation system using the interface dial and buttons on the center panel or using the switches on the left
handlebar.
Multi-Information Display (MID)
Left Handlebar
(P 11)
Center Panel (P 10)
Interface Dial () (P 10)
Rotate or move up or down
to move the highlight in a menu/
list and
press (Enter) to set your
selection.
Move up, down, left, right and
on diagonals to scroll the map,
and rotate to zoom in or out of
the map.
ENTER
(Back) Button
Press to return to the previous
screen.
(P 10)
While using the navigation
system, press and hold to display
the map screen with your
current location centered.
(Home) Button
Press to display the Home
screen.
(P 10)
(Back) Switch
Press to return to the previous
screen.
(P 11)
While using the navigation
system, press and hold to
display the map screen with
your current location centered.
Lever
Push up or down to adjust
the audio/guidance
volume.
(P 11)
VOL
4-way Key/ Switch
(P 11)
Press
3
/
4
to move the
highlight in a menu or list.
Press switch to set
your selection.
When en route, press and
hold switch to replay
the voice guidance.
ENT
ENT
ENT
(Home) Switch
Press to display the Home
screen.
(P 11)
31MLJT00.book 8 ページ 2022年5月19日 木曜日 午前11時31分
9
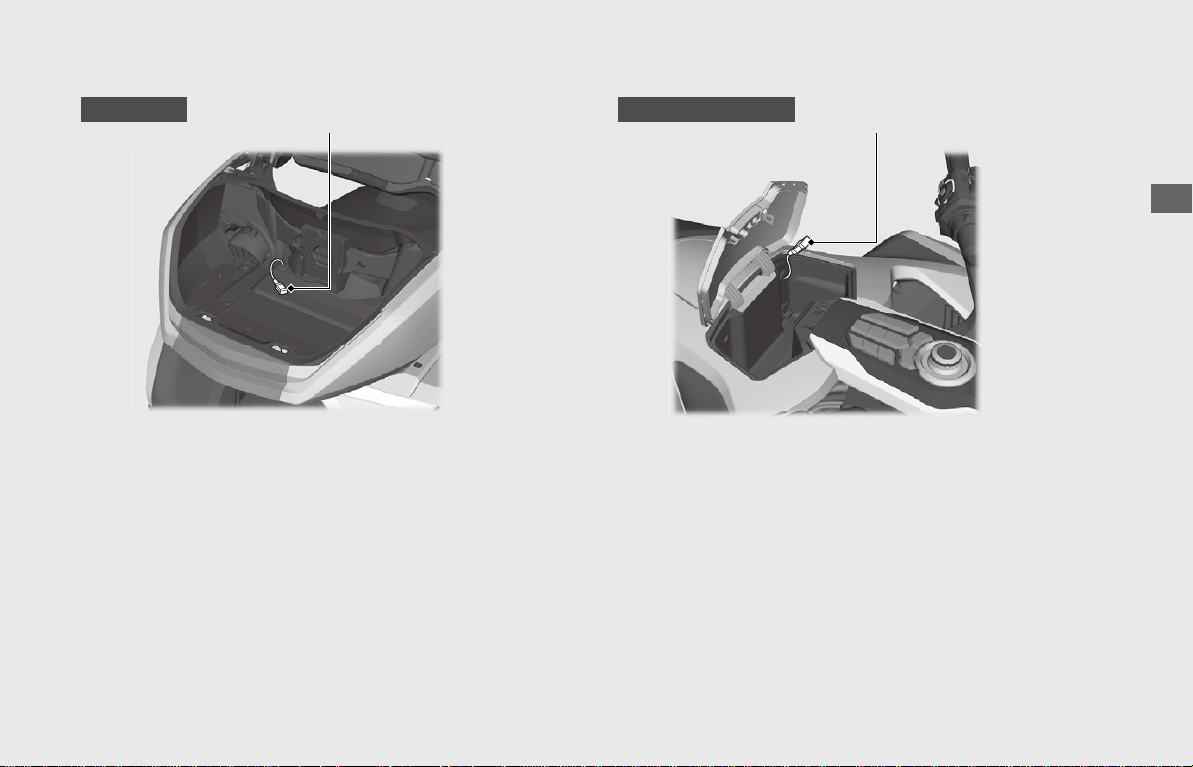
Operation Guide
Connecting a USB flash drive
Open the travel trunk and connect your USB flash drive to the USB
connector.
For more information, see the Owner's Manual.
Open the shelter case and connect your USB flash drive to the USB
connector.
For more information, see the Owner's Manual.
USB connector
GL1800DA
USB connector
Except GL1800DA
NOTE
Use a USB 2.0 flash drive with 256 MB to 64 GB capacities, formatted in FAT32.
31MLJT00.book 9 ページ 2022年5月19日 木曜日 午前11時31分
10
Operation Guide
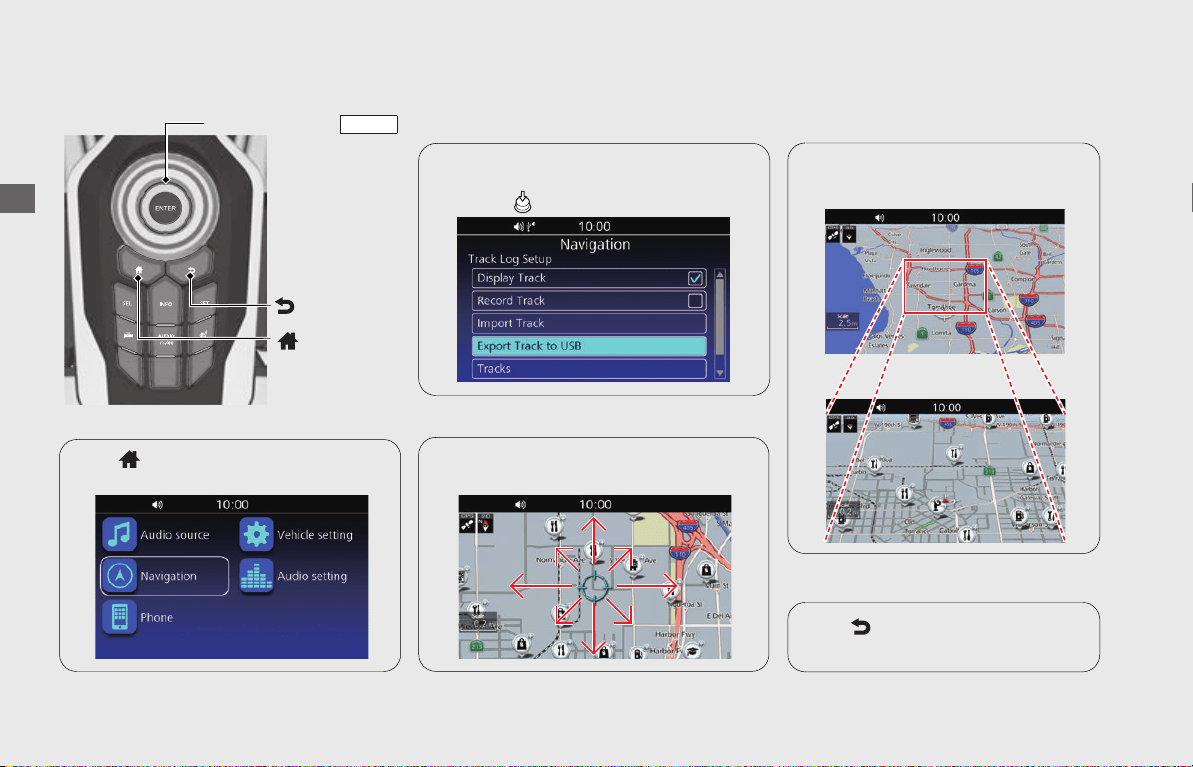
Basic Operations
Center Panel
You can operate the navigation system using the interface dial and buttons on the center panel while the vehicle is not moving.
(Back) Button
(Home) Button
Interface Dial ()
ENTER
Zoom In/Out
Rotate the interface dial clockwise/
counterclockwise to zoom in or out
of the map.
Map Scroll
Return to Previous Screen
Press (Back) button to return to
the previous screen.
Press (Home) button to display the
main Home screen.
(P 13)
Display Home Screen
Select Menu
Rotate or move the interface dial to
highlight the desired menu/option/item,
and press (Enter) to set your selection.
Move the interface dial up, down, left,
right and on diagonals to scroll the map.
31MLJT00.book 10 ページ 2022年5月19日 木曜日 午前11時31分
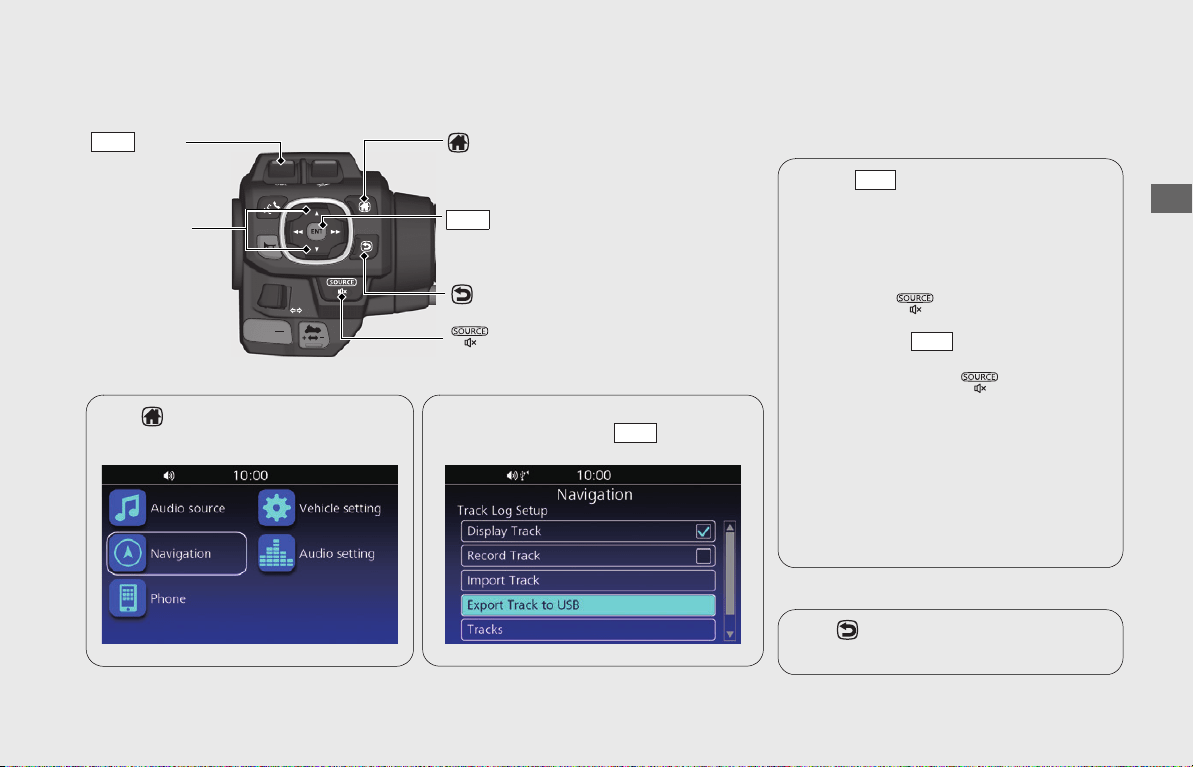
11
Operation Guide
Left Handlebar
You can operate the navigation system using switches on the left handlebar while the vehicle is in motion.
Lever
VOL
3/4 Switch
Adjust Volume
Push the
lever up or down during the
voice guidance to increase/decrease the
guidance volume.
•
The audio volume and the guidance volume
can be adjusted separately. To adjust the
audio volume, see Owner's Manual.
Press and hold (Source/Private Mode)
switch to mute the volume. To resume the
volume, operate
lever while volume is
muted.
•
Pressing and holding (Source/Private
Mode) switch mutes the voice guidance and
audio.
NOTE
• You can also adjust the guidance volume from
the map menu.
(P 44)
• You can also select the guidance volume
setting to automatically increase volume as the
speed of the vehicle increases.
(P 41)
VOL
VOL
(Back) Switch
(Home) Switch
Switch
ENT
Press (Home) switch to display the
main Home screen.
(P 13)
Display Home Screen Select Menu
Press
3
/
4
to highlight the desired menu/
option/item, then press switch to set
your selection.
ENT
Return to Previous Screen
Press (Back) switch to return to the
previous screen.
(Source/Private Mode) Switch
31MLJT00.book 11 ページ 2022年5月19日 木曜日 午前11時31分
12
Operation Guide
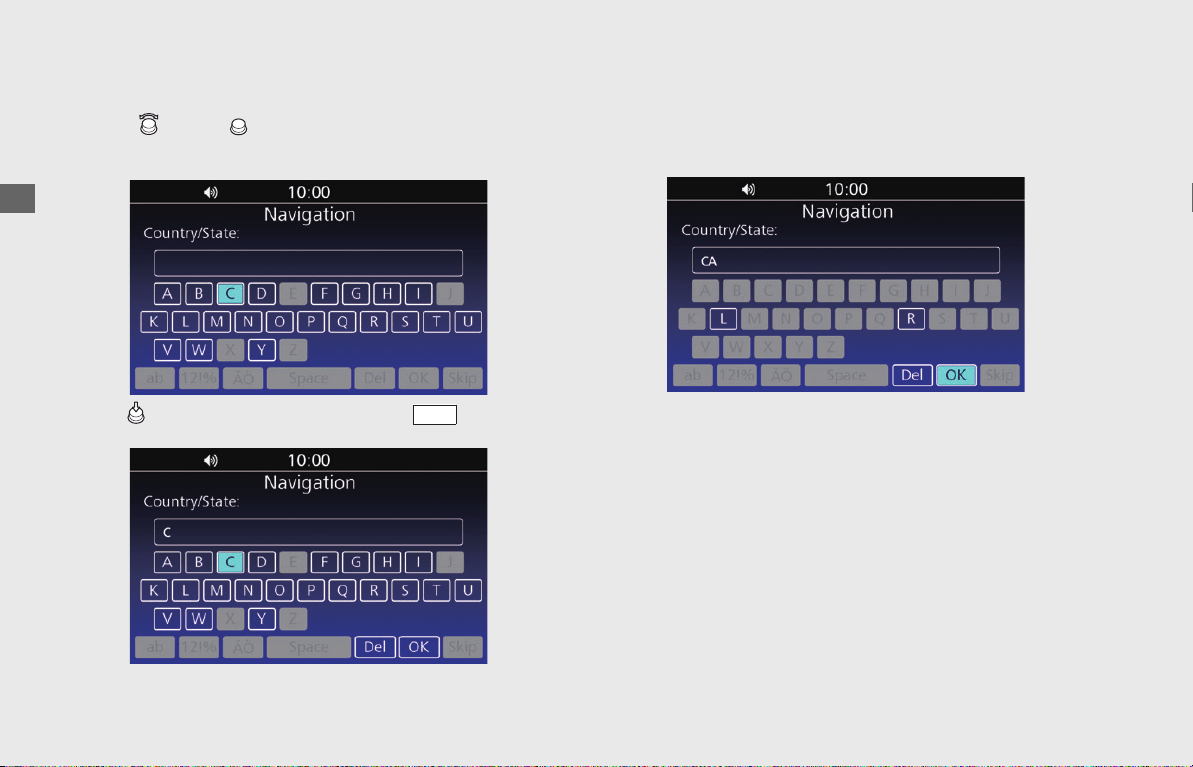
How to Enter Information
You can enter information (e.g., city names, street names, numbers, and symbols) when prompted on the input screen.
!a Rotate or move on the center panel, or press 3/4 switch
on the left handlebar to highlight the character you want to
enter.
!b
Press (Enter) on the center panel or press switch on the
left handlebar.
!c Repeat steps 1 and 2 to enter another character.
!d Select OK to display a list of possible entries.
●
Select ab/AB to display upper/lower case characters.
●
Select 12!% to display other types of characters.
●
Select Space to enter a space character.
●
Select Del to remove the last entered character.
ENT
31MLJT00.book 12 ページ 2022年5月19日 木曜日 午前11時31分
13
Operation Guide
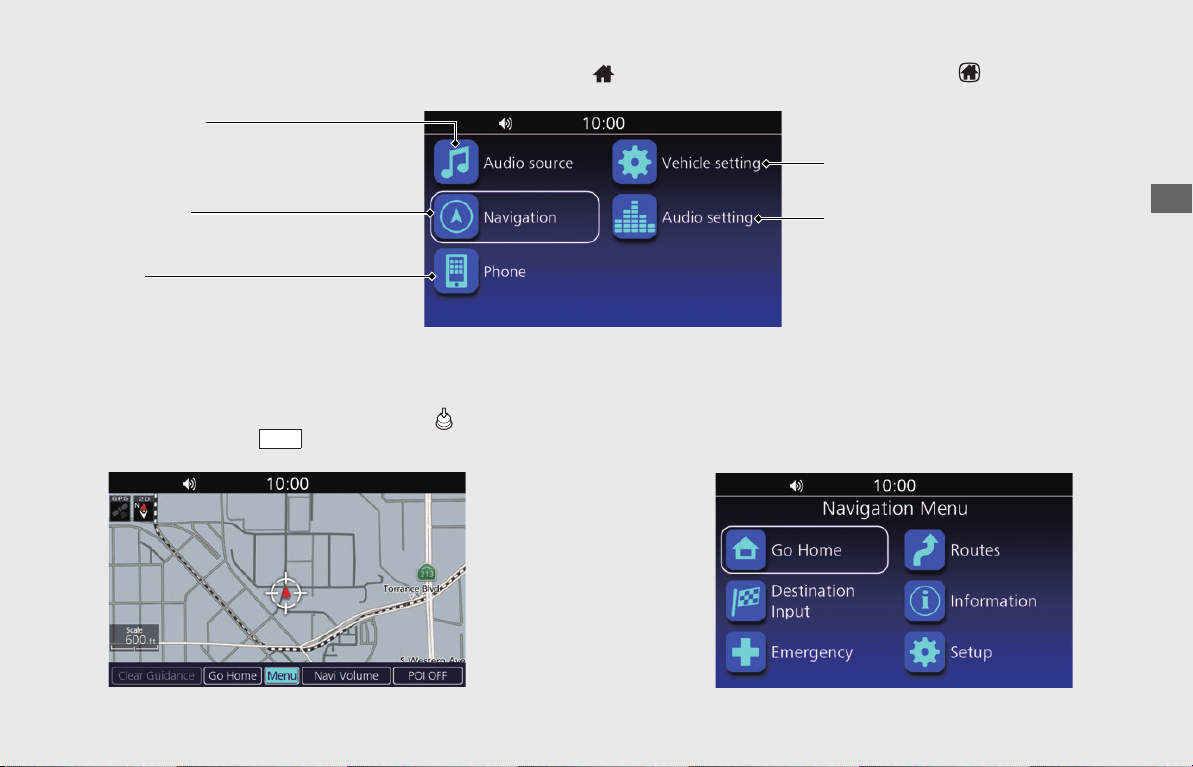
Home Screen and Map/Navigation Menu
The system displays various functions from the Home screen. Press (Home) button on the center panel or press (Home) switch on
the left handlebar at any time to return to the main Home screen.
Navigation
Display the navigation feature.
(P 43)
Vehicle setting
Display the vehicle settings.
(P 39)
Audio setting
Display the audio settings.
(P 39)
Map Menu
Display the map screen and operate the navigation features. Select
Navigation
on the Home screen, then press (Enter) on the
center panel or press switch on the left handlebar. The map
menu will be displayed on the bottom of the maps screen.
(P 44)
ENT
Navigation Menu
Use main navigation functions, change settings, and view
useful information.
From the map menu, select Menu. The navigation menu will
be displayed.
(P 45)
Audio source
Display the audio control screen. For
more information, see the Owner's
Manual.
Phone
Display the phone screen. For more
information, see the Owner's Manual.
31MLJT00.book 13 ページ 2022年5月19日 木曜日 午前11時31分

14
Operation Guide
Map Screen Legend
Cursor Radius Point Locator (P 56)
Map Orientation (P 33)
Map Scale (P 10)
Street
Feature Area
POI Icon
(P 33, 56)
Current Vehicle Position
: North Up
: Heading Up
: Heading Up 3D
GPS Icon
Speed Limit Icon
NOTE
• Honda motorcycle dealership icons will appear when the map scale is 1.2 miles (2 kilometers) or smaller and other POI icons will appear when the map scale is 0.2 miles (400
meters) or smaller.
• Map scale unit varies depending on the area.
• Speed limit icon is available in certain areas.
• Always check the speed limit for the road you are on. Honda is not liable for errors in the maps and accepts no responsibility if you are caught breaking the speed limit.
31MLJT00.book 14 ページ 2022年5月19日 木曜日 午前11時31分
15
Operation Guide
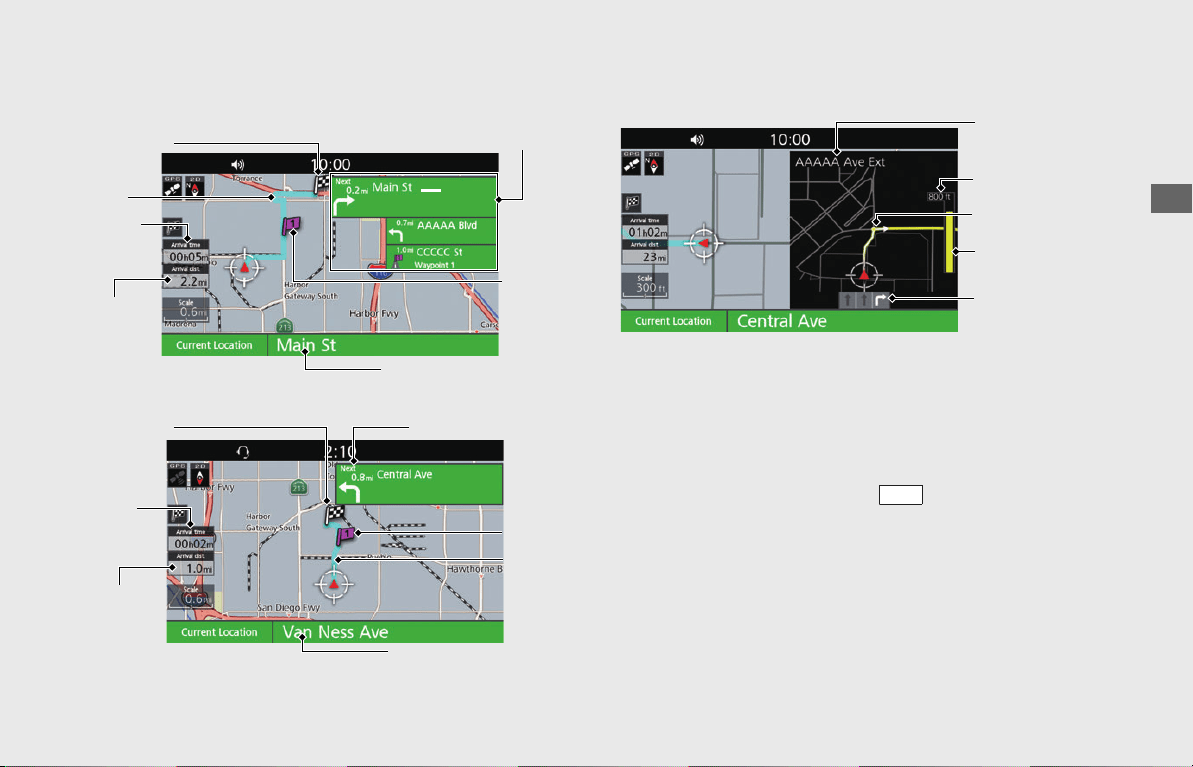
During Route Guidance
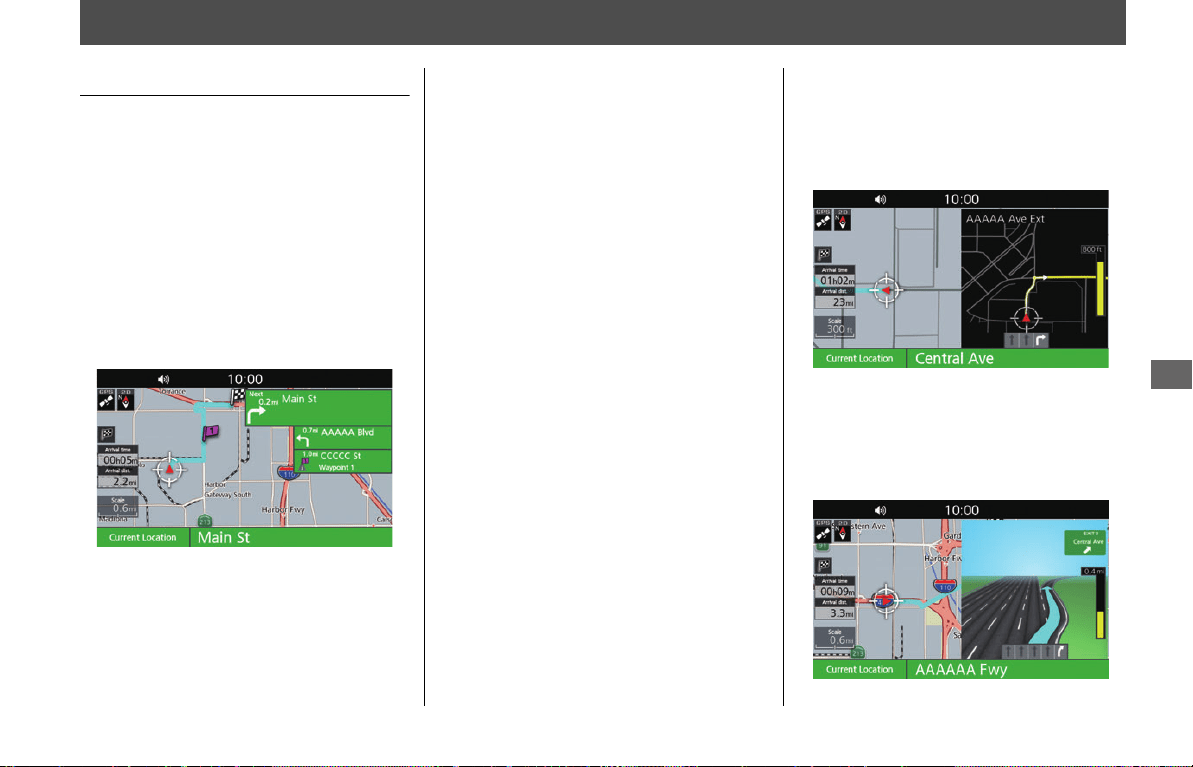
Map Screen
Route List Mode
Map Mode
Guidance Screen
Next Three Maneuvers
Current Street Name
Arrival
Time/
ETA
Travel
Distance
Destination
Calculated
Route
Waypoint
Next Maneuver
Current Street Name
Arrival
Time/
ETA
Calculated
Route
Destination
Waypoint
Travel
Distance
NOTE
• You can switch between displaying the arrival time (remaining time until arrival)
and ETA (estimated time of arrival).
(P 62)
• When en route, you can press and hold switch on the left handlebar to
replay the voice guidance.
(P 62)
Next Maneuver
Street Name
Countdown Bar
Lane Information
Remaining Distance
ENT
31MLJT00.book 15 ページ 2022年5月19日 木曜日 午前11時31分
16
Operation Guide
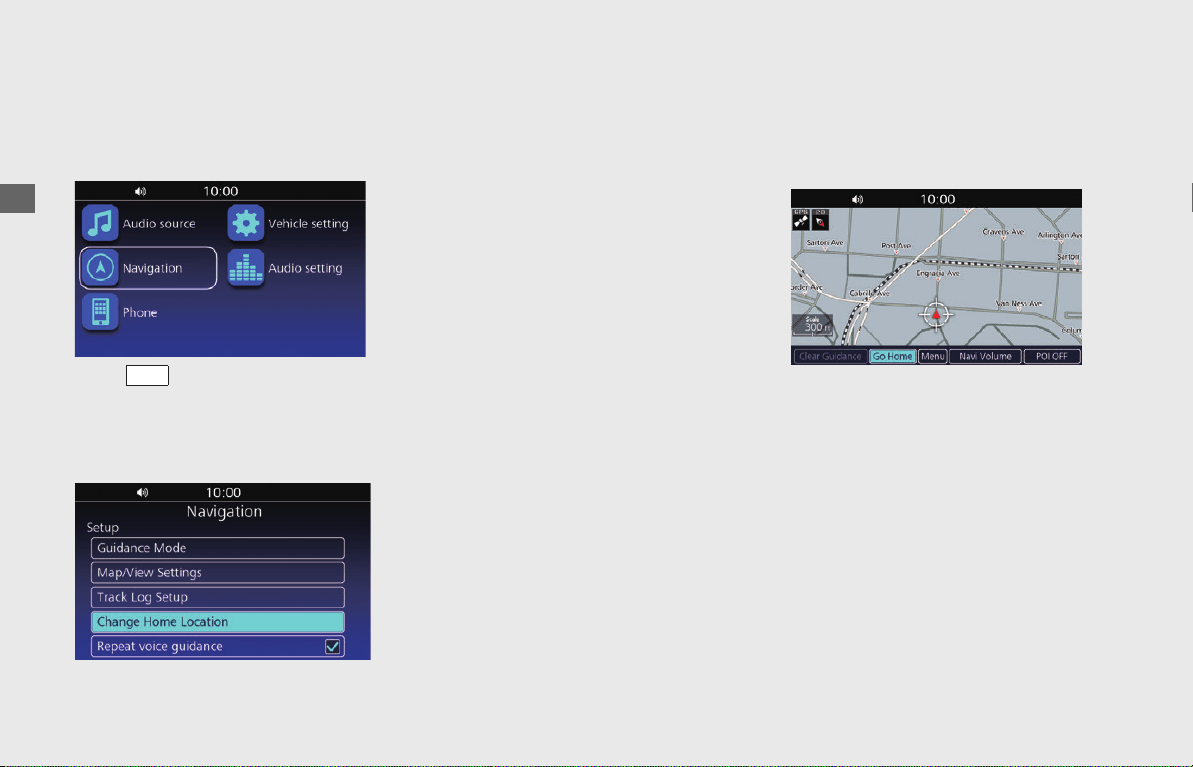
Home Location and Going Home
The "Go Home" feature automatically routes you to your home from any location simply by selecting Go Home.
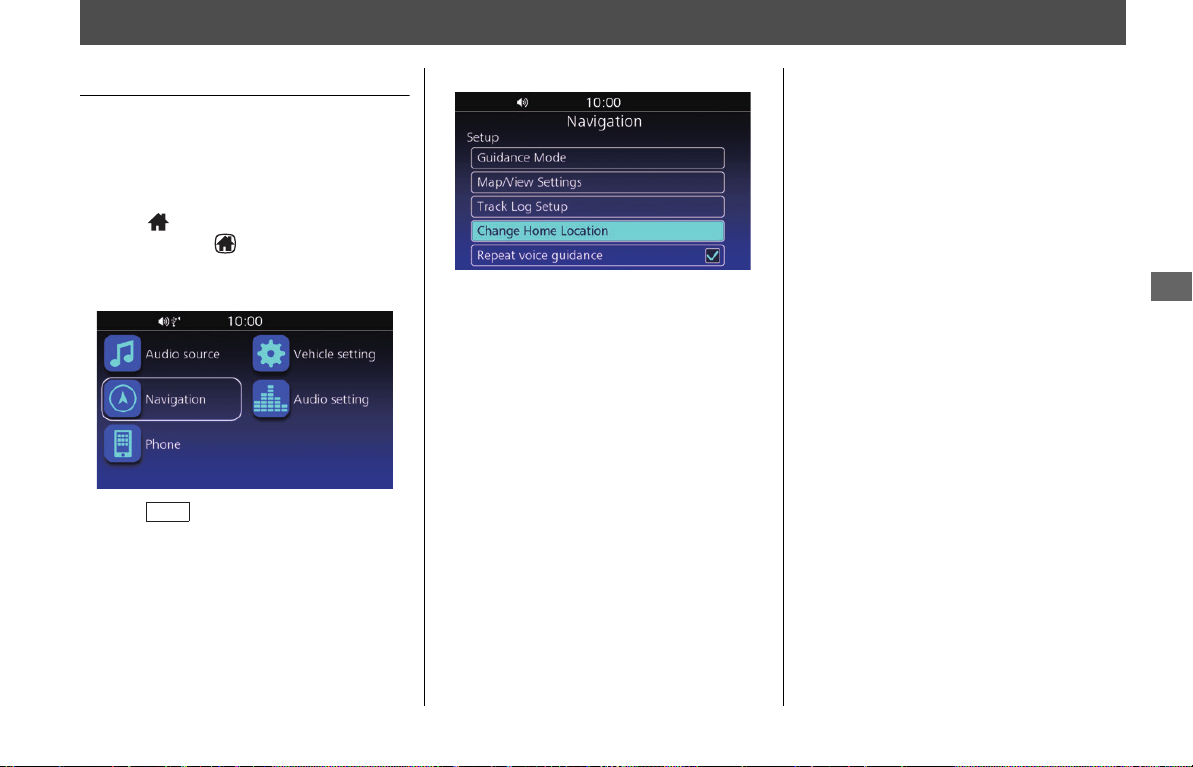
Storing Your Home Location
!a Select Navigation on the Home screen.
(P 13)
!b
Press switch on the left handlebar
.
!c
Select
Menu
.
!d
Select
Setup
.
!e
Select
Change Home Location
.
!fSelect a search method to find your
home location from the destination
input section.
(P 46)
!gSelect Save to set your home location.
Going Home
!aSelect Go Home from the map menu.
(P 13)
ENT
NOTE
• You can select the location directly from the map.
(P 56)
• You can select a favorite place, previous
destination or point of interest as the home
location.
(P 25) (P 47)
31MLJT00.book 16 ページ 2022年5月19日 木曜日 午前11時31分
17
Operation Guide
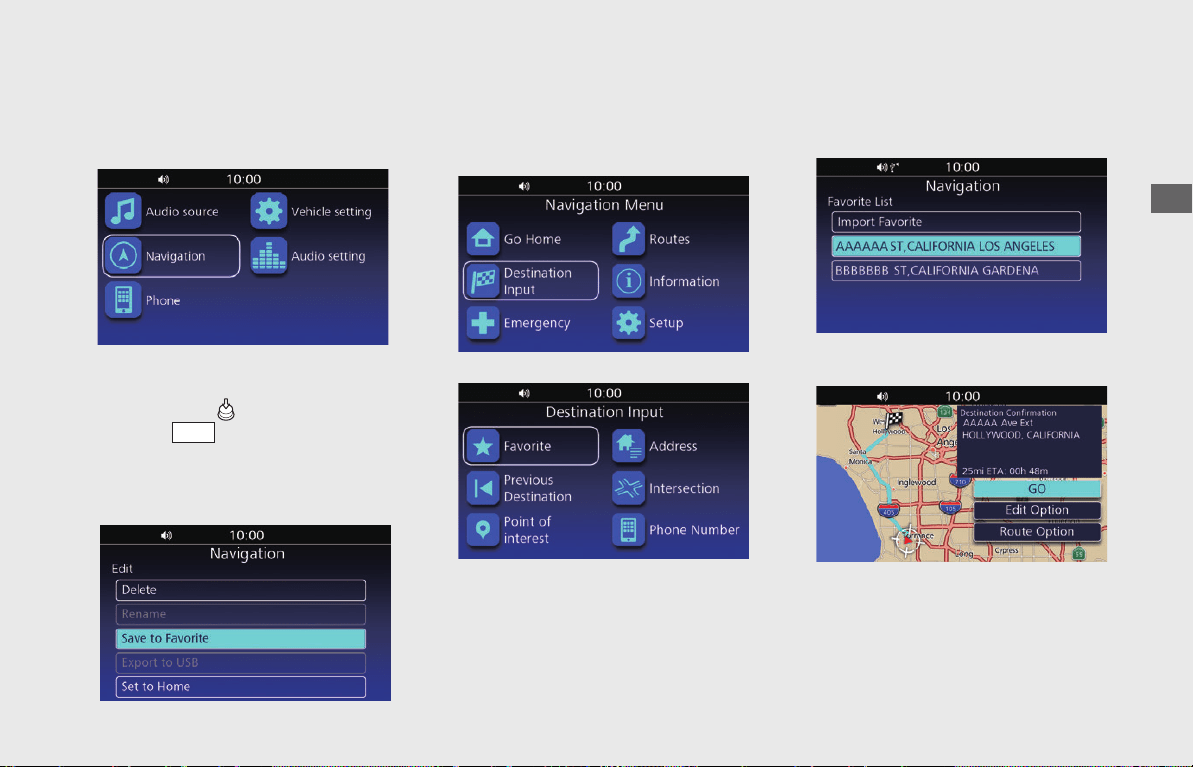
Entering a Destination—Selecting a Favorite Place
Enter your destination using one of several methods, then follow route guidance on the map to your destination.
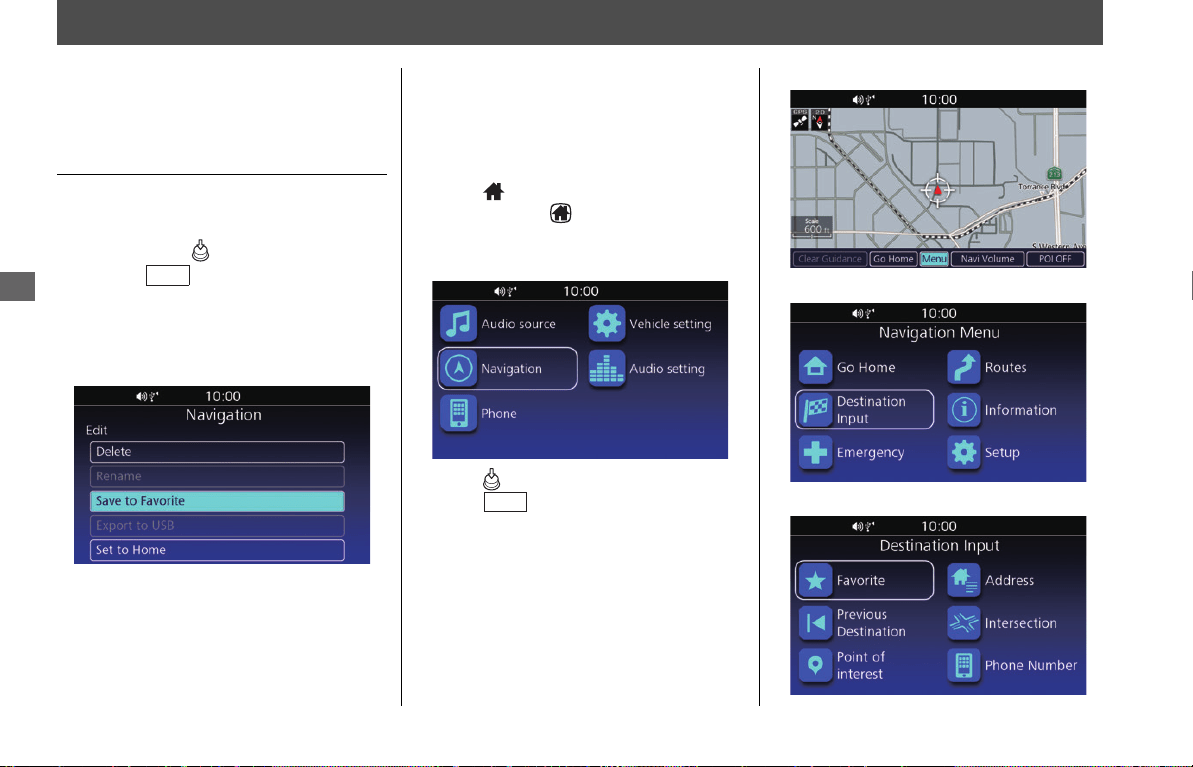
Storing a Favorite Place
!a Select Navigation on the Home screen.
(P 13)
!b Select a search method and find a
location that you want to store.
(P46)
!c
Press and hold (Enter) on the center
panel or switch on the left
handlebar
while the location is selected.
uIf you select the location directly from
the map, proceed to step 4.
!d Select Save to Favorite.
Going to a Favorite Place
!a Select Destination Input from the
navigation menu. (P 13)
!b Select Favorite.
!cSelect your destination from the list.
!dSelect GO to set the route to your
destination.
• Edit Option:
Edits your destinations and route.
(P 57)
• Route Option:
Changes the route preferences. (P 59)
ENT
31MLJT00.book 17 ページ 2022年5月19日 木曜日 午前11時31分
18
Operation Guide
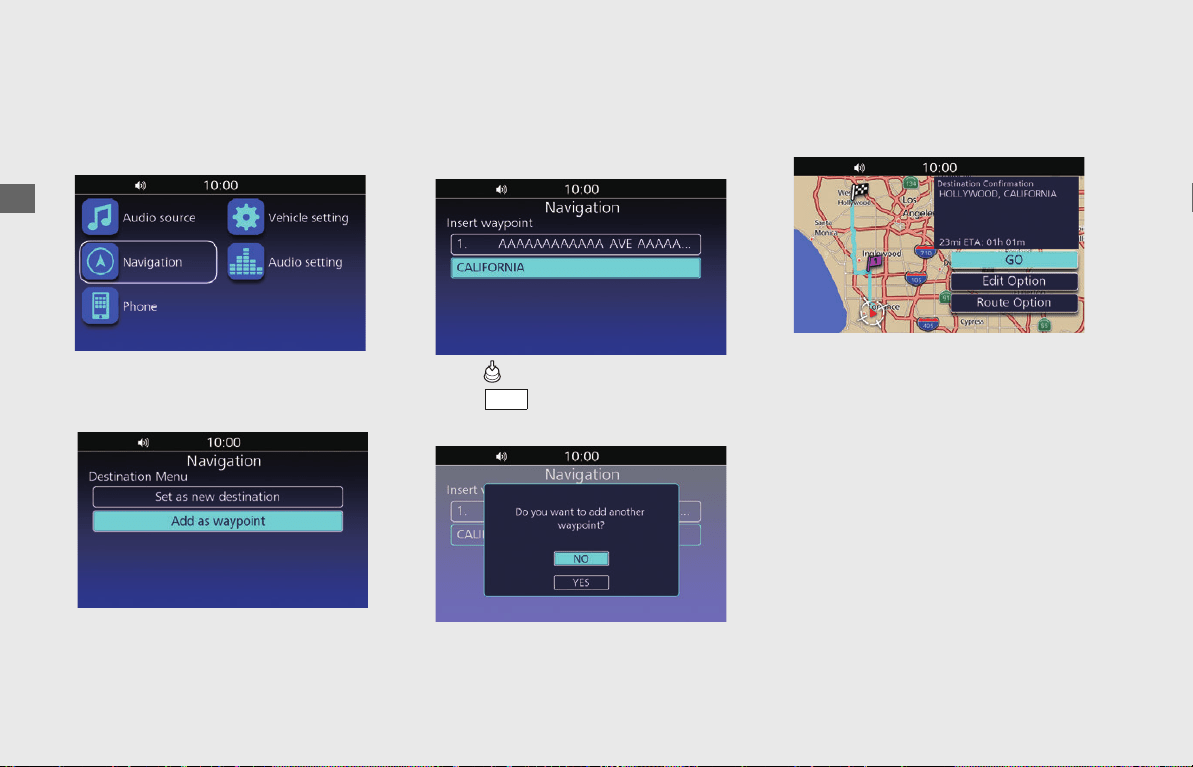
Changing Route or Destination
You can alter your route by adding waypoints to visit, adding streets to avoid, or changing your destination during route guidance.
Adding a Waypoint
!a Select Navigation on the Home screen.
(P 13)
!b Select a search method and find a
location to add. (P 46)
!c Select Add as waypoint.
!dIf necessary, move the location to the
desired position.
!e
Press (Enter) on the center panel or
press switch on the left handlebar.
!fSelect NO.
uSelect YES to add another waypoint.
!gSelect GO.
ENT
31MLJT00.book 18 ページ 2022年5月19日 木曜日 午前11時31分

19
Operation Guide
Changing Your
Destination
There are two methods you can use to
specify a new destination during route
guidance.
• Searching nearby fire departments,
hospitals or police stations
(P 66)
Select Emergency from the Navigation
menu.
• Entering a new destination
(P 67)
Select a search method to find a new
location, and select Set as new
destination to cancel your current route
and start a new route.
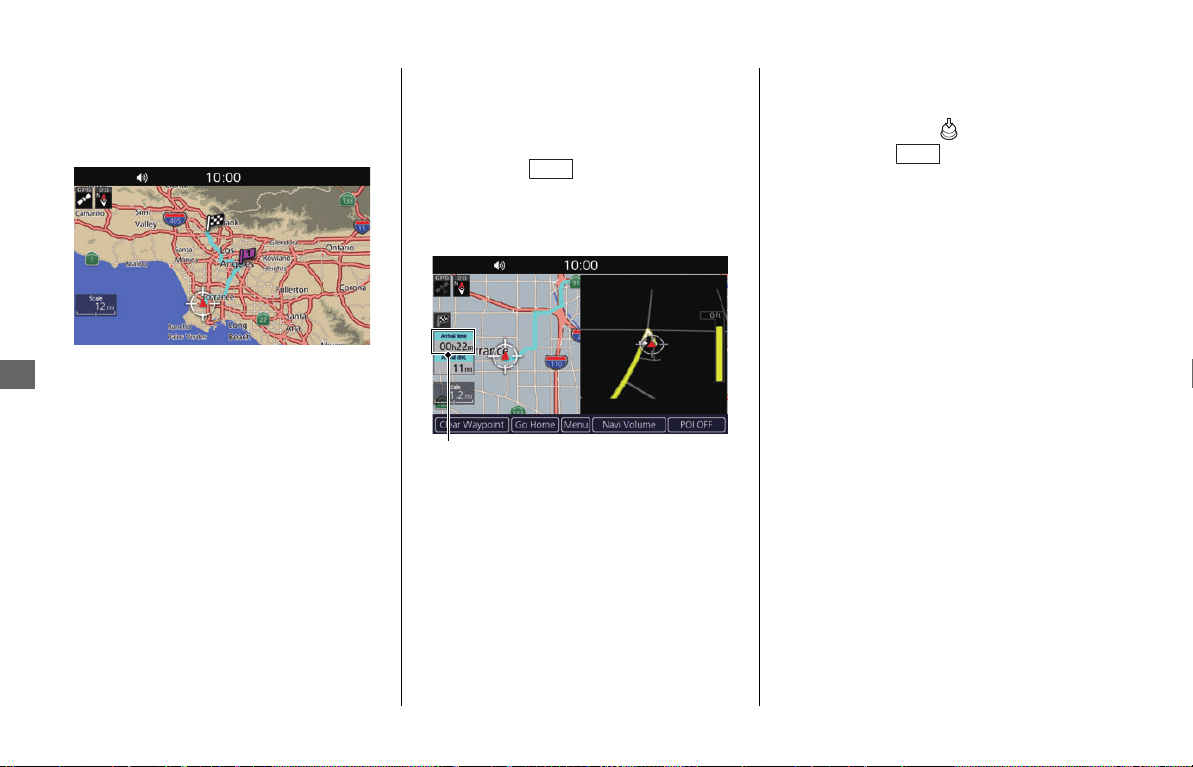
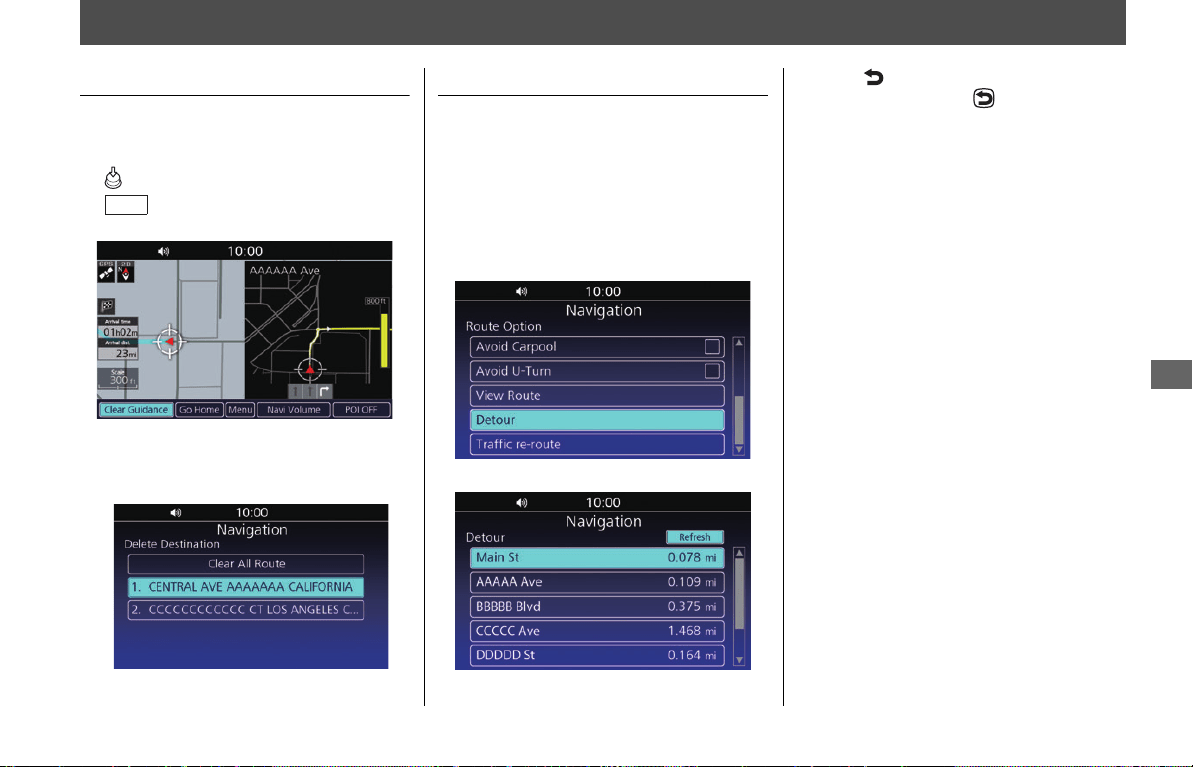
Canceling Your Route
!a While the map screen is displayed, press
(Enter) on the center panel or press
switch on the left handlebar.
!b Select Clear Guidance.
uIf you are in the route with multiple
destinations, the following screen is
displayed.
Select a destination to clear, or select
Clear All Route to clear all
destinations.
!c Select YES.
ENT
31MLJT00.book 19 ページ 2022年5月19日 木曜日 午前11時31分
20
Operation Guide
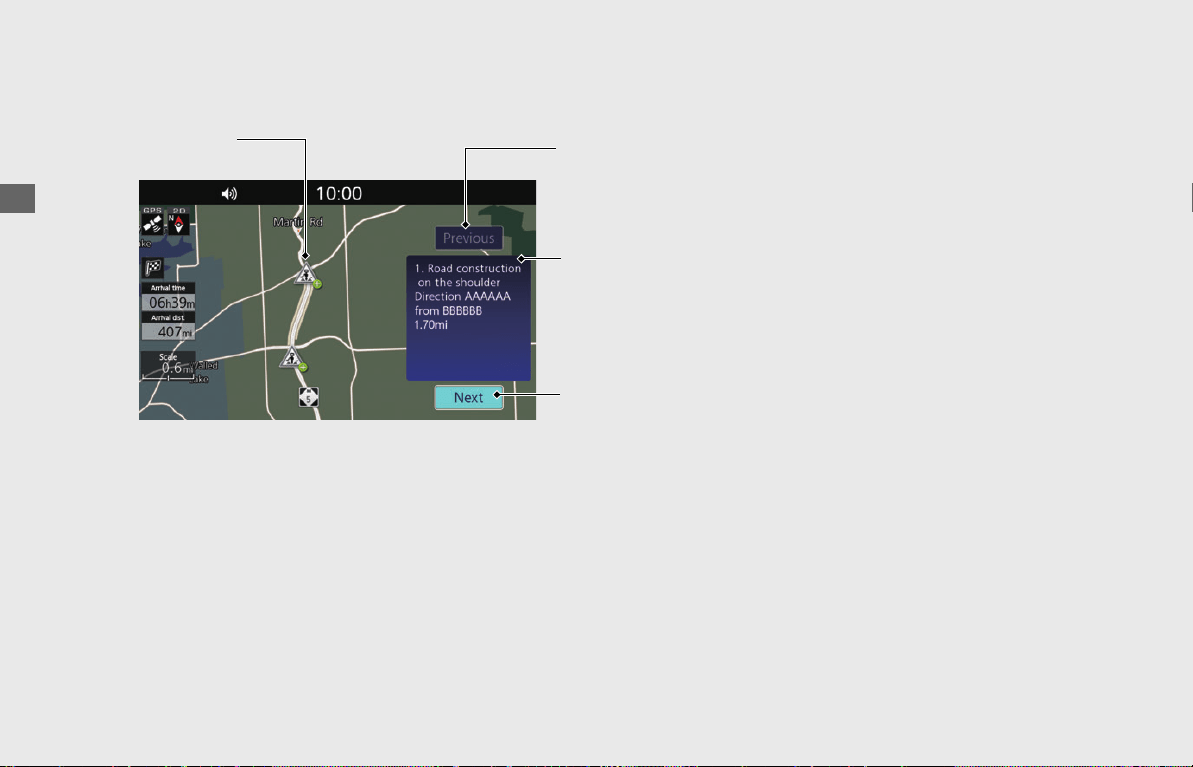
Viewing Traffic Information
You can check traffic incidents near your current location or on your current route. (P 69)
NOTE
Subscription of SiriusXM
®
Radio is required for viewing traffic information. For details about subscribing to SiriusXM
®
Radio, see the Owner's Manual.
SiriusXM
®
is a registered trademark of SiriusXM Radio, Inc.
Previous
Displays the previous
information
Next
Displays the next
information
Traffic event description
Traffic incident icon
31MLJT00.book 20 ページ 2022年5月19日 木曜日 午前11時31分

System Setup
This section describes the start-up procedure and the navigation and setup functions.
Start-up.................................................P.22
Home Location ......................................P.23
Setting Home Location .......................... P.23
Favorite Places......................................P.24
Storing a Favorite Place.......................... P.24
Editing a Favorite Place.......................... P.25
Routes ...................................................P.27
Route Menu List Screen......................... P.27
Creating a New Route ........................... P.28
Editing a Saved Route............................ P.29
Guidance Mode Settings .......................P.31
Map/View Settings................................P.32
Map/View Settings Screen ..................... P.32
Map Setup.............................................P.33
POI List ..................................................P.33
Track Log Setup.................................... P.36
Track Log Setup Screen..........................P.36
Import Track ..........................................P.37
Export Track to USB ...............................P.38
Tracks ....................................................P.38
Other Navigation Settings ................... P.39
Interface Language ................................P.39
Voice Guidance Language......................P.39
Map Screen Brightness...........................P.40
Auto Volume .........................................P.41
Repeat Voice Guidance ..........................P.41
Restore All Settings.............................. P.42
System Setup
31MLJT00.book 21 ページ 2022年5月19日 木曜日 午前11時31分
22
System Setup
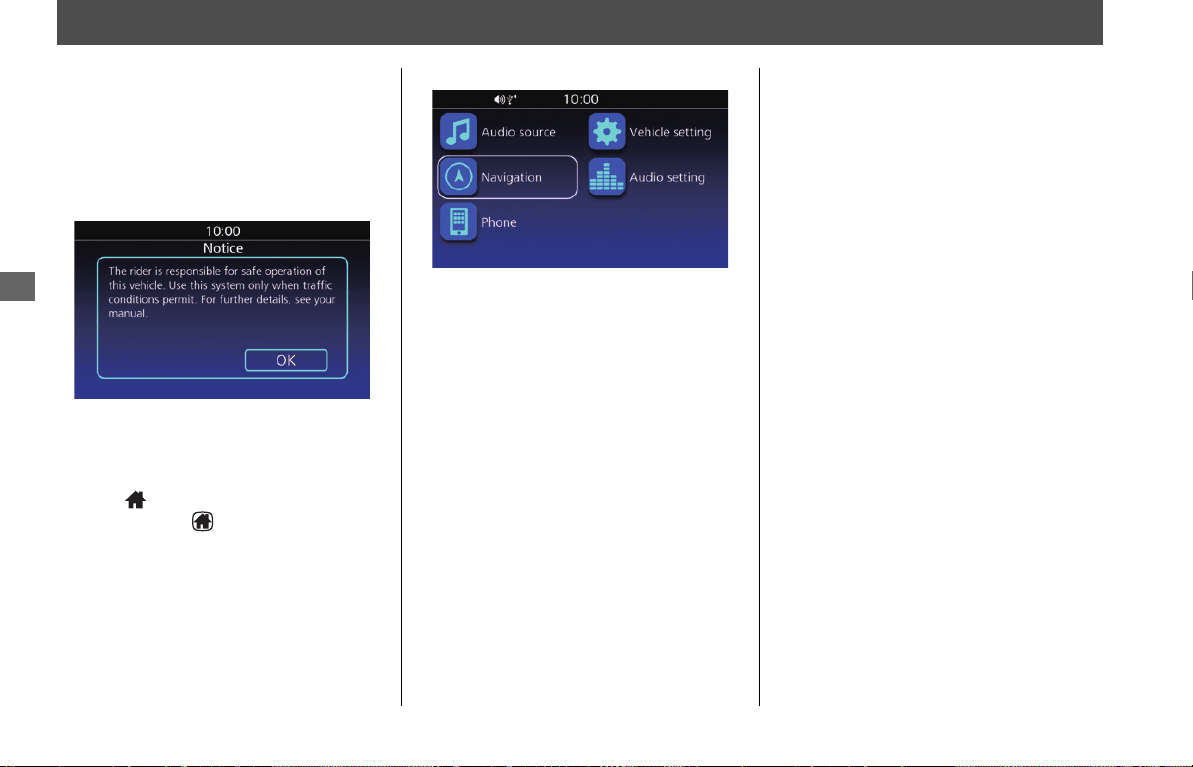
Start-up
The navigation system starts automatically
when you set the power mode to ACC or
ON.
At start-up, the following confirmation
screen is displayed.
1.
Select OK.
u If you do not select OK, the system will
automatically select OK after a certain
period of time.
2.
Press (Home) button on the center
panel or press (Home) switch on the
left handlebar.
3.
Select Navigation.
uThe map screen is displayed.
31MLJT00.book 22 ページ 2022年5月19日 木曜日 午前11時31分
23
System Setup
Home Location
Setting Home Location
Sets your home location to use the “Go
Home” feature which automatically routes
you to your home from any location simply
by selecting Go Home.
2 P. 16
1.
Press (Home) button on the center
panel or press (Home) switch on the
left handlebar.
2.
Select Navigation.
3.
Press switch on the left handlebar.
4.
Select Menu.
5.
Select Setup.
6.
Select Change Home Location.
7.
Select a search method to find your
home location. 2 P. 46
8.
Select Save to set your home location.
ENT
NOTE
• You can select the location directly from the map.
2 P. 56
• You can select a favorite place, previous destination,
or point of interest as the home location.
2 P. 25
2 P. 47
31MLJT00.book 23 ページ 2022年5月19日 木曜日 午前11時31分
24
System Setup
Favorite Places
Store up to 30 favorite places so you can
quickly find them and create routes to
them.
Storing a Favorite Place
1.
Select a search method and find a
location that you want to store.
2 P. 46
2.
Press and hold (Enter) on the center
panel or switch on the left
handlebar
while the location is selected.
uIf you select the location directly from
the map, proceed to step 3.
3.
Select Save to Favorite.
❙
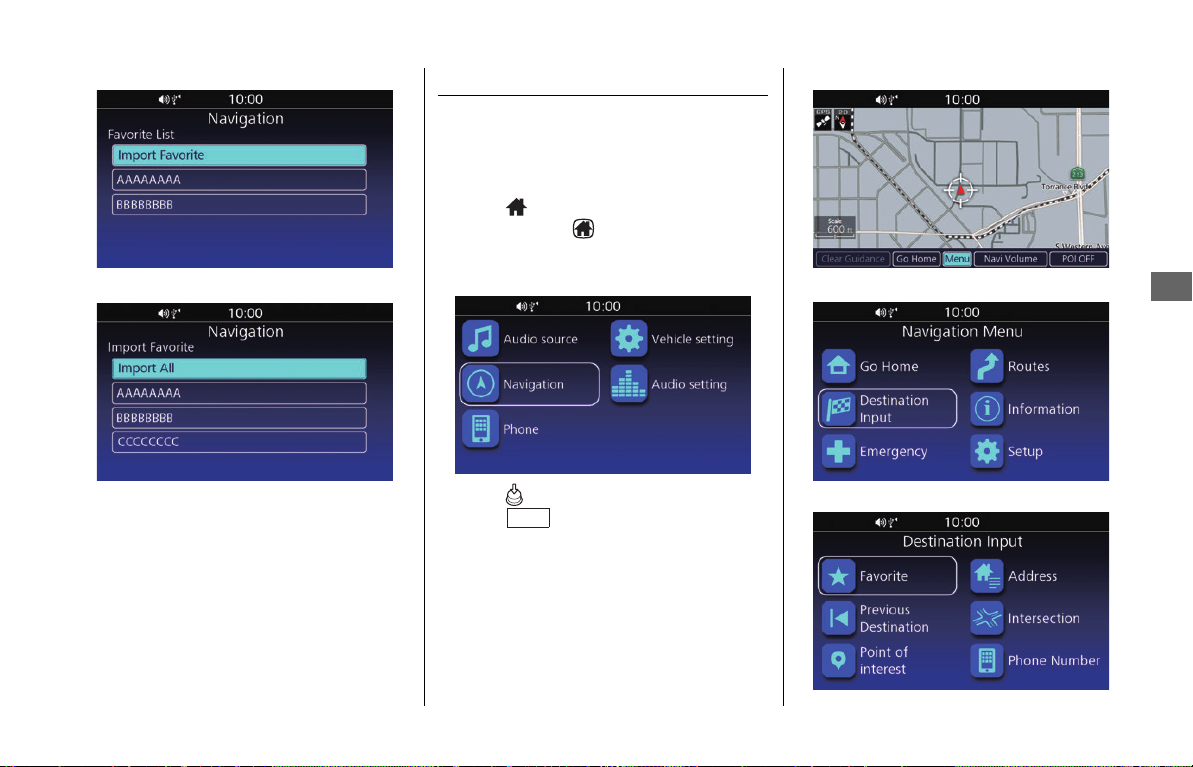
Importing a Favorite Place
You can import a favorite place from the
USB.
1.
Connect the USB. 2 P. 9
2.
Press (Home) button on the center
panel or press (Home) switch on the
left handlebar.
3.
Select Navigation.
4.
Press (Enter) on the center panel or
press switch on the left
handlebar.
5.
Select Menu.
6.
Select Destination Input.
7.
Select Favorite.
NOTE
You can store up to 30 favorite places.
ENT
ENT
31MLJT00.book 24 ページ 2022年5月19日 木曜日 午前11時31分
Favorite Places u Editing a Favorite Place
25
System Setup
8.
Select Import Favorite.
9.
Select the favorite place to import.
uSelect Import All to import all the
places.
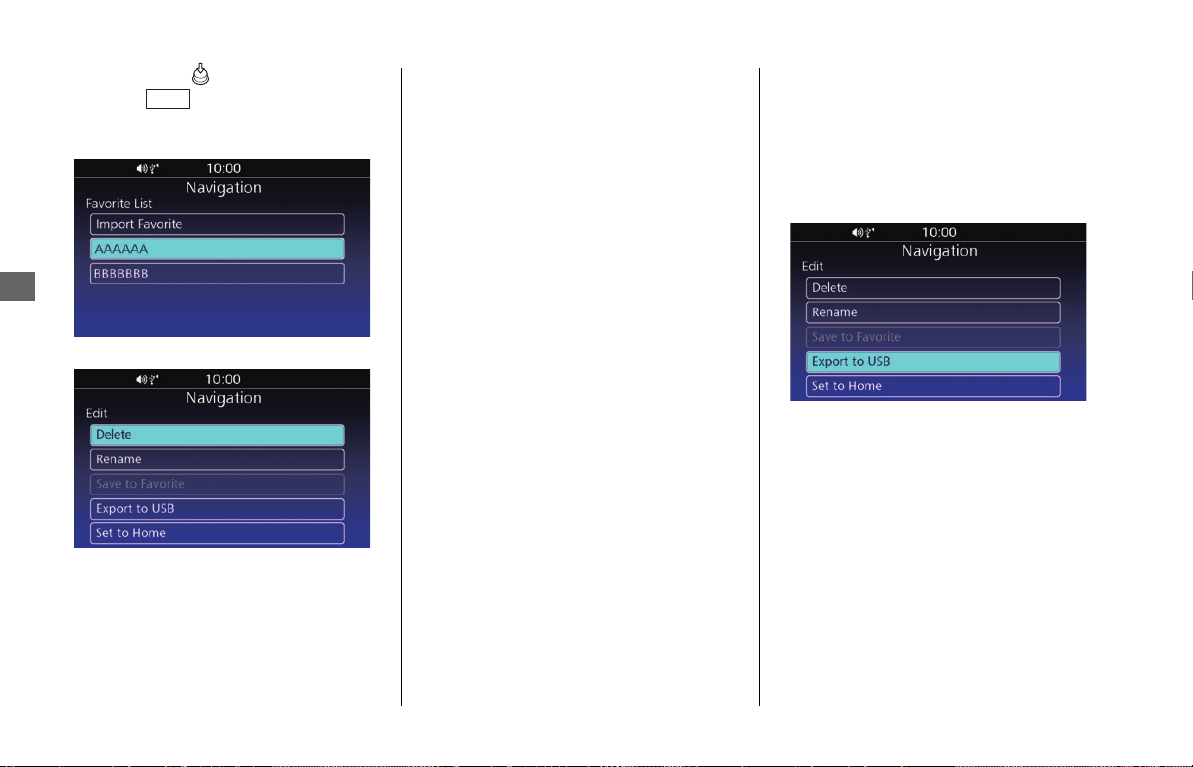
Editing a Favorite Place
❙
Edit Screen
Access the Edit screen to edit or delete a
favorite place.
1.
Press (Home) button on the center
panel or press (Home) switch on the
left handlebar.
2.
Select Navigation.
3.
Press (Enter) on the center panel or
press switch on the left
handlebar.
4.
Select Menu.
5.
Select Destination Input.
6.
Select Favorite.
NOTE
• If 30 favorite places are stored, Import Favorite is
grayed-out. Delete stored places.
2 P. 25
• A file which has *, /,“, ?, or : in the filename is not
displayed.
ENT
31MLJT00.book 25 ページ 2022年5月19日 木曜日 午前11時31分
Favorite Places u Editing a Favorite Place
26
System Setup
7.
Press and hold (Enter) on the center
panel or switch on the left
handlebar
while a favorite place is
highlighted.
8.
Select an option.
The following options are available:
●
Delete:
Deletes the favorite place. Select YES on
the confirmation screen.
●
Rename:
Changes the name of the favorite place.
Enter a new name and select OK.
●
Export to USB:
Exports favorite place data to the USB.
2 P. 26
●
Set to Home:
Sets a favorite place to your home
location.
❙
Exporting a Favorite Place
You can export a favorite place to the
USB.
1.
Connect the USB. 2 P. 9
2.
Select Export to USB on the Edit
screen. 2 P. 25
ENT
31MLJT00.book 26 ページ 2022年5月19日 木曜日 午前11時31分
27
System Setup
Routes
Create and save a route with multiple
destinations. Up to 15 routes can be saved.
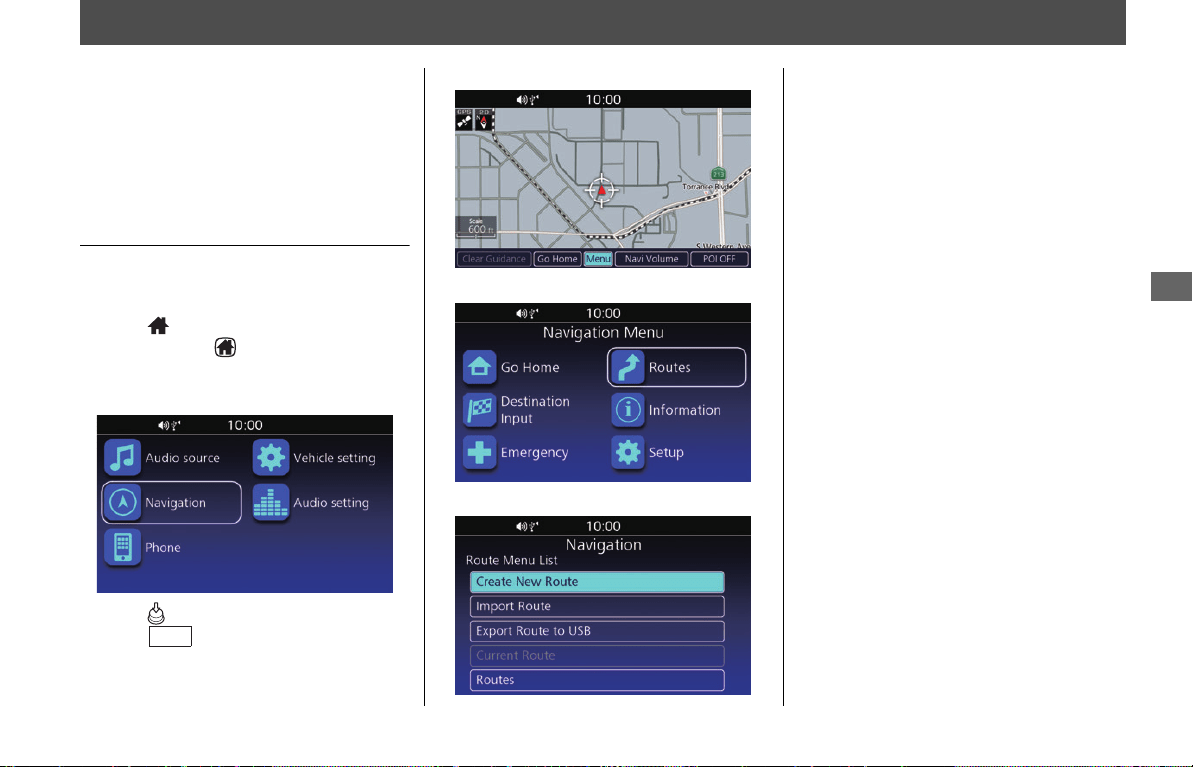
Route Menu List Screen
Access the Route Menu List screen to
create, import, export, use, or edit a route.
1.
Press (Home) button on the center
panel or press (Home) switch on the
left handlebar.
2.
Select Navigation.
3.
Press (Enter) on the center panel or
press switch on the left
handlebar.
4.
Select Menu.
5.
Select Routes.
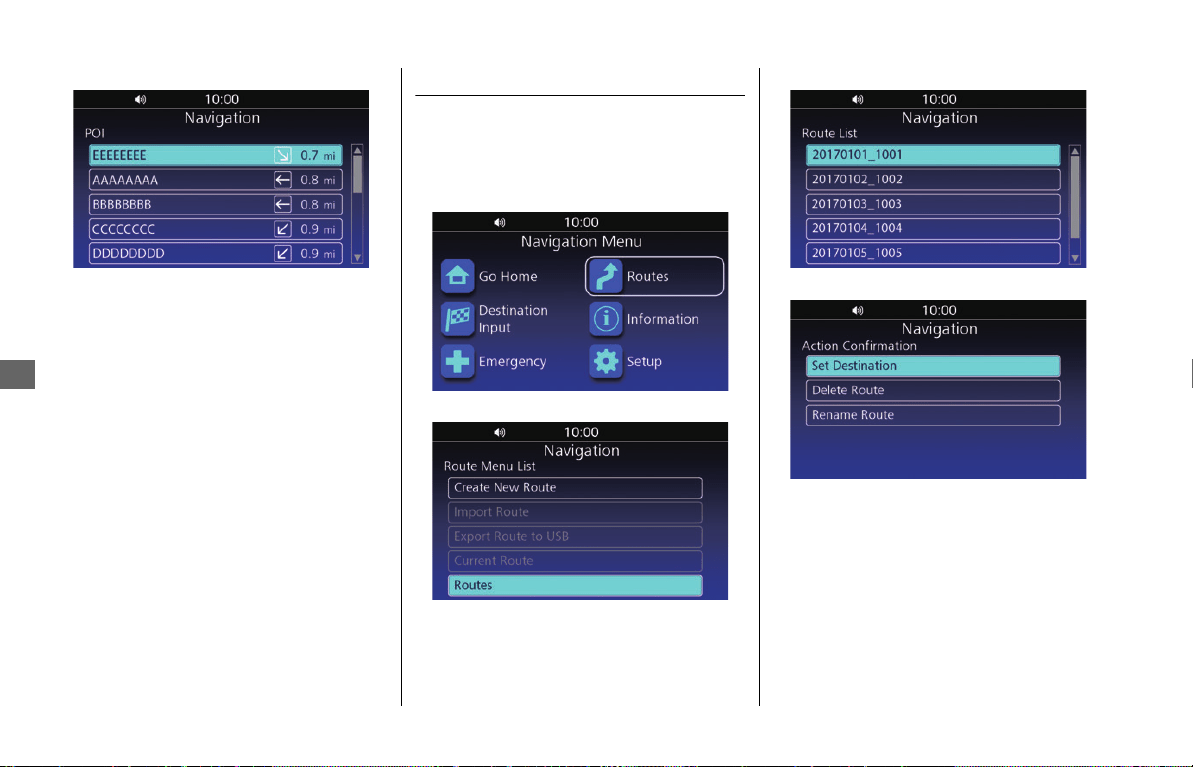
6.
Select an option.
The following options are available:
●
Create New Route:
Creates and saves a new route.
●
Import Route:
Imports your route from a USB. 2 P. 28
●
Export Route to USB:
Exports a saved route to a USB.
2 P. 30
●
Current Route:
Displays the current route and route
options.
2 P. 57
●
Routes:
Displays the list of saved routes.
2 P. 54
NOTE
You can edit a saved route in the same way as editing
the active route.
2 P. 57
ENT
31MLJT00.book 27 ページ 2022年5月19日 木曜日 午前11時31分
Routes u Creating a New Route
28
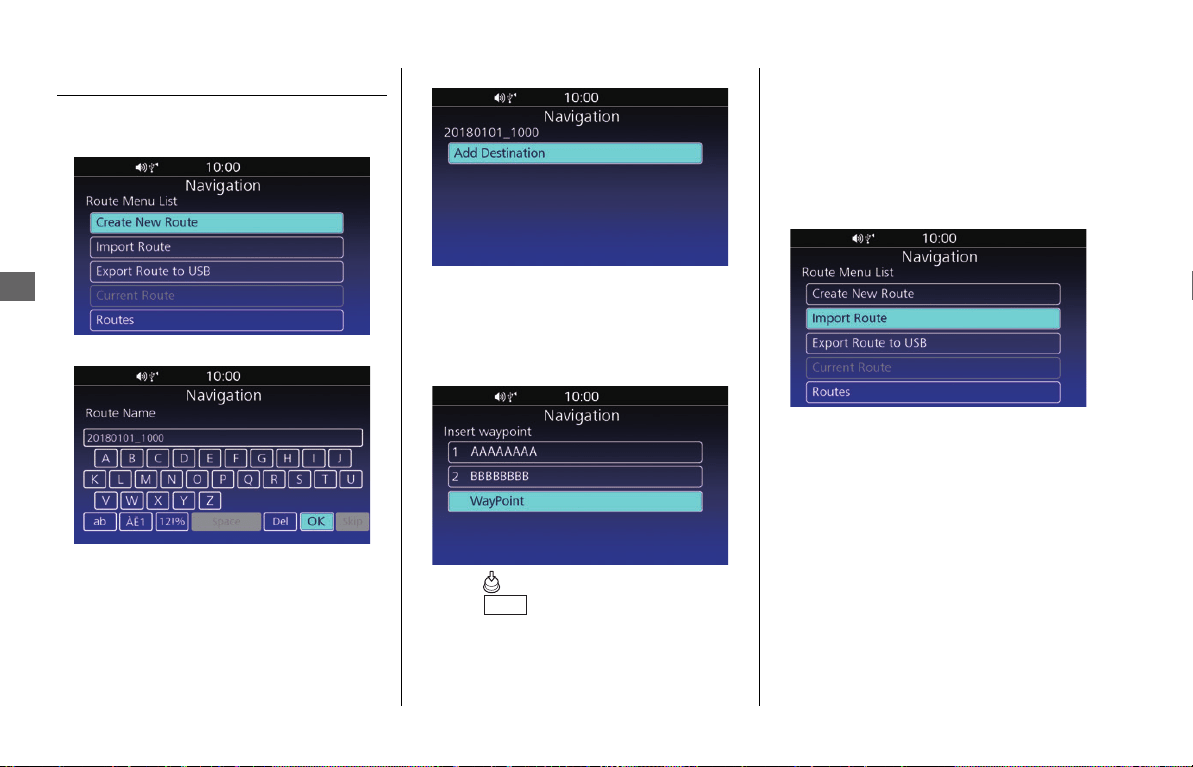
System Setup
Creating a New Route
1.
Select Create New Route on the Route
Menu List screen.
2.
Enter the route name and select OK.
3.
Select Add Destination.
4.
Select a search method and find a
location. 2 P. 46
uRepeat steps 3 and 4 to add additional
locations.
5.
Move the location to the desired position.
6.
Press (Enter) on the center panel or
press switch on the left
handlebar.
❙
Importing a Route Set
You can import a route to the navigation
system via USB.
1.
Connect the USB. 2 P. 9
2.
Select Import Route on the Route
Menu List screen. 2 P. 27
NOTE
You can also save the active route. 2 P. 59
ENT
31MLJT00.book 28 ページ 2022年5月19日 木曜日 午前11時31分
Routes u Editing a Saved Route
29
System Setup
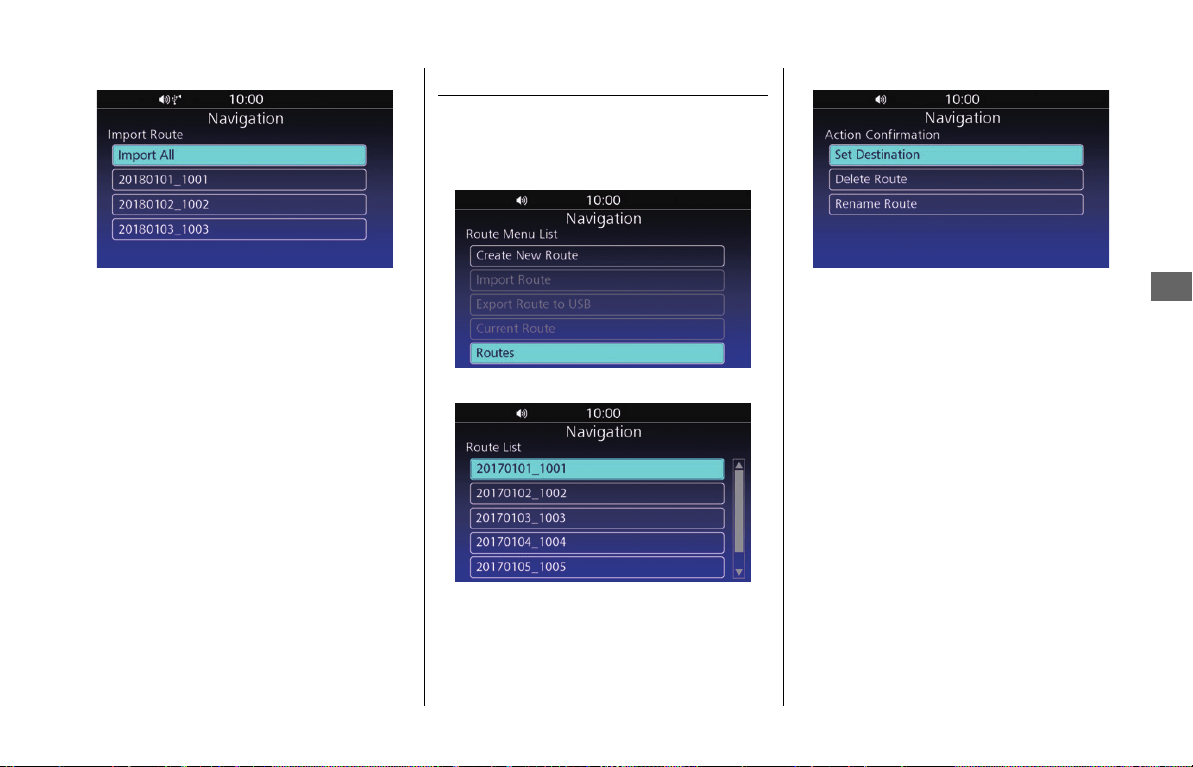
3.
Select a route to import.
uSelect Import All to import all the
routes.
Editing a Saved Route
You can delete or rename a saved route.
1.
Select Routes on the Route Menu List
screen.
2 P. 27
2.
Select a route.
3.
Select an option.
The following options are available:
●
Set Destination:
Sets the route.
2 P. 54
●
Delete Route:
Deletes the route. Select YES on the
confirmation screen.
●
Rename Route:
Changes the route name. Enter the new
name and select OK.
NOTE
• A maximum of 15 routes can be saved. You will
need to delete an existing route to use Import
Route.
2 P. 29
• The route set on the website may look different
when imported because the route will be optimized
by the map software in the navigation system. The
route might be changed when it is recalculated.
• A file which has *, /,“, ?, or : in the filename is not
displayed.
31MLJT00.book 29 ページ 2022年5月19日 木曜日 午前11時31分
Routes u Editing a Saved Route
30
System Setup
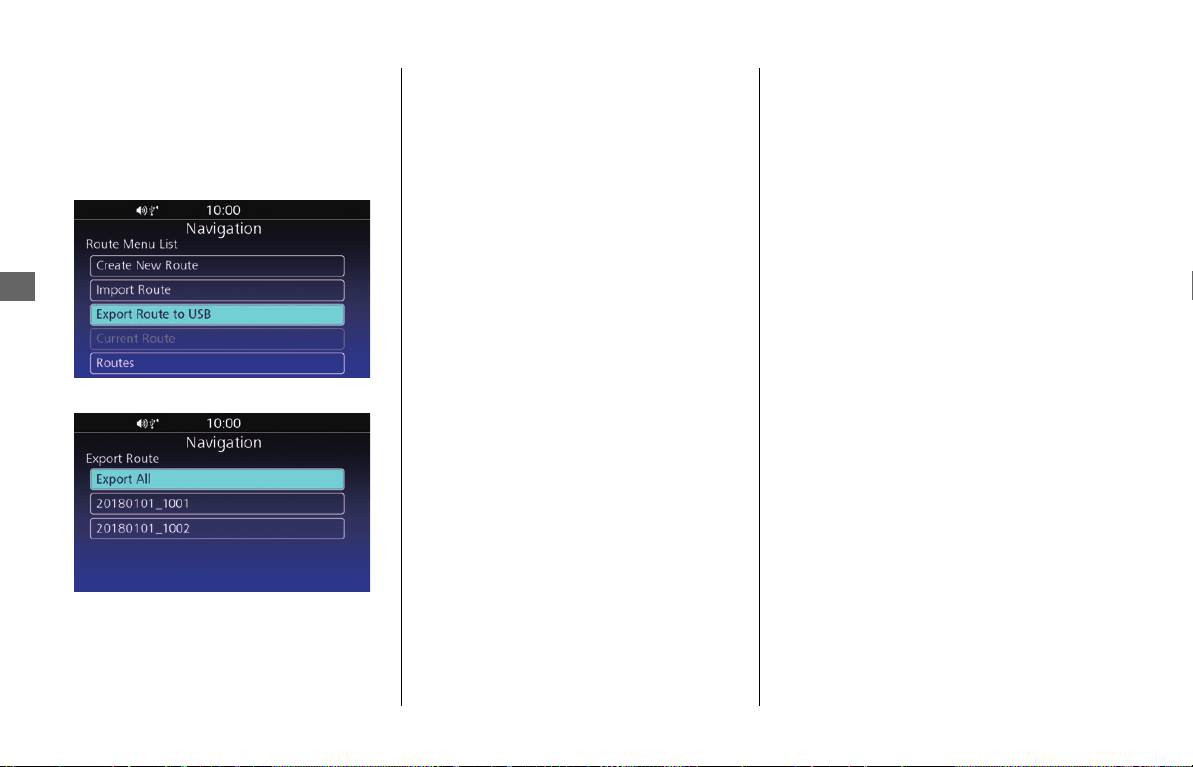
❙
Exporting a Saved Route
You can export a saved route to the USB.
1.
Connect the USB. 2 P. 9
2.
Select Export Route to USB on the
Route Menu List screen. 2 P. 27
3.
Select the route to export.
uSelect Export All to export all the
routes.
31MLJT00.book 30 ページ 2022年5月19日 木曜日 午前11時31分
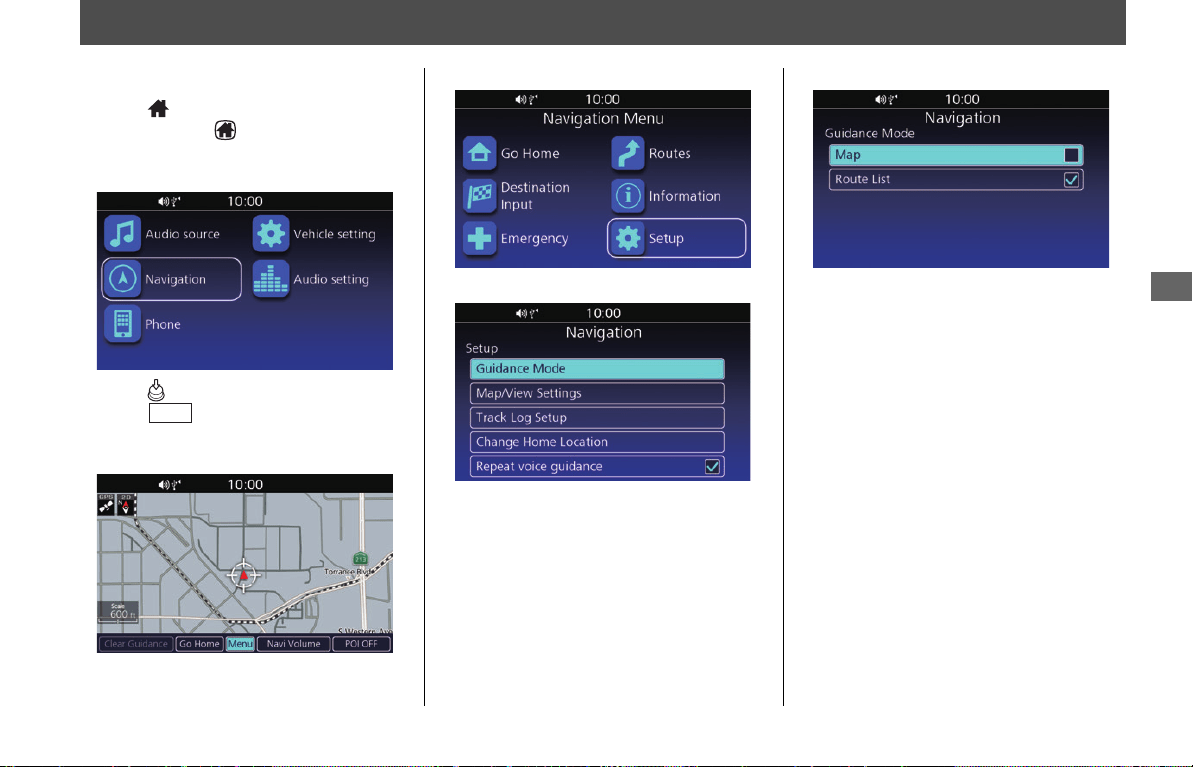
31
System Setup
Guidance Mode Settings
Change the guidance mode settings.
1.
Press (Home) button on the center
panel or press (Home) switch on the
left handlebar.
2.
Select Navigation.
3.
Press (Enter) on the center panel or
press switch on the left
handlebar.
4.
Select Menu.
5.
Select Setup.
6.
Select Guidance Mode.
7.
Select an option.
The following options are available:
●
Map:
Displays only the map screen.
●
Route List (Default):
Displays the map and direction list
simultaneously on the map screen.
ENT
31MLJT00.book 31 ページ 2022年5月19日 木曜日 午前11時31分

32
System Setup
Map/View Settings
Map/View Settings Screen
Display the Guidance Settings screen to
change the map/view settings.
1.
Press (Home) button on the center
panel or press (Home) switch on the
left handlebar.
2.
Select Navigation.
3.
Press (Enter) on the center panel or
press switch on the left handlebar.
4.
Select Menu.
5.
Select Setup.
6.
Select Map/View Settings.
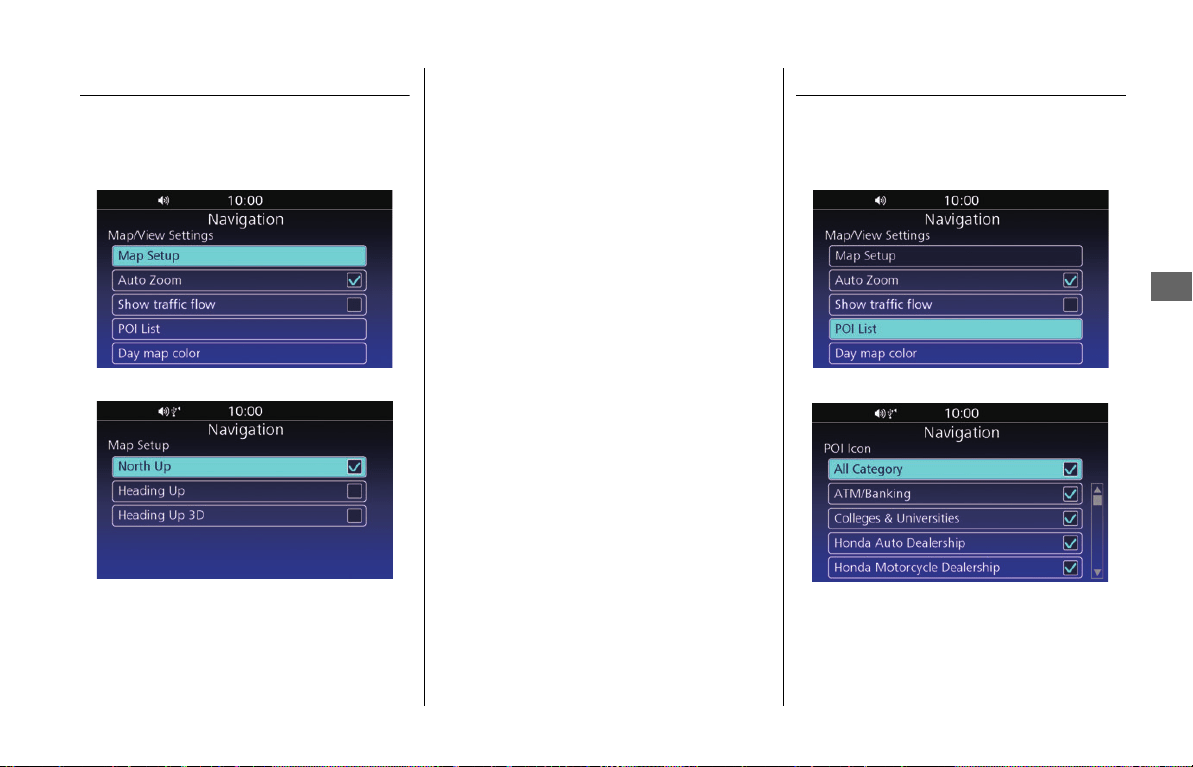
7.
Select an option.
The following options are available:
●
Map Setup:
Changes the map orientation. 2 P. 33
●
Auto Zoom:
Turns the auto zoom on or off.
●
Show traffic flow:
Sets whether the system shows traffic
jams on the map. When this option is
enabled, the red (heavy traffic
congestion) or yellow (light traffic
congestion) lines are displayed along the
road on the map.
●
POI List:
Display the list of categories to show on
the map. 2 P. 33
●
Day map color:
Selects the map color.
ENT
NOTE
• Auto Zoom is set to off as factory default.
• Subscription of SiriusXM
®
Radio is required for
adding Show traffic flow function. For details
about subscribing to SiriusXM
®
Radio, see the
Owner's Manual.
31MLJT00.book 32 ページ 2022年5月19日 木曜日 午前11時31分
Map/View Settings u Map Setup
33
System Setup
Map Setup
Select the map orientation.
1.
Select Map Setup on the Map/View
Settings screen.
2 P. 32
2.
Select an option.
The following options are available:
●
North Up (Default):
Displays the map with north always
pointing up.
●
Heading Up:
Displays the map with your direction of
travel facing upwards.
●
Heading Up 3D:
Displays the map in 3D with your
direction of travel facing upwards.
POI List
Set the point of interest (POI) to show.
1.
Select POI List on the Map/View
Settings screen.
2 P. 32
2.
Select categories to show.
uSelect All Category to show icons of
all the categories.
31MLJT00.book 33 ページ 2022年5月19日 木曜日 午前11時31分

Map/View Settings u POI List
34
System Setup
❙
List of All Categories
Vehicle Services
All
Honda Auto Dealership
Honda Motorcycle Dealership
Gas Station
Car Wash
Auto Parts
Car Repair
Truck Repair
Restaurant
All
Bar & Pubs
Coffee Shop
American Food
Californian Food
Chinese Food
French Food
Indian Food
Italian Food
Japanese Food
Mexican Food
Seafood
Barbecue/Southern
Fast Food
Grill
Jewish/Kosher Food
Steak House
Turkish Food
African Food
Pizza
Snacks & Beverages
Breakfast
Ice Cream
Tapas
Caribbean Food
Sushi
Shopping
All
Apparel & Accessories
Books
Computers & Electronics
Convenience Stores
Department Stores
Gifts
Grocery Stores
Home & Garden
Housewares
Office Supply
Pharmacies
Shopping centers
Sporting Goods
Wine Beer & Liquor
ATM/Banking
Attraction
All
Major Attractions
Amusement Parks
Beach
Historic Landmarks
Park & Gardens
Tourist Information
Wineries
Zoos & Aquariums
Recreation
All
Bowling Alley
Golfing
Skiing & Winter Sports
Sport Centers
Stadiums & Tracks
Camps & RV Parks
Art & Entertainment
All
Casinos
Movie Theaters
Museum & Galleries
Night Clubs
Performing Arts
31MLJT00.book 34 ページ 2022年5月19日 木曜日 午前11時31分

Map/View Settings u POI List
35
System Setup
Transport & Travel
All
Border Crossing
Train Station
Ferry Terminal
Commuter Train
Bus Station
Airport
Rent a Car Facility
Parking Lot
Parking Garage
Park and Ride
Rest Area
Emergency Services
All
Hospital/Medical Center
Fire Stations
Police Stations
Community Services
All
City Halls
Community Centers
Court Houses
Post Offices
Everyday Life
All
Fitness & Gyms
Libraries
Places of Worship
Schools
Colleges & Universities
Hotel
31MLJT00.book 35 ページ 2022年5月19日 木曜日 午前11時31分
36
System Setup
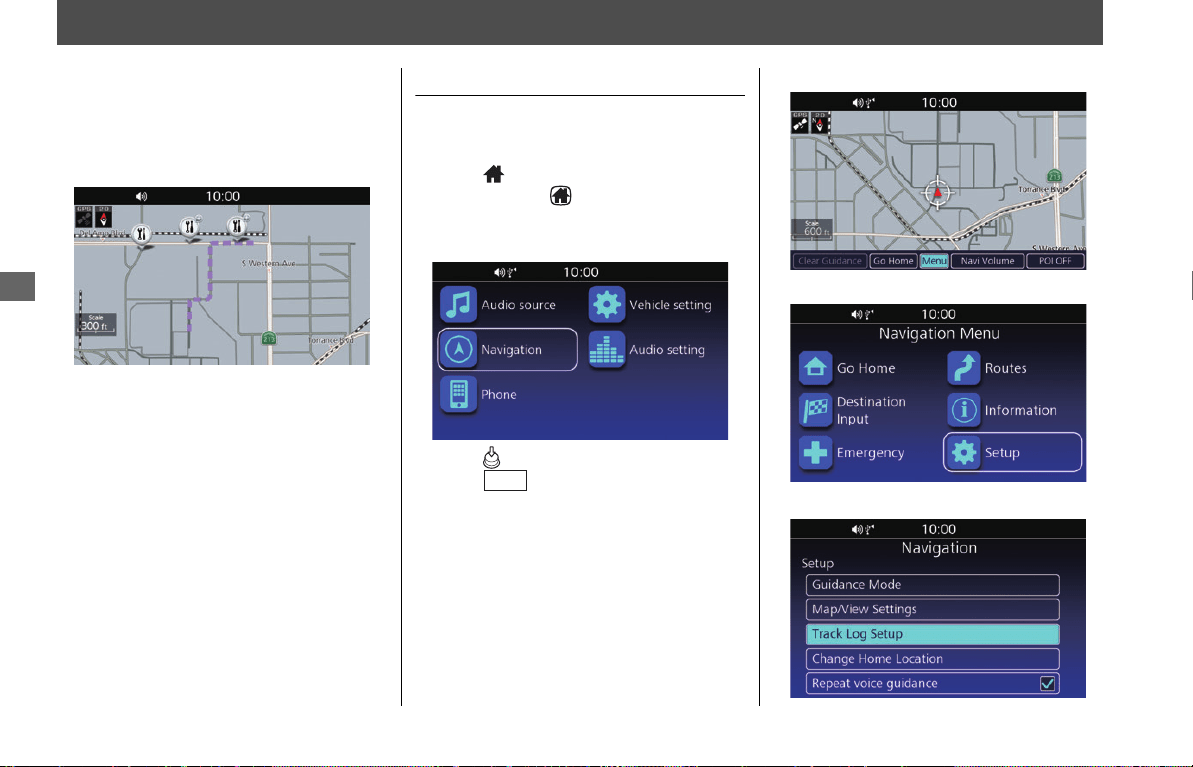
Track Log Setup
You can select whether the system creates
a visual log of where you have ridden by
spreading tracking dots, “breadcrumbs.”
These breadcrumbs appear for any map
scale up to and including 60 miles.
Track Log Setup Screen
Access the Track Log Setup screen to
change the track log settings.
1.
Press (Home) button on the center
panel or press (Home) switch on the
left handlebar.
2.
Select Navigation.
3.
Press (Enter) on the center panel or
press switch on the left
handlebar.
4.
Select Menu.
5.
Select Setup.
6.
Select Track Log Setup.
ENT
31MLJT00.book 36 ページ 2022年5月19日 木曜日 午前11時31分
Track Log Setup u Import Track
37
System Setup
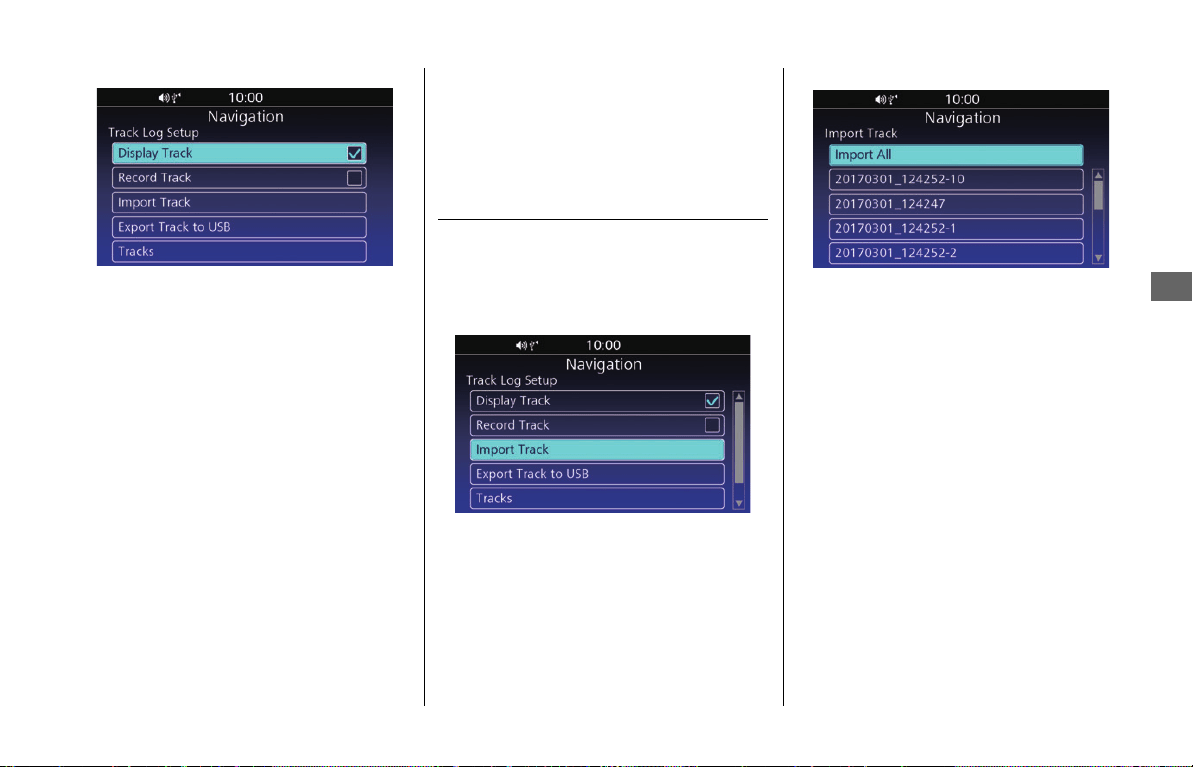
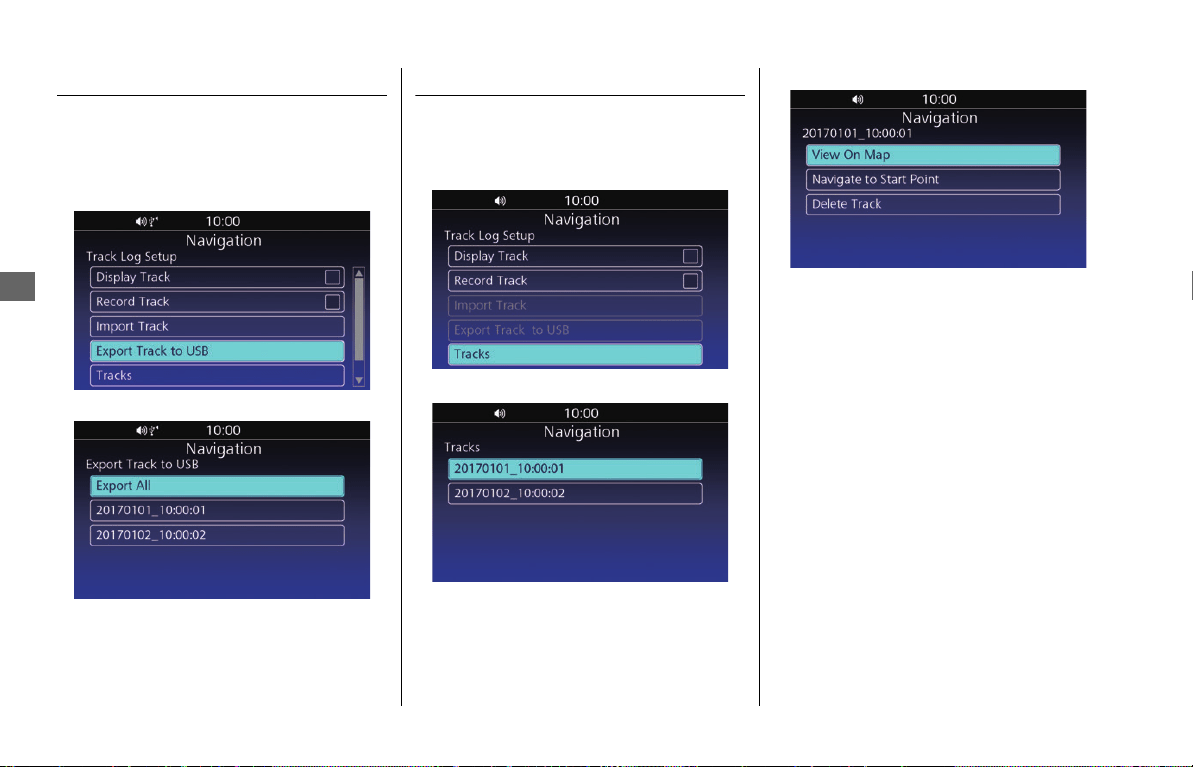
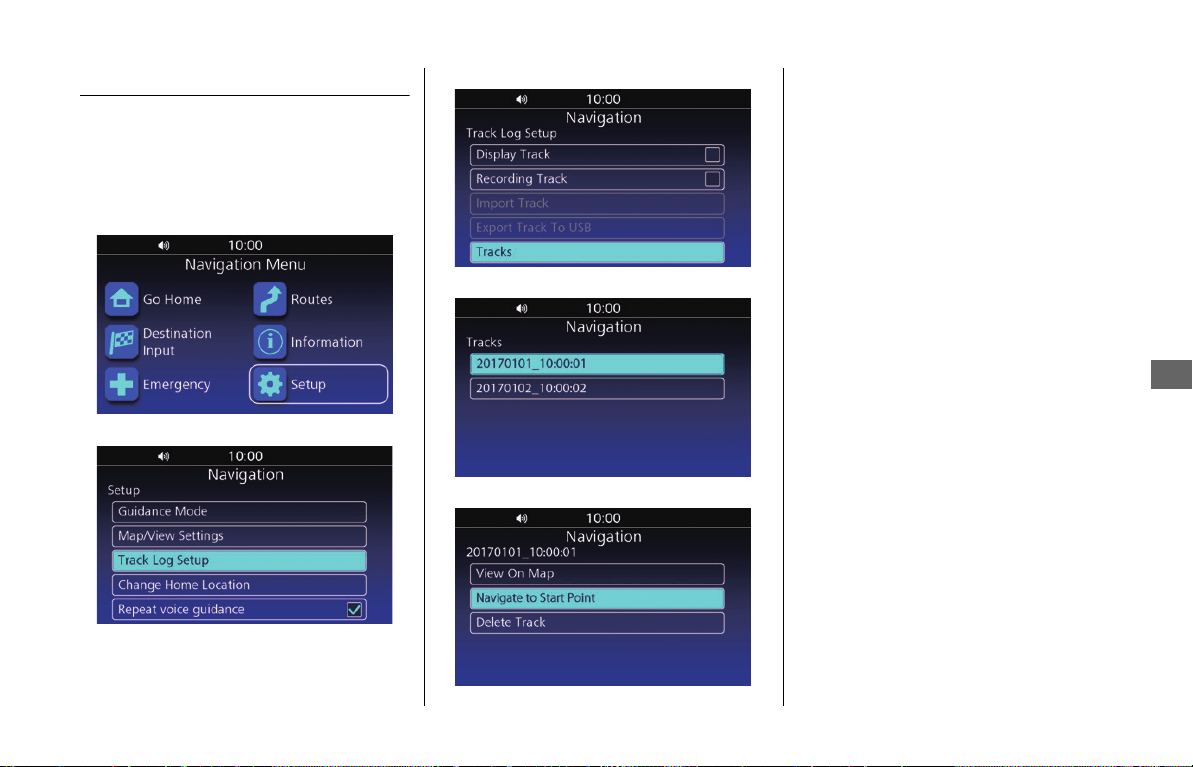
7.
Select an option.
The following options are available:
●
Display Track:
Shows the breadcrumbs on the map.
●
Record Track:
Starts recording the track log. When this
option is disabled, the recording stops
and the recorded track log is added to
the list of tracks.
2 P. 38
●
Import Track:
Imports the track log from the connected
USB.
2 P. 37
●
Export Track to USB:
Exports the track log to the connected
USB.
2 P. 38
●
Tracks:
Displays the list of tracks.
2
P. 38
●
Hide Track on Map:
Hides the breadcrumbs on the map when
the starting point of the recorded track is
set to your destination.
2
P. 55
Import Track
You can import track data from a USB.
1.
Connect the USB. 2 P. 9
2.
Select Import Track on the Track Log
Setup screen.
2 P. 36
3.
Select the track to import.
uSelect Import All to import all the
tracks.
NOTE
• Display Track and Record Track are set to off as
factory default.
• Up to 15 tracks can be recorded.
NOTE
• A maximum of 15 tracks can be recorded. You will
need to delete an existing track to use Import
Track.
2 P. 38
• A file which has *, /,“, ?, or : in the filename is not
displayed.
31MLJT00.book 37 ページ 2022年5月19日 木曜日 午前11時31分
Track Log Setup u Export Track to USB
38
System Setup
Export Track to USB
You can export the track data to a USB.
1.
Connect the USB. 2 P. 9
2.
Select Export Track to USB on the
Track Log Setup screen. 2 P. 36
3.
Select the track to export.
uSelect Export All to export all the
tracks.
Tracks
View, replay, or delete the track.
1.
Select Tracks on the Track Log Setup
screen.
2 P. 36
2.
Select the track.
3.
Select an option.
The following options are available:
●
View On Map:
Displays the track on the map.
●
Navigate to Start Point:
Sets the route to the starting point of the
track.
2 P. 55
●
Delete Track:
Deletes the track. Select YES on the
confirmation screen.
31MLJT00.book 38 ページ 2022年5月19日 木曜日 午前11時31分
39
System Setup
Other Navigation Settings
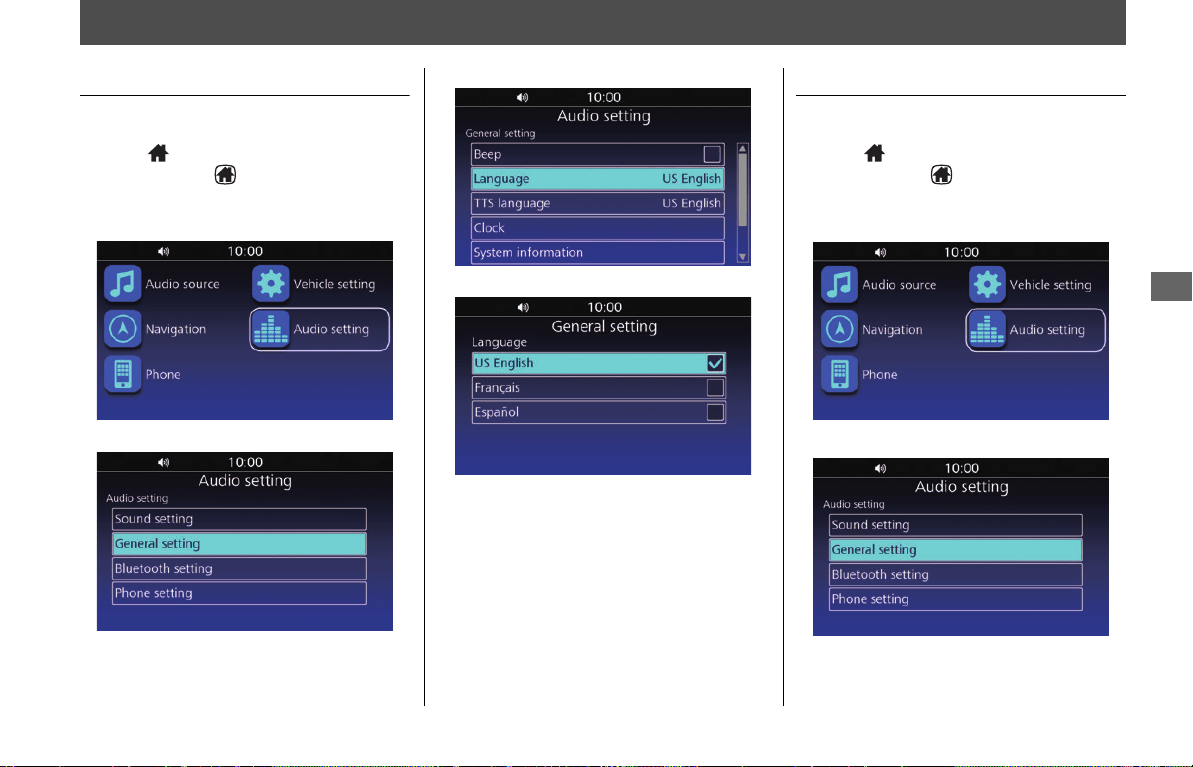
Interface Language
Change the interface language.
1.
Press (Home) button on the center
panel or press (Home) switch on the
left handlebar.
2.
Select Audio setting.
3.
Select General setting.
4.
Select Language.
5.
Select the desired language.
uFor more information, see the Owner’s
Manual.
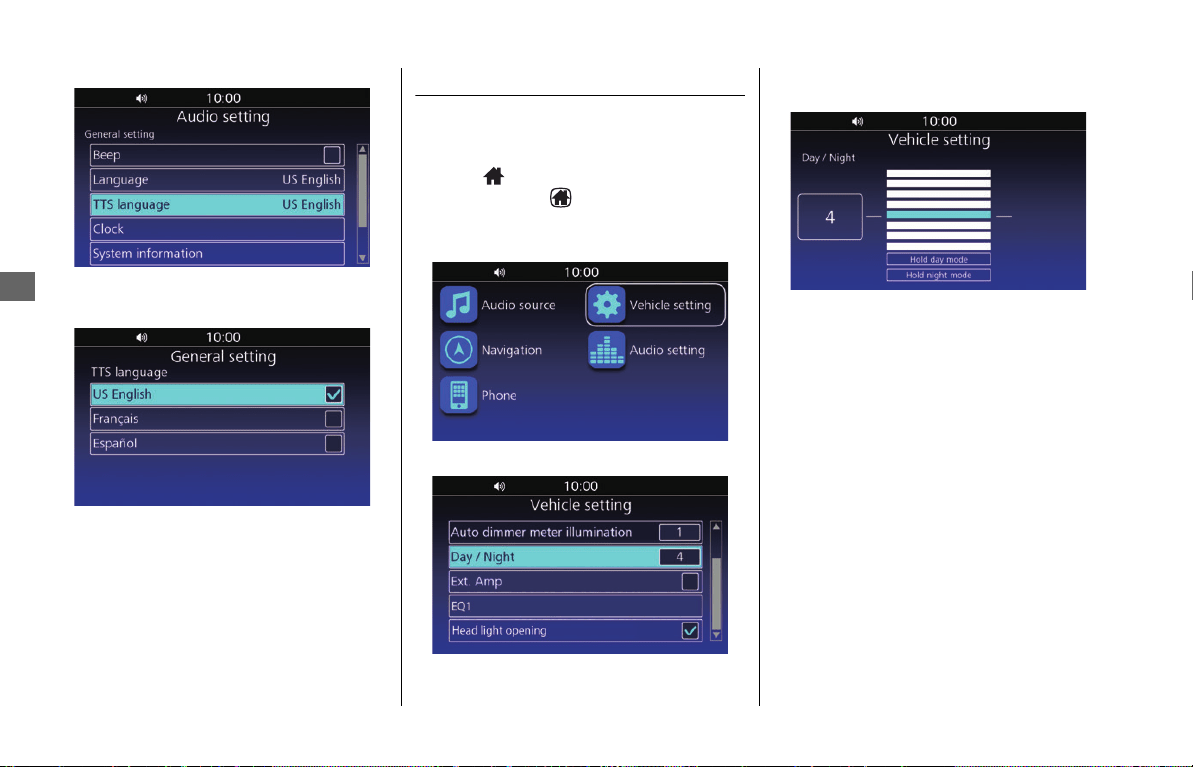
Voice Guidance Language
Change the language for voice guidance.
1.
Press (Home) button on the center
panel or press (Home) switch on the
left handlebar.
2.
Select Audio setting.
3.
Select General setting.
31MLJT00.book 39 ページ 2022年5月19日 木曜日 午前11時31分
Other Navigation Settings u Map Screen Brightness
40
System Setup
4.
Select TTS language.
5.
Select the desired language for the voice
guidance.
uFor more information, see the Owner’s
Manual.
Map Screen Brightness
Adjust the display brightness for the map
screen.
1.
Press (Home) button on the center
panel or press (Home) switch on the
left handlebar.
2.
Select Vehicle setting.
3.
Select Day / Night.
4.
Select the brightness level, or select an
option.
The following options are available:
●
Hold day mode:
Set the map screen to Day mode.
●
Hold night mode:
Set the map screen to Night mode.
uFor more information, see the Owner’s
Manual.
31MLJT00.book 40 ページ 2022年5月19日 木曜日 午前11時31分
Other Navigation Settings u Auto Volume
41
System Setup
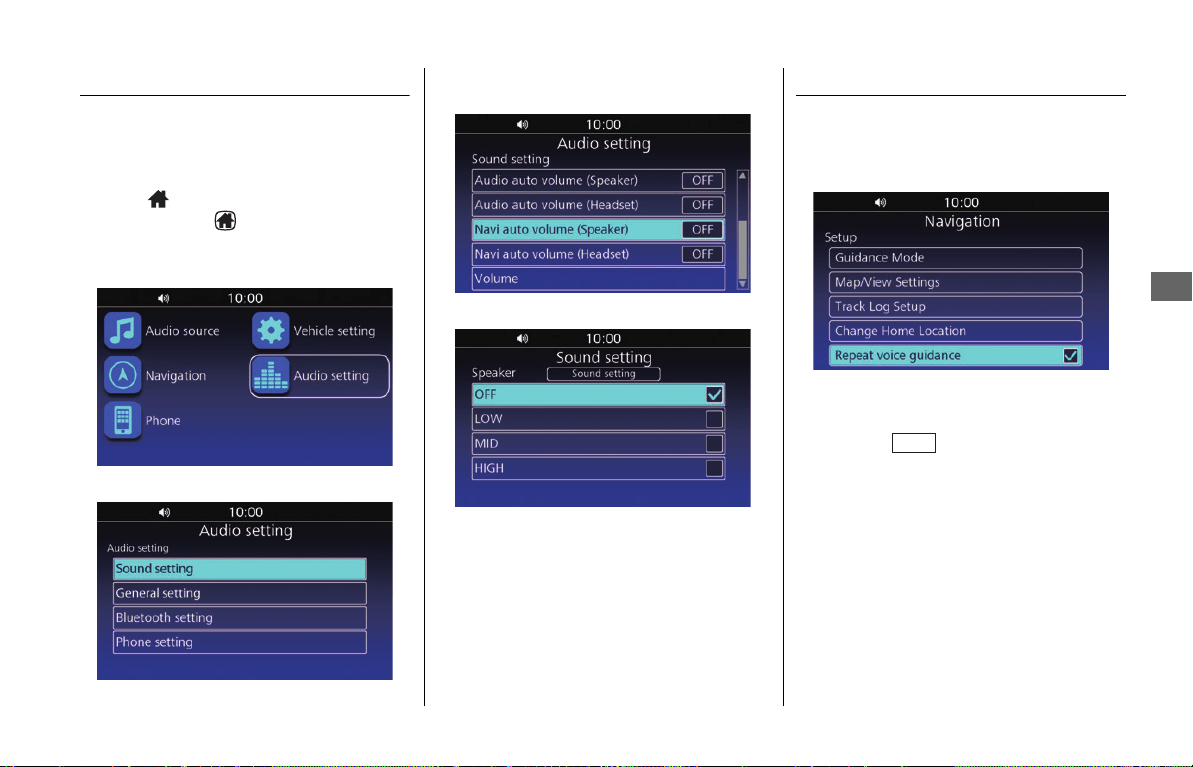
Auto Volume
Selects the volume setting to automatically
increase volume as the speed of the vehicle
increases.
1.
Press (Home) button on the center
panel or press (Home) switch on the
left handlebar.
2.
Select Audio setting.
3.
Select Sound setting.
4.
Select Navi auto volume (Speaker)/
(Headset).
5.
Select the desired setting.
uFor more information, see the Owner’s
Manual.
Repeat Voice Guidance
Turns the voice guidance replay on or off.
1.
Select Setup from the navigation menu.
2.
Select Repeat voice guidance.
NOTE
When Repeat voice guidance is enabled, you can
press and hold switch on the left handlebar to
replay the voice guidance when en route.
2 P. 8, P. 62
ENT
31MLJT00.book 41 ページ 2022年5月19日 木曜日 午前11時31分
42
System Setup
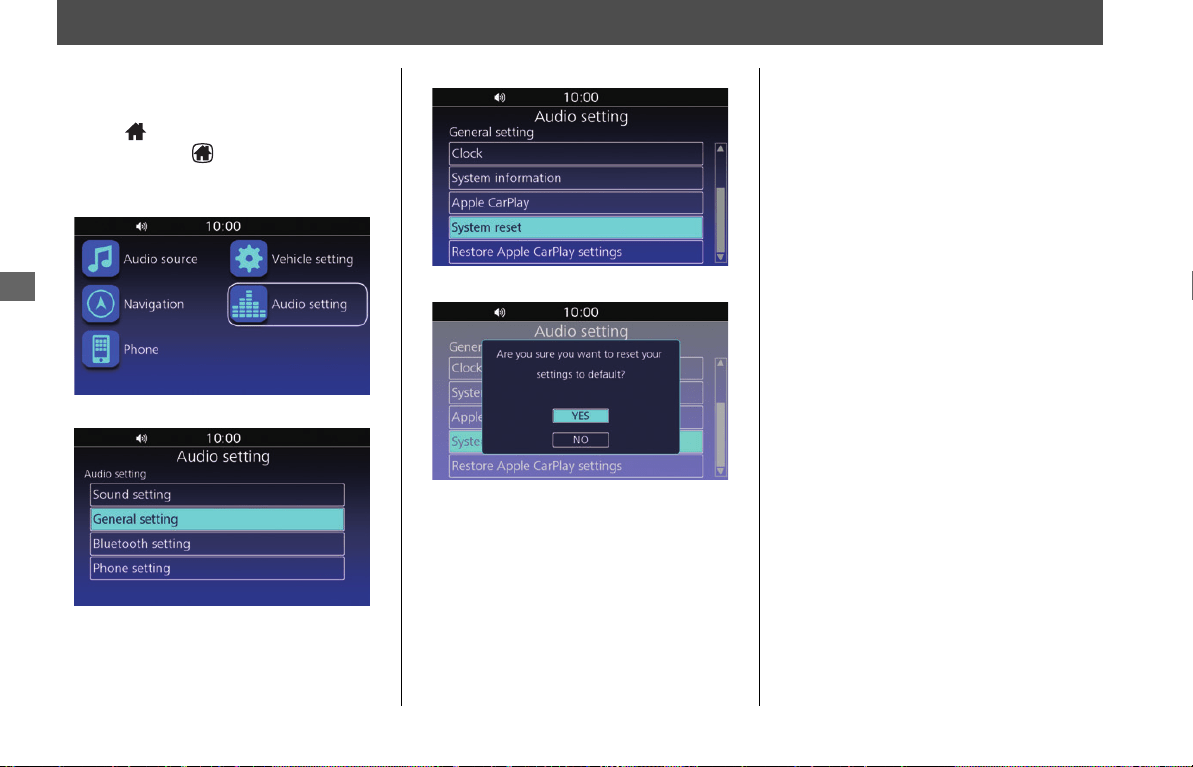
Restore All Settings
Reset all the menu and customized settings
to the factory defaults.
1.
Press (Home) button on the center
panel or press (Home) switch on the
left handlebar.
2.
Select Audio setting.
3.
Select General setting.
4.
Select System reset.
5.
Select YES.
uFor more information, see the Owner’s
Manual.
NOTE
When you restore the settings, all the data saved in the
navigation system will be also deleted.
31MLJT00.book 42 ページ 2022年5月19日 木曜日 午前11時31分

Navigation
This section describes how to enter a destination and follow the route to your destination. It also describes how to change
your route or destination along the way.
Map Menu .............................................P.44
Adjusting the Guidance Volume ............ P.44
Navigation Menu...................................P.45
Entering a Destination ..........................P.46
Destination Input Screen........................ P.46
Favorite ................................................. P.46
Previous Destination .............................. P.47
Point of Interest..................................... P.47
Address................................................. P.49
Intersection ........................................... P.52
Phone Number ...................................... P.53
Routes................................................... P.54
Tracks ....................................................P.55
Map Input..............................................P.56
Calculating the Route........................... P.57
Destination Confirmation Screen............P.57
Editing the Route ...................................P.57
Changing Route Preferences ..................P.59
Riding to Your Destination................... P.61
Viewing the Route .................................P.61
Changing Your Route ........................... P.63
Canceling the Route ..............................P.63
Taking a Detour .....................................P.63
Traffic Avoidance ...................................P.64
Adding Waypoints................................. P.64
Changing Your Destination .................. P.66
Finding an Emergency Service................ P.66
Entering a New Destination ................... P.67
Viewing Information ............................ P.68
Information Screen................................ P.68
Current Location Information ................ P.68
Weather Information............................. P.69
Traffic Information ................................ P.69
System Information ............................... P.70
Navigation
31MLJT00.book 43 ページ 2022年5月19日 木曜日 午前11時31分
44
Navigation
Map Menu
Access the map menu to use main
navigation functions, change the guidance
volume, set the route to your home
location, show or hide POI icons, or clear
the current guidance.
1.
Press (Home) button on the center
panel or press (Home) switch on the
left handlebar.
2.
Select Navigation.
3.
Press (Enter) on the center panel or
press switch on the left
handlebar.
4.
Select an option displayed at the bottom
of the screen.
The following options are available:
●
Clear Guidance:
Cancels the current route guidance.
2 P. 63
●
Go Home:
Sets the route to your home location.
2 P. 16
●
Menu:
Displays the navigation menu.
2 P. 45
●
Navi Volume:
Changes the guidance volume. 2 P. 44
●
POI ON (Default)/POI OFF:
Shows/hides POI icons on the map
screen.
You can select the categories of icons to
show on the map screen.
2 P. 33
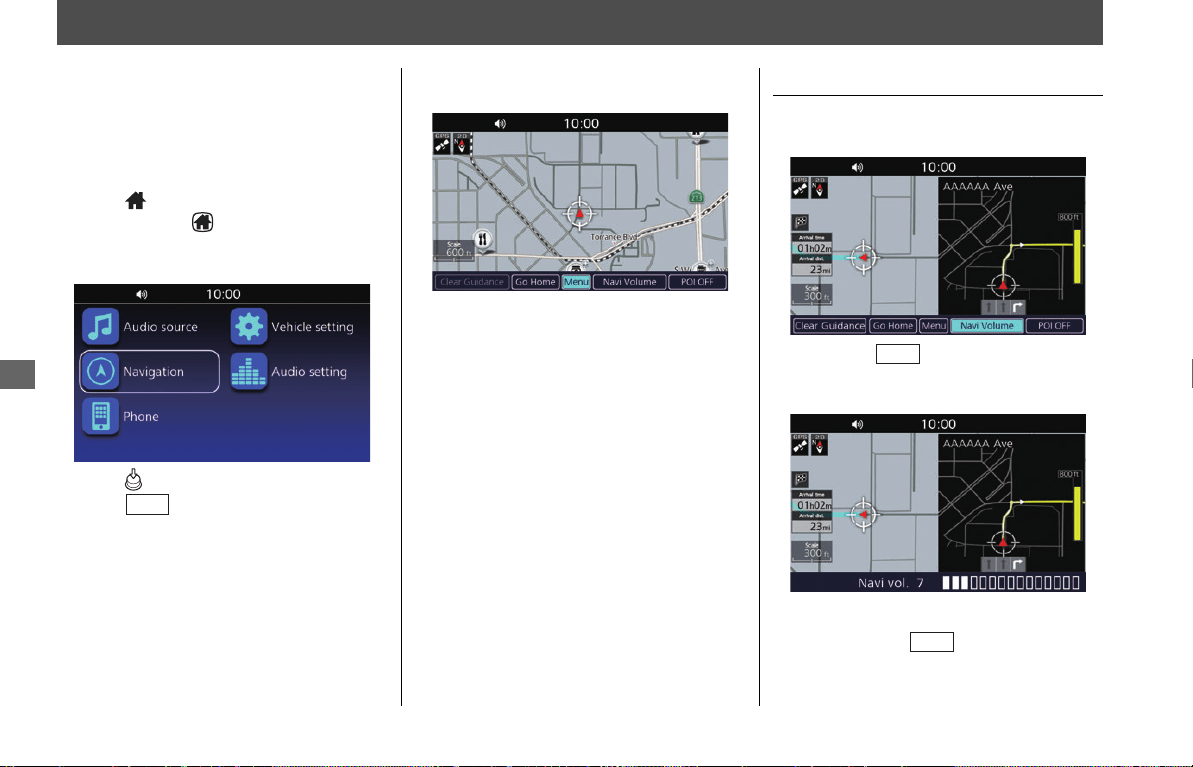
Adjusting the Guidance Volume
1.
Select Navi Volume from the map
menu. 2 P. 44
2.
Move the lever up or down to
increase or decrease the guidance
volume.
2 P. 11
ENT
NOTE
You can also push the lever up or down during
the voice guidance to increase or decrease the
guidance volume.
VOL
VOL
31MLJT00.book 44 ページ 2022年5月19日 木曜日 午前11時31分
45
Navigation
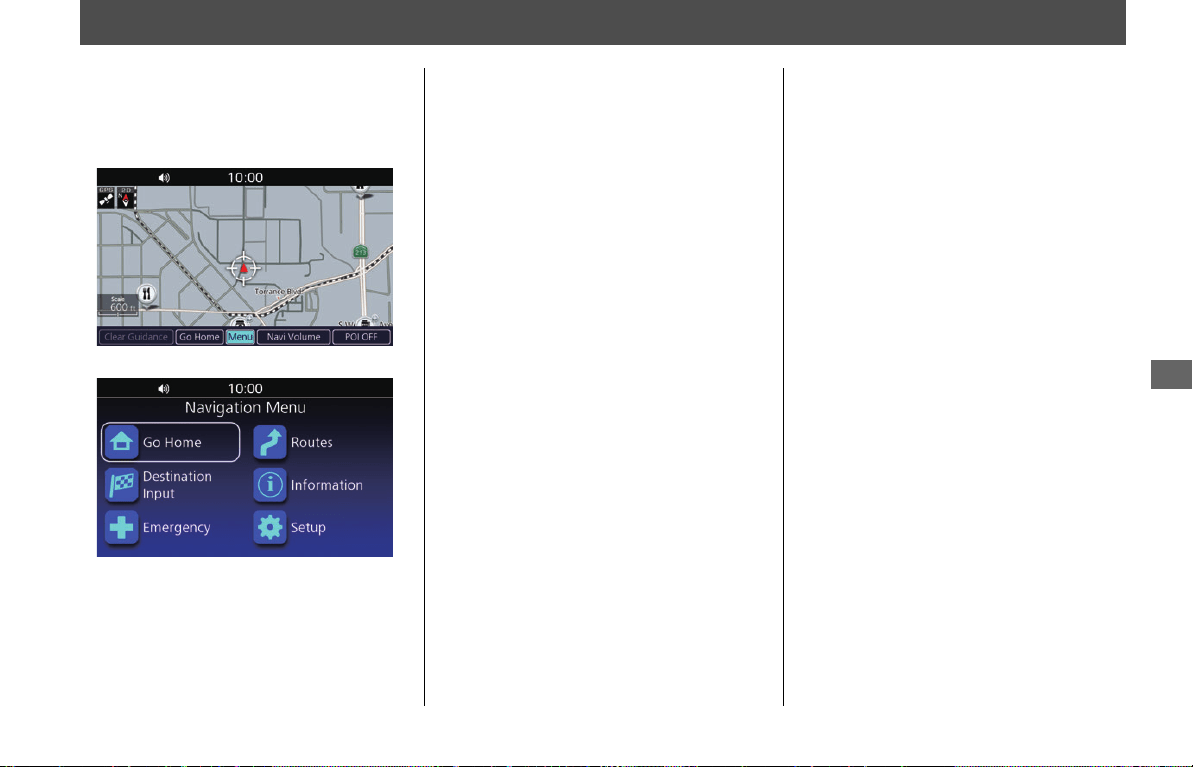
Navigation Menu
This section describes how to access the
navigation menu to use main navigation
functions.
1.
Select
Menu
from the map menu.
2
P. 44
2.
Select an option.
The following options are available:
●
Go Home:
Sets the route to your home location.
2
P. 16
●
Destination Input:
Selects your destination by selecting one
of your favorite destinations or recent
destinations, selecting a point of interest,
entering an address, or selecting a
location on the map.
2 P. 46
●
Emergency:
Searches for emergency services or
displays information about your current
location.
2 P. 66
●
Routes:
Creates and saves the route with multiple
destinations, or edits the current route.
2 P. 27, P. 57
●
Information:
Displays different information.
2
P. 68
●
Setup:
Customizes the settings related to the
navigation function. 2 P. 21
31MLJT00.book 45 ページ 2022年5月19日 木曜日 午前11時31分
46
Navigation
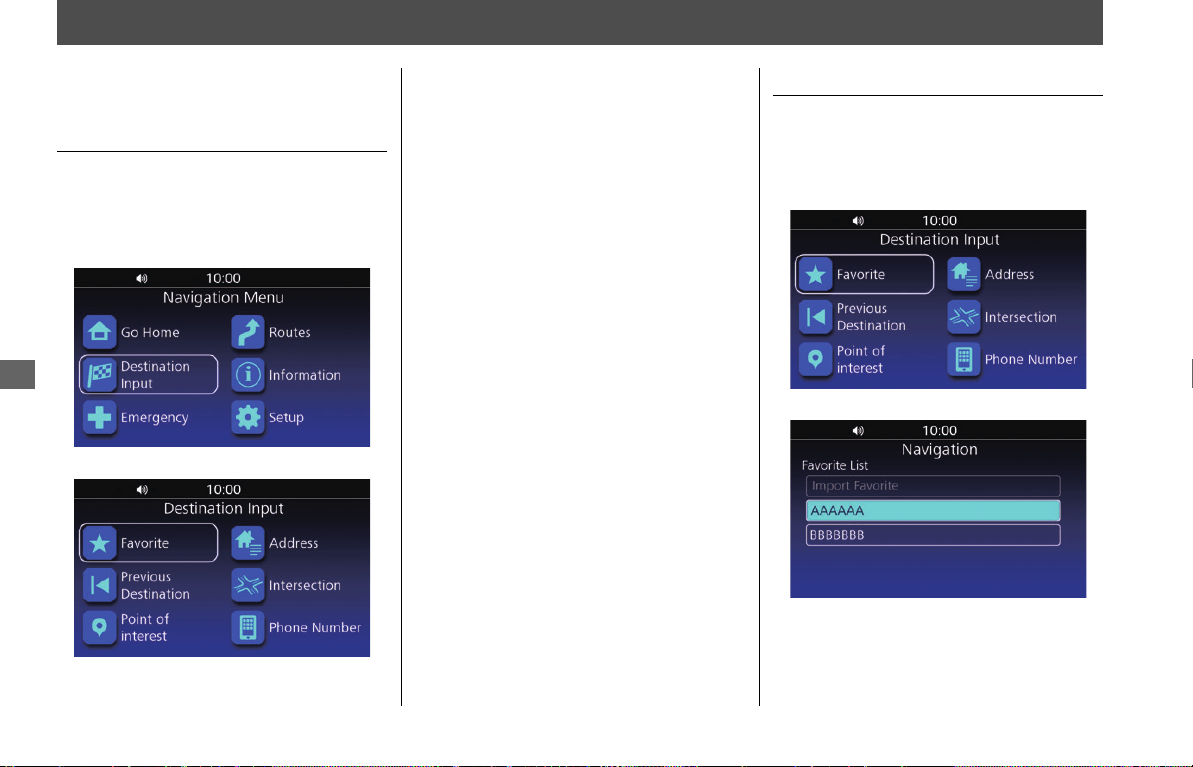
Entering a Destination
This section describes how to find a
location to set as your destination.
Destination Input Screen
Access the Destination Input screen to
select a search method.
1.
Select Destination Input from the
navigation menu.
2
P. 45
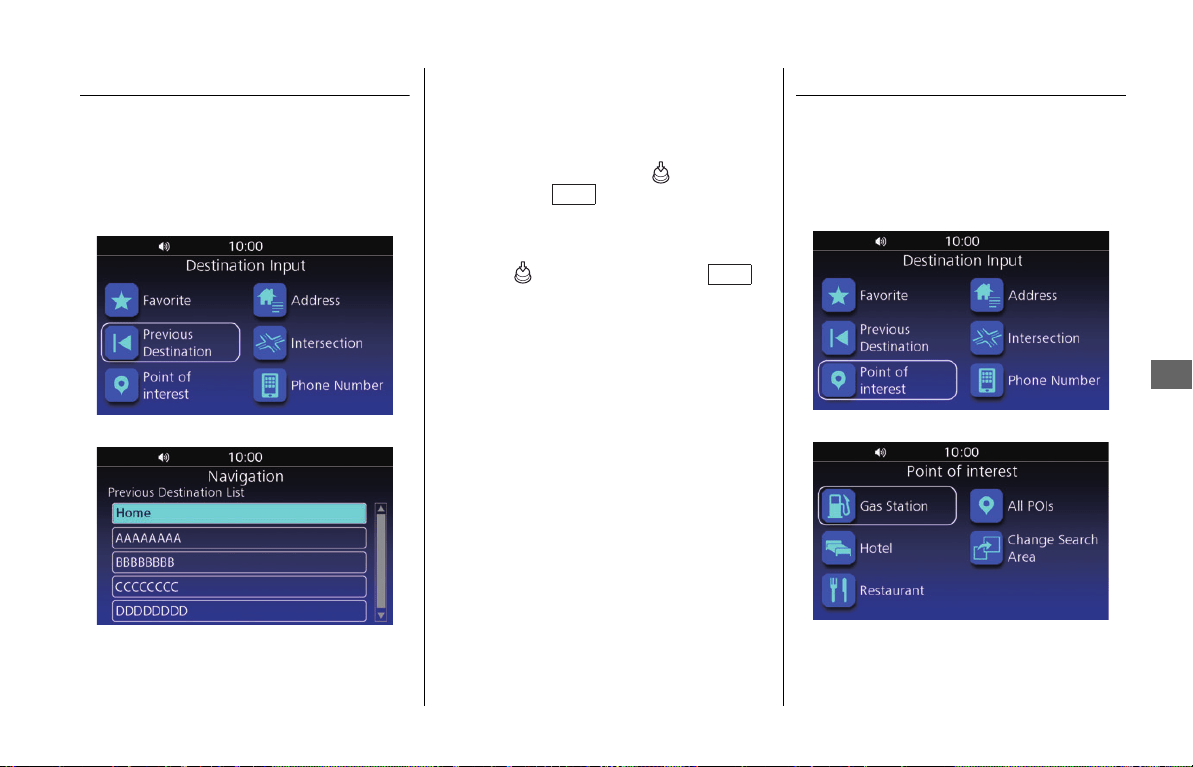
2.
Select an option.
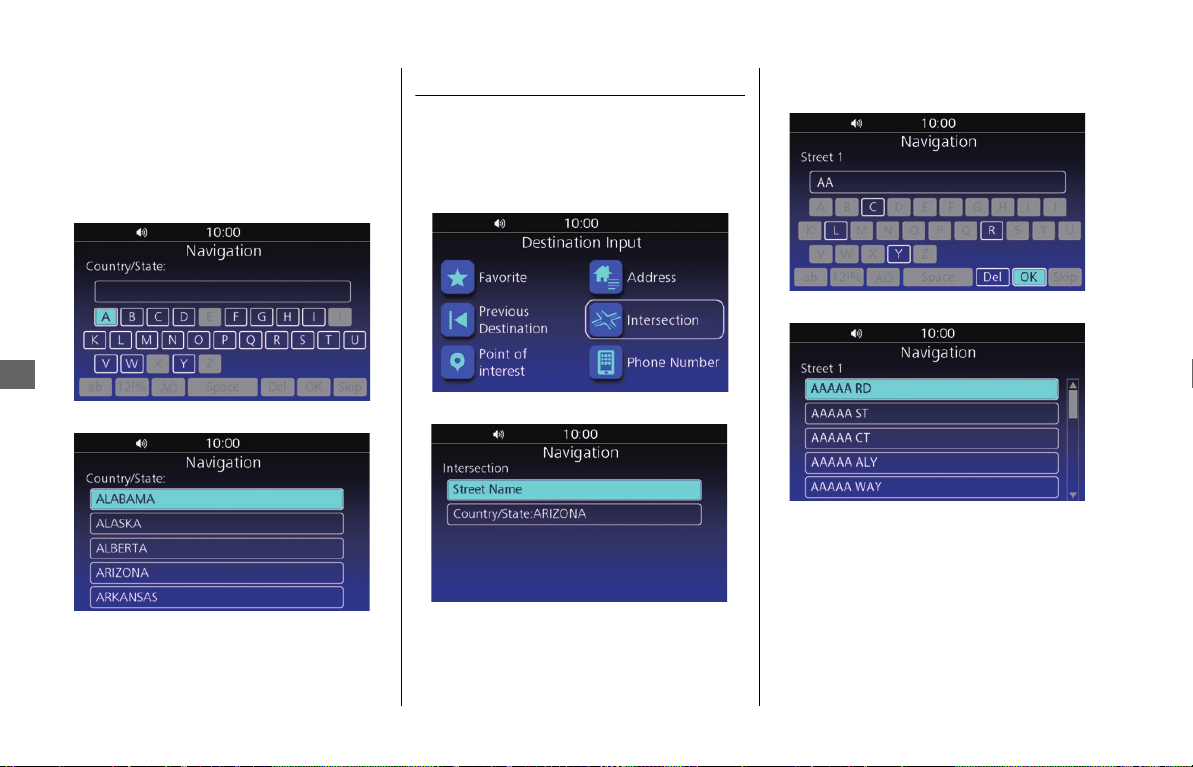
The following options are available:
●
Favorite:
Sets a destination by selecting a place
stored in the Favorite list.
2 P. 46
●
Previous Destination:
Sets a destination by selecting a previous
destination.
2 P. 47
●
Point of Interest:
Sets a destination by selecting a point of
interest.
2 P. 47
●
Address:
Sets a destination by entering an address.
2 P. 49
●
Intersection:
Sets a destination by finding an
intersection.
2 P. 52
●
Phone Number:
Sets a destination by entering a phone
number.
2 P. 53
Favorite
Select a favorite location to use as the
destination.
1.
Select Favorite on the Destination Input
screen. 2 P. 46
2.
Select your destination from the list.
3.
Select GO to set the route to your
destination. 2 P. 57
NOTE
You can add, edit, or delete the favorite place. 2 P. 24
31MLJT00.book 46 ページ 2022年5月19日 木曜日 午前11時31分
Entering a Destination u Previous Destination
47
Navigation
Previous Destination
Select a location from a list of your 30 most
recent destinations to use as the
destination.
1.
Select Previous Destination on the
Destination Input screen. 2 P. 46
2.
Select your destination from the list.
3.
Select GO to set the route to your
destination. 2 P. 57
Point of Interest
Select the point of interest (e.g., gas
stations, restaurants, hotels) stored in the
map database to search for the destination.
1.
Select Point of Interest on the
Destination Input screen.
2 P. 46
2.
Select a category.
NOTE
• You can save a previous destination as your favorite
or home location. Press and hold (Enter) on the
center panel or switch on the left
handlebar while the place is selected, and then
select Save to Favorite or Set to Home.
• If you want to remove a location from the list, press
and hold (Enter) on the center panel or
switch on the left handlebar while the place is
selected, and then select Delete.
ENT
ENT
31MLJT00.book 47 ページ 2022年5月19日 木曜日 午前11時31分
Entering a Destination u Point of Interest
48
Navigation
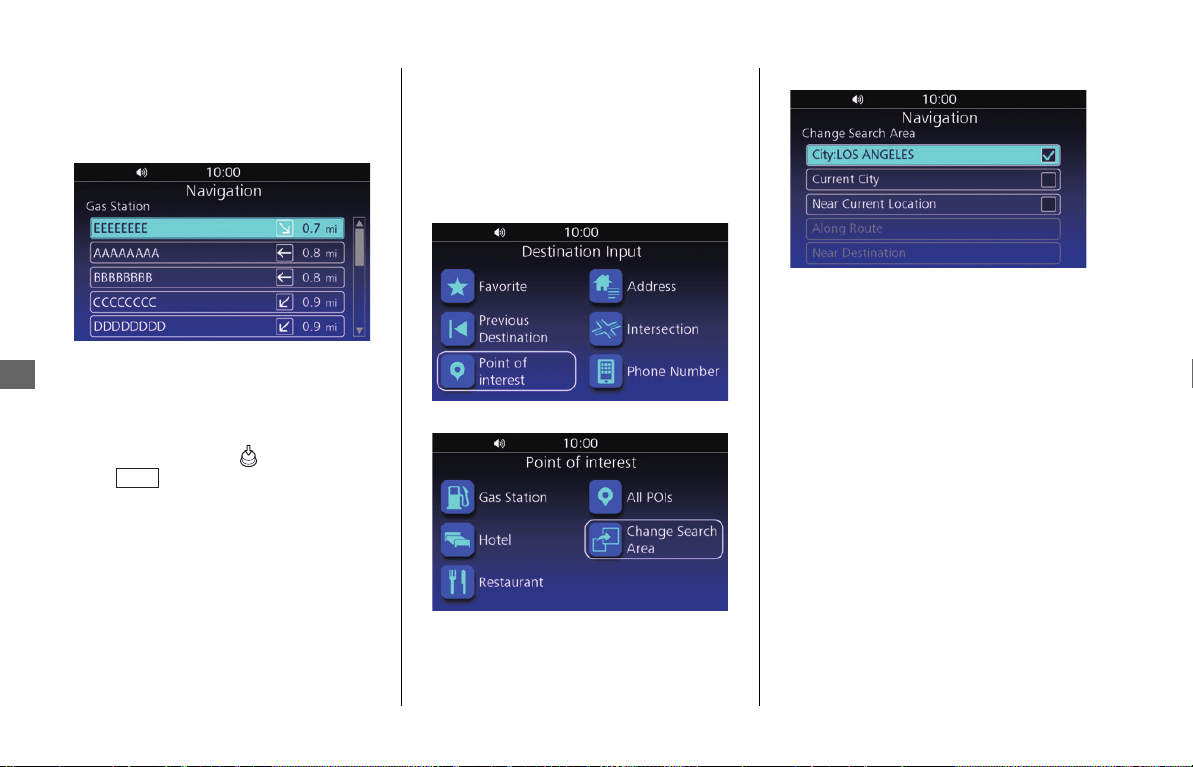
3.
Select a subcategory.
uIf the subcategory screen is not
displayed, proceed to step 4.
4.
Select a location from the list.
5.
Select GO to set the route to your
destination.
2 P. 57
❙
Changing the Search Area
By default, the system finds locations
closest to your current location. You can
find a location near another city or location.
1.
Select Point of Interest on the
Destination Input screen. 2 P. 46
2.
Select Change Search Area.
3.
Select an option.
The following options are available:
●
City:
Searches near the city you enter.
●
Current city:
Searches near your current city.
●
Near Current Location (Default):
Searches near your current location.
●
Along Route:
Searches along your current route.
●
Near Destination:
Searches near your current destination.
NOTE
You can save the found location as your favorite or
home location. Press and hold (Enter) on the center
panel or switch on the left handlebar while the
place is selected, and then select Save to Favorite or
Set to Home.
ENT
NOTE
• Along Route and Near Destination are
available when the route is active.
• When you select City, the confirmation screen may
be displayed. Select YES, and enter the state name
then city name.
31MLJT00.book 48 ページ 2022年5月19日 木曜日 午前11時31分
Entering a Destination u Address
49
Navigation
Address
Enter an address to use as the destination.
❙
Address Screen
1.
Select Address on the Destination Input
screen. 2 P. 46
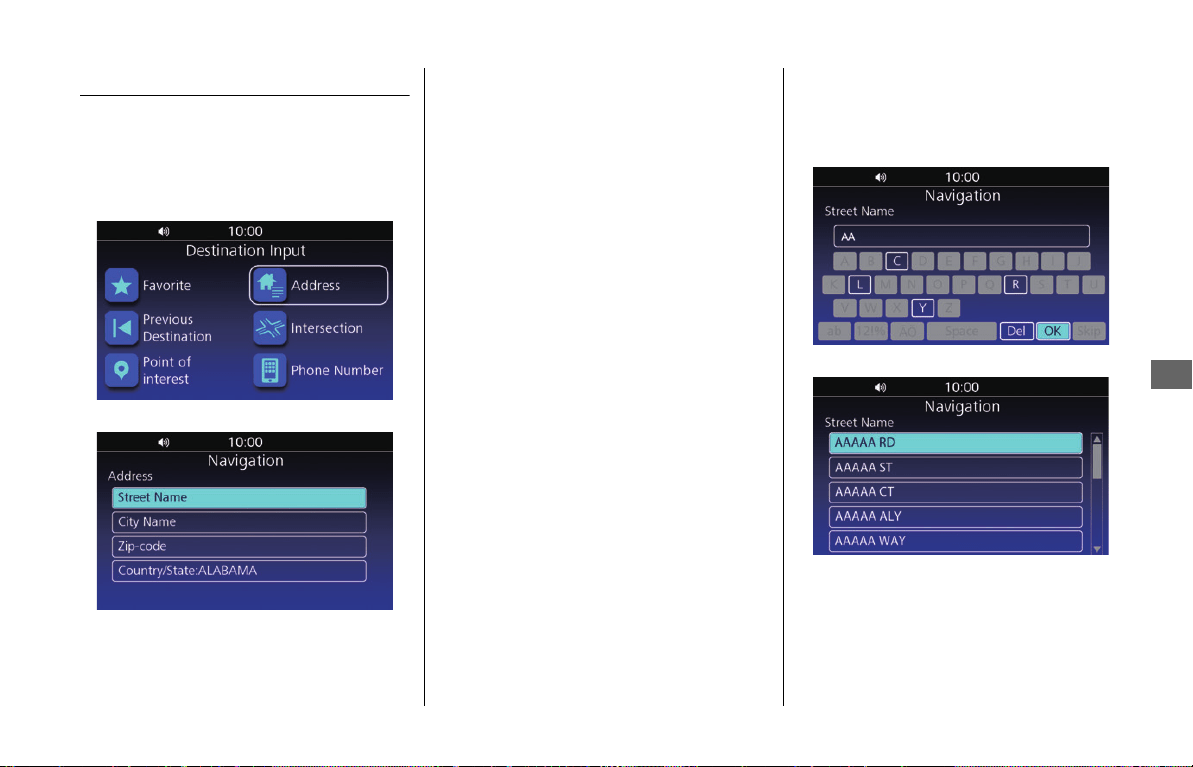
2.
Select an option.
The following options are available:
●
Street Name:
Searches for your destination street.
2
P. 49
●
City Name:
Searches for your destination city.
2 P. 50
●
Zip-code:
Searches for your destination zip code.
2 P. 51
●
Country/State:
Sets the country/state in which to search.
2 P. 52
❙
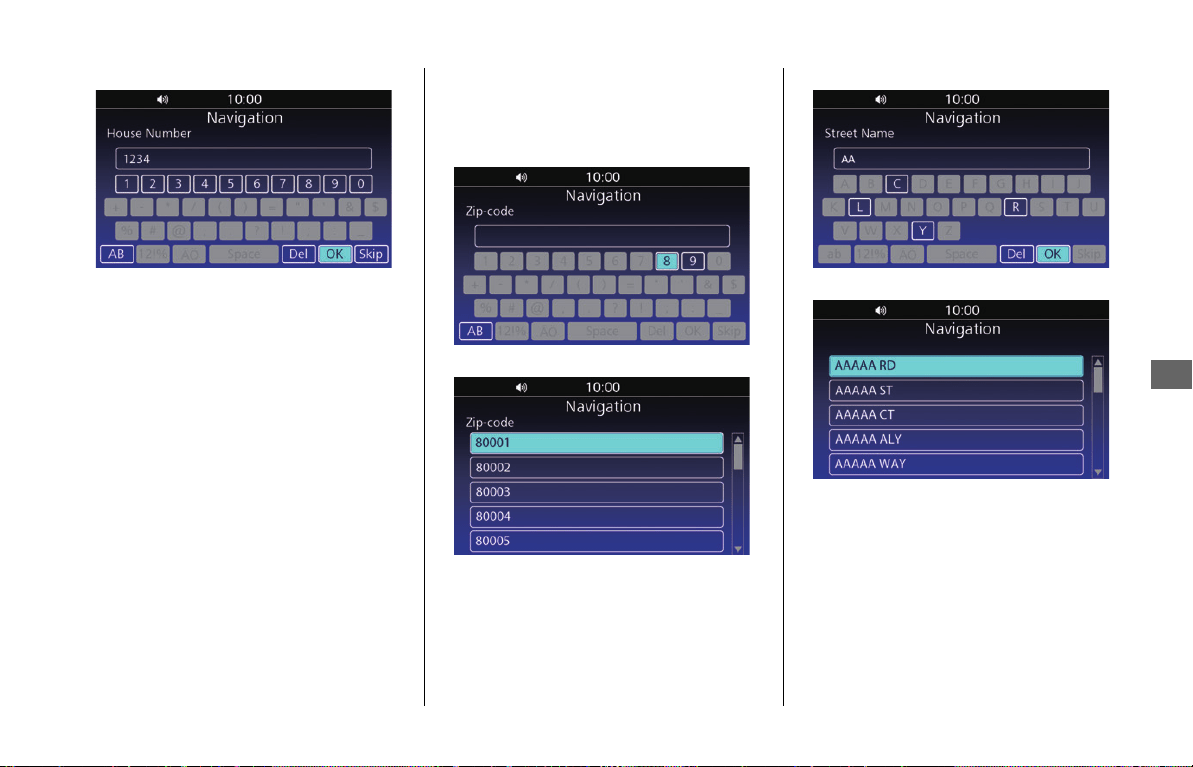
Street Name
1.
Select Street Name on the Address
screen.
2 P. 49
2.
Enter the street name and select OK.
3.
Select the street from the list.
NOTE
Unless Country/State is set, the other options cannot
be selected.
31MLJT00.book 49 ページ 2022年5月19日 木曜日 午前11時31分
Entering a Destination u Address
50
Navigation
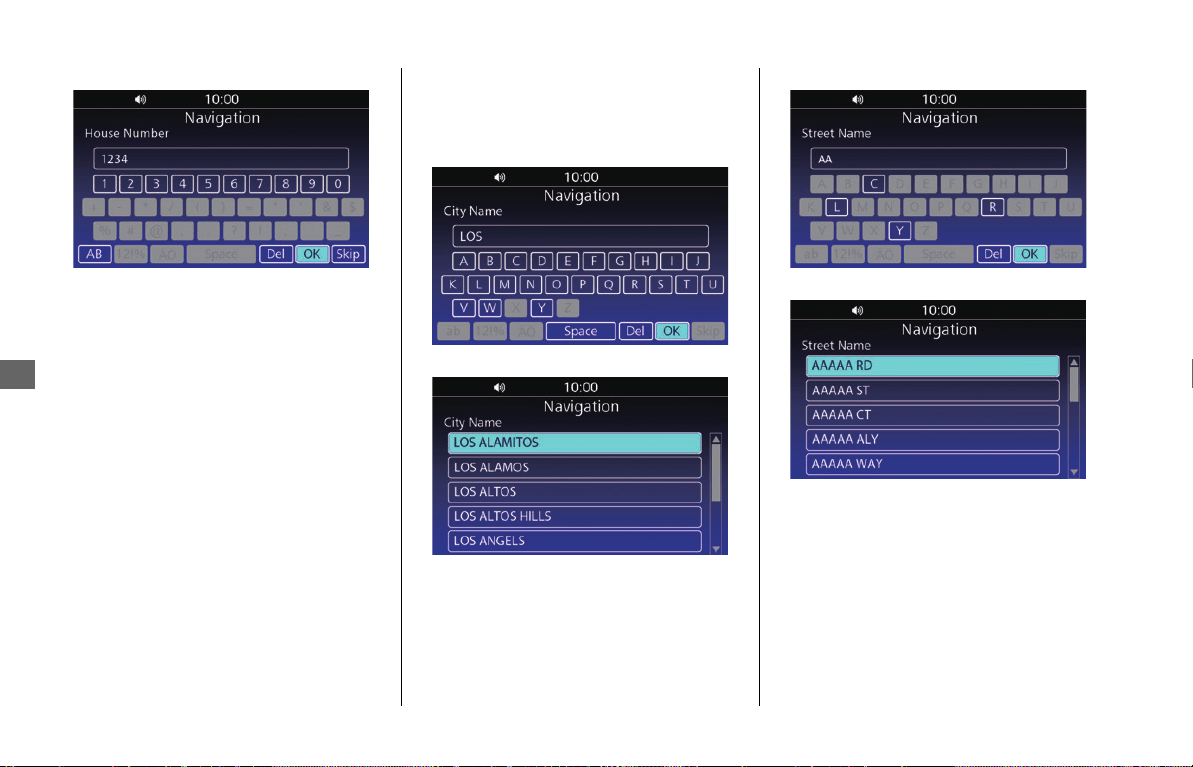
4.
Enter the house number and select OK.
u
If you want to search for the selected
street, select
Skip
.
5.
Select the house number from the list.
uIf prompted, enter the city name and
select OK, then select the city from the
list.
6.
Select GO to set the route to your
destination. 2 P. 57
❙
City Name
1.
Select City Name on the Address
screen.
2 P. 49
2.
Enter the city name and select OK.
3.
Select the city from the list.
4.
Enter the street name and select OK.
5.
Select the street from the list.
NOTE
The order of the steps may change depending on the
map data loaded on your system.
31MLJT00.book 50 ページ 2022年5月19日 木曜日 午前11時31分
Entering a Destination u Address
51
Navigation
6.
Enter the house number and select OK.
uIf you want to search for the selected
street, select Skip.
7.
Select the house number from the list.
8.
Select GO to set the route to your
destination. 2 P. 57
❙
Zip-Code
1.
Select Zip-code on the Address screen.
2 P. 49
2.
Enter the zip code and select OK.
3.
Select the zip code from the list.
4.
Enter the street name and select OK.
5.
Select the street from the list.
uIf prompted, enter the house number
and select OK, then select the house
number from the list.
6.
Select GO to set the route to your
destination. 2 P. 57
NOTE
• When you select Skip in step 6, the system may
display the list of zip codes. If so, select the zip code
and proceed to step 8.
• The order of the steps may change depending on
the map data loaded on your system.
NOTE
The order of the steps may change depending on the
map data loaded on your system.
31MLJT00.book 51 ページ 2022年5月19日 木曜日 午前11時31分
Entering a Destination u Intersection
52
Navigation
❙
Country/State
Set the country/state in which to search.
1.
Select Country/State on the Address
screen.
2 P. 49
2.
Enter the country/state name and select
OK.
3.
Select the country/state from the list.
Intersection
Select the intersection of two streets as the
destination.
1.
Select Intersection on the Destination
Input screen.
2 P. 46
2.
Select Street Name.
3.
Enter the first street name and select
OK.
4.
Select the street from the list.
u
If prompted, enter the city name and select
OK
, then select the city from the list.
5.
Enter the second street name and select
OK.
6.
Select the street from the list.
7.
Select GO to set the route to your
destination. 2 P. 57
31MLJT00.book 52 ページ 2022年5月19日 木曜日 午前11時31分

Entering a Destination u Phone Number
53
Navigation
❙
Changing Country/State
Change the country/state in which to
search.
1.
Select Intersection on the Destination
Input screen. 2 P. 46
2.
Select Country/State.
3.
Enter the country/state name and select
OK.
4.
Select the country/state from the list.
Phone Number
Search for your destination by entering a
phone number.
1.
Select Phone Number on the
Destination Input screen.
2 P. 46
2.
Enter the country calling code and 10
Digit phone number, and select OK.
E.g., U.S.: +1 (XXX) XXX-XXXX
31MLJT00.book 53 ページ 2022年5月19日 木曜日 午前11時31分
Entering a Destination u Routes
54
Navigation
3.
Select the location from the list.
4.
Select GO to set the route to your
destination. 2 P. 57
Routes
Set the route by selecting one of the saved
routes.
1.
Select Routes from the navigation
menu.
2
P. 45
2.
Select Routes from the route menu list.
3.
Select a saved route from the list.
4.
Select Set Destination.
5.
Select GO to set the route to your
destination. 2 P. 57
NOTE
You can save, edit, or delete the route. 2 P. 27
31MLJT00.book 54 ページ 2022年5月19日 木曜日 午前11時31分
Entering a Destination u Tracks
55
Navigation
Tracks
Set the route using a recorded track. The
starting point of the selected track is set to
your destination.
1.
Select Setup from the navigation
menu.
2
P. 45
2.
Select Track Log Setup.
3.
Select Tracks.
4.
Select the track.
5.
Select Navigate to Start Point.
6.
Select GO to set the route to your
destination. 2 P. 57
31MLJT00.book 55 ページ 2022年5月19日 木曜日 午前11時31分

Entering a Destination u Map Input
56
Navigation
Map Input
Select an icon or a location as the
destination.
1.
Scroll the map then select any point,
street, intersection or POI icon.
2 P. 10
2.
Select Set Destination.
uSelecting POI displays a list of POIs
around the location you selected.
When selecting a POI from the list,
proceed to step 3.
3.
Select GO to set the route to your
destination. 2 P. 57
NOTE
You can save the location as your favorite or home
location. Select Save to Favorite or Set to Home in
step 2.
31MLJT00.book 56 ページ 2022年5月19日 木曜日 午前11時31分
57
Navigation
Calculating the Route
This section describes how to calculate your
route.
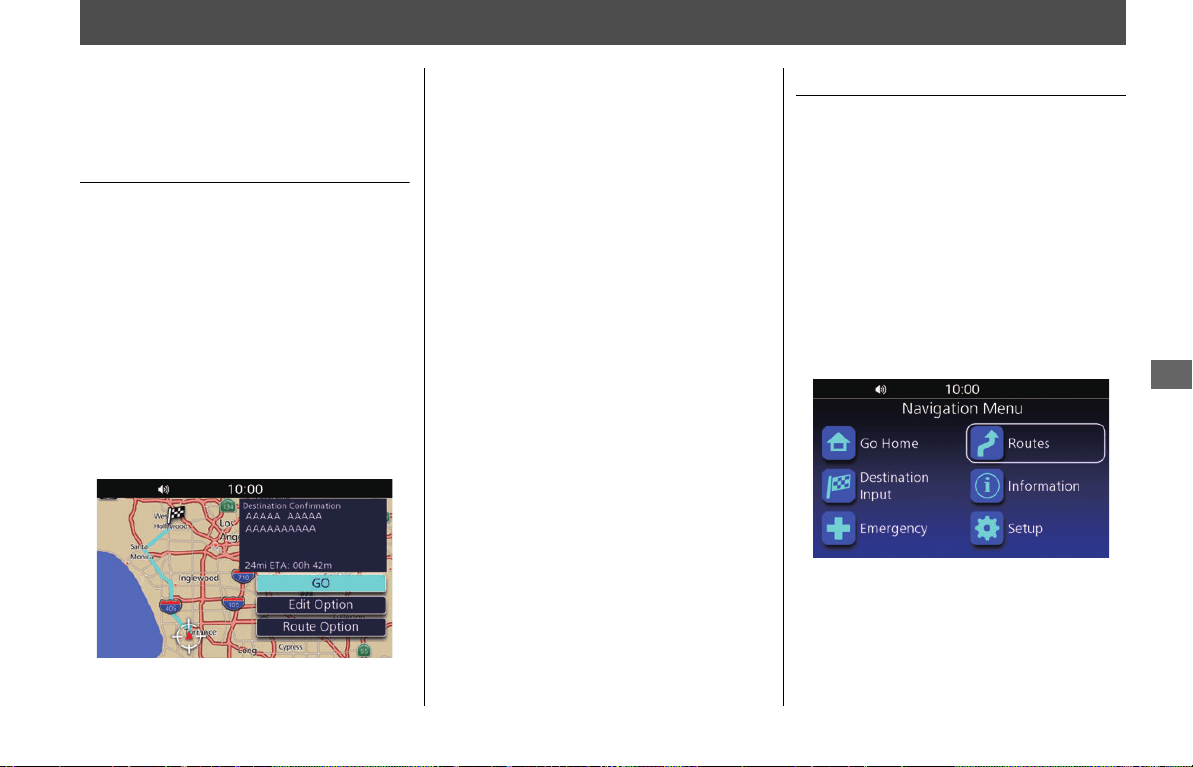
Destination Confirmation
Screen
When you select your destination, the
Destination Confirmation screen is
displayed.
Confirm your destination address, the
estimated distance/time and the calculated
route before setting the route.
If necessary, edit destinations or change the
route preferences.
1.
Select the search method to find your
destination.
2 P. 46
2.
Select an option.
The following options are available:
●
GO:
Sets the route to your destination. The
system calculates and displays the route
on the map screen.
●
Edit Option:
Edits your destinations and route.
2 P. 57
●
Route Option:
Changes the route preferences. 2 P. 59
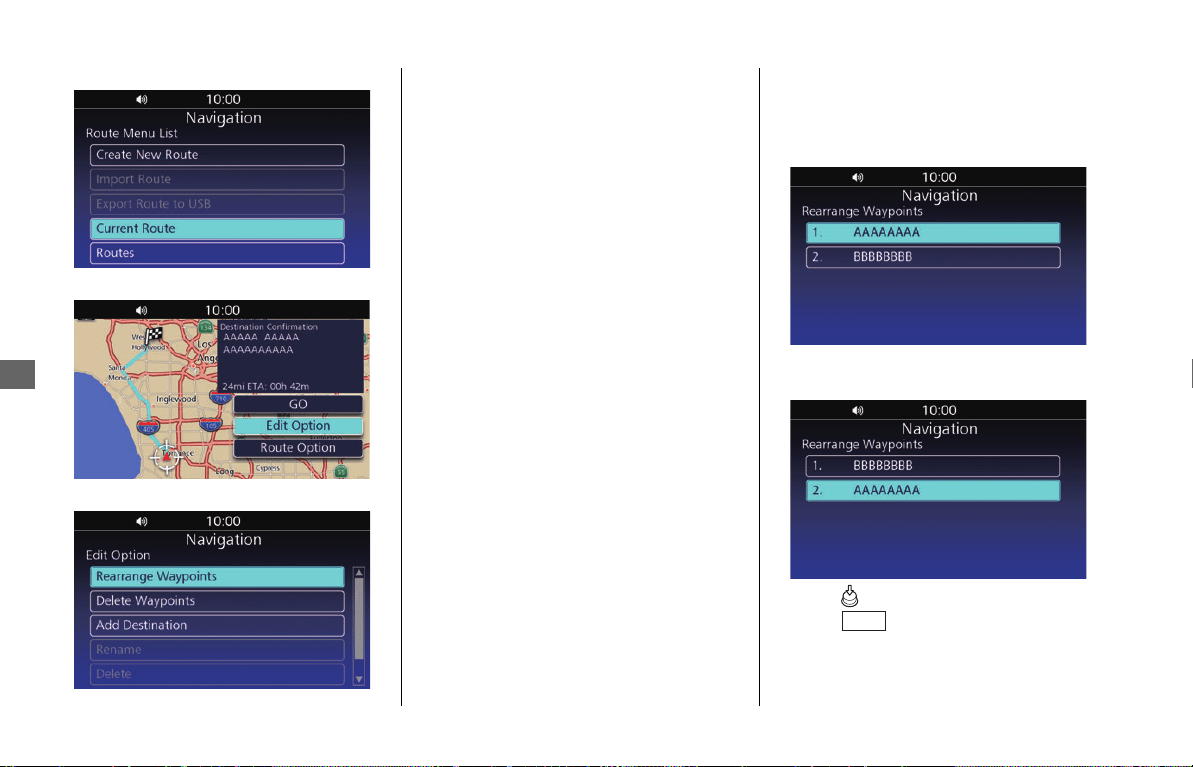
Editing the Route
Rearrange, add, or delete destinations and
save the route using the edit menu.
❙
Edit Option Screen
Access the Edit Option screen by selecting
Edit Option on the Destination
Confirmation screen. 2 P. 57
When en route, access the screen as
follows:
1.
Select Routes from the navigation
menu.
2
P. 45
31MLJT00.book 57 ページ 2022年5月19日 木曜日 午前11時31分
Calculating the Route u Editing the Route
58
Navigation
2.
Select Current Route.
3.
Select Edit Option.
4.
Select an option.
The following options are available:
●
Rearrange Waypoints:
Changes the order of destinations.
2 P. 58
●
Delete Waypoints:
Deletes a destination. 2 P. 59
●
Add Destination:
Adds a waypoint. 2 P. 65
●
Rename:
Changes the name of the route. Enter
the new name and select OK.
●
Delete:
Removes the route from the list of saved
routes.
●
Save as Route:
Adds the route to the list of saved routes.
2 P. 59
❙
Changing the Order of Destinations
1.
Select Rearrange Waypoints on the
Edit Option screen.
2 P. 57
2.
Select the destination to move.
3.
Move the selected destination to the
desired position.
4.
Press (Enter) on the center panel or
press switch on the left
handlebar.
NOTE
• Rearrange Waypoints and Delete Waypoints
are available when the route has multiple
destinations.
• Rename, Delete and Save as Route are
available when the route is saved.
2 P. 27
ENT
31MLJT00.book 58 ページ 2022年5月19日 木曜日 午前11時31分
Calculating the Route u Changing Route Preferences
59
Navigation
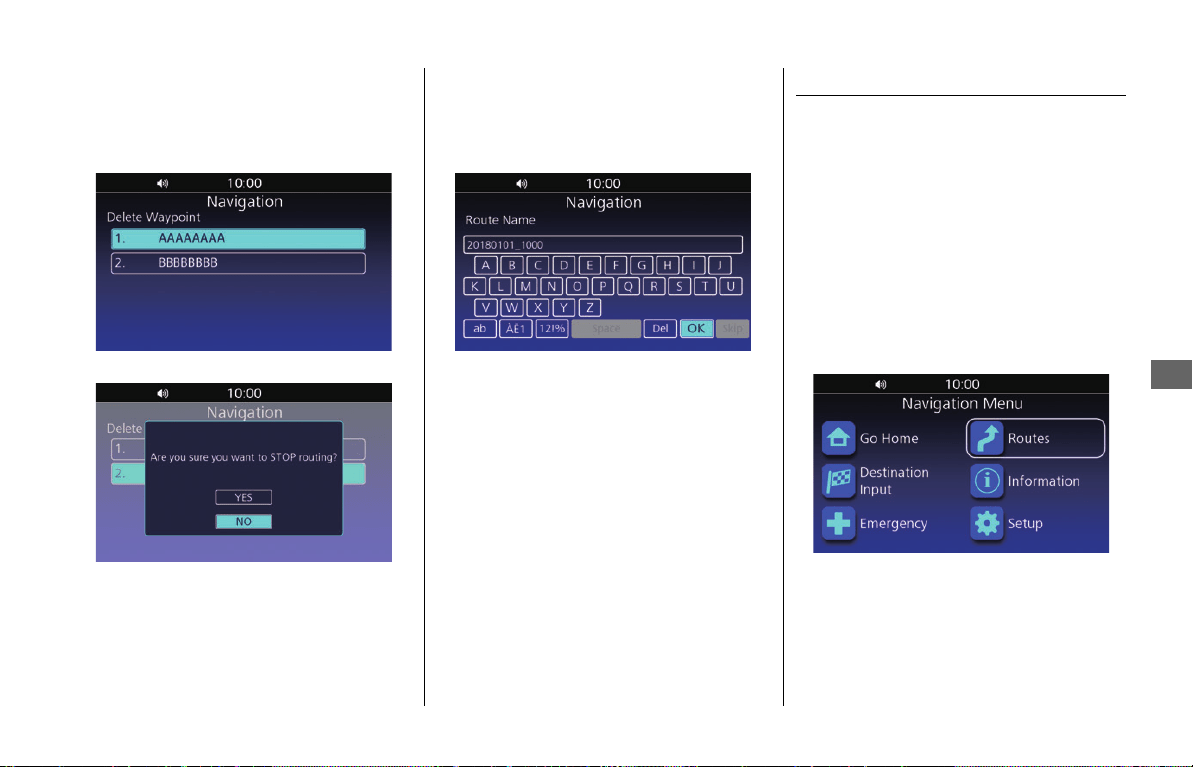
❙
Deleting a Destination
1.
Select Delete Waypoints on the Edit
Option screen.
2 P. 57
2.
Select the destination to delete.
3.
Select YES.
❙
Saving the Route
1.
Select Save as Route on the Edit
Option screen.
2 P. 57
2.
Enter the route name and select OK.
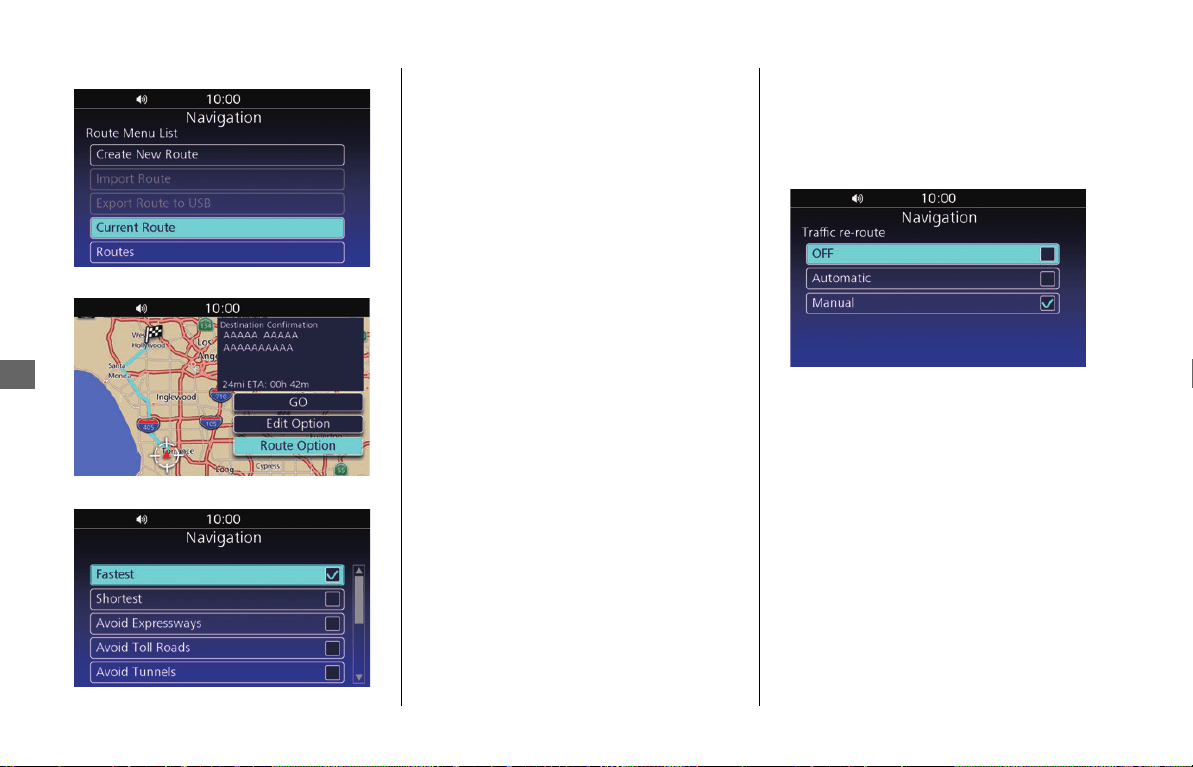
Changing Route Preferences
Recalculate the current route using another
route preference.
❙
Route Option Screen
Access the Route Option screen by
selecting Route Option on the Destination
Confirmation screen.
2 P. 57
When en route, access the screen as
follows:
1.
Select Routes from the navigation
menu. 2 P. 45
NOTE
You can use a saved route. 2 P. 54
31MLJT00.book 59 ページ 2022年5月19日 木曜日 午前11時31分
Calculating the Route u Changing Route Preferences
60
Navigation
2.
Select Current Route.
3.
Select Route Option.
4.
Select an option.
The following options are available:
●
Fastest (Default):
Calculates routes that are faster to ride
but can be longer in distance.
●
Shortest:
Calculates routes that are shorter in
distance but can take more time to ride.
●
Avoid Expressways:
Avoids expressways.
●
Avoid Toll Roads:
Avoids toll roads.
●
Avoid Tunnels:
Avoids tunnels.
●
Avoid Ferries:
Avoids ferries.
●
Avoid Carpool:
Avoids car share lanes.
●
Avoid U-Turn:
Avoids U-turns.
●
View Route:
Displays the entire route. 2 P. 62
●
Detour:
Calculates a detour route.
2 P. 63
●
Traffic re-route:
Traffic re-route feature allows the
system to manually or automatically
recalculate the faster route based on the
latest traffic information.
2 P. 60
❙
Traffic Re-route
Set whether you use the traffic re-route feature.
1.
Select Traffic re-route on the Route
Option screen. 2 P. 59
2.
Select an option.
The following options are available:
●
OFF:
Turns off the traffic re-route.
●
Automatic:
The system reroutes automatically based
on traffic information.
●
Manual (Default):
The system examines traffic conditions and
offers the faster route while navigating.
You can select whether to accept it or not.
NOTE
Subscription of SiriusXM
®
Radio is required for adding the
Traffic re-route
function. For details about subscribing to
SiriusXM
®
Radio, see the Owner's Manual.
31MLJT00.book 60 ページ 2022年5月19日 木曜日 午前11時31分
61
Navigation
Riding to Your Destination
Viewing the Route
This section describes how to follow the
route guidance to your destination.
❙
Map Screen
After calculating the route to your
destination, the route is displayed on the
map screen.
2 P. 57
As you ride, the system tracks your position
on the map in real time and provides
guidance as you approach each guidance
point on the route.
2 P. 15, P. 61
The next guidance point and its distance
from the current position are displayed at
the top right of the screen.
On a multilane road, the lane information is
also available.
The lanes and their directions are displayed
with small arrows. The lane(s) you should
take will be shown in white.
❙
Guidance Screen
The guidance screen will be displayed when
you get close to the next turn. A countdown
bar appears in the screen when you are
approaching a turn.
❙
Intersection View Screen
The intersection view screen displays a view
of the upcoming intersection and which
lane you should be driving in.
NOTE
• When you set Guidance Mode to Map, only the
next maneuver is displayed.
2 P. 31
• When driving to your destination, the system
automatically displays traffic incident icons on the
map.
• When you enable Show traffic flow, traffic flow is
displayed.
2 P. 32
- Heavy traffic congestion: Red
- Light traffic congestion: Yellow
31MLJT00.book 61 ページ 2022年5月19日 木曜日 午前11時31分
Riding to Your Destination u Viewing the Route
62
Navigation
❙
Entire Route
You can check the entire route by selecting
View Route on the Route Option screen.
2 P. 59
❙
Deviating From the Planned Route
If you go off the route, the system
automatically recalculates a route to the
desired destination based on your current
location and direction.
❙
Displaying the Arrival Time/ETA
At the left of the map screen, the arrival
time/ETA (remaining time until arrival/
estimated time of arrival) and distance are
displayed.
When you are in a route with multiple
destinations, you can check the arrival
time/ETA and distance of each destination
by selecting the flag icon.
You can switch between displaying the
arrival time and ETA.
You can press switch on the left
handlebar and then rotate the interface dial
counterclockwise to select the arrival time
or ETA.
❙
Replaying the Voice Guidance
You can replay the voice guidance by
pressing and holding (Enter) on the
center panel or switch on the left
handlebar when en route.
NOTE
If the route includes a waypoint, you can switch
between displaying the arrival time and ETA for the
waypoint.
ENT
Arrival Time/ETA
NOTE
You can only replay voice guidance when Repeat
voice guidance is enabled.
2 P. 41
ENT
31MLJT00.book 62 ページ 2022年5月19日 木曜日 午前11時31分
63
Navigation
Changing Your Route
Canceling the Route
Clear a destination to stop the route guidance.
1.
While the map screen is displayed, press
(Enter) on the center panel or press
switch on the left handlebar.
2.
Select Clear Guidance.
uWhen you are in the route with
multiple destinations, select a
destination to cancel, or select Clear
All Route to clear all destinations.
3.
Select YES.
Taking a Detour
Calculate a new route to avoid something
ahead of you. The system creates a new
route if possible and attempts to get you
back on your original route as quickly as
possible.
1.
Select Detour on the Route Option
screen. 2 P. 59
2.
Select the street to avoid.
3.
Press (Back) button on the center
panel twice or press (Back) switch on
the left handlebar twice.
4.
Select GO to set the new route.
ENT
NOTE
• If your current route is the only reasonable option,
the system might not calculate a detour.
• Select Refresh to cancel detour.
31MLJT00.book 63 ページ 2022年5月19日 木曜日 午前11時31分
Changing Your Route u Traffic Avoidance
64
Navigation
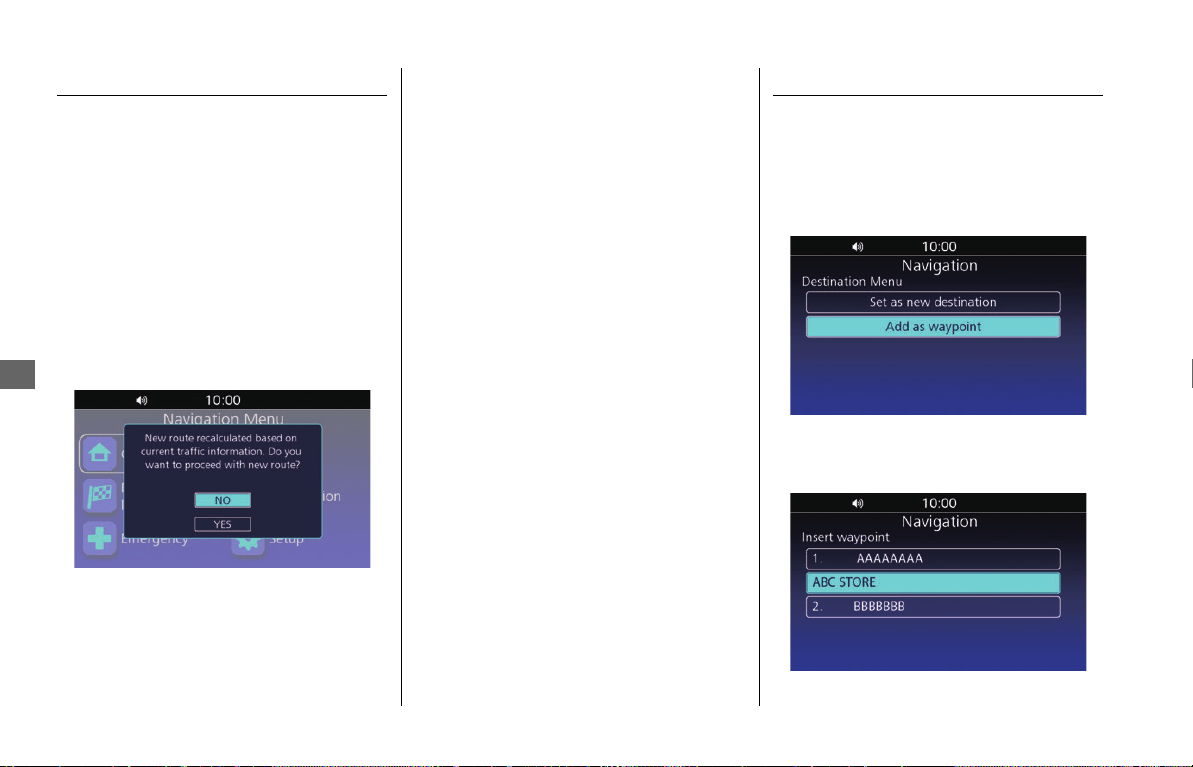
Traffic Avoidance
When you set the traffic re-route feature,
the system examines traffic conditions and
searches for a faster route.
2 P. 60
If Traffic re-route is set to Automatic, the
system automatically optimizes the route
for the shortest time.
If Traffic re-route is set to Manual, the
system prompts you when it finds a faster
route and you can choose to accept the
new route.
Select
YES to accept the new route.
Adding Waypoints
Add up to 99 waypoints along the route to
your destination.
1.
While en route, select a search method to
add a new destination or waypoint.
2
P. 46
2.
Select Add as waypoint.
uSelect Set as new destination to set
the location as your new destination.
3.
Move the location to the desired position.
NOTE
• Subscription of SiriusXM
®
Radio is required for
adding the Traffic re-route function. For details
about subscribing to SiriusXM
®
Radio, see the
Owner's Manual.
• The system may route you through a traffic delay if
a better alternative route does not exist. The delay
time is added into your estimated time of arrival
automatically.
31MLJT00.book 64 ページ 2022年5月19日 木曜日 午前11時31分

Changing Your Route u Adding Waypoints
65
Navigation
4.
Press (Enter) on the center panel or
press switch on the left handlebar.
5.
Select NO.
uSelect YES and repeat steps 1 through
4 to add another waypoint.
6.
Select GO.
❙
Adding Waypoints from the Edit
Option Screen
1.
Select Add Destination on the Edit
Option screen. 2 P. 57
2.
Select a search method to add a new
destination or waypoint. 2 P. 46
3.
Move the location to the desired
position.
4.
Press (Enter) on the center panel or
press switch on the left handlebar.
5.
Select NO.
uSelect YES and repeat steps 1 through
4 to add another waypoint.
6.
Select GO.
ENT
ENT
31MLJT00.book 65 ページ 2022年5月19日 木曜日 午前11時31分
66
Navigation
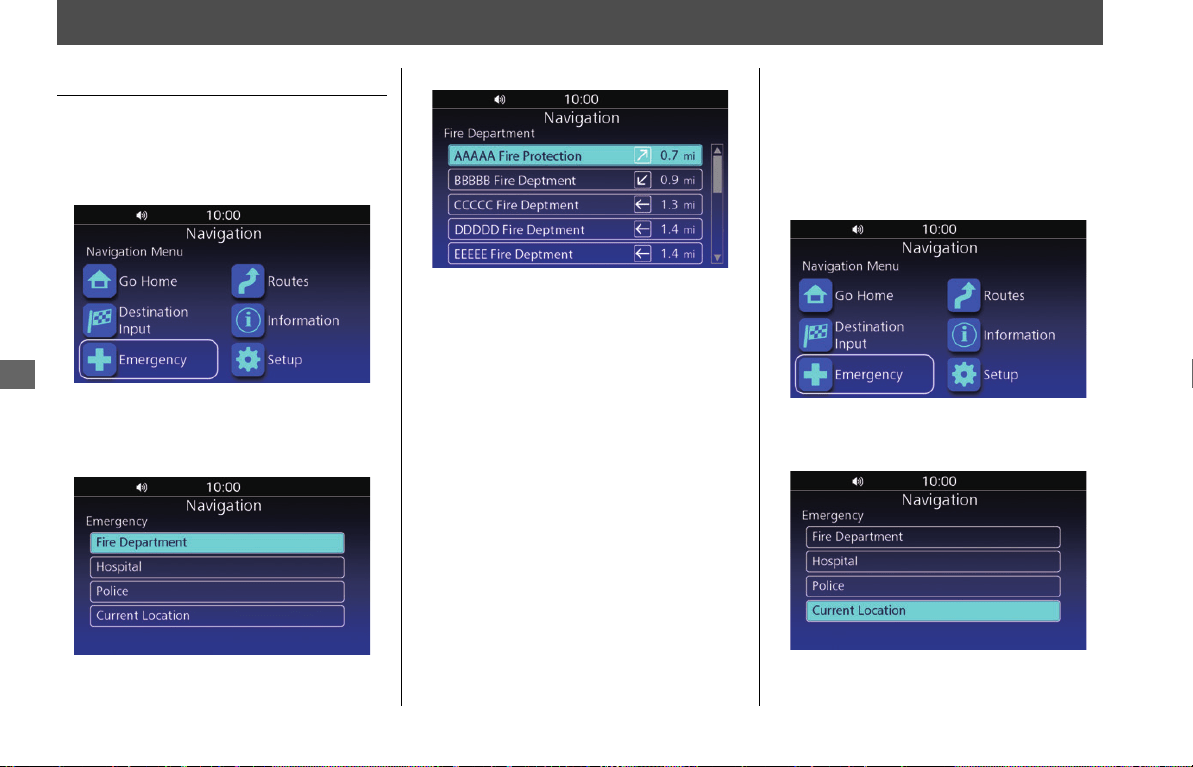
Changing Your Destination
Finding an Emergency Service
Search for a fire department, hospital or
police station around your current location.
1.
Select Emergency from the navigation
menu.
2 P. 45
uSelect OK if the confirmation screen is
displayed.
2.
Select Fire Department, Hospital or
Police.
uPlaces of your selected category are
listed with the nearest place at the top.
3.
Select a location from the list.
4.
Select GO to set the route to your
destination.
uYou can edit destinations or route
preferences.
2 P. 57, P. 59
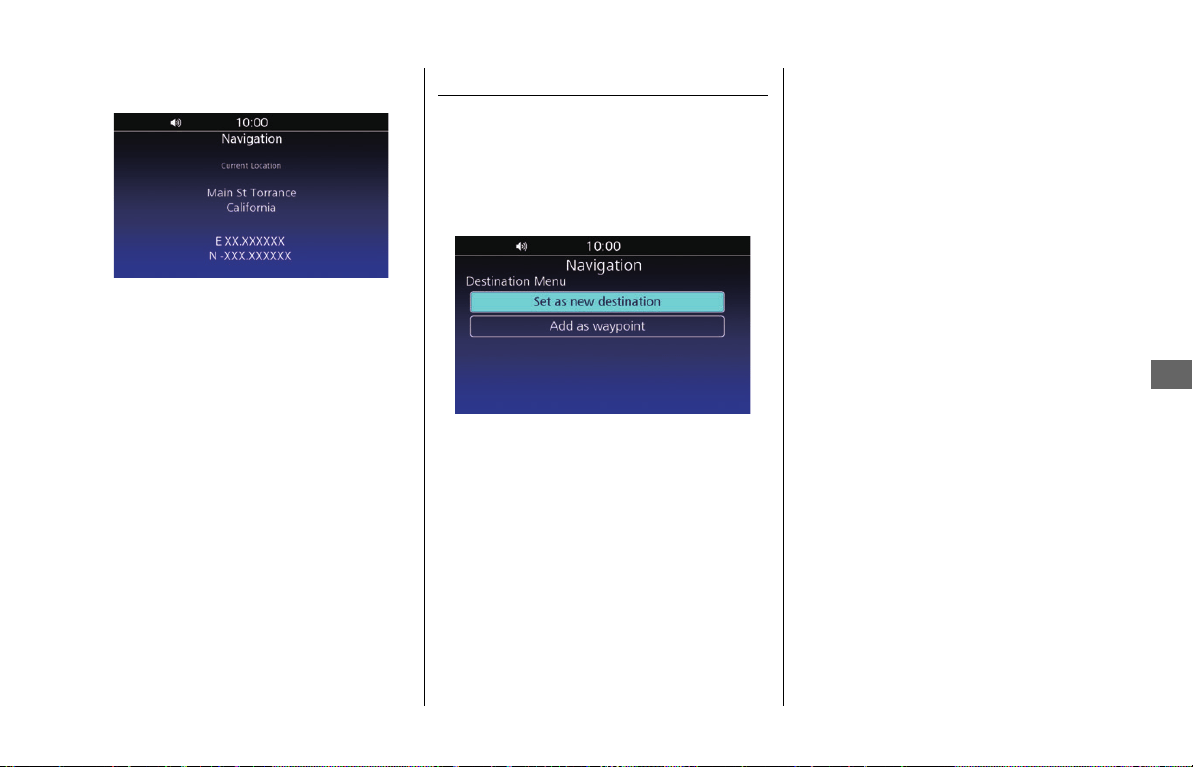
❙
Viewing Information about Your
Current Location
View the address and coordinates of your
current location.
1.
Select Emergency from the navigation
menu.
2 P. 45
uSelect OK if the confirmation screen is
displayed.
2.
Select Current Location.
31MLJT00.book 66 ページ 2022年5月19日 木曜日 午前11時31分
Changing Your Destination u Entering a New Destination
67
Navigation
uThe address and coordinates of your
current location are displayed.
Entering a New Destination
This section describes how to change or
add a new destination to your route.
1.
Select a search method to enter a new
destination.
2 P. 46
2.
Select an option.
The following options are available:
●
Set as new destination:
Clears the current route and starts the
new route to the location.
●
Add as waypoint:
Adds the location as a waypoint.
2 P. 64
31MLJT00.book 67 ページ 2022年5月19日 木曜日 午前11時31分
68
Navigation
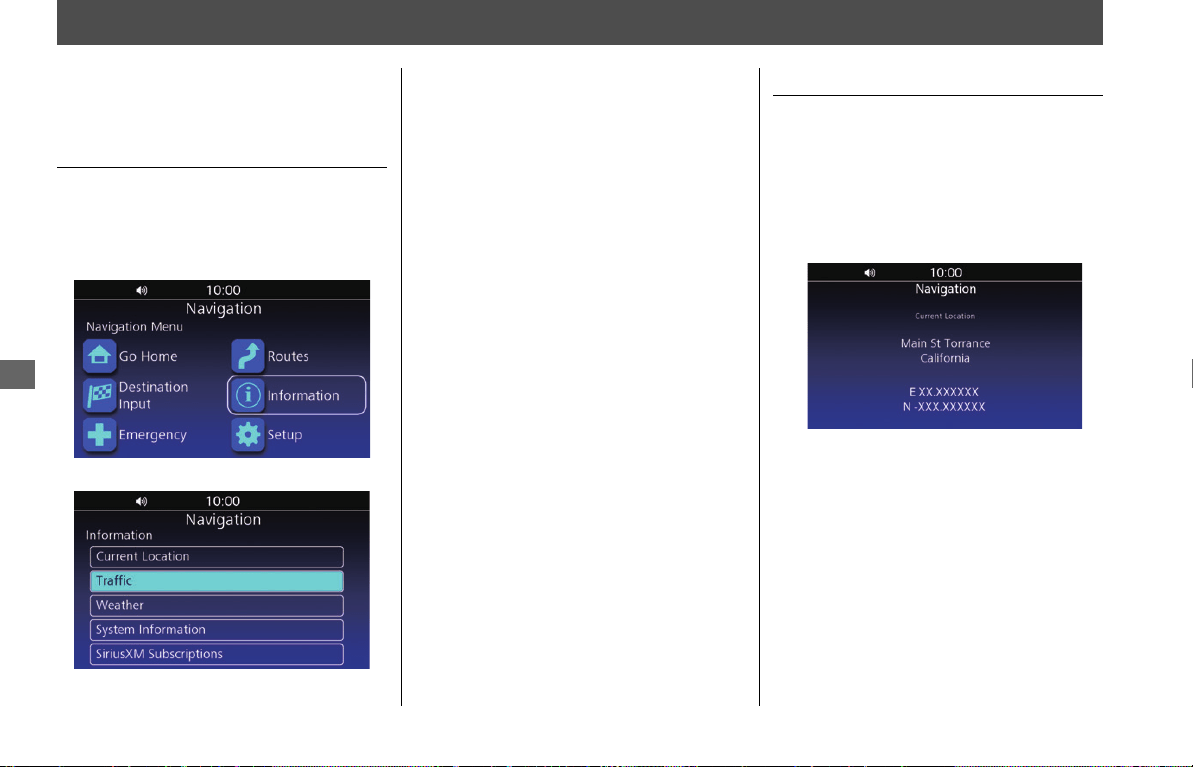
Viewing Information
You can check different information, such
as your current location or navigation
system.
Information Screen
Access the Information screen and check
different information.
1.
Select Information from the navigation
menu.
2 P. 45
2.
Select an option.
The following options are available:
●
Current Location:
Displays the address and coordinates of
your current location. 2 P. 68
●
Traffic:
Displays the traffic events near your
location or on your route. 2 P. 69
●
Weather:
Displays the current weather
information. 2 P. 69
●
System Information:
Displays information about the
navigation system and map database.
2 P. 70
●
SiriusXM
®
Subscriptions:
Displays information about subscription
of SiriusXM
®
Radio.
Current Location Information
View the address and coordinates of your
current location.
1.
Select Current Location on the
Information screen.
2 P. 68
uThe address and coordinates of your
current location are displayed.
NOTE
Subscription of SiriusXM
®
Radio is required for adding
Traffic and Weather functions. For details about
subscribing to SiriusXM
®
Radio, see the Owner's
Manual.
31MLJT00.book 68 ページ 2022年5月19日 木曜日 午前11時31分
Viewing Information u Weather Information
69
Navigation
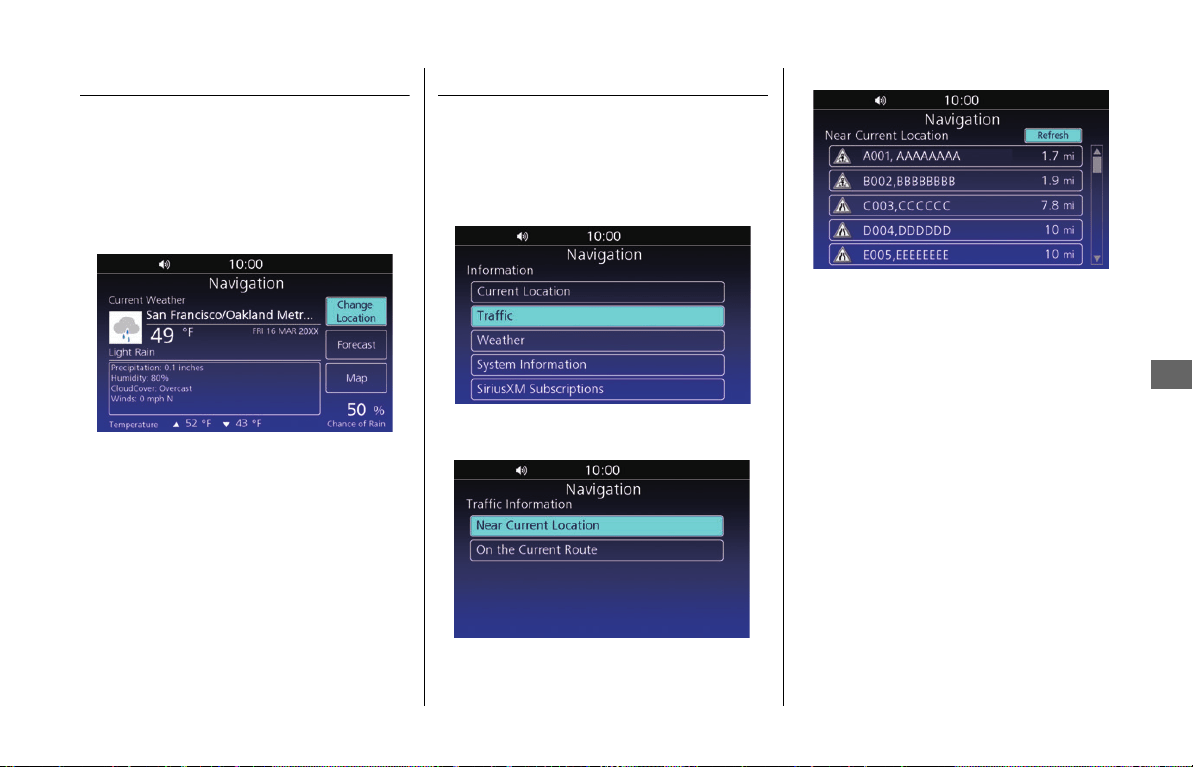
Weather Information
Obtain weather information at a present
location and in other places.
1.
Select Weather on the Information
screen. 2 P. 68
uThe weather information screen is
displayed.
The following options are available:
●
Change Location:
Change the location to obtain the
weather information. Select the state
and weather point from the list.
●
Forecast:
Displays the weather forecast for a full
day or 5 days.
●
Map:
Displays the weather map. Select Map
Option to set whether to display
weather radar and/or front.
Traffic Information
View information about traffic events near
your current location or on your current
route.
1.
Select Traffic on the Information
screen. 2 P. 68
2.
Select Near Current Location or On
the Current Route.
uOn the Current Route is available
when the route is active.
3.
Select an item to check details.
uThe traffic information screen is
displayed. 2 P. 20, P. 70
uSelect Refresh to update traffic
information.
31MLJT00.book 69 ページ 2022年5月19日 木曜日 午前11時31分
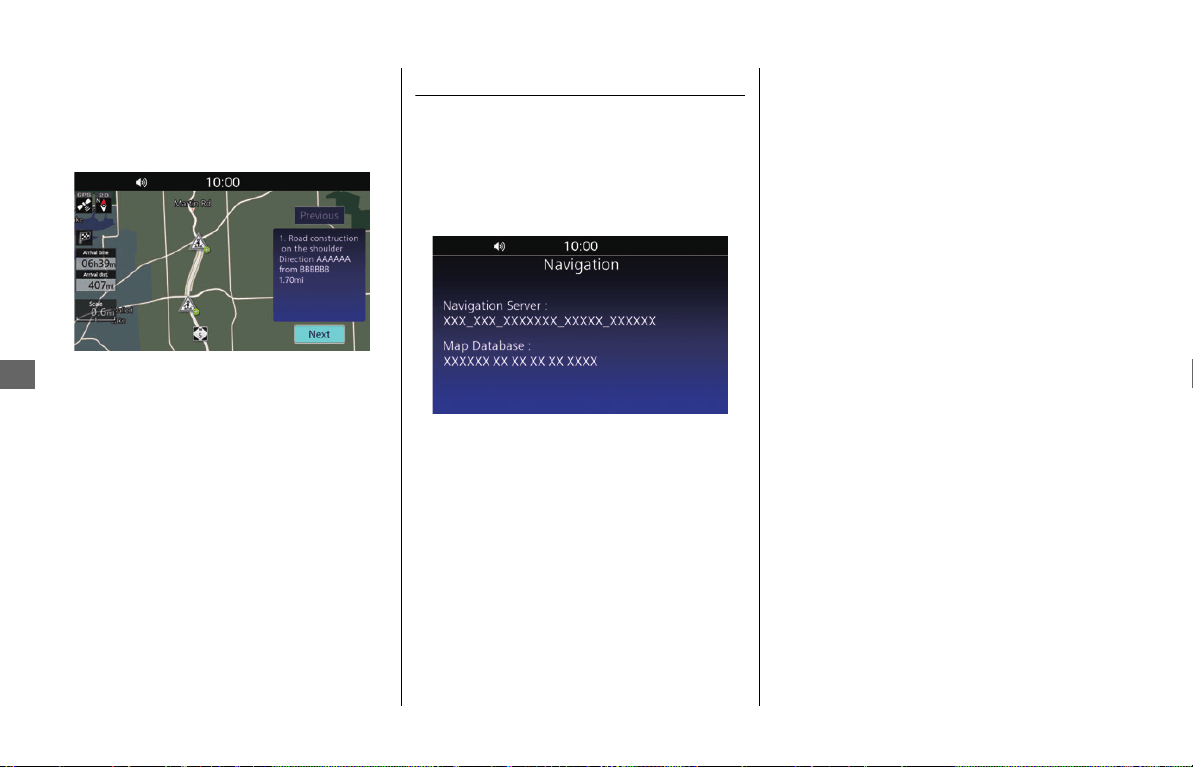
Viewing Information u System Information
70
Navigation
❙
Traffic Information Screen
On the traffic information screen, you can
check detailed information about traffic
events.
2 P. 20
The following information is available:
●
Description of the traffic event
●
Location information of the event
●
Direction of the event
●
Duration time (if information is provided)
System Information
View information about the navigation
system and map database.
1.
Select System Information on the
Information screen.
2 P. 68
uThe system information is displayed.
NOTE
• Select Previous or Next to view previous/next
traffic information.
• You can set the traffic re-route to avoid traffic
incidents.
2 P. 60, P. 64
31MLJT00.book 70 ページ 2022年5月19日 木曜日 午前11時31分

Troubleshooting
System Messages ................................. P.72
Troubleshooting ................................... P.74
Hardware .............................................. P.74
Voice Guidance ..................................... P.74
Screen................................................... P.74
Software ............................................... P.75
Routing ................................................. P.76
GPS Signal............................................. P.78
Traffic ................................................... P.79
Troubleshooting
31MLJT00.book 71 ページ 2022年5月19日 木曜日 午前11時31分

72
Troubleshooting
System Messages
Screen Message Explanation – Suggested Action
Maximum number of favorite
reached.
Do you want to edit favorite?
Favorite entries have reached the maximum number. Delete a favorite entry to save a new location.
Select YES to proceed to the Favorite List screen, and delete a favorite location.
2 P. 25
Route to selected destination
cannot be calculated.
There is no available route to the selected destination. Try another destination.
No data found Searched POI was not found. Try another POI.
Reached the maximum number of
waypoints.
Do you want to delete a waypoint?
Waypoint entries have reached the maximum number. Delete a waypoint entry to add another
waypoint. Select YES to proceed to the Delete Waypoint screen and select a destination to delete.
2 P. 59
Reached the maximum number of
routes.
Route entries have reached the maximum number. Delete a route entry to create or import a route.
2 P. 29
In case of emergency, please
contact the facility to verify their
availability before proceeding.
Message for emergency confirmation. Read the message and select OK.
Reached the maximum number of
favorites.
Favorite entries have reached the maximum number. Delete a favorite entry to save a new location.
2 P. 25
The data is not valid. Imported route, favorite and track were corrupted. Check if the data was copied correctly to the
USB.
Unable to export. Export route, favorite, and track were not successful. Reconnect the USB flash drive and try
importing again. If the problem persists, try using another USB flash drive.
Route to selected destination was
calculated. But one or more route
options were not avoided.
Some of selected avoid options were not avoided to calculate the route.
31MLJT00.book 72 ページ 2022年5月19日 木曜日 午前11時31分

System Messages
73
Troubleshooting
Reached the maximum number of
tracks.
Track entries have reached the maximum number. Delete a track entry to record or import a track.
2 P. 38
The import of the following
Favorite failed.
Importing Favorite from USB failed. Reconnect the USB flash drive and try importing again. If the
problem persists, try using another USB flash drive.
The import of the following Route
failed.
Importing Route from USB failed. Reconnect the USB flash drive and try importing again. If the
problem persists, try using another USB flash drive.
The import of the following Track
failed.
Importing Track from USB failed. Reconnect the USB flash drive and try importing again. If the
problem persists, try using another USB flash drive.
Selected street does not contain
any intersections.
When entering the destination by intersection, the intersection was not included in the first street.
Enter the street containing an intersection.
Destination is not reachable An unreachable destination was set. Try another destination.
Screen Message Explanation – Suggested Action
31MLJT00.book 73 ページ 2022年5月19日 木曜日 午前11時31分

74
Troubleshooting
Troubleshooting
Hardware
Voice Guidance
Screen
PROBLEM EXPLANATION
The vehicle position icon is not correct position while I’m riding my
vehicle.
Satellite reception has been lost or your vehicle was moved without
the engine on. Icon will recover during driving.
PROBLEM EXPLANATION
I did not hear the voice guidance when I expected to hear it. If the Navi Volume is turned fully off, or “Mute” is selected, you
will not hear the voice guidance. Also, since the voice guidance can
be routed through the speakers or the headphones, check that you
are listening to the sound source you selected.
PROBLEM EXPLANATION
While I ride, my screen shows “purple dots” on it. What do they
mean?
These are called “breadcrumbs.” They appear if Display Track is
set to on in the track log settings. (The default is off.)
2 P. 36
After using the cursor radius point locator, I resumed riding, but the
map display is frozen.
If you resume riding after using this feature without removing it
from the screen, the screen will continue to display the last map
screen until you terminate the point locator feature.
I get inconsistent results when I type in initials searching for a
location.
The database includes some entries that leave spaces between
initials and some entries do not. If your entry fails, try the
alternative.
31MLJT00.book 74 ページ 2022年5月19日 木曜日 午前11時31分
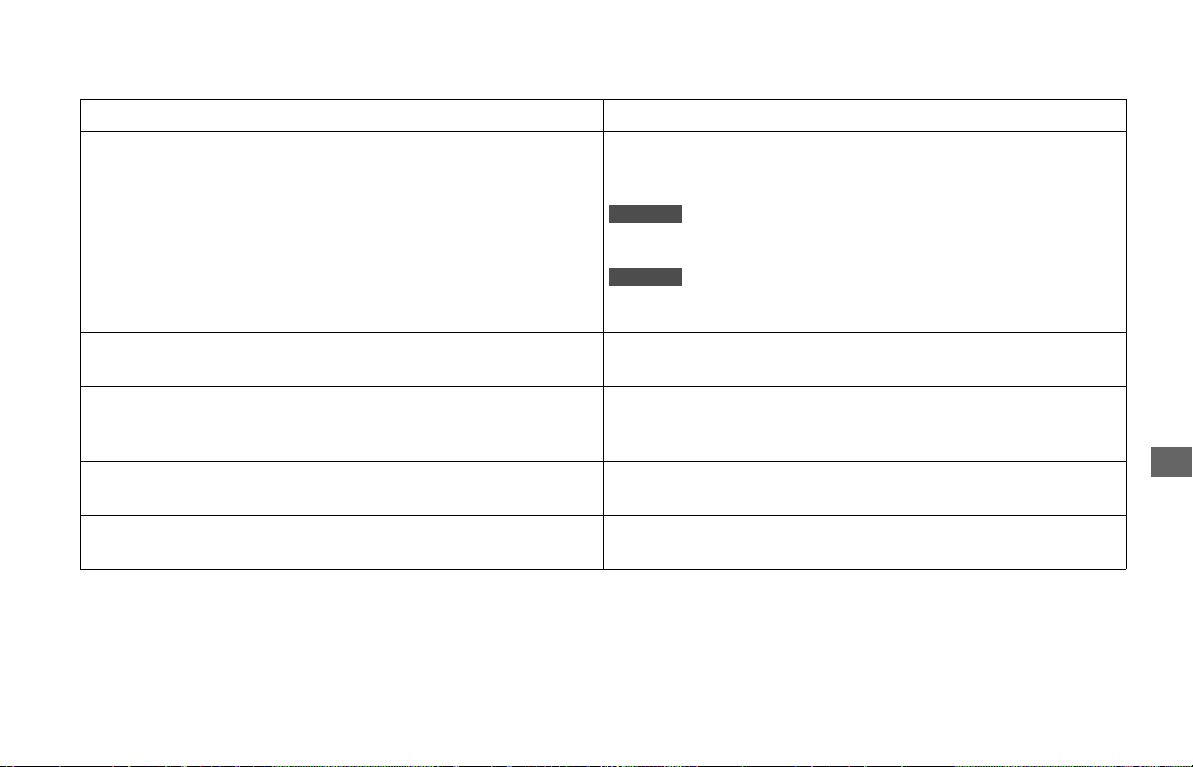
Troubleshooting u Software
75
Troubleshooting
Software
PROBLEM EXPLANATION
How do I obtain a navigation update? Honda is continually expanding the scope of the Map software and
the Audio/Navigation System software. The softwares are updated
to correspond with new version releases.
For the software updates, visit our website
www.powersports.honda.com.
For the software updates, visit our website
https://motorcycle.honda.ca.
How can I determine the software version in my Navigation
System?
Select System Information on the Information screen. 2 P. 68
When is my city going to become part of a fully verified detailed
coverage area?
The mapping database supplier is constantly verifying new and
existing areas that currently show on the map as unverified. Alaska
and Hawaii are covered.
Will the navigation system work outside North America? It will work in Hawaii, Alaska, Canada, and Mexico as well as the
continental U.S.
Why is the street I am on not on the map? It has been here for a
year.
The mapping database is constantly undergoing revision. Contact
your dealer.
USA
Canada
31MLJT00.book 75 ページ 2022年5月19日 木曜日 午前11時31分

Troubleshooting u Routing
76
Troubleshooting
Routing
PROBLEM EXPLANATION
My system does not route me the same way I would go. Why is
this?
- In some situations, your local knowledge may generate a better
route than the data currently available to the system.
- When you set the calculation mode to Fastest, the system
examines traffic information if available and calculates the route.
Therefore, the route may differ depending on the traffic
conditions.
I entered a new route with waypoints that would create a loop
starting and ending at my current location, and turned off the
ignition. When I turned the system on again, the route was gone.
Shutting the system off after entering a loop from your current
location cancels the route. The system assumes you reached your
destination.
You can save the route before turning off the ignition.
2 P. 59
I stopped for coffee about 220 yards (200 meters) from my route
destination. When I started up again, the route was no longer in the
system.
If you turn the ignition off when you are within 220 yards (200
meters) of your destination, the system assumes you have reached
your destination.
I went more than 33 yards (30 meters) off my route, but the system
did not alert me.
The automatic re-routing feature will normally give you visual and
voice alerts if you move more than 33 yards (30 meters) off route.
However, some situations, such as riding on a road that closely
parallels another road, may prevent activation of this feature
because the system may be reading your location on the other
road, within the 33 yards (30 meters) limit. As explained in System
Limitations, there are elements that can affect the accuracy of all
GPS equipment.
The navigation system does not provide information for some roads
or POIs.
- The navigation system’s map database does not contain all the
information.
- Update the map data. Contact your dealer.
31MLJT00.book 76 ページ 2022年5月19日 木曜日 午前11時31分

Troubleshooting u Routing
77
Troubleshooting
The vehicle position icon is not correct position. The process of map matching may take time to start working when
you start riding from a place does not contain the road, such as
parking.
In addition, it may occur when there is a problem with GPS or the
satellite reception, or there is another road near your current
position.
The navigation system continuously recalculates the route. The system may continuously recalculate the route depending on
the road shape.
The navigation system does not stop routing though I arrived at the
destination.
The system may not judge correctly whether you arrive at or pass
the location depending on the GPS status.
The distance unit is not what I set. It may recover as you keep the ignition on.
The route guidance stops. When you use the navigation of Apple CarPlay
TM
or Android
Auto
TM
, the route guidance on the navigation system is cleared.
A road that I selected to avoid is being used when routing. The system might calculate the route containing the road you select
to avoid if it cannot find another route to your destination.
Lane information is not displayed, or it sometimes looks different. Lane information may not be displayed correctly depending on the
road shape.
On the guidance screen or the intersection view screen, the latest
lane information is displayed based on your vehicle position.
The route set on the website looks different when imported. The route will be optimized by the map software in the navigation
system. The route may be changed when it is recalculated.
PROBLEM EXPLANATION
31MLJT00.book 77 ページ 2022年5月19日 木曜日 午前11時31分

Troubleshooting u GPS Signal
78
Troubleshooting
GPS Signal
How do I stop the map scale from changing as I drive along? Disable Auto Zoom. 2 P. 32
When Auto Zoom is enabled, automatic zooming on the map for
optimal viewing will be activated.
The guidance volume is too quiet/loud. The audio volume and the guidance volume can be adjusted
separately.
2 P. 44
No results found when searching for a destination by a phone
number.
Enter the country calling code, and then enter the phone number.
The vehicle position icon is not exactly where I am when the system
calculates the route.
The vehicle position icon will recover as you ride.
When I set a route and turned the ignition off then on, the route
disappeared.
The system may take time to resume the guidance depending on
the GPS status or the route.
PROBLEM EXPLANATION
The Navigation System is unable to acquire a proper GPS signal. Make sure there is nothing blocking the GPS antenna located near
the left saddlebag. 2 P. 6
If there is not, move the vehicle to an open space away from tall
buildings, trees, etc.
How long should it take for my system to become GPS-ready if it
has not been used for some time?
In a garage or other area that would interfere with receiving GPS
signals, turn on the ignition for four minutes. Then move your
vehicle outside to a clear area where it should be able to pick up
GPS signals. If you don’t receive any signals, contact your dealer.
PROBLEM EXPLANATION
31MLJT00.book 78 ページ 2022年5月19日 木曜日 午前11時31分

Troubleshooting u Traffic
79
Troubleshooting
Traffic
PROBLEM EXPLANATION
Traffic information is missing or is not displaying properly. What is
wrong?
Verify the following:
- Traffic information relies on a clear signal. If signal strength is low,
traffic data may not be available.
- It is possible that there is a temporary technical problem with your
metropolitan area traffic provider.
- Your SiriusXM
®
Radio subscription may have expired. Contact
SiriusXM
®
Radio and verify your account status.
- If the situation persists, see your local Honda dealer for assistance.
- Traffic information is available only in certain areas.
31MLJT00.book 79 ページ 2022年5月19日 木曜日 午前11時31分

Technical & Consumer Information
System Limitations ...............................P.81
Database Limitations ............................. P.84
Customer Support.................................P.85
Honda Customer Support...................... P.85
Legal Information .................................P.86
End User Terms..................................P.86
Technical & Consumer
Information
31MLJT00.book 80 ページ 2022年5月19日 木曜日 午前11時31分

81
Technical & Consumer Information
System Limitations
Although your Navigation System is a highly
sophisticated piece of equipment, you may
find it has certain limitations. The system
uses signals from the Global Positioning
System (GPS) to determine its current
location. The GPS is operated by the U.S.
Department of Defense. The system is
subject to changes that could affect the
accuracy and performance of all GPS
equipment, including your Navigation
System.
❙
Favorable Reception Areas for GPS Signals
GPS reception is best in open areas, with no trees, tall buildings, or other tall objects that
can interfere with the signal.
31MLJT00.book 81 ページ 2022年5月19日 木曜日 午前11時31分

System Limitations
82
Technical & Consumer Information
❙
Unfavorable Reception Areas for GPS Signals
The following areas restrict GPS signal reception. However, these obstacles do not interfere with the operation of the speed sensor in your
vehicle that tracks your movement along the route.
Be aware that high rise buildings may diffuse your GPS signal and cause an inaccurate display of your current location on the map screen. If
this occurs, the GPS icon on the top of the screen shows its signal strength and displays poor GPS satellite reception by the strength bar. If
the satellite reception has been lost, the icon will be grayed-out.
Low GPS satellite position
(less than 10 degrees) on
the horizon.
Areas with tall
buildings.
Areas with tall trees.
Enclosed or indoor areas
such as parking lots or
tunnels.
The bottom level of
multiple-level highways.
31MLJT00.book 82 ページ 2022年5月19日 木曜日 午前11時31分

System Limitations
83
Technical & Consumer Information
Although the system will direct you to your
desired destination, it may not always do it
by what you consider to be the most direct
route.
The points of interest listings are not as
complete in outlying areas as they are in
metropolitan areas. For example, only
limited numbers of gas stations, restaurants,
supermarkets, banks, etc., are included. In
outlying areas, you may not find listings for
places you know exist, and the facilities
listed may not be the closest. This is also true
for police, agencies and hospitals. Always
check with local information sources if you
need law enforcement or hospital services.
On rare occasions, you may find that the
system “reboots.” This is indicated by the
display returning to the logo screen. A
reboot can be caused by a number of
things, including excessive heat or shock. It
does not necessarily indicate a problem
that requires service.
After the system completes the reboot, it
should allow you to complete whatever
functions you were performing before the
reboot.
Honda has made every effort to verify that
the system’s database was accurate at the
time it was created. However, businesses
do close or move to new locations, and
new businesses start in the old locations.
For this reason, you may occasionally find
inaccurate information when you select
and ride to a point of interest. The number
of these inaccuracies will increase as time
goes on.
However, database updates are available
annually. See the Owner’s Manual for
details.
Loss of Satellite Signal
If the system loses power for more than five
minutes, it takes a while to reacquire the
GPS signal (satellite positions).
●
The ignition must be turned to ON or
ACC.
●
The vehicle must be parked outside,
away from buildings.
●
The vehicle should be stationary.
(Acquiring the signal takes longer if the
vehicle is moving.)
The average acquiring time is about five
minutes, but it can take as long as 30
minutes. If the system is unable to acquire a
signal, follow the instructions on the
screen. Contact your local Honda dealer if a
problem still persists.
31MLJT00.book 83 ページ 2022年5月19日 木曜日 午前11時31分

System Limitations u Database Limitations
84
Technical & Consumer Information
Database Limitations
The navigation system’s digitized map
database reflects the most complete and
accurate data available at the time of
production.
Accordingly, your copy may contain
inaccurate or incomplete data or
information due to the passage of time,
road construction, changing conditions, or
other causes.
In addition, this database does not include,
analyze, process, consider, or reflect any of
the following categories of information:
●
Population density
●
Neighborhood quality or safety
●
Availability or proximity of law
enforcement
●
Construction work, zones, or hazards
●
Legal restrictions (such as vehicular type,
weight, load, height, and speed
restrictions)
●
Road slope or grade
●
Bridge height, width, weight, or other
limits
●
Traffic facilities safety
●
Pavement characteristics or conditions
●
Special events
We assume no liability for any incident that
may result from an error in the program or
from changed conditions not noted above.
31MLJT00.book 84 ページ 2022年5月19日 木曜日 午前11時31分

85
Technical & Consumer Information
Customer Support
Honda Customer Support
You may contact:
●
U.S.A.:
Powersports Customer Relations
American Honda Motor Co., Inc.,
P.O. Box 2200, Torrance,
CA 90509-2200
Mailstop: 100-4W-5F
Telephone: (866) 784-1870
Website:
https://powersports.honda.com/contact-
us
●
Canada:
Honda Customer Relations, Honda
Canada Inc., 180 Honda Boulevard,
Markham, Ontario L6C 0H9
Telephone: (888) 946-6329
Fax: (877) 939-0909
e-Mail: [email protected]
31MLJT00.book 85 ページ 2022年5月19日 木曜日 午前11時31分

86
Technical & Consumer Information
Legal Information
End User Terms
The data (“Data”) is provided for your
personal, internal use only and not for
resale. It is protected by copyright, and is
subject to the following terms and
conditions which are agreed to by you, on
the one hand, and HONDA MOTOR CO.,
LTD. (“Honda”) and its licensors (including
their licensors and suppliers) on the other
hand.
© 2022 HERE. All rights reserved. The Data
for areas of Canada includes information
taken with permission from Canadian
authorities, including: © Her Majesty the
Queen in Right of Canada, © Queen's
Printer for Ontario, © Canada Post
Corporation, GeoBase
®
, © Department of
Natural Resources Canada.
HERE holds a non-exclusive license from the
United States Postal Service
®
to publish and
sell ZIP+4
®
information.
©United States Postal Service
®
2022.
Prices are not established, controlled or
approved by the United States Postal
Service
®
. The following trademarks and
registrations are owned by the USPS:
United States Postal Service, USPS, and
ZIP+4.
The Data for Mexico includes certain data
from Instituto Nacional de Estadística y
Geografía.
❙
Terms and Conditions
Personal Use Only
. You agree to use this
Data together with the Satellite Linked
Navigation System for the solely personal,
non-commercial purposes for which you
were licensed, and not for service bureau,
time-sharing or other similar purposes.
Accordingly, but subject to the restrictions
set forth in the following paragraphs, you
agree not to otherwise reproduce, copy,
modify, decompile, disassemble, create any
derivative works of, or reverse engineer any
portion of this Data, and may not transfer or
distribute it in any form, for any purpose,
except to the extent permitted by
mandatory laws.
Restrictions
. Except where you have been
specifically licensed to do so by Honda, and
without limiting the preceding paragraph,
you may not (a) use this Data with any
products, systems, or applications installed
or otherwise connected to or in
communication with vehicles, capable of
vehicle navigation, positioning, dispatch,
real time route guidance, fleet management
or similar applications; or (b) with or in
communication with any positioning devices
or any mobile or wireless-connected
electronic or computer devices, including
without limitation cellular phones, palmtop
and handheld computers, pagers, and
personal digital assistants or PDAs.
Warning
. The Data may contain inaccurate
or incomplete information due to the
passage of time, changing circumstances,
sources used and the nature of collecting
comprehensive geographic data, any of
which may lead to incorrect results.
No Warranty
. This Data is provided to you
"as is," and you agree to use it at your own
risk. Honda and its licensors (and their
licensors and suppliers) make no
guarantees, representations or warranties of
any kind, express or implied, arising by law
or otherwise, including but not limited to,
content, quality, accuracy, completeness,
31MLJT00.book 86 ページ 2022年5月19日 木曜日 午前11時31分

Legal Information u End User Terms
87
Technical & Consumer Information
effectiveness, reliability, fitness for a
particular purpose, usefulness, use or results
to be obtained from this Data, or that the
Data or server will be uninterrupted or error-
free.
Disclaimer of Warranty
: HONDA AND ITS
LICENSORS (INCLUDING THEIR LICENSORS
AND SUPPLIERS) DISCLAIM ANY
WARRANTIES, EXPRESS OR IMPLIED, OF
QUALITY, PERFORMANCE,
MERCHANTABILITY, FITNESS FOR A
PARTICULAR PURPOSE OR NON-
INFRINGEMENT. Some States, Territories
and Countries do not allow certain warranty
exclusions, so to that extent the above
exclusion may not apply to you.
Disclaimer of Liability
: HONDA AND ITS
LICENSORS (INCLUDING THEIR LICENSORS
AND SUPPLIERS) SHALL NOT BE LIABLE TO
YOU: IN RESPECT OF ANY CLAIM, DEMAND
OR ACTION, IRRESPECTIVE OF THE NATURE
OF THE CAUSE OF THE CLAIM, DEMAND
OR ACTION ALLEGING ANY LOSS, INJURY
OR DAMAGES, DIRECT OR INDIRECT,
WHICH MAY RESULT FROM THE USE OR
POSSESSION OF THE INFORMATION; OR
FOR ANY LOSS OF PROFIT, REVENUE,
CONTRACTS OR SAVINGS, OR ANY OTHER
DIRECT, INDIRECT, INCIDENTAL, SPECIAL
OR CONSEQUENTIAL DAMAGES ARISING
OUT OF YOUR USE OF OR INABILITY TO USE
THIS INFORMATION, ANY DEFECT IN THE
INFORMATION, OR THE BREACH OF THESE
TERMS OR CONDITIONS, WHETHER IN AN
ACTION IN CONTRACT OR TORT OR BASED
ON A WARRANTY, EVEN IF HONDA OR ITS
LICENSORS HAVE BEEN ADVISED OF THE
POSSIBILITY OF SUCH DAMAGES. Some
States, Territories and Countries do not
allow certain liability exclusions or damages
limitations, so to that extent the above may
not apply to you.
Export Control
. Honda shall not export
from anywhere any part of the Data or any
direct product thereof except in compliance
with, and with all licenses and approvals
required under, applicable export laws, rules
and regulations, including but not limited to
the laws, rules and regulations administered
by the Office of Foreign Assets Control of
the U.S. Department of Commerce and the
Bureau of Industry and Security of the U.S.
Department of Commerce. To the extent
that any such export laws, rules or
regulations prohibit HERE from complying
with any of its obligations hereunder to
deliver or distribute Data, such failure shall
be excused and shall not constitute a breach
of this Agreement.
Entire Agreement
. These terms and
conditions constitute the entire agreement
between Honda (and its licensors, including
their licensors and suppliers) and you
pertaining to the subject matter hereof, and
supersedes in their entirety any and all
written or oral agreements previously
existing between us with respect to such
subject matter.
Governing Law
. The above terms and
conditions shall be governed by the laws of
the State of Illinois, without giving effect to
(i) its conflict of laws provisions, or (ii) the
United Nations Convention for Contracts for
the International Sale of Goods, which is
explicitly excluded. You agree to submit to
the jurisdiction of the State of Illinois for any
and all disputes, claims and actions arising
from or in connection with the Data
provided to you hereunder.
31MLJT00.book 87 ページ 2022年5月19日 木曜日 午前11時31分

Legal Information u End User Terms
88
Technical & Consumer Information
Government End Users. If the Data is
being acquired by or on behalf of the United
States government or any other entity
seeking or applying rights similar to those
customarily claimed by the United States
government, this Data is a "commercial
item" as that term is defined at 48 C.F.R.
("FAR") 2.101, is licensed in accordance
with these End-User Terms, and each copy
of Data delivered or otherwise furnished
shall be marked and embedded as
appropriate with the following "Notice of
Use," and shall be treated in accordance
with such Notice:
If the Contracting Officer, federal
government agency, or any federal official
refuses to use the legend provided herein,
the Contracting Officer, federal government
agency, or any federal official must notify
HERE prior to seeking additional or
alternative rights in the Data.
NOTICE OF USE
CONTRACTOR (MANUFACTURER/
SUPPLIER) NAME: HERE
CONTRACTOR (MANUFACTURER/
SUPPLIER) ADDRESS:
c/o 425 West Randolph Street, Chicago,
Illinois 60606
This Data is a commercial item as defined in
FAR 2.101 and is subject to these End-User
Terms under which this Data was provided.
© 1987 - 2022 HERE - All rights reserved.
31MLJT00.book 88 ページ 2022年5月19日 木曜日 午前11時31分

Index
89
Index
A
Add as Waypoint ....................................................................... 64
Add Destination......................................................................... 65
Address ....................................................................................... 49
Country/State............................................................................ 52
Auto Zoom ................................................................................. 32
B
Brightness................................................................................... 40
C
Change Search Area .................................................................. 48
City Name ................................................................................... 50
Clear All Route ........................................................................... 19
Clear Guidance........................................................................... 19
Current Location ........................................................................ 66
D
Day Map Color ........................................................................... 32
Delete Waypoints ...................................................................... 59
Destination Input....................................................................... 46
Detour ........................................................................................ 63
Display Track .............................................................................. 37
E
Edit Option................................................................................. 57
Delete ....................................................................................... 58
Rename .................................................................................... 58
Emergency.................................................................................. 66
Export Track to USB ................................................................... 38
F
Favorite....................................................................................... 24
Deleting .................................................................................... 25
Editing ...................................................................................... 25
Exporting .................................................................................. 26
Importing .................................................................................. 24
Storing ...................................................................................... 24
Using ........................................................................................ 46
G
Go................................................................................................ 57
Go Home..................................................................................... 16
Guidance Mode.......................................................................... 31
Guidance Volume....................................................................... 44
H
Home Screen .............................................................................. 13
I
Import Track ............................................................................... 37
Information ................................................................................ 68
Intersection................................................................................. 52
Country/State ............................................................................ 53
L
Language .................................................................................... 39
Left Handlebar ............................................................................. 8
Index
Index
31MLJT00.book 89 ページ 2022年5月19日 木曜日 午前11時31分

90
Index
M
Map ....................................................................................... 15, 31
Map Input ................................................................................... 56
Map Menu .................................................................................. 44
Map Screen Legend.................................................................... 14
Map Setup .................................................................................. 33
Map/View Settings ..................................................................... 32
N
Navi Volume ............................................................................... 44
Navigate to Start Point .............................................................. 55
Navigation .................................................................................. 43
Navigation Menu ....................................................................... 45
P
Phone Number ........................................................................... 53
POI
Map Input ................................................................................. 56
POI List ........................................................................................ 33
POI OFF ....................................................................................... 44
POI ON ........................................................................................ 44
Point of Interest ......................................................................... 47
Previous Destination .................................................................. 47
R
Rearrange Waypoints ................................................................ 58
Record Track ............................................................................... 37
Repeat voice guidance............................................................... 41
Route List .............................................................................. 15, 31
Route Option.............................................................................. 59
Routes .........................................................................................27
Creating ....................................................................................28
Deleting.....................................................................................29
Exporting ...................................................................................30
Importing ..................................................................................28
Setting.......................................................................................54
S
Save as Route ..............................................................................59
Set as New Destination ..............................................................67
Show Traffic Flow.......................................................................32
Street Name ................................................................................49
System Controls ............................................................................8
System Reset ...............................................................................42
T
Track Log Setup ..........................................................................36
Tracks ..........................................................................................38
Using.........................................................................................55
Traffic Avoidance .......................................................................64
Traffic Information...............................................................20, 69
TTS Language .............................................................................39
U
USB Connector Location ..............................................................9
V
View Route .................................................................................62
31MLJT00.book 90 ページ 2022年5月19日 木曜日 午前11時31分


© 2022 Honda Motor Co., Ltd.
All Rights Reserved Printed in the U.S.A.
31MLJT00
00X31-MLJ-T000