Loading ...
Loading ...
Loading ...
11
Tilt Head Mixer Features
R-5
5
Motor Head
Motor Head
Locking Lever
(not shown)
Attachment Knob
Attachment Hub
Flat Beater
Wire Whip
Dough Hook
Speed
Control
Lever
Bowl Clamping Plate
Beater Shaft
4.8 L (5 Qt)
Stainless
Steel Bowl
Motor Head
English
TO RAISE BOWL
• Rotate handle back and up until it snaps
into the locked vertical position.
• Bowl must always be in raised, locked
position when mixing.
TO LOWER BOWL
• Rotate handle back and down.
TO ATTACH FLAT BEATER,
WIRE WHIP, OR DOUGH HOOK
• Turn speed control to OFF and unplug.
• Lower bowl by rotating bowl lift handle
downward.
• Slip flat beater on beater shaft and press
upward as far as possible.
• Turn beater to right, hooking beater over the
pin on shaft.
TO REMOVE FLAT BEATER,
WIRE WHIP, OR DOUGH HOOK
• Turn speed control to OFF and unplug.
• Lower bowl by rotating bowl lift handle
downward.
• Press beater upward as far as possible and
turn left.
• Pull beater from beater shaft.
TO OPERATE SPEED CONTROL
• Speed control lever should always be set on
lowest speed for starting, then gradually
moved to desired higher speed to avoid
splashing ingredients out of bowl. See
“Speed Control Guide.”
OVERLOAD RESET BUTTON
(Model 5KPM50 only)
• If the mixer is overloaded, the Overload
Reset Button will pop out and the mixer will
shut off. Turn the Speed Control Lever to
OFF. Wait a few minutes, then push in the
Overload Reset Button. Turn the Speed
Control Lever to the desired speed and
continue mixing.
8
TO ATTACH BOWL
• Be sure speed control is OFF.
• Place bowl lift handle in down position.
• Fit bowl supports over locating pins.
• Press down on back of bowl until bowl pin
snaps into spring latch.
• Sit pouring shield* on bowl.
• Raise bowl before mixing.
TO ATTACH POURING SHIELD*
1. Turn speed control to OFF.
2. Unplug Stand Mixer or disconnect power.
3. Attach Flat Beater, Dough Hook, or Wire
Whip and bowl.
4. From the front of the mixer, slide the Pouring
Shield over the bowl until the shield is
centered. The bottom rim of the shield
should fit within the bowl.
TO REMOVE POURING SHIELD
1. Turn speed control to OFF.
2. Unplug Stand Mixer or disconnect power.
3. Lift the front of the Pouring Shield clear
of the bowl rim and pull forward.
4. Remove attachment and bowl.
TO USE POURING SHIELD
1. For best results, rotate the shield so the
motor head covers the “u” shaped gap in
the shield. The pouring chute will be just to
the right of the attachment hub as you face
the mixer.
2. Pour the ingredients into the bowl through
the pouring chute.
* If Pouring Shield is included
NOTE: Check that bowl and pouring shield are
properly in place.
TO REMOVE BOWL
• Place bowl lift handle in down position.
• Grasp bowl handle and lift straight up and
off locating pins.
0 1 2 4 6 8 10
9
Flat Beater, for normal to heavy mixtures,
such as:
cakes biscuits
creamed frostings crumpets
candies meat loaf
cookies mashed potatoes
pie pastry
Dough Hook for mixing and kneading yeast
doughs, such as:
breads coffee cakes
rolls buns
Using Your KitchenAid Attachments
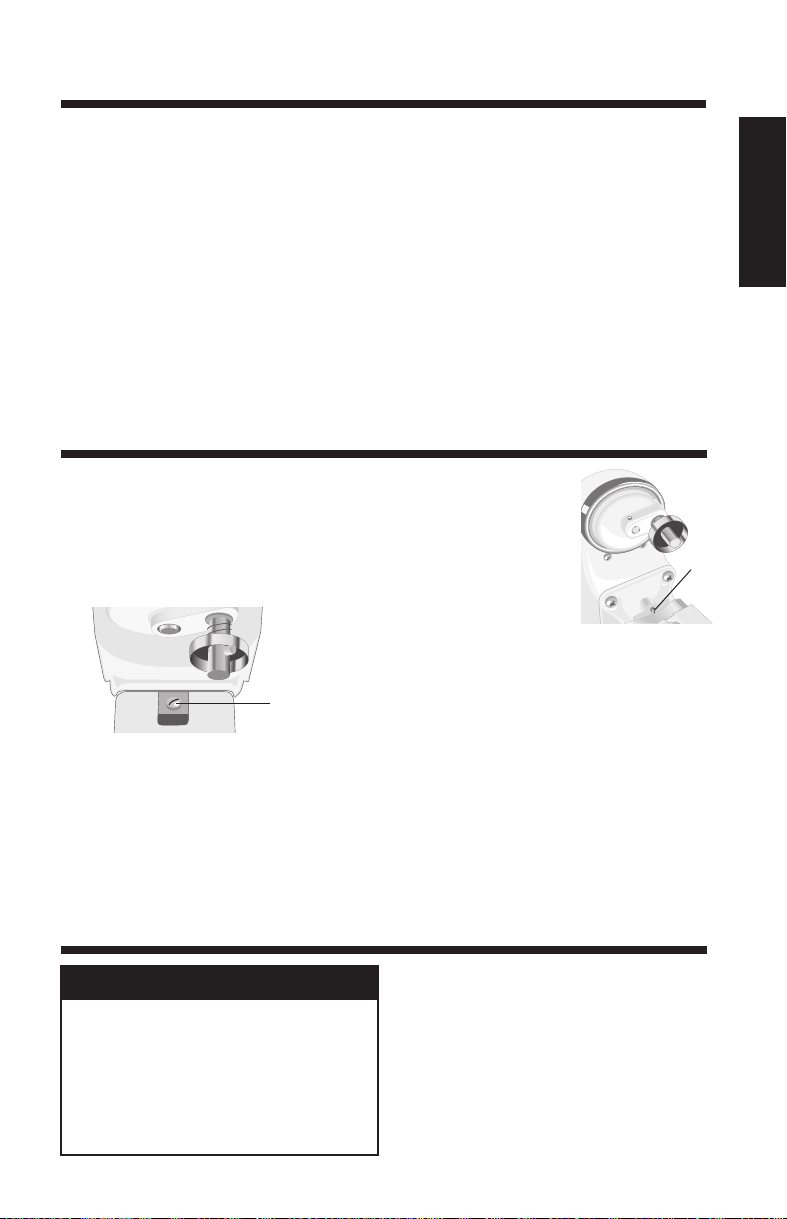
Beater-to-Bowl Clearance
Wire Whip for mixtures that need
to incorporate air, such as:
eggs sponge cakes
egg whites mayonnaise
heavy cream some candies
boiled frostings
Tilt Head
• Lift motor head.
• Turn screw (A) slightly to the left to raise
flat beater and to the right to lower flat
beater.
• Make adjustment with flat beater, so it just
clears surface of bowl.
Your mixer is adjusted at the factory so that
the fla
t beater just clears the bottom of the
bowl. If, for any reason, the flat beater strikes
the bottom of the bowl, or is too far away
from the bowl, clearance can be corrected as
follows:
A
Bowl Lift
• Place bowl lift handle
in down position.
• Turn screw (B) slightly to
the left to raise flat beater
and to the right to lower
flat beater.
• Make adjustments with
flat beater, so it just clears surface of bowl.
NOTE: Flat beater must not strike on bottom or side
of bowl when properly adjusted. If beater or wire
whip is adjusted too close so that it strikes bottom
of bowl, coating may wear off of beat
ers or wires
may wear through on wire whip.
Scraping sides of bowl may be necessary under
certain conditions regardless of beater adjustment.
Mixer must be stopped to scrape bowl or damage
to mixer may occur.
Bowl, flat beater, and dough hook may be
washed in an automatic dishwasher. The wire
whip and these other basic accessories can be
cleaned thoroughly in hot sudsy water and
rinsed completely before dry
ing.
Lubrication: Motor bearings are self-
lubricating and should require no further
attention under normal use.
ELECTRICAL SHOCK HAZARD
ALWAYS BE SURE TO UNPLUG
MIXER BEFORE CLEANING TO AVOID
POSSIBLE ELECTRICAL SHOCK.
Wipe mixer with a damp cloth. DO
NOT IMMERSE IN WATER. Wipe off
beater shaft frequently, removing any
residue that may accumulate.
wWARNING
Care and Cleaning of Your Mixer
B
Your mixer is adjusted at the factory so that
the flat beater just clears the bottom of the
bowl. If, for any reason, the flat beater strikes
the bottom of the bowl, or is too far away
from the bowl, clearance can be corrected as
follows:
See the Stand Mixer Attachments Use and Care Guide for speed settings and operating times.
English
W10544160C_v04.indd 11 6/1/15 3:02 PM
Loading ...
Loading ...
Loading ...