Assembly and Operating Instructions
Series II
FOR OUTDOOR USE ONLY
2
Safety Warning
Failure to follow these instructions and observe the warnings provided in this operations manual could result in
fire, explosion or burn hazard, which could cause property damage, personal injury or death.
Gas vapour is highly explosive and can cause serious bodily injury or damage to property if allowed to accumulate in a confined
space and ignited.
This appliance must not be installed under or on any combustible material. Minimum clearance from combustible materials to all
sides of the appliance is 450mm (18”).
These instructions must be left with the owner.
NOTE
1. Do not use gas other than the type specified on the Data Plate
2. The appliance is designed for use by adults, keep children away from the BUGG BBQ at all times.
3. Use only on a flat, level, stable non-combustible surface. Do not use this appliance on any surface that can burn or melt.
4. When in use, gas cylinder should be kept at designated mountings on BUGG Trolley, or if not used with Trolley on a flat
level surface, with supply hoses kept away from any hot surfaces, and not kinked, stretched or twisted.
5. To prevent accidental fires, before using the appliance ensure that there is no apparent damage to hose and regulator
and all joint connections are in good order and not leaking.
6. Use a soapy water solution on all joints in order to check for leaks. If bubbles appear, it indicates that there is a leak and
the appliance must not be used.
7. LPG cylinder, regulator and hose must comply with national standards.
8. Do not move or attempt to move the appliance while in operation.
9. Do not operate this appliance before leak checking hoses and gas cylinder connection.
IMPORTANT:
• BeefEater Barbecues are approved for OUTDOOR USE ONLY and
must not be used in a building, garage or any other enclosed
area.
• BeefEater Barbecues must not be used inside recreational
vehicles or boats.
• Read instructions thoroughly before operating this Barbecue.
• Save this manual for future reference.
• Always use the Barbecue on a flat, level surface.
• Some foods produce flammable greases and juices. Regular
cleaning is essential.
• Attend an operating barbecue at all times. Damage caused by
grease & grease fires is not covered by warranty.
• When not in use keep Barbecue dry and covered.
FOR YOUR SAFETY
If you smell gas:
1. Shut off gas to the appliance.
2. Extinguish any open flame.
3. Open hood.
1. If odour continues, immediately call your gas
supplier or your fire department.
FOR YOUR SAFETY
1. Do not store or use gasoline or other
flammable vapours or liquids in the vicinity of
this or any other appliance.
2. An LPG cylinder not connected for use shall
not be stored in the vicinity of this or any
other appliance.
To the installer:
For fixed installations, in Australia refer also to the requirements of AS5601/AG601, local authority, gas, electricity, and
any other relevant statutory regulations.
For fixed installations, refer to AS 5601/AG 601 for pipe sizing details.
Refer to the local gas authority for confirmation of the gas type, if any doubt exists.
Consult other trades. Where required, consult a bricklayer or an electrician for parts of the installation that could have an
effect on these areas.
Allow sufficient gap from back of barbecue body for the hood to open fully.
Test appliance for correct operation before leaving, and instruct user on its use.
If correct operation cannot be achieved, disconnect barbecue from gas supply, and contact your nearest BeefEater
dealer.
Please only use BeefEater supplied hose(s) to connect this appliance. Natural Gas conversion kits are available from
your nearest BeefEater dealer.
Leave these instructions with customer

3
DO NOT
• Lean over barbecue when lighting.
• Leave cooking food unattended.
• Delay lighting burners after turning gas on.
• Spray or store aerosols in vicinity of barbecue whilst
in operation.
Operate burners on ‘High’ when hood is closed.
• Store combustible materials, gasoline or flammable
liquids or vapours within 450mm (18”) of barbecue.
• Use caustic based cleaning agents on the barbecue.
• Operate barbecue with any cover on.
• Use plastic or glass utensils on the barbecue.
• Operate barbecue in strong winds.
• Attempt to dismantle control valves.
• Attempt to dismantle or adjust regulator.
• Test for gas leaks with a naked flame.
• Store gas cylinder indoors, or in any enclosed area.
• Lay the gas cylinder down. Always keep it upright.
• Use barbecue indoors.
• Expose hose to direct sunlight.
• Modify the construction of this appliance or the size
of any burner or valve orifice.
• Move the appliance during use.
• Obstruct any ventilation of barbecue or the cylinder.
• Allow the flexible gas supply hose or any electrical
cord to come in contact with hot surface of the
appliance.
• Allow children to operate this appliance.
• Use charcoal or any other solid fuel in this
appliance.
• Disconnect any gas fittings while the appliance is
operating.
• Use a rusty or dented gas cylinder or cylinder with a
damaged gas valve.
• Fill the gas cylinder beyond 80% capacity.
• Touch some accessible parts, other than the ones
meant for handling. They may be hot.
Operate the Barbecue before cleaning the inside and
grease tray content.
DO
• Spanner tighten all gas fittings as per
instructions.
• Check all gas hoses and line connections for
damage, cuts or cracks each time the appliance is
about to be used.
• Always leak test with a solution of soapy water.
• Check main opening, throat and venturi to each
burner and pilot flame tube regularly for insect
nests (eg. wasp, ants or spiders). Nests are
dangerous and must be cleaned out thoroughly.
• Visually check burner flames to confirm lighting.
• Use your barbecue only on a level surface.
• Attend barbecue whilst cooking food.
• Preheat the barbecue for up to 10 minutes.
• After cooking turn barbecue to high for up to 10
minutes to burn off excess grease.
• Let the barbecue cool before replacing any lid or
cover.
• Regularly replace any foil material in grease/drip
tray if used.
• Keep children away from barbecue at all times.
• Have the gas cylinder filled by an authorised LPG
supplier.
• Refer to this instruction manual if in doubt
concerning assembly, installation, or operation.
• Use protective gloves when handling hot
components.
• Close the gas cylinder valve after each use.
• Clean the grease/drip tray regularly and clean
the appliance at least twice annually.
• Always remove any lid or cover off the appliance
before lighting.
• Carefully follow the instructions relating to the
hose/regulator connection.
• Keep the barbecue area free from combustible
materials, gasoline, flammable liquids or vapours.
Keep burners on ‘Low’ when hood is closed.
Should the appliance go out for any reason, turn off all control knobs and the cylinder gas valve. Wait 5
minutes before attempting to relight the appliance.
If a grease or grease fire should occur, immediately turn off all control knobs and the gas cylinder valve until
the fire is out. Remove all food from the appliance.
A leak test must be carried out prior to using the appliance for the first time and whenever the gas cylinder is
refilled or whenever the gas hose and regulator have been disconnected from the gas cylinder or appliance.
In North America, the installation must conform with local codes or, in the absence of local codes, with
either the National Fuel Gas Code, ANSI Z223.1/NFPA 54, Natural Gas and Propane Installation Code,
CSA B149.1, or Propane Storage and Handling Code, B149.2.
4
Gas Cylinder Safety Information
Gas cylinders must be stored outdoors, out of reach of children and must not be stored in a building, garage or any other
enclosed area.
This appliance is designed to be used with a gas cylinder not exceeding 9KG (20lbs) capacity.
The Gas cylinder must be constructed and marked in accordance with specifications for LP Gas Cylinders.
The gas cylinder supply valve must be turned off when the appliance is not in use.
The gas cylinder used must incorporate a safety collar to protect the valve assembly.
The gas cylinder must always be kept and used in the upright position.
Do not store a spare LPG cylinder under or near this appliance
Never fill the cylinder beyond 80 percent full.
If the information above is not followed exactly, a fire causing death or serious injury may occur.
Important:
When disconnecting and removing the gas cylinder for the purpose of refilling, always observe the following procedure:
Ensure that all gas control valves on the appliance and the gas cylinder are turned off before disconnecting the gas line
from the cylinder.
Do not smoke or use a naked flame near the appliance or gas cylinder while disconnecting the gas line between the
appliance and gas cylinder.
Remove the gas cylinder from the enclosure before disconnecting the gas line from the appliance.
Tighten all connections before placing the gas cylinder back in its enclosure.
The Gas Leak Testing Procedure should be conducted every time the gas cylinder is refilled and reconnected to the appliance –
before using the appliance.
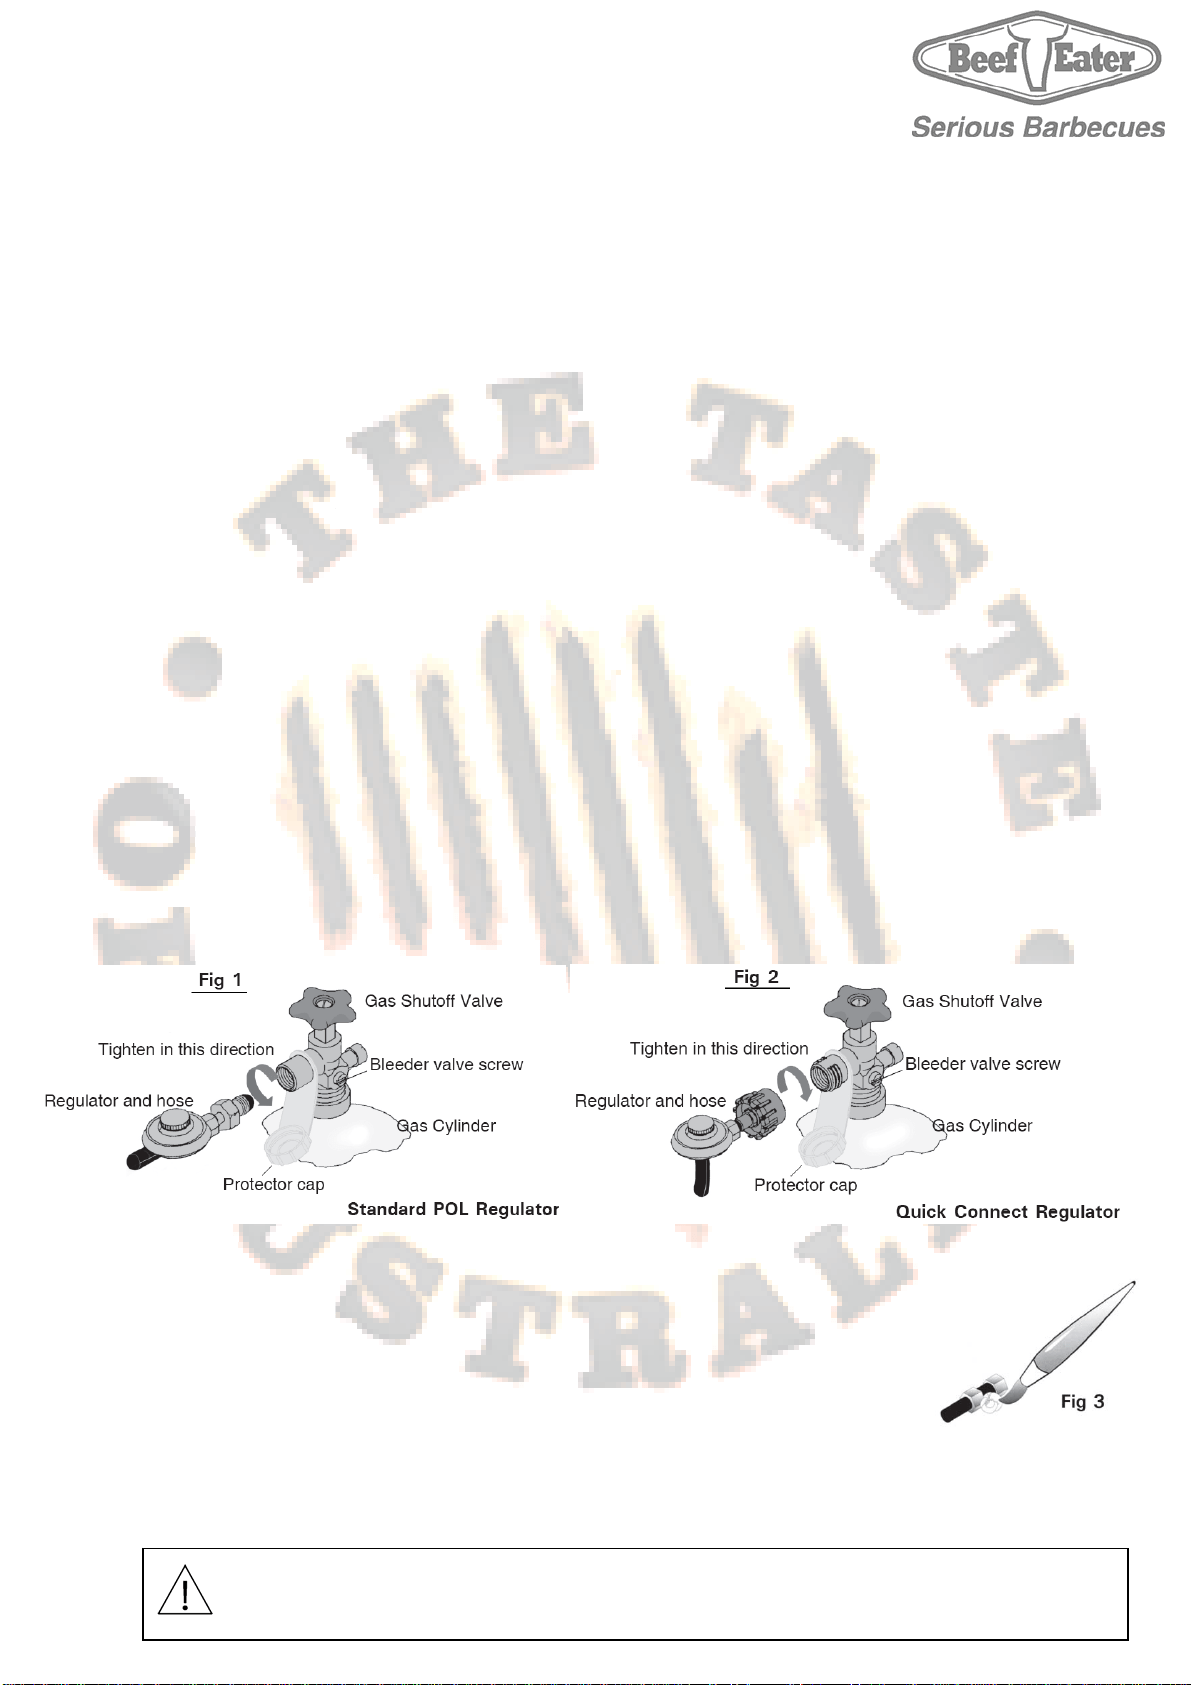
Regulator Connection
1. Check that all control knobs are in the ‘Off’ position.
2. Make sure the cylinder valve is off by turning the valve knob all the way clockwise.
3. Remove the protective cap from the cylinder if present.
4. Make connection as described in figures 1 and 2.
5. Leak-test the connection with a soapy water solution. (See Gas Leak Testing Procedure).
Hose and regulator replacement must be a genuine part specified for this appliance, and can be obtained at your nearest
BeefEater stockist.
Gas Leak Test Procedure
Use the following procedure to check for gas leaks.
Never use a naked flame to check for gas leaks.
1. In a small container, mix up a solution of water and detergent or soap. Mix the solution well.
2. Make sure that the gas supply valve on the gas cylinder is turned on.
3. Make sure that the gas control valves on the appliance are all turned off.
4. Using a brush or spray bottle apply the solution to the gas line and each join in the gas line. See Fig 3.
5. Bubbling of the solution will indicate that there is a leak present.
6. Re-tighten or re-seal any joints that are leaking.
7. If a leak persists then contact your distributor or the manufacturer for assistance.
When the BBQ is used without a trolley, ensure the gas cylinder is stable, and placed on a firm, level,
non-combustible surface, and that the hose is not under stress, kinked, twisted or in contact with any
hot surface.
When movin
g
the BBQ, disconnect hose from c
y
linder first.
5
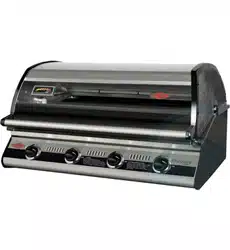
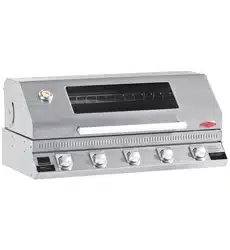
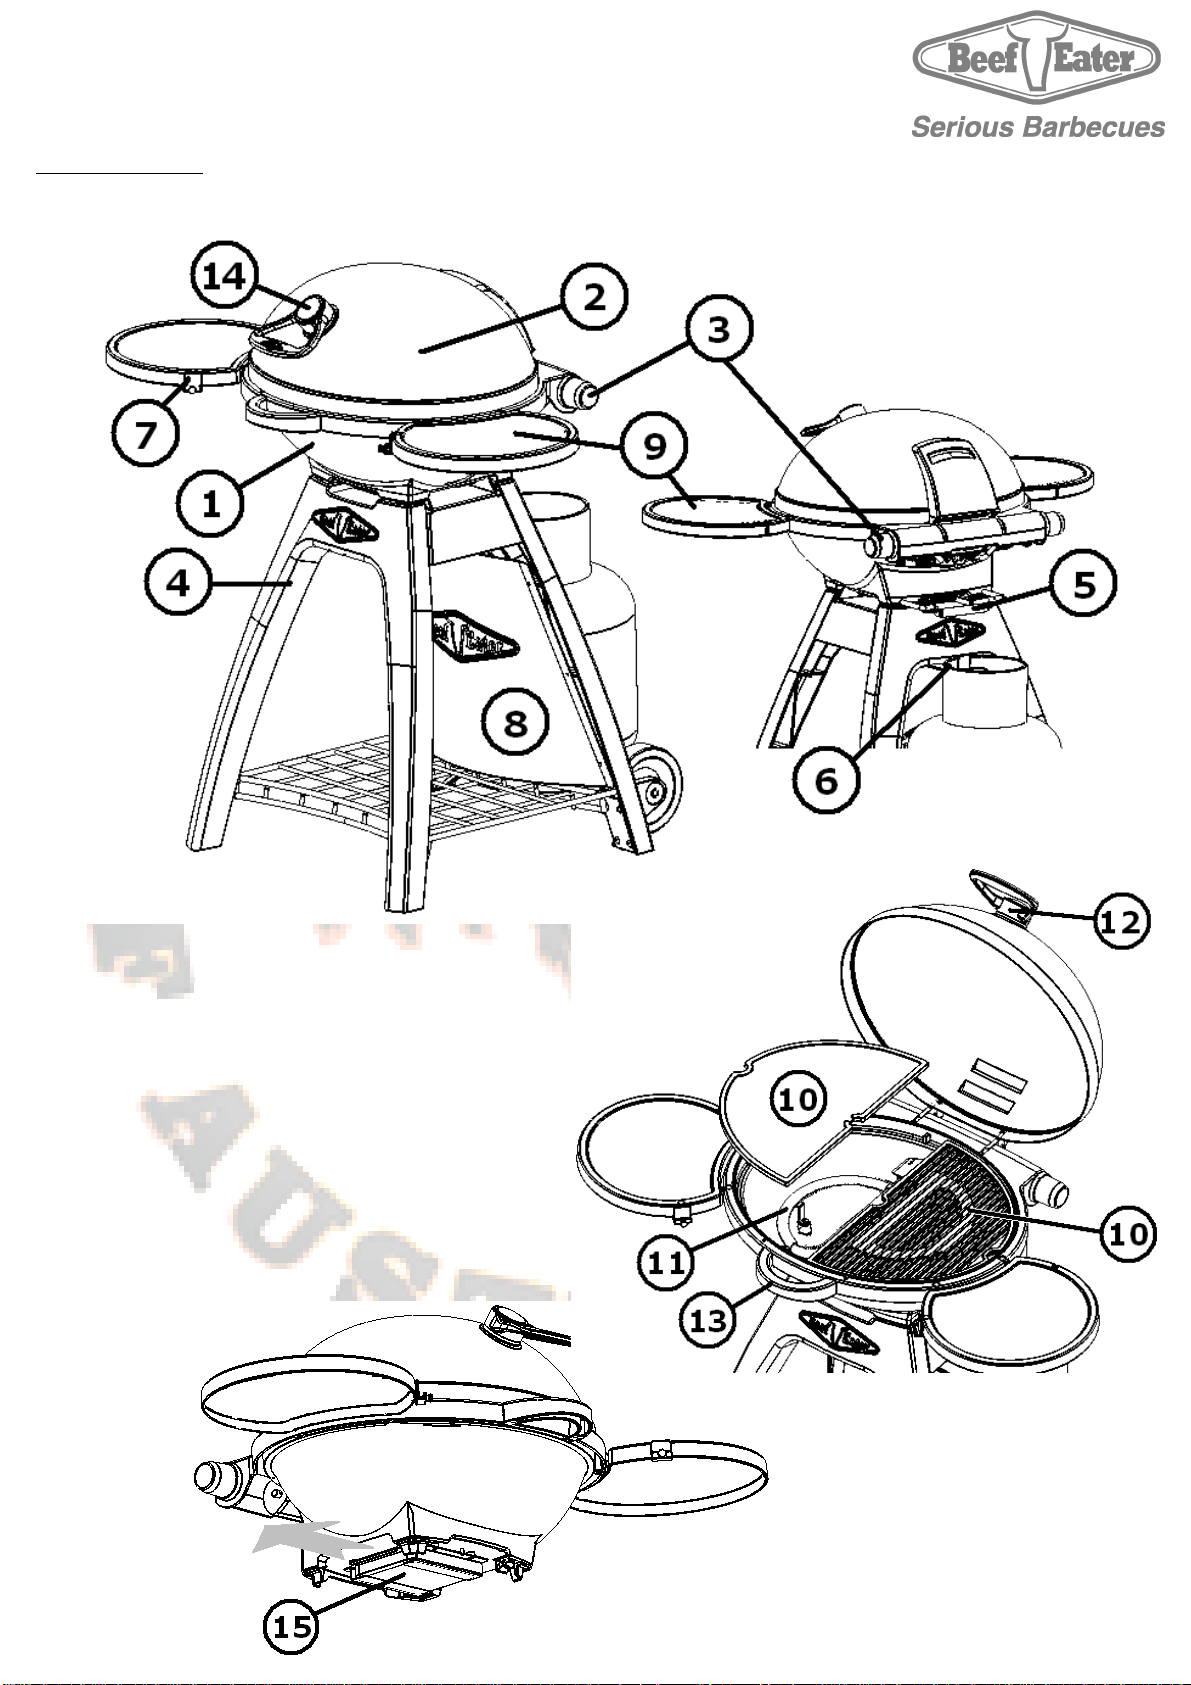
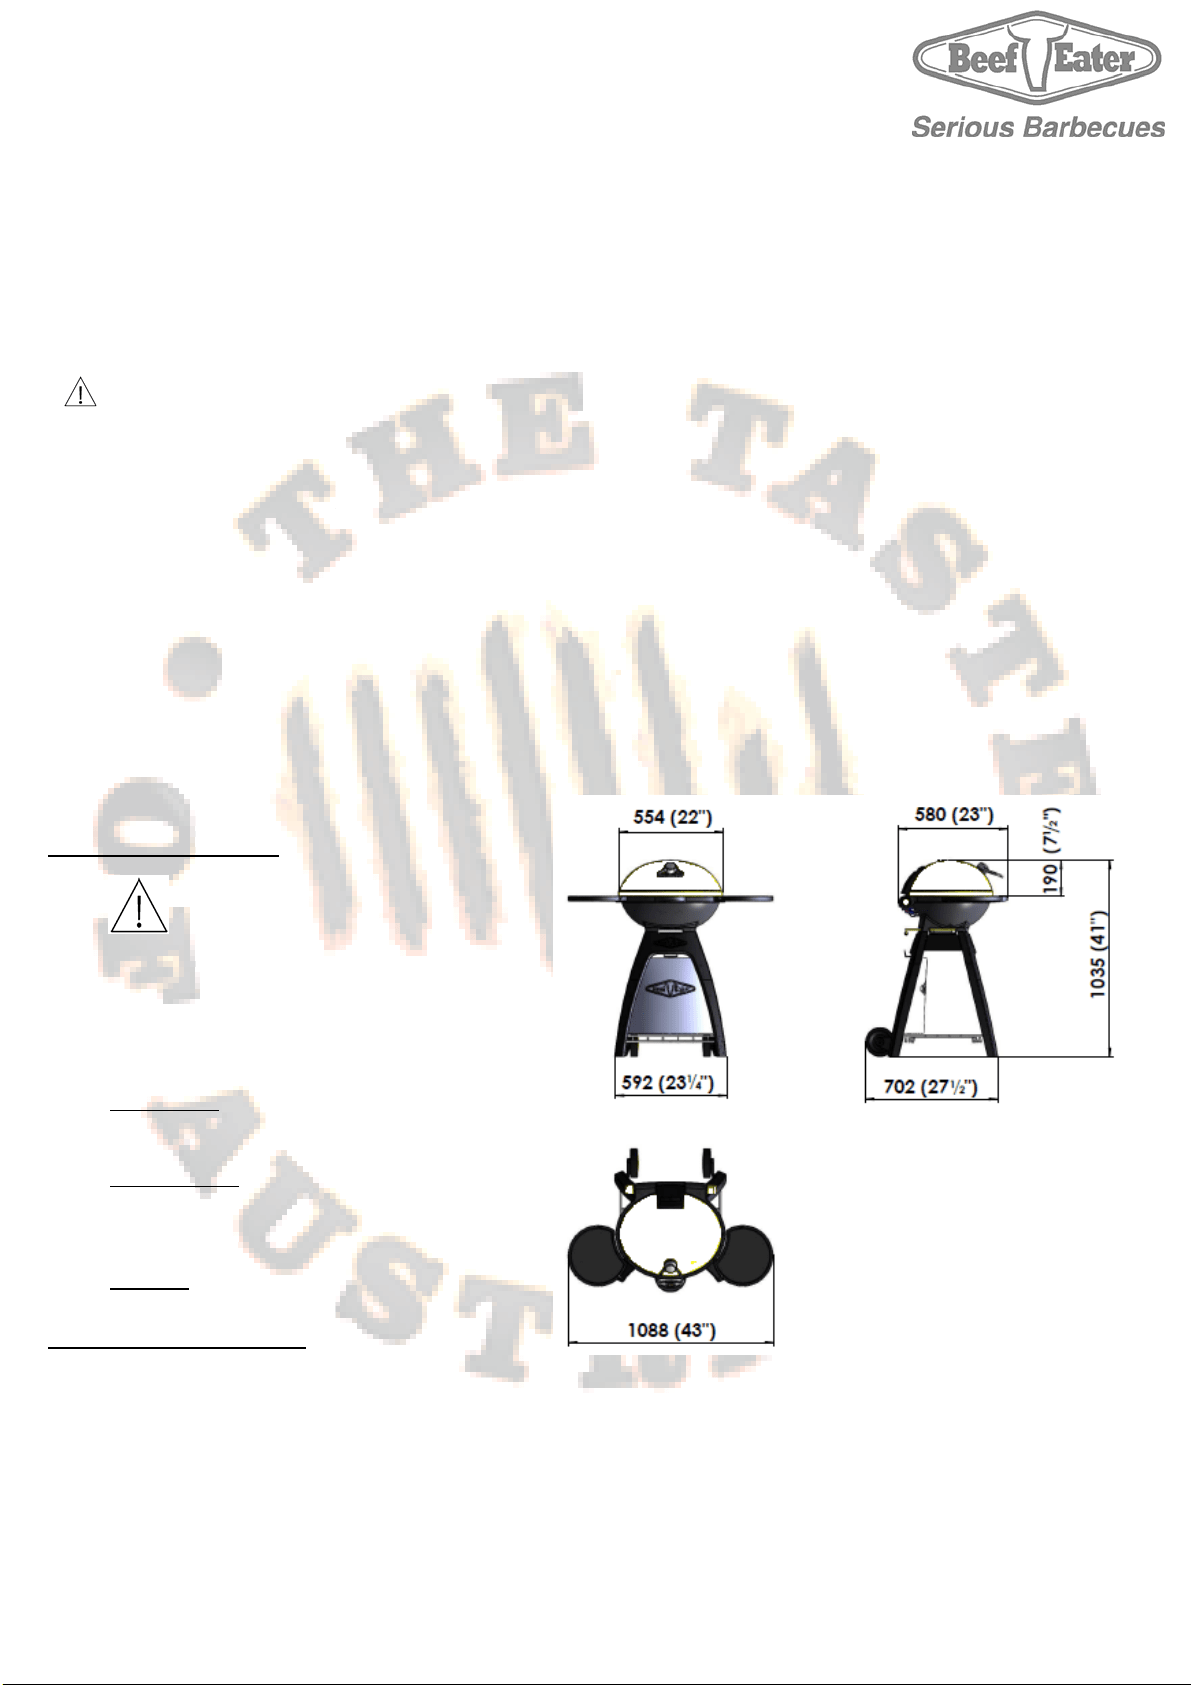
Know your BBQ:
1. BBQ Body
2. Hood
3. Operating Knobs R + L
4. Stand *
5. Locking U Bolt
6. Cylinder Hook
7. Utility Hook
8. Cylinder Shield*
9. Shelves
10. Grill and Plate
11. Burner
12. Hood Handle
13. Body handle
14. Thermometer **
15. Grease Tray
* Stand is sold separately
** May not be included with all models
6
Assembly Instructions
General
This barbecue comes ready to use, and requires very minimal preparation before it can be used.
It can be mounted onto a mobile Stand.
The Stand is packed and sold separately. Please refer to the Stand instruction booklet for assembly, and barbecue mounting.
Once the barbecue had been unpacked, please check the following:
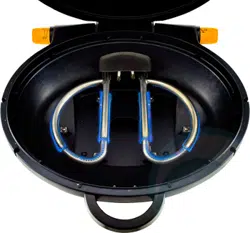
1. Hood is correctly engaged into the 2 slots in the barbecue’s body, and is free to open and close.
2. Both burners are in place correctly and secured by screws.
3. Place the Grill and Plate, in their position in the Barbecue’s body.
Note: both Grill and Plate are fully reversible, and can be used on either side of the Barbecue.
4. Place the grease tray in its brackets, and insert the Locking U bolt to place.
5. Make connection to the gas source. See page 4 for details
6. Conduct leak test.
NOTE: The locking U Bolt must be fully engaged at all times while using the Barbecue
Using Your Barbecue:
Before you light the Barbecue
Perform the following checks:
Make sure all connections are tight, and leak-tested. Gas regulators fitted with a hand-tightened wheel must be checked to
ensure they are secured.
Check that both control knobs are in the ‘Off’ position, and that gas supply is turned off.
Ensure that the Hood of the barbecue is open. If lid is closed there is a risk of gas accumulating inside, and creating a
dangerous situation.
The hose and regulator supplied with this barbecue must be used at all times whilst operating this barbecue. Inspect the hose
and regulator regularly for cracks or any sign of damage. If there is excessive abrasion or wear, replace only with a genuine
BeefEater regulator.
The bottom of the Barbecue body is clean and free of any grease or other food residue.
Grease Collecting Pan
The grease Collecting Pan is located on 2 brackets below the BBQ’s bottom, it can inserted
and removed from the left-hand-side, once the Locking U Bolt had been pulled out.
Make sure the pan is always in its place when operating the barbecue, to avoid grease
dripping directly into the Stand. Make sure the grease pan is emptied and cleaned regularly.
***
Ensure the grease is cleaned off the inside of the Barbecue before each use.
***
Lighting the Barbecue
Ensure the appliance is placed on a flat, level, non-combustible surface.
Ensure the regulator is connected to the LPG cylinder (See Regulator Connection page 4.), and the hose is not subject to any
twisting, and is not close to hot surfaces.
Verify all joints are spanner tight and check for leaks after turning on gas supply. See correct procedure on page 4.
Ensure both knobs are in the ‘Off’ position.
Ensure cooking plate and grill are in place.
Open Gas Cylinder valve.
Note:
The barbecue is fitted with a safety feature that prevents the burners from being accidentally turned on. You must push the knob
inwards to disengage the lock, and only then start turning it.

7
Light each burner by following this procedure
:
- Read all instructions before lighting.
- Open Hood before lighting.
- Push in knob and turn counter-clockwise towards ‘High’.
- If ignition does not occur, return to ‘Off’ and repeat after 5 minutes.
Check for a clear blue flame with just a tip of yellow.
Once the burner is alight, light other burner if required.
Excess yellow tipping means the combustion is not right, if that is observed, turn the Barbecue burners off, and refer to
troubleshooting at the end of this manual.
Both burners must always be kept on ‘low’ while the hood is closed.
If the burner does not light
Keep the control knob pushed, and return the knob in the clockwise direction to the ‘Off’ position. Wait 5 minutes, and repeat the
lighting procedure steps 1 – 4 above again.
If after a few attempts you still can not light the burners, contact your retailer before proceeding.
Manual Lighting
Press and turn the knob anti-clockwise to the ‘High’ position, then, using a long match, light the corresponding burner
immediately through the cooking grill.
Check for proper burner operation
Following operating instructions light each burner and check for a clear blue flame with just a
tip of yellow. Excess yellow tipping can be adjusted using the air entry adjustment shutter on
the side of the burner venturi.
If you are unable to achieve correct operation, consult your dealer.
Preparing the Plate and Grill:
Your barbecue has heavy duty porcelain enamelled Cast Iron plate and grill. Porcelain Enamel is a hard, non-rusting surface which
will ensure the long life of your cooking surface.
The plate and grill are ready to use, but it is recommended to wash them with warm soapy water and a soft cloth, and rinse before
use.
To ensure the longevity of the porcelain enamel surface on the Cast Iron plate and grill it is strongly advised to avoid
impact with other metal parts and sharp utensils.
To turn off a burner
Simply press in, and turn the knob clockwise to the ‘Off’ position.
After Use
It is a good idea to leave the barbecue on for about 10 minutes after you have finished cooking. This helps to burn away any
excess food residues and oil, and makes cleaning easier.
1. Be sure to turn off all control knobs and the gas supply.
2. Allow the barbecue to cool.
3. Clean the grease-tray and cooking surfaces. Clean any food spills from the inside of barbecue.
4. Lower the hood.
The gas cylinder supply valve must be turned off when the appliance is not in use.
Direct Cooking Method
Commonly used for traditional barbecuing. Place food over the lit grill section. Some flaring may occur, so care must be taken
while cooking. Check inside the roasting hood regularly. The direct cooking method is recommended for steaks, chops, sausages,
and hamburgers.
NOTE: The locking U Bolt must be fully engaged at all times while using the Barbecue
8
Indirect Cooking
Indirect cooking involves little or no heat directly underneath the food. Instead, the food is placed on the grill, with the burner
below the food turned Off or Low, and other burner is used. The hood is closed to trap heat and moisture. With this method, heat
circulates around the food, cooking by convection. By trapping the vapour inside your “outdoor oven”, the cooking vapour will fall
back on the food on all sides, not just from underneath. The food cooks more evenly, and stays moist in the process.
Indirect cooking is similar to using a conventional oven and is recommended for rotisserie cooking, roasts, poultry, casseroles,
vegetables and whole fish.
When cooking a roast, it is a good idea to use a roast holder and baking dish. Always use a baking dish with a depth greater than
35mm, as shallower trays may fill quickly and overflow, which may result in a grease fire.
Note: with the hood closed, two burners must only be operating on Low. One can be operated on Hi, only if the other is Off.
Controlling the Burners
The control knob can now be turned to the desired heat setting, Low, High or anywhere in between. The control knob does not need
to be pushed in while selecting the heat setting.
Clean the Grease-Tray
The Grease-Tray is located under the bottom of the Barbecue, and slides out to the left (looking from front of barbecue). The
Grease-Tray is secured in place by the Locking U Bolt, and in order to remove it, the Bolt needs to be taken out first.
Ensure the Grease-Tray is thoroughly cleaned before each use.
Storing Your Barbecue
When storing barbecue for extended periods, be certain all controls and cylinder valves are turned off. If storing the barbecue
indoors remove gas cylinder and store the cylinder in a ventilated area outdoors. Gas cylinders must be stored outdoors, out of
reach of children and must not be stored in a building, garage or any other enclosed area.
The barbecue should be covered when not in use. Eg with a polyester or vinyl barbecue cover.
Technical Information
Locating Your Barbecue:
Most importantly, this is an outdoor appliance. Ensure your barbecue is positioned safely away from anything that can catch fire.
Outdoor Use Only
: Under no circumstances is this barbecue to be used indoors. This includes garages or any other enclosed
area.
Clearance from Combustibles: Ensure your barbecue remains at a distance of at least 45 cm (18”) from any combustible material
such as wood, gyprock, paper and plants. Do not store combustible materials, gasoline or flammable liquids or vapours within 45
cm (18”) of the barbecue.
Adequate Ventilation
: Ensure there is adequate ventilation for both the barbecue and cylinder. This is required not only for
proper combustion, but also to prevent gas build up.
Note: Do not modify this appliance.
Any deviation from factory settings could result
in a safety hazard.
Barbecue manifold inlet thread:
3/8 SAE male flare fitting.
Gas Pressure
:
LPG – 2.75 Kpa; 11”WC
NG – 1.0 Kpa; 4” WC
Gas Nozzle size
:
LPG –
Ø 0.90mm (Au); Ø0.95mm (America)
NG – Ø 1.50mm;
Gas Input
: 10Mj/Bnr, 9500BTU/Bnr
9
Firm Level Surface
: Use your barbecue only on a firm level surface. This barbecue is not designed for recreational vehicles, and
shall not be installed on a boat or any marine craft.
Protection from Weather
: Keep the barbecue protected from adverse weather, including rain and high winds.
Polyvinyl covers are available that have been specially designed for this range of barbecues.
Maintenance Access
: When your barbecue is installed, you should be able to access the gas supply line including the gas piping
or hose, gas regulator, gas cylinder and any shut off valves. Allow clear access to the entire gas supply hose and regulator.
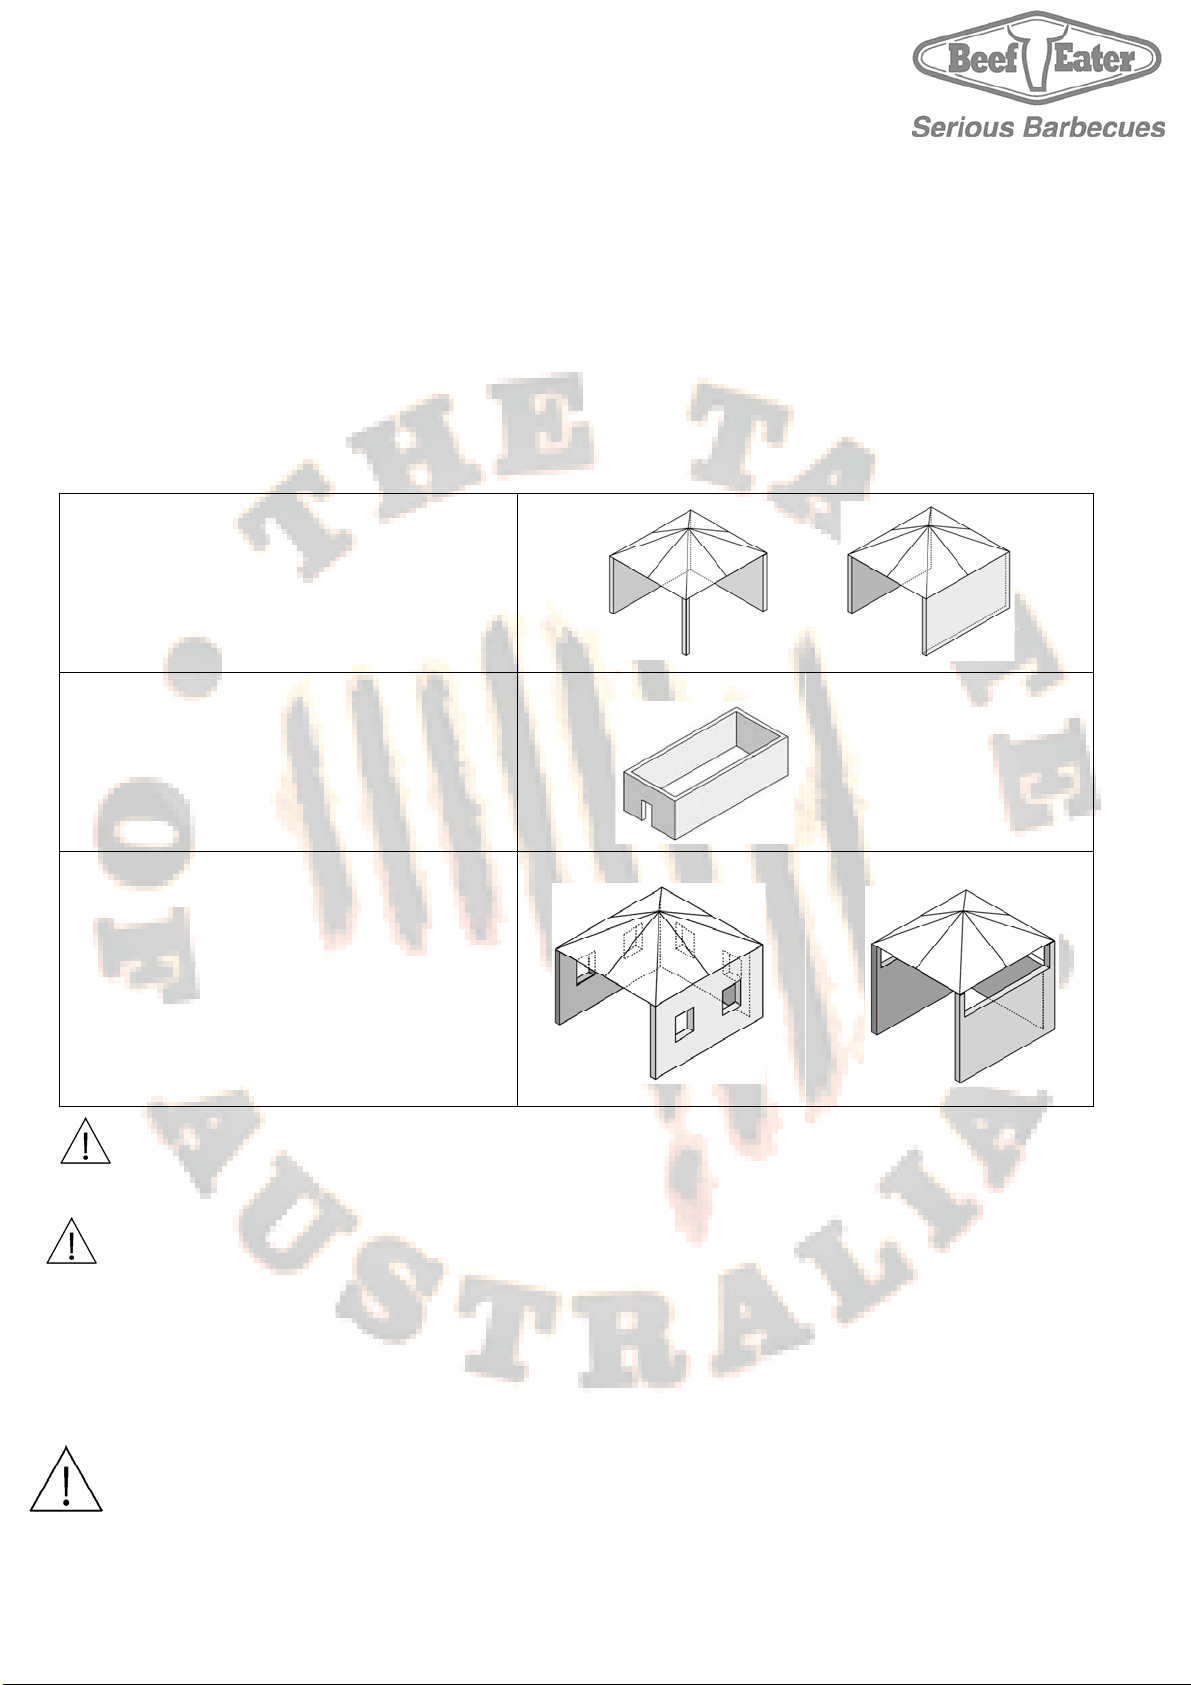
Partial Enclosures
: Many backyards have areas that are partially closed off, such as balconies and pergolas. In some cases, it is
hard to decide whether these partially enclosed areas should be classified as indoor areas. Here are some clear definitions of
such areas for your reference:
This appliance shall only be operated in an above ground, open air situation with natural ventilation, without stagnant areas,
where gas leakage and products of combustion are rapidly dispersed by wind and natural convection. Any enclosure in which the
appliance is used shall comply with one of the following:
NOTE: In North America operating a Barbecue under an Overhead Cover is not allowed.
Connect the Regulator to the gas Cylinder
Verify ‘Gas Type’ label and Data-Plate, attached to back of barbecue, are correct for the gas you are about to connect to.
The hose and regulator is connected to the BBQ and leak tested at factory. Do not disassemble unnecessarily.
1. Make sure burner valves are in the ‘Off’ position.
2. Screw regulator side to the cylinder, and hand-tighten. See more details on page 4.
Note:
If moving the BBQ from one place to another, never drag the cylinder behind. Disconnect the cylinder first, move, and
re-connect once reached the new location.
For storage and cylinder exchange, disconnect hose at the cylinder only, do not disconnect hose from the appliance.
Please refer to Stand instruction book for correct mounting of the Barbecue.
The locking U Bolt must always be fully engaged whether the Barbecue is in use, or not.
Within a partial enclosure that includes an overhead
cover and no more than two walls.
Any enclosure with walls on all sides, but at least
one permanent opening at ground level, and no
overhead cover.
Within a partial enclosure that includes an overhead
cover and more than two walls, the following shall
apply:
At least 25% of the total wall area is
completely open; and
At least 30% of the remaining wall area is
open and unrestricted.
In the case of balconies, at least 20% of the total of
the side, back and front wall areas shall be and
remain open and unrestricted.
10
Maintenance
1. Use only soft cloth or sponge to clean the surfaces of barbecue and then carefully dry.
2. Avoid leaving acidic or alkaline substances on the plate. It may cause discolouration and corrosion.
3. Keep the igniters probe clean. Wipe away any apparent water or dirt.
4. Clean the unit after each use to maintain the appearance and prolong the appliance’s life. Do not use corrosive materials
or harsh detergents to clean the BBQ.
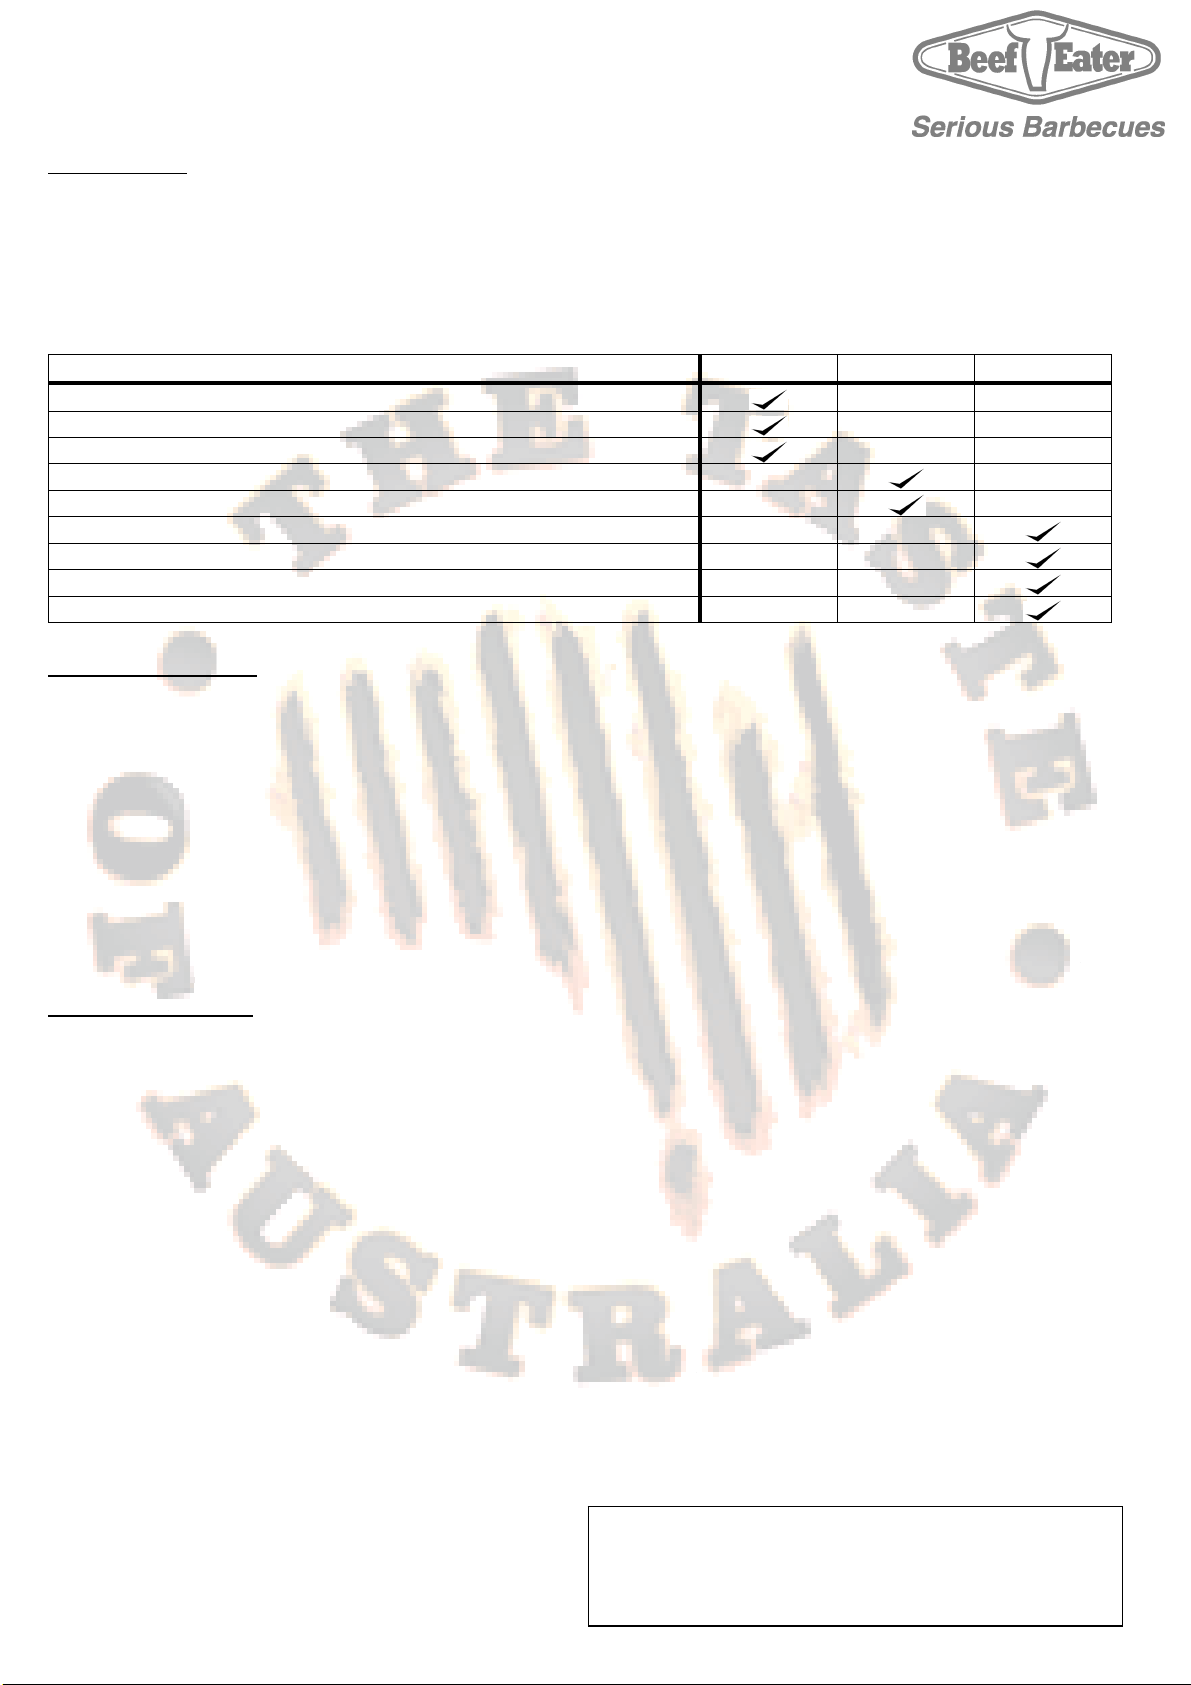
Service and Maintenance Schedules Each Use 6 Monthly 2 Yearly
Check gas supply hose(s) for cracks and leaks
Check gas regulator for leaks
Check that all gas fittings are tight
Inspect and clean ignition module and tube
Inspect and clean barbecue Burners
Inspect and clean gas injectors
Check gas control valve on cylinder
Inspect gas control valves
Inspect and proof all internal structure barbecue and Stand
Installation Options
Before proceeding, you need to establish the gas type which your barbecue will run on, and the style of installation you need.
Natural Gas or LPG/Propane.
Before beginning installation or assembly, check that the gas type which the barbecue is designed for is correct for the gas
available to you. In most countries the choices are Natural Gas or LPG/Ppropane. You will find the gas type label on the back side
of your barbecue. If your barbecue uses the incorrect gas type, or if you are unsure, consult your dealer before going any further.
Using the wrong type of gas for a barbecue is extremely dangerous.
Natural Gas Conversion: Newly purchased barbecues are made for LPG/Propane. A Natural Gas conversion kit is available to allow
your barbecue to run on Natural Gas. This kit includes all parts required for installation.
Service Assistance:
To assist you when contacting your after-sales service agent and to arrange for service, please have the barbecue details ready
when you call. You do not need to register your warranty. However, you must retain your receipt or proof of purchase. When
claiming warranty for this appliance you must provide a copy of your proof of purchase receipt. No claims for warranty will be
accepted without proof of purchase. For all parts and service, contact your nearest BeefEater dealer.
To assist with the required details, you may record them here:
Barbecue Model ___________________________________________________________________________________________________________________________________
Serial Number: ____________________________________________________________________________________________________________________________________
Date of Purchase _____________________________________________________________________________________________________________________________________
Place of Purchase: ______________________________________________________________________________________________________________________________________
Images in this manual are for illustrative purposes only.
Due to constant improvement, BeefEater advises that
changes to the design, material, specifications and product
configuration may occur at any time without notice.

11
Warranty:
Our goods come with guarantees that cannot be excluded under the Australian Consumer Law. You are entitled to a replacement
or refund for a major failure and for compensation for any other reasonably foreseeable loss or damage. You are also entitled to
have the goods repaired or replaced if the goods fail to be of acceptable quality and the failure does not amount to a major failure.
Should any part fail due to defective workmanship or faulty materials within the specified period from the date of purchase,
BeefEater or its distributor will repair or, (at distributors option), replace the defective part free of charge.
LP / Propane Gas Cylinder
The cylinder manufacturer is responsible for the materials, workmanship and performance of the gas cylinder. Contact your
dealer or the cylinder manufacturer in respect of all warranty claims or service.
Warranty Administration
In Australia, warranty is administered by Woodland Home Products.
To ensure speedy processing of your warranty service claim, ensure that you record all details about your appliance, including
serial number. Keep this information handy for future reference, and a copy of your purchase receipt. Note: serial number can be
found on the Data Plate, or the first page of this book.
NOT COVERED
Storage
Exposure of the barbecue appliance to the elements should be minimised. Once the unit has cooled and is cleaned, store the
barbecue under cover. Rain covers are an optional accessory that will ensure years of trouble free operation.
This warranty does not cover the purchaser or any other person for damage, malfunction or loss due to the following:
Lack of maintenance, abuse, neglect, misuse, accident or improper installation of this appliance.
Scratches, dents, corrosion or discolouring caused by heat, abrasive or chemical cleaners or chipping of porcelain or
painted parts.
Corrosion or damage caused by exposure to the elements, grease fires, insects, weather or hail.
Cleaning and normal wear and tear. Service calls of this nature are chargeable.
Rusting of steel plates and burners.
Commercial use of the barbecue.
Unauthorised repairs during the warranty period
Removal or re-installation costs.
Cracks and weathering of plastic parts caused by exposure to the elements or damage by weather, heat, insects,
chemicals or foods acids or juices.
Note: Barbecues must be covered when not in use.
Note: Rust should be removed by a scrub pad and the surface coated with cooking oil. Cooking surfaces must be covered when not
in use.
Conditions of Warranty
1. The appliance is delivered to the BeefEater distributor’s service department or
authorised service agent and freight charges both ways are paid by the owner. No
liability is accepted for loss or damage during transit.
2. The appliance is operated and maintained in accordance with the instructions
supplied.
3. Repairs or service must be carried out by an authorised person. Installation must
conform to the applicable Gas, Electrical and Building standards laid down by the
local codes for your state or region.
4. No alterations or repairs have been carried out without obtaining the distributors
prior consent. Such repair or any replacement does not extend the warranty
period.
5. Proof of purchase together with this warranty card must be provided to verify
purchase date and establish the warranty period. Only the original purchaser is
covered under this warranty.
6. The warranty period is calculated from the date of purchase only.
7. Where this warranty is inconsistent with any state laws, the statutory rights of
the purchaser shall prevail.
8. Parts installed from other manufacturers’ products will void this warranty.
Terms of Warranty (Years)
BBQ
Barbecue Frame
5
S/S Burners
2
Cast Iron Cooktops
2
Valves
2
Ignition System
2
All other parts
2
Hood
Hood
3
Cast Alloy Parts
2
All other parts
2
Stand
All Stand parts
2

12
Troubleshooting
Condition Possible Cause Solution
Flame goes out while in use
Empty Gas cylinder. Replace cylinder.
Air mixed in hoses. Re-ignite and allow operating for a short while, till clears out
Blockage Seek professional assistance.
Ignition failure
gas cylinder valve close Turn off knob button, then open the cylinder valve
Air mixed in the hoses Re-ignite and allow operating for a short while, till clears out.
Rubber hose wrapped,
deformed or pinched
Release hose, ensure not damaged or leaking
Spark Escaping
Visually ensure the spark is present at end of tube. If not, seek professional
assistance.
No Pilot Flame Check that ignition pilot tube is clear. If so, seek professional assistance.
Foul smell of gas
Damage to hose Turn cylinder valve off, replace hose.
Leakage
Leak-test, and tighten where required. If leakage can’t be rectified, cease
using appliance, and seek professional assistance.
Burner went off Shut off valves, wait for 5 minutes and reignite
Incorrect combustion Seek professional assistance
Flame appear to separate off the
burner or flame burns with noise
blockage of some burner
Ports
Clean the burner thoroughly.
If problem persists, Seek professional assistance
Incorrect gas pressure seek professional assistance
Yellow Tipping in Flame
Air/Gas mixture in burner
incorrect
Try to adjust air opening at burner to remove yellow. If not changing, seek
professional assistance.
Spare Parts:
index
Part No Description
1 B01 0011 Body
2 B03 0011 Hood
3 B01 0012 Hood Hinge
4 B06 0012 Hood Handle spacer
5 B04 0011 Hood handle cap
6 B09 0011 Thermometer (optional)
7 B01 0013 Handle Hood
8 B06 0013 handle Badge
9 B06 0014 Side shelf
10 B01 0016 Hook
11 B06 0015 Body handle
12 B02 0017 Grease tray
13 B09 0020 Body leg
14 B04 0012 LHS grease tray bracket
15 B04 0013 RHS grease tray bracket
16 B06 0016 Knob (R or L)
17 B09 0012 Spring (L+R)
18 B02 0012 Burner shield
19 B02 0011 Hinge rod
21 B01 0015 Hinge bracket
22 B07 0012 Plate
23 B07 0011 Grill
24 B02 0013 Burner LHS (view from front)
25 B02 0014 Burner RHS (view from front)
26 B02 0015 Locking U Bolt
27 B02 0016 Locking clip
B09 0017 Valve LHS (view from front)
B09 0027 Valve RHS (view from front)
B09 0019 Al tube LHS (view from front)
B09 0028 Al tube RHS (view from front)
B09 0016 Manifold LHS (view from front)
B09 0029 Manifold RHS (view from front)
Ignition Module RHS
Ignition Module LHS
B09 0030 Cross gas flexible tube
B09 0031 Injector holder
040262 Injector 0.90 LPG
040263 Injector 1.50 NG
B09 0015 Hose and regulator
B09 0025 Rain cover ( long )
B09 0026 Rain cover ( short )
B05 0002 Instruction BBQ
Woodland Home Products
3-5 Birmingham Av, Chester Hill, NSW,
Australia, 2162
Phone: 1800 356 660
Facsimile: 02 9724 8899
E-mail: [email protected]
Website: www.beefeaterbbq.com
USA Toll Free:
1866 550 2333
Bugg_Ins_Au_V0.2