Record Your Model & Serial Numbers .......................................... Cover
Important Safety Instructions ............................................................ 2-4
Control Pad Functions ........................................................................... 5
Setting the Clock & Minute Timer ........................................................ 6
Setting Surface Controls ....................................................................... 7
Before Setting Oven and Warm & Ready Drawer Controls ................ 8
Setting Oven Controls ...................................................................... 9-11
Setting Warm & Ready Drawer Controls (some models) .................. 12
Oven Cleaning .................................................................................. 13-14
General Cleaning ............................................................................ 15-17
Changing Cooktop and/or Oven Lights (some models) .................... I8
Adjusting Oven Temperature .............................................................. 18
Avoid Service Checklist .................................................................. 19-20
Warranty .............................................................................................. 21
Sears Service ........................................................................................ 22
Read all instructions before using
this appliance This book contains
valuable information about:
• Operation
o Care
• Service
Keep it in a safe place.
Read and Save These Instructions
Record Your Model and Serial Numbers
The model and serial numbers of your range are located under the
lift-up cooktop Record and retain these numbers
Model Number:
Serial Number:
Date of Purchase:
Sears, Roebuck and Co., Hoffman Estates, IL 60179 U.S.A.
P/N 316000931 (9805)
IMPORTANT SAFETY INSTRUCTIONS
Read all instructions before using this
appliance. Save these instructions for future
reference.
This guide contains irnportant safety symbols and
instructions. Please pay special attention to these symbols
and follow all instructions given. Here is a brief explanation
of the use of these symbols
_This symbol wilt help alert you to situations
that may cause serious bodily harm, death or property
damage.
_This symbol wilt help alert you to situations
that may cause bodily injury or property damage.
• Remove all tape and packaging wrap before using
the range. Destroy the carton and plastic bags after
unpacking the range Never allow children to play with
packaging material
- Proper Installation--Be sure your appliance is
properly installed and grounded by a qualified
technician in accordance with the National Electrical
Code ANSI/NFPA No. 70--latest edition and local
code requirements. Install only per installation
instructions provided in the literature package for this
range
Ask your dealer to recommend a qualified technician and
an authorized repair service Know how to disconnect the
electrical power to the range at the circuit breaker or fuse
box in case of an emergency.
= User Set€icing--Do not repair' or replace any part of
the appliance unless specifically recommended in the
manuals. All other servicing should be done only by a
qualified technician to reduce the risk of personal injury
and damage to the range
° Never modify or alter the construction of a range by
removing leveling legs, panels, wire covers, anti-tip
brackets/screws, or any other part of the product.
_Stepping, leaning or sitting on the doors
or drawers of this range can result in serious injuries
and may also cause damage to the range= Do not allow
children to climb or play around the range The weight of a
child on an open door may cause the range to tip, resulting
in serious burns or other injury,
Do not use the oven for storage.
Do not store items of interest to children
in the cabinets above or on the backguard of a range.
Children climbing on the range to reach items could be
seriously injured
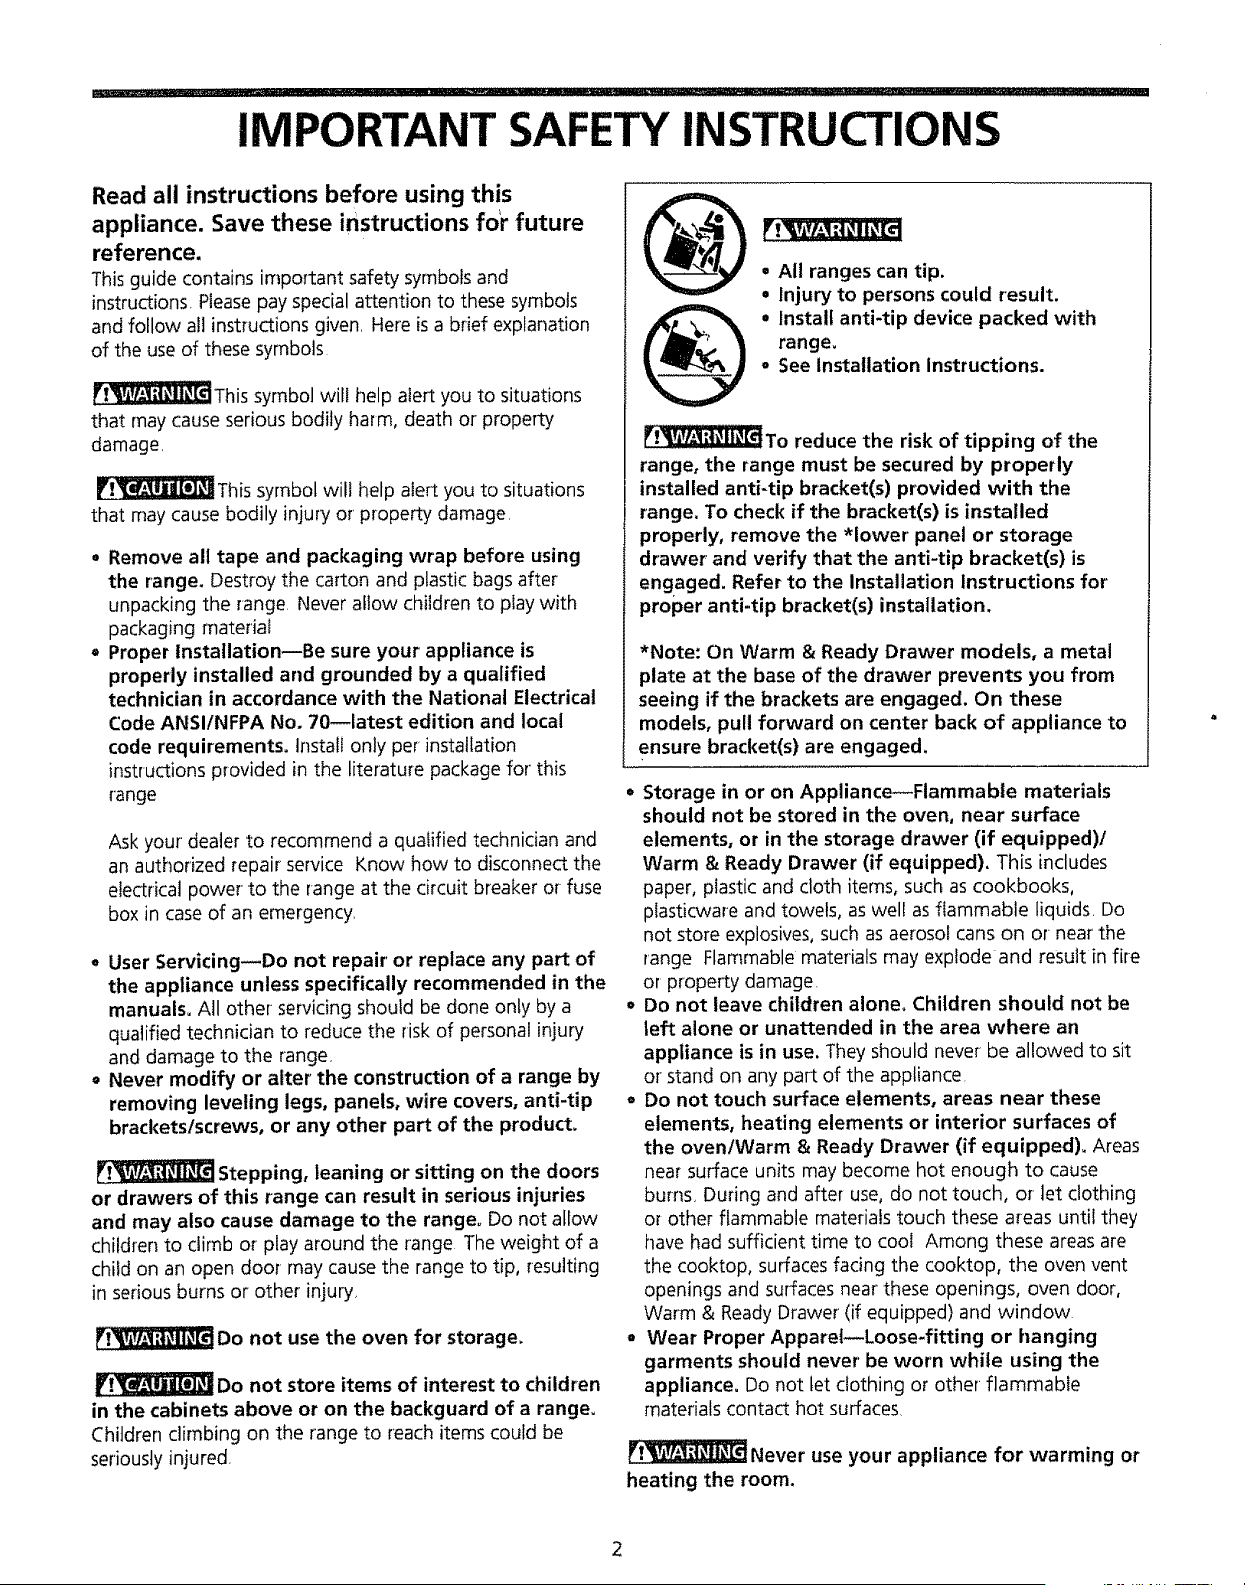
• All ranges can tip.
• Injury to persons could result.
• Install anti-tip device packed with
range.
o See Installation Instructions.
_To reduce the risk of tipping of the
range, the range must be secured by properly
installed anti-tip bracket(s) provided with the
range, To check if the bracket(s) is installed
properly, remove the *lower panel or storage
drawer and verify that the anti-tip bracket(s) is
engaged. Refer to the Installation Instructions for
proper anti-tip bracket(s) installation.
*Note: On Warm & Ready Drawer models, a metal
plate at the base of the drawer prevents you from
seeing if the brackets are engaged. On these
models, pull forward on center back of appliance to
ensure bracket(s) are engaged.
° Storage in or on Appliance--Flammable materials
should not be stored in the oven. near surface
elements, or in the storage drawer (if equipped)/
Warm & Ready Drawer (if equipped), This includes
paper, plastic and cloth items, such as cookbooks,
ptasticware and towels, as well as flammable liquids, Do
not store explosives, such as aerosol cans on or near' the
range Flammable materials may explode and result in fire
or property damage.
o Do not leave children alone° Children should not be
left alone or unattended in the area where an
appliance is in use. They should never be allowed to sit
or stand on any part of the appliance.
• Do not touch surface elements, areas near these
elements, heating elements or interior surfaces of
the oven/Warm & Ready Drawer (if equipped), Areas
near surface units may become hot enough to cause
burns_ During and after use, do not touch, or let clothing
or other flammable materials touch these areas until they
have had sufficient time to cool Among these areas are
the cooktop, surfaces facing the cooktop, the oven vent
openings and surfaces near these openings, oven door,
Warm & Ready Drawer (if equipped) and window
° Wear Proper Apparel--Loose-fitting or hanging
garments should never' be worn while using the
appliance, Do not let clothing or other flammable
materials contact hot surfaces,
_Never use your appliance for warming or
heating the room.
PORTANT SAFETY iNSTRUCTIONS
o Do Not Use Water or Flour on Grease Fires--Smother
the fire with a pan lid, or use baking soda, a dry
chemical or foam-type extinguisher.
° When heating fat or grease, watch it closely. Fat or
grease may catch fire if allowed to become too hot
o Use Only Dry Potholders--Moist or damp potholders
on hot surfaces may result in burns from steam. Do
not let the pothotders touch the surface units Do not use
a towel or other bulky cloth instead of a potholder
° Do Not Heat Unopened Food Containers--Build-up
of pressure may cause the container to burst and
result in injury.
o Remove the oven door from any unused range if it is
to be stored or discarded.
Cold temperatures can damage the
electronic control. When using the appliance for the first
time, or when the appliance has not been used for an
extended period of time, be certain the unit has been in
temperatures above 32°F for at least 3 hours before turning
on the power to the appliance
° IMPORTANT--Do not attempt to operate the range
during a power failure° tf the power fails, always
turn off the range, If the range is not turned off and the
power resumes, surface units wil! begin to operate again,
Food left unattended could catch fire or spoil Once the
power resumes, reset the clock and oven functions
Important Instructions for Using Your
Cooktop
= Know which knob controls each surface heating
element,
= Use proper pan size--This appliance is equipped with
one or more surface elements of different sizes Select
utensils having ftat bottoms large enough to cover the
surface element The use of undersized utensils will
expose a portion of the heating element to direct contact
and may result in ignition of clothing Proper relationship
of utensil to element will also improve efficiency
- Utensil Handles Should Be Turned Inward and
Should Not Extend Over Adjacent Surface
Eiements_To reduce the risk of burns, ignition of
flammable materials, and spillage due to unintentional
contact with the utensil, the handle of the utensil should
be positioned so that it is turned inward, and does not
extend over adjacent surface units
= Never Leave Surface Elements Unattended at High
Settings--Boilovers cause smoking and greasy spillovers
that may ignite, or a pan that has boiled dry may melt
- Make sure drip pans or drip bowls are in place--
Absence of these pans or bowls during cooking may
subject wiring or components underneath to damage
o Protective Liners--Do not use aluminum foil to line
surface unit reflector pans, drip bowls, oven bottom or
any other part of the range Only use aluminum foil as
recommended for baking if used as a cover placed on the
food, Any other use of protective liners or aluminum foil
may result in a risk of electric shock or fire
= Glazed Cooking Utensils--Only certain types of glass,
glass/ceramic, ceramic, earthenware, or other glazed
utensils are suitable for rangetop service without breaking
due to the sudden change in temperature, Check the
manufacturer's recommendations for rangetop use
= Do Not Use Decorative Surface Element Covers If an
etement is accidentally turned on, the decorative cover
will become hot and possibly melt You will not be able to
see that the surface unit is on, Burns will occur if the hot
covers are touched Damage may also be done to the
cooktop
IMPORTANT SAFETY INSTRUCTIONS
Important instructions for Using Your Oven/
Warm & Ready Drawer (some models)
• Use Care When Opening the Oven Door or
Warm & Ready Drawer (if equipped)--Stand to the
side of the range when opening the door of a hot oven/
Warm & Ready Drawer. Let hot air or steam escape before
you remove or replace food in the ovenANarm & Ready
Drawer (some models),
• Keep Oven Vent Ducts Unobstructed. The oven vents
through the left rear surface element, Touching the
surfaces in this area when the oven is operating may
cause severe burns Also, do not place plastic or heat _
sensitive items on or near the oven vent These items
could melt or ignite.
- Placement of Oven/Warm & Ready Drawer Racks.
Always place racks in desired location while oven is cool
if a rack must be moved while the oven is hot, use
extreme caution Use potholders and grasp the rack with
both hands to reposition Do not let potholders contact
the hot oven element or interior of the oven/Warm &
Ready Drawer Remove all utensils from the rack before
removing rack
o Do not use the broiler pan without its insert The
broiler pan and grid allow dripping fat to drain and be
kept away from the high heat of the broiler
° Do not cover the broiler grid or Warm & Ready
Drawer with aluminum foil Exposed fat and grease
could ignite
• Do not touch a hot light bulb (some models) with a
damp cloth. Doing so could cause the bulb to break
Disconnect the range or turn off the power to the range
before removing and replacing the light bulb,
Important Instructions for Cleaning Your
Range
e Clean the range regularly to keep all parts free of
grease that could catch fire= Pay particular attention to
the area underneath each surface element,, Exhaust fan
ventilation hoods and grease filters should be kept clean,
Do not allow grease to accumulate Greasy deposits in the
fan could catch fire Refer to the hood manufacturer's
instructions for cleaning
• Kitchen cleaners/aerosols--Always follow the
manufacturer's recommended directions for' use Beaware
that excessresidue from cleaners and aerosols may ignite
causing damage and/or injury
Self-Cleaning Ovens:
• Clean in the self-cleaning cycle only the parts of the
oven listed in this owner's guide. Before self-cleaning
the oven, remove the broiler pan and any utensils stored
in the oven
° Do not clean the oven door gasket. The door gasket is
essential for a good seal Care should be taken not to rub,
damage or move the gasket
• Do not use oven cleaners. No oven cleaner or oven liner
protective coating of any kind should be used in or
around any part of the oven
SAVE TH
INSTRUCTIONS
4
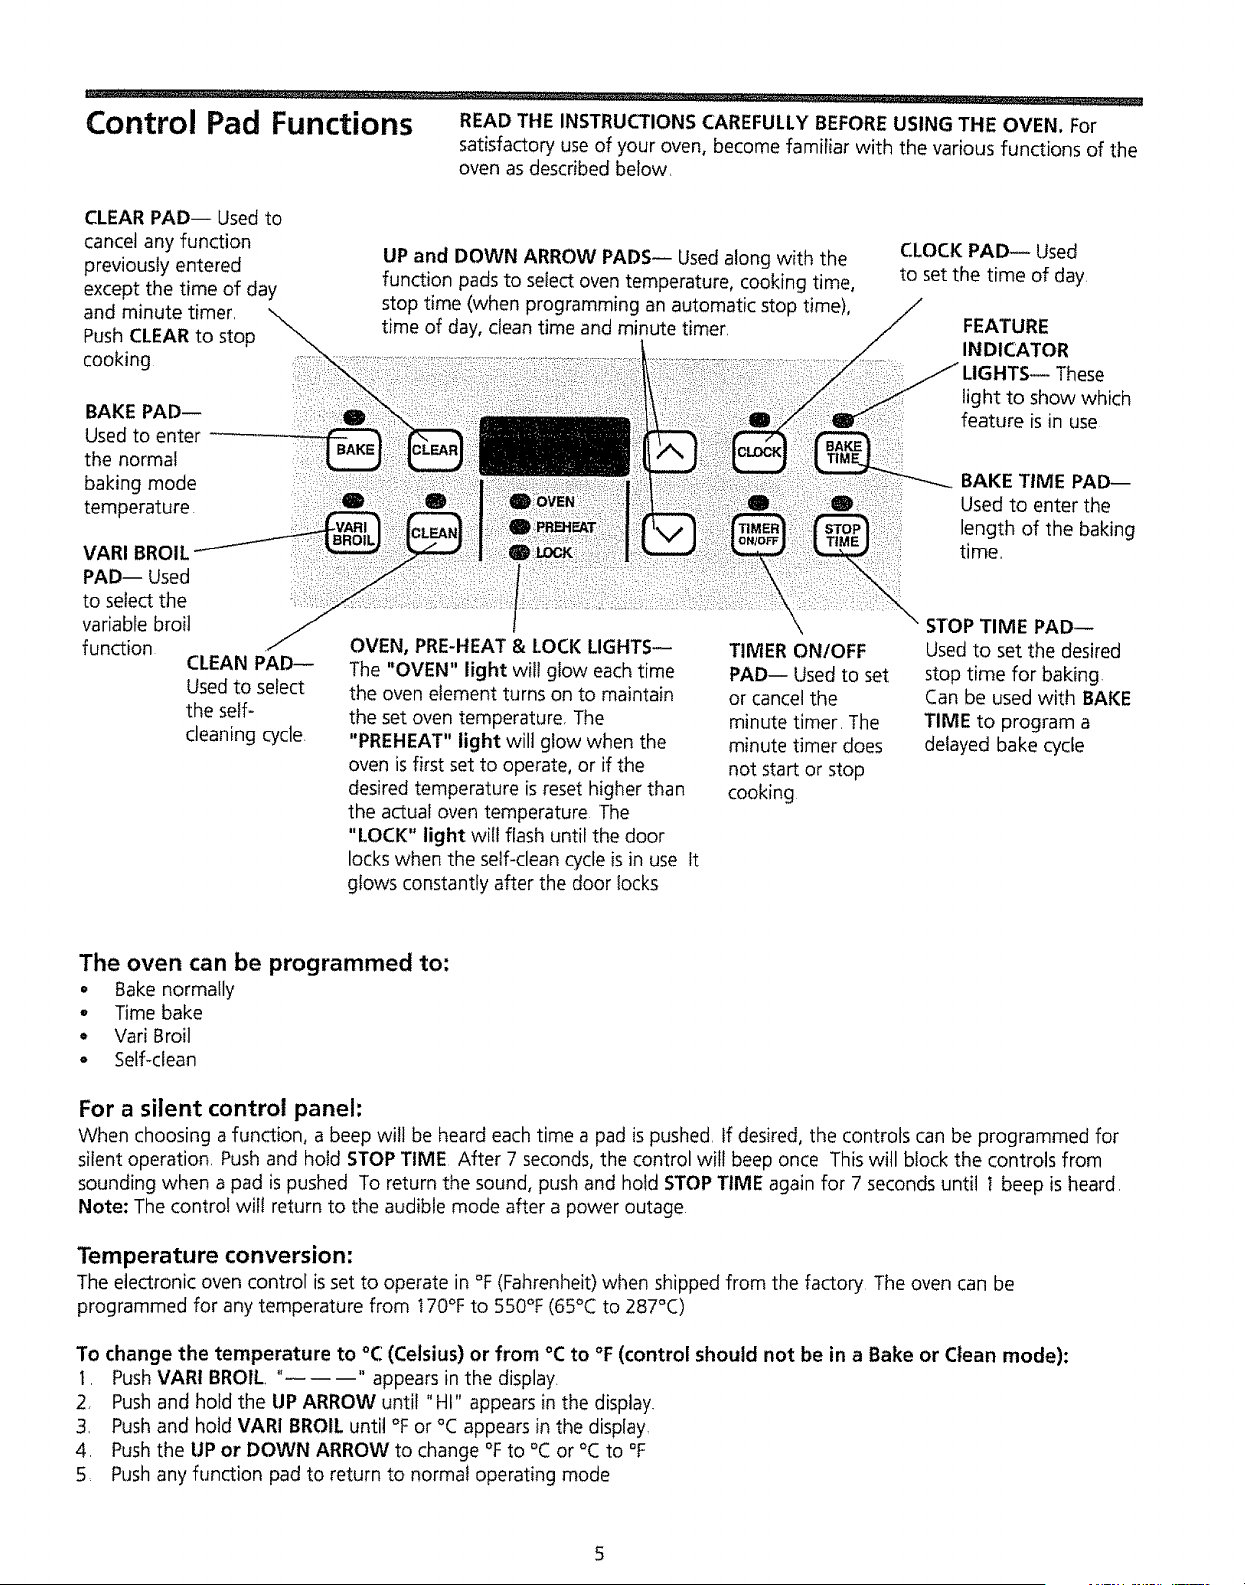
Control
Pad Functions READ THE INSTRUCTIONS CAREFULLY BEFORE USING THE OVEN. For
satisfactory use of your oven, become familiar with the various functions of the
oven as described below,
CLEAR PAD-- Used to
cancel any function
previously entered
except the time of day
and minute timer,
Push CLEAR to stop
cooking
BAKE PAD-- ::;::":
Used to enter
the normal ,:_:,:_
baking mode
temperature.
VARI BROIL
PAD-- Used
to select the _::=
variable broil
function
CLEAN PAD--
Used to select
the self-
cleaning cycle.
UP and DOWN ARROW PADS-- Used along with the
function pads to select oven temperature, cooking time,
stop time (when programming an automatic stop time),
time of day, clean time and minute timer_
CLOCK PAD-- Used
to set the time of day.
FEATURE
INDICATOR
light to show which
feature is in use
BAKE TIME PAD--
Used to enter the
length of the baking
time,,
OVEN, PRE-HEAT & LOCK LIGHTS_
The "OVEN" light wilt glow each time
the oven element turns on to maintain
the set oven temperature, The
"PREHEAT" light wilt glow when the
oven is first set to operate, or if the
desired temperature is reset higher than
the actual oven temperature The
"LOCK" light will flash until the door
locks when the self-clean cycle is in use It
glows constantly after the door locks
TIMER ON/OFF
PAD-- Used to set
or cancel the
minute timer. The
minute timer does
not start or stop
cooking
STOP TIME PAD_
Used to set the desired
stop time for baking.
Can be used with BAKE
TIME to program a
delayed bake cycle
The oven can be programmed to:
Bake normally
o Time bake
o Vari Broil
° Self-clean
For a silent control panel:
When choosing a function, a beep will be heard each time a pad is pushed. If desired, the controls can be programmed for
silent operation. Push and hold STOP TIME After 7 seconds, the control will beep once This will block the controls from
sounding when a pad is pushed To return the sound, push and hold STOP TIME again for 7 seconds until l beep is heard.
Note: The control wif! return to the audible mode after a power outage
Temperature conversion:
The electronic oven control is set to operate in °F (Fahrenheit) when shipped from the factory The oven can be
programmed for any temperature from 170°Fto 550°F (65°C to 287°C)
To change the temperature to °C (Celsius) or from °C to °F (control should not be in a Bake or Clean mode):
t. Push VAR1 BROIL "_----" appears in the display.
2, Push and hold the UP ARROW until "HI" appears in the display.
3, Push and hold VARI BROIL until °F or °C appears in the display
4. Push the UP or DOWN ARROW to change °F to °C or °C to °F
5, Push any function pad to return to normal operating mode
5
...................................... , ,,, ,,,,,,,,
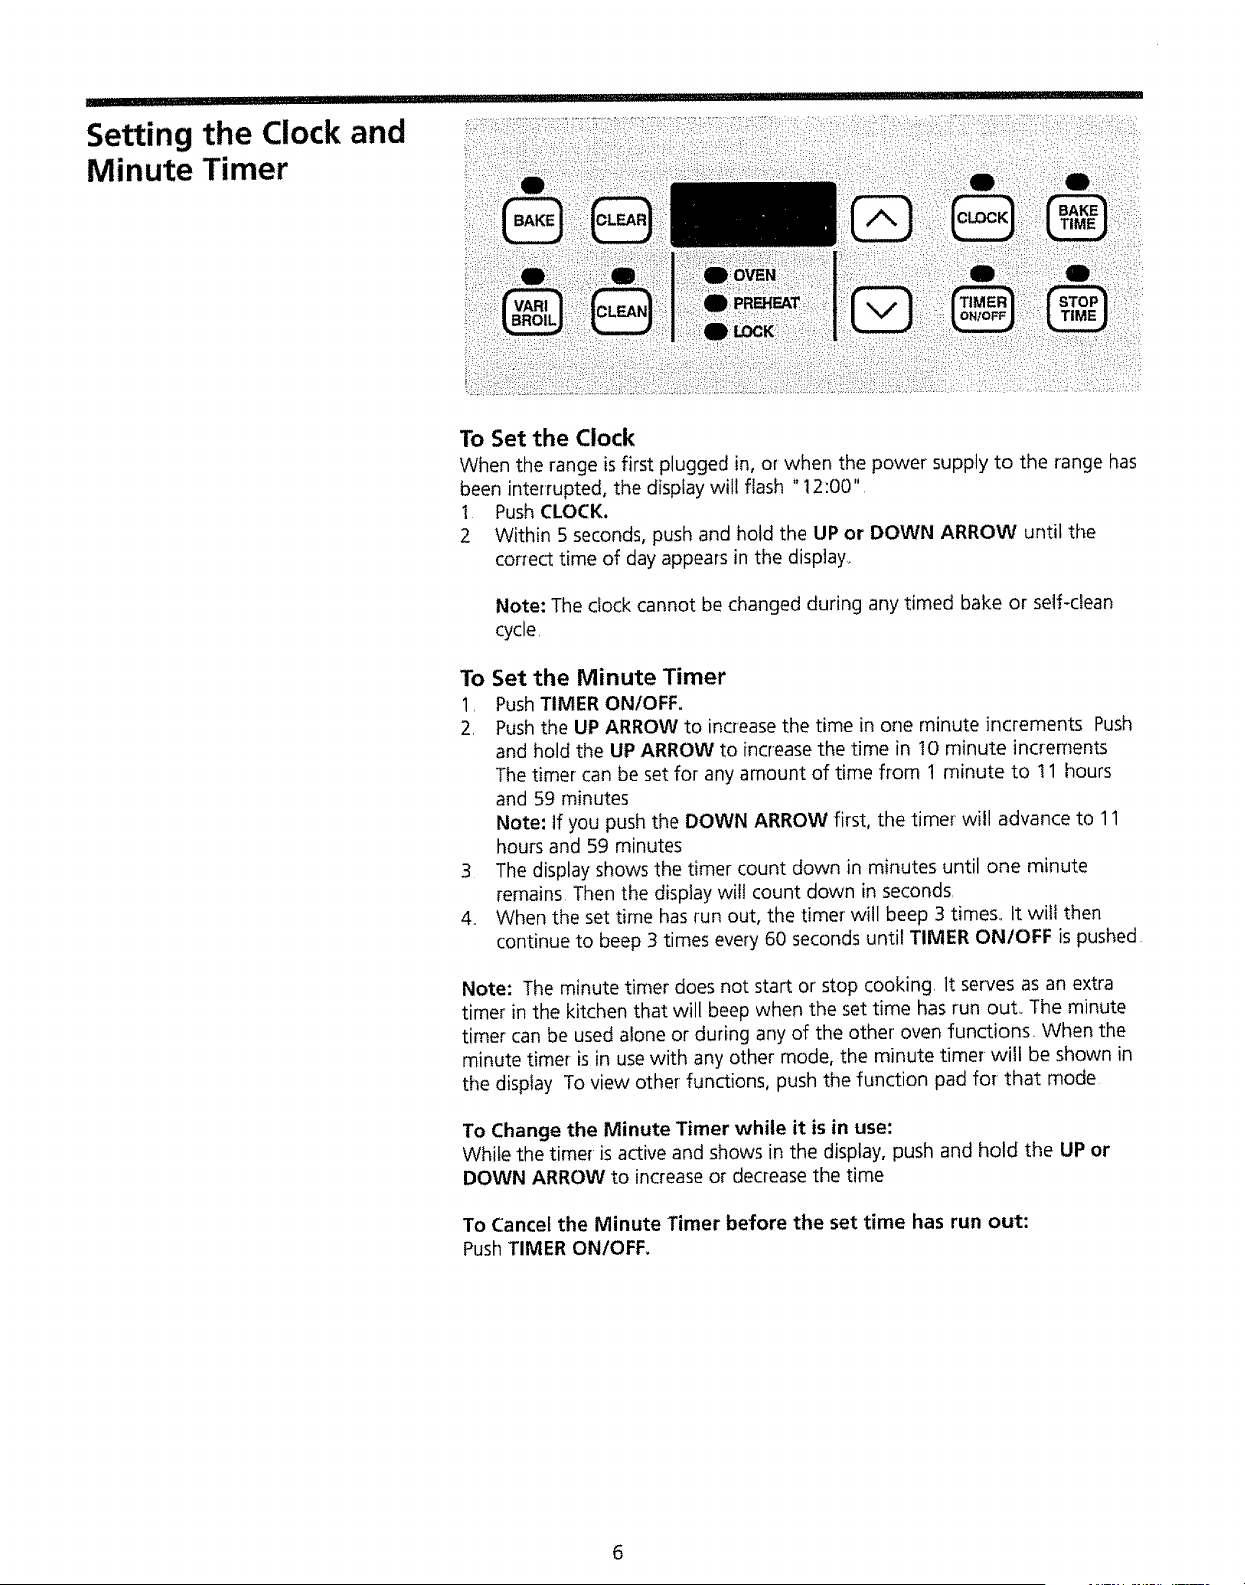
Setting the Clock and
Minute Timer
To Set the Clock
When the range is first plugged in, or when the power supply to the range has
been interrupted, the dispiay will flash "12:00"
1 Push CLOCK.
2 Within 5 seconds, push and hold the UP or DOWN ARROW until the
correct time of day appears in the display.
Note: The clockcannot be changed during any timed bake or self-clean
cycle.
To Set the Minute Timer
1, Push TIMER ON/OFF.
2 Push the UP ARROW to increasethe time in one minute increments Push
and hold the UP ARROW to increase the time in 10 minute increments
The timer can be set for any amount of time from 1 minute to 11 hours
and 59 minutes
Note: If you push the DOWN ARROW first, the timer will advance to 11
hours and 59 minutes
3 The display shows the timer count down in minutes until one minute
remains Then the display will count down in seconds.
4.. When the set time has run out, the timer will beep 3 times., It will then
continue to beep 3 times every 60 seconds until TIMER ONtOFF is pushed
Note: The minute timer does not start or stop cooking. It serves as an extra
timer in the kitchen that will beep when the set time has run out.. The minute
timer can be used alone or during any of the other oven functions. When the
minute timer is in use with any other mode, the minute timer will be shown in
the display To view other functions, push the function pad for that mode
To Change the Minute Timer while it is in use:
While the timer is active and shows in the display, push and hold the UP or
DOWN ARROW to increase or decrease the time
To Cancel the Minute Timer before the set time has run out:
Push TIMER ON/OFF.
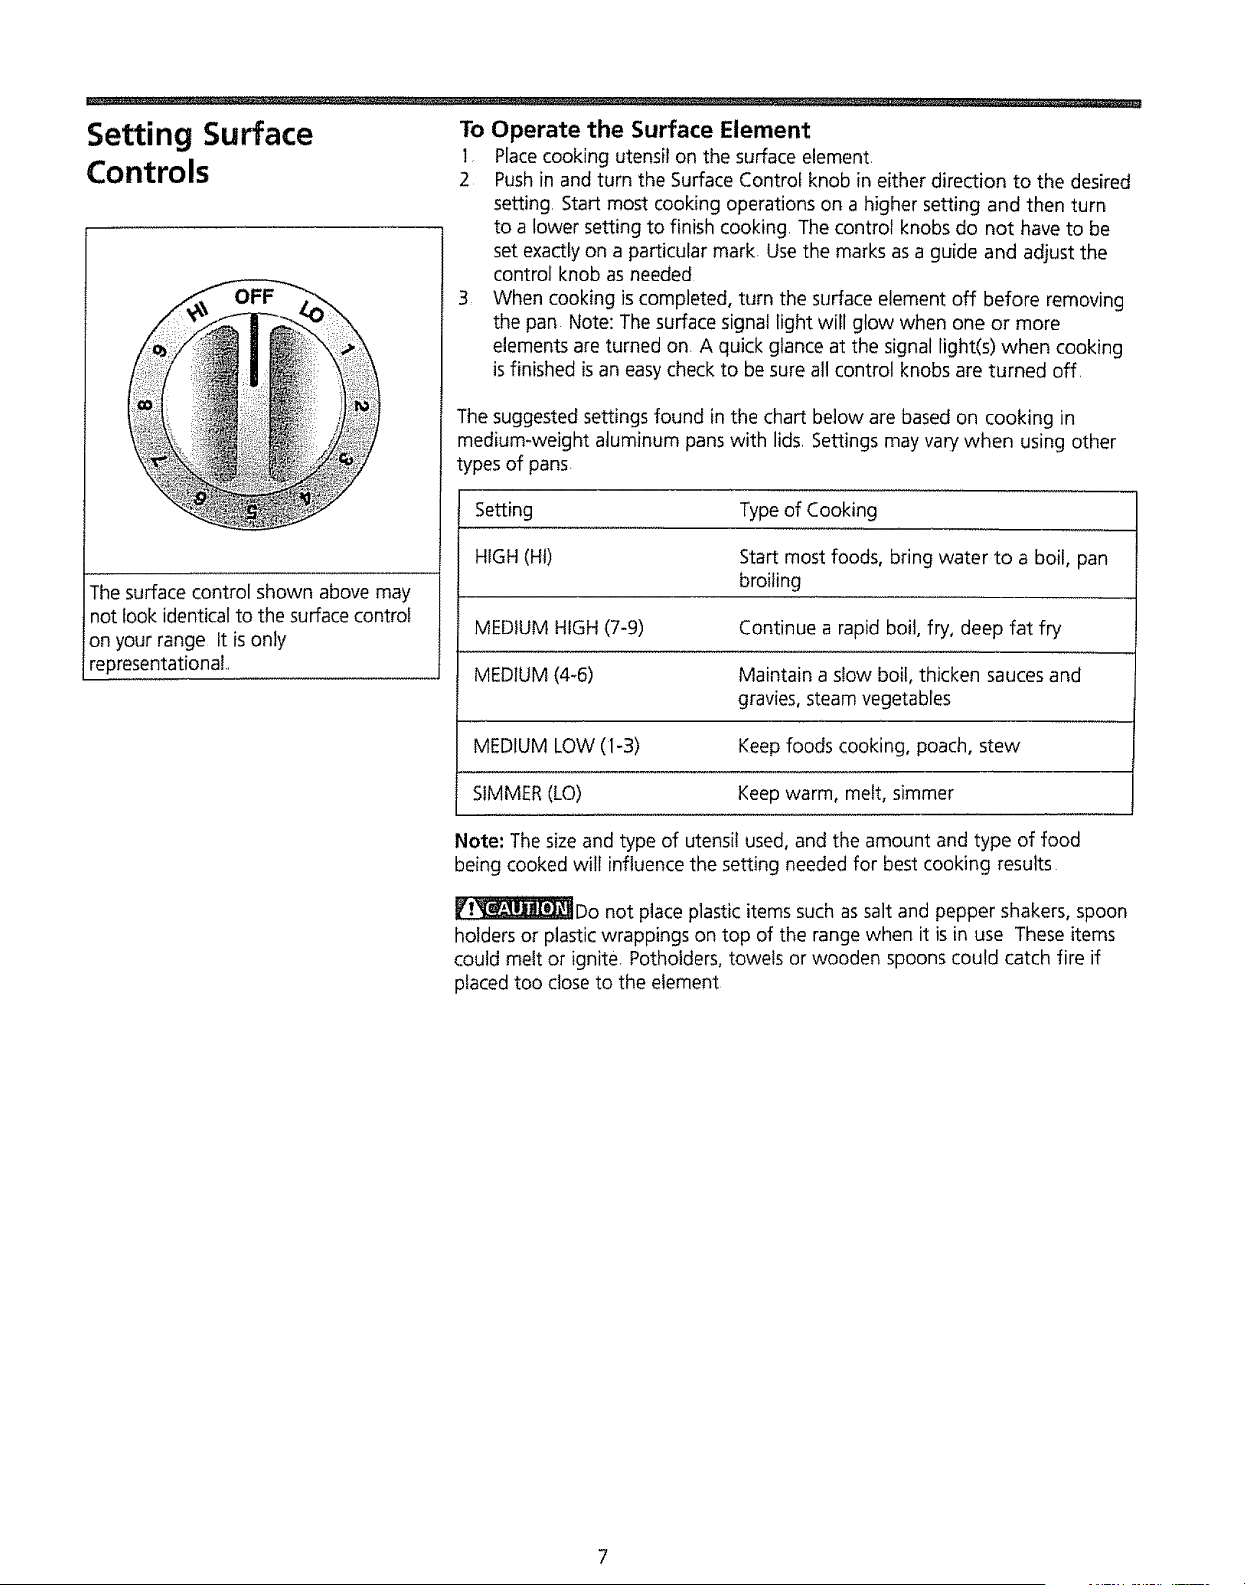
Setting Surface To Operate the Surface Element
1 Place cooking utensil on the surface element=
Controls 2 Push in and turn the Surface Control knob in either direction to the desired
setting, Start most cooking operations on a higher setting and then turn
to a lower setting to finish cooking. The control knobs do not have to be
set exactly on a particular mark. Use the marks as a guide and adjust the
control knob as needed
3, When cooking is completed, turn the surface element off before removing
the pan Note: The surface signal light will glow when one or more
elements are turned on. A quick glance at the signal light(s) when cooking
is finished is an easy check to be sure all control knobs are turned off,
The surface control shown above may
not look identical to the surface control
on your range It is only
representational
The suggested settings found in the chart below are based on cooking in
medium-weight aluminum pans with lids, Settings may vary when using other
types of pans.
Setting Type of Cooking
HIGH (HI) Start most foods, bring water to a boil, pan
broiling
MEDIUM HIGH (7-9) Continue a rapid boil, fry, deep fat fry
MEDIUM (4-6) Maintain a slow boil, thicken sauces and
gravies, steam vegetables
MEDIUM LOW (1-3) Keep foods cooking, poach, stew
SIMMER(LO) Keep warm, melt, simmer
Note: The size and type of utensil used, and the amount and type of food
being cooked will influence the setting needed for best cooking results
V!_Do not place plastic items such as salt and pepper shakers, spoon
holders or plastic wrappings on top of the range when it is in use These items
could melt or ignite, Potholders, towels or wooden spoons could catch fire if
placed too close to the element,
............................ ........................................................... I' '11'1i!1'1!1!
Before Setting Oven
and Warm & Ready
Drawer Controls
Oven Vent Location
The oven is vented under the left rear surface element. When the oven is on,
warm air is released through the vents. This venting is necessary for proper air
circulation in the oven and good baking results.
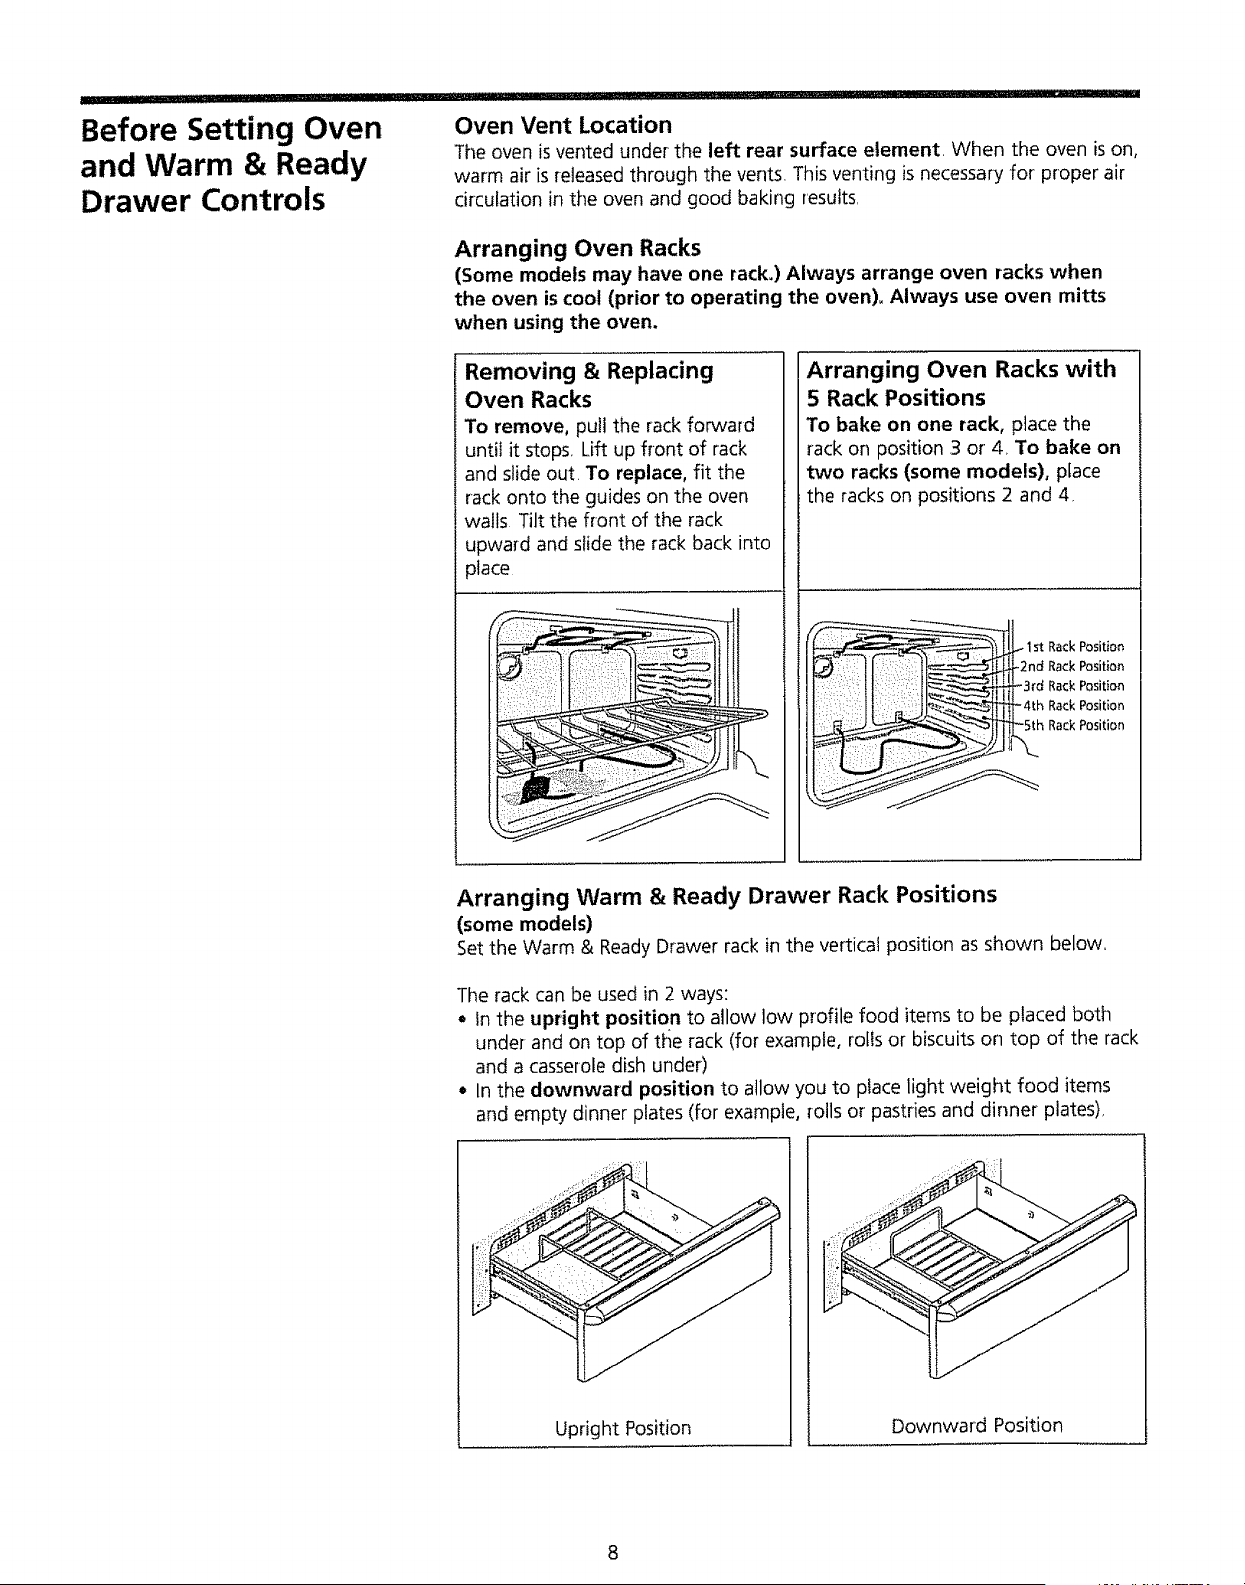
Arranging Oven Racks
(Some models may have one rack_)Always arrange oven racks when
the oven is cool (prior to operating the oven). Always use oven mitts
when using the oven.
Arranging Oven Racks with
5 Rack Positions
To bake on one rack, place the
rack on position 3 or 4, To bake on
two racks (some models), place
the racks on positions 2 and 4.
Removing & Replacing
Oven Racks
To remove, pullthe rack forward
until it stops. Lift up front of rack
and slide out. To replace, fit the
rack onto the guides on the oven
walls Tilt the front of the rack
upward and siide the rack back into
place
4th
st Rack Position
-2nd Rack Position
Rack Position
Rack Position
Rack Position
Arranging Warm & Ready Drawer Rack Positions
(some models)
Set the Warm & Ready Drawer rack in the verticat position as shown below.
The rack can be used in 2 ways:
In the upright position to allow low profile food items to be placed both
under and on top of t_ie rack (for example, rolls or biscuits on top of the rack
and a casserole dish under)
- In the downward position to allow you to place light weight food items
and empty dinner plates (for example, rolls or pastries and dinner plates),
Upright Position
Downward Position

Setting Oven Controls
To Set or Change the Temperature for Normal Baking
The oven can be programmed to bake at any temperature from 170°F to 550°F
(65°C to 287°C)
To Set the Controls for Normal Baking:
1 Push BAKE, "--- --" appears in the display
2, Within 5 seconds, push the UP or DOWN ARROW, The display will show
"350°F (t77°C)" By holding the UP or DOWN ARROW, the temperature
can then be adjusted in 5°F (1°C)increments,
3 As soon as the UP or DOWN ARROW is released, the oven will begin
heating to the selected temperature When the displayed temperature
reaches the desired baking temperature, the control will beep 3 times
4 To cancel the baking function, push CLEAR,
To Change the Oven Temperature after Baking has Started:
I, If you are using the minute timer, push BAKE and make sure the bake
temperature is displayed
2 Push the UP or DOWN ARROW to increase or decrease the set
temperature,

III I'11" II'11'11'1"1'
Setting Oven Controls
(continued)
Use caution when using
the automatic timer Use the
automatic timer when cooking cured
or frozen meats and most fruits and
vegetables, Foods that can easily spoil
such as milk, eggs, fish, meat or
poultry, should be chilled in the
refrigerator first Even when chilled,
they should not stand in the oven for
more than 1 hour before cooking
begins, and should be removed
promptly when cooking is completed°
To Set the Automatic Timer (Timed Bake Feature)
The BAKE TIME and STOP TIME controls operate the Tinqed Bake feature The
automatic timer wilt turn the oven on and off at the times you select in
advance The oven can be programmed to start immediatefy and shut off
automatically or to begin baking at a later time with an automatic shutoff
To Program the Oven to Begin Baking Immediately and To
Shut Off Automatically:
! Be sure that the clock shows the correct time of day
2 Place the food in the oven.
3, Push BAKE,
4. Within 5 seconds, push the UP or' DOWN ARROW. The display will show
"350°F (177°C)," By holding the UP or DOWN ARROW, the temperature
can then be adjusted in 5°F (1°C) increments
5. Push BAKE TIME "0:00" will flash in the display
6, Push the UP or DOWN ARROW until the desired amount of baking time
appears in the display.
Once the Controls are Set:
a The oven will come on and begin heating to the selected baking
temperature
b The oven temperature will show in the display.
When the Set Bake Time Runs Out:
a "END" wilt appear-in the display window and the oven will shut off
automatically.
b The control will beep 3 times every 60 seconds until CLEAR is pushed
To Program Oven for a Delayed Start Time and to Shut-Off
Automatically
Follow steps I-6 above, THEN:
7 Push STOP TIME The earliest possible stop time will flash in the disptay,
8, Push the UP or DOWN ARROW until the desired stop time appears in the
display,
9, Once the controls are set, the control calculates the time when baking will
start in order to finish at the time you have set,
When the Set Bake Time Runs Out:
a "END" will appear in the display window and the oven wilt shut off
automatically.
b, The control will beep 3 times every60 seconds until CLEAR is pushed,
To Change the Oven Temperature or' Bake Time after Baking has Started:
1 Push the function pad you want to change,
2 Push the UP or DOWN ARROW to adjust the setting,
t0
Setting Oven Controls
(continued)
Stop
Position
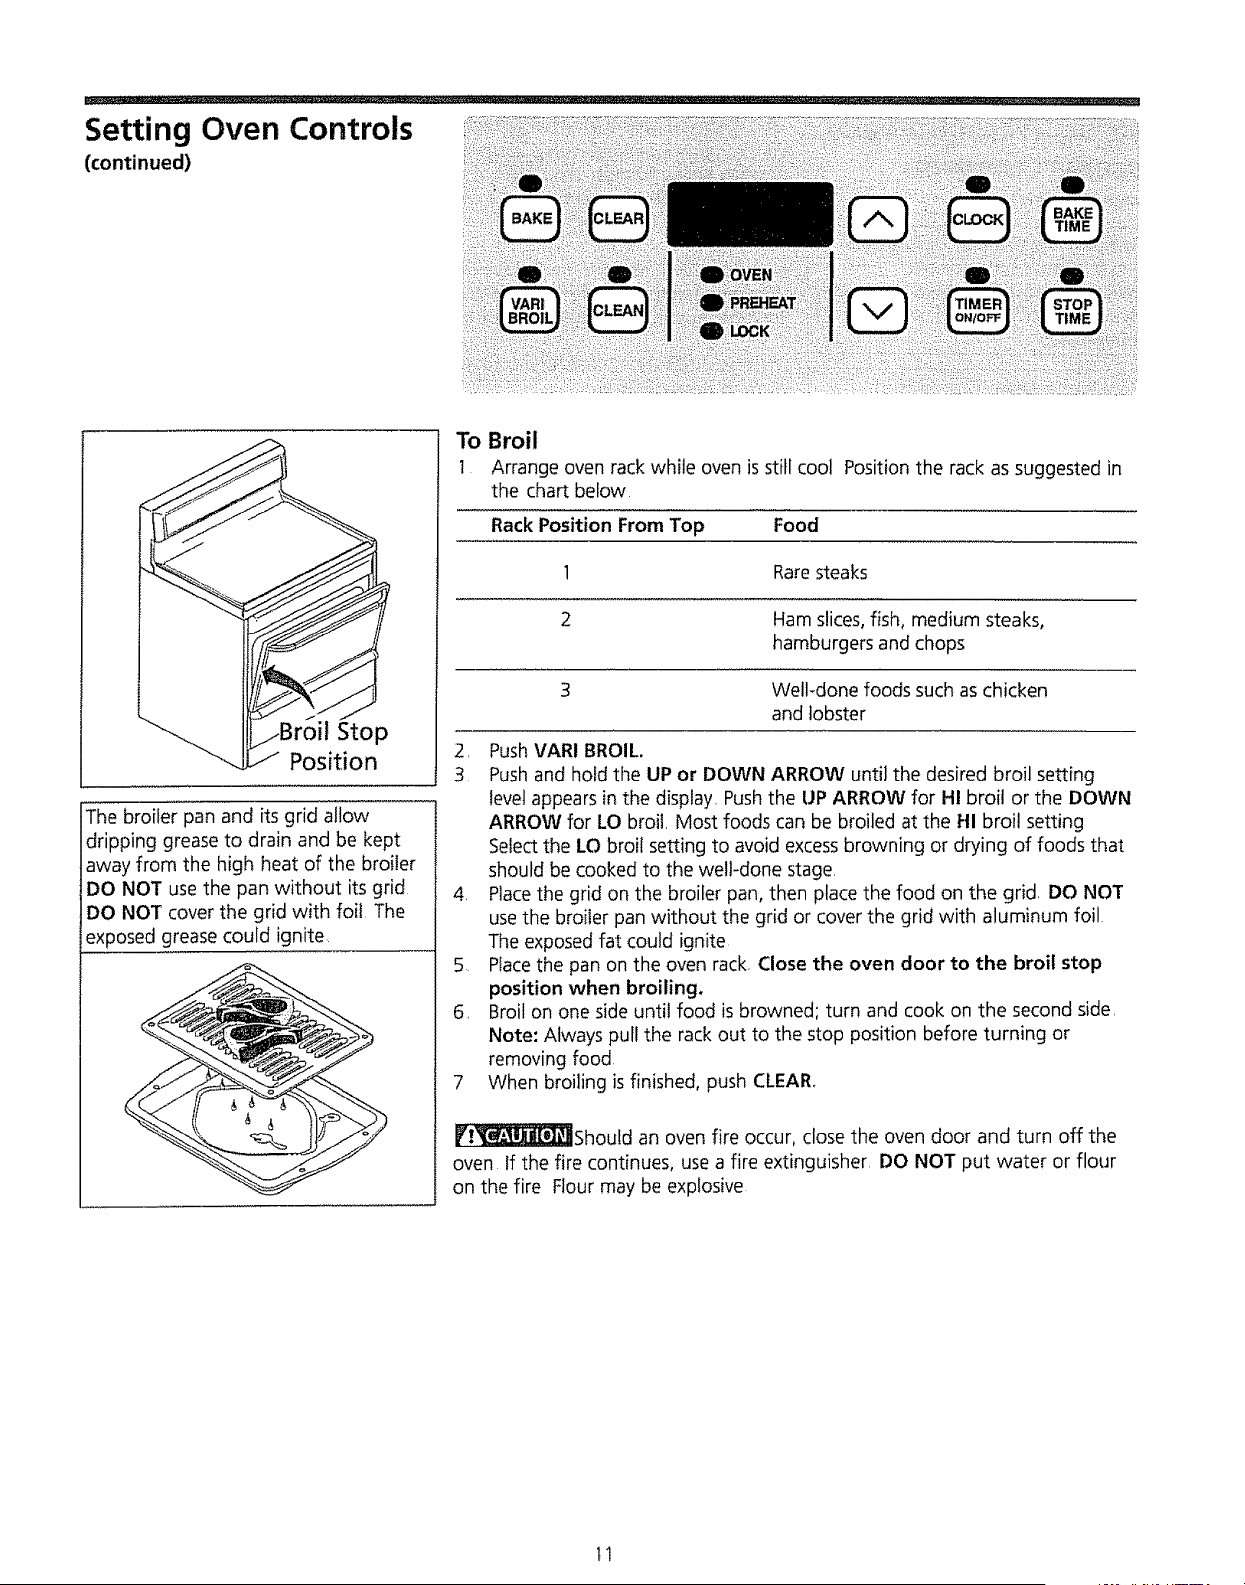
The broiler pan and its grid allow
dripping grease to drain and be kept
away from the high heat of the broiler
DO NOT use the pan without its grid
DO NOT cover the grid with foi! The
exposed grease could ignite
To Broil
t Arrange oven rack while oven is still cool Position the rack as suggested in
the chart below
Rack Position From Top Food
1 Rare steaks
2 Ham slices, fish, medium steaks,
hamburgers and chops
3 Welt-done foods such as chicken
and lobster
2 PushVARI BROIL.
3 Push and hold the UP or DOWN ARROW until the desired broil setting
level appears in the display Pushthe UP ARROW for H! broil or the DOWN
ARROW for LO broil Most foods can be broiled at the HI broil setting
Select the LO broil setting to avoid excess browning or drying of foods that
should be cooked to the well-done stage
4 Place the grid on the broiler pan, then place the food on the grid DO NOT
use the broiler pan without the grid or cover the grid with aluminum foil
The exposed fat could ignite
5 Placethe pan on the oven rack Close the oven door to the broil stop
position when broiling.
6 Broil on one side until food is browned; turn and cook on the second side
Note: Always pull the rack out to the stop position before turning or
removing food
7 When broiling is finished, push CLEAR.
_Should an oven fire occur, close the oven door and turn off the
oven If the fire continues, use a fire extinguisher DO NOT put water or flour
on the fire Flour may be explosive
11

Ill Ill I lll ..............:'i::i: .......................................
i i,,, illll,lll,ll "'1"1 II'lllll' I 'i ..................III
Setting Warm & Ready
Drawer Controls
(some models)
Use the Warm & Ready Drawer to
keep hot foods hot such as:
vegetables, gravies, meats, casseroles,
biscuits and rolls, pastries and heated
dinner plates,
The Warm & Ready Drawer is
equipped with a catch which may
require extra force when opening and
closing the drawer,
To Operate the Warm & Ready Drawer
Your range isequipped with a Warm & Ready Drawer The purpose of the
Warm & Ready Drawer is to keep hot cooked foods at serving temperature
Always start with hot food it is not recommended to heat cold food in the
Warm & Ready Drawer
Al! food placed in the Warm & Ready Drawer should be covered with a lid or
aluminum foil to maintain quality Do not use plastic wrap to cover food.
Plastic may melt onto the drawer and be very difficult to clean.
Use only dishware, utensils and cookware recommended for oven use in the
Warm & Ready Drawer,.
_Always use potholders or oven mitts when removing food from
the Warm & Ready Drawer as cookware and plates will be hot
OFF
HI
MED
WARMER DRAWER
Indicator Light
The indicator light is tocated below the thermostat control, It turns on when
the control is set, and stays on until the control is turned off_ The Warm &
Ready Drawer will not operate during the self-clean cycle, The indicator light
will not come on duringthe self-clean cyde_
To Set the Thermostat Control
The thermostat control is used to select the temperature of the Warm & Ready
Drawer, tt is located on the control panel To set the thermostat, push in and
turn the knob to the desired setting The temperatures are approximate, and
are designated by HI, MED and LQ
1 Select the temperature setting
2, For best results, preheat the drawer before adding food An empty drawer
will preheat in approximately 15 minutes,.
3, When done, turn the thermostat control to OFF
Temperature Selection
Refer to the chart in the side column for recommended settings, If a particular
food is not listed, start with the medium setting if more crispness is desired,
remove the lid or aluminum foil,
Warm & Ready Drawer
Recommended Food Settings
Chart
Food Item,. Setting
Roasts(Beef, Pork, Lamb) MED
Pork Chops HI
Bacon HI
Hamburger Patties HI
Poultry Ht
Gravies MED
Casseroles MED
Eggs MED
Fried Foods HI
Vegetables MED
PizZa HI
Biscuits MED
Rolls, soft LO
Rolls, hard MED
Pastries MED
Empty Dinner Plates LO
Most foods can be kept at serving temperatures by using the n'ledium setting
When a combination of foods are to be kept warm (for instance, a meat with
2 vegetables and rolls), use the highest setting
Refrain from opening the Warm & Ready Drawer while in use to eliminate toss
of heat from the drawer,
t2
Oven Cleaning
_During the self-cleaning
cycle, the outside of the range can
become very hot to the touch DO
NOT leave small children unattended
near the appliance,
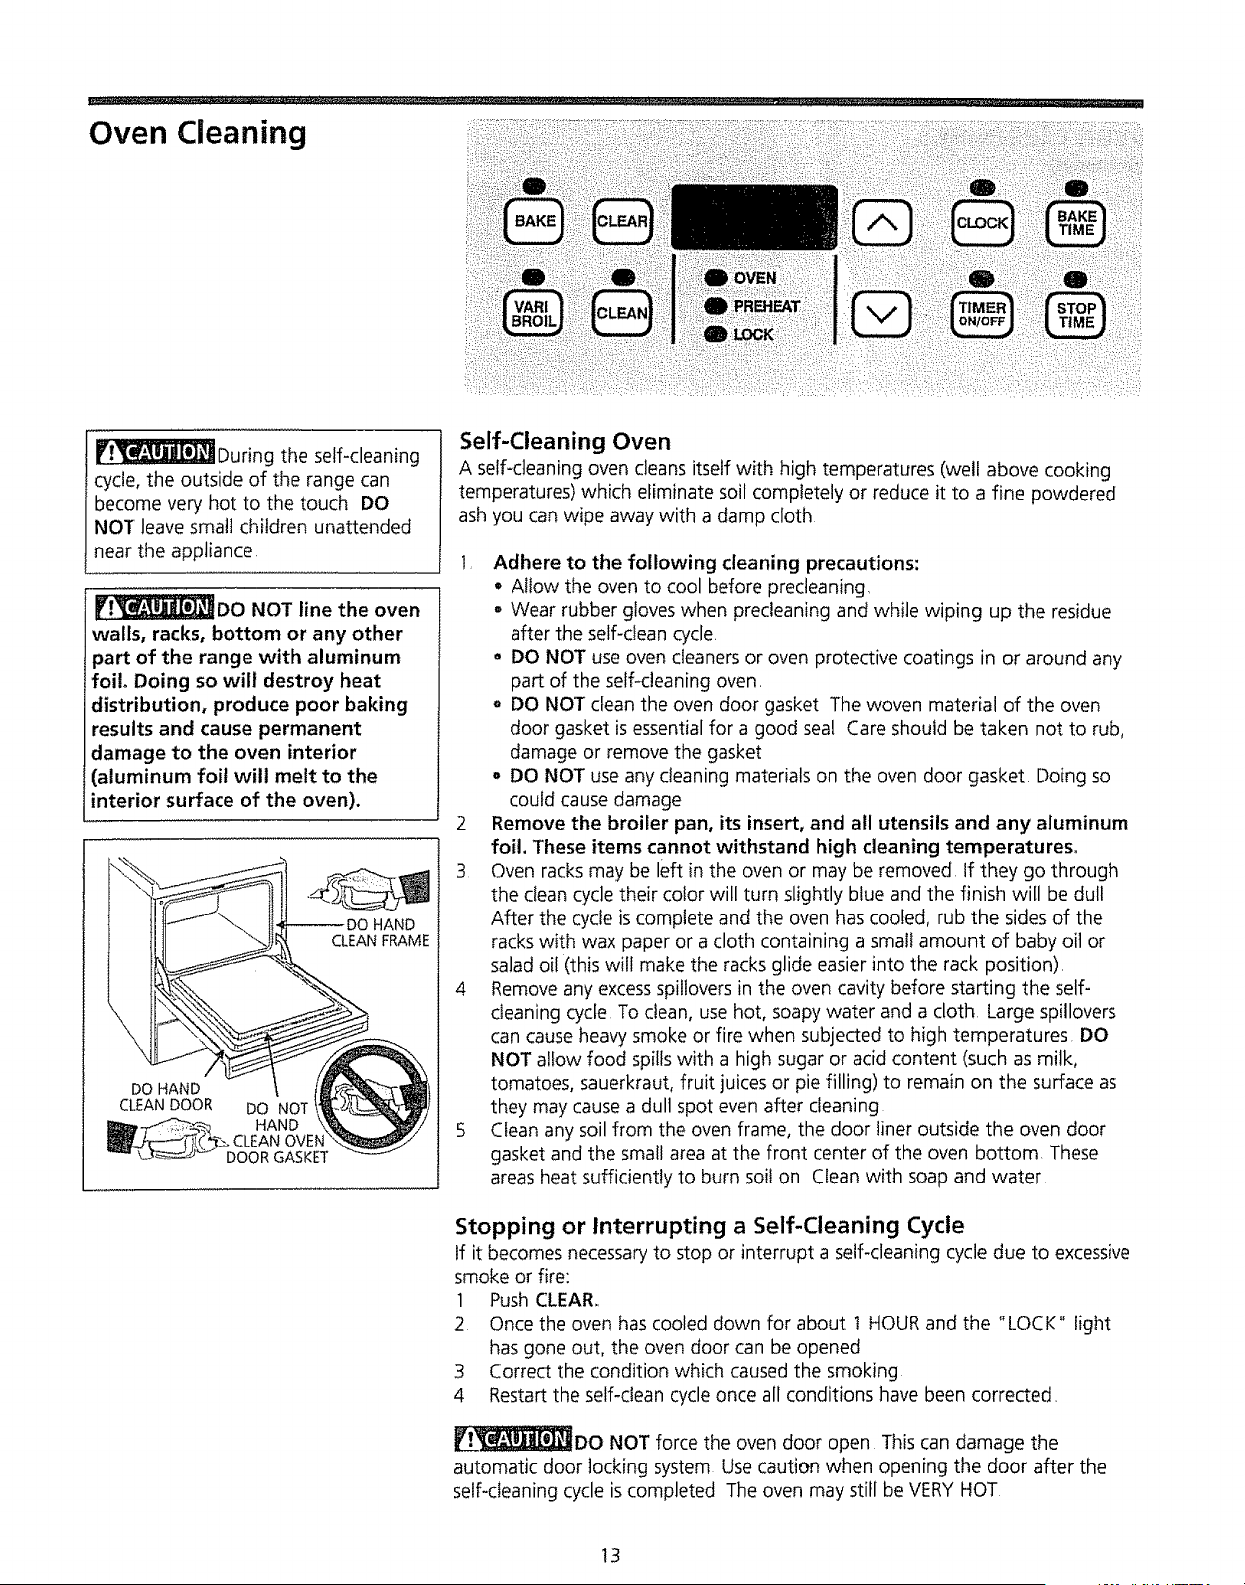
.rL__ DO NOT line the oven
wails, racks, bottom or any other
part of the range with aluminum
folio Doing so will destroy heat
distribution, produce poor baking
results and cause permanent
damage to the oven interior
(aluminum foil will melt to the
interior surface of the oven).
HAND
CLEAN FRAME
DO HAND
CLEAN DOOR DO NOT
Self-Cleaning Oven
A self-cleaning oven cleans itself with high temperatures (well above cooking
temperatures) which eliminate soil completely or reduce it to a fine powdered
ash you can wipe away with a clamp cloth
1_ Adhere to the following cleaning precautions:
• Allow the oven to cool before precteaning
o Wear rubber gloves when precteaning and while wiping up the residue
after the self-clean cycle.
• DO NOT use oven cleaners or oven protective coatings in or around any
part of the self-cleaning oven,
o DO NOT clean the oven door gasket The woven material of the oven
door gasket is essential for a good seal Care shouid be taken not to rub,
damage or remove the gasket
, DO NOT use any cleaning materials on the oven door gasket Doing so
could cause damage
2 Remove the broiler pan, its insert, and all utensils and any aluminum
foil. These items cannot withstand high cleaning temperatures°
3 Oven racks may be left in the oven or may be removed If they go through
the clean cycle their color will turn slightly blue and the finish will be dull
After the cycle iscomplete and the oven has cooled, rub the sides of the
racks with wax paper or a cloth containing a small amount of baby oil or
salad oil (this will make the racks glide easier into the rack position).
4 Remove any excessspillovers in the oven cavity before starting the self-
cleaning cycle To clean, use hot, soapy water and a cloth Large spillovers
can cause heavy smoke or fire when subjected to high temperatures DO
NOT allow food spills with a high sugar or acid content (such as milk,
tomatoes, sauerkraut, fruit juicesor pie filling) to remain on the surface as
they may cause a dull spot even after cleaning
5 Clean any soil from the oven frame, the door liner outside the oven door
gasket and the small area at the front center of the oven bottom, These
areas heat sufficiently to burn soil on Clean with soap and water
Stopping or Interrupting a Self-Cleaning Cycle
If it becomes necessary to stop or interrupt a self-cleaning cycle due to excessive
smoke or fire:
1 Push CLEAR.
2 Once the oven has cooled down for about t HOUR and the "LOCK" light
has gone out, the oven door can be opened
3 Correct the condition which caused the smoking
4 Restart the self-clean cycle once all conditions have been corrected_
_DO NOT force the oven door open This can damage the
automatic door locking system Use caution when opening the door after the
self<leaning cycle is completed The oven may still be VERY HOT
!3

........... Illll'll"l ' I' ]11
Oven Cleaning
(continued)
_Use care when opening
the oven door after the self-cleaning
cycle Stand to the side of the oven
when opening the door' to allow hot
air or steam to escape,
To Start the Self-Clean Cycle
We recommend a 2 hour self-dean cycle for light soils and a 3 hour cycle for
average to heavy soils (to assure satisfactory results)
To Set the Controls for' a Self-Clean Cycle:
1 Be sure the clock shows the correct time of day
2 Push CLEAN " " appears in the display.
3 Push the UP ARROW until "3:00" appears in the display for a 3 hour
cycle, or push the DOWN ARROW until '_2:00" appears in the display for
a 2 hour cycle.
4 As soon as the UP or DOWN ARROW is released, "CLn" appears in the
disptay_
5 As soon as the controls are set, the motor driven lock will begin to close
automatically and the "LOCK" indicator' light will flash, DO NOT open the
door while the light is flashing (it takes about 15 seconds for the lock to
close)
6 The "LOCK" light will glow until the cleaning cycle is completed or
cancelled, and the oven temperature has cooled
When the Self-Clean Cycle is Completed:
1= The time of day will appear in the display window and the "LOCK" light
will continue to glow.
2 Once the oven has cooled down for about 1 HOUR and the "LOCK" light
has gone out, the oven door can be opened
_DO NOT force the oven door open This can damage the
automatic door' locking system Use caution when opening the door after the
self-cleaning cycle is completed.. The oven may stilt be VERY HOT
14
General Cleaning Cleaning Various Parts of Your Range
Before cleaning any part of the range, be sure all controls are turned OFFand
the range is cool. Remove spiiiovers and heavy soiling as soon as
possible° Regular cleanings will reduce the number of major cleanings
later.
Surfaces
Aluminum (Trim Pieces)&
Vinyl
Glass, Paint and Plastic
Control Knobs, Body Parts
and Decorative Trim
Control Panel ,
Porcelain Enamel
Cooktop, Under Cooktop,
Broiler Pan and Insert, Door
Liner, Warm & Ready Drawer
(if equipped)
Stainless Steel, Chrome
Decorative Trim
Oven Racks
Oven Door
How to Clean
' Use hot, soapy water and'a' cloth, Dry with a clean'cl'oth ..........
For general cleaning, use hot, soapy water and a cloth For more difficult soils and
built-up grease, apply a liquid detergent directly onto the soil, Leave on soil for 30 to
60 minutes Rinse with a damp cloth and dry DO NOT use abrasive cleaners on any of
these materials; they can scratch To remove control knobs, turn to the OFF position;
grasp firmly and pull straight off the shaft, To replace knobs after cleaning, line up the
flat sides of both the knob and the shaft; then push the knob into place,
Before cleaning the controfpanet, turn all controls to OFFand remove the control
knobs To remove, pull each knob straight off the shaft, Clean using hot, soapy water
and a dishcloth Be sure to squeeze excess water from the cloth before wiping the
panel; especially when wiping around the controls, Excesswater in or around the
controls may cause damage to the appliance To replace knobs after cleaning, fine up
the flat sides of both the knob and the shaft; then push the knob into place
Gentle scouring with a soapy scouring pad will remove most spots, Rinse with a 1:1
solution of clear water and ammonia. If necessary, cover difficult spots with an
ammonia-soaked paper towel for 30 to 40 minutes Rinsewith clean water and a
damp cloth, and then scrub with a soap-filled scouring pad Rinse and wipe dry with a
clean cloth. Remove all cleaners or the porcelain may become damaged during future
heating DO NOT use spray oven cleaners on the cooktop,
Clean with hot, soapy water and a dishcloth Rinse with clean water and a dishcioth_
Cover stubborn spots with an ammonia-soaked paper towel for 30 to 40 minutes
Rinse. Cleaners made especially for stainless steel are recommended Be sure to rinse
the cleaners as bluish stains may occur during heating and cannot be removed
Oven racks may be removed or left in the oven during the self-clean cycle for cleaning
If removed, clean by using a mild, abrasive cleaner following manufacturer's
instructions Rinse with clean water and dry
tf the racks are cleaned in the self-clean cycle, their color will turn slightly blue and the
finish will be dull. After the self-clean cycle is complete, and the oven has cooled, rub
the sides of the racks with wax paper or a cloth containing a small amount of baby oil
or salad oil (this will make the racks glide easier into the rack positions)
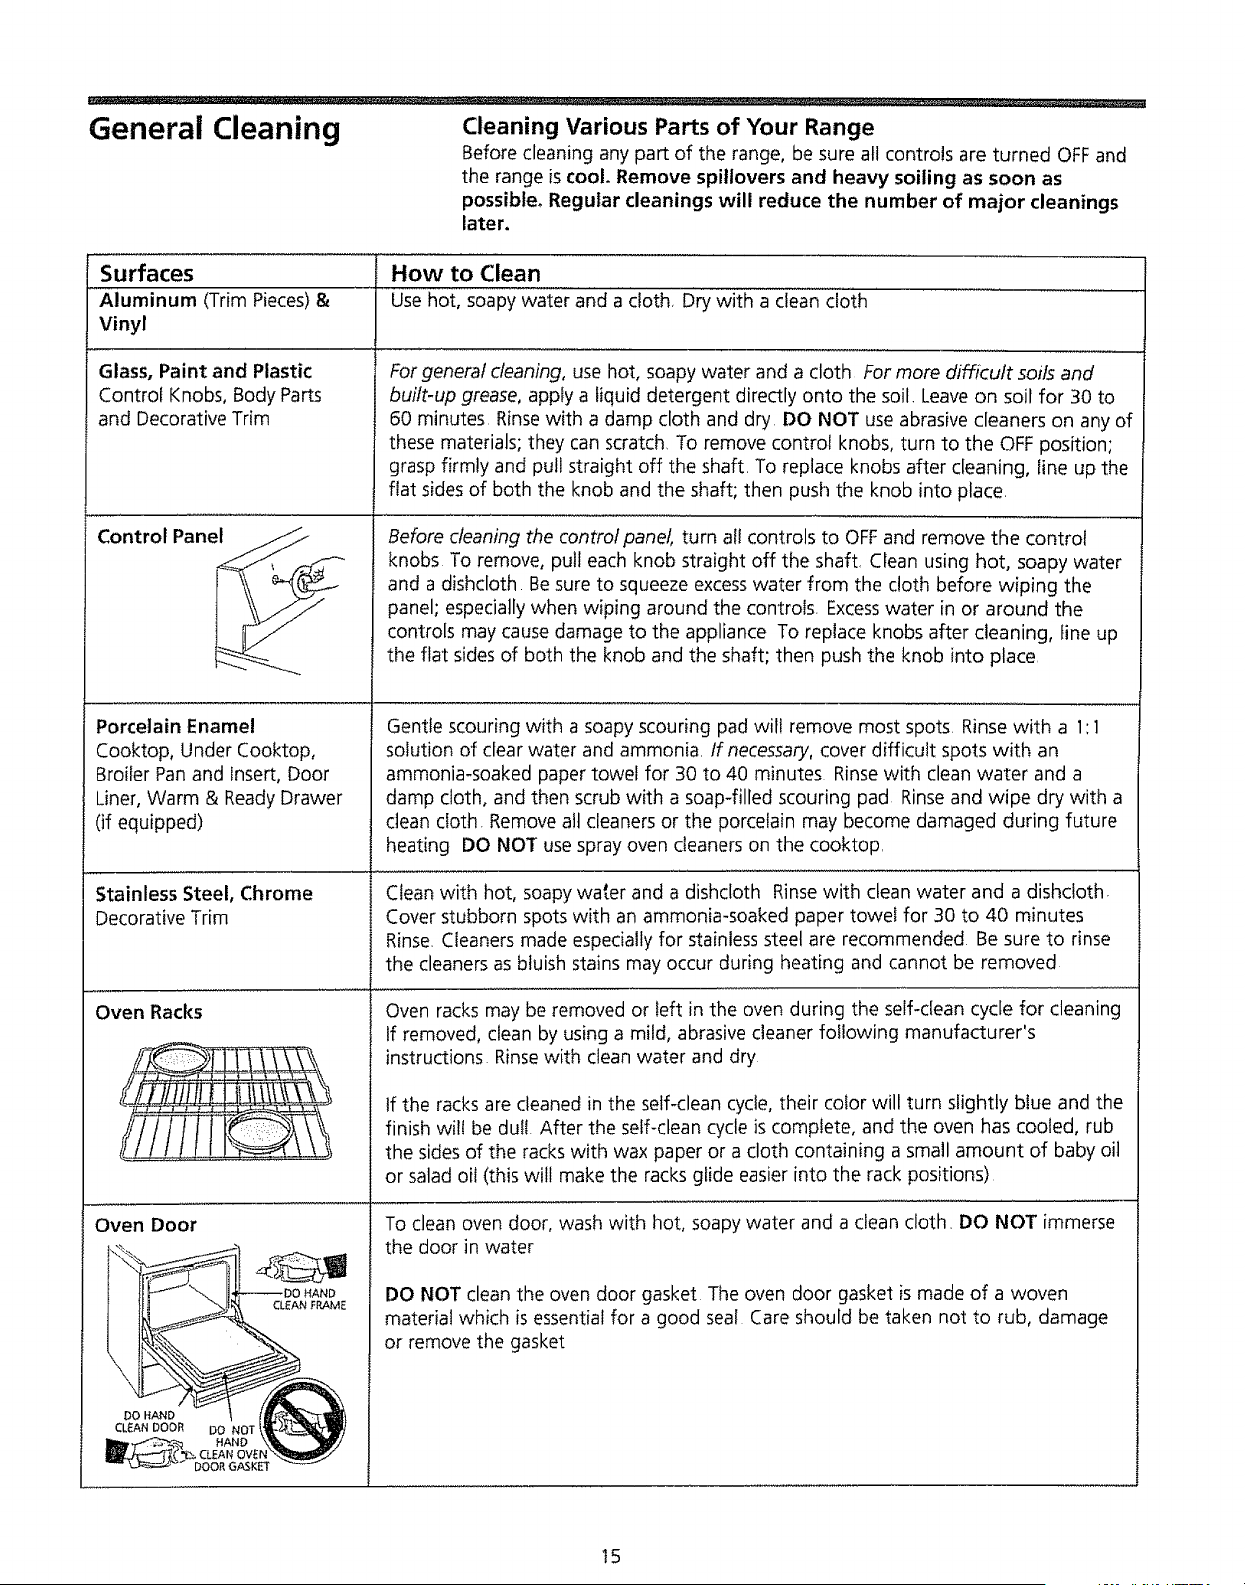
To clean oven door, wash with hot, soapy water and a clean cloth, DO NOT immerse
the door in water
DO NOT clean the oven door gasket The oven door gasket is made of a woven
material which is essential for a good seal Care should be taken not to rub, damage
or remove the gasket
15
Illl'!ll III IIl'll,ll'll................................................ ii,l,l,l,,i,
General Cleaning
(continued)
_Be sure the range is cool
before removing elements or drip
bowls
Be careful not to bend terminal ends
when replacing elements after
cleaning
TermlnaIEnd
Plug
Main Top
_When lowering the lift-
up range top, grasp the sides with
fingertips only Be careful not to pinch
fingers DO NOT drop or bend the
range top when raising or lowering,
This could damage the surface
Surface Elements and Drip Bowls
Surface elements can be unplugged and removed to make cleaning the drip
pans easier, The surface elements clean themselves when they are turned on
Food spilled on a hot element will burn off, Food spilled on a cool element may
be cleaned with a damp cloth--any remaining soil will burn off the next time
the element is used, Never immerse a surface element in water.
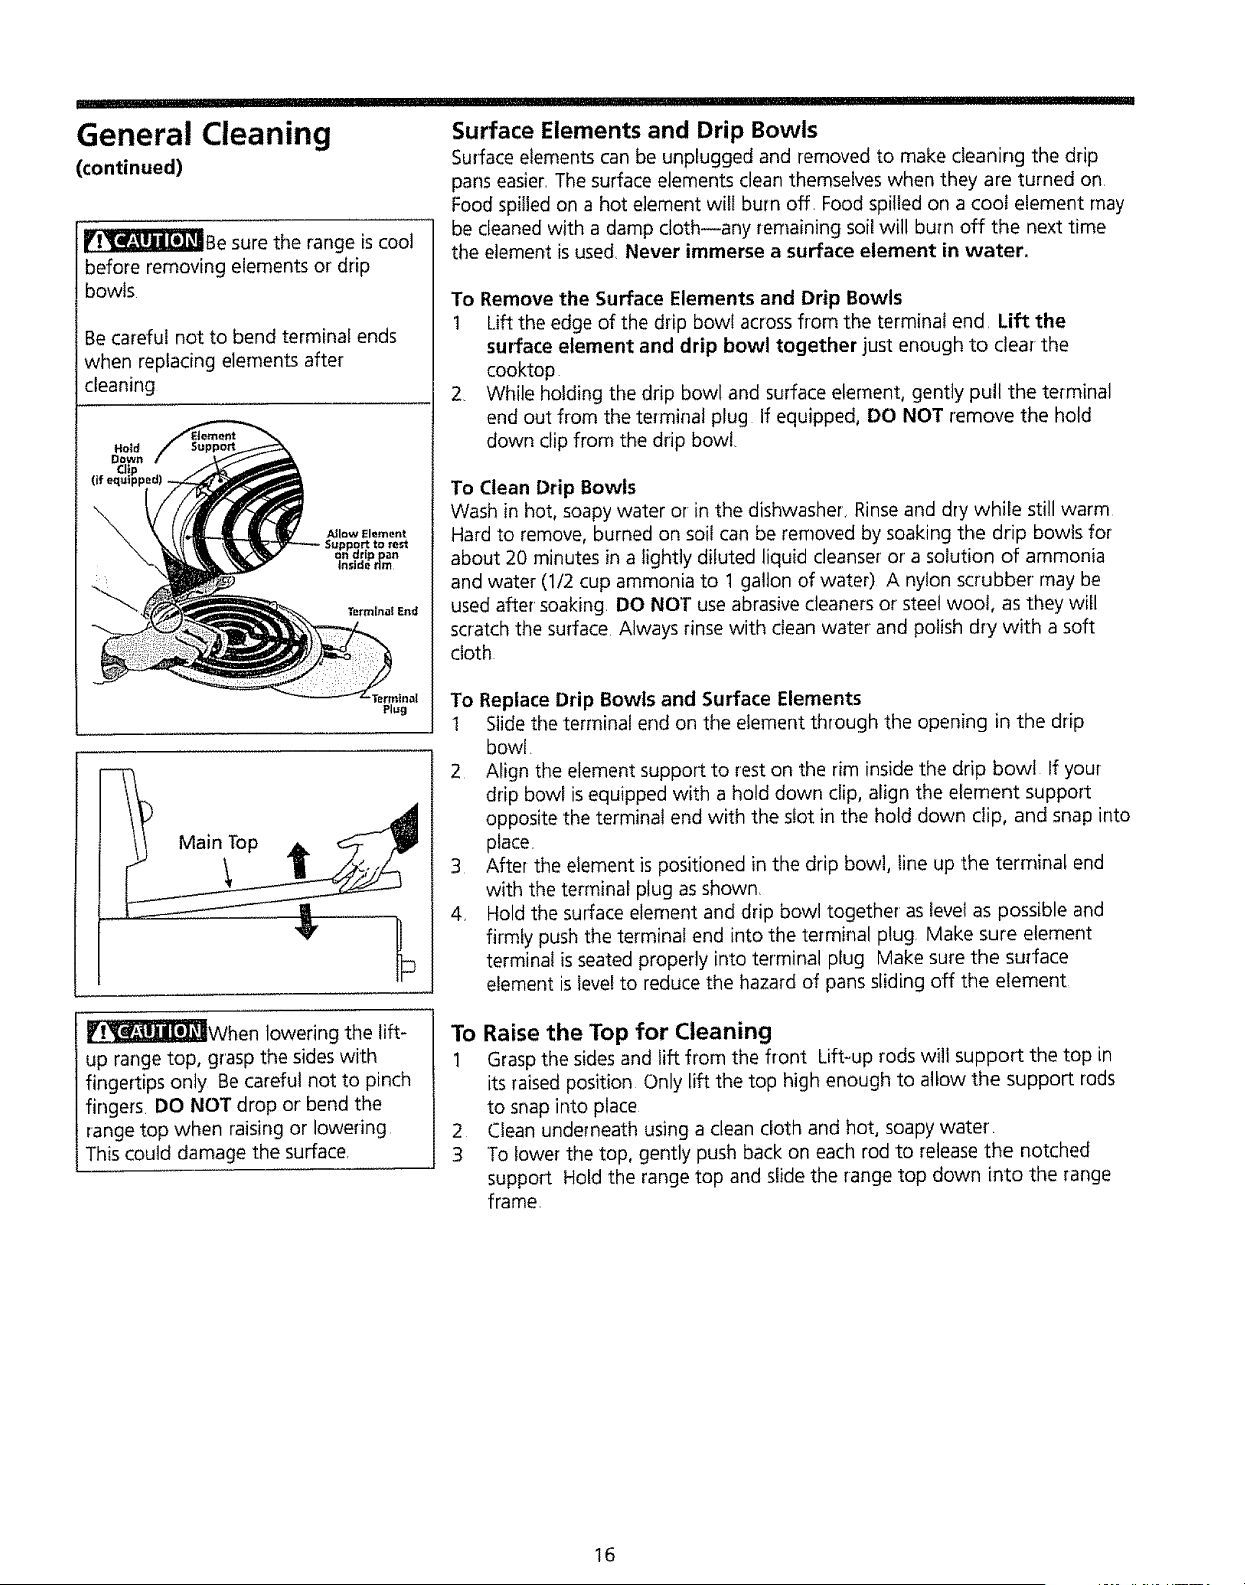
To Remove the Surface Elements and Drip Bowls
t Lift the edge of the drip bowl across from the terminal end, Lift the
surface element and drip bowl together just enough to clear the
cooktop
2. While holding the drip bowl and surface element, gently pull the terminal
end out from the terminal plug If equipped, DO NOT remove the hold
down clip from the drip bowl.
To Clean Drip Bowls
Wash in hot, soapy water or-in the dishwasher, Rinseand dry while still warm
Hard to remove, burned on soil can be removed by soaking the drip bowls for
about 20 minutes in a tightly diluted liquid cleanser or a solution of ammonia
and water (1/2 cup ammonia to 1 gallon of water) A nylon scrubber may be
used after soaking, DO NOT use abrasive cleaners or steel wool, as they will
scratch the surface. Always rinse with clean water and polish dry with a soft
cloth.
To Replace Drip Bowls and Surface Elements
t Slide the terminal end on the element through the opening in the drip
bowl.
2 Align the element support to rest on the rim inside the drip bowl If your
drip bowl is equipped with a hold down clip, align the element support
opposite the terminal end with the slot in the hold down clip, and snap into
place.
3 After the element is positioned in the drip bowl, line up the terminal end
with the terminal plug as shown
4. Hold the surface element and drip bowl together as levet as possible and
firmfy push the terminal end into the terminal plug. Make sure element
terminal is seated properly into terminal plug Make sure the surface
element is level to reduce the hazard of pans sliding off the element.
To Raise the Top for Cleaning
1 Grasp the sides and lift from the front Lift-up rods will support the top in
its raised position Only lift the top high enough to allow the support rods
to snap into place
2 Clean underneath using a clean cloth and hot, soapy water.
3 To lower the top, gently push back on each rod to release the notched
support Hold the range top and slide the range top down into the range
frame.
16
General Cleaning To
(continued) To
t.
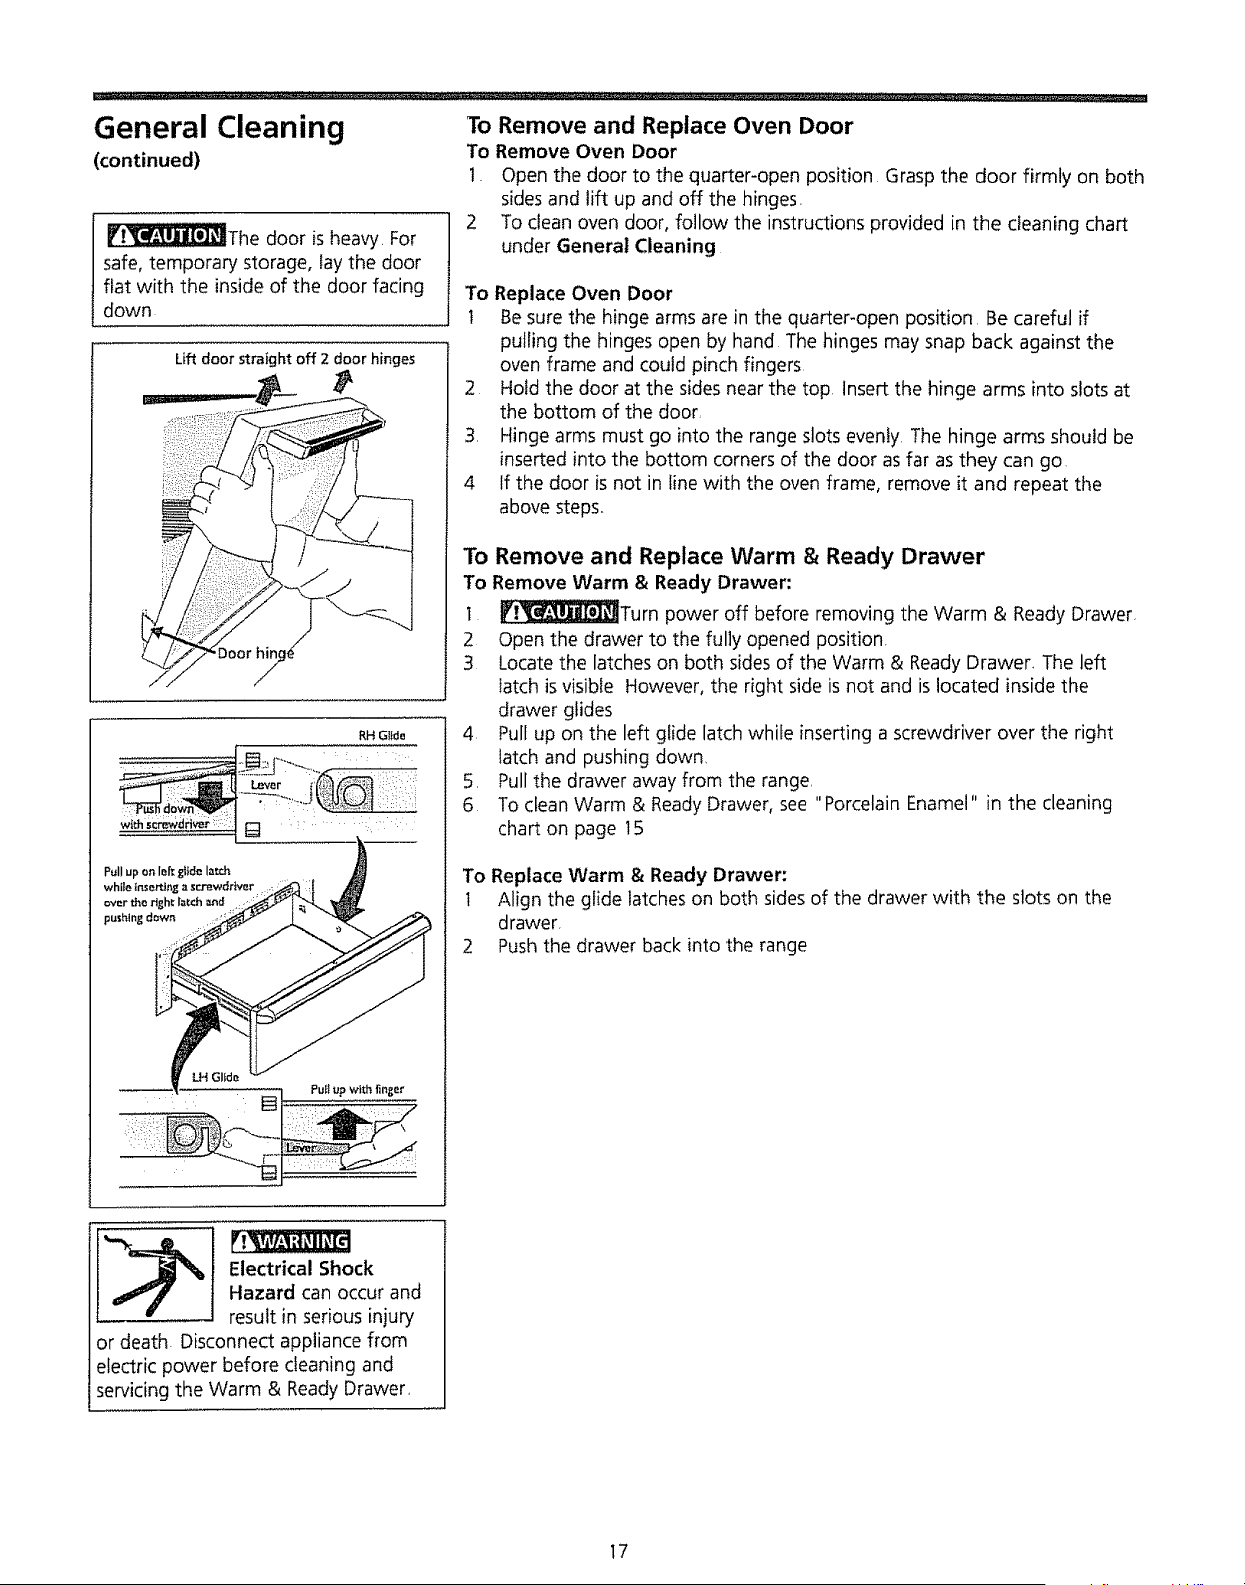
_]_l_The door is heavy. For
safe, temporary storage, tay the door
fiat with the inside of the door facing
down
Liftdoor straight off 2 door hinges
Remove and Replace Oven Door
Remove Oven Door
Open the door to the quarter-open position Grasp the door firmly on both
sides and lift up and off the hinges.
To clean oven door, follow the instructions provided in the cleaning chart
under General Cleaning
To Replace Oven Door
t Be sure the hinge arms are in the quarter-open position Be careful if
pulling the hinges open by hand The hinges may snap back against the
oven frame and could pinch fingers
2 Hold the door at the sides near the top Insert the hinge arms into slots at
the bottom of the door,
3. Hinge arms must go into the range slots evenly The hinge arms shoutd be
inserted into the bottom corners of the door as far as they can go
4 If the door is not in line with the oven frame, remove it and repeat the
above steps,
To Remove and Replace Warm & Ready Drawer
To Remove Warm & Ready Drawer:
1 _Turn power off before removing the Warm & Ready Drawer,
2 Open the drawer to the fully opened position.
3 Locatethe latches on both sides of the Warm & Ready Drawer. The left
latch is visible However, the right side is not and is located inside the
drawer glides
4. Pull up on the left glide latch whife inserting a screwdriver over the right
latch and pushing down
5, Pull the drawer away from the range,
6 To clean Warm & Ready Drawer, see "Porcelain Enamel" in the cleaning
chart on page 15
To Replace Warm & Ready Drawer:
1 Align the glide latches on both sides of the drawer with the slots on the
drawer,
2 Push the drawer back into the range
Electrical Shock
Hazard can occur and
result in serious injury
or death. Disconnect appliance from
electric power before cleaning and
servicing the Warm & Ready Drawer.
17
HII
Changing Cooktop and/
or Oven Lights
(some models)
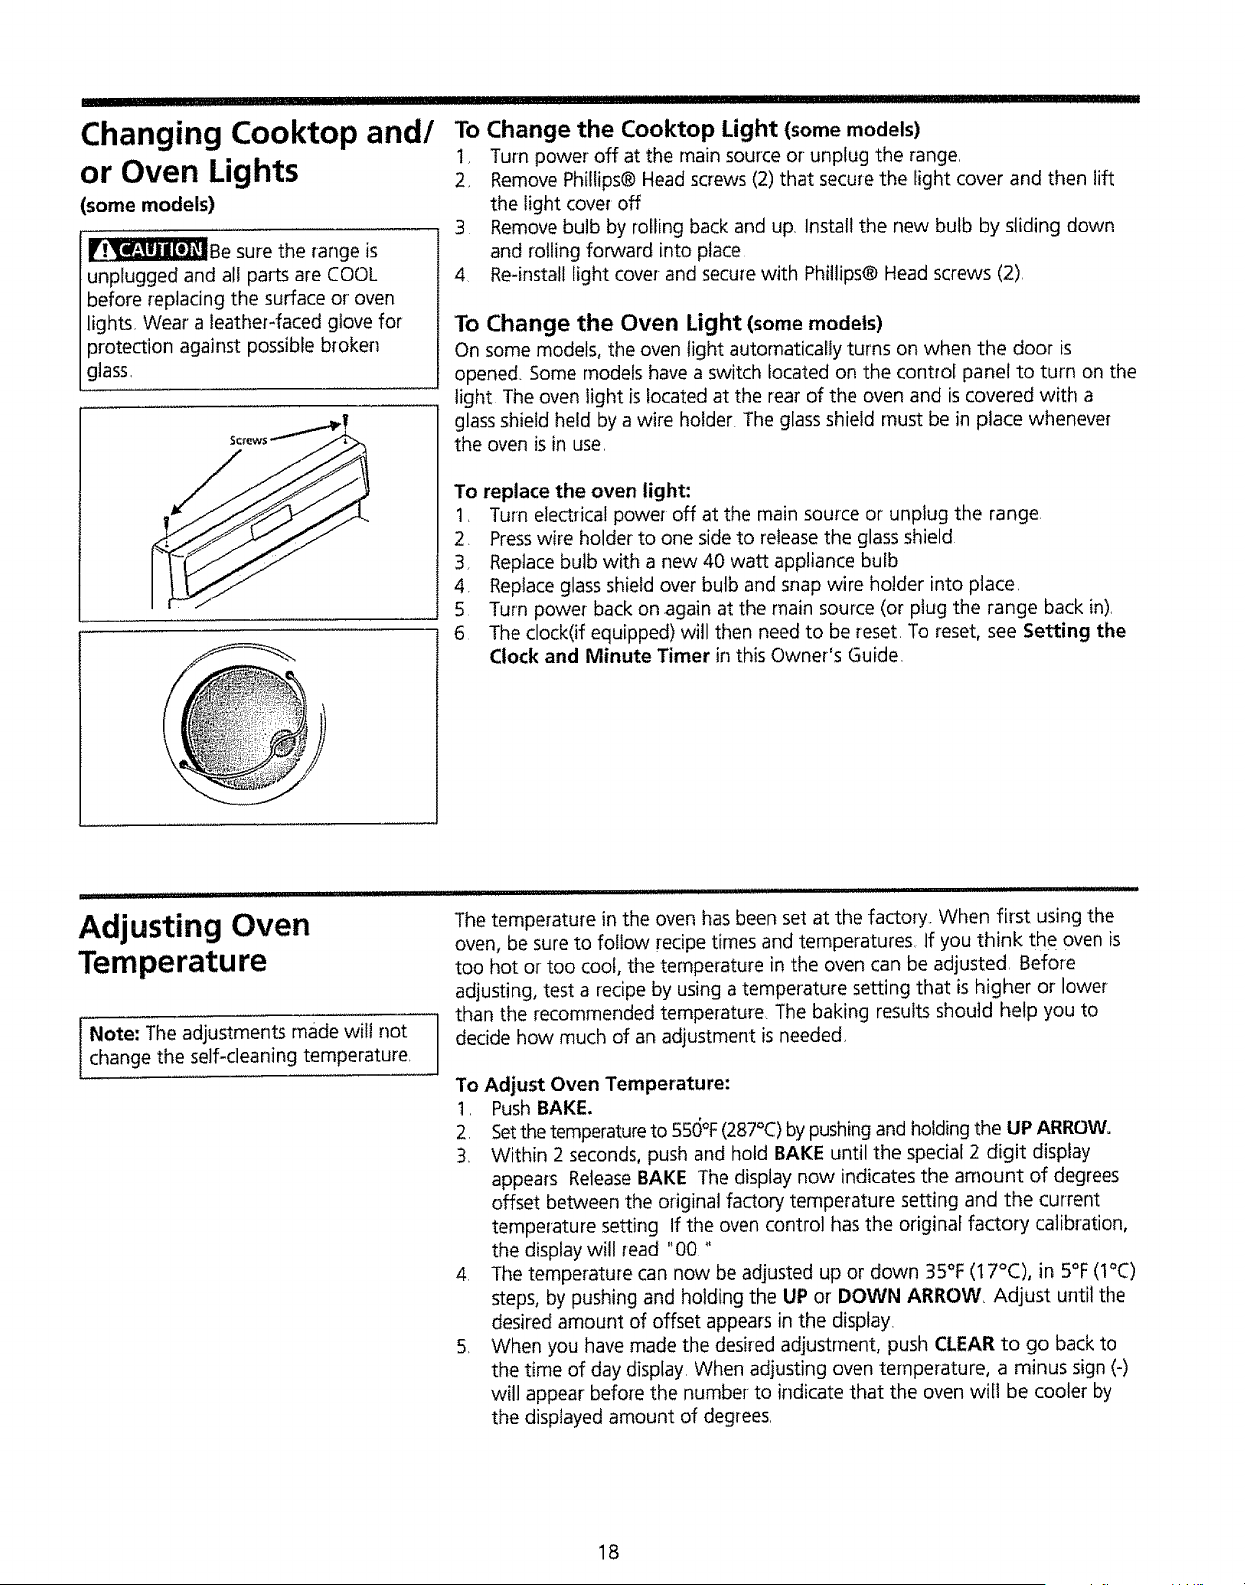
_Be sure the range is
unplugged and all parts are COOL
before replacingthe surface or oven
lights, Wear' a leather-faced glove for
protection against possible broken
glass_
To Change the Cooktop Light (some models)
1, Turn power off at the main source or unplug the range.
2_ Remove Phillips® Head screws (2) that secure the light cover and then lift
the light cover off
3 Remove bulb by rolling back and up. Install the new bulb by sliding down
and rolling forward into place
4 Re-install light cover-and secure with Phillips® Head screws (2).
To Change the Oven Light (some models)
On some models, the oven light automatically turns on when the door is
opened. Some models have a switch located on the control panel to turn on the
light The oven light is located at the rear of the oven and is covered with a
glass shield held by a wire holder. The glass shield must be in place whenever
the oven is in use
To replace the oven light:
t _ Turn electrical power off at the main source or unplug the range
2. Presswire holder to one side to release the glass shield
3, Replace bulb with a new 40 watt appliance bulb
4. Replace glass shield over bulb and snap wire holder into place.
5 Turn power back on again at the main source (or ptug the range back in),
6 The clock(if equipped) will then need to be reset. To reset, see Setting the
Clock and Minute Timer in this Owner's Guide.
Adjusting Oven
Temperature
I Note: The adjustments made will not
change the self-cleaning temperature
u i II'I'IHIIII'
The temperature in the oven has been set at the factory. When first using the
oven, be sure to follow recipe times and temperatures If you think the oven is
too hot or too coot, the temperature in the oven can be adjusted. Before
adjusting, test a recipe by using a temperature setting that is higher or lower
than the recommended temperature The baking results should help you to
decide how much of an adjustment is needed,
To Adjust Oven Temperature:
t_ Push BAKE.
2. Setthe temperatureto 550°F(287°C)by pushing and holding the UP ARROW.
3, Within 2 seconds, push and hold BAKE until the special 2 digit display
appears ReleaseBAKE The display now indicates the amount of degrees
offset between the original factory temperature setting and the current
temperature setting If the oven control has the original factory calibration,
the display will read "00 "
4. The temperature can now be adjusted up or down 35°F (t7°C), in 5°F (1°C)
steps, by pushing and holding the UP or DOWN ARROW, Adjust until the
desired amount of offset appears in the display.
5 When you have made the desired adjustment, push CLEAR to go back to
the time of day display. When adiusting oven temperature, a minus sign (-)
will appear before the number to indicate that the oven will be cooler by
the displayed amount of degrees.
18
Avoid Service Checklist Beforeyou calf for service, review this list, It may saveyou time and expense,
The list includes common occurrences that are not the result of defective
workmanship or materials in this appliance
This oven is equipped with a state of the art electronic oven controller Among
its many features is a full time oven circuit diagnostics system The controller
constantly monitors its internal circuitry as well as several crucial oven circuits to
insure they are atl operating correctly. If at any time one of these systems fails,
the controller will immediately stop operation, beeping and flashing an error
code of F1 or F3 in the display window
OCCURRENCE POSSIBLE CAUSE/SOLUTION
Range is not level°
Poor installation. Place oven rack in center of oven Place a level on the oven
rack, Adjust leveling legs at base of range until the oven rack is level,
Be sure floor is level and is strong and stable enough to adequately support
range.
If floor is sagging or sloping, contact a carpenter to correct the situation
Kitchen cabinet alignment may make range appear unlevel Be sure cabinets are
square and have sufficient room for range clearance
Cannot move appliance easily.
Appliance must be accessible for
service.
Cabinets not square or are built in too tightly Contact builder or installer to
make appliance accessible
Carpet interferes with range Provide sufficient space so range can be lifted over
carpet
Oven control beeps and displays F1
or F3,
Electronic control has detected a fault condition, Push CLEAR to clear the
display and stop the beeping Reprogram oven If fault recurs, record fault
number, push CLEAR and contact authorized servicer
Surface element too hot or not hot
enough.
Incorrect control setting Make sure the correct control is on for the surface
element to be used
Surface element does not heat,
Lightweight or warped pans used Use only flat, evenly balanced, medium or
heavyweight cookware Flat pans heat better than warped pans. Cookware
materials and weight of the material affect heating Heavy- and medium-weight
pans heat evenly, Because lightweight pans heat unevenly, foods may burn
easily
No power to the appliance Check steps under "Entire Appliance Does Not
Operate" in this Avoid Service Checklist,
Incorrect control setting Make sure the correct control is on for the surface
element to be used
Element not making contact in block Follow instructions under "Surface
Elements and Drip Bowls" in the General Cleaning section
Entire oven does not operate. Make sure cord/plug is plugged tightly into outlet
Service wiring is not complete Contact your dealer, installing agent or
authorized servicer
Power outage Check house lights to be sure Call your local electric company
for service,
19
Cooktop andtor Oven lights (some
models) do not ,work,
Replace or tighten bulb See Changing Cooktop and/or Oven Lights (some
models) in this Owner's Guide for instructions.
Oven smokes excessively during
broiling.
Control(s) not set properly Follow instructionsunder Setting Oven Controls,
Make sure oven door is opened to broil stop position.
Meat too close to the element. Reposition the rack to provide proper clearance
between the meat and the element. Preheat broil element for searing..
Meat not properly prepared Remove excessfat from meat Cut remaining fatty
edges to prevent curling, but do not cut into lean.
Grid on broiler pan wrong side up and grease not draining Always place grid on
the broiler pan with ribs up and slots down to allow grease to drip into pan
Grease has built up on oven surfaces. Regular cleaning is necessary when
broiling frequently Old grease or food spatters cause excessive smoking
Poor baking results.
Many factors affect baking results Make sure the proper rack position is used
Center food in the oven and space pans to allow air to circulate Allow the oven
to preheat to the set temperature before placing food in the oven.. Try adjusting
the recipe's recommended temperature or baking time. If you feel the oven is
too hot or cool, see Adjusting Oven Temperature in this Owner's Guide.
Self-cleaning cycle does not work. Control(s) not set properly Follow instructionsunder Oven Cleaning°
Self-cleaning cycle was interrupted Follow steps under' "Stopping or
Interrupting a Self-Cleaning Cycle" under Oven Cleaning
Soil not completely removed after
self-cleaning cycle.
Failure to clean bottom, front top of oven, frame of oven or door area outside
oven seal. These areas are not in the self-cleaning area, but get hot enough to
burn on residue. Clean these areas before the self-cleaning cycle is started.
Burned-on residue can be cleaned with a stiff nylon brush and water or a nylon
scrubber. Be careful not to damage the oven gasket.
Flames inside oven or smoking from
vent,
Excessivespillovers in oven Set self-clean cycle for a longer cleaning time
Excessivespillovers in oven. This is normal, especially for high oven
temperatures, pie spillovers or large amounts of grease on bottom of oven.
Wipe up excessive spillovers before starting cycle. If flames or excessive smoke
are present, stop the self-clean cycle and follow steps under' "Stopping or
Interrupting a Self-Cleaning Cycle" in the Oven Cleaning section.
2O
® Range Warranty
f
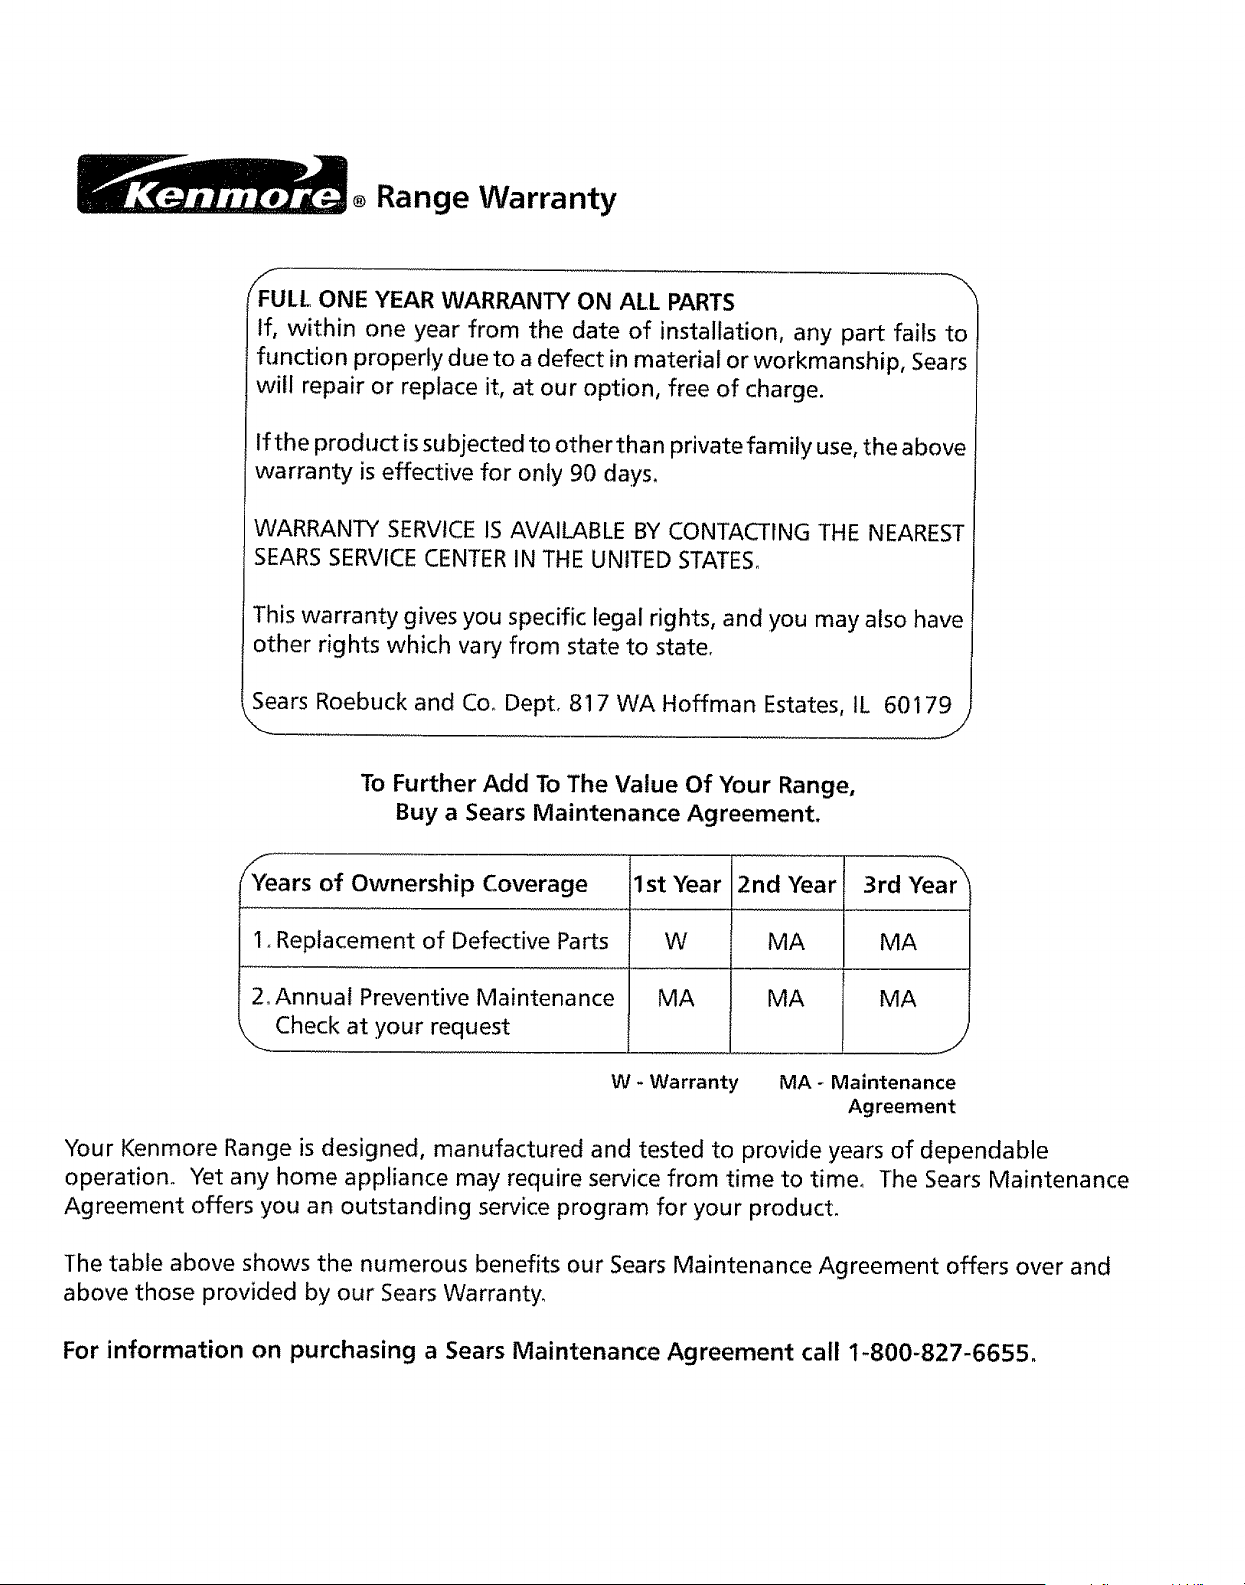
FULL ONE YEAR WARRANTY ON ALL PARTS
If, within one year from the date of installation, any part fails to
function properly due to a defect in material or workmanship, Sears
will repair or replace it, at our option, free of charge.
If the product is subjected to other than private family use, the above
warranty is effective for only 90 days.
WARRANTY SERVICE IS AVAILABLE BY CONTACTING THE NEAREST
SEARS SERVICE CENTER IN THE UNITED STATES_
This warranty gives you specific legal rights, and you may also have
other rights which vary from state to state,
Sears Roebuck and Coo Depto 817 WA Hoffman Estates, tL 60179
---_ i/
To Further Add To The Value Of Your Range,
Buy a Sears Maintenance Agreement.
/Years of Ownership Coverage
1, Replacement of Defective Parts
2. Annual Preventive Maintenance
_ Check at your request
1 st "{ear 2nd Year
3rd Year
W
MA
MA
MA
MA
MA
.J
W - Warranty
MA- Maintenance
Agreement
"tour Kenmore Range is designed, manufactured and tested to provide years of dependable
operation° Yet any home appliance may require service from time to time. The Sears Maintenance
Agreement offers you an outstanding service program for your product
The table above shows the numerous benefits our Sears Maintenance Agreement offers over and
above those provided by our Sears Warranty,
For information on purchasing a Sears Maintenance Agreement call 1-800-827-6655.
................... u i,i iii i,l,l,l,lUll ........................ Ul ii1,1 ii ii ii , i iii
u'n ii i n,lll,l_ll
For in-home major brand repair service:
Call 24 hours a day, 7 days a week
1-800-4-MY-HOME sM(1-800-469-4663)
Para pedir servicio de reparacion a domicillio - 1-800-676-5811
In Canada for all your service and parts needs call
Au Canada pour tout le service ou les pi_ces - 1-800-665-4455
For repair or replacement parts you need:
Call 7 am - 7 pm, 7 days a week
1=800-366-PART (1-800-366-7278)
Para ordenar piezas con entrega a domicilio - 1-800-659-7084
For the location of a Sears Parts and Repair Center in your area:
Call 24 hours a day, 7 days a week
1-800-488-1222
For information on purchasing a Sears Maintenance Agreement
or to inquire about an existing Agreement:
Call 9 am - 5 pm, Monday - Saturday
1-800-827-6655
The ServiceSideof Sears:
............... ii I III'I'I IIILILU II
Registre su modelo y numero de serie ..................................... Portada
Instrucciones importantes sobre la seguridad ................................. 2-4
Funciones del panel de control ............................................................ 5
Reglaje del reloj y del minutero ........................................................... 6
Ajuste de los controles de la superficie ............................................... 7
Antes de ajustar dei homo y del Cajbn de Calentar y Retener ......... 8
Ajuste de los controles det horno ................................................... 9-11
Reglaje de los controles del Caj6n de Calentar y Retener
(algunos modelos) .............................................................................. 12
Limpieza del homo ........................................................................ 13-14
Limpieza general ............................................................................ 15-17
C6mo cambiar las bombillas de la estufa y/o del horno
(algunos modelos) .............................................................................. 18
Ajuste de la temperatura del homo .................................................. 18
Lista para evitar las llamadas de servicio ..................................... 19-20
Garantia ............................................................................................... 21
Servicio Sears ...................................................................................... 22
Lea todas las instrucciones antes de
usar este aparato, Este manual
contiene informaci6n importante
sobre:
e La operaci6n
• Elcuidado
° El servicio
Lea y guarde estas instrucciones
Registre su modelo y n_mero de serie
En el espacio siguiente registre el modelo y el numero de serie que
se encuentran en la plata ubicada debajo de la cubierta abatible de
la estufa
Modelo n_mero:
Nt_mero de serie:
Fecha de compra:
Sears, Roebuck and Co., Hoffman Estates, IL 60179 EE.UU.
P!N 316000931 (9805)

iI _ II III_........................
INSTRUCCIONES IMPORTANTES SOBRE LA SEGURIDAD
Lea todas las instrucciones antes de usar este
aparato. Guarde estas instrucciones para
consulta futura.
Estagufa contiene slmbolos e instrucciones importantes sobre
la seguridad Enseguida, se da una breve explicaci6n sobre el
uso de estos s_mbofos Por favor preste atenciOn especial a
estos slmbolos y siga todas las instrucciones Esta es una
explicaci6n breve del uso de estos sfmbolos.
Este slmbolo alerta acerca de situaciones
que pueden provocar serios daflos corporales, muerte o da_os
materiales
Esteslmbolo alerta acerca de situaciones que
pueden provocar daflos corporales o materiales
- Quite todas las cintas y todo el embalaje antes de usar
Jaestufa. Despu6s de habeHa desempacado destruya
todo cart6n de embalaje y las botsas pl6sticas. Nunca
permita que los niflos jueguen con el material de embalaje
• Instalaci6n correcta--Aseg_rese que un t6cnico calificado
instale y ponga a tierra su aparato correctamente y de
acuerdo con la ,31tima edici6n del C6digo National de
Electricidad ANSIINFPA No. 70, asi como de acuerdo con
los requisitos de los c6digos locales. Instale su aparato
solamente de acuerdo alas instrucciones impartidas en la
literatura adjunta correspondiente a esta estufa
Pidalea su proveedor que le recomiende un t0cnico calificado,
asfcomo un servicio de reparaciOn autorizado Para los casos
de emergencia0 aprenda a desconectar el suministro el_ctrico
de su estufa, ya sea sirvi_ndose del interriJptor de circuito o de
la caja de fusibles
o Servicio pot parte del usuario--No repare ni reemplace
ninguna parte del aparato a menos que los manua]es asi
1o recomienden. Solamente un t_cnico calificado puede
ocuparsede todos los demas servicios; asi se reducira el riesgo
de lesiones personates y de dafios a la estufa
o Nunca modifique ni altere la construcci6n de una estufa
quit_ndole sus paras niveladoras, los paneles, el
revestimiento de los alambres, los tornillos, los soportes
antivuelco ni sustornillos, ni cualquier parte del producto_
_Escalar, apoyarse o sentarse sobre las
puertas o gavetas de esta estufa puede provocar lesiones
de consideraci6n y tambi6n puede dafiarse la estufa. No
permita que los nitros se trepen sobre la estufa o jueguen a su
alrededor El peso de un ni_o sobre una puerta abierta podrla
provocar el que la estufa se votteara, to que a su vez darfa pot
resultadoquemaduras graves u otros daflos corporales,
_No almacene articulos de inter6s para los
nifios dentro de los armarios situados por encima de la
estufa o en su parte posterior. Losnifios que se subieran
sobre la estufa para alcanzar objetos podflan resultar
gravemente lesionados
° Todas las estufas pueden
votcarse.
o Esto podria resultar en lesiones
personaleso
° Instale el dispositivo antivuelcos
que se ha empacado junto con
esta estufa,
• Lea las instrucciones de
instalaciono
_Para evitar que la estufa se incline, la
estufa debe set asegurada por los soportes antivuelco
que son incluidos con la estufa. Estos soportes deben
ser adecuadamente instalados. Para averiguar que los
soportes se instaten adecuadamente, quite *el panel
inferior o el cajbn de almacenaje para averiguar que !os
soportes antivuelco se engranen correctament. Refiera
alas lnstrucciones de insta[acibn para saber la
instalaci6n apropiada de los soportes antivuelco.
*Nora: En los modelos con un caj6n de calentar y
retener, un plato de metal a la base del caj6n impide
que usted pueda ver los soportes para verificar el
engranaje. En estos casos, tire el centro del fondo del
aparato hacia adetante para asegurarse de que los
soportes se engranen,
• Almacenamiento dentro o sobre el aparato_No deben
almacenarse materiales quemables en el homo de la
estufa, cerca de los quemadores, ni en su gaveta (si
hay) o en el Caj6n de Calentar y Retener (si hay). Esto
inctuye articu!os de papel, plastico y de tela, tales como tibros
de cocina, utensilios de pl6stico y toatlas, asi como lfquidos
quemables, No almacene expfosivos, tales como latas de
aerosol, cerca o encima de la estufa, Los materiales
quemables pueden explotar y causar incendios o da_os a la
propiedad, No utilice el homo ni e{ Caj6n de Calentar y
Retener (si hay) para almacenemiento
• No de_e a los nifios solos. Nunca hay que dejar a los
nifios solos o desatendidos en el sitio en el que se est&
usando un aparato_ Nunca les permita senta_se o pararse
en ninguna parte de un aparato
• No toque los quemadores de superficie, las areas
cercanas a esos quemadores, el quemador det homo o
tas superficies interiores del homo o el Caj6n de
Calentar y Retener. Las areas cercanas a los quemadores de
superficie pueden calentarse io suficiente como para causar
quemaduras Durante y despuL_s de su uso, no toque, ni
permita que ningun tipo de tela o material quemables
toquen estas areas hasta que hayan tenido el tiempo
necesario de enfriarse Entre elias se cuentan la cubierta de
la estufa, las superficies que se encuentran mirando a la
cubierta, las aber¢uras de los respiraderos dei horno y las
superficies cercanas a los respiraderos, ta puerta y la ventana
dei homo
Q P6ngase ropa adecuada_Nunca lleve puesta ropa
suelta o prendas que cuefguen mientras est_ usando ta
estufa. No deje que su ropa ni otros mate_iales quemables
entren en contacto con superficies calientes
JNSTRUCCIONES IMPORTANTES SOBRE LA SEGURIDAD
_Nunca use su estufa para mantener un
cuarto ca|iente ni para calentarlo,
o No vierta agua ni harina sobre el fuego provocado por
grasa-- Ahogue las llamas con la tapa de una olla, o
con bicarbonato de sosa, un producto quimico seco o
un extinguidor a base de espuma.
, Cuando caliente manteca o grasa, obs6rvela de cerca,
La manteca o la grasa pueden incendiarse si se catientan
demasiado
* Use solamente manoplas o agarraderas secas--Cuando
se las pone sobre superficies calientes, las manop|as, o
las agarraderas ht_medas o mojadas, pueden causar
quemaduras resultantes del vapor. No deje que dJchos
protectores toquen los quemadores calientes ni las
resistencias interiores de! homo At ask utensil|as calientes,
no use toallas ni articu[os de tela gruesos en lugar de una
manopfa o una agarradera
. No caliente envases de comida sin antes abrirlos--La
presi6n resultante podria causar el estallido de! envase
y provocar lesiones.
o Desmonte la puerta det homo de cualquier estufa que
no se use porque se va a atmacenar o desechar.
_Las temperaturas altas pueden daSar el
control electr6nico. Cuando se use el aparato pot primera
vez, o cuando el aparato no ha sido usado por un periodo
de tiempo largo, asegt_rese de que la unidad ha estado en
temperaturas pot encima de 32°F por to menos 3 horas antes
de conectar la electricidad al aparato.
, IMPORTANTE--No intente usar su horno cuando haya
ocurrido una falta ei6ctrica., Si la corriente el6ctrica
falla, apague el homo, Si no se ha apagado el homo y
luego vuelve ta corriente, el aparato comenzar_ a funcionar
de nuevo Entonces, la comida que se habla dejado a cooer
podrla quemarse o echarse a perder
Instrucciones importantes para el uso de la
cubierta de su estufa
= Familiaricese con |as peritlas que controlan cada
quemador de superficie.
* Utilice una cacerola de tama5o adecuado--Este aparato
tiene uno o mas quemadores de superficie de varios
tamafios Seleccione utensilios con el fondo piano Io
suficiente grande para cubrir la superficiedel elemento
quemador El usa de utensilios demasiado pequefios
expondra una porci6n det quemador al contacto directo y
puede resultar en un encendido de ropa Una relaci6n
adecuada entre quemador y utensilio tambi_n mejorar_ la
eficada de! producto
. Los mangos de los utensilios deben quedar hacia
adentro y no tienen que estar extendtdos encima de los
quemadores adyacentes--Fara reducir el riesgo de
quemaduras, ignici6n de mater|ales inflamabies y derrames
debido ai contacto no intencionat con eI utensil|o, hay que
colocar su mango de tal manera que quede volteado hacia
adentro y no sobre los quemadores adyacentes
o No sumerja ni remoje elementos de quemador
separabtesJLos quemadores nunca se deben sumergir en
agua Los quemadores se autolimpian durante el
fundonamiento normal
= Nunca deje desatendidos los quemadores cuando est&n
funcionando a alta temperatura_Lo que al hervir causa
humo o desbordamientos de grasa puede provocar ia ignici6n.
Asimismo, una cacerofa que se ha dejado hervir hasta secarse
puede derretirse
° Aseg_rese de que los recipientes de goteo est_n bien
ubicados--La ausencia de estos recipientes durante la
cocci6n pueden causar daffos aI alabrado o a tos
componentes que est_n debajo
° Revestimientos de protecci6n_No use hojas de aluminio
para proteger las bandejas de los quemadores de superficie,
e! rondo del homo o en cuaiquier otra parte del aparato
Solamente use laminiila de aluminio como se recomienda
para cooer, para cubrir el alimento siendo coo|do Otros usos
de revestimientos protectores o Laminilta de aluminio puede
resultar en el riesgo de choque eIectrico o incendio
o Utensilios de cocina vidriados_Solamente ciertos tipos
de vidrio, vitroceramica, cer_mica, barro y otros utensilios
vidriados se pueden utilizar sobre la cubierta de la estufa sin
romperse a causa de cambios de temperatura subitos Vea
las recomendaciones deI fabricante acerca de su uso sobre la
cubierta de la estufa
o No use cubiertas decorativas para los quemadores de
superficieo Si se enciende un quemador accidentaimente, la
cubierta decorativa se calentar_ y puede derretirse Usted no
podr_ ver que el quemador est.1 encendido Se quemara si
toca tas cubiertas caiientes

J_ ..... ' '1 ..................III
INSTRUCCIONES IMPORTANTES SOBRE LA SEGURIDAD
Instrucciones importantes para usar su horno/
Cajbn de Calentar y Retener (si hay)
• Tenga cuidado cuando abra la puerta del horno o el
Caj6n de Calentar y Retener--Mant_ngase a un iado de ia
estufa cuando abra la puerta de un homo ca]iente Deje que
el aire catiente o e! vapor escapen antes de retirar comida del
hornoiCaj6n de Calentar y Retener o af volver a rnetefla
o Mantenga los ductos de aireaci6n del homo sin
obstrucciones_ El homo se ventfla debaio del tab]ero
posterior, Tocar tas superficies de ese area cuando el homo
est_ funcionando puede provocar quemaduras graves
Tampoco coloque art[cutos de p]astico, o sensibles al calor,
sobre el respiradero del horno o cerca de 510ya que pueden
derretirse o encenderse
° Colocaci6n de las parriltas del horno o et Caj6n de
Calentar y Retener (si hay). Coloque siempre tas parriItas
del homo en el sitio deseado, cuando est_ fifo Si hay que
mover tas parriilas cuando el homo est_ caliente, hEgalo con
extrema precauci6n Use manoplas o agarraderas, y tome la
pa_ritta con ambas manos para co]ocaria donde desee No
deje que las agarraderas hagan contacto con la llama det
quemador del homo caliente o e! interior de L_ste Saque
todos los utensilios de la parritla antes de retiraria
o No use el asador sin su complernento_ E1asador y su
charola ranurada permiten que escurra ]a grasa, y la
mantienen alejada det intenso caIor del asador
• No cubra la charola ranurada del asador o el Caj6n de
Calentar y Retener con hojas de aluminio, La manteca y
ta grasa pueden encenderse
o No toque la bornbilla de luz con un paso hQmedo
cuando est_ caliente, Hacerlo podrta causar el estaliido de
la bombi]ta Antes de quitar o reemplazar la bombilla,
desconecte la estufa o apaguela para que no le Hegue
corfiente
Instrucciones importantes para la limpieza de
su estufa
* Limpie la estufa regularmente para rnantener todas sus
partes libres de grasa y evitar que se enciendan. Preste
atenci_n especial al clrea debajo de cada quemador de
supe_ficie, Hay que mantener limpias las campanas de
aireaciOn del ventilador y [os filtros de grasa No permita que
[a grasa se acumule La grasa que se deposita en el
ventilador puede encenderse Tome en cuenta las
recomendaciones det fabricante de la campana
° Limpiadores y aerosoles--Observe siempre las
instrucciones de uso que recomiendan los fabricantes Tome
en cuenta el hecho que el exceso de residuos de limpiadores
y aerosotes podrla encenderse, Io cuai a su vez podrIa
provocar dahos y/o lesiones
Hornos autolimpiantes
Lirnpie en el ciclo autolimpiante solamente las partes
det homo que aparecen en el manual del usuario_ Antes
de hater que el horno se autolimpie, quite la bandeja del
asador y cualquier utensilio que se haya guardado en el
homo
° No limpie la junta de empaque de la puerta del horno.
La junta de empaque de la puerta es de suma importancia
para fograr que derre herm_ticamente Hay que obrar con
mucho cuidado pafa no frotar; da_ar ni mover la junta de
empaque
o No us6 limpiadores para hornos. No use dentro ni
alrededor del homo ningan tipo de limpiador para homos ni
ningun tipo de revestimiento protector para hornos
GUARDE ESTAS INSTRUCCIONES
4
Funciones del panel de LEA ESTAS INSTRUCCIONESCON CUIDADO ANTES DE USAR EL HORNO.
Para hater uso de su homo de manera satisfactoria, familiaHcese con [as
control diversas funciones del homo, tal como se describen a continuaci6n.
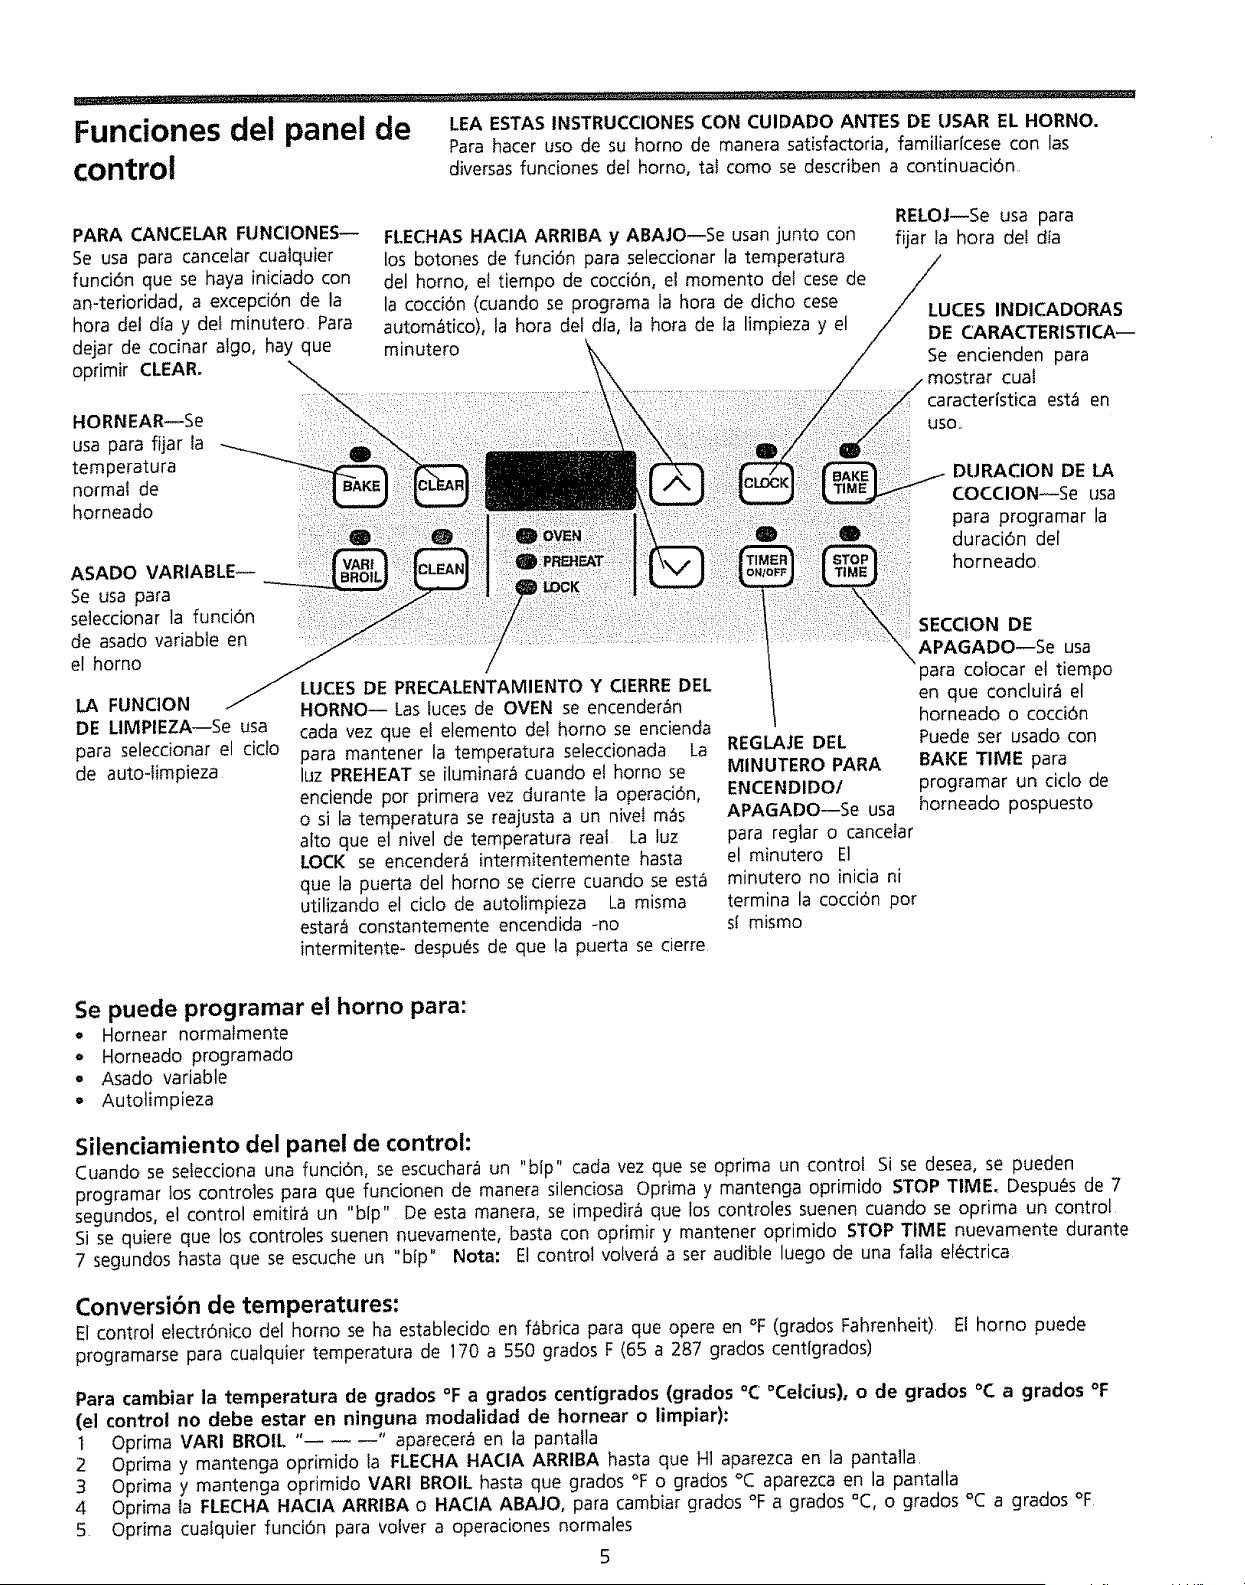
PARA CANCELAR FUNCIONES--
Se usa para cancelar cuatquier
funci6n que se haya iniciado con
an-terioridad, a excepci6n de la
horn del din y def minutero. Para
dejar de cocinar atgo, hay que
oprimir CLEAR°
HORNEAR_Se
usa para fijar la
temperatura
normal de
horneado
ASADO VARtABLE_
Se usa para
seleccionar la funci6n
de asado variable en
el homo
LA FUNCION
DE LIMPtEZA--Se usa
para seleccionar el cicto
de auto-Iimpieza.
FLECHAS HACIA ARRIBA y ABAJO--Se usan junto con
los botones de funci6n para seleccionar la temperatura
del homo, e! tiempo de cocci6n, el momento det cese de
la cocci6n (cuando se programa la horn de dicho cese
autom_tico), la horn del din, la horn de la limpieza y el
minutero
LUCES DE PRECALENTAMIENTO Y ClERRE DEL
HORNO_ Las tuces de OVEN se encenderEn
cada vez que et elemento def homo se encienda
para mantener la temperatura seleccionada La
luz PREHEAT se iluminar_ cuando el homo se
enciende pot primera vez durante la operaci6n,
o si la temperatura se reajusta a un nivet m_s
alto que el nivel de temperatura real La luz
LOCK se encender_ intermitentemente hasta
que la puerta del homo se cierre cuando se esta
utilizando el ciclo de autolimpieza La misma
estar_ constantemente encendida -no
intermitente- despu_s de que la puerta se cierre,
REGLAJE DEL
MINUTERO PARA
ENCENDIDOI
APAGADO--Se usa
para reglar o cancelar
el minutero El
minutero no inicia ni
termina la coccion por
sl mismo
RELOJ_Se usa para
fiiar la hora del dla
LUCES INDICADORAS
DE CARACTERISTICA_
Se encienden para
cual
caracterlstica esta en
USO ,,
DURACION DE LA
COCCION_Se usa
para programar la
duraci6n de[
horneado
SECCtON DE
APAGADO_Se usa
para colocar el tiempo
en que concluir_ el
horneado o cocci6n
Puede set usado con
BAKE TIME para
programar un ciclo de
horneado pospuesto
Se puede programar el homo para:
, Hornear normafmente
o Horneado programado
, Asado variable
• Autolimpieza
Silenciamiento del panel de control:
Cuando se selecciona una funci6n, se escuchar_ un "blp" cada vez que se optima un control Si se desea, se pueden
programar los controles para que funcionen de manera silenciosa Optima y mantenga oprimido STOP TIME, Despu_s de 7
segundos, el control emitirLl un "blp" De esta manera0 se impedira que los controles suenen cuando se oprima un control
Si se quiere que los controles suenen nuevamente, basta con oprimir y mantener oprimido STOP TIME nuevamente durante
7 segundos hasta que se escuche un "blp" Nora: El control volver_ a ser audible luego de una faila el_ctrica
Conversibn de temperatures:
El control electr6nico det homo se ha establecido en fabrica para que opere en °F (grados Fahrenheit), El homo puede
programarse para cualquier temperatura de 170 a 550 grados F (65 a 287 grados cent[grados)
Para cambiar la temperatura de grados °F a grados centigrados (grados °C _Celcius), o de grados °C a grados °F
(el control no debe estar en ninguna modalidad de hornear o limpiar):
I Oprima MARl BROIL .... aparecer_ en ia pantatla
2 Oprima y mantenga oprimido la FLECHA HACIA ARRIBA hasta que H1 aparezca en la pantalla,
3 Oprima y mantenga oprimido VAR! BROIL hasta que grados °F o grados °C aparezca en la pantalla
4 Oprima la FLECHA HACIA ARRIBA o HAClA ABAJO, para cambiar grados °F a grados °C, o grados °C a grados °F
5 Oprima cualquier funci0n para vofver a operaciones normales
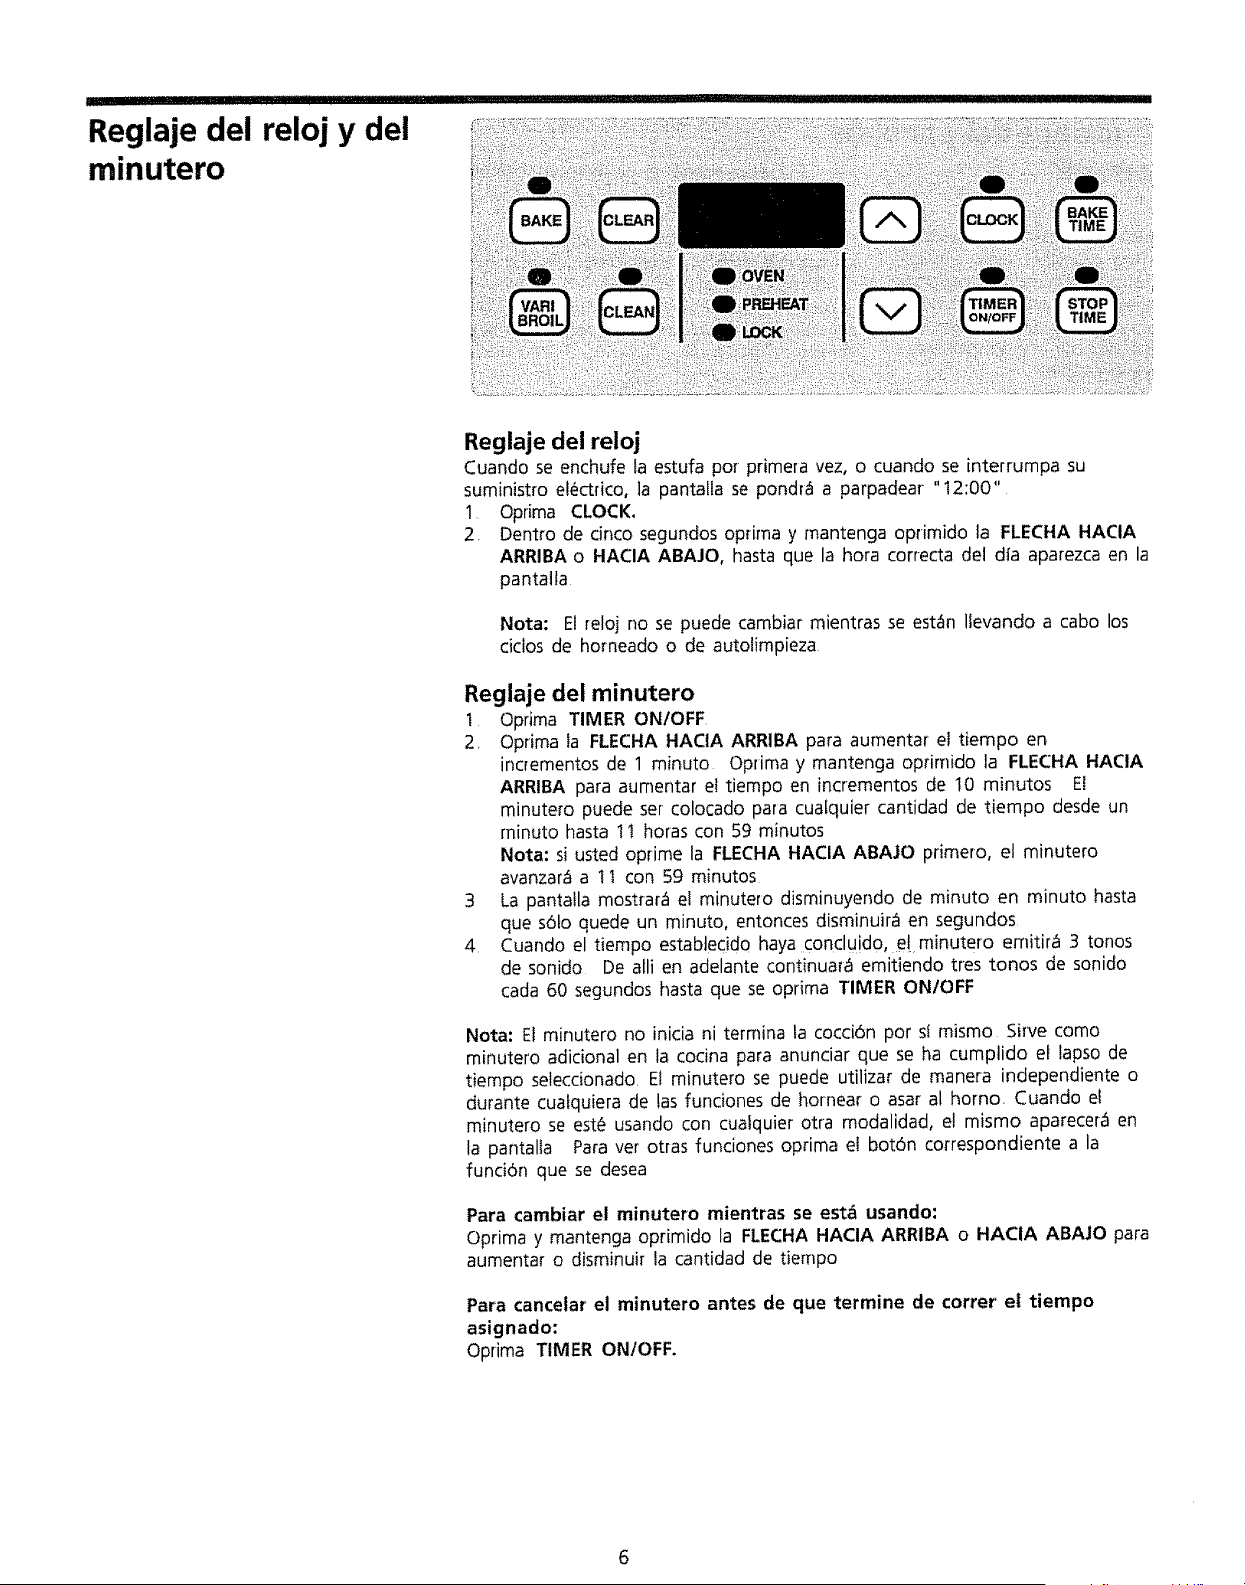
Reglaje dei reloj y del
minutero
Reglaje dei reloj
Cuando se enchufe ta estufa pot primera vez, o cuando se interrumpa su
suministro et_ctrico, la pantaila se pondrcl a parpadear" 12:00"
1 Optima CLOCK.
2. Dentro de cinco segundos optima y mantenga oprimido ]a FLECHA HACIA
ARRIBA o HACIA ABAJO, hasta que la hora correcta del dfa aparezca en la
pantalla
Nora: El reloj no se puede cambiar mientras se est_n Ilevando a cabo los
delos de homeado o de autolimpieza
Reglaje del minutero
1 Opdma TIMER ON/OFF
2, Oprima la FLECHA HACIA ARR1BA para aumentar el tiempo en
incrementos de 1 minuto Optima y mantenga oprimido la FLECHA HACIA
ARRIBA para aumentar el tiempo en incrementos de 10 minutos El
minutero puede set colocado para cuafquier cantidad de tiempo desde un
minuto hasta 11 horas con 59 minutos
Nota: si usted oprime la FLECHA HAClA ABAJO primero, el minutero
avanzar_ a tt con 59 minutos
3 La pantatla mostrara el minutero disminuyendo de minuto en minuto hasta
que s6to quede un minuto, entonces disminuira en segundos
4 Cuando el tiernpo establecido haya concluido, el minutero emitir_1 3 tonos
de sonido De alli en adelante continuara emitiendo tres tonos de sonido
cada 60 segundos hasta que se optima TIMER ON/OFF
Nora: El minutero no inicia ni terrnina la cocci6n por st mismo Sirve como
minutero adicional en la cocina para anunciar que se ha cumplido el lapso de
tiempo seleccionado, El minutero se puede utilizar de manera independiente o
durante cuatquiera de las funciones de hornear o asar al homo, Cuando el
minutero se est6 usando con cualquier otra modalidad, e! mismo aparecer_ en
la pantalla Para ver otras funciones oprima el bot6n correspondiente a la
funci6n que se desea
Para cambiar el minutero mientras se est_ usando:
Oprima y mantenga oprimido la FLECHA HAClA ARRIBA o HACIA ABAJO para
aumenta_ o disminuir la cantidad de tiernpo
Para cancelar el minutero antes de que termine de correr et tiempo
asignado:
Optima TIMER ON/OFF.
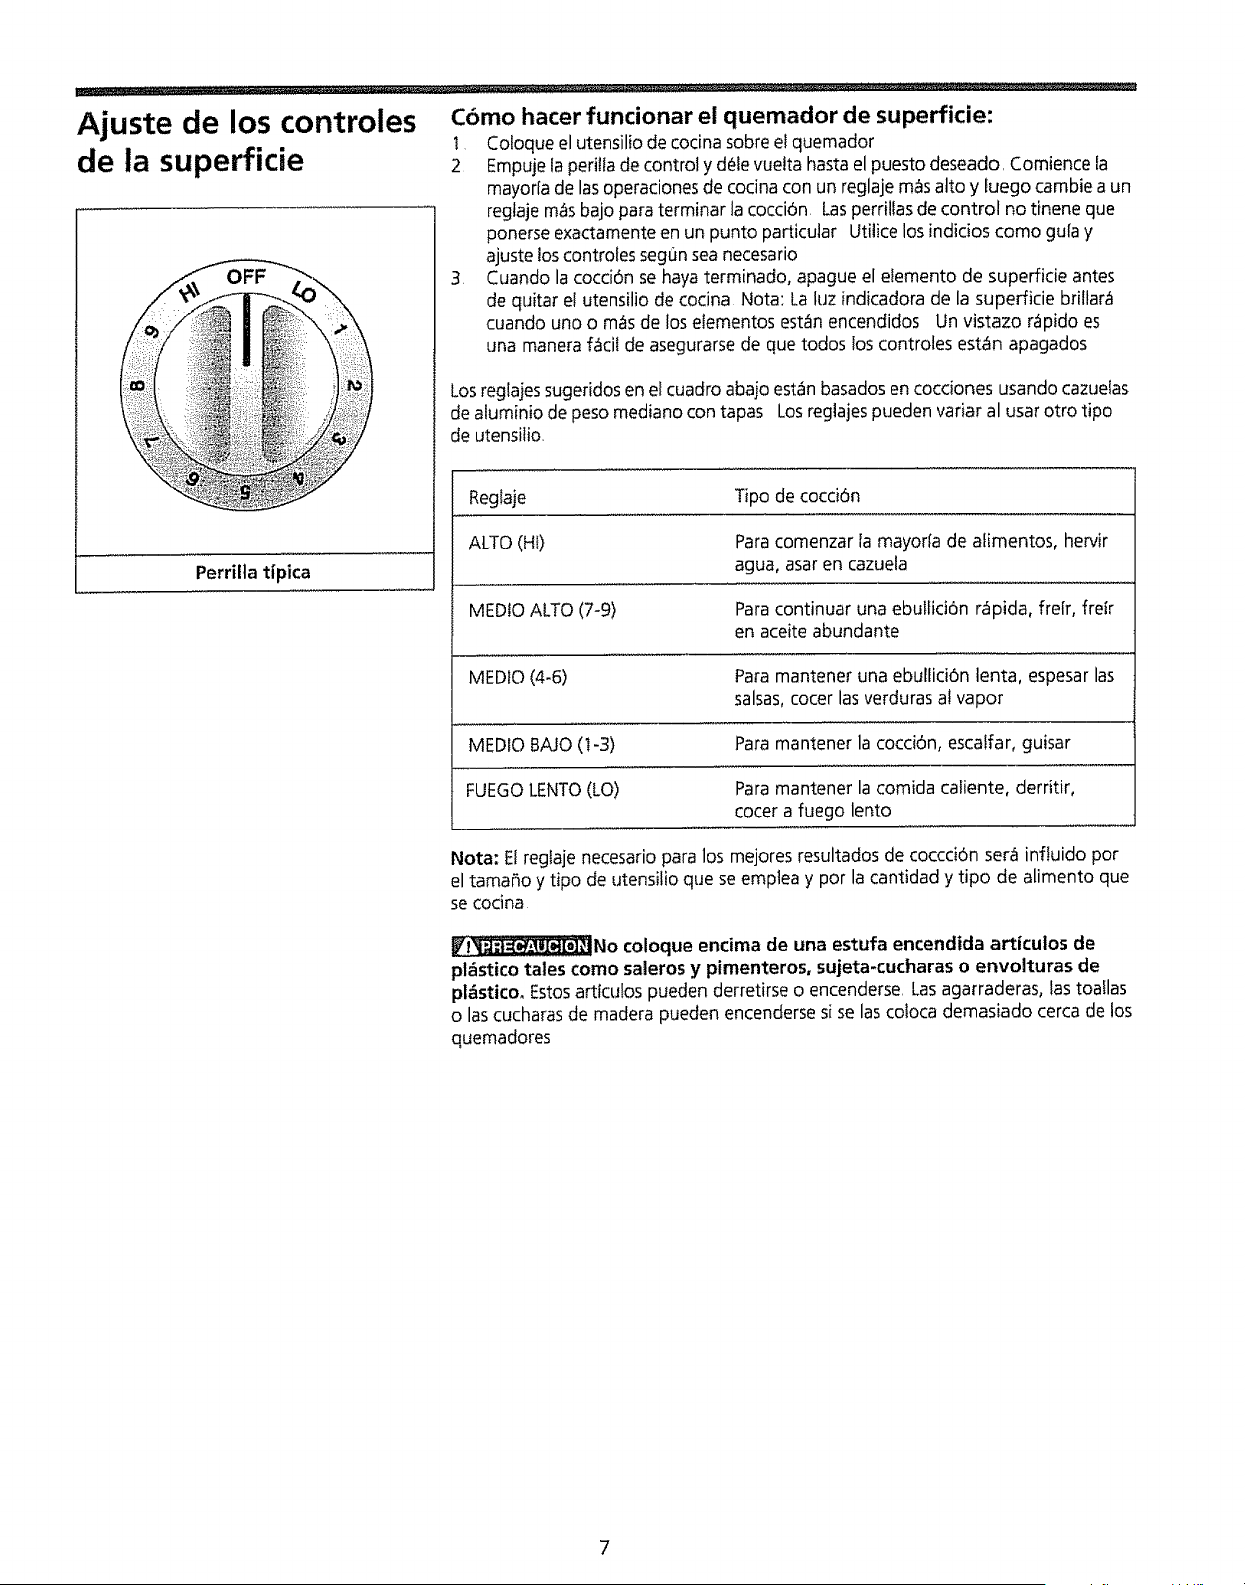
Ajuste de los controles
de la superfide
Perrilta tfpica
C6mo hacer funcionar el quemador de superficie:
t Coloque el utensilio de cocina sobre el quemador
2 Empuje la peri!la de control y d_le vuelta hasta el puesto deseado, Comience la
mayorla de las operaciones de cocina con un reglaje m_s alto y luego cambie a un
regtaje m_s bajo para terminar la cocciOn Las perriltas de control no tinene que
ponerse exactamente en un punto particular Utilice los indidos como gufa y
ajuste los controles seg0n sea necesario
3. Cuando la cocci6n se haya terminado, apague el elemento de superficie antes
de quitar e! utensilio de cocina Nota: La luz indicadora de la superficie brillar_
cuando uno o m_s de los eIementos estEn encendidos Un vistazo r_pido es
una manera f_ciI de asegurarse de que todos los controles est_n apagados
Los reglajes sugeridos en el cuadro abajo estan basados en cocciones usando cazuelas
de aluminio de peso mediano con tapas Los reglajes pueden variar al usar otro tipo
de utensilio,
Reglaje Tipo de cocci6n
ALTO (HI) Para comenzar Ia mayorla de afimentos, hervir
agua, asar en cazuela
MEDtO ALTO (7-9) Para continuar una ebullid6n r_pida, frefr, fretr
en aceite abundante
MEDIO (4-6) Para mantener una ebullici6n lenta, espesar las
salsas, cocer las verduras al vapor
MEDIO BAJO (I-3) Para mantener la cocci6n, escatfar, guisar
FUEGO LENTO (LO) Para mantener la comida catiente, derritir,
cocer a fuego lento
Nota: Et reglaje necesario para los mejores resultados de coccci6n sera inftuido pot
el tama_o y tipo de utensilio que se emplea y por la cantidad y tipo de alimento que
se cocina
_No coloque encima de una estufa encendida articulos de
pl_stico tales como saleros y pimenteros0 sujeta-cucharas o envolturas de
pl_stico_ Estos articulos pueden derretirse o encenderse, Las agarraderas, las toaflas
o las cucharas de madera pueden encenderse si se las coloca demasiado cerca de los
quemadores
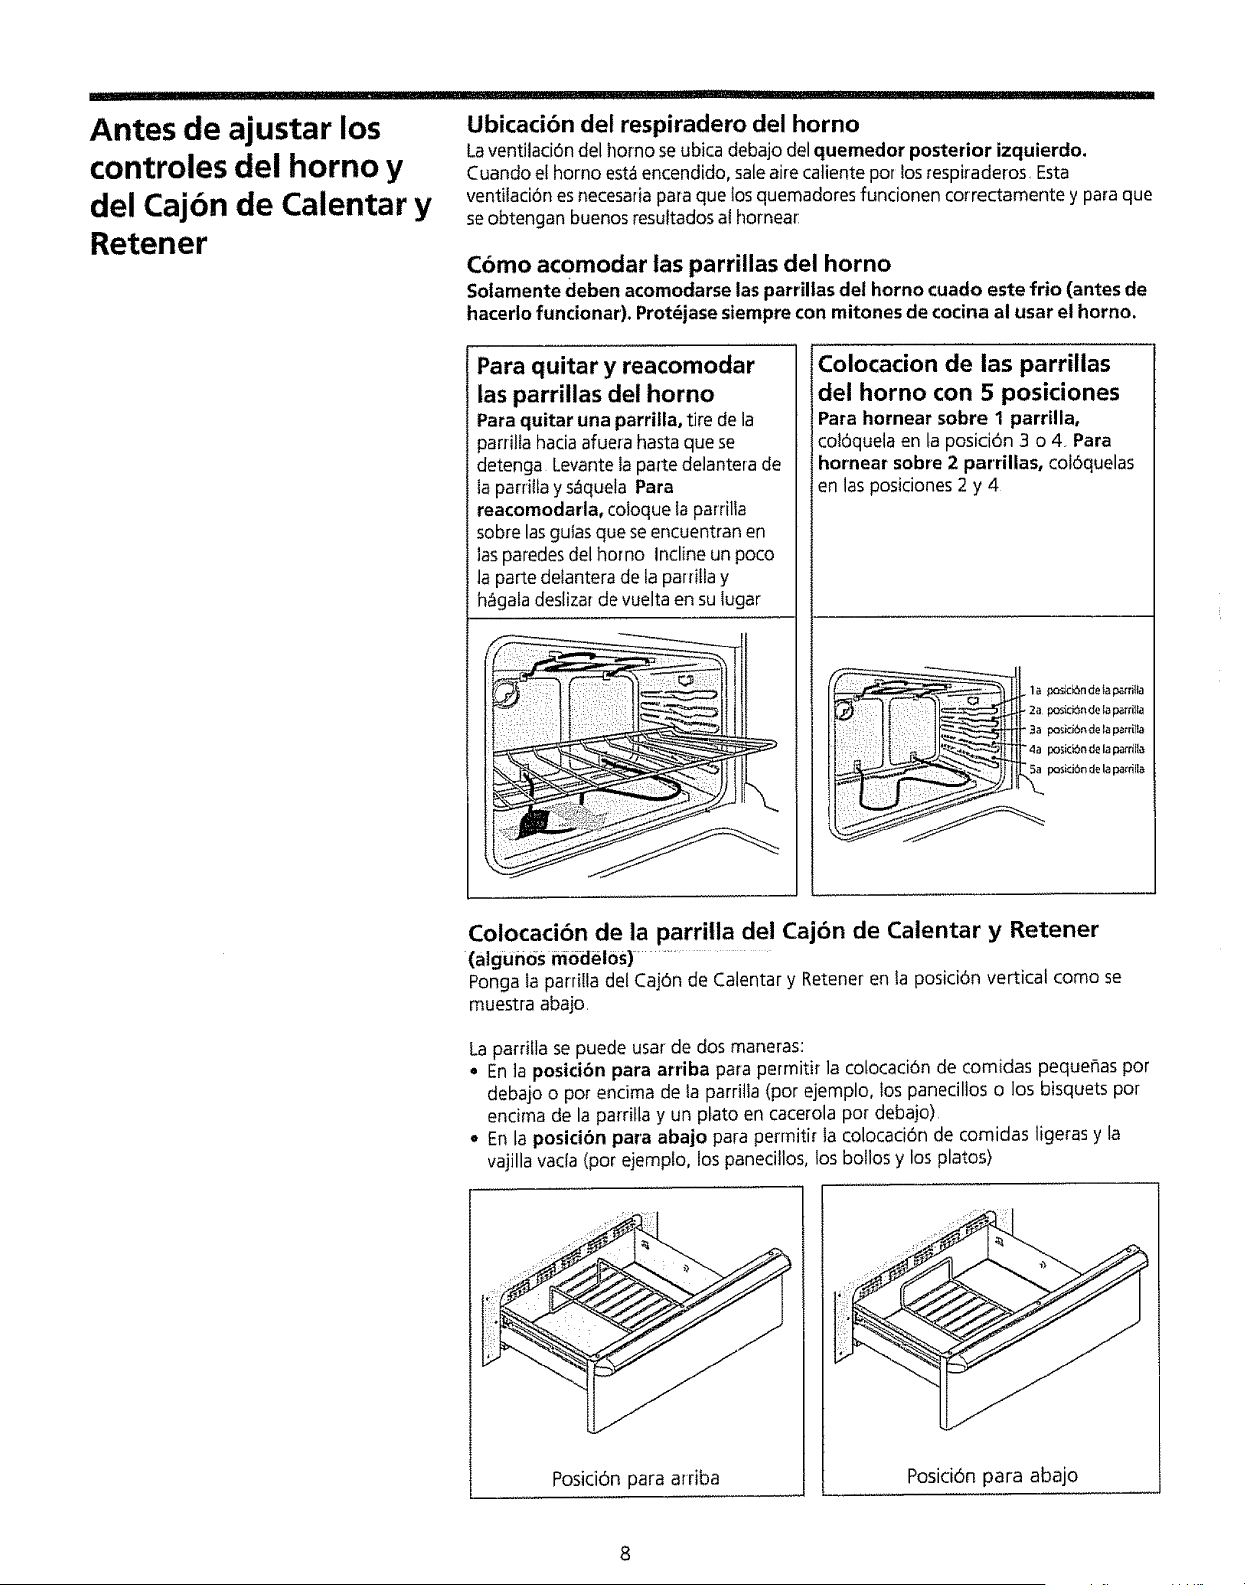
Antes de ajustar los
controles dei horno y
del Cajbn de Calentar y
Retener
Ubicacibn del respiradero del horno
La ventilaci6n del homo se ubica debajo del quemedor posterior izquierdo,
Cuando el homo est.1encendido, sale aire catiente por los respiraderos, Esta
ventilaci6n es necesafia para que tos quemadores funcionen correctamente y para que
se obtengan buenos resultados at hornea_:
Cbmo acomodar las parrillas del horno
SoIamente deben acomodarse las parrillas del homo cuado este frio (antes de
hacerlo funcionar). Prot_jase siernpre con mitones de cocina al usar el homo.
Para quitar y reacomodar
las parrillas del horno
Para quitar una parrilla, tire de la
parrilia hacia afuera hasta que se
detenga Levante la parte delantera de
la parriIla y s_tquela Para
reacomodarla, coloque fa parrilia
sobre las guias que se encuentran en
]as paredes del homo incline un poco
la parte detantera de ta parrifla y
h_tgala deslizar de vuelta en su lugar
Colocacion de las parrillas
del horno con 5 posiciones
Para hornear sobre 1 parrilla,
col6quela en ta posici6n 3 o 4. Para
hornear sobre 2 parrillas, coi6quelas
en las posiciones 2 y 4
1a _cbn de _apam!la
2a pos_dc_nclela patd_ta
3a p_sici6nde la pa_rilla
Colocaci6n de la parrilla del Caj6n de Calentar y Retener
(alguti6S model0s) ......................................
Ponga la parfilla del Caj6n de Calentar y Retener en la posici6n vertical como se
muestra abajo
La pardlla se puede usar de dos maneras:
• En ta posici6n para arriba para permitir la colocaci6n de comidas pequehas por
debajo o pot encima de la parritla (por ejemplo, los panecillos o los bisquets pot
encima de la parrilla y un plato en cacerola pot debajo)
o En la posici6n para abajo para permitir la colocaci6n de comidas ligeras y la
vajilla vada (pot ejemplo, los panecillos, los bollos y los platos)
Posici6n para arriba
PosiciOn para abajo
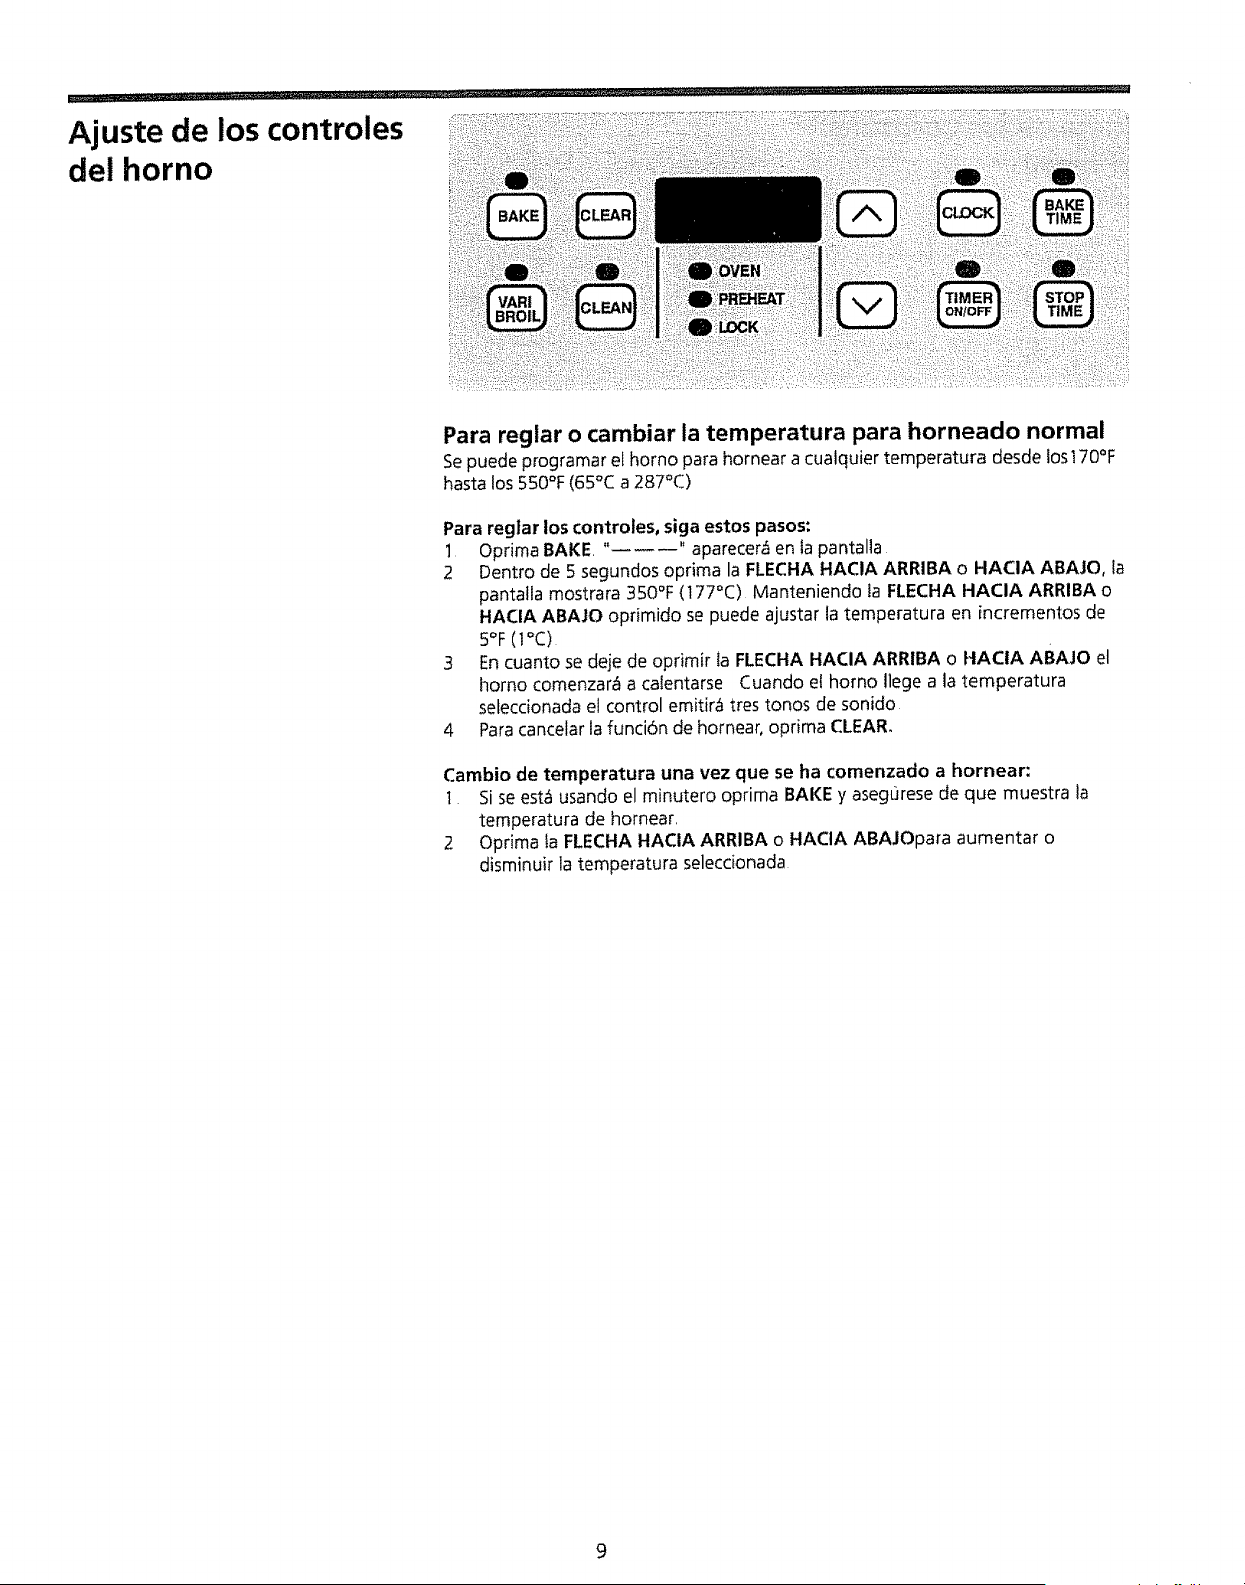
Ajuste de los controles
del horno
Para reglar o cambiar la temperatura para horneado normal
Se puede programar el homo para hornear a cuatquier temperatura desde los170°F
hasta los 550°F (65°C a 287°C)
Para reglar los controles, siga estos pasos"
1 Optima BAKE "------" aparecer& en fa pantalla
2 Dentro de 5 segundos oprima la FLECHA HACIA ARRIBA o HACIA ABAJO, la
pantatla mostrara 350°F (177°C) Manteniendo la FLECHA HACIA ARRIBA o
HACIA ABAJO oprimido se puede ajustar la temperatura en incrementos de
S°F(T°C)
3 En cuanto se deje de oprimir Ia FLECHA HACIA ARRIBA o HACIA ABAJO el
homo comenzarc! a calentarse Cuando el homo liege a la ternperatura
seleccionada el control emitira tres tonos de sonido
4 Para cancelar Jafunci6n de hornear, optima CLEAR.
Cambio de temperatura una vez que se ha comenzado a hornear:
1 Si se est_ usando el minutero oprima BAKE y asegt]rese de que muestra la
temperatura de hornear,
2 Oprima la FLECHA HACIA ARRIBA o HAClA ABAJOpara aumentar o
disminuir la temperatura seleccionada
9
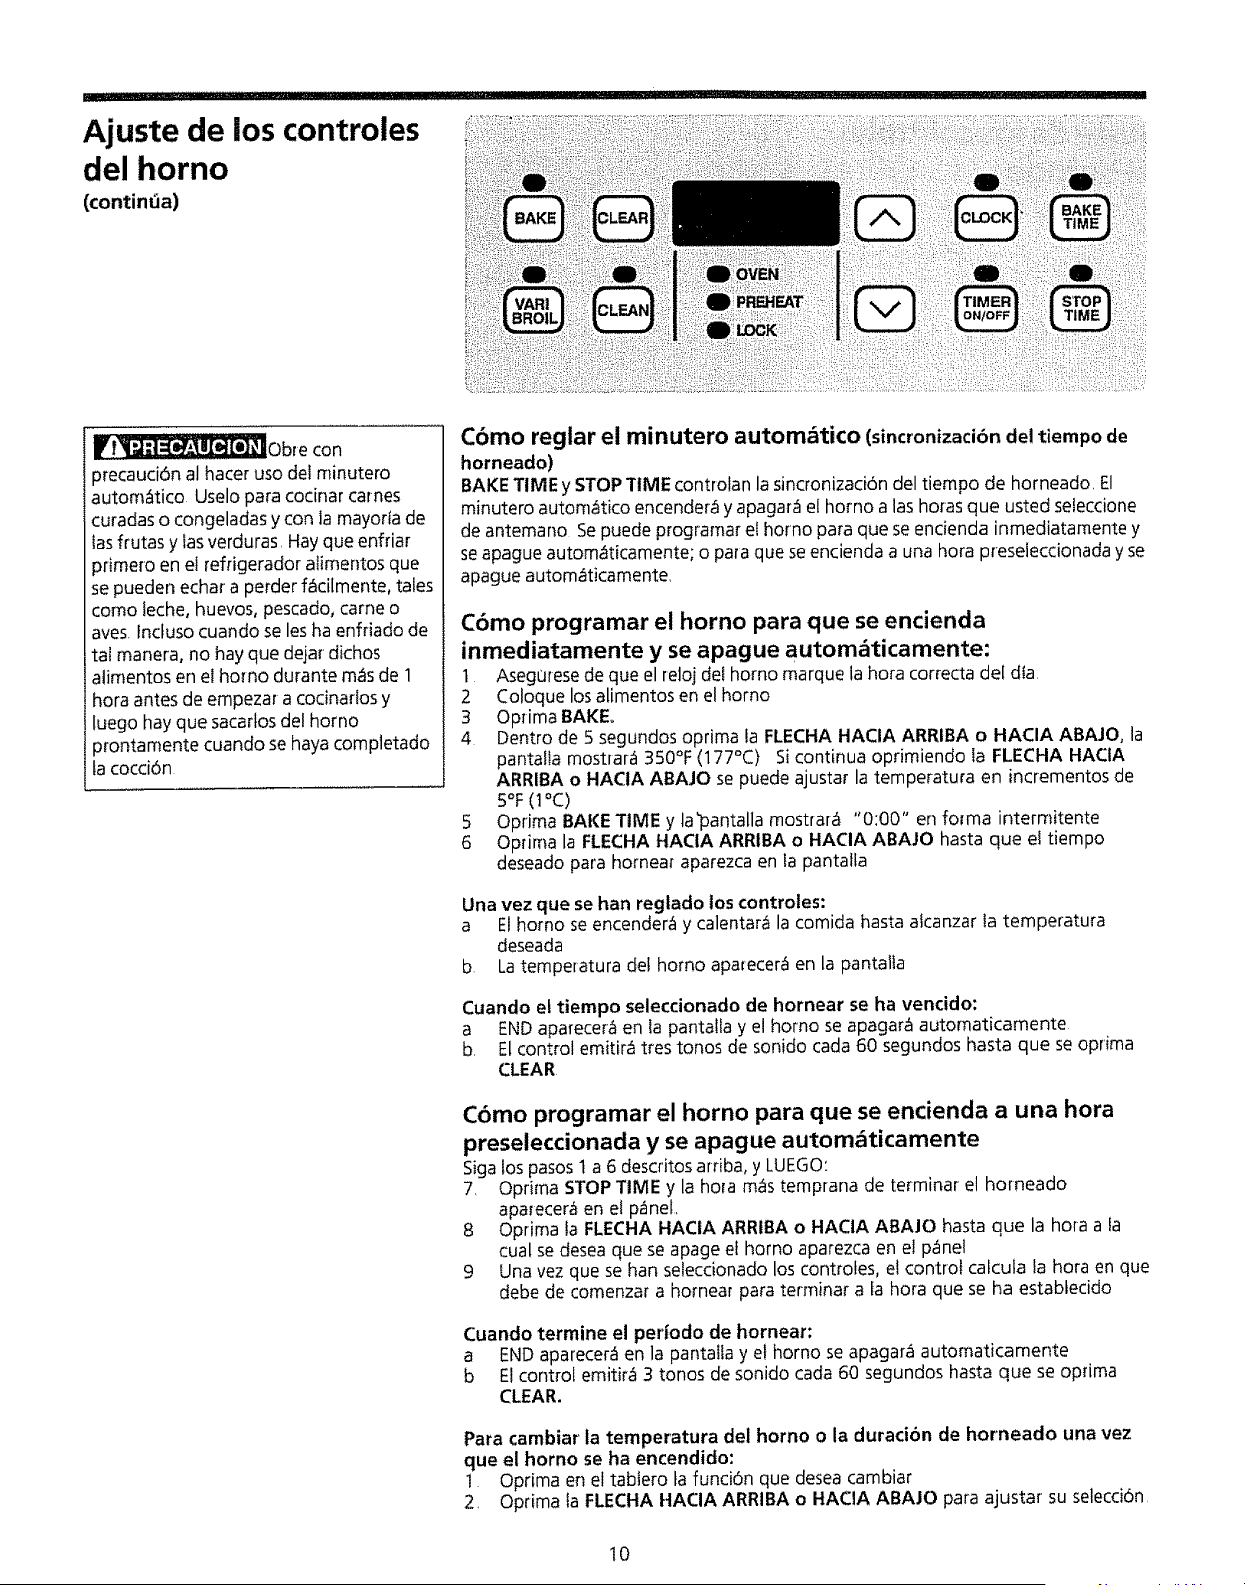
I I,l'lll
Ajuste de los controles
del horno
(continUa)
_1!'!_ Obre con
)recauci6n al hacer uso del rninutero
autom_tico Uselo para cocinar tames
curadas o congeladas y con la mayorfa de
lasfrutas y tasverduras, Hayque enfriar
_rimeroen eI refrigerador atimentos que
se pueden echar a perder f_cilmente, tales
como lethe, huevos, pescado, came o
ayes.lnctuso cuando se lesha enfriado de
tal manera, no hay que dejar dichos
alimentos en el homo durante m_s de 1
hora antes de empezar a cocinarlos y
luego hay que sacarlos del homo
)rontamente cuando se haya comptetado
ta cocci6n
Cbmo reglar el minutero autom_tico (sincronizaci6ndel tiempo de
horneado)
BAKE TIME y STOP TIME controlan la sincronizaci6n del tiempo de horneado, El
minutero auton'l_tico encender_ y apagara el homo a las horas que usted seleccione
de antemano Se puede programaP el horno papa que se encienda inmediatamente y
se apague autom_ticamente; o para que se encienda a una hora preseieccionada y se
apague autom_ticamente
C6mo programar el horno para que se encienda
inmediatamente y se apague autom&ticamente"
1 Aseg0rese de que el reloj del homo marque la hora correcta del dia
2 Coloque los alimentos en el homo
3 Optima BAKE°
4 Dentro de 5 segundos oprima fa FLECHA HACIA ARRIBA o HACIA ABAJO, la
pantalta mostrara 350°F (177°C) Si continua oprimiendo Ia FLECHA HACtA
ARRIBA o HACIA ABAJO se puede ajustar la temperatura en incrementos de
5°F (t °C)
5 Oprima BAKE TIME y la_pantalla mostrar_ "0:00" en fo_ma intermitente
6 Optima la FLECHA HACIA ARRIBA o HACIA ABAJO hasta que el tiempo
deseado para hornear aparezca en la pantalta
Una vez que se han reglado los controles:
a El homo se encender_ y calentara la comida hasta atcanzar la temperatura
deseada
b La temperatura def homo aparecer_ en la pantalla
Cuando el tiempo seleccionado de hornear se ha vencido:
a END aparecer_ en ta panta!ta y el homo se apagar_ automaticamente
b, El control emitir& tres tonos de sonido cada 60 segundos hasta que se oprima
CLEAR
Cbmo programar el horno para que se encienda a una hora
preseleccionada y se apague autombticamente
Siga los pasos 1 a 6 descritos arriba, y LUEGO:
7, Optima STOP TIME y la hora m_s temprana de terminar el horneado
apa_ecer_ en el panet,
8 Optima ta FLECHA HACiA ARRIBA o HAClA ABAJO hasta que la hora a fa
cual se desea que se apage el homo aparezca en el panel
9 Una vez que se han selecdonado los controtes, e! control calcula la hora en que
debe de comenzar a hornear papa terminar a fa hora que se ha estabiecido
Cuando termine el periodo de hornear:
a ENDaparecer_ en la pantalta y el homo se apagar_ automaticamente
b Etcontrol emitir_ 3 tonos de sonido cada 60 segundos hasta que se optima
CLEAR.
Para cambiar la temperatura del homo o la duraci6n de horneado una vez
que el homo se ha encendido:
1 Oprima en el tablero ta funcibn que desea cambiar
2_ Oprima Ia FLECHA HACIA ARRIBA o HACtA ABAJO para ajustar su selecci6n,
10

............... , .c .......... ++_+_....t++.j+............ "+rr. ......... - . ,,,, u ......
Ajuste de los controles
del horno
(continua)
de
)arada para
asar
Labandeja dei asador y su charola
ranurada permiten que la grasa que gotea
de los alimentos no se quede estancada y
est_aalejada del calor excesivo de la
resistenciasuperior, NO use la bandeja sin
la charola ranurada NO cubra la charota
ranurada con hojas de aluminio. La
grasa podria encenderse,
Asar
1 Acomode la parrilla del horno mientras el homo esta todavia frio, Coloque la
parrilta seg0n se recomienda en la tabla siguiente
Posici6n de la parrilla desde la parte superior Atimentos
t Bistecs casi crudos
2 Rebanadas de jam6n, pescado,
bistecs a t_rmino medio,
hamburguesas y chutetas
3 Atimentos bien cocidos tales
como potlo y langosta
2 OprimaVARI BROIL,
3. Optima y mantenga oprimido ta FLECHA HACIA ARRIBA o HACIA ABAJO
hasta que la temperatura de asar que se desea aparezca en el p_nel Optima la
FLECHA HAClA ARRIBA hasta que aparezca Ht para asado a alta temperatura y
ta FLECHA HACIA ABAJO para asado a baja temperatru'ra La mayorla de las
comidas pueden asarse a altas temperaturas (HI) Seleccione asado a bajas
temperaturas (LO) para evitar dorar o secar excesivamente comidas que deben
de quedar muy bien cocidas
4 Cofoque la charola ranurada sobre la bandeja del asador y ponga ei alimento
sobre la charola frla del asador. NO use la bandeja det asador sin su charola
ranurada, ni cubra _sta con hojas de aluminio La grasa podda encenderse,
5 Co!oque la bandeja sobre la parritla del homo Deje la puerta abierta a la
posici6n de parada del asado mientras se hace el asado.
6 Ase por un lado hasta que el alimento est_ dorado; voit_eto y aselo pot el otro
lado Sazone y sirva Nota: Siempre hay que tirar de la parrifla hasta que se
detenga en su posicidn de parada antes de voltear el aiimento o retirarlo del
homo.
7 Cuando haya terminado de asar, optima CLEAR.
Si se enciende el fuego en el horno, deje la puerta det homo
cerrada y apague el homo Si el fuego contint)a, o]braio con bicarbonato s6dico, o
use un extinguidor NO arroje agua ni harina sobre el fuego, La harina puede
explotar
11
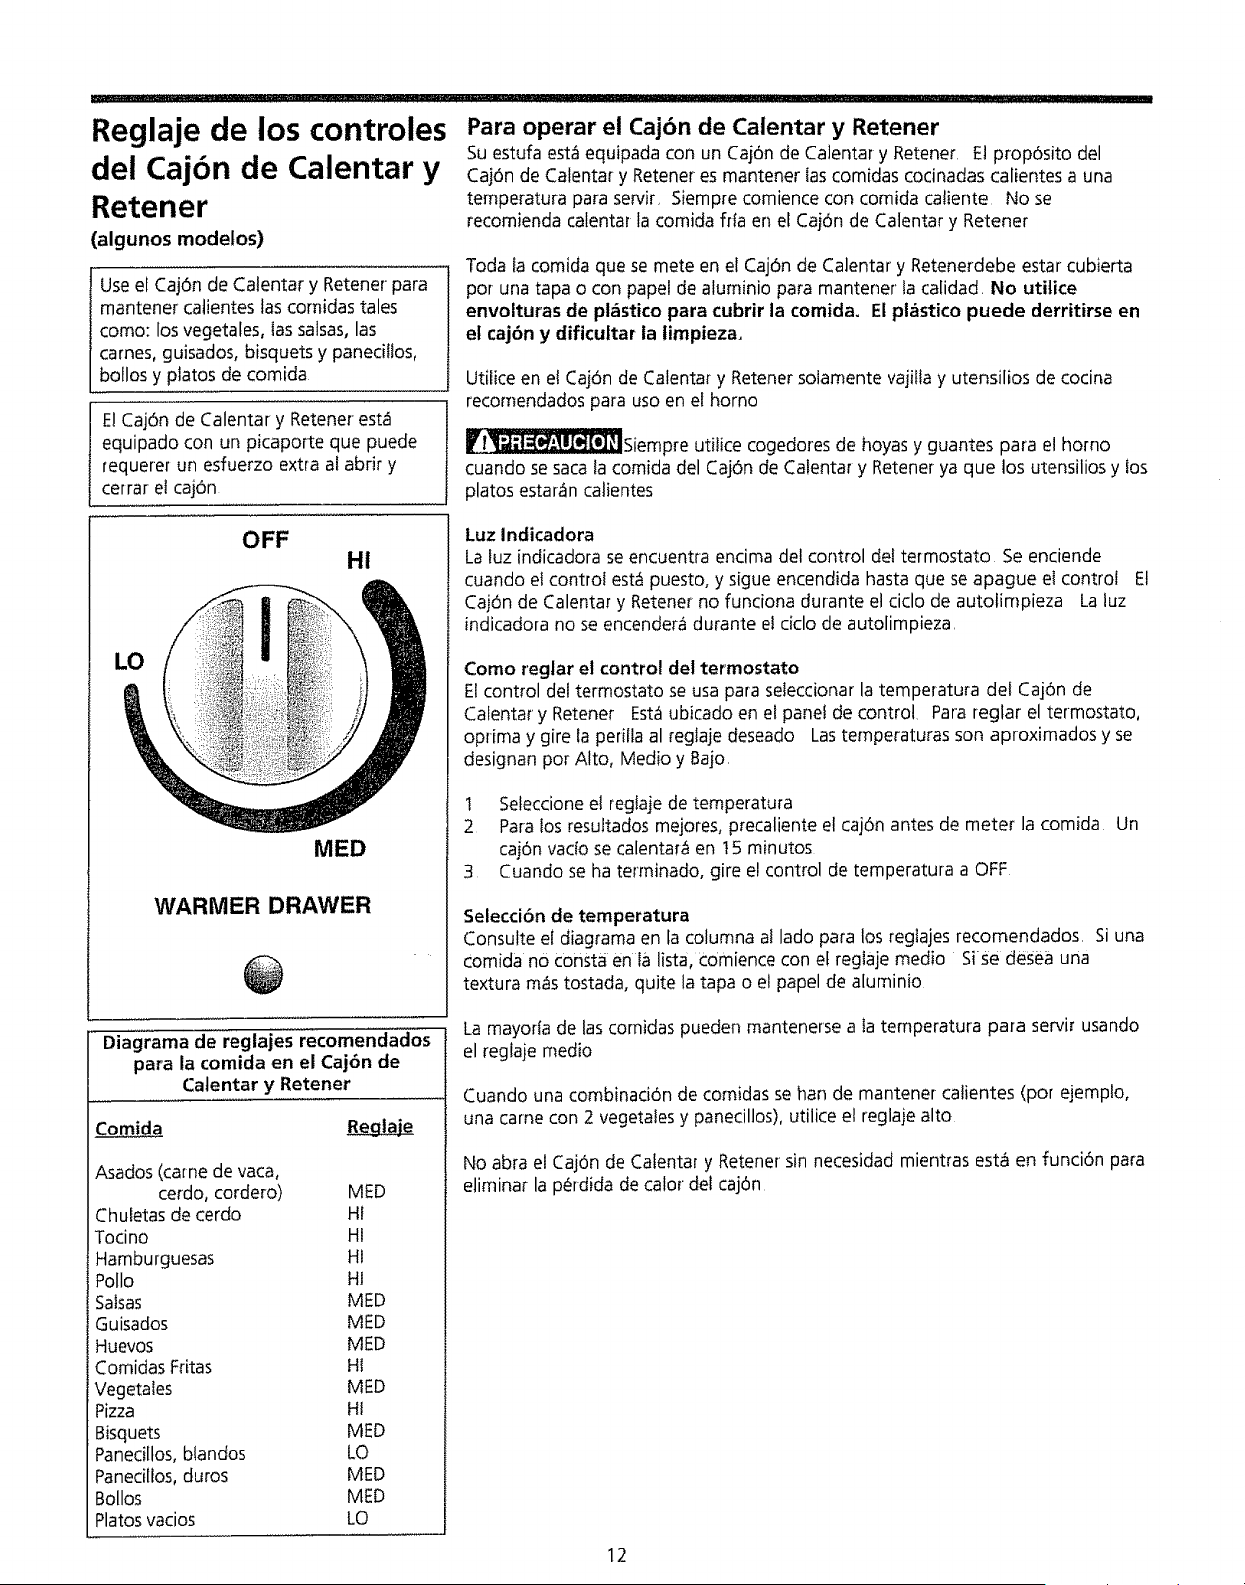
Reglaje de los controles
del Cajbn de Calentar y
Retener
(algunos modelos)
Use el Caj6n de Calentar y Retener para
mantener catientes las comidas tales
como: los vegetales, 1as salsas, las
carnes, guisados, bisquets y panecitlos,
[ boos y ptatos de comida
El Caj6n de Calentar y Retener est=f
equipado con un picaporte que puede
requerer un esfuerzo extra al abfir y
cerrar et caj6n
Para operar el Caj6n de Calentar y Retener
Su estufa est_iequipada con un Caj6n de Ca]entar y Retener. E] prop6sito del
Caj6n de Caientar y Retener es mantener las comidas cocinadas calientes a una
temperatura para servir_ Siempre comience con comida catiente No se
recomienda calentar la comida frfa en el Caj6n de Catentar y Retener
Toda fa comida que se mete en el Caj6n de Calentar y Retenerdebe estar cubierta
por una tapa o con papei de aiuminio para mantener ta calidad= No uti]ice
envolturas de pl6stico para cubrir la comida. El pl_stico puede derritirse en
el caj6n y dificultar ia timpieza_
Utilice en el Caj6n de Calentar y Retener solamente vajilla y utensilios de cocina
recomendados para uso en el homo
_Siempre utilice cogedores de hoyas y guantes para el horno
cuando se saca ta comida del Caj6n de Calentar y Retener ya que los utensilios y los
platos estar_fn calientes
OFF
H!
MED
WARMER DRAWER
@
Diagrama de reglajes recomendados
para la comida en el Caj6n de
Catentar y Retener
Asados (came de vaca,
cerdo, cordero) MED
Chuletas de cerdo HI
Tocino HI
Hamburguesas HI
Polio HI
Salsas MED
Guisados MED
Huevos MED
Comidas Fritas HI
Vegetales MED
Pizza HI
Bisquets MED
Panecillos, blandos LO
Panecilfos, duros MED
Bollos MED
Platos vacios LO
Luz Indicadora
La luz indicadora se encuentra encima del control del termostato Se enciende
cuando el control est6 puesto, y sigue encendida hasta que se apague el control
Caj6n de Calentar y Retener no funciona durante el ciclo de autotirnpieza La luz
indicadora no se encender_ durante el ciclo de autolimpieza.
Et
Como reglar el control del termostato
El control del termostato se usa para seleccionar la temperatura del Caj6n de
Calentar y Retener Est6 ubicado en el panel de control. Para reglar el termostato,
oprima y gire la perilla al fegtaje deseado Las temperaturas son aproximados y se
designan por Alto, Medio y Bajo.
1 Seteccione el regtaje de temperatura
2 Para los resultados mejores, precaliente e! caj6n antes de meter la comida Un
caj6n vacfo se calenta_ en t5 minutos
3 Cuando se ha terminado, gire e! control de temperatura a OFF
Selecci6n de temperatura
Consulte el diagrama en la columna a! lado para los regtajesrecomendados, Si una
Comida no €onsta enla lista, €omience con e[ reglaje medio Sise desea una
textura me%tostada, quite la tapa o el papel de aluminio
La mayorta de las comidas pueden mantenerse a Ia temperatura para servir usando
el reglaje medio
Cuando una cornbinaci6n de comidas se han de mantener catientes (por ejemplo,
una carne con 2 vegetales y panecillos), utilice el reglaje alto
No abra el Caj6n de Cafentar y Retener sin necesidad mientras esta en funci6n para
eliminar la p_ardida de calor del caj6n
12

II_Jtlt IH _ _ L[I_[I_L-_ ................
_r_r_o_Ourante et cido de
autolimpieza, eI exterior de la estufa
puede resultar muy caliente al tacto NO
deje a ni_os peque_os solos cerca del
aparato
_-7_NO recubra ias
paredes del homo, sus parrillas, su
fondo ni ninguna parte de la estufa
con hojas de aluminio. El hacerio
destruir& ia distribuci6n del calor,
producir_ malos resultados al
hornear y le causar_ dafios
permanentes al interior del homo
(las hojas de aluminio se fundir_n a
la superficie interior del homo).
LiMPIE EL
MANO
LIMPIE LA PUERTA
A MANO
NO LIMPE
LA JUNTA
DE
EMPAOUE
DEL HORNO
_NO fuerce ia
puerta del homo para abrirla Esto
podr{a dahar e! sistema de trabaz6n
autom_tica de la puerta Obre de
manera precavida al abfir la puerta
despu_sque se haya completado el cicto
de autolimpieza El homo aun podda
estar MUY CALIENTE
Horno autotimpiante
Un homo autolimpiante se limpia a si mismo a alta temperatura (mucho m_isalta
que la requerida para cocinar), la cua! elimina la suciedad completamente o la
reduce hastaconvertirla en un fino polvo de ceniza que se puede quitar con un
paso hOmedo
2
3
4
Observe las siguientes precauciones de limpieza:
* Permita que et homo se enfrle antes de su prelimpieza
o P6ngase guantes de caucho al prelimpiar el homo y mientras limpie los
residuos despues de terminado el ciclo de autolimpieza
o NO use limpiadores para hornos ni revestimientos protectores para hornos
dentro o alrededor de ninguna parte del homo autolimpiante
o NO limpie ta junta de empaque de la puerta de] homo La tela tramada de la
junta de empaque de la puerta es de esencial importancia para proporc_onar
hermeticidad Hay que tener mucho cuidado de no frotar, daSar ni quitar la
junta de empaque
o NO te aplique ningun agente limpiador a ta junta de empaque del homo El
hacedo podrfa causar da_os,
Saque la bandeja del asador y su charota ranurada, todos los utensilios y
las hojas de aluminio que pueda habero Estos articulos no pueden
soportar la aita temperatura que se genera ai autolimpiar el homo.
Se pueden dejar las parrillas en el homo o sacarse de c_l,Si las parrillas pasan por
el ciclo de autolimpieza, se pondr_n ligeramente azules y su acabado quedara
mate Despues de haberse completado et ciclo de autolimpieza y dejado que se
enfrie e! homo, frote los bordes de tas parrillas con papel encerado, o un paso
que tenga una peque_a cantidad de aceite para bebes o para ensalada (esto
har_t que tas parrillas se deslicen m_fs f_cilmente en posici6n)
Quite todos los restos de derrames que haya en el espacio interior del homo
antes de comenzar el cicto de autolimpieza Para el!o, use agua catiente y
jabonosa, y un paso Los derrames de gran tamar3o pueden causar que se
despidan grandes cantidades de humo, o incluso Ilamaradas cuando se los
expone a altas temperaturas NO permita que derrames de alimentos con un
gran contenido de azucar o de _fcido (tales como la leche, los tomates, e!
chucrut, los jugos de fruta o los rellenos para torta) permanezcan sobre la
superficie ya que podrfan causar la formaci6n de manchas opacas, incluso
despues de que se limpien
Limpie toda suciedad que se acumule en el marco del homo, el revestimiento
que recubre la junta de empaque de la puerta y el _rea pequer_a que se
encuentra en ta parte delantera central del lado inferior det homo Estas _freas
se calientan Io suficiente como para quemar toda suciedad Limpie con agua y
jab6n
C6mo detener o interrumpir un ddo de autolimpieza
Si Ilegara a ser necesario detener o interrumpir un dclo de limpieza debido al exceso
de humo o a que se haya prendido fuego en el homo:
1 Optima CLEAR,
2 Una vez que el homo se ha enfriado por aproximadamente una hora y la luz
"LOCK" se ha apacjado comptetamente, se puede abrir el homo
3 Corrija el problema que caus6 et humo
4 Vuelva a iniciar el cicto de autolimpieza una vez que todos los problemas hayan
sido corregidos
t3
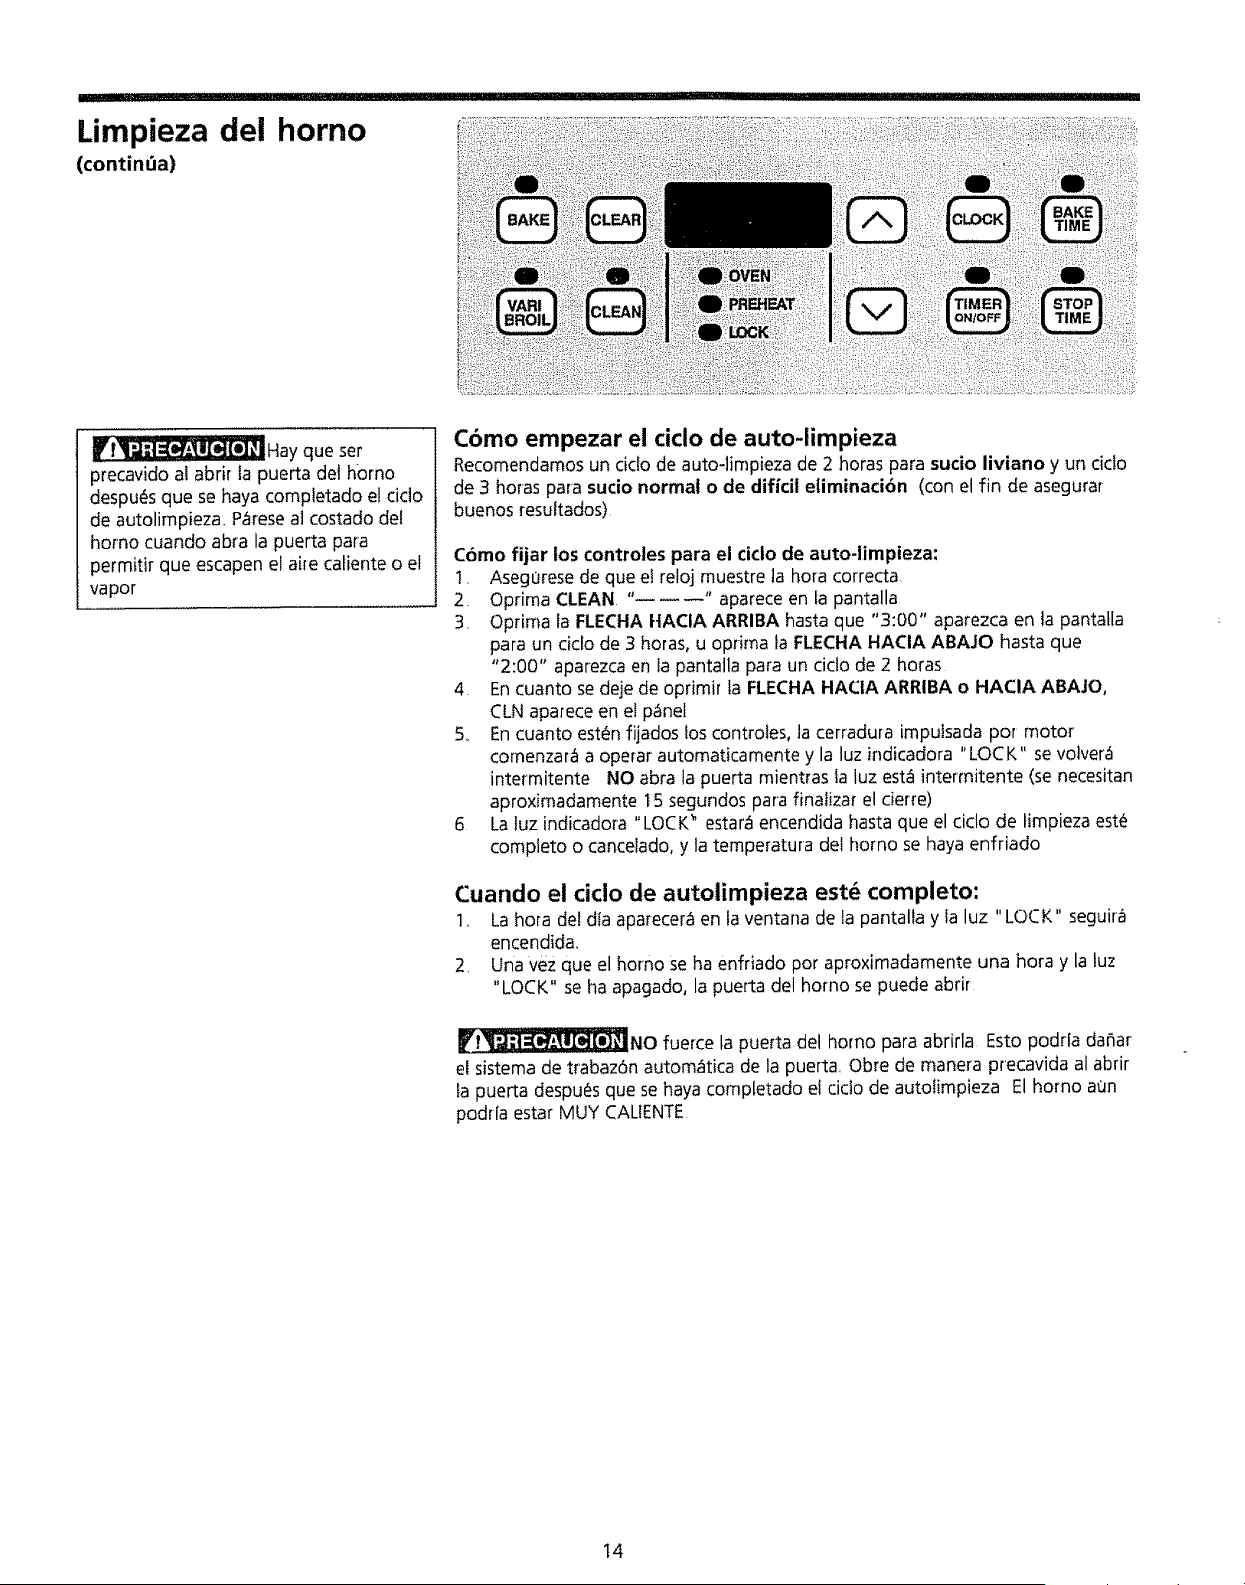
I ' Ill'lllllll
Limpieza del horno
(continda)
rl_l.,,].,]=[i./.,_|[o][o]#iHay que ser
precavido al abrir ta puerta det homo
despues que se haya comptetado el ciclo
de autolimpieza. P:tresea] costado del
homo cuando abra la puerta para
permitk que escapen el aire cafiente o el
vapor
Cbmo empezar el ciclo de auto-limpieza
Recomendamos un cido de auto-]impieza de 2 horas para sucio liviano y un cido
de 3 horas para sucio normal o de dificiJ eliminaci6n (con el fin de asegurar
buenos resultados)
Cbmo fijar los controles para el cicio de auto-limpieza:
1, Aseg_rese de que e! reloj muestre ta hora correcta
2. Oprima CLEAN "------'° aparece en la pantalla
3, Optima ia FLECHA HAClA ARRIBA hasta que "3:00" aparezca en ]a pantatla
para un cido de 3 horas, u optima la FLECHA HAClA ABAJO hasta que
"2:00" aparezca en la pantatla para un cido de 2 horas
4. En cuanto se deje de oprimir la FLECHA HACIA ARRIBA o HACIA ABAJO,
(LN aparece en ef p_nel
5o En cuanto est_n fijados los controies, la cerradura impulsada por motor
comenzar_ a operar automaticamente y la luz indicadora "LOCK" se volver:_
intermitente NO abra la puerta mientras la tuz est_ intermitente (se necesitan
aproximadamente 15 segundos para finaiizar el cierre)
6 La tuz indicadora "LOCK _ estar:_ encendida hasta que el ciclo de limpieza est_
compieto o canceiado, y ]a temperatura del homo se haya enfriado
Cuando el cicio de autolimpieza est_ completo:
1,, La hora dei dia aparecera en la ventana de la pantatla y la luz "LOCK" seguira
encendida,
2, Una vez que el homo se ha enfriado por aproximadamente una hora y la luz
"LOCK" se ha apagado, la puerl:a del homo se p_Jede abrir
_NO fuerce la puerta del homo para abrirla Esto podria daSar
el sistema de trabaz6n autom_tica de la puerta, Obre de manera precavida al abrir
la puerta despuc_sque se haya completado el cicto de autotimpieza El homo aan
podria estar MUY CALIENTE
t4
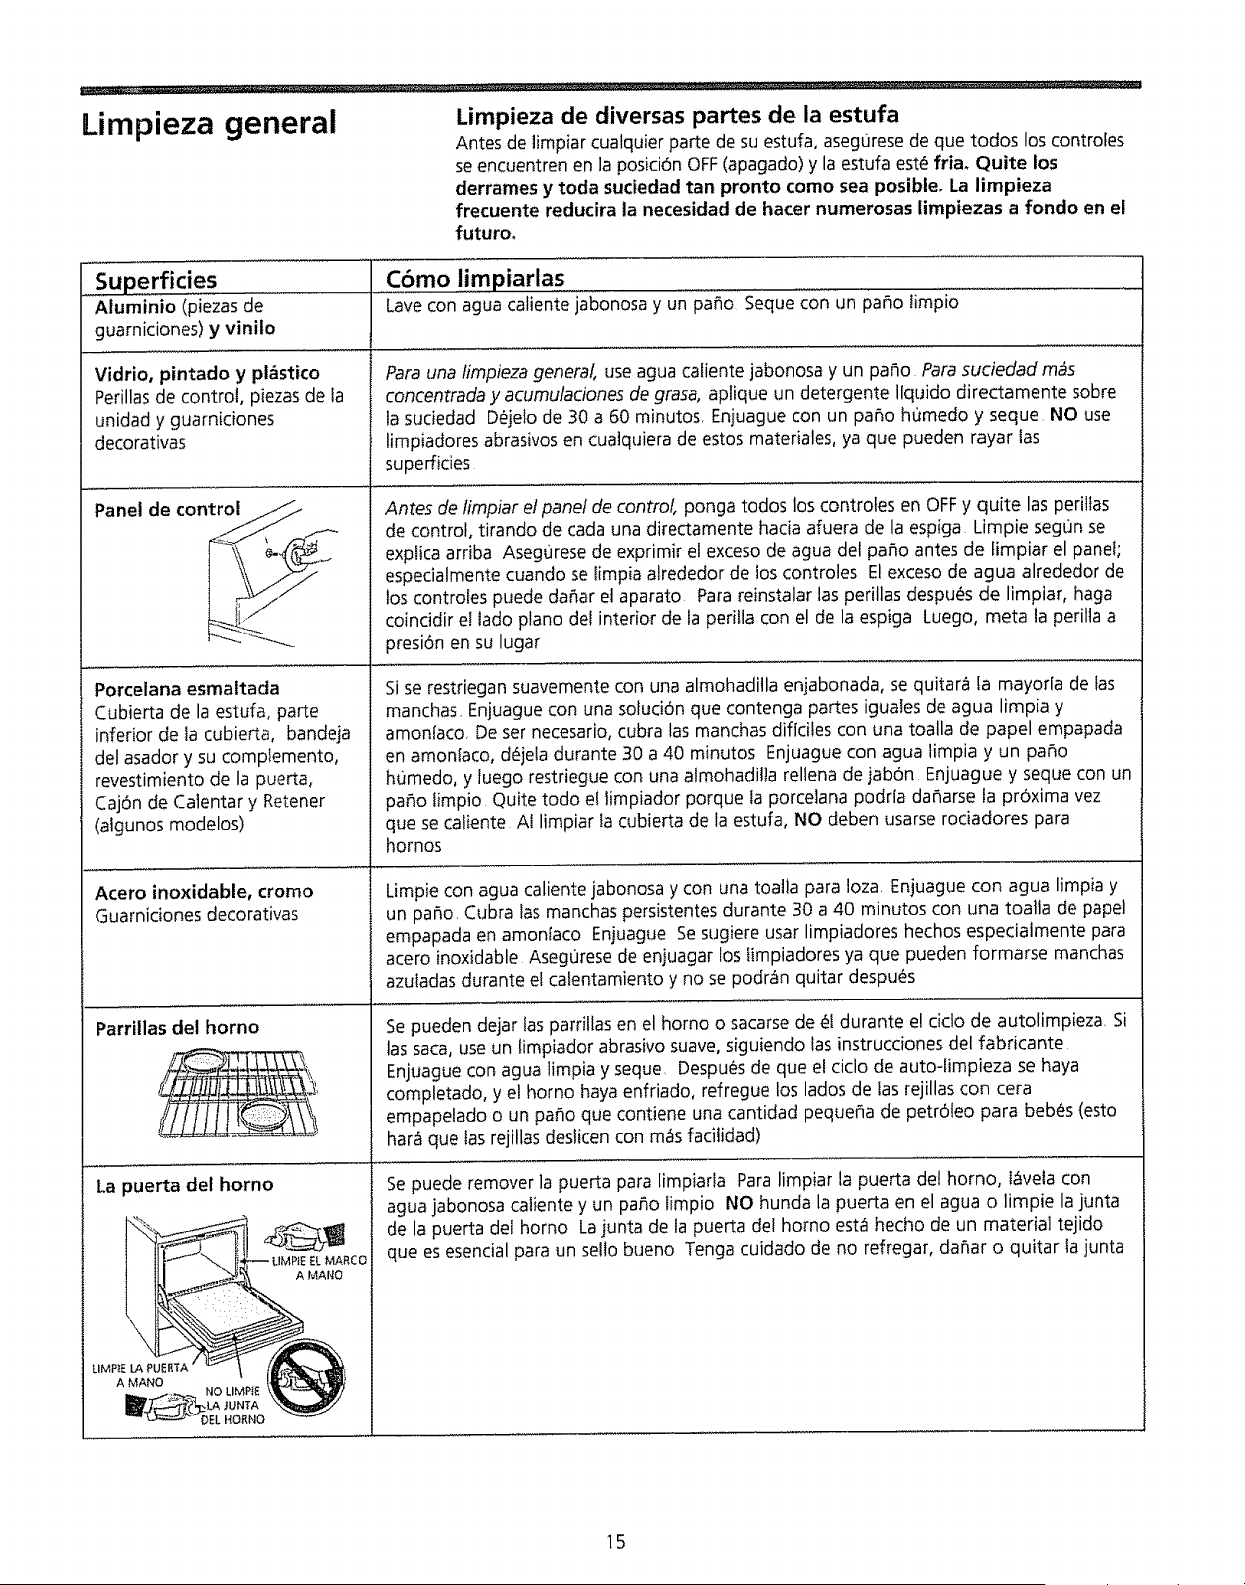
Limpieza general
Limpieza de diversas partes de la estufa
Antes de limpiar cualquier parte de su estufa, aseguresede que todos los controfes
se encuentren en la posici6n OFF(apagado) y la estufa est6 fria. Quite los
derrames y toda suciedad tan pronto como sea posible. La limpieza
frecuente reducira la necesidad de hacer numerosas limpiezas a fondo en el
futuro.
......Superficies ,,,,,,,,iiii,, .........Cbmo !,impiarlas
Aluminio (piezas de Lavecon agua caliente jabon0sa y unpa_o S'equecon un paho limpio .....................
guarniciones) y vinito
Vidrio, pintado y pl_stico
Perillasde control, piezasde la
unidad y guarniciones
decorativas
Panel de contro_j
Porcelana esmaltada
Cubierta de la estufa, parte
inferior de la cubierta, bandeja
del asador y su complemento,
revestimiento de la puerta,
Caj6n de Calentar y Retener
(algunos modelos)
Acero inoxidable, cromo
Guarniciones decorativas
Parriilas del homo
La puerta del homo
Para una limpieza general, use agua caliente jabonosa y un paso Parasuciedad m_s
concentrada y acumutaciones de grasa, aplique un detergente Ilquido directamente sobre
la suciedad D#jelo de 30 a 60 minutos, Enjuague con un paso humedo y seque NO use
limpiadores abrasivos en cualquiera de estos materiales, ya que pueden rayar las
superficies
Antes de limpiar el panel de control, ponga todos los controles en OFFy quite las perillas
de control, tirando de cada una directamente hacia afuera de la espiga Limpie segun se
explica arriba Asegurese de exprimir el exceso de agua del paso antes de limpiar el panel;
especialmente cuando se limpia alrededor de los controles Elexceso de agua alrededor de
los controles puede da_ar el aparato Parareinstalar las perillas despu_s de limpiar, haga
coincidir el lado plano del interior de la perilla con el de la espiga Luego, meta la perilla a
presiOn en su lugar
Si se restriegan suavemente con una almohadilla enjabonada, se quitara la mayorla de las
manchas Enjuaguecon una soluci6n que contenga partes iguales de agua limpia y
amonlaco, De ser necesario, cubra las manchas diflciles con una toalla de papel empapada
en amonlaco, d_jela durante 30 a 40 minutos Enjuague con agua limpia y un paso
humedo, y luego restriegue con una almohadilla rellena de jabon Enjuague y seque con un
paso limpio Quite todo el limpiador porque la porcelana podrla da_arse la pr6xima vez
que se caliente AI limpiar la cubierta de la estufa, NO deben usarserociadores para
hornos
Limpie con agua caliente jabonosa y con una toalla para Ioza Enjuague con agua limpia y
un paso, Cubra las manchas persistentes durante 30 a 40 minutos con una toatla de papel
empapada en amonfaco Enjuague Sesugiere usar limpiadores hechos especialmente para
acero inoxidable Aseg0resede enjuagar los fimpiadores ya que pueden formarse manchas
azuladas durante e! calentamiento y no se podr_n quitar despu_as
Sepueden dejar tas parrillas en el homo o sacarsede _t durante e! cic!o de autolimpieza Si
tassaca, use un limpiador abrasivo suave,siguiendo ias instrucciones del fabricante
Enjuague con agua limpia y seque Despuesde que e! ciclo de auto-limpieza se haya
completado, y el homo haya enfriado, refregue los lados de las rejillas con cera
empapelado o un patio que contiene una cantidad pequer_ade petr61eo para bebes (esto
har_ que las rejillas deslicen con m_s facilidad)
Sepuede remover la puerta para limpiarla Paralimpiar la puerta del homo, lavela con
agua jabonosa caliente y un paso limpio NO hunda la puerta en el agua o limpie lajunta
de la puerta del homo Lajunta de la puerta del homo esta hecho de un material tejido
que es esencial para un sello bueno Tenga cuidado de no refregar, da_ar o quitar la junta
15

Limpieza general
(continUa)
_Aseg_rese de que la
estufa no est_ caliente antes de quitar los
elementos o los recipientes de goteos
Tenga cuidado de no doblar las puntas
del borne at reinstatar los etementos
despu_s de limpiar
La grapa
Permita que el
(si hay una) apoyo del
elemento
ctescansesobre
el redpiente de
del aro
Extremo de ta
terminal
Enchufe de la
terminal
Cubierta
principal
AI bajar ta cubierta de
ta estufa, sostenga sus bordes con tas
puntas de los dodos sotamente Tenga
mucho cuidado de no lastimarse los
dedos NO deje caer ni dobte la cubier_a
de la estufa at fevantarla o bajarta Esto
podria daSar la superficie
Elementos y recipientes de goteo
Loselementos pueden ser desenchufados y quitados para hacer mas faci] la
limpieza de los recipientes de goteo. Los elementos se autolimpian cuando se
endenden Los atimentos derramados sobre un etemento caliente se quemar&n y
los alimentos derramados sobre un etemento frfo pueden ser limpiados con un
paso h0medo Cualquier suciedad que permanezca se quemara la pr6xima vez que
se use el etemento. Nunca sumerja un e|emento en agua.
Para quitar los elementos y los recipientes de goteo
1 Levante la oritla det recipiente de goteo que esta opuesta al extremo de la
terminal Levante simultaneamente el elemento y el recipiente de goteo,
lo suficiente para librar la supefficie de la estufa
2 Mientras sostiene et recipiente de goteo y et elemento separe con cuidado el
extremo de ta terminal de su enchufe NO quite el clip del recipiente de
goteo
Para limpiar los recipientes do goteo
Lavetosen agua caliente con jab6n o en et lavaptatos Engu_guelos y sequelos
cuando a0n estan calientes. La sudedad o los alimentos quemados que sean
diflciles de quitar, pueden limpiarse sumergiendo los recipientes de goteo por 20
minutos en un timpiador lfquido ligeramente diluido o en una solucic_nde agua y
amoni_co despu_s de haber sumergido los recipientes NO use limpi_dores
abrasivos o esponjas de acero porque rayaran la superficie Siempre enju_gue con
agua fimpia y sL_que!oscon un paso suave.
Para reinstalar los recipientes de goteo y los elementos
1. Desliceel extremo de la terminal en el elemento, a travL_sde la apertura que
existe en el recipiente de goteo
2 Afinie el soporte del elemento para que descanse en el aro interior del
recipiente de goteo. Si su recipiente de goteo esta equipado con un clip,
alinee et soporte del elemento que est_ opuesto at extremo de la terminal, con
la ranura que existe en el clip en su lugar
3 Despu_sde que el etemento es colocado en el recipiente de goteo, alinie e
extremo de la terminal con el enchufe de ta terminal
4 Mantenga juntos y hasta donde sea posible nivelados, el elemento y el
recipiente de goteo y empuje firmemente el extremo de !a terminal adentro del
enchufe de la misma Aseg0rese de queta terminal del elemento est_
apropiadamente asentada dentro del enchufe della terminal. Asegurese
tambi_Snde que el elemento est_ nivelado para reducir el peligro de que ias
ollas o sartenes se desliceno caigan
Cbmo levantar y bajar la cubierta para la limpieza
t Sujete por los lados y levante la cubierta del frente Levante la cubierta hasta
donde se necesite para permitir el posicionamiento de lasvaritlas de apoye Las
varillas abatibles sostendr_n la cubierta cuando e_t_ ]evantada
2 Limpie pot debajo con un paso limpio y agua jabonosa y caiiente; luego seque
3 Parabajar Ia cubierta, haga presion ligeramente sobre cada una de las varitlasa
fin de liberar el soporte Sostenga la cubierta de la estufa y hagala ctesiizarde
manera que cuadre con su marco
16

Limpieza general
(contintJa)
_ti_l:t=€_-",'!_]l:=]_! La puerta es pesacla _
Para almacenada temporalmente en
forma segura0 acu_stela de manera que
quede horizontal con su lado interior
cara abajo
C6mo quitar y reinstalar la puerta del homo
C6mo quitar ia puerta del homo
1 Abm lapuertahastaun cuartode abertura Sujetelapoerta firmemente a
ambos Jadosy tirede ellahaciaarribasepar_ndolade sus bisagras
2 Para limpiaria puerta del homo, sigalasinstruccionesque se dan en la
tablade limpiezaen lapSgina 15
Levante la puerta fuera de las dos
bisagras de la puerta
Bisagra de la puerta
: ///
[]
C6mo reinstalar la puerta de! horno
1 Asegorese de que !os brazos de ias bisagras est_n abiertos a un cuarto de su
extensi6n total Tenga mucho cuidado si va a retirar las bisagras a mano pues
podrlan replegarse autom_ticamente contra el marco del homo y prensarle los
dedos
2 Sostenga la puerta pot sus bordes cerca de la parte superior, Inserte los brazos
de las bisagras en las ranuras que se encuentran en ia parte inferior de la
puerta
3 Los brazos de las bisagras deber_n entrar de manera pareja en las ranuras= Hay
que insertar los brazos de las bisagras en las esquinas inferiores de la puerta
empujando basra donde alcancen
4 Si la puerta no est_ alineada con el marco del homo, s_quela y repita fos pasos
arriba indicados
Para quitar y reponer el Cajbn de Calentar y Retener
Para quitar el Caj6n de Calentar y Retener:
t _Apague ta electricidad antes de quitar el Caj6n de Calentar y
Retener
2 Abra el cai6n a la posici6n de abertura completa
3 Localice los pestillos en cada lado del Caj6n de Calentar y Retener El pestitlo
izquierdo es visible Sin embargo el de la derecha no lo es y esta ubicado
dentro de los raites deslizadores del caj6n
4 Tire para arriba det pestillo deslizador izquierdo mientras se introduce un
destomillador por encima del pesti!!o derecho empujando para abajo=
5 Separe el caj6n de la estufa
6 Para limpiar el caj6n, v6ase "Porcetana esmaltada" en e! diagrama de limpieza
en la p_gina 15
Para volver a poner el Caj6n de Catentar y Retener:
1 AlinL_e los pestillos de los railes en ambos tados dei caj6n con las ranuras en e]
caj6n
2 lntroduzca el caj6n en la estufa empuj_ndolo,
,_!_Peligro
/de choque el_ctrico
_puede ocurrir y resultar en
Jdaflos serios o Ia muerte
Desconecte el
electrodom6stico de la fuente de
alirnentaci6n antes de limpiar y reparar el
Caj6n de Calentar y Retener
t7

_m
C6mo cambiar las luces
de la superficie y/o del
homo
(aigunos modelos)
Asegorese de que la
estufa est_ desconectada y que todas
sus partes est_n FRIASantes de cambiar
las luces de la cubierta de fa estufa o ctel
horno, Useun guante con patina de
cuero para protegerse contra la posible
rotura del vidrio
.............. '.................................... II'lllllllJ/ II Ill' IillJ I iiii '!1 _
C6mo cambiar la luz de la superficie (algunos mode|os)
t Desconecte fa etectricidad o desenchufe la estufa,
2. Quite los (2) tornitlos de cruz (Phillips®) que mantienen fija la cubierta y
levantela para sepa_ada
3, Quite la bombilta haci_ndola girar hacia atr_s y hacia arriba Instale la bombifla
nueva desliz_ndola hacia abajo y haci_ndola girar hacia e! frente
4, Vuelva a instatar la cubierta de la luz y suj_tela con (2) tornillos de cruz
(Phillips®)
Cbmo cambiar la luz del horno (algunosmodelos)
En a_gunosmodelos, fa tuz del homo se endende autom_ticamente cuando se abre
la puerta. Atgunos modefos tienen un interruptor ubicado en el panel de control
para encender fa luz La luz del homo se encuentra en la parte posterior del homo y
esta cubierta con un protector sujetado pot un alambre sujetador El protector de
vidrio debe estar colocado siempre que el homo est_ siendo usado
C6mo reemplazar la ,luz del horno:
t Desconectela electricidad o desenchufe la estufa
2 Haga a un lado et alambre sujetador para soltar el protector de vidrio
3 Reemplaceta bombilla con una nueva, de 40 ratios para aparatos
etectrodomesticos
4 Reinstaleel protector de vidrio sobre la bombilla y coloque en su sitio el alambre
sujetadof
5 Vuelva a conectar ta electricidad (o enchufe de nuevo taestufa)
6 Reajusteet reloj, si Io tiene Para hacerlo, yea la secci6n titulada Reglaje de!
reloj y del minutero en esta Manual det Usuario
Ajuste de la
temperatura dei horno
La temperatura en el homo se ha reglado en la f_brica AI usar el homo por primera
vez, asegurese de seguir los tiempos y las temperaturas en las recetas. Si Ud cree
que el homo este demasiado caliente o no Io suficientemente catiente, la
temperatura se puede ajustar Antes de ajustarla, pruebe una receta con una
temperatura m&s alta o m_s baja que la recomendada Los resultados dei horneado
le ayudar_n a determinar cuanto hay que ajustar
I Nora: Losajustes no cambiar&n la
temperatura de auto-limpieza
Para ajustar la temperatura del homo:
1 Apriete BAKE
2 Ponga la temperatura a 550°F (287°C) apretando y manteniendo apretado la
FLECHAHACIA ARRIBA
3 Dentro de dos segundos, apriete y mantenga apretado BAKE hasta que se
enciende la pantaIfa especia!de dos nQmeros Suelte BAKE. La pantatla ahora
indica la cantidad de grados de dife_encia entre la temperatura original de la
f_brica y la temperatura actual Si el control del homo tiene calibraci6n, "oo"
aparece en la pantalla
4 La temperatura ahora se puede ajustar para arriba o pafa abajo pot 35°F (17%),
en pasos de 5°F(t°C), apretando y manteniendo apretado el bot6n de la
FLECHAHACIA ARRIBA o HACIA ABAJO Ajuste hasta que la cantidad de
diferencia deseada aparezca en ia pantalla.
5 Cuando se haya hecho el ajuste deseado, apriete CLEAR para volver a la hora
del dra Cuando se ajusta la temperatura deI horno, una sepal de menos (-)
aparece ante ef namero paraindicar que el homo est_ menos caliente segQn
la cantidad de grados que aparecen
18

H
Lista para evitar las
Ilamadas de servicio
Antes de llamar af servicio, examine esta iista Puedeahorrarle tiempo y dinero En la
tista se incluyen incidentes comunes que no son el resultado de fabricacibn o
materiales defectuosos en el aparato efectrodomestico
Estehomo est_ equipado con un controlador electrOnico de Oltima moda. Entre sus
caracterlsticasse cuenta con un sistema que diagnostica constantemente los
circuitos del homo, Estecontrolador verifica constantemente los circuitos internos,
ad como varios circuitos del homo de gran importancia, para asegurarse de que
todos est_n funcionando correctamente Si, en cualquier momento, alguno de estos
sistemaslIegara a fallar, el controlador terminarla la funciOn afectada, emitida una
serie de "bfps" yen la pantalla parpadearfan c6digos de error del F1 o F3
PROBLEMA
POSlBLE CAUSA/SOLUCION
La estufa no est_ nivelada,
Mala instalaciOn Coloque la parritla en el centro del homo Coloque un nivel sobre la
parrilla Ajuste las patas niveladoras en la base de la estufa hasta que la parrilfa se nivele,
Cuando la estufa est# nivelada, la superfide puede parecer desatineada si la cubierta no
est.1 nivelada.
AsegOrese de que el piso este nivelado y que puede soportar adecuadamente la
estufa.
Ltame a un carpintero para corregir el hundimiento o el desnivel del piso
Los armarios de cocina mal alineados podrian dar la impresiOnque la estufa estol
desnivelada Asegurese de que los armarios esten bien a escuadra y que haya
suficiente espacio fibre para la estufa
No se puede mover el aparato
f_cilmente, Debe tenerse acceso a la
estufa para darle servicio_
Losarmarios no est_n bien a escuadrao quedaron muy apretados Llamar a un
ebanista para corregir el problema
La alfombra interfiere con la estufa Proporcionar sufidente espacio para que pueda
levantarse la estufa por encima de la alfombra
Et control det homo emite un "bip" y
aparecen en la pantalla los cOdigos
F1 o F3.
El control electrOnico ha detectado una fall& Optima CLEAR para que se despeje la
pantalla y cesen los "bips" Vuelva a programar el homo Si la falla continOa, apunte
el cOdigocorrespondiente a la falla, oprima CLEAR, y pOngaseen contacto con un
tecnico de servicio autorizado,
Loselementosest_ndemasiadocalientes El control incorrecto est_1puesto Asegurese de usar la perilla correcta para
o no Io suficientemente calientes, encender el elemento deseado
La superficie no funciona
Seemplean Utensilios demasiado ligeros o deformados Utitice solamente los
utensitiosde cocina que son pianos, equilibrados y de peso mediano o pesado Los
utensitios pianos se catientan mejor que los utensilios deformados Los materialesde
cocina y su peso afectan el calor Losutensitios de peso mediano y peso pesado
calientan de modo uniforme Ya que los utensilios de peso ligero se calientan de
manera desigual la comida se puede quemar f_cilmente
Falla de corriente, Veanse las instrucciones en la secciOn "E! aparato no funciona en
absoluto" en esta Lista para evitar las Ilamadas de servicio
El control incorrecto est_!puesto AsegOresede usar la perilla correcta para
encender el elemento deseado
La tuz (algunos modelos) del horno no
funcionao
Reemplaceo apriete la bombilla Vea la secciOnintitulada COmo cambiar las luces
de la superficie ylo del homo (algunos modelos) de este Manual del Usuario
para instrucciones,
El aparato no funciona en absoluto.
Asegt]resede que el cordon electricolenchufe est¢ enchufado correctamente en su
toma de corriente
La instalaci0n el¢ctrica no est.1 completa, Llame a su representante o agente de
servicio autorizado
Fatla de corriente Verifique si se pueden encender las fuces de la casa Llame a la
compa_la de servicio etectrico local,
19
El horno humea excesivamente cuando Los controles no estan correctamente reglados Siga las instrucciones en la secci6n
se asa usando la resistencia superior. Ajuste de los controles dei homo
La pue_a deberfa estar abierta a la posici6n para asar durante un asado
La came est_ demasiado cercanaa ta resfstenciasuperior Reacomode la parri!la para
que haya sufidente espacio tibre entre la came y la resistencia
No se prepar6 la came adecuadamente Quftele el excesode grasa a la came Corte
los bordes grasosossobrantes en _ngu]o recto para evitar el pandeamiento de la
came, pero no corte hasta la parte magra
La parrilla de fa cazueta asadora est_ puesta al rev_s La grasa no se escurve a fa
cazuela asadora Siempre cotoque la parrilla asadora pot encima de la cazuela con
las costillas para arfiba y las ranuras para abajo para permitir el drenaje de la grasa a
I a cazuela
El homo necesita ser limpiado Se ha acumulado la grasa en las paredes del homo
Cuando se usa el asador con frecuencia, hay que limpiar el homo en forma regular
La grasa acumulada o tas salpicaduras de comida causan humo en exceso
Malos resultados al hornear= Muchos factores influyen en los resuttados al homear, AsegOrese de ubicar las
parrillas dei homo adecuadamente Ponga las cacerotas en el centro del horno y
posici6netas para que el aire pueda circular adecuadamente Permite que et homo
se precaliente ante de hornear Esposible necesitar ajustar la duraci6n del tiempo
de hornear o la temperatura recomendados por la receta. Si usted piensa que eI
horno no est_s bastante caliente o que est_ demasiado caliente, consutte ta secci6n
Ajuste de ia temperatura del homo en este Manual del Usuafio
El cido de autolimpieza no funciona.
Los controles no est_n debidamente ajustados Siga las instrucciones de Limpieza
del homo.
El cicto de autolimpieza fue interrumpido. El tiempo para la detend6n debe ser
regfado para 2 a 4 horas despu_s del inicio Siga los pasos que se dan en la parte
intitulada "COmo detener o int_rrumpir un ciclo de autolimpieza", de la secci6n
denominada Limpieza del homo°
No se ha eliminado la suciedad
completamenteo
No se fimpi6 correctamente ta parte inferior det frente, la parte superior del homo o
tas _flreasde ta puerta fuera de la junta de empaque del homo Estas partes no est_n
en el _rea de autotimpieza, pero se catientan to suficiente como para quemar
residuos Limp! e estas _reas antes de iniciar e! ciclo de autotimpieza: Los residuos que
se hayan quemado sobre las superficies se pueden timpiar con un cepitto de nit6n
duro y agua, o con un restregador de nil6n Tenga cuidado de no da_ar la junta de
empaque del homo.
Derrames demasiado grandes dent_o del homo Haga durar et cic!o de autotimpieza
durante m_s tiempo
Hay llamas dentro del horno o sale
humo del respiraderoo
Derrames demasiado grandes dentro del homo Esto es normal, especialmente si se
homean tartas o cuando se acumula una gran cantidad de gfasa en el fondo Limpie
dichos derrames antes de iniciar el ciclo de autolimpieza Sisurgen llamas o hay
demasiado humo, detenga el ciclo de autolimpieza y siga los pasos que se dan en la
parte intitulada "COmo detener o interrumpir un ciclo de autolimpieza", de la
secciOndenominada Limpieza del homo.
20

GARANTiA PAPA UNA
ESTUFA AUTONOMA
UN AIgO COMPLETO DE GARANTiA PARA TODAS LAS PIEZAS _'
Si, dentro de un afio a partir de la fecha de instalaci6n, cualquier parte
funciona indebidamentea causa de un defecto en materiales o fabricaci6n,
Sears la reparar_-o la reemplazar_, a nuestra descreci6n, sin costo alguno
para el comprador.
Si este producto se utiliza para otros fines que no sean el uso familiar
privado, las garantias indicadas arriba s61o tendr_n vigencia durante 90
dfaso
EL SERVtC!O DE GARANTIA ESTAA SU DISPOSICION CON SOLO PONERSE
EN CONTACTO CON EL CENTRO O DEPARTAMENTO DE SERVICIO SEARS
MAS CERCANO A USTED EN LOS ESTADOS UNIDOSo
Esta garantia le otorga derechos legates especfficos yes posible que usted
tenga tambi_n otros derechos que varian de un estado a otro,.
Sears Roebuck and Con Dept. 817 WA Hoffman Estates, IL 60179
J
Para ampliar el valor de su estufa,
compre un Acuerdo de Mantenimiento (MA) Sears
/_A_0 de cobertura para .................
el propietario
1. Reemplazo de las partes
defectuosas, excepto las W
unidades de vidrio radiante
y superficie radiante,
2. Revisi6n anual de
mantenimiento preventivo MA
a petici6n suya°
,\
Primer a_o
Segundo a li0. Tercer aflo
MA
MA
MA
MA
/
W - Garantia MA - Contrato de Mantenimiento
La estufas Kenmore han sido disefiadas, fabricadas y probadas para brindarle afios de operaci6n confiableo
Sinembargo, cualquier aparato electrodom_astico moderno puede requerir alguna reparaci6n de tiempo en
tiempoo La garantia Sears, adem_s del Acuerdo de Mantenimiento Sears, le brinda protecci6n contra facturas
inesperadas de reparaci6n.
Arriba en la tabla se compara la garantia y el Acuerdo de Mantenimiento y se muestran los beneficios de tener un
Acerdo de Mantenimiento para su estufa Sears.
Pbngase en contacto con su asociado de ventas Sears o con el Centro de Servicio Sears de la locatidad hoy mismo
y adquiera un Acuredo de Mantenimiento Sears.
For information on purchasing a Sears Maintenance Agreement call 1-800-827-6655.

For in-home major brand repair service:
Call 24 hours a day, 7 days a week
1-800-4-MY-HOME sM(1-800-469-4663)
Para pedir servicio de reparacion a domicillio - 1-800-676-5811
In Canada for all your service and parts needs call
Au Canada pour tout le service ou les pi_ces - 1-800-665-4455
For repair or replacement parts you need:
Call 7 am - 7 prn, 7 days a week
1-800-366-PART (1-800-366-7278)
Para ordenar piezas con entrega a domicilio - 1-800-659-7084
For the location of a Sears Parts and Repair Center in your area:
Call 24 hours a day, 7 days a week
1-800-488-1222
For information on purchasing a Sears Maintenance Agreement
or to inquire about an existing Agreement:
Call 9 am - 5 pm, Monday - Saturday
1-800-827-6655
TheServiceSideof Sear£


