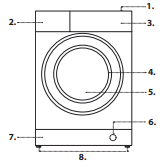
compartment 2: Detergent for the wash cycle (powder or liquid)
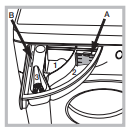
If liquid detergent is used, it is recommended that the removable plastic partition A (supplied) be used for proper dosage.
If powder detergent is used, place the partition into slot B.
compartment 3: Additives (fabric softeners, etc.) The fabric softener should not overflow the grid.
Use powder detergent for white cotton garments, for pre-washing, and for washing at temperatures over 60°C.
Follow the instructions given on the detergent packaging.
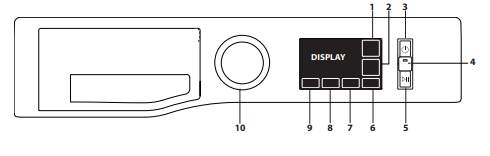
DAILY USE
Prepare the laundry by following the suggestions appearing under the “TIPS AND SUGGESTIONS” section.
Press the ON/OFF button .
Open the door. Load the laundry while making sure not to exceed the maximum load quantity indicated in the wash cycle table.
Pull out the detergent dispenser drawer and pour the detergent into the relevant compartments, as described in the “DETERGENT DISPENSER DRAWER” section.
Close the door.
The machine automatically displays the default temperature and spin speed values for the selected cycle, or the most recently used settings if they are compatible with the selected cycle.
Select the desired wash cycle.
Select the desired options.
STARTING CYCLE
Press the start/pause button.
The machine will lock the door ( symbol on) and the drum will start to rotate; the door will be unlocked ( symbol OFF) and then locked again ( symbol on) as preparation phase of each washing cycle. The “Clicking” noise is part of the door locking mechanism. Water will enter the drum and start the washing phase once the door is locked.
TIPS AND SUGGESTIONS
Divide the laundry according to: Type of fabric (cotton, mixed fibres, synthetics, wool, garments to be hand-washed). Colour (separate coloured garments from whites, wash new coloured garments separately). Delicates (small garments – such as nylon stockings – and items with hooks – such as bras: insert them in a fabric bag).
Empty the pockets: Objects such as coins or lighters can damage the washing machine and the drum. Check all buttons.
Follow the dosage recommendation / additives: It optimizes the cleaning result, it avoids irritating residues of surplus detergent in your laundry and it saves money by avoiding waste of surplus detergent
Use low temperature and longer duration: The most efficient programmes in terms of energy consumption are generally those that perform at lower temperatures and longer duration.
Observe the load sizes: Load your washing machine up to the capacity indicated in the “PROGRAMME CHART” table to save water and energy. Noise and remaining moisture content
They are influenced by the spinning speed: the higher the spinning speed in the spinning phase, the higher the noise and the lower the remaining moisture content
CARE AND MAINTENANCE
Cutting off the water and electricity supplies
Close the water tap after every wash. This will limit wear on the hydraulic system inside the washing machine and help to prevent leaks. Unplug the washing machine when cleaning it and during all maintenance work.
Cleaning the washing machine
The outer parts and rubber components of the appliance can be cleaned using a soft cloth soaked in lukewarm soapy water. Do not use solvents or abrasives.
Cleaning the detergent dispenser drawer
Remove the dispenser drawer by lifting and pulling it outwards. Wash it under running water; this procedure should be effected regularly.
Caring for the door and drum
Always leave the porthole door ajar in order to prevent unpleasant odours from forming.
Cleaning the pump - The washing machine is fitted with a self-cleaning pump that does not require any maintenance. Small items (such as coins or buttons) may sometimes fall into the protective pre-chamber situated at the base of the pump. ! Make sure that the wash cycle has ended and unplug the appliance. To access the pre-chamber:
remove the covering panel on the front side of the machine by inserting a screwdriver in the centre and sides of the panel and using it as a lever;
place a low and wide container under the water filter in order to collect the residual water.
loosen the drainage pump cover by turning it anti-clockwise: it is normal for some water to leak out;
clean the inside thoroughly;
screw the cover back on;
put the panel back in place, making sure the hooks slot in place before pushing the panel onto the appliance.
Checking the water inlet hose
Check the water inlet hose at least once a year. If it is cracked or broken, it must be replaced: during wash cycles, the high pressure of the water could suddenly split the hose open.
Never use hoses that have already been used.
CLEANING THE OUTSIDE OF THE WASHING MACHINE
Use a soft damp cloth to clean the outer parts of the washing machine.
Do not use glass or general purpose cleaners, scouring powder or similar to clean the control panel – these substances might damage the printing.
CHECKING THE WATER SUPPLY HOSE
Check the inlet hose regularly for brittleness and cracks. If damaged, replace it by a new hose available through our After-Sales Service or your specialist dealer. Depending on the hose type:
If the inlet hose has a transparent coating, periodically check if the colour intensifies locally. If yes, the hose may have a leak and should be replaced.
For water stop hoses: check the small safety valve inspection window (see arrow). If it is red, the water stop function was triggered, and the hose must be replaced by a new one. For unscrewing this hose, press the release button (if available) while unscrewing the hose.
CLEANING THE MESH FILTERS IN THE WATER SUPPLY HOSE
Close water tap and unscrew the inlet hose.
Clean the mesh filter at the hose’s end carefully with a fine brush.
Now unscrew the inlet hose on the back of the washing machine by hand. Pull out the mesh filter from the valve on the back of the washing machine with pliers and carefully clean it.
Insert the mesh filter again. Connect the inlet hose to water tap and washing machine again. Do not use a tool to connect the inlet hose. Open the water tap and check that all connections are tight.
CLEANING THE DETERGENT DISPENSER
Remove the dispenser by raising it and pulling it out (see figure).
Wash it under running water; this operation should be repeated frequently.
CLEANING THE WATER FILTER / DRAINING RESIDUAL WATER
Switch off and unplug the washing machine before cleaning the water filter or draining residual water. If you used a hot wash programme, wait until the water has cooled down before draining any water. Clean the water filter regularly, to avoid that the water cannot drain after the wash due to obstruction of the filter. If the water cannot drain, the display indicates that the water filter may be clogged.
Remove the kick panel: Using a screwdriver, do that which is shown in the following figure.
Container for the drained water: Place a low and wide container under the water filter in order to collect the residual water.
Drain the water: Slowly turn the filter counter-clockwise until all the water has come out. Allow the water to flow out without removing the filter. Once the container is full, close the water filter by turning it clockwise. Empty the container. Repeat the procedure until all the water has been drained.
Remove filter: Lay a cotton cloth beneath the water filter, which can absorb a small amount of rest water. Then remove the water filter by turning it out anticlockwise.
Clean the water filter: remove residues in the filter and clean it under running water.
Insert the water filter and reinstall the plinth: Reinsert the water filter again by turning it in clockwise direction. Make sure to turn it in as far as it goes; the filter handle must be in vertical position. To test water tightness of the water filter, you can pour about 1 liter of water into the detergent dispenser. Then reinstall the plinth.
TROUBLESHOOTING
The washing machine does not start.
The appliance is not plugged into the socket fully, or not enough to make contact.
There is no power in the house.
The wash cycle does not start.
The washing machine door is not closed properly.
The ON/OFF button has not been pressed.
The START/PAUSE button has not been pressed.
The water tap has not been opened. A delay has been set for the start time.
The Demo Mode is active
The washing machine does not fill with water (“” appears on the display).
The water inlet hose is not connected to the tap.
The hose is bent.
The water tap has not been opened.
There is no water supply in the house.
The pressure is too low.
The START/PAUSE button has not been pressed.
The washing machine continuously loads and unloads water.
The drain hose is not fitted between 65 and 100 cm from the floor.
The free end of the hose is immersed in water.
The wall drainage system is not fitted with a breather pipe.
If the problem persists even after these checks, turn off the water tap, switch the appliance off and contact the Technical Assistance Service. If the home is on one of the upper floors of a building, there may be problems relating to back-siphonage, causing the washing machine to fill with water and drain continuously. Special anti-siphon valves are available in shops and help to prevent this inconvenience.
The washing machines does not drain and the symbol (F9E1) on the display.
Clean the pump filter (see Care and maintenance chapter)
The drain hose is bent.
The drainage duct is clogged.
The washing machine vibrates a lot during the spin cycle.
Transport bolts have been not removed correctly during installation.
The washing machine is not leveled.
The washing machine is tucked between furniture cabinets and the wall.
The washing machine leaks.
The water inlet hose is not screwed on properly.
The detergent dispenser drawer is obstructed.
The drain hose is not properly attached
The symbol blinks and the display visualises an error code (e.g.: F1E1, F4...).
Switch off the machine and unplug it, wait for approximately 1 minute and then switch it back on again.
There is too much foam.
The detergent is not suitable for machine washing (it should display the text “for washing machines” or “hand and machine wash”, or the like).
Unbalance of laundry load prevented spin cycle, to protect the washing machine. If you want to spin the wet laundry, add more laundry items of different sizes and start “Spin&Drain” programme. Avoid small laundry loads consisting of few big, absorbent pieces of laundry / wash different sizes of articles in one load.
 .
. symbol on) and the drum will start to rotate; the door will be unlocked (
 button has not been pressed.
 button has not been pressed.
 ” appears on the display).
 (F9E1) on the display.
 symbol blinks and the display visualises an error code (e.g.: F1E1, F4...).