Use & Care Guide
ManuaJ de Uso y Cuidado
Kenmore
}d_®de/#,/%®deo
"/16,_ 26'/4
Vacuum Cleaner Help Line:
1-877-531-7321
8:00am-5:00pm EST, M-F
(U.S.A. and Canada)
Sears Brands Management Corporation
Hoffrnan Estates,
60179 USA
www.kenmore.corn
www.sears.corn
www.krnar t.corn
Before Using Your New Vacuum Cleaner .............................................................................. 2
Packing List .......................................................................................................................... 2
Kenmore Vacuum Cleaner Warranty .................................................................................... 3
important Safety instructions ................................................................................................ 4
Parts and Features ............................................................................................................ 5-7
Assembly instructions ........................................................................................................ 8-9
Operating instructions ........................................................................................................ 10
Canister Care ...................................................................................................................... 16
PowerMate Care .................................................................................................................. 21
Troubleshooting ............................................................................................................ 24-25
Notes .................................................................................................................................. 26
Requesting Assistance Or Service .......................................................................... Back Cover
Please read this guide. It will help you assemble and operate your new Kenmore vacuum
cleaner in the safest and most effective way.
For more information about vacuum cleaner care and operation, call the Vacuum Cleaner
Help Line at 1-877-531-7321. You will need the complete model and serial numbers when
requesting information. Your vacuum cleaner's model and serial numbers are located on the
Model and Serial Number Plate.
Use the space below to record the model number and serial number of your new Kenmore
vacuum cleaner.
Model No.
Serial No.
Date of Purchase
Keep this book and your sales check (receipt) in a safe place for future reference.
Your KENMORE VACUUM CLEANER is packaged with the following parts and
components assembled separately in the carton:
• Canister Vacuum Cleaner
• PowerMate ®
• Hose & Handle Assembly
• Pet PowerMate ®
• Telescoping Wand
• Tool Caddy
• Crevice Tool
• Dusting Brush
• Use & Care Guide
• Repair Parts List
Each of the above assemblies are shown in detail inside the repair parts list.
-2-
KENMORELIMITED WARRANTY
FOR ONE YEAR from the date of sale this appliance is warranted against defects in
material or workmanship when it is correctly installed, operated and maintained
according to all supplied instructions.
WITH PROOF OF SALE, return a defective appliance to the retailer from which it was
purchased for free repair or replacement at option of seller.
This warranty applies for only 90 DAYS from the sale date if this appliance is ever used
for other than private household purposes.
This warranty covers ONLY defects in material and workmanship, and will NOT pay
for:
1. Expendable items that can wear out from normal use, including but not limited to
filters, belts, bags or screw-in base light bulbs.
2. A service technician to clean or maintain this appliance, or to instruct the user in
correct appliance installation, operation and maintenance.
3. Service calls to correct appliance installation not performed by Sears authorized
service agents, or to repair problems with house fuses, circuit breakers, house wiring,
and plumbing or gas supply systems resulting from such installation.
4. Damage to or failure of this appliance resulting from installation not performed by
Sears authorized service agents, including installation that was not in accord with
electrical, gas or plumbing codes.
5. Damage to or failure of this appliance, including discoloration or surface rust, if it is
not correctly operated and maintained according to all supplied instructions.
6. Damage to or failure of this appliance, including discoloration or surface rust,
resulting from accident, alteration, abuse, misuse or use for other than its intended
purpose.
7. Damage to or failure of this appliance, including discoloration or surface rust,
caused by the use of detergents, cleaners, chemicals or utensils other than those
recommended in all instructionssupplied with the product.
8. Damage to or failure of parts or systems resulting from unauthorized modifications
made to this appliance.
9. Service to an appliance if the model and serial plate is missing, altered, or cannot
easily be determined to have the appropriate certification logo.
Disclaimer of implied warranties; limitation of remedies
Customer's sole and exclusive remedy under this limited warranty shall be product
repair or replacement as provided herein. Implied warranties, including warranties of
merchantability or fitness for a particular purpose, are limited to one year or the
shortest period allowed by law. Seller shall not be liable for incidental or consequential
damages. Some states and provinces do not allow the exclusion or limitation of
incidental or consequential damages, or limitation on the duration of implied warranties
of merchantability or fitness, so these exclusions or limitations may not apply to you.
This warranty applies only while this appliance is used in the United States.
This warranty gives you specific legal rights, and you may also have other rights which
vary from state to state.
Sears Brands Management Corporation, Hoffman Estates, IL 60179
-3-
Read all instructions in this guide before assembling or using your vacuum cleaner.
WARNING:
Your safety is important to us. To reduce the risk of fire, electrlcal shock, injury to
persons or damage when using your vacuum cleaner, follow basic safety
precautions including the following:
Use your vacuum cleaner only as described
in this guide. Use only with Sears
recommended attachments.
Disconnect electrical supply before
servicing or cleaning out the brush area.
Failure to do so could result in brush
unexpectedly starting causing personal
injury from moving parts.
Do not leave vacuum cleaner when plugged
in. Unplug from outlet when not in use and
before performing maintenance.
To reduce the risk of electrical shock - Do
not use outdoors or on wet surfaces.
Do not allow to be used as a toy. Close
attention is necessary when used by or near
children.
Do not use with a damaged cord or plug.
If vacuum cleaner is not working as it
should, has been dropped, damaged, left
outdoors, or dropped in water, return it to a
Sears Service Center.
Do not pull or carry by cord, use cord as a
handle, close a door on cord, or pull cord
around sharp edges or corners. Do not run
vacuum cleaner over cord. Keep cord
away from heated surfaces.
Do not unplug by pulling on cord. To unplug,
grasp the plug, not the cord.
Do not handle plug or vacuum cleaner with
wet hands.
Do not put any objects into openings.
Do not use with any opening blocked; keep
free of dust, lint, hair, and anything that
may reduce air flow.
Keep hair, loose clothing, fingers, and all
parts of body away from openings and
moving parts.
Turn off all controls before unplugging.
Use extra care when cleaning on stairs.
Do not put on chairs, tables, etc. Keep on
floor.
Do not use vacuum cleaner to pick up
flammable or combustible liquids (gasoline,
cleaning fluid, perfumes, etc.), or use in
areas where they may be present. The
fumes from these substances can create a
fire hazard or explosion.
Do not pick up anything that is burning or
smoking, such as cigarettes, matches, or hot
ashes.
Do not use vacuum cleaner without dust cup
and/or filters in place.
Always empty the dust cup after
vacuuming carpet cleaners or freshener,
powders, and fine dust. These products
clog the dust cup, reduce airflow and can
cause the bag to burst. Failure to empty
the dust cup could cause permanent
damage to the vacuum cleaner.
Do not use the vacuum cleaner to pick up
sharp hard objects, small toys, pins, paper
clips, etc. They may damage the vacuum
cleaner.
Do not operate the vacuum cleaner without
the exhaust filter or filter door in place.
The hose contains electrical wires. Do not
use when damaged, cut, or punctured.
Replace if cut or worn. Do not pick up
sharp objects.
Always turn off and unplug vacuum cleaner
before connecting or disconnecting either
hose, wand, Pet PowerMate, or PowerMate.
Hold plug when rewinding onto cord reel.
Do not allow plug to whip when rewinding.
Youare responsiblefor making sure that
your vacuum cleaner is not used by anyone
unable to operate it properly.
SAVE THESEINSTRUCTIONS
Proper assembly and safe use ofyour vacuum cleaner are your responsibilities. Your vacuum
cleaner is intended for Householduse. Read this Use & Care Guide carefully for important
use and safety intormation. This guide contains satety statements under warning and
caution symbols.
-4-
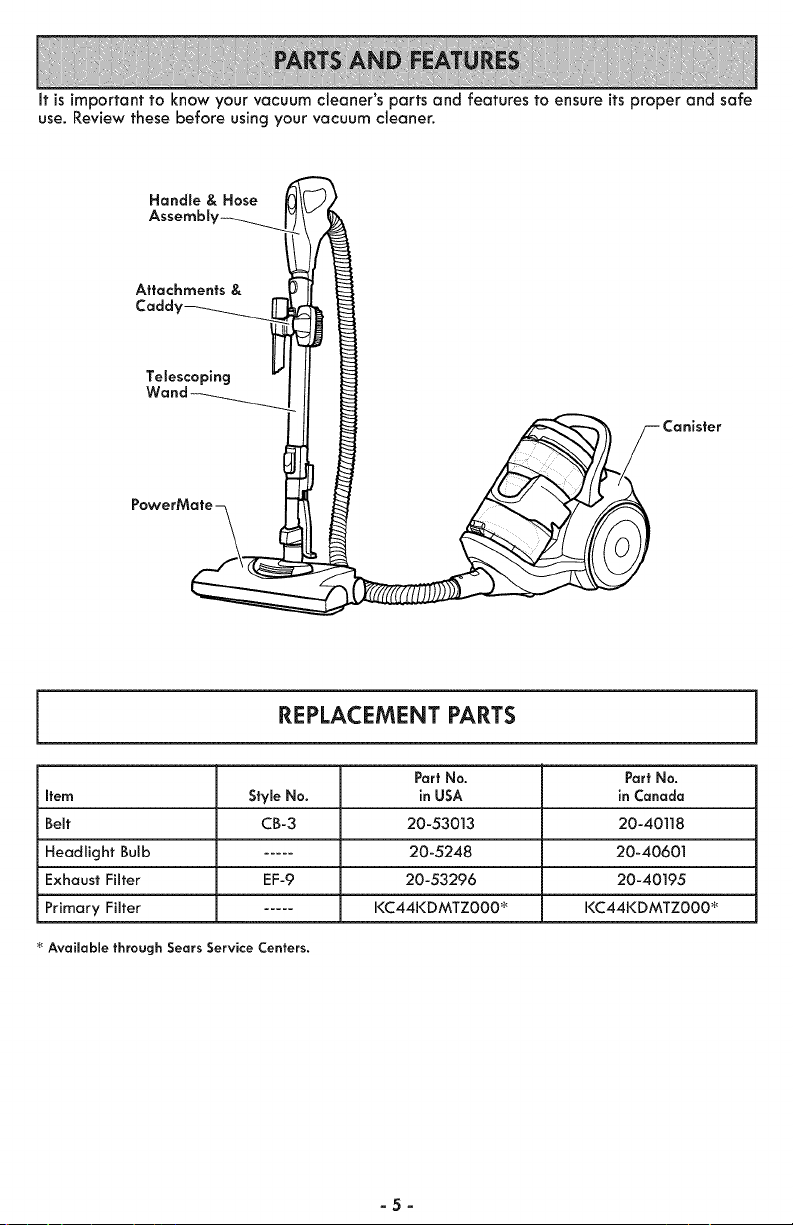
It is important to know your vacuum cleaner's parts and features to ensure itsproper and safe
use. Review these before using your vacuum cleaner.
Handle & Hose
Attachments &
Cadd_
Telescoping
REPLACEMENT PARTS
Part No. Part No.
Item StymeNo. in USA in Canada
Belt CB-3 20-53013 20-40]]8
Headlight Bulb ..... 20-5248 20-40601
Exhaust Filter EF-9 20-53296 20-40195
Primary Filter ..... KC44KDMTZ000 _ KC44KDMTZ000 _
Available through Sears Service Centers.
-5-
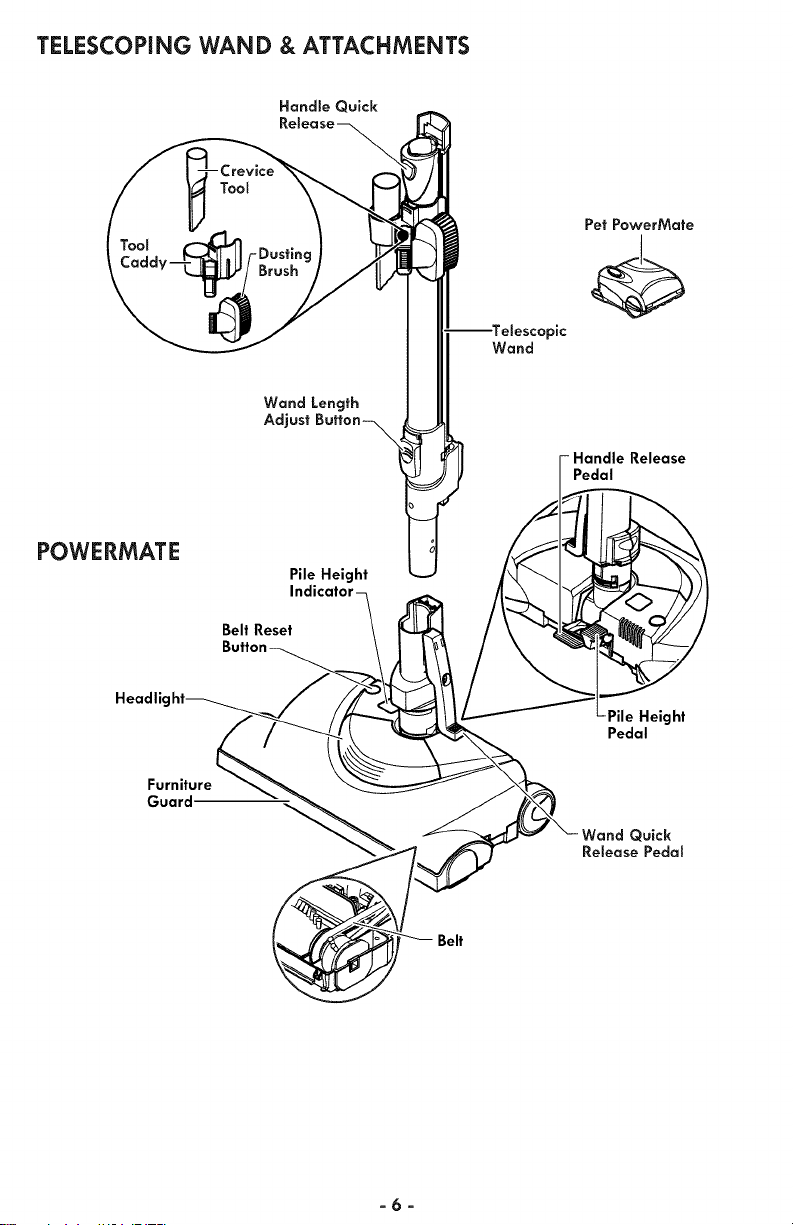
TELESCOPING WAND & ATTACHMENTS
Handle Quick
POWERMATE
Headlic
Furniture
Guard
Wand Length
Adjust
Pile Height
Belt Reset
Wand
Pet PowerMate
pic
-Handle Release
Pedal
Pedal
Quick
Release Pedal
Belt
-6-
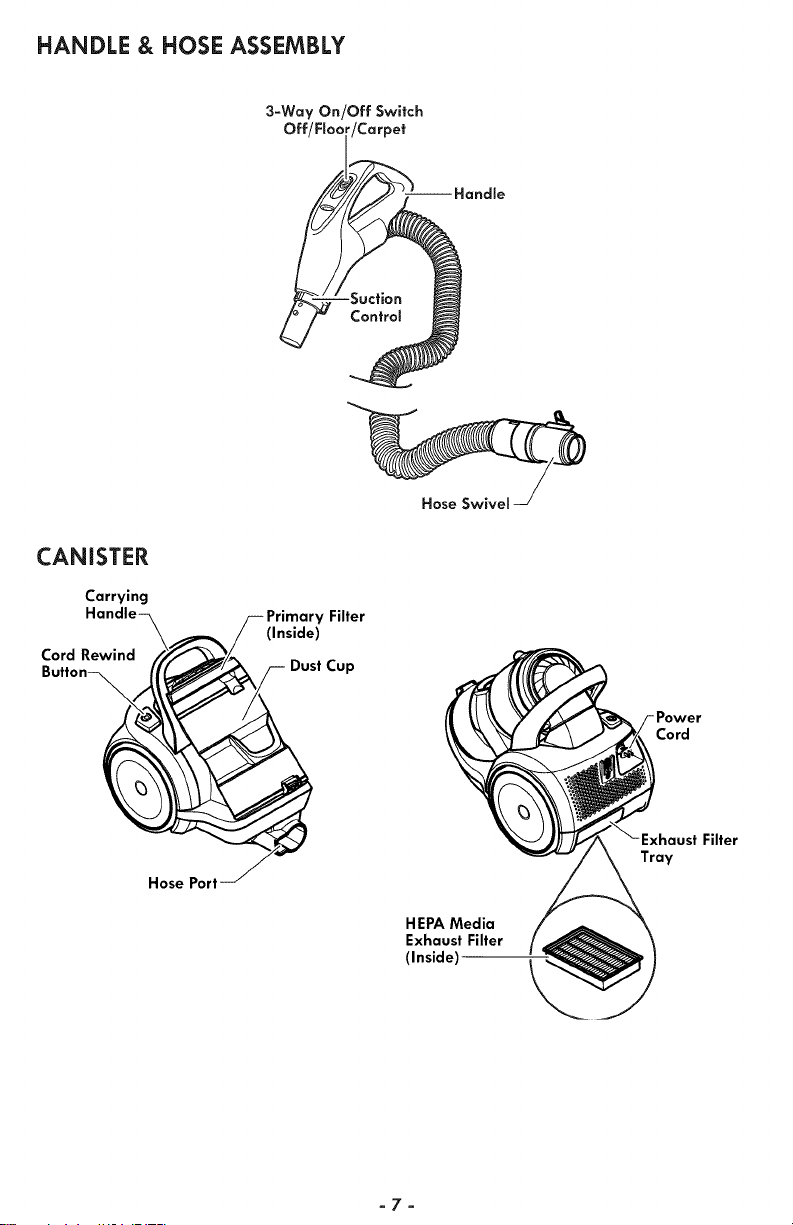
HANDLE & HOSE ASSEMBLY
3-Way On/Off Switch
Off/FIo_ /Carpet
CANISTER
Carrying
Cord Rewind
Filter
(Inside)
Dust Cup
Hose Swivel
Cord
Hose Port
HEPA Media
Exhaust Filter
(Inside)
Tray
-7-
Please pay special attention to these hazard alert boxes, and follow any instructions
given. WARNING statements alert you to such dangers as fire, electric shock, burns
and personal injury. CAUTION statements alert you to such dangers as personal
injury and/or property damage.
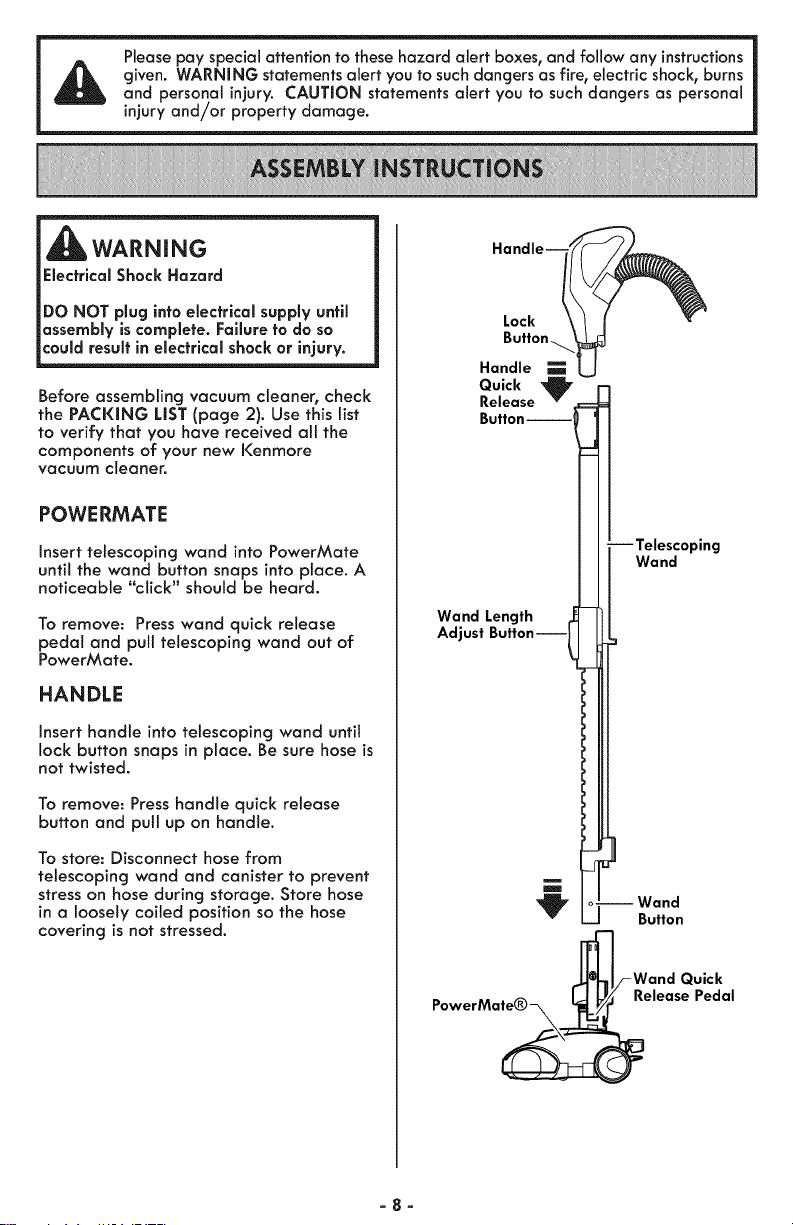
WARNING
Electrical Shock Hazard
DO NOT plug into electrical supply until
assembly is complete. Failure to do so
could result in electrical shock or injury.
Before assembling vacuum cleaner, check
the PACKING LiST (page 2). Use this list
to verify that you have received all the
components of your new Kenmore
vacuum cleaner.
POWE RMATE
Insert telescoping wand into PowerMate
until the wand button snaps into place. A
noticeable '"click" should be heard.
To remove: Press wand quick release
pedal and pull telescoping wand out of
PowerMate.
HANDLE
Insert handle into telescoping wand unfit
lock button snaps in place. Be sure hose is
not twisted.
To remove: Press handle quick release
button and pul! up on handle.
To store: Disconnect hose from
telescoping wand and canister to prevent
stress on hose during storage, Store hose
in a loosely coiled position so the hose
covering is not stressed,
Lock
Handle
Quick '_
Release
Button-
-Telescoping
Wand
Wand Length
Adjust ButtonJ
--Wand
Button
_/-Wand Quick
PowerMate® L_/_ Release Pedal
-8-
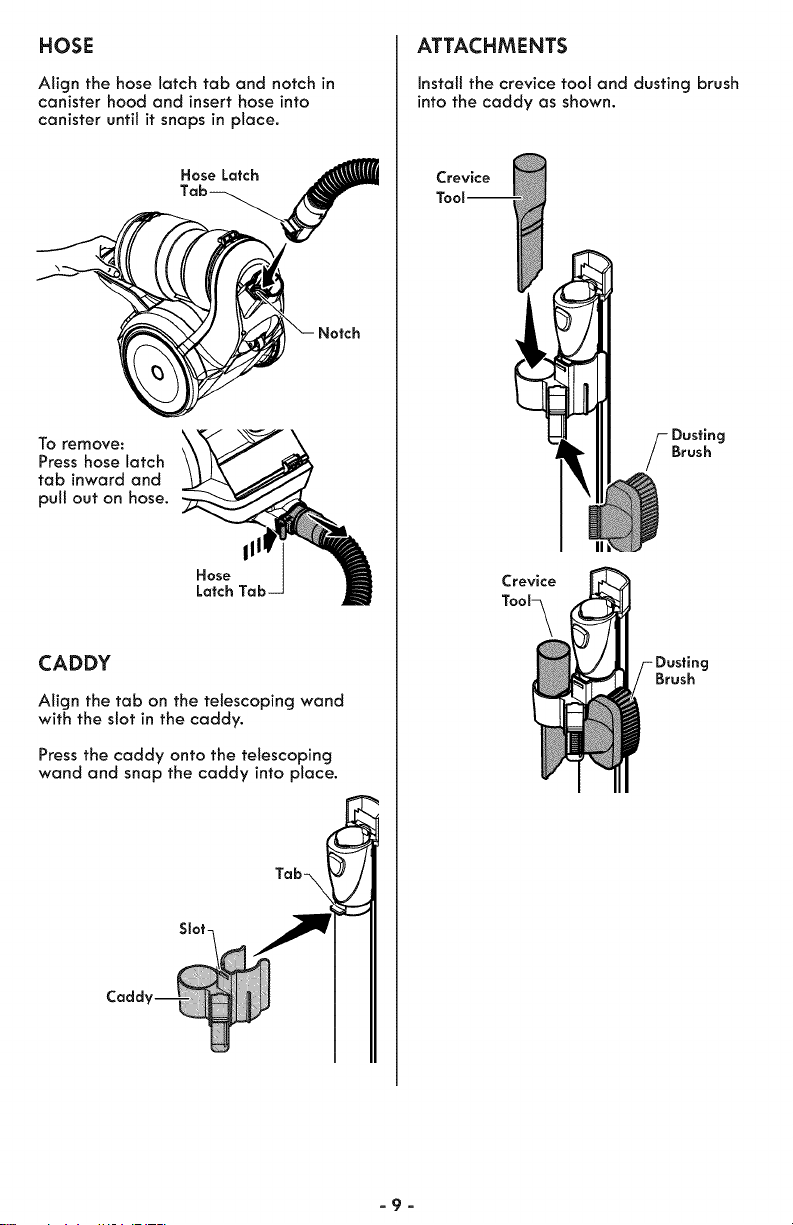
HOSE
Align the hose latch tab and notch in
canister hood and insert hose into
canister until it snaps in place.
Hose Latch
_ Notch
To remove:
Press hose latch
tab inward and
pull out on hose.
111
Hose
Latch
CADDY
Align the tab on the telescoping wand
with the slot in the caddy.
Press the caddy onto the telescoping
wand and snap the caddy into place.
Tab-\
Slot-
ATTACHMENTS
Instalt the crevice tool and dusting brush
into the caddy as shown.
Crevice
S usting
Brush
Crevice
Tool_
Brush
-9-
,CAUTION
Moving parts! To reduce the risk of personal injury, DO
NOT touch the agitator when vacuum cleaner is on.
Contacting the agitator while it is rotating can cut,
bruise or cause other injuries. Always turn off and
unplug from electrical outlet before servicing.
Use caution when operating near children.
HOW TO START
WARN|NG
Personal injury and Product Damage
Hazard
DO NOT place hands or feet under
the vacuum cleaner at any time.
DO NOT plug in if switch is in ON
position. Personal injury or property
damage could result.
The cord moves rapidly when rewind-
ing. Keep children awayand provide a
clear path when rewinding the cord to
prevent personal injury.
DO NOT use outlets above counters.
Damage from cord to items in sur-
rounding area could occur.
When any abnormality/failure occurs,
stop using the product immediately
and disconnect the power plug.
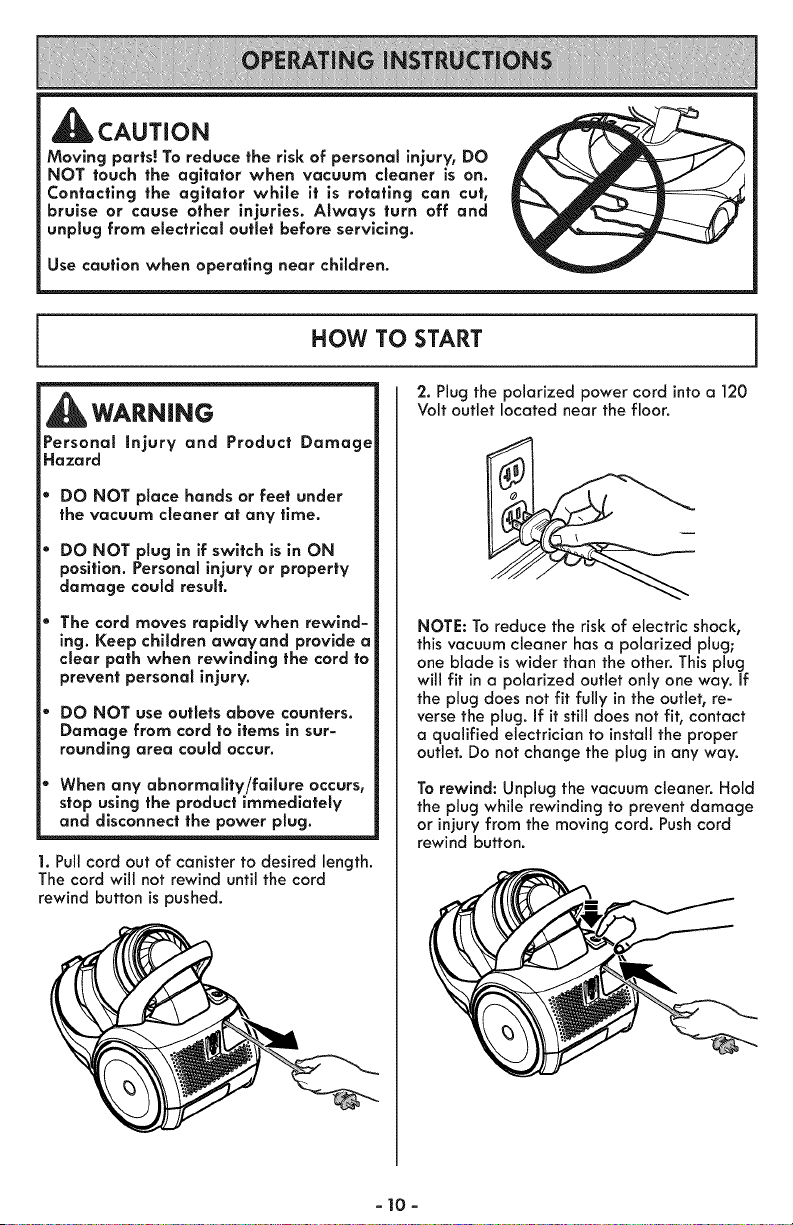
1. Pull cord out of canister to desired length.
The cord will not rewind until the cord
rewind button is pushed.
2. Plug the polarized power cord into a 120
Volt outlet located near the floor.
NOTE: To reduce the risk of electric shock,
this vacuum cleaner has a polarized plug;
one blade is wider than the other. This plug
will fit in a polarized outlet only one way. If
the plug does not fit fully in the outlet, re-
verse the plug. If it still does not fit, contact
a qualified electrician to install the proper
outlet. Do not change the plug in any way.
To rewind: Unplug the vacuum cleaner. Hold
the plug while rewinding to prevent damage
or injury from the moving cord. Push cord
rewind button.
- 10-
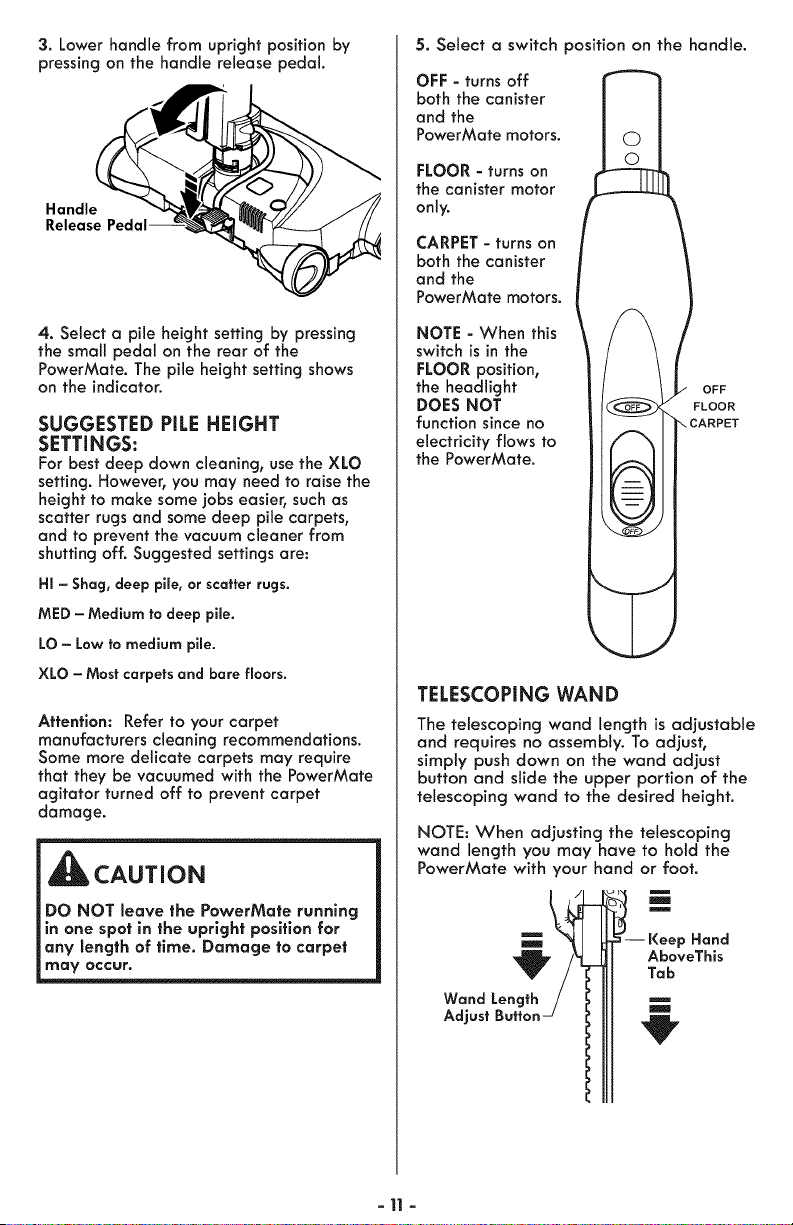
3. Lower handle from upright position by
pressing on the handle release pedal.
Handle
4. Select a pile height setting by pressing
the small pedal on the rear of the
PowerMate. The pile height setting shows
on the indicator.
SUGGESTED PiLE HEIGHT
SETTINGS:
For best deep down cleaning, use the XLO
setting. However, you may need to raise the
height to make some lobs easier, such as
scatter rugs and some deep pile carpets,
and to prevent the vacuum cleaner from
shutting off. Suggested settings are:
HI - Shag, deep pile, or scatter rugs.
MED - Medium to deep pile.
LO - Low to medium pile.
XLO - Most carpets and bare floors.
Attention: Refer to your carpet
manufacturers cleaning recommendations.
Some more delicate carpets may require
that they be vacuumed with the PowerMate
agitator turned off to prevent carpet
damage.
CAUTION
DO NOT leave the PowerMate running
in one spot in the upright position for
any length of time. Damage to carpet
may occur.
5. Select a switch position on the handle.
OFF - turns off
both the canister
and the
PowerMate motors.
FLOOR - turns on
the canister motor
only.
CARPET - turns on
both the canister
and the
PowerMate motors.
NOTE - When this
switch is in the
FLOOR position,
the headlight
DOES NOT
function since no
electricity flows to
the PowerMate.
OFF
FLOOR
..CARPET
TELESCOPING WAND
The telescoping wand length is adjustable
and requires no assembly. To adjust,
simply push down on the wand adjust
button and slide the upper portion of the
telescoping wand to the desired height.
NOTE: When adjusting the telescoping
wand length you may have to hold the
PowerMate with your hand or foot.
m
m
m
-- Keep Hand
AboveThis
Tab
m
m
-11 -
VACUUMING TiPS
_WARNING
Personal injury and Product Damage
Hazard
DO NOT run over power cord with
PowerMate. Personal injury or product
damage could result.
DO NOT pull plug from wall by
the power cord. if there is damage to
the cord or plug, personal injury or
property damage could result.
_lb CAUTION
Product Damage Hazard
Use care if the PowerMate and wand is
left in the upright position as it may tip
over easily. Property damage can occur if
tipped.
Suggested sweeping pattern.
For best cleaning action, the PowerMate
should be pushed straight away from you
and pulled straight back. At the end of
each pull stroke, the direction of the
PowerMate should be changed to point into
the next section to be cleaned. This pattern
should be continued across the carpet with
slow, gliding motions.
NOTE: Fast,
jerky strokes
do not provide
complete
cleaning.
The hose swivel
allows the hose to
turn without moving
the canister. This is
helpful for cleaning
in small areas.
Check hose for twisting before pulling
canister.
WARNING
Personal injury Hazard
Use care if canister is placed on stairs. It
may fall, causing personal injury or
property damage.
CAUTION
Product Damage Hazard
Do not pull on the hose to move the
canister from one stair to the next. When
finished cleaning in one area use the
handle grip on the canister to move the
vacuum cleaner to a new location for
further cleaning.
Suction
Control
Carpeted stairs need to be vacuumed
regularly. For best cleaning results, fully
close the suction control.
For best cleaning results,keep the airflow
passage open. Check each assemblyarea
in REMOVING CLOGS (page 16)
occasionally for clogs. Turn off and unplug
vacuum cleaner from outlet before
checking.
- 12 -
ATTACHMENTS
_CAUTION
DO NOT attach or remove handle or
telescoping wand while vacuum cleaner is
ON. This could cause sparking and
damage the electrical contacts.
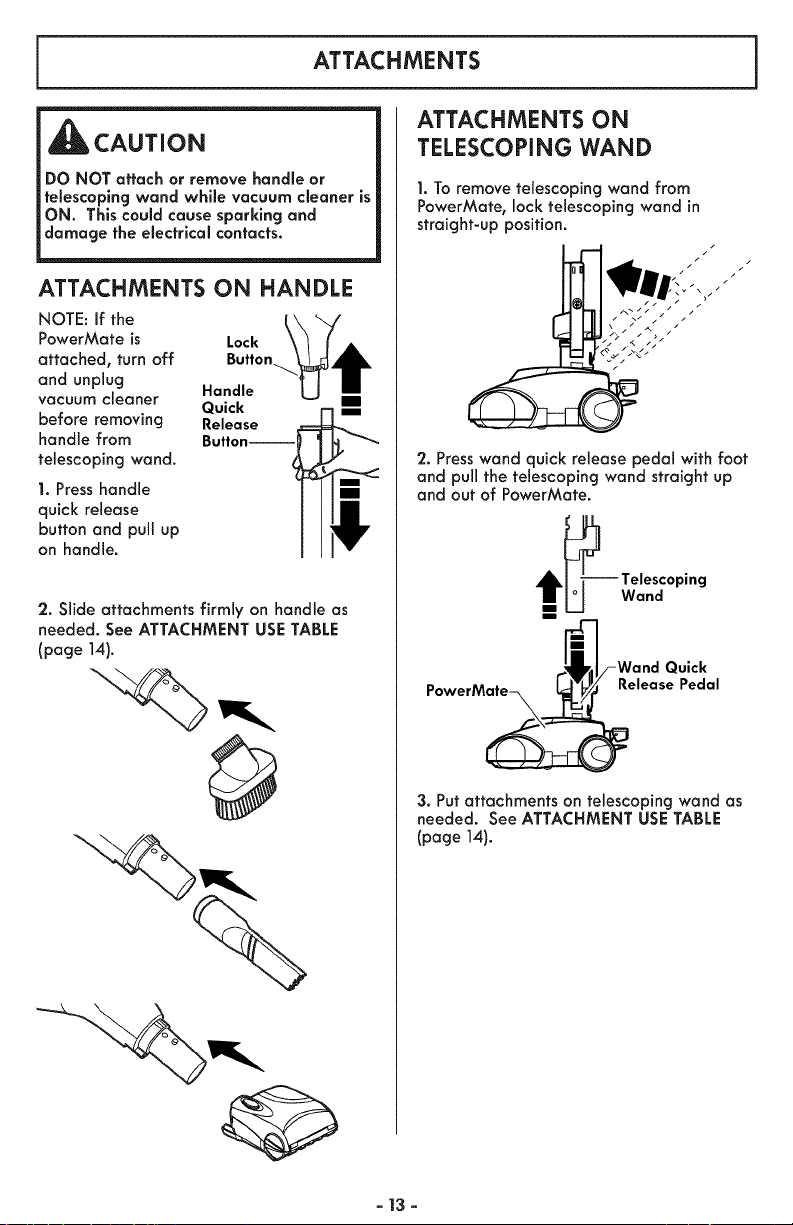
ATTACHMENTS ON HANDLE
NOTE: If the
PowerMate is Lock
attached, turn off Button
and unplug Handle
vacuum cleaner Quick
before removing Release
handle from Button--
telescoping wand.
1. Press handle
quick release
button and pull up
on handle.
2. Slide attachments firmly on handle as
needed. See ATTACHMENT USE TABLE
(page 14).
ATTACHMENTS ON
TELESCOPING WAND
1. To remove telescoping wand from
PowerMate, lock telescoping wand in
straight-up position.
/
/
2. Presswand quick release pedal with foot
and pull the telescoping wand straight up
and out of PowerMate.
_---_ Telescoping
U Wand
m
_1/-Wand Quick
PowerM_Release Pedal
3. Put attachments on telescoping wand as
needed. See ATTACHMENT USE TABLE
(page 14).
- 13 -
ATTACHMENT USE TABLE
CLEANING AREA
Between Bare Carpeted
ATTACHMENT Furnito_o 1 Cushions1 Drapes 1 Stairs R.... Roors/Rugs Wails
Crevice fool _ v' v' v'
brush _ v' v' v' v'Dusting
PowerMafe
Pet PowerMafe 3 _ v' v'
]. Always clean attachments before using on fabrics.
2. 3-way switch should be in FLOOR position.
3. Pet PowerMate attachment instructions are included with the product.
PERFORMANCE FEATURES
WARNING
Personal Injury Hazard
Always turn off and unplug the vacuum
cleaner before cleaning the agitator area
as agitator may suddenly restart. Failure
to do so can result in personal injury.
THERMAL PROTECTOR
This vacuum cleaner has a thermal
protector which automatically trips to
protect the vacuum cleaner from
overheating. If a clog prevents the normal
flow of air to the motor, the thermal
protector turns the motor off
automatically. This allows the motor to
cool in order to prevent possible damage
to the vacuum cleaner.
To correct problem: Turn the vacuum
cleaner off and unplug the power cord
from the outlet to allow the vacuum
cleaner to coot and the thermal protector
to reset. Check for and remove clogs, if
necessary. Also check and replace any
dogged filters. Waif approximately fifty
(50) minutes and plug the vacuum
cleaner in and turn back on to see if the
motor protector has reset.
MOTOR PROTECTOR
This vacuum cleaner
also has a motor
protector by-pass
valve which prevents
motor overheating
and damage. The
valve opens to
provide cooling air
when a clog prevents
normal air flow to the
Motor
Protector
Dust
Cup
vacuum cleaner suctionmotor. You will
notice a change of soundas air rushes
through the valve opening.
To correct problem: Empty the dust cup and
clean the primary filter and pre-filter. Check
for and remove clogs, and empty dust cup if
necessary. See CLOG REMOVAL (page 16).
NOTE: Do not block motor protector.
NOTE: The motor protector may open when
using attachments or when cleaning new
carpet due to reduced airflow caused by
the attachments themselves or by new
carpet.
- 14-
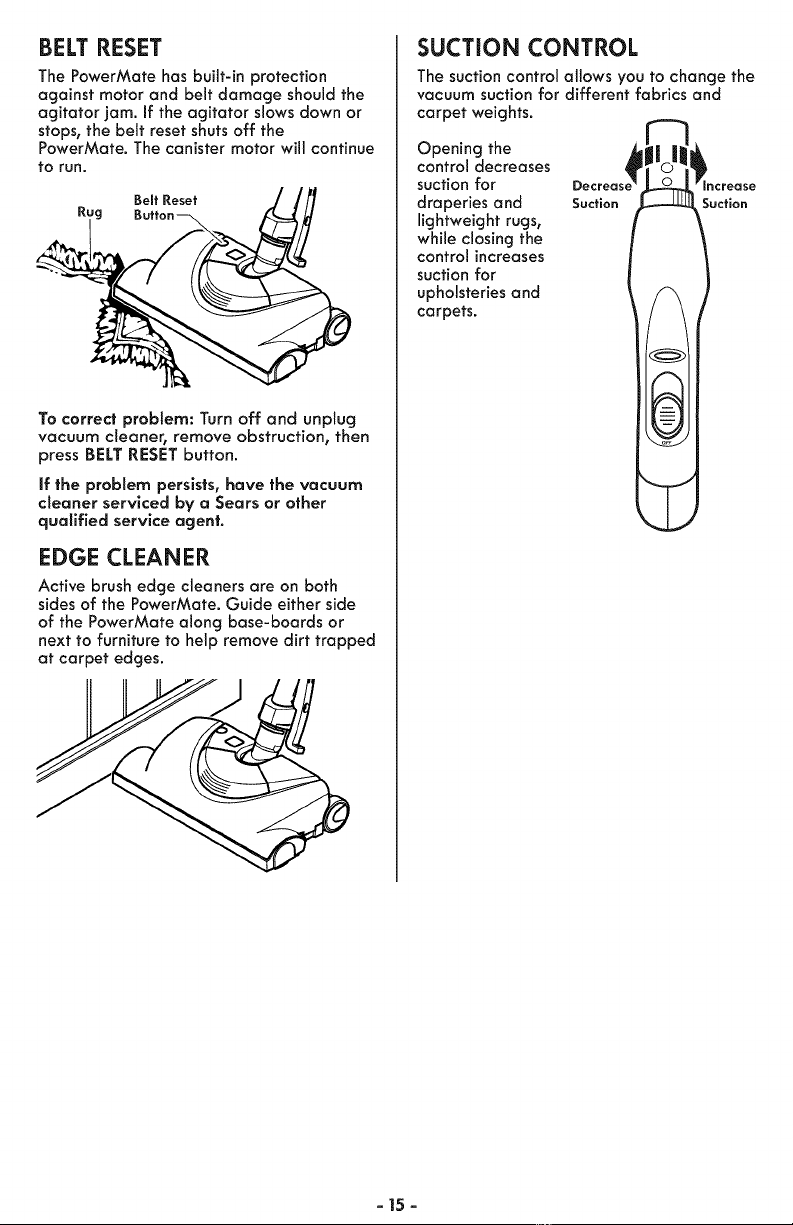
BELT RESET
The PowerMate has built-in protection
against motor and belt damage should the
agitator jam. If the agitator slows down or
stops, the belt reset shuts off the
PowerMate. The canister motor will continue
tO run.
Bo..o.o, //fl
Rug Button_ _ L/
To correct problem: Turn off and unplug
vacuum cleaner, remove obstruction, then
press BELT RESETbutton.
if the problem persists, have the vacuum
cleaner serviced by a Sears or other
qualified service agent.
EDGE CLEANER
Active brush edge cleaners are on both
sides of the PowerMate. Guide either side
of the PowerMate along base-boards or
next to furniture to help remove dirt trapped
at carpet edges.
SUCTION CONTROL
The suction control allows you to change the
vacuum suction for different fabrics and
carpet weights.
Opening the
control decreases
suction for
draperies and
lightweight rugs,
while closing the
control increases
suction for
upholsteries and
carpets.
Suction Suction
- 15 -

REMOVING CLOGS
The vacuum cleaner creates suction that picks up dirt. Rapidly moving air carries the dirt to
the dust cup throughthe airflow passages. The dust Cup lets the air pass through, while it
traps the dirt.
For best cleaning results,keep the
airflow passage open. Check the
starred areas occasionally for clogs.
Turn off and unplug vacuum
cleaner from outlet before Tele,copic
checking.
PowerMate
TO CHECK FOR CLOGS:
Check dust cup and empty if full. See
EMPTYING DUST CUP (page 17).
Check pre-filter, primary filter and
exhaust filter and clean/replace if dirty.
See PRE-FILTER CLEANING (page 18),
PRIMARY FILTER CLEANING (page 19)
and EXHAUST FILTER CHANGING
(page 20).
Check PowerMate for any dirt or debris
in the belt path area or in the agitator
area. Carefully remove any string or
debris located on the agitator or end
caps. See "TO CLEAN AGITATOR" in
BELT CHANGING AND AGITATOR
CLEANING (page 21-22).
Primary
If the vacuum cleaner still has poor
suction, do the following:
Connect the hose to the canister and
turn vacuum cleaner on. Check the end
of the hose for suction. If there is good
suction on the hose handle, there is no
clog in the hose. If the suction is bad,
remove any dirt or debris in the hose
and handle.
2. Connect hose handle to wand. Check
the end of the wand for suction. If
there is good suction at the end of the
wand, there is no clog in the wand. If
the suction is bad, remove any dirt or
debris in the wand.
3. Check PowerMate swivel. Remove any
dirt or debris.
CLEANING EXTERIOR AND ATTACHMENTS
1. Turn off and unplug vacuum cleaner. DO
NOT drip water on vacuum cleaner.
2. To clean exterior, or to reduce static elec-
tricity and dust build-up, wipe outer surface
of vacuum cleaner and attachments. Use a
clean, soft cloth that has been dipped ina
solution of mild liquid detergent and water,
then wrung dry. Wipe dry after cleaning.
_CAUTION
Do not use attachments if they are wet.
Attachments used in dirty areas, such as
under a refrigerator, should not be used
on other surfaces until they are washed.
They could leave marks.
- 16 -
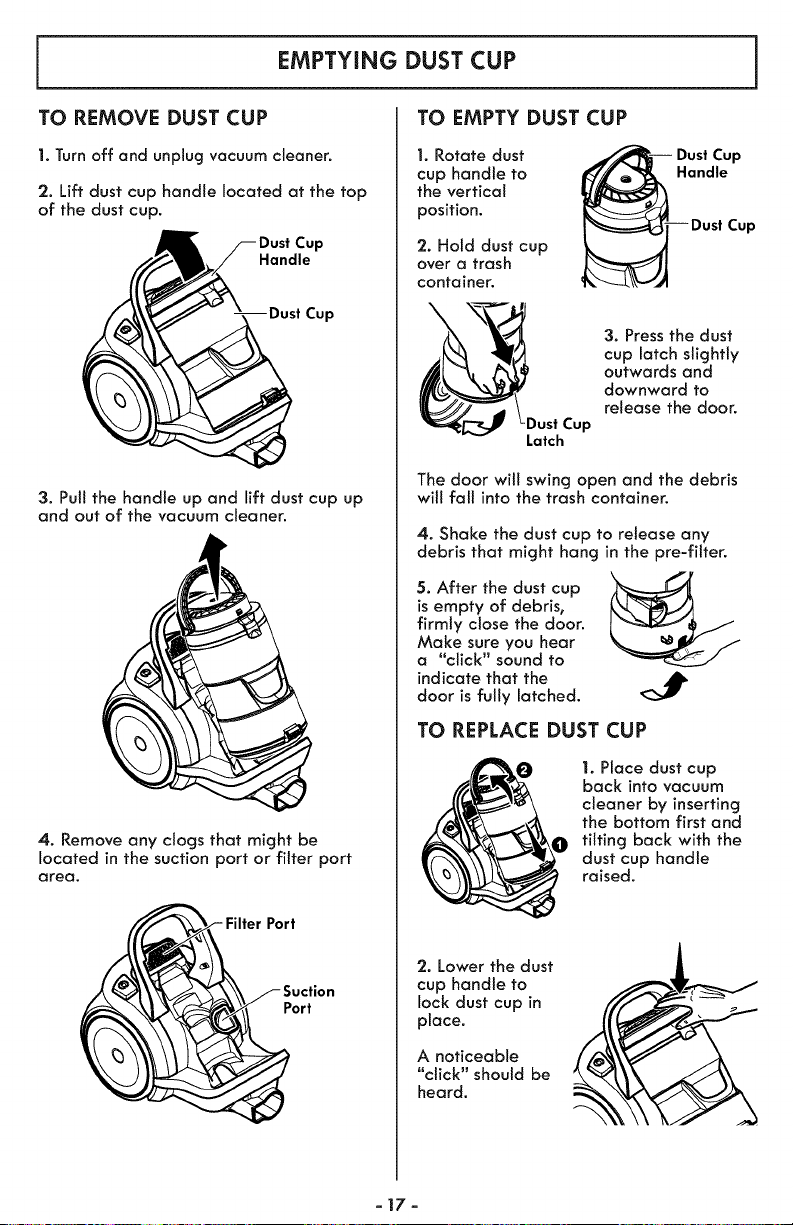
EMPTYING DUST CUP
TO EMPTY DUST CUPTO REMOVE DUST CUP
1. Turn off and unplug vacuum cleaner.
2. Lift dust cup handle located at the top
of the dust cup.
Handle
Cup
3. Pul!the handle up and lift dust cup up
and out of the vacuum cleaner.
4. Remove any clogs that might be
located in the suction port or filter port
area.
Port
iuction
Port
1. Rotate dust
cup handle to
the vertical
position.
2. Hold dust cup
over a trash
container.
_Dust Cup
Latch
Dust Cup
Handle
Cup
3. Press the dust
cup latch slightly
outwards and
downward to
release the door.
The door will swing open and the debris
will fall into the trash container.
4. Shake the dust cup to release any
debris that might hang in the pre-filter.
5. After the dust cup
is empty of debris,
firmly close the door.
Make sure you hear
a "click" sound to
indicate that the AIb
door is fully latched.
TO REPLACE DUST CUP
1. Place dust cup
back into vacuum
cleaner by inserting
the bottom first and
tilting back with the
dust cup handle
raised.
'2. Lower the dust
cup handle to
lock dust cup in
place.
A noticeable
"click" should be
heard.
-17-
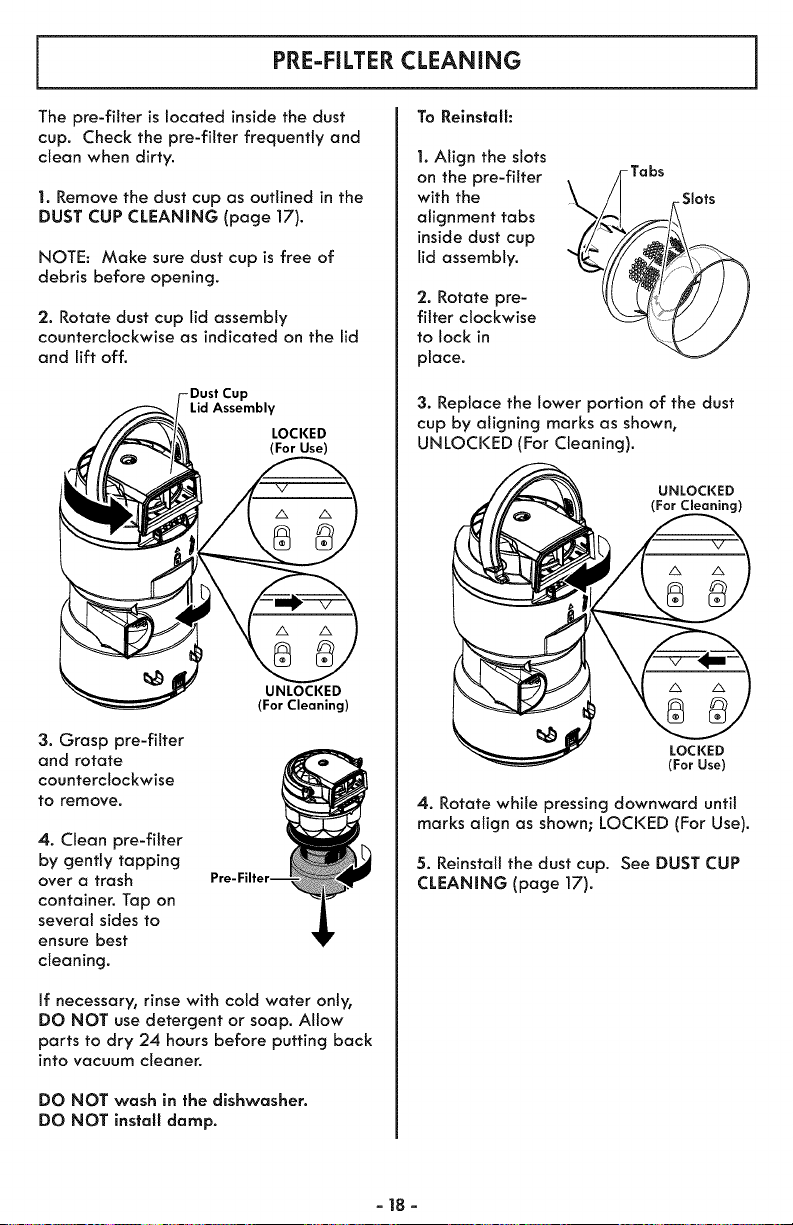
PRE-FILTER CLEANING
To Reinstall:
The pre-fitter is located inside the dust
cup. Check the pre-filter frequently and
clean when dirty.
1. Remove the dust cup as outlined in the
DUST CUP CLEANING (page 17).
NOTE: Make sure dust cup is free of
debris before opening.
'2. Rotate dust cup lid assembly
counterclockwise as indicated on the lid
and lift off.
Lid Assembly
LOCKED
(For Use)
3. Grasp pre-fitter
and rotate
counterclockwise
to remove.
UNLOCKED
(For Cleaning)
4. Clean pre-filter
by gently tapping
over a trash
container. Tap on
several sides to
ensure best
cleaning.
If necessary, rinse with cotd water only,
DO NOT use detergent or soap. Allow
parts to dry 24 hours before putting back
into vacuum cleaner.
DO NOT wash in the dishwasher.
DO NOT install damp.
1. Align the slots
on the pre-fitter
with the //.
alignment tabs
inside dust cup ,//_
lid assembly.
'2. Rotate pre-
filter clockwise
to lock in
place.
-Tabs
Slots
3. Replace the lower portion of the dust
cup by aligning marks as shown,
UNLOCKED (For Cleaning).
UNLOCKED
(For Cleaning)
LOCKED
(For Use)
4. Rotate while pressing downward until
marks align as shown; LOCKED (For Use).
5. Reinstall the dust cup. See DUST CUP
CLEANING (page 17).
-18-
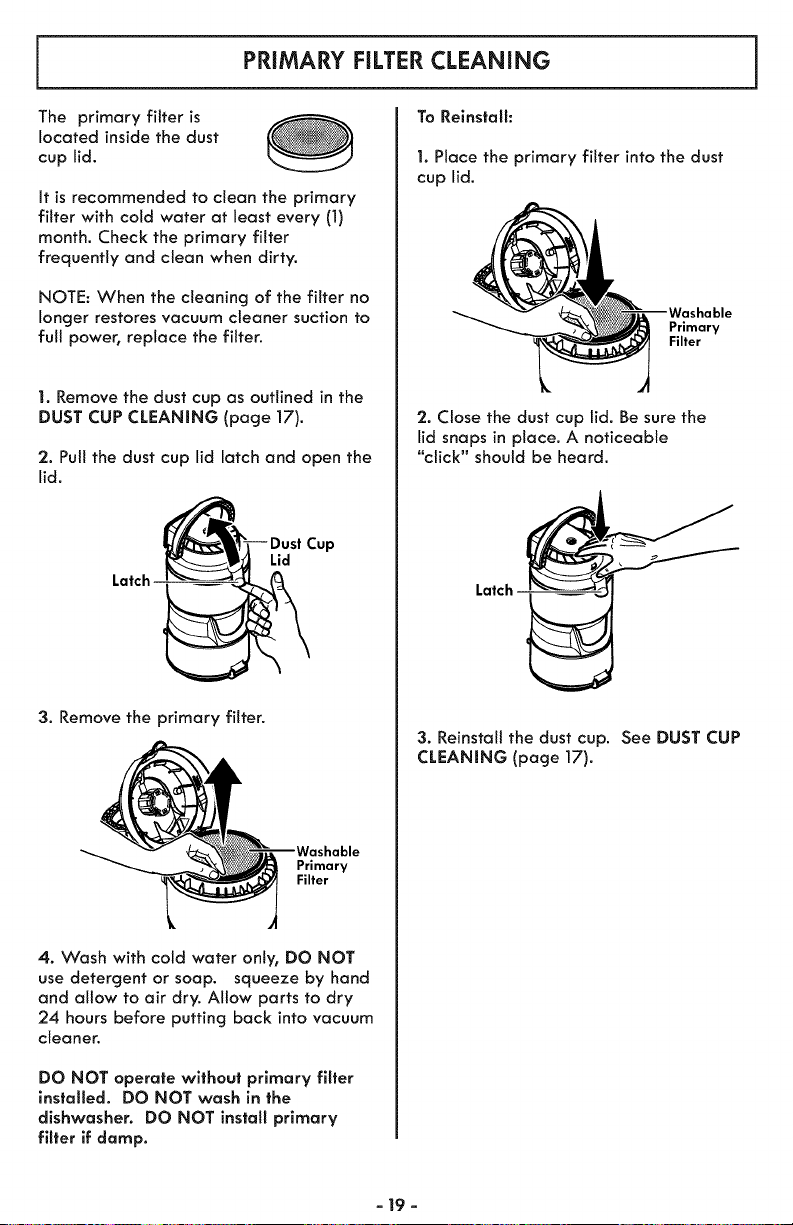
PRIMARY RLTER CLEANING
The primary filter is
located inside the dust
cup lid.
It is recommended to clean the primary
filter with cold water at least every (1)
month, Check the primary filter
frequently and clean when dirty,
NOTE: When the cleaning of the filter no
longer restores vacuum cleaner suction to
full power, replace the filter.
1. Remove the dust cup as outlined in the
DUST CUP CLEANING (page 17).
'2. Pull the dust cup lid latch and open the
lid.
Lid
Latch
3. Remove the primary filter.
Primary
Filter
4. Wash with cold water only, DO NOT
use detergent or soap. squeeze by hand
and allow to air dry. Allow parts to dry
24 hours before putting back into vacuum
cleaner.
DO NOT operate without primary filter
installed. DO NOT wash in the
dishwasher. DO NOT install primary
filter if damp.
To Relnstalh
1. Place the primary filter into the dust
cup lid.
Primary
Filter
2. Close the dust cup lid. Be sure the
lid snaps in place, A noticeable
"click" should be heard,
Latch
3. Reinstall the dust cup. See DUST CUP
CLEANING (page 17).
- 19 -

EXHAUST FILTERCHANGING
WARNING
Fire and/or Electrical Shock Hazard
Do not operate with a clogged exhaust
filter or without the exhaust filter or
exhaust filter tray installed.
HEPA MEDIA EXHAUST FILTER
The exhaust filter cartridge must be
replaced when dirty. Replace the filter
when the entire surface area is covered
evenly. The filter CANNOT be washed as it
will lose its dust trapping ability.
NOTE: See PARTSAND FEATURES(page 5)
for Exhaust Filter number.
1. Pull out and up on the exhaust filter tray
to remove from the canister.
Exhaust Filter
Tray
2. Remove exhaust filter from filter tray and
dispose.
Filter
Exhaust Filter
Tray
3. Replace exhaust filter cartridge. Place
the new filter cartridge into the exhaust
filter tray as shown.
_h Exhaust
aust Filter
Y
4. Reinstall the exhaust filter tray. Press into
place until it snaps closed.
- 20 -
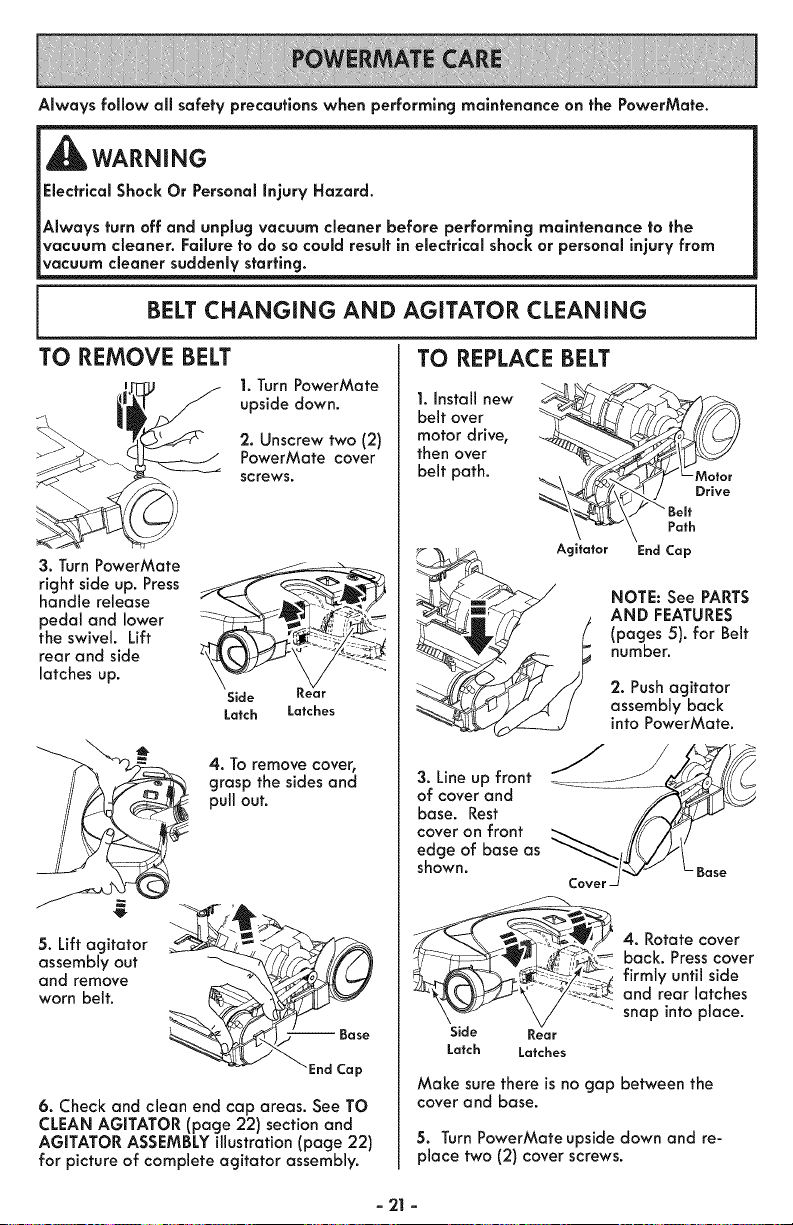
Always follow all safety precautions when performing maintenance on the PowerMate.
WARNING
Electrical Shock Or Personal Injury Hazard.
Always turn off and unplug vacuum cleaner before performing maintenance to the
vacuum cleaner, Failure to do so could result in electrical shock or personal injury from
vacuum cleaner suddenly starting.
BELT CHANGING AND AGITATOR CLEANING
TO REMOVE BELT
1. Turn PowerMate
upside down.
2. Unscrew two (2)
PowerMate cover
screws.
3. Turn PowerMate _ -_-___
right side up. Press
handle release
pedal and lower - - _ ;;-_>,___
the swivel. Lift - _ "
rear and side __'_-"_-:_'
latches up.
Side Kear
Latch Latches
4. To remove cover,
grasp the sides and
pull out.
5. Lift agitator
assembly out
and remove
worn belt.
6. Check and clean end cap areas. See TO
CLEAN AGITATOR (page 22) section and
AGITATOR ASSEMBLY illustration (page 22)
for picture of complete agitator assembly.
TO REPLACE BELT
I. Install new
belt over
motor drive,
then over
belt path.
Agitator End Cap
NOTE: See PARTS
AND FEATURES
(pages 5). for Belt
number.
2. Push agitator
assembly back
into PowerMate.
3. Lineup front _-___
of cover and
base. Rest __
cover on front
edge of base as
shown. Base
': "_ _ back. Press cover
n___; firmly until side
snap into place.
Side Rear
Latch Latches
Make sure there is no gap between the
cover and base.
5. Turn PowerMate upside down and re-
place two (2) cover screws.
- 21 -
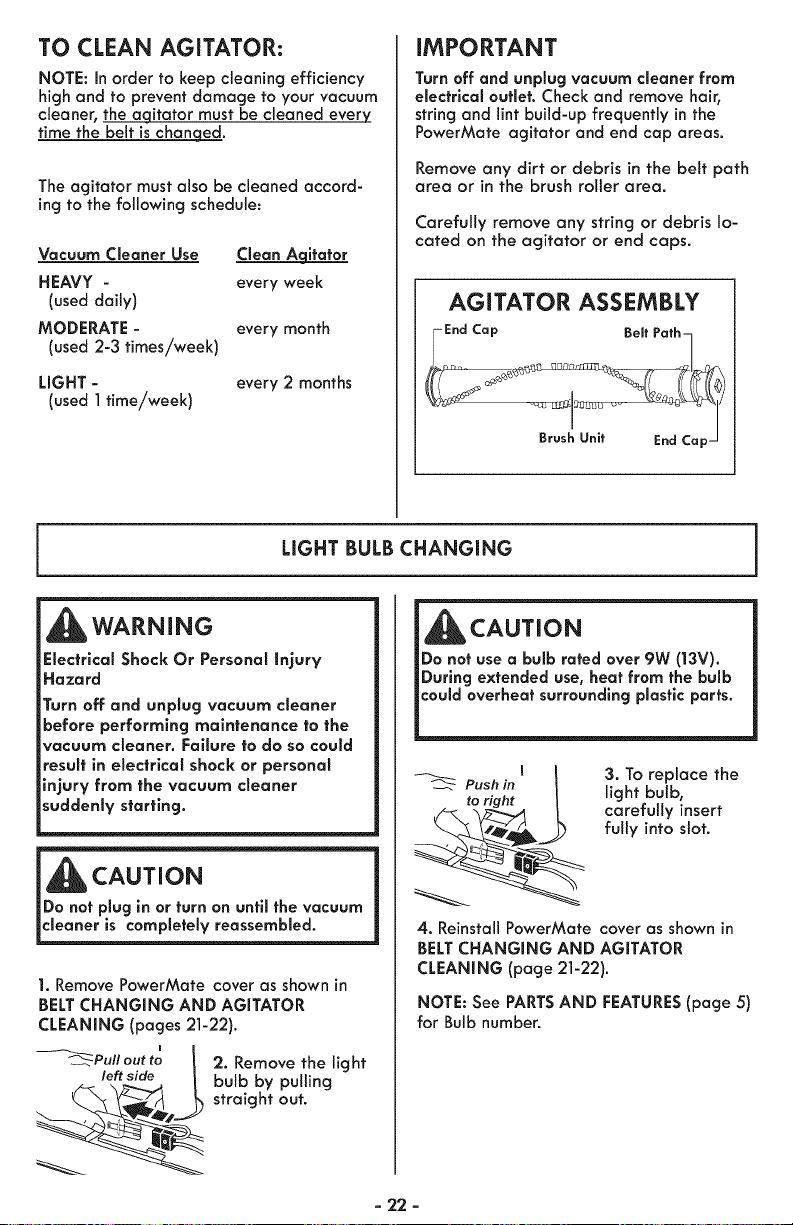
TO CLEAN AGITATOR:
NOTE: in order to keep cleaning efficiency
high and to prevent damage to your vacuum
cleaner, the aqitator must be cleaned every
time the belt is chan eqed.
The agitator must also be cleaned accord-
ing to the following schedule:
Vacuum Cleaner Use _itator
HEAVY - every week
(used daily)
MODERATE - every month
(used 2-3 times/week)
LIGHT - every 2 months
(used ] time/week)
iMPORTANT
Turn off and unplug vacuum cleaner from
electrical outlet. Check and remove hair,
string and lint build-up frequently in the
PowerMate agitator and end cap areas.
Remove any dirt or debris in the belt path
area or in the brush roller area.
Carefully remove any string or debris lo-
cated on the agitator or end caps.
AGITATOR ASSEMBLY
IEnd CaP Beff Pafh_
LIGHT BULB CHANGING
WARNING
Electrical Shock Or Personal Injury
Hazard
Turn off and unplug vacuum cleaner
before performing maintenance to the
vacuum cleaner. Failure to do so could
result in electrical shock or personal
injury from the vacuum cleaner
suddenly starting.
i cAoT,o.
_Do not plug in or turn on until the vacuum
cleaner is completely reassembled.
1. Remove PowerMate cover as shown in
BELT CHANGNNG AND AGITATOR
CLEANING (pages 21-22).
i
_Pull out to I 2. Remove the light
left side k bulb by pulling
_ straight out.
,
_]lb CAUTION
Do not use a bulb rated over 9W (13V).
During extended use, heat from the bulb
Push in
to right
3. To replace the
light bulb,
carefully insert
fully into slot.
4. Reinstall PowerMate cover as shown in
BELT CHANGING AND AGITATOR
CLEANING (page 21-22).
NOTE: See PARTS AND FEATURES (page 5)
for Bulb number.
- 22 -
AGITATOR SERViCiNG
,_WARNING
Electrical Shock Or Personal injury Hazard
Turn off and unplug vacuum cleaner elec-
frlcal supply before performing mainte-
nance to the vacuum cleaner. Failure to do
so could result in electrical shock or per-
sonal injury from vacuum cleaner sud-
denly starting.
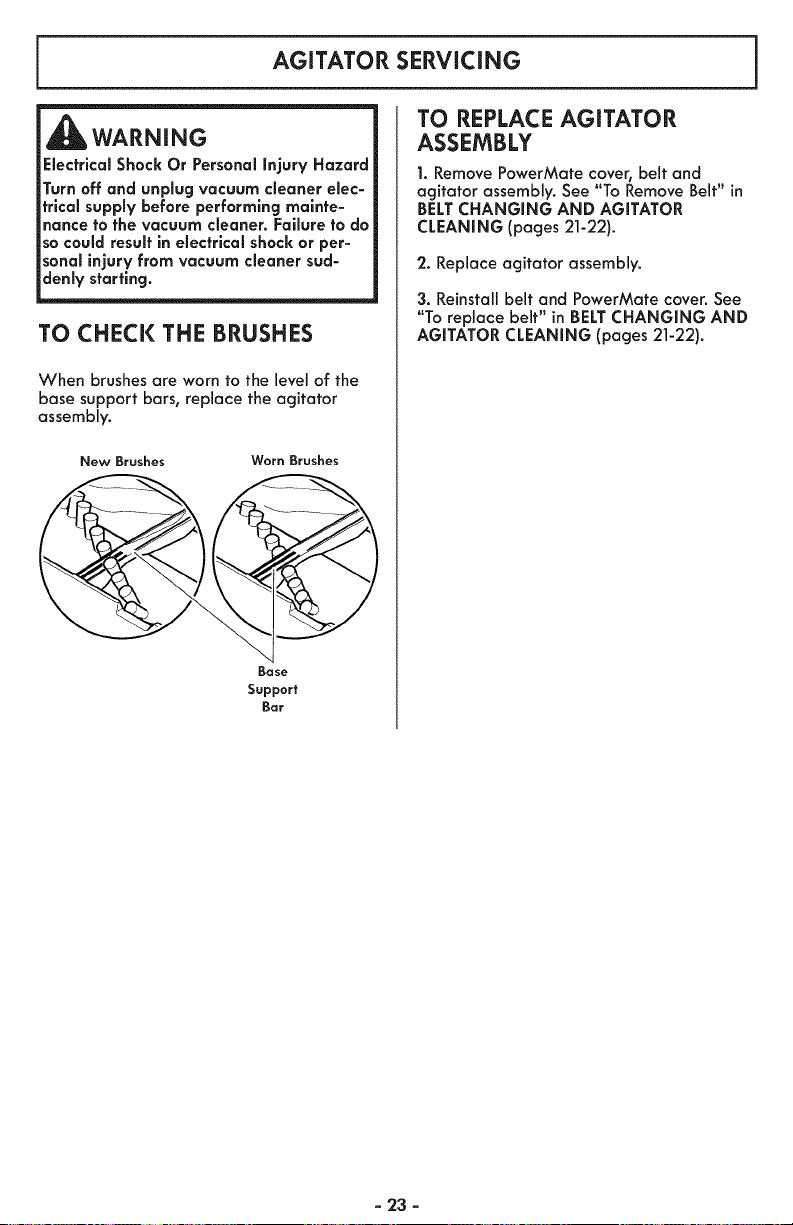
TO CHECK THE BRUSHES
When brushes are worn to the level of the
base support bars, replace the agitator
assembly.
New Brushes Worn Brushes
Bose
Support
Bar
TO REPLACE AGITATOR
ASSEMBLY
1. Remove PowerMate cover, belt and
agitator assembly. See "To Remove Belt" in
BELT CHANGING AND AGITATOR
CLEANING (pages 21-22).
2. Replace agitator assembly.
3. Reinstall belt and PowerMate cover. See
"To replace belt" in BELT CHANGING AND
AGITATOR CLEANING (pages 21-22).
- 23 -
Reviewthistabletofinddo-it-yourselfsolutionsforminorperformanceproblems.Anyother
serviceneededshouldbeperformedbyaSearsorotherqualifiedserviceagent.
WARNING
Always turn off and unplug vacuum cleaner before performing maintenance to the
vacuum cleaner. Failure to do so could result in electrical shock or personal injury.
Vacuum cSeaner
won't start.
Poor job of dirt
pick-up.
Vacuum cSeaner starts
but shuts off.
PowerMate will not
run when attached.
1.
2.
3.
Unplugged at wall outlet.
Tripped circuit breaker/
blown fuse at household
service panel.
Loose hose electrical
connections.
1. Full or clogged dust cup.
2. Clogged airflow passages.
3. Dirty filters.
4. Wrong pile height setting.
5. Suction control is open.
6. Hole in hose.
7. Worn PowerMate agitator.
8. Worn or broken belt.
9. Dirty agitator or end caps.
]0. Dust cup installed
incorrectly.
11. Dust cup lid and dust cup
missassembly.
1. Hose electrical connection.
2. Tripped overload protector
in PowerMate.
3. Tripped thermal protector
in canister.
1. PowerMate connections
unplugged.
'2. Worn or broken belt.
3. Dirty agitator or end caps.
4. Tripped overload protector
in PowerMate.
5. Switch not in CARPET
position.
1. Plug in firmly, move switch to
FLOOR or CARPET position.
2. Reset circuit breaker or replace
fuse.
3. Reconnect hose ends.
1. Empty and clean dust cup.
2. Clear airflow passages.
3. Change/clean filters.
4. Adjust setting.
5. Adjust control.
6. Replace hose.
7. Change agitator.
8 & 9. See BELT CHANGING AND
AGITATOR CLEANING.
10. See EMPTYING DUST CUP.
11. See PRE-FILTER CLEANING.
1.
2.
3.
1.
2&3.
4.
5.
Check connections, reconnect
hose ends.
Remove any items that may be
caught or jammed, then reset. If
vacuum cleaner starts and stops
again, clean agitator and end
caps, then reset.
Reset thermal protector.
Plug in firmly.
See BELT CHANGING AND
AGITATOR CLEANING.
Remove any items that may be
caught or jammed, then reset. If
vacuum cleaner starts and stops
again, clean agitator and end
caps, then reset.
Move switch to CARPET position.
- 24 -
Vacuum cleaner picks
up moveable rugs
-or- PawerMate
pushes too hard.
Light won't work.
1. Wrong pile height setting.
2. Suction too strong.
1. Burned out light bulb.
2. Tripped overload protector
in PowerMate.
1. Adjust setting.
2. Open suction control.
1.
2.
Change light bulb.
Remove any items that may be
caught or jammed, then reset. If
vacuum cleaner starts and stops
again, clean agitator and end
caps, then reset.
Cord won't rewind. 1. Dirty power cord. 1. Clean the power cord.
2. Cord jammed. 2. Pull out cord and rewind.
Vacuum cSeaner 1. Wrong vacuuming pattern. 1. See VACUUMING TIPS.
leaves marks on
carpet.
Vacuum Cleaner Help Line:
1-877-531-7321
8:00am-5:00pm EST, M-F
(U.S.A. and Canada)
- '25 -

- 26 -
Antes de usar su aspiradora nueva ................................................. 1
Lista de embalaje ........................................................... 1
Garantia de la asplradora de Kenmore .............................................. 2
Instrucclanes importantes de secjuridad ............................................. 3
Piezas y caracteristicas ......................................................... 4_6
Instrucciones de ensamble ............................................... 7-8
Instrucclones de aperaci6n ........................................................ 9
Culdado del recept6cula ......................................................... 15
Cuidado de la PawerMate ....................................................... 20
Recanoclmiento de problemas .................................................. 24-25
Informaci6n de asistencia o servicia ................................... Cubierta Posterior
Par favor lea esta cjuia que le oyudara a ensamblar y a operar su aspiradora nueva de I<enmore
de una manera m6s secjura y efectivo.
Para mas informaci6nacerca del cuidado y operaci6n de esta aspiradora, Ilame a Io Unea de
Ayudo de aspirodoras al 1-877-531-7321. Cuando precjunte par informoci6nusted necesitar6 el
n6mero completo de serie y modelo de la aspiradora que est6 Iocalizado en la placa de 1asn6me-
ros de modelo y serie.
Useel espacio de abajo para registrar el n6mero de modelo y serie para su nueva aspiradora de
I<enmore.
NOmero de Mode_o
NOmero de Serie
Fecha de Compra
Mantencjo este libra y su recibo en un lugor secjuro para futuras referencias.
Su ASPIRADORA I<ENMORE se empaca con los siguientes piezas y componentes par separado:
• Recept6culo
• PowerMate
• Manguera
• Pet PowerMate
• Tuba Telesc6pico
• Soporte para herramientas
• Herramienta para hendiduras
• Cepillo para sacudir
• Manual de usa y cuidado
• Lista de partes de reparaci6n
Coda uno de estos ensambles es mostrado detalladamente en la lista de piezas para reparaci6n.
_Estos arficulos se encuentran bajo la cubierta de almacenamiento para accesorios.
-1-
Garanfia limitada de Kenmore
DURANTE un afio a partir de la fecha de compra este aparato est6 garantizado contra
defectos de material o mano de obra cuando sees instalado correctamente, operado y
mantenido seg6n las instrucciones suministradas.
CON LA PRUEBA DE COMPRA, devuetva el aparato defectuoso a la tienda donde Io
compr6 para la reparaci6n o reemplazo sin costo a discreci6n del vendedor.
Esta garant[a es v61ida solamente durante 90 dras desde la fecha de compra,
si la aspiradora se utiliza para otros fines que no sean e! uso familiar privado.
Esta garantia cubre EXCLUSIVAMENTE los defec|os de ma|eriales y fabricaci6n y NO
pagar6:
1. Los elementos desechabies que puedan desgastarse con un uso normal, incluyendo
sin car6cter exciuyente, filtros, correas, bolsas., y bombilias con rosca en la base.
2. Un t_cnico det servicio t_cnico para limpiar o mantener este aparato, o para que
ense_e al usuario a instatar, manejar o mantener correctamente el producto.
3. Ltamadas de servicio para corregir instalaciones de un aparato no realizadas pot
agentes de servicios autorizados por Sears o para reparar problemas con fusibles
de casas, interruptores de circuitos, cableado de casa, y plomer[a o sistemas de
alimentaci6n de gas que resuiten de la instalaci6n.
4. Da_os o falias en este aparato que resutten de una instalaci6n no realizada pot
agentes de servicio autorizados pot Sears, incluyendo instalaci6n que no rue de
acuerdo a los c6digos de etectricidad, gas o plomer[a.
5. Da_os o falias de este aparato, incluyendo descoloraci6n u oxido en ta superficie, si
no se ha manejado correctamente o mantenido siguiendo todas las instrucciones
incluidas con el producto.
6. Da_os o faiias de este aparato, incluyendo descoloraci6n u oxido en la superficie,
originados pot accidente, alteraci6n, abuso, uso incorrecto o uso del producto para
otros fines distintos de los indicados.distintos de los indicados.
7. Dafios o falias de este aparato, incluyendo descoloraci6n u oxido en la superficie,
causados pot et uso de detergentes, limpiadores, productos qu[micos o utensilios
diferentes a los recomendados en todas las instrucciones que se incluyen con el
producto.
8. Dafios o averras de las piezas o sistemas causados por modificaciones no
autorizadas que se hayan hecho a este producto.
9. Servicio a un aparato si el modelo y etiqueta de serie faltan, son alteradas o si no se
puede determinar f6citmente si tienen el logo de certificaci6n apropiado
Limltaci6n de responsabilidad de las garantias implicitas; limitaci6n de remedios
F:I6nico y exclusivo remedio del cliente bajo esta garantfa limitada ser6 el reemplazo
del aparato segOn Io indicado en este documento. Las garanHas impffcitas, incluyendo
las garantfas de comerciabilidad o idoneidad para un prop6sito especffico, se limitan a
un aSo o el perrodo m6s corto permitido pot la ley. El comerciante no set6 responsable
pot dafios incidentales ni consecuenciales. Algunos estados no permiten la exclusi6n o
limitaci6n de dafios incidentales o consecuenciales, ni limitaciones en la duraci6n de las
garant[as impffcitas de comerciabilidad o idoneidad, pot Io que estas exclusiones o
limitaciones podrfan no aplicar en su caso.
Esta garantfa aplica solamente cuando este aparato se utiliza en Estados Unidos.
Esta garanHa le otorga derechos legales especrficos, y usted podrra tener otros
derechos que varran en funci6n de cada estado.
Sears Brands Management Corporation, Hoffman Estates, IL 60179
-2-
Lea las instrucciones en este manual antes de armar o usar su aspiradora.
4k ADVERTENCIA
Su seguridad es muy importante pare nosotros. Para reducir ei riesgo de incendio,
choque electrico, lesi6n corporal o daEos al utilizar su aspiradora, act_e de acuerdo
con precauciones b&sicas de seguridad, entre elias:
Use su aspiredere Onicemente en le forme
descrite en este manual. Use Onicamente cen
accesorios recomendedos por Sears.
Desconecte el cord6n el_ctrico antes de
componer o limpier el 6tee del cepillo. De Io
contrerio, el cepillo podda arrencer de forme
imprevista o podr{a producirse un choque
el_ctrice.
No ebendone le espiredora cuendo est_
conectede. Descon_ctele cuendo no le est_
usando y antes de derle servicio.
Pare reducir el riesgo de choque el_ctrico, no
use su espiradora el eire libre ni sobre
superficies mejedes.
No permite que see ufilizede como juguete.
Se requiere tener mayor cuidedo cuendo sea
ufilizeda en la proximidad de niSos o por
ni_es.
No use la aspiredore si el cerd6n o el
enchufe est6n decades. Si le espiredera ne
est6 funcionendo adecuedamente o si se ha
dejado ceer, est6 de_ede, se he dejado
expueste ele intemperie o se he dejede ceer
en egua, devu_lvela a un Centro de servicio
de Seers.
No jale ni trensporte la espiredore por el
cord6n; no use el cord6n como mango; no
cierre puertas sobre el cord6n; no jele el
cord6n sobre rebordes egudos ni esquines.
No pese le espiredere sebre el cord6n.
Mantenge el corct6n alejado de superficies
celientes.
No desconecte la espiredore firendo del
cord6n el_ctrico. Pare desconectarla, jele el
enchufe, no el cord6n.
No toque la espiradora ni el enchufe con las
manes mejades.
No celoque ebjetes en lesaberturas.
No utilice Ia espiredera si elguna ebertura
est6 bloqueade; mant&ngala libre de pelve,
peluse, cabeHos y cuelquiere cosa qua
pedr_e disminuir el fluje de eire.
Mantenga el cebello, rope suelte, dedos y
todas les pertes del cuerpo elejedes de les
abertures y piezes mec6nices.
GUARDE ESTAS
Apague redes los centreles antes de
desenchufer.
Tenga cuidede especial el utilizer le
aspiredere en escelenes. No le celeque sebre
silles, mesas, etc. Ment_ngele en el piso.
No use le espiredore pare aspirer ffquides
inflamables o combustibles (gasoline, ffquidos
pare limpieza, perfumes, etc.) nile use en
lugeres donde _stes podrien ester presentes.
Losvaperes de estes sustencies pueden crear
un peligro de incendio o explosi6n.
No levente ningune cose que se est_
quemendo o emifiendo humo, como
cigerrillos, cerillos o cenizes celientes.
No use la espiredore sin tener insteleda la
boise pare polvo y/o los filtros.
Cembie siempre le bolsa pera polvo despu_s
de aspirar limpiadores de alfombres o
desodorantes, telcos y polvos flnos. Estos
productos etascen le boise, reducen el flujo
de aire y pueden causer que _sta se rompa.
Si no cambie le boise podr_e ocasionar daSo
permanente ale aspiredere.
No use le espiredore pare leventer objetos
agudos, juguetes pequeSos, alfileres,
sujetapepeles, etc. Podr_andeSer la
aspiradore o le boise pare polvo.
No opera sin el flltro de escape nila cubierta
del filtro de escape instelados.
La manguera contiene cables el_ctricos. No
le use cuando est6 deSede, corfade, o
perforade. Reemplece si est6 corteda o
desgesteda. No levente obietos afiledos.
Siempre apagu_ y desconecte le espiradora
antes de conecter o desconectar la
menguere, Pet HendiMafe (si aplicable), o la
boquille.
Sujete el enchufe con le mano el enroller el
cord6n el_ctrico. Pare desconectarla, jele el
enchufe, no el cord6n.
Usted es respenseble de esegurer que su
espiredore no sea utilizeda por ninguna
persona que no pueda menejarla
correctemente.
INSTRUCCIONES
El armade y uso segure de su aspiredere sen su responsebilided. Este espiradere he sido
diseffeda exclusivamente pare uso dom_stico. Le espiredora deber6 elmecenerse en un luger
seco yen el interior. Lea este Manual de Uso y Cuidedo detenidemente, pues contiene
informeci6n importente sobre seguridad y uso. Esta guia contiene informeci6n sobre seguridad
debajo de siml0olos de advertenc[a cuidado.
-3-
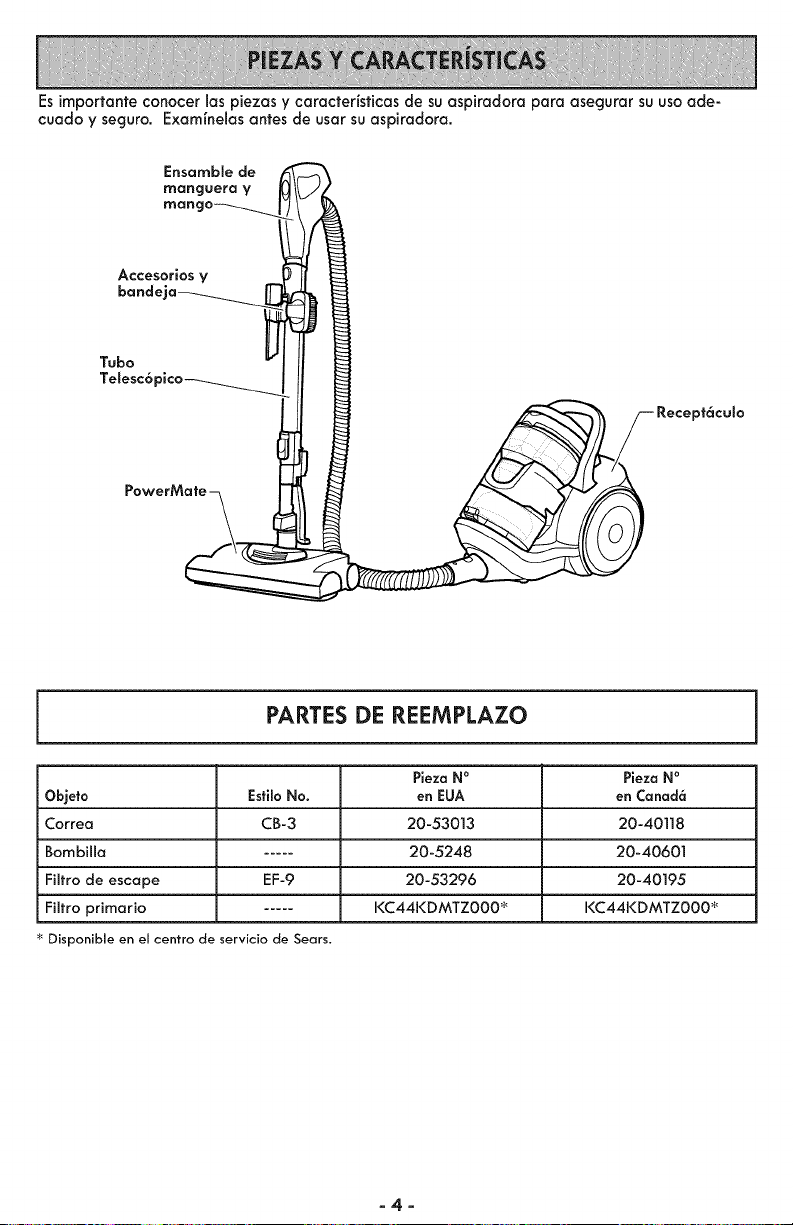
Esimportanteconocerlaspiezasycaracteristicasdesuaspkadoraparaasegurarsuusoade-
cuadoyseguro,Examlnelasantesdeusarsuaspiradora,
Ensamble de
manguera V
mane
Accesorios V
bande"
Tubo
Telesc6 "
Recept6culo
PARTES DE REEMPLAZO
Pieza N° Pieza N°
Objeto EsfiloNo. en EUA en Canad6
Correa CB-3 20-53013 20-40118
Bombilla ..... 20-5248 20-40601
Filtro de escape EF-9 20-53296 20-40195
Filtro primario ..... I<C44KDMTZ000 _ I<C44KDMTZ000 _
Disponible en el centro de servicio de Sears.
-4-
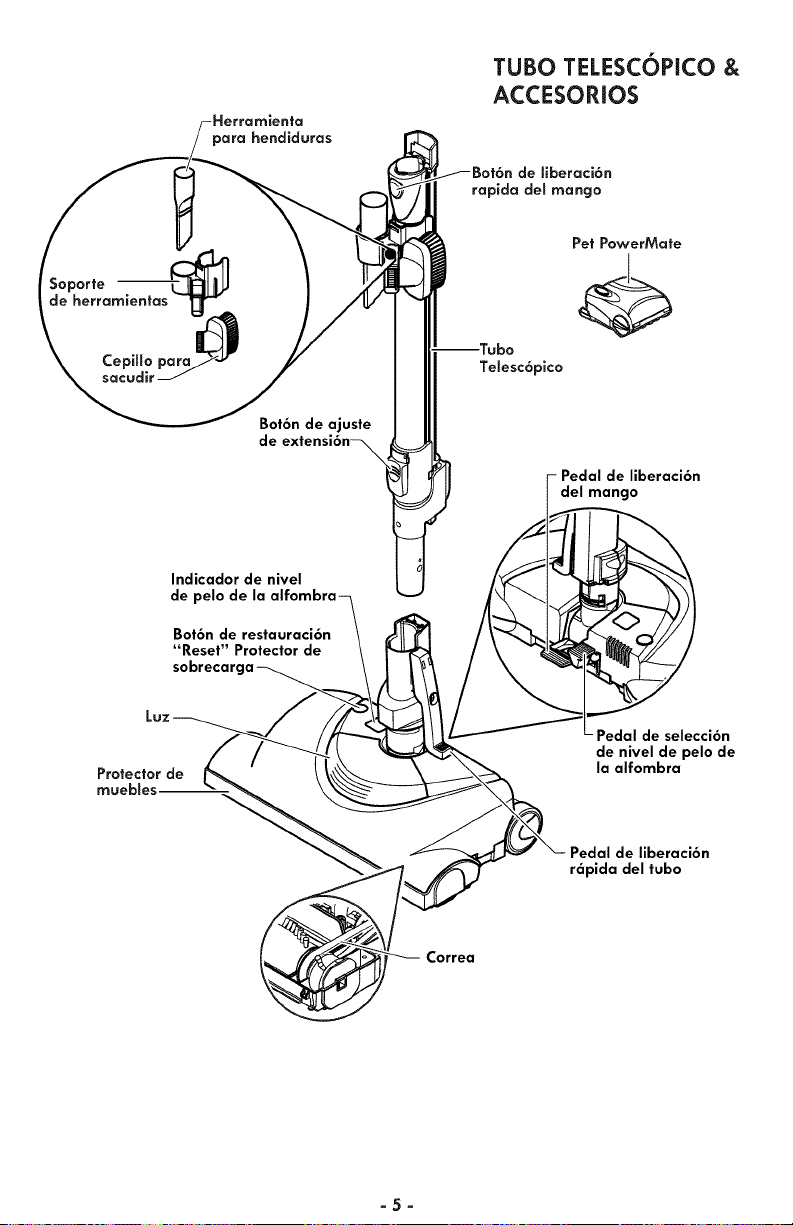
para hendiduras
TUBO TELESCOPICO &
ACCESORIOS
Soporte
de herramientas T_,
Bot6n de ajuste
de
Telesc6pico
Pet PowerMate
- Pedal de liberaci6n
del mango
Indicador de nivel
de pelo de la
Bot6n de restauraci6n
"Reset" Protector de
Protector de
muebles--
Pedal de selecci6n
de nivel de pelo de
la alfombra
Pedal de liberaci6n
r6pida del tubo
Correa
-5-
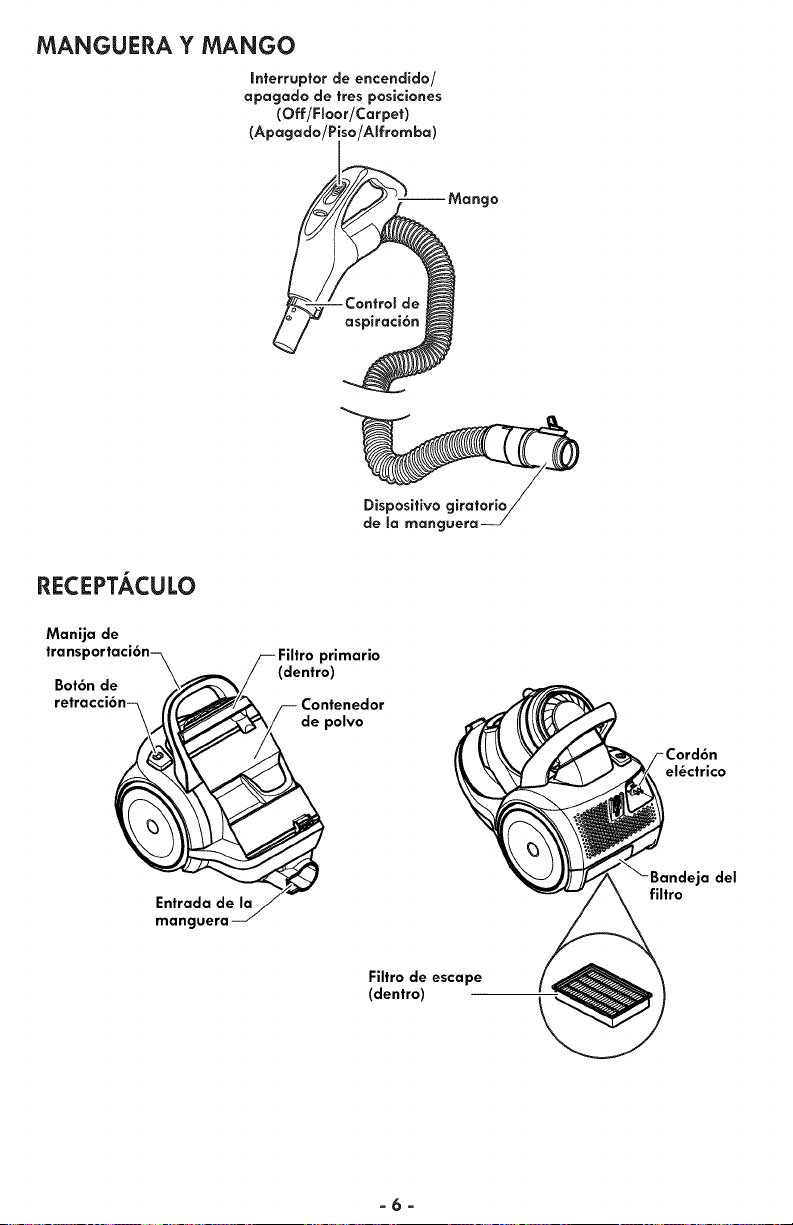
MANGUERA Y MANGO
Interruptor de encendido/
apagado de tres posiciones
(Off/FSoor/Carpet)
(Apagado/Piso/Alfromba)
gO
Dispositivo
de la manguera
RECEPTACULO
Manija de
transportaci6n-_ /-- Filtro primario
(dentro)
Be_tr6anden-_ ;/'_ _ /-- Contenedor
_ _depolvo
Entrada de I
manguera _/
el_ctrico
._jadel
filtro
Filtro de escape
(dentro)
-6-
Pot favor pongo especial atenci6n a 6stos recuadros con olerta de riesgo.
Advertencla: Este informaci6n le alertor6 del peligro de fuego, choques
el6ctricos, quemadas y lesiones. Culdado: Esto informaci6n le alertara de
petigros como lesiones y dodos de propiedad.
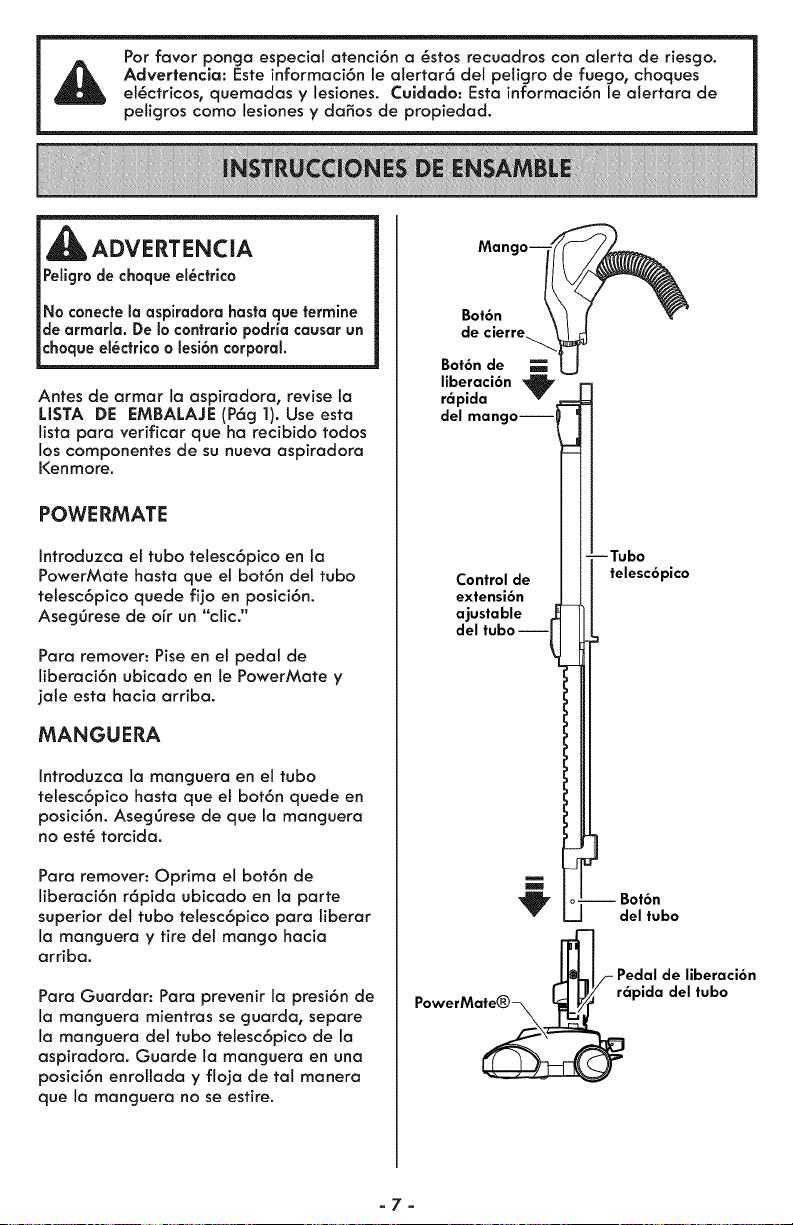
_ADVERTENCIA
Pellgrode choque el6ctrlco
No conecte la aspiradora basra que termine
de armarla. De Io contrarlo podfia causar un
choque el6ctrico o lesi6n corporal.
Antes de armor la aspiradoro, revise ia
LISTA DE EMBALAJE (P6g ]). Use esta
lista pora verificar que ha recibido todos
los componentes de su nuevo aspiradoro
Kenmore.
POWERMATE
Introduzca el tubo telesc6pico en la
PowerMate hosta que et bot6n det tubo
tetesc6pico quede fijo en posici6n.
AsegOrese de o[r un "clic."
Para remover: Pise en el pedal de
liberaci6n ubicado en le PowerMate y
jale esta hocio arribo.
MANGUERA
Introduzca la manguera en el tubo
telesc6pico basra que el bot6n quede en
posici6n. AsegOrese de que Io manguera
no est6 torcido.
Para remover: Oprima et bot6n de
liberaci6n r6pida ubicado en Io porte
superior del tubo telesc6pico para liberar
Io monguera y tire del mango hocio
arribo.
Para Guordor: Pora prevenir Io presi6n de
Io monguero mientros se guarda, separe
Io manguera del tubo telesc6pico de la
aspiradoro. Guorde Io manguero en uno
posici6n enrolloda y flojo de tal manera
que Io manguera no se estire.
Manc
Bot6n
de cierre_
Bot6n de
liberaci6n "_
r_pida
del mangoJ
--Tubo
Control de telesc6pico
extensi6n
ajustable
del tuboJ
J
Bot6n
del tubo
_'_/- Pedalde liberaci6n
PowerMe_iIpida del tubo
-7-
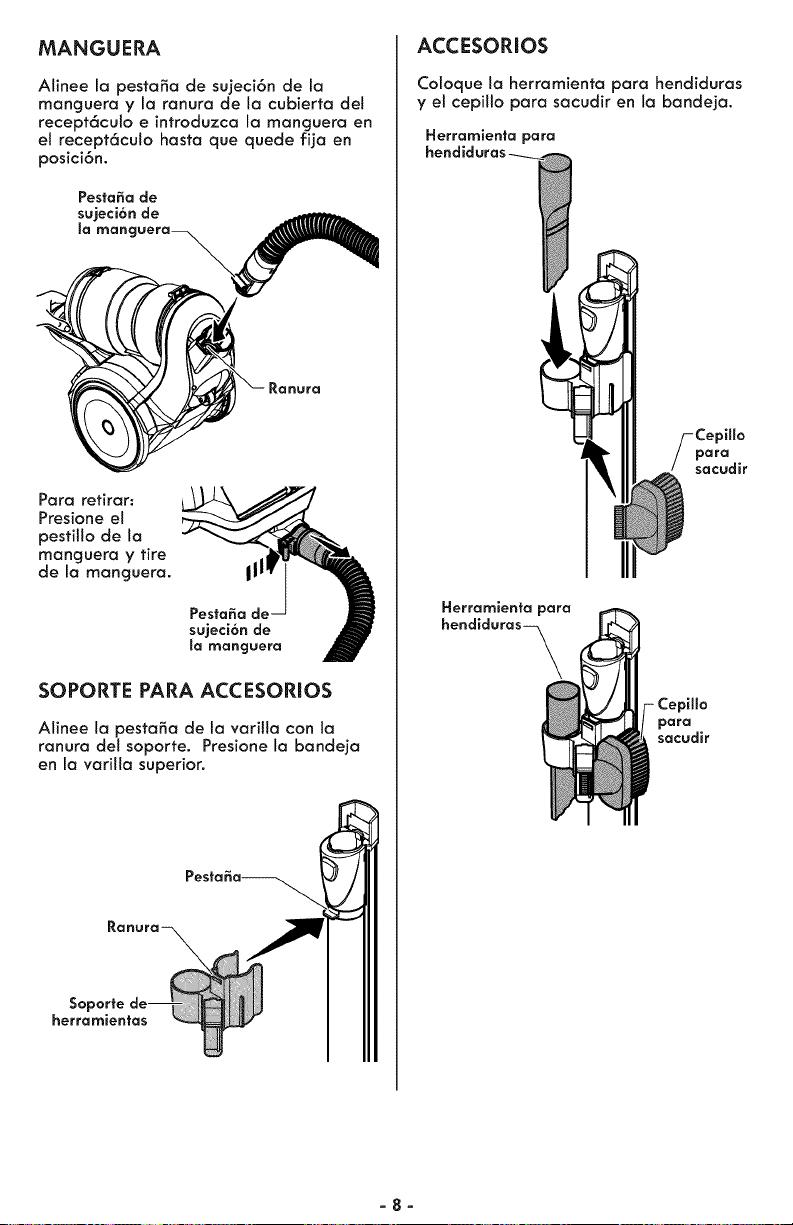
MANGUERA
Alinee la pestaSo de sujeci6n de la
monguero y la ranuro de la cubierta det
recept6culo e introduzca la manguera en
el recept6culo hosta que quede fija en
posici6n.
Para retirar:
Presione et
pestitlo de la
manguera y tire
de la manguera. III
PestaSa de
sujeci6n de
la manguera
SOPORTE PARA ACCESORIOS
Alinee la pestafia de la vorilla con la
ranura del soporte. Presione la bandeja
en la varilla superior.
SQ
herramientas
ACCESORIOS
Coloque la herramienta para hendiduras
y el cepillo para sacudir en la bandeja.
Herramienta para
_illo
para
sacudir
Herramienta para
hendiduras-_
Cepillo
para
sacudir
-8-
CUIDADO
iPartes en movlmlento! Para reduclr el rlesgo de da_os
corporales, no toque el agltador cuando la asplradora
est6 encendida. El tocar el agitador mientras que est6
glrando puede cortar, contusionar o causar otras
lesiones. Siempre apague y desconecte del
tomacorriente antes de dar mantenlmlento. Tenga
culdado al asplrar cerca de ni_os.
PARA COMENZAR
ADVERTENCIA
Peligro de lesi6n personal y dafio al pro-
ducto
NO enchufe la aspiradora si el
interruptor est6 en la posici6n ON.
Podria causar lesi6n personal o da_o
al producto.
El cord6n el_ctrico se mueve
r6pldamente durante el enrollamlento.
Mantenga alejados a los ni_os y
asegure dejar espacio suficiente para
evitar leslones personales al enrollar
el cord6n.
NO use los enchufes Iocallzados sobre
los muebles. Los ol0jetos cercanos
podrian resultar da_ados.
Cuando alguna anormalidad/desper-
recto ocurra, pare de usar el producto
inmediatamente y desconectarlo del
toma corrlente.
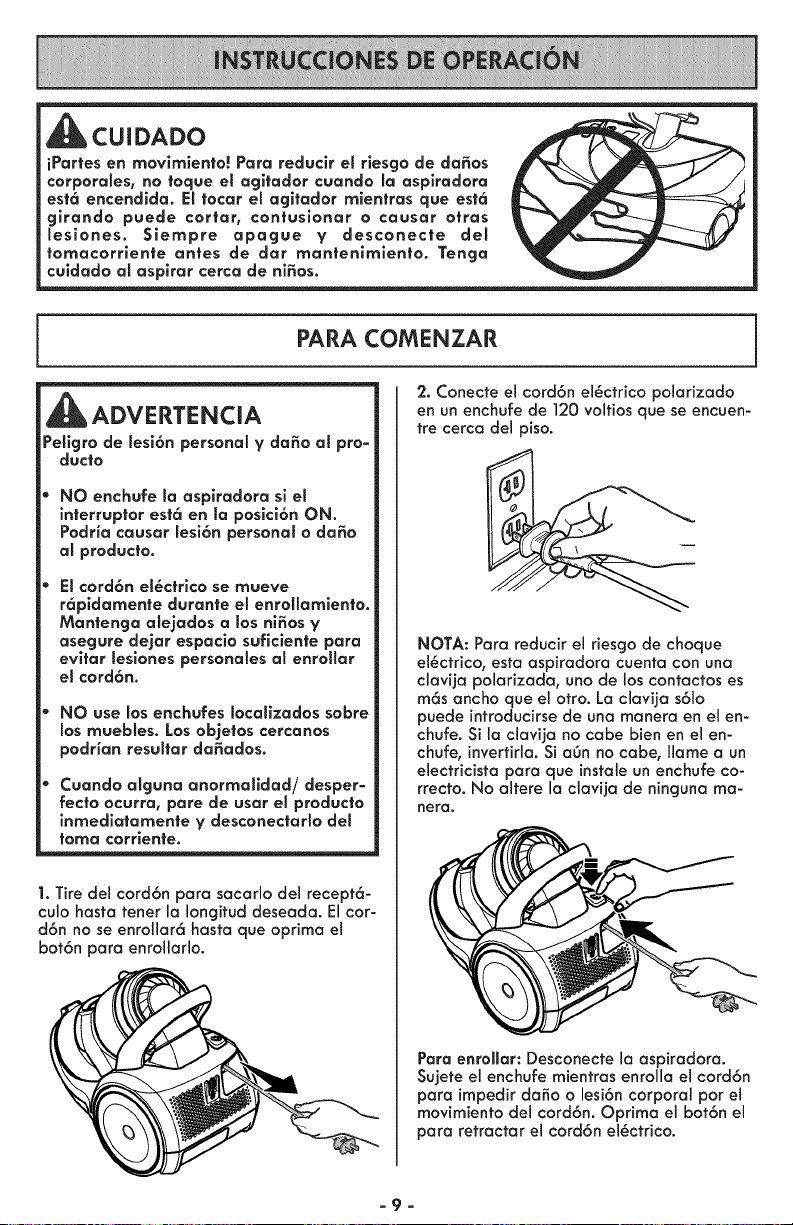
1. Tire del cord6n para sacarlo del recept6-
culo hasta tenet la Iongitud deseada. El cor-
d6n no se enrollar6 hasta que optima el
bot6n para enrollarlo.
2. Conecte el cord6n el_ctrico polarizado
en un enchufe de 120 voltios que se encuen-
ire cerca del piso.
NOTA: Para reducir el riesgo de choque
el_ctrico, esta aspiradora cuenta con una
clavija polarizada, uno de los contactos es
m6s ancho que el otro. La clavija s61o
puede introducirse de una manera en el en-
chufe. Si la clavija no cabe bien en el en-
chufe, invertirla. Si a6n no cabe, Ilame a un
electricista para que instale un enchufe co-
rrecto. No altere la clavija de ninguna ma-
hera,
Para enroHar: Desconecte la aspiradora.
Sujete el enchufe mientras enrolla el cord6n
para impedir daSo o lesi6n corporal pot el
movimiento del cord6n. Optima el bot6n el
para retractar el cord6n el_ctrico.
-9-
3. Baje el tubo
desde la posici6n
vertical pisando
el pedal de
liberaci6n del
mango.
Pedal de
liberaci6n
del mango
4. Seleccione una altura de pelo de la
alfombra usando el pedal pequeSo ubicado
en la parte posterior de la PowerMate. El
nivel del pelo la aifombra se muestra en el
indicador.
Pedal de selecci6n
de nivel de pelo
de la alfombra
Indicator de nivel d_
pelo de la alfombra
SUGERENCIAS SOBRE EL AJUSTE
DE NIVEL DE PELO DE LA
ALFOMBRA
Use el ajuste "XLO" para obtener la mejor
limpieza a fondo. Pot otra porte, quiz6s se
requiera elevar el nivel para facilitar
algunas tareas, como pot ejemplo cuando
se trata de tapetes y algunas alfombras de
pelo largo, y para impedir que la
aspiradora se apague. Se sugieren los
siguientes ajustes:
HI - Pelo rnuy largo y sueffo,tapetes, alfornbras
muy acojinadas.
MED - Pelo mediano a largo.
LO - Pelo corto a mediano.
XLO - La mayorfa de los alfombras y pisos
descubiertos.
Atenci6n: Refieras a las recomendaciones
del fabricante para limpiar su alfombra.
Algunas alfombras m6s delicadas pueden
requerir el uso de la aspiradora con el
agitador de PowerMate desconectado para
prevenir que la aifombra sea daSada.
CUIDADO
NO dejar la PowerMate funcionando
en posici6n vertical en un lugar durante
ningOn espacio de tiempo: se puede
da_ar la alfombra.
5. Seleccione una posici6n det interruptor
en e! mango.
OFF - apaga los
motores del
recept6culo y de la
PowerMate.
FLOOR - s61oen-
ciende et motor del
recept6culo.
CARPET - enciende
los motores del
recept6culo y de la
PowerMote.
NOTA - Cuando
este control est6 en
la posici6n FLOOR,
la luz no funciona
porque no la
electricidad no fluye
al PowerMate.
OFF
FLOOR
TUBO TELESCOPICO
La extensi6n del tuba es ajustable y no
requiere el montaje.
Para ajustar, empuje hacia abajo en el
bot6n del tuba y mueva el tubo superior
a la posici6n deseada.
Cuando ajuste la Iongitud del tubo
telesc6pico hay que tenet el PowerMate
con la mano o el pie.
Control
extensi6n
adjustable
del tubo
,6
m
m
ase
la IYlano
orriba esta
lengiieta
- 10-
SUGERENCIAS PARA ASPIRAR
_ADVERTENCIA
Peligro de lesi6n personal y da_o al
:_roducio
No atropelle el cord6n el@ctrico con la
PowerMate. Hay un peligro de
lesi6n corporal o unos da_os de
posesiones.
No tire del cord6n el@ctrlco de la
pared para desenchufarlo. Si hay
dodos en el cord6n el@ctrico o el
enchufe, hay un peligro de lesi6n
corporal o unos dodos de poseslones.
CUIDADO
Peligro da_o al producto
Tenga cuidado sl el PowerMate y la
manguera se dejan en poslci6n vertical
pues pueden caerse f6cilmente. Si se
voltean puede causar da_o de
propledad.
Estilo de limpieza sugerido.
Para obtener ta mejor acci6n de limpieza
se recomienda empujar la PowerMate en
direcci6n directamente opuesta a usted y
jalar la en ffnea recta. AI final de cada
pasada de regreso, cambie la direcci6n
de la PowerMate hacia la siguiente sec-
ci6n a limpiar. ContinOe asr a troves de
toda la alfombra de una manera lenta y
deslizante.
NOTA: Movi-
mientos r6pi-
dos no logran
una limpieza
completa.
El dispositivo
giratorio de la
manguera permite
que @sta gire sin ne-
cesidad de mover e!
recept6culo. Esto es
muy 6til para lim-
piar en 6reas pe-
quefias.
AsegOrese de que la manguera no est_
torcida antes de jalar el recept6culo.
Peligro de lesi6n personal
Tenga cuidado si coloca el recept6culo
sobre escalones. Si se cae, podHa causar
CUIDADO
Peligro de lesi6n personal V daSo al pro-
duc|o
No jale de la manguera para mover la
aspiradora de un escal6n al sigulente.
Cuando termine de limplar un 6tea use
la manija en la aspiradora para
moverla a otto lugar para contlnuar la
limpleza.
Control de
Los escalones alfombrados requieren lim-
pieza peri6dica. Cierre por completo et
control de aspiraci6n para Iograr los
mejores resultados de limpieza.
Mantenga el paso de aire abierto para
Iograr los mejores resultados de limpieza.
Examine de vez en cuando cada una de
las 6reas de uni6n como se muestra en
REMOVER OBSTRUCCIONES para
asegurarse de que no existan bloqueos.
Apague y desconecte la aspiradora
antes de revisarla.
-11 -
ACCESORIOS
_CUIDADO
NO instale nl retire la manguera ni los
tubas cuando la asplradora est_ encen-
dlda. Esto podria causar chispas y da_ar
los contactos el_ctricos.
ACCESORIOS DEL LA
MANGUERA
NOTA: Si tiene instalada la PowerMate,
apague y desconecte la aspiradora antes de
quitar la
manguera de tuba Bot6n
telesc6pico, de cierre
1.Oprima el bot6n Bat6n de
de liberaci6n liberaci6n
r6pida del tuba r_pida
telesc6pico para del manga--i
liberar la
manguera y tire
del mango hacia
arriba.
2. Desliceel acce-
soriodeseado con
firmezaen la manguera. Consultela CUADRO
DE USO DE LOS ACCESORIOS (p6g 13).
ACCESORIOS DEL TUBa
1. Para retirar el tuba de la PowerMate, col6-
quelos en la posici6n vertical de bloqueo.
/
/
2. Pise el pedal de liberaci6n r6pida para
tuba y tire del tuba hacia arriba para des-
prenderlo de la PowerMate.
--_ Tuba
U telesc6pico
M-1
lilF Pedal de liberaci6n
PowerMate _-'q_,_" r_pida del tuba
3. Coloque el accesorio deseado en el tuba
telesc6pico. Consulte el CUADRO DE USO DE
LOS ACCESORIOS (P6g 13).
- 12 -
CUADRO DE USO DE LOS ACCESORIOS
AREA A LIMPIAR
Entre Pisos Pisos
ACCESORIO Moebles I cojines I Cortinas I Escal .... d .... biertos alfornbrados/ Paredes
alfornbras
Herramlenta _ v' v' v'
para hendiduras
Cepillo para
sacudir v' v' v' v'
PowerMate
Pet PowerMate 3
1. Siempre limpie los accesorios antes de usar sabre telas.
2. El interruptor de 2 posiciones debe estar en la posici6n FLOOR (PISO).
3. Pet HandiMate incluyen sus propias instrucciones para usa de accesodos.
CARACTERiSTICAS DE RENDIMIENTO i
J
_ADVERTENCIA
Pelicjro de lesiones personales
Siempre apacjue y desconecte la asplradora
antes de limplar las 6reas del agltador ya
que _stos podrian arrancar de manera
imprevista. El no haceHo, podria resultar en
lesiones personales.
PROTECTOR TERMICO
Esto aspirodoro fiene un protector
t_rmico que se octiva outom6ticamente
para proteger la aspiradora de un
sobrecalentamiento. Si una obstrucci6n
impide et flujo normal de aire al motor, el
protector t_rmico opago el motor
outom6ticamente para permitir que et
motor se enfr{e o fin de evitar posibles
daSos a la aspiradora.
Para corregir el problema: Apague Io
aspirodora y desenchufe el cord6n del
tomacorriente poro permitir que la
aspiradora se enfrfe y que el protector
t_rmico se desocfive. Busque y limpie las
obstrucciones, si es necesarlo. Examine y
reemplace/llmple cualquler filtro
obstruida. Espere aproximadamente
cincuenta (50) mlnutos, enchufe la
aspiradora y enclendala para ver si el
protector t_rmico del motor se ha
desactlvado.
PROTECTOR CONTRA
SOBRECARGAS
La PowerMate cuenta con protecci6n
incorporadacontra daSo al motor y la correa
en caso de atascamientodel agitador. Si el
agitador funciona m6s despacio o frena, el
protector de sobrecarga detiene la
PowerMate. El motor del recept6culo
continuar6 funcionando.
Bot6n de
BELT
Para corregk el problema: Apague y
desconecte la aspiradora,limpie la
obstrucci6n, y despu_s presione el bot6n de
BELTRESET(protector de sobrecarga). Puede
ser necesario un boligrafo para presionar el
bot6n.
Si el problema perslste, haga revisor su
asplradora par Sears o algOn agente de
servicio cafificado.
- 13 -
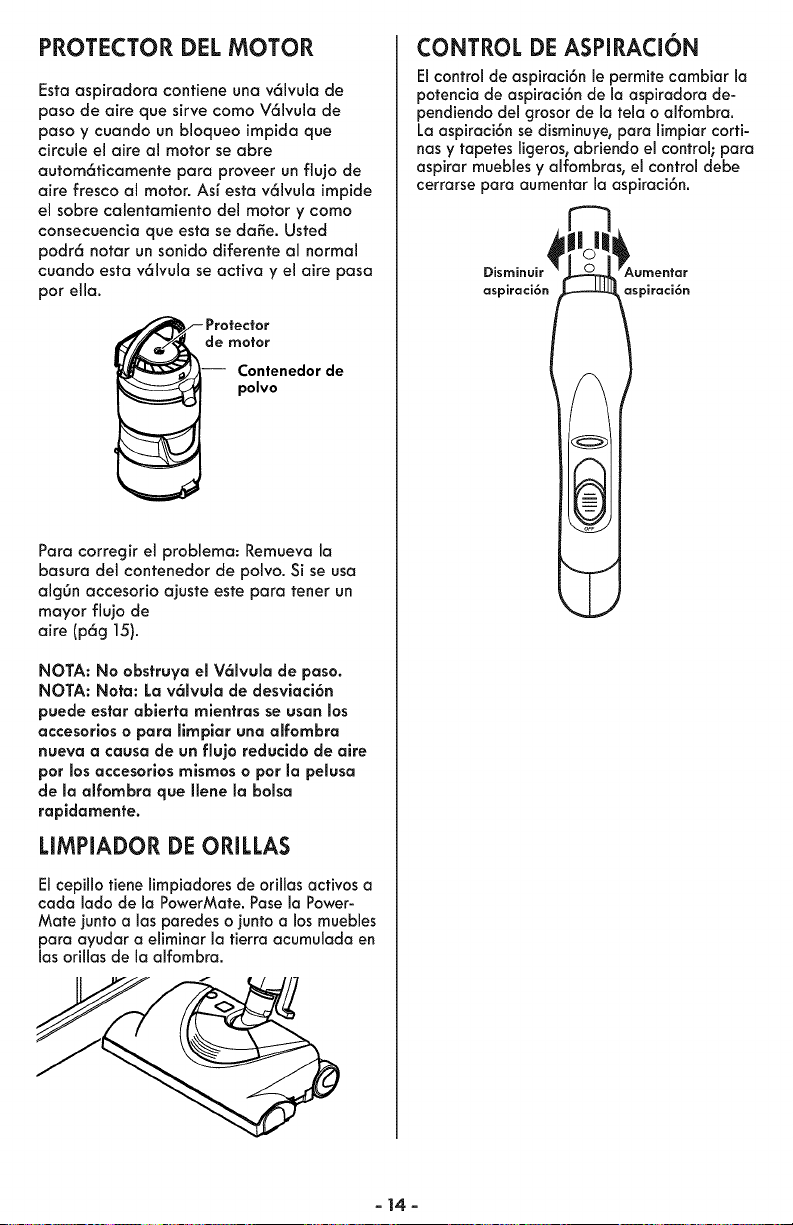
PROTECTOR DEL MOTOR
Esta aspiradora contiene una v61vula de
paso de aire que sirve como V61vula de
paso y cuando un bloqueo impida que
circule el aim al motor se abre
autom6ticamente para proveer un flujo de
aire fresco al motor. Asf esta v61vula impide
el sobre calentamiento del motor y como
consecuencia que esta se da_e. Usted
podr6 notar un sonido diferente al normal
cuando esta v61vula se acfiva y el aire paso
par ella.
de motor
Contenedor de
polvo
Para corregir el problema: Remueva la
basura del contenedor de polvo. Si se usa
algOn accesorio aiuste este para tenet un
mayor flujo de
aire (p6g 15).
NOTA: No obstruya el V61vula de paso.
NOTA: Nora: La v61vula de desviaci6n
puede esfor ablerta mientras se usan los
accesorlos o para llmpiar una alfombra
nueva a causa de un flujo reducldo de alre
por los accesorios mismos o por la pelusa
de la alfombra que Ilene la bolsa
rapidamente.
LIMPIADOR DE ORILLAS
El cepillo fiene limpiadores de orillas acfivos a
cada lado de la PowerMafe. Pose la Power-
Mate junto alas paredes o junto a los muebles
para ayudar a eliminar la tierra acurnulada en
las orillas de la alfombra.
CONTROL DE ASPIRACION
Elcontrol de aspiraci6n le permite cambiar la
potencia de aspiraci6n de la aspiradora de-
pendiendo del grosor de la tela o alfombra.
La aspiraci6n se disminuye, para limpiar corti-
has y tapetes ligeros, abriendo el control; para
aspirar mueblesy alfombras, el control debe
cerrarse para aumentar la aspiraci6n.
aspiraci6n aspiraci6n
- 14-
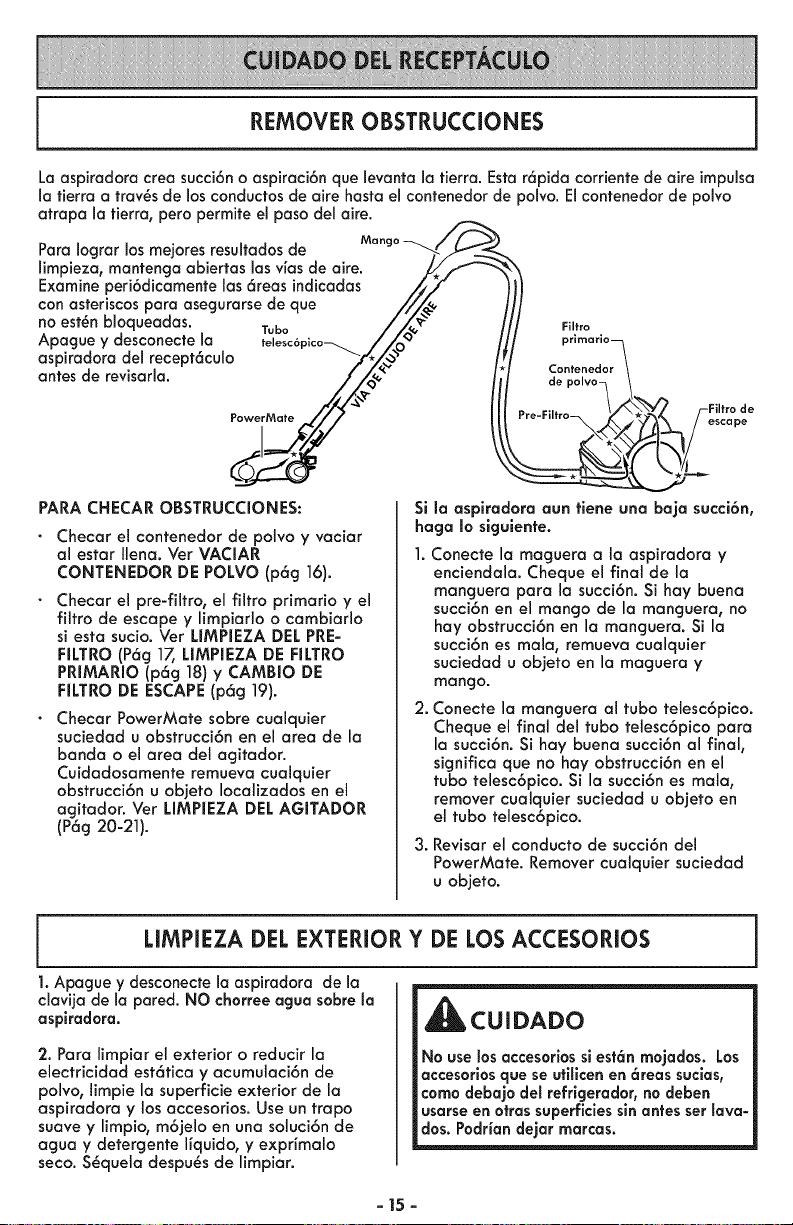
REMOVER OBSTRUCCIONES
La aspiradora crea succi6no aspiraci6n que levanta la tierra. Esta r6pida corriente de aire impulsa
la tierra a trav_s de losconductos de aire hasta el contenedor de polvo. Elcontenedor de polvo
atrapa la tierra, pero permite el paso de1aire.
Para Iocjrar los mejores resultados de
limpieza, mantencja abiertas las vias de aire.
Examine peri6dicamente las6reas indicadas
con asteriscos para asecjurarsede que
no est_n bloqueadas. Tubo
Apague y desconecte la telesc6•
aspiradora del recept6culo
antes de revisarla.
PowerMate
PARA CHECAR OBSTRUCCIONES:
Checar el contenedor de polvo y vaciar
al estar Ilena. Vet VACIAR
CONTENEDOR DE POLVO (p6g 16).
Checar el pre-filtro, el filtro primario y el
filtro de escape y limpiarlo o cambiarlo
si esta sucio. Ver LIMPIEZA DEL PRE-
FILTRO (P6g 17, LIMPIEZA DE RLTRO
PRIMARIO (p6g 18) y CAMBIO DE
RLTRO DE ESCAPE(p6g 19).
Checar PowerMate sobre cualquier
suciedad u obstrucci6n en el area de la
banda o el area del agitador.
Cuidadosamente remueva cualquier
obstrucci6n u ob]eto Iocalizados en el
acjitador. Ver LIMPIEZA DEL AGITADOR
(P6g 20-21).
Filtro
primario_
Contenedor t
depolvoq\
Si la aspiradora aun tiene una baja succi6n,
haga Io slguiente.
1. Conecte la macjuera a la aspiradora y
enciendala. Cheque el final de la
mancjuera para la succi6n. Si hay buena
succi6n en el mango de la mancjuera, no
hay obstrucci6n en la mancjuera. Si la
succi6n es mala, remueva cualquier
suciedad u objeto en la macjuera y
mango.
2. Conecte la mancjuera al tubo telesc6pico.
Cheque el final del tubo telesc6pico para
la succi6n. Si hay buena succi6n al final,
sicjnifica que no hay obstrucci6n en el
tubo telesc6pico. Si la succi6n es mala,
remover cualquier suciedad u objeto en
el tubo telesc6pico.
3. Revisar el conducto de succi6ndel
PowerMate. Remover cualquier suciedad
u objeto,
LIMPIEZA DEL EXTERIOR Y DE LOS ACCESORIOS
1. Apague y desconecte la aspiradora de la
clavija de la pared. NO chorree agua sabre la
aspiradora.
2. Para limpiar el exterior o reducir la
electricidad est6tica y acumulaci6n de
polvo, limpie la superficie exterior de la
aspiradora y los accesorios. Use un trapo
suave y limpio, m6jelo en una soluci6n de
acjua y detercjente ffquido, y expHmalo
seco. S_quela despu_s de limpiar.
_CUIDADO
No use losaccesorios sl est6n mojados. Los
accesor;osque se utillcen en 6reas suclas,
coma debajo del refrigerador, no deben
usarse en otrassuperficlessinantes set lava-
dos. Podrian dejar marcas.
- 15 -
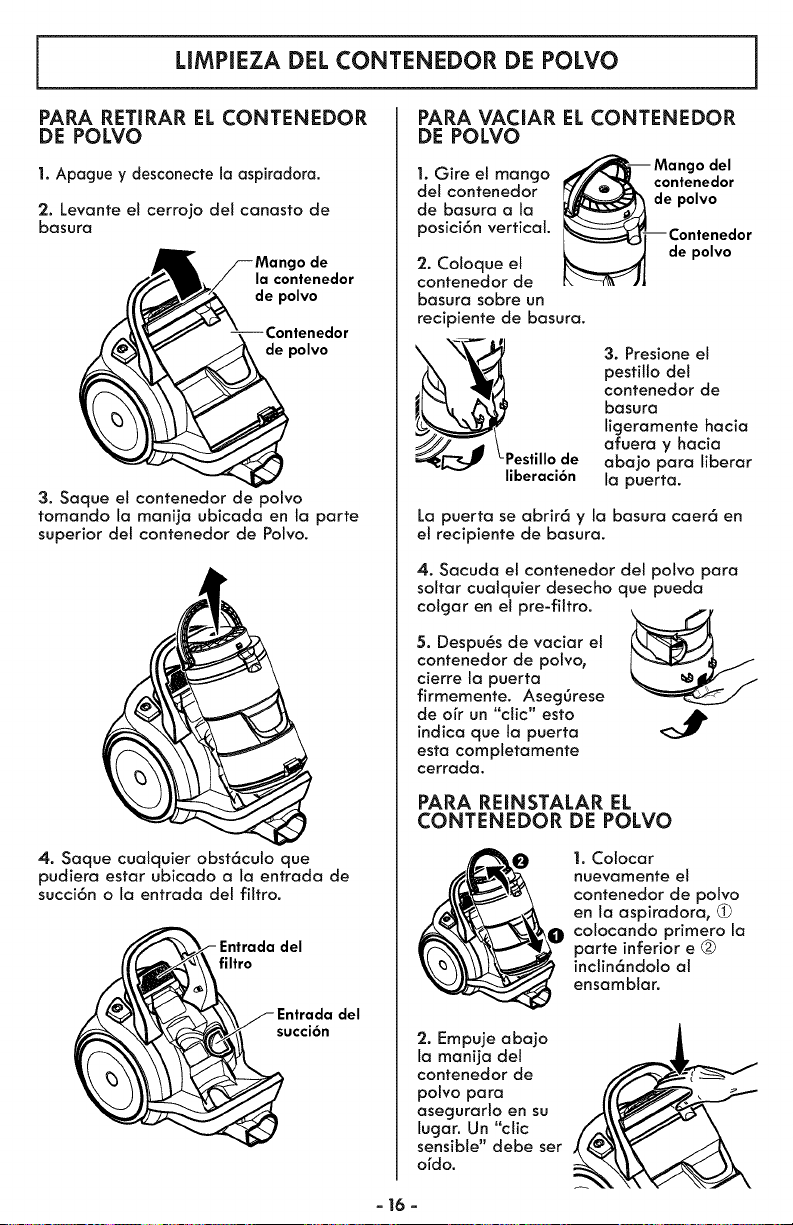
LIMPIEZA DEL CONTENEDOR DE POLVO
PARA RETIRAR EL CONTENEDOR
DE POLVO
1. Apague y desconecte la aspiradora.
2. Levante el cerrojo del canasto de
basura
o de
la contenedor
de polvo
de polvo
3. Saque el contenedor de polvo
tomando la manija ubicada en la parte
superior del contenedor de Polvo.
4. Saque cualquier obst6culo que
pudiera estar ubicado a la entrada de
succi6n o la entrada del filtro.
filtro
del
succi6n
PARA VACIAR EL CONTENEDOR
DE POLVO
del
1. Gire el mango contenedor
del contenedor de polvo
de basura a la
posici6n vertical.
2. Coloque el
contenedor de
basura sobre un
recipiente de basura.
de polvo
= \-_,ll_"_\ \_,,,_/ 3. Presione el
pestillo del
contenedor de
basura
ligeramente hacia
______ Lp afuera y hacia
estillo de abajo para liberar
liberaci6n la puerta.
La puerta se abrir6 y la basura caer6 en
el recipiente de basura.
4. Sacuda el contenedor del polvo para
soltar cualquier desecho que pueda
colgar en el pre-filtro.
5. Despu_s de vaciar et
contenedor de polvo,
cierre la puerta
firmemente. AsegOrese
de orr un "clic" esto
indica que ta puerta
esta completamente
cerrada.
PARA REINSTALAR EL
CONTENEDOR DE POLVO
1. Colocar
nuevamente el
contenedor de polvo
en la aspiradora,
colocando primero la
parte inferior e
inctin6ndolo al
ensamblar.
2. Empuje abajo
la manija del
contenedor de
polvo para
asegurarlo en su
lugar. Un "clic
sensible" debe set
ordo.
- 16 -
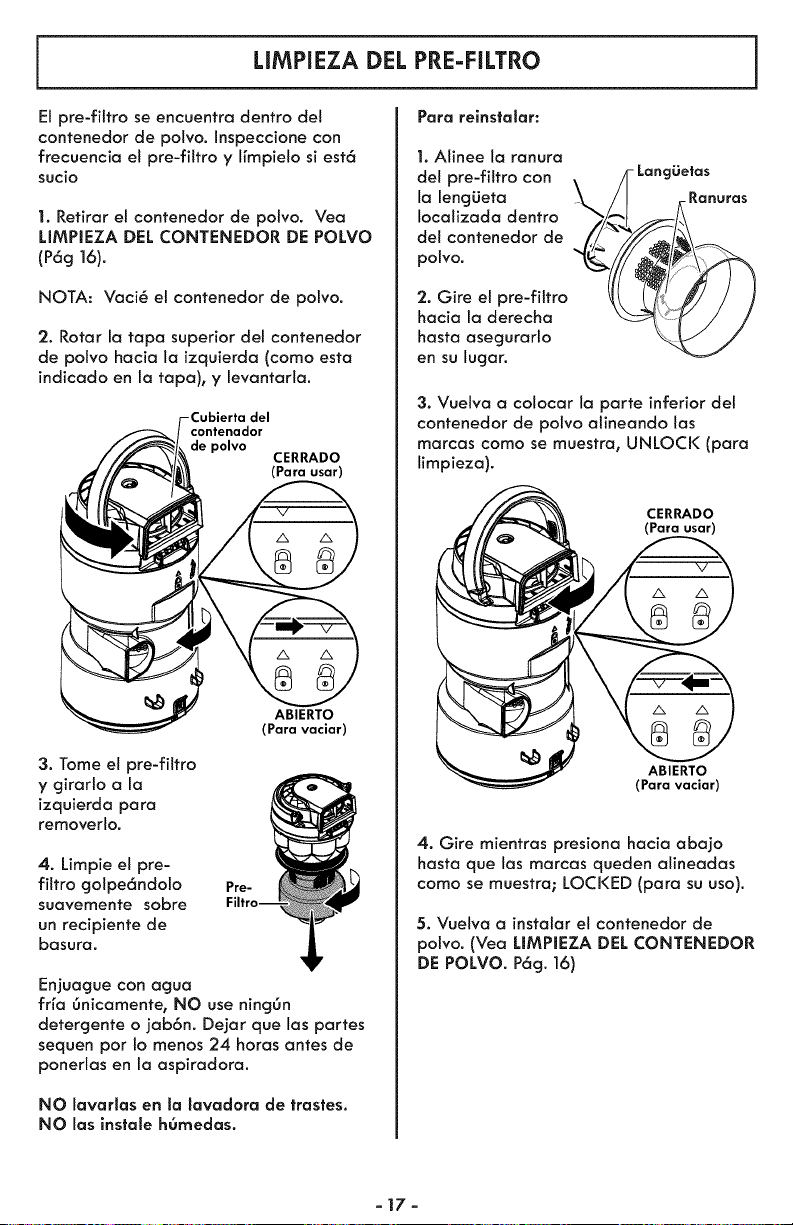
LIMPIEZA DEL PRE-FILTRO
Para relnslalar:
El pre-fittro se encuentra dentro del
contenedor de polvo. Inspeccione con
frecuencia el pre-filtro y ffmpielo si est6
sucio
1. Retirar et contenedor de polvo. Vea
LIMPIEZA DEL CONTENEDOR DE POLVO
(P6g ]6).
NOTA: Vaci@ el contenedor de polvo.
2. Rotar la tapa superior det contenedor
de polvo hacia la izquierda (como esta
indicado en la tapa), y levantarla.
del
contenador
de polvo
CERRADO
(Para usar)
3. Tome et pre-filtro
y girarlo a la
izquierda para
removerlo.
ABIERTO
(Para vaciar)
4. Limpie el pre-
filtro golpe6ndolo
suavemente sobre
un recipiente de
basura.
Ere-
Enjuague con aguo
frfa 6nicamente, NO use ningOn
detergente o jab6n. Dejar que las partes
sequen por Io menos 24 horas antes de
ponerlas en la aspiradora.
NO lavarlas en la lavadora de trastes.
NO las instale h0medas.
1. Alinee la ranura
det pre-filtro con \ /]- LangLietas
la lengLieta L,/I Ranuras
ocozoeo
del contenedor de
polvo.
'2. Gire et pre-filtro
hacia la derecha
hasta asegurarlo
en su lugar.
3. Vuelva a colocar la parte inferior del
contenedor de polvo alineando las
marcas como se muestra, UNLOCK (para
limpieza).
CERRADO
(Para usar)
ABIERTO
(Para vaciar)
4. Gire mientras presiona hacia abajo
hasta que las marcas queden alineadas
como se muestra; LOCKED (para su uso).
5. Vuelva a instalar el contenedor de
polvo. (Vea LIMPIEZA DEL CONTENEDOR
DE POLVO. P6g. 16)
-17-
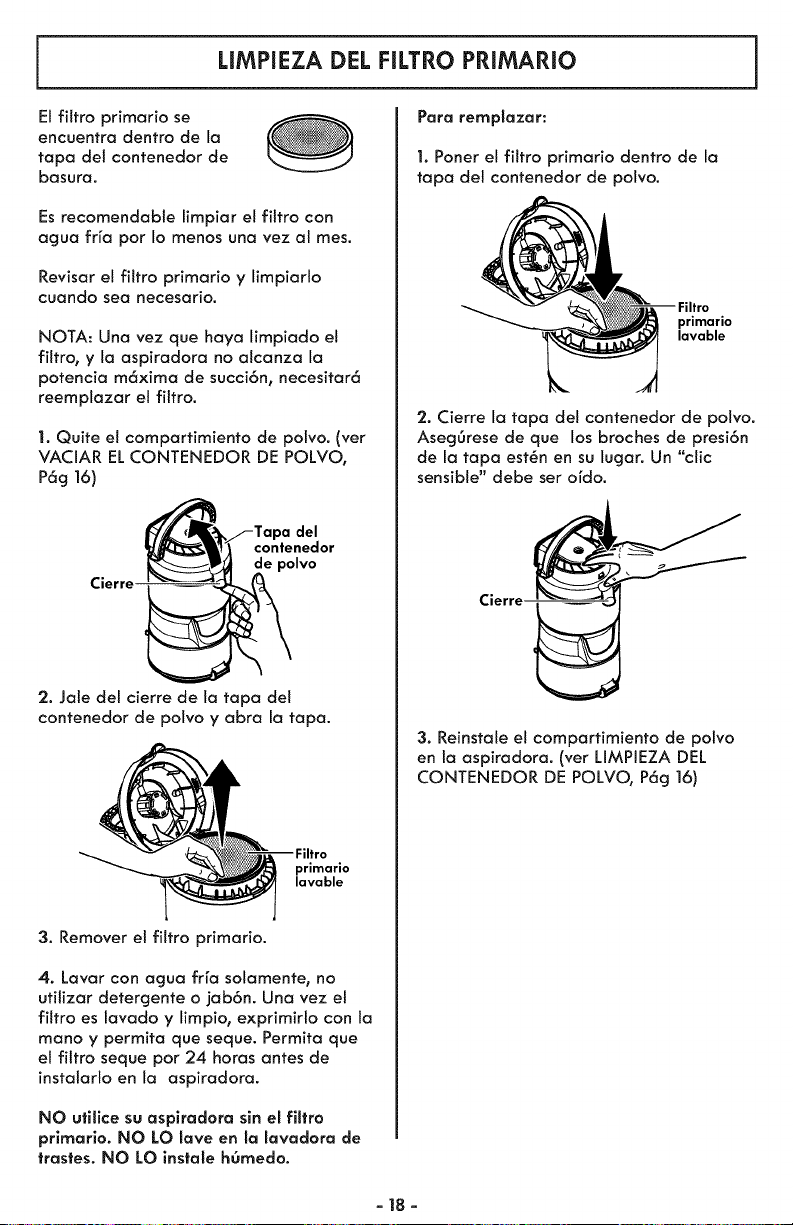
LIMPIEZA DEL FILTRO PRIMARIO
El filtro primario se
encuentra dentro de la
tapa del contenedor de
basura.
Es recomendable limpiar et filtro con
agua frfa por Io menos una vez al mes.
Revisar el filtro primario y limpiarlo
cuando sea necesario.
NOTA: Una vez que haya limpiado el
filtro, y la aspiradora no alcanza la
potencia m6xima de succi6n, necesitar6
reemplazar el filtro.
1. Quite et compartimiento de polvo. (vet
VACIAR EL CONTENEDOR DE POLVO,
P6g 16)
Cierre
del
contenedor
de polvo
2. Jale del cierre de la tapa del
contenedor de polvo y abra la tapa.
primario
lavable
3. Remover e! filtro primario.
4. Lavar con agua frfa solamente, no
utitizar detergente o jab6n. Una vez et
filtro es lavado y limpio, exprimirlo con la
mano y permita que seque. Permita que
el filtro seque por 24 horas antes de
instalarlo en la aspiradora.
NO utilice su asplradora sin el filtro
prlmario. NO LO lave en la lavadora de
trastes. NO LO instale hOmedo.
Para remplazar:
1. Poner el filtro primario dentro de la
tapa del contenedor de polvo.
primario
lavable
'2. Cierre la tapa del contenedor de polvo.
Aseg6rese de que los broches de presi6n
de la tapa est6n en su lugar. Un "clic
sensible" debe ser ordo.
Cierre
3. Reinstale el compartimiento de polvo
en la aspiradora. (ver LIMPIEZA DEL
CONTENEDOR DE POLVO, P6g 16)
-18-
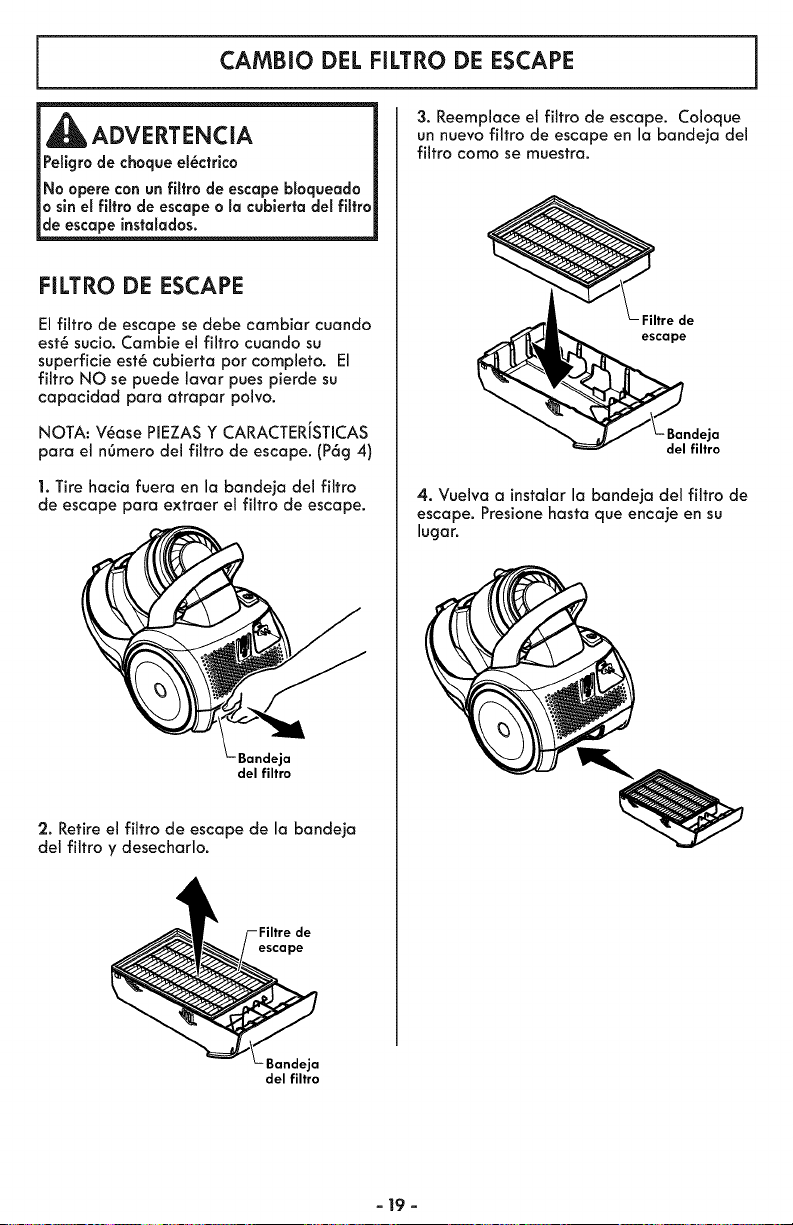
CAMBiO DEL FILTRO DE ESCAPE
ADVERTENCIA
Pellgro de choque el_ctrlco
No opere can un filtra de escape bloqueada
a sin el filtra de escape a la cubierta del filtra
de escape instalados.
FILTRO DE ESCAPE
El filtro de escape se debe cambiar cuando
est_ sucio. Cambie el filtro cuando su
superficie est_ cubierta par completo. El
filtro NO se puede lavar pues pierde su
capacidad para atrapar polvo.
NOTA: V_ase PIEZAS Y CARACTERiSTICAS
para el nOmero del filtro de escape. (P6g 4)
1. Tire hacia fuera en la bandeja del filtro
de escape para extraer el filtro de escape.
Bandeja
del filtro
2. Retire el filtro de escape de la bandeja
del filtro y desecharlo.
escape
3. Reemplace el filtro de escape. Coloque
un nuevo filtro de escape en la bandeja del
filtro coma se muestra.
Filtre de
escape
- Bandeja
del filtro
4. Vuelva a instalar la bandeja del filtro de
escape. Presionehasta que encaje en su
lugar.
Bandeja
del filtro
- 19 -
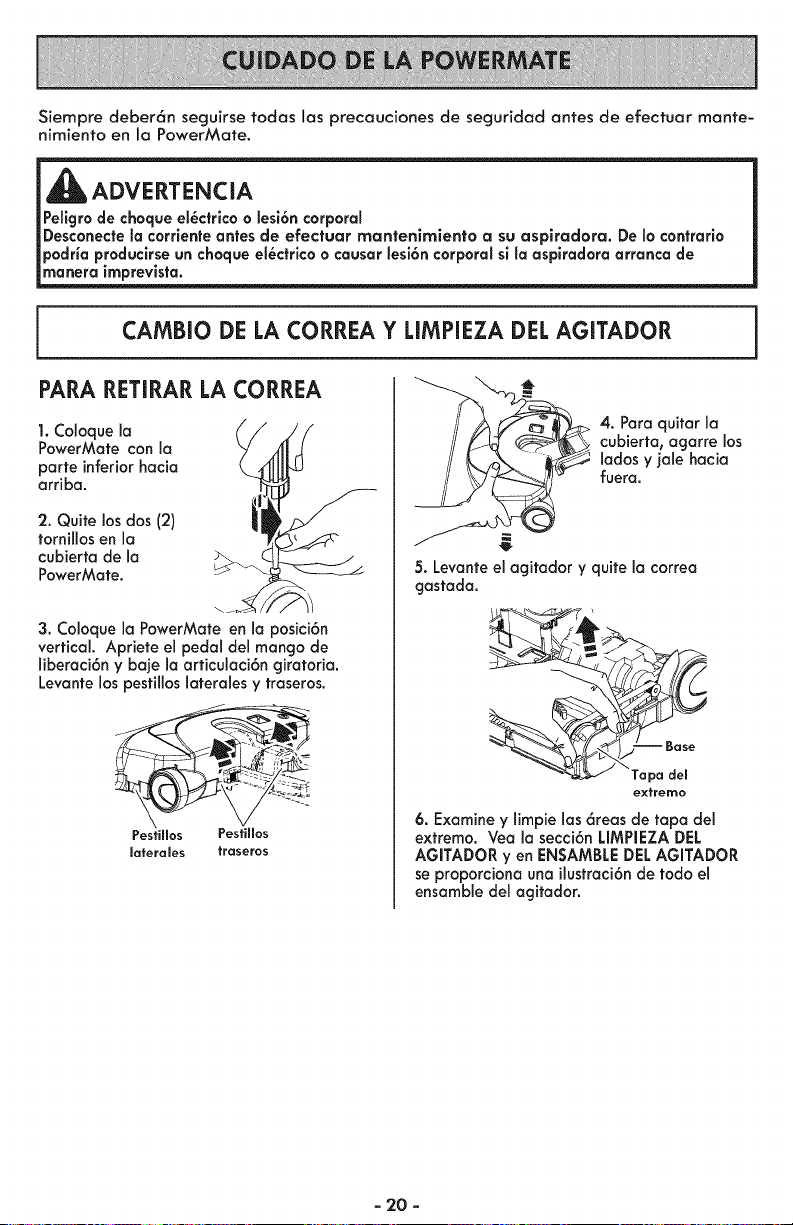
Siempre deber6n seguirse todas las precauciones de seguridad antes de efectuar mante-
nimiento en la PowerMate.
,i_ ADVERTENCIA
Pellgro de choque el_ctrico o lesi6n corporal
Desconecte la corriente antes de efectuar rnantenimiento a su aspiradora. De Io contrario
podria produclrse un choque el_ctrico o causar lesi6n corporal si la aspiradora arranca de
manera imprevista.
CAMBIO DE LA CORREA Y LIMPIEZA DEL AGITADOR
PARA RETIRAR LA CORREA
1. Coloquela
PowerMafe con la
parte inferiorhacia
arriba.
2. Quite los dos (2)
fornillos en la
cubierta de la
PowerMate.
3. Coloquela PowerMafe en la posici6n
vertical. Apriete el pedal del mango de
liberaci6n y baje la articulaci6n giratoria.
Levante los pesfillos laterales y traseros.
Pesfillos Pestillos
laferales fraseros
4. Para quifar la
cubierfa, agarre los
lados y jale hacia
fuera.
5. Levante el agitador y quite la correa
gastada.
Tapa del
extremo
6. Examine y limpie las 6reas de tapa del
extremo. Vea la secci6n LIMPIEZADEL
AGITADOR yen ENSAMBLEDELAGITADOR
se proporciona una ilustraci6nde todo el
ensamble del agitador.
- 20 -
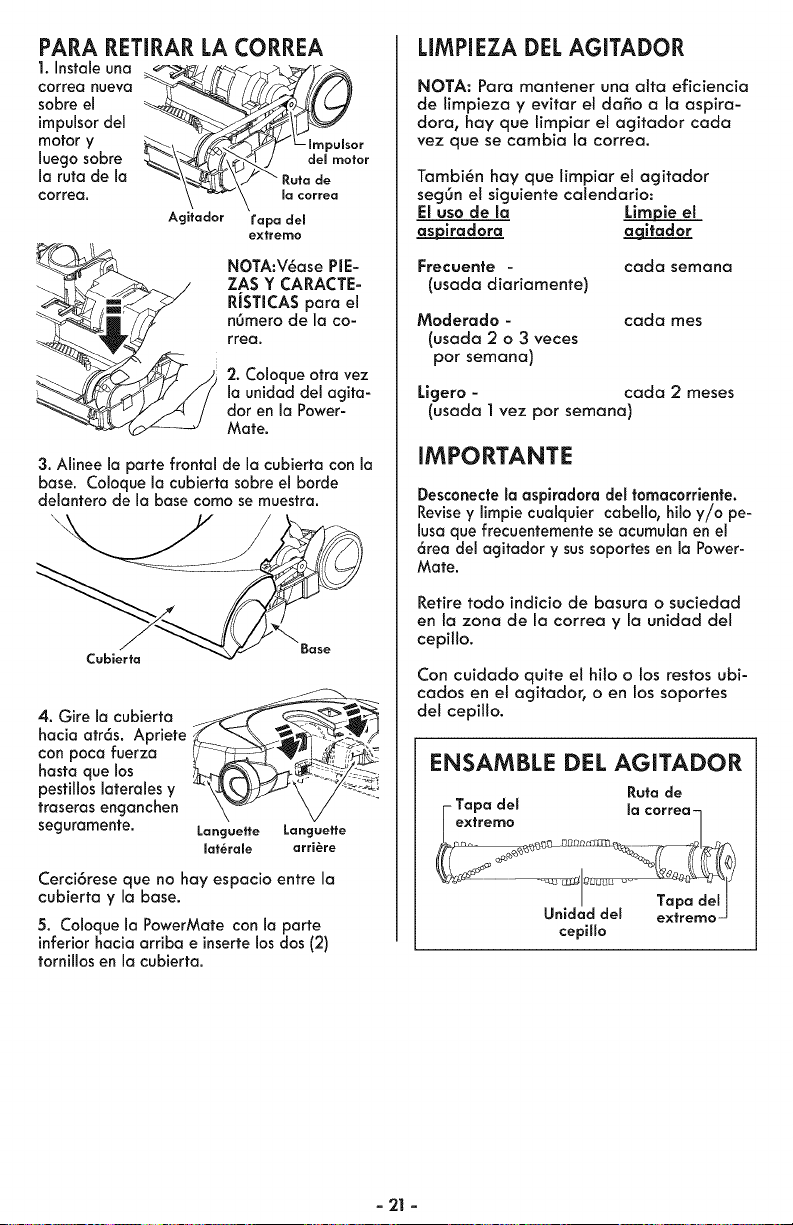
PARA RETIRAR LA CORREA
1. Instale una
correa nueva
sobre el
impulsor de1
motor y r
,uegosabre
la ruta de la -_\_ ._./ _ Ruta de
_orrea, \ _ \ _ _o._
Agitador rapa del
gxtrerno
NOTA:V_ase PIE-
ZAS Y CARACTE-
RJSTICAS para el
n6mero de la co-
rrea.
2. Coloqueotra vez
la unidad del agita-
dor en la Power-
Mate.
3. Alinee la parte frontal de la cubierta con la
base. Coloque la cubierta sobre el borde
delantero de la base como se muestra.
Cubierta
Base
4. Gire la cubierta _f _._
hacia atr6s. Apriete
con poca fuerza ; ;;-_
hasta que los --_;"
pestillos laterales y
traseras enganchen
seguramente. Langueffe Langueffe
maf_rale arri_re
Cerci6rese que no hay espacio entre la
cubierta y la base.
5. Coloque la PowerMate con la parte
inferiorhacia arriba e insertelos dos (2)
tornillos en la cubierta.
LIMPIEZA DEL AGITADOR
NOTA: Para mantener una aita eficiencia
de limpieza y evitar el daSo a la aspira-
dora, hay que limpiar el agitador cada
vez que se cambia la correa.
Tambi_n hay que limpiar el agitador
segOn e! siguiente calendario:
El uso de la Lim_ie el
a_piradora a qitador
Frecuente -
(usada diariamente)
cada semana
Moderado -
(usada2 o 3 veces
por semana)
cada rues
Ligero - carla 2 meses
(usada 1 vez por semana)
IMPORTANTE
Desconectela asplradora del tomacorriente.
Revisey limpie cualquier cabello, hilo y/o pe-
lusa que frecuentementese acumulanen el
6tea del agitador y sussoportes en la Power-
Mate.
Retire todo indicio de basura o suciedad
en la zona de la correa y la unidad de!
cepillo.
Con cuidado quite el hilo o los restos ubi-
carlos en el agitador, o en los soportes
del cepillo.
ENSAMBLE DEL AGITADOR
Ruta de
i Tapa des la correa-n
extremo /
cepillo
- 21 -
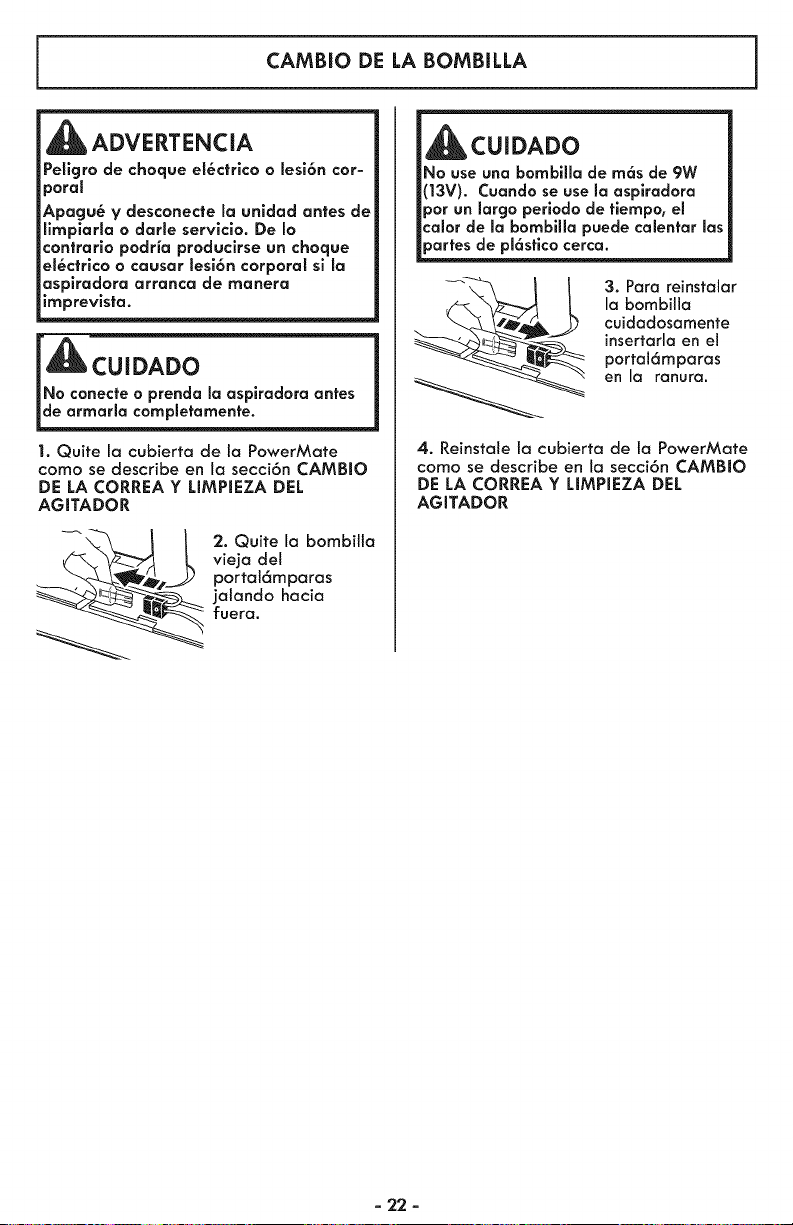
CAMBIO DE LA BOMBILLA
ADVERTENCIA
Peligro de choque el_ctrlco o lesi6n cor-
poral
Apagu_ y desconecte la unldad antes de
limplarla o darie servlcio. De Io
contrario podria producirse un choque
el_ctrico o causar lesi6n corporal sl la
asplradora arranca de manera
imprevlsta.
1. Quite la cubierta de la PowerMate
como se describe en la secci6n CAMBIO
DE LA CORREA Y LIMPIEZA DEL
AGITADOR
_ . Quite la bombilta
vieja del
portat6mparas
jalando hacia
fuera.
_CUIDADO
No use una bombllla de m6s de 9W
(13V). Cuando se use la asplradora
por un largo periodo de fiempo, el
calor de la bombilla puede calentar las
partes de pl6sfico cerca.
3. Para reinstalar
la bombilla
cuidadosamente
insertarla en el
portal6mparas
en la ranura.
4. Reinstale la cubierta de la PowerMate
como se describe en la secci6n CAMBIO
DE LA CORREA Y LIMPIEZA DEL
AGITADOR
- 22 -
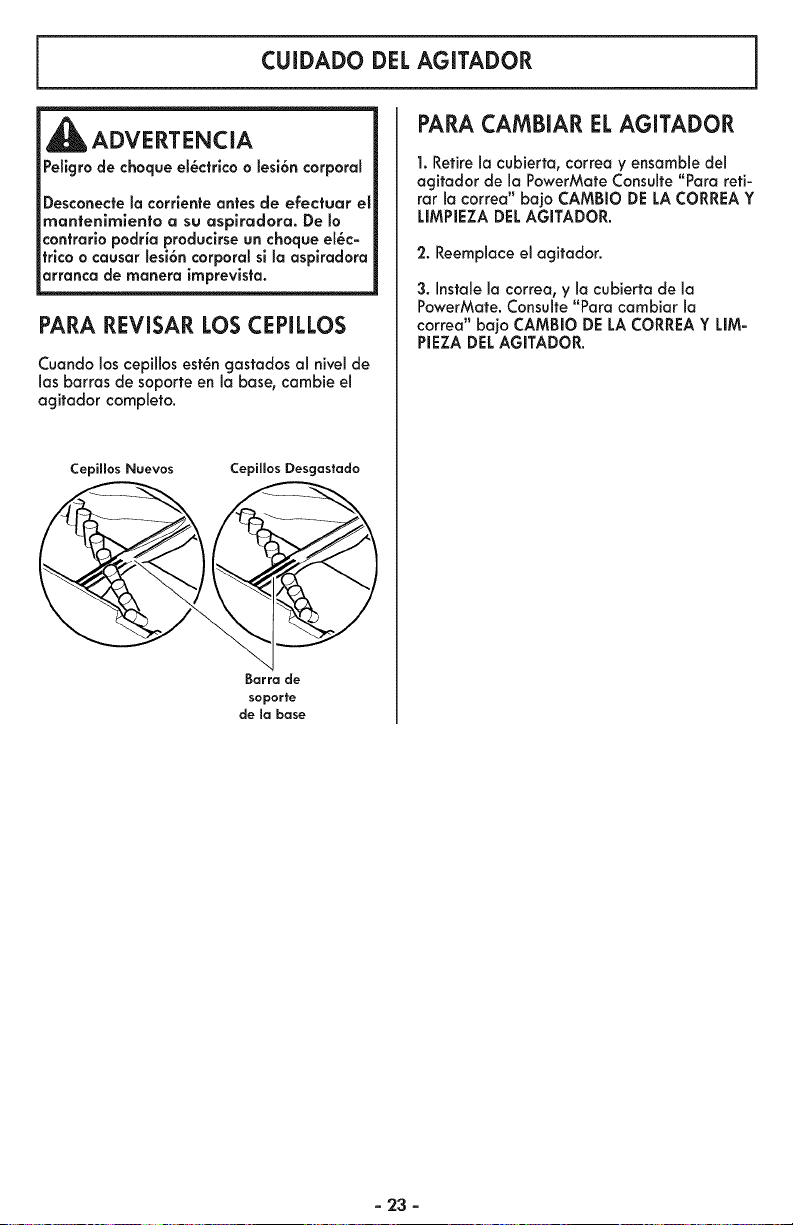
CUIDADO DEL AGITADOR
_ADVERTENCIA
Pellgro de choque el_ctrlco a lesi6n corporal
Desconecte la corriente antes de efectuar el
mantenimlento a su asplradora. De b
contrarlo podria produclrse un choque el_c-
trlca o causar lesi6n corporal sl la aspiradara
arranca de manera imprevista.
PARA REVISAR LOS CEPILLOS
Cuando los cepillos est_n gastados al nivel de
1asbarras de soporte en la base, cambie el
agitador completo.
CepiHos Nuevos CepiHos Desgastado
_arra _e
soporte
de ma base
PARA CAMBIAR ELAGITADOR
1. Retire la cubierta, correa y ensambledel
agitador de la PowerMate Consulte "Para reti-
rar la correa" ba]o CAMBIO DE LA CORREAY
LIMPIEZA DELAGITADOR.
2. Reemplace el agitador.
3. Instale la correa, y la cubiertade la
PowerMate. Consulte "Para cambiar la
correa" bajo CAMBIO DELA CORREAY LIM-
PIEZA DELAGITADOR.
- 23 -
Revise este recuadro para encontrar soluciones a problemas que puede corregir usted
mlsmo. Cualquler otro servlclo debe ser realizado por SEARS u otro agente de servlclo
caEficado.
Apa__ento asu aspira-
dora. De Io con|rarlo podHa produclrse un choque el_ctrlco o causar lesi6n corporal.
La aspiradora no
arranca.
No aspira
satisfactoriamente.
La aspiradora
arrancal pero se
apaga.
La PowerMate no
funciona caando
est6 instalada.
Est6 desconectada.1.
2. Cortacircuitos botado o fusible
quemodo en el toblero de
servicio de la residencio.
3. Conexiones el_ctricos de la
manguera sueltas.
1. Contenedor de polvo Ileno o
atascodo.
2. V_as de flujo de aire
otascados.
3. Filtros sucios.
4. Ajuste incorrecto de nivel de
pelo de la alfombra.
5. Control de aspiraci6n abierto.
6. Manguera rota.
7. Agitador de la PowerMate
desgastado.
8. Correo desgastoda o rota.
9. Agitodor o topos de los
extremos sucios.
10. Contenedor de polvo instalado
incorrectamente.
]]. Cubierto del contenedor de
polvo y el contenedor de
polvo mol ensambloda.
1. Conexiones el6ctricos de Io
monguera o de Io topo.
2.
Protector contra sobrecorgos
de Io PowerMote botodo.
3. Protector t6rmico botodo
en el recept6culo.
1. Conexiones de la Power-Mate
2. Correo desgostado o rota.
3. Agitador o topos de extremos
est6n sucios.
4. Protector contro sobrecargos
de la PowerMate botado.
5. El interruptor no est6 en Io
posici6n CARPET.
1. Conecte bien0 oprimo selector
de encendido/opagado.
2. Restablezca el cortacircuitos o
cambie el fusible.
3. Vuelvo a conectar los extremos
de la monguera.
1. Vaciar el contenedor de polvo.
2. Limpie los vias de flujo de aire.
3. Cambie los filtros.
4. Ajuste el nivel.
5. Ajuste el control.
6. Combie Io manguera.
7. Cambie el agitador.
B&9. Consulte CAMBIO DE LA
CORREA Y UMPIEZA DEL
AGITADOR.
]0. Consulte UMPIEZA EL
CONTENEDOR DE POLVO.
]]. Consulte UMPIEZA DEL
PRE-FILTRO.
1. Examine los conexiones
el_ctricos, vuelvo o conector los
extremos de Io manguero.
2. Retire cualquier objeto otorodo
o ofoscodo, luego restablezco.
Si [a aspiradora arronca pero se
vuelve o opagar, limpie el
ogitador y los topos de los
extremos, luego restablezca.
3. Desconecte Io unidad y espere.
50 minutos para restablecer.
1. Conecte bien.
2&3. Consulte CAMBIO DE LA
CORREA Y LIMPIEZA DEL
AGITADOR.
4. Retire cualquier objeto atorado
o atascado, luego restablezca.
Si iaaspiradora orronca pero se
vuelve a apagar, limpie el
agitador y los topos de los
extremos0 luego restablezca.
5. Ponga elinterruptor a la
posici6n CARPET.
- 24 -
La aspiradora Sevanta
tapetes o es diflcil
empujar Sa
PowerMate.
La luz no funciona.
1. Ajuste incorrecto de nivel de
pelo de Io olfombro.
2. Abro el control de ospiroci6n.
1. Bombilla fundida.
2. Protector contro sobrecarcjos
de Io PowerMote botodo.
1. Ajuste el nivel.
2. Aspiroci6n demosiodo potente.
1.
2.
Cambie Io bombilla.
Retire cuolquier objeto atorodo
o atoscado, luego restablezco.
Si Io ospirodoro arronca pero se
vuelve o opogor, limpie el
ogitodor y los topos de
extremos, luego restoblezca.
Et cord6n no se 1. Cord6n el_ctrico sucio. 1. Limpie el cord6n el6ctrico.
enro[[a. 2. Cord6n otoscodo. 2. Tire del cord6n y despu_s
enr611elo.
La aspiradora deja 1. Estilo de limpieza incorrecto. 1. Consulte SUGERENCIAS PARA
marcas en la ASPIRAR.
affombra.
Linea de ayuda de Aspiradoras:
1-877-531-7321
8:00am-5:00pm EST, M-F
(U.S.A. and Canada)
- 25 -

Your Home
For troubleshooting, product manuals and expert advice:
managemylife
www.managemylife.com
For repair - in your home - of all major brand appliances,
lawn and garden equipment, or heating and cooling systems,
no matter who made it, no matter who sold it !
For the replacement parts, accessories and
owner's manuals that you need to do-it-yourself.
For Sears professional installation of home appliances
and items like garage door openers and water heaters.
1-800-4-MY-HOME ® Call anytime, day or night
(1-800-469-4663) (U.S.A. and Canada
www.sears.com www.sears.ca
TM
® Registered Trademark / Trademark of KCD IP, LLC in the United States, or Sears Brands, LLC in other countries
TM
® Marca Registrada/ Marca de Fabrica de KCD IP, LLC en Estados Unidos, o Sears Brands, LLC in otros paises
MC Marque de commerce / MD Marque depos6e de Sears Brands, LLC
P/N C01ZDYU20U00 - I<C01ZDYUZOU0

