Owner's Manual
Liquid Propane GasGrill
Model 141.166400
Natural Gas Grill
Modem141.176400
TM
//.vXk VVARNmNG:
Read this Owner's Manual carefully and be sure your
gas grill is properly assembled, installed and main-
tained. Failure to follow these instructions could
result in serious bodily injury and/or property dam-
age. This gas grill is intended for outdoor use only
and is not intended to be installed in or on
recreational vehicles or boats.
Note to Installer:
Leave this Owner's Manual with the consumer
after delivery and/or installation.
Note to Consumer:
Leave this Owner's Manual in a convenient place
for future reference.
Manufacturer's Customer Service Ne_pline:
if there are damaged or missing parts when you
unpack this unit from the shipping box, or you have
questions about assembly, call us 8am - 8pm CST,
Mondaythrough Friday at:
1-888-317-7642
Sears, Roebuck and Co.,
Hoffman Estates, RL 60179 U.S.A.
P4799C- Rev: 11/2%2001
Warranty ..................................................... 2
Safety Instructions ..................................... 2
PreoAssembly Instructions ........................ 4
Hardware, Parts Diagram and Lists...5
Assembly Instructions ................................ 9
Lighting Instructions ................................. 16
Cleaning and Maintenance Instructions .. 18
Frequently Asked Questions ................. 20
Cooking Instructions ............................... 21
Cooking Guide and Recipes ............... 22
Full 1-Year Warranty on Grill
For one year from the date of purchase Sears will
repair or replace, at our option, any grill part
(except for paint loss and ignitor battery) that is
defective in material or workmanship.
Limited Warranty on Selected Gritl Parts
From one year after the date of purchase for the
designated time periods listed below, Sears will
replace the following grill parts if they are defective
in matedal or workmanship. You will be charged
for labor.
" Lifetime of Grill: Exterior Stainless Steel Parts,
Aluminum Castings (except for paint loss)
'_ 2 Years: Flame Tamers, Cooking Grids, Burners
,_ 4 Years: All Other Grill Parts (except ignitor battery)
Warranty Service
Warranty service is available by contacting your
nearest Sears Service Center.
Warranty Restrictions
,, This warranty is void if grill is used for commer-
cial or rental purposes.
" This warranty applies only when the grill is
used in the United States.
" This warranty gives you specific legal rights,
and you may also have other rights which vary
from state to state.
Sears, Roebuck and Co., Dept. 817WA,
Hoffman Estates, IL 60179
Combustion by-products produced when
using this product contain chemicals known
to the State of California to cause cancer,
birth defects, or other reproductive harm.
/_ WARNING
Failure to comply with these instructions
could result in a fire or explosion that
could cause serious bodily injury, death,
or property damage.
GrHI hstallation Codes
This gas grill must be installed in accordance with
all local codes. In areas without local codes,
follow the latest edition of the National Fuel Gas
Code ANSI Z223.1. In Canada, installation must
conform to standard CAN/CGA 1b149.1 or 1-
b149.2 (Installation Code for Gas Burning Appli-
ances and Equipment) and all local codes.
Correct LP Gas Tank Use
LP gas grill models are designed for use with a
standard 20 lb. Liquid Propane Gas (LP gas)
tank, not included with grill box. Never connect
your gas grill to an LP gas tank that exceeds
this capacity. A tank of approximately 12 inches
in diameter by 18-1/2 inches high is the maxi-
mum size LP gas tank to use. We recommend
buying an "OPD" gas tank which offers an
Overfill Prevention Device. This safety feature
prevents the tank from being overfilJed which can
cause malfunction of the LP gas tank, regulator
and/or grill.
The LP gas tank must be constructed and
marked in accordance with specifications of the
U.S. Dept. of Transportation (DOT). In Canada, the
LP gas tank must meet the Canadian Transporta-
tion and Communications (CTC)
specifications. Also be sure:
1. The LP gas tank has a shutoff valve, termi-
nating in an LP gas supply tank valve outlet,
that is compatible with a Type 1 tank con-
nection device. The LP gas tank must also
have a safety relief device that has a direct
communication with the vapor space of the
tank.
2. The tank supply system must be arranged
for vapor withdrawal.
3. The LP gas tank used must have a collar
to protect the tank valve.
2 @ Sears, Roebuck and Co.
Proper Placementand Clearanceof Gritl
Neveruse yourgasgrillinagarage,porch,shed,
breezewayoranyotherenclosedarea.Yourgasgrillis
tobeusedoutdoorsonly,atleast24inchesfromthe
backandside of any combustiblesurface.Your
gasgrillshouldnot be placedunderany surface
that will burn.Do not obstructtheflowofventilation
air aroundthe gasgrill housing.
Thisoutdoorgasgrillisnotintendedtobeinstalledin
oronrecreationalvehiclesand/orboats.
Failureto comply with these instructions
could result in a fire or explosion that
could cause serious bodity injury, death,
or property damage.
,, Never connect an unregulated LP gas tank to
your gas grill. The gas regulator assembly
supplied with your gas grill is adjusted to have
an outlet pressure of 11" water column (W.C.)
for connection to an LP gas tank.
,, Only use the regulator and hose assembly
supplied with your gas grill. Replacement
regulators and hose assemblies must be those
specified by Sears.
,, Have your LP gas tank filled by a reputable
propane gas dealer and visually inspected and
re-qualified at each filling.
,, Never fill the gas tank beyond 80% full.
Have your propane gas dealer check the
release valve after every filling to ensure that it
remains free of defects.
,, Always keep LP gas tanks in an upright
position.
,_ Do not store (or use) gasoline or other flammable
vapors and liquids in the vicinity of this gas grill.
,, An LP gas tank that is not connected for use must
not be stored in the vicinity of this or any other gas
grill.
,_ Do not subject the LP gas tank to excessive heat.
,, Never store an LP gas tank indoors. If you
store your gas grill in the garage or other indoor
location, always disconnect the LP gas tank
first and store it safely outside.
,, LP gas tanks must be stored outdoors in a
weGventilated area. Disconnected LP gas tanks
must not be stored in a building, garage or
any other enclosed area.
,, When your gas grill is not in use the gas
must be turned off at the LP gas tank.
,, The regulator and hose assembly must be
inspected before each use of the grill. If there
is excessive abrasion or wear or if the hose is
cut, it must be replaced prior to the grill being
used again.
,, Keep the gas regulator hose away from
hot grill surfaces and dripping grease.
Avoid unnecessary twisting of hose. Visually
inspect hose prior to each use for cuts,
cracks, excessive wear or other damage.
If the hose appears damaged do not use the
gas grill. Call Sears at 1-800-4-MY-HOME for
a Sears authorized replacement hose.
,, Never light your gas grill with the lid closed
or before checking to insure the burner tubes
are fully seated over the gas valve orifices.
,, Never allow children to operate your grill. Do
not allow children to play near your grill.
A strong gas smell, or the hissing sound of
gas indicates a serious problem with your
gas grill or the LP gas tank. Failure to
immediately follow the steps listed below
could result in a fire or explosion that could
cause serious bodily injury, death, or prop-
erty damage.
Shut off gas supply to the gas gdll.
Turn the control knobs to OFF position.
Put out any flame with a fire extinguisher.
Open grill lid.
, Get away from the LP gas tank.
, Do not try to fix the problem yourself.
, If odor continues or you have a fire you
cannot extinquish, call your fire department.
Do not call near the LP gas tank
because your telephone is an electrical
device and could create a spark resulting
in fire and/or explosion.
CAUTION: Spiders and small insects occa-
sionally spin webs or make nests in the
grill burner tubes during transit and ware-
housing. These webs can lead to a gas flow
obstruction which could result in a fire in
and around the burner tubes. This type of
fire is known as a "FLASH-BACK" and can
cause serious damage to your grill and
create an unsafe operating condition for the
user.
Although an obstructed burner tube is not
the only cause of "FLASH-BACK", it is the
most common cause.
To reduce the chance of "FLASH-BACK",
you must clean the burner tubes before
assembling your grill, and at least once a
month in late summer or early fall when
spiders are most active. Also perform this
burner tube cleaning procedure if your grill
has not been used for an extended period
of time.

To reducethe chanceof "FLASH-BACK"(see
CAUTIONon page3) cleanthe burnertubesand
burnersbeforefully assemblingyour grill.Remove
the cotterpin from the rear undersideof each
burnerusinga pairof long nosepliers.Carefully
lift eachburnerup and awayfromthe gas valve
orifice,then referto Figure1 andperformoneof
thesethreecleaningmethods:
1. Benda stiffwire, (a lightweightcoathanger
workswell) intoa smallhookas shownbelow.
Runthe hookthroughthe burnertube and
insidethe burnerseveraltimesto removeany
debris.
2. Use a bottlebrushwith a flexiblehandle.Run
the brushthroughthe burnertube and inside
the burnerseveraltimes,removingany debris.
3. Use an air hoseto force air througheach
burnertube.The forcedair shouldpassdebris
or obstructionsthroughthe burnerand out the
ports.
iF,, WARNtNG
The location of the burner tube with respect
to the orifice is vital for safe operation.
Check to ensure the orifice is inside of the
burner tube before using your gas grill. See
Fig. 2. If the burner tube does not fit over
the valve orifice, lighting the burner may
cause explosion and/or fire.
Figure 2
GASVALVE ASSEMBLY
ORIFICE BURNER TUBE
Figure 1
GAS COLLECTOR BOX
SPARK ELECTRODE ,_
ASSEMBLY \ BURNER
BURNER PORT
TO CLEAN BURNER TUBE,
INSERT HOOK HERE
................... OOT
/ COTTER PIN
BURNER TUBE
" Size 2 phillips screwdriver
'_ Size 4 phillips screwdriver
'_ Adjustable wrench
'_ Long nose pliers
'_ Open-end wrench, 11/16" size
', Protective work gloves
" Eye protection
4
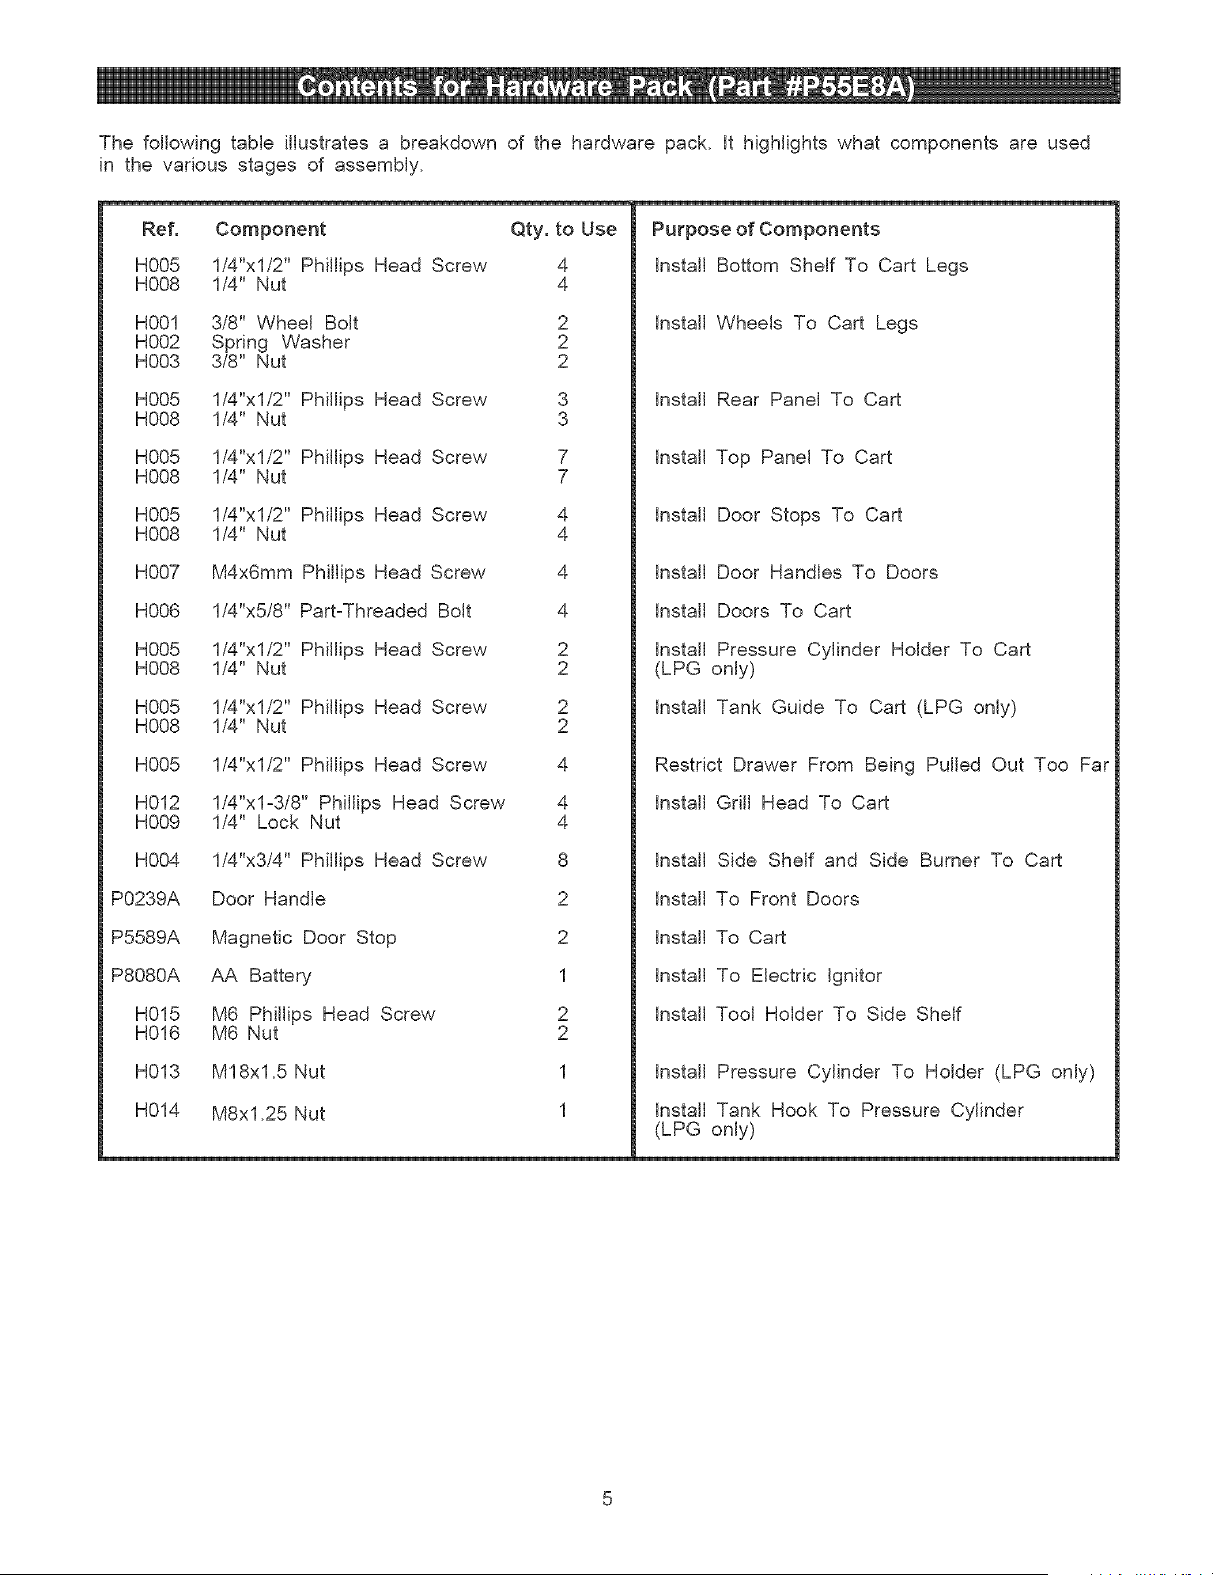
Thefollowingtableillustratesa breakdownof the hardwarepack.it highlightswhat componentsare used
in the variousstagesof assembly.
Ref. Component Qty.to Use
H005 1/4"xl/2"PhillipsHeadScrew 4
H008 1/4"Nut 4
H001 3/8" WheelBolt 2
H002 SpringWasher 2
H003 3/8" Nut 2
H005 1/4"xl/2"PhillipsHeadScrew 3
H008 1/4"Nut 3
H005 1/4"xl/2"PhillipsHeadScrew 7
H008 1/4"Nut 7
H005 1,"4"xl/'2"PhillipsHeadScrew 4
H008 1/4"Nut 4
H007 M4x6mmPhillipsHeadScrew 4
H006 1/4"x5/8"PartzThreadedBolt 4
H005 1/4"xl/2"PhillipsHeadScrew 2
H008 1/4"Nut 2
H005 1/4"xl/2"PhillipsHeadScrew 2
H008 1/4"Nut 2
H005 1/'4"xl/2"PhillipsHeadScrew 4
H012 1/4"xlz3/8"PhillipsHeadScrew 4
H009 1/4" LockNut 4
H004 1/4"x3/4"PhillipsHeadScrew 8
P0239A DoorHandle 2
P5589A MagneticDoorStop 2
P8080A AA Battery 1
H015 M6PhillipsHeadScrew 2
H016 M6Nut 2
H013 M18x1.5Nut 1
H014 M8x1.25Nut 1
Purposeof Components
InstallBottomShelfTo Cart Legs
InstallWheelsTo Cart Legs
InstallRearPanelTo Cart
InstallTop PanelTo Cart
installDoorStopsTo Cart
InstallDoorHandlesTo Doors
InstallDoorsTo Cart
InstallPressureCylinderHolderTo Cart
(LPGonly)
InstallTankGuideTo Cart(LPGonly)
RestrictDrawerFromBeingPulledOut Too Far
InstallGrill HeadTo Cart
InstallSide Shelfand Side BurnerTo Cart
InstallTo FrontDoors
InstallTo Cart
InstallTo ElectdcIgnitor
InstallTool HolderTo SideShelf
InstallPressureCylinderTo Holder(LPGonly)
InstallTankHookTo PressureCylinder
(LPGonly)

Actual Size and Quantity of Each Hardware Piece:
f-,
3/8" Wheel Bolt
Qty. 2 Spring Washer
Ref. # H001 Qty. 2
Ref. # H002
i' 'i
1/4"x3/4" Phillips 1/4"xl/2" Phillips 1/4"x5/8" Part-
Head Screw Head Screw Threaded Bolt
Qty. 8 Qty. 26 (4 for LPG) Qty. 4
Ref. # H004 Ref. # H005 Ref. # H006
Door Handle Part # P0239A
Qty. 2 Scale 1:2
3/8" Nut
Qty. 2
Ref. # H003
\\ i
\4
M6 Phittips Head Screw
Qty. 2
Ref. # H015(packed with
Tool Holder)
M4x6mm Phiitips 1/4" Nut 1/4" Lock Nut
Head Screw Qty. 22 Qty. 4
Qty. 4 Ref. # H008 Ref. # H009
Ref. # H007
Magnetic Door Stop Part # P5589A
Qty. 2 Scale 1:2
AA Battery Part # P8080A
Qty. 1 Scale 1:2
M18xl.5 Nut
Qty. 1 (for LPG)
Ref. # H013(attached
to Pressure Cylinder)
M8x1.25 Nut
Qty. 1 (for LPG)
Ref. # H014(attached
to Pressure Cylinder)
M6 Nut
Qty. 2
Refi # H016(packed
with Tool Holder)
\
1/4"xl-3/8" Philtips
Head Screw
Qty. 4
Ref. # H012
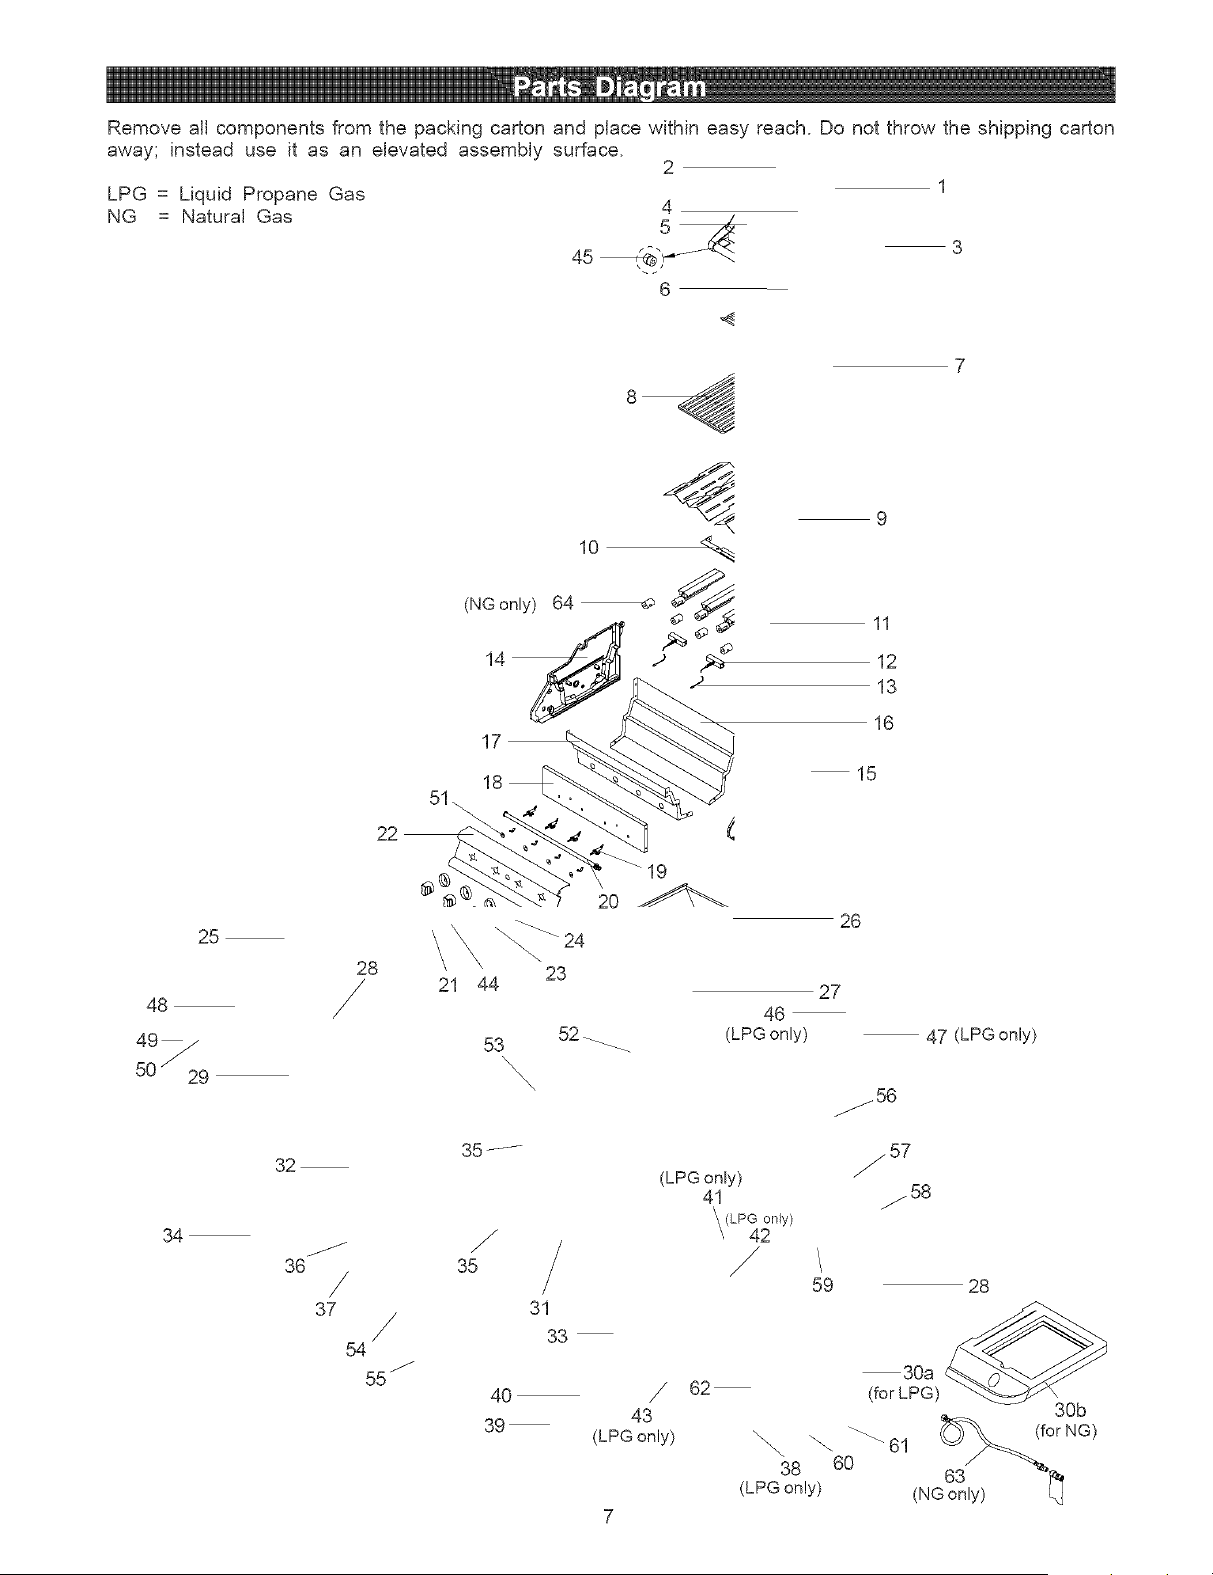
Remove all components from the packing carton and place within easy reach. Do not throw the shipping carton
away;
LPG = Liquid Propane Gas
NG = Natural Gas
instead use it as an elevated assembly surface.
4
6
1
3
25
48
49_
50 / 29
32
34
J
36
Y
37
Y
54
15
26
23
21 44
53 52 .....
46
(LPG only)
27
11
12
13
16
47 (LPG only)
55 j
35J
Y
35
4O
39
31
33
Y
43
(LPGonly)
(LPGonly)
41
'\ (LPG only)
\ 42
Y
j56
/57
/58
59 28
62
30a
(for LPG)
30b
"\\\ _ _ 61 _or NG)
38 60
(LPG only') (NG6o31y) -_
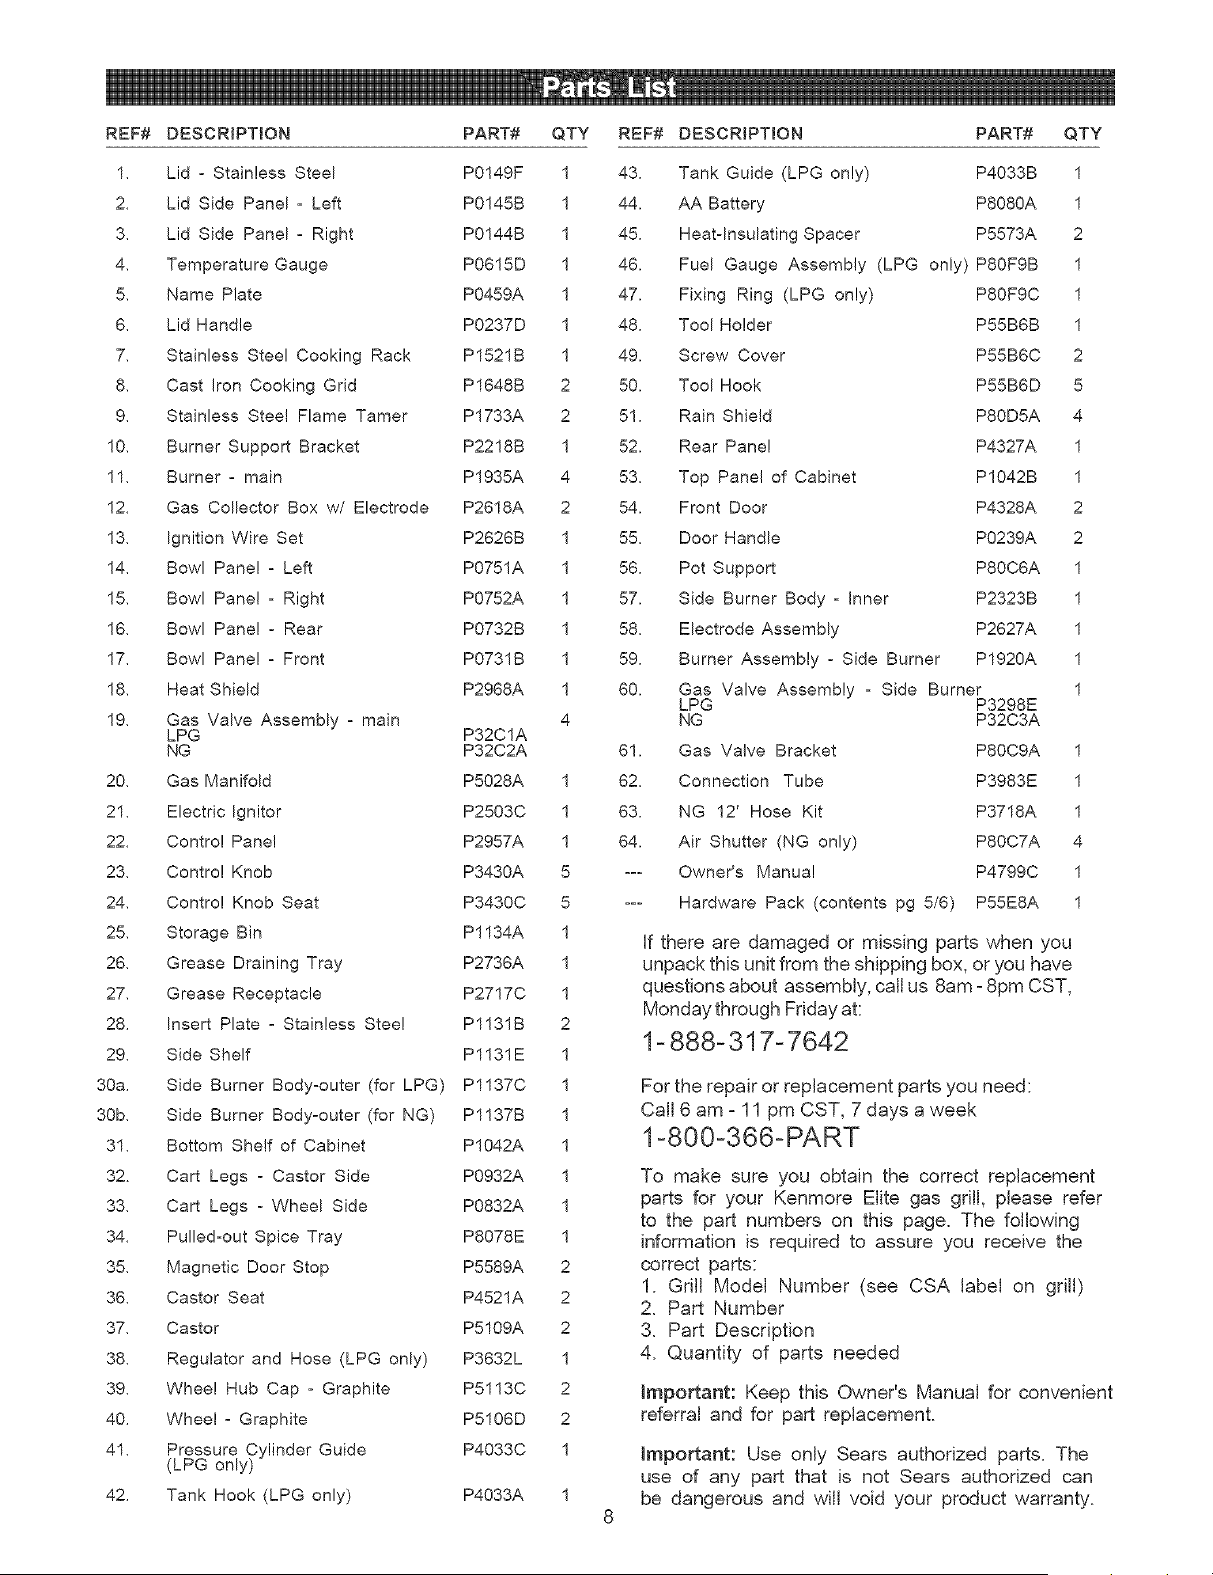
REF# DESCR_PT{ON PART# QTY REF# DESCR{PTION PART# QTY
1, Lid o Stainless Steel P0149F 1 43.
2, Lid Side Panel- Left P0145B 1 44.
3, Lid Side Panel- Right P0144B 1 45.
4, Temperature Gauge P0615D 1 46.
5. Name Plate P0459A 1 47.
6. Lid Handle P0237D 1 48.
Tank Guide (LPG only) P4033B 1
AA Battery P8080A 1
Heat°Insulating Spacer P5573A 2
Fuel Gauge Assembly (LPG only)P80F9B 1
Fixing Ring (LPG only) P80F9C 1
Tool Holder P55B6B 1
7. Stainless Steel Cooking Rack P1521B 1 49. Screw Cover
8. Cast iron Cooking Grid P1648B 2 50. Tool Hook
9, Stainless Steel Flame Tamer P1733A 2 51. Rain Shield
P55B6C 2
P55B6D 5
P80D5A 4
10. Burner Support Bracket P2218B 1 52. Rear Panel
11, Burner ° main P1935A 4 53. Top Panel of Cabinet
12, Gas Collector Box w/ Electrode P2618A 2 54. Front Door
P4327A 1
P1042B 1
P4328A 2
13, Ignition Wire Set P2626B 1 55.
14, Bowl Panel - Left P0751A 1 56.
15. Bowl Panel = Right P0752A 1 57.
16, Bowl Pane! o Rear P0732B 1 58.
17, Bowl Panel ° Front P0731B 1 59.
18. Heat Shield P2968A 1 60.
19. Gas Valve Assembly = main 4
LPG P32C1A
NG P32C2A 61.
Door Handle PO239A 2
Pot Support P80C6A 1
Side Burner Body - inner P2323B 1
Electrode Assembly P2627A 1
Burner Assembly o Side Burner P1920A 1
Gas Valve Assembly = Side Burner 1
LPG P3298E
NG P32C3A
Gas Valve Bracket P80C9A 1
20. Gas Manifold P5028A 1 62. Connection Tube P3983E 1
21, Electric Ignitor
22, Control Pane!
23, Control Knob
P2503C 1 63. NG 12' Hose Kit P3718A 1
P2957A 1 64. Air Shutter (NG only) P80C7A 4
P3430A 5 o=- Owner's Manual P4799C 1
24, Control Knob Seat P3430C 5
25, Storage Bin P1134A 1
26, Grease Draining Tray P2736A 1
27, Grease Receptacle P2717C 1
28, Insert Plate ° Stainless Steel P1131B 2
29, Side Shelf P1131E 1
o-- Hardware Pack (contents pg 5/6) P55E8A 1
If there are damaged or missing parts when you
unpack this unit from the shipping box, or you have
questions about assembly, ca[[ us 8am z8pm CST,
Monday through Friday at:
1- 888-317-7642
3Oa, Side Burner Body-outer (for LPG) P1137C 1
3Ob, Side Burner Body-outer (for NG) P1137B 1
31, Bottom Shelf of Cabinet P1042A 1
32. Cart Legs - Castor Side P0932A 1
33, Cart Legs - Wheel Side P0832A 1
34, Pulled°out Spice Tray P8078E 1
35, Magnetic Door Stop P5589A 2
36, Castor Seat P4521A 2
37, Castor P5109A 2
38, Regulator and Hose (LPG only) P3632L 1
39, Wheel Hub Cap - Graphite P5113C 2
40, Wheel - Graphite P5106D 2
41, Pressure Cylinder Guide P4033C 1
(LPG only)
42, Tank Hook (LPG only) P4033A
1
8
For the repair or replacement parts you need:
Call 6 am z 11 pm CST, 7 days a week
1-800-366-PART
To make sure you obtain the correct replacement
parts for your Kenmore Elite gas grill, please refer
to the part numbers on this page. The following
information is required to assure you receive the
correct parts:
1. Grill Mode[ Number (see CSA label on grill)
2. Part Number
3. Part Description
4. Quantity of parts needed
Important: Keep this Owner's Manual for convenient
referral and for part replacement.
Important: Use only Sears authorized parts. The
use of any part that is not Sears authorized can
be dangerous and wi[[ void your product warranty.
Beforeassemblingyourgasgrill,use the parts
Figure 1
list to checkthat all necessarypartsare included.
inspectall partsfor damageas youproceed.Donot
assembleor operateyourgrillif it appearsdamaged.
if youhavequestionsduringtheassemblyprocess,call
8am- 8pmCST,MondaythroughFriday,
1-888-317-7642
Remove the white PVC protective film from
stainless stee{ surfaces before assembly.
CAUTION:
While it is possible for one person to assemble
this gas grill, obtain assistance from another
person when handling some of the larger, heavier
pieces, especially the grill head.
Remove all cart parts, hardware, and grill head
from carton. Assemble the gas grill on a protective
work surface, such as the shipping box, to avoid
scratching surfaces. Refer to parts list and hard-
ware pack illustrations to help assemble your grill.
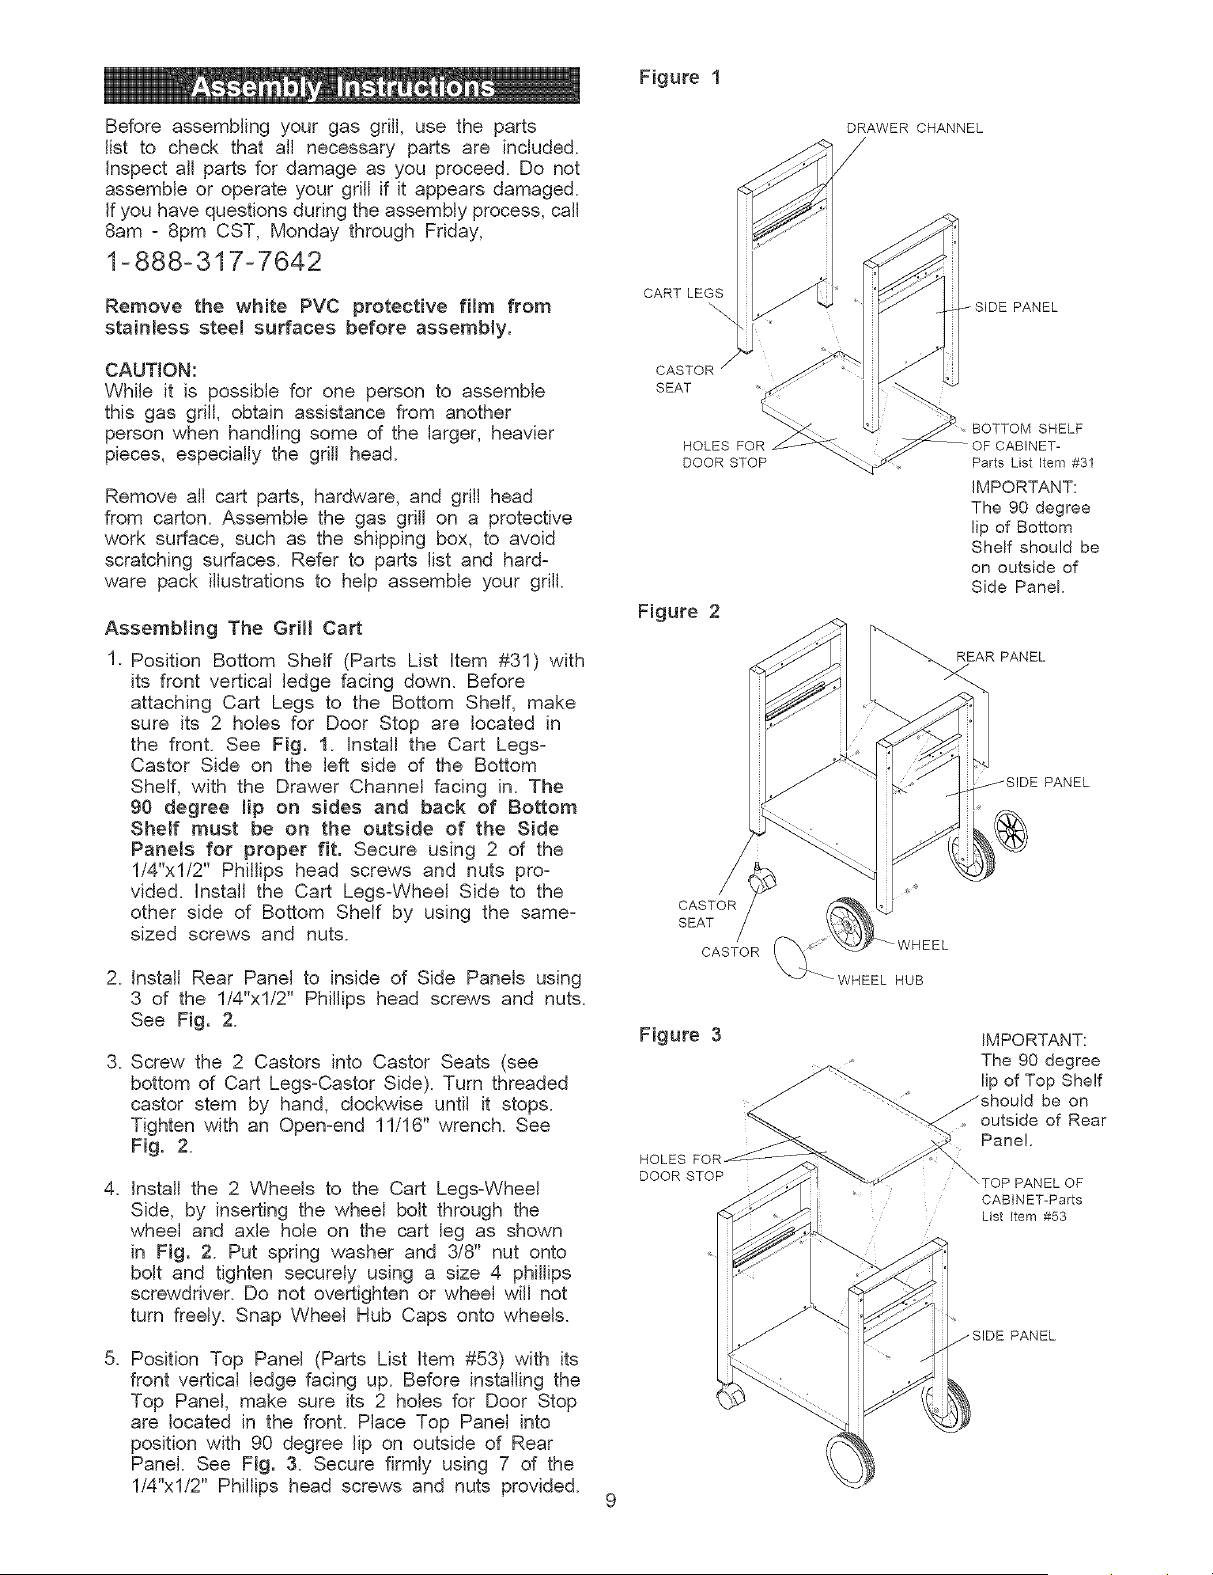
Assembling The Grill Cart
1. Position Bottom Shelf (Parts List item #31) with
its front vertical ledge facing down. Before
attaching Cart Legs to the Bottom Shelf, make
sure its 2 holes for Door Stop are located in
the front. See Fig. 1. Install the Cart Legs-
Castor Side on the left side of the Bottom
Shelf, with the Drawer Channel facing in. The
90 degree lip on sides and back of Bottom
Shelf must be on the outside of the Side
Panels for proper fit. Secure using 2 of the
1/4"xl/2" Phillips head screws and nuts pro-
vided. Install the Cart Legs-Wheel Side to the
other side of Bottom Shelf by using the same-
sized screws and nuts.
2. Install Rear Panel to inside of Side Panels using
3 of the 1/4"xl/2" Phillips head screws and nuts.
See Fig. 2.
3. Screw the 2 Castors into Castor Seats (see
bottom of Cart Legs=Castor Side). Turn threaded
castor stem by hand, clockwise until it stops.
Tighten with an Open=end 11/16" wrench. See
Fig. 2.
4. Install the 2 Wheels to the Cart Legs=Wheel
Side, by inserting the wheel bolt through the
wheel and axle hole on the cart leg as shown
in Fig. 2. Put spring washer and 3/8" nut onto
bolt and tighten securely using a size 4 phillips
screwdriver. Do not overtighten or wheel will not
turn freely. Snap Wheel Hub Caps onto wheels.
5. Position Top Panel (Parts List Item #53) with its
front vertical ledge facing up. Before installing the
Top Panel, make sure its 2 holes for Door Stop
are located in the front. Place Top Panel into
position with 90 degree lip on outside of Rear
Panel. See Fig. 3. Secure firmly using 7 of the
1/4"xl/2" Phillips head screws and nuts provided.
DRAWER CHANNEL
CART LEGS
CASTOR
SEAT
HOLES FOR
DOOR STOP
Figure 2
BOTTOM SHELF
CABINET-
Parts List Item #31
iMPORTANT:
The 90 degree
lip of Bottom
Shelf should be
on outside of
Side Panel.
REAR PANEL
PANEL
CASTOR LJ
SEAT
CASTOR _'_WHEEL HUB
Figure 3
HOLES FOR
DOOR STOP
IMPORTANT:
The 90 degree
lip of Top Shelf
be on
outside of Rear
Pane!.
\TOP PANEL OF
CABINET-Parts
List Item #53
_SIDE PANEL
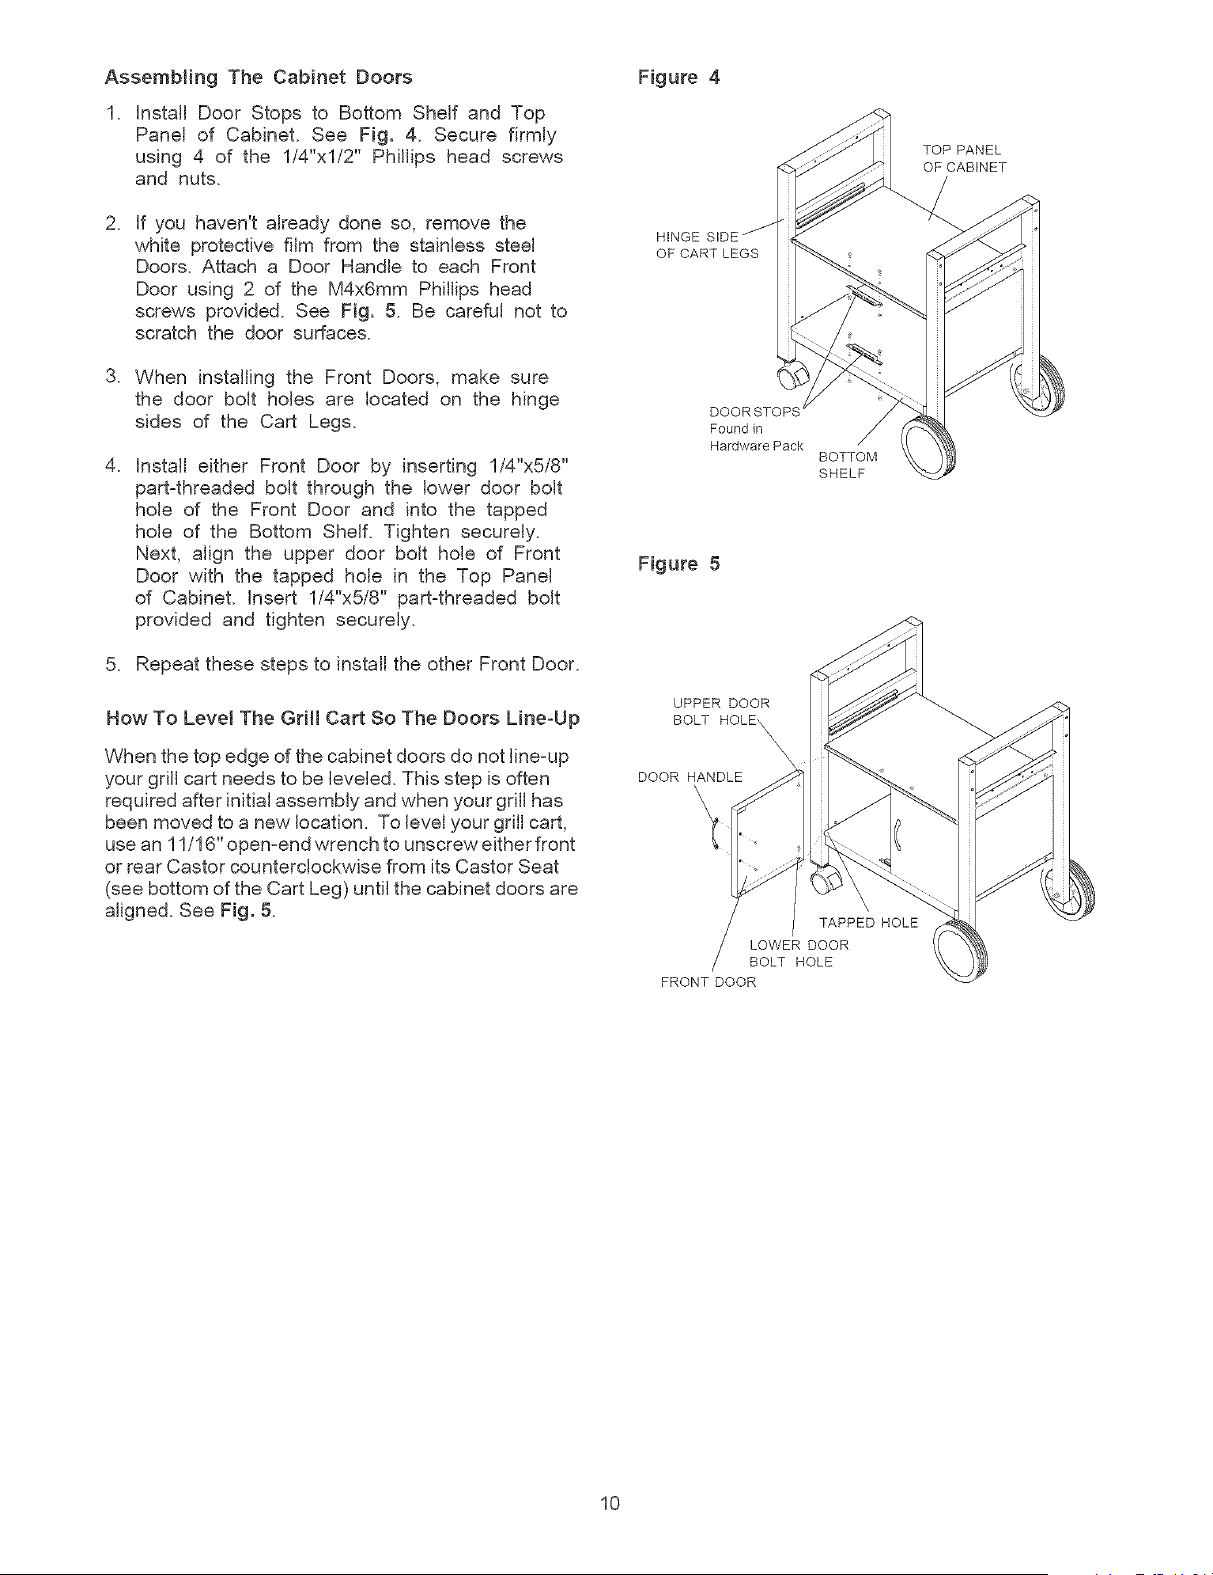
Assembling 1"he Cabinet Doors
1. Install Door Stops to Bottom Shelf and Top
Panel of Cabinet. See Fig. 4. Secure firmly
using 4 of the 1/4"xl/2" Phillips head screws
and nuts.
2. if you haven't already done so, remove the
white protective film from the stainless steel
Doors. Attach a Door Handle to each Front
Door using 2 of the M4x6mm Phillips head
screws provided. See Fig. 8. Be careful not to
scratch the door surfaces.
3. When installing the Front Doors, make sure
the door bolt holes are located on the hinge
sides of the Cart Legs.
4. Install either Front Door by inserting 1/4"x5/8"
part4hreaded bolt through the lower door bolt
hole of the Front Door and into the tapped
hole of the Bottom Shelf. Tighten securely.
Next, align the upper door bolt hole of Front
Door with the tapped hole in the Top Panel
of Cabinet. Insert 1/4"x5/8" part4hreaded bolt
provided and tighten securely.
5. Repeat these steps to install the other Front Door.
How To Level The Gritl Cart So The Doors Line-Up
When the top edge of the cabinet doors do not line-up
your grill cart needs to be leveled. This step is often
required after initial assembly and when your grill has
been moved to a new location. To level your grill cart,
use an 11/16" open-end wrench to unscrew either front
or rear Castor counterclockwise from its Castor Seat
(see bottom of the Cart Leg) until the cabinet doors are
aligned. See Fig. 5.
Figure 4
TOP PANEL
OF CABINET
HINGE SIDE
OF CART LEGS
DOORSTOPS
Found in
Hardware Pack
BOTTOM
SHELF
Figure 5
UPPER DOOR
BOLT HOLE_
DOOR HANDLE
'\
\
\
TAPPED HOLE
LOWER DOOR
BOLT HOLE
FRONT DOOR
10
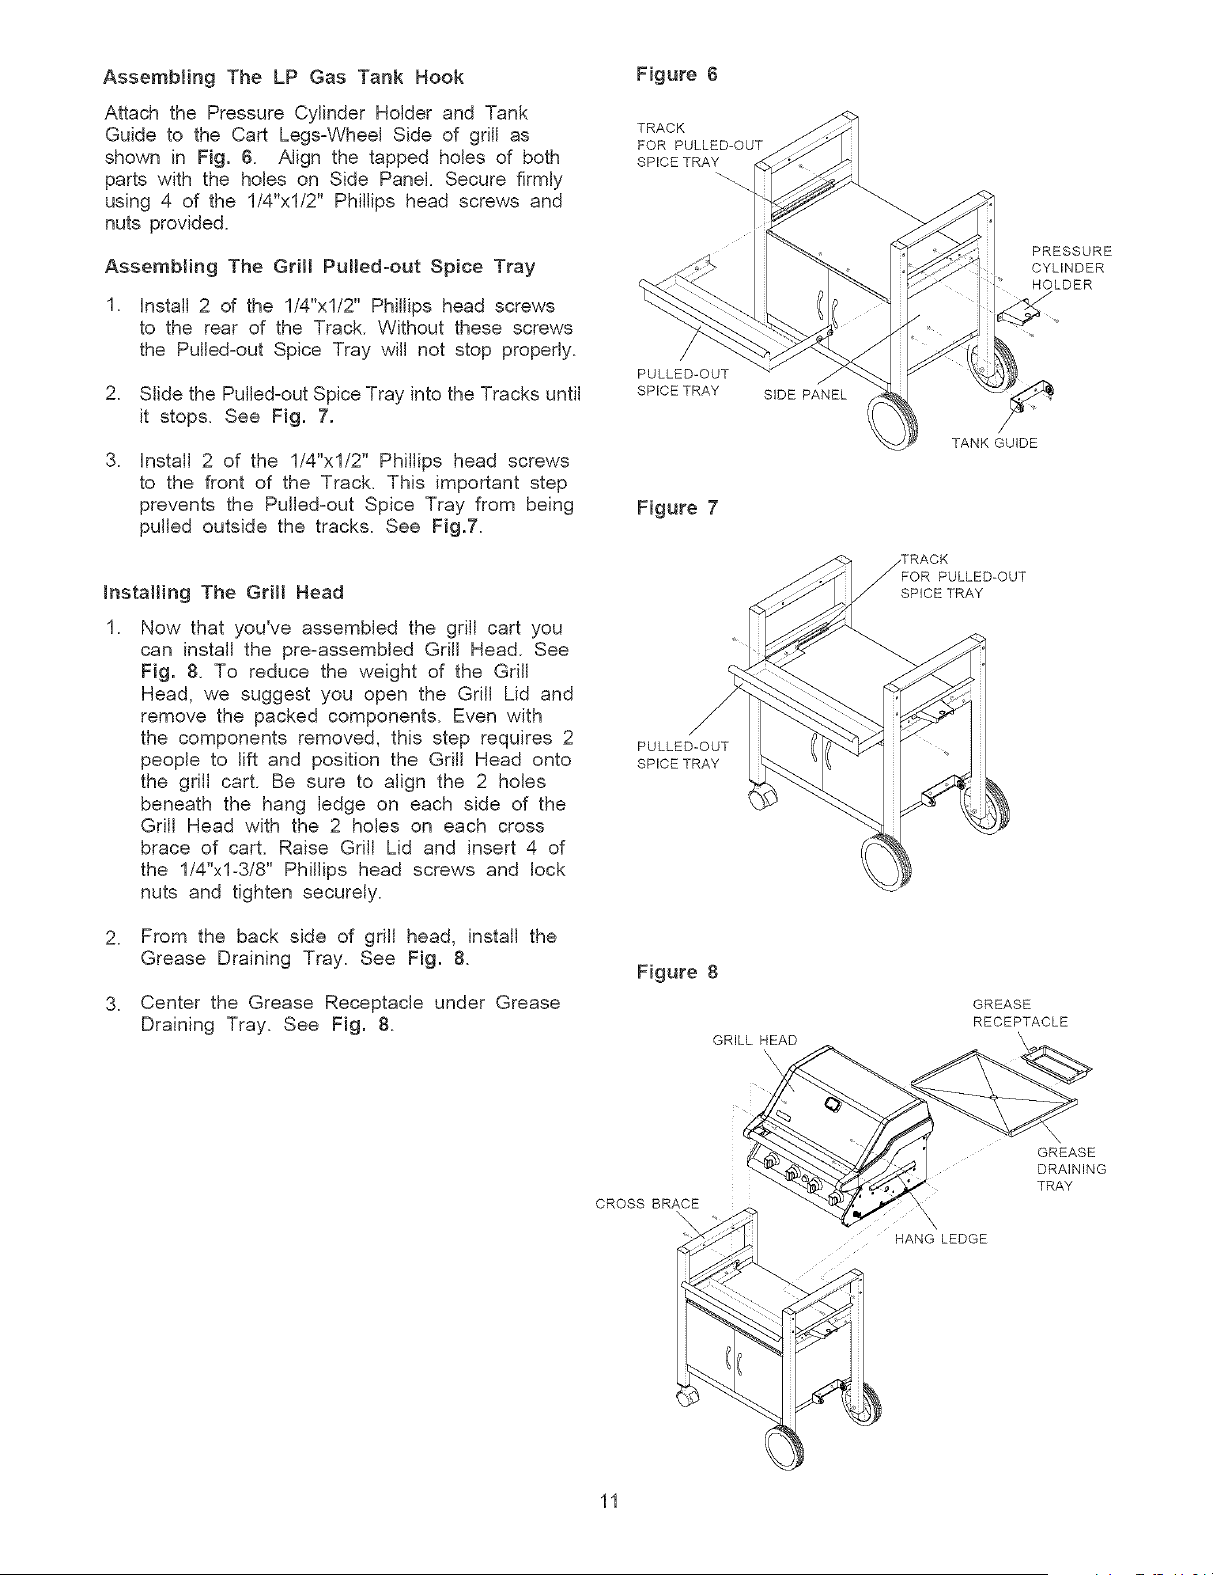
Assernb{ingThe LP Gas Tank Hook
Attachthe PressureCylinderHolderandTank
Guideto the CartLegs-WheelSideof grillas
shownin Fig.6. Alignthe tappedholesof both
partswith the holeson SidePanel.Securefirmly
using4 of the 1/4"xl/2"Phillipsheadscrewsand
nutsprovided.
AssemblingTheGrilmPulled-outSpiceTray
1. install2 of the 1/4"xl/2"Phillipsheadscrews
to the rearof the Track.Withoutthesescrews
the Pulled-outSpiceTraywill notstopproperly.
2. SlidethePulled-outSpiceTrayintotheTracksuntil
it stops.See Fig. 7.
Install2 of the 1/'4"xl/2"Phillipshead screws
to the frontof the Track.This importantstep
preventsthe Pulled-outSpiceTrayfrom being
pulledoutsidethe tracks.See Fig.7.
Installing The GrimmHead
Nowthat you'veassembledthe grillcart you
can installthe pre-assembledGrill Head.See
Fig. 8. To reducethe weightof the Grill
Head,we suggestyou openthe Grill Lid and
removethe packedcomponents.Evenwith
the componentsremoved,this steprequires2
peopleto lift and positionthe Grill Headonto
the grill cart. Be sure to alignthe 2 holes
beneaththe hangledgeon eachside of the
Grill Headwith the 2 holeson each cross
braceof cart. RaiseGrill Lid and insert4 of
the 1/4"xl-3/8"Phillipsheadscrewsand lock
nutsand tightensecurely.
2. Fromthe backside of grill head,installthe
GreaseDrainingTray. See Fig. 8.
3. Centerthe GreaseReceptacleunderGrease
DrainingTray.See Fig. 8.
Figure6
TRACK
FOR PULLED-OUT
SPICE TRA_
PULLED-OUT
SPICE TRAY SIDE PANEL
Figure 7
PULLED-OUT
SPICE TRAY
Figure 8
GRILL HEAD
PRESSURE
CYLINDER
HOLDER
TANK GUIDE
PULLED-OUT
SPICE TRAY
GREASE
RECEPTACLE
\
CROSS BRACE
\
HANG LEDGE
GREASE
DRAINING
TRAY
11
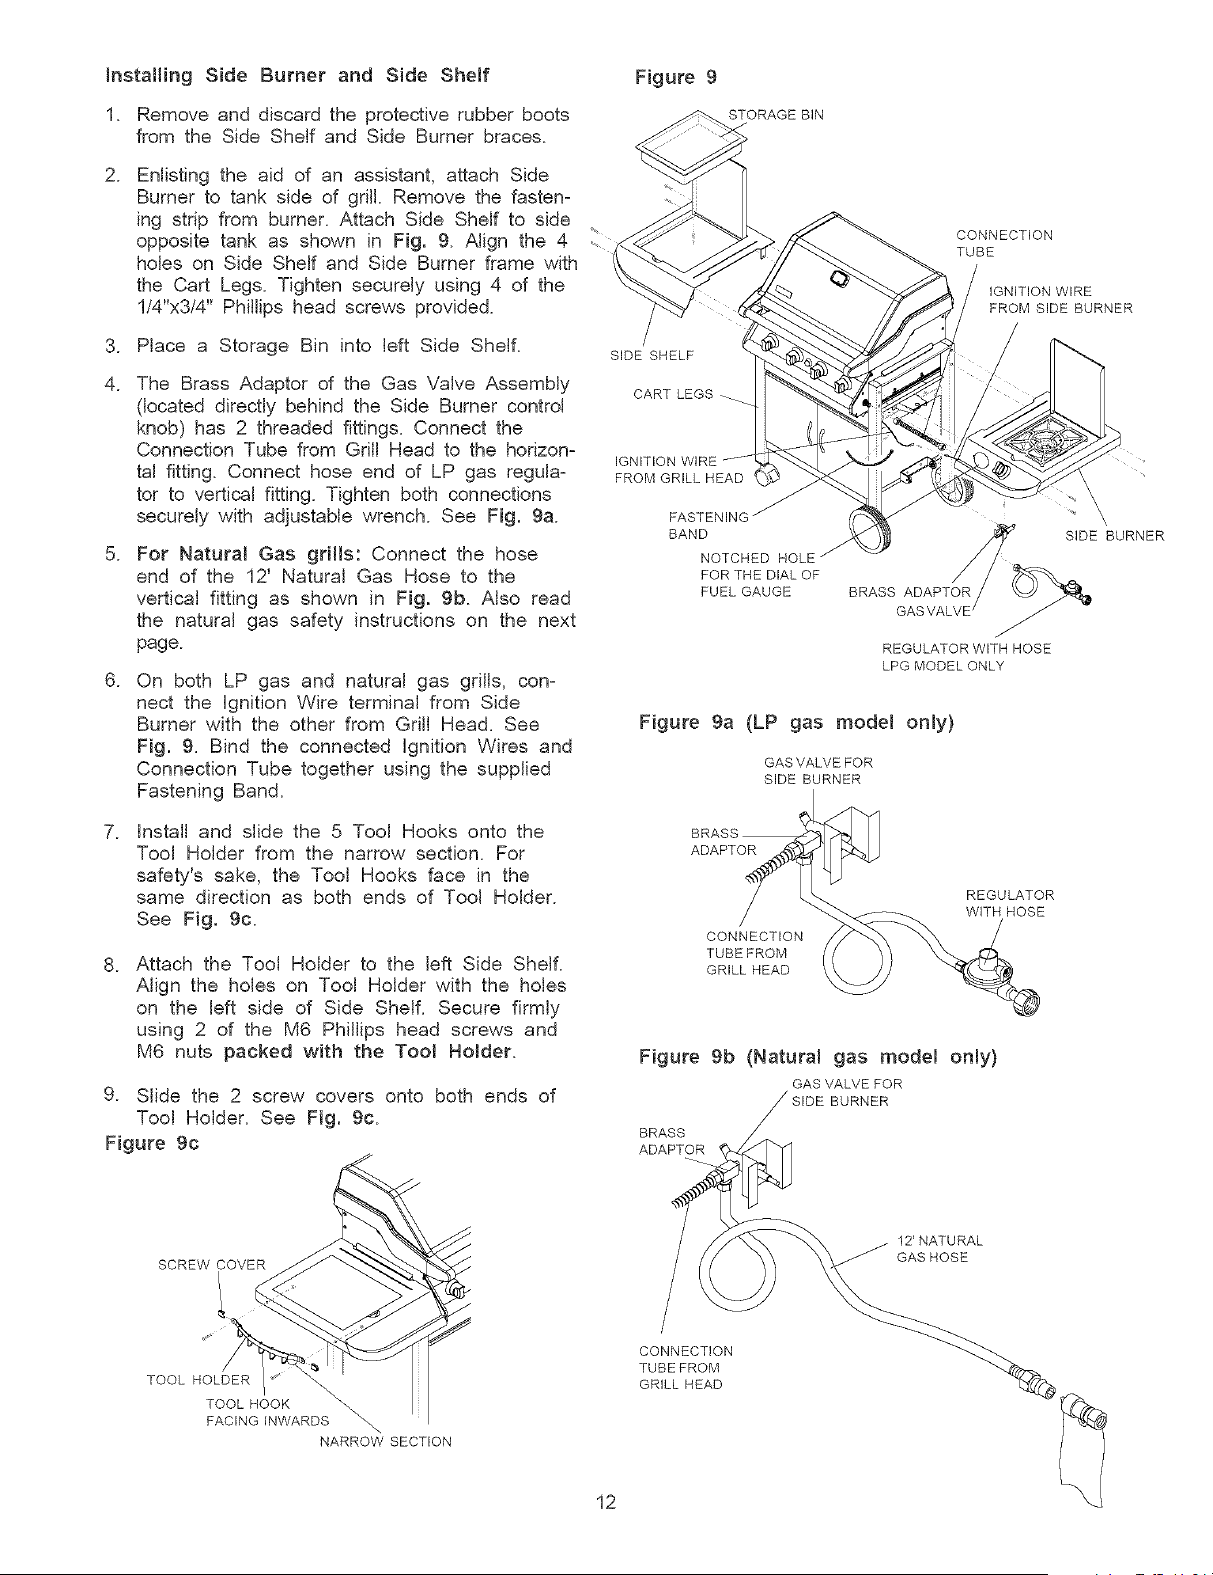
Installing Side Burner and Side Shelf
1. Remove and discard the protective rubber boots
from the Side Shelf and Side Burner braces.
2. Enlisting the aid of an assistant, attach Side
Burner to tank side of grill. Remove the fasten-
ing strip from burner. Attach Side Shelf to side
opposite tank as shown in Fig. 9. Align the 4
holes on Side Shelf and Side Burner frame with
the Cart Legs. Tighten securely using 4 of the
1/4"x3/4" Phillips head screws provided.
3. Place a Storage Bin into left Side Shelf.
4. The Brass Adaptor of the Gas Valve Assembly
(located directly behind the Side Burner control
knob) has 2 threaded fittings. Connect the
Connection Tube from Grill Head to the horizon-
tal fitting. Connect hose end of LP gas regula-
tor to vertical fitting. Tighten both connections
securely with adjustable wrench. See Fig. 9a.
5. For Naturam Gas grills: Connect the hose
end of the 12' Natural Gas Hose to the
vertical fitting as shown in Fig. 9b. Also read
the natural gas safety instructions on the next
page.
6. On both LP gas and natural gas grills, con-
nect the Ignition Wire terminal from Side
Burner with the other from Grill Head. See
Fig. 9. Bind the connected Ignition Wires and
Connection Tube together using the supplied
Fastening Band.
7. Install and slide the 5 Tool Hooks onto the
Tool Holder from the narrow section. For
safety's sake, the Tool Hooks face in the
same direction as both ends of Tool Holder.
See Fig. 9c.
8. Attach the Tool Holder to the left Side Shelf.
Align the holes on Tool Holder with the holes
on the left side of Side Shelf. Secure firmly
using 2 of the M6 Phillips head screws and
M6 nuts packed with the Tool Holder.
9. Slide the 2 screw covers onto both ends of
Tool Holder. See Fig. 9c.
Figure 9c
Figure 9
STORAGE BIN
SIDE SHELF
CART LEGS
CONNECTION
TUBE
IGNITION WIRE
FROM SIDE BURNER
FROM GRILL HEAD
FASTENING
BAND
NOTCHED HOLE
FOR THE DIAL OF
FUEL GAUGE
SIDE BURNER
BRASSADAPT?, /
GASVALVE ._"
REGULATOR WITH HOSE
LPG MODEL ONLY
Figure 9a (LP gas modem only)
GAS VALVE FOR
SIDE BURNER
BRASS
ADAPTOR
CONNECTION
TUBEFROM
GRILL HEAD
REGULATOR
WITH HOSE
Figure 9b (Natural gas model only)
GAS VALVE FOR
BURNER
BRASS
SCREW COVER
12'NATURAL
GAS HOSE
J
TOOL HOLDER
TOOL HOOK
FACING INWARDS _
NARROW SECTION
CONNECTION
TUBE FROM
GRILL HEAD
12
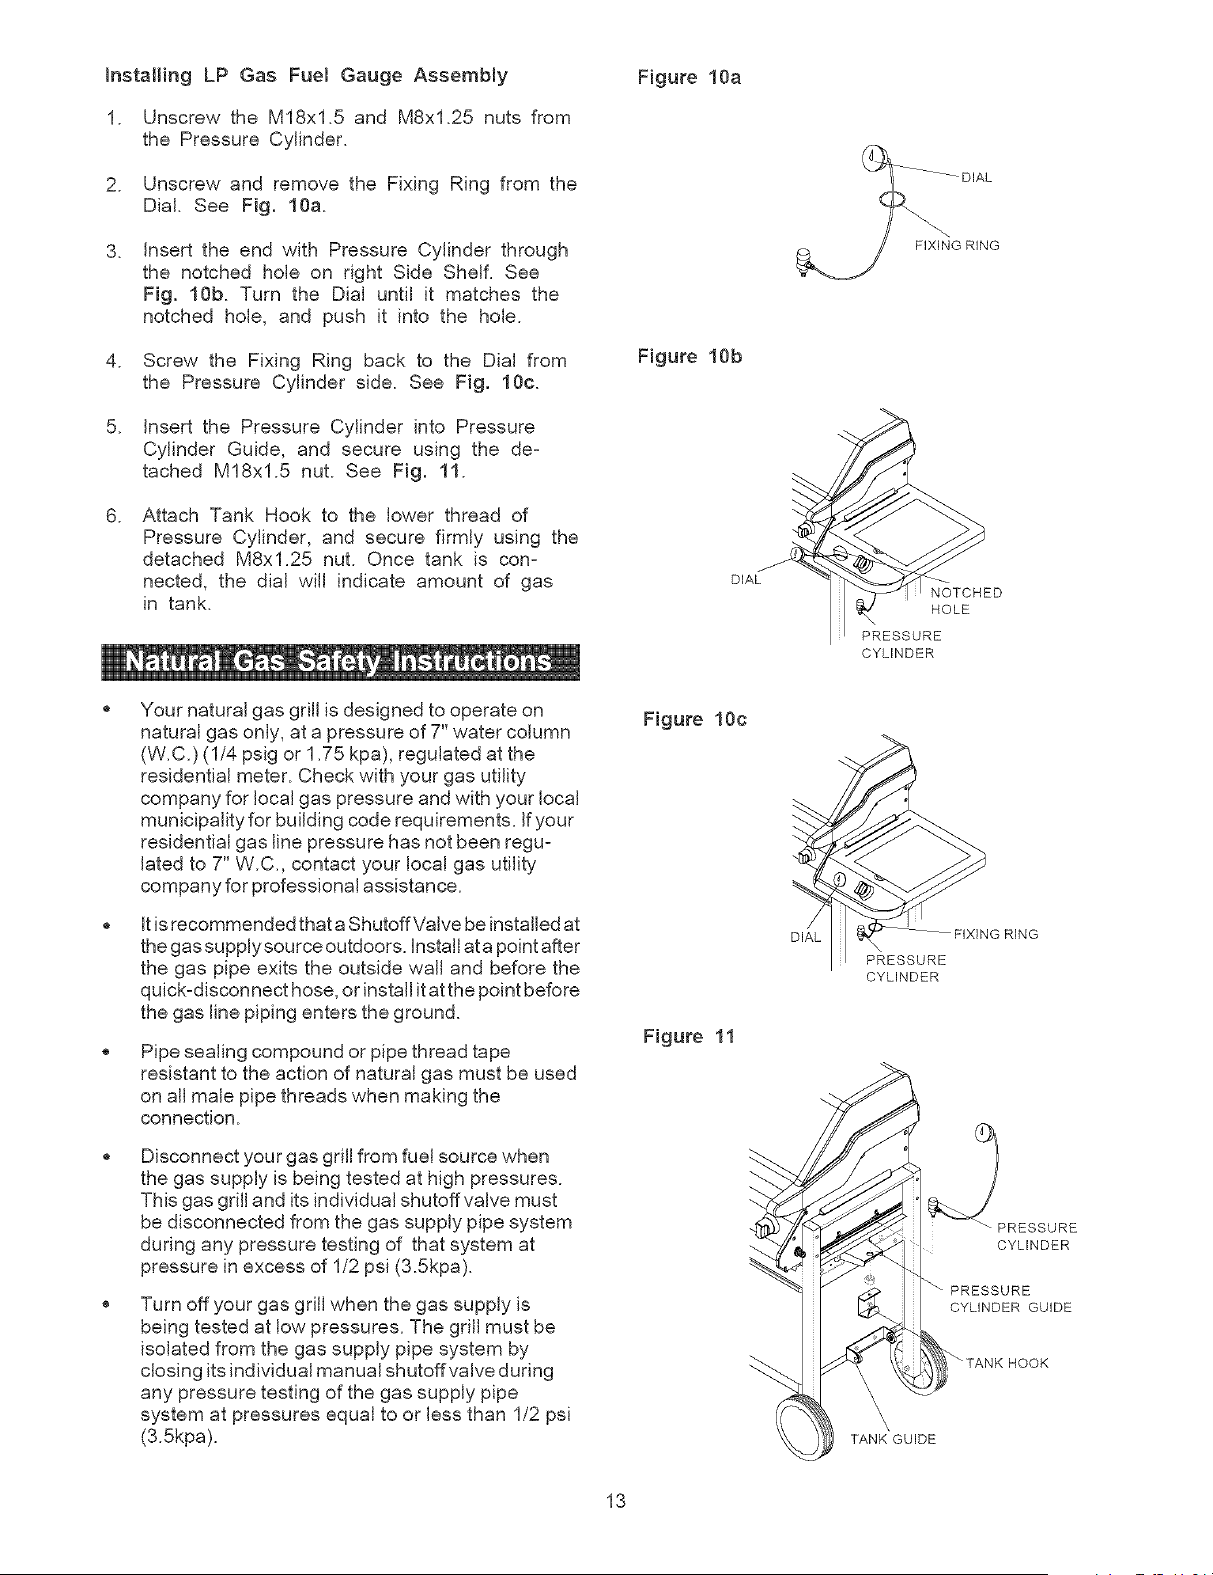
Insta{lingLP Gas FuemGaugeAssemb{y
1. Unscrewthe M18x1.5and M8x1.25nutsfrom
the PressureCylinder.
2. Unscrewand removethe FixingRingfromthe
Dial.See Fig. 10a.
3. inserttheend with PressureCylinderthrough
the notchedholeon right SideShelf.See
Fig. 10b. Turn the Dialuntil it matchesthe
notchedhole,and pushit into the hole.
4. Screwthe FixingRingbackto the Dialfrom
the PressureCylinderside. See Fig. 10c.
5. insertthe PressureCylinderinto Pressure
CylinderGuide,and secureusingthe de-
tachedM18x1.5nut. See Fig. 11.
6. AttachTankHookto the lowerthreadof
PressureCylinder,and securefirmlyusingthe
detachedM8x1.25nut. Oncetank is con-
nected,the dial will indicateamountof gas
in tank.
Figure10a
FigurelOb
DIAL
FIXING RING
NOTCHED
HOLE
PRESSURE
CYLINDER
Your natural gas grill is designed to operate on
natural gas only, at a pressure of 7" water column
(W.C.) (1/4 psig or 1.75 kpa), regulated at the
residential meter. Check with your gas utility
company for local gas pressure and with your local
municipality for building code requirements. If your
residential gas line pressure has not been regu-
lated to 7" W.C, contact your local gas utility
company for professional assistance.
It is recommended that a ShutoffValve be installed at
the gas supplysource outdoors. Install ata point after
the gas pipe exits the outside wall and before the
quick-discon nect hose, or install it at the point before
the gas line piping enters the ground.
Pipe sealing compound or pipe thread tape
resistant to the action of natural gas must be used
on all male pipe threads when making the
connection.
Disconnect your gas grill from fuel source when
the gas supply is being tested at high pressures.
This gas grill and its individual shutoffvalve must
be disconnected from the gas supply pipe system
during any pressure testing of that system at
pressure in excess of 1/2 psi (3.5kpa).
Turn off your gas grill when the gas supply is
being tested at low pressures. The grill must be
isolated from the gas supply pipe system by
closing its individual manual shutoffvalve during
any pressure testing of the gas supply pipe
system at pressures equal to or less than 1/2 psi
(3.5kpa).
Figure 10c
Figure 11
DIAL
PRESSURE
CYLINDER
TANK GUIDE
FIXING RING
CYLINDER
PRESSURE
CYLINDER GUIDE
_TANKHOOK
13

ignitor Battery Installation- See Fig. 12
1. Unscrewthe IgnitorCaplocatedon the grin
ControlPanelandremovethe Contactand
Springfromthe ignitorSlot.
2. Placethe manufacturersuppliedAA battery
into the ignitorSlot. Be sure to placethe
positivepolefacingtowardyou.
.
Place the Spring over the AA battery, then
place the Contact on top of the Spring.
Screw the ignitor Cap back onto the grill
Control Panel.
Electrode Check - Requires an Assistant
Before placing the cooking components into your
grill, ensure that the Spark Electrode Tip is
properly positioned within each Gas Collector Box
(a 3=1/4" wide stainless mechanism found at the
front between each set of burners.) The easiest
way to ensure this is to perform the following
Electrode Check:
1. Be sure aN Control Knobs are set to OFF.
Open the Grin Lid.
. Have an assistant stand behind to the right
of the grill and look down at each Gas
Collector Box. NEVER put your face inside
the Grill Head.
Press the Ignitor Cap and have the assistant
watch for a smaN blue spark within each
Gas Collector Box. If a spark is present the
Electrode Tips are properly positioned.
4. If no spark is seen the Spark Gap shown in
Fig. 13 needs to be adjusted as follows:
', Using an adjustable wrench, loosen the Inside
Nut just until the Gas Collector Box can be
maneuvered and turned upward.
" The gap between the Spark Electrode Tip
and the Spark Receiver should be approxio
mately 3/16".
,, If the gap is wider than 3/16" use a pair of long
nose pliers and gently squeeze the Gas CoNec=
tot Box until the gap is correct.
,, Return the Gas CoNector Box to its original
horizontal position, secure the Inside Nut and
try the Electrode Check again.
Figure 12
IGNITOR CAP _,,
AA BATTERY
\ SPRING
CONTACT
Figure 13 - Side View
GAS COLLECTOR BOX
SPARK RECEIVER
IGNITOR SLOT
14
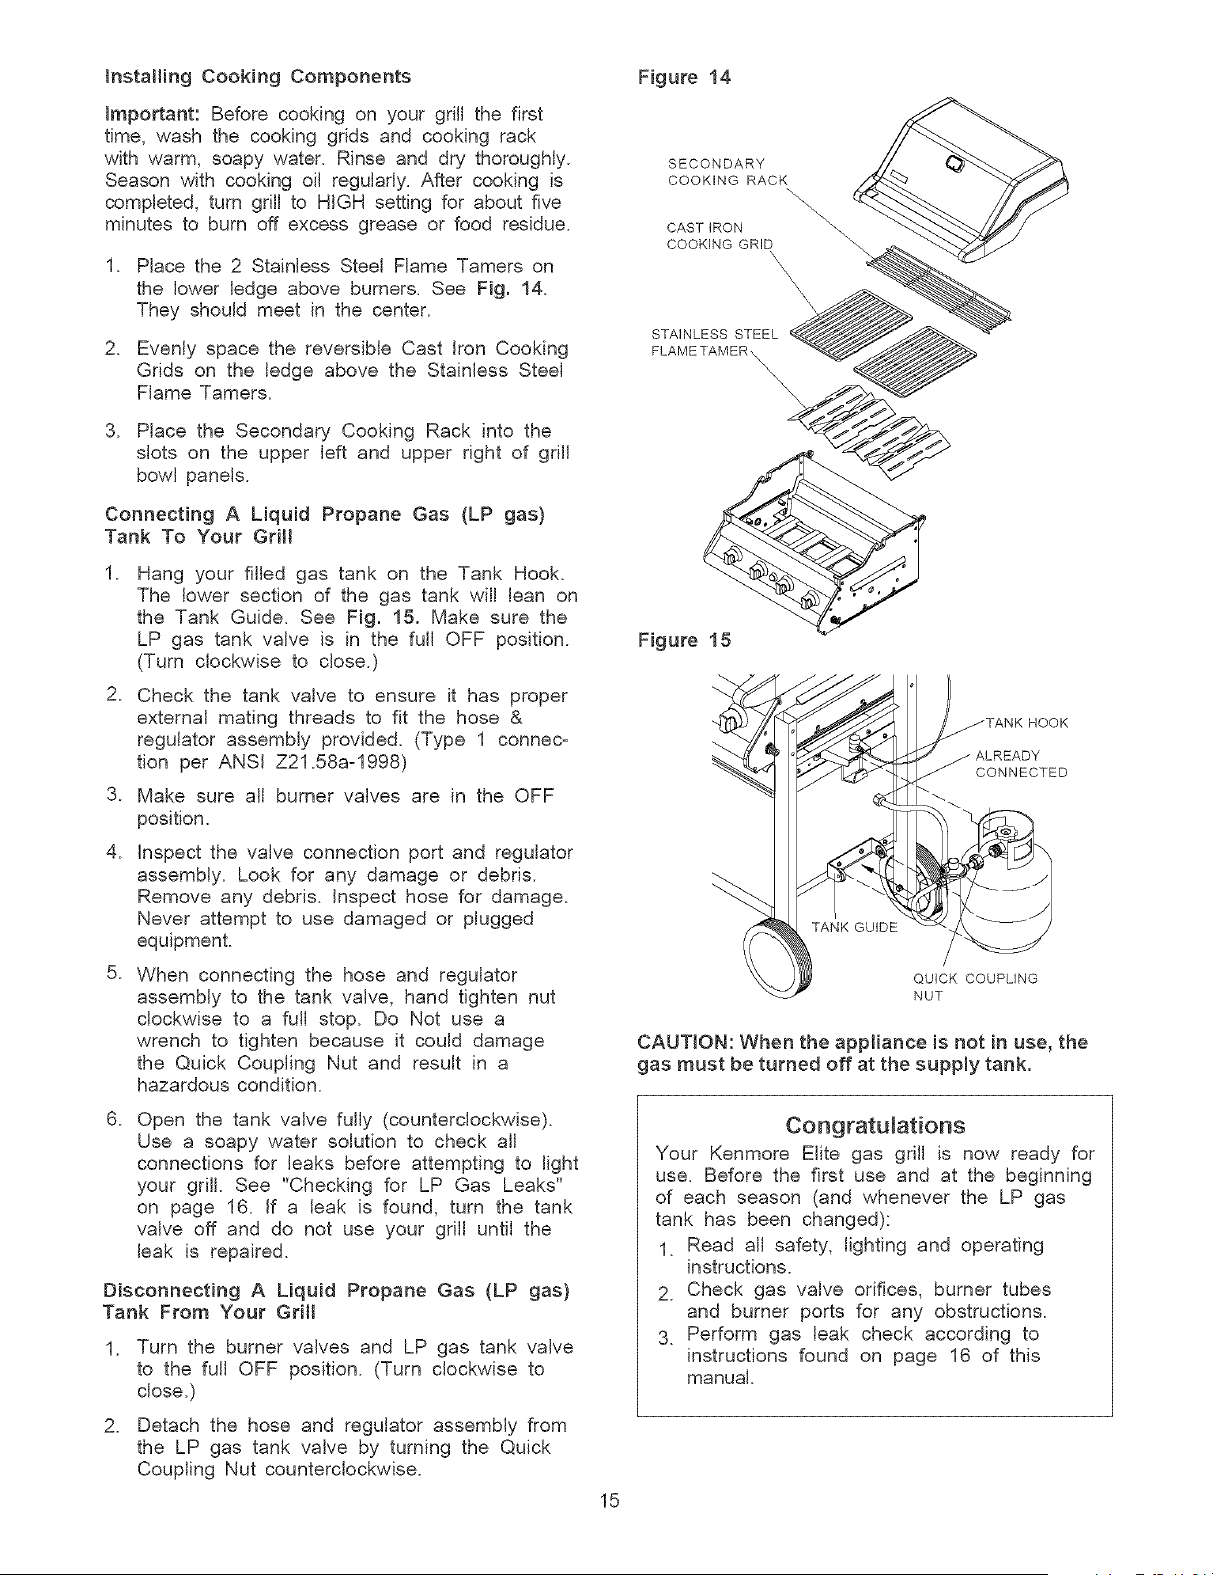
Installing CookingComponents Figure14
important:Beforecookingon yourgrillthefirst
time,washthe cookinggridsandcookingrack
withwarm,soapywater.Rinseand dry thoroughly.
Seasonwithcookingoil regularly.Aftercookingis
completed,turngrill to HIGHsettingfor aboutfive
minutesto burnoff excessgreaseor food residue.
1. Placethe2 StainlessSteelFlameTamerson
thelowerledgeaboveburners.See Fig. 14.
Theyshouldmeetin the center.
2. EvenlyspacethereversibleCastIronCooking
Gridson the ledgeabovethe StainlessSteel
FlameTamers.
SECONDARY
COOKING RACK
"-,\
\
\4
CAST iRON _
COOKING GRID \
STAINLESS STEEL
FLAMETAMER
3. Place the Secondary Cooking Rack into the
slots on the upper left and upper right of grill
bowl panels.
Connecting A Liquid Propane Gas (LP gas)
Tank To Your Grill
.
Hang your filled gas tank on the Tank Hook.
The lower section of the gas tank will lean on
the Tank Guide. See Fig. 15. Make sure the
LP gas tank valve is in the full OFF position.
(Turn clockwise to close.)
2. Check the tank valve to ensure it has proper
external mating threads to fit the hose &
regulator assembly provided. (Type 1 connec-
tion per ANSI Z21.58a-1998)
3. Make sure all burner valves are in the OFF
position.
4. Inspect the valve connection port and regulator
assembly. Look for any damage or debris.
Remove any debris. Inspect hose for damage.
Never attempt to use damaged or plugged
equipment.
5. When connecting the hose and regulator
assembly to the tank valve, hand tighten nut
clockwise to a full stop. Do Not use a
wrench to tighten because it could damage
the Quick Coupling Nut and result in a
hazardous condition.
Figure 18
HOOK
CONNECTED
QUICK COUPLING
NUT
CAUTION: When the appliance is not in use, the
gas must be turned off at the supply tank.
6. Open the tank valve fully (counterclockwise).
Use a soapy water solution to check all
connections for leaks before attempting to light
your grill. See "Checking for LP Gas Leaks"
on page 16. If a leak is found, turn the tank
valve off and do not use your grill until the
leak is repaired.
Disconnecting A Liquid Propane Gas (LP gas}
Tank From Your Griti
1. Turn the burner valves and LP gas tank valve
to the full OFF position. (Turn clockwise to
close.)
2. Detach the hose and regulator assembly from
the LP gas tank valve by turning the Quick
Coupling Nut counterclockwise.
Congratulations
Your Kenmore Elite gas grill is now ready for
use. Before the first use and at the beginning
of each season (and whenever the LP gas
tank has been changed):
1. Read all safety, lighting and operating
instructions.
2. Check gas valve orifices, burner tubes
and burner ports for any obstructions.
3. Perform gas leak check according to
instructions found on page 16 of this
manual.
15
z. WARNING
A strong gas smell, or the hissing sound of
gas indicates a serious problem with your gas
grill or the LP gas tank. Failure to immedi-
ately follow the steps listed below could result
in a fire or explosion that could cause seri-
ous bodily injury, death, or property dam-
age.
Shut off gas supply to the gas grill.
Turn the control knobs to OFF position.
Put out any flame with a fire extinguisher.
Open grill lid.
Get away from the LP gas tank.
Do not try to fix the problem yourself.
If odor continues or you have a fire you
cannot extinquish, call your fire department.
Do not call near the LP gas tank
because your telephone is an electrical
device and could create a spark resulting in
fire and/or explosion.
Checking For LP Gas Leaks
Never test for leaks with a flame. Prior to first
use, at the beginning of each season, or every
time your LP gas tank is changed, you must
check for gas leaks. Follow these four steps:
1. Make a soap solution by mixing one part
liquid detergent and one part water.
2. Turn the grill control knobs to the full OFF
position, then turn the gas ON at source.
3. Apply the soap solution to all gas connec-
tions. If bubbles appear in the soap solution
the connections are not properly sealed.
Check each fitting and tighten or repair as
necessary.
4. If you have a gas leak that you cannot
repair, turn off the gas at the source, discon-
nect fuel line from your grill and call
1-800-4-MY-HOME or your gas supplier for
repair assistance.
.
7.
.
9.
10.
11.
WARNING
Failure to open Grill or Side Burner Lid
during the lighting procedures could
result in a fire or explosion that could
cause serious bodily injury, death, or
property damage.
Set control knobs to OFF and open the LP gas
tank valve slowly until 1/4 to 1/2 open.
For grill lighting push and turn the LEFT control
knob to HIGH. To light the Side Burner turn its
control knob to HIGH.
Immediately press the electric ignitor for 3-4
seconds to light the burner.
If the burner does not light, turn the control knob to
OFF, wait 5 minutes for gas to clear, then retry.
Once the left grill burner is ignited, the adjacent
burner can be lit by simply turning its control knob
to HIGH.
Adjust control knobs to your desired cooking
temperature.
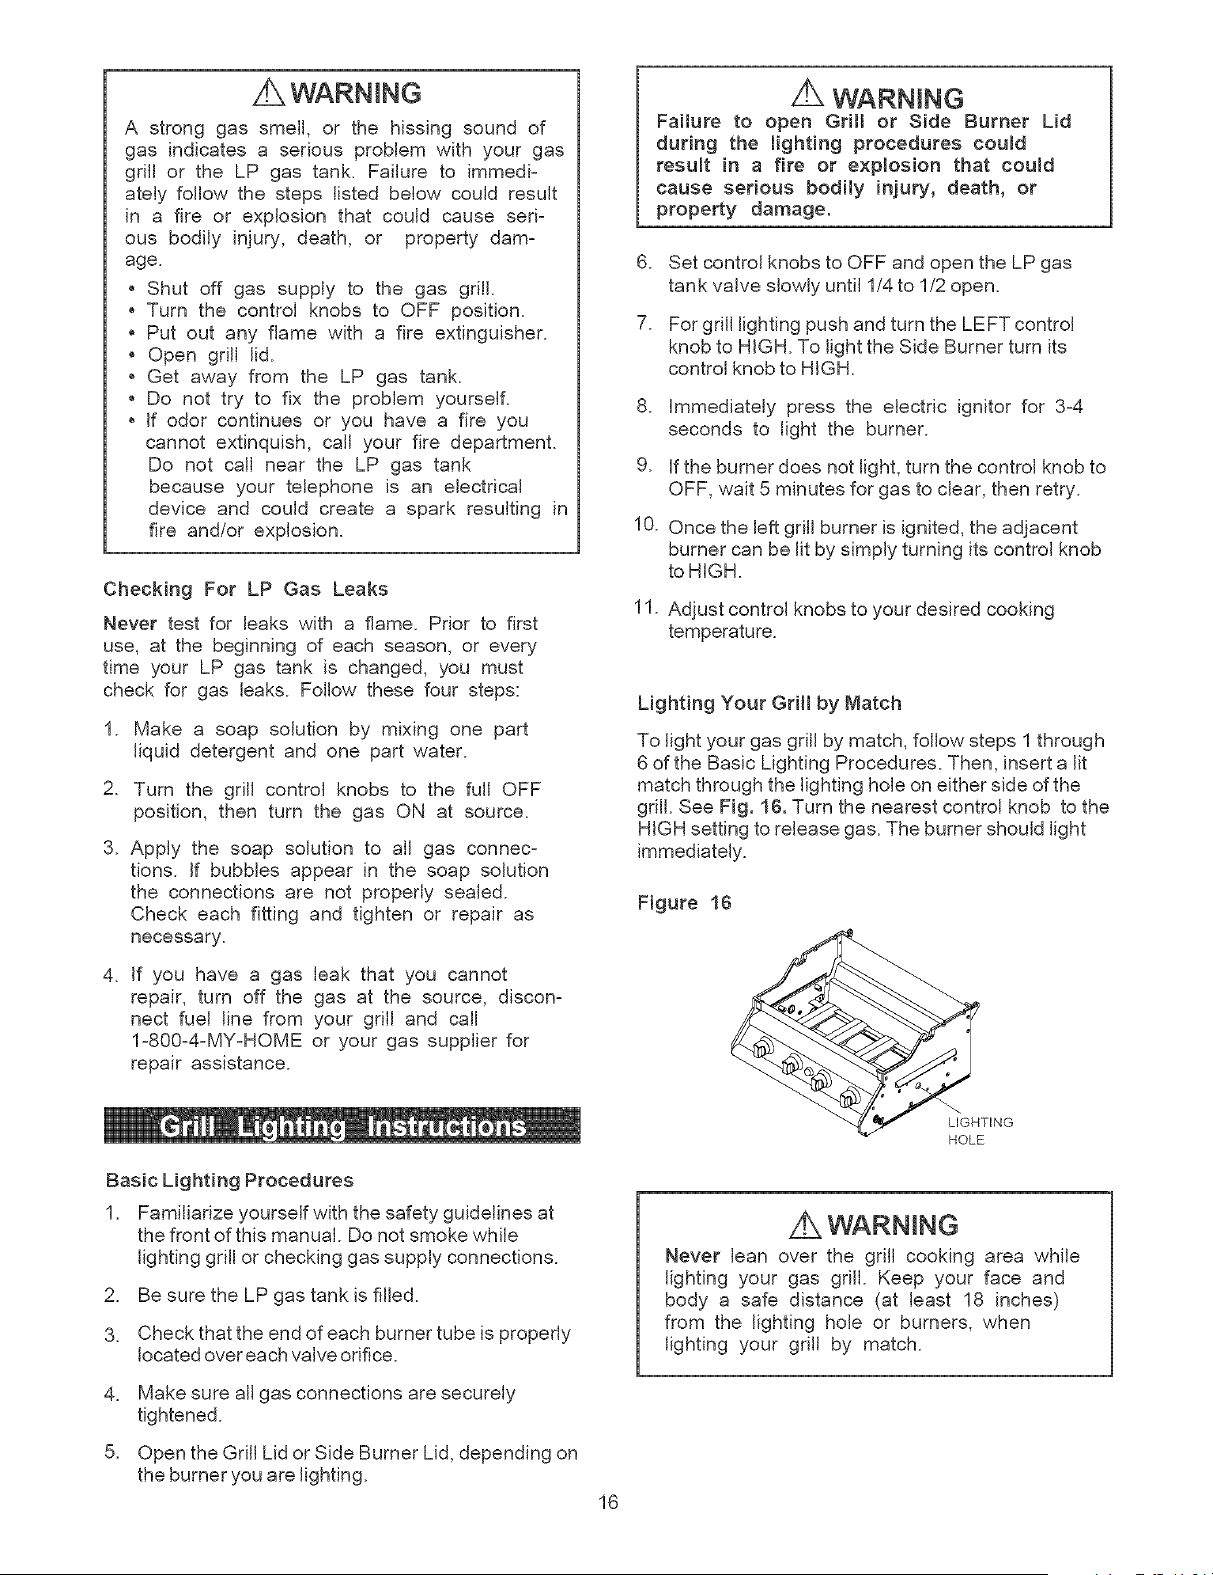
Lighting Your Grill by Match
To light your gas grill by match, follow steps 1 through
6 of the Basic Lighting Procedures. Then, insert a lit
match through the lighting hole on either side of the
grill. See Fig. 16. Turn the nearest control knob to the
HIGH setting to release gas. The burner should light
immediately.
Figure 16
_TING
HOLE
Basic Lighting Procedures
1. Familiarize yourself with the safety guidelines at
the front of this manual. Do not smoke while
lighting grill or checking gas supply connections.
2. Be sure the LP gas tank is filled.
3. Check that the end of each burner tube is properly
located over each valve orifice.
Never lean over the grill cooking area while
lighting your gas grill. Keep your face and
body a safe distance (at least 18 inches)
from the lighting hole or burners, when
lighting your grill by match.
.
5.
Make sure all gas connections are securely
tightened.
Open the Grill Lid or Side Burner Lid, depending on
the burner you are lighting.
16
if thegrill fallsto light propeNy:
1. Turngasoffatsourceandturnthecontrolknobto
OFF.Waitatleastfiveminutesforgastoclear,
thenretry.
2. Checkgassupplyandconnections.
3. Repeatlightingprocedure.If yourgrillstillfails
to operateproperly,turnthegasoff atsource,
turnthecontrolknobsto OFF,thencheckthe
following:
,, Misaiignmentofburnertubesoverodfices
Correction:Repositionburnertubesoverorifices.
" Obstructioningasline
Correction:Removefuellinefromgrill.Donot
smoke!Opengassupplyforonesecondtoclear
anyobstructionfromfuelline.Closeoffgassupply
atsourceandreconnectfuellinetogrill.
" Pluggedorifice
Correction:Removeburnersfromgrillbypulling
cotterpin(beneathburner)usinga screwdriveror
pliers.Carefullylifteachburnerupandawayfrom
gasvalveorifice.Removetheorificefromgas
valveandgentlyclearanyobstructionwithafine
wire.Thenreinstalla[[orifices,burners,cotter
pinsandcookingcomponents.
ifanobstructionissuspectedingasvalvesor
gasvalvebracket,pleasecallforrepairserviceat
1-800-4-MY-HOME.
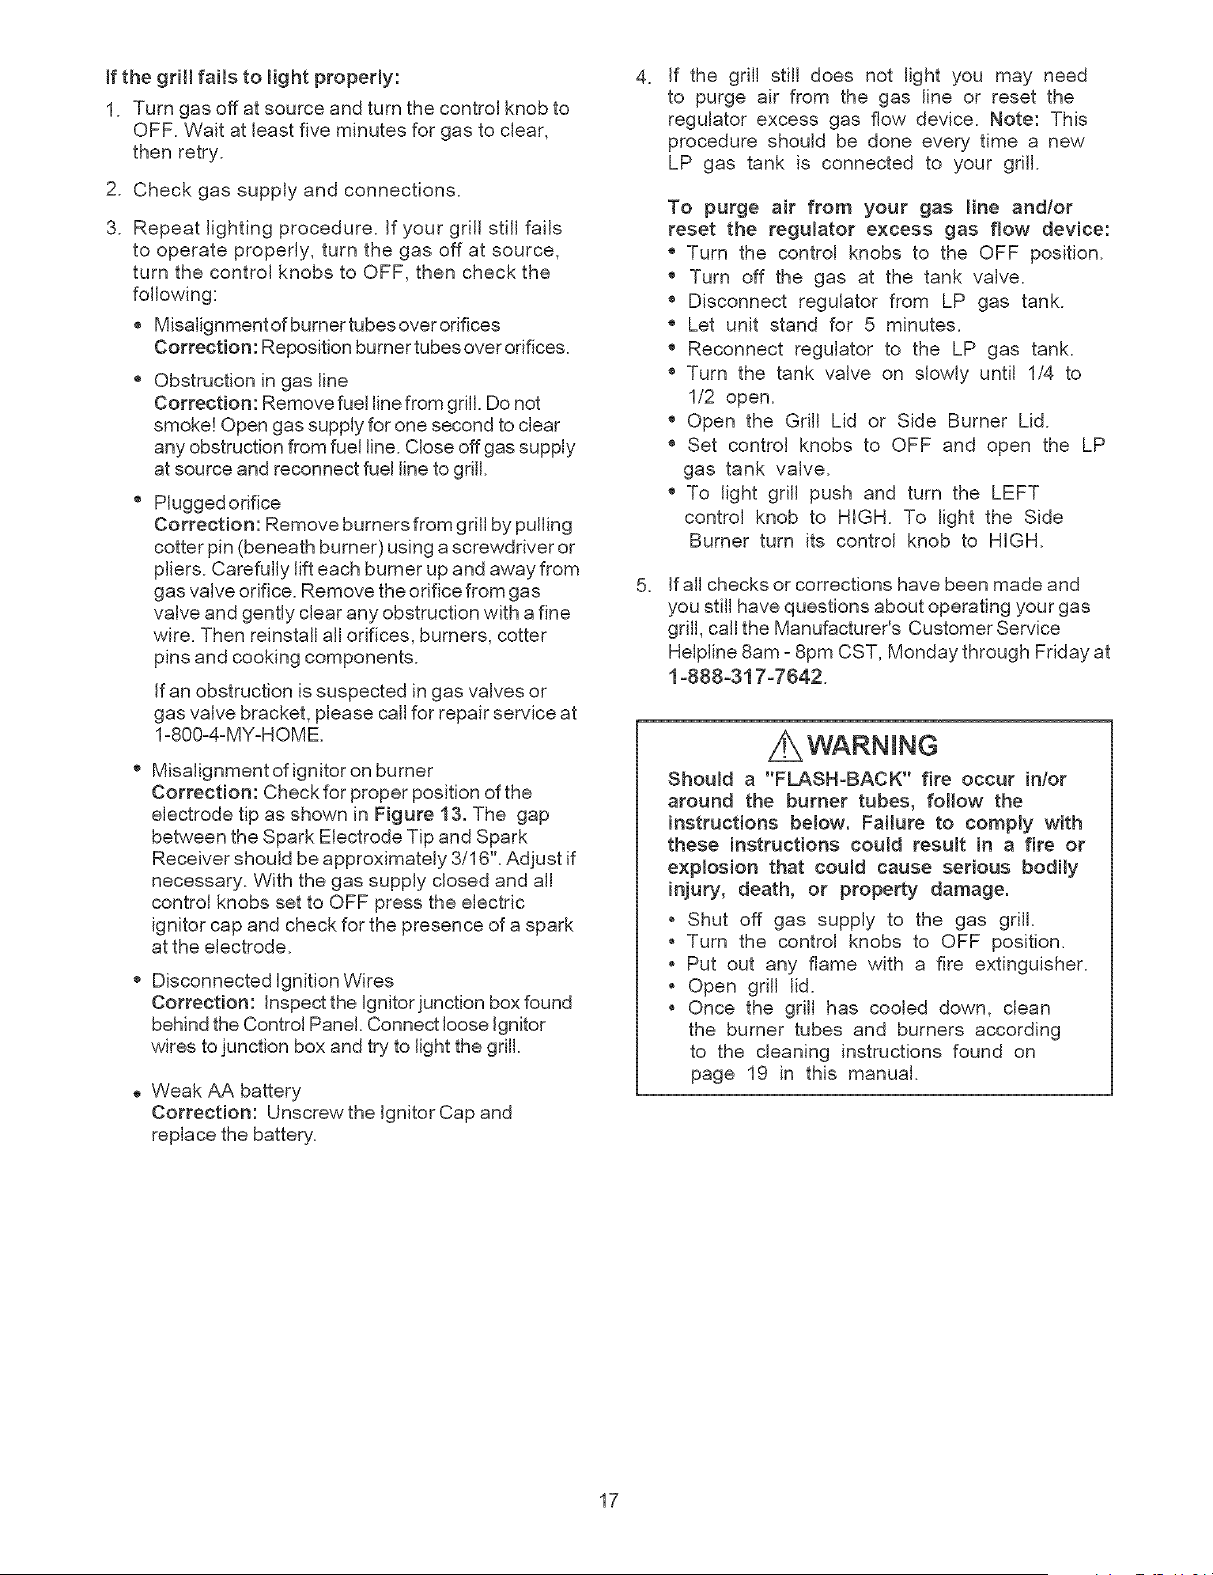
" Misalignmentofignitoronburner
Correction:Checkforproperpositionofthe
electrodetipasshownin Figure13.The gap
betweentheSparkElectrodeTipandSpark
Receivershouldbeapproximately3/16".Adjustif
necessary.Withthegassupplyclosedandall
controlknobssettoOFFpresstheelectric
ignitorcapandcheckforthepresenceofa spark
attheelectrode.
', DisconnectedignitionWires
Correction:Inspectthebnitorjunctionboxfound
behindtheControlPanel.Connectlooseignitor
wirestojunctionboxandtrytolightthegrill.
,, WeakAAbattery
Correction:UnscrewtheignitorCapand
replacethebattery.
. if the gdH still does not light you may need
to purge air from the gas line or reset the
regulator excess gas flow device. Note: This
procedure should be done every time a new
LP gas tank is connected to your grill.
To purge air from your gas line and/or
reset the regulator excess gas flow device:
" Turn the control knobs to the OFF position.
" Turn off the gas at the tank valve.
" Disconnect regulator from LP gas tank.
" Let unit stand for 5 minutes.
" Reconnect regulator to the LP gas tank.
" Turn the tank valve on slowly until 1/4 to
1/2 open.
" Open the Grill Lid or Side Burner Lid.
" Set control knobs to OFF and open the LP
gas tank valve.
" To light grill push and turn the LEFT
control knob to HIGH. To light the Side
Burner turn its control knob to HIGH.
5. if all checks or corrections have been made and
you still have questions about operating your gas
grill, ca[[ the Manufacturer's Customer Service
Help[ine 8am z 8pm CST, Monday through Friday at
1-888-317W642.
Should a "FLASH-BACK" fire occur in/or
around the burner tubes, follow the
instructions below. Failure to comply with
these instructions could result in a fire or
expbsion that could cause serious bodily
injury, death, or property damage.
, Shut off gas supply to the gas grill.
, Turn the control knobs to OFF position.
, Put out any flame with a fire extinguisher.
, Open grill Hd.
, Once the grill has cooled down, dean
the burner tubes and burners according
to the cleaning instructions found on
page 19 in this manual
17

Aswithallappliances,propercareandmaintenance
willkeepyourgrillintopoperatingconditionand
prolongitslife.Byfollowingthesecleaningprocedures
onatimelybasis,yourgrillwillstaycleanandwork
properlywithminimumeffort.
CAUTION:
BesureyourgrillisOFFandcoolbeforecleaning.
Takecarenottochiporscratchthepaintedsurfaces
becauseitwillvoidyourwarrantyagainstrusting.
CleaningThe Cooking Grids
Before initial use and periodically we suggest you wash
your cooking grids in a mild soap and warm water
solution. You can use a wash cloth or brass brush to
clean your cooking grids.
CAUTION:
Take care not to chip or scratch the porcelain finish
because it will void your warranty against rusting.
Never try to clean your cooking grids unless you are
sure the grids are cool to the touch.
Cleaning The Flame Tamers
Periodically you should wash the Flame Tamers in a
soap and warm water solution. Use a brass brush to
remove stubborn burnt-on cooking residue. Dry the
Flame Tamers thoroughly before you reinstall them into
the cooking bowl.
Cleaning The Grease Tray and Receptacle
To reduce the chance of fire, the Grease Draining Tray
and Grease Receptacle should be visually inspected
before each gdll use. Remove any grease and wash
grease tray and receptacle with a mild soap and warm
water solution.
Annual Cleaning of The Grill Interior
Burning-off the grill after every cookout will keep it
ready for instant use. However, once a year you
should give the entire grill a thorough cleaning to keep
it in top operating condition. Follow these steps:
1. Turn all burner valves to the full OFF position.
2. Turn the LP gas tank valve to the full OFF position.
3. Detach the LP gas regulator assembly from your gas
grill.
4. Remove and clean the flame tamers, cooking grids
and grill burners.
8. Check each spark electrode, adjusting as needed.
The space between the Spark Electrode Tip and
Spark Receiver should be approximately 3/16".
9. Replace the burners and adjust the gas collector
box. The edge of the collector box should be
overlapping the burner port.
10. Replace flame tamers and the cooking grids.
11. Reconnect the gas source and observe the burner
flame for correct operation.
Cleaning Exterior Surfaces:
Before initial use, and periodically thereafter, we
suggest you wash your grill using a mild soap and
warm water solution. You can use a wash cloth or
sponge for this process. Do not use a stiff wire or
brass brush that might remove paint during the
cleaning process.
Cleaning Exterior Stainless Steel Surfaces:
Weathering and extreme heat can cause exterior
stainless steel surfaces to turn tan in color. Use a
foam or cream Stainless Steel Cleaner to polish the
stainless steel surfaces of your grill. Never use abra-
sive cleaners or scrubbers because they will scratch
and damage your grill. Follow these steps for the best
results.
. Turn the LP gas tank valve (clockwise) to the full OFF
position. Disconnect the regulator and hose assembly
from LP gas tank. Cover exposed gas fitting with
aluminum foil.
2. Remove dirt or grease using a soft cloth and polish
stainless surfaces. Wipe with a soft cloth.
3. Remove aluminum foil from exposed gas fitting and
allow grill to air dry before attaching the regulator
and hose to your LP gas tank.
5. Cover each gas valve orifice with aluminum foil.
6. Brush the inside and bottom of the grill with a stiff
brass brush, and wash with a mild soap and warm
water solution. Rinse thoroughly and let dry.
7. Remove aluminum foil from orifices and check
each orifice for obstruction.
18
CleaningThe BurnerTubesandBurnerPorts
Toreducethechanceof"FLASH=BACK"theproce=
durebelowshouldbefollowedatleastonceamonthin
latesummerorearlyfallwhenspidersaremostactive
orwhenyourgrillhasnotbeenusedforaperiodof
time.
1. TurnallburnervalvestothefullOFFposition.
2. TurntheLPgastankvalve(clockwise)tothefull
OFFposition.
3. DetachtheregulatorassemblyfromtheLPgas
tankbyturningtheQuickCouplingNutcounterz
clockwise.
4. Removethecookinggrids,flametamers,and
greasetraysfromyourgrill.
5. Removethecotterpinfromtherearundersideof
eachburnerusingapairoflongnosepliers.
6. Carefullylifteachburnerupandawayfromthegas
valveorifice.
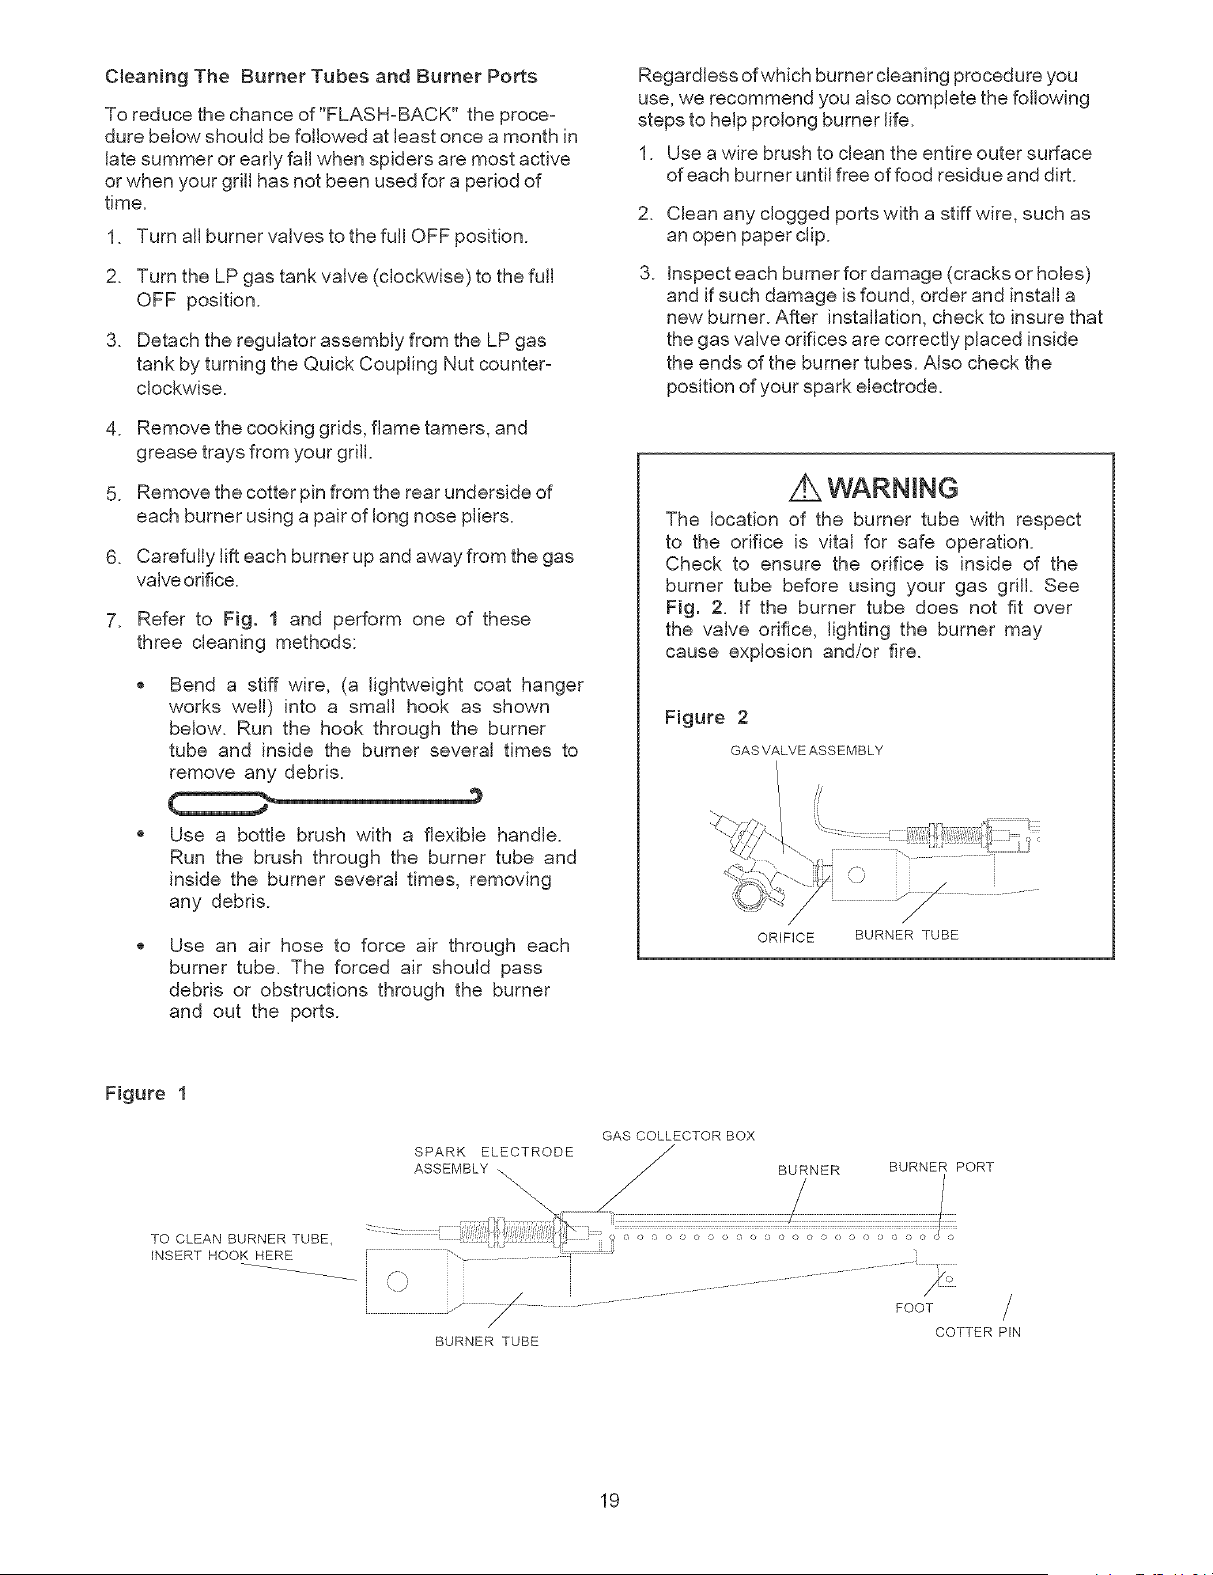
7. Referto Fig. 1 and performoneof these
threecleaningmethods:
Benda stiff wire,(a lightweightcoathanger
workswell) into a smallhookas shown
below.Runthe hookthroughthe burner
tube and insidethe burnerseveraltimes to
removeanydebris.
Usea bottlebrushwith a flexiblehandle.
Runthe brushthroughthe burnertubeand
insidetheburnerseveraltimes,removing
any debris.
Usean air hoseto forceair througheach
burnertube.Theforcedair shouldpass
debrisor obstructionsthroughthe burner
and out the ports.
Regardlessofwhichburnercleaningprocedureyou
use,werecommendyoualsocompletethefollowing
stepstohelpprolongburnerlife.
1. Useawirebrushtocleantheentireoutersurface
ofeachburneruntilfreeoffoodresidueanddirt.
2. Cleananycloggedportswitha stiffwire,suchas
anopenpaperclip.
.
inspect each burner for damage (cracks or holes)
and if such damage is found, order and install a
new burner. After installation, check to insure that
the gas valve orifices are correctly placed inside
the ends of the burner tubes. Also check the
position of your spark electrode.
The location of the burner tube with respect
to the orifice is vital for safe operation.
Check to ensure the orifice is inside of the
burner tube before using your gas grill. See
Fig. 2. If the burner tube does not fit over
the valve orifice, lighting the burner may
cause explosion and/or fire.
Figure 2
GAS VALVE ASSEMBLY
/ /
ORIFICE BURNER TUBE
Figure 1
GAS COLLECTOR BOX
SPARK ELECTRODE _"
ASSEMBLY \..
BURNER
BURNER PORT
TO CLEAN BURNER TUBE,
iNSERT HOOK HERE :................. ,
i ......................... OOT
/ COTTER PIN
BURNER TUBE
19
Question:CanI convertmyKenmoregasgrillfrom
onefueltypetoanother?
Answer:YourKenmoregasgrillismanufacturedto
exactspecificationsandisapprovedbytheCanadian
StandardsAssociation(CSA)forLPgasuseonly.For
yourownsafety,conversionkitsarenotavailableand
anyattempttoconvertyourgrillfromLPgastoNatural
Gaswillvoidyourproductwarranty.
Question:Whydoesn'tthehoseandregulatorassem-
blysuppliedwithmynewKenmoregrillfittheolderLP
gastankI'veusedforyears?
Answer:TheU.S.Governmentregulatesgasappli-
ancesandLPgastanks.Whenevernewregulationsare
passedtheLPgastankfittingsarealtered.Ifyourtank
doesnotfitthehoseandregulatorsuppliedwithyour
newgrill,thetankisoutdatedandmustbereplaced.
Question:Whatcancausegrillpartstorustandwhat
affectdoesithaveonthegrillmaterials.
Answer:Rustingisa naturaloxidationprocessand
mayappearoncast-ironandsteelparts.Rustwillnot
affecttheshorttermperformanceofyourgrilloraffect
thetasteofyourfoods.
Stainlesssteelgrillpartswillnotrust.However,weather-
ingandextremeheatcancausestainlesssteelLid
surfacestoturntancolor.Thisisdiscoloration,notrust.
Question:HowcanI minimizetheriskofrustor
stainlesssteeldiscoloration?
Answer:Toprotectagainstthenaturalrustingprocess,
theGrillBowl,Burners,CookingGridsandFlame
Tamershaveaporcelainfinish.However,dropping,
scrapingorscratchingtheseitemswilldamagethe
porcelainfinishandallowrusting.Werecommendyou
"season"theseitemsbeforeandaftereachuse.
Consistentseasoningwillhelpdeterrustingandwill
createaneasytocleancookingsurface.
Weatheringandextremeheatcancauseexterior
stainlesssteelsurfacestoturntanincolor- whichis
nottobeconfusedwithrust.Machineoilsusedinthe
manufacturingprocessofstainlesssteelcanalso
causethistanningcolor.Afterremovingtheprotective
PVCfilmfromyourGrillLiduseaStainlessSteel
Cleanertopolishtheinsideandoutsideofyourgrill
Lid.Neveruseabrasivecleanersorscrubbers.Follow
theeasy"CleaningExteriorStainlessSteelSurfaces"
proceduresfoundinthisOwner'sManual.
Question:HowdoIseasonCastiron?
Answer:Beforeandaftereachcookout,applyathin
layerofcookingoil,sprayorvegetableshorteningto
eachCookingGridandoptionalcast-ironaccessory.Be
suretocoattheentiresurfaceincludingedgesandany
areaswithchippedporcelain.InserttheCookingGrids
andaccessoriesintoyourgrillandwarm2to3 minutes.
Question:SometimesmygrilldoesnotlightwhenI
pushtheIgnitionButton.Why?
Answer:RefertotheLightinginstructionsinthis
Owner'sManual.Alsocheckthesecommoncauses:
, IgnitionAAbatterymayneedreplacing.
, ignitionwiresmaybeloose.RemovetheAAbattery,
inspecttheIgnitorJunctionBoxfoundbehindthe
ControlPanel,andconnectanyloosewires.
Question: What is the best way to protect my new
Kenmore gas grill from the weather?
Answer: A good quality grill cover should be used to
protect your gdJJwhen not in use. Kenmore Grill Cover
# 15811 is made to fit this particular grill model. Also,
follow the cleaning and maintenance instructions in this
Owner's Manual on a timely basis, and your new grill will
give you years of enjoyment.
Question: Where can I buy replacement parts?
Answer: For the repair or replacement parts you need
call 6 am - 11 pm CST, 7 days a week 1-800-366-
PART (1-800-366-7278). Use only Sears authorized
parts. The use of any part that is not Sears authorized
can be dangerous and will also void your product
warranty. You will need your model number and serial
number to order parts.
Question: Are the serial and model numbers of my grill
listed somewhere for future reference?
Answer: This information is listed on a silver label found
on the right side of your Grill Head under the Side Shelf.
Question: Sometimes I hear a humming sound
coming from my regulator. What causes this?
Answer: The humming noise is actually the gas
flowing through the regulator. A low volume of noise is
perfectly normal and will not interfere with the opera-
tions of the grill. If humming noise is loud and exces-
sive you may need to purge air from the gas line or
reset the regulator excess gas flow device. Note: This
purging procedure should be done every time a new LP
gas tank is connected to your grill. For help with this
procedure refer to page 17, step 4, or call the
Customer Service Helpline at the number shown
below.
2O
/!X WARNtNG
Your gritl wilt get very hot. Never lean
over the cooking area while using your grill.
Do not touch cooking surfaces, gdll housing,
grill lid or any other grill parts while the grill
is in operation, or until the grill has cooled
down after use.
Failure to comply with these instructions may
result in serious bodily injury.
Bum-off
Before cooking on your gas grill for the first time, you will
want to "burn off" the grill to eliminate any odor or
foreign matter. Just ignite the burners, close the lid, and
operate grill on the HIGH setting for three to five minutes.
CAUTION:
Operating your grill on the HiGH setting for longer than
five minutes may damage certain parts of your grill. Do
not leave your gNll unattended.
Preheating
To preheat, light your grill on HIGH, close the lid and
follow this timetable:
,, For high temperature cooking, preheat grill
3 to 5 minutes.
', For Iowtemperature cooking, preheat grill
3 minutes.
" To slow cook, preheating is not necessary.
Cooking Temperatures
High setting: Only use this setting for fast warm=up,
searing steaks or chops and for burning food residue
off the grill after cooking is complete. Never use the
HIGH setting for extended cooking.
Medium to Low settings: Most recipes specify
medium to low settings, including all smoking, rotis=
serie cooking and for cooking lean cuts such as fish.
NOTE: Temperature settings will vary with the amount
of wind and temperature outside your home.
Direct Cooking
The direct cooking method can be used with the
supplied cooking grids, optional griddle or cooking pan
placed directly over the lit grill burners. Direct cooking
requires the grill Hd to be open. This method is
ideal for searing and whenever you want meat, poultry
orfish to have an open-flame barbecued taste. Deep
frying and smoking are also best cooked in this
manner because they require direct heat.
Indirect Cooking
The indirect cooking method can also be used with the
supplied cooking grids, optional griddle, or cooking
pan. To cook indirectly, the food should be placed on
the left or right side of your grill with the burner lit on
the opposite side. Or place your food on the secondary
cooking rack mounted inside your grill bowl and light
the outer grill burners. Either way, indirect cooking
must be done with the lid down.
Seasoning Cooking Grids and Cast=iron
Before and after each cookout, apply a thin layer of
cooking oil, spray or vegetable shortening to each
cooking grid and/or optional cast iron cooking accesso-
ries. Be sure to coat the entire surface including edges
and any areas with chipped porcelain. Insert the cooking
grids into your warm grill for 2 to 3 minutes.
Flare=Ups
The fats and juices dripping from grilled food can cause
flare-ups. Sinceflare-ups impart a favorably distinctive
taste and color to food cooked over an open flame,
they should be accepted up to a point. Nevertheless,
uncontrolled flaring can result in a ruined meal.
Do not line the bottom of the grill housing
with aluminum foil, sand or any substance
that will restrict the flow of grease into the
grease draining tray and receptacle.
Failure to comply with these instructions
could result in a fire or explosion which
could cause serious bodily injury, death, or
property damage.
CONGRATULATIONS
Your Kenmore Elite gas grill is now ready to gritl.
Remember to keep the lid open when cooking directly
on the grill. For most foods it's best to start grilling on
high. Once the food is seared, reduce the heat to
medium. Foods marinated with ingredients such as
honey may burn because of the high sugar content.
You should begin their cooking on medium. A favorite
on the grill is sausages. Always cook them slowly and
if they're particularly fatty, it may be best to partially
boil them first.
21
GritlingSteakand Ribs
Turnthegrillburnersonhigh,closethelid
andpreheatyourgrill3to5minutes.Openlid
andplacethemeatonthecookinggrid
directlyabovethelitburners.Cookthemeat
onbothsidesuntilseared.Reducetheheat
tomediumandcookmeatuntildone.Grilling
timeswillvaryaccordingtomeatthickness.
GritlingHamburgerandSausages
Turnthegrillburnersonhigh,closelidand
preheatyourgrill3to5minutes.Openlidand
placethemeatonthecookinggriddirectly
abovethelitburners.Cookthemeatonboth
sidesuntilseared.Reducetheheatto
mediumandcookthemeatuntildone.
Grillingtimeswillvaryaccordingtomeat
thickness.
GritlingPoultry
Turnthegrillburnersonhigh,closelidand
preheatyourgrill2 to3minutes.Thenraise
thelid,reduceheattomediumandcook
poultrydirectlyoverlitburnersuntildone.
Poultryskinisfattyso youshouldexpect
someflare=upswhenusingthisdirect
method.
Tominimizeflare=ups,trygrillingpoultryusing
theindirectmethod.Placethepoultryonone
sideofthegrillwiththeopposingburnerson
mediumheat,andlowerthegrilllid.Grilling
timeswillvarybasedonthesizeofyour
poultry.
GritlingPork
Turnburnersonhighandpreheatyourgrill3
to5 minuteswiththeliddown.Raiselid,
placeporkoncookinggridandcookuntil
seared.Reduceheattomediumandcook
untildone.Grillingtimeswillvaryaccordingto
meatthickness.
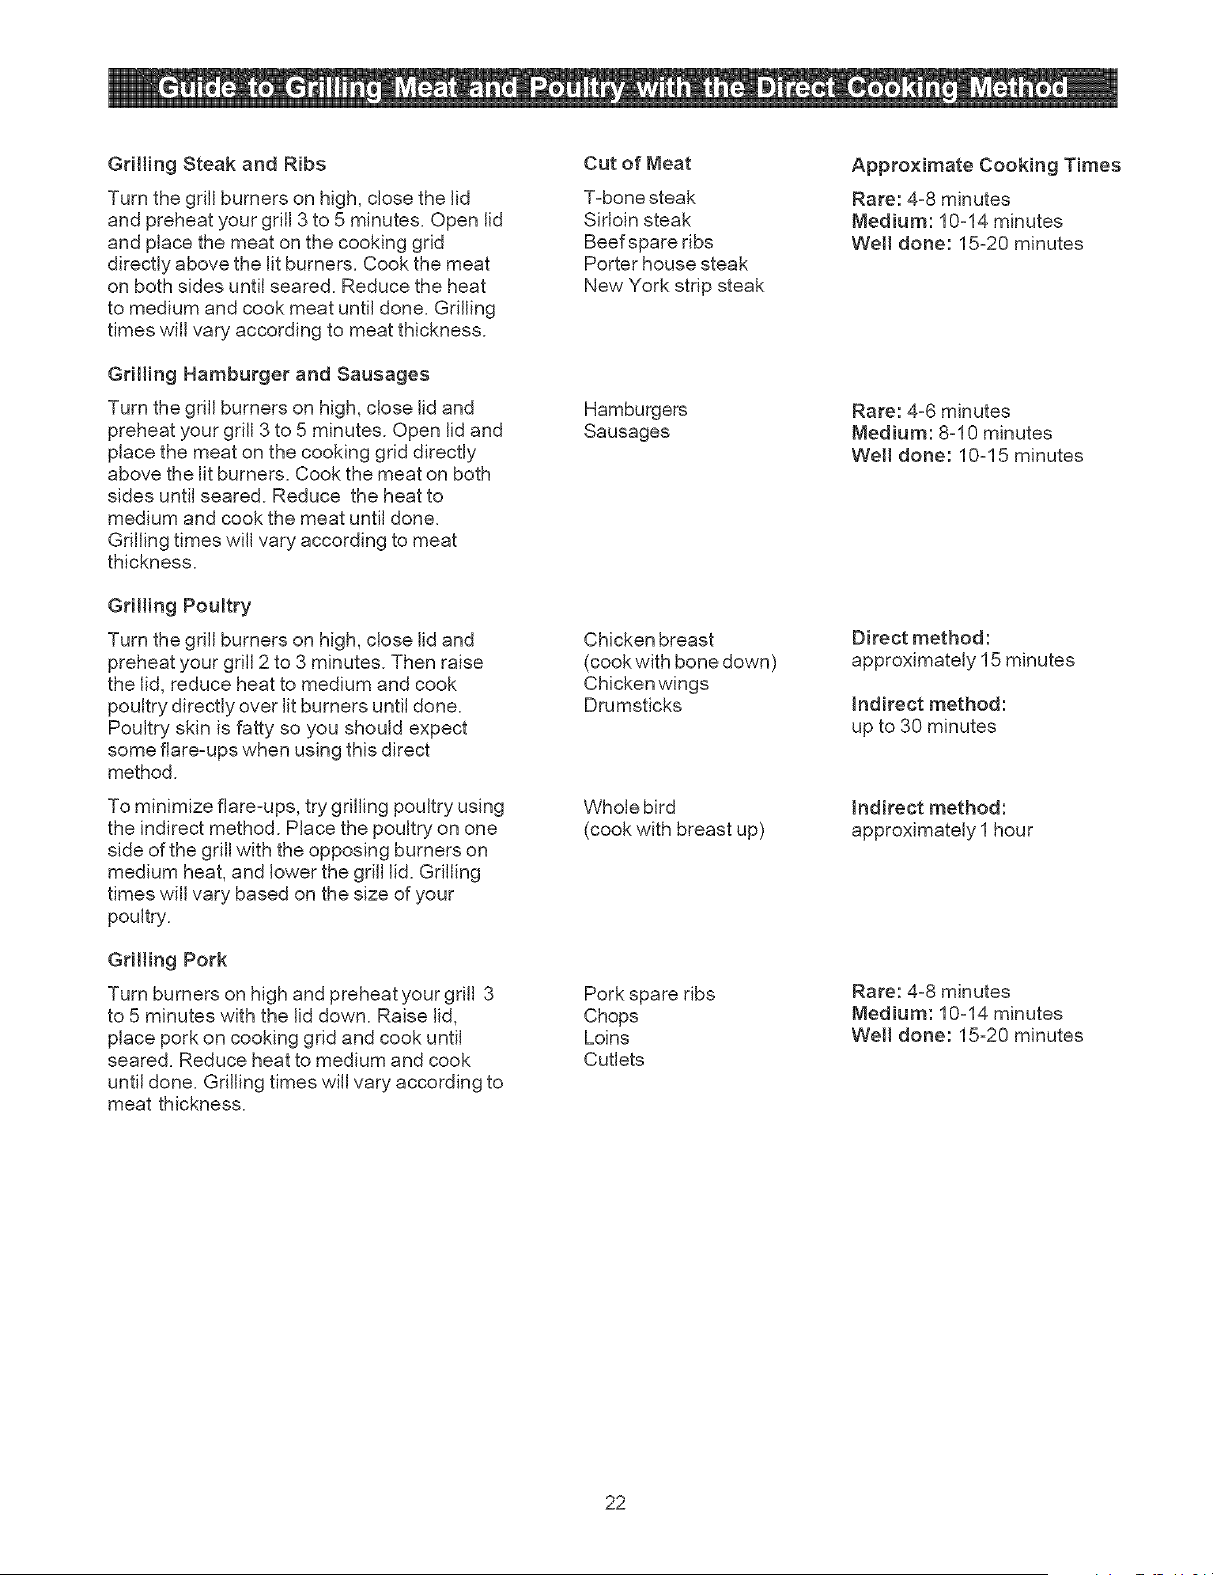
Cutof Meat
T=bonesteak
Sirloinsteak
Beefspareribs
Porterhousesteak
NewYorkstripsteak
Hamburgers
Sausages
Chicken breast
(cook with bene down)
Chicken wings
Drumsticks
Whole bird
(cook with breast up)
Pork spare ribs
Chops
Loins
Cutlets
Approximate Cooking Times
Rare: 4=8 minutes
Medium: 10=14 minutes
Well done: 15=20 minutes
Rare: 4=6 minutes
Medium: 8=10 minutes
Well done: 10=15 minutes
Direct method:
approximately 15 minutes
Indirect method:
up to 30 minutes
indirect method:
approximately I hour
Rare: 4=8 minutes
Medium: 10=14 minutes
Well done: 15=20 minutes
22
WholeFishandWholeFillets
PreheatyourgrillonHiGHfor2=3minutes
withtheliddown.Raiselidandturnburners
tomediumheat.Placefish(skindown)on
grillandcookoverdirectheatuntildone.
Usecookingtimeasaguideor untilfishis
opaquebutstillmoist.
SmallerFishFimletsandCubes
Followthedirectionsfromabove,using
approximatecookingtimesshownatright.
Placeasmallpieceofaluminumfoilonthe
cookinggridsif thefishpiecesaresmall
enoughtodropbetweenthecookinggrids.
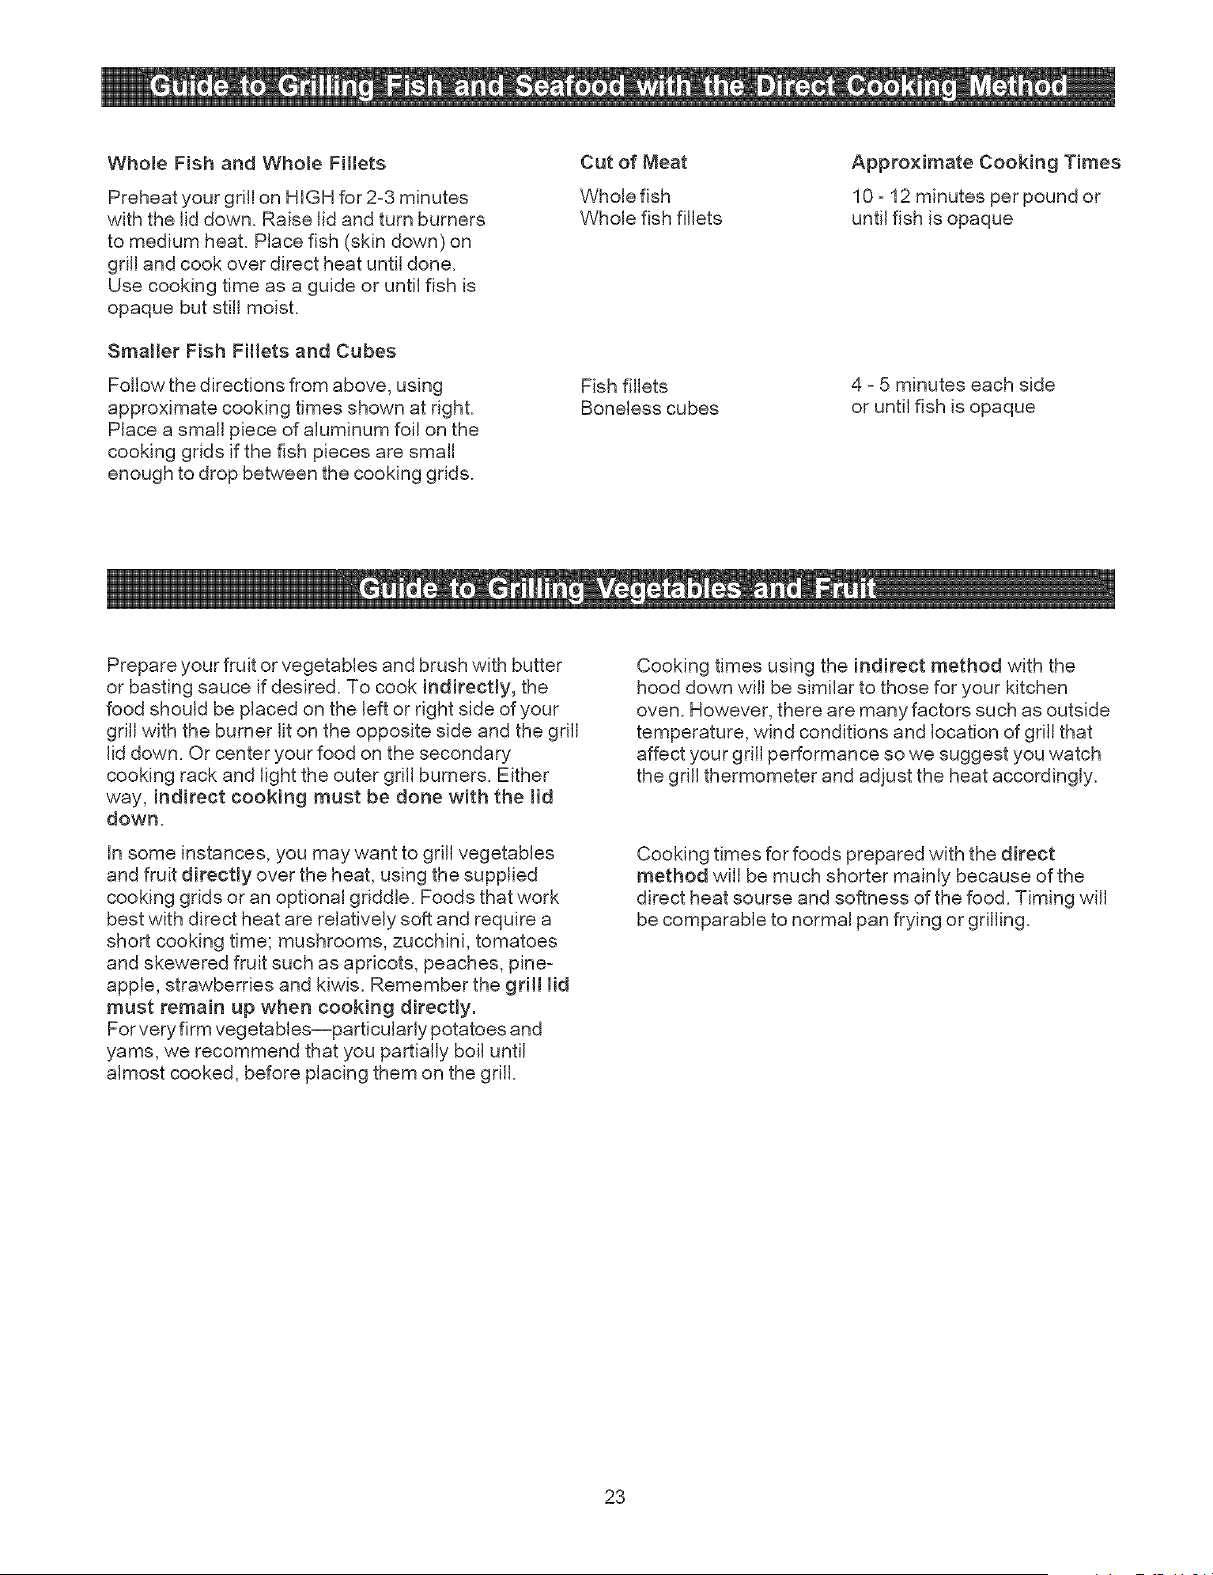
Cutof Meat
Wholefish
Wholefishfillets
Fishfillets
Bonelesscubes
ApproximateCookingTimes
10=12minutesperpoundor
untilfishis opaque
4 =5 minutes each side
or until fish is opaque
Prepare your fruit or vegetables and brush with butter
or basting sauce if desired. To cook indirectly, the
food should be placed on the [eft or right side of your
grill with the burner [it on the opposite side and the grill
lid down. Or center your food on the secondary
cooking rack and light the outer grill burners. Either
way, indirect cooking must be done with the lid
down.
in some instances, you may want to grill vegetables
and fruit directly over the heat, using the supplied
cooking grids or an optional griddle. Foods that work
best with direct heat are relatively soft and require a
short cooking time; mushrooms, zucchini, tomatoes
and skewered fruit such as apricots, peaches, pine=
apple, strawberries and kiwis. Remember the grill lid
must remain up when cooking directly.
For veryfirm vegetables--particularly potatoes and
yams, we recommend that you partially boil until
almost cooked, before placing them on the grill.
Cooking times using the indirect method with the
hood down will be similar to those for your kitchen
oven. However, there are many factors such as outside
temperature, wind conditions and location of grill that
affect your grill performance so we suggest you watch
the grill thermometer and adjust the heat accordingly.
Cooking times for foods prepared with the direct
method will be much shorter mainly because of the
direct heat sourse and softness of the food. Timing will
be comparable to normal pan frying or grilling.
23
AnimportantNoteAboutHeatSettings
Thesuggestedheatsettingsshownareapproximate.
Therearemanyfactorssuchasoutsidetemperature,
windconditionsandgrilllocationthataffectyourgrill
performance.Weofferthesecookingtimesasa
convenience,butsuggestyouwatchthegrillthermom-
eterandadjusttheheataccordingly.
Preparingto Roast
Roastingusestheindirectcookingmethod.Therefore,
thefoodshouldbeplacedontheleftorrightsideofyour
grillwiththeburnerlitontheoppositeside.Placeyour
meatinsideanoptionalroastingrackandcookingpan
thatallowsyoutocollectjuicesformakinggravy.You
canalsousethesuppliedcookinggridwithanalumi-
numdrippanunderneath.Eitherway,indirectcooking
requiresthelidofyourgrilltobeclosed.
Preheatingyourgrillisnotrequiredforslowcooking
methodssuchasroasting,ifyoudochoosetopreheat
yourgrillbeforeroasting,turntheburnersonhighand
closelidforapproximately2-3minutes.
Foodpreparation
Trimmeatofexcessfat.Trussmeatandpoultrywith
cookingstringtoretainshapeifdesired.Baconstrips
canbeusedtocovertheoutsidesurfaceofleanmeat
andpoultrytohelppreventitfromdryingout.Another
methodforkeepingfoodmoistduringroastingistoput
waterinacookingpan,thencoverwithfoil.Thefoil
shouldberemovedforthefirstorthelastpartofthe
cookingtimetoensureproperbrowning.
Tips for roasting
Except when roasting with water in the roasting pan, the
juices that collect in the pan can be used as the base for
a tasty sauce or gravy. Place a cooking pan directly over
the heat, add extra butter if needed, then add several
spoonfuls of flour to thicken sauce. Finally, add sufficient
chicken or beef stock to obtain the desired consistency.
Once the meat is cooked, remove it from your grill and
cover with a piece of foil. Allow it to stand for 10-15
minutes which allows the juices to settle. This will make
carving easier and ensure a tender juicy roast.
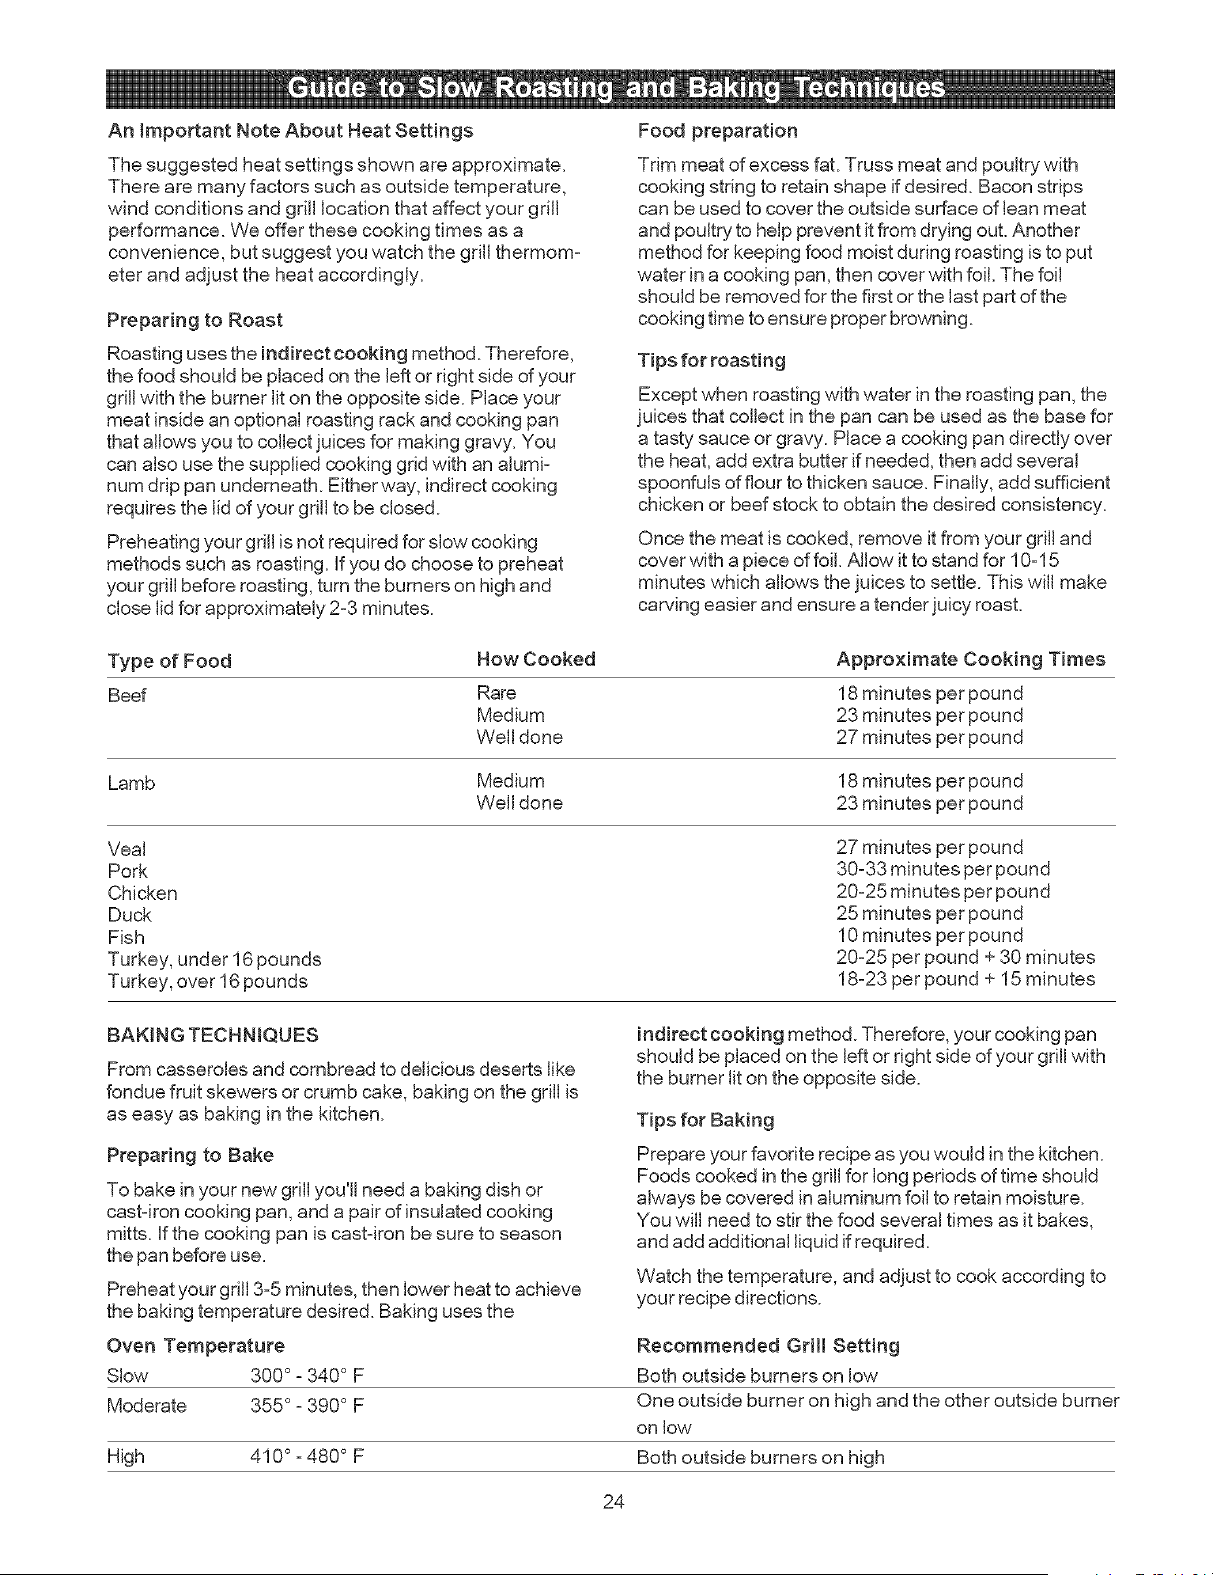
Type of Food How Cooked Approximate Cooking Times
Beef Rare 18 minutes per pound
Medium 23 minutes per pound
Well done 27 minutes per pound
Lamb Medium 18 minutes per pound
Well done 23 minutes per pound
Veal
Pork
Chicken
Duck
Fish
Turkey, under 16 pounds
Turkey, over 16pounds
27 minutes per pound
30-33 minutes per pound
20-25 minutes per pound
25 minutes per pound
10 minutes per pound
20-25 per pound + 30 minutes
18-23 per pound + 15 minutes
BAKING TECHNIQUES
From casseroles and cornbread to delicious deserts like
fondue fruit skewers or crumb cake, baking on the grill is
as easy as baking in the kitchen.
Preparing to Bake
To bake in your new grill you'll need a baking dish or
cast-iron cooking pan, and a pair of insulated cooking
mitts. If the cooking pan is cast-iron be sure to season
the pan before use.
Preheat your grill 3-5 minutes, then lower heat to achieve
the baking temperature desired. Baking uses the
Oven Temperature
Slow 300 ° - 340 ° F
Moderate 355 ° - 390 ° F
High 410 ° - 480 ° F
indirect cooking method. Therefore, your cooking pan
should be placed on the left or right side of your grill with
the burner lit on the opposite side.
Tips for Baking
Prepare your favorite recipe as you would in the kitchen.
Foods cooked in the grill for long periods of time should
always be covered in aluminum foil to retain moisture.
You will need to stir the food several times as it bakes,
and add additional liquid if required.
Watch the temperature, and adjust to cook according to
your recipe directions.
Recommended Grill Setting
Both outside burners on low
One outside burner on high and the other outside burner
on low
Both outside burners on high
24
STIR-FRYINGTECHNIQUES
Thismethodofcookingispopulararoundtheworldand
canbeeasilyaccomplishedoutdoorsonyourKenmore
Elitegasgrill.It'saquickandhealthfulwayofprepar-
ingacompletemealusingmeat,poultryorseafoodin
infinitecombinationswithotherinterestingingredients
likevegetables,riceornoodles.
Preparingto Stir-fry
Althoughit is possible to stir fry in other dishes, the
wok is your best tool. Its high sides enable the cook to
stir food without spillage. Its construction allows you to
cook quickly at high temperatures, with instant control
of heat which is essential for successful stir frying.
Food preparation
Slice meat and poultry into long thin strips and cube
fish fillets. Remove all fat from meat and poultry and
cut large vegetables into even slices or cubes.
Marinate foods for extra flavor and tenderness. Marinat-
ing times will vary for red meat, fish and or various
cuts. Less tender cuts of meat should be marinated
longer. Remember to always chill marinating food in
the refrigerator prior to cooking.
Stir-fry meats, poultry or fish first. Next, add hard
vegetables like carrots. Then continue with softer
vegetables like snowpeas and peppers. To ensure even
cooking, continually stir and toss the food in the wok
using a wooden spoon or spatula.
Tips for Stir-frying
Place the wok directly over a high heat on your grill or side
burner. Add only a small amount of food at a time to
ensure fast cooking and also to allow the wok to reheat
between ingredients.
DEEP-FRYING TECHNIQUES
A wide variety of foods can be deep-fried outdoors on
your grill, from potatoes, to seafood and chicken.
Deep-frying uses a large portion of oil, preferably
saturated. The outdoor location is ideal for deep-frying
as smoke, grease and smells reach for the sky--not
the ceiling of your kitchen.
Preparing to Deep-fry
Deep-fry on your grill using a cooking pan or wok, over
direct heat with the grill lid raised.
Fill the cooking pan no more than half full of vegetable
or corn oil. Start with low heat, then raise the heat
gradually. Check the temperature of the oil carefully
with a frying thermometer or test with a cube of bread.
The cube of bread should brown in about 30 seconds
for most cooking needs. A temperature between 350
and 400 degrees is optimal for preparing the majority
of deep-fried foods.
Food Preparation
Foods being deep-fried taste better when coated with
either batter or breadcrumbs to add flavor and prevent
moisture from escaping.
Tips for Deep-frying
Wear an insulated cooking glove and slowly lower
foods into the hot oil using a wire scoop or stainless
steel tongs. Add only a small quantity of food to the
oil, allow it to cook, then repeat with another small
quantity. This ensures the oil doesn't drop in
temperature.Once the food is cooked, remove it
carefully and drain onto a paper towel. Turn the heat
off as soon as you have finished deep-frying and allow
the pan to cool. When the oil is cool, remove all
remnants of fried foods by straining it through a fine
metal sieve. Once the oil is quite cool, store it in a
clean bottle for future use.
Vegetables are generally easy to cook on the grill. The
cooking rack makes it convenient because you can
still use the main cooking area while the vegetables
are suspended above the grids.
Pre-cook hard vegetables by briefly boiling or
microwaving them before cooking on the grill. Wrap
vegetables in a double thickness of foil to protect them
while cooking on the grill. Then, remove the foil if
desired, 10-15 minutes before the end of cooking,
brush vegetables with butter or oil and finish cooking.
The cooking rack can be used for purposes other than
just the obvious. Consider using it for warming French
bread, garlic bread, croissants or even bagels.
A small whole fish wrapped in foil also cooks well in
the cooking rack. Parcels of seafood such as scal-
lops, prawns and sliced fish fillets prepared in a sauce
and portioned into small foil wraps cooks well this
way, too.
25

ROTISSERIETECHNIQUES
Rotisseriecookingproducesfoodsthataremoist,
flavorfulandattractive.Althoughtherotisserieismost
commonlyusedforcookingmeatorpoultry,nearly
anythingcanbeusedifpreparedproperly.
BalancingtheFood
inrotisseriecooking,balancingthefoodisofutmost
importance.Therotisseriemustturnevenlyorthe
stoppingandstartingactionwillcausethefoodtocook
unevenlyandpossiblyburntheheavierside.
Theeasiestfoodstobalancearethoseofuniform
shapeandtexture.Totestifthefoodisbalanced
correctlywhensecured,placetheendsoftherotis-
seriespitlooselyinthepalmsofyourhands.If thereis
notendencytoroll,givethespita quarterturn.If itis
stillstable,giveita finalquarterturn.Itshouldrest
withoutturningineachofthesepositions,itcanthen
beattachedtoyourgrill.
FoodPreparation
Whenpreparingpoultry,trussthebirdstightlysothat
wingsanddrumsticksareclosetothebodyofthebird.
Thecavityofthebirdmaybestuffedpriortothisifyou
wish.Pulltheneckskindownand,usingasmall
skewer,fixit tothebackofthebird.Pushtherotis-
seriespitthroughlengthwise,catchingthebirdinthe
forkofthewishbone.Centerthebirdandtightenwith
theholdingforks.Testthebalanceasdescribedabove.
Arolledpieceofmeatrequirestherotisserieskewerto
beinsertedthroughthecenterofthelengthofmeat,
thensecuredandbalanced.
Formeatsthatcontainbones,itis besttosecurethe
rotisserieskewerdiagonallythroughthemeatysec-
tions.Ifprotrudingbonesorwingsbrowntooquickly,
coverwithpiecesoffoil.
Tipsfor RotisserieCooking
Whenrotisseriecooking,themajorityofheatwillcome
fromanindirectsource.Inotherwords,the burnersat
eachendofthegrillarelitandthefoodisplaced
centrallyontherotisserie,withnodirectheatsource
underneath.Tocatchanydripsfromtherotisseriefood
itwillbenecessarytoremovethecookinggridsand
thenplaceadrippandirectlyunderthefood.These
drippingscanbeusedtomakegraviesandother
saucestoaccompanythecookedmeats.Placethelid
downoverthefoodwhenyoustarttocook.
Thecookingtimesonarotisseriewillbeapproximately
thesameasforovencooking.
SMOKINGTECHNIQUES
Smokinggivesfoodadistinctive,deliciousflavor.This
surprisinglyquickandversatilecookingmethodexpands
thecreativechef'smenuwithendlessnewandinnovative
waystopreparepopularbarbecuedishes.
Preparingto Smoke
AllyouneedforsmokingonyourKenmoreElitegas
grillisa cookingpanandroastingrack.First,linethe
insideofthepanwithfoil.Thesmokingagent,either
purewoodchipsorsmokingmix,issprinkledoverthe
foil.Driedherbsandspicesmayalsobeaddedto
producedifferentflavors.Placethecookingpan
directlyovertheburner.Thedirectheatwilleventually
producesmokeandseasonthefood.Elevateyour
foodabovethecookingpanwitharoastingrackor
bakingrack.
Tipsfor Smoking
Youcanreducethestrengthofthesmokeflavorby
onlysmokingforhalforthreequartersofthecooking
time,thenroastyourfooduntildone.Theheatre=
quiredforsmokingisnormallylowtomedium.
Foodsnaturallyhighinoilslendthemselveswellto
smoking,whiledrierfoodsbenefitfromamarinade.
Redmeats,poultry,game,fishandseafoodcanallbe
smokedeasilyinyournewgrill.Youcanalsorubthe
foodwithherbs,spicesorflavoredoils.Anenormous
arrayoffoodscanbesmokedinyourKenmoreElite
gasgrilltoproducestunningresultswithverylittle
effort.Hereareafewsuggestions:
', Tuna steaks, marinated in Asian flavors of sesame
oil, soy sauce and sherry.
" Pork fimJets,rubbed with ginger, orange rind and
brushed with maple syrup.
,, Mussels, brushed with lemon rind and chiJioil.
,, Lamb cutlets, marinated in virgin olive oil, lemon,
oregano and black pepper. The same marinade can
be used for a whole leg or rack of lamb.
26

ONIONBURGERS
A honey and mustard sauce glazes the onion slices as
they cook alongside these delicious burgers. For
optimal sweetness, select Vidalia or Walla Walla
onions. Makes 4 open face burgers.
ingredients
2
2
2
2
1
1/4
1/8
4
4
4
large sweet onions, sliced (12 to 16 ounces)
tablespoons margarine or melted butter
teaspoons dry mustard
teaspoons honey
pound lean ground beef
teaspoon salt
teaspoon pepper
slices Texas toast
lettuce leaves
tomato slices
Preparing Onions
Place onions in a cooking pan or on a small piece of
aluminum foil. Combine melted margarine, mustard
and honey, then drizzle over onions. Cover pan with
lid or fold up edges of foil and seal with double fold to
completely enclose onions--leaving space for steam to
build. Place pan or foil packet on grill directly over
medium heat for 15 minutes with the grill hood up.
Preparing Burgers
While onions are cooking, combine ground beef, salt
and pepper in a medium bowl and mix well. Shape
mixture into four 3/4 inch burger patties and add to
grill, directly over heat. Gdll burgers along with onions
for about 5 minutes, then turn burgers. Grill for 8 to 10
minutes more or until no pink remains in meat, and
onions are tender. To serve, toast both sides of Texas
toast on grill. Then top each slice of Texas toast with a
burger, lettuce, tomato and onion. Sprinkle with
pepper if desired.
DOUBLE SALSA BURGERS
A fresh tomato salsa flavors the beef mixture for a
zesty tasting burger. The salsa also serves as a
colorful topping. Makes 6 burger patties.
ingredients
1
1/2
1/4
2
1
1
large tomato, seeded and finely chopped
cup finely chopped green pepper
cup finely chopped red onion
finely chopped, seeded jalapeno peppers
gadic clove, minced
tablespoon snipped cilantro
1/4 teaspoon salt
1 1/2 pounds lean ground beef
2 cups shredded lettuce
1/3 cup finely shredded cheddar cheese
1/4 cup dairy sour cream and/or guacamole
Preparing the Salsa
Combine tomato, green pepper, onion, jalapeno
peppers, garlic, ciJantro and salt in a bowl Set
aside 2 tablespoons of salsa. Cover and chili
remaining salsa until serving time.
Preparing Burgers
in another bowl, combine ground beef with 2
tablespoons of reserved salsa, mix well. Shape
mixture into six 1/2 inch thick burgers and place on
the grill directly over medium heat with hood up.
Grill for 13 to 15 minutes or until no pink remains.
Turn burgers once, halfway through grilling time.
Arrange the shredded lettuce on individual plates.
Top lettuce with a burger, cheddar cheese and
salsa. Serve with sour cream and/or guacamole.
CHICAGO STYLE HOT DOGS
Serve these hot dogs "Chicago-style" with pickled pep-
pers! Makes 4 servings.
Ingredients
1/3
1/4
2
2
1/4
4
4
cup ketchup
cup chopped pickled peppers
tablespoons pickle relish
tablespoons chopped onion
teaspoon poppy seed
fully cooked 4-ounce jumbo hot dogs
hot dog buns
Preparing the Relish
Combine ketchup, chopped pickled peppers, relish,
onion and poppy seed in a small bowl, then set aside.
Preparing Hot Dogs
Place hot dogs on grill directly over medium heat 5 to
8 minutes with the lid up. Turn hot dogs and brush with
some of the relish mixture. Grill hot dogs 6 to 8 minutes
more or until thoroughly cooked.
To Serve
Toast inner sides of hot dog buns on grill. Serve hot
dogs inside buns and top with remaining relish mixture.
27
RiB EYESTEAKSWiTHGRILLEDGARLIC
Astheycook,thegarlicclovesmellowinflavor,
makinga delicioussauceforanygrilledmeat.Andfor
anappetizer,spreadthesoftenedclovesovertoasted
slicesoffrenchbread!Makes4 servings.
ingredients
1
2
1
wholeheadofgarlic
tablespoonsoliveoilorcookingoil
tablespoonsnippedfreshbasil,or 1/2
teaspoondriedbasil,crushed
tablespoonsnippedfreshrosemaryor1/2
teaspoondriedrosemary,crushed
twelve-oz,bonelessribeyesteaks
PreparingtheGarlic
Useacookingpanortearoffa24x18-inchpieceof
aluminumfoilandfoldlonglengthinhalf,thentrimto
makea 12-inchsquare.Removetheouterlayerof
garlichead,thencutoffanddiscardthetop 1/2-inch
ofgarlicheadtoexposethegarliccloves.Placegarlic
headincenterofacookingpanorin centeroffoil
withallsidesofthefoilfoldeduparoundthegarlicto
formacup.Drizzlegarlicwithoilandsprinklewith
basilandrosemary.Coverpanor twisttheendsofthe
foiltocompletelyenclosethegarlic.
PreparingSteaks
Placesteaksandthegarlicpackongrilldirectlyover
mediumheatandcookabout7minuteswiththelidup.
Turnsteaksandgrillfor5to8minutesmore,oruntil
cookedtotaste.Thenremovesteaksandplaceon
platter.Removegarlicanddrizzleitsjuicesoveryour
steak.Removethesoftenedgarlicclovesandspread
overyoursteak.Seasonwithsaltandpepperas
desiredandcutintoserving-sizepieces.
Preparation
Combineketchup,pepper,rosemary,basilandgarlic
powder.Coatbothsidesofsteakwithmixture.Grill
steakwithhoodup,directlyovermediumheatfor6
minutes.Turnsteakandgrillfor8to12minutesmore
oruntilcookedasdesired.Cutintoservingsize
pieces.
BARBECUEDRiBS
Servethistangybarbecueclassicwithcorn-on-the-
cob,greensalad,potatosaladorcoleslaw!
Makes4servings.
Ingredients
2 poundsAmericanstyleporkspareribs
1/2 cupbarbecuesauce
1/2 cuptomatosauce
2 clovesgarlic,crushed
juiceof I lemon
fewdropsoftobascosauce
Preparation
Placeribsintoa largeglassorceramicdish.
Combineremainingingredientsandpouroverthe
ribs.Refrigerateforseveralhours.
Preheatyourgrill3mintesandplacetheribson
cookinggrid.Cookindirectly,overa lowtomedium
heatuntilcooked.Duringthelastfewminutesof
cookingyoucancookthe ribsoveradirectfirefor
addedbarbecueflavorandtexture.
HERB-PEPPERSiRLOiNSTEAK
Theheartybeefflavoriscomplementedwithadeli-
ciousherbcoating!Makes6servings.
Ingredients
2 tablespoonsketchup
1/2 teaspooncoarselygroundpepper
11/2 teaspoonssnippedfreshrosemaryor 1/2
teaspoondriedrosemary,crushed
11/2 teaspoonssnippedfreshbasilor1/2teaspoon
driedbasil,crushed
1/8 teaspoongarlicpowder
1 11!2-poundbonelessbeefsirloinsteak,
cutl-inchthick
28
MARINATEDTUNASTEAK
Experimentwithuniquedishes,likethistunasteak
recipeboastingadeliciouswinemarinade!
Makes4 servings.
ingredients
1/3
1
1
1
2
1/4
6-ouncefreshorfrozentunasteakscut1inch
thick.Thawfishiffrozen
cupdrywhitewine
tablespoonlemonjuice
tablespoonoliveoilorcookingoil
clovegarlic,minced
teaspoonssnippedfreshrosemary,crushed,
or1/2teaspoondriedrosemary,crushed
teaspoonsnippedfreshoregano,crushed,or
1/4teaspoondriedoregano,crushed
teaspoonsalt
Preparation
Combinewine,oil,garlic,rosemary,oreganoand
salt.Placetunasteakinplasticbagandintoshallow
dish,addmarinadethensealbag.Rotatebagto
coatfishwellthenchiliforupto2hours,turning
fishonce.
Removefishfrombaganddiscardmarinade.Placea
cookingpanwithbakingrackorroastingrackinto
centerofgrillwithouterburnersonmediumheat.
Cooktunasteakontopofrackwithliddownfor8to
12minutesor untilfishbeginstoflakeeasily.Turn
fishonceduringcooking.Whencooked,removefish
fromgrillandserve.
MUSTARD-GLAZEDHALIBUTSTEAKS
Asimplesauceofmeltedmargarine,lemonjuice,
Dijon-stylemustardandbasiladdsascintillatingnote
tothesesizzlingfishsteaks!Makes4 servings.
Ingredients
2
2
1
2
6-ouncefreshorfrozenhalibutsteaks,cut1
inchthick
tablespoonsmargarineorbutter
tablespoonslemonjuice
tablespoonDijon-stylemustard
teaspoonssnippedfreshbasilor 1/2
teaspoonsdriedbasil,crushed
Preparation
Combinethawedfish,margarineor butter,lemon
juice,mustardandbasilintoacookingpanor
aluminumfoilrectangle,andcookdirectlyoverlow
flameuntilmelted.Brushmixtureoverbothsidesof
halibutfishsteaks.Pourbalanceof mixtureinto
smallbowl.
Placecleancookingpanorfoiloncenterof grill
withbothouterburnersonmedium.Placefishon
grillandcloselid.Cookindirectlyfor8 to 12
minutesorjustuntilfishbeginstoflakeeasily,
turningonceandbrushingasneededwithremain-
ingmixture.
ALMONDCOATEDTROUT
Thisdeliciousrecipeisuniqueandeasytoprepareon
yourKenmoreElitegasgrill.Makes4 servings.
Ingredients
2
1/2
1
1
1/3
trout
cupallpurposeflour
egg,lightlybeaten
cupslicedalmonds
cupparmesancheese,grated
oliveorpeanutoilforfrying
Preparation
Removetheheadandtailfromtroutandfilletall
bones.Cuteachfishinhalftoform4 longfillets.
Coatfishinflour,dipineggandrollinalmonds.
Refrigeratefor 1hour.
Fillacastgronpanwith1to2 inchesofoil,and
placeoverhighheat.Cooktroutuntilgoldenbrown.
Drainoil,sprinkletroutwithparmesancheeseand
serverightfromthegrill.
29

SOUTHWESTCHCKENBREASTS
Thispopularrecipecanalsobeagrilledchicken
salad!Slicechickenintosmallstripsandplacethem
ontopofshreddedlettucewithavocadodressingand
topwithcheese!Makes6servings.
ingredients
1/4
2
2
1/4
6
2
1
1
2
2
1
1
1
cupdrywhitewine
tablespoonsoliveoilorcookingoil
teaspoonssnippedfreshtarragonor1/4
teaspoondriedtarragon,crushed
teaspoonsalt
skinless,bonelesschickenbreasthalves
avocados,pitted,peeledandchopped
tomato,chopped
clovegarlic,minced
tablespoonsfinelychoppedseeded
greenchilipeppersofyourchoice
greenonions,finelychopped
tablespoonsnippedfreshcilantro
tablespoonhoney
tablespoonlemonjuice
PreparingtheChicken
Combinewine,oil,tarragonandsalt.Rinsechicken
anddrywithpapertowels.Placechickeninplastic
bagandintoshallowdish--thenaddmarinadeandseal
bag.Rotatechickentocoatwellandchiliupto24
hours,turningbagoccasionally.
PreparingtheAvocadoDressing
Combineavocados,tomato,garlic,chilipeppers,
onions,cilantro,honeyandlemonjuice.Tosswell
thencoverandchillupto2 hours.
GrillingtheChicken
Removethechickenfromplasticbagandreservethe
marinade.Grillchickendirectlyovermediumheatwith
lidupfor5minutes.Turnchickenandbrushwith
marinade,thengrillfor5-10minutesmoreoruntil
chickenisnolongerpink.Servewithsideofavocado
dressing.
BARBECUEDCHCKEN
Anotherbackyardfavorite,thisrecipeincludesan
easytomake,sweetandspicysauce.
Makes4 servings.
Ingredients
1/2 cupketchup
1/4 cuporangemarmalade
1 tablespoonvinegar
1/2 teaspoonceleryseed
1/2 teaspoonchilipowder
1/4to 1/2teaspoonbottledhotpeppersauce
1 2 1/2to3 poundbroiler-fryerchicken,pre-cut
PreparingtheSauce
Combineketchup,marmalade,vinegar,celery
seed,chilipowderandhotpeppersaucein a
cookingpan,andcookdirectlyovera lowto
mediumheat.Leavethecookedsauceinthepan
andremovefromheatuntilchickenisprepared.
PreparingtheChicken
Washchickenanddrywithpapertowels.Turn
outsideburnersonmediumandplacepre-cut
chickenpieces(bonesidedown)in centerof grill.
Closelidandcookindirectlyfor 1houroruntil
chickenisnolongerpink.Brushoccasionallywith
sauce.Removechickenfromgrilloncecooked,
thenplacecookingpanwithsauceintocenterof
grillandreheat.Pourwarmedsauceoverchicken
andserve.
3O
TRADITIONALHOLIDAYTURKEY
imagineeveryone'ssurprisewhenyouserveyour
nextholidayturkey--completewithdressing--delicious
andtenderstraightfromthegrill! Serves8 - 10
Ingredients for Turkey
8-10
4
2
2
2
pound whole turkey
ounces butter, softened
tablespoons chopped thyme
tablespoons lemon juice
teaspoons grated lemon rind
Ingredients for Dressing
2
2
8
2
1/4
2
4
1/2
1/2
ounces butter
onions, finely chopped
ounces bacon, chopped
tablespoons port wine
cup red wine
chicken stock cubes
ounces chopped cashews, hazelnuts or
pecans
cup chopped celery
cup chopped carrot
1 - 1 1/2 cups fresh white breadcrumbs
1 egg, lightly beaten
-- salt and pepper to taste
Preparing the Dressing
Prepare dressing in a cooking pan directly over
medium heat. Melt butter, add onions and bacon then
saute 3 minutes. Add port, red wine and stock cubes
and bring to a boil. Cook 2 minutes. Remove pan to
allow ingredients to cool. Add remaining ingredients
and mix.
Preparing the Turkey
Although not required, you may want to preheat your
grill 3 minutes.
Wash inside of turkey and dry with paper towels.
Pack breadcrumb seasoning into the turkey cavity.
Combine the butter, thyme, lemon juice and rind
together in a bowl. Using turkey baster, insert butter
mixture under skin covering the turkey breast.
Truss the turkey with string and place it on a baking
pan or roasting rack that rests into a cooking pan.
Remove the cooking grids from your grill if neces-
sary, then place the cooking pan and turkey in the
center of your grill. Turn one outside burner to low,
the other to medium, and close lid. Cook indirectly
for 3 1/2 to 4 hours or until cooked. Halfway through
cooking time you may alternate burner temperatures
so that the turkey browns evenly. Once cooked,
remove dressing from cooked turkey, slice and serve.
PIZZA ON THE GRILL
You may never want to calJ out for pizza again!
FoNow this pizza dough recipe, or purchase ready-
made pizza dough found in your grocers refrigerated
section--next to the biscuits. Slice and serve directly
from the griJl. Serves 6 - 8
Ingredients
1 1/2 teaspoons dried yeast
1 cup lukewarm water
1/2 teaspoon sugar
3 tablespoons olive oil
3 cups all purpose flour
1/4 cup tomato paste or Italian tomato sauce
6 ounces sliced pepperoni
1 red pepper, roasted and sliced
3/4 cup pitted black olives
8 ounces grated mozzarella cheese
It's easy to customize this recipe with toppings to suit
your family's taste. For spicier crust, lightly rub the
dough with olive oil then spice with pepper and gadic
salt before spreading your tomato sauce.
Preparing the Pizza Dough
Combine yeast, water and sugar together and let
stand in a warm place until mixture starts to foam.
Add this yeast mixture to flour and oil and combine to
form your pizza dough. Knead on a lightly floured
surface until smooth and elastic. Cover and stand in a
warm place until doubled in size. Knock back dough
and roll out to a rectangle the size of your cooking
pan or baking dish. Place dough into a lightly oiled
pan.
If you purchased a ready-made pizza dough,
simply open can and roll dough into a lightly oiled
cooking pan.
Preparing the Pizza
Spread tomato paste or Italian tomato sauce on top of
your pizza dough. Top with pepperoni, red peppers,
olives, and lastly, mozzarella cheese. Or if you prefer,
you may place cheese first with toppings on last.
Place cooking pan in center of grill and cook indio
rectly, with one outside burner on high and the other
on low, for approximately 20 minutes or until bottom of
crust is light brown. Lastly, raise the lid and finish
cooking pizza by turning burner under the cooking
pan on high for about 2 minutes. This will insure the
center of pizza gets brown. Then turn off heat, slice
and serve directly from pan.
31

FRESHVEGETABLESTR-FRY
TakeatriptotheOrientwiththiseasy, and healthy
vegetable recipe. Makes 4 - 6 servings.
Ingredients
2
1
1
2
1
2
1
1/2
tablespoons oil
onion, cut into wedges
carrot, thinly sliced
cups broccoli, cut into small flowerets
red pepper, sliced
sticks celery, thinly sliced
cup snow peas
cup chicken broth
Preparation
Heat oil in a wok or saute pan, directly over a high
heat. Add onion and cook 1 minute. Add carrot and
broccoli and stir-fry 2 minutes, then add red
pepper, celery and snow peas and continue
cooking 1 minute more. Add chicken broth and toss
vegetables until cooked to desired doneness.
OMON BLOSSOMS
Great served as a snack, or to dress up barbecued
meats, poultry or fish. Makes 4 servings.
Ingredients
4
1
1
1/8
1
1
medium sweet onions (4=5 ounces each)
tablespoons margarine or butter, melted
teaspoon Dijomstyle mustard
teaspoon hot pepper sauce
tablespoon brown sugar
pepper (optional)
Preparation
Peel onions, then cut almost completely through each
onion, forming 8 wedges. Onion will be loose, but still
be intact. Prepare four 12qnch squares of aluminum
foil. Place one onion in the center of each foil square.
Stir margarine (or butter) with hot pepper sauce and
drizzle over onions. Sprinkle with brown sugar. Then
bring up two sides of foil square and double fold.
Bring remaining corners up and completely enclose -
leaving enough space for steam to build.
Place wrapped onion blossoms on grill, directly over
medium heat. Close lid and cook 15 to 25 minutes or
until onions are nearly tender. Make a 2qnch opening
at the top of each onion wrapping, then close lid and
cook 5 to 10 minutes more, or until onions are lightly
browned. Sprinkle with pepper if desired and serve
,,warm.
GRILLED POTATO SKINS
Serve these crispy potatoes as a snack or side dish.
We've included microwave instructions for a timesaw
ing short cut. Makes 12 servings.
Ingredients
6
3
1/2
1
3
1
1
1/2
baking potatoes (about 8 ounces each)
tablespoons margarine or butter, melted
cup picante sauce
cup shredded cheddar cheese (4 ounces
slices bacon, crisp-cooked and crumbled
or use prepackaged bacon bits
chopped tomato (optional)
diced green onion (optional)
cup sour cream (optional)
Preparation
Puncture clean potatoes with a fork, wrap in alumi-
num foil and place directly over low to medium heat.
Close lid and cook directly for 1 hour or until center is
tender. OR - Microwave clean, punctured potatoes
on high for 15 to 20 minutes, or until center tender.
Allow cooked potatoes to cool then unwrap and
discard foil.
Cut potatoes in half - lengthwise. Scoop out potato
pulp (serve separately or discard.) Be sure to leave
l/4qnch thick potato shell remaining. Brush the inside
of each potato shell with melted margarine. Spoon 2
teaspoons picante sauce into each potato shell,
sprinkle with cheese and top with bacon.
Place prepared potato skins on grill, directly over
medium heat. Close lid and cook for 8 to 10 minutes
or until potato skins are crisp. Sprinkle each potato
skin with tomato and green onion and then top with
sour cream, if desired.
32

me or oursT
For repair of major brand appliances in your own home...
_r_ Paler woo made iL no matter w_o sold it!
1-800-4- MY- HO ME_MA°__,_,_o=_'r_ __:_
41-800-469_663)
W_. S_O_$S.COm
To bring m products such as vacuums own equ_pmen_ and e_ec[ron_cs
tot repair call lot the localo_"_ of your nearest Seats Pa_s & Repair Center.
www._a_s,.com
Far the replacement pa_s accessones ano owner s manuals
_nat you need to do-l-yoursel, ca/ Sears Pa,_sDirect
1-800-366-PART _m _i r,_ cs_
1-800-366o7278) 7 t,_s ,aw_ek
www,,searsocom_partsd_rec_
To purchase or lnGu_re about a Sears Service Agreement:
1-800-827.6655
7 a_l 5 p_ CST Mo¢l S,J,
1-877-LE,-FOYER "
t-8 77- 533-6937

