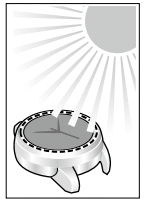
This watch has a rechargeable cell which is charged by exposing the dial to light. Expose the dial to direct sunlight regularly to charge the watch. For details of charging, see page 44 -.
After unpacking, follow the steps below when starting time and calendar adjustment.
1 Checking the current power reserve (page 16 )
2 Changing the world time setting (page 24 )
3 Receiving the time signal (page 29 )
Band adjustment
We recommend seeking the assistance of an experienced watch technician for sizing of your watch. If adjustment is not done correctly, the bracelet may unexpectedly become detached leading to loss of your watch or injury. Consult an authorized service center.
Protective stickers
Be sure to remove any protective stickers that may be on your watch (case back, band, clasp, etc.). Otherwise, perspiration or moisture may enter the gaps between the protective stickers and the parts, which may result in a skin rash and/or corrosion of the metal parts.
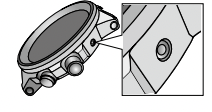
How to use a specially designed crown/button
Some models are equipped with a specially designed crown and/or push button to prevent accidental operation.
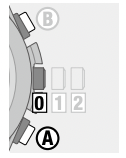
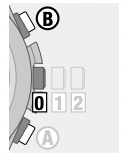
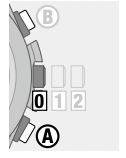
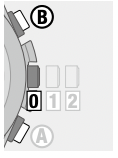
Screw down crown/button
Unlock the crown/button prior to operate your watch.
Unlock
Lock
Screw down crown
Rotate the crown counterclockwise until it releases from the case.
Push the crown in to the case. With gentle pressure towards the case, rotate the crown clockwise to secure it to the case. Be sure to tighten firmly.
Screw down push button
Rotate the locking screw counterclockwise, and loosen until it stops.
Rotate the locking screw clockwise, and tighten firmly
Recessed button
Press the button with a non-marring narrow-tipped object.
Metal objects may cause marring or scratching of the button.
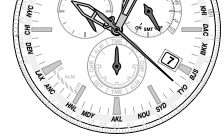
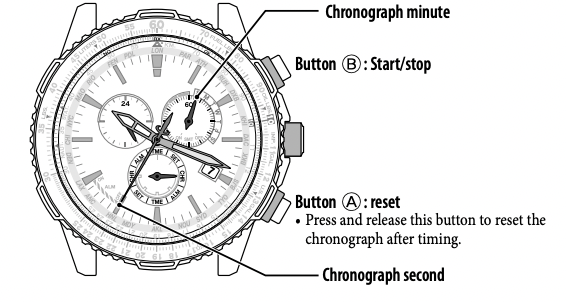
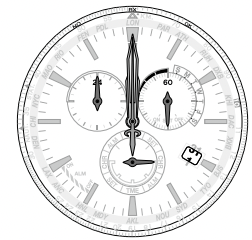
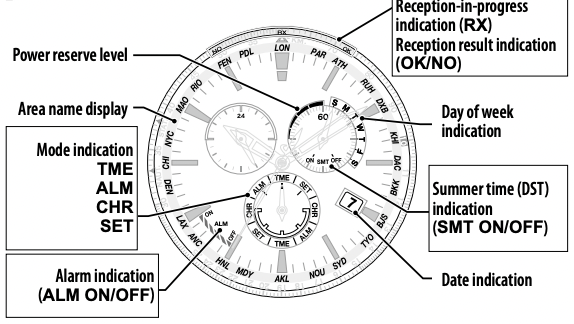
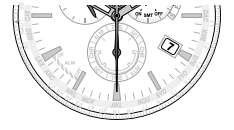
Component identification
Hands and buttons
The illustrations in this instruction manual may differ from the actual appearance of your watch.
Indication
A solar cell is under the dial.
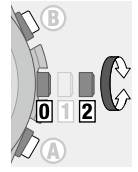
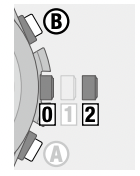
Changing the mode
This watch features the four different modes as follows:
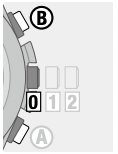
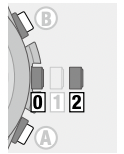
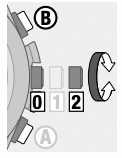
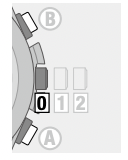
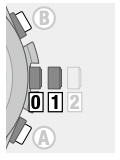
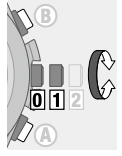
Pull the crown out to position 1.
The second hand points to 30 seconds and stops.
2. Rotate the crown to change the mode
Turn the crown so that the mode hand will point to a marker of the mode indication securely.
3. Push the crown in to position 0 to finish the procedure.
Indication of the watch changes into that of the mode selected.
It may take a moment to change indication.
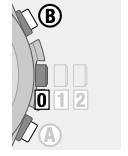
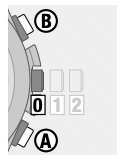
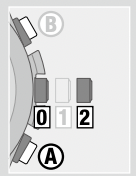
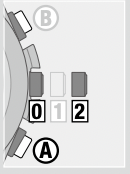
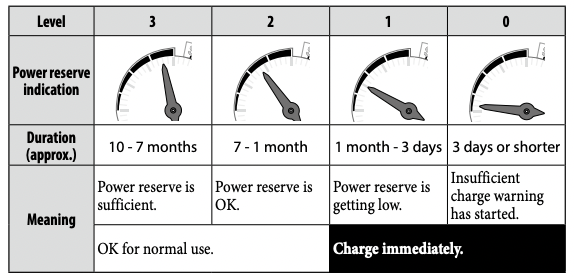
Checking the power reserve
For details of charging, see “Charging your watch” (page 44).
Checking the power reserve
See page 18 for instructions on how to read power reserve indication.
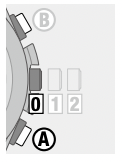
Change the mode to [TME] (page 14 ) and push the crown in to position 0.
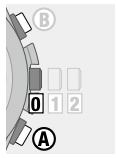
Press and release the lower right button. The function hand indicates power reserve and the second hand indicates the previous reception result.
Press button to return to normal indication. It returns to normal indication automatically in about 10 seconds without pressing the button.
Indication of power reserve in levels
CAUTION
At the level “0”, the second hand starts to move once every two seconds (insufficient charge warning function, page 46). The function hand on the upper right sub dial always indicates the power reserve in this mode. In addition, functions other than time indication stop and become unavailable
Checking the previous signal reception result
For details of signal reception, see “About signal reception” (page 49).
Change the mode to [TME] (page 14 ) and push the crown in to position 0.
Press and release the lower right button . The function hand indicates power reserve and the second hand indicates the previous reception result.
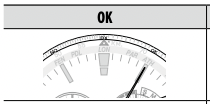
The reception was successful.
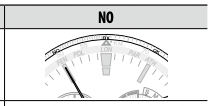
The reception failed.
Press button to return to normal indication. It returns to normal indication automatically in about 10 seconds without pressing the button.
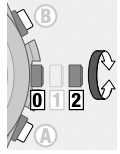
Checking the current world time setting
For details of the world time, see “Setting the world time” (page 24).
Change the mode to [TME] (page 14 ) and push the crown in to position 0.
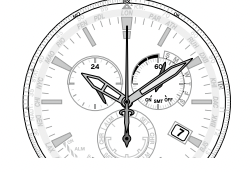
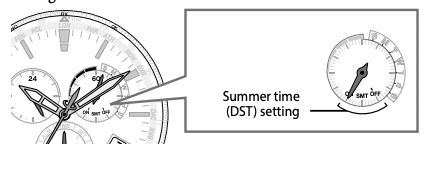
Press and release the upper right button. The second hand indicates the current time zone setting and the function hand indicates the current summer time (DST) setting (page 32).
Ex.: When the time zone setting is “TYO” and the summer time (DST) setting is “SMT OFF”
Press button to return to normal indication. It returns to normal indication automatically in about 10 seconds without pressing the button.
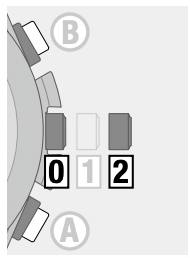
Setting the world time
This watch can indicate the time around the world according to which of 24 time zones (offsets from UTC — Coordinated Universal Time) is chosen.
See page 22 to check which time zone is currently indicated.
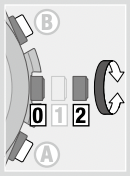
Change the mode to [TME] (page 14 ) and pull the crown out to position 2.
The second hand indicates the current time zone setting and the function hand indicates the current summer time (DST) setting (page 32).
Ex.: When the time zone setting is “TYO” and the summer time (DST) setting is “SMT OFF”
2. Rotate the crown to select an area.
The hour and minute hands start moving as you finished to select an area.
For details of areas and time zones, see “Table of time zones and representative places” (page 26).
Pressing button while the hands stops changes the summer time (DST) setting.
3. Push the crown in to position 0 to finish the procedure.
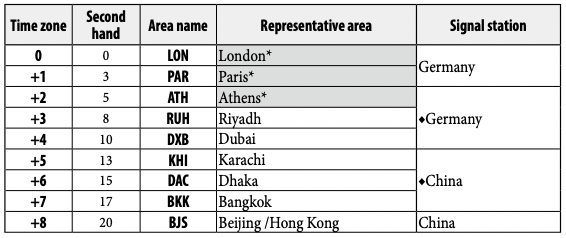
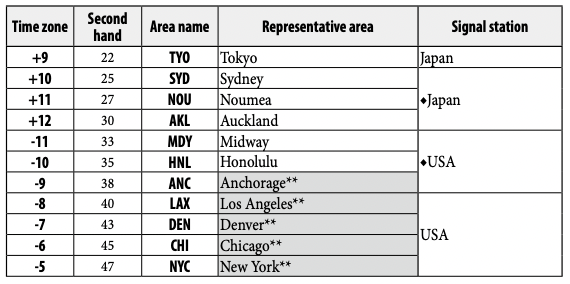
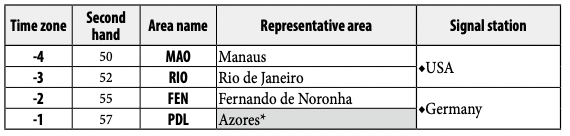
Table of time zones and representative places
Countries or regions may change time zones for various reasons.
When using the watch in an area not listed in the table, select an area name in the same time zone.
The offsets in the table are based on the standard time.
The areas whose “Signal station” has ◆ mark in the table are out of reception range and cannot receive its signals.
For an area with * or **, automatic change of summer time (DST) setting are linked. For details, see “Setting summer time (DST)” (page 32).
Change the mode to [TME] (page 14 ) and push the crown in to position 0.
Press and hold the lower right button for 2 seconds or more until the second hand points "RX".
The second hand point to "RX" after indicating the previous reception result and signal reception starts.
3. Put the watch in a place with good conditions for time signal reception.
Do not move the watch as far as possible while the second hand points “RX”.
After the reception finished, the reception result (OK/NO) is indicated and the watch returns to normal indication.
To cancel signal reception
Pressing button while the second hand points “RX” cancels signal reception and the watch returns to normal indication.
Setting summer time (DST)
Summer time (DST: Daylight Saving Time) is a system adopted in some countries/ areas to gain an extra daylight during summer.
In regions utilizing summer time (DST), the time signal includes summer time (DST) check signal.
The summer time (DST) period varies depending on the country or area.
The summer time (DST) rules may change depending on the country or area.
About summer time (DST) setting
You can set summer time (DST) on or off for each time zone.
This watch can change summer time (DST)/standard time indication automatically when it receives time signals including summer time (DST) signals.
You can also execute summer time (DST) setting manually
Checking the summer time (DST) setting
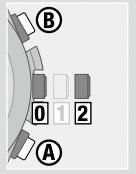
Change the mode to [TME] (page 14 ) and push the crown in to position 0.
Press and release the upper right button . The second hand indicates the current time zone setting and the function hand indicates the current summer time (DST) setting.
Summer time (DST) is indicated.
Standard time is indicated.
Press button to return to normal indication. It returns to normal indication automatically in about 10 seconds without pressing the button.
Changing the summer time (DST) setting
1. Change the mode to [TME] (page 14 ) and pull the crown out to position 2. The second hand indicates the current time zone setting and the function hand indicates the current summer time (DST) setting.
2. Rotate the crown to choose a time zone where you want to change the summer time (DST) setting.
The time zone changes and the hour and minute hands start moving.
The summer time (DST) setting of the chosen time zone is indicated.
3. Press and release the upper right button B while the hands stop.
SMT ON
Summer time (DST) is indicated.
Automatic switching of the summer time (DST) setting is activated. The summer time (DST) setting is automatically changed corresponding to reception of summer time (DST) signals.
SMT OFF
The standard time is indicated.
Automatic switching of the summer time (DST) setting is deactivated. Summer time (DST) is not indicated even after reception of summer time (DST) signals.
Each time you press button , the summer time (DST) setting of the chosen time zone changes alternately
4. Repeat steps 2 and 3 to execute the summer time (DST) settings of other time zones.
5. Push the crown in to position 0 to finish the procedure.
Link of summer time (DST) setting
In the following groups of areas, the summer time (DST) setting of all areas in a group is automatically changed when summer time (DST) signals are received in an area of the group.
USA ANC, LAX, DEN, CHI, NYC
Germany LON, PAR, ATH, PDL
The link does not work for areas where the automatic switching is turned off.
Using the chronograph
The chronograph on this watch can measure up to 60 minutes in 1 second increments.
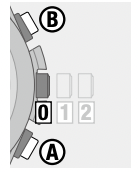
1. Change the mode to [CHR] (page 14 ) and push the crown in to position 0.
0 minute 0 second is indicated.
2. Start measurement.
See the next page for the method of measurement.
Pulling out the crown will stop and reset the chronograph.
3. Change the mode to [TME] and push the crown in to position 0 to finish the procedure.
After 60 minutes of continuous chronograph operation, the chronograph automatically stops and is reset.
Using alarm
The alarm on this watch is based on the time indicated. It is based on the time of the time zone newly selected when the time zone setting of the world time is changed.
Checking alarm setting
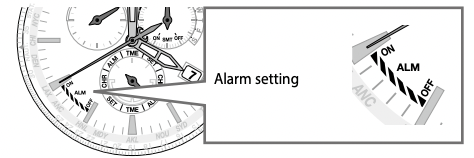
Change the mode to [ALM] (page 14 ) and push the crown in to position 0. The hour, minute and 24-hour hands indicate the alarm time currently set and the second hand shows the alarm setting
ALM ON Alarm sounds as the time set comes.
ALM OFF No alarm sounds.
Each time you press button , on/off of the setting changes alternately.
2. Change the mode to [TME] and push the crown in to position 0 to finish the procedure. The hands returns to normal.
Checking the alarm
Pressing button in step 1 sounds the alarm for 5 seconds. Press the same button to stop the alarm sound.
Changing alarm setting
The alarm time is set in 24-hour basis.
1. Change the mode to [ALM] (page 14 ) and pull the crown out to position 2. The hour, minute and 24-hour hands indicate the alarm time currently set and the second hand shows the alarm setting.
2. Rotate the crown to set the alarm time.
Check AM/PM referring to the 24-hour hand.
If you rotate the crown quickly a few times, the hand will move continuously. To stop the rapid movement, rotate the crown in either direction.
3. Press and release the upper right button to set the alarm setting to “ALM ON”.
Each time you press button , on/off of the setting changes alternately
4. Change the mode to [TME] and push the crown in to position 0 to finish the procedure. The watch returns to normal indication.
When the time set comes
Alarm sounds for 15 seconds as the time set comes.
Alarm does not sound when the position of the crown is not 0 and/or the mode is not [TME] or [SET].
To stop alarm
Press any of the buttons.
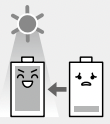
Charging your watch
This watch has a solar cell under the dial and stores the power generated by the cell in its built-in rechargeable cell.
The cell is charged by exposing the dial to light such as direct sunlight or fluorescent lamps.
For optimal performance, be sure to:
Put the watch in a location where the dial is exposed to bright light such as by the window even when it is not used.
Expose its dial to direct sunlight for 5 or 6 hours at least every month.
Do not leave it in dark places for long periods of time.
CAUTION
Do not charge the watch at a high temperature (about 60°C (140°F) or higher) as doing so may cause movement malfunction.
If the watch is obscured from light by long sleeves frequently, supplemental charging may be needed to ensure continual operation.
The watch stops charging automatically after finishing (overcharging prevention function). The function prevents damage to performance of the watch and rechargeable cell due to overcharging
When the watch reaches a low charge state (insufficient charge warning function)
When the power reserve becomes low, the second hand moves once every two seconds. This is the insufficient charge warning function. Be sure to fully charge your watch immediately as outlined on page 47.
When the watch is sufficiently charged, the second hand will move normally.
If you do not charge the watch for 3 days or longer after the insufficient charge warning movement has begun, the watch will be depleted of all power and stop.
During the insufficient charge warning state
The time and date are indicated correctly.
The indication in the [TME] mode is displayed in the other modes and functions in them are not available.
The function hand on the upper right sub dial indicates the power reserve level “0” in this mode.
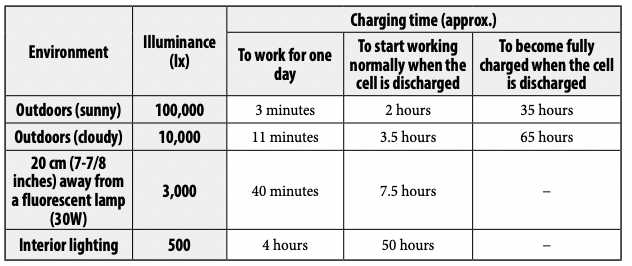
Charging time by environment
Below are the approximate charging times when exposing to light continuously. Please use this table as a reference only
Exposing to direct sunlight is recommended to charge your watch.
A fluorescent lamp or interior lighting does not have sufficient illumination to charge the rechargeable cell efficiently
Power save function
The second hand stops automatically to save power when the watch has been kept in a dark place for a certain period of time and it cannot generate power.
The watch works normally even while saving power.
The alarm sounds even while saving power.
The power save function does not operate under the following conditions:
- The crown is in position 1 or 2.
- The mode is [CHR] or [ALM].
- During 2-second interval movement (insufficient charge warning status)
Canceling the power save function
The power save status ends and the hands return to normal indication as the watch is operated or the dial is exposed to light and power generation starts.
Troubleshooting
Checking and correcting the reference position
If the time or calender is not shown correctly even after proper reception of the time signal, check whether the reference position is correct.
If the hands and indication do not reflect the correct reference position, the time and calendar will not be indicated accurately even if the time signal is received.
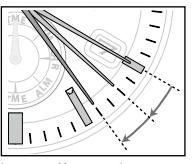
What is the reference position?
The base position of all hands and calendar to properly indicate the various functions of this watch.
Hour, minute and second hands: 0 hour 00 minute 0 second
24-hour hand: “24”
Date indication: between “31” and “1”
Function hand: “30” (straight below)
Correct reference positions
Change the mode to [CHR] (page 14 ) and pull the crown out to position 2. The hands and indication move to the current reference positions stored in memory and stop.
Check the reference positions of them referring to the illustration of the previous pages.
Correct Push the crown in to position 0 to finish the procedure. Set the mode to [TME] after that.
Wrong Proceed to step 3 and correct the reference position.
3. Press and release the lower right button. The function hands move slightly
4. Press and release the lower right button repeatedly to change the hand/indication to be corrected.
Each time you press button, the target changes as follows.
Function hand/date indication → Hour/minute/24-hour hands → Second hand → (back to the top)
The hands and indications slightly move when selected to show they become adjustable.
The function hand points “60” (straight above) when the hour, minute, second and 24-hour hands are the targets of adjustment.
5. Rotate the crown to adjust the hand/indication.
The hour, minute and 24-hour hands move synchronously.
Date indication changes to the next as the function hand rotates 5 times.
When you rotate the crown quickly a few times, the hand/ indication will move continuously. To stop the rapid movement, rotate the crown in either direction.
6. Repeat steps 4 and 5.
7. Push the crown in to position 0.
8. Change the mode to [TME] to finish the procedure.
Symptom and Remedies
Symptom
Remedies
Cannot receive time signals
• Manual reception (on demand reception) cannot be executed.
• Automatic reception is not executed.
Change the mode to [TME] and push the crown in to position 0.
Check power reserve. If the second hand is moving once every two seconds, you cannot perform time signal reception.
Check the world time setting.
Check whether the watch is in a receivable area
Check reception environment.
Put the watch in an appropriate place and do not move it until reception is finished
Consult an authorized service center.
Time/calendar is abnormal.
Indication is incorrect even after successful reception.
Change the mode to [TME] and push the crown in to position 0.
Check the world time setting.
Check the summer time (DST) setting.
Check and correct the reference position.
Adjust the time and calendar manually.
The summer time (DST) setting does not change automatically.
Change the summer time (DST) setting to “SMT ON”.
Day of week is not indicated.
Change the mode to [TME] and push the crown in to position 0.
Check power reserve. When the second hand is moving once every two seconds, it is not indicated.
Movement of a hand seems strange
The hands rotate rapidly soon after you take the watch out of a case or something similar.
The power save function is canceled. Wait until the current time is displayed.
The hands move in an unexpected direction.
Check the current mode.
The second hand does not move.
Check the current mode.
Check power reserve
The second hand moves once every two seconds.
Power reserve is low. Charge immediately
The power reserve is not indicated.
Change the mode of the watch to [TME], push the crown in to position 0 and press button .
• The world time setting is not indicated.
• The summer time (DST) setting is not indicated.
Change the mode of the watch to [TME], push the crown in to position 0 and press button.
Check power reserve. When the second hand is moving once every two seconds, it is not indicated.
• No alarm sound is emitted.
• Alarm sounds at an incorrect moment.
Check whether the time and calendar is correct.
Check power reserve. When the second hand is moving once every two seconds, alarm does not sound.
Check the alarm setting and the alarm time set
Check the current mode.
Check the world time setting.
Check the summer time (DST) setting.
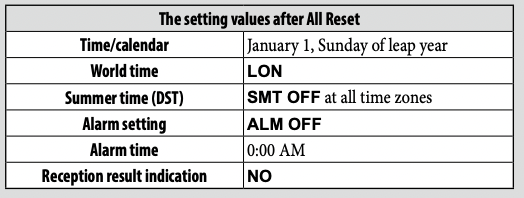
Resetting the watch — All Reset
When the watch does not work properly, you can reset all the settings. If the power reserve is insufficient, charge the watch first.
Be sure to perform the following operations after All Reset.
Correct the reference positions. After All Reset, the watch is in the reference position adjustment mode. Refer to step 3 and after on page 61.
Set the world time. (page 24)
Adjust the time and calendar. Adjust the time and calendar manually (page 56) or by receiving time signals (page 29).
1. Change the mode to [CHR] (page 14 ) and pull the crown out to position 2. The hands and indication move to the current reference positions stored in memory.
Proceed to the next step when the hands and indication stop.
2. Press and release both the lower right button and upper right button simultaneously. As you release the buttons, the alarm sounds and all reset is executed.


 . The function hand indicates power reserve and the second hand indicates the previous reception result.
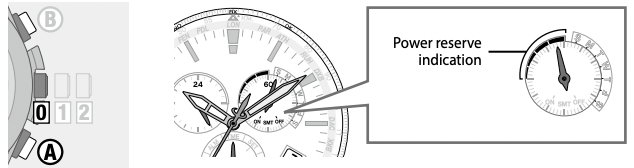
 . The second hand indicates the current time zone setting and the function hand indicates the current summer time (DST) setting (page 32).