Loading ...
Loading ...
Loading ...
Yournewrefrigeratormaymakesoundsthatyouroldonedidn't
make.Becausethesoundsarenewtoyou,youmightbe
concernedaboutthem.Mostofthenewsoundsarenormal.Hard
surfaces,suchasthefloor,walls,andcabinets,canmakethe
soundsseemlouder.Thefollowingdescribesthekindsofsounds
andwhatmaybemakingthem.
• Ifyourrefrigeratorisequippedwithanicemaker,youwillhear
abuzzingsoundwhenthewatervalveopenstofilltheice
makerforeachcycle.
Yourrefrigeratorisdesignedtorunmoreefficientlytokeep
yourfooditemsatthedesiredtemperaturesandtominimize
energyusage.Thehighefficiencycompressorandfansmay
causeyourrefrigeratortorunlongerthanyouroldone.You
mayalsoheara pulsatingorhigh-pitchedsoundfromthe
compressororfansadjustingtooptimizeperformance.
Youmayheartheevaporatorfanmotorcirculatingairthrough
therefrigeratorandfreezercompartments.Thefanspeed
mayincreaseasyouopenthedoorsoraddwarmfood.
Rattlingnoisesmaycomefromtheflowofrefrigerant,the
waterline,oritemsstoredontopoftherefrigerator.
Waterdrippingonthedefrostheaterduringadefrostcycle
maycauseasizzlingsound.
Aseachcycleends,youmayhearagurglingsounddueto
therefrigerantflowinginyourrefrigerator.
Contractionandexpansionoftheinsidewallsmaycausea
poppingnoise.
Youmayhearairbeingforcedoverthecondenserbythe
condenserfan.
Youmayhearwaterrunningintothedrainpanduringthe
defrostcycle.
REFRIGERATOR USE
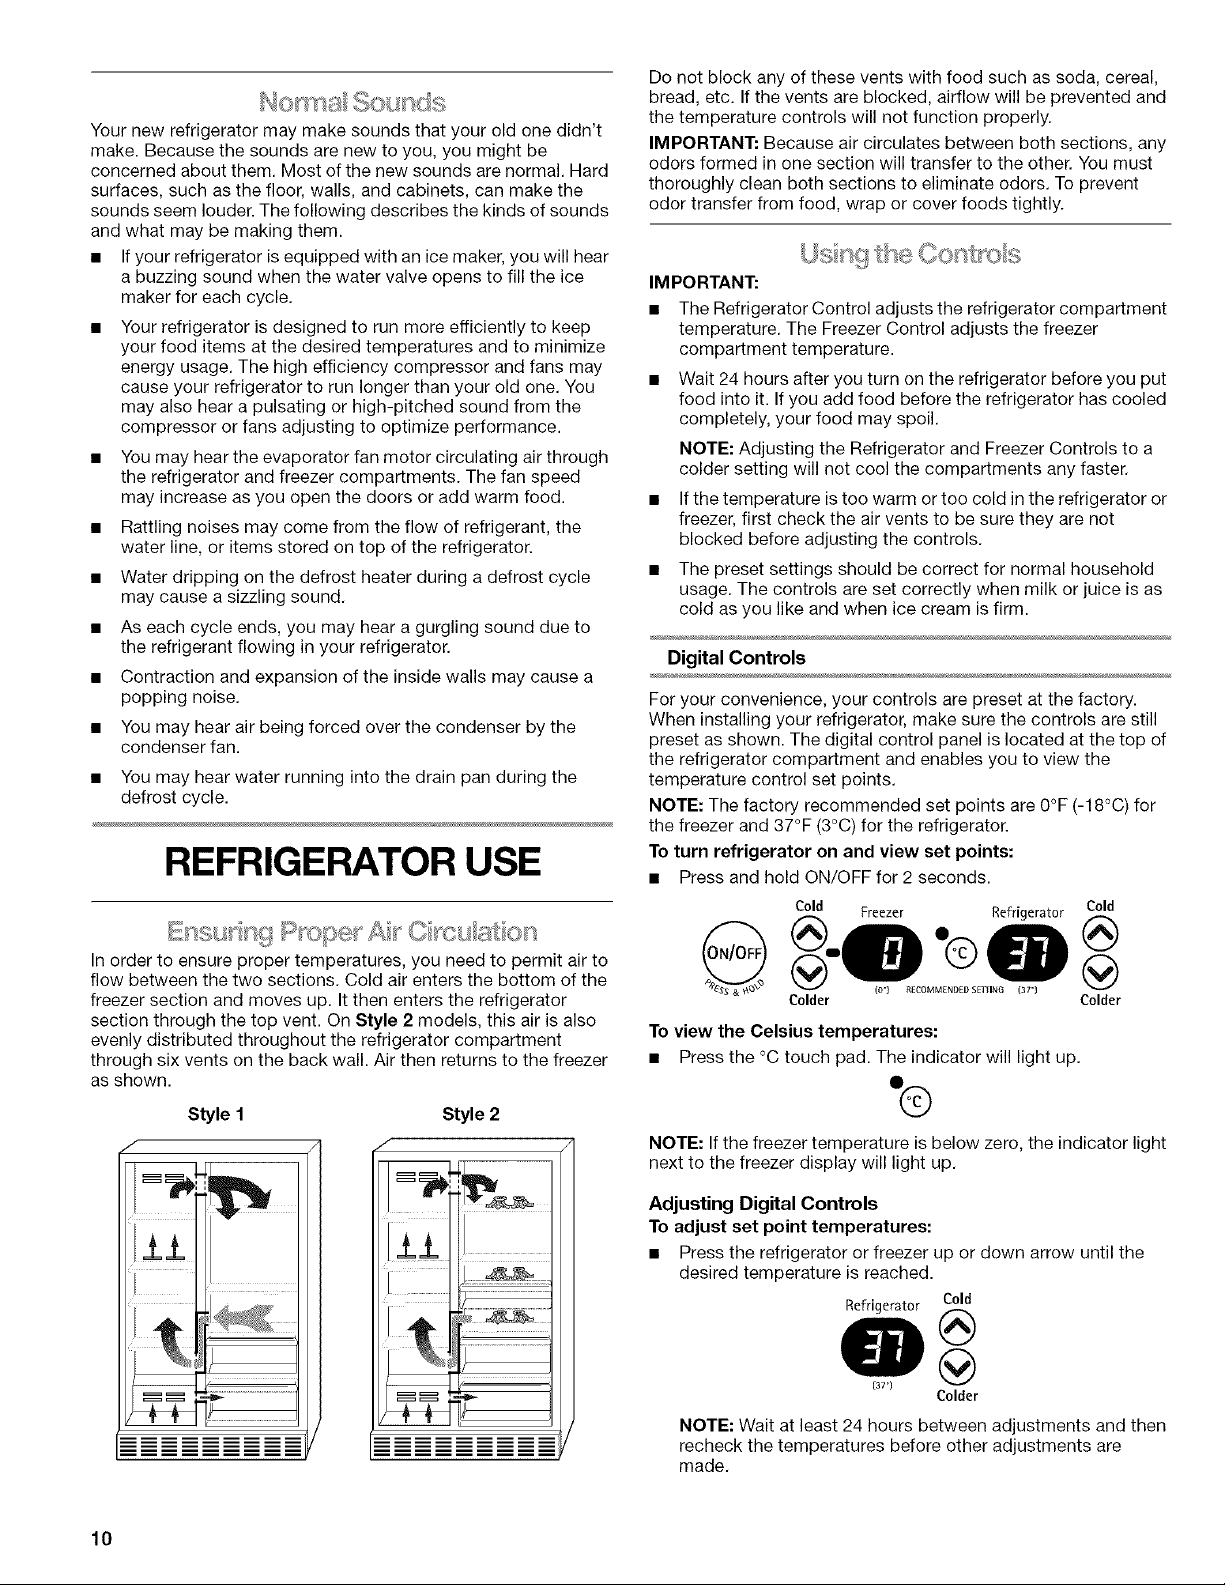
In order to ensure proper temperatures, you need to permit air to
flow between the two sections. Cold air enters the bottom of the
freezer section and moves up. It then enters the refrigerator
section through the top vent. On Style 2 models, this air is also
evenly distributed throughout the refrigerator compartment
through six vents on the back wall. Air then returns to the freezer
as shown.
Style 1 Style 2
,/
Do not block any of these vents with food such as soda, cereal,
bread, etc. If the vents are blocked, airflow will be prevented and
the temperature controls will not function properly.
IMPORTANT: Because air circulates between both sections, any
odors formed in one section will transfer to the other. You must
thoroughly clean both sections to eliminate odors. To prevent
odor transfer from food, wrap or cover foods tightly.
IMPORTANT:
• The Refrigerator Control adjusts the refrigerator compartment
temperature. The Freezer Control adjusts the freezer
compartment temperature.
Wait 24 hours after you turn on the refrigerator before you put
food into it. If you add food before the refrigerator has cooled
completely, your food may spoil.
NOTE: Adjusting the Refrigerator and Freezer Controls to a
colder setting will not cool the compartments any faster.
If the temperature is too warm or too cold in the refrigerator or
freezer, first check the air vents to be sure they are not
blocked before adjusting the controls.
The preset settings should be correct for normal household
usage. The controls are set correctly when milk or juice is as
cold as you like and when ice cream is firm.
Digital Controls
For your convenience, your controls are preset at the factory.
When installing your refrigerator, make sure the controls are still
preset as shown. The digital control panel is located at the top of
the refrigerator compartment and enables you to view the
temperature control set points.
NOTE: The factory recommended set points are 0°F (-18°C) for
the freezer and 37°F (3°C) for the refrigerator.
To turn refrigerator on and view set points:
• Press and hold ON/OFF for 2 seconds.
Cold Freezer _@ Refrigerator Col(_(_(_))
o
S_ & _ {O] }{[COMMENDED SETTING {31)
Colder Colder
To view the Celsius temperatures:
• Press the °C touch pad. The indicator will light up.
0®
NOTE: If the freezer temperature is below zero, the indicator light
next to the freezer display will light up.
Adjusting Digital Controls
To adjust set point temperatures:
• Press the refrigerator or freezer up or down arrow until the
desired temperature is reached.
Refrigerator Cold
@
(sT) @
Colder
NOTE: Wait at least 24 hours between adjustments and then
recheck the temperatures before other adjustments are
made.
10
Loading ...
Loading ...
Loading ...