Home
Bookmarks
Home
LG Electronics
LG Electronics LRMXS3006S User Manual
Page 8
User Manual - Page 8
For LRMXS3006S.
Page 8/68
Page 1
Page 2
Page 3
Page 4
Page 5
Page 6
Page 7
Page 8
Page 9
Page 10
Page 11
Page 12
Page 13
Page 14
Page 15
Page 16
Page 17
Page 18
Page 19
Page 20
Page 21
Page 22
Page 23
Page 24
Page 25
Page 26
Page 27
Page 28
Page 29
Page 30
Page 31
Page 32
Page 33
Page 34
Page 35
Page 36
Page 37
Page 38
Page 39
Page 40
Page 41
Page 42
Page 43
Page 44
Page 45
Page 46
Page 47
Page 48
Page 49
Page 50
Page 51
Page 52
Page 53
Page 54
Page 55
Page 56
Page 57
Page 58
Page 59
Page 60
Page 61
Page 62
Page 63
Page 64
Page 65
Page 66
Page 67
Page 68
Contents
Table of Contents
Search
Previous
Next
Bookmarks
Loading ...
Loading ...
Loading ...
8
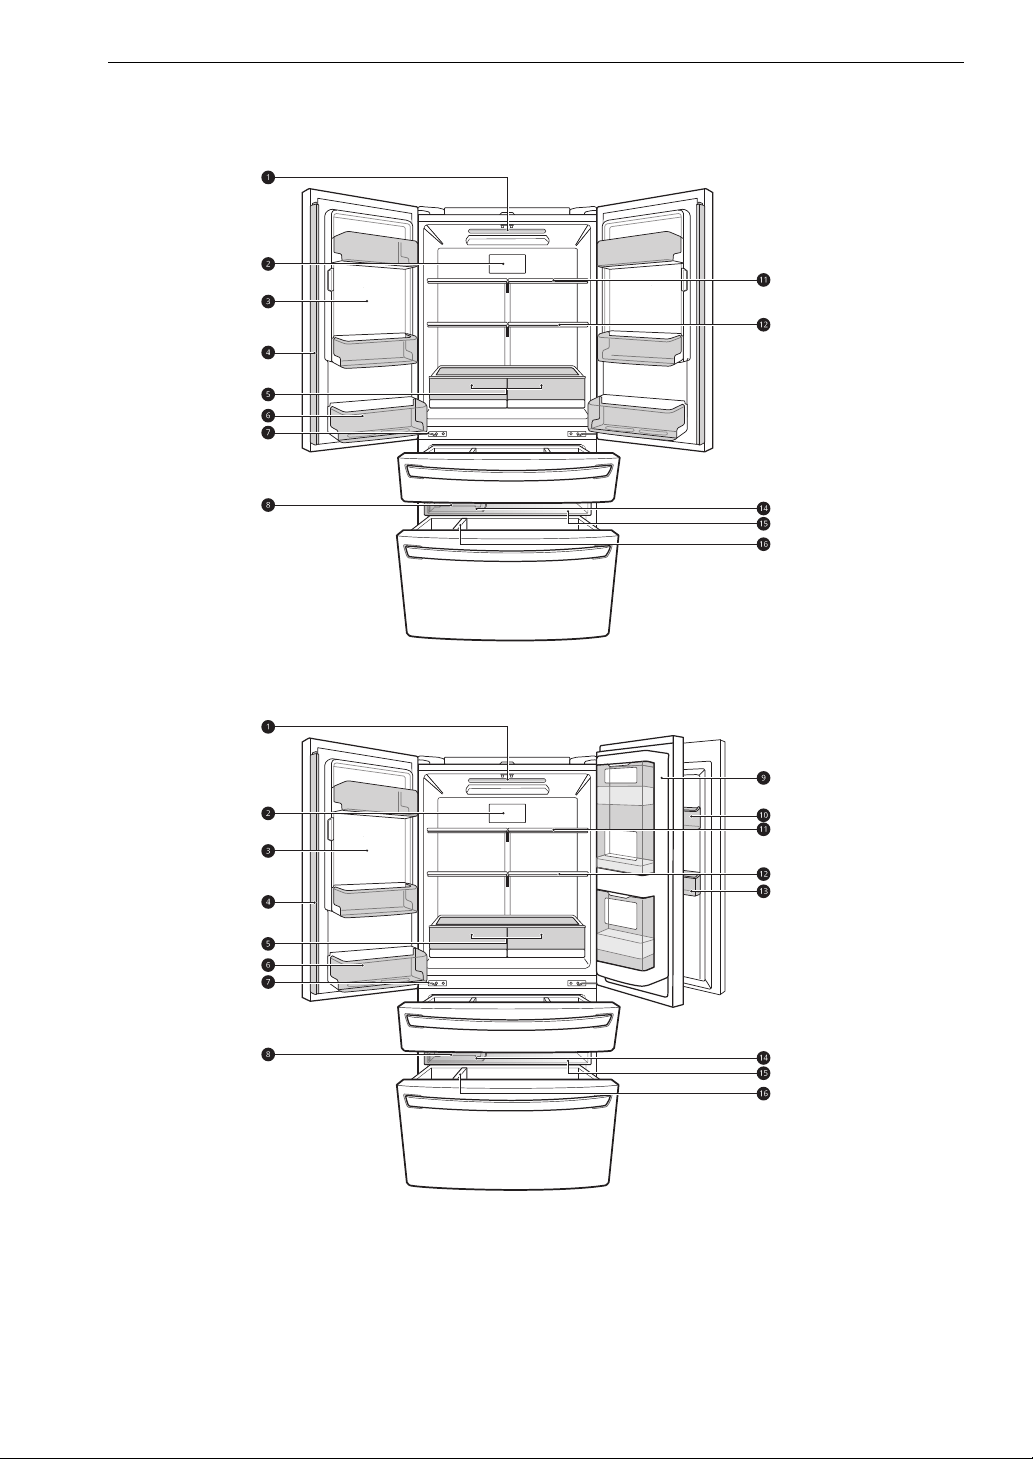
PRODUCT OVERVIEW
Interior
Standard Door : LLMXS
3006* / LRMXS3006*
Door-in-Door: LRMDS3006
* / LRMDC2306*
Loading ...
Loading ...
Loading ...
<
5
6
7
8
9
10
>
File type: PDF
File name: 23339399_lrmxs3006s.pdf
File size: 2.05 MB
File Language: Spanish
Pages: 68
Author: LG Electronics
File created: 2022-08-17
Published: 2022-08-20
Updated: 2023-04-23
Download File
Table of Contents
×
IMPORTANT SAFETY INSTRUCTIONS
3
READ ALL INSTRUCTIONS BEFORE USE
3
Safety Messages
3
WARNING
3
Installation
3
Operation
4
Maintenance
5
Disposal
5
Grounding Instructions
5
Risk of Fire and Flammable Materials
5
CAUTION
6
Installation
6
Operation
6
Maintenance
6
PRODUCT OVERVIEW
7
Product Features
7
Exterior
7
Interior
8
Product Specifications
10
INSTALLATION
11
Before Installing
11
Installation Overview
11
Unpacking the Refrigerator
12
Choosing the Proper Location
12
Water
12
Electricity
12
Flooring
12
Ambient Temperature
12
Dimensions and Clearances
13
Removing/Assembling Handles
14
Removing Refrigerator Handles
14
Assembling Refrigerator Handles
14
Removing Freezer Drawer Handles
14
Assembling Freezer Drawer Handles
14
Removing/Assembling Doors and Drawers
15
Removing the Hinge Cover
15
Removing the Left Refrigerator Door
15
Removing the Right Refrigerator Door
16
Removing the Freezer Drawer
16
Removing the Full Convert Drawer
17
Assembling the Freezer Drawer
18
Assembling the Full Convert Drawer
18
Assembling the Right Refrigerator Door
19
Assembling the Left Refrigerator Door
19
Assembling the Hinge Cover
20
Connecting Refrigerator to Water Supply
20
Before Beginning
20
Water Pressure
20
Supplies Needed
21
Connecting Water Line to Refrigerator
21
Leveling and Door Alignment
22
Leveling
22
Door Alignment
22
Refrigerator Type A
22
Refrigerator Type B
23
Turning on the Power
24
Position the Refrigerator
24
Start the Icemaker
24
OPERATION
25
Before Use
25
Checklist
25
Control Panel
26
Control Panel Features
26
Changing the Craft Ice Mode
27
Sabbath Mode
28
Using the Sabbath Mode
28
Ice and Water Dispenser
29
Before Using the Ice and Water Dispenser
29
Using the Ice and Water Dispenser
29
Using the Measured Fill
29
Locking the Ice and Water Dispenser
30
Cleaning the Dispenser
30
In-Door Ice Bin
30
Before Using the In-Door Ice Bin
30
Detaching the In-Door Ice Bin
30
Assembling the In-Door Ice Bin
31
Automatic Icemaker
31
Before Using the In-Door Icemaker
31
In-Door Icemaker
31
Before Using the Freezer Icemaker
31
Freezer Icemaker (Cubed Ice)
32
Freezer Icemaker (Craft IceTM)
32
Turning the Icemaker On/Off
32
Normal Sounds You May Hear
32
Preparing for Vacation
33
Storing Food
33
Food Storage Tips
33
How to Store Food
33
Storing Frozen Food
34
Freezing
34
Packaging
34
Humidity Controlled Crispers
34
Using the Humidity Controlled Crispers
34
Removing/Assembling the Humidity Controlled Crispers
34
Refrigerator Shelves
35
Using the Folding Shelf
35
Detaching/Assembling the Shelf
36
InstaView
36
InstaView Door-in-Door
36
InstaView Door-in-Door Compartment
36
Door-in-Door
37
Door-in-Door Compartment
37
Door-in-Door Bin
37
Using the EasyLift Bin
37
Door-in-Door Case
38
Door Bins
38
Detaching/Assembling the Door Bin
38
Durabase
38
Using the Durabase
38
Full-Convert DrawerTM
39
Using the Full ConvertTM Drawer
39
SMART FUNCTIONS
40
LG ThinQ Application
40
LG ThinQ Application Features
40
Before Using LG ThinQ Application
40
Installing the LG ThinQ Application
41
Connecting to Wi-Fi
41
Wireless LAN Module Specifications
41
FCC Notice
41
FCC RF Radiation Exposure Statement
41
Industry Canada Statement
42
IC Radiation Exposure Statement
42
Open Source Software Notice Information
42
Smart Grid Function
42
Smart Grid Application Features
42
Using the Smart Grid Function
42
Delay Appliance Load (DAL)
42
Temporary Appliance Load Reduction (TALR)
43
Override Smart Grid Mode
43
LG Open API
43
API List
43
Smart DiagnosisTM Feature
43
Using LG ThinQ to Diagnose Issues
43
Using Audible Diagnosis to Diagnose Issues
43
MAINTENANCE
45
Cleaning
45
General Cleaning Tips
45
Exterior
45
Inside Walls
45
Door Liners and Gaskets
45
Plastic Parts (Covers and Panels)
45
Condenser Coils
45
Air Filter
45
Replacing the Fresh Air Filter
45
Water Filter
46
Before Replacing the Water Filter
46
Replacing the Water Filter
47
Performance Data Sheet
48
Replacement Cartridge: LT1000P, LT1000PC, LT1000PCS or ADQ747935**
49
TROUBLESHOOTING
50
FAQs
50
Frequently Asked Questions
50
Before Calling for Service
51
Cooling
51
Craft Ice
53
Ice
53
Water
56
Parts & Features
57
Noises
58
Wi-Fi
59
LIMITED WARRANTY
60
USA
60
TERMS AND CONDITIONS
60
THIS LIMITED WARRANTY DOES NOT COVER:
60
PROCEDURE FOR RESOLVING DISPUTES:
61
Canada
64
TERMS AND CONDITIONS
64
THIS LIMITED WARRANTY DOES NOT COVER:
65
PROCEDURE FOR RESOLVING DISPUTES:
66
Search:
×
Search