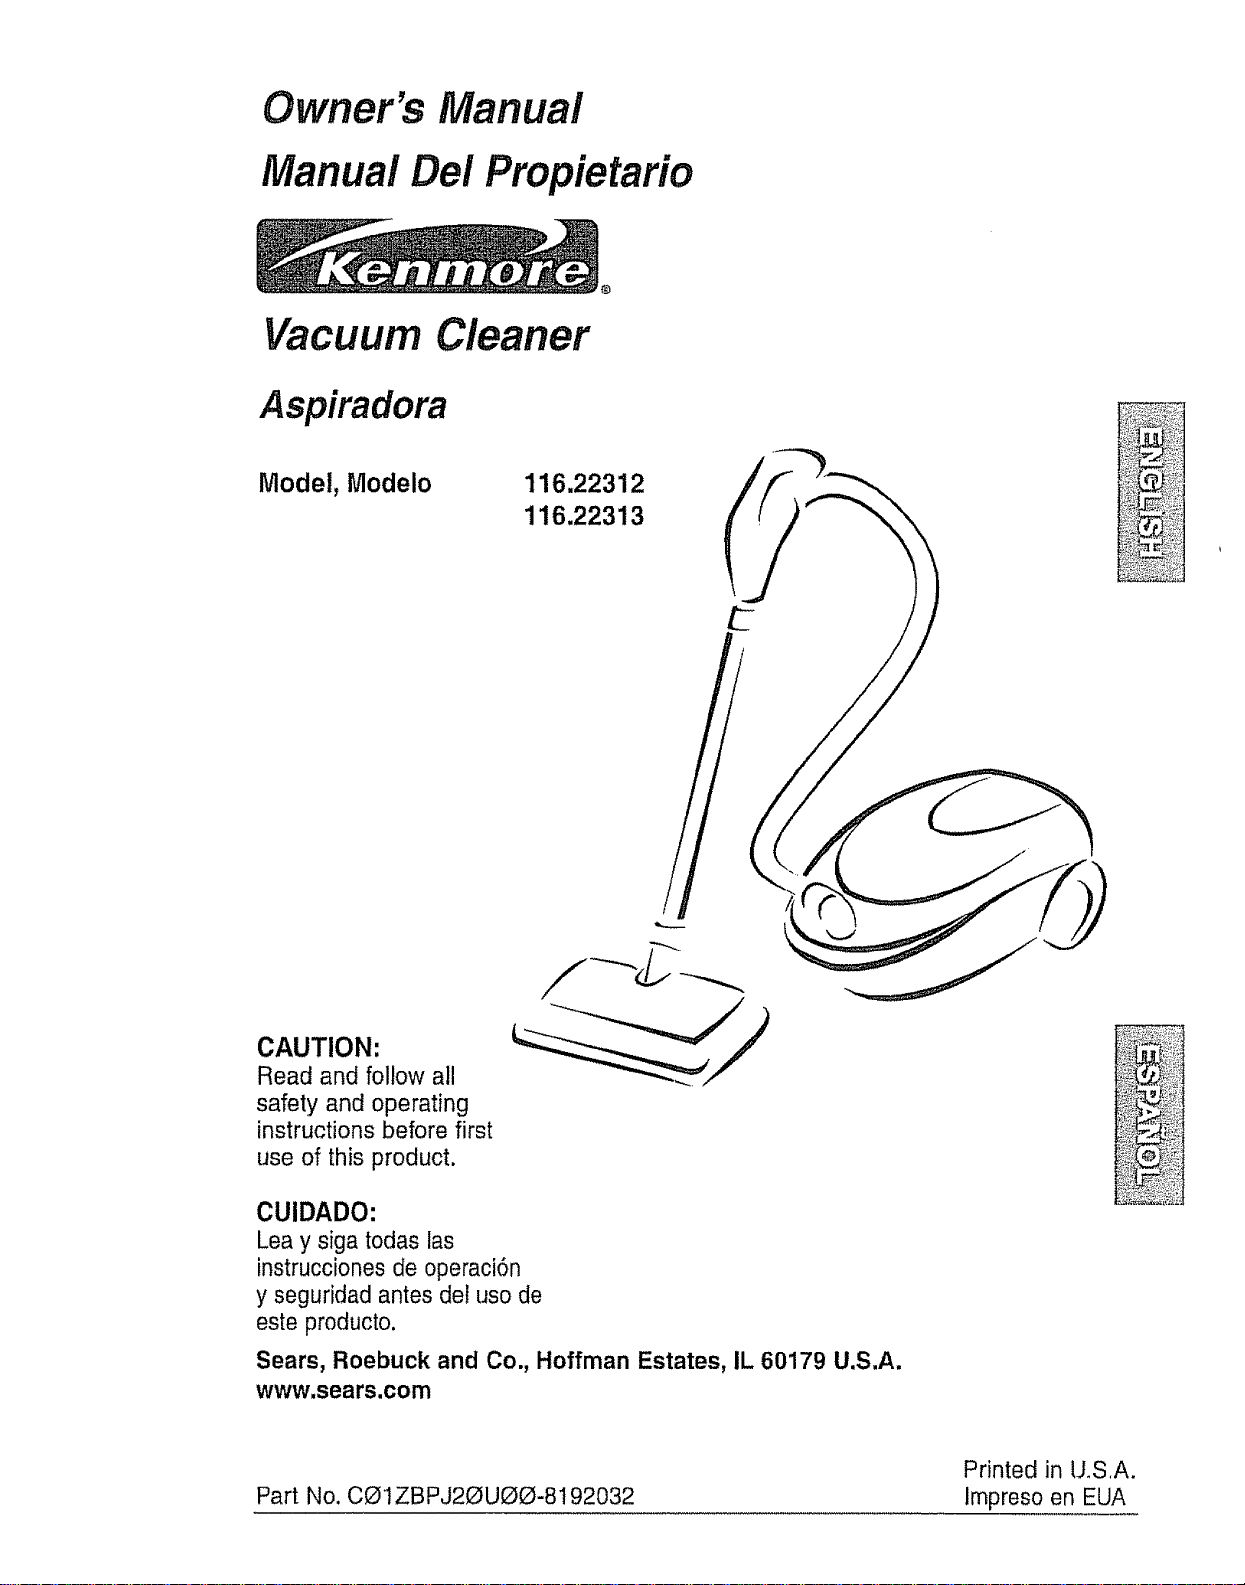
Owner's Manual
Manual Del Propietario
Vacuum Cleaner
Aspiradora
Model, Modelo
116.22312
116.22313
CAUTION:
Read and follow all
safety and operating
instructionsbefore first
use of this product.
CUIDADO:
Lea y siga todas las
instrucciones de operaci6n
y seguridad antes del uso de
este producto.
Sears, Roebuck and Co., Hoffman Estates, IL 60179 U.S.A.
www,sears,com
Part No. CO1ZBPJ20UO_-8192032
Printed in U.S.A.
Impreso en EUA

Before Using Your New Vacuum ......... 2
Kenmore Vacuum Cleaner Warranty . ._2
Important Safety Instructions ......... 3
Parts and Features .................. 4-5
Assembly Instructions ................. 6.7
Use .............................................. 8
How to Start ......................... 8
Vacuuming Tips ...................... 9
Suggested Pile Height Settings .......... 9
Attachments ........................ t0
Attachment Use Chart ................ I0
Performance Features ..................... 11
How Your Vacuum Works ............... 12
Canister Care ............................ 12
Bag Changing ....................... 't2
Cleaning Exterior and Attachments ..... I3
Motor Safety Filter Changing ............. 13
Exhaust Filter Changing ............... 14
Power-Mate s Care ................... 14
Light Bulb Changing .................. 15
Belt Changing and Brush Cleaning , o,_15-16
Agitator Servicing .................... 17
Agitator Assembiy ................... 17
Troubleshooting ........................ 18
Requesting Assistance
Or Service ...................... Back Cover
Please read this guide° tt will help you assemble and operate your new Kenmore vacuum in
the safest and most effective way°
For more information about vacuum cleaner care and operation, call your nearest Sears store.
You will need the complete model and serial numbers when requesting information.Your vacu-
um's model and serial numbers are located on the Model and Serial Number Plate.
Use the space below to record the model number and serial number of your new Kenmore
vacuum.
Model No.
Serial No.
Date of Purchase
Keep this book and your sales check (receipt) in a safe place for future reference.
LIMITED ONE YEAR WARRANTY ON KENMORE VACUUM CLEANER
This warranty is for one year from the date of purchase, and includes only private household
vacuum cleaner use. During the warranty year, when this vacuum cleaner is operated and
maintained according to the owner's manual instructions, Sears will repair any defects in
material or workmanship free of charge°
This warranty excludes vacuum bags, belts, light bulbs, and filters, which are expendable parts
and become worn during normal use.
For warranty service, return this vacuum cleaner to the nearest Sears Service Center in
the United States.
This warranty applies only while this product is in use in the United States.This warranty gives
you specific legal rights, and you may also have other rights which vary from state to state.
Sears, Roebuck and Co., D/817 WA, Hoffman Estates, IL 60179
2
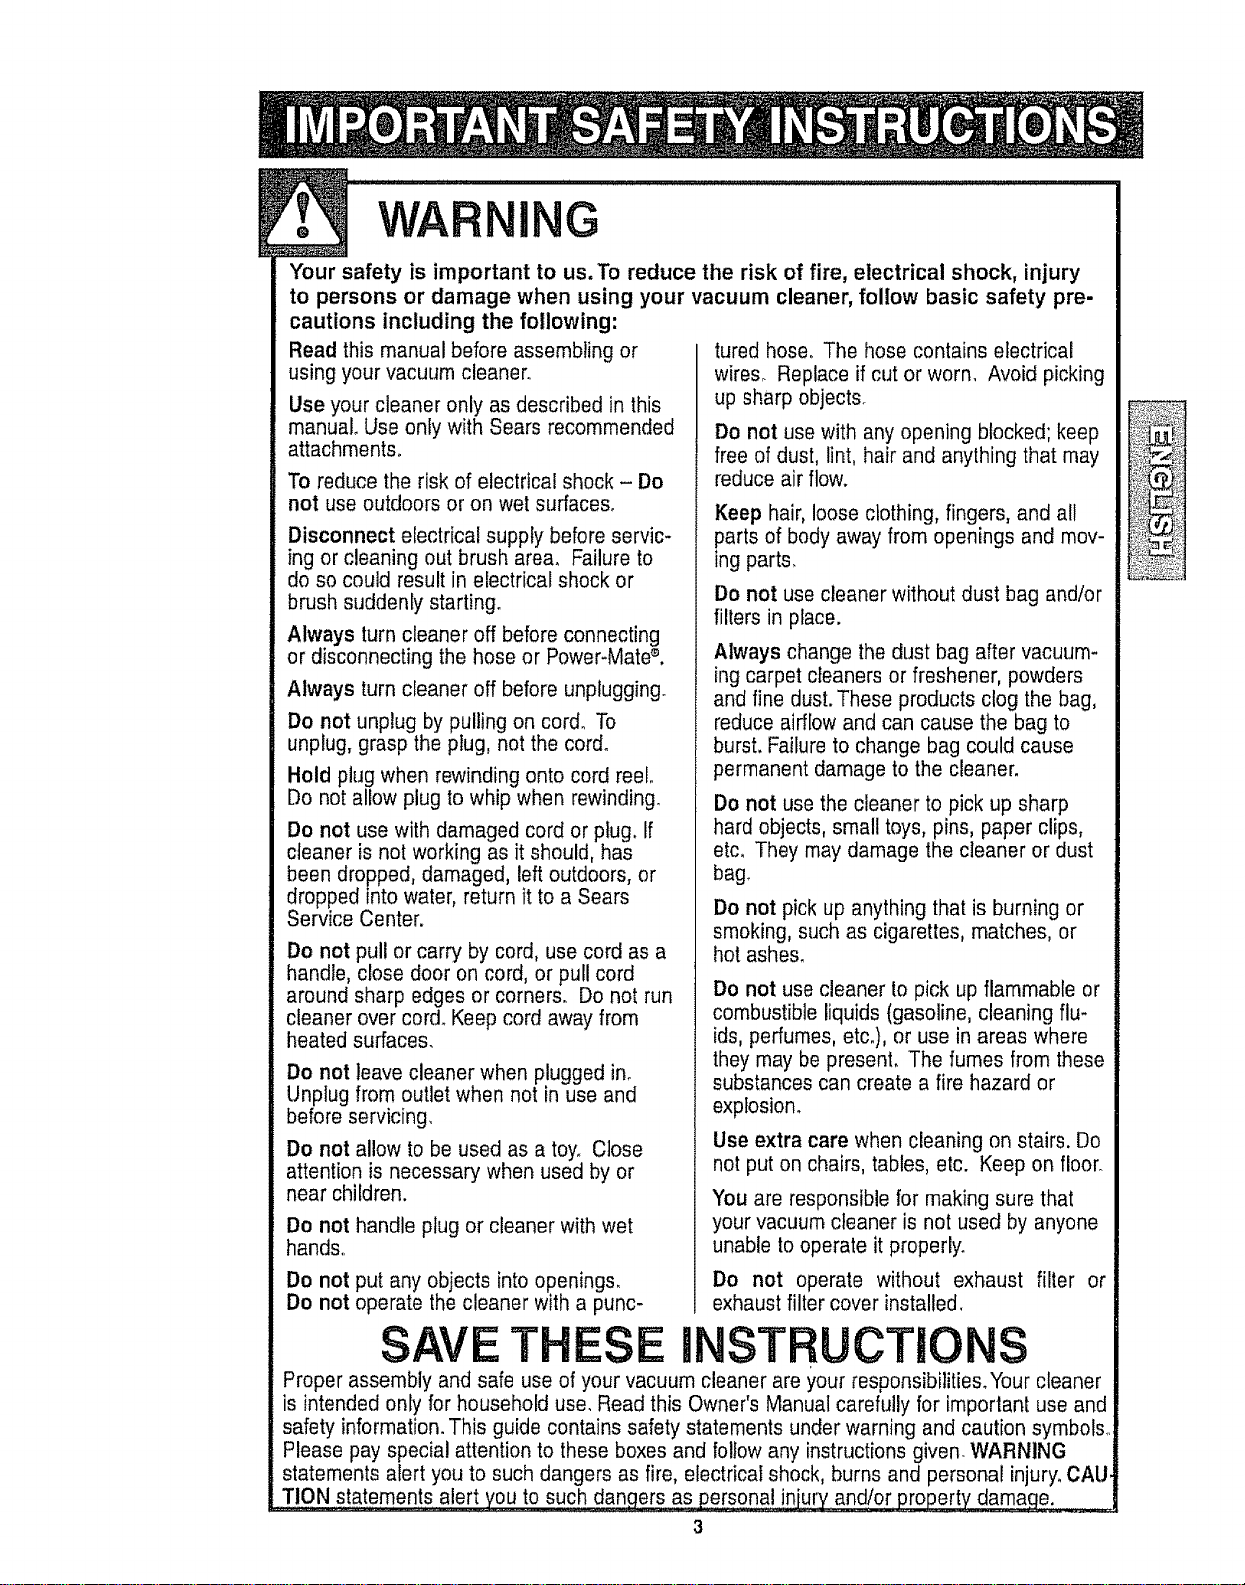
WARNING
Your safety is important to us. To reduce the risk of fire, electrical shock, injury
to persons or damage when using your vacuum cleaner, follow basic safety pre-
cautions including the following:
Read this manual before assembling or
using your vacuum cleaner.
Use your cleaner only as described in this
manual. Use only with Sears recommended
attachments.
To reduce the risk of electrical shock- Do
not use outdoors or on wet surfaces.
Disconnect electrical supply before servic-
ing or cleaning out brush area. Failure to
do so could result in electrical shock or
brush suddenly starting.
Always turn cleaner off before connecting
or disconnecting the hose or Power-Mate ®.
Always turn cleaner off before unplugging_
Do not unplug by pulling on cord° To
unplug, grasp the plug, not the cord.
Hold plug when rewinding onto cord reel
Do not allow plug to whip when rewinding.
Do not use with damaged cord or plug. If
cleaner is not working as it should, has
been dropped, damaged, left outdoors, or
dropped into water, return it to a Sears
Service Center.
Do not pull or carry by cord, use cord as a
handle, close door on cord, or pull cord
around sharp edges or corners. Do not run
cleaner over cord_ Keep cord away from
heated surfaces_
Do not leave cleaner when plugged in.
Unplug from outlet when not in use and
before servicing,
Do not allow to be used as a toy_ C]ose
attention is necessary when used by or
near children.
Do not handleplug or cleaner withwet
hands,
Do not put any objects into openings.
Do not operate the cleaner with a punc-
SAV E
tured hose. The hose contains electrical
wires. Replace if cut or worn. Avoid picking
up sharp objects.
Do not use with any opening blocked; keep
free of dust, lint, hair and anything that may
reduce air flow.
Keep hair, loose clothing, fingers, and all
parts of body away from openings and mov-
ing parts_
Do not use cleaner without dust bag and/or
filters in place.
Always change the dust bag after vacuum-
ing carpet cleaners or freshener, powders
and fine dust. These products clog the bag,
reduce airf[ow and can cause the bag to
burst. Failure to change bag could cause
permanent damage to the cleaner.
Do not use the cleaner to pick up sharp
hard objects, small toys, pins, paper clips,
etc. They may damage the cleaner or dust
bag.
Do not pick up anything that is burning or
smoking, such as cigarettes, matches, or
hot ashes.
Do not use cleaner to pick up flammable or
combustible liquids (gasoline, cleaning flu-
ids, perfumes, etco), or use in areas where
they may be present. The fumes from these
substances can create a fire hazard or
exptosion_
Use extra care when cleaning on stairs. Do
not put on chairs, tables, etc. Keep on floor_
You are responsible for making sure that
your vacuum cleaner is not used by anyone
unable to operate it properly.
Do not operate without exhaust filter or
exhaust filter cover installed.
INSTRUCTIONS
Proper assembly and safe use of your vacuum cleaner are your responsibilities. Your cleaner
is intended only for household use. Read this Owner's Manual carefully for important use and
safety information. This guide contains safety statements under warning and caution symbols
Please pay special attention to these boxes and follow any instructions given WARNING
statements alert you to such dangers as fire, etectricaI shock, burns and personal injury. CAU
TION Statements alert you to such dangers as personal injury a_nd/orp[oPerty darnag e_
3
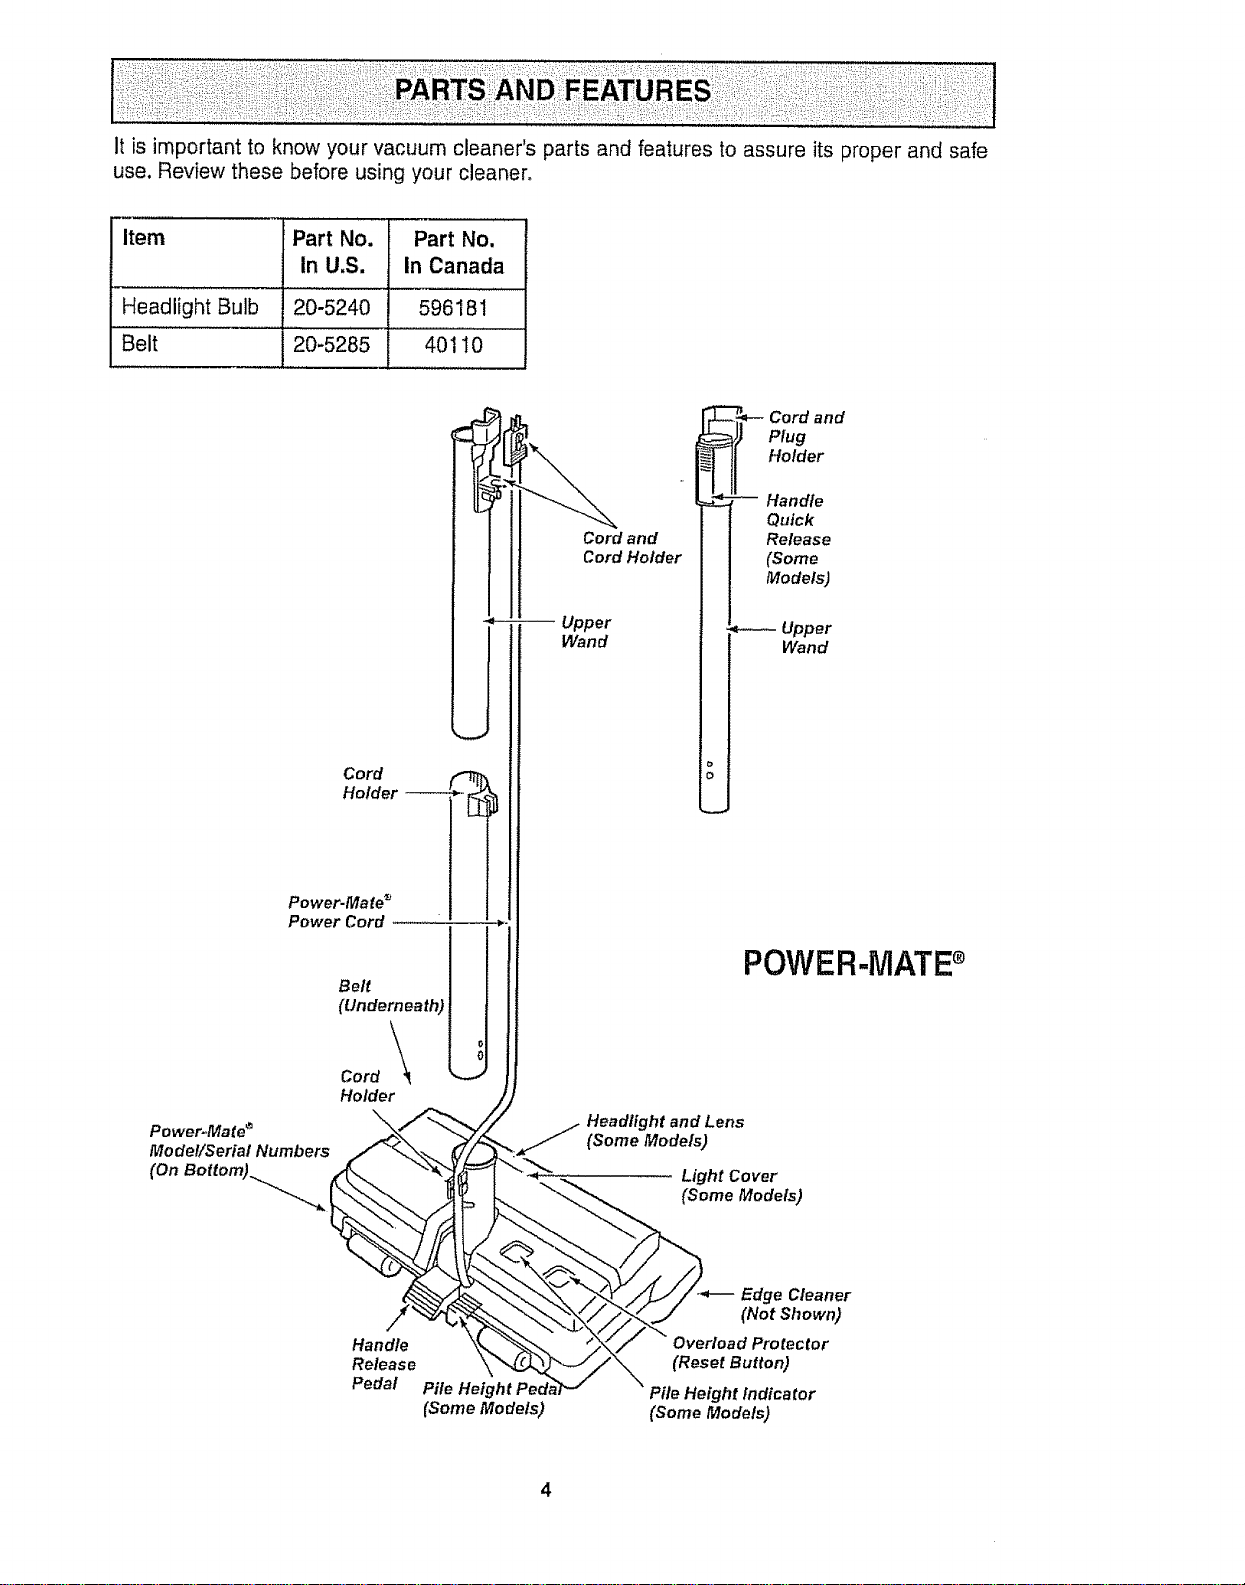
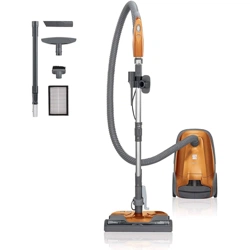
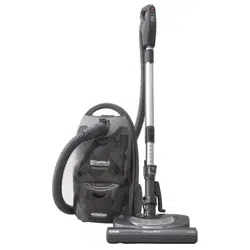
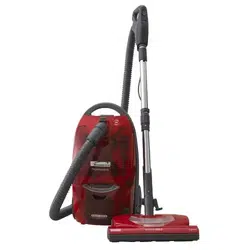
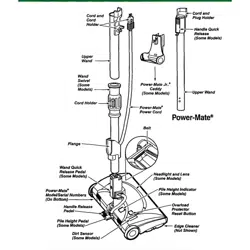
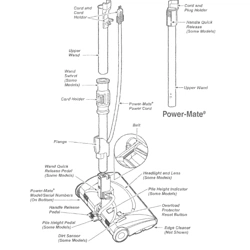
itisimportantto knowyourvacuumcleaner'spartsandfeaturestoassureitsproperandsafe
use.Reviewthesebeforeusingyourcleaner,
item PartNo. Part No,
In U,S. In Canada
Headlight Bulb 20-5240 596181
Belt 20-5285 401 I0
Cord
Holder
Power.Mate ®
Power Cord
Power=Mates
Model/Serial Numbers
(On Bottom)_...,
Belt
(Underneath)
Cord \\_
Holder
Cord and
Cord Holder
Upper
Wand
_- Cord and
Plug
HoMer
-- Handle
Quick
Release
(Some
Models)
Upper
Wand
POWER-MATE
Headlight and Lens
(Some Models)
Light Cover
(Some Models)
Handle
Release
Pedal
Pile Heig
(SomeModels)
Edge Cleaner
(Not Shown)
Overload Protector
(Reset Button)
Pile Height indicator
(Some Models)
4
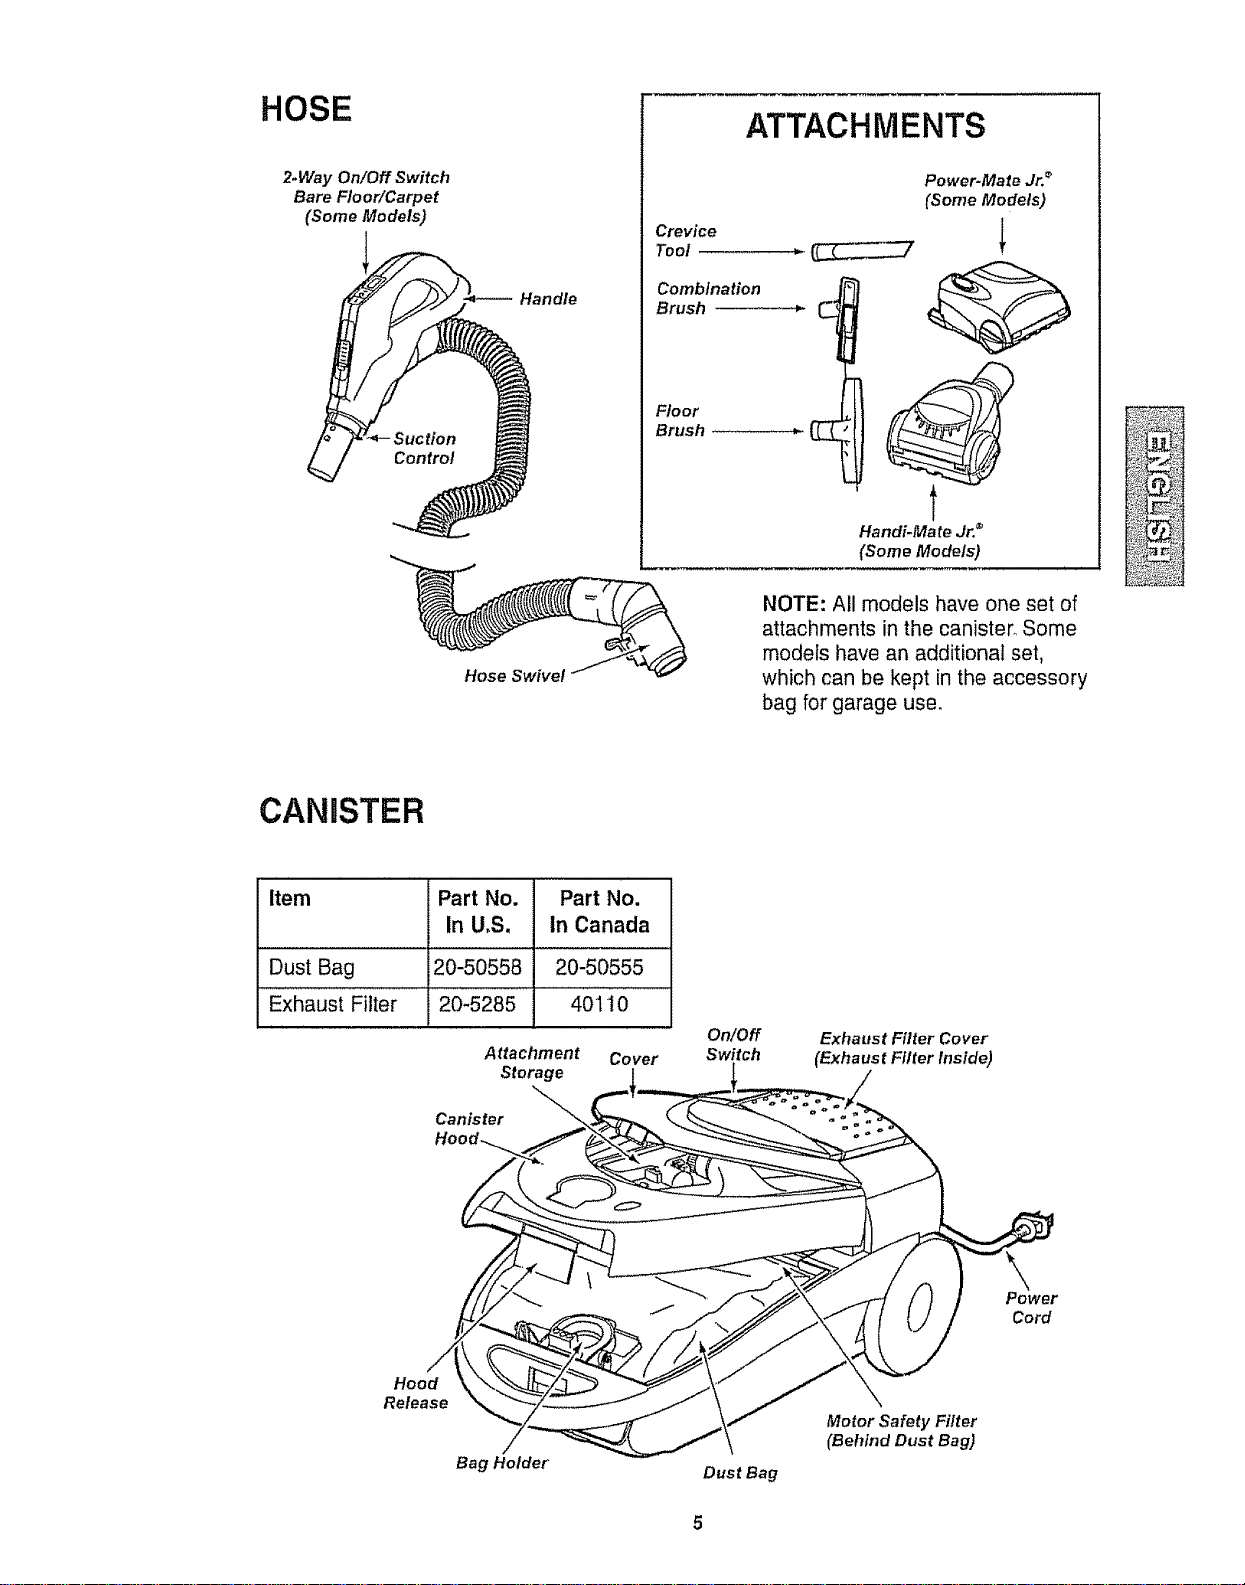
HOSE
2-Way On/Off Switch
Bare FloorlCarpet
(Some Models)
Handle
Hose Swivel
Crevice
Toot
Combination
Brush
Floor
Brush
ATTACHMENTS
Power-Mate Jr. _
(Some Models)
t
Handi-Ma te Jr. ®
(Some Models)
NOTE: All models have one set of
attachments in the canister° Some
models have an additional set,
which can be kept in the accessory
bag for garage use.
CANISTER
Item Part No. Part No.
In U,S, in Canada
Dust Bag 20-50558 20-50555
Exhaust Filter 20-5285 401 I0
Attachment Cover
Storage
Canister
On/Off
Switch
Exhaust Filter Cover
(Exhaust Filter Inside)
Power
Cord
Hood
Release
Bag Holder
Dust Bag
Motor Safety Filter
(Behind Dust Bag)
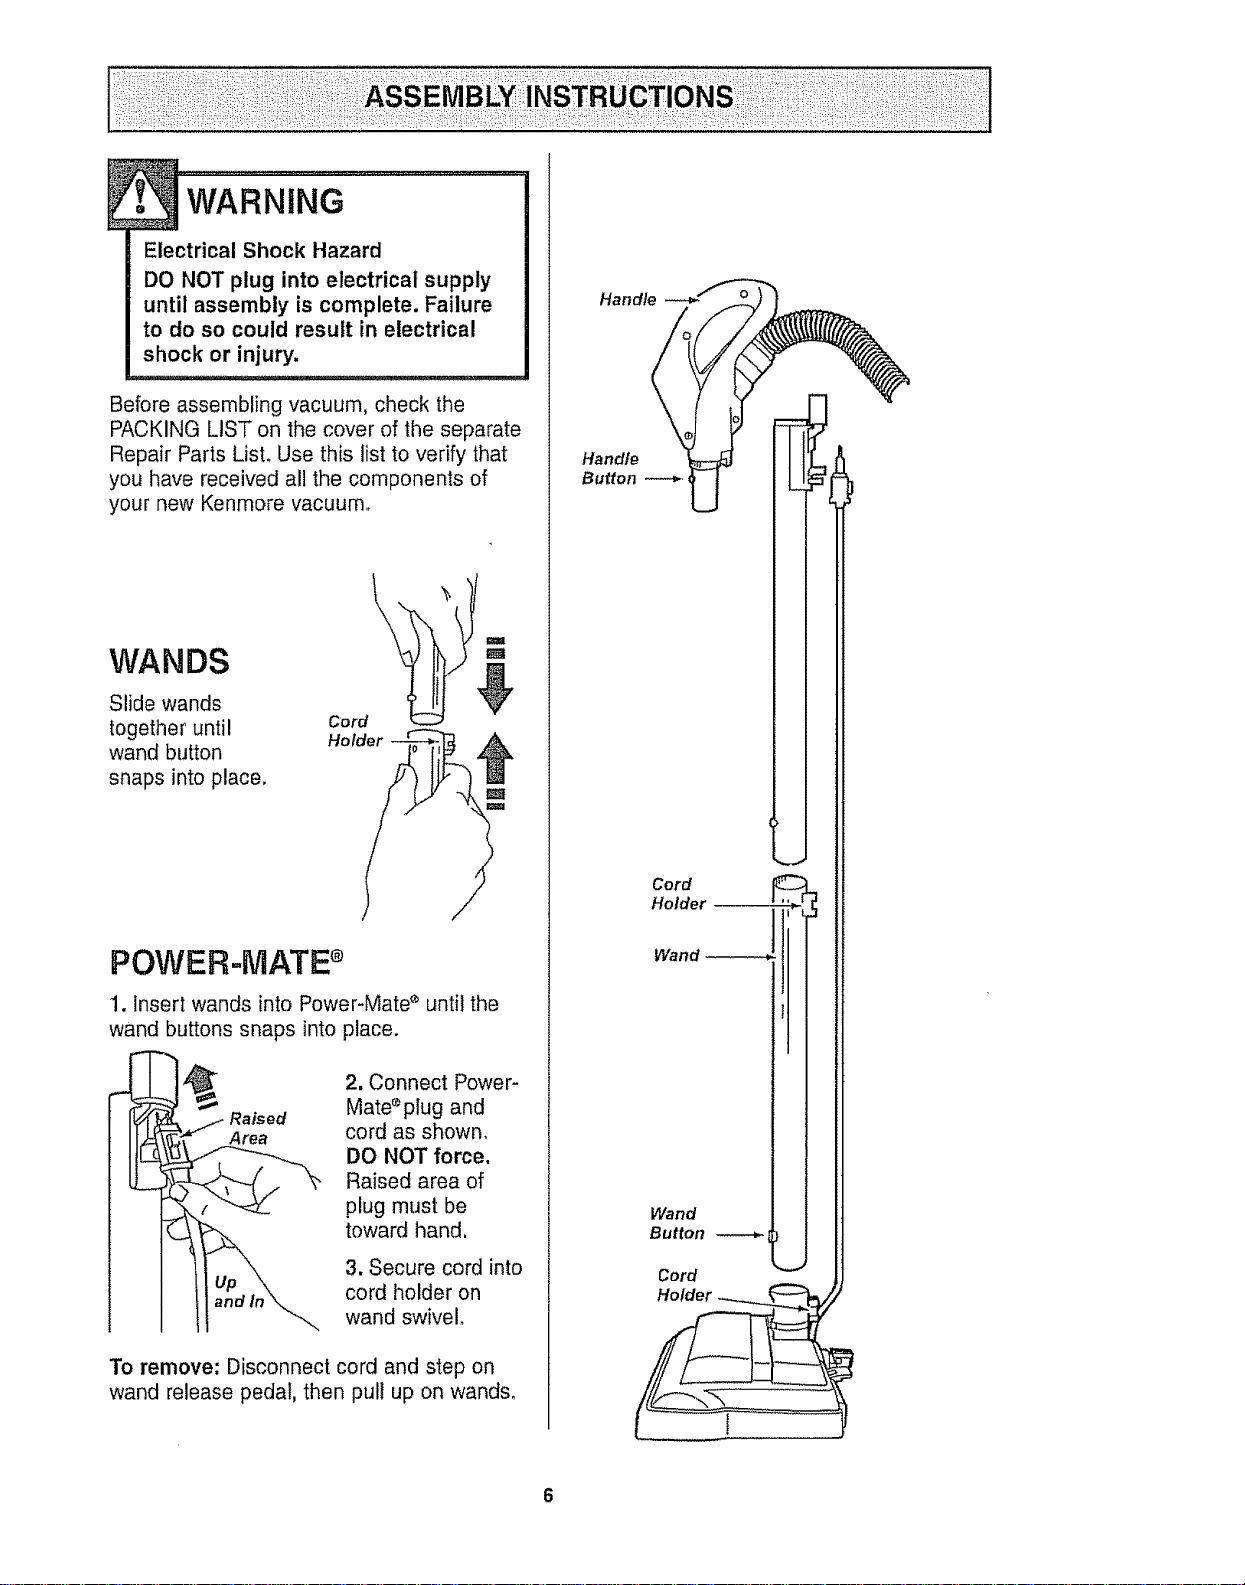
Electrical Shock Hazard
DO NOT plug into electrical supply
until assembly is complete. Failure
to do so could result in electrical
shock or injury.
Before assembling vacuum, check the
PACKING LIST on the cover of the separate
Repair Parts LisL Use this list to verify that
you have received all the components of
your new Kenmore vacuum,,
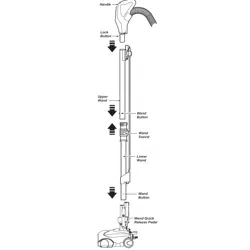
WANDS
Slide wands
together until
wand button
snaps into place.
\
m
m
Cord
Hol
POWER-MATE
1. Insert wands into Power-Mate _ until the
wand buttons snaps into place.
Area
2. Connect Power-
Mate _plug and
cord as shown,
DO NOT force,
Raised area of
plug must be
toward hand,
3. Secure cord into
cord holder on
wand swivel.
To remove: Disconnect cord and step on
wand release pedal, then pul! up on wands,
Handle
Handle
Button
Cord
Holder
Wand
Wand
Button
Cord
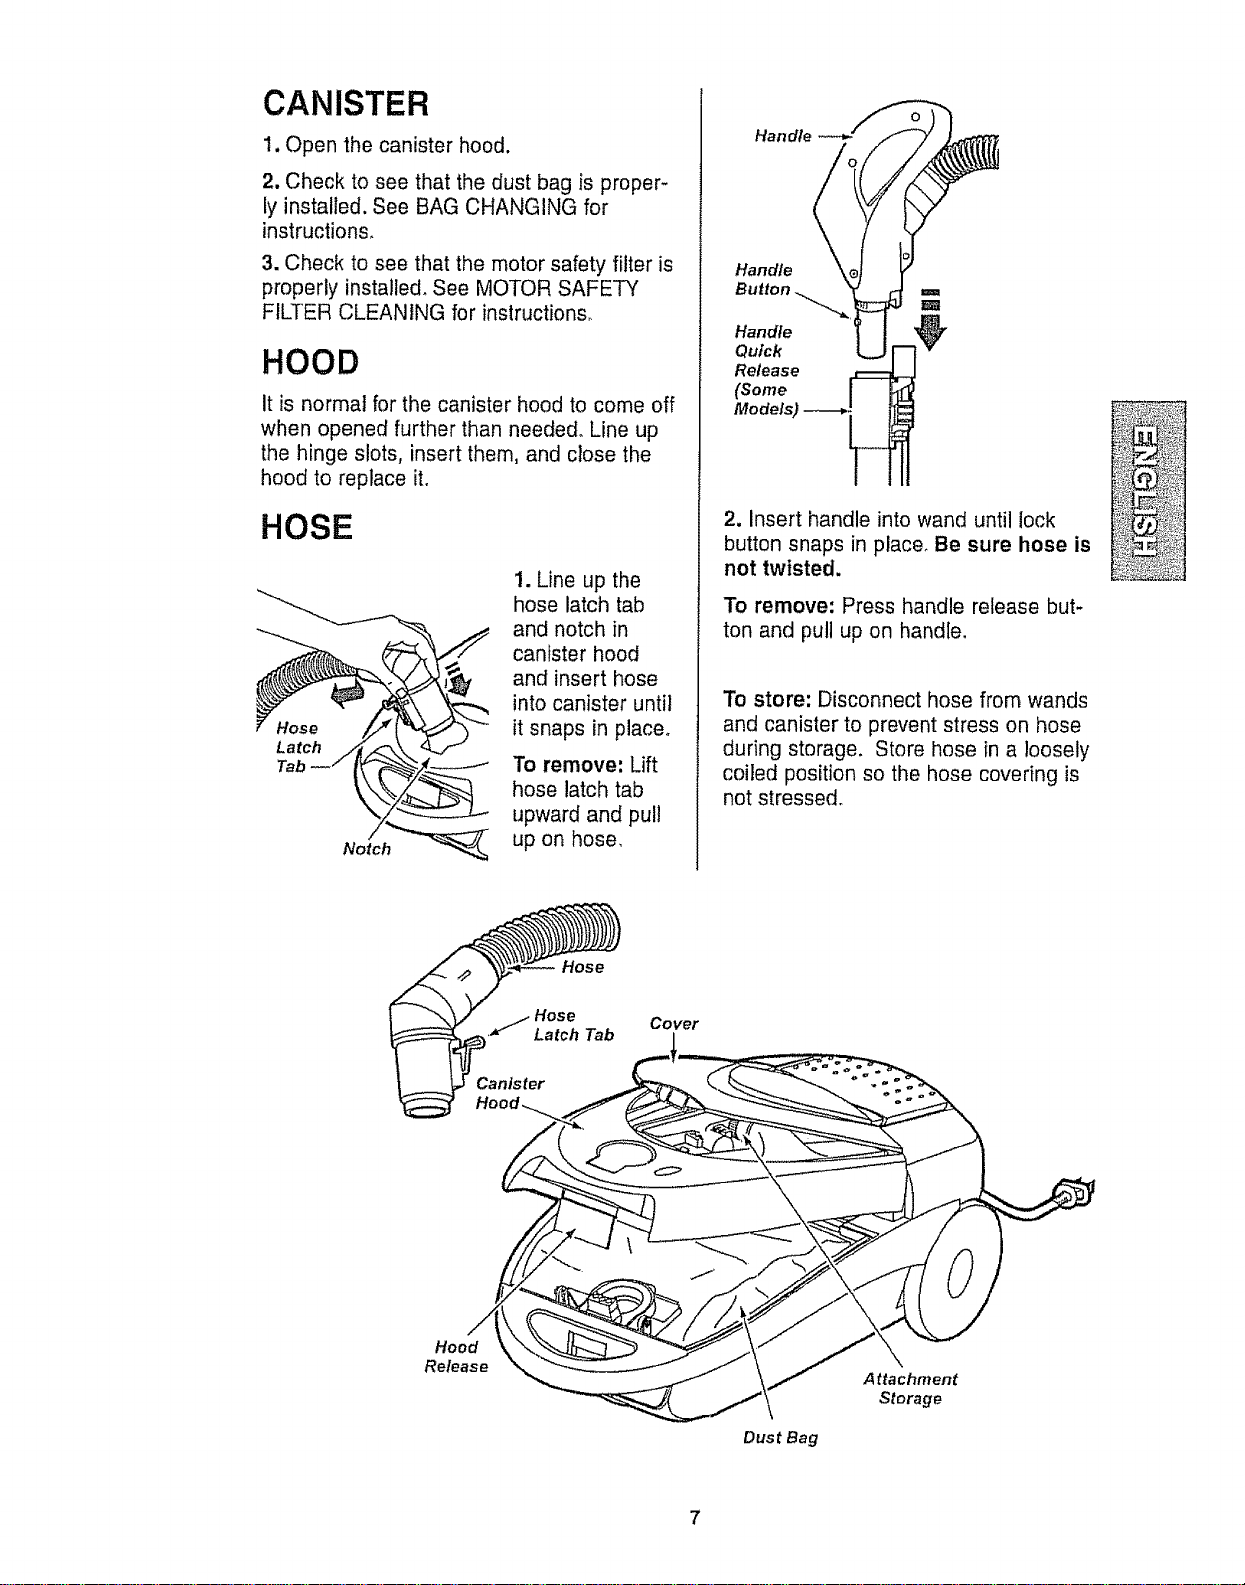
CANISTER
1. Open the canister hood.
2. Check to see that the dust bag is proper-
ly installed. See BAG CHANGING for
instructions.
3. Check to see that the motor safety filter is
properly installe& See MOTOR SAFETY
FILTER CLEANING for instructions°
HOOD
It is normal for the canister hood to come off
when opened further than needed° Line up
the hinge slots, insert them, and close the
hood to replace it.
HOSE
1. Line up the
hose latch tab
and notch in
canister hood
and insert hose
into canister until
it snaps in place°
To remove: Lift
hose latch tab
upward and pull
up on hose,
Handle
Handle
Handle
Quick
Release
(Some
Models)
2. Insert handle into wand until lock
button snaps in place. Be sure hose is
not twisted.
To remove: Press handle release but-
ton and pull up on handle.
To store: Disconnect hose from wands
and canister to prevent stress on hose
during storage. Store hose in a loosely
coiled position so the hose covering is
not stressed.
Hose
Cover
Hood
Release
Dust Bag
Attaehment
Storage
7
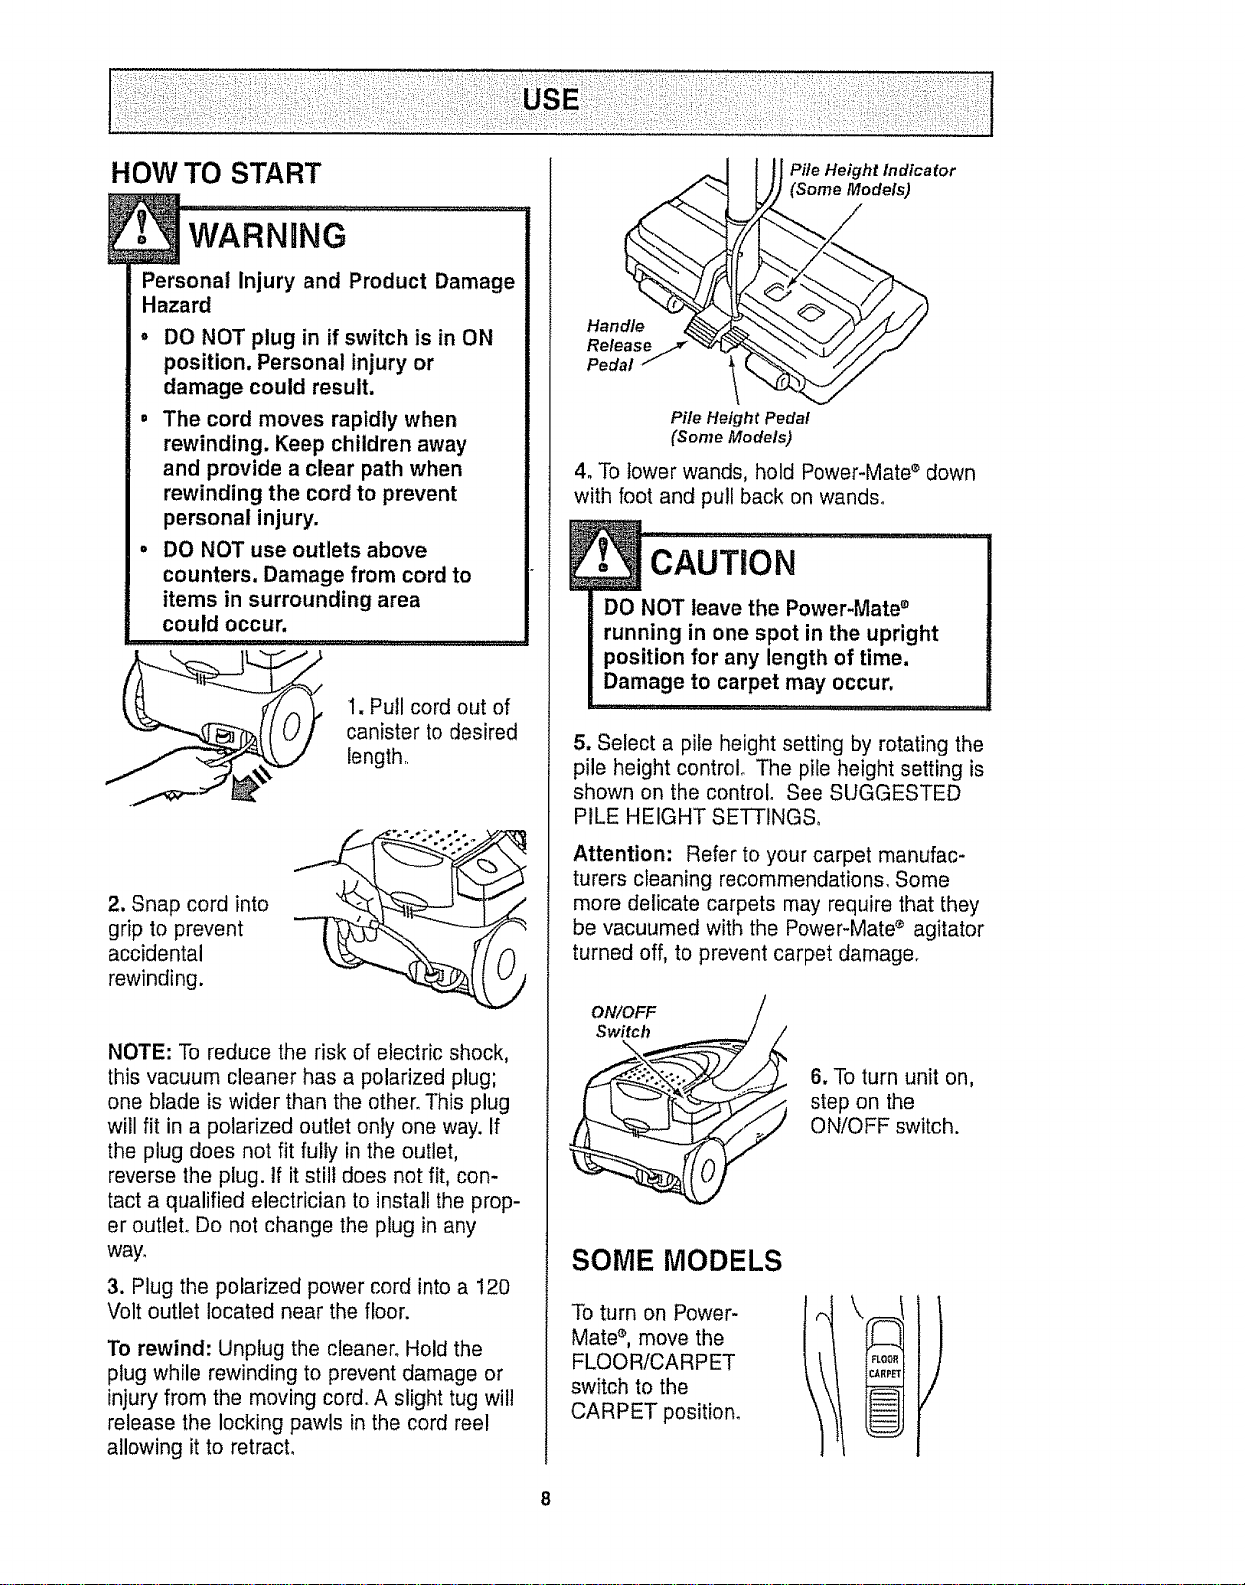
HOW TO START
Personal Injury and Product Damage
Hazard
• DO NOT plug in if switch is in ON
position. Personal injury or
damage could result.
= The cord moves rapidly when
rewinding. Keep children away
and provide a clear path when
rewinding the cord to prevent
personal injury.
• DO NOT use outlets above
counters. Damage from cord to
items in surrounding area
could occur.
,,1..................
L_ 1. Pull cord out of
canister to desired
length,
2. Snap cord into
grip to prevent
accidental
rewinding.
NOTE: To reduce the risk of electric shock,
this vacuum cleaner has a polarized plug;
one blade is wider than the other. This plug
will fit in a polarized outlet only one way. If
the plug does not fit fully in the outlet,
reverse the plug. If it still does not fit, con-
tact a qualified electrician to install the prop-
er outlet. Do not change the plug in any
way.
3. Plug the polarized power cord into a 120
Volt outlet located near the floor.
To rewind: Unplug the cleaner. Hold the
plug while rewinding to prevent damage or
injury from the moving cord. A slight tug will
release the locking pawls in the cord reel
allowing it to retracL
Han .d_
Rele.,s
Pedal 1
Pile Height
_ fle Height Indicator
(Some Models)
_edal
(Some Models)
4. To lower wands, hold Power-Mate ®down
with foot and pull back on wands°
cAuTi0N .........
DO NOT leave the Power-Mate ®
running in one spot in the upright
position for any length of time.
Damage to carpet may occur.
5. Select a pile height setting by rotating the
pile height control The pile height setting is
shown on the control. See SUGGESTED
PILE HEIGHT SETTINGS°
Attention: Refer to your carpet manufac-
turers cleaning recommendations, Some
more delicate carpets may require that they
be vacuumed with the Power-Mate _ agitator
turned off, to prevent carpet damage.
ON/OFF
Switch
\
.__ 6, To turn unit on,
step on the
• ON/OFF switch.
SOME MODELS
To turn on Power-
Mate `_,move the
FLOOR/CARPET
switch to the
CARPET position_
8
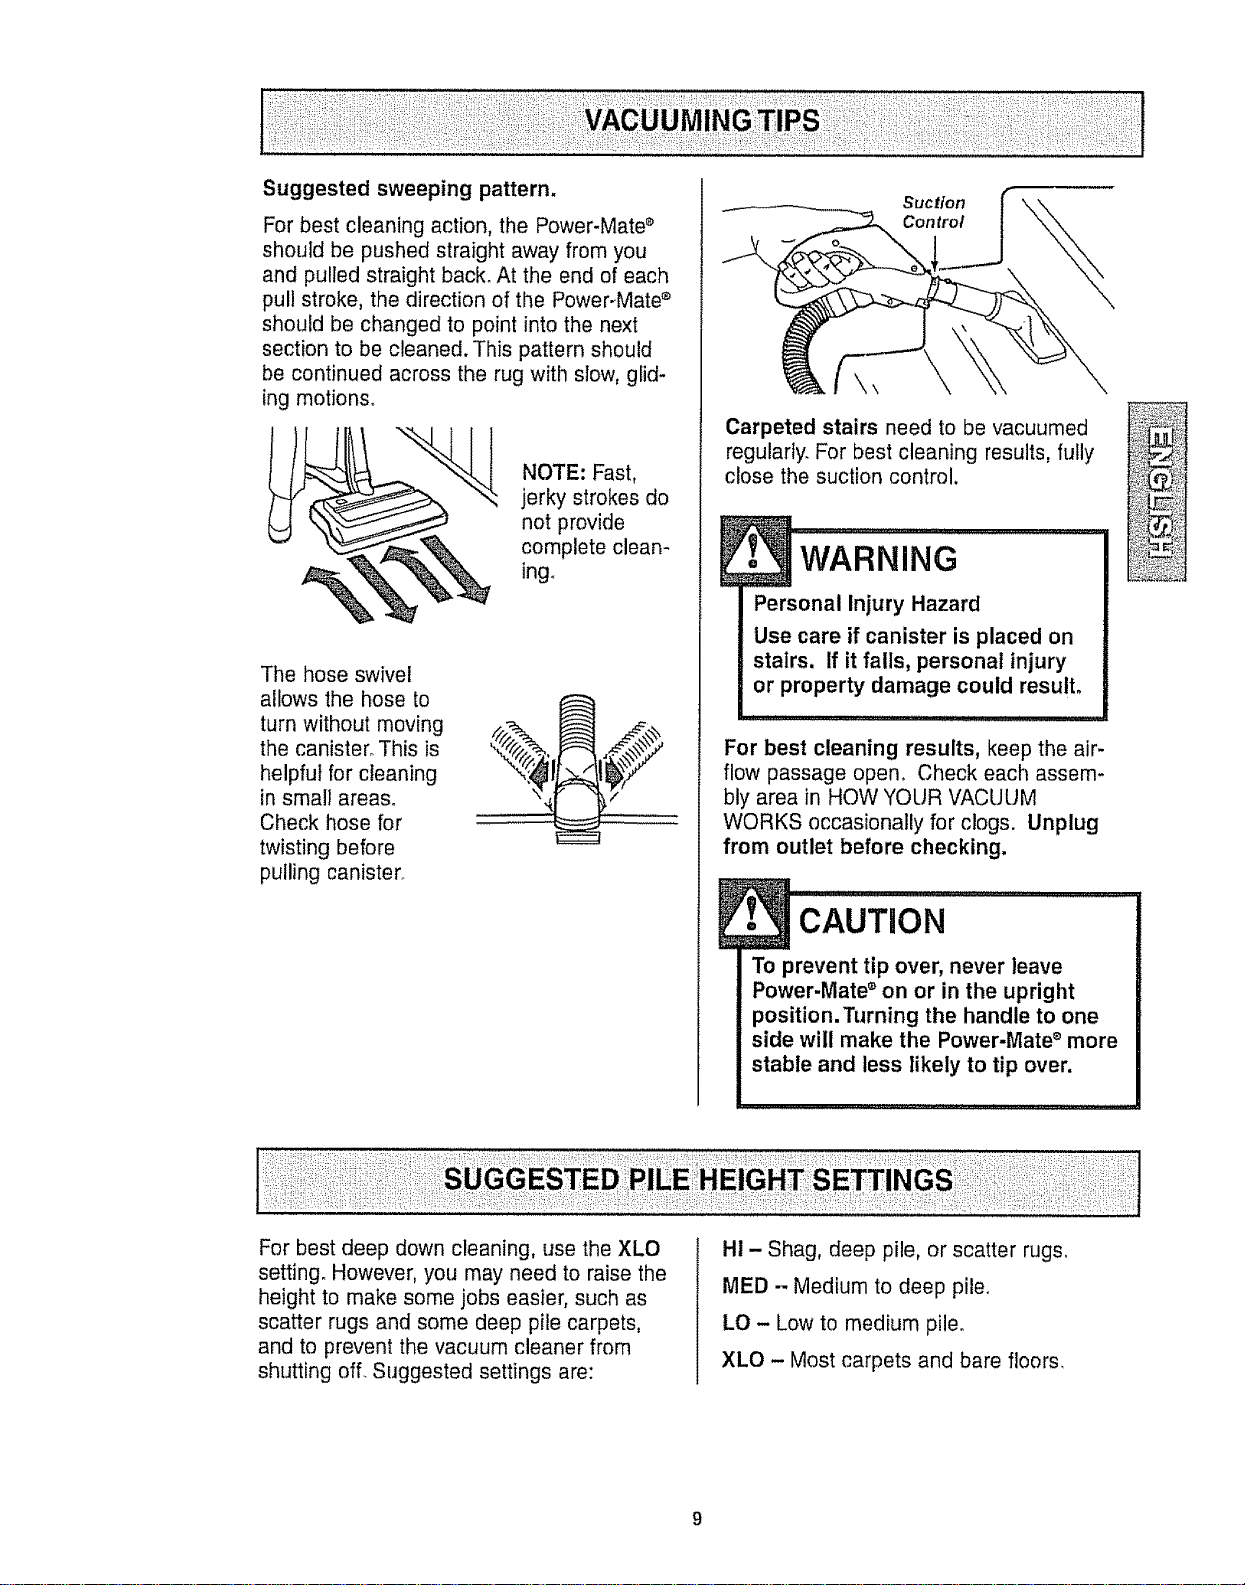
For best cleaning action, the Power-Mate s
should be pushed straight away from you
and pulled straight back. At the end of each
pull stroke, the direction of the Power-Mate ®
should be changed to point into the next
section to be cleaned. This pattern should
be continued across the rug with slow, glid-
ing motions.
NOTE: Fast,
jerky strokes do
not provide
complete clean-
ing.
The hose swivel
allows the hose to
turn without moving
the canister° This is
helpful for cleaning
in small areas.
Check hose for
twisting before
pulling canister°
Suction
Controt
\
Carpeted stairs need to be vacuumed
regularly. For best cleaning results, fully
close the suction control.
Personal Injury Hazard
Use care if canister is placed on
stairs. If it falls, personal injury
or property damage could result,
For best cleaning results, keep the air-
flow passage open, Check each assem-
bly area in HOW YOUR VACUUM
WORKS occasionally for clogs. Unplug
from outlet before checking.
CAUTION .............................
To prevent tip over, never leave
Power-Mate _ on or in the upright
position. Turning the handle to one
side will make the Power-Mate _ more
stable and less likely to tip over,
I
For best deep down cleaning, use the XLO
setting° However, you may need to raise the
height to make some jobs easier, such as
scatter rugs and some deep pile carpets,
and to prevent the vacuum cleaner from
shutting of[ Suggested settings are:
H! - Shag, deep pile, or scatter rugs,
MED - Medium to deep pile.
LO - Low to medium pile.
XLO - Most carpets and bare floors.
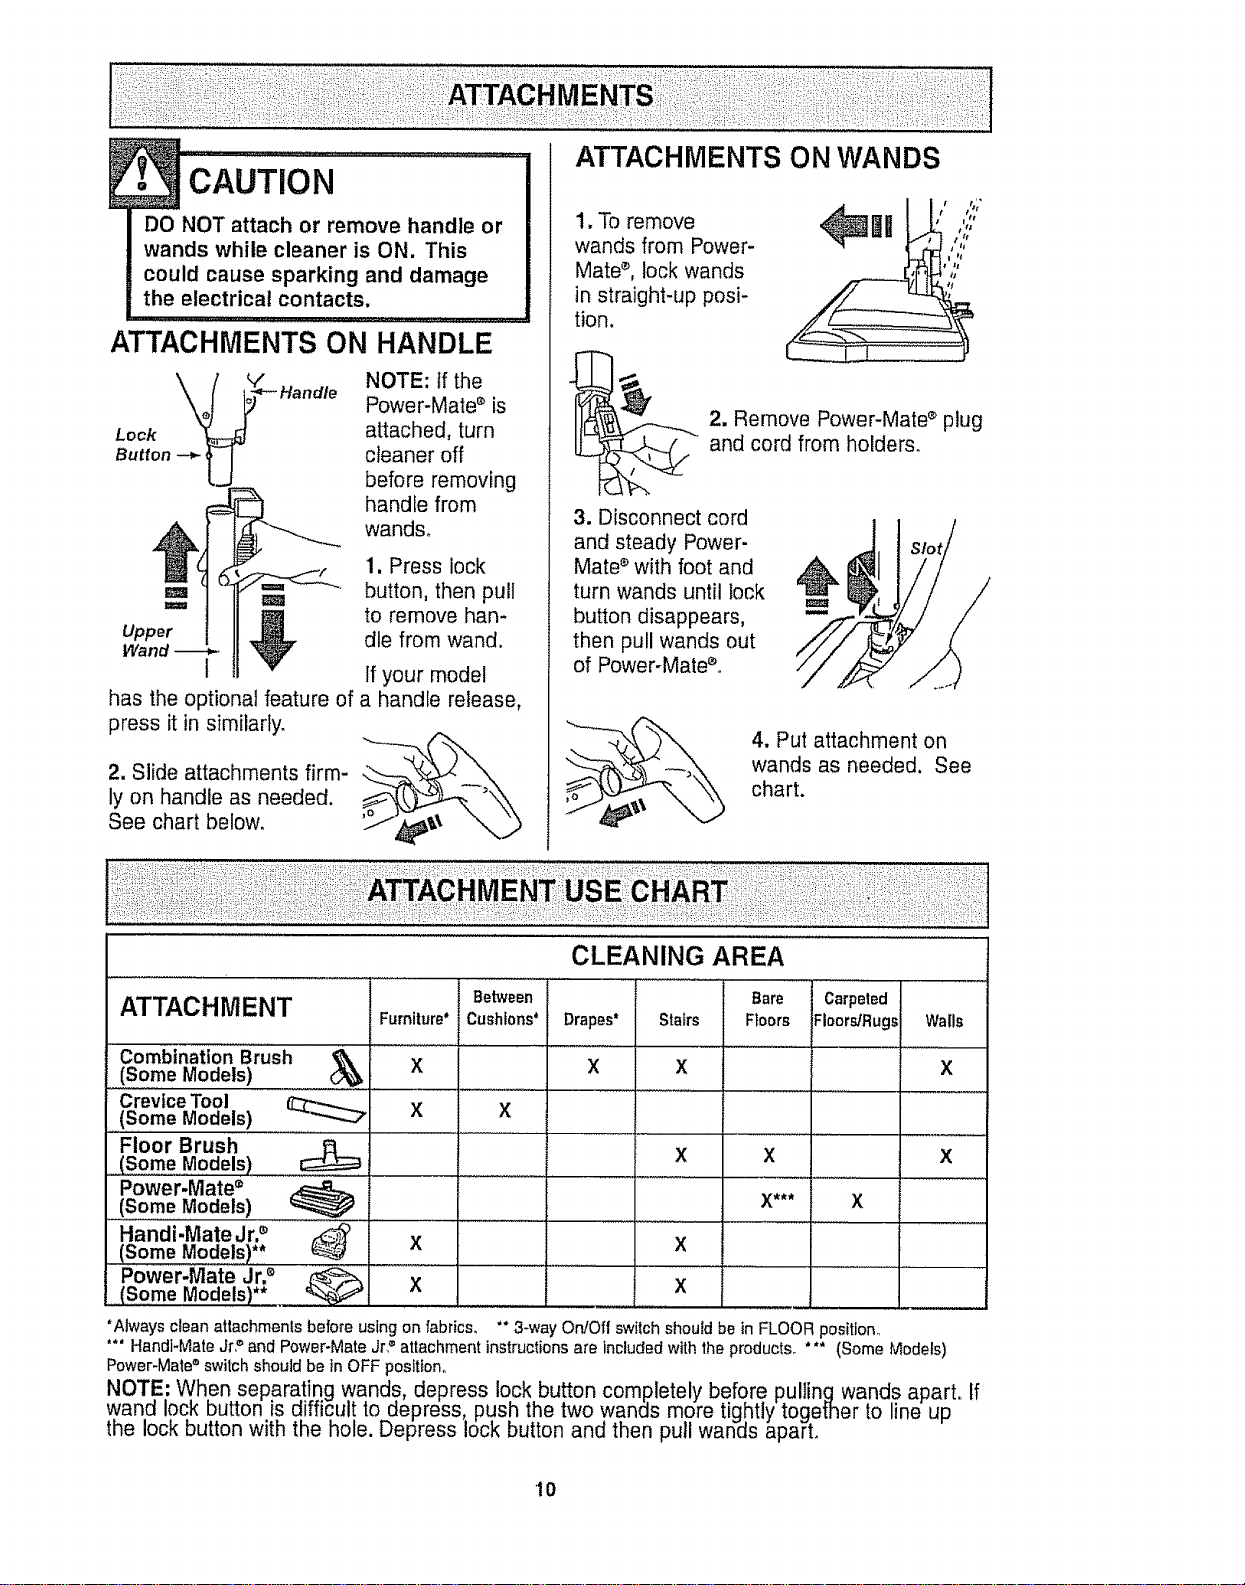
DONOTattach or remove handle or
wands while cleaner is ON. This
could cause sparking and damage
the electrical contacts,
ATTACHMENTS ON HANDLE
Lock
Butt°n-_l J
NOTE: tf the
Power-Mate s is
attached, turn
cleaner off
before removing
handle from
wands.
1. Press lock
,_ button, then pull
,,,,,,, reel
to remove hen-
Upper die from wand
Wand t If your model
has the optional feature of a handle release,
press it in similarly
2. Slide attachments firm-
ly on handle as needed
See chart below °
1. To remove
wands from Power-
Mate d lock wands
in straight-up posi-
tion
L_ _ _;*
/ t tltt
//;
t q
2. Remove Power-Mated plug
and cord from holders
3. Disconnect cord
and steady Power
Mate e with foot and
turn wands until lock
button disappears
then pull wands out
of Power-Mate°
/
4. Put attachment on
wands as needed See
chart.
CLEANING AREA
Between Bare Carpeted
ATTACHMENT Furniture* Cushions* Drapes* Stairs Floors Floors/Rugs Walls
Combination Brush _
(Some Models) X X X X
Crevice Tool
......(Some Models) X X
Floor Brush
(Some Models) X X X
Power.Mate •
(Some Models) X*** X
Handi-Mate Jr2 _ .......... X .................... X ...........
Power-Mate Jr2
(Some Models)** X
Always cleanattachmenls before using on fabrics, "* 3-way On/Off switch should be in FLOOR position
**" Handi-Mate Jr? and Power-Mate Jr? attachment instructions are included with the products *** (Some Models)
Power-Mate®switch should be tnOFF position.
NOTE: When separating wands, depress lock button completely before pullingwands apart If
wand lock button is difficult to depress, push the two wands more tightly together to ine up
the lock button with the hole. Depress lock button and then pull wan_s aparL
lO
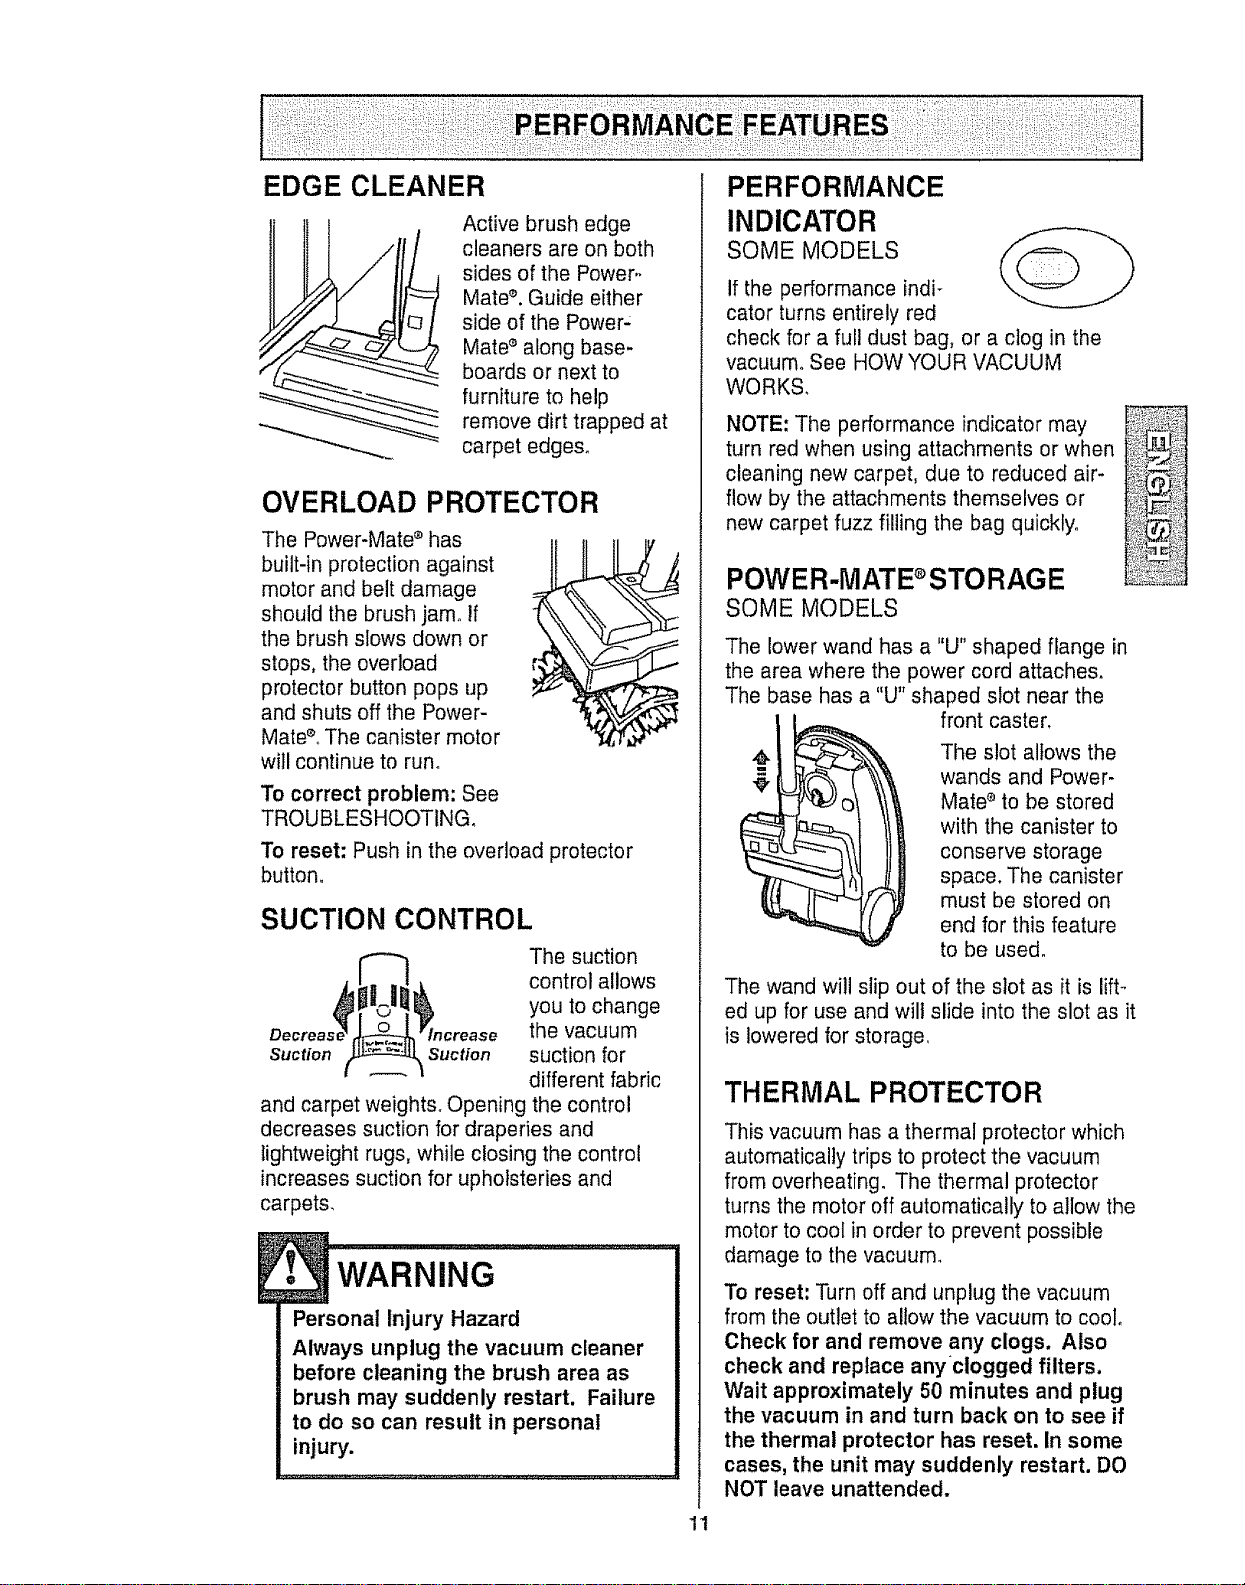
EDGE CLEANER
/
Active brush edge
cleaners are on both
sides of the Power,.
Mate _'.Guide either
side of the Power:
Mate _'along base-
boards or next to
furniture to help
remove dirt trapped at
carpet edges.
OVERLOAD PROTECTOR
The Power-Mate _'has
built-in protection against
motor and belt damage
should the brush jam° If
the brush slows down or
stops, the overload
protector button pops up
and shuts off the Power-
Mate_LThe canister motor
will continue to run°
To correct problem: See
TROUBLESHOOTING.
To reset: Push in the overload protector
button°
SUCTION CONTROL
The suction
control allows
you to change
the vacuum
Suction Suction suction for
different fabric
and carpet weights. Opening the control
decreases suction for draperies and
lightweight rugs, while closing the control
increases suction for upholsteries and
carpets.
WARNING ................
Personal Injury Hazard
Always unplug the vacuum cleaner
before cleaning the brush area as
brush may suddenly restart. Failure
to do so can result in personal
injury.
11
PERFORMANCE
INDICATOR
SOME MODELS
if the performance indi-
cator turns entirely red
check for a full dust bag, or a clog in the
vacuum° See HOW YOUR VACUUM
WORKS.
NOTE: The performance indicator may
turn red when using attachments or when
cleaning new carpet, due to reduced air-
flow by the attachments themselves or
new carpet fuzz filling the bag quickly°
POWER-MATE STORAGE
SOME MODELS
The lower wand has a "U" shaped flange in
the area where the power cord attaches,
The base has a "U" shaped slot near the
front caster,
The slot allows the
wands and Power-
Mate _ to be stored
with the canister to
conserve storage
space. The canister
must be stored on
end for this feature
to be used.
The wand will slip out of the slot as it is lift-
ed up for use and wilt slide into the slot as it
is lowered for storage
THERMAL PROTECTOR
This vacuum has a thermal protector which
automatically trips to protect the vacuum
from overheating. The thermal protector
turns the motor off automatically to allow the
motor to cool in order to prevent possible
damage to the vacuum.
To reset: Turn off and unplug the vacuum
from the outlet to allow the vacuum to cool,
Check for and remove any clogs, Also
check and replace anyclogged filters.
Wait approximately 50 minutes and plug
the vacuum in and turn back on to see if
the thermal protector has reset. In some
cases, the unit may suddenly restart. DO
NOT leave unattended.
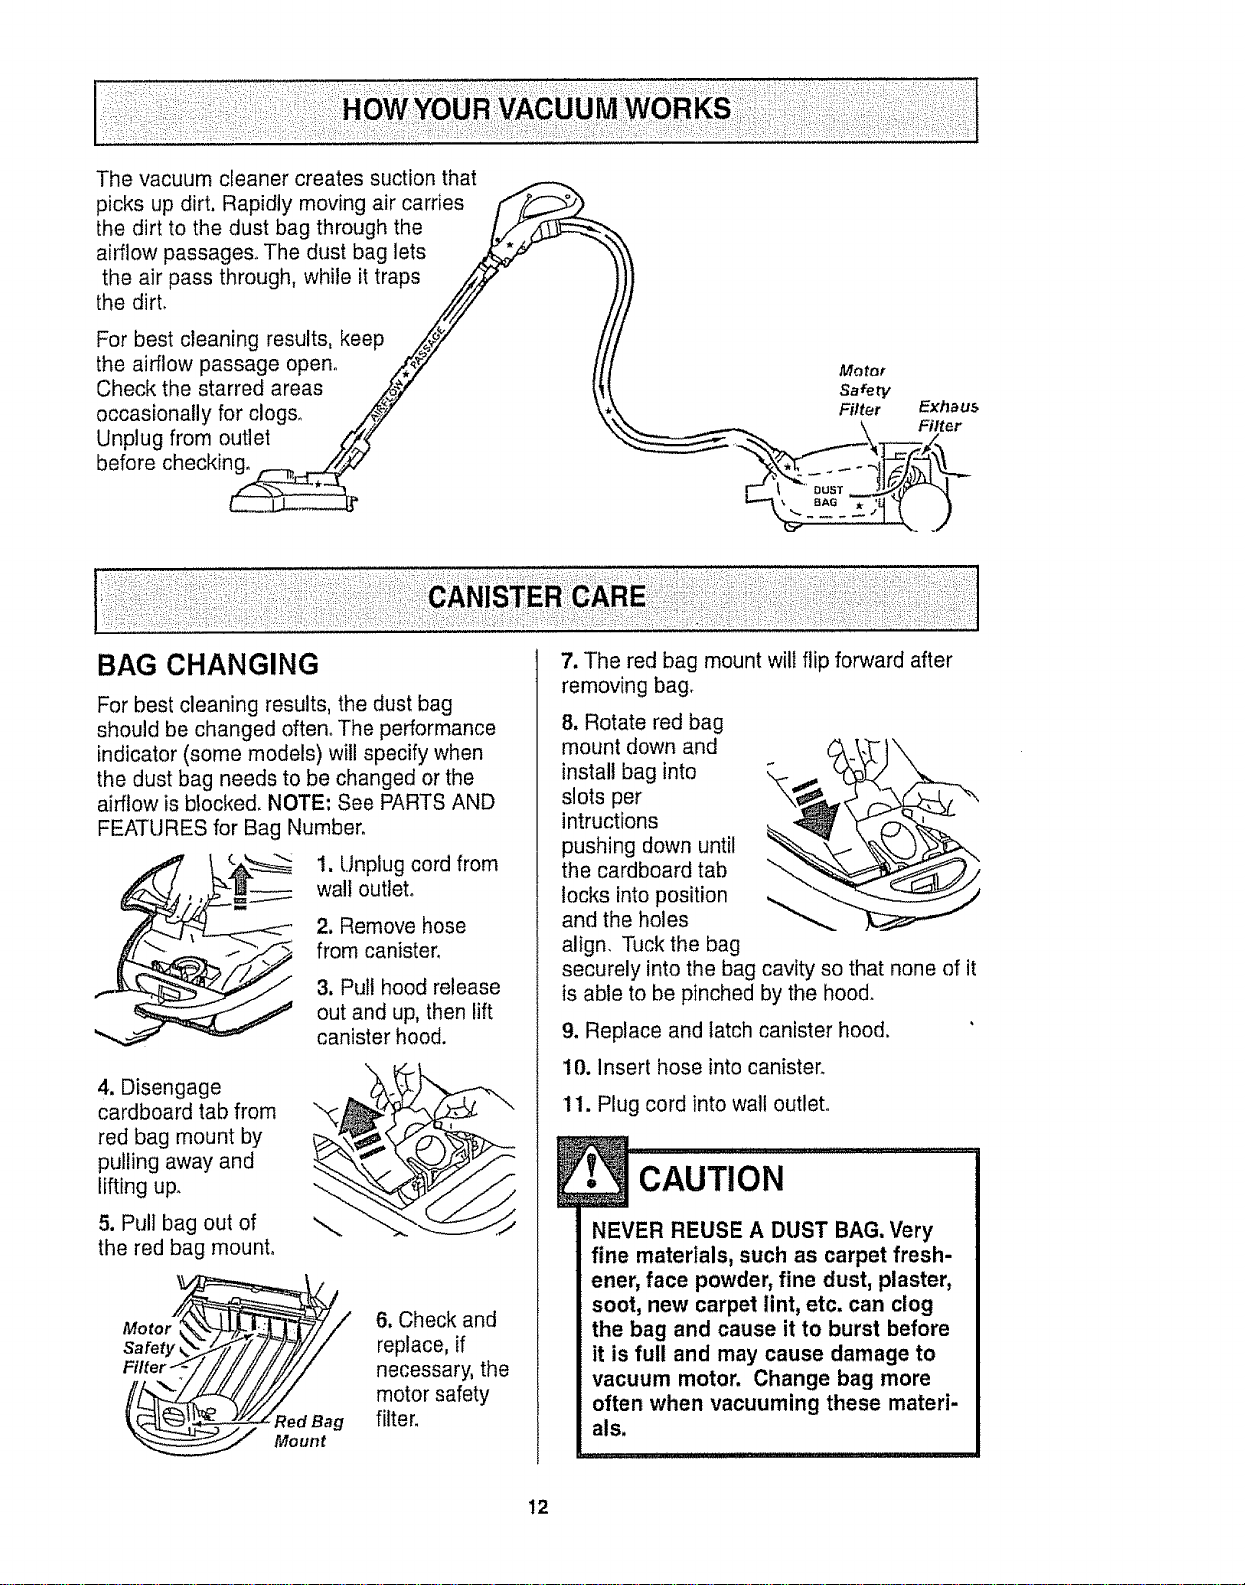
Thevacuumcleanercreatessuctionthat
picksupdirt.Rapidlymovingaircarries
thedirttothedustbagthroughthe
airflowpassages°Thedustbaglets
theairpassthrough,whileittraps
thedirt.
Forbestcleaningresults,keep
theairflowpassageopen.
Checkthestarredareas
occasionallyforclogs_
Unplugfromoutlet
beforechecking,
Motor
Safety
Filter
BAG CHANGING
For best cleaning results, the dust bag
should be changed often. The performance
indicator (some models) will specify when
the dust bag needs to be changed or the
airflow is blocked. NOTE: See PARTS AND
FEATURES for Bag Number.
4. Disengage
cardboard tab from
red bag mount by
purling away and
lifting up_
5. Pull bag out of
the red bag mount.
1. Unplug cord from
wall outlet°
2. Remove hose
from canister,
3, Pull hood release
out and up, then lift
canister hood.
6, Check and
replace, if
necessary, the
motor safety
filter.
7. The red bag mount will flip forward after
removing bag.
8, Rotate red bag
mount down and
install bag into
slots per
intructions
pushing down until
the cardboard tab "_
locks into position
and the holes
align. Tuck the bag
securely into the bag cavity so that none of it
is able to be pinched by the hood.
9. Replace and latch canister hood.
10. insert hose into canister.
11. Plug cord into wall outlet.
CAUTION .........................
NEVER REUSE A DUST BAG. Very
fine materials, such as carpet fresh-
ener, face powder, fine dust, plaster,
soot, new carpet lint, etc. can clog
the bag and cause it to burst before
it is full and may cause damage to
vacuum motor. Change bag more
often when vacuuming these materi-
als.
12
1. Unplug cord from wall outlet. DO NOT
drip water on cleaner,
2. Clean exterior using a clean, soft cloth
that has been dipped in a solution of mild
liquid detergent and water, then wrung dry_,
Wipe dry after cleaning.
3, To reduce static electricity and dust build-
up, wipe outer surface of cleaner and
attachments°
E, 'CAUTION .........
Do not use attachments if they
are wet. Attachments used in
dirty areas, such as under a
refrigerator, should not be used
on other surfaces until they are
washed,They could leave marks,
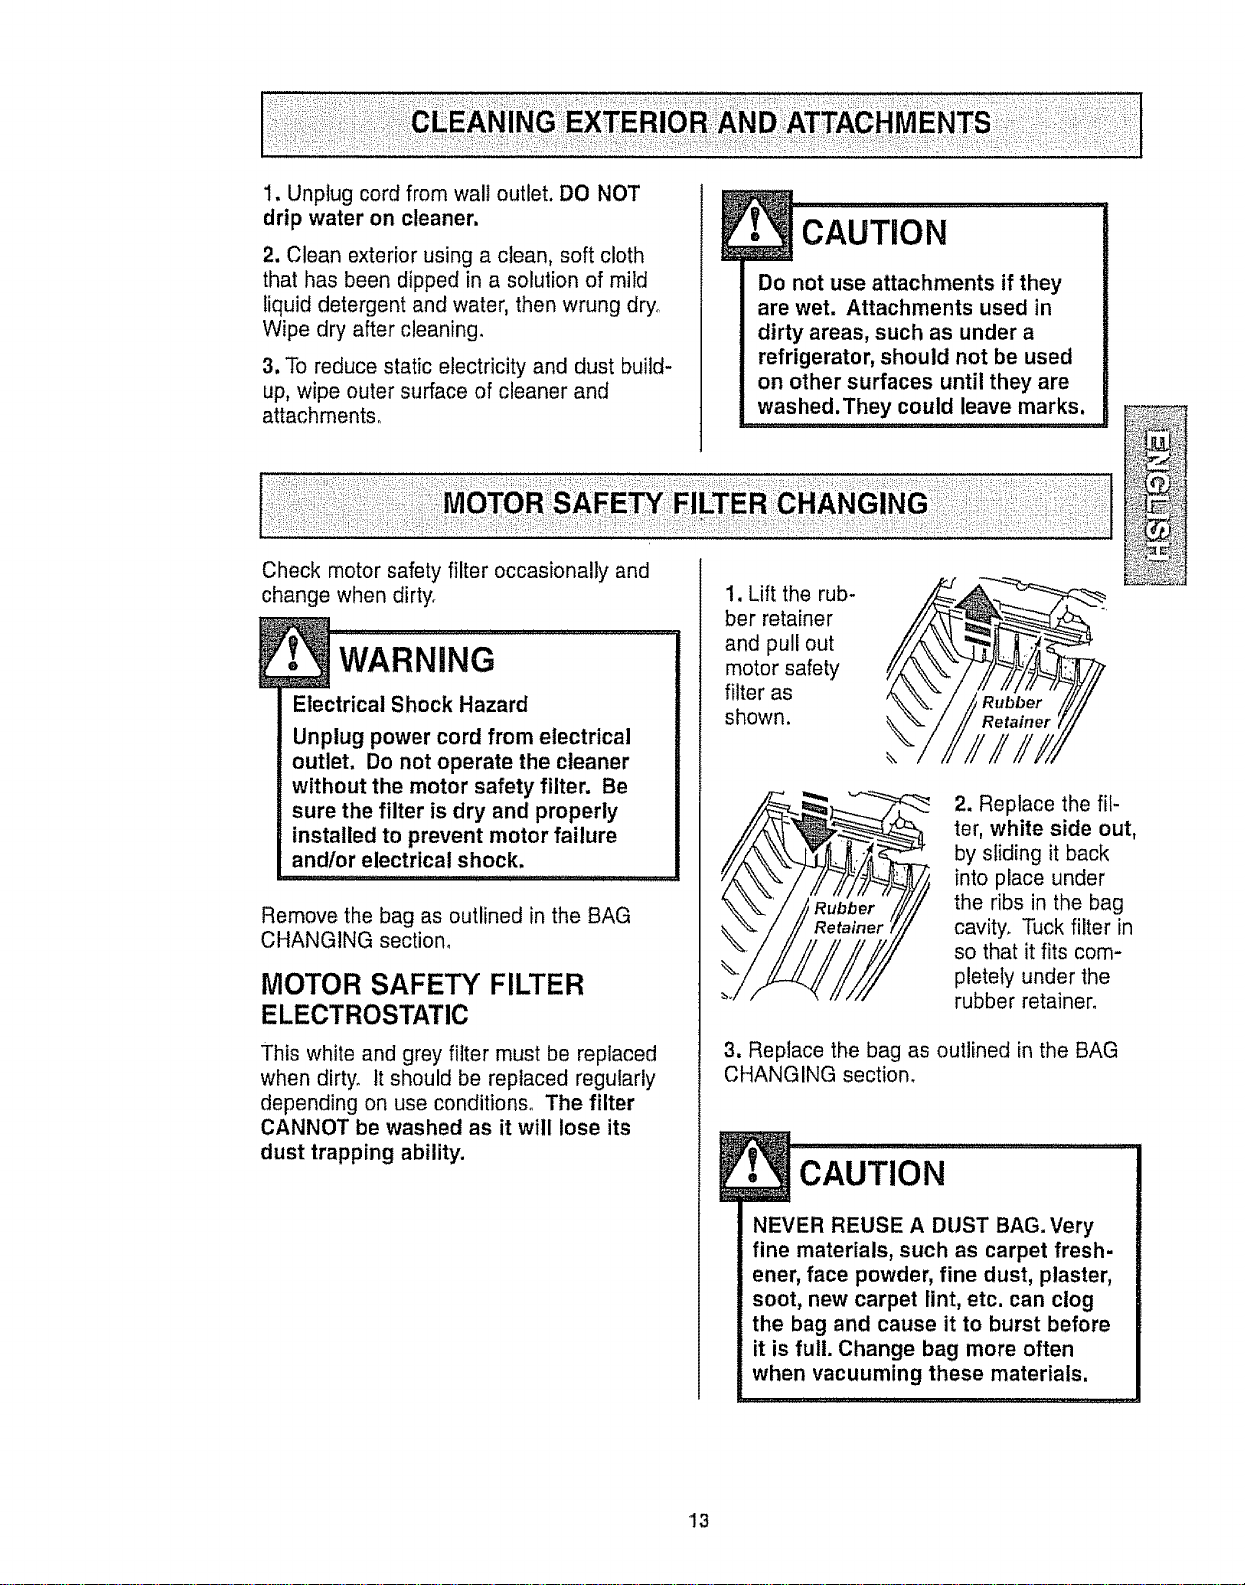
change when dirty.
Electrical Shock Hazard
Unplug power cord from electrical
outlet. Do not operate the cleaner
without the motor safety filter. Be
sure the filter is dry and properly
installed to prevent motor failure
and/or electrical shock,
Remove the bag as outlined in the BAG
CHANGING section,
MOTOR SAFETY FILTER
ELECTROSTATIC
This white and grey filter must be replaced
when dirty. It should be replaced regularly
depending on use conditions. The filter
CANNOT be washed as it will lose its
dust trapping ability.
1, Lift the rub-
ber retainer
and pull out
motor safety
filter as
shown.
2. Replace the fil-
ter, white side out,
by sliding it back
into place under
the ribs in the bag
cavity, Tuck filter in
so that it fits com-
pletely under the
rubber retainer.
3. Replace the bag as outlined in the BAG
CHANGING section.
CAUTION ................ I
NEVER REUSE A DUST BAG. Very
fine materials, such as carpet fresh-
ener, face powder, fine dust, plaster,
soot, new carpet lint, etc. can clog
the bag and cause it to burst before
it is full. Change bag more often
when vacuuming these materials.
13
I
Fire and/or Electrical Shock Hazard
Do not operate with a clogged
exhaust filter or without the exhaust
filter or exhaust filter cover installed.
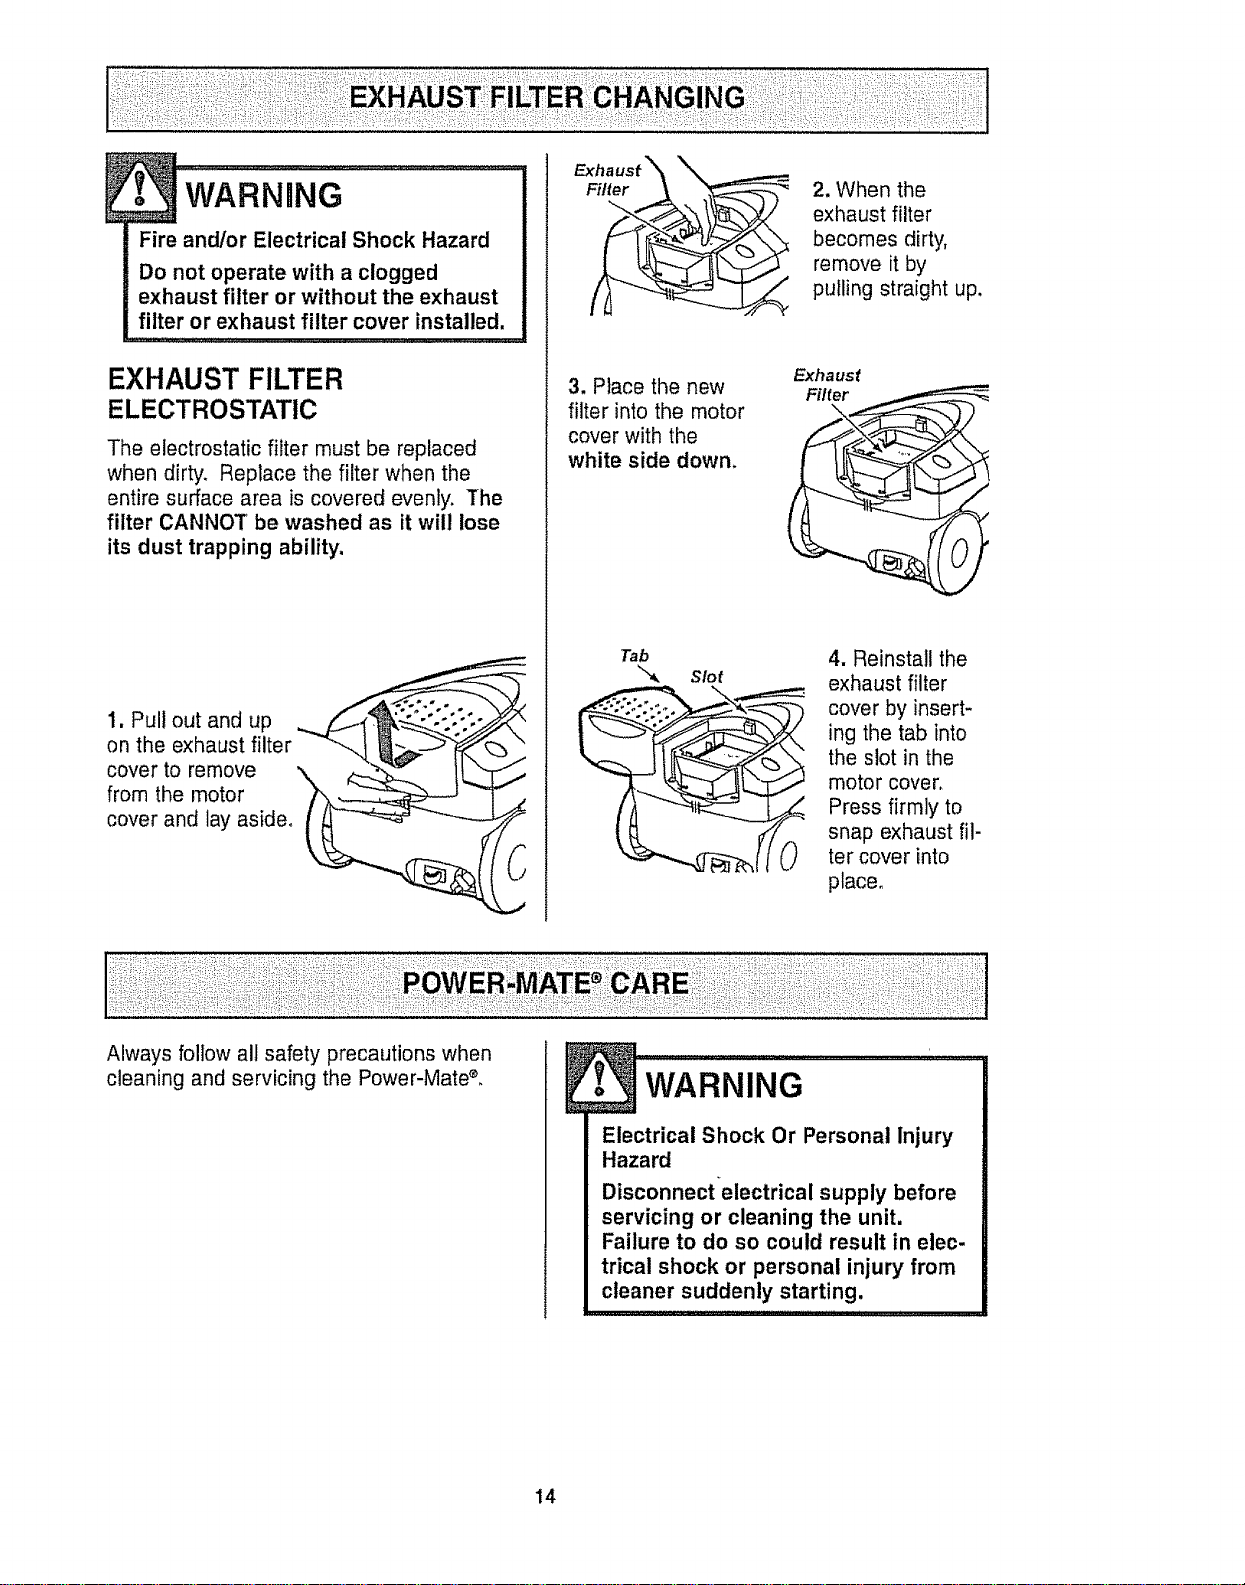
EXHAUST FILTER
ELECTROSTATIC
The electrostatic filter must be replaced
when dirty. Replace the filter when the
entire surface area is covered evenly. The
filter CANNOT be washed as it will lose
its dust trapping ability,
1, Pull out and up
on the exhaust filter
cover to remove
from the motor
cover and lay aside,
Filter
3. Place the new
filter into the motor
cover with the
white side down.
Tab
Slot
2. When the
exhaust filter
becomes dirty,
remove it by
pulling straight up.
Exhaust
4. Reinstall the
exhaust filter
cover by insert-
ing the tab into
the slot in the
motor cover,
Press firmly to
snap exhaust fil-
ter cover into
place,
Always follow all safety precautions when
cleaning and servicing the Power-Mate*,
Electrical Shock Or Personal injury
Hazard
Disconnectelectrical supply before
servicing or cleaning the unit.
Failure to do so could result in elec-
trical shock or personal injury from
cleaner suddenly starting.
14
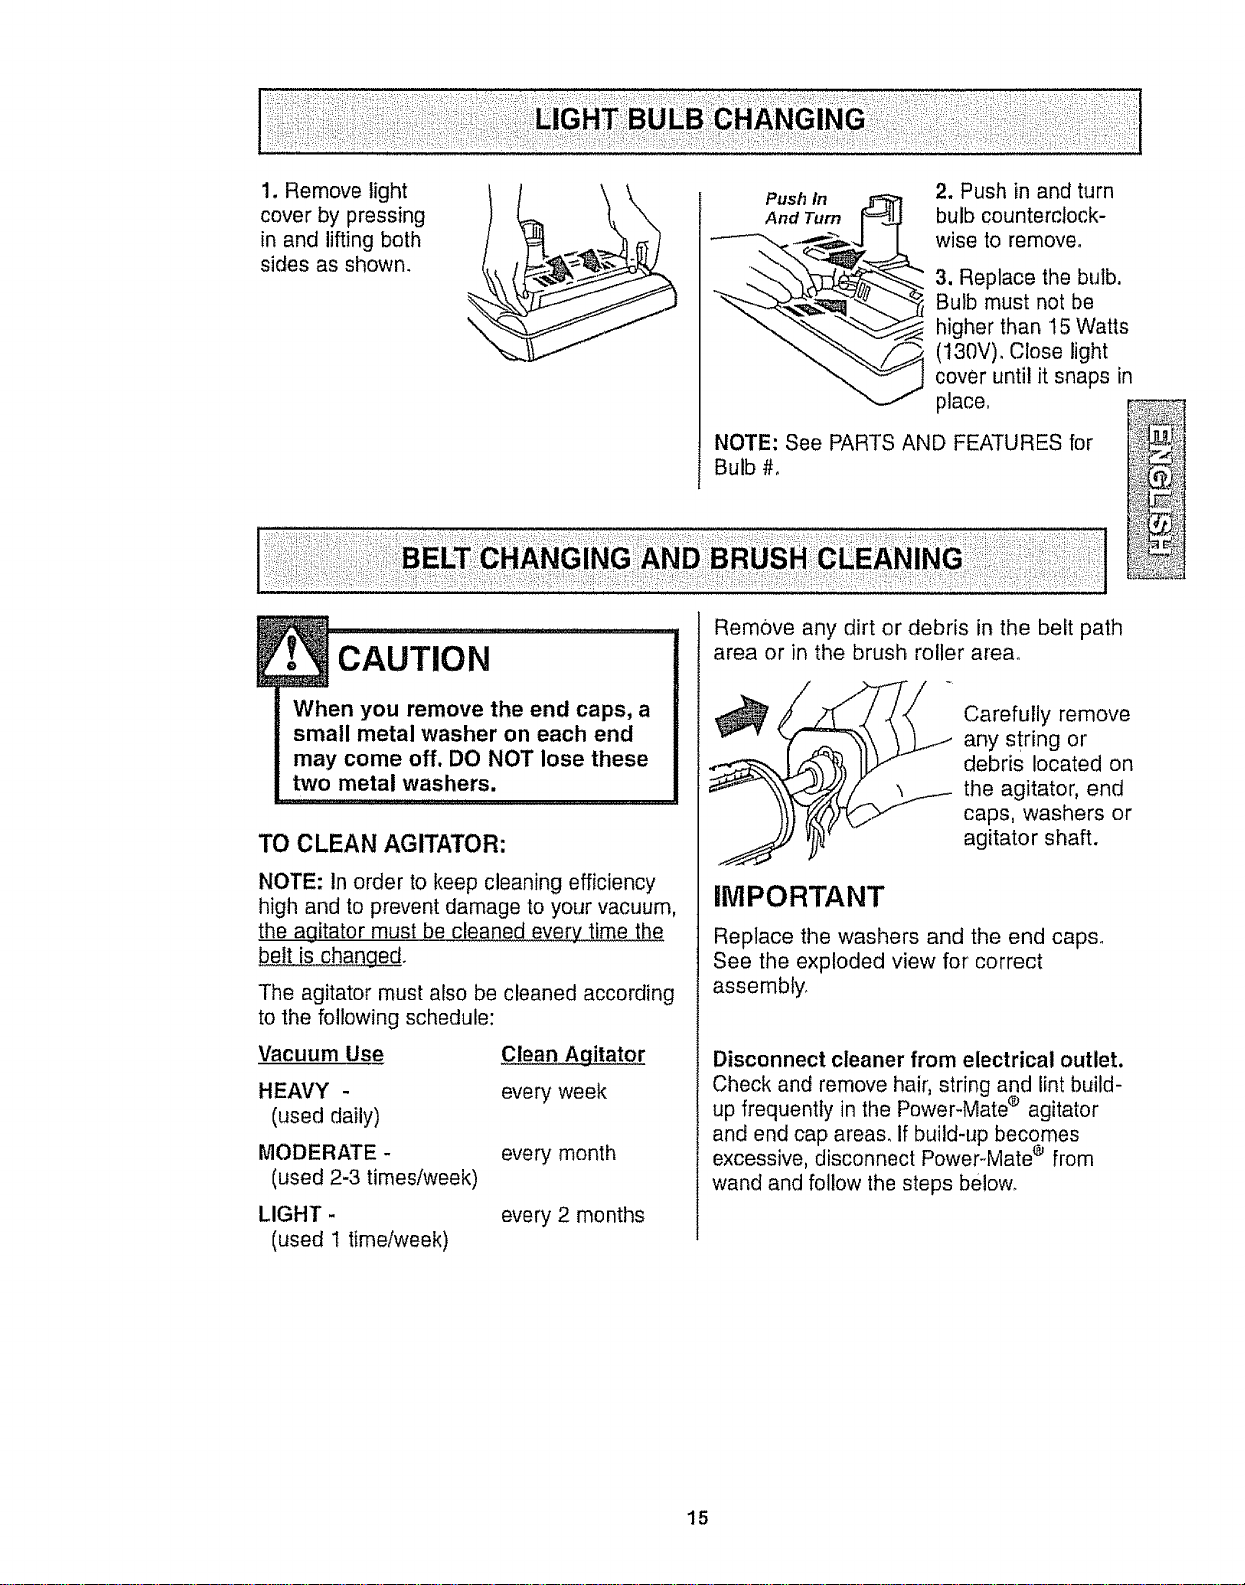
1.Removelight
coverbypressing
inandliftingboth
sidesasshown.
Push In
And Turn
2. Push in and turn
bulb counterclock-
wise to remove,
3. Replace the bulb.
Bulb must not be
higher than 15 Watts
(130V)_ Close light
cover until it snaps in
place,
NOTE: See PARTS AND FEATURES for
Bulb #,
®
E• CAUTION ......................
When you remove the end caps, a
small metal washer on each end
may come off, DO NOT lose these
two metal washers.
TO CLEAN AGITATOR:
NOTE: In order to keep cleaning efficiency
high and to prevent damage to your vacuum,
the agitator must be cleaned every time the
belt is changed.
The agitator must also be cleaned according
to the following schedule:
Vacuum Use
Clean Agitator
HEAVY - every week
(used daily)
MODERATE - every month
(used 2-3 times/week)
LIGHT -
(used 1 timetweek)
every 2 months
Remove any dirt or debris in the belt path
area or in the brush roller area°
• Carefully remove
any string or
,, debris located on
the agitator, end
caps, washers or
agitator shaft.
iMPORTANT
Replace the washers and the end caps°
See the exploded view for' correct
assembly.
Disconnect cleaner from electrical outlet.
Check and remove hair, string and lint build-
up frequently in the Power-Mate ® agitator
and end cap areas, If build-up becomes
e,
excessive, disconnect Power-Mate from
wand and follow the steps below.
15
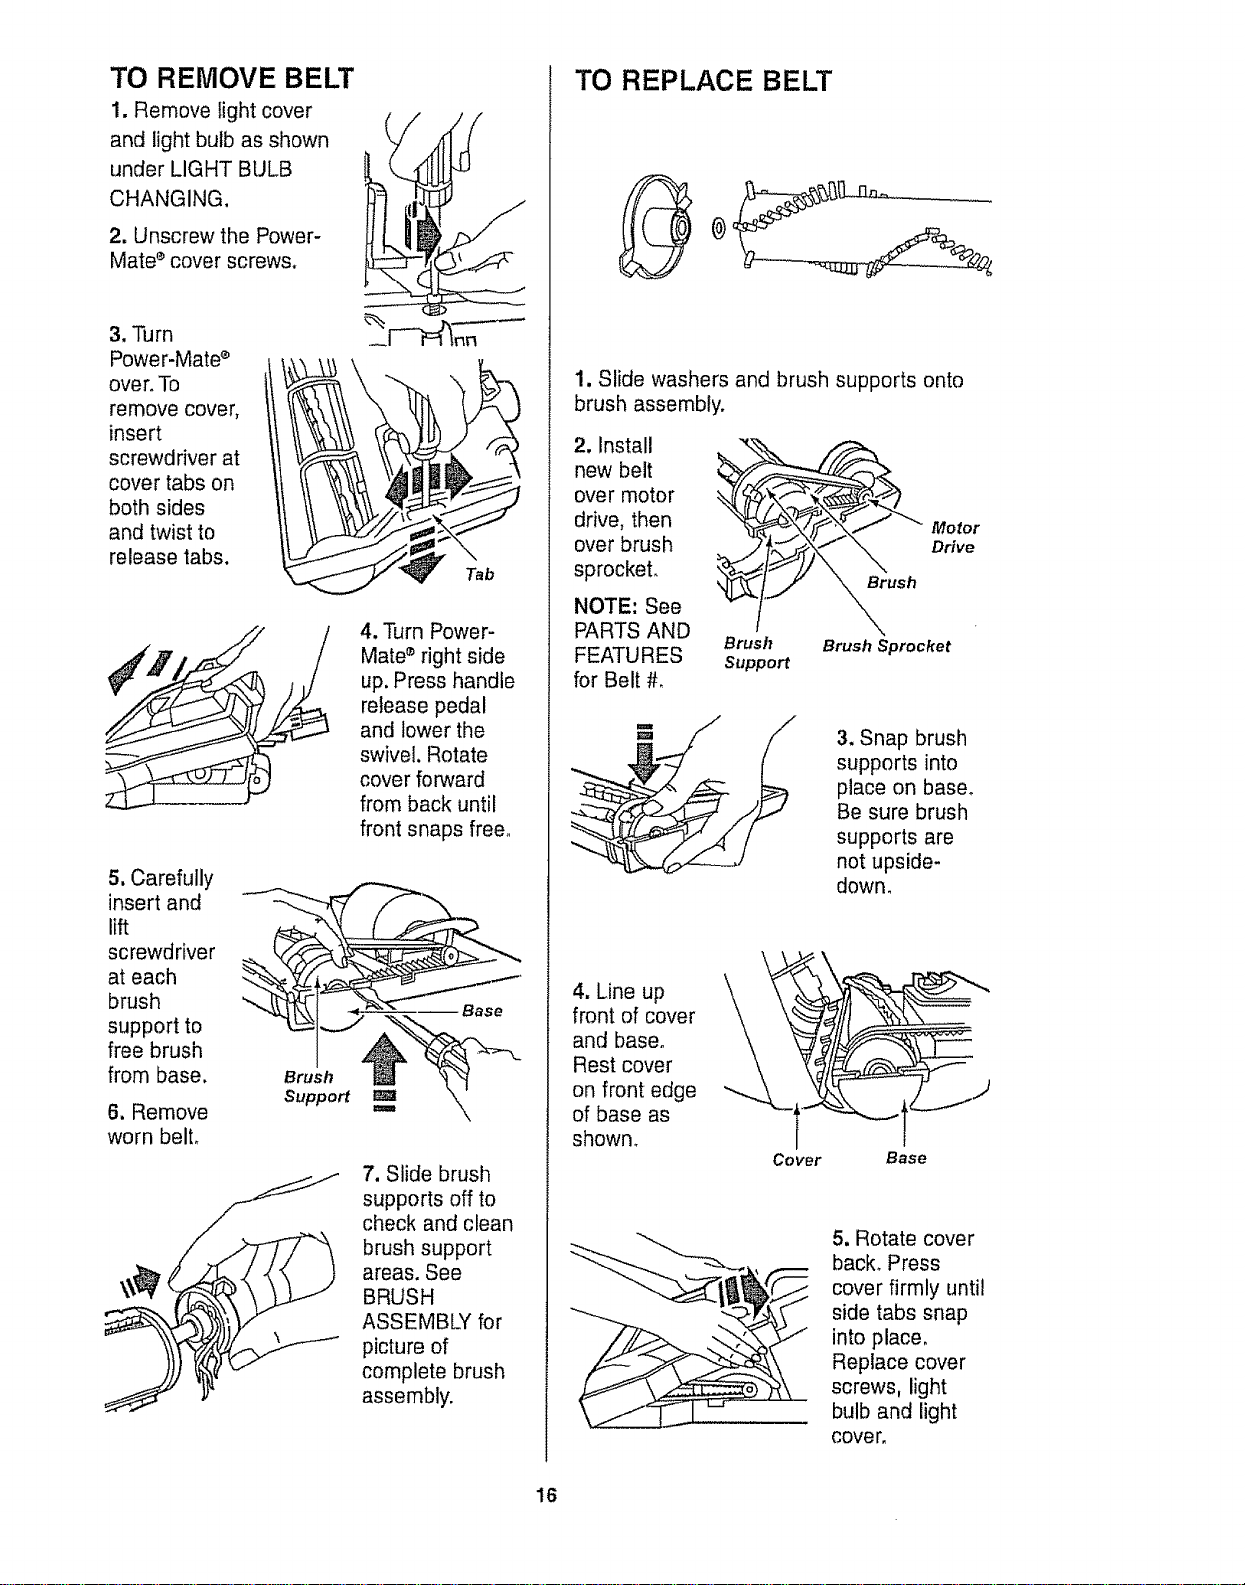
TO REMOVE BELT
1. Remove light cover
and light bulb as shown
under LIGHT BULB
CHANGING.
2. Unscrew the Power-
Mate s cover screws,
3, Turn
Power-Mate s
over. To
remove cover,
insert
screwdriver at
cover tabs on
both sides
and twist to
release tabs.
5. Carefully
insert and
lift
screwdriver
at each
brush
support to
free brush
from base.
6. Remove
worn belt,
Brush
Support
Tab
4. Turn Power-
Mate s right side
up. Press handle
release pedal
and lower the
swivel. Rotate
cover forward
from back until
front snaps free_
7. Slide brush
supports off to
check and clean
brush support
areas. See
BRUSH
ASSEMBLY for
picture of
complete brush
assembly.
TO REPLACE BELT
1. Slide washers and brush supports onto
brush assembly.
2. Install
new belt
over motor
drive, then
over brush
sprocket.
NOTE: See
PARTS AND
FEATURES
for Belt #_
Brush
Support
Motor
Drive
Brush
Brush Sprocket
3, Snap brush
supports into
place on base°
Be sure brush
supports are
not upside-
down,
4. Line up
front of cover
and base.
Rest cover
on front edge
of base as
shown_
Cover
Base
5, Rotate cover
back° Press
cover firmly until
side tabs snap
into place,
Replace cover
screws, light
bulb and light
cove r,
16
E
• wA""i.G .......
Electrical Shock Or Personal Injury
Hazard
Disconnect electrical supply before
servicing or cleaning the unit.
Failure to do so could result in elec-
trical shock or personal injury from
cleaner suddenly starting.
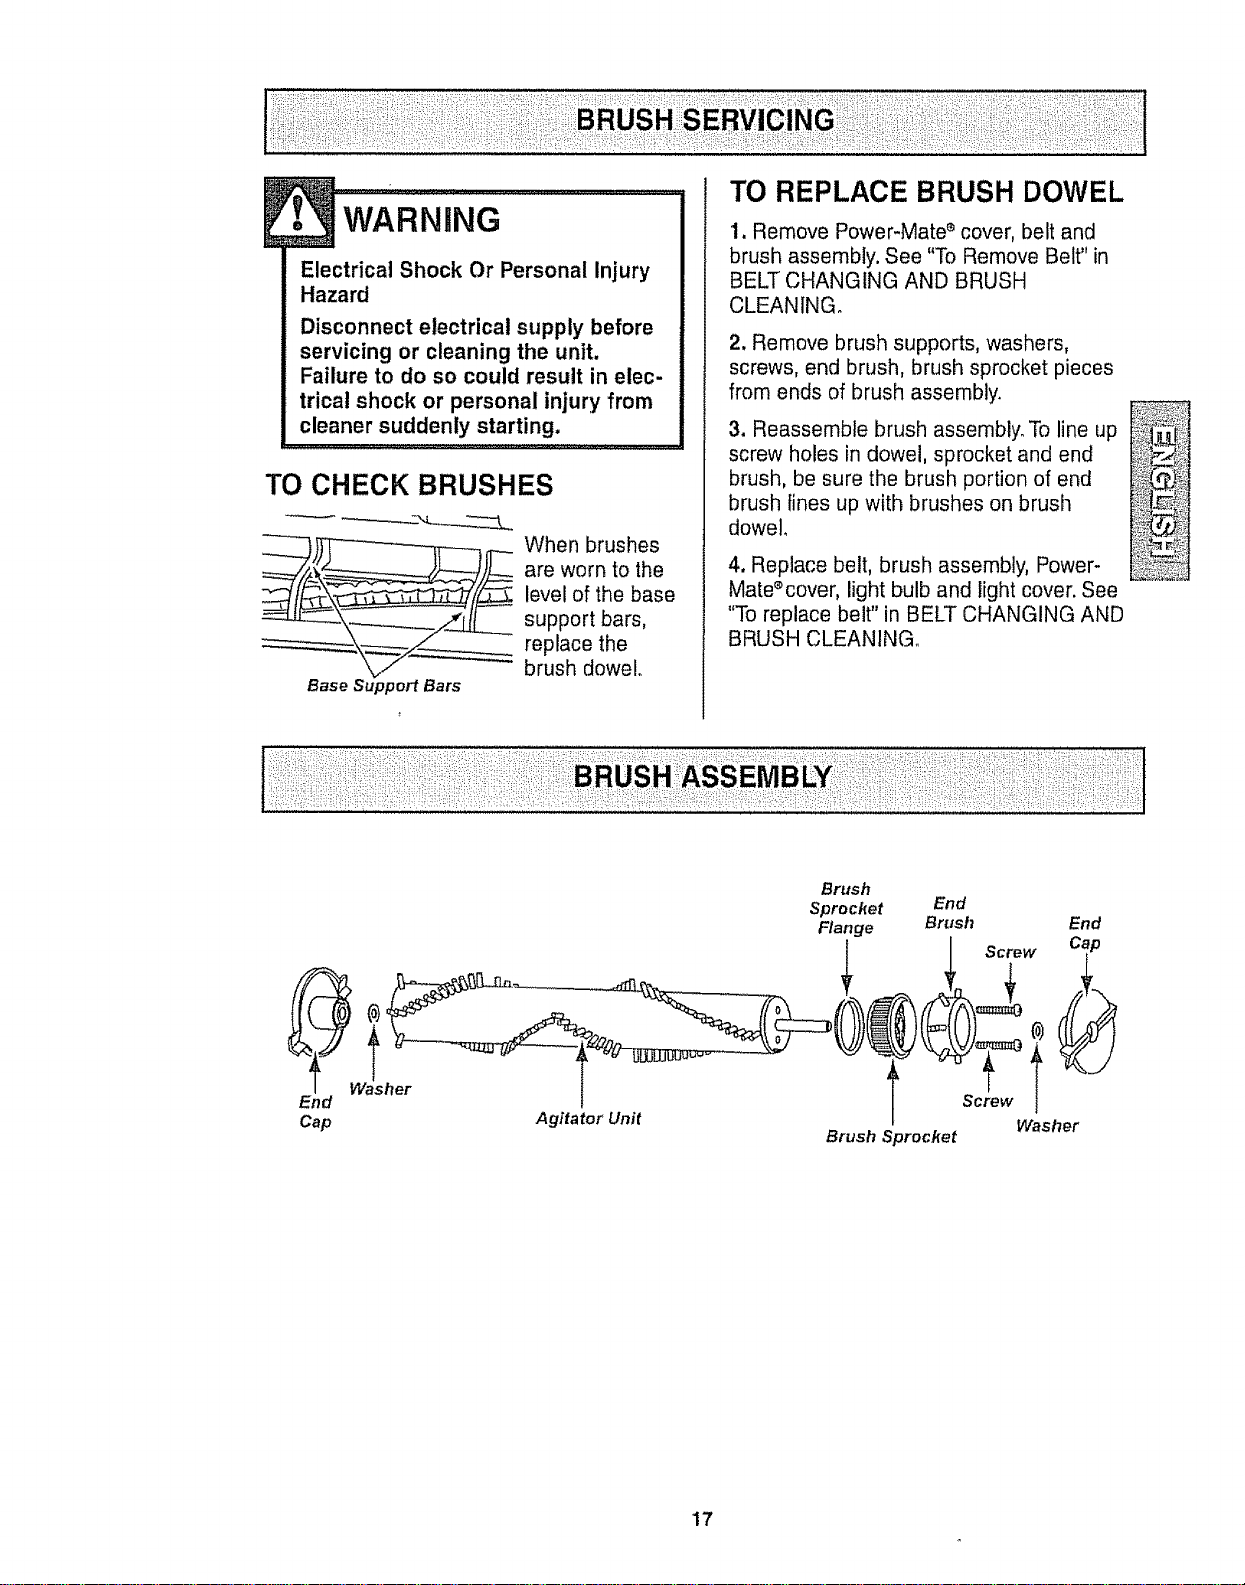
TO CHECK BRUSHES
whenbrushos
are worn to the
level of the base
support bars,
replace the
brush dowel°
Base Support Bars
TO REPLACE BRUSH DOWEL
1. Remove Power-Mate e cover, belt and
brush assembly. See "To Remove Belt" in
BELT CHANGING AND BRUSH
CLEANING°
2. Remove brush supports, washers,
screws, end brush, brush sprocket pieces
from ends of brush assembly.
3. Reassemble brush assembly. To line up
screw holes in dowel, sprocket and end
brush, be sure the brush portion of end
brush lines up with brushes on brush
dowel.
4. Replace belt, brush assembly, Power-
Mate%over, light bulb and light cover. See
"To replace belt" in BELT CHANGING AND
BRUSH CLEANING_
W_asher
End
Cap
Agitator Unit
Brush
Sprocket
Flange
Brush Sprocket
End
Brush End
I Screw Cap
Screw i _
Washer
17
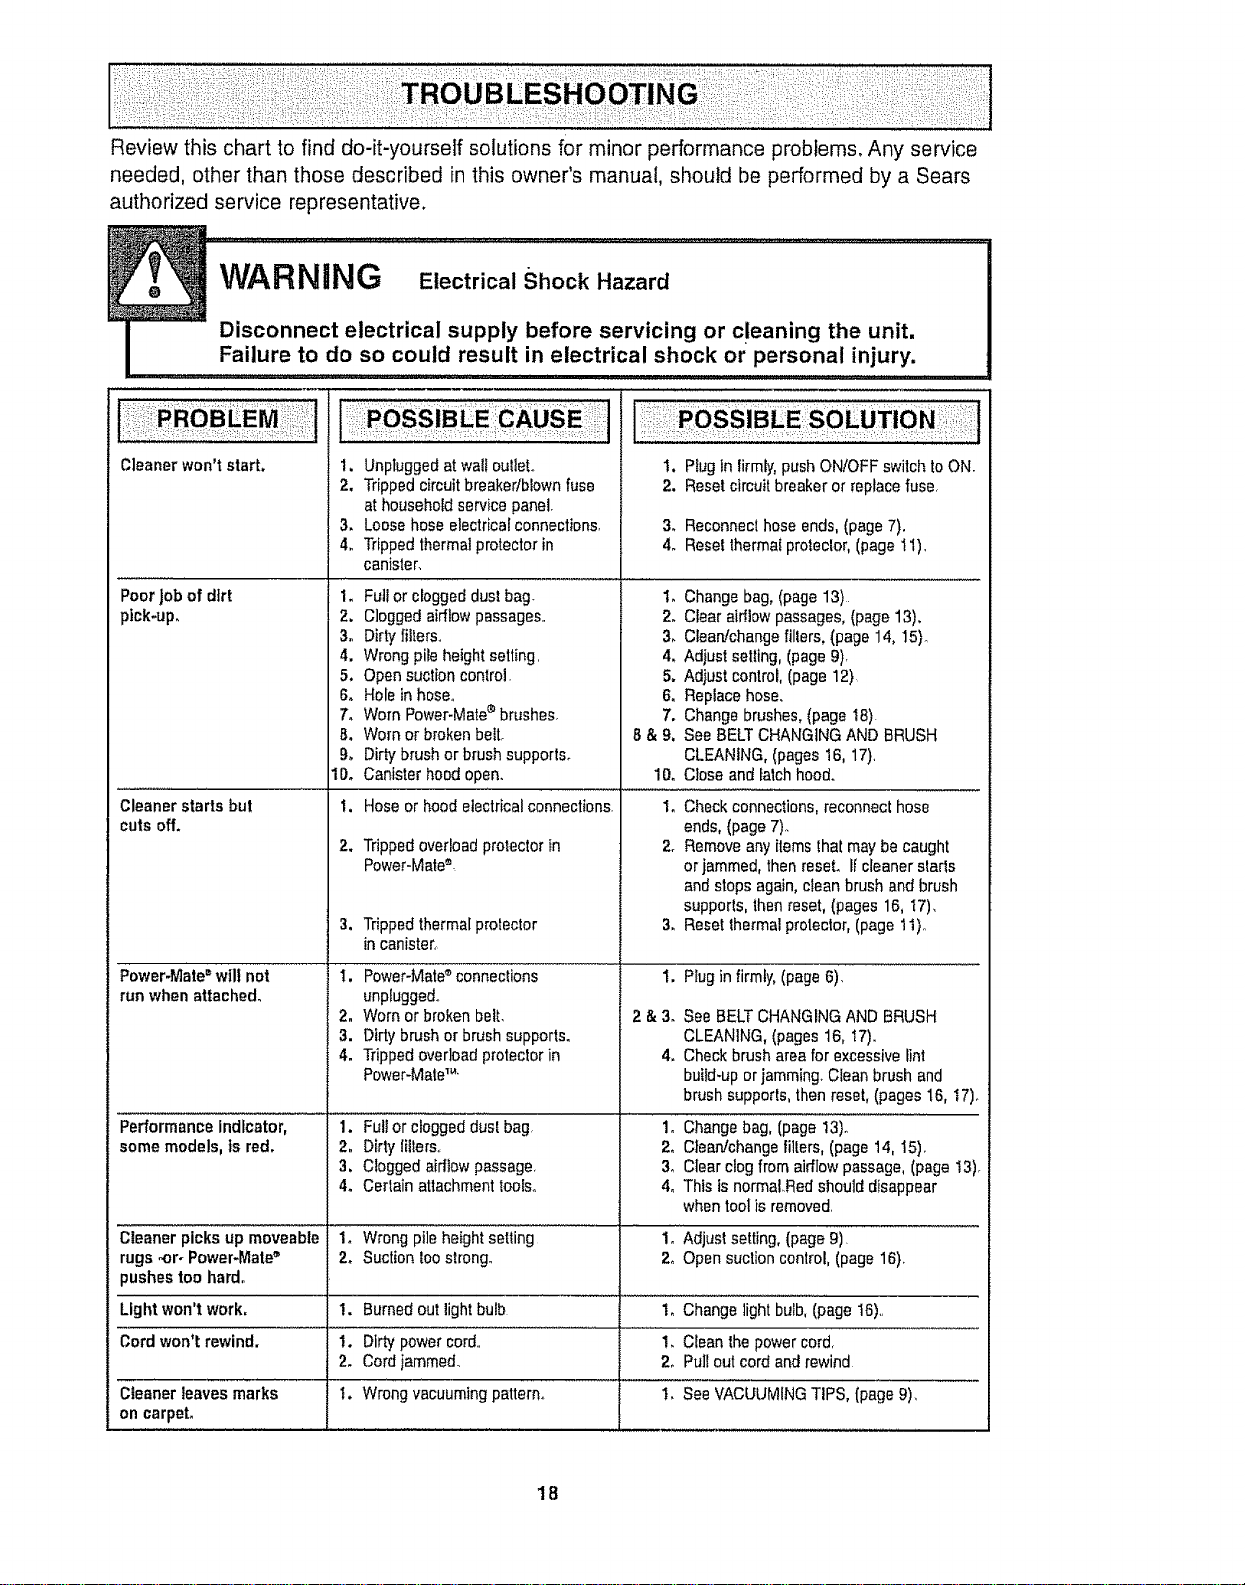
Review this chart to find do-it-yourself solutions for minor performance problems, Any service
needed, other than those described in this owner's manual, should be performed by a Sears
authorized service representative.
Cleanerwon't start.
Poor job of dirt 1.
ptck-up, 2.
3o
4.
5.
6.
7,
B,
9°
1Do
Cleanerstarts but 1.
cutsoff.
2.
Power-Mate=wilt not
runwhen attached.
Performance indicator, 1.
some models, is red, 2.
3,
4.
Cleaner picksup moveable
rugs -or. Power-Mate"
pushestoo hard.
Lightwon't work,
Cordwon't rewind.
Cleaner leaves marks
on carpet,
t
1. Unpluggedat wa{loutieL
2. Trippedcircuitbreaker/blownfuse
athouseholdservice panel.
3. Loosehoseelectricalconnections, 3,
4o Trippedthermalprotectorin 4.
canister.
Fullor cloggeddust bag. 1.
Cloggedairflowpassages., 2.
Dirtyfilters., 3,
Wrongpileheightsetting, 4.
Open suctioncontrol. 5,
Holeinhose. 6,
Worn Power-Mate_brushes, 7.
Worn or brokenbeIt. 8 & g,
Dirtybrush orbrushsupports.
Canister hoodopen.
Hoseor hood electricalconnections.
Trippedoverloadprotectorin
Power-Mate®.
3. Trippedthermalprotector 3.
in canister,
I. Power-Mate connections 1.
unp{uggedo
2. Worn or brokenbelt, 2 & 3,
3. Dirty brush or brushsupports.
4. Trippedoverloadprotectorin 4.
Power-Mate1..
Fultor cloggedduel bag,
Dirty litters.,
Cloggedaidlow passage,
Certain attachmenttooled,
I. Plug Inlirmly,pushON!OFFswitch toON.
2. Resetclmuit breakeror replacefuse,
Reconnecthose ends,(page7).
Reselthermatproteclor,(page 11)_
Changebag, (page 13)
Clear airllowpassages, (page13).
Clean!changefillers, (page 14, 15)_
Adjustselling, (page 9)_
Adiust control,(page 12)
Replacehose.
Changebrushes,(page I8).
See BELTCHANGINGAND BRUSH
CLEANING,(pages 16, 17),
10. Close andlatchhood.
1. Checkconnections,reconnect hose
ends,(page7).
2. Removeany items thaimay becaught
orjammed, thenreset, if cleanerstads
andstops again,clean brush andbrush
supports,thenreset, (pages 16, I7),
Resetthermalprotector,(page 11),,
Plugin firmly, (page6). _.....................................................
2_
3_
4_
See BELTCHANGINGAND BRUSH
CLEANING,(pages 16, t7).
Checkbrusharea forexcessivelint
buiid-upor jamming.Clean brush and
brush supports,then reset,(pages 16, t7)o
Changebag,(page 13)°
Clean!changefillers, (page 14, 15).
Clearclogfrom airflow passage,(page13),
This isnormaLRedshould disappear
when tool is removed,
1, Wrongpile"f_eigh'i"seiting '................... 1. 'Adjust setting,(page9). "'
2. Suctiontoo strong. 2o Opensuction control,(page 16)o
!. Burnedout lightbulb 1. Change lightbulbl (page16),,
1. Dirtypower cord., 1. Cleanthe powercord,
2. Cordjammed. 2. Pullout cordand rewind
I. Wrong ,vacuumingpattern° ' .................'!'_See VAc'uUMINGTIPS, [page9),
18
Antes de usar su aspiradora nueva ..... 1
Garantia de la aspiradora de Kenmore _,o 1
Instrucctones importantes de
seguridad ............................... 2
Piezas y caractedsticas .............. 3-4
Instrucciones de ensemblado ......... 5-6
Uso .................................. 7
Para comenzar ....................... 7
Sugerencias para aspirar ................ 8
Sugerencias sobre el ajuste de nivel de
pelo de la aifombra .................... 8
Accesorios ............................. 9
Uso de los accesorios .................. 9
Caracter[sticasde rendimiento ............... t0
Funcionamiento de su aspiradora ...... 11
Cuidado del receptdculo .................. 11
Cambio de la bolsa ................... tl
Limpieza del exterior y de los accesorios o.o 12
Cambio del filtro de seguridaddel motor ,. o12
Cambio del filtro de escape ............. 13
Cuidado de la Power-Mate* ............ I3
Cambio de la bombilla ................. 14
Cambio de la correay limpieza
del cepiUo ......................... 14-15
Cuidadodel cepillo .................... 16
Ensambledel cepillo ........................ 16
Reconocimiento de problemas ......... 17
Informacidn de
assistancia o servicio ..... PosteriorCubierta
Por favor lea esta guia que le ayudaraa assemblary operar su aspiradoranuevade Kenmoreen una manera
m,_sseguray effectiva.
Para mas informaciSnacerca del cuidadoy operaci6nde esta aspirador,Ilame a su tiendaSears mas cercana.
Cuando prequnte pot informaci6nusted necisitar&el numero_ompleto de serie y modelo de la aspiradoraque
est,_locadoen la placa de los nSmerosde modeloy serie.
Use e!espacio de abajo para registrar el numero de modelo y serie para su nuevaaspiradorade Kenmore.
N_mero de Modelo
Ntimero de Serie
Fecha de Compra
Matenga este ]ibroy su recibo en u fugarseguro para referenciasfuturaso
GARANTiA LIMITADADEUN A_iO DELA ASPIRADORA KENMORE
Esta garantla es por un afio desde tafecha de compra, e incluyesolamenteeluso de laaspiradoraen
hogares privadosoDuranteel afio de garantia, cuando la aspiradoraes operada y mantenida de acuerdoal
manual de instruccionesdeldue5o,Sears reparar_,cualquier defectoen materialeso fabricaciSnlibrede cargo.
Esta garantiaexcluyelasbolsasde colecci6n, correas, lampariilas,y fillros, las cuales son partes gastablesque
se deterioran con el uso normal.
Para el servtciode garantia,retorne esta aspiradora al Centro deServicio Sears rods cercanoen los
Estados Unidos.
Esta garantfase aplica solamentemientrasesteproducto est,_en usoen tos EstadosUnidos.Esta garantia le
da a usted derechos legalesespecificos, y ustedpuede tenet tambi_notros derechos loscualesvat[an de
estado a estado.
Sears, Roebuckand Co,, D1817WA, Hoffman Estates, IL 60179
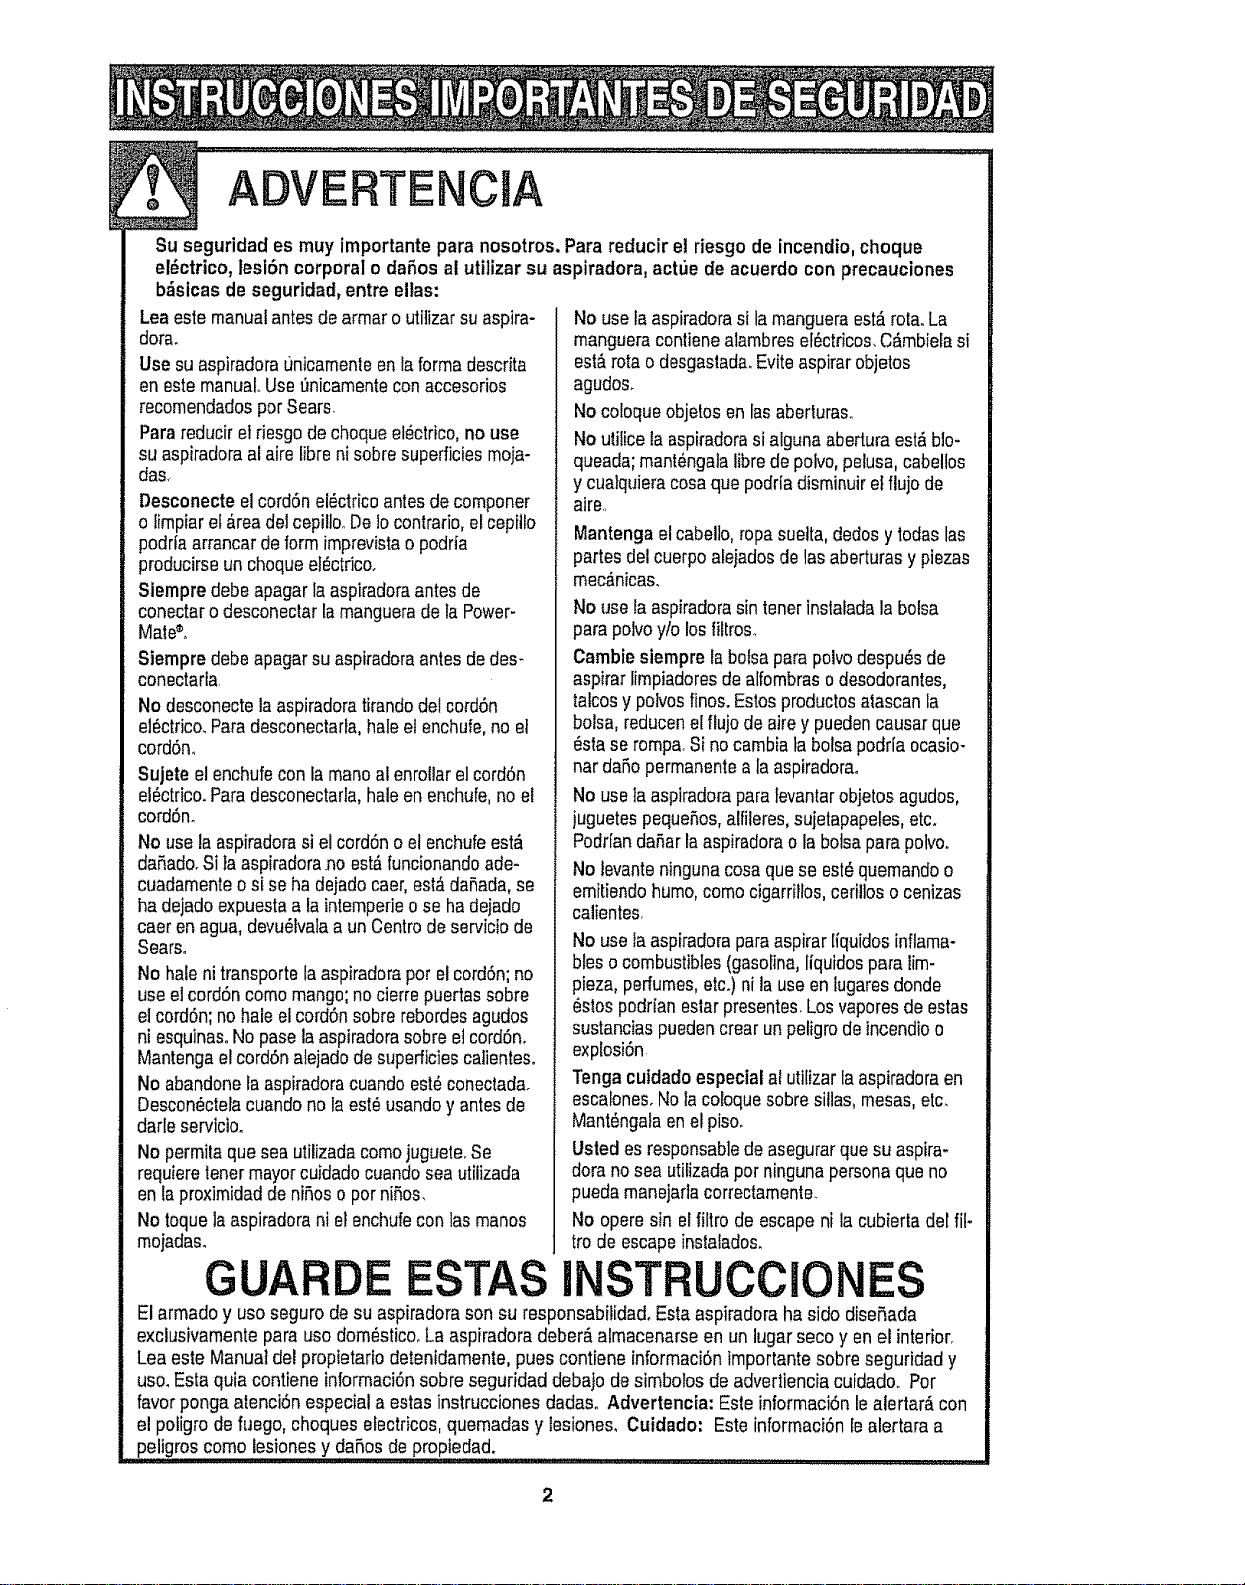
ADVERTE CIA
Su seguridad es rnuy importantepara nosotros. Para reducirel riesgo de incendio,choque
el_ctrico, lesl6n corporal o dahos al utilizar su aspiradora,actue de acuerdocon precauciones
b_sicas de seguridad, entre elias:
Leaestemanualantes dearmaro utilizarsu asp#a-
dora.
Use su aspiradoraunicamenteen la formadescrita
en estemanual Use t_nicamenteconaccesorios
recomendadospor Sears.
Para reducirelriesgode choqueel_ctrico,no use
suaspiradoraal airs libra ni sobresuperficiesmoja-
das<
Desconecte el cord6nei_ctricoantesde componer
o limpiarel _readel cepi!]ooDeIocontrario,el cepitlo
podrfaarrancarde formimprevistao podrfa
producirseun choqueelectrico.
Siernpre debeapagar la aspiradoraantesde
conectaro desconectarlamanguerade taPower-
Mate®.
Siempre debeapagarsu aspiradoraantes dedes-
conectarla.
No desconectela aspiradoratirandodetcordSn
el6ctrico.Paradesconectarfa,haleetenchufe,noet
cord6no
Sujete el enchufecon la manoal enrollarel cord6n
el_ctrico.Paradesconectarla,haleen enehufe,no el
cord6m
No usela aspiradorasi el cord6no etenchufeest,_
daf_ado.Si }aaspiradora.noest#,funcionandoade-
cuadamenteo si seha dejadocaer,est&dahada,se
hadejadoexpuestaa la intemperieo se hadejado
caer en agua,devu_tvafaa un Centrode serviciode
Sears.
Nohale ni transportsla aspiradorapot elcord6n;no
useelcord6ncomo mango;no cierrepuertassobre
elcord6n;no hale elcord6nsobrerebordesagudos
ni esquinasoNopass la aspiradorasobre elcord6n,
Mantengael cordbnatejadodesuperficiescalientes.
Noabandonsla aspiradoracuandoest_conectada.
Descon_ctelacuandonola est_usandoy antesde
darle servicio.
Nopermilaque seautilizadacomojuguete.Se
requieretenermayorcuidadocuandoseautilizada
enla proximidadde nihoso por niRos.
Notoquela aspiradorani elenchufeconlasmanos
mojadas.
GUARDE ESTAS
Nouse la aspiradorasi lamangueraest,_rot& La
mangueracontienealambresef_ctricos.C_mbielasi
est&rotao desgastada.Eviteaspirarobjetos
agudos_
Nocoloqueobjetosen lasaberturas_
Noutilicela aspiradorasialgunaaberturaest,_blo-
queada;mant_ngatalibrede polvo,pelusa,cabeltos
y cualquieracosaque poddadisminuiretflujo de
airs.,
Mantengaelcabello,ropasueita,dedosylodas las
partes delcuerpoaleiadosdelasaberturasy piezas
mec_nicas.
No uselaaspiradorasin tenerinslaladala bolsa
para polvoy/o losiiltros_
Carnbtesiempre labotsapara polvodespu_sde
aspirarlimp!adoresde alfombraso desodorantes,
talcosypolvosfinos.Estosproductosatascanla
bolsa, reducenel flujode aire y puedencausarque
_stase romp&Si no cambiala bolsapodrIaocasio-
nar daSopermanentsa laaspiradorao
No usetaaspiradorapara fevantarobjetosagudos,
juguetespequeSos,alfileres,suietapapeles,etc.
PodrfandaSarla aspiradorao la bolsapara polvoo
No levanteningunacosaque se est_quemandoo
emitiendohumo,comocigarrillos,cerilloso cenizas
calientea
No uselaaspiradoraparaasp!tar[iquidosinflama-
bleso combustibles(gasoIina,liquidosparalim-
pieza,perfumes,etc.)ni la useeniugaresdonde
6stospodrlaneslarpresentes,Losvaporesde estas
sustanciaspuedencrearun peligrodeincendioo
explosi6n.
Tenga cuidadoespecialal utitizarla aspiradoraen
esealonesoNolacoloquesobresitlas,mesas,etc.
Mant_ngafaenel piso.
Ustedesresponsablede asegurarque suasp#a-
dora no seautilizadapor ningunapersonaqueno
pueda manejadacorrectamente.
No operesin elfiltro de escape ni la cubierta del ill-
tro de escapeinstalados,
INSTRUCClO ES
Elarmado y uso segurode su aspiradorason su responsabilidad.Esta aspiradoraha sido disehada
exclusivamentepara uso dom_stico,La aspiradoradeber&almacenarseen un lugar seco yen el interior.
Lea este Manualdel propietariodetenidamente,puss contiene informaci6nimportantesobre seguridady
uso. Estaquia contiene informaci6nsobre seguridad debajo de simbolosde advertienciacuidado,.Por
favor pongaatenci6n especial a estasinstruccionesdadasoAdvertencia: Este iniormaci6n le alertar_ con
el potigrode fuego, choques efectricos,quemadas y iesione& Cuidado: Esteinformaci6n lealertara a
peligroscomo lesionss y dahosde propiedad.
...... Hlml ' I
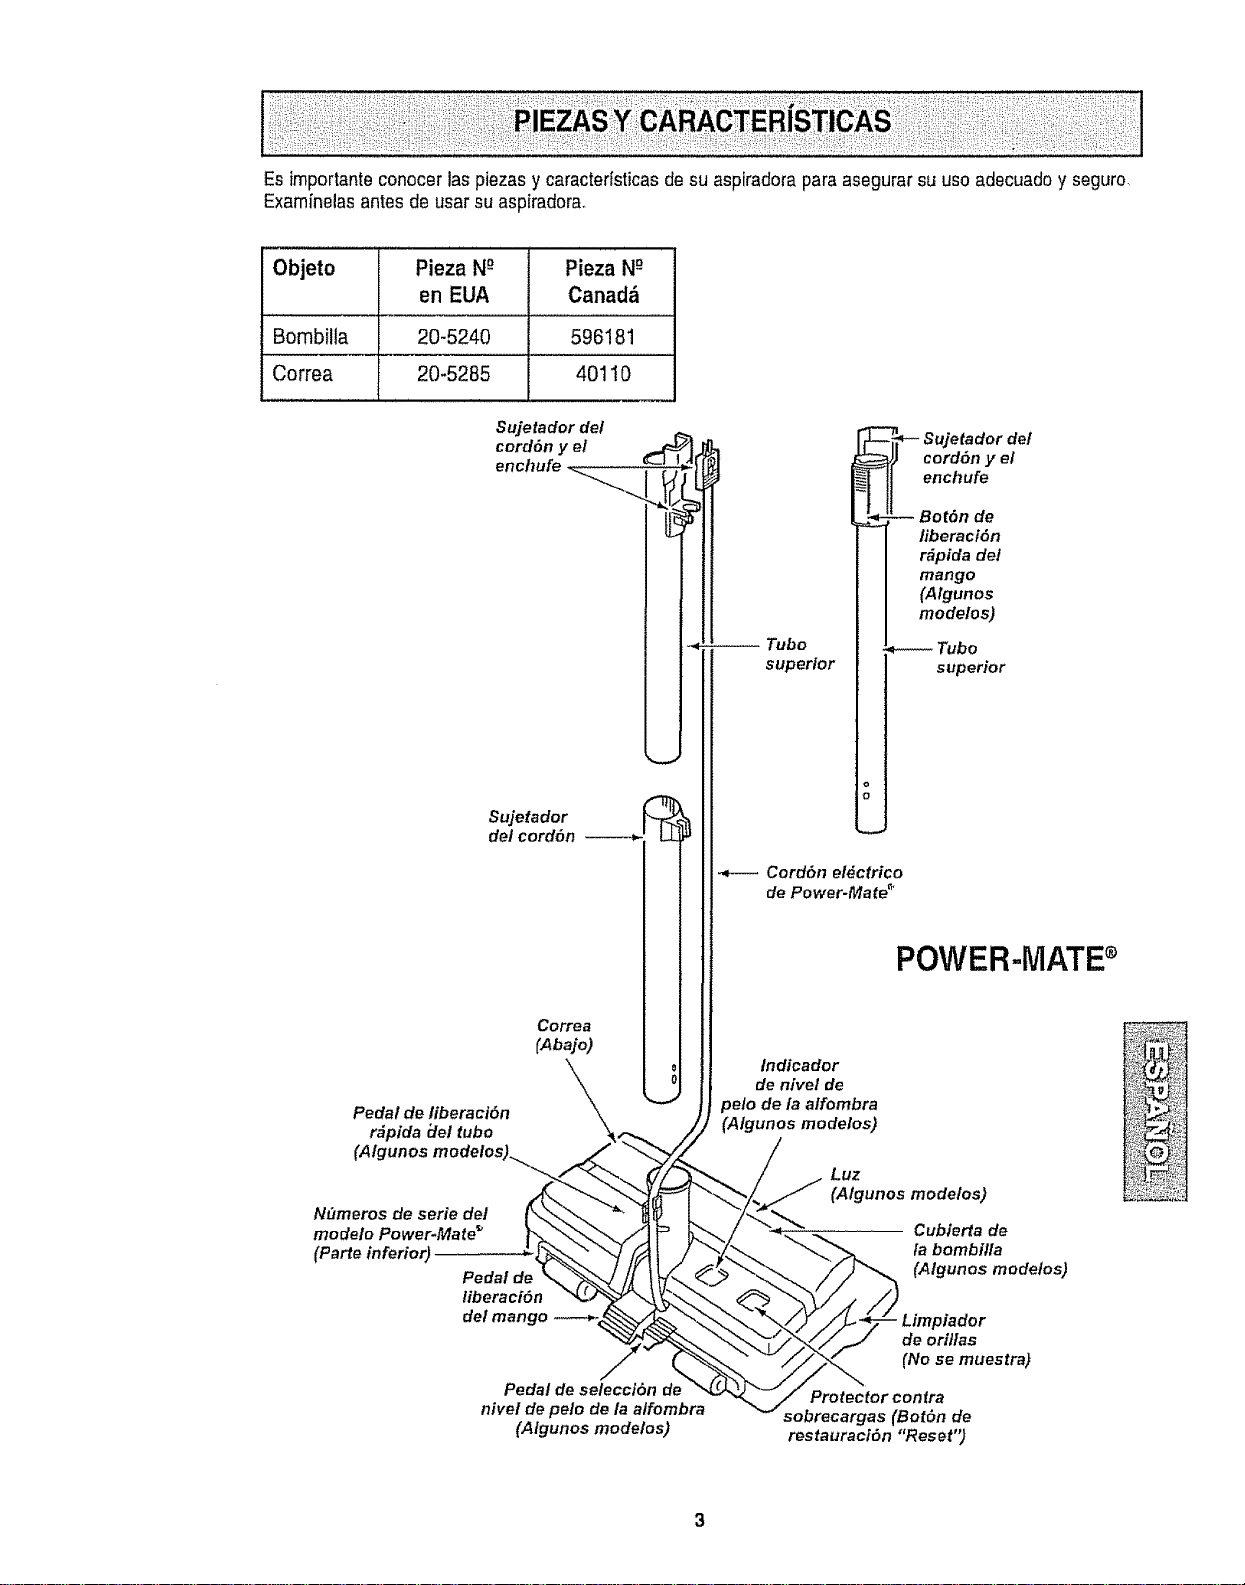
Esimportante conocer las piezas y caracterfsticas de su aspiradorapara asegurarsu uso adecuadoy seguro.
Examfnelasantes de usar su asp[radora.
Objeto Pieza N_ Pieza N-_
en EUA Canad_
Bombilla 20-5240 596181
Correa 20-5285 40110
Sujetador del
cord6n y el .._
Sujetador
det cord6n ------,_'. LLiP
Correa
CA0ajo I I
U
Pedal de liberacidn
r&pida iJe/ tuba
(AIg
N_meros de serie det
modelo Power-Mate _
(earte inferior)
Pedal de
liberaci6n
del mango
Pedal de selecci6n de
nivel de pelo de la alfombra
(Algunos modelos)
Tubo
superior
_-- Sujetador del
cord6n y el
enchufe
-- Bot6n de
liberaci6n
r_pida del
mango
(Algunos
modelos)
Tubo
superior
Cord6n elgctrico
de Power-Mate"
POWER-MATEs
Indicador
de nivel de
pelo de/a alfombra
(Algunos mode/os)
Luz
(A/gunos mode/os)
Cubierta de
la bombilla
(A/gunos mode/os)
Limpiador
de orillas
(No se muestra)
Protector contra
sobrecargas (Bot6n de
restauraci6n "Reset")
3
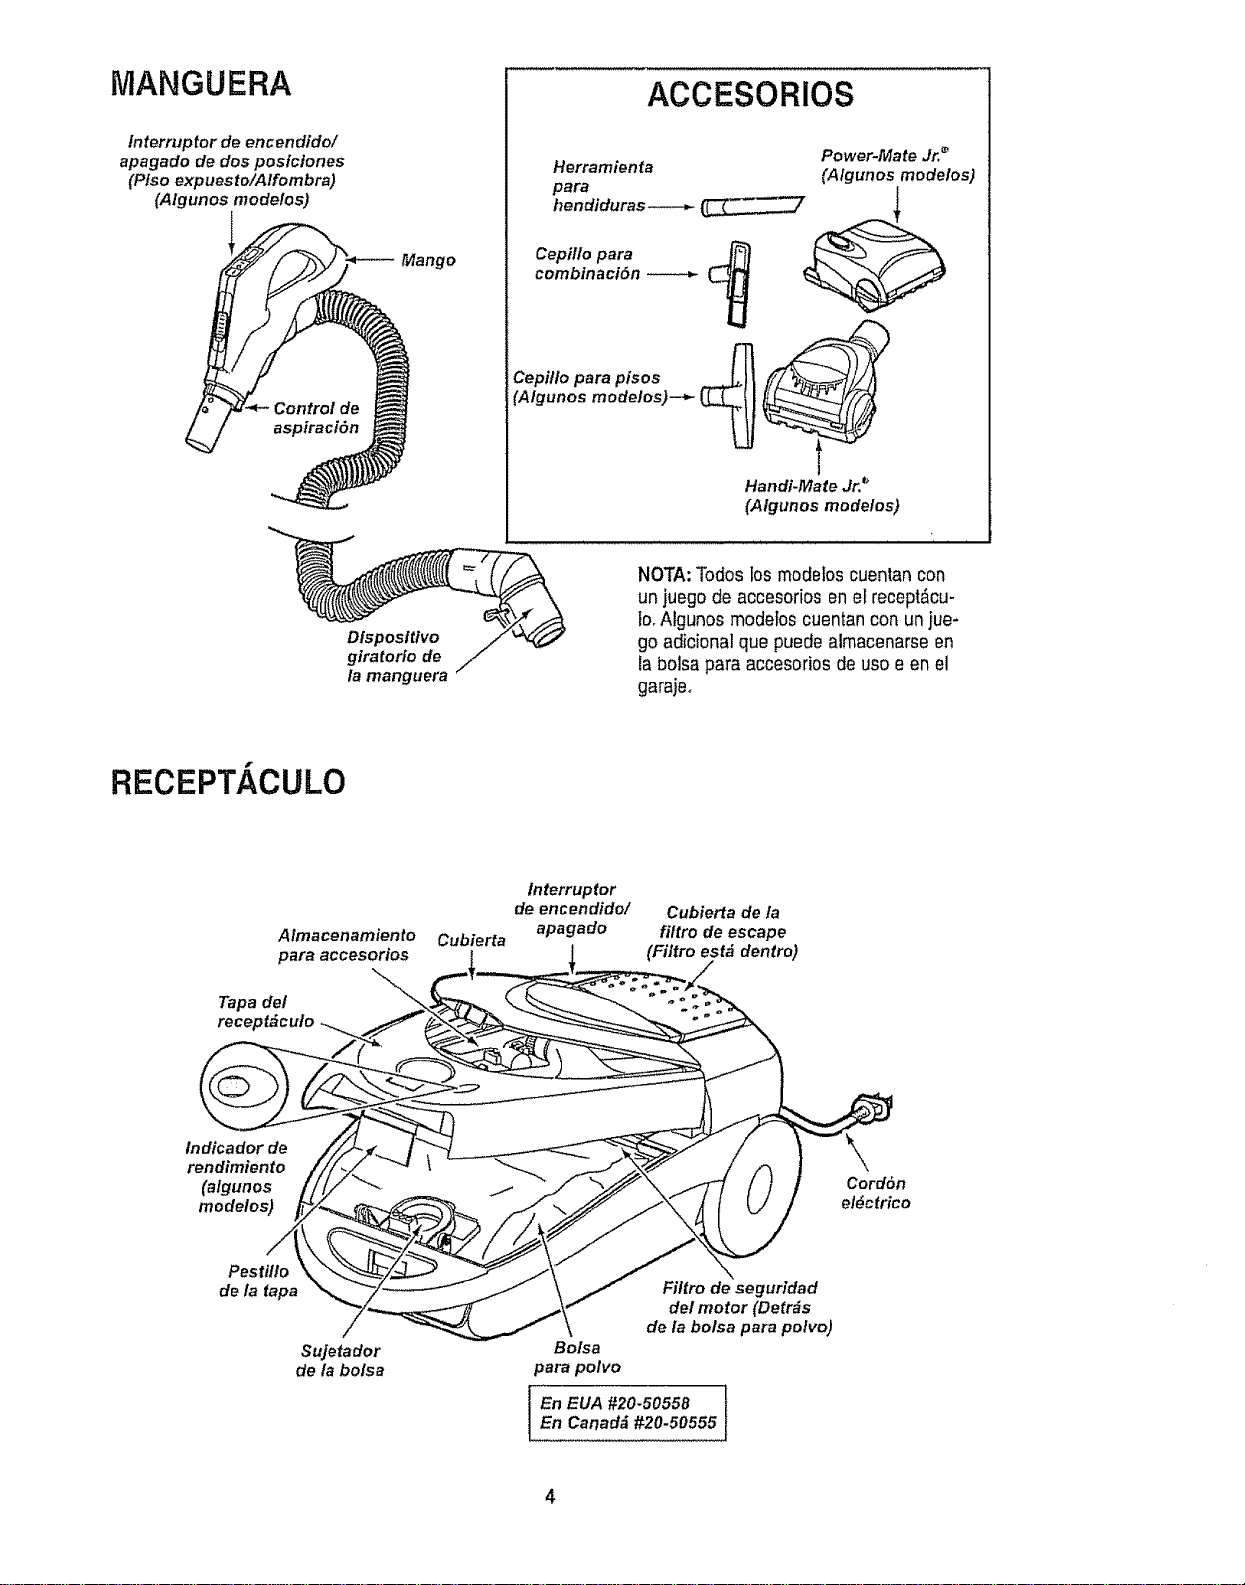
MANGUERA
fnterruptor de encendido/
apagado de dos posictones
(Ptso expuesto/Alfombra)
(Algunos modelos)
Mango
ACCESORIOS
Herramienta
para
hendiduras---_
Power-Mate Jr,,_
(Algunos modelos)
Cepillo para
combtnaci6n
Cepitlo para pisos 4
_Algunos modelos)--*-
Handi-Mate Jr, _
(Algunos modelos)
Dtsposttivo
giratorio de
la manguera
NOTA:Todos los modelos cuentan con
un juego de accesorios en el recept_cu-
1o_Aigunos modebs cuentancon un}ue-
go adicional que puede alrnacenarseen
la bolsa para accesorios de uso e en el
garajeo
RECEPT/ CULO
Almacenamiento
para accesorios
Tapa del
receptdculo
Cubierta
lnterruptor
de encendido/
apagado
Cubierta de la
filtro de escape
(Filtro est& dentro)
tndicador de
rendimiento
(algunos
modelos)
Cordbn
el_ctrico
Pestillo
de ia fapa
Sujetador
de la bo/sa
Filtro de seguridad
del motor (Detrds
de la bolsa para polvo)
Bolsa
para polvo
En EUA #20-50558 }
En Canadd #20-50555
4
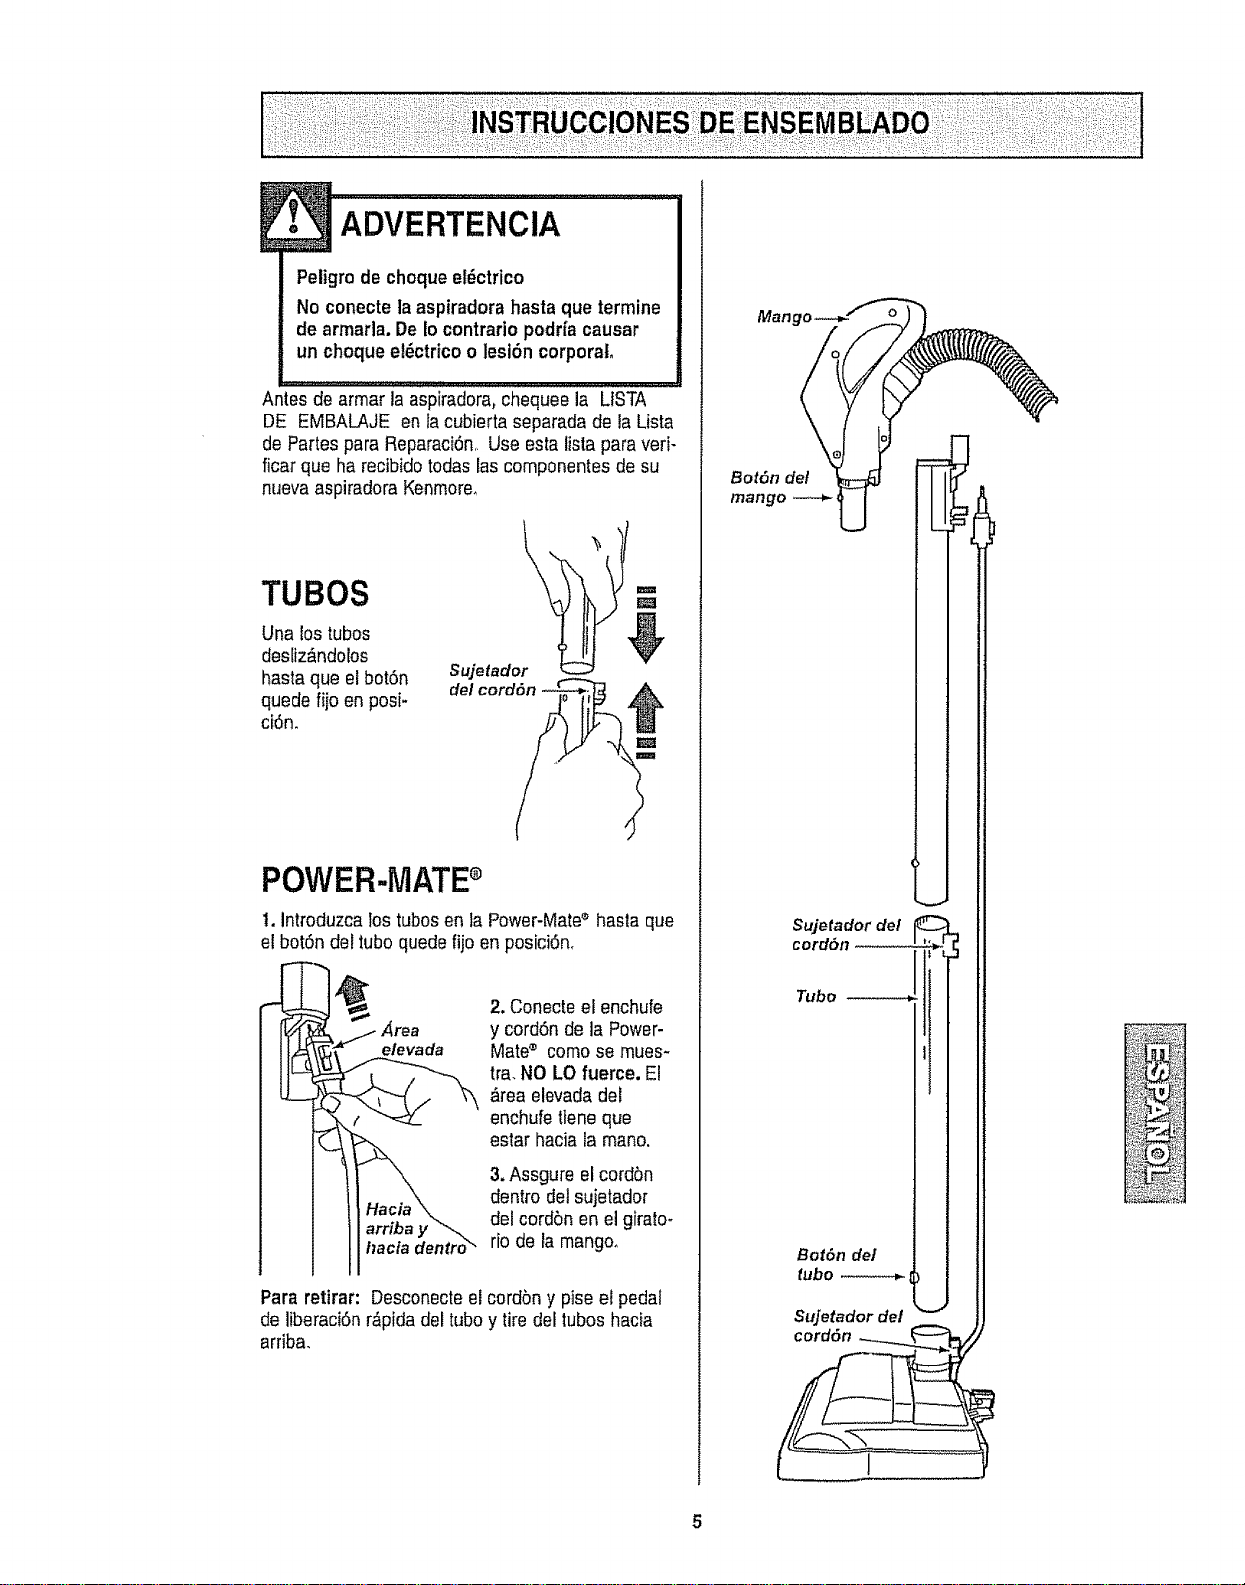
ADVERTENCiA ....
Peligrode chequeet_ctrico
No conecte la aspiradorahastaque termine
de armada. DeIo contrariopodrfa causar
un cheque el_ctricoo lesi6n corporal.
Antes de armar la aspiradora,chequee la LtSTA
DE EMBALAJE en lacubierta separadade la Lista
de Partes para Reparaci6n,.Use esta lista para verb
ficar que ha recibido todas las cornponentesde su
nuevaaspiradoraKenrnore.
TUBES -=
Una lostubes
desliz_ndolos V
hasta que el bot6n Sujetador
quede fiio en posi- del cordon
ci6n.
POWER-MATEe
t. introduzca los tubes en la Power-Mate®hasla que
el botSn del Iubo quede fijo en posici6n.
_rea
elevada
I_acia dentro_
2.Conecte el enchufe
y cord6n de la Power-
Mate® comose mues-
tra.NO LOfuerce. El
,_reaelevada del
enchufetiene que
estar hacia la mane.
3,Assgure elcordbn
dentro detsujetador
del cordbn enel girato-
rio de la mango.
Para retirar: Desconecteel cordbn y pise el pedal
de liberaci6n r&pidadel tube y tire del tubes hacia
arriba.
Man
Bot6n de/
mango
Sujetador de!
cord6n ......... . ,_
I
Tube _ i
Bot6nde/ |
_ubo _ J
Sujetadordel
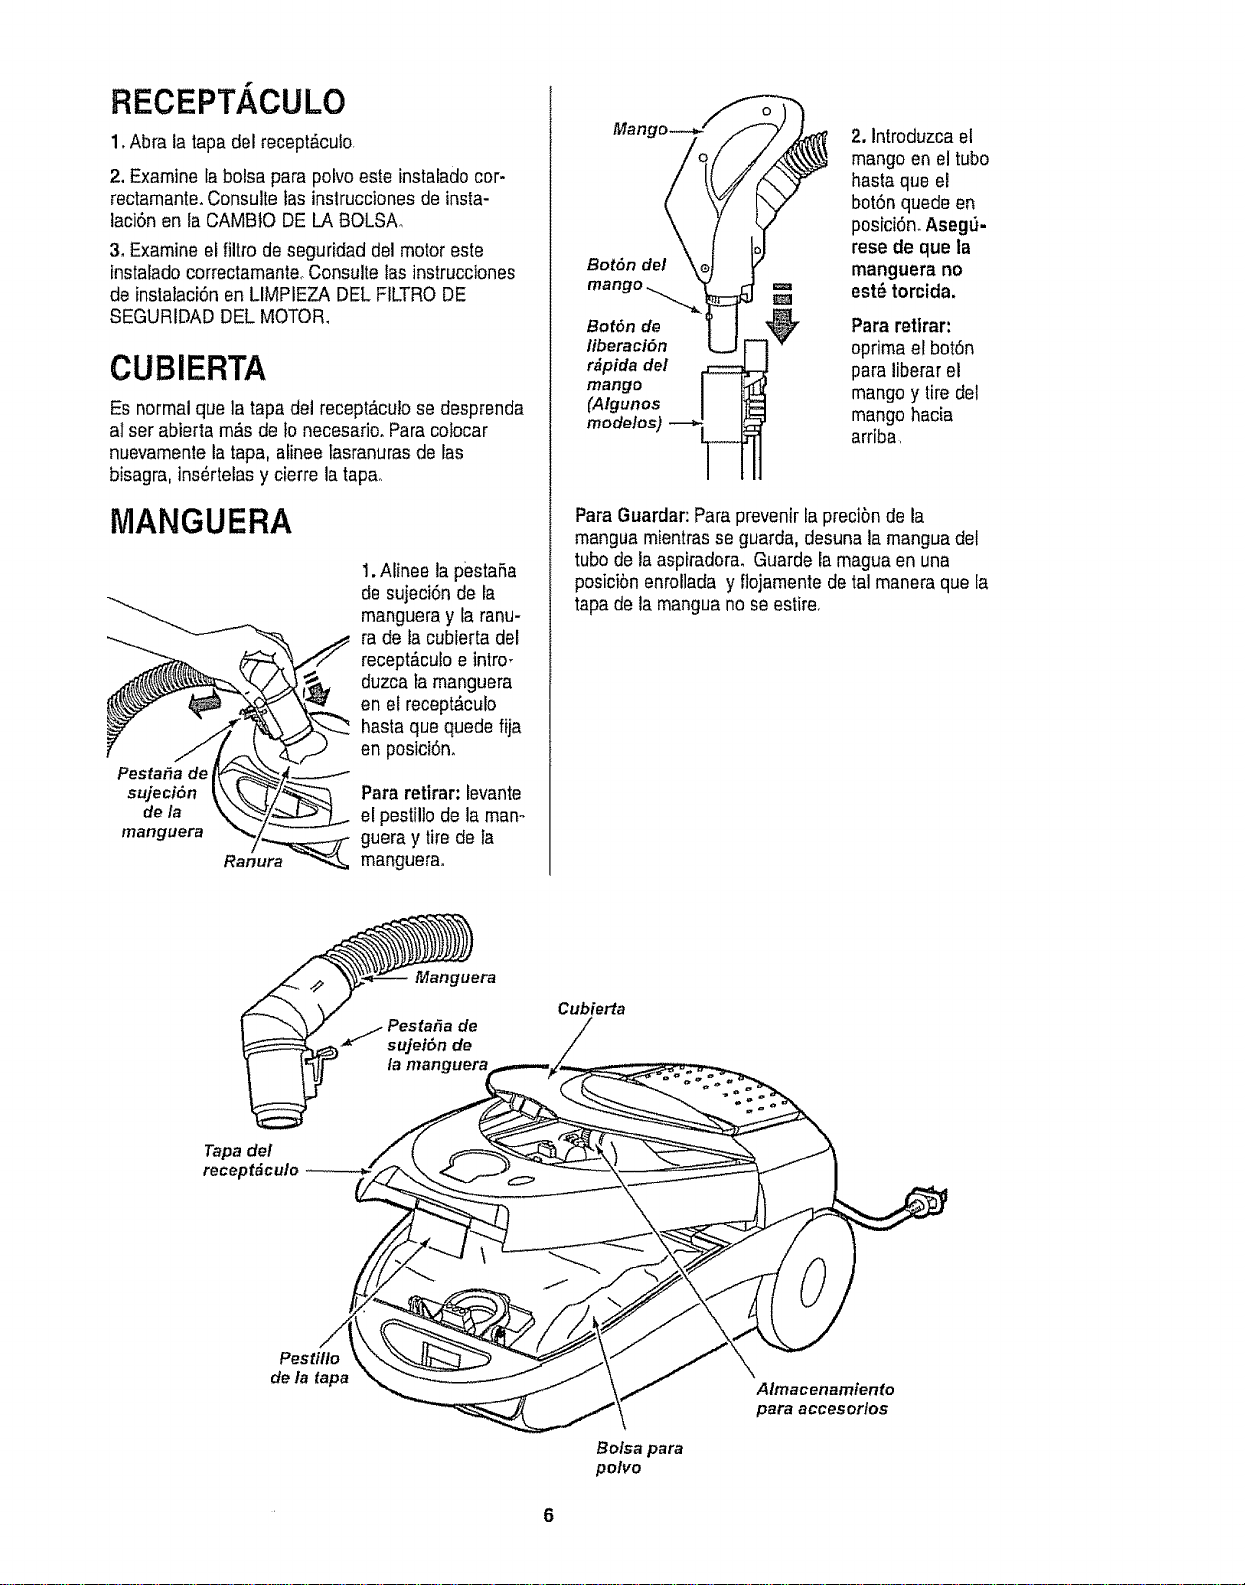
RECEPT/ CULO
1.Abra la tapa del recept&cuio,
2, Examine la bolsa para polvoeste instalado cer-
rectamante.Consulte tasinslrucciones de insta-
laci6nen la CAMBIO DE LA BOLSA,,
3, Examine el filtro de seguridad del motor este
instalado correctamanteoConsulte las instrucciones
de instalaci6nen LIMPIEZA DEL FILTRODE
SEGURIDAD DEL MOTOR,
CUBIERTA
Es normalque la tapadel recept_culose desprenda
al ser abierta m,% de to necesariooPara colocar
nuevamente la tapa, alinee tasranurasde las
bisagra, ins_rteias y cierre latapa_
MANGUERA
Pesta_a de
sujeci6n
de la
manguera
1. Alinee la pestaSa
de sujeci6n de la
mangueray la ranu-
ra de fa cubierta del
recept_.culoe intro_
duzca ta manguera
en el recept_,culo
hasta que quede fija
en posici6n.
Para retirar: levante
el pestillo de la man°
guera y tirede ta
manguerao
Bot6n del
2. Introduzca el
mango en el tube
hasta que el
botSnquede en
posici6n.Aseg6-
rese de que la
manguera no
est_ torcida.
Bot6n de Para retirar:
liberaci6n oprima el bot6n
r#pida del para liberar el
mango
(Algunos mango y tire del
mode!os) mango hacia
arriba,
ParaGuardar:Paraprevenir lapreciSnde la
manguamientrasse guarda, desunala manguadel
tubede la aspiradora. Guarde la maguaen una
posiciSnenrollada y flojamentedetal maneraque la
tapade la manguano seestire,
Cubierta
Tapa del
receptdculo
Pestiflo
de la tapa
Bolsa para
polvo
Almacenamienfo
para accesorlos
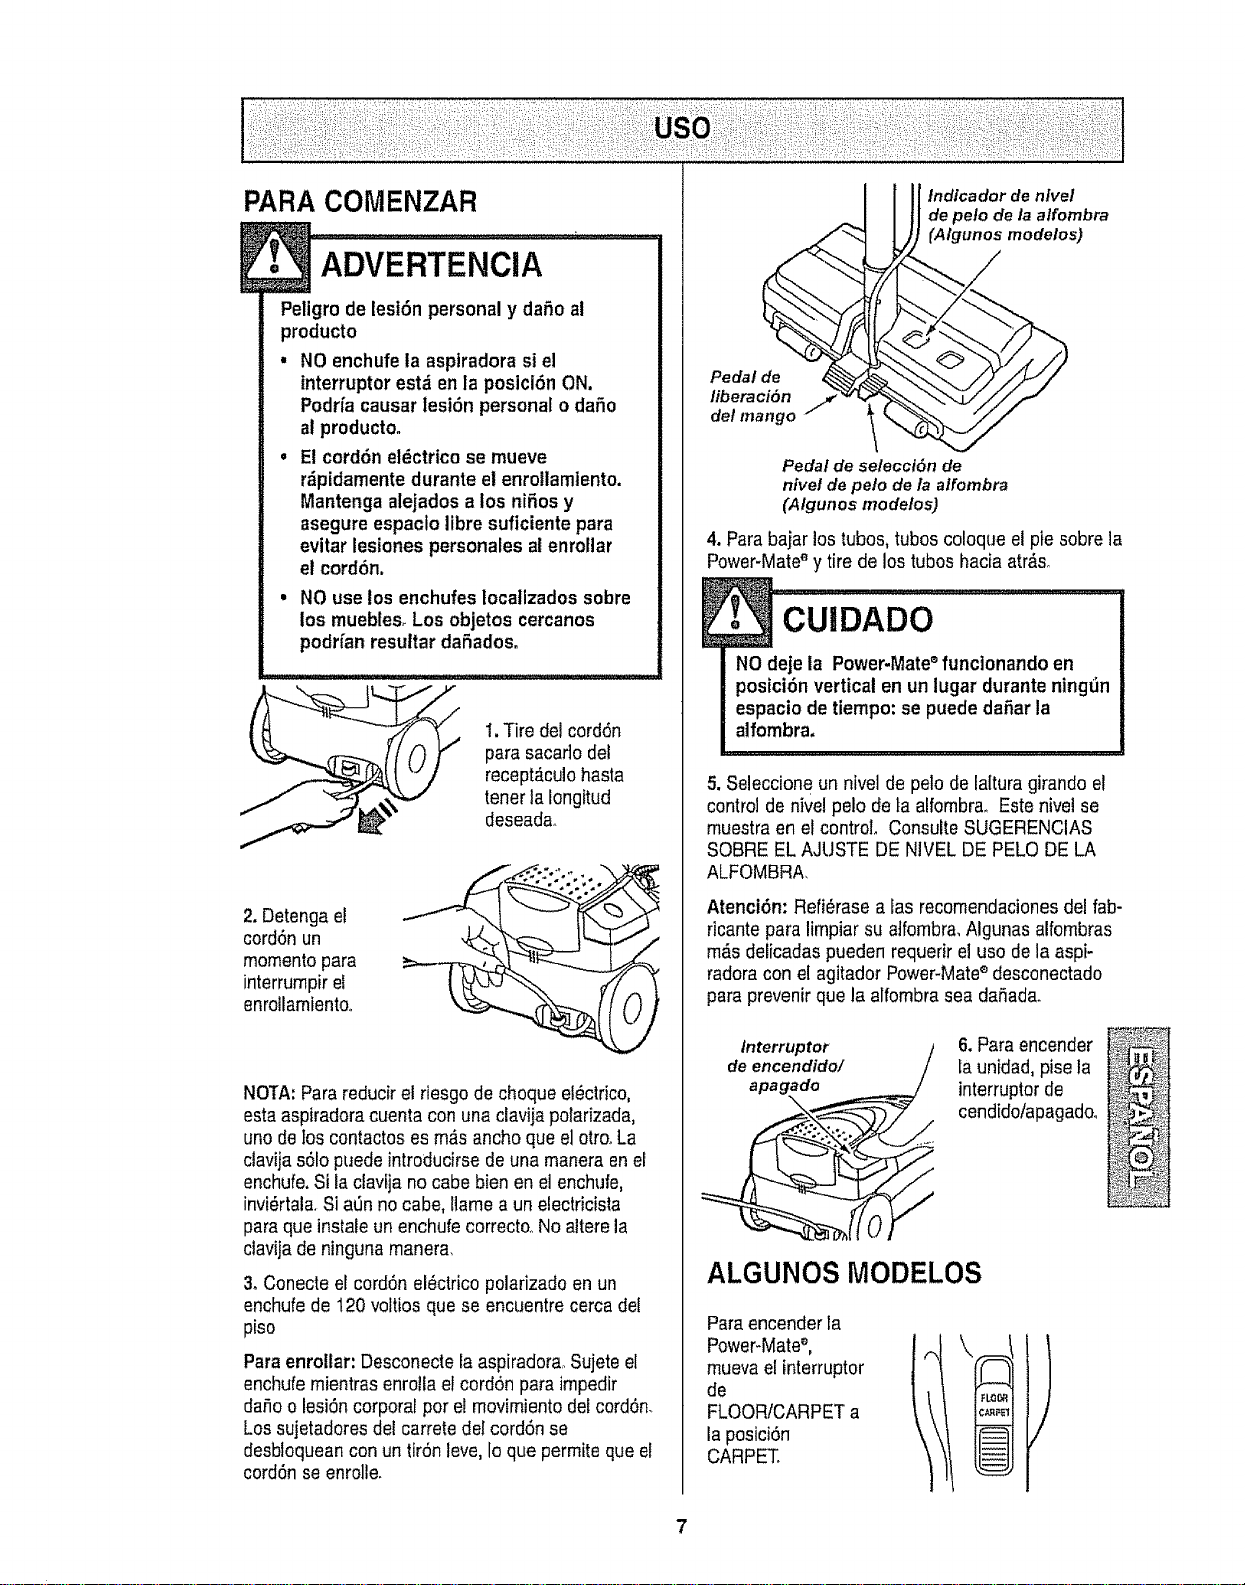
PARA COMENZAR
Peligrode lest6n personaly daSo al
producto
, NO enchufela asptradorasiel
interruptor est;ien la posici6n ON.
Podrfacausar lesi6n personal o dafio
at producto.
o E! cord6n et_ctricose mueve
r_ipidamentedurante el enro!lamtento.
Mantenga alejados a los niSosy
asegureespaclo libre suficiente para
evitar lesiones personales aienrollar
el cord6n.
, NO uselos enchufesIocatlzados sobre
los muebtes.Los objetos cercanos
podHanresuttardaSadoso
1.Tire del cord6n
para sacarlo del
recept_culohasta
tonerla Iongitud
deseada.
2. Detenga el
cord6n un
momentopara
interrurnpirel
enrollamiento,.
NOTA:Para reducirel riesgode choqueet_ctrico,
estaaspiradoracuenta con una clavija porarizada,
uno de los contactos esm_s anchoque el otrooLa
clavija s61opuedeintroducirse de una maneraen el
enchufe,Si la ctavijano cabebienen el enchufe,
invi_rtala.SiaSn no cabe, Ilame a un electricista
para que instaleun enchufe correcto..Noalterela
ctavijade ninguna manera.
3oConecte el cord6nel_ctrico polarizado enun
enchufe de 120 voltios que se encuentre cerca del
piso
Paraenrollar: Desconectela aspiradora.Sujeteel
enchufe rnientrasenrolla el cord6n para impedir
da,%o lesi6ncorporal pot el rnovimientodel cord6n.
Los sujetadoresdel carrete del cord6nse
desbloqueancon un tir6n leve, Ioque permite que el
cord6n seenrolle.
Pedal de
lib eraci5n
dot mango
tndfcador de nlvel
de peto de la a/fombra
(Algunos modelos)
Pedal de selecci6n de
nivet de pelo de/a alfombra
(Algunos mode/os)
4. Para bajar los tubos,tubos coloque el pie sobrela
Power-Mate'_y tire de los tubos hacia atr_s_
E
NO deje la Power-Mate_funclonando en
posici6n vertical en un lugar durante ningtin
espacio de tiernpo:se puede daSarla
alfombra,
5. Seleccione un nivel de polo de lalturagirando el
control de nivelpolo de_aalfombra. Este nivei se
rnuestraen el control. ConsulteSUGERENCIAS
SOBRE EL AJUSTE DE NIVEL DE PELO DE LA
ALFOMBRA,
AtenciSn:Refi_rase a las recomendacionesdel fab-
ricante paralimpiar su atfombra,Algunas alfombras
rndsdeiicadas puedenrequerir el uso de la aspi-
radoracon el agitador Power-Mates desconectado
paraprevenirque la alfombratea daSada.
Interruptor
de encendido/
apagado
\
6.Para encender
Launidad,pise la
interruptorde
cendido/apagado_
i_:_ _,
ALGUNOS MODELOS
Paraencenderla
Power-Mate_,
muevael interruptor
de
FLOOR/CARPETa
la posici6n
CARPET.
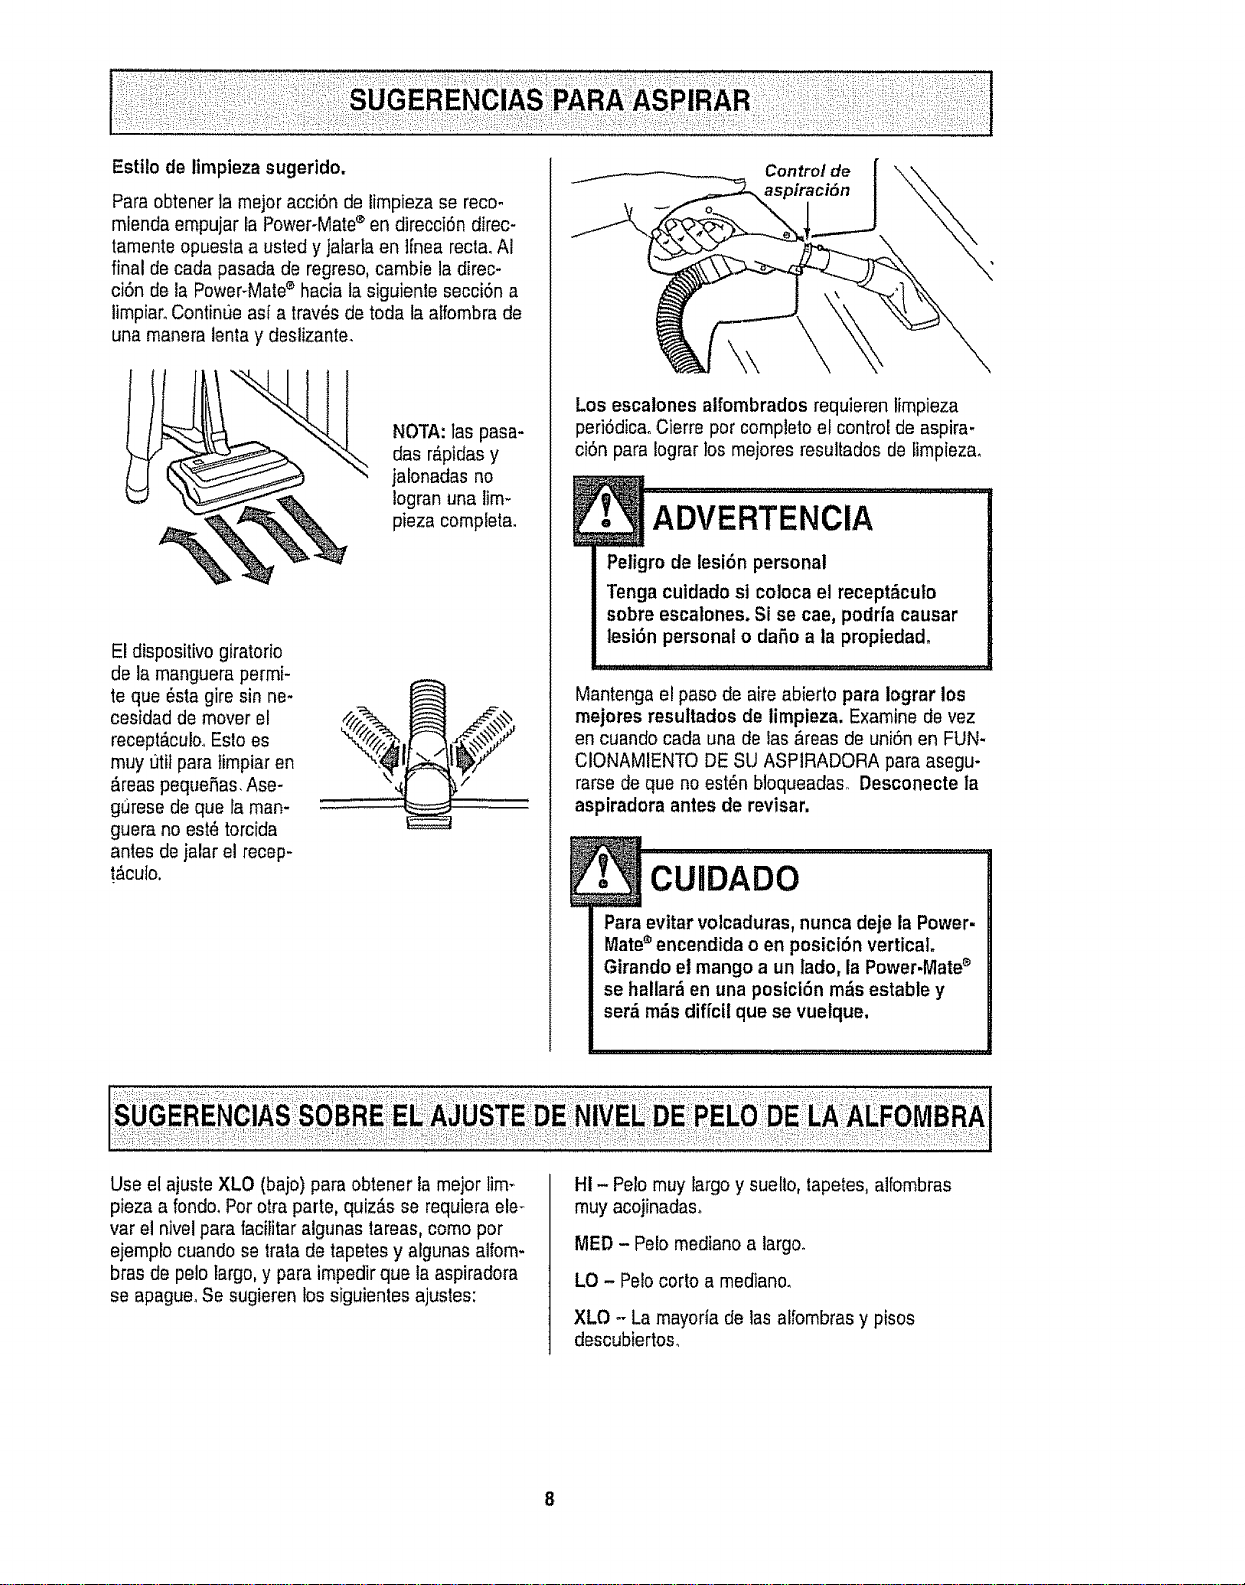
Estt!odetimpiezasugerido,
Para obtenerla mejoracciSn de limpieza se reco-
miendaempujar IaPower-Matesen direcciSndirec-
tamenteopuesta a ustedy jafarta en lfnea recta_AI
final de cadapasada de regreso,cambie la direc-
ciSn de la Power-Mates hacia la siguienle secciSna
limpiaroContint]e asi a tray,s de toda taaIfombrade
una maneralentay deslizante.
NOTA:las pasa-
das r_pidasy
jatonadasno
Iogranuna lim-
pieza completa.
El dispositivogiratorio
de la manguerapermi-
te que @stagire sin ne-
cesidad de mover el
recept_culooEslo es
muy t]titpara timpiar en
&teas pequeSas.Ase-
gurese de que la man-
guera no est@torcida
antes de jalar el recep-
!_cuto,
Control de
)iraciSn
Los escalones alfombrados requieren limpieza
peri6dica..Cierre per completeel control de aspira-
ciSnpara Iograrlos mejores resultados de _impieza.
ADVERTENcIA ......
Peligro de lesi6n personal
Tengacutdadost coloca el recept_culo
sobreescalones. Si se cae, podrfa causar
lesi6n personalo dafio a la propiedad,
Mantengae! pasode aire abierto para iograr los
mejores resultades de limpieza. Examine de vez
en cuando carla una de las,_reasde uniSnen FUN-
CIONAMIENTODESU ASPIRADORA para asegu-
rarsede que no est6n bloqueadas,.Desconecte ta
aspiradora antes de revisar,
. cu,oAoo !
Para evttar volcaduras,nunca deje la Power-
Mate®encendida o en posicl6n vertical.
Girando el mango a un lade, la Power.lVlate_
se hallar_ en una postci(_n m_s estabte y
ser,_m_s diffcfl que se vuelque,
Use el ajusteXLO (bajo) para obtener fa meier lira-.
pieza a fondo. Perotra parte, quJz_sse requiera ele-
var el nivel para facititaralgunas tareas,come per
ejemplocuando se trata de tapetesy algunasalfom-
bras de pelo largo, y para impedir que la aspiradora
se apagueoSe sugieren lossiguientesajustes:
H!- Pelo muy largo y suello, tapetes,alfombras
muy acojinadas_
MED - Pelo medianoa largo.
LO - Pelocorto a mediano.
XLO - La mayoria de las alfombrasy pisos
descubiertos_
8
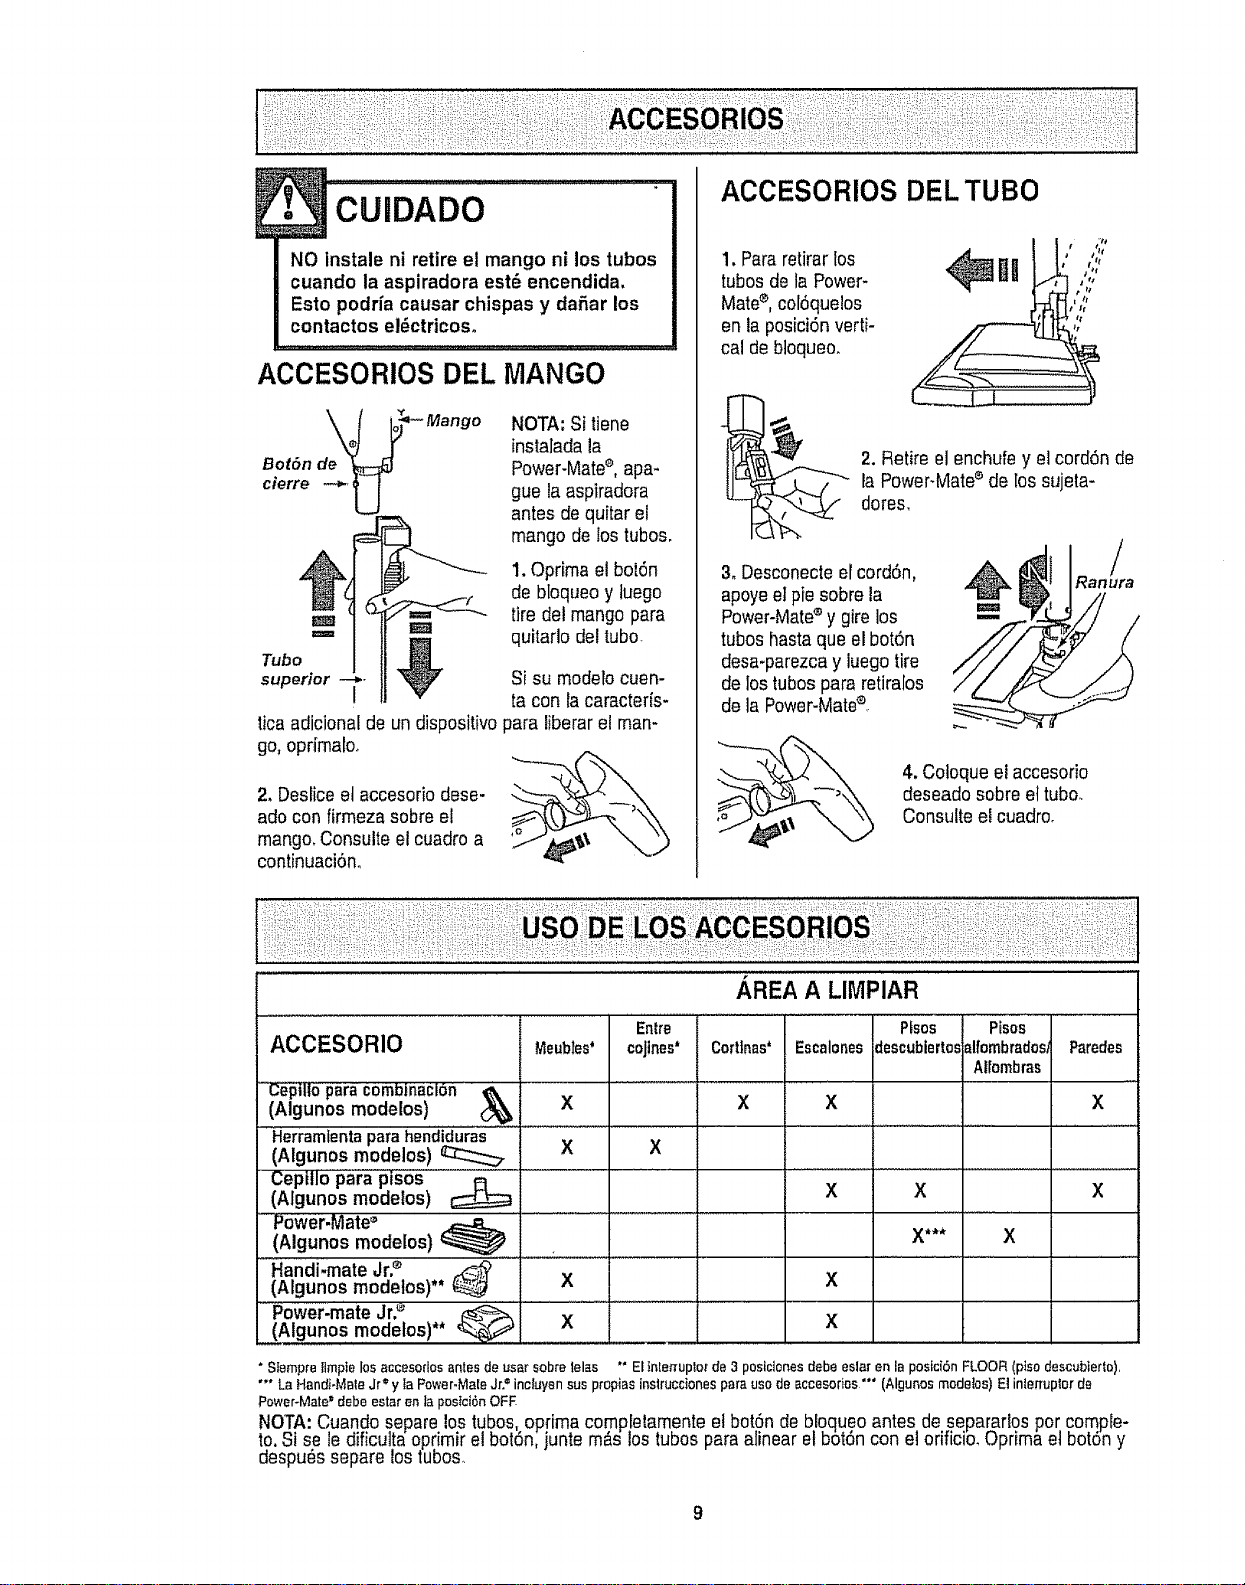
1
NO lnstale ni retire el mango ni los tubes
cuando la aspiradora est6 encendida.
Esto podrfa causar chispas y dafiar los
contactos eldctrtcoso
ACCESORIOS DEL MANGO
NOTA: Si tiene
instalada la
Power-Matee,apa-
gue la aspiradora
antes de quitar el
mango de los tubes.
1. Oprima el boiSn
de bloqueoy luego
tire det mango pare
i_m w
Tube =_ M quitarlo de!tube
superior I V Si su modelocuen-
ta con la caracterfs-
tica adicional de un dispositivopara Iiberarel man-
go, oprfmaloo
2. Deslice et accesoriodose-
ado con firmeza sobree!
mango. Consulte el cuadroa
continuaciSn.
ACCESORIOS DEL TUBe
1. Pare retirarlos
tubes de la Power-
Mate_,col6quelos
en la posiciSnverti-
cal de bloqueo.
2, Retire el enchufe y el cord6n de
la Power-Mate_ de los sujeta-
dores.
3. Desconecteel cord6n,
apoyeel pie sobre la
Power-Mate®y gire los
tubes haste que el bot6n
desa-parezcay iuego tire
de los tubes pare retiralos
de la Power-Mate®,
Ran /ura
4, Coloqueel accesorio
deseadosobre el tube.
Consultee! cuadro.
AREA A LIMPIAR
ACCESORIO meubles'
.......(AlgunosC'_tll°paramodelos)COmb|naclon_ X
Herramlentaparahendid'u_:as.............
(Aigunos modelos) _ X
Cepillo para piS0S
(Algunos modelos) _
P0wer,Mate_,
(Algunos modelos)
Handi"mate Jr2 _ .................
(Algunos modelos)** @ X
Power'mate Jr.e _ ......................
(Algunos modelos)** _._-6-6-6-6-6-6-6-6__ X
Entre Pfsos
cojines* Corttnas* Escalonesdescubiertos
X
X
' Ptsos
alfombrados/Paredes
Alfombras
X X
X X X
X
x
X*** X
* Stempre tlmpte los accesodos antes de t_sarsobre telas '" El tnler[upler de 3 posiclones debe eslar en la pesici6n FLOOR (ptso clescublerte),
"'* La Handi-Mate Jr e'y ta Power-Male Jr.= incluyen sus propias inslruccienes pare use de accesories "" (Algunos medetes) El interruplor de
®
Power-Mate debe ester en la pestci6n OFF
NOTA:Cuando separe lostubes, optima co.rnp!etarnenteet boto'nde bloqueoantes de separarlos per comple-
te. Si sele dificultaeprimir el bot6n junte rnaslOStubes parealinear etbot6ncon elorificio. Oprimaet botSny
despu_s separe ostubes.
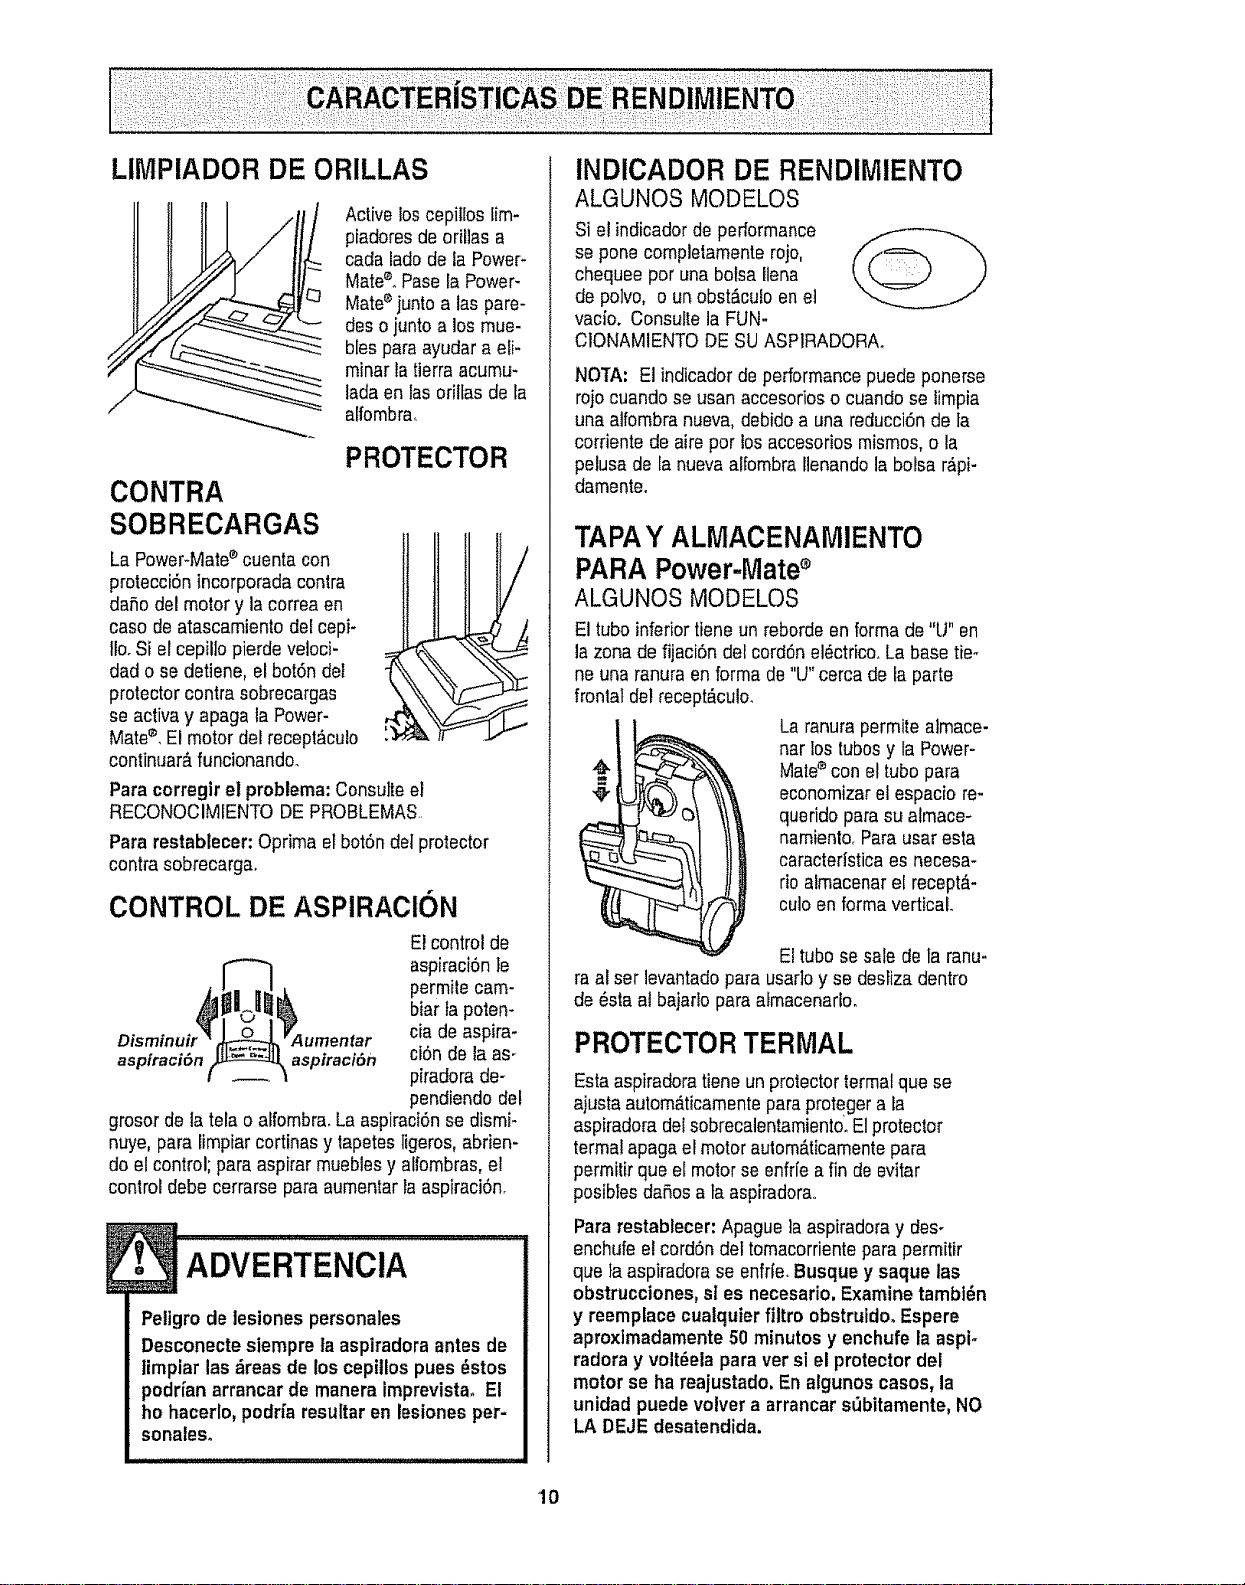
LIMPIADOR DE ORILLAS
Active loscepillos lira+
piadores de orillas a
cada lado de ia Power+
Mate+°Pase la Power-
Mate+junto alas pare-
des o junto a los mue-
bles para ayudara eli-
minar la tierra acumu-
ladeen fas oriltas de ta
alfombra,,
PROTECTOR
CONTRA
SOBRECARGAS
La Power+Mate+cuenta con
protecci6n incorporada contra
daSo del motor y la correa en
caso de atascamiento del cepi+
llo.Si el cepil]o pierde veloci-
dad o se detiene, el bot6ndel
protector contra sobrecargas
se active y apaga la Power-
Mate®,Elmotor del recep!_culo
continuar_,funcionando.
Para corregir el problema:Consulteel
RECONOCIMIENTO DE PROBLEMAS.
Para restablecer: Oprima etbotSndetprotector
contra sobrecarga.
CONTROL DE ASPIRAClON
Disminuir _ 0 _Aumentar
aspiraci#n [_ aspiraci6n
El control de
aspiraciSnIe
permite cam-
bier tapoten-
cia de aspira-
ci6n de la as-
piradora de-
pendiendo del
grosor de la telao alfombra.LaaspiraciOnse dismi-
nuye, para limpiarcortinas y tapetes ligeros, abden-
do el control; pare aspirer mueblesy alfombras, e!
control debe cerrarse pare aumentarla aspiraci6n_
Petigro de lesiones personales
Desconecte siempre laaspiradora antes de
timpiar las _reas de los cepillos pues _stos
podrfan arrancar de manera imprevista, El
ho hacerlo,podrfa resultar en lesiones per-
sonales°
INDICADOR DE RENDIMIENTO
ALGUNOS MODELOS
Si el indicadorde pedormance
se pone completamente rojo,
chequee por una bolsa Ilena
de polvo, o un obst&culoen et
vacioo Consulte la FUN-
CIONAMIENTODE SUASP1RADORAo
NO't'A: El indicadorde performancepuede ponerse
rojocuando se usan accesorioso cuando se limpia
una alfombra nueva, debido a una reducci6n do ta
corriente de aire por losaccesorios mismos,o la
pelusa de la nuevaalfombra llenando la boise r,_pi-
damenteo
TAPAY ALMACENAMIENTO
PARAPower-Mate
ALGUNOS MODELOS
El tubo inferiortieneun reborde en forma de "U" en
la zona de fijaciSn del cordSnel_ctrico°La basetier
ne una ranura en forma de"U" cercade la parte
frontal del recept_culo.
La ranura permite aJmace-
nar los tubosy la Power-
Mate®con el tubo pare
economizarel espacio re-
querido para su afmace-
namienlo_Pareuser esta
caractedstica es necesa-
rio almacenarel recept_-
culo en forma vertical
Ettubo se sale de la ranu-
ra al set levantadopare usar]oy se desrizadentro
de #sta at bajarlo pare afmacenarto.
PROTECTORTERMAL
Estaaspiradoratiene un protectorterrnalque se
ajusta autom,_ticamentepareproteger a _a
aspiradora delsobrecalentamiento.Elprotector
termal apaga el motor autom_ticamentepare
permitir que el motor se enfrle a fin de evitar
posibles daRosala aspiradora,.
Pare restablecer: Apague ]aaspiradoray des-
enchufe el cordSndel tomacorrienteparepermitir
que ia aspiradorase enfrte.Busque y saque las
obstrucciones, sl es necesario. Examine tambt_n
y reemplace cualquier filtro obstruido° Espere
aproximadamente 50 minutos y enchufe la aspi-
fedora y volt_ela para versi el protector del
motor se ha reajustado, En algunos casos, la
unidad puede volver a arrancarst_bitamente,NO
LA DEJEdesatendida.
10
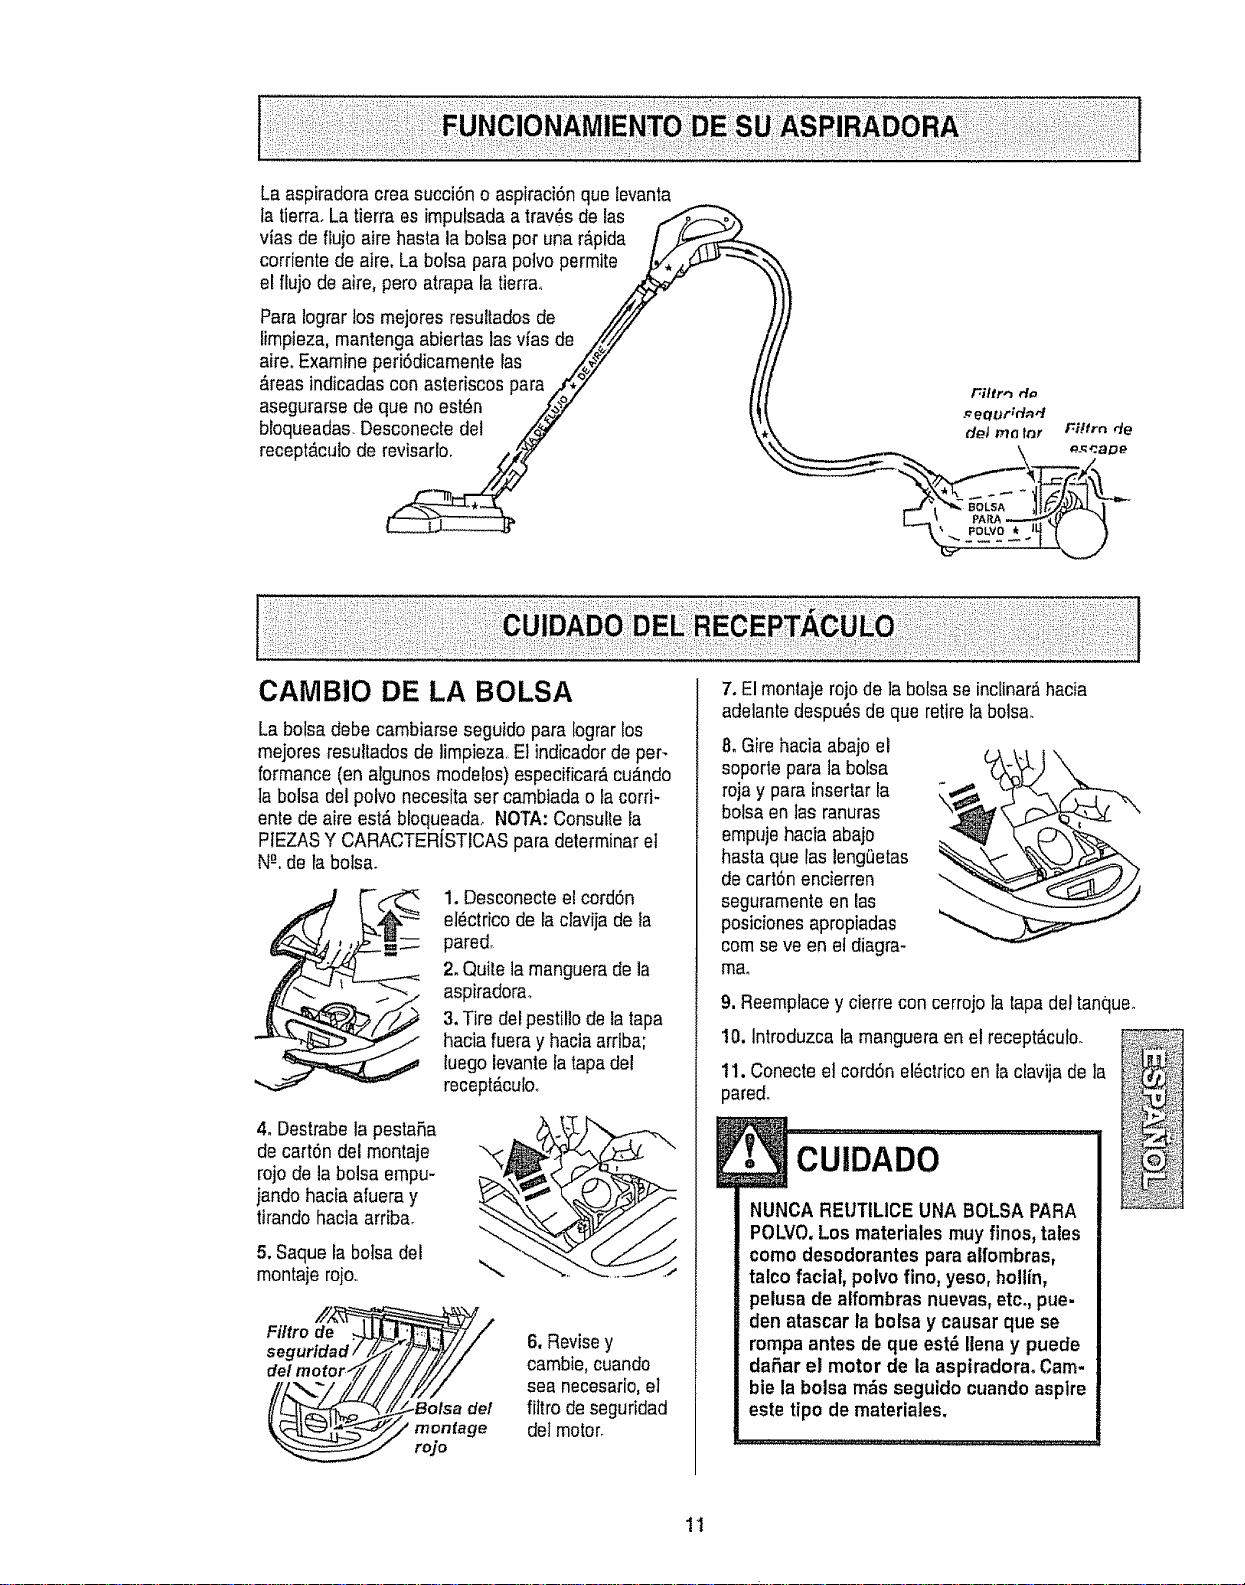
Laaspiradoracreasucci6noaspiraci6nquelevanta
latierra.Latierraesimpulsadaatray,sdelas
viasdeflujoairehastalabolsapotunar&pida
corrientedeaire.Labolsaparapolvopermite
elflujodeaire,peroatrapalatierra_
Paratograrlosmejoresresultadosde
limpieza,mantengaabiertaslasvfasde
aire.Examineperi6dicarnentelas
&teasindicadasconasteriscospara
asegurarsedequenoest6n
bloqueadas.Desconectedel
recept_.culodorevisarlo.
CAMBIO DE LA BOLSA
La bolsa debe carnbiarse seguido para Iograrlos
mejores resultadosde limpieza, Etindicadorde per-
formance(en algunos modelos) especificar,_cu_.ndo
la bolsa del polvo necesitaser cambiada o ia corri-
ente de aire est& bfoqueadaoNOTA:Consutle la
PIEZASY CARACTERISTICAS para determinarel
N-"ode la bolsa.
1. Desconecteel cord6n
el_ctricode la clavija de la
pared.
2. Quite la manguerade la
aspiradora.
3, Tire del pestillo de la tapa
hacia fueray haciaarriba;
luego levantefatapadel
recept#,culoo
4. Destrabe la pestafia
de cart6n del montaje
rojo do la bolsa empu-
]andohacia afuera y
tirando hacia arriba.
5. Saque la boisa del
montaje rojo,.
Filtrode ._
seguridad/
de/motoP
Y
6. Revisey
cambie,cuando
sea necesario,el
filtro de seguridad
del moton
7. El montaje rojo de ]a bolsase inc[inar,_hacia
adelantedespu_s de que retirefabolsa.
8. Gire hacia abajo el
soporle para la bo[sa
roja y para insertar la
bolsa en las ranuras
empujehacia abajo
hasta que las leng0etas
de cart6n encierren
seguramenteen las
posicionesapropiadas
cornse ve en el diagra-
ma.
9. Reemptacey cierrecon cerrojo la tapadel tanque.
10, Introduzca lamangueraen elrecept_culo.
11. Conecteel cord6n el#ctricoenla clavija de ]a
pared.
CUiDADO
NUNCA REUTtLICE UNA BOLSA PARA
POLVO.Los materiales muy finos, tales
como desodorantes para alfombras,
tatcofacial, polvo fino, yeso, hollin,
pelusa de alfombras nuevas,etc. pue-
den atascar la botsay causar que se
rompa antes de que est_ Iienay puede
dafiar el motor de la aspiradora° Cam.
bie la bolsa m_s seguido cuando aspire
este tipo do materiales.
11
1. Desconecteel cordon eldctricode la clavija de la
pared.NOchoree agua sobre la aspiradora.
2. Limpieel exterior con un trapo suavey limpio,que
ha sidoexprimido despu6s de remojarenuna solu-
ciSnde agua y detergente tfquidoligerooSequeel
exterior con un trapo seco despu6s de limpiar.
3, Umpie la superficieexterior del recept_culoy de
los accesorios para reducir la etectricidadest_tica y
la acumulaci6nde polvo.
E
No use los accesodos si est_n mojados.
Los accesorios que se utilicenen _reas
sucias, debajo del refrigerador,no deben
usarse en otras superficiessin antesser
lavados.Podr[andejar marcas.
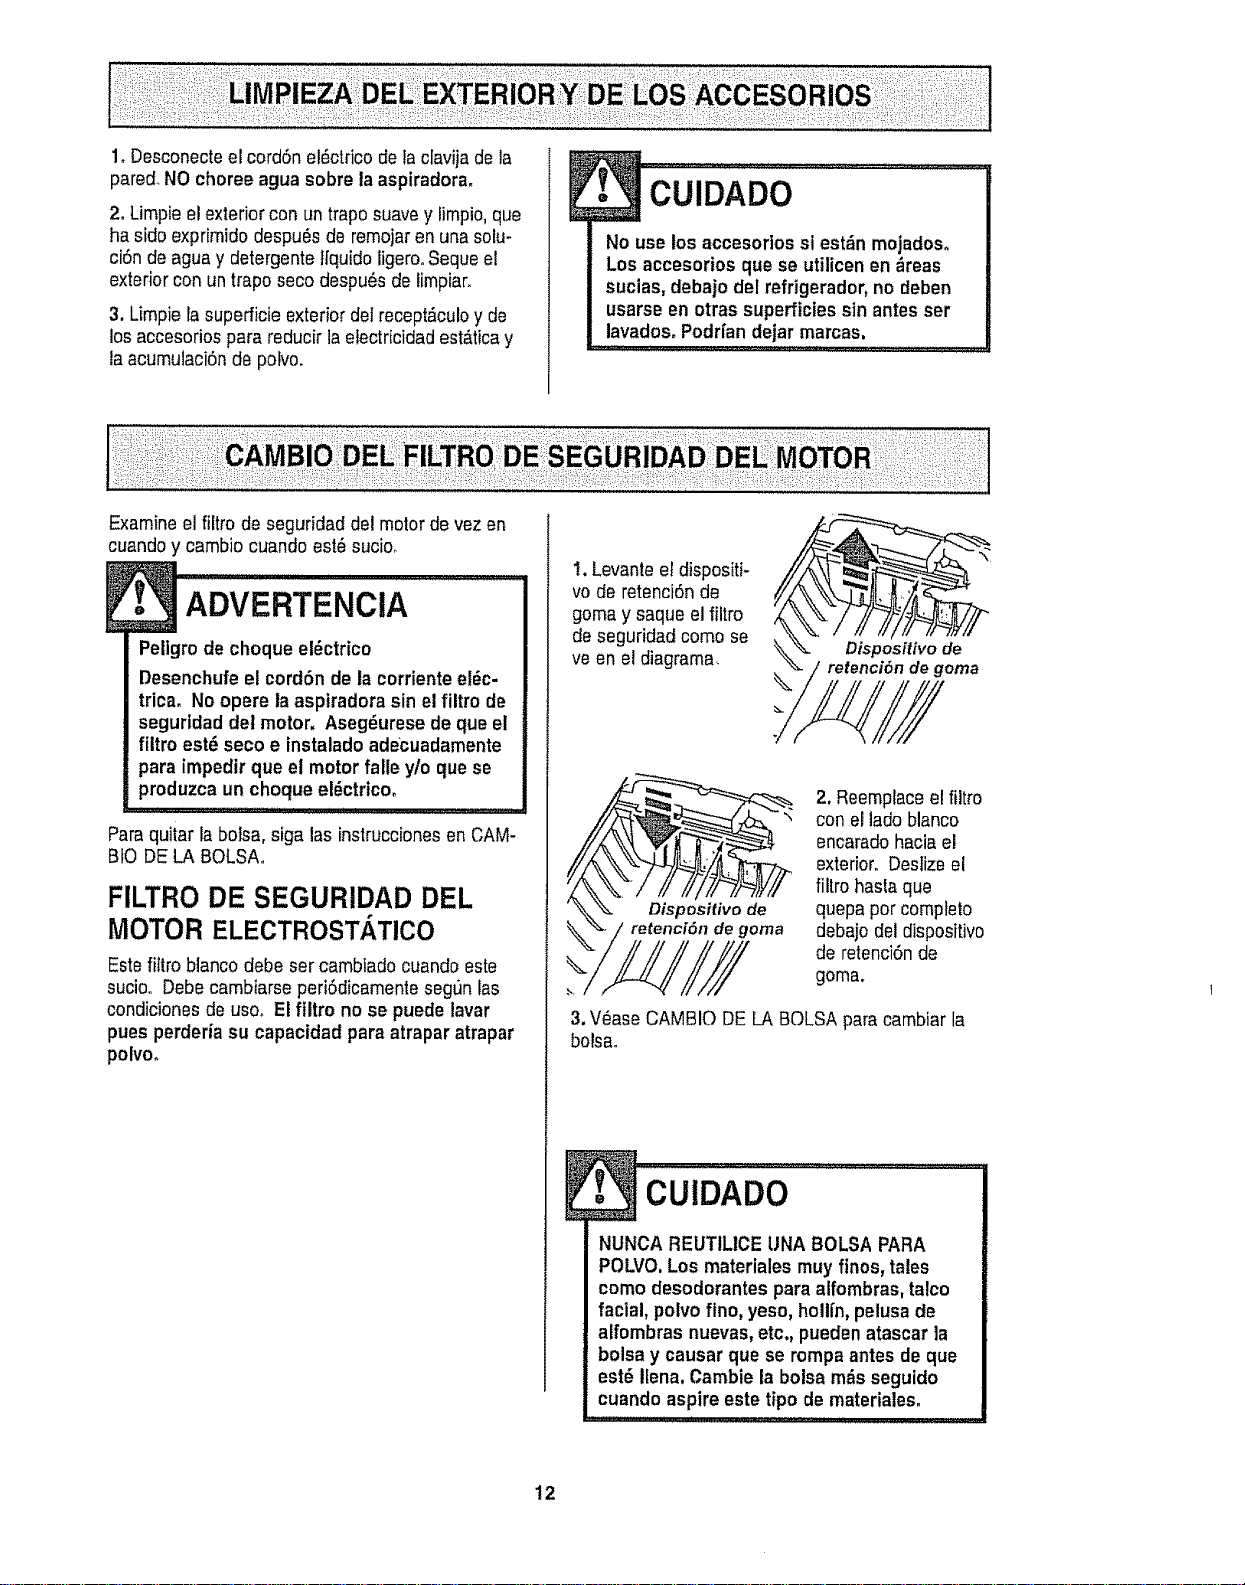
Examine el filtro de seguridad del motorde vez en
cuandoy cambio cuando est_ sucio.
ADVERTENOIA
Peligrode choque e!_ctrico
Desenchufe el cord6n de ia corrientee!_c-
trica, No opere la asptradorasin el filtro de
seguridad del motor, Aseg_urese de que el
fiitro est_ seco e instaladoadecuadamente
para impedir que el motor falle y/o que se
produzca un choque el_ctricoo
, , ........_'JL'J:LL'J-_LL'JMI,'l I I I
Paraquitar la boisa, siga las instruccionesen CAM-
BIO DELA BOLSAo
FILTRO DE SEGURIDAD DEL
MOTOR ELECTROST/ TlCO
Estefi!tro blancodebe ser cambiado cuando este
sucio.. Debecambiarse peri6dicamentesegun las
condicionesde uso, El filtro no se puede lavar
pues perderia su capacidad para atrapar atrapar
polvoo
1.Levante el dispositi-
vo de retenci6nde
gomay saque el filtro
de seguridad como se
ve en el diagrama.
Dispositivo de
retenci6n de goma
Dispositivo de
retenciSn de goma
2. Reemplaceel filtro
con el lade blanco
encaradohaciael
exterior. Deslizeel
filtro haslaque
quepa por cornpteto
debajo del dispositivo
de retenciOnde
goma.
3.V_ase CAMBIO DELA BOLSA para cambiar la
bolsao
CUIDADrO ........
I
NUNCA REUTILICE UNA BOLSA PARA
POLVO.Los materlales muy fines, tales
como desodorantes para aifombras,talco
facial, polvo flno, yeso, holli'n,pelusade
alfombras nuevas,etc. puedenatascar ]a
bolsa y causar que se rompaantes deque
est_ Ilena. Cambie la boisa m_s seguido
cuando aspire este tipo de materiales,
12
E
Peligro de choqueel_ctrico
No opere con un filtro de escape bloqueado
o sin el filtro de escapeo lacubierta del ill-
fro de escapeinstalados.
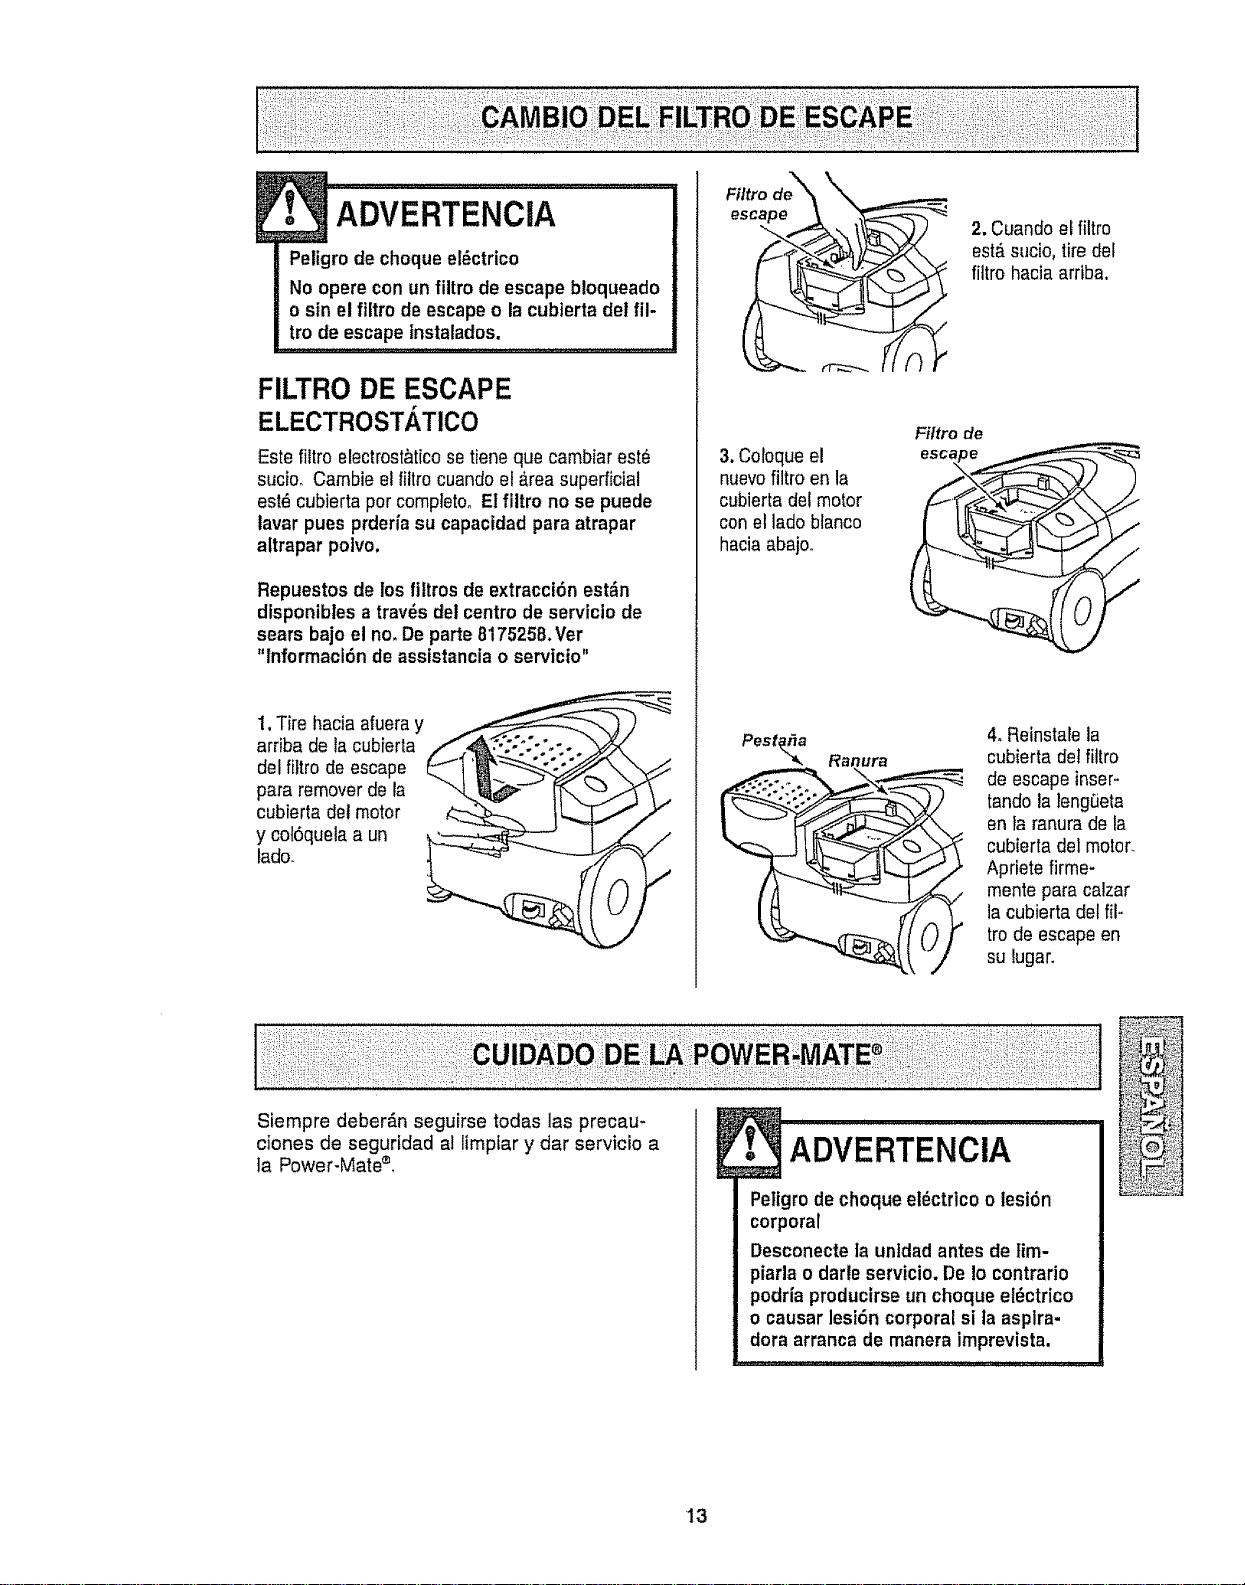
FILTRO DE ESCAPE
ELECTROSTATICO
Este filtro electrost&t[cosetiene que cambiar est_
sucio_ Cambie etfiltrocuandoet _.reasuperficial
est_ cubierta pot compietooEl fiitro no se puede
lavar pues prdeHa su capactdadpara atrapar
altrapar poivo.
Repuestos de los ftltros de extracci6n est_n
disponibles a tray,s del centro de servicio de
sears bajo el no. Departe 8175258.Ver
"Informaci6n deassistanciao servicio"
1,Tire hacia afueray
arriba de tacubierta
del filtro de escape
para removerde la
cubierta detmotor
y cof6quela a un
lado.
Filtro de_,_ \__
esc_
3. Coloqueel
nuevofiltro en la
cubierta del motor
con el lado blanco
haciaabajoo
Filtro de
Pest_a Ranura
2. Cuando eEfiltro
est&sucio, tiredel
filtro hacia arriba.
4. Reinstale la
cubiertade]filtro
de escape inser-
tando la ]eng_eta
en Faranura de la
cubierta de]motor.
Apriete firme-
mente para calzar
la cubierta del f{I,.
tro de escape en
su lugar.
Siempre deber_n seguirse todas las precau-
ciones de segurtdad al limplar y dar servicio a
]a Power-Mate®.
ADVERTENCIA
Peligrode choque el_ctrico o lesi6n
corporal
Desconecteta unidadantes de tim-
piarla o darteservicio. De 1ocontrario
podr{aproducirseun choque et_ctrico
o causar lesi6n corporal si ta asplra-
dora arranca de manera imprevista.
13
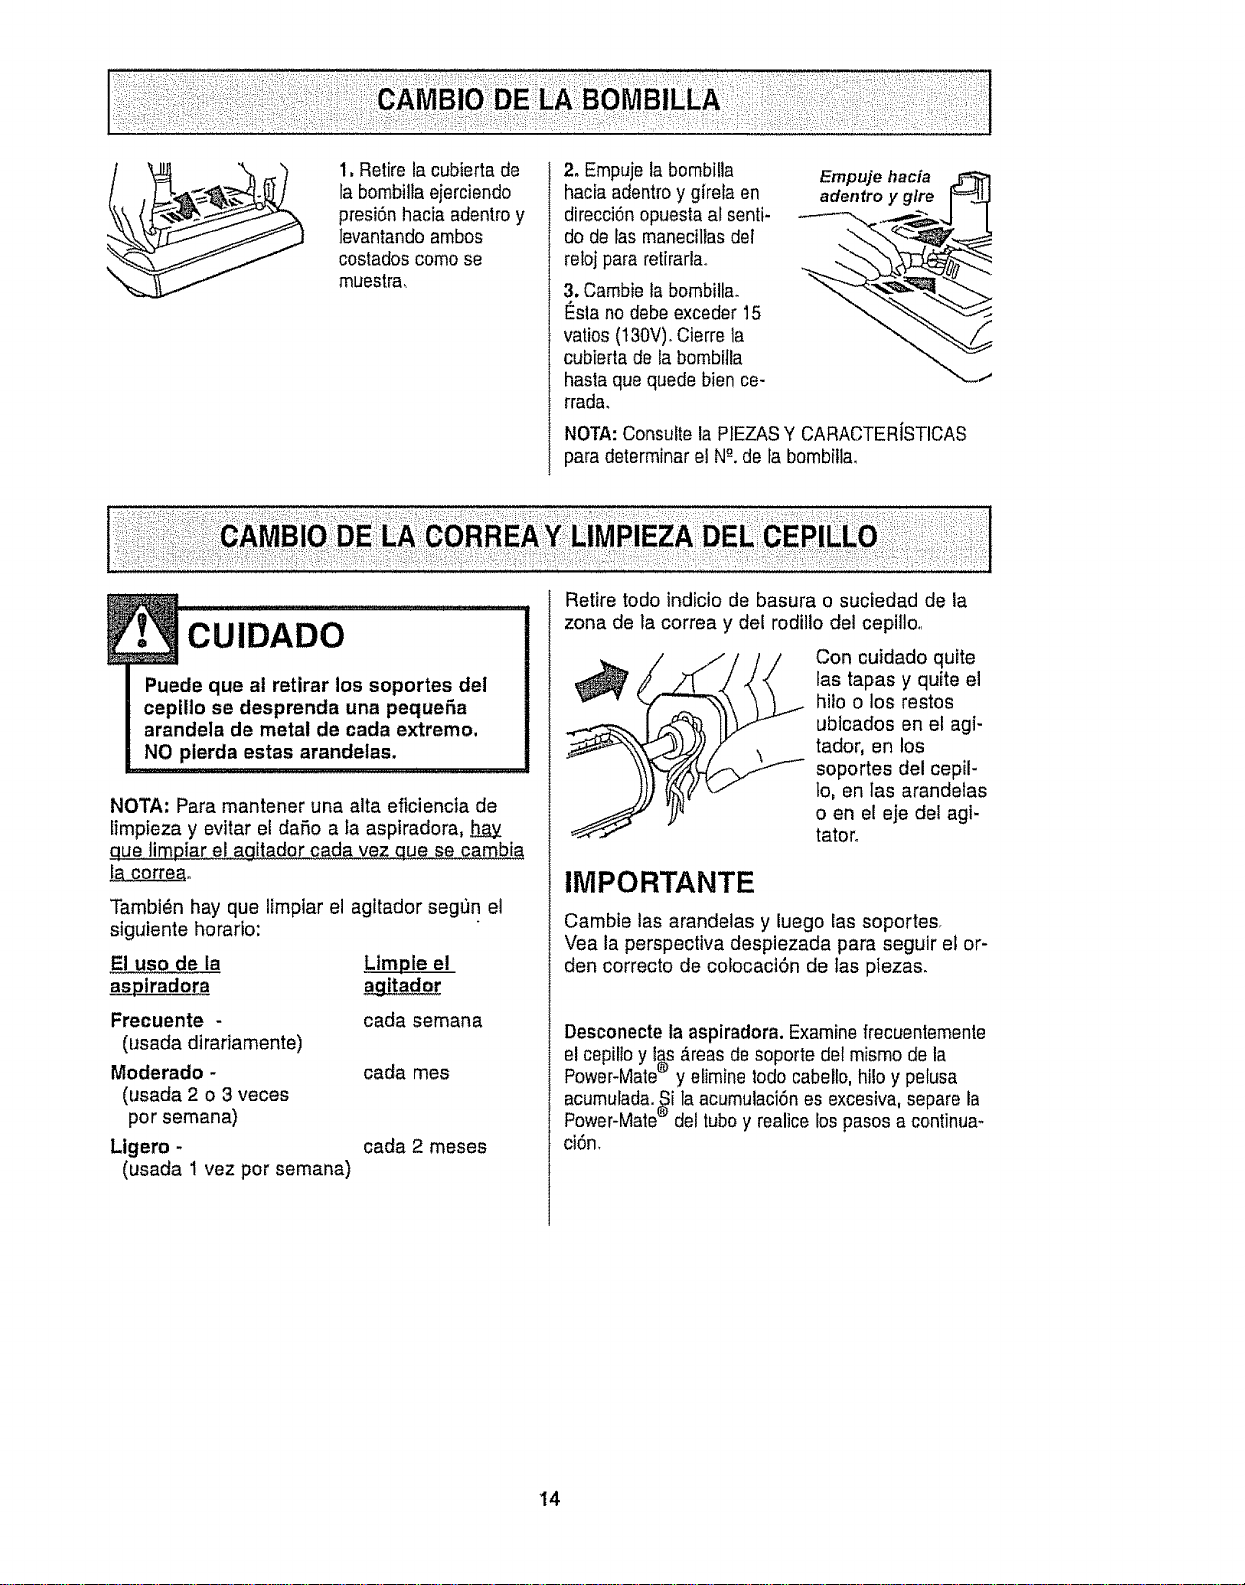
1, Retire la cubierta de
la bombillaejerciendo
presi6n hacia adentroy
levantando ambos
costados como se
muestra,
2. Empujela bombifla
hacia adentroy g[rela en
direcci6nopuesta al senti-
do de tas maneciliasdel
refojpara retirarla..
3, Cambie la bombilla.
I_slano debe exceder 15
ratios (t30V), Cierre la
cubierta de la bombilla
hasta que quede bien ce-
rrada,
Empuje hacia
adentro y glre
NOTA:Consulte la PIEZASY CARACTERISTICAS
para determinar el N"-.dela bombilla.
CU DA DO.......................
Puede que ai retirar los soportes del
cepIIlo se desprenda una pequet3a
arandela de metal de cada extremo.
NO pierda estas arandelas.
NOTA: Para mantener una alta eficiencia de
limpieza y evitar el da_o a la aspiradora, h__ay
que timpiar e! agitador cada vez que se cambia
ia correao
Tambi_n hay que limplar el agttador segt)n el
siguiente horado:
El uso de la LimpJe el
agitador
Frecuente -
(usada dirariamente)
Moderado -
(usada 2 o 3 veces
por semana)
Ligero -
(usada 1 vez por semana)
cada semana
cada mes
cada 2 meses
Retire todo indicio de basura o suciedad de la
zona de la correa y del rodillo del cepilto,.
Con cuidado qutte
las tapas y quite el
hiio o los restos
ubicados en el agi-
tador, en los
soportes del cepil-
lo, en las arandelas
o en el eje dei agi-
tatoro
IMPORTANTE
Cambie las arandelas y luego las soportes.
Vea la perspectiva despiezada para seguir e_or-
den correcto de colocaci6n de tas piezas.
Desconectela aspiradora.Examinefrecuentemente
elcepilloy las _reas de soporte del mismo de la
®
Power-Mate y etiminebdo cabello,hi!o y pelusa
acumulada.eSila acumulaci6nes excesiva,separe ia
Power-Mate del tubo y realice los pasos a continua-
ci6n,
14
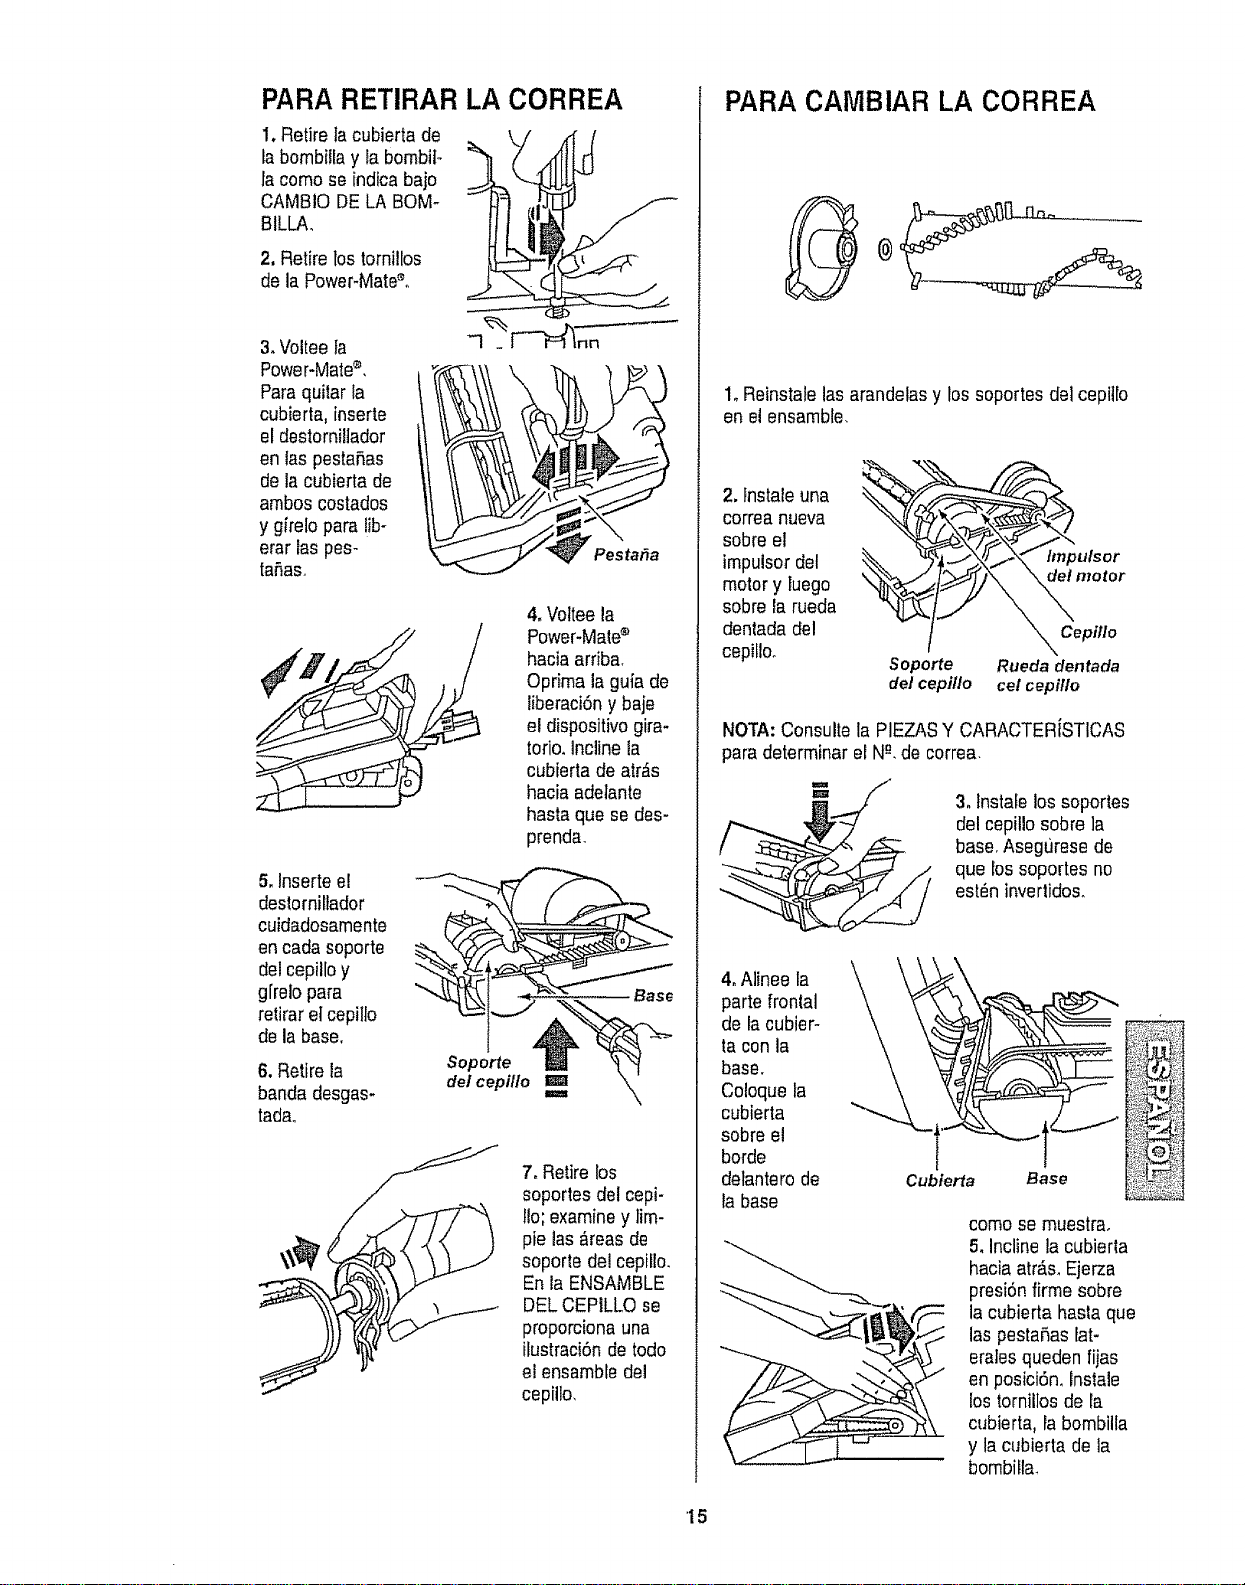
PARARETIRAR LA CORREA
1.Retire lacubierta de
labombilla y la bombito
la como se indicabaje
CAMBIO DELA BOM-
BILLA,
2, Retire los tornillos
de la Power-Mate_,
t;
3,Voltee ta
Power-Mate®.
Paraquilar la
cubierta, inserte
eldestorniUador
en las pestaRas
de la cubierta de
arnbos costados
y girelo para lib-
erar lax pes-
ta£_aso
4oVotteela
Power-Mate®
hacia arriba.
Oprirna laguia de
liberaci6ny baje
el dispositivogira-
torio. Incline ta
cubierta de arras
hacia adelante
hasta que se des-
prenda_
5,lnserte e!
deslorniltador
cuidadosamente
encarlasoporte
del cepilloy
g[relopara
retiraretcepillo
de la base.
6,Retire la
banda desgas-
tada,
Soporte
del cepillo
7, Retire los
soportes del cepi-
Iio; examiney tim-
pie las_reas de
soporte del cepillo.
En la ENSAMBLE
DEL CEPILLO se
proporcionauna
itustracibnde todo
el ensarnbledel
cepillo,
PARA CAMBIAR LA CORREA
1oReinstale lasarandelasy los soportes detcepillo
en el ensamble,
2, lnstale una _'%;_,Y_
correa nueva
sobre el
irnpulsordel
motor y luego
sobre ia rueda
dentada del
cepillo_
Soporte
de/cepillo
hnpulsor
motor
X Cepillo
Rueda dentada
cel cepillo
NOTA:Consulte la PIEZASY CARACTERfSTICAS
para determinar el Ng,decorrea.
3, Instalelos soportes
del cepillo sobre la
base. Asegt]rese de
que los soportes no
est_n inverlidos.
4, Alinee la
parte fronlal
de la cubier-
ta con la
base,
Coloque la
cubierta
sobre el
borde
detantero de
la base
Cubierta
como se rnuestra,
5, Incline la cubierla
hacia atr_.s,Ejerza
presi6nfirrne sobre
la cubierta basraque
las pesta5as lat-
eralesqueden fijas
en posici6n, lnslale
los tornillos de la
cubierta, la bombilla
y la cubierta de la
bornbifla_
'15
Peligro de choque el_ctrico o lesi6n corpo-
ral
Desconectela unidad antes de iimpiarla o
darle servicio, De Io contrario podria pro-
ducirse un choque el_ctrico o causer
tesiSn corporal si la aspiradora arranca de
manera imprevista.
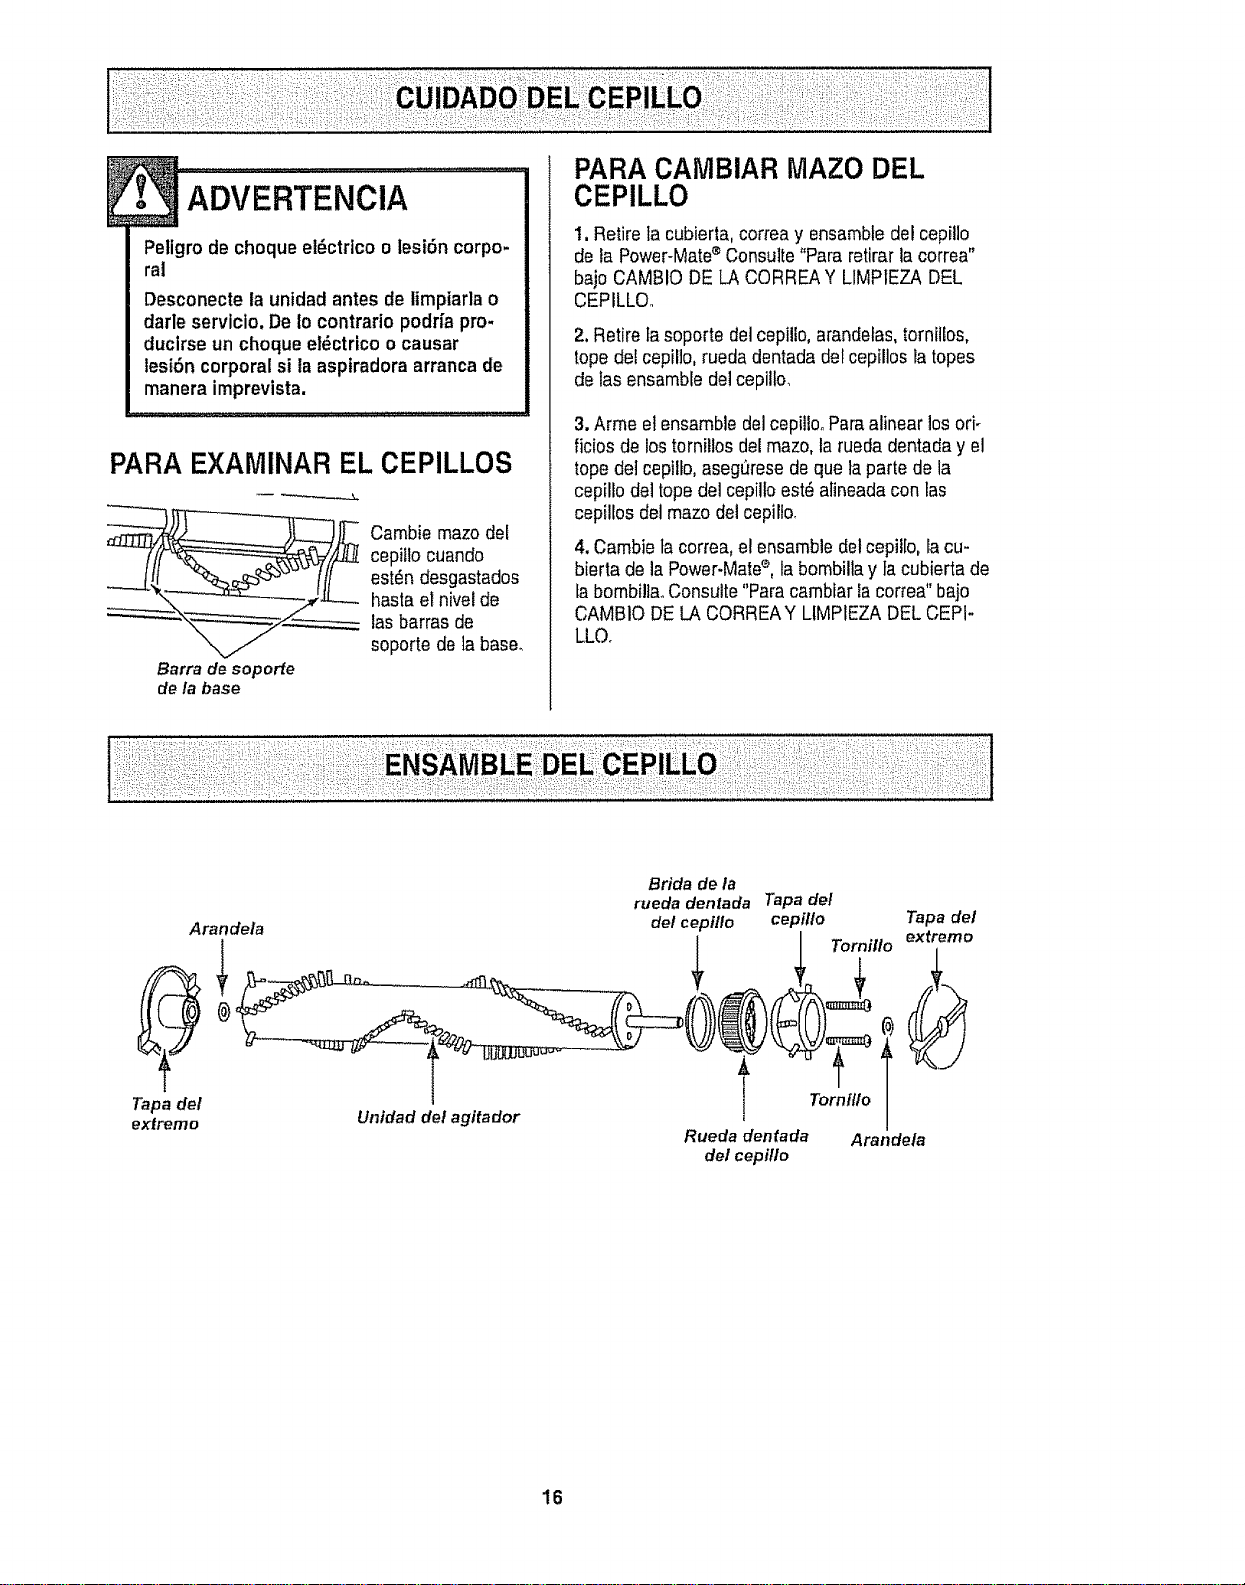
PARA EXAMINAR EL CEPILLOS
Cambie mazo clel
cepiflo cuando
est_n desgastados
haste et nivel de
las barras do
soporte de la base°
Barra de soporte
de la base
PARA CAMBIAR IVlAZODEL
CEPILLO
1.Retire tacubierta, correay ensembledel cepillo
de ta Power-Mate®Consulte"Para retirarla correa"
bajo CAMBIO DE LA CORREAY LIMP1EZADEL
CEPILLOo
2,Retire tasoporte del cepiUo,arandelas,tornillos,
topedel cepillo,rueda dentada del cepillos Fatopes
de las ensambtedelcepillo,
3.Arme el ensemble delcepillooParealinear los ori-
ficiosde lostornillos del mazo,la rueda dentaday el
topedel cepillo,aseg_rese do que taparte de la
cepillode] topedel cepilloest_ alineada con las
cepillos del mazo del cepillo,
4.Cambie tacorrea,el ensemble delcepil[o, lacu-
bierta de la Power-Matee, la bombillay tacubierta de
tabombi!la,,Consulte"Paracambiar la correa" bajo
CAMBIO DELA CORREAY LIMPIEZADELCEPI-
LLO.
Arandela
Tapa del
extremo
Unidad del agitador
Bride de la
rueda dentada Tapa del
del cepi!lo cepillo Tapa del
Tornillo extremo
Rueda dentada Arandela
de/cepi/Io
16
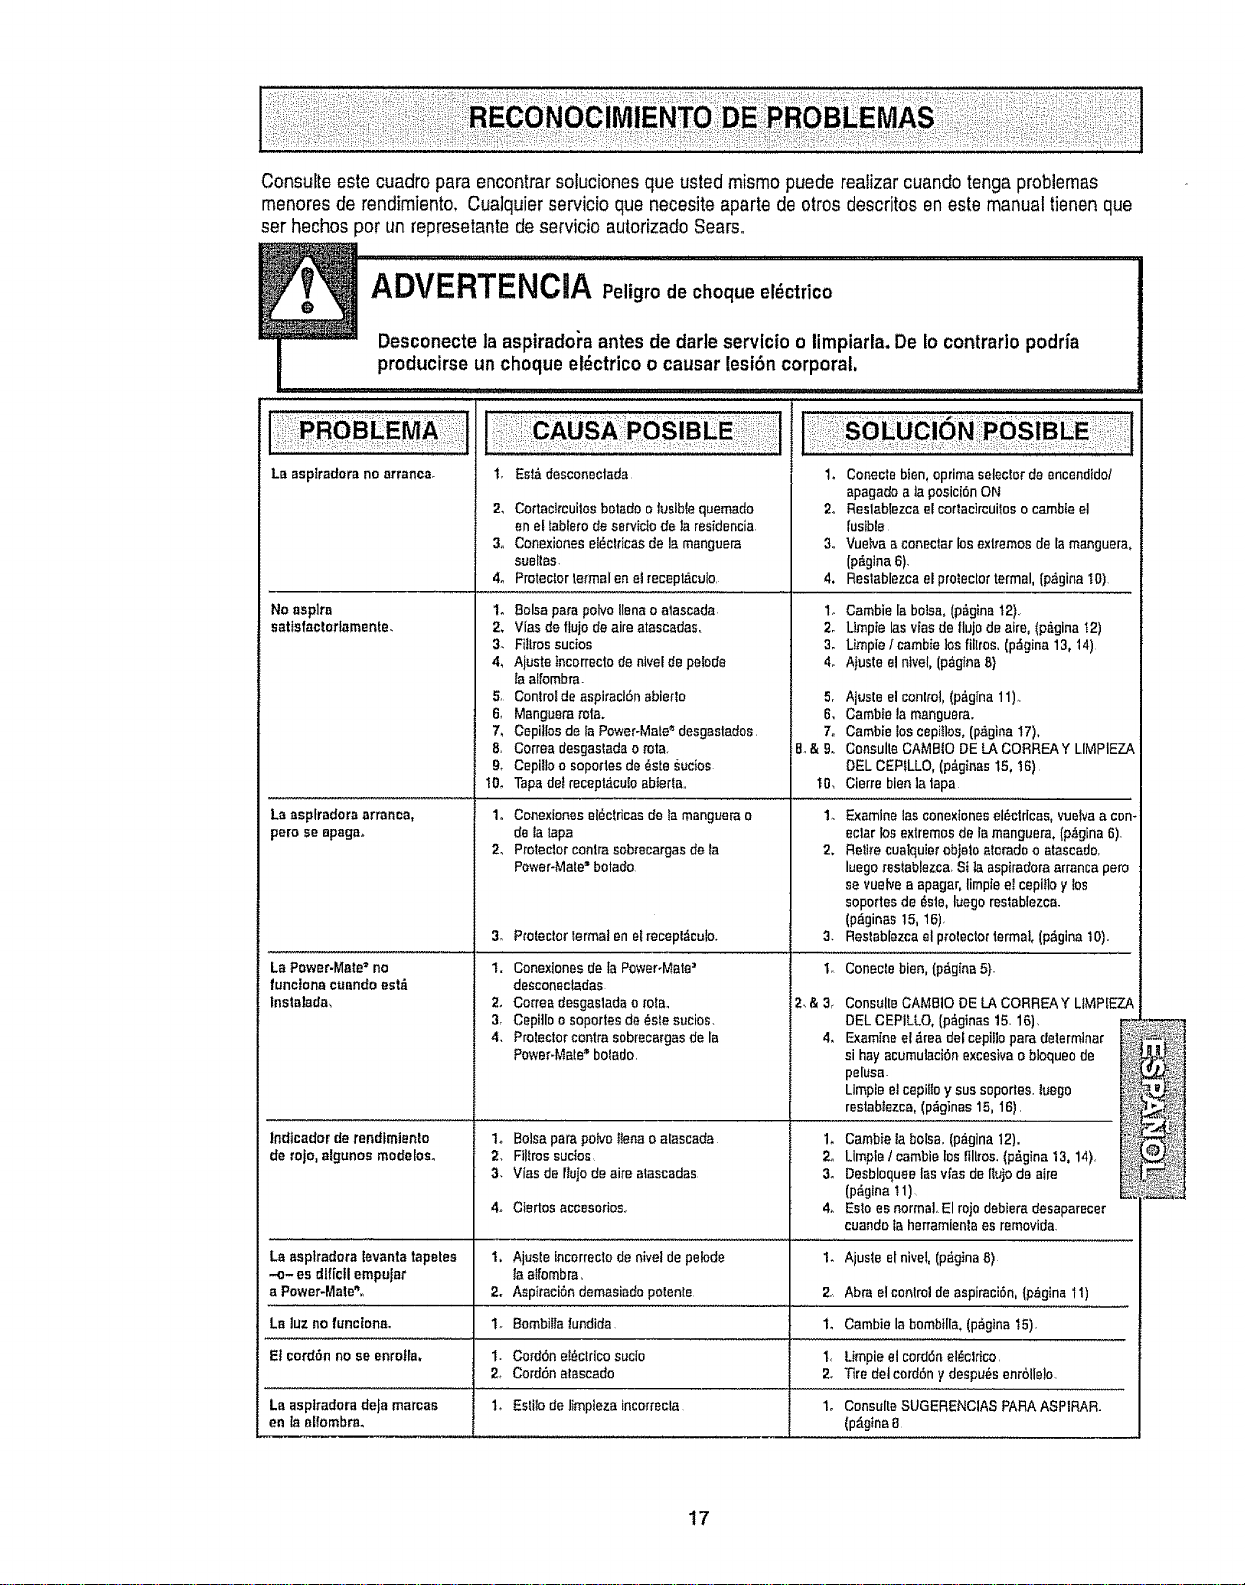
Consulteestecuadroparaencontrarsolucionesquaustedmismopuederealizarcuandotengaproblemas
menoresderendimiento,Cualquierservicioquanecesiteapartedeotrosdescritosenestemanualtienenque
serhechosperunrepresetantedeservicioautorizadoSears,
ADVERTENCIA Peligrode cheque el_ctrico
Desconectela aspiradol'aantesde darte servlcio o limpiarla. De Io contrario podda
producirse un cheque et_ctricoo causar lesion corporal.
La asplradorano arranca_
No asplm
satfsfactoflamente.
Laasplradora arranca,
pem seepaga.
LaPower.Mate=no
funclonacuendoest_
Instalada,
lndtcadorderendfmlento
de tojo,elgunos modelos.
EsI,&desconeotada
Cortae_reuilesbetedoo fusiblequemado
enel labfarodesarvicIodela residencia
Conexionese{_elricasde Is manguera
suel{as.
Protectortextualen elrecepl,iculo.
t,
2_
3o
4o
1. Balsaparapolvolianao atascada
2_ Vies deflujo deaire atascadaso
3. FiIlrossucios
4_ AjusteIncerrecfode hive[depetode
_aalfombra.
5, Centro_deaspiraclSnabierlo
6, Manguerarata.
7, Cepiilosde ;aPower-Mate"desgastados.
8. Correadesgastadao rata
& Cepilloo sopodesde _stesucios
10. Tapedetrecept,icuIoabierta..
1. Conexiones el_ctricas de _amanguara o
de {a tapa
2, Protect.or centre seb_ecargas de la
Pawer-Mate ='bolado
3. ProtectorIermal en etrecepl,fculo.
1. Conexionesde Is Power-Mate'
desconectadas
2° Ce_readesgasladao rotao
3, Cepi]leo sopertesde(_stesucios.
4. Pro_ectorcentresobrecargasde Is
Power-Mete"botado.
1. Conectebien, oprimaseleclorde encendido/
epagadea ]apesiciSnON
2o Reslablezcae{eor_aclrcuileeocambteel
fusible
3,. Vueivaa co.attar losexlremosde la manguera,
{p&glna6)
4, Restablezcael pro_eclortermal,{p,iginaI0)
1o Cambie la balsa,(p_glna12).
2o Umpte las vlasde flujode alto, (p#,gina'_2)
3. Umpie lcambie los fillros, (p_gina13, 14)
4. Atusteel nivel, (p_gtnaB}
5,
6.
7.
B.& 9..
1{).
Ajuste elconlrol,(p_gIna11)_
Cambtela manguera.
Camblelos cepilloso(p_gina17),
ConsulteCAMB{ODELACORREAY LIMPIEZA
DELCEP_LLO,(p_.ginas15,t6)
Cierre bien]atape
1, Balsa pare potvo {tena o aIascada
2, Filtrossucies,
3, Vies de rlujode aire atascadas
4, Ctertos accesorios.
1. Examinelas eonexlanesel_,etrloas,vuelvaacan_
eclatlos exlremosdele manguera,(p,_gina6).
2, Retire cualquierobje_oaleradeo atascedo,
luegores_ablez_a,Si ia aspiradoraarrancapare
sevuelvea epagar,limpleel cepitloy los
soportesde _ste,luegoreslablezca.
(p_ginas15,t6).
3. Reslablezcael proleetorformal, (p_gina10).
'I. Conecle bien,(p_g{na5}-
2o
3_
Le asplradota ievanta tapetea 1, Ajusle incorreclodenivel depelode 1.
-o- esdlf[cflempelar Iaa_fombra,
a Power-Mate",. 2. Aspiraei_ndemasiadopotente 2., Abraelcenlreldeaspiraci6n,(p,_gine11)
La luz nofunciona. 1. Bombi_latundida 1, Cambiela hornbill& (p_,gina15).
E! cordonno se enrella, 1. CordSneI_ctricosucio 1, Umpieelcordon el_cldco,
2_ CordSnatascado 2. Tire detcordony despu,_senrbllelo.
La aeplradoradeJamarcas 1, Estilodelimplezaincorrecta 1. ConsulteSUGERENClASPARAASPIRAR.
en la el_[ombre_ (pAgtna8
ConsalleCAMB10DELACORREAY LIMP[EZA
DELCEPILLO,(p&ginas15.16).
Examfneel _readefcepilloparedeterminer
si hayacumulaci6nexcesivao bloqueode
pelusa.
Limpieelcepittoy sussoportes.{_ego
reetab{ezea,(p_ginas15,16).
Cambielabo!sa.(p_gina12}.
Lim#,leI cambielos{tltros.(p#,gina13,14),
Desbloqueelasvies dellujo de aire
(p_glna !1)
Es_oes normal,.El rojodebieradesaparecer
cuandola herramlenlaes removida.
Ajuste elnivet,(p_gina8)
17

Your Home
For repair - in your home - of all major brand appliances,
lawn and garden equipment, or heating and cooling systems,
no matter who made it, no matter who sold it!
For the replacement parts, accessories and
owner's manuals that you need to do-it-yourself.
For Sears professional installation of home appliances
and items like garage door openers and water heaters.
1-800-4-MY-HOME ® Anytime, day or night
(1-800-469-4663) (U_SoAoand Canada)
www,sears.com www.sears,ca
Our Home
i
For repair of carryqn products like vacuums, lawn equipment,
and electronics, call or go on-line for the nearest
Sears Parts and Repair Center.
1-800486-1222 Anytime, day or night (U,.S..Aonly)
www.sears.com
To purchase a protection agreement (U.S.A.)
or maintenance agreement (Canada) on a product serviced by Sears:
1-800-827-6655 (U..S°A.) 1-800-361-6665 (Canada)
Para pedir servicio de reparaciSn
a domicilio, y para ordenar piezas:
1-888_U-HOGAR sM
(1-888-784-6427)
Au Canada pour service en frangais:
1-800-LE-FOYER Mc
(1-800-533-6937)
www.sears.oa k • ..... ,
© Sears, Roebuck and Co,
® Registered Trademark 1Tt_Trademark I s_ Service Mark of Sears, Roebuck and Coo
® Marca Registrada / T_,4Marca de F&brica / s_ Marca de Servicio de Sears, Roebuck and Co,
MCMarque de commerce / _D Marque d_pos_e de Sears, Roebuck and Co,