0
GEAppliances.com
Safety Instructions ........... 2-4
Operating Instructions
Controls ........................... 4-7
Quick Start ........................... 5
Using the Dryer ...................... 8
Care and Cleaning ............. 9
Installation Instructions
Reversing the Door Swing ....... 10-15
Stacking the Washer/Dryer ..... 14-16
Troubleshooting Tips....... 17-20
Consumer Support
Consumer Support ................. 22
Warranty .......................... 21
GFDS175
GFDS170
Printed in Mexico
Write the model and serial
numbers here:
Model #
Serial #
They are on the label on the front
of the dryer behind the door.
IIIIIIIElllllllIMIIIlllllllllll
234D2270PO01
49-90520 04-14 GE
IMPORTANT SAFETY INFORMATION.
READ ALL INSTRUCTIONS BEFORE USING.
A This is the safety alert symbol. This symbol alerts to potential hazards that can kill or hurt and others. All
you you you
safety messages will follow the safety alert symbol and the word "DANGER","WARNING", or "CAUTION".These words
are defined as:
_ Indicates a hazardous situation which, if not avoided, will result in death or serious inJury.
Indicates a hazardous situation which, if not avoided, could result in death or serious injury.
Indicates a hazardous situation which, if not avoided, could result in minor or moderate inJury.
IMPORTANT SAFETYINSTRUCTIONS
To reduce the riskof fire, explosion, electric shock, or injury to persons when using your appliance, follow basic
precautions, including the following:
[] Readall instructionsbeforeusing the appliance.
[] DO NOT dry articles that have been previously cleaned in, washed in, soaked in or spotted with gasoline, dry-cleaning
solvents, or other flammable or explosive substances, as they give off vapors that could ignite or explode.
[] DO NOT allow children to play on or in this appliance. Close supervision of children is necessary when this appliance
is used near children. Before the appliance is removed from service or discarded, remove the door to the drying
compartment.
[] DO NOT reach into the appliance if the drum is moving.
[] DO NOT install or store this appliance where it will be exposed to the weather.
[] DO NOT tamper with controls, repair or replace any part of this appliance or attempt any servicing unless specifically
recommended in the user maintenance instructions or in published user repair instructions that you understand and have
the skills to carry out.
[] DO NOT use fabric softeners or products to eliminate static unless recommended by the manufacturer of the fabric
softener or product.
[] DO NOTuse heat to dry articles containing foam rubber or similarly textured rubber-like materials.
[] Clean lint screen before or after each load. DO NOToperate the dryer without the lint filter in place.
[] Do not store combustible materials, gasoline or other flammable liquids near the dryer. Keep area around the exhaust opening
and adjacent surrounding areas free from the accumulation of lint, dust and dirt. Keep dryer area clear and free from items
that would obstruct the flow of combustion and ventilation air.
[] The interior of the appliance and exhaust duct should be cleaned periodically by qualified service personnel.
[] DO NOT place items exposed to cooking oils in your dryer. Items contaminated with cooking oils may contribute to a
chemical reaction that could cause a load to catch fire.
[] Keepthe floor around your appliances clean and dry to reduce the possibility of slipping.
[] Unplug the appliance or turn offthe circuit breaker before servicing. Pressingthe Power or Start/Pause button DOESNOT
disconnect power.
[] DONOToperate this appliance if it is damaged, malfunctioning, partially disassembled, or has missing or broken parts, including a
damaged cord or plug.
[] DO NOTspray any type of aerosol into, on or near dryer at any time. Do not use any type of spray cleaner when cleaning dryer
interior. Hazardous fumes or electrical shock could occur.
[] See "Electrical Connection" located in the Installation Instructions for grounding instructions.
SAVE THESE INSTRUCTIONS
GEAppliances.com
1
ADDITIONAL GAS DRYERWARNINGS
I For your safety, the information in this manual must be followed to minimize the risk of fire or explosion
or to prevent damage, personal injury, or death.
- DO NOTstore or use gasoline or other flammable vapors and liquids in the vicinity of this or any other appliance.
- WHATTO DO IFYOUSMELLGAS:
* DO NOTtry to light any appliance.
* DO NOTtouch any electrical switch; DO NOT use any phone in your building.
* Clear the room, building, or area of any occupants.
* Immediately call your gas supplier from a neighboCsphone. Follow the gas supplier's instructions.
* If you cannot reach your gas supplier, call the fire department.
- Installation and service must beperformed by a qualified installer, service agency, or the gas supplier.
State of California Proposition 65 Warnings:
The California Safe Drinking Water and Toxic Enforcement Act requiresthe governor of Californiato publish a list of substances known
to the state to causecancer, birth defectsor other reproductive harm and requires businessesto warn of potential exposureto such
substances.
Thisproduct contains one or more chemicals known to the State of California to cause cancer, birth defects or
other reproductive harm.
Gasappliances can cause low-levelexposure to some of thesesubstances,including benzene,carbon monoxide, formaldehyde and
soot, caused primarily by the incomplete combustion of natural gas or LPfuels. Exposureto these substancescan be minimized by
properly venting the dryer to the outdoors.
SAVE THESE INSTRUCTIONS
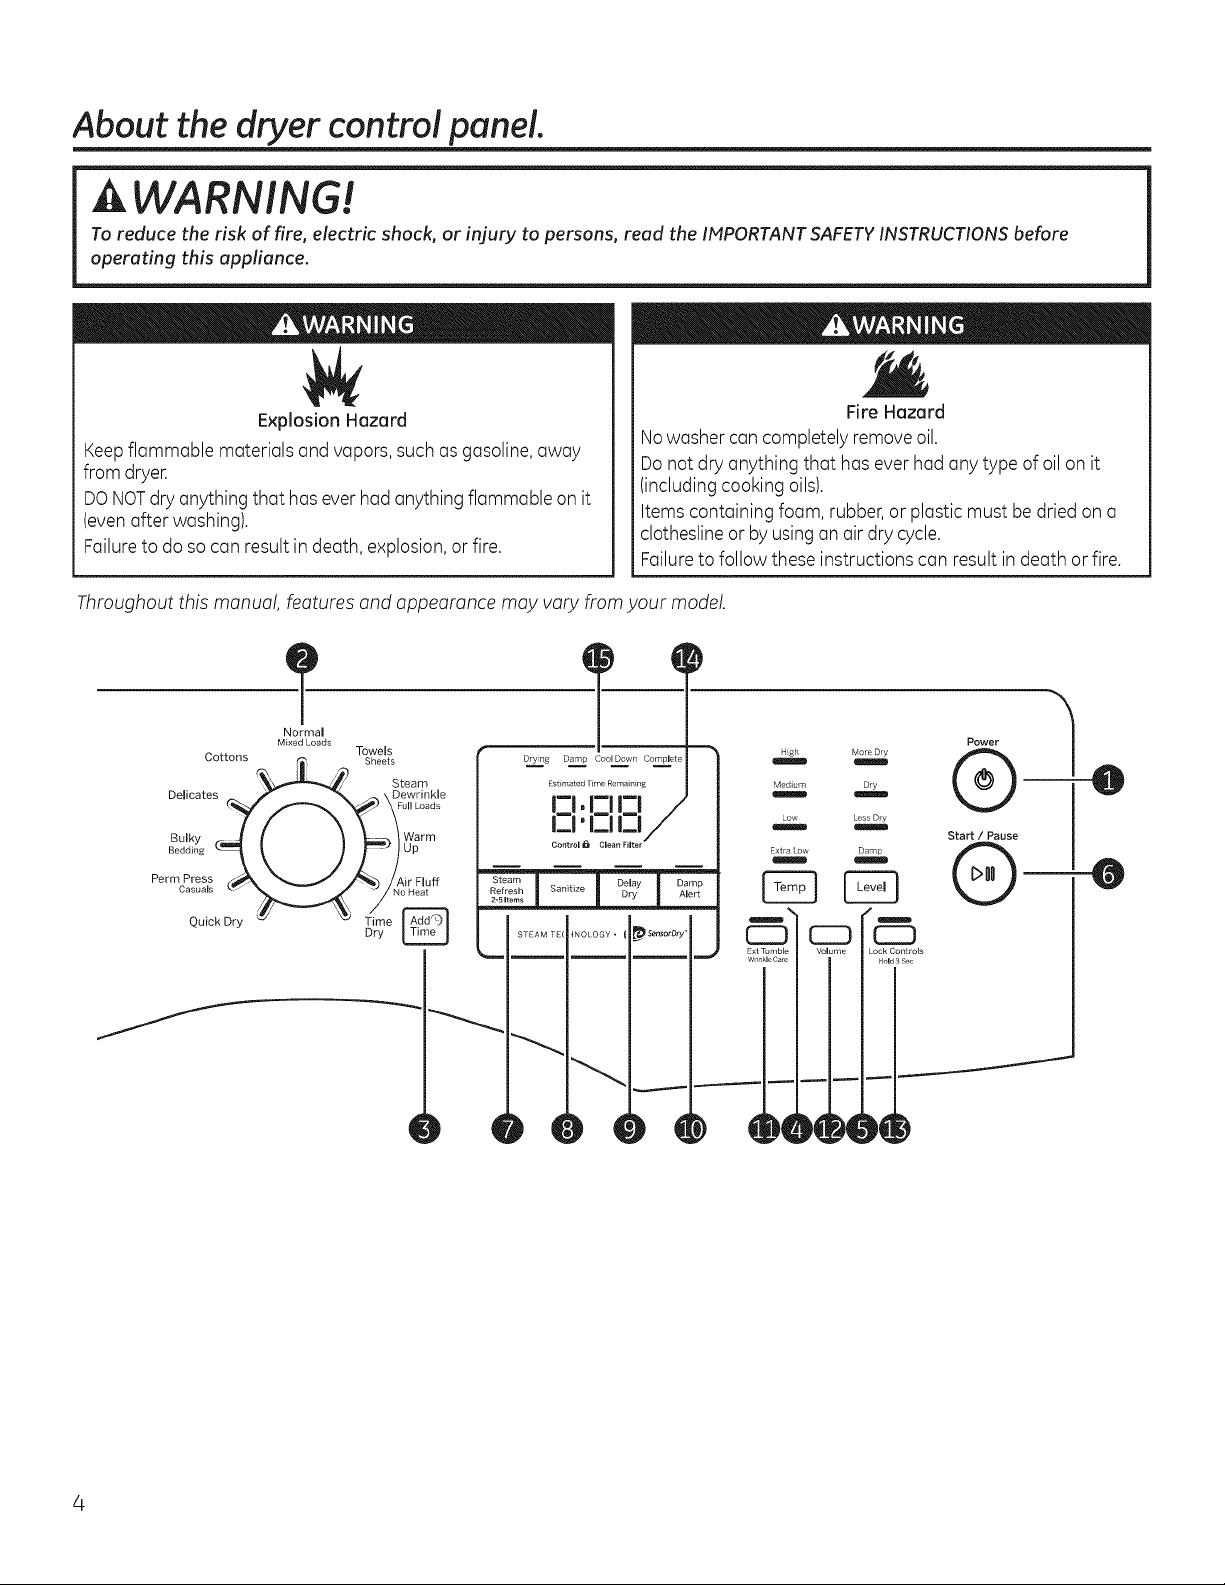
About the dryer control panel.
A WARNING!
To reduce the risk of fire, electric shock, or injury to persons, read the IMPORTANTSAFETYINSTRUCTIONSbefore
operating this appliance.
Explosion Hazard
Keepflammable materials and vapors, such as gasoline, away
from dryer.
DONOTdry anything that has ever had anything flammable on it
(evenafter washing).
Failureto do so can result in death, explosion, or fire.
Fire Hazard
No washer can completely remove oil.
Do not dry anything that has ever had any type of oil on it
(including cooking oils).
Items containing foam, rubber, or plastic must be dried on a
clothesline or by using an air dry cycle.
Failureto follow these instructions can result in death or fire.
Throughout this manual, features and appearance may vary from your model.
Normal
Mixed Loads
Cottons
Delicates (.__
Bulky r_ "_
cT:Lb:d
Towels
Sheets
Steam
--D_-_ evlvri°'a_dk'SeWarm
Z-_)°p
_'_) / Air Fluff
No Heat
Time _
Dry _
T _
Drying Damp Cool Down Complete
Steam Damp
Refresh Alert
n
q
More Dry
)ry
L#ss Dry
Damp
f_
CD
Power
®-
start/ Pause
-0
-0
Control settings.
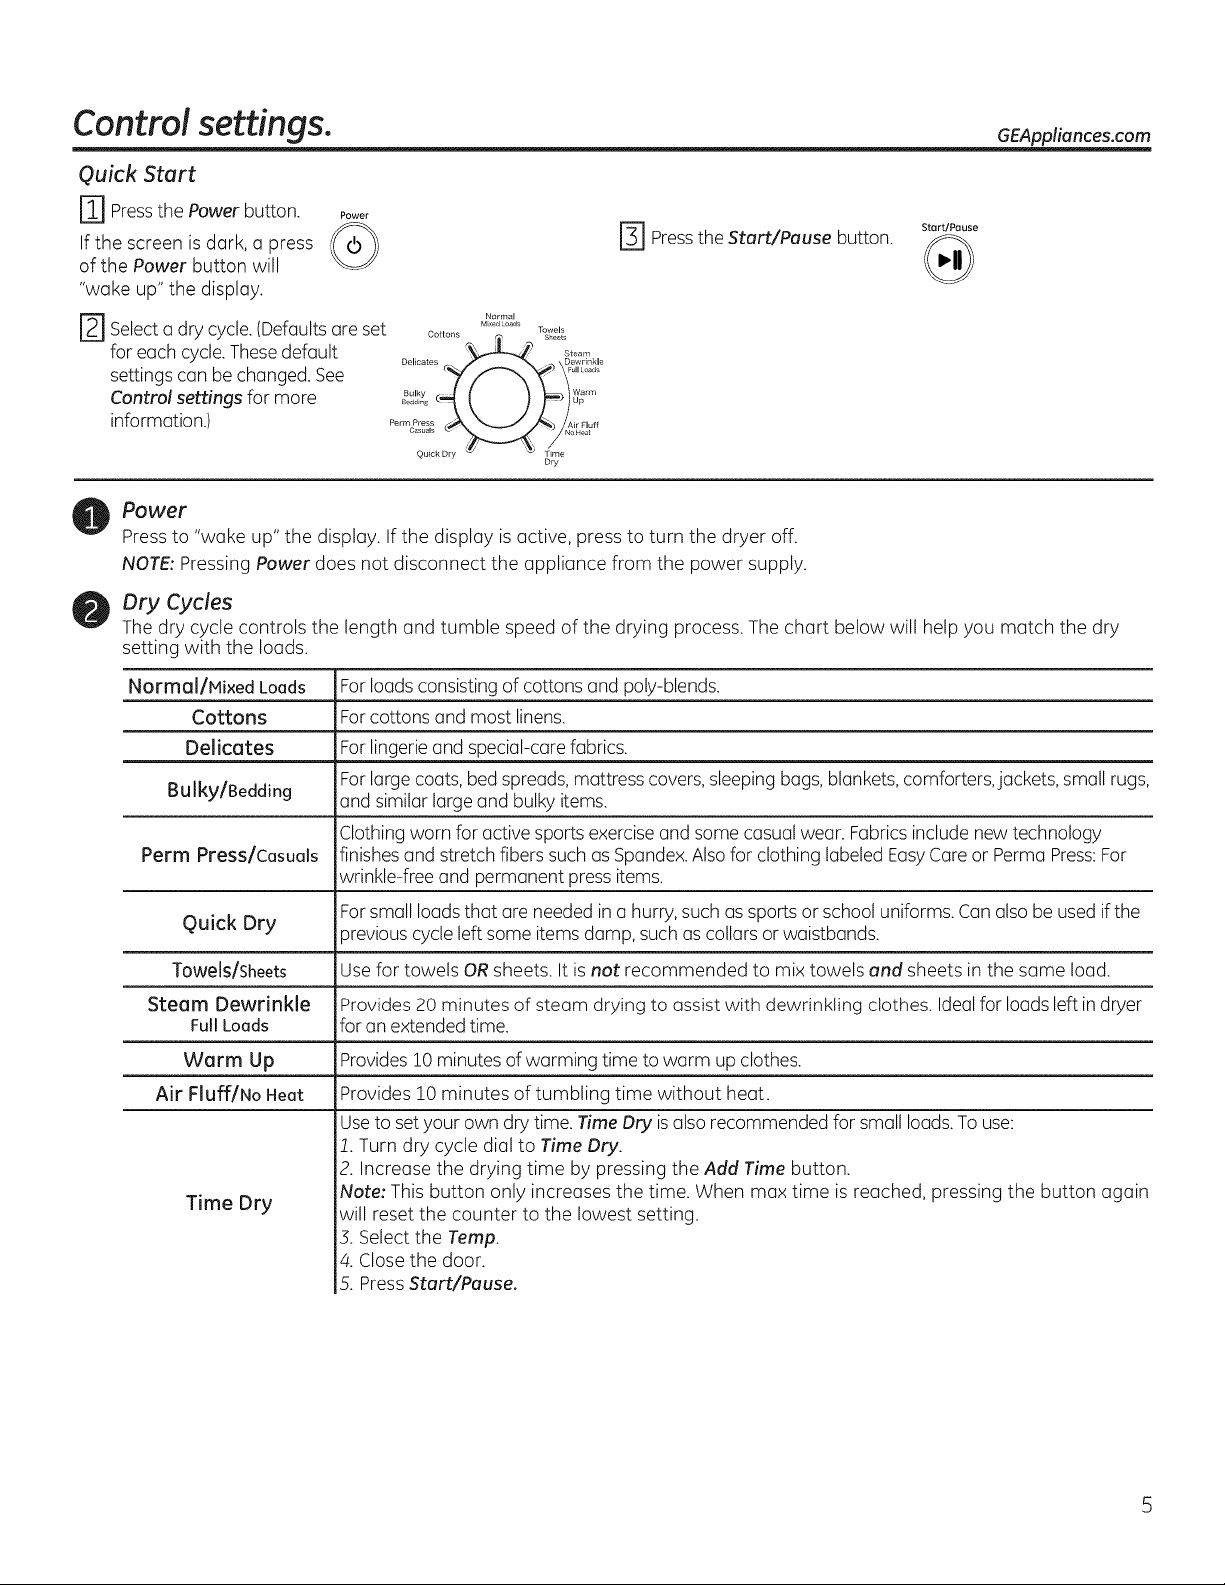
Quick Start
[i]Press the Power button.
If the screen is dark, a press
of the Power button will
"wake up" the display.
Power
r_ Normal
M xed Loads Towels
Selecta dry cycle. (Defaults ore set c............ _o
for each cycle.These default , // B.......
settings can be changed. See ....
Bulky _IlWarm
Control settings for more ...... _ o_
information.) Po,mP ...... Fluff
........Qu_ckJ_ _ T_......
Dry
F_ Press the Start/Pause button.
Start/Pause
GEAppliances.com
Power
press to "wake up" the display. If the display is active, press to turn the dryer off.
NOTE: Pressing Power does not disconnect the appliance from the power supply.
Dry Cycles
The dry cycle controls the length and tumble speed of the drying process. The chart below will help you match the dry
setting with the loads.
Normal/Mixed Loads For loads consisting of cottons and poly-blends.
Cottons For cottons and most linens.
Delicates For lingerie and special-care fabrics.
For large coats, bed spreads, mattress covers, sleeping bags, blankets, comforters,jackets, small rugs,
Bulky/Bedding and similar large and bulky items.
Clothing worn for active sports exercise and some casual wear. Fabrics include new technology
Perm Press/Casuals finishes and stretch fibers such as Spandex.Also for clothing labeled EasyCare or Perma Press:For
wrinkle-free and permanent press items.
Quick Dry For small loads that are needed in a hurry, such as sports or school uniforms. Can also be used if the
previous cycle left some items damp, such as collars or waistbands.
Towels/Sheets Usefor towels OR sheets. It is not recommended to mix towels and sheets in the same load.
Steam Dewrinkle Provides 20 minutes of steam drying to assist with dewrinkling clothes. Ideal for loads left in dryer
Full Loads for an extended time.
Warm Up Provides 10 minutes of warming time to warm up clothes.
Air Fluff/No Heat Provides 10 minutes of tumbling time without heat.
Useto set your own dry time. Time Dry is also recommended for small loads. To use:
!. Turn dry cycle dial to Time Dry.
2. Increase the drying time by pressing the Add Time button.
Note: This button only increases the time. When max time is reached, pressing the button again
will reset the counter to the lowest setting.
3. Select the Temp.
4. Close the door.
5. PressStart/Pause.
Time Dry
Control settings.
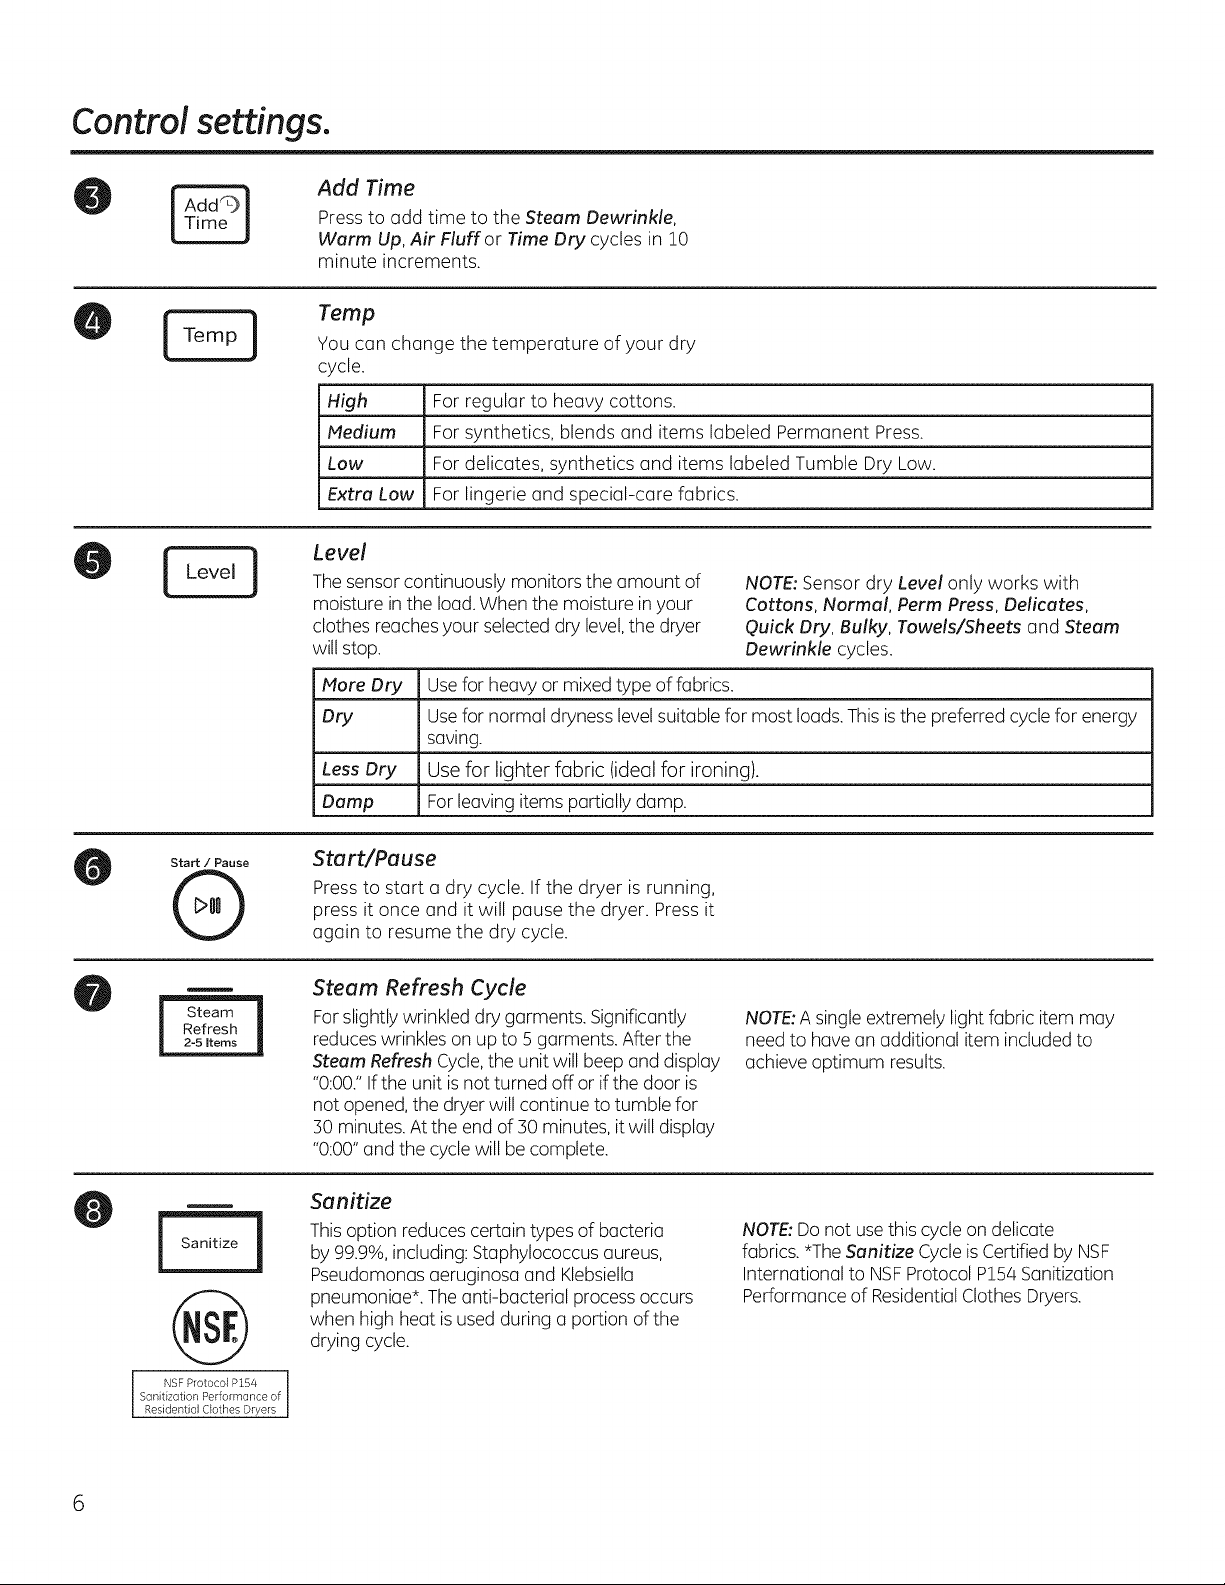
Add Time
Press to add time to the Steam Dewrinkle,
Warm Up, Air Fluff or Time Dry cycles in !0
minute increments.
!
Temp
You can change the temperature of your dry
cycle.
High
Medium
Low
Extra Low
For regular to heavy cottons.
For synthetics, blends and items labeled Permanent Press.
For delicates, synthetics and items labeled Tumble Dry Low.
For lingerie and special-care fabrics.
i
Level
J
Level
The sensor continuously monitors the amount of
moisture in the load. When the moisture inyour
clothes reaches your selected dry level,the dryer
will stop.
NOTE: Sensor dry Level only works with
Cottons, Normal, Perm Press, Delicates,
Quick Dry, Bulky, Towels/Sheets and Steam
Dewrinkle cycles.
More Dry Usefor heavy or mixed type of fabrics.
Dry Usefor normal dryness level suitable for most loads.This isthe preferred cycle for energy
saving.
Less Dry Use for lighter fabric (ideal for ironing).
Damp Forleaving items partially damp.
Start / Pause
@
Start/Pause
Press to start a dry cycle. If the dryer is running,
press it once and it will pause the dryer. Press it
again to resume the dry cycle.
II Refresh |
I 2-s_omsI
@
NSF Protocol P154 l
Sanitization Performance of
Residential CLothes Dryers
Steam Refresh Cycle
For slightly wrinkled dry garments. Significantly
reduces wrinkles on up to 5 garments. After the
Steam Refresh Cycle,the unit will beep and display
"0:00." If the unit is not turned off or if the door is
not opened, the dryer will continue to tumble for
30 minutes.At the end of 30 minutes, it will display
"0:00" and the cycle will be complete.
NOTE:A single extremely light fabric item may
need to have an additional item included to
achieve optimum results.
Sanitize
Thisoption reduces certain types of bacteria
by 99.9%,including: Staphylococcus aureus,
Pseudomonas aeruginosa and Klebsiella
pneumoniae*. The anti-bacterial process occurs
when high heat is used during a portion of the
drying cycle.
NOTE:Do not use this cycle on delicate
fabrics. *TheSanitize Cycle is Certified by NSF
International to NSFProtocol P154Sanitization
Performance of ResidentialClothes Dryers.
GEAppliances.com
Dry
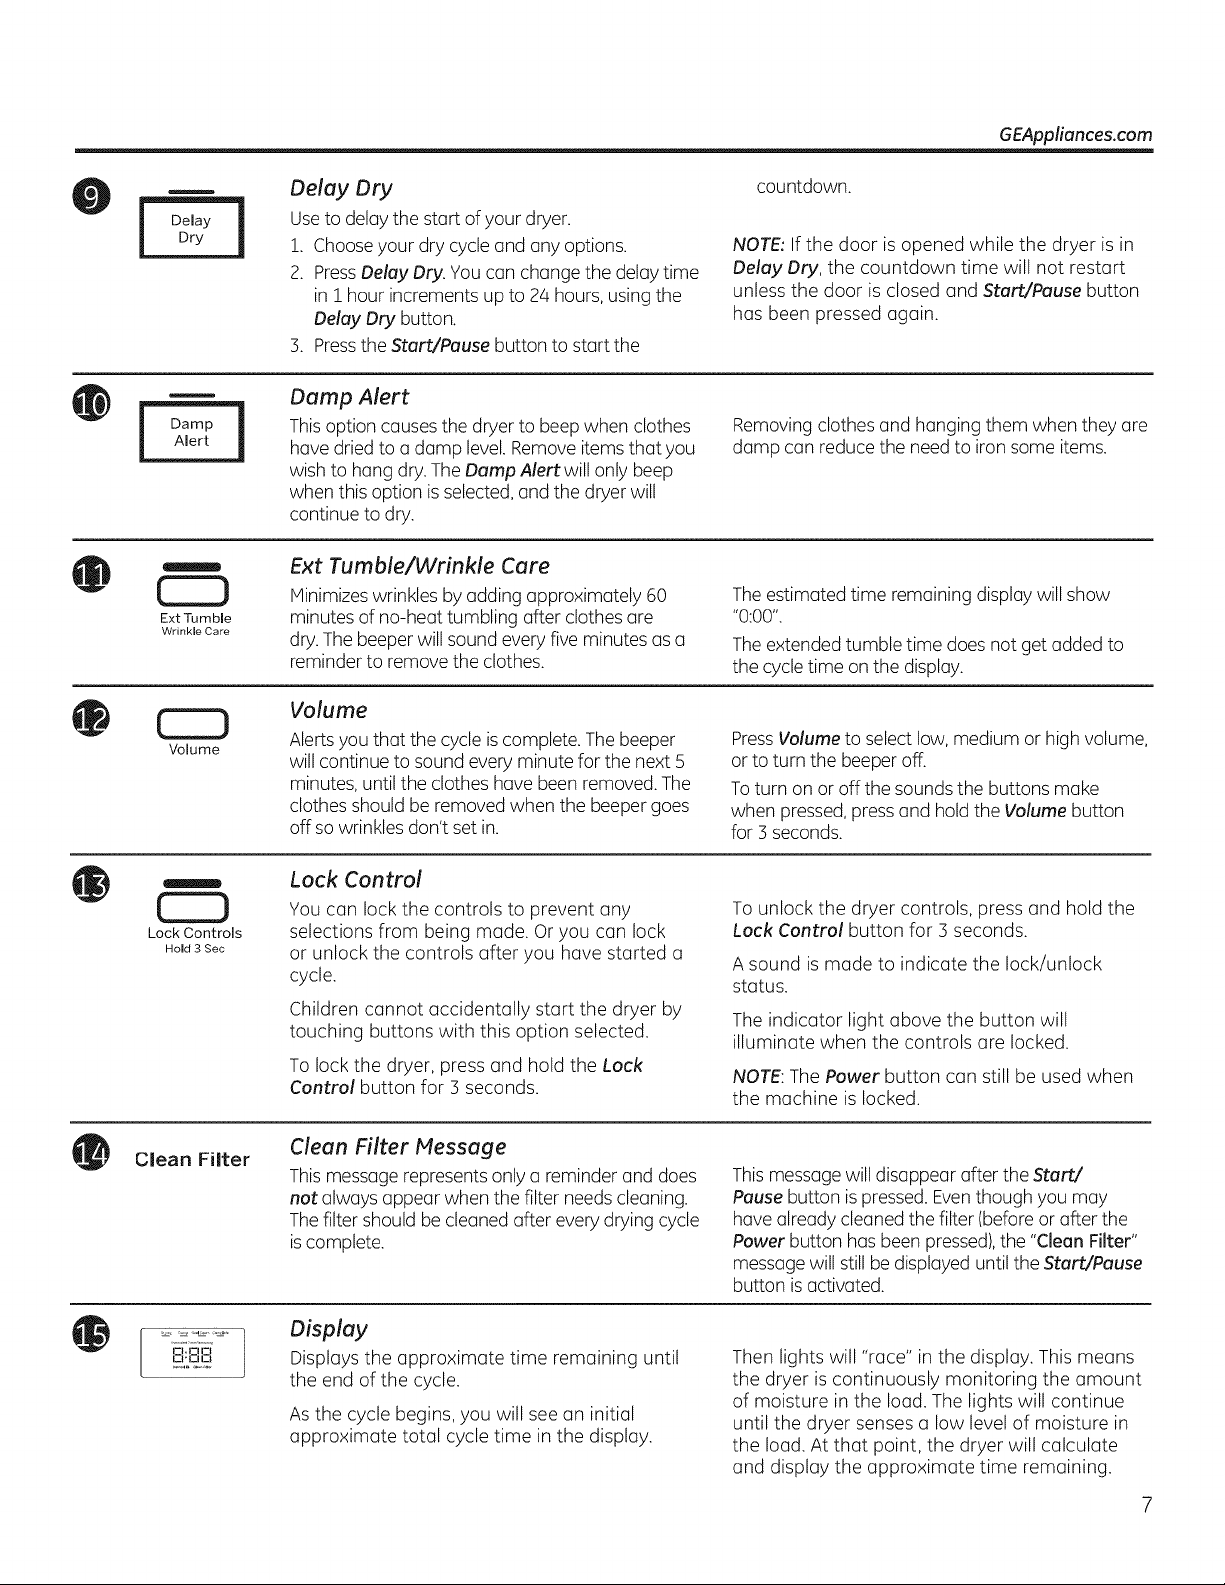
Delay Dry
Use to delay the start of your dryer.
!. Choose your dry cycle and any options.
2. Press Delay Dry. You can change the delay time
in ! hour increments up to 24 hours, using the
Delay Dry button.
3. Pressthe Start/Pause button to start the
countdown.
NOTE: If the door is opened while the dryer is in
Delay Dry, the countdown time will not restart
unless the door is closed and Start/Pause button
has been pressed again.
Alert
Damp Alert
Thisoption causes the dryer to beepwhen clothes
hove dried to a damp level.Remove items that you
wish to hang dry. The Damp Alert will only beep
when this option is selected,and the dryer will
continue to dry.
Removing clothes and hanging them when they are
damp can reduce the need to iron some items.
Ext Tumble
WrJnkle Care
CZD
Volume
Ext Tumble/Wrinkle Care
Minimizeswrinkles by adding approximately 60
minutes of no-heat tumbling after clothes are
dry. The beeper will sound every five minutes as a
reminder to remove the clothes.
The estimated time remaining display will show
"0:00".
The extended tumble time does not get added to
the cycle time on the display.
Volume
Alerts you that the cycle is complete. The beeper
will continue to sound every minute for the next 5
minutes, until the clothes have been removed. The
clothes should be removed when the beeper goes
off so wrinkles don't set in.
PressVolume to select low, medium or high volume,
or to turn the beeper off.
To turn on or off the sounds the buttons make
when pressed,press and hold the Volume button
for 3 seconds.
Lock Controls
Hold 3 Sec
Lock Control
You can lock the controls to prevent any
selections from being made. Or you can lock
or unlock the controls after you have started a
cycle.
Children cannot accidentally start the dryer by
touching buttons with this option selected.
To lock the dryer, press and hold the Lock
Control button for 3 seconds.
To unlock the dryer controls, press and hold the
Lock Control button for 3 seconds.
A sound is made to indicate the lock/unlock
status.
The indicator light above the button will
illuminate when the controls are locked.
NOTE:The Power button can still be used when
the machine is locked.
Clean Filter
Clean Filter Message
This message represents only a reminder and does
not always appear when the filter needs cleaning.
The filter should be cleaned after every drying cycle
is complete.
Thismessage will disappear after the Start/
Pause button is pressed. Eventhough you may
have already cleaned the filter (before or after the
Power button has been pressed),the "Clean Filter"
message will still be displayed until the Start/Pause
button is activated.
[
I_I,IZIIZt
Display
Displays the approximate time remaining until
the end of the cycle.
As the cycle begins, you will see an initial
approximate total cycle time in the display.
Then lights will "race" in the display. This means
the dryer is continuously monitoring the amount
of moisture in the load. The lights will continue
until the dryer senses a low level of moisture in
the load. At that point, the dryer will calculate
and display the approximate time remaining.
Using the dryer.
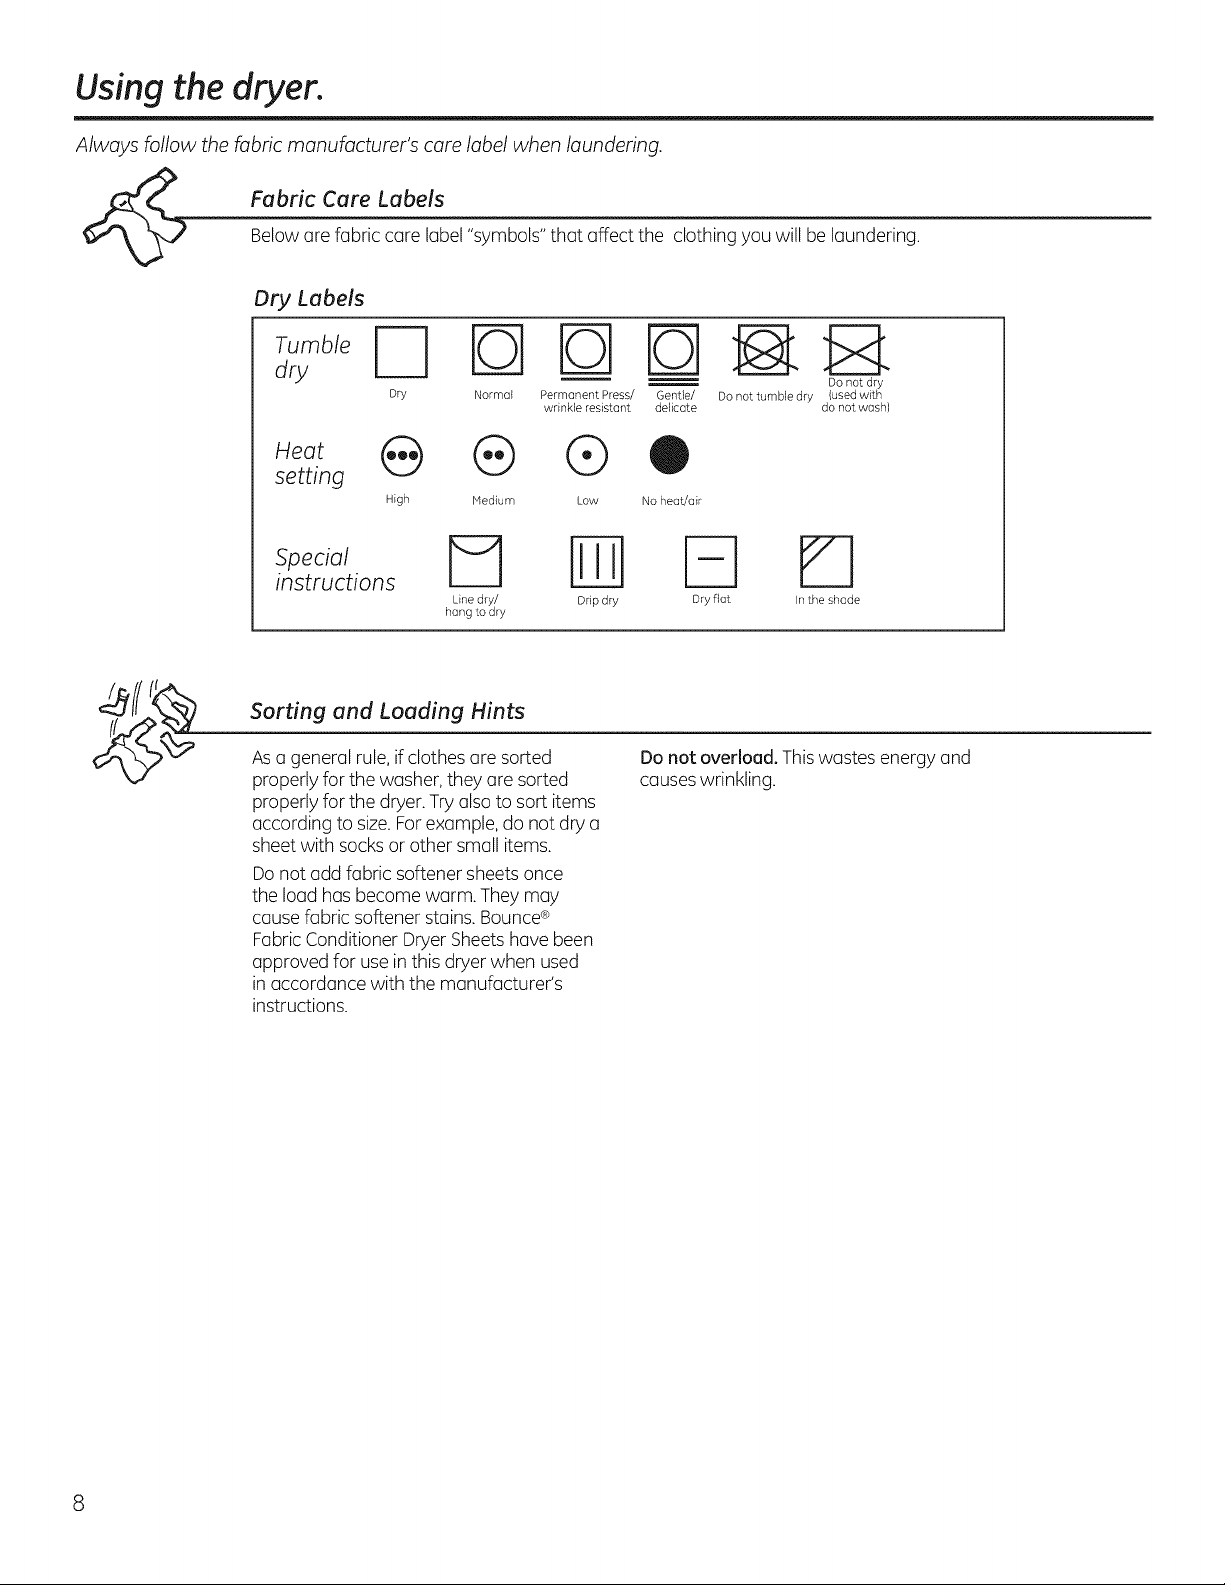
Always follow the fabric manufacturer's care label when laundering.
Fabric Care LabelsBelow are fabric care label "symbols" that affect the clothing you will be laundering.
Dry Labels
um , FIFO-1DD
d_ Donotdry
Dry Normal Permanent Press/ Gentle/ Do not tumble dry (used with
wrinkle resistant delicate do not wash)
setting
High Medium Low No heat/air
SPsetCriua/tions _ _] [-_
Line dry/ Drip dry Dry fiat In the shade
hang to dry
Sorting and Loading Hints
As a general rule, if clothes are sorted
properly for the washer, they are sorted
properly for the dryer.Try also to sort items
according to size. Forexample, do not dry a
sheet with socks or other small items.
Do not add fabric softener sheets once
the load has become warm. They may
cause fabric softener stains. Bounce®
Fabric Conditioner Dryer Sheetshave been
approved for use in this dryer when used
in accordance with the manufacturer's
instructions.
Do not overload. Thiswastes energy and
causes wrinkling.
Care and Cleaning of the Dryer. GEAppliances.com
The Exterion Wipe or dust any spills or
washing compounds with a damp cloth.
Dryer control panel and finishes may be
damaged by some laundry pretreatment
soil and stain remover products. Apply these
products away from the dryer. The fabric
may then be washed and dried normally.
Damage to your dryer caused by these
products is not covered by your warranty.
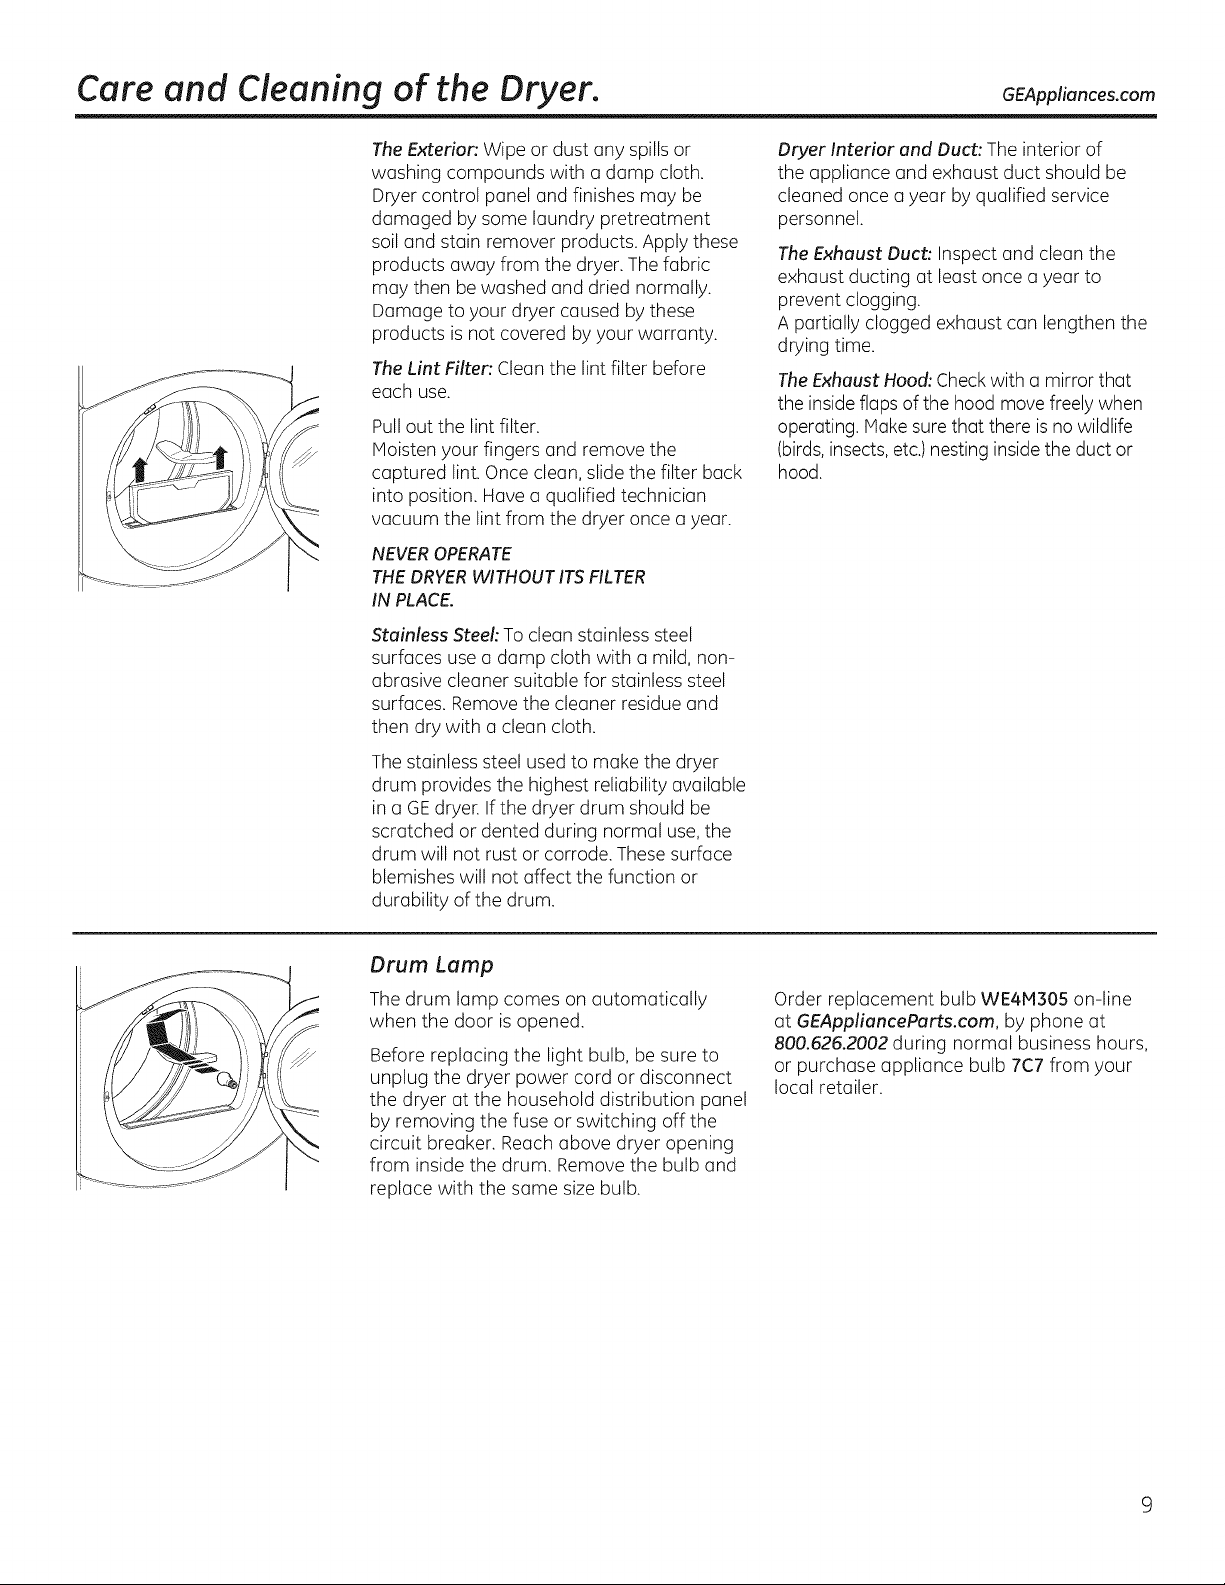
The Lint Filten Clean the lint filter before
each use.
Pull out the lint filter.
Moisten your fingers and remove the
captured lint. Once clean, slide the filter back
into position. Have a qualified technician
vacuum the lint from the dryer once a year.
NEVER OPERATE
THE DRYER WITHOUT ITS FILTER
IN PLACE.
Stainless Steel: To clean stainless steel
surfaces use a damp cloth with a mild, non-
abrasive cleaner suitable for stainless steel
surfaces. Remove the cleaner residue and
then dry with a clean cloth.
The stainless steel used to make the dryer
drum provides the highest reliability available
in a GEdryer. If the dryer drum should be
scratched or dented during normal use, the
drum will not rust or corrode. These surface
blemishes will not affect the function or
durability of the drum.
Dryer Interior and Duct: The interior of
the appliance and exhaust duct should be
cleaned once a year by qualified service
personnel.
The Exhaust Duct: Inspect and clean the
exhaust ducting at least once a year to
prevent clogging.
A partially clogged exhaust can lengthen the
drying time.
The Exhaust Hood: Checkwith a mirror that
the inside flaps of the hood move freely when
operating. Make sure that there is no wildlife
(birds,insects, etc.) nesting inside the duct or
hood.
Drum Lamp
The drum lamp comes on automatically
when the door is opened.
Before replacing the light bulb, be sure to
unplug the dryer power cord or disconnect
the dryer at the household distribution panel
by removing the fuse or switching off the
circuit breaker. Reach above dryer opening
from inside the drum. Remove the bulb and
replace with the same size bulb.
Order replacement bulb WE4M305 on-line
at GEApplianceParts.com, by phone at
800.626.2002 during normal business hours,
or purchase appliance bulb 7C7 from your
local retailer.
Installation Instructions
REVERSINGTHE DOOR SWING (if desired}
IMPORTANT NOTES
, Read the instructions all the way through before
starting.
, Handle ports carefully to ovoid scratching point.
, Set screws down by their related ports to ovoid
using them in the wrong places.
, Provide a non-scratching work surface for
the doors.
, Normal completion time to reverse the door swing
is 30-60 minutes.
IMPORTANT: Once you begin, do not move the
cabinet until door-swing reversal is completed.
These instructions are for changing the hinges
from the right side to the left side-if you ever want
to switch them back to the right side, follow these
some instructions and reverse all references
to the left and right.
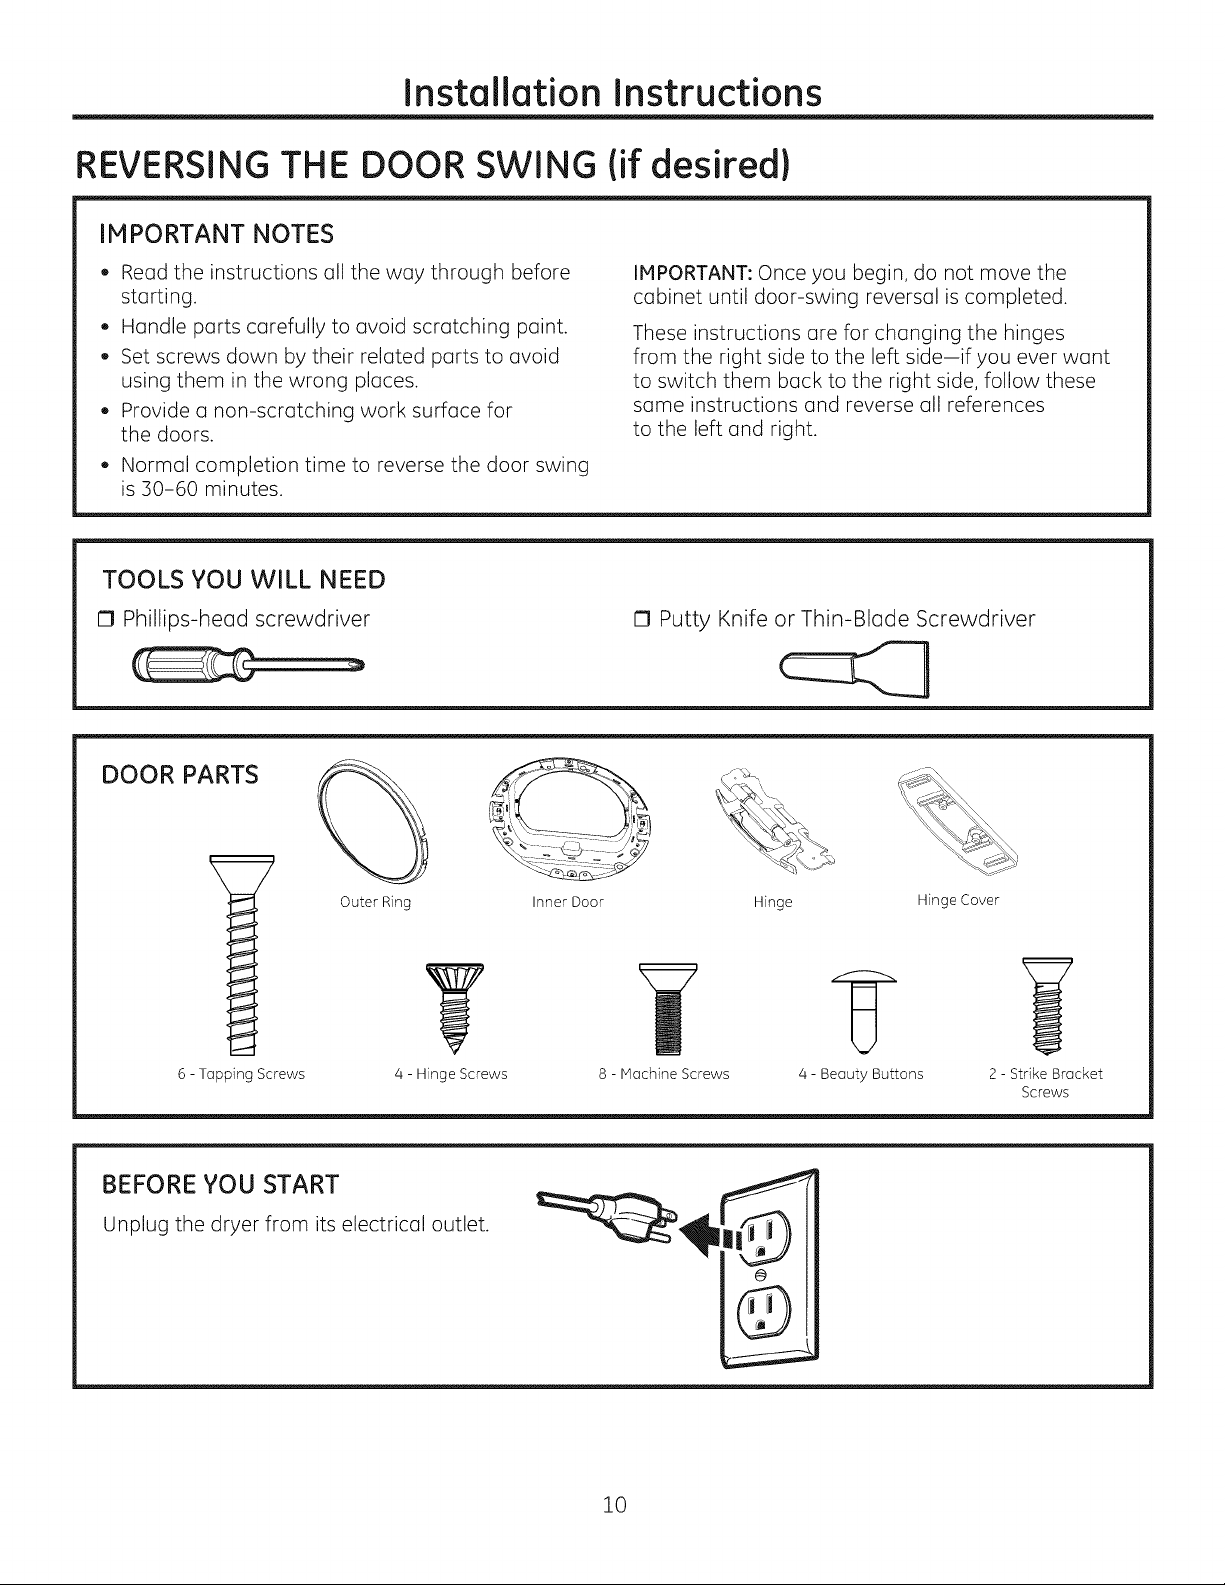
TOOLS YOU WILL NEED
0 Phillips-head screwdriver 1:3 Putty Knife or Thin-Blade Screwdriver
DOOR PARTS
6 - Tapping Screws
%
Outer Ring
?
4 - Hinge Screws
Inner Door
Hinge
8 - Machine Screws
tt
4 - Beauty Buttons
Hinge Cover
2 - Strike Bracket
Screws
BEFORE YOU START
Unplug the dryer from its electrical outlet.
10
Installation Instructions
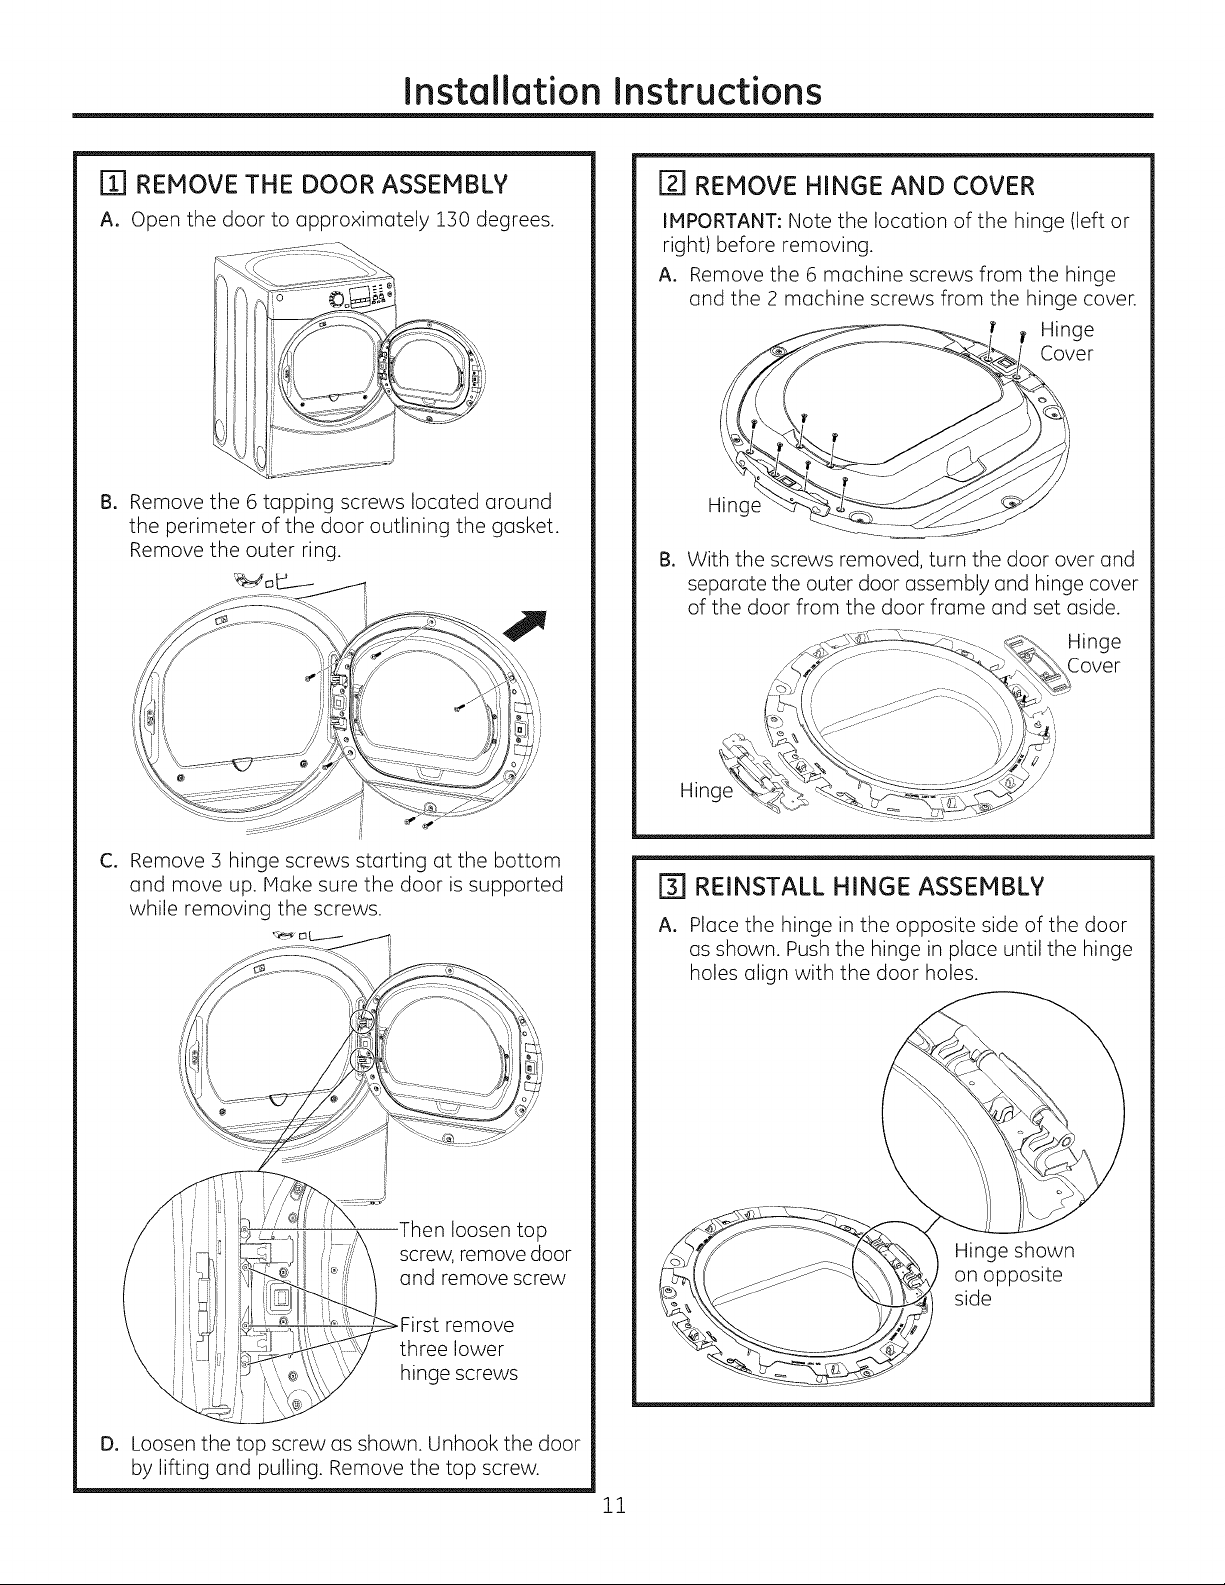
m REMOVE THE DOOR ASSEMBLY
A. Open the door to approximately Z30 degrees.
Ba
Remove the 6 tapping screws located around
the perimeter of the door outlining the gasket.
Remove the outer ring.
Ca
Remove 3 hinge screws starting at the bottom
and move up. Make sure the door is supported
while removing the screws.
-Then loosen top
screw, remove door
and remove screw
remove
three lower
hinge screws
D. Loosen the top screw as shown. Unhook the door
by lifting and pulling. Remove the top screw.
[] REMOVE HINGE AND COVER
IMPORTANT: Note the location of the hinge (left or
right) before removing.
A. Remove the 6 machine screws from the hinge
and the 2 machine screws from the hinge cover.
Hinge
Cover
Hinge
B. With the screws removed, turn the door over and
separate the outer door assembly and hinge cover
of the door from the door frame and set aside.
FTI REINSTALL HINGE ASSEMBLY
A. Place the hinge in the opposite side of the door
as shown. Push the hinge in place until the hinge
holes align with the door holes.
Hinge shown
on opposite
side
11
Installation Instructions
REVERSINGTHE DOOR SWING (if desired}
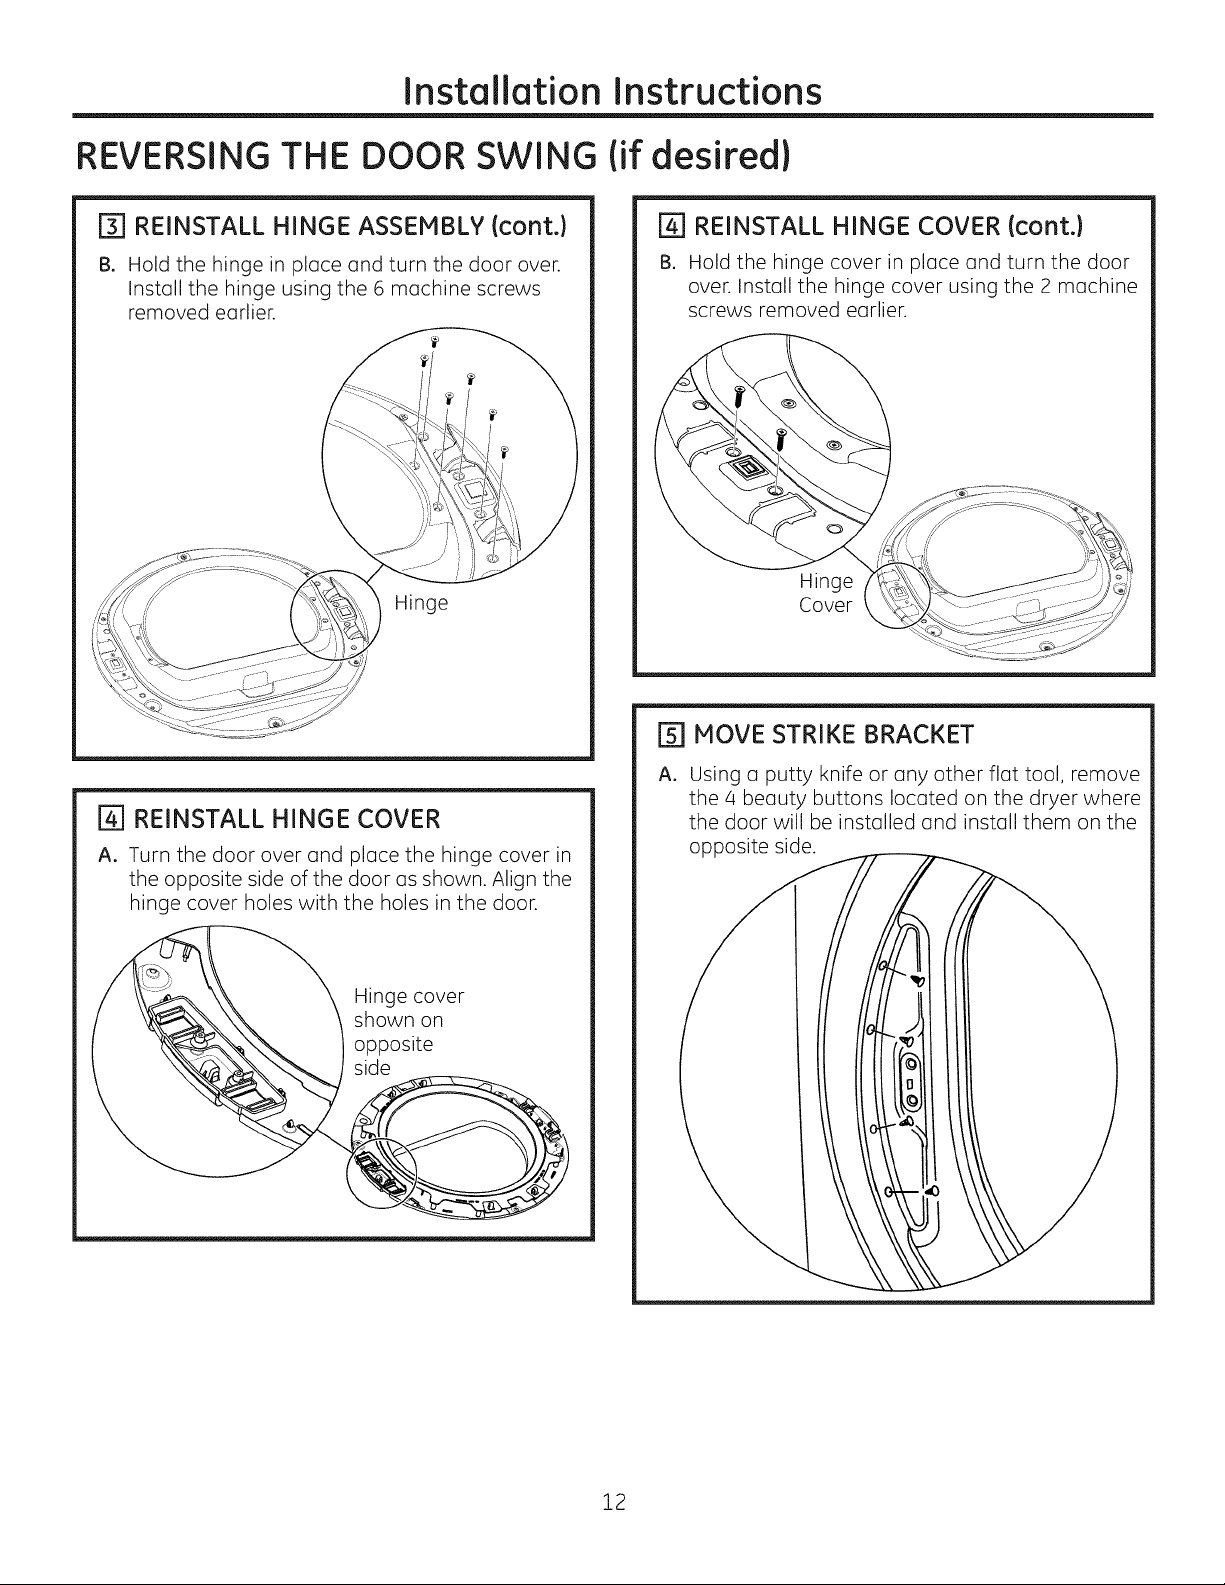
[] REINSTALL HINGE ASSEMBLY {cont.)
B. Hold the hinge in place and turn the door over.
Install the hinge using the 6 machine screws
removed earlier.
Hinge
I_1 REINSTALL HINGE COVER
A. Turn the door over and place the hinge cover in
the opposite side of the door as shown. Align the
hinge cover holes with the holes in the door.
Hinge cover
shown on
opposite
side
I_1 REINSTALL HINGE COVER {cont.)
Bo Hold the hinge cover in place and turn the door
over. Install the hinge cover using the 2 machine
screws removed earlier.
Hinge
Cover
ITI HOVE STRIKE BRACKET
At
Using a putty knife or any other flat tool, remove
the 4 beauty buttons located on the dryer where
the door will be installed and install them on the
opposite side.
12
Installation Instructions
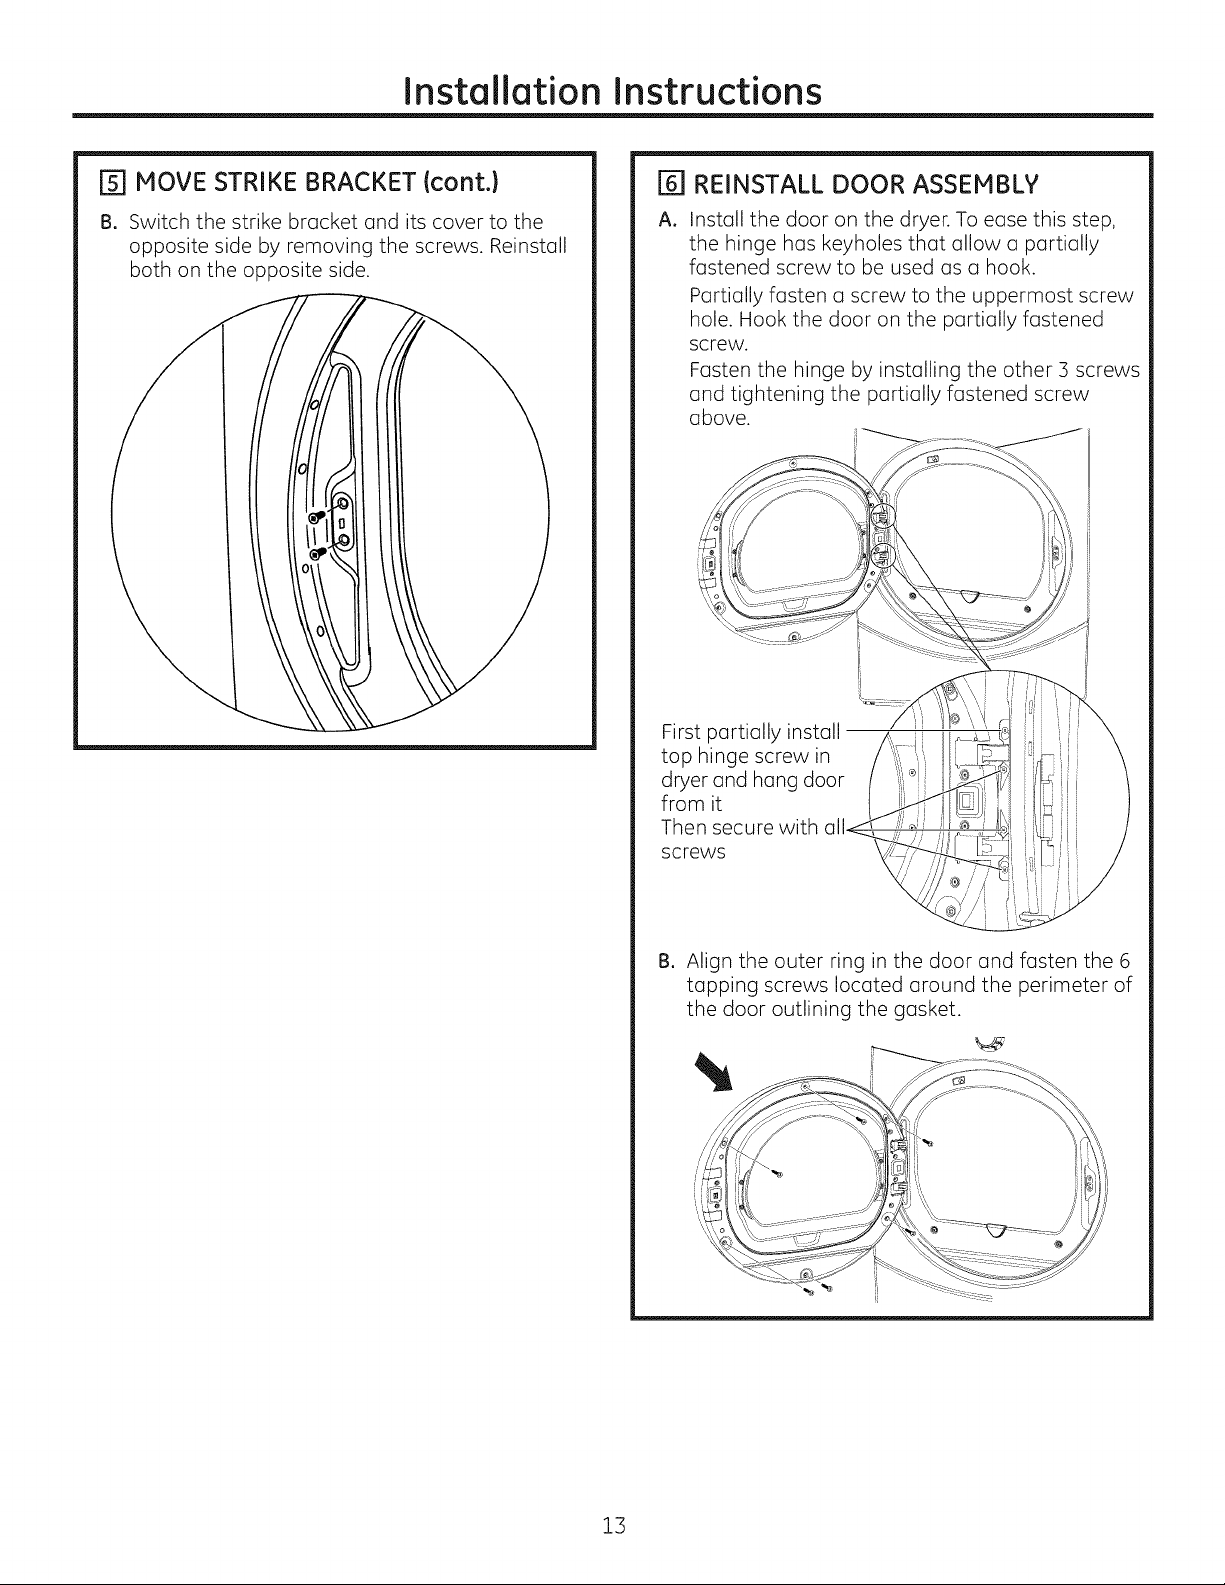
[_] MOVE STRIKE BRACKET (cont.)
B. Switch the strike bracket and its cover to the
opposite side by removing the screws. Reinstall
both on the opposite side.
%
A.
REINSTALL DOOR ASSEMBLY
Install the door on the dryer. To ease this step,
the hinge has keyholes that allow a partially
fastened screw to be used as a hook.
Partially fasten a screw to the uppermost screw
hole. Hook the door on the partially fastened
screw.
Fasten the hinge by installing the other 3 screws
and tightening the partially fastened screw
above.
First partially install
top hinge screw in
dryer and hang door
from it
Then secure with
screws
Bo Align the outer ring in the door and fasten the 6
tapping screws located around the perimeter of
the door outlining the gasket.
13
Installation Instructions
STACKING THE WASHER AND DRYER(if desired)
BEFORE YOU BEGIN
Read these instructions completely and carefully.
. IMPORTANT- Savetheseinstructionsfor
local electrical inspector's use.
, IMPORTANT-Observe all governing
codes and ordinances.
, Note to Installer- Be sure to leave these
instructions with the Consumer.
, Note to Consumer - Keep these instructions for
future reference.
, Service must be performed by a qualified
installer.
, Proper installation is the responsibility of the
installer.
, Disconnect power before installing. Failure to do
so could result in serious injury or death.
I-_1- Excessive Weight Hazard
Use two or more people to install dryer.
Failure to do so may result in back or other injury.
Avoid Tipping and Rupture of Utility Services.
Dryer must be securely attached to the washer.
DO NOT place the washer on top of the dryer.
Failure to do so could result in personal injury/
death or property damage.
Mobile Home or Manufactured Home Installation
- Stacking of a gas dryer is not permitted in a
mobile home or manufactured home.
MINIMUM CLEARANCE OTHER THAN
ALCOVE OR CLOSET INSTALLATION
Minimum clearance to combustible surfaces and
for air opening are: 0" both sides, 3" front/rear and
1" top. Consideration must be given to provide
adequate clearance for installation and service.
REQUIREMENTS FOR ALCOVE OR
CLOSET INSTALLATION
, Your dryer is approved for installation in an
alcove or closet, as stated on a label on the dryer
back.
, The dryer MUST be vented to the outdoors. See
the EXHAUSTING THE DRYERsection.
, Minimum clearance between dryer cabinet and
adjacent walls or other surfaces is:
0" either side
3" front and rear
12" top
, Minimum vertical space from floor to overhead
shelves, cabinets, ceilings, etc., is 52".
, Closet doors must be Iouvered or otherwise
ventilated and have at least 60 square inches
of open area equally distributed. If the closet
contains both a washer and a dryer, doors must
contain a minimum of 120 square inches of open
area equally distributed.
, The closet should be vented to the outdoors to
prevent gas pocketing in case of gas in the supply
line.
, No other fuel-burning appliance shall be installed
in the same closet with the dryer (gas models
only).
NOTE: WHEN THE EXHAUST DUCT IS LOCATED AT
THE REAR OF THE DRYER,MINIMUM CLEARANCE
FROM THE WALL IS 5.5 INCHES.
GE STACK KIT:
Order on-line at GEApplianceParts.com, 24 hours a day or by
phone at 800.525.2002during normal businesshours.
Part Number Accessory
GEFLSTACK CompleteStackKit
14

Installation Instructions
STACKING THE WASHER AND
DRYER{if desired){cont.)
INSTALLING THE STACK BRACKET
KIT
STACKING KIT GEFLSTACK CONTENTS
(OPTIONAL ACCESSORY}
,o oj
I o o e 1----
17Left hand bracket 04 #12 x 1" screws
17Right hand bracket 174 #8 × 1/2" screws
04 rubber pads
TOOLS YOU WILL NEED
C1Phillips screwdriver 1__
C1GIoves
ClOpen-ended wrench
C1Level
C1Pliers
INSTALLATION PREPARATION
Remove the packaging.
Flatten the product carton to use as a pad to lay the
dryer down on its side. Continue using the carton to
protect the finished floor in front of
the installation location.
I_] REMOVE THE DRYER LEVELING LEGS
A. Carefully lay the dryer on its side. Use the
packing material so you don't scratch the finish
on the dryer.
B.
Use an open-end wrench or pliers to remove the
dryer leveling legs.
r move
r_l INSTALL RUBBER PADS TO DRYER
BASE
Locate the 4 rubber pads in the parts package.
Remove the adhesive backing and firmly place
over each bracket where you removed the
leveling legs.
Place pads over
all four leveling
leg brackets
15
Installation Instructions
STACKING THE WASHER AND DRYER(if desired)
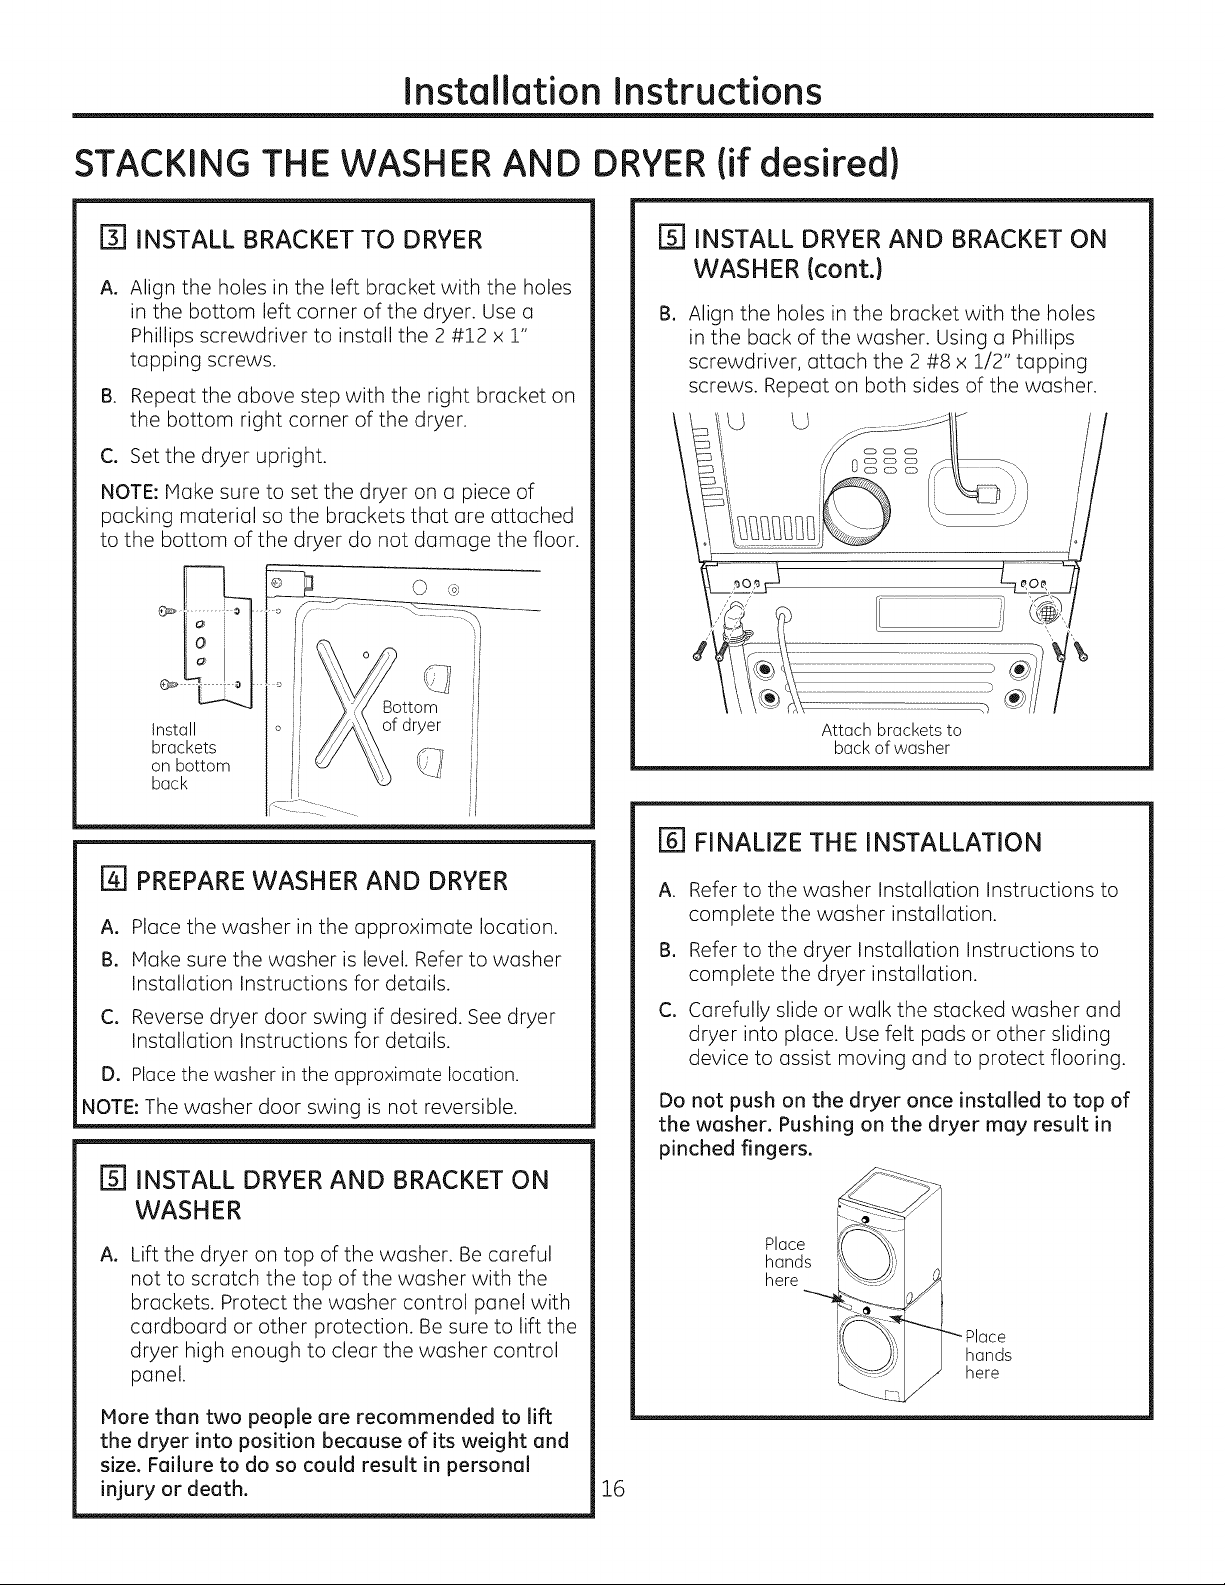
[J] INSTALL BRACKET TO DRYER
At
Align the holes in the left bracket with the holes
in the bottom left corner of the dryer. Use a
Phillips screwdriver to install the 2 #12 x 1"
tapping screws.
B. Repeat the above step with the right bracket on
the bottom right corner of the dryer.
Ca Set the dryer upright.
NOTE: Make sure to set the dryer on a piece of
packing material so the brackets that are attached
to the bottom of the dryer do not damage the floor.
i
Bottom !
Install of dryer
brackets
on bottom
back
[] PREPARE WASHER AND DRYER
A. Place the washer in the approximate location.
B. Make sure the washer is level. Refer to washer
Installation Instructions for details.
C. Reverse dryer door swing if desired. See dryer
Installation Instructions for details.
D. Place the washer in the approximate location.
NOTE: The washer door swing is not reversible.
[_] INSTALL DRYER AND BRACKET ON
WASHER
At
Lift the dryer on top of the washer. Be careful
not to scratch the top of the washer with the
brackets. Protect the washer control panel with
cardboard or other protection. Be sure to lift the
dryer high enough to clear the washer control
panel.
More than two people are recommended to lift
the dryer into position because of its weight and
size. Failure to do so could result in personal
injury or death.
16
rsl INSTALL DRYERAND BRACKET ON
WASHER (cont.}
B.
Align the holes in the bracket with the holes
in the back of the washer. Using a Phillips
screwdriver, attach the 2 #8 x 1/2" tapping
screws. Repeat on both sides of the washer.
Attach brackets to
back of washer
[_] FINALIZE THE INSTALLATION
A.
B.
eL
Refer to the washer Installation Instructions to
complete the washer installation.
Refer to the dryer Installation Instructions to
complete the dryer installation.
Carefully slide or walk the stacked washer and
dryer into place. Use felt pads or other sliding
device to assist moving and to protect flooring.
Do not push on the dryer once installed to top of
the washer. Pushing on the dryer may result in
pinched fingers.
Place
hands
here
"_Place
hands
here
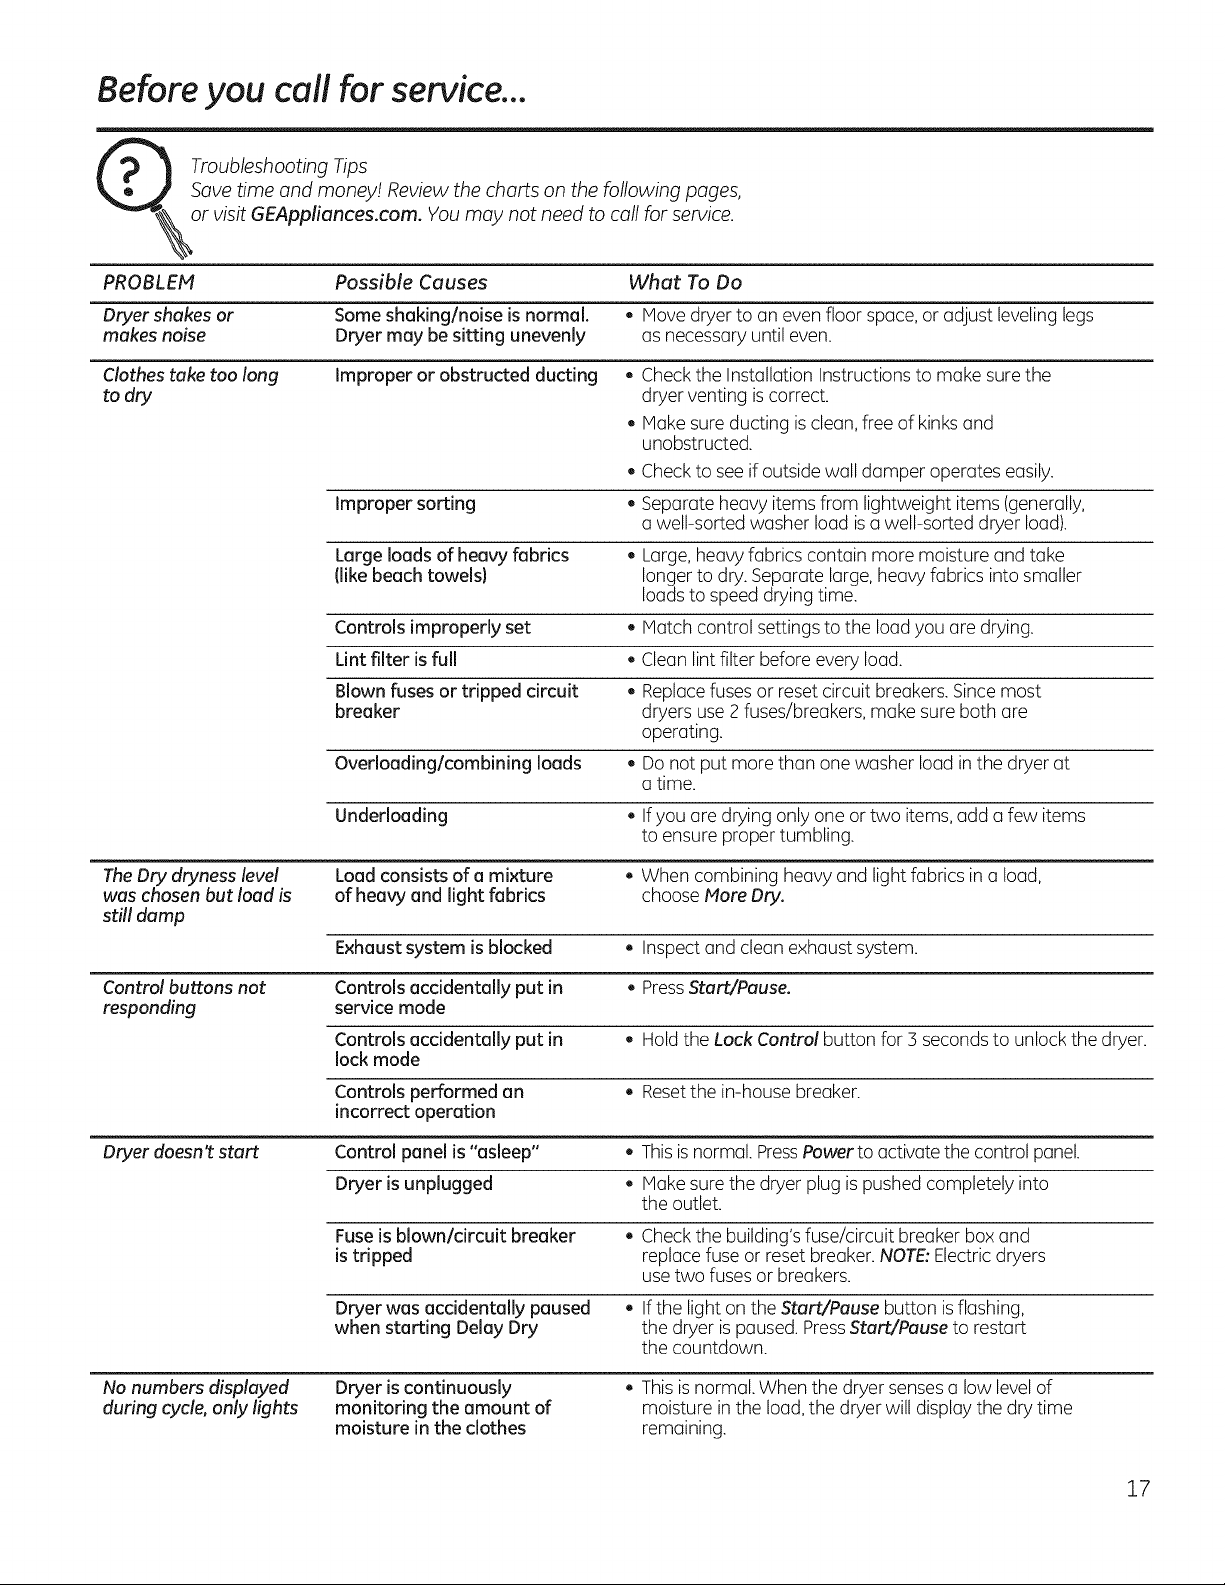
Before you call for service...
Troubleshooting Tips
Save time and money! Review the charts on the following pages,
or visit GEAppliances.com. You may not need to call for service.
PROBLEM Possible Causes What To Do
Dryer shakes or Some shaking/noise is normal. , Move dryer to an even floor space, or adjust leveling legs
makes noise Dryer may be sitting unevenly as necessary until even.
Clothes take too long
to dry
Improper or obstructed ducting ,
Check the Installation Instructions to make sure the
dryer venting is correct.
, Make sure ducting is clean, free of kinks and
unobstructed.
Check to see if outside wall damper operates easily.
Improper sorting , Separate heavy items from lightweight items (generally,
a well-sorted washer loud is a well-sorted dryer load).
Large loads of heavy fabrics , Large, heavyfabrics contain more moisture and take
(like beach towels} longer to dry. Separate large, heavy fabrics into smaller
loads to speed drying time.
Controls improperly set • Hatch control settings to the load you are drying.
Lint filter is full , Clean lint filter before every load.
Blown fuses or tripped circuit , Replacefuses or reset circuit breakers. Since most
breaker dryers use 2 fuses/breakers, make sure both are
operating.
Overloading/combining loads , Do not put more than one washer load in the dryer at
a time.
Underloading , Ifyou are drying only one or two items, add a few items
to ensure proper tumbling.
The Dry dryness level Load consists of a mixture , When combining heavy and light fabrics in a load,
was chosen but load is of heaw and light fabrics choose More Dry.
still damp
Exhaust system is blocked , Inspect and clean exhaust system.
Control buttons not Controls accidentally put in , PressStart/Pause.
responding servicemode
Controls accidentally put in , Hold the Lock Control button for 3 seconds to unlock the dryer.
lock mode
Controls performed an , Resetthe in-house breaker.
incorrect operation
Dryer doesnt start Control panel is "asleep" • Thisis normal. PressPower to activate the control panel.
Dryer is unplugged , Make sure the dryer plug is pushed completely into
the outlet.
Fuseis blown/circuit breaker , Check the building's fuse/circuit breaker box and
is tripped replace fuse or reset breaker. NOTE:Electricdryers
use two fuses or breakers.
Dryer was accidentally paused , If the light on the Start/Pause button is flashing,
when starting Delay Dry the dryer is paused. PressStart/Pause to restart
the countdown.
No numbers displaved
during cycle, only lights
Dryer is continuously
monitoring the amount of
moisture in the clothes
, This is normal. When the dryer sensesa low levelof
moisture in the load, the dryer will display the dry time
remaining.
17
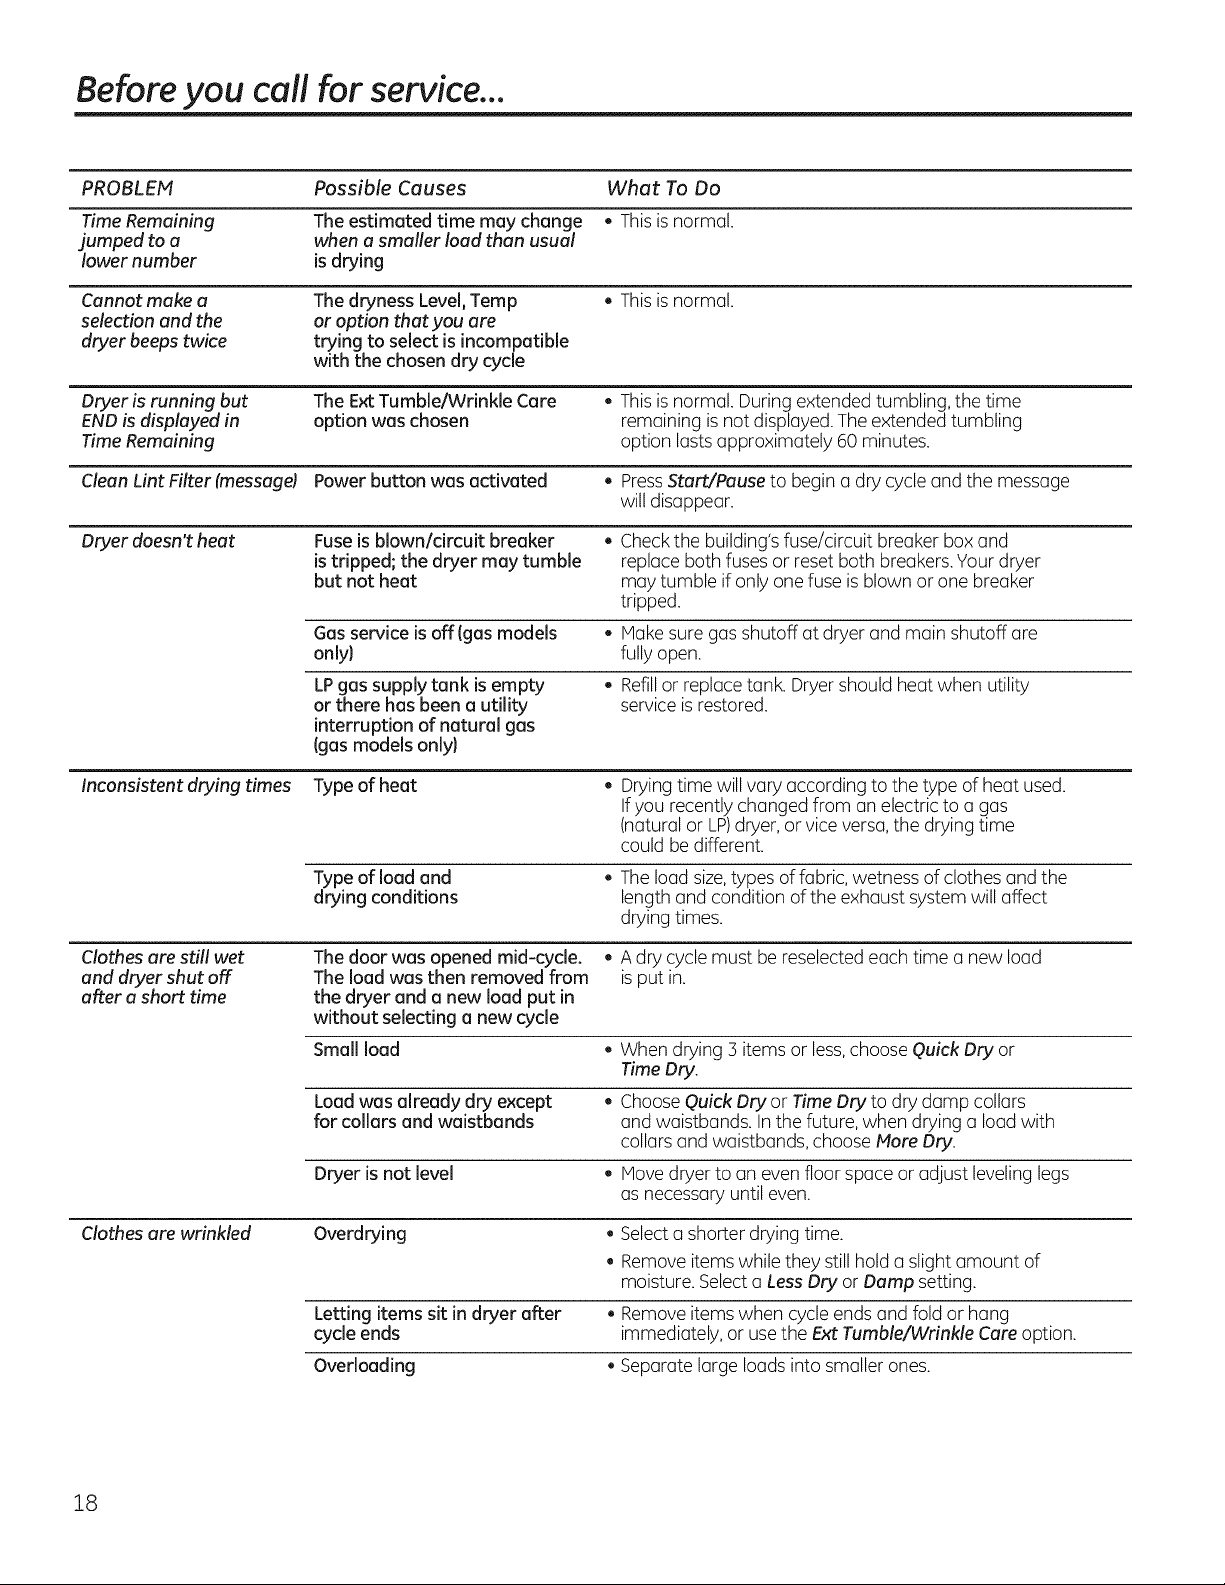
Before you call for service...
PROBLEM
Time Remaining
jumped toa
lower number
Possible Causes
The estimated time may change
when a smaller load than usual
is drying
What To Do
, Thisis normal.
Cannot make a
selection and the
dryer beeps twice
The dryness Level,Temp
or option that you are
trying to select is incompatible
with the chosen dry cycle
, Thisis normal.
Dryer is running but
END is displayed in
Time Remaining
The Ext Tumble/Wrinkle Care
option was chosen
, Thisis normal. During extended tumbling, the time
remaining is not displayed. The extended tumbling
option lasts approximately 60 minutes.
Clean Lint Filter (message) Power button was activated , PressStartYPauseto begin a dry cycle and the message
will disappear.
Dryer doesn't heat
Fuseis blown/circuit breaker
is tripped; the dryer may tumble
but not heat
Checkthe building's fuse/circuit breaker box and
replace both fuses or reset both breakers. Your dryer
may tumble if only one fuse is blown or one breaker
tripped.
Gas service is off(gas models
only}
• Make sure gas shutoff atdryer and main shutoff are
fully open.
LPgas supply tank is empty
or there has been a utility
interruption of natural gas
(gas models onlyl
Refillor replace tank. Dryer should heat when utility
service is restored.
Inconsistent drying times Type of heat Drying time will vary according to the type of heat used.
If you recently changed from an electric to a gas
(natural or LP)dryer, or vice versa, the drying time
could be different.
Type of load and . The load size,types of fabric, wetness of clothes and the
drying conditions length and condition of the exhaust system will affect
drying times.
Clothes are still wet The door was opened mid-cycle. . A dry cycle must be reselected each time a new load
and dryer shut off The load was then removed from is put in.
after a short time the dryer and a new load put in
without selecting a new cycle
Small load . When drying 3 items or less,choose Quick Dry or
Time Dry.
Load was already dry except . ChooseQuick Dry or Time Dry to dry damp collars
for collars and waistbands and waistbands. In the future, when drying a load with
collars and waistbands, choose More Dry.
Dryer is not level . Move dryer to an even floor space or adjust leveling legs
as necessary until even.
Clothes are wrinkled Overdrying , Select a shorter drying time.
, Remove items while they still hold a slight amount of
moisture. Selecta LessDry or Damp setting.
Letting items sit in dryer after , Remove items when cycle ends and fold or hang
cycle ends immediately, or use the Ext Tumble/Wrinkle Care option.
Overloading , Separate large loads into smaller ones.
18
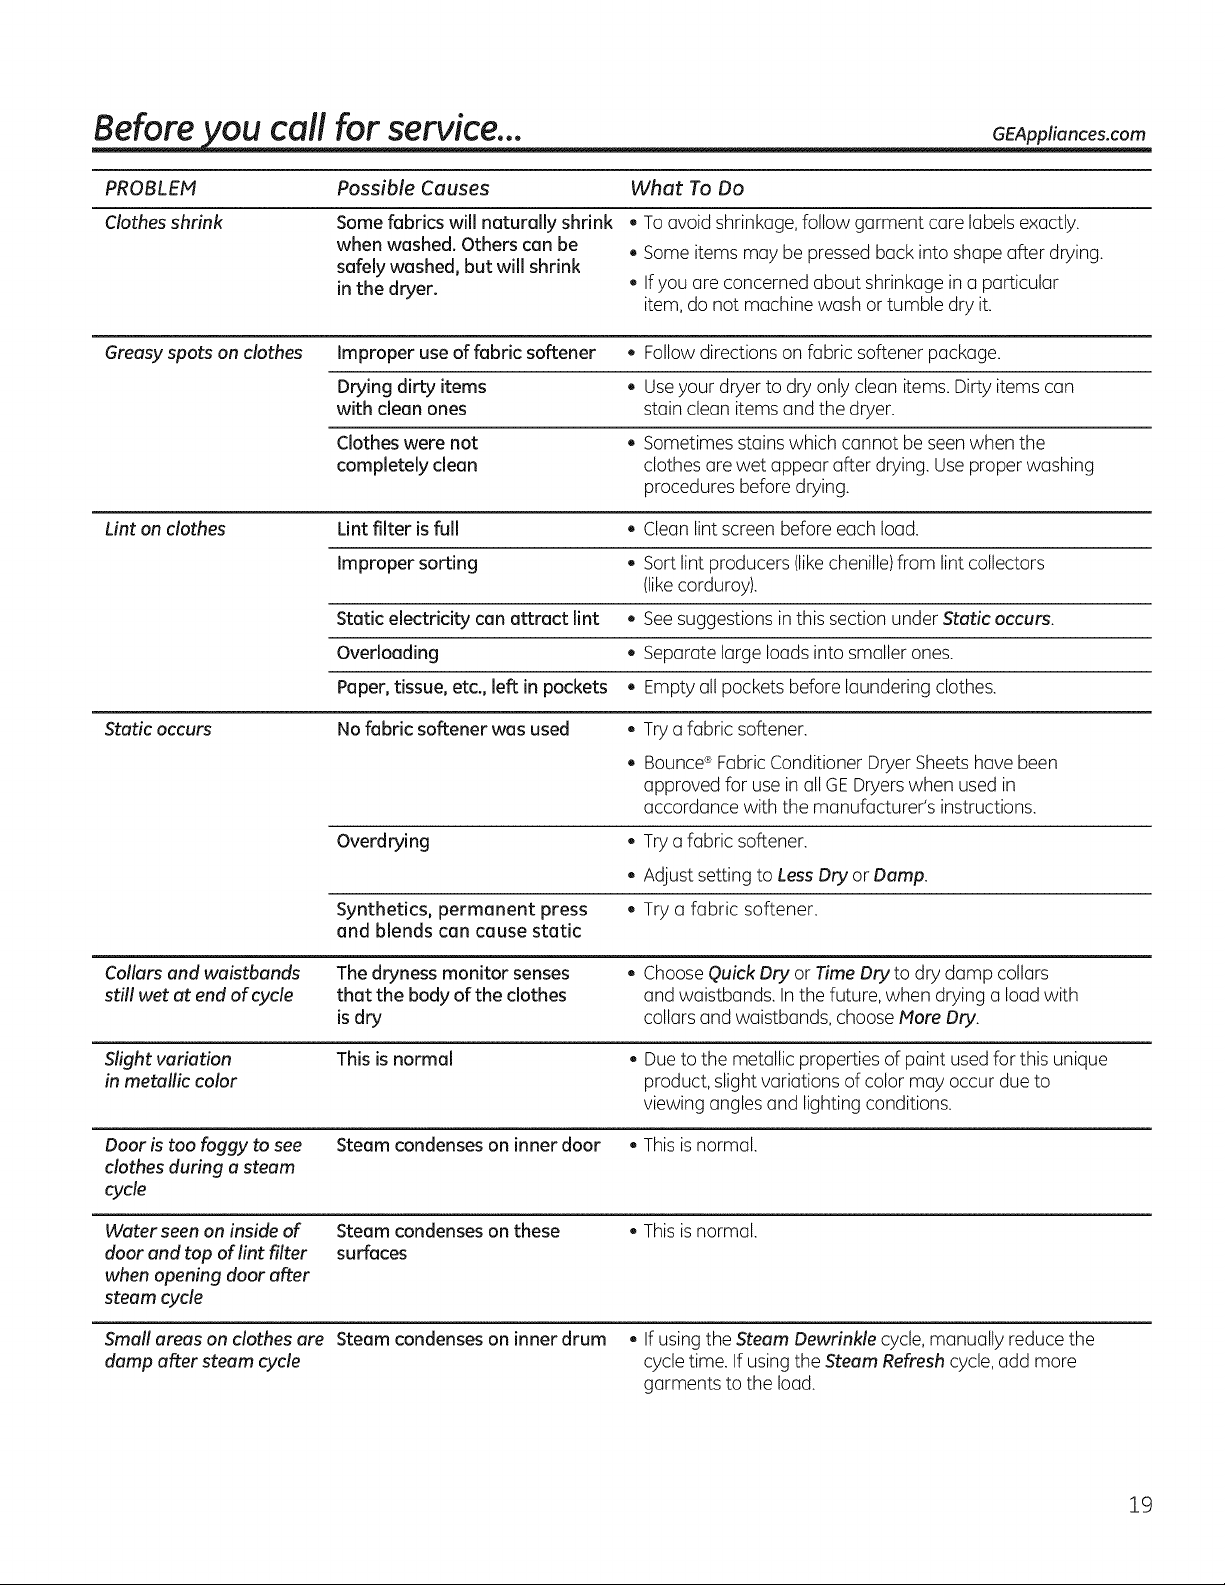
Before ou call for service... GEAppliances.com
PROBLEM
Clothes shrink
Passible Causes What To Do
Some fabrics will naturally shrink
when washed. Others can be
safely washed, but will shrink
in the dryer.
, To avoid shrinkage, follow garment care labels exactly.
. Some items may be pressed back into shape after drying.
Ifyou are concerned about shrinkage in a particular
item, do not machine wash or tumble dry it.
Greasy spots on clothes Improper use of fabric softener • Follow directions on fabric softener package.
Drying dirty items . Useyour dryer to dry only clean items. Dirty items can
with clean ones stain clean items and the dryer.
Clothes were not . Sometimes stains which cannot be seen when the
completely clean clothes are wet appear after drying. Use proper washing
procedures before drying.
Lint on clothes Lint filter is full . Clean lint screen before each load.
Improper sorting . Sort lint producers (likechenille)from lint collectors
(likecorduroy).
Static electricity can attract lint • Seesuggestions in this section under Static occurs.
Overloading • Separate large loads into smaller ones.
Paper, tissue, etc., left in pockets . Empty all pockets before laundering clothes.
Static occurs No fabric softener was used . Try a fabric softener.
e
Bounce®Fabric Conditioner Dryer Sheets have been
approved for use in all GEDryers when used in
accordance with the manufacturer's instructions.
Overdrying
Synthetics, permanent press
and blends can cause static
, Try a fabric softener.
, Adjust setting to LessDry or Damp.
Try a fabric softener.
Collars and waistbands
still wet at end of cycle
The dryness monitor senses
that the body of the clothes
is dry
. Choose Quick Dry or Time Dry to dry damp collars
and waistbands. In the future, when drying a load with
collars and waistbands, choose Mare Dry.
Slight variation
in metallic color
This is normal
, Due to the metallic properties of paint used for this unique
product, slight variations of color may occur due to
viewing angles and lighting conditions.
Door is too foggy to see
clothes during a steam
cycle
Steam condenseson inner door , This is normal.
Water seen on inside of
door and top of lint filter
when opening door after
steam cycle
Steam condenses on these
surfaces
, This is normal.
Small areas on clothes are Steam condenseson inner drum , If using the Steam Dewrinkle cycle,manually reduce the
damp after steam cycle cycle time. If using the Steam Refresh cycle, add more
garments to the load.
19
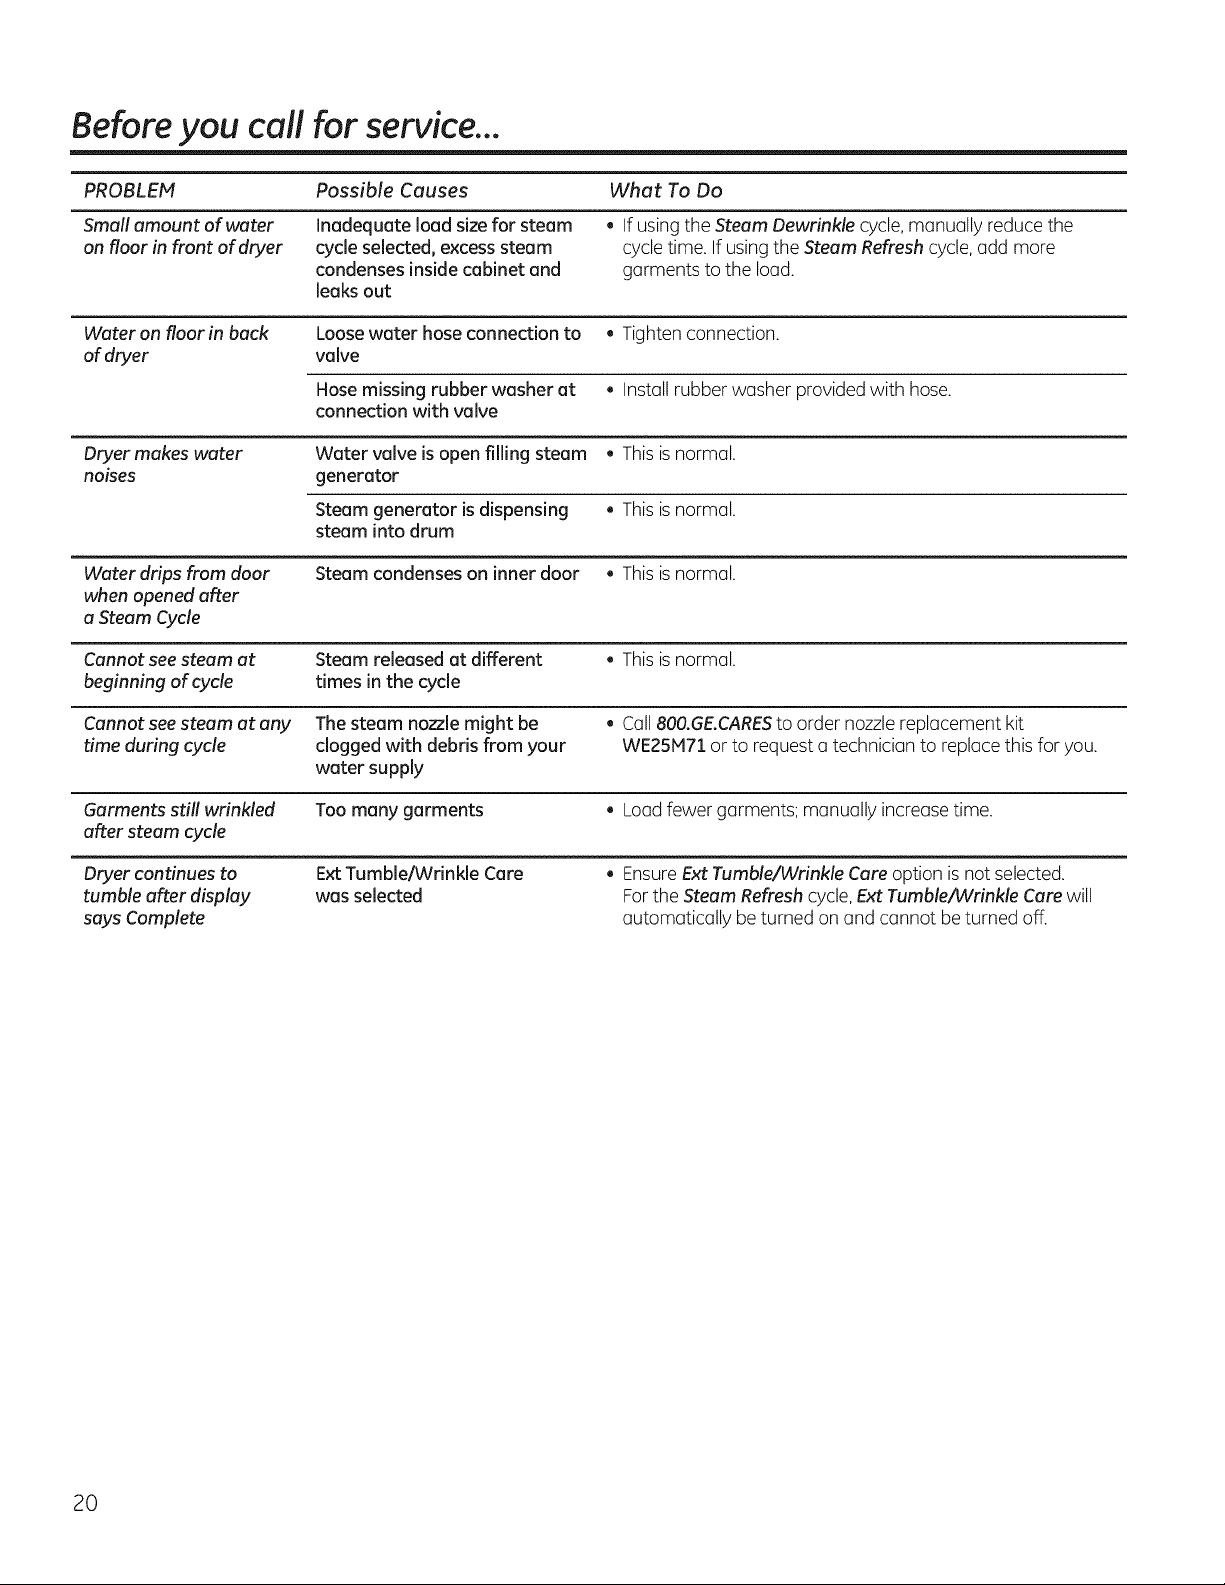
Before you call for service...
PROBLEM Possible Causes What To Do
Small amount of water Inadequate load size for steam . If using the Steam Dewrinkle cycle, manually reduce the
on floor in front of dryer cycle selected, excess steam cycle time. Ifusing the Steam Refresh cycle, add more
condenses inside cabinet and garments to the load.
leaks out
Water on floor in back Loose water hose connection to . Tighten connection.
of dryer valve
Hose missing rubber washer at . Install rubber washer provided with hose.
connection with valve
Dryer makes water Water valve is open filling steam • This is normal.
noises generator
Steam generator is dispensing . Thisis normal.
steam into drum
Water drips from door Steam condenses on inner door . Thisis normal.
when opened after
a Steam Cycle
Cannot see steam at Steam released at different . This is normal.
beginning of cycle times in the cycle
Cannot see steam at any The steam nozzle might be . Call 800.GE.CARES to order nozzle replacement kit
time during cycle clogged with debris from your WE2SH71 or to request u technician to replace this for you.
water supply
Garments still wrinkled Too many garments . Load fewer garments; manually increase time.
after steam cycle
Dryer continues to
tumble after display
says Complete
ExtTumble/Wrinkle Cure
was selected
. EnsureExt Tumble/Wrinkle Care option is not selected.
For the Steam Refresh cycle, Ext Tumble/Wrinkle Care will
automatically be turned on and cannot be turned off.
20

GE Dryer Warranty. GEAppliances.com
All warranty service provided by our Factory Service Centers,
or an authorized Customer Care®technician. To schedule
service, on-line, visit us at GEAppliances.com, or call 800.
GE.CARE5(800.432.2737).
Pleasehave serial number and model number available when
calling for service.
One Year
Staple your receipt here.
Proof of the original purchase
date is needed to obtain
service under the warranty.
From the date of the
original Puichase
We Will Replace:
Any part of the dryer which fails due to a defect in materials or workmanship. During this
limited one-.veer warranty, GEwill also provide, free of charge, all labor and related service costs
to replace the defective part.
[] Service trips to your home to teach you how to use the
product.
[] Improper installation, delivery or maintenance.
[] Failure of the product if it is abused, misused or used for
other than the intended purpose or used commercially.
[] Replacement of the light bulb after its expected useful
life.
[] Replacement of house fuses or resetting of circuit
breakers.
[] Damage to the product caused by accident, fire, floods
or acts of God.
[] Incidental or consequential damage caused by possible
defects with this appliance.
[] Damage caused after delivery.
[] Product not accessible to provide required service.
[] Defects or damage due to operation in freezing
temperatures.
[] Products which are not defective or broken, or which
are working as described in the Owner's Manual.
EXCLUSION OF IMPLIED WARRANTIES--Your sole and exclusive remedy is product repair as provided in
this Limited Warranty. Any implied warranties, including the implied warranties of merchantability or
fitness for a particular purpose, are limited to one year or the shortest period allowed by law.
This warranty is extended to the original purchaser and any succeeding owner for products purchased for home
use within the USA. If the product is located in an area where service by a GE Authorized Servicer is not available,
you may be responsible for a trip charge or you may be required to bring the product to an Authorized GE Service
location for service. In Alaska, the warranty excludes the cost of shipping or service calls to your home.
Some states do not allow the exclusion or limitation of incidental or consequential damages. This warranty gives
you specific legal rights, and you may also have other rights which vary from state to state. To know what your
legal rights are, consult your local or state consumer affairs office or your state's Attorney General.
Warrantor: General Electric Company. Louisville, KY /40225
21
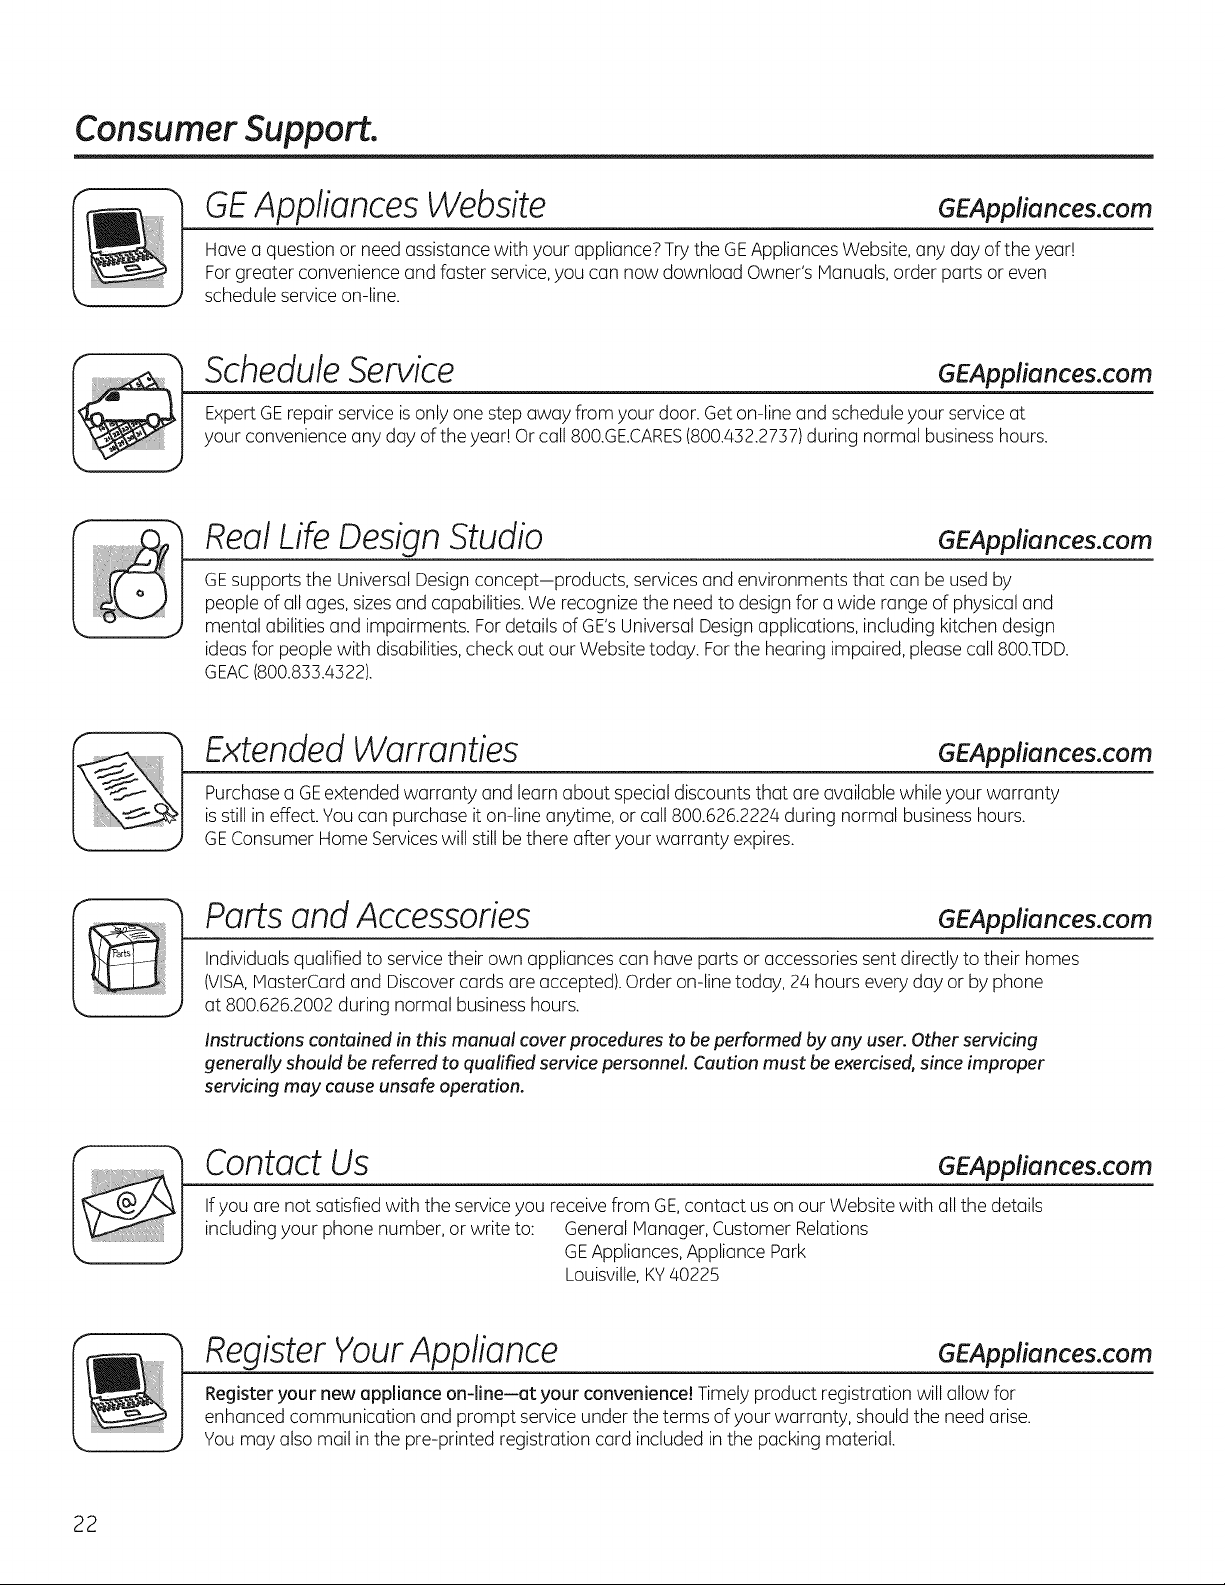
Consumer Support.
GEAppliances Website GEAppliances.com
Have a question or need assistance with your appliance?Try the GEAppliances Website, any day of the year!
For greater convenience and faster service,you can now download Owner's Manuals, order parts or even
schedule service on-line.
Schedule Service GEAppliances.com
Expert GErepair service is only one step away from your door. Get on-line and schedule your service at
your convenience any day of the year! Or call 800.GECARES (800.432.2737) during normal business hours.
Real Life Design Studio GEAppliances.com
GEsupports the Universal Designconcept-products, services and environments that can be used by
people of all ages,sizes and capabilities. We recognize the need to design for a wide range of physical and
mental abilities and impairments. For details of GE'sUniversal Designapplications, including kitchen design
ideas for people with disabilities,check out our Website today. Forthe hearing impaired, please call 800.TDD.
GEAC(800.833.4322).
Extended Warranties
GEAppliances.com
Purchase a GEextended warranty and learn about special discounts that are available while your warranty
is still in effect. You can purchase it on-line anytime, or call 800.626.222/4during normal business hours.
GEConsumer Home Serviceswill still be there after your warranty expires.
Parts and Accessories
GEAppliances.com
Individuals qualified to service their own appliances can have parts or accessories sent directly to their homes
(VISA,MasterCard and Discovercards are accepted).Order on-line today, 24 hours every day or by phone
at 800.626.2002during normal business hours.
Instructions contained in this manual cover procedures to be performed by any user. Other servicing
generally should be referred to qualified service personnel. Caution must be exercised, since improper
servicing may cause unsafe operation.
Contact Us
GEAppliances.com
If you are not satisfied with the service you receive from GE,contact us on our Website with all the details
including your phone number, or write to: General Manager, Customer Relations
GEAppliances, Appliance Park
Louisville,KY40225
Register Your Appliance GEAppliances.corn
Register your new appliance on-line--at your convenience! Timely product registration will allow for
enhanced communication and prompt service under the terms of your warranty, should the need arise.
You may also mail in the pre-printed registration card included in the packing material.
22
0
GEAppliances.com
Instrucciones
de seguridad .................. 2-4
Instrucciones de funcionamiento
Controles .......................... 4-7
Inicio rdpido ......................... 5
C6mo usar la secadora .............. 8
Cuidado y limpieza ............. g
Instrucciones de instalaci6n
C6mo invertir la apertura
de la puerta .................... 10-13
C6mo apilar la lavadora
y la secadora ................... 14-16
Consejos para soluci6n
de problemas ............... t7-20
Soporte al consumidor
Garantia ........................... 21
Soporteal consumidor ............. 22
GFDS175
GFDS170
Impreso en Mexico
Escribo los nElmeros de
modelo y de serie oqu[:
Modelo #
Serie #
Se encuentmn en una etiqueta
en el frente de la secadora
detras de la puerta.
IIIllllllllllllIHllllllllllll
234D2270PO01
49-90520 o4-14 GE
INFORMACiON DE SEGURIDAD IMPORTANT&
LEA TODAS LASINSTRUCCIONESANTES DE USAR.
,t_ Este es el s[mbolo de alerta de seguridad. El mismo alerta sabre potenciales riesgos que le pueden producir la muerte
o lesiones tanto a usted coma a otras personas. Todos los mensajes de seguridad estarcin a continuaci6n del s[mbolo
de alerta de seguridad y con la palabra "PELIGRO","ADVERTENCIA"o "PRECAUCION".Estas palabras se definen coma:
Indica una situaci6n de riesgo que, si no se evita, producir6 la muerte o lesiones graves.
Indica una situaci6n de riesgo que, si no se evita, podrio producir la muerte o lesiones graves.
Indica una situaci6n de riesgo que, si no se evita, podria resultar en lesionesmenores o moderadas.
INSTRUCCIONES IMPORTANTES DE SEGURIDAD
Para reducir el riesgo de incendio, explosi6n, descargas el@ctricaso lesiones sabre las personas al usar su
electrodom@stico,siga las precauciones b6sicas, incluyendo Io siguiente:
[] Leatodas las instruccionesantes de usar este electrodom@stico.
[] NO seque prendas queen forma previa hayan sido secadas,lavadas, penetradas o manchadas con gasolina, solventes de
limpieza en seco, u otras sustancias inflamables o explosivas,ya que despiden vapores que se podrfan encender o explotar.
[] NO permita que los ninosjueguen sobre o dentro de este electrodom6stico. Cuando el electrodom6stico se use cerca de
ninos,ser6 necesario supervisarlos de cerca. Antes de que este electrodom6stico quede fuera de uso o se descarte, retire la
puerta del compartimiento de secado.
[] NO introduzca las manos en la secadora cuando el tambor se encuentre en movimiento.
[] NO instale ni guarde este electrodom@sticodonde quede expuesto a los factores climdticos.
[] NO manipule indebidamente los controles, reparar ni reemplazar cualquier parte del electrodom@stico o realizar cualquier
otro trabajo t@cnico,a menos que esto sea espedficamente recomendado en las instrucciones de mantenimiento del
usuario o en instrucciones publicadas sabre reparaciones del usuario, que entienda y para las cuales posea las destrezas
necesarias.
[] NO utilice suavizantes de tela ni productos para eliminar la est6tica, a menos que esto sea recomendado por el fabricante del
suavizante de tela u otro producto.
[] NOutilicecalor para secarartfculosque contengan gomaespumao materialesde goma con textura similar.
[] Limpie la rejilla para pelusas antes o despu@sde cada carga. NOutilice la secadorasiel filtro de pelusasno seencuentra
colocado.
[] No guarde materiales combustibles, gasolina u otros Ifquidos inflamables cerca de la secadora. Evite la acumulaci6n
de pelusa, polvo o tierra alrededor del @reade la apertura de ventilaci6n y @reasadyacentes. IVlantenga el @reade la
secadora despejada y libre de objetos que puedan obstruir el flujo del aire de la ventilaci6n y combusti6n.
[] La parte interior del electrodom@sticoy el conducto de ventilaci6n se deber6n limpiar peri6dicamente par personal calificado
del servicio t@cnico.
[] NO coloque prendas expuestas a aceites de cocci6n en su secadora. Las prendas contaminadas con aceites de cocci6n
podr6n contribuir a una reacci6n qufmica que podrfa hacer que una carga de ropa se prenda fuego.
[] Mantenga el piso alrededor de sus electrodom@sticoslimpio y seco para reducir la posibilidad de resbalones.
[] Desenchufe el electrodom@sticoo apague el disyuntor antes de realizar el servicio t@cnico.Presionar el bot6n Power
(Encendido)o Start/Pause (Inicio/Pausa)NOdesconecta el encendido.
[] NO utilice este electrodom@sticosi se encuentra daSado, funcionando mal, parcialmente desensamblado, o si tiene partes
faltantes o rotas, incluyendo un cable o enchufe daSado.
[] NO rode ning0n tipo de aerosol dentro, sabre ni cerca de la secadora en ning0n momenta. No use ning0n tipo de limpiador
en espray para limpiar el interior de la secadora. Se podr6n producir vapores o una descarga el@ctrica.
[] Para acceder alas instrucciones de conexi6n a tierra, lea los "Conexi6nEl@ctrica"ubicados en las Instrucciones de Instalaci6n.
GUARDE ESTAS INSTRUCCIONES
GEAppliances.com
ADVERTENCIAS ADICIONALES SABRE LA SECADORA A GAS
Para su seguridad, siga los instrucciones de este manual a fin de minimizar riesgos de incendio o
explosi6n, o para evitar da_os, lesiones personales o la muerte.
- NOguarde ni use gasolina u otros vapores y liquidos inflamables cerca de _ste ni de otros electrodom_sticos.
- QUt_DEBEHACERSIHUELEGAS:
• NO intente iluminar ningSn electrodom_stico.
• NOtoque ningOn interruptor el_ctrico; NO usetel_fonos en su edificio.
• Haga que se retiren los ocupantes de la sala, edificio o _rea.
• De inmediato Ilame a su proveedor de gas desdeel tel_fono de un vecino. - Sigalas instrucciones del proveedor de gas.
• Sino se puede comunicar con su proveedor de gas, Ilame al departamento de bomberos.
- Lainstalaci6n y las reparaciones deber_n ser realizadas par un instalador calificado, agencia de servicios o el proveedor de gas.
Advertencias de la Proposici6n 65 del Estado de California:
La Ley sabre Agua Potable Inocua y Tratamiento de Residuos T6xicos de California (California Safe Drinking Water and
Toxic Enforcement Act) solicita al Gobernador de California que publique una lista de sustancias que el estado reconoce
que producen c6ncer, defectos de nacimiento u otros dahos reproductivos y solicita alas empresas que adviertan sabre la
posible exposici6n a tales sustancias.
Este producto contiene uno o mc_squ[micos que el Estado de California entiende que producen cancer,
defectos en el nacimiento u otros dahos reproductivos.
Los electrodom6sticos a gas puedan causar una exposici6n de bajo nivel a algunas de estas sustancias, incluyendo
benceno, mon6xido de carbono, formaldehido y hall[n, ocasionado principalmente par la combusti6n incompleta de
gas natural o combustibles de LR La exposici6n a estas sustancias puede set minimizada ventilando correctamente la
secadora hacia el exterior.
GUARDE ESTASINSTRUCCIONES
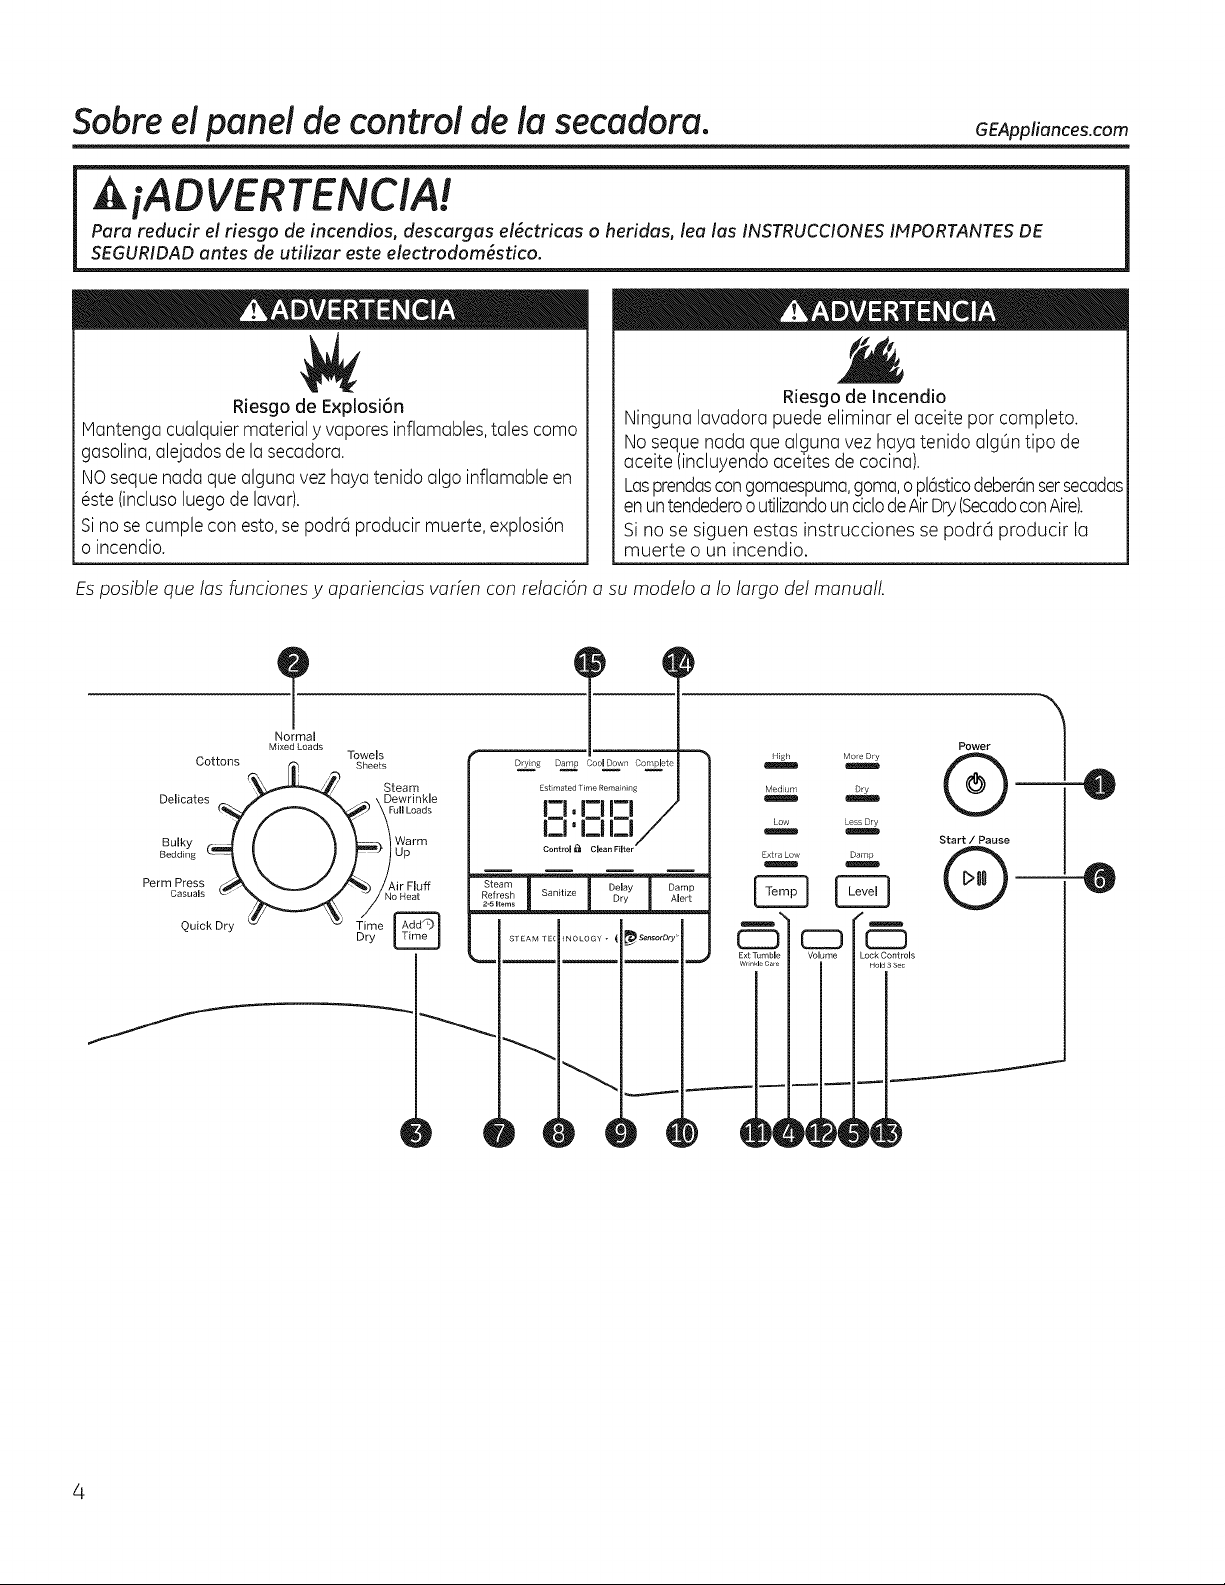
Sobreel panel de control de la secadora. GEApUiancescom
_iADVERTENCIA!
Para reducir el riesgo de incendios, descargas el_ctricas a heridas, leo las INSTRUCCIONESIMPORTANTESDE
SEGURIDADantes de utilizar este electradam6stica.
Riesgo de Explosi6n
Hantenga cualquier material y vapores inflamables,tales coma
gasolina, alejadosde lasecadora.
NOseque nada que alguna vez haya tenido alga inflamable en
6ste (inclusoluego de lavar).
Sino se cumple con esto, se podr6 producir muerte, explosi6n
o incendio.
Riesgo de Incendio
Ninguna lavadora puede eliminar el aceite por completo.
No seque nada que alguna vez haya tenido alg0n tipo de
aceite (incluyendo aceites de cocina).
Lasprendascongomaespuma,goma,opl6sticodeber6nsetsecadas
enuntendederoo utilizandoun cidodeAirDry(SecadoconAire).
Sino se siguen estas instrucciones se podra producir la
muerte o un incendio.
Esposible que las funciones y apariencias varien con relaci6n a su modelo a Io largo del manuall.
Cottons
Delicates
Bulky r-2
Quick Dry
Normal
Mixed Loads
Drying Damp Cool Down Complete
O
Towels
Sheets
Steam
-Dewrinkle
un Loads
Warm
Time
Dry _
st maied Time Remaining
I-I, I-I 17 /
n. n n/
Control _1 Clean Filter
Power
High Moe Dy
Medium Dry
Low Less Dry
Start / Pause
Extra Low Damp
U
-0
-0
Ajustes de control. GEAppliances.com
Inicio r6pido
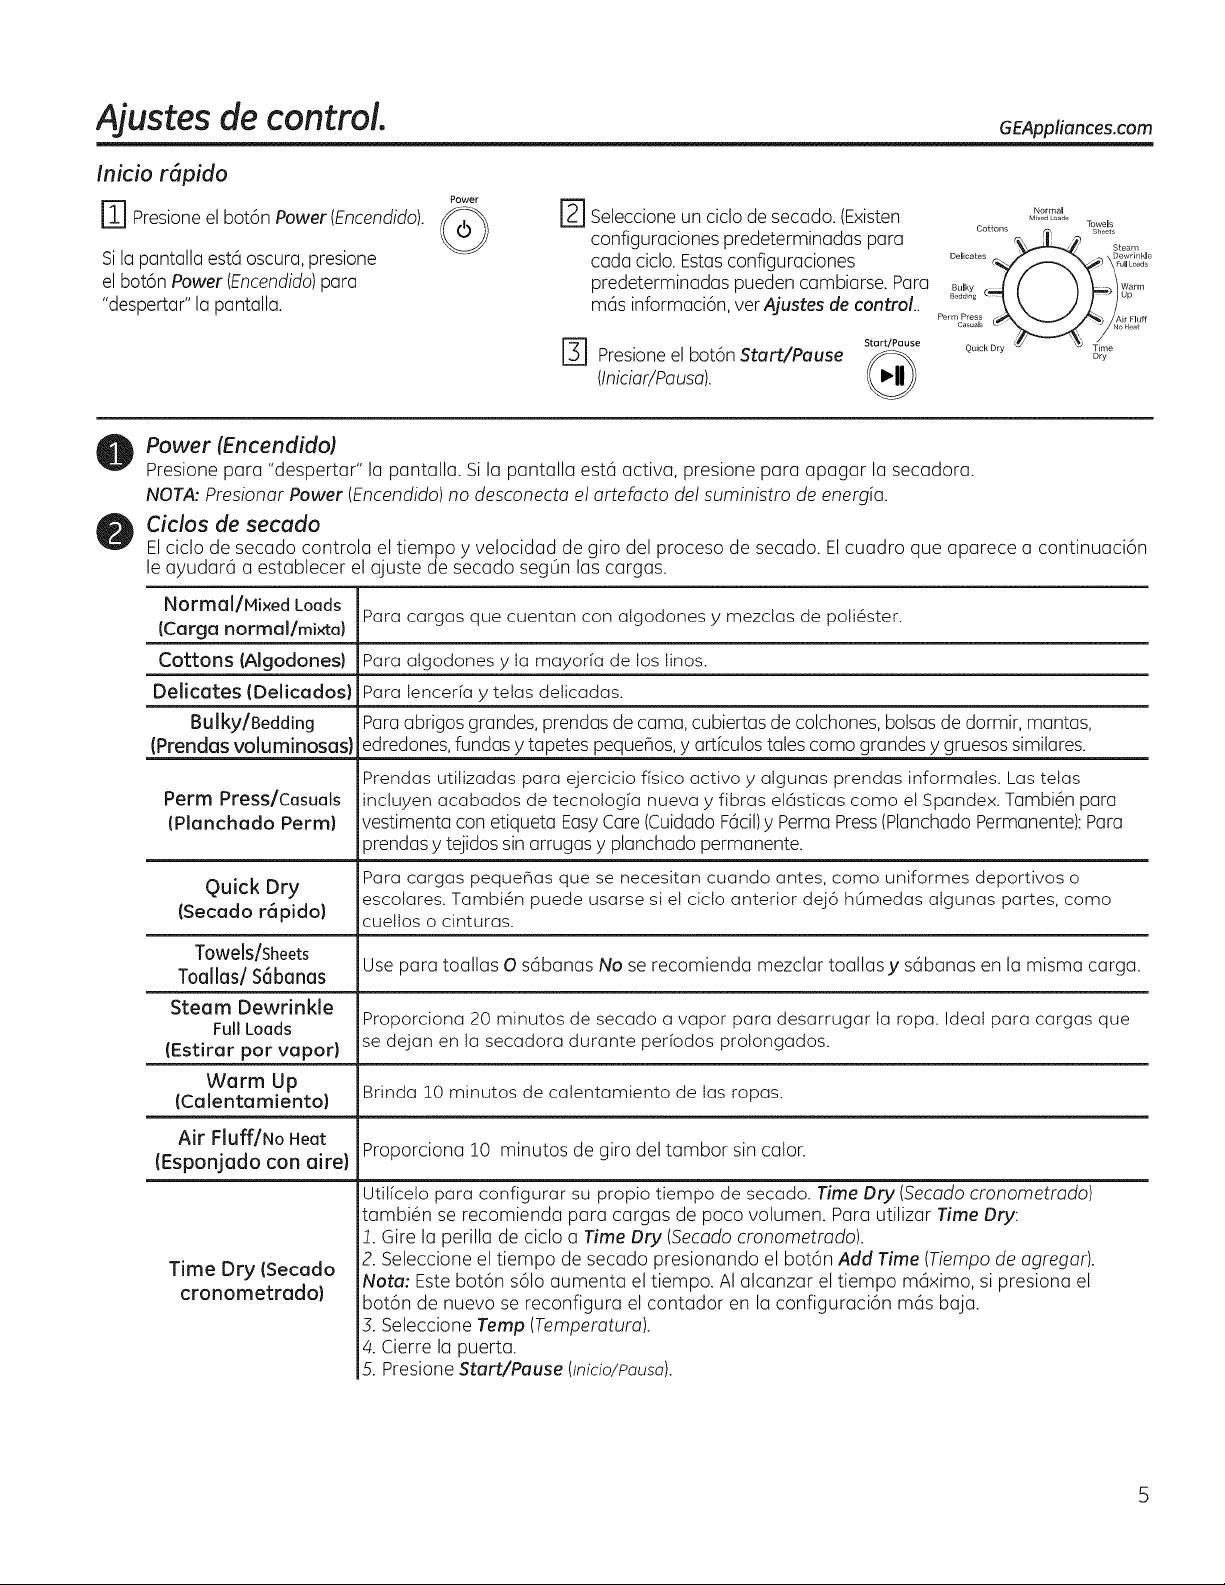
E1 Presioneel bot6n Power (Encendido).
Sila pantalla est6 oscura, presione
el bot6n Power (Encendido)para
"despertar" la pantalla.
Power
r_ Seleccioneun ciclo de secado. (Existen
configuraciones predeterminadas para
cada ciclo. Estasconfiguraciones
predeterminadas pueden cambiarse. Para
mas informaci6n, ver Ajustes de control..
Start/Pause
[] Presioneel bot6nStart/Pause @(Iniciar/Pausa).
Normal
M ×_dLoads Towels
Cottons Sheets
Delicates ' _ Dewrinkle
. _ull Loads
QuickDry (_' _ _ T_/me
Dry
Power (Encendido)
Presione para "despertar" la pantalla. Si la pantalla est6 activa, presione para apagar la secadora.
NOTA: Presionar Power (Encendido) no desconecta el artefacto del suministro de energ[a.
Ciclos de secado
El ciclo de secado controla el tiempo y velocidad de giro del proceso de secado. El cuadro que aparece a continuaci6n
le ayudar6 a establecer el ajuste de secado segOn las cargas.
Normal/Hixed Loads
Para cargas que cuentan con algodones y mezclas de poti6ster.
(Carga normal/mixta}
Cottons (Algodones) Para algodones y Ia mayoria de los Iinos.
DelJcates (Delicados) Para Ienceria y tetas deticadas.
Bulky/Bedding Para abrigos grandes, prendas de cama, cubiertas de colchones, balsas de dormir, mantas,
(Prendas voluminosas) edredones,fundas y tapetes peque_os, y articulos tales coma grandes y gruesos similares.
Prendas utitizadas para ejercicio fisico activo y algunas prendas informales. Las tetas
Perm Press/Casuals incluyen acabados de tecnologfa nueva y fibras el@sticascoma el Spandex. Tambi#n para
(Planchado Perml vestimenta con etiqueta EasyCare (Cuidado F6cil)y Perma Press(Planchado Permanente):Para
prendas y tejidos sin arrugas y planchado permanente.
Quick Dry Para cargas peque_as que se necesitan cuando antes, coma uniformes deportivos o
escolares. Tambi6n puede usarse si et cicto anterior dej6 hOmedas algunas partes, coma
(Secado r6pido) cuetlos o cinturas.
Towels/Sheets
ToaJlas/SSbanas Use para toallas O sabanas No se recomienda mezclar toallas y sabanas en la misma carga.
Steam Dewrinkle
Full Loads Proporciona 20 minutos de secado a vapor para desarrugar Ia ropa. Ideal para cargas qua
(Estirar par vapor) se dejan en Ia secadora durante perfodos protongados.
Warm Up
(Calentamiento} Brinda 10 minutos de calentamiento de Ias ropas.
Air Fluff/No Heat
(Esponjado con (]ire) Proporciona 10 minutos de giro del tambor sin calor.
Time Dry (Secado
cronometrado)
Utilfcelo para configurar su propio tiempo de secado. Time Dry (Secado cronometrado)
tambi6n se recomienda para cargas de poco volumen. Para utilizar Time Dry:
!. Gire la perilla de ciclo a Time Dry (Secado cronometrado).
2. Seleccione el tiempo de secado presionando el bot6n Add Time (Tiempo de agregar).
Nora: Este bot6n s61oaumenta el tiempo. AI alcanzar el tiempo m6ximo, si presiona el
bot6n de nuevo se reconfigura el contador en la configuraci6n m6s baja.
3. Seleccione Tamp (Temperatura).
4. Cierre la puerta.
5. Presione Start/Pause (Inicio/Pausa).
Ajustes de control.
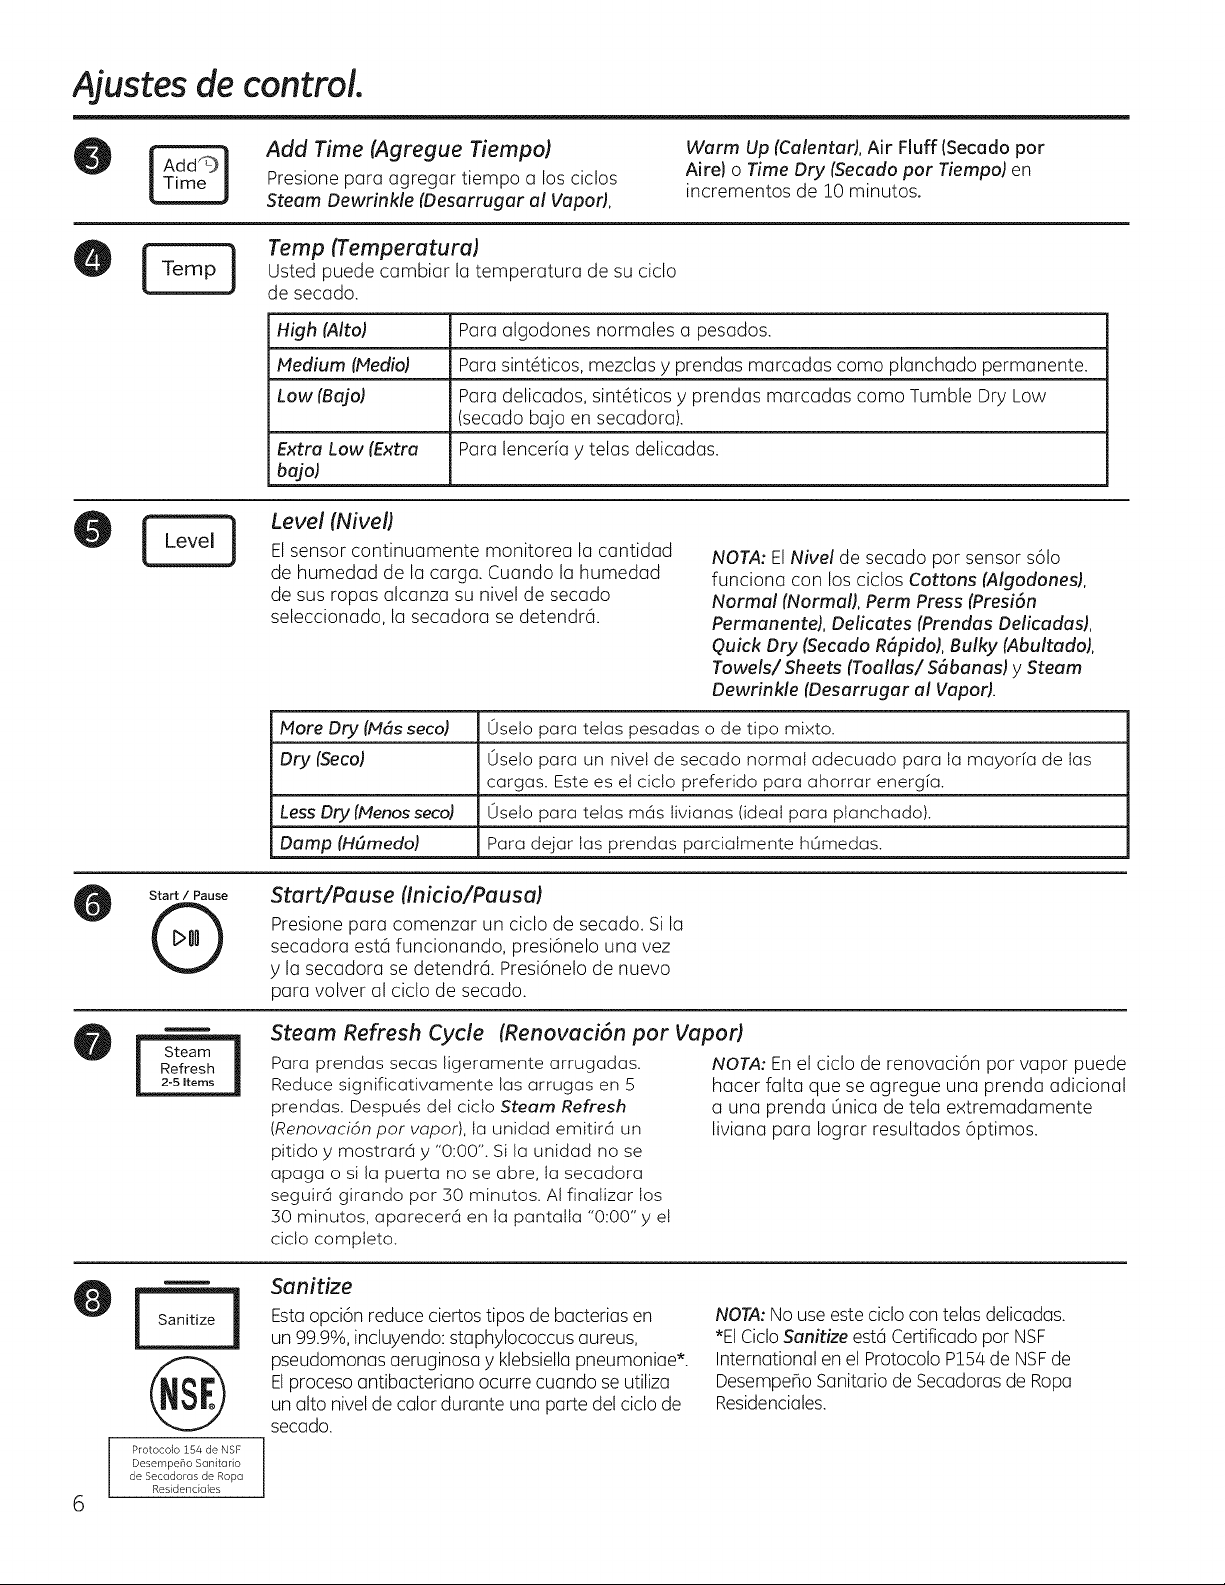
Add Time (Agregue Tiempo) Warm Up (Calentafi, Air Fluff (Secado por
Presione para agregar tiempo a los ciclos Aire) o Time Dry (Secado por Tiempo) en
Steam Dewrinkle (Desarrugar al Vapor), incrementos de !0 minutos.
Temp (Temperatura)
Usted puede cambiar la temperatura de su ciclo
de secado.
High (Alto) Para algodones normales a pesados.
Medium (Medio) Para sint6ticos, mezclas y prendas marcadas como planchado permanente.
Low (Bajo) Para delicados, sint6ticos y prendas marcadas como Tumble Dry Low
(secado bajo en secadora).
Extra Low (Extra Para lenceria y telas delicadas.
bajo)
Level (Nivel)
Start / Pause
@
Refresh
2-5 Items
l Sanitize I
Protocolo 154 de NSF
Desemper_o Sanitario
de Secadoras de Ropa
Residenciales
Elsensor continuamente monitorea la cantidad
de humedad de la carga. Cuando la humedad
de sus ropas alcanza su nivel de secado
seleccionado, la secadora se detendra.
NORA: El Nivel de secado por sensor s61o
funciona con los ciclos Cottons (Algodonesl,
Normal (Normal), Perm Press (Presi6n
Permanente), Delicates (Prendas Delicadas),
Quick Dry (Secado R(_pido),Bulky (Abultado),
Towels/Sheets (Toallas/ S6banas) y Steam
Dewrinkle (Desarrugar al Vapor).
More Dry (Mhs seco) Useto para tetas pesadas o de tipo mixto.
Dry (Seco) Uselo para un nive! de secado normal adecuado para Ia mayorfa de Ias
cargas. Este es et cic!o preferido para ahorrar energia.
Less Dry (Menos seco) 0seto para tetas m@s Iivianas (ideal para ptanchado).
Damp (Hbmedo) Para dejar Ias prendas parcialmente h0medas.
Start/Pause (Inicio/Pausa)
Presione para comenzar un ciclo de secado. Si la
secadora est6 funcionando, presi6nelo una vez
y la secadora se detendr& Presi6nelo de nuevo
para volver al ciclo de secado.
Steam Refresh Cycle
Para prendas secas ligeramente arrugadas.
Reduce significativamente las arrugas en 5
prendas. Despu_s de! cicto Steam Refresh
(Renovacidn por vapor), Ia unidad emitir@ un
pitido y mostrar@ y "0:00". Si la unidad no se
apaga o si la puerta no se abre, Ia secadora
seguira girando por 30 minutos. AI finalizar los
30 minutos, aparecer@ en Ia pantalIa "0:00" y et
cic!o completo.
(Renovaci6n por Vapor)
NORA: En el ciclo de renovaci6n por vapor puede
hacer falta que se agregue una prenda adicional
a una prenda Onica de tela extremadamente
liviana para Iograr resultados 6ptimos.
Sanitize
Estaopci6n reduce ciertos tipos de bacterias en
un 99.9%,incluyendo: staphylococcus aureus,
pseudomonas aeruginosa y klebsiella pneumoniae*.
Elproceso antibacteriano ocurre cuando se utiliza
un alto nivel de calor durante una parte del ciclo de
secado.
NORA:No use este ciclo con telas delicadas.
*El Ciclo Sanitize estc_Certificado pot NSF
International en el Protocolo P154de NSFde
Desempe_o Sanitario de Secadorasde Ropa
Residenciales.
Dry
i !
Alert
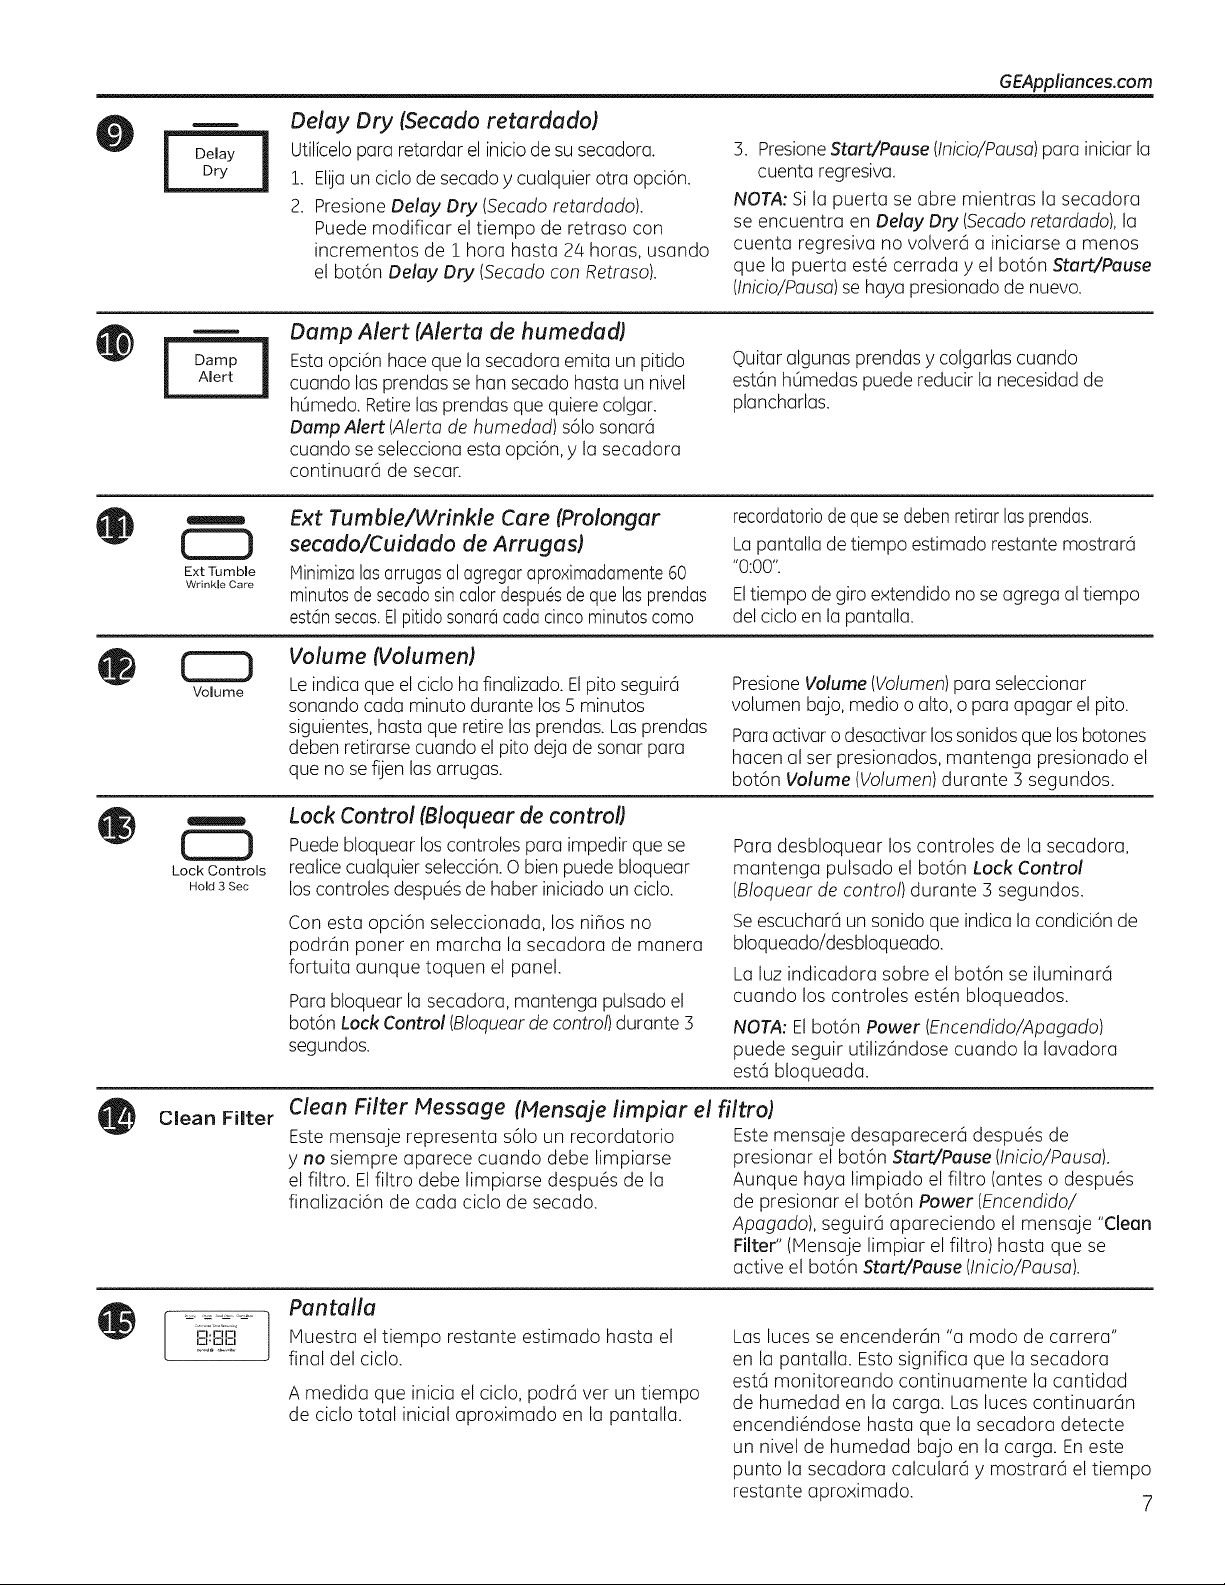
Delay Dry (Secado retardado)
utilfcelo para retardar el inicio de su secadora.
1. Elija un ciclo de secado y cualquier otra opci6n.
2. Presione Delay Dry (Secado retardodo).
Puede modificar el tiempo de retraso con
incrementos de 1 hora hasta 24 horas, usando
el bot6n Delay Dry (Secado con Retraso).
3. PresioneStart/Pause (Inicio/Pausa)para iniciar la
cuenta regresiva.
NOTA: Si la puerta se abre mientras la secadora
se encuentra en Delay Dry (Secadoretardado), la
cuenta regresiva no volver6 a iniciarse a menos
que la puerta est6 cerrada y el bot6n Start/Pause
(Inicio/Pausa)se haya presionado de nuevo.
Damp Alert (Alerta de humedad)
Estaopci6n hace que la secadora emita un pitido
cuando las prendas se han secado hasta un nivel
hOmedo.Retire las prendas que quiere colgar.
Damp Alert (Alerta de humedad) s61osonar6
cuando se selecciona esta opci6n, y la secadora
continuar6 de secar.
Quitar algunas prendas y colgarlas cuando
est6n hOmedas puede reducir la necesidad de
plancharlas.
CZD
Ext Tumble
Wrinkle Care
CD
Volume
CZ3
Lock Controls
Hold 3 Sec
Clean Filter
I-h I-I I-I
I-I' O I-I
Ext Tumble/Wrinkle Care (Prolongar
secado/Cuidado de Arrugas)
Minimizalasarrugasalagregar aproximadamente60
minutosde secadosincalor despu6sdeque lasprendas
estdnsecas.El pitidosonardcada cinco minutoscomo
Volume (Volumen)
Le indica que el ciclo ha finalizado. Elpito seguir6
sonando cada minuto durante los 5 minutos
siguientes,hasta que retire las prendas. Lasprendas
deben retirarse cuando el pito deja de sonar para
que no se fijen las arrugas.
recordatoriode quese@ben retirarlas prendas.
La pantalla de tiempo estimado restante mostrard
"0:00".
Eltiempo de giro extendido no se agrega al tiempo
del ciclo en la pantalla.
Lock Control (Bloquear de controll
puede bloquear los controles para impedir que se
realice cualquier selecci6n. O bien puede bloquear
los controles despu6s de haber iniciado un ciclo.
PresioneVolume (Volumen)para seleccionar
vohmen bajo, medio o alto, o para apagar el pito.
Paraactivar o desactivar los sonidosque losbotones
hacen al set presionados, mantenga presionado el
bot6n Volume (Volumen) durante 3 segundos.
Con esta opci6n seleccionada, los nihos no
podr6n poner en marcha la secadora de manera
fortuita aunque toquen el panel.
Para bloquear la secadora, mantenga pulsado el
bot6n Lock Control (Bloquearde control) durante 3
segundos.
Este mensaje representa s61oun recordatorio
y no siempre aparece cuando debe limpiarse
el filtro. Elfiltro debe limpiarse despu6s de la
finalizaci6n de cada ciclo de secado.
Para desbloquear los controles de la secadora,
mantenga pulsado el bot6n Lock Control
(Bloquear de control) durante 3 segundos.
Seescuchar6 un sonido que indica la condici6n de
bloqueado/desbloqueado.
La luz indicadora sobre el bot6n se iluminar6
cuando los controles est6n bloqueados.
NOTA: Elbot6n Power (Encendido/Apagado)
puede seguir utiliz6ndose cuando la lavadora
est6 bloqueada.
Clean Filter Message (Mensaje limpiar el filtro)
Este mensaje desaparecer6 despu6s de
presionar el bot6n Start/Pause (Inicio/Pausa).
Aunque haya limpiado el filtro (antes o despu6s
de presionar el bot6n Power (Encendido/
Apagado), seguir6 apareciendo el mensaje "Clean
Filter" (Mensaje limpiar el filtro) hasta que se
active el bot6n Start/Pause (Inicio/Pausa).
Pantalla
Muestra el tiempo restante estimado hasta el
final del ciclo.
A medida que inicia el ciclo, podr6 ver un tiempo
de ciclo total inicial aproximado en la pantalla.
Las luces se encender6n "a modo de carrera"
en la pantalla. Esto significa que la secadora
est6 monitoreando continuamente la cantidad
de humedad en la carga. Las luces continuar6n
encendi6ndose hasta que la secadora detecte
un nivel de humedad bajo en la carga. En este
punto la secadora calcular6 y mostrar6 el tiempo
restante aproximado. 7
C6mousar la secadora.
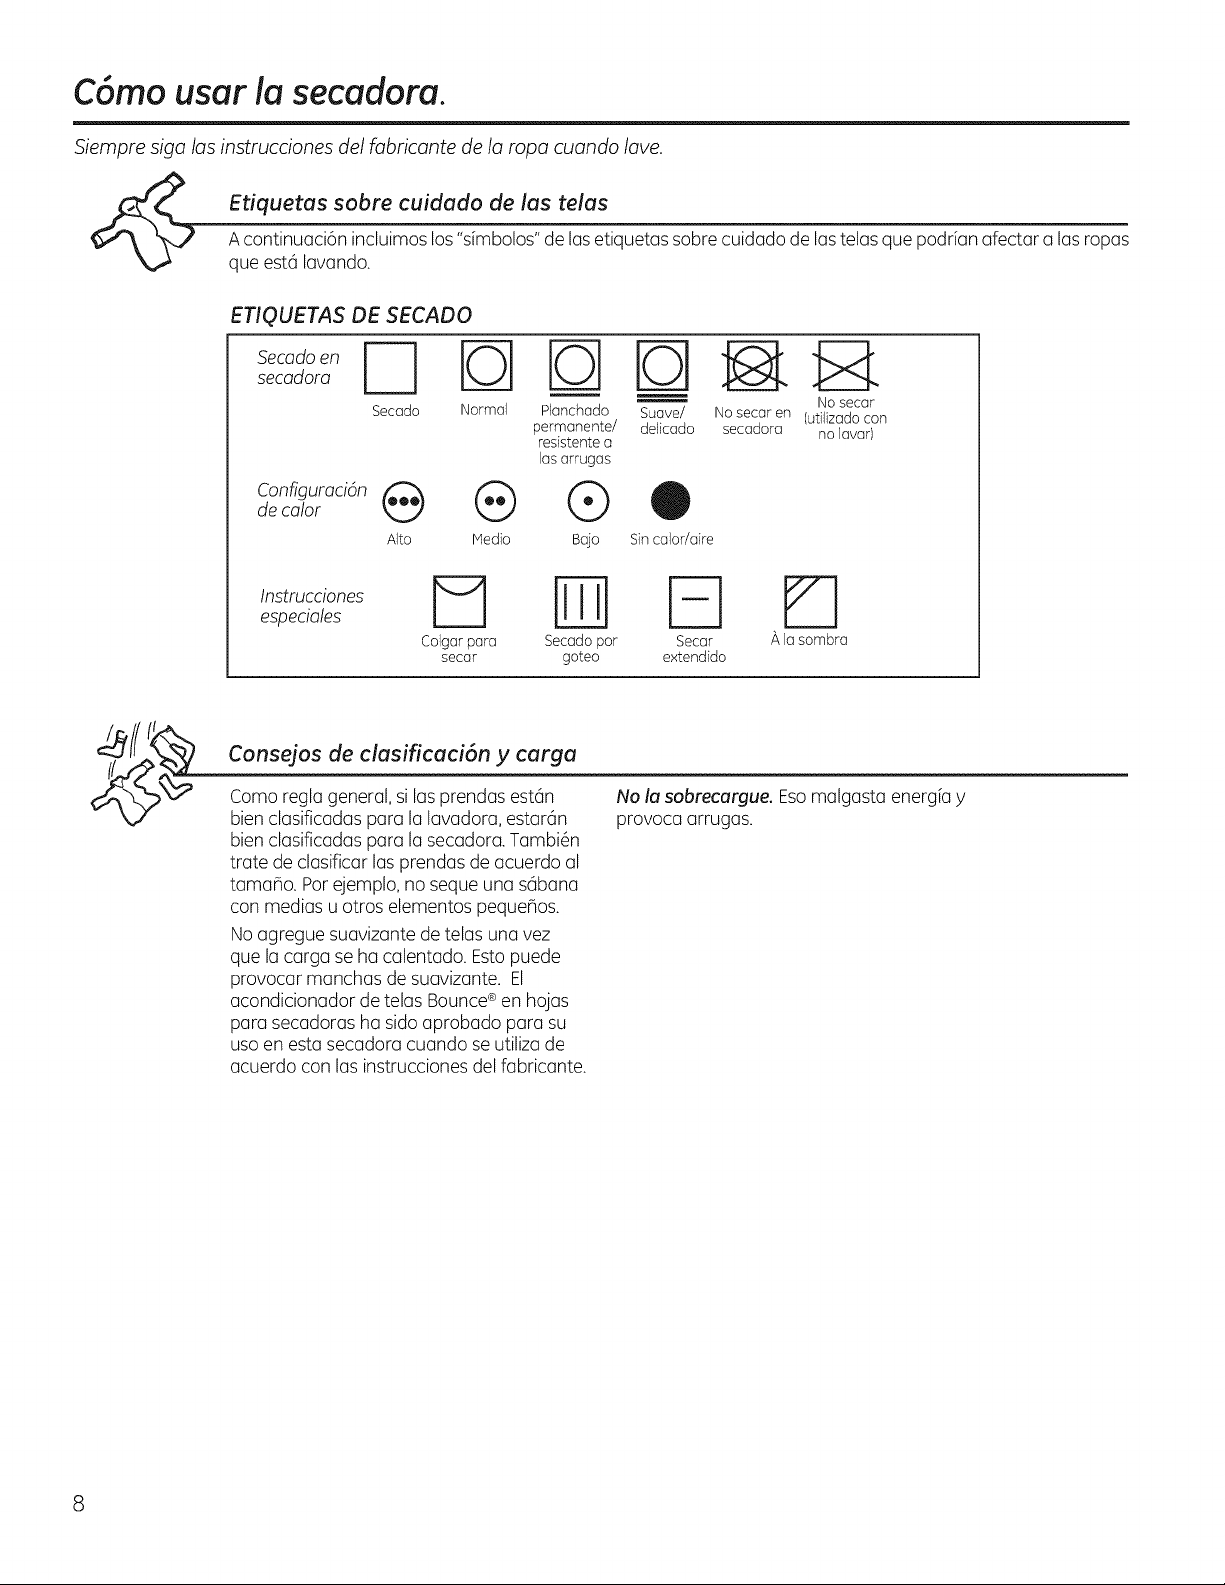
Siempre siga las instrucciones del fabricante de la ropa cuando lave.
Etiquetas sobre cuidado de las telas
Acontinuaci6n incluimos los "s[mbolos" de las etiquetas sobre cuidado de lastelas que podr[an afectar alas ropas
que est6 lavando.
ETIQUETAS DE SECADO
SseCcad°rean[_ _ r-_ r_ _
No secar
Secado Normal Planchado Suave/ No secar en (utilizado con
permanente/ delicado secadora no lavar)
resistente a
lasarrugas
Configuracian
de calor @ @
Alto Medio
®
Bajo Sin calor/aire
lenpreUciCaClieCsnes _ _]]] [_ _]
Colgar para Secado por Secar A la sombra
secar goteo e×tendido
Consejos de clasificaci6n y carga
Como regla general, si las prendas est6n
bien clasificadas para la lavadora, estar6n
bien clasificadas para la secadora. Tambi6n
trate de clasificar las prendas de acuerdo al
tamaho. Por ejemplo, no seque una s6bana
con medias u otros elementos pequeBos.
No agregue suavizante de telas una vez
que la carga se ha calentado. Estopuede
provocar manchas de suavizante. El
acondicionador de telas Bounce®en hojas
para secadoras ha sido aprobado para su
uso en esta secadora cuando se utiliza de
acuerdo con las instrucciones del fabricante.
No la sobrecargue. Esomalgasta energia y
provoca arrugas.
Cuidado y limpieza de la secadora. 6EAppliances.cam
El exterior: Pc_seleun trapo y elimine el polvo
o cualquier derrame de productos de
lavanderfa con un trapo hOmedo. Los
productos de trutamiento pura quitar mugre
y manchus podrfan dahar el panel de control
de la secadoru y afectar su apuriencia.
Aplique estos productos a cierta distancia de
la secudora. Luego las telas podrc_nlavarse y
securse normalmente. Los dahos causados a
la secadora par estos productos
no estc_ncubiertos bujo su garant[a.
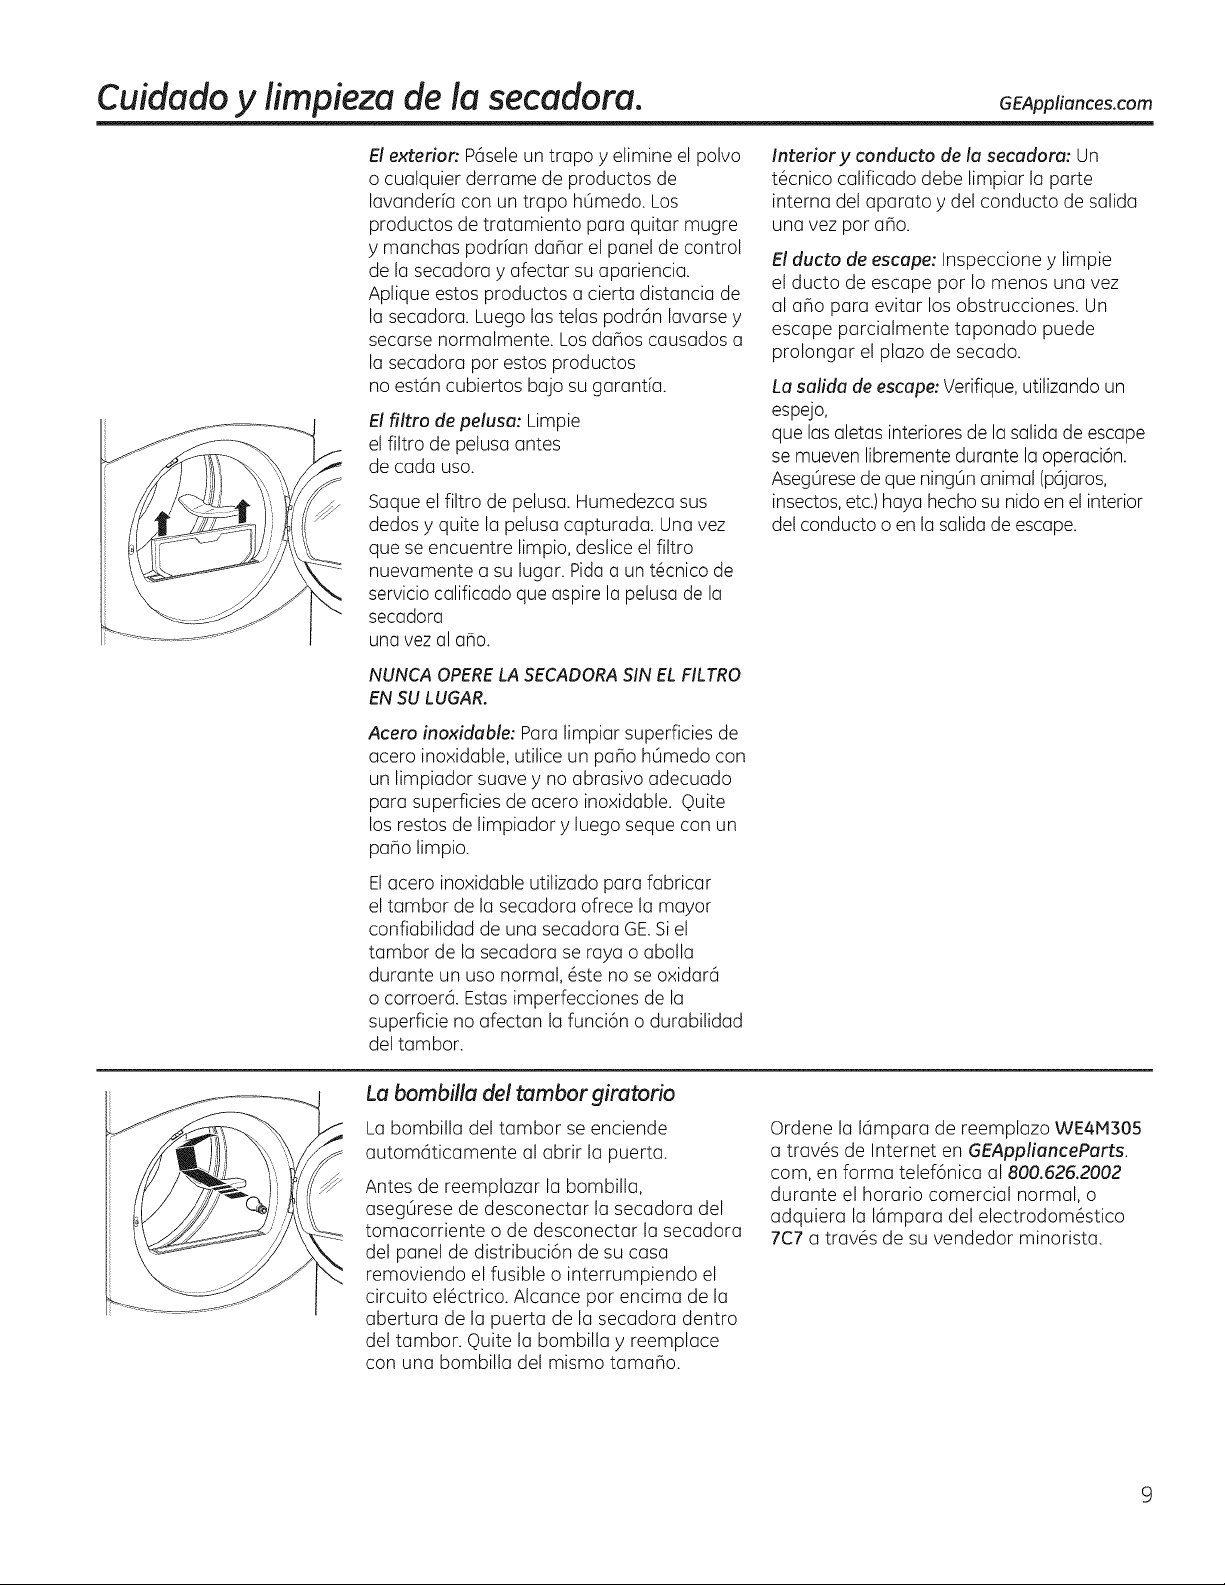
El filtro de pelusa: Limpie
el filtro de pelusa antes
de cada usa.
Saque el filtro de pelusa. Humedezca sus
dedos y quite la pelusa capturada. Una vez
que se encuentre limpio, deslice el filtro
nuevamente a su lugar. Pida a un t6cnico de
servicio calificado que aspire la pelusa de la
secadora
una vez al a_o.
NUNCA OPERE LA SECADORA SIN EL FIL TRO
EN SU LUGAR.
Acero inaxidable: Para limpiar superficies de
acero inoxidable, utilice un paho hSmedo con
un limpiador suave y no abrasivo adecuado
para superficies de acero inoxidable. Quite
los restos de limpiador y luego seque con un
paho limpio.
Elacero inoxidable utilizado para fabricar
el tambor de la secadora ofrece la mayor
confiabilidad de una secadora GE.Si el
tambor de la secadora se raya o abolla
durante un usa normal, 6ste no se oxidarc_
o corroer& Estas imperfecciones de la
superficie no afectan la funci6n o durabilidad
del tambor.
Interior y canducto de la secadara: Un
t6cnico calificado debe limpiar la parte
interna del aparato y del conducto de salida
una vez par aho.
El ducta de escape: Inspeccione y limpie
el ducto de escape par Io menos una vez
al a_o para evitar los obstrucciones. Un
escape parcialmente taponado puede
prolongar el plaza de secado.
La salida de escape: Verifique, utilizando un
espejo,
que las aletas interiores de la salida de escape
se mueven libremente durante la operaci6n.
AsegQresede que ningOnanimal (pc_jaros,
insectos,etc.) haya hecho su nido en el interior
del conducto o en la salida de escape.
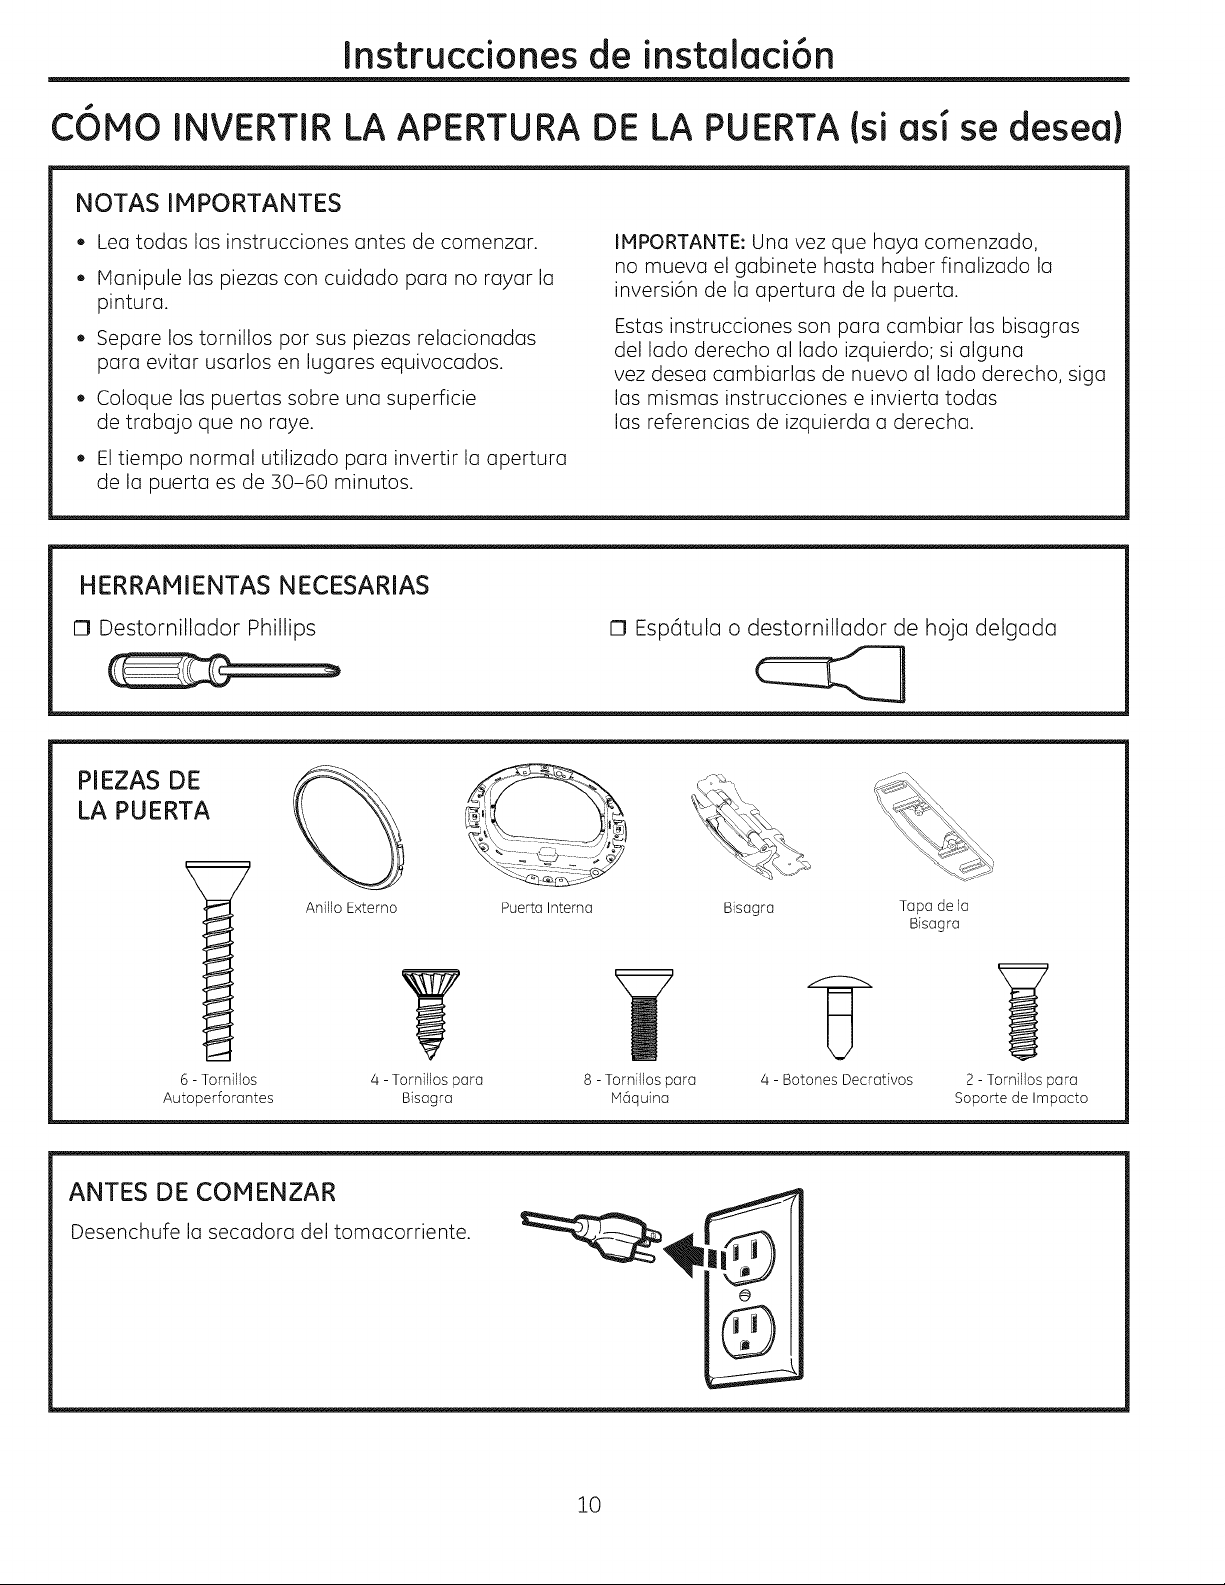
La bombilla del tambor giratorio
La bombilla del tambor se enciende
autom@icamente al abrir la puerta.
Antes de reemplazar la bombilla,
asegSrese de desconectar la secadora del
tomacorriente o de desconectar la secadora
del panel de distribuci6n de su casa
removiendo el fusible o interrumpiendo el
circuito el6ctrico. Alcance por encima de la
abertura de la puerta de la secadora dentro
del tambor. Quite la bombilla y reemplace
con una bombilla del mismo tama_o.
Ordene la Idmpara de reemplazo WE4M305
a trav6s de Internet en GEApplianceParts.
cam, en forma telef6nica al 800.525.2002
durante el horario comercial normal, o
adquiera la Idmpara del electrodom6stico
7C7 a trav6s de su vendedor minorista.
Instruccionesde instalaci6n
C6MO INVERTIR LA APERTURA DE LA PUERTA (siasise desea}
NOTAS IMPORTANTES
, Lea todas las instrucciones antes de comenzar.
, Hanipule las piezas con cuidado para no rayar la
pintura.
, Separe los tornillos por sus piezas relacionadas
para evitar usarlos en lugares equivocados.
, Coloque las puertas sobre una superficie
de trabajo que no raye.
, El tiempo normal utilizado para invertir la apertura
de la puerta es de 30-60 minutos.
IMPORTANTE: Una vez que haya comenzado,
no mueva el gabinete hasta haber finalizado la
inversi6n de la apertura de la puerta.
Estas instrucciones son para cambiar las bisagras
del lado derecho al lado izquierdo; si alguna
vez desea cambiarlas de nuevo al lado derecho, siga
las mismas instrucciones e invierta todas
las referencias de izquierda a derecha.
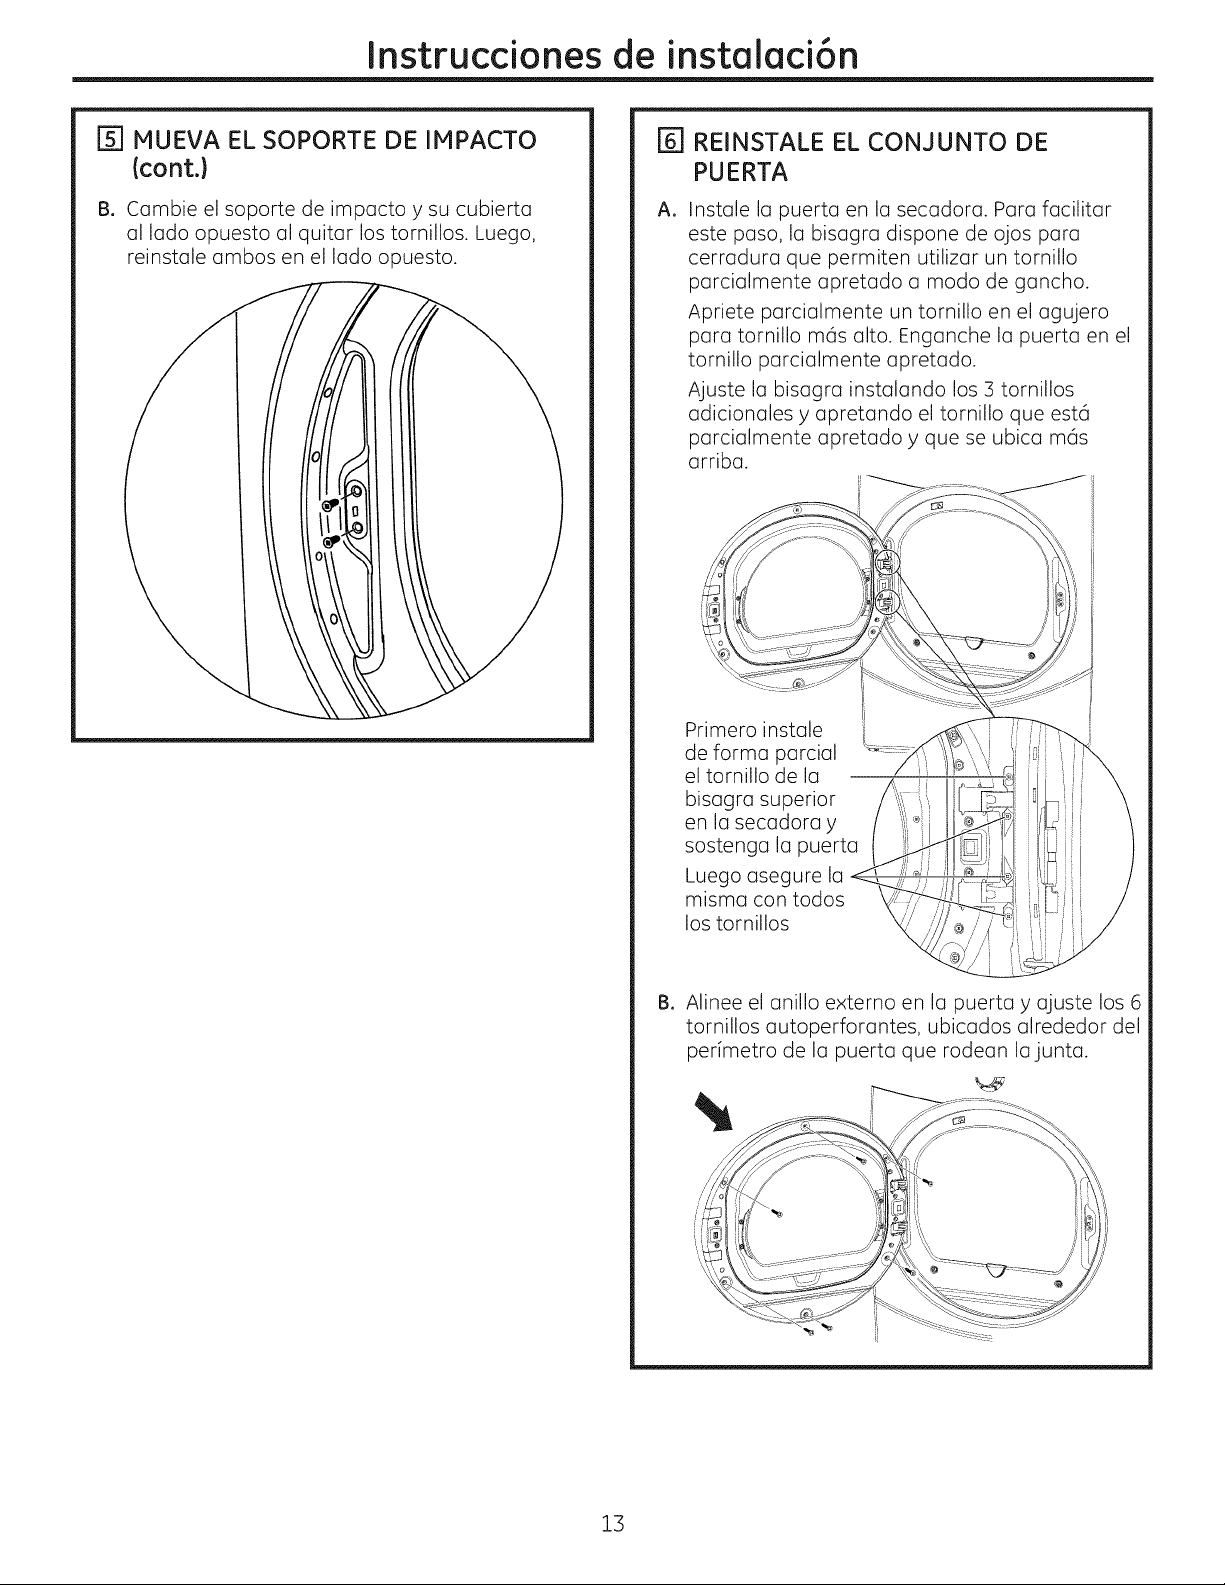
HERRAMIENTAS NECESARIAS
O Destornillador Phillips C1 Esp6tula o destornillador de hoja delgada
PIEZAS DE
LA PUERTA
6 - Tomillos
Autoperforantes
Anillo E×temo Puerta Intema
Bisagra Tapa de la
Bisagra
4 - Tornillos para 8 - Tornillos para 4 - Botones Decrativos 2 - Tornillos para
Bisagra M6quina Soporte de Impacto
ANTES DE COMENZAR
Desenchufe la secadora del tomacorriente.
10

Instruccionesde instalaci6n
[] RETIRE EL ENSAMBLE DE LA PUERTA
A. Abra la puerta 130 grados aproximadamente.
B,
Quite los 6 tornillos roscadores ubicados alrededor
del perimetro de la puerta que rodea lajunta. Retire
el anillo externo.
J
C.
Retire los 3 tornillos para bisagra comenzando
por la parte inferior y movi6ndose hacia arriba.
Aseg0rese de sostener la puerta mientras quita
los tornillos.
Luego afloje el
tornillo superior,
retire la puerta y
retire el tornillo.
retire los
tres tornillos de la
bisagra inferior.
D. Afloje el tornillo superior de la manera indicada.
Desenganche la puerta levantando y jalando.
Retire el tornillo superior.
r_ QUITE LA BISAGRA Y LA TAPA
IMPORTANTE: Observe la ubicaci6n de la bisagra
(izquierda o derecha) antes de retirar la misma.
A. Retire los 6 tornillos para m6quina de la bisagra
y los 2 tornillos para m6quina de la tapa de la
bisagra.
Tapa de
la bisagra
Bisagra
B,
Una vez que haya quitado los tornillos, gire la
puerta y separe el montaje de la puerta exterior y
la tapa de la bisagra de la puerta del armaz6n de la
puerta y coloque a un lado.
Tapa de
a bisagra
Bisagra
I'TI REINSTALE EL CON,JUNTO DE
BISAGRAS
A.
Coloque el montaje de la bisagra en el lado
opuesto de la puerta como se indica. Empuje el
montaje de la bisagra en su lugar hasta que los
orificios de la bisagra queden alineados con los
orificios de la puerta.
La bisagra se
muestra del
lado opuesto
11

C6MO
INVERTIR
Instrucciones de
LA APERTURADE
instalaci6n
LA PUERTA (si asi se desea)
_l REINSTALE EL CON.JUNTO DE
BISAGRAS (cont.)
Bo Sostenga la bisagra y d6 vuelta la puerta. Instale
la bisagra usando los 6 tornillos para m6quina
retirados previamente.
Bisagra
[] RETIREEL ENSAMBLE DE LA PUERTA
(cont.)
B. Sostenga la tapa de la bisagra y d6 vuelta la
puerta. Instale la bisagra usando los 2 tornillos
para m6quina retirados previamente.
Tapa de
la bisagra
l_l RETIRE EL ENSAMBLE DE LA PUERTA
A.
D6 vuelta la puerta y coloque la tapa de la
bisagra del lado opuesto de la puerta, como se
muestra. Alinee los agujeros de la cubierta de
bisagra con los agujeros en la puerta.
La bisagra
se muestra
del lado
opuesto
ITI MUEVA EL SOPORTE DE IMPACTO
A.
Utilizando una esp6tula u otra herramienta plana,
quite los 4 botones decrativos ubicados en la
secadora en el sitio donde se instalar6 la puerta e
inst61elosen el lado opuesto.
12
Instruccionesde instalaci6n
[_] MUEVA EL SOPORTE DE IMPACTO
(cont.)
B.
Cambie el soporte de impacto y su cubierta
al lado opuesto al quitar los tornillos. Luego,
reinstale ambos en el lado opuesto.
[5] REINSTALE EL CON JUNTO DE
PUERTA
a.
Instale la puerta en la secadora. Para facilitar
este paso, la bisagra dispone de ojos para
cerradura que permiten utilizar un tornillo
parcialmente apretado a modo de gancho.
Apriete parcialmente un tornillo en el agujero
para tornillo m6s alto. Enganche la puerta en el
tornillo parcialmente apretado.
Ajuste la bisagra instalando los 3 tornillos
adicionales y apretando el tornillo que est6
parcialmente apretado y que se ubica m6s
arriba.
Primero instale
de forma parcial
el tornillo de la
bisagra superior
en la secadora y
sostenga la puerta
Luego asegure la
misma con todos
los tornillos
Bo Alinee el anillo externo en la puerta y ajuste los 6
tornillos autoperforantes, ubicados alrededor del
perimetro de la puerta que rodean lajunta.
13

Instruccionesde instalaci6n
C6MO APILAR LA LAVADORA
ANTES DE COMENZAR
Lea detenJdamente todas Jas JnstruccJones.
. IMPORTANTE - Guarde estas
instrucciones pare uso del inspector local.
. IMPORTANTE - Cumpletodos
los c6digos y ordenanzas regulatorias.
, Note al instalador - AsegQrese de dejar
estes instrucciones al usuorio.
, Note al usuario - Guarde estas instrucciones
pare consultas futures.
. La instalaci6n debe efectuarla un instalador
calificado.
, La instalaci6n edecuada es responsebilidad
del insteledor.
, Desconecte la energia antes de instalar. No
hacerlo puede provocar una lesi6n personal
grave o la muerte.
_II_II- Riesgo de Peso Excesivo
Se deber6 contar con dos o m6s personas pare
instalar la secadora.
Si esto no se cumple, se podr6n producir lesiones
en la espalda u otras heridas.
Evite la inclinaci6n y rupture de los servicios
pQblicos. La secadora debe ester bien sujeta
ala lavadora. NO coloque la lavadora sobre
la secadora. Hacerlo puede provocar una lesi6n
personal/la muerte o da_os a la propiedad.
Instalaci6n encasas rodantes o casas
prefabricadas - No se permite apilar
una secadora a gas en cases rodantes
o cases prefabricadas.
Y LA SECADORA {siasiIodesea)
ESPACIO LIBRE MINIMO EN OTROS
ESPACIOS QUE NO SEAN INSTALACIONES
EN NICHOS 0 ARMARIOS
Los espacios libres minimos respecto de superficies
combustibles y de aberturas de aire son: 0" a ambos
lades, 3" en el frente/en la porte trasera y 1" superior.
Debe tenerse en cuenta un espacio libre adecuado
pore un funcionamiento y reparaci6n correctos.
REQUERIMIENTOS PARA INSTALACI6N
EN NICHOS 0 ARMARIOS
, Su secadora puede instalarse en un nicho o
armario, como se indica en la etiqueta de la
parte trasera del aparato.
, Esta secadora DEBE tenet una ventilaci6n el
exterior. Ver la secci6n SALIDA AL EXTERIOR
DE LA SECADORA.
Elespacio libre minimo entre el armario de la
secadora y las paredes adyacentes u otras
superficies es:
0" sobre ambos lados
3" sobre el frente y la porte tresere
12" superior
El espacio vertical mfnimo desde el piso a los
estantes superiores, gabinetes, cielorrasos, etc.,
es de 52".
, Las puertas del armario deben contar con rejillas
u otro tipo de ventilaci6n y tener por Io menos
60 pulgadas cuadradas de espacio abierto
igualmente distribuido. Si el armario incluye una
lavadora y una secadora, las puertas deben
contener un minimo de 120 pulgadas cuadradas
de espacio abierto distribuido uniformemente.
, El armario debe tener ventilaci6n hacia el
exterior para evitar la acumulaci6n de gas en
caso de que haya gas en la linea de suministro.
, No deber6n instalerse otros artefactos a
combustible en el mismo armario con la secadora
(s61o modelos a gas).
NOTA: CUANDO EL CONDUCTO DE SALIDA ESTA
UBICADO EN LA PARTETRASERA DE LA SECADORA,
EL ESPACIO LIBRE MiNIP10 DESDE LA PARED DEBE
SER 5.5 PULGADAS.
KIT DE APILADO DE GE:
Ordene hey a trav6s de Internet en GEAppliancesparts.com,
las 24 horas del d[a o en forma telef6nica Ilamando al
800.626.2002, durante el horario comercial habitual.
N6mero de Pieza
GEFLSTACK
Accesorio
Kit Complete de Apilado
14
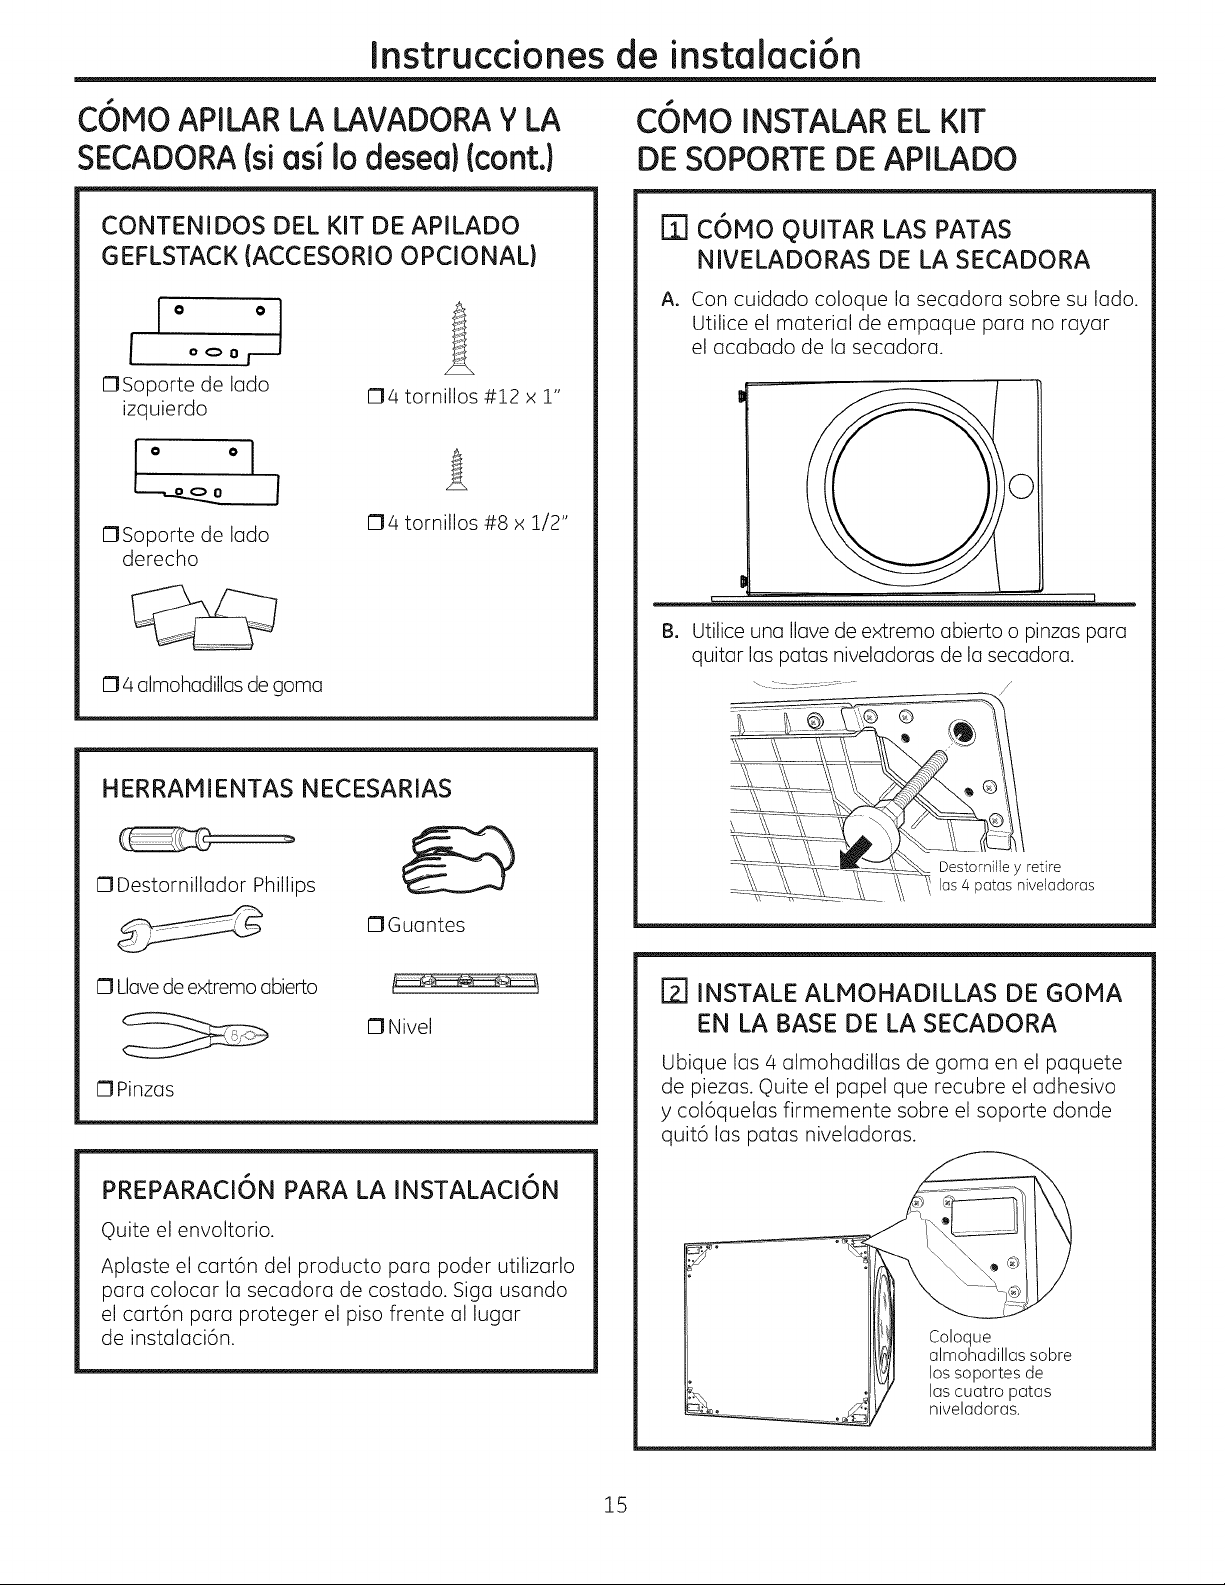
Instruccionesde instalaci6n
COMO APILARLA LAVADORA V LA
SECADORA (siosiIodeseo)(cont.)
CONTENIDOS DEL KIT DE APILADO
GEFLSTACK (ACCESORIO OPCIONAL)
,o ol A
l ° ° e l---
OSoporte de lado
04 tornillos #12 x 1"
izquierdo
17Soporte de lado
derecho
04 tornillos #8 x Z/2"
04 almohadillas de goma
HERRAHIENTAS NECESARIAS
17Destornillador Phillips I__
17Gua ntes
17Llave de extremo abierto
17Nivel
17Pinzas
PREPARACION PARA LA INSTALACION
Quite el envoltorio.
Aplaste el cart6n del producto para poder utilizarlo
para colocar la secadora de costado. Siga usando
el cart6n para proteger el piso frente al lugar
de instalaci6n.
C6MOINSTALAR EL KIT
DE SOPORTE DE APILADO
FTIC6MO QUITAR LAS PATAS
NIVELADORAS DE LA SECADORA
A. Con cuidado coloque la secadora sobre su lado.
Utilice el material de empaque para no rayar
el acabado de la secadora.
B. Utilice una Ilave de extremo abierto o pinzas para
quitar las patas niveladoras de la secadora.
Destornille y retire
las 4 patas niveladoras
[E] INSTALE ALMOHADILLAS DE GOMA
EN LA BASE DE LA SECADORA
Ubique las 4 almohadillas de goma en el paquete
de piezas. Quite el papel que recubre el adhesivo
y col6quelas firmemente sabre el soporte donde
quit6 las patas niveladoras.
Coloque
almohadillassobre
los soportes de
las cuatro patas
niveladoras.
15
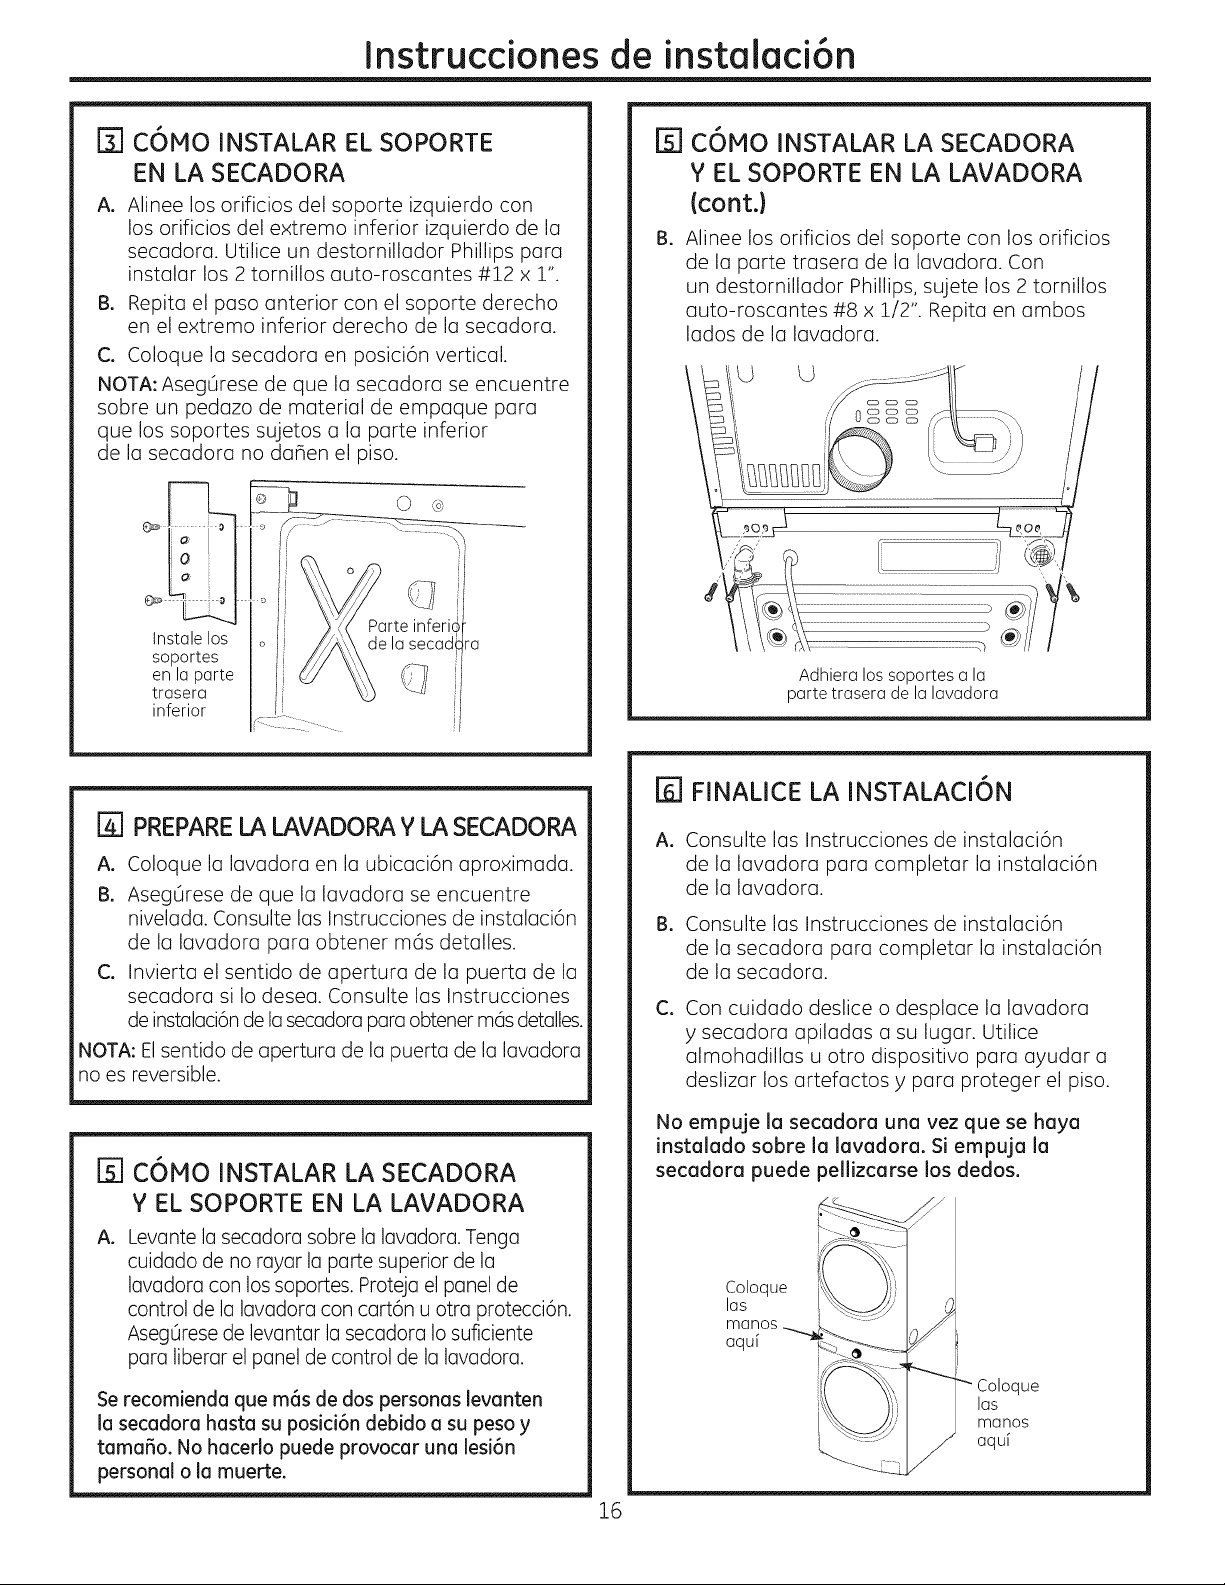
Instruccionesde instalaci6n
%
A.
B,
COMO INSTALAR EL SOPORTE
EN LA SECADORA
Alinee los orificios del soporte izquierdo con
los orificios del extremo inferior izquierdo de la
secadora. Utilice un destornillador Phillips para
instalar los 2 tornillos auto-roscantes #12 x 1".
Repita el paso anterior con el soporte derecho
en el extremo inferior derecho de Io secodoro.
C. Coloque Io secodoro en posici6n vertical.
NOTA: AsegOrese de que la secodoro se encuentre
sobre un pedazo de material de empaque para
que los soportes sujetos a la parte inferior
de la secadora no da_en el piso.
Instale los
soportes
en la parte
trasera
inferior
q
Parte inferk •
delo secad ra
_] COMO INSTALAR LA SECADORA
Y EL SOPORTE EN LA LAVADORA
Icont.}
B,
Alinee los orificios del soporte con los orificios
de la parte trasera de la lavadora. Con
un destornillador Phillips, sujete los 2 tornillos
auto-roscantes #8 x 1/2". Repita en ambos
lados de la lavadora.
Adhiera los soportes a la
parte trasera de la lavadora
I_1 PREPARELA LAVADORA Y LA SECADORA
A. Coloque la lavadora en la ubicaci6n aproximada.
B. AsegQrese de que la lavadora se encuentre
nivelada. Consulte las Instrucciones de instalaci6n
de la lavadora para obtener mds detalles.
C. Invierta el sentido de apertura de la puerta de la
secadora si Io desea. Consulte las Instrucciones
de instalaci6n de la secadora para obtener mas detalles.
NOTA: El sentido de apertura de la puerta de la lavadora
no es reversible.
B1
A.
C6MO INSTALAR LA SECADORA
V EL SOPORTE EN LA LAVADORA
Levante la secadora sobre la lavadora.Tenga
cuidado de no rayar la parte superiorde la
lavadora con los soportes.Proteja el panel de
control de la lavadora con cart6n u otra protecci6n.
Aseg0resede levantar la secadora Io suficiente
para liberar el panel de control de la lavadora.
Se recomienda que m6s de dos personas levanten
la secadora hasta su posici6n debido a su peso y
tamaBo. No hacerlo puede provocar una lesi6n
personal o la muerte.
16
r61FINALICE LA INSTALACI6N
A. Consulte las Instrucciones de instalaci6n
de la lavadora para completar la instalaci6n
de la lavadora.
B. Consulte las Instrucciones de instalaci6n
de la secadora para completar la instalaci6n
de la secadora.
C.
Con cuidado deslice o desplace la lavadora
y secadora apiladas a su lugar. Utilice
almohadillas u otro dispositivo para ayudar a
deslizar los artefactos y para proteger el piso.
No empuje la secadora una vez que se haya
instalado sobre la lavadora. Si empuja la
secadora puede pellizcarse los dedos.
llx '",
fa_ I°que i_/_ ,}
t
- fcO'Oq"e
'_,) aqanOs
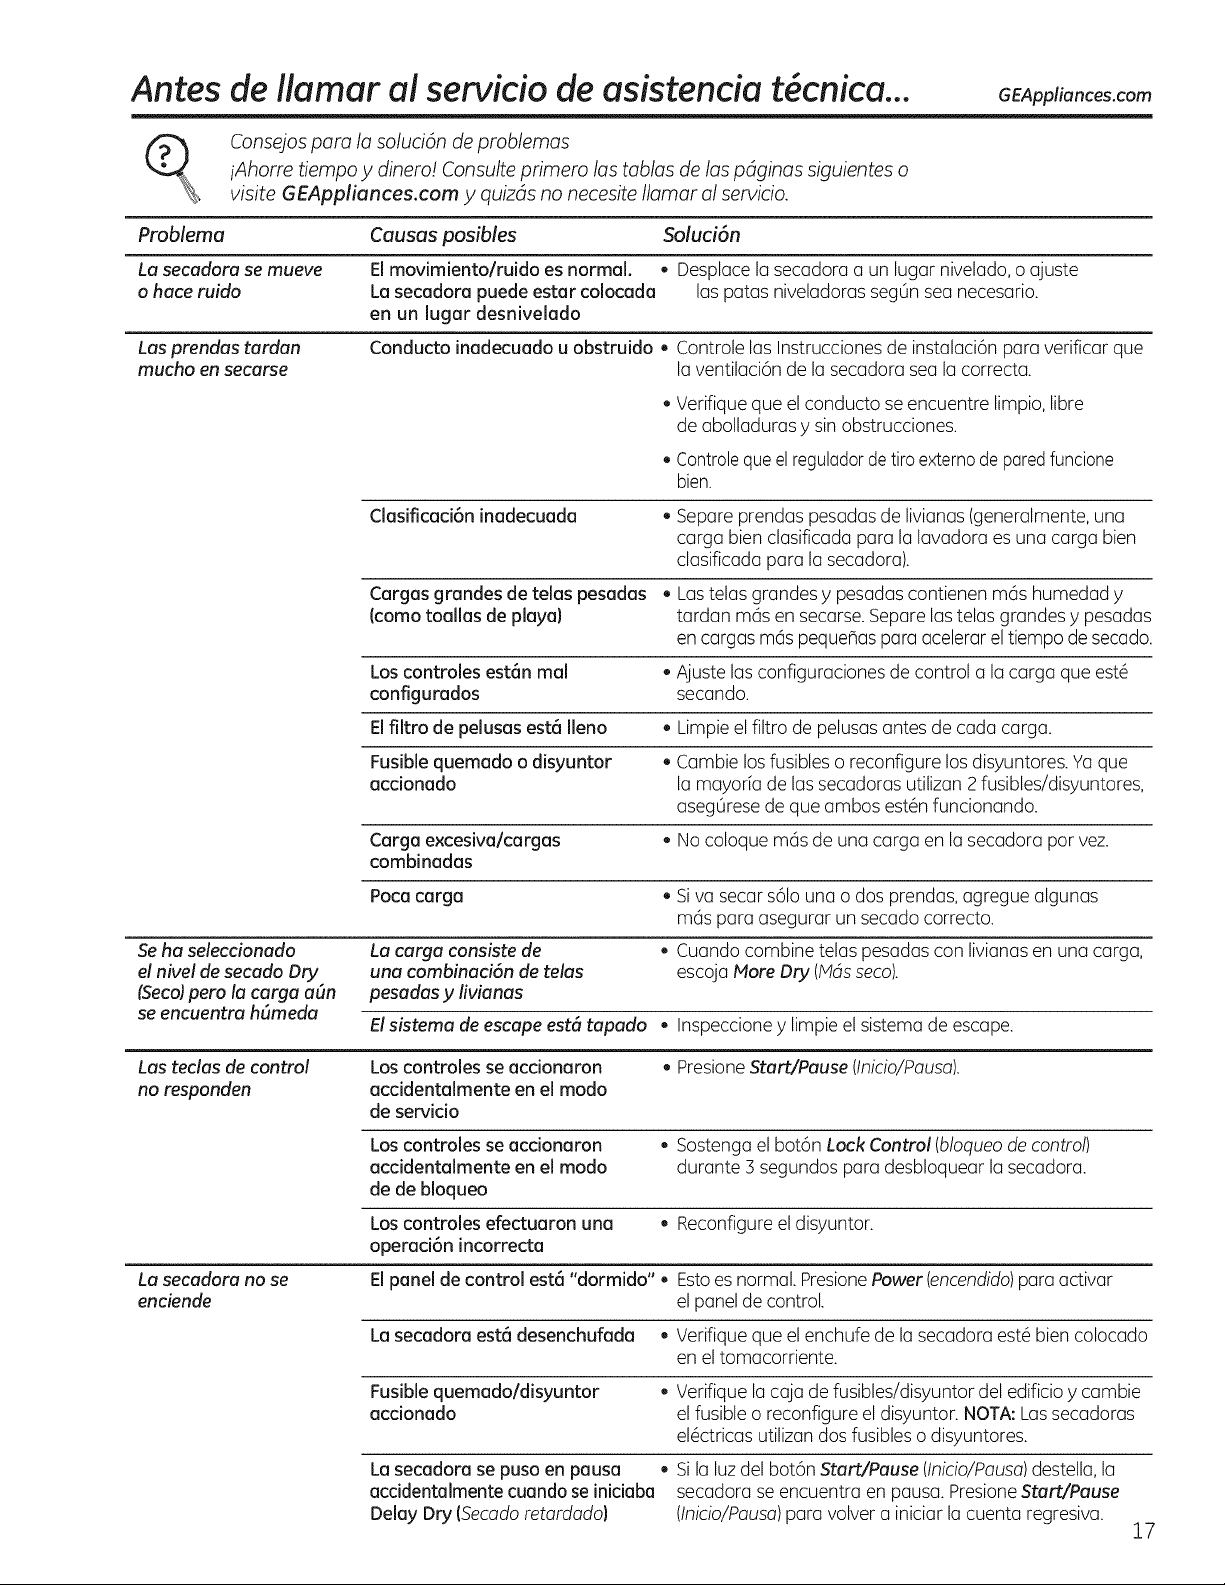
Antes de llamar a! servicio de asistencia t cnica... GEAppliancescom
@_ Consejos para la soluci6n de problemas
iAhorre tiempo y dinero! Consulte primero las tablas de las pdginas siguientes o
visite GEAppliances.com y quizds no necesite Ilamar al servicio.
Problema Causas posibles Saluci6n
La secadara se mueve El movimiento/ruido es normal. • Desplace la secadora a un lugar nivelado, o ajuste
a hace ruida La secadora puede estar colocada las patas niveladoras seg_n sea necesario.
en un lugar desnivelado
Los prendas tardan
mucho en secarse
Conducto inadecuado u obstruido, Controle las Instrucciones de instalaci6n para verificar que
la ventilaci6n de la secadora sea la correcta.
Verifique que el conducto se encuentre limpio, libre
de abolladuras y sin obstrucciones.
Controlequeel reguladorde tiro externode paredfuncione
bien.
Clasificad6n inadecuada _ Separe prendas pesadas de livianas (generalmente, una
carga bien clasificada para la lavadora es una carga bien
clasificada para la secadora).
Cargos grandes de telas pesadas _ Las telas grandes y pesadascontienen m6s humedad y
(como toallas de playa} tardan mc_sen secarse.Separe las telas grandes y pesadas
en cargos rods peque_as para acelerar eltiempo de secado.
Los controles estSn mal • Ajuste los configuraciones de control a la carga que est6
configurados secando.
Elfiltro de pelusas est6 Ileno • Limpie el filtro de pelusas antes de cada carga.
Fusible quemado o disyuntor _ Cambie los fusibles o reconfigure los disyuntores. Va que
accionado la mayorfa de las secadoras utilizan 2 fusibles/disyuntores,
asegOresede que ambos est6n funcionando.
Cargo excesiva/cargas _ No coloque mas de una carga en la secadora pot vez.
combinadas
Poca cargo _ Si va secar s61ouna o dos prendas, agregue algunas
mas para asegurar un secado correcto.
Seha seleccionado La cargo cansiste de _ Cuando combine telas pesadas con livianas en una carga,
el nivel de secado Dry una combinaci6n de telas escoja More Dry (Mdsseco).
(Seca)pera la cargo a_n pesadas y livianas
se encuentra hF_meda
Elsistema de escape est6 tapada , Inspeccione y limpie el sistema de escape.
Los teclas de control Los controles se accionaron , PresioneStart/Pause (Inicio/Pausa).
no respanden accidentalmente en el modo
de servicio
Los controles se accionaron , Sostenga el bot6n Lock Control (bloqueode control)
accidentalmente en el modo durante :3segundos para desbloquear la secadora.
de de bloqueo
Los controles efectuaron una , Reconfigure el disyuntor.
operaci6n incorrecta
La secadora no se Elpanel de control est8 "dormido", Estoes normal. PresionePower (encendido)para activar
enciende el panel de control.
La secadora est8 desenchufada _ Verifique que el enchufe de la secadora est6 bien colocado
en el tomacorriente.
Fusible quemado/disyuntor _ Verifique la caja de fusibles/disyuntor del edificio y cambie
accionado el fusible o reconfigure el disyuntor. NOTA: Lassecadoras
el6ctricas utilizan dos fusibles o disyuntores.
La secadora se puso en pausa •
accidentalmente cuando seiniciaba
Delay Dry (Secadoretardado)
Sila luz del bot6n Start/Pause (Inicio/Pausa)destella, la
secadora se encuentra en pausa. PresioneStart/Pause
(Inicio/Pausa)para volver a iniciar la cuenta regresiva.
17
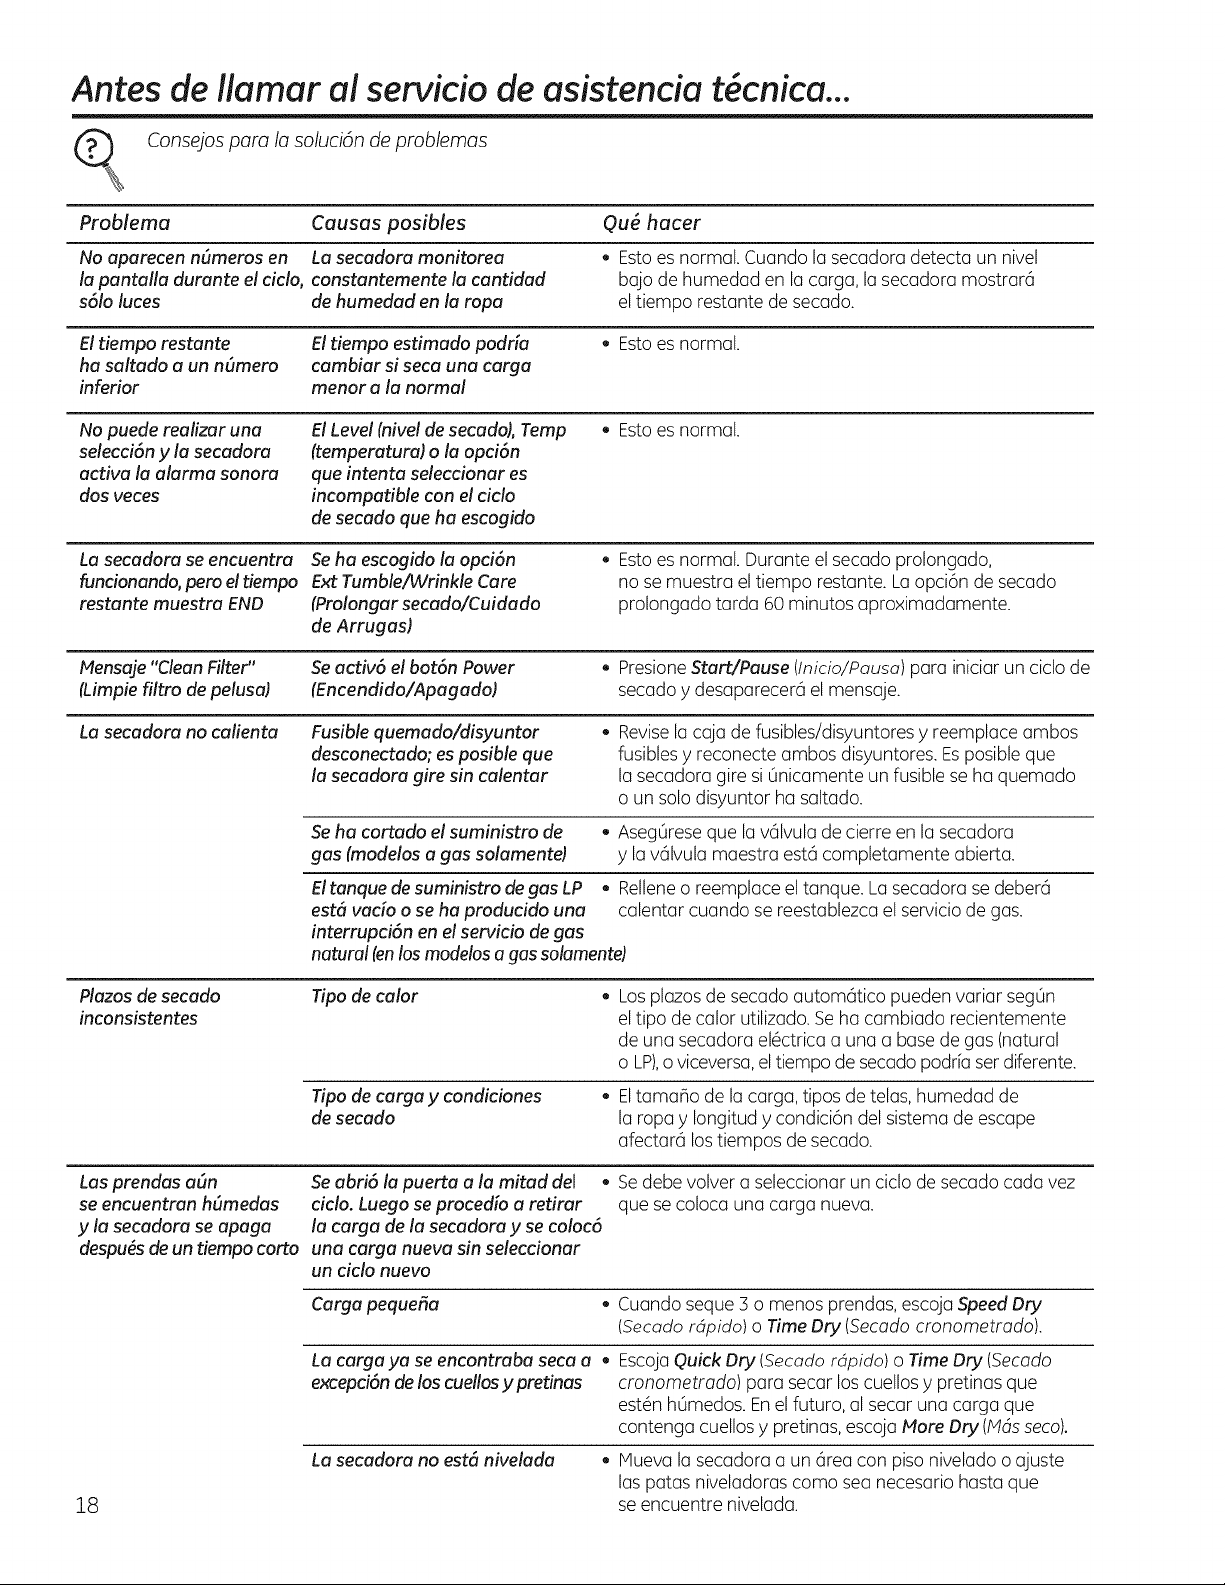
Antes de llamar al servicio de asistenciat cnica...
@_ Consejos para la soluci6n de problemas
Problema Causas posibles 9u6 hacer
No aparecen n6meras en La secadora monitarea . Esto es normal. Cuando la secaclora cletecta un nivel
la pantalla durante el cicla, canstantemente la cantidad bajo de humedad en la carga, la secadora mostrar6
s61aluces de humedad en la rapa eltiempo restante de secado.
El tiempo restante El tiempo estimado padda . Esto es normal.
ha saltada a un n6mera cambiar si seca una cargo
inferior menar a la normal
Na puede realizar una El Level (nivel de secado), Temp _ Estoes normal.
selecci6n y la secadora (temperatura) o la opci6n
activa la alarma sonora que intenta seleccionar es
dos veces incompatible can el ciclo
de secada que ha escagida
La secadora se encuentra
funcionando, pero el tiempo
restante muestra END
Se ha escogido la opci6n
Ext TumbleANrinkle Care
(Prolongar secada/Cuidada
de Arrugas)
Estoes normal. Durante el secado prolongado,
no se muestra el tiempo restante. La opci6n de secado
prolongado tarda 60 minutos aproximadamente.
Mensaje "Clean Filter"
(Limpie filtra de pelusa)
Se activ6 el bat6n Power
(Encendida/Apagada)
PresioneStart/Pause (tnicio/Pausa) para iniciar un ciclo de
secado y desaparecer4 el mensaje.
La secadora no calienta
Fusible quemado/disyuntor
desconectado; es pasible que
la secadora gire sin calentar
Revisela caja de fusibles/disyuntores y reemplace ambos
fusibles y reconecte ambos disyuntores. Esposible que
la secadora gire si 0nicamente un fusible se ha quemado
o un solo disyuntor ha saltado.
Se ha cortado el suministro de
gas (madelas a gas salamente)
. Aseg@eseque la v61vulade cierre en la secadora
y lav61vula maestra est6 completamente abierta.
Eltanque de suministro de gas LP . Relleneo reemplace el tanque. Lasecadora se deber6
est6 vado a se ha praducida una calentar cuando se reestablezca el servicio de gas.
interrupci6n en el servicia de gas
natural (en los modelos a gas solamente)
Plazas de secado
inconsistentes
Tipa de color Los plazos de secado autom6tico pueden variar seg0n
eltipo de calor utilizado. Seha cambiado recientemente
de una secadora el6ctrica a una a base de gas (natural
o LP),o viceversa,eltiempo de secado podria ser diferente.
Tipo de cargo y condicianes
de secada
Eltamaho de la carga, tipos de telas, humedad de
la ropa y Iongitud y condici6n del sistema de escape
afectard los tiempos de secado.
Las prendas a6n
se encuentran h6medas
y la secadora se apaga
despu6s de un tiempo corto
Se abfi6 la puerto a la mitad del .
ciclo. Luego se procedfo a retirar
la cargo de la secadora y se coloc6
una carga nueva sin seleccionar
un ciclo nuevo
Sedebe volver a seleccionar un ciclo de secado cada vez
que se coloca una carga nueva.
18
Cargapequefia . Cuando seque 3 o menos prendas, escoja SpeedDry
(Secado rdpido) o Time Dry (Secado cronometrado).
La cargo ya se encantraba seca a ,
excepci6n de los cuellos y pretinas
La secadara no est6 nivelada .
EscojaQuick Dry (Secado rdpido) o Time Dry (Secado
cronometrado) para secar los cuellos y pretinas que
est6n h0medos. Enel futuro, al secar una carga que
contenga cuellosy pretinas, escoja Mare Dry (Mdsseco).
iVluevala secadora a un 6rea con piso nivelado o ajuste
los patas niveladoras como sea necesario hasta que
se encuentre nivelada.
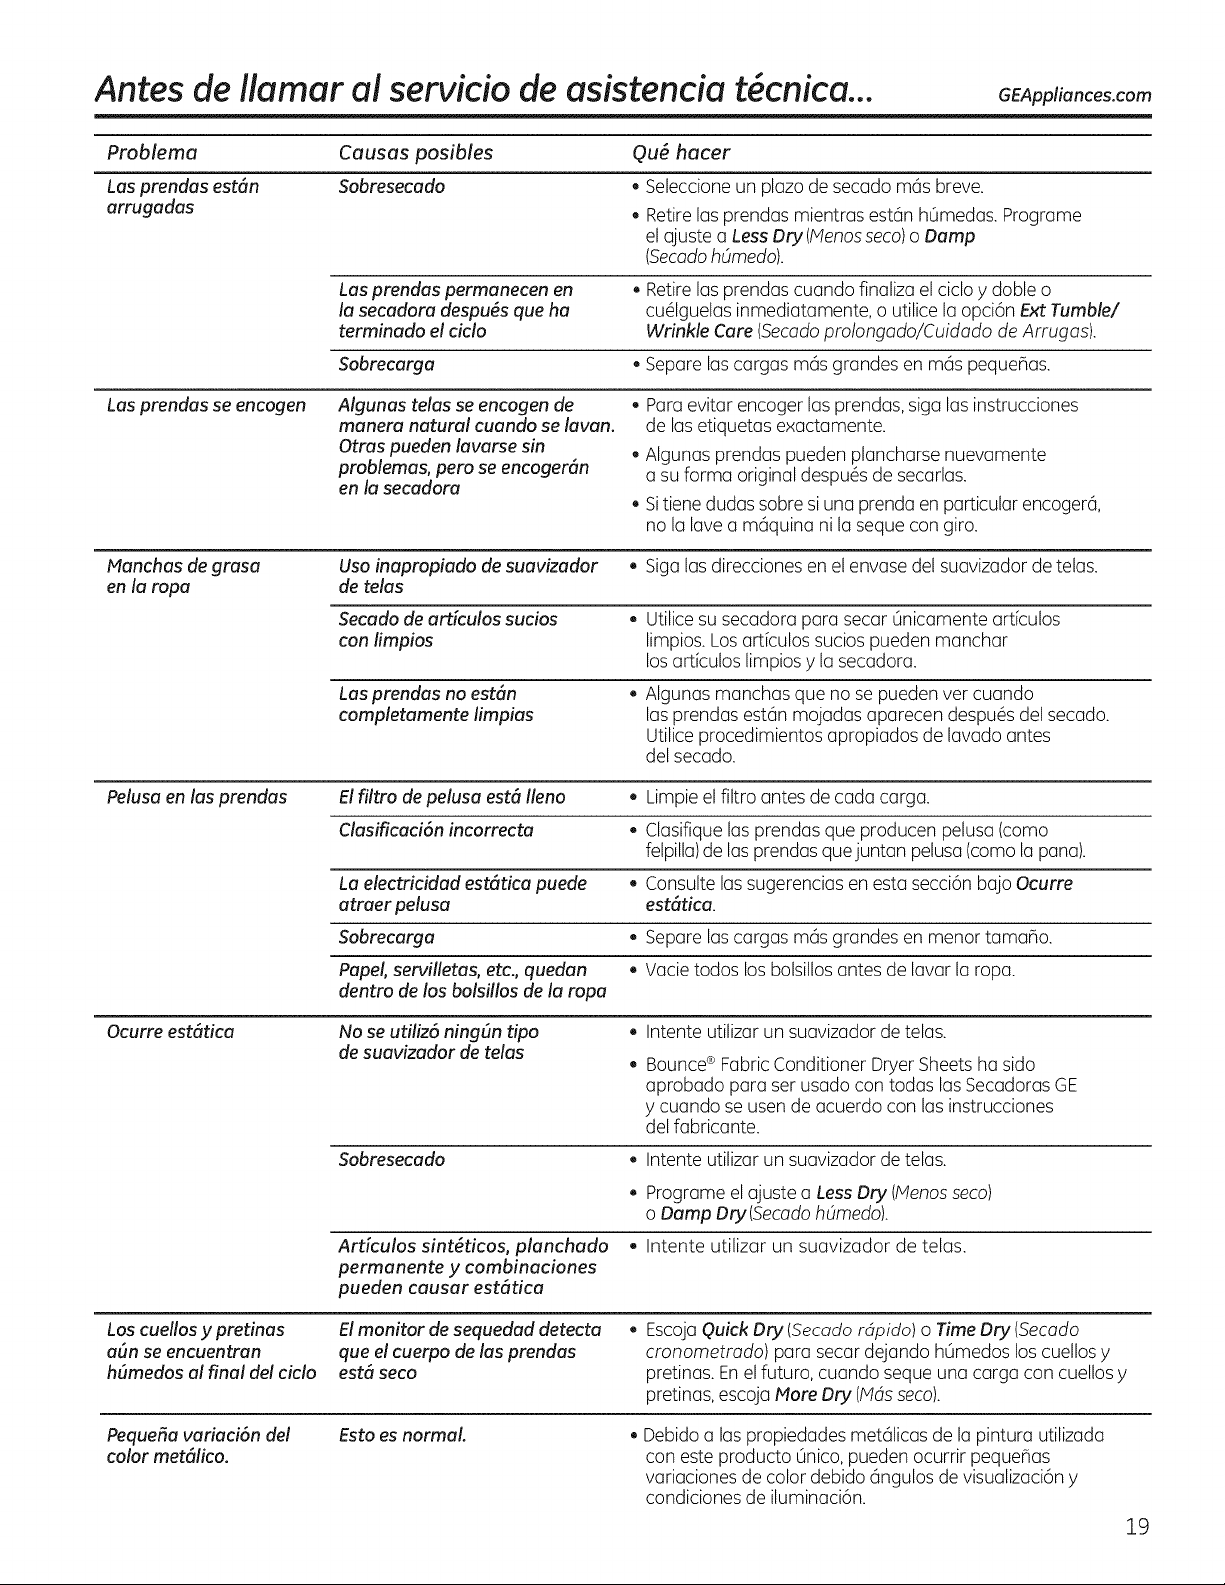
Antes de llamar a! servicio de asistenciat cnica... GEAppliancescom
Problema Causas posibles Ou_ hacer
Las prendas est6n Sobresecado _ Seleccioneun plazo de secado rnc_sbreve.
arrugadas _ Retirelas prendas rnientras est6n h_medas. Programe
el ajuste a Less Dry(Menos seco)o Damp
(Secadohdmedo).
Las prendas permanecen en _ Retirelas prendas cuando finaliza el ciclo y doble o
la secadora despu6s que ha cu61guelasinrnediatamente, o utilice la opci6n Ext Tumble/
terminado el ciclo Wrinkle Care (Secadoprolongado/Cuidado de Armgas).
Sobrecarga _Separe las cargas mas grandes en mas peque_as.
Las prendas se encogen Algunas telas se encagen de _ Para evitar encoger las prendas, siga las instrucciones
manera natural cuando se lavan, de las etiquetas exactarnente.
Otras pueden lavarse sin _ Algunas prendas pueden plancharse nuevarnente
problemas, pero se encoger6n a su forrna original despu6s de secarlas.
en la secadora
Sitiene dudas sobre si una prenda en particular encogera,
no la lave a maquina ni la seque con giro.
Nanchas de grasa Usa inapropiado de suavizador _ Siga las direcciones en el envase del suavizador de telas.
en la ropa de telas
Secado de ardculos sucios _ Utilice su secadora para secar Qnicamente articulos
con limpios limpios. Los articulos sucios pueden manchar
los articulos limpios y la secadora.
Las prendas no est6n _ Algunas rnanchas que no se pueden vet cuando
completamente limpias las prendas estc_nmojadas aparecen despu6s del secado.
Utilice procedimientos apropiados de lavado antes
del secado.
Pelusa en las prendas El filtro depelusa est6 Ileno • Limpie el filtro antes de cada carga.
Clasificaci6n incorrecta _ Clasifique las prendas que producen pelusa (corno
felpilla)de las prendas quejuntan pelusa (como la pana).
La electricidad est6tica puede • Consulte las sugerencias en esta secci6n bajo Ocurre
atraer pelusa est6tica.
Sobrecarga _ Separe las cargas mas grandes en menor tama_o.
Papel, servilletas, etc., quedan _ Vacie todos los bolsillosantes de lavar la ropa.
dentro de los bolsillos de la ropa
Ocurre est6tica No se utiliz6 ning_n tipo _ Intente utilizar un suavizador de telas.
de suavizador de telas
e
Bounce® FabricConditioner Dryer Sheetsha sido
aprobado para ser usado con todas las Secadoras GE
y cuando se usen de acuerdo con las instrucciones
del fabricante.
Sobresecado Intente utilizar un suavizador de telas,
Ardculos sint6ticos, planchado
permanente y combinaciones
pueden causar est6tica
Programe elajuste a LessDry (Menosseco)
o Damp Dry (SecadohOmedo).
Intente utilizar un suavizador de telas.
Los cuellos y pretinas
a(m se encuentran
hSmedos al final del ciclo
El monitor de sequedad detecta
que el cuerpo de las prendas
est6 seco
EscojaQuick Dry (Secado rdpido) o TimeDry (Secado
cronometrado) para secar dejando h6medos los cuellos y
pretinas. En el futuro, cuando seque una carga con cuellos y
pretinas, escoja More Dry (Mds seco).
Pequefia variaci6n del
color met61ico.
Esto es normal
Debido a las propiedades met61icasde la pintura utilizada
con este producto Onico,pueden ocurrir peque_as
variaciones de color debido angulos de visualizaci6ny
condiciones de iluminaci6n.
19
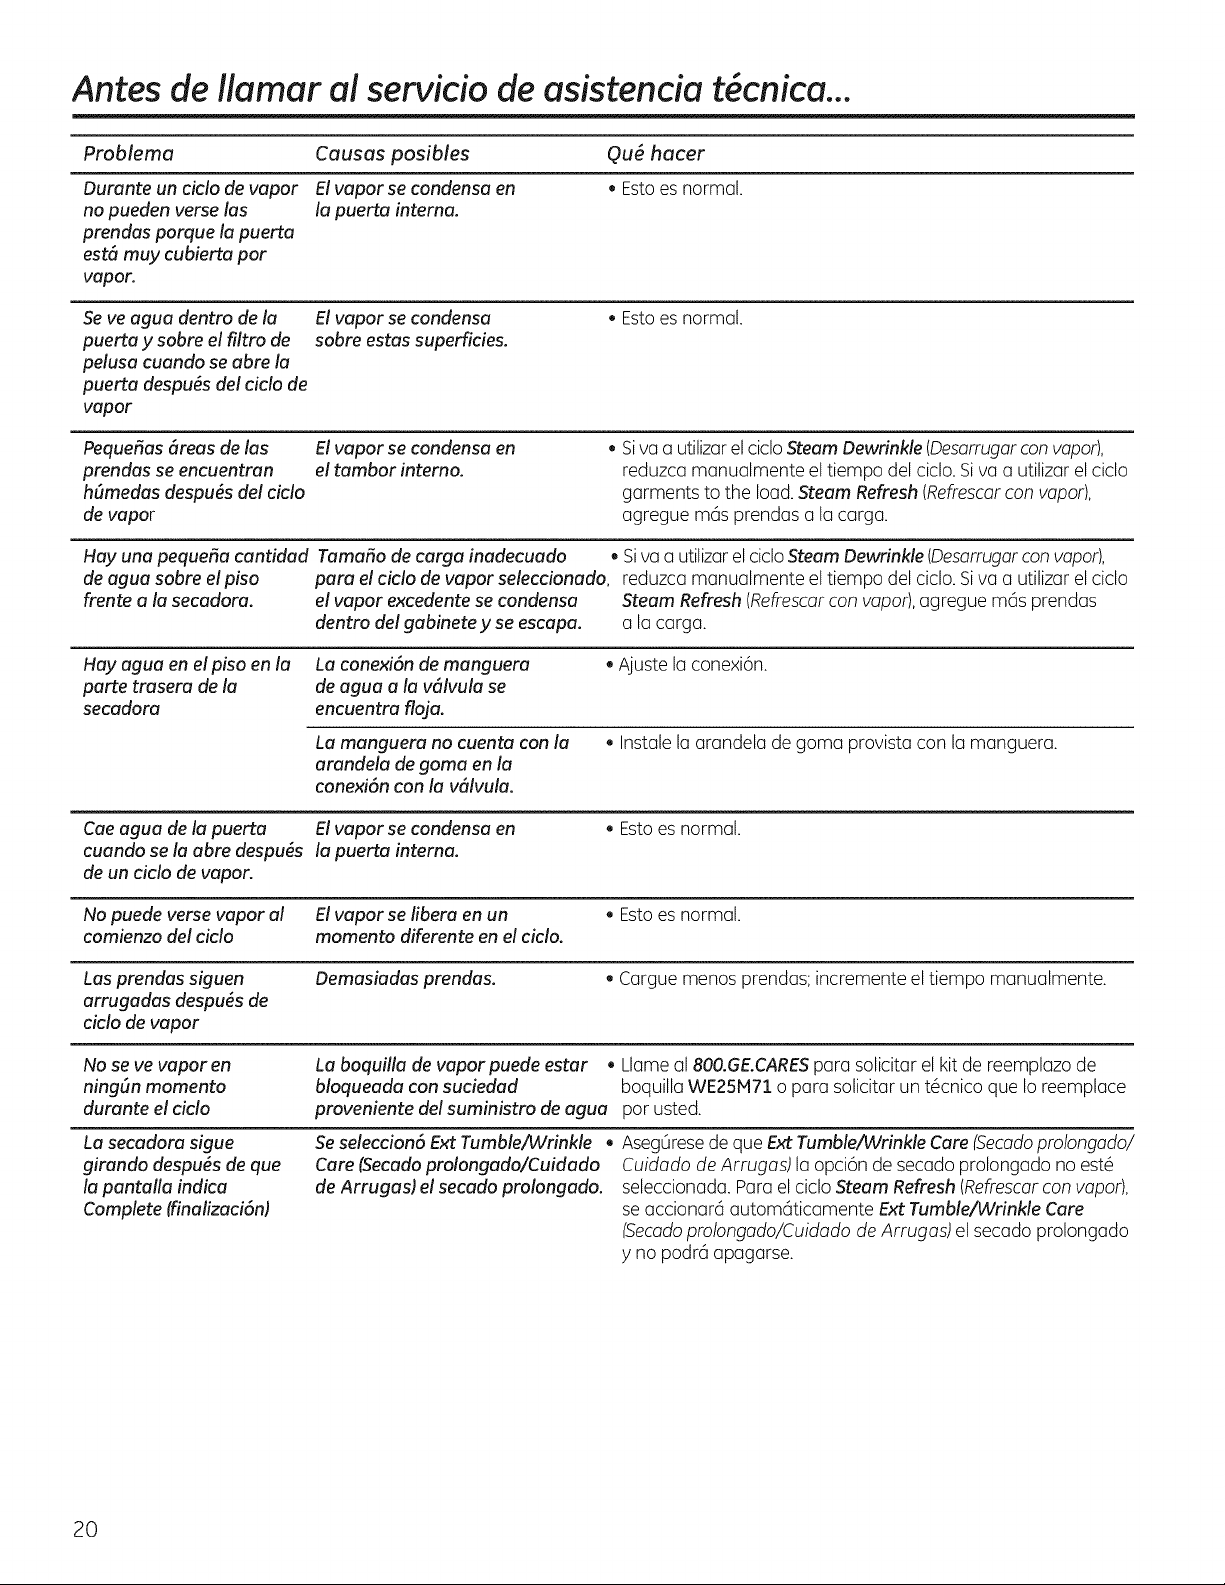
Antes de llamar al servicio de asistencia t cnica...
Problema Causas posibles Qu6 hacer
Ourante un ciclo de vapor El vapor se candensa en . Esto es normal.
no pueden verse las la puerta interna.
prendas porque la puerta
est6 muy cubierta par
vapor.
Seve agua dentro de la
puerta y sabre el filtro de
pelusa cuando se abre la
puerta despu#s del ciclo de
vapor
Peque_as 6reas de las
prendas se encuentran
h(lmedas despu6s del cicla
de vapor
El vapor se condense
sabre estas superficies.
El vapor se condensa en
el tambor interna.
. Estoes normal.
Siva a utilizarel ciclo Steam Dewrinkle (Desarrugarcon vapor),
reduzca manualmente el tiempo del ciclo. Siva a utilizar el ciclo
garments to the load.Steam Refresh (Refrescarcon vapor),
agregue mas prendas ala carga.
Hay una peque_a cantidad Tama_a de carga inadecuado . Si va a utilizar el ciclo Steam Dewrinkle (Desarrugar con vapor),
de agua sabre el piso para el cicla de vapor seleccionada, reduzca manualmente el tiempo del ciclo. Siva a utilizar el ciclo
frente ala secadora, el vapor excedente se condensa Steam Refresh (Refrescar con vapor), agregue mas prendas
dentra del gabinete y se escape, ala carga.
Hay ague en el piso en la La conexi6n de manguera
parte trasera de la de ague a la v61vula se
secadora encuentra floja.
• Ajuste la conexion.
La manguera no cuenta con la
arandela de goma en la
conexi6n con la v61vula.
. Instale la arandela de goma provista con la manguera.
Cae ague de la puerta El vapor se candensa en
cuando se la abre despu_s la puerta interna.
de un ciclo de vapor.
. Estoes normal.
No puede verse vapor el
comienzo del cicla
El vapor se libera en un
momenta diferente en el cicla.
. Estoes normal.
Las prendas siguen
arrugadas despu_s de
cicla de vapor
Demasiadas prendas. . Cargue menos prendas; incremente el tiempo manualmente.
No se ve vapor en
ning(ln momenta
durante el cicla
La boquilla de vaporpuede estar . Llame a1800.GE.CARESpara solicitar el kit de reemplazo de
bloqueada con suciedad boquilla WE25M71 opara solicitar un t6cnico que Io reemplace
praveniente del suministra de agua par usted.
La secadora sigue
girando despu6s de que
la pantafla indica
Complete (finalizaci6n)
Se seleccion6 E×tTumble/Wrinkle .
Care (Secado prolongado/Cuidado
de Arrugas) el secado pralongado.
Aseg0rese de que Ext Tumble/Wrinkle Care (Secado prolongado/
Cuidado de Arrugas) la opci6n de secado prolongado no est6
seleccionada. Para el ciclo Steam Refresh (Refrescar con vapor),
se accionarc_ autom@icamente E×t Tumble/Wrinkle Care
(Secado prolongado/Cuidado de Arrugas) el secado prolongado
y no padre apagarse.
20
Garantia de la secadora GE. GEAppliances.com
Todos los servicios de garantia se ofrecen a trav6s de nuestros centros
de asistencia t6cnica o un t6cnico autorizado de Customer Care ®.
Pare programar servicio de asistencia t6cnica, en linea, visite la p6gina
GEAppliances.com o Ilame a1800.GE.CARES(1.800.432.2737). Cuando
Ilame pare solicitar servicio, par favor tenga a mano el n0mero de serie y
el n0mero de modulo.
Engrape el recibo aqu[,
Se necesita el comprobante
con la fecha de compra
original para que la garant[a
cubra los servicios.
Se sustituir(7:
unu_o Cualquierpieza de la secadora qua falle debido a un defecto de los materiales omano
Desde la fechu de de obru. Durante esta garantia limitada de un aria, GE tambi_n ofrece, en farina gratuita,
compra original toda la mano de obra y los costos de servicio para reemplazar la pieza defectuosa.
[] Visitas a su hogar para enseSarle a usar el producto. [] Dafios incidentales o resultantes provocados par posibles
defectos en este artefacto.
[] Instalaci6n, entrega o mantenimiento inadecuados.
[]
[] Fallas del producto debido a abuso, usa indebido, usa
diferente pare el que fue disefiado, o usa comerdal. []
[] Recombio de la bombille de luz despu_s de su vida
Otil esperada. []
[] Reemplazo de fusibles dom6sticos o la reconfiguraci6n
de los interruptores de circuito. []
[] Dafios al producto provocados par accidentes, incendios,
inundaciones o fuerza mayor.
Dafios provocados despu_s de laentrega.
Producto no accesible pare prestar el servicio t_cnico
solicitado.
Defectos o dafios causados par la operaci6n en
tempemturas bajo cero C.
Productos que no est6n defectuosos o dafiados o que
funcionan seg0n la descripd6n del Manual del usuario.
EXCLUSION DE GARANT[AS IMPLiCITAS--Su (1nice y exclusive derecho es la reparaci6n del producto, tel y
coma se indica en este Garantie limiteda. Cualquier garentie implicite, incluyendo las garunties implicitus
de comerciubilidad o adecuuci6n pure un fin determinudo, est_n limitedus u un aria o el periodo de tiempo
m_s breve permitido par lu lay.
Esta garant[a se extiende al comprador original y cualquier comprador posterior de productos comprados pare usa
residencial dentro des Estados Unidos. Si el producto estd situado en un drea que no dispone de servicio par parte de un
proveedor de servicio autorizado de GE, podrfa tuner qua hacerse cargo de los castes de envio o bien podrfa solicitdrsele
que Ileve el producto a una centro de servicio de GE autorizado pare realizer la reparaci6n. En Alaska, la garantia excluye
el costa de envio olas visitas de servicio a su case.
Algunos estados no permiten la exclusi6n olas limitaciones de da_os incidentales o consecuenciales. Esta garantia da
derechos legales espedficos, y usted podffa tuner otros derechos qua variardn de estado a estado. Pare saber cudles son
sus derechos legales, consulte ala oficina de asuntos del consumidor local ola oficina del Prucurador (Attorney General)
en su Iocalidad.
Garante: General Electric Company. Louisville, KY 40225
21
Soporte a! consumidor.
Pdgina Web de GEAppliances GEAppliances.com
_LTieneulguna pregunta sabre su electrodom6stico? iPruebe la pc_ginaWeb de GEAppliances, cuulquier d[a
del a_o! Paramayor conveniencia y servicio mas rc_pido,ya puede descargar los IVlanualesde los Propietarios,
pedir piezaso incluso hacer una cita en I[neapara que vengan a realizar una reparaci6n.
Solicite una reparaci6n GEAppliances.com
Elservicio de expertos GE estc_ a tan s61o un paso de su puerta, iEntre en I[nea y solicite su reparaci6n cuando
le venga cualquier d[a del aho! O Ilame al 800.GE.CARES(800.4:32.2737) durante horas normales de oficina.
RealLifeDesignStudio(Estudiodedisehoparalavidareal)GEAppliances.com
GEapoya elconcepto de DiseBo Universal-productos, servicios y ambientes que pueden usar gente de todas
las edades, tamaBos y capacidades. Reconocemos la necesidad de diseBar para una gran gama de habilidades
y dificultades fisicasy mentales. Para m6s detalles cobre las aplicaciones de GEDiseBo Universal,incluyendo
ideas de dise_o para la cocina para personas con discapacidades, mire nuestra p@ginaWeb hay mismo.
Para personas con dificultades auditivas, favor de Ilamar al 800.TDD.GEAC(800.833.4322).
Garantios ampliadas GEAppliances.com
Compre una garant[a ampliada y obtenga detalles sobre descuentos especiales disponibles mientras
su garant[a estc_aOn activa. Puede comprarla en ffnea en cualquier momento, o Ilamar a1800.626.2224
durante horas normales de oficina. GEConsumer Home Services estar_ a0n ah[ cuando su garant[a termine.
Piezas y accesorios GEAppliances.com
Aquellos individuos con la calificaci6n necesaria para reparar sus propios electrodom6sticos pueden
pedir que se les manden las piezas o accesorios directamente a sus hogares (aceptamos las tarjetas VISA,
klasterCard y Discover). Haga su pedido en ffnea hoy, 24 horas cada d[a o Ilamar por tel6fono a1800.626.2002
durante horas normales de oficina.
Las instrucciones descritas en este manual cubren los pracedimientos a seguir par cualquier usuaria.
Cualquier otra reparuci6n deberia, pot regla general, referirse a personal calificado autorizado. Debe ejercerse
precauci6n ya que las reparaciones incorrectas pueden causar condiciones de funcionamiento inseguras.
P6ngase en contacto con nosotros GEAppliances.com
Si no estc_satisfecho con el servicio que recibe de GE,p6ngase en contacto con nosotros en nuestra pc_gina Web
indicando todos los detalles as[ como su n0mero de tel_fono o escr[banos a:
General Manager, Customer Relations
GEAppliances, Appliance Park
Louisville,KY40225
l Registre su electrodom_stico GEAppliances,com
iRegistre su nuevo electradam6stica en linea-cuanda usted prefiera! Elregistrar su producto a tiempo
le proporcionarc_,si surgiera la necesidad, una mejor comunicaci6n y un servicio mc_src_pidobajo los t6rminos
de su garant[a. Tambi6n puede enviar su taffeta de registro pre-impresa que se incluye en el material
de embalaje.
22

