Loading ...
Loading ...
Loading ...
5
En
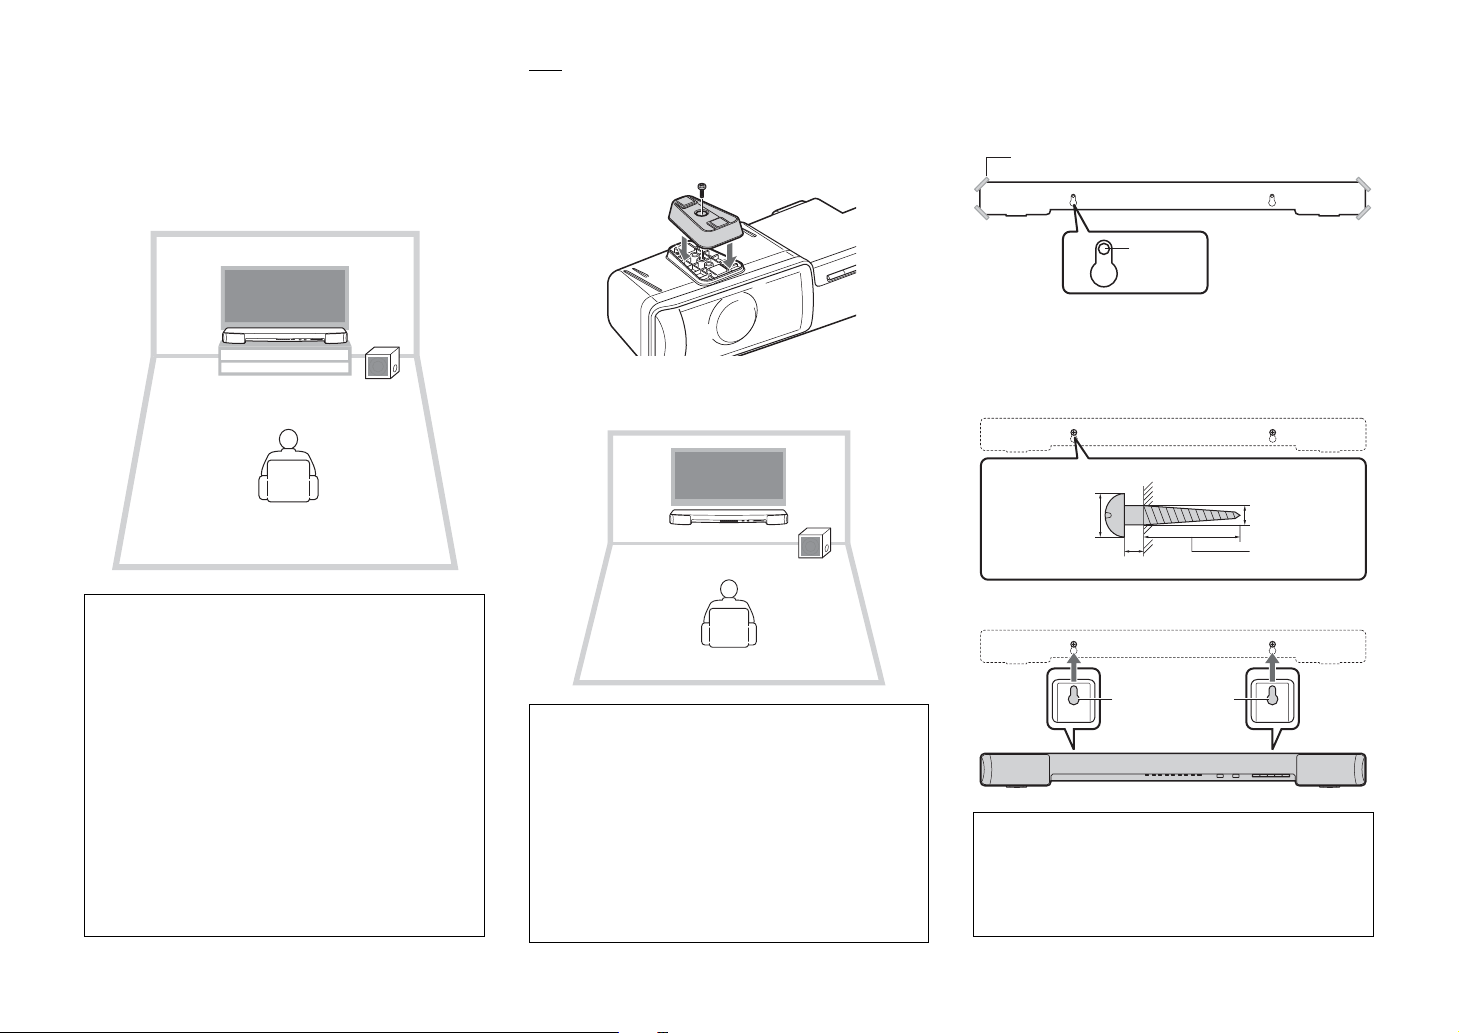
Installation
Place the sound bar on a flat surface such as on top of a
TV cabinet.
Place the subwoofer to the outside of the sound bar.
To avoid echoes from the wall, face the front side of the
subwoofer slightly inward.
HINT
• If it is difficult to operate the TV, use the TV Remote Repeater
function (p.14) to transmit the TV’s remote control signal via sound
bar.
• When placing the sound bar across the bases of the TV, or when
changing the height of the sound bar, attach the supplied stands
with the stand attachment screws.
Attaching the sound bar to a wall
How to install on the wall
1 Attach the mounting template on a wall and mark
for the screw holes.
2 Remove the mounting template from the wall,
then install commercially available screws (as
illustrated below) at the points marked on the
wall.
3 Hang the sound bar on the screws.
Cautions
• Do not stack the sound bar/subwoofer and a BD player or other
device directly on each other. Doing so may cause a malfunction
due to vibrations.
• Do not hold the speaker portion (fabric part) on the front of the
subwoofer when moving it.
• The sound bar contains non-magnetic shielding speakers. Do not
place magnetically sensitive items (hard disk drive, etc.) near the
sound bar.
• Depending on your installation environment, it may be better to
connect the sound bar and external devices (such as a TV)
before installing the sound bar.
• Do not place the sound bar within 50 mm (2") of the TV.
• The subwoofer and sound bar communicate wirelessly. Do not
place objects that block wireless signals, such as metallic
furniture and devices, between the subwoofer and sound bar as
the wireless communication may be adversely affected.
• If the subwoofer is covered with a cloth or other object, the sound
volume is reduced. Install the subwoofer so that it is not hidden
behind a thick curtain, etc.
Cautions
• When installing the sound bar on a wall, all installation work must
be performed by a qualified contractor or dealer. The customer
must never attempt to perform this installation work. Improper or
inadequate installation could cause the sound bar to fall,
resulting in personal injury.
• Do not attach the sound bar to a wall that is made of weak
materials such as plaster or veneered woods. Doing so may
cause the sound bar to fall.
• Make sure you use commercially available screws that can
support the weight of the installation (specified in Step 2 on the
right). Using clamps other than specified screws, such as short
screws, nails, and two-sided tape, may cause the sound bar to
fall.
Cautions
• Fix the cables in place where they will not become loose. If your
foot or hand accidentally gets caught on a loose cable, the sound
bar may fall.
• Check that the sound bar is fixed securely after the installation.
Yamaha will bear no responsibility for any accidents caused by
improper installations.
Tapes or thumbtacks
Mounting template (supplied)
Screw
holes
7 to 8.5 mm
(1/4" to 5/16")
3 to 4 mm (1/8" to 3/16")
4 mm (#8)
20 mm (3/4")
or more
Mounting holes
on rear of sound bar
Loading ...
Loading ...
Loading ...