User Manual for Induction Cooktop
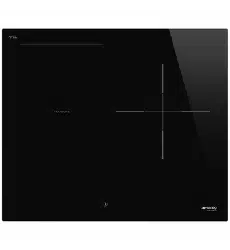
Description
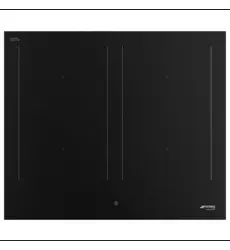
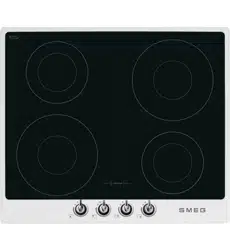
General description

Maximum absorbed power table (Watt)
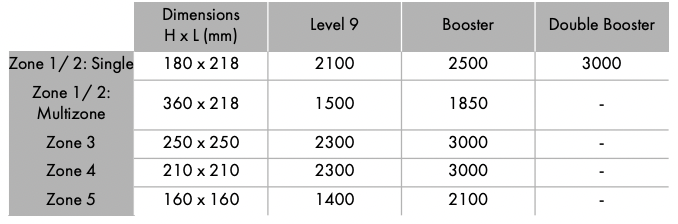
Power levels are approximate and may vary according to the pan used or the settings made
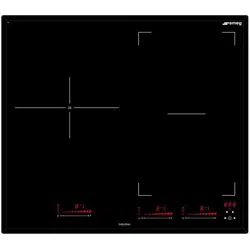
Control panel
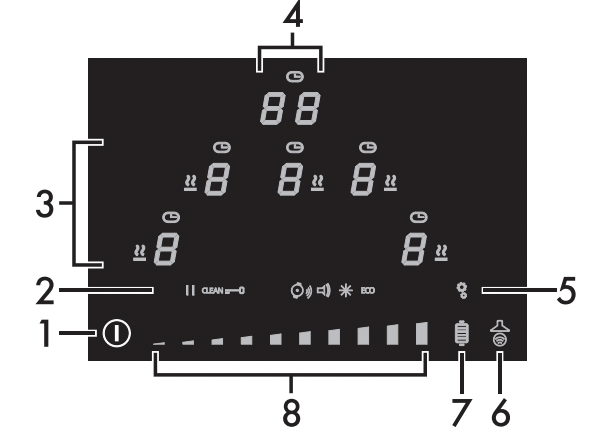
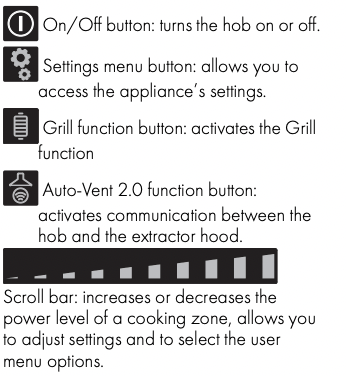
- On/Off button
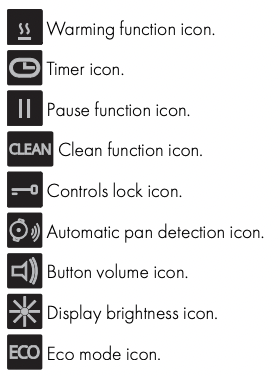
- Settings icons
- Cooking zone display
- Timer display
- Settings menu button
- Auto-Vent 2.0 function button
- Grill function button
- Scroll bar
 The number of cooking zone displays varies according to the model:
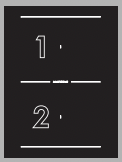
• 60 cm models: 3 displays.
• 70 cm models: 4 displays.
• 90 cm models: 5 displays.
Advantages of induction cooking
The appliance is equipped with an induction generator for each cooking zone. Each generator located under the glass ceramic cooking surface creates an electromagnetic field which induces a thermal current in the base of the pan. This means the heat is no longer transmitted from the hob to the pan but created directly inside the pan by the inductive current.
- Energy saving thanks to the direct transmission of energy to the pan suitable magnetisable cookware is required) compared to traditional electric cooking.
- Improved safety as the energy is only transmitted to the pan placed on the hob.
- High level of energy transmitted from the induction cooking zone to the base of the pan.
- Rapid heating speed.
- Reduced danger of burns as the cooking surface is only heated under the base of the pan; foods which overflow do not stick.
Power control
The hob is fitted with a power control module that optimises/limits consumption. If the overall set power level exceeds the maximum limit permitted, the electronic circuit board will automatically manage the power supplied by the hot plates. The module tries to maintain the maximum deliverable power levels. Levels set by the automatic control will appear on the display.
• Priority is given to the last zone that is set.
• The power control module does not affect the total power consumption of the appliance.
Use
Instructions
High temperature Danger of burns
- Protect your hands by wearing heatproof gloves during use.
- Do not touch or clean the hob surface during operation or when the residual heat indicator lights are still on.
- Do not put empty pans or frying pans on switched on cooking zones.
- Keep children under the age of 8 away from the appliance when it is in use.
- Activate the controls lock when you have children or pets which could reach the hob.
- After use the cooking zones remain hot for a certain period of time after they have been turned off. Do not touch the hob surfaces.
High temperature Danger of fire or explosion
- Do not use or leave flammable materials near the appliance or directly underneath the hob.
- Do not cook in closed tins or containers, plastic kitchenware or containers.
- Do not leave the appliance unattended during cooking operations where fats or oils could be released.
- In case you notice cracks or fissures or you cannot turn off the appliance, disconnect the power supply and contact the Assistance Centre.
Improper use Risk of damage to surfaces
- Do not use the hob if the pyrolytic cycle is taking place inside any oven installed below.
- Never place pans with bases which are not perfectly flat and smooth.
- Avoid hard, solid objects falling on the cooking surface.
- Do not use the hob as a support surface.
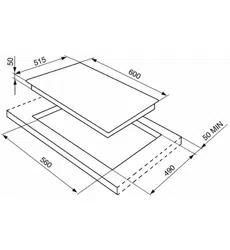
Preliminary operations
In order to remove any moisture that could have accumulated during the manufacturing process and for the electronic circuits and control keypad to work properly:
1. Remove the protective films from the external surfaces of the appliance and accessories.
2. Remove any labels (apart from the technical data plate).
Using the hob
All the appliance’s control and monitoring devices are located together on the front panel. The induction hob is controlled by means of the Touch control sensor buttons. Lightly touch a symbol on the glass ceramic surface. A beep will sound to confirm every effective touch.
Switching on the hob for the first time
When the appliance is first connected to the mains power supply, an automatic check is carried out that momentarily switches on all the indicator lights.
When the appliance is used for the first time, after having been connected to the mains the flashing  symbol appears on the display. It is used to access the appliance’s technical menu and is intended only for Technical Support personnel. Once the appliance has been switched on, the
 icon, the dimly lit
  button and the
text  will appear on the timer display
List of icons
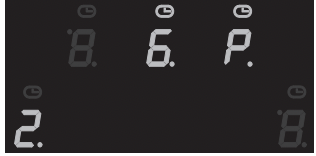
Cooking zones display

The buttons for selecting the cooking zones and the timer icons above each of them and the Warming function icon are found in this zone
Timer display
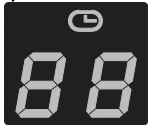
The controls for setting the independent timer and the timer for the cooking zones are located in this area. The following text is displayed when it is possible to set an independent timer
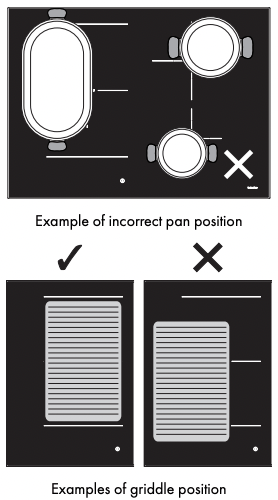
Pan diameters
Make sure that the minimum diameter of the pans is that indicated in the following table:
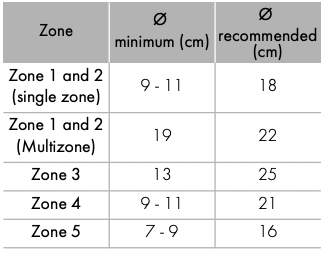
Bear in mind the following:
- Do not exceed the limits of the zones printed on the hob.
- Do not cover the control panel.
- Do not place the pans next to the edges of the glass.
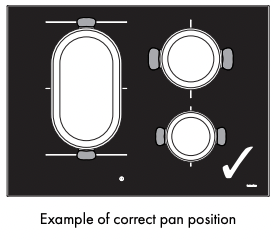
- If you intend to use a griddle or a long pan in zones 1 and 2 in Multizone mode, it is recommended to use one with a maximum size of 22 x 36 cm and a minimum size of 19 x 19 cm.
- If using a pan with smaller diameter than the smallest diameter shown in the “Ø minimum (cm)” column, it may not be detected.
Cookware suitable for use in induction cooking
Cookware used on the induction cooking surface must be made of metal, with magnetic properties and a sufficiently large base.
Suitable cookware:
- Enamelled steel cookware with thick bases.
- Cast iron cookware with an enamelled base.
- Cookware in multilayer stainless steel, ferritic stainless steel and aluminium with a special base.
Unsuitable cookware:
- Copper, stainless steel, aluminium, fireproof glass, wood, ceramic and terracotta cookware.
To see whether the pan is suitable, bring a magnet close to the bottom: if it is attracted, the pan is suitable for induction cooking. If you do not have a magnet, you can put a small amount of water in the pan, place it on a cooking zone and start the hot plate.
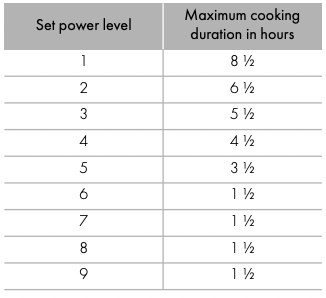
Limiting the cooking duration
The hob has an automatic device which limits the duration of use.
If the cooking zone settings are not changed, the maximum duration of operation for each zone depends on the power level selected.
When the device for limiting the duration of use is activated, the cooking zone turns off, a short alert sounds and, if the zone is hot, the residual heat symbols appear on the display.
Protection from overheating
If the hob is used on full power for a long period, the electronics will have trouble cooling down if the room temperature is high.
If the temperature of the internal electronic components exceeds the safety threshold, the appliance will switch off automatically and “ER21” will be displayed
Error codes
If the appliance malfunctions or operates incorrectly, the associated error code appears on the cooking zones display. The error codes always begin with “E..” or “Er..”, followed by a number. The following error codes can be corrected without having to contact the Technical Support Service.
- Er03: Remove any materials or pans from the area of the front control panel.
- E2: Make sure that the pans are suitable for induction cooking and that they are not empty; allow the appliance to cool down.
Advice on energy-saving
- The diameter of the base of the pan must not exceed the width of the silk-screened cooking zone.
- Pans must not be placed outside the perimeter of the hob or above the front control panel.
- When buying a pan, check whether the diameter indicated is that of the base or the top of the pan, as the top is almost always larger than the base.
- When preparing dishes with long cooking times, you can save time and energy by using a pressure cooker, which also helps to retain vitamins contained in the food.
- Make sure that the pressure cooker contains enough liquid as, if there is not enough and it overheats, this may cause damage to both the pressure cooker and the cooking zone.
- If possible, always cover saucepans with a suitable lid.
- Choose a pan suitable for the quantity of food to be cooked. A large, half-empty saucepan leads to a waste of energy
 Under certain circumstances, if the hob and the oven are being used at the same time, the maximum power limit that can be used by the electrical system might be exceeded.
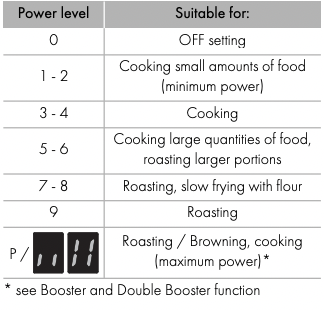
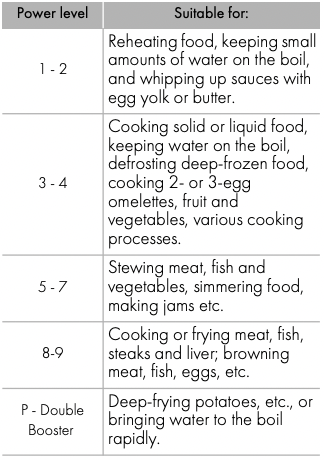
Power levels
The power in the cooking zone can be adjusted to various levels. The table shows the levels suitable for various types of cooking.
Switching the hob on and off
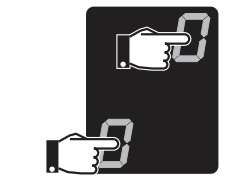
Keep the On/Off button pressed in for at least 1 second to activate the hob. Press it again for at least one second to deactivate it.
If no power value is selected within a few seconds, the hob is automatically deactivated.
- The text appears on the timer display for a few seconds, during which an independent timer can be set (see "Independent timer”).
- If a power limitation has been set, the number associated with the set power will be displayed for a few seconds instead of . In this case, you can still set an independent timer by touching the timer display
Switching on the cooking zone automatically
The hob is provided with an automatic pan sensing system, indicated by the icon. This feature is active by default, but can be disabled via the user menu.
After switching on the hob:
- Position a pan (suitable for induction cooking and not empty) on the cooking zone you wish to use.
- The button corresponding to the zone on which the pan has been placed turns on automatically and displays
 . The other zones cannot be activated.
If automatic pan detection is disabled, when the appliance is switched on, the symbol appears on the display of all the cooking zones. To activate the zones, select them via the relative display and then select the required power level.
Pan detection indication
Once a zone has been activated / selected, if the  symbol appears on the display, it means the pan is unsuitable. The symbol also appears if there is no pan or if the pan is removed.
Use only cookware with a perfectly flat bottom which is suitable for induction hot plates. Using cookware with an irregular bottom could jeopardise the efficiency of the heating system and prevent cookware from being detected on the hot plate.
Make sure that the pans do not cover the control panel.
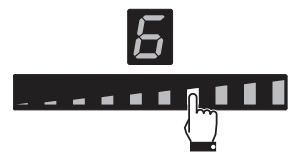
Adjusting the cooking zone
After having selected/activated a cooking zone:
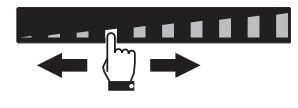
- Place a finger on the left-hand side of the scroll bar of the cooking zone to be used.
The power level is now 
2. Move your finger to the left or right on the scroll bar to select the power level, from to  or activate the Booster function (see “Booster Function”).

The display of the zone being used will indicate the selected power level.
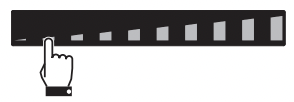
Switching off the cooking zone
1. Move your finger all the way to the left on the scroll bar of the cooking zone you wish to turn off.

The display of the zone being used indicates .
Hold the On/Off button down for at least 2 seconds to switch off all cooking zones at the same time.
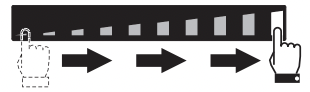
Quick selection
This function allows you to quickly set the cooking zones to the required power.
After switching on the hob and having selected a cooking zone:
1. Place a finger on the scroll bar at approximately the required power level.
2. Move your finger to the left or right to select the required cooking power.
Booster Function
Improper use Danger of burns
• Do not use the Booster and Double Booster functions to heat fats or oils as they could catch fire.
This function allows you to use the maximum available power of the cooking zone in order to bring a large amount of water to the boil rapidly.
After switching on the hob and having selected a cooking zone:
- Place a finger on the left-hand side of the scroll bar.

The display of the cooking zone used will turn on: the power value indicated is .
2. Move your finger to the far right on the scroll bar to select power level 9.
3. Press the segment at the far right of the scroll bar.
The display of the cooking zone used will show  . Select any other power level to deactivate the Booster function.
The Booster function can be activated quickly.
- After switching on the hob and having selected a cooking zone, press the last segment on the far right of the scroll bar twice.
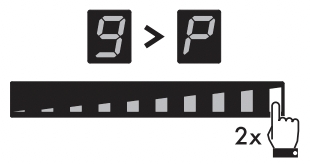
The Booster function remains active for a maximum of 5 minutes, after which the power is reduced automatically to level 9.
Double Booster Function
The Double Booster Function is available only for zones 1 and 2.
The Double Booster function allows more power to be supplied compared to the Booster function.
After having activated the Booster function for a cooking zone, press the last segment at the far right of the scroll bar. The symbols ,
,  and will be displayed in sequence.
Multizone function
This function can be used to operate two cooking zones (front and rear) when using pans like fish kettles or rectangular pans.
After switching on the hob:
1. Place a finger on the front left and rear left cooking zone buttons at the same time.
After a short beep, the symbol will appear next to the button of the rear zone. The Multizone function is now active.
The Multizone function can be activated automatically by placing a long pan on zones 1 and 2.
2. Use the left-hand scroll bar to set the required cooking power.
The same power level will be set for both cooking zones.
It is only possible to activate the Multizone function between zones 1 and 2.
• This function automatically divides the power equally between both of the hot plates in use.
• It is not possible to activate the Double Booster function for the cooking zones on which the Multizone function is active.
If a large, oval or oblong pan is being used, make sure that it is placed in the centre of the cooking zone.
To deactivate the Multizone function:
Simultaneously press the buttons of the cooking zones on which the Multizone function is active. The symbol disappears and the two zones can be regulated separately
Cooking guidelines
The table below shows the power values which can be set, together with the corresponding type of food. Settings may vary depending on the amount of food and consumer taste.
Residual heat indication
Improper use Danger of burns
• Supervise children carefully as they cannot easily see the residual heat indicator. The cooking zones remain hot for a certain period of time even after they have been turned off. Make sure that children never touch the hob.
After the cooking zone has been switched off, each display shows a special symbol to indicate whether the zone is still hot, together with its indicative temperature:
1.  if the temperature is between 60°C and 79°C.
2.  if the temperature is between 80°C and 99°C.
3.  if the temperature is 100°C or higher.
Additional functions
Rapid heating
This function is not available for power level 9 or the Booster and Double Booster functions.
The rapid heating function heats one cooking zone at maximum power for a limited time, after which it continues cooking at the set power level.
After selecting a cooking zone:
- Press and hold a power level (from 1 to 8) for at least 3 seconds.
- The
 symbol appears on the display of the cooking zone alternating with the selected power level.
- After the heating time has elapsed, the cooking zone reverts to the previously selected power level.
This function can be deactivated by selecting a different power level or by switching the zone off.
Warming Function
This function allows you to keep cooked food warm or to keep water on the boil.
To activate the Warming function, first turn on the hob, then:
- Select a cooking zone.
- Press the scroll bar between level 0 and level 1.

3. The  symbol and the
 icon appear on the cooking zone display.
To deactivate the Warming function:
1. Select the cooking zone on which the function is active.
2. Select another power level or switch off the zone.
Independent timer
• This function is used to set a countdown timer that will emit a sound at the end of the pre-set time.
• A minimum of 1 minute and a maximum of 99 minutes can be set.
After having switched on the hob, without having selected a cooking zone:
1. Touch the inside of the timer setting area, which displays “CL”.
2.  appears and the
 icon flashes on the display.
3. Select the minutes using the scroll bar (e.g . ). If no selections have been made for a few seconds, 5- minute timer can be started.
4. Once selected, the minutes digit flashes briefly and then the display allows you to select the tens of minutes (
).
5. When the digit on the left stops flashing, the tens of minutes (e.g. ) can be selected using the same procedure.
6. After a few seconds, the timer will start the countdown.
7. When the time elapses, a series of beeps will be emitted and the timer display will start to flash. Press the timer display to deactivate the buzzer.
Using the independent timer does not switch off the cooking zones, it only informs the user when the set minutes have elapsed.
Timed cooking
- This function is used to program the automatic switch-off of a cooking zone at the end of a period of time.
- A minimum of 1 minute and a maximum of 99 minutes can be set.
- Timed cooking can be activated on multiple zones at the same time.
The timed cooking function can be activated after a cooking zone has been switched on:
1. Select a power level.
2. Follow the same procedure as for an independent timer.
• The symbol appears above the cooking zone display to indicate that the zone is timed.
3. Timed cooking will start a few seconds after the last selection.
4. When the time elapses, a series of beeps will be emitted. This can be deactivated by pressing the timer area.
Modifying and deactivating the independent timer
If you modify a timer that has already been started, it has to be reset from the beginning.
1. Activate the hob using the button.
2. Press the timer display to reset the independent timer following the relative instructions (see “Independent timer”). To reset the timer, simply set both digits of the timer to zero.
Modifying and deactivating timed cooking
- Activate the hob using the button.
- Select the timed cooking zone to modify.
- Press the timer display to reset the countdown following the relative instructions (see “Independent timer”). To reset the timer, simply set both digits of the timer to zero.
Settings menu
The settings menu allows you to modify some of the operating characteristics of the appliance and allows you to With the appliance switched on, press the button to access the settings menu. The scroll bar and all the icons of the settings that can be modified appear:
Individual settings can be selected using the segment of the scroll bar that is most directly below it.
Press the button again to exit from the menu.
The and  icons refer to functions that can only be modified via the user menu.
Pause function
This function pauses the operation of all the cooking zones and the timer.
To activate the Pause function:
1. Switch on at least one cooking zone.
2. Access the settings menu.
3. Press the segment of the scroll bar below the  icon. The
 symbol appears on the cooking zone displays.
To deactivate the Pause function:
1. Access the settings menu.
2. Press the segment of the scroll bar below the icon. The symbols disappear and the appliance resumes the previous functions.
• The cooking time limitation, the residual heat indicators and the control lock function remain enabled during the Pause function.
• The pause function can be maintained for a maximum of 10 minutes, after which the appliance switches off.
• When the power comes back on after a power failure, the pause function will be deactivated.
Clean Function
Improper use Danger of burns
• When this function is active, take extra care when removing dirt if the glass surface is hot.
This function pauses the appliance for 15 seconds, during which it is possible to remove dirt or stains.
At least one cooking zone must be active in order for the Clean function to be used:
1. Access the settings menu.
2. Press the segment of the scroll bar below the icon.
icon.
3. A 15-second countdown appears on the timer display, after which the appliance resumes with the previous settings.
Controls lock
This function allows you to disable all the buttons of the appliance, except for the and buttons.
This is useful when cleaning the appliance and to prevent functions being activated by mistake.
To activate the control lock:
1. Access the settings menu.
2. Press the segment of the scroll bar below the icon. The
  symbol appears on the display of all the cooking zones.
To deactivate the control lock:
1. Access the settings menu.
2. Press the segment of the scroll bar below the icon. All the symbols disappear.
Button sound volume
Allows you to adjust the volume of the sounds associated with pressing the buttons.
- Access the settings menu.
- Press the segment of the scroll bar below the
 icon.
icon.
- Use the scroll bar to select the required volume.
Display lighting
Allows you to adjust the brightness of the displays.
- Access the settings menu.
- Press the segment of the scroll bar below the
 icon.
icon.
- Use the scroll bar to select the required level of brightness.
User menu
The user menu allows you to modify the operating characteristics of the appliance. The user menu contains 9 options that can be modified. Each option is indicated on the display with the letter “U”, which alternates with a progressive number.
Option Description
U0 Appliance power limitation (kW) - Change by the installer only
U1 Option disabled
U2 Button volume
U3 Timer alarm volume
U4 Display brightness
U5 Timer animation
U6 Automatic pan detection
U7 Timer alarm duration
U8 Hood fan configuration
U9 Auto-Vent 2.0 function
Accessing the user menu
- If the hob is off, switch it on using the On/Off button .
- Press again within 3 seconds to switch it off; the button starts to flash.
- Press and hold .
The button continues to flash when you access the user menu.
Cleaning and maintenance
Instructions
Improper use Risk of damage to surfaces
- Do not use steam jets to clean the appliance.
- Do not spill sugar or sweet mixtures on the hob during cooking.
- Do not place materials or substances that could melt (plastic or aluminium foil).
- Keep sensor buttons clean at all times and do not rest any object on them.
- Do not use cleaning products containing chlorine, ammonia or bleach on parts made of steel or that have metallic surface finishes (e.g. anodizing, nickelor chromium-plating).
- Do not use abrasive or corrosive detergents (e.g. scouring powders, stain removers and metallic sponges) on glass parts. Use wooden or plastic utensils.
Cleaning the surfaces
To keep the surfaces in good condition, they should be cleaned regularly after use. Let them cool first.
Ordinary weekly cleaning
Clean and maintain the hob once a week using an ordinary glass cleaning product. Always follow the manufacturer’s instructions. The silicon in these products creates a protective, water-repellent membrane which also resists dirt. All marks stay on the membrane and can therefore be removed easily. After cleaning, dry the surface with a clean cloth. Make sure that there is no detergent left on the cooking surface as it will undergo a corrosive reaction when heated up and could modify the structure of the cooking surface.
Food stains or residues
Light coloured marks from pans with aluminium bases can be easily cleaned off with a cloth moistened in vinegar. Remove any burnt-on residues after cooking; then rinse with water and dry thoroughly with a clean cloth. Dirt which may have fallen on the hob while cleaning lettuce or potatoes can scratch the hob when moving pans. Consequently, remove any dirt from the cooking surface immediately.
Changes in colour do not affect the operation and stability of the glass. These are not alterations to the material of the hob but just residues which have not been removed and have then carbonised.
Shiny surfaces can form due to the bases of pans, especially aluminium ones, rubbing on the surface, and due to the use of unsuitable detergents. They are difficult to remove using conventional cleaning products. It may be necessary to repeat the cleaning process several times. Use of corrosive detergents or rubbing of pan bases can wear away the decoration on the hob over time and contribute to the formation of stains
What to do if...
The hob does not work:
- Make sure that the hob is connected and that the main switch is turned on.
- Make sure that there is no power failure.
- Make sure that the fuse has not blown. In this case replace the fuse.
- Make sure that the circuit breaker of the residential electrical system has not tripped. In this case, reset the circuit breaker.
The cooking results are unsatisfactory:
- Make sure that the cooking temperature is not too high or too low.
The hob smokes:
- Let the hob cool down and clean it once cooking is complete.
- Make sure that the food has not spilled out of the pan and use a larger cooking vessel, if needed.
The fuses blow or the circuit breaker of the residential electrical system trips repeatedly.
- Call Technical Support or an electrician.
There are cracks or fissures in the hob:
- Turn off the appliance immediately, disconnect the power supply and contact Technical Support.