User Gudie KitchenAid KEMS308SSS04 Oven
Table of contents
OVEN SAFETY
- Your safety and the safety of others are very important. We have provided many important safety messages in this manual and on your appliance.
- Always read and obey all safety messages. This is the safety alert symbol. This symbol alerts you to potential hazards that can kill or hurt you and others.
- All safety messages will follow the safety alert symbol and either the word "DANGER" or "WARNING." These words mean: You can be killed or seriously injured if you don't immediately follow instructions.
IMPORTANT SAFETY INSTRUCTIONS
WARNING:
- To reduce the risk of fire, electrical shock, injury to persons, or damage when using the oven, follow basic precautions, including the following:
- Proper Installation - Be sure the oven is properly installed and grounded by a qualified technician.
- Never Use the Oven for Warming or Heating the Room.
- Do Not Leave Children Alone - Children should not be left alone or unattended in area where oven is in use. They should never be allowed to sit or stand on any part of the oven.
- Wear Proper Apparel- Loose-fitting or hanging garments should never be worn while using the oven.
- User Servicing - Do not repair or replace any part of the oven unless specifically recommended in the manual. All other servicing should be referred to a qualified technician.
- Storage in Oven - Flammable materials should not be stored in an oven.
- Do Not Use Water on Grease Fires - Smother fire or flame or use dry chemical or foam-type extinguisher.
- Use Only Dry Potholders - Moist or damp potholders on hot surfaces may result in burns from steam. Do not let potholder touch hot heating elements. Do not use a towel or other bulky cloth.
- Use Care When Opening Door - Let hot air or steam escape before removing or replacing food.
- Do Not Heat Unopened Food Containers - Build-up of pressure may cause container to burst and result in injury
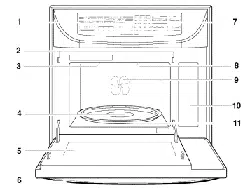
PARTS AND FEATURES
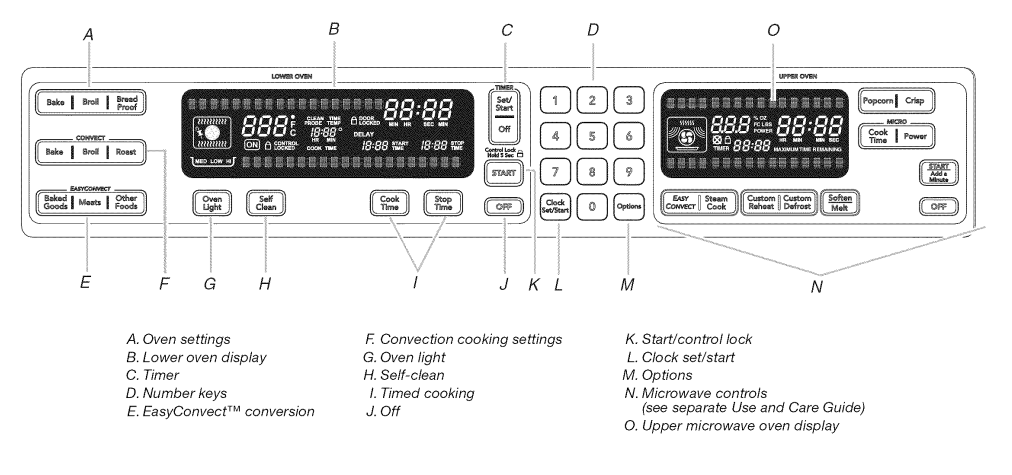
ELECTRONIC OVEN CONTROL
- This manual covers different models. The oven you have purchased may have some or all of the items listed. The locations and appearances of the items shown here may not match those of your model.
Display(s)
- When power is first supplied to the oven, the clock will be flashing the message "clock-enter time." Time can be entered by touching either CLOCK SET/START or START to allow operation.
- To allow operation without setting a time, touch
CLOCK SET/START, START or OFE
- Lower Oven Display (combination oven models)
- When the lower oven is in use, this display shows the oven temperature, heat source(s) and start time. In addition, during
- Timed Cooking, this display shows a time countdown and the stop time (if entered).
- If "Err" appears on the lower oven display, an error condition has occurred. Call for service. See the "Assistance or Service" section.
Time of Day, Timer Display
- When the lower oven is n
- Upper Microwave Oven Display combination oven models)
- When the upper microwave oven is in use, this display shows the upper oven heat source(s), cooking power, quantities, weights and/or help prompts and time countdown.
- If "Err" appears on the lower oven display, an error condition has occurred. Call for service. See the "Assistance or Service" section.
- When the upper microwave oven is not in use, this display is blank.
Start
- START key begins all oven functions except Sabbath Mode. If the
- Start key is not touched within 5 seconds after touching another key, "START?" will appear on the lower oven display as a reminder.
- Depending on your model, if the Start key is not touched within 5 minutes after touching another key, the lower oven display will return to inactive mode and the programmed function will be canceled.
OVEN USE
Tone Volume
- The volume is preset at high, but can be changed to low.
- To Change: Touch OPTIONS and then "3" to toggle volume between high and low settings.
- All Tones
- All tones are preset on, but can be turned off.
To Turn Off/On:
- Touch OPTIONS and then "2" to toggle tones between on/off settings.
End-of-Cycle and Reminder Tones
- The Timed Cooking end-of-cycle and reminder tones are preset on, but can be turned off. If all tones have been turned off, the end-of-cycle and reminder tones cannot be independently turned on.
- To Turn Tones Off/On: Touch OPTIONS and then "4" to turn On.
- Touch OPTIONS and then "4" to turn Off.
To Set:
- Touch TIMER SET/START.
- Touch again to switch between MIN/SEC and HR/MIN.
- If no action is taken, the control will continue to wait for a length of time to be entered.
- Touch the number keys to set the length of time.
- Touch TIMER SET/START.
- If the key is not touched, the control will continue to wait for
- Timer Set/Start to be touched.
- When the set time ends, if enabled, end-of-cycle tones will continuously repeat until the TIMER OFF key is touched.
- Touch TIMER OFF anytime to cancel the Timer or stop the reminder tones. If OFF key is touched, the oven will turn off; however, the timer can be turned off only by using the Timer
Off key
- The Control Lock shuts down the control panel keys to avoid unintended use of the oven(s). The Control Lock will remain set after a power failure, if set before the power failure occurs.
- When the control is locked, only the TIMER SET/START, TIMER
- OFF and OVEN LIGHT keys will function.
- The Control Lock is preset unlocked, but can be locked.
- To Lock Control: Touch and hold START for approximately seconds, until "control locked" appears on the lower text line and a lock icon appears in the display.
- To Unlock Control: Repeat to unlock and remove "control locked" and lock icon from the display.
IMPORTANT:
- Do not use a thermometer to measure oven temperature because opening the oven door during cycling may give incorrect readings.
- The oven provides accurate temperatures; however, it may cook faster or slower than your previous oven, so the temperature calibration can be adjusted. It can be changed in Fahrenheit or
Celsius.
- A minus sign means the oven will be cooler by the displayed amount. The absence of a minus sign means the oven will be warmer by the displayed amount. Use the following chart as a
Aluminum Foil
To Deactivate:
- The oven can be disabled of the ability to set the Sabbath Mode by repeating the previous steps. See the "To Activate" section.
- When disabled "SABBATH DISABLED" will appear on the display and remain on for approximately 5 seconds. The Sabbath Mode cannot be regularly set until re-enabled.
To Regularly Set, Untimed:
- Sabbath Mode must be enabled before starting the Bake cycle.
- See the "To Activate" section.
- Touch BAKE.
- Touch the number keys to enter a temperature other than
- F (177°C). The bake range can be set between
- F and 500°F (77°C and 260°C).
Touch START.
- Touch OPTIONS and then number key "7." "SABBATH
- MODE" will appear on the lower oven display.
- To Regularly Set, Timed:
- Sabbath Mode must be enabled before starting the Bake cycle.
- See the "To Activate" section.
Touch BAKE.
- Touch the number keys to enter a temperature other than
- F (177°C). The bake range can be set between
- F and 500°F (77°C and 260°C).
- Touch COOKTIME.
- Touch the number keys to enter the length of Sabbath Mode time, up to 9 hours 59 minutes.
- Touch START. The oven will begin a timed bake cycle.
- The start time and stop time will appear on the lower oven display.
- Touch OPTIONS and then touch number key "7." "SABBATH
- MODE" will appear on the lower oven display.
- When the stop time is reached, the oven will automatically turn off. The oven control will remain in Sabbath Mode until the Off button is touched.
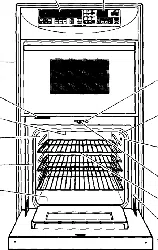
Positioning Racks and Bakeware
- Temperature Change The oven temperature can be changed when the oven is in the Sabbath Mode. No tones will sound, and the display will not change.
- The heating elements will not turn on or off for a random time, anywhere from 16 to 24 seconds. It may take up to one-half hour for the oven to change temperature. Number keys 1 through 0 represent temperatures. Use the following chart as a guide.
RACKS
- Position racks before turning on the oven.
- Do not position racks with bakeware on them.
- Make sure racks are level. To move a rack, pull it out to the stop position, raise the front edge, then lift out. Use the following illustration and charts as a guide.
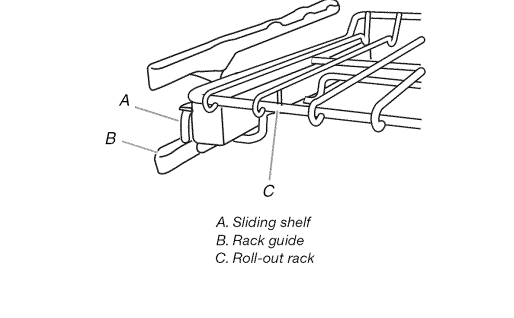
Roll-Out Rack
OVEN USE
- Odors and smoke are normal when the oven is used the first few times, or when it is heavily soiled.
- During oven use, the heating elements will not remain on, but will cycle on and off throughout oven operation.
IMPORTANT:
- The health of some birds is extremely sensitive to the fumes given off. Exposure to the fumes may result in death to certain birds. Always move birds to another closed and wellventilated room.
IMPORTANT:
- To avoid permanent damage to the oven bottom finish, do not line the oven bottom with any type of foil, liners or cookware.
- For best cooking results, do not cover entire rack with foil because air must be able to move freely for best cooking results.
- To catch spills, place foil on rack below dish. Make sure foil is at least 1/2"(1.3 cm) larger than the dish and that it is turned up at the edges.
Bakeware
To Remove Roll-Out Rack:
1. Slide the rack in completely so that it is closed and engaged with the sliding shelf.
2. Using 2 hands, lift up on the front edge of the rack and the sliding shelf together. Slowly push both to the back wall of the oven so the front edge of the sliding shelf sits on the rack guide located on the sides of the oven. The front edge of the rack and the sliding shelf should be higher than the back edge.
To Replace Roll-out Rack
1. Using 2 hands, grasp the front of the closed rack and the sliding shelf. Place the closed rack and the sliding shelf on the rack guide.
2. Slowly push the rack and the sliding shelf to the back of the oven until the back edge of the sliding shelf drops.
3. Pull the rack and the sliding shelf slightly forward until the front edge drops and the sliding shelf is on the rack guide. To avoid damage to the sliding shelves, do not place more than 25 Ibs (11.4 kg) on the rack. Do not clean the roll-out rack in a dishwasher. It may remove the rack's lubricant and affect its ability to slide. See the "General Cleaning" section for more information.

Meat Thermometer
- On models without a temperature probe, use a meat thermometer to determine whether meat, poultry and fish, are cooked to the desired degree of doneness. The internal temperature, not appearance, should be used to determine doneness. A meat thermometer is not supplied with this appliance.
- Insert the thermometer into the center of the thickest portion of the meat or inner thigh and breast of poultry. The tip of the thermometer should not touch fat, bone or gristle.
- After reading the thermometer once, push it into the meat 1/2"(1.3 cm) more and read again. If the temperature drops, cook the meat or poultry longer.
- Check all meat, poultry and fish in 2 or 3 different places.
- During baking or roasting, the bake and broil elements will cycle on and off in intervals to maintain the oven temperature.
- If the oven door is opened during baking or roasting, the heating elements (bake and both broils) will turn off approximately seconds after the door is opened. They will turn on again approximately 30 seconds after the door is closed.
To Bake or Roast:
- Before baking or roasting, position racks according to the
- Positioning Racks and Bakeware" section. When roasting, it is not necessary to wait for the oven to preheat before putting food in, unless recommended in the recipe.
Touch BAKE.
- Touch the number keys to enter a temperature other than
- F (177°C). The bake range can be set between 170°F and 500°F (77°C and 260°C).
Touch START.
- Lo" will appear on the oven display if the actual oven temperature is under 170°F (77°C).
- When the actual oven temperature reaches 170°F (77°C), the oven display will begin displaying the temperature as it increases.
- When the set temperature is reached, if on, one tone will sound.
- Touch OFF when finished cooking.
Oven Vent
BROILING CHART
- For best results, place food 3" (7 cm) or more from the broil elements, rack position 4 is recommended.
- For diagram, see the "Positioning Racks and Bakeware" section. A temperature setting of 500°F (260°C) is recommended. Times are guidelines only and may need to be adjusted for individual foods and tastes.
Baking and Roasting
- Broiling uses direct radiant heat to cook food.
- During full broiling, both the inner and outer broil elements heat.
- During center broiling, only the inner broil element heats. The element(s) cycle on and off in intervals to maintain the oven temperature.
- If the oven door is opened during broiling, the broil element(s) will turn off in approximately 30 seconds. When the oven door is closed, the elements will come back on approximately seconds later.
- For best results, use a broiler pan and grid. It is designed to drain juices and help avoid spatter and smoke.
- If you would like to purchase a Broiler Pan Kit, it may be ordered. See "Assistance or Service" section to order. Ask for
- Part Number W10123240.
- For proper draining, do not cover the grid with foil. The bottom of the broiler pan may be lined with aluminum foil for easier cleaning.
- Trim excess fat to reduce spattering. Slit the remaining fat on the edges to avoid curling.
- Pull out oven rack to stop position before turning or removing food. Use tongs to turn food to avoid the loss of juices. Very thin cuts of fish, poultry or meat may not need to be turned.
- After broiling, remove the pan from the oven when removing the food. Drippings will bake on the pan if left in the heated oven, making cleaning more difficult.
To Broil:
- Before broiling, position rack according to the Broiling Chart.
- When broiling, changing the temperature allows more precise control. The lower the temperature, the slower the cooking.
- Thicker cuts and unevenly shaped pieces of meat, fish and poultry may cook better at lower broiling temperatures.
- Position food on the grid on the broiler pan, then place it in the center of the oven rack with the longest side parallel to the door.
- It is not necessary to wait for the oven to preheat before putting food in, unless recommended in the recipe.
- Close the door.
- Touch BROIL once for Full broiling, twice for Center broiling.
- Touch the number keys to enter a temperature other than
- F (260°C). The broil range can be set between 170°F and
- F (77°C and 260°C).
Touch START.
- The set oven temperature will appear on the oven display until the oven is turned off.
- Touch OFF when finished cooking.
Full and Center Broiling
To Convection Broil:
- Before convection broiling, see "Full and Center Broiling" section for general broiling guidelines. Position rack.
- Allow the oven to preheat for 5 minutes. Position food on the unheated grid on the broiler pan, then place it in the center of the oven rack with the longest side parallel to the door.
- Close the door.
- Touch CONVECTION BROIL.
- Touch the number keys to enter a temperature other than
- F (232°C). The convection broil range can be set between 170°F and 500°F (77°C and 260°C).
Touch START.
- The set oven temperature will appear on the oven display until oven is turned off.
- Touch OFF when finished cooking.
- Convection temperatures and times differ from those of standard cooking. The oven can automatically reduce standard recipe temperatures and times for convection cooking.
- The conversion may not be exact because foods are grouped in general categories. To ensure optimal cooking results, the oven will prompt a food check at the end of a non-delayed cook time.
- Use the following chart as a guide.
Convection Cooking
To Proof:
- Before first proofing, place dough in a lightly greased bowl and cover loosely with wax paper coated with shortening. Place on rack guide 2, then place broiler pan on guide 1. See "Positioning
- Racks and Bakeware" for diagram. Close door.
- Touch BREAD PROOF. Display will show 100°F (38°C).
- Touch START.
- Let dough rise until nearly doubled in size, check at 20 to minutes. Proofing time may vary depending on dough type and quantity.
- Touch OFF when finished proofing.
- Before second proofing, shape dough, place in baking pan(s) and cover loosely with plastic wrap coated with cooking spray. Follow same placement, and control steps above. Before baking, remove plastic wrap.
To Use:
- Before using Convection Temperature Conversion for BAKED
- GOODS and OTHER FOODS, allow the oven to preheat before placing food in the oven.
- Touch BAKED GOODS, MEATS or OTHER FOODS.
- Touch number keys to enter standard cook temperature.
- Touch number keys to enter standard cook time.
- Touch START.
- CHECK FOOD AT" and the stop time will appear on the oven display after preheating is complete.
- When the stop time is reached, end-of-cycle tones will sound if enabled. Open the door and check food.
- Touch OFF when finished cooking.
Convection Bake
To Set a Cook Time:
- Touch BAKE, CONVECTION BAKE OR CONVECTION
- ROAST.
- Touch the number keys to enter a temperature other than the one displayed. The range can be set between 170°F and
- F (77°C and 260°C).
- Timed Cooking may also be used with the Bread Proof function, but the temperature is not adjustable.
- Touch COOK TIME.
- Touch number keys to enter the length of time to cook.
Touch START.
- The minute time countdown will appear on the oven display.
- The start time and stop time are not displayed until the oven is finished preheating.
- When the stop time is reached, the oven will shut off automatically and "cooking complete" will appear on the oven display.
- If enabled, end-of-cycle tones will sound, then reminder tones will sound every minute.
- Touch OFF, or open the oven door to clear the display and/or stop reminder tones.
- To Set a Cook Time and Stop Time:
- Before setting, make sure the clock is set to the correct time of day. See "Clock" section.
- Touch BAKE, CONVECTION BAKE OR CONVECTION
ROAST.
- Touch the number keys to enter a temperature other than the one displayed. The range can be set between 170°F and
- F (77°C and 260°C).
- Timed Cooking may also be used with the Bread Proof function but the temperature is not adjustable.
- Touch COOK TIME.
- Touch number keys to enter the length of time to cook.
- Touch STOP TIME.
- Touch the number keys to enter time of day to stop.
OVEN CARE
Self-Cleaning Cycle
Prepare Oven:
- Remove the broiler pan, grid, cookware and bakeware and, on some models, the temperature probe from the oven.
- Remove oven racks to keep them shiny and easy to slide.
- See "General Cleaning" section for more information.
- Remove any foil from the oven because it may burn or melt, damaging the oven.
- Hand clean inside door edge and the 1W' (3.8 cm) area around the inside oven cavity frame, being certain not to move or bend the gasket. This area does not get hot enough during self-cleaning to remove soil. Do not let water, cleaner, etc. enter slots on door frame. Use a damp cloth to clean this area.
- Wipe out any loose soil to reduce smoke and avoid damage.
- At high temperatures, foods react with porcelain. Staining, etching, pitting or faint white spots can result. This will not affect cooking performance.
How the Cycle Works
IMPORTANT:
- The heating and cooling of porcelain on steel in the oven may result in discoloring, loss of gloss, hairline cracks and popping sounds.
- The Self-Cleaning cycle uses very high temperatures, burning soil to a powdery ash.
- The oven is preset for a 3 hour 30 minute clean cycle, however the time can be changed. Suggested clean times are 2 hours minutes for light soil and between 3 hours 30 minutes and hours 30 minutes for average to heavy soil.
To Self-Clean:
- Before self-cleaning, make sure the door is closed completely or it will not lock and the cycle will not begin.
- Touch SELF CLEAN. Touch SELF CLEAN repeatedly to set a clean time other than 3 hours and 30 minutes. The clean time can be set between 2 hours and 30 minutes and 4 hours.
- Number keys cannot be used to set a clean time.
- Touch START.
- The oven door will automatically lock and "DOOR LOCKED," the start time and stop time will appear on the oven display.
- The door will not unlock until the oven cools.
- When the cycle is complete and the oven is cool, "self clean complete" will appear on the oven display and "DOOR
- LOCKED" will disappear.
- Touch OFF, or open or close the oven door to clear the oven display.
To Delay the Start of Self-Cleaning:
- Before delay the starting of Self-Clean, make sure the clock is set to the correct time of day. See "Clock" section. Also, make sure the door is closed completely or it will not lock and the cycle will not begin.
- Touch SELF CLEAN. Touch SELF CLEAN repeatedly to set a clean time other than 3 hours and 30 minutes.The clean time can be set between 2 hours and 30 minutes and 4 hours.
- Number keys cannot be used to set clean time.
- Touch STOP TIME.
- Touch the number keys to enter the time of day to stop.
- Touch START.
- The start time is automatically calculated and displayed.
- The door will automatically lock and "DOOR LOCKED,"
- DELAY," and the stop time will also appear on the display.
- The door will not unlock until the oven cools.
- When the start time is reached, the oven will automatically turn on.
- When the cycle is complete and the oven cools, "self clean complete" will appear on the oven display and "DOOR
- LOCKED" will disappear.
General Cleaning
TAINLESS STEEL (on some models)
Cleaning Method:
- Rub in direction of grain to avoid damaging.
- KitchenAid _ Stainless Steel Cleaner and Polish Part Number not included) or KitchenAid _ Stainless Steel Wipes
- Part Number 8212510 (not included):
- See "Assistance or Service" section to order.
- Liquid detergent or all-purpose cleaner:
- Rinse with clean water and dry with soft, lint-free cloth.
- Vinegar for hard water spots
- To avoid damage to stainless steel surfaces, do not use soapfilled scouring pads, abrasive cleaners, Cooktop Polishing
- Creme, steel-wool pads, gritty washcloths or some paper towels.
OVEN DOOR EXTERIOR
Cleaning Method:
- Glass cleaner and a soft cloth or sponge:
- Apply glass cleaner to soft cloth or sponge, not directly on panel.
- All-Purpose Appliance Cleaner Part Number 31682 not included):
- See "Assistance or Service" section to order.
OVEN DOOR INTERIOR
- Cleaning Method:
- Self-Cleaning cycle:
- For optimal door cleaning result, wipe away any deposits with a damp sponge before running cycle.
- CONTROL PANEL
- Cleaning Method:
- Glass cleaner and soft cloth or sponge:
- Apply glass cleaner to soft cloth or sponge, not directly on panel.
- All-Purpose Appliance Cleaner Part Number 31682 not included):
- See "Assistance or Service" section to order.
- To avoid damage to the control panel, do not use abrasive cleaners, steel-wool pads, gritty washcloths or some paper towels.
OVENCAVITY
Do not use oven cleaners.
- Food spills should be cleaned when oven cools. At high temperatures, foods react with porcelain and staining, etching, pitting or faint white spots can result.
- Cleaning Method:
- Self-Cleaning cycle: See "Self-Cleaning Cycle" first.
OVEN RACKS AND ROASTING RACKS
Cleaning Method:
- Self-Cleaning cycle:
- See "Self-Cleaning Cycle" first. Remove racks or they will discolor and become harder to slide. If this happens, a light coating of vegetable oil applied to the rack guides will help them slide.
- Steel-wool pad
- BROILER PAN AND GRID (on some models)
- Do not clean in the Self-Cleaning cycle.
Cleaning Method:
- Mildly abrasive cleanser:
- Scrub with wet scouring pad.
- Solution of 1/2cup (125 mL) ammonia to 1 gal. (3.75 L) water:
- Soak for 20 minutes, then scrub with scouring or steel-wool pad.
Oven Lights
- The oven lights are 12-volt, 5-watt maximum halogen bulbs. They will come on when the oven door is opened.
- On double oven models, both upper and lower lights will come on when either door is opened. The oven lights will not work during the SelfCleaning cycle. When the oven door is closed, touch OVEN
- LIGHT to turn light on or off.
To Replace:
- Before replacing the bulb, make sure the oven is off and cool.
- Disconnect power.
- Remove glass light cover by grasping the front edge and pulling away from oven.
IM PC RTANT:
- To avoid oven door glass breakage:
- Do not close the oven door if the racks are not fully inserted into the oven cavity or when bakeware extends past the front edge of an oven rack.
- Do not set objects on the glass surface of the oven door.
- Do not hit glass surfaces with bakeware or other objects.
- Do not wipe down glass surfaces until the oven has completely cooled.
- For normal oven use, it is not suggested to remove the oven door.
- However, if removal is necessary, make sure the oven is off and cool. Then, follow these instructions. The oven door is heavy.
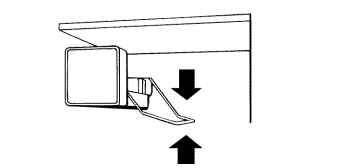
Oven Door
To Remove:
- Open oven door all the way.
- Flip up the hinge latch on each side.
- Close the oven door as far as it will shut.
- Lift the oven door while holding both sides.
- Continue to push the oven door closed and pull it away from the oven door frame.
To Replace:
- Insert both hanger arms into the door.
- Remove bulb from socket.
- Replace bulb, using tissue or wearing cotton gloves to handle bulb. Do not touch bulb with bare fingers.
- Replace bulb cover by snapping back into wall.
- Reconnect power.
TROUBLESHOOTING
Nothing will operate
- Has a household fuse blown, or has a circuit breaker tripped?
- Replace the fuse or reset the circuit breaker. If the problem continues, call an electrician.
- Is the appliance wired properly?
- See Installation Instructions.
- Oven will not operate
- Is the electronic oven control set correctly?
- See "Electronic Oven Control" section.
- Has a delay start been set?
See "Timed Cooking" section.
- Is the Control Lock set?
- See "Control Lock" section.
- Is the Sabbath Mode set?
- See "Sabbath Mode" section.
- On double oven models, is one oven self-cleaning?
- When one oven is self-cleaning the other oven cannot be set or turned on.
- On double oven models, has the correct oven been selected?
- Choose UPPER OVEN or LOWER OVEN first.
Self-Cleaning cycle will not operate
- Is the oven door open?
- Close the oven door all the way.
- Has the function been entered?
- See "Self-Cleaning Cycle" section.
- On some models, has a delay start Self-Clean cycle been set?
- See "Self-Cleaning Cycle" section.
- Has a delay start been set?
See "Timed Cooking" section.
- On double oven models, is one oven self-cleaning?
- When one oven is self-cleaning, the other oven cannot be set to self-clean.
- Oven cooking results not what expected
- Is the proper temperature set?
- Double-check the recipe in a reliable cookbook.
- Is the proper oven temperature calibration set?
- See "Oven Temperature Control" section.
- Was the oven preheated?
- See "Baking and Roasting" section.
- Is the proper bakeware being used?
See "Bakeware" section.
- Are the racks positioned properly?
- See "Positioning Racks and Bakeware" section.
- Is there proper air circulation around bakeware?
- See "Positioning Racks and Bakeware" section.
ASSISTANCE OR SERVICE
- Our consultants provide assistance with:
- Features and specifications on our full line of appliances.
- Installation information.
- Use and maintenance procedures.
- Accessory and repair parts sales.
- Specialized customer assistance (Spanish speaking, hearing impaired, limited vision, etc.).
- Referrals to local dealers, repair parts distributors and service companies. KitchenAid designated service technicians are trained to fulfill the product warranty and provide afterwarranty service, anywhere in the United States.
- To locate the KitchenAid designated service company in your area, you can also look in your telephone directory Yellow
- Pages.
- For further assistance
- If you need further assistance, you can write to KitchenAid with any questions or concerns at:
- KitchenAid Brand Home Appliances
- Customer eXperience Center
- Benson Road
- Benton Harbor, MI 49022-2692
- Please include a daytime phone number in your correspondence.
In the U.S.A
Accessories
In Canada
WAR RANTY
- For one year from the date of purchase, when this major appliance is operated and maintained according to instructions attached to or furnished with the product, KitchenAid brand of Whirlpool Corporation or Whirlpool Canada LP (hereafter "KitchenAid") will pay for Factory Specified Parts and repair labor to correct defects in materials or workmanship. Service must be provided by a KitchenAid designated service company.
- This limited warranty is valid only in the United States or Canada and applies only when the major appliance is used in the country in which it was purchased. Outside the 50 United States and Canada, this limited warranty does not apply. Proof of original purchase date is required to obtain service under this limited warranty.