Loading ...
Loading ...
Loading ...
72
To switch off the Timer:
• select Zone/Display (4)
• set the duration of the Timer to
, via (5)
Note: If timer is ON and the appliance is switched OFF, the
timer remain ON until it expires.
To reset the timer before, switch ON the appliance again, the
timer will switch OFF.
Cooking Zones Timer
The Cooking Timer Zone function is a countdown that can be set,
also at the same time, on each cooking zone
At the end of the period set, the cooking zones switch off
automatically and the user is notified with a dedicated acoustic
signal.
Activation of the cooking zone timer function
• Touch (press) the Selection/Display area (2) (power level ≠0)
• Press
(6) relating to the cooking zone
Use the symbols (5) to set the duration of the
Timer, which is displayed in the Zone/Display (4)
during setting the symbol
(6) is flashing
Note: wait 10 seconds without pressing any other command,
so that the Cooking Zone Timer will start.
Note: by pressing and holding
(6) , the cooking zone
timer is reset
If desired, repeat the operation for several cooking zones.
Note : each cooking zone can have a separate Timer set; the
countdown for the selected cooking zone will be appear on the
display (4);
If no cooking zone is selected and the STAND-ALONE timer is
not active, the timer closest to the end of the countdown is
displayed.
If no cooking zone is selected and the STAND-ALONE timer is
active, it is displayed with priority, with respect to the timer
closest to the end of the countdown.
The display mode of the countdown is the same for the
“STAND-ALONE” Timer (see previous paragraph “STAND-
ALONE” Timer)
When the timer has finished the countdown, an acoustic
signal sounds and the cooking zone switches off.
To switch off the Timer:
• select the cooking zone (2)
• set the duration of the Timer to
, using (5)
Note: If the induction hob turns off with the timer active, the
timer will continue to count down until the set time expires; if
you wish to manually stop the timer, it is necessary to turn the
hob on again and follow the timer switch-off instructions
provided above.
Power Limitation
The Power Limitation function allows setting of the operation
of the product, limiting its maximum absorption.
Note: the setting must take place with the hob off, without
pressing the
(1) key, when the hob is connected to
the mains, or when the electric mains are reconnected within
the following 2 minutes.
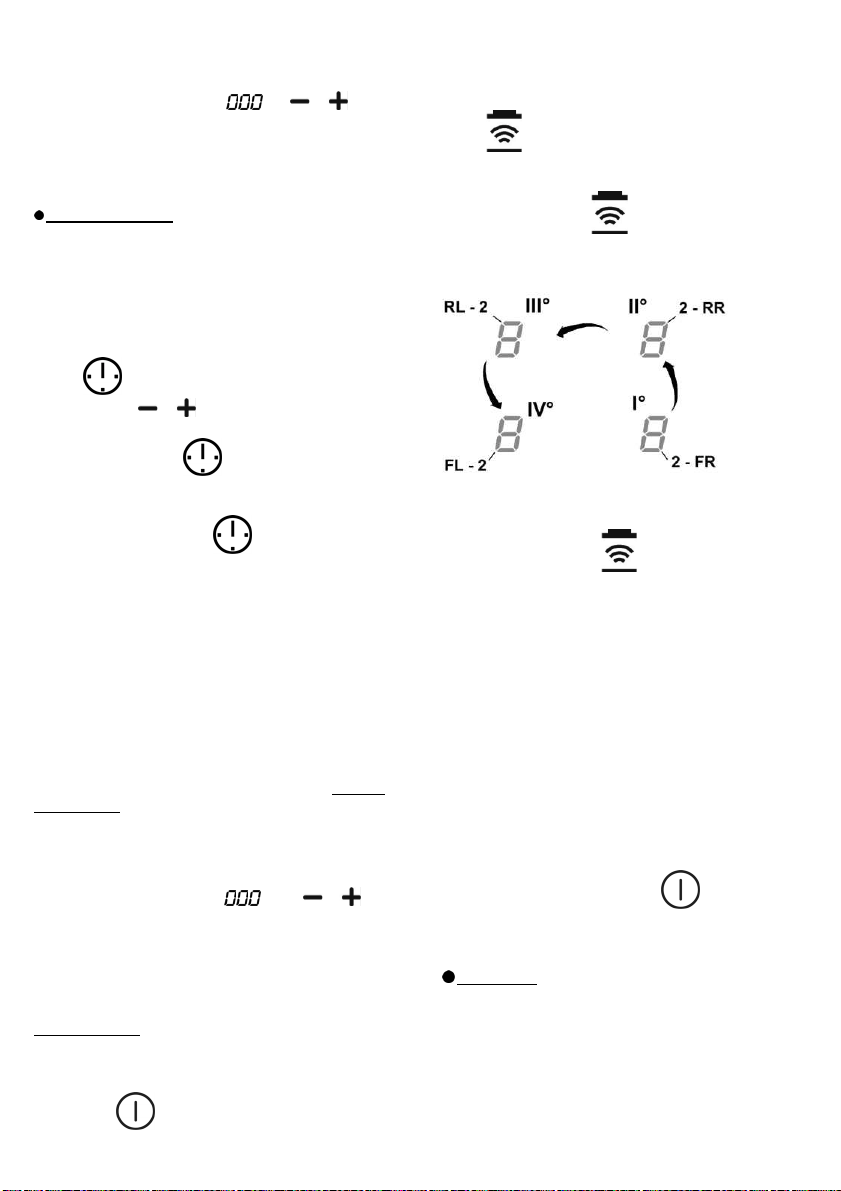
To set the Power Limitation:
- press
(which will be flashing, only for the first 2 minutes after
powering of the product)
- continuing to hold down
press, one at a time, all the
areas of Selection/Display (2) of the cooking zones, anti-
clockwise starting from the front right zone (FR)
- each press will be accompanied by a short audible signal
- once all the Displays (2) have been pressed, it will be
possible to release the key
at this point:
- the Display (2) of the left rear zone (RL) will show in
alternate sequence the symbols “C” and “0”, indicating that it
is possible to perform the setting:
select the Display (2-RL)
then scroll on the Selection bar (3), until the symbols
“C” and
“8”,appear
the Display (2-FL) will show the current setting**
0 = 7.4 KW
1 = 4.5 KW
2 = 3.1 KW
** by default the setting is 7.4 KW
To change the Power Limitation setting
- press the Display (2) of the left front area (FL)
- then scroll on the Selection bar (3), to select the new setting
- to save the choice made, press the
(1), for 2
seconds; a prolonged audible signal will be emitted to confirm
the successful setting
Bridge Zones
Thanks to the Bridge function, the cooking zones are able to work
in a combined manner, creating a single zone with the same
power level. This function allows evenly distributed cooking with
large-sized pots and pans.
The front “Master” cooking zone can be used in combination with
the corresponding “Secondary” cooking zone at the back
(to check which zones are equipped with this function, see the
illustrated part of this manual).
Loading ...
Loading ...
Loading ...