Read all instructions before you operate your grill.
SAVE THIS MANUAL!
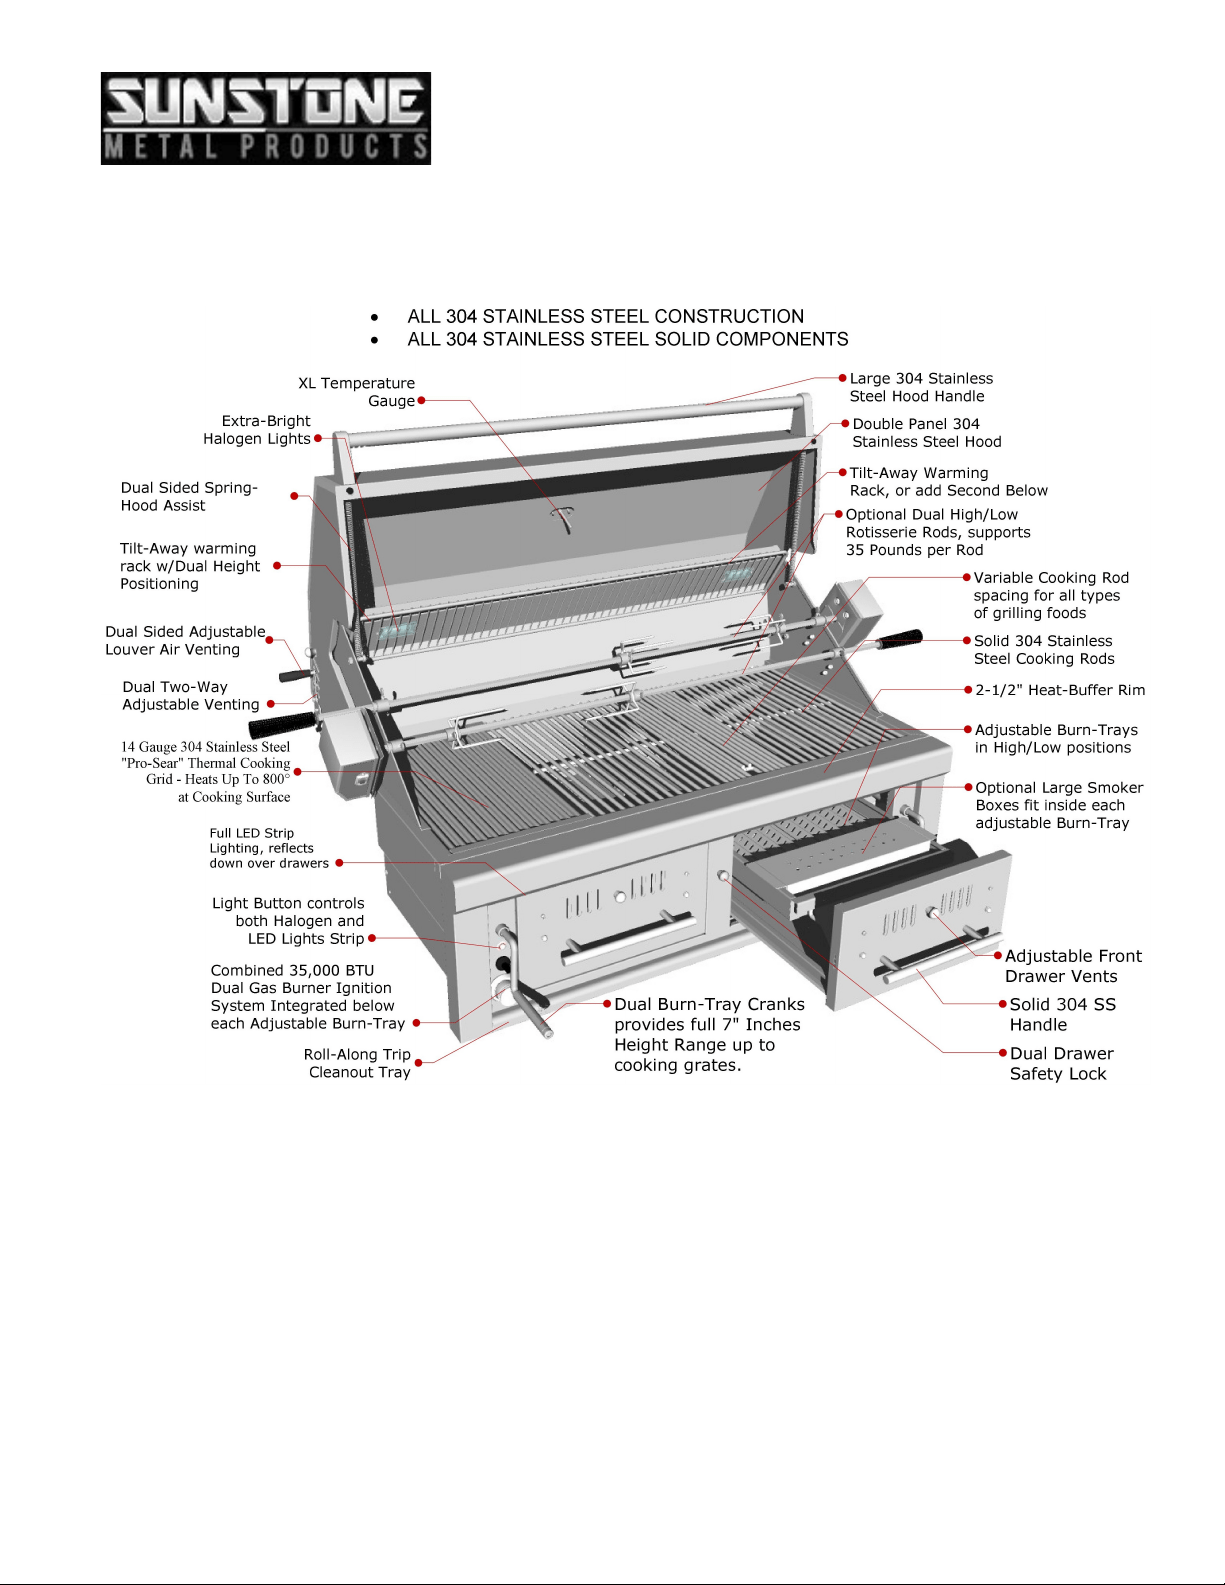
PRODUCT
MAN
UAL
SUNSTONE SERIES GAS HYBRID CHARCOAL GRILL
Page 2
INDEX DIRECTORY
Grill Safety and Warnings
Grill Safety
and Warnings
---------
-----------
--
-
3
Clearances and Placement
--------
--------
4
Grill Specification Guide
---------
--
----------------
5
Island and Gas Setup
--------------
-------------
6
Step by Step Guide
-----------------
----------
7
Lighting the Grill
---------
-----------
--
--
8
Using your Grill
---------
------------
-
--
10
Grill Parts Diagram
--------------
---
----------
1
1
Grill Gas Conversion
----
------------
-
--
1
3
Q & A Trouble Shooting
----------
--------------------
10
1
7
Grill
Warranty
---------
--------------
1
8
Must keep copy of your sales slip for proof of purchase to
receive any warranty on product. Register your Warranty at
www.sunstonemetalproducts.com and receive special perks
and bonuses.
YOU’RE NAME_________________________________
DATE OF PURCHASE _______________________
ADDRESS_________________________________________
INVOICE NUMBER________________________
How to Obtain Service
Before you call
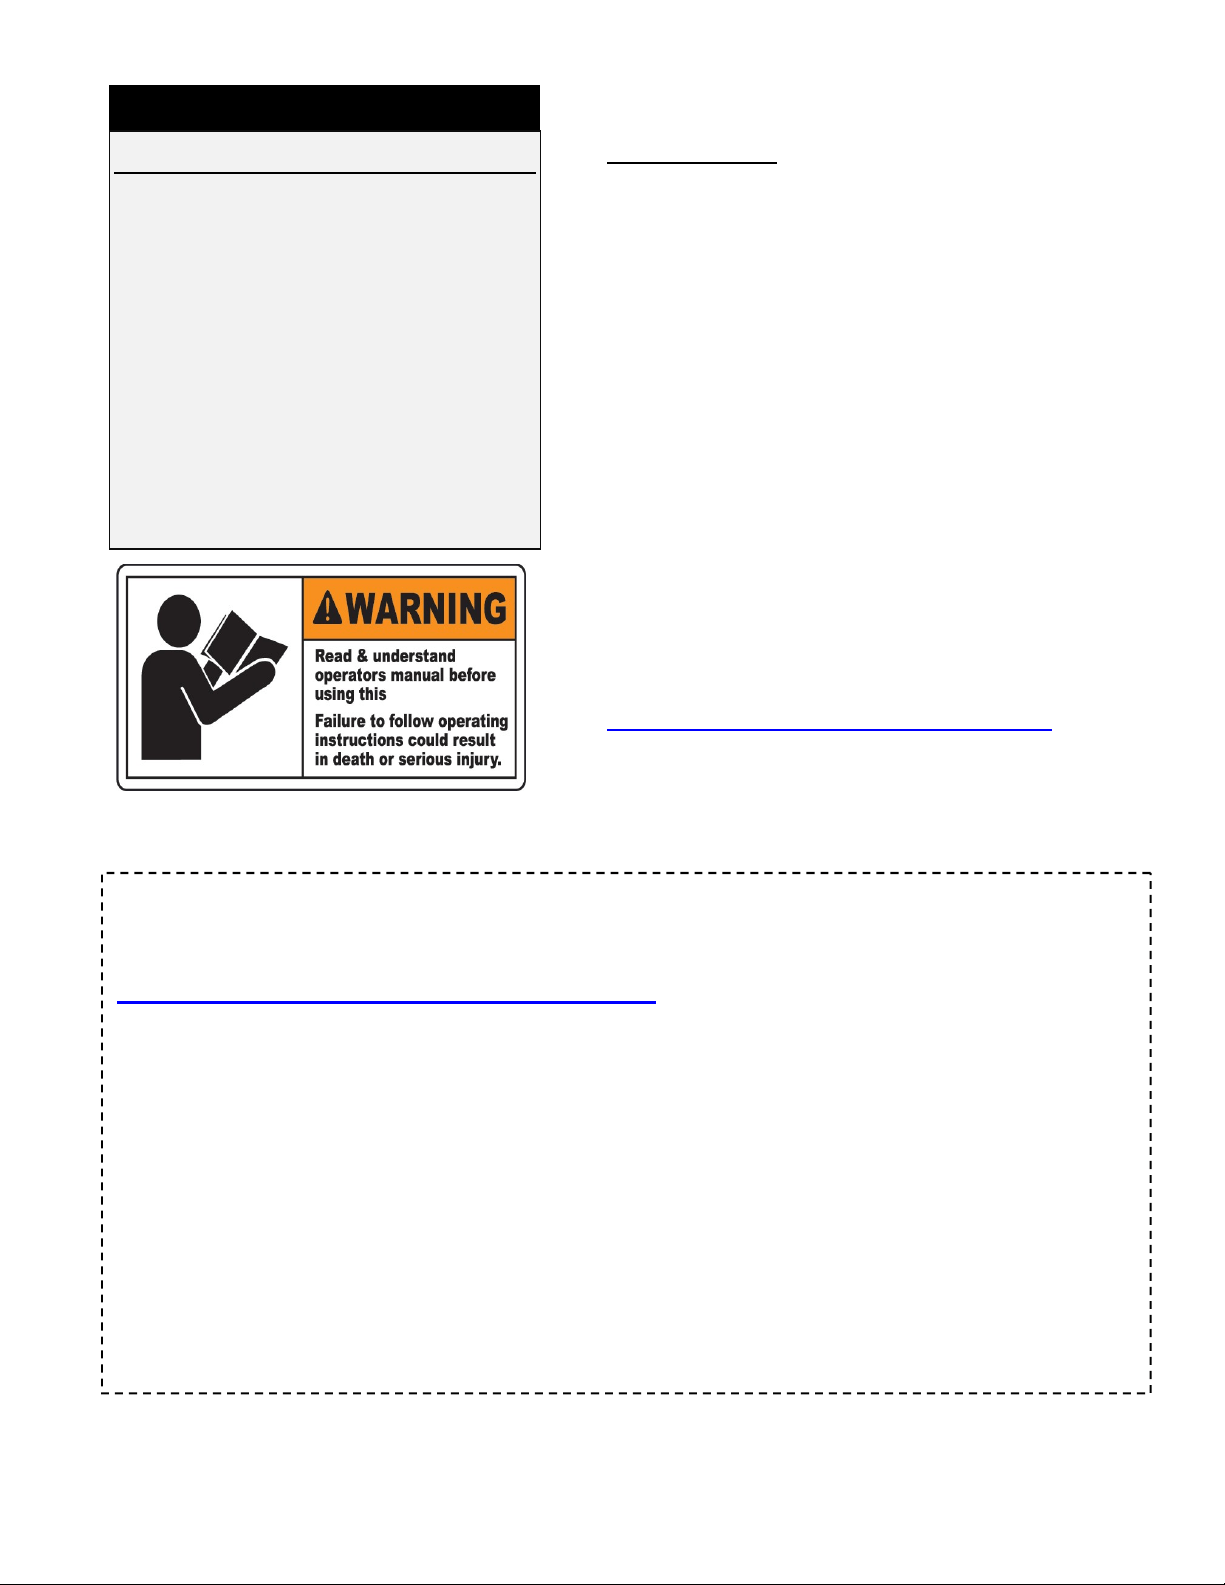
Have your read through this product manual?
Have you read and understood the Product
Warranty on the last page of this manual?
Please make sure you have the following
information:
Model Number | Date of Purchase | Invoice
Number. (The Invoice Number can be found
on the packing slip when your grill is
delivered, it is 5 digits numeric number) Be
sure to keep that for your records and any
future warranty claims.
For warranty service, contact SUNSTONE
Customer Service Department at (888)-934-
9449 or email
service@sunstonemetalproducts.com, we will
response within 1-2 business days Monday to
Thursday.

Page 3
GRILL SAFTY AND WARNINGS
Do not add charcoal starter fluid or charcoal
impregnated with charcoal lighter fluid to hot
or warm coals. Cap starter fluid after using and
place a safe distance away from the grill.
Barbecue mitts or hot pads should always be
used to protect hands while barbecuing,
opening the fire door, or adjusting the dual
draft vents.
Do not use gasoline, alcohol, or other highly
volatile fluids to ignite charcoal.
Use proper barbecue tools with long, heat resistant
handles.
Do not leave infants, children, or pets
unattended near the grill.
Never touch the cooking grates while charcoal
Or gas burners are lit to see if it is hot.
Do not remove ashes until all coals are
completely burned out and are fully
extinguished.
Burning charcoal inside can kill you. It gives off carbon
monoxide, which has no odor. NEVER burn charcoal
inside homes, vehicles, or tents.
Do not wear clothing with loose flowing
sleeves while lighting or using the grill.
To extinguish coals, close the hood, fire door,
and dual draft vents. Do not use water.
Do not use this charcoal grill in high
winds. Or with back of grill facing wind direction.
To control flare ups, close the hood and, if
necessary, the fire door and dual draft vents.
Do not store combustible materials (charcoal,
Firelighters, etc.) in the storage area under the
ash pan while using the grill.
Gas Ignition Burners are for Igniting Charcoal or Wood
Logs ONLY, do not run continually.
Do Not Close the Lid of the Grill while Lighting the
Charcoal with Gas Burners.
Handle and store hot electric starters carefully. Keep
electrical cords away from the hot
surfaces of the grill.
ATTENTION: Indicates a potentially
hazardous situation which, if not avoided, may
result in minor or moderate personal injury, or
property damage.
WARNING: Indicates an imminently
hazardous situation which, if not avoided, will
result in death or serious injury.
EXPLOSION: Indicates an imminently
hazardous situation which, if not avoided, will
result in possible explosion and cause death or
serious injury.
BODILY INJURY: Indicates a potentially hazardous
situation which, if not avoided, may result in minor
or moderate personal injury, or property damage.
HOT SURFACE: Indicates an imminently
hazardous hot surface which, if not avoided, will
result in serious burn or injury.
OPEN FLAME: Indicates an imminently hazardous
situation which, if not avoided, will result in death or
serious injury.
ATTENTION: Improper installation, adjustment, alteration, service or maintenance can cause injury
or property damage. Read the installation, operating and maintenance instructions thoroughly before
installing or servicing this equipment.

Page 4
CLEARANCES AND PLACEMENT
Your grill is SELF-RIMMING, meaning the lip of grill rests on top of the counter edge around the cut-out
with the front of grill which is Free-Hanging from counter top. Because of this, there is No Need for any
Trim-Kit like with many other grill in the market.
Maintain 24” Clearance from any Combustible Materials in ANY direction of Grill.
If any combustible materials within 24” distance, must have Heat Barrier like Grill Jacket, or other
Non-Combustible type like Bricks, Hardy Board, Metal.
Orient the grill so the Prevailing winds are not blowing into the rear or side of grill.
Windy Area
Positioning your grill in your backyard is more often thought of how it is pleasing to the eye, but more
important than this is how that it functions correctly. Unlike an indoor appliance, your grill has to combat
many outside weather influences in all manner of weather related instances, most severely is Wind.
Maintain proper Prevailing wind, grill direction – with the front of grill facing in to the wind, and the
back of grill in the direct wind is blowing. If direction of wind is unclear, or difficult to combat even
with preventative measures, then always grill with the hood open, and when hood is closed –
always be within close proximity to grill and monitor it that it does not overheat.
If wind or breeze is in the direction of back of grill, you must erect partition wall of 14” height so
that the top of grill hood is covered by several inches. If this is not done, you must grill with hood
open and or when hood is closed stand in close area to grill and monitor if the grill overheats.
Minimum Distances
From Back Cut-Out Grill Line to Wall 6-1/2" Min. Clearance
From Counter to Outdoor Vent Hood 36" Min. Clearance
From Floor to Counter Top 34" Min. Clearance
From Grill to Vent Hood Width 4”-6" Min. Clearance
From Appliance to Appliance 12" Min. Clearance
From Appliance to Combustible Material
24" Min. Clearance
ATTENTION: Do Not Build Enclosure around Firebox of Grill, Grill Free-Hangs from Counter Top,
DO Not Build Shelf below Grill of any kind. Must have Minimum of Two Vents for this Grill, for
Natural Gas place in High Position, and for Liquid Propane place in Low Position.
ATTENTION: Take special precaution when installing grill in open Breezy area, check the direction
of Prevailing Wind, if the back of the grill is facing any oncoming wind or breeze, be sure to protect
the back of
the
grill, and erect
a partition wall, or only use grill with hood open on breezy days.
Page 5
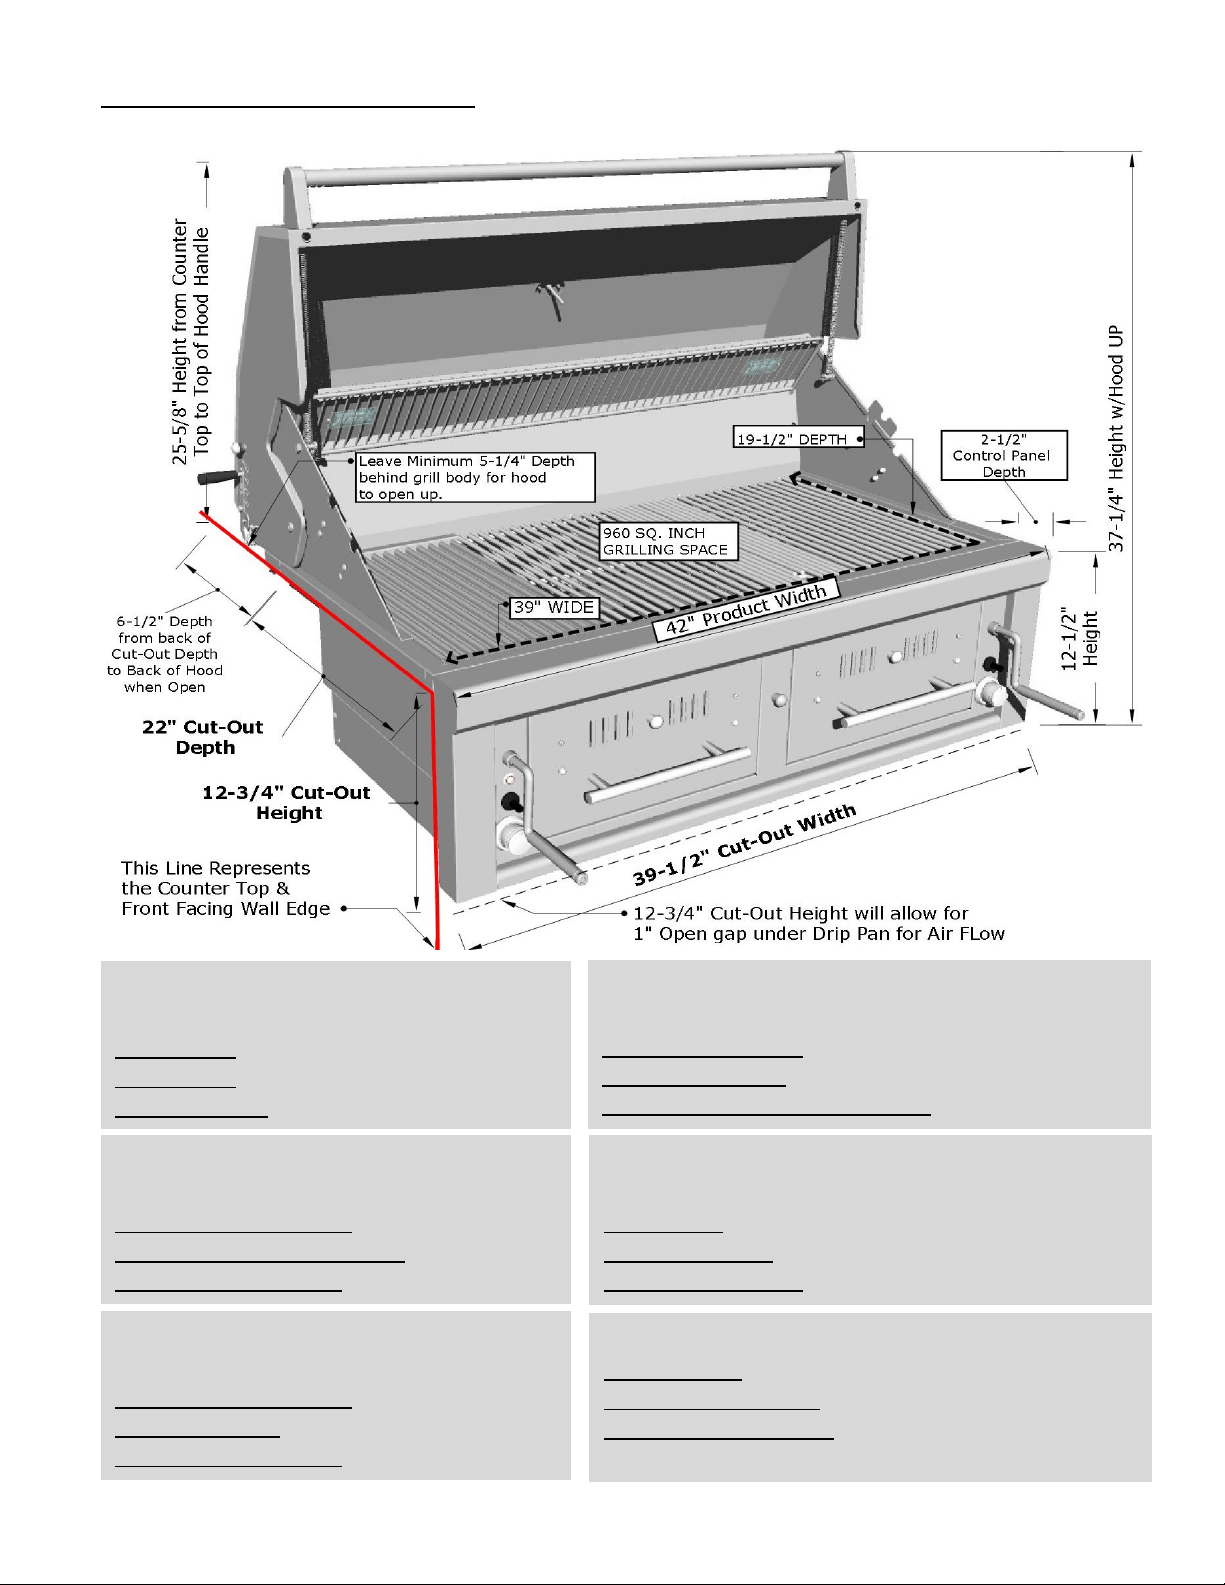
GRILL SPECIFICATION GUIDE
PRODUCT DIMENSIONS
Product Size - 42"W x 27-1/8"D x 28"H
Cut-Out Size -39-1/2"W x 22"D x 12-3/4"H
Product Weight – 216 LBS
HOOD UP DIMENSIONS
Counter to Top of Hood - 25-5/8” Height
Back Cut-Out to Back of Hood -6-1/2” Depth
Space behind Grill Back – 5-1/4” Depth
COOKING SPECIFICATIONS
Cooking Surface Size - 960 Sq. In.
Warming Rack Size - 220 Sq. In.
Rotisserie Rod Supporting Weight – 35 Pounds
GAS BURNER SPECIFICATIONS
Burner Type - 304 SS Tubular
Gas Burner BTU’s - 17,500 BTU’s per. Burner
Burner Ignition Type – Piezo
HOOD DOWN DIMENSIONS
Counter to Top of Hood – 14-1/4” Height
Front Hood Riser -5” Height
Space behind Grill Back – 5-1/4” Depth
BURN TRAY SPECIFICATIONS
Burn Tray Size - 14” Width x 13-1/2” Depth
Burn Tray Load Height - 3” Charcoal/Wood Height
Burn Tray Height Range – 7” Adjustable Height within
1” of Cooking Grate.

Page 6
ISLAND AND GAS SETUP
NOTICE: All Gas Lines for either Liquid Propane or Natural Gas should be installed by a Licensed
Professional ONLY! All Liquid Propane Installation with a Large Capacity Side Yard Tank, requires a
Medium Pressure In-Line Regulator to be installed by Licensed Professional. Grill includes LP Regulator
for 25 Pound Portable Tank only, if you require grill to use Natural Gas, please call our Technical
Support Line and request NG-Conversion Kit for Item No. SUNCHDZ42 at 888-934-9449.

Page 7
STEP BY STEP GUIDE
1. Locate the Electrical Transformer inside Grill
Remove the transformer from the plastic bag located in the interior
of grill. Make sure the Transformer is complete, and double check
the grill light plug cord is properly secured to transformer, and all
wires are firmly fixed into plastic clip plug.
2. Mount Transformer to Interior Island Wall
Using metal screws and attach the transformer to the back inner
wall of your islands cabinet wall, somewhere near the already
installed GFCI electrical outlet. When you plug the transformer in,
double check then GFCI breaker switch, that the outlet has power.
4. Connect Light Transformer Plug to Grill
Locate the Light Connection on BACK-LEFT SIDE of grill. The
connection clips together, to form a secure connection. Double
check that all wires are tightly pushed into plug sockets, so all wires
make proper connections.
5. Slide Grill in Place
Your Sunstone™ grill is specially designed with an internal built in
hanger lip located at the Right, Left and Back sides. The grill lip
allows it to hang by the three supported edges on the right, left and
back. The front control panel requires no supporting edge; it is
designed to hang down the front of your cut-out.
6. Securing in Place
The control panel is designed to sit flush against the island face. If counter top extends beyond the
islands face, creating a countertop overhang, it must be cut flush with the island face where the width of
the control panel or a gap will be created exposing the forward portions of the left and right side
firewalls.
5. Connect Gas Line to Grill
See the BACK-RIGHT SIDE – This is where the Gas Line will connect to
the Grill. Grill is shipped as Liquid Propane ONLY and includes a LP-
Regulator for portable tank. Recommendation to have a 18” Rubber
or Flex hose to allow grill to be pulled out if necessary.
7. Allow for Ventilation
Your Sunstone™ grill is engineered with special vents on the back of unit, which allow proper airflow out
of the back of grill. Be sure you allow a minimum of 6-1/2" behind grill for proper air ventilation and to
allow hood to open properly. Push grill all the way into cut-out, so there are no gaps present to inside of
island frame and grill control panel is flush against island wall.
Page 8
LIGHTING THE GRILL
OPEN HOOD
!
Ensure Burner Control Knobs
are In the “OFF” position,
Turn Knob to High Position.
2
. Push in Black Push Button Igniter
located above the Gas Knob on each side
of grill.
3
. You will hear a loud click as the
electronic lighter produces a spark.
Listen for the sound of the gas igniting
and look for a flame through the cooking
grids. If the burner does not light on the
first try, repeat immediately.
4
. If the burner does not light in 5
seconds then wait five minutes until the
gas clears before attempting to light it
again. Repeat the procedure or try the
manual lighting options on next page.
WARNING:
When Lighting the Grill, continue to rapidly press the Black Igniter Button In & Out while allowing the Gas to Flow, if
you Do Not hear a Clicking Sound, immediately turn the gas OFF – otherwise gas will continue to flow.
5
. Upon successful lighting, repeat the
process on the other burners you wish to
light.
6
. To shut off the burners,
rotate the
knob and turn to OFF.
7
. It is normal to hear a popping sound
when the burners are turned off.
Lighting Time 3 to 5 minutes
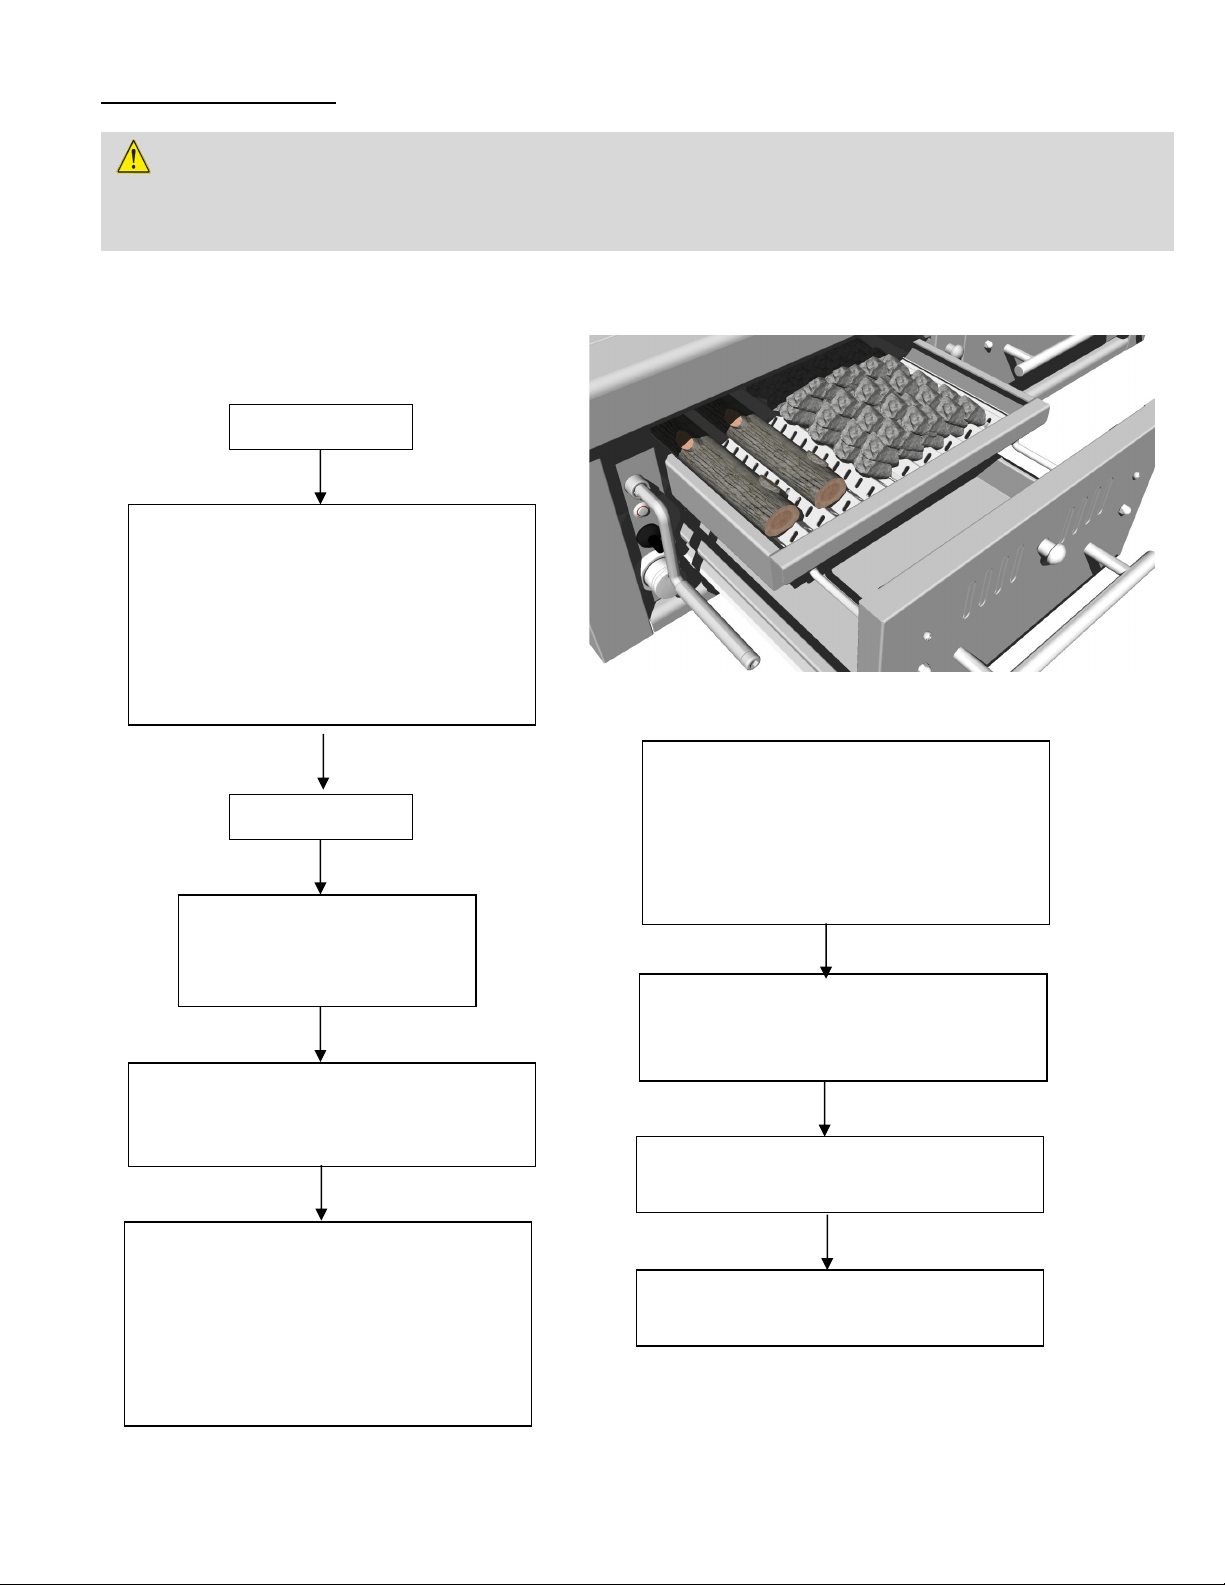
OPEN DRAWER
1
. Stack charcoal briquettes or wood into
a pyramid-shaped pile on top of the
charcoal grate or pan. We recommend
using 2 pounds (approximately 30
briquettes) to start your fire, adding
more as needed. – CLOSE DRAWER -
Page 9
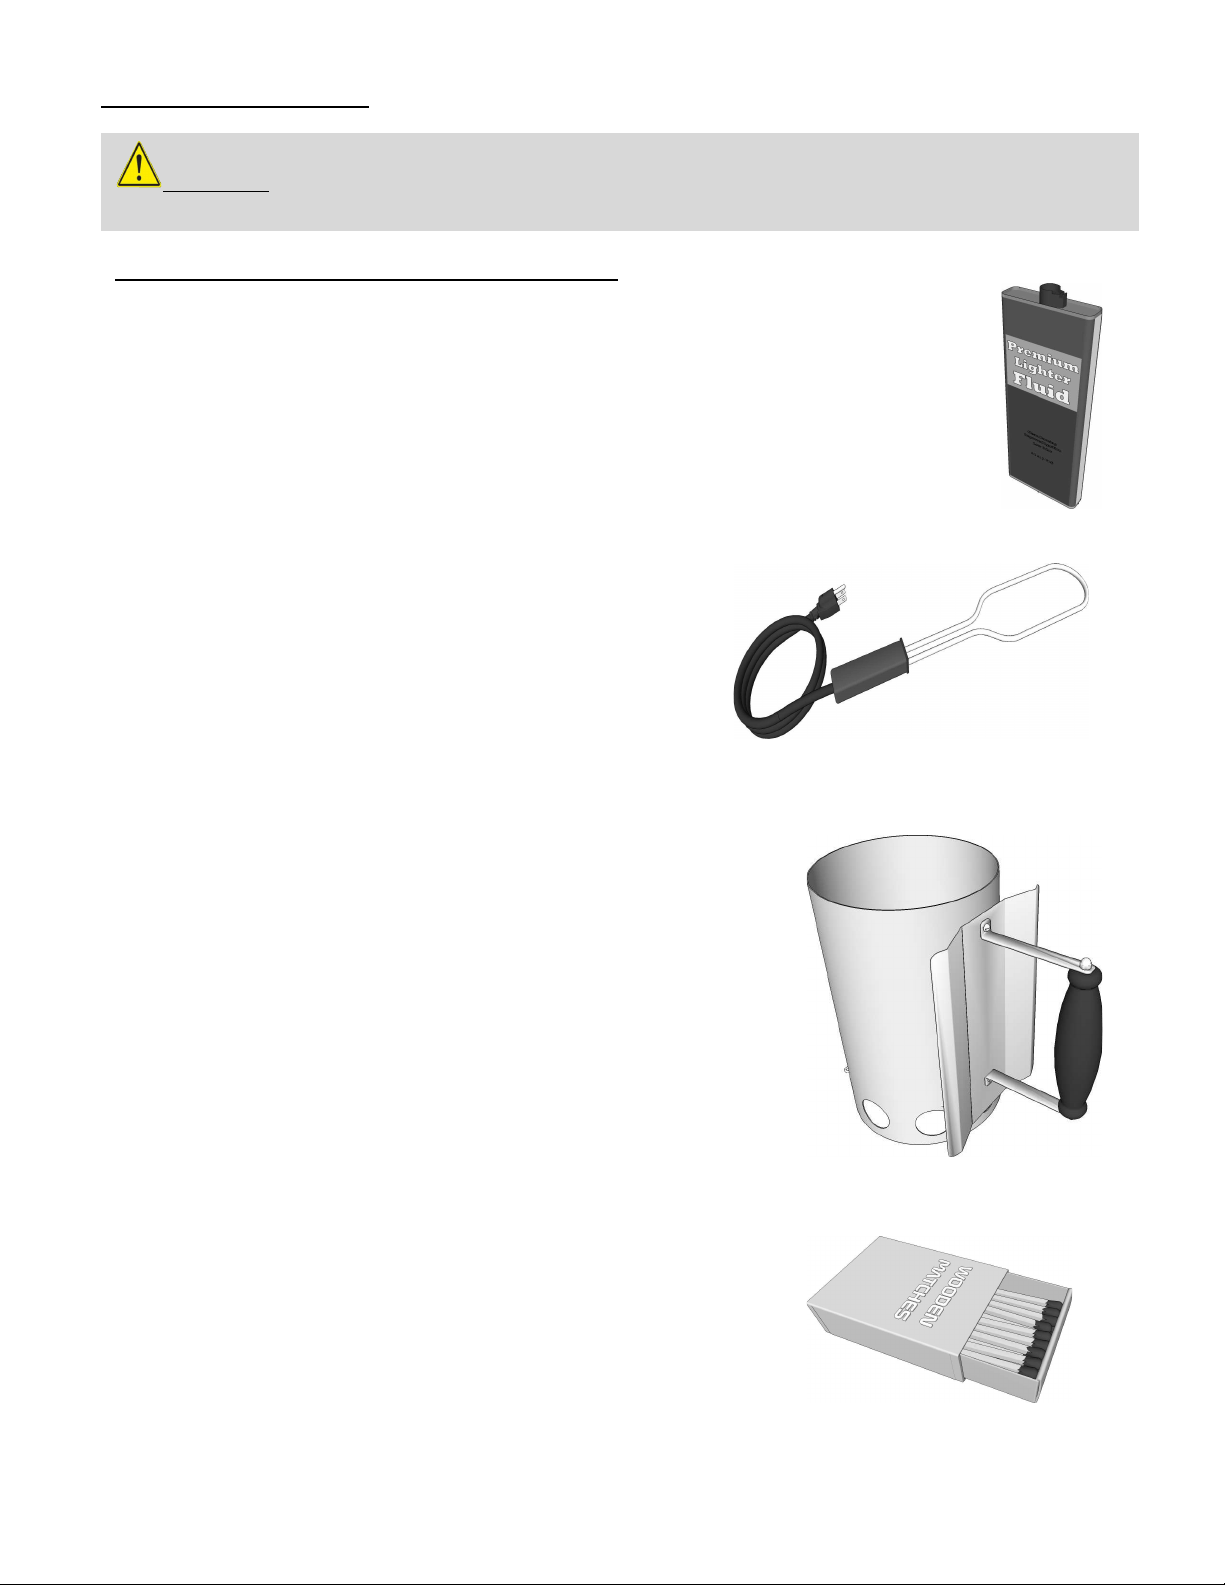
LIGHTING THE GRILL
4. Self-Starting Briquettes
If you don’t want to fool around with lighter fluid, there is one
more alternative—self-lighting charcoal briquettes. With
these, all you do is pile the briquettes on the grill, light them
with a match or butane lighter, and you have an almost instant
fire. Some grillers like to use these as starters, with a mixture
of regular briquettes. One thing to note, however: self-lighting
briquettes are not recommended for use with chimney starters.
3. Charcoal Chimney Lighter
A charcoal chimney starter is essentially a metal tube, usually
steel, with a handle on the side. Inside is a grate to hold the
briquettes and to keep them above the crumpled newspaper,
which goes in under the charcoal and is what starts the
briquettes. Ventilation holes ring the bottom of the tube.
The goal is to start a charcoal fire without using lighter fluid or
other petroleum-based fuels. This is to avoid unpleasant taste to
the food, environmental regulations or for other reasons.
2. Electric Charcoal Lighter
Electric charcoal lighters look like an elongated outline of
a Ping-Pong paddle. That outline is the lighter element
loop that, when plugged in, glows like the heating
elements in a toaster.
1. Lighter Fluid
The most common way to light charcoal briquettes is
with charcoal lighter fluid—an easily ignitable,
petroleum-based product.
Optional Charcoal Starters are not included
CAUTION: Do Not use any of these alternative lighting options in conjunction with the Gas
Burners, Serious Injury or Fire may result.

Page 10
USING YOUR GRILL
Dual Zone Cooking
Your Emerald Grill is divided into two individual cooking zones, each cooking zone is designed to be
controlled individually by how the top adjustable rack is positioned, and the front air intake slider is
adjusted. Depending on how you independently configure these components, will give you control
over diverse types of cooking, including Smoking, Indirect, Slow Cooking and Direct Cooking.
Heat Distribution
Knowing how to configure the different components will give you the very best possible food
positioning while grilling. Depending on how you position you’re Charcoal or Wood. The Cooking
Rods have Variable Spacing for different sized foods, and the Sear Zone Grilling Grate will Sear your
Steaks at over 800 Degrees depending on how hot your Charcoal or Wood is below. It is important
to play with many variations to find what way of grilling is best for you.
Grilling Combination
Your Emerald Grill is designed for an exquisite cooking experience with the use of three separate
grilling surfaces in one. This enables you to be simultaneously searing your food on one side, while
slow cooking or smoking on other side and slow simmer on top warming rack. The two individual
drawer systems allow you to individual control how much either Charcoal or Wood materials you
want to grill with also use multiple types, for some amazing flavors.
Indirect Cooking
Indirect cooking is the process of cooking your food without the heat source directly under your
food. You can sear meats over a high flame on one side of the grill while slow cooking on the other
side of the grill. It is like cooking in an oven and is generally used for larger cuts of meats but can
also be used for cooking foods that are prone to flare ups. Indirect Cooking will result in tender
foods every time you grill.
Direct Cooking
Direct cooking is the process of cooking your food directly over hot coals. This method is also
called Searing, Grilling or even Frying. Direct cooking is recommended for most grilling
applications, and the best place to perform Direct Cooking is in the place where the cooking
surface is the hottest. This type of cooking locks in flavor and juices while allowing the outer
surface to absorb smoke and food aroma that is produced as grease and drippings are vaporized
by the coals. The result is a crisp, flavorful outside with a tender, juicy inside.
Smoker/Steamer Box
Adding the smoker box to your cooking experience adds unique flavor to your food, you will
come to enjoy. Use it for either a smoker box with wood chips, or by filling with Water it
becomes a steamer box. While in use, remember to close the hood. There are many
different wood chips available on the market, the most common are mesquite and hickory.
Just remember to soak the chips for 30 minutes prior, for best results.

Page 11
GRILL PARTS DIAGRAM
ATTENTION: If you do not see the specific part you are needing replaced, please visit our website
at www.sunstonemetalproducts.com. For further assistance please call our Technical Support Office
at 888-934-9449.

Page 12
GRILL PARTS ITEM LIST
NOTES
Item No. EMCHDZ42 Parts List
No
.
Description Qty
.
Part No.
1 Complete Hood Assembly 1 SUN-Hood
2 Hood Mounting Bolt 2 SUN-HBolt
3 Hood Louver Vent - Inside 2 SUN-LVI
4 Hood Louver Vent - Outside 2 SUN-LVO
5 Louver Vent Lever 2 E-LOULEVER
6 Louver Vent Lever Handle 2 E-LOUHAND
7 Hood Thermometer 1 P-ETMeter
8 Louver Vent Lever Spring 2 E-LOUSP
9 Emerald Brand Emblem 1 E-BRAND
10 Side Hood Adjustable Vent 2 E-SHVENT
11 Hood Rod Handle 1 HOOD-E5B
12 Hood Spring Assistance 2 E-HSPRING
13 Main Light Control Button 1 R-LIGHT-SW
14 Lights Wire Assembly 1 E-LWIRE
15 Burner Flare Orifice – LP/NG 2 P-OR-LP/NG
16 Elbow Flare Adapter 2 E-ELBFLAR
17 Manifold Flare ½” NG, 3/8” LP 1 E-MF-LP/NG
18 Light Box w/Halogen Bulb 2 R-LIGHT
19 Crank Rod for Burn Tray 2 E-CRANK
20 Piezo Igniter Button 2 E-PIEZO
21 Emerald Gas Valve – LP/NG 2 E-VA-LP/NG
22 Emerald Valve Knob 2 E-KNOB
23 Emerald Knob Ring 2 E-KNOBR
24 Emerald Gas Burner Tube 2 E-GBURNER
25 Emerald Impulse Igniter 2 E-IMPIG
26 Emerald Burner Frame 2 E-BURFRAM
27
Warming Rack for 42” Grill
1 R-FL-5B
28 Cooking Grates for 42” Grill 2 R-GR5B L/R
29 Burn Tray Racks 4 E-BTRAY
30 Pro Searing Grate 1 R-GSEAR-5B
31 Drawer Handle 2 E-HANDLE
32 Drawer Box Assembly 2 E-DBA
33 Burn Tay Support Frame 2 E-BTSF
34 Firebox Flame Divider 1 E-DIVWAL
35 Vented Drip Pan for 42” Grill 1 R-DTRAY-5B
Page 13
Grill Gas Conversion
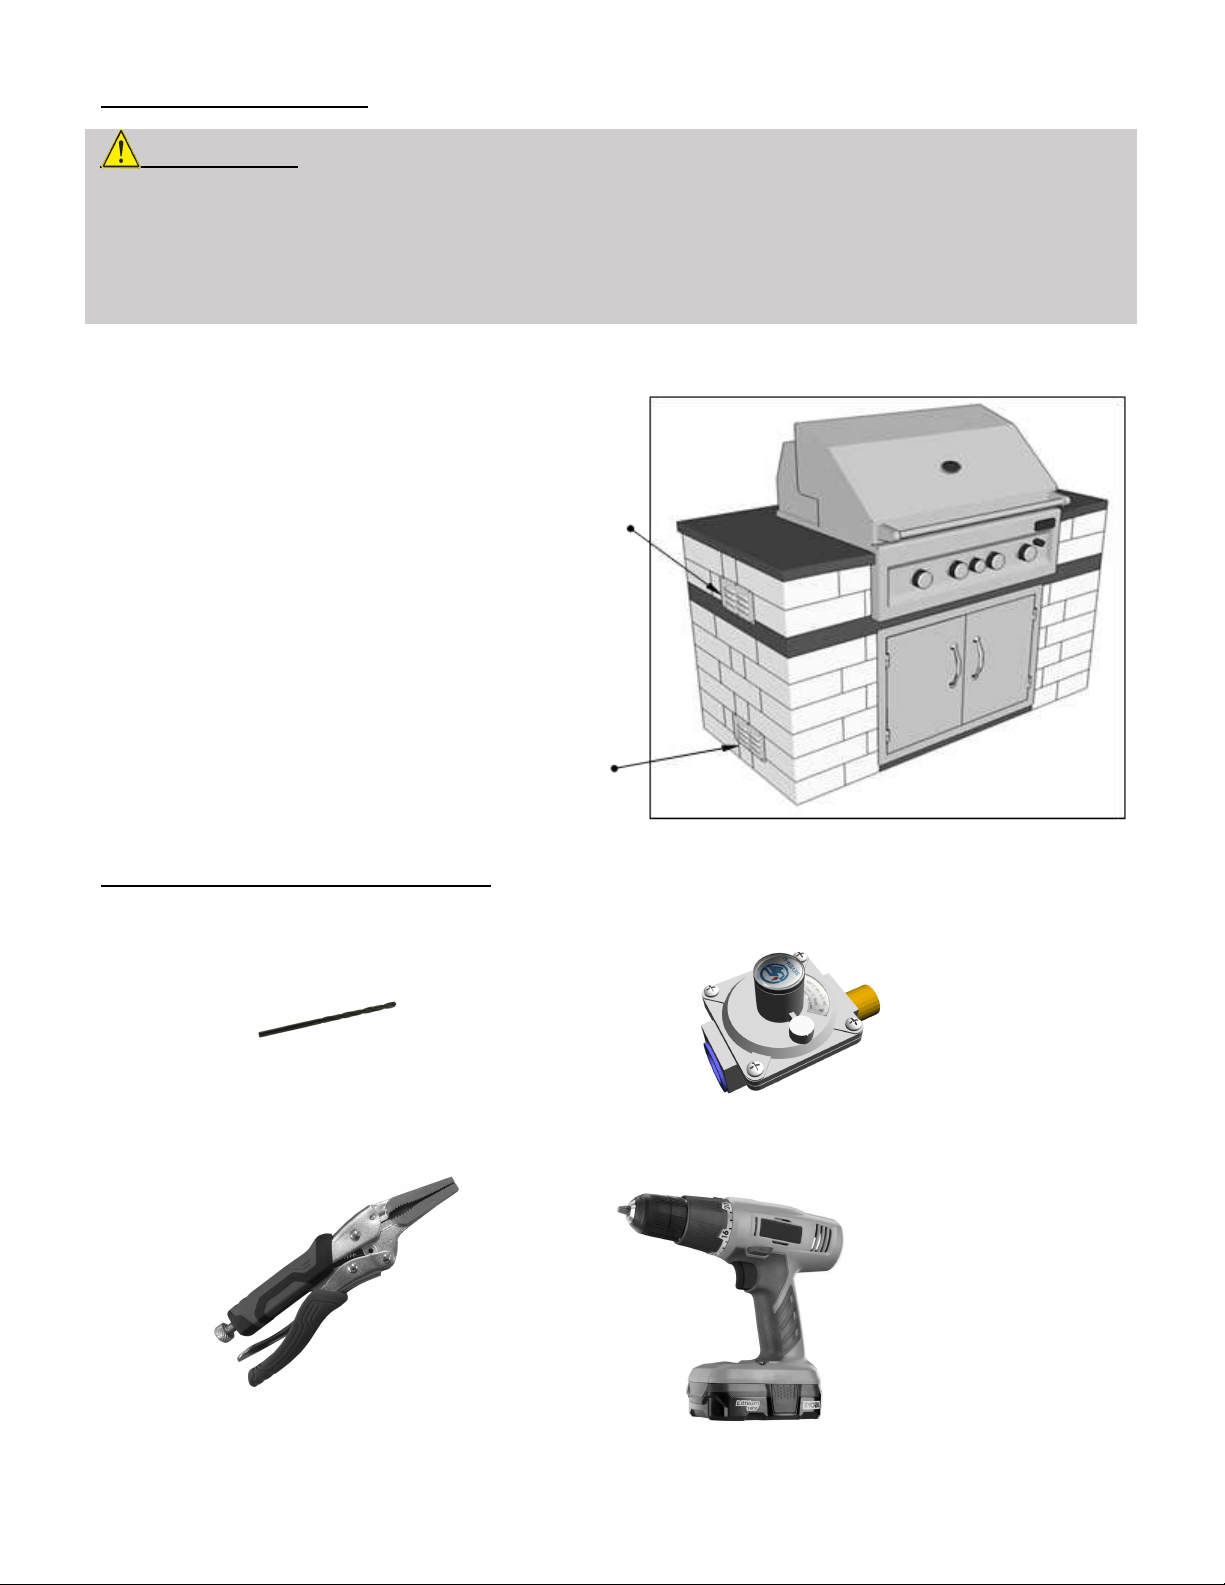
Island Safety Vent Installation for either Liquid Propane or Natural Gas
Grill LP to NG Gas Conversion
This Gas Conversion requires the following parts (Included in Kit)
(1) #50 Drill Bit (1) NG Regulator
with 3/8” Flare Adapter
The following tools are recommended (Not Included in Kit)
Wrench Power Drill
For Natural Gas
Natural Gas (NG) is Lighter and will raise to upper
end of structure upon leak. Outdoor Kitchen Islands
housing Natural Gas Appliance must have several
vents located at the approximate level as the
Appliance Control Panel, were Knobs are located.
For Propane Gas
Liquid Propane Gas (LP) is Heavier and will lower to
base of structure upon leak. Outdoor Kitchen Islands
housing Propane Gas Appliance must have several
vents located within 4" to 6" from ground level.
IMPORTANT!
The Best time to perform this conversion is before grill has been installed into island enclosure. As you
will need access Multiple parts of the Back Underside of Grill where Gas Line hooks up and Two positions
of Flare Adapters. Accessing this location afterwards requires either removing the grill from island or
crawling underneath grill through an access door to reach back underside of grill.

Page 14
Grill Gas Conversion
The Following Steps illustrate the LP to NG Flare adapter change to the RIGHT
Side Flare Adapter ONLY. You will also be required to follow the same steps
when modifying the LEFT Side Flare Adapter to NG gas type.
1. Reveal Grill Firebox
Remove from the Grill ALL Burn Trays, Cooking Grates, Sear Grate, and clean out any residue. Turn
each Burn Tray Cranks so that the Burn Tray Racks are placed to the lowest position. You can tilt the
waring rack into the Stow-Away position instead of removing it. Now look towards the back of each
burner position Left and Right, you will notice a Flare Adapter coming in though the back wall panel.
Page 15
Grill Gas Conversion
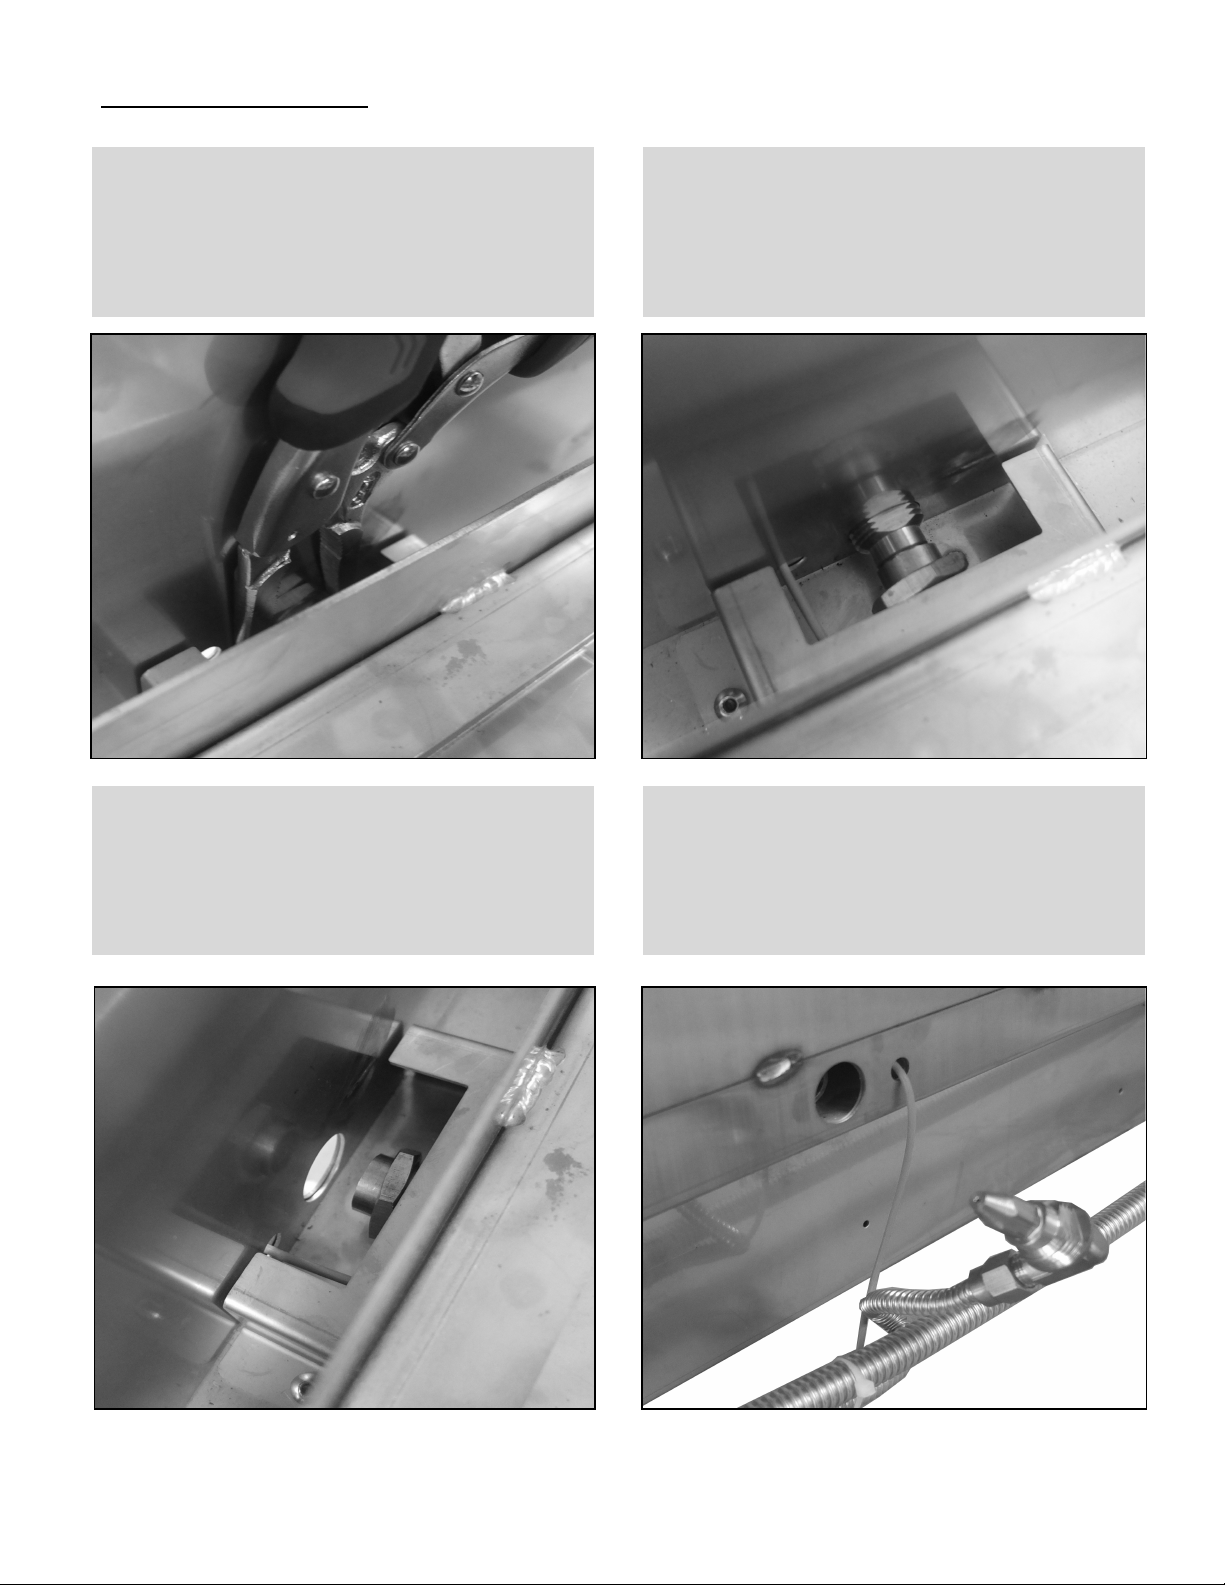
2. Unscrew Brass Flare O-Ring
Using the recommended “Needle Nose Plyers” –
unscrew the brass O-Ring which is securing the
Flare Adapter tightly in place, with it’s nose end
inserted into the open burner hole port.
3. Stow-Away the O-Ring
Important! Be sure to slide the brass O-Ring, if
O-Ring falls below it may be very difficult to pull
it back up as it is a very small area with limited
access under burner compartment.
4. Push the Flare Adapter Out
Push the Flare Adapter out through the port-
hole, while keeping the Brass O-Ring stationary
on the end of Burner.
5. Locate the Flare Adapter in Back
If the Flare Adapter has not been pushed out all
the way, do that now by pulling it out, and
rotate it slightly revealing the Orifice Hole at tip
the Tip of the Flare Adapter Cone.
Page 16
Grill Gas Conversion
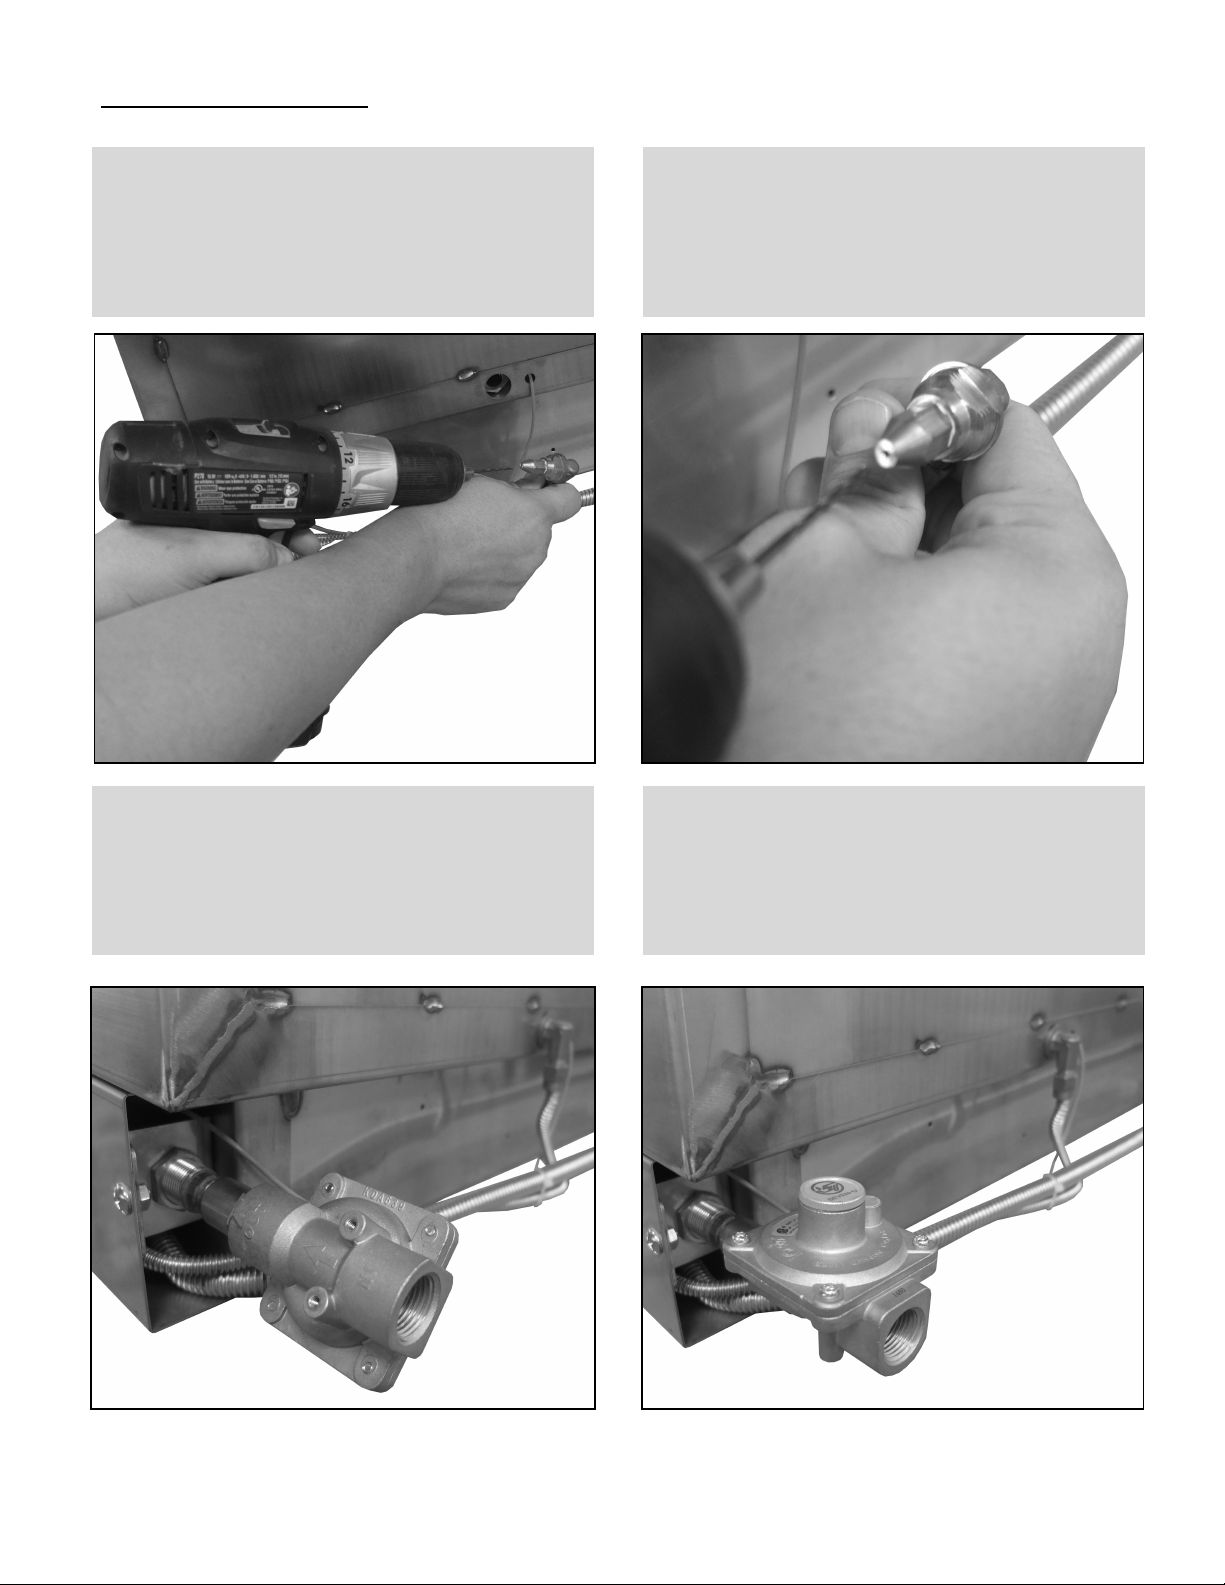
6. Prep #50 Drill Bit & Power Drill
Secure the #50 size Drill-Bit and install it into the
Power Drill. While grasping the Elbow of the
Flare Adapter – Align to the tip of drill bit so
your drill-bit is perfectly aligned to orifice hole.
7. Drill the Adapter Orifice
Aligning Drill to Flare Adapter, Push the Spinning
Drill into the center of Orifice Hole approx. 1/8
th
Inch then pulling out, lastly blow some air into
tip clearing any small particles.
8. Fasten the New NG Regulator
Fasten on the NG Regulator, with the Female
Flare Adapter connecting to the Grills Right Back
Side Gas Manifold Male Flare Adapter. Notice
Arrow indicating direction of Gas Flow.
9. Finalize LP to NG Conversion
The NG Regulator will have a ½” Female Flare
Adapter on other end, try our 18” Black Hose, or
a Quick Disconnect – Always have a Licensed
Plumber make this final connection.

Page 17
Grill Trouble Shooting
Q. Grill Gas Burner Doesn’t Ignite, when pressing in the Black Ignition Button
A. Remove the Cooking Grates, Burn Trays and Locate the Back of each Gas Burner where you will see a
small Angled Metal Prong, this is the Impulse Igniter. When you press in the Black Igniter Button, an
Electrical Impulse travel down the connecting wire to this Metal Prong, resonating at the Point and will
then Ark over to the adjacent Burner. If the Burner is Not Clean enough, it will diminish the amount of
surface area the ARK can impact and thus it will not ARK and the gas will not ignite.
Q. LED Light is not functioning while interior lights are ON
A. Likely your LED Light has malfunctioned do to the grill being Overheated, or there may be a loose wire
on the internal control circuit board. You can access these components by sliding the grill out from your
island approx. 6 Inches, there are 4 screws on either side holding the front control panel to grill body, and 4
Alan Wrench Screws on the inside facing towards front panel, you will see 4 Holes. Removing these screws
will allow the main control panel to be removed revealing the internal LED light and Circuit Board. You can
then easily unplug and replace LED light with new one or check for other loose connections.
Q. Either One or Both Interior Lights do not work but LED Light works
A. Most often the interior Halogen Lights will burn out One at a time, if both are out at the same time, you
could have a connection issue. Check the Plug in the back bottom Left of grill, the plug consists of two
sockets on either side, check to make sure each is securely pushed in. If all the Lights do not work, then it is
either unplugged or the Transformer has malfunctioned. Each Halogen light can be replaced by unscrewing
a single screw per light located on left sides of light cover, the entire light box needs to be removed, there
are two small black wires hard-plugged into back of light. Use a pair of plyers to remove these, replacing to
new Halogen Light box, again use a pair of plyers to push each wire into each socket of light box, Test light
is working before inserting back into hole and again tightening the small screw on left outer side.
Q. The Gas Burners flame is very Low
A. If your grill is using a 25 Pound Portable tank and is directly connected to grill with no other appliance,
you may have a Spider Web or other clog in the gas Pipe. If your grill is connected to a Side Yard 500 Gallon
Tank, there may be an issue with the Regulator – either it is a Low-Pressure Regulator being used, or not
enough gas pressure is being allowed to the grill. If you have any T-Connections in gas line going to other
outdoor Appliances like a Fireplace or Side Burner, this can also greatly diminish gas flow.

Page 18
GRILL WARRANTY
SUNSTONE SERIES 42” GAS HYBRID CHARCOAL GRILL WARRANTY
***All Warranties Start from the Date of Purchase***
LIMITED LIFETIME WARRANTY
Sunstone Stainless Rod Cooking Grids and Stainless-Steel Housings (including liners, frames, firebox and hood and all exterior
grill faces) are warranted for as long as you own you’re Sunstone Barbecue Grill against all factory defects. This warranty
does not cover against consumer usage wear and tear from using the grill as all grilling methods will erode the 304 Stainless
Steel Materials.
LIMITED LIFETIME WARRANTY WITH ONE YEAR BURNER REPLACMENT
The Stainless-Steel Gas Tube Burner is warranted for as long as you own you’re Sunstone Barbecue Grill against all factory
defects. In addition, the Burner is covered for the first full year from date of purchase with FREE replacement against all wear
and tear. This warranty covers the burner only, it does not cover the cost of a service tech to replace the burner.
LIMITED ONE-YEAR WARRANTY
All other grill components including, thermometer, light assemblies, gas-valves, piezo-igniters, springs, all electrical wire are
warranted to be free from defects in material and workmanship for a period of one year from the original date of purchase.
LIMITATIONS & EXCLUSIONS
1. SUNSTONE warranty applies only to the original purchaser and may not be transferred.
2. SUNSTONE warranty is in lieu of all other warranties expressed or implied and all other obligations or liabilities
related to the sale or use of its grill products.
3. SUNSTONE warranty shall not apply, and SUNSTONE is not responsible for damage resulting from misuse, abuse,
alteration of or tampering with the appliance, accident, hostile environment, flare-up fires, improper installation, or
installation not in accordance with the instructions contained in the User Manual, or the local codes.
4. SUNSTONE is not responsible for warping of component parts due to overheating or using in a way not in line with
the product manual.
5. SUNSTONE shall not be liable for incidental, consequential, special or contingent damages resulting from its breach
of this written warranty or any implied warranty.
6. Some states do not allow limitations on how long an implied warranty lasts, or the exclusions of or limitations on
Consequential damages. This warranty gives you specific legal rights and you may have other rights, which vary
from state to state.
7. No one has the authority to add to or vary SUNSTONE warranty, or to create for SUNSTONE any other obligation or
liability in connection with the sale or use of its products.
8. SUNSTONE DOES NOT COVER FOR WARPING OF STEEL DRAWER, GRATES, OR ANY OTHER COMPONENT FROM THE
RESULT OF MISUSE OR OVERHEATING OF COMPONETS.
WHAT IS NOT COVERED. & INTERNET PURCHASE DISCLAIMER
1. SUNSTONE shall not be responsible for and shall not pay for the following Installation or start-up.
2. Service by an unauthorized service provider and the cost of a service tech of any warrantied parts.
3. Damage or repair due to service by an unauthorized service provider or use of unauthorized parts.
4. Damage caused by accidents, abuse, alteration, misuse, installation that is not in accordance with the instructions
contained in the User Manual, or local codes.
5. To correct normal adjustments or settings, due to improper installation, commissioning or local gas supply
properties.
6. Shipping and handling costs, export duties, or installation cost.
7. The cost of service calls to diagnose trouble; or Removal or re-installation cost.
This warranty applies to the original purchaser with invoice or proof of purchase and covers Sunstone products intended for
personal, family or household usage only. It does not apply to surface rust, corrosion, oxidation or discoloration, which may
occur due to moisture or overheating, unless the affected component becomes inoperable. This warranty does not cover
parts becoming defective by misuse, accidental damage, improper handling and/or installation. It does not cover labor or
labor related charges. It specifically excludes liability for indirect, incidental or consequential damages. Some states do not
allow the exclusion or limitation of incidental or consequential damages, so the above exclusion or limitation may not apply
to you. This warranty gives you specified legal rights and you may have other rights which may vary from state to state.
For additional information regarding this warranty, or information on how to place a warranty claim, contact your
authorized Sunstone dealer.