website http:/i_ ww.lgservice.c
Air Conditioner
'S
PHor to insta|llation, tins airs
_nditioning unit must be
submitled for approval by the
s_vice which provid_
EN 61000-2_
EN 610_-3 Norm),
and thoroughly
air conditioner.
future re!erence after
FOR YOUR RECORDS
Wrile the m_el _sd seria_ numbers he_e:
Model #
Serial #
You can find them on a label on the side of each unit
DealeCs Name
Da_ Purc_sed
i! Stap!e your r_eipt Io this page in the _¢e_t 'you need
it to prove date d purchase or _or warranty issues,
READ TH!S MANUAL
Inside you will find many helpful hints on how to use
&rid m_nt.air_ your air conditioner pro_riy. Just: a littie
preventive c_re on your part c_n save you a great dea_
of time and imo_'_eyover rise lite of you_' aiw'c_ndi[ioner
Youli find many answers to _mmon problems in the
chart of troublesh_ting tips. If you review our chart ,d
Troubleshooting Tips first, you may not. need to ca_
for seevice at all.
* Co,act the a_horized service technician _or
repair or maintenance of this unlt_
. _act the installer for installation o_ _is unlit
.The air conditioner is not intended _or use by
you_ ,children or invalids without supervision.
* Young chiidren should _ sullied to ensure
that they do not p_lay'with the air condittonerr,.
-When the power cord Is to be replaced,
replacement work shall be performed by
_uthorized personnel only _sin9 only _e_uine
replacement _s.
.l_stallation work m_st be performed in
_ccordance with the National Electric Code b,y
qualified and _uthonz_ _rsonneil only.
2 Room Air Conditioner
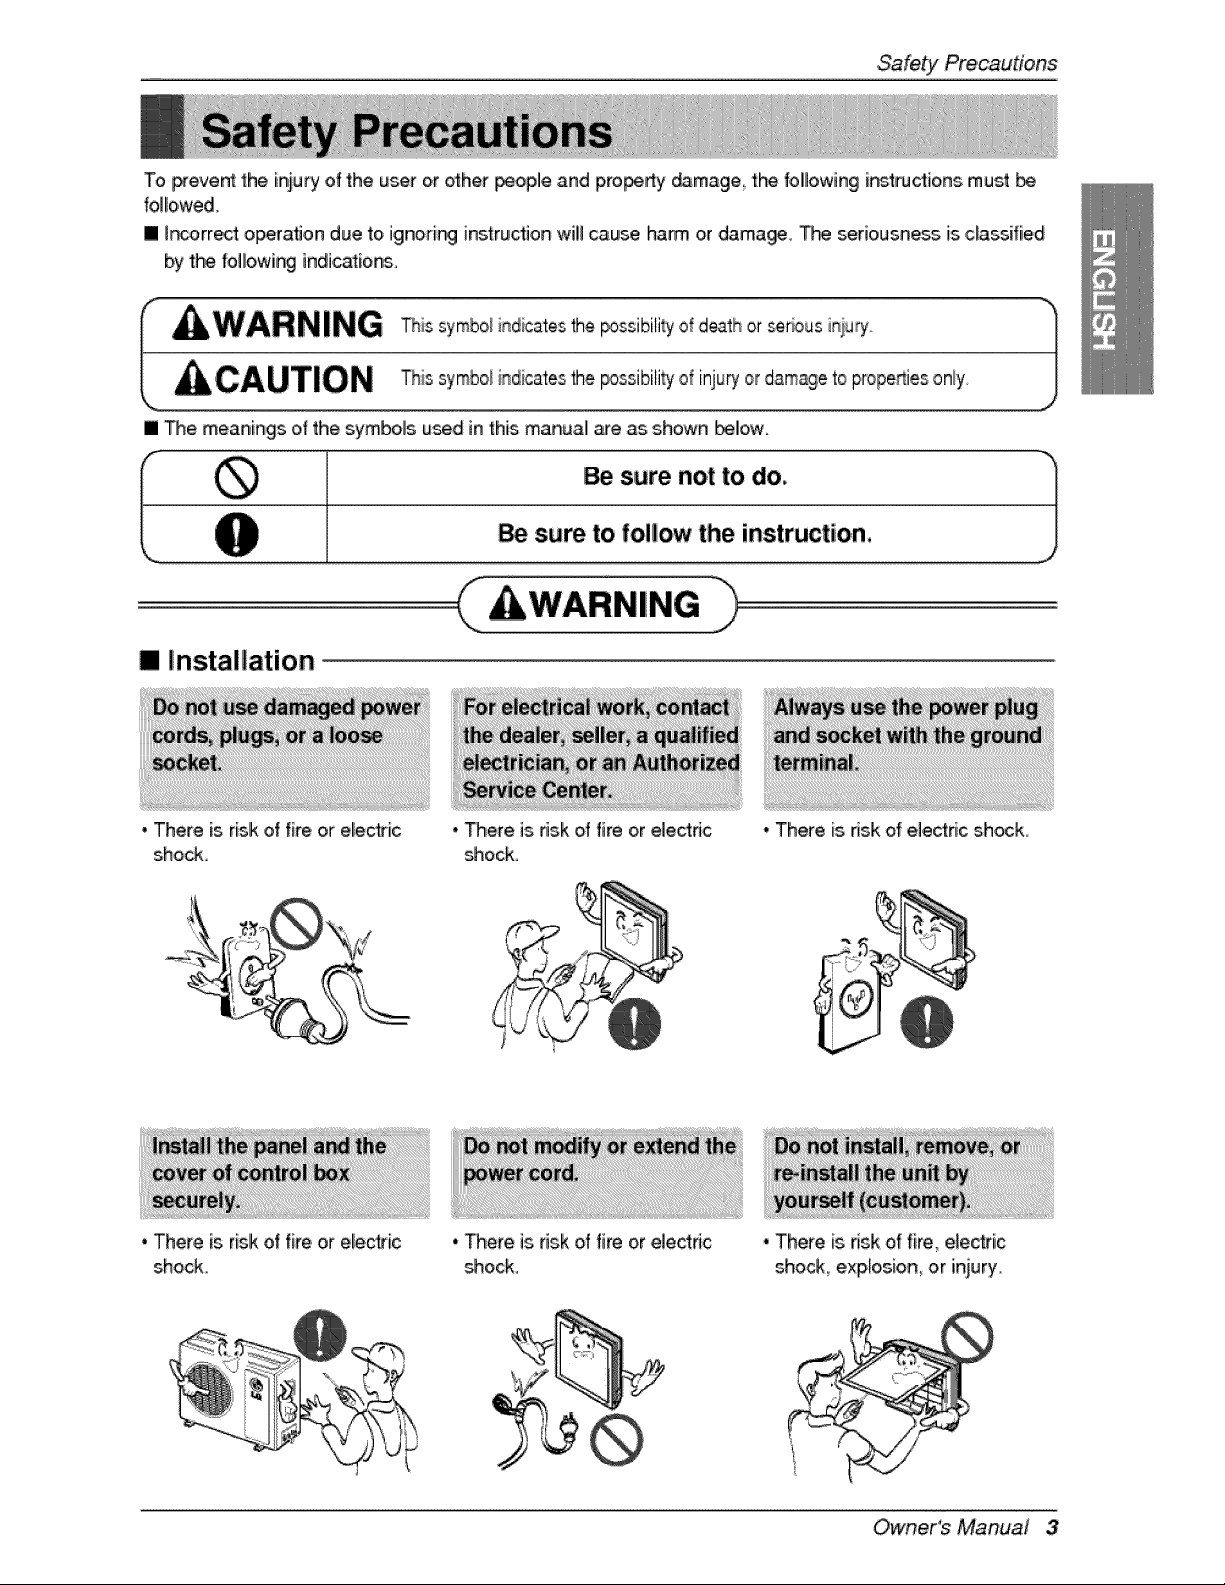
To prevent the iniury of the u_r or other _oplle and p,ro_dy _mage the follllowing i_ttudio, ns must
folio,wed.
[] _r_orrect operat_Jondue to ignorir_ instruction wili cause, harm or damagie_ T_ seriousne_ is classified
by the following indi,c_ions.
[] Me meanings of the symbols u_d in this manual me as shown I_ow.
[] Installation
, There is risk of fire or ele@ic
shock.
, There is risk of fire or elect,tic
shock.
° There is risk of fire or el,ectdc
_ock.
• Mere is.dsk of fire or electric
_ock,
° There is risk of electric shock,
, There is risk of fire, electric
shock explosion, or injury,
Owner's Manual 3
SafetyPrecautions
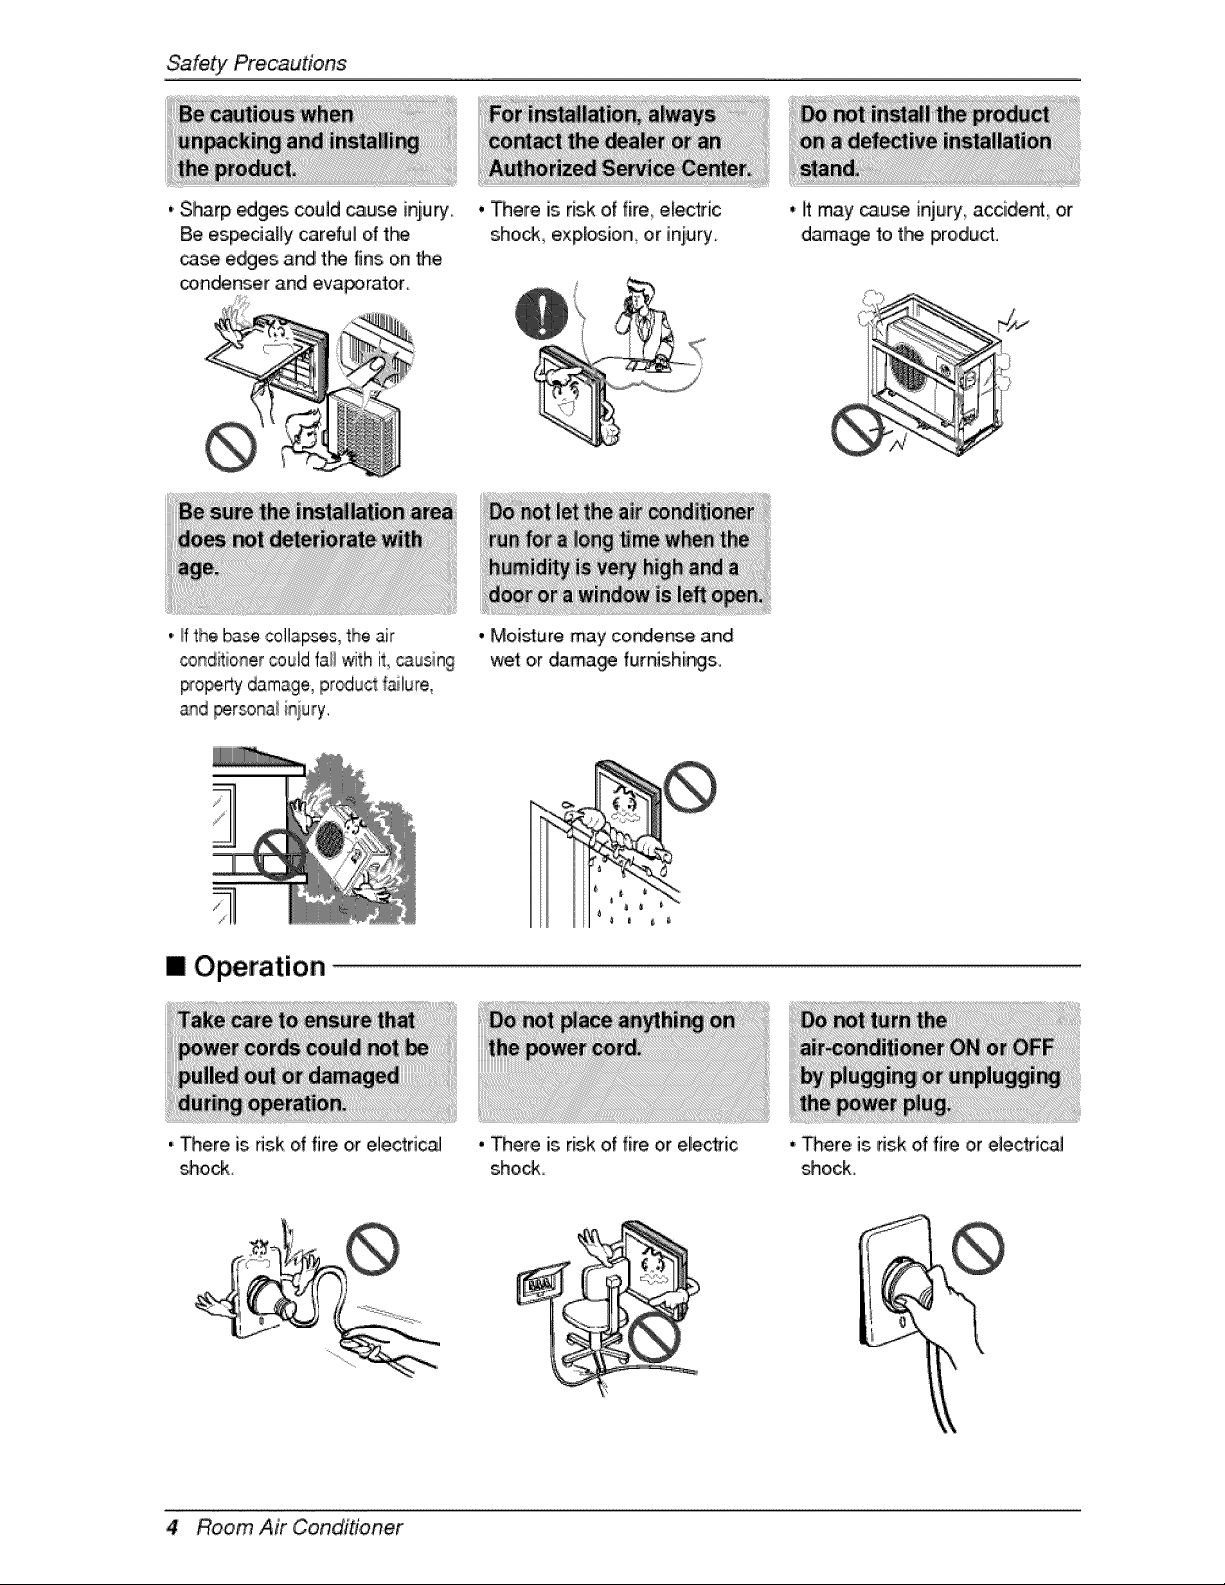
, Sharp _ges could cause iniury.
Be espedaHy careful o{ t_
case ewes and t_ fins on Me,
con_nser and eva_rator
, There is risk of fire electric
sho_., explosio,n_or injury_
0 litmay _u_, injury accide_ or
dama_ fo t_ product,
.,ffthe base c,ollaps,es,the air
_r_ditioner could fa_lwith it, causing
_o_rty damage, pr_uct _lure,
_d per_na_ i_iury.
[] Operation
, There is dsk d fire o,relectrical
shock.
. Moisture may condense and
we_ oir dama_ fumishings.
• There is risk of fire or electric
shock
.,There is risk of fire or electricaJ
s_hock.
,t
4 Room Air Conditioner
._re is risk of fire or electrical
sh_k.
, There is risk of fire or eliecttical
shock.
Safety Precautions
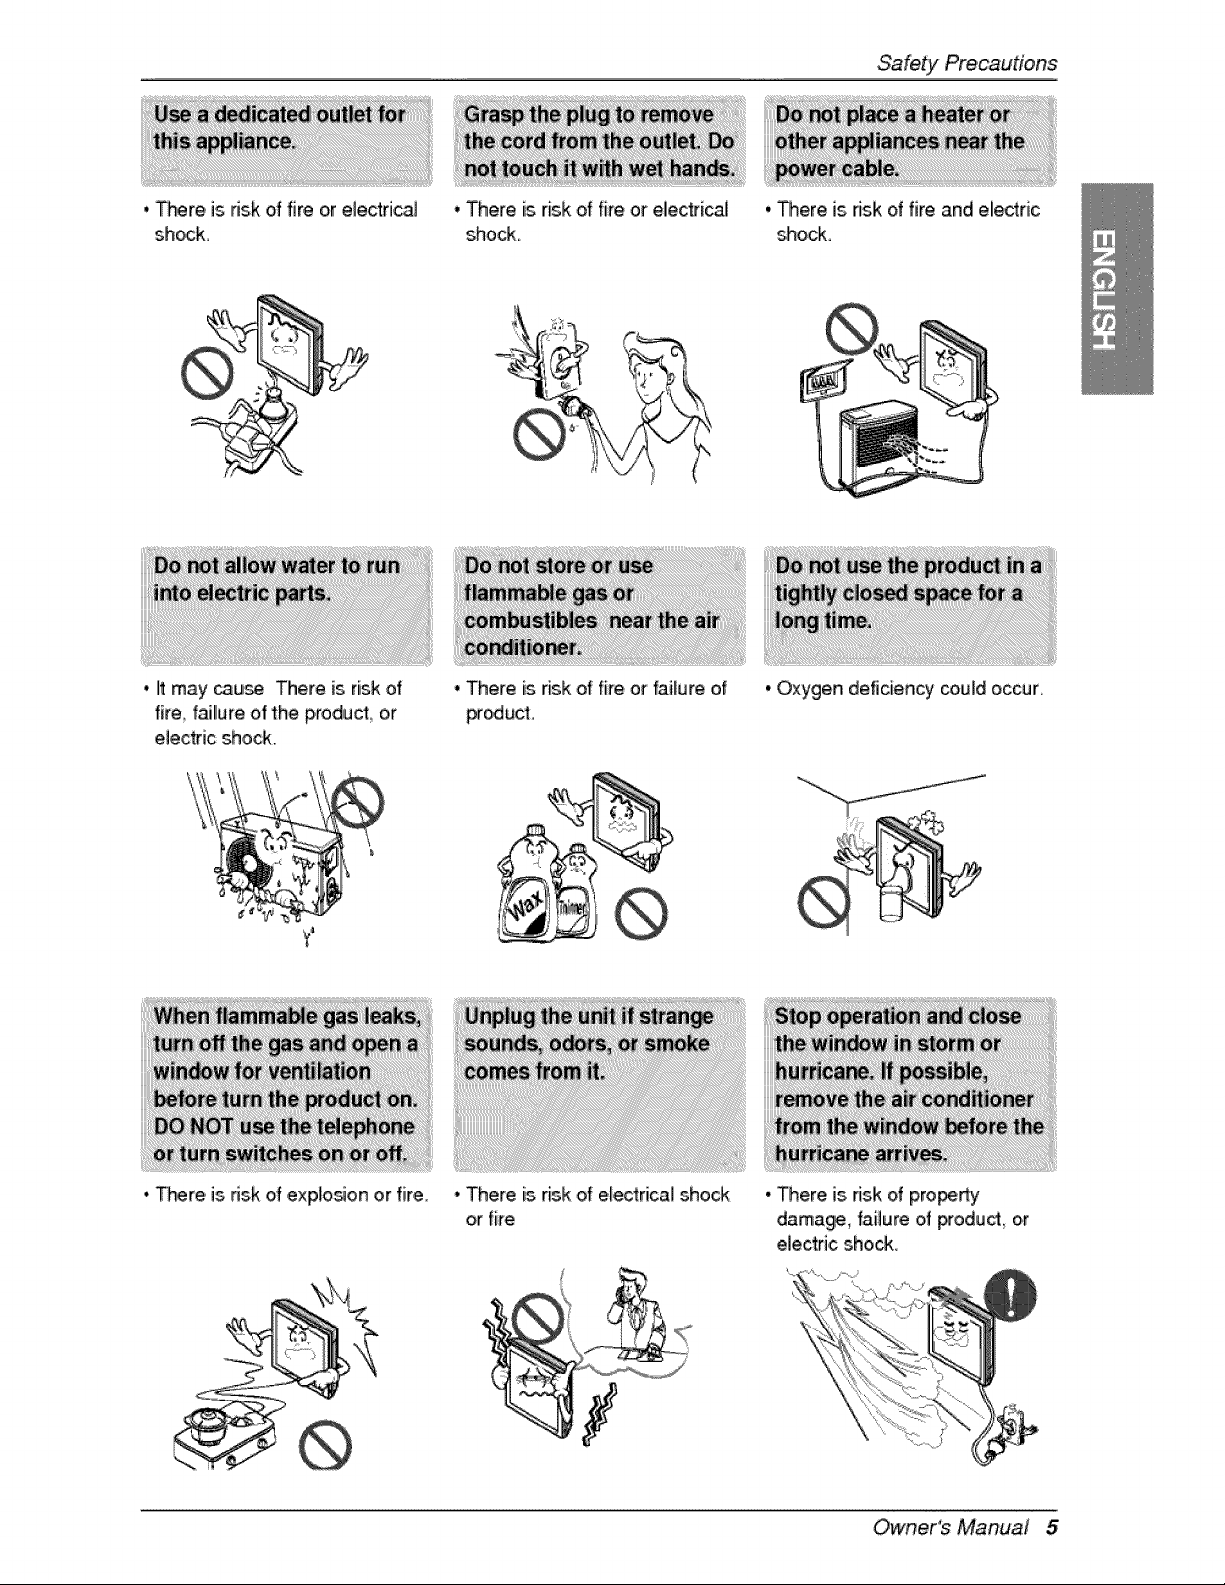
. It may cause There is risk of
fire f_llure of the p,roduct_o,r
electric shock,
• _re is 5sk of exp!o_on or fire.
. There is risk of fire or failure of
producl,
' There [s risk of e_ectrica! shock
or fire
, There is risk of fire and electric
shock,
o Oxygen deficiency could occur,
oThere is ds.kd pro_rty
damage, failure of product, or
electric sho_,
Owner's Manual 5
SafetyPrecautions
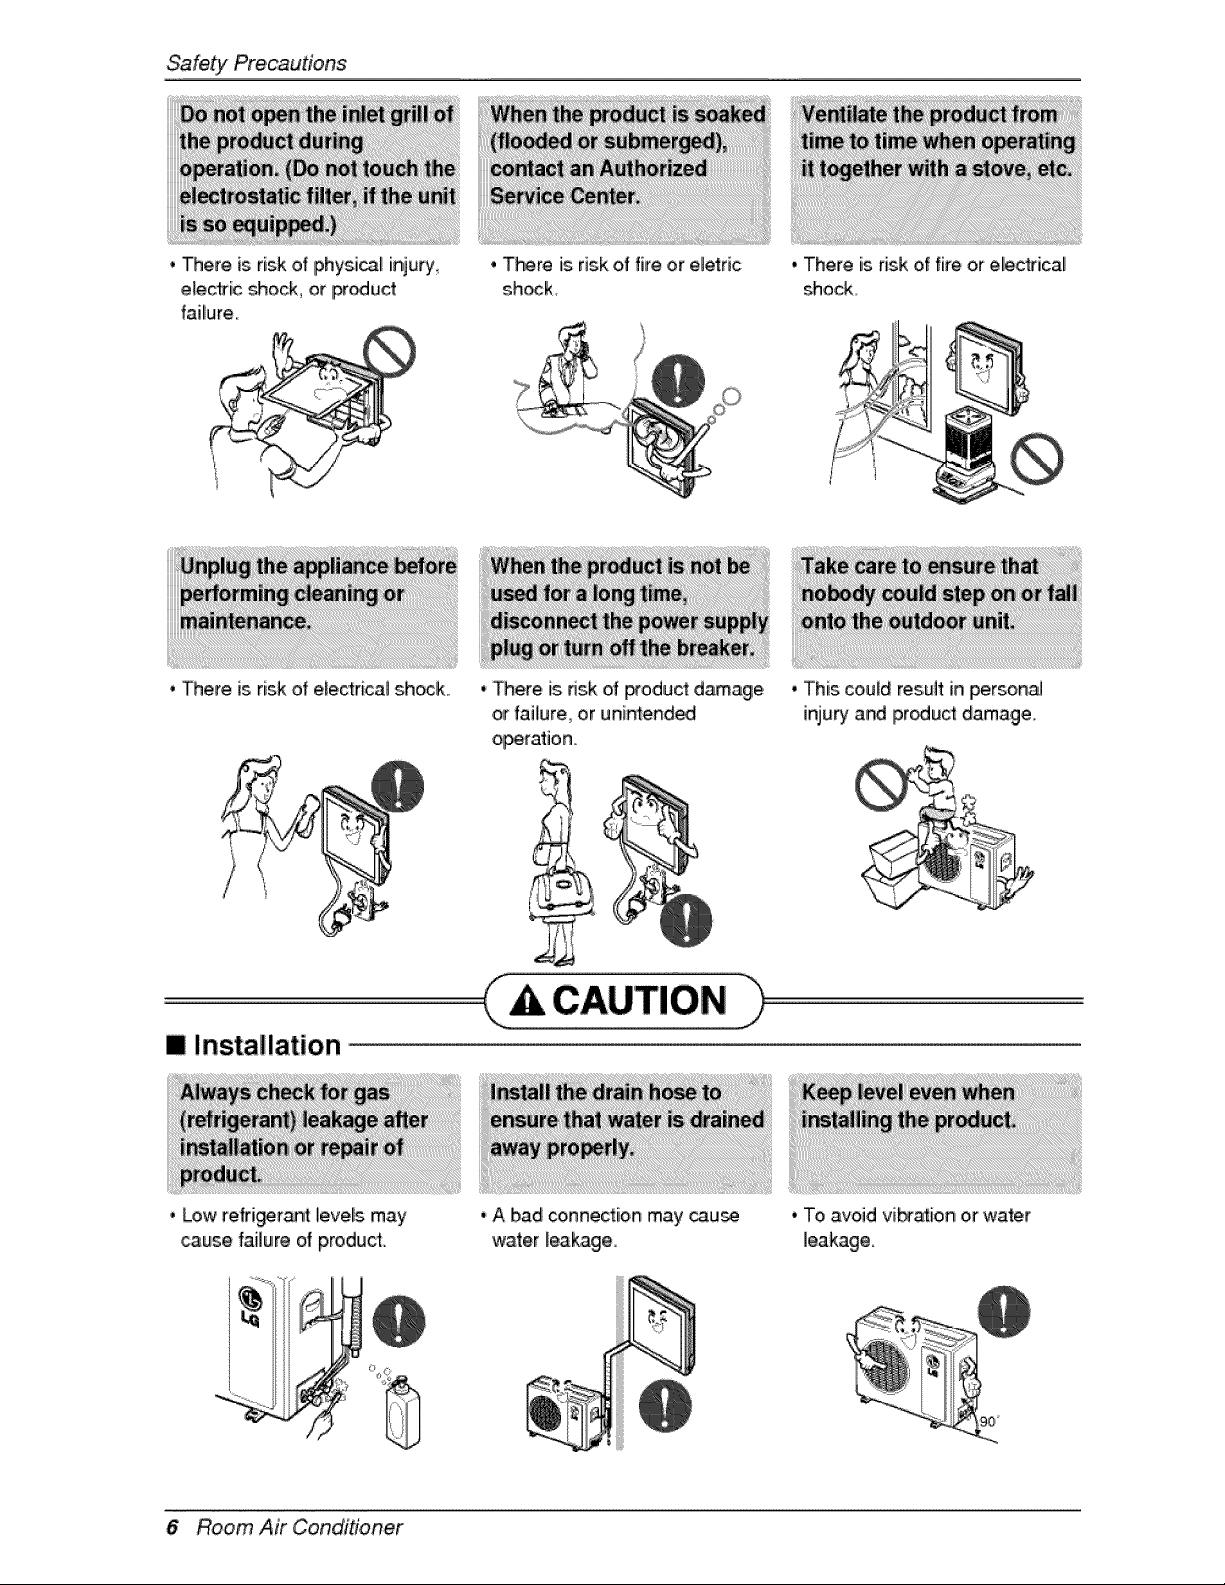
, There is risk of physic[ inju_j
e_ec'lric_ock, or iPr_uclr
failure
, There is risk of electrical shock.
, There is risk of fire or elet:ric
shock
* There is dsk oil product d_agle
or failure, or unintended
operation
m Installation
i' Low refrigeran_ ievels may
_use failure of product.
6 Room Air Conditioner
' A bad co,nnectiion may cau_
water leakage
, There is risk of fire or electrical
shod{.
. This could res,ult in person,_
injury and Ipr_uct damage,
. To avoid vibta_io,n o,rwater
leakage.
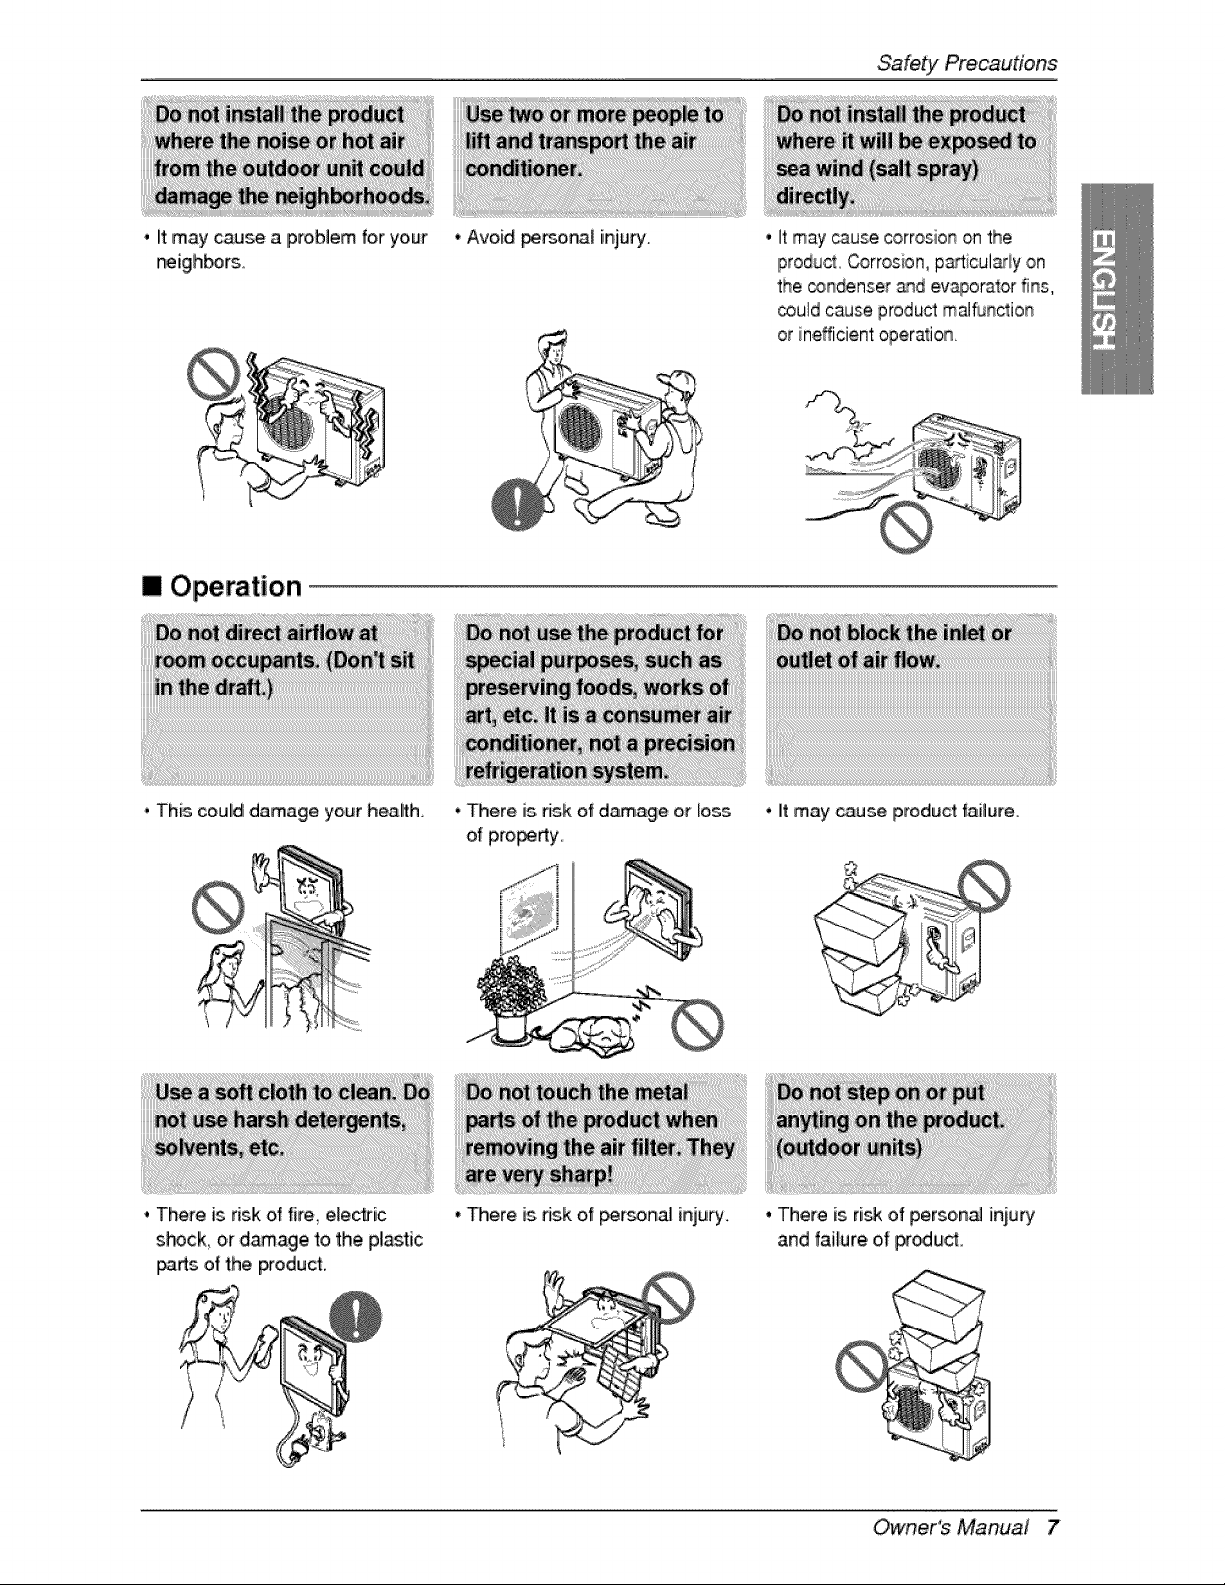
, it may cause a problem for your
f_igh_rs.
[] Operation
• This could damage your health
. There is risk of fire_eUectric
shock, or d_age to the plastic
i_rts of the product.
• Avoid persoi_i injury.
• There is,dsk ef damage or loss
of pro_rty,
• There is dsk of _r_onal injury.
Safety Precautions
• It may cause corrosion on the
iProdu_. Corrosion, p_licul_ly on
the _ndenser _d ev_orator fins,
could cause product malflJnction
• it may cause product failure,
, There is ri_ of perso,n_ injury
and failure o,f proud.
Owner's Manual 7
Sa'fety Precautions
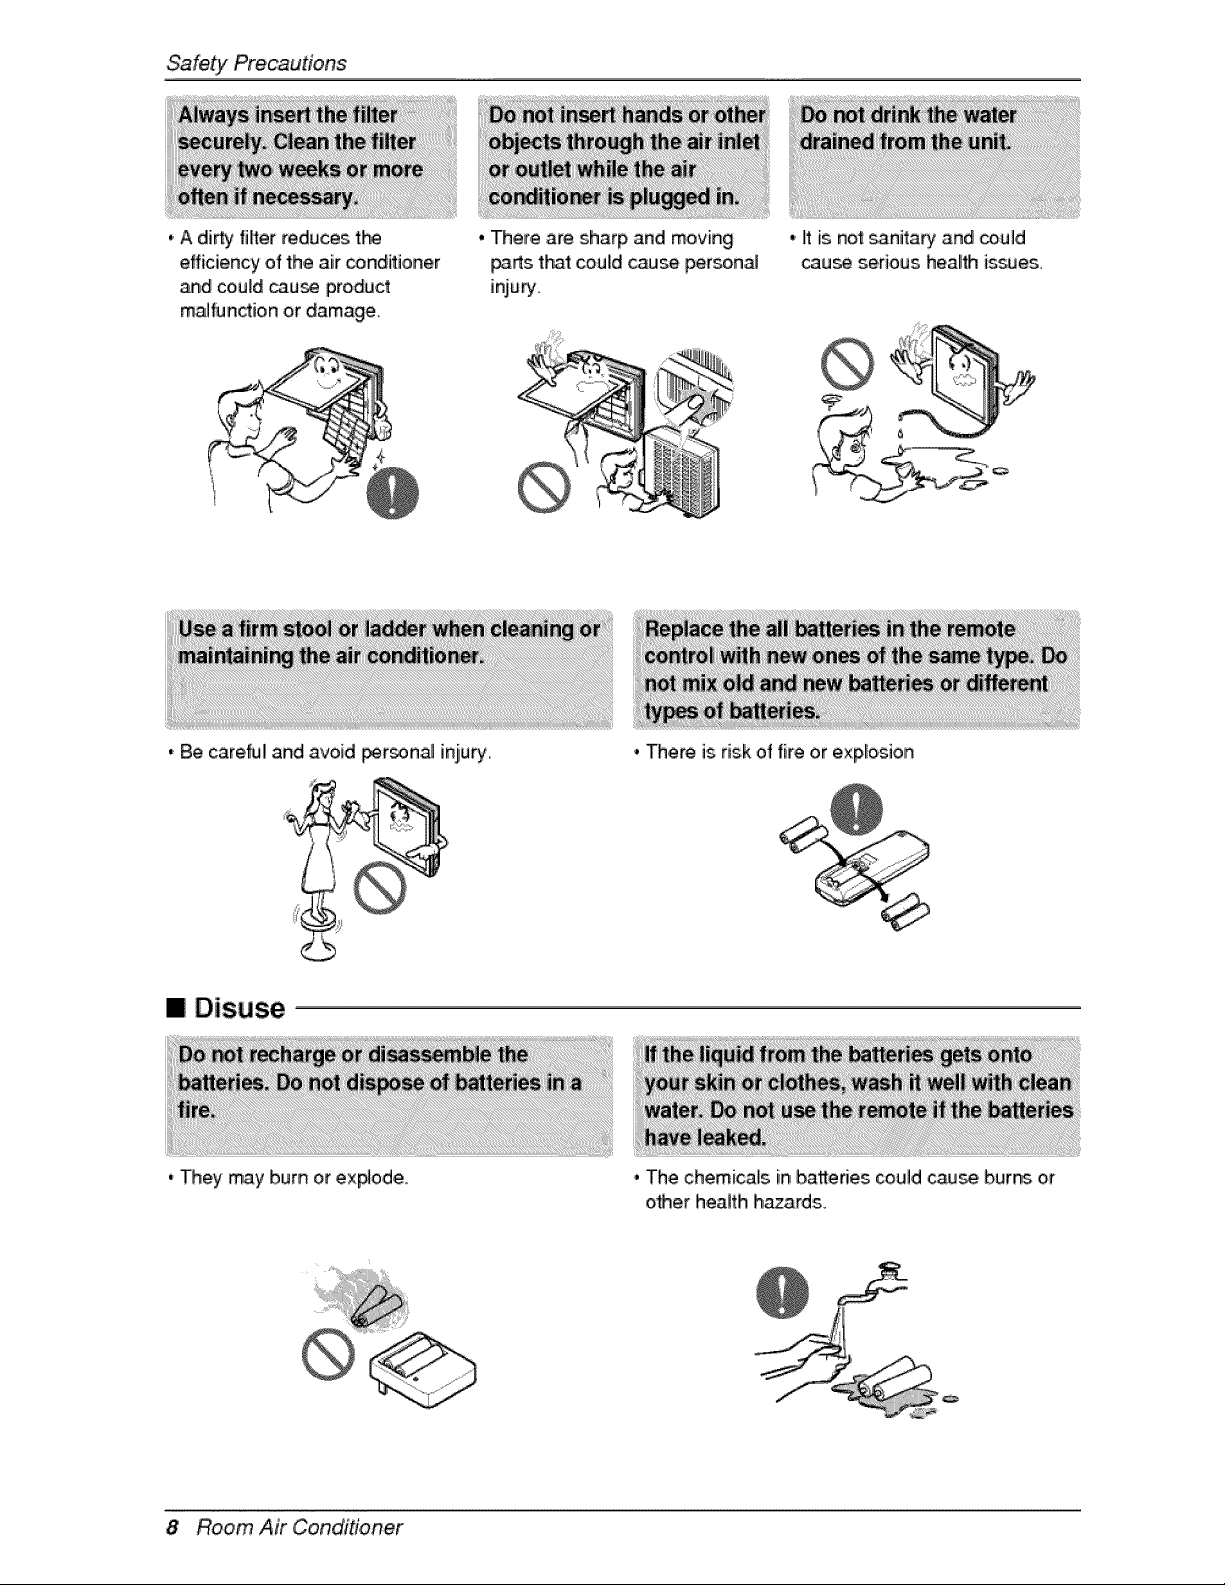
,,A dirty filter reduces tN
efficiency of the air _nditioner
_d co,uld caru_ product
m_function or damage.
, There are sharp and moving
_rts t_t could c_se person_
injury.
• Be careNI and avoid i_r_nal injury.
[] Disuse
' They may burn or explode.
,. Itis no'__nita_i and could
cau_ serious health is_es.
, There isrisk of fire or explosion
, The chemicals inbatteries couldcause burn_ or
other heaffh h_ards.
8 Room Air Conditioner
Priorto Operation
1. Contact an installation specialist for inst_lation.
2. pilug in the _wer p_ugproperly.
3 Use a dedicated circuit
4. Do _t use,an extension cord
5. Do _t s_rtistop o_riatio,n by pluggin£_"unplugging the po_r cord.
6, ff the cordipfug is, damaged, replace, it wffh only _i _tho, dzed replacement part.
1 Being exposed to direct aidlow 1ora long time may _ hazardous to your heaffh Do not ex_se
o,ccup_ls pets or pllants to direct airflow for a Ilongtime.
2,,Due to the _ssiNlity of oxygen deficiency ve_ilate the room when using the isp,p4iar_,etogether with
stoves or ot_r heating ,devices.
3. Do not use 'this air conditioner for non-s_cified special pur_ (e.g. preservi_ precision devices_
too,d, pets p_ian_, or art obj_ts). Such use may d_age your p_o_Hies.
1. De not touch the metall parts of 'the unit when removing the filter Injury can oic_ur.
2. Do not use water to clean inside the air condffioner. Ex_sure to, water can d_troy tt'_ insul_io, n
leading to electric shock.
3. When cleaning the unit, tirst make sure,that the power and brewer are _rned off. The, fan rotates at a
very high speed during o_ration. There is a possibility oil inju_ if the unit's, power is triggered while
clewing inner par_ of the unit.
For repair and main_tein,an_ oon_ct your authorized service dealer
i i i
Owner's Manual 9
Introduction
This symbol alerts you to the risk of ei_tric shock.
This symbol alerts you to hazards that may cause ham to the
air conditioner.
This symbol indicates sp_ial notes.
WARNING: This appliance should Ibeinstall_ in _cordian_ with national wiring
r_ul_ions. Dis guide acts as a guide to help to ex_ain _oduct feature.
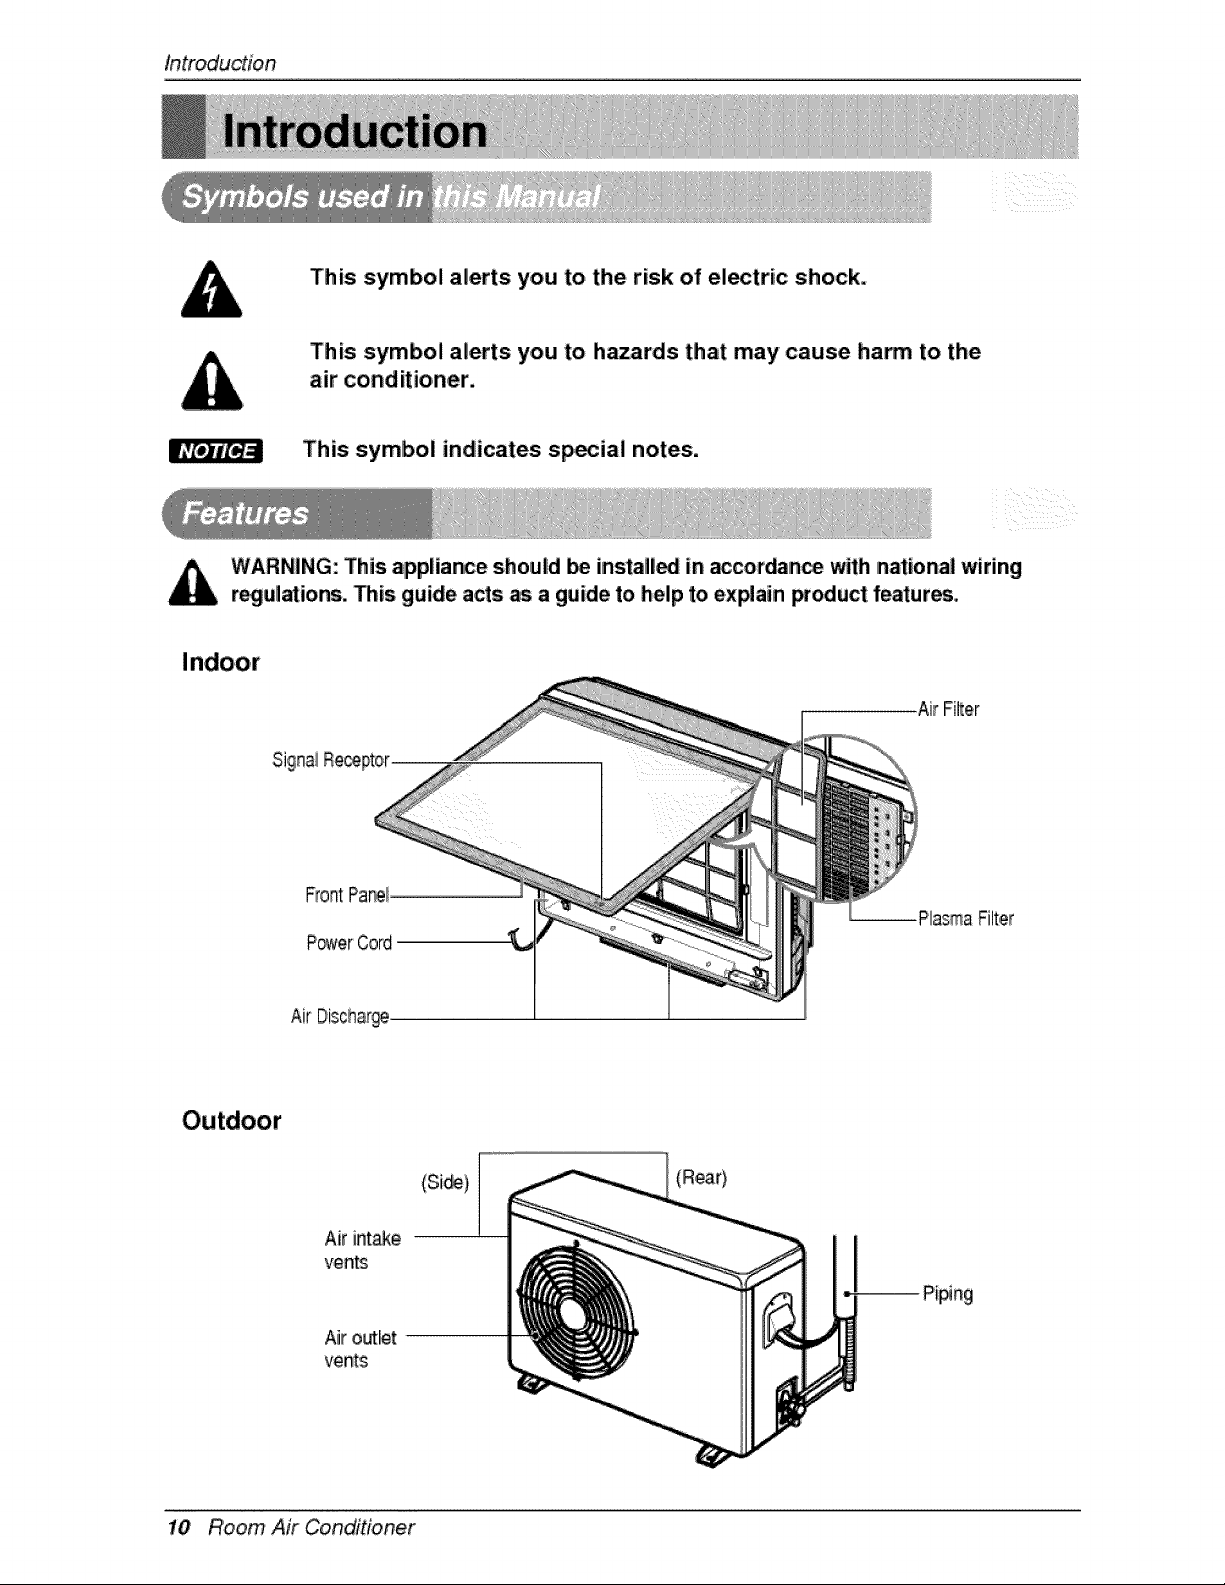
Air FiRer
P_erCord
Air Disch,af@
Air intake
vents
10 Room Air Conditioner

This appliance must be pro_rly grounded.
To minimize the risk of el_tric sh_k, you must alway plug into a grounded oulet.
Pref_red method
(
i
Ensure proper ground
exists before use
Do not cut or remove the grounding prong from the
power plug.
Attaching the adapter ground terminal to. the. wa!!
=receptacle cover _rew does not ground the appliance unless the
cover screw is metal and not insulated, and the wall re_ptacle is
grounded through the hou_ wiring.
If you have any doubt whether the air conditioner is
properly grounded, have the wall r_eptacle and circuit ch_k_ by
a qualified el_trician.
Owne,r's Manual 1!
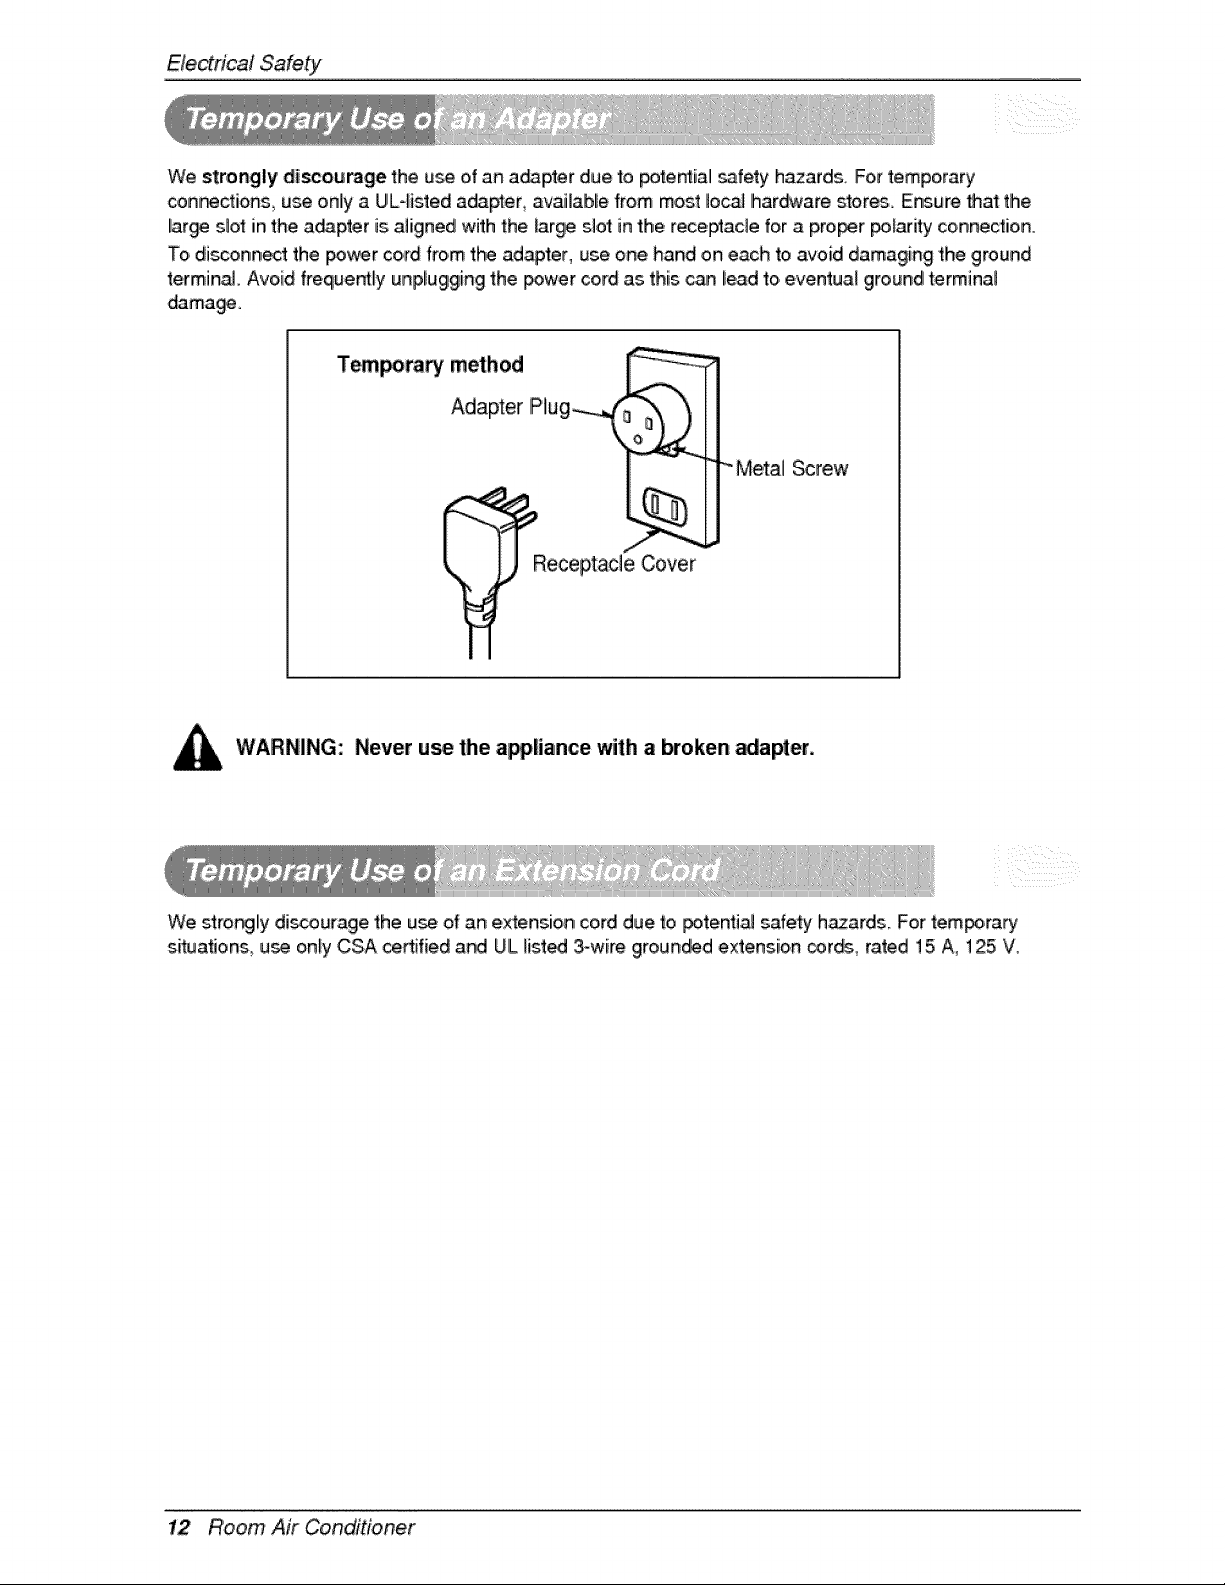
We strongly discourage the u_ of an a_pter due to _te_iall _fety hazards For temporary
confections, use only a UL-listed a_pter, available from most Io_ Ihar_¢are stor_i. Ensure that the
lar_ slot in the a_pter is aligned with the large slot in the receptacle for a proof _adty connection
'To,disconnect the _wer cord from t_ ada#l!er, use one hand on each to avoid damaging the ground
terminaJ. Avoid frequency unplugging the _wer cord as this can lead to eventual ground terminal
dama_.
T_ra_ method _ _
\
,/_-/ I
__Receptade Cover
WARNING: Never use the appliance with a broken _a_er.
We stro_ly di_ouragie the use of an e_ensio, n cord due to potenti_ safety h_ards. For tem_irary
sit_a_ons use only CSA certified a_ UiLlis.t_ 3-wire groun_d extension _r_, rated 15 A, 125 V.
12 Room Air Conditioner
Op,eradnginstructions
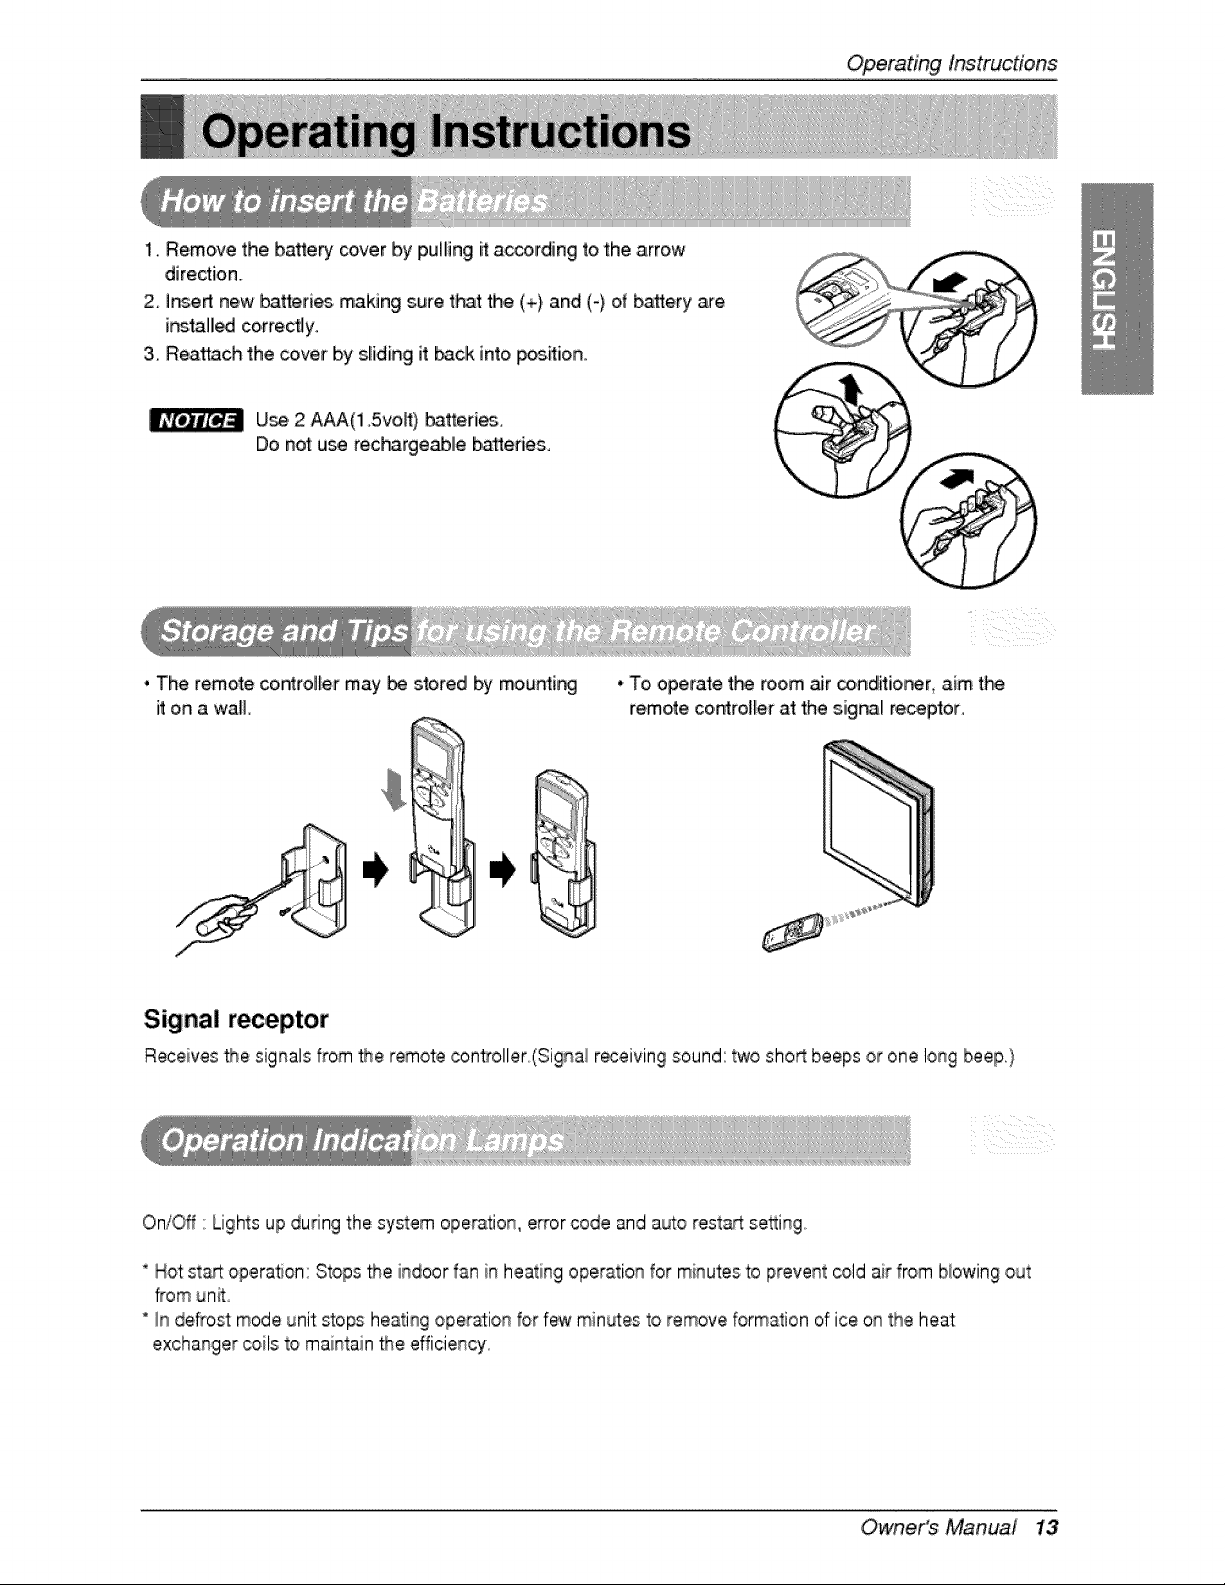
1. Remove the bakery cover by pulling it:according to the arrow
dire_ion.
2° inert new batteri_, making sure t_t the (+) and (-) of battery are
i_tal_ correctly.
3, Reattach the cover by sliding it back into p_ion..
U_, 2 A_(1 5voW) _tter[_
Do not use rec_-_rgeablle batteries,
, The remote co,roller may_ stored by mountir_
it on a wall.
•To operate t_ room ._r co.ndit[or_r, aim t_
remote co,n_roi_erat the siig_[ receptor,
Signal receptor
Receives _e signals from _e remote controller_(Signal r_eiving sound:two sho_ beeps or one long beep.)
Oni_f ' Lights up during the system operation, error code and auto restad:se_ingo
* Hot st_ opera, on: Stops the indoor fan in heating operation for minutes to prevent cold air from blowing out
from unit
" In defrost mode unit stops heati% oper_ion for few minL4esto remove formation of ice on the heat
exchanger coils to maintain _e efficiency.
Owne,r's Manual 13
Operatinglnstruc#ons
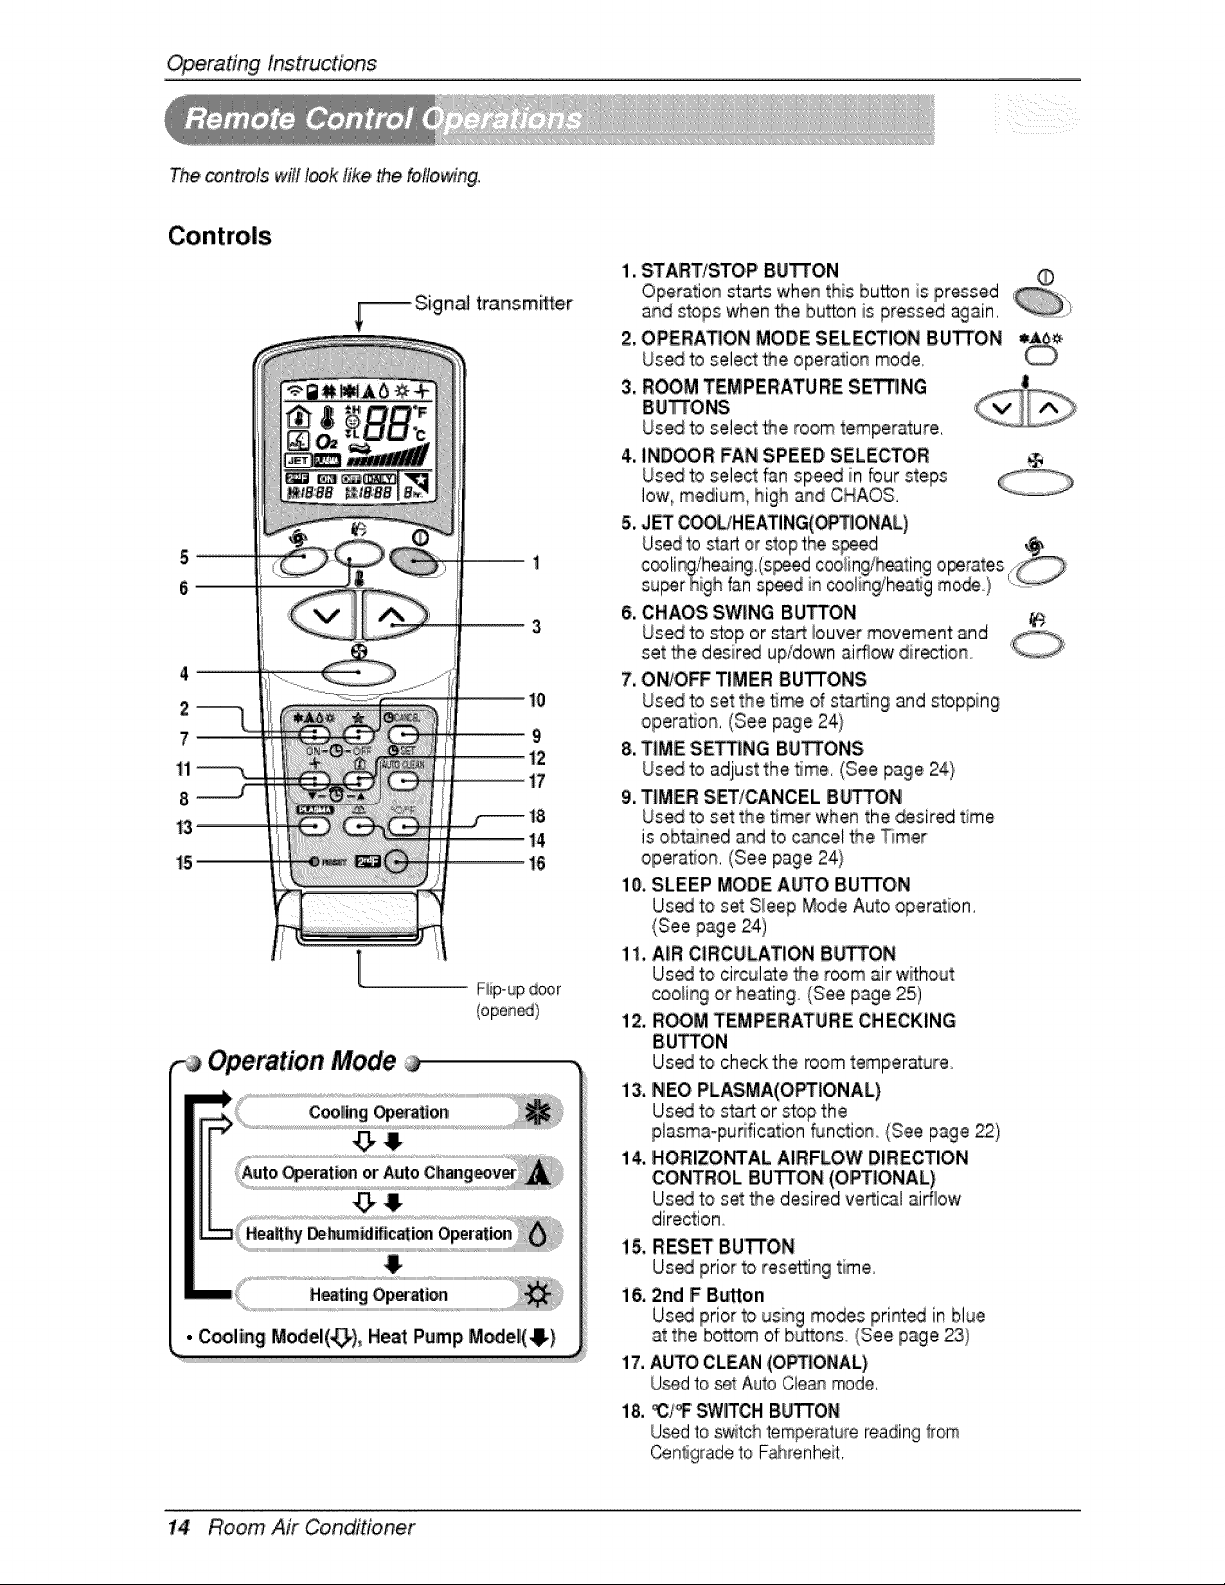
The _ntrois will I_k Iike the following°
_-_ Sign_ transmffter
6
F:iip-updoor
Operation Mode
• C_ling Model(_), Heat Pump M_e_(O)
1. START/STOP BUTTON
Operation sta_s whenthis button is pressed
and stops when_e button is pressed again,
2. OPERATION MODE SELECqr'IONBUTTON
Used to select the operation mode,
3. ROOM TEMPERATURE SET'I3NG
BUTTONS
Used to select _e room temperature,
4. INDOOR: FAN SPEED SELECTOR @
Used to select fan speed in bur steps
low, medium_high a_d CHAOS,
5. JET C_HEATING(OPTIONAL)
6. CHAOS SWING BUTTON
7. ON/O_ TIMER BUTTONS
Used to set the _me of sta_ng and stopping
opera, on, (See page 24}
8. TIME SETTING BUTTO'NS
Used to adjust the 5me, (See page 24)
9. T|MER SET!CANCEL SUTTON
Used to set the _mer when the desired time
is obtained and to c_cel the T_mer
opera, on, (See page 24}
i0, SLEEP MODE A_O BUTTON
Us_ to set S_eep Mode Auto operation,
(See page 24)
1I, A_RCIRCULATION 8bq'TON
Us_ 'to circul_e _e room air without
ooollingor heating (See page 25)
12. R_M TEMPERATURE CHECKING
BUTTON
Us_ 'to check the room temperature
13, NEO PLASMA(OPTIONAL)
Us_ to stag or stop the
plasma-purification flJnction, (See page _)
14, HORIZONTAL AIRFLOW DIRECTION
CONTROL IBUTTON(OPTIONAL)
Us_ to set _e desired ve_icsl airflow
direction
15, RESET Bu'TrON
Us_ prior to resort|% time,
i6, 2nd F BL,_ton
17. AUTO CLaN (OPT|ONAL)
U_d to set Auto Clean mode,
18. _C/_ swrrcH BUTTON
U_d to sw_tch temperalure reading _rom
Cenligrade to Fahrenheit,
14 Room Air Conditioner
OperatingInstructions
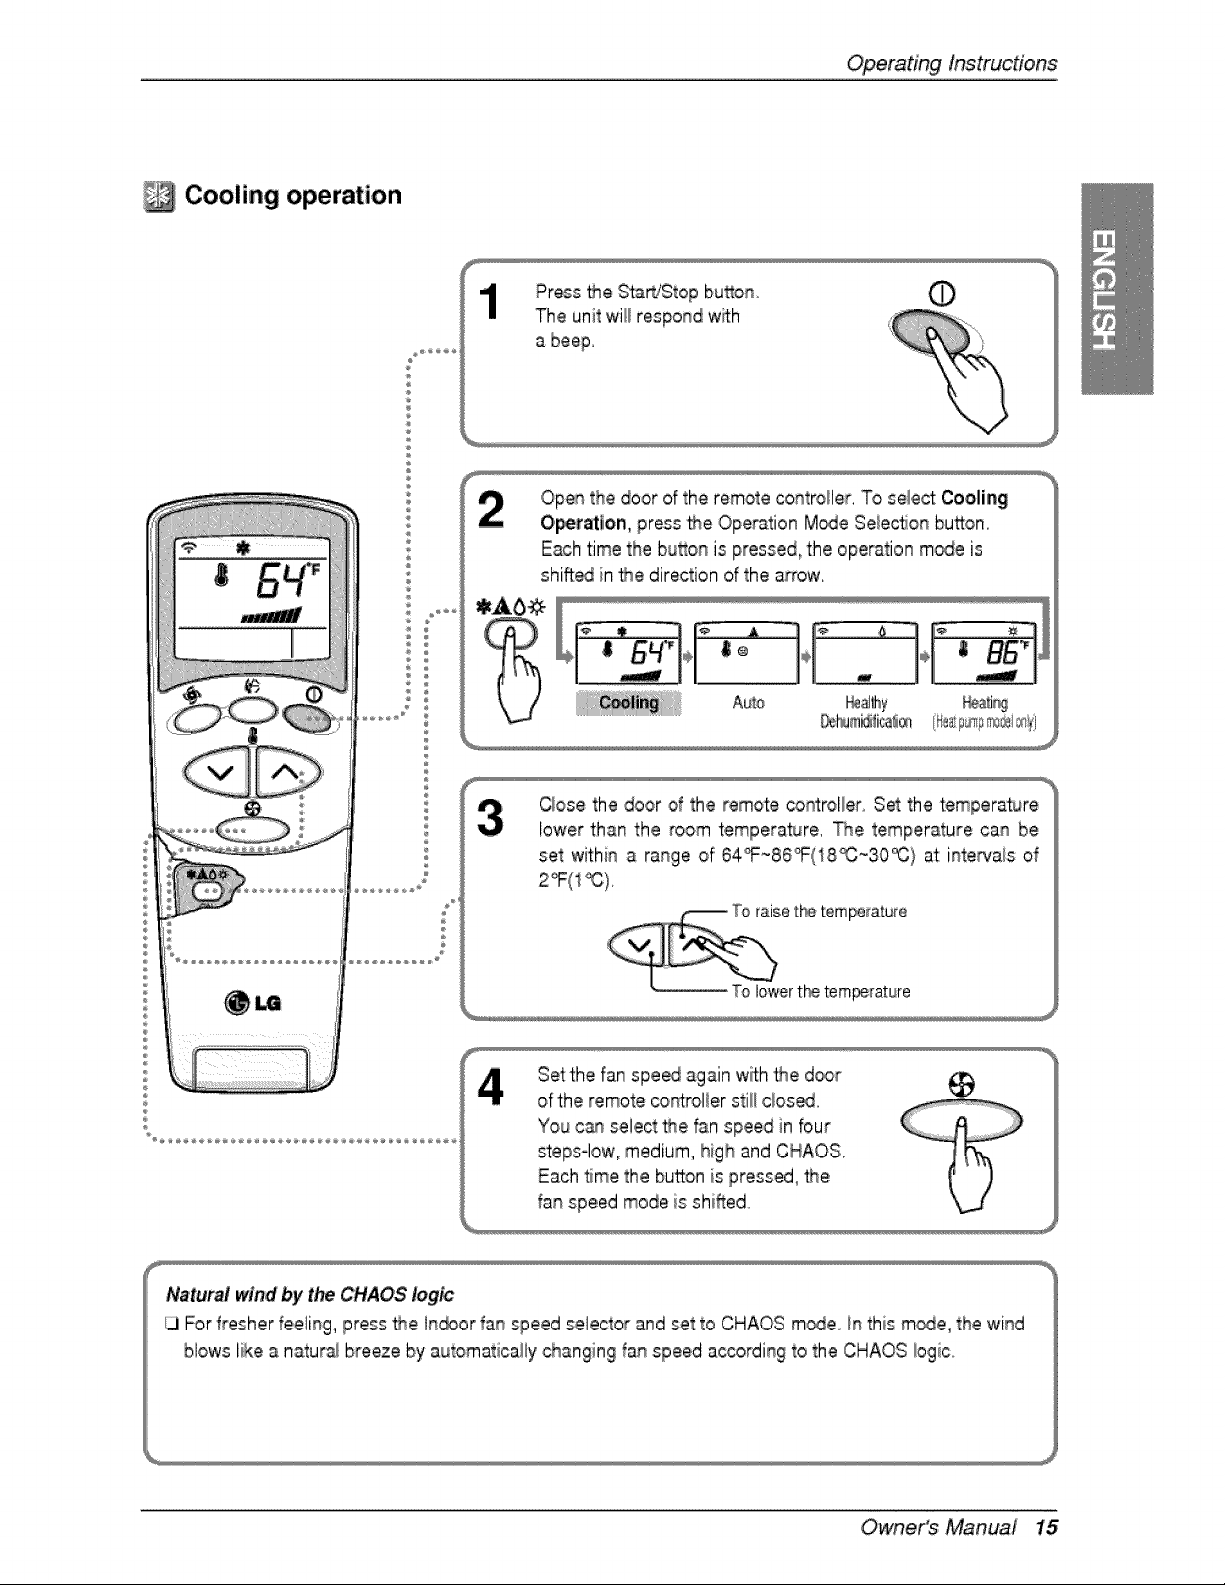
Cooling operation
÷
Press _e Start/Stop bu_on
The unit will respond wi_Lh
a beep.
Open the door of the remote co_troHer. To select Coolia_
O'pe_atlon, press _e Opera_ion M_e Seiec_ionbutton.
Each time the button is pressed, the operation m_e is
shifted in _e direction of the arrow.
%
C_osethe door of the remote _ntroller Set the temperature
lower than the room temperature. The temperature can be
set within a range of 64_-86_(18_-30_} at:inte_a/s of
Setthe fan spe_ again w_h the d_r
of the remote corot:rollerstilllclose.
You c_n select the fan speed in bur
steps-low, medium, high and CHAOS.
Each time the button is pressed, _e
fan speed mode is shifted
Natural wind by t_ CHAOS logic
ij For fresher re,cling, press _e l_or fan speed selector and set to CHAOS m_e in this m_e, the wind
blows like a natu_ breeze by a_tomatically changing fan speed a_ordi% to the CHAOS Iogi_c..
Owne,r's Manual 15
Operatinglnstruc#o,ns
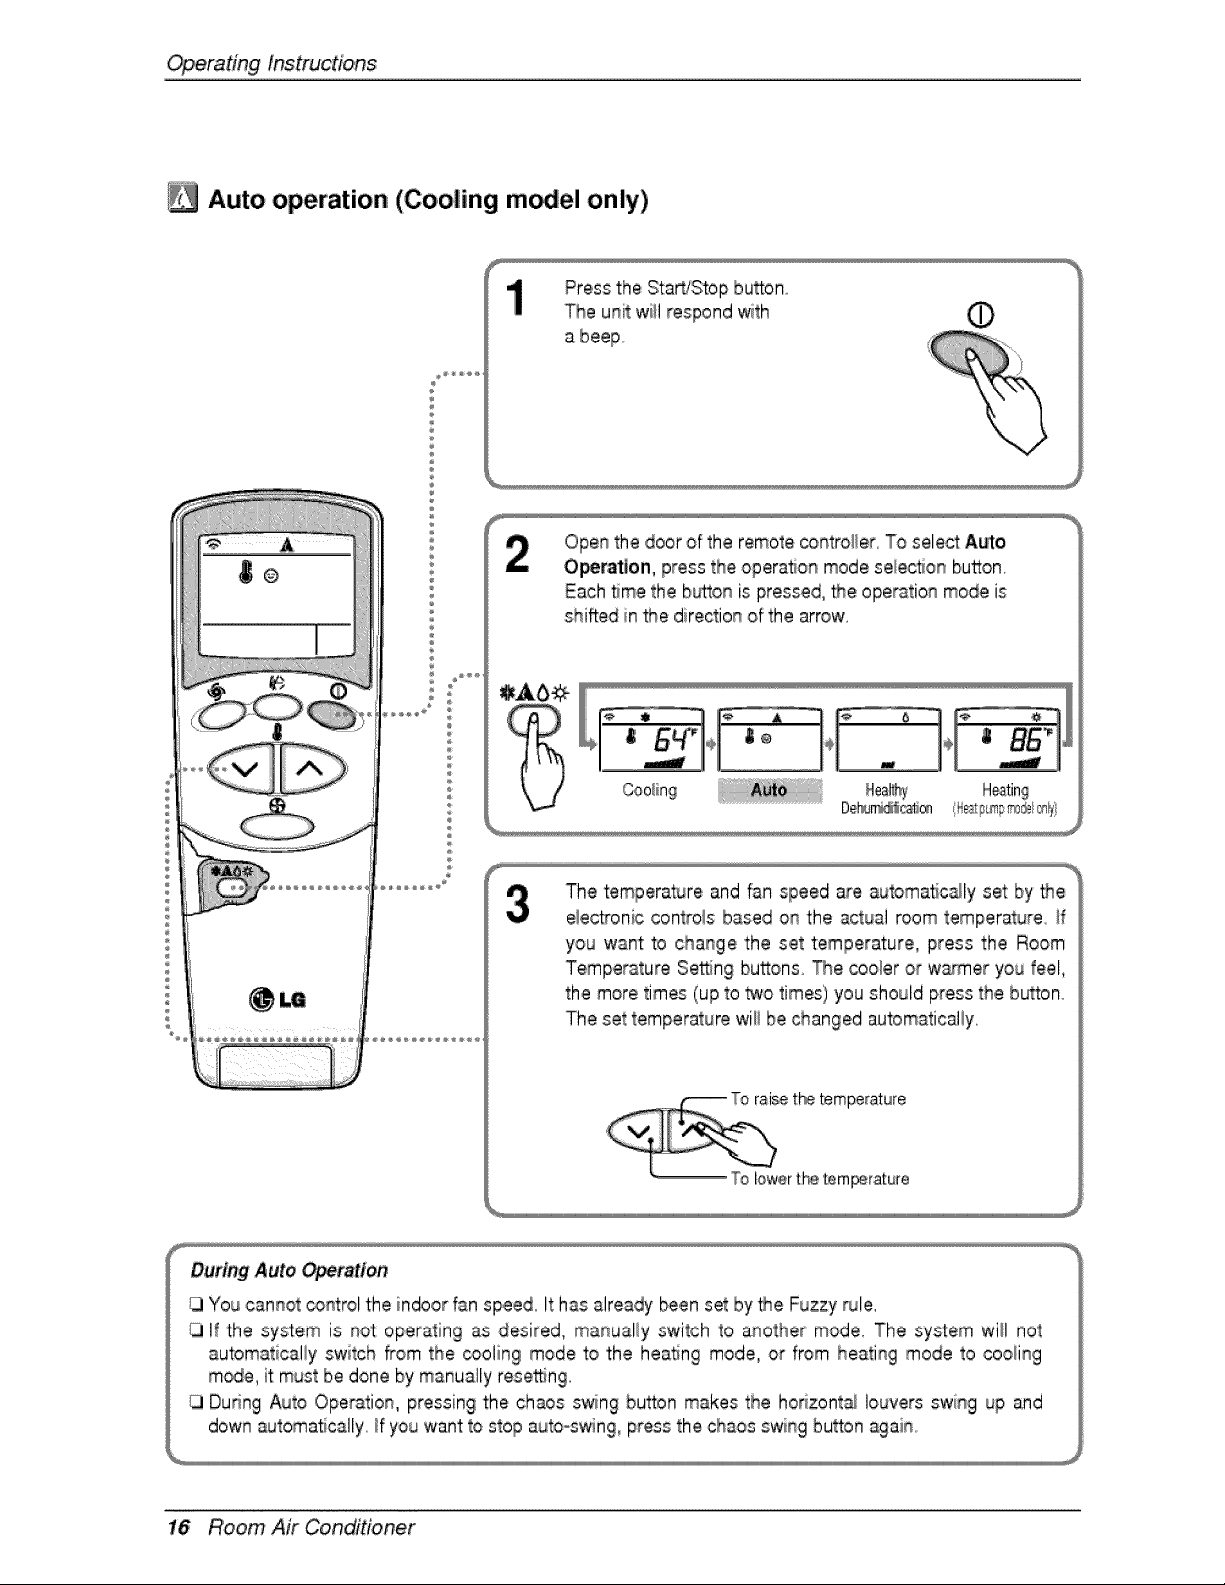
Auto operation (Cooling m el only)
Press the Start/Stop button
The unit will respond with
a beep
Open the door of the remote controller, To select A_o
Operation, press the operation mode selec_on button,
Each _me the b_.on is pressed, the operation mode is
shifted in _e direction of the arrow,
The temperat_Jreand fan speed are _Jtomatic_ly set by _e
eiectronic controis based on the actual room temperature. _f
you want to change the set temperature, press the Room
Temperature Setting buttons The cooler or w_er you feel,
the more times (up to _o times) you should press the button.
The set temperature wiii be changed automatical!y,
' t_ temperature
r th,etempe_rature
16 Room Air Conditioner
OperatingInstructions
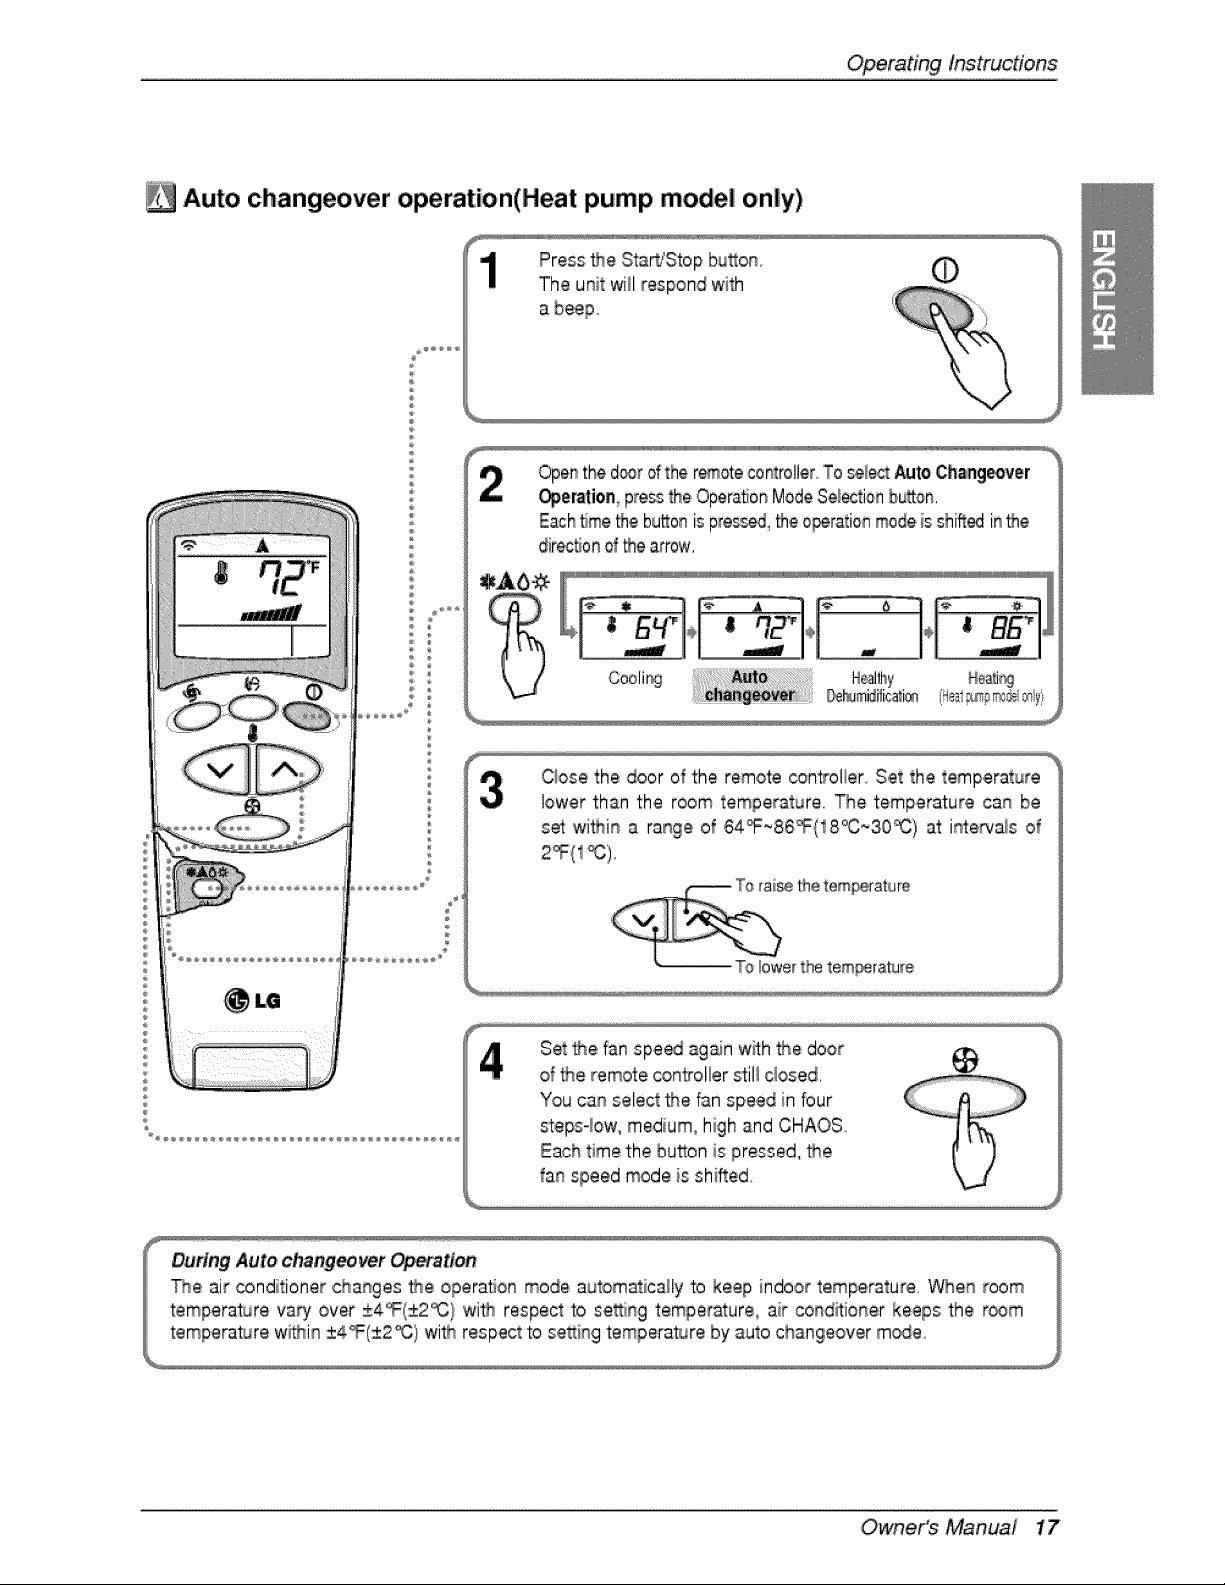
Auto changeover operation(Heat pump model only)
Press _e Sta_Stop bu_on
The u_it will respond with
a beep
©
Open_the d_r ofthe remotecontroller_To sele= Auto,Chsageover
_er_tion pressthe Opera,on ModeSe_tio_ b_on.
Each_me_e bu_oais pre_ _e ,o_ratioa modeis shinedinthe
dir_tJo_of _e arrow.
=_Ab_(_["
U
Cooli_ _eal_hy Henri%
_mid#ica_i® 'Heal_sp#_@rr_
Qose the door of the remote controlier Set the temperature
lower than the room temperature. The temperature can be
set wi_in a range o_64_F~86_(18_C;_3,0_) at intewais of
Set t#e fan spe_ ag_n w_h the door
d the remote controller stil! closed.
You can select the fan speed in bur
steps-low, medium, high and CHAOS
Each time the button is pressed, _e
fan speed mode is shiBed
Owne,r's Manuai 17
Operatinglnstruc#ons
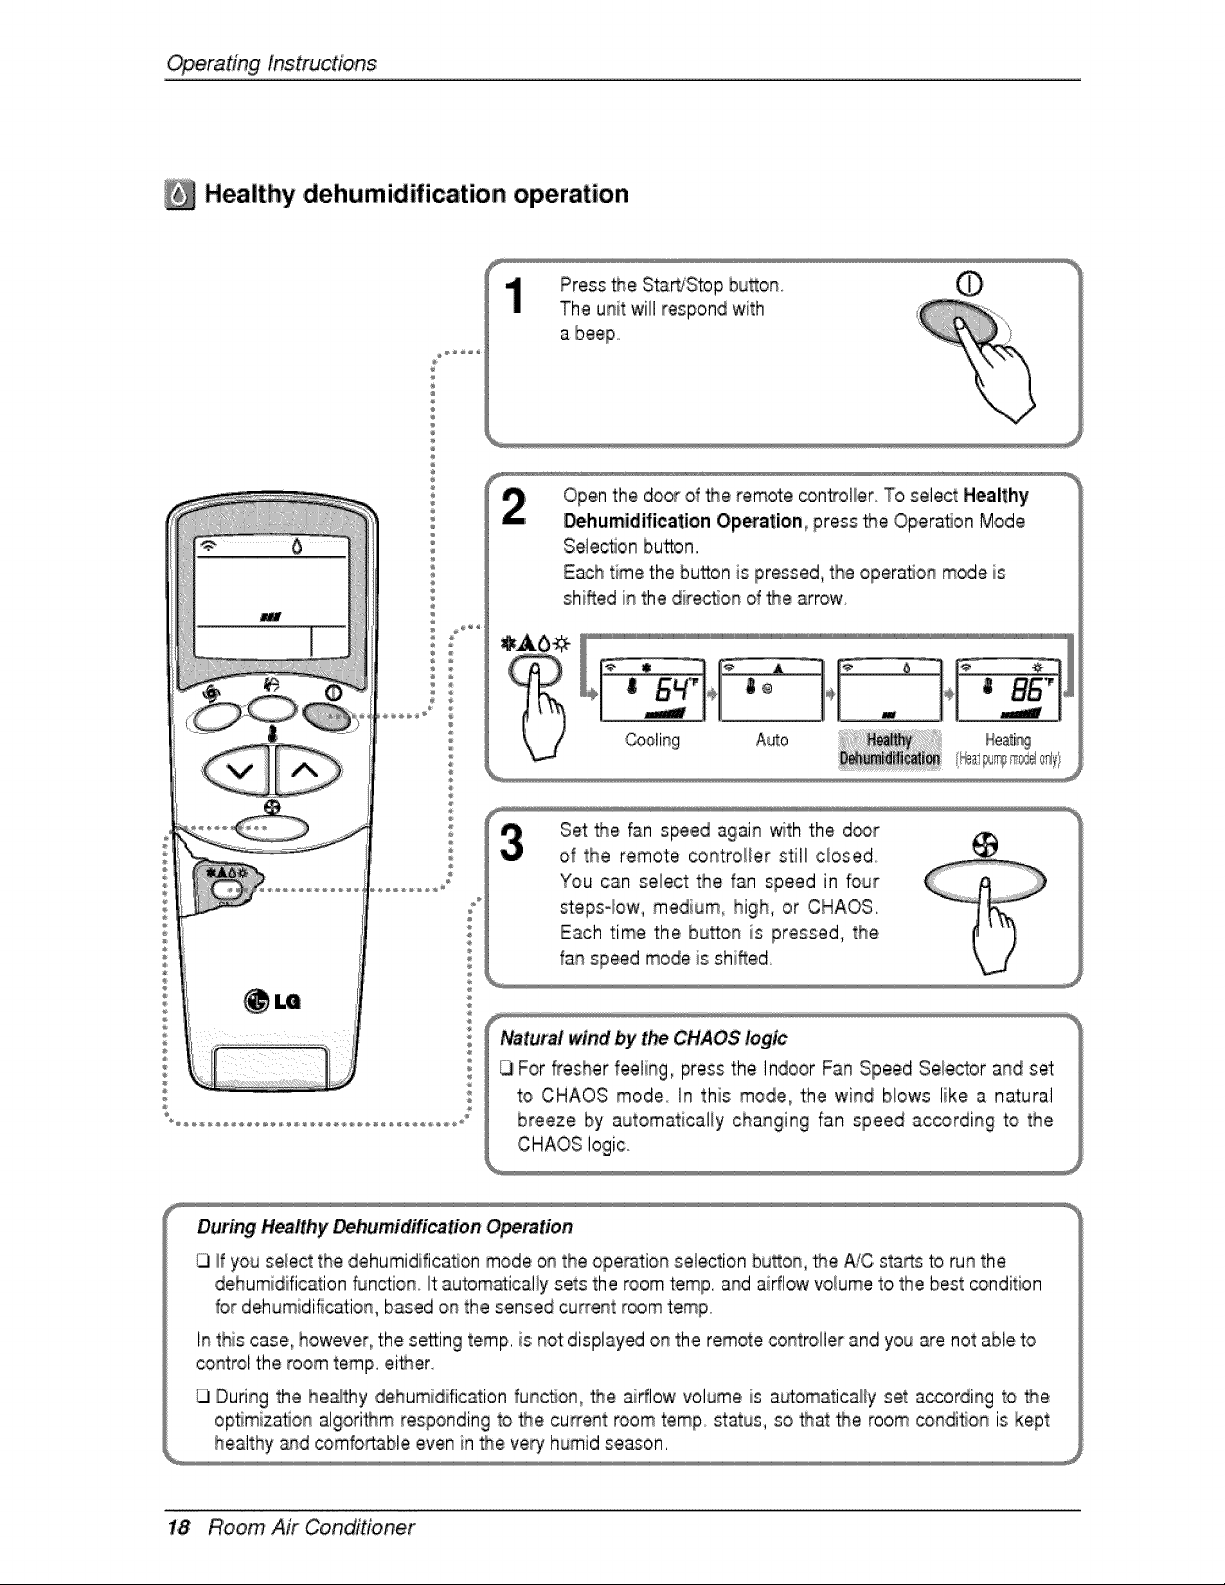
Healthy ,dehumidification operation
Press the StartjStop bu_on
The unit will respond with
Open the door d _e remote control/or. To select Healthy
Dehumidification Op_ation, press t.r_eOperaSon Mode
Selection button.
Each time the button is pressed, the operaSon mode is
shi'_ed in the dire_on of _e arrow
Cooling Auto
Set _e fan speed again with the d_r
of the remote controDer still cbsed
CHAOS logic..
During Healthy Dehumidification Opemtien
If you select the dehumidification mode on the ope_tion selection bu_on, _e Ai,Csta_s to run the
dehumidification function it autom_ically sets the room temp. and aiflow volume to the best oondition
for dehumidification, based on the sensed current room temp
In this case, however, the se_ing romp. is not:displayed on the remote controller and you are not able to
control the room romp. eider.
G During the healthy dehumidification funcSon, _e airflow volume _sautomatically set a_or,ding to _e
opSmizat_onalgori_m responding to the cu_ent room 'temp status, so _at the room condi#on is kept
healthy _qd comfo_able even in _e very humid season.
1,8 Room Air Conditioner
OperatingInstructions
E_
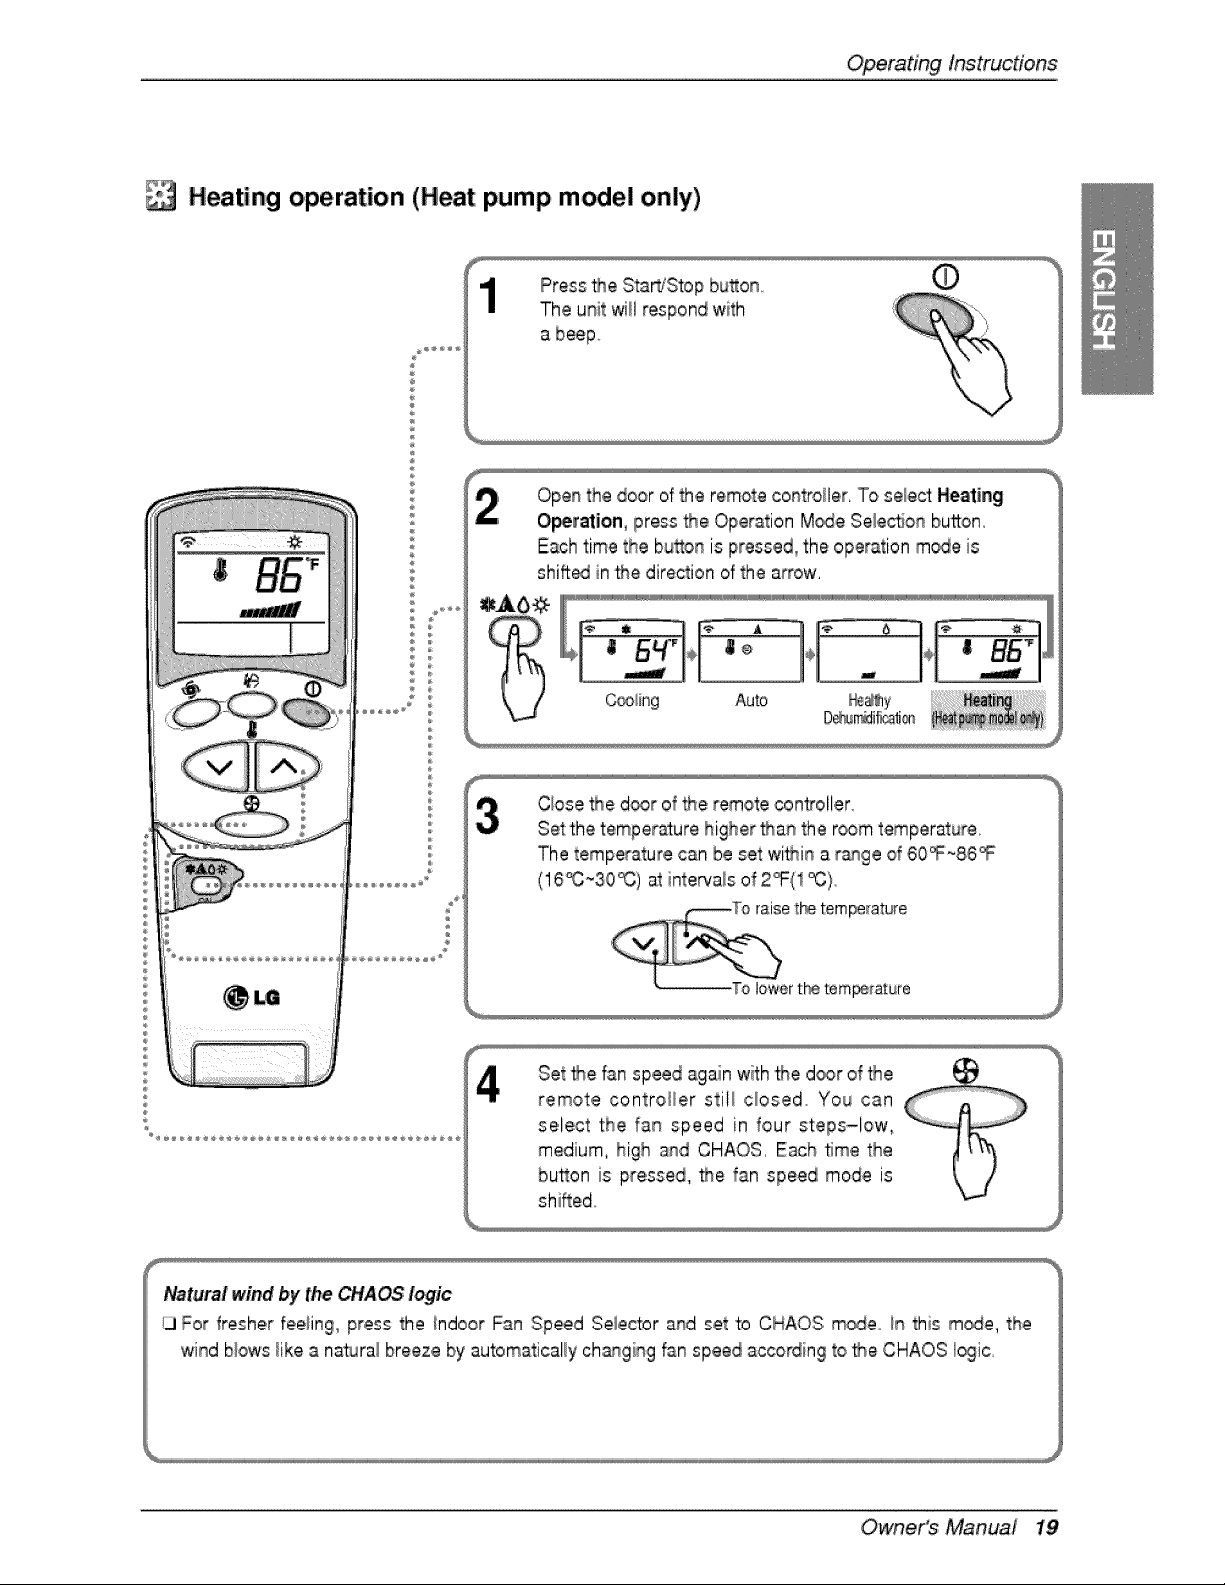
Heating operation (Heat pump model only)
Press _e Sta_IStop bu_o_ 0
The unit will respond with
Ope_ the door of the remote co#troller, To select: Heating
O_ration, press _e ,Operation M_e Se,lecflon button,
E_h time the bu_on is pressed, the operation m_e is
shifted in _e direction of the arrow,
[_ [_ J[UiUiUiUiUiiiiiiiiiiiiiiiiiiiiiiiiiiiiiiiiiiiiiiiiiiiiiiiiiiiWJWi
¢ ® ÷
_!ing Auto _e_y
D_n_ili_ali_
i
Close _e d_r of _e remote controller
Seethe 'temper_ure higher tha_ the room temperature
The temperature can be set wi_i_ a r_%e of 60_~86_
(16_:_30_) at intewais o! 2i°F(1 _}
Set _e fan speed ;againwith the door of _e
remote controiier stitl ciosed. You can
select the fa_ speed in four steps-low,
medium, high a_d CHAOS. Each 1me the
button is pressed, _e fan speed mode is
shifted.
Owner's Manual 19
Operatinglnstruc#o,ns
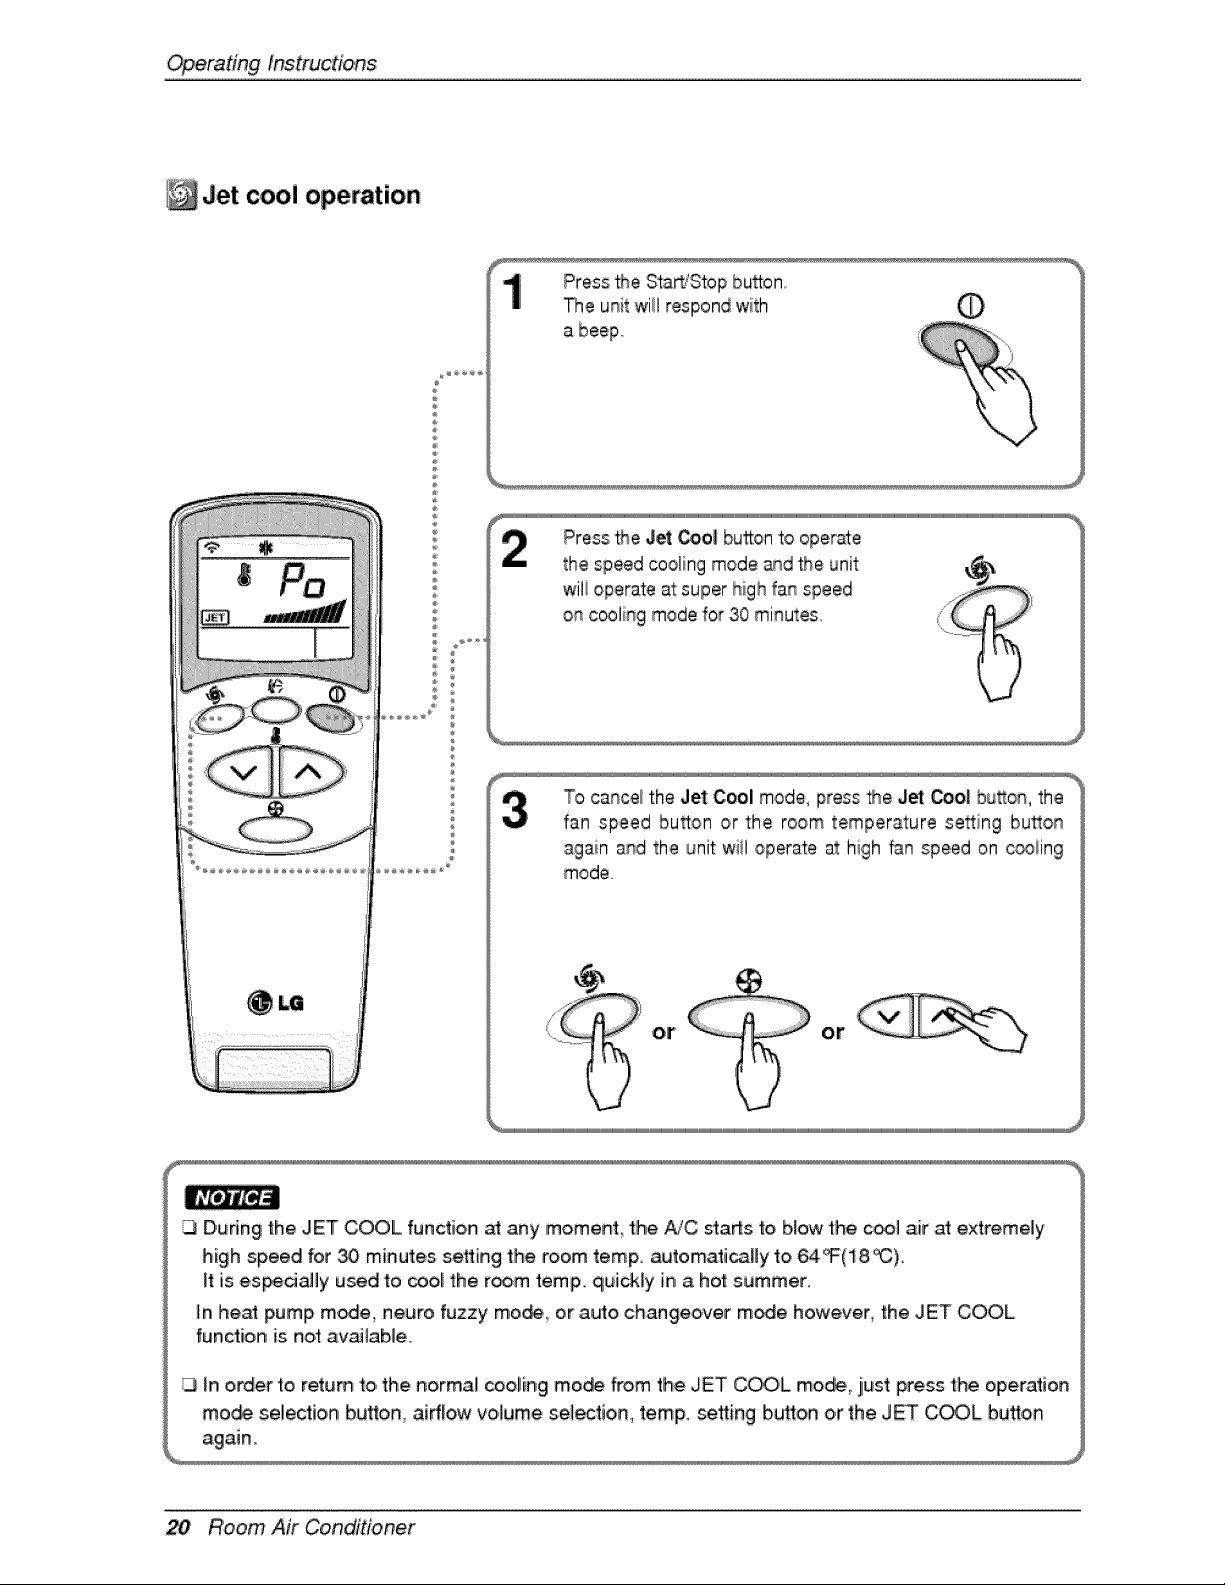
Jet cool operation
®
Pressthe Jet _ol button t_ operate
the speed cooling mode and the unit
wili operate at super high fan speed
on cooling mode _or30 minutes
To c:a_ce_the Jet Cool mode, press the Jet _o| bu_o_, the
fan speed bu_on or the room tempera,ture se_ing bu_o_
again and the unit wiil operate at high fan speed on _iing
mode
ot or
[J D,udng the JET COOL function at any moment the A/C sta_s fo b,_owthe coo_ air at extremely
high speed for _ minutes setting the room temp. automati_Hy t,o 64 _(18, _).
if:is es_dally used to _ol the room temp. quickly in a hot summer..
In he_ pump m_e, neuro fuzzy mo_ or auto changeover m_e however, the JET COOL
function is not av_lable.
in order to return to, the normal _,oling mo_ from the JET COOL mod_ i, just press the operation
rno,_ selection huron, airflow volume se_ectio,n, temp. se_ing button or the JET COOL button
20 Room Air Conditioner
OperatingInstructions
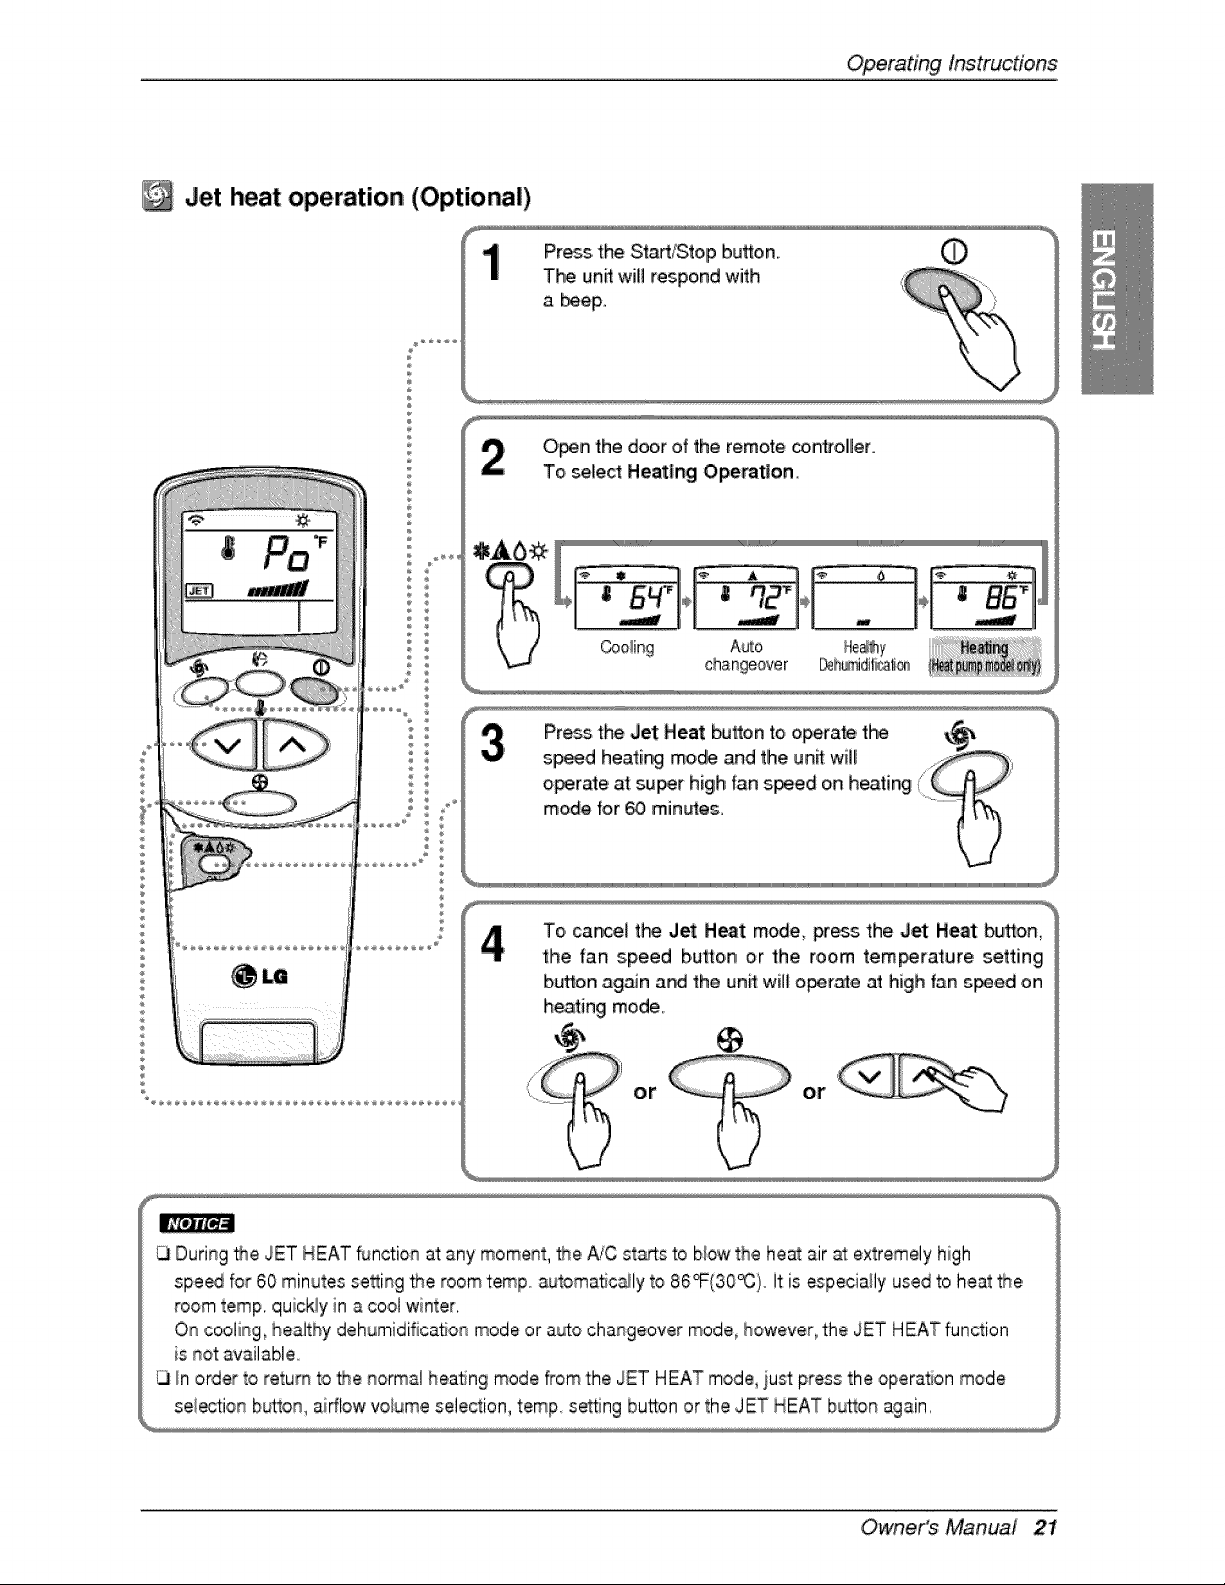
3et heat operation (Optiona|)
®
Press the Start/Stop button. (_
T_ un_ will respond with
a beeF
O_n the door of the remote _,n#oller,
To select Heating Operation.
÷ ÷ ÷ _ .............
Coo!ing Auto _ole_y
changeover _h_idifi_ti_'_
To cance_ t_ Jet Heat mode, press the Jet Heat bu_on_
the fan speed button or the, room tem_rature setting
button ag_n a_ the unff wiff o_r_e at high fan _ed on
heating mode.
or or
Owner's Manual 21
Operatinglnstruc#ons
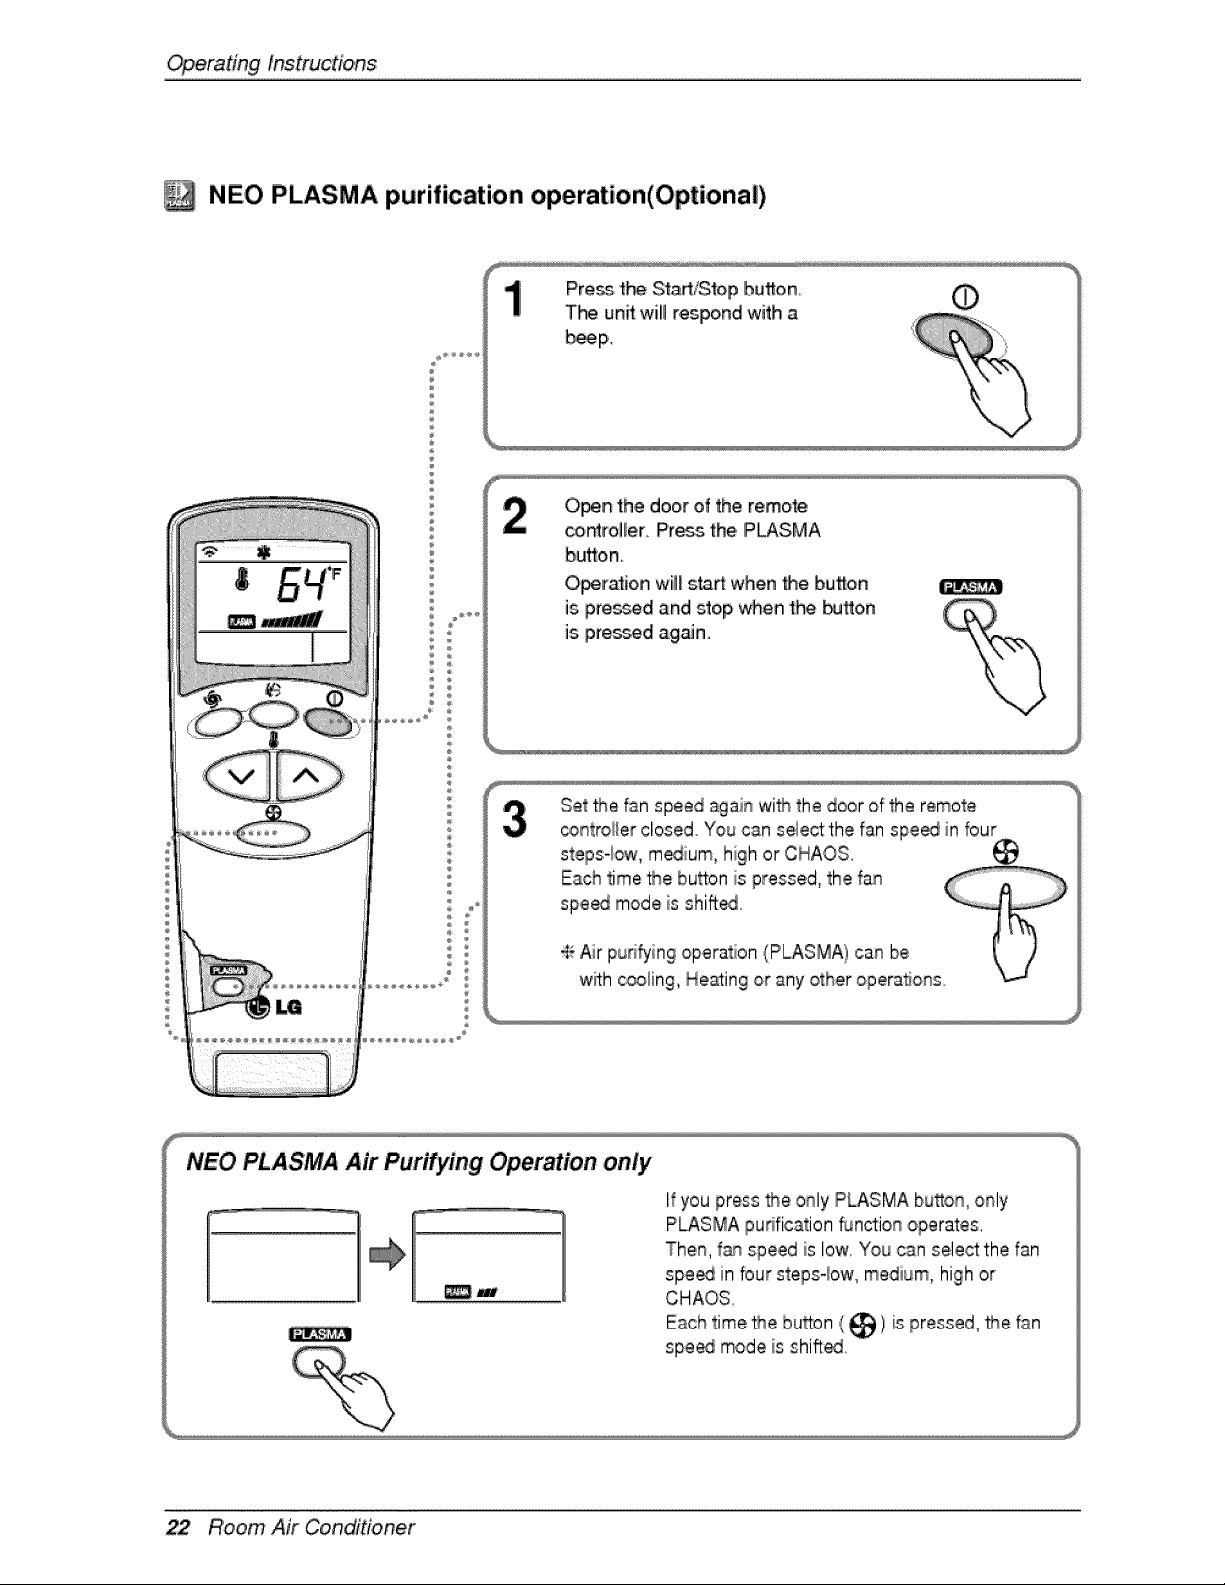
NE,O PLASMA purification operation(Optional)
Press the Sta_l_op button O
The _un_will respond with a
b_p.
0_# the door of the remote
co_ro]ler, Press=the,P_SMA
button
O_ra_ion w[l_st_ when Me, button
is.pres_d isRdstop _en 'the _'tton
is pressed iagaJno
Set the fsn speed again wi_ the door ,ofthe remote
_ntrolier closed You cs.n select the fan spe_ in bur
stepsqow, m_ium, hi;h or CHAOS.
NEO PLASMA Air PurL_'ing Operation only
_w
I_you press _e only PLASMA button, only
PLASMA puNficstion 5JnGionoperates,
Then, f_/nspeed is low, You csn select the fan
spe_ in four stepsqow, medium, high or
CHAOS
Each time _e button __ _1is pressed, Me _n
speed mode is shi_ed,
22 Room Air Conditioner
OperatingInstructions
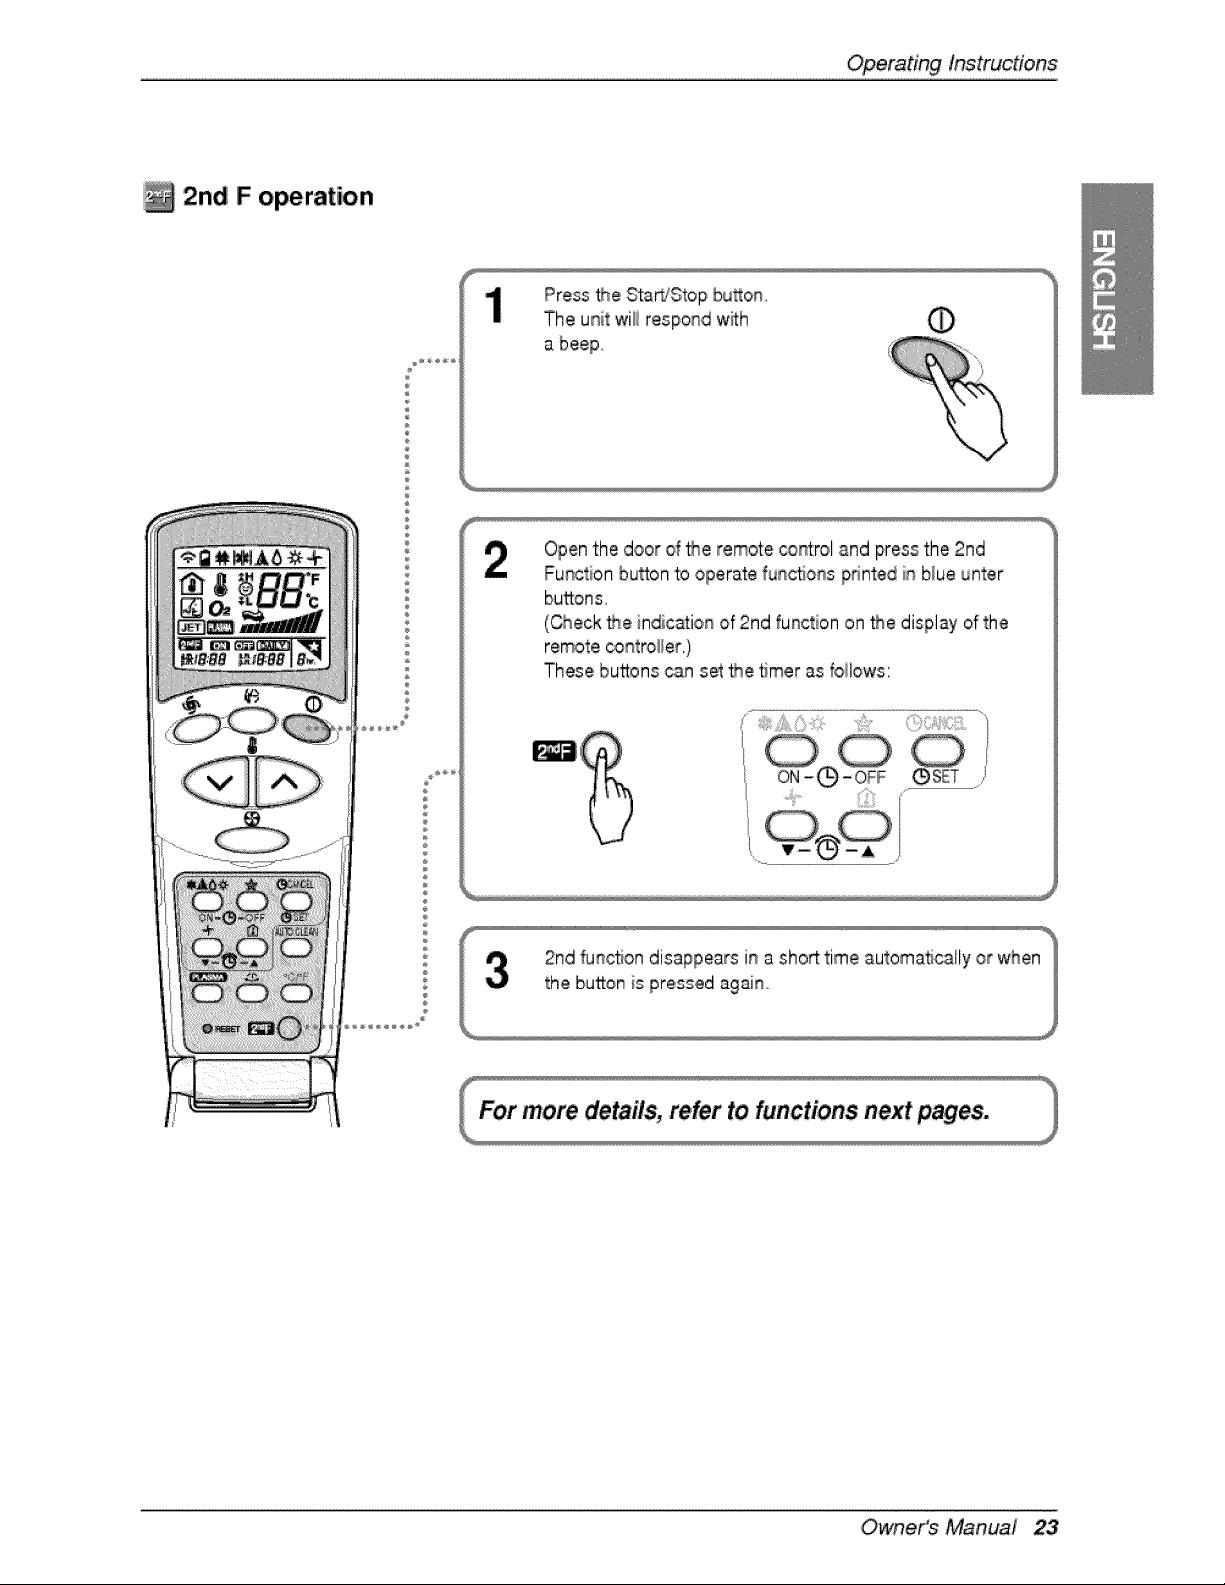
2n,d F operation
Press the Sta_'S'top bu_on,,
The unit wili respond with _
%
Openthe door d _e remote cor_t:roland press the 2nd
Function bu_on to operate func_o_s pdnted in blue unter
buttons,
(Check the indication of 2rid function on the display of the
remote _ntro_er,)
These buttons can set _e timer as follows:
Owne,r's Manual 23
Operating lnstruc#ons
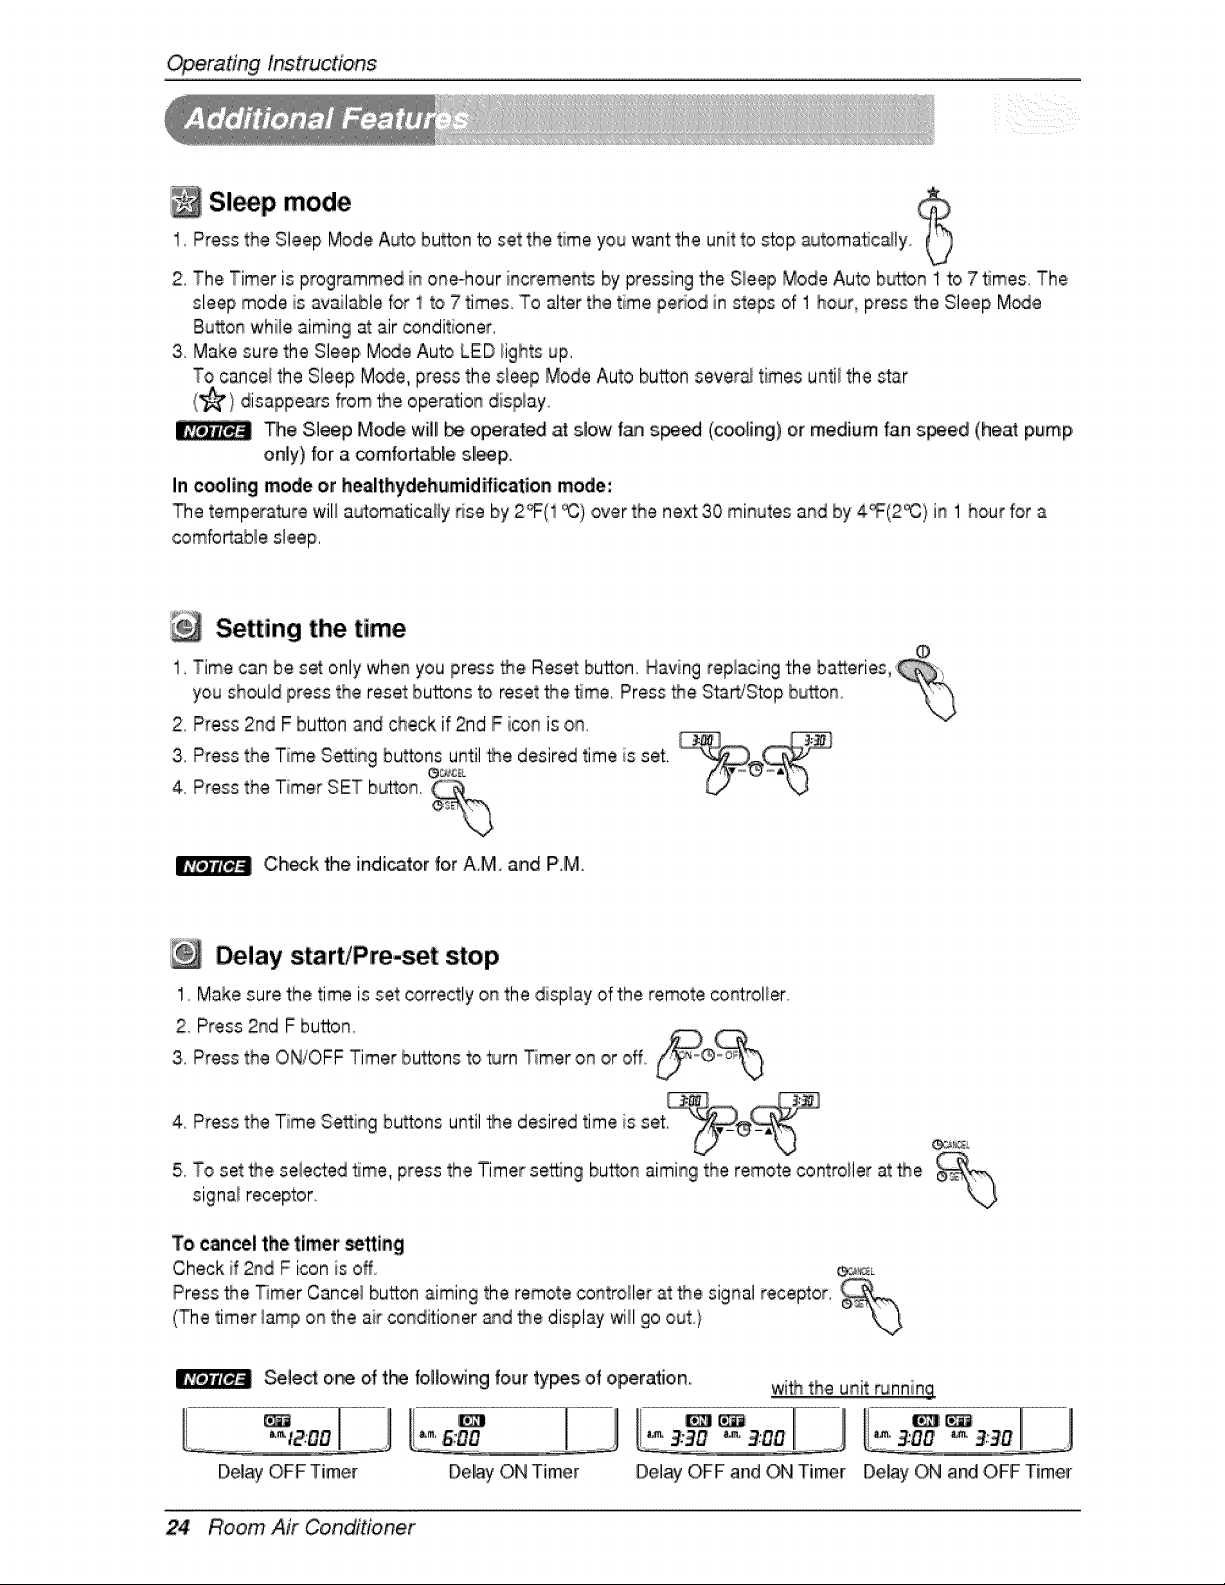
Sl p mode1, Press the Sleep Mode A_o button to set the time you want the unit to _op _Jtomatic_ly
2, The Timer is programmed in oneohour increments by pressing the Sleep Mode Auto button 1 to 7 5rues, The
sleep mode is available for 1to 7 times To alter the time period in steps of 1 hour, press the Sleep M_Je
Button whi_eaiming at air _nditioner
3, Make sure the Sleep M_e Auto LED fights up.
To cance_the Sleep M_e, press the sleep Mode Auto button sever_ times until the star
(_) disappe_s _om _e ope_tioL_ disp_ayo
The Sleep Mode will _ operated at slow t_ s_ed (cooling) or medium fan s_ed (heat pump,
only) |or a comfoAable sll_ F
In e_ling mode or healthydehemid_ication mode',
The temperature will a_omatica_y _se by 2_(1 _) over the next 30 minutes and by 4_(2% / in 1 hour for a
combrtab_e sleep.
Setting the, time
1, Time can be set only whenyou press _e Reset button, Having replacing the batteries,
you should press the reset buttons to reset _e _me. Press _e Sta_Stop button
2, Press 2rid F burn and ,checkif 2nd F icon is on,
4,3'PressPressthetheTimerTimeSe_ingSETbutton.bu_°nse_LC%untilthe desired time is set.
Ch_k _e indicatorfor A,M, and PM.
Delay start/Pre-set stop
1, Make sure the time is set correctly on the dispiay of the remote _ntrolier
2, Press 2rid F button,
3, Press the ON/OFF Timer buttons to turn Timer on or off°
4, Press the Time Se_ing bu_ons until _e desired time is set ®,_
5, To set _e selected time, press the Timer se'_ng button aiming the remote contro[iler at the _,-,
signai receptor, \J
To cancel the timer _lng
Check if 2rid F icon is off _L
Press _e Timer Cance_button aiming the remote controller at the signal receptor,
(The timer lamp on the air conditioner _d '_e display will go out}
Select one of t_ fol_owin,gfour types of operation, wi_ the u_it _nnin,g
Del_ ON Timer Delay OFF and _ Timer Delay ON and OFF Timer
24 Room Air Conditioner

Operatinginstructions
Airflow dir tio, n control
_e uFtdown and dghtfle_ airflow can be adlust_d by
using the remote _n_ol.
Press the Start/Stop button to sta_the un_..
Press Chaos Swing bu_on and _e louvers 'willswing
Press the button again and the _ouverswil_s4op.After
30 min_es, the louvers return to the maximum airflow
position automatically.
Air circulation mode
Circulates the room air withoutcooiin 9 or heating.
1..Press the Start/Stop button.._e unit will respond wi_ a beep
2oOpen the door on the remote control Press the Air Circulation bu_on. Close the _or on the remote control
Now each time _at you press the Indoor Fan Speed Selector, the fan speed is shifted f_om low to CHAOS
and back to low again
.....................................................................................................................................................................................................................................................................................................................................................................................................................................................................................
CHAOS A[_' Fan s_d is ® iow, Fan _eed is ® medium Fan s_d is on high
CHAOS Air eco_mizes ipower con_mlpt[on and prevents overcoo][ngi. The fan s_ed is
auto,matically chang_ from hiighto low or vice versa, depending on _le ambie_ tem_rature.
Auto clean
1,Wheneveryou pressthe AutoC!eanbuflon,Auto Ciean Functionwill be reserved_d cancelled.
2, Auto Cieanfunc_onworksbeforeand alter _oling or dehumidificalJonmo_. Fordetails_referto
AUTO,CLEAN the beiow _i_s.
3, When the unlitis start_ after the reservationof _uto Ciean 4he_oi Startfunction operatesand
ind®r F_ is startedafter 20 _conds
4, When you press Start/Stopbulton to turn offthe unitafter the you have resoled Ab% Cte_
run,ion, the air-condiitonercircumatestheind_rair in the _fo Qean m_e w_hno more
Coolingor Dehumidificationoperation.For Coolingonly m_e/, it lastsfor 30 minulesfor Hea_
pumpmodel, 1or1,6minutes
5. if you pressthe _to c_eanbu_on again duringthe producto_ration, Auto Cieanfunctionwill be
cancelled,
ILlDuring A_o Clean function, moistures le_ in indoor uni_ after Cooling Operation or Healthy
DehumidificaSon Opera, on can be removed.
During Auto Clean function, only St_/S_op button, Pl_ma bu_on and Auto Clean button are available.
Owne,r's Manual 25
Operating Instructions
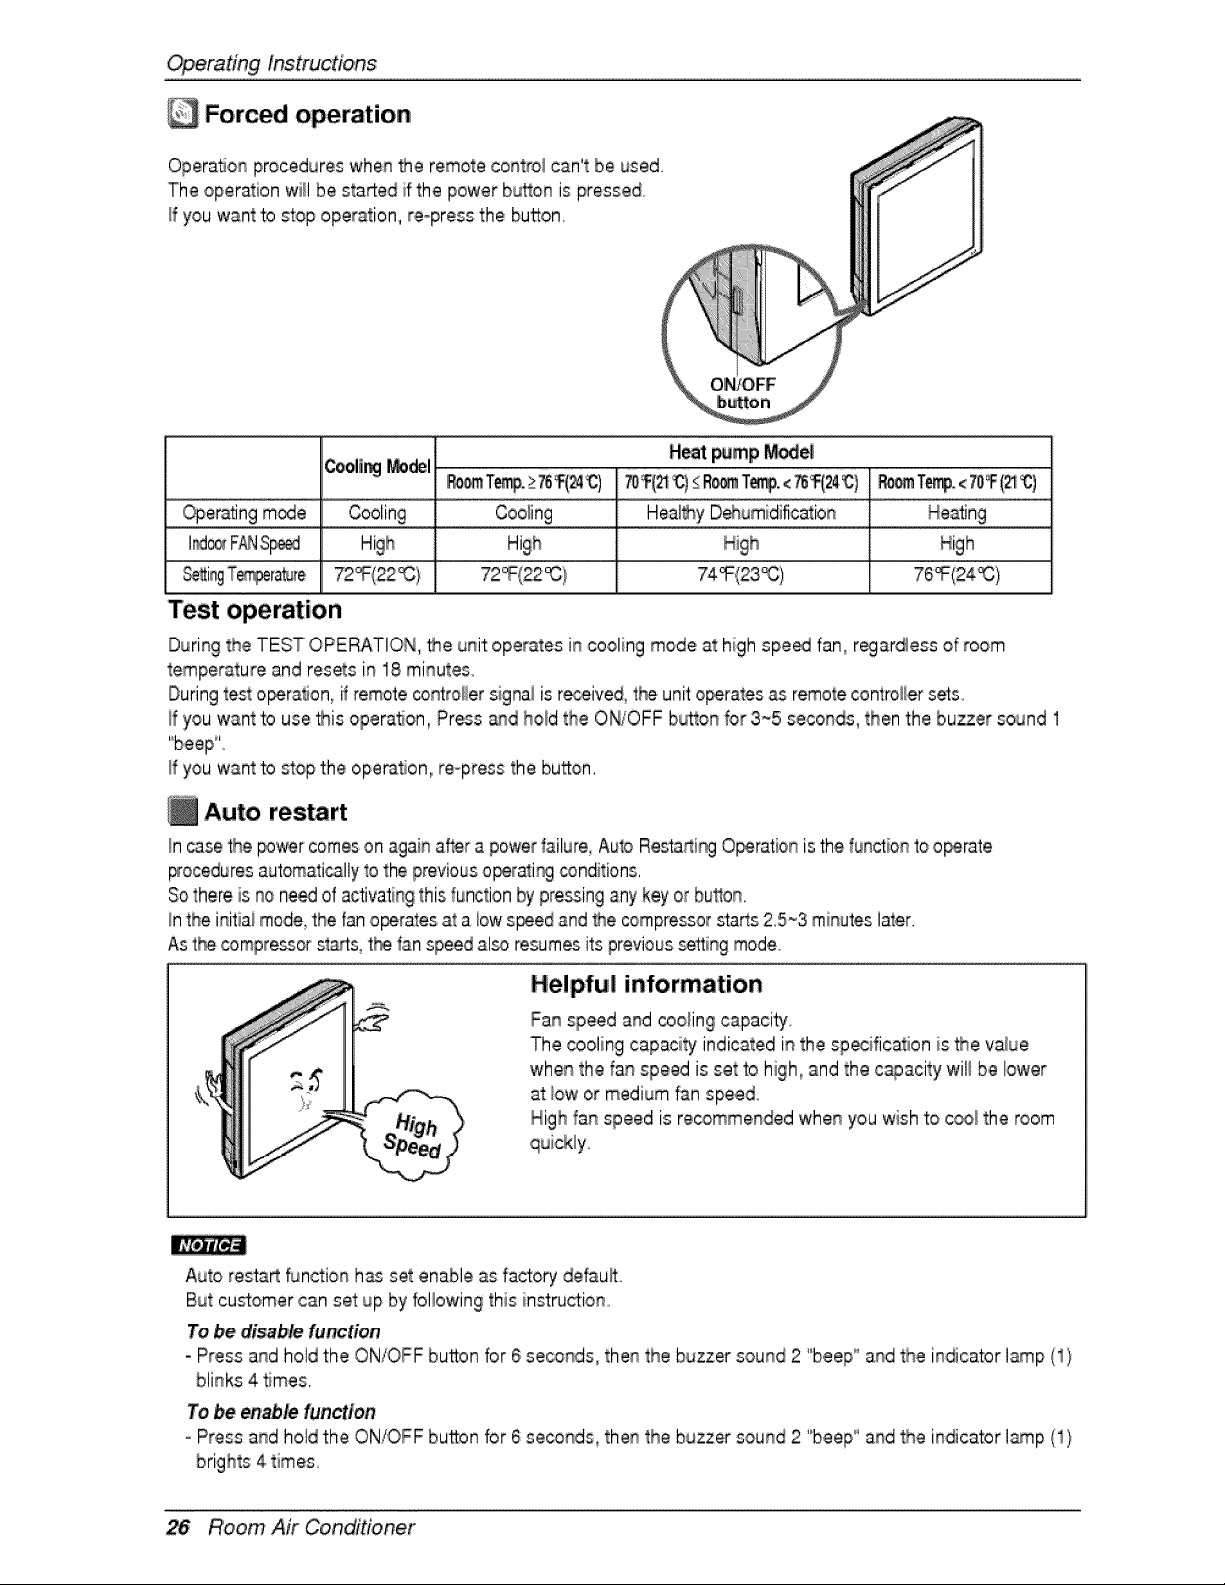
Forced operation
OperaSonprocedures whenthe remote control can't be used
The operation willbe started if the power button is pressed
!f you want to mop opePation,re-press the button,
H_ _mp r_e|
Cooli_ _del .....................................
Oper_ng mode Cooling Cooling
I_ F_JS_ High
Test operation
During the TEST OPERATION, _e unit operates in cooling mode at high speed fan, regardless of room
temperature and resets in 18 minutes
Duringtest o_,ration, if remotecontroliersignai is received, the unit o_rates as remote controiiersets
if you want to use _is opera, on, Press _d hold the ON/OFF b_on for 3_5 seconds, then the buzzer sound 1
"beep"'
If you want to stop the ope_tion, re-press the button.
Auto restart
_r] c_se the _wer comes on i_g_i_ _fter a power _ailure,Auto Resta_i_ O_ration is the fu_q_ionto o_rate
_ocedures automatically1othe previouso_rati_ _nditions,
Sothere is no need of activating this function by pressingany key or button,
!nthe initiai mode,the fan o_rates at a iow speedand _e compressor starts 2,5~3 minutes later,
,Ast__e_ompressors_tts, t_ _anspeed al_ resumesits previoussetting mode
Helpful information
Fan speed and _oling capacity_
The cooling capaci_ indicated i_ the sp_ification is _e value
when the fan speed is set to high, and the c_acity wil_be lower
at low or medium fan speed
High fa_ speed is recommended whe_ you wish to c_! the room
Auto resta_ function h_ set enable as f_to_ default
But customer can set up by folbwing this instruction,
To be dis_bte function
- Press a._dhold the or-J/OFFbutton for 6 seconds, the_ the buzzer sound 2 "beep_'a_d the il_dica.torI_p ,',1/
blinks 4 times.
Te be _able function
=Press a_d hold the ON/OFF button for 6 seconds the_ the buzzer sound 2 '"beep_'a_d the i_dicator lamp (1}
26 ROom Air Conditioner
MaintenanceandService
A CAUTION
Before pe_o_ing any maintenance turn off the main power to the system_disconn,e_ the circuit breaker and
unplug the power cord.
Clean the unff with a _ff dry cloth. Do not use bleach o,ra_a_ves,
& CAUTION
Never use any of these
• Water hotter than 40_ !'t may cause deformation and discoloration.
• Volatile sub_nc_. They may d_age the sudace of _e _r conditioner.
Air Filters
The air fi_ers, behind the front panel / gdB should be checked _d
clea_d once in every 2 w_ks, or more often if n,eces_ry. To
remove 'the fillers see the self exp,lanatory diagr_s 'for each model
type ,Cle_ the fiffe_, wffh a vacuum cleaner o,rwarm soapy w_er. If
dirt is not easily removed wash w_h a _luflon of detergent in luke
w_m water. Dry we,ll in s_-_de after washi_ and reiinsta_the filters
back in #ace.
Plasma Filters
The pl[asma filte,rs belhind the air fillterrshould be checked a_ c]ean_ once in
every 3 months or more often if nece_ry. To remove the riflers see _e serf
explanatory diiagr_s for each mode] type, Clean the filters with a vacuum
c]ea_r 1|it is didy wash it with water and dry wei[ in shade an [ns_][ back in
place.
D_dorizeir Filters
Remove the deodorizer fillte_ Ibeh[ndthe _r filter and expo_ _em iindirect sunBght for 2 hours.
And then inse_ the_ fi]te_ into orig[_l _sition
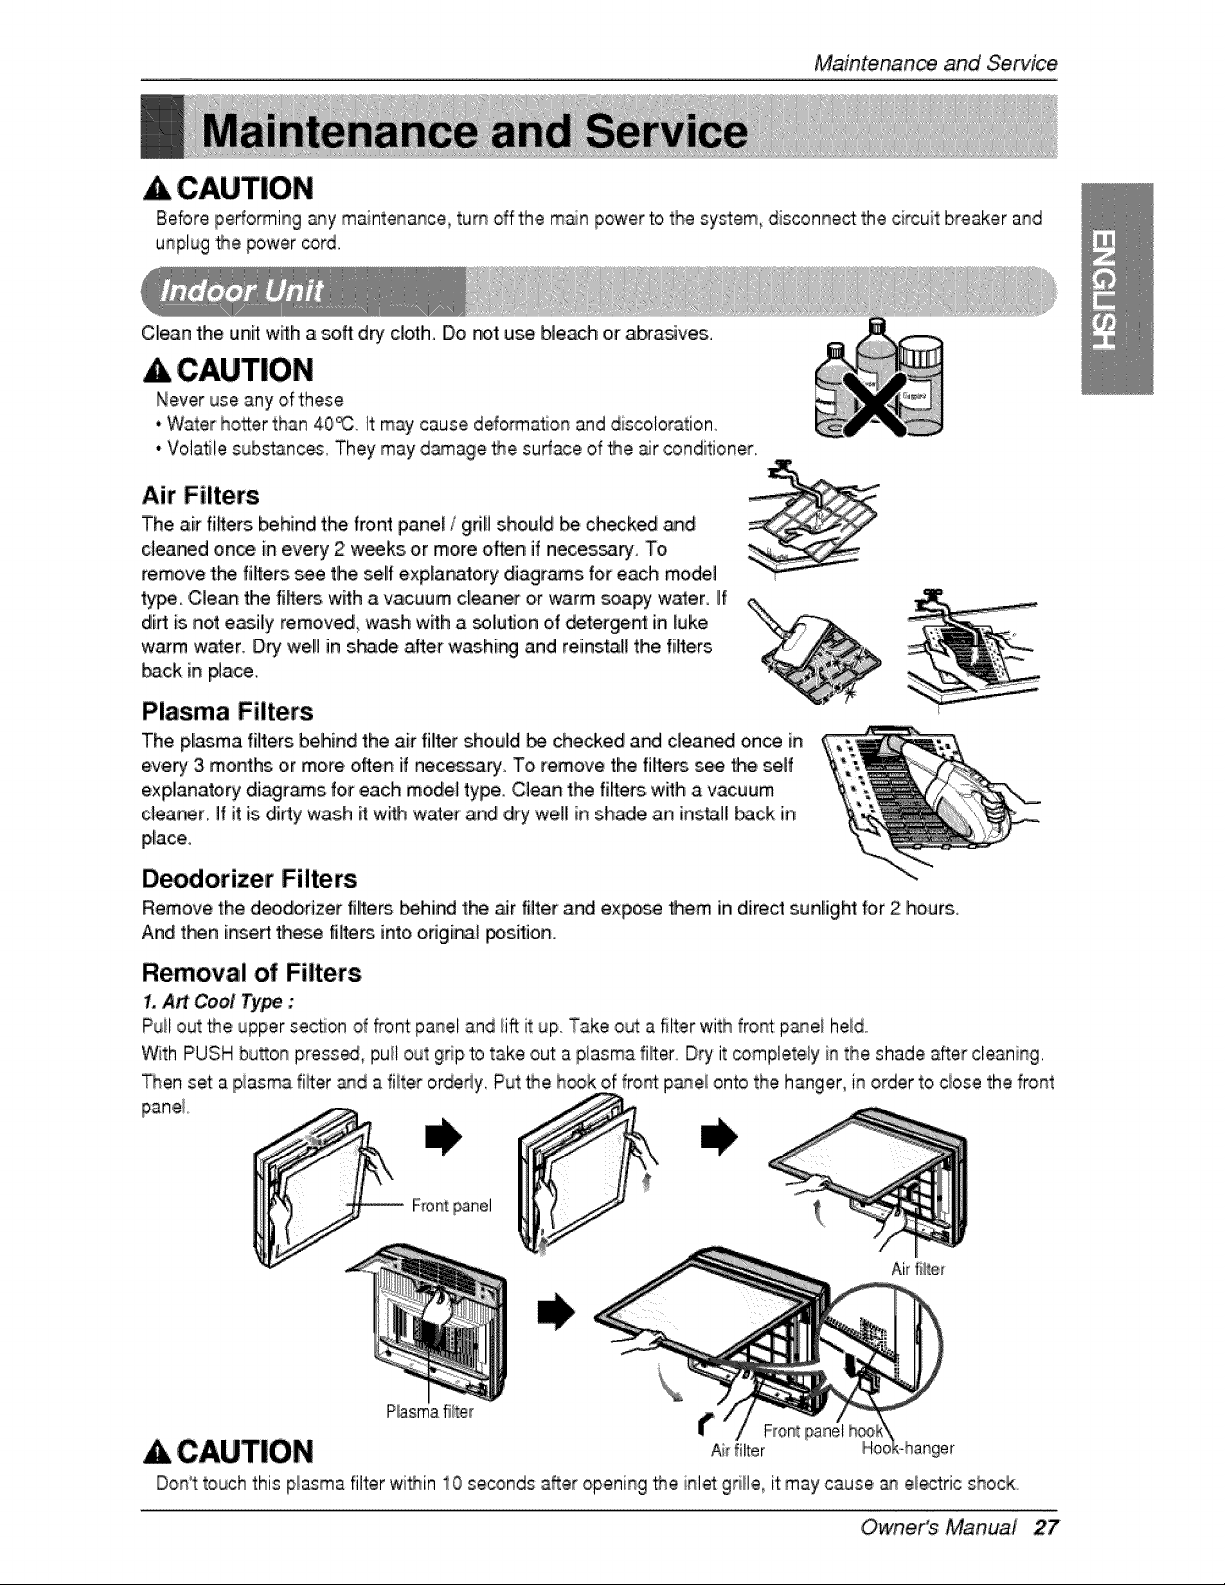
Removal of Filters
1,A_ Cool Type :
Puil out _e upper section of _ont panel and lift it up. Take out a filter with fro_t p_ei held,,
With PUSH bu_on preset, pull out grip 'totake out a plasma lifter Dry it _mpiete_y in the shade after cleaning,
_en set a piasma fiffer and a fiiter orderly, Put the h,_k of front panel onto the hanger, in order to ciose the front
Ai_filter
& CAUTION
Don_ttouch this plasma filter wi_in 10 seconds after opening _e inlet gri!le_it may cause _ electric shock.
Owne,r's Manual 27
MaintenanceandServi_
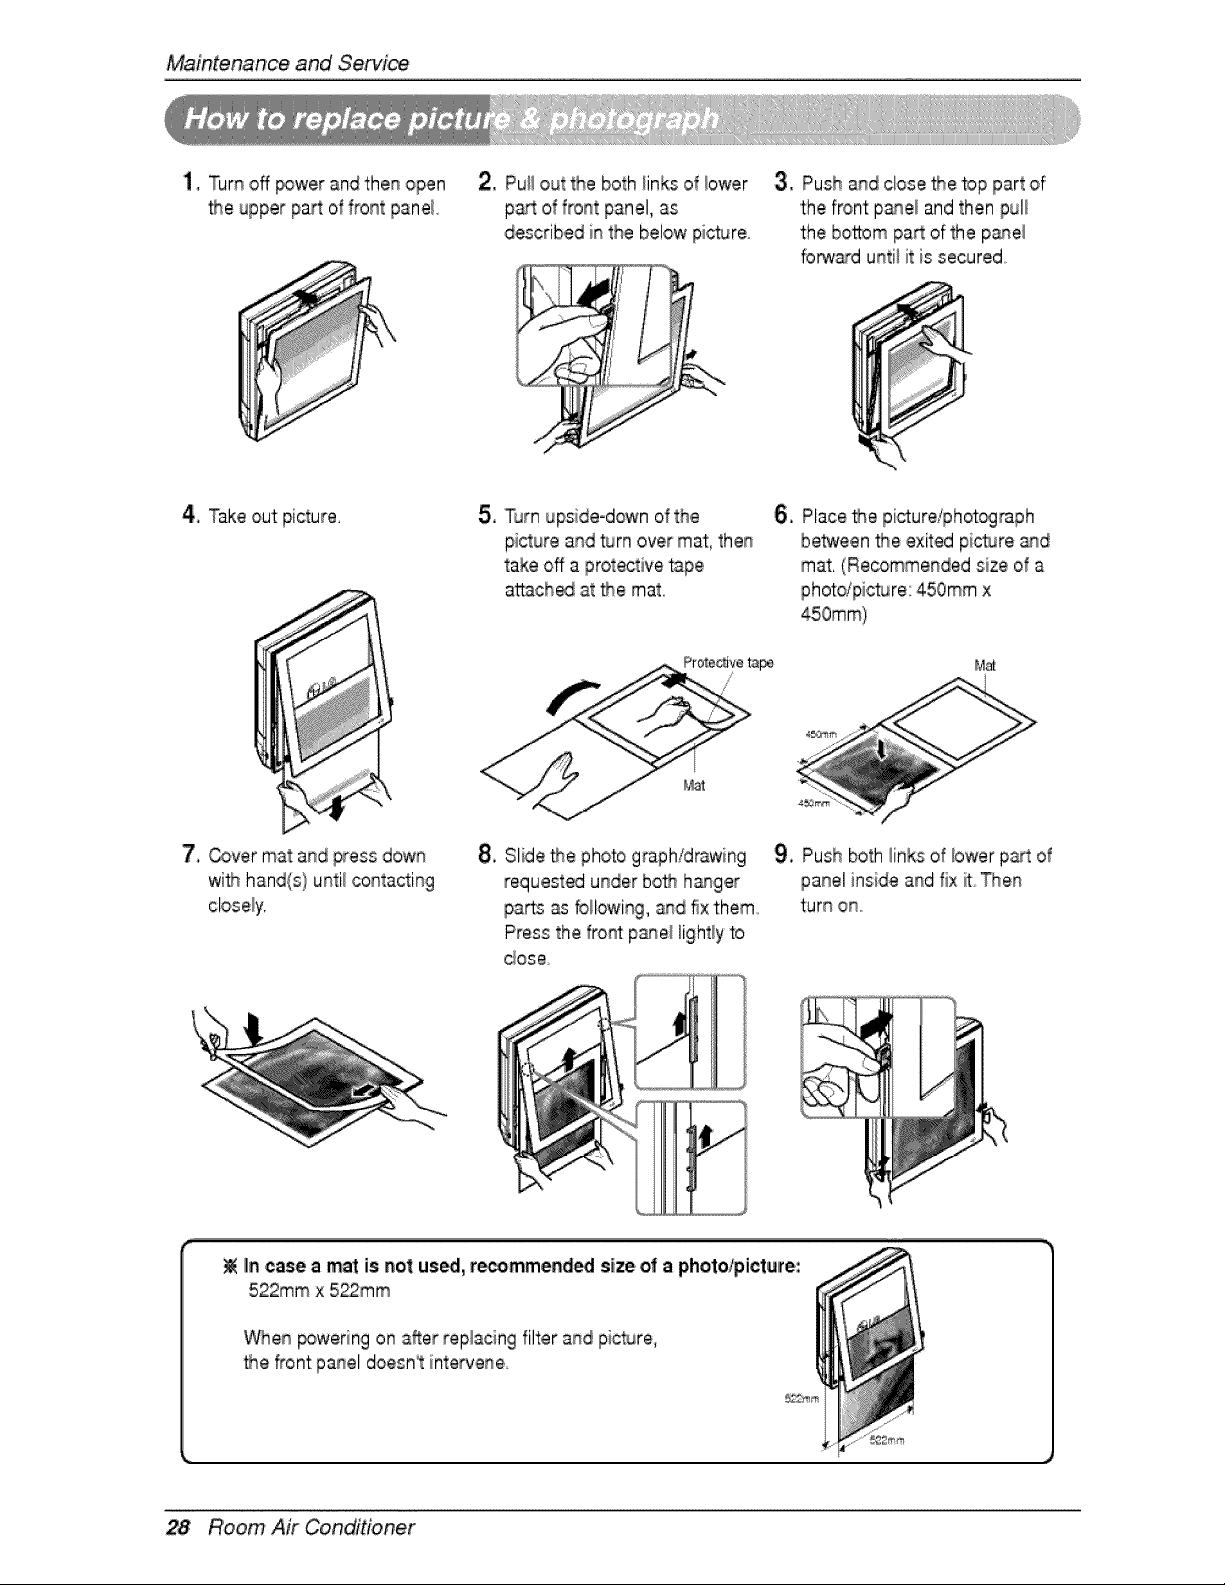
1, Turn off _wer and then open
the upper pa_ of front panel,
2, Pu!i out the both iinks of iower
part of front panel, as
described in the below pic_re
3, Push and close Me top part of
t:hefront pane! and then pul!
the bottom pa_ of the p_el
fo_ard until it is secured°
4, Take out picture, 5, T_rn upside-down of the
picture and turn over mat, then
take off a protective tape,
attach_ at the mat,
6, Place Me picture/phot_raph
between Me exited picture and
mat, (Recommended size of a
photdpicture: 450ram x
M_
7, Cover mat and press down
wifn hand(s} until contacting
8, Slide Me photo graph/d_wing
requested under both hasger
parts as foilowi%, and fix them
Press the front panel lightly to
dose
9, Push both links of lower part of
panel inside and fix ff Then
turn ono
IIn,case a mat is not us_, r_mmend_ size o! a photo/picture:
522mm x 522mm
When _wering on after replacing filter and pic_re,
• ,e,_ont panel doesn_ intervene
28 Room Air Conditioner
Maintenanceand Service
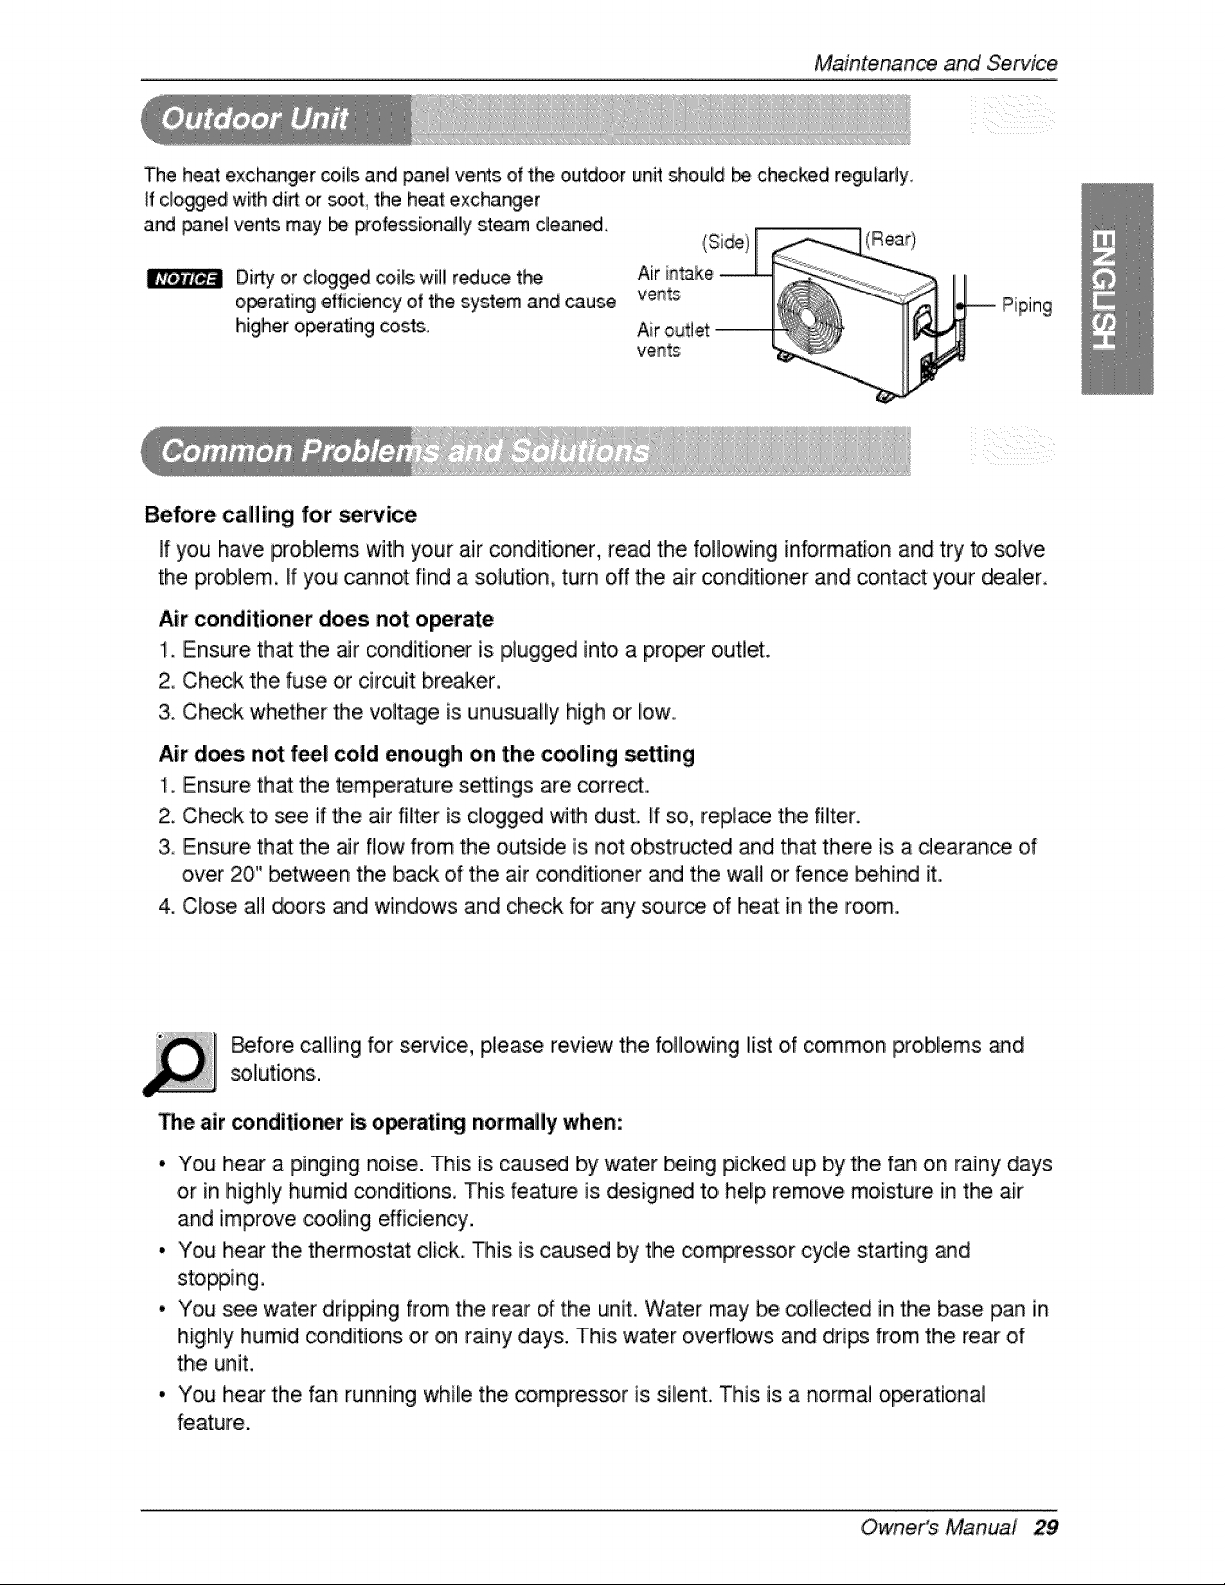
The heat exch_ger ceils and panel ve_s of the outdoor unit should b checked regularly.
ff clogged with di_ or soot_ the heat exchanger
and _3nel vents may _ _ofessio,n_ly steam cleaned.
Didy o,rclogged coils will r_uce t}_
o_ra.ting ,efficiency ,of the ,system and cause
higher operating _sts.
_ Piping
Before calling for se_ice
If you have problems with your air coindit[oner, read the following information and try to solve
the problem, ff you cannot find a solution, turn off the air conditioner and contact your d_a[er..
Air conditioner does not operate
1. Ensure that the air condit[,oner is plugged into a proof o,utlet.
2, Check the fuse or circuit breaker,
3. Check whether the vo,lt_ge is unusually high or low..
Air does not fee! cold enough on the cooling setting
1. Ensure that the temperature settings are corred...
2. Check to _e if the air fil_er is clogged with dust. [f so, replace the filter.
3, Ensure that the _r flow from the outside is not obstructed and that there, is a dearan_ of
over 20" between the back ,of the air conditioner and the wall or fen_ behind it..
4. C_ose all _ors _d windows and check for any source of heat in the room..
_fore caliing for service, please review the following list o.fcommon pro,blems and
sol[utions.
The air conditio_r is o_ratir'_ normagy when:
• You he_ a pinging noise. This is caus_ by water being picked up by the fan on rainy days
or in highly humid conditions, This feature is designed to help remove moisture in the air
and improve cooling efficiency.
i, You hear tlhe thermostat click. This is caused by the _mpressor cycle sta_ing _d
stopping.
• You see water drip#ng from the rear of the unit. Water may be co[l e_ed in the base pan in
highly humid _nditJons or on rainy days. This water overflows and drips from the rear of
the unit,
• You he_ the fan running while the comp,_essor is silent. This is a n,ormal o_rational
feature,
Owne,r's Manual 29
Maintenanceand Servi_
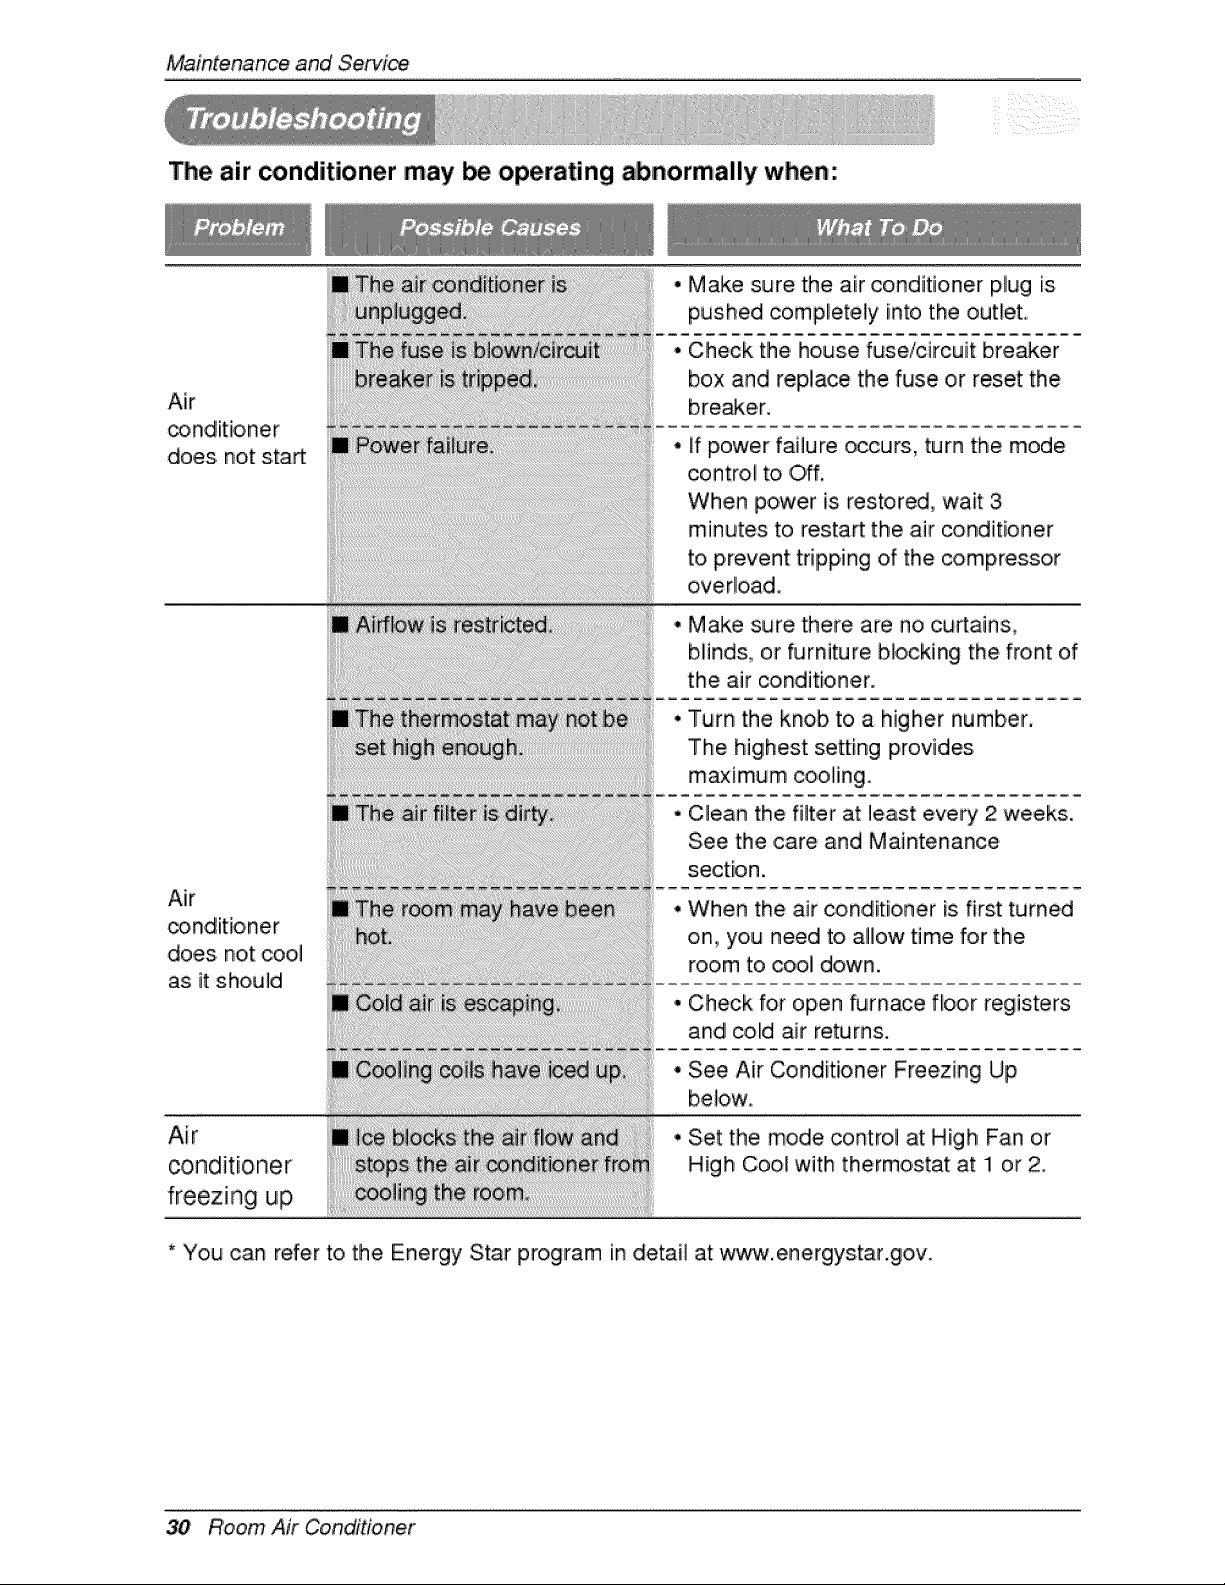
The air _nditioner may be operating abnormally when:
Air
does. not start
Air
_nd[tioner
does not coo,]
as it should
Air
conditioner
freezing up
Make sure the air conditioner plug is
into
pushed completely the outlet.
Check the house fuse/circuit breaker
box and rep,iace the fuse or reset the
bre,_e,r.
ff power failure occurs, turn the mode
control to Off,
When power is restored, wait 3
minutes to restart the air conditioner
to prevent tripping of the compressor
overload.
Make sure there are no curtains_
bl!inds..,,or furniture b]o,cking the front of
the air conditioner.
Turn the knob to a higher number,
The highest setting provides
maximum cooling.
C_ean the filter at least every 2 weeks.
See the ,care and Maintenance
section.
When the air conditioner is first turned
on., you need to .allow time for the
room to cool down.
Check for open _rnace floor registers
and colld air returns.
See Air Conditioner Freezing Up
below
Set the mode control at High Fan or
High Cool with thermostat at: !1 or 2
* You can refer to the Energy Star program in detail at ww_w.energystar.goiv.
30 Room Air Conditioner

P/No.: 3828A20928B Impreso en Corea