OWNER'S MANUAL
®
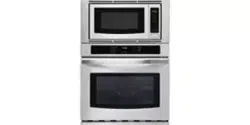
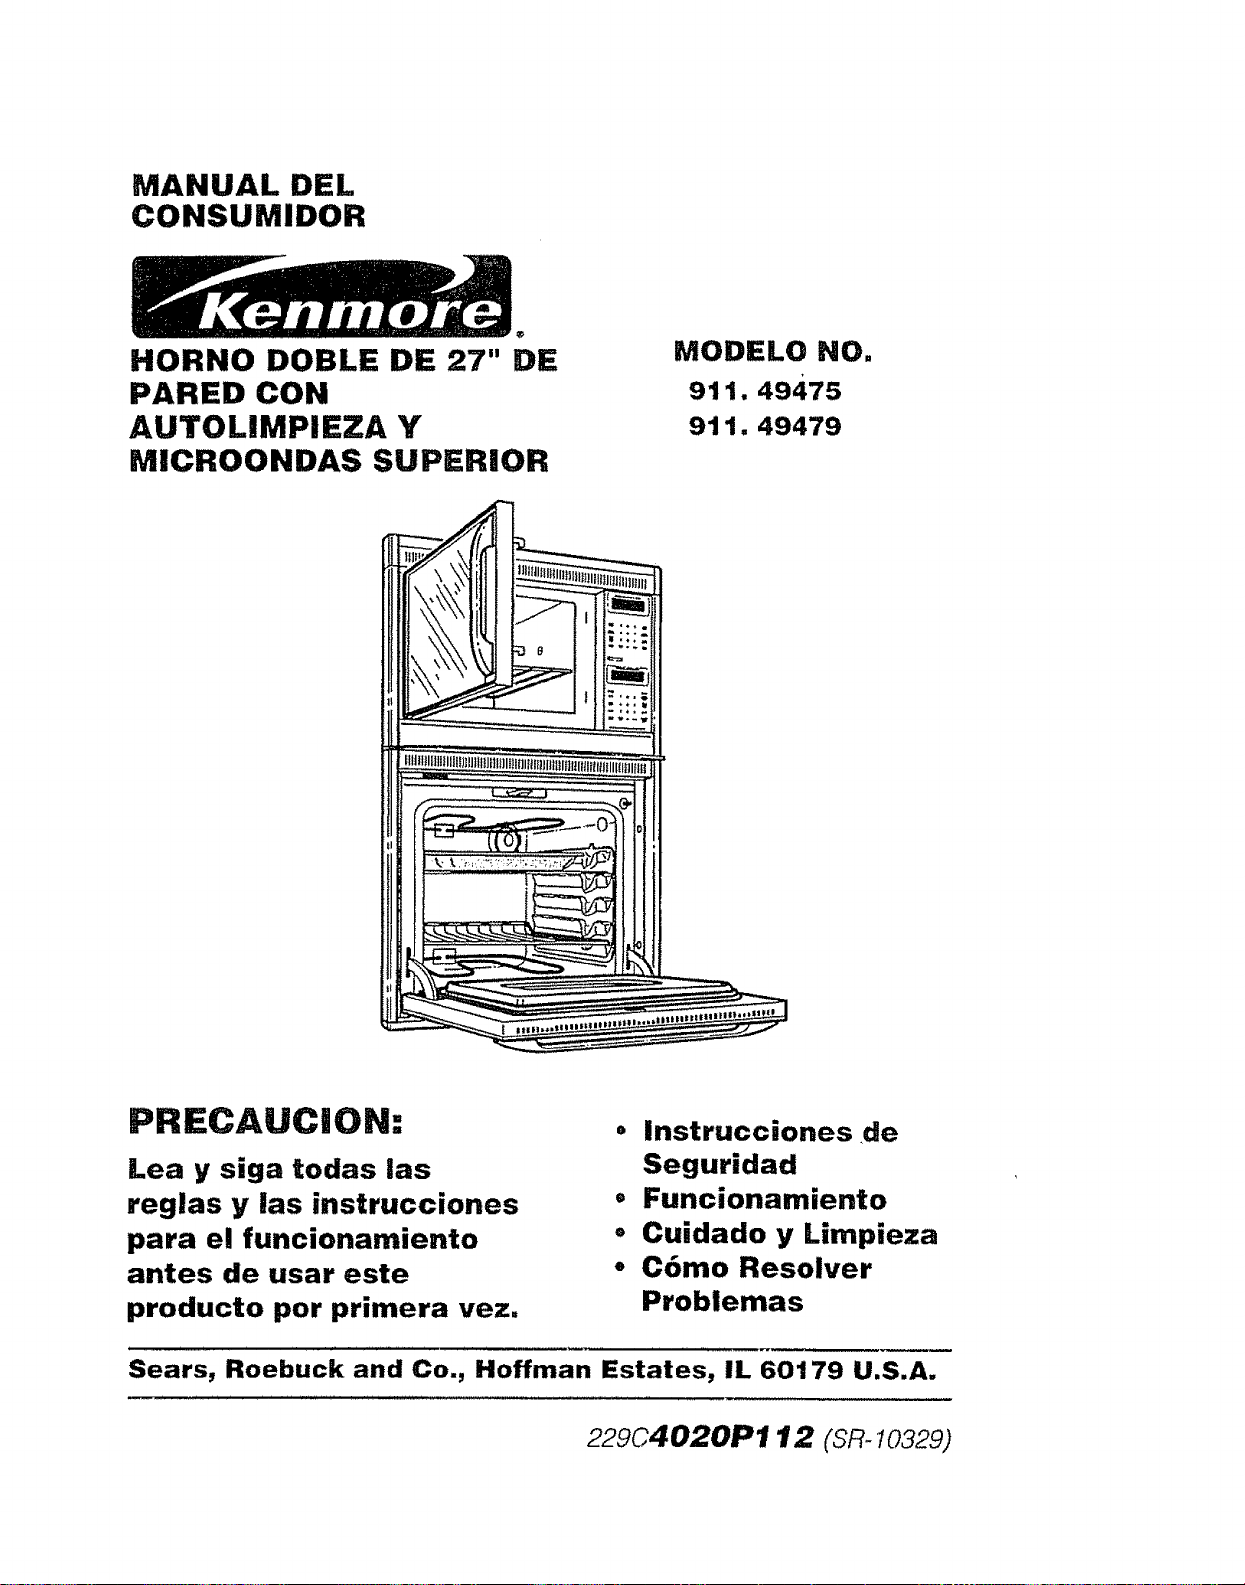
DOUBLE 27" SELF-
CLEANING BUILT-IN
WALL OVEN WITH
UPPER MICROWAVE
MODEL NO,
91_.4947s'1_O
o_I. 494_o"7_'_
CAUTION:
Before using this range,
read this manual and
follow all its Safety Rules
and Operating
Instructions.
• Safety instructions
• Operation
• Care and Cleaning
• Problem Solving
Sears, Roebuck and Co., Hoffman Estates, IL 60179 U.S.A.
229c4020P1 12 (SR 10329)
TABLEOFCONTENTS
SELF-CLEANING
WALLOVENWITHMICROWAVE
Oven Safety ............................ 3-6
Removal of Packaging Tape .... 7
Features of Your Oven ....... 7
Microwave Oven Control ..............8
Setting the Min!Sec Kitchen Timer
.,,-,..,.,,.,. ................. . .,,.,,, ,, .... 9
Setting Delay Cooking .......... 9
Time Defrost, Hold and Time Cook
Setting Time Cooking .............. 10
Setting Time Cook 11................ 10
How to set Time Defrost ....... 11
Auto Defrost ......................... 11
Temperature Probe ................ 12
Setting Temp/Cook .................. 12
Automatic Cooking ................. 13
Cooking Codes ....................... 13
Auto Roast ............................. 13
To Set Auto Roast .................. 13
Automatic Simmering ............ 14
To Adjust Auto Cooking Codes
........... ,................. ,.......... 14
Microwave Oven Shelf .......... 15
Lower Oven Control ............. I6
To Set the Clock .................. 17
To Black Out The Clock Display
................................................ 17
To Set The Timer ...................... 17
Oven Cooking Tips ........ 18-19
To Set Bake .......................... 20
To Set Timed Bake ................. 20
To Set Delayed Start ............. 20
Broiling ................................... 21
Self-Clean Cycle .............. 22-23
Microwave Interior ................. 24
Microwave Oven Floor ............ 24
Microwave Door Window ........ 24
Outside Oven Surfaces .......... 24
Control Panel ........................... 24
Broiler Pan and Grid .............. 24
Oven Light Bulb .................... 25
Oven Door ............................. 25
Microwave Oven Lamp .......... 26
Removable Oven Rack .......... 26
Before Calling for Service ..........
........................................... 27-29
Temperature Adjustment ...... 30
Warranty .................................. 31
Consumer Service Numbers 32
For your convenience and future reference, please write down
your model and serial numbers in the space provided. They are
located on the front frame behind the oven door,
MODEL NUMBER: SERIAL NUMBER:
IMPORTANTSAFETY
INSTRUCT/ONS
SAVE THESE INSTRUCTIONS
Read all instructions before using this appliance, When using
gas or electrical appliances, basic safety precautions should
be followed, including the following:
IMPORTANT: To insure safety for
yourself, family and home, please
read your Owner's Manual carefully
Keep it handy for reference. Pay
close attention to Safety Sections.
BE SURE your appliance is in-
stalled and grounded by a qualified
technician,
o DO NOT leave children alone or
unattended near an appliance in
use
• TEACH CHILDREN not to play
with controls or any part of the ap-
pliance and not to sit, climb or
stand on the door or any part of the
appliance
• CAUTION NEVER STORE items
of interest to children in cabinets
above the appliance. Children
climbing on the appliance could be
seriously injured.
• KEEP THIS book for later use_
• NEVER TRY to repair or replace
any part of the appliance unless in-
structions are given in this manual.
All other work should be done by a
qualified technician.
• NEVER USE your appliance for
warming or heating the room.
• ALWAYS KEEP combustible wal!
coverings, curtains, dishcloths, tow-
els, potholders, and other linens a
safe distance from the appliance
• NEVER USE a towel or other
bulky cloth as a potholder and
3
make sure the potholder is dry
Moist potholders could cause
steam burns DO NOT let
potholders touch hot surfaces
• ALWAYS KEEP the oven area
free from things that will burn. Food,
wooden utensils, grease buildup,
could catch fire. Plastic utensils
could melt and canned foods could
explode. Your appliance should
never be used as a storage area_
• ALWAYS KEEP your appliance
clear of things that will burn (gaso-
line and other flammable vapors or
liquids).
o NEVER HEAT unopened food
containers. Pressure buildup can
cause the container to burst and
cause injury.
o NEVER LEAVE jars or cans of fat
or drippings in your oven.
o NEVER TRY to clean a hot sur-
face° Some cleaners produce nox-
ious fumes and wet cloths or
sponges could cause steam burns.
° BE SURE the oven is securely in-
stalled in a cabinet that is firmly at-
tached to the house structure.
o DO NOT touch heating elements,
surfaces near them, or interior oven
surfaces. These may be hot enough
to cause burns even though they
are dark in color. During and after
use, do not touch or let clothing or
flammable materia! contact the ele-
ments or hot surfaces until they
have had time to cool Other sur-
faces near the oven vent openings,
oven door and window surfaces
may also be hot enough to cause
burns
IMPORTANTSAFETY
INSTRUCTIONS
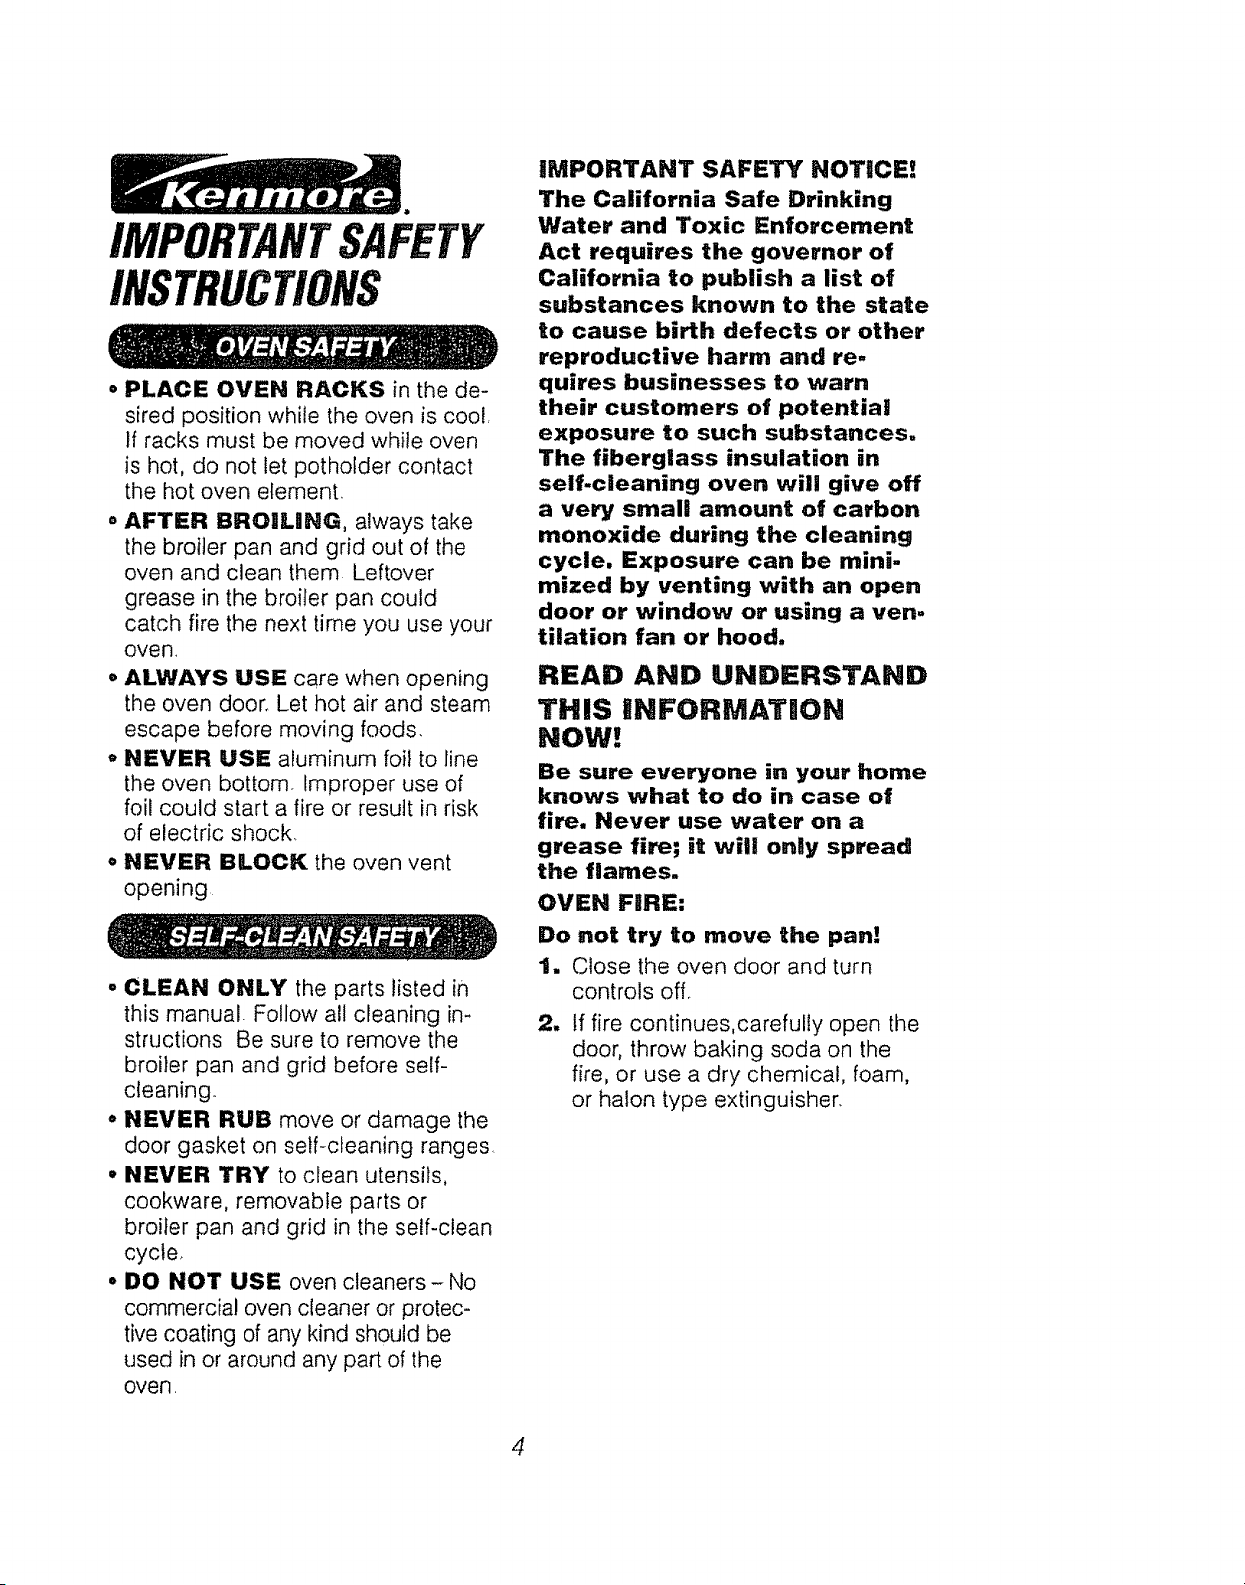
• PLACE OVEN RACKS in the de-
sired position while the oven is cool.
If racks must be moved while oven
is hot, do not let potholder contact
the hot oven element.
,, AFTER BROILING, always take
the broiler pan and grid out of the
oven and clean them Leftover
grease in the broiler pan could
catch fire the next time you use your
oven.
• ALWAYS USE care when opening
the oven door, Let hot air and steam
escape before moving foods.
, NEVER USE aluminum foil to line
the oven bottom. Improper use of
foil could start a fire or result in risk
of electric shock.
o NEVER BLOCK the oven vent
opening
o CLEAN ONLY the parts listed in
this manual. Follow all cleaning in-
structions Be sure to remove the
broiler pan and grid before self-
cleaning.
• NEVER RUB move or damage the
door gasket on self-cleaning ranges.
• NEVER TRY to clean utensils,
cookware, removable parts or
broiler pan and grid in the self-clean
cycle
° DO NOT USE oven cleaners - No
commercial oven cleaner or protec-
tive coating of any kind should be
used in or around any part of the
oven,
IMPORTANT SAFETY NOTICE!
The California Safe Drinking
Water and Toxic Enforcement
Act requires the governor of
California to publish a list of
substances known to the state
to cause birth defects or other
reproductive harm and re-
quires businesses to warn
their customers of potential
exposure to such substances.
The fiberglass insulation in
self.cleaning oven will give off
a very small amount of carbon
monoxide during the cleaning
cycle. Exposure can be mini-
mized by venting with an open
door or window or using a ven-
tilation fan or hood,
READ AND UNDERSTAHD
THIS |NFORMATIIOH
NOW!
Be sure everyone in your home
knows what to do in case of
fire. Never use water on a
grease fire; it will only spread
the flames.
OVEN FIRE:
Do not try to move the pan!
1, Close the oven door and turn
controls off.
2, If fire continues,carefully open the
door, throw baking soda on the
fire, or use a dry chemical, foam,
or halon type extinguisher.
4
IMPORTANTSAFETY
INSTRUCTIONS
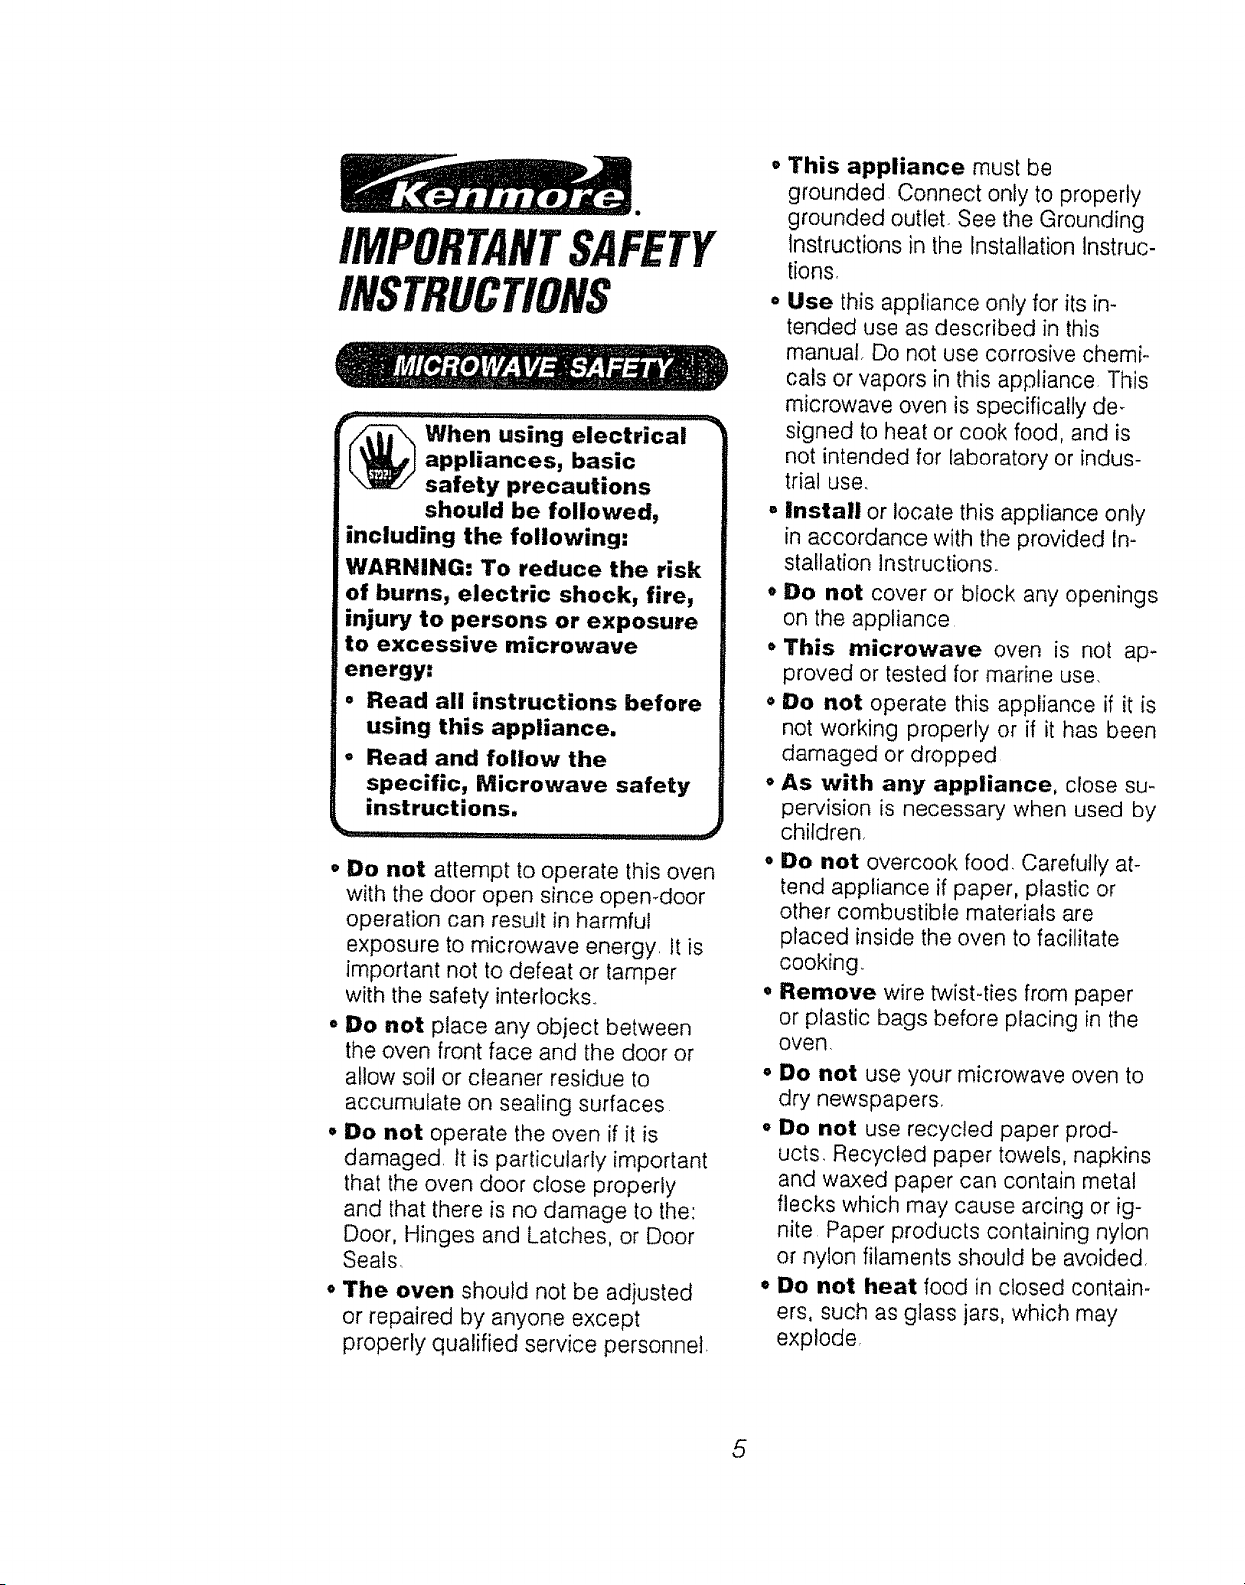
/_ When using electrical
I_MJJ appliances, basic
"_/" safety precautions
should be followed,
including the following:
WARNING: To reduce the risk
of burns, electric shock, fire,
injury to persons or exposure
to excessive microwave
energy:
• Read all instructions before
using this appliance.
. Read and follow the
specific, Microwave safety
instructions.
• Do not attempt to operate this oven
with the door open since open-door
operation can result in harmful
exposure to microwave energy, It is
important not to defeat or tamper
with the safety interlocks.,
° Do not place any object between
the oven front face and the door or
allow soil or cleaner residue to
accumulate on sealing surfaces
• Do not operate the oven if it is
damaged. It is particularly important
that the oven door close properly
and that there is no damage to the:
Door, Hinges and Latches, or Door
Seals,
• The oven should not be adjusted
or repaired by anyone except
properly qualified service personnel,
• This appliance must be
grounded Connect only to properly
grounded outlet. See the Grounding
Instructions in the Installation Instruc-
tions,
• Use this appliance only for its in-
tended use as described in this
manual Do not use corrosive chemi-
cals or vapors in this appliance This
microwave oven is specifically de-
signed to heat or cook food, and is
not intended for laboratory or indus-
trial use.
° install or locate this appliance only
in accordance with the provided In-
stallation Instructions.
• Do not cover or block any openings
on the appliance
o This microwave oven is not ap-
proved or tested for marine use.
o Do not operate this appliance if it is
not working properly or if it has been
damaged or dropped
° As with any appliance, close su-
pervision is necessary when used by
children,
° Do not overcook food. Carefully at-
tend appliance if paper, plastic or
other combustible materials are
placed inside the oven to facilitate
cooking..
• Remove wire twist4ies from paper
or plastic bags before placing in the
oven.
• Do not use your microwave oven to
dry newspapers.
• Do not use recycled paper prod-
ucts. Recycled paper towels, napkins
and waxed paper can contain metal
flecks which may cause arcing or ig-
nite Paper products containing nylon
or nylon filaments should be avoided,
• Do not heat food in closed contain-
ers, such as glass jars, which may
explode
5
IMPORTANTSAFETY
INSTRUCTIONS
• Do not pop popcorn in your micro-
wave unless you use popcorn la-
beled for use in microwave ovens.
• #o not overcook potatoes They
could dehydrate and catch fire,
causing damage to your oven.
o Do not operate the microwave
oven if it is empty.
• Do not use your microwave oven
as a storage space.
° if material inside the oven
should ignite, close the door, turn
the oven Off and disconnect the
power to the appliance.
o Oversized food or oversized metal
cookware should not be used in a
microwave oven. Electrical shock or
fire could occur..
° Do not clean with metal scouring
pads. Pieces can break off the pad,
causing electrical shock_
o Do not defrost frozen beverages
that have narrow necked bottles. Pres-
sure could build up, causing the bottle
to burst.
° Use potholders when removing
cookware from the oven. Cookware
could become hot during cooking
due to the transferred heat from the
food,
° Be carefu! touching the walls or
the oven bottom during or after
cooking, The walls and floor could
become hot,
• Do not boil eggs in a microwave
oven. Pressure will build up inside
the egg yolk and will cause the egg
to burst.
o Use plastic containers that are
approved by the manufacturer for
microwave use. Do not allow chil-
dren to use plastic containers un-
less supervised. Do not subject
empty containers to microwaving
• Foods with unbroken outer
skin, such as potatoes, sausages,
tomatoes, apples, chicken liver, egg
yolks and other giblets, should be
pierced to allow steam to escape
during cooking.
° Make sure plastic wraps used
during microwave cooking are ap-
proved for microwave use.
° Spontaneous boiling: under
certain circumstances, tiquids may
start to boil during or shortly after
removal from the oven, Stirring the
liquid briefly before removing the
container will help prevent burns or
splashing of liquids,
• Do not heat baby food in glass jars
in the microwave,
Boiiable cooking pouches and
tightly closed plastic bags should
be slit, pierced or vented as di-
rected by package, tf they are not
vented in some way, pressure will
cause them to burst.
6
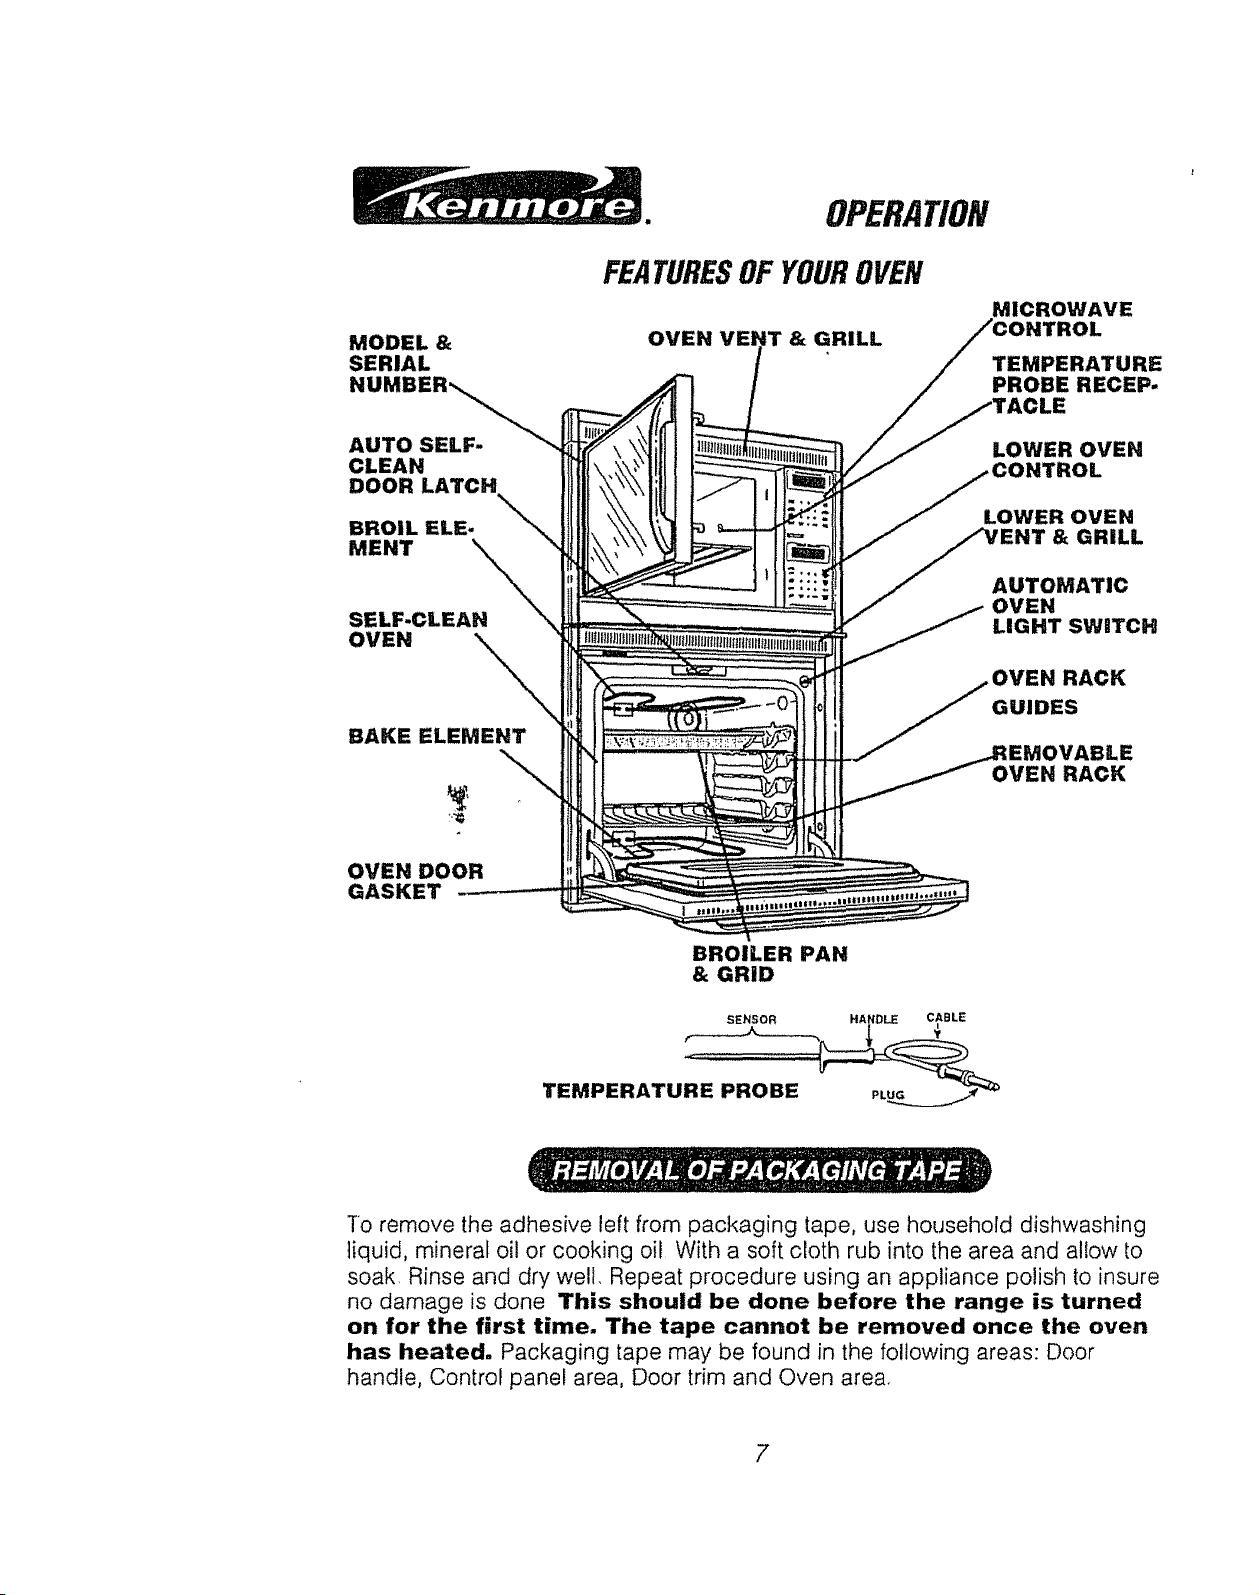
MODEL 8=
SERIAL
OPERATION
FEATURESOFYOUROVEN
OVEN VE! & GRILL
MICROWAVE
rROL
TEMPERATURE
PROBE RECEP.
AUTO SELF-
CLEAN
DOOR LATCH
BROIL ELE-
MENT "\\\\
SELF.CLEAN
OVEN
BAKE ELEMENT
OVEN DOOR
GASKET
LOWER OVEN
'ROL
LOWER OVEN
rENT & GRILL
AUTOMATIC
OVEN
LIGHT SWITCH
RACK
GUIDES
OVEN RACK
BROILER PAN
& GRID
SENSOR HANDLE CABLE
To remove the adhesive left from packaging tape, use household dishwashing
liquid, mineral oil or cooking oil With a soft cloth rub into the area and allow to
soak. Rinse and dry well. Repeat procedure using an appliance polish to insure
no damage is done This should be done before the range is turned
on for the first time. The tape cannot be removed once the oven
has heated. Packaging tape may be found in the following areas: Door
handle, Control panel area, Door trim and Oven area.
7

OPERATION
YourMicrowave OvenContro/
UPPER MICROWAVE OVEN
Your new
®®® @
®®® @
microwave oven offers a
wide variety of ways to cook foods.
Your microwave uses very short, high
frequency radio waves that move
through the food to generate heat.
Reheating and defrosting is very con-
venient because time and preparation
is so short
DISPLAY--Shows time or tempera-
ture during cooking, power level
used, cooking mode and instructions.
TIMED COOK--Microwave using an
High power level You can also
change the power level after entering
the cooking time,
TIMED DEFROST--For automatic
thawing at power level 3. You can
change the power level after entering
the defrost time
TEMP COOK/HOLD--Cooking with
the probe, the oven will automatically
switch to the Hold function, to maintain
the temperature until you open the
door or press the Clear!Off pad
POWER CONTROL--You can set
your preferred power level for cooking
by pressing the Power Control pad
first.
AUTO COOK--The oven automati-
cally microwaves at a pre-pro-
grammed power level, cooks for the
exact amount of time and shuts off
automatically.
AUTO DEFROST--When you enter
the weight of foods, the oven automati-
cally sets the power level and defrost-
ing time,
AUTO ROAST--Using the probe and
setting the temperature, this feature
cooks meat automatically,
NUMBER PADS--Enters cooking,
defrosting time, temperature and
power levels.
START--Starts the microwaving pro-
cess.
HOLD TIMER--Uses no microwave
energy, It will hold foods between de-
frosting and cooking, act as a kitchen
timer or aid in temperature cooking.
CLEAR/OFF--Shuts off the oven or
erases all settings.
You may notice the microwave fan run-
ning while using the microwave and
even after cooking is complete, This is
normal. The fan helps cool internal
parts
8
OPERATION
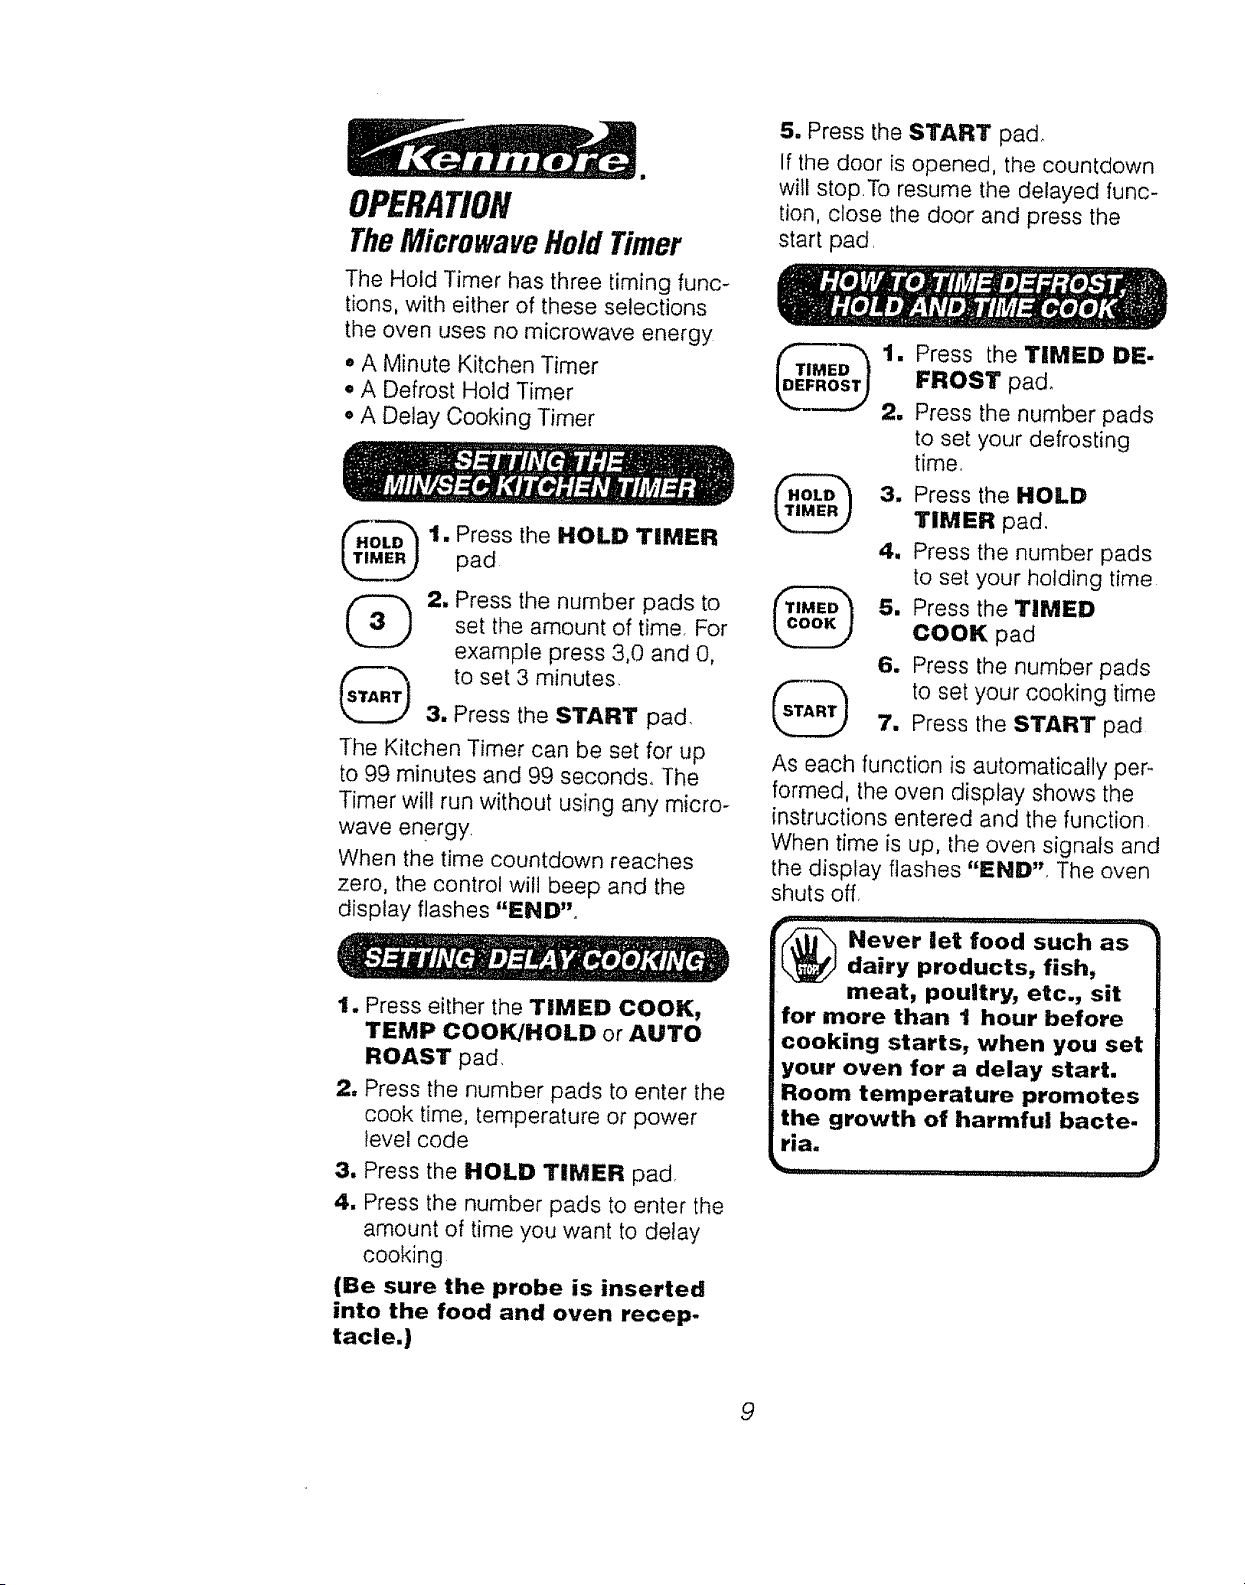
TheMicrowaveHold Timer
The Hold Timer has three timing func-
tions, with either of these selections
the oven uses no microwave energy
• A Minute Kitchen Timer
• A Defrost Hold Timer
• A Delay Cooking Timer
Press the HOLD TIMER
pad
Press the number pads to
set the amount of time. For
example press 3,0 and O,
to set 3 minutes,
Press the START pad,
lhe Kitchen Timer can be set for up
to 99 minutes and 99 seconds. The
Timer will run without using any micro-
wave energy
When the time countdown reaches
zero, the control will beep and the
display flashes "EHD"
1. Press either the TIMED COOK,
TEMP COOK/HOLD or AUTO
ROAST pad
2. Press the number pads to enter the
cook time, temperature or power
level code
3, Press the HOLD TIMER pad,
4. Press the number pads to enter the
amount of time you want to delay
cooking
(Be sure the probe is inserted
into the food and oven recep-
tacle,}
5, Press the START pad_
If the door is opened, the countdown
will stopTo resume the delayed func-
tion, close the door and press the
start pad,
T(_ MED-'_ 1. Press the TIMED DE-
FROST pad°
|DEFROST/
2, Press the number pads
to set your defrosting
time,
3. Press the HOLD
TIMER pad.
4. Press the number pads
to set your holding time
5. Press the TIMED
COOK pad
6, Press the number pads
to set your cooking time
7. Press the START pad
As each function is automatically pep
formed, the oven display shows the
instructions entered and the function,
When time is up, the oven signals and
the display flashes "END" The oven
shuts off,
:: '" I r I ' ' I I i i IIII I , I':_#..
Never let food such as
t_ dairy products, fish,
meat, poultry, etc., sit
for more than 1 hour before
cooking starts, when you set
your oven for a delay start.
Room temperature promotes
the growth of harmful bacte-
m
rla.
_- ,................. i,,, i, i III, I ,,, _4
9

OPERATION
Microwave TimeCooking
The time cooking feature allows you to
preset the cooking time, The oven
shuts off automatically at the end of
the cooking time,
Power level 10 (High) is recom-
mended for most cooking, but you
may change this for more flexibility,
1, ress the TIMED COOKpad.
2, Press number pads to
enter cooking time.
Power level 10 will be displayed. If
power level 10 is not desired, press
POWER CONTROL and then press
number pad to select new power
level,
3, Press the START pad
When time is up, the oven signals and
display flashes "END" The oven
light and fan shut off
TIMED COOK II lets you set two
time cooking functions within one
program, This is ideal when you want
to change power levels during your
cooking operations,
1. ress the TIMED COOKpad,
2. Press number pads to set
cooking time.
Power level 10 wile be displayed If
power level 10 is not desired, press
POWER CONTROL and then press
number pad to select new power
level,
Press the TmMED COOK
pad
Press the number pads to
set the second cooking
time.
5, Press the START pad,
The display will show the cooking time
countdown and the first power level,
At the end of the first cooktime count-
down the display will show the sec-
ond cooking time countdown and the
second power level
When the time is up the oven will sig-
nal and the display will flash "END _',
10
OPERATION
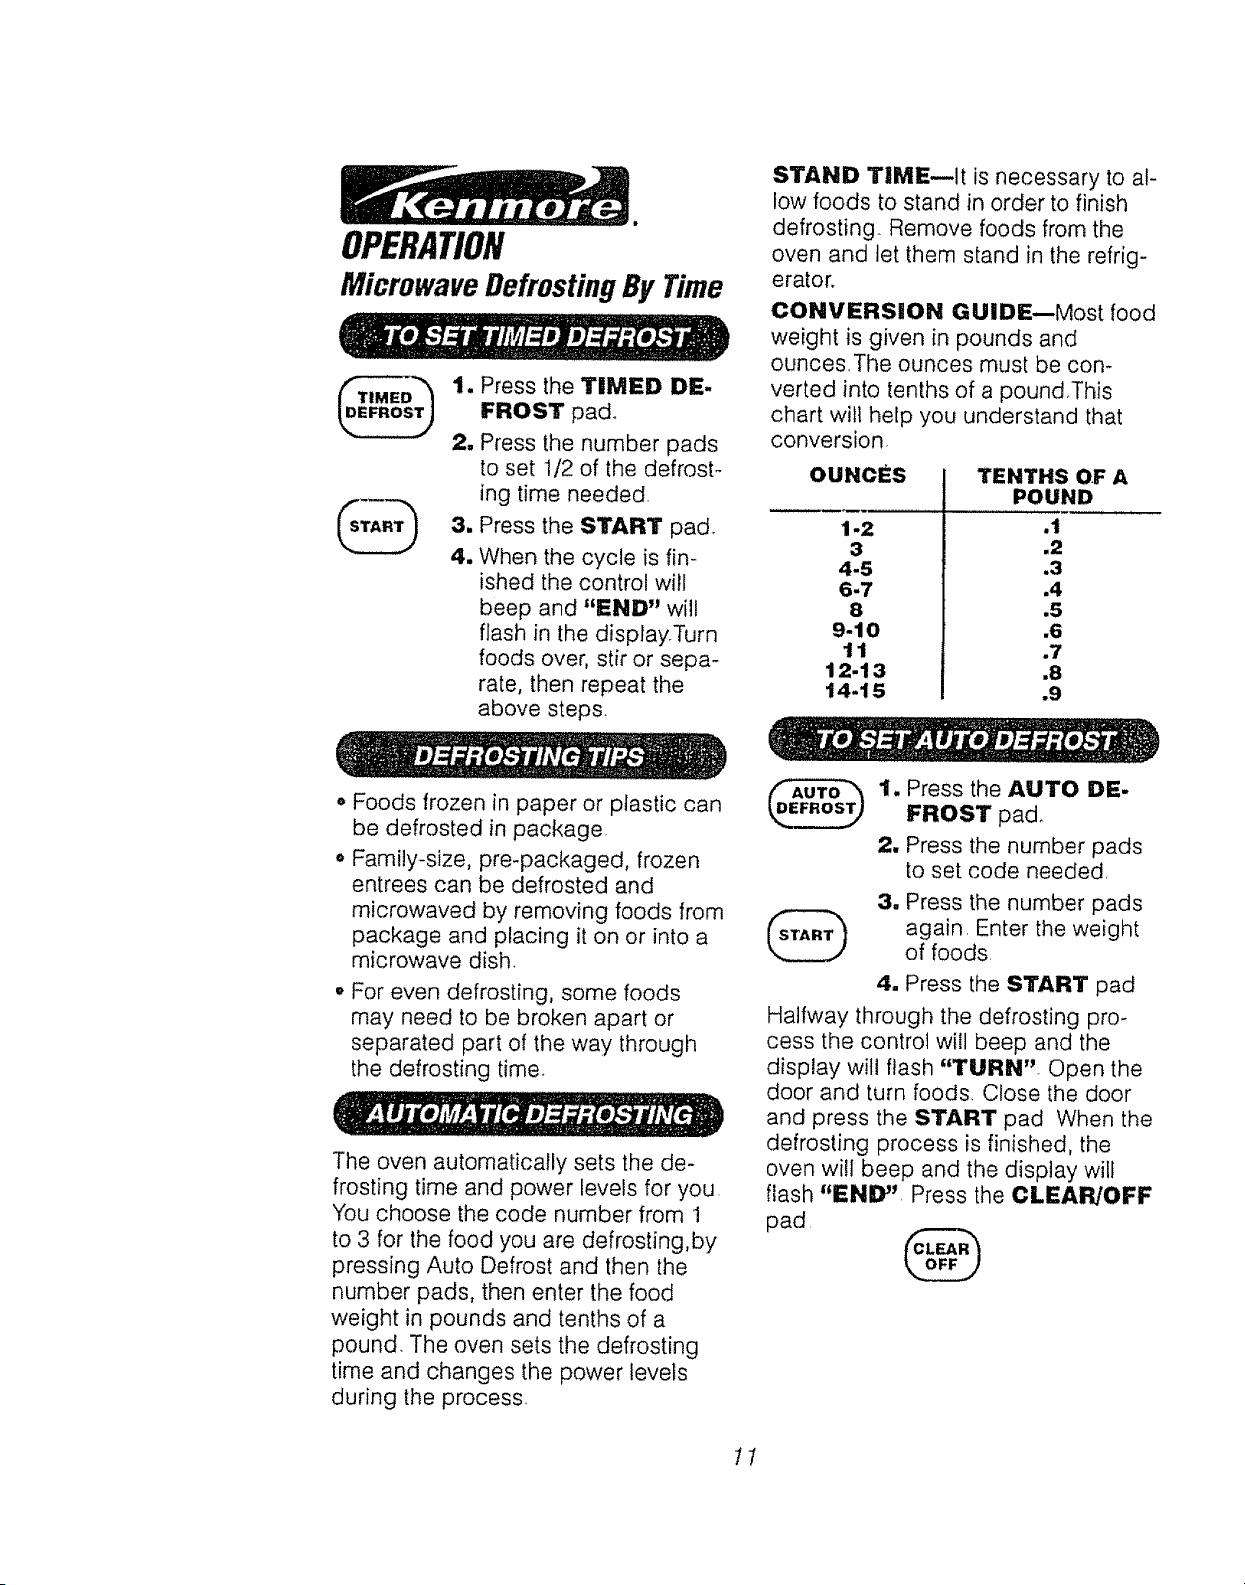
MicrowaveDefrostingBy Time
1. Press the TIMED DE-
FROST pad°
2. Press the number pads
to set 1/2 of the defrost-
ing time needed,
3. Press the START pad.
4. When the cycle is fin-
ished the control will
beep and "END" will
flash in the display.Turn
foods over, stir or sepa-
rate, then repeat the
above steps.
STAND TtlME--It is necessary to al-
low foods to stand in order to finish
defrosting.. Remove foods from the
oven and let them stand in the refrig-
erator.
CONVERSION GUIDE--Most food
weight is given in pounds and
ouncesThe ounces must be con-
verted into tenths of a poundoThis
chart wit1 help you understand that
conversion.
ouNcEs
1-2
3
4-5
6-7
8
9-10
11
12-13
14-15
TENTHS QF A
POUND
.1
.2
.3
.4
.5
.6
.7
,8
.9
• Foods frozen in paper or plastic can
be defrosted in package.
o Family-size, pre-packaged, frozen
entrees can be defrosted and
microwaved by removing foods from
package and placing it on or into a
microwave dish,
o For even defrosting, some foods
may need to be broken apart or
separated part of the way through
the defrosting time.
The oven automatically sets the de-
frosting time and power levels for you
You choose the code number from 1
to 3 for the food you are defrosting,by
pressing Auto Defrost and then the
number pads, then enter the food
weight in pounds and tenths of a
pound. The oven sets the defrosting
time and changes the power levels
during the process.
1. Press the AUTO DE-
FROST pad_
2. Press the number pads
to set code needed,
3, Press the number pads
again, Enter the weight
of foods
4. Press the START pad
Halfway through the defrosting pro-
cess the control will beep and the
display will flash "TURN". Open the
door and turn foods, Close the door
and press the START pad When the
defrosting process is finished, the
oven will beep and the display will
flash "END" Press the CLEAR/OFF
pad
@
11
OPERATION
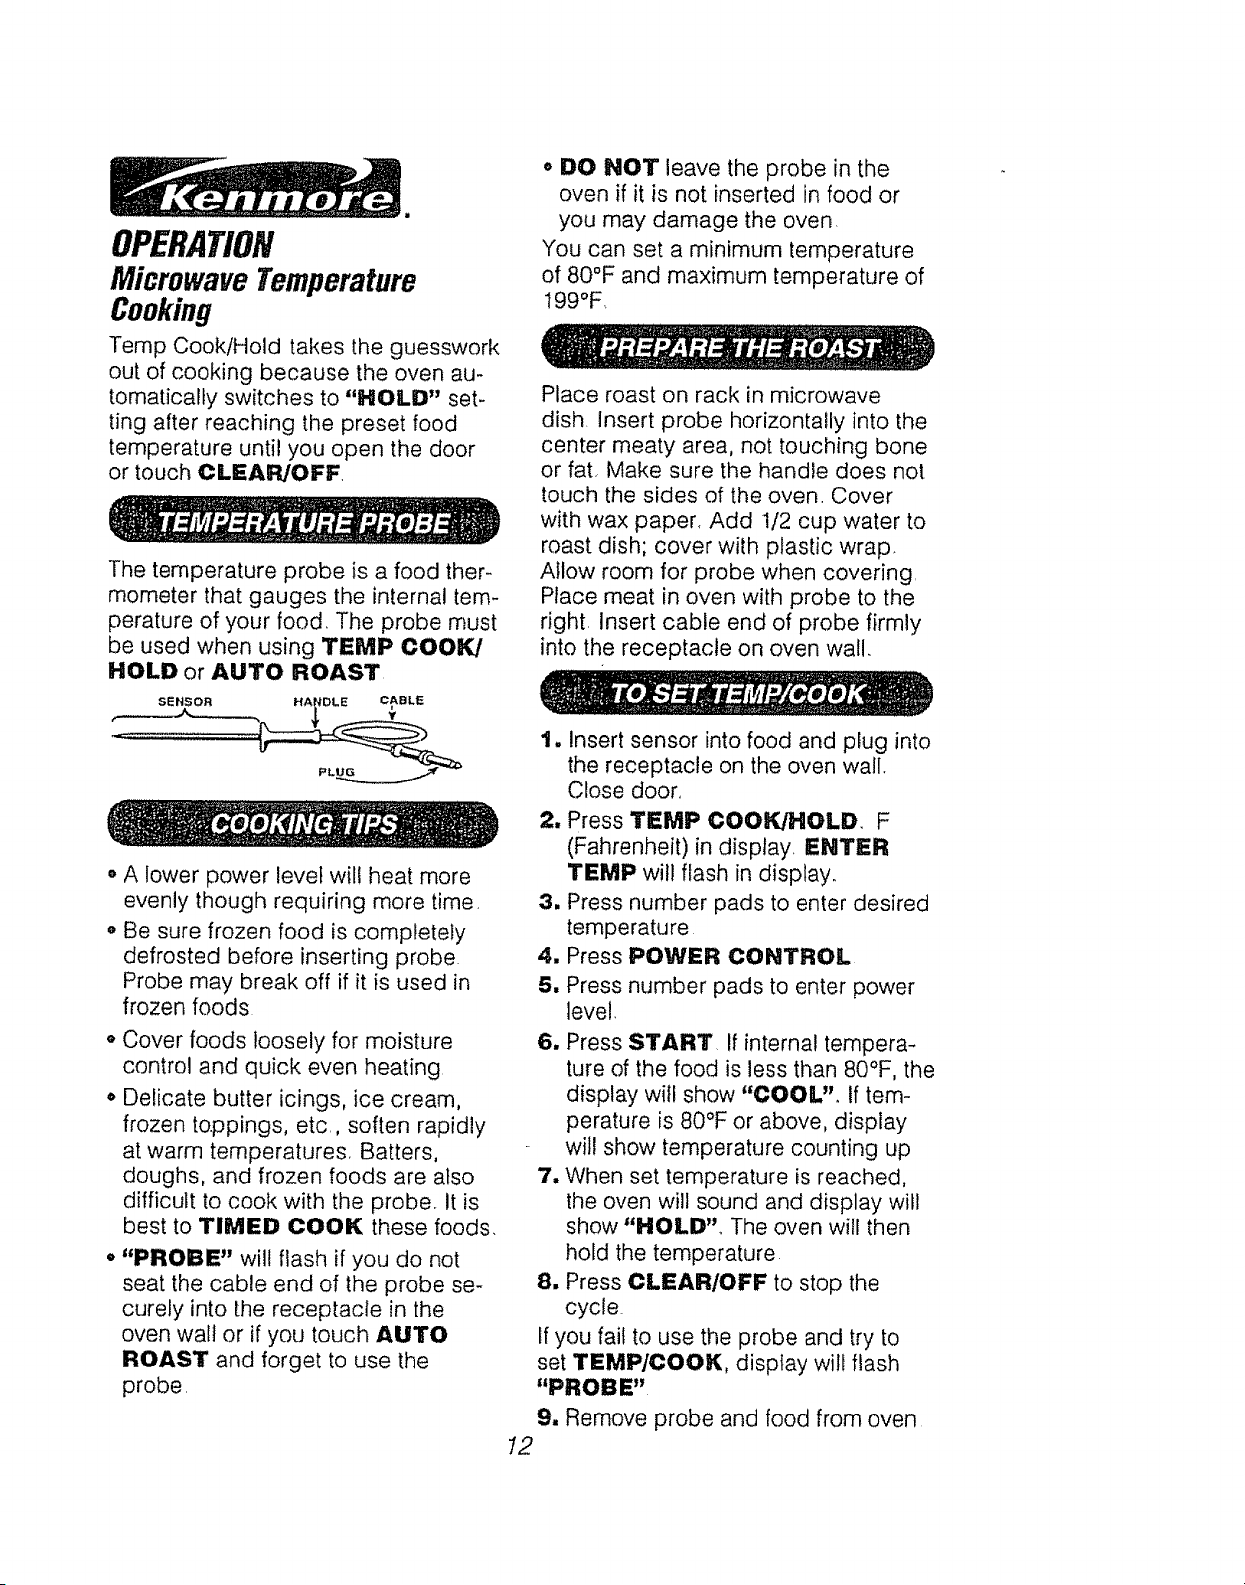
Microwave Temperature
Cooking
Temp Cook/Hold takes the guesswork
out of cooking because the oven au-
tomatically switches to "HOLD" set-
ting after reaching the preset food
temperature until you open the door
or touch CLEAFUOFF,
The temperature probe is a food ther-
mometer that gauges the internal tem-
perature of your food, The probe must
be used when using TEMP COOK/
HOLD or AUTO ROAST
SENSOR
o A lower power level wil! heat more
evenly though requiring more time,
° Be sure frozen food is completely
defrosted before inserting probe,
Probe may break off if it is used in
frozen foods
• Cover foods loosely for moisture
control and quick even heating
o Delicate butter icings, ice cream,
frozen toppings, etc., soften rapidly
at warm temperatures, Batters,
doughs, and frozen foods are also
difficult to cook with the probe. It is
best to TIMED COOK these foods.
° "PROBE" will flash if you do not
seat the cable end of the probe se-
curely into the receptacle in the
oven wall or if you touch AUTO
ROAST and forget to use the
probe,
o DO NOT leave the probe in the
oven if it is not inserted in food or
you may damage the oven.
You can set a minimum temperature
of 80°F and maximum temperature of
199°F.
Place roast on rack in microwave
dish. Insert probe horizontally into the
center meaty area, not touching bone
or faL Make sure the handle does not
touch the sides of the oven. Cover
with wax paper, Add 1/2 cup water to
roast dish; cover with plastic wrap.
Allow room for probe when covering,
Place meat in oven with probe to the
right, Insert cable end of probe firmly
into the receptacle on oven wall.
t. insert sensor into food and plug into
the receptacle on the oven wall,
Close door,
2, Press TEMP COOK/HOLD, F
(Fahrenheit) in display, ENTER
TEMP will flash in display.
3. Press number pads to enter desired
temperature
4, Press POWER CONTROL
5. Press number pads to enter power
level,
6. Press START, If internal tempera-
ture of the food is less than 80°F, the
display will show "COOL". If tem-
perature is 80°F or above, display
will show temperature counting up
7. When set temperature is reached,
the oven will sound and display will
show "HOLD"_ The oven will then
hold the temperature
8, Press CLEAR/OFF to stop the
cycle
If you fail to use the probe and try to
set TEMP/COOK, display will flash
"PROBE"
9. Remove probe and food from oven
I2
OPERATION
A guide behind the oven door lists
cooking codes for frequently pre-
pared fresh or uncooked foods
MicrowaveAuto Cooking
Use AUTO COOK to eliminate your
need to look up cooking time in your
cookbook or guess how long to set
cooking time. By sensing the steam
that escapes as food microwaves, the
control adjusts the oven's cooking
time to various types and amounts of
food,
This feature is best used with foods
that you want to steam or retain mois-
ture.
NOTE: Use of the metal shelf with Au-
tomatic Cooking is not recommended.
FOODS NOT RECOMMENDED
for Auto Cooking--F0ods that
must be cooked uncovered, foods re-
quiring constant attention, foods re-
quiring additional ingredients during
cooking, foods calling for a dry or
crisp appearance, foods cooked us-
ing the probe should not be Auto
Cooked.
Automatic Cooking Codes 1-9 are de-
signed to give you easy automatic re-
sults with a number of foods.
CODE 1--Used for reheating foods
quickly and turns off the oven auto-
matically as soon as the sensor de-
tects steam from foods.
CODE 2-9--When used, the oven
will determine how much additional
cooking time is needed after steam
has been detected .The oven will auto-
matically switch to TIME COOK,
When the oven signals, foods are
ready to be stirred, turned or rotated.
AUTO ROAST uses the temperature
probe to cook to the desired serving
temperature Auto Roast uses up to 3
power settings which automatically
switch during roasting, providing ten-
der, even cooking results without
overcooking
Just as in conventional roasting, only
tender cuts of meats should be Auto
Roasted until specified internal tem-
peratures are reached, Less tender
cuts of meat should be microwaved
by time, according to your recipe.
1, Press AUTO ROAST, "AUTO"
and "TEMP" appear on display
and "ENTER CODE" flashes.
2. Press number pad to set Auto
Roast Codex See Auto Roast
Guide.
3. Press START_ Display shows
"COOL" and "CODE" until Food
temperature reaches 80°F. At 80°F,
display switches to show meat's in-
ternal temperature
4. When you select Auto Roast Codes
1,2, 3, or 4, the oven signals with 4
beeps and "TURN" flashes on the
display when it's time to turn the
roast over After you turn the roast,
close the door and press START
again. (NOTE: Oven centin.
ues to cook after the signal
whether or not roast is
turned over.)
After a pre-programmed food tem-
perature is reached, oven signals with
4 beeps and "END" appears on dis-
play.
13
OPERATION
MicrowaveAuto Cooking
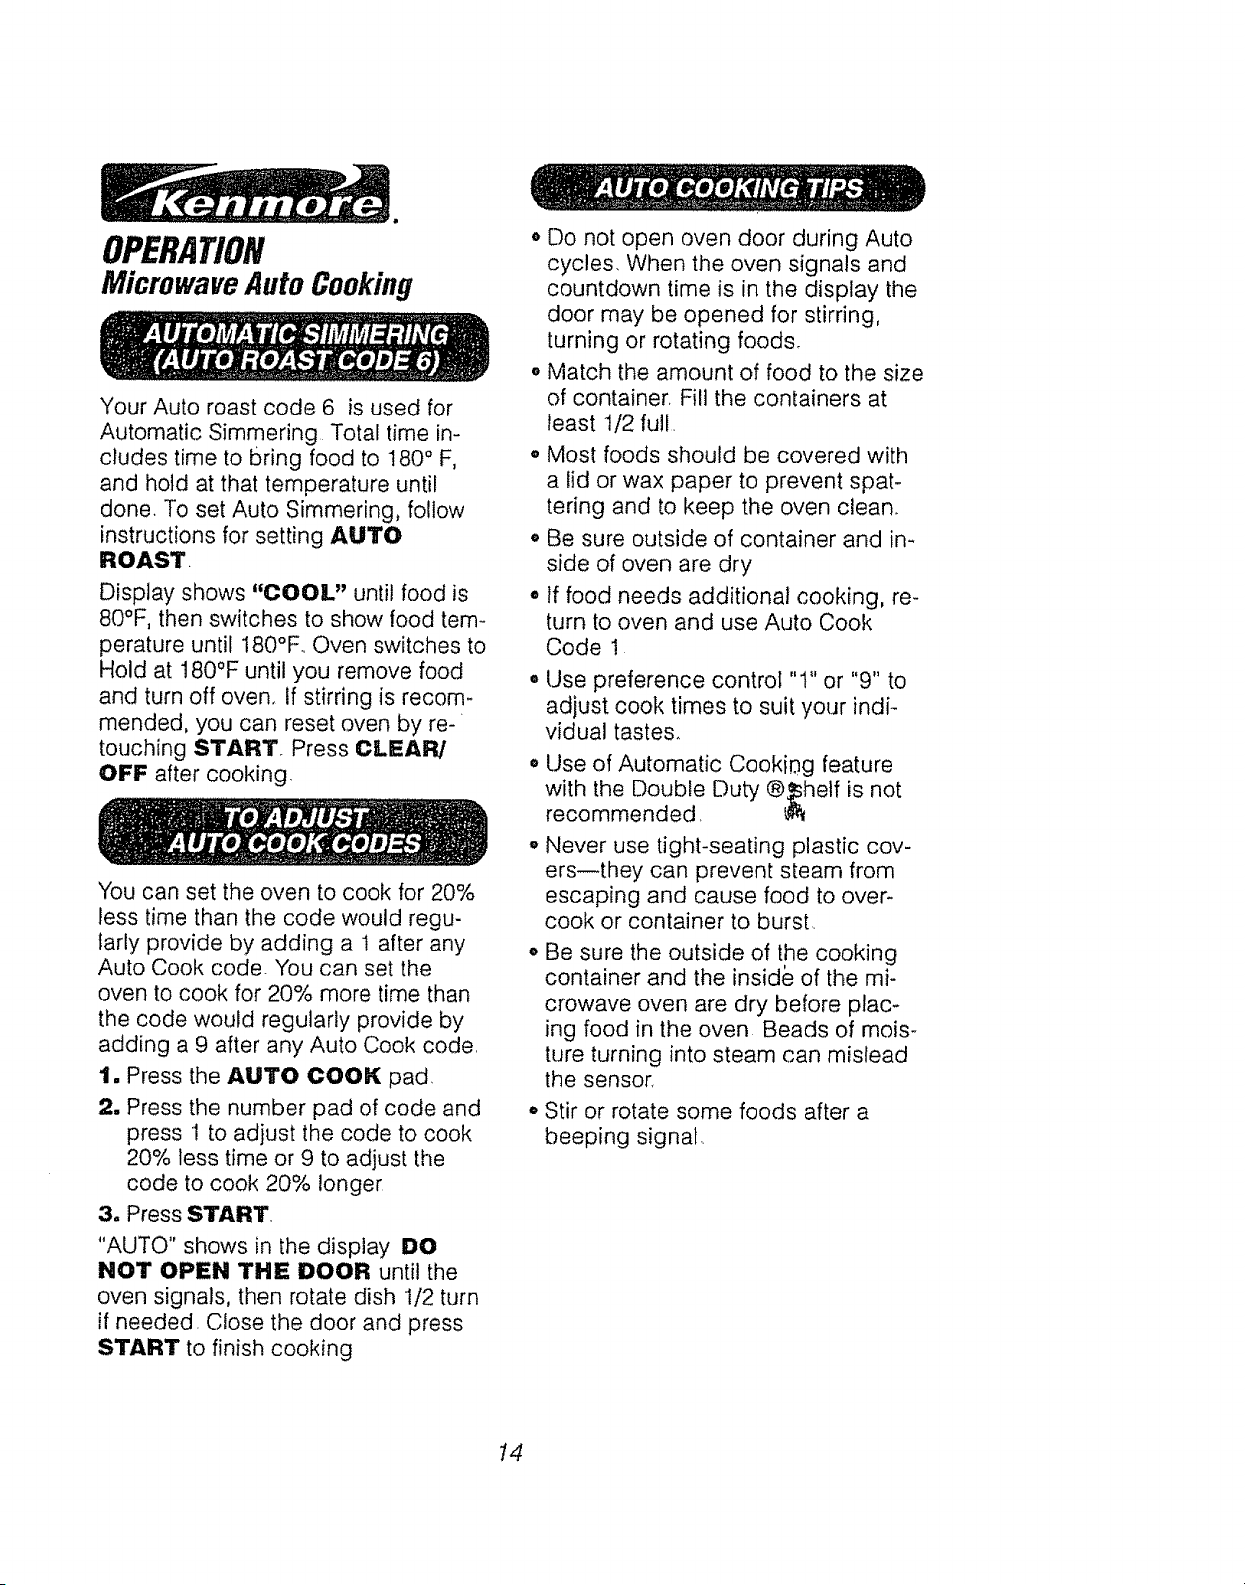
Your Auto roast code 6 is used for
Automatic Simmering Total time in-
cludes time to bring food to 180 ° F,
and hold at that temperature until
done. To set Auto Simmering, follow
instructions for setting AUTO
ROAST.
Display shows "COOL" until food is
80°F, then switches to show food tem-
perature until 180°F.. Oven switches to
Hold at 180°F until you remove food
and turn off oven. if stirring is recom-
mended, you can reset oven by re-
touching START Press CLEAR/
OFF after cooking,
You can set the oven to cook for 20%
less time than the code would regu-
larly provide by adding a 1 after any
Auto Cook code. You can set the
oven to cook for 20% more time than
the code would regularly provide by
adding a 9 after any Auto Cook code,
1. Press the AUTO COOK pad,
2, Press the number pad of code and
press 1 to adjust the code to cook
20% less time or 9 to adjust the
code to cook 20% longer
3. Press START.
"AUTO" shows in the display DO
NOT OPEN THE DOOR until the
oven signals, then rotate dish 1/2 turn
if needed. Close the door and press
START to finish cooking
o Do not open oven door during Auto
cycles. When the oven signals and
countdown time is in the display the
door may be opened for stirring,
turning or rotating foods_
o Match the amount of food to the size
of container, Fill the containers at
least t/2 full.
o Most foods should be covered with
a lid or wax paper to prevent spat-
tering and to keep the oven clean.
o Be sure outside of container and in-
side of oven are dry
o If food needs additional cooking, re-
turn to oven and use Auto Cook
Code 1
,, Use preference control "!" or "9" to
adjust cook times to suit your indi-
vidual tastes.
o Use of Automatic Cooking feature
with the Double Dub:/®_hetf is not
recommended,
o Never use tight-seating plastic cov-
ers-they can prevent steam from
escaping and cause food to over-
cook or container to burst.
Be sure the outside of the cooking
container and the inside of the mi-
crowave oven are dry before plac-
ing food in the oven Beads of mois-
ture turning into steam can mislead
the sensor,
o Stir or rotate some foods after a
beeping signal.
14
OPERATION
YourMicrowaveOvenShelf
P .................................... _4
_ MPORTANT SAFETY
INFORMATION
DO NOT STORE OR
COOK with shelf on floor of
oven. Product damage may
result.
Use potholders when han-
dling metal shelf and uten.
sils, THEY MAY BE HOT.
DO NOT store microwave
browning dish on metal shelf,
Use of shelf with Automatic
Cooking is not recom.
The wire shelf is designed for added
capacity when heating and reheating
in your microwave oven, More than
one food may be heated or reheated
and ready to serve at the same time
When microwaving with the oven
shelf, it is important to arrange foods
properly. Cookware size is important
Be sure dishes will fit together on or
under the shelf. Food size should be
considered; foods over 4 inches high
or 3 1/2 lbs, are not recommended
for shelf cooking.
Batters and dough foods and also un-
cooked foods which need to be pre-
I_ared from scratch should be cooked
without the oven shelf following recipe
directions.
Use potholders when handling foods
heated together with your oven shelf,
especially when heating larger
amounts of food, Extra steam gener-
ated from multiple food cooking may
make cookware hotter than with regu-
lar microwaving
To position the microwave oven shelf,
tip the back slightly and fit the shelf
support guides onto the support
guides located on each side of the
oven in the rear.
Next, lower the front until the shelf
support guides fit onto the support
guides located at each side of the
oven in the front
When properly positioned, the shelf
should fit snugly in place, be level
and not touch the back wall of the
oven,
If arcing occurs when using the shelf,
turn the oven off Make sure the shelf
is positioned right side up on all four
shelf supports and not touching oven
walls,
Tips for Reheating Different
Types of Food
When heating different types of food
together, foods which should be
served hot must be placed on the
oven floor, while foods which are only
warmed should be placed on the
shelf. Microwave energy enters the
oven from the bottom only It is impor-
tant to remember that foods absorb
microwave energy at different rates.
You may need to start heating large or
dense food a few minutes ahead of
smaller or less dense foods. Stagger
and rotate foods as described above
15

OPERATION
YourLowerOvenControl
I
THEPJV'd_ LOWER OVEN
OVEN
G
TIMER
®®® @
®®® @
@@®@
_: M IC_ OWAV£ F/I_ MAY 0 _l_J_,1_ WHIt_ O V1FJ/18 C_J,,_ NO
Clock must be set before any Conventional Oven Timer function wilt operate,
DISPLAY -- Displays time of day,
time or temperature during cooking,
cooking mode, and tells you what to
do next,
BAKE -- Press to set oven to bake,
BROIL -- Lets you broil at full power
by touching BROIL and START
pads Lets you select Lo Broil for
longer, slower broiling.
CLEAN -- Press to select Self-
Cleaning function. Follow al! instruc-
tions in section on Self-clean cycle,
OVEN LIGHT -- Press to turn oven
light on and off,
OVEN COOKING TIME- Use to
enter amount of time required for
automatic baking
DELAY START TIME--Use when
baking or cleaning to enter the time of
day you want oven to turn on
CLOCK--Press to enter time of day
or check time of day when display is
showing other information
KITCHEN TIMER ON/OFF--Lets
you time any kitchen function.
START--Press to start any cooking
or cleaning function.
CLEAR/OFF--Cancels all operations
except the Clock and Timer.
NUMBER PADS--Press these pads
to set any function requiring numbers;
time of day, kitchen timer, oven
temperature, starting times, and
leng!h of baking or clean times.
!6
OPERATION
ClockandKitchen Timer
To change the time of day, all lower
oven controls must be off.
When power is first connected to your
cooking center or after a power
failure, the digital display on both the
microwave and the lower oven control
will show lighted 8's and t8's and all
oven functions for about 15 second&
Then all lights go off and "RESET"
and "PF" appear in the lower display.
(Clock must be set before the
lower oven control will work,}
1. Press the CLOCK pad
2, Press the numbers pads
to set the time of day.
3. Press the START pad.
To check the time of day when the
display is showing other information,
Press the CLOCK pad. The time of
day will show as long as the Clock
pad is held down.
The Timer can be set up to 1t hours
and 59 minutes. The Timer counts
down in minutes until the last minute
is reached, then seconds are dis-
played. When the timer reaches zero,
"TIMERt' flashes in the display.
The smallest amount of time you can
set is 1 minute.
The timer does not control
oven operations, The CLEAR/
OFF pad wil! not cancel the
1. Press the TIMER ON/
OFF pad
2, Press the number pads
to set the amount of
time you will need,
3. Press the START pad.
If you make a mistake while setting or
want to change the time, press the
TIMER ONIOFF pad twice to reset
the timer.
The Timer will immediately start to
count down, After ! minute has
passed the display will change,.
When time countdown is complete,
the control wil! beep four times and
the display will flash° Press the
TIMER pad to cancel,
To cancel the timer at any time, press
the TIMER pad.
When you black out the display, the
Clock will maintain the correct time of
day It will reappear for the duration of
any function that displays a start and
stop time.
1, Press and hold, at the same time,
the CLOCK and STOP TIME
pads until the display goes blank.
To make the time of day reappear
press the CLOCK pad_
!7

OPERATION
OvenCookingTips
Preheating is bringing the tempera-
ture up to the temperature you will be
using during baking,, Let the oven
preheat thoroughly when recipes call
for preheating,
it is normal to have some odor when
using your oven for the first time To
help eliminate this odor, ventilate
the room by opening a window
or using a vent hood,
iMPORTANT: Never cover the oven
bottom or oven rack with aluminum
foil. Improper use can cause poor
heat flow, poor baking results, and
may damage the oven finish
In the back of the oven you will notice
a small tube, This is a heat sensor
that maintains the temperature of the
oven, Never move or bend this tube,
R ,_' ", _.,
T°mpo, ,o,oSoosor
The low temperature zone of .your
oven (between t70 ° and 200°F) is
available to keep hot cooked foods
warm. However, foods should not be
kept at these temperatures longer
than 2 hours.
The oven vent is located under the
control panel. This area could
become hot during oven use The
vent is important for proper air
circulation, Never block this
vent,
Oven Vent
Location
When using your convenient Delay
Start operation, foods such as dairy
products, fish, poultry, etc., should
never sit more than 1 hour before
cooking. Room temperatures and the
heat from the oven light promote
bacterial growth.
Opening the door often to check
foods will cause heat loss and poor
baking results
18
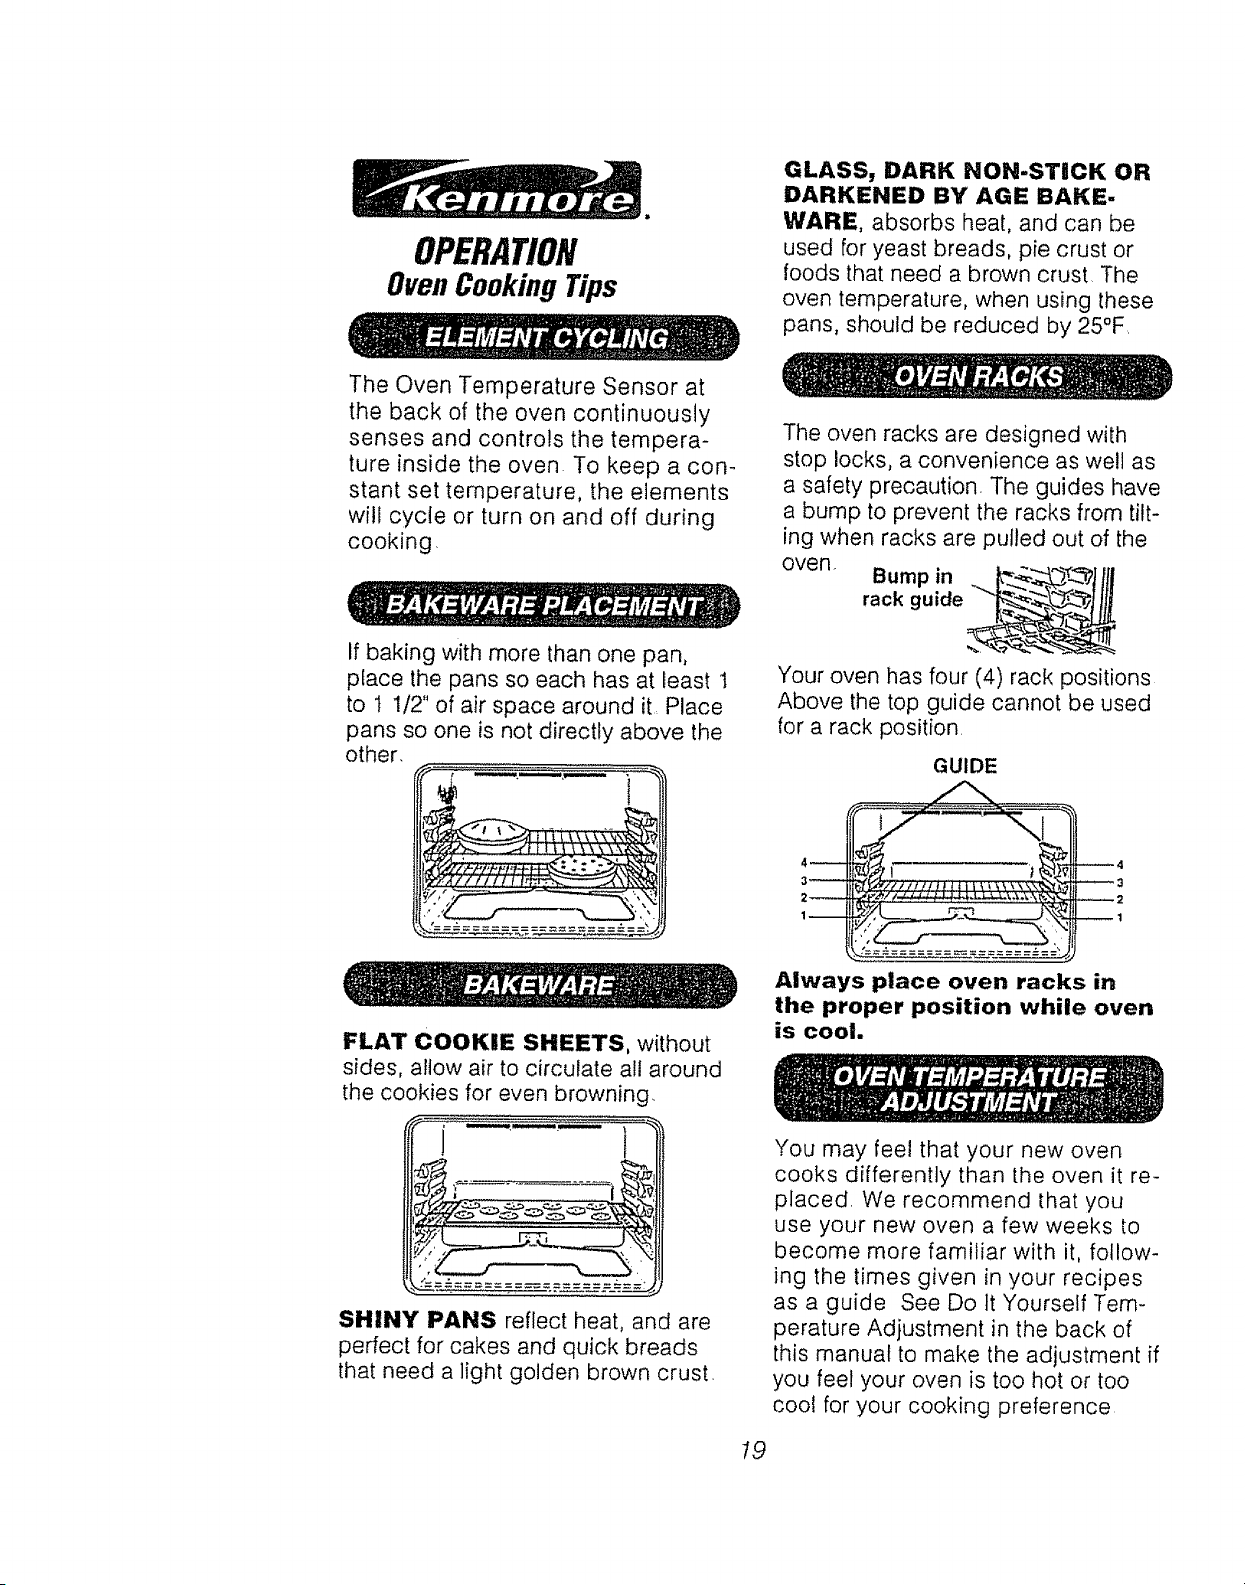
OPERATION
OvenCookingTips
GLASS, DARK NON-STICK OR
DARKENED BY AGE BAKE-
WARE, absorbs heat, and can be
used for yeast breads, pie crust or
foods that need a brown crust The
oven temperature, when using these
pans, should be reduced by 25°F.
The Oven Temperature Sensor at
the back of the oven continuously
senses and controls the tempera-
ture inside the oven To keep a con-
stant set temperature, the elements
will cycle or turn on and off during
cooking
If baking with more than one pan,
place the pans so each has at least 1
to 1 1/2" of air space around it, Place
pans so one is not directly above the
other.
The oven racks are designed with
stop locks, a convenience as well as
a safety precaution. The guides have
a bump to prevent the racks from tilt-
ing when racks are pulled out of the
oven.
Your oven has four (4) rack positions
Above the top guide cannot be used
for a rack position
GUIDE
FLAT COOKIE SHEETS, without
sides, allow air to circulate all around
the cookies for even browning.
r_'zz__ _._" _._
SHINY PANS reflect heat, and are
perfect for cakes and quick breads
that need a light golden brown crust,
Always place oven racks in
the proper position while oven
is cool.
19
You may feel that your new oven
cooks differently than the oven it re-
placed. We recommend that you
use your new oven a few weeks to
become more familiar with it, follow-
ing the times given in your recipes
as a guide See Do It Yourself Tem-
perature Adjustment in the back of
this manual to make the adjustment if
you feel your oven is too hot or too
cool for your cooking preference
OPERATION
Baking
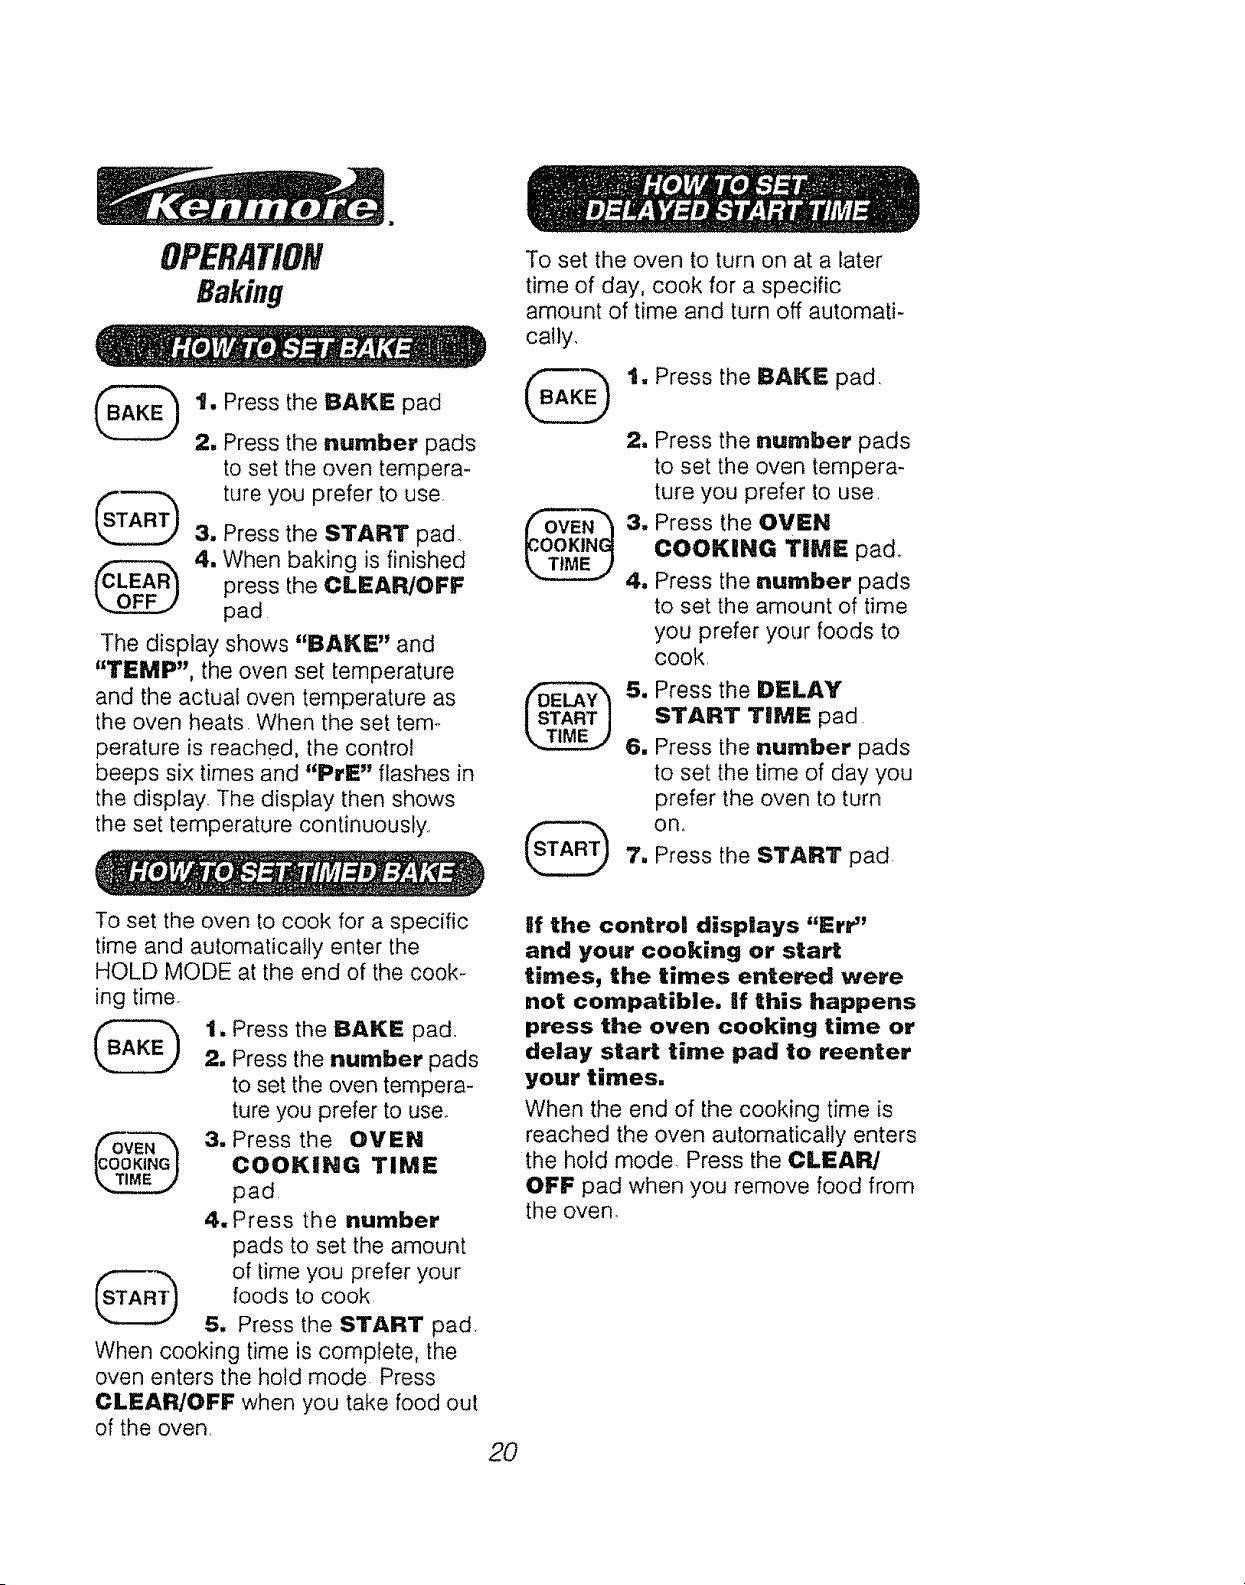
1. Press the BAKE pad
2, Press the number pads
to set the oven tempera-
ture you prefer to use,
3. Press the START pad_
4. When baking is finished
the CLEAR/OFF
press
pad
The display shows "BAKE" and
"TEMP", the oven set temperature
and the actual oven temperature as
the oven heats. When the set tem-
perature is reached, the control
beeps six times and "PrE" flashes in
the display. The display then shows
the set temperature continuously,
To set the oven to turn on at a later
time of day, cook for a specific
amount of time and turn off automati-
cally,
1. Press the BAKE pad,
2. Press the number pads
to set the oven tempera-
ture you prefer to use,
3, Press the OVEN
COOKING TIME pad°
4. Press the number pads
to set the amount of time
you prefer your foods to
cook,
5. Press the DELAY
START TIME pad
6. Press the number pads
to set the time of day you
prefer the oven to turn
on_
7. Press the START pad.
To set the oven to cook for a specific
time and automatically enter the
HOLD MODE at the end of the cook-
ing time.
(_ 1. Press the BAKE pad.
2. Press the number pads
to set the oven tempera-
ture you prefer to use.
('_VEN--'_ 3. Press the OVEN
ICOOKINGI COOKING TIME
pad,
4.Press the number
pads to set the amount
of time you prefer your
foods to cook
5. Press the START pad.
When cooking time is complete, the
oven enters the hold mode Press
CLEAR/OFF when you take food out
of the oven,
2O
if the control displays "Err"
and your cooking or start
times, the times entered were
not compatible, if this happens
press the oven cooking time or
delay start time pad to reenter
your times,
When the end of the cooking time is
reached the oven automatically enters
the hold mode, Press the CLEAR/
OFF pad when you remove food from
the oven.
OPERATION
Broiling
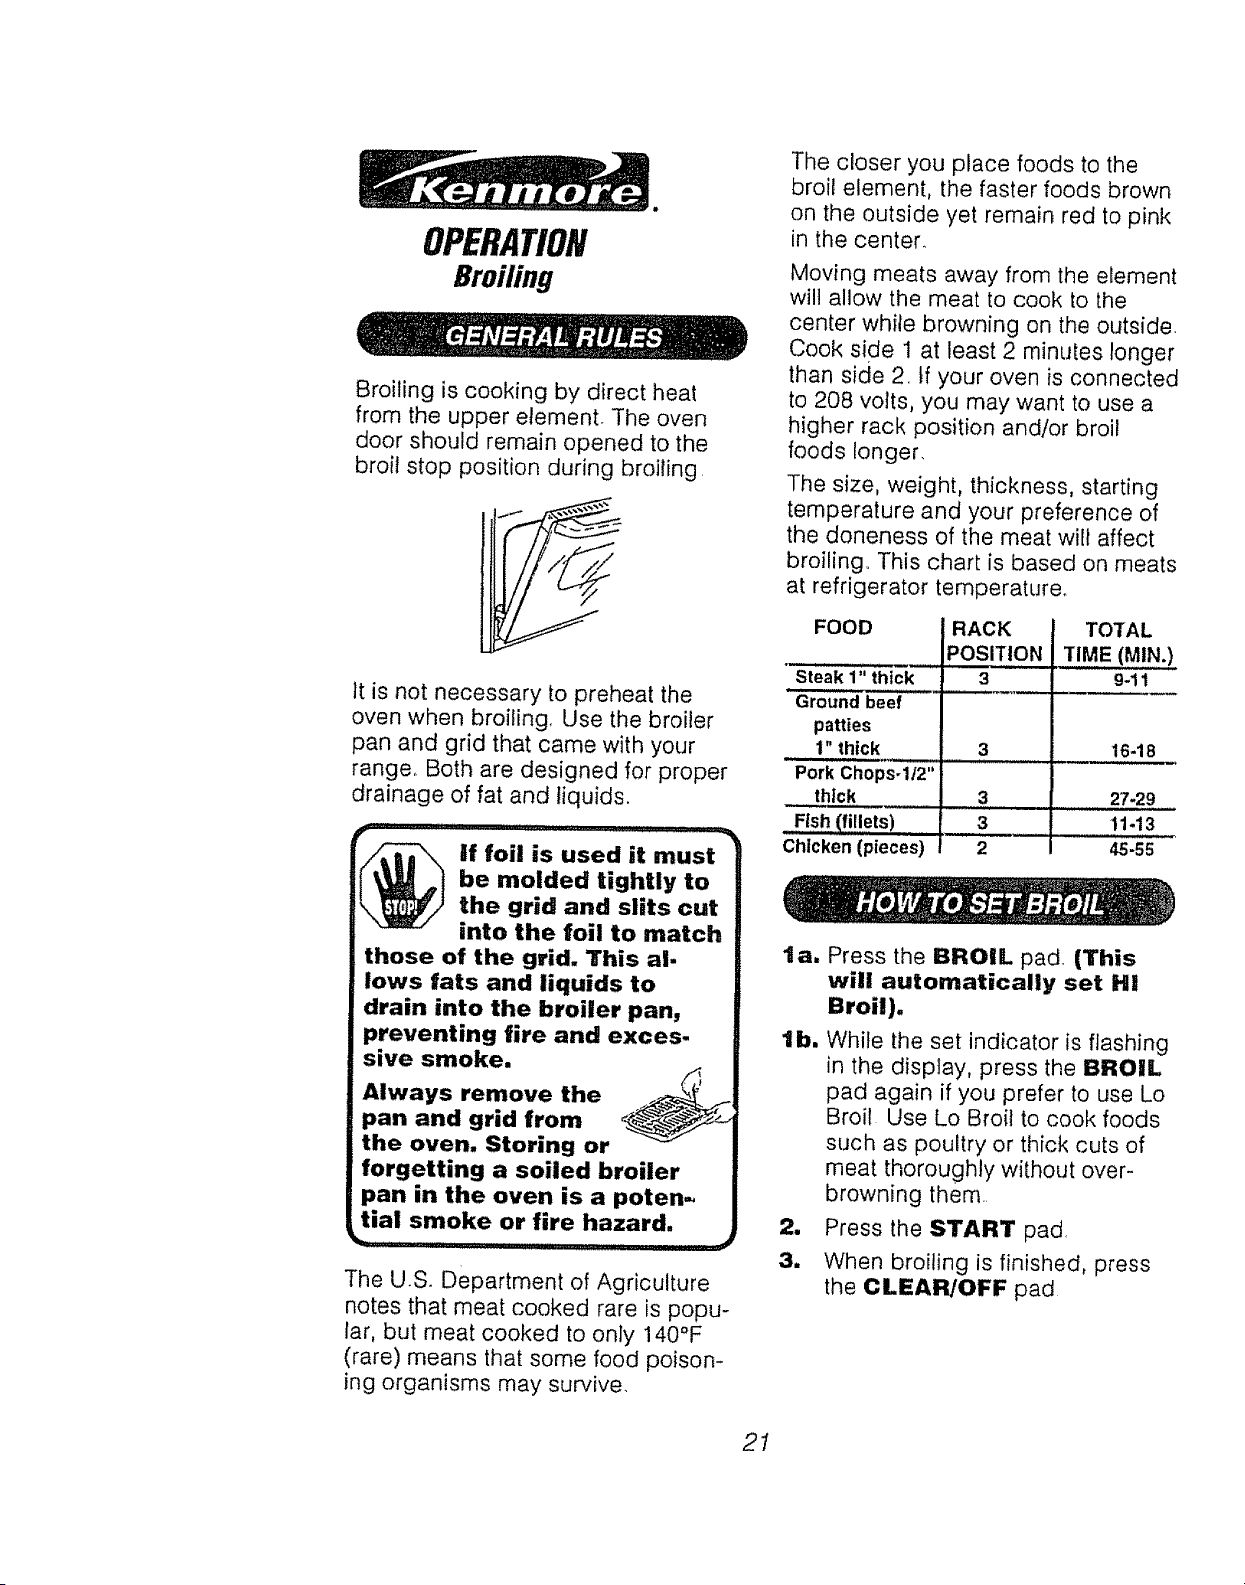
Broiling is cooking by direct heat
from the upper element The oven
door should remain opened to the
broil stop position during broiling
It is not necessary to preheat the
oven when broiling. Use the broiler
pan and grid that came with your
range,. Both are designed for proper
drainage of fat and liquids.
__ f foil is used it must
be molded tightly to
the grid and slits cut
into the foil to match
those of the grid. This al-
lows fats and liquids to
drain into the broiler pan,
preventing fire and exces-
sive smoke.
Always remove the
pan and grid from
the oven. Storing or
forgetting a soiled broiler
pan in the oven is a poten=
tial smoke or fire hazard.
L
The U.S. Department of Agriculture
notes that meat cooked rare is popu-
lar, but meat cooked to only 140°F
(rare) means that some food poison-
ing organisms may survive.
The closer you place foods to the
broil element, the faster foods brown
on the outside yet remain red to pink
in the center.
Moving meats away from the element
wil! allow the meat to cook to the
center while browning on the outside.
Cook side 1 at least 2 minutes longer
than side 2. if your oven is connected
to 208 volts, you may want to use a
higher rack position and/or broil
foods longer.
The size, weight, thickness, starting
temperature and your preference of
the doneness of the meat will affect
broiling,. This chart is based on meats
at refrigerator temperature,.
FOOD
Steak 1" thick
Ground beef
patties
1" thick
Pork Chops-ll2"
thick
Fish (fillets)
Chicken (pieces)
RACK
:_OSITION
3
TOTAL
TIME (MIN.)
9-11
3 16-18
3
3
2
27-29
11-13
45-55
la.
lb.
1
3,
Press the BROIL pad, (This
will automatically set Hi
Broil).
While the set indicator is flashing
in the display, press the BROIL
pad again if you prefer to use Lo
Broil Use Lo Broil to cook foods
such as poultry or thick cuts of
meat thoroughly without over-
browning them..
Press the START pad,
When broiling is finished, press
the CLEAR/OFF pad
21
OPERATION
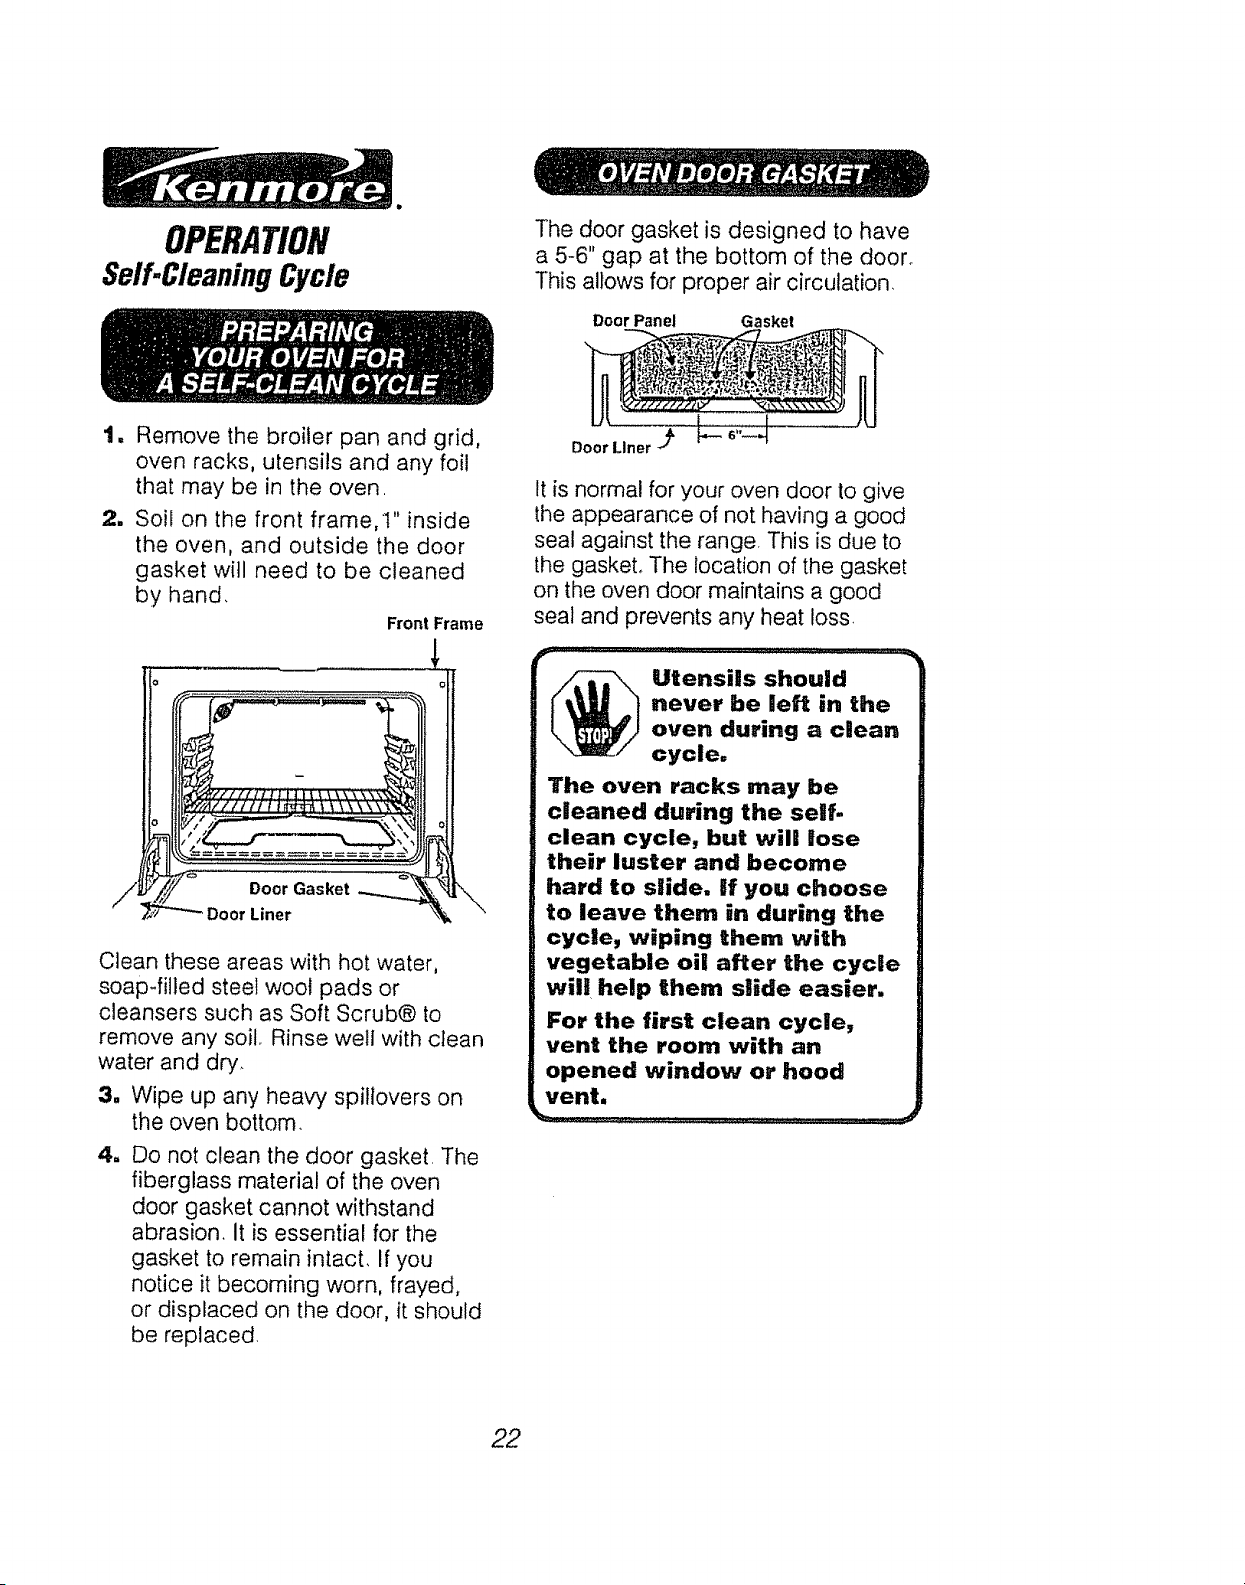
Self-CleaningCycle
The door gasket is designed to have
a 5-6" gap at the bottom of the door.
This allows for proper air circulation.
Door Panel Gasket
t, Remove the broiler pan and grid,
oven racks, utensils and any foil
that may be in the oven,
2, Soil on the front frame,t" inside
the oven, and outside the door
gasket witl need to be cleaned
by hand,
Front Frame
j:
f_
Door Gasket '=_
Door Liner
\
Clean these areas with hot water,
soap-filled steel wool pads or
cleansers such as Soft Scrub@ to
remove any soil_ Rinse well with clean
water and dry:
3. Wipe up any heaw spi!lovers on
the oven bottom,
m
Do not clean the door gasket. The
fiberglass material of the oven
door gasket cannot withstand
abrasion, It is essential for the
gasket to remain intact, If you
notice it becoming worn, frayed,
or displaced on the door, it should
be replaced
It is normal for your oven door to give
the appearance of not having a good
seal against the range, This is due to
the gaskeL The location of the gasket
on the oven door maintains a good
seal and prevents any heat loss,
Utensils should
never be left in the
oven during a clean
cycle.
The oven racks may be
cleaned during the self-
clean cycle, but will Jose
their luster and become
hard to slide. If you choose
to leave them in during the
cycle, wiping them with
vegetable oil after the cycle
will help them slide easier,
For the first clean cycle,
vent the room with an
opened window or hood
vent.
Self-CleaningCycle
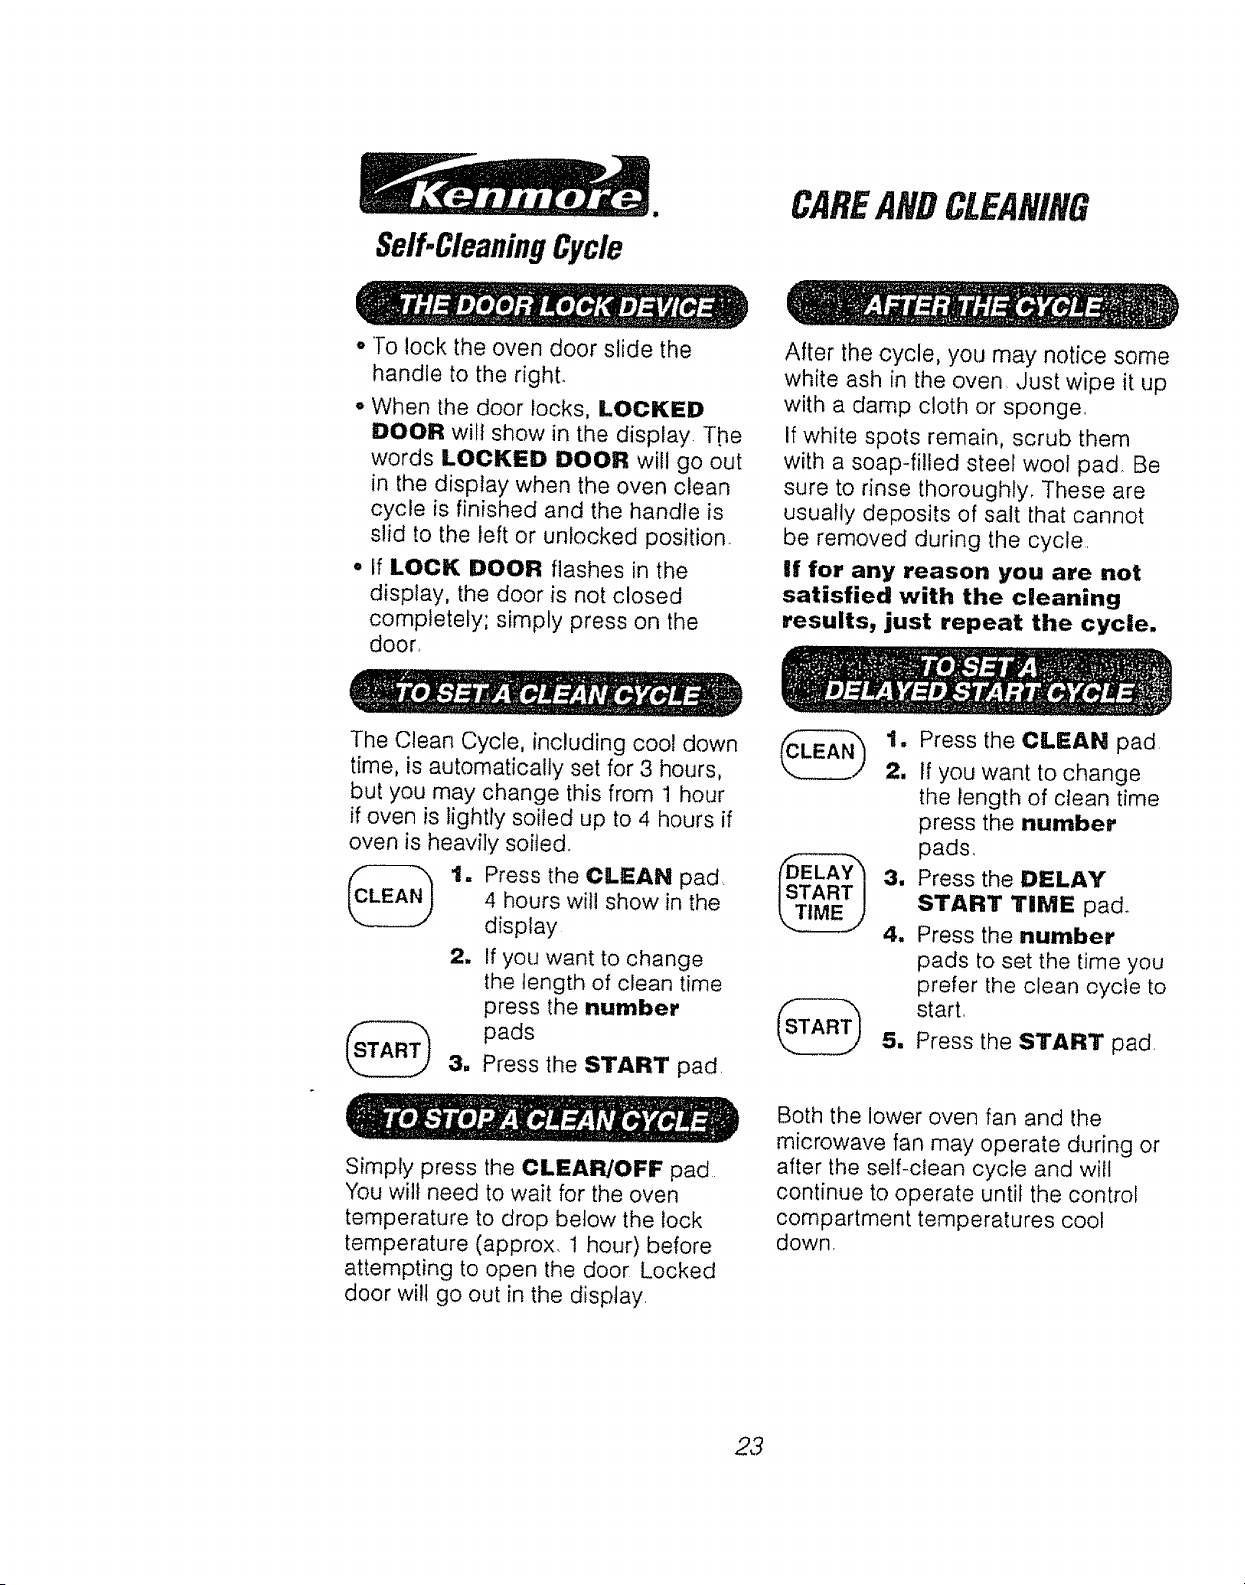
CAREANDCLEANING
° To lock the oven door slide the
handle to the right.
o When the door locks, LOCKED
DOOR will show in the display. The
words LOCKED DOOR will go out
in the display when the oven clean
cycle is finished and the handle is
slid to the left or unlocked position.
° If LOCK DOOR flashes in the
display, the door is not closed
completely; simply press on the
door,
After the cycle, you may notice some
white ash in the oven Just wipe it up
with a damp cloth or sponge,
If white spots remain, scrub them
with a soap-filled steel wool pad. Be
sure to rinse thoroughly. These are
usually deposits of salt that cannot
be removed during the cycle.
if for any reason you are not
satisfied with the cleaning
results, just repeat the cycle.
The Clean Cycle, including cool down
time, is automatically set for 3 hours,
but you may change this from 1 hour
if oven is lightly soiled up to 4 hours if
oven is heavily soiled.
t. Press the CLEAN pad.
4 hours will show in the
display
2. If you want to change
the length of clean time
press the number
pads
3. Press the START pad.
Simply press the CLEAR/OFF pad
You will need to wait for the oven
temperature to drop below the lock
temperature (approx. 1 hour) before
attempting to open the door Locked
door wilt go out in the disptay
1, Press the CLEAN pad.
2, if you want to change
the length of clean time
press the number
pads,
3, Press the DELAY
START TIME pad.
4. Press the number
pads to set the time you
prefer the clean oycle to
start,
5, Press the START pad
Both the lower oven fan and the
microwave fan may operate during or
after the self-clean cycle and will
continue to operate until the control
compartment temperatures coot
down,
23
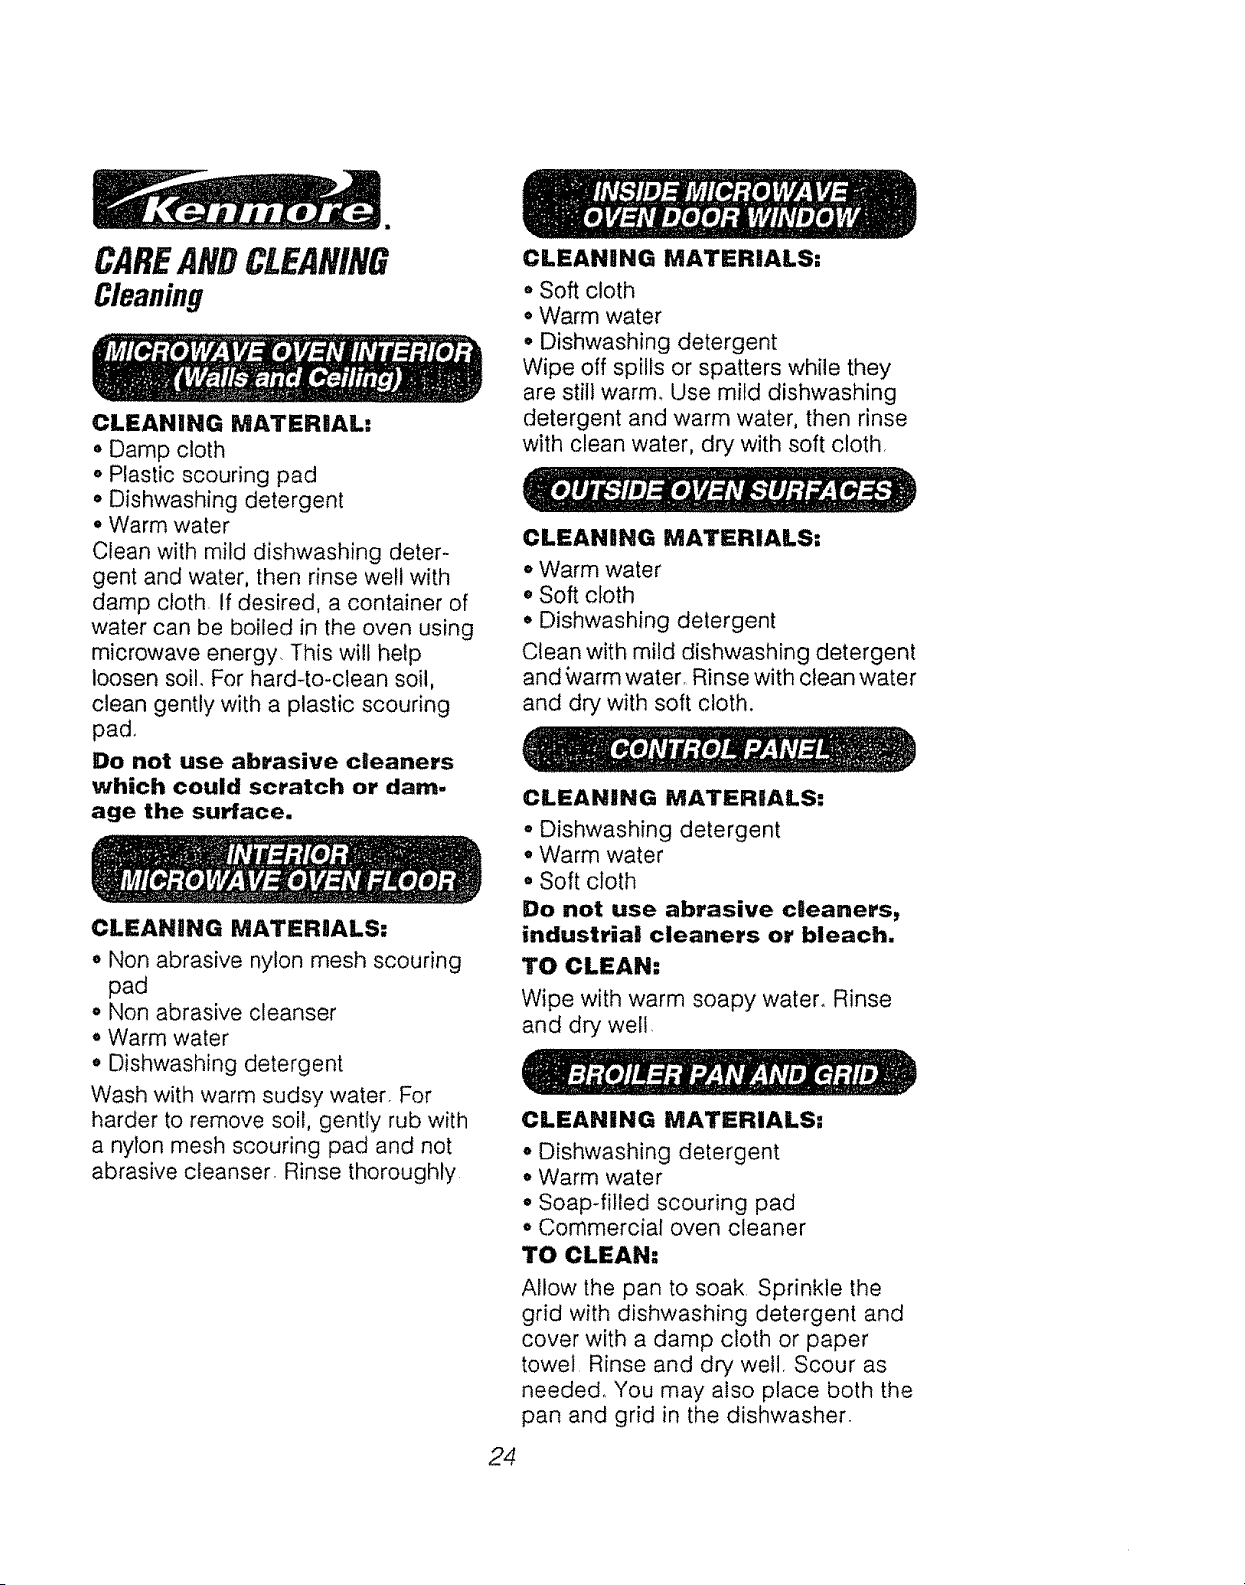
CLEANING MATERIAL:
o Damp cloth
o Plastic scouring pad
o Dishwashing detergent
o Warm water
Clean with mild dishwashing deter-
gent and water, then rinse well with
damp cloth If desired, a container of
water can be boiled in the oven using
microwave energy. This will help
loosen soi!. For hard-to-clean soil,
clean gently with a plastic scouring
pad.
Do not use abrasive cleaners
which could scratch or dam-
age the surface.
CLEANING MATERIALS:
• Non abrasive nylon mesh scouring
pad
o Non abrasive cleanser
o Warm water
. Dishwashing detergent
Wash with warm sudsy water. For
harder to remove soil, gently rub with
a nylon mesh scouring pad and not
abrasive cleanser. Rinse thoroughly
CLEANING MATERIALS:
. Soft cloth
• Warm water
o Dishwashing detergent
Wipe off spells or spatters while they
are still warm. Use mild dishwashing
detergent and warm water, then rinse
with clean water, dry with soft cloth,
CLEANING MATERIALS:
,, Warm "water
o Soft cloth
° Dishwashing detergent
Clean with mild dishwashing detergent
and warm water. Rinse with clean water
and dry with soft cloth.
CLEANING MATERIALS:
• Dishwashing detergent
• Warm water
° Soft cloth
Do not use abrasive cleaners,
industrial cleaners or bleach,
TO CLEAN:
Wipe with warm soapy waters Rinse
and dry well,
CLEANING MATERIALS:
° Dishwashing detergent
° Warm water
° Soap-filled scouring pad
o Commercial oven cleaner
TO CLEAN:
Allow the pan to soak Sprinkle the
grid with dishwashing detergent and
cover with a damp cloth or paper
towel Rinse and dry well. Scour as
needed,, You may also place both the
pan and grid in the dishwasher_
24
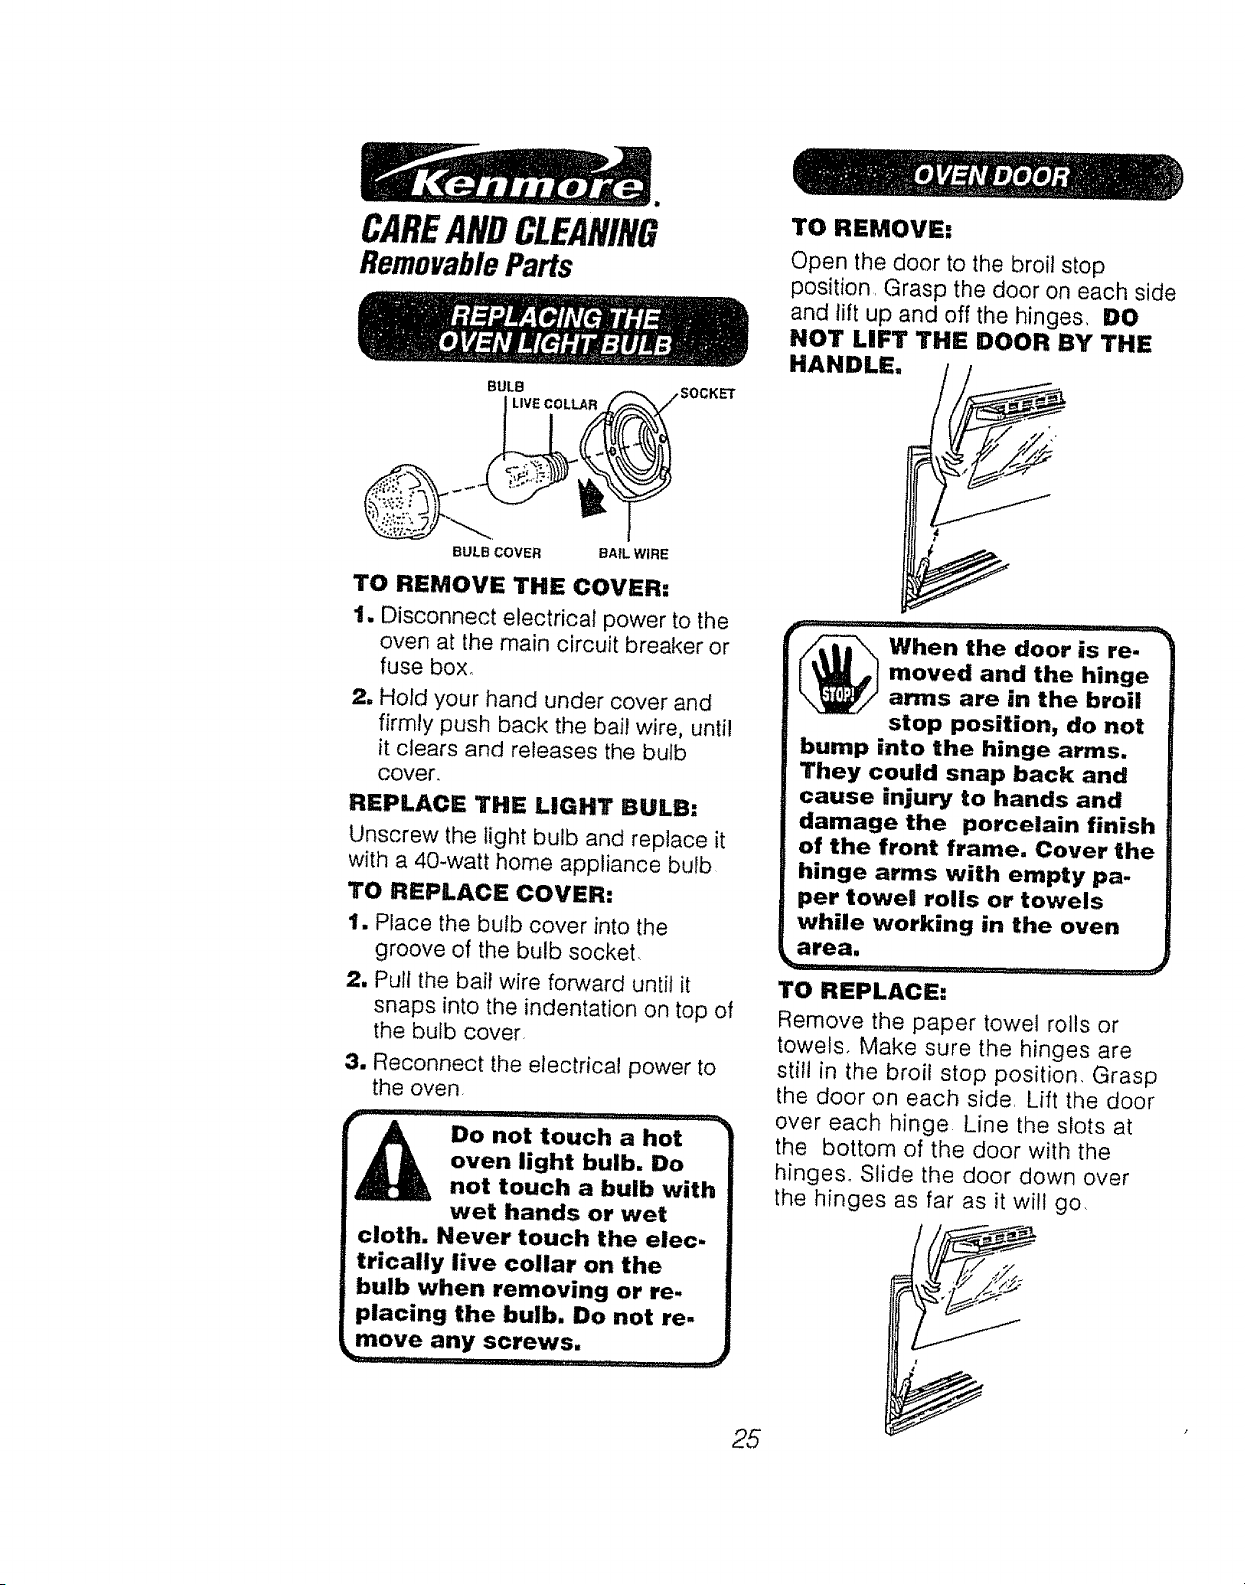
CAREANDCLEANING
RemovableParts
BULB
LIVE COLLAR
;KET
BULB COVER BAiL WiRE
TO REMOVE THE COVER:
1. Disconnect electrical power to the
oven at the main circuit breaker or
fuse box.
2, Hold your hand under cover and
firmly push back the bail wire, until
it clears and releases the bulb
cover.
REPLACE THE LIGHT BULB:
Unscrew the light bulb and replace it
with a 40-watt home appliance bulb
TO REPLACE COVER:
1, Place the bulb cover into the
groove of the bulb socket.
2, Pull the bait wire forward unti! it
snaps into the indentation on top of
the bulb cover.
,!t, Reconnect the electrical power to
the oven.
-_ I}11_ : . Ill"'Ill 1_II ""IIiI{,Vl"
Do not touch a hot
oven light bulb. Do
not touch a bulb with
wet hands or wet
cloth. Never touch the elec-
trically live collar on the
bulb when removing or re-
placing the bulb. Do not re-
move any screws.
TO REMOVE:
Open the door to the broil stop
position, Grasp the door on each side
and lilt up and off the hinges, DO
NOT LIFT THE DOOR BY THE
HANDLE. /_
-_f_When the door is re.
moved and the hinge
arms are in the broil
stop position, do not
bump into the hinge arms.
They could snap back and
cause injur), to hands and
damage the porcelain finish
of the front frame= Cover the
hinge arms with empty pa-
per towel rolls or towels
while working in the oven
area,
TO REPLACE:
Remove the paper towel rolls or
towels. Make sure the hinges are
still in the broil stop position. Grasp
the door on each side. Lift the door
over each hinge. Line the slots at
the bottom of the door with the
hinges. Slide the door down over
the hinges as far as it will go.
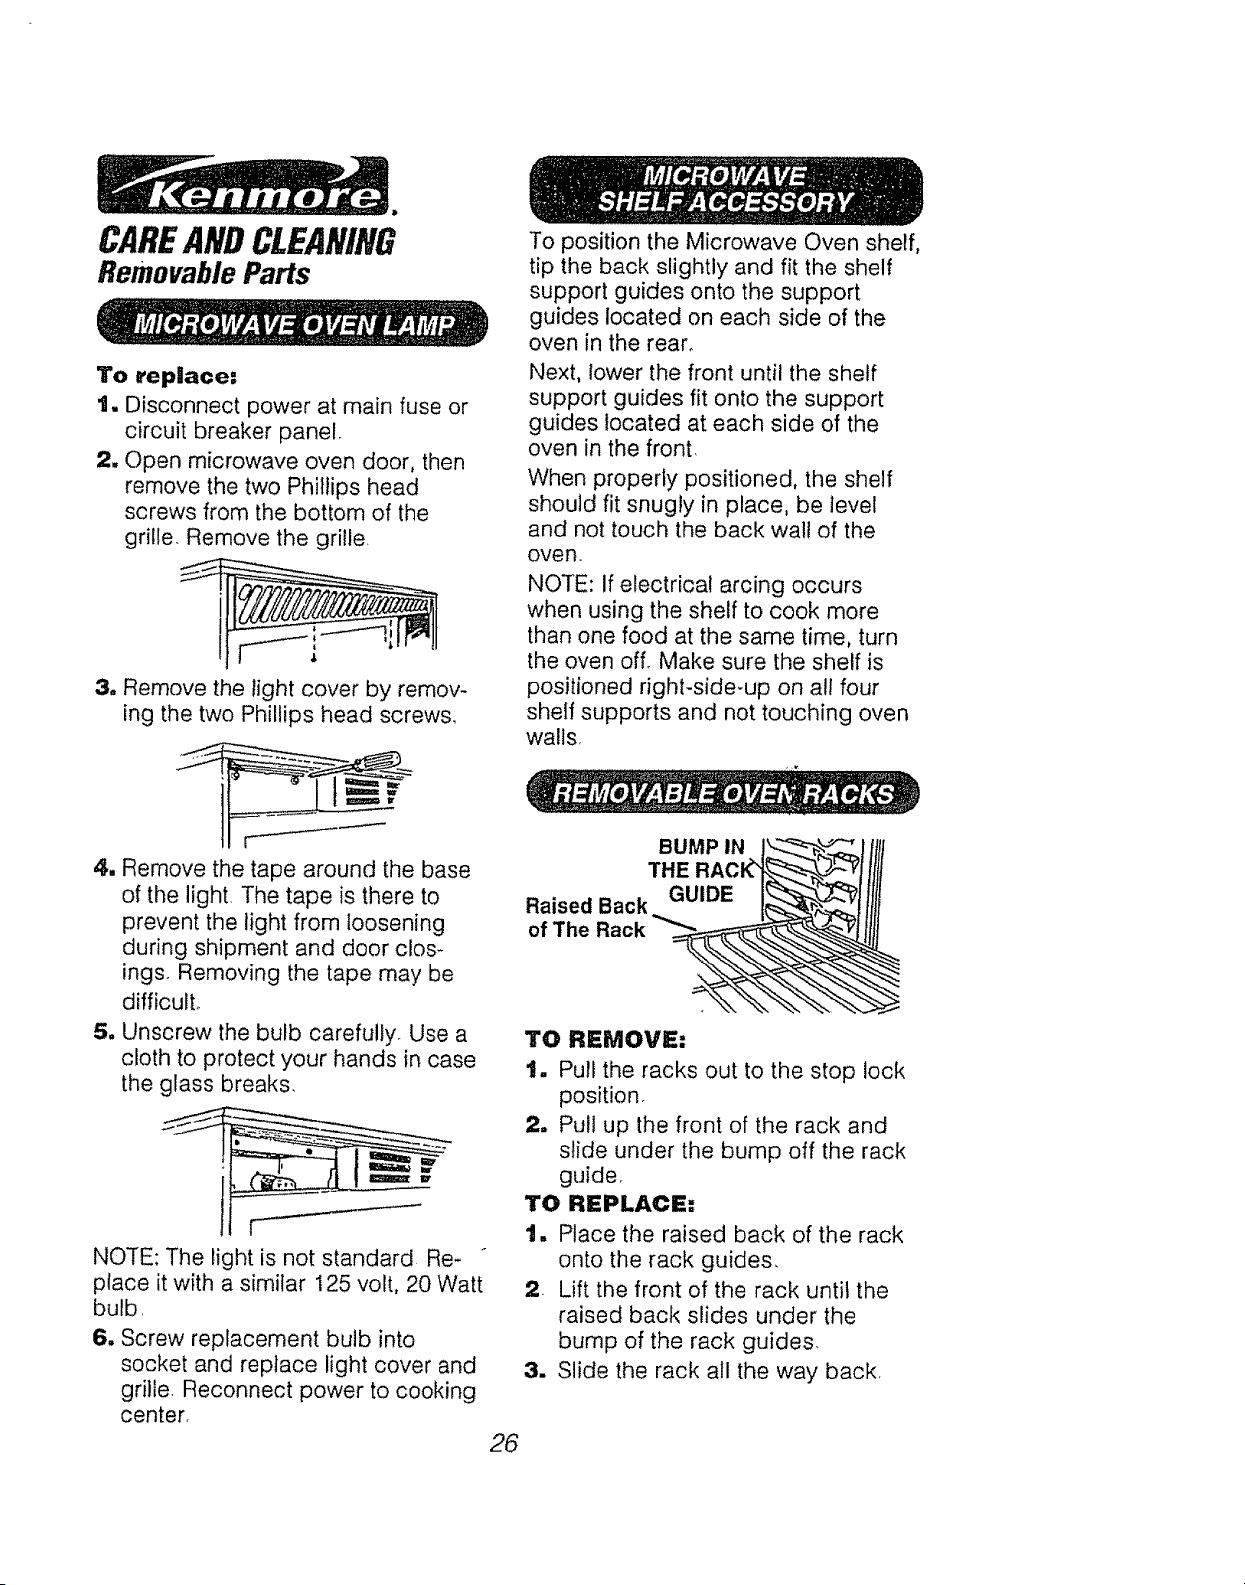
CAREANDCLEANING
Removable Parts
To replace:
t. Disconnect power at main fuse or
circuit breaker panelr
2. Open microwave oven door, then
remove the two Phillips head
screws from the bottom of the
grille. Remove the grille.
3. Remove the light cover by remov-
ing the two Phillips head screws.
To position the Microwave Oven shelf,
tip the back slightly and fit the shelf
support guides onto the support
guides located on each side of the
oven in the rear.
Next, lower the front until the shelf
support guides fit onto the support
guides located at each side of the
oven in the front.
When properly positioned, the shelf
should fit snugly in place, be level
and not touch the back wall of the
oven.
NOTE: if electrical arcing occurs
when using the shelf to cook more
than one food at the same time, turn
the oven off. Make sure the shelf is
positioned right-side-up on all four
shelf supports and not touching oven
walls,
4. Remove the tape around the base
of the lighL The tape is there to
prevent the light from loosening
during shipment and door clos-
ings. Removing the tape may be
difficult°
5. Unscrew the bulb carefully. Use a
cloth to protect your hands in case
the glass breaks.
NOTE: The light is not standard Re-
place it with a similar 125 volt, 20 Watt
bulb,
6,, Screw replacement bulb into
socket and replace light cover and
grille. Reconnect power to cooking
center.
26
BUMP IN
THE RA
Raised Back GUIDE
of The Rack
TO REMOVE:
t. Pull the racks out to the stop lock
position.
2,, Pull up the front of the rack and
slide under the bump off the rack
guider
TO REPLACE:
1. Place the raised back of the rack
onto the rack guides,
2 Lift the front of the rack until the
raised back slides under the
bump of the rack guides.
3. Slide the rack all the way back,
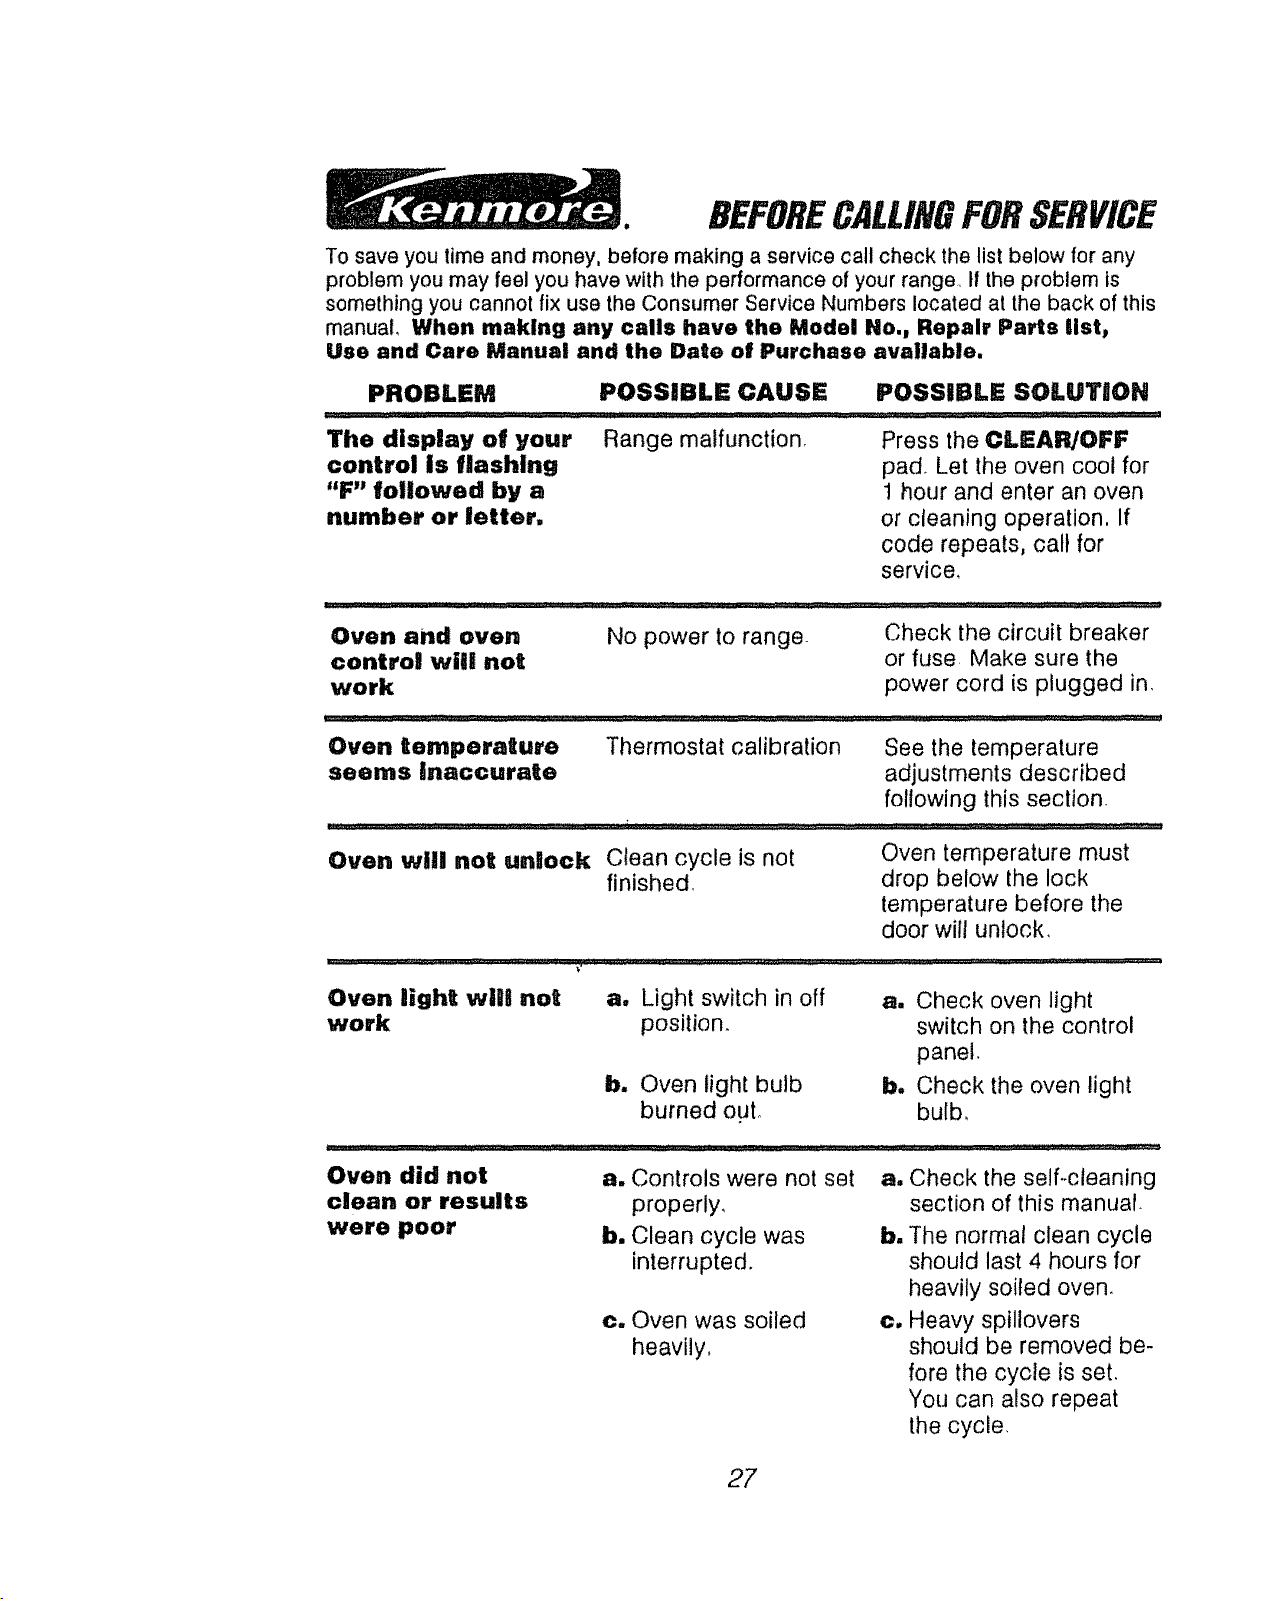
BEFORECALLINGFORSERVICE
To save you time and money, before making a service call check the list below for any
problem you may feel you have with the performance of your range If the problem is
something you cannot fix use the Consumer Service Numbers located at the back of this
manual When making any calls have the Model No., Repair Parts list,
Use and Care Manual and the Date of Purchase available.
PROBLEM POSSIBLE CAUSE POSSIBLE SOLUTION
The display of your Range malfunction. Press the CLEAR/OFF
control Is flashing pad Let the oven cool for
"F" followed by a t hour and enter an oven
number or letter, or cleaning operation, If
code repeats, call for
service,
Oven and oven No power to range Check the circuit breaker
control will not or fuse Make sure the
work power cord is plugged in.
Oven temperature Thermostat calibration See the temperature
seems Inaccurate adjustments described
following this section
Oven will not unlock Clean cycle is not Oven temperature must
finished drop below the lock
temperature before the
door will unlock,
Oven light will not a. Light switch in off a,, Check oven light
work position, switch on the control
panel.
b. Oven light bulb b,, Check the oven light
burned ouL bulb,
Oven did not
clean or results
were poor
a. Controls were not set a.
properly,
b. Clean cycle was b.
interrupted.
c. Oven was soiled
heavily,
Clw
Check the self.ocleaning
section of this manual.
The normal clean cycle
should last 4 hours for
heavily soiled oven.
Heavy spillovers
should be removed be-
fore the cycle is set.
You can also repeat
the cycle,
BEFORECALLINGFORSERVICE
PROBLEM POSSIBLE CAUSE POSSIBLE SOLUTION
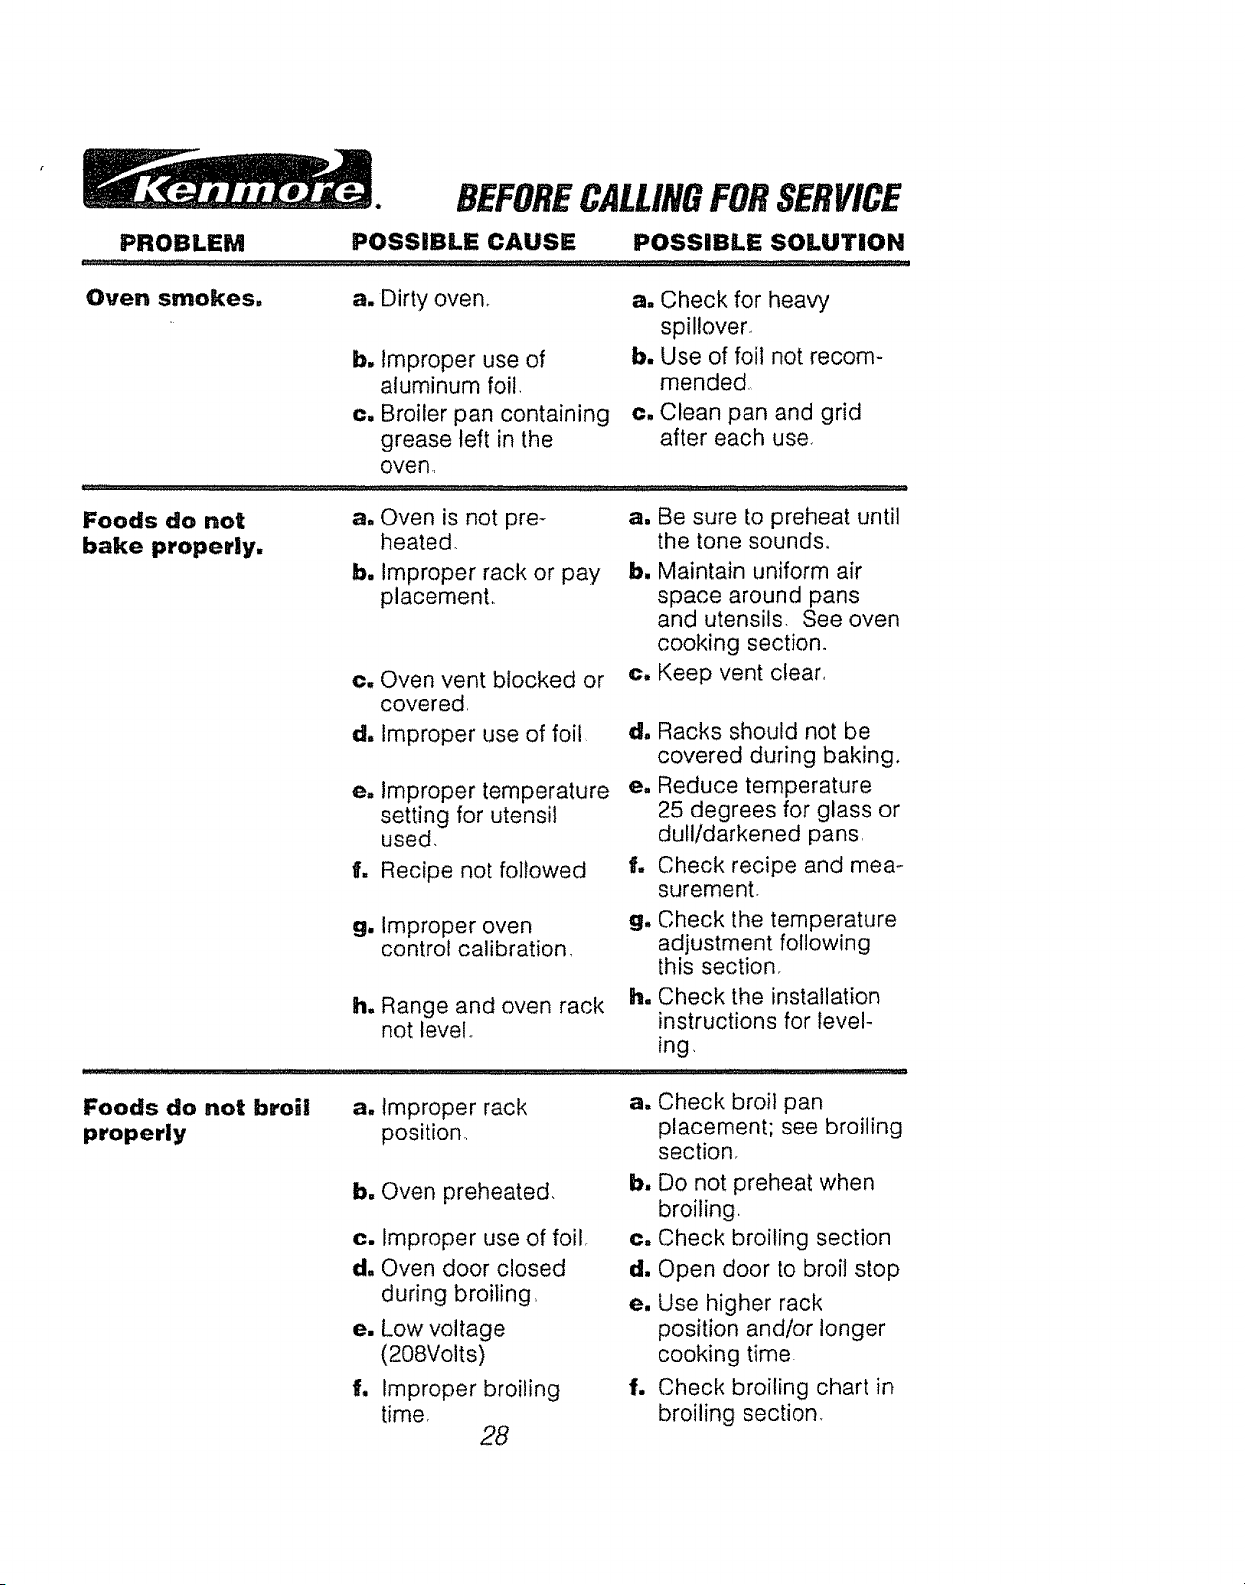
Oven smokes,
a. Dirty oven,
b. Improper use of
aluminum foil,
¢. Broiler pan containing
grease left in the
oven.,
a. Check for heaw
spillover,
b. Use of foil not recom-
mended.,
¢. Clean pan and grid
after each use,
Foods do not
bake properly,
a. Oven is not pre-
heated..
a. Be sure to preheat until
the tone sounds,
b. Improper rack or pay
placement.
¢. Oven vent blocked or
covered,
d. Improper use of foil
em
Improper temperature
setting for utensil
used,
f. Recipe not followed
b. Maintain uniform air
space around pans
and utensils See oven
cooking section.
c. Keep vent clear,
d. Racks should not be
covered during baking,
e. Reduce temperature
25 degrees for glass or
dull/darkened pans,
f. Check recipe and mea-
surement,
g, Improper oven
control calibration,
g. Check the temperature
adjustment following
this section,
h, Range and oven rack h. Check the installation
not level° instructions for level-
ing,
_, ,_,,,,,,,,, , ,, ,,, ,,, , , ,, ,, , ..........................±.._.,, ................ , , ,,, , ,,, , ,,, ,,,,,,,,,,,,,,,,,,_L_,,_
Foods do not broil
properly
a. improper rack a. Check broil pan
position,, placement; see broiling
section,
b. Oven preheated, b. Do not preheat when
broiling
e. Improper use of foil_ ¢. Check broiling section
d. Oven door closed d. Open door to broil stop
during broiling, e. Use higher rack
e. Low voltage position and/or longer
(208Volts) cooking time.
f. Improper broiling f. Check broiling chart in
timer broiling section,
28
BEFORECALLINGFORSERVICE
PROBLEM POSSIBLE CAUSE POSSIBLE SOLUTION
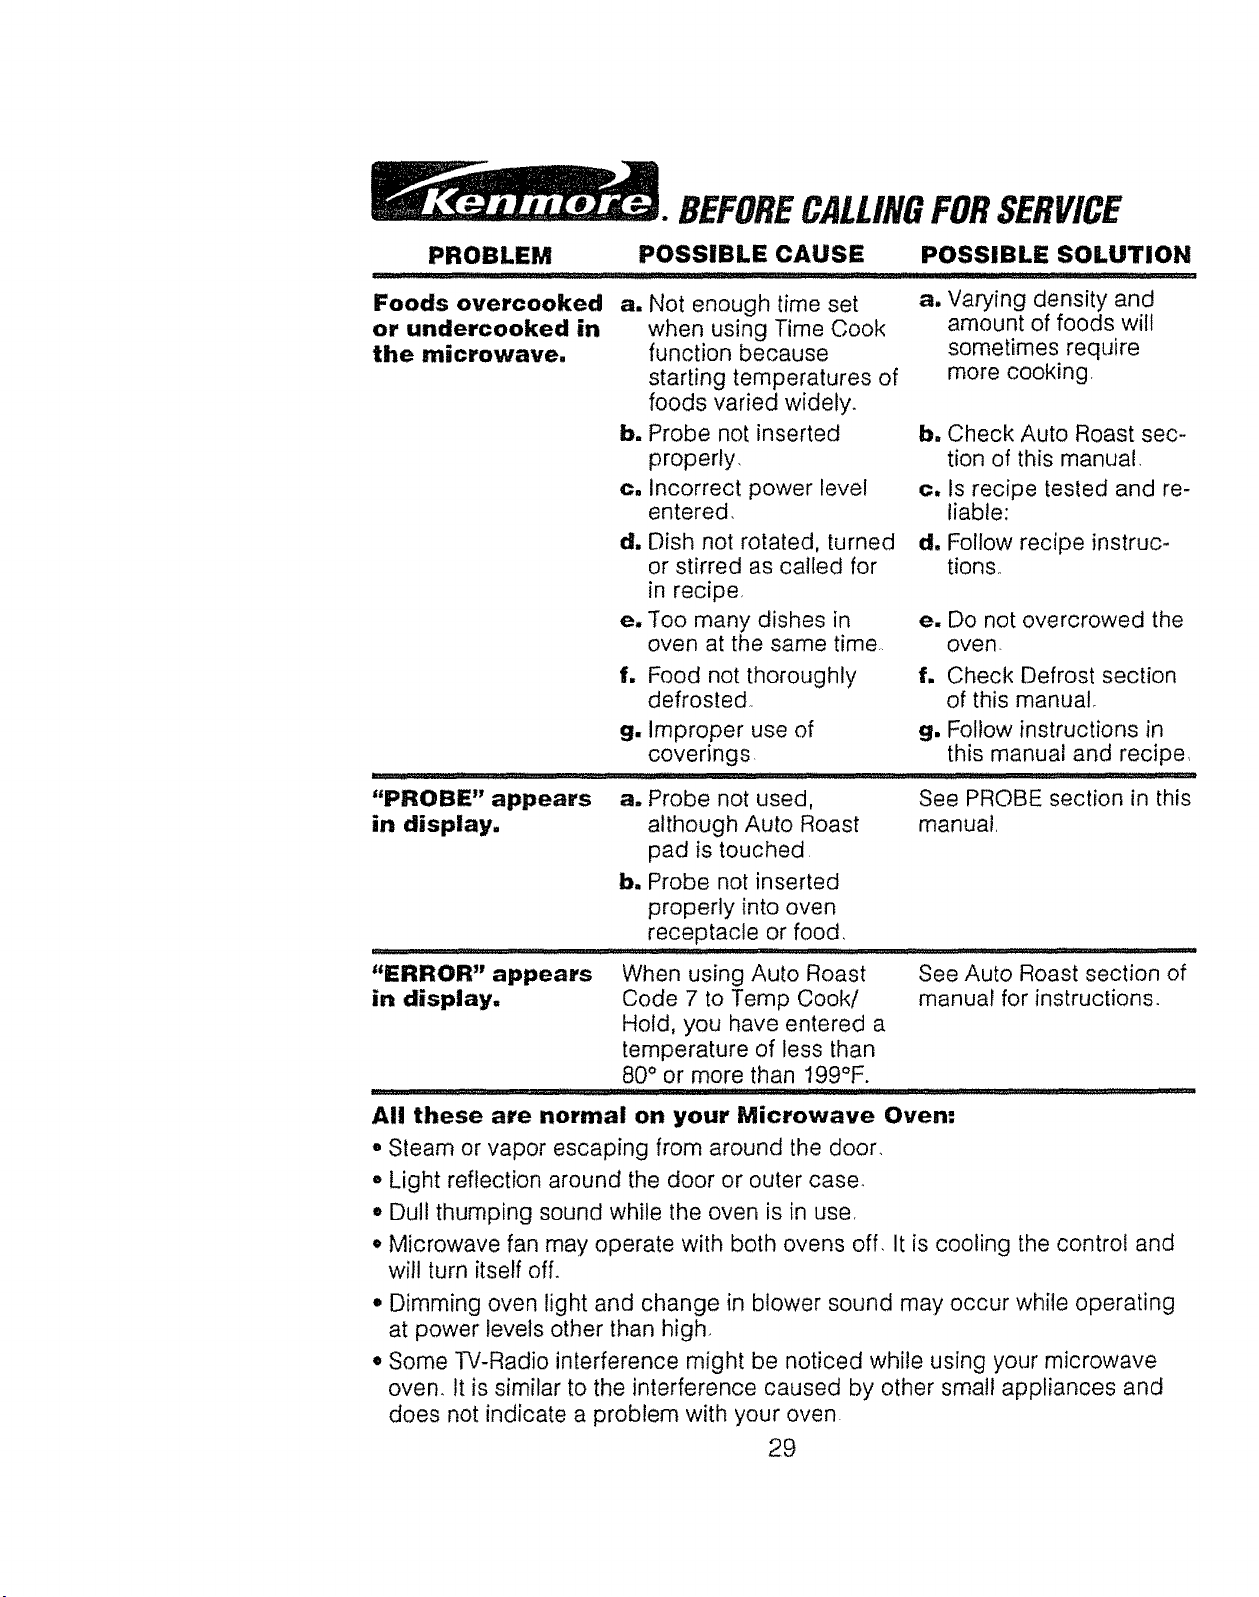
Foods overcooked a. Not enough time set a. Varying density and
or undercooked in when using Time Cook amount of foods will
the microwave.
bl
C.
function because
starting temperatures of
foods varied widely.
Probe not inserted
properly.
Incorrect power level
entered.
d. Dish not rotated, turned
or stirred as called for
in recipe,
e. Too many dishes in
oven at the same time
f. Food not thoroughly
defrosted
g. Improper use of
coverings.
sometimes require
more cooking.
b. Check Auto Roast sec-
tion of this manual.
c. Is recipe tested and re-
liable:
d. Follow recipe instruc-
tions.
e. Do not overcrowed the
oven.
f, Check Defrost section
of this manual,
g. Follow instructions in
this manual and recipe,
" '" ..... ,J,',',"' 4,,,,,,,,,, ' ..... ,,,.... , ' ,,,,_ ........, ,,,,,',',,_",,, ,, " ::: ::: : ::: ..-:-
"PROBE" appears a,, Probe not used, See PROBE section in this
in display, although Auto Roast manual,
pad is touched
b. Probe not inserted
properly into oven
receptacle or food,
_'II I, "1 I1'1 ....!'"'"!'"'!' ' '11 _"ll',ll II IIII , _tt '11" ..........
"ERROR" appears When using Auto Roast See Auto Roast section of
in display, Code 7 to Temp Cook/ manual for instructions.
Hold, you have entered a
temperature of less than
80 ° or more than 199°F.
......... :"l_[,Ui'l'l'J"J .... I 'I ' I'IIII 'I .......... ll_;rlll I III .... _[I : ...... ::::: " : : : .......
All these are normal on your Microwave Oven:
• Steam or vapor escaping from around the door,
• Light reflection around the door or outer case.
• Dull thumping sound while the oven is in use,
• Microwave fan may operate with both ovens off, It is cooling the control and
wil! turn itself off.
• Dimming oven light and change in blower sound may occur while operating
at power levels other than high.
,, Some TV-Radio interference might be noticed while using your microwave
oven. It is similar to the interference caused by other small appliances and
does not indicate a problem with your oven
29
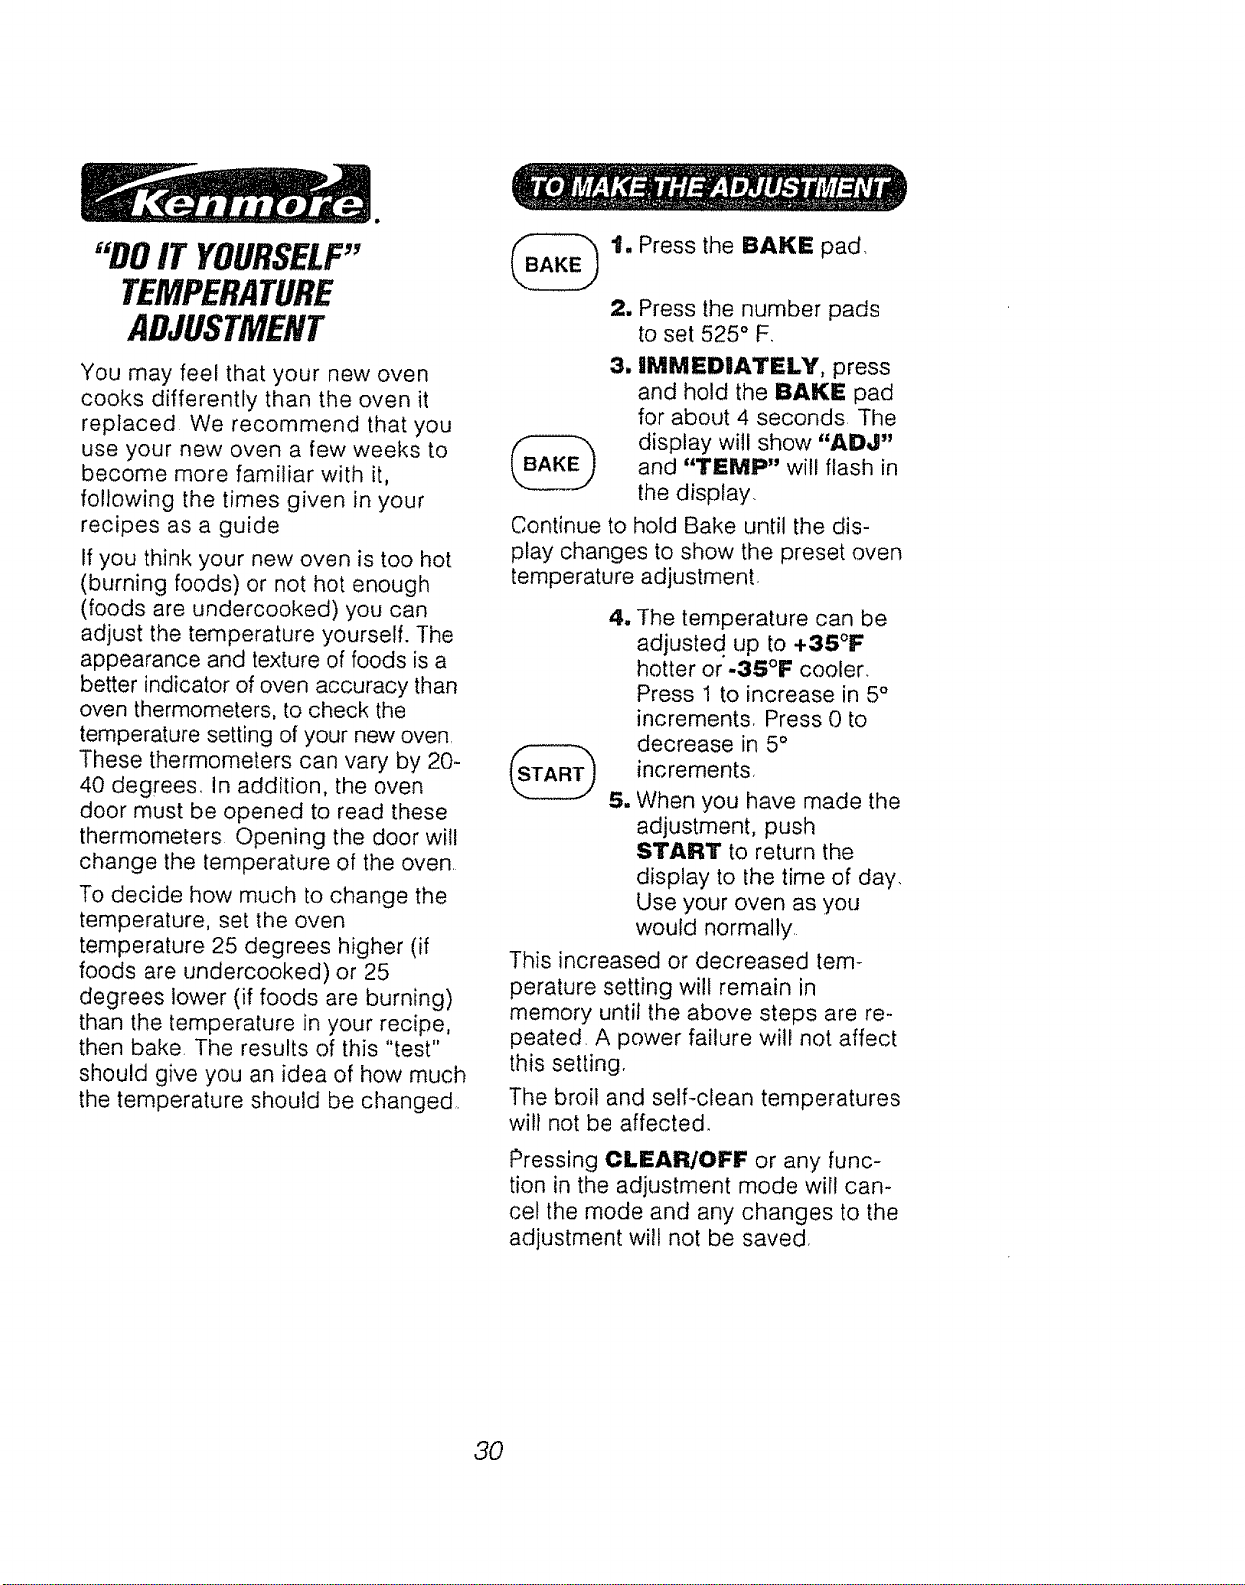
"DOIT YOURSELF"
TEMPERATURE
ADJUSTMENT
You may feel that your new oven
cooks differently than the oven it
replaced We recommend that you
use your new oven a few weeks to
become more familiar with it,
following the times given in your
recipes as a guide
If you think your new oven is too hot
(burning foods) or not hot enough
(foods are undercooked) you can
adjust the temperature yourself. The
appearance and texture of foods is a
better indicator of oven accuracy than
oven thermometers, to check the
temperature setting of your new oven
These thermometers can vary by 20-
40 degrees, In addition, the oven
door must be opened to read these
thermometers Opening the door will
change the temperature of the oven
To decide how much to change the
temperature, set the oven
temperature 25 degrees higher (if
foods are undercooked) or 25
degrees lower (if foods are burning)
than the temperature in your recipe,
then bake The results of this "test"
should give you an idea of how much
the temperature should be changed
B__ t. Press the BAKE pad,
2, Press the number pads
to set 525 ° F,
3. iMMEDiATELY, press
and hold the BAKE pad
for about 4 seconds The
display will show "ADJ"
and "TEMP" will flash in
the display,
Continue to hold Bake until the dis-
play changes to show the preset oven
temperature adjustment.
4, The temperature can be
adjusted up to +35°F
hotter or -35°F cooler.
Press 1 to increase in 5 °
increments, Press 0 to
decrease in 5 °
increments,
5. When you have made the
adjustment, push
START to return the
display to the time of day,
Use your oven as you
would normally,
This increased or decreased tem-
perature setting wilt remain in
memory until the above steps are re-
peated, A power failure will not affect
this setting,
The broil and self-clean temperatures
will not be affected,
Pressing CLEAR/OFF or any func-
tion in the adjustment mode will can-
cel the mode and any changes to the
adjustment wilt not be saved,
3O
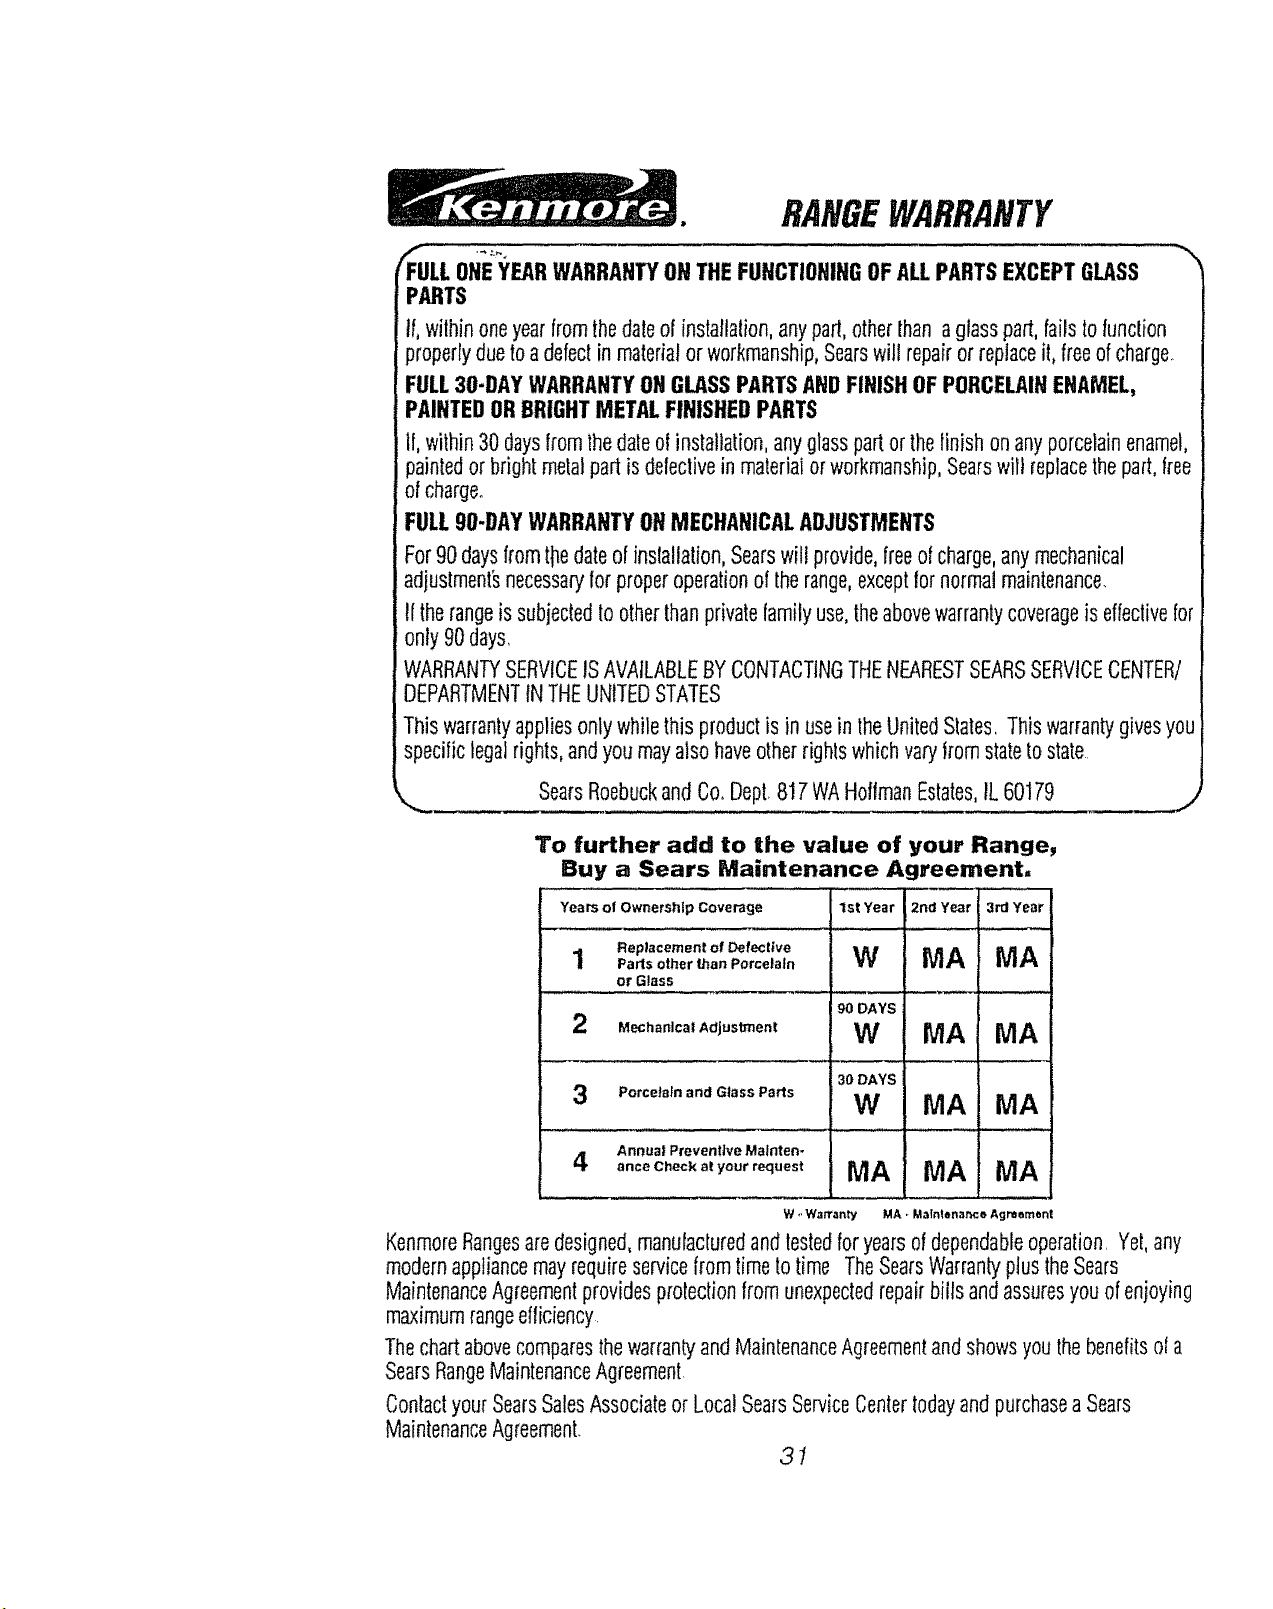
RANGEWARRANTY
f
'FULLONEYEARWARRANTYONTHEFUNCTIONINGOFALLPARTSEXCEPTGLASS
PARTS
If, withinoneyearfromthedateof installation,anypart,otherthan a glasspart,failsto/unction
properlydueto a defectinmaterialor workmanship,Searswill repairor replaceit, freeof charge_
FULL30-DAY WARRANTYONGLASSPARTSANDFINISHOF PORCELAINENAMEL,
PAINTEDORBRIGHTMETALFINISHEDPARTS
If, within30 daysfromthedateof installation,anyglasspartor thefinish onanyporcdainenamel,
paintedor brightmdal partis delectivein materialorworkmanship,Searswilt replacethe part,free
ot charge.
FULL9B-DAYWARRANTYONMECHANICALADJUSTMENTS
For90 daysfromthedateof insfallation,Searswil! provide,freeof charge,anymechanical
adjustment_necessaryfor properoperationof therange,exceptfor normalmaintenance.
!f therangeis subjectedto otherthanprivatefamilyuse,theabovewarrantycoverageis effectivefor
only 90days,
WARRANTYSERVICEIS AVAILABLEBY CONTACTINGTHENEARESTSEARSSERVICECENTER/
DEPARTMENTtNTHEUNITEDSTATES
This warrantyappliesonlywhile this productis in usein theUnitedStates,Thiswarrantygivesyou
specificlegalrights,andyou mayalsohaveotherrightswhichvaryfromstateto state
SearsRoebuckand Co,.DepL817WAHolfmanEstates,IL 60179 j
To further add to the value of your Range,
Buy a Sears Maintenance Agreement,
Years of Ownership Coverage
Replacement of DefectIve
4
I Pads other than Porcelain
or Glass
Mechanical Adjustment
Porcetafn and Glass Parts
Annual Preventive Mainten-
A
_t ance Check at your request
W ,,Warranty
1st Year
W
90 DAYS
W
30 DAYS
W
MA
MA
2rid Year I 3rd Year
MAIMA
MAI MA
, MA! MA
i
' MAI MA
. Mafntananco Agreement
KenmoreRangesaredesigned,manufacturedand testedfor yearsof dependableoperation.Yet,any
modernappliancemayrequireservicelrom timeto time TheSearsWarrantyplustheSears
MaintenanceAgreementprovidesprotectionfromunexpectedrepairbills andassuresyouof enjoying
maximumrangeelficiency
ThechartabovecomparesthewarrantyandMainlenanceAgreementandshowsyouthe benefitsoi a
SearsRangeMaintenanceAgreement.
ContactyourSearsSalesAssociateor LocalSearsServiceCenterlodayand purchasea Sears
MaintenanceAgreement.
3t

For the repair or replacementparts you need
delivereddirectly toyourhome
Call7 am - 7 pro, 7 daysa week
t -800=366=PART L_
(1-800-366..7278)
For in-homemajorbrandrepair service
Call24 hours a day,7 daysa week
1-800-4=REPAIIR
(1-800-473-7247)
For the locationof a
Searsparts and RepairCenterin yourarea
Call24 hours a day,7 daysa week
1 =800-488-t 222
Forinformationonpurchasinga Sears
MaintenanceAgreementor to inquire
aboutan existingAgreement
Call 9 am - 5 pm, Monday-Saturday
t -800-827=6655
America's Repair Specialists
32
MANUAL DEL
CONSUMIDOR
HORNO DOBLE DE 27" DE
PARED CON
AUTOLIMPIEZA Y
MICROONDAS SUPERIOR
MODEll O NO.
911. 49475
911, 49479
PRECAUC|ON:
Lea y siga todas las
reglas Y las instrucciones
para el funcionamiento
antes de usar este
producto por primera vez.
• Instrucciones de
Seguridad
• Funcionamiento
• Cuidado y Limpieza
• C6mo Resolver
Problemas
Sears, Roebuck and Co., Hoffman Estates, IL 60179 U.S.A.
229C4020P1 12 (SR- 10329)
INDICE
HORNODEPAREDCON
AUTOLIMPIEZAYMICROONDAS
Seguridad en el uso del homo ........
......................................................... 3-6
C6mo sacar la cinta de empaque
Caracteristicas de su homo ............ 7
Control del homo microondas
..... ............. .......... - .......................... 8
Programaci6n de MintSeg en
el cron6metro de la cocina ........... 9
C6mo programar para cocinar
en forma demorada ...................... 9
Tiempo para descongelar,
Tiempo y Mantenci6n del tiempo
para cocinar .................................... 9
Programacbn de tiempo para
cocinar ......................................... 10
Programaci6n de tiempo para
cocinar I1....................................... 10
C6mo programar el tiempo
para descongelar ..................... 11
Descongelaci6n autom_,tica ........ 11
Medidor de temperatura ............. t2
CSmo programar para
Cocinar/Temperatura ..................... 12
COmo cocinar en forma
autom_tica .................................. 13
C6digos para cocinar ................... 13
Asado autom_tico ...................... I3
C6mo programar para asar
autom_,ticamente .......................... 13
Calentado a fuego lento
autom_tico ................................ 14
C6mo ajustar los c6digos para
cocinar en lorma aulom_tica ...... 14
Pahilla del microondas ................ t5
Control det homo inferior ..... 16
COmo programar et reloj .... 17
COmo poner el reloj en blanco , 17
COmo programar el cronOmetro .... 17
Conselos para cocinar en el
homo ......... 18-19
COmo programar para hornear .... 20
C0mo programar para hornear
autom_ticamente ................... 20
C6mo programar un comienzo
demorado ................................... 20
C6mo asar a la parrilla ................... 21
Ciclo de aulofimpieza ............... 22-23
Interior del microondas ...................24
Fondo del microondas .............. 24
Ventana de la puerta del
microondas .................................... 24
Superficies exteriores del homo r 24
Panel de control ............................. 24
Cacerola y parriila para asar ......... 24
Foco de la luz del homo ...................25
Puerta del homo ............................. 25
Foco del homo microondas ........... 26
Parril/a del homo removible ........... 26
Antes de Ilamar para un servicio .....
................................................ 27-29
Ajustes a la temperatura .............. 30
Garantia ........................................... 31
Nt]meros de servicio para el
consumidor .................................. 32
Para su conveniencia y referencia futura, por favor escriba los nzimeros
de modelo y serie en el espacio que se provee. Est_n ubicados en el
marco frontal detr_s de la puerta.
NUMERO DE MODELO:
NUMERO DE SERiE:
INSTRUCCIONESDE
SEGURIDADIMPORTANTE$
GUARDEESTASINSTRUCCIONES
Lea todas las instrucciones antes de usar este aparato. Cuando use
aparatos a gas o el_ctricos, se deberian seguir precauciones de
seguridad_ incluyendo Io siguiente:
IMPORTANTE: Para garantizar su
seguridad, la de su familia y la de stu
hogar, por favor tea su Manual del
Consumidor cuidadosamente Mant_nga!o
a la mano para referencias Ponga mucha
atenci6n alas secciones de seguridad.
ASEGt)RESE que su estufa sea
instalada por un tecnico especializado y
que haga tierra adecuadamente,
• NO DEJE a los niNos solos o sin
supervisi6n cerca de una estufa en
funcionamiento,
• ENSE_,IE A LOS Nltl_lOS A: No }ugar
con los controles o cualquier parle de la
estufa, no sentarse, subirse o pararse
sobre la puerta del homo o cualquier
parte de la estufa
. PRECAUCION: NUNCA GUARDE
articulos que sean de inter_.s para los
niSos en los gabinetes sobre el estufa
Los niSos que se suban sobre la estufa
podrian resultar gravemente heridos.
o GUARDE ESTE libro para un uso
futuro.
• NUNCA TRATE de reparar o
reemplazar una parle de la estufa a
menos que las instrucciones se den en
este manual. Todo otro trabajo deberfa
set hecho por un tecnico especializado
° NUNCA USE su estufa para entibiar o
calentar una habitaci6n
• SIEMPRE MANTENGA los
revestimientos combustibles de las
paredes, cortinas y otros paSos a una
distancia prudente de ta estufa
• NUNCA USE una toa!la u otro paso
abultado como agrraderas y asegurese
que la agarradera este seca, Las
agarraders humedas podrian causar
3
quemaduras por vapor. No permita que
las agarraderas toquen las superficies
calientes,
0 SIEMPRE MANTENGA el area de la
homo despejada de cosas que se
prodrian quemar La acumutaci6n de
comida y grasa y los utensilios de
madera se prodrian incendiar Los
utensilios de pl_stico se prodrian
derretir y las comidas en conservas
podrian explolar. Su homo numca se
deberia usar para almacenar cosas_
• SIEMPRE MANTENGA la horno
despejada de cosas que se podrian
quemar (gasotina y otros vapores y
liquidos inflamables).
, NUNCA CALIENTE contenedores de
alimentos cerrados. El aumento de la
presi6n puede causar que el
contenedor explote y cause heridas.
• NUNCA DEJE fiascos o latas con
grasa o goteaduras dentro o cerca de
la estufa
• NUNCA TRATE de limpiar una
cubierta caliente Una esponja o un
pai_o caliente puede causar
quemaduras pot vapor. Algunos
limpiadores pueden producir vapores
!6xicos sobre una superficie caliente.
° ASEGURESE que el homo est_
instalado f#memente en un gabinete que
este bien pegado a la pared.
• NO TOQUE las superficies para
calentar, las superficies cerca de ellas o
las superficies interiores. Estas podrian
estar suficientemente calientes para
quemar aunque se vean de color
oscuro. Durante y despues del uso, no
toque o permita que fa ropa o materiales
inflamables hagan contacto con las
superficies catientes hasta que hayan
tenido tiempo de enfriarrse_ Las otras
suprficies cerca de las ventaniilas de
venlitaci6n del homo, puerlas, ventanas
y las superficies para cocinar tambien
podrtan estar suficientemente calientes
para causar quemaduras
INSTRUCCIONESDE
SEGURIDAD
IMPORTANTES
• COLOQUE LAS PARRILLAS DEL
HORNO en la posici6n deseada'rnientras
el homo est_ frfo. Si las parrillas se deben
mover mientras el homo est,. caliente, no
permita que la agarradera haga contacto
con et quemador caliente del homo.
• DESPUES DE ASAR A LA PARRILLA,
siempre saque la c-acerola y ]a parrilla para
asar del homo y limpielas. Los sobrados de
grasa en ta cacerola para asar podrian
incendiarse la prSxima vez que usted use el
homo.
• SIEMPRE TENGA CUIDADO cuand0
abra la puerla del homo. Deje que el aire
caliente y et vapor esoapen antes de mover
los alimentos.
° HUNCA USE papel de aluminio para
forrar el rondo del homo. El uso
inadecuado del papel de atuminio podria
resultar en un golpe de corriente o en un
incendio.
• NUNCA OBSTRUYA la abertura de la
ventilaci6n del homo,
• LIMPIE SOLAMEHTE las partes que
se listan en este manual Siga todas las
instrucciones para la limpieza.
• NUNCA FRIEGUE, mueva, o daSe el
sello de la puerta en las estufas con
autolimpieza.
o NUNCA TRATE de timpiar los
utensilios, ollas, partes removibles o la
cacerola y la parrilla para asar en el
ciclo de autolimpieza,
• NUNCA USE limpiadores para hornos
Ningt'Jn limpiador comercial se deberia
usar dentro o alrededor de ninguna parte
del horno.
;ADVERTENCIA DE SEGURIDAD
iMPORTAHTE!
California Safe Drinking Water and
Toxic Enforcement Act requiere
que el gobernador de California
publique una lista de substancias
que el estado sepa que producen
defectos de nacimiento u otros
da_os reproductivos ¥ requiere
que los hombres de negocios
adviertan a sus clientes del
contacto potencial a tales
substancias. El aislante de libra
de vidrio en el horno con
autolimpieza emitir_ una muy
peque_a cantidad de mon6xido de
carbono durante el ciclo de
autolimpieza. El contacto se
puede minimizar ventilando con
una puerta o ventana abierta o
usando un ventilador o una
campana de ventilaci6n.
iLEA Y COMPRENDA ESTA
BNFORMACIOH AHORA]
Aseg_rese que todos en su hogar
sepan qu6 hacer en caso de
incendio. Nunca use agua sobre un
incendio de grasa, esto sotamente
extender& las llamas.
FUEGO EN EL HORNO:
;No trate de mover la cacerota!
1. Cierre la puerLa del homo y apague los
controles
1 Si el incendio
contint3a,cuidadosamente abra la
puerta, arroje soda para cocinar sobre
el fuego, o use un extintor de qu[mico
seco, espuma o "halon",
4
INSTRUCCIONESDE
SEGURIDAD
IMPORTANTES
seguridad, incluyendo las
siguientes:
ADVERTENCIA: Para reducir et
riesgo de quemaduras, golpes de
corriente, incendio_ heridas
personales o exposici6n
excesiva a energia de
microondas:
• Lea todas las instrucciones
antes de usar este aparato.
° Read and follow the specific,
Microwave safety instructions.
• No trate de operar este homo con ]a
puerta abierta ya qua el funcionamiento
con ta puerta abierta puede resultar en
una exposici6n daSina a ]a energia de
microondasr Es importante no
desconectar o interferir con los sistemas
de seguridad.
. No coloque ning0n objeto entre el
frente del homo y ta puerta o permita la
acumulaci0n de suciedad o residuo de
limpiadores en las superficies de cierre
No haga funcionar el homo si est_
daSado Es particuiarmente importante
qua el homo cierre correctamente y qua
no haya daNo a: Pueda, Bisagras y
Cerrojos, o Sello de ta Puerta.
. E! homo no debeda set ajustado o
reparado por nadie excepto por un
servicio de personal especializado
o
I)
O
D
O
Este aparato debe hacer tierra,
Conecte solamente a on recept&cu!o
que haga tierra Vea ]as instrucciones
para hacer tierra en las instrucciones
para ta instataci6n
Use este aparato solamente para su
uso apropiado como se describe en este
manual. No use quimicos o vapores
corrosivos en este aparato Este homo a
microondas estA espeificamente
dise_ado para calentar o cocinar
alimentos, y no tiene un prop6sito indus-
trial o de laboratorio.,
instale o ubique este aparato
solamente de acuerdo con las
instrucciones para instalaci6n qua se
proveen,
No cubra u obstruya ninguna abertura
de este aparato,
Este homo microondas no est_
aprobado o probado parta uso maritimo
No haga funcionar este aparato si no
est_ funcionando bien o si ha sido
da_ado o se ha dejado caer,
Como cualquier otro aparate
el_ctrico, se necesita una vigilancia
muy de cerca cuando se usa por los
n|nos
No sobrecocine la comidao Vigile el
homo cuidadosamente si papel, pl_stico
u otros materiales combustibles se han
colocado dentro del homo para facilitar
la cocci6n
Saque las amarras de alambre de
las bolsas de papet o pl_stico antes de
ponerlas en el homo
No use su homo microondas para
secar peri6dicos,
No use productos de papal reciclado,
Las toallas y las servifletas de papal
reciclado y e! papet de ' cera pueden
contener particulas de metal qua
podrian producir arcos o incendiarse,
Los productos de papal que contienen
nil6n o filamentos de ni!6n deberian
evitarse
Do not heat food in closed ontainers,
such as glass jars, which may explode,
5
INSTRUCCIONESDE
SEGURIDAD
IMPORTANTE$
o No prepare pop corn en su homo
microondas a menos que use un "pop
corn" que sea marcado para uso en los
hornos microondas,
• No cocine demasiado las papas
Se poddan deshidratar e incendiarse,
causando da_o a su homo.
o No haga funcionar el homo
microondas si est_ vacio
• No use su homo microondas para
almacenar cosas
o Si el material dentro del homo se
incendia, cierre la puerta, apague e]
homo y desconecte la electricidad al
aparato
• Alimentos de tama_o grande y
utensilios de metal demasiado grande
no deberian usarse en un homo
microondas, Se podria producir un
golpe de corriente o un incendio
o No limpie con lani]las para fregar de
metal, Se podrian quebrar fragmentos
de la lanilla, causando un go]pe de
corriente.
• No descongele bebidas congeladas
que tienen botellas de cuello angosto.
Podrfa subir la presidn y causar que la
botella exploteo
• Use agarraderas cuando saque los
utensilios de! homo Los utensilios se
podr[an calentar cuando coc}ne debido
a la transferencia de] calor desde la
comida
• Tenga cuidado si toca las paredes o
el fondo del homo durante y despues
que cocine, l_as paredes y el fondo
podr[an estar calientes,
• No hierva huevos en un homo
microondaso La subida de presi6n
dentro de ta yema de! huevo podfla
causar que el huevo explore
• Use contenedores de pl,_stico que
sean aprobados per el fabricante para
uso con microondas, No permita que los
niSos usen contenedores de pl&stico a
menos que est_n siendo vigilados_ No
exponga contenedores vacfos a }as
microondas,
• Alimentos con pieg o c_scara
entera, tales como papas, salchichas,
tomates, manzanas, higado de polro,
yemas de huevo y otras partes del polio,
deberian tener hoyos para permitir que
el vapor escape durante la cocci6n.
• Asegt_rese que Bos envoitorios de
pl_stico que use cuando cocine a
microondas sean aprobados para uso
con microonda&
• Ebullici6n espont_nea. Bajo ciertas
circunstancias, los Ifquidos podrian
empezar a hervir durante o poco tiempo
despues que se sacan deJ horno.
Revuelva el Iiquido.
o No caliente cemida para los
beb_s en fiascos de vidrio con
microondas.
• A las bolsas para cocinar hervibles y
bolsas de pl&st}co herm,_ticamente
cerradas se les debefian hacer hoyos,
tajaduras o debeflan ser ventiladas
como se instruye en el paquete, Si no
son venti]adas de alguna manera, la
presiSn causar& que se revienten.
6
NUMERO DE
MODELO Y SERIE
CERROJO DE LA
PUERTA PARA L_
LIMPIEZA
ELEMENTO PARA
ASAR A
PARRILLA
HORNO CON
CACEROLA Y
PARRILLA PARA
ASAR
ELEMENTO
HORNEAR
OPERACION
CARACTERISTICASDE SU HORNO
REJILLA Y VENTILACION DEL
HORNO
CONTROL DEL HORNO
MICROONDAS
RECEPTACULO DEL
DE TEMPERATURA
SENSOR
CONTROL DEL HORNO
INFERIOR
VENTILACION Y
REJILLA DEL HORNO
INFERIOR
INTERRUPTOR
'AUTOMATICO DE LUZ
DEL HORNO
GUIA PARA
PARRILLAS DEL
HORNO
PARRILLA
REMOVIBLE DEL
HORNO
SELLO DE LA
JERTA DEL
HORNO
TEMPERATURA
Para sacar el residuo del adhesivo de la cinta de empaque, use un detergente liquido
para lavar platos, aceite mineral o para cocinar, Con un patio suave frote el Area y
permita que se remoje. Enjuague y seque bien. Repita el procedlmiento usando un
pulidor para homos para asegurarse que e! horno no ha sido daSado. Esto se
deberia hacer antes que el homo se encienda por primera vez. La cinta
no se puede sacar una vez que el homo ha sido calentado. La cinta de
empaque se puede encontrar en las _,reas siguientes: Manilla de la puerta, Area del panel
de control, Moldura de la puerta y Area del homo
OPERACION
ControlDe SuHomo
Microondas
HORNO MICROONDAS SUPERIOR
UPPER MIDROWAVE OVEN
@®® @
®®® @
@®® @
@®® @
Su nuevo homo microondas ofrece una
gran variedad de maneras en ta cual
cocinar la comida, El homo microondas
usa ondas de radio cortas y de alta
frecuencia que se mueven a trav_s de los
alimentos para generar calor, Es muy
conveniente para recalentar y descongelar
porque el tiempo y la preparaci6n son muy
cortos,
DIAL--Muestra el tiempo y la temperatura
durante la cocci6n, el nivel de poder que
se est& usando, m6dulo para cocinar y las
instruccione&
TIMED COOK-- Para microondas
usando un nivel de poder autom,_tico,
Usted tambi_n puede cambiar et nivel de
poder despu_s de programar el tiempo de
cocci6n.
TIMED DEFROST-- Para
descongelaci6n autom_tica en e! nivel de
poder 3. Usted puede cambiar el nivel de
poder despues de programar el tiempo
para descongelar,
TEMP COOF, JHOLD--Cuando cocine
con el term6metro, et homo cambiar_
autom,_ticamente a la funci6n de
mantencidn, para mantener la temperatura
hasta que usted abra la puerta o empuje
et botdn Clear/Off
POWER CONTROL--Usted puede
seleccionar su nivel de poder preferido
para cocinar empujando el bot6n para
Control de Poder (Power Control) primero,
AUTO COOK--El homo cocina a
microondas autom,_ticamente a un hive!
de poder previamente programado,
cocina por una exacta cantidad de tiempo
y se apaga autom&ticamente
AUTO DEFROST-- Cuando programa
el peso de los alimentos, el homo
programa autom_ticamente el nivet de
poder y la cantidad de tiempo para
descongeSar.
AUTO ROAST--Usando el term6metro y
programando la temperatura, esta funci6n
cocina la came autom&ticamente.
NUMBER PADS (Botones con los
NLimeros)_Programa ta cantidad de
tiempo para cocinar y descongetar, la
temperatura y los niveles de poder
START_Hace comenzar el proceso a
microondas,
HOLD TIIMER--No usa energia
microondas. Mantendr,_ los alimentos
entre descongelamiento y cocci6n, actL)a
como cron6metro de la cocina a ayuda en
la temperatura para cocinar
CLEAR/OFF.--Apaga el homo o borra
todos los programas.
Usted podfia nolar que el ventitador del
microondas funciona mientras usa el
microondas e incluso despu6s que ]a
cocci6n ha sido completada Esto es nor-
mal. El ventilador ayuda a enfriar las
partes internas,
8
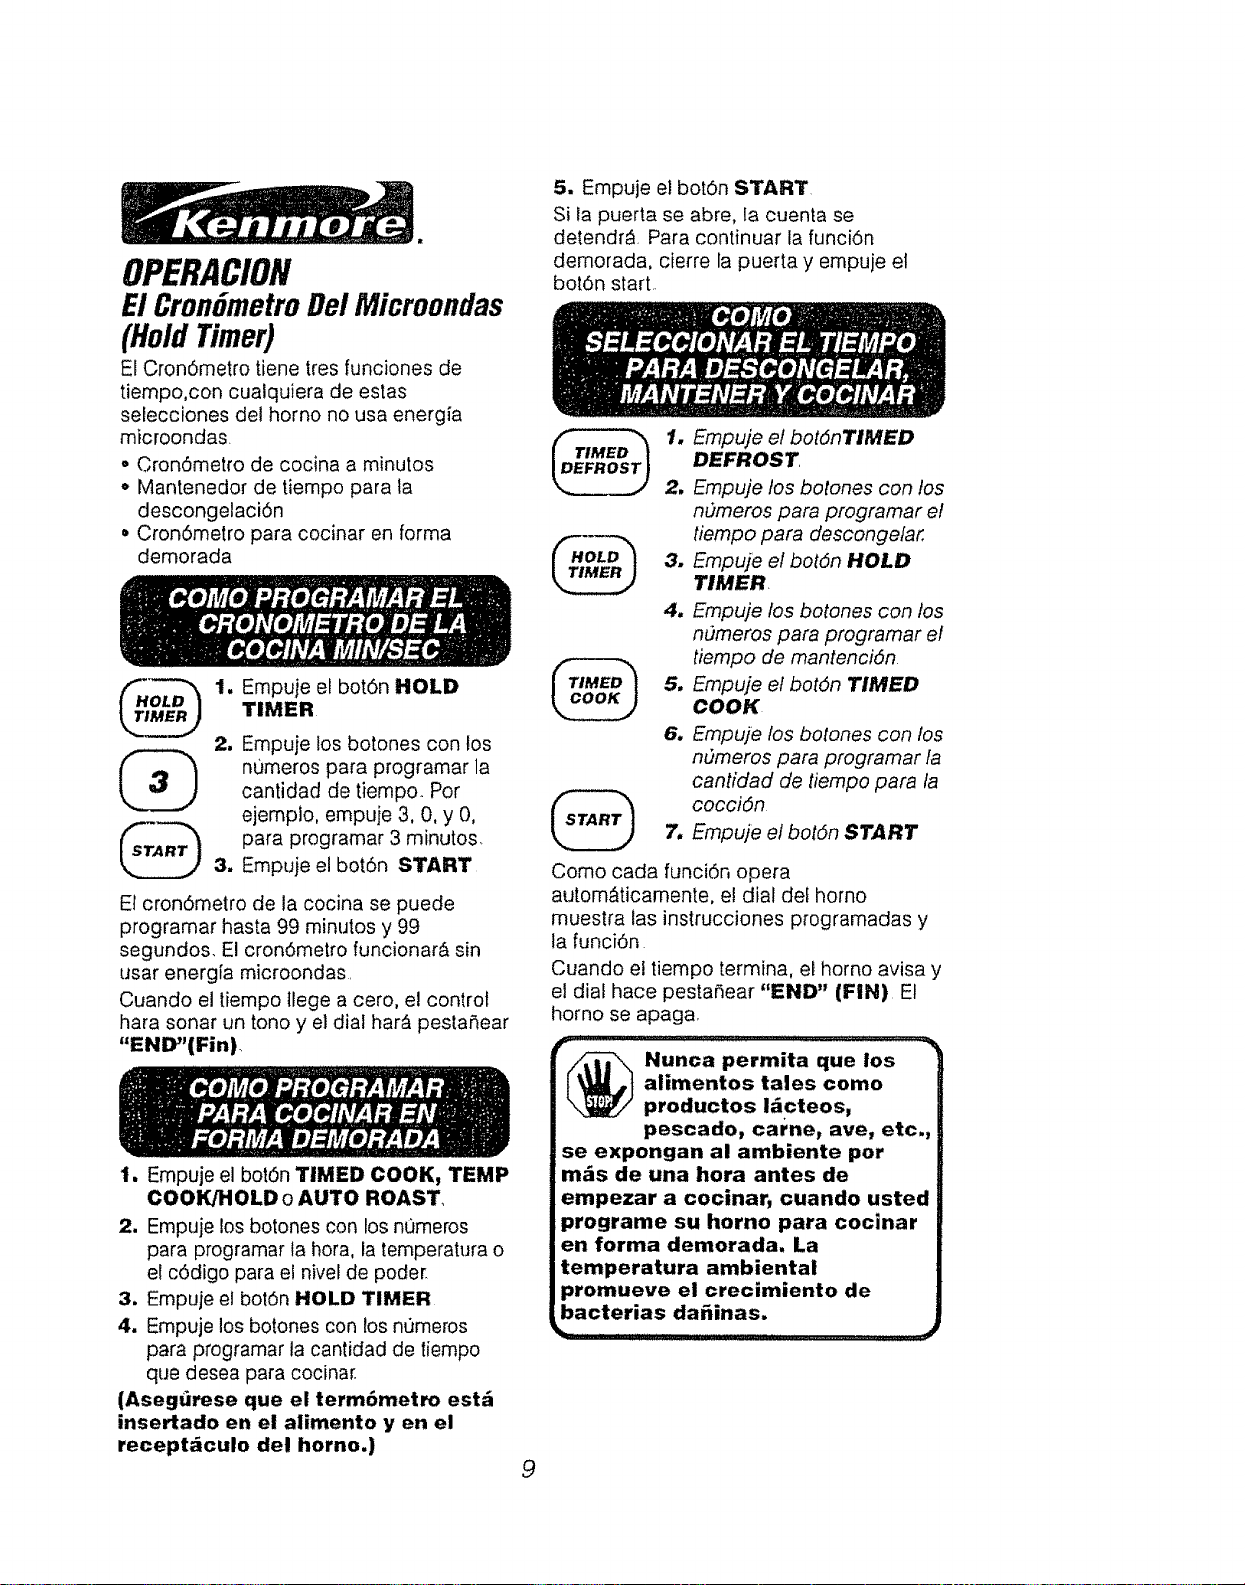
OPERACION
E1CronSmetroDel Microondas
(Hold Timer)
El Cron6metro tiene tres funciones de
tiempo,con cualquiera de estas
selecciones de! horno no usa energia
microondas
o Cron6metro de cocina a minutos
* Mantenedor de tiempo para ta
descongelaci6n
, Cron6metro para cocinar en forma
demorada
2.
Empuje el bot6n HOLD
TIMER
Empuje los botones con los
numeros para programar la
cantidad de tiempo. Por
ejemp]o, empuje 3, O, y O,
para programar 3 minutos.
Empuje el bot6n START
El cron6metro de la cocina se puede
programar hasta 99 minutos y 99
segundos El cron6metro funcionar& sin
usar energia microondas
Cuando el tiempo tlege a cero, el control
hara sonar un tono y el dial har_ pesta5ear
"END"IFin)
1. Empuje el bot6n TIMED COOK, TEMP
COOK/HOLD o AUTO ROAST
2. Empuje los botches con los nt)meros
para programar la hora, la temperatura o
e! c6digo para el nivel de poder
3. Empuje el botSn HOLD TIMER
4. Empuje los botones con los n0meros
para programar la cantidad de tiempo
que desea para cocinar
(Asegtirese que el term6metro est_
insertado en el alimento y en el
recept_culo del homo.)
5. Empuje el botOn START
Si la puerta se abre, la cuenta se
detendr_. Para continuar la funciOn
demorada, cierre la puerta y empuje el
bot6n start
1
2,
J
4.
7,
Empuje et botdnTIMED
DEFROST
Empuje los botones con los
nOmeros para programar el
tiempo para descongefar
Empuje el botdn HOLD
TIMER
Empuje los botones con los
nOmeros para programar el
tiempo de mantencidn
Empuje el botdn TIMED
COOK
Empuje los botones con los
nOmeros para programar fa
cantidad de tiempo para fa
coccidn
Empu/e el boldn START
Como cada funci6n opera
autom&ticamente, el dial def homo
muestra las instrucciones programadas y
la funci6n
Cuando e! tiempo termina, el homo avisa y
el dial hace pesta_ear "END" (FIN) El
homo se apaga
alimentos tales eomo B
productos i_cteos, R
pescado, carne_ ave, etc.,
se expongan al amblente por
m&s de una hora antes de
empezar a cocinar, cuando usted
programe su homo para cocinar
en forma demorada. La
temperatura ambiental
promueve el crecimiento de
bacterias da_inas.
I_ ....
9
OPERACION
Com#ProgramarEl Tiempode
CoccionEnE1Microondas
Esta funcidn le perm[ite programar la
cantidad de tiempo para cocinar con
anterioridad. El homo se apaga
autom_ticamente al fin de la cantidad de
tiempo para cocinar..
El nivel de poder 10 (ALTO) se
recomienda para la mayoria de las
cocciones, pero usted podria cambiar
esto para m_s flexibilidad.
("_Tl_ 1, Empuje el bot6n TIMED
COOK,
2, Empuje los botones con los
numeros para programar el
tiempo de coccidn.
Se mostrar_, el nivel de poder 10. Si no
desea el nivel 10, empuje POWER
CONTROL y entonces empuje los
numeros para seleccionar un nuevo nivel
de poder.
3, Empuje el bot6n START
Cuando el tiempo termina, el homo avisa y
el dial hace pestaSear "END" (FIN) La
tuz y el ventifador del homo se apagan
EL TIEMPO PARA COCINAR iI [e
permite programar dos funciones de
tiempo dentro de un programa, Esto es
ideal cuando usted desea cambiar niveles
de poder durante las operaciones para
cocinar,
_#-_ 1. Empuje e! bot6n TIMED
COOK.
2. Empuje los botones con
los numeros para
programar el tiempo para
cocinar,
Se mostrarA el nivel de poder t0 Si no
desea el nivel de poder 10, empuje
POWER CONTROL y entonces empuje
el botSn con el nGmero para sefeccionar e!
nuevo nivel de poder_,
3, Empuje el bot6n TIMED
COOK
4. Empuje los botones con
los nOmeros para
programar el segundo
tiempo para cocinar
5, Empuje el bot6n START.
El dial mostrar_ la cuenta det liempo para
cocinar y el primer nivel de poder
AI fin de la cuenta del primer tiempo el dial
mostrar& la cuenta det segundo tiempo
para cocinar y el segundo nivel de poder
Cuando el tiempo termine, el homo
avisar_f y el dial har_. pestaSear "END"
(FIN),
10
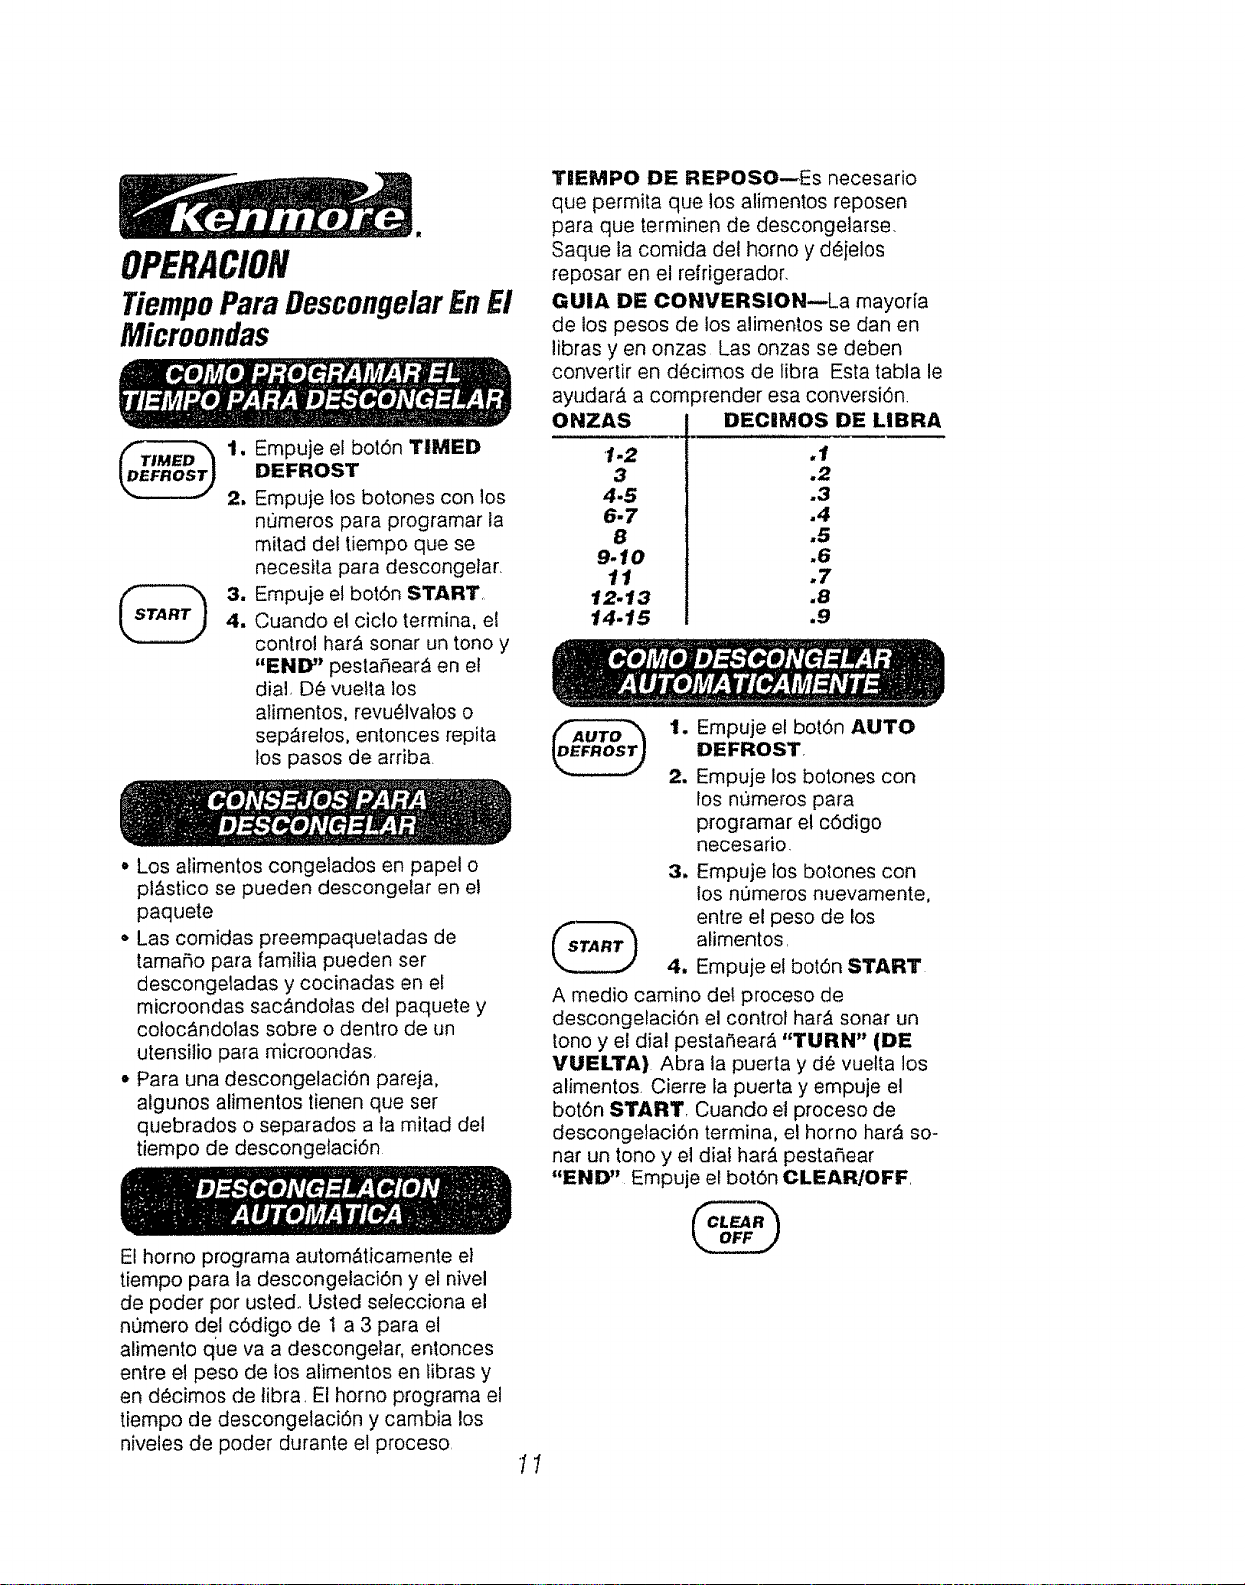
OPERACION
TiempoPara DescongelarEnEl
Microondas
2,
Empuje el bot6n TIMED
DEFROST
Empuje los botones con los
numeros para programar la
mitad del tiempo que se
necesita para descongelar,
Empuje el bot6n START
Cuando el cic!o termina, el
control har_ sonar un tono y
"END" pestaSear_ en el
dia]_ D_ vuelta los
alimentos, revu_lvalos o
sepArelos, entonces repita
los pasos de arriba
* Los alimentos congelados en papel o
pl&stico se pueden descongelar en e!
paquete
o Las comidas preempaquetadas de
tama_,o para familia pueden ser
descongeladas y cocinadas en el
microondas sac&ndolas del paquete y
coloc&ndolas sobre o dentro de un
utensilio para microondas,
- Para una descongelaci6n pareja,
algunos alimentos tienen que ser
quebrados o separados a ta mitad del
tiempo de descongefaci6n
El homo programa autom&ticamente el
tiempo para la descongelaci6n y el nivel
de poder por usted. Usted selecciona el
numero del c6digo de 1 a 3 para el
alimento que va a descongelar, entonces
entre el peso de los alimentos en libras y
en decimos de libra. El homo programa el
tiempo de descongetaci6n y cambia los
niveles de poder durante el proceso.
TIEMPO DE REPOSO--Es necesario
que permita que los alimentos reposen
para que terminen de descongelarse.
Saque ia comida del homo y d_ielos
reposar en el refrigerador.
GUIA DE CONVERSION--La mayor[a
de los pesos de los alimentos se dan en
libras yen onzas Las onzas se deben
convertir en decimos de libra Esta tabla le
ayudarb, a corn )render esa conversi6n.
ONZAS DECIMOS DE LIBRA
f-2
3
4-5
6.7
8
9.10
fl
12.13
14.15
.1
.2
.3
.4
.5
.6
.7
.8
.9
1. Empuje el bot6n AUTO
DEFROST,
2. Empuje los botones con
los numeros para
programar el c6digo
necesario.
3. Empuje los botones con
los numeros nuevamente,
entre el peso de los
atimentos,
4. Empuje el bot6n START
A medio camino det proceso de
descongelaci6n el control har_, sonar un
tone y el dial pestar_ear_ "TURN" (DE
VUELTA} Abra la puerta y de vuelta los
alimentos Cierre la puerta y empuje el
bot6n START, Cuando el proceso de
descongelaci6n termina, el homo har_ so-
nar un tono y el dial har_. pestaC_ear
"END" Empuje el bot6n CLEAR/OFF
I!
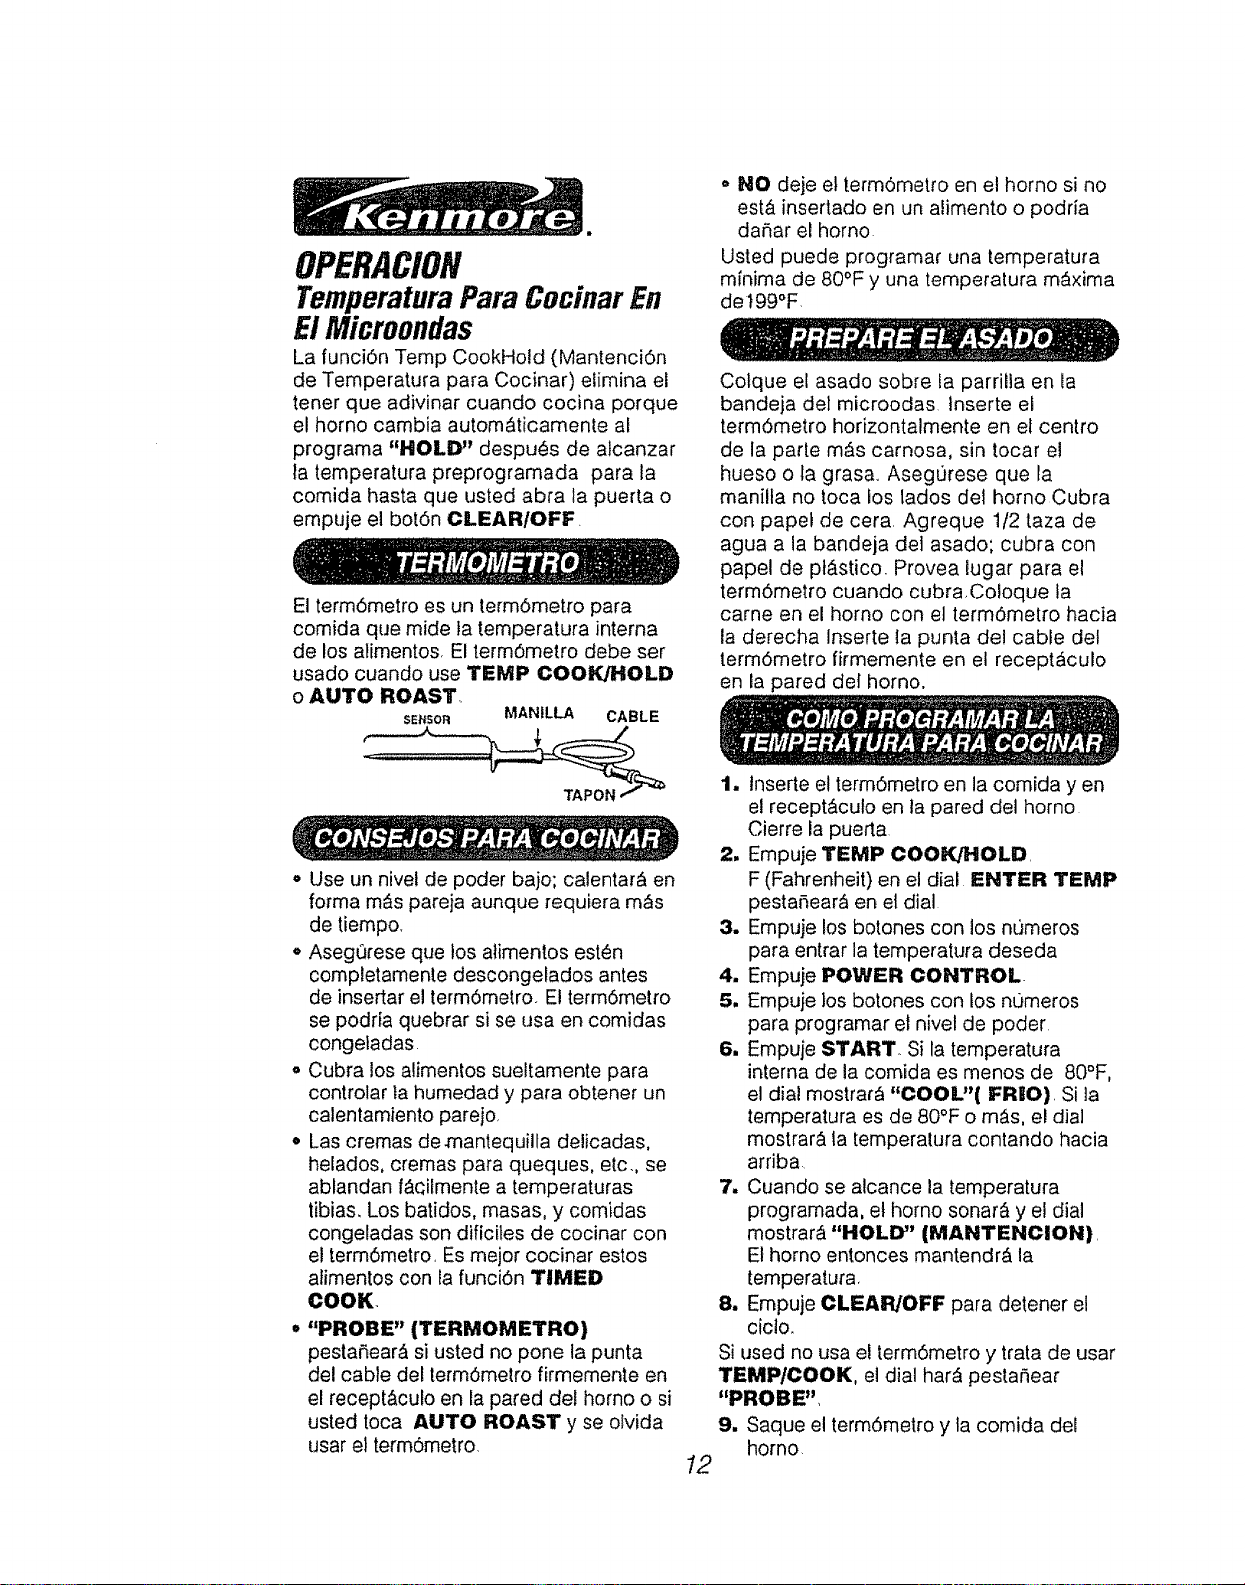
OPERACION
TemperaturaPara CocinarEn
ElMicroondas
La funci6n Temp CookHold (Mantenci6n
de Temperatura para Cocinar) etimina el
tener que adivinar cuando cocina porque
el homo carnbia autom_ticamente al
programa "HOLD" despu_s de atcanzar
la temperatura preprogramada para la
comida hasta que usted abra la puerta o
empuje el bot6n CLEAR/OFF.
El termSmetro es un termSmetro para
comida que mide la temperatura interna
de los alimentos El term6metro debe set
usado cuando use TEIVIP COOK/HOLD
o AUTO ROAST..
SEt_SOR MANILLA CABLE
o NO deje el term6metro en el homo si no
est& insertado en un alimento o podria
dar_ar el homo
Usted puede programar una temperatura
minima de 80°F y una temperatura m&xima
de t 99°F.
Colque el asado sobre la parrilla en ia
bandeja del microodas inserte el
termOmetro horizontalmente en el centro
de la parle m_.s carnosa, sin tocar e!
hueso o la grasa,, Aseg0rese que la
manilla no toca los lados del homo Cubra
con papet de cera, Agreque 1f2 taza de
agua a la bandeja de] asado; cubra con
papel de ptAstico. Provea lugar para el
term6metro cuando cubra,Coloque la
carne en el homo con el term6metro hacia
la derecha Inserte la punta del cable det
termSmetro firmemente en el recept_culo
en la pared def homo.
TAPON
o Use un nivet de poder bajo; calentarb, en
forma m_s pareja aunque requiera m,_s
de tiempo.
o Asegerese que los alimentos esten
completamente descongelados antes
de insertar el term6metro. El term6metro
se podria quebrar si se usa en comidas
congeladas.
o Cubra los alimentos sueltamente para
controlar la humedad y para obtener un
calentamiento parejo,
• Las cremas de.mantequilta delicadas,
helados, cremas para queques, etc., se
ablandan f_cilmente a temperaturas
tibias. Los batidos, masas, y comidas
congeladas son dificiles de cocinar con
el term6metro, Es mejor cocinar estos
alimentos con la funciOn TIIMED
COOK.
• "PROBE" (TERMOMETRO)
pesta_ear_ si usted no pone la punta
del cable del term6metro firmemente en
el recept&culo en la pared del homo o si
usted toca AUTO ROAST y se olvida
usar el term6metro,
t. tnserte el term6metro en la comida yen
el recept&culo en la pared del homo
Cierre la puerta
2, Empuje TEMP COOK/HOLD,
F (Fahrenheit) en el dial ENTER TEMP
pesta_ear_, en el dial
3. Empuje los botones con los numeros
para entrar la temperatura deseda
4. Empuje POWER CONTROL.
5, Empuje los botones con los numeros
para programar el nivel de poder
6, Empuje START. Si la temperatura
interna de la comida es menos de 80°F,
el dial mostrar_ "COOL"(FRIO), Si ]a
temperatura es de 80°F o m_s, el dial
mostrar& la temperatura contando hacia
arriba
7. Cuando se alcance la temperatura
programada, et homo sonar_ y el dial
mostrar_ "HOLD" (MANTENCION),
El homo entonces mantendr_ la
temperatura,
8. Empuje CLEAR/OFF para detener el
cicto.
Si used no usa el term6metro y trata de usar
TEMPIOOOK, el dial hard pestaSear
"PROBE",
9, Saque el termSmetro y ta comida del
homo.
12
OPERACiON
CSmoCocinar
Una gala detr&s de la puerta dei homo lista
los c6digos para cocinar los alimentos fres-
cos o crudos que se preparan m_.s
frecuentemente.
Autom ticamenteEn E1
Microondas
Use AUTO COOK para eliminar la
necesidad de mirar el tiempo de cocci6n
en su libro de cocina o adivinar en cuAnto
tiempo tiene que programar para cocinar
Midiendo el vapor que escapa a medida
que la comida se cocina en el microondas,
el control ajusta la cantidad de tiempo para
cocinar al homo de varios tipos y
cantidades de atimento
Esta funci6n se usa mejor con comidas que
usted desea hacer al vapor o que desea
que retengan humedad
t',;IOTA: El uso de ta parrilla de metal no se
recomienda con la Cocci6n Autom_.tica.
ALIMENTOS NO RECOMENDADOS
PARA COCCIION AUTOMATilCA--
Alimentos que tienen que ser cocinados
destapados, comidas que requieran una
atenci6n constante, alimentos que
requieran ingredientes adicionaies mientras
se cocinan, comidas que requieren una
apariencfa seca y quebradiza, aimentos
cocinados usando el term6metro no
deberian set cocinados autom_ticamente.
Los c6digos para la cocina aulom_lica 1-9
est_,n diseSados para darle resullados
autom&ticos t_ciles con un numero de
alimentos..
CODIGO l_Usado para recalentar la
comida r_pidamente y apagar el homo
autom&licamente tan pronto como el sensor
delecta el vapor de los alimentos
CODIGO 2.9--.Si se usa, el homo
determinar_ ta cantidad de tiempo
adicional que se necesita despues que el
vapor ha sido deteclado El homo cambiar_
a TIME COOK (COCCION A TIEMPO)
autom_ticamente Cuando el homo de la
seSal que la com_da esl_ lista para set
revueila, h_gala dar vueltas o h_gala rotar.
13
EL ASADO AUTOMATICO usa el
term6metro para cocinar a la temperatura
de servir deseada. El asado autom_tico usa
hasta 3 posiciones de poder que cambian
autom,tticamente durante el asado,
proveyendo resultados blandos y parejos
sin cocinar dernasiado
Tal como el asado convencional, solamente
carnes btandas se deberian asar
autom_ticamente hasta que se alcancen
las temperauras internas especificadas
Cames menos blandas debefian set
asadas en el microondas a tiempo, de
acuerdo a su receta..
t. Empuje AUTO ROAST, "AUTO" y
"TEMP" aparecen en el deal y "EN-
TER CODE" pesta_ea.
2. Empuje los botones con los n0meros
para programar un C6digo para Asado
Autom_tico. Vea la Gufa de CSdigos
par Asar.
3. Empuje START. El dEalmuestra
"COOL" (FRIO) y "CODE"
(CODIGO) hasta que ia temperatura
de ia comida Ilega a 80°F. A 80°F, el
dial cambia para mostrar la
temperatura interna de la came,
4. Cuando selecciona los C6digos para
Asado Autom_tico 1, 2, 3, o 4, el homo
avisa con 4 tonos y "TURN" pesta_Sea
cuando es hora de dar ' vuelta el asado.
Despu6s que d6 vuelta e! asado,
cierrre la puerta y empuje START
nuevamenteo (NOTA: El homo
continua cocinando despu_s del
aviso aunque ei asado no se d6
vuelta.)
Despu_s que se llegue a la temperatura
preprogramada para la comida, el homo
avisa con 4 tonos y "END" (FIN) aparece
en el dial.
OPERACION
Corn6CocinarAutom ficamente
EnEl Microondas
Su c6digo para asado autom&tico 6 se usa
para asar lentamente en forma autom_,tica,
Et tiempo total intuluye e! tiempo para subir
la temperatura a 180° F, y mantener esa
temperatura hasta que este hecho. Para
programar un asado lento autom&tico, siga
las instrucciones para programar AUTO
ROAST (ASADO AUTOMATICO).
El dial muestra "COOL" (FRIO} hasta que
la temperatura de la comida llega a 80°F,
entonces cambia para mostrar la
temperatura de la comida hasta 180°R El
homo cambia para matener t80°F hasta
que usted saque la comida y apague el
homo, Si se recomienda revolver, usted
puede reprogramar et homo tocando el
bot6n START nuevamen_e Empuje
CLEAR/OFF despu6s de cocinar,
Usted puede programar el homo para que
cocine 20% menos de tiempo que to que
el c6digo provee normatmente agregando
un 1 despu_s de cualquier cSdigo
autom_tico para cocinar, Usted puede
programar el homo para que cocine 20%
m_s de tiempo que Io que el c6digo
proveefla normalmente agregando un 9
despues de cualquier c6digo automAtico
para cocinar,
1, Empuje el bot(_n AUTO COOK,
2. Empuje el n0mero del c6digo y empuje
1 para ajustar el c6digo para que
cocine 20% menos de tiempo o 9 para
que cocine 20% m_,s de tiempo,
3, Empuje el botbn START
"AUTO" se muestra en el dial, NO ABRA
LA PUERTA hasta que el homo avise,
entonces haga girar el plato 1/2 vuelta si
es necesario Cierre la puerta y empuje
START para terminar de cocinar
I4
• No abra la puerta durante los ciclos
autom_ticos Cuando el horno avisa y la
cuenta del tiempo est,. en el dial, la
puerta se puede abrir para revolver o
hacer girar los alimentos,
,, Haga coincidir el tamaho de la comida
con el tamaSo del contenedor, Llene los
contenedores por !o menos hasta la
mitado
,, La mayoria de las comidas se debedan
cubrir con una tapa o con papel de cera
para prevenir salpicaduras y para
mentener el homo ]impio.
,, Aseg0rese que el contenedor est¢ seco
pot fuera y que el homo este seco por
dentro
• Si la comida necesita cocci6n adicional,
cotOquela nuevamente en el homo y use
el COdigo Autom_tico 1
o Use el control de preferencia "t" o "9"
para ajustar los tiempos de cocci6n para
sa/isfacer su preferencia personal.
o El uso de la funci6n para Cocinar
Autom_ticamente con la parrilla "Double
Duty@" del homo no se recomienda
,, Nunca use cubiertas de pt&stico
apretadas--pueden prevenir que et va-
por escape y causar que los alimentos
se cocinen demasiado o que el
contenedor explore.
• AsegOrese que el exterior del
contenedor y que el interior del homo
est_n secos antes de colocar ta comida '
en el homo, Las gotas de agua que se
transforman en vapor podrian enga_ar al
sensor.
• Revuelva o haga rotar algunos alimentos
despues de los tonos de aviso.
OPERACION
ParriilaDel HomoMicroondas
SEGURIDAD
IMPORTANTE
NO ALMACENE O
COCINE con la parrilla en el
fondo del homo, El producto se
podria da_ar.
Use agarraderas cuando tome la
parrilla de metal y los utensilos.
PODRIAN ESTAR CALIENTES.
NO almacene el plato para dorar
del microondas sobre la parrilla
de metal.
E! uso de ia parrilla no es
recomendado para cocinar en
Para colocar ta parrilla de! homo
microondas, levante levemente ]a parte de
atr&s y ponga tas guias de soporte de la
parrilla sobre las galas de soporte
ubicadas sobre cada lado en la parte pos-
terior del homo
Luego, baje el frente hasta que las guias
de soporte de la parrilla catcen sobre las
guias de soporte ubicadas en cada lado
del frente del horno.
Cuando est_ cotocada correctamente, la
parritla debe estar bien aiustada en su
lugar, debe estar nivelada y no debe tocar
la pared trasera del homo
Si se producen arcos e!_ctricos cuando
use la parrilla, apague el homo.
AsegQrese que la parrilta est_ colocada
con el lado correcto hacia arriba sobre los
cuatro soportes y que no est¢ tocando las
paredes del homo.
La parrilta esl_ dise,fiada para agregar
capacidad para calen_.ar y reca;entar en
su homo microondas M&s de una comida
puede ser calentada o recalentada para
set servidas a la misma vez
Cuando use el rnicroondas con la parrilla,
es importante colocar los alimentos
correctamente. El tama¢,o de los utensilios
es importante. AsegOrese que los
utensitios quepan bien juntos sobre o bajo
la parrifla, El tamafio de la comida tiene
que ser considerado; los alimentos de
m_s de 4" de alto o 3 1/2 tbs, no son
recomendados para ser cocinados en la
parritla.
Lo batidos y alimentos de masa y tambi_n
los alimentos sin cocinar que son
preparados a mano debedan ser
cocinados sin la parrilla del homo
siguiendo las direcciones de la receta
Use agarraderas para tomar los alimentos
que se calientan juntos sobre la parrilla,
especialmente cuando cocine cantidades
grandes de comida. La cantidad adicional
de vapor generada pot la cocciOn de
comidas mQltiples podria causar que los
utensilios se calienten m,_s que con una
coccidn a microondas normal.
Consejos Para Recalentar
Diferentes Tipos De Comida
Cuando catiente juntos diferentes tipos de
comida, los atimentos que se deberian
servir caliente deben ser colocados en el
fondo del homo, mientras que ]as comidas
que deben estar s01o tibias debedan
cotocarse sobre la parriila La energta
microondas entra por el rondo del homo
solamenteo Es importante recordar que los
atimentos absorben la energia de
microondas en diferentes proporciones,
Usted podria tener que empezar a
calentar las cantidades de comidas m_s
grandes o m,_s densas unos pocos
minutos antes que las comidas m,_s
pequefias o menos densas Cambie de
posiciOn y haga rotar los alimentos como
se describe arriba
15
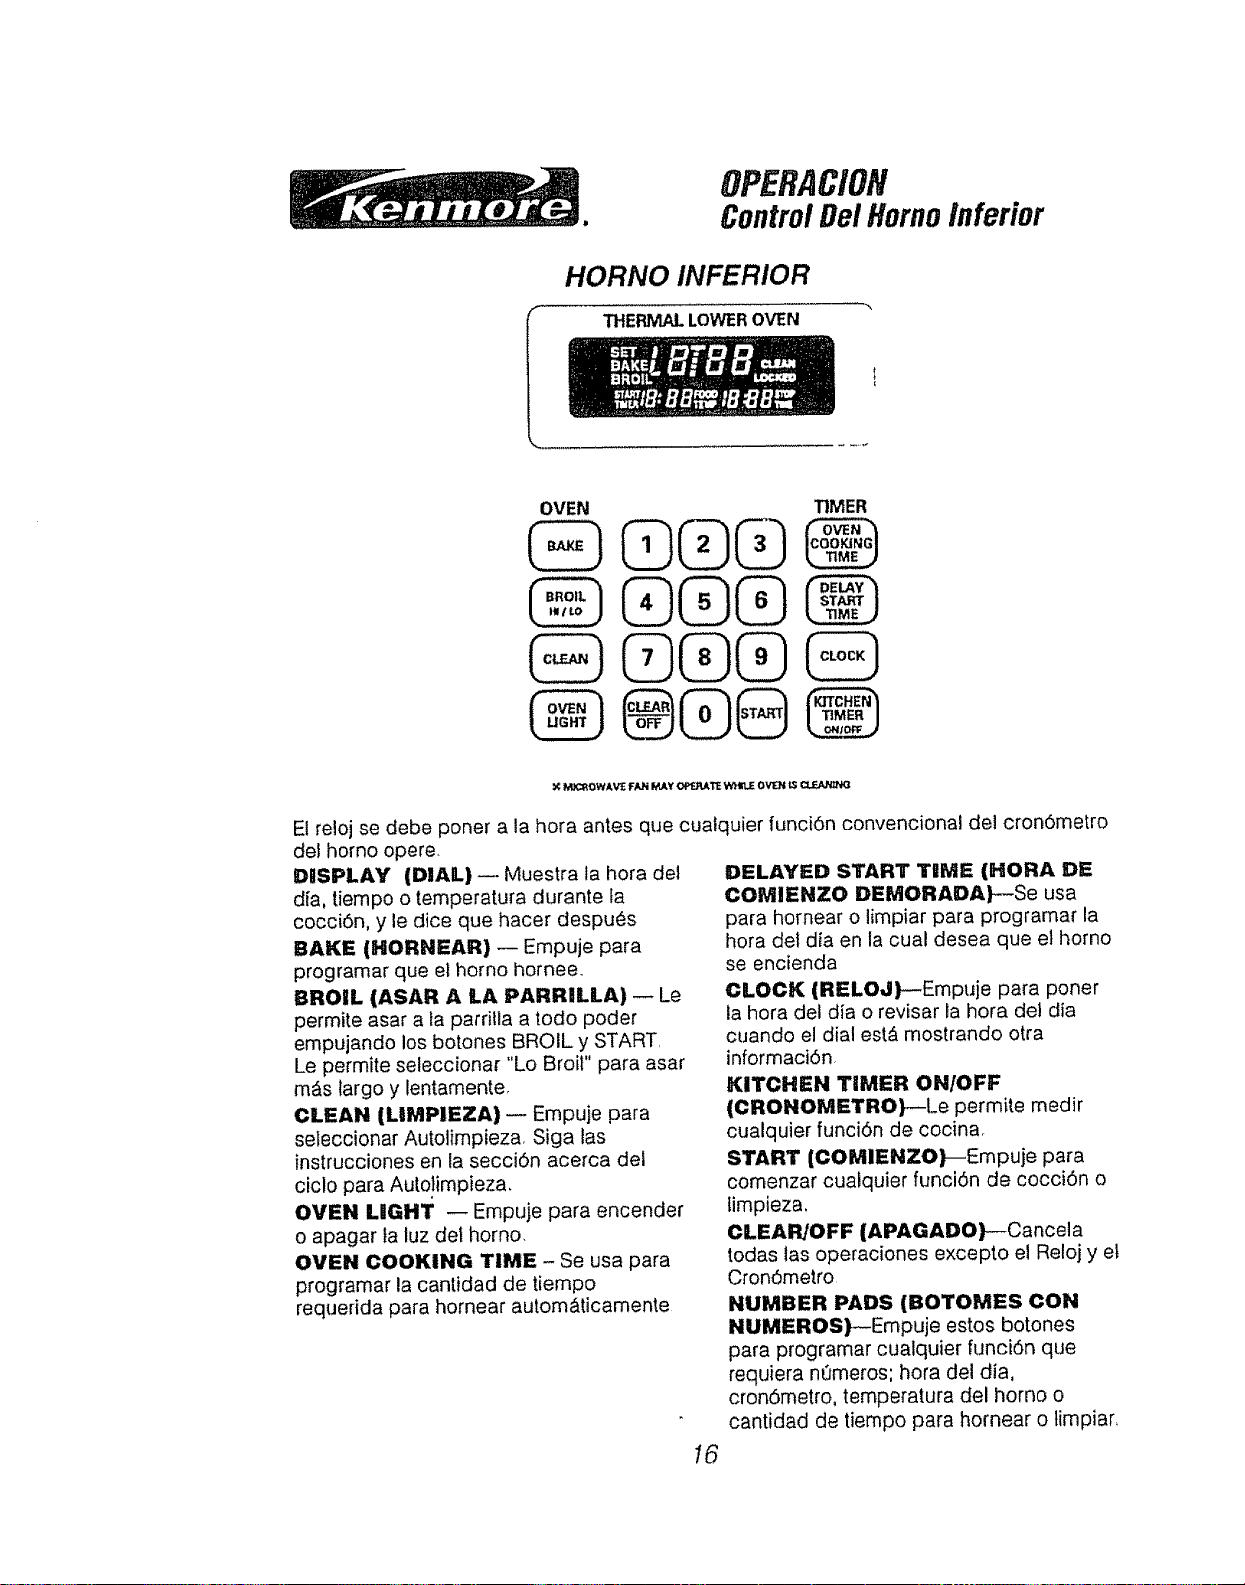
OPERACION
ControlDel HomoInferior
HORNO INFERIOR
I
THE
, • i
OVEN TIMER
QQQ
Q®G
@®@@
_. M,X_OWAVlE F/_i MAt OPC-F_TE'¢t_,t_EOV'_N tS CL.F..AJ'_;NG
El reloj se debe poner a la hora antes que cualquier funci6n convencional de! cron6metro
def homo opere,
DISPLAY (DIAL) -- Muestra ia hora del
dfa, tiempo o temperatura durante la
cocci6n, y le dice que hacer despu6s
BAKE (HORNEAR) -- Empuje para
programar que el homo hornee.
BROIL (ASAR A LA PARRILLA) -- Le
permite asar a la parritla a todD poder
empujando los botones BROIL y START,
Le permite seleccionar "Lo Broil" para asar
m_s largo y Jentamente,
CLEAN (LIMPIEZA) -- Empuje para
seleccionar Autolimpieza, Siga las
instrucciones en la secciOn acerca del
ciclo para Auto!impieza.
OVEN LIGHT -- Empuje para encender
o apagar la luz del homo.
OVEN COOKING TIME - Se usa para
programar la cantidad de tiempo
requerida para homear aulom4ticamente
I6
DELAYED START TIME (HORA DE
COMIENZO DEMORADA}--Se usa
para hornear o limpiar para programar la
hora det dia en la cual desea que el homo
se encienda
CLOCK (RELOJ)--Empuje para poner
la hora del dia o revisar la hora del dia
cuando el dial est_ mostrando otra
informaci6n,
KITCHEN TIMER ONIOFF
(CRONOMETRO)--Le permite medir
cualquier funci6n de cocinao
START (COMIENZO)_Empuje para
comenzar cualquier funci6n de cocci6n o
timpieza.
CLEAR/OFF {APAGADO}--Cancela
todas las operaciones excepto el Reloj y et
Cron0rnetro
NUMBER PADS (BOTOMES CON
NUMEROS)--Empuje estos botones
para programar cualquier funci6n que
requiera nt_meros; hora del dia,
cron6metro, temperatura del homo o
cantidad de tiempo para homear o timpiar,
OPERACION
Relojy Cron6metroDeLa
Cocina
Para cambiar la hora del dia, todos los
controles del homo inferior deben estar
apagados.
Cuando la electricidad es conectada por
primera vez a su homo, o despu6s de un
corte de corriente, los diales digitales del
control del microondas y del homo inferior
encender,tn los nQmeros 8 y 18 y todas las
funciones del homo pot unos 15 segundos.
Luego, todas las tuces se apagan y "RE-
SET" y "PF" aparecen en dial inferior, (El
Reloj debe ponerse a la hora antes
que e! control dol horno inferior
pueda funcionar).
1. Empuje el boron CLOCK
(RELOJ)
2, Empuje los botones con los
nt]meros para poner ta hora
de} dfa,
3. Empuje el bot6n START
(COMIENZO)
Para ver la hora del dfa cuando el dial est_
mostrando otra informaci6n, empuje el
bol6n CLOCK (RELOJ) La hora del dfa
se mostrar& mientras el bot6n Clock se
mantenga presionado.
El cron6metro se puede programar hasta
11 horas y 59 minutos. El cron6metro
cuenta en minutos hasta que llega al t]ltimo
minuto, entonces se muestran los
segundos. Cuando el cron0metro Ilega a
cero, "TIMER" pestaSea en el dial.
La cantidad de tiempo m_s pequeSa que
puede programar es 1 minuto.
El cron6metro no controla las
operaciones del horno. E! bot(_n
CLEAR/OFF no cancelar_ el
cron6metro.
1. Empuje el bot6n TIMER
ON/OFF
2, Empuje los botones con los
n0meros para programar la
(_ cantidad de tiempo que
necesita,
3, Empuje el bot6n START
Si usted hace un error mientras programa
o desea cambiar la cantidad de liempo,
empuje el bot6n TIMER ONIOFF dos
veces para reprogramar el cron6metro,
El cronSmetro empezar_, a contar
inmediatamenteo DespuL, s que pase I
minuto, el dial cambiar& Cuando la cuenta
est6 completa, el control har_ sonar 4
tonos y el dial pestar_ear_., Empuje el bot6n
TIMER para cancelar,
Para cancelar el cron6metro en cualquier
momento, empuje e! botSn TIMER
Cuando pone el dial en blanco, el Reloj
mantendr& Ia correcta hora del dia.
Reaparecer_ por la duraci6n de cualquier
funci6n que muestra una hora de comienzo
y una hora de paro..
1. Empuje y sujete, a la misma vez, los
botones CLOCK y STOP TIME
hasta que et dial se pone en b]anco.
Para hacer que la hora del dfa reaparezca,
empuje el bot<SnCLOCK
17
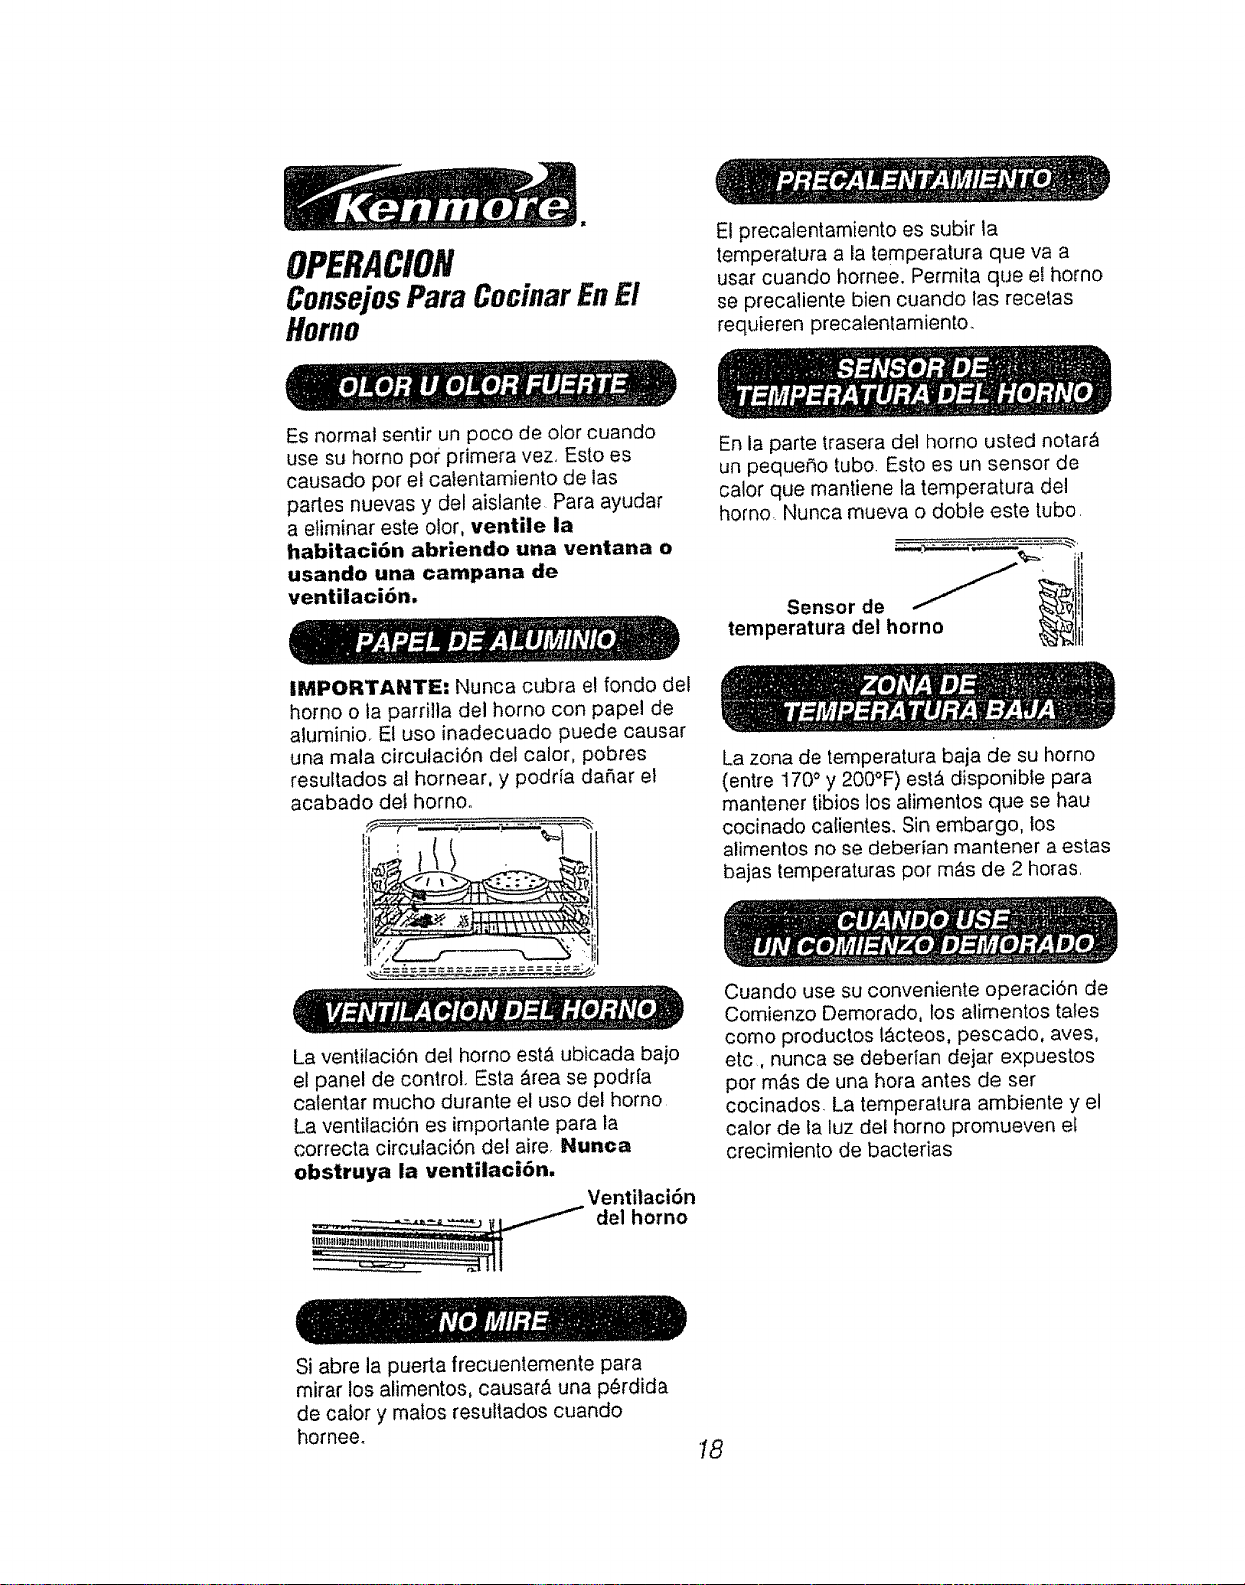
OPERACION
ConsejosPara CocinarEnEl
Homo
El precalentamiento es subir la
temperatura a la temperatura que vaa
usar cuando hornee. Permita que el homo
se precaliente bien cuando las recetas
requieren precalentamiento.
Es normal sentir un poco de olor cuando
use su homo pot: primera vez, Esto es
causado por el catentamiento de las
partes nuevas y del aislante Para ayudar
a eliminar este olor, ventile la
habitaci6n abriendo una ventana o
usando una campana de
ventilaci6n.
IMPORTANTE: Nunca cubra el fondo del
homo o ta parri]ta del homo con papel de
aluminio_ El uso inadecuado puede causar
una main circulaci6n del calor, pobres
resultados al hornear, y podria daSar el
acabado det homo°
LI t t" "
La ventilaci6n del homo est& ubicada bajo
el panel de control. Esta &tea se podrla
calentar mucho durante el uso det homo
La ventilaci6n es importante para la
correcta circulaciOn del aire, Nunca
obstruya la ventilaci6n,
En la parte trasera del horno usted notar_
un peque_o tubo. Esto es un sensor de
calor que mantiene la temperatura del
homo. Nunca mueva o doble este tubo.
iil
,omporo,..o 1;i
La zona de temperatura baja de su homo
(entre 170° y 200°F) esl_ dfsponible para
mantener tibios los alimentos que se hau
cocinado calientes, Sin embargo, los
alimentos no se deberian mantener a estas
bajas temperaturas por m_s de 2 horns,
Cuando use su conveniente operaci6n de
Comienzo Demorado, los alimentos tales
como productos I_,cteos, pescado, ayes,
etc, nunca se deberian dejar expuestos
pot m_s de una hora antes de ser
cocinados, La temperatura ambiente y el
calor de la luz del homo promueven el
crecimiento de bacterias
Si abre la puerta frecuentemente para
mirar los alimentos, causar& una p6rdida
de calory matos resuttados cuando
hornee.
18
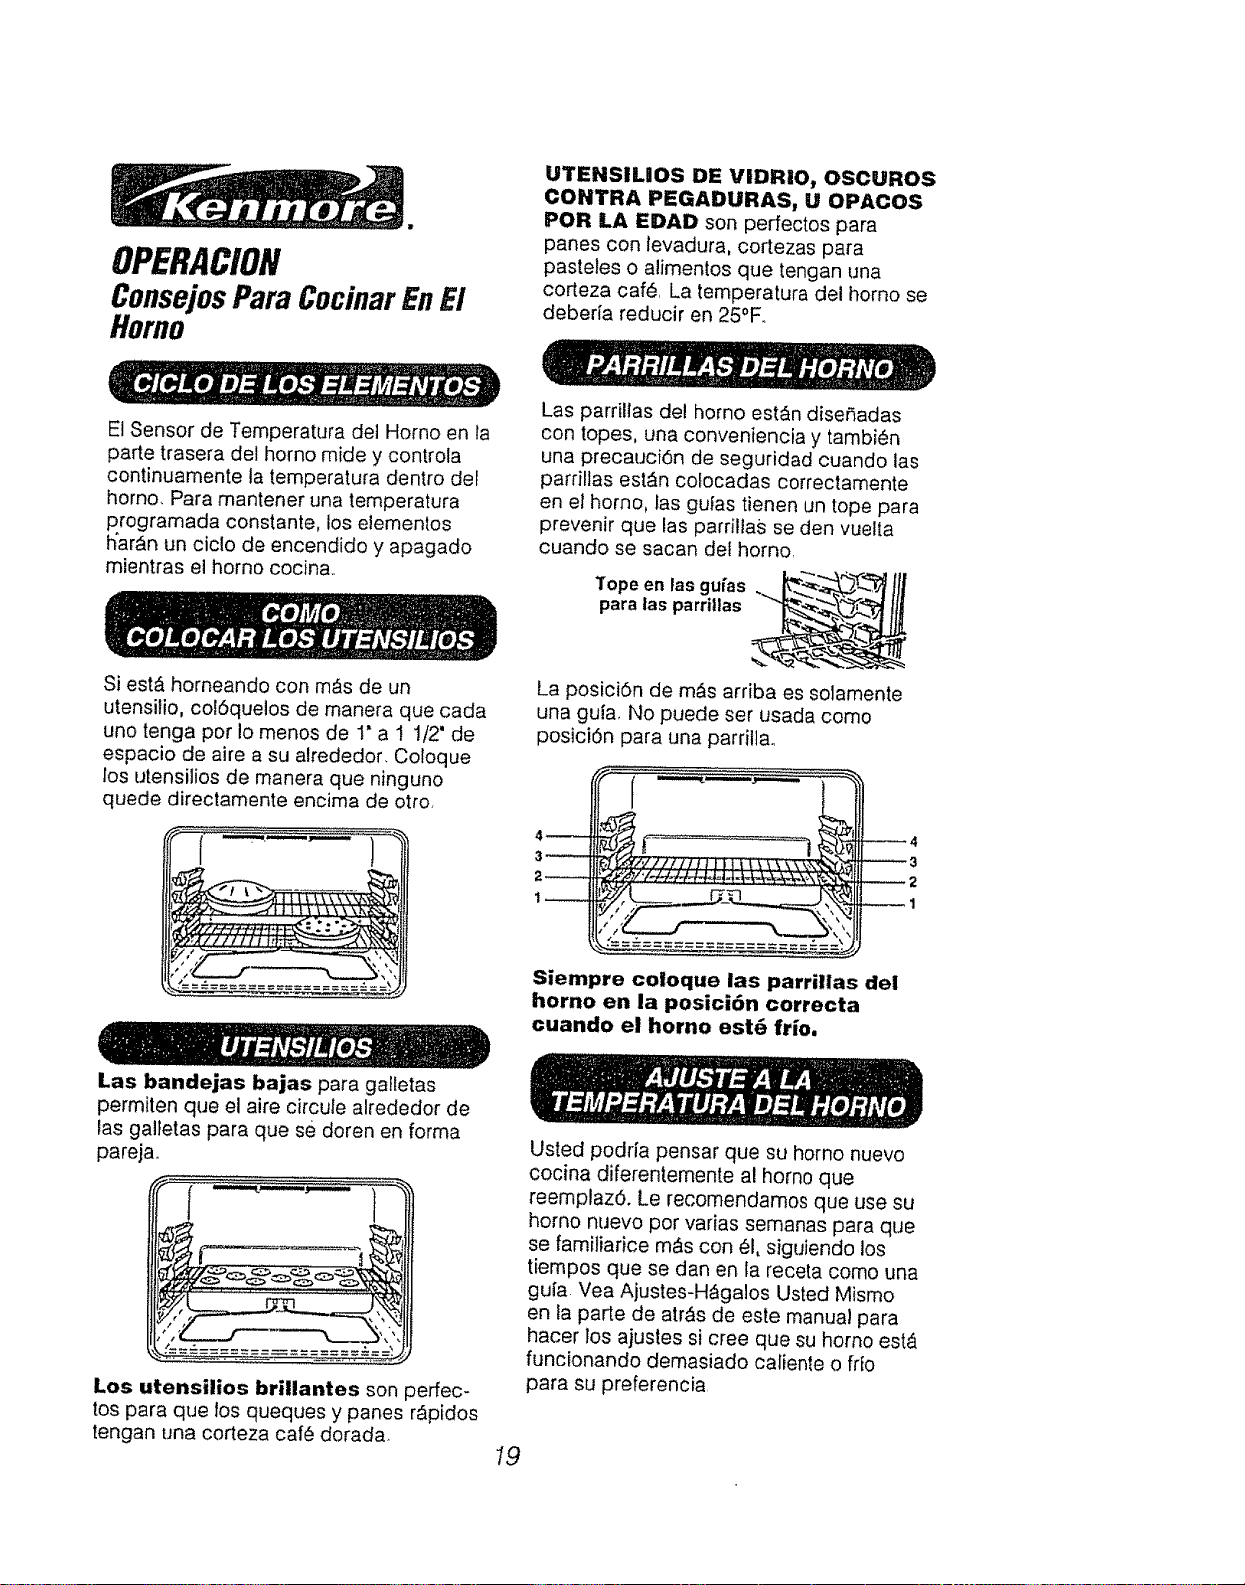
OPERATION
ConsejosPara CocinarEn El
Homo
UTENSILeOS DE VIDRIO, OSCUROS
CONTRA PEGADURAS, U OPACOS
POR LA EDAD son pedectos para
panes con levadura, cortezas para
pasteles o alimentos que tengan una
corteza caf_.. La temperatura del homo se
debeda reducir en 25°R
El Sensor de Temperatura del Homo en la
parte trasera del homo mide y controla
continuamente la temperatura dentro del
homo. Para mantener una temperatura
rogramada constante, los elementos
ar&n un ciclo de encendido y apagado
mientras el homo cocina.
Las parri!las del homo est&n diseLSadas
con topes, una conveniencia y tambien
una precauci6n de seguridad cuando las
parrillas est&n colocadas correctamente
en el homo, las gulas tienen un tope para
prevenir que las pafrillas se den vuelta
cuando se sacan del homo,
3"ope en las gu[as
para las parrillas
Si est& horneando con m,Csde un
utensilio, col6quelos de manera que cada
uno tenga por io menos de 1" a 1 1/2" de
espacio de aire a su alrededor, Coloque
los utensilios de manera que ninguno
quede directamente encima de otto,
La posici6n de m_ts arriba es solamente
una gula, No puede ser usada come
posici6n para una parrilla.
4_
3
2_
Siempre coloque las parrillas del
horno en la posici6n correcta
cuando el homo est6 frio.
Las bandejas bajas para galletas
permiten que el aire circule alrededor de
las galtetas para que se doren en forma
pareja.
Los utensilios brillantes son perfec-
tos para que los queques y panes r_pidos
tengan una corteza caf6 dorada
Usted podria pensar que su homo nuevo
cocina diferentemente al homo que
reemplaz6. Le recomendamos que use su
homo nuevo pot varias semanas para que
se familiarice m_s con _1,siguiendo los
tiempos que se dan en la receta como una
guia Vea Ajustes-H&galos Usted Mismo
en la parte de atr&s de este manual para
hacer los ajustes si cree que su homo est,.
funcionando demasiado caliente o fifo
para su preferencia.
19

OPERACION
CSmoHornear
1, Empuje el botdn BAKE
2. Empuje los botones con los
nQmeros para seteccionar
la temperatura que prefiere
usar,
3. Empuje el bot6n START
El dial muestra "BAKE" y "TEMP", la
temperatura programada en el homo y la
temperatura actual del homo mienlras el
homo se calient& Cuando se ilega a ta
temperatura programada, el control hace
sonar 6 tonos y "PrE" pestahea en et dial.
El dial entonces muestra la temperatura
prograrnada continuamente.
Para que el homo cocine por un Iiempo
especifico y entre HOLD MODE (MODULO
DE MANTENClON) autom&ticamente al fi-
nal del tiempo de coccidn
il. Empuje el botdn BAKE.
2. Empuje los nQmeros para
seleccionar la temperatura
que prefiere usar.,
3. Empuje el bot6n OVEN
COOKmNG T|ME.
4. Empuje los n_meros
para programar la
cantidad de tiempo en
que prefiere que los
alimentos se cocinen,
5, Empuje et bot6n START
Cuando el tiempo de cocci6n termina, el
homo entra el m6duto HOLD MODE
Empuje CLEAR/OFF cuando saque la
comida del homo,
C6mo programar para que el homo
comience en lorma demorada, cocine por
una cantidad de liempo especifica y se
apague autom_ticamente,
1. Empuje el bot6n BAKE
2. Empuje los ntimeros para
programar la temperatura
que desea usar
3, Empuje et bot6n OVEN
COOKING TIME.
4. Empuje los ne3meros para
programar la cantidad de
tiempo en que prefiere que
los alimentos se cocinen
5. Empuje et botdn DELAYSTART TIME.
6. Empuje las flechas UP o
DOWN para programar la
hora de! d[a en que desea
que et homo se sobre.
7. Empuje el botdn START
Si el control muestra "Err" y su
hora de paro y comienzo, los
tiempos que se programaron no
son compatibles. Si esto sucede,
empuje el bot6n oven cooking time
o delay start time para
reprogramar los tiempos,
Cuando se ilega a la hora de parada, el
homo aulom_ticamente entra el MODULO
DE MANTENCION (HOLD MODE),
Empuje el botdn CLEAR/OFF cuando
saque la eomida del homo.
20
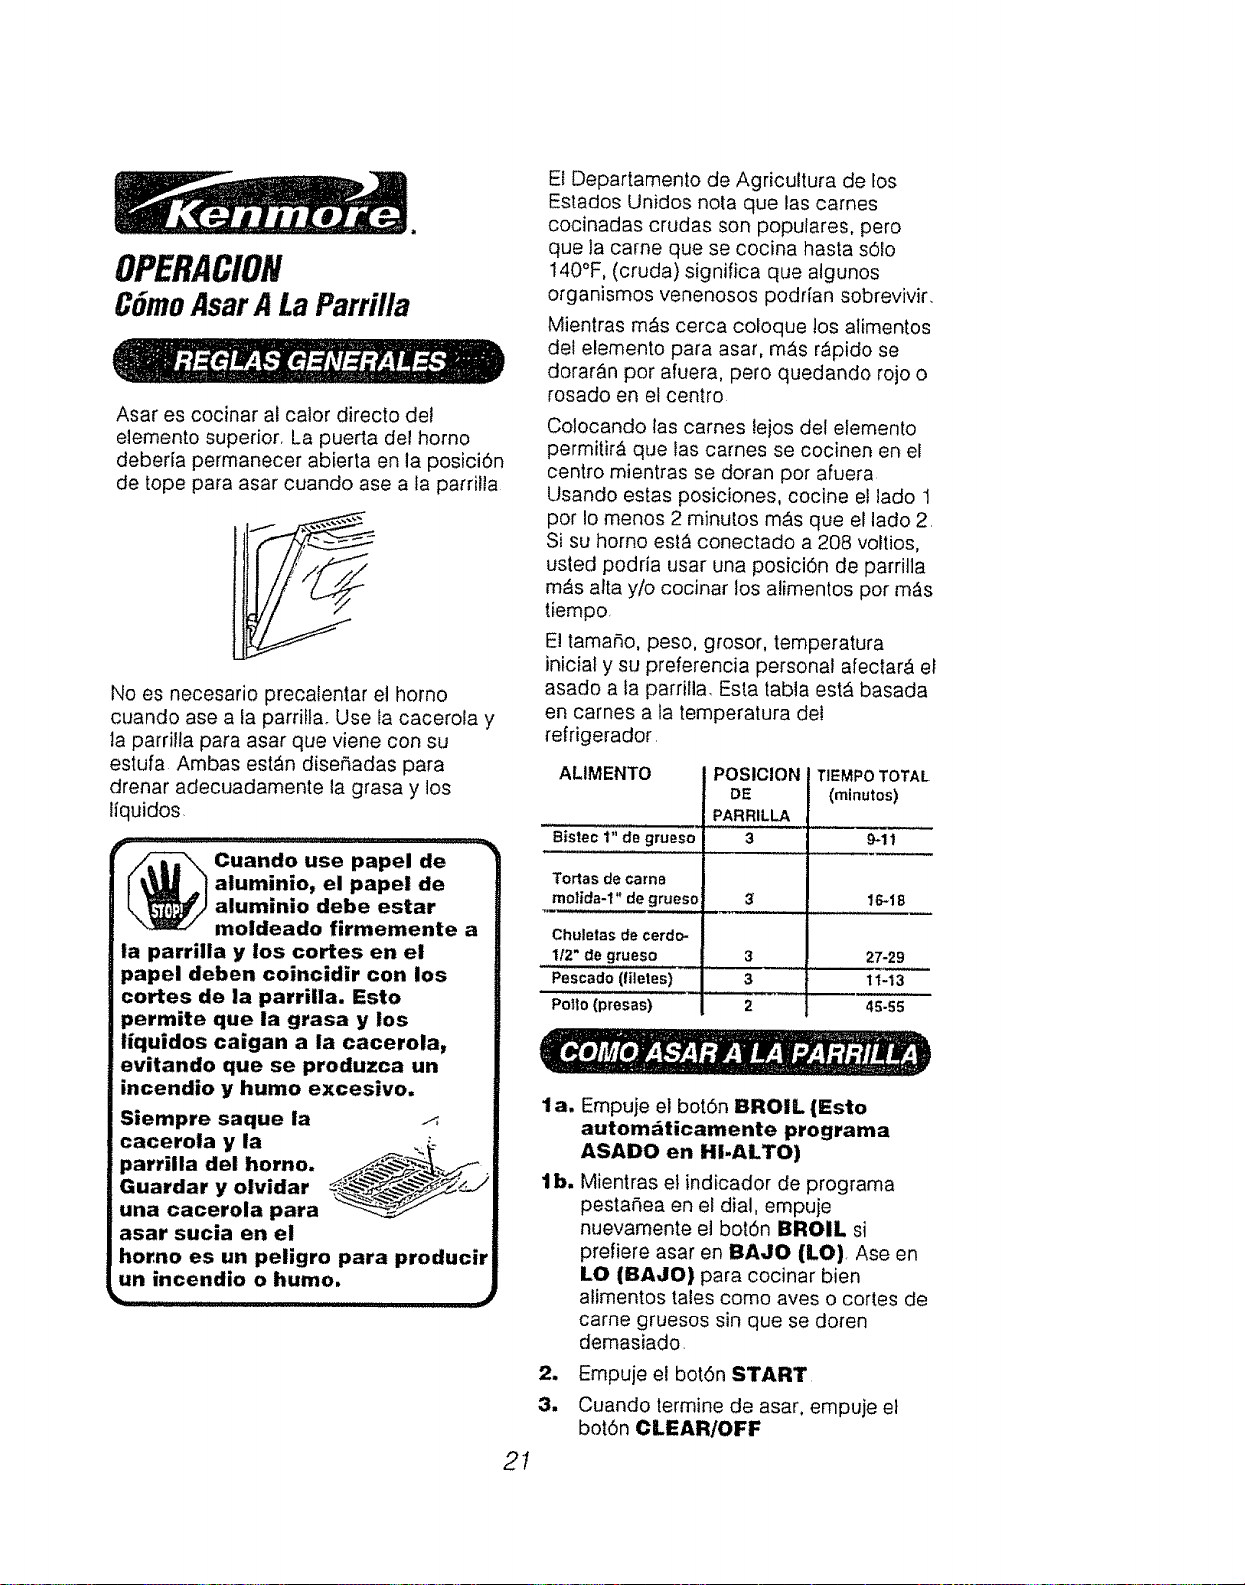
OPERACiON
CSmoAsarA LaParrilla
Asar es cocinar al calor directo del
elemento superior, La puerta del homo
deberia permanecer abierta en la posiciOn
de tope para asar cuando ase a fa parrilla
No es necesario precalentar el homo
cuando ase a la parriftao Use fa cacerola y
ta parrilla para asar que viene con su
estufa Ambas est_n disefiadas para
drenar adecuadamente la grasa y los
liquidos,
__ _=: ===================== ......'''" -',1
L/i_'i\,, Cuando use papel de
i ./al...!.!o, e,papelde
_, _Jt'_) alumlmo debe estar
\_rJ moldeado firmemente a
la parrilla y los cortes en el
papel deben coincidir con los
certes de la parrilla. Esto
permite que la grasa y los
liquidos caigan a la cacerola,
evitando que se produzca un
incendio y humo excesivo.
Siempre saque la
cacerola y la
parrilla del homo.
Guardar y olvidar
una cacerola para
asar sucia en el
homo es un peligro para producir
un incendio o humo.
21
El Departamento de Agricultura de los
Estados Unidos nota que las carnes
cocinadas crudas son populares, pero
que la came que se cocina hasta s0lo
140°F, (cruda) significa que algunos
organismos venenosos podrian sobrevivir,
Mientras m_s cerca coloque !os alimentos
del elemento para asar, mAs r&pido se
dorar_n por afuera, pero quedando rojo o
rosado en el centro
Colocando las carnes lejos det elemento
permitir& que las carnes se cocinen en el
centro mientras se doran pot afuera
Usando estas posiciones, cocine el lado 1
por !o menos 2 minutos m&s que el lado 2,
Si su homo est_ conectado a 208 voltios,
usted podria usar una posiciOn de parrilla
m_s alia y/o cocinar los alimentos por m&s
tiempo,
El tamaOo, peso, grosor, temperatura
inicial y su preferencia personal afectar& el
asado a la parrilla, Esta labia est,, basada
en carnes a la temperatura de!
refrigerador,
ALIMENTO
POSIOION
DE
TIEMPO TOTAL
(minutos)
PARRILLA
8iste: 1" de grueso 3 9.11
Tortas de came
mofida-l" de grueso 3 16,18
Chuletas de cerdo-
1/2" de grueso 3 27-29
Pescado (filetes) 3 t 1-13
Porto (presas) 2 45-55
la,
lb.
2_
3.
Empuje el boron BROIL (Esto
autom;_ticamente programa
ASADO en HI-ALTO)
Mientras el indicador de programa
pestaOea en el dial, empuje
nuevamente el boron BROIL si
prefiere asar en BAJO (LO) Ase en
LO (BAJO) para cocinar bien
alimentos tales como ayes o cortes de
came gruesos sin que se doren
demasiado,
Empuje el boron START
Cuando termine de asar, empuje et
boron CLEAR/OFF
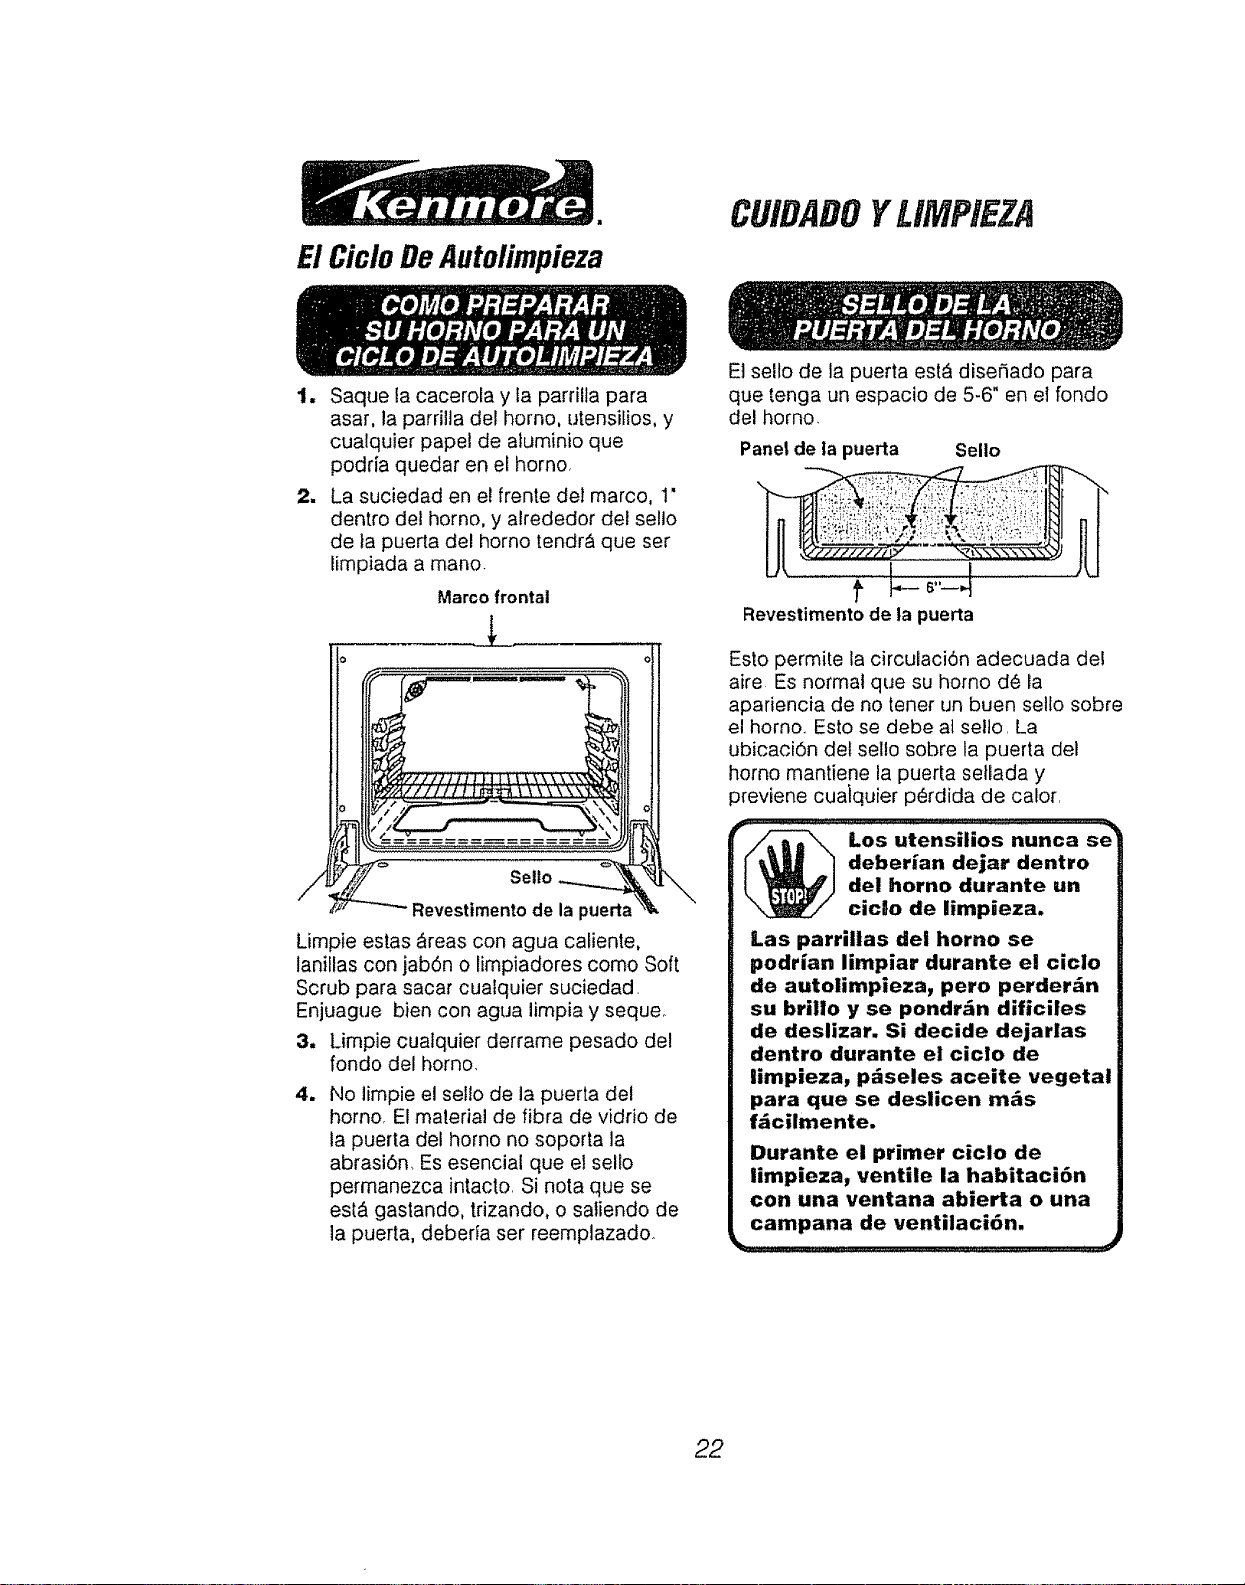
El CicloDe Autolimpieza
CUIDADOYLIMPIEZA
tl
=
Saque la cacerola y la parrilta para
asar, la parrilla del horno, utensilios, y
cualquier papel de aluminio que
podria quedar en el homo,
La suciedad en el frente del marco, 1'
dentro del homo, y alrededor del sello
de ta puerta del homo tendr_, que set
Iimpiada a mano
Marco frontal
Sello
Revestimentode la puerta
Limpie estas &teas con agua caliente,
lanillas con jab6n o limpiadores como Soft
Scrub para sacar cualquier suciedad
Enjuague bien con agua limpia y seque_
3, Limpie cuatquier derrame pesado del
rondo del homo,
m
No limpie el sel!o de la puerta del
homo, El material de libra de vidrio de
la puerta del homo no soporta la
abrasiSn, Es esencial que el sello
permanezca intacto Si nota que se
est& gastando, trizando, o saliendo de
la puerta, deberla ser reemplazado_
El sello de la puerta est& diseSado para
que tenga un espacio de 5-6" en el fondo
clel homo,
Panel de Ia puerta Sello
f 1-'-6" q
Revestimento de ta puerta
Esto permite la circulaci6n adecuada del
aire Es normal que su homo de la
apariencia de no tenet un buen setlo sobre
el homo Esto se debe al selto La
ubicaci6n del sel!o sobre la puerta del
homo mantiene ia puerta seliada y
]reviene cualquier p6rdida de calor
-Los-uten---sii--ios-nunca se_
deberian dejar dentro
del homo durante un
cicto de limpieza.
Las parriltas del horno se
podrian limpiar durante el ciclo
de autolimpieza, pete perder_n
su brillo y se pondr_n dificiles
de deslizar. Si decide dejarlas
dentro durante el ciclo de
limpieza, p_seles aceite vegetal
para que se deslicen mrs
f_cilmente.
Durante el primer ciclo de
limpieza, ventile la habitaci6n
con una ventana abierta o una
campana de ventilaci6n.
kL............................................................................
22
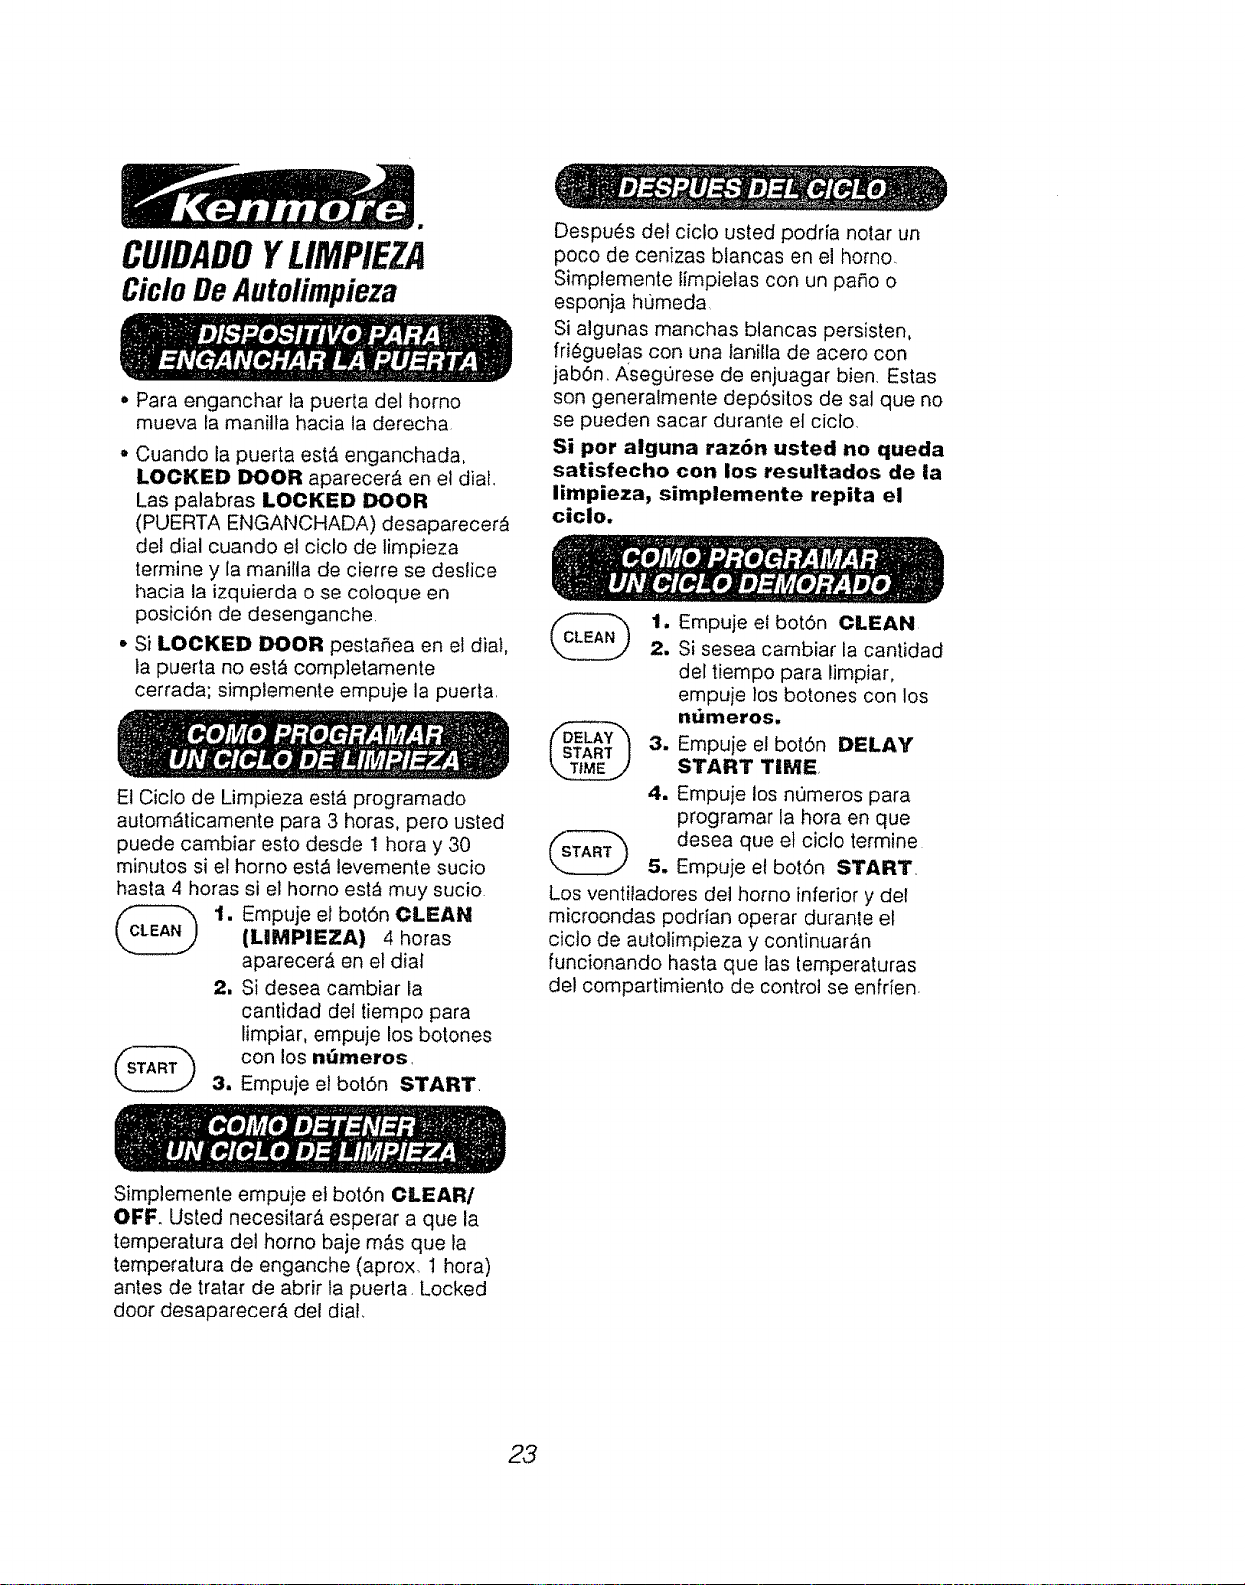
CUIDADOYLIMPIEZA
CicloDe Autolimpieza
, Para enganchar la puerta del homo
mueva la manilla hacia la derecha
,, Cuando la puerta est& enganchada,
LOCKED DOOR aparecer_ en el dial,
Las palabras LOCKED DOOR
(PUERTA ENGANCHADA) desaparecer,_
del dial cuando el ciclo de limpieza
termine y la manilla de cierre se desfice
hacia la izquierda o se coloque en
posici6n de desenganche
• Si LOCKED DOOR pestafiea en el dial,
la puerta no est_ completamente
cerrada; simplemente empuje la puerta,
El Ciclo de Limpieza est& programado
autom_ticamente para 3 horas, pero usted
puede cambiar esto desde 1 hora y 30
minutos si et homo est,_ levemente sucio
hasta 4 horas si el homo est_ muy sucio
1. Empuje el bot6n CLEAN
(LIMPIEZA) 4 horas
aparecer_ en el dial
2, Si desea cambiar la
cant/dad del tiempo para
limpiar, empuje los botones
con los n,_meros,
3, Empuje el bot6n START,
Despu_s del ciclo usted podria notar un
poco de cenizas btancas en el homo.
Simplemente limpietas con un patio o
esponja humeda
Si algunas manchas blancas persisten,
frieguelas con una lanilla de acero con
jabOn, Asegurese de enjuagar bien Estas
son generalmente dep6sitos de sal que no
se pueden sacar durante el ciclo,
Si por alguna raz6n usted no queda
satisfecho con los resultados de la
limpieza, simplemente repita el
ciclo.
1. Empuje el bot6n CLEAN
2. Si sesea cambiar la cant/dad
del tiempo para limpiar,
empuje los botones con los
numeros,
3. Empuje el bot6n DELAY
START TIME,
4. Empuje los numeros para
programar la hora en que
desea que et ciclo termine
5. Empuje et bot6n START.
Los ventiladores del homo inferior y del
microondas podrian operar duranle et
ciclo de autolimpieza y continuar_n
funcionando hasta que las temperaturas
del compartimiento de control se enfrien
Simplemente empuje el bot6n CLEAR/
OFF Usted necesitar_ esperar a que la
temperatura del homo baje m&s que la
temperatura de enganche (aprox, 1 hora)
antes de tratar de abrir la puerta, Locked
door desaparecer_ del dial,
23
CUIDADOYUMPIEZA
Limpieza
MATERIALES DE LIMPREZA
• PaSo homedo
,, Lanilla para fregar de pl&sfico
,, Detergente liqbido para platos
• Agua tibia
Limpie con un detergente para platos
suave y agua, entonces enjuague bien
con un patio homedo. Si desea, puede
hacer hervir un contenedor con agua en el
homo usando energia de microondas..
Esto ayudar_ a soitar la suciedad Para
suciedad dificil de limpiar, limpie
cuidadosamente con una lanilla para
fregar de pl&stico.
Ho use limpiadores abrasivos que
puedan rayar on dafiar la
superficie.
MATERIALES DE LIMPIEZA
. Lanilla para fregar de nil6n no abrasiva
o Limpiadores no abrasivos
,, Agua tibia
- detergente para pEatos
COMO LIMPIAR
Lave con jaboncillo tibio. Para suciedad
m_s dificil de limpiar, fdegue suavemente
con una laniila de nil(tn y un iimpiador que
no sea abrasivo. Enjuague bien
MATERIALES DE LIMPIEZA
o Patio suave
° Agua tibia
• Detergente para platos
Limpie las salpicaduras o derrames
mientras est&n tibios. Use un detergente
para platos suave y agua tibia, luego
enjuague con agua ]impia, seque con un
patio suave..
MATERIALES DE LIMPIEZA
• Agua tibia
• Patio suave
• Detergente para piatos
Limpie con un detergente para platos
suave y agua tibia Enjuague con agua
limpia y seque con un patio suave,.
MATERIALES DE LIMPIEZA
o Detergente I[quido para ptatos
,, Agua tibia
• Patio suave
No use limpadores abrasivos,
limpiadores industriales, o
blanquedores (cloro).
PARA LIMPIAR
Limpie con agua tibia con fab6n.
Enjuague y seque bien,
MATERIALES DE LIMPIEZA
o Detergente liquido para platos
,, Agua tibia
,, Laniltas de acero con jabdn
* Limpiador comercial para hornos
COMO LIMPIAR
Permita que la cacerola se remoje, Ponga
detergente para platos sobre la parriila y
cubra con un patio o una toalla hOmeda
por un rato, Friegue a medida que sea
necesario, Lave, enjuague, y seque bien,
Usted tambien podria poner la cacerola y
la parritla en la lavadora de platos
24
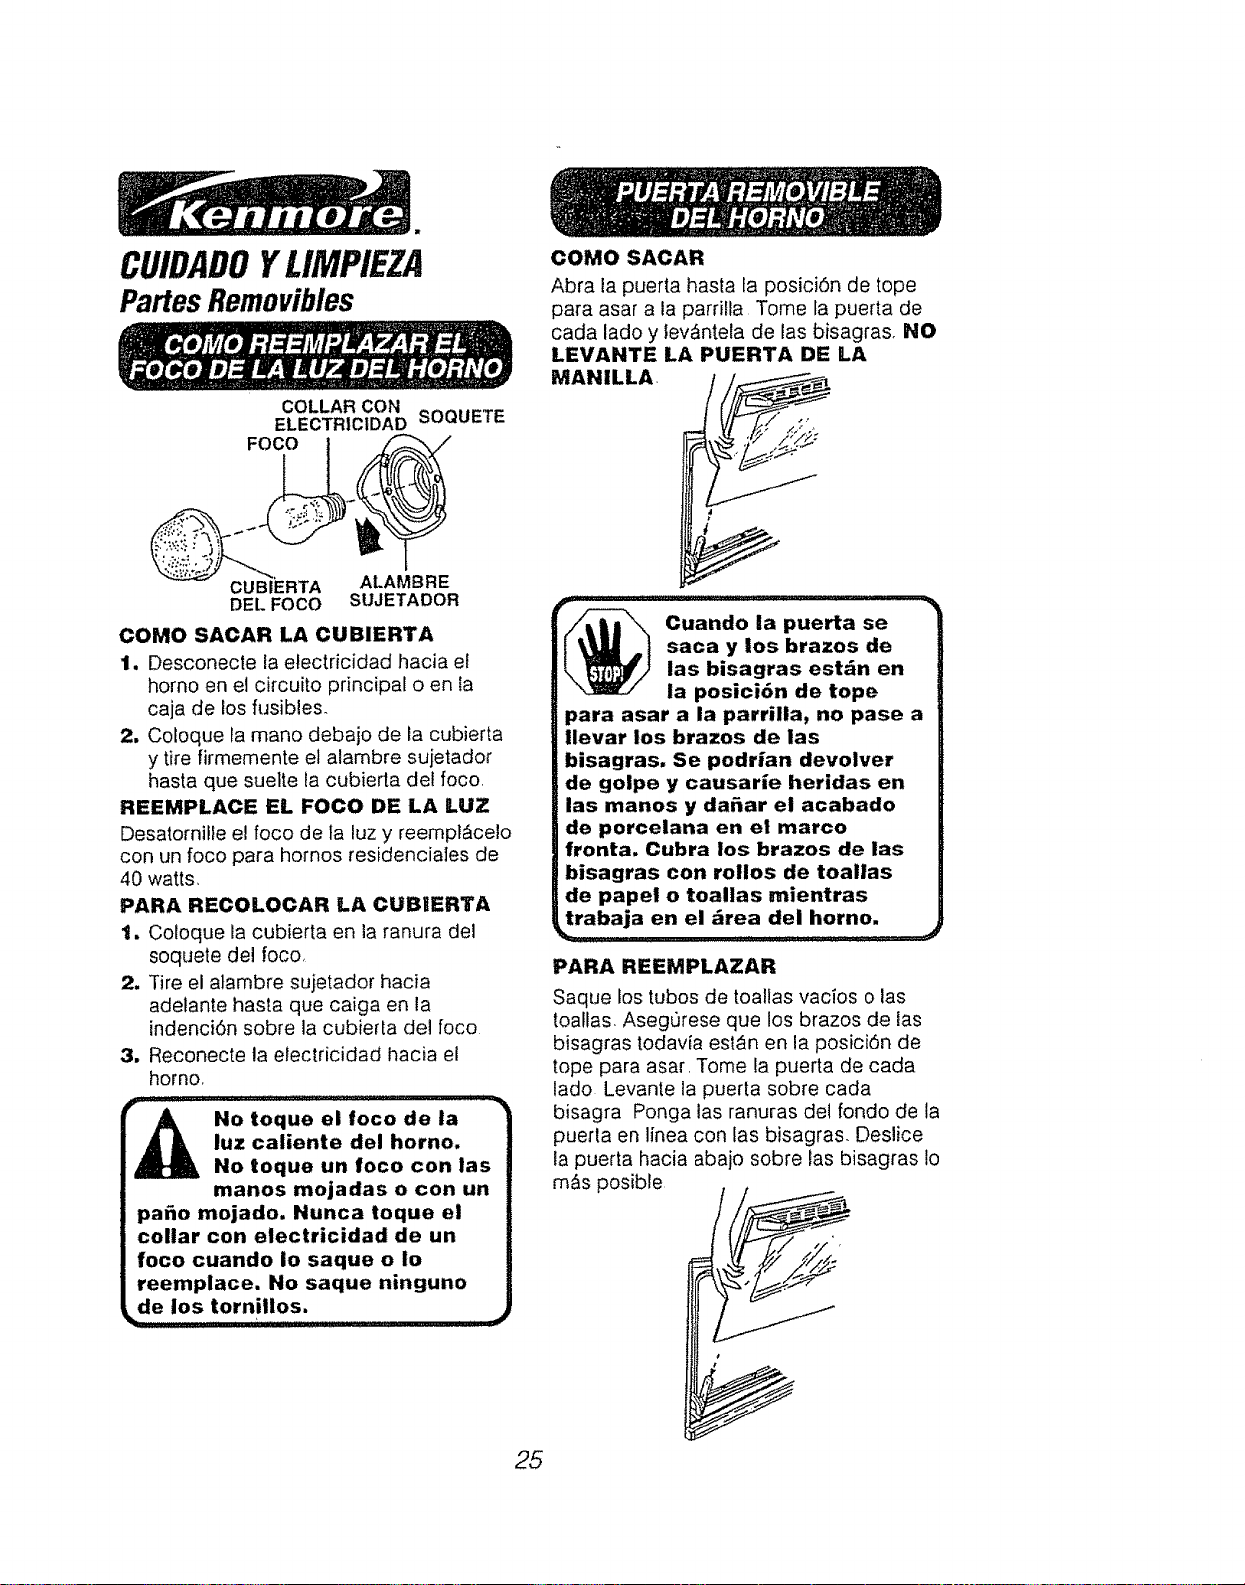
It
CUIDADOYLIMPIEZA
PartesRemovibles
COLLAR CON
ELECTR|CIDAD SOQUETE
FOCO
CUBIERTA ALAMBRE
DEL FOCO SUJETADOR
COMO SACAR LA CUBIERTA
1. Desconecte la etectricidad hacia el
homo en el circuito principal o en ta
caja de los fusibles.
2, Coloque la mano debajo de la cubierta
y tire firmemente et alambre sujetador
hasta que suelte la cubierta del foco
REEMPLACE EL FOCO DE LA LUZ
Desatornille el foco de ia luz y reempl_celo
con un foco para hornos residenciales de
40 watts,
PARA RECOLOCAR LA CUBIERTA
1, Coloque la cubierta en la ranura de]
soquete del foco,
2, Tire el alambre sujetador hacia
adelante hasta que caiga en la
indenci6n sobre la cubierta del foco
3, Reconecte la electricidad hacia el
homo,
p..l' I111,11!1,
_ o toque el foco de ta )
luz caliente del horno,
No toque un foco con las
manos mojadas o con un
pa6o mojado, Nunca toque el
collar con electricidad de un
foco cuando Io saque o io
reemplace, No saque ninguno
"'-'-=a,e,,,,,,ostorn!lies.
COMO SACAR
Abra la puerta hasta la posici6n de tope
para asar a la parritla Tome la puerta de
cada lado y lev;&ntela de las bisagras. NO
LEVANTE LA PUERTA DE LA
MANILLA
w- "q
Cuando la puerta se
saca y los brazos de
las bisagras est_n en
la posici6n de tope
para asar a la parrilla, no pase a
Ilevar los brazes de las
bisagras, Se podrian devolver
de golpe y causarie heridas en
las manes y da6ar el acabado
de porcelana en el marco
fronta, Cubra los brazes de las
bisagras con rollos de toallas
de papel o toallas mientras
trabaja en el &tea del horno.
PARA REEMPLAZAR
Saque los tubos de toallas vacios o las
toallas, AsegOrese que los brazos de las
bisagras todavia esl_n en la posici6n de
tope para asar Tome la puerta de cada
lado Levante la puerta sobre cada
bisagra Ponga las ranuras del fondo de la
puerta en linea con las bisagras. Deslice
la puerta hacia abajo sobre las bisagras Io
m_s posible
//_
J
J
J
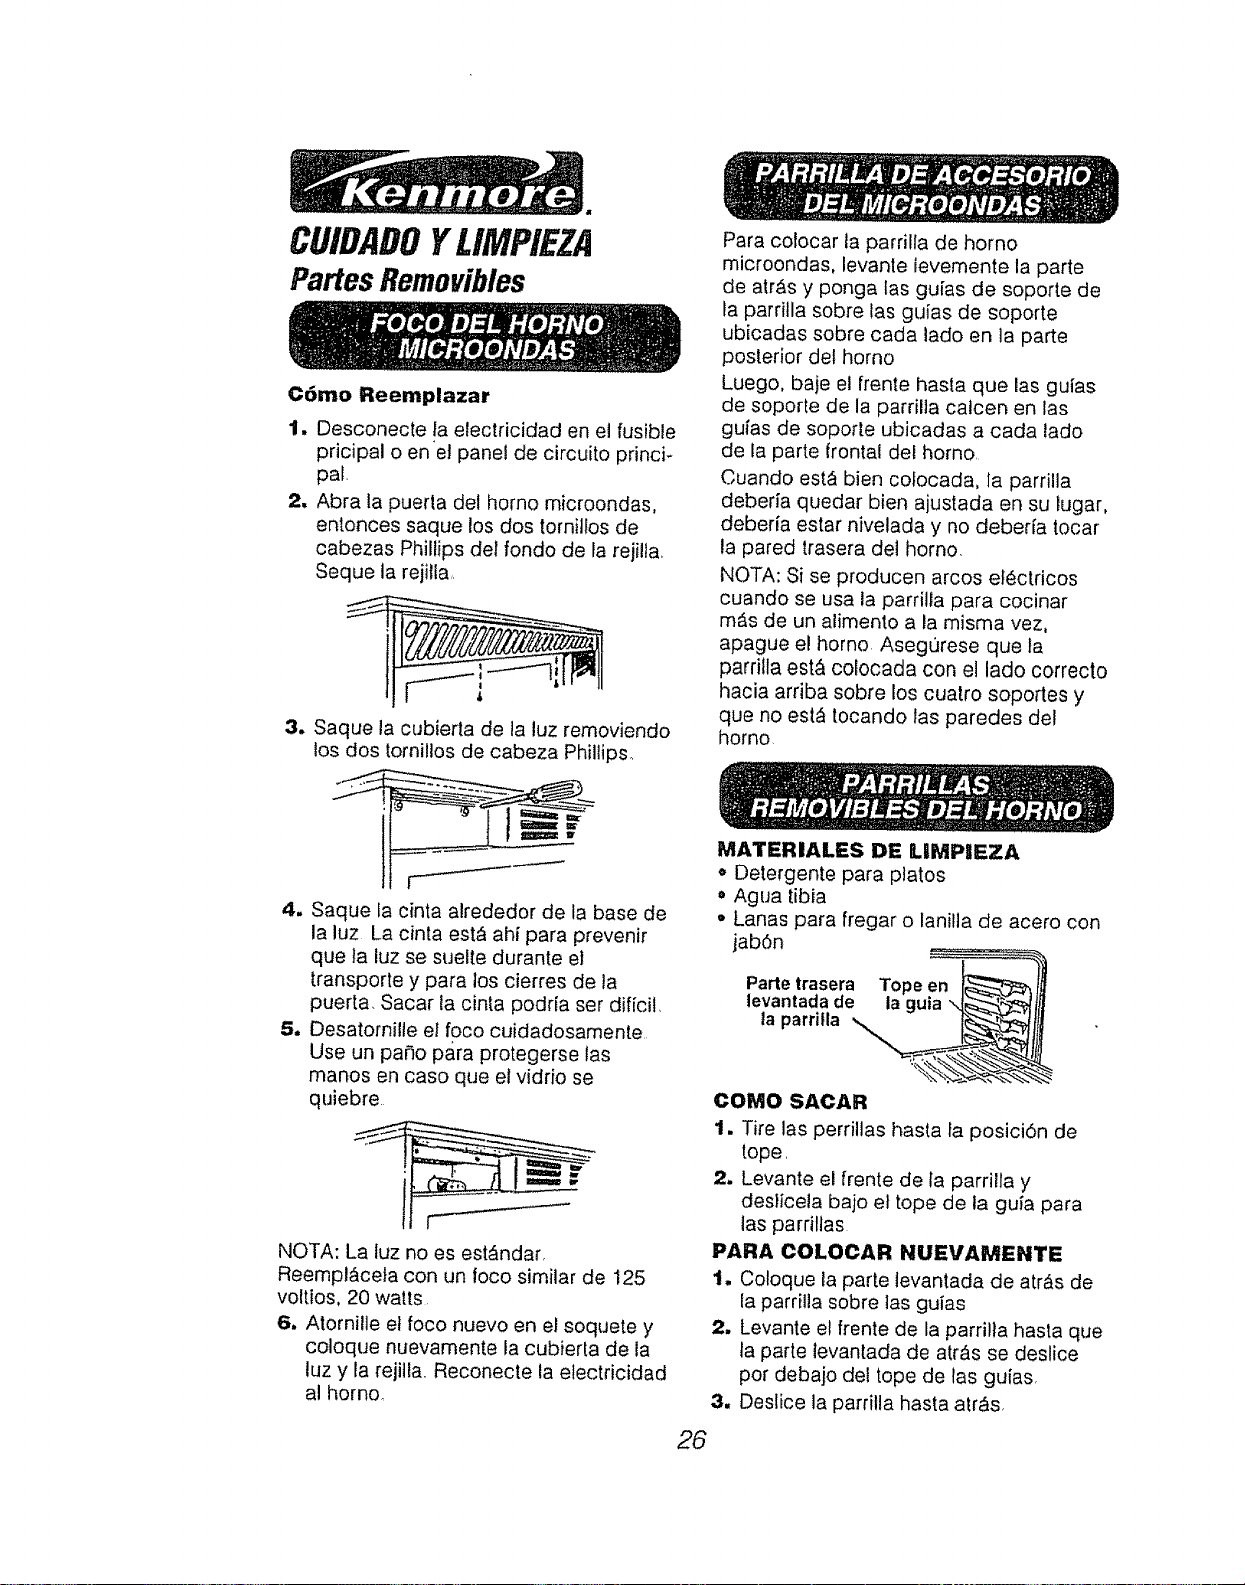
CUIDADOYLIMPIEZA
Partes Removibles
C6mo Reemplazar
1. Desconecte la electricidad en et fusible
pricipal o en'et panel de circuito princi-
pal,
2. Abra la puerta del homo microondas,
entonces saque los dos tornitlosde
cabezas Phillips del rondo de la reji!la,
Seque la rejilla.
3. Saque la cubierta de la luz removiendo
los dos tornillos de cabeza Phillips.
Para colocar la parrilla de homo
microondas, levante levemente la parte
de atr&s y ponga las guias de soporte de
la parritla sobre las guias de soporte
ubicadas sobre cada lado en la parte
posterior del homo
Luego, baje el frente hasta que las guias
de soporte de la parrilla catcen en las
gufas de soporte ubicadas a cada lado
de la parte frontal del homo,
Cuando est& bien colocada, la parrilta
deberia quedar bien ajustada en su lugar,
deberia estar nivelada y no debeda tocar
la pared trasera del homo.
NOTA: Si se producen arcos electricos
cuando se usa la parrilla para cocinar
mAs de un alirnento a la misma vez,
apague el homo Asegurese que la
parrilla est& colocada con el lado correcto
hacia arriba sobre los cuatro soporles y
que no est_ tocando las paredes del
homo.
4. Saque la cinta alrededor de la base de
la luz La cinta est_ ahi para prevenir
que ]a luz se suelte durante et
transporte y para los cierres de ta
puerta. Sacar la cinta podria ser dificit.
5. Desatornille et foco cuidadosamente
Use un paso para protegerse las
manos en caso que el vidfio se
quiebre
NOTA: La luz no es est_ndar,
Reemp!&ceta con un foco similar de 125
voltios, 20 watts.
6, Atornille et foco nuevo en el soquete y
coloque nuevamente la cubierta de la
luz y la rejitla, Reconecte la electricidad
al homo.
MATERIALES DE LIMPmEZA
o Detergente para platos
= Agua tibia
,, Lanas para fregar o lanilla de acero con
jab6n
Parte trasera Tope en
levantada de la guia
la parrifla
26
COMO SACAR
1. Tire las perriltas hasta fa posici6n de
tope,
2. Levante el frente de la parrilla y
deslicela bajo el tope de ta guia para
las parrillas
PARA COLOCAR NUEVAMENTE
1. Coloque la parte levantada de arras de
la parrilla sobre las guias
2. Levante el frente de la parrilla hasta que
ta parte levantada de atr_s se deslice
pot debajo del tope de tas guias
3. Deslice la parrilla hasta atr_s,
ANTESDEL MAR PARAUN
SERVICIO
Para ahorrar tiempo y dinero, antes de Itamar para un servicio, revise ta !ista de m_s abajo
para cualquier problema que usted crea que tiene con et funcionamiento de su estufa St
el problema es algo que usted no puede reparar, use los Nt)meros de Servtcio para e!
Consumidor que se encuenlran al final de este manual. Cuendo hege un Ilemado,
tenga dlsponlble el nQmero de modelo, I|ste de partes para repereciones,
manual de uso y culdedo y la lethe de cornprao
PROBLEMA POSIBLE CAUSA POSIBLE SOLUCIOH
El dial del control Mat funcionamiento de la
pestetiea une "F" estufa.
segulde pot un nQmero
o letra.
El homo y los No pasa
controlos del homo no electricidad a ta
funclonan, estufa.
Empuje el bot6n CLEAR!OFF,
Permita que la estufa se
enfrle pot una hora y ponga
nuevamente el homo en
funclonamiento. Si el
problema se repite, Ilame
para un servicio_
Revise ta caja del clrcuito o
los fusibles° Aseg0rese que el
cord6n de la corriente est6
enchufado.
La
temperatura
det homo
parece ester
inoxecta,
Catibraci6n del
termostato,
Yea los temperatura ajustes
descritos que siguen esta
secci6n.
La puerta de!
homo no se
desenganche.
Et ciclo de limpieza no ha
terminado
La temperatura del homo
debe bajar a mShos de la
temperatura de enganche
antes que la puerta pueda
abrirse,
La luz dei a. lnterruptor de la luz e.
homo no en posicl6n de
funclone, apagado.
b. Foco de la luz est_ b.
quemado.
Revise la posici6n del
interruptor de la luz del
homo,
Revise et foco de la luz
del horno.
El homo no
se Ilmpl6 o
los
resuitedos
fuero,
malos.
a, Los controles no se e,
pusieron bien..
b, El ciclo de ltmpleza
fue interrumpido_ b.
c. El homo estaba
demasiado sucloo c,
27
Lea la secci6n de
autolimpteza de este
manual.
El clclo de timpleza norma!
debert'a ser de 4 I_oras.
Los derrames grandes se
deberian limpiar antes de
programar un ctclo, Usted
tamblen podrla repetlr el
ctclo.
PROBLEMA
El homo humea.
ANTESBEUAMAR PARAUN
SERVICIO
POSRBLE CAUSA
a. Hoino Suciol
...............
Los alimentos no
se hornean
adecuadamente.
b,, Mat uso de pape! de
aluminio
c. Se dejd la cacerola para
asar con grasa dentro det
homo
a. El homo se precalenlO
b.
Cm
PosiciOn incorrecta de la
parrilla o la cacerola
La ventilaci6n del homo
est& obstruida o cubierta,
POSIBLIE SOLUCION
a, Vea que no hayan
derrames grandes
b, No se recomienda el uso
del papel de atuminio
e, L_mDJela cacerola y la
pamlla despu_s de cada
U$9
a. AsegUrese de precalentar
hasla que suene el tono
b, Manlenga un espacio de
aire unilorme alrededor de
las otlas y utensi]ios Vea ta
seccidn para cocinar en el
Homo
c, Mantenga la ventilaci6n
despejada
d, Uso incorrecto del papel
de aluminio,
g. No cubra las parrillas
cuando hornee
e, Temperatura incorrecta
para et utensilio usado,
f, No se sigui6 ta receta
g, Mata calibracidn del
control del homo
h, La estufa o la parrilla del
homo no est&n niveladas
Los alimentos a.
no se asan
adecuadame.te.
b.
.......................... ,,,_,,,,,,,_,,,*LL,
Posici6n incorrecla de ia
parrilla
El homo se precalent5
Cm
d.
em
Mal uso de papel de
aluminio,
La puerta del homo se
cerr6 durante el asado a
la parritla
Bajo voltage (208 Vo]tios).
f. Cantidad de tiempo
incorrecta para asar,
e, Reduzca la temperatura en
25 grados para utensilios
de vidrio, oscuros u
opacos,
f. sEs la receta confiable y
probada?
g. Revise ta secci6n de
ajustes a ia temperatura
que sigue esta seccidn
h, Vea las instrucciones de
instalaci6n para la
nivelaciOn.
a_
bm
Co
d.
Revise la posiciOn de las
cacerolas; yea la secci6n
para asar a la parrilta
No precaliente cuando ase a
la parrilla,
Lea la seccidn para asar a la
parrilla
Abra ia puerta a la posicidn
de tope para asar,
e, Use una posici6n de parrilla
m_s alta y/o ase por m&s
tiempo
f, Vea la labia para asar en la
secci6n de c6mo asar a la
parrilla,
28
ANTESDELLAMARPARAUN
SERVICIO
PROBLEMA POSIBLE CAUSA POSIBLE SOLUCION
Las comidas se a.
cocinan demasiado
o muy poco
b_
lnsuficiente cantidad de
tiempo cuando se cocina
con la funcidn de tiempo
porque tas temperaturas
iniciafes de los alimentos
varian mucho.
Termdmetro insertado
incorrectamente
c. Se program6 un nivet de
poder incorrecto
d, El plato no se hizo girar, no
se revolvi5 como to
requiere la receta
e. Demasiados platos en el
homo a ta misma vez
f, Los alimentos no se
descongetaron bien.
g. Mal uso de las cubiertas
a, La variaci6n de la
densidad de la comida
algunas veces requiere
m;_s tiempo de cocci6n,
b, Revise la secci6n de
asado automAtico de este
manual,
c. _,Es la receta probada y
confiable?
d. Siga las instrucciones de
la receta
e. No Ilene demasiado el
homo.
f. Yea la secci6n de la
descongelaciOn del
manual,
g. Siga las instrucciones
en este manual y en la
receta.
"PROBE" aparece a. No se us6 el termdmetro, Vea la secci6n Asado
e. ei dial. aunque se empuj6 el Autom_tico en este manual
bot6n para instrucciones
b. Term6metro insertado
incorrectamente en el
recept_.cu!o de! homo o la
comida,
"ERROR" aparece Cuando us6 el cSdigo 7 para Vea ta secci6n Asado
en el dial. asado autom_.tico TEMP/ Autom_tico en este manual
COOK HOLD, usted program6 para instrucciones
una temperatura menor a
80°F o m_s de199°F.
Todo esto es normal en su Homo Microondas:
* Escape de vapor alrededor de ta puerla
. Reflecci6n de luz alrededor del marco exterior de ta puerta,
,, Ruido apagado mientras el homo est_ en uso
. El ventilador del microondas podria operar con ambos hornos apagados, Est& enfriando
el control y se apagar_ solo
. Disminuci6n de la luz del homo y cambio en el sonido del ventilador podrian ocurrir si
se opera a un nivel de poder que no sea alto
. Algo de interferencia con la T',/y radio se podria notar cuando use el homo microondas,
Es similar a la interferencia causada pot otros aparatos el6ctricos pequeSos y no indica
un problema con su homo
29
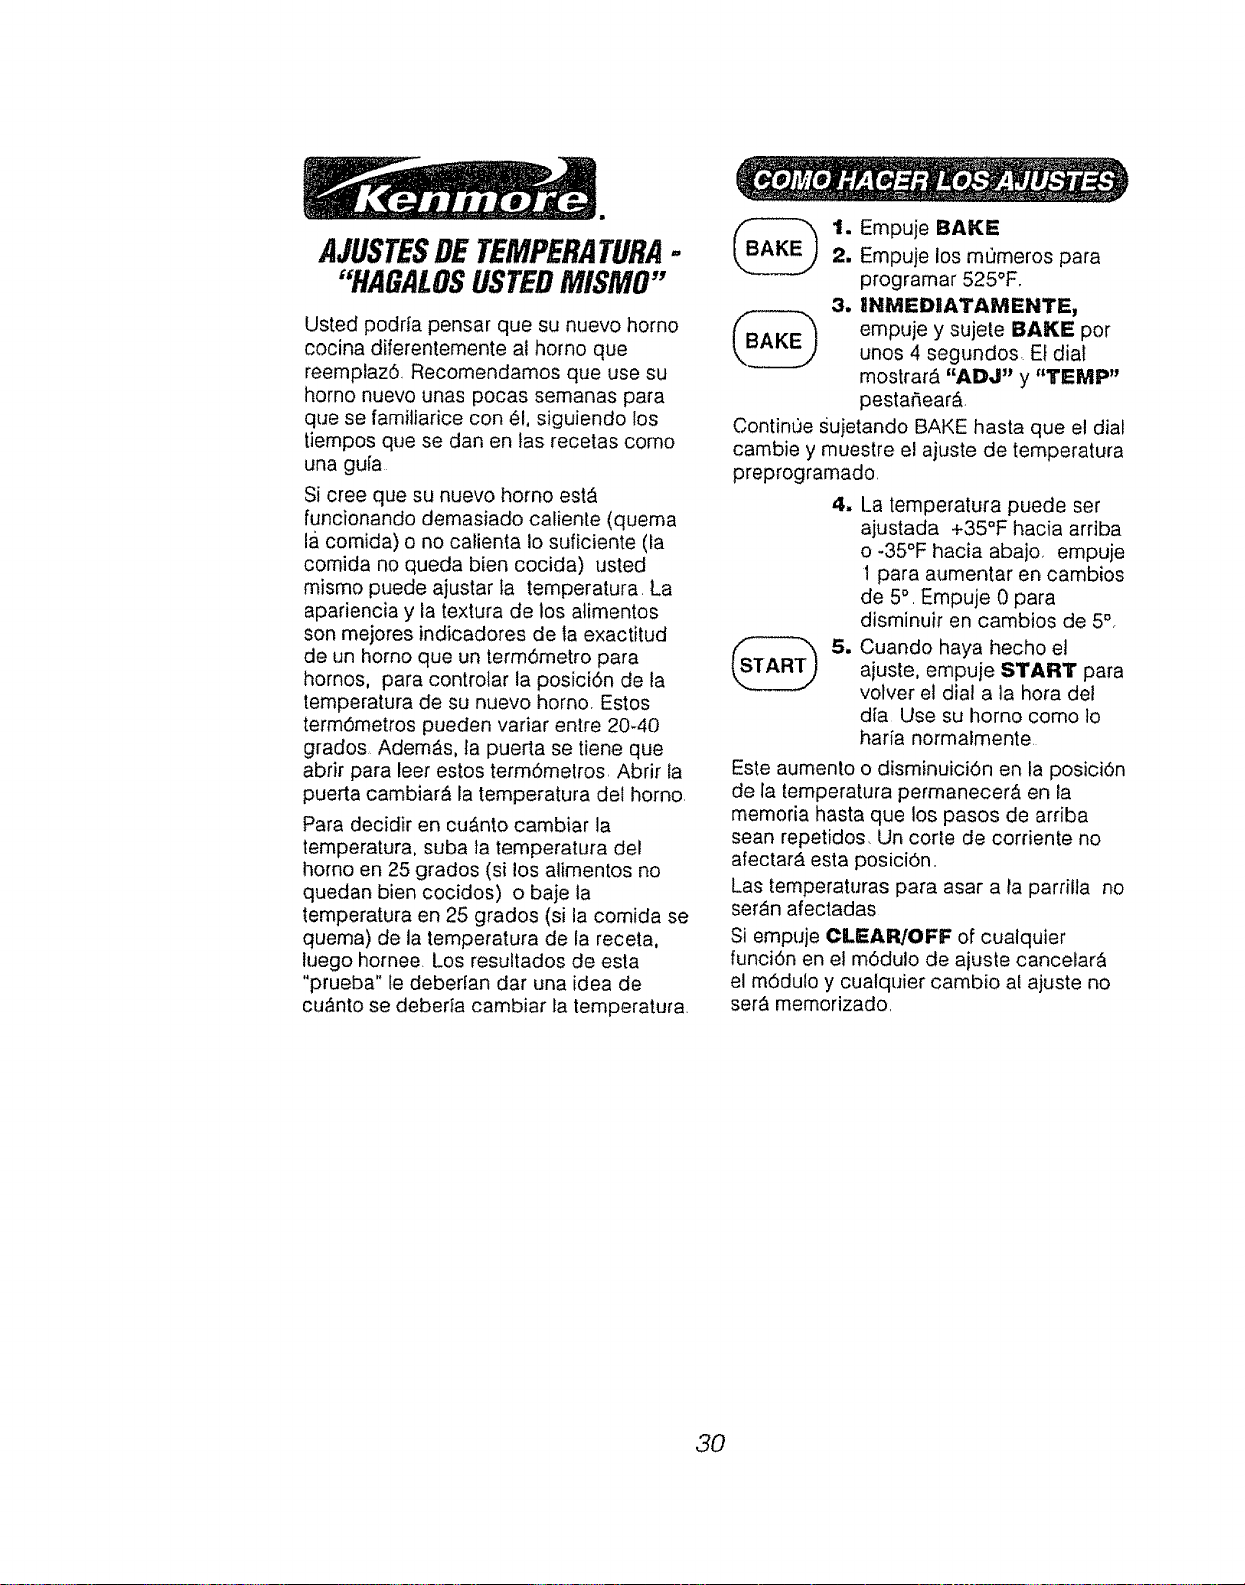
AJUSTESDE TEMPERATURA.
"HAGALOSUSTEDMISMO"
Usted podrfa pensar que su nuevo homo
cocina diferentemente al homo que
reemplaz6. Recomendamos que use su
homo nuevo unas pocas semanas para
que se familiarice con _1, siguiendo los
tiempos que se dan en las recetas como
una gu{a
Si cree que su nuevo homo est_
funcionando demasiado caliente (quema
I& comida) o no calienta Io suficiente (la
cornida no queda bien cocida) usted
mismo puede ajustar ta temperatura, La
apariencia y la textura de los atimentos
son mejores indicadores de la exactitud
de un homo que un term6metro para
hornos, para controtar la posicidn de la
temperatura de su nuevo homo, Estos
term6metros pueden variar entre 20-40
grados Adem_s, la puerta se tiene que
abrir para leer estos termdmelros, Abrir ta
puerta cambiar_, la temperatura del homo,
Para decidir en cu,_nto cambiar la
temperatura, suba la temperatura del
homo en 25 grados (si los alimentos no
quedan bien cocidos) o baje la
temperatura en 25 grados (si la comida se
quema) de la temperatura de la receta,
luego hornee Los resultados de esta
"prueba" te deberfan dar una idea de
cu_nto se deberta cambiar ta temperatura,
1. Empuje BAKE
2. Empuje los mt_meros para
programar 525°F,
3. IINMEDIATAMENTE,
empuje y sujete BAKE por
unos 4 segundos, El dial
mostrar_ "ADJ" y "TEMP"
pesta_ear_.,
Contin0e sujetando BAKE hasta que el dial
cambie y muestre el ajuste de temperatura
preprogramado,
4. La temperatura puede ser
ajustada +35°F hacia arriba
o -35°F hacia abajo, empuje
1 para aumentar en cambios
de 5 °, Empuje 0 para
disminuir en cambios de 5°_
5. Cuando haya hecho el
ajuste, empuje START para
vofver el dial a la hora del
d{a Use su homo come to
haria normalmente
Este aumento o disminuici6n en la posiciOn
de la temperatura permanecer,_ en la
memoria hasta que los pasos de arriba
sean repetidos, Un corte de corriente no
afectarA esta posici6n,,
Las temperaturas para asar a la pardlla no
ser_,n afectadas
Si empuje CLEAPJOFF of cualquier
funci6n en el m6dulo de ajuste cancelarA
el m6dulo y cualquier cambio al ajuste no
ser& memorizado,
3O
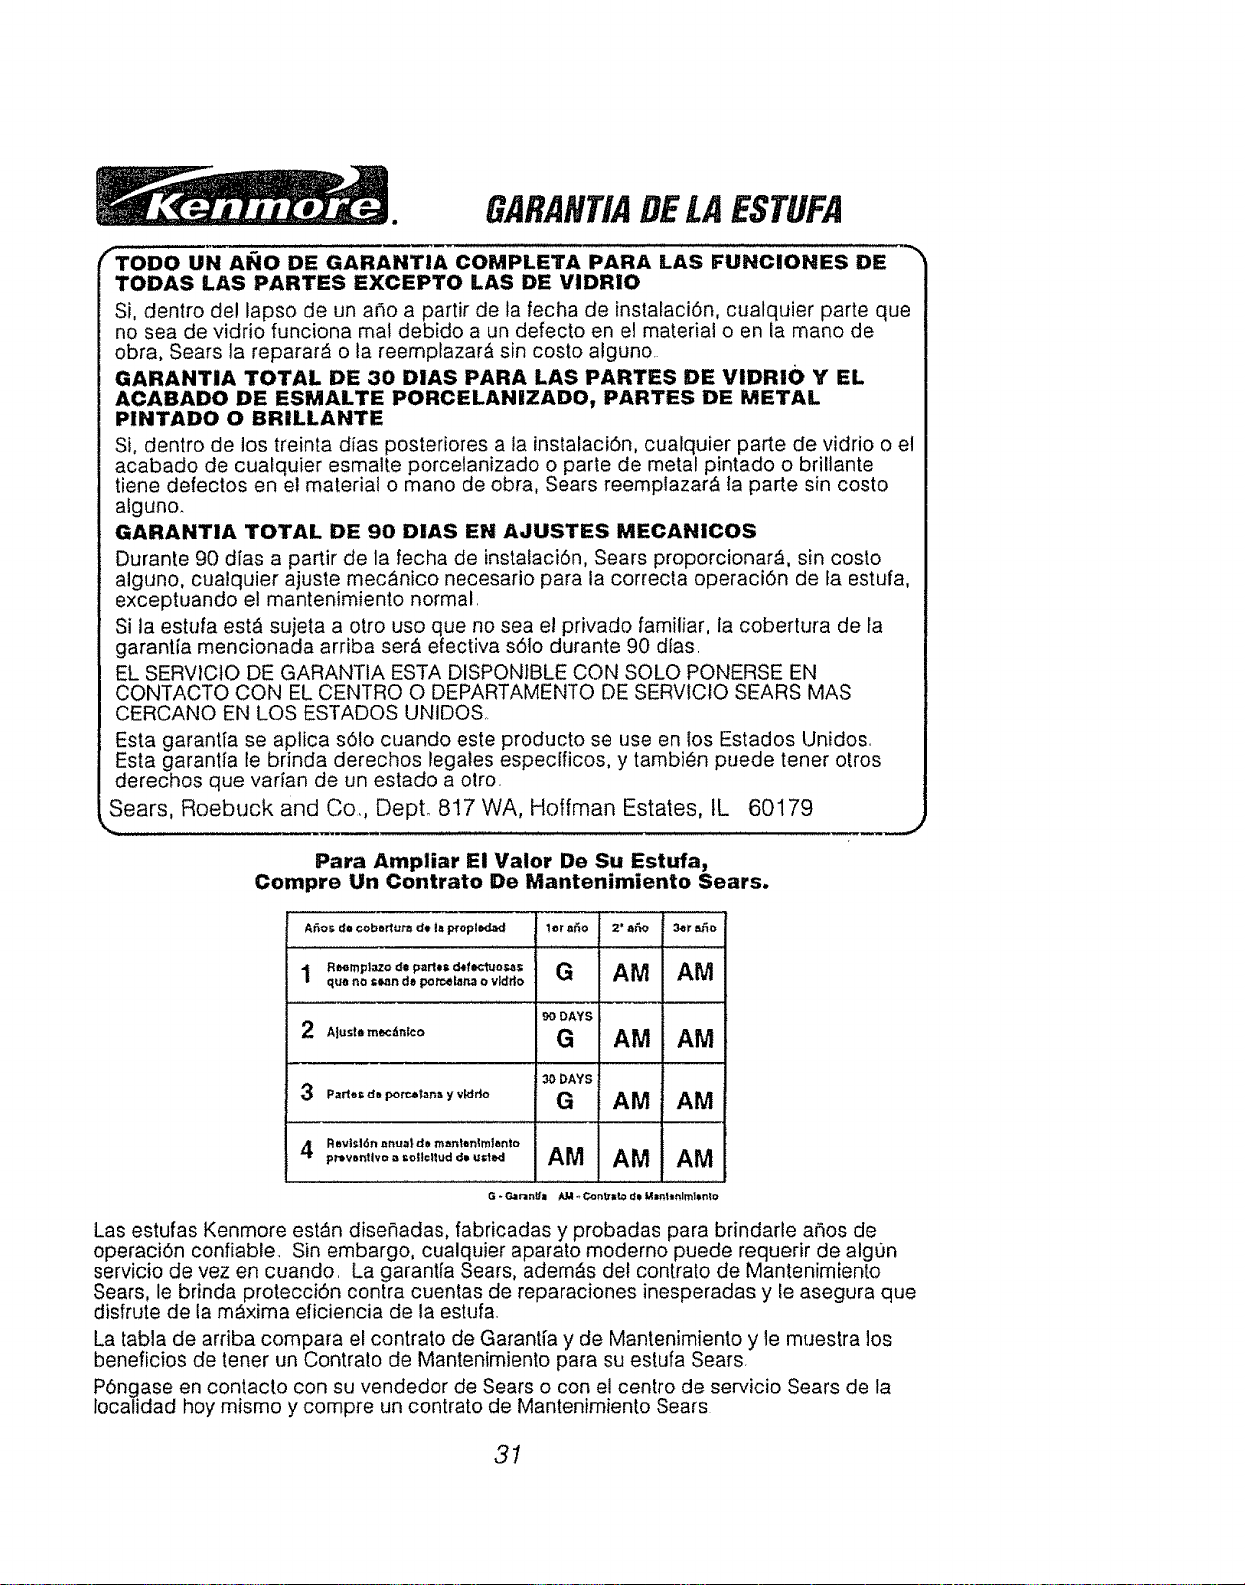
GARANTIADELAESTIlFA
_TODO UN Al_lO DE GARANTIA COMPLETA PARA LAS FUNCIONES DE
TODAS LAS PARTES EXCEPTO LAS DE VIDRIO
Si, dentro de! lapso de un a_o a partir de ta fecha de instalaci6n, cualquier parte que
no sea de vidrio funciona mal debido a un defecto en el material o en ia mano de
obra, Sears la reparar_ o ta reemplazar_ sin costo alguno
GARANTIA TOTAL DE 30 DIAS PARA LAS PARTES DE VIDRIO Y EL
ACABADO DE ESMALTE PORCELANIZADO, PARTES DE METAL
PINTADO O BRILLANTE
Si, dentro de los treinta dias posteriores a la instalaci6n, cualquier parte de vidrio o el
acabado de cualquier esmalte porcelanizado o parte de metal pintado o brillante
tiene defectos en el material o mano de obra, Sears reemplazar& la parte sin costo
alguno.
GARANTIA TOTAL DE 90 DIAS EN AJUSTES MECANICOS
Durante 90 dias a partir de la fecha de instalaci6n, Sears proporcionar_, sin costo
alguno, cualquier ajuste mec&nico necesario para la correcta operaci6n de la estufa,
exceptuando el mantenimiento normal.
Si la estufa estfi sujeta a otro uso que no sea el privado familiar, la cobertura de la
garantia mencionada arriba ser_, efectiva s6Io durante 90 dfas.
EL SERV1CIO DE GARANTIA ESTA DISPONIBLE CON SOLO PONERSE EN
CONTACTO CON EL CENTRO O DEPARTAMENTO DE SERVICIO SEARS MAS
CERCANO EN LOS ESTADOS UNIDOS
Esta garantfa se aplica s61o cuando este producto se use en los Estados Unidos,
Esta garantfa le brinda derechos legales especificos, y tambien puede tener otros
derechos que varian de un estado a otro.
Sears, Roebuck and Co,, Depto 817 WA, Hoffman Estates, tL 60179
J
Para Ampliar El Valor De Su Estufa,
Compre Un Contrato De Mantenimiento Sears.
....... = - ,_ .
1 ,...p_.od.p.rt.._f._o==. G AM AM
qua no =_,ande pot'_lana o vldrio
90 DAYS
2 At,,,t.m._°.co G AM AM
30 DAYS
.,t Revlsl6n at_ua|de mantenlmlonto
q
p_....,.o_.o,o,.do.o._, AM AM AM
G - G_rznU| /da ._Conttl_ d¢ M=nl'm_lmtlnlo
Las estufas Kenmore est_n diseC_adas, fabricadas y probadas para brindarle aSos de
operaci6n confiable, Sin embargo, cualquier aparato moderno puede requerir de algon
servicio de vez en cuando, La garantla Sears, adem&s del contrato de Mantenirniento
Sears, le brinda protecci6n contra cuentas de reparaciones inesperadas y le asegura que
disfrute de la m_,xima eficiencia de la estufa,
La tabla de arriba compara el contrato de Garantia y de Mantenimiento y le mueslra los
beneficios de tener un Contralo de Mantenimiento para su estufa Sears,
POngase en contacto con su vendedor de Sears o con el centro de servicio Sears de la
localidad hoy mismo y compre un contrato de Mantenimiento Sears
31
Sears se compiace en ofrecer a sus ciientes
servicio de reparaci6n de aparatos
electrodomdsticos y electr6nicos de todas las
marcas,
EEn Sears, usted puede contar con operadores en
espa_ol, a los que puede Ilamar sin cargo alguno.
Para servicio de reparacidn
a domiciJio,
Llame 24 horas al dia, 7 dias a la
semana
t 800-676o581 t
Para o_lenar piezas con entrega
a domiciiio,
Llame de 7 am a 7 pro, 7 dias a la
semana
t 800-659-7084
32