Owner's Manual
Vacuum Cleaner
CAUTION:
Read and follow all
safety and operating
instructions before first
use of this producL
Sears, Roebuck and Co., Hoffman Estates, IL 60179 U.S.A°
PART NO. CO1ZARD10UOO-4370537 Printed in U.S.A.
Before Using Your New Vacuum ....... 2
Kenmore Vacuum Cleaner Warranty ___2
Important Safety Instructions .......... 3
Parts and Features ................. 4-5
Assembly ......................... 6-7
Use .................................... 8
How to Start ........................... 8
Vacuuming Tips ........................ g
Suggested Pile Height Settings ......... 9
Attachments .......................... 10
Attachment Use Chart ................. t0
Performance Features ................. 11
How Your Vacuum Works ........... 12
Canister Care ....................... 12
Bag Changing ......................... 12
Motor Safety Filter Cleaning ......... 13
Cleaning Exterior and Attachments ....... 13
Power-Mate TM Care ................... 14
Light Bulb Changing ................. 14
Belt Changing and Brush Cleaning .... 14-15
Brush Servicing ..................... 16
Brush Assembly ...................... 16
Troubleshooting ..................... 17
Requesting Assistance Or Service ,,, 18
Please read this guide, it will help you assemble and operate your new Kenmore vacuum in
the safest and most effective way_
For more information about the care and operation, call your nearest Sears store. You will
need the complete model and serial numbers when requesting information. Your vacuum's
model and serial numbers are located on the Model and Serial Number Plate.
Use the space below to record the model number and serial number of your new Kenmore
vacuum°
Model No.
Serial No,
Date of Purchase
Keep this book and your sales check (receipt) in a safe place for future reference.
FU LL ONE-YEAR WARRANTY
When used for private household purposes, if within one year from the date of purchase, this
vacuum cleaner fails due to a defect in material or workmanship, RETURN IT TO THE NEAR-
EST SEARS SERVICE CENTER/DEPARTMENT IN THE UNITED STATES, and Sears will
repair it free of charger
This warranty gives you specific legal rights, and you may also have other rights which vary
from state to state.
SEARS, ROEBUCK AND COo, D1817 WA, Hoffman Estates, IL 60179
WARNING
"Yoursafety is important to us. To reduce the risk of fire, electrical shock, injury to
persons or damage when using your vacuum cleaner, follow basic safety precau-
tions including the following:
Read this manual before assembling or
using your vacuum cleaner.
Use your cleaner only as described in this
manual° Use only with Sears recommended
attachments.
To reduce the risk of electrical shock - Do
not use outdoors or on wet surfaces.
Disconnect electrical supply before servic-
ing or cleaning out brush area. Failure to do
so could result in electrical shock or brush
suddenly starting
Always turn cleaner off before connecting or
disconnecting the hose or POWER-MATET*L
Always turn cleaner off before unplugging
Do not unplug by pulling on cord. To unplug,
grasp the plug, not the cord.
Hold plug when rewinding onto cord reel.
Do not allow plug to whip when rewinding.
Do not use with damaged cord or plug, If
cleaner is not working as it should, has been
dropped, damaged, left outdoors, or dropped
into water, return it to a Sears Service
CentertDepartment.
Do not pull or carry by cord, use cord as a
handle, close door on cord, or pull cord
around sharp edges or corners° Do not run
cleaner over cord. Keep cord away from
heated surfaces_
Do not leave cleaner when plugged in.
Unplug from outlet when not in use and
before servicing
Do not allow to be used as a toy. Close
attention is necessary when used by or near
children.
Do not handle plug or cleaner with wet
hands,
S/WE THESE
Do not operate the cleaner with a punctured
hose_ The hose contains electrical wires.
Replace if cut or worn. Avoid picking up
sharp objects..
Do not put any objects into openings.
Do not use with any opening blocked; keep
free of dust, lint, hair and anything that may
reduce air flow..
Keep hair, loose clothing, fingers, and all
parts of body away from openings and mow
ing parts.
Do not use cleaner without dust bag and/or
filters in place
Always change the dust bag after vacuum-
ing carpet cleaners or freshener, powders
and fine dust. These products clog the bag,
reduce airflow and can cause the bag to
burst. Failure to change bag could cause
permanent damage to the cleanen
Do not use the cleaner to pick up sharp hard
objects, small toys, pins, paper, etc. They
may damage the cleaner or dust bag
Do not pick up anything that is burning or
smoking, such as cigarettes, matches, or hot
ashes.
Do not use cleaner to pick up flammable or
combustible liquids (gasoline, cleaning fluids,
perfumes, etc_), or use in areas where they
may be present. The fumes from these sub-
stances can create a fire hazard or explo-
sion.
Use extra care when cleaning on stairs. Do
not put on chairs, tables, etc. Keep on floor.
You are responsible for making sure that
your vacuum cleaner is not used by anyone
unable to operate it properly.
INSTRUCTIONS
Proper assembly and safe use of your vacuum cleaner are your responsibilities. Your cleaner
is intended only for household use_Read this Owner's Manual carefully for important use and
safety information.This guide contains safety statements under warning and caution symbols°
Please pay special attention to these boxes and follow any instructions given_ WARNING
statements alert you to such dangers as fire, electrical shock, burns and personal injury.CAU-
TION statements alert you to such dangers as personal injury and!or property damage.
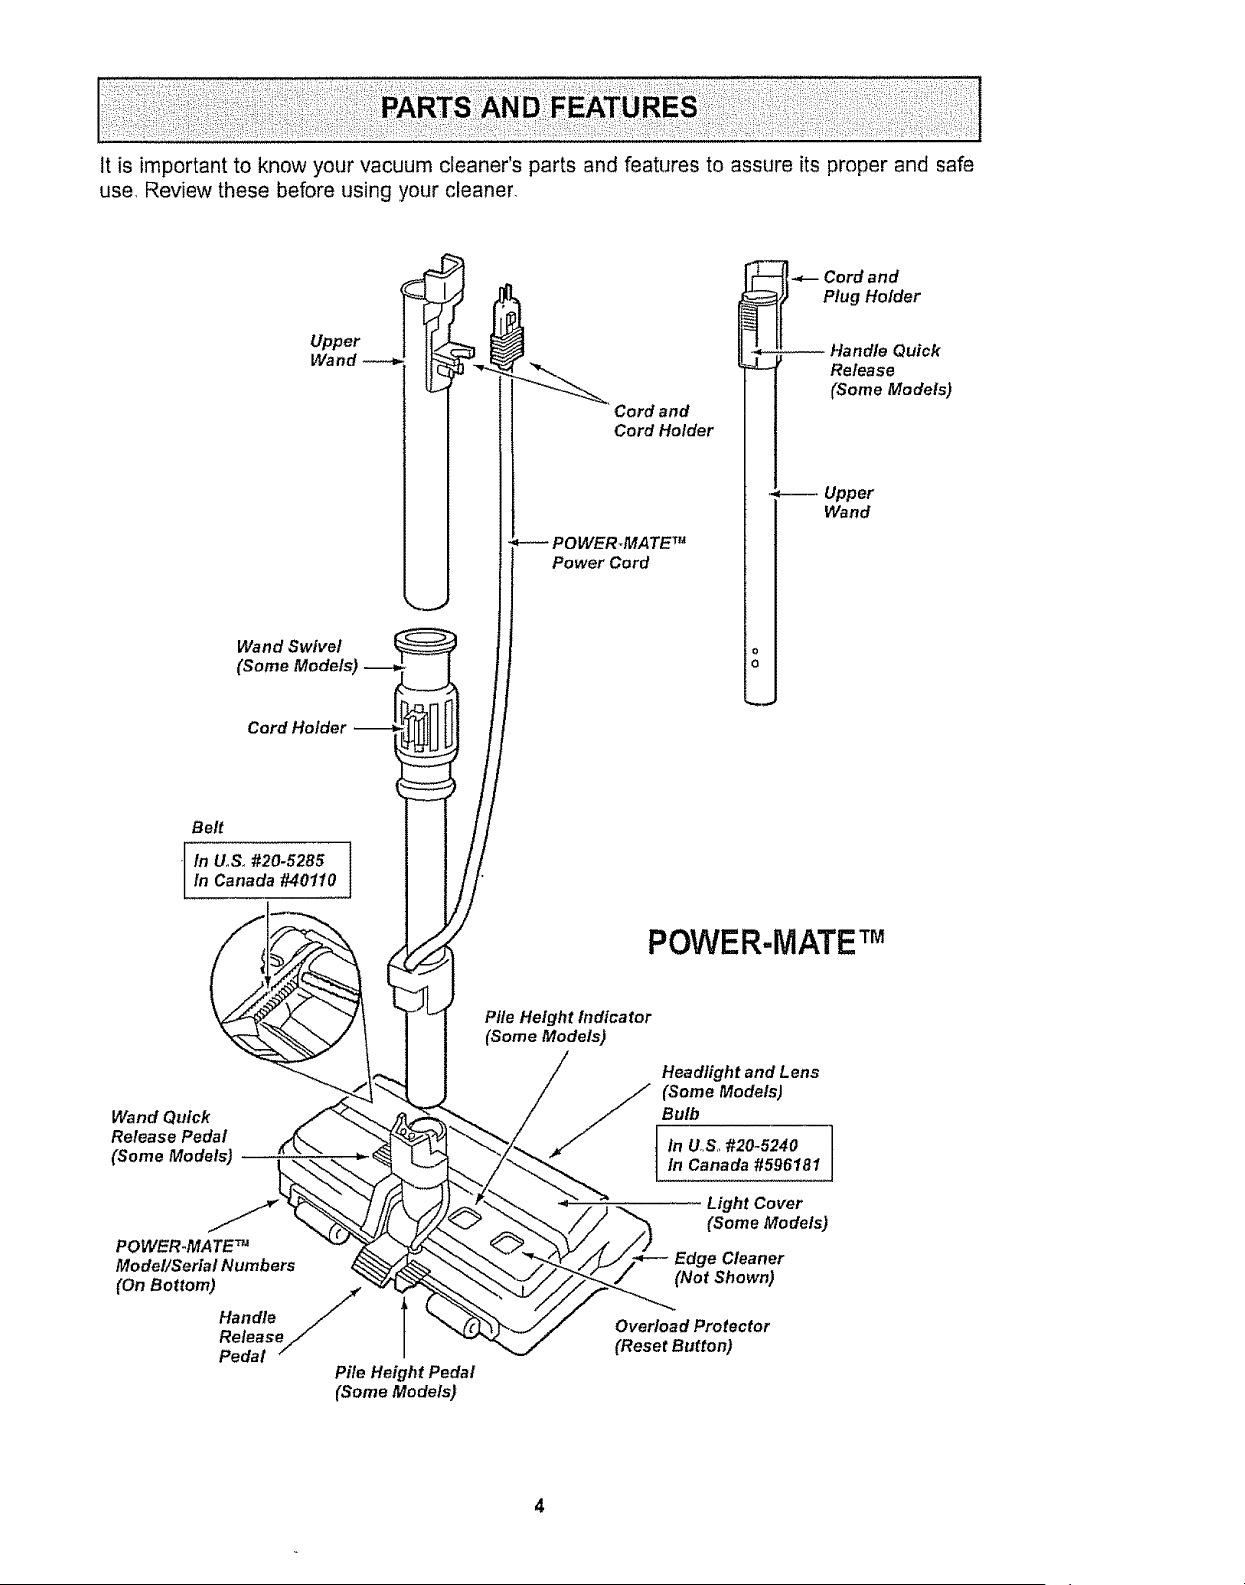
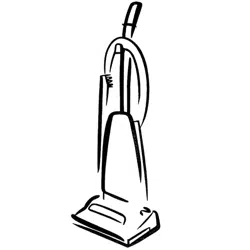
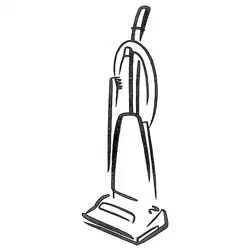
Itisimportantto knowyourvacuumcleaner'spartsandfeaturesto assureitsproperandsafe
use,Reviewthesebeforeusingyourcleaner,
Upper
Wand
Wand Swivel
(Some Models)
Cord Holder
Cord and
Cord Holder
POWERTMATETM
Power Cord
-_-- Cord and
Plug Holder
Wand
o
o
Belt
[ In U,S. #20-5285 ]in Canada #40110
POWER-IViATE TM
Wand Quick
Release Pedal
(Some Models)
POWER-MATE TM
Mode!/Serial Numbers
(On Bottom)
Handle /
Release
Pedal /
Pile Height Pedal
(Some Models)
Pile Height hzdicator
(Some Models)
Headlight and Lens
(Some Models)
Bulb
in U_,S,,#20_5240In Canada #596181
Light Cover
(SomeModels)
Edge Cleaner
(NotShown)
Overload Protector
(Reset Button)
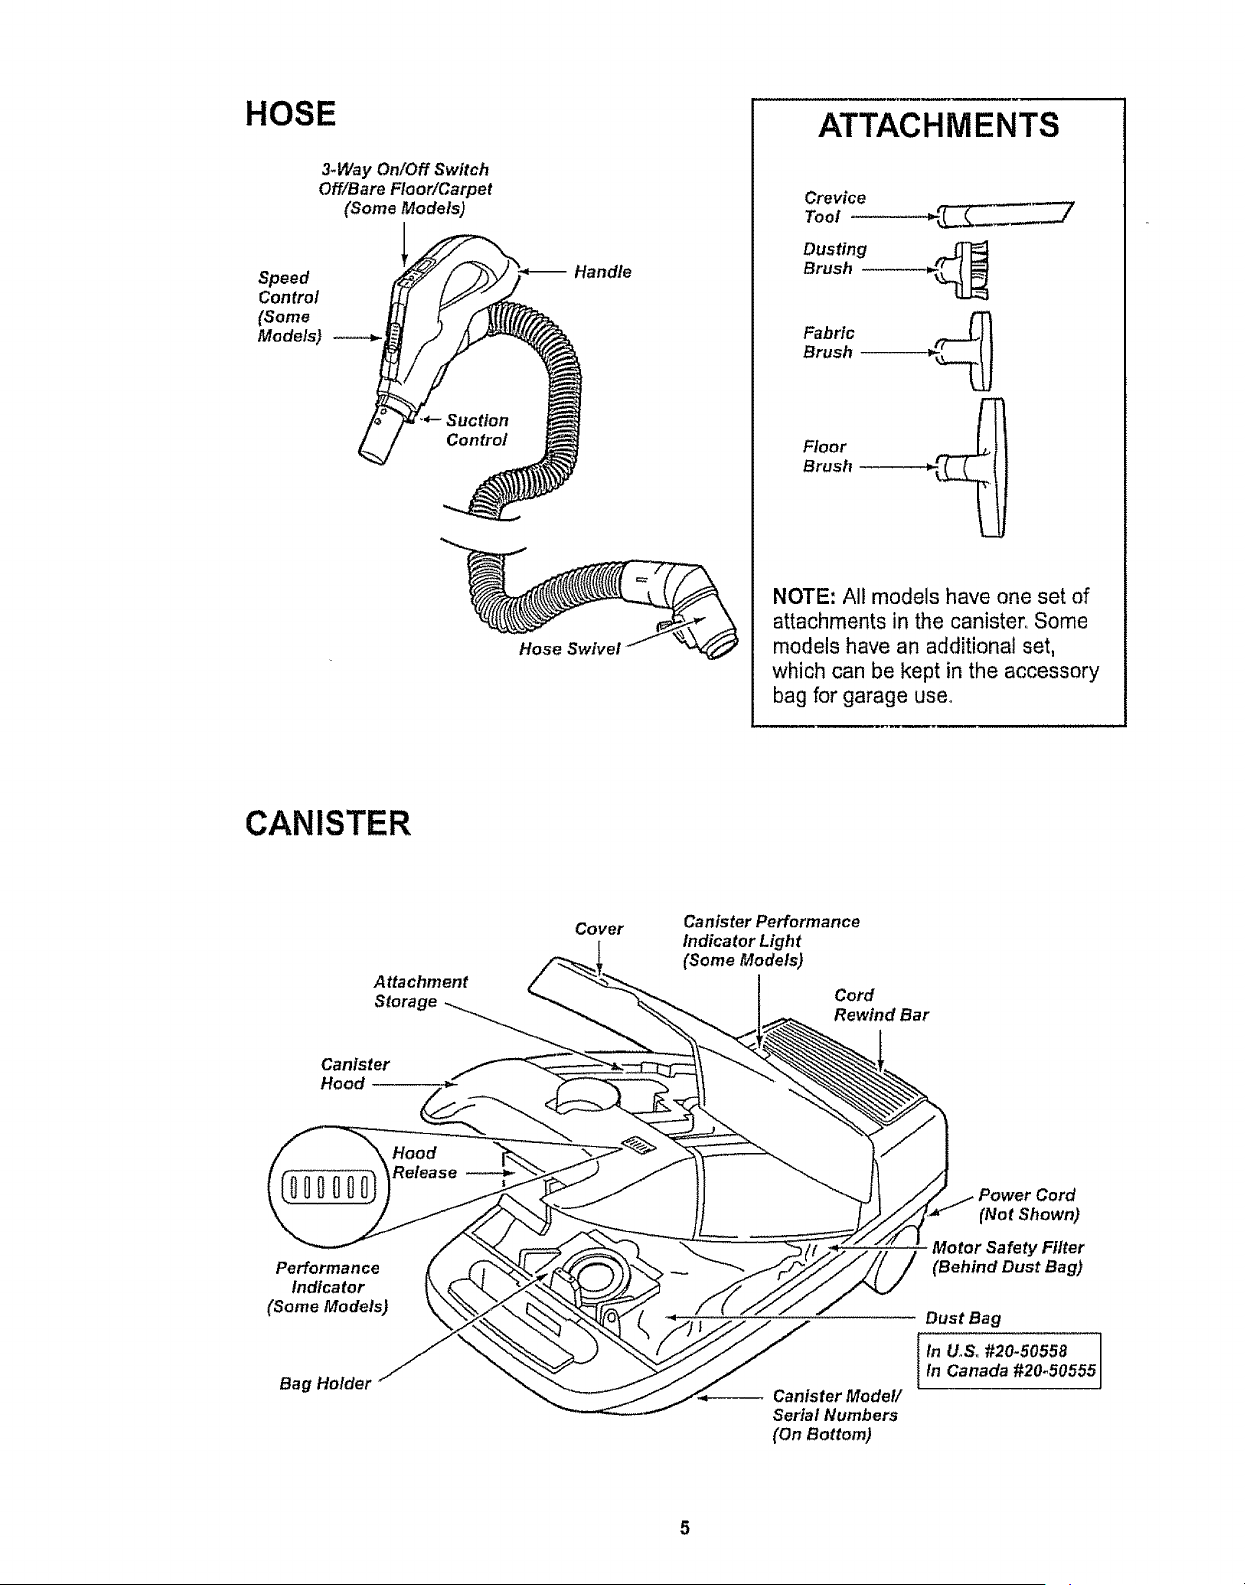
HOSE
3.Way On/Off Switch
Off!Bare Floor/Carpet
(Some Models)
Speed
Control
(Some
Models)
Suction
Control
Handle
Hose SwlveJ
ATTACHMENTS
Crevice
Tool
Dusting
Brush ---------_
Fabric
Brush --_
Floor
Brush
NOTE: All models have one set of
attachments in the canister,, Some
models have an additional set,
which can be kept in the accessory
bag for garage user
CANISTER
Attachment
Storage
Cover
Canister Performance
Indicator Light
(Some Models)
Cord
Rewind Bar
Canister
Hood
Performance
Indicator
(Some Models)
Bag Holder
Canister Mode!/
Serial Numbers
(On Bottom)
(Not Shown)
Motor Safety Filter
(Behind Dust Bag)
Dust Bag
_in U_S. #20.50558
In Canada #20_50555
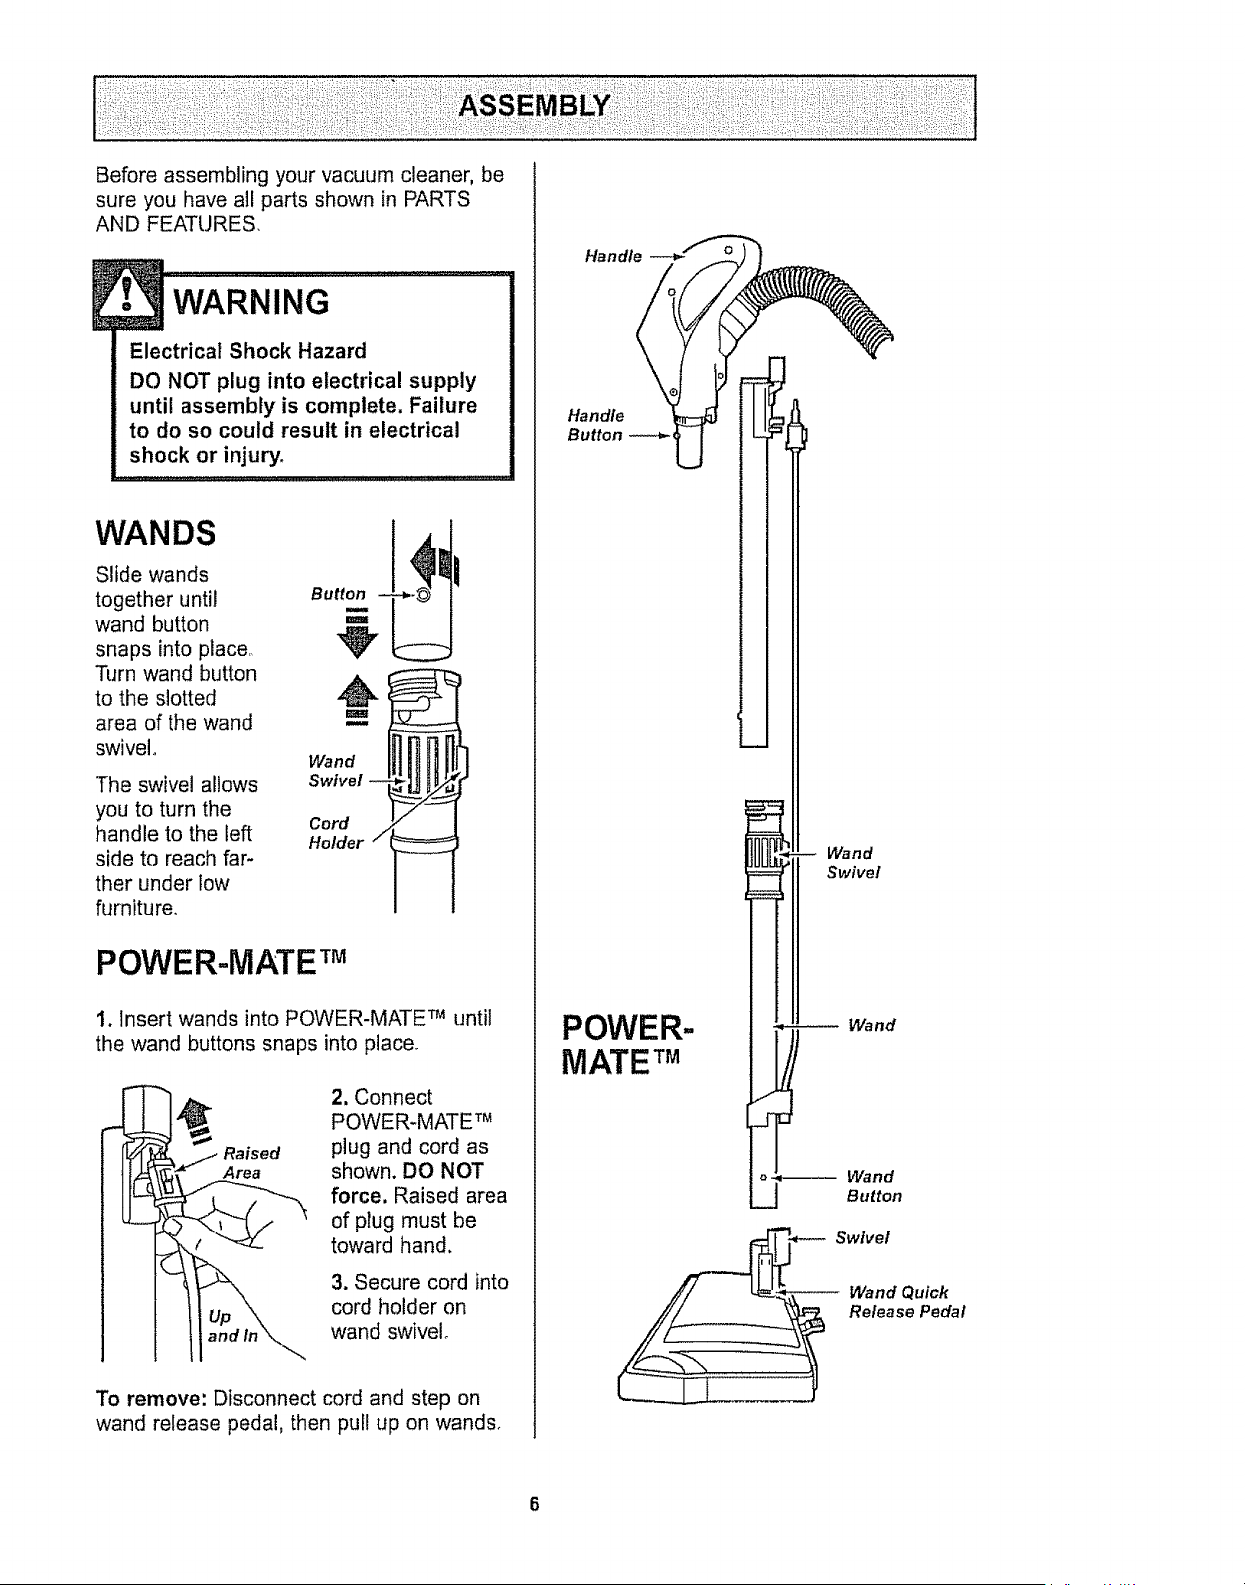
Before assembling your vacuum cleaner, be
sure you have all parts shown in PARTS
AND FEATURES
• WARNING ....................
Electrical Shock Hazard
DO NOT plug into electrical supply
until assembly is complete, Failure
to do so could result in electrical
shock or injury.
==.o_::=:=
WANDS
Slide wands
together until Bu
wand button
snaps into place,
Turn wand button _,
to the slotted
area of the wand
swivel. Wand _ ]
Swivel
Cord
Holder / --
The swivel allows
you to turn the
handle to the left
side to reach far-
ther under tow
furniture.
POWER-MATE TM
1. Insert wands into POWER-MATE TM until
the wand buttons snaps into place.
Raised
Area
2. Connect
POWER-MATE TM
plug and cord as
shown. DO NOT
force. Raised area
of plug must be
toward hand.
3. Secure cord into
cord holder on
wand swivel,
To remove: Disconnect cord and step on
wand release pedal, then pull up on wands,
Handle___
Handle
Button _ _
POWER-
MATE TM
Wand
Swivel
Wand
o_ Wand
J Button
Swivel
Wand Quick
Release Pedal
CANISTER
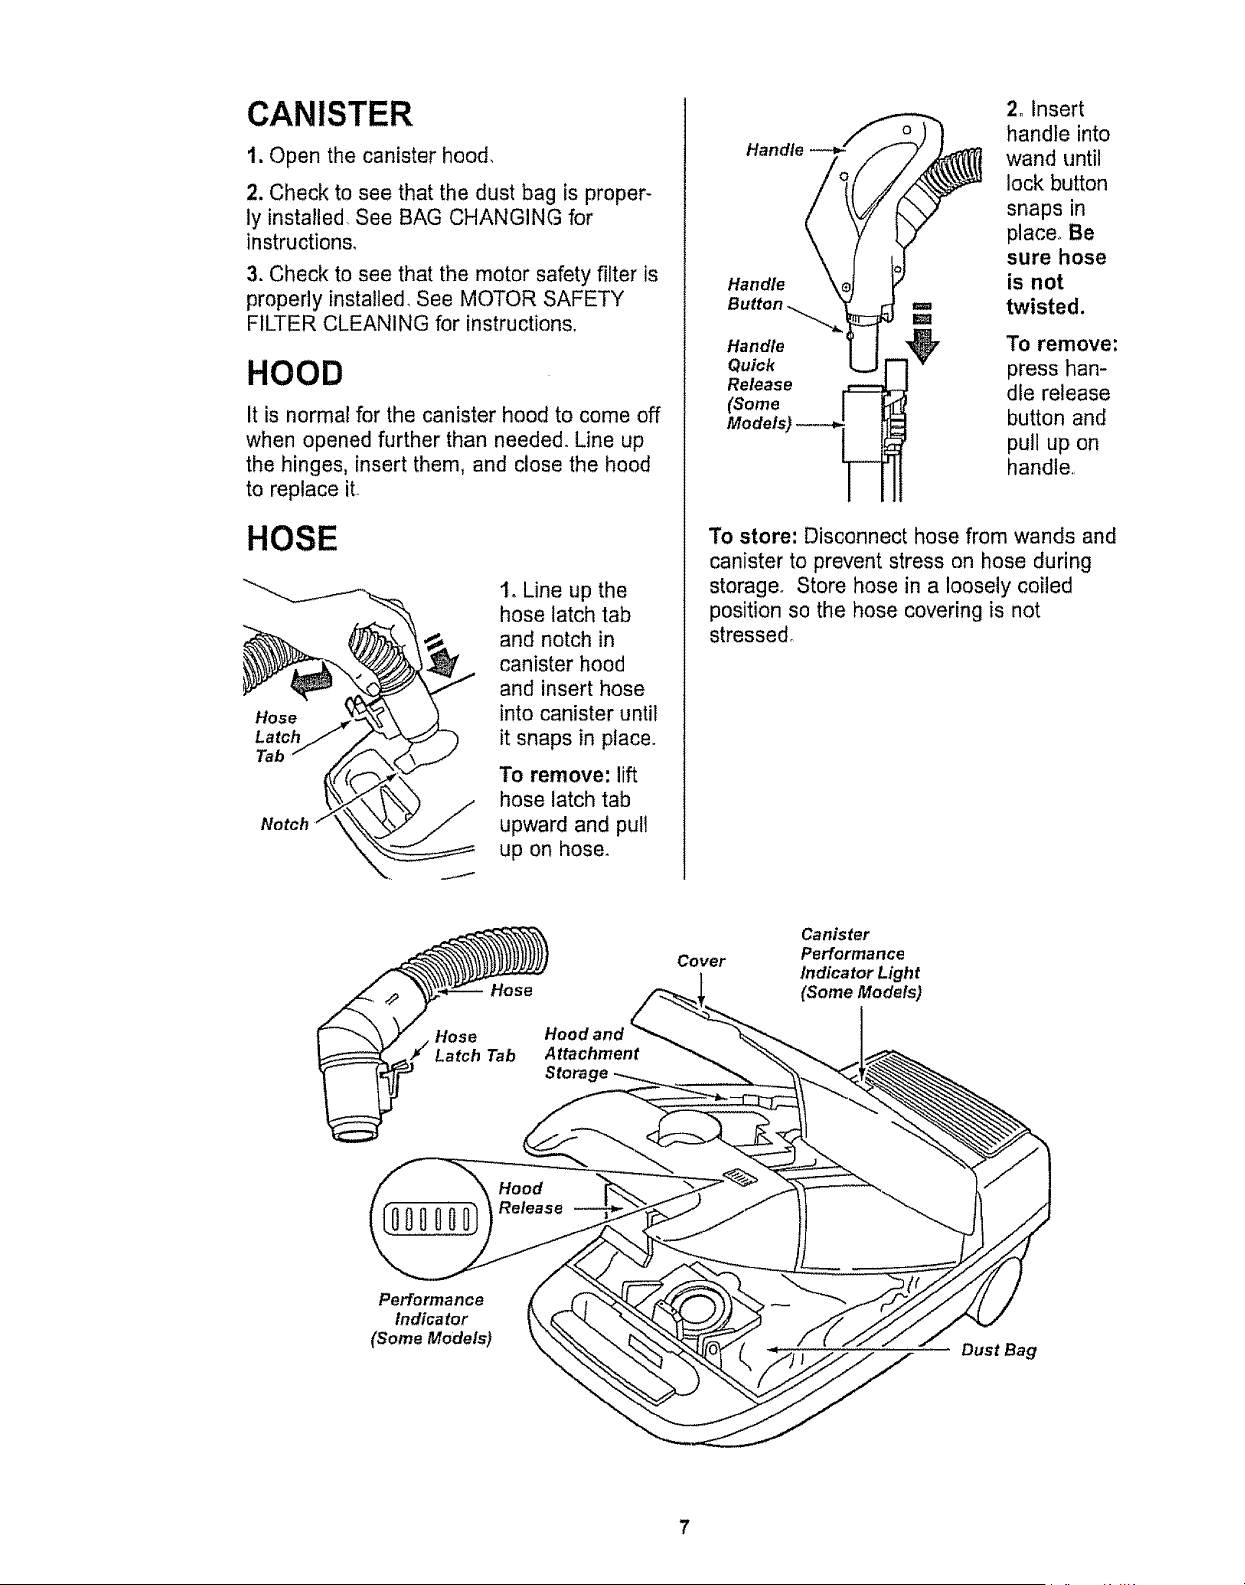
1, Open the canister hood,
2. Check to see that the dust bag is proper-
ly installed, See BAG CHANGING for
instructions,
3. Check to see that the motor safety filter is
properly installed, See MOTOR SAFETY
FILTER CLEANING for instructions.
HOOD
It is normal for the canister hood to come off
when opened further than needed, Line up
the hinges, insert them, and close the hood
to replace it
HOSE
Hose
Latch
Tab
1, Line up the
hose latch tab
and notch in
canister hood
and insert hose
into canister until
it snaps in place.
To remove: lift
hose latch tab
upward and pull
up on hose_
Handle --_
Handle
Button _
Handle
Quick
Release
(Some
Models)
2_ Insert
handle into
wand until
lock button
snaps in
place. Be
sure hose
is not
twisted,
To remove:
press han-
dle release
button and
pull up on
handle
To store: Disconnect hose from wands and
canister to prevent stress on hose during
storage. Store hose in a loosely coiled
position so the hose covering is not
stressed.
Hose
Hose
Latch Tab
Cover
Hood and _
Attachment
Stora _,
Canister
Performance
Indicator Light
(Some Models)
Hood
(000000)Roleoso
Performance
Indicator
(Some Models)
Dust Bag
7
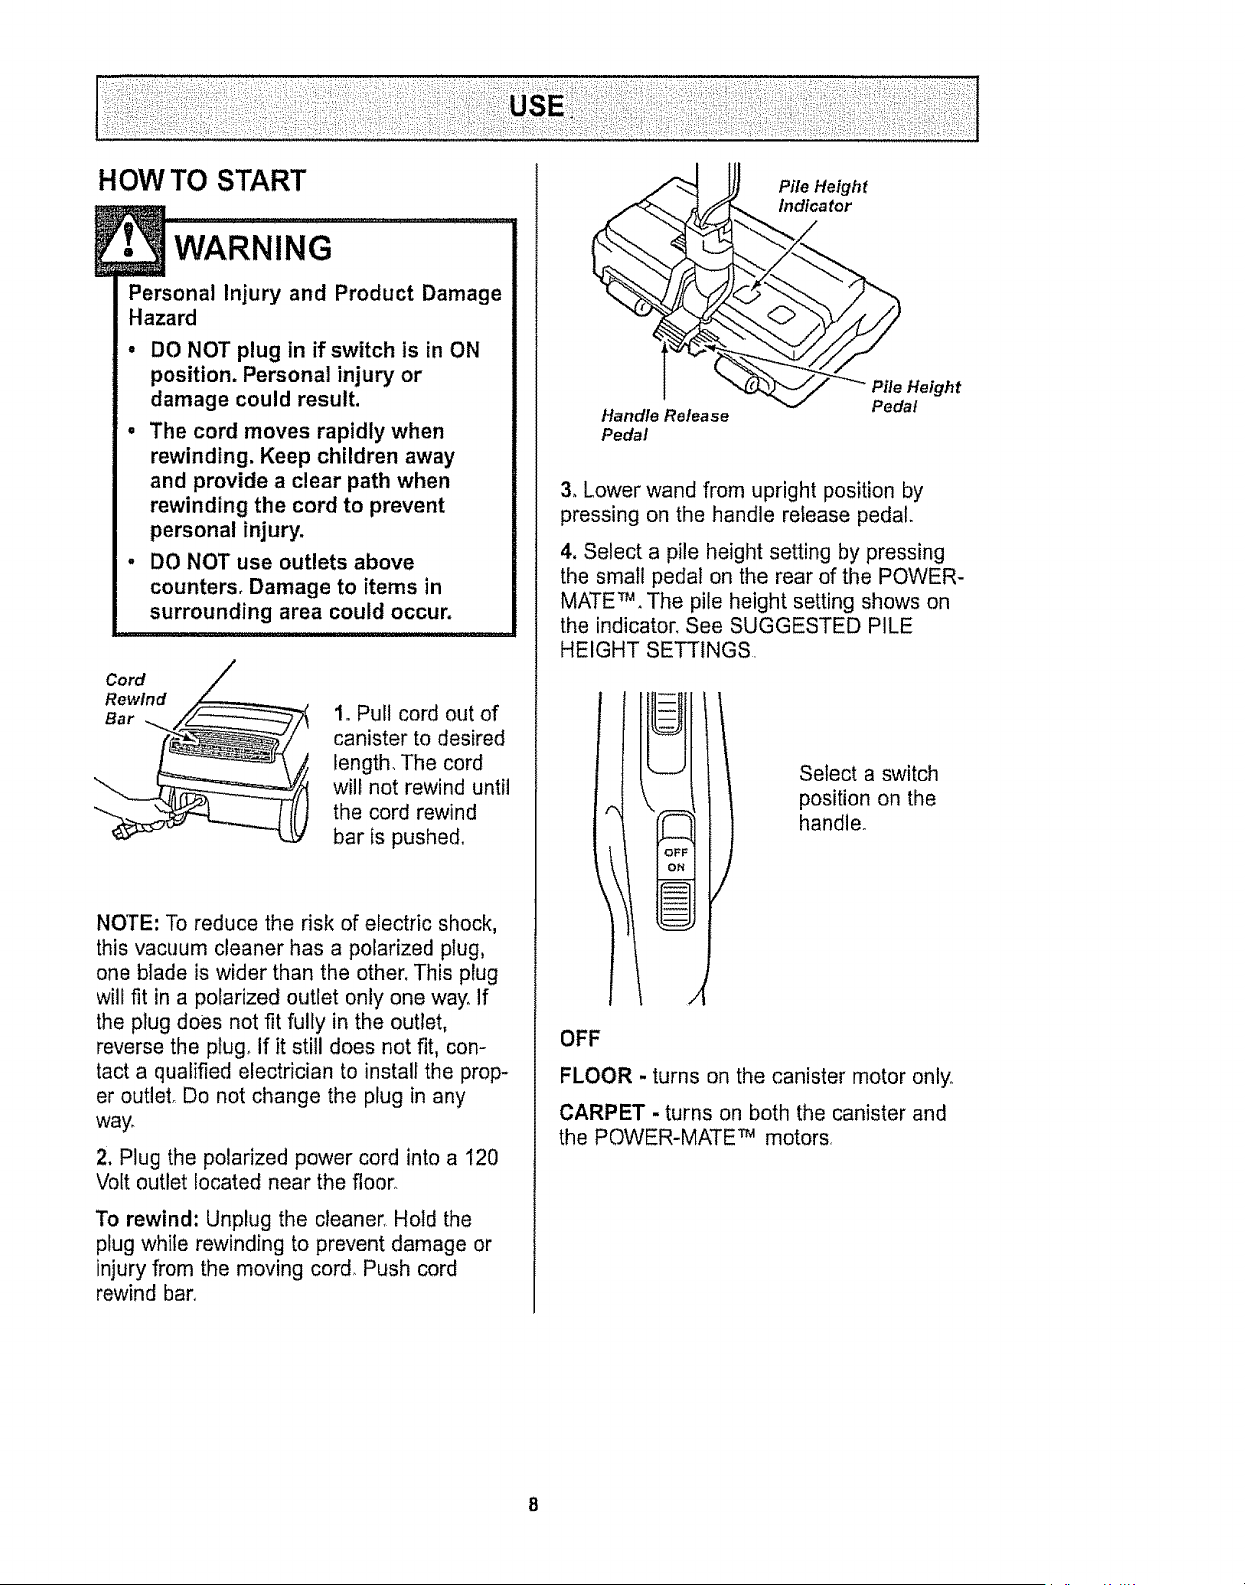
HOW TO START
Personal Injury and Product Damage
Hazard
• DO NOT plug in if switch is in ON
position. Personal injury or
damage could result.
° The cord moves rapidly when
rewinding. Keep children away
and provide a clear path when
rewinding the cord to prevent
personal injury.
° DO NOT use outlets above
counters. Damage to items in
surrounding area could occur.
Cord
Rewind
Bar
1oPull cord out of
canister to desired
length, The cord
wilt not rewind until
the cord rewind
bar is pushed.
NOTE: To reduce the risk of electric shock,
this vacuum cleaner has a polarized plug,
one blade is wider than the other, This plug
will fit in a polarized outlet only one way. If
the plug does not fit fully in the outlet,
reverse the plug_ If it still does not fit, con-
tact a qualified electrician to install the prop-
er outleL Do not change the plug in any
way_
2. Plug the polarized power cord into a 120
Volt outlet located near the floor°
To rewind: Unplug the cleaner, Hold the
plug while rewinding to prevent damage or
injury from the moving cord_ Push cord
rewind barn
Handle Release
Pedal
Pile Height
indica tot
Pile Height
Pedal
3. Lower wand from upright position by
pressing on the handle reiease pedal.
4. Select a pile height setting by pressing
the small pedal on the rear of the POWER-
MATE TM . The pile height setting shows on
the indicator, See SUGGESTED PILE
HEIGHT SETTINGS
Select a switch
position on the
handle°
OFF
FLOOR - turns on the canister motor onlyo
CARPET. turns on both the canister and
the POWER-MATE TM motors
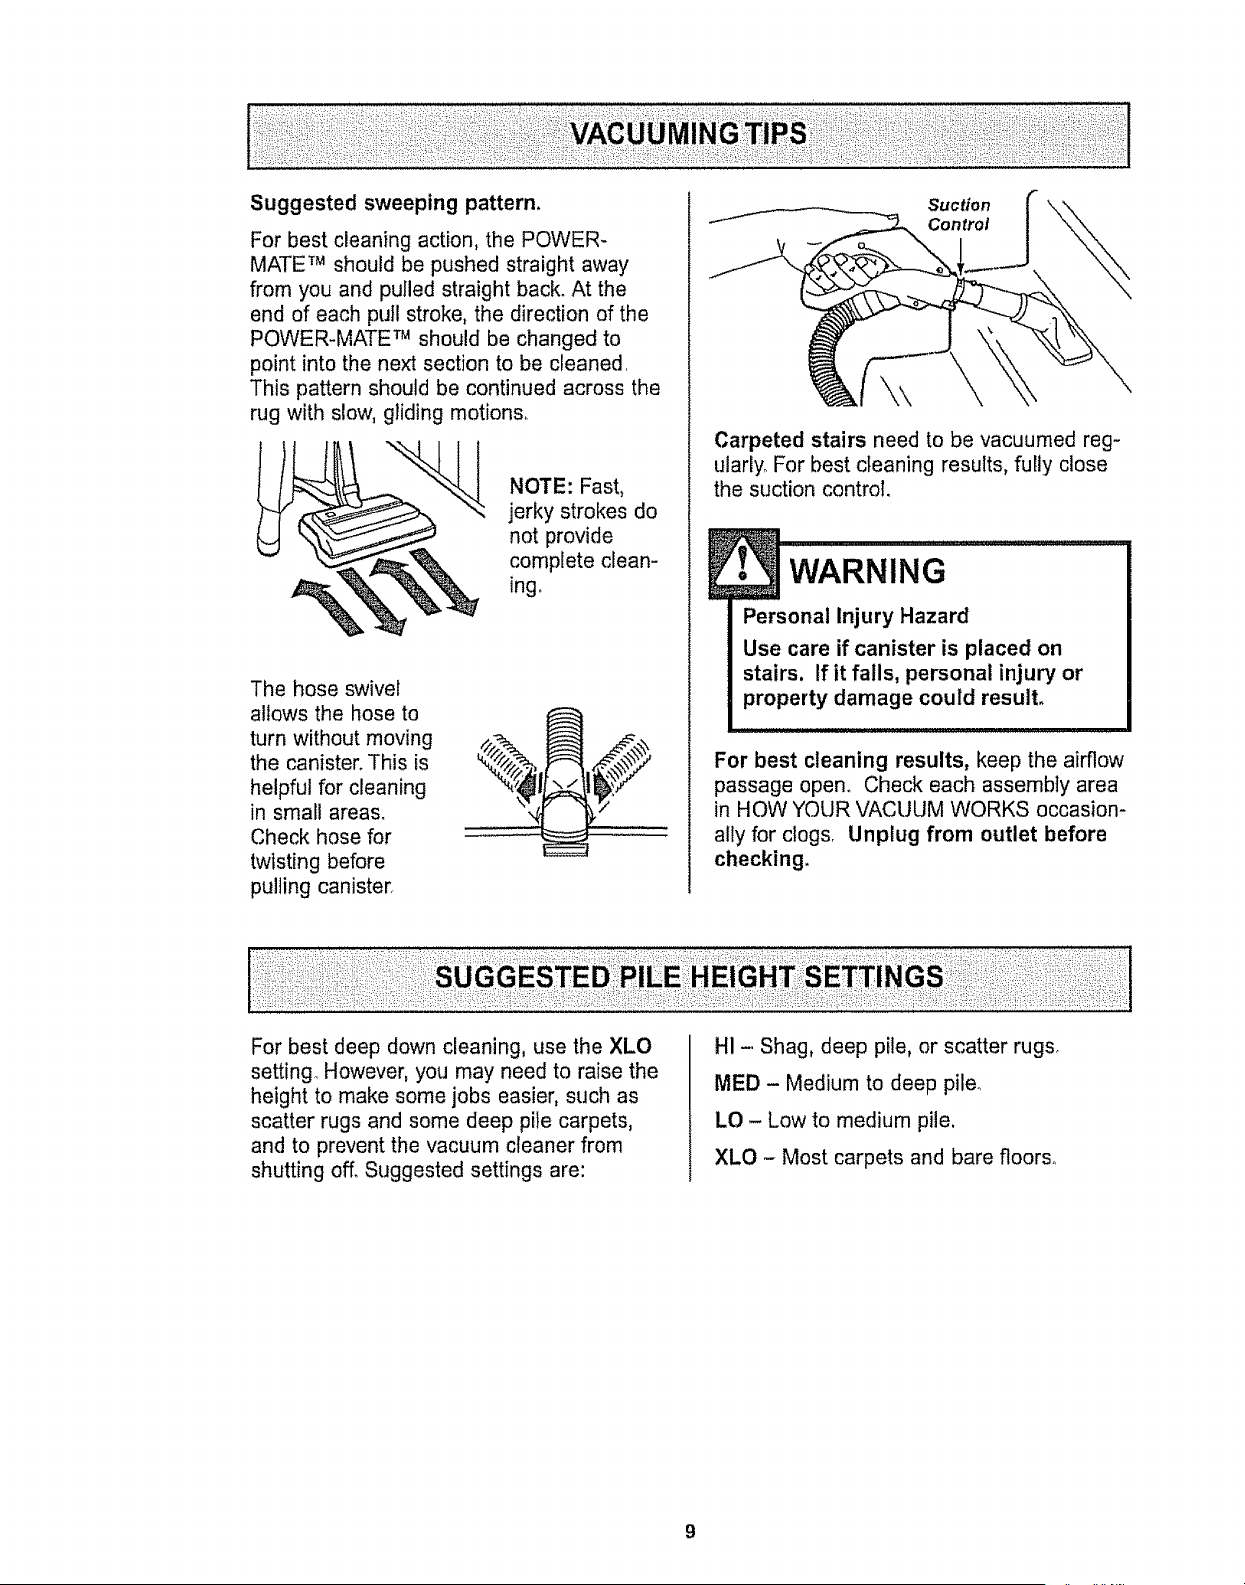
Suggested sweeping pattern.
For best cleaning action, the POWER-
MATE TM should be pushed straight away
from you and pulled straight back_ At the
end of each pull stroke, the direction of the
POWER-MATE TM should be changed to
point into the next section to be cleaned,
This pattern should be continued across the
rug with slow, gliding motion&
NOTE: Fast,
jerky strokes do
not provide
complete clean-
ing_
The hose swivel
allows the hose to
turn without moving
the canister. This is
helpful for cleaning
in small areas,
Check hose for
twisting before
pulling canister.
Suction
Control
\\
Carpeted stairs need to be vacuumed reg-
ularly. For best cleaning results, fully close
the suction control.
!
• WARNING
Personal Injury Hazard
Use care if canister is placed on
stairs. If it fails, personal injury or
property damage could result.
For best cleaning results, keep the airflow
passage open. Check each assembly area
in HOW YOUR VACUUM WORKS occasion-
ally for clogs, Unplug from outlet before
checking,
For best deep down cleaning, use the XLO
setting However, you may need to raise the
height to make some jobs easier, such as
scatter rugs and some deep pile carpets,
and to prevent the vacuum cleaner from
shutting off. Suggested settings are:
HI - Shag, deep pile, or scatter rugs,
MED - Medium to deep pile_
LO - Low to medium pile.
XLO - Most carpets and bare floors°
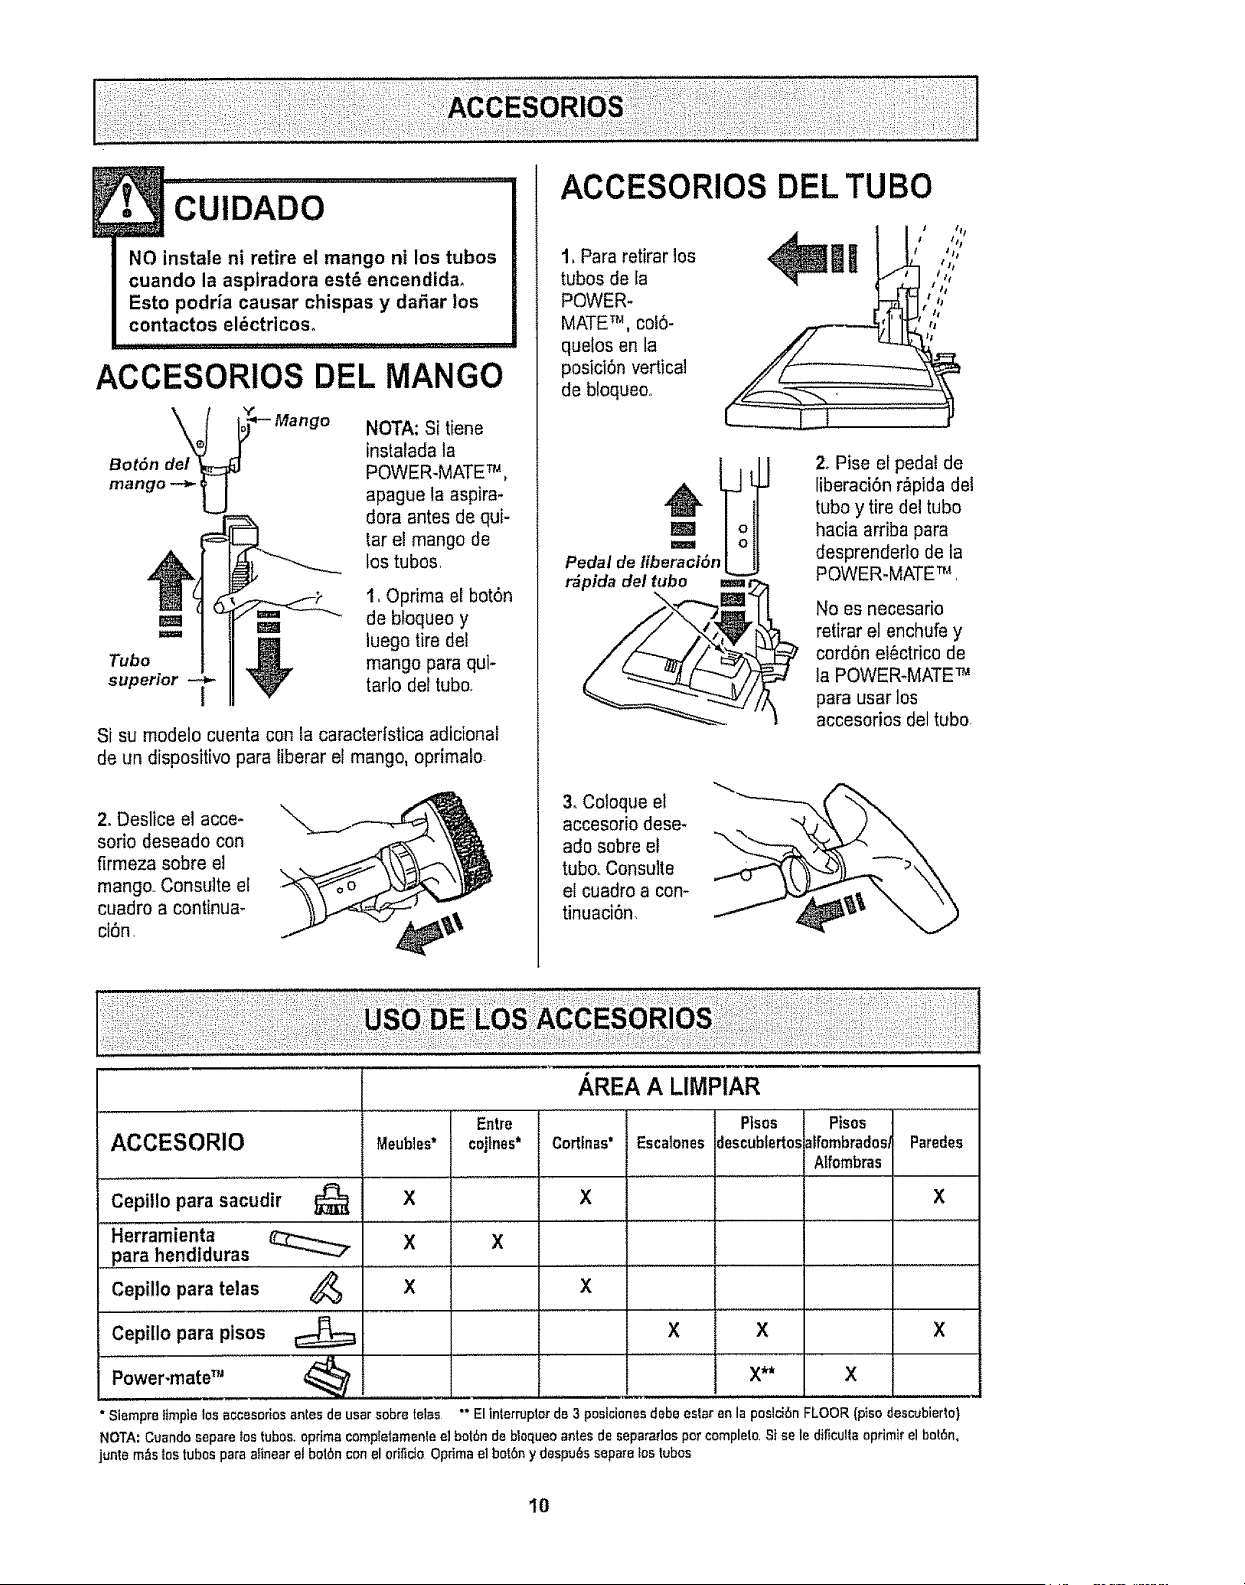
CUiDADO ....................
NO instale ni retire el mango ni los tubes
cuando la asplradora est_ encendida,
Esto podria causar chispas y dafiar los
contactos el_ctricoso
ACCESORIOS DEL MANGO
Bot6n del _]
mango_ U
NOTA:Si tiene
instaladala
POWER-MATETM,
apague laaspira-
doraantes de qui-
tar el mango de
lostubes
1,Oprima el bot6n
r_m _ de bfoqueoy
== _ luegotiredel
Tube _ mango para qui-superior -_ tartodettube.
t
Si su modelo cuenta con ta caracterfsticaadicional
de un dispositivo pars tiberaret mango, oprimafo.
2. Deslice el acce-
sorio deseado con
firmeza sobre el
mango..Consulte el
cuadro a continua-
ci6n,
ACCESORIOS DEL TUBe
1, Para retirarlos
tubes de la
POWER-
MATETM, colS-
quelos en la
posict6nvertical
de bfoqueo..
_ t/;,nl !:','
Pedal de libe_r_ci6n_
r_pida del tube ===
2, Pise el pedal de
liberaci6n r,_pidadel
tubey tiredel tube
hacia arriba pars
desprenderlo de la
POWER.MATETM .
No es necesario
retirar el enchufey
cord6n el6ctrico de
la POWER-MATETM
pars userlos
accesorios deltube
3. Coloqueel
accesoriodese-
ado sobreel
tube.Consuite
etcuadroa con-
tinuaci6n_
ACCESOR10 Meubies*
X
Cepillo para sacudir
Herramienta
para hendiduras
Cepillo pars telas
Cepillo pars pisos
Power'mater"
"Siernpra l_mpie los accesodas antes de ussr sabra tells
_,REA A LIMPIAR
Entre
Ptsos Pisos
Parades
cejtnes* Cortfnas" EscWonesJescublertos_ffombradosf
Affombras
X X
X
X
X X X
X** X
"" El interrupter de 3 poslciones debe ester an la poslciSn FLOOR (ptso des_bierto)
NOTA:Cuandasepaceios tubes+optimacornpletamenteel bot6nde bloqueaantesde separadospercamplelo,Stsele dificultaoprimirelbot6n,
juntamz_slos tubesparaalinearel baibnconelorificieOptimaelbat6n ydespu_ssepatelos tubas
I0
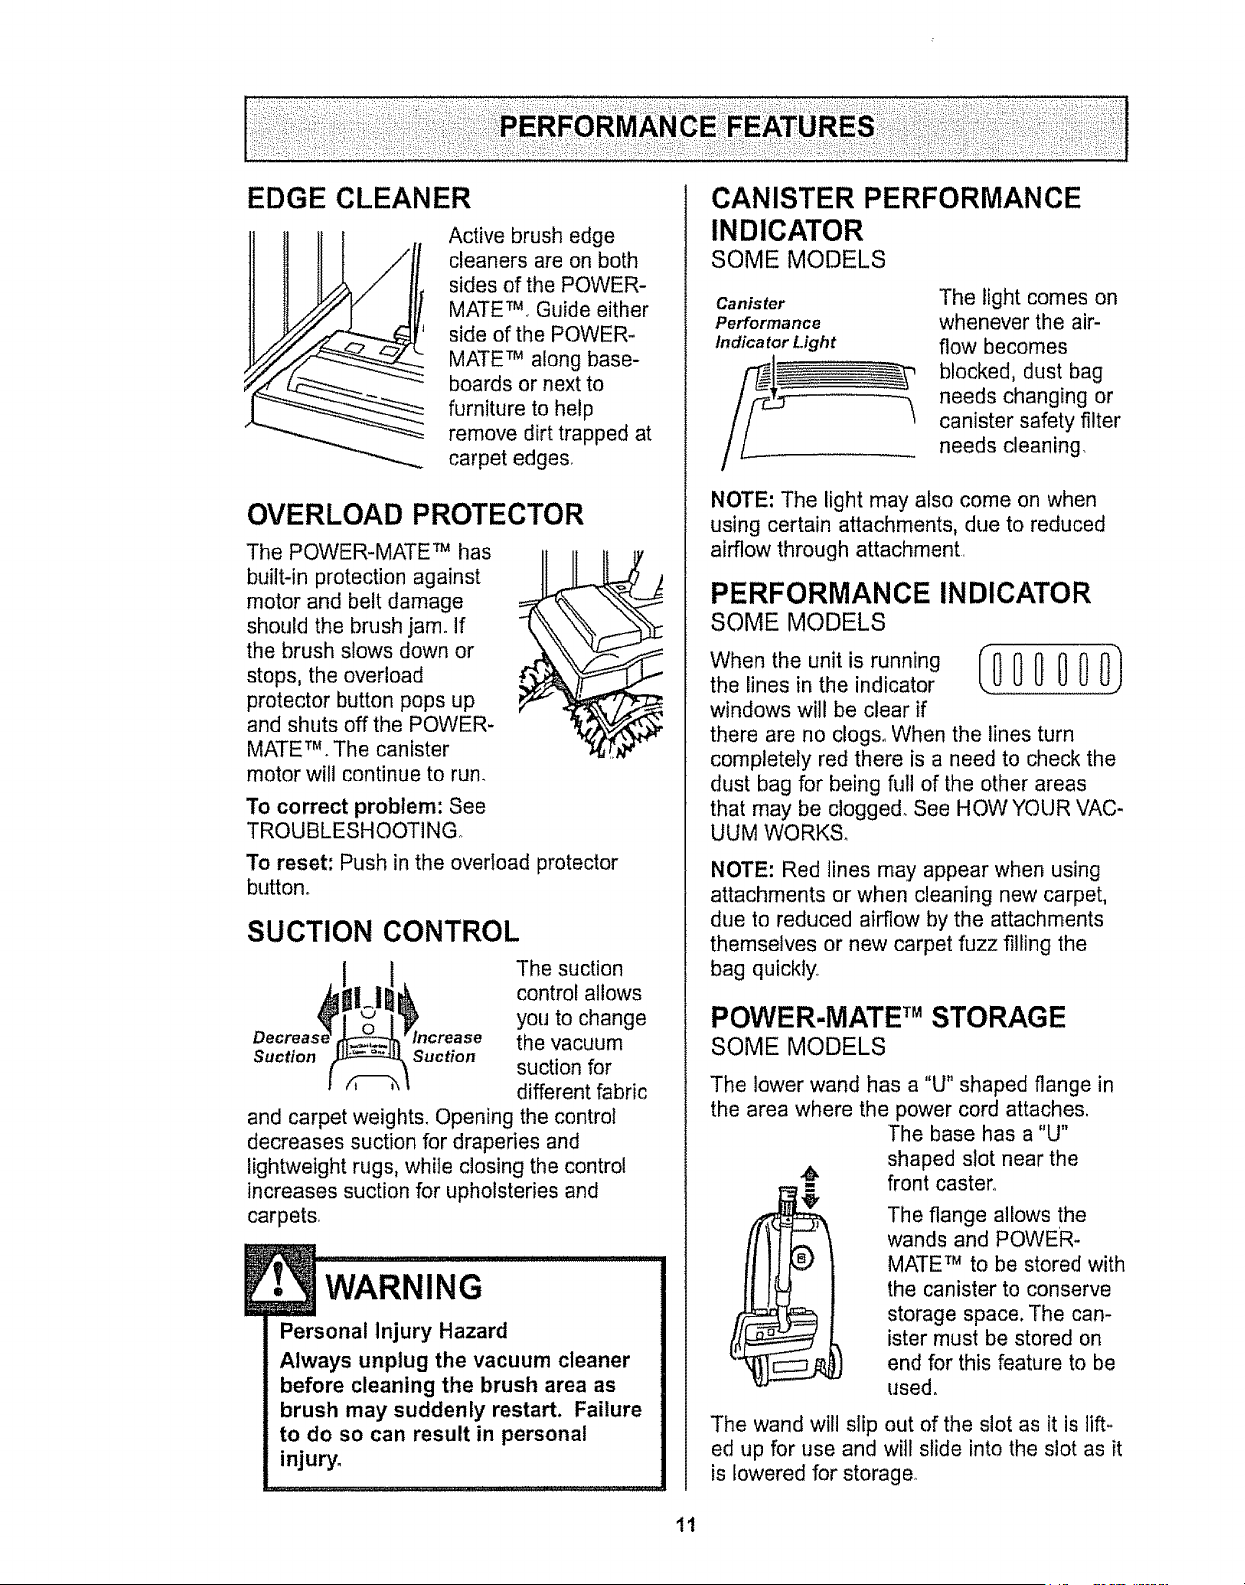
EDGE CLEANER
Active brush edge
cleaners are on both
sides of the POWER-
MATETM_Guide either
side of the POWER-
MATE TM a!ong base-
boards or next to
furniture to help
remove dirt trapped at
carpet edge&
OVERLOAD PROTECTOR
The POWER-MATE TM has
built-in protection against
motor and belt damage
should the brush jam° If
the brush slows down or
stops, the overload
protector button pops up
and shuts off the POWER-
MATE TM. The canister
motor will continue to run_
To correct problem: See
TROUBLESHOOTING°
To reset: Push in the overload protector
button°
SUCTION CONTROL
The suction
control allows
you to change
the vacuum
Suction Suction suction for
different fabric
and carpet weights. Opening the control
decreases suction for draperies and
lightweight rugs, while closing the control
increases suction for upholsteries and
carpets,
• WARNING ........... i
Personal Injury Hazard
Always unplug the vacuum cleaner
before cleaning the brush area as
brush may suddenly restart. Failure
to do so can result in personal
injury.
CANISTER PERFORMANCE
INDICATOR
SOME MODELS
Canister
Performance
Indica tar Light
The light comes on
whenever the air-
flow becomes
blocked, dust bag
needs changing or
canister safety filter
needs cleaning.
NOTE: The light may also come on when
using certain attachments, due to reduced
airflow through attachment,
PERFORMANCE INDICATOR
SOME MODELS
When the unit is running IO00 000)
the lines in the indicator
windows will be clear if
there are no clog& When the lines turn
completely red there is a need to check the
dust bag for being full of the other areas
that may be clogged, See HOWYOUR VAC-
UUM WORKS,
NOTE: Red lines may appear when using
attachments or when cleaning new carpet,
due to reduced airflow by the attachments
themselves or new carpet fuzz filling the
bag quickly,
POWER-MATE TM STORAGE
SOME MODELS
The lower wand has a "U" shaped flange in
the area where the power cord attaches.
The base has a "U"
shaped slot near the
front caster°
The flange allows the
wands and POWER-
MATE TM to be stored with
the canister to conserve
storage space. The can-
ister must be stored on
end for this feature to be
used.
The wand will slip out of the slot as it is lift-
ed up for use and will slide into the slot as it
is lowered for storage.
11
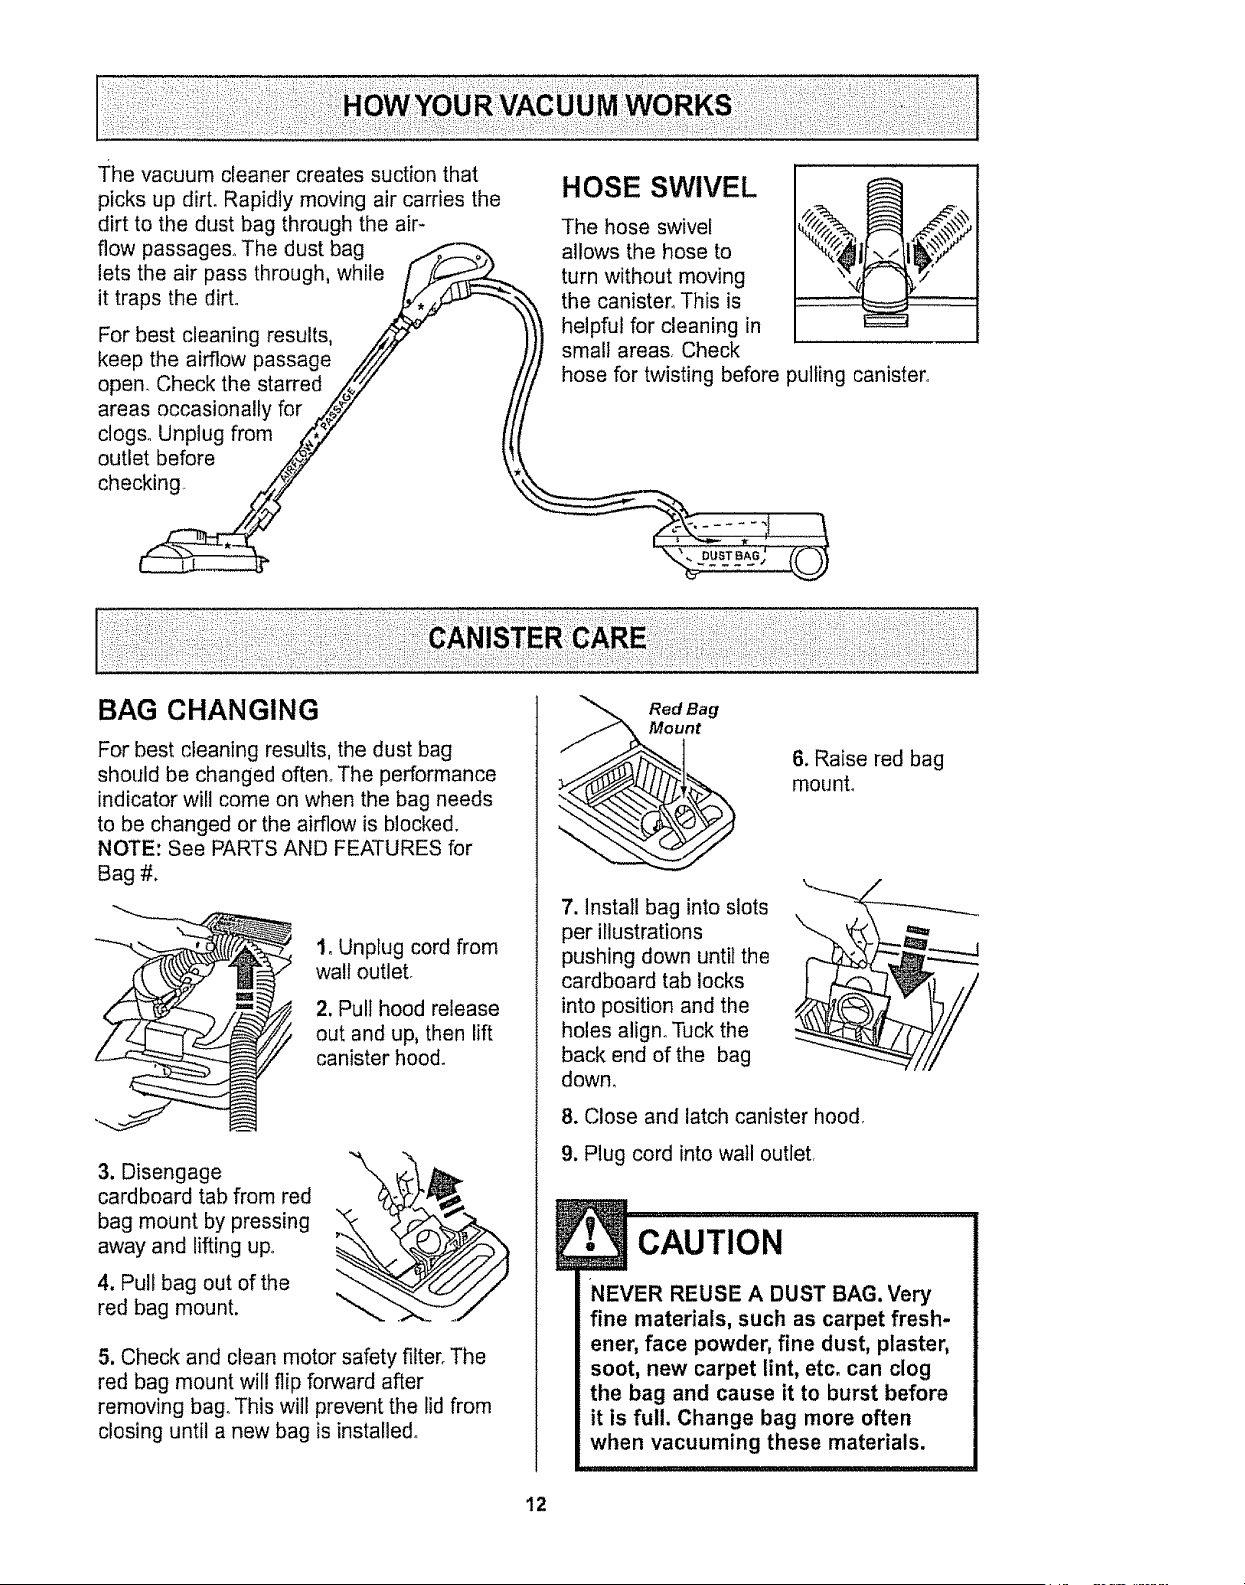
Thevacuumcleanercreatessuctionthat
picksupdirt.Rapidlymovingaircarriesthe
dirttothedustbagthroughtheair-
flowpassages.Thedustbag _ _.,,,
letstheair passthrough,while /
it traps the dirt. .__'_-..,:
For best cleaning results, _"
keep the airflow passage _/////
open. Check the starred _"
areas occasionally for _,_#_7 _/
clogs. Unplug from _7 ti
outletbefo,e p/ \
chec_
HOSE SWIVEL
The hose swivel
allows the hose to
turn without moving
the canister, This is
helpful for cleaning in
small areas. Check
hose for twisting before pulling canister
BAG CHANGING
For best cleaning results, the dust bag
should be changed often° The performance
indicator will come on when the bag needs
to be changed or the airflow is blocked.
NOTE: See PARTS AND FEATURES for
Bag #.
1, Unplug cord from
wall outlet
2, Pull hood release
out and up, then lift
canister hood.
3. Disengage
cardboard tab from red
bag mount by pressing
away and lifting up.
4. Pui bag out of the
red bag mount.
5, Check and clean motor safety filter. The
red bag mount will flip forward after
removing bag. This will prevent the lid from
closing until a new bag is installed.
Red ag
nt
7. Instal bag into slots
per illustrations
pushing down until the
cardboard tab locks
into position and the
holes align. Tuck the
back end of the bag
down,
6. Raise red bag
mounL
8. Close and latch canister hood.
9. Plug cord into wail outlet,
1• CAUTION
NEVER REUSE A DUST BAG. Very
fine materials, such as carpet fresh-
ener, face powderr fine dust, plaster,
soot, new carpet lint, etc. can clog
the bag and cause it to burst before
it is full. Change bag more often
when vacuuming these materials.
12
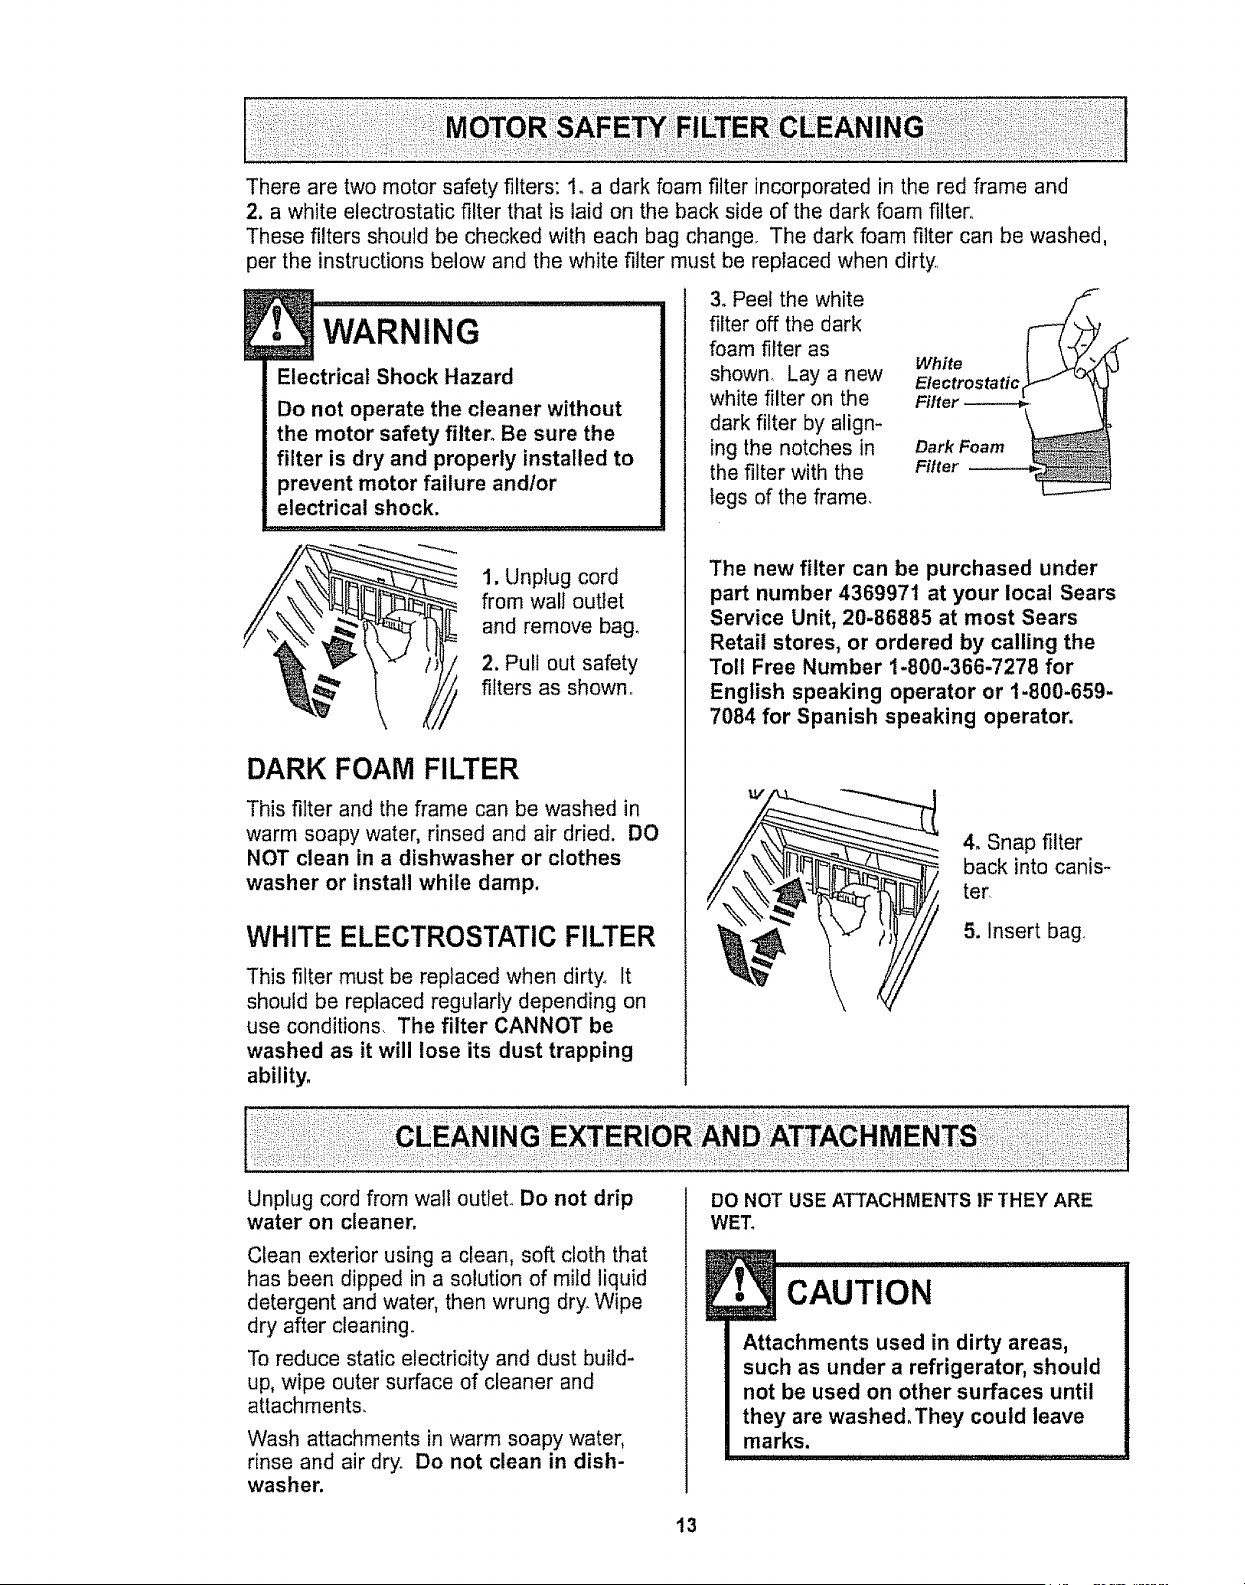
There are two motor safety filters: 1_ a dark foam filter incorporated in the red frame and
2. a white electrostatic filter that is laid on the back side of the dark foam filter.
These filters should be checked with each bag change The dark foam filter can be washed,
per the instructions below and the white filter must be replaced when dirty
WARNING .... J
Electrical Shock Hazard
Do not operate the cleaner without
the motor safety filter. Be sure the
filter is dry and properly installed to
prevent motor failure andlor
electrical shock.
1. Unplug cord
from wall outlet
and remove bag.
2, Pull out safety
filters as shown_
DARK FOAM FILTER
This filter and the frame can be washed in
warm soapy water, rinsed and air dried. DO
NOT clean in a dishwasher or clothes
washer or install while damp.
WHITE ELECTROSTATIC FILTER
This filter must be replaced when dirty. It
should be replaced regularly depending on
use conditions. The filter CANNOT be
washed as it will lose its dust trapping
ability.
3. Peel the white
filter off the dark
foam filter as
shown Lay a new
white filter on the
dark filter by align-
ing the notches in
the filter with the
legs of the frame_
White
Dark Foam _
Niter
J
The new filter can be purchased under
part number 4369971 at your local Sears
Service Unit, 20-86885 at most Sears
Retail stores, or ordered by calling the
Toll Free Number t-800-366-7278 for
English speaking operator or 1-800-659-
7084 for Spanish speaking operator.
4o Snap filter
back into canis-
ter
5. Insert bag
Unplug cord from wall outlet. Do not drip
water on cleaner.
Clean exterior using a clean, soft cloth that
has been dipped in a solution of mild liquid
detergent and water, then wrung dry. Wipe
dry after cleaning.
To reduce static electricity and dust build-
up, wipe outer surface of cleaner and
attachments.
Wash attachments in warm soapy water,
rinse and air dry. Do not clean in dish-
washer.
DO NOT USE ATTACHMENTS IF THEY ARE
WET_
E CAoT,o. I
Attachments used in dirty areas,
such as under a refrigerator, should
not be used on other surfaces until
they are washed.They could leave
marks.
13
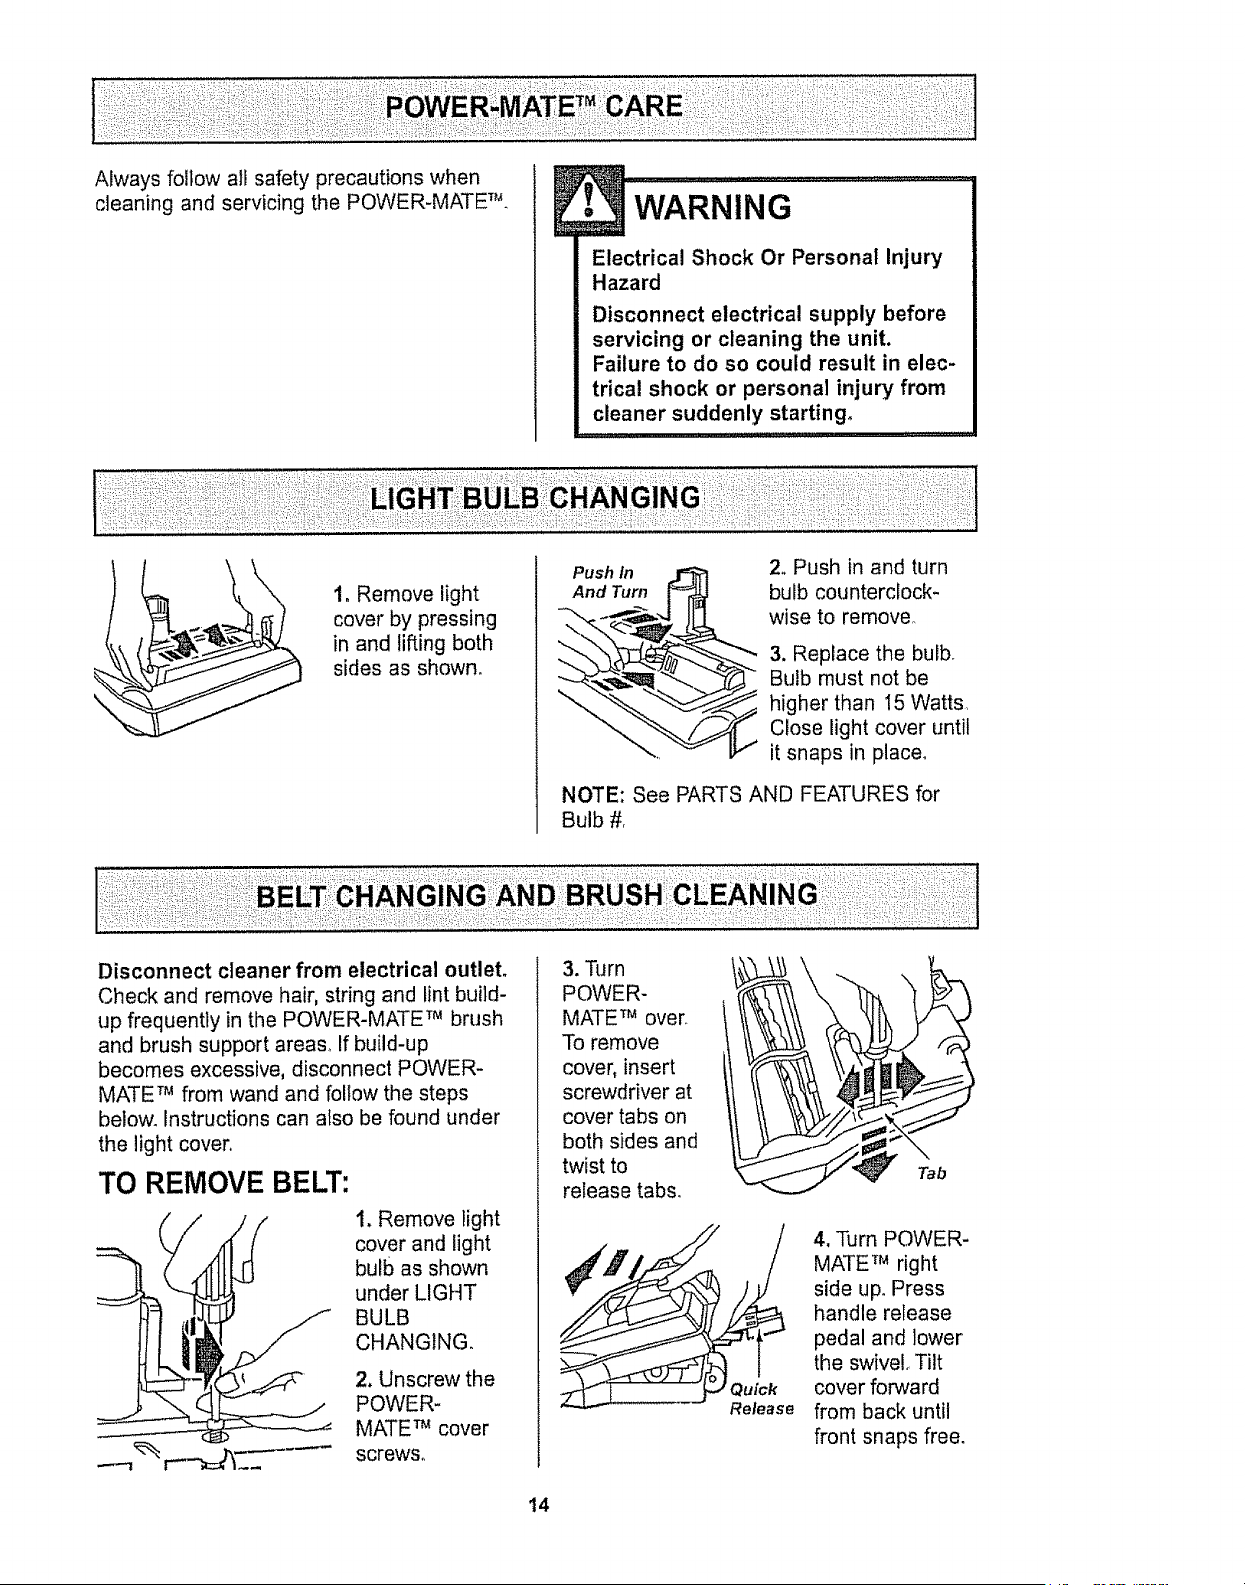
Always follow all safety precautions when
cleaning and servicing the POWER-MATE_L
! WARNIN 'G...................................
Electrical Shock Or Personal Injury
Hazard
Disconnect electrical supply before
servicing or cleaning the unit.
Failure to do so could result in elec-
trica! shock or persona] injury from
cleaner suddenly starting.
1. Remove light
cover by pressing
in and lifting both
sides as shown.
Push In _ 2. Push in and turn
And Turn [_ bulb counterclock-
-'-._-..___,.-4 IIq wise to remove_
_.,"__6_._ 3. Rep,ace the bu,b_
_ ulb must not be
higher than 15 Watts,
Close light cover until
it snaps in place.
NOTE: See PARTS AND FEATURES for
Bulb #.
Disconnect cleaner from electrical outlet.
Check and remove hair, string and lint build-
up frequently in the POWER-MATE TM brush
and brush support areas. If build-up
becomes excessive, disconnect POWER-
MATE TM from wand and follow the steps
below. Instructions can also be found under
the light cover
TO REMOVE BELT:
I. Remove light
cover and light
bulb as shown
under LIGHT
BULB
CHANGING.
2. Unscrew the
POWER-
MATE TM cover
screws°
3. Turn
POWER-
MATE TM over
To remove
cover, insert
screwdriver at
cover tabs on
both sides and
twist to
release tabs.
Tab
Quick
Release
4, Turn POWER-
MATE TM right
side up. Press
handle release
pedal and lower
the swivel Tilt
cover forward
from back until
front snaps free.
14

5. Carefully
insert and
twist
screwdriver
at each
brush
support to
free brush
from base°
Brush
Support
6. Remove worn
belt,
7. Slide brush
supports off to
check and clean
brush support
areas, See
BRUSH
ASSEMBLY for
picture of
complete brush
assembly.
TO REPLACE BELT:
1, Slide washers and brush supports onto
brush assembly,
2. Install
new belt
over motor
drive, then
over brush
sprocket.
NOTE: See
PARTS AND
FEATURES
for Belt #,
Brush
Brush Brush Sprocket
Support
Motor
Drive
3. Snap brush
supports into
place on baser
Be sure brush
supports are
not upside-
down,
4, Line up
front of cover
and base
Rest cover
on frpnt edge
of base as
shown,
CO ver
Base
5. Tilt cover to
back_ Press
cover firmly until
side tabs snap
into place_
Replace cover
screws, light
bulb and light
cover,,
!5
Electrical Shock Or Personal Injury
Hazard
Disconnect electrical supply before
servicing or cleaning the unit°
Failure to do so could result in elec-
trical shock or personal injury from
cleaner suddenly starting.
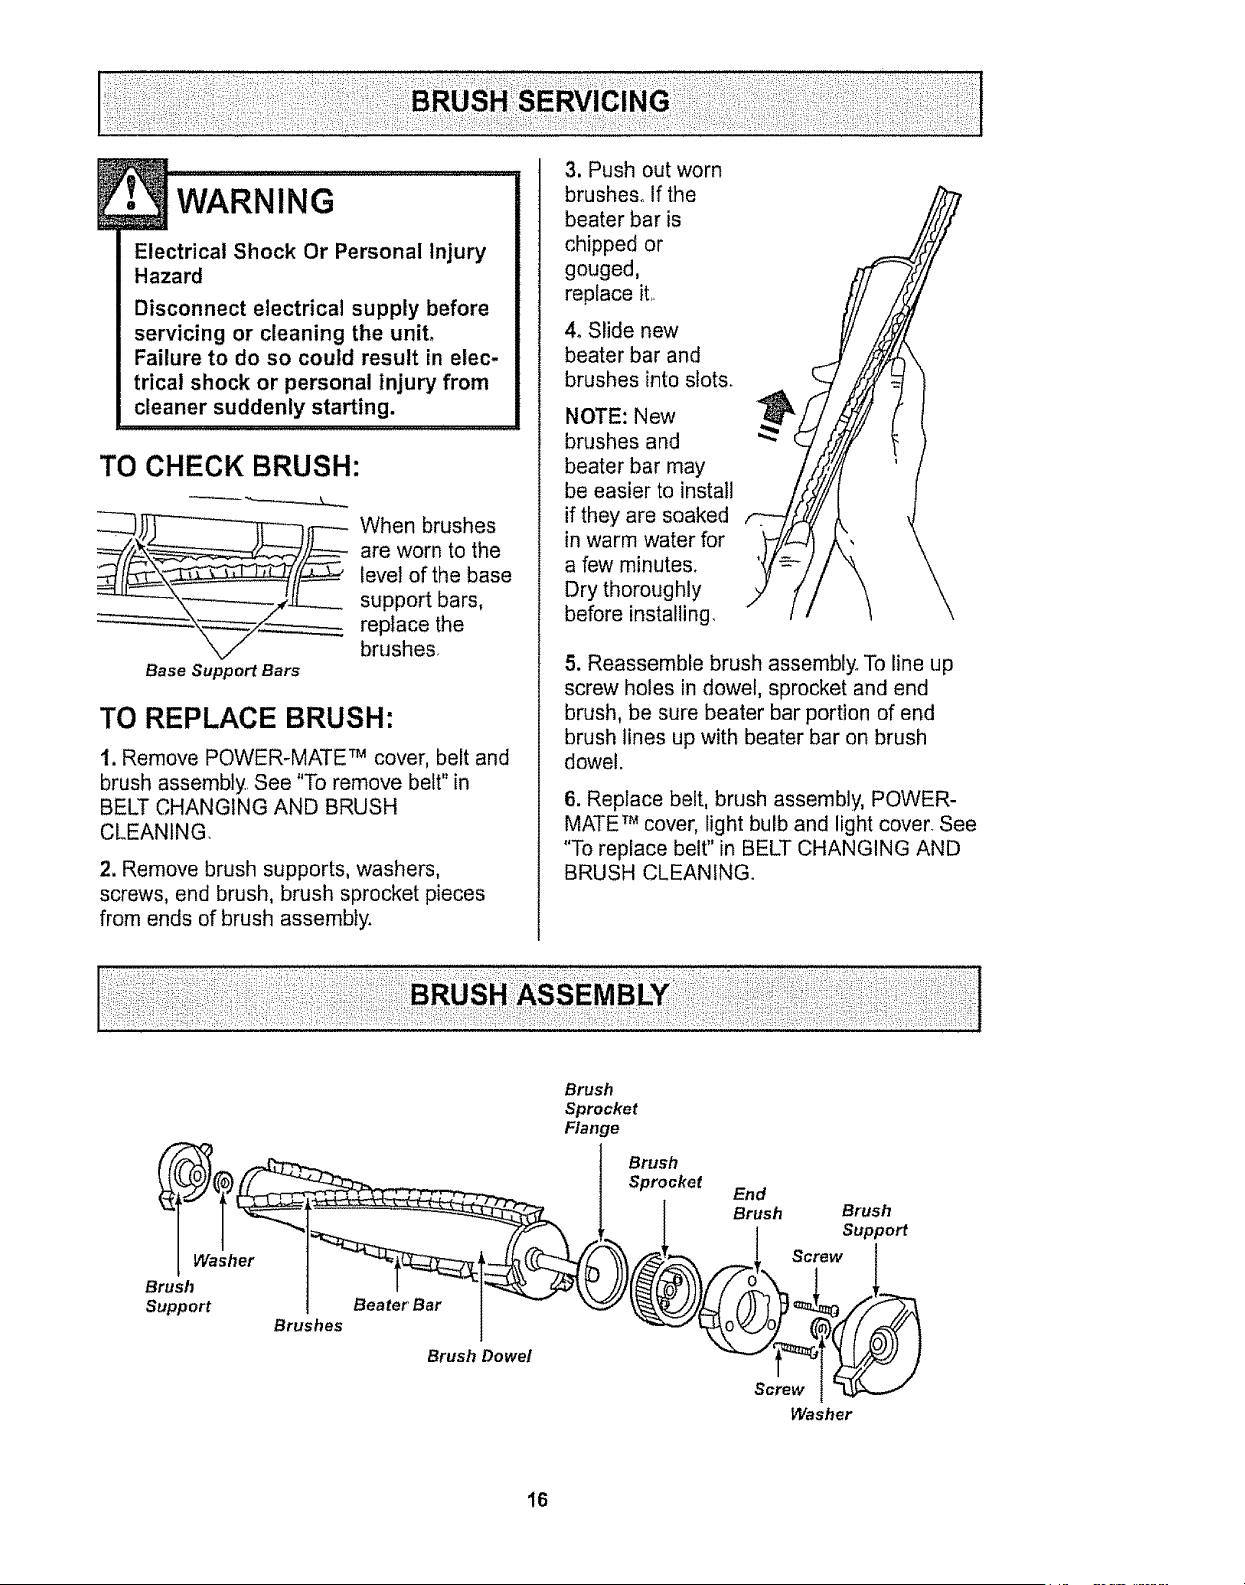
TO CHECK BRUSH:
When brushes
are worn to the
level of the base
support bars,
replace the
brushes
Base Support Bars
TO REPLACE BRUSH:
t. Remove POWER-MATE TM cover, belt and
brush assembly.. See "To remove belt" in
BELT CHANGING AND BRUSH
CLEANING,
2. Remove brush supports, washers,
screws, end brush, brush sprocket pieces
from ends of brush assembly.
3. Push out worn
brushes° If the
beater bar is
chipped or
gouged,
replace it.,
4, Slide new
beater bar and
brushes into slots.
NOTE: New
brushes and
beater bar may
be easier to install
if they are soaked
in warm water for
a few minutes.
Dry thoroughly
before installing.
5. Reassemble brush assembly° To line up
screw holes in dowel, sprocket and end
brush, be sure beater bar portion of end
brush lines up with beater bar on brush
dowel.
6. Replace belt, brush assembly, POWER-
MATE TM cover, light bulb and light cover. See
"To replace belt" in BELT CHANGING AND
BRUSH CLEANING.
Washer
Brush
Support
Beater Bar
Brushes
Brush Dowel
Brush
Sprocket
Flange
Brush
Sprocket
End
Brush Brush
Suppo_
Screw
Screw
Washer
16
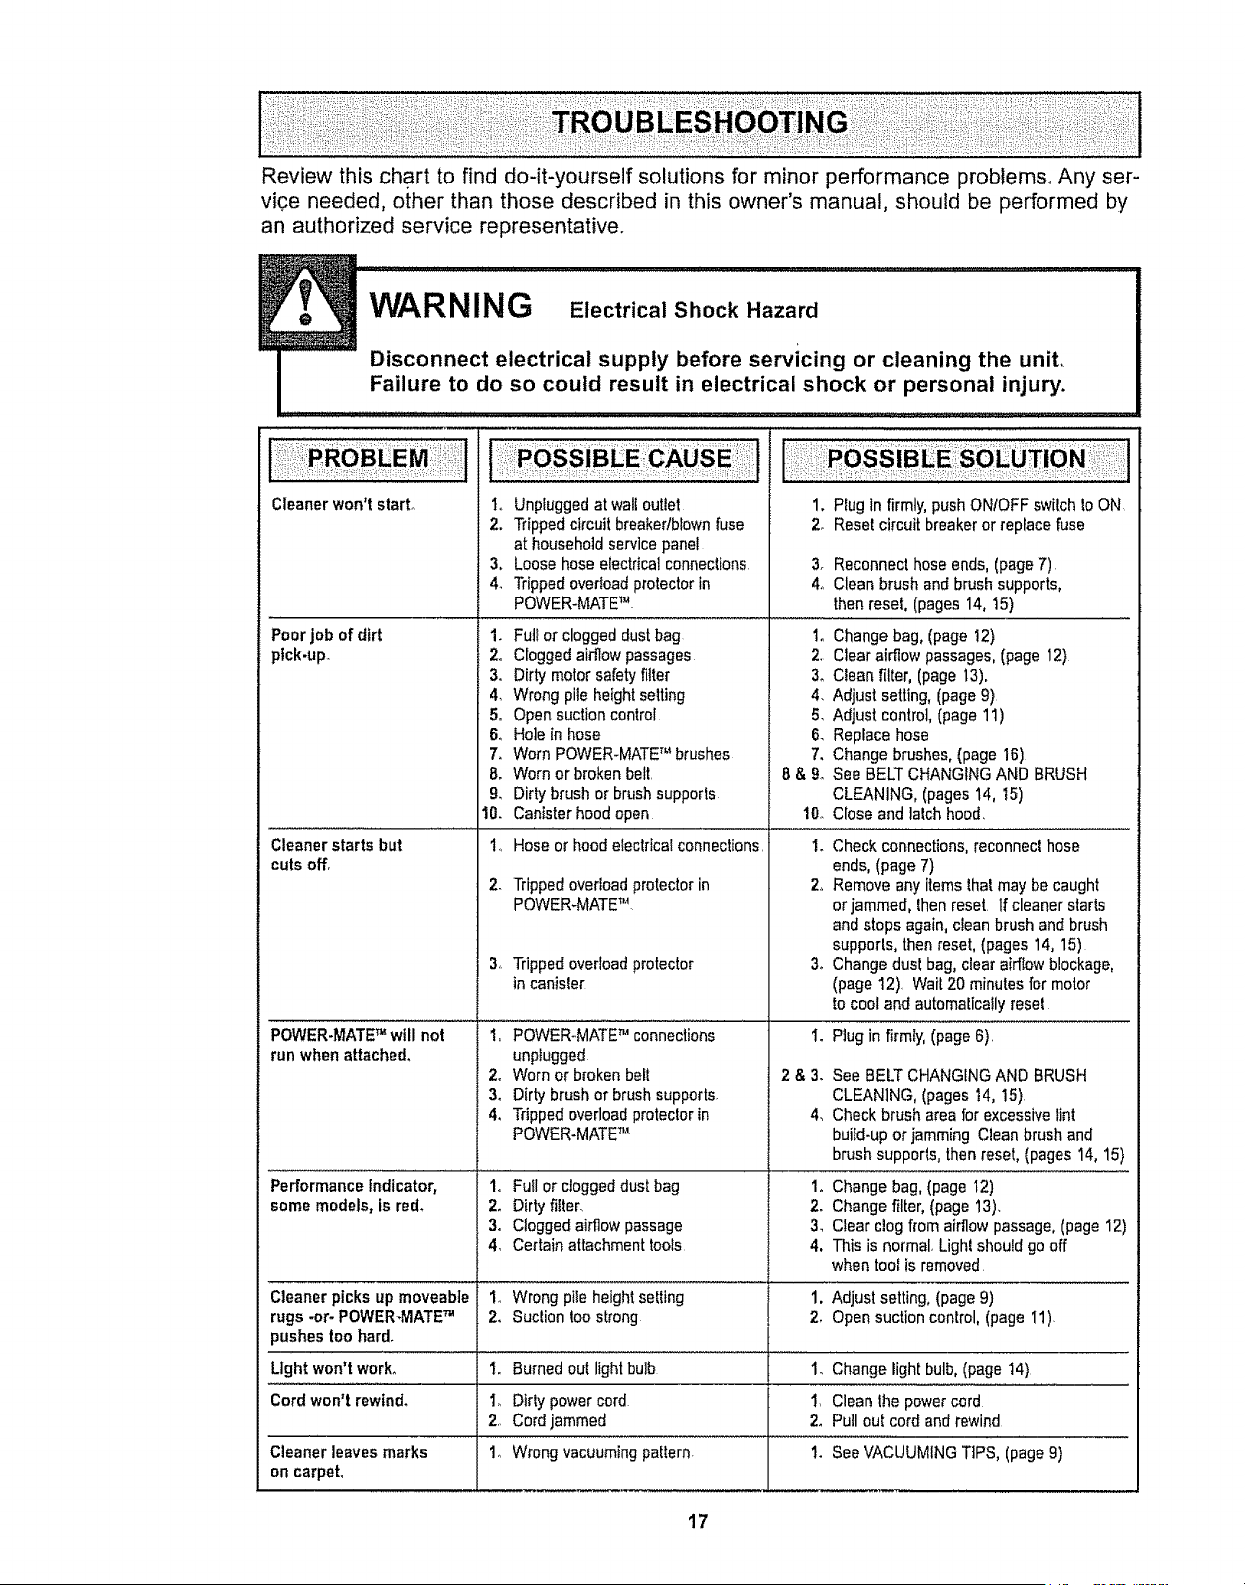
Review this chart to find do-it-yourself solutions for minor performance problems° Any ser-
vice needed, other than those described in this owner's manual, should be performed by
an authorized service representative°
I
Cleaner won't start°
Poor job ofdirt
ptck-up.
Cleanerstarts but
cutsoff.
1. Unpluggedat wall outlet
2, Trippedcircuitbreakedblownfuse
athousehold servicepanel
3. Loosehose electricalconnections
4_ Trippedoverloadprotectorin
POWER-MATETM
1. Ful!or cloggeddust bag
2o Cloggedaidlowpassages
3, Dirtymolarsafety filter
4, Wrong pileheightsetting
1. PIugIn firmly,push ONIOFF switch toON
2, Resetcircuit breakeror replacefuse
5_
6o
7,
8,
9, Dirtybrush or brushsupports
10. Cantsterhoodopen
I.,Hoseorhoodelectricalconnections,
2- Trippedoverloadprotectorin
POWER.MATETM
3. Trippedoverloadprotector
incanisle[
3. Reconnecthoseends,(page7)
4o Clean brush and brush supports,
thenreset, (pages 14, 15)
1oChange bag,(page 12)
2, Clear airflowpassages,(page 12)
3o Clean filter,(page 13).
4. Adjust selling, (page9}
Adjust control, [page 11)
Replacehose
Change brushes,(page 16)
See BELTCHANGINGAND BRUSH
CLEANING, (pages 14, 15)
10. Close and lalch hood,
1. Checkconnections,reconneclhose
ends,(page 7)
2, Removeany items lhat may be caught
or jammed, lhen reset Ifcleaner starts
andstops again, clean brush and brush
supports,thenreset, (pages 14, 15)
3. Changedust bag,clearaidlow blockage,
(page12). Wait20 minutes formotor
to cooland automalicaflyresel
I. Plug infirmly, (page 6).
2 & 3. See BELTCHANGINGAND BRUSH
CLEANING,(pages t4, 15)
4_ Checkbrush area for excessivelint
buiId-upor jammingClean brush and
brush supports,thenreset, (pages14, 15)
1. Changebag, (page 12)
2. Changefilter, (page 13).
3_ Clear clogfrom airflowpassage,(page12)
4, This is normal,Light shouldgo off
whentool is removed
Opensuctioncontrol 5.
Holein hose 6.
Worn POWER-MATETM brushes 7.
Worn orbroken belt 8 & 9.
i .... •
POWER-MATETM will not to POWER-MATETM conneclions
runwhen attached, unpiugged
2o Worn orbrokenbelt
3. Dirtybrushor brushsupports.
4. Trippedoverloadproteclorin
POWER-MATETM
Performance indicator, 1o FuIl or cloggeddust bag
somemodels, Is red, 2. Dirty filter,
3. Cloggedairflow passage
4. Certainattachmenttools
Cleaner picks up moveable I_ Wrongpile heightsetting 1. Adjust setting, (page9)
rugs -or- POWER-MATETM 2. Suclion too strong 2, Opensuctioncontrol, (page I1)
pushestoohard.
Light won't work° 1.. Burnedout lightbulb 1. Changelightbulb, (page 14)
Cord won't rewind° I. Dirty powercord 1. Cleanthe powercord
2. Cordjammed 2. Pullout cordand rewind
Cleaner leaves marks 1o Wrongvacuumingpaltern. 1. SeeVACUUMINGTIPS, (page9}
on carpet,
17
For the repair or replacement parts you need
Call 7:00 am - 7:00 pro, 7 days a week
1-800-366-PART
(1-800-366-7278)
For in-home major brand repair service:
Call 24 hours a day, 7 days a week
1-800-4-MY-HOME sM
(1-800-469-4663)
For the location of a
Sears Parts and Service Center in your area:
Call 24 hours a day, 7 days a week
1-800-488-1222
For information on purchasing a
Sears Maintenance Agreement
or to inquire about an existing Agreement:
Call 9:00 am - 5:00 prn, Monday - Saturday
1-800-827-6655
When requesting service or ordering parts, always provide the following information:
• Product Type • Part Number • Model Number • Part Description
HomeCentral"
TheServiceSided Sears."
18
Manuel Dei Propietario
Aspiradora
CUIDADO:
Lea y sigue todas las
instrucciones de operaci6n
y seguridad antes del uso de
este producto,
Sears, Roebuck and Co., Hoffman Estates, IL 60179 U.S,A.
PIEZA NOCO1ZARD IOUOO-437_537 Impreso en EUA
Antes de usar su aspiradora nueva ..... 2
Garantia de la aspiradora de Kenmore _, _2
Instrucciones importantes de
seguridad ........................... 3
Piezas y caracteristicas ................ 4-5
Armado ............................ 6-7
Uso ............................. 8
Para comenzar ....................... 8
Sugerencias paraaspirar ................ 9
Sugerenciassobre el ajuste de nivel de
pelo de la alfombra .................... 9
Accesorios .......................... 10
Uso de los accesorios ................... 10
Caracteristicas de rendimiento ............... 11
Funcionamiento de su aspiradora ........ 12
Cuidado del recept_culo ................ 12
Cambio de la botsa ................. 12
Limpiezadel filtro de seguridaddel motor 13
Limpiezadel exterior y de losaccesorios .... 13
Cuidado de la Power-Mate TM ........... 14
Cambiode la bombilla ................. 14
Cambiode la correay limpieza
del cepitlo ........................ t4-15
Cuidadodetcepi!]o ..................... 16
Ensamble delcepilto .................. I6
Reconocimiento de problemas ......... 17
Informacibn de assistancia
o servicio ............................. 18
Pot favorlea estaguia que te ayudaraa assembtary operar su aspiradoranuevade Kenmoreen una manera
m_s seguray effectiva
Para masinformaci6nacerca del cuidado y operaci6nde esta aspirador, Ilamea su tiendaSears mas cercana
Cuando prequnteper informaci6nusted necisitar_el n_mero comptetode serie y modelode la aspiradoraque
est_ iocado enla placa de los numeros de modelo y serie_
Use el espaciode abajo para registrarel n_mero de modefoy serie para su nuevaaspiradorade Kenmoi'e,
Nt_merode Modelo
Numero de Serie
Fecha de Compra
Matenga este libro y su recibo en u lugar seguropara referenciasfuturas
Mientrassu use se limite a fines dom_sticos particufares,si esta aspiradora falla dentro de un pe[iodo de un
aSo a partir de la fecha de compra, pot razonesde defectos en materialeso mane de obra, DEVUELVALA AL
CENTRO O DEPARTAMENTO DE SERVICIO DE SEARS MAS CERCANO y Sears la reparar,_sin ningun
cargo.
Esta garantia le confiere derechos legales especificos y adem&spuede que tenga otros derechos que difieren
entreestados.
SEARS,ROEBUCKAND CO.,D/817WA, HoffmanEstates,IL 60179
2

ADVERTENCIA
Suseguridad es muy importantepara nosotros_Pars reducirel riesgo de incendio, cheque
el_ctrico,lesibn corporal o dafios al utilizar su aspiradora,actue de acuerdocon precauciones
b,isicas de seguridad, entre elias:
Leaes[e manualantes de armar o ulilizarsu aspi-
radora
Use suaspiradoraUnicamenteen la forma descrita
en estemanual..Use _nicamentecon accesorios
recomendadosper Sears
Para reducirel riesgode chequeel_ctrico, no use
su aspiradoraal sire ]ibre ni sobresuperficies
mojadas.
Desconecte elcordon el_ctrico antesde
componero limpiar el_rea del cepitlo..De1o
conlrario,elcop!fiepodria arrancar deform
imprevistao podria producirseun cheque el_ctrico.
Siempre debe apagar la aspiradoraantes de
conectaro desconectarla manguerade la
POWER.MATET'L
Siempredebe apagarsu aspiradoraantes de des-
conectarta
Nodesconecte la aspiradoratirandodel cord6n
el_ctrico Pars desconectarfa,hale et enchufe,no
el cord6n.
Sujeteel enchufecon la mane alenrollar el cord6n
el_ctrico.Parsdesconectarla,hale en enchufe,no
el cordon.
No use faasp!faders sie! cord6n o elenchufe est&
dafiado,Si la aspiradorano est_ funcionandoade-
cuadamenteo si se ha dejadocaer, est,_dafiada,
se ha dejadoexpuestaa la intemperieo se ha
dejado caeren agua, devu_lvalaaun Cen-
troiDepartamentode servicio de Sears.
No hale ni transportetaaspiradora per elcordon;
no use elcordoncome mango;no cierrepuertas
sobre e]cordon;no hale el cord6n sobrerebordes
agudosni esquinas No paso la aspiradorasobre
el cord6n,Mantengael cordonafejadode superfi-
cies calientes
No abandonela aspiradoracuando est_conec-
tada Descon_ctetacuandono la est6 usandoy
antes dedarle servicio.
No permita queseautilizada comejuguete Se
requieretenor mayorcuidado cuandosea utilizada
en la proximidadde nif,os o per nifios.
No toquefaaspiradorani elenchufecon las
manes mojadas
No use la aspiradorasi lamangueraest_ rots La
mangueracent!oneatambresel6ctricos,C,_mbiela
si est_ rotao desgastada.Evite asp!tar objetos
agudos
No coloqueobjetos en 1asaberturas
No utilicela aspiradorasi alguna aberturaest,_blo-
queada;mant_ngalalibre de polvo, pe[usa,cabe-
lies y cualquieracosa que podrla disminuir elflujo
de sire
Mantenga elcabetlo,ropa suelIa,dodos y todas
las partes delcuerpa aiejadosde las aberturas y
piezas mec,_nicas.
No usela aspiradorasin tenorinstatadala bolsa
pars polvoy/o los filtros.
Cambie siempre la bolsa parapolvodespu_s de
asp!rat limp!adoresde alfombraso desedorantes,
talcos y potvosfines Estos productos atascanla
bolsa, reducenel flujode sire y pueden causar que
_sta serompaoSi no cambia ta bolsapodrta oca-
sionar dar'iopermanente ala aspiradora
No usela aspiradorapara fevantarobjetos agudos,
juguetespequefios, aifiteres,papet, etc Podrtan
daOarla aspiradorao la bolsapars potvo
No levanteninguna cosaque se est_ quemandoo
emitiendo humo,come cigarritlos,cerillos o ceni-
zas calienles
No usela asp!faders para asp!ratliquidos inflama-
bteso combustibles(gasolina, Ifquidos paralim-
pieza, perfumes,etc) ni la useen lugaresdonde
_stos podrian estarpresentes Losvapores de
estassustancias puedencroat un peligro de incem
die o explosion
Tonga cuidadoespecialal utilizar la aspiradora
enescalones.No la colaque sobresiltas, mesas,
etc_Mant_ngalaen elpiso.
Usted es responsablede asegurar quesu asp!fa-
dersno sea utilizada perninguna persona que no
puedamanejarlacorrectamente.
GUARDE ESTAS INSTRUCCIONES
El armadoy usesegurode su aspiradorason su responsabilidad Esta aspiradoraha side diseOada
exclusivamentepara use dom6stico.La aspiradoradeber&alrnacenarseen un lugarseco yen el interior.
Lea esteManualdel propietariodetenidamente, puescent!oneinformaci6nimportantesobre seguridady
uso_Estaquiacontiene informaci6nsobre seguridaddebajo de simbolosde advertienciacuidado_Per
favor pongaatenciOnespecial a estas instruccionesdadas. Advertencia: Esteinformaci6n le alertar_ con
el poligrode fuego, chequeselectricos,quemadas y los!ones Cuidado: Este informaci6nle alertara a
peligroscome lesiones y dafiosde propiedad

Esimportanteconocerlaspiezasycaracterlsticasdesuaspiradoraparaasegurarsuusoadecuadoyseguro,
Examinelasantesdeusarsuaspiradora
superior
Dispositivo
giratorio
del mango
(Algunos
medeles) --
Sujetador
get cerd6n
Sujetador del
cerd6n y el
enchufe
CordOn el_ctrico
de POWER.MATE TM
-_-- Sujetador del
cord6n y el
enchufe
- ::,_-_-----Bot6n de
J-_ liberacidn
| r_pida del
| mange
| (Algunos
I modelos)
-_ Tubo
superior
o
o
Cerrea
I En EUA #20-5285 1En Canadd #40110
POWER-IVlATETM
Indicador de nivel
de pe/o de/a alfembra
(Algunes medelos)
Pedal de
liberaci6n rdpida
gel tubo
(Algunes medelos)
Luz
(Algunes modetos)
Bombilta
I En EUA #20-5240En Canadd #595181
N_meros de serie del
modele POWER-MATE TM
(Parte inferior)
Pedal de /
liberaci6n //
del mango
Pedal de setecci6n de
hive/de pelo de/a affombra
(Algunos mode/os)
Cubierta de la bombflla
(Atgunos modelos)
)iader de eriltas
(No se muestra)
Protector centra
sobrecargas (Bot6n de
restauraci6n "Reset")
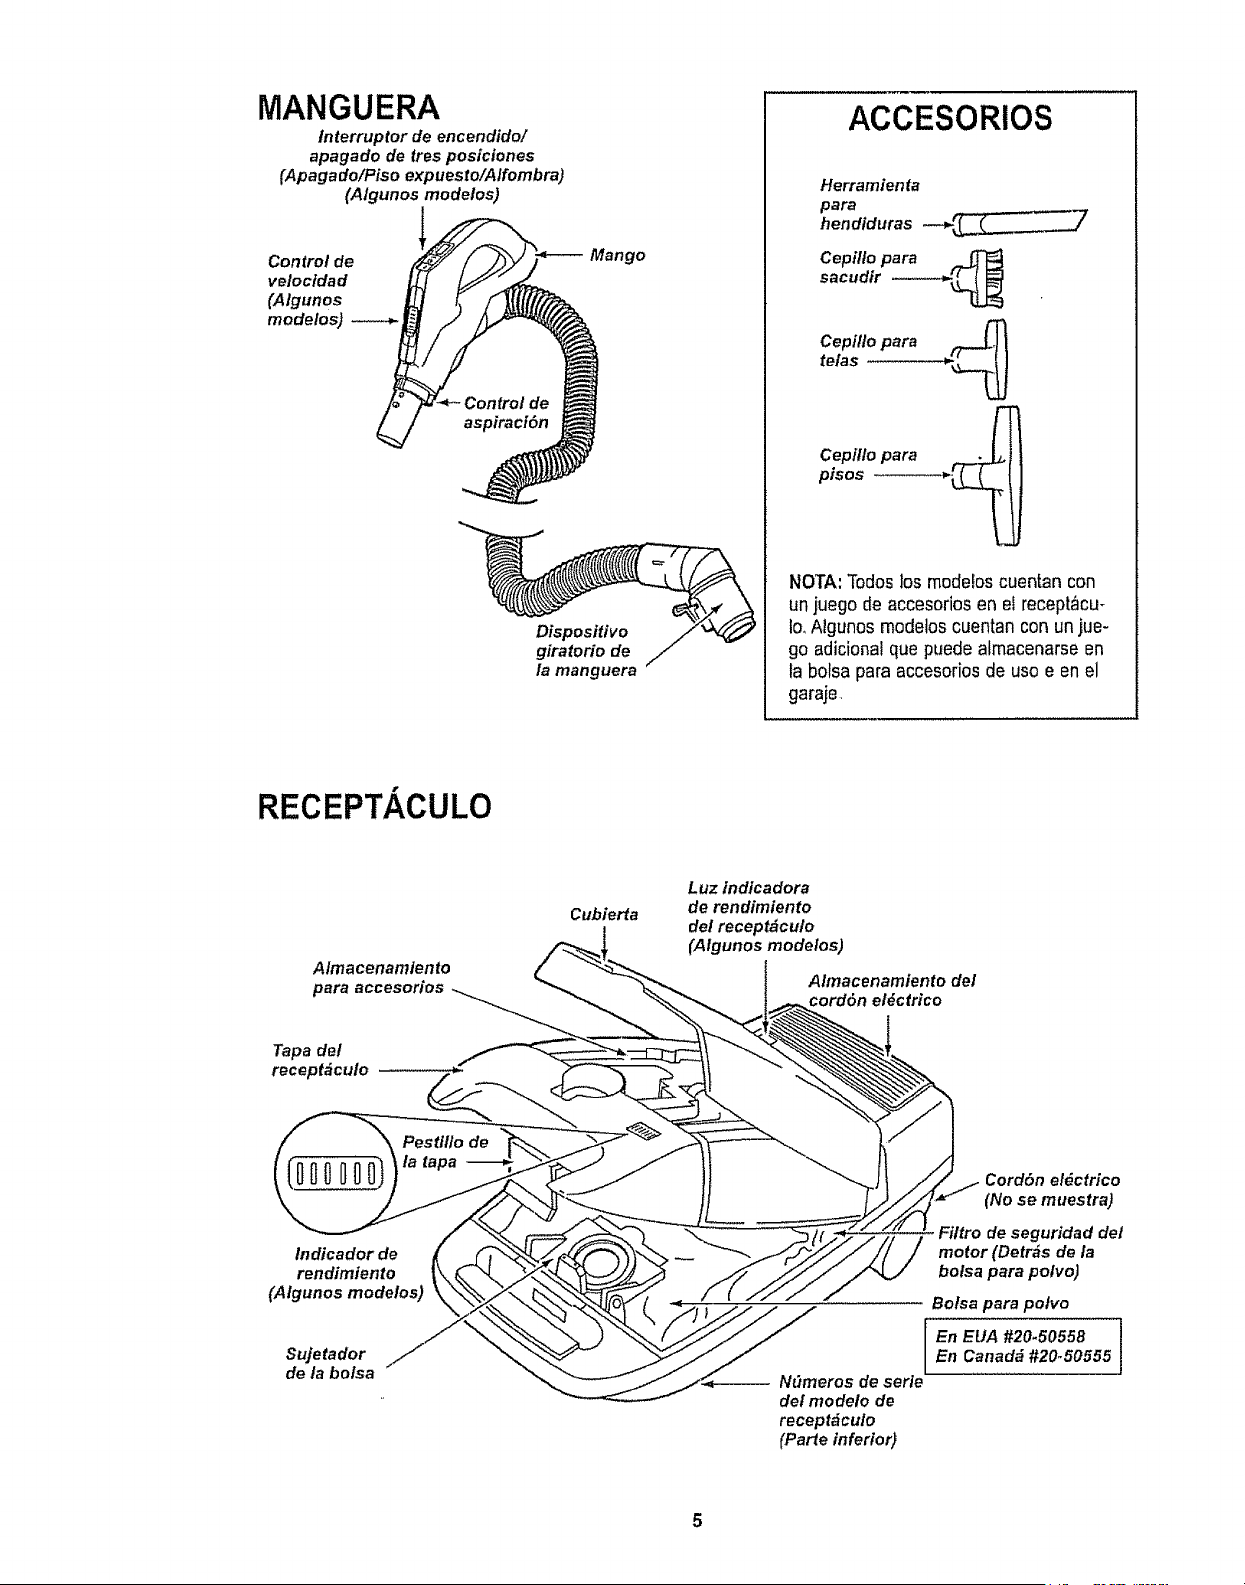
MANGUERA
interruptor de encendido/
apagado de tres posiciones
(Apagado/Piso expuesto/A/fombra)
(Algunos modelos)
Control de
veloctdad
(Atgunos
modelos)
Mango
/a manguera
ACCESORIOS
Herramienta
para
hendiduras ____7
Cepillo para
sacudir -----_
te/asCepi/l°para ,.._
Cepillo para t._r_ I
pisos --------___j
NOTA' Todoslos modebs cuentan con
un juegode accesorios en eirecept_cu-
Io_Algunos modeloscuentan con unjue-
go adicionalque puede almacenarse en
la bolsa para accesoriosde uso e en el
garaje,
RECEPTACULO
A/macenamiento
para accesorios
Cubierta
Luz indicadora
de rendimiento
del recept_culo
(Algunos modelos)
Almacenamtento del
cord6n el#ctrico
Tapa del
receptdculo
tndicador de
rendimiento
(Algunos modelos)
Sujetador
de la bolsa
Cord6n el_ctrico
(No se muestra)
Filtro de seguridad det
motor (Detr_s de la
bolsa para pofvo)
Bofsa para polvo
[ !
En EUA #20.50558
En Canada #20-50555
-- N_meros de serie
def modelo de
recept_culo
(Parte inferior)

Antes de armar su aspiradora, aseguresede tener
disponibles todas fas piezas quese muestranen
PIEZASY CARACTERICAS
ADVERTENClA ......
Peligro de choque el6ctrico
No conecte ia aspiradora basra que termine
de armada, De Io contrario podria causar
un choque el6ctrico o lesi6n corporal,
TUBOS I I
Una tos tubos
desliz_ndotos Bot6n u
hasta que el bot6n
quede fijo en posi- "_
ci6n.Gire el bot6n
del tubo hacia la A
zona ranurada del
dispositivo giralorio
dettubo. Oisposltlve
giratorio
dei mango - _._
Sujetador
del cord6n /
Eldispositivo gira-
toriolepermite
girar el mango
hacia la izquierda
para limpiarmejor
debajo de los mue-
bles bajoso
POWER-MATETM
1otntroduzca los tubos en la POWER-MATETM
hasta que el bot6n dettuboquede fijo en posici6n.
- ,4tea
etevada
2. Conecteel enchufe
y cord6nde la
POWER-MATETM
como se muestra NO
LO fuerce. El Areaele-
vada del enchufetiene
que estar hacia ta
mano.
3, Assgure elcordbn
dentro del sujetador
del cord6nen el girato*
rio de la mango,
Para retirar: Desconecte el cord6ny piseel pedal
de liberaci6nr,_pidadel tuboy tire del tubos hacia
arriba,
Mang
Bot6n del
mango
POWER=
Dispositivo
giratorio
de/mango
Tube
MATE TM
Bot6n det
J fubo
.*---_ Dispositivo
giratorto
Pedal de
liberaci6n
r_pida del tubol
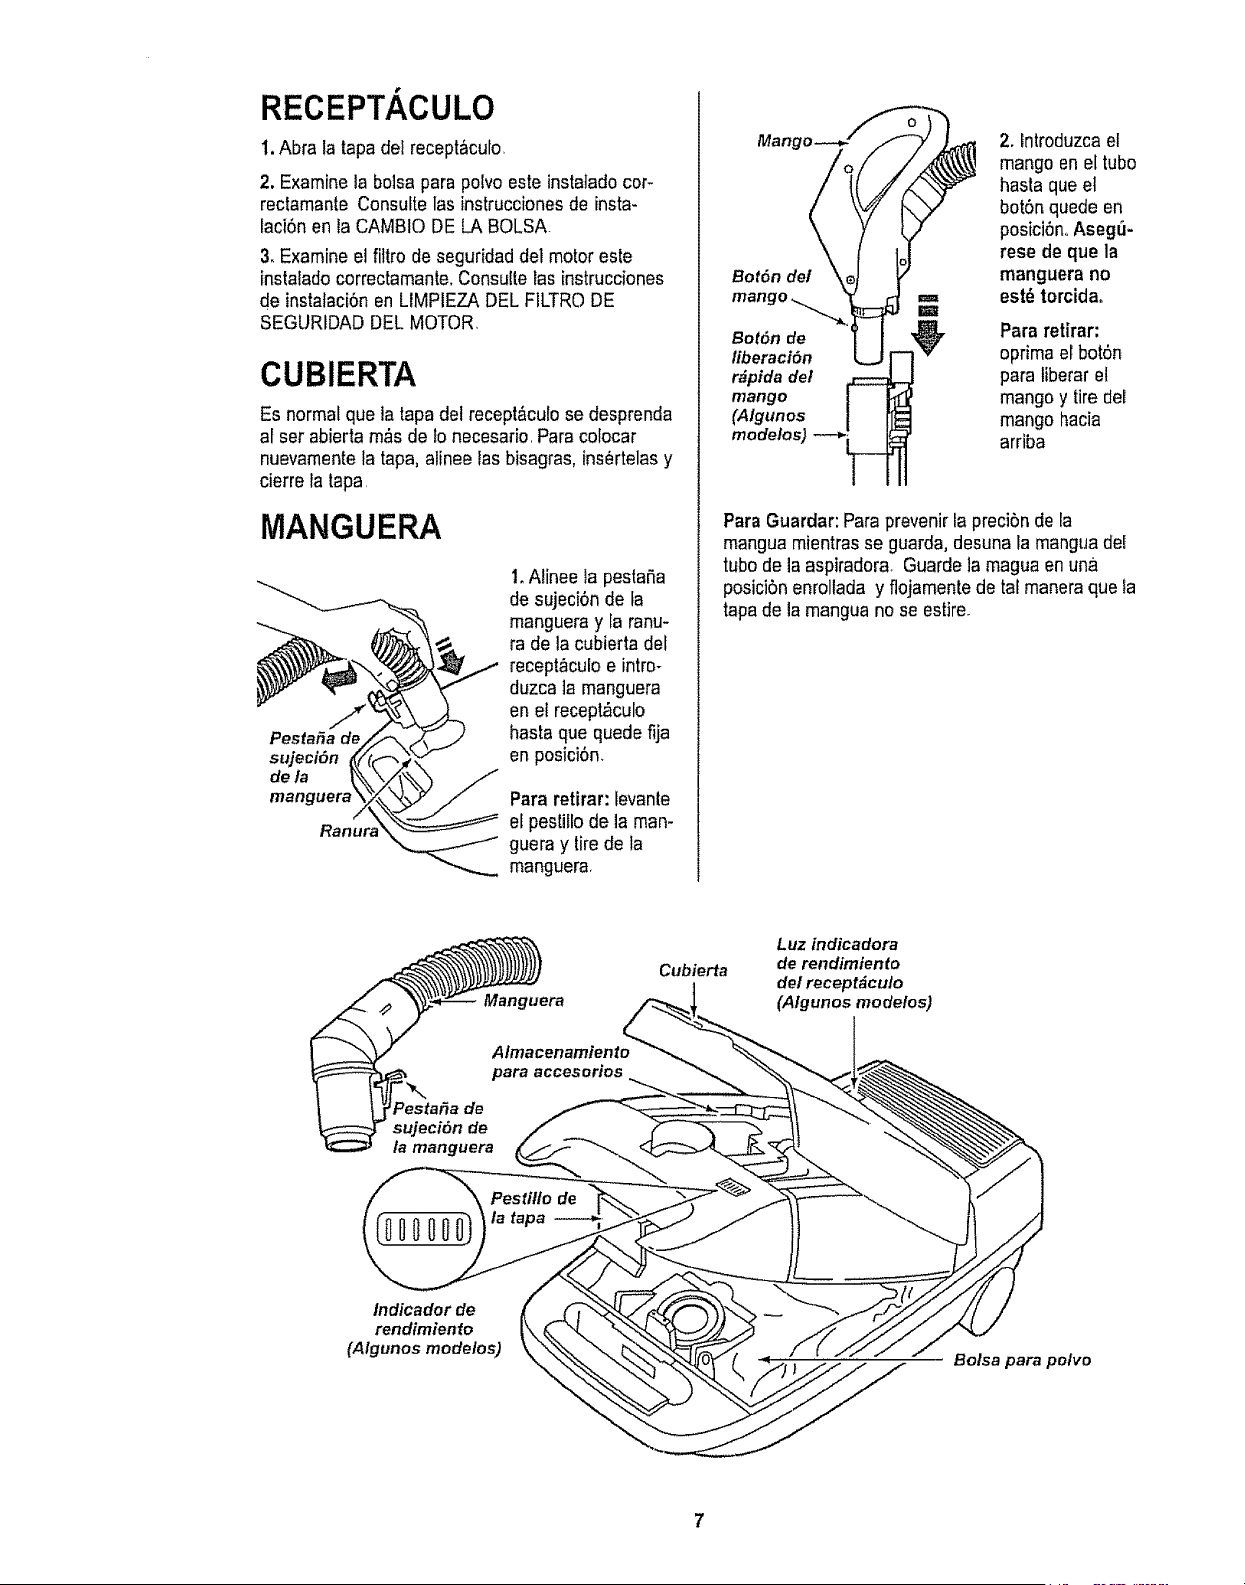
RECEPTACULO
I. Abra la tapa det receptaculo,
2. Examine la bolsa parapolvo esteinstatadocor-
reclamante Consulte las instruccionesde insta-
faci6nen ta CAMBIO DELA BOLSA,
3.Examine el filtro de seguridaddeI motor este
instalado correctamante,Censultelas instrucciones
de instalaci6nenLIMPIEZA DEL FILTRODE
SEGURtDADDELMOTOR,
CUBIERTA
Es normalque latapa del recept&culose desprenda
af set abierta m&sde !o necesario,Para colocar
nuevamentela tapa, alinee lasbisagras, ins_rtelasy
cierre la tapa,
MANGUERA
PestaSa de
sujeci6n
de la
manguerz
1.Alinee la pestafia
de sujeci0n de la
mangueray la ranu-
ra de la cubierta del
recept&culoe intro-
duzca tamanguera
en el recept,_culo
basraque quede fija
en posici6n,
Para retirar: levante
el pestillo dela man-
guera y tirede la
manguera,
2. lntroduzcael
mango en el tubo
basra queet
bot6n quede en
posiciOn<,Aseg_-
rese de que la
Bot6n del manguera no
,=,, est_ torcidao
mango _ m
Bot6n de Para retirar:
liberaciSn oprima el bot6n
r#pida del para Iiberaret
mango mango y tire del
(Algunos mango hacia
modelos) arriba
Para Guardar:Para prevenirla preci5nde la
mangua mientrasse guarda,desuna la manguadel
tubo de laaspiradora, Guarde la magua enuna
posicbn enrollada y flojamentede taf maneraque la
tapade la mangua no se estire.
Cubierta
Luz indicadora
de rendimtento
del recept&cu/o
(A/gunos mode/os)
/ndicador de
rendimiento
(A/gunos modelos)
Bolsa para polvo
7

PARA COMENZAR
B ADVERTENc+IA
I
Peligro de lesi6n personal y daAoal
producto
• NOenchufe la aspiradorast el
interruptorestAen la posici6n ON+
Podria causar lesi6n personalo da_o
al producto+
• Elcord6n et6ctrico se mueve
rApidamentedurante elenrollamiento,
Mantengaalejados a los nihosy
asegure espacio libre suficiente para
evitar lesiones personalesal enrollar
el cord6n.
. NO usectavijas ubicadas ardba de
mostradores, Podriacausar dafioa
los objetos cercanos,
Almacenamlento
del cordon I. Tire detcord6n
para sacaflo del
recept_culo hasta
tener la Iongitud
deseada El cord6n
no se enroIlar&has-
ta que optima la ba-
rra paraenrollarlo+
NOTA:Parareducir elriesgode choqueei_ctrico,
esta aspiradoracuenta conuna clavija polarizada,
uno deloscontactoses m_s anchoque el otto.La
clavija s61opuedeintroducirsede una maneraenel
enchufe.Si la clavija nocabebien en elenchufe,
invi6rtala.Si aOnno cabe,llamea un electricista
para queinstale un enchurecorrecto, Noaltere ta
ctavfjade ningunamanera
2+Conecte el cord6nel_ctricopolarizado en un
enchufe de t20 voltios quese encuentre cerca del
piso
Para enrotlar:desconecteIaaspiradora,Sujete el
enchufe mientrasenrolla elcord6npara impedir
daho o lesi6ncorporalpot el movimientodel cord6n.
Empuje ]abarra paraenroliarel cord6n et6ctfico,
4
Pedal de liberackJn
de/mango
lJ lndicador denivel
_e pelo de/a alfombra
de nivet de pelo
de la alfombra
3, Baje eltubo desde la posici6nvertica! pisandoel
pedal de liberacbn del mango.
4, Seleccione unaallura de pelo de fa alfombra
usandoel pedal peque5o ubicadoen laparle poste-
rior de la POWER-MATETM E]nivelde pelo la
atfombrase muestraen el indicador,Consulte SUG-
ERENCIAS SOBRE ELAJUSTE DE NIVEL DE
PELO DELA ALFOMBRA
Sefeccioneuna posi-
ci6n del interruptoren
el mango.
OFF
FLOOR - s6!o enciendee! motor del recept&culo,
CARPET - enciende los motoresdel recept_culoy
de la POWER-MATETM,
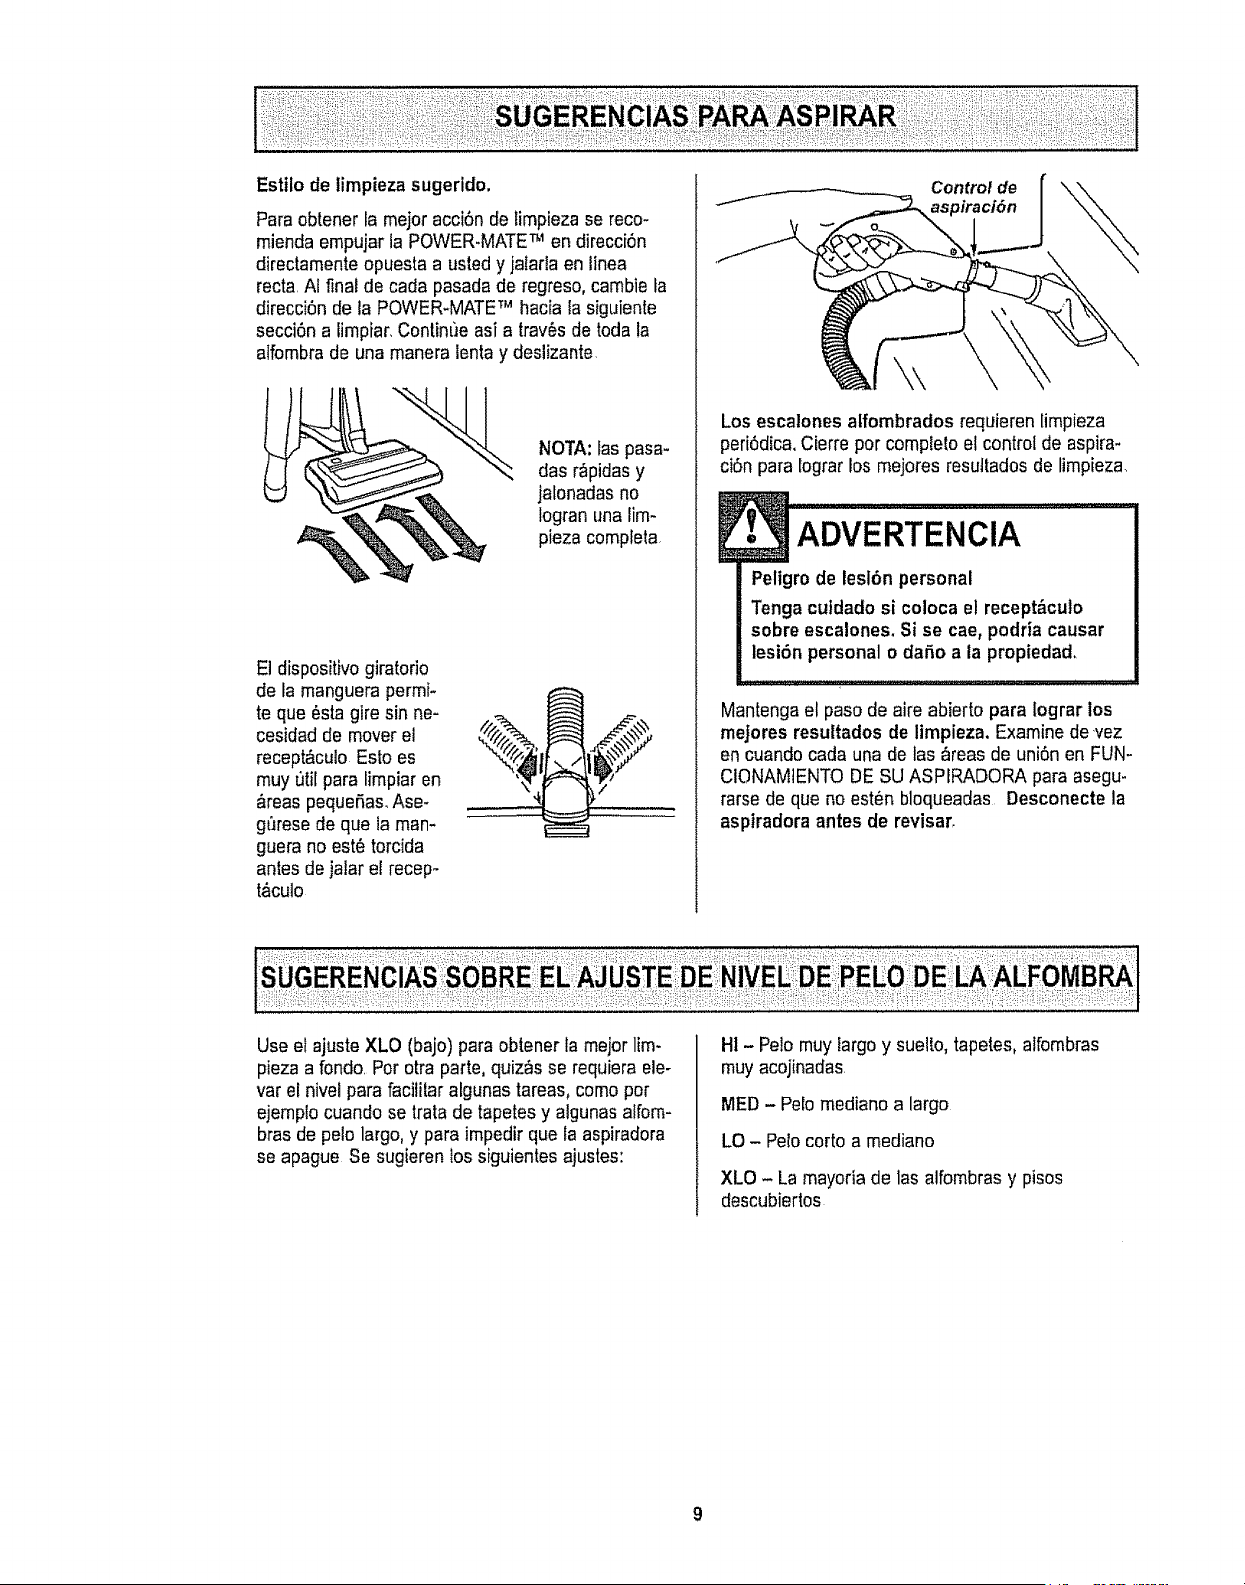
Estilo de timpieza sugerido.
Para obtener lamejor acciSnde limpieza se reco-
miendaempujar la POWER+MATETM en direcci6n
directamenteopuesta a usted y jalartaen linea
recta.Ai final de carla pasadade regreso, cambie la
direcci6n dela POWER+MATETM hacia la siguiente
secci6na limpiar.Contin['Jeasi a tray,s de toda la
alfombrade una maneraientay deslizante.
NOTA:las pasa-
das r_pidasy
jalonadasno
logran unalim-
pieza compfeta
El dispositivogiratorio
de la manguerapermf+
te que_sta gire sin ne-
cesidad de moverel
recept&culo Esto es
rnuyutil para limpiaren
&reaspequefias_Ase-
gt_resede que la man-
guera noest_ torcida
antes dejatarel recep-
t,_culo
Controlde
aspiraci6n
Los escalonesalfombrados requieren limpieza
peri0dica.Cierre per complete el control de aspira-
ciSnpara lograr los mejores resuttadosde limpieza
Peligrode lesl6n personal
Tenga cutdado si coloca el recept_.culo
sobre escalones. Si se cae,podria causar
lesi6n personal o dafio a la propiedad.
Mantenga el pasode aire abierto para lograr los
mejores resultados de limpieza. Examinede _vez
en cuandocada una de las _reas de uni6n en FUN-
CIONAM1ENTODESU ASPIRADORA para asegu-
rarsede que no est_n bloqueadas Desconecte la
aspiradora antes de revisar.
Useel ajuste XLO (bajo) paraobtener tameier lira+
pieza a fondo.Per otra parte, quiz_sse requiera ele-
var el nivel parafacititar algunas tareas0come per
ejemplo cuandose tratade tapetesy algunas alfom-
bras de pelo largo,y para impedir que la aspiradora
se apague Se sugierenlos siguientesajustes:
HI - Pe!omuy targoy suelto,tapetes,alfombras
muy acojinadas.
MED - Petemediano a largo
LO - Pelocorto a mediano
XLO - La mayoria de las alfombrasy pisos
descubiertos
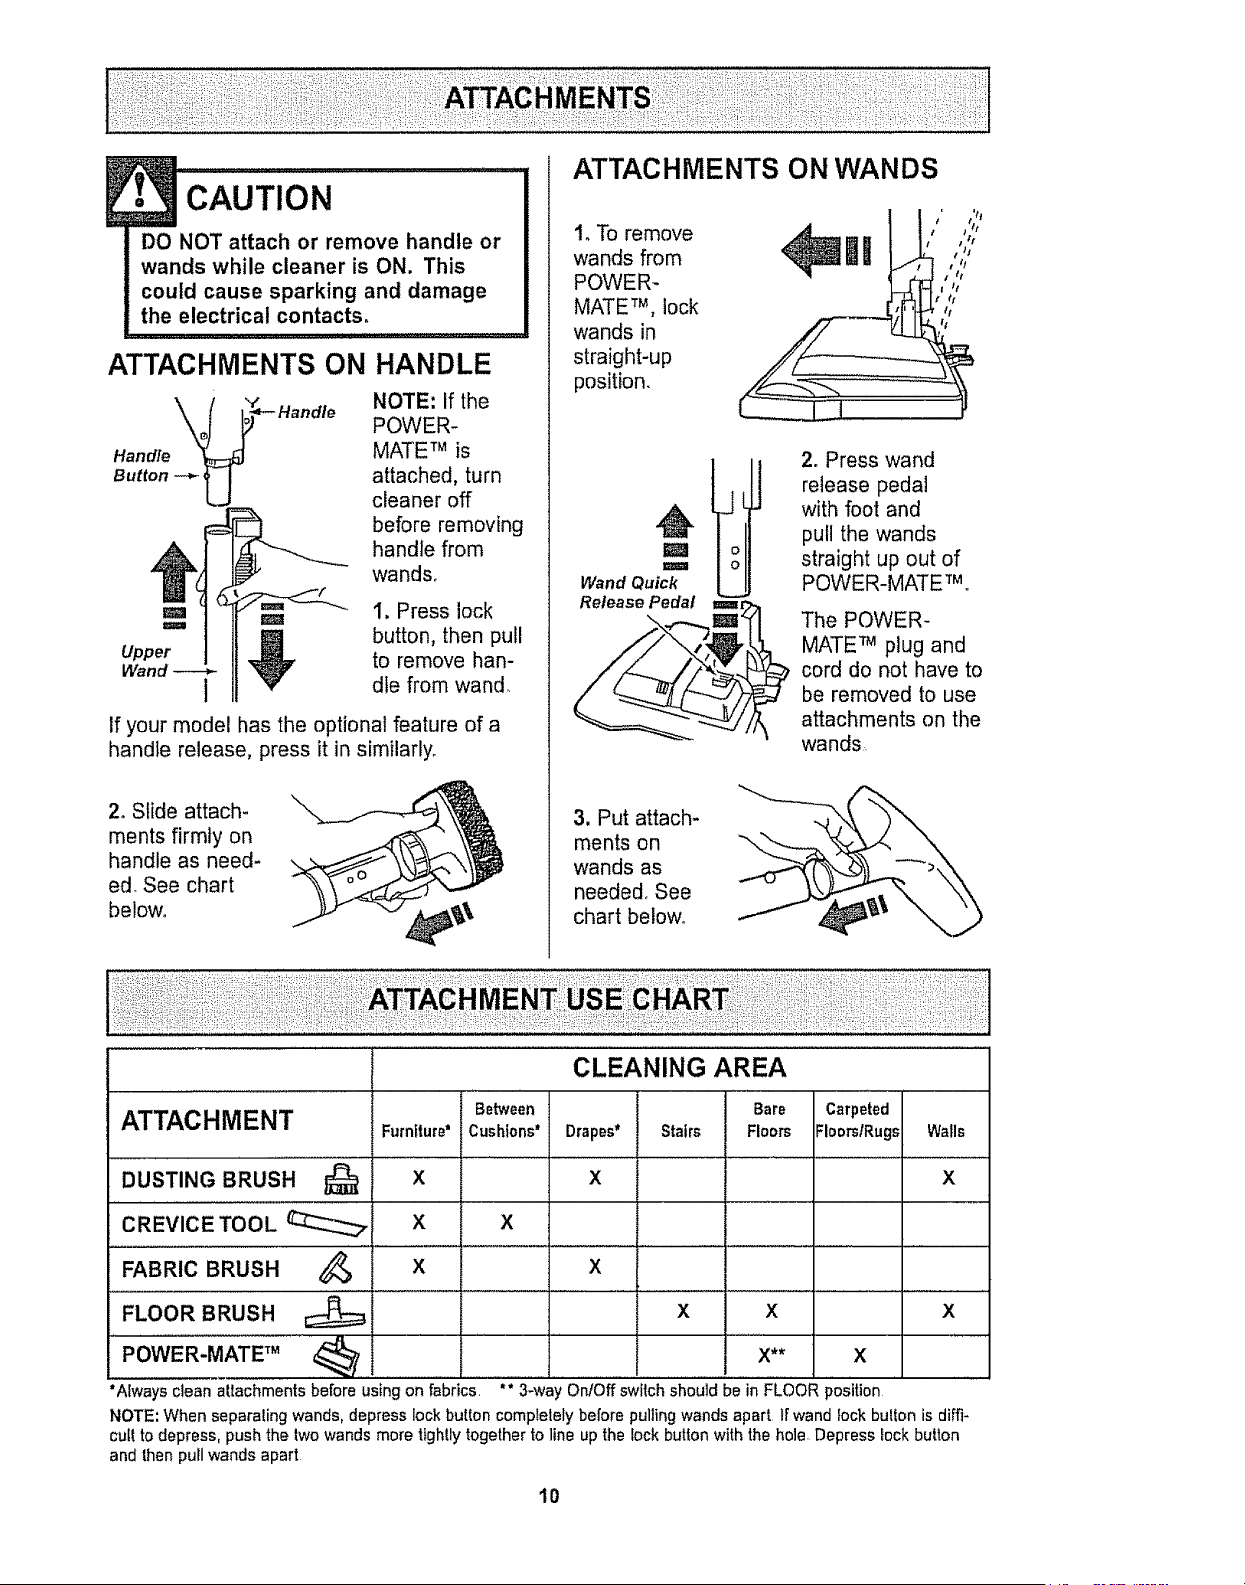
ATTACHMENTS ON
",t"
Handle
Button -_ U
• CAUTION ...............
DO NOT attach or remove handle or
wands while cleaner is ON. This
could cause sparking and damage
the electrical contacts.
HANDLE
NOTE: If the
POWER-
MATE TM is
attached, turn
cleaner off
before removing
handle from
wands.
m m 1. Press lock
'=" _1 button, then pull
Upper _ to remove hart-
Wand 1 die from wand
If your model has the optional feature of a
handle release, press it in similarly.
2, Slide attach-
ments firmly on
handle as need-
ed, See chart
below.
ATTACHMENTS ON WANDS
1, To remove
wands from
POWER-
MATE TM, lock
wands in
straight-up
position.
t ' ';2
IR ,,,;,
I tt
I /t
I t I
M
I
Wand Quick
Release Pedal
2. Press wand
release pedal
with foot and
pull the wands
straight up out of
POWER-MATETM,
l=i=m=r
The POWER-
MATE TM plug and
cord do not have to
be removed to use
attachments on the
wands
3, Put attach-
ments on
wands as
needed, See
chart below,
ATTACHMENT
DUST,NGBRUSH...............Q
CREVICE TOOL __
FABRIC BRUSH
FLOOR BRUSH
Furniture*
x
X
Between
Cushions*
X
CLEANING AREA
Bare
Drapes* Stairs Floors
x
Carpeted
FloorslRugs
Walls
X
_, x x
x x x
POWER-MATE TM _ X** X
"Always clean attachments before using on fabrics ** 3-wa OnfOff switch should be in FLOOR position
NOTE',When separaling wands, depress lock button complelely before pulling wands apart Ir wand fock bulton is dih'i-
cult to depress, push the lwo wands more tightly togetherto line up the lock button with the hole Depress lock button
and then pull wands apart
I0
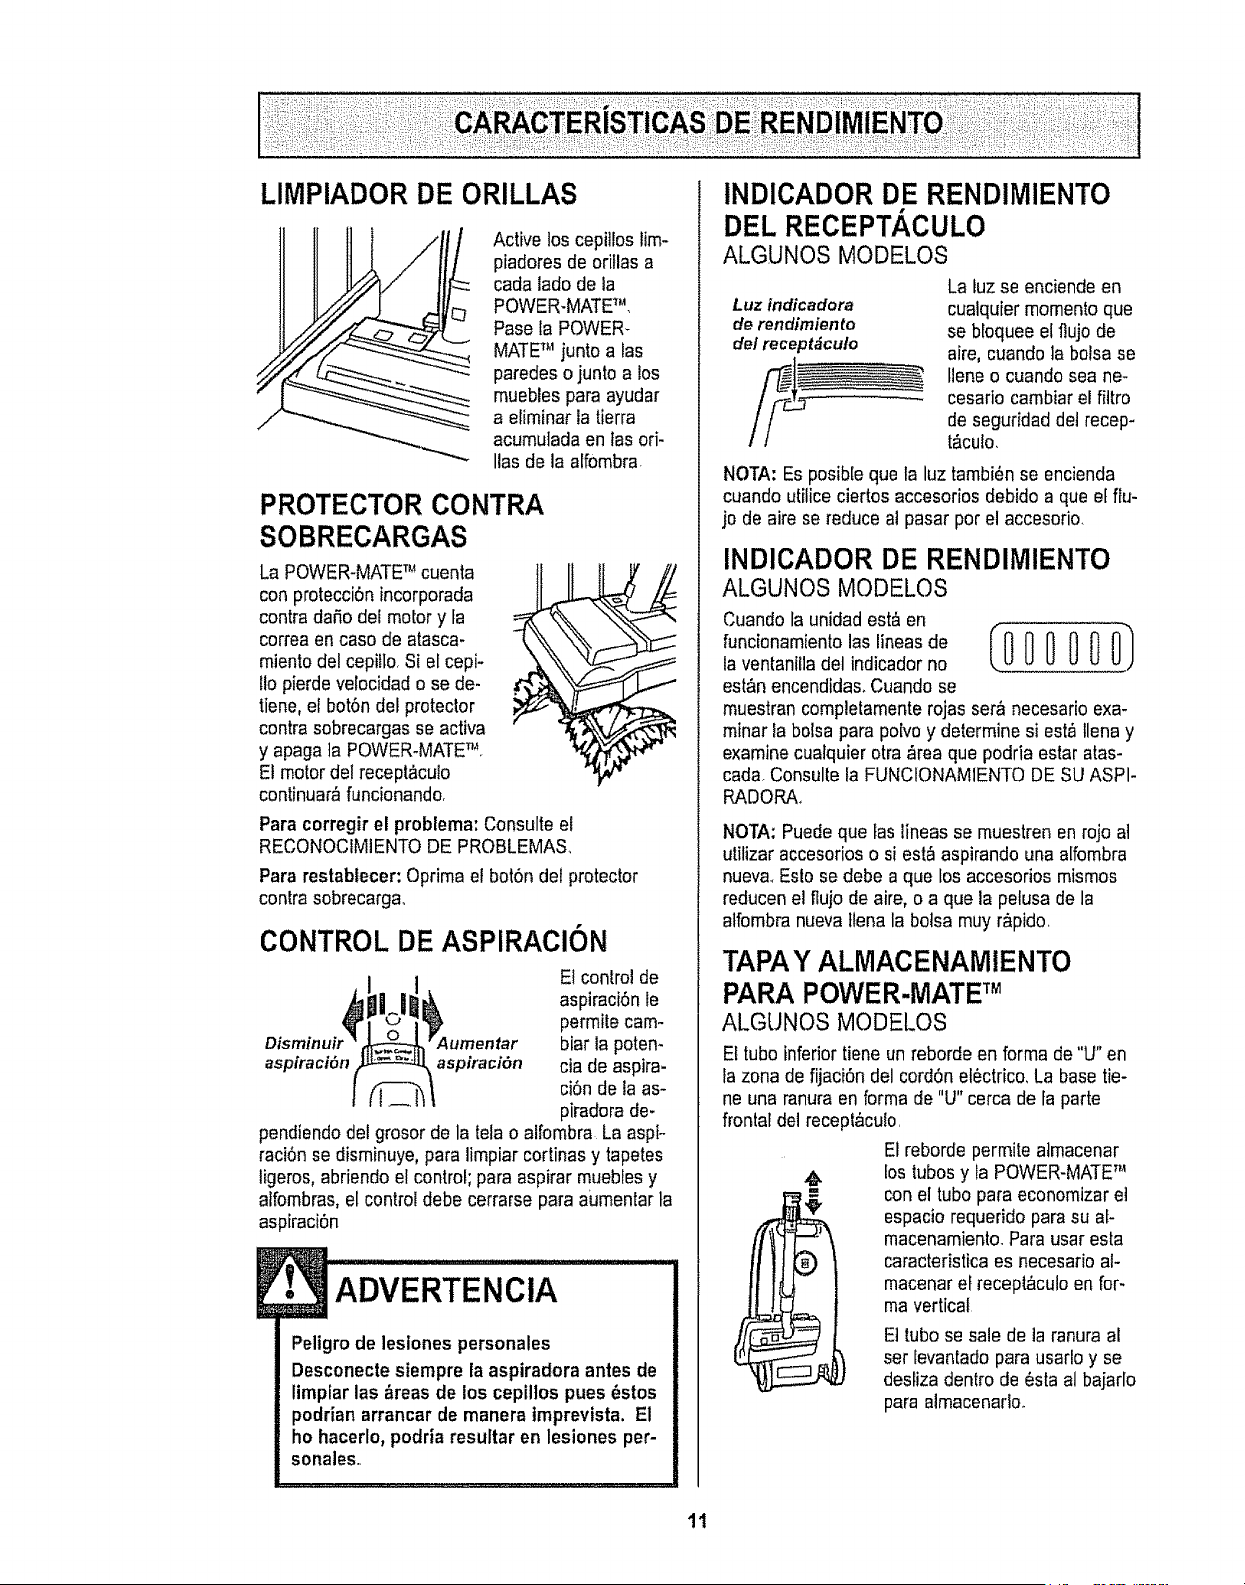
LIMPIADOR DE ORILLAS
Active los cepitloslirn-
piadores de oritlas a
cada ladode la
POWER-MATETM,
Pase la POWER*
MATETM juntoalas
paredes o junto a los
muebles para ayudar
a eliminar latierra
acurnutadaen tas ori-
Ilas de la atfornbra.
PROTECTOR CONTRA
SOBRECARGAS
La POWER-MATETM cuenta
con protecciSnincorporada
contra dafio del motor y ta
correa en caso de atasca-
miento del cepitto.Si el cepi-
11opierde velocidad ose de-
tiene, el bot6ndel protector
contra sobrecargas seactiva
y apaga la POWER-MATENq
El motor delrecept&culo
continuar_ funcionando.
Para corregirel problema:Consulte el
RECONOCIMIENTODE PROBLEMA&
Para restablecer: Oprirnael bot6n del protector
contra sobrecarga..
CONTROL DE ASPIRACION
El controlde
aspiraci6n le
permite carn-
biar lapoten-
aspiraci6n aspiraci6n cia de aspira-
ci6nde laas-
piradorade-
pendiendo delgrosor de la telao alfornbra La aspi-
raci6nse disrninuye,para limpiar cortinas y tapetes
ligeros, abriendoel control; para aspirar mueblesy
aifornbras,el control debe cerrarse para aumentar ta
aspiraci6n
ADVERTENClA
Peligmde lesiones personales
Desconectesiempre la aspiradora antes de
limplarlas _reas de los cepillos pues _stos
podrianarrancar de manera tmprevista, El
ho hacerlo,podriaresultar en lesiones per-
sonales..
INDICADOR DE RENDIMIENTO
DEL RECEPTACULO
ALGUNOS MODELOS
La luzse enciendeen
Luzindicadora cualquier mornentoque
derendimiento se bloqueeelflujo de
delreceptdcuto aire, cuando ]abotsa se
Ileneo cuando sea ne-
cesario cambiarel filtro
de seguridaddet recep-
t_culo.
NOTA:Es posib[eque la luz tarnbi_nse encienda
cuando utilice ciertos accesoriosdebido a que el flu-
jo de aire sereduce al pasar pot el accesorio.
INDICADOR DE RENDIMIENTO
ALGUNOS MODELOS
Cuando la unidadest& en
funcionarnientolas lineasde
la ventaniiladel indicadorno
est&nencendida& Cuandose
muestrancompletamenterojas ser_ necesario exa-
rninar labolsa para poivoy determine si est,_tlenay
examinecualquier otra ,_reaque podria estar atas-
carla.Consulte la FUNClONAMIENTODE SUASPI-
RADORA+
NOTA:Puedeque Ias lineas se rnuestren enrojo at
utilizar accesorioso siest_ aspirando una alfornbra
nuev& Esio se debe a que los accesorios rnismos
reducenel flujo de aire, o a que la pelusa de la
alfombranueva flenala botsa rnuyrApido.
TAPAY ALMACENAMIENTO
PARA POWER-MATETM
ALGUNOS MODELOS
El tubo inferior tiene unreborde en forma de "U" en
la zona defijaci6n del cord6n el6ctrico,La base tie-
ne una ranura en formade "U" cerca de fa parte
frontal del receplaculo,
El rebordepermite atmacenar
m
lostubos y la POWER-MATETM
conel tubo para economizaret
espacio requeridopara su af-
macenamiento.Para usaresta
caracteristicaes necesario at-
macenarel receptaculoen for-
mavertical
El tubo se sale dela ranura al
set levantado parausarloy se
desiiza dentro de _sta al bajarlo
para alrnacenadoo
11
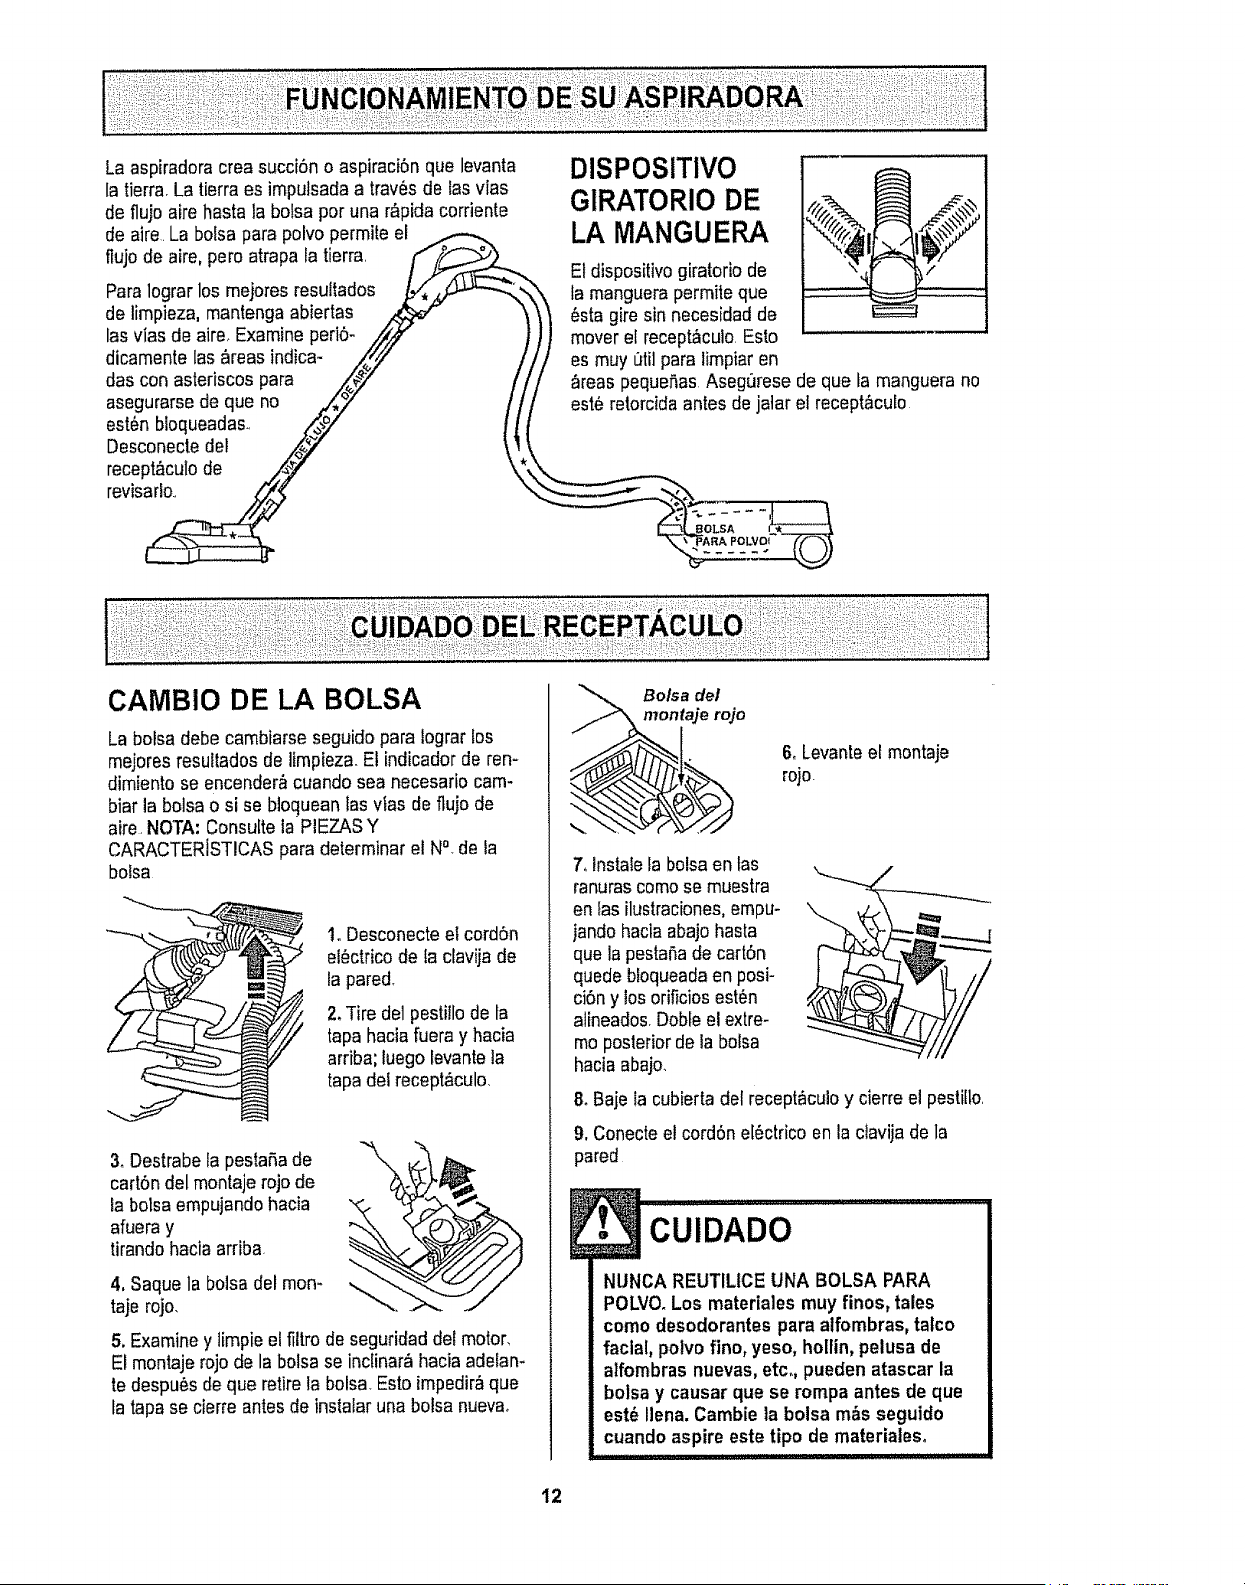
La aspiradoracrea succi6n o aspiraci6n qua levanta
la tierra, Latierraes impulsada a trav6sde Iasvlas
de fluio aire basra labolsa per una r_pida corriente
de aire.La bolsapara polvo permite el
flujo de aire,pare atrapa la tierra
Paralograr los mejores resuffados
de limpieza, mantengaabiertas
lasvias de aire_Examine peri6-
dicamente las _reas indica-
das con astedscospara
asegurarsede qua no
est6n bloqueadas,
Desconectedel
recept_culode
revisado.,
CAMBIO DE LA BOLSA
DISPOSITIVO
GIRATORIO DE
LA MANGUERA
E1dispositivogiratorio de
famanguerapermite que
_sta giresin necesidad de
mover elrecept_culo.Esto
es muy _til paralimpiar en
_reas pequefias Asegurese de qua la manguera no
est6 retorcidaantes de jatar el recept,_culo
La bolsa debecambiarse seguido para lograr los
mejores resultadosde limpieza.El indicadorde ren-
dimiento se encender&cuando sea necesario cam-
biar la bolsao si se bloc]ueanlas vfas de flujo de
aire,NOTA: Consulteia PIEZASY
CARACTER[STICASpara determinar el N°_dela
bolsa
1. Desconecteel cord6n
el_ctricode la clavija de
la pared,
2.Tire de1pesti!lode fa
tapahaciafuera y hacia
arriba; luego levantela
tapa del recept&culo_
3. Destrabela pestaSade
cart6n delmontaje rojo de
la bolsa empujandohacia
afueray
tirandohacia arriba
4, Saque la bolsadel mon-
taje rojo,
\
5. Examiney limpieel filtrode seguridad del motor_
El montajerojode la bolsa seinctinar_ haciaadelan-
te despu6s dequa retirela bolsa,Esto impedir,_qua
tatapase cierfe antesde instalaruna bolsa nueva,
Bolsa de/
taje rojo
6, Levanteel montaje
rojo
7, lnstale labolsaen tas
ranurascomese muestra
en tasilustraciones,empu°
jandohaciaabajo hasta
qua lapestaSade cart6n
quede bloqueadaen posi-
ci6ny losorificiosest'_n
alineados,Dobleel extre-
meposteriorde la bolsa
haciaabajo.
8. Baje la cubierta del recept&culoy cierreel pastille,
9, Conecteel cord6n e[6ctrico enla clavijade la
pared
l. cu,o oo.........................
NUNCA REUTILICEUNA BOLSA PARA
POLVO.Los materiales muy finos, tales
como desodorantes para alfombras, tatco
facial, polvofino, yeso, holtin,pelusa de
alfombras nuevas,etc. pueden atascar la
bolsa y causar que se rompa antes de que
est_ liana. Cambiela bolsa m_s seguido
cuando aspire este tipo de materialeso
I
12
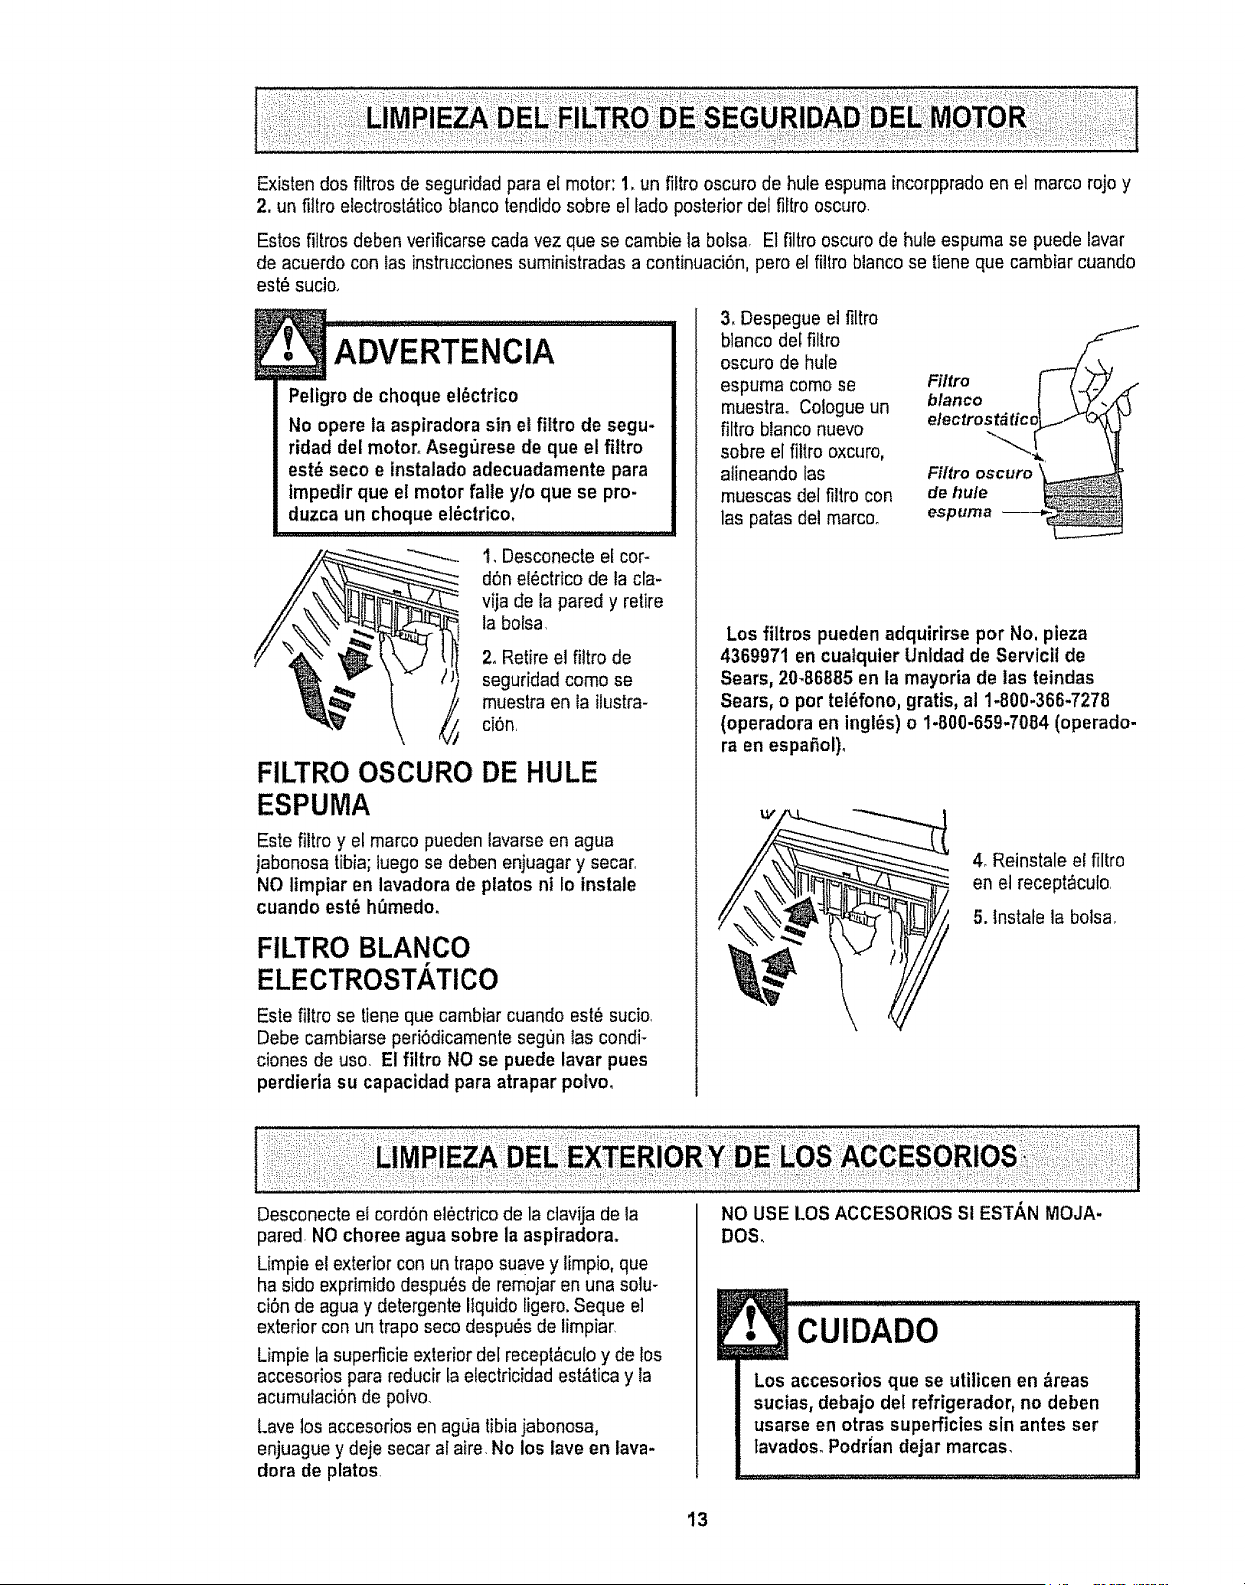
Existen dosfiltros de seguridadpara el motor: 1.un filtro oscuro de hule espumaincorppradoen el marco rojoy
2. un fillro eleclrost&ticoblancotendidosobre el fadoposterior del fillro oscuro.
Estos filtrosdeben verificarsecadavez que se cambie la bolsa E1filtro oscuro dehule espuma se puedelavar
de acuerdocon lasinstruccionessuministradasa continuaci6n,pero el fi]trobiancose tiene que cambiar cuando
est_ sucio.
! ADvERTENCiA..........
Peligrode choque el_ctrico
No opere la aspiradorasin el fittro de segu-
ridad de[motor.Asegurese de que el filtro
est_ seco e instaladoadecuadamente para
tmpedirque el motorfalle y/o que se pro-
duzca un choque el_ctrico.
FILTRO OSCURO
ESPUMA
1, Desconecteel cor-
d6n electrico dela cla-
vija de la pared y retire
la bolsa,
2. Retireel filtro de
seguridadcomo se
muestraen la ilustra-
ci6n,
DE HULE
Este filtro y el marco pueden lavarseen agua
jabonosa tibia;luego se debenenjuagar y secar,
NO limplar en lavadora de platos nt Io instale
cuando est6 h_medo.
FILTRO BLANCO
ELECTROSTATICO
Este filtro se tieneque cambiar cuando est_sucio
Debe cambiarse peri6dicamentesegun las condi-
ciones de uso. El filtro NO se puede lavar pues
perdieria su capacidad para atrapar polvo.
3. Despegue elfiltro
blanco delfiltro
oscuro de hule
espuma comose
muestra. Cologueun
filtro blanconuevo
sobre el filtro oxcuro,
alineando las
muescas delfiltro con
las parasdel marco.
Filtro
b,..oo t
electrost& tico_L,_ _"
Fiftro oscuro
de hule
espurna --
Los filtros pueden adquirirsepor No, pieza
4369971 en cualquier Unldadde Servlcil de
Sears, 20-86885 en la mayoriade ias teindas
Sears, o por tel6fono,gratis,al 1-800-366-7278
(operadora en ingles) o 1-800-659-7084 (operado-
ra en espaRol).
LV
4_Reinstaleel filtro
en el recept_culo,
5. tnstafe labolsa,
Desconecte el cord6nel_ctricode la ctavijade la
pared. NOchoreeagua sobre la aspiradora.
Limpie el exteriorcon un traposuavey limpio, que
ha sido exprimidodespu6sde remojaren unaso]u-
ci6n de aguay detergente Itquidoligero,Seque e]
exteriorcon un traposeco despu_sde Iimpiar_
Limpie tasupen'icieexteriordel recept_culoy de los
accesorios parareducir taelectricidadest&tica y la
acumulaci6nde polvo_
Lave los accesoriosen agLiatibiajabonosa,
enjuague y dejesecar al aire.No los lave en lava-
dora de platos
NO USE LOSACCESORIOSSI EST,&,NMOJA-
DOS.
CUIDADO
Los accesoriosque se utilicen en _reas
sucias, debajo detrefrigerador,no deben
usarse en otras superficies sin antes ser
lavados. Podrian dejar marcas.
13

Siempre deber&n seguirse todas las precau-
ciones de seguridad at limpiar y dar servicio a
la POWER..MATE TM,
E• ADVERTENCiA ............i
Peligro de choque el6ctrico o lesiSn corpo-
ral
Desconecte la unidad antesde limpiarla o
darle servicio. Delo contrario podria pro-
ducirse un choque el6ctrico o causar
lesi6n corporal si la aspiradora arranca de
manera imprevista.
1. Retire lacubierta
de labombilla ejer-
ciendopresiSnhacia
adentroy levantando
ambos costadoscomo
se muestra
Empuje hacia _ 2. Empuje la bombitlahacia
adentro y gire _ adentroy girela en direc-
_,_ ciOnopuesta ai sentidode
.___ lasmanecilias del reloj
para retirarla
._. 3_Cambie labombiUa.Esta
Cierrela cubierta de la
bombilla basraque quede
bien cerrada.
NOTA: Consulte la PIEZASY CARACTERISTICAS
para determinar el N°, de la bombirla
Desconectela aspiradora. Examinefrecuente-
monte el cepilto y tasareas de soporte det mismo
de la POWER-MATETM y elimine todo cabello,hilo y
pelusa acumutada.Si la acumulaciOnesexcesiva,
separe la POWER-MATETM del tuboy realicetos
pasosa continuaciSn.Las instruccionestambi_n
aparecen bajo Iacubierta de la bombiila.
PARA RETIRAR LA CORREA:
1. Retire lacubierta
de la bombiIlay la
bombiflacomo se
indJcabajo CAM.
BIO DE LA BOM-
BILLA
2, Retire lostdrnil-
los de la POWER-
MATETM .
3. Volteela
POWER.MATETM,
Paraquitar ]a
cubierta, inserte
et destorniItador
en fas pestaSas
de la cubierta de
ambos costados
y gfrelopara lib-
erar las pes.
taSas.
Pesfa_a
liberaci6n
4,Voltee la
POWER.MATETM
hacia arriba
Oprima la guta de
liberaciSny baje
e]dispositivo gira-
torio Incline ra
cubierta de arras
hacia adelante
hasta que se des-
prenda
14

5. lnserte el
destornillador
cuidadosamente
en carlasoporte
del cepilloy
gireto para retirar
el cepiltode la
base.
Soporte
del cepillo
Base
6, Retire tabanda
desgastada,
7, Retire los
soportesdel cepi-
11o;examine y lira-
pie las _reas de
soporte del cepilto..
En la ENSAMBLE
DEL CEPILLOse
proporcionauna
ilustraci6nde redo
el ensambledel
cepillo.
PARA CAMBIAR LA CORREA:
I, Reinstalelas arandelas y los soportesdel cepilto
en el ensamble.
2. lnstale una
correa nueva
sobre el
impulsor det
motor y luego
sobre la rueda
dentada del
cepiUo.
Soporte
de/cepitfo
hnpulsor
IXm°t°r
X Cepillo
Ruedadentada
celcepillo
NOTA:Consulte la PIEZASY CARACTERiSTICAS
para determinarel N°, de correa
3, Instalelos soportes
del cepillosobre la
base.Asegurese de
que losSoportesno
est6n invertidos.
4,Alinee la _\
parte frontal de
la cubierta con
la base.
Coloque la
cubierta sobre
el borde
delantero de la
base como se
muestra.
Cubierta Base
5. Inclinela cubierta
haciaatr_s.Ejerza
presi6nfirme sobre
facubierta hasta que
laspesta_,as]at-
eralesqueden fiias
en posici6n,Instate
lostornillos de la
cubierta,la bombifla
y facubierta de ia
bombilia
15
• ADVERTENCIA
Peligro de cheque el_ctricoo lesi6n corpo-
ral
Desconecte la unidad antes de limpiarla o
darte servicio, De to contrario podria pro-
ductrseun cheque el6ctrico o causar
iesi6n corporal sl la aspiradora arranca de
manera imprevista.
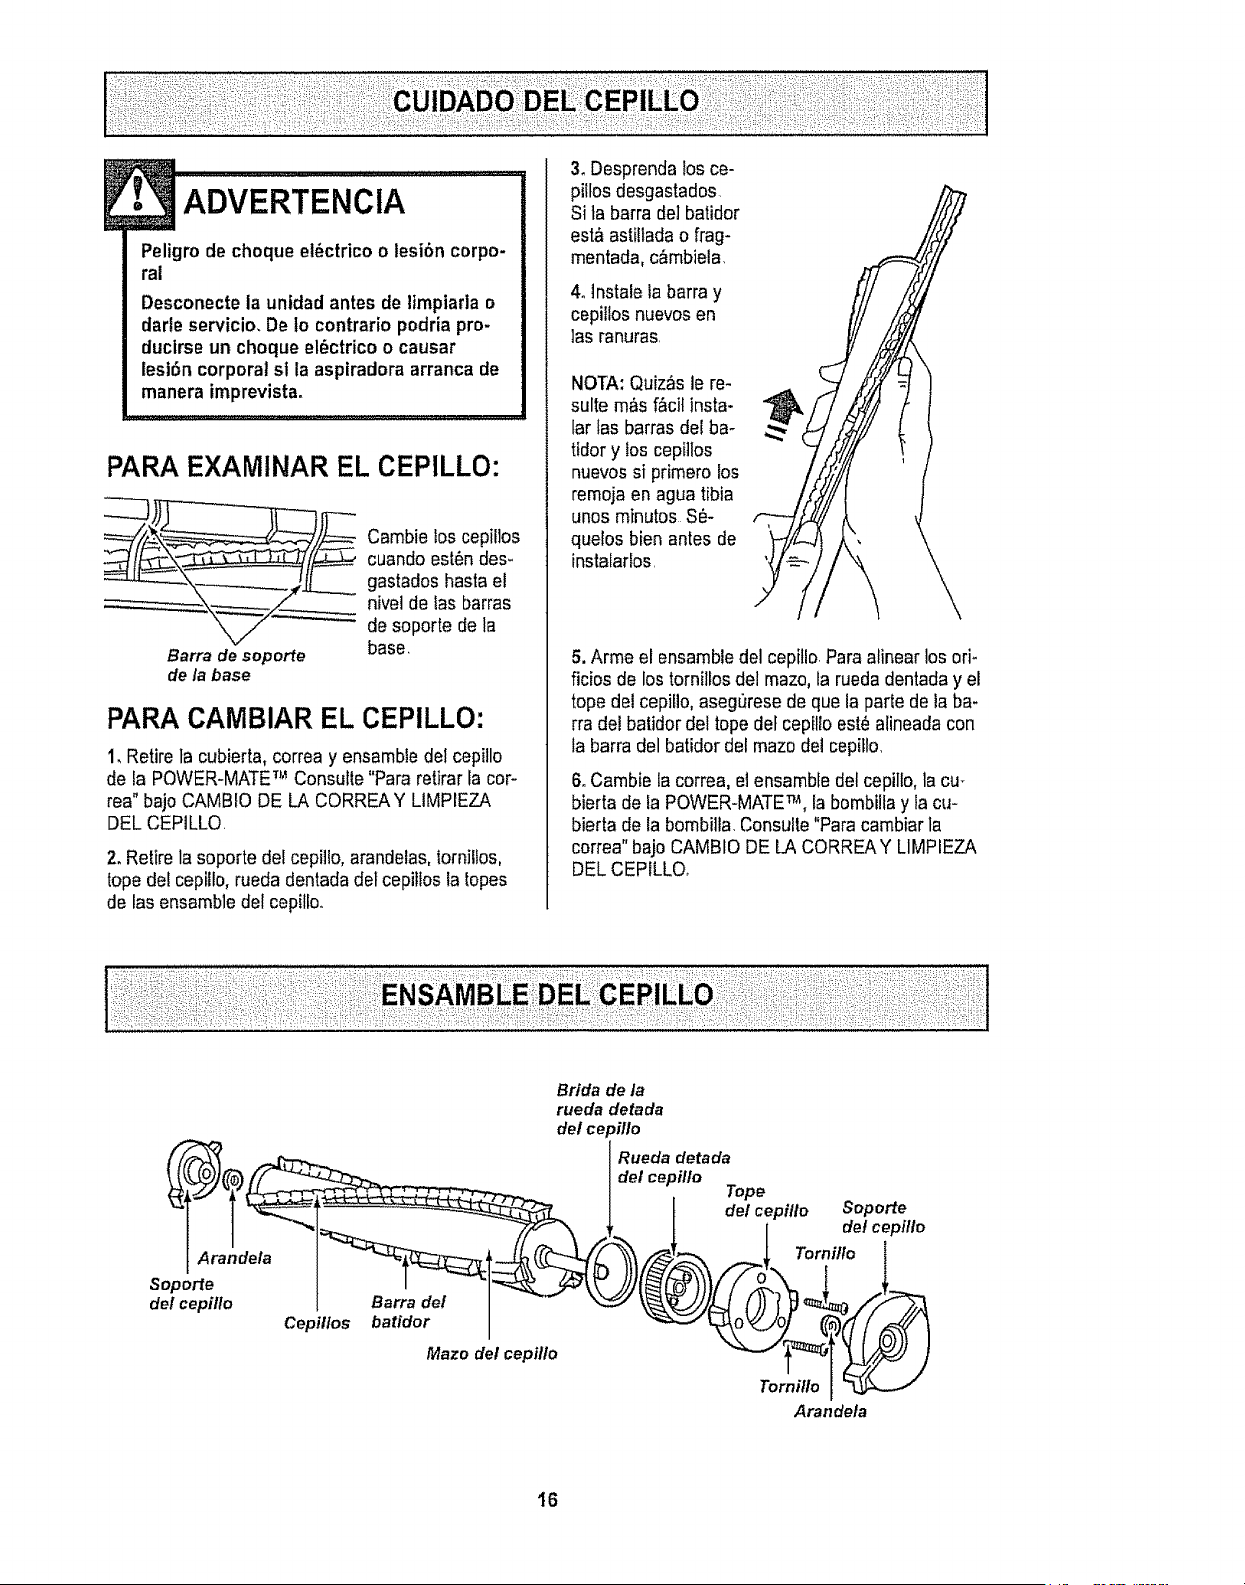
PARAEXAMINAR EL CEPILLO:
_j_.__ ambielos cepillos
cuando est6n des_
gastados hasta el
nivel de tas barras
de soporte de la
Barra de seporte base,
de la base
PARACAMBIAR EL CEPILLO:
I,Retire la cubierta, correa y ensambledel cepillo
de la POWER-MATETM Consufte"Pararelirar facor-
rea" bajoCAMBtO DE LA CORREAY LIMPIEZA
DELCEPILLQ
2. Retire lasoporte del cepillo,arandelas, iorniltos,
topedetcepillo, rueda dentada detcepiflosla lopes
de lasensambie del cepillo,.
3, Desprenda losce-
pillosdesgastados.
Si ta barrade]batidor
est&asti!ladao flag-
mentada,c&mbiela,
4olnstale la barra y
cepilfosnuevos en
las ranuras.
NOTA:Quiz&s le re-
suite m&sf&cilinsta-
far fas barrasdel ba-
tidor y los cepillos
nuevos si primero los
remoja en agua tibia
unos minutes S_-
quelos bien antes de
instalarlos.
5. Arme el ensambledel cepitlo.Para alinear losoff-
ficios de lostornillos del maze,la ruedadentaday el
tope del cepitlo,aseg_rese deque ia partede la ba-
rra del batidordel topedeFcepilloest_ alineada con
la barra delbatidor del maze delcepiflo,
6. Cambie lacorrea, el ensambledel cepillo, lacu-
bierta de la POWER-MATETM, labombiitayla cu-
bierta de la bombilla, Consulte"Paracambiarla
correa" bajoCAMBIODE LA CORREAY LIMPIEZA
DELCEPILLO,
Brida de la
rueda detada
del ce )illo
Mazo del cepillo
Rueda detada
del cepillo
Tope
, t "o'er
Arandela
I6
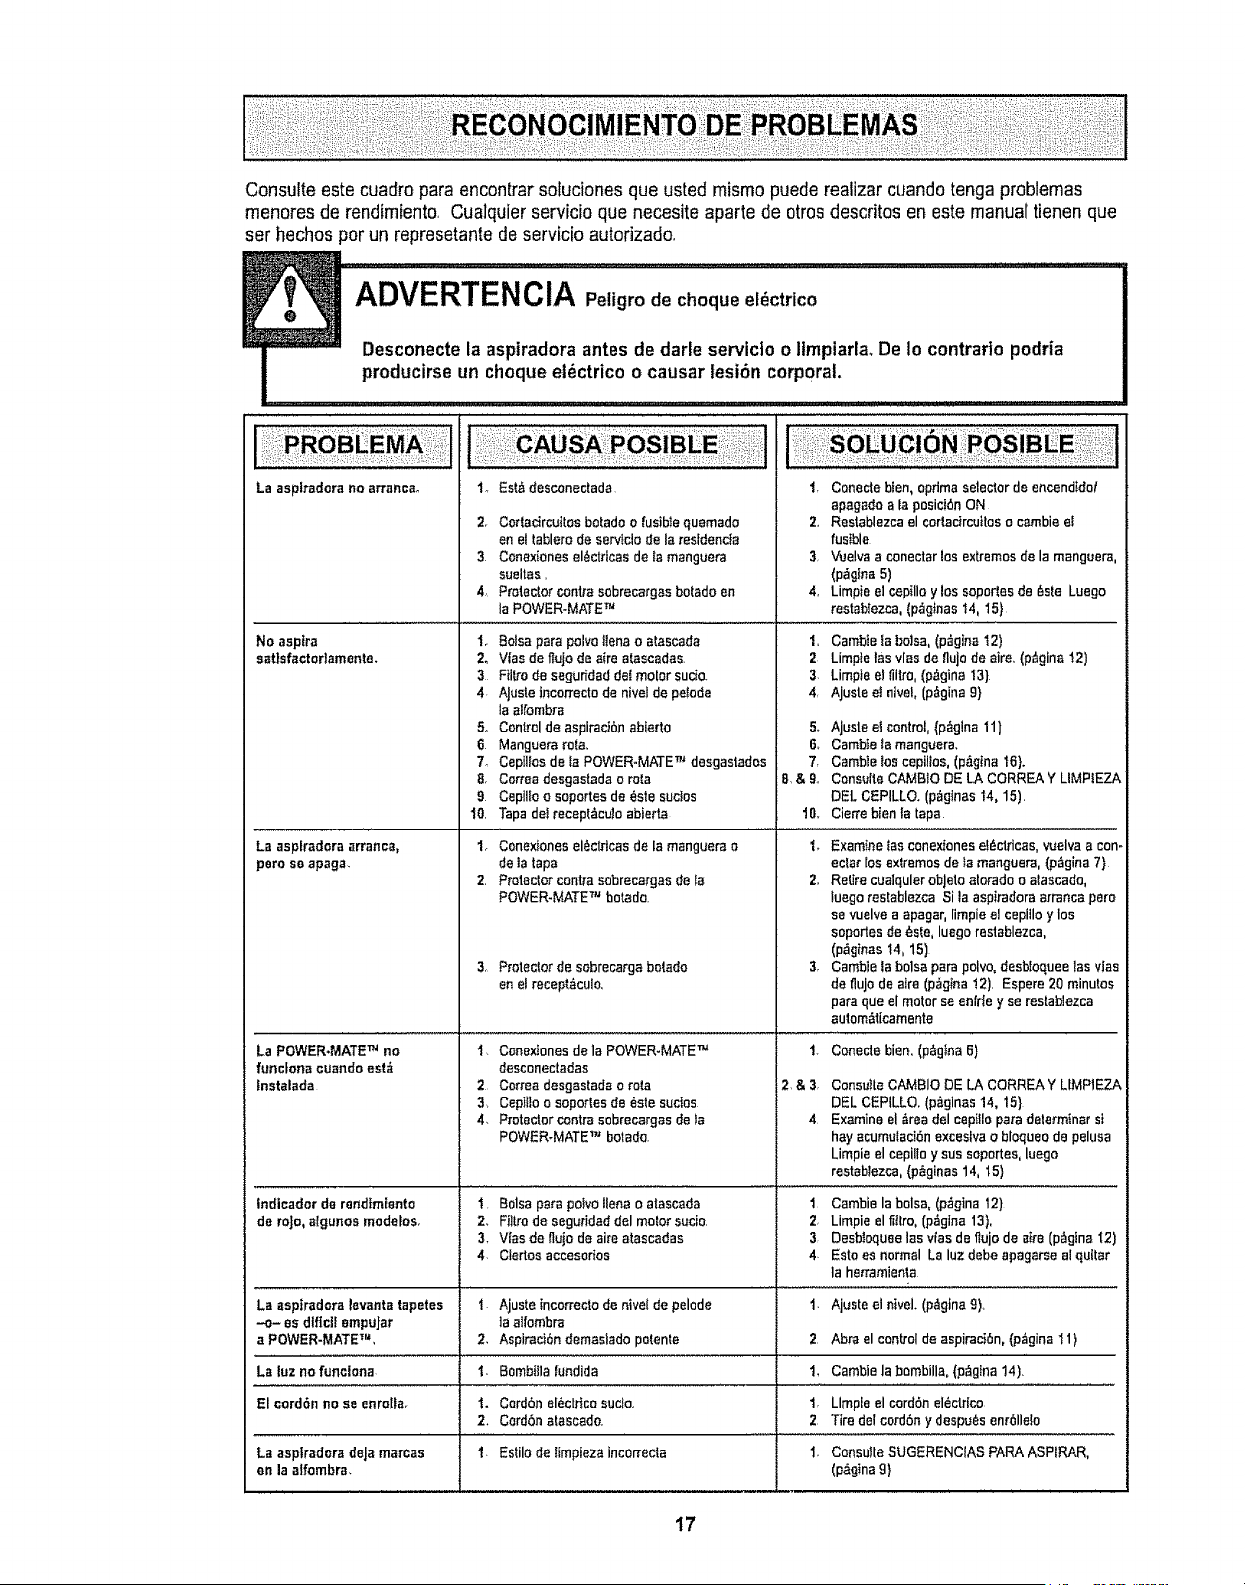
Consuite este cuadropara encontrarsoluciones que usted mismopuede reatizarcuandotonga problemas
menores de rendimiento, Cualquierservicio qua necesite aparte de otrosdescfitos en este manualtienen que
set hechos per un represetantede servicio autofizado,
La aspiradora no arranca,,
No aspire
sat}sfactor]amente.
1_ Est_ desconectada
Z Cortadrcuttes botado o lusibte qusmado
en el tablero de serv_clo de la restdenc_a
3. Conexiones el_ctficas de la manguera
sueltas,
4, Protector centre sobrecargas botado en
la POWER-MATE TM
!. Balsa pare polve llano o atascada
2. Vies de frujo de aira atascadas.
3 Fiitro de segufidad dot molar sucio.
4. AJuste tncorrecto de nivel de pe$o,'le
la alt'ombra
5. Control de aspiract6n abierte
6 Manguera rata,
7_ Cepllros de ta POWER-MATE TM deegastados
8, Correa desgastada o rata
9 Cepillo o soportes de Sate suctos
t0. Tapa de! recept_cuJo abierta
La asplradora arranca,
poreso apaga.
La POWER-MATE TM no
funclona ouando est_
Instalada
1. Conexiones el6ctricas de la manguera o
de la tape
2. Protector centre sobrecargaa de ta
POWER-MATE TM botado.
3, Protectorde sobrecargabe|ado
enetreceptdculo,
l r Conede blen, optima selector de encendtdo!
apagado ala posicibn ON
2,, Restablezca el cortactrcuites o cambie e{
fusible
3 Vuelva a conectar los extremes de la mangoera,
(p_glna 5)
4, Limp}e el cepillo y los soportes de _sle Luego
restablezca, (pa'g_nast4, 15}
1. Cambte la balsa, (p_gina t2)
2 Limpte tas v[ae de fluje de atre, (p_gina t2)
3. Limpie el fiitro, (p,_gina !3)
4, Ajuste e! nlvel, {p_gina 9}
5_ AJuste el control,(p_glna 11)
6o Cambte _amanguara,
7, Camble ies ceptllos, (p&gIna 16}.
8 & 9, Consutte CAMB10 DE LA CORREA Y LIMPIEZA
DEL CEPILLO. (p_gtnas 14, 15),
t8o Cierre bien la tape
'L Examine los cenexiones e_ctricas, vuelva a con-
ectar los extremes de fa manguera, (p._gina7)
2, Retire cuatqulerobJeto alorado o alascado,
luego restablazca Sila aspiradora arranca pare
se vuelve a apager, limpie el cepiilo y los
soportes de _ste, luego restablezca,
(p_gtnas 14, 15)
3, Cambie ]a balsa pare polvo, desbfequee los vies
de fluJo de alre (p_=glna !2). Espere 20 minutes
pare que el motor se en[rle y se restablezca
aulom_t[camente
l. Conextones de la POWER-MATE TM 1.
desconectadas
2 Correa desgastada o rata 2, & 3,
3, Ceptfio o soportes de _ste suctos
4_ P_otector centre eebrecargas de !e 4
POWER-MATE '_'Jbotado.
Indicador de randtm[ento
de re|o,_lgunes modelos.
La aspiradora levanta tapetes
.-o- as dlflc]f empuJar
a POWER-MATE TM,
La luzno funclona
!, Balsa parepeevelianao atascada
2, Filtrode aeguridaddel motorsucio
3, Vies de flujode aireatascadas
4, Ciertosaccesorios
2,
1.
Ajuste incorrecto de nivel de pelode
]a alfombra
Aspiracibn demasiado potente
Bombilla fundida
I. Cordbnel_ctHcosucio.
2, Cord6natescedo.
1. Estile de timpieza incon'ecta
El oord6n no se enrolta.
La asplradorade|amarcas
en la aifombra,
Coneciebien,(p_gtna6)
ConsutteCAMBIODE LA CORF_EAY UMP1EZA
DELCEPILLO,(p_ginas14, 15}
Examineel_readelcepitloparedeterminerst
hayacumu{aci_nexceslvae blequeodepeluaa
Limpieelcepi!loy suesoportes,luego
rastablezca,(p_glnas14, 15)
1 Cambie la balsa, (p_gtne 12)
2, Limpie el fHIro, (pdgina 13),
3 Desb_oquae lee v_asde flujo de airs (p_gtna I2)
4. Eato es normal La luz debe apagarse el quitar
Is hen'amienta
1. Ajuste el ntvel. (p,_gtna9),
2 Abra el control de aspiraci6n, (p_gina 11)
1, Cambie la bembilla, (p_gina 14)
t, Llmple el cord6n el_ctdco
2 Tire del cord6n y despots enr611e{o
1. ConsuHe SUGERENCIAS PARA ASPtRAR,
(p>na 9}
17
Sears se complace en ofrecer a sus clientes servicio de reparaci6n de aparatos
electrodom_sticos y electr6nicos de todas las marcas.
En Sears, usted puede contar con operadores en espa_ol, a los que puede Ilamr
sin cargo alguno.
Para pedir servicio de reparaci6n a domocillio, Llame 24 horas al alia, 7 dias a la semana
1-800-676-5811
Para ordenar piezas con entrega a domocillio, Llame 24 horas al dia, 7 dfas a la semana
1-800-659-7084
TheServiceSideof Sears,"
t8