Cool Down Period
To ensure safe food storage, allow the refrigerator to operate with the doors dosed for at bast 8 hours before ioading it with food.
Refrigerator & Freezer Controls (some models)
NOTE When first turning refrigerator on, adjust the refrigerator controi to Normal This is the recommended init]ai setting. After 24 hours, adjust the controis as needed.
NOTE If your unit is in a garage or area where the temperature is bellow 55 °, adjust the freezer controi to the coidest setting to improve performance.
Cool Down Period
To ensure safe food storage, allow the refrigerator to operate with the doors dosed for at bast 8 hours before ioading it with food.
Refrigerafor & Freezer Confrols (some models)
Note
It may take up to 10 minutes for the compressor to start when first turned on or after power interruption.
When first turning refrigerator on, adiust control to Normal. This is the recommended initial setting. After 24 hours, adjust the controis as needed.
Temperature Adjustment
Adiust temperature gradualiy: adiust the knob in smali increments, allowing the temperature to stabilize.
For colder temperatures, adiust the knob towards Coider.
For warmer temperatures, adiust the knob towards Cold.
Adjusting the refrigerator/freezer controi will change temperatures in both compartments. The auxiliary freezer controi can be Heft at the factory preset (Normai) or adjusted as desired; it has no effect on electricai power to the refrigerator. To maintain temperatures, a fan circulates air in the refrigerator and freezer compartments. For good circulation, do not biock coid air vents with food items.
Adjust temperature gradualiy: adjust the knob in small increments, allowing the temperature to stabilize.
Adjusting the refrigerator/freezer controi wili change temperatures in both compartments. The auxiliary freezer controi can be Heft at the factory pre_ set (Normai) or adiusted as desired; it has no effect on electricai power to the refrigerator. To maintain temperatures, a fan circulates air in the refrigerator and freezer compartments. For good drculafion, do not block cold air vents with food items,
iMPORTANT Adjusting the refrigerator/freezer temperature controi to "0" turns off the compressor and prevents the refrigerator from cooling but does not disconnect the power to the Hight bulb and other electricai components, To turn off power to your refrigerator, you must unpiug the power cord from the wali outlet
Optional Features
CAUTION Do not cJean glass shelves or covers with warm water when they are cold. Shetves and covers may break if exposed to sudden temperature changes or impact, such as bumping. Tempered Glass is designed to shatter into many small_ pebble-size pieces. This is normal. Glass shelves and covers are heavy. Use both hands when removing them to avoid dropping.
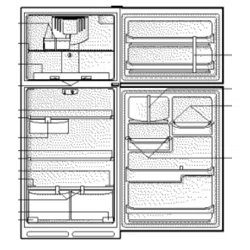
Shelf Adjustment
Refrigerator shelves are easily adjusted to suit individual needs. Before adjusting the shelves, remove all food. To adjust sliding shelves:
1. Remove shelf by pulling forward to stop position.
2. Lift front edge up and pull out. To replace shelf, rest side edges on any pair of shelf rails and carefully push shelf back into position.
To adjust slide-under/flip shelf:
1. Pull shelf forward until the back of the shelf drops down, then gently push shelf back and under.
2. Lift front of shelf to flip it upwards toward the back of the cabinet°
Door storage
Door bins, shelves_ and racks are provided for convenient storage of jars, bottles, and cans. Frequently used items can be quickly selected. The dairy compartment, which is warmer than the general food storage section, is intended for short term storage of cheese, spreads, or butter.
Door rack Some models have door racks or bins that can accommodate gallon-sized plastic drink containers and economy-sized jars and containers.
To remove door rack:
1. Push on rack sides to release from locking tabs.
2. Pull straight out.
To install door rack:
1. Push rack straight ahead.
2. You will hear the sides lock into the tabs.
Adjustable door bins
Some models have adjustable door bins that can be moved to suit individuaU needs.
To move door bin along a rail:
1. Tilt bin up so the back of the bin is off: the door but the hook is stiUUengaged.
2. SUide bin aUong raiU to desired position.
3. Lower bin back into pUace.
To move door bin from rail to rail:
1. Lift bin up disengaging the hook.
2. Move bin to desired rail location.
3. Push bin hook into rail engag[ng the hook.
Crisper Humidity
The crisper humidity control, present on the crisper drawers of some models, allows you to adiust the humidity within the crisper. This can extend the life of fresh vegetables that keep best in high humidity.
NOTE Leafy vegetables keep best when stored with the Humidity Control set on High Humidity, or in a drawer without a Humidity Control. This keeps incoming air to a minimum and maintains maximum moisture content. Store nonleafy vegetables and fruits still in their skins at the low humidity setting.
Reference file: Kenmore 25360602411 Refrigerator
Additionally, the document applies to other Kenmore models: 253, 6000*, 6002 *, 6008*, 6011*, 6030*, 6031*, 6038*, 6040*, 6041*, 6050*, 6060*, 6062*, 7030*, 7040*, 7050*, 7060*, 7062*, 7063 *