Loading ...
Loading ...
Loading ...

08/2018
- 5 -
Copyright © 2018, Fast ČR, a.s.
EN
Electric Coffee Grinder
User'smanual
■ Prior to using this appliance, please read the user’smanual thoroughly, even in cases,
when one has already familiarised themselves with previous use of similar types of
appliances. Only use the appliance in the manner described in this user’smanual.
Keep this user’smanual in asafe place where it can be easily retrieved for future use.
■ We recommend saving the original cardboard box, packaging material, purchase
receipt and responsibility statement of the vendor or warranty card for at least the
duration of the legal liability for unsatisfactory performance or quality. In the event
of transportation, we recommend that you pack the appliance in the original box
from the manufacturer.
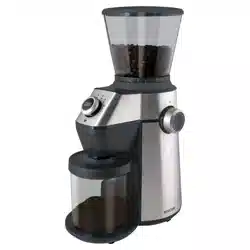
DESCRIPTION OF THE APPLIANCE
A1 Coffee bean hopper lid
A2 Coffee bean hopper with capacity of
approximately 350 g
A3 Start/Stop button
A4 Ground coffee dial
A5 Ground coffee container lid
A6 Ground coffee container with
capacity of approximately 150g
A7 Coffee bean hopper holder
A8 Coffee bean hopper release button
A9 Grind dial enables the selection of
15 grinding fineness levels
A10 Coffee grinder body
A11 Ground coffee outlet
A12 Space for ground coffee container
A13 Upper grinding burr
A14 Handle
A15 Lower grinding burr
A16 Cleaning brush
BEFORE FIRST USE
■ Before first use, take the appliance and its accessories out of the packaging material
and remove all promotional labels and stickers from it. Check that neither the
appliance nor any of its parts is damaged.
■ Place the coffee grinder on an even, dry and clean surface and remove the coffee
bean hopper A2. Press the coffee bean hopper release button A8 and simultaneously
turn the bean hopper A2 anticlockwise. Pull the hopper A2 out.
■ Coffee bean hopper A2, coffee bean hopper lid A1, ground coffee container A6
and ground coffee container lid A5 rinse out with warm water with the addition of
asmall amount of neutral dishwashing detergent. Then thoroughly rinse them out
using clean water and dry them.
■ Wipe the outer surface of the appliance with alightly dampened sponge and then
wipe it dry.
Warning:
Never wash the appliance under running water or submerge
it in water or another liquid. Never fill the coffee bean hopper
with water or another liquid in order to clean it.
OPERATING THE APPLIANCE
■ Place the coffee grinder on an even, dry and clean surface and make sure the power
cord plug is disconnected from the power socket. Check the coffee bean hopper
A2 is empty.
Assembling and disassembling of the coffee grinder
■ To assemble the coffee grinder, align the tab on the coffee bean hopper A2 with the
groove on the holder A7, push the hopper A2 down to the holder A7 and turn the
hopper A2 clockwise until you feel aslight resistance.
■ To remove the coffee bean hopper A2 from the coffee grinder, press the coffee
bean hopper release button A8 and simultaneously turn the bean hopper A2
anticlockwise. Pull the hopper A2 out.
Note:
The coffee grinder is provided by a safety switch to prevent the coffee
grinder from running if the coffee bean hopper A2 is not installed, or this
is not installed properly.
Before assembling and disassembling, always make sure the power cord
plug is disconnected from the power socket.
Filling the coffee bean hopper
■ Pour freshly roasted beans into the coffee bean hopper A2 and close the lid A1. For
the safety reasons, do not leave the hopper A2 open. The coffee beans would also
lose their aroma.
Warning:
The maximum capacity of the hopper A2 is 350 g. Do not
overfill it past the maximum mark. Never fill the coffee bean
hopper A2 with ground or instant coffee, caramelised or
otherwise specially modified coffee beans, cocoa beans or
other items. Otherwise, this could damage the appliance.
Note:
If you do not use the coffee beans, remove the hopper A2 from the coffee
grinder and pour the coffee beans into the airtight container and store it.
Grinding coffee
1. Fully unwind the power cord and insert the power cord plug to the power socket.
2. The Start/Stop button A3 will be illuminated.
3. Place the lid A5 on the ground coffee container A6 and put the ground coffee
container A6 under the ground coffee outlet A11. The opening of the lid should be
aligned with the ground coffee outlet A11 so that the ground coffee falls directly
into the ground coffee container A6.
4. Using the dial A9, set the desired grinding fineness level depending on the coffee
machine:
– levels 1 – 6 are suitable for espresso type machines;
– levels 6 – 8 are suitable for percolator;
– levels 8 – 11 are suitable for drip coffee machines;
– levels 11 – 15 are suitable for plunger.
5. Using the dial A4, choose the required amount of ground coffee according to
the number of cups you will prepare. You can set the amount from 2 to 10 cups.
Moreover, using the dial, you can choose amanual grind for 5 minutes.
6. Press the Start/Stop button A3 and the grinding will start. During the grinding, the
Start/Stop button A3 will flash. You can stop the grinding process at any time by
pressing the Start/Stop button A3.
7. Once the grinding process has been finished, the coffee grinder will turn off
automatically. The Start/Stop button A3 will remain illuminated.
8. If you no longer use the coffee grinder, disconnect the power cord plug from the
power socket.
■ If, during the grinding, the ground coffee container A6 gets full, or the coffee bean
hopper A2 gets empty, always stop the operation of the coffee grinder by pressing
the Start/Stop A3 button at first, and then disconnect the power cord plug from the
power socket. Then empty the container A6, or refill the coffee beans, assembly the
coffee grinder, insert the power cord plug to the power socket and turn it on again
by pressing the Start/Stop button A3.
Note:
If the coffee grinder is operated continuously for 5 minutes, it is important
to allow it to cool down for at least 30 minutes. Disconnect the power cord
plug from the power socket while the coffee grinder is cooling down. This is
asafety precaution to prevent the coffee grinder from possible damage. It
is recommended to grind coffee for 90 seconds and then allow the coffee
grinder to cool down for 90 seconds before turning on again.
Note:
The maximum capacity of the ground coffee container A6 is approximately
150g. After each grind, pour the ground coffee into the airtight container
and store it according to the instructions of the coffee bean manufacturer.
The ground coffee container A6 supplied with the coffee grinder is not
intended for storing ground coffee.
Sleep mode
■ The coffee grinder will automatically enter the sleep mode after 90 seconds of
inactivity.
Recommendations for purchasing and storing coffee
■ To shorten the storage time, purchase coffee beans in smaller packages.
■ Use fresh roasted coffee beans with a marked roasting date and consume them
within 3 weeks of the roasting date.
■ Store coffee beans in acool, dark and dry location, ideally in an air-tight container.
■ We recommend grind the coffee beans immediately prior to brewing the coffee
beverage. Coffee that is ground in advance loses its flavour and aroma.
Recommended coffee grinding fineness
■ This appliance is equipped with a15-level regulation to enable the grinding fineness
to be adjusted to various coffee brewing methods. When the ground coffee is used
in espresso type machines, select a finer grinding level. For brewing percolated
coffee, select acoarser grind.
■ When the ground coffee is used in espresso type machines, and coffee flows out too
slowly and its taste is too bitter, it may mean that the coffee beans have been ground
too finely and it is necessary to set acoarser grind. On the other hand, if the brewed
coffee is flowing out too fast and its taste is bland, it may mean that the coffee grains
are too coarsely ground and it is necessary to set afiner grind.
CLEANING AND MAINTENANCE
■ Before cleaning, disconnect the power cord plug from the power socket and allow
the coffee grinder to cool down.
■ For cleaning, do not use cleaning products with an abrasive effect, solvents, etc. that
could damage the appliance. No part of this appliance is intended for washing in
adishwasher.
Warning:
To prevent the risk of injury by electrical shock, do not
submerge the appliance, power cord or power plug into
water or another liquid.
■ To remove the coffee bean hopper A2 from the coffee grinder, press the coffee
bean hopper release button A8 and simultaneously turn the bean hopper A2
anticlockwise. Pull the hopper A2 out.
■ Pour the ground coffee to the airtight container and unused coffee beans from the
hopper A2 pour to the airtight container.
Loading ...