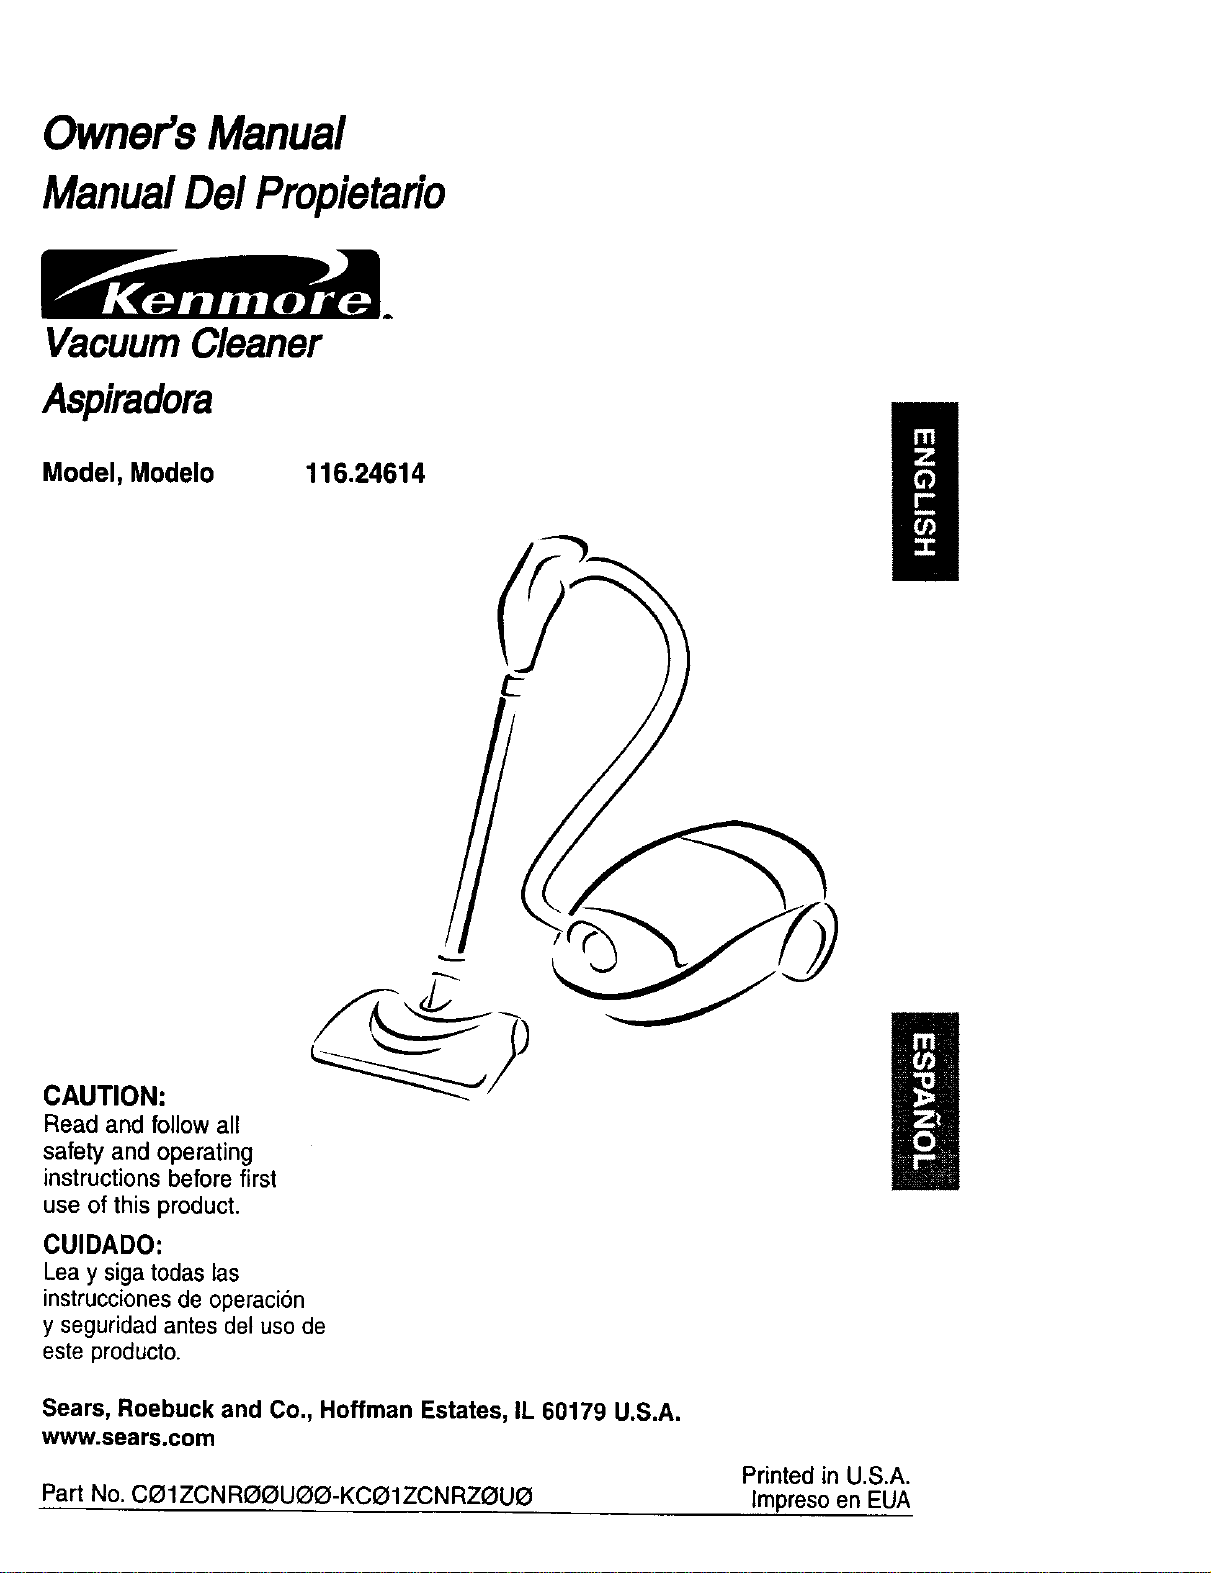
Owner'sManual
ManualDelPropietario
VacuumCleaner
Aspiradora
Model, Modelo
116,24614
CAUTION:
Read and follow all
safety and operating
instructions before first
use of this product.
CUIDADO:
Lea y siga todas las
instrucciones de operaci6n
y seguridad antes del uso de
este producto.
Sears, Roebuck and Co., Hoffman Estates, IL 60179 U.S.A.
www.sears.com
Printed in U.S.A.
Part No. CI211ZCNR_(_UQI3-KC_IZCNRZI3U_I lmpreso en EUA

Before Using Your New Vacuum ....... 2
Kenmora Vacuum Cleaner Warranty ... 2
Important Safety Instructions ......... 3
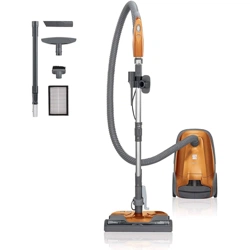
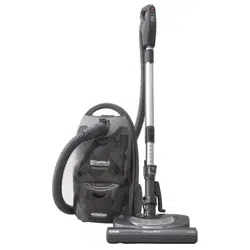
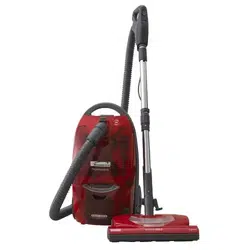
Parts and Features ................. 4-5
Assembly Instructions ............. 6-7
Power-Mata Jr." Storage .............. 7
Use ................................ 8
Howto Start ........................ 8
VacuumingTips ..................... 9
SuggestedPile HeightSettings ........ 10
Attachments....................... 10
AttachmentUse Chart ............... 11
PerformanceFeatures ............. 11-12
HowYour Vacuum Works ............ 13
Canister Care ...................... 13
Bag Changing ..................... 13
Cleaning Exteriorand Attachments ..... 14
MotorSafety FilterChanging .......... 14
ExhaustFilterChanging .............. 15
Power-Mata • Care .................. 15
Belt Changingand AgitatorCleaning.. 16-17
LightBulbChanging ................. 18
AgitatorServicing................... 18
Troubleshooting .................... 19
Requesting Assistance
Or Service .................. BackCover
Please read this guide. It will help you assemble and operate your new Kenmore vacuum in
the safest and most effective way.
For more information about vacuum cleaner care and operation, call your nearest Sears store.
You will need the complete model and serial numbers when requesting information. Your vacu-
um's model and serial numbers are located on the Model and Serial Number Plate.
Use the space below to record the model number and serial number of your new Kenmore
vacuum.
Model No.
Serial No.
Date of Purchase
Keep this book and your sales check (receipt) in a safe place for future reference.
LIMITED ONE YEAR WARRANTY ON KENMORE VACUUM CLEANER
This warranty is for one year from the date of purchase, and includes only private household
vacuum cleaner use. During the warranty year, when this vacuum cleaner is operated and
maintained according to the owner's manual instructions, Sears will repair any defects in
material or workmanship free of charge.
This warranty excludes vacuum bags, belts, light bulbs, and filters, which are expendable parts
and become worn during normal use.
For warranty service, return this vacuum cleaner to the nearest Sears Service Center in
the United States.
This warranty applies only while this product is in use in the United States. This warranty gives
you specific legal rights, and you may also have other rights which vary from state to state.
Sears, Roebuck and Co., D/817 WA, Hoffman Estates, IL 60179
Yn_Ursafety is important to us. To reduce the risk of fire, electrical shock,
uryto persons or damage when using your vacuum cleaner, follow basic
safely precautions including the following:
Read all intstructionsinthis manual before
assembling or usingyour vacuum cleaner.
Use your cleaner only as described inthis
manual. Use onlywith Sears recommended
attachments.
Disconnect electdcal supply before
servicingor cleaning out brush area.
Failure todo so couldresult in electrical
shock or brushsuddenly starting,
Do not leave cleanerwhen plugged in.
Unplug from outletwhen not in use and
before servicing,
To reduce the riskof electrical shock - Do
not use outdoorsor on wet surfaces.
Do not allow to be used as a toy. Close
attention isnecessary when used by or
near children.
Do not use with damaged cord or plug. If
cleaner is not working as itshould, has
been dropped, damaged, left outdoors,or
dropped intowater, return itto a Sears
Service Centre.
Do not pull or carry by cord, use cord as a
handle, close door on cord, or pull cord
around sharpedges or comers. Do not run
cleaner over cord. Keep cordaway from
heated surfaces.
Do not unplug by pulling on cord. To
unplug,grasp the plug, not the cord.
Do not handle plug or cleaner with wet
hands.
Do not put any objectsinto openings.
Do not use with any opening blocked; keep
free of dust, lint, hairand anythingthat may
reduce air flow.
Keep hair, loose clothing,fingers, and all
parts of body away from openings and
moving parts.
SAVE THESE
Turn off all controls before unplugging.
Use extra care when cleaning on stairs.Do
not put on chairs, tables, etc. Keep on
floor.
Do not use cleaner to pick up flammable or
combustible liquids (gasoline, cleaning
fluids,perfumes, etc.), or use in areas
where they may be present. The fumes
from these substances can create a fire
hazard or explosion.
Do not pickup anythingthat is burningor
smoking,such as cigarettes, matches, or
hot ashes.
Do not use cleaner without dust bag and/or
filters in place.
Always change the dust bag after
vacuuming carpet cleaners or freshener,
powdersand fine dust.These productsclog
the bag, reduce airflow and can cause the
bag to burst. Failure to change bag could
cause permanent damage tothe cleaner.
Do not use the cleaner to pick up sharp
hardobjects, small toys, pins, paper clips,
etc. They may damage the cleaner or dust
bag.
Do not operate cleaner without the exhaust
filteror exhaust filter door in place (If
applicable).
The hose contains electrical wires. Do not
use when damaged, cut, or punctured.
Replace ifcut or worn. Do not pickup
sharpobjects.
Always turn off and unplug the cleaner
before connecting or disconnecting either
hose, Handi-Mate Jr.® (if applicable), or
nozzle.
Hold plug when rewinding ontocord reel.
Do not allow plug to whip when rewinding.
You are responsiblefor making sure that
yourvacuum cleaner is not used byanyone
unable to operate it properly.
INSTRUCTIONS
Proper assembly and safe use of your vacuum cleaner are,your responsibilit es
Your cleaner is intended for household use. Read this Owner s Manual carefully for
important use and safety information. This guide contains safety statements under
warning and caution symbols. Please pay special attention to these boxes and
follow any instructions given. WARNINGs[atements alert you to such dangers as
fire, electrical shock burns and personal injury. CAUTION statements a erfyou to
such dangers as persona njury and/or propertydamage.
3

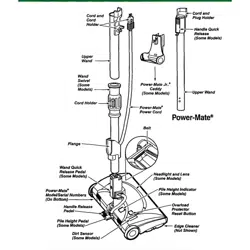
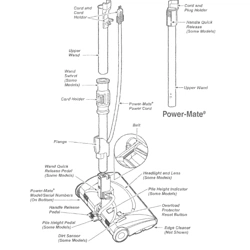
Itis importantto knowyourvacuum cleaner'sparts and features to ensure itsproperand safe
use. Reviewthese before usingyour cleaner.
Item Part No. Part No.
In U.S. In Canada
HeadlightBulb 20-5240 596181
Belt 20-5218 20-5218C
Power-Mate®
Telescoping
Wand
Range
Wand Quick
Release Pedal
(Not Shown)
Handle
Quick
Release
Button
_---Wand
Length
Adjust
Button
Belt
Pile
Height Pedal
Handle
Protector
ResetBu_on
Power-Mate"
Model/Serial Number
(On Bottom)
s Cleaner
(Not Shown)
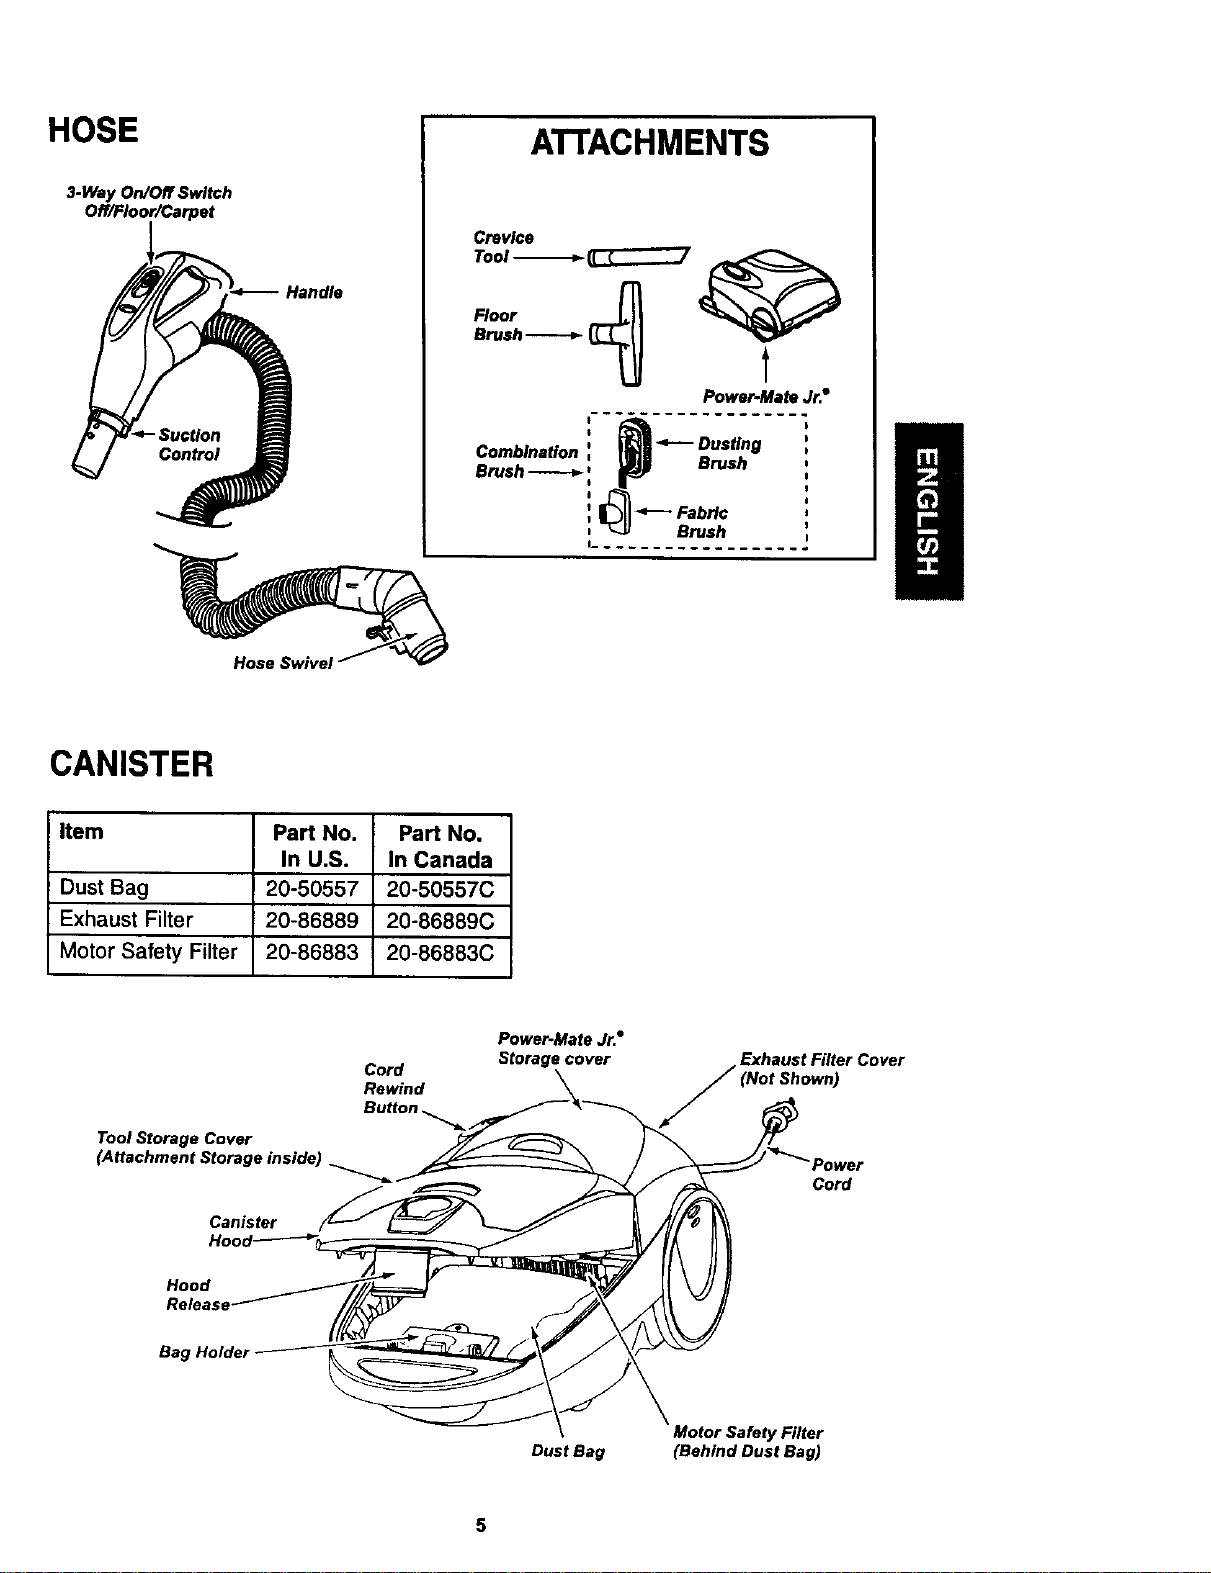
HOSE
3-Way On/Off Switch
Off/Floor/Carpet
_-q_-- H_,andle
J
L
ATTACHMENTS
Crevice
TOOI "_" _]_7
Floor
Brush _ _
Power-Mate Jr.°
It.................
Combination _E _ <-'- Dusting
Brush_ : __) Brush
I ................. d
H
CANISTER
Item Part No. Part No.
In U.S. In Canada
Dust Bag 20-50557 20-50557C
Exhaust Filter 20-86889 20-86889C
Motor Safety Filter 20-86883 20-86883C
Tool Storage Cover
(Attachment Storage inside)
Canister
Cord
Rewind
Button _.
Power.Mate Jr."
Storage cover
Exhaust Filter Cover
Cord
Hood
Bag Holder
Dust Bag
Motor Safety Filter
(Behind Dust Bag)
5
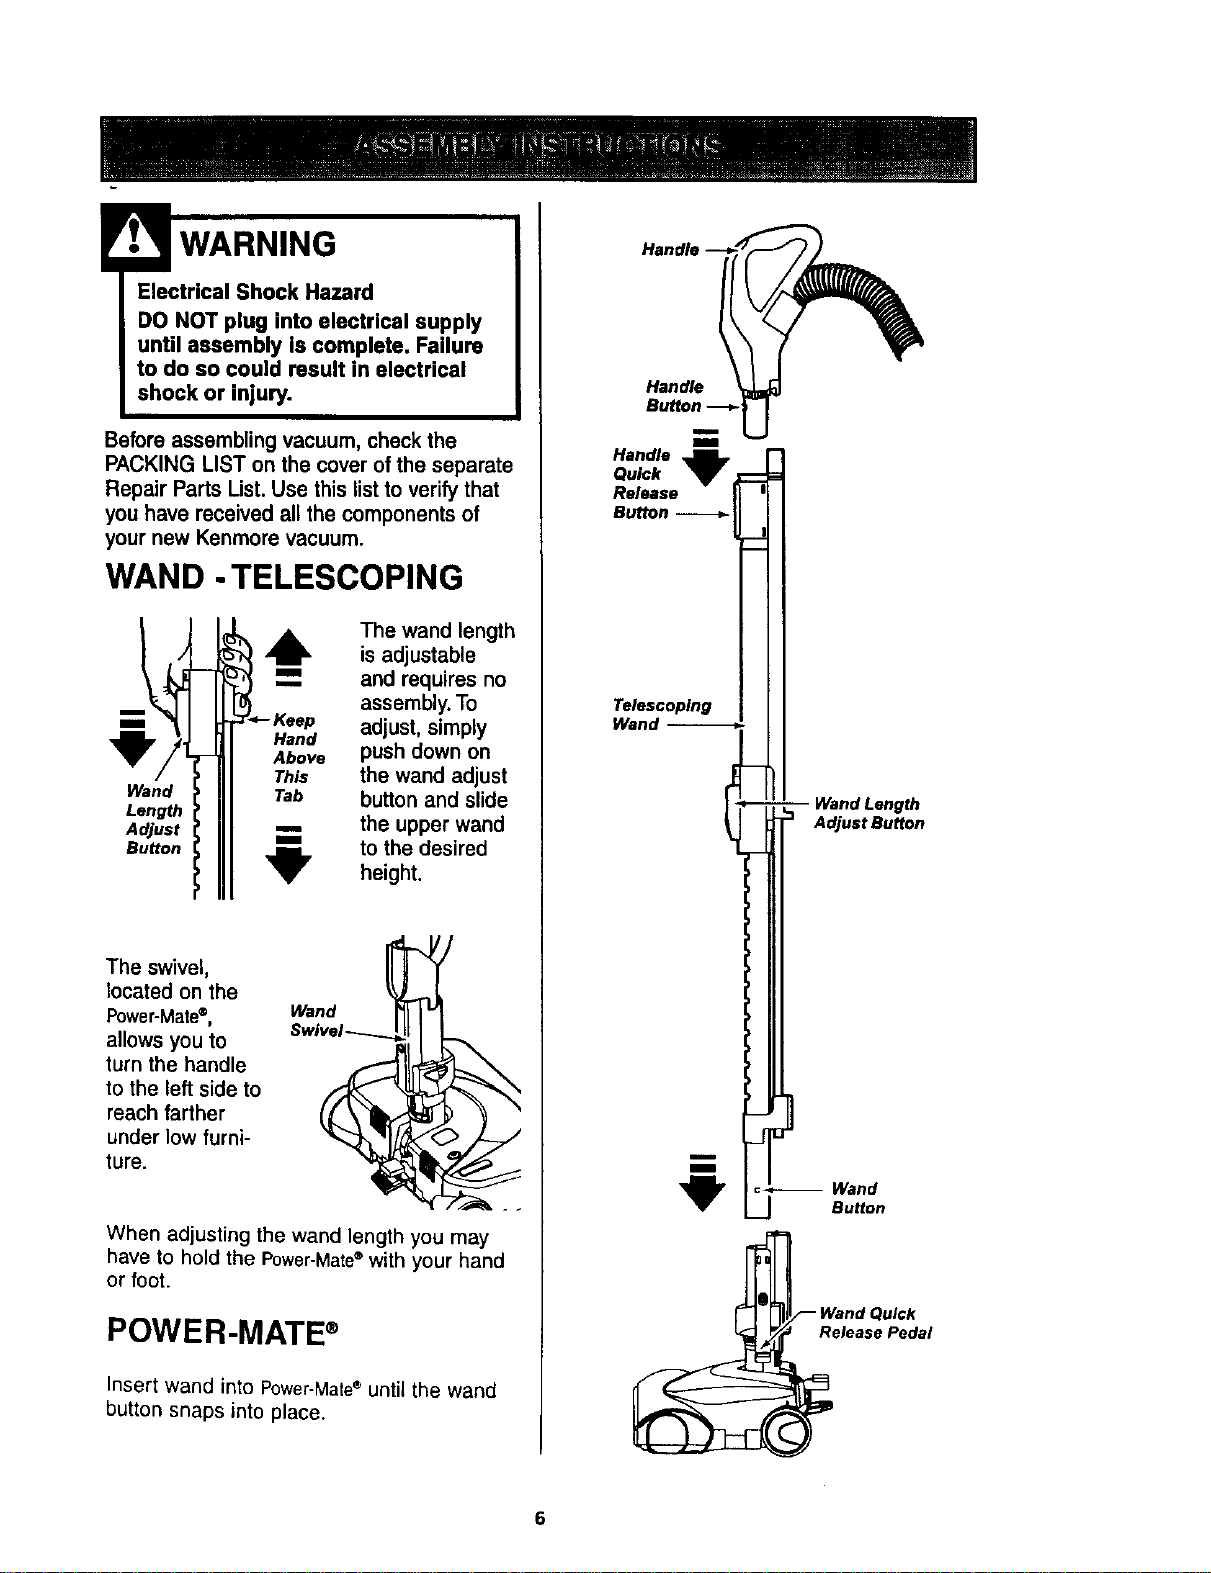
Electrical Shock Hazard
DO NOT plug into electrical supply
until assembly Is complete. Failure
to do so could result in electrical
shock or injury.
Beforeassemblingvacuum,checkthe
PACKING LIST onthe coverof the separate
Repair Parts List.Use this listto verifythat
you have received allthe componentsof
yournew Kenmorevacuum.
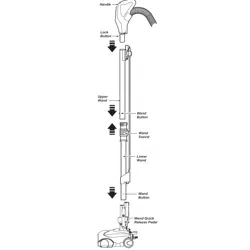
WAND -TELESCOPING
Wand
Length
Adjust
Button
The wand length
6, is adjustable
="=.- and requires no
assembly. To
Hand adjust, simply
Above push down on
This the wand adjust
Tab button and slide
the upper wand
_lr to the desired
height.
The swivel,
located on the
Power-Mate®,
allows you to
turn the handle
to the left side to
reach farther
under low furni-
ture.
!
When adjusting the wand length you may
have to hold the Power-Mate®with your hand
or foot.
POWER-MATE ®
Insert wand into Power-Mate®until the wand
button snaps into place.
Handle
Handle
Quick
Release
Button
Telescoping
Wand
-- Wand Length
Adjust Button
:_--_ Wand
Button
Wand Quick
lease Pedal
6
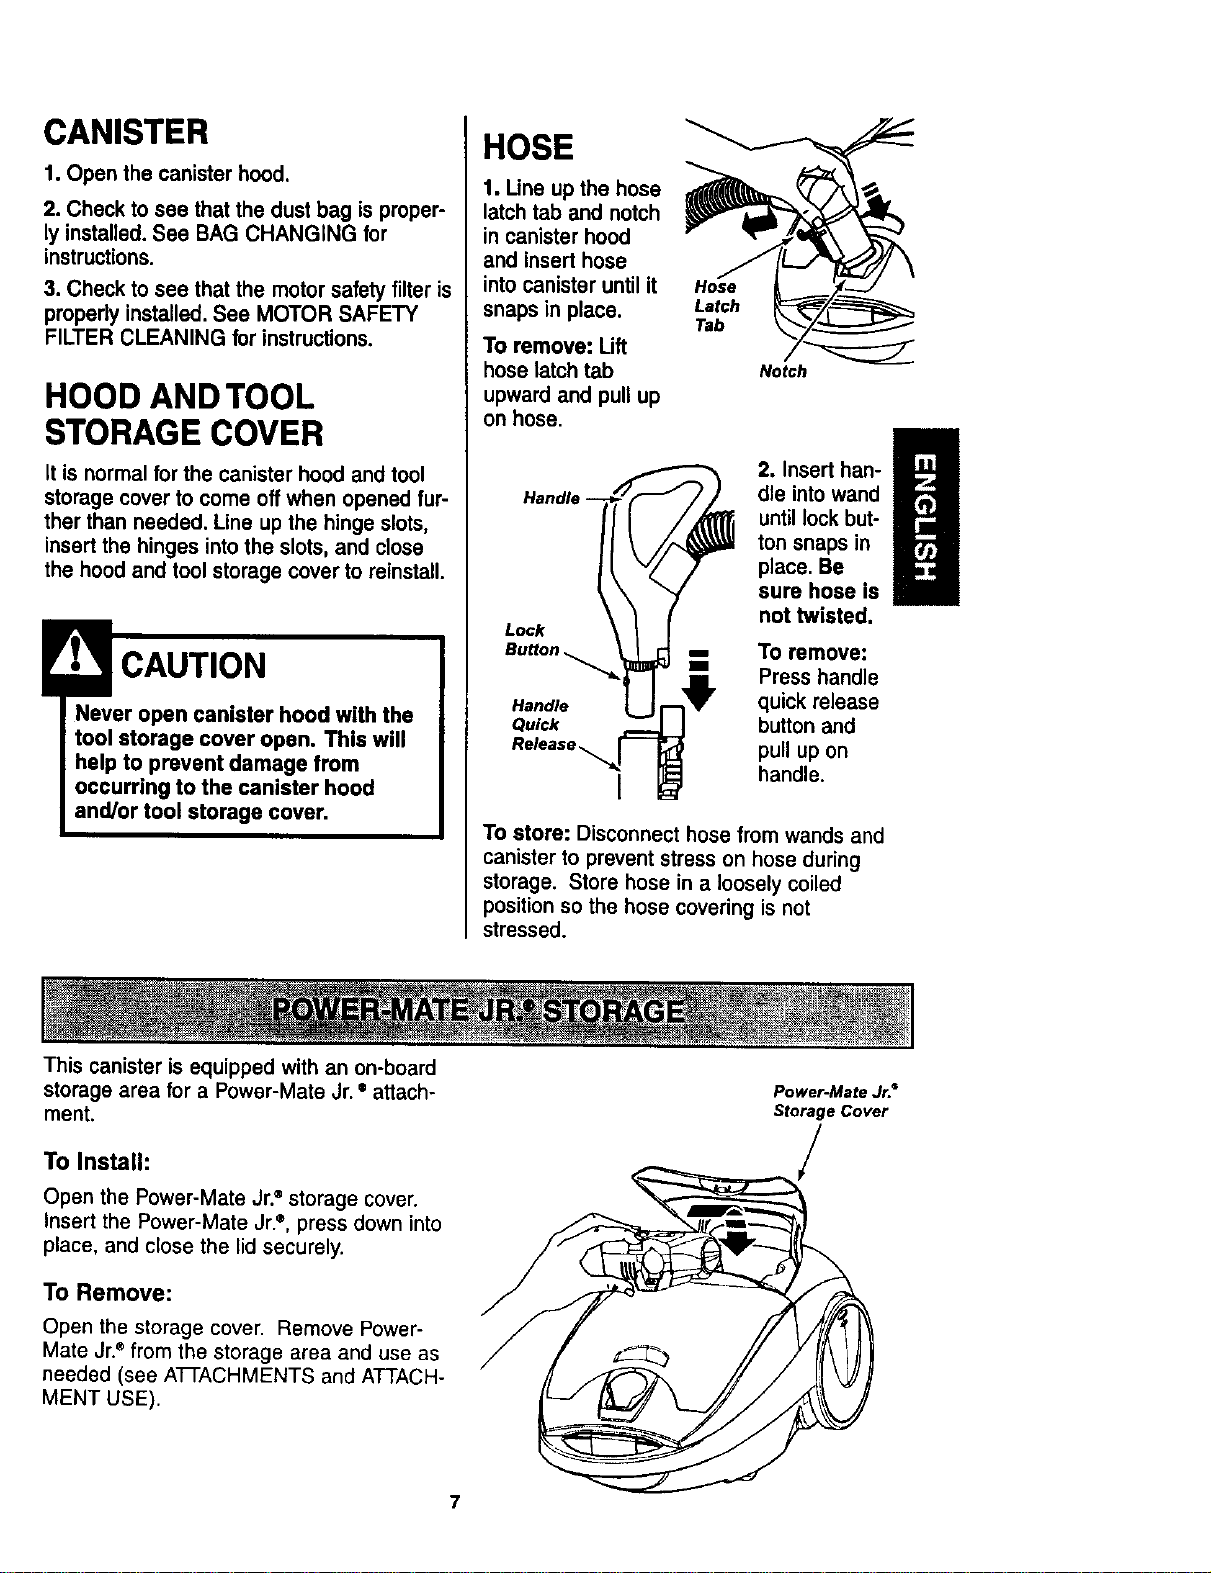
CANISTER
1. Open the canister hood.
2. Check to see that the dust bag is proper-
ly installed. See BAG CHANGING for
instructions.
3. Check to see that the motor safety filter is
properly installed. See MOTOR SAFETY
FILTER CLEANING for instructions.
HOODAND TOOL
STORAGE COVER
it is normal for the canister hood and tool
storage cover to come off when opened fur-
ther than needed. Line up the hinge slots,
insert the hinges into the slots, and close
the hood and tool storage cover to reinstall.
CAUTION
Never open canister hood with the
tool storage cover open. This will
help to prevent damage from
occurring to the canister hood
and/or tool storage cover,
This canister is equipped with an on-board
HOSE
1. Line up the hose
latch tab and notch
in canister hood
and insert hose
into canister until it
snaps in place.
To remove: Lift
hose latch tab
upward and pull up
on hose.
Handl
Lock
Notch
Pl
2. Insert han- H
die into wand
I
until lock but-
ton snaps in
place. Be
sure hose is
not twisted.
To remove:
-- Press handle
Handle quick release
Quick buttonand
Release_ pull up on
I handle.
To store: Disconnect hose from wands and
canister to prevent stress on hose during
storage. Store hose in a loosely coiled
position so the hose covering is not
stressed.
storagearea for a Power-MateJr.= attach-
ment.
To Install:
Open the Power-Mate Jr.®storage cover.
Insert the Power-Mate Jr.", press down into
place, and close the lid securely.
To Remove:
Open the storage cover. Remove Power-
Mate Jr.®from the storage area and use as
needed (see AI-IACHMENTS and ATTACH-
MENT USE).
Power-Mate Jr. _
Storage Cover
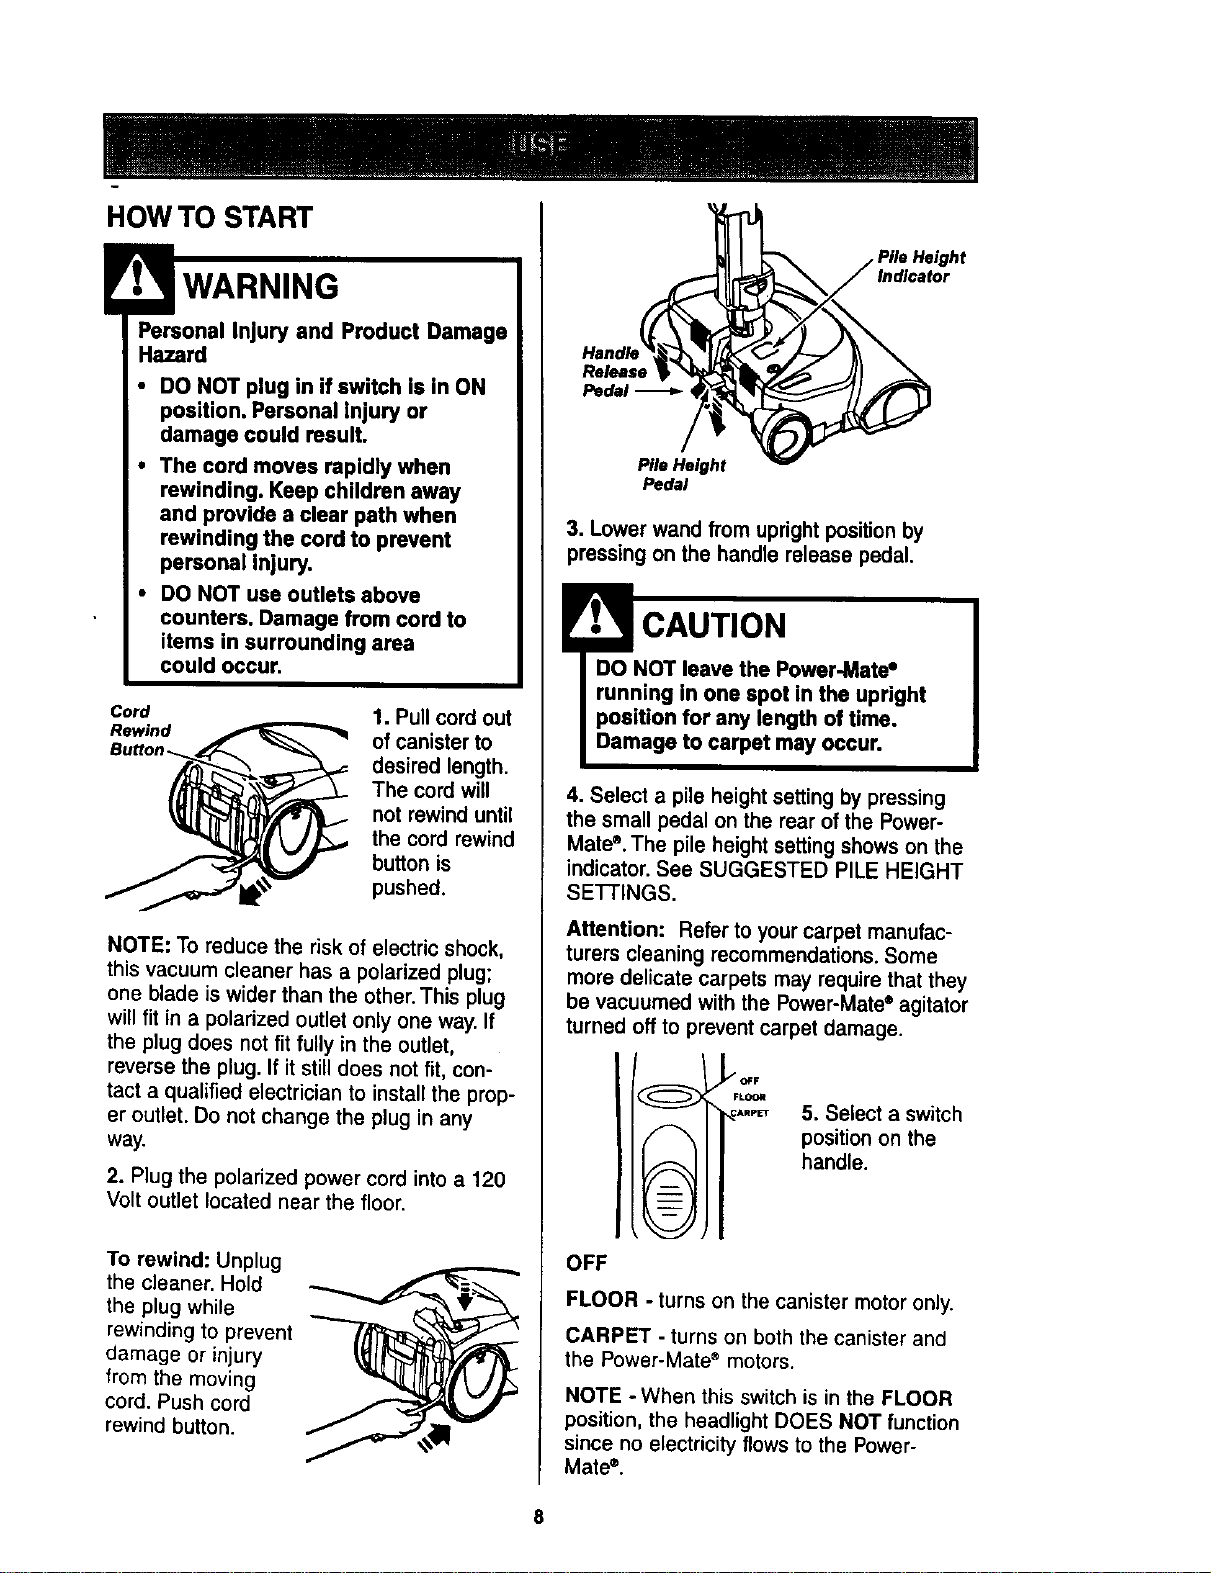
HOW TO START
WARNING
Personal Injury and Product Damagi
Hazard
• DO NOT plug in if switch is in ON
position. Personal injury or
damage could result.
• The cord moves rapidly when
rewinding. Keep children away
and provide a clear path when
rewinding the cord to prevent
personal injury.
• DO NOT use outlets above
counters. Damage from cord to
items in surrounding area
could occur.
Cord 1. Pull cord out
_eu_nd .__ of canister to
_ esired length.
The cord will
not rewind until
the cord rewind
button is
pushed.
NOTE: To reduce the risk of electric shock,
this vacuum cleaner has a polarized plug;
one blade is wider than the other. This plug
will fit in a polarized outlet only one way. If
the plug does not fit fully in the outlet,
reverse the plug. If it still does not fit, con-
tact a qualified electrician to install the prop-
er outlet. Do not change the plug in any
way.
2. Plug the polarized power cord into a 120
Volt outlet located near the floor.
To rewind: Unplug
the cleaner. Hold
the plug while
rewinding to prevent
damage or injury
from the moving
cord. Push cord
rewind button.
Indicator
Release
Pedal -_ ,
Pile Height
Pedal
3. Lowerwandfrom uprightpositionby
pressingonthe handlerelease pedal.
CAUTION
DO NOT leave the Power-Mate •
Damage to carpet may occur.
4. Select a pile height setting by pressing
the small pedal on the rear of the Power-
Mate". The pile height setting shows on the
indicator. See SUGGESTED PILE HEIGHT
SEI-i'INGS.
Attention: Refer to your carpet manufac-
turers cleaning recommendations. Some
more delicate carpets may require that they
be vacuumed with the Power-Mate • agitator
turned off to prevent carpet damage.
_OFF
FLOOm
&RPET
5. Select a switch
position on the
handle.
OFF
FLOOR - turns on the canister motor only.
CARPET - turns on both the canister and
the Power-Mate" motors.
NOTE - When this switch is in the FLOOR
position, the headlight DOES NOT function
since no electricity flows to the Power-
Mate e.
8
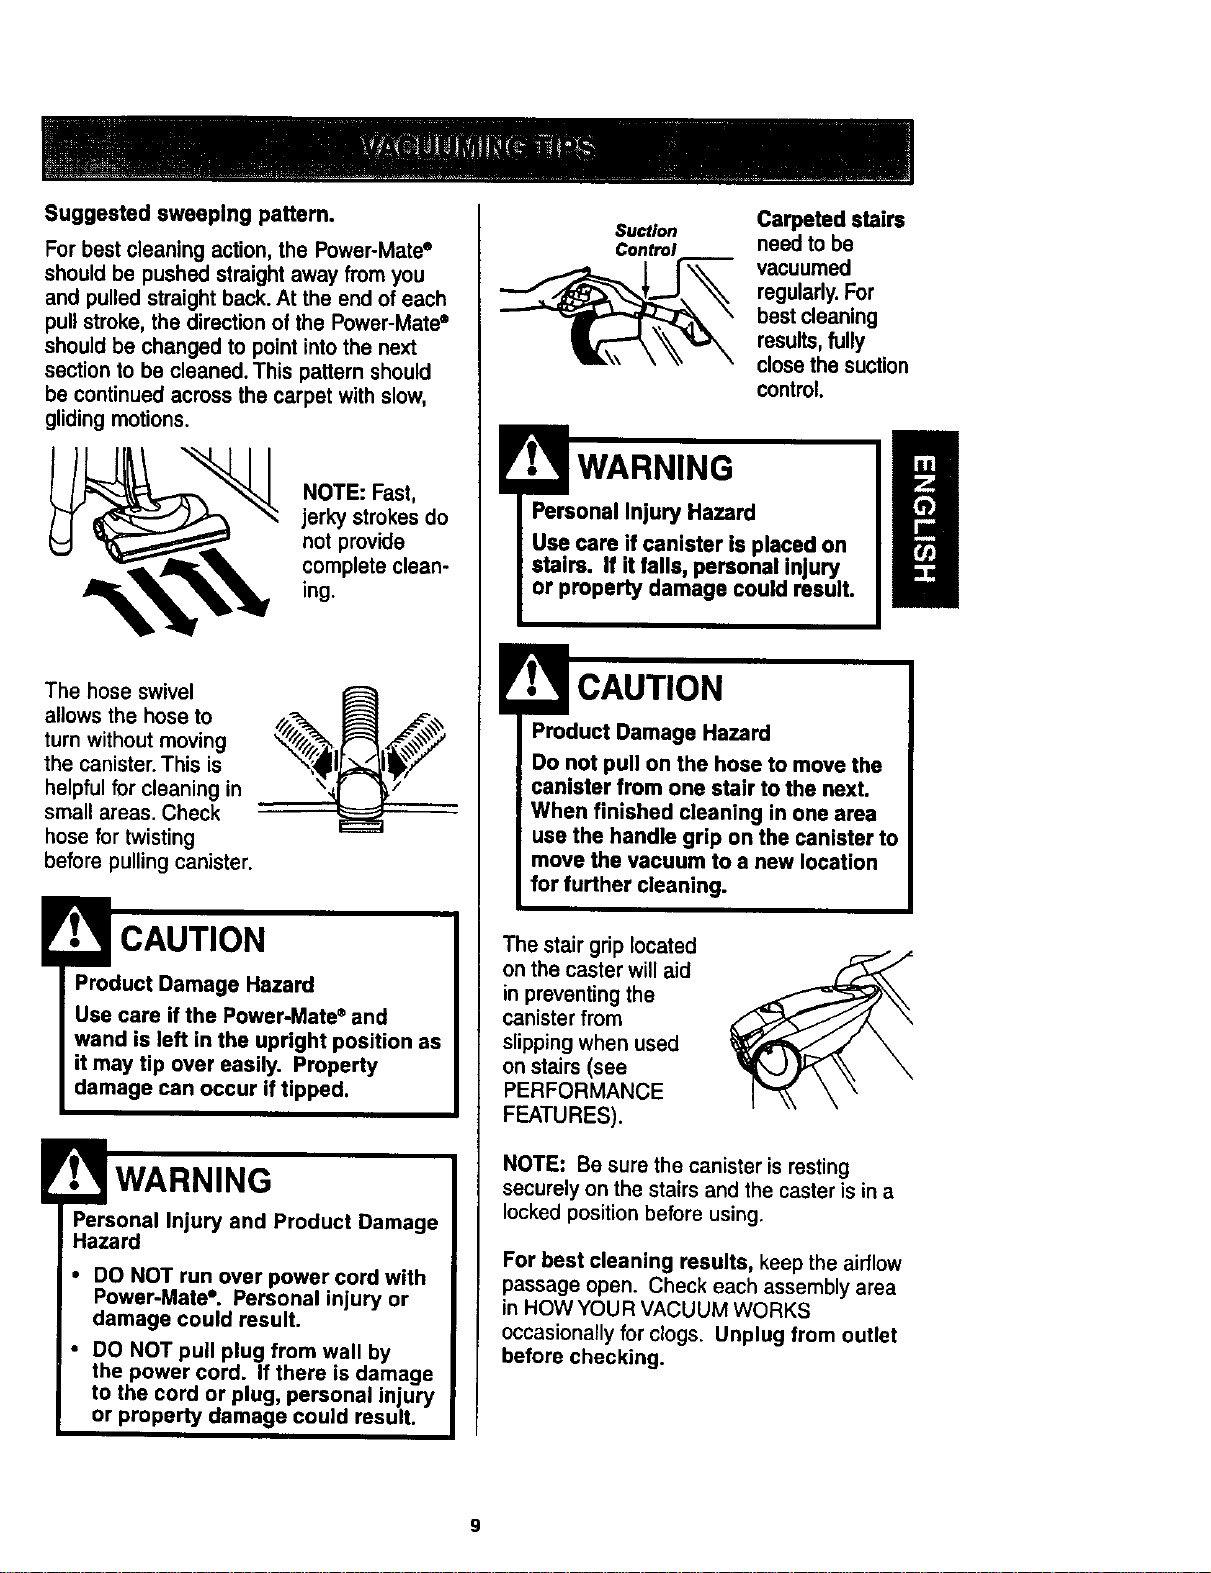
Suggested sweeping pattern.
For best cleaning action, the Power-Mate"
should be pushed straight away from you
and pulled straight back. At the end of each
pull stroke, the direction of the Power-Mate ®
should be changed to point into the next
section to be cleaned. This pattern should
be continued across the carpet with slow,
gliding motions.
"_ NOTE: Fast,
jerky strokes do
not provide
complete clean-
ing.
The hose swivel
allows the hose to _,._ _
turn without moving _I_I_
the canister. This is
helpful for cleaning in _,_r _,"
small areas. Check
hose for twisting
before pulling canister.
Product Damage Hazard
Use care if the Power-Mate ®and
wand is left in the upright position as
it may tip over easily. Property
damage can occur if tipped.
Personal Injury and Product Damage
Hazard
• DO NOT run over power cord with
Power-Mate °. Personal injury or
damage could result.
• DO NOT pull plug from wall by
the power cord. If there is damage
to the cord or plug, personal injury
or property damage could result.
Suction
ContrOl
Carpeted stairs
needto be
vacuumed
regularly.For
best cleaning
results, fully
close the suction
control.
WARNING
Personal Injury Hazard
Use care if canister is placed on
stairs. If it falls, personal injury
or property damage could result.
H
! CAUTION
Product Damage Hazard
Do not pull on the hose to move the
canister from one stair to the next.
=When finished cleaning in one area
use the handle grip on the canister to
move the vacuum to a new location
for further cleaning.
The stair grip located
on the caster will aid
in preventing the
canister from
slipping when used
on stairs (see
PERFORMANCE
FEATURES).
NOTE: Be sure the canister is resting
securely on the stairs and the caster is in a
locked position before using.
For best cleaning results, keep the airflow
passage open. Check each assembly area
in HOW YOUR VACUUM WORKS
occasionally for clogs. Unplug from outlet
before checking.
9
w
For best deep down cleaning, use the XLO
setting. However, you may need to raise the
height to make some jobs easier, such as
scatter rugs and some deep pile carpets,
and to prevent the vacuum cleaner from
shutting off. Suggested settings are:
HI - Shag, deep pile, or scatter rugs.
MED - Medium to deep pile.
LO - Low to medium pile.
XLO - Most carpets and bare floors.
CAUTION
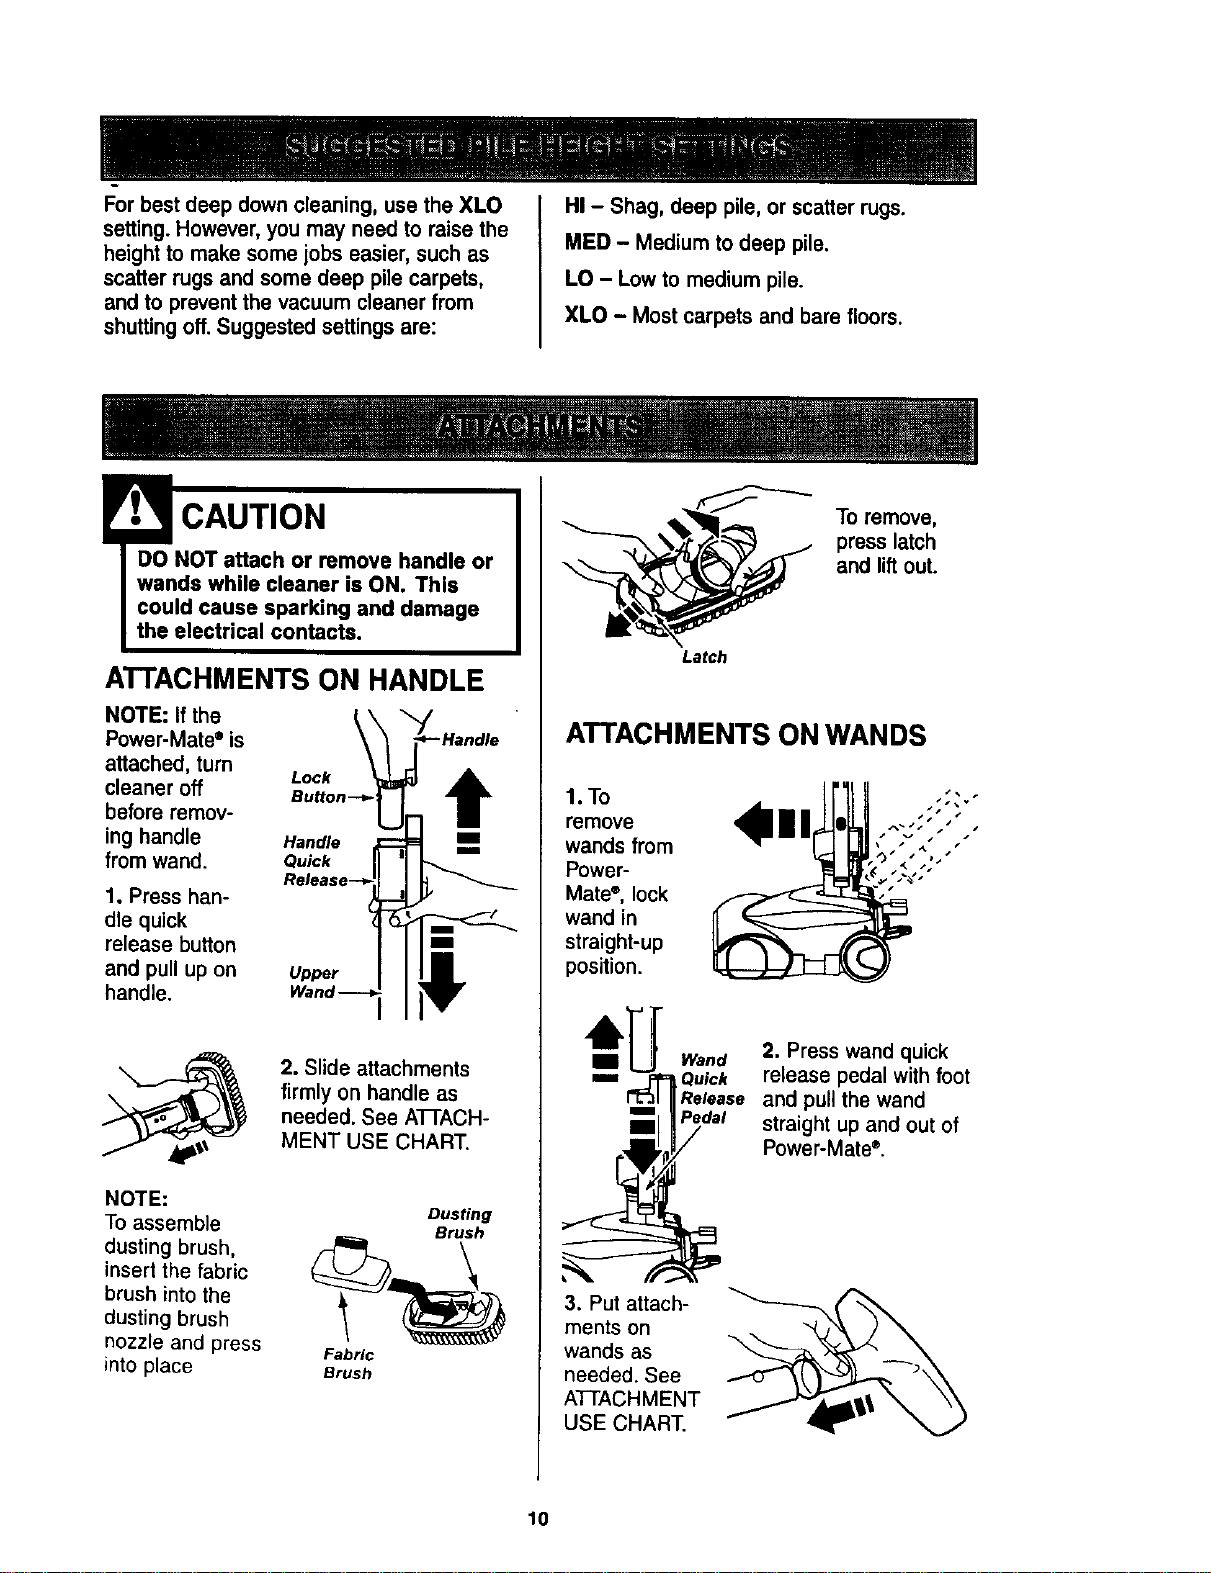
ATTACHMENTS ON HANDLE
NOTE: If the
Power-Mate" is
attached, turn
cleaner off
before remov-
ing handle
from wand.
1. Press han-
dle quick
release button
and pull up on
handle.
Lock t
Handle m
Quick
I
Upper
NOTE:
To assemble
dusting brush,
insert the fabric
brush into the
dusting brush
nozzle and press
into place
2. Slide attachments
firmly on handle as
needed. See ATI-ACH-
MENT USE CHART.
Dusting
Brush
FabHc
Brush
Latch
To remove,
presslatch
and liftout.
ATTACHMENTS ON WANDS
1.To
remove
wands from
Power-
Mate ®, lock
wand in
straight-up
position.
3. Put attach-
meats on
wands as
needed. See
ATTACHMENT
USE CHART
Wend 2. Press wand quick
Quick release pedal with foot
Release and pull the wand
P,_det straight up and out of
Power-Mate ®.
10
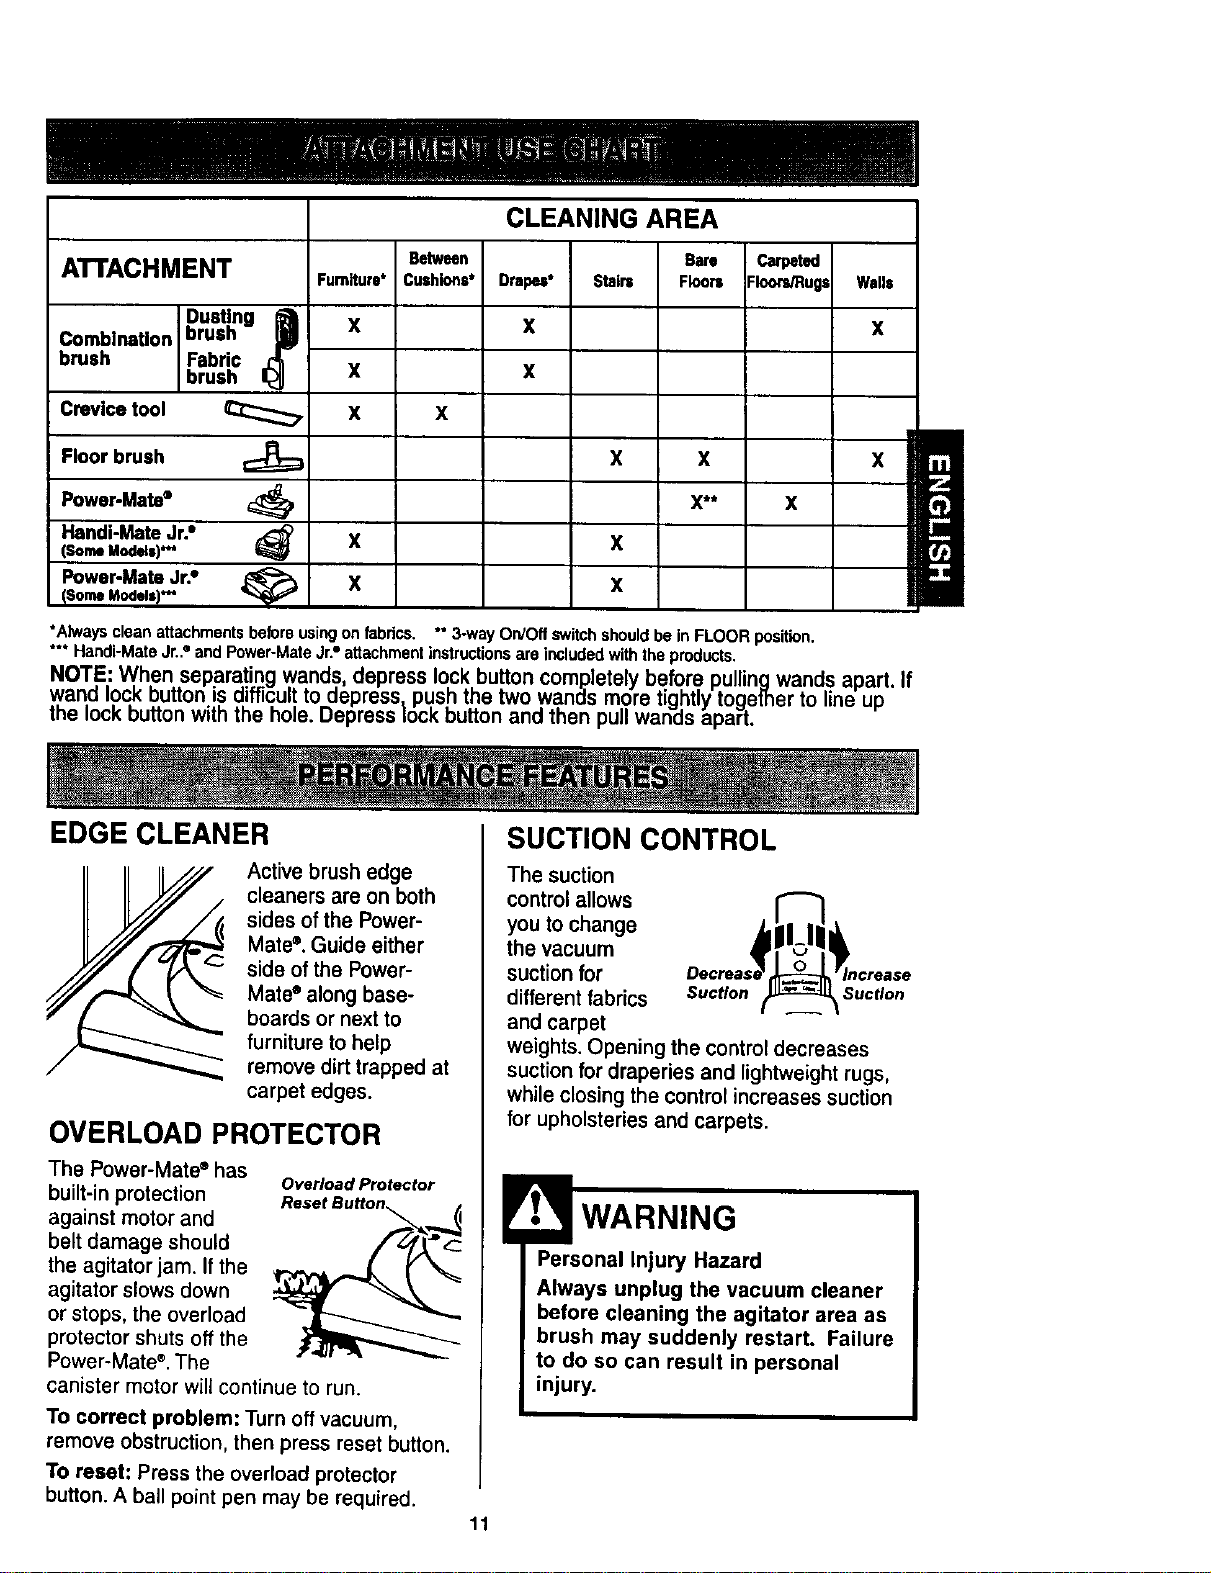
ATTACHMENT
.Dusting !
CombtnaUon oruan
brash Fabric _
brush
Crevice tool
Floor brush €;_
Power'Mate=
Hand!-:.',.;:_Jr."
(SomeUodet=)'*'
Power-Mate Jr.•
(SomeMod,s)-- _ _;_
Furn_ure*
X
X
X
x
x
Between
Cushions*
X
CLEANING AREA
Drapes°
x
x
Bare
Stair= Floors
x x
X**
x
x
Carpeted
Floors/Rugs
X
Walls
X
X
*Alwaysclean attachments beforeusingon fabrics. "*3-way OnJOflswitchshouldbe in FLOOR position,
*** Handi-MateJr.2 and Power-MateJr."attachmentinstructionsare includedwiththe products.
NOTE: When separating wands, depress lock button complete y before pullinqwands apart. If
wand lock button is difficult to depress, push the two wands more tightly together to line up
the lock button with the hole. Depress lock button and then pull wands apart.
EDGE CLEANER
Active brush edge
cleaners are on both
sides of the Power-
Mate`=. Guide either
side of the Power-
Mate" along base-
boards or next to
furniture to help
remove dirt trapped at
carpet edges.
OVERLOAD PROTECTOR
The Power-Mate ° has
built-in protection
against motor and
belt damage should
the agitator jam. If the
agitator slows down
or stops, the overload
protector shuts off the
Power-Mate ®.The
canister motor will continue to run.
Overload Protector
To correct problem: Turn off vacuum,
remove obstruction, then press reset button.
To reset: Press the overload protector
button. A ball point pen may be required.
SUCTION CONTROL
The suction
control allows
you to change
the vacuum
suction for
different fabrics Suction Suction
and carpet
weights. Opening the control decreases
suction for draperies and lightweight rugs,
while closing the control increases suction
for upholsteries and carpets.
Personal Injury Hazard
Always unplug the vacuum cleaner
before cleaning the agitator area as
brush may suddenly restart. Failure
to do so can result in personal
injury.
11

POWER-MATE eSTORAGE
The lower wand
has a "U" shaped 4,
tlange in the area _!"
where the power
cord attaches. The
base has a"U"
shaped slot near
the front.
The flange allows
the wands and Power-Mate®to be stored
with the canister to conserve storage space.
The canister must be stored on end for this
feature to be used.
To attach the Power-Mate ®, it must be in the
flat position as shown in the illustration. Use
the handle release pedal to place it in this
position.
The wand will slip out of the slot as it is lifted
up for use and will slide into the slot as it is
lowered for storage.
THERMALPROTECTOR
This vacuum has a thermal protector which
automatically trips to protect the vacuum
from overheating. The thermal protector
turns the motor off automatically to allow the
motor to cool in order to prevent possible
damage to the vacuum.
To reset: Turn off and unplug the vacuum
from the outlet to allow the vacuum to cool
Check for and remove any clogs. Also
check and replace any clogged filters.
Wait approximately 50 minutes and plug
the vacuum in and turn back on to see if
the thermal protector has reset. In some
cases, the unit may suddenly restart. DO
NOT leave unattended.
ELECTRONIC BAG/HOSE
CHECK INDICATOR
Ele_onlc
Bag/Hose
Check Indicator
The light comes
on whenever
the airflow
becomes
blocked, dust
bag needs
changing or
canister safety
filter needs
cleaning.
NOTE: The light may come on when using
certain attachments, due to reduced airflow
through attachment.
Refer to TROUBLESHOOTING.
STAIR GRIP
During normal operation while the vacuum is
in the horizontal position, the caster wheel
rotates freely 360 °.
The Stair Grip
feature allows
the caster
wheel to lock in
position when
the unit is
rotated 25 °
from horizontal
into a vertical
position in
order for the
vacuum to rest on stairs.
12
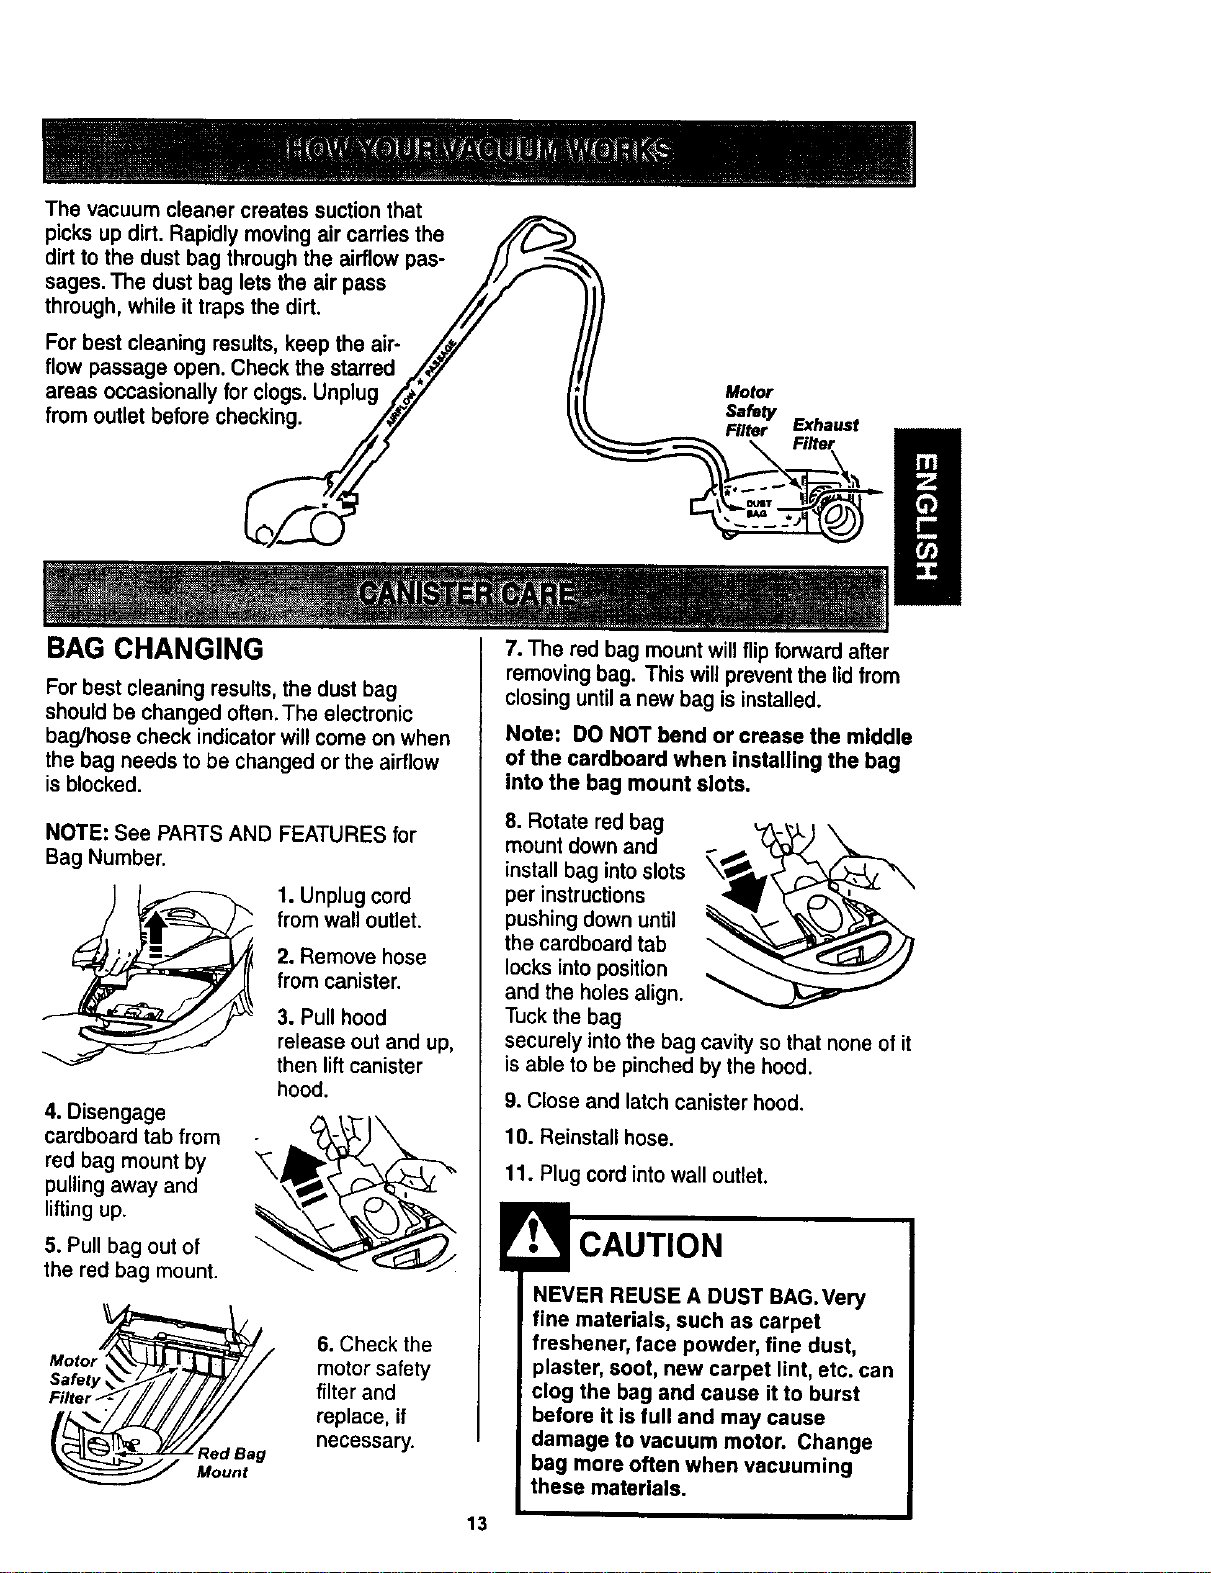
The vacuum cleaner creates suction that
picksup dirt.Rapidlymovingair carriesthe /'/"_'_
dirtto the dust bag throughthe airflowpas- /)
sages.The dust bag letsthe air pass _/_ •
through, while it traps the dirt. J/"f
Forbest cleaningresults, keep the air- /_/ /
flow passage open. Check the starred _,,_/" /_
areas occasionallyfor clogs.Unplug L#Y Ii
from outletbefore ch_ _,
Motor
Safety
Filter Exhaust
BAG CHANGING
For best cleaning results, the dust bag
should be changed often. The electronic
bag/hose check indicator will come on when
the bag needs to be changed or the airflow
is blocked.
NOTE: See PARTS AND FEATURES for
Bag Number.
1. Unplugcord
from walloutlet.
2. Remove hose
from canister.
4. Disengage
cardboard tab from
red bag mount by
pulling away and
lifting up.
5. Pull bag out of
the red bag mount.
3. Pull hood
release out and up,
then lift canister
hood.
6. Check the
motor safety
filter and
replace, if
necessary.
Mount
13
7. The red bag mount will flip forward after
removing bag. This will prevent the lid from
closing until a new bag is installed.
Note: DO NOT bend or crease the middle
of the cardboard when installing the bag
into the bag mount slots.
8. Rotate red bag
mount down and
install bag into slots
per instructions
pushing down until
the cardboard tab
locks into position
and the holes align.
Tuck the bag
securely into the bag cavity so that none of it
is able to be pinched by the hood.
9. Close and latch canister hood.
10. Reinstall hose.
11. Plug cord into wall outlet.
NEVER REUSE A DUST BAG.Very
fine materials, such as carpet
freshener, face powder, fine dust,
plaster, soot, new carpet lint, etc. can
clog the bag and cause it to burst
before it is full and may cause
damage to vacuum motor. Change
bag more often when vacuuming
these materials.

1. Unplugcordfromwall outlet.DO NOT
drip water on cleaner.
2. Clean exterior using a clean, soft cloth
that has been dipped in a solution of mild
liquid detergent and water, then wrung dry.
Wipe dry after cleaning.
3. To reduce static electricity and dust build-
up, wipe outer surface of cleaner and
attachments.
Do not use attachments if they
are wet. Attachments used in
dirty areas, such as under a
refrigerator, should not be used
on other surfaces until they are
washed. They could leave marks.
Check motorsafetyfilteroccasionallyand
change when dirty.
Electrical Shock Hazard
Unplug power cord from electrical
outlet. Do not operate the cleaner
without the motor safety filter. Be
sure the filter is dry and properly
installed to prevent motor failure
and/or electrical shock.
Removethe bag as outlined in the BAG
CHANGING section.
MOTOR SAFETY FILTER
ELECTROSTATIC
This white filter must be replaced when
dirty. It should be replaced regularly
depending on use conditions. The filter
CANNOT be washed as it will lose its
dust trapping ability.
NOTE: See PARTS AND FEATURES for
motor safety filter number.
1. Lift the rubber
retainer and pull
out motor safety
filter as shown.
Rubber
Retainer
//#
2. Replace the fil-
ter, white side out,
facing the dust bag,
by sliding it back
into place under
the ribs in the bag
cavity. Tuck filter in
so that it fits com-
pletely under the
rubber retainer.
3. Replace the bag as outlined in the BAG
CHANGING section.
14

WARNING
Do not operate with a clogged
EXHAUST FILTER
HEPA
The exhaustfilter cartridgemustbe
replacedwhen dirty. Replace thefilterwhen
the entire surfacearea iscoveredevenly.
The filter CANNOT be washed as it will
lose its dust trapping ability.
NOTE: See PARTS AND FEATURES for
exhaust filter number.
1. Pull out and
up on the
exhaust filter
cover to remove
from the vacu-
um and lay
aside.
3. Replace the
exhaust filter
cartridge.
Place the new
filter into the
vacuum with
the foam seal
facing
towards the
vacuum.
Tabs
Filter
2. Pullthe exhaust
tilterupand out
from the rear of
the vacuum.
Filter i
4. Replace the
exhaust filter
cover by placing
the two tabs on
the filter cover
into the slots on
the vacuum and
rotate into place
until it snaps
closed.
15

Alwaysfollow all safety precautionswhen
cleaningand servicingthe Power-Matee.
Electrical Shock Or Personal Injury
Hazard
Disconnect electrical supply before
servicing or cleaning the uniL
Failure to do so could result in elec-
trical shock or personal Injury from
cleaner suddenly starting.
TO REMOVE BELT
1. TurnPower-
Mate® upside
down.
2. Unscrewthe
two (2) Power-
Mate® cover
screws.
3. Turn Power-
Mate ® right side
up. Press handle
release pedal
and lower the
swivel. Lift rear
_atches up.
Side
Latch Latches
4. TOremove cover,
grasp the sides and
pull out.
5. Lilt agitator
assembly out
and remove
worn belt.
End Cap
6. Check and clean end cap areas. See
AGITATOR ASSEMBLY for picture of
complete agitator assembly.
16
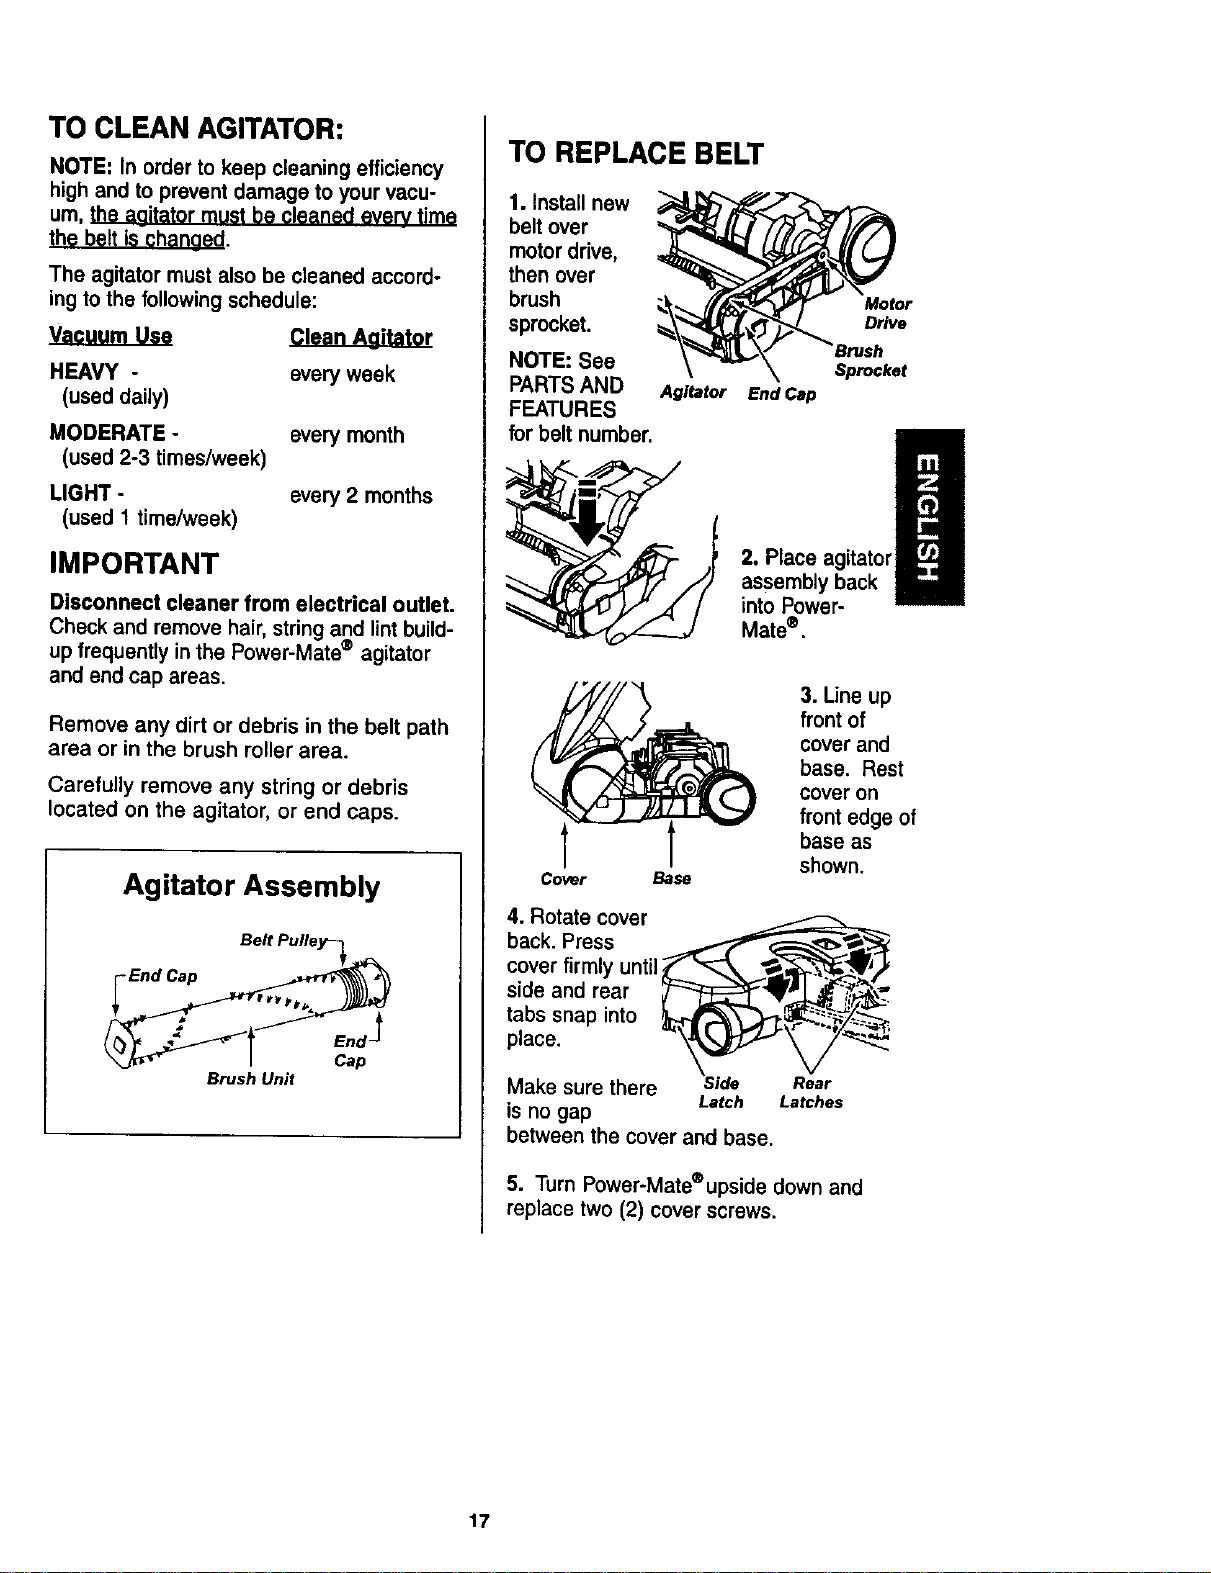
TO CLEAN AGITATOR:
NOTE: In order to keep cleaning efficiency
high and to prevent damage to your vacu-
um, the aaitator must be cleaned every time
The agitator must also be cleaned accord-
ing to the following schedule:
Vacuum Use
HEAVY -
(used daily)
MODERATE -
(used 2-3 times/week)
LIGHT -
(used 1 time/week)
Clean Aoitator
everyweek
everymonth
every2 months
IMPORTANT
Disconnect cleaner from electrical outlet.
Check and remove hair, string and lint build-
up frequently in the Power-Mate ® agitator
and end cap areas,
Remove any dirt or debris in the belt path
area or in the brush roller area.
Carefully remove any string or debris
located on the agitator, or end caps.
Agitator Assembly
Belt Pulley_
Brush Unit
TO REPLACE BELT
1. Install new
belt over
motor drive,
then over
brush
sprocket.
NOTE: See
PARTS AND
FEATURES
for belt number.
Motor
Drive
Sprocket
Agitator End Cap
2. Place agitator/
assemblyback
into Power-
Matee.
Cover Base
4. Rotate cover
back. Press
cover firmly until
side and rear
tabs snap into
place.
Make sure there
is no gap Latch
between the cover and base.
3. Line up
front of
cover and
base. Rest
coveron
front edge of
base as
shown.
Rear
Latches
5. Turn Power-Mate®upside down and
replace two (2) cover screws.
17

1. Remove Power-Mate ® cover as shown in
BELT CHANGING AND AGITATOR CLEAN-
ING section.
--_Pushln I
2. Push in and turn
bulb counterclock-
wise, then pull out
to remove.
I I
And Turn I I
3. Push inand turn
bulbclockwise,to
replace. Bulbmust
not be higherthan
15Watts(130 Volts).
4. Reinstall Power-Mate ® cover as shown in
BELT CHANGING AND AGITATOR CLEAN-
ING section.
NOTE: See PARTS AND FEATURES for
bulb number.
Electrical Shock Or Personal Injury
Hazard
Disconnect electrical supply before
servicing or cleaning the unit.
Failure to do so could result in elec-
trical shock or personal injury from
cleaner suddenly starting.
TO CHECK AGITATOR
ASSEMBLY
When brushes
_---"_____}r[--__ are worn to the
level of the base
support bars,
replace the
agitator
assembly.
Base Support Bars
TO REPLACE AGITATOR
ASSEMBLY
1. Remove Power-Mate ®cover, belt and
agitator assembly. See "To Remove Belt"
in BELT CHANGING AND AGITATOR
CLEANING.
2. Replace Agitator
3. Replace belt, agitator assembly, Power-
Mate"cover, light bulb and light cover.
See "To replace belt" in BELT CHANGING
AND AGITATOR CLEANING.
18
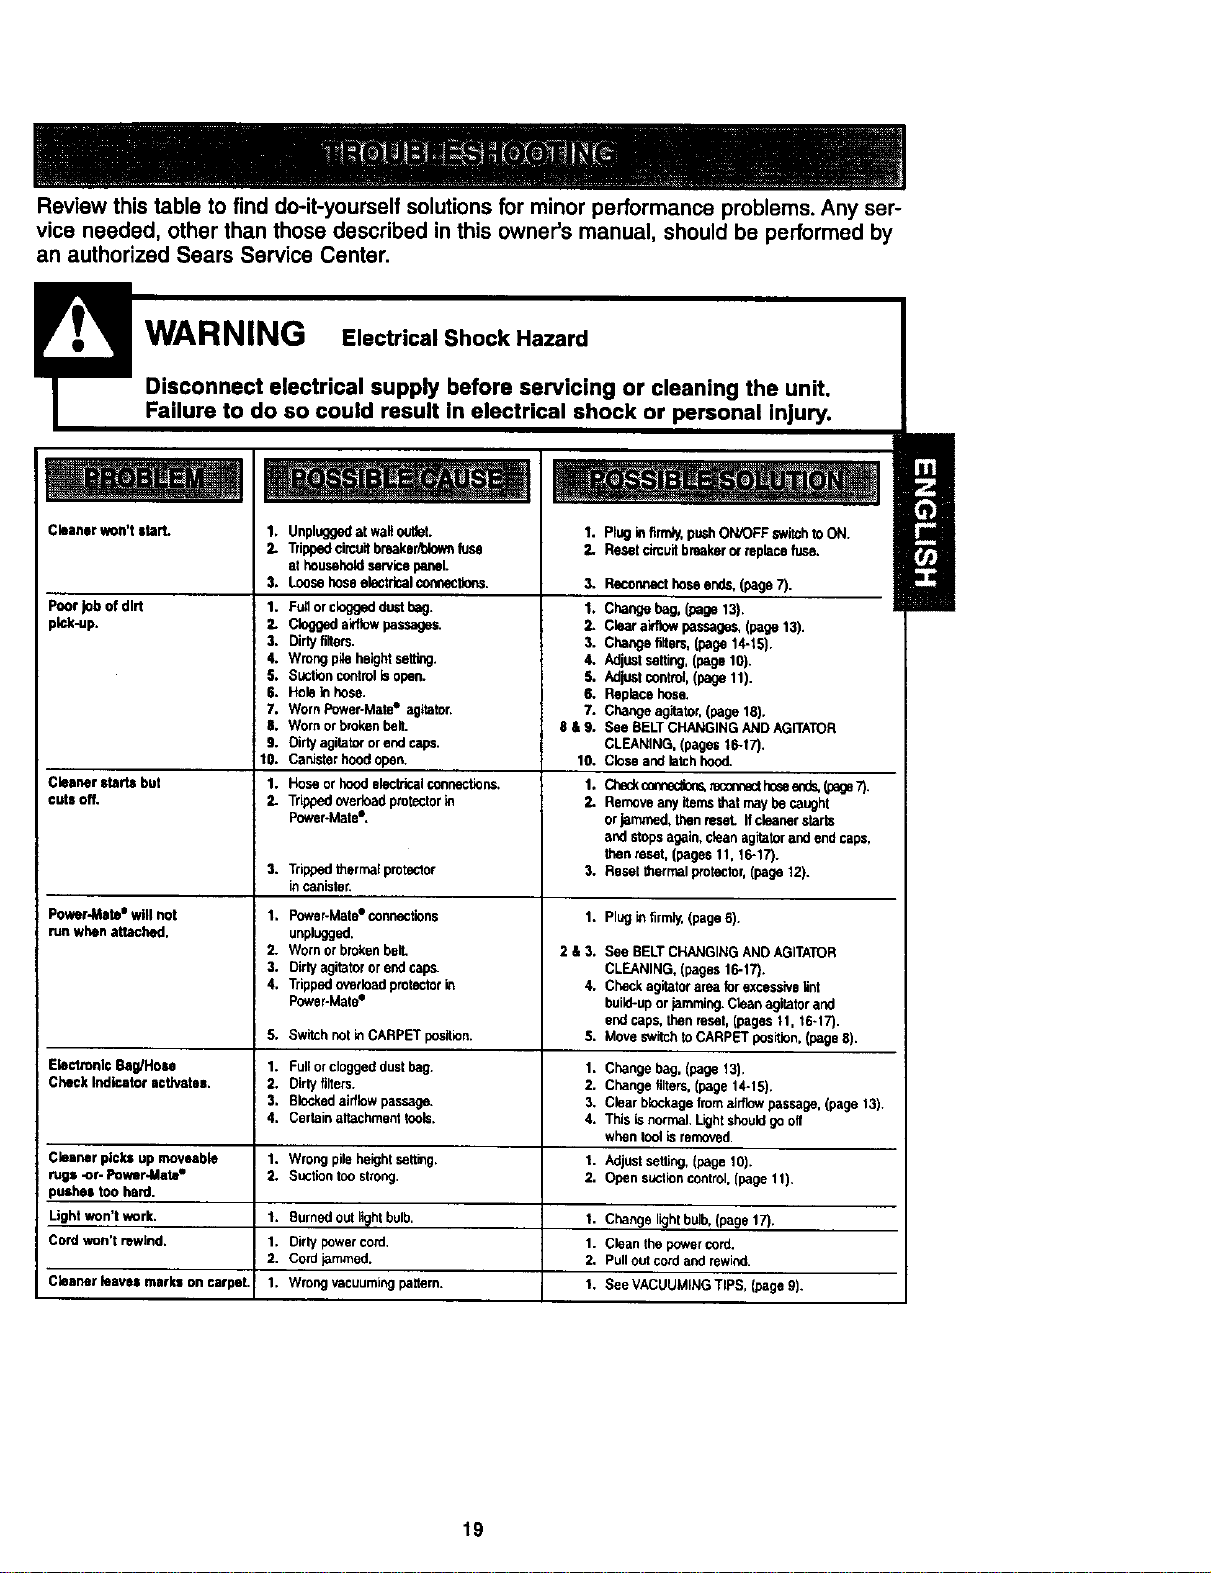
Review this table to find do-it-yourself solutionsfor minor performance problems. Any ser-
vice needed, other than those described in this owner's manual, should be performed by
an authorized Sears Service Center.
WARNING Electrical Shock Hazard
Disconnect electrical supply before servicing or cleaning the unit.
Failure to do so could result in electrical shock or personal injury.
Cleanerwon't storL I, Unpluggedut walloubet.
Poorjob of dirt
pick-up.
Trippedcimuitbreakar/bkw/nfuse
athouseholdservisepaneL
3. Loosehoseelectricalconsections.
1. Fu_orcleggeddustbeg.
2. Cloggedaidlowpassages.
3, Dirtyfiiters.
4. Wrongpileheightsetting.
S. Suctioncontrolisopen.
6. HokzIn hose.
7. WornPower-Mate° agitator.
g. WornorbrokenbelL
9, Dirtyagitatororendcape.
10. Canletorhoodspan,
1, Hoseorhoodelectricalconnections.
2.
1. Pluginfirmly,pLP_hOhPOFFswitchto ON.
2. Resetcircuitbreakero_replacefuse,
3. Recormecthoseends,(page7).
I. Changebag,(page13).
2. Clearairflowpassages,(page13).
3. Changefilters,(page14-15).
4. Adjustsetting,(page10).
S. Adjustcontrol,(page11).
6. Replecehose,
7. Changeagitator,(page18).
fi &9. See BELTCHANGINGANDAGITATOR
CLEANING,(pagest6-t7).
10. Closeandletchhood.
Cleanerstorte but 1. Checkcozlnec_m,recmnecth_e eed_(page7).
cuteoff. Tr_opadoverloadprotectorin 2. Removeanyitemsthatmaybecaught
Power-Mate=, orjammed,thenreseLIfcleanerstarts
andstopsagain,dean agitatorandendcaps,
thenreset,(pages11.16-17).
3. TrippedthermaFprotactor 3. Resetlhermalprotoclor,(page12).
incanister.
Power-lVleto=will not 1. Power-Mateeconnections 1. Pluginfirmly.(page6).
runwhenattached, unplugged.
2. WornorbrokenbelL 2 & 3. See BELTCHANGINGANDAGITATOR
3, Dirtyugitatororeedcap_ CLEANING,(pages16-17).
4. Trippedovedoadprotoctorin 4. Chackagitotoraroalorexcessivelint
Power-Matse build-uporjamming.Cleanagitatorand
endcaps,thenreset,(pages11.16-17).
5, Switchnoti_CARPETposition. 5. MoveswitchtoCARPETposition,(page8).
ElectronicSeg/Hose 1. Fullorcloggeddustbug. 1. Changebag.(page13).
CheckIndicatoractivates. 2. Dirtyfilters. 2. Changefilters,(page14-15).
3. Blockedairflowpassage. 3, Clearblockagefromairflowpassage,(page13).
4. Certainaltachmenttoohs. 4. Thisisnormal,Lightshouldgooff
whentoolisremoved
CleanerpicksUpmoveable 1. Wrongpileheightsetting. 1. Adjustsetting,(page10).
rugs-or-Power-Mate= 2. Suctiontoostroug. 2. Opensuctioncontrol,(page11).
pushestooherd.
Light won'twork. 1. Burnedoutlightbulb. 1. Changelightbulb,(page17).
Cordwon'trewind. 1. Dirtypowercord, 1. Cleanthe powercord.
2. Cordjammed. 2. Pulloutcordandrewind.
Cleanerleavesmarksoncarpet 1. Wrongvacuumingpattern. 1, SeeVACUUMINGTIPS, (page9).
19

20
Antes de usar su asplmdora nueva ..... I
Gamntia de la asplradom de Kenmore .. I
Instrucclones importantes de
seguridad ............................ 2
Piezas y camcteristicas ............... 3-4
Instruccionee de
ensamblamiento ............... 5-6
Almacenaje del Power-Mate Jr.® ....... 6
Uso .............................. 7
Parecoroenzar.......................... 7
Sugerenciaspara aspirer ............... 8
Sugereociassobreelajustede nivelde
pelode laalforobra.................... 9
Accesorios........................... 9
Usode losaccesorios ................. 10
Caracterfsticasde rendiroiento........ 10-11
Funclonamlento de su asplradora ....
Cuidado del recep_culo ............
Cambiode labolsa .................
Liropiezadelexteriory delosaccesorlos.
Cambiodelfiltrodesegurideddelmotor .
Cambiodelfiflrodeescape ...........
Cuidado de la Power.Mate" ..........
..12
..12
..12
..13
..13
..14
Carnblodelacorreay limpieza
..14
delagitader ....................... 15-16
Carnbiode fa bombilla................. 16
Cuidadodel agitador .................. 17
Reconocimiento de problemas ......... 18
Informacl6n de
assistancia o serviclo ..... PosteriorCubierta
Porfavorlea estaguiaque leayudarea assemblary opersrsuaspiradorenuevade Kenmoreenunaroanere
masseguray effectiva.
Paremas inforroaci6nacercadelcuidadoy operaci6nde estaaspirador,Ilamea sutJondaSearsmascorcana.
Cuandoprequnteporinformaci6nustednecisitardelnOroerecompletodeseriey roodelodela aspiradoraque
est_Iocadoenla placade losn_merosde modeloy serio.
Useel espaciode abajopararegistrarel n0roemde modeloy serioparasunuevaaspiradoradeKenroore.
N6mero deModelo
N0rnerodeSerie
Fechade Coropra
Matengaeste libroy sureciboen ulugarseguroparareferenciasfuturas.
GARANTiALIMITADADE UN ANO DELA ASPIRADORAKENMORE
Estagarantia espor unaho desdela fecha de coropra,e incluyesolamenteel usodela aspiradoraen hogares
privados.DuranteelaSodegarantla,cuandolaaspiradoraes operaday mantenidadeacuerdoalroanualde
instruccionosdoldueSo,Searsreparar&cualquierdefoctoanroatorialosofabricaci6nlibrode cargo.
Estagarantiaexcluyelasbolsasde colocci6n,correas,lamparillas,y filtros, lascualessonpartesgastablesque
sedeterioranconelusonormal.
Paraelservicio degaranfia,retorneesta aspiradoraal Centrode ServicioSearsm_s cercanoen los
EstadosUnidos.
Estagarantfase aplicasolamentemientrasesteproducto estaen usoen losEstadosUnidos.Estagarantia le
da a usledderechos legalesespecificos,y ustedpuede tenertambi_n otrosderechosloscuales variande
estadoa estado.
Sears,Roebuckand Co., 13/817WA,HoffmanEstates,IL 60179
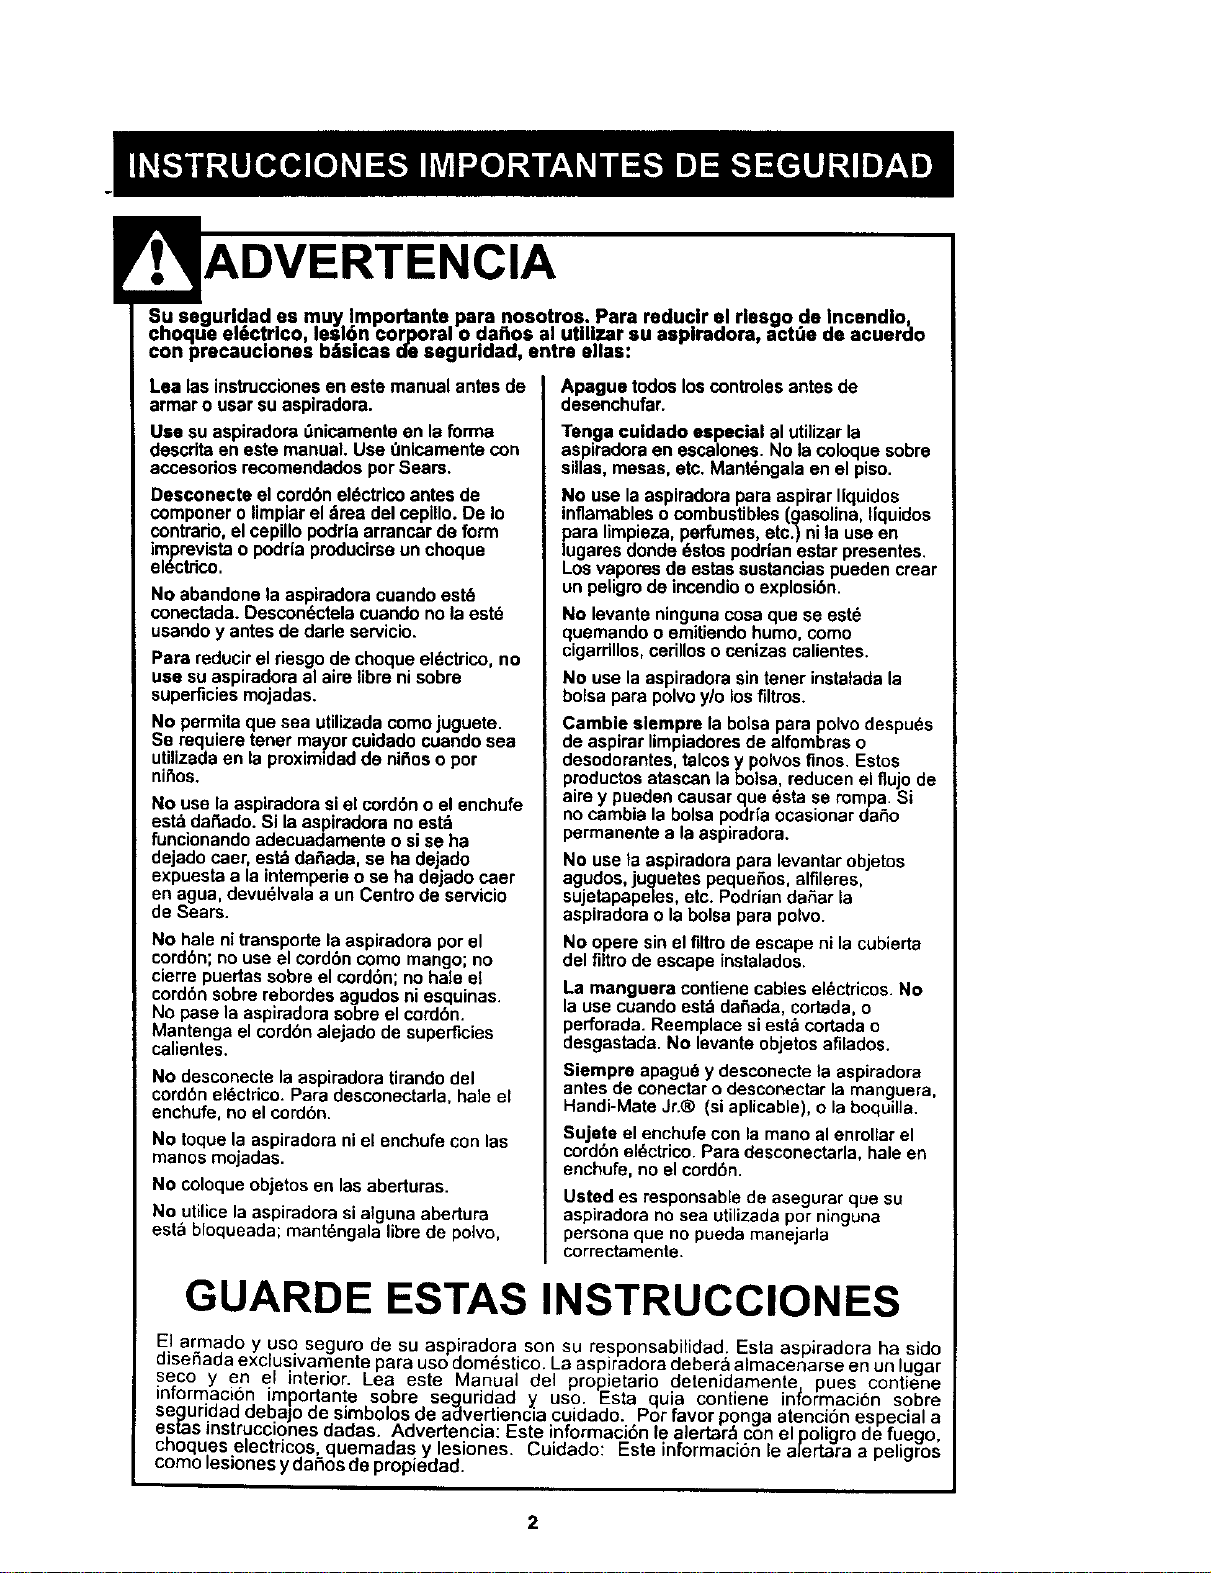
Susegurldadesmuy.Importanteparanosotros.ParsreduclrelrlesgodeIncendlo_
cnoquee,6ctrlcolesi6n corporal o daflos el utlllzar su asplradora, actGe de acueroo
con precauc ones b_s cas oe segur dad, entre • as:
Lea las instrucciones en este manual antes de
armar o user su aspiradora.
Use su aspiradore _nicamente en la forma
descrita en este manual. Use 0nicamente con
accesorios recomendados per Sears.
Desconecte el cord6n el6ctrico antes de
componer o limpiar el Area del cepillo. De Io
contrerio, el cepillo podria arrancar de form
imprevista o podria producirse un choque
el6ctdco.
No abandone la aspiradora cuando estd
conectada. Descon6ctela cuando no la estd
usendo y antes de dade servicio.
Para reducir el riesgo de choque eldctrico, no
use su aspiradora al aire libre ni sobre
superficies rnojadas.
No permita que sea utilizada como juguete.
Se requiere tener mayor cuidado cuando sea
utilizada en la proximidad de nil_oso por
ni_os,
No use la aspiradora si el cord6n o el enchufe
esta daSado. Si la aspiradora no est_
funcionando adecuadamente o si se ha
dejado caer, estd da6ada, se ha dejado
expuesta a la intemperie o se ha dejado caer
en agua, devudlvala a un Centre de servicio
de Sears.
No hale ni transporte la aspiradore por el
cordbn; no use el cordbn como mango; no
cierre puertas sobre el cord6n; no hale el
cordbn sobre rebordes agudos ni esquinas.
No pase la aspiradora sobre el cord6n.
Mantenga el cordbn alejado de superficies
calientes.
No desconecte la aspiradora tirando del
cord6n el6ctrico. Para desconectarla, hale el
enchufe, no el cordbn.
No toque la aspiradora ni el enchufe con las
manos mojadas.
No coloque objetos en las aberturas.
No atilice la aspiradora si alguna abertura
est_ bloqueada; mant6ngala libre de polvo,
Apague todoslos controlesantesde
desenchufar.
Tenga cuidado especial al utilizar la
aspiradora en escalones. No la coloque sobre
sillas, mesas, etc. Mantdngala en el piso.
No use la aspiradore para aspirer liquidos
inflamables o combustibles (gasolina, liquidos
para limpieza, perfumes, etc.) ni la use en
lugares donde dstos podrian estar presentes.
Los vapores de estas sustancias pueden crear
un peligro de insendio o explosibn.
No levante ninguna cosa que se est_
quemando o emitiendo humo, como
cigarrillos, cerillos o cenizas calientes.
No use la aspiradore sin tener instalada la
bolsa para polvo y/o losfiltros.
Cambie siempre la bolsa para polvo despu_s
de aspirer limpiadores de alfombras o
desodorantes, talcos y polvos finos. Estos
productos atascan la balsa, reducen el flujo de
aire y pueden causar que dsta se rompa. Si
no carnbia la bolsa podrla ocasionar daSo
permanente a la aspiradora.
No use ta aspiradora para levantar objetos
agudos, juguetes pequeSos, alfileres,
sujetapapeles, etc. Podrian daSar la
aspiradora o la bolsa para polvo.
No opere sin el filtro de escape ni la cubierta
del filtro de escape instalados.
La manguera contiene cables electricos. No
la use cuando est_ daSada, cortada, o
perforada. Reemplace siesta cortada o
desgastada. No levante objetos afilados.
Siempre apagu_ y desconecte la aspiradora
antes de conectar o desconectar la manguera,
Handi-Mate Jr.® (si aplicable), o la boquilla.
Sujete el enchufe con la mano al enrollar el
cordbn eldctrico. Para desconectarla, hale en
enchufe, no el cord6n.
Usted es responsable de asegurar que su
aspiradora no sea utilizada por ninguna
persona que no pueda manejarla
correctamente.
GUARDE ESTAS INSTRUCCIONES
E] armado y uso seguro de su aspiradora son su responsab dad. Esta aspiradora ha sido
diseSada exclusivamente para uso domestico. La asp radora deberz_ almacenarse en un lugar
seco yen el interior. Lea este Manual del prop etario detenidamente pues contiene
informaci6n importante sobre sequridad y uso. Esta quia contiene in1'ormaci6n sobre
seguridad debaJo de simbolos de aavert enc a cuidado. Pot favor ponga atencion especial a
estas instrucciones dadas. Advertenc a Este nformaci6n le alertar& con el poligro de fuego,
choques electricos, quemadas yes ones Cu dado: Este informaci6n le alertara a peligros
como lesiones y daSos de propiedad.
2

Esimportanteconocerlaspiezasycaractedsticasdesuaspiradoraparaasegurarsuusoadecuadoyseguro.
Examfnelasantesdeusarsuaspiradora.
Objeto PlezaI_. PiezaNg.
en EUA en Canad=t
Bombillado farol 20-5240 596181
Correa 20-5218 20-5218C
_ .t---- Bot6n de
flberaci6n
rdpldadel
mango
Tubo
telesc6pico
Controlde
extensi6n
adjustable
del tubo
Power.Mate®
Rebord_ I_ Correa
Pedal deliberaci6n ___
rdpida del tubo -- _ _ D
=" _! _J L;:dicadorde nivel
N0=oro. ase.lo e, J de.elode,aa.om..a
_°drt_l°n;e°r/W°er_'_M_ e' _ __J_"_X _Protectorcontra
Pednailvde_;e_eClCol°n _r_/_ _l _ restaurac#on"Reset"
liberaci6n _._ I, / /..*_'_v_ _ Limpiadordeorinas
delmango f ___!_ (Nosemuestra)
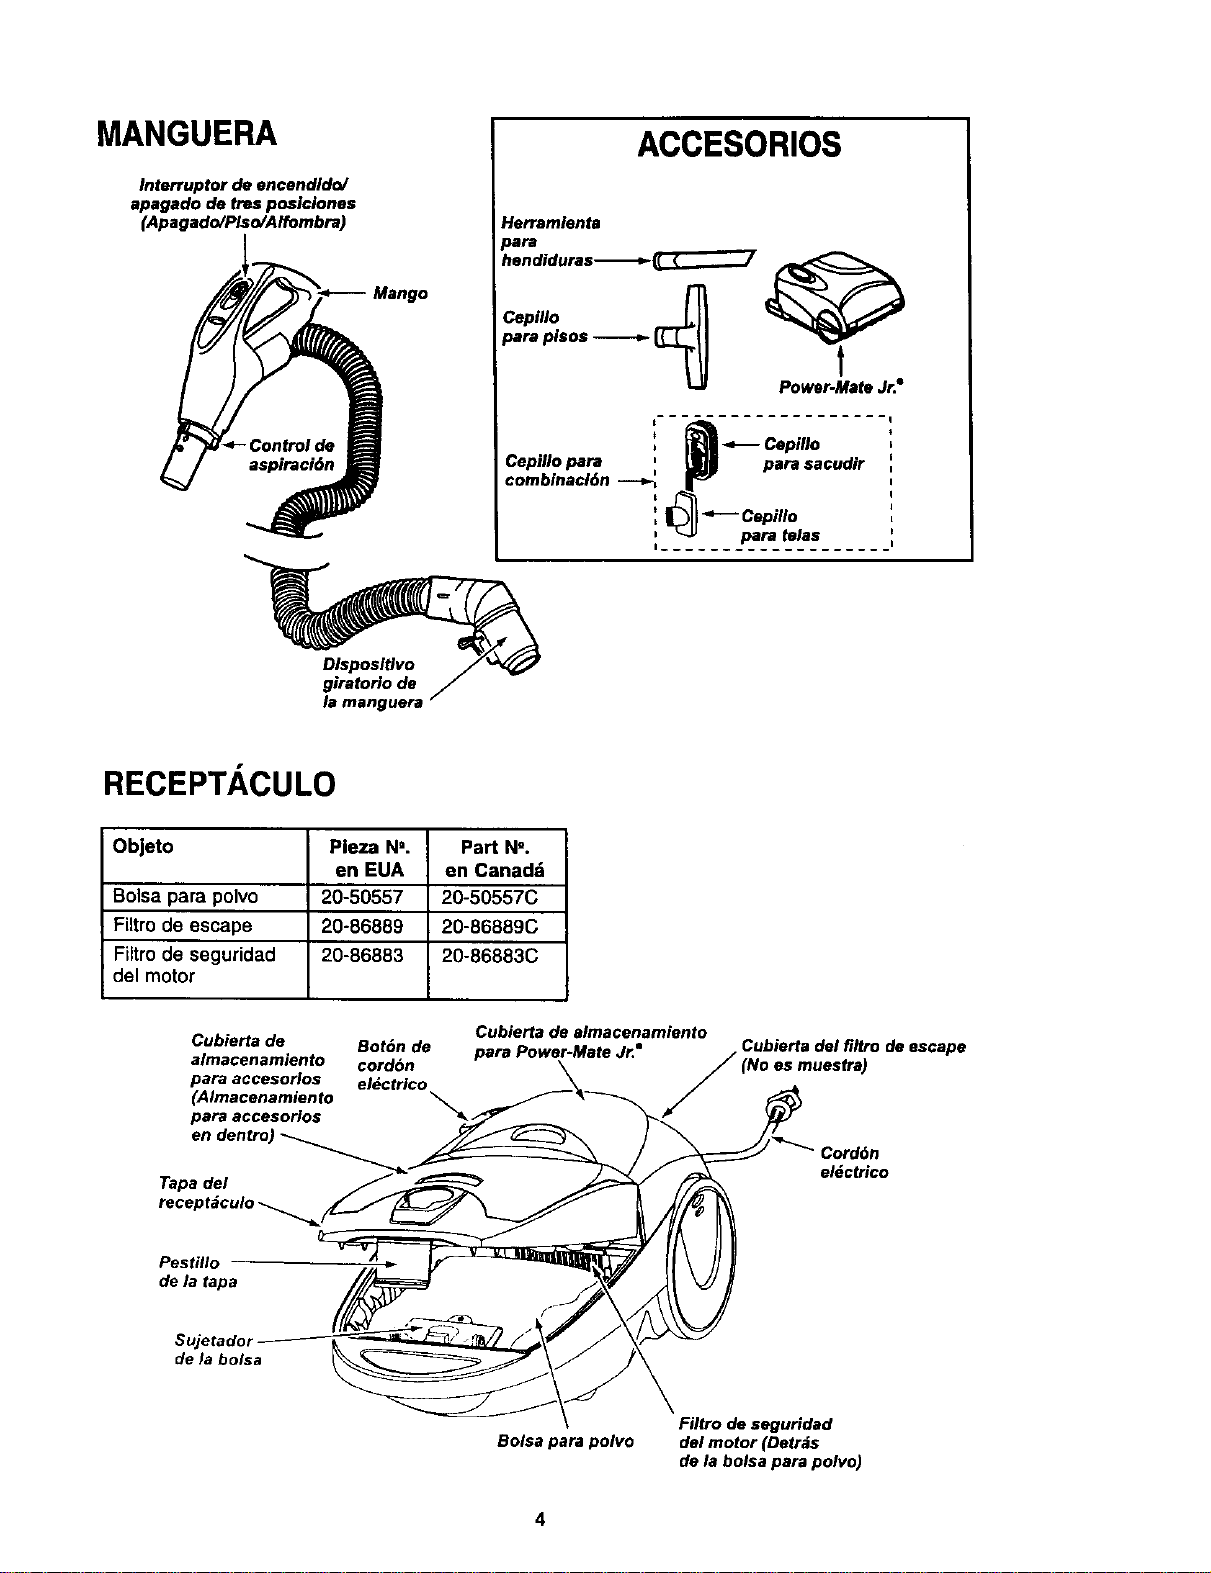
MANGUERA
Interruptor de encendldo/
apagado de ires poslciones
(Apagado/Plso/Alfombra)
ACCESORIOS
Herramienta
Cep.lo ___ _'_._
_raplsos-------_._ p_7_Mt_.r._
_, _ Cepillo
Cepillo pars ' till| pars sacudir
combinacl6n --_
r
I "4---Cepillo
I _ra te_s
Dlspositlvo
giratorio de
la manguera
RECEPTACULO
Objeto Pleza N,. Part N'.
en EUA en Canadd
Bolsa para polvo 20-50557 20-50557C
Filtro de escape 20-86889 20-86889C
FLItrode seguridad 20-86883 20-86883C
del motor
Cubierta de
almacenamiento
pars accesorlos
(Almacenamiento
pars accesorios
Cubierta de slmacenamiento
Bot6n de para Power-Mate Jr.* Cubierta del filtro de escape
cordon _ (No es muestra)
el_ctrico
/
Pestillo
de la tapa
eldctrico
de la bolsa
Bolsa pars polvo
Filtro de seguHdad
del motor (Detrds
de la bolsa pars polvo)
4

ADVERTENCIA
Pellgmdechoqueel_trlco
Noconecte laasplradorahastaqua termlne
de armada.De Io contrarlopodrlacausar
un choqueel6ctrico o lesi6ncorporal.
Antesdearmarlaaspiradora,chequeela LISTA
DE EMBALAJEen lacubiertaseparadadela Usta
de Partespara Reparaci6n.Useesta listaparaveri-
ficar que harecibidotodaslascomponentesdesu
nuevaaspiradoraKenmore.
TUBO TELESC( PICO
Control de
exfensi6n
adjustable
del tubo
Man_6ngas e
laman,
arriba
esta
lengOete
Laextensi6n
deltub, es
ajustabley no
requeireel
montaje.Para
ajustar,empu-
je haciaabajo
enel bot6ndel
tub, y mueva
eltub, superi-
ora la posi-
ci6ndedeada
Lapartegirato-
ria,situadaenel
Power-Mate',le
permitemoverel
mangoa la
izquierdapara
pasarlaaspi-
radoraa una
extensi6nm_,s
largadebajode
losmuebles
bajos.
del mango_
Cuando ajuste la Iongitud de la vara hay quetener
el Power-Mate°conlaman, o el pie.
POWER-MATE®
Introduzcalostub,s enla Power-Mate"hasta que el
bot6n del tub, quede fijoen posici6n.
Bot6n
de#mango-_..
m
m
Bot6nde
Iiberacl6n
r_;plda
delmango
Tube
POWER-
MATE®
Control de extensi6n
ajustable del tube
Bot6n del R
tube
liberaci6n
r_pida del tub,
RECEPTACULO
1.Abralatapadel receptdculo.
2. Examinelabolsaparapolvoeste instaladocorrec-
tamante.Consultolasinstruccionesde instalaci6nen
la CAMBIODE LA BOLSA.
3.Examineel filtm deseguridaddelmotoreste insta-
ladecorrectamante.Consultelasinstruccionesde
instalaci6nen LIMPIEZADEL FILTRODE SEGURI-
DADDELMOTOR.
LATAPAY LA CUBIERTA
Es normalquela tapadel mcept_culo se desprenda
alserabiertamdsdeIo necesado.Paracolocarnue-
vamentelatapa,alineelasranurasde labisagra,in-
s_rtelasycierrela tapa.
!
CUIDADO
Nuncadebe abrir lacapuchadel contenedor
estandolatapa ablerta.As| se evitar_ da_o=
a la capuchadelcontenedory/o a la tape.
i
Est._ aspiradora esta equipada con almacdn
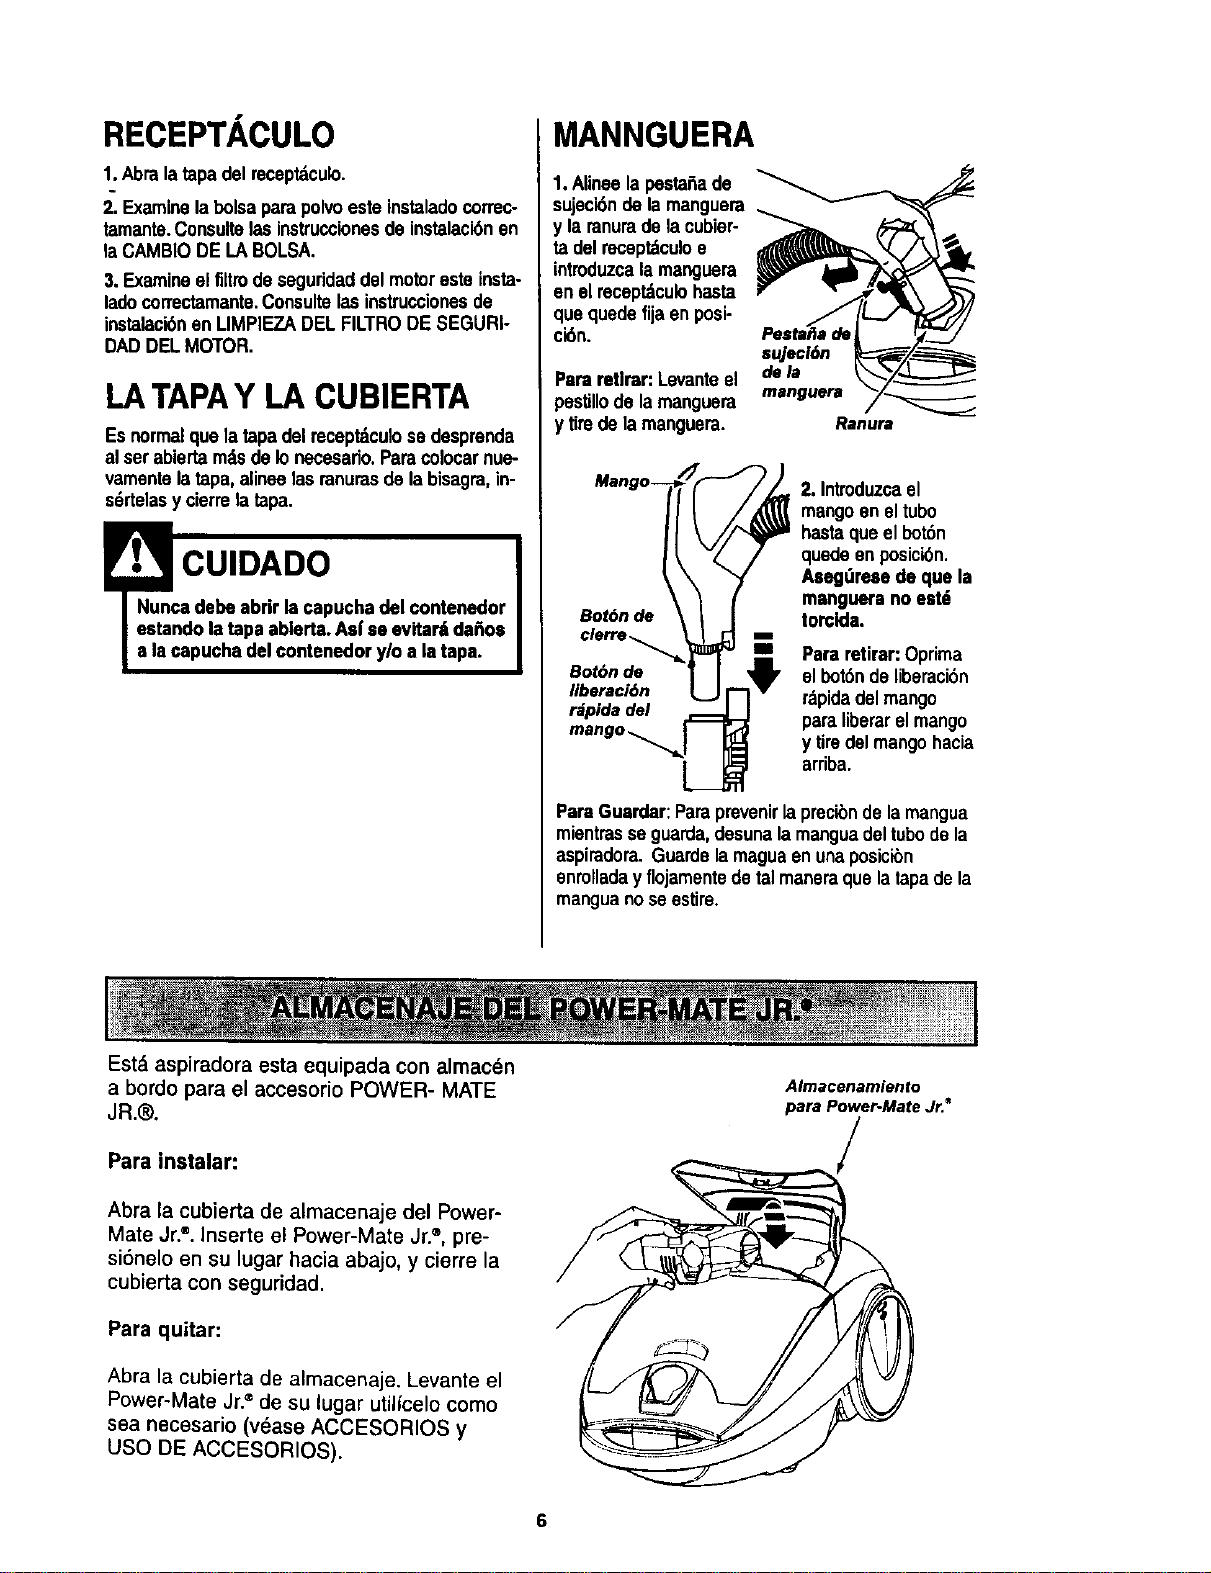
MANNGUERA
1.Alinoela pestai_ade
sujec'_ndela manguem
la ranurade lacubier-
ta delreceptdculoe
introduzcala manguera
en elreceptdculohasta
que quede fija en posi-
ci6n.
Pararetlrar:Levanteel
)estJllode la manguera
y tirede lamanguera.
sujecl6n
dela
manguera
Ra/lura
Bot6n de
Botdn de
liberaci6n
r_pida del
2. Introduzcael
mangoen el tubo
hasta queel bot6n
quede enposici6n.
Asegdresede que la
manguerano estd
torclda.
m Pararetirar:Oprima
el bot6nde liberaci6n
rapidedelmango
paraliberarelmango
y tiredelmangohacia
arriba.
PareGuarder:Paraprevenirlaprecibnde lamangua
mientrasse guarda,desunalamanguadel tubode la
aspiradora.Guardslamaguaenunaposicibn
enmlladayflojamentedetalmaneraquelatapadela
manguanoseestire.
a bordo parael accesorio POWER- MATE
JR.®.
Para instalar:
Abra la cubierta de almacenaje del Power-
Mate Jr.®.Inserte el Power-Mate Jr.®, pre-
si6nelo en su lugar hacia abajo, y cierre la
cubierta con seguridad.
Para quitar:
Abra la cubierta de almacenaje. Levante el
Power-Mate Jr.®de su lugar utilicelo como
sea necesario (v_ase ACCESORIOS y
USO DE ACCESORIOS).
Almacenamiento
para Power-Mate Jr.*
/
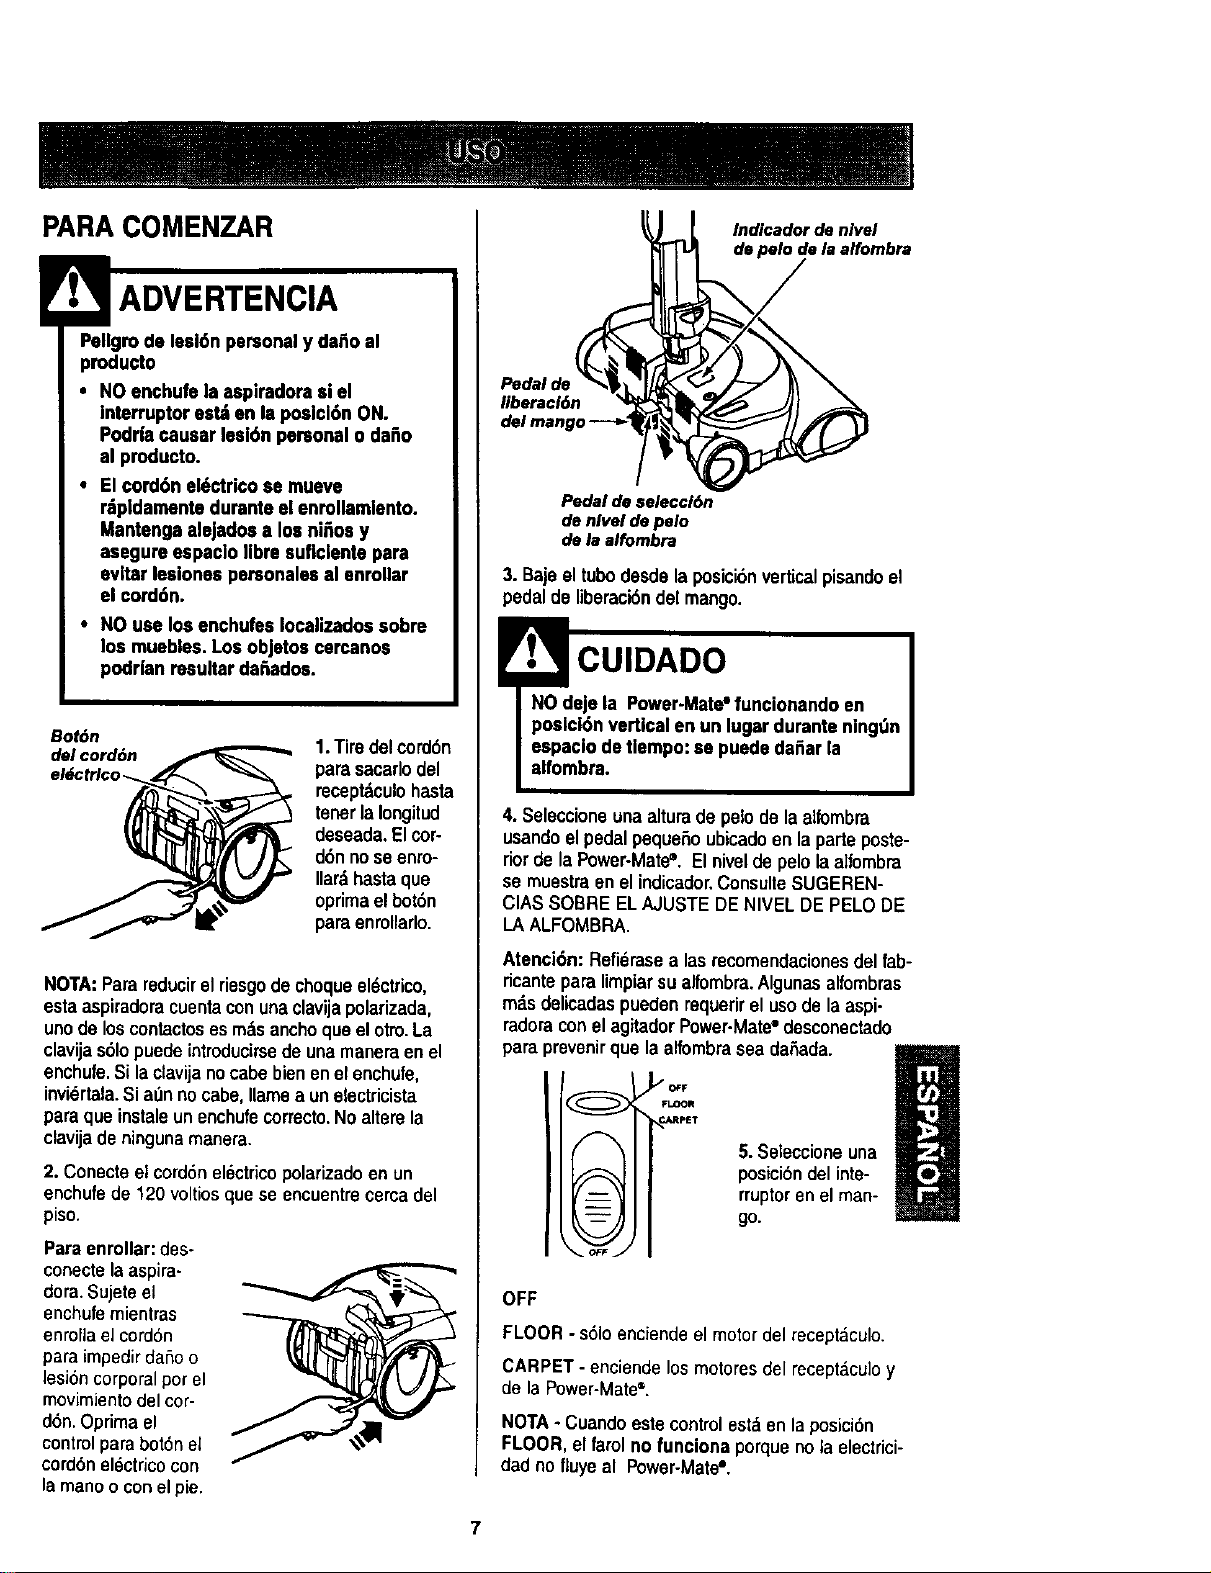
PARA COMENZAR
Pellgrodo lesi6n personaly dafioal
producto
• NO enchufela asplradorasi el
interruptorest_ on laposlol6n ON.
Podrla causar lesi6npersonalo dafio
al producto.
• Elcord6n eldctricose rnueve
rdpldamentedurante el enrollamlento.
Mantenga alejado$a los ni_oay
asegureespaclo lime suficlente pare
evltar lesiones personaleaal enrollar
el cord6n.
• NO use losenchufesIocalizadossobre
los muebles.Los objetos cercanos
podrian resultarda5ados.
Bo|6n
del cord6n
1.Tire delcordon
paresacarlodel
recept_culohasta
tear la longitud
deseada,Elcor-
d6nnose enro-
Ilar._hastaque
oprimaelbot6n
paraenrollarlo.
NOTA:Parereducirel riesgode chequeel6ctrico,
estaaspiradoracuentaconunaclavijapolarizada,
unode loscontactosesm_tsanchoquaelotto.La
clavijasSIopuedeintroducirsede unamaneraen el
enchufa.Silaclavijanocadebienenel enchufe,
invk_rtala.Siat_nnocabe,Ilamea unelectricista
paraqueinstaleunenchufecorrect(].No alterela
clavijade ningunamanera.
2. Conecteelcord6n el6ctricopolarizadoenun
enchufade 120voltiosque se encuentrecerca del
piso.
Paraenrollar:des-
conectelaaspira-
dora.Sujeteel
enchufemientras
enrollae]cordon
para impedirdaSoo
lesion corporalper el
movimientodel cor-
d6n. Oprimael
control para botOnel
cord6n electricocon
la maneo conel pie.
liberacl6n
Indicedor de nlvel
de pelo de la alfombra
Pedal de selecci6n
de nlvel de pelo
de la alfombra
3. Baje eltubedesdela posici6nverticalpisandeel
pedalde liberaci6ndelmango.
I.L1c,,o,oo
NO dale la Power-Mate"funcionando en
poslcl6nvertical en un lugardurante ning_n
eepaclodetlempo:ae puededaSarla
alfombra.
4. Seleccioneuna alturade palede la allombra
usandoelpedalpequeSoubicadoen laparte poste-
riorde la Power-Mate'.El nivel de pelo la affombra
se muestraen el indicador.ConsulleSUGEREN-
ClAS SOBRE ELAJUSTE DE NIVEL DEPELO DE
LA ALFOMBRA.
m_,sdelicadas
radoracon el a
paraprevenir
Atencidn: Refierasealas reeomendacionesdel fab-
ficante para limpiarsualfombra.Algunasalfombras
)uedenraquerirel usedelaaspi-
itador Power-Mate"desconectado
OFF.
Jela alfombrasea daSada.
R
o_F
FLOOR
_c#,Rpelr
5. Seleccionauna
posici6ndel inte-
rrupteren el man-
go.
OFF
FLOOR- s61oenciendeel me_ordel recept_.culo.
CARPET- enciendelos motoresdel recept_,cu]oy
de la Power-Mate=,
NOTA- Cuandoeste controlestden la posJci6n
FLOOR,el farol no funcionaporque no la electrici-
dad nofluyeal Power-Mate'.
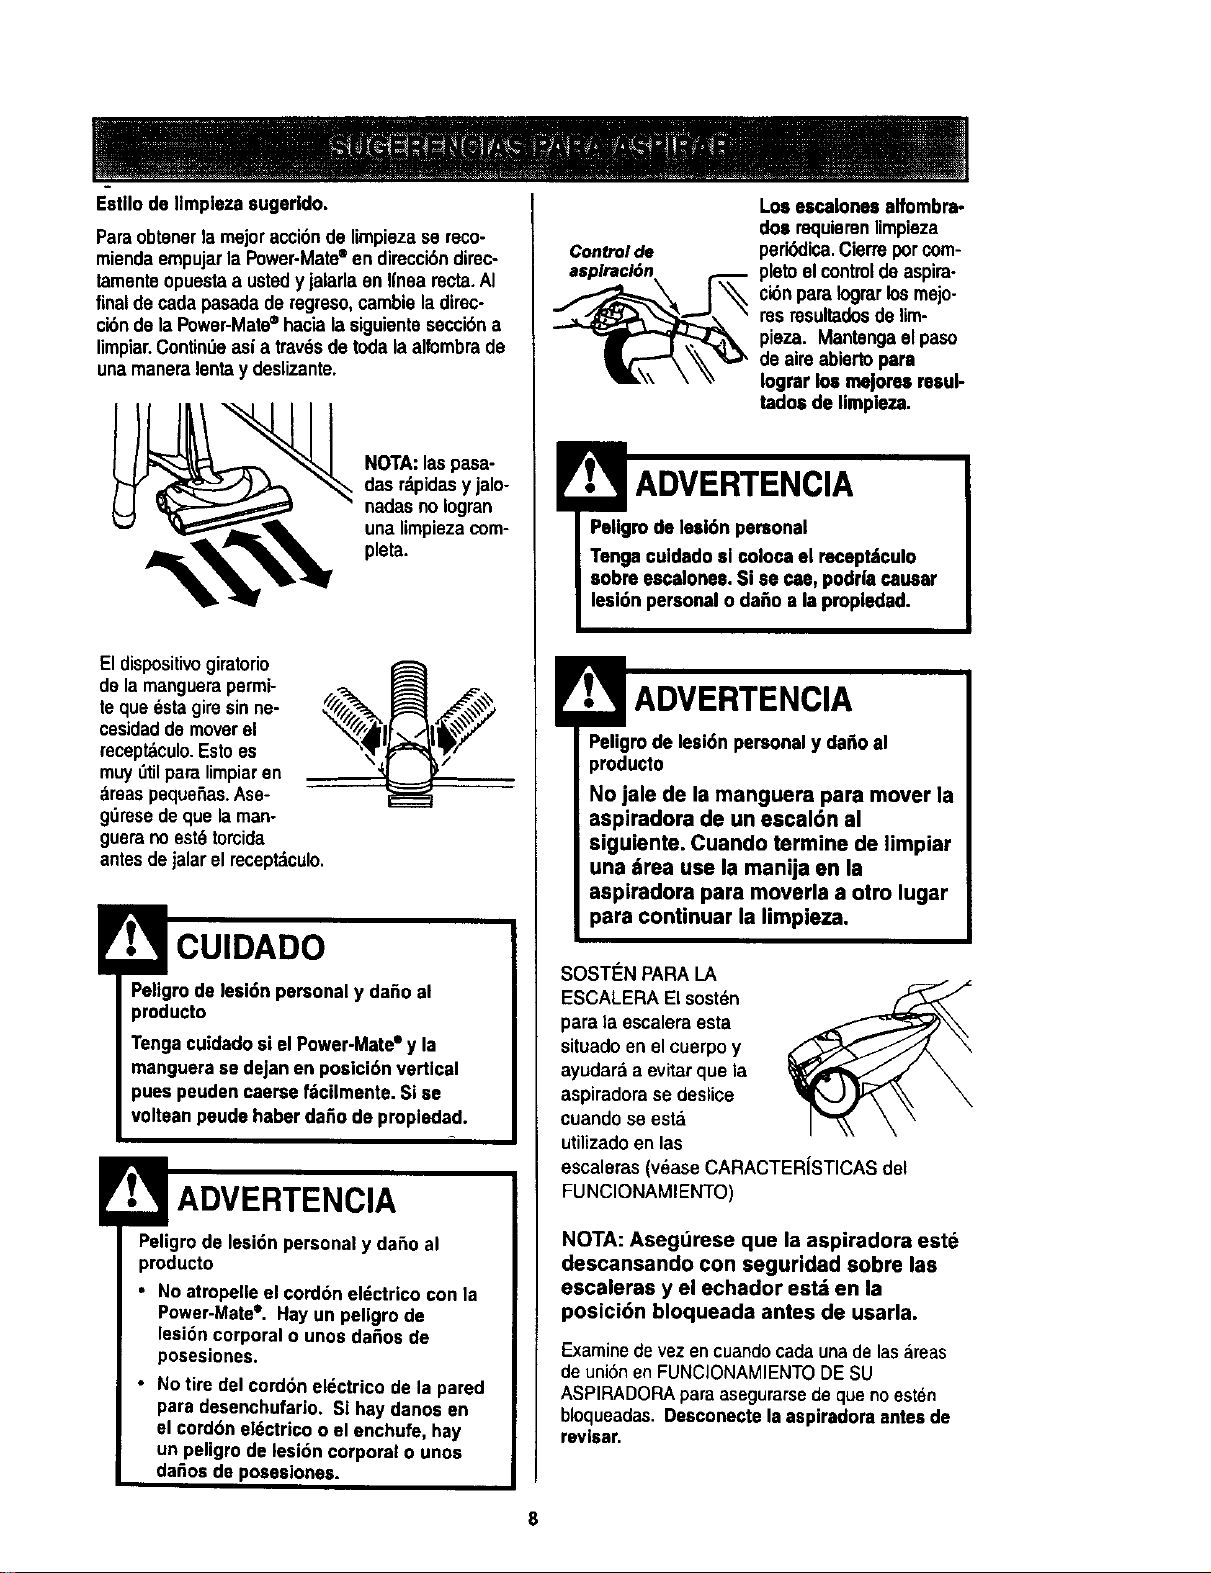
E-stllodeIlmplezasugerldo,
Paraobtenerlamejoracci6ndelimpiezasereco-
miendaempujarla Power-Matesen direcci6ndirec-
tamenteopuestaa ustady jalarlaenIfnearecta.AI
final decadapasadaderegreso,cambieladirec-
ci6nde laPower-Mate®hacialasiguientesecci6na
limpiar.ContinUeasia trav6sde todalaalfombrade
unamaneralentay deslizante.
NOTA:las pasa-
dasrdpidasy jalo-
nadasnoIogran
una limpiezacom-
pleta.
Eldispositivogiratorio
de lamanguerapermi-
te quedsta giresinne-
cesidadde moverel
recept_culo.Estoes
muy dtilparalimpiaren
areaspequeSas.Ase-
g0resedeque laman-
guerano est_torcida
antesdejalarel mceptdculo.
Peligrode lesi6npersonaly dafio al
producto
Tengacuidadosi el Power-Matee y la
manguera se dejanen posici6n vertical
pues peudencaersef=ioilmente.Siae
volteanpeudehaberda5o de propledad.
Peligrode lesi6npersonaly daSo al
producto
• No atropeneel cord6n eldctrico con la
Power-Mate°. Hayun peligrode
lesi6ncorporal o unosda6os de
posesiones.
• No tire del cordonel_ctrico de la pared
para desenchufario. Si hay danosen
el cord6n ek_ctricoo el enchufe, hay
un peligro de lesi6ncorporal o unos
da_os de posesiones.
Controlde
Los e.=calone=alfombrs-
dos requierenlimpieza
peri6dica.Cierreporcorn-
platoelcontroldeaspira.
ci6npara Iograrlosmejo.
resresultadosdelim-
pieza. Mantengaelpaso
de aireabiertopara
Iogrsrlos mejorssresul-
tados de limpiez.a.
ADVERTENClA
Pallgmde lesl6n personal
Tengaculdadosl colocael recept_iculo
sobreescalones.Si se cae, podr|acausar
lesl6n personalo da_o a Ispropledad.
Peligrode lesi6npersonaly da_o al
producto
No jale de la manguera para mover la
aspiradora de un escal6n al
siguiente. Cuando termine de limpiar
una =trea use la manija en la
aspiradora para moverla a otto lugar
para conUnuar la limpieza.
SOSTI_NPARALA
ESCALERA Elsost_n
para la escaleraesta
situadoen elcuerpoy
ayudaraa evitarque la
aspiradorase deslice
cuandose esta
utilizadoen las
escaleras(v_ase CARACTERiSTICAS del
FUNCIONAMIENTO)
NOTA: Asegdrese que la aspiradora este
descansando con seguridad sobre las
escaleras y el echador estd en la
posici6n bloqueada antes de usarla.
Examinede vez en cuandocadauna de lasareas
de uni6n en FUNCIONAMIENTODESU
ASPIRADORAparaasegurarsede que no esten
bloqueadas. Desconectelaaspiradoraantesde
revlsar,
8

UseelajusteXLO(bajo)paraobtenerlamejorlim-
piezaarondo.Porotraparte,quiz_ se requiemele-
varelnivelparafacUitaralgunastareas,comopor
ejernplocuandose tratadotapetesy algunasalfom-
brasdepelolargo,y paraimpedirque laaspiradora
se apague.Se sugierenlossiguientesajustes:
HI- Pelomuylargoy suelto,tapetes,alfombras
muyacojinadas.
MED - Pelomedlanoa largo.
LO- Pelocortoa mediano.
XLO- La mayorfade lasalfombrasy pisos
descubiertos.
!'I. 1 CUIDADO
NO instale ni retire el mango nl los tubos
cuando la aspiredore est6 encendida.
Esto podrfa causar chlspas y da_larlos
contactos el6ctrlcos.
ACCESORIOS DEL MANGO
NOTA:Si tieneinstaladalaPower-Mate=,apaguela
aspiradoraantesdequitarelmangode lostubos.
1.Optima el
bot6n de lib-
eraci6nr_pida
del mangopara
liberarel mango
y tiredel mango
haciaarriba.
Bot6n d t
cierre--'_
Bot6n de
Ilberacl6n
rapide
Tubo
I
2. Desliceelaccesoriodese-
ado confirmezasobreel
mango.Consultela USODE
LOSACCESORIOS
NOTA: Cepillo
Para montar el -J',mw_==='= pare sacudir
cepillo para sacudir _(,j_ __
inserte el cepillo para
telas dentro de la
boquilla del cepillo Cepfllo
para sacudir para telae
presione en su lugar.
Paraquitar,
_ presionar el
pestillo y
_1_:_"" _ levantarse.
Pestillo
ACCESORIOS DELTUBO
1. Pararetirarlos
tubosde la
POWER-MATE=,
col6quelosen la
posici6nvertical
de btoqueo.
m
Pedal de
liberaci6n
rdpidadel
m tubo
==
2. Piseel pedalde
liberaci6nrapidadel
tuboy tiredel tubo
,
haciaarriba para
desprendedode la
POWER-mATE"e.
3.Coloqueel
accesoriodese-
ado sobre el
tubo,Consulte
la USODE LOS
ACCESORIOS,
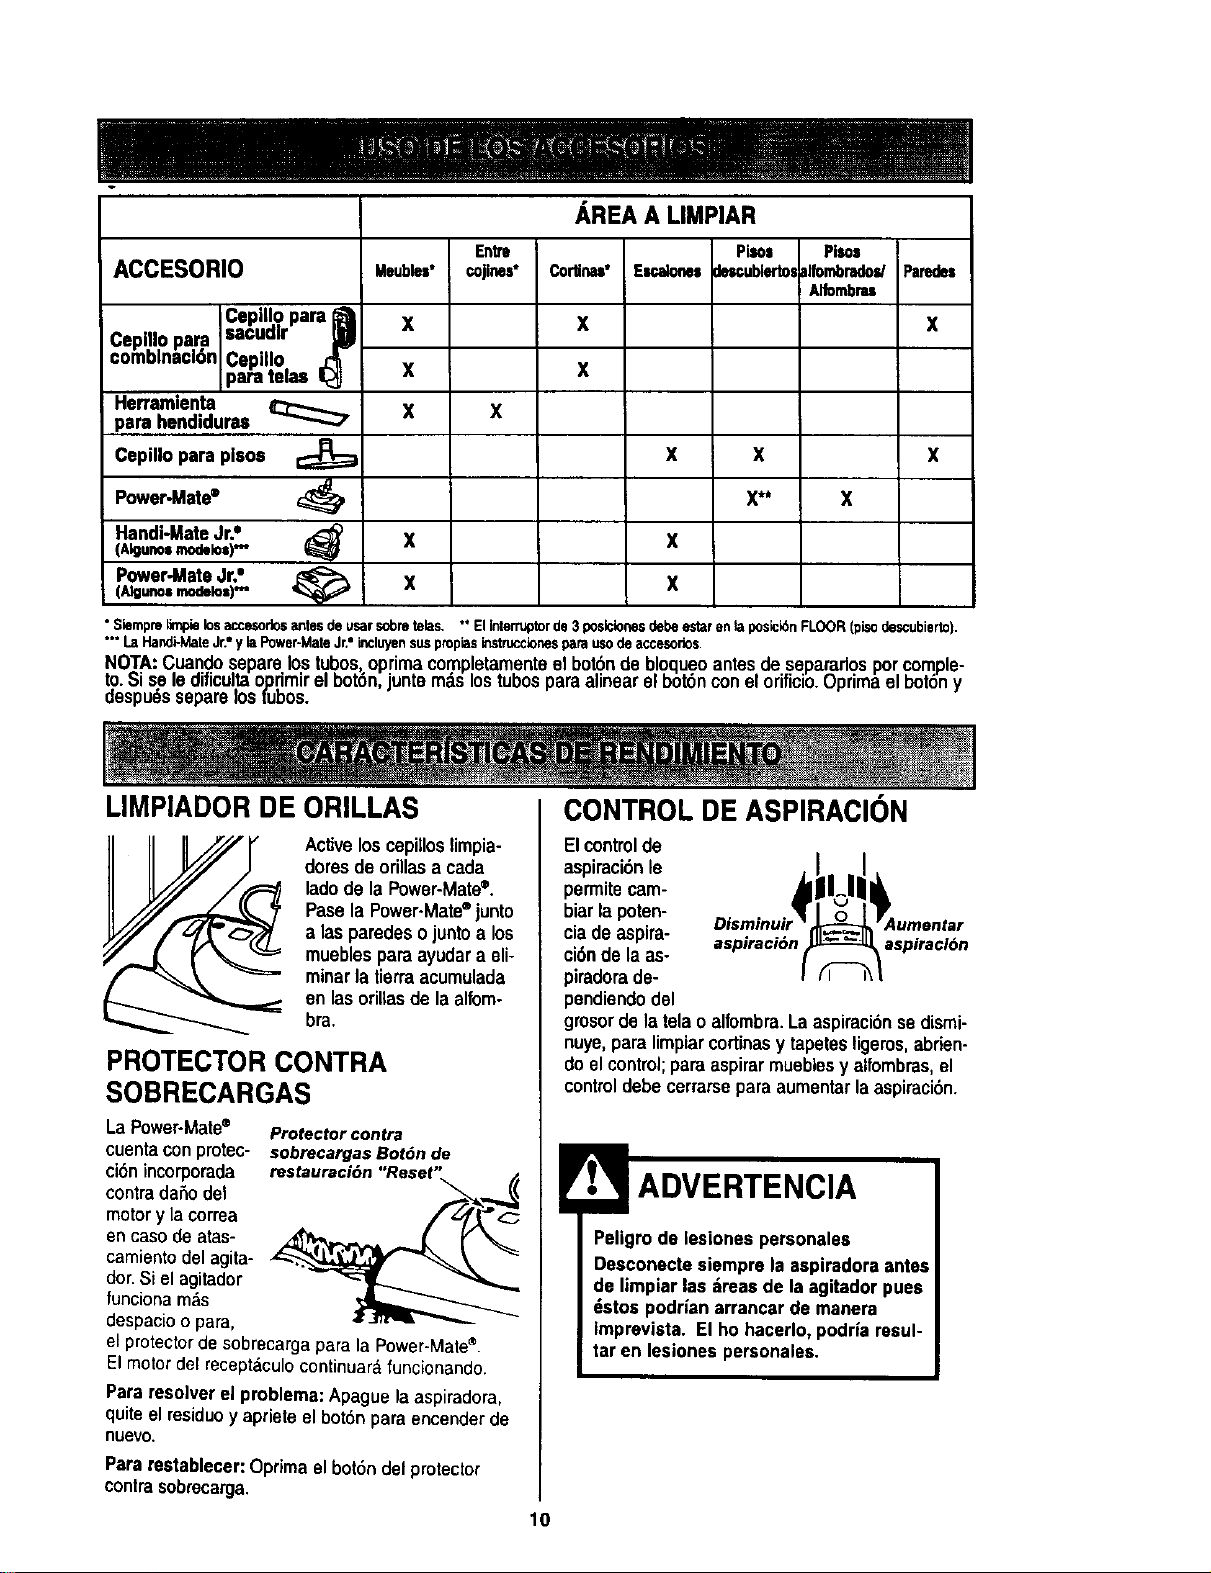
AREA A LIMPIAR
Entre Pilos Pisol
ACCESORIO colin.* E_$ _llcublertoaalfombradoldPamdel
Aifombm
X
Cepillo para D
Cepillopara =sacudlr
comblnact6n Cepillo
)aratelas
Herramienta
para hendiduras
Cepillo para pisos
PowerJAate®
Handi-MateJr.•(Allunosmodelo=)"_'
Power.MateJr." ,_(Algu.o=modelo=)'*"
Meubbl*
X
X
X
COl'tim*
X
X
x
x
X
x
x
X
X** x
*Siemprefimpielosaccesodosantesdeusarsobrebias, **Elinterruptorde3 poslcioP,esdebeestarenla posici_nFLOOR(pisodescubierto).
**"LaHandi-MateJr.*y laPower-MateJr.*blcluyensuspropiasi_struccionesparausodeaccesofios.
NOTA: Cuando separe los tubos, optima completamente el bot6n de bloqueo antes de separaflos por comple-
to. Si se le dificultaoprimir el bot6n, junte rods lostubos para alinear el bot6n con el orificio.Optima el bot6n y
despu6s separe losTubos.
LIMPIADOR DE ORILLAS
Activeloscepilloslimpia-
doresdeorillasa cada
ladode la Power-Mate=.
Pasela Power-Mate®junto
alas paredeso juntoa los
mueblesparaayudara eli-
minarla tierraacumulada
en lasoff,asde la alfom-
bra.
PROTECTORCONTRA
SOBRECARGAS
LaPower-Mate® Protectorcontra
cuentaconprotec- sobrecargasBot6n de
ci6nincorporada
contrada_odel
motory lacorrea
encasodeatas-
camientodelagita-
dor.Si elagitador
funcionam;_s
despacioopara,
elprotectordesobrecargapara laPower-Male®.
Elmotor delrecept_,culocontinuardfuncionando.
Pararesolverel problema:Apaguelaaspiradera,
quiteelresiduoy aprieteelbot6nparaencenderde
nuevo.
Pararestablecer:Optimaelbotondel protector
contrasobrecarga.
CONTROL DE ASPIRACION
Elcontrolde
aspiraci6nle
permitecam-
biarlapoten-
ciade aspira- aspiraci6n aspiracldn
ci6nde laas- /
piradorade-
I
pendiendodel
grosordela telaoalfombra.Laaspiraci6nse dismi-
nuye,para limpiarcortinasy tapetesligeros,abfien-
doelcontrol;paraaspirarmuebiesy alfombras,el
controldebecerrarsepara aumentarlaaspiraci6n.
Peligrode lesionespersonales
Desconectesiemprela aspiradora antes
de limpiar las _;reasde la agitadorpues
dstos podrian arrancarde manera
Impreviata. El ho hacerlo,podriaresul-
tar en lesiones personales.
10
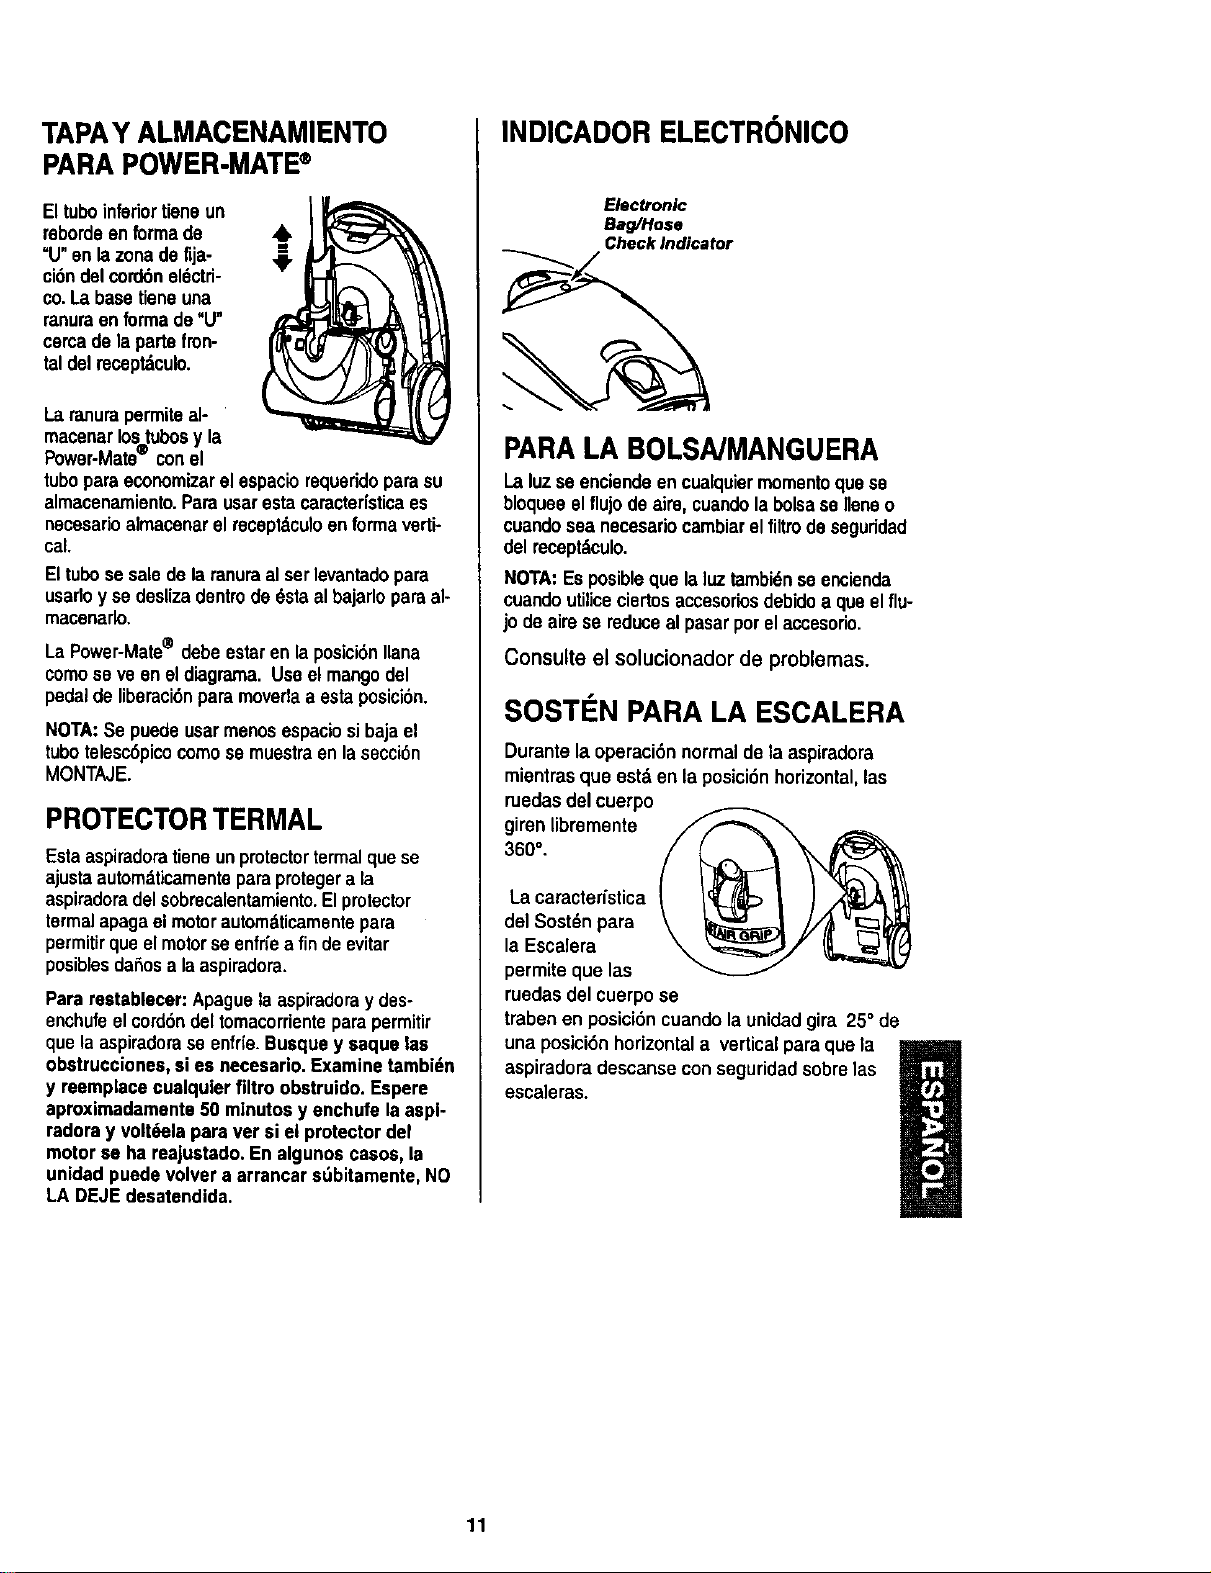
TAPAY ALMACENAMIENTO
PARA POWER-MATE®
Eltuboinferiortieneun
rebordeanforrnade
=U"en lazonadefija-
ci6ndel cord6nel6ctri-
co.La basetieneuna
ranuraenforma de"U"
cercade lapartefron-
taldel recept_culo.
Laranuraperrniteal-
macenarlostubosy la
Power-Mate® conel
tuboparaeconomizarel espaciorequeridoparasu
almacenamiento.Parausarestacaractedsticaes
nocesarioalmacenarel receptdculoen formaverti-
cal.
Eltubose saledela ranuraal serlevantadopara
usadoy se deslizadentrode_sta al bajarloparaal-
rnacenarlo.
La Power-Mate® debe estarenlaposici6nliana
cornose ve eneldiagrama.Useel mangodel
pedalde liberaci6nparamoverlaa estaposici6n.
NOTA:Se puedeusarmenos espaciosibajael
tubotelesc6picocomose rnuestraen lasecci6n
MONTAJE.
PROTECTORTERMAL
Estaaspiradoratienounprotectortermalquese
ajusta automdticamenteparaprotegera la
aspiradoradelsobrecalentamiento.El protector
termalapagaelmotorautomdticarnentepara
permitirque el motorse enfrfea finde evitar
posiblesdahosa laaspiradora.
Pararestablecer:Apaguelaaspiradoray des-
enchufeelcord6ndeltomacorrienteparapermitir
que la aspiradorase enfr(e.Busquey saque lae
obstrucciones,ei as necesario.Examinetambidn
y reemplacecualquierflltro obetruido.Espere
aproximadamente50 minutosy enchufela aspi-
radoray volt6elapara ver si el protectordel
motorso hareajustado.En algunosoasos,la
unidadpuedevolvera arranoarst_bitamente,NO
LA DEJE desatendida.
INDICADOR ELECTR( NICO
Electronic
Bag/Hose
Chock Indicator
PARALA BOLSA/MANGUERA
Laluzse enciendeencualquiermomentoquese
bloqueeelflujode aim, cuandolabolsase neneo
cuandosea necesariocambiarelfiltrode seguridad
del receptdculo.
NOTA:Es posibleque laluztambi6nse encienda
cuandoutiliceciertosaccesoriosdebidoa que elflu-
jo deaire se reduceal pasarporel accesorio.
Consulte el solucionador de problemas.
SOSTI=N PARA LA ESCALERA
Durantela operaci6nnormal de laaspiradora
mientras que estden la posici6nhorizontal, las
ruedasdel cuerpo
giren libremente
360".
La caracterfetica
del Sost_npara
la Escalera
permitsque las
ruedasdel cuerpose
trabenen posici6ncuandolaunidadgira 25° de
una posici6nhorizontala verticalpara quela
aspiradoradescansecon seguridadsobrelas
escaleras.
11
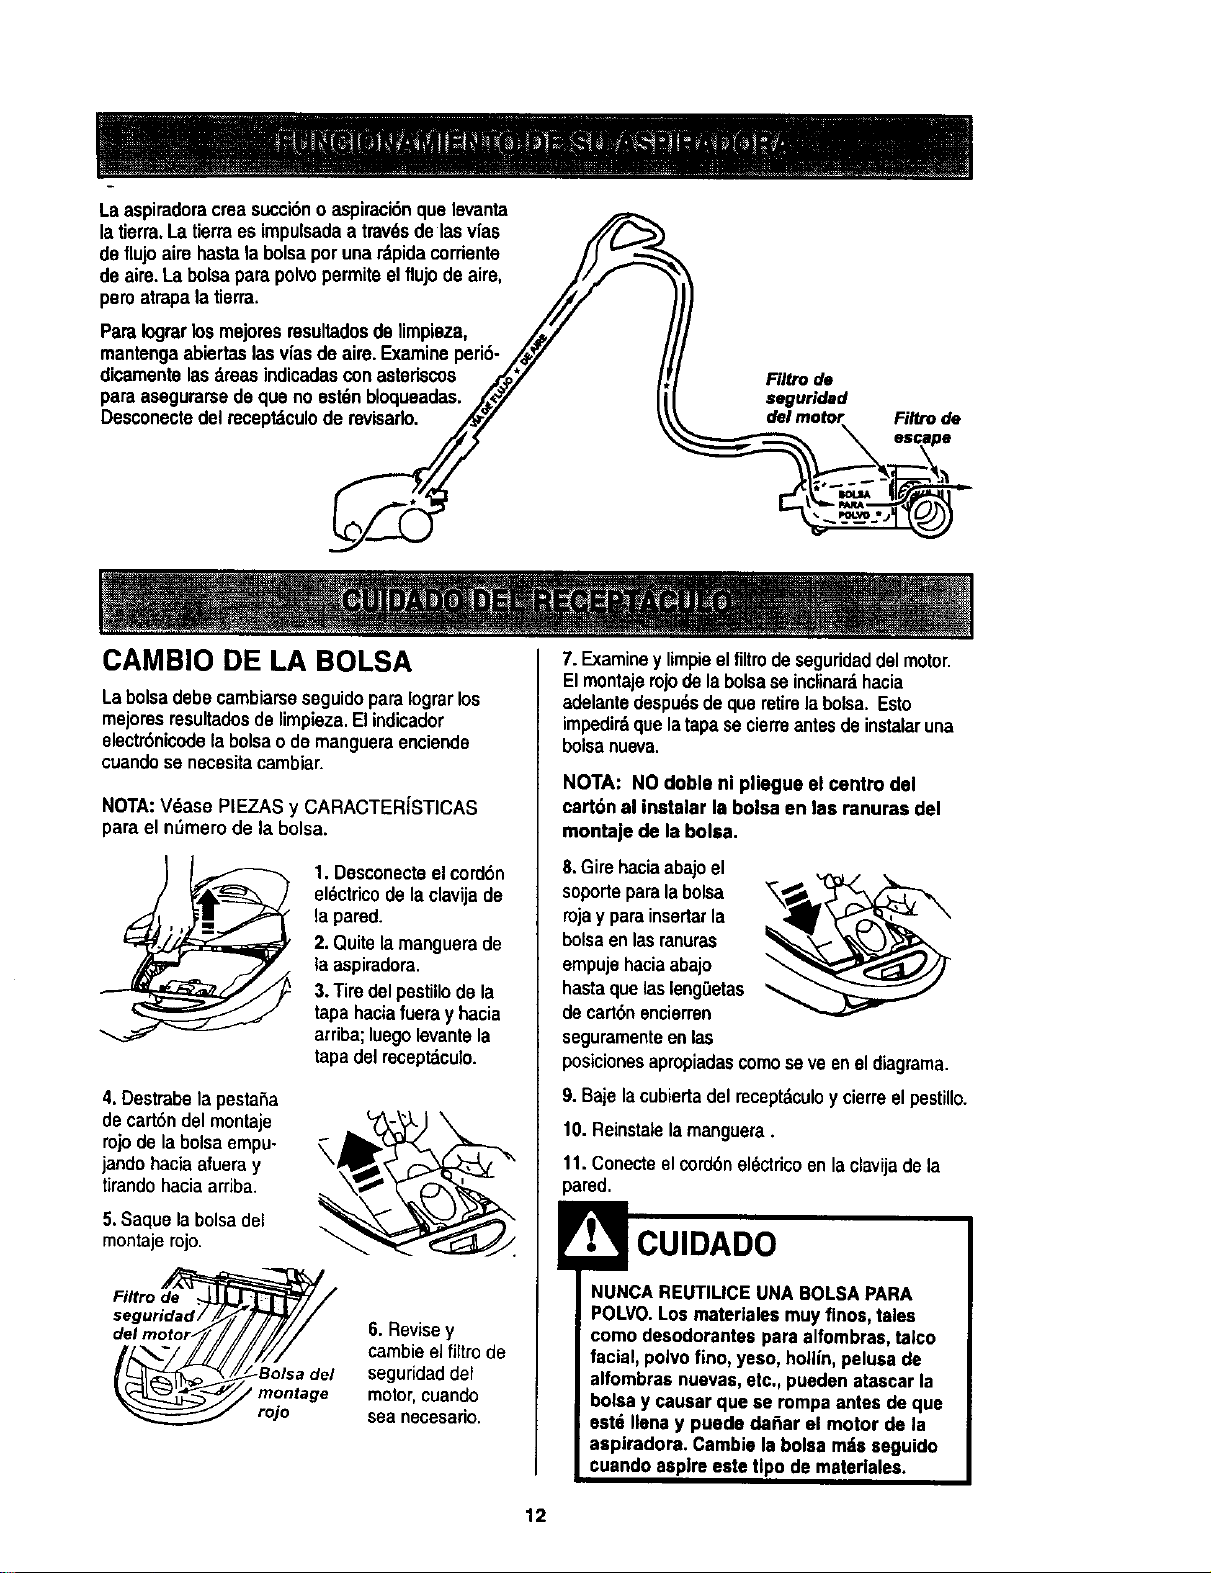
Laaspiradoracreasuccibnoaspiraci6nquelevanta
latierra.Latierraesimpulsadaatrav_sdelasvfas
deflujoairehastalabolsaporunardpidacorriente /J
de aire.Labolsaparapolvopermiteelflujode aire, J//_
peroatrapalatierra. ///
ParaIograrlosmejoresresultadosde limpieza, ,/_" j
mantengeabiertaslasv[asde aire.Examineperi6-/_7 /
dicamentelasdreasindicadasconasteriscos ,/_y /!
paraasegurarsedequa no est6nbloqueadas./_,_/ II
Desconectedelrecept_culode reVmarlo. _/
Filtro de
seguridad
|..... _ __ ==_i,
CAMBIO DE LA BOLSA 7.Examiney limpieelfiltro deseguridaddelmotor.
Labolsadebe cambiarseseguidopara Iograrlos
mejoresresultadosde limpieza.El indicador
eleotr6nicedela bolsao de mangueraenciende
cuando senecesitacambiar.
NOTA:V6ase PIEZAS y CARACTERiSTICAS
para el nSmerode la bolsa.
1. Desconecteel cord6n
el6ctricode la clavijade
la pared.
2. Quite la manguerade
la aspiradora.
3.Tiredel pestillode la
tapa haciafuera y hacia
arriba;luego levantela
tapadel receptaculo.
4.Destrabela pestaSa
decart6ndel montaje
rojo de la bolsaempu-
jando haciaafuera y
tirandohacia arriba.
5.Saque la bolsadel
montajerojo.
del motor. / I
6. Revisey
cambie el fiftrode
seguridaddel
motor,cuando
sea necesario.
Elmontajerojode la bolsase inclinar_hacia
adelantedespuc_sdeque retirela bolsa.Esto
impedir&quelatapasecierreantes deinstalaruna
boisenueva.
NOTA: NOdoble ni pliegue el centro del
cart6n al instalar la bolsa en lae ranuras del
montaje de la bolea.
8.Girehaciaabajo el
soportepara la bolsa
rojay parainserterla
bolsaen lasranuras
empujehaciaabajo _.
hastaquelaslengGetas
decart6nencierren
seguramenteenlas
posicionesapropiadascomoseve enel diagrama.
9.Baje lacubiertadelmcept&culoy cierreelpestillo.
f0. Reinstaielamanguera.
11.Conecteelcordbnel6ctdcoenlaclevijadela
pared.
NUNCAREUTIMCE UNABOLSAPARA
POLVO.Los materlales muyfinos,tales
como desodorantespara alfombras,taloo
facial, polvofino,yeso, hollin,pelusade
alfombrasnuevas,etc., puedenatascarla
bolsay causar que se rompaantes deque
estd lianay puede dafiar el motor de la
aspiradora. Cambiela boleamdseeguido
ouandoaspire este Upode materiales.
12

1.Desconecteelcordonel6ctricodelaclavijadela
pared.NOchoresagossobrelaasplradora.
2.Limpieelexteriorconuntreposuaveylimpio,que
ha sideexprimidedespudsderemojaren unasolu-
ci6nde aguay detergentsI|quidoligem.Sequeel
exteriorconuntraposecodespu6sdelimpiar.
3. Umpielasuperficieexteriordel recept_cuioyde
losaccesoriosparsreducirlaelectricidadestdticay
laacumulack_nde polvo.
CUIDADO
No uselos accesorlossi est_n mojados.
Losaccesodos qos se utillcenen =_reas
sucla=, debaJodel refrigerador,no deben
usameen otras superficiessin antes set
lavados.Podrfandejar marcas.
Examineelfiltrode segurideddel motorde vez en
cuandoycambiocuandoest6sucio.
Pellgmde choque el6ctrlco
Desenchufeel cord6n de Is corrienteel6c-
trica. No operela asplradora sin el filtro de
seguridaddel motor. Aseg6uresede que el
filtro est6 seco• instaladoadecuadamente
para impodirque el motorfalle y/o qua se
produzca unchoqos eldctrlco.
Paraquitarlabolsa,sigalas instruccionesen CAM-
BIO DELA BOLSA.
FILTRODE SEGURIDAD DEL
MOTOR
ELECTROSTATICO
Estefiltmblancosotieneque cambiarcuandoest6
sucio.Debecambiarseperi6dicamentesegt_nlas
condicionesde uso. El flltrono se puede lavar
pues perderfasu capacidad pars atraparaltrapar
polvo.
NOTA:Vdase PIEZAS y CARACTER{STICAS
para el n_mero del filtro de seguridaddel motor.
Dlspositivo de
retencl6n de goma
1. Levanteeldispositi-
voderetenci6nde
gomay saqueelfiltro
de seguridedcomose
ve eneldiagrama.
2. Reemplaceel
filtre,conellado
dsperohaciaafuera,
endirecci6ndela
bolsadelpolvo,
deslizdndoloensu
lugardentindelas
costillasdela
cavidadparala
bolsa.Metaelfiltm
paraquequepa por
completodebajodel
dispositivede
retenci6nde goma.
Dispositivo de
rerencl6n de goma
3.VdaseCAMBIO DE LABOLSA para cambiar
la bolsa.
13
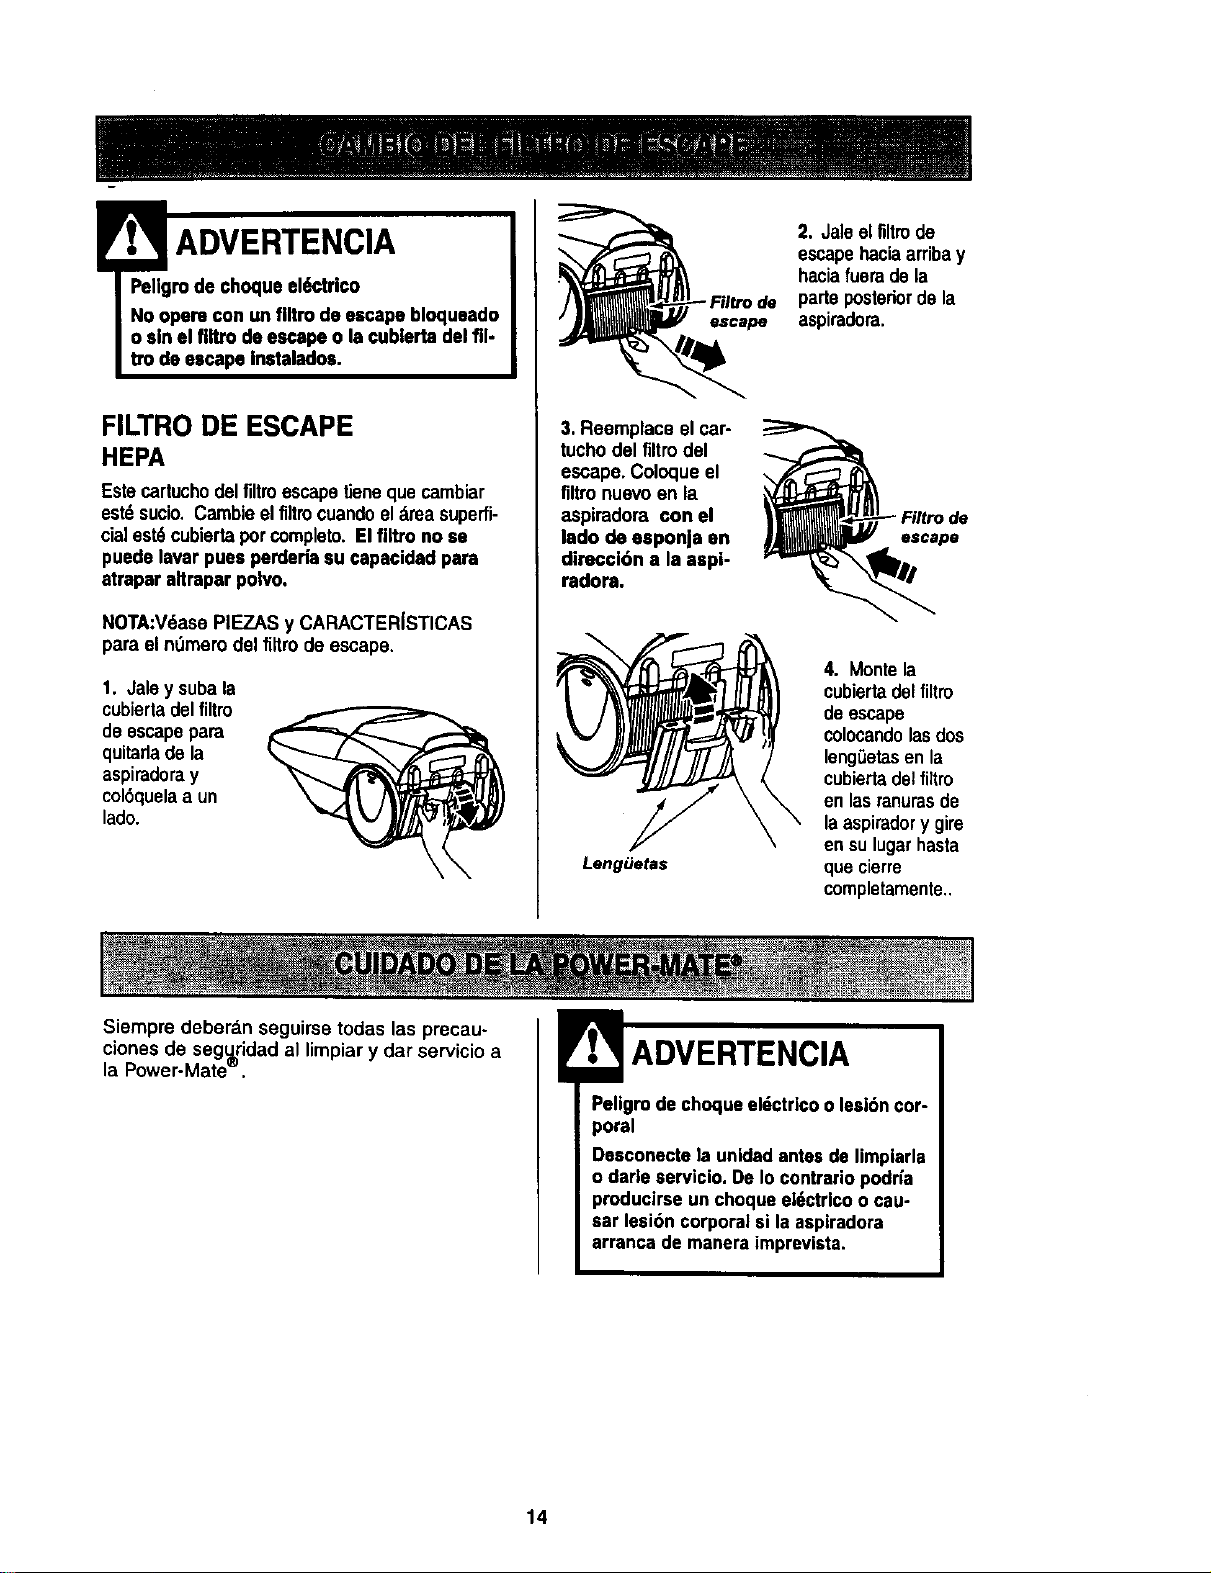
! ADVERTENCIA
Pellgmde choque el(,ctrico
No opera con un flltm de escape bloqueado
o sin el flltro de escapeo lacublerta delill-
tro de escape Instalados.
FILTRO DE ESCAPE
HEPA
Estecartuchodelfiltroescapetienequecambiar
est_sucio, Cambieel fiitmcuandoeldreasuperfi-
cialest6cubiertapor completo.El flltro no se
puedelaver pues perderiasucapscidad para
atrapar altrapar polvo.
NOTA:V6ase PIEZAS y CARACTERJSTICAS
para el nOmerodel firm de escape.
1. Jaley subala
cubiertadelfiltro
deescapepara
quitadade la
aspiradoray
col6quelaa un
lado.
escape
3. Reemplaceel car-
tuchodel filtrodel
escape. Coloqueel
filtronuevoen la
aspiradora con el
lado de esponja an
dirsccl6n a la scpi-
radora.
LengiJetas
2. Jaleelfiltmde
escapehaciaarribay
haciafuerade la
park)posteriordela
aspiradora.
escape
4. Montela
cubiertadelfiltro
de escape
colocandolasdos
lengSetasenla
cubiertadelfiltro
en lasranurasde
laaspiradory gire
en sulugarhasta
que cierre
completamente..
Siempre deberan seguirse todas las precau-
clones de seguridad al limpiary dar servicio a
la Power-Mate .
Peligrode choqueeldctricoo lesi6ncor-
poral
Desconectela unidadantesde limpiarla
o darle servicio. DeIo contrariopodr/a
producirseun chequeel_ctricoo cau-
sar lesi6n corporalsi la aspiradora
arranca de manera imprevista,
14
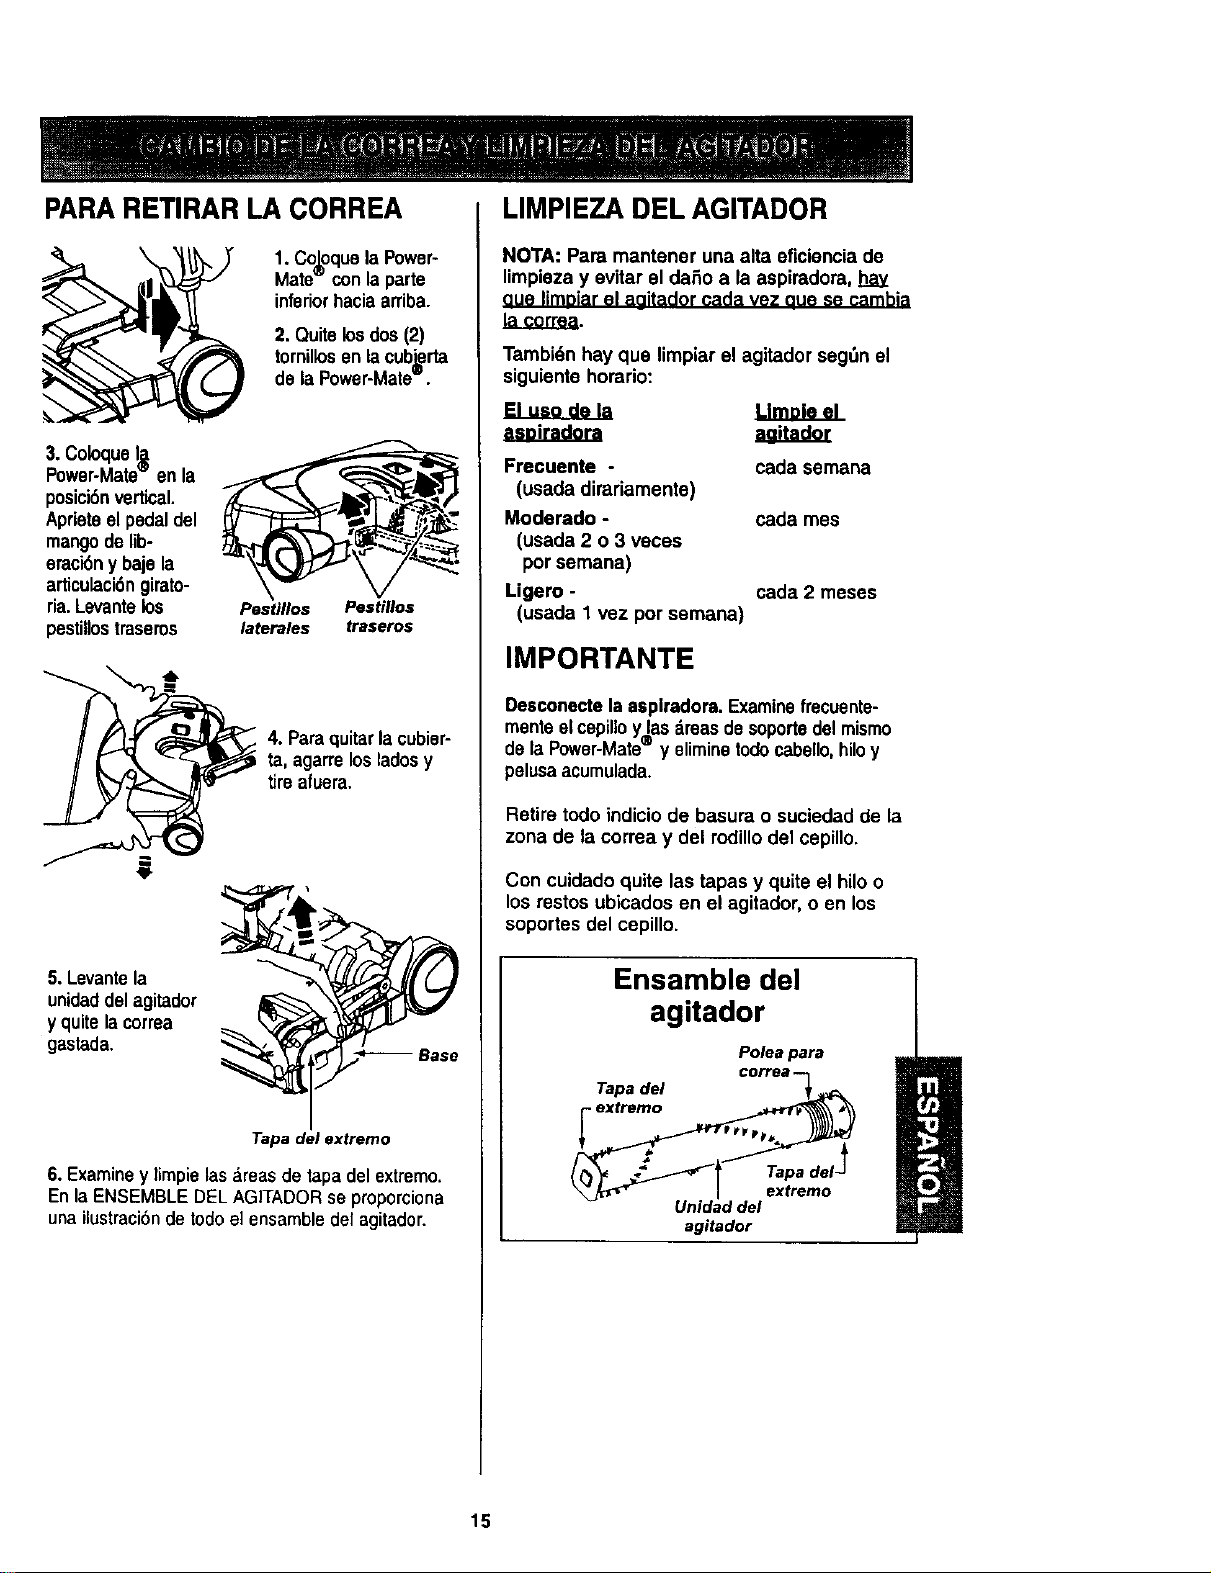
PARARETIRAR LA CORREA
1. CoLoquela Power-
Mate`="con laparte
inferiorhaciaarriba.
2. Quitelosdos(2)
tornUlosen lacub.Lerta
de laPower-Mate_.
3.ColoqueI_
Power-Mate"="en la
posici6nvertical.
Aprieteel pedaldel
mangodelib-
eraci6ny bajela
articulaci6ngirato-
ria.Levantelos
pestillostraseros
Pestiflos Pestillos
laterales traseros
4. Paraquitar lacubier-
ta, agarrelosladosy
tireafuera.
5. Levantela
unidaddelagitador
y quitelacorrea
gastada.
Tapa del extremo
6. Examiney limpielas&reasde tapadel extremo.
En la ENSEMBLE DELAGITADORse proporciona
una ilustraci6nde todoel ensamble del agitador.
LIMPIEZA DEL AGITADOR
NOTA: Para mantener una alta aficiencia de
limpieza y evitar el daSo a la aspiradora, hay
aue limoiarel aaitador cada vez aue se cambia
lacorrea.
Tambidnhay qua limpiar el agitador seg6n el
siguiente horario:
Frecuente -
(usada dirariamente)
Moderado -
(usada 2 o 3 veces
porsemana)
Ligero -
(usada 1 vez porsemana)
cada semana
cada mes
cada 2 meses
IMPORTANTE
Deeconectelaaapiradora.Examinefrecuente-
mente elcepilloy lasdreasde soportedelmismo
dela Power-Mate® y eliminetodocabello,hiloy
pelusaacumulada.
Retire todo indicio de basura o suciedad de la
zona de la correa y del rodillo del cepillo.
Con cuidadoquite las tapas y quite el hilo o
los restos ubicados en el agitador, o en los
soportes del cepillo.
Ensamble del
agitador
Polea para
Tapa del corre = -_ ,_.
agitador
15

PARA RETIRAR LA CORREA
1. Instale
unacorrea
nueva
sobreel
impulsor
del motor
y luego
sobrela
ruedaden-
tadadel
cepillo.
Agitador Tapa del
extremo
Impulsor
del motor
tueda
dentadada
del cepillo
NOTA:V6ase PIEZAS y CARACTERfSTICAS
para elnt_merode la correa.
2. Coloqueotravez
la unidaddelagita-
doren taPower-
Mete®.
Cu/derm Base
3. Alineelaparfe
frontaldela
cubiertaconla
base. Coloque
lacubiertasobre
elborde
delantemdefe
basecomo se
muastra.
5. Rotelacubierta
haciaatr'_s.Aprfete
con pocafuet-za
hastaquelas
leng0etaslateralas
y traserasencierren
seguramente.
Cerci6reseque no
hayespacioentre
la cubiertay labase.
Pestlllos Pestillos
laterales traseros
5. Coloquefe Power-Mate® con laparteinferior
heciearribay insertelosdos(2) tornillosenla
cubierta.
1. Quite iacubiertade la Power-Mate® comese
describeenla secci6nCAMBIO DE LA CORREAY
LIMPIEZA DELAGITADOR.
Empuje h'acia
adentro y gire
2. Empujehaciaaden-
troy girela bombilla en
el sentidosontrarioal
de lasagujasdel reloj,
luegotirehaciaafuera
pare sacar.
EmpuJe hacla
adentro y gire
3. Empujehacia
adentroy gireen el
sentidocontrarioal de
lasagujasdel reloj
para reemplacer.La
bombillanodebeser
rodsde 15 varies(130
voltios/).
4. Reinstalela cubiertadela Power-Mate® come
se describe en la secoi6nCAMBIODE LA COR-
REAY LIMPIEZADEL AGITADOR.
NOTA:Vdase PIEZAS y CARACTERiSTICAS
para el nSmero de la bombilla.
16

Peligm do choquoeldctrlcoo lesi6n corpo-
ral
Desconectela unldadantesde Ilmpiarlao
darle sarviclo.DeIo contrarlopodia pro-
ducirsa un choqueol6ctricoo causar
lesi6n corporalsi la aspiradoraarranca de
manera imprevista.
PARAREVISAR LA UNIDAD DEL
AGITADOR
Barradesoporte
dela base
Cuandoestdngas-
tadosloscepillosal
nivelde lasbarras
desoporteen la
base,cambiela
unidaddelagita-
dor.
PARACAMBIAR MAZO DEL
AGITADOR
1. Retirelacubierta,correay ensambledelagitador
de laPower-Mate° Consulte"Pararetirarlacorrea"
bajoCAMBIODELACORREAY LIMPIEZADEL
AGITADOR.
2.Reemplaceelagitador.
3.Cambiela correa,el ensambledel agitador,lacu-
bierladela Power-Mate°, labombillay lacubiertade
labombilla,Consulte=Paracambiarlacorrea"bajo
CAMBIODELACORREAY LIMPIEZADEL
AGITADOR.
17
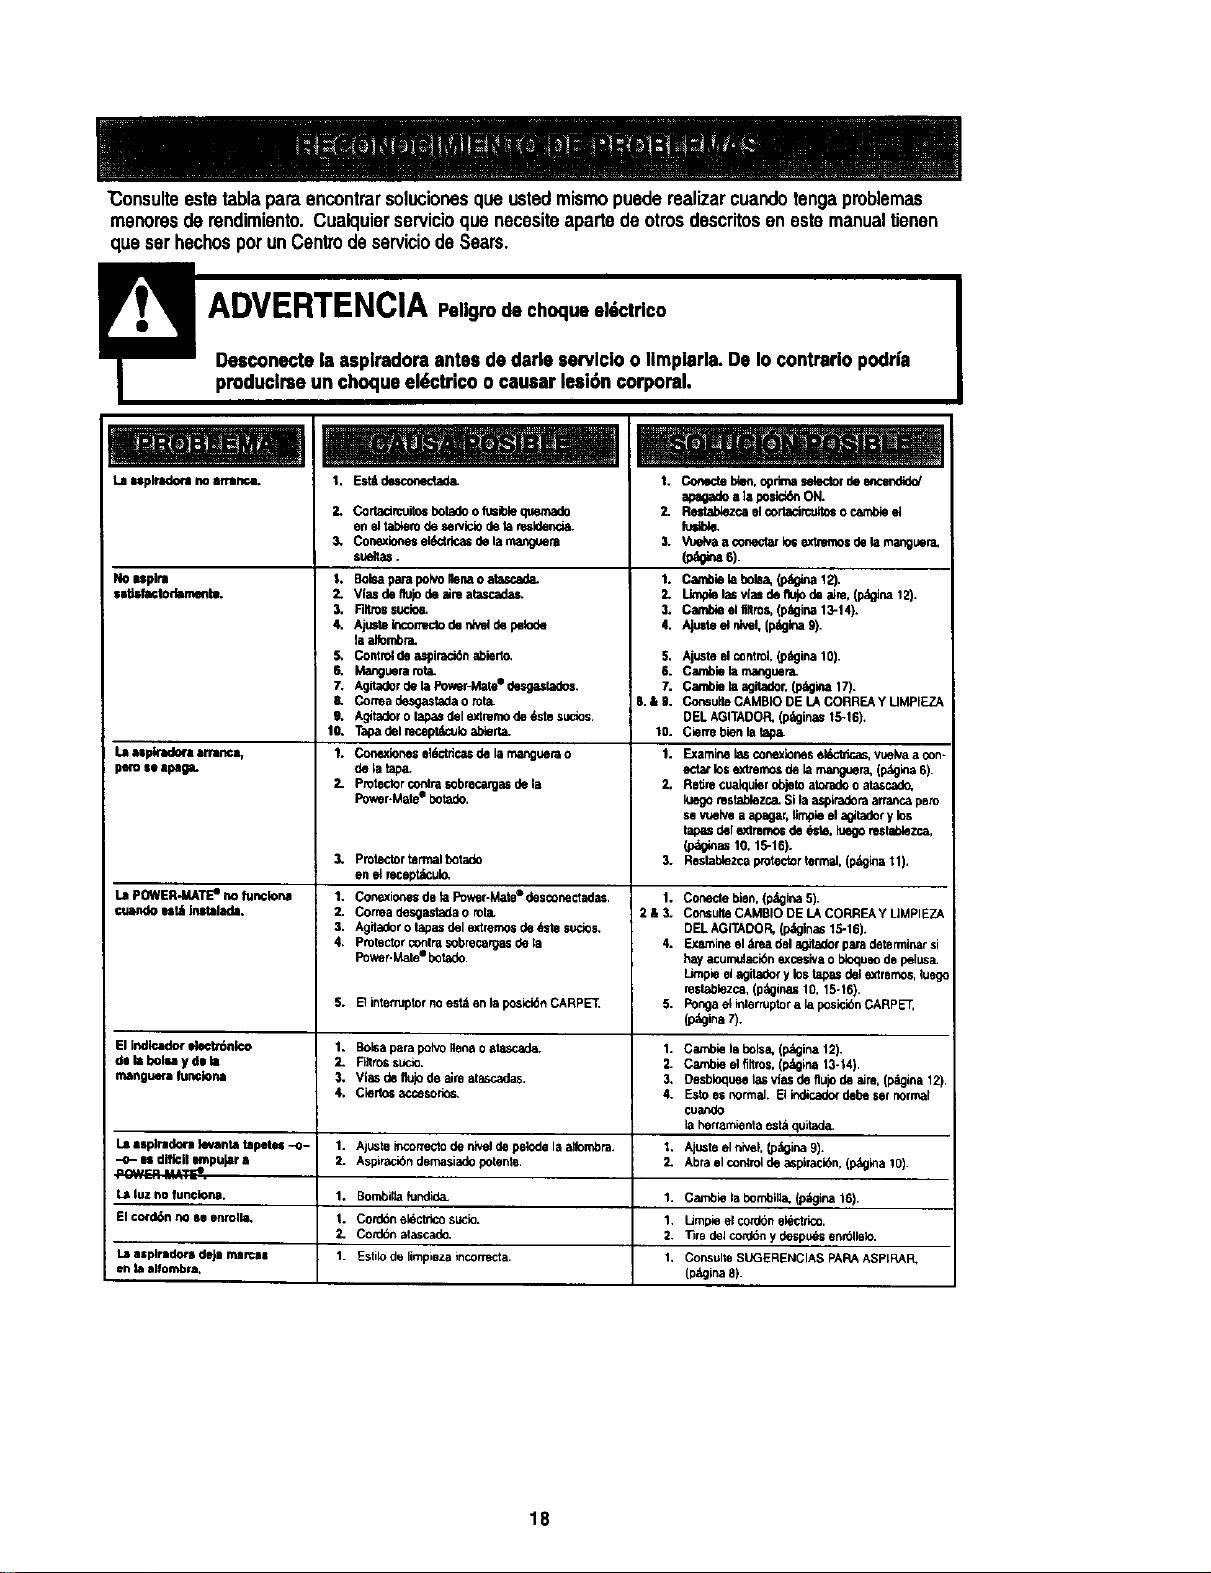
"Consulteestetablaparaencontrarsolucionesqueustedmismopuederealizarcuandotengaproblemas
menoresdemndimiento.Cualquierservicioquenecesiteapartedeotmsdescritosenestemanualtienen
queserhechosporunCentrodeserviciodeSears.
f
La _plradma no m'mncL
NOISpka
saUstactodamente.
1. Est6 desconectade.
2. Cortadrcudesbotedeo kslole quemade
en =dteb_m de serviciodete msld_
3.
2.
Cone.toonesel6cl6casde temanguera 3.
sue_.
Bolsapara poh_oIlenao atescade. 1.
Vias de Itt_jode =;reatescades. 2.
Rltros sucks. 3.
Ajusteloconec_ode nMd de pek_de 4.
tealfombra_
Controlde _spiraci6n ablerto, 5.
Manguerarota. 6.
Agitaderde teFoyer-Mate" desgastedes, 7.
Conea desgastadao rote. B.&9.
Agitatoro tapasdel evtrernode _te su=dos.
Tapadel mcepRtculoabterta. 10.
Conexlones=d_ctric_ de la manguemo 1.
de _atepa.
Protectorcontmsobrecargasde te 2,
Pov_r-M=dee detade.
Protectortermalbotado 3.
en e_recept6culo.
Conexionesde ta Power-Matee desconectadas. 1.
Cotrea desgastadao rota. 2 & 3.
Agitadoro lapasdelextrernosde &slosucios.
Protectorcontrasobrecargasde ta 4.
Power.Maleebotado.
El intermptornoestAenfa posloi_nCARPET. 5.
Bok;apara polvoItenaoalascada. 1.
Filtrossuoo. 2.
Vias de ftu;ode aim =dascadas. 3,
Ciertos a_.cesorios, 4.
Ajusteinconectodeniveldedelodelaaffombra. I,
Aspirac_bndemasiado potente. 2.
I.
I.
2.
1.
|.
2.
3"
4.
5.
6.
7.
&
9,
10.
I,=aspkadoca wmncz, 1.
pen=seapaga.
2-
3,
1. Corlecteblen,oprin_ s=dectorde encendide/
=degade a Izposid6nON.
Restabiezcael¢ortacimuiteeo cambie=d
fraY=de.
Vue_a a conectarIo6 extmmosde te manguera,
(.o_na6).
Can_lo te I:olsz (p_ 12).
las via=del_JjOdeaim, (p_na 12).
Cambte elflnr0s,(p_gina13-14).
Alume_r_i, (p_gm9).
Ajuste elcontrol,(p_gina10).
Camblote mangue_
Camblote agdeder,(p6gm 17).
ConsodeCAMBIO DE LACORREAY UMPIEZA
DELAGITADOR, (pztginas15.16).
Cterrebiente tapa.
Examinelos conexlonesek_l_as, vue_vaa con-
ectarlos extren_osde lamanguer_ (pAgi_a6).
Retirecualquiero_letoatomdeo at_
luegom=dabte_a.Si la aspiraderaarranc_pero
se vuelve a apag_r,limpieel a_tader y los
tapas derextmmo_de _te, luegorestabtezca,
(p_g_as 10, 15-16).
Restabtezcaprotec_0rterm=d,(p_ioina11).
La POWER-MATEe no fun¢lona 1. Conecle bien.(p_tgina5).
cuando estll Inltalm_a. 2. ConsudeCAMBIO DE LACORREAY LIMPIEZA
3. DELAGITADOR,(p_inas 15-16).
4, ExamineelAread=dag_tadorpara determiner si
hay acum_aclonexcesivao bloqoeode pel_&
Limp=d=dagitadery lostapas del extremos,lueg<
resteblezca_(p_ginas10, 15-16).
S- Po_gae_lolerruptor a laposloi6nCARP_,
(p_ina 7).
El indlcadorele_nloo 1. Cambie te bolsa,(p._gina12).
de hi boteay de te 2- Cat, hie =dflltros,(p,_g_na13-14).
manguera hmclona 3, Desbloqueete_ Wasde flujode =dre,(p_lgina12)
4, Estoe$ norm=d.Ellodloador debe set normal
cuando
laherramientaest_qudeda.
I.=uplradora tevanta tapetu --o- 1. AjL_teel nivel,Ip_gina9).
-.o- Is diflcil I,mpuJara 2. Abrael controlde aspiraclon,(pdgkla10).
e=_z-B la =-_
L.tluz no fun¢iona. 1. Bombiitefundida= Can_k_ I_bOrT_il_l.(p_gina16).
El cord6n no n enmde, 1. CordOnel_ctrloosuclo. LJmpieel co_n ek_cltloo.
2- Co_n atascade. 13rede]co_d_ y despu_s enn_llelo.
Laaa;plrldorl de|a marcas 1. Estilode limpiezaincorrecta. Consulte SUGERENCIAS PARAASPIRAR,
ente a_fombra, (p_ina 8)
18

19
Your Home
For repair - in your home - of all major brand appliances,
lawn and garden equipment, or heatingand coolingsystems,
no matter who made it, no matter who sold it!
For the replacement parts, accessories and
owner's manuals that you need to do-it-yourself.
For Sears professional installationof home appliances
and items like garage door openers and water heaters.
1-800-4-MY-HOME _ Anytime, day or night
(1-800-469-4663) (U.S.A. and Canada)
www.sears.com www.sears.ca
For repair of carry-in products like vacuums, lawn equipment,
and electronics, call or go on-line for the nearest
Sears Parts and Repair Center.
1-800-488-1222 Anytime, day or night (U.S.A. only)
www,sears.com
To purchase a protection agreement (U.S.A.)
or maintenance agreement (Canada on a product serviced by Sears:
1-800-827-6655 (U.S,A) 1-800-361-6665 (Canada)
Para pedir servicio de reparacibn
a domicilio, y para ordenar piezas:
1-,888-SU-HOGARsM
(1-888-784-6427)
Au Canada pour service en tran_ais:
1-800-LE-FOYER Mc
(1-800-533-6937)
www.sears.ca
SIARS
_) Sears, Roebuck and Co.
® Registered Trademark / TMTrademark / su Service Mark of Sears, Roebuck and CO.
® Marca Registrada / TM Marca de Fdbrica / su Marca de Servicio de Sears, Roebuck and Co.
MCMarque de commerce / MDMarque d_pos&e de Sears, Roebuck and Co.